

Page 1
User Guide
BT ESPRIT 1250
Page 2
Section
Welcome…
to your BT Esprit 1250 digital cordless
telephone answering machine
Download pictures and ring tones from your PC via infrared.
•
Phonebook lets you store up to 255 names each with 3
•
contact numbers for easy dialling.
Copy the whole directory or individual entries to and from
•
your mobile phone SIM card.
Send and receive text messages using T9®predictive text.
•
Caller Display lets you see who’s calling and your phone
•
stores details of the last 50 callers in a Calls list.
Expandable system. You can have up to 5 GAP compatible
•
handsets registered to your BT Esprit 1250 base and you
can use your handset with up to 4 other GAP compatible
bases. Make internal calls between two handsets while a
third is on an external call.
Digital call clarity with up to 300m range outdoors and up to
•
50m indoors (in ideal conditions).
1
1 Requires subscription to a Caller Display service. A quarterly fee may be payable.
Page 3

This User Guide provides you with all
the information you need to get the
most from your phone.
You must first set up your phone before
you can use it. This doesn’t take long as
it is easy to do. Just follow the simple
instructions on the next few pages.
Need help?
If you have any problems setting up or using your BT Esprit
1250, contact the Helpline on 0870 605 8047. The
Helpline is also pre programmed into the BT Services
menu for ease of dialling.
Alternatively, you may find the answer in ‘Help’ at the back
of this guide.
Hearing aid user?
Please note that the BT Esprit 1250 works by sending radio
signals between the base and handset. These signals may
interfere with some hearing aids, causing a humming noise.
Got everything?
BT Esprit 1250 handset
•
BT Esprit 1250 base
•
Mains power adaptor
•
Telephone line cord
•
2 x AAA NiMH
•
rechargeable batteries
If you have purchased
a BT Esprit 1250
multiple pack you
will also have the
following for each
additional handset:
BT Esprit 1250 charger
•
2 x AAA NiMH
•
rechargeable batteries
Mains power adaptor for
•
the charger
Section
Page 4

4
In this guide
Getting started . . . . . . . . . . . . . . . . .8
Location . . . . . . . . . . . . . . . . . . . . . . .8
Setting up . . . . . . . . . . . . . . . . . . . . . .8
Getting to know your phone . . . . . . .12
Handset buttons . . . . . . . . . . . . . . . . .12
Handset display icons . . . . . . . . . . . . .13
Base . . . . . . . . . . . . . . . . . . . . . . . . . .14
Navigating the menus . . . . . . . . . . . . .15
Menu map . . . . . . . . . . . . . . . . . . . . . .16
Using your phone . . . . . . . . . . . . . . .17
Switch handset on and off . . . . . . . . . .17
Make an external call . . . . . . . . . . . . . .17
Preparatory dialling . . . . . . . . . . . . . . .17
End a call . . . . . . . . . . . . . . . . . . . . . .17
Receive a call . . . . . . . . . . . . . . . . . . . .18
Handsfree . . . . . . . . . . . . . . . . . . . . . .18
Volume . . . . . . . . . . . . . . . . . . . . . . . .18
Headset (not provided) . . . . . . . . . . . .19
Secrecy . . . . . . . . . . . . . . . . . . . . . . . .19
Internal calls . . . . . . . . . . . . . . . . . . . .19
Call another handset . . . . . . . . . . . . . .19
Receiving an external call while
engaged on an internal call . . . . . . . . .20
Transfer a call to another handset . . . .20
Put a caller on hold and call another
handset . . . . . . . . . . . . . . . . . . . . . . . .21
Conference call . . . . . . . . . . . . . . . . . .21
If you experience any problems, please call the Helpline on 0870 605 8047
Finding a handset (Paging) . . . . . . . . . .22
Call Waiting . . . . . . . . . . . . . . . . . . . . .22
Redial a number . . . . . . . . . . . . . . . . .22
Delete a redial number . . . . . . . . . . . .22
Save a redial number
to the phonebook . . . . . . . . . . . . . . . .23
Send a text message
to a redial number . . . . . . . . . . . . . . . .24
Keypad lock . . . . . . . . . . . . . . . . . . . . .24
Quick accesss to messages . . . . . . . . .24
New text messages . . . . . . . . . . . . . . .25
New calls . . . . . . . . . . . . . . . . . . . . . . .25
Phonebook . . . . . . . . . . . . . . . . . . . .26
Open the phonebook . . . . . . . . . . . . . .26
Store new phonebook entry . . . . . . . . .26
Phonebook character map . . . . . . . . . .28
Dial from the phonebook . . . . . . . . . . .29
View a phonebook entry . . . . . . . . . . .
Copy an entry to another handset . . . .30
Copy the entire phonebook
to another handset . . . . . . . . . . . . . . .30
Edit an entry . . . . . . . . . . . . . . . . . . . .31
Delete an entry . . . . . . . . . . . . . . . . . .32
Delete the entire phonebook . . . . . . . .32
Using infrared connection . . . . . . . . . .32
Receiving vCards via infrared . . . . . . . .32
Store a vCard . . . . . . . . . . . . . . . . . . .33
29
Page 5

5In this guide
Copy an entry/entire phonebook
via infrared . . . . . . . . . . . . . . . . . . . . .33
Copy to or from a SIM card . . . . . . . . .34
Check phonebook memory capacity . . .35
Using the answering machine . . . . . .36
Switch on/off . . . . . . . . . . . . . . . . . . . .36
Outgoing messages . . . . . . . . . . . . . . .36
Set answer mode . . . . . . . . . . . . . . . . .37
Record your own outgoing message . . .37
Play/delete outgoing message . . . . . . .38
Set answer delay . . . . . . . . . . . . . . . . .39
Audible message alert . . . . . . . . . . . . .39
New message display . . . . . . . . . . . . . .40
Memory full . . . . . . . . . . . . . . . . . . . . .40
Play messages . . . . . . . . . . . . . . . . . . .40
Delete all messages . . . . . . . . . . . . . . .42
Record a memo . . . . . . . . . . . . . . . . . .42
Call screening . . . . . . . . . . . . . . . . . . .
43
Remote access . . . . . . . . . . . . . . . . . .43
Security code . . . . . . . . . . . . . . . . . . . .43
Set remote access security code . . . . .44
Switch answering machine on remotely 44
Time saver . . . . . . . . . . . . . . . . . . . . .44
Operating your answering machine from
another phone . . . . . . . . . . . . . . . . . . .45
Caller Display . . . . . . . . . . . . . . . . . .46
Calls list . . . . . . . . . . . . . . . . . . . . . . .46
New calls . . . . . . . . . . . . . . . . . . . . . . .46
View the Received and
Missed Calls lists . . . . . . . . . . . . . . . . .47
Dial from the Calls list . . . . . . . . . . . . .48
Copy a number to the phonebook . . . .48
Delete an entry in the Calls list . . . . . .49
Delete the entire Calls list . . . . . . . . . .50
BT Calling Features . . . . . . . . . . . . . .51
Product Helpline/Directory Enquiries . .51
Call Divert On . . . . . . . . . . . . . . . . . . .51
Call Divert Off . . . . . . . . . . . . . . . . . . .51
Check Divert . . . . . . . . . . . . . . . . . . . .52
Call Waiting On . . . . . . . . . . . . . . . . . .52
Call Waiting Off . . . . . . . . . . . . . . . . . .52
Check Call Waiting . . . . . . . . . . . . . . .52
Add/Edit BT Calling F
eatures . . . . . . . .53
Text messaging . . . . . . . . . . . . . . . . .54
Subscribe to the text service . . . . . . . .54
Cost of the fixed line service . . . . . . . .54
Send a text message . . . . . . . . . . . . . .55
Receiving a call while writing a text . . .57
Entering text . . . . . . . . . . . . . . . . . . . .58
Setting the text entry mode . . . . . . . . .58
Standard text entry . . . . . . . . . . . . . . .59
If you experience any problems, please call the Helpline on 0870 605 8047
Page 6

6 In this guide
Writing tips for standard text entry . . .59
Predictive T9
®
text entry . . . . . . . . . . .60
Writing tips for predictive text entry . . .60
Templates . . . . . . . . . . . . . . . . . . . . . .61
Edit templates . . . . . . . . . . . . . . . . . . .61
Delete templates . . . . . . . . . . . . . . . . .62
Emoticons . . . . . . . . . . . . . . . . . . . . . .62
Read, edit and send draft
text messages . . . . . . . . . . . . . . . . . . .63
Receiving and reading text messages . .63
Text alert . . . . . . . . . . . . . . . . . . . . . . .65
Service Centre numbers . . . . . . . . . . . .65
Adding or changing Send Service
Centre numbers . . . . . . . . . . . . . . . . . .66
Select a Send Service Centre number . .66
Set a user area . . . . . . . . . . . . . . . . . .67
Open a user area . . . . . . . . . . . . . . . . .68
Sounds & Pictures . . . . . . . . . . . . . . .
69
Handset ringtones . . . . . . . . . . . . . . . .69
Record a ringtone . . . . . . . . . . . . . . . .70
Receiving pictures/ringtones
via infrared . . . . . . . . . . . . . . . . . . . . .71
Handset pictures . . . . . . . . . . . . . . . . .72
Games . . . . . . . . . . . . . . . . . . . . . . .74
Handset settings . . . . . . . . . . . . . . . .75
Ringer melody and volume . . . . . . . . .75
Change the look of
your handset display . . . . . . . . . . . . . .76
Switch infrared on/off . . . . . . . . . . . . .77
Handset name . . . . . . . . . . . . . . . . . . .77
Keypad beeps . . . . . . . . . . . . . . . . . . .78
Auto talk . . . . . . . . . . . . . . . . . . . . . . .78
Access code . . . . . . . . . . . . . . . . . . . . .79
Base settings . . . . . . . . . . . . . . . . . .80
Ringtone and volume . . . . . . . . . . . . . .80
Dial mode . . . . . . . . . . . . . . . . . . . . . .80
Handset priority . . . . . . . . . . . . . . . . .81
System PIN (Personal Identification
Number) . . . . . . . . . . . . . . . . . . . . . . .82
First ring . . . . . . . . . . . . . . . . . . . . . . .82
Reset base . . . . . . . . . . . . . . . . . . . . .83
Time settings . . . . . . . . . . . . . . . . . .84
Alarm . . . . . . . . . . . . . . . . . . . . . . . . .84
To stop the alarm . . . . . . . . . . . . . . . .85
Time & date . . . . . . . . . . . . . . . . . . . .85
If you experience any problems, please call the Helpline on 0870 605 8047
Page 7

Additional handsets and bases . . . . .87
Register a new BT Esprit 1250 handset
to your BT Esprit 1250 base . . . . . . . .87
Register your handset
to another base . . . . . . . . . . . . . . . . . .88
Select a base to use . . . . . . . . . . . . . . .89
De-register a handset . . . . . . . . . . . . .90
Help . . . . . . . . . . . . . . . . . . . . . . . . .91
General information . . . . . . . . . . . . .97
Safety information . . . . . . . . . . . . . . . .97
Cleaning . . . . . . . . . . . . . . . . . . . . . . .97
Environmental . . . . . . . . . . . . . . . . . . .97
Product disposal instructions . . . . . . . .98
Switchboard compatibility . . . . . . . . . .98
Dialling mode . . . . . . . . . . . . . . . . . . .98
Guarantee . . . . . . . . . . . . . . . . . . . . . .98
Additional/Replacement Items . . . . . . .99
How many telephones can you have? .100
R&TTE . . . . . . . . . . . . . . . . . . . . . . .100
7In this guide
If you experience any problems, please call the Helpline on 0870 605 8047
Page 8
8
Getting started
WARNING
Do not place your BT Esprit 1250
in the bathroom or other humid
areas.
Handset range
The BT Esprit 1250 has a range of
300 metres outdoors when there is
a clear line of sight between the
base and handset. Any obstruction
between the base and handset will
reduce the range significantly.
With the base indoors and handset
either indoors or outdoors, the
range will normally be up to
50 metres. Thick stone walls
can severely affect the range.
Signal strength
The symbol on your handset
screen indicates when you are in
range. When you are out of
range, it flashes and
is displayed.
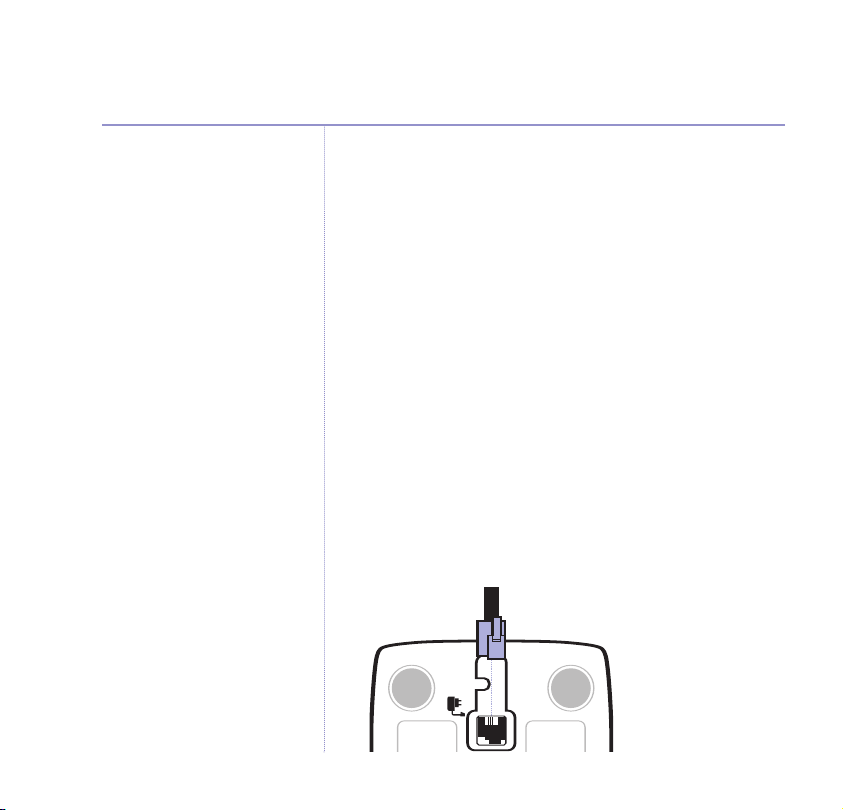
IMPORTANT
Do not connect the telephone line
until at least one of the handsets is
fully charged.
The base must be plugged into the
mains power at all times.
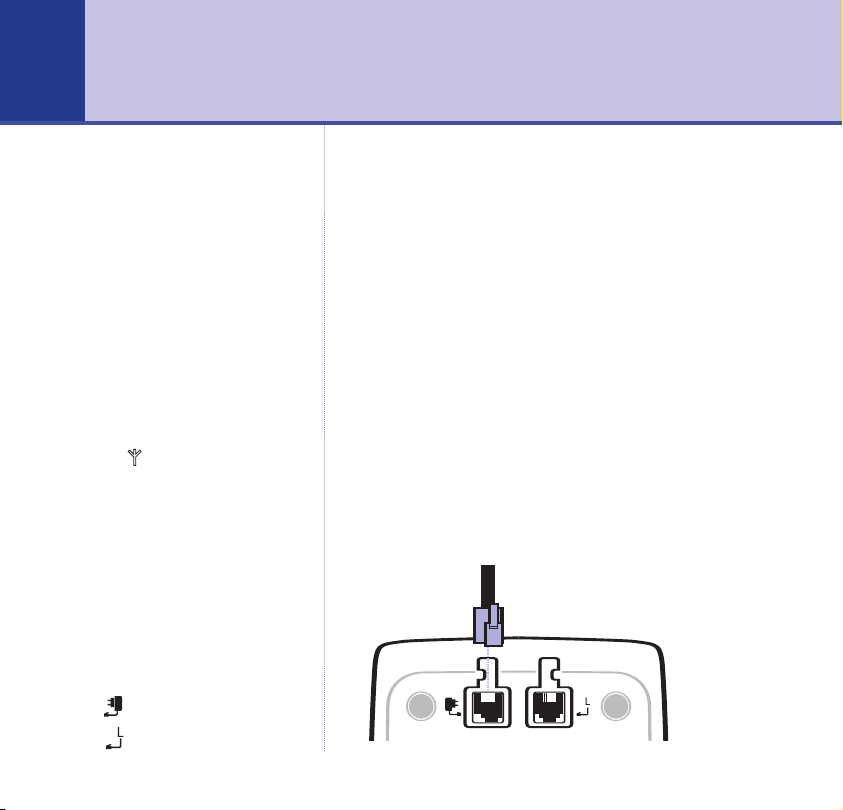
Which socket?
Power socket
Telephone line socket
Searching
Location
You need to place your BT Esprit 1250 base close
enough to a mains power and telephone socket so that
the cables will reach.
Make sure it is at least 1 metre away from other
electrical appliances to avoid interference.
Your BT Esprit 1250 works by sending radio signals
between the handset and base. The strength of the
signal depends on where you site the base. Putting it as
high as possible ensures the best signal.
Setting up
1. Plug the mains power adaptor into the power socket on
the underside of the base. Plug the other end into the
mains socket and switch on. The Power/In Use indicator
lights up.
If you experience any problems, please call the Helpline on 0870 605 8047
Page 9
9Getting started
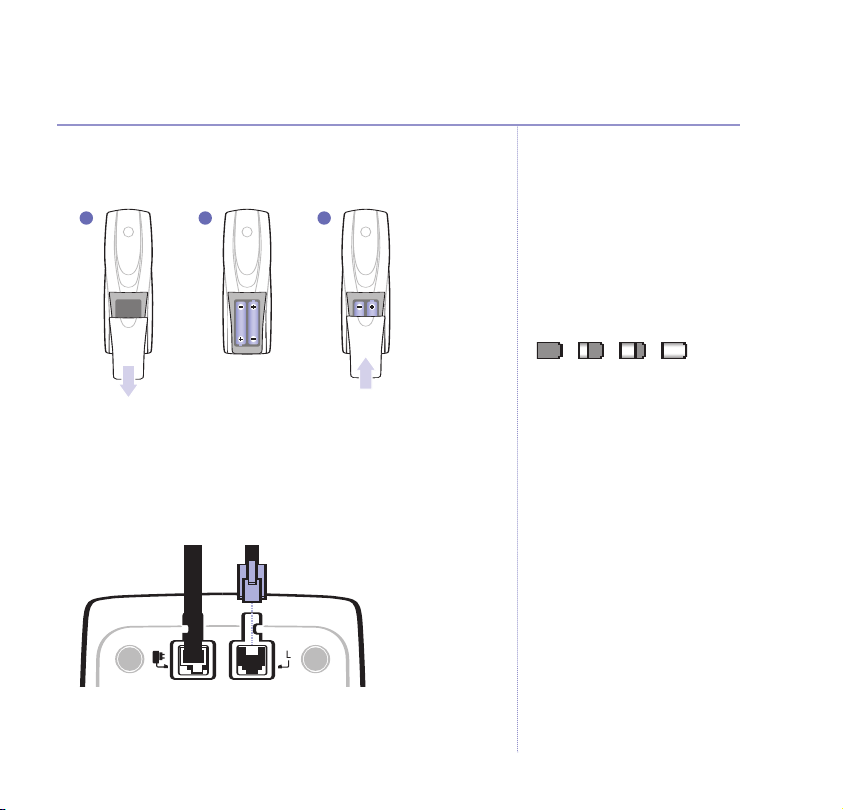
2. Insert 2 x AAA NiMH batteries (supplied) into the
handset. Slide the battery compartment cover into place.
1 2 3
3. Charge the handset batteries for at least 24 hours by
placing the handset on the base. The screen shows the
battery icon filling up.
4. Connect the telephone line cord to the base and plug the
other end into the wall socket.
Your BT Esprit 1250 is ready for use.
Talk/Standby time
Under ideal conditions, fully charged
handset batteries should give up
to 9 hours talktime or 65 hours
standby on a single charge.
Battery low warning
The handset battery symbol is
empty and you will hear a warning
beep. Start recharging your
handset right away.
When charging the battery, level
bars are animated.
Replacing batteries
Use only rechargeable 750mAh or
higher capacity AAA NiMH batteries.
Battery performance
When batteries are fully charged
the display shows a full battery
icon.
To keep your batteries in the best
conditions, leave the handset off
the base for a few hours at a time
(after the initial 24 hour charge).
Please note however, that new
NiMH batteries do not reach full
capacity until they have been in
normal use for several days.
If you experience any problems, please call the Helpline on 0870 605 8047
Page 10
10 Getting started
Running the batteries right down
at least once a week will help them
last as long as possible.
The charge capacity of rechargeable
batteries will reduce with time as
they wear out, so reducing the
talk/standby time of the handset.
Eventually they will need to be
replaced. New batteries can be
obtained from the BT Esprit
Helpline
0870 605 8047.
Helpline
If you have any difficulties setting
up your BT Esprit 1250, please call
the BT Esprit Helpline on 0870
605 8047.
Providing you have subscribed to your network’s Caller
Display service, the date and time are automatically set
when you receive your first incoming call.
However, you can also set the day and time manually,
see page 85.
BT Esprit 1250 multiple pack
owners only
Location
You need to place your BT Esprit 1250 charger close
enough to a mains power socket so that the cable will
reach.
Setting up the charger
1. Plug the power adaptor cable into the underside of the
charger.
If you experience any problems, please call the Helpline on 0870 605 8047
Page 11

2. Plug the power adaptor into the mains wall socket and
switch the power on.
3. Insert 2 x AAA NiMH batteries (supplied) into the handset
and slide the battery compartment cover into place.
4. Place the handset in the charger and charge the handset
for at least 24 hours.
Your BT Esprit additional handset(s) comes pre-registered
to the base as Handset 2, Handset 3, Handset 4 etc. and
this is shown on the handset display.
11Getting started
If you experience any problems, please call the Helpline on 0870 605 8047
Page 12
12
Getting to know your phone
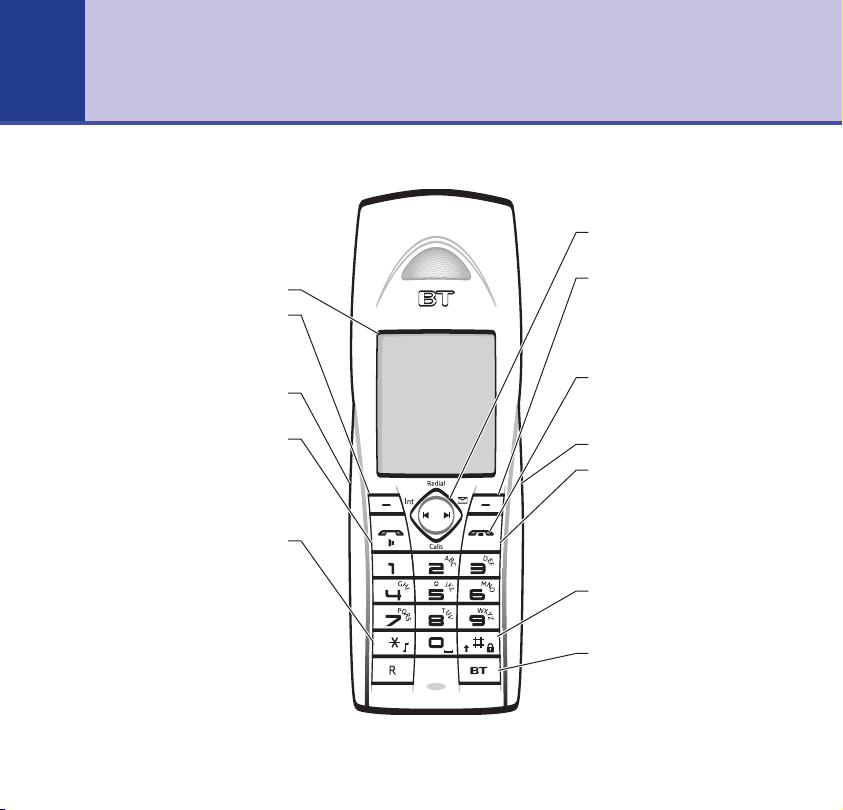
Handset buttons
Colour display
In standby, press to open the Menu,
page 15. In the Menu, press to select
on-screen options, page 15.
Lets you plug in a headset, page 19.
Press to make a call, page 17.
Talk light flashes when receiving a
call. Also used for Handsfree calling,
Press to switch from Pulse to
Press
and hold to switch the ringer
Menu/Options
Headset socket
Talk/Handsfree
*
Tone dialling.
page 18.
/Ringer off
on/off.
Navigation buttons
See following page.
Phonebook/Options
In standby, press to open the
phonebook, page 26.
In the Menu, press to select onscreen options, page 15.
Backlight:
Call in progress – On
Call ended – Off
Infrared lens
End
Press to end calls, page 17.
Press to exit the menu and return
to standby.
In standby, press
switch the power on/off, page 17.
#/Keylock
Press and hold to lock the keypad,
page 24.
BT
Quick access to a range of
BT Calling Features, page 51.
and hold to
If you experience any problems, please call the Helpline on 0870 605 8047
Page 13
13Getting to know your phone
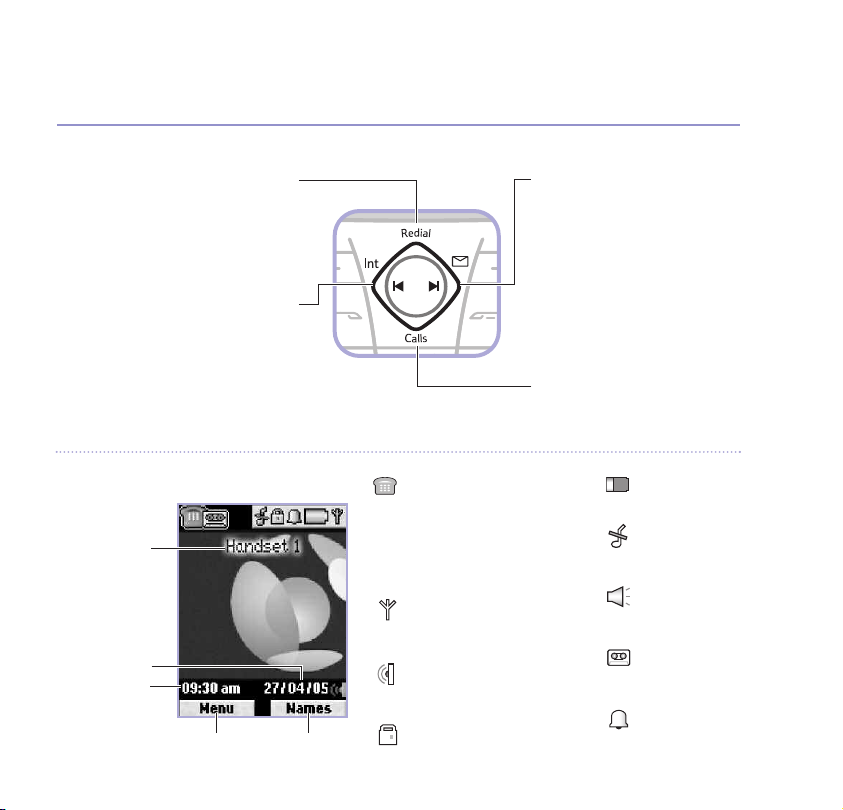
Handset navigation buttons
In standby, press to open
the Redial List, page 22.
During a call - press to increase
Use to move up through
In standby, press to make
an internal call, page 19.
When entering digits/characters,
press to move the cursor back.
When playing messages, press to skip
back through messages, page 41.
Use to move left through
Redial/Up
the volume, page 18.
the menu options.
the menu options.
Handset display icons
Handset name
Date
Time
On-screen menu options
If you experience any problems, please call the Helpline on 0870 605 8047
(located under the handset display)
Left
TELEPHONE
Handset on hook – when line
is idle
Handset lifts – during a call or
caller on hold
Moving – incoming call.
RANGE
Steady when in range. Flashes
when you are out of range.
INFRARED
Indicates that infrared is
switched on.
PADLOCK
Keypad lock on.
Right
In standby, press to open your
text message inbox, page 63.
When entering digits/characters,
press to move the cursor forward.
When playing messages, press to skip
forward through messages, page 41.
Use to move right through
the menu options.
Calls/Down
In standby, press to open the
Missed/Received Calls List, page 46.
During a call - press to decrease
the volume, page 18.
Use to move down through
the menu options.
BATTERY
Shows current battery level.
HANDSET RINGER OFF
Indicates that the ringer
is switched off.
HANDSFREE
Indicates that handsfree
is on.
TAPE
Answering machine
switched on.
ALARM
The alarm has been set.
Page 14
BT Esprit 1250
New Messages
New Text
Power/In Use
Find
14 Getting to know your phone
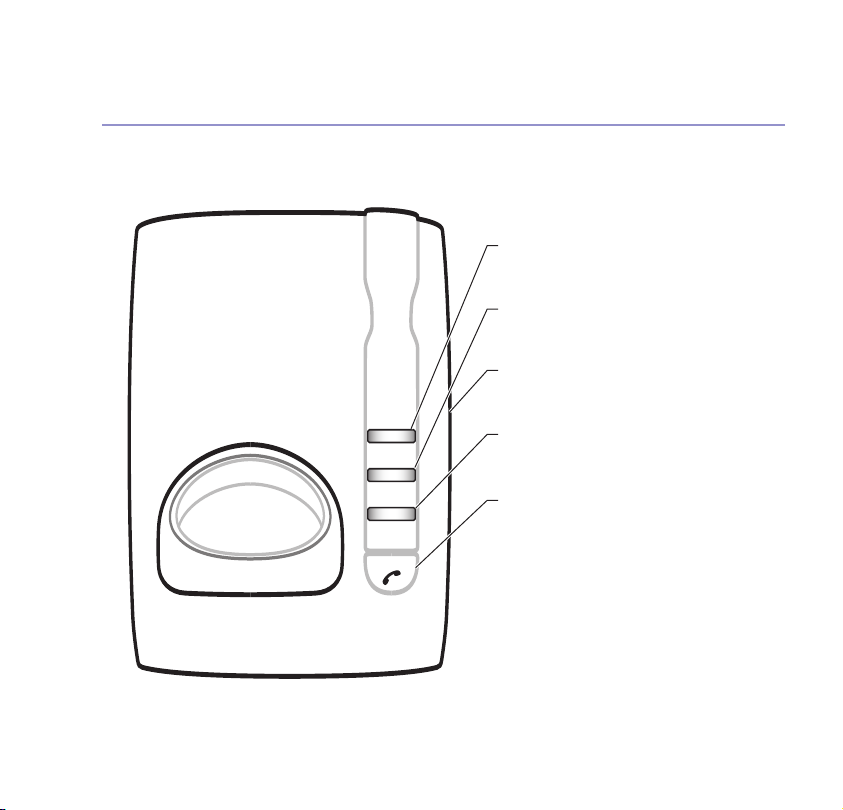
Base
New Messages (red)
Flashes when you have new answering
messages or voice messages, page 36.
New Text (red)
Flashes when you have received
new text messages, page 63.
SIM reader/writer
Insert a SIM card for copying numbers/
names to the directory, page 34.
Power/In Use indicator (green)
On when the power is connected.
Flashes when line is in use.
Find handset
Rings all registered handsets,
so you can find them, page 22.
Used to register additional handsets,
page 87.
If you experience any problems, please call the Helpline on 0870 605 8047
Page 15

15Getting to know your phone
Navigating the menus…
Your BT Esprit 1250 has a menu system which is easy to
use. Each menu leads to a list of options. Have a look at
the menu map on the following page.
To open the main menu from standby, press the left
Menu
Option button under
. To select from the menu
display screen use the navigation
buttons to navigate to the option you want and press
to select further options.
For example, to change the base ringer melody:
1. Press
Menu
then scroll to highlight the icon using
the navigation buttons and press the left Option
OK
button under
. The display shows
2. Use to scroll to
Ringer
is displayed, press OK. Press or to display
Base Settings
Handset Settings
and press OK.
and hear the choice of melodies. With the melody you
want displayed, press
to confirm.
Saved
is
Save
displayed.
Go back one level
You can go back to the previous menu level at any time
by pressing the right option button under
Back
Exit menu
To exit a menu, either press
and the display will return to
standby, or press
standby screen appears. If no
button is pressed for 30 seconds,
the phone will return to standby
automatically. Any unsaved
changes to your phone settings will
be lost.
OK
Option buttons
Select the on-screen options by
pressing the button underneath
the displayed option.
Highlight bar
When you scroll through the menu
options using the navigation
buttons, the active menu option
.
will be indicated with a highlight
bar.
Back
until the
.
If you experience any problems, please call the Helpline on 0870 605 8047
Page 16

16 Getting to know your phone
Menu map
Handset Settings
• Ringer • Display
• Infrared • Handset Name
• Keypad Beeps • Auto Talk
ccess Code
• A
Base Settings
• Ringer • Dial Mode • Handset Priority
• System PIN • First Ring • Reset
Time Settings
• Set Alarm • Set Date & Time
Phonebook
• Names
Games
• Concentration
• Air Hockey
• Mars Lander
• Solitaire
• Apples and Pears
Options
• New Entry
•View Details
•Send Text Message
•Delete Entry
•Edit Entry
•Copy Entry
•Copy Phonebook
•SIM Copy
•Memory Status
•Delete All
If you experience any problems, please call the Helpline on 0870 605 8047
Calls Lists
• Received Calls
• Missed Calls
• Dialled Calls
• Delete Calls List
Messaging
• Write Message
• Inbox
• Drafts
• Outbox
• Templates
• Text Settings
Answer Machine
• Play Messages
•Delete Messages
• Answer On/Off
• Record Memo
• Outgoing Message
•Answer Setting
Registration
• Register Handset
• De-Register Handset
• Select Base
Sound & Pictures
• Ringtones
• Pictures
• Record Ringtone
BT Services
• Product Helpline
• Dir. Enquiries
• Call Divert On
• Call Divert Off
• Check Divert
• Call Waiting On
aiting Off
• Call W
• Check Call Wait
Page 17

Using your phone
17
Switch handset on and off
1. Press and hold for 1.5 seconds to switch the handset
off. The display goes blank.
2. Press
and hold for 1.5 seconds to switch the handset
back on again. The display shows
Searching
while it links
up with the base, then reverts to the standby display.
Making calls
Make an external call
1. Press ,
2. Dial the number. The number is displayed and dialled.
The In Use light on the base flashes to indicate the line is
in use.
Preparatory dialling
1. Enter the number first. If you make a mistake press
Clear
2. Press to dial.
End a call
Press or place the handset back on the base. The
call duration is displayed.
Calling
to delete.
is displayed.
If you experience any problems, please call the Helpline on 0870 605 8047
Call timer
Your handset automatically times
the duration of every external call.
The call timer activates 5 seconds
into a call and continues to display
the time until a few seconds after
the call has ended.
Accessing the Phonebook during
a call
During a call you can press the
Names
option button to access the
phonebook to search for or store a
number, see page 26.
Making calls with multi-handsets
If a handset is engaged on an
external call and another handset
attempts to dial out, the display on
that handset will show Line In Use.
Preparatory dialling lets you see
the number on the display before it
is dialled out. You can enter a
number up to 32 digits long.
Press and hold 0 to enter a pause
in a number.
Page 18

18 Using your phone
Display/keypad backlight
When any button is pressed, the
display backlight comes on. If no
button is pressed for 30 seconds,
the backlight will dim to preserve
the battery life.
When you lift the handset from the
base/charger the backlight will
automatically come on.
When the backlight is on and you
put the handset back in the
base/charger the backlight will dim
immediately.
Handsfree lets you talk to your
caller without holding the handset.
It also enables other people in the
room to listen to both sides of your
conversation.
To switch to handsfree at any time
during a call, just press .
When in handsfree, the display
shows the icon and the light
on the button will come on.
The default volume is level 3.
Receive a call
When you receive an incoming call, your phone rings and
the green button flashes. The display shows
External Call
and the display backlight comes on.
If you have subscribed to your network’s Caller Display
service, the caller’s number (and name if stored in the
phonebook) is displayed.
Press or if the handset in on the base, simply lift it
up and speak.
Handsfree
1. Press , wait until you hear the dial tone then press
again. Dial the number. The call switches from the
handset to the loudspeaker.
2. To switch the call back to the handset at any time,
press .
3. Press to end the call.
Volume
During a call, press or to select from 5
volume levels.
If you experience any problems, please call the Helpline on 0870 605 8047
Page 19

19Using your phone
Headset (not provided)
1. Peel back the rubber bung on the side of the handset
and plug the headset supplied into the socket.
2. Make and receive calls as normal.
Secrecy
1. During a call, press
Your caller cannot hear you.
Off
2. Press
to resume your call.
Secrecy
. Display shows
Secrecy On
Internal calls
If you have more than one handset registered to your
base, you can make internal calls and transfer calls
between handsets.
Call another handset
1. Press . If you have two handsets, the other handset will
ring. If you have more handsets, all available handsets
are displayed. Scroll to highlight the handset you
want (or enter the handset number using the keypad)
and press
2. The called handset will show the number of the calling
handset.
OK
.
If you experience any problems, please call the Helpline on 0870 605 8047
You can purchase a compatible
headset by calling the Helpline
on 0870 605 8047.
When on a call, you can talk to
.
someone in the same room
without your caller hearing.
If the other handset is making an
external call, the screen shows
Available
.
Not
Page 20

20 Using your phone
Receiving an external call while engaged on an
internal call
If an internal call is in progress and an external caller is
trying to get through, beeps will be heard through the
earpiece of both internal handsets. If you have
subscribed to a Caller Display service via your network
provider, the caller’s details will also be displayed. You
will need to end the internal call to be able to answer the
waiting external call.
Transfer a call to another handset
1. During an external call, press . Your caller is put on
hold.
2. If you have two handsets, the other handset will ring
automatically.
If you have more handsets, press or to
select the handset number you want (or enter the
OK
handset number using the keypad) and press
.
3. When the other handset answers, press to transfer
the call or if the other handset does not answer, press
End
to go back to the external call.
If you experience any problems, please call the Helpline on 0870 605 8047
Page 21

Put a caller on hold and call another handset
1. During an external call, press . Your caller is put
on hold.
2. If you have two handsets, the other handset will ring
automatically.
If you have more handsets, press or to select
the handset number you want (or enter the handset
OK
number using the keypad) and press
.
3. Press to switch back and forth between your external
and internal callers.
Conference call
1. During an external call, press . Your caller is put on hold.
2. If you have two handsets, the other handset will ring
automatically.
If you have more handsets, press or to select
the handset number you want (or enter the handset
number using the keypad) and press
Join
3. Press
shows
to speak to both callers together. The screen
Conference Call
.
OK
.
4. Either internal handset can leave the conference call by
pressing . The other internal handset will remain
connected to the external call.
If you experience any problems, please call the Helpline on 0870 605 8047
21Using your phone
You can hold a 3-way conversation
with an external caller and another
handset user at the same time.
Page 22

Find
F
ind
22 Using your phone
The paging ring is a pre-set ring
that cannot be changed.
You can use the paging ring to
locate a misplaced handset.
Finding a handset (Paging)
1. Press on the base. Any handsets registered to your
BT Esprit 1250 base will ring and display
Paging Call
.
2. To stop the paging ring, press on the handset(s) or
on the base.
Call Waiting*
Recall
to take the waiting call.
Recall
to toggle between the two calls.
. The last number dialled is displayed.
Call Waiting lets you know if
another person is trying to contact
you while you are on a call. If a
second caller rings you will hear a
beep in the handset. Providing you
have Caller Display, the screen will
show the caller’s details.
* A quarterly fee may be payable,
see page 51.
1. Press
2. Press
Redial
Redial a number
1. Press
2. Scroll or to the number you want.
You can redial any of the last 20
numbers called. If you have stored
a name in the phonebook to go
with the number, the name will be
displayed instead, see phonebook,
page 26.
If there are no calls stored in the
redial list the display will show
Dialled Calls List Empty
.
If you experience any problems, please call the Helpline on 0870 605 8047
3. Press to dial.
Delete a redial number
1. Press . The last number dialled is displayed. Scroll
or to the number you want.
2. Press
Options,Delete Call
is highlighted.
Page 23

3. Press OK. The number is deleted. Press to return to
standby.
Save a redial number to the phonebook
1. Press . The last number dialled is displayed. Scroll
or to the number you want.
2. Press
Options
3. Use or to select
Existing
4. Press or to select the type of number:
<Mobile>
and scroll to
and press OK.
or
<Work>
and press OK.
Save Number
Create New Entry
<Home>
. Press OK.
or
Add to
,
5. Enter the name (see Entering names page 26) and press
Save
.
6. If necessary scroll to edit the number, or to add
further numbers for this contact.
7. If required, scroll to
Ringtone
then press or
select a ringtone for that number.
8. If required, scroll to
Picture
then press or to
select a picture that will be displayed when that number
calls. Press
8. Press
9. Press
View
to see the picture then
Save
to store the entry.
Back
or to return to standby.
Use
to select it.
Phonebook full
Phonebook Full
there is no more room in the
phonebook.
will be displayed if
23Using your phone
If you experience any problems, please call the Helpline on 0870 605 8047
Page 24
24 Using your phone
Text messaging
Refer to the text messaging
section on page 55 for full
instructions on sending text
messages.
You must press the Unlock and
buttons within 2 seconds or
the keypad will remain locked.
When the keypad is locked
incoming calls can still be
answered. Once the call has
ended, the keypad lock is
re-activated.
You can lock the keypad to prevent
accidentally dialling numbers while
carrying the handset around.
IMPORTANT
Emergency calls CANNOT be made
when the keypad lock is on.
If you experience any problems, please call the Helpline on 0870 605 8047
Send a text message to a redial number
1. Press . The last number dialled is displayed. Scroll
or to the number you want.
2. Press
Press
Options
OK
.
and scroll to
Send Text Message
3. Write your text message using the keypad, then press
Options
.
Send To
4.
displayed, press
Sending Message
5.
9. Press
is displayed, press OK, the redial number is
Send
to confiirm.
is displayed, then
Back
or to return to standby.
Message Sent
.
Keypad lock
1. Press and hold for 1.5 seconds until you hear a
beep. Screen shows
Keypad Locked
2. To unlock the keypad, press
shows
Keypad Unlocked
.
Unlock
and the icon.
then . Display
Quick access to messages
When the screen shows you have new Calls or text
messages, you can use the and navigation
.
Page 25

buttons to see details of new missed calls or new text
messages.
New calls and text messages are indicated on all
registered handsets until viewed.
New text messages
1. Press to enter your Inbox.
2. Scroll or through the message list and press
Read
to read the message.
3. Press
4. Press
1. Press . The most recent entry is displayed.
2. Scroll or through the missed Calls list.
4. Press
5. Press
Options
etc.
Back
New calls
Options
Message
Back
to delete, reply or forward the message
to return to the previous menu.
to
Delete Call,Save Number
.
to return to the previous menu.
or
Send Text
25Using your phone
If you experience any problems, please call the Helpline on 0870 605 8047
Page 26

26
Phonebook
For an entry to be stored, you must
enter a name and at least one
contact number.
Names can be up to 16 characters
long and numbers up to 24 digits
long. Stored entries are displayed
alphabetically. Any entries starting
with a number will be shown first in
the phonebook list. Any icons you
have stored for the entry will also
be displayed.
Entering names
Use the keypad to enter the letters
shown on the buttons, e.g. to store
TOM:
Press once to enter T.
Press three times to enter O.
Press once to enter M.
Writing tips
If you make a mistake, press Clear
to delete the last character or
digit.
Press once to insert a space.
Press repeatedly to enter the
following symbols . , - ? ! ’ @ :
; / 1
Your phone is set to insert the first
letter of a name as an upper case
letter. The rest will be in lower
case.
Press to set lower case or
upper case letters.
If you experience any problems, please call the Helpline on 0870 605 8047
You can store up to 255 names in the phonebook, each
with 3 contact numbers: home, mobile and work. One of
these numbers can be set as the default number. You
can also personalise entries with individual ringtones
and pictures. When you receive an incoming call, the
ringtone and picture will let you know who’s calling
before you pick up the phone.
Open the phonebook
In standby:
Names
Press
.
Or
Press
Menu
, then use the navigation buttons to highlight
OK
the icon and press
.
You can use either of the above methods to open the
phonebook for the procedures shown in this section of
the guide.
Store new phonebook entry
1. Press
Press
Names
OK
.
then
Options
. Display shows
New Entry
2. Use the keypad to enter the name then scroll to
enter the contact numbers for Home, Mobile and Work.
.
Page 27

27Phonebook
3. Scroll to Default Number and press or to
select either the Home, Mobile or Work number as the
default number.
4. If required, you can scroll to
Ringtone
and press
or to hear and assign a ringtone to the number.
Similarly, you can scroll to
to select a picture. Press
Use
to save it (or
Back
View
to cancel).
Picture
to see the picture and
and press or
5. Once you have stored all the details for this contact,
Save.Name Saved
press
is displayed and the entry is
shown in the phonebook list.
6. To add another entry, press
Options
and repeat the
storing procedure or to return to standby, press .
Insert a pause in a number
You may need to do this if you are
connected to a switchboard. When
entering a number, usually after
entering the switchboard access
code (e.g. 9) press
P appears in the display.
Duplicate names
It is possible to store the same
name twice in the phonebook and
to assign the same number to two
names.
and hold 0 until
If you experience any problems, please call the Helpline on 0870 605 8047
Page 28

28 Phonebook
CaseButton
Assigned Characters and Symbols
1
L/U . , - ? ! ¡ ¿ ‘ @ : ; / 1
L a b c 2 ä æ å à ç
2
U A B C 2 Ä Æ Å Ç
L d e f 3 è é
3
U D E F 3 É
L g h i 4 ì
4
U G H I 4
L j k l 5
5
U J K L 5
L m n o 6 ö ø ò ñ
6
U M N O 6 Ö Ø Ñ
L p q r s 7 ß
7
U P Q R S 7
L t u v 8 ù ü
8
U T U V 8 Ü
L w x y z 9
9
U W X Y Z 9
Space 0
When writing a text message
0
L/U
Space 0 + &
When entering a phonebook entry
Character map
If you experience any problems, please call the Helpline on 0870 605 8047
Page 29

29Phonebook
Dial from the phonebook
1. Press
Names
then scroll or to the entry you
want or search alphabetically.
2. If there is only one contact number stored or you want
to dial the default number, press .
Or
If the name has more than one number stored,
press . Scroll or to the entry you want
and press .
The number is displayed and dialled.
View a phonebook entry
1. Press
2. Scroll to
Names
and scroll to the entry you want (or
search alphabetically) then press
View Details
and press OK.
Options
.
3. The name and number(s) are displayed along with any
selected ringtone and picture.
4. Press to return to standby.
Search for a name alphabetically
Press
Names
letter of the name you want e.g.
for Emma, press 3 twice to display
names beginning with E, then
scroll using or to the
name you want.
If there is a default number stored
with the phonebook entry, the icon
to the left of the entry will tell you
whether the default number is a
home, work or mobile number.
If you’ve set a default number
but wish to use one of their other
numbers, press
OK
select the number you want and
press .
If a phonebook number is too long
to be displayed at one time, the
first part of the number will be
displayed for 5 seconds and then
the last part of the number will be
displayed.
then enter the first
Options
View Details
to
, then use or to
, scroll
and press
If you experience any problems, please call the Helpline on 0870 605 8047
Page 30

30 Phonebook
Phonebook full
If you are copying a phonebook
entry to another handset and the
phonebook memory is full the
receiving handset screen shows
Phonebook Full
handset shows
Entry Failed
Problems copying numbers
If you try to copy a phonebook
entry to another handset and there
is only one handset registered to
your base, you will see the error
message
available
If you try to copy a phonebook
entry/the entire phonebook to
another handset and the other
handset is switched off or out of
range, you will see the error
message
Failed
Stored ringtones and pictures that
you have assigned to phonebook
entries are specific to the BT Esprit
1250 and will therefore not be
copied to another type of handset.
and the sending
Copy Phonebook
.
Receiving H/Set not
.
Copy Phonebook Entry
or
Copy Phonebook failed
If you experience any problems, please call the Helpline on 0870 605 8047
.
Copy an entry to another handset
1. Press
2. Scroll to
3. The display shows
press
Names
and scroll to the entry you want then
Options
.
Copy Entry
<to Handset>
and press OK.
, press OKto select.
4. Scroll or to select the number of the handset you
OK
want to copy to and press
Screen shows
Copying to handset X
.
(where X is the
selected handset).
5. At the receiving handset the screen shows
Phonebook Entry?
Press
Yes
.
6. The receiving handset screen shows
Handset X
.
Receive
Copying From
Copy the entire phonebook to another handset
1. Press
2. Scroll to
3. The display shows
Names
then
Options
.
Copy Phonebook
<to Handset>
and press OK.
, press OKto select.
4. Scroll or to select the number of the handset you
OK
want to copy to and press
Screen shows
Copying to handset X
.
(where X is the
selected handset).
Page 31

31Phonebook
4. At the receiving handset the screen shows
Phonebook?
Press
YES
.
5. The receiving handset screen shows
Handset X
.
Replace
Copying From
Edit an entry
1. Press
2. Scroll to
3. Use the keypad to edit the name, press
press
Names
and scroll to the entry you want then
Options
.
Edit Entry
and press OK.
Clear
to delete
any incorrect characters and enter new ones using the
keypad. Then scroll to edit the number(s) in the
same way.
4. If required scroll to
Ringtone
and press or to
hear and assign a ringtone to the number.
5. If required, scroll to
select a picture. Press
View
Picture
and press or to
to see the picture and
Use
save it.
6. When you have made all the changes to this entry, press
Save,XXXX Saved
is displayed. (where XXXX is the
name).
7. Press to return to standby.
IMPORTANT
Copying the entire phonebook will
replace any existing entries stored
in the receiving handset.
If you receive an incoming call
while the phonebook is being
copied, only the entries that had
been successfully copied up until
the point the phone rang will be
stored.
You can use and to
move the cursor.
to
If you experience any problems, please call the Helpline on 0870 605 8047
Page 32

32 Phonebook
Delete an entry
1. Press
2. Scroll to
3.
Names
and scroll to the entry you want then
Options
press
Delete XXXX?
Yes
Press
to delete or Noto cancel.
.
Delete Entry
and press OK.
is displayed (where XXXX is the name).
4. Press to return to standby.
Delete the entire phonebook
1. Press
2. Scroll to
3.
4. Press
Names
then press
Delete All
Delete All Entries?
No
to cancel.
to return to standby.
Options
and press OK.
is displayed. Press
.
Yes
to delete or
Single and multiple vCards can be
sent and received via infrared.
You need to switch infrared on to
receive a vCard, see page 77 for
instructions. If infrared is not
switched on, you will see
Not Switched On
Infrared
.
If you experience any problems, please call the Helpline on 0870 605 8047
Using infrared connection
Receiving vCards via Infrared
A vCard is an electronic (or virtual) business card. It
allows you to exchange personal information such as
name, address and telephone number, etc. with other
Page 33

devices. Information transferred in vCards can be
automatically added to your BT Esprit 1250 phonebook.
Store a vCard
1. When you receive a single vCard you will see
vCard?
on your handset display.
2. To accept and store the vCard, press
vCard
is displayed.
When the vCard has stored successfully,
Store
Yes.Receiving
XXXX Stored
be displayed (where XXXX is the name).
Or
To reject the vCard, press No. The phone will
automatically return to standby.
Copy an entry (vCard)/entire phonebook
via infrared
You can copy a phonebook entry (vCard) or the entire
phonebook to another device if it is capable of receiving
multiple vCards. You need to line up the red infra lenses
on both devices so they are facing each other. If no
device is found in that time
Unable to Connect
will be
displayed. Copied entries are added to any existing
entries that have been stored.
If you are receiving multiple
vCards simultaneously they will
be received one after the other.
TRANSFERRING VCARDS
TO A COMPUTER
Please note that when a vCard
is transferred to a computer,
will
different makes of computer will
save the vCard in a different place.
The file will not necessarily be
transferred to the Contact
Management list, you will probably
need to import the file into the
Contact Management software
yourself.
Infrared will automatically be
switched on for approx. 10 minutes
when you copy a vCard.
If you receive an incoming call
while the phonebook is being
copied, only the entries that had
been successfully copied up until
the point the phone rang will
be stored.
Only the first 16 characters of a
name and the first 24 digits of a
number can be stored.
33Phonebook
If you experience any problems, please call the Helpline on 0870 605 8047
Page 34

34 Phonebook
If copying is unsuccessful you will
Unable to Connect
see
Transfer failed
Press at any time to cancel.
Any entries that have already been
copied will be retained.
On most devices able to copy via
SIM card and infrared, infrared
tends to give the best results.
The PIN number will be displayed
as asterisks for security reasons.
If you enter the wrong PIN twice,
SIM PIN Error is displayed and the
screen returns to standby.
or
Infrared
.
If you experience any problems, please call the Helpline on 0870 605 8047
1. Press
2. Scroll to
3. Press to display
Names
and scroll to the entry you want then
press
press
shows
Options
OK
.
.
Copying via Infrared
Copy Entry
<via Infrared>
or
Copy Phonebook
and press OK. Screen
, then
Sending via Infrared
and
4. Follow the instructions on the receiving device to store
the phonebook entry.
5. The receiving handset screen shows
Handset X
.
Copying From
Copy to or from a SIM card
1. Insert the SIM card into the SIM READER slot on the side
of the base.
Names
2. Press
then press
show
3. Scroll to
show
4. If required, enter the SIM Card PIN and press
5. The screen displays
to the SIM Card, scroll to highlight
and press OK. Display shows
. If you have enties they will be displayed,
Options
New Entry
Please Wait
. If you have no entries the display will
and
SIM Copy
SIM Copy
.
and press OK. The display will
whilst it checks your SIM Card.
SIM to Phone/Phone to SIM
Please Wait
OK
.
. If copying
Phone to SIM
.
.
Page 35

35Phonebook
6. Screen shows
to highlight the option you want and press
7. If you selected
Please wait
Copy Entry/Copy All
Copy Entry
. Use or
OK
.
the display will show,
whilst it creates a list of entries for you to
select from. Scroll or to the entry you want
and press
Save.XXXX Copied
is displayed (where XXXX is
the name). You can now select another entry.
If you selected
Copy All
: Each entry is displayed and
copied, until all entries are copied or the phonebook/SIM
Card is full. The display will show either
Copied
or
Memory Full Not All Copied
XX Entries
.
Check phonebook memory capacity
1. Press
2. Scroll to
Names
then
Options
Memory Status
.
and press OK.
3. The display shows the memory status, e.g.
Memory Used
30 Entries
Memory Free
225 Entries
4. Press to return to standby.
Check that you have the right SIM
PIN. If you cannot find it, contact
your mobile phone network for
help.
Only the first 16 characters of a
name and the first 24 digits of a
number can be stored.
If you receive an incoming call
while the SIM copy is in progress,
only entries copied before the call
was received will be copied
successfully.
If you have problems copying
phonebook entries from your SIM
onto the BT Esprit 1250 place the
SIM back into your mobile and
confirm that the directory entries
are stored on the SIM and not on
the mobile handset directory. If
they are stored in your mobile
handset directory you will first
need to copy them onto the SIM.
Refer to your mobile user guide for
details. Note: sometimes the
mobile handset directory entries
will appear differently when they
are copied to the SIM, with the
name being appended with a
number, e.g. Tom 1.
If you experience any problems, please call the Helpline on 0870 605 8047
Page 36

36
Using the answering machine
During operation, you will hear
prompts to guide you through
each step.
Base indicator light
On – answering machine on.
Off – answering machine off.
The handset screen displays
when the answering
machine is switched on.
The default setting for the
answering machine is On.
If you experience any problems, please call the Helpline on 0870 605 8047
You can operate your BT Esprit 1250 answering machine
from the handset or remotely from any external
Touchtone™ telephone.
Until you change your outgoing message, your callers
will be greeted with the pre-recorded message ‘Hello,
your call cannot be taken at the moment, so please leave
your message after the tone’.
Switch on/off
1. Press
2.
3. The current setting is highlighted. Press or to
Menu
, then press to highlight the icon
OK
and press
Play Messages
On/Off
switch
The display confirms your selection, displaying
Machine On
or ‘Answer Off’ is announced and the handset reverts to
idle and the icon is either shown (if on) or
disappears (if off).
.
is highlighted, scroll to
and press OK.
On
or
Off
and press OK.
or
Answer Machine Off
Answer
Answer
and either ‘Answer On’
Outgoing messages
This is the message your callers hear when the answering
machine picks up their call. Your BT Esprit 1250 comes
with two pre-recorded outgoing messages, one for
Page 37

37Using the answering machine
Answer & Record and one for Answer Only modes.
The default Answer mode is Answer and Record.
Set answer mode
1. Press
2.
3.
4. Press
5. Press to return to standby or
Menu
, then press to highlight the icon
OK
and press
Play Messages
Settings
Answer Mode
.
is highlighted, scroll to
and press OK.
is highlighted, press or to select either
Answer & Record
Save.Saved
or
Answer Only
is displayed.
.
Back
Answer
to go one step
back in the menu.
Record your own outgoing message
1. Press
2.
3.
Menu
, then press to highlight the icon
and press
Play Messages
Message
OK
.
is highlighted, scroll to
and press OK.
Record Message
Outgoing
is highlighted, press OK.
4. Press or to highlight the type of outgoing
message you want either
Only
and press OK.
If you experience any problems, please call the Helpline on 0870 605 8047
Answer & Record
or
Answer
Answer & Record mode
This invites your caller to leave a
message.
The pre-recorded message is
your call cannot be taken at the
moment, so please leave your
message after the tone’
Answer Only mode
This does not allow your caller to
leave a message.
The pre-recorded message is
your call cannot be taken at the
moment, and you cannot leave a
message, so please call later’.
Your outgoing messages can be up
to 2 minutes long. Recording a
new message will replace the prerecorded outgoing message.
You can reinstate the original prerecorded messages at any time by
deleting your own recorded
message.
‘Hello,
.
‘Hello,
Page 38

38 Using the answering machine
If you delete your own recorded
outgoing message, the prerecorded message is re-instated.
You cannot delete the pre-recorded
message. Incoming messages can
be up to 3 minutes long.
When recording an incoming
message, if there is silence for
7 seconds, the machine
automatically plays
for calling’ and hangs up.
‘Thank you
If you experience any problems, please call the Helpline on 0870 605 8047
5. Follow the instructions you hear and speak your message
clearly close to the handset microphone. While recording
the display shows
6. Press
Save
Recording
to stop recording. Your message is played
.
back for you to check.
7. Press
to use the outgoing message or
Delete
to erase
OK
the recording and revert to the old outgoing message.
Back
8. Press to return to standby or
to go one step
back in the menu.
Play/delete outgoing message
1. Press
2.
3.
Menu
, then press to highlight the icon
OK
and press
Play Messages
Message
.
is highlighted, scroll to
and press OK.
Record Message
Play Message
and press OK. Your message is played back.
Outgoing
is highlighted, scroll to highlight
4. Press or to highlight the type of outgoing
message you want either
Answer Only
5. Press
.
OK
to stop playback or
Answer & Record
Delete
to delete the
or
message and reinstate the pre-recorded message.
Back
6. Press to return to standby or
to go one step
back in the menu.
Page 39

39Using the answering machine
Answer delay
Answer delay sets the amount of time before your BT
Esprit 1250 answering machine picks up a call.
You can select an answer delay of 2-9 rings or Time
Saver. The default setting is 6 rings.
Set answer delay
1. Press
2.
3.
4. Press
5. Press to return to standby or
1. Press
Menu
, then press to highlight the icon
OK
and press
Play Messages
Settings
Answer Mode
.
is highlighted, scroll to
and press OK.
is highlighted, scroll to
Answer Delay
then press or to select the number of rings you
2
to 9or
want
Time Saver
Save.Saved
.
is displayed.
Back
to go one step
back in the menu.
Audible message alert
Menu
, then press to highlight the icon
and press
OK
.
If you experience any problems, please call the Helpline on 0870 605 8047
Answer
Time saver
If you set time saver and call
remotely to check for messages,
your answering machine will
answer after 2 rings if you have
new messages. If you do not have
new messages it will answer after 6
rings, so if you hear a third ring
you can hang up and save the cost
of a call.
Your BT Esprit 1250 base can be
set to beep every few seconds to
indicate that you have new
messages. The default setting
is off.
Page 40

40 Using the answering machine
The new message indicators
remain on until all new messages
have been played.
Memory full
The memory becomes full either
because the maximum recording
time of 18 minutes has been used
up or the maximum number of
messages – 59 – has been
reached.
If the maximum message length of
3 minutes is reached while
recording an incoming message
the caller will hear
“Thank you for calling”, and the
machine automatically hangs up
and switches to answer only mode.
2.
Play Messages
Settings
3.
Answer Mode
then press or to select Onor
Alert
4. Press
Save.Saved
5. Press to return to standby or
is highlighted, scroll to
and press OK.
is highlighted, scroll to
is displayed.
Off
Back
to go one step
Answer
Message
.
back in the menu.
New message display
At the handset:
When you have new answering machine messages the
PLAY
screen shows the and
is shown as an option.
At the base:
The answering machine message indicator flashes.
Play messages
When you select to play messages, your BT Esprit 1250
will announce,
‘You have X new messages’, and then play
back any new messages first. When all new messages
have played back you will hear,
‘You have X old messages’,
and any old messages will play back.
If you experience any problems, please call the Helpline on 0870 605 8047
Page 41

41Using the answering machine
1. Press
2.
Menu
, then press to highlight the icon
OK
and press
.
Play Messages
is highlighted, press OK. The messages
will be played over the handset loudspeaker. The number
or name of caller (if available) and date and time of the
call are also displayed.
During playback, you can press:
Pause
– to pause the message, then press
Play
to
resume playback.
Delete
– to delete the current message. Display confirms
Message Deleted
.
– press once to replay the message or twice to play
the previous message.
– to play the next message.
or – to adjust the volume.
– to hear messages handsfree, over the handset
loudspeaker.
Press again to switch back to the earpiece.
– to stop playback and return to standby.
To free up more space for new
messages, play and delete
messages stored on your machine.
At the handset:
The icon flashes.
If you have no messages
will be displayed.
Messages
The caller’s name will only be
displayed if an exact number
match is found in the handset
phonebook.
If you have stored a picture with
the name in the phonebook, the
picture will also be displayed.
If a memo is playing back,
will be displayed in place of a
name/number.
No
Memo
If you experience any problems, please call the Helpline on 0870 605 8047
Page 42

42 Using the answering machine
You cannot delete new (unplayed)
messages.
You can record a memo message
on the answering machine for
other users of your BT Esprit 1250
to hear.
Memos are stored in the same way
as incoming messages.
Delete all messages
1. Press
2.
3. The display shows
Menu
, then press to highlight the icon
OK
and press
.
Play Messages
Messages
and press OK.
is highlighted, scroll to
Delete All Old Messages?
to confirm or Noto cancel.
4. Press to return to standby or
back in the menu.
Record a memo
1. Press
2.
3. The voice prompt announces
4. Press
5. Press
Menu
, then press to highlight the icon
OK
and press
Play Messages
Memo
.
is highlighted, scroll to
and press OK.
to end recording, press save”
display shows
Save
to end recording. Your memo is played back.
OK
to stop playback and save the memo or
Recording
.
“Please speak after the tone,
. Speak your message. The
to erase the memo.
Back
to go one step
Delete
, press
Record
Delete
Yes
If you experience any problems, please call the Helpline on 0870 605 8047
Page 43

43Using the answering machine
6. Press to return to standby or
back in the menu. The
Back
to go one step
icon will be displayed to show
that the memo has been saved.
Call screening
1. When the answering machine takes a call, press
Screen
to listen in to your caller leaving a message.
2. To speak to your caller, press . Recording stops
automatically and any message recorded is not saved.
Or
To stop screening, press .
Remote access
Security code
You can operate your answering machine from any
modern phone by calling your BT Esprit 1250 and
entering a 3-digit security code.
The pre-set code is 000. You can change this to help
prevent unauthorised callers from listening to your
messages.
You can listen while your answering
machine takes a call.
This lets you identify the caller and
decide whether to take the call
yourself.
During screening, any other
handsets registered to the base
Screening
display
.
If you experience any problems, please call the Helpline on 0870 605 8047
Page 44

44 Using the answering machine
If you experience any problems, please call the Helpline on 0870 605 8047
Set remote access security code
1. Press
2.
3.
4. Enter the new PIN and press
5. Press to return to standby or
1. Dial your phone number and let it ring. After 20 rings,
Menu
, then press to highlight the icon
OK
and press OK.
. Press
.
is highlighted, scroll to
is highlighted, scroll to
Clear
to delete the existing digits.
Save.Saved
Back
Answer
Security
is displayed.
to go one step
and press
Play Messages
Settings
Answer Mode
Code
back in the menu.
Switch answering machine on remotely
If you forget to switch on your answering machine, you
can do it from another phone.
the outgoing message will be announced. You can now
enter the menu and switch the answering machine on.
Time saver
If you have set the Answer Delay to Time Saver, your
answering machine will answer after 2 rings if you have
new messages or 6 rings if you do not have new
messages. This gives you time to hang up before you are
connected, saving you the cost of a call. To set Answer
Page 45

Delay, see page 39.
Operating your answering machine from
another phone
Dial your phone number. When you hear your outgoing
message, press . You will hear ‘
security code’
.
Please enter your
Enter your 3-digit code. The outgoing message stops
and you hear 2 beeps.
If you have messages, your machine announces
(n) new messages’
, and they are played. Or you will hear
‘You have
‘You have no new messages, to hear main menu press 1’.
Use the buttons on the keypad to operate
your answering machine:
45Using the answering machine
The default security code is 000.
Once you enter your security code,
you will hear announcements to
guide you.
hear main menu.
play all messages.
play new messages
only.
once to repeat the
current message,
twice to play previous
message.
delete the message
being played.
If you experience any problems, please call the Helpline on 0870 605 8047
play next message.
set answer mode.
play your outgoing
message.
record a new
outgoing message.
switch answering
machine off/on.
Page 46

46
Caller Display
IMPORTANT
To use Caller Display you must first
subscribe to your network
provider’s Caller Display service.
A quarterly fee may be payable.
For more details on BT’s Calling
Features, call BT free on 0800 800
150.
If you subscribe to a Caller Display service, your handset
shows who is calling (provided the number is not
withheld, unavailable or is an international call).
If you have stored a name to go with the number in your
handset phonebook and an exact match is found, the
name and the number will be displayed.
Calls list
The Calls list contains the telephone numbers of your last
50 callers. Whether you take a call or not, the caller’s
details are stored in the Calls list. You can display, scroll
through, dial and copy numbers in the list.
If a call is received when the Calls list is full, then the
oldest entry will be deleted automatically to make room
for the new call.
New calls
When you have new (unread) calls the display shows You
have new .
1. Press
View
or to go straight to the Missed Calls list
and view the new calls. The Missed Calls light stops
NEW
flashing. All new calls are marked
.
If you experience any problems, please call the Helpline on 0870 605 8047
Page 47

47Caller Display
View the Received and Missed Calls lists
The Received Calls list stores details of all received calls,
whether you answered them or not. The Missed Calls list
only stores details of any unanswered/missed calls.
1. Press to open the Calls list.
Or
Press
Menu
to open the main menu, then the
navigation button to highlight the icon and press
OK
.
Received Calls
2.
is displayed, press OKto view all received
calls
Or
To view Missed calls only, press to highlight
Missed Calls
and press OK.
2. The details for the most recent call are displayed at the
top of the list. The date and time the call was received
are displayed together with the caller’s number. All new
calls are marked
NEW
.
If the caller’s details are stored in the phonebook, the
caller’s name will be displayed instead of their number
and to the left of the name, the icon shows you if the
caller rang from their home, work or mobile number.
If there are no calls stored in the
calls list and you press , the
display will show
List Empty
If the same number rings you more
than once, each call is stored in the
calls list.
Caller information is not available
With some incoming calls, the
telephone number of the caller is
not available and cannot therefore
be displayed.
In this case your BT Esprit 1250
provides you with some
explanatory information:
Unavailable
unavailable.
Withheld
their number.
Int’l
– International call.
Received Calls
.
- The number is
- The caller has withheld
If you experience any problems, please call the Helpline on 0870 605 8047
Page 48

48 Caller Display
You can add a Calls list number to
your phonebook, either as a new
entry or to an existing entry if the
caller rings from a number which is
not already stored.
If you experience any problems, please call the Helpline on 0870 605 8047
To view the caller’s number, press
to highlight
View Number
and press OK.
Options
, then
3. Scroll or through the list.
4. Press to return to standby.
Dial from the Calls list
1. Press to open the Calls list.
Or
Press
Menu
to open the main menu, then the
navigation button to highlight the icon and press
OK.Received Calls
is displayed, press OK.
2. Scroll or to the entry you want.
3. Press to dial.
Copy a number to the phonebook
1. Press to open the Calls list.
2. Scroll or to the name or number you want.
3. Press
, scroll to
Save Number
and press
Options
OK.
4. Use or to select
Existing
and press OK.
Create New Entry
or
Add to
Page 49

5. Press or to select the type of number you want to
OK
store - Home, Mobile or Work and press
Save
name for the entry and press
6. If required scroll to
hear and assign a ringtone to the number.
7. If required, scroll to
to select a picture. Press
Use
and
8. When all details for the entry are correct, press
XXXX Saved
9. Press to return to standby.
Delete an entry in the Calls list
1. Press to open the Calls list.
2. Scroll
3. Press
Screen shows
4. Press to return to standby.
to save it.
is displayed. (where XXXX is the name).
or to the name or number you want.
Options,Delete Call
Call Deleted
Ringtone
.
Picture
View
is highlighted, press OK.
.
. Enter a
and press or to
and press or
to see the picture
Save
49Caller Display
.
If you experience any problems, please call the Helpline on 0870 605 8047
Page 50

50 Caller Display
You can delete the Received Calls
list, Missed Calls List, Dialled Calls
List (Redial List) or you can delete
all the Calls lists.
Please note
If you delete the Received Calls
List, the Missed Calls List will also
be deleted.
Delete the entire Calls list
1. Press
Menu
to open the main menu.
2. Use the navigation button to highlight the
OK
icon and press
3. Press to highlight
.
Delete Calls List
and press OK.
4. Press to highlight the Calls list you want to delete
or highlight All Calls Lists to delete all the calls lists and
OK
press
5. Confirm your selection by pressing
.
Yes
or press Noto
cancel. Confirmation will be shown on the display.
6. Press to return to standby.
If you experience any problems, please call the Helpline on 0870 605 8047
Page 51

BT Calling Features
51
By pressing the button on the handset your BT
Esprit 1250 gives you easy access to a range of useful
pre-stored numbers and BT Calling Features.
These are:
Product Helpline.
•
Call Waiting On.
•
Call Waiting Off.
•
Check Call Wait.
•
Dir. Enquiries.
•
Call Divert On.
•
Call Divert Off.
•
Check Divert.
•
Product Helpline/Directory Enquiries
1. Press ,
or scroll to highlight
Product Helpline
Dir. Enquiries
is highlighted, press
and then
press .
2. The BT Helpdesk for this product or Directory enquiries
will be automatically dialled.
Call Divert On
1. Press then scroll to
Call Divert On
and press
.
2. Follow the spoken instructions.
Call Divert Off
1. Press then scroll to
Call Divert Off
and
press .
If you experience any problems, please call the Helpline on 0870 605 8047
IMPORTANT
To use BT Calling Features you
must first subscribe (if required)
to the relevant service from your
network provider. A quarterly fee
may be payable.
For more details on BT’s Calling
Features, call BT free on 0800 800
150.
If you are not connected to the BT
network, some of these services
may not be available. Please
contact your Network Provider.
Call Diversion services may allow
other divert options. Check with
your network provider for details.
For further information, see the BT
Calling Features User Guide
supplied when you subscribe to the
services of your choice.
Divert all incoming calls to another
number of your choice.
Page 52

52 BT Calling Features
Call Waiting lets you know if
another person is trying to contact
you while you are on a call. If a
second caller rings you will hear a
beep in the handset. Providing you
have Caller Display, the screen will
show the caller’s details.
2. Listen for confirmation of your instructions.
Check Divert
1. Press then scroll to
Check Divert
.
2. Listen to hear the status of your Call Divert.
Call Waiting On
1. Press then scroll to
Call Waiting On
press .
2. Listen for confirmation of your instructions.
Call Waiting Off
1. Press then scroll to
Call Waiting Off
and press
.
2. Listen for confirmation of your instructions.
Check Call Waiting
1. Press then scroll to
Check Call Waiting
.
2. Listen to hear the status of your Call Waiting.
and press
and
and press
If you experience any problems, please call the Helpline on 0870 605 8047
Page 53

53BT Calling Features
Add/Edit BT Calling Features
1. Press , scroll to highlight the service which
Options
you want and press
New Entry
2.
is displayed.
To add a new service: press
.
OK
. Enter the name for the
new service, then press and enter the number for
the new service and press
Save.XXXX Saved
is displayed
(where XXXX is the name). The new service is added to
the services list.
To check details of an existing service: press to
highlight
Show Details
and number are displayed. Press
Back
to return to the service list.
or
To edit an existing service: press to highlight
Entry
and press OK. Press or to highlight the
details you want to edit. Press
and press OK. The service name
Dial
to dial the service,
Edit
Clear
to delete details
and use the keypad to enter the new details, then press
Save.XXXX Saved
is displayed (where XXXX is the
name).
To delete an existing service: press to highlight
Delete Entry
and press OK. Press
Yes
to confirm or Noto
cancel.
To delete all services: press to highlight
and press OK. Press
Yes
to confirm or Noto cancel.
If you experience any problems, please call the Helpline on 0870 605 8047
Delete All
BT Calling Features work in exactly
the same way as the main
phonebook and can store up to
10 entries. If you prefer, you can
delete the pre-stored entries and
replace them with your own
numbers. New stored numbers
are added to the end of the list.
Each handset registered to your
BT Esprit 1250 base can store a
different set of service numbers.
Page 54

54
Text messaging
IMPORTANT
You must subscribe to your
Network Provider’s Caller Display
service so that you can use text
messaging. A quarterly fee may be
payable, please contact your
network provider for more details.
You may also send messages to
landline phones that are NOT text
compatible. Messages to noncompatible lines will be connected
to voice text and delivered in
spoken words to the telephone as
a call. Please note that the
conversion can translate common
abbreviations and smileys etc, but
to ensure maximum clarity of
message delivery, abbreviations
etc should be used sparingly.
Back
At any time, press
to the previous menu, or press
to cancel and return to
standby.
to go back
If you experience any problems, please call the Helpline on 0870 605 8047
Welcome to the BT text messaging Service on your BT
Esprit 1250. Your BT Esprit 1250 can send and receive
text messages from participating mobile networks and
compatible landline telephones in the UK.
The fixed line text service is provided under BT’s terms
and conditions for telephone service. These can be found
by visiting the BT.com website at:
http://www.bt.com/terms/tor.htm
Subscribe to the text messaging service
When you send your first text message from your BT
Esprit 1250 you will automatically be registered for the
service.
On receipt of your first text through the service, the
system will send you a welcome text message back.
You may also register by sending the word ‘R
egister’ to
00000 upon which you will receive a confirmation
message.
Cost of the fixed line service
There is no subscription charge (other than the
subscription to Caller Display). Visit the BT.com website
(www.bt.com) to find out how much it costs to send a
text message (depends upon your call package).
Page 55

55Text messaging
Send a text message
1. Press
Menu
, the icon is highlighted, press OK.
2. If you have set up personal user areas, press to
OK
highlight the user area you want and press
OK
mailbox PIN and press
.
. Enter your
If you have not set up any user areas continue to point 3.
Write Message
3.
to write your message then press
is highlighted, press OK. Use the keypad
Options
.
4. You can now scroll or to choose between:
Send To
want using the keypad and press
Or, press
– press OK, then either enter the number you
OK
.
Search
to open the Phonebook and scroll
or to the name you want and press
OK
, then
if necessary, press or again to select the
Send
number. Press
Save Message
.
– press OKto save a text in the Draft
messages box for sending later.
Insert Symbol
a text message. Press
– use to insert a punctuation symbol into
OK
to display the choice of
symbols. Scroll , , or to the symbol you
want and press
Use
. The symbol is added to your text at
the cursor.
For more information on personal
user areas, see page 67.
Use the navigation button to move
the cursor through the text, if you
want to insert/delete text.
See Entering text, page 58 for help
with writing text.
You can enter a number of up to
24 digits.
If you experience any problems, please call the Helpline on 0870 605 8047
Page 56

56 Text messaging
Insert Emoticon
text message. Press
Scroll , , or to the icon you want and
Use
press
Insert Template
you can select to be inserted into your text message (see
page 61 for the list or pre-set templates). Press
scroll or to the template phrase you want
and press
cursor.
Spell Word
text may not guess. Press
letter by letter, using the keypad.
5. When sending a message the display shows
Message
, and then, if the message is sent successfully,
Message Sent
the Outbox.
– use to insert a picture icon into your
OK
to display the choice of icons.
. The icon is added to your text at the cursor.
– these are pre-stored messages, which
OK
Use
. The template is added to your text at the
– use to spell unusual words that predictive
OK
and then enter the word
Sending
. The message is automatically stored in
and
If you experience any problems, please call the Helpline on 0870 605 8047
Page 57

57Text messaging
Receiving a call while writing a text
If you are writing a text and you receive a call, the text is
automatically stored in the Drafts folder. After the call,
to continue writing your message:
1. Press
2. Scroll to
3. If necessary, scroll to your message then press
MENU
, the icon is highlighted, press OK.
Drafts
and press OK.
Read
can now continue writing your message.
Sent messages are stored in the Outbox
Your BT Esprit 1250’s outbox is like a redial list. It holds
a copy of the latest sent messages up to a maximum of
50*. Each message has details of the time and date it
was sent.
Saved messages are stored in the Drafts folder
If you want to save a message to complete and/or send
later you can store it in the drafts folder. Your BT Esprit
1250 can store up to 5 messages.
Received messages are stored in the Inbox
Your BT Esprit 1250 can store up to 50* messages.
. You
If there is a problem sending a
message the display shows
Message Sending Failed
handset returns to standby. If you
open the Outbox the message is
marked
Not Sent
1250 will have 2 further attempts
at sending your message at 10
minute intervals. If the message
fails to be sent on the third
attempt the message
Error
will be displayed alongside
the message in the Outbox
(replacing the time and date).
If another handset is on the line
when you try to send a text
message, you will see
and the message will be stored in
the Outbox with the message
. When the line becomes
Sent
available your BT Esprit 1250 will
attempt to send the message
again.
When writing a message, if no
keypad button is pressed for 1
minute, the message will
automatically be stored to the
Drafts folder, where you can
retrieve it at a later time.
* Maximum number of messages
across Inbox, Outbox and Drafts
is 50. The newest messages
replace the oldest messages in
the Outbox.
and the
. Your BT Esprit
Sending
Line in Use
Not
If you experience any problems, please call the Helpline on 0870 605 8047
Page 58

58 Text messaging
The default text input mode is:
sentence case, predictive text.
Entering text
There are 2 text entry modes on your BT Esprit 1250,
standard text entry and predictive text entry. The text
entry mode is shown in the top right of the display.
A single text can be up to 160 characters. The number of
characters still available to use is shown in the top left
corner of the display as you enter each character.
Setting the text entry mode
You can select normal text entry or predictive text entry.
Press to switch between the different text entry
modes, the mode is shown in the top right corner of the
display.
For sentence case, select Abc
For upper case, select ABC
For lower case, select
abc
For sentence case, predictive text, select T9Abc
For upper case, predictive text, select T9ABC
For lower case, predictive text, select T9abc
To enter numbers, press
and hold until the mode
shows: 123
and hold again to switch back to text entry.
Press
If you experience any problems, please call the Helpline on 0870 605 8047
Page 59

Standard text entry
Symbol Table
. , - ? ! ¡
¿
‘ @ : ; /
“ ( ) _ + &
% * = < > £
€ $ ¥ ? \ ~
# § ∆? ? ?
Ω? ? ? ? ?
With standard text entry you can enter a word by
pressing each letter button a number of times to display
the character you want on the screen. For example, to
write the word “Hello”, press
Writing tips for standard text entry
1. If you make a mistake, press
Clear
to delete the last
character or digit to the left of the cursor. Press
Clear
to delete all characters/digits.
2. Press / / / to move the cursor.
Characters/digits are entered to the left of the cursor.
3. Press and release to insert a space.
4. Press repeatedly to add punctuation: . , - ? ! ¡
¿ ‘ @ : ; /
5. To enter a number, press
and hold the required number
button until the number is displayed.
6. Press as a shortcut to the ‘insert symbol’ table,
then use / / / to highlight the symbol you
want and press
7. Press
Back
Use
to insert it into your message.
to go back to the previous screen.
If you experience any problems, please call the Helpline on 0870 605 8047
59Text messaging
.
and hold
See page 28 for the complete
character map.
Page 60

60 Text messaging
If you experience any problems, please call the Helpline on 0870 605 8047
8. The cursor automatically moves to the right after a
couple of seconds. So when the next letter is on the
same button as the one you have just entered, wait for
the cursor to move to the right before trying to enter it.
Predictive (T9®) text entry
For quick texting you can use Predictive (T9®) text entry.
You press the button showing the letter you want once
and your BT Esprit 1250 predicts what you want to write.
For example, to write the word “Hello”, press
.
If the word you want is not displayed and there are
alternative words available based on the characters you
have entered the text will be underlined, press
repeatedly to display the alternative words.
If your BT Esprit 1250 cannot find a word based on the
characters you have entered, you can select
use standard text entry to spell the word out and insert it
OK
using
dictionary for future use.
Writing tips for predictive text entry
1. If you make a mistake, press
character or digit to the left of the cursor. Press
Clear
. The new word will be added to your phone’s
Clear
to delete the last
to delete all characters/digits.
Spell
and hold
and
Page 61

2. Press to display alternative letter combinations.
(If there are alternative letter combinations available the
text will be underlined.) Press
Previous
to go back to the
previous text selection.
3. Press
and hold as a shortcut to the ‘insert symbol’
table.
4. Press
Previous
to go back to the previously displayed
option.
5. When punctuation is entered using the button, the
most likely symbol is suggested. If this is not the symbol
you want, press repeatedly until the symbol you
want is displayed.
61Text messaging
See page 59 for the complete
symbol table.
Text templates
The pre-set templates are:
Please call
•
I’ll be there at
•
What time will you be home?
•
I’ll call you
•
Happy Birthday!
•
Edit templates
1. Press
2. Scroll to
Menu
, the icon is highlighted, press OK.
Templates
If you experience any problems, please call the Helpline on 0870 605 8047
and press OK.
Use a template to add pre-set
statements to make your texts
easier to write. Templates can be
up to 32 characters.
To use a template, see Send a text
message, page 55.
You can overwrite the existing
templates with your own
messages, up to 32 characters
long.
Page 62

62 Text messaging
When you delete a template it is
shown on the screen as
To use an emoticon, see Send a
text message, page 55.
Empty
3. The available templates are displayed. Scroll to the
OK
template you want and press
4.
Edit Template
is highlighted, press OK. Press
.
Clear
to
delete characters then enter your own template and
Save.Template Saved
press
is displayed. You can now
insert the new template into any text message.
5. Press to exit to standby.
Delete templates
1. Press
.
2. Scroll to
Menu
, the icon is highlighted, press OK.
Templates
and press OK.
2. The available templates are displayed. Scroll to the
OK
template you want and press
3. Scroll to
Template?
Del Template
is highlighted. Press
.
and press OK.
Yes
to confirm or Noto
Delete
cancel.
4. Press to exit to standby.
Emoticons
You can add any of the emoticons displayed on your
handset to your text message. You can either select
Insert Emoticon
from the menu list or enter the symbols
If you experience any problems, please call the Helpline on 0870 605 8047
Page 63

shown in the top line manually and the symbols will
automatically convert to those shown in the bottom line.
Read, edit and send draft text messages
1. Press
2. Scroll to
Menu
, the icon is highlighted, press OK.
Drafts
and press OK. The date and time
of the latest draft message is displayed. Press
Read
2. The message is displayed. Edit the message using
to delete characters and the keypad to enter new ones,
Options
then press
Send To
3.
is displayed, press OK, then either enter the
number you want using the keypad and press
Or, press
Search
or to the name you want and press
.
OK
.
to open the Phonebook and scroll
OK
if necessary, press or again to select the
Send
number. Press
.
Receiving and reading text messages
When you receive a new text message, the display shows
You Have New
and you will hear the new message
alert beeps (provided the alert beeps are set to on).
1. To read the new messages, either press then
OK
open the Inbox and display the message list.
63Text messaging
If you have saved a message you
have written for sending later, you
can view, edit and send it from the
Draft Messages box.
.
Clear
, then
to
If you experience any problems, please call the Helpline on 0870 605 8047
Page 64

64 Text messaging
If a message has not been
previously read then
displayed next to it.
If you experience any problems, please call the Helpline on 0870 605 8047
New
will be
Or,
Menu
Press
, the icon is highlighted, press OK. Scroll
Inbox
to
and press OK.
2. If you have set up personal user areas, press to
OK
highlight the User area you want and press
OK
your mailbox PIN and press
.
. Enter
If you have not set up any user areas continue to point 3.
3. The newest message will be displayed first. If the
sender’s details are stored in your phonebook and a
name/number match is found, the sender’s name will be
displayed, otherwise you will see the sender’s number.
Scroll or through the messages and press
Read
to open the highlighted message.
4. Scroll or to move through the message.
You can now press
Options
, then or to
select any of the following:
Reply
– to write and send a reply.
Forward
Delete
Use Number
Save Number
– to forward the message to another number.
– to delete the current message.
– to ring the number.
– to save number to the phonebook (if the
number is already stored, this option is not displayed).
Page 65

65Text messaging
Delete All
– to delete all messages in the Inbox.
5. Follow the on-screen prompts to save, write, send or
Back
delete the messages. Or press
to return to the
previous menu level.
6. Press to exit and return to standby.
Text alert
1. Press
2. Scroll to
3. Scroll to
4. Press or to select
5. Scroll to
Menu
, the icon is highlighted, press OK.
Text Settings
Message Alert
On
or
Melody
and press or to select a
melody for the alert and press
and press OK.
and press OK.
Off
.
Save
.
6. Press to exit and return to standby.
Service Centre numbers
To send and receive text messages you need the
telephone number of your Network’s text Centre. If you
accidentally delete the SEND or RECEIVE Service Centre
numbers you will need to re-enter them in order for your
text Service to work.
If you experience any problems, please call the Helpline on 0870 605 8047
You will not be able to receive text
messages until you have first sent
a message. The first message sent
registers you with the text service.
Inbox capacity
Your BT Esprit 1250 can store up
to 50 received text messages.
If there are no new messages and
you press , the messaging submenu will be displayed.
Your handset will alert you when
you receive a text message
(provided your handset is in
standby mode). The message
alert can be switched on or off,
the default setting is On with
Chime 1.
Send Centre 1 - contains the preset Send Service Centre number.
Send Centre 2 - lets you store an
alternative Send Service Centre
number.
Receive Centre 1 - contains the
pre-set Receive Centre number.
Receive Centre 2 to 5 – let you
store alternative Receive Centre
numbers.
Page 66

66 Text messaging
If you have more than one ‘Send
Service Centre’ stored on your BT
Esprit 1250 you will need to select
which one you want to use for
sending, see next section.
In order to send and receive text
messages you must not withhold
your number. On most networks
if you normally withhold your
number the 1470 prefix presents
your number for you.
Press and hold to enter a P.
If you enter an additional Send
Service Centre number, you can
choose which number you want to
use. Your BT Esprit 1250 is pre-set
to send using Send Centre 1.
All messages sent will go via the
selected provider.
The SEND Service number is: 1470P1709400.
The RECEIVE Service number is: 080058752.
Adding or changing Service Centre numbers
1. Press
2. Scroll to
3.
4. Use or to highlight either
Menu
, the icon is highlighted, press OK.
Text Settings
Service Centres
or
Receive Centres
and press OK.
is highlighted, press OK.
Sending Centres
and press OK.
5. Scroll or to highlight the service centre you
OK
want and press
5. If necessary, press
centre number and enter the new one, then press
6. Press to return to standby or
.
Clear
to delete the existing service
Back
Save
to go one step
back in the menu.
Select a Send Service Centre number
1. Press
2. Scroll to
3.
4.
Menu
, the icon is highlighted, press OK.
Text Settings
Service Centres
Set Send Centre
and press OK.
is highlighted, press OK.
is highlighted, press OK.
.
If you experience any problems, please call the Helpline on 0870 605 8047
Page 67

67Text messaging
5. Press or to highlight
Save
press
.
6. Press to return to standby or
Service 1
or
Service 2
Back
to go one step
and
back in the menu.
User Areas
Your BT Esprit 1250 is pre-set to make all text messages
available to every user.
To keep your messages private, you can set up to 3 PIN
protected personal user areas (sub-addresses). Each
personal user area has its own Inbox, Outbox and Drafts
folder which are only accessible when the correct PIN is
entered.
Set a user area
1. Press
2. Scroll to
3. Scroll to
4. If required, scroll to highlight the User 1-3 you
5. Enter the name you want, e.g. Anne, and scroll to
Menu
, the icon is highlighted, press OK.
Text Settings
Users
want and press
PIN Protection
and press OK.
and press OK.
Options.Edit
is highlighted, press OK.
and press or to select Onor
Off
.
IF you set-up user areas you must
tell people your user area number.
They must put the relevant user
area number at the end of your
telephone number when they send
you a text message.
If you experience any problems, please call the Helpline on 0870 605 8047
Page 68

68 Text messaging
If you select GENERAL MESSAGES
the sub-address has been pre-set
as 9.
Use Clear to delete any exiting
characters/digits.
Follow the instructions for ‘set a
user area’ to edit a user area.
Mailboxes 1,2 and 3 have subaddresses 1, 2 and 3 assigned to
them as default.
The GENERAL MESSAGE user area
is assigned the sub-address of 9.
6. Scroll to
Mailbox PIN
. Enter your PIN if you have
changed this from the factory setting of 0000 and PIN
protection is set to ON.
Save
7. Press
. The screen shows your named user area.
How callers send a text to a user area
When your caller sends a text, by simply adding your 1digit sub-address number on the end of your telephone
number, the text will automatically be stored in your
personal user area.
Open a user area
When you want to read, write and send text messages,
you must open your user area first.
1. Press . All user areas are displayed in a list. Scroll
OK
to the user area you want and press
.
2. If you have set a PIN protection, enter your 4-digit PIN
OK
and press
.
3. You can now read, write, send and delete your messages
as normal.
If you experience any problems, please call the Helpline on 0870 605 8047
Page 69

Sounds & Pictures
Handset ringtones
There are 10 polyphonic and 5 standard ringtones to
choose from.
The ‘Sounds & Pictures’ menu lets you select ringtones
to use as your external or internal handset ringer melody,
record your own ringtone or send a ringtone via Infrared
to another compatible phone or computer.
Menu
1. Press
press
Ringtones
2.
3. Scroll or to display and hear all the available
ringtones.
When the one you want is displayed, press
scroll to the option you want and press
View Details
and Status (protected/unprotected) are displayed.
Send Via Infrared
infrared to another computer/compatible phone within
infrared range.
Use as Ringer
either
then scroll to
OK
.
is highlighted, press OK.
– Name of ringtones, File T
– Press OK. The ringtone is sent via
– Press OK. Press or to highlight
External
or
Internal
Rename Ringtone–Press OK
current name and enter a new name using the keypad,
If you experience any problems, please call the Helpline on 0870 605 8047
Sounds & Pictures
Options
OK
ype, File Size
and press
. Press
Save
Clear
.
to delete the
and
, then
.
If Infrared sending is unsuccessful
you will see
.
Failed
Infrared
Transfer
69
Page 70

70 Sounds & Pictures
If you are interrupted by an
incoming call when recording a
ringtone, recording will stop. If you
are recording over an existing
ringtone, that ringtone will be
retained. You will need to begin
recording again.
If you experience any problems, please call the Helpline on 0870 605 8047
then press
Delete Ringtone
Save
.
– Press OKthen
Yes
to confirm or Noto
cancel.
Memory Status
– Press OKto view Memory Used and
Memory Free.
Back
4. Press
to return to the previous menu or to
return to standby.
Record a ringtone
If you record your own ringtone directly onto the phone,
the default name for this ringtone will be Recording 1.
Only 1 user-recorded ringtone can be stored. A new
recording will overwrite the existing one.
Your ringtone can be up to 15 seconds long and can be
recorded through the handset mouthpiece.
Menu
1. Press
OK
.
2. Scroll to
Record Ringtone?
3.
then scroll to
Record Ringtone
is displayed. Press or to display
Sounds & Pictures
and press OK.
and press
and play the existing ringtone that you want to replace
OK
and press
Record Ringtone?
4.
.
is displayed again. Press OK, then
record your new ringtone through the handset
Page 71

71Sounds & Pictures
mouthpiece and press
recording is played back to you, press
Delete
to delete it.
Ringtone Name
5.
Stop
to end recording. Your
is displayed, press
Save
Clear
to keep it or
to delete the
existing name and enter a name for your new ringtone
Save
and press
6. Press
Back
.
to return to the previous menu or to
return to standby.
Receiving pictures/ringtone via Infrared
If another device attempts to send a picture/ringtone to
your BT Esprit 1250 via Infrared:
1. When the handset display shows
Yes
to accept or Noto reject the file transfer.
If you select Yes: the display will show
Infrared
. Once the file is successfully transferred the
Receive file?
Receiving via
, press
display will return to standby. The picture or ringtone will
be automatically added to the relevant folder on
your phone.
If you select
No
: the sending device will receive an error
message.
Your ringtone name can be up to
16 characters long.
Recorded ringtones cannot be
transferred to another handset.
You need to line up the red infra
lenses on both devices so thay are
facing each other.
The handset accepts ringtones
with .mid extensions only.
If you experience any problems, please call the Helpline on 0870 605 8047
Page 72

72 Sounds & Pictures
If your Picture/Ringtone memory is
full, the error message
Failed Memory Full
displayed. You will need to delete
some of your existing
ringtones/pictures before new ones
can be received.
If there is an error during transfer,
File Transfer Failed
displayed.
The handset accepts pictures
with.bmp extensions (not.jpg or
.gif) and with a resolution of
128x110 pixels.
Transfer
will be
will be
Handset pictures
The ‘Sounds & Pictures’ menu lets you rename and
delete pictures, select one of the pictures as your
handset wallpaper or send a picture via Infrared to
another compatible phone or computer.
Menu
1. Press
OK
.
2. Scroll to
then scroll to
Pictures
3. Scroll or to see all the pictures available.
When the one you want is displayed, press
scroll to the option you want and press
The options are:
View Details
– Name of picture, File Type or File Size are
displayed.
Send Via Infrared
– Press OK. The picture is sent via
infrared to another computer/compatible phone within
infrared range.
Use as Wallpaper
– Press OK. The picture is saved as
your wallpaper.
Rename Picture
– Press OK. Press
current name and enter a new name using the keypad,
Save
then press
.
Sounds & Pictures
and press OK.
Clear
to delete the
and press
Options
OK
.
, then
If you experience any problems, please call the Helpline on 0870 605 8047
Page 73

73Sounds & Pictures
Delete Picture
cancel.
Memory Status
Memory Free
4. Press
Back
return to standby.
– Press OKthen
– Press OKto view
.
to return to the previous menu or to
Yes
to confirm or Noto
Memory Used
and
If you experience any problems, please call the Helpline on 0870 605 8047
Page 74

74
Games
There are 5 games to play on your BT Esprit 1250
handset:
Concentration
•
Mars Lander
•
Apples and Pears
•
Air Hockey
•
Solitaire
•
1. Press
2. Press or to highlight the game you want and
3. Follow the on-screen instructions for the selected game.
If you experience any problems, please call the Helpline on 0870 605 8047
Menu
then use the navigation buttons to move
and to highlight the icon and press
OK
press
.
OK
.
Page 75

Handset settings
75
Ringer melody and volume
Your BT Esprit 1250 has 10 polyphonic and 5 standard
ringer melodies to choose from or if you prefer you can
record your own ringtone or transfer them via Infrared.
You can also set separate ringer melodies for external
and internal calls to help you establish who is calling.
There are 5 volume level or you can switch the ringer off
if you do not want to be disturbed.
Menu
1. Press
Handset Settings
2.
Ringer
3.
4.
External
then use the navigation buttons to move
OK
and to highlight and press
.
is highlighted press OK.
is highlighted, press OK.
is highlighted, press or to hear and select
a melody for external calls.
5. Press then use or to hear and select a melody
for internal calls.
6. Press then use or to set the volume level.
Save
7. Press
show
8. Press to return to standby or
to keep the displayed settings. Display will
Saved
.
BACK
to go one step
back in the menu.
The default ringer melody for
external calls is 1.
The default ringer melody for
internal calls is 2.
The default ringer volume is
level 5.
See page 32 for more information
on infrared transfer.
When the ringer is switched off,
the icon is displayed.
If you experience any problems, please call the Helpline on 0870 605 8047
Page 76

76 Handset settings
The default wallpaper is BT
eclipses.
The default menu colour is slate.
The backlight setting is for both
the display and the keypad
backlight. The default setting is 30
seconds.
Change the look of your handset display
You can change the display wallpaper and menu colour
and set the time the backlight comes on for when keypad
buttons are pressed.
1. Press
2.
3.
Menu
then use the navigation buttons to move
and to highlight
Handset Settings
Ringer
is highlighted, press to highlight
Settings
is highlighted, press OK.
and press OK.
Display
and press OK.
Wallpaper
4.
selection of wallpapers, press
Press
is highlighted, press or to display the
View
to see a wallpaper.
Back
to return to the previous screen.
5. Press then use or to select the menu colour
(slate, lilac or peppermint).
6. Press
then use or to set the time you want
the backlight to come on for (15, 30 or 45 seconds).
Save
7. Press
8. Press to return to standby or
to keep the displayed settings.
Back
to go one step
back in the menu.
If you experience any problems, please call the Helpline on 0870 605 8047
Page 77

Switch infrared on/off
To be able to receive pictures and ringtones and copy
phonebook entries between your BT Esprit 1250 and
other devices using the Infrared feature, Infrared must be
set to On to allow the files to be transferred.
Menu
1. Press
Handset Settings
2.
Ringer
3.
then use the navigation buttons to move
and to highlight
Settings
and press OK.
is highlighted, press OK.
is highlighted, press to highlight
Infrared
and press OK.
4. Press or to display either
Save
press
. Display shows
Infra red Switched off
On for 10mins
Infra red Switched On
.
5. Press to return to standby or
Back
or
Off
to go one step
back in the menu.
77Handset settings
See page 71 for correct format of
ringtones and page 72 for pictures.
When infrared is switched on the
icon is displayed.
and
or
Handset name
1. Press
Menu
then use the navigation buttons to move
and to highlight
Handset Settings
2.
Ringer
3.
4. Press
is highlighted, press to highlight
Name
and press OK.
Clear
When registered to the base, each
handset is given a number 1-5.
Settings
and press OK.
is highlighted, press OK.
Handset
You can also give the handset a
name to match the location or
user, e.g. Mike or Office. You can
choose a name up to 12 characters
long.
to delete the current name. Use or to
If you experience any problems, please call the Helpline on 0870 605 8047
Page 78

78 Handset settings
Each time you press a button on
the handset keypad you will hear a
beep to confirm the button push.
You can switch these beeps on
or off.
The default setting is On.
It is not possible to turn off the
confirmation tone, error tone,
battery low tone or out of
range tone.
You can answer a call just by lifting
the handset off the base. This is
called auto talk. When you switch
auto talk off, all calls must be
answered by pressing the
button.
If you experience any problems, please call the Helpline on 0870 605 8047
move the cursor.
5. Use the keypad to enter the name you want and press
Save.Saved
6. Press to return to standby or
is displayed.
Back
to go one step
back in the menu.
Keypad beeps
1. Press
2.
3.
4. Press or to select either
5. Press to return to standby or
Menu
then use the navigation buttons to move
and to highlight
Handset Settings
Ringer
is highlighted, press to highlight
Beeps
and press OK.
Saved
is displayed.
Settings
is highlighted press OK.
and press OK.
On
or
Off
Back
Keypad
and press
Save
to go one step
back in the menu.
Auto talk
1. Press
2.
3.
Menu
then use the navigation buttons to move
and to highlight
Handset Settings
Ringer
is highlighted, press to highlight
Settings
is highlighted, press OK.
and press OK.
Auto Talk
.
Page 79

79Handset settings
and press OK.
On
or
Off
4. Press or to select either
Saved
is displayed.
5. Press to return to standby or
and press
Back
to go one step
back in the menu.
Access code
1. Press
2.
3.
4. Press or to select either
5. Press to highlight
Menu
then use the navigation buttons to move
and to highlight
Handset Settings
Ringer
is highlighted, press to highlight
Code
and press OK.
Settings
is highlighted, press OK.
On
Code
and press OK.
or
Off
.
and enter the access code.
To change an existing access code, press
it and then enter the new code using the keypad.
Save
6. Press
to keep the displayed settings.
displayed.
Back
7. Press to return to standby or
to go one step
back in the menu.
Clear
Saved
Save
Access
to delete
is
When your handset picture file is
full, you must delete pictures from
it before you can download new
.
ones. It is not possible to delete a
picture that is currently in use
either as your handset wallpaper or
as a picture associated with a
phonebook entry.
If your BT Esprit 1250 is connected
to a switchboard, you may need to
enter an access code in the dialling
sequence to be able to connect to
the outside line.
The access code will not be used
when you dial the number yourself
(rather than for example from the
phonebook) to allow you to make
calls to other switchboard
extensions.
The default setting is Off.
To add a pause in a number,
press
and hold .
If you experience any problems, please call the Helpline on 0870 605 8047
Page 80

80
Base settings
Choose from 5 base ringtones and
5 volume levels plus Off.
The default base ringtone is 1.
The default base volume is off.
Tone is the default setting for the
UK. You should only have to
change this if connected to a
switchboard that requires Pulse
dialling.
The default dial mode is
Tone/Timed Break.
1. Press
2. Scroll to
3.
4. Press or until you hear and display the ringtone
5. Press and use or to set the volume level
6. Press
7. Press to return to standby or
1. Press
2. Scroll to
3. Scroll to
4. Press
Ringtone and volume
Menu
then use the navigation buttons to move
and to highlight and press
Base Settings
Ringer
is highlighted, press OK.
you want.
you want.
Save
to keep the displayed settings.
displayed.
back in the menu.
Dial mode
Menu
then use the navigation buttons to move
and to highlight and press
Base Settings
Break
Dial Mode
OK
then or to display either
,
Tone/Earth
and press OK.
or
Pulse/Earth
OK
and press OK.
Back
to go one step
OK
and press OK.
Tone/Timed
.
.
Saved
.
is
If you experience any problems, please call the Helpline on 0870 605 8047
Page 81

81Base settings
3. Press
4. Press to return to standby or
Save
to keep the displayed settings.
Back
to go one step
back in the menu.
Handset priority
1. Press
2. Scroll to
3. Scroll to
4. For all handsets to ring together, press
Menu
then use the navigation buttons to move
and to highlight and press
Base Settings
Handset Priority
Handsets
is displayed.
OK
and press OK.
and press OK.
OK
.
when
Or
To select a priority handset, press to highlight
Select Handset
and press OK. Press or to select the
handset you want to have priority, then press to
highlight
Ring Delay
and press or to select the
number of times you want the priority handset to ring
before the other handsets start to ring.
5. Press
6. Press to return to standby or
Save
to keep the displayed settings.
Priority Saved
is displayed.
Back
to go one step
Handset
back in the menu.
All
Normally, if you have more than
one handset registered to your
base and you receive an incoming
call, the handsets all ring at the
same time. However, handset
priority lets you set one of them to
ring before the others, so that calls
can always be answered at one
handset first.
If you experience any problems, please call the Helpline on 0870 605 8047
Page 82

82 Base settings
Your System PIN can help prevent
unauthorised users from changing
the settings on your phone.
If you have changed the PIN and
cannot remember it, please
contact the Helpline on 0870 605
8047
The default PIN setting is 0000.
If you change your PIN, keep
a note of the new number by
writing it in the space provided
on page 100.
Protecting your settings
When entering a PIN the digits are
shown as asterisks.
The First ring setting is set to ON
(the default setting).
With some connections to the
public telephone network, you may
experience a short burst of
ringtone when receiving a text
message. If you want to stop this
happening, you can change the
First ring setting to OFF.
If you experience any problems, please call the Helpline on 0870 605 8047
System PIN (Personal Identification Number)
1. Press
2. Scroll to
Menu
then use the navigation buttons to move
and to highlight and press
Base Settings
System PIN
to
and press OK.
OK
.
and press OK. Scroll
3. Enter the old PIN using the keypad and press
.
Save
Enter New PIN
Confirm New PIN
. The display shows
4. The display shows
Save
press
5. The display shows
again and press
Changed
.
6. Press to return to standby or
. Enter the new PIN and
. Enter your new PIN
System PIN
Back
to go one step
back in the menu.
First ring
1. Press
2. Scroll to
3. Scroll to
4. Press or to select either
5. Press
Menu
then use the navigation buttons to move
and to highlight and press
Base Settings
First Ring
Save
to keep the displayed settings.
and press OK.
and press OK.
Off
or On.
OK
.
Saved
displayed.
OK
.
is
Page 83

83Base settings
6. Press to return to standby or
Back
to go one step
back in the menu.
Reset base
1. Press
2. Scroll to
3. Scroll to
4.
Menu
then use the navigation buttons to move
and to highlight
Settings
Base Settings
Reset
and press OK.
Reset To Factory Settings?
Either, press
press
resets, then
Yes
to confirm. Enter the System PIN and
OK,Please Wait
Reset Complete
is displayed while the phone
is displayed and the phone
and press OK.
and press OK.
is displayed:
resets itself and automatically shows the standby screen.
No
Or, press
standby or
to cancel the reset. Press to return to
Back
to go one step back in the menu.
The reset will only revert the
settings of the handset and base to
their default factory settings it will
not affect the information loaded
into the phone. The phonebook,
ringtones, pictures and text
messages will not be affected.
If you experience any problems, please call the Helpline on 0870 605 8047
Page 84

84
Time settings
The default setting is Off.
When setting the alarm time you
will need to use the 24 hour clock,
regardless of the time format
setting.
If you experience any problems, please call the Helpline on 0870 605 8047
1. Press
2.
3.
4. Press or to select either:
5. Press then enter the digits for the time you want
6. Press to highlight
7. Press
8. Press to return to standby or
Alarm
You can use your handset as an alarm clock and set an
alarm to sound at the same time every day of the week
(On Daily), or at the same time every day from Monday
to Friday. The alarm can be switched On or Off.
When an alarm is set the icon is shown in the top line
of the display.
Each handset has it’s own alarm settings.
Menu
then use the navigation buttons to move
OK
and to highlight and press
Handset Settings
highlight
Set Alarm
Time Settings
is highlighted, press OK.
is highlighted, press to
and press OK.
Off,Mon
Daily
.
the alarm to sound.
Ringtone
display and hear the alarm ringtone you want.
Save
to keep the displayed settings.
, then press or to
Back
back in the menu.
.
to
Fri
or
On
to go one step
Page 85

To stop the alarm
When the alarm time is up, the handset will ring. Press
Stop
or any button on the keypad (except ) to stop
the alarm. The handset display will return to standby.
The alarm will ring for 30 seconds and then it will switch
off automatically and the display will return to standby.
Time & date
You can set the time and date on your BT Esprit 1250
using following the procedure shown. However, if you
have described to a Caller Display service via your
network service provider, the time and date will be set
automatically on receipt of your first incoming call.
Menu
1. Press
Handset Settings
2.
highlight
Set Alarm
3.
Date & Time
then use the navigation buttons to move
and to highlight and press
is highlighted, press to
Time Settings
and press OK.
is highlighted, press to highlight
and press OK.
OK
.
Set
4. The first digit is highlighted. Enter the date, using 2
digits for the day, month and year.
5. Press then enter the time, using 2 digits for the
hour and 2 for the minute.
If you experience any problems, please call the Helpline on 0870 605 8047
85Time settings
If you have more than one handset
registered to your BT Esprit 1250
base, you only need to set the time
and date on one handset and all
handsets will be updated
automatically.
The default date setting is
01/01/05.
The default time setting is
12.01pm, using the 12 hour
time format.
DD/MM/YY
HH:MM
Page 86

86 Time settings
The format you choose will affect
how the time is displayed on the
idle screen and when calls and text
messages are received.
6. Press to highlight
display either
7. Press
12 Hour
Save
to keep the displayed settings.
Format
or
24 Hour
, then press or to
displayed.
8. Press to return to standby or
back in the menu.
.
Back
Saved
is
to go one step
If you experience any problems, please call the Helpline on 0870 605 8047
Page 87

Additional handsets and bases
Up to 5 GAP compatible handsets can be registered and
operated from the BT Esprit 1250 base. This allows you
to hold internal calls even while another handset is
making an external call.
Each handset can be registered on up to four bases.
Registering additional handsets
The handset that came with your base is pre-registered.
If you have bought a multiple pack any additional
handsets are also pre-registered to the base.
If you buy new handsets to use with your BT Esprit 1250
they will have to be registered to the base before you can
use them.
Register a new BT Esprit 1250 handset to your BT
Esprit 1250 base
Insert batteries into the handset and make sure it is close
to the base. The screen shows
On the handset:
1. Place the handset in the base.
On Base
is displayed on the handset.
Please Register
.
Press & Hold Find Button
Make sure new handsets are fully
charged before attempting to
register them to your BT Esprit
1250 base.
87
If you experience any problems, please call the Helpline on 0870 605 8047
Page 88

F
ind
88 Additional handsets and bases
At the base:
2. Press and hold until the base beeps.
You now have 1 minute to complete the registration
procedure.
The Power/In Use Light on the base flashes during
registration.
3. The handset display shows
Registration in Progress
When the handset is registered it will display the standby
screen and will be assigned the next available handset
number.
Register your handset to another base
On the handset:
1. Press
2.
3. Scroll to the next available base and press
Menu
then use the navigation buttons to move
and to highlight
Register Handset
Registration
and press OK.
is highlighted, press OK.
OK
.
3. Enter the System PIN code (original setting 0000) and
OK
press
4. The handset screen displays
On Base
.
Press & Hold Find Button
.
.
If you experience any problems, please call the Helpline on 0870 605 8047
Page 89

F
ind
89Additional handsets and bases
At the base:
5. Press and hold for about 10 seconds until you hear
a beep. The base is now in registration mode.
The handset screen displays
When the handset is registered
Registration in Progress
Handset Registered
will
be displayed, then the standby screen and the handset
will be assigned the next available handset number.
Select a base to use
If you have registered your handset with more than one
base, you can select which base you want to use. You will
only be able to make and receive calls on the base you
are currently registered to. The currently selected base
will be labelled (in use).
On the handset:
1. Press
2. Scroll to
3. The display shows
Menu
then use the navigation buttons to move
and to highlight
Select Base
you want and press
Registration
and press OK.
Base 2,Base 3
OK
.
and press OK.
etc. Scroll to the base
If registration is unsuccessful, the
Registration Failed
message
be displayed and you will need to
repeat the registration procedure.
.
will
If you experience any problems, please call the Helpline on 0870 605 8047
Page 90

90 Additional handsets and bases
De-register a handset
You need to use another handset to de-register the
handset you are using. A handset cannot de-register
itself.
1. Press
2. Scroll to
3. Enter the System PIN (original setting 0000) and press
4. Press and to select the handset to be de-registered
5. Display shows
6. Press to return to standby or
Menu
then use the navigation buttons to move
and to highlight
De-Register Handset
OK
.
and press
Press
OK.De-Register Handset X?
Yes
to confirm or Noto cancel.
Handset X De-Registered
back in the menu.
Registration
and press OK.
Back
to go one step
and press OK.
is displayed.
.
If you experience any problems, please call the Helpline on 0870 605 8047
Page 91

Find
Find
Help
91
Handset not registering
Check that the base is plugged into the mains power and
•
switched on.
Check that there are charged batteries in the handset
•
and that they are fitted correctly.
If you have changed the system PIN you will have to go
•
into the menu to register the handset rather than just
putting the handset on the base and pressing .
Please ensure you hold the button until it beeps
•
while registering.
Forgotten your PIN number
Try entering the default PIN = 0000. If you have changed
•
the number and cannot remember it, contact the BT
Esprit Helpline on 0870 605 8047
No display
Check that the handset batteries are charged. If
•
necessary, replace the batteries.
Nothing happens when you press any button
Is the keylock switched on? If so, press
•
switch keylock off, see page 24.
Unlock
then to
BT Esprit Helpline
0870 605 8047
Call the dedicated BT Esprit
Helpline:
• if you are having difficulties
using your BT Esprit
• if you need replacement
batteries or mains power lead
Lines open 8am – 8pm, Monday to
Saturday and 10am – 3pm Sunday
If you experience any problems, please call the Helpline on 0870 605 8047
Page 92

92 Help
•
•
•
•
•
•
•
No connection between handset and base
You may be out of range of the base. The icon and
Ensure that the power is connected and switched on.
Handset on the base does not charge
Make sure the handset is placed properly on the base. You will hear a tone when the base
is placed correctly in the base. When charging, the battery symbol is shown filling up.
Handset does not ring
Check that the batteries are inserted correctly.
Check that the handset ringer has not been switched off, see page 75. The icon will
be shown if it is off.
Your caller cannot hear you
Secrecy is switched on. Press the secrecy
Incoming caller’s number is not displayed even though you have Caller Display
Caller has to allow their number to be sent. It has been withheld or is unavailable.
Off
option button to speak to your caller again.
Searching
will flash. Move closer.
If you experience any problems, please call the Helpline on 0870 605 8047
Page 93

Possible problems with text messaging
93Help
Text messages cannot be sent and screen displays
The base station power supply or telephone line cord might not be properly connected.
•
Check that the base station power supply is plugged into the mains socket and switched
on and that the telephone is plugged into the telephone wall socket.
There might be a fault on the line. Check your telephone line is working properly.
•
You might have deleted the server number in error. See pages 65 – 66 for instructions on
•
how to enter the number.
Cannot send text
Check service centre number is correct including 1470P prefix (this is for BT lines. If you
•
have another network provider please check the prefix number with them). In order to
send and receive text messages you must not withhold your number. If you normally
withhold your number the 1470 prefix presents your number for you.
Cannot receive text
More than one text messaging product is plugged into the line. Remove other products.
•
Check service centre number is correct.
•
Ensure you have subscribed to a Caller Display service and that it is active. You can
•
check this by noting if your phone displays your caller's number when you receive an
incoming call.
If you experience any problems, please call the Helpline on 0870 605 8047
Message Sending Failed
Page 94

94 Help
•
•
•
•
•
•
•
•
If you are using personal user areas please ensure you have given people your user area
number and that they are entering it to the end of your telephone number when sending
you a text message.
Text has previously been sent and received but you are now only receiving voice
spoken text messages, from number 08456021111.
This may be due to your line being de-registered at the text service centre. All you need
Reset
to do is text
This assumes that your Caller Display service is active and working on your line. Messages
sent to 00000 are free.
Further help and advice for text queries on BT lines:
BT Residential customers – call 151, choose option 2, when prompted by the Fault
Management Service select option 2, enter your phone number on the handset and wait
to speak to a customer adviser.
BT Business Customers – call 152, choose option 2, when prompted by the Fault
Management Service select option 2, enter your phone number on the handset and wait
to speak to a customer adviser.
For other telephone service providers please contact their customer services.
General sales enquiries
BT Residential lines – call 150. BT Business lines – call 152.
For non BT line customers, call 0800 800 150 (residential) or 0800 800 152 (business).
Additional handsets are available from the Helpdesk on 0870 605 8047.
If you experience any problems, please call the Helpline on 0870 605 8047
and send it to 00000. You will receive a confirmation message back.
Page 95

Billing enquiries
Refer to the telephone number shown on your telephone bill.
•
Other functions and services available from the text messaging service
By sending the following commands to the BT text self administration facility you can
•
control functions and capabilities in your text phone and the way messages are handled.
Menu
1. Press
commands (depending upon what you want to do):
1 #
*
#1 #
*2*
All incoming text is delivered as voice text.
#2 #
2. Press
If you are sending a message from a fixed line phone to another fixed line phone
•
3#
*
may have a text enabled phone and usually receives written text. This command is
inserted at the start of the message and applies only to that message, e.g.
will be home late’.
, then press OKto display
Opt out from receiving voice text messages.
Turns off the opt out option.
Turns on permanent voice text message delivery to your phone.
Turns off permanent voice text message delivery.
Options.Send To
Forces a message you send to be delivered as a voice text even though the recipient
is displayed, press OK. Enter
Write Message
. Press OKand type in the following
00000
and press
Send
.
3 #
*
95Help
‘Hello I
If you experience any problems, please call the Helpline on 0870 605 8047
Page 96

96 Help
If you are sending a message from a fixed line phone
and require a status report
•
•
•
Will allow a status report to be sent back to you
3#
*
when you have sent a message to confirm delivery.
Place
message and send it.
You will receive a reply text back to your phone giving
the status report for that message.
You keep hearing an error beep
You have pressed the wrong button in a sequence. Check
the prompts in the display or refer to instructions in this
user guide.
at the start of your text message. Write the
0#
*
If you experience any problems, please call the Helpline on 0870 605 8047
Page 97

General information
97
IMPORTANT
This equipment is not designed for making
emergency telephone call when the power fails.
Alternative arrangements should be made for
access to emergency services.
This product is intended for connection to
analogue public switched telephone networks and
private switchboards in the United Kingdom.
Safety information
• Only use the power supply suitable for the BT
Esprit 1250 range. Using an unauthorized power
supply will invalidate your guarantee and may
damage the telephone. The item code for the
base mains power supply is 022072. If you have
purchased a multiple pack the item code for the
charger mains power supply is 025231.
• For the handset, use only AAA Nickel Metal
Hydride (NiMH) rechargeable batteries with a
minimum capacity of 750mAh. Never use other
batteries or conventional alkaline batteries as this
could lead to a short circuit or destroy the battery
casing.
• If the keylock is switched on, it is possible to
make calls, including emergency numbers
(999/112).
• Do not open the handset (except to replace the
handset batteries). This could expose you to high
voltages or other risks.
• Radio signal transmitted between the handset
and base may cause interference to hearing aids.
If you experience any problems, please call the Helpline on 0870 605 8047
• It is recommended that advice from a qualified
expert be sought before using this product in the
vicinity of emergency/intensive care medical
equipment.
• It is recommended that if you have a pacemaker
fitted you check with a medical expert before
using this product.
• Never dispose of batteries in a fire. There is a
serious risk of explosion and/or the release of
highly toxic chemicals.
Cleaning
• Simply clean the handset and base with a damp
(not wet) cloth, or an anti-static wipe.
• Never use household polish as this will damage
the product. Never use a dry cloth as this may
cause a static shock.
Environmental
• Do not expose to direct sunlight.
• The handset may become warm when the
batteries are being recharged. This is normal.
We recommend that you do not place the
product on antique/veneered wood to avoid
damage.
• Do not stand your product on carpets or other
surfaces which generate fibres or place it in
locations preventing the free flow of air over its
surfaces.
• Do not submerge any part of your product in
water and do not use it in damp or humid
conditions, such as bathrooms.
Page 98

98
General information
• Do not expose your product to fire, explosive or
other hazardous conditions.
• There is a slight chance your phone could be
damaged by an electrical storm. We recommend
that you unplug the power and telephone line
cord during an electrical storm.
Product disposal instructions
The symbol shown here and on the product
means that the product is classed as Electrical or
Electronic Equipment and should not be disposed
with other household or commercial waste at the
end of its working life.
The Waste of Electrical and Electronic Equipment
(WEEE) Directive (2002/96/EC) has been put in
place to recycle products using best available
recovery and recycling techniques to minimise
the impact on the environment, treat any
hazardous substances and avoid the increasing
landfill.
Product disposal instructions for residential users
When you have no further use for it, please
remove any batteries and dispose of them and
the product as per your local authority’s recycling
processes. For more information please contact
your local authority or the retailer where the
product was purchased.
Product disposal instructions for business users
Business users should contact their suppliers and
check the terms and conditions of the purchase
contract and ensure that this product is not
mixed with other commercial waste for disposal.
Connecting to a switchboard
Switchboard compatibility
• This telephone may be connected to most types
of switchboard, however in the event of any
difficulties, consult your switchboard Service
Provider.
Dialling mode
• Your BT Esprit 1250 is set to Tone dialling. Some
switchboards may require Pulse dialling. To
change the dialling mode, see Dialling mode,
page 80.
Guarantee
Your BT Esprit 1250 is guaranteed for a period of
12 months from the date of purchase. Subject to
the terms listed below, the guarantee will provide
for the repair of, or at BT’s or its agent’s
discretion the option to replace the BT Esprit
1250, or any component thereof, (other than
batteries), which is identified as faulty or below
standard, or as a result of inferior workmanship
or materials. Products over 28 days old from the
date of purchase may be replaced with a
refurbished or repaired product.
If you experience any problems, please call the Helpline on 0870 605 8047
Page 99

General information
99
The conditions of this guarantee are:
• The guarantee shall only apply to defects that
occur within the 12 month guarantee period.
• Proof of purchase is required.
• The equipment is returned to BT or its agent as
instructed.
• This guarantee does not cover any faults or
defects caused by accidents, misuse, fair wear
and tear, neglect, tampering with the equipment,
or any attempt at adjustment or repair other than
through approved agents.
• This guarantee does not affect your
statutory rights.
Within the 12 month guarantee period:
If you experience difficulty using the product,
prior to returning your product, please read the
Help section beginning on page 91 or contact the
BT Esprit Helpline for assistance on 0870 605
8047. The Helpline is open from 8am-8pm MonSat and 10am-3pm Sundays.
In the unlikely event of a defect occurring, please
follow the Helplines’ instructions for replacement
or repair.
Outside of the 12 month guarantee period:
If your product needs repair after the guarantee
period has ended, the repair must meet the
approval requirements for connection to the
telephone network. We suggest that you call our
recommended repair agent on 08702 405029.
Additional/Replacement Items
For a full range of items, including additional
handsets for either the BT Esprit 1200, 1250 and
1300 or 1350, please call 0870 605 8047.
If you experience any problems, please call the Helpline on 0870 605 8047
Page 100

100
General information
Technical information
How many telephones can you have?
All items of equipment have a Ringer Equivalence
Number (REN) which is used to calculate the
number of items that may be connected to any
one telephone line.
The BT Esprit 1250 has a total REN of 1, i.e. for a
base and up to 5 handsets.
Any other instrument provided by BT may be
assumed to have a REN of 1 unless stated
otherwise.
A total REN of 4 is allowed per telephone line.
(For example, if the BT Esprit 1250 is used in
conjunction with three extension telephones,
each with a REN of 1, then the total = 4.)
R&TTE
This product is intended for use within the UK for
connection to the public telephone network and
compatible switchboards.
This equipment complies with the essential
requirements for the Radio Equipment and
Telecommunications Terminal Equipment
Directive (1999/5/EC). In demonstration with the
Essential Requirement for efficient use of the
radio spectrum, the product complies with EN301
406. For a copy of the Declaration of Conformity
please contact the BT Esprit Helpline on 0870
605 8047.
For your records
Date of purchase:
Place of purchase:
Serial number:
For guarantee purposes proof of purchase is
required so please keep your receipt.
Enter your system PIN here:
[ / / / ]
(See page 82 for more information.)
If you experience any problems, please call the Helpline on 0870 605 8047
 Loading...