

Page 1

This product is intended to be connected to analogue networks and private switching
systems in the United Kingdom.
This equipment complies with the essential requirements of the Radio Equipment and
Telecommunications Terminal Equipment Directive, 1999/5/EC.
eFax 2000 - Edition 4 – 14th November ’00 (3313)
User Guide
BT eF@x 2000
Multifunctional, plain paper fax machine with Internet and e-mail capability
Page 2

eFax 2000 - Edition 4 – 14th November ’00 (3313)
Please open this page for an ‘at a glance’
guide to your BT eF@x 2000.
Page 3

eFax 2000 - Edition 4 – 14th November ’00 (3313)
Please open this page for a further ‘at a glance’
guide to your BT eF@x 2000.
Page 4

At a glance
eFax 2000 - Edition 4 – 14th November ’00 (3313)
1. Delayed TX
Lets you send a fax at a pre-set time, p37.
2. Print operation
Used to print faxes received into the memory, p25.
3. Conf. TX
Lets you send a confidential fax to a personal mailbox, p41.
4. Relay Init. TX
Lets you initiate a relay fax when communicating with compatible
machines, p44.
5. Polling
Used for polling faxes, p45.
6. Report print
Print a report, p48.
7. Counter display
Displays the number of pages printed and scanned, p28.
8. Location Prog
Used when storing entries in the one touch and auto dial directories.
9. User Prog
Used to change settings on your machine.
10. Printer Cleaning
Cleans excess toner from the image drum.
1 2 3 4 5
DELAYED PRINT
CONF. TX
RELAY
POLLING
TX OPERATION INIT.-TX
6 7 8/+ 9/SPACE 10/PAUSE
REPORT COUNTER LOCATION USER PRINTER
PRINT DISPLAY PROG. PROG. CLEANING
21 3 4 5
6
7 8 9
10
Note
These one touch dialling buttons are used for storing
names and numbers. When used in conjunction with
the Select Function button, they perform additional
functions.
1
Page 5

eFax 2000 - Edition 4 – 14th November ’00 (3313)
1 2 3 4 5
DELAYED PRINT
CONF. TX
RELAY
POLLING
TX OPERATION INIT.-TX
6 7 8/+ 9/SPACE 10/PAUSE
REPORT COUNTER LOCATION USER PRINTER
PRINT DISPLAY PROG. PROG. CLEANING
STOP START
1 2 3
4 5 6
7 8 9
*
0
#
WXYZTUVPQRS
MNOJKL
DEFABC
GHI
8.5" A4 B5 A5
PHOTO EX FINE FINE STD
LIGHT NORMAL DARK
OPER/UNIQUE ALARM
HOOK SELECT
YES NO
AUTO REC HYPHEN SEARCH V.REQUEST REDIAL AUTO DIAL FUNCTION
COPY
1. LCD display
2. Resolution/Yes
Selects option from the menu. Also lets you set the resolution, p21.
3. Contrast/No.
Displays option from the menu. Also lets you set the contrast, p21.
4. Auto Rec
Sets the reception mode.
5. Hyphen
Inserts a ‘wait for dial tone’ pause when storing numbers.
Also inserts a ‘+’ in TSI/CSI and call back numbers.
6. Search
Lets you find numbers stored in the directory and one-touch buttons.
7. Hook/Voice. Request
Press to hear dialling tone. During a fax call, press to let the person
at the other machine know that you want to talk (both faxes must
have telephone attached), p28.
8. Redial
Press to redial the last number called.
9. Auto Dial
Used to dial and search numbers stored in the director y, p31.
Also used when sending group faxes.
10. Select Function
Lets you select options from the one-touch menu buttons.
11. Copy
Lets you copy a document, p27.
12. Stop
Press to stop the current action.
13. Start
Press to dial a number or send a fax. Also used to accept some
entries when programming.
14. Alarm light
Comes on to indicate a problem.
15. 8/
+
Lets you add phone numbers longer than 32 digits into the
memory, p31.
16. Pause
Lets you enter a Pause when storing a number, p31.
17. Space
Lets you enter a space when entering a number. Also used deletes
previously stored information.
18. One touch keypad
Lets you dial numbers with one touch. Also lets you access functions
and change settings.
19. Directory label
Lift off plastic cover to write details of one-touch numbers.
20. Group/
#
Lets you send a fax to a group of numbers stored in the
directories, p32.
21. 0/Oper/Unique
When storing information, lets you enter a range of different
characters.
22.
✱
Lets you switch from pulse to tone dialling.
14
15
16
17
18192021
1
2 3 4 5 6 7 8 9 10 11 12 13
22
2
Page 6

3
eFax 2000 - Edition 4 – 14th November ’00 (3313)
Paper tray
Holds up to 100 sheets of A4 paper.
Received document tray
Holds up to 30 pages of
received faxes or copied
documents.
Document feeder tray
Holds original documents
to be faxed or copied.
Document guides
Adjust to the width of the
document to keep pages
straight.
One touch buttons
For dialling numbers.
Manual paper feeder
Lets you load a different type of
paper than that in the paper tray.
Sent document tray
Holds original documents that
have been faxed or copied.
Control panel
LCD display
Keypad
Page 7

4
eFax 2000 - Edition 4 – 14th November ’00 (3313)
Print Head
Image Drum Unit
Toner Cartridge
PC connection socket
Telephone line socket
Phone sockets
Lets you connect a
telephone, or answering
machine.
Power on/off
Mains power socket
Page 8

5
eFax 2000 - Edition 4 – 14th November ’00 (3313)
Key features
Email/Internet capable
Once connected to the Fax2Net service you can:
• Send international faxes for the cost of a local call.
• Send a text fax to an email address.
• Receive an email from a PC in the form of a fax.
• Retrieve web pages from Internet sites as faxes.
A Fax2Net registration document is included with
your eF@x 2000, for quick set up of your Fax2Net
service. You can pay as you go or set up an account.
Multifunctional fax machine
When connected to a computer, you can use your
eF@x 2000 to:
• Print documents
• Send faxes directly from your PC
• Receive and store fax messages directly into
your PC
• Scan pages into your PC
• Carry out Optical Character Recognition (OCR)
on received faxes or scanned pages.
You can also add entries into the directories from
your PC.
One touch and auto dial directories
10 one-touch buttons let you display names, phone
numbers, email addresses and web addresses at a
single press.
The auto dial directory stores up to 70 numbers and
lets you display them by pressing just three buttons.
Directory search
Search facility lets you search for stored entries
by name.
Memory reception
You can receive faxes into memor y for printing later.
You can also keep faxes confidential by protecting
the memory with a 4-digit password.
Advanced features
Your eF@x 2000 has a range of special fax features
including:
• Group sending - send a fax to up to 5 different
groups of numbers in a single operation.
• Polling – lets you store a fax in the memory for
other machines to dial in and pick up.
• Delayed faxing – lets you store a fax in the memor y
for sending at a pre-set time.
• Password protection – enables you to keep faxes
confidential.
Page 9

6
eFax 2000 - Edition 4 – 14th November ’00 (3313)
In this guide
At a glance 1
Introduction 7
Safety information 8
Setting up 10
Connecting to a PC 17
Installing the JetSuite Pro software 17
Registering your software 18
Printing the user guides 19
Using Online Help 20
Using your eF@x 2000 21
Loading documents 21
Setting the answering mode 22
Sending faxes 23
Redialling 24
Receiving faxes 25
Dual access 26
Using the copier 27
Voice request 28
Using the directories 29
One touch buttons 29
Auto Dial directory 31
Additional features 32
Group dialling 32
Delayed faxing 37
Confidential faxes and mailboxes 41
Relaying faxes 44
Polling 45
Confidential polling 46
Print outs and reports 48
Using the Fax2Net service 52
E-mails 53
Web pages 55
Sending international faxes 56
Reports 57
Using a pre-paid card 58
Joining Fax2Net 58
Optional settings 59
Memory password 63
Restricted access 64
Dial settings 66
One touch dialling settings 68
Language 68
General information 69
Guarantee and customer helpline 69
Technical specification 70
Help 71
Clearing jams 72
Replacing toner 73
Replacing drum 75
Problem checklist 77
Index 80
Page 10

7
eFax 2000 - Edition 4 – 14th November ’00 (3313)
For your records
For warranty purposes, proof of purchase is required,
so please keep your receipt.
Introduction
Unpacking
When you unpack your eF@x 2000 you should have:
Fax
Paper Tray/Received Document Tray
Document Tray
Document Stacker
Toner Cartridge
Mains power cable with
3-pin plug fitted with 5A fuse
Printer cable
Date of purchase:
Place of purchase:
Serial number (on base of unit):
Purchase price:
Telephone line cord
CD containing PC software
and manuals
Fax2Net registration form
TAD adaptor lead
Page 11

8
eFax 2000 - Edition 4 – 14th November ’00 (3313)
Safety information
General
Your eF@x 2000 has been designed to give you
years of safe, reliable performance.
Never put foreign bodies into the fax machine. Their
accidental contact with powered parts may cause a
fire or electric shocks.
Disconnect the machine before you clean it. Do not
use liquid or aerosol cleaners to clean the machine.
Do not attempt to service the machine or lubricate
moving parts yourself.
Cleaning
Always use a dry cloth to clean the control panel and
the main body of the machine.
Environmental
Do not expose to direct sunlight.
Do not stand your fax machine on carpets or other
surfaces which generate fibres, or place it in
locations preventing free flow of air over its surfaces.
Do not use your machine near water or spill liquid of
any kind into it. Do not use it in damp or humid
conditions such as bathrooms.
Do not expose your fax machine to fire, explosive or
other hazardous conditions.
There is a slight chance that your fax machine could
be damaged by an electrical storm. We recommend
that you unplug the power and telephone line cord
for the duration of the storm.
CAUTION
Always leave unused toner cartridges and image
drum units in their packages until needed.
Reuse the packaging to dispose of the old toner and
drum.
Do not expose the toner cartridge and image drum
units to light for more than 5 minutes. Never expose
the green drum (inside the image drum unit) to
direct sunlight.
Small amounts of tone spilled on the skin or clothing
can be removed with soap and cold water. Using hot
water makes the stain much more difficult to remove.
Page 12

9
eFax 2000 - Edition 4 – 14th November ’00 (3313)
WARNING
If you open the top cover, you will see a label that
reads CAUTION – HOT. This area is extremely hot
and must not be touched.
EMERGENCY FIRST AID
IF TONER IS SWALLOWED – induce vomiting and
seek medical attention. If the person is unconscious,
never attempt to induce vomiting or give anything by
mouth.
IF TONER IS INHALED – take the person into the
open for fresh air. Seek medical attention.
IF TONER GETS IN THE EYES – flush eyes with
large quantities of cool, not cold, water for a
minimum of 15 minutes keeping eyelids open with
fingers. Seek medical attention.
Page 13

10
eFax 2000 - Edition 4 – 14th November ’00 (3313)
Insert the tabs of the Received Document Tray into
the slots at the front of the machine until they click
into place.
Setting up
1 Plan the location of your eF@x 2000
Situate your machine close enough to both
telephone and mains power sockets so that the
cables will reach.
Make sure the surface is stable and flat.
2 Install the paper trays
Insert the tabs of the Paper Tray into the slots at the
rear of the machine.
Insert the Document Tray into the long slot on top
of the machine until it clicks into place.
3 Install the Toner Cartridge
Remove the protective sheet from the document
feeder.
Open the top cover.
Page 14

11
eFax 2000 - Edition 4 – 14th November ’00 (3313)
Now press down firmly on both ends of the drum
until it snaps into place.
To remove the orange plastic cover from the toner
well which is located in the image drum unit. First
remove the tape, then press in the left hand tab and
lift out the cover. You can discard the plastic cover.
Remove the protective film from the image drum unit.
Place the image drum unit back into your machine
Make sure the tabs on both sides of the drum slot
into place as shown.
Pull the control panel up and forward.
First making a note of its installed position, lift the
image drum unit out. Do not touch the green
surface of the drum.
CAUTION
Do not expose the toner cartridge and image drum
units to light for more than 5 minutes. Never expose
the green drum (inside the image drum unit) to
direct sunlight.
Always hold the image drum unit by the ends. Never
touch the surface of the green drum inside the image
drum unit.
Page 15
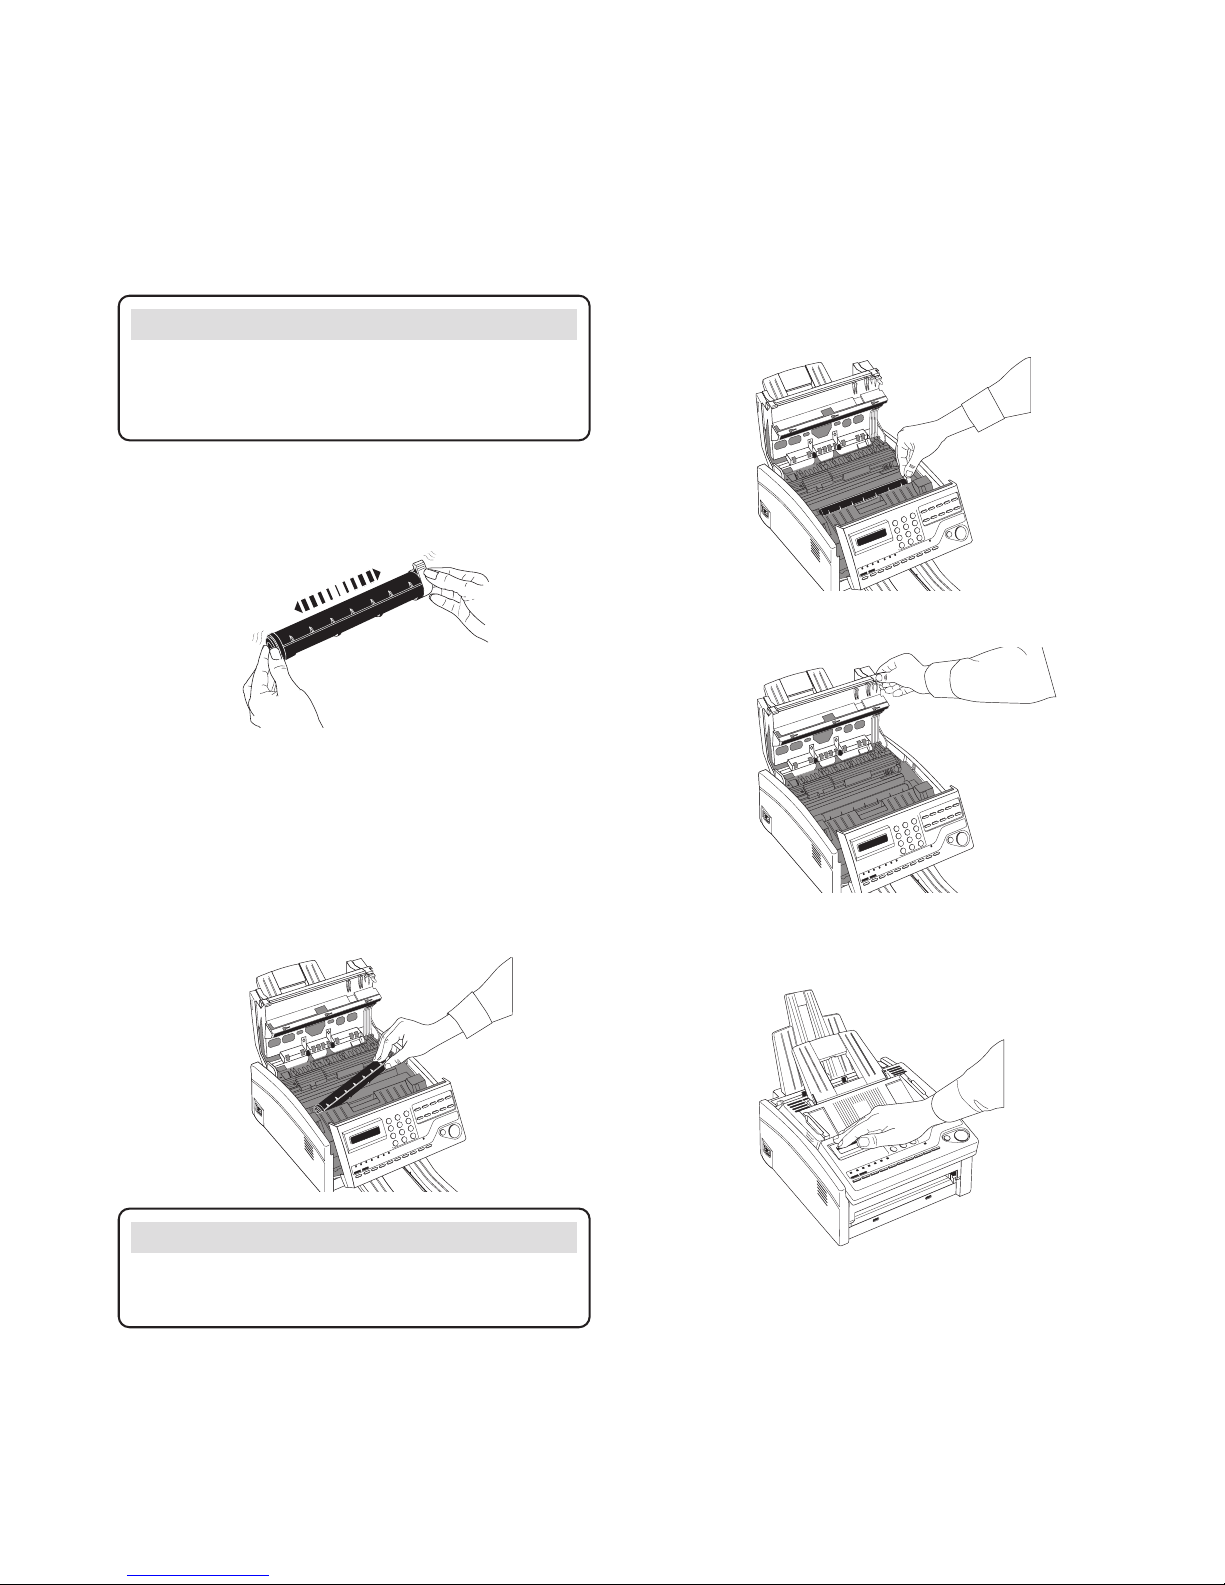
Remove toner cartridge from packaging and gently
shake it from side to side in order to distribute the
toner evenly.
Now carefully peel the white plastic tape from the
bottom of the cartridge.
With the smooth, black surface uppermost
(marked L and R) and the grey lever on the right,
insert the toner cartridge into the image drum unit.
Slide in the left end of the cartridge first, then lower
the right end into place.
12
eFax 2000 - Edition 4 – 14th November ’00 (3313)
Close the top cover until is snaps into place.
Close the control panel by pressing down until it
clicks into place.
Caution
Be sure to insert the toner cartridge into the drum
the right way around.
Once in place, push the grey lever on the toner
cartridge towards the back of the machine to secure it.
WARNING
Handle toner cartridge carefully. Avoid spilling toner
onto your clothing or other materials. See ‘Safety
Information’ on page 8)
Page 16

13
eFax 2000 - Edition 4 – 14th November ’00 (3313)
Note
To connect both an answering machine and a
telephone, first connect your answering machine to the
eF@x 2000 and then insert the telephone cable into
the telephone socket on the answering machine
5 Connect a telephone or answering
machine
If you want to connect an answering machine you
must set the reception mode of your eF@x 2000 to
TAD/FAX AUTO SW MODE in order for the
answering machine to work. See page 22.
• Plug the TAD adaptor lead into the TEL 1 socket
at the back of the machine.
• Plug the answering machine (or telephone) line
cord into the TAD adaptor socket.
4 Connect the power and telephone line
Plug one end of the telephone line cord into the
LINE socket at the back of the machine.
Plug the other end into the telephone wall socket.
Plug the mains power cable into the socket on the
back of the machine and the other end into a mains
power socket.
Switch your eF@x 2000 on using the On/Off switch.
Display shows the time and reception mode.
Your machine is now in standby, ready to send
and receive faxes.
Caution
Before connecting power, ensure that the power switch
is OFF (The side nearest 0 is down).
Page 17

eFax 2000 - Edition 4 – 14th November ’00 (3313)
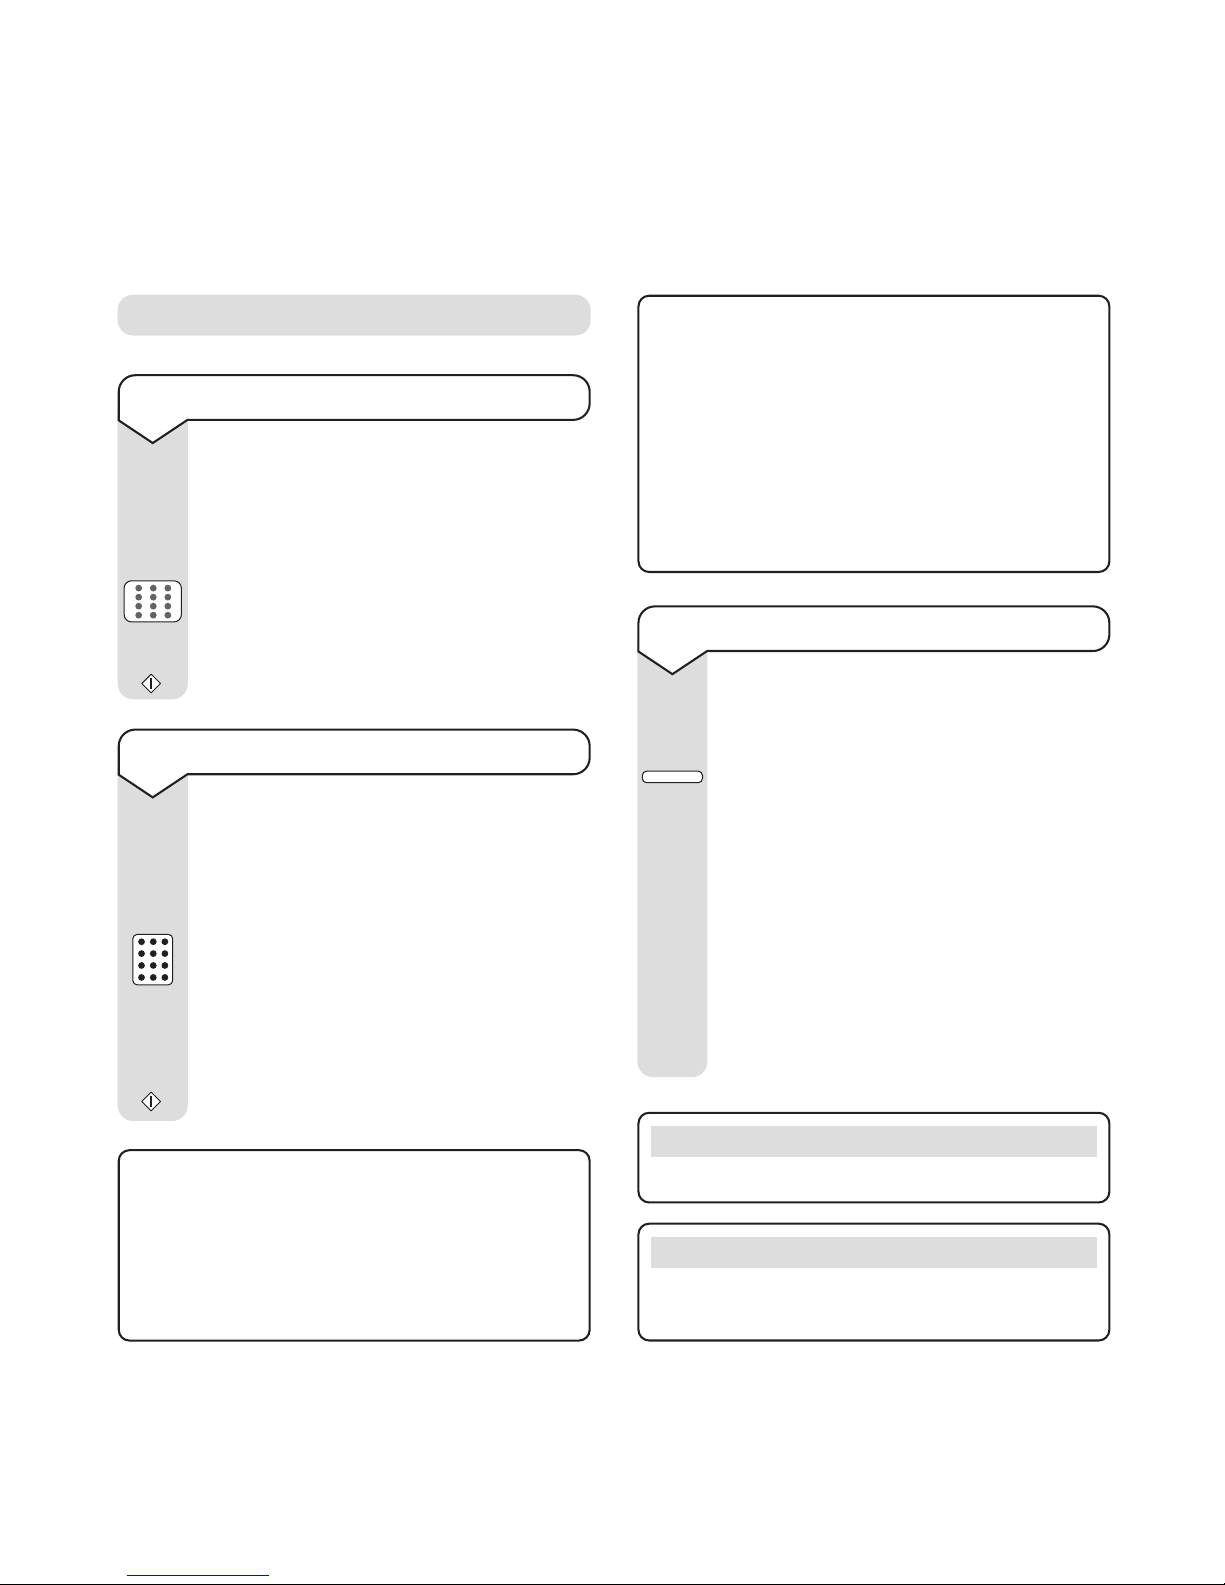
7 Set the time and day
The current date and time will be printed
on every fax page you send.
Press
SELECT FUNCTION.
Press
USER PROG.
Press 3.
Display shows
3: CLOCK ADJUSTMENT
Press YES. Display shows the default date
and time.
Use the keypad to enter the correct date and
time using the format
DD/MM/YYYY HH:MM
Press to confirm.
Press
SELECT FUNCTION to return to
standby.
SELECT
FUNCTION
SELECT
FUNCTION
USER
PROG.
3
DEF
YES
YES
8 Enter your name and fax number
Your name and number will be added to
every fax page you send. You can enter a
maximum of 20 digits and 23 characters.
You can also enter a Call Back number.
This is a phone number that the person you
are faxing can use to call you.
See ‘Voice
Request’, page 28.
Press SELECT FUNCTION.
Press
USER PROG.
Press
4.
Display shows
4: SYSTEM DATA PRG
.
Press
YES. Display shows
NO = <TSI/CSI>
I D = <SENDER ID>
and changes to
NO =
ID =
SELECT
FUNCTION
USER
PROG.
4
GHI
YES
6 Loading paper
The Paper Tray can hold up to 100 sheets of standard
weight (80gsm) paper. Your eF@x 2000 automatically
reduces the size of incoming documents so that they
can fit onto A4 paper.
1 Fan the paper to separate the sheets.
2 Insert the paper into the Paper Tray.
3 Adjust the paper guides to the width of the paper.
You can set your machine to take different paper
sizes, see page 60.
14
Page 18

15
eFax 2000 - Edition 4 – 14th November ’00 (3313)
Connecting to a switchboard
When connecting to a switchboard you normally
have to dial a prefix (e.g. 9) to get an outside line.
When storing numbers in memory you will need to
enter the prefix before each external number. Please
note that if your switchboard requires a pause after
the prefix, before the rest of the number is dialled,
you will also need to set PBX LINE to ON and enter
a DIAL PREFIX. This is shown below.
If, when dialling outside numbers, you find that your
eF@X 2000 dials the prefix but not the rest of the
number, you should switch of f Dial Tone Detection. To
do this, please contact the Helpline on 0870 241 3929.
Enter your fax machine’s number.
Press
START to save the entry.
Enter your name or Sender ID.
START
Please note
Press the HYPHEN button to enter a + before
a number.
Press the 9/SPACE button to enter a space.
0
Press START to save the entry. Display shows
NO = <CALL BACK NO >
and then clears.
If required enter a telephone number that
can be used to contact you.
Press Start to confirm.
Press
SELECT FUNCTION to return to
standby.
START
OPER/UNIQUE
HYPHEN
9/SPACE
5
JKL6MNO6MNO
4
GHI
YES
NO
HYPHEN
9/SPACE
For example to enter the name JOHN:
Press the
5 button until the display shows
J
Press the 6 button until the display shows
O
Press the 4 button until the display shows
H
Press the 6 button until the display shows
N
Press 9/SPACE = space.
Press
HYPHEN = -
Press 0 OPER/UNIQUE repeatedly until the
character you want is displayed. These
include:
Ø./!#&’()*+,-:;=?
Press the NO button to move the cursor
forward.
Press the
YES button to move the cursor
back.
If you make a mistake when entering a
name or number, move the cursor back to
the error and either over write it by entering
the correct number or press the
9/SPACE
button to delete it.
SELECT
FUNCTION
START
To set your eF@x 2000 to switchboard mode
Press SELECT FUNCTION.
Press
USER PROG.
Display shows
1: FUNC.PROGRAMMING
Press 2. Display shows
2:DIAL PARAMETER
Press YES until the display shows
PBX LINE [OFF]
Press NO until the display shows
PBX LINE [ON]
Press SELECT FUNCTION to return to
standby.
SELECT
FUNCTION
SELECT
FUNCTION
USER
PROG.
2
ABC
YES
NO
Page 19

16
eFax 2000 - Edition 4 – 14th November ’00 (3313)
To enter the dial prefix
If you enter the dial prefix then eF@x 2000
will always insert a pause after any number
starting with this prefix.
Press
SELECT FUNCTION.
Press
USER PROG. Display shows
1:FUNC.PROGRAMMING
Press 2 . Display shows
2:DIAL PARAMETER
Press YES until the display shows
DIAL
PREFIX [OFF]
Press NO until the display shows
DIAL
PREFIX [ ] ENTER 4 DIGITS
Enter the number you dial to get an outside
line
Press
9/SPACE until the display changes.
Press
YES .
Press
SELECT FUNCTION to return to
standby.
To delete the dial prefix
Press SELECT FUNCTION.
Press
USER PROG. Display shows
1:FUNC.PROGRAMMING
Press 2 . Display shows
2:DIAL PARAMETER
Press YES until the display shows
DIAL PREFIX [OFF]
Press NO until the display shows
DIAL PREFIX [ ] ENTER 4 DIGITS
Press NO to delete the existing prefix.
Press
9/SPACE four times to display
OFF
Press YES .
Press
SELECT FUNCTION to return to
standby.
USER
PROG.
2
ABC
YES
YES
NO
9/SPACE
SELECT
FUNCTION
SELECT
FUNCTION
SELECT
FUNCTION
USER
PROG.
2
ABC
YES
NO
NO
YES
9/SPACE
SELECT
FUNCTION
Page 20

17
eFax 2000 - Edition 4 – 14th November ’00 (3313)
Connecting to a PC
Installing the JetSuite Pro software
Please note
The JetSuite Pro software manual is contained on the
CD ROM and can be printed once the software has
been installed. On screen help is also available.
If you have a previous version of JetSuite or a JetSuite
driver installed on your PC, you must uninstall it first
using the JetSuite Uninstall program.
When connected to a PC you can:
• Use your eF@x 2000 as a printer.
• Send fax messages directly from your PC.
• Receive and store fax messages directly onto
your PC.
• Scan pages from your eF@x 2000 into your PC.
• Carr y out Optical Character Recognition (OCR)
on documents. This allows you to convert scanned
pages (or faxes received to your PC) into ‘text’
documents which can then be read and edited by
your word processing program.
• Easily store numbers in the directories.
When connected to a PC you can use your eF@x
2000 as a printer, fax and scanner.
To connect to a PC
Plug one end of the printer connection
cable into your eF@x 2000 and the other
end into the printer socket of your PC.
To install the software
Install the JetSuite Pro software by following
the steps for the version of Microsoft
Windows you are using. The software is
provided on a CD-ROM.
Make sure that no other programmes
are running.
Insert the PC Software CD in your CD
drive.
Autorun should locate and begin installing
your eF@x 2000 software automatically.
1
2
3
Page 21

18
eFax 2000 - Edition 4 – 14th November ’00 (3313)
If this does not happen
For Windows 95, Windows 98 or Windows
NT4.0:
Click on Start, then highlight Settings and
click on Control Panel.
On the Control Panel screen, double click
Add/Remove Programs.
Click on Install and follow the on-screen
prompts to run SETUP.EXE from the CD.
(You can double click on the file to run it.)
For Windows 3.1 (or 3.11):
In Program Manager, choose RUN from the
FILE menu.
In the Command Line, type D:\SETUP.EXE
(where D = your CD drive).
On screen prompts
When following the on-screen prompts for
installation:
You are asked which device to install, select
select eF@ax 2000.
When prompted by the INSTALL programme,
enter your name, company, voice and fax
number and PC sender ID number (this is
the number that will be printed at the top of
faxes sent from the PC, it would normally
be your fax number, including your area
code). The fax number and sender ID can
contain up to 20 digits and must be
completed before you can proceed.
When asked to select the installation type,
it is recommended that you choose Typical.
(Custom install is for advanced users and
allows you to deselect certain features. You
will also be asked which COM ports to use
for faxing and printing. Please note that these
do not correspond to actual connectors on
your PC but are locations used inside the
computer and, in most cases, you shouldn’t
change the ports that are selected
automatically.)
Click on NEXT and follow on-screen prompts
until the software is installed
When installation is complete, the program
will restart your computer so that you can
use JetSuite Pro.
•
•
•
•
•
•
•
•
•
•
Registering your software
Register the software by visiting www.caere.com or
by calling free on 0800 614 759.
Alternatively, you can register by:
1. Completing and faxing the registration form
included in the eF@x 2000 packaging.
2. Load the completed form face down in the
document tray.
3. Enter the fax number provided on the registration
form (along with a prefix, if necessar y, to get an
outside line).
4. Press the START button on your eF@x 2000.
When the fax has been sent successfully, the
display shows
RESULT = OK
.
Page 22

19
eFax 2000 - Edition 4 – 14th November ’00 (3313)
Printing the user guides
Your PC Software CD ROM contains copies of four
user guides.
These are: -
• The BT eF@x 2000 user guide (the guide you
are reading).
• The JetSuite Pro software user guide.
• The Fine Reader OCR user guide.
• The Fax2Net user guide.
You can display the user guides at any time but you
can print them only if you have Acrobat Reader
installed. If you do not, your PC Software CD ROM
contains a copy for installation.
To install Acrobat Reader
Open the Manual/Acrobat/English folder
on the CD and double-click on the
appropriate file icon for your version of
Windows.
There are two versions, depending on your
Windows software
1) ar16e301.exe for Windows 3.1
Or
2) ar32e301.exe for Windows 95/98/NT4.0
Follow the screen prompts to install the
Reader.
If you wish, you can print the manuals and
then remove the Acrobat Reader, using the
Add/Remove Programs icon in the
Windows Control Panel.
•
•
•
•
To print the user guides
Once Acrobat Reader is installed.
Insert the CD in the CD drive.
Open the CD.
Open the Manual/Manual/English folder
to display the guides.
eF@x 2000 guide = eF@x 2000 user guide.pdf
JetSuite guide = JetSuite user guide.pdf
Fax2Net guide = Fax2Net user guide.pdf
Fine Reader guide = OCR user guide.pdf
You can now print the user guide.
•
•
•
•
•
•
•
To receive faxes to your PC
Set your eF@x 2000 in PC MODE.
Open JetSuite and from the Options menu
select Fax.
In the new window click on the Receive tab.
Check the “Receive to PC” box and click OK.
•
•
•
•
Please note
Your PC has to be switched on and JetSuite open for
faxes to be received.
Page 23

20
eFax 2000 - Edition 4 – 14th November ’00 (3313)
Using Online Help
For general information about using JetSuite Pro,
choose Help Contents (the Contents command in
the Help menu).
If you want help on a specific JetSuite Pro menu
command or toolbar button, follow these steps:
1. Click the ? button in the toolbar. Your cursor
changes to a ?
2. Choose the menu command or click on the
toolbar button you want to know more about.
➚
Please note
Do not attempt to send a second fax via your eF@x
2000 software while a current fax is already in progress
as this may disconnect the current fax.
Depending on your software application, DOS printing
may not be possible in Windows NT4.0
If the Fax Status Monitor shows the wrong
number or transmission speed
When using your eF@x 2000 software, while a
document is being sent to the correct number at the
correct speed, the Fax Status Monitor may occasionally
display the wrong number or transmission speed.
You can check the fax details as follows:
• Select the Fax Send folder and highlight the
individual fax from the list.
• Select File to open the drop-down menu.
• Select Properties to display the fax number and
transmission speed details.
For further information, see the README.TXT file
after installation.
Minimum system requirements
33Mhz 486 PC
16MB RAM memory
8MB of permanent swap file space
(Win.3.111/Windows for Workgroups)
20MB of free disk space
256 colour video driver
Bi-directional Parallel printer port
Win 31, Windows for Workgroups 3.11 or Win 95,
Win 98 or Win NT4.0.
Windows NT4.0 requires Pentium 90 and 16 to
32MB of RAM
Recommended system requirements
166Mhz 486 PC
32MB RAM memory
16MB of permanent swap file space
(Win.3.111/Windows for Workgroups)
50MB of free disk space
256 colour or higher video driver
Bi-directional Parallel printer port
Win 95, Win 98
JetFax, JetSuite, and JetShare are trademarks of
JetFax, Inc.
All other brand or product names are trademarks
or registered trademarks of their respective
companies or organisations.
Page 24

Setting the resolution and contrast
You can choose different resolution and contrast
settings to ensure the best quality when faxing or
copying a document. The resolution and contrast
settings are shown by the lights on the control panel
above the YES and NO buttons.
Resolution
Press to select the setting you want.
•
STD
(standard) – when the original contains easy
to read text
•
FINE
or
EX FINE
– when the original contains
small or hard-to-read text
•
PHOTO
– when the document contains varying
shades of grey or pictures.
Contrast
Press to select the setting you want.
•
NORMAL
– when the original document is clearly
printed.
•
DARK
– when the original document is dark.
•
LIGHT
– when the original document is light.
21
eFax 2000 - Edition 4 – 14th November ’00 (3313)
Using your eF@x 2000
Loading documents
What type of paper you can use
Dimensions:
• width 148mm – 216mm
• length 128mm – 356mm
Thickness:
• 50-105gsm
You can load up to 20 sheets of 80gsm paper or up to
15 sheets of heavier paper
Very heavy sheets of paper can be loaded one at a
time, manually.
Do not use
Torn, crumpled and rolled paper.
Paper that is too thin.
Wet or moist paper.
Carbon paper.
Documents with paperclips or staples attached.
Inserting documents in the feeder
Insert documents to be faxed or copied face down.
Adjust the paper feeder width guides to fit.
Your machine will grip the document and pull the
bottom sheet in.
YES
Note
A document must be loaded before you can adjust the
resolution and contrast.
Note
FINE and PHOTO settings take longer to send.
NO
Page 25

22
eFax 2000 - Edition 4 – 14th November ’00 (3313)
Setting the answering mode
Your eF@x 2000 has a number of answering modes
which determine how it handles incoming calls.
The current answering mode is shown on the display
when the machine is in standby.
FAX = Auto receive mode
Your machine answers all calls automatically and
assumes all incoming calls are faxes.
TEL = Manual receive mode
Ideal when you use the same line for fax and
telephone calls but most incoming calls are telephone
calls. Each time you receive a call your machine rings
like a telephone. You can answer using an attached
telephone. If you hear the fax tones, press the Start
button to receive a fax and replace the handset.
In this mode, if you do not answer the phone and
someone tries to send you a fax, your machine will
not answer the call.
If you answer a call on another telephone connected
to the same line (but not connected to your eF@x
2000 TAD socket), you can enter a 2-digit code to tell
your machine to receive an incoming fax.
See
‘Remote Receive’, page 61.
T/F = Telephone/Fax Auto Switch mode
Your machine automatically answers all calls. If the
call is a fax, it is received automatically. If it is a
phone call, your machine will ring like a telephone
and you can pick up the call on an attached phone.
If you do not answer the call the eF@x will switch
back to fax mode so your caller can send a fax.
TAD = Telephone Answering Device mode
Select this mode when you want to use an answering
machine connected to your eF@x 2000. When a call
is received, your answering machine takes the call.
If it is a voice call, your machine will play the outgoing
message as normal. If the call turns out to be a fax call,
your eF@x 2000 will automatically start receiving it.
MEM = Memory reception mode
Select MEM if you want to receive faxes directly into
the memory and not immediately printed. You can
then use the Print Operation function (see page 25)
to print out any faxes stored in the memory.
To stop other users from printing out your faxes,
you can protect the memory with a 4-digit password,
see page 63.
PC = PC Receive mode
Set this mode when your eF@x 2000 is connected to
your computer and you have the MFP software
installed which allows your machine to act as a fax
modem. Incoming fax messages are stored directly
to your computer hard disc and not printed or saved
in the memory by your eF@x 2000.
To change the answering mode
You can set the answering mode as
required.
Press AUTO REC. The current answering
mode is displayed.
Press
AUTO REC until the answering mode
you want is displayed.
After a few seconds, the mode is set and the
display returns to standby
The various modes are explained below.
Choose the one which best suits your
requirements.
AUTO REC
AUTO REC
Page 26
23
eFax 2000 - Edition 4 – 14th November ’00 (3313)
Sending faxes
To send a fax
Insert the document to be faxed face down
into the document feeder tray. Display
shows
SELECT LOCATION(S)
.
Dial the number. If you make a mistake
press YES to go back and re-enter the
number.
Press
START to dial and send the fax.
To dial from an attached phone
Insert the document to be faxed face down
into the document feeder tray.
Lift the handset.
From the telephone keypad, dial the
number. If the receiving fax is in automatic
reception mode you will hear the fax tones.
If a person answers, ask them to press the
START button on their machine.
Press
START to send your fax then replace
the handset.
To search for a stored number
You can scroll through the
One Touch
and
Auto Dial
entries.
Press
SEARCH repeatedly to display the
stored names in alphabetical order.
Press
SEARCH.
Use the keypad to enter the first letter of
the name you have stored.
Repeated presses of that key will display all
the entries starting with those letters. For
example, repeated presses of the
2 button
will display all names starting with A, then
all names starting with B, then all names
starting with C.
START
START
JOHN SMITH
– the name (or number) programmed
into the far end machine is displayed.
SENDING /XXX
– The fax is being sent. XXX is the
speed that data is being sent.
RESULT = OK
– the fax has been sent successfully.
COMMUN. ERROR
– if you see this or another error
message a problem occurred during sending.
Try resending the fax.
Display messages
When you send a fax, the display keeps you up
to date with progress.
DIALLING
– the number is being dialled.
CALLING
– the line is ringing.
SEARCH
Note
Numbers stored without names are not displayed.
Note
To store numbers in memory see ‘One touch buttons’,
page 29 and ‘Auto Dial directory’, page 31.
Page 27

To redial a number manually
Press REDIAL. The last number called is
displayed.
Press
START to call the number.
REDIAL
START
Please note
If you have an alternate number programmed for
the person you are calling then, if the first attempt
fails, your eF@x 2000 will automatically try the
alternate number at the next attempt.
Redialling
If the line is busy or if there is no answer, your fax
will automatically try to redial the number every
three minutes and up to 5 times.
24
eFax 2000 - Edition 4 – 14th November ’00 (3313)
To get a line before dialling
Insert the document to be faxed face down
into the document feeder tray.
Press
HOOK.
Use the keypad, One Touch or Auto Dial to
call the number you want.
When the far end machine responds, press
START to send your fax.
HOOK
V. REQUEST
START
Enter 17 .Display shows
17:MEM/FEEDER SW
Press NO to switch between MEM for
storing documents in the memory and
FEED for sending from the feeder tray.
Press
YES until the display shows
25:/INSTANT DIALLING
Press NO. Display shows
OFF
Press YES to confirm.
Press
SELECT FUNCTION to return to
standby.
Please note
The FEED setting of 17:MEM./FEEDER SW.
only becomes effective if user function
25:INSTANT DIALLING is set to OFF.
If 25:INSTANT DIALLING is set to ON, all
documents are scanned when you start dialling.
SELECT
FUNCTION
SELECT
FUNCTION
USER
PROG.
YES
NO
YES
NO
YES
To send documents from the feeder tray
Your eF@x 2000 is pre-set to scan
documents into memory before sending.
You can change this so that documents are
held in the feeder tray. This is useful if you
want to use the voice request feature. (See
‘To send a voice request’ on page 28.)
Press SELECT FUNCTION.
Press
USER PROG.
Display shows
1:FUNC.PROGRAMMING
Press YES.
Display shows
FUNCTION NO.[ ]
Page 28

Receiving faxes
Faxes are normally printed out on reception.
If your eF@x 2000 has been set to memory
reception mode (MEM) (see page 22), or there is
no paper in the paper tray, faxes are received into
the memory. The memory will hold up to 60 pages
of the standard Slerexe letter (see page 75). This
includes any faxes stored for sending. When the
memory is full, your eF@x 2000 will not answer
incoming calls.
Please note
When you change the reception mode of your machine,
any non-confidential fax messages stored in the memory
are printed automatically.
If you have set a password to keep faxes confidential,
you will need to enter the password before you can
print out. See ‘Memory Password’, page 63.
To print out a fax from the machine’s
memory
The display shows
MSG. IN MEMORY
if faxes
are received into the memory.
Press
SELECT FUNCTION.
Press
PRINT OPERATION.
Display shows
PRINT MEMORY MSG?
Press YES. The stored fax is printed.
SELECT
FUNCTION
PRINT
OPERATION
YES
To delete messages stored in the memory
You can delete stored faxes without printing
them.
Press
SELECT FUNCTION.
Press
PRINT OPERATION.
Display shows
PRINT MEMORY MSG?
Press YES. Display shows
PRINTING
.
Immediately press
STOP. Display shows
CANCEL?
Press YES. The message is deleted.
SELECT
FUNCTION
PRINT
OPERATION
YES
YES
STOP
25
eFax 2000 - Edition 4 – 14th November ’00 (3313)
To check the fax result
You can confirm the success of the last fax
sent.
Press
COPY (with no documents loaded)
Display confirms whether the fax was sent
successfully.
Press
COPY again to receive a printed
report. See also ‘Print outs’ and ‘Reports’,
page 48.
To stop a fax
You can stop a fax while it is being sent.
Press
STOP twice. Display shows
STOPPED
.
If your document gets stuck the display
shows
RELOAD DOCUMENT
. Press STOP
again and the document is ejected. If the
paper is still stuck, see ‘Paper Jams’, page 72.
COPY
COPY
STOP
STOP
Page 29

Please note
IF THE MAINS POWER IS SWITCHED OFF OR FAILS
• All documents scanned into the memory are lost.
• All faxes received into the memory are lost.
• Dialling and transmitting settings for documents
loaded into the document feeder are lost.
Your eF@x 2000 will print a report informing you of
a power failure. The report will show details of the
faxes (incoming and outgoing) that you have lost and
which may need to be resent. See ‘Printouts and
Reports’, page 48.
SELECT
FUNCTION
YES
NO
SELECT
FUNCTION
YES
8
TUV
0
USER
PROG.
26
eFax 2000 - Edition 4 – 14th November ’00 (3313)
To reject unsolicited faxes and/or bar
outgoing calls to any numbers not stored
in the directories
You can set your machine to receive faxes
only from numbers that are stored in the
One Touch or Auto Dial memories (or that
have the same last 4 digits as stored
numbers). Additionally, you can also prevent
dialling to any numbers except those stored
in the memory.
Press
SELECT FUNCTION.
Press
USER PROG.
Display shows
FUNC. PROGRAMMING
Press YES. Display shows
FUNCTION NO. [ ]
Press 0.
Press
8. Display shows
08: CLOSED NETWORK
and the current setting.
RX
= restrict faxes received.
T/R
= restrict faxes sent and received
OFF
= no restrictions.
Press
NO until the setting you want is
displayed.
Press
YES to confirm.
Press
SELECT FUNCTION to return to
standby.
Dual access
In order to give you maximum efficiency, you can load
and prepare documents for faxing while your machine
is sending or receiving another message or printing.
While sending faxes
After your eF@x 2000 has finished scanning a
document into the memory and is transmitting from
memory, you can:
• Store another document in the memory and
prepare to send it.
• Continue to store other documents in the memory
so long as you have enough memory free.
• Make copies of documents.
While receiving faxes
You can:
• Load another document into the memory and
prepare to send it.
• Continue to store other documents in the memory
so long as you have enough memory free.
• Continue to receive faxes while earlier messages
are being printed (providing your machine is set
to memory reception mode).
Page 30

Please note
We recommend you make single copies only when
using the manual paper feed slot. This will prevent any
possible paper feed jams from occurring.
COPY
Using the copier
You can make up to 50 copies of a document.
The Resolution is pre-set to FINE and the Contrast
is pre-set to NORMAL.
To make copies
Load the document.
If required, change the resolution and
contrast.
Press
COPY. Display shows
PRG. NO. OF
COPIES
.
Enter the number of copies you want
Press
START.
If you don’t enter the number of copies
within a few seconds, the machine will
automatically print one copy.
YES
COPY
NO
START
To make copies using the manual paper
feeder
You can make copies onto a different type
of paper than that loaded in the paper tray.
Load the document to be copied. (Load one
sheet at a time when copying onto special
paper.)
If required, change the resolution and
contrast.
Insert a sheet of paper, printing side up,
into the manual paper feeder until you feel
the machine grip the paper.
Press
COPY.
YES
NO
While making copies
You can:
• Continue to receive faxes (providing your machine
is set to memory reception mode).
While printing reports
You can:
Continue to receive faxes providing enough memory
is free. When the report is printed, the fax will be
printed. Continue to load documents into the
memory providing enough memory is free. When
the report is printed, the fax is sent automatically.
27
eFax 2000 - Edition 4 – 14th November ’00 (3313)
Page 31

To read the print counter
The print counters keep count of the total
number of pages your eF@x 2000 has
printed and scanned. The drum counter
should be reset each time the image drum
unit is replaced, see ‘Replacing the image
drum unit’, page 75.
Press SELECT FUNCTION.
Press
COUNTER DISPLAY.
Display shows the
DRUM COUNT
.
Press
NO to scroll through the display
DRUM COUNT, PRINT COUNT
and
SCAN COUNT
.
Press
SELECT FUNCTION to return to
standby.
SELECT
FUNCTION
SELECT
FUNCTION
COUNTER
DISPLAY.
NO
To answer a voice request
When you hear a warbling sound:
Lift the handset.
Press
V. REQUEST.
Please note
Providing you have stored a call back number on your
machine (see page 14) your eF@x 2000 automatically
sends a call back message giving a phone number
where you can be reached if no-one is available at the
other machine to answer a voice request.
HOOK
V. REQUEST
To send a voice request
During a fax call:
Press V. REQUEST. Display shows
VOICE
REQ. ACTIVATED
When the other person answers your
request, your machine gives a warbling
sound. Display shows
LIFT HANDSET AND
PRESS VOICE REQUEST
.
Lift the handset on the attached phone.
Press
V.REQUEST on your eF@x 2000.
HOOK
V. REQUEST
HOOK
V. REQUEST
Please note
To be able to use voice request while sending a
fax, user function
17:MEM./FEEDER SW.
must be set
to FEED and
25:INSTANT DIALLING
must be set
to OFF (see ‘To send documents from the feeder
tray’ on page 24).
28
eFax 2000 - Edition 4 – 14th November ’00 (3313)
Voice request
When sending a fax, the voice request lets the
person at the other machine know you want to talk
to them. They can also send a voice request to you.
If you are sending a fax, you can answer a voice
request when all pages have been sent.
If receiving a fax, you can answer a voice request
after the current page has been received.
A voice request is indicated by a warbling tone from
your eF@x 2000. If you do not respond within 6
seconds, the request is cancelled.
You must have a phone attached to your eF@x 2000
so that you can speak to the caller.
Page 32

5
JKL
6
MNO
6
MNO
4
GHI
YES
NO
HYPHEN
0
OPER/UNIQUE
9/SPACE
One touch buttons
There are 10 one-touch buttons which let you select
a number for dialling with just one press. Each
button can hold a name and up to two phone
numbers – a main number and an alternate number.
The alternate number will be dialled automatically if
the main number is busy or if there is no answer.
29
eFax 2000 - Edition 4 – 14th November ’00 (3313)
Using the directories
YES
NO
9/SPACE
9/SPACE
HYPHEN
*
Entering numbers
Press the YES and NO buttons to move
the cursor.
Press the
9/SPACE button to enter a
space.
Press the
HYPHEN button to enter a
hyphen.
If you have set your eF@x 2000 to Pulse
dialling, you can change to Tone dialling
by pressing the
✱/TONE button.
If you make a mistake when entering a
name or number, move the cursor back to
the error and either over write it by
entering the correct number or press the
9/SPACE button to delete it.
9/SPACE
Entering names
For example to enter the name JOHN:
Press the 5 button until the display shows
J
Press the 6 button until the display shows
O
Press the 4 button until the display shows
H
Press the 6 button until the display shows
N
Press 9/SPACE = space.
Press
HYPHEN = -
Press 0 OPER/UNIQUE repeatedly until the
character you want is displayed. These
include:
Ø./!#&’()*+,-:;=?
Press the NO button to move the cursor
forward.
Press the
YES button to move the cursor
back.
If you make a mistake when entering a
name or number, move the cursor back to
the error and either over write it by entering
the correct number or
press the
9/SPACE button to delete it.
Page 33

30
eFax 2000 - Edition 4 – 14th November ’00 (3313)
Names can be up to 15 characters long and numbers
up to 32 digits.
Pressing a one touch button when in standby will
display the name stored.
To store one-touch numbers
Press SELECT FUNCTION.
Press
LOCATION PROG.
Display shows
LOCATION PROGRAMMING
Press the ONE TOUCH button you want.
Press
YES.
Enter the main fax number.
Press
START to confirm.
Enter the name.
Press
START to confirm.
Display shows:
NO = <OR LOCATION>
Enter an alternate number if required.
Press
START to confirm.
Press to return to standby.
Or
Press USER PROG to begin storing another
one-touch entry.
START
START
SELECT
FUNCTION
LOCATION
PROG.
Please note
If you have registered with Fax2Net and
programmed your details into the machine, when
you select a one touch button the display will show
ONE TOUCH KEY PRG [FAX] YES(?) NO(?)
.
YES
SELECT
FUNCTION
USER
PROG.
START
To dial a one touch number
Insert the document to be faxed into the
document feeder tray.
Press the
ONE TOUCH button you want.
The name (or number) is displayed.
Press
START to send the fax.
To delete a one touch number
Deleting a fax number automatically deletes
the name and any alternate number stored.
Press
SELECT FUNCTION.
Press
LOCATION PROG.
Display shows
LOCATION PROGRAMMING
Press the ONE TOUCH button you want.
Press
YES.
Press
9/SPACE until the number is deleted.
Press
START to confirm.
Press to return to standby.
Or
Select another ONE-TOUCH button.
SELECT
FUNCTION
SELECT
FUNCTION
LOCATION
PROG.
9/SPACE
START
Please note
If you have registered with Fax2Net and
programmed your details into the machine, when
you select a one touch button the display will show
ONE TOUCH KEY PRG [FAX] YES (<––– ) N O ( –––>)
.
To delete the existing number, press YES.
START
YES
Page 34

31
eFax 2000 - Edition 4 – 14th November ’00 (3313)
To store an Auto Dial entry
Press SELECT FUNCTION.
Press
LOCATION PROG. Display shows
LOCATION PROGRAMMING
Press AUTO DIAL.
Enter the 2 digit number between 01- 70
under which you want to store the entry.
Enter the fax number.
Press
START to confirm.
Enter the name – up to 15 characters.
Press
START to confirm. Display shows
AUTO DIAL NO. [ ] ENTER 01-70
Enter another two-digit number to store
another name and number.
Or
Press to return to standby.
Auto Dial directory
Your eF@x 2000 can hold up to 70 names and
numbers in the Auto Dial directory. Each entry can
hold up to 32 digits and 15 characters.
START
START
AUTO DIAL
SELECT
FUNCTION
SELECT
FUNCTION
LOCATION
PROG.
To dial an Auto Dial number
Insert the document to be faxed into the
document feeder tray.
Press
AUTO DIAL.
Enter the 2-digit location you want.
Press the
START button. The number is
dialled.
Chain dialling numbers longer than 32 digits
If you need to dial a number longer than 32
digits you can use Chain Dialling where you
store the number in two One Touch or Auto
Dial locations.
Creating a Chain Dial number
• Store the first 31 digits as a One Touch or
Auto Dial entry.
• Then press the 8/+ ONE TOUCH button to
make it a chain dial number.
• Store the rest of the number in another
One Touch or Auto Dial entry.
Dialling a Chain Dial number
• Select the One Touch button or Auto Dial
entry containing the first part of the number
(which must end with a +). Display shows
PRESS OT/AD/SRCH KEY
.
• Now select the next One Touch or Auto Dial
entry containing the second part of the
number, or enter the rest of the number
manually using the keypad.
• Press the START button. The chain number
is dialled.
AUTO DIAL
START
Page 35

32
eFax 2000 - Edition 4 – 14th November ’00 (3313)
Additional features
Group dialling
When you have stored One Touch and Auto Dial
entries you can set these numbers into groups. This
enables you to send one fax to a pre-set group of
destinations in a single operation.
You can set up to 5 groups sending to a total of 80
numbers.
To add an AUTO DIAL number:
Press AUTO DIAL.
Enter the 2-digit location 01-70 for the
number you want. (If required, press the
SEARCH button to scroll through the entries
until the display shows the one you want).
Press
START to save.
Display shows
SELECT LOC. (S)
You can now add another ONE TOUCH or
AUTO DIAL entry.
To complete the group
Press NO to confirm.
Display shows
LOCATION PROGRAMMING
Press to return to standby.
Or
Press #to begin storing another group.
START
NO
SELECT
FUNCTION
#
To set a fax group
Press SELECT FUNCTION.
Press
LOCATION PROG.
Display shows
LOCATION PROGRAMMING
Press #. Display shows
GROUP SETTING [ ]
Enter the group number you want 1-5.
Display shows the group number and
SELECT LOC. (S)
You can now set the numbers you want
your group to contain.
To add a ONE TOUCH number:
Press the ONE TOUCH button you want.
Press
START to save. You can now add
another ONE TOUCH or AUTO DIAL entry.
SELECT
FUNCTION
#
START
LOCATION
PROG.
AUTO DIAL
Page 36

33
eFax 2000 - Edition 4 – 14th November ’00 (3313)
To view a group
Press SELECT FUNCTION.
Press
LOCATION PROG.
Display shows
LOCATION PROGRAMMING
Press #. Display shows
GROUP SETTING [ ]
Enter the group number you want 1-5.
Display shows the group number and
SELECT LOC. (S)
Press START to scroll through the entries
in the group.
To send a fax to a group
Load the document.
Press
AUTO DIAL.
Press
#
.
Enter the number of the Group you want.
Press
START.
Display shows
ENTRY IS OK?
Press START to begin.
SELECT
FUNCTION
LOCATION
PROG.
#
START
Please note
You can add a second group by pressing #and the
next group number you want.
You can add additional numbers by pressing a
ONE TOUCH button, or the AUTO DIAL button
plus the 2-digit location of the number you want.
AUTO DIAL
#
START
START
To add entries to a group before sending
Load the document.
Press
AUTO DIAL.
Press
#
.
Enter the number of the Group you want.
Press
START. Display shows
ENTRY IS OK?
DIAL (START) CHECK (–––>)
Press NO. Display shows
PRINT ENTRY
REPORT? YES (<––– ) N O ( –––>)
Press NO. Display shows
CHECK LOCATIONS
YES (STR/LOC.) EXIT (–––>)
Enter the number you want to add using
One touch, Autodial or the keypad. The
display shows the name/number and
ENT
(STR) EXIT (LOC./–––>)
Press START to accept the number.
Press
NO when you have added all the
numbers you want. Display shows
ENTRY
IS OK? DIAL (START) CHECK (–––>)
Press START to begin sending.
Please note
To cancel at any time during these steps, press the
STOP button repeatedly until the document is ejected.
AUTO DIAL
#
START
START
START
NO
YES
NO
Page 37

34
eFax 2000 - Edition 4 – 14th November ’00 (3313)
To print a list of fax numbers in a group
before sending
Load the document.
Press
AUTO DIAL.
Press
#
.
Enter the number of the Group you want.
Press
START. Display shows
ENTRY IS OK?
Press NO. Display shows
PRINT ENTRY
REPORT? YES (<––– ) N O ( –––>)
Press YES to print a list of the destinations.
After printing, the display shows
CHECK
LOCATIONS YES (STR/LOC.) EXIT (–––>)
Press NO if you are happy with the list.
Display shows
ENTRY IS OK? DIAL (START)
CHECK (–––>)
Press START to send the fax.
AUTO DIAL
#
START
START
NO
YES
NO
To view or delete entries in a group
before sending
If you don’t want to send to the whole group
you can delete entries if required. Note that
this does not delete them permanently from
the group, but only for the fax being sent.
Load the document.
Press
AUTO DIAL.
Press
#
.
Enter the number of the Group you want.
Press
START. Display shows
ENTRY IS OK?
DIAL (START) CHECK (–––>)
Press NO. Display shows
PRINT ENTRY
REPORT? YES (<––– ) N O ( –––>)
Press NO. Display shows
CHECK LOCATIONS
YES (STR/LOC.) EXIT (–––>)
Press START. Display shows the first fax
destination and
OK (START) CLEAR (–––>)
Press NO to delete the entr y and display
the next entry
Or
Press START to display the next entr y
without deleting.
When you have viewed all the destinations,
the display shows
CHECK LOCATIONS YES
(STR/LOC.) EXIT (–––>)
Press NO if you are happy with the list.
Display shows
ENTRY IS OK? DIAL
(START) CHECK (–––>)
Press START to begin sending.
AUTO DIAL
#
START
START
START
START
NO
NO
NO
NO
Page 38

35
eFax 2000 - Edition 4 – 14th November ’00 (3313)
To send a fax to multiple destinations
Load the document.
Select the destinations. This can include
groups
(see page 32) as well as individual
numbers.
To select a group:
Press AUTO DIAL.
Press
#
.
Enter the number of the Group you want.
To select a ONE TOUCH number:
Press the ONE TOUCH button you want.
If the display asks for confirmation, press
the START button.You can then select
another one touch number.
Or
To select an AUTO DIAL number:
Press AUTO DIAL.Enter the 2-digit location
number you want. If the display asks for
confirmation, press the START button. You
can then select another one touch number.
Or
To enter a number from the keypad:
Dial a number as normal.
Press
START. You can now enter another
number, up to a total of 10 fax numbers.
Press
START again.
Display shows
ENTRY IS OK?
DIAL (START) CHECK (–––>)
Press START to begin faxing.
Please note
You can add a another group by pressing
#
within 3 seconds and then next group number
you want.
Please note
If you pause for more than 3 seconds after
entering a number, the display will show MULTI
LOCATION and the numbers set for 5 seconds.
You can continue to enter numbers whilst this is
in the display.
AUTO DIAL
AUTO DIAL
#
START
START
START
START
START
Page 39

36
eFax 2000 - Edition 4 – 14th November ’00 (3313)
To view, edit or delete numbers from a
multiple destination fax before sending
Load the document.
Select the destinations using the keypad,
One-Touch buttons and Auto Dial entries.
This can include groups
(see page 32) as
well as individual numbers.
Press
START.
Display shows
ENTRY IS OK?
DIAL (START) CHECK (–––>)
Press NO. Display shows
PRINT ENTRY
REPORT? YES (<–––) NO (–––>)
Press NO. Display shows
CHECK LOCATIONS
YES (STR/LOC.) EXIT (–––>)
Press START. Display shows the first fax
destination and
OK (START) CLEAR (–––>)
Press NO to delete the entr y and display
the next entry.
Or
Press START to display the next entr y
without deleting. When you have viewed all
the destinations, the display shows
CHECK
LOCATIONS YES (STR/LOC.) EXIT (–––>)
Press NO if you are happy with the list.
Display shows
ENTRY IS OK?
DIAL (START) CHECK (–––>)
Press START to begin sending.
START
START
START
START
NO
NO
NO
NO
To add entries to a multiple destination
fax before sending
Load the document.
Select the destinations using the keypad,
One-Touch buttons and Auto Dial entries.
This can include groups
(see page 33) as
well as individual numbers.
Press
START.
Display shows
ENTRY IS OK?
DIAL (START) CHECK (–––>)
Press NO. Display shows
PRINT ENTRY
REPORT? YES (<–––) NO (–––>)
Press NO. Display shows
CHECK LOCATIONS
YES (STR/LOC.) EXIT (–––>)
Enter the number you want to add using
One touch, Autodial or the keypad. The
display shows the name/number and
ENT
(STR) EXIT (LOC./–––>)
Press START to accept the number.
Now you can add another number if
required.
Press
NO when you have added all the
numbers you want.
Display shows
ENTRY IS OK?
DIAL (START) CHECK (–––>)
Press START to begin.
START
START
START
NO
NO
NO
Please note
To cancel at any time during these steps, press the
STOP button repeatedly until the document is ejected.
Page 40

37
eFax 2000 - Edition 4 – 14th November ’00 (3313)
Please note
If user function 17:MEM./FEEDER SW. has been
set to FEED and you are sending a delayed fax to a
single location, your document will remain in the
document feeder until the date and time you have
set. This prevents you from sending further faxes
until your delayed fax has been sent. By setting
MEM./FEEDER SW to MEM, the document will
be scanned into the memory.
Delayed faxing
You can set your eF@x 2000 to send a fax at a
specific time. For instance, this lets you take
advantage of cheaper dialling rates or to allow for
different time zones.
You can store up to 5 documents in the memor y to
be sent at any time up to 3 days in advance (see
“To send documents from the feeder tray” on page 24).
To send a delayed fax to a single location
Load the document.
Press SELECT FUNCTION.
Press
DELAYED TX. Display shows
DELAYED TX DATE
and the current date.
If you want to send the fax today:
Press YES. Display shows
DELAYED TX TIME
If you want to send the fax another day:
Press NO. Display shows
DELAYED TX DATE
Use the keypad to enter the date you want
the fax to be sent – up to three days in
advance.
SELECT
FUNCTION
DELAYED
TX
YES
NO
To print the list of numbers for a multiple
destination fax before sending
Load the document.
Select the destinations using the keypad,
One-Touch buttons and Auto Dial entries.
This can include groups
(see page 34) as
well as individual numbers.
Press
START.
Display shows
ENTRY IS OK?
DIAL (START) CHECK (–––>)
Press NO. Display shows
PRINT ENTRY
REPORT? YES (<–––) NO (–––>)
Press YES to print a list of the destinations.
After printing, the display shows
CHECK
LOCATIONS YES (STR/LOC.) EXIT (–––>)
Press NO if you are happy with the list.
Display shows
ENTRY IS OK?
DIAL (START) CHECK (–––>)
Press START to begin.
START
START
NO
YES
NO
Page 41

Press YES. Display shows
DELAYED TX TIME
.
Enter the time:
Use the keypad to enter the time you want
the fax to be sent. Use the 24 hour clock,
e.g.
0800
= 8.00 am,
19.30
= 7.30 pm.
Press YES. Display shows
SELECT LOCATION
Enter the location:
Use a ONE TOUCH number, an AUTO
DIAL number or a manually entered
number (using the keypad).
Press START to confirm. After a short
delay, the fax is scanned into memor y.
Auto Dial number
One Touch number:
Press AUTO DIAL.
Enter the 2-digit location number you want.
If the display asks for confirmation, press
the START button. After a shor t delay that
fax is scanned into the memory.
Dial number from the keypad:
Dial a number as normal
Press
START to confirm. After a shor t delay
that fax is scanned into the memory.
38
eFax 2000 - Edition 4 – 14th November ’00 (3313)
YES
YES
START
AUTO DIAL
START
START
To cancel a delayed fax from the
document feeder.
Press STOP twice and remove the
document.
STOP
To cancel a delayed fax from the memory
Press STOP.
Display shows
COMMUNICATION CANCEL
Press YES. Display shows the Location ID
or fax number of the first delayed fax stored
in the memory.
Press
YES to cancel the delayed fax shown
on the display.
Or
Press NO to scroll to the next delayed fax
you want to cancel and then press YES.
Please note
If you have stored a fax for polling (see page 45),
the display shows
WAITING TO BE POLLED
before
showing the delayed faxes. If this happens, press NO
and the delayed fax will be displayed.
STOP
YES
YES
NO
YES
Page 42

39
eFax 2000 - Edition 4 – 14th November ’00 (3313)
To select a ONE TOUCH number:
Press the ONE TOUCH button you want.
If the display asks for confirmation, press
the START button. You can then select
another one touch number.
Or
To select an AUTO DIAL number:
Press AUTO DIAL.
Enter the 2-digit location number you want.
If the display asks for confirmation, press
the
START button. You can then select
another auto dial number.
Or
To enter a number from the keypad:
Dial a number as normal.
Press
START.
If you want to enter another number you
must start entering within 3 seconds. You
can enter up to 10 fax numbers.
Press
START again.
Display shows
ENTRY IS OK?
DIAL (START) CHECK (–––>)
Press START to begin faxing.
YES
#
AUTO DIAL
Please note
You can add a second group by pressing # and the
next group number you want.
AUTO DIAL
START
START
START
To send a delayed fax to multiple
locations
Load the document.
Press
SELECT FUNCTION.
Press
DELAYED TX. Display shows
DELAYED TX DATE
and the current date.
If you want to send the fax today:
Press YES. Display shows
DELAYED TX TIME
If you want to send the fax another day:
Press NO. Display shows
DELAYED TX DATE
Use the keypad to enter the date you want
the fax to be sent – up to three days in
advance.
Press
YES. Display shows
DELAYED TX TIME
Enter the time:
Use the keypad to enter the time you want
the fax to be sent. Use the 24 hour clock,
e.g.
0800
= 8.00 am,
19.30
= 7.30 pm.
Press
YES. Display shows
SELECT LOCATION
To enter the fax destination numbers
To select a group:
Press AUTO DIAL.
Press
#
.
Enter the number of the Group you want,
using the One Touch buttons 1-5.
NO
YES
YES
SELECT
FUNCTION
DELAYED
TX
Please note
If you pause for more than 3 seconds after entering
a number, the display will show
MULTI LOCATION
and the numbers set for 5 seconds. You can continue
to enter numbers whilst this is in the display.
START
START
Page 43

40
eFax 2000 - Edition 4 – 14th November ’00 (3313)
To print a list of numbers before sending a
delayed fax to multiple locations
Load the document.
Press
SELECT FUNCTION.
Press
DELAYED TX. Display shows
DELAYED TX DATE
and the current date.
Enter the day and time you want the fax to
be sent then the fax destination numbers as
shown above in
‘To send a delayed fax to
multiple destinations’.
When you have entered all the numbers:
Press START again. Display shows
ENTRY
IS OK? DIAL (START) CHECK (–––>)
Press NO. Display shows
PRINT ENTRY
REPORT? YES (<–––) NO (–––>)
Press YES to print a list of the destinations.
After printing, the display shows
CHECK
LOCATIONS YES (STR/LOC.) EXIT (–––>)
Press NO if you are happy with the list.
Display shows
ENTRY IS OK?
DIAL (START) CHECK (–––>)
Press START to begin sending.
SELECT
FUNCTION
DELAYED
TX
START
NO
YES
NO
START
To view, edit, delete or add entries before
sending a delayed fax to multiple
destinations
Load the document.
Press
SELECT FUNCTION.
Press
DELAYED TX. Display shows
DELAYED TX DATE
and the current date.
Enter the day and time you want the fax to
be sent then the fax destination numbers as
shown above in
‘To send a delayed fax to
multiple destinations’.
When you have entered all the numbers:
Press START again.
Display shows
ENTRY IS OK?
DIAL (START) CHECK (–––>)
Press NO. Display shows
PRINT ENTRY
REPORT? YES (<–––) NO (–––>)
Press NO. Display shows
CHECK LOCATIONS
YES (STR/LOC.) EXIT (–––>)
To view or delete entries
Press START. Display shows the first fax
destination and
OK (START) CLEAR (–––>).
Press NO to delete the number and display
the next number or press START to display
the next number without deleting. When
you have viewed all the destinations, the
display shows
CHECK LOCATIONS
YES (STR/LOC.) EXIT (–––>)
SELECT
FUNCTION
DELAYED
TX
START
START
START
NO
NO
NO
Page 44

41
eFax 2000 - Edition 4 – 14th November ’00 (3313)
Either:
Press NO if you are happy with the list.
Display shows
ENTRY IS OK?
DIAL (START) CHECK (–––>)
Press START to begin sending.
Or, to add entries:
When the display shows
CHECK LOCATIONS
YES (STR/LOC.) EXIT (–––>)
Enter the number you want to add using
One touch, Autodial or the keypad.
The display shows the name/number and
ENT (STR) EXIT (LOC./–––>)
Press START to accept the number.
You can now add another number if
required.
Press
NO when you have added all the
numbers you want. Display shows
ENTRY
IS OK? DIAL (START) CHECK (–––>)
Press START to begin sending.
NO
NO
START
START
START
Please note
To cancel at any time during these steps, press the
STOP button repeatedly until the document is ejected.
To send a confidential fax
Load the document.
Press
SELECT FUNCTION.
Press
CONF. TX.
Enter the mailbox number or sub-address
of the person you are faxing.
Press
START.
Display shows
SELECT LOCATION
.
Enter the fax number you want.
Press
START to begin sending the fax.
SELECT
FUNCTION
CONF. TX.
START
START
Please note
You cannot send a confidential fax to a group number
or more than one destination at a time.
Confidential faxes and mailboxes
You can keep faxes confidential by sending them to
personal mailboxes at other fax machines. You can
also receive confidential faxes into your own
personal mailbox in the eF@x 2000’s memory.
You can then only print faxes from your mailbox by
entering a 4-digit password.
When sending a confidential fax, you must know the
mailbox number or sub-address of the person you
are sending to.
Please note
This feature works only with compatible fax machines.
These are: eF@x 2000, OKIFAX 4500, 5200, 5400, 5500,
5650, 5700 and 5900.
Page 45

To create a confidential mailbox
Your eF@x 2000 allows up to 8 individual
mailboxes.
Press
SELECT FUNCTION.
Press
USER PROG.
Press 5.
Display shows
5: PERSONAL BOX PRG
Press YES.
Display shows
PERSONAL BOX NO [ ]
Enter the mailbox number you want between
1 and 8.
Press
YES.
Display shows
PERSONAL BOX [CLOSE]
Press NO until the display shows
PERSONAL BOX [CONF]
Press YES. Display shows
PRG PASSWORD [ ]
Enter the 4-digit password you want.
Press
YES to confirm.
Display shows
PERSONAL BOX NO. [ ]
You can now create another mailbox.
Press
SELECT FUNCTION to return to
standby.
SELECT
FUNCTION
USER
PROG.
5
JKL
YES
YES
NO
Please note
If you cannot display
CONF
the mailbox number you
have selected already contains a message. If the
display shows
ILLEGAL OPERATION
, the mailbox
already holds a confidential message. Please select
another mailbox.
YES
YES
SELECT
FUNCTION
42
eFax 2000 - Edition 4 – 14th November ’00 (3313)
To receive and print a confidential fax
Make sure the person who is sending the
document knows your mailbox number.
When your machine receives a confidential
fax, it stores the fax in your mailbox and
then prints a report telling you that you
have received a confidential fax. The display
shows
MSG. IN MEMORY
.
Press
SELECT FUNCTION.
Press
PRINT OPERATION.
Display shows
PRINT PERSONAL BOX?
Press YES.
Display shows
PERSONAL BOX NO [ ]
Enter your mailbox number.
Press
YES.
Display shows
PRG. PASSWORD [ ]
If the mailbox selected contains no messages,
the display shows
NO DATA IN MEMORY
Enter your 4-digit password.
Press
YES. The fax starts to print out.
PRINT
OPERATION
YES
YES
YES
SELECT
FUNCTION
Page 46

To delete a mailbox
Press SELECT FUNCTION.
Press
USER PROG.
Press
5.
Display shows
5: PERSONAL BOX PRG
Press YES.
Display shows
PERSONAL BOX NO [ ]
Enter the mailbox number you want between
1 and 8.
Press
YES.
Display shows
PERSONAL BOX [CONF]
Press NO until the display shows
PERSONAL
BOX [CLOSE]
Press YES.
Display shows
DELETE PERSONAL BOX
Press YES to confirm.
Display shows
PERSONAL BOX NO. [ ]
You can now close another mailbox.
Press
SELECT FUNCTION to return to
standby.
Please note
If the display shows
ILLEGAL OPERATION
, the
mailbox already holds a confidential message.
Please select another mailbox.
SELECT
FUNCTION
USER
PROG.
5
JKL
YES
YES
NO
YES
YES
SELECT
FUNCTION
43
eFax 2000 - Edition 4 – 14th November ’00 (3313)
To change a mailbox password
Press SELECT FUNCTION.
Press
USER PROG.
Press
5.
Display shows
5: PERSONAL BOX PRG
Press YES.
Display shows
PERSONAL BOX NO [ ]
Enter the mailbox number you want between
1 and 8.
Press
YES.
Display shows
PERSONAL BOX [CONF]
Press YES.
Display shows
PRG PASSWORD [XXXX]
Enter the new 4-digit password.
Press
YES to confirm.
Display shows
PERSONAL BOX NO. [ ]
Press SELECT FUNCTION to return to
standby.
Please note
If the display shows
ILLEGAL OPERATION
, the
mailbox already holds a confidential message.
Please select another mailbox.
SELECT
FUNCTION
USER
PROG.
5
JKL
YES
YES
YES
YES
SELECT
FUNCTION
Page 47

Please note
This feature works only with compatible machines
which can act as a relay station. These are:
OKIFAX 5900 and 5950.
Relaying faxes
You can send a document to another, fax machine
and request it to forward the document on to a
number of destinations.
You will need to know the 4-digit relay password of
the machine you are sending the fax to as well as
the relay list numbers which are the 2-digit code
numbers of destinations or groups of destinations
stored in the relaying machines memory.
After a fax has been relayed to its final destinations
by the relaying fax, it can send a message back to
the original machine to confirm the success of the
relay. For this feature to work, your eF@x 2000 your
machine’s phone number must be stored in the
AUTO DIAL directory as number 70.
44
eFax 2000 - Edition 4 – 14th November ’00 (3313)
To start relaying a fax
Load the document.
Press
SELECT FUNCTION.
Press
RELAY INIT.-TX.
Display shows
RELAY PASSWORDS
Enter the 4-digit relay password of the
machine you are sending the document to.
Press
YES.
Display shows
REMOTE LIST NO. [ ]
Enter the 2-digit code of the relay group
stored in the other machine.
Press
YES.
Display shows
SELECT LOCATION
Enter the number of the other machine
using the ONE TOUCH, AUTO DIAL or
KEYPAD as normal.
Press
START to begin sending the fax.
SELECT
FUNCTION
RELAY
INIT.-TX.
YES
YES
START
Page 48

Polling
Polling lets you call another fax machine which then
sends you a fax automatically.
It also enables another fax machine to call your
eF@x 2000 and request a document that you have
set ready to be received. This is often also known as
‘faxback’.
You can retrieve documents from individual
mailboxes or sub-addresses.
To set a fax for one-time polling
A document can be stored in the memory
for polling by another fax machine. After
polling the memory is cleared.
Load the document.
Press
SELECT FUNCTION.
Press
POLLING.
Display shows
BULLETIN POLL
Press NO. The document is scanned into
the memory. Display shows
WAITING TO
BE POLLED
Please note
One time polling uses the mailbox 0 to store the
document. After your machine has been polled, the
mailbox is automatically cleared.
If display shows
ALREADY EXIST
, then the standard
or one-time polling feature is already in use.
SELECT
FUNCTION
POLLING
NO
45
eFax 2000 - Edition 4 – 14th November ’00 (3313)
To set a fax for standard polling
A document can be polled repeatedly by
other machines.
Load the document.
Press
SELECT FUNCTION.
Press
POLLING.
Display shows
BULLETIN POLL
Press YES.
Display shows
PERSONAL BOX NO. [ ]
Enter the mailbox number 0.
Press
YES to confirm. The document is
scanned into the memory. Display shows
WAITING TO BE POLLED
SELECT
FUNCTION
POLLING
YES
0
YES
Please note
If display shows
ALREADY EXIST
, then the standard
or one-time polling feature is already in use.
Page 49

To poll a document from another fax
machine
When you know that another fax machine
has a document ready for polling, you can
set your eF@x 2000 to receive the document.
Press
SELECT FUNCTION.
Press
POLLING.
Display shows
NO. = < MAIL BOX NO. >
Press START. Display shows
POLLING RX.
SELECT LOCATION.
Enter the number of the
machine you are calling.
Press
START to begin polling.
SELECT
FUNCTION
POLLING
START
START
To cancel a document set for polling
You can cancel a one-time poll and standard
polling.
Press
STOP.
Display shows
COMMUNICATION CANCEL
Press YES.
Display shows
WAITING TO BE POLLED
.
If this is not shown, press NO until it is
displayed.
Press
YES and the polling is cancelled.
STOP
YES
YES
46
eFax 2000 - Edition 4 – 14th November ’00 (3313)
Please note
This feature works only with compatible machines.
These are:
eF@x 2000, OKIFAX 4500, 5200, 5400, 5500,
5650 and 5700.
In order to store a fax for confidential polling, you
will need to create a polling mailbox, see below.
Confidential polling
To create a polling mailbox
You can use a personal mailbox to store
messages for polling (as well as receiving
confidential faxes).
Press
SELECT FUNCTION.
Press
USER PROG.
Press
5.
Display shows
5: PERSONAL BOX PRG
Press YES.
Display shows
PERSONAL BOX NO. [ ]
Enter the mailbox number you want to use,
between 1- 8.
Press
YES. Display shows
PERSONAL BOX
[CLOSE]
Press NO until the display changes to
PERSONAL BOX [POLL]
Press YES to set the personal mailbox.
Press
SELECT FUNCTION to return to
standby.
SELECT
FUNCTION
USER
PROG.
5
JKL
YES
YES
NO
NO
YES
SELECT
FUNCTION
Page 50

To set a fax for polling from a specific
mailbox
Load the document.
Press
SELECT FUNCTION.
Press
POLLING.
Display shows
BULLETIN POLL
.
Press
YES.
Display shows
PERSONAL BOX NO. [ ]
Enter the mailbox number you want
between 1- 8.
Press
YES to confirm. The document is
scanned into the memory. Display shows
BULLETIN MSG. IN MEM
Please note
If display shows
ILLEGAL OPERATION
, then mailbox
0 is being used as a confidential mailbox. Select
another mailbox.
If the display shows
OVER WRITE
, the personal
mailbox you have selected is already in use for
polling. Select another mailbox or allow the new
document to over write the existing document by
pressing YES.
SELECT
FUNCTION
POLLING
YES
YES
47
eFax 2000 - Edition 4 – 14th November ’00 (3313)
To cancel a document for polling stored in
a specific mailbox
Press SELECT FUNCTION.
Press
USER PROG.
Press
5.
Display shows
PERSONAL BOX PRG
Press YES.
Display shows
PERSONAL BOX NO. [ ]
Enter the number of the mailbox you want
to close.
Press
YES.
Display shows
PERSONAL BOX [ POLL]
(Press NO until the display shows
PERSONAL BOX [CLOSE]
Press YES.
Display shows
DELETE PERSONAL BOX
Press YES to confirm. The polling
document is deleted and the mailbox closed.
SELECT
FUNCTION
USER
PROG.
5
JKL
YES
YES
NO
YES
YES
Page 51

To print the document stored for polling in
a personal mailbox
Press SELECT FUNCTION.
Press
PRINT OPERATION.
Display shows
PRINT PERSONAL BOX? [ ]
Press YES.
Display shows
PERSONAL BOX NO. [ ]
Enter the mailbox number you want.
Press
YES to confirm. The document is
printed.
To poll a document from a mailbox
Press SELECT FUNCTION.
Press
POLLING.
Display shows
NO. = < MAIL BOX NO. >
Enter the mailbox or sub-address number.
Press
START. Display shows
POLLING RX.
SELECT LOCATION.
Enter the number of the machine you are
calling.
Press
START to begin polling.
Please note
One-time and standard polling documents cannot
be printed.
SELECT
FUNCTION
PRINT
OPERATION
YES
YES
SELECT
FUNCTION
START
START
48
eFax 2000 - Edition 4 – 14th November ’00 (3313)
Print outs and reports
Your eF@x 2000 lets you print out a range of repor ts
that tell you the current settings, operations and
functions of your machine.
Activity Report
Provides a record of faxes sent and received and
includes:
• The total amount of time spent sending and
receiving faxes.
• Date, time and duration of each fax.
• Name or number of the other machine.
• Communication mode.
• Number of pages.
• Result (if there was an error or the fax was stored
in the memory before printing).
• Service codes.
To print a report
A configuration report shows the current
settings on your machine.
Press
SELECT FUNCTION.
Press
REPORT PRINT.
Display shows
1: ACTIVITY REPORT
Press NO to scroll through the list of
reports until the one you want is displayed.
Press
YES. The report is printed.
When printing is finished, press
SELECT
FUNCTION to return to standby.
SELECT
FUNCTION
REPORT
PRINT
NO
YES
SELECT
FUNCTION
Page 52

49
eFax 2000 - Edition 4 – 14th November ’00 (3313)
Broadcast Confirmation Report
Confirms the results of faxes sent to multiple
locations and includes:
• Date and time the fax operation started.
• How long the fax took to send.
• The name or number of each destination.
• Number of pages sent.
• Result of broadcast (If the fax was not sent at all,
the report cannot be printed).
Active Memory Files Report
Provides a list of all fax messages stored in the
memory of your machine and includes:
• List of faxes received and number of pages.
• List of the setup status of each mailbox (1-8) in
use, the number of messages and total number of
pages in each mailbox.
• List of the faxes sent and received when polling,
with the polling date and time, name or number
of the other machine, communication mode and
number of pages of each fax.
• List of faxes that have been scanned into the
memory for delayed sending with the date and time
set for sending, the name or number of the other
machine and the number of pages of each fax.
Telephone Directory
The list includes:
• Name and main fax number for each ONE TOUCH
button.
• Back-up number for each ONE TOUCH button.
• One Touch settings.
• Name and number stored for each AUTO DIAL
entry.
• List of ONE TOUCH buttons and AUTO DIAL
codes stored for group dialling.
Configuration Report
The list includes:
• Current user function settings of your machine
(except One Touch settings which appear under
the Telephone Directory).
• The name and number you have set for your
eF@x 2000.
• The dial settings.
Message Confirmation Report
Provides details about the last fax sent to, or polled
from, a single destination, including:
• Date.
• Duration of send.
• Name or number programmed into the machine
at the other end (if none is available, the number
you have dialled or the memory location ID is
printed).
• Communication mode.
• Number of pages send or received.
• Result of transmission.
• Service codes.
• A part of the fax for reference (providing this
setting has been set. See ‘User Function settings,
04: IMAGE IN MCF’, page 59).
Confidential Reception Report
Printed automatically each time your machine
receives a confidential fax into a mail box. The
report includes:
• Date of reception.
• Duration of fax.
• Name or number of the other machine (if none
is available, any number you have stored for that
machine is printed).
• The mailbox number.
• Number of pages received.
• Reception result.
• Service codes.
Page 53

50
eFax 2000 - Edition 4 – 14th November ’00 (3313)
Confidential Reception Report
Printed automatically each time your machine
receives a confidential fax into a mail box. The
report includes:
• Date of reception.
• Duration of fax.
• Name or number of the other machine (if none
is available, any number you have stored for that
machine is printed).
• The mailbox number.
• Number of pages received.
• Reception result.
• Service codes.
Broadcast Entry Report
Each time you set a fax to be sent to multiple
destinations, your eF@x 2000 ask if you want a
report to confirm the list of other destinations.
Details include:
• List of the One Touch or Auto Dial entries used.
• List of the phone numbers entered manually.
Power Failure Report
If the mains power has failed or been switched off
and your machine has delayed faxes set or received
faxes stored in the memory, you will get a report
when the power comes back on to alert you that
these faxes have been lost. The report will show the
date and time that each fax was received or due to
be sent. It will also show the destination number on
faxes to be sent and sender’s number on received
faxes (but only if it has been stored in the sending
machine).
Report codes
The following codes are used in reports.
Result Codes
CODE MEANING
BUSY
Engaged or no answer.
COMP
. A multiple-destination fax was
completed.
COVER
The machine’s cover was opened during
sending or receiving.
NO
Communication error. The fax did not
go through.
OK
Fax sent or received successfully.
PUNIT
Error. Problem with the printing unit.
Contact an engineer.
R--JAM
A paper jam occurred while receiving a fax
and eF@x 2000 was unable to receive the
entire message into memory.
S--JAM
A document jam has occurred in your
machine.
STOP
The Stop button was pressed.
Fax2Net details
If you use the Fax2Net service these details will also
be included on printed reports. See page 57.
Page 54

51
eFax 2000 - Edition 4 – 14th November ’00 (3313)
Communication Codes
CODE MEANING
B.C.
Multiple-destination.
CALLING
A fax call sent from your machine.
CALLED
A fax call received by your machine.
POLLING
Polling reception.
POLLED
Document set for one-time polling
POLL=**
Document set for polling by any number of
machines. (** = the number of the mailbox
in which the document was stored).
CONF=**
Confidential fax (** = the number of the
mailbox in which the document was stored).
LOST
Faxes stored in the memory have been lost
due to power failure.
Page 55

52
eFax 2000 - Edition 4 – 14th November ’00 (3313)
Using the Fax2Net service
Complete and return the
registration form
After registering, you receive 45 minutes of free
e-mail and international faxing. (Valid for one month).
With your eF@x 2000 you will have received a
Fax2Net registration form (a copy is shown below).
Fill out the form and fax to the number shown.
You will receive by fax, confirmation of your
registration along with your email address, Fax2Net
account number, PIN number and the ser ver
telephone number. You will also receive easy
instructions on how to get star ted together with a
copy of the Fax2Net terms and conditions.
At the end of the trial period, you will receive a
reminder from Fax2Net asking you if you want to
continue with the service.
Group dialling
You can send a document to a mixture of fax and
e-mail addresses by combining into a group. To create
a group, see ‘Group Dialling’, page 32.
Please note
You cannot use Web addresses as par t of a group
dial.
0207 341 5524
Page 56

To set your eF@x 2000 for Fax2Net dialling
When you receive the Registration
Confirmation fax from Fax2Net you can set
up your machine for using the Fax2Net
service.
Press
SELECT FUNCTION.
Press
USER PROG.
Press
7. Display shows
7: FAX NETWORK PRG
Press YES. Display shows
SERVER TEL NO:
Enter the server telephone number shown
on your Registration Confirmation.
If you need to dial a number to get an
outside line, enter that number first.
Press
10/PAUSE = pause.
Press
8/+ = +
Press 9/SPACE = space
Press
HYPHEN = -
Press
YES and NO to move the cursor.
Press
START. Display shows
ACCOUNT NO.
Enter the Fax2Net account number and PIN
shown on your Registration Confirmation as
one number.
Press
START.
Display shows
INTERNATIONAL PREFIX
Enter the international prefix you normally
use for international phone calls. (00 when
in the UK).
Press
START.
To store an e-mail address
You can store e-mail addresses of up to 64
characters. Before you can enter an e-mail
address, you must enter your server and
account details, (see ‘To set your eF@ax
2000 for Fax2Net dialling’).
Press
SELECT FUNCTION.
Press
LOCATION PROG. Display shows
LOCATION PROGRAMMING
Press the ONE TOUCH button under which
you want to store the address. Display
shows
ONE TOUCH KEY PRG
53
eFax 2000 - Edition 4 – 14th November ’00 (3313)
Press SELECT FUNCTION to return to
standby.
You can now begin sending and receiving
e-mail and fax messages using your Fax2Net
account.
Fax2Net Customer Support
If you have any questions about the service, please call
the Fax2Net Customer Support Centre at 0207 341
5523. Lines are open 9am-5pm, Monday – Friday.
E-mails
SELECT
FUNCTION
SELECT
FUNCTION
YES
7
PQRS
START
START
9/SPACE
10/PAUSE
8/+
HYPHEN
YES
NO
Please note
You cannot enter e-mail and web page addresses
from a PC. You must use the eF@x 2000 keypad.
SELECT
FUNCTION
USER
PROG.
START
LOCATION
PROG.
Page 57

If you make a mistake when entering a
name or number, move the cursor back to
the error and either over write it by
entering the correct number or press the
9/SPACE button to delete it.
Press
START to save the address.
Display shows
LOCATION PROGRAMMING
You can now enter another e-mail address
by pressing the next ONE TOUCH button
you want.
Press
SELECT FUNCTION to return to
standby.
Press NO until the display shows
EMAIL
Press YES. Display shows
EMAIL CAPS OFF
Enter the e-mail address you want.
Entering e-mail and web site addresses
For example to enter the name JOHN:
Press the
5 button until the display shows
J
Press the 6 button until the display shows
O
Press the 4 button until the display shows
H
Press the 6 button until the display shows
N
Press 9/SPACE = space.
Press
HYPHEN = -
Press ONE TOUCH button 1 = .
Press
ONE TOUCH button 2 = _
Press
ONE TOUCH button 3 = ~
(shown as –1 on the display)
Press
ONE TOUCH button 4 = “”
(double quotation mark)
Press
ONE TOUCH button 5 = /
Press
ONE TOUCH button 6 = @
Press
ONE TOUCH button 7 = CAPS (lets
you switch between small and capital letters)
Press
0 OPER/UNIQUE repeatedly until the
character you want is displayed: These
include:
Ø./!#&’()*+,-:;=?
Press NO to move the cursor for ward.
Press
YES to move the cursor back.
54
eFax 2000 - Edition 4 – 14th November ’00 (3313)
To send an e-mail
To send an e-mail you must first store the
address in the One touch directory.
Load the document as normal in the
document feeder tray.
Press the
ONE TOUCH button containing
the e-mail address.
Press
START to send.
To receive e-mail
When someone sends an e-mail to your
Fax2Net address, your eF@x will receive
it just like a fax. The Fax2Net service
automatically changes it from an e-mail to a
fax format.
START
START
SELECT
FUNCTION
YES
5
JKL
6
MNO
6
MNO
4
GHI
HYPHEN
0
UNIQUE
1
2
3
4
5
6
7
9/SPACE
YES
NO
NO
9/SPACE
Page 58

55
eFax 2000 - Edition 4 – 14th November ’00 (3313)
Press NO until the display shows
WEB
Press YES. Display shows
WEB CAPS OFF
http://
Enter the Web page address (URL).
Entering e-mail and web site addresses
For example to enter the name JOHN:
Press the
5 button until the display shows
J
Press the 6 button until the display shows
O
Press the 4 button until the display shows
H
Press the 6 button until the display shows
N
Press 9/SPACE = space.
Press
HYPHEN = -
Press ONE TOUCH button 1 = .
Press
ONE TOUCH button 2 = _
Press
ONE TOUCH button 3 = ~
(shown as –1 on the display)
Press
ONE TOUCH button 4 = “”
(double quotation mark)
Press
ONE TOUCH button 5 = /
Press
ONE TOUCH button 6 = @
Press
ONE TOUCH button 7 = CAPS (lets
you switch between small and capital letters)
Press
0 OPER/UNIQUE repeatedly until the
character you want is displayed: These
include:
Ø./ ! #&’() *+,-:; =?
Press NO to move the cursor for ward.
Press
YES to move the cursor back.
5
JKL
6
MNO
6
MNO
4
GHI
HYPHEN
0
OPER/UNIQUE
1
2
3
4
5
6
7
NO
YES
9/SPACE
To store a Web page address (URL)
Press SELECT FUNCTION.
Press
LOCATION PROG. Display shows
LOCATION PROGRAMMING
.
Press the
ONE TOUCH button under which
you want to store the address. Display
shows
ONE TOUCH KEY PRG.
To find free entries in the phone directory
You can scroll through the One Touch and
Auto Dial directories to look for free
locations.
Press
SELECT FUNCTION.
Press
LOCATION PROG. Display shows
LOCATION PROGRAMMING
Press SEARCH. Display shows
ONE TOUCH
NO.
and the first free entry.
Press
SEARCH to scroll through the one
touch and auto dial directories.
SELECT
FUNCTION
SEARCH
SEARCH
Web pages
You can store Web addresses (URLs) of up to 64
characters.
NO
YES
SELECT
FUNCTION
LOCATION
PROG.
Please note
You can only scroll through the free locations while
the display shows
SRCH
.
LOCATION
PROG.
Page 59

If you make a mistake when entering a
name or number, move the cursor back to
the error and either over write it by
entering the correct number or press the
9/SPACE button to delete it.
Press
START to save the address.
Display shows
LOCATION PROGRAMMING
You can now enter another Web address by
pressing the next ONE TOUCH button you
want.
Press
SELECT FUNCTION to return to
standby.
56
eFax 2000 - Edition 4 – 14th November ’00 (3313)
To send a fax abroad
Load the document as normal in the
document feeder tray.
Dial the fax number as normal using the
Keypad, One Touch buttons or Auto Dial
directory.
When you dial the international prefix,
your eF@x 2000 automatically routes the
document over the Fax2Net network for
lower call charges.
Sending international faxes
If you do not want to use the Fax2Net service
to send an international fax
Enter a +before the number.
For example, if the international code is 0021, you
can stop the call from using the Fax2Net service by
pressing the button to enter ‘ +’ before 0021
8/+
To retrieve Web pages
Press SELECT FUNCTION.
Press
USER PROG. Display shows
FUNC.
PROGRAMMING
Press 8. Display shows
FAX2NET SERVICE
Press YES.
Display shows
1: WEB RETRIEVAL
Press YES.
Display shows
SELECT LOCATION
Press the ONE TOUCH button which
contains the Web address you want.
Press
START to begin dialling. Your eF@x
2000 sends the request to the Fax2Net
service and then hangs up. Fax2Net then
calls back to deliver the page that you have
requested.
SELECT
FUNCTION
8
TUV
YES
YES
START
SELECT
FUNCTION
USER
PROG.
START
9/SPACE
Page 60

57
eFax 2000 - Edition 4 – 14th November ’00 (3313)
Reports
When you are using Fax2Net, your eF@x 2000
reports will additionally show the following details.
Configuration Reports
Will include:
• Fax2Net server telephone number
• Fax2net account number
• International telephone prefix
Telephone Directory
Registered e-mail address and web pages contained
in the One Touch directory
Activity Report
E-mail address (up to 20 characters)
Web page
Codes
The following codes will be added:
FNET
International fax via Fax2Net
or
Fax to E-mail
WEB
Web page retrieved
P-CARD
Prepaid Card Registration
If the call doesn’t go through
If the Fax2Net server does not respond or is busy,
your call is handled as a normal fax and your machine
will redial.
If the information is not sent correctly or if your account
has expired, the connection is stopped and your
machine gives a warning beep and an error message
is displayed.
If the display shows
CHECK ACCOUNT NO
, you may have
entered your account number incorrectly. Please check
and try again. If you entered the correct account
number, please contact the Fax2Net Customer Support
Centre at 0207 341 5523. Lines are open 9am-5pm,
Monday – Friday.
Please note
You cannot use the Fax2Net service if you have set
Restricted access, see page 64.
Page 61

58
eFax 2000 - Edition 4 – 14th November ’00 (3313)
Choice of payment methods
You can pay for the Fax2Net ser vice in a choice
of ways.
1. Direct debit from bank account.
2. Electronic transfer from bank account.
3. Credit card (Visa, MasterCard).
4. Pre-paid card.
You receive a monthly invoice for checking/payment
(except pre-paid account holders).
Cancellation
You can cancel your account by calling the Fax2Net
Customer Support Centre. If you are a pre-paid
account holder you will be refunded the remaining
credit on your account.
Charges
Fax2Net charges are for the duration of the call from
your fax machine to the Fax2Net server. At the time
of printing, the Fax2Net service costs just 10p per
minute for sending and receiving e-mails and
retrieving web pages.
The current charges and those for international
faxing are e-mailed to you when you first register for
the service. You will then be kept up to date with any
further changes automatically for as long as you
remain a Fax2Net account holder.
Current charges can be obtained from the following
web pages:
http://www.fax2net.com/rates/IPfax/uk_rates.html
and
http://www.fax2net.com/rates/ser vice_rates/bt/uk
_ok_services.html
Billing
Billing is in 6 second increments with a 30 second
minimum.
Using a pre-paid card
If you subscribe to Fax2Net using a pre-paid card,
you will need to register the card number each time
you use the service.
To register the card number
Press SELECT FUNCTION.
Press
USER PROG. Display shows
FUNC.
PROGRAMMING
Press 8.
Display shows
FAX2NET SERVICE
Press YES.
Display shows
1: WEB RETRIEVAL
Press NO.
Display shows
2: PREPAID CARD REG
Press YES.
Display shows
NO. < CARD NUMBER >
Enter your pre-paid card number.
Press
START. The server phone number
will be displayed and the machine will
receive the report.
START
SELECT
FUNCTION
8
TUV
YES
NO
YES
USER
PROG.
Joining Fax2Net
Once your free 45 minutes are almost up, the
Fax2Net service will send you details of how to join
the service by subscription or by pre-paid card.
Page 62

59
eFax 2000 - Edition 4 – 14th November ’00 (3313)
Optional settings
The User Function options are:
01: MCF (SINGLE LOC) ON or OFF
Switch on to print a Confirmation Report for each
fax sent and received. Original setting = OFF.
02: MCF (MULTI-LOC.) ON or OFF
Switch on to print a Broadcast Confirmation Report
every time a fax is sent to a group or multiple
destinations. Original setting = OFF.
03: ERR. REPORT (MCF.) ON or OFF
Switch on to print a Message Confirmation Report
each time there is an error on an incoming or
outgoing fax. Original setting = ON.
04: IMAGE IN MCF ON or OFF
Switch on to add a section of the first page your
machine printed as a useful reference underneath a
Message Confirmation Report. Original setting = ON.
05: SENDER ID ON or OFF
When switched on, your machines ID, date and
time is printed on each page you send. Original
setting = ON.
06: MONITOR VOLUME HIGH, LOW, OFF
You can set the volume for the telephone line and
fax tones you hear. Original setting = HIGH.
You can change the settings on your eF@x 2000 to
suit your personal preferences.
For
04: IMAGE IN MCF
to work, the function
17: MEM/FEEDER SW
must be set to MEM and function
25: INSTANT DIALLING
must be switched On.
To change the User Function settings
Press SELECT FUNCTION.
Press
USER PROG.
Display shows
1: FUNC. PROGRAMMING
Press YES.
Display shows
FUNCTION NO. [ ]
Enter the 2-digit number of the function you
want to change. Display shows the name of
the function.
Press
NO to scroll through the options.
Press
YES to select the option displayed.
Press
STOP to select another function.
Or
Press SELECT FUNCTION to return to
standby.
SELECT
FUNCTION
SELECT
FUNCTION
USER
PROG.
YES
NO
YES
STOP
Page 63

60
eFax 2000 - Edition 4 – 14th November ’00 (3313)
12: DISTINCTIVE RING
Distinctive ringing is a service offered by BT and
other networks that allows you to have two telephone
numbers on the same line, each with its own
distinctive ring. This enables you to separate calls,
for example, into business and personal. If you have
distinctive ringing you will need to adjust this function.
See ‘To set distinctive ringing’, page 63. For more
information contact BT or your network.
Original setting = OFF.
13: 1’ST PAPER SIZE A4, LET, LGL13, LGL14,
OTHER
You can set what size paper you are using in the
paper tray of your machine so that it prints out on
the correct area. Original setting = A4.
14: USER LANGUAGE ENG or FRE
You can switch between the two languages, English
or French, used for the display. Original setting =
ENGLISH.
15: INCOMING RING ON, OFF or DRC
You can set the type of ring you hear for incoming
calls. When set to Off, your machine will not ring for
incoming calls. When switched On, you machine only
rings when set to Manual receive mode or when
11:
RING RESPONSE
is set to 5-20 seconds (except 1 ring).
When set to DRC, you machine rings for each
incoming call with the same tone, even if you have
12:
DISTINCTIVE RING
switched on. Original setting = ON.
If your machine is set to Telephone/Fax mode, the
recommended setting is 1 ring.
07: BUZZER VOLUME HIGH, MID, LOW
You can set the volume for the secondar y ringing tone
your hear when your machine is set to
TEL/FAX AUTO
SW MODE
. It also adjusts the volume of the alarm tone
your machine produces. Original setting = HIGH.
08: CLOSED NETWORK OFF. T/R and RX
You can set your machine only to send and/or
receive faxes from numbers stored in the One Touch
and Auto Dial directories.
If you do not want you machine to send faxes or
receive faxes from other numbers, select T/R. if you
only want you machine to refuse faxes from other
numbers, select RX. Original setting = OFF.
09: TX MODE DEFAULT
You can change the default resolution and contrast
settings for sending faxes and copying documents.
Original settings = STANDARD and NORMAL.
10: T/F TIMER PRG 20 or 35 SECONDS
When set to telephone/fax answering mode your
machine automatically distinguishes between
incoming voice and fax calls. If it is a voice call, your
machine tells you to pick up the handset connected
to the TAD socket. If you do not answer, the machine
automatically switches to fax mode to enable the caller
to send a fax. The T/F TIMER function sets how long
your machine waits for you to answer the call before
switching back to fax mode. Original setting = 20 SECS.
11: RING RESPONSE 1 RING, 5, 10, 15 or
20 SECONDS
This sets how long your machine waits before
answering an incoming call when it is set to Auto or
Telephone/Fax answering modes.
Original setting = 1 RING.
Page 64

61
eFax 2000 - Edition 4 – 14th November ’00 (3313)
19: ECM FUNCTION ON or OFF
The error correction mode helps your machine
improve communication quality where telephone
line conditions are poor. When using ECM the
sending machine will re-send a document as
necessary if the receiving machine cannot verify
the transmission. Using ECM increased the
transmission time because data is checked as it is
sent. Original setting = ON.
20: REMOTE DIAGNOSIS ON or OFF
This allows an engineer to dial and service your
machine via the telephone line. Original setting = OFF.
21: PC/FAX SWITCH ON or OFF
When your eF@x 2000 is set to receive in PC
Receive Mode and your MFP software is set to
receive fax messages, all incoming calls are
transferred directly to your PC. How ever, if you are
having problems with your PC, you can switch this
function On so that your eF@x 2000 will receive and
print faxes direct. Original setting = ON.
22: NO TONER MEM. RX ON or OFF
When switched On, your machine automatically
receives and stores incoming faxes in the memory
when the toner level is low. When switched Of f,
messages are printed even if the toner is low or
empty. Original setting = ON.
If connected to a PC
It is recommended that Power Save Mode is not
used because your PC cannot switch the machine
back to full operation.
If you switch Power Save Mode on, once the
machine has ‘gone to sleep’, you will not be able to
print from a PC without first ‘waking up’ your
eF@x 2000 by pressing the START button.
16: REMOTE RECEIVE OFF, 00, 11, 22, 33,
44, 55, 66, 77, 88,
99, ** and ##.
When you answer an incoming call on a telephone
connected to the same line as your fax or via an
attached handset, you can tell your fax machine to
switch to fax mode to receive an incoming fax by
entering a 2-digit code. Use the keypad of a handset
or an external phone to enter the code number you
have set into your machine. Original setting = OFF.
17: MEM/FEEDER SW. MEM or FEEDER
The setting controls how your machine normally sends
messages – either via the document feeder (FEEDER)
or by scanning documents into the memory and then
sending. Original settings = MEMORY.
18: POWER SAVE MODE ON or OFF
Your machine can be set to use substantially less
power 3 minutes after the last button press. When in
Power Save Mode, the display shows
POWER SAVE
MODE. PRESS “START” TO EXIT
. To resume
normal operation when the telephone rings, when
the handset is lifted or when you load a document,
press Start. Original setting = OFF.
This function depends on the setting for
25: INSTANT
DIALLING
. If Instant Dialling is set to On, all documents
are scanned into the memory automatically. To use the
MEM/FEEDER settings, you should switch Instant
Dialling to Off.
DRC is only available if the setting of user function
12: DISTINCTIVE RING
is available. Also, when set to
Off, there is no effect on ringer in Telephone/Fax auto
answering mode.
Page 65

62
eFax 2000 - Edition 4 – 14th November ’00 (3313)
26: RESTRICT ACCESS ON or OFF
Lets you select whether or not you want prevent
unauthorised people from using your machines.
Select On to activate and then set your restricted
access codes. See page 64. Original setting = OFF.
27: WIDTH REDUCTION ON or OFF
Switch to On to print your incoming faxes at a
slightly reduced width. Original setting = ON.
28: ONE TOUCH PARAM
This allows you to make changes to the settings of
a ONE TOUCH button, without changing the normal
communications settings used by your machine.
23: MEM. FULL SAVE ON or OFF
If the memory when storing pages, the display
shows
MEMORY OVERFLOW
before changing to
SEND
SCANNED PAGES </Yes No/>
If you press NO
Scanning stops and the display shows
MEMORY
OVERFLOW REFER TO USER GUIDE
. Now press STOP
and remove the remaining pages from the document
feeder. Any pages of the document scanned into the
memory are deleted.
If you press YES
All the pages scanned into the memory will be sent.
Then the display changes to
RELOAD DOCUMENT
.
You can send the remaining pages as a separate
transmission. Original setting = ON.
24: CONTINUOUS TONE ON or OFF
When switched On, your machine will give a
continuous tone while receiving a fax. Pressing
STOP once turns off the tone. When switched Off,
your machine gives a short beep after each fax
received. Original setting = OFF.
25: INSTANT DIALLING ON or OFF
With this feature switched On, and when sending a
fax to a single destination, your machine
automatically scans the document into the memory
and dials the number. Original setting = ON.
When set to On, and you do not press the NO
button within one minute the messages
SEND
SCANNED PAGES
, your machine will send the pages
automatically.
When set to Off, and you do not press the NO button
within one minute the messages
SEND SCANNED
PAGES
, your scanned pages are deleted from the
memory.
Page 66

63
eFax 2000 - Edition 4 – 14th November ’00 (3313)
Memory password
When you have your machine set to receive faxes to
memory (select MEM RECEIVE MODE using the
AUTO REC button, see page 22), you can prevent
unauthorised persons from printing out faxes by
setting a password.
Please note
If a password has been set and MEMORY
RECEIVE RX MODE selected, you will not be able
to print out faxes, change the reception mode or
change the password unless the current password
has been entered.
To set distinctive ringing
To use this feature you must subscribe to
the distinctive ring service supplied by your
telephone service provider.
You should also be ready to ring your fax
machine from another number.
Press
SELECT FUNCTION.
Press USER PROG.
Display shows
1: FUNC. PROGRAMMING
Press YES.
Display shows
FUNCTION NO. [ ]
Enter 12.
Display shows
12: DISTINCTIVE RING
Press NO to switch from OFF to SET.
Press
YES.
Display shows
SETUP FAX RING
CALL FAX NUMBER NOW
Within 90 seconds, call your eF@x from a
phone on another line, (dial the number that
gives the distinctive ring).
When your machine begins to ring:
The display shows
AUTO DETECTING RING
PATTERN
Your eF@x 2000 automatically
detects and remembers its assigned ring
pattern.
When it has finished, the display changes to
DISTINCTIVE RING SET. RESULT – OK
.
The display then changes to
DISTINCTIVE
RING [ON]
Press YES to confirm.
Press SELECT FUNCTION to return to
standby.
Please note
If your eF@x 2000 does not detect the ring pattern, the
display shows
DISTINCTIVE RING SET RESULT = NG
.
If this happens, repeat these steps.
SELECT
FUNCTION
USER
PROG.
YES
NO
YES
YES
SELECT
FUNCTION
Page 67

64
eFax 2000 - Edition 4 – 14th November ’00 (3313)
To delete a memory password
Press SELECT FUNCTION.
Press
USER PROG.
Display shows
1: FUNC. PROGRAMMING
Enter 6.
Display shows
6: MEM PASSWORD PRG
Press YES.
Display shows
PRG PASSWORD [ ]
Press SPACE.
Display changes to
DELETE PASSWORD?
Press YES. The password is deleted.
Press
SELECT FUNCTION to return to
standby.
SELECT
FUNCTION
USER
PROG.
6
MNO
YES
YES
SELECT
FUNCTION
9/SPACE
Restricted access
You can stop unauthorised people from using your
machine and give different groups of people
separate passwords. You first set a Department ID
for each group you want – this is a 2-digit code and
then a 4-digit password. Users just enter the
appropriate 4-digit password in order to use your
eF@x 2000.
The user function
26: RESTRICT ACCESS
must be
set to On.
Please note
When restricted access is switched On, you will not
be able to use the Fax2Net service.
To set a memory password
Press SELECT FUNCTION.
Press
USER PROG.
Display shows
1: FUNC. PROGRAMMING
Enter 6.
Display shows
6: MEM PASSWORD PRG
Press YES.
Display shows
PRG PASSWORD [ ]
Enter the 4-digit password you want.
Display shows
PRG PASSWORD
Press YES.
Display shows
MEM. PASSWORD PRG
Press SELECT FUNCTION to confirm.
SELECT
FUNCTION
USER
PROG.
6
MNO
YES
YES
SELECT
FUNCTION
To change the memory password
Press SELECT FUNCTION.
Press
USER PROG.
Display shows
1: FUNC. PROGRAMMING
Enter 6.
Display shows
6: MEM PASSWORD PRG
Press YES.
Display shows
PRG PASSWORD [ ]
Enter the new 4-digit password you want.
Display shows
PRG PASSWORD
Press YES.
Display shows
MEM. PASSWORD PRG
Press SELECT FUNCTION to confirm
SELECT
FUNCTION
SELECT
FUNCTION
YES
YES
6
MNO
USER
PROG.
Page 68

65
eFax 2000 - Edition 4 – 14th November ’00 (3313)
To change a restricted access password
Press SELECT FUNCTION.
Press
USER PROG.
Display shows
1: FUNC. PROGRAMMING
Enter 9.
Display shows
9: RESTRICT ID PRG
Press YES.
Display shows
DEPARTMENT NO
Enter the 2-digit code of the department
you want to change.
Display changes to
ENTER ID [ ]
Enter the 4-digit password you want to
change. Display changes to
ID CLOSE
Press NO. Display shows
ENTER ID [ ]
Enter the new password.
Press
YES to confirm.
Display shows
DEPARTMENT NO. [ ]
Press SELECT FUNCTION to return to
standby.
SELECT
FUNCTION
USER
PROG.
9
WXYZ
YES
NO
YES
SELECT
FUNCTION
To set restricted access
Press SELECT FUNCTION.
Press
USER PROG.
Display shows
1: FUNC. PROGRAMMING
Enter 9.
Display shows
9: RESTRICT ID PRG
Press YES.
Display shows
DEPARTMENT NO
Enter the 2-digit code between 01-24.
Display changes to
ENTER ID [ ]
Enter a 4-digit password.
Press
YES to confirm.
Display shows
DEPARTMENT NO. [ ]
.
If required, you can now create another
department and password.
Press
SELECT FUNCTION to return to
standby. Display shows
ENTER ID
to
indicate that a password must be entered
before the machine can be operated.
YES
YES
9
WXYZ
SELECT
FUNCTION
USER
PROG.
SELECT
FUNCTION
Page 69

66
eFax 2000 - Edition 4 – 14th November ’00 (3313)
Dial settings
These settings allow you to control the way your
eF@x 2000 dials numbers.
Your options are:
MF (TONE) / DP (PULSE)
Lets you switch between tone and pulse dialling.
Original setting = MF (Tone dialling)
PBX LINE ON or OFF
Switch On if connecting your eF@x 2000 to a
switchboard. This enables your machine to
automatically dial a prefix number in order to get an
To cancel restricted access
You can cancel restricted access for
individual departments/groups of users.
Press
SELECT FUNCTION.
Press
USER PROG.
Display shows
1: FUNC. PROGRAMMING
Enter 9.
Display shows
9: RESTRICT ID PRG
Press YES.
Display shows
DEPARTMENT NO
Enter the 2-digit code of the department
you want to cancel.
Display changes to
ENTER ID [ ]
Enter the 4-digit password.
Display changes to
ID CLOSE
Press YES to confirm.
Display shows
DEPARTMENT NO. [ ]
Press SELECT FUNCTION to return to
standby.
SELECT
FUNCTION
YES
YES
9
WXYZ
USER
PROG.
SELECT
FUNCTION
Please note
You can cancel all restricted access settings by
switching the user function setting 26:RESTRICT
ACCESS to Off. See page 64.
To change the dial settings
Follow these steps to change any of the dial
settings shown above.
Press
SELECT FUNCTION.
Press
USER PROG.
Display shows
1: FUNC. PROGRAMMING
Enter 2.
Display shows
2: DIAL PARAMETERS
Press YES to scroll through the dial
settings.
Press
NO to scroll through the options for
the displayed setting.
Press
YES to select the option displayed.
Press
SELECT FUNCTION to return to
standby.
SELECT
FUNCTION
USER
PROG.
2
ABC
YES
NO
YES
SELECT
FUNCTION
Page 70

67
eFax 2000 - Edition 4 – 14th November ’00 (3313)
outside line before dialling the rest of the number.
See ‘Connecting to a switchboard’, page 15.
Original setting = OFF.
AUTO START ON or OFF
When switched On, your eF@x 2000 automatically
begins dialling as soon as you press a ONE TOUCH
button or enter an AUTO DIAL number. When
switched Off, you have to press the START button in
order to begin dialling. Original setting = OFF.
DIAL PREFIX
When connected to a switchboard, this function lets
you enter the number your machine has to dial in
order to get an outside line. See ‘Connecting to a
switchboard’, page 15. Original setting = OFF.
There are further options which can be changed with
the assistance of the Helpdesk 0870 241 3929.
These are:
REDIAL TRIES 0-10
You can set how many times your eF@x 2000
automatically tries to redial a number which is busy
or does not answer. Original setting = 5.
REDIAL INTERVAL 1-6 MINUTES
You can set the inter val between each redial attempt.
Original setting = 3 MINS.
DIAL TONE DETECT ON or OFF
Allows your machine to wait for and detect a dial
tone before dialling. Original setting = ON.
BUSY TONE DETECT ON or OFF
Allows your machine to detect a busy tone when
sending a fax. Original setting = ON.
PULSE DIAL RATE
Sets the rate of pulse dialling.
Original setting = 10 PPS.
PULSE MAKE RATIO 33% or 39%
Original setting = 33%.
PULSE DIAL TYPE N, 1—N and N+
Controls the type of pulse dialling used.
Original setting = N.
MF (TONE) DURATION 73ms, 85ms or 100ms.
Sets the duration of tones used for dialling.
Original settings = 85ms.
FLASH/EARTH/NORMAL
If connected to a switchboard, you may need to reset
your machine to suit your switchboard’s line –
normal (N), flash (F) or earth (E).
Original setting = NORMAL.
Page 71

68
eFax 2000 - Edition 4 – 14th November ’00 (3313)
Language
You can switch between English and French for the
text shown in the display and on printed reports.
To set the language
Press SELECT FUNCTION.
Press
USER PROG.
Display shows
1: FUNC. PROGRAMMING
Press YES.
Display shows
FUNCTION NO. [ ]
Enter 14.
Display shows
14: USER LANGUAGE
.
Press
NO to display the next language.
Press
SELECT FUNCTION to confirm the
language option shown.
SELECT
FUNCTION
USER
PROG.
YES
NO
SELECT
FUNCTION
One touch dialling settings
If you are having trouble getting through to a number
because of line problems you can try turning Echo
Protection on or lowering the transmission speed for
that individual ONE TOUCH button.
To adjust Echo Protection and speed
Press SELECT FUNCTION.
Press
USER PROG.
Display shows
1: FUNC. PROGRAMMING
Press YES.
Display shows
FUNCTION NO. [ ]
Enter 28.
Display shows
14: ONE TOUCH PARAM
Press the ONE TOUCH button you want.
Display shows
ECHO PROTECTION [OFF]
Press NO to switch echo protection ON.
Press
YES to confirm.
Display shows
FAX SPEED [14.4K]
Either:
Press YES to confirm fax speed.
Or
Press NO until the fax speed you want is
displayed.
Press
YES to confirm.
Display shows:
28 ONE TOUCH PARAM
Press SELECT FUNCTION to return to
standby.
SELECT
FUNCTION
USER
PROG.
YES
NO
YES
YES
NO
YES
Please note
If you change the ONE TOUCH entry at a later date,
follow the steps above to switch Echo Protection OFF
and reset the speed to 14.4K.
SELECT
FUNCTION
Page 72

69
eFax 2000 - Edition 4 – 14th November ’00 (3313)
General information
Guarantee information
Subject to the terms listed below the guarantee will
provide for the repair of, or at BT’s or its agent’s
discretion the option to replace the eF@x 2000, or any
component thereof, which is identified as faulty or
below standard, or as a result of inferior workmanship
or materials. Products over 28 days old from the date
of purchase may be replaced with a refurbished
product.
The conditions of the guarantee are:
• The guarantee shall only apply to defects that
occur within 12 months from the date of purchase,
provided that the equipment is sent to the repair
address within this period.
• This guarantee does not cover any faults or defects
caused by accidents, misuse, fair wear and tear,
neglect, tampering with the equipment, or any
attempt at adjustment or repair other than through
approved agents.
• This guarantee does not affect your statutory rights.
Helpline support and returns back
to point of sale
Within the 12 month guarantee period:
Prior to returning your product, first read the Help
section beginning on page 71 or contact the Helpline
on 0870 241 3929.
Outside the 12 month guarantee period:
If your product needs repair after the guarantee
period has ended, the repair must meet the approval
requirements for connection to the telephone
network. We recommend that you call the Helpline
and ask for details of our recommended repairers.
Returning the product:
If the Helpline is unable to remedy the problem they
will ask you to return your eF@x 2000. Remove the
image drum unit with toner car tridge from the machine
and place it in a black plastic bag. Where possible,
pack it in its original packaging. Please remember to
include all parts, including line cords and mains power
plug. (Please note we cannot take responsibility for
products damaged in transit).
Please obtain and keep proof of posting or delivery.
A copy of the proof of purchase such as your receipt
must be returned with your product.
Page 73

70
eFax 2000 - Edition 4 – 14th November ’00 (3313)
Technical specification
eF@x 2000
Type/compatibility .....................................Desktop ITU-T G3 transceiver
Applicable network ....................................PSTN and PBX
Transmission Speed ...................................14400/12000/9600/7200/4800/2400 Automatic fall back
Communications .......................................Half duplex
Coding scheme .........................................MH/MR/MMR with ITU-T ECM
Horizontal resolution .................................8 dots/mm or 300dpi
Vertical resolution .....................................3.85 line/mm (standard0
7.7 line/mm (fine)
15.4 line/mm (ex.fine, TX and copy)
Halftone transmission .................................64 shades of grey
Document size .........................................A4, A5, letter or legal size
Recording paper ........................................Plain paper, A4, letter or legal size
Effective scan width ...................................208 mm for transmission
200 mm for copying
208 mm for copying with reduction
Weight.....................................................8 kg approx. (excluding paper)
Display ....................................................2 rows of 20 characters, LCD panel
Dimensions ..............................................Approx. 316mm (W) x 383mm (D) x 190mm (H)
(excluding paper tray, document feeder tray and
document receive tray)
Power .....................................................220/240 ± 10% VAC, 50/60 Hz ± 2%
Operating conditions .................................Relative humidity 20% - 80% (non-condensing)
Temperature 10
C to 32C
Document feed .........................................20 pages maximum (80gsm, A4 size)
Model number...........................................eF@x 2000
Horizontal resolution of 300 dpi is used if the remote
machine also used 300 dpi. Also, 300 dpi is used if
EX.FINE is selected for copying.
Page 74

71
eFax 2000 - Edition 4 – 14th November ’00 (3313)
Help
MESSAGE MEANING ACTION
COVER OPEN Top cover is not shut properly. Press down firmly on the cover to make
sure it is shut.
PAPER OUT/JAM No paper. Add more paper.
or
Paper Jam. Check and remove any jammed paper
from the paper tray or inside the
machine. Follow Clearing Printing Paper
Jam, page 72.
DOCUMENT JAM Paper jammed in the scanner. Follow Clearing Document Jam, page 72.
RELOAD DOCUMENT Document feed error. Remove the document and reload it.
REPLACE TONER CART Toner almost empty. Replace toner cartridge, page 73.
CHANGE DRUM SOON Image drum unit is wearing out. Replace image drum unit as soon as
the print quality begins to deteriorate,
page 75.
PRINTER ALARM Open and close the cover. If this does
not work, switch off your machine and
call the BT Helpline 0870 241 3929.
CONFIRM PAPER SIZE The paper loaded in your machine Check your settings and paper.
is a different size to the paper setting.
MEMORY OVERFLOW Memory full. Print received faxes that are stored in
the memory or wait until delayed faxes
have been sent before scanning more
documents into the memory.
MEMORY ERROR Call the BT Helpline 0870 241 3929.
Page 75

72
eFax 2000 - Edition 4 – 14th November ’00 (3313)
Clearing document jams
If a document gets jammed, your eF@x 2000 beeps
and the display shows an error message.
If the paper appears to be positioned correctly in the
document feeder tray, press the STOP button. If this
does not clear the jam the paper is stuck inside the
machine.
1. Open the control panel by pulling it up and forward.
2. Remove the paper.
3. Push the control panel back until it clicks into place.
Clearing printing paper jams
If the display shows
PAPER JAM
or
NO PAPER
while
there is still paper in the paper tray, there may be
paper jammed in the machine.
1. Lift the front cover.
2. Open the control panel by pulling it up and for ward.
3. Lift the image drum unit out and put it to one side.
Keep it out of direct sunlight and DO NOT TOUCH
THE GREEN SURFACE of the drum.
Page 76

73
eFax 2000 - Edition 4 – 14th November ’00 (3313)
Caution
Do not expose the image drum unit to light for more
than 5 minutes. Always hold the image drum unit by
the ends.
Caution
Do not expose the image drum unit to light for more
than 5 minutes. Always hold the image drum unit by
the ends.
WARNING
Be careful when handling the toner cartridge. See
Safety information, page 8.
WARNING
If you open the top cover, you will see a label that reads
CAUTION – HOT. This area is extremely hot and must
not be touched.
4. Carefully pull out any paper you see inside the
machine.
5. Replace the image drum unit. Ensure that the tabs
on both sides of the drum slot into the machine
as shown. Press down firmly on both ends of the
drum until it clicks into place.
6. Close the top cover.
7. Push the control panel back until it clicks into
place.
8. Pull the paper out of the paper tray. If any of the
sheets are damaged, remove them.
9. Reload the paper.
Replacing the toner cartridge
When the cartridge is almost empty, the display
shows
REPLACE TONER CART.
and the print quality
starts to get lighter. You should replace the
cartridge immediately.
Replacement toner cartridges and image drum units
can be obtained by telephoning 0800 590 009.
It is important that you do not use any toner other
than that specifically intended for use in the eF@x
2000. Using the wrong toner may damage your
machine and invalidate your guarantee.
1. Open the top cover.
2. Pull the control panel up and for ward.
Page 77

74
eFax 2000 - Edition 4 – 14th November ’00 (3313)
3. Pull the grey lever on the old toner cartridge
towards the front of the machine. Lift the old toner
cartridge out of the image drum unit. Dispose of it
in the plastic bag that your new cartridge came in.
4. Remove the new toner cartridge from its package
and gently shake it from side to side. Then peel
the white plastic tape from the bottom of the toner
cartridge.
5. With the smooth black sur face uppermost (marked
L and R) and the grey lever on the right, insert the
toner cartridge into the image drum unit. Slide in
the left end of the cartridge first, then lower the
right end into place.
6. Once in place, push the grey lever on the toner
cartridge towards the back of the machine to
secure it.
7. Using the cleaning wipe, gently wipe back and
forth across the full length of the LED array.
8. Close the top cover.
Caution
Be sure to insert the toner cartridge into the drum the
right way around.
Page 78

75
eFax 2000 - Edition 4 – 14th November ’00 (3313)
The number of pages you can print with one toner
cartridge depends on the type of documents you
receive or copy. A toner cartridge typically prints 1250
A4 pages of a standard business letter with 4% print
coverage. The first toner cartridge installed in a new
image drum unit has a slightly decreased yield
because the image drum unit itself has to be filled.
The life of an image drum depends on a number of
factors, including temperature and humidity, the type
of paper you use, and the number of pages per job.
The image drum car tridge should last about 10,000
pages for continuous printing, up to 8,000 pages at 3
pages per job, and about 4,500 pages at 1 page per job.
Replacement toner cartridges and image drum units
can be obtained by telephoning
0800 590 009.
It is important that you do not use any toner other
than that specifically intended for use in the eF@x
2000. Using the wrong toner may damage your
machine and invalidate your guarantee.
Replacing the image drum unit
Caution
Never expose the image drum unit to light for more
than 5 minutes. Never expose to direct sunlight. Always
hold the image drum by the ends. Never touch the green
surface of the green drum inside the image drum unit.
WARNING
When you open the top cover you will see a label that
reads CAUTION – HOT. This area is extremely hot
and must not be touched.
1. Open the top cover.
Please note
If the print quality becomes faint and the display does
not show
REPLACE TONER CART
you need to clean the
surface of the LED array. See Replacing the toner
cartridge, step 7, page 73.
9. Close the control panel by pressing down until it
clicks into place.
Page 79

5. Insert the new unit into your machine. Make sure
that the tabs on both sides of the drum slot in as
shown. Then press down firmly on both ends until
it clicks into place.
6. Install a new toner cartridge (see ‘Replacing Toner
Cartridge’, page 73) and close the top cover and
control panel.
7. Wait for the display to show the current time and
answering mode.
8. Press SELECT FUNCTION.
Press
COUNTER DISPLAY.
Display shows
DRUM COUNT
Press YES to reset the drum unit counter
to zero.
Press
SELECT FUNCTION to return to
standby.
76
eFax 2000 - Edition 4 – 14th November ’00 (3313)
SELECT
FUNCTION
COUNTER
DISPLAY
YES
SELECT
FUNCTION
2. Pull the control panel up and for ward.
3. Remove the old image drum unit (with its toner
cartridge), wrap it in the packaging from the new
image drum unit and dispose of safely.
4. Remove the protective sheet from your new
image drum unit.
Page 80

77
eFax 2000 - Edition 4 – 14th November ’00 (3313)
Your documents jam
Check the documents for wrinkles, tears or other
damage. Make sure there are no staples or paper
clips and that the paper is dry. Tr y making a copy of
the document and then faxing the copy.
You cannot dial a number
Check the mains power cable is connected properly
and that your telephone line is connected to the LINE
socket on the back of the machine.
If you have a telephone connected, pick up the
handset and check for a dial tone. If you do not have
a telephone attached, press the HOOK/V.REQUEST
button.
If you still do not hear a dial tone, there may be a
problem with your line.
If your machine is connected to a switchboard, make
sure it has been set to work with it. (See Connecting
to a switchboard, page 15.)
You cannot dial a One Touch or Auto Dial number
Check the numbers have been stored correctly.
Remember to press Auto Dial before you enter the
2-digit code.
If your eF@x 2000 has the Auto Start feature
switched off, you must press the Start button in order
to dial the number.
(See Dial settings, page 66.)
Your machine does not answer the phone or
receive faxes
Check that the mains power is connected.
Check that the telephone line cord is connected to
the LINE socket on the back of the machine.
Check that you have set the right reception mode.
Your eF@x 2000 will not automatically receive faxes
when set to manual answering, TEL.
See page 22.
Problem checklist
Printed pages have lines on them
If the print quality is poor, the image drum may need
to be cleaned.
Press
SELECT FUNCTION.
Press PRINTER CLEANING.
Press
YES to print a cleaning page.
Repeat this several times. Check the print quality
again. if it is still bad, you need to replace the Image
Drum Unit,
page 75. Call the BT Helpline 0870 241
3929 for details of your nearest supplier or to order
direct.
Your telephone does not ring if your machine is
set to TEL/FAX mode and the incoming call is a
voice call
This is normal. In the TEL/FAX answering mode,
your machine answers the call and detects whether
it is a voice or fax call. If it is a voice call, your eF@x
will ring but your telephone will remain silent. For
this reason we recommend that you use TEL/FAX
mode only if your phone is located near the machine.
No display
Check mains power cable is connected properly and
that the power is switched on.
Nothing happens when you press the buttons on
the control panel
Switch your eF@x 2000 off, wait 10 seconds then
turn it on again.
The display tells you to replace paper even though
there is paper in the paper tray.
Check that the paper is loaded correctly. Check for
a paper jam in the machine.
SELECT
FUNCTION
PRINTER
CLEANING
YES
Page 81

78
eFax 2000 - Edition 4 – 14th November ’00 (3313)
send the fax again. If you still have a problem, try
making a copy of the document on your machine to
check that it is working properly.
Your machine keeps printing out reports you do
not want
Check the user functions and turn off the reports
you do not want. See User Function settings, page 59.
You sent a fax but is was completely blank
Check that you have loaded the document face down.
The received documents are light or have vertical
streaks on them and you are not out of toner
The LED array may need cleaning (see ‘Replacing
the toner cartridge’, page 73).
Also try removing the image drum unit (see
‘Replacing the image drum unit’, page 75), tapping
the toner cartridge and slowly tipping from side to
side. If this does not work, you may need to replace
your drum unit.
A delayed fax did not get sent
Check the clock is set to the correct time.
See ‘Set the time and day’, page 14.
Your machine disconnected before you could
answer a voice request tone
You must answer a voice request while the
warbling tone is still being played and press
HOOK/V. REQUEST after lifting your handset.
You cannot poll a document from another machine
Check that the other machine has a document
loaded and set for polling.
You want to answer an external phone, but your
machine always answers the call first
Change the ring response setting, see 11: RING
RESPONSE, User Functions, page 60.
Display shows a communication error
This alarm can indicate a number of different
problems.
You may be tr ying to communicate with an
incompatible machine (your eF@x can only
communicate with ITU-T Group 3 machines).
The other machine may not be able to perform the
function you want, such as polling or confidential
messages. The other machine may be out of paper
or have a paper jam. Try sending the fax again.
Check that you are calling the right number.
Poor line conditions can cause problems with
sending and receiving. Tr y sending the fax again.
Check that you are calling the right number.
If you have to dial a prefix number to get an outside
line, you may need to enter a pause (using the
PAUSE one touch button) after the prefix or
international dialling code so that your machine
waits for a dial tone.
If you have problems communicating with a
particular fax machine, try programming its number
into a One Touch button. You can then change the
dial parameters for that button,
see ‘One touch
dialling settings’, page 68.
Your eF@x may need ser vicing. Try sending a fax to
another location in order to check your machine.
You sent a fax but the clarity of image received at
the other machine was very poor
If your document has a lot of small type, complex
illustrations, photos or was very light or dark, try
changing the contrast and resolutions settings, see
page 21.
The image received on your machine was very poor
Contact the person sending the fax and ask them to
change their Resolution and Contrast settings and
Page 82

79
eFax 2000 - Edition 4 – 14th November ’00 (3313)
Received faxes appear distorted
The original may be wider or longer than the paper
you have loaded into your paper tray and your
eF@x 2000 has automatically reduced the width or
length to fit on your paper.
Your eF@x 2000 does not immediately switch to
TEL mode when you make or receive a voice call
Try pressing the STOP button. Your machine returns
to standby mode enabling you to talk. If this happens
frequently, call the BT Helpline on 0870 241 3929.
Your machine is connected to a switchboard.
Page 83

80
eFax 2000 - Edition 4 – 14th November ’00 (3313)
Index
Activity report 48
Answering machine 13
Answering mode 22
Auto dial directory
dial 31
store 31
chain dialling 31
Bar outgoing calls 26
Buzzer volume 60
Call sign 63
Confidential faxing and mail boxes 41
change password 43
create mailbox 42
delete mailbox 43
receive and print 42
send 41
Confidential polling
cancel 47
create mailbox 46
poll from another mailbox 48
print document stored in mailbox 48
set fax for polling 47
Contrast 21
Copier 27
manual paper feed 27
Day and time – set 14
Delayed faxing
cancel from memory 38
from feeder tray 24
multiple locations 39
print destination numbers 40
single location 37
view, edit, delete, add number 40
Delete
messages stored in memory 25
Dial prefix 16
Dial settings 66
auto start 67
busy tone detect 67
dial prefix 67
dial tone detect 67
flash/earth/normal 67
MF (tone) duration 67
PBX line 66
pulse 67
redial interval 67
redial tries 67
tone/pulse dialling 66
Directories
auto-dial 31
Page 84

81
eFax 2000 - Edition 4 – 14th November ’00 (3313)
one-touch 29
Distinctive ringing 63
Drum unit replacement 75
Dual access 26
E-mails
find free directory spaces 55
receive 54
send 54
store address 53
Fax
confidential faxing 41
confidential polling 46
delayed send 37
delete from memory without printing 25
dial using handset 23
dial/send 23
group send 32
header 14
international 56
multiple destinations 39
polling 45
print from memory 25
receive into memory 22
receive to your PC 19
receiving 25
redialling 24
reject unsolicited faxes/calls 26
relaying 44
result of send 25
send 23
stop 25
Fax2Net
dialling 53
email 53
international faxes 56
joining Fax2Net 58
pre-paid card 58
reports 57
sample registration form 52
web pages 55
General information 69
Group dialling
add entries 33
edit, delete numbers 34
multiple destinations inc. groups 35
print list of numbers 34
send 33
set fax group 32
view group 33
Guarantee 69
Help 71
Helpline 69
Incoming ring 60
Jams
document 72
printer paper 72
Loading documents 21
Loading paper 14
Language 60, 68
Memory password 63
Multiple destinations
add numbers 36
Page 85

82
eFax 2000 - Edition 4 – 14th November ’00 (3313)
print list of numbers 37
send 35
view, edit, delete numbers 36
One touch buttons
delete 30
dial 30
search 23
store 30
One touch dial settings 68
Paper trays 10
Paper size 14, 21, 60
PC
acrobat reader 19
connecting 17
installing software 17
online help 20
printing user guides 19
receiving faxes 19
registering software 18
system requirements 20
Polling
cancel 46
confidential 46
one-time polling 45
poll from another machine 46
standard polling 45
Power failure 26
Print counter 28
Print outs and reports
active memory files 49
activity 48
broadcast confirmation 49
broadcast entry 50
communication codes 51
confidential reception 49
configuration 49
message confirmation 49
power failure 50
print 48
report codes 50
telephone directory 49
Problem checklist 77
Receiving
e-mails 54
faxes 25
faxes to your PC 19
into memory 22
Redial 24
Reject unsolicited faxes 26
Relaying faxes 44
Remote receive 61
Resolution 21
Restricted access 64
Ring count 60
Ring response 60
Returning your product 69
Safety information 8
Send
fax 23
international fax 56
Sender ID 59
Setting up 10
Page 86

83
eFax 2000 - Edition 4 – 14th November ’00 (3313)
Stop 25
Switchboard 15
Technical specification 70
Telephone – connecting 13
Telephone line cord 13
Time and day 14
Toner cartridge
installation 10
replacement 73
User function settings 59
buzzer volume 60
closed network 60
confirmation reports 59
continuous tone 62
distinctive ring 60
ECM function 61
error report 59
image in MCF 59
incoming ring 60
instant dialling 62
mem full save 62
memory feeder 61
monitor volume 59
no toner 61
one touch 62
paper size 60
PC/fax switch 61
power save mode 61
remote receive 61
remote diagnosis 61
restrict access 62
ring response 60
sender ID 59
T/F timer 60
TX mode 60
user language 60
width reduction 62
Voice request 28
Volume – buzzer 60
– monitor 59
Web pages
retrieve 56
store address (URL) 55
Page 87

eFax 2000 - Edition 4 – 14th November ’00 (3313)
Offices worldwide
The telecommunications services described in this publication
are subject to availability and may be modified from time to time.
Services and equipment are provided subject to British
Telecommunications plc’s respective standard conditions of contract.
Nothing in this publication forms any part of any contract.
© British Telecommunications plc 2000.
Registered Office: 81 Newgate Street, London EC1A 7AJ.
Registered in England No. 1800000.
eF@x 2000 (11/00) 4
Designed by The Art & Design Par tnership Limited.
Printed in the UK.
Printed on paper which meets international environmental standards.
CE compliant to RTTE Directive (1999/5/EC)
 Loading...