

Page 1
E-mail and caller display on your TV screen
eas i com
TV3
User Guide
No subscription to e-mail service provider required.
Caller Display features require subscription to your network’s caller display service.
Page 2
At a glance
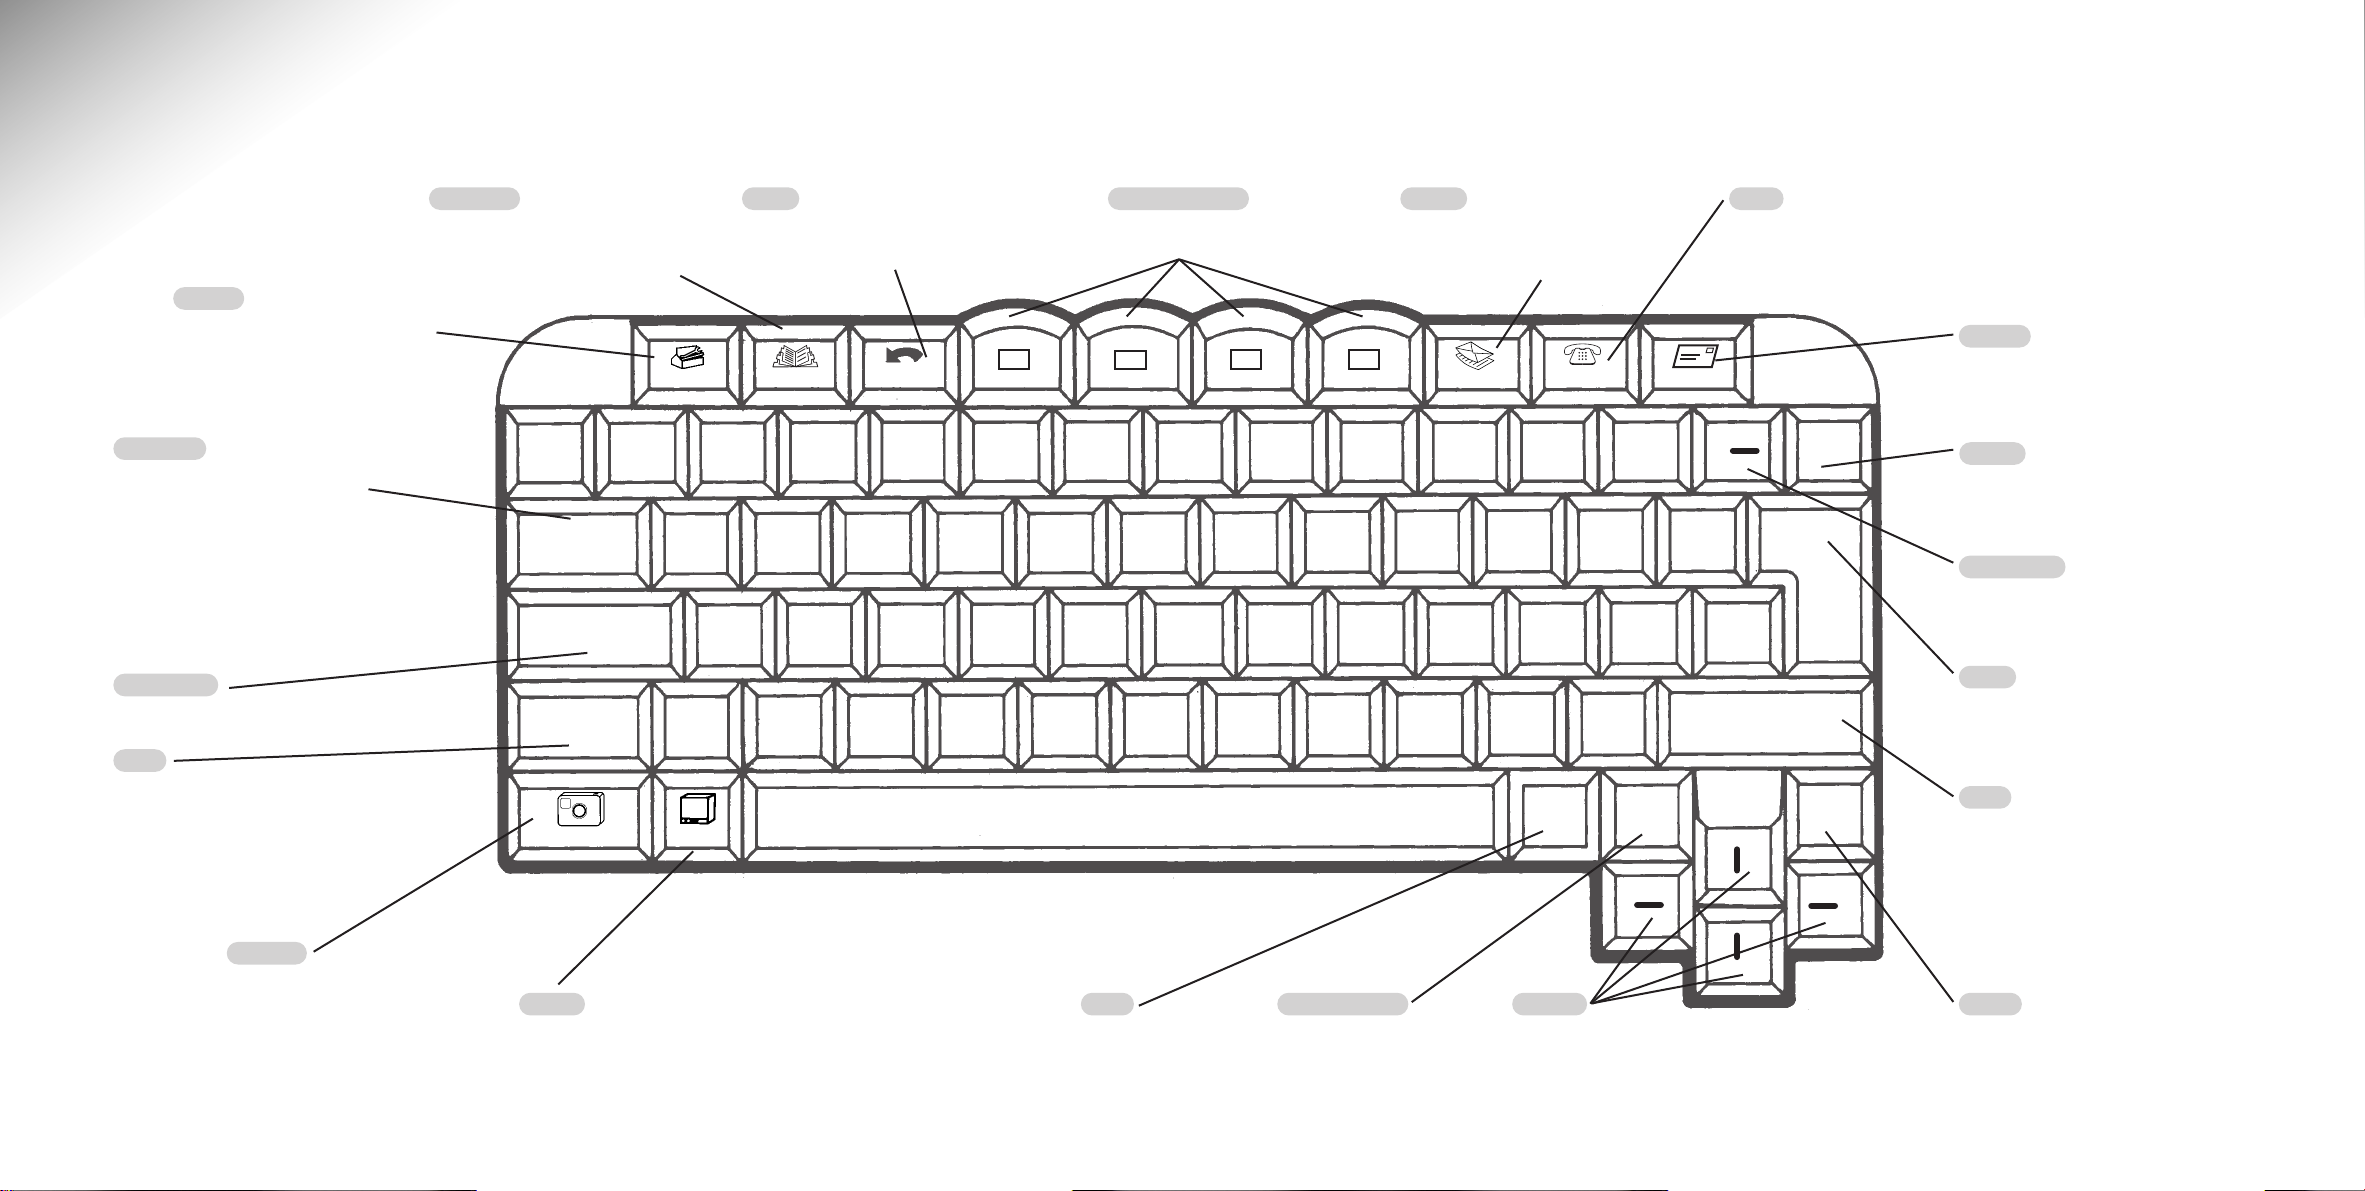
Keyboard
Set Up
Opens the Set Up menu.
To set up e-mail, users, system
and printers, etc. (See page 9)
Press again to exit.
TAB/AUX
Press to move the cursor to the
next optional setting displayed.
Press (at the same time press and
hold the SHIFT KEY) to manually
switch to the equipment connected
to your AUX port e.g., video,
satellite, games console. Repeat to
switch back.
Caps Lock
All typed letters will be capitals.
Shift
Hold down to temporarily switch
between capital and lower case
letters.
Hold down to type the top letter on
the dual symbol keys, e.g. the
on the
+=
key.
+
Directory
Lets you access the directory menu
to add, change and delete entries.
Press again to exit. See page 31.
‘
~
Tab/Aux
Caps Lock
Shift
Camera
sign
Back
Takes you back through the
menu until you return to the
normal TV picture.
Set up Directory Back
!
1
2
’
£
3
WQERT
AS DF G
|
\
TV/AV
ZXC
$
4
5
%
Colour buttons
Used to select options from the
on-screen display.
v
&
6
7
YUI
H
V
BN
8
E-mail
Lets you access e-mail folders
to send and receive your mail.
Press again to exit. See page 17.
E-mail
*
(
9
)
0
Calls Letters
––
-
+
=
{
O
P
[
:
?
/
@
Send/
Receive
䊴
J
KL
<
M
,
;
>
.
Print
Calls
Displays the Calls List so you can see who has
been trying to contact you. Press again to exit.
See page 28.
Letters
Lets you write a letter. Printing
requires an optional printer. Press
again to exit. See page 26.
䊴
Delete
Delete
Deletes the character highlighted by
the cursor.
}
#
$
䊱
Enter
Shift
Home
䊳
Backspace
Deletes the character to the left of
the cursor.
Enter
Moves the cursor to the next line.
Used to select a highlighted option
from the menu.
Shift
Hold down to temporarily switch
between capital and lower case
letters.
Hold down to type the top letter on
the dual symbol keys.
]
Camera
Press and hold to switch the
camera picture on. Press and
hold again to switch the
camera off. (Optional extra,
see page 34.)
1
TV/AV
Switches between your normal
TV channels (BBC, ITV etc.) and
AV video channel.
Print
Prints your letters and e-mails via
an attached printer (not supplied).
Send/Receive
Dials your e-mail service
provider to send and
receive e-mail.
Arrows
Lets you move the cursor. Scroll through the
calls list, e-mail list and directory.
Highlight options from the on-screen menus.
䊲
Home
Moves the cursor to the start of
your e-mail or letter text.
Page 3
Set-top box
TV3
O
n
-
L
i
n
e
E
-
m
a
i
l
C
a
l
l
s
. . .
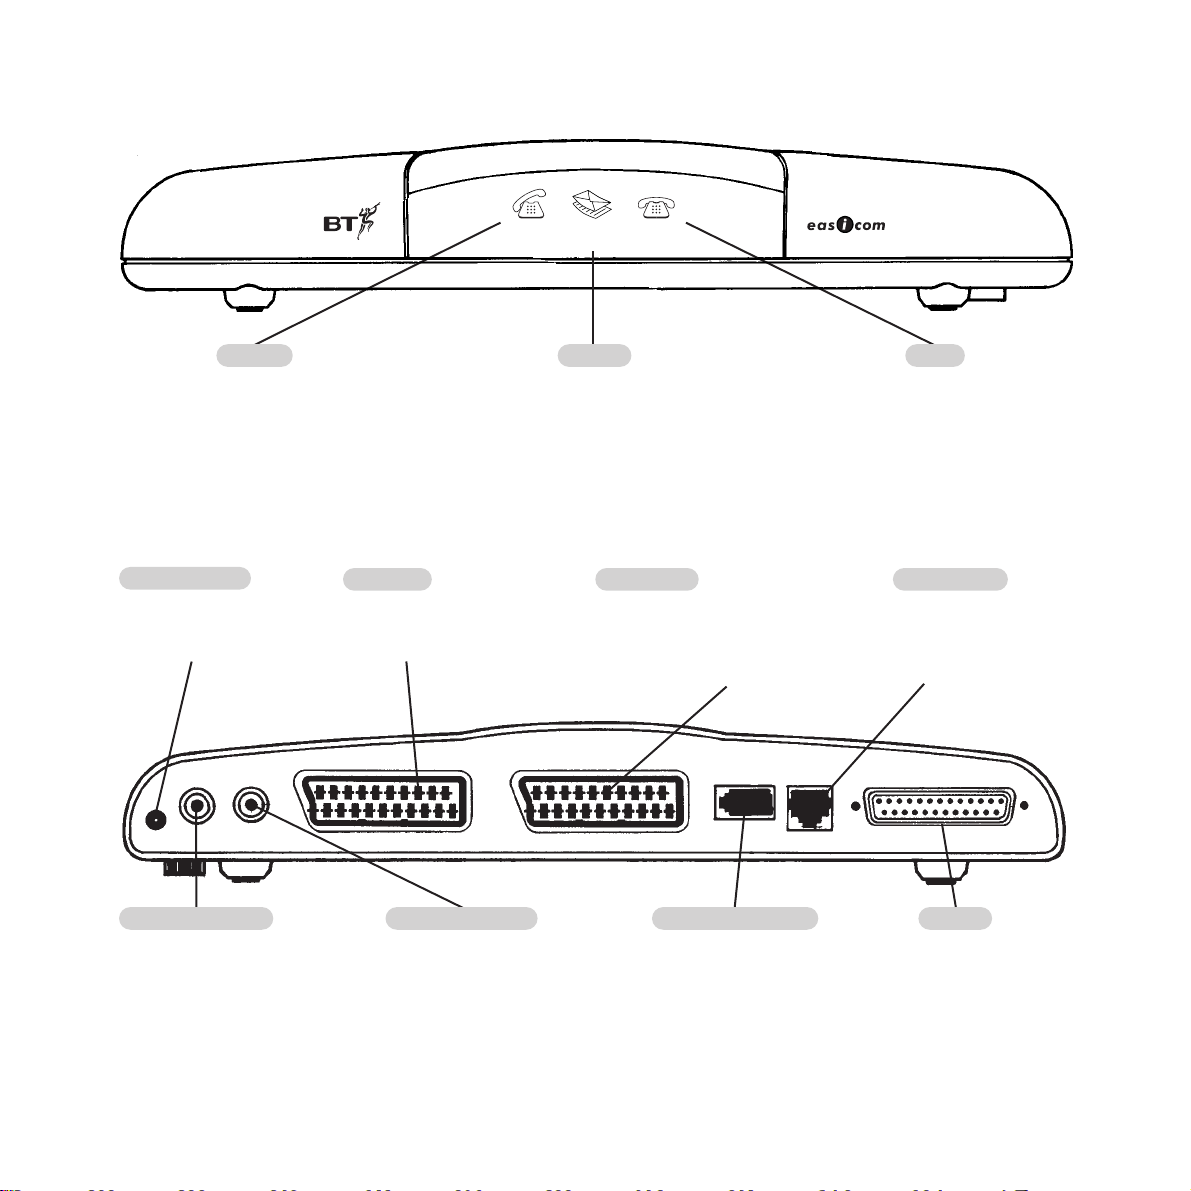
Front
On line
Lights up when the Easicom
on-line to your e-mail service
provider, or you are using a
telephone connected to the rear
of the product.
Back
Power socket
Connects via the mains
power cable and
transformer supplied.
Camera
Camera
Video in
Audio in
12v
DC
Connects your Easicom
to your TV via the Scart
cable supplied.
Camera audio in
If you connect a camera to
give you a visual
monitoring system (see
page 34), this socket lets
you add sound.
TV3
is
Lights up when you have new
e-mail stored in your Easicom
TV Scart
TV Scart
Camera video in
Lets you connect a camera
to give you a visual
monitoring system.
TV3
E-mail
TV3
.
AUX Scart
Connects your Easicom
other equipment e.g., video
player, satellite receiver, games
console via a Scart cable (not
supplied).
Aux Scart
Telephone
Telephone socket
Lets you plug in a
telephone.
Calls
Lights up when you have new calls.
Flashes to indicate Priority callers.
Line socket
TV3
to
Connects your
Easicom
TV3
to your
telephone line wall
socket.
Line
Printer
Lets you connect a
compatible printer.
(See page 35)
2
Page 4

Contents
At a glance 1
Introduction 4
Key features 4
Setting up 6
The quick guide to user names,
e-mail addresses and passwords 11
Set up your Internet Service Provider (ISP) 12
Safety instructions 16
Using your Easicom
E-mail 17
E-mail etiquette 25
Letters 26
Calls 28
Directory 30
TV3
17
Additional features 33
Camera monitoring system 33
Adding a printer 34
Maintenance 35
Help and advice 36
Technical information 40
Index 41
3
Page 5

Introduction
Key features
Subscription free e-mail via your TV screen
Your Easicom
straightforward text messages via the internet.
Compose e-mail on screen and send it at the
touch of a key. Your Easicom
simple to pick up and read incoming e-mail.
Up to five users can each have password
protected folders to keep their e-mail private.
E-mail is the low cost way to keep in touch
locally, nationally and internationally. There is
no subscription to the e-mail provider offered by
INTRODUCTION
BT. Your Easicom
line as soon as the messages have been sent and
any incoming e-mail has been received.
Cordless keyboard
Infra red connection means no wires between
your set top box and keyboard.
TV3
lets you send and receive
TV3
makes it just as
TV3
automatically hangs up the
up to the last 100 calls received.
Directory
Store the names, addresses, phone numbers and
e-mail addresses of up to 100 people.
Optional Camera Monitoring System
You can attach a camera that will send pictures
and sound to your screen. Ideal for seeing who’s
at your front door.
Priority calls
Key names in your directory can be highlighted
so you know immediately when someone
important is trying to contact you.
Write and print letters
Edit on screen, spell check. Add an optional
printer to print out at the touch of a key.
Fast to use
Hotkeys let you jump between each of the
functions – Set-up, Directory, E-mail, Calls,
Letters and send/receive – at the touch of a key.
Caller display
Lets you see who is calling from the comfort of
your armchair. When you have been away from
your phone, the Calls List lets you see details of
4
Page 6
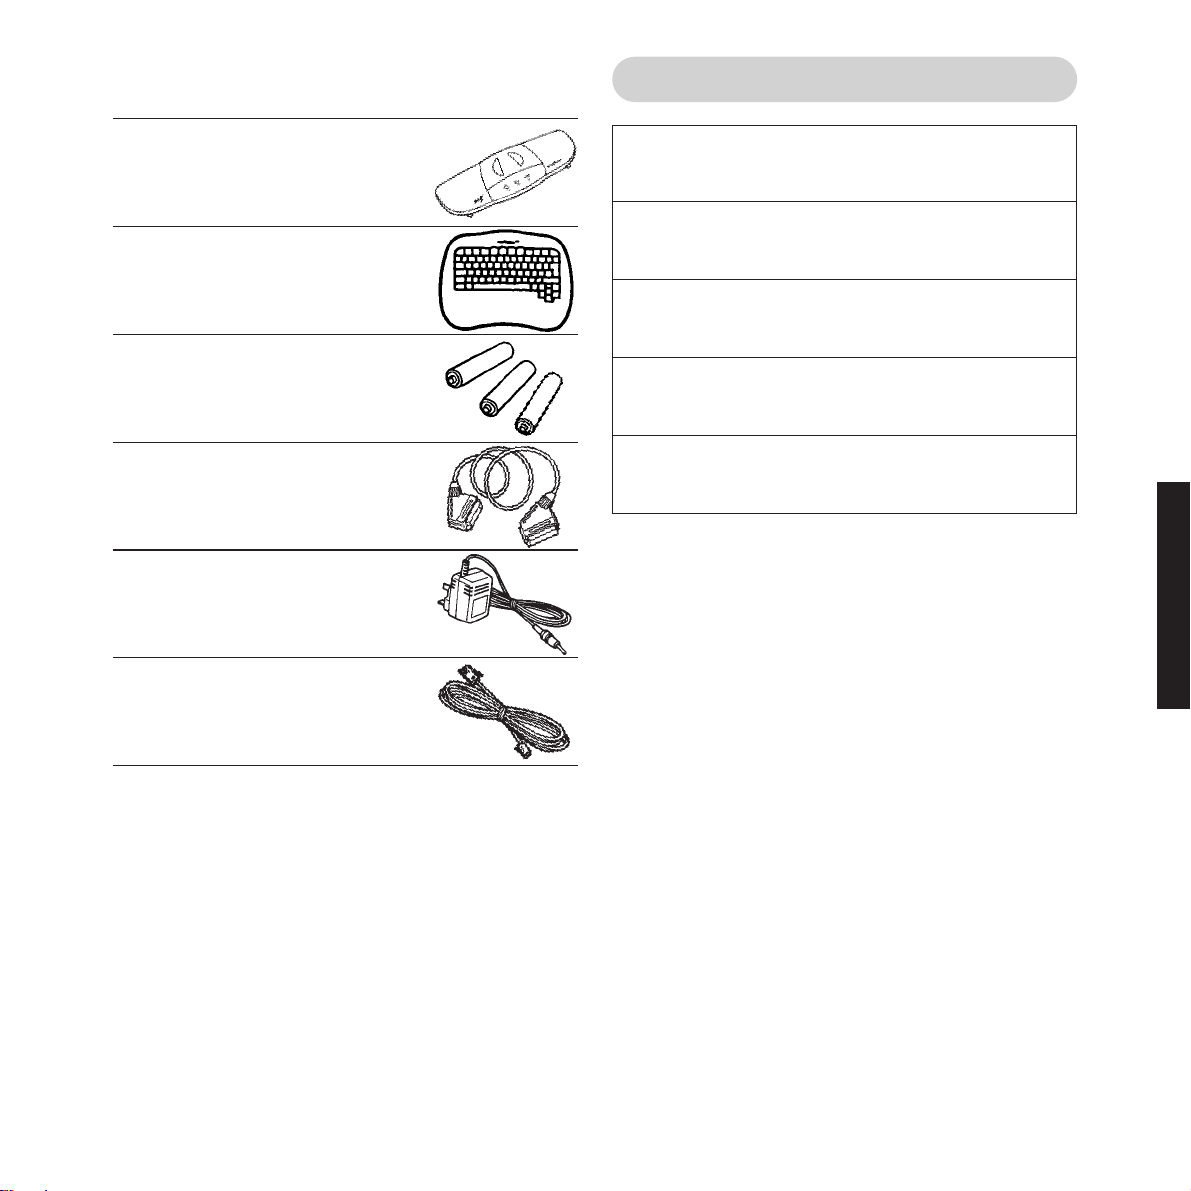
When you have unpacked your Easicom
should have:
TV3
you
For your records
Easicom
●
Easicom
●
TV3
Set-Top Box
TV3
Remote Control
Keyboard
Batteries for the Keyboard
●
Scart lead for connecting
●
to your television
Power supply cable with
●
attached transformer plug
7.5m telephone line cord
●
Model
Where purchased
Date purchased
Price
Serial number
(on underside of the Set Top Box)
For warranty purposes, proof of purchase is
required, so please keep your receipt.
INTRODUCTION
5
Page 7
Setting up
Follow the instructions in this section to set up your Easicom
for use.
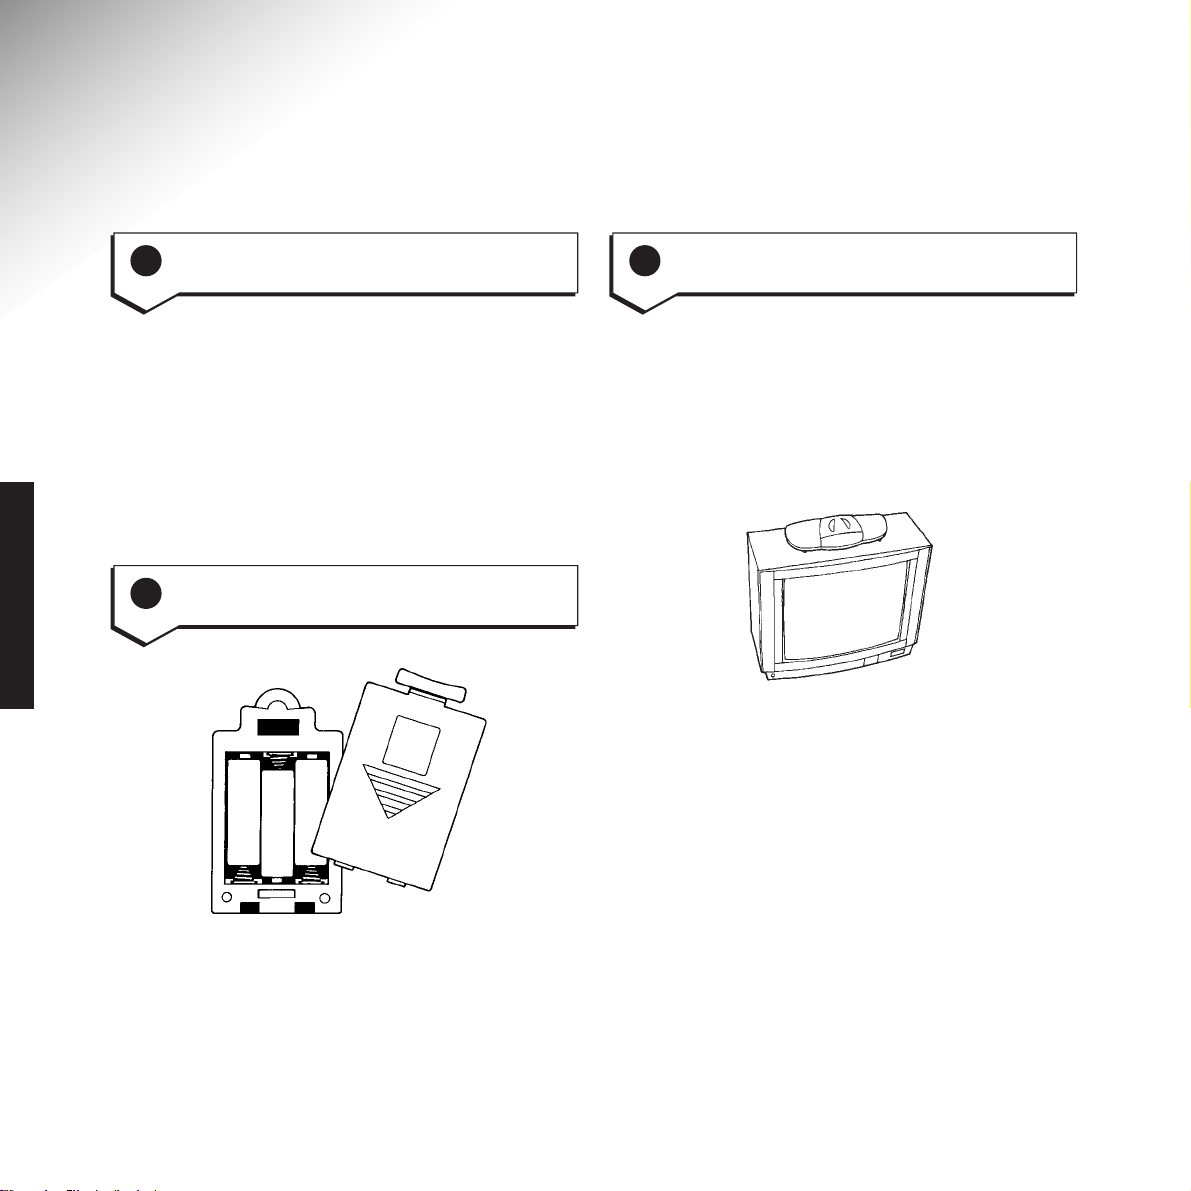
Have you subscribed to a
1
Caller Display service
Place your Easicom
3
box on your television set
TV3
TV3
ready
set top
SETTING UP
If you wish to use the Caller Display features you
need to subscribe to BT’s Caller Display service
or a Caller Display service from your network
provider.
For BT’s Caller Display service, call BT on
800 150.
Insert the 3 AA batteries supplied
2
0800
into the keyboard
It has been designed to sit neatly on top of your
television. You can also place it below or next to
the set as long as the front of the box is facing
forwards and is not obscured from where you
would normally sit with the keyboard. This
ensures the remote control infra red link will
work properly.
Ensure that the set top box is close enough to
connect to the mains power supply, your
television (via the
metres of a telephone socket.
Switch off your TV and any other additional
equipment before connecting the cables.
SCART lead) and within 7.5
6
Page 8
Telephone extension socket
BT have provided an extra long telephone cable
to reduce the need of fitting an extension socket.
However, if you do not have a telephone socket
within reach, you will need to have an extension
socket installed. Contact BT on 150 (or your
network provider) who will be happy to provide
an extension socket for you (this is a chargeable
service). Alternatively, you can buy a DIY
extension kit (from BT shops and other retailers)
and fit an extension yourself.
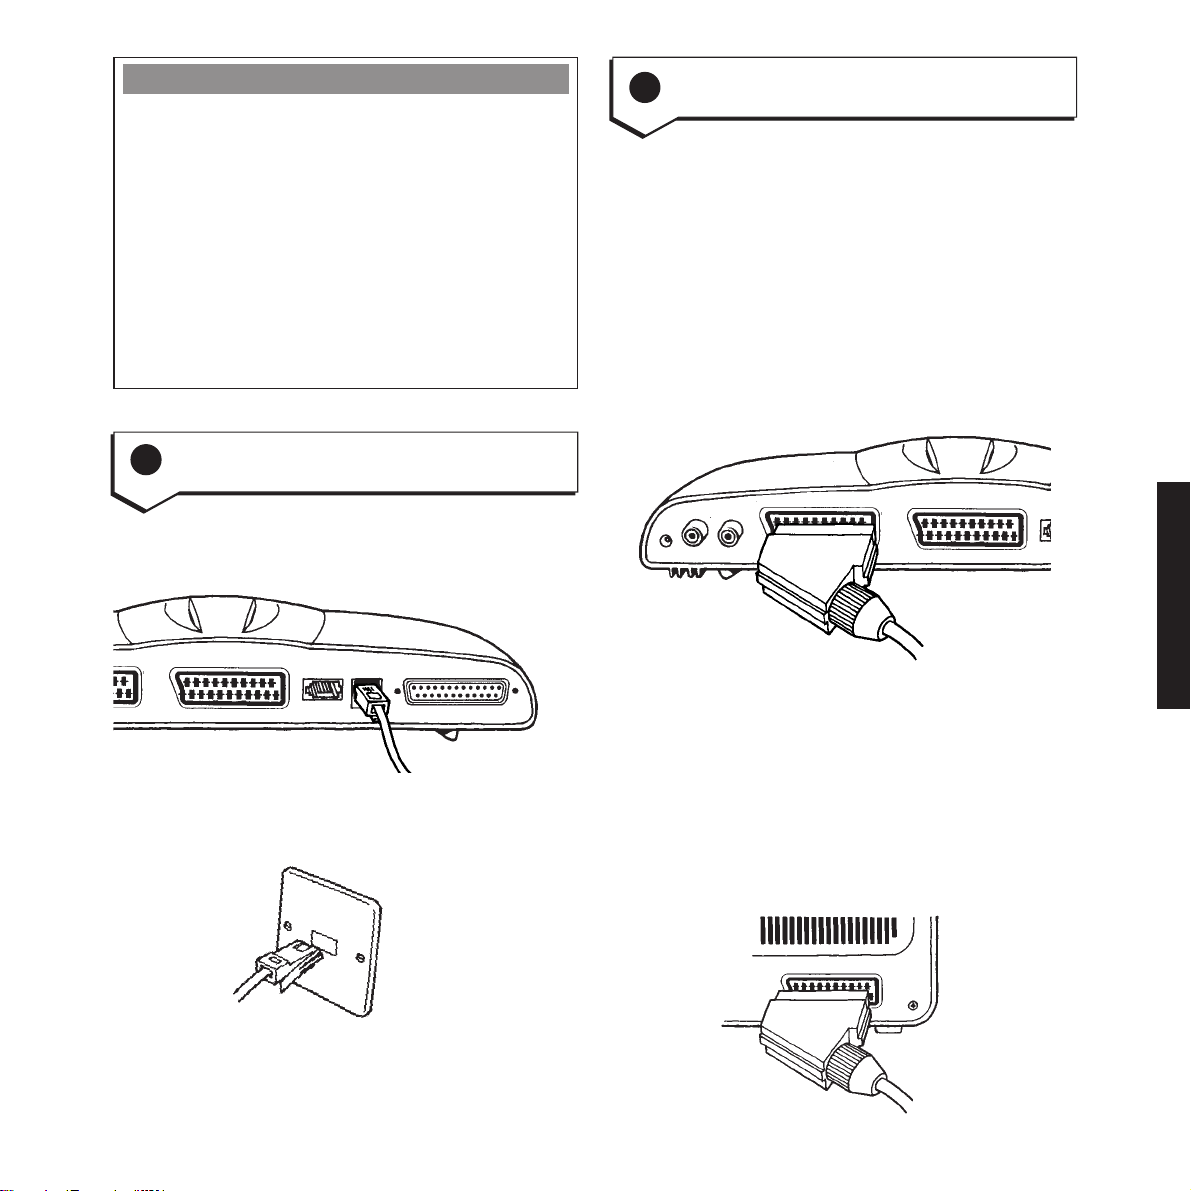
Connect the telephone line cord
4
to the Easicom
TV3
set top box
Plug the smaller end of the line cord into the
LINE socket on the back of the box.
5 Connecting to the TV
Plug one end of the SCART lead into the socket
marked TV on the back of your Easicom
TV3
set
top box. Plug the other end into the SCART
socket on the back of the TV.
If you are unsure which is the SCART socket on
your television, please refer to the manufacturer’s
guide for your particular set.
If there are two SCART sockets, connect the
12v DC
TV3
set top box to SCART connector 1.
Camera
Audio in
Camera
Video in
TV Scart
Aux Scart
Easicom
SETTING UP
Aux Scart
Telephone
Line
Plug the other end into the telephone line wall
socket.
If you already have another piece of equipment
connected to the TV SCART socket, (such as a
video, satellite decoder or games console), please
refer to the next step (step 6).
If your television is not equipped with a SCART
socket, you will need to buy a separate modulator.
(Call the Easicom
TV3
Helpline on 08457 573464
for advice.)
7
Page 9
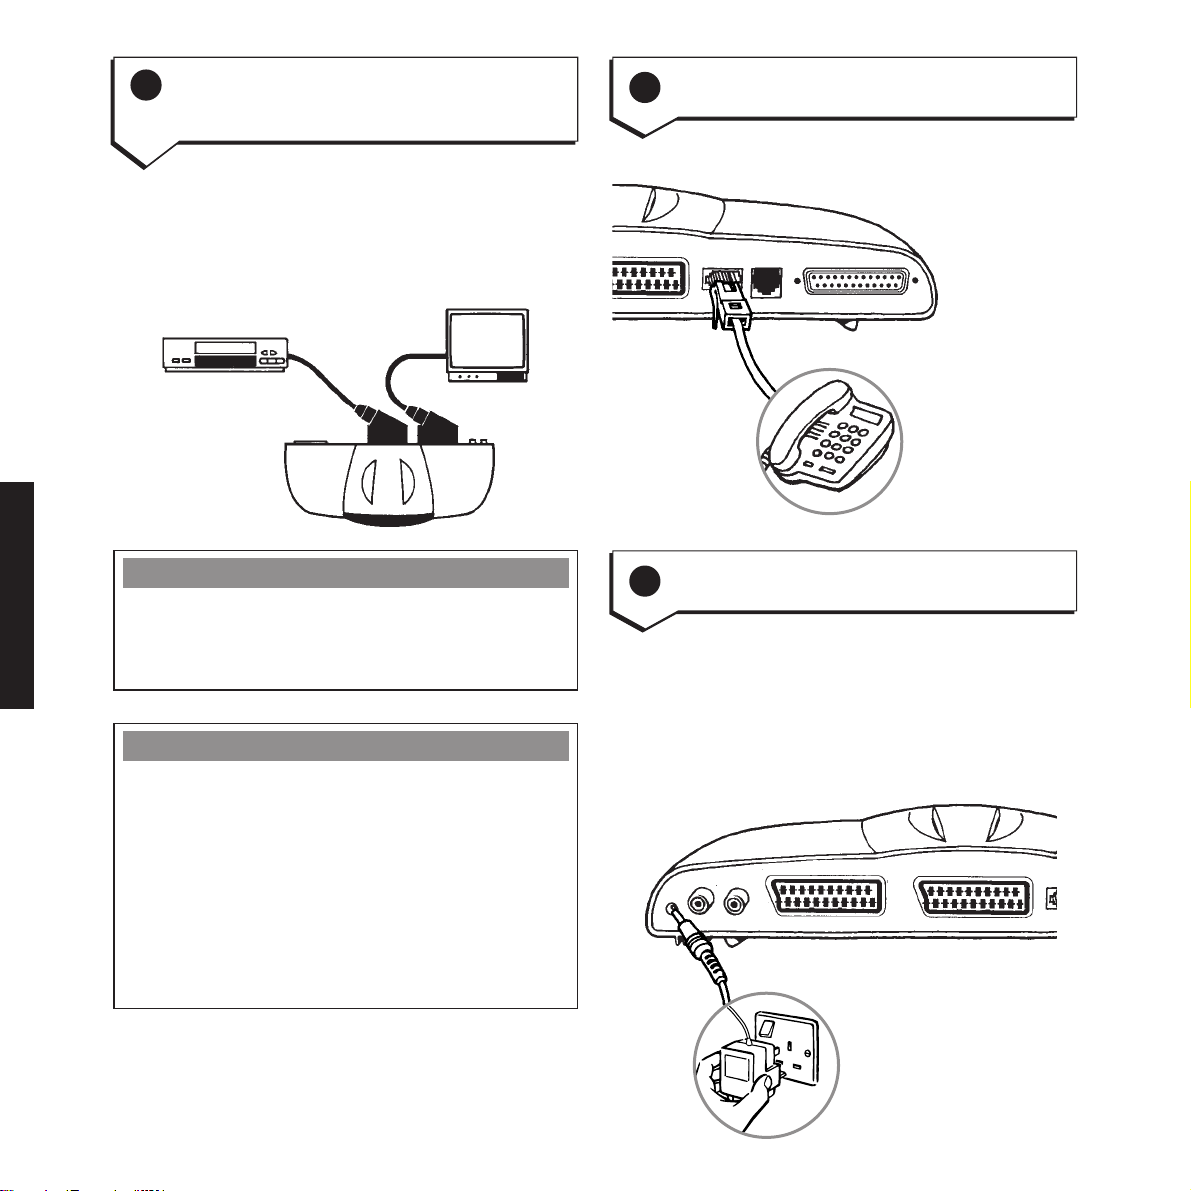
Connect to other equipment
6
(video, satellite decoder or games
console etc.)
If your television is already connected to
another piece of equipment via the Scart sockets,
you can connect to that equipment through your
Easicom
TV3
set top box as shown.
VCR/Satellite/Games console
TV
AUX TV
7 Connect a telephone (optional)
Plug a telephone to the set top box if required.
Aux Scart
Telephone
Line
SETTING UP
8
VIDEO RECORDING
If you are recording onto video when
a call comes in, the caller’s number is displayed
on screen, but not recorded onto the tape.
IMPORTANT
In some instances, it may be necessary to
ensure that other equipment connected through
your Easicom
in use. This ensures you can view the caller
information and menus at all times.
If you have any problems viewing caller
information on screen, please refer to the Help
TV3
is switched to standby when not
section, page 37.
8 Connect the mains power
Plug the adaptor into the mains power socket
and the other end into the 12vDC socket on the
back of the set top box.
Switch on the mains power and switch on your
TV and any other equipment connected.
12v DC
Camera
Audio in
Camera
Video in
TV Scart
Aux Scart
Page 10
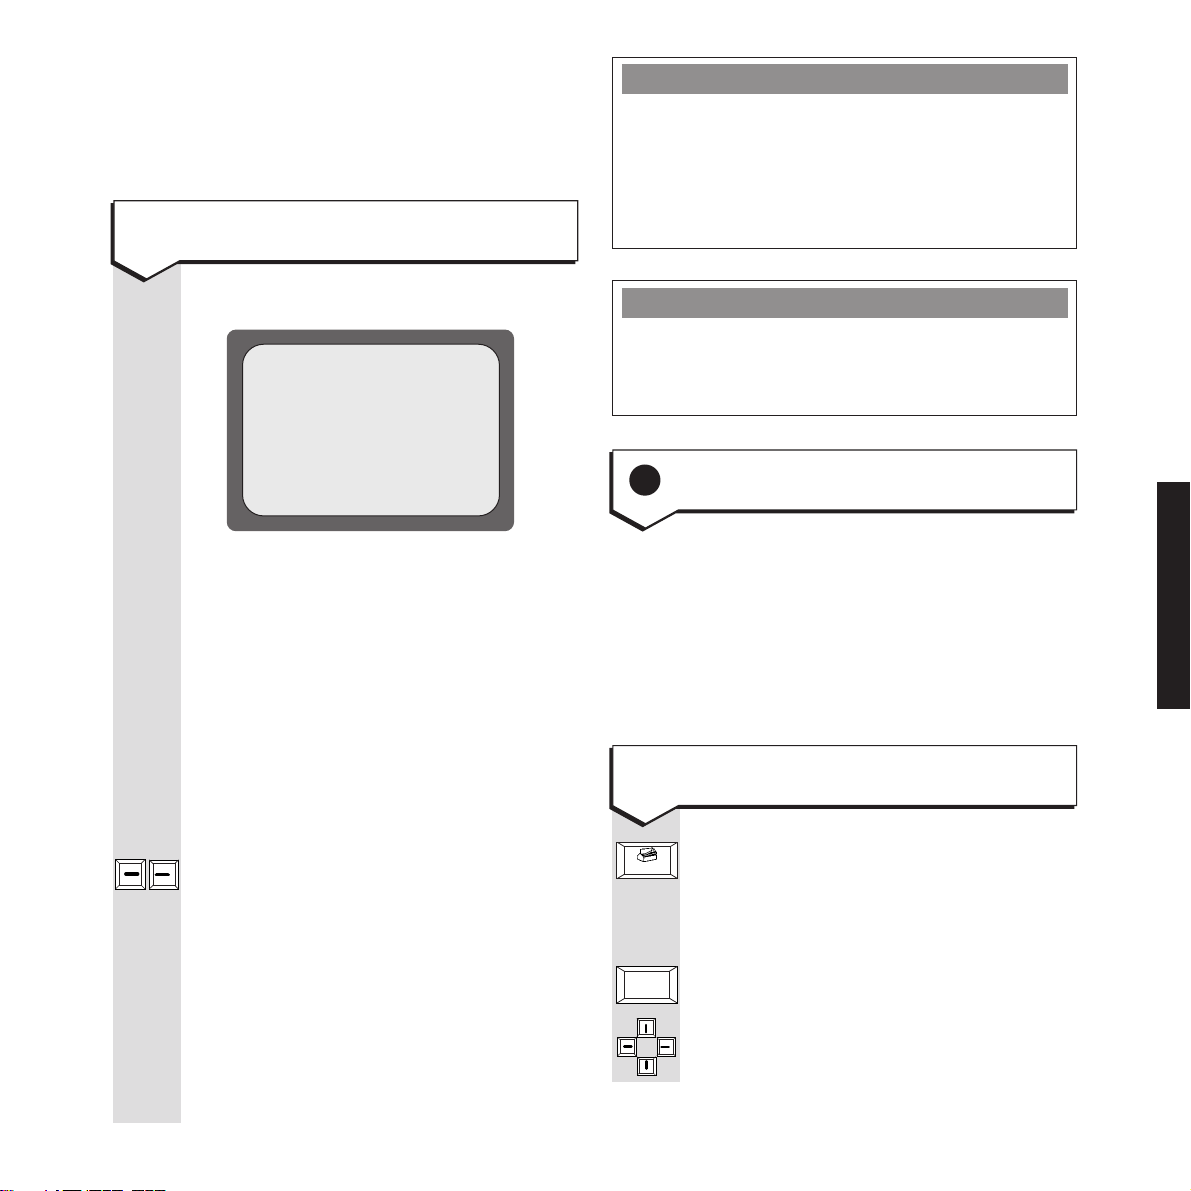
The three red lights on the Set Top box flash on
Tab/Aux
and off.
Your TV screen flashes INITIALISING and
then shows the TIME SET UP screen.
To enter the time and date manually
PLEASE NOTE
If you have subscribed to Caller Display,
the time and date (but not the year) is entered
automatically into your Easicom
TV3
when it
receives its first incoming call. Incoming calls
then ensure the correct time is kept.
KEYPAD
䊴
SAVE
Press keys in the order shown
Time set up
Please enter current date and time
Date(dd:mm:yyyy) 01/01/2000
Time(hh:mm) 01:00 AM PM
Save Cancel
The text should be displayed centrally
on your TV screen as shown above.
If the text is not central, you can change
the position of the text by holding down
the
SHIFT key and using the 4 arrow
keys. This facility is only available when
you power the product up and the
‘Time set up’ screen is displayed.
Use the number keys on the keyboard
to enter the date and time.
䊴
Press the 䊴 䊳 keys to move the
cursor.
Select AM or PM by moving the cursor
to the setting you want. It is important
that you enter the correct date as an
incorrect date can cause some e-mail
systems to reject any mails that you send.
To confirm the time. The screen
returns to the TV channel.
POWER FAILURE
TV3
In the event of a power failure to the Easicom
,
all stored data will be saved in the memory except
date and time information.
9 Set up options
The Easicom
TV3
allows you to configure a
product to your individual requirements.
However, BT have already pre-configured most
settings for typical use.
The various options are explained in more detail
below:
System set up
Set-up
SYSTEM
䊴
Screen shows SET UP and the Set Up
options of USERS; EMAIL; SYSTEM
and PRINTER.
Screen shows SYSTEM SET UP.
Moves the cursor to the next option.
䊴
Moves the cursor back and forward
䊴
between the options.
䊴
SETTING UP
9
Page 11

Moving the cursor to an option
highlights it.
CLI text: Changes the size of the text
that appears on your TV screen when a
call is received. The ‘large’ setting is
particularly useful for people with sight
impairment.
CLI interrupt: If you have subscribed,
Caller Display will automatically display
caller information on your screen as
you receive each new call. Highlight
NO if you do not want this.
Connect to TV: If your TV does not
have a SCART socket you can buy a
modulator which will enable you to
connect your Easicom
TV3
. (For details
of your nearest stockist, call BT on the
Easicom Helpline
0845 757 3464).
Back
To exit
Press the
BACK key until you return to
your TV programme, or press
again.
SET UP
SETTING UP
10
SAVE
Only if you are not using a SCART cable,
should you highlight the RF cable
option.
Volume: A loudspeaker in the
Easicom
TV3
allows you to hear it dialling
your e-mail service provider. Set volume
to Low, Medium or High.
Mute TV when in use: This turns the
sound off so you are not disturbed when
using e-mail. If you want to hear the TV
programme, set this option to NO.
Date/Time: Lets you adjust the date
and time as required.
To save the settings. Screen shows
SET UP and the Set Up options of
USERS; EMAIL; SYSTEM and PRINTER.
Page 12

The quick guide to user names, e-mail addresses and passwords
USER NAME
Your Easicom
TV3
enables up
to five users to register their
own user name. This could
be your first name, e.g. John.
It enables you to keep
e-mails separate from other
users.
TV3
Your Easicom
is supplied
with one name – User 1 –
already stored and which
you can change.
See page 12.
POP 3 USER NAME
The POP 3 user name will
be allocated to you when
you ring up to register with
Freeserve.
This POP 3 user name will
then form part of your e-mail
address.
If your POP 3 user name is
“smith.freeserve.co.uk”
then your e-mail address
becomes “your name
@
smith.freeserve.co.uk”.
The Freeserve registration
desk will help you with this.
Using your Easicom
TV3
PASSWORD
If you wish, you can also
enter a password which
helps prevent other users
from seeing your e-mails.
A password can be anything
you like, e.g. ‘123’.
TV3
The Easicom
is supplied
with one password already
stored. This is ‘password’ –
which you can change.
See page 12.
Using Freeserve
POP 3 PASSWORD
Once you have agreed your
POP 3 user name with your
Freeserve Operator, you will
then be asked to select a
POP 3 password.
You will not have to enter
a password every time you
log on to the Internet,
TV3
Easicom
will handle this
for you, but you should write
it down as you may need it
in the event of any queries
with Freeserve.
USAGE
You have to enter your User
Name and Password
whenever you want to use
TV3
your Easicom
to
write/read e-mails or letters.
USAGE
The POP 3 user name and
POP 3 password should be
TV3
entered into the Easicom
.
See page 13/14.
TV3
The Easicom
then
automatically uses this
information whenever you
send or receive an e-mail.
Your POP 3 user
name/password is not the
same as your Easicom
TV3
user name/password.
Do not enter your POP 3
user name/password instead
of your user name/password
when you want to use your
TV3
Easicom
.
SETTING UP
11
Page 13
Set-up
To change the “User 1” password
Enter
To enter the names of other e-mail
users
SETTING UP
Your Easicom
T V3
is pre-set with one
name ‘USER 1’ and one password.
You should start by changing this
name and password.
The Set Up screen is displayed.
USERS
CHANGE
PASSWORD
Display shows User 1.
Cursor is shown next to OLD
PASSWORD. Type password. If you
make a mistake press the BACKSPACE
key to delete the last letter.
Enter
Enter
Cursor moves to NEW PASSWORD.
Type the new password you want.
Cursor moves to confirm PASSWORD.
Type the new password again.
SAVE
Screen returns to USER SET UP.
To change the “User 1” name
CHANGE
USER NAME
Cursor moves to PLEASE ENTER
PASSWORD. Type in the new
password you have just set.
Set-up
USERS
NEW USER
Enter
SAVE
Display shows Set Up screen.
Display shows all current user names.
Type in the name of the user. If you
make a mistake, press the
BACKSPACE
key to delete the character.
The cursor moves to PASSWORD.
Enter a password to prevent anyone
else reading your e-mail. (You will have
to type this each time you want to
access your e-mail folder. For no
password, just press the ENTER key).
The cursor moves to CONFIRM
PASSWORD. Type the password again,
if required.
To confirm. Screen shows SAVING
NEW USER and then displays the name
you have just entered. You can now add
another new user.
Up to 5 different users can have their
own e-mail accounts. If possible, you
should enter all the names you want
before you connect to the e-mail service
provider.
12
Enter
SAVE
Cursor moves to NEW USER NAME.
Type in the name you want.
The new name is saved and displayed.
You can now add further names.
If you enter an incorrect password,
the screen shows INCORRECT PASSWORD
and then lets you try again.
Page 14

Back
To exit
Press until you return to your TV
programme, or press
SET UP again.
To move to another function
Press any hotkey DIRECTORY,
E-MAIL, CALLS, or LETTERS.
SAVE
Mute Dialling: Lets you hear the
dialling and connection tones.
Highlight OFF to hear the tones or ON
for silent dialling.
To confirm the settings. Screen
displays INTERNET SETTINGS and
Mail Accounts options.
Set up your Internet Service Provider
(ISP)
Most settings for connecting to your
ISP are pre-configured by BT and
cannot be changed. The settings that
cannot be changed are those required
to call up the Internet Service Provider
and make a connection that then enables
you to send and receive e-mail.
Set-up
EMAIL
INTERNET
SETTINGS
䊴
Screen shows Email Set Up.
Screen shows Internet settings.
Optional settings
䊴
To move the cursor to highlight the
䊴
option you want.
䊴
Schedule: Lets your Easicom
your e-mail number at the same time
every day to check for incoming mail
and send any mail sitting in your
Outbox. To do this highlight ON and
press ENTER. Set the time of day you
want your product to dial up your
e-mail number.
T V3
dial
To Set-up your individual E-mail
address
Existing Freeserve customers will
already have their account details.
Example account details are:
POP3 user name:
smith.freeserve.co.uk
POP3 password:
Monday (note passwords are case
sensitive)
E-mail address:
john@smith.freeserve.co.uk
Existing Freeserve customers should
now proceed to page 14, ‘Your Settings’.
New customers must obtain their
Freeserve e-mail User Name and
Password. Please telephone the
Freeserve Registration Line on
0870 010 2418.
Calls are charged at National Call Rate.
The registration line is open between
9am-5pm, Monday to Saturday.
Freeserve is only available in the UK.
SETTING UP
If your account is inactive for 90 days or
more, your internet access and e-mails
may be permanently deleted.
*E-mail access on the EasicomTV3 is subject to premium call rates.
13
Page 15

Enter
Before you call.
E-mail
It is essential that you read the Terms
& Conditions that apply to using the
Freeserve e-mail service BEFORE you
register. These can be found in an
e-mail that has been pre-loaded onto
your Easicom
TV3
.
If you have allocated more than one user
in the previous Section (Set Up Users),
you will need to choose a different mail
account for each user, so that everyone
has a different e-mail address and
password. The Freeserve assistant will
help you.
SETTING UP
Enter
Enter
Enter
To read this e-mail, press the following
keys
Your password.
You can choose whatever name you like
to go before “freeserve.co.uk”, most
people use their own name.
When you call the Freeserve Registration
Line and give them your preferred name,
it is quite likely that a popular name
like “john.smith” has already been
allocated. The operator will give you
alternatives that closely match your
chosen name e.g.”john.smith6” or
“j.smith”.
Select a Password.
Your e-mail address is the address other
people need in order to send you e-mails.
SET UP
E-MAIL
MAIL
ACCOUNTS
KEYPAD
Enter
䊴
䊴
Display lists the user names
.
To highlight the name you want
to register.
Display shows PLEASE ENTER
PASSWORD.
Type your user password (if one has
been set).
Display shows the EMAIL SET UP
screen.
Fixed settings.
Your Easicom
T V3
automatically sets the
following:
POP3 Host: pop.freeserve.net
SMTP Host: smtp.freeserve.net
Your Settings.
For the Easicom
T V3
to send and receive
e-mail, you need to complete the
following details (obtained from the
Freeserve Registration Line).
14
When you have selected your User
name, you will then be asked to select
a Password. Choose something that is
easy to remember for you but unlikely
to be guessed by another person.
POP3 user name: Fill in the
exact User Name agreed with the
Freeserve Operator here.
Page 16

POP3 password: Fill in the
exact Password agreed with the
Freeserve Operator here. The password
will appear as “********” to prevent
anyone else seeing.
Email address:
Fill in your e-mail address as agreed
with the Freeserve Operator.
This should now look something like
john@smith.freeserve.co.uk
This is the e-mail address that will be
sent out with any mail that you send
and allows people to send you a reply.
SAVE
No - E-mail will always be deleted from
the server after it has been downloaded.
Auto empty Deleted folder on
logout?: This automatically empties
items you have sent to the Deleted folder
when you exit from the e-mail screens.
To confirm the settings. Screen returns
to Email set up.
You can now register another user by
repeating this ‘Fixed Settings’ Section for
another User name.
Optional settings:
Save copy of mails sent: Keeps a
copy of each e-mail you send in the
memory. Please note that the memory
holds a maximum of 100 e-mail
messages or letters. If the memory
becomes full, all users you will need to
delete stored e-mail or letters.
Spell check before send?: Select
YES and the spell checker will
automatically check the spelling of your
e-mail before sending.
Leave copy on server?: Y ES Copies of all your e-mails will be kept on
the server. Every time a user downloads
e-mail, all previous mail will be included.
Paperclip icon - Mail will
automatically be deleted from the server
after downloading to your Easicom
TV3
unless it has an attachment. All mail
with an attachment will be left on the
server so that users with a PC can then
download the attachment.
Customer Helpline
If you need help with operating your Easicom
please call the Easicom
TV3
Helpline 08457 573464.
TV3
SETTING UP
15
Page 17

Safety instructions
Warning
damage your Easicom
and telephone line socket during storms.
SAFETY INSTRUCTIONS
Use only approved batteries (3 x AA
alkaline batteries) to power the
keyboard. Do not try to use any other
power supply or you may permanently
There is a slight chance that your
Easicom
electrical storm. We recommend that
you unplug it from the mains power
TV3
.
TV3
could be damaged by an
Do not submerge any part of the
Easicom
batteries in water or use in a damp
environment, such as a bathroom.
Do not expose to fire.
The set top box will produce a
certain amount of heat during normal
use. Please allow adequate ventilation
around it.
TV3
set top box, keyboard or
16
Page 18

Using your Easicom
Enter
Enter
䊴
䊴
䊴
Shift
Shift
Enter
On-screen display
TV3
Once you have registered your user name with
Freeserve, you can send and receive
straightforward text messages to a maximum
size of 4k – about 12 screens of text. If an incoming
e-mail is longer than this, the remaining text
will not be received. Should this happen, ask your
sender to e-mail smaller chunks of text.
Please note that your Easicom
TV3
will not
receive any files or documents which have
been attached to an e-mail message, but it will
show there was originally an attachment by
displaying a paper clip icon. Tell your sender
that you cannot receive attachments.
E-mail
To write an e-mail message
KEYPAD
NEW
MESSAGE
KEYPAD
䊴
䊴
䊴
or
Tab/Aux
BACKSPACE
DELETE
Type your password.
Screen shows INBOX and will show a
list of all the e-mails you have received.
To display the heading for your e-mail.
Type your e-mail message.
Using the keypad
To move the cursor to the place where
you want to change or add text.
To move to the end of each section.
Hold down the shift key and then
to scroll a screen at a time.
To start a new line.
Deletes the previous character.
Deletes the character highlighted by
the cursor.
USING
E-mail
䊴
You can send to an address stored in
the directory or put in the address of
the recipient prior to sending. Always
complete the Subject of the e-mail.
Display lists the users.
To highlight your user name.
䊴
Caps Lock
Home
To type in capital letters. Press
LOCK again to type in lower case letters.
CAPS
Press and hold down to type individual
letters as capital letters or, to type the
top letter when using dual letter keys
such as
=+.
To move the the start of each section.
17
Page 19

To enter an e-mail address that’s
stored in the directory
When the header of your e-mail is
displayed:
DIRECTORY
䊴
The list of names in your directory that
have an e-mail address are displayed.
To highlight the name you want to send
䊴
or cc your e-mail to.
PLEASE NOTE
If you want to send an e-mail message to more
than one person, separate each e-mail address by
a ‘comma’. As soon as you type in the ‘comma’,
a new screen appears giving you more space to
enter up to 8 different e-mail addresses.
To enter an e-mail address not stored
in the directory
USING
TO
or
CC
BACK
TO MAIL
SEND
TO OUTBOX
To select the name highlighted.
Display shows TO (NAME).
To select the name highlighted.
Display shows CC (NAME).
Screen returns and shows your e-mail .
addresses TO and CC in place.
When you have finished writing your
e-mail,
Your spelling is checked automatically
if switched on.
When the spell check is complete, the
screen shows SENDING TO OUTBOX.
An outbox is a temporary storage area
for sending all e-mails. By sending a
batch of e-mails together rather than
individually, you save money on the
cost of the call.
If you want, you can now compose a
NEW MESSAGE e-mail to another person.
KEYPAD
SEND
TO OUTBOX
When the header of your e-mail is
displayed:
Type the full e-mail address of the
person you want.
When you have finished writing your
e-mail,
Your spelling is checked automatically
if switched on.
If you have made a spelling mistake,
the word is highlighted.
Type the correct spelling and press
ENTER or CHANGE. The new word is
inserted.
Press the IGNORE key if you do not
want to change the highlighted word.
When the spellcheck is completed, the
screen shows SENDING TO OUTBOX.
If you want, you can now compose a
NEW MESSAGE to e-mail to another
person.
18
Page 20

Enter
Enter
E-mail
To send e-mail messages from the
outbox
To save unfinished e-mail
messages in the draft folder
Send/
Receive
When you have e-mails stored in the
Outbox and are ready to send them. You
can do this at any time even when the
television is switched off.
Any incoming e-mails will be received.
The indicator lights on your Set Top
Box let you follow what is happening.
If your TV is turned on, the screen
shows DIALLING SERVICE PROVIDER
to send your e-mail messages. Any
incoming messages will also be
downloaded to your Easicom
TV3
.
Please note that when you connect to
Freeserve, all e-mail stored in the Outbox
– by any of the users – will be sent.
To stop dialling, press CANCEL or the
Back
key. Screen shows DISCONNECTING.
If you get the screen message CANNOT CONNECT
TO SERVICE PROVIDER, it may be that the line
to the service provider is busy.
䊴
䊴
KEYPAD
NEW
MESSAGE
Tab/Aux
OR
䊴
䊴
KEYPAD
SAVE
If your message is not ready to send,
you can save it in the draft folder and
finish it later.
The user list is displayed.
To highlight the user name you want.
Type in the password.
The INBOX screen is displayed.
To display the e-mail message screen.
To move the cursor.
USING
Type your message, entering the e-mail
address and subject.
Your e-mail is checked for spelling.
When the spell check is complete, the
e-mail is saved in the Draft folder.
Automatic line hang up
Giving you maximum cost efficiency, once your
e-mail has been sent and any new incoming
messages received, your Easicom
TV3
automatically hangs up the line.
19
Page 21

Enter
Enter
Enter
To edit and send an e-mail from
Enter
Enter
䊴
䊴
䊴
䊴
䊴
䊴
the draft folder
To delete from your draft,
outbox and sent e-mail folders
USING
E-mail
KEYPAD
Enter
FOLDERS
DRAFT
EITHER:
䊴
䊴
OR:
SEND
TO OUTBOX
The user list is displayed.
To highlight the user name you want.
Type in the password.
The INBOX screen is displayed.
To open the FOLDERS options.
To open the DRAFT folder. The list of
e-mails in the folder is displayed.
To highlight any e-mail you want to
view and edit.
To display the e-mail. You can now
change it and then move it to the
outbox ready for sending.
To highlight any e-mail you want
to send.
To move the highlighted e-mail to the
outbox. The remaining messages are
listed. You can now edit or move them
straight to the outbox ready for sending.
E-mail
KEYPAD
FOLDERS
DRAFT
OUTBOX
OR:
SENT
䊴
䊴
DELETE
The user list is displayed.
To highlight the user name you want.
Type in the password.
The INBOX screen is displayed.
To open the FOLDERS options. Select
the folder you want to delete from.
To highlight the e-mail you want
to delete.
The e-mail is sent to the DELETED
FOLDER. It will automatically be emptied
when you exit the e-mail function if this
has been selected in the Mail set up
screen.
20
The MEMORY FULL message
Your Easicom
TV3
has a capacity to store a total
of 100 e-mail and letters. When the memory is
full, the screen displays Memory Full. Press
the
BACK key and then use the E-MAIL key or
LETTER key so you or other users can delete
documents from your e-mail or letter folders
Page 22

Back
Enter
Enter
Delete
The deleted folder
Enter
E-mail
䊴
䊴䊴䊴
To highlight the e-mail name you want
to look at.
When the INBOX screen is displayed:
FOLDERS
DELETED
Screen shows FOLDERS.
To display e-mail selected for deletion.
You can now choose between DELETE
which permanently deletes the
highlighted e-mail, DELETE ALL, and
RESTORE which restores the highlighted
e-mail to the folder it came from.
To use search
You can search your entire personal
e-mail section by giving the search
engine a key word or phrase to look
for. This feature is only available within
the E-mail function.
The user list is displayed.
䊴
Enter
KEYPAD
To highlight the user name you want.
䊴
Type in the password.
The INBOX screen is displayed.
To display the e-mail.
To go back to search results.
NEW
SEARCH
To search again.
To delete a user
You can delete a name from your
Easicom
Set-up
USERS
YES
KEYPAD
YES
Screen shows SET UP.
Screen shows user list.
To highlight the user name you want
to delete.
Screen shows DELETE THIS USER?
Screen shows PLEASE ENTER
PASSWORD.
Enter the password.
Screen shows the WARNING statement.
Screen shows DELETING USER then
shows the modified user list.
TV3
’s user list.
USING
SEARCH
KEYPAD
SEARCH
Screen shows SEARCH FOR.
Type in the word or phrase you want
to find.
If there are none, the screen shows
No matches found. Otherwise the
screen lists all e-mails in your folders
that contain the word or phrase.
21
Page 23

Enter
Set-up
Set-up
To change your password
䊴
䊴
To change your user name
USING
USERS
CHANGE
PASSWORD
䊴
䊴
SAVE
You can change the password
associated with a name in your
Easicom
TV3
’s user list
Screen shows SET UP.
Screen shows user list.
To highlight the user name for whom
you want to change the password.
Change password.
Screen shows:
OLD PASSWORD
NEW PASSWORD
CONFIRM PASSWORD
Enter the passwords as required.
The new password is saved.
If you make a mistake and don’t type
the same new password twice, you will
be asked to enter them again.
USERS
䊴
䊴
CHANGE
USER NAME
KEYPAD
SAVE
You change a name shown in your
Easicom
TV3
’s user list.
Screen shows SET UP.
Screen shows user list.
To highlight the user name you want
to change.
Screen shows ENTER PASSWORD.
Enter the password.
Screen shows:
OLD USER NAME
NEW USER NAME
Enter your new user name.
Your new name is saved.
22
Page 24

䊴
䊴
Enter
Receiving e-mail messages
To receive new e-mail messages, simply
press the
time. The product will connect to the
telephone line and receive any new
e-mails.
SEND/RECEIVE button at any
If the e-mail has a paperclip icon beside
it, it means there is an attachment to
the message. You cannot open this with
your Easicom
TV3
. You can open
attachments on a PC, if you have one.
The screen tells you who the e-mail is
from and the subject of the message.
E-mail
Enter
KEYPAD
When you have been on-line and checked
for e-mail, the E-mail light will light up.
Whenever your Easicom
TV3
is
connected to Freeserve, all new e-mail
messages for your registered users will
automatically be downloaded to each
user’s inbox ready to be read.
Screen shows the list of users and
gives the number of new e-mail
messages waiting beside each user
name.
Andy (0)
Sarah (4)
Dad (1)
To highlight the user name you want.
Enter your password if required.
Screen shows your inbox, listing all
your messages.
The envelope icon beside each e-mail is
shown sealed if the message is new and
unread, and open if the e-mail has
already been read.
The bottom of the screen gives you the
date and time the e-mail was received
and the size of the message.
Enter
To read the highlighted e-mail.
To reply to a viewed e-mail
When you have read a received e-mail,
TV3
makes it easy to reply
REPLY
OR
REPLY ALL
your Easicom
to it. While the e-mail message is on
screen, select the appropriate option.
Lets you write a reply to the e-mail you
are reading. Their address is
automatically included and the subject
has “Re.” before their original subject.
Select this option if you want to reply to
the original sender and any other
people to which the original e-mail was
also copied, up to a maximum of the
first eight addresses on the list.
USING
23
Page 25

Send/
Receive
To forward a received e-mail
To dial up and check for new e-mail
USING
When you have read a received e-mail,
you can forward it to other people.
While the e-mail message is on screen,
select:
FORWARD
You can now enter up to 8 addresses
under the “to” heading and up to
another 8 addresses under the “cc”
heading. Each full e-mail address
should be separated by a comma, or
space or semi-colon.
Your Easicom
TV3
automatically puts
“Fw” in front of the subject heading.
To delete a viewed e-mail
When you have read a received e-mail,
you can delete it simply by selecting:
DELETE
The e-mail is sent to the Deleted folder.
It will be deleted when you exit from
the e-mail menu, if set to do this under
Set Up.
You can look to see if you have new
mail at any time.
The screen shows DIALLING SERVICE
PROVIDER.
CANCEL
To stop dialling.
Printing out e-mail messages
If you attach a printer you can print your
outgoing and incoming e-mail messages.
(See Attaching a printer, page 34.)
24
To switch to the TV channel
while receiving e-mails
While the on-line light is on, and your
TV3
is receiving or sending your
TV/AV
Easicom
messages:
To put the TV programme on screen.
When your e-mail has been received
or sent, the on-line light goes out.
Page 26

E-mail etiquette
There are generally agreed guidelines for using
e-mail and some of the most important are listed
here.
Using smilies
Some people use smilies as a fun shorthand to
express emotions.
• Always fill out the subject line on your
message to help recipients decide when
(and whether) to read your message.
• Pause before you send an e-mail you might
later regret.
• Don’t type in all capital letters; YOUR
MESSAGE WILL LOOK LIKE YOU ARE
SHOUTING!
• Don’t send messages you wouldn’t want to be
forwarded by the recipient (at least not
without adding a “for your eyes only” note).
• Don’t send confidential or secret information
such as credit card information) through non
secured e-mail.
The notation : - ) is a “smiley”.
Turn the page around and you can see a smiling
face where : is the eyes, – is the nose, ) is the
mouth. Smilies are also abbreviated as : ) or : >
Smiley Emotion Meaning
: - ) Happy This was a joke
; - ) Happy winking I’m pulling your leg
: - P Sticking out tongue “Nyahh” or “Bleh”
: - ( Unhappy I’m sad about this
: ~ ( Crying I’m very sad about this
: - 1 Unemotional I’m less than thrilled
> : - ( Very unhappy I’m upset
USING
8 - ) Wide eyed happiness This surprised me
: - O Shouting I’m yelling and upset
8 – O Wide eyed shouting I’m even more upset
> 8 - ) Mad, wide eyed shouting Now I’m really angry
1 – 1 Asleep Zzzzzz...
25
Page 27

Enter
Enter
Delete
Enter
Letters
䊴
䊴䊴䊴
䊴
Shift
To write a new letter
Shift
Press and hold down to type individual
letters as capital letters or, to type the
top letter when using dual letter keys
such as
=+.
USING
Letters
Screen shows the list of users.
To choose your user name.
Screen shows PLEASE ENTER
PASSWORD. If you have a password,
KEYPAD
use the keypad to enter it.
Screen shows LETTERS.
NEW
You now have the option of choosing
a LETTER for a more formal layout or
NOTEPAD for an informal layout.
LETTER
NOTEPAD
ARROWS
For the Formal layout.
For the Notepad layout.
To move the cursor around the screen.
Type in the subject and date you want.
If you want to save your letter, it will be
stored under the subject and date you
give it.
To start a new line.
BACKSPACE
Deletes the previous character.
Deletes the character highlighted by
the cursor.
CAPS
LOCK
To type in capital letters. Press CAPS
LOCK again to type in lower case
letters.
SPELL
䊴
To spell check your letter.
To move the cursor to the place where
䊴
you want to change or add text.
䊴
Hold down the shift key and then
䊴
to scroll a screen at a time.
䊴
To address your letter
When writing a letter:
ADDRESS
KEYPAD
DIRECTORY
Enter
BACK TO
LETTER
Screen shows ADDRESSING LETTER.
Type your address under sender. You
need only do this once. Each time you
write a letter and select the address
option, your address will be shown.
Either
To move the cursor to ‘Recipient’.
Type your recipient’s address
Or, if it is already stored in the directory:
To highlight the name you want.
Their address is added.
To display your letter again.
Continued on page 27.
26
Tab/Aux
Home
To move to the end of your letter.
To move to the start of your letter.
Page 28

Print
Enter
Letters
Enter
Enter
Letters
䊴䊴䊴䊴䊴
䊴
To print your letter on the attached
Print
printer.
To delete a saved letter
SAVE
CANCEL
YES
To save your letter in the memory.
OR
To delete the letter.
To confirm.
To view, change or print a letter
You can display and edit a previously
saved letter.
Screen shows the list of users.
To choose your user name.
Enter
KEYPAD
Screen shows PLEASE ENTER
PASSWORD. If you have a password,
use the keypad to enter it.
Screen lists your saved letters by
subject and date.
To highlight the letter you want.
Screen shows the list of users.
To choose your user name.
Screen shows PLEASE ENTER
PASSWORD. If you have a password,
KEYPAD
use the keypad to enter it.
Screen lists your saved letters by
subject and date.
䊴
䊴
To highlight the letter you want to
delete.
DELETE
YES
To delete the letter.
Screen shows DELETING ENTRY and
then any letters remaining in your list.
Choice of layouts
When you want to write a letter, your
Easicom
TV3
gives you a choice of layout formats
to suit formal or informal letter styles.
USING
Enter
SAVE
The letter is displayed on screen.
To print your letter on the attached
printer.
To save your letter in the memory.
Formal
Provides a template for your address heading.
When you print your letter, it will be
automatically formatted into a formal layout.
Notepad
This is like a blank notepad.
27
Page 29

USING
Calls
BT’s Caller Display Service
Your Easicom
information, which is transmitted over the BT
network. The information will include the date
and time the call is received and in most cases
the caller’s phone number.
To enable your Easicom
information, you will first have to subscribe to
BT’s Caller Display service, details of which are
available from BT on:
Freephone 0800 800 150 for residential
customers.
Freephone 0800 800 152 for business
customers.
Information displayed via other UK
networks.
To enable your Easicom
transmitted via another UK network, you will
first have to subscribe to that network’s own
Caller Display. Call your network provider for
more information.
TV3
receives and displays caller
TV3
to show this
TV3
to display information
The information is displayed discreetly but
clearly at the top left of the screen. It will stay on
screen for 10 seconds or until you press the
DELETE key on the keyboard.
The television needs to be turned on in order for
you to see the display, but it does not have to be
switched on to record details of your incoming
calls in the Calls List.
If you wish you can allocate a Priority tag to
your most important callers (see page 31).
PLEASE NOTE
When a call is received or details stored by your
TV3
Easicom
, the screen and sound go off for an
instant. This does not affect any video recording.
If you have equipment connected to the AUX socket
(e.g. VCR or satellite receiver) make sure it is in
standby mode when not in use otherwise your
caller’s name and number may not appear on your
screen. However, their details will be recorded in
the Calls List.
To remove a displayed number from
your screen
28
Caller Display on your TV screen.
Your Easicom
TV3
lets you see who is calling
without having to move from your seat.
When the phone rings, the Calls indicator light
comes on and the telephone number of the caller
is displayed. If you have stored this number
along with a name in the directory, the name is
also displayed.
Delete
Details of incoming calls will
automatically disappear from your screen
after 10 seconds and the information is
stored in the Calls List. If you want to
remove the information from your screen
immediately:
The number disappears from the
screen but the information is recorded
in the Calls List.
Page 30

Calls
Calls
The Calls List
Calls
Directory
The Calls List provides details of the last 100
calls you have received (whether you answered
the call or not). So if you have been away from
your phone you can see at a glance who has
been trying to contact you.
The Calls List will show the number of the
person that called you, including their area code.
If you have already stored the caller’s number
and name in the directory, the display also shows
the name.
If the caller is tagged as a Priority their name is
shown highlighted in red.
To quit the Calls List
When the Calls List is displayed:
Calls
The TV screen returns to normal.
To switch from the Calls List to the
Directory
From the Calls List screen:
The names stored in the directory are
displayed.
Highlighted
call in
yellow
Phone
number
when a name
1 of 6 Calls List
Andy Saunders
Mick Trenter
Louise Vanags
0171-257 2298
INTERNATIONAL
PHIL
0173-116 4111 AUG 25 17:39
is displayed
To display the Calls List
The Calls List is displayed showing
your most recent calls first.
䊴
Shift
䊴
To scroll through the Calls List. As each
䊴
call is highlighted, the date and time of
the call is also displayed.
Hold down the shift key while pressing
to scroll a screen at a time.
䊴
DELETE DELETE
ALL
Priority
caller in red
Time and
date of call
highlighted
by cursor
To delete an entry from the Calls List
The Calls List is displayed.
䊴
To highlight the entry you wish to
䊴
delete.
DELETE
YES
NO
The screen shows DELETE THIS CALL?
To delete
or
To cancel.
To delete the entire Calls List
The Calls List is displayed.
DELETE
ALL
YES
NO
The screen shows DELETE ALL
CALLS?
To confirm.
To cancel.
USING
29
Page 31

Caller information not available
With some incoming calls the telephone number
of the caller is not available and cannot therefore
be displayed on your Easicom
In this case, your Easicom
TV3
.
TV3
provides you with
some explanatory information about the type of
call you have received. This comes in the form
of a text message and will be one of the following.
WITHHELD
The caller has stopped their number from
being sent.
INTERNATIONAL
The call received was from outside the UK.
Directory
Your Easicom
each containing a name, address, two phone
numbers and e-mail address.
Once you have stored a name and number in
the Directory, every time you receive a call from
that number, the name of the person calling will
be displayed.
You can add new details to the directory at any
time or copy a number directly from the Calls
List or an e-mail address directly from a stored
message.
TV3
lets you store up to 100 entries
USING
UNAVAILABLE
The caller’s exchange/network does not offer
a Caller Display Service.
OPERATOR
The call has come via the operator.
PAYPHONE
The caller is ringing from a payphone.
RINGBACK
The exchange is ringing to let you know that
a previously engaged number is free.
If your Easicom
TV3
does not recognise the
information contained within the caller display
message, it will show INVALID DATA rather
than a message that may contain errors. It does
not mean that there is a fault with your Caller
Display service or your Easicom
TV3
.
When the Calls List is full
Each time a new call is received, details of the
oldest call are automatically deleted.
Directory entries are stored in alphabetical order.
1 of 1 Directory
William Smith
New Edit Delete
Priority calls
When storing an entry in the directory, you can
choose to allocate Priority status to mark it out
as a special caller.
When a Priority caller rings, the Calls light on
the set top box flashes rapidly and the word
PRIORITY appears above the callers name.
Once you have received a Priority call, you can
access your Calls List to see when they called.
A Priority call is stored in the Calls List and in
the Directory highlighted in red.
30
Page 32

Tab/Aux
Directory
1 of 3
䊴
䊴
䊴
Directory
Directory
䊴
䊴
䊴
䊴
䊴
䊴
Ann
Dad Mobile
DEREK
New Edit Delete
Directory
Priority caller
highlighted in red
To add an entry in the directory
If there is a power failure, all data stored
on your Easicom
TV3
is saved.
To change an entry in the directory
Screen shows DIRECTORY and any
entered names in alphabetical order.
䊴
Highlight the entry you want to
䊴
change.
You must include a name to go with the
rest of the entry.
Screen shows DIRECTORY and any
entered names in alphabetical order.
NEW
KEYPAD
Screen shows a new entry.
Enter the details you want.
䊴
Press the
ARROW keys or the TAB key
to move the cursor around the screen.
If you make a mistake, just hit the
BACKSPACE key. The cursor moves
back, deleting the previous character.
If you want to mark the entry as a
Priority caller, move the cursor to
highlight YES next to PRIORITY.
SAVE
To confirm the entry.
If the directory is full, the message
DIRECTORY IS FULL is displayed when you
press the
NEW key in the Directory. You must
delete an existing entry before adding a new one.
EDIT
KEYPAD
The entry is displayed.
Enter the new details you want.
Press the
ARROW keys to move the
cursor around the screen. If you make
a mistake, just hit the
BACKSPACE
key. The cursor moves back, deleting
the previous character.
If you want, mark the entry as a Priority
caller, move the cursor to highlight YES
next to PRIORITY.
SAVE
To confirm the entry.
To delete an entry in the directory
Screen shows DIRECTORY and any
entered names in alphabetical order.
To highlight the entry you want to delete.
DELETE
YES
NO
Screen shows DELETE THIS ENTRY.
To confirm.
To cancel.
USING
31
Page 33

To view entries in the directory
䊴
䊴
䊴
䊴
Shift
Letters
Back
To exit the directory
USING
Directory
Screen shows DIRECTORY and any
entered names in alphabetical order.
Scroll through the list of names until
the one you want is highlighted.
Hold down the shift key while pressing.
to scroll one screen at a time.
ENTER
KEYPAD
To display the full entry details.
or
Enter the first letter of the name you
want to display the entries starting with
that letter or closest to that letter.
To add a phone number from the
Calls List to the directory
Calls
䊴
ADD
Display the Calls List on the screen.
To highlight the number you want to
䊴
add to the directory.
Directory entry is displayed with the
number already included. You can now
add the rest of the details.
The previous screen is displayed.
Press again until you reach the screen
you want or the normal TV picture is
shown.
or
E-mail
Press any of the Hotkeys to jump to
another function.
Calls
or
Directory
Press DIRECTORY key again.
PLEASE NOTE
You cannot add a number from the Calls List
if it has already been entered in the directory or
you received any of the following text messages
WITHHELD, INTERNATIONAL
UNAVAILABLE, OPERATOR
CLI IS PRIVATE
, or
PAYPHONE
,
,
.
32
You must also enter a name to go with
the number.
SAVE
To save the entry.
To switch from the directory to the
Calls List
When the directory screen is displayed:
Calls
The screen shows the Calls List.
Page 34

Additional features
Camera monitoring system
Easicom
you can connect a camera monitoring system.
Follow the instructions provided with your
camera monitoring system to set the camera
where you wish it to be eg. at your front door.
Run the cables back to the Easicom
box (ensuring they are fastly secured and do not
cause an obstruction).
Connect the Video output from your camera into
the CAMERA VIDEO IN port at the back of
your Easicom
TV3
has purpose built ports into which
Set up your Camera Monitoring
System
TV3
set-top
Connect the Camera Monitoring
System to the Easicom
TV3
.
TV3
Connect the Audio output from your camera into
the CAMERA AUDIO IN port at the back of
Camera
Audio in
TV3
Camera
Video in
.
TV Scart
Aux Scart
your Easicom
12vDC
Once your camera monitoring system has
been set up, it is very simple to use with your
Easicom
TV3
.
To view the camera image on the
TV screen
Camera
Press and hold the CAMERA key until
the camera image appears on screen.
You will also hear the audio output
through your television speakers.
CAMERA
33
Page 35

To remove the camera image from
Print
Set-up
the TV screen
To connect a printer
CAMERA
Camera
Press and hold the CAMERA key until
the camera image disappears from the
screen.
The image and audio will return to the
TV broadcast.
If you receive a call, the callers
telephone number will appear on your
TV screen as normal while viewing the
camera picture.
Adding a printer
TV3
TV3
PRINTER
䊴
䊴
Easicom
edit letters on screen and print them
out via an attached printer.
Screen shows SET UP.
Select the printer you want from the list
displayed. If you already have a printer
that is different from this list, your
Easicom
it. Try each printer option in turn.
To select the printer you want to add or
try with your existing printer.
enables you to compose and
may work perfectly well with
Plug the printer cable (supplied with
your printer) into the printer socket on
the back of your Easicom
Plug the other end into your printer
and connect up to the mains power as
shown in your printer manufacturer’s
user guide.
To print an e-mail or letter
Display the e-mail or letter you want to
print on screen.
To print a copy.
TV3
set top box.
34
SAVE
Screen shows SAVING PRINTER
SETTING.
PLEASE NOTE
You can only print when the text of your e-mail
or letter is displayed on the screen.
Page 36

Maintenance
General
Clean the outside of the
control with damp (not wet) cloth or anti-static wipe.
Easicom
TV3
and remote
Service
Do not leave dead batteries in the keyboard. Replace
them immediately with new AA Alkaline batteries as
soon as they run out.
There are no customer replaceable parts on the
Easicom
TV3
(except for the batteries in the keyboard).
CAMERA
35
Page 37

Help and advice
Symptom Possible Cause Solution
The product does not appear to be
working at all.
The calls light goes on when I have a
new call but no information appears
on the TV screen. Also, nothing
appears on the screen when I press
the Calls or Directory key on the
keyboard but the light does stop
flashing.
HELP AND ADVICE
Easicom
Scart cable fitted incorrectly.
You have connected equipment to the
AUX socket of Easicom
equipment is turned on but you are
watching normal terrestrial TV (this
has disabled the automatic Scart
switching).
Your TV has two Scart connectors,
but only one is fully wired.
Your TV Scart connector does not
support full Scar t functionality.
TV3
not powered.
TV3
and the
Ensure the power supply lead is
plugged in and switched on,
(see page 8.)
Ensure Scart cable is fitted between
Television and “TV” socket of
Easicom
This problem can be avoided if you
ensure that any equipment attached to
the AUX socket of your Easicom
(video, satellite etc) is set to
STANDBY when not in use.
Ensure that Easicom
to Scart connector 1 on your TV.
Cable your Easicom
Recorder with Scart cables according
to steps 5 or 6 on page 7 or 8 of this
User Guide. Select the AV input on
your TV. Always change TV channels
via the Video Recorder Remote
Controller.
TV3
, (see page 7.)
TV3
is connected
TV3
, TV and Video
TV3
36
My TV picture has disappeared.
Caller Display information does not
appear on the screen and calls light
doesn’t flash when new calls are
received.
Has the camera or AUX key been
pressed?
Have you registered to the Caller
Display service?
Press and hold Camera key for
greater than 1 second or press AUX
key while SHIFT key is held down.
Call BT or your telephone service
provider.
Page 38

Symptom Possible Cause Solution
No name is presented when I receive
a call, just the number.
The keyboard doesn’t appear to
work.
The Easicom
TV3
keeps scrolling
through some screens telling about
the product.
I only have one telephone socket in
my house Where do I plug my
telephone?
When my TV is in standby mode, an
incoming telephone call causes my
TV to turn on!
There is no Scart connector on the
back of my TV.
There is no directory entry for this
number.
The path is blocked between the
controller and the Easicom
TV3
.
Batteries are low.
You have accessed the in-built
demonstration mode.
Some TVs auto-switch from Standby
mode to On when the Scart
connector is activated.
Enter the person’s name in your
Directory (see page 31).
Ensure that the front of the Easicom
TV3
has nothing obscuring it.
Replace batteries.
Press the BACK arrow key or turn
off the power to the product for a few
seconds.
Either Plug it into the telephone
phone socket at the rear of
Easicom
TV3
or buy a doubler
connector.
Ensure that your TV is switched Off
(i.e. not in Standby mode) when not
in use. This will also save power.
BT recommend that the Easicom
TV3
is connected to a TV via a scart.
However, if you do not have a TV with
a scart socket, Easicom
TV3
can be
connected via a modulator, which will
need to be purchased separately. Please
call the BT Helpline on 08457 573464
for advice.
HELP AND ADVICE
Sometimes when a call is received,
“Unavailable” or “Withheld” is
displayed on the TV screen.
When a call is received and the
number appears on the TV screen, my
TV also shows the channel identifier.
This is because the caller may not
want you to know who is calling, or
perhaps because the call has come
from a private company that does not
deliver Caller Display.
This is a function of the Scart
switching and is quite normal.
37
Page 39

Symptom Possible Cause Solution
Occasionally when the phone rings,
“INVALID DATA” appears on the TV
screen.
Everything on the product seems to
have stopped working.
TV Channel changes when you use
Easicom
E-mail message cuts off suddenly.
“MEMORY FULL” is displayed on
screen.
HELP AND ADVICE
Every time I download new e-mails, I
also get all the old ones again.
TV3
The data from the telephone
exchange has become corrupted - the
Easicom
TV3
is not faulty.
Set Top Box is locked up.
If this occurs on a frequent basis,
contact your telephone Service
Provider for assistance.
Unplug the mains power cable for a
few seconds then reconnect. All
information is retained except the
time and date setting.
This may happen if you have a VCR
.
or Satellite Receiver connected to the
AUX socket of Easicom
TV3.
The message might be longer than
the maximum 4k of text.
Up to 100 e-mails/letters can be
stored in the memory.
You have set the Easicom
TV3
to save
all messages on the mail server.
Switch your VCR or Satellite receiver
to Standby when not in use.
Ask your sender to e-mail you in
smaller chunks of text.
Delete some e-mails/letters from the
memory.
Under the SET UP, E-MAIL, MAIL
ACCOUNTS screen, set the “LEAVE
COPY ON SERVER” option to “NO”.
38
When creating a long e-mail or letter,
the keyboard seems to stop working.
When dialling to Send/Recieve
e-mail, I get an error message:
“Cannot communicate with ISP”
Each e-mail/letter is limited to about
4,000 characters. When you have
reached this limit, TV3 cannot accept
anymore keystrokes.
The Internet Ser vice Provider phone
line is busy.
Easicom TV3 is not connected to the
phone line.
Ensure that new e-mail/letters are
less than 4,000 characters (about 12
screens of information).
Try again later.
Connect Easicom TV3 as shown on
page 7.
Page 40

Symptom Possible Cause Solution
“Cannot communicate with ISP”
“Unable to send message”
or
“Unable to receive message”
“Incorrect POP3 user name/password”
Faulty phone line.
The mail servers in the network
are busy.
Temporary fault in the netowrk.
Incorrect information in the e-mail
setup menu.
If other telephones in your house are
not working, report the fault to your
telephone service provider.
Try again later. If problem persists,
contact the BT helpline.
Try again later.
Go to SETUP/EMAIL/
MAILACCOUNTS and ensure that
“POP3 user name” and “POP3
password” are correctly filled in.
Contact the BT helpdesk if this
problem persists.
If you forget your user password
If you enter the wrong password, the display shows INCORRECT PASSWORD. You can override
the password protection.
When you are asked to enter a password:
KEYPAD
Type “reset”. This resets your Easicom
TV3
to its original user
password of “password”.
HELP AND ADVICE
ENTER
You can now enter a new password.
Please note. If you do this to read someone else’s e-mail messages, any that you read are
marked with the opened envelope symbol to show that they have been accessed.
HELPLINE
If you continue to have any problems, please call our Helpline on 08457 573464
39
Page 41

Technical specification
Non-volatile Memory Storage 512 Kb
On Screen Display 40 Characters X 17 Lines
TV and AUX sockets SCART
Camera video and audio sockets Phono
Power Supply 12v DC, 300mA
Infra Red Controller batteries 3 X AA alkaline
Video Levels 1Volt p-p, 75 Ohms
Weight 400 grams Set Top Box
Telephone line cord 7.5 metres
TECHNICAL
40
Scart Cable 1.2 metres
Dimensions 260(L) x 100(D) x 40(H)mm Set Top Box
Printer socket 25 way parallel printer port
Page 42

Index
Batteries 6
Calls
BT Caller Display subscription 28
delete entire calls list 29
delete entry 29
display calls list 29
quit calls list 29
remove number from TV screen 28
switch to directory 29
Camera monitoring system
remove image from TV 34
set up and connect 33
view image on TV 33
Cleaning 35
Connection of other equipment 8
Directory
add new entry 31
add number from calls list 32
change entry 31
delete entry 31
exit 32
priority callers 30
view directory 32
switch to calls list 32
Easicom
E-mail
TV3
User list
change name 22
change password 22
delete name 21
forgot your password 39
check for new e-mail
delete draft, outbox or sent folders 20
delete a read e-mail 24
edit e-mail 20
enter names of other users 12
24
enter recipients address 18
etiquette 25
forward 24
outbox and sent folder 20
printing 24
quick guide 11
receiving e-mail 23
reply 23
restore a deleted e-mail folder 21
search for specific e-mail 21
send from draft folder 19
send from outbox 19
set up individual e-mail address 13
set up internet ser vice provider 13
switch to TV channel 24
write 17
Help and advice 36
L etters
add address 26
delete 27
view, change or print 27
write 26
Maintenance 35
Power supply 8
Printer
connecting 34
printing 34
Safety instructions 16
Service 35
Telephone, connecting a 8
Telephone line cord 7
Television, connecting to 7
Time and date, to set 9
Unpacking 5
INDEX
41
Page 43

Offices in Europe, North America,
Japan and Asia Pacific.
The telecommunications services described in this publication
are subject to availability and may be modified from time to time.
Services and equipment are provided subject to British
Telecommunications plc’s respective standard conditions of contract.
Nothing in this publication forms any part of any contract.
Touchtone™ is a registered trade mark of
British Telecommunications plc in the UK.
© British Telecommunications plc 1999.
Registered Office: 81 Newgate Street, London EC1A 7AJ.
Registered in England No. 1800000.
Designed by: The Art & Design Par tnership Limited.
Printed in China. Easicom
Printed on paper which meets international environmental standards.
TV3
. Issue 1 (9/99) 5
CE compliant to 89/336/EEC
(EMC Directive) & 73/23/EEC
(Low Voltage Directive)
APPROVED
for connection to
telecommunication systems specified
in the instructions for use subject to
the conditions set out in them
 Loading...