

Page 1

T V1
eas i com
Digital Telephone Answering Machine with Caller Display
User Guide
For use with BT’s Caller Display. Caller Display ser vice requires set-up by BT or your service
provider and connection to a digital exchange.
Page 2
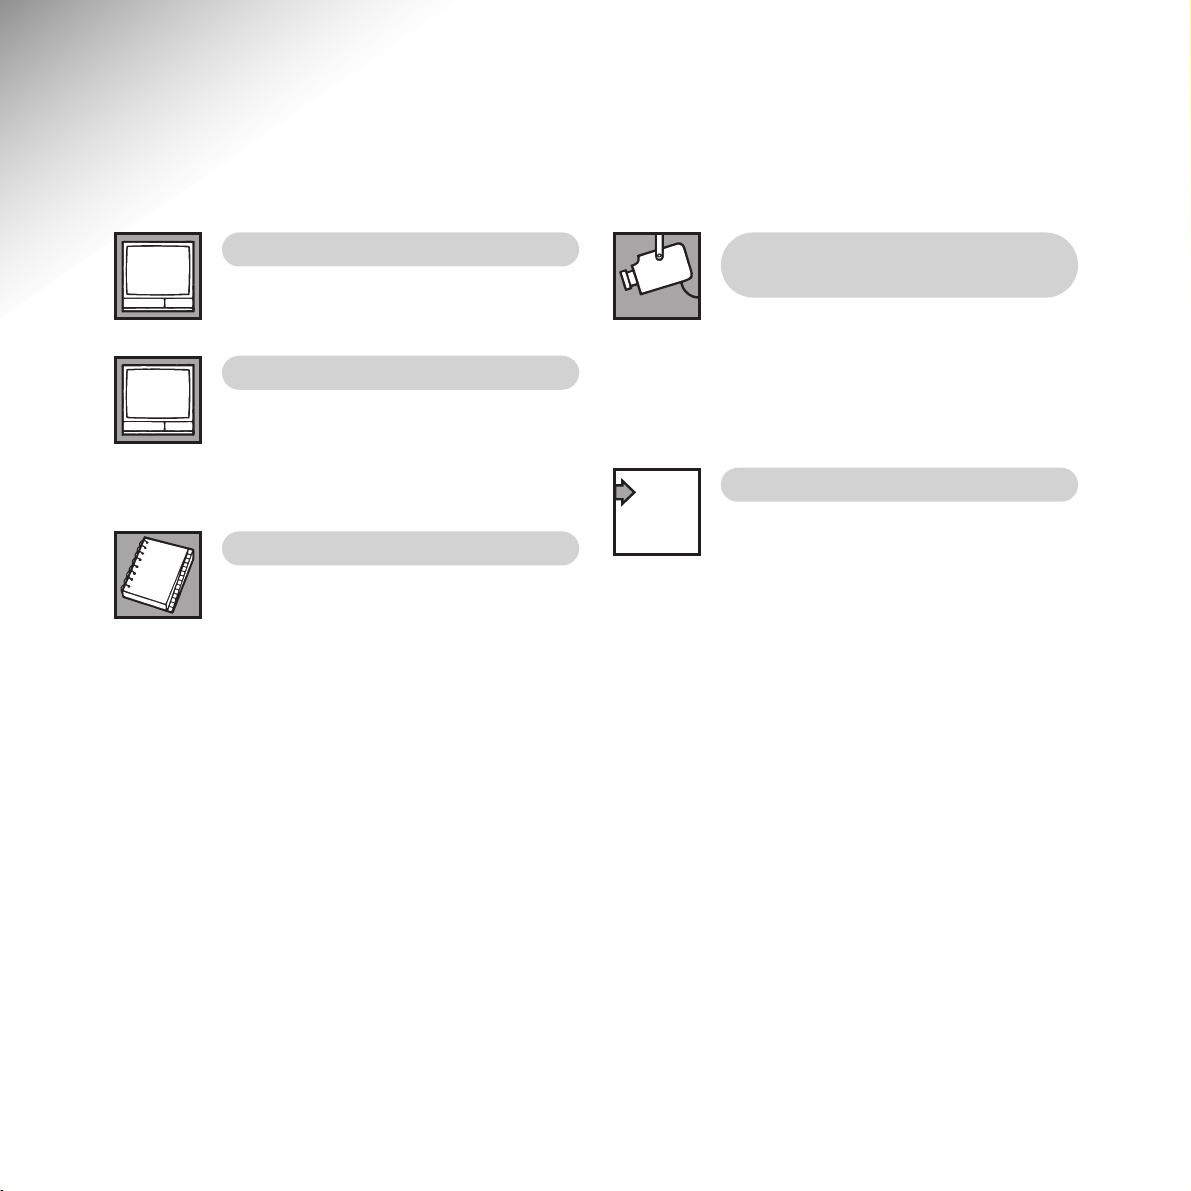
Key features
MUM
01234 56789786
Caller Display on the TV screen
Lets you see who is calling you from
the comfort of your armchair.
JANE
01768 234 72789
JOHN
01678 5645788
ROBERT
01446 678723466
Calls List
On screen record of your last 25
calls. When you have been away from
your phone, just look at your Calls List to see
who has been trying to contact you.
Directory
You can store the names and numbers
of the people who call you most often.
When they ring you, their name will appear on
your screen as well as the number.
Optional Camera Monitoring
System
If you wish, you can attach a Camera
Monitoring System which will transmit pictures
and sound to your screen. See who is knocking
at your front door, or perhaps monitor the
babies room, without leaving your seat!
012325 2
015847 5
015842 9
017612 8
016889 3
015842 9
the people most important to you, whose call you
would not want to miss. Priority calls are marked
with a special symbol on screen and with a special
visible alert to let you know when they have called
(see page 17).
Priority Calls
You can select certain callers as
‘Priority’. Typically, these would be
Page 3
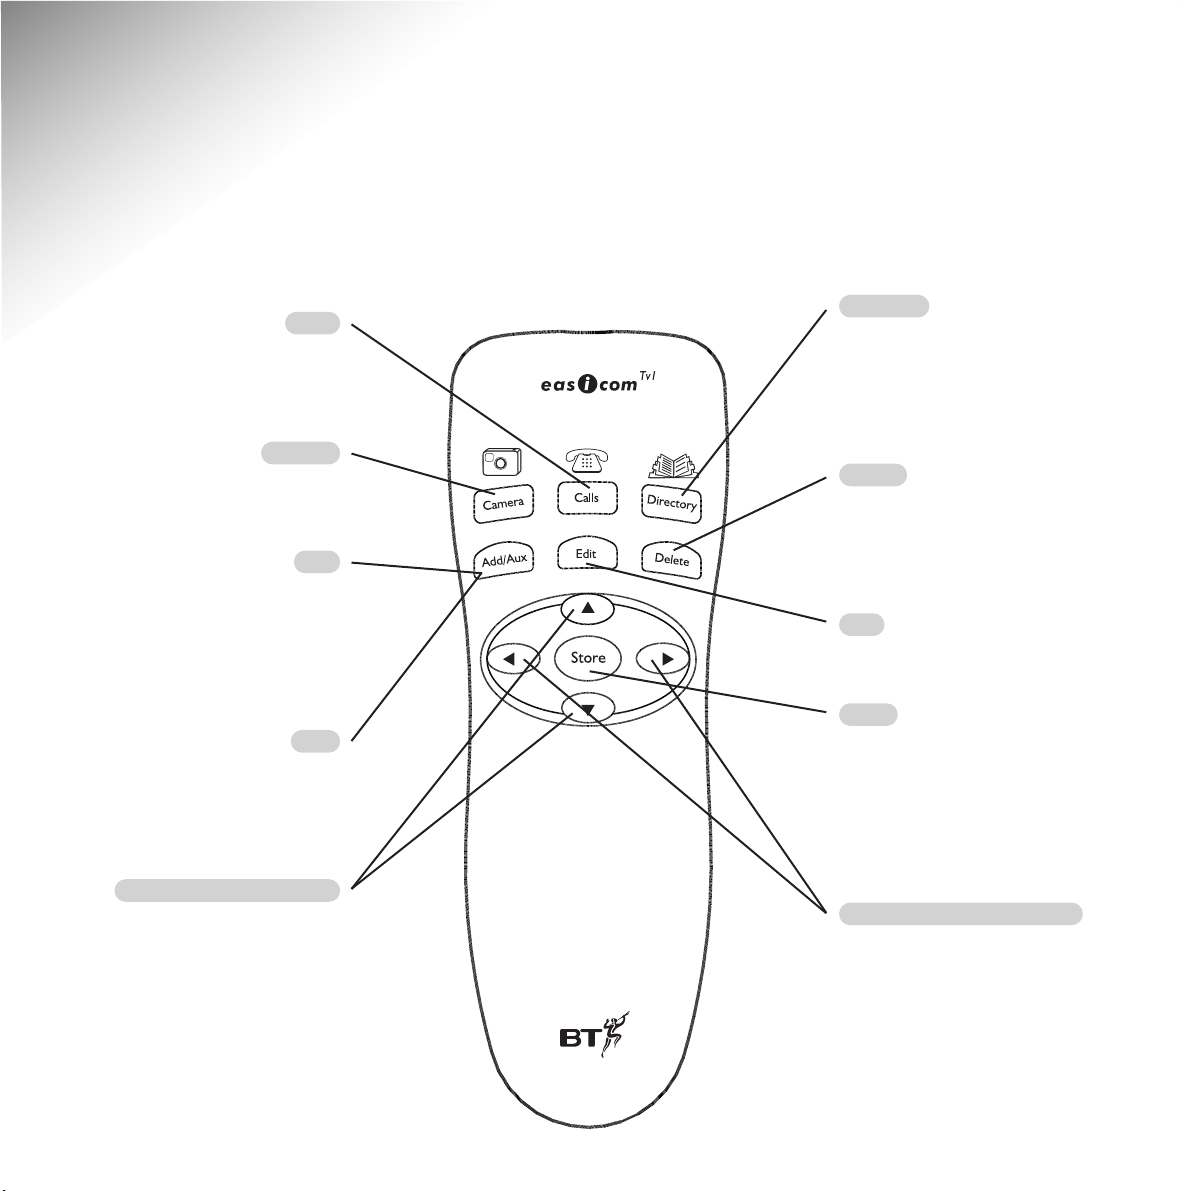
At a glance
Remote control
Calls
Brings the Calls List onto the
screen (see page 11), so that you
can see who has been trying to
contact you. Press again to exit.
Camera
Switches to the Camera picture
(optional extra, see page 18).
Press again to switch back.
Add
Used to add an entry into the
Directory from either the Director y
or Calls List screen.
Confirms selection of individual
characters when saving or editing
names or numbers in the Directory.
AUX
The AUX key will switch to the
equipment attached to your AUX
port (see page 10)
eg. Video, Satellite, Games console.
Press again to switch back.
UP and DOWN ARROWS
Move you up and down the Calls
List and Directory screens.
Directory
Brings your Directory details onto
the screen (see page 13). You can
now add to or edit the details of
your most frequent callers. Press
again to exit.
Delete
Will delete the current entry
highlighted in the Calls List or
Directory.
Edit
To edit an entry in the Director y.
Store
Stores entries in the Directory.
Saves changes when editing the
Directory.
Can also be used to produce a plain
blue background to make
information on the screen easier to
read (see page 12).
LEFT and RIGHT ARROWS
To select characters when entering
names and numbers into the
Directory.
Also used to select on screen options
when prompted.
1
Page 4
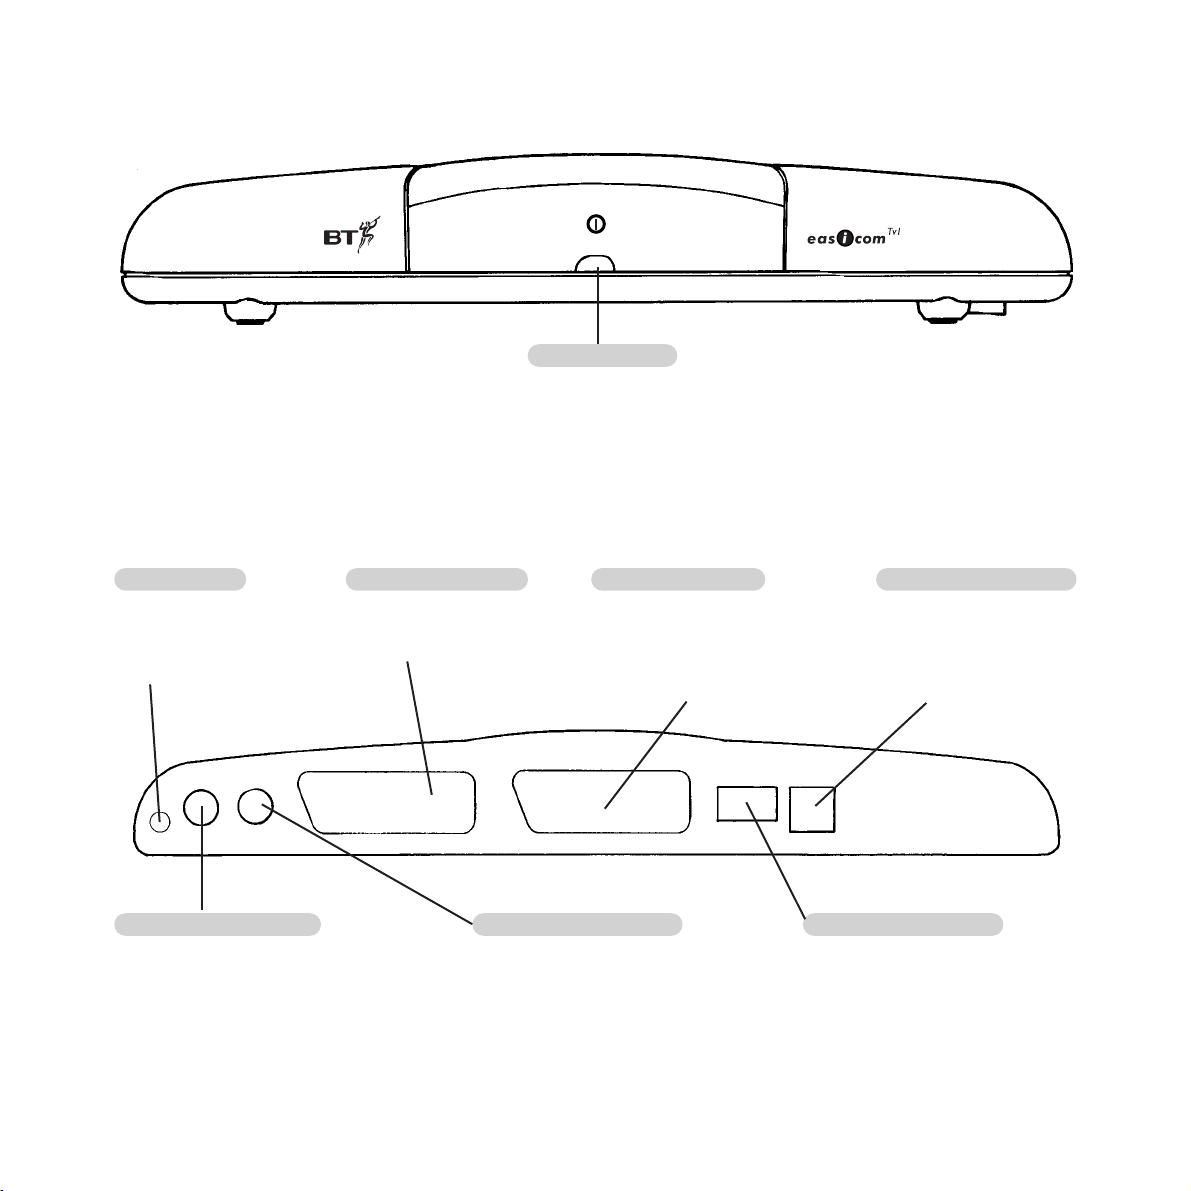
Set-top box
Front
Back
Power
Status Indicator
Red light is on when the power is
connected. The light flashes to let you
know when you have calls in your
Calls List (page 10) and flashes fast when
a priority caller has called you (page 17).
Power socket
To connect Easicom
TV1
the mains power via the
power supply cable (with
Transformer) provided.
Scart socket (to TV
to
To connect Easicom
to your television, via the
Scart cable (provided).
TV1
)
Scart socket (AUX
To connect Easicom
other equipment (such as a
Video player, Satellite receiver,
games console etc) via a Scart
)
TV1
to any
Telephone line socket
To connect Easicom
TV1
the telephone wall socket
via the telephone line
cord (provided).
to
cable (not provided).
Camera
Camera
Video in
Audio in
12 v
DC
Camera port 2 (AUDIO
TV Scart
)
If you wish to connect a camera
monitoring system (See page 18) to
the Easicom
TV1
. This port is used to
connect the Audio input.
Camera port 1 (VIDEO
If you wish to connect a camera
monitoring system (See page 18) to
the Easicom
connect the Video input.
Aux Scart
)
TV1
. This port is used to
Telephone Line
Enables you to plug in a telephone.
When the Easicom
to the telephone line you can if you
wish, plug in your telephone here,
Telephone socket
TV1
is connected
so that it is conveniently situated
near the television for you to
answer calls.
2
Page 5

Contents
At a Glance 1
Introduction 4
Setting up 5
Safety Instructions 8
Using Your Easicom
Optional Camera Monitoring System 18
Maintenance 20
Help and advice 21
Technical specification 24
Index 25
TV1
9
3
Page 6
Introduction
Look who’s calling!
BT are always looking for new ways to make
communicating easier. That is why we are
pleased to introduce the Easicom
innovative new product which lets you make
the most of the Caller Display telephone
network service.
For those of you who already use Caller Display,
you will appreciate how convenient and helpful it
is to know who is calling you before you pick up
the phone and to find out who has been trying to
contact you while you were away.
Easicom
INTRODUCTION
way you use this service – by showing this
information on your television screen. Now you
need not leave your armchair to see who is
calling you, and when you have been away, the
touch of a button will display a clear list of who
has been trying to contact you.
A whole host of other useful features have been
included to make Easicom
With name and number matching from your
personal Directory, you will see the name of the
caller appear on screen and priority calls can be
‘tagged’ with a special symbol to ensure you
spot your most important callers instantly.
TV1
, an
TV1
has been designed to enhance the
TV1
even more helpful.
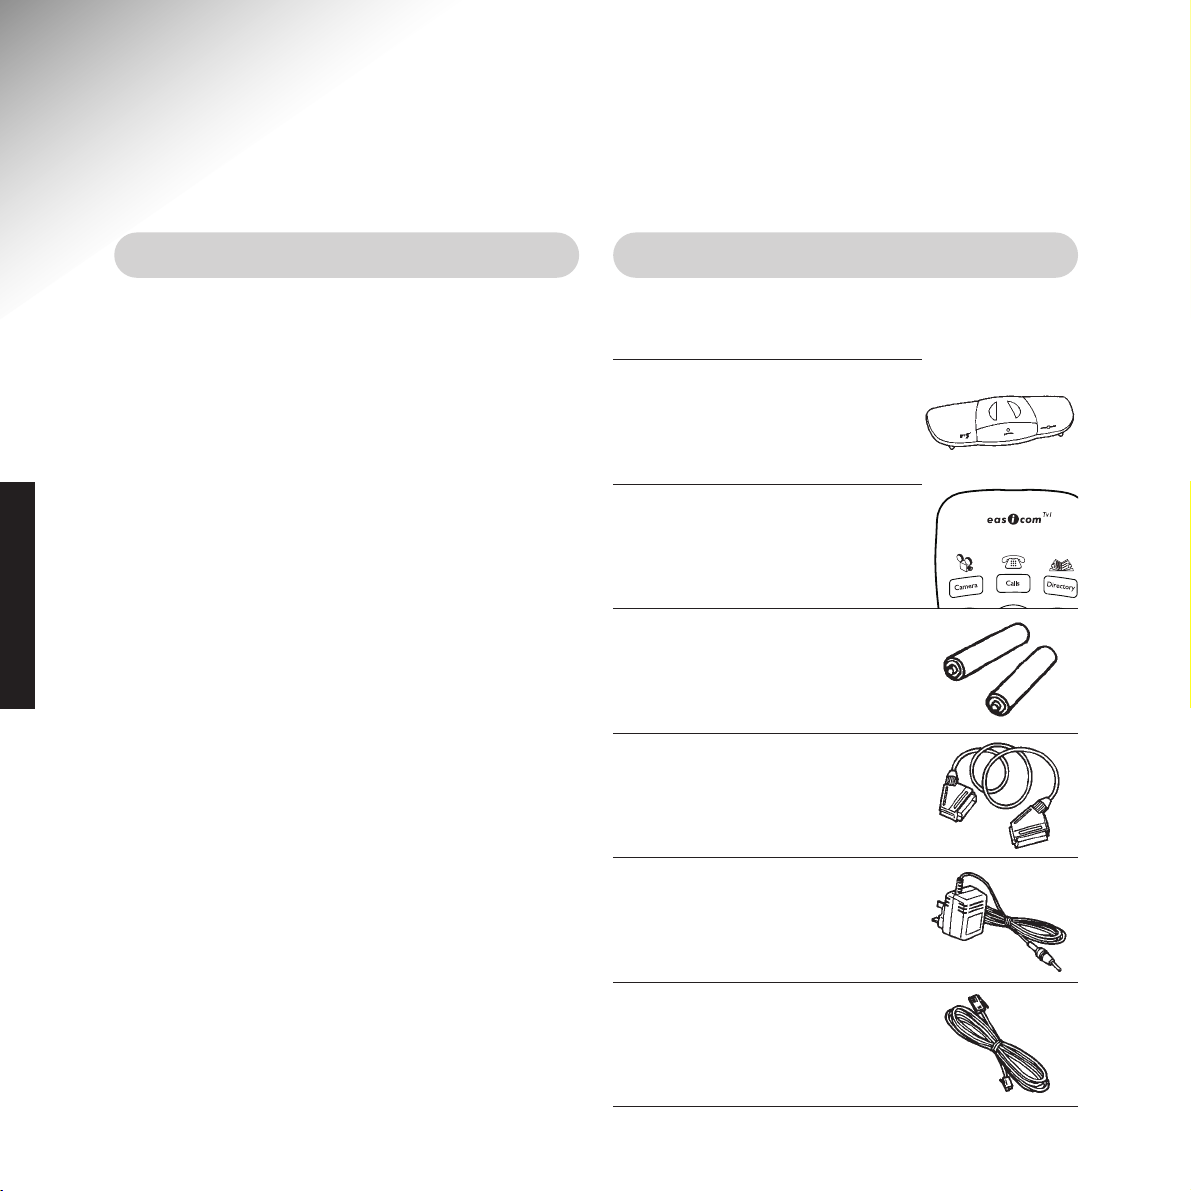
Unpacking your Easicom
TV1
When you have unpacked your Easicom
should have:
Easicom
●
Easicom
●
Batteries for the Remote
●
Control (AAA Alkaline)
Scart Lead (for connecting
●
to your television)
Power Supply and Transformer
●
TV1
Set-Top Box
TV1
Remote Control
TV1
you
If you wish, you can even add a camera
monitoring system to allow you to see who is
at your front door, or if the baby is asleep, with
7.5m Telephone Line Cord
●
pictures and audio direct to your screen!
4
Page 7
Setting up
Follow the instructions in this section to set up your Easicom
for use.
TV1
ready
Subscribe to a Caller Display
1
service
You must subscribe to BT’s Caller Display
service (or a Caller Display service from your
network provider), before the Easicom
TV1
will
work. This is a chargeable service.
If you do not yet subscribe to this service,
contact BT on
0800 800 150 (or your network
provider).
TV1
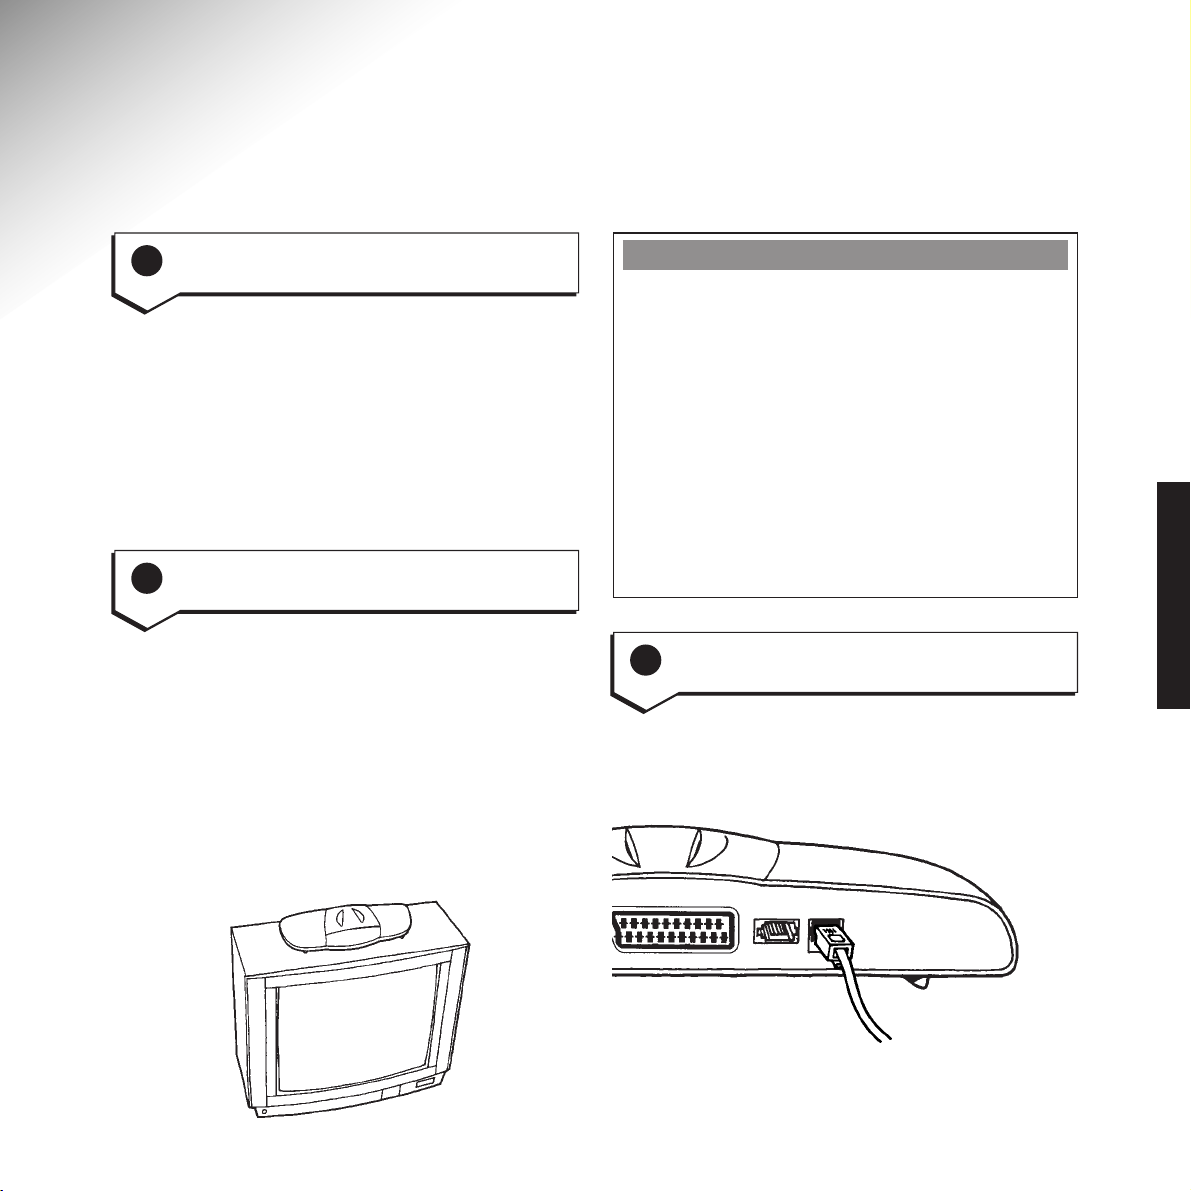
Place your Easicom
2
on your
Television set
TV1
The Easicom
on top of your television. If you wish, you can
place it below or next to the set – as long as the
front of the unit is facing forwards and is not
obscurred from where you would normally wish
to operate it (eg. your sofa). Also, check that it is
close enough to connect to the Television via the
Scart lead, within reach of a power socket and
within 7.5 metres of a telephone socket.
has been designed to sit neatly
Telephone extension socket
BT have provided an extra long telephone cable
(7.5m) to reduce the need to install an
additional extension socket. However, if you do
not have a telephone socket within reach, you
will need to have an extension socket installed.
Contact BT on 150 (or your network provider)
who will be happy to provide an extension for
you (this is a chargeable service). Alternatively,
you can purchase a DIY extension kit (available
from BT shops and other retail outlets) and fit
an extension yourself.
Connect the telephone line cord
3
to the Easicom
TV1
Plug the smaller end of the telephone line cord
into the telephone socket on the back of your
Aux Scart
TV1
.
Telephone
Line
Easicom
SETTING UP
5
Page 8
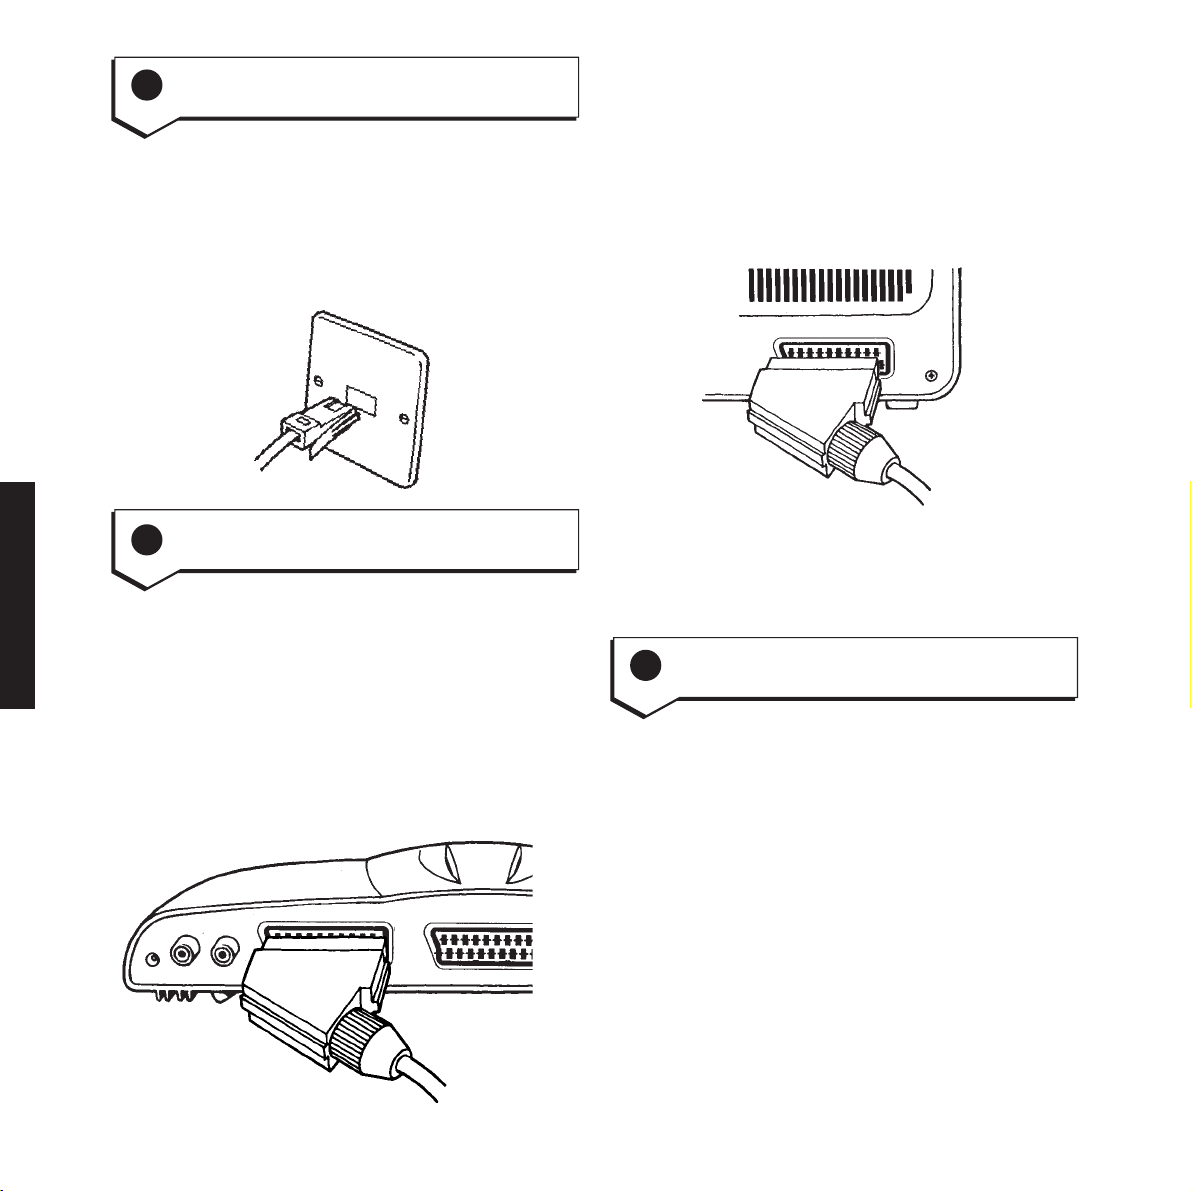
Plug the telephone line cord into
4
the telephone wall socket
Run the other end of the telephone line cord to
the telephone wall socket. Be sure that the line
cord is safety fixed where there is no danger of
anybody tripping over it .
Connect the plug into the telephone wall socket.
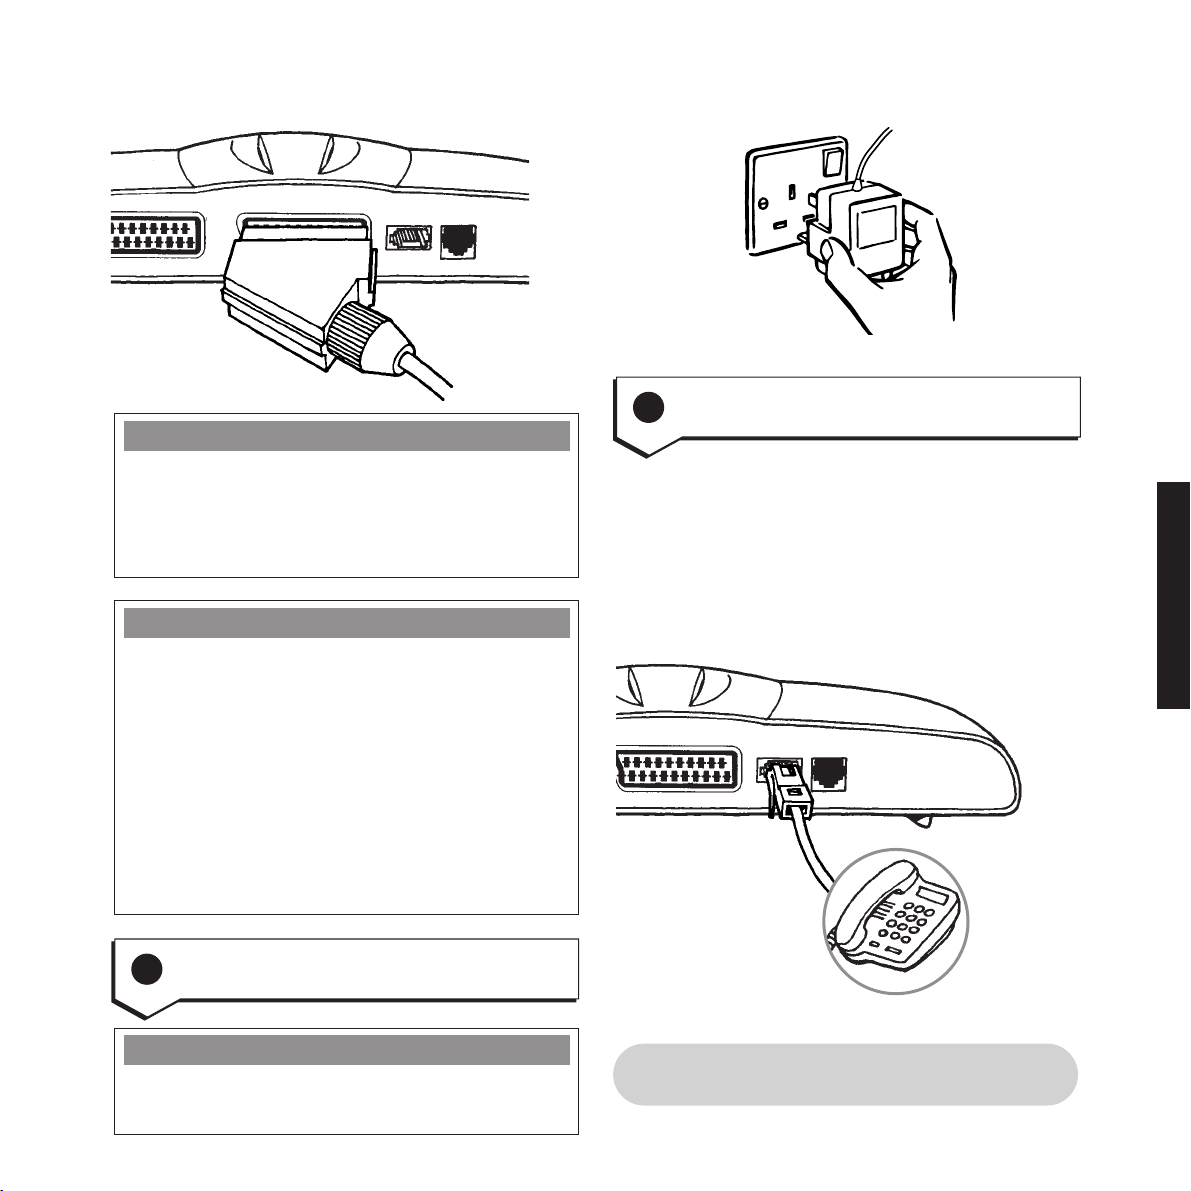
Connect the plug at the other end of the Scart
lead to the Scart connector on the back of your
Television set. If you are unsure which is the
Scart socket on your television, please refer to
the manufacturers guide for your particular set.
If there are two Scart connectors, connect the
Easicom
TV1
to Scart connector 1.
SETTING UP
5 Connect the Scart lead to the TV
The Easicom
TV1
is best connected to a Television
via a Scart connector.
Connect the plug at one end of the Scart lead
(it does not matter which) to the socket marked
TV on the back of your Easicom
TV1
. If the
Television Scart connector is already in use,
unplug the current connector and refer to the
next step (step 6).
Aux Scart
12v DC
Camera
Audio in
Camera
Video in
TV Scart
If your TV is not equipped with a Scart
connector you will need to purchase a separate
modulator.
Connect to other equipment
6
(Video, Satellite etc)
If your television is already connected to another
piece of equipment (eg. video) via the Scart
port, you will need to connect that equipment
through the Easicom
equipment through the Easicom
to see incoming calls on screen when you are
using that equipment eg. when watching a video.
Locate the existing Scart used to connect your
equipment to the television. Unplug the end
attached to the socket at the back of your
television.
TV1
. Connecting your other
TV1
will allow you
6
Page 9
Plug this end into the back of the Easicom
the socket marked AUX.
TV1
in
Plug the power adaptor into the power socket on
the wall and switch on.
TV Scart
Aux Scart
Telephone
Line
VIDEO
If you happen to be recording on to video when
a call comes in, the callers number will be
displayed on the screen, but will not be recorded
onto the video tape.
IMPORTANT
In some instances, when other equipment is
connected through the Easicom
necessary to ensure that this equipment is
switched to standby when not in use. This will
ensure you can view the caller information and
menus in all circumstances.
TV1
, it may be
8 Connect a telephone (optional)
If you wish, you can connect your existing
telephone into the Easicom Set-top box to
ensure that it is conveniently placed for you to
answer the calls you see appear on the screen.
Simply plug the telephone into the socket as
shown.
Aux Scart
Telephone
Line
SETTING UP
If you have any problems viewing caller
information on screen, please refer to the Help
and advice section, page 21.
7 Connect to the power supply
POWER FAILURE
In the event of a power failure to the Easicom
all stored data will be saved in the memory.
TV1
Your Easicom
,
for use
TV1
is now ready
7
Page 10

Safety instructions
Warning
one provided, otherwise you may permanently
damage your Easicom
and telephone line socket during storms.
SAFETY INSTRUCTIONS
For the remote control use only
approved batteries (2 x AAA
Alkaline batteries). Do not try
to use any power supply except the
TV1
.
There is a slight chance that your
Easicom
electrical storm. We recommend that
you unplug it from the mains power
TV1
could be damaged by an
Do not submerge any part of the
Easicom
or use in a damp environment, such
as a bathroom.
Do not expose to fire.
The product will produce a certain
amount of heat during normal use.
Make sure that you allow adequate
ventilation around the Easicom
TV1
, base or batteries in water
TV1
.
8
Page 11

Using your Easicom
TV1
Caller Display on your TV screen
The Easicom
without you having to move from your armchair!
When your phone rings, the red light on your
Easicom set-top box will flash and the telephone
number and name (see page 12) of the person
calling you will appear on your TV screen, so
you know who is calling before you answer.
The number will appear discreetly but clearly at
the top left of the Television or Satellite
programme, Video or Game you are watching.
It will stay on screen for 10 seconds or until you
hit the Delete key on the Remote Control.
If you wish you can allocate a priority tag to your
most important callers (see page 17).
You must have your TV switched on to view the
calls as they arrive, but it does not have to be
switched on to record the callers details into the
Calls List (see page 10).
TV1
lets you see who is calling you
PLEASE NOTE
When a call is received or stored by your
Easicom
go blank and the sound briefly mute. This
The red light on the Easicom set-top box will
continue to flash until the Calls List is accessed
TV1
, the screen will momentarily
will not affect any Video recording.
(see Page 10).
To remove an incoming number from
the top of the screen
When the number appears on screen:
Press the
will disappear from the screen (but will
be recorded in the Calls List).
You do not need to delete every call
from the screen as it will disappear
automatically after 10 seconds.
DELETE button. The number
USING
9
Page 12

To stop all numbers appearing on
the screen
Disconnect the telephone socket
from the back of the Easicom
set-top box or from the telephone
wall socket.
Please note that this will also stop
incoming calls from being recorded in
the Calls List. Also, any equipment
plugged into the associated phone
socket will not work.
TV1
To manually switch from the TV
screen to other equipment connected
via the AUX connector
The Calls List
The Calls List provides a visual record of the last
25 telephone numbers that called you (whether
you answered the call or not).
The touch of a button brings your Calls List onto
the TV screen, so that if you have been away
from your phone, you will be able to see at a
glance who has been trying to contact you.
Flashing
Cursor
Date of call
highlighted
by cursor
Calls Page 1 of 5
䊳
0123-9842
INTERNATIONAL
0171-257 2298
䊳
䊴
JOHN
0789-1011
DEREK
9 Jun 11:00am
Priority tag
Time of call
highlighted
by cursor
USING
10
When viewing TV and no text from
TV1
Easicom
Press and hold the
displayed
ADD/AUX button
until the screen switches to the AUX
connected equipment (eg. video).
Press and hold the
ADD/AUX button
again to view the TV screen again.
The Calls List will show:
1 The number of the person that called you,
including the area code.
If a number has been WITHHELD by the
caller, or is UNAVAILABLE from the network,
it will be recorded as such and the number
will not be shown.
International numbers will not be shown,
just the word INTERNATIONAL.
Calls from a payphone will state PAYPHONE
and give the number.
Caller details originating from a Cable network
will be shown if provided by that network.
However, the name will only be shown if
matched to a Directory entry (see page 12).
Mobile phone numbers will be shown if that
information is available from that particular
network.
Page 13

2 The name allocated to that number
(if associated with a name stored in your
Directory, see page 12)
3 Whether the call was one of your allocated
Priority numbers (see page 17). This will be
shown by an arrow indicator next to the call.
Further caller information is available when
you highlight a particular call with the on
screen cursor (using the up and down arrow
buttons). At the bottom of the screen, below
the dotted line, further details of that call will
be shown, these are.
4 The day and time of the call.
When the Calls List is full (25 entries), the
oldest call record will automatically be deleted
to allow the latest call to be recorded. You
may wish to delete calls from the Calls List
yourself, once they have been viewed (see ‘to
delete an entry from the calls list’, page 12).
If you wish, you can add numbers from the
Calls List straight into the Directory, see
Page 15.
To view the Calls List
Press the CALLS button.
To exit from the Calls List
From the Calls List screen:
Press the
CALLS button.
Moving around the Calls List
The Calls List entries will be displayed
over up to 5 screens.
Scroll through the individual entries
using the
UP or DOWN ARROW
buttons. Your position on the screen
will be indicated by a flashing arrow
cursor next to the selected entry.
You will automatically move to the next
screen after you reach the top or
bottom entry.
If you wish to jump straight to the next
screen, press and hold the
ARROW button (the cursor will remain
UP or DOWN
in the same position on each page).
To switch from the Calls List to
the Directory
USING
VIDEO
Viewing the Calls List whilst recording a
Video will not affect the recording or appear on
the recording.
From the Calls List screen:
Press the
DIRECTORY button.
11
Page 14

To delete an entry from the Calls List
To view the Calls List on a plain blue
background
USING
From the Calls List screen:
Use the
UP or DOWN ARROWS to
highlight the entry you wish to delete.
The selected entry will be highlighted
on screen by a flashing arrow symbol.
Press the
DELETE button. The screen
will ask you to confirm YES or NO.
Select YES by pressing the
STORE
button. The screen will briefly show
DELETING....
The selected entry has now been
deleted.
To delete all entries from the Calls List
From the Calls List screen:
Press and hold the
The screen will show DELETE ALL
CALLS?
Select YES by pressing the
button to confirm.
If you select YES, the screen will show
DELETING and all entries from the
Calls List will be deleted.
DELETE button.
STORE
Press buttons in the order shown
To improve clarity, you may wish to
view the Calls List over a plain
background. If so, you can change the
background.
With the Calls List on screen:
Press and hold the
STORE button.
The Calls List will appear over a plain
blue background. Press and hold again
to remove.
If you have set your Calls List to appear
over a blue background it will not effect
the appearance of any new calls, which
will still be shown on top of the TV
picture.
The Directory
You can build up a personal Directory of up to
20 of the people that call you most frequently, or
are most important to you.
Once you have stored a name and number in
the Directory, every time you receive a call from
that number, the name of the person calling will
be displayed and then stored in the Calls List.
This makes it much easier to identify your
callers at a glance.
12
Page 15

Sample of Directory screen
Directory Page 1 of 5
䊳
DAD
DEREK
JOANNE
JOHN
JOHN MOBILE
MUM
SUE
Num: 0123 438 9101
You can add a new name and number to the
Directory (see page14), or you can add a
number directly from the Calls List to the
Directory (see page 15).
You can also choose whether to store that
number as a Priority Call (see page 17).
Directory entries are stored in alphabetical
order, and with numeric entries before alpha
entries.
To view the Directory
Moving around the Directory
The Directory entries will be displayed
over up to 3 screens (up to 20 entries).
You can scroll through the entries using
the
UP or DOWN ARROW buttons - your
position on the screen will be indicated
by the flashing arrow cursor next to
the entry.
Flashing
Cursor
You will automatically move on to the
next screen after you reach the top or
bottom entry.
Directory Page 1 of 5
DAVE
䊳
DEREK
JANE
JOHN
MARK
MUM
SUE
Num: 0123 045 67891
USING
Press the DIRECTORY button.
VIDEO
Viewing the Directory whilst recording a
Video will not affect the recording or appear on
the recording.
If you wish to jump straight to the next
screen, press and hold the
ARROW button (the arrow cursor will
UP or DOWN
remain in the same position on each
page).
13
Page 16

USING
Adding a new name and number to
the Directory
You cannot add a number to the
Directory without storing a name to go
with it.
If the Directory is full, the message
DIRECTORY FULL will be displayed
on the screen when you press the
button. Delete an existing entry to create
space for your new Directory entry.
Press the
DIRECTORY button. If you
have not stored any Directory entries,
the screen will read Directory Empty.
Press the
ADD button. The screen will
appear for you to add a telephone
number, name and whether to allocate
the number as a Priority (see Page 17).
Add To
NAME:................
NUM:.................
PRIORITY: YES䊳NO
PRESS STORE TO SAVE
Directory
Now add the name of the person you
wish to store to your Directory.
When adding names and numbers to
the Directory, use the
ARROW buttons to scroll through the
LEFT and RIGHT
choice of characters (letters, numbers,
a space, and other characters). Press
and hold down the key to scroll through
more quickly.
ADD
When you reach the character you
wish to use, release the
ARROW button
so that the character is displayed on
screen.
Press the
ADD button. The character
will be retained and the cursor will
automatically move on to the next space,
ready for you to add the next character.
Continue adding characters until you
have completed the name (maximum
20 characters).
If you make a mistake, just hit the
DELETE key – the cursor moves back
deleting the previous character.
Now, use the
DOWN ARROW to move
down the screen to the next line, where
you must enter the telephone number
(including area code) that you wish to
store under that name.
Use the
LEFT and RIGHT ARROWS as
before, to scroll through the numerals
until the numeral you wish to add
appears on the screen.
Press the
ADD button. The numeral will
be retained and the cursor will move on
to the next space, ready for you to add
the next numeral.
Continue adding numerals until you
have completed the telephone number
(maximum 18 digits). You do not need
to add any spaces for the telephone
number to be recognised by the
Easicom
TV1
and displayed on screen – but
if you do wish to, a space (blank) has
been included as one of the characters,
or simply press the
ADD button again.
14
Page 17

Using the DOWN ARROW move the
cursor down to the next line, which
gives you the option to allocate the
entry a Priority status (see Priority
Call page 17).
Use the
LEFT and RIGHT ARROW buttons
to move the cursor to either the YES or
NO position, depending on your choice.
When you have completed your new
Directory entry, you must press the
STORE button. The screen shows
SAVE CHANGES?
To add a number from the Calls List
to the Directory
You cannot add a number to the
Directory without storing a name to go
with it.
If the Directory is full, the message
DIRECTORY FULL will be displayed
on the screen when you press the
button. Delete an existing entry to create
space for your new Directory entry.
With the Calls List on screen:
ADD
Use the
LEFT and RIGHT ARROW
buttons to select either YES or NO
then press the
STORE button to
confirm. If YES is selected the screen
shows SAVING and the entry is now
stored in the Directory.
From now on, when you receive a call
from that number, the name will also
appear on the screen and be stored in
the Calls List.
TIME OUT
The Directory menu will clear from the
screen if you do not use it for 60 seconds.
Any information not stored will not be saved.
PLEASE NOTE
Whenever the screen prompts you to confirm,
you must move the cursor to highlight the choice
you wish to make, then press the
STORE button.
Using the
UP and DOWN ARROWS,
highlight the number you wish to
store to the Directory.
Press the
ADD button. Your cursor will
be positioned for you to start to enter a
name.
Using the
LEFT and RIGHT ARROW
buttons to select the first letter, then
press the
ADD button.
The cursor will move to the next space,
ready for you to add the next letter of
the name. Continue adding letters until
you have completed the name you wish
to associate with the chosen telephone
number.
Press the
DOWN ARROW button to move
you on to allocate a Priority marker.
The screen will ask if you wish to
allocate the number as a priority (see
page 17). Move the cursor using the
LEFT and RIGHT ARROWS to select
YES or NO.
USING
15
Page 18
Press the STORE button. The screen
will show SAVE CHANGES.
Use the
LEFT or RIGHT ARROW
buttons to select either YES or NO
then press the
STORE button to
confirm. The screen shows SAVING
and the number is now stored in your
Directory under the chosen name.
From now on, when you are called from
that telephone number, the associated
name will appear on the screen and be
shown in your Calls List.
Using the UP and DOWN ARROW
buttons to move up and down the screen
to select the line you wish to edit.
When editing names and numbers in the
Directory, use the
DELETE button to
move back through the current entry
and delete it. Then select the characters
you need, using the
ARROW buttons to scroll through the
LEFT or RIGHT
choice of characters (letters, numbers, a
space, and other characters). Press and
hold down the key to scroll through
more quickly.
USING
PLEASE NOTE
You cannot add a number from the Calls List
if it has already been entered in the Directory,
or if the number was
WITHHELD, INTERNATIONAL, UNAVAILABLE,
OPERATOR, RINGBACK, OTHER OPERATOR,
CLI IS PRIVATE or PAYPHONE.
To edit a Directory entry
Press the DIRECTORY button.
The first page of the Directory will
appear on screen.
Using the
buttons, highlight the entry you wish to
edit with the arrow cursor.
Press the
the entry will appear on the screen.
UP and DOWN ARROW
EDIT button. The details of
When you reach the character you wish
to use, release the
ARROW button so
that the character is displayed on screen.
Press the
ADD button. The character
will be retained and the cursor will
automatically move on to the next space,
ready for you to edit the next character.
If you make a mistake, press the
DELETE key – the cursor moves back
deleting the previous character.
If you wish to delete an entire line eg:
John Smith press and hold the
DELETE
button until the line disappears.
Continue adding characters until you
have finished editing the entry.
Press the
STORE button to save the
changes. The screen will show SAVE
CHANGES?
16
Page 19

Press the LEFT or RIGHT ARROW
buttons to select either YES or NO
then press the
STORE button to
confirm. If YES is selected the screen
shows SAVING and the changes made
to the Directory entry are saved.
Once you have recieved a Priority call, the red
light will continue to flash at the faster rate, letting
you know that a Proirity call has been received.
You can then access your Calls List to see when
they called. A Priority call is stored in the Calls
List and in the Directory with the Priority tag.
To switch from the Directory to the
Calls List
From the Directory screen:
Press the
CALLS button.
To exit from the Directory
From the Directory screen:
Press the
DIRECTORY button.
Priority Calls
When storing a name and number into the
Directory, you will be given the choice to
allocate Priority status to that number (page 15).
You might typically wish to allocate Priority
status to those callers most important to you.
Flashing
Cursor
Date of call
highlighted
by cursor
Calls Page 1 of 5
0124-429 6247
䊳
䊳
䊳
0247-949 9494
䊳
0207-327 2867
01473-612290
8 Jun 11:22am
䊴
MUM
DAD MOBILE
0123-456 789
䊴
䊴
Priority tag
Time of call
highlighted
by cursor
USING
When a Priority Caller rings you, the red light
on the Easicom set-top box will flash at a more
rapid rate than for a non-priority caller and the
name will appear on screen with a special
priority tag.
17
Page 20

Optional Camera Monitoring
System
CAMERA
Easicom
TV1
has purpose built ports into which
you can connect a camera monitoring system.
Setting up
Set up your Camera Monitoring
System in situ
Follow the instructions provided with your
camera monitoring system to set the camera
where you wish it to be eg. at your front door or
a babies room.
TV1
TV1
set-top
Run the cables back to the Easicom
box (ensuring they are fastly secured and do not
cause an obstruction).
Connect the Camera Monitoring
System to the Easicom
Connect the Video output from your camera into
the CAMERA VIDEO IN port at the back of
your Easicom
TV1
.
Connect the Audio output from your camera into
the CAMERA AUDIO IN port at the back of
Camera
Audio in
TV1
Camera
Video in
.
TV Scart
Aux Scart
TV1
your Easicom
12v DC
Using with your Easicom
Once your camera monitoring system has
been set up, it is very simple to use with your
Easicom
TV1
.
To view the camera image on the
TV screen
Press and hold the CAMERA button
until the camera image appears on
screen.
18
12v DC
Camera
Audio in
Camera
Video in
TV Scart
Aux Scart
You will also hear the audio output
through your television speakers.
Page 21

To remove the camera image from
the TV screen
Press and hold the CAMERA button
until the camera image disappears from
the screen.
The image and audio will return to the
TV broadcast.
A callers telephone number will appear
on your TV screen as normal while
viewing the camera picture.
CAMERA
19
Page 22

Maintenance
General
Clean the outside of the
control with damp (not wet) cloth or anti-static wipe.
Service
Do not leave dead batteries in the Remote Control.
Replace them immediately with new AAA Alkaline
batteries as soon as they run out.
There are no customer replaceable parts on the
Easicom
Remote Control).
MAINTENANCE
Easicom
TV1
(except for the batteries in the
TV1
and remote
20
Page 23

Help and advice
Symptom Possible Cause Solution
The product does not appear to be
working at all.
The red light starts flashing
when I have a new call but no
information appears on the TV
screen. Also, nothing appears on the
screen when I press the Calls or
Directory button of the Remote
Controller but the red light does stop
flashing.
Easicom
Scart cable fitted incorrectly.
You have connected equipment to the
AUX socket of Easicom
equipment is turned on but you are
watching normal terrestial TV (this
has disabled the automatic Scart
switching).
Your TV has two Scart connectors,
but only one is fully wired.
Your TV Scart connector does not
support full Scar t functionality.
TV1
not powered.
TV1
and the
Ensure the power supply lead is
plugged in and switched on,
(see page 7.)
Ensure Scart cable is fitted between
Television and “TV” socket of
Easicom
This problem can be avoided if you
ensure that any equipment attached to
the AUX socket of your Easicom
(video, satellite etc) is set to
STANDBY when not in use.
Ensure that Easicom
to Scart connector 1 on your TV.
Cable your Easicom
Recorder with Scart cables according
to instructions 5 and 6 on page 6 of
this User Guide. Select the AV input
on your TV. Always change TV
channels via the Video Recorder
Remote Controller.
TV1
, (see page 6.)
TV1
is connected
TV1
, TV and Video
TV1
HELP AND ADVICE
My TV picture has disappeared !!
Has the camera or AUX button been
pressed?
Press and hold Camera or AUX
button for greater than 1 second.
21
Page 24

Symptom Possible Cause Solution
Caller Display information does not
appear on the screen and red light
doesn’t flash when new calls are
received.
No name is presented when I receive
a call, just the number.
The Remote controller doesn’t appear
to work.
The Easicom
through some screens telling about
the product.
I only have one telephone socket in
my house Where do I plug my
telephone?
HELP AND ADVICE
The product displays the Calls List
and Directory over a blue
background.
TV1
keeps scrolling
Have you registered to the Caller
Display service?
There is no directory entry for this
number.
The path is blocked between the
controller and the Easicom
TV1
.
Batteries low.
You have somehow accessed the inbuilt demonstration mode.
You are in blue screen mode,
(see page 12.)
Call BT or your telephone service
provider.
Enter the person’s name in your
Directory (see page 14).
Ensure that the front of the Easicom
TV1
has nothing obscuring it.
Replace batteries.
Press and hold the right arrow button
for greater than 10 seconds or turn
off the power to the product for a few
seconds.
Either Plug it into the associated
telephone phone socket at the rear of
Easicom
TV1
or buy a doubler
connector.
While Calls List or Directory are
displayed on the screen Press and
hold the Store key for greater than 1
second.
22
Easicom
TV1
displays the Calls List,
Directory AND Caller Display
information over a blue background.
When my TV is in standby mode, an
incoming telephone call causes my
TV to turn on!
Your TV Scart connector does not
support full Scar t functionality.
Some TVs auto-switch from Standby
mode to On when the Scart
connector is activated.
Cable your Easicom
TV1
, TV and Video
Recorder with Scart cables according
to instructions 5 and 6 on page 6 of
this User Guide. Select the AV input
on your TV. Always change TV
channels via the Video Recorder
Remote Controller.
Ensure that your TV is switched Off
(i.e. not in Standby mode) when not
is use. This will also save power.
Page 25

Symptom Possible Cause Solution
There is no Scart connector on the
back of my TV.
Sometimes when a call is received,
“Unavailable” or “Withheld” is
displayed on the TV screen.
When a call is received and the
number appears on the TV screen,
my TV also shows the channel
identifier.
Occasionally when the phone rings,
“INVALID DATA” appears on the TV
screen.
This is because the caller may not
want you to know who is calling, or
perhaps because the call has come
from a private company that does not
deliver Caller Display.
This is a function of the Scart
switching and is quite normal.
The data from the telephone
exchange has become corrupted - the
Easicom
TV1
is not faulty.
BT recommended that the Easicom
TV1
is connected to a TV via a scart.
However, if you do not have a TV with
a scart connection ability, Easicom
TV1
can be connected via a modulator,
which will need to be purchased
separately. Please call the
BT Helpline on 08457 573464
for advice.
If this occurs on a frequent basis,
contact your telephone Service
Provider for assistance.
HELP AND ADVICE
HELPLINE
If you continue to have any problems, please call our Helpline on 08457 573464
23
Page 26

Technical specification
Non-volatile Memory Storage 1Kbytes
On Screen Display 24 Characters X 10 Lines
TV and AUX sockets Scart
Camera video and audio sockets Phono
Power Supply 12v DC, 300mA
Infra Red Controller batteries 2 X AAA alkaline
Video Levels 1Volt p-p, 75 Ohms
Weight 400 grams
Telephone line cord 7.5 metres
TECHNICAL
24
Scart Cable 1.2 metres
Dimensions 260(L) x 100(D) x 40(H)mm
Page 27

Index
AUX 1, 2, 6
Batteries 4, 20
Cable TV 6
Caller Display on your TV screen 9
removing a number from the screen 9
stop numbers appearing on the screen 10
Caller Display subscription 5
Calls List 10
delete all entries 12
delete an entry 12
exit 11
moving around 11
to switch to the Directory 11
viewing 11
viewing on a plain blue background 12
Camera monitoring system 18
connection to Easicom TV1 18
remove camera image from TV screen 19
setting up 18
using with your Easicom TV1 18
viewing camera image on screen 18
Cleaning 20
Connection to other equipment 6
Directory 12
add a number from the Calls List 15
adding an entry 14
edit an entry 16
exit 17
moving around 13
to switch to the Calls List 17
viewing 13
Help and advice 21
Maintenance 20
Positioning your Easicom TV1 5
Power failure 7
Power light 2
Power supply 7
Priority calls 17
Safety instructions 8
Satellite 6
Scart lead 6
Service 20
Switching from TV screen to
other equipment 10
Technical specification 24
Telephone, connecting a 7
Telephone extension socket 2, 5
Telephone line cord 2, 5, 6
Time Out 15
Unpacking 4
Video 6, 11
Warnings 8
INDEX
25
Page 28
Offices in Europe, North America,
Japan and Asia Pacific.
The telecommunications services described in this publication
are subject to availability and may be modified from time to time.
Services and equipment are provided subject to British
Telecommunications plc’s respective standard conditions of contract.
Nothing in this publication forms any part of any contract.
Touchtone™ is a registered trade mark of
British Telecommunications plc in the UK.
© British Telecommunications plc 1999.
Registered Office: 81 Newgate Street, London EC1A 7AJ.
Registered in England No. 1800000.
Designed by: The Art & Design Par tnership Limited.
Printed in China. Easicom
Printed on paper which meets international environmental standards.
TV1
. Issue 1 (7/99) 1
CE compliant to 89/336/EEC
(EMC Directive) & 73/23/EEC
(Low Voltage Directive)
APPROVED
for connection to
telecommunication systems specified
in the instructions for use subject to
the conditions set out in them
 Loading...