

Page 1

installation, start-up
and service instructions
SINGLE PACKAGE ROOFTOP
ELECTRIC HEA TING/ELECTRICCOOLING UNITS
Cancels: II 559F-180-3 II 559F-180-4
559F
Sizes 180-300
15 to 25 Tons
10/15/98
CONTENTS
Page
SAFETY CONSIDERATIONS ........................1
INSTALLATION .................................1-15
I. Step 1 — Provide Unit Support ...............1
II. Step 2 — Rig and Place Unit .................1
III. Step 3 — Field Fabricate Ductwork ............7
IV. Step 4 — Make Unit Duct Connections .........7
V. Step5—TrapCondensate Drain ..............7
VI. Step 6 — Make Electrical Connections .........8
VII. Step 7 — Make Outdoor-Air Inlet
Adjustments ......................11
VIII. Step 8 — Install Outdoor-Air Hood ...........12
IX. Step 9 — Install All Accessories .............13
START-UP ....................................15-20
SERVICE .....................................20-24
TROUBLESHOOTING ............................25
START-UP CHECKLIST ..........................CL-1
SAFETY CONSIDERATIONS
Installation and servicing of air-conditioning equipment can
be hazardous due to system pressure and electrical components. Only trained and qualified service personnel should
install, repair, or service air-conditioning equipment.
Untrained personnel can perform basic maintenance functions of cleaning coils and filters and replacing filters.Allother
operations should be performed by trained service personnel.
When working on air-conditioning equipment, observe precautions in the literature, tags and labels attached to the unit,
and other safety precautions that may apply.
Follow all safety codes. Wear safety glasses and work gloves.
Use quenching cloth for unbrazing operations. Have fire extinguishers available for all brazing operations.
WARNING:
nance operations on unit, turn off main power switch
to unit. Electrical shock could cause personal injury.
IMPORTANT: Units have high ambient operating limits. If
limits are exceeded, the units will automatically lock the compressor out of operation. Manual reset will be required to restart the compressor.
Before performing service or mainte-
INSTALLATION
I. STEP 1 — PROVIDE UNIT SUPPORT
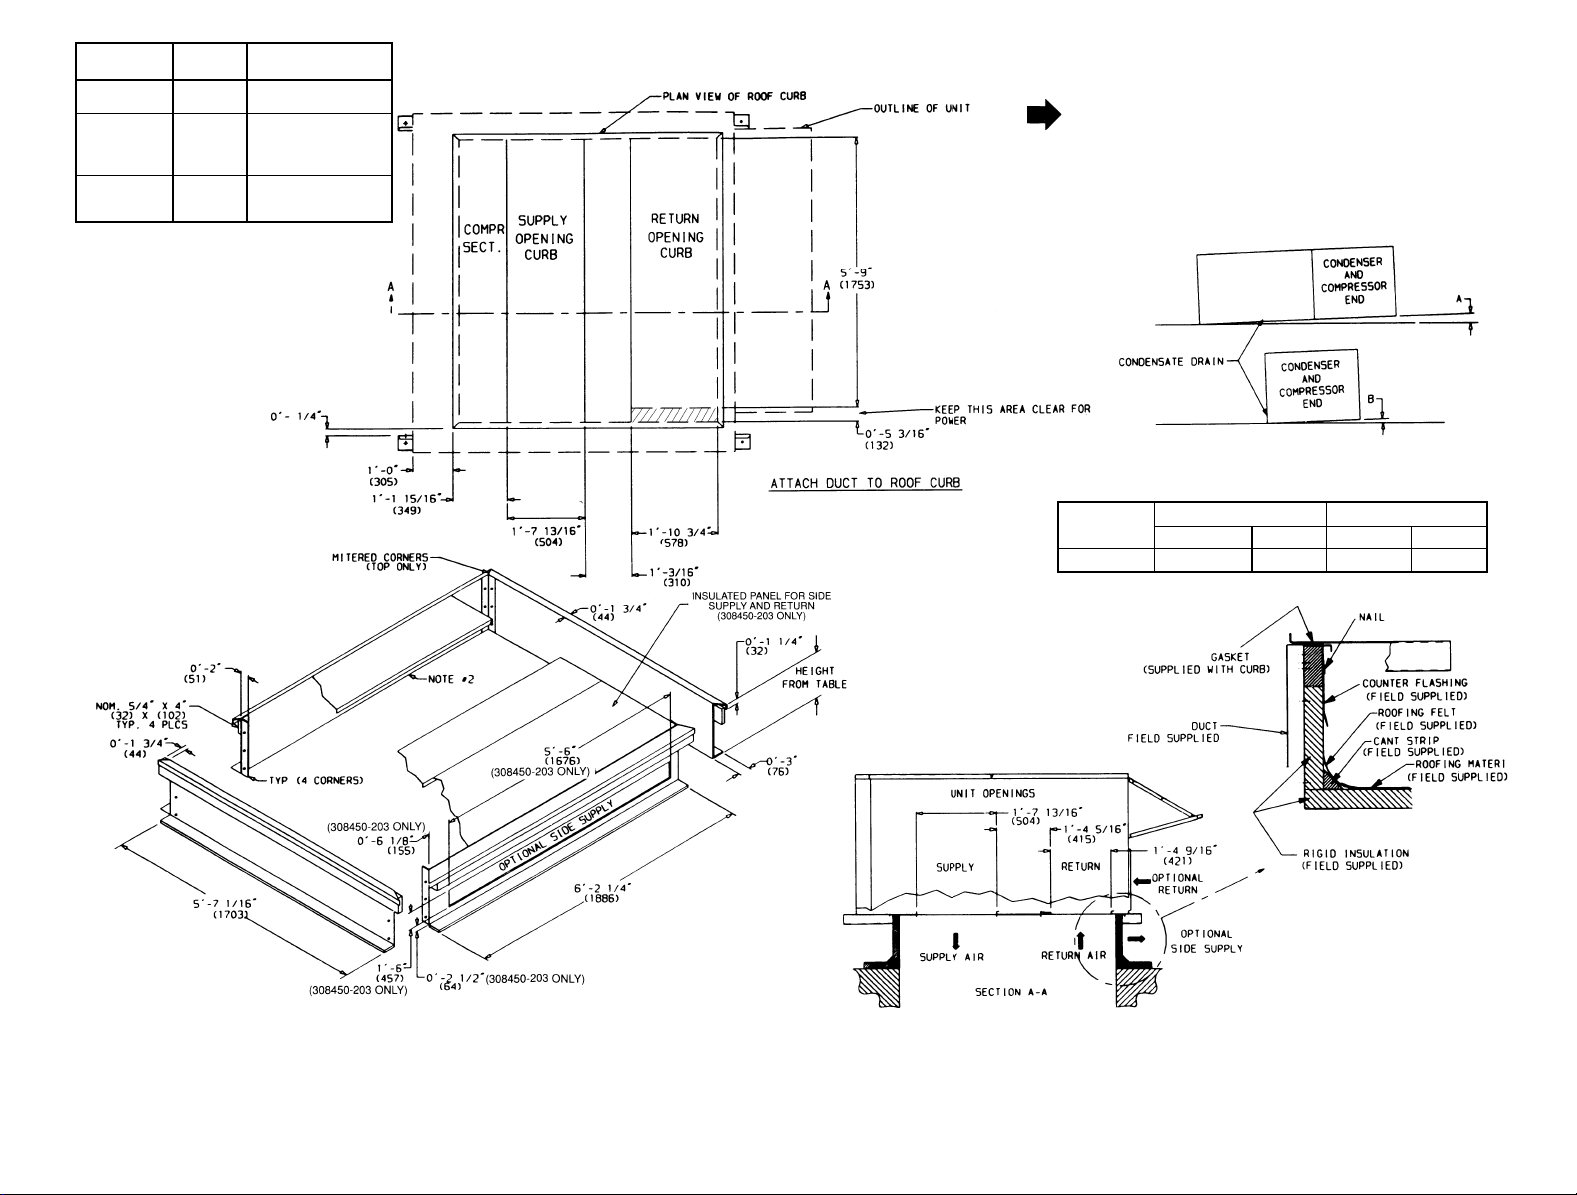
A. Roof Curb
Assemble and install accessory roof curb or horizontal adapter
roof curb in accordance with instructions shipped with the
curb or horizontal adapter. Accessory roof curb and horizontal adapter roof curb and information required to field fabricate a roof curb or horizontal adapter roof curb are shown in
Fig. 1 and 2. Install insulation, cant strips, roofing, and counter
flashing as shown. Ductwork can be secured to roof curb before unit is set in place.
IMPORTANT: The gasketing of the unit to the roof curb or
adapter roof curb is critical for a leak-proof seal. Install gasket supplied with the roof curb or adapter roof curb as shown
in Fig. 1. Improperly applied gasket can result in air leaks
and poor unit performance.
Curb or adapter roof curb should be level. This is necessary
to permit unit drain to function properly. Unit leveling tolerance is 6
cessory Roof Curb or Horizontal Adapter Roof Curb Installation Instructions for additional information as required.
B. Alternate Unit Support
When the curb or adapter cannot be used, support unit with
sleepers using unit curb or adapter support area. If sleepers
cannot be used, support long sides of unit with a minimum of
3 equally spaced 4-in. x 4-in. pads on each side.
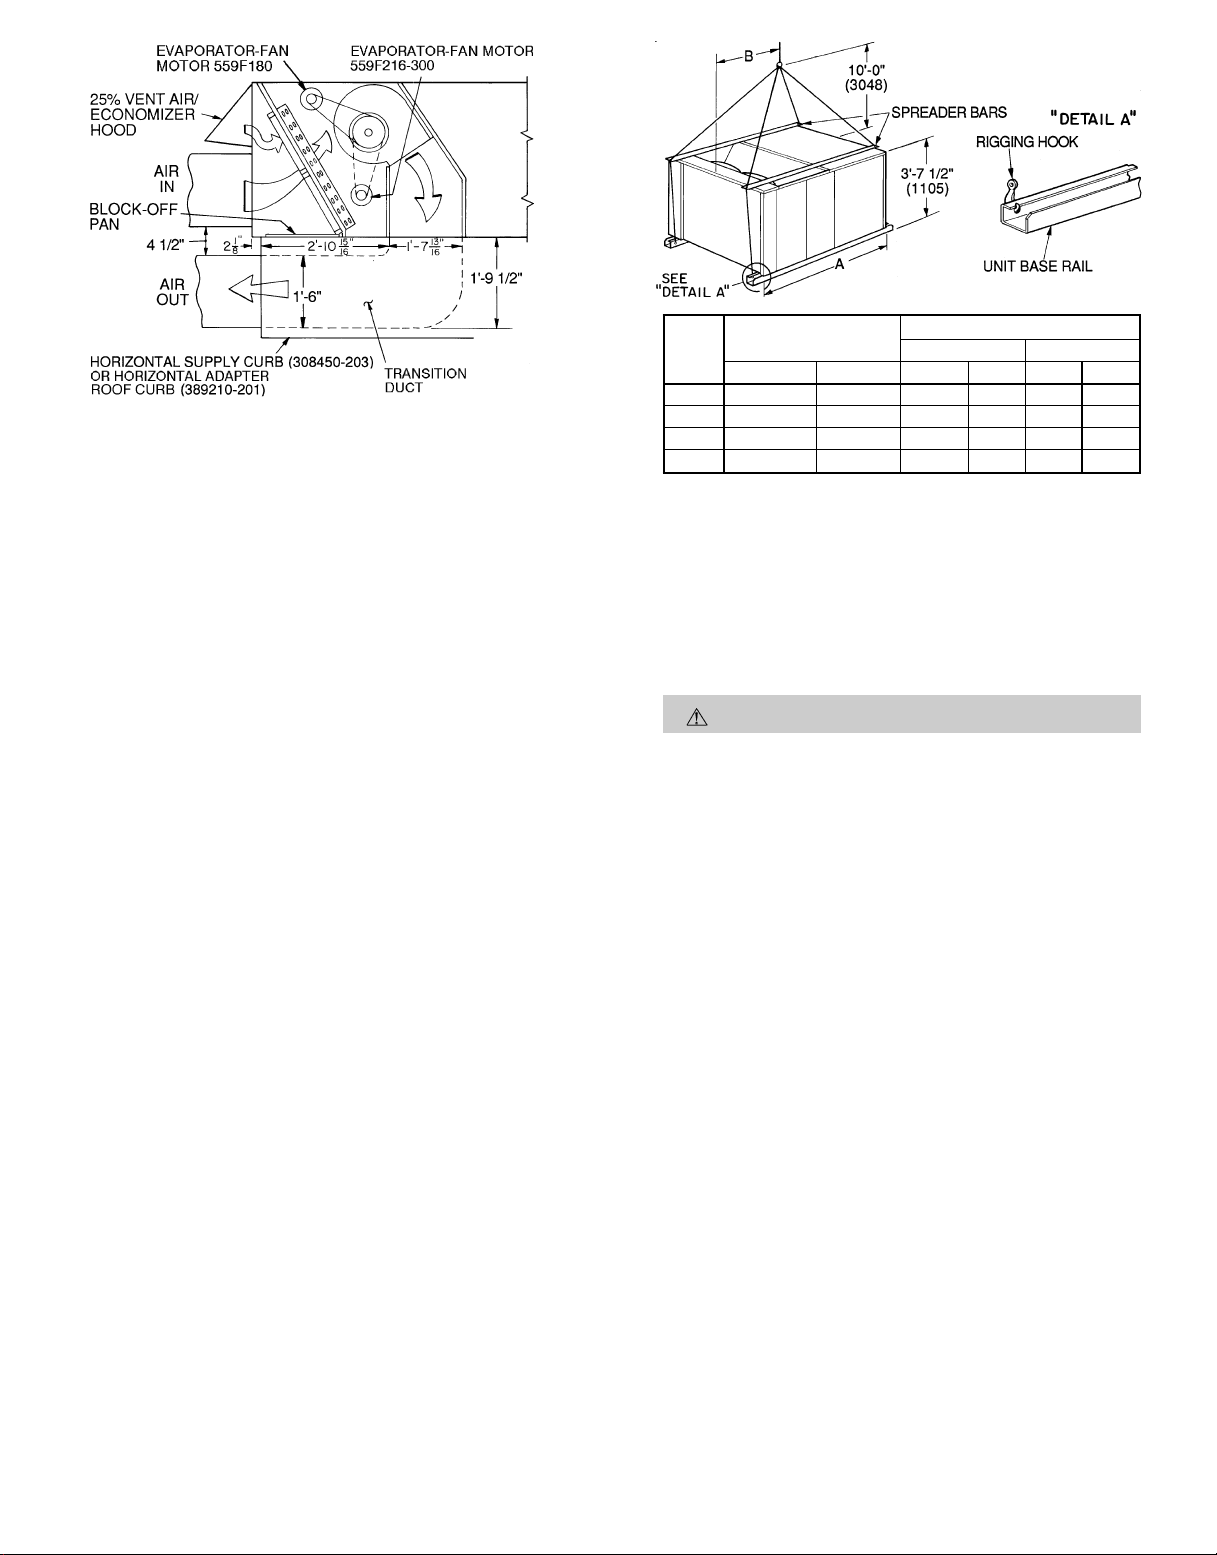
II. STEP 2 — RIG AND PLACE UNIT
Inspect unit for transportation damage. File any claim with
transportation agency. Keep unit upright, and do not drop.
Use spreader bars over unit to prevent sling or cable damage. Rollers may be used to move unit across a roof. Level by
using unit frame as a reference; leveling tolerance is
1
6
tional information. Unit weight is shown in Table 1.
Four lifting holes are provided in ends of unit base rails as
shown in Fig. 3. Refer to rigging instructions on unit.
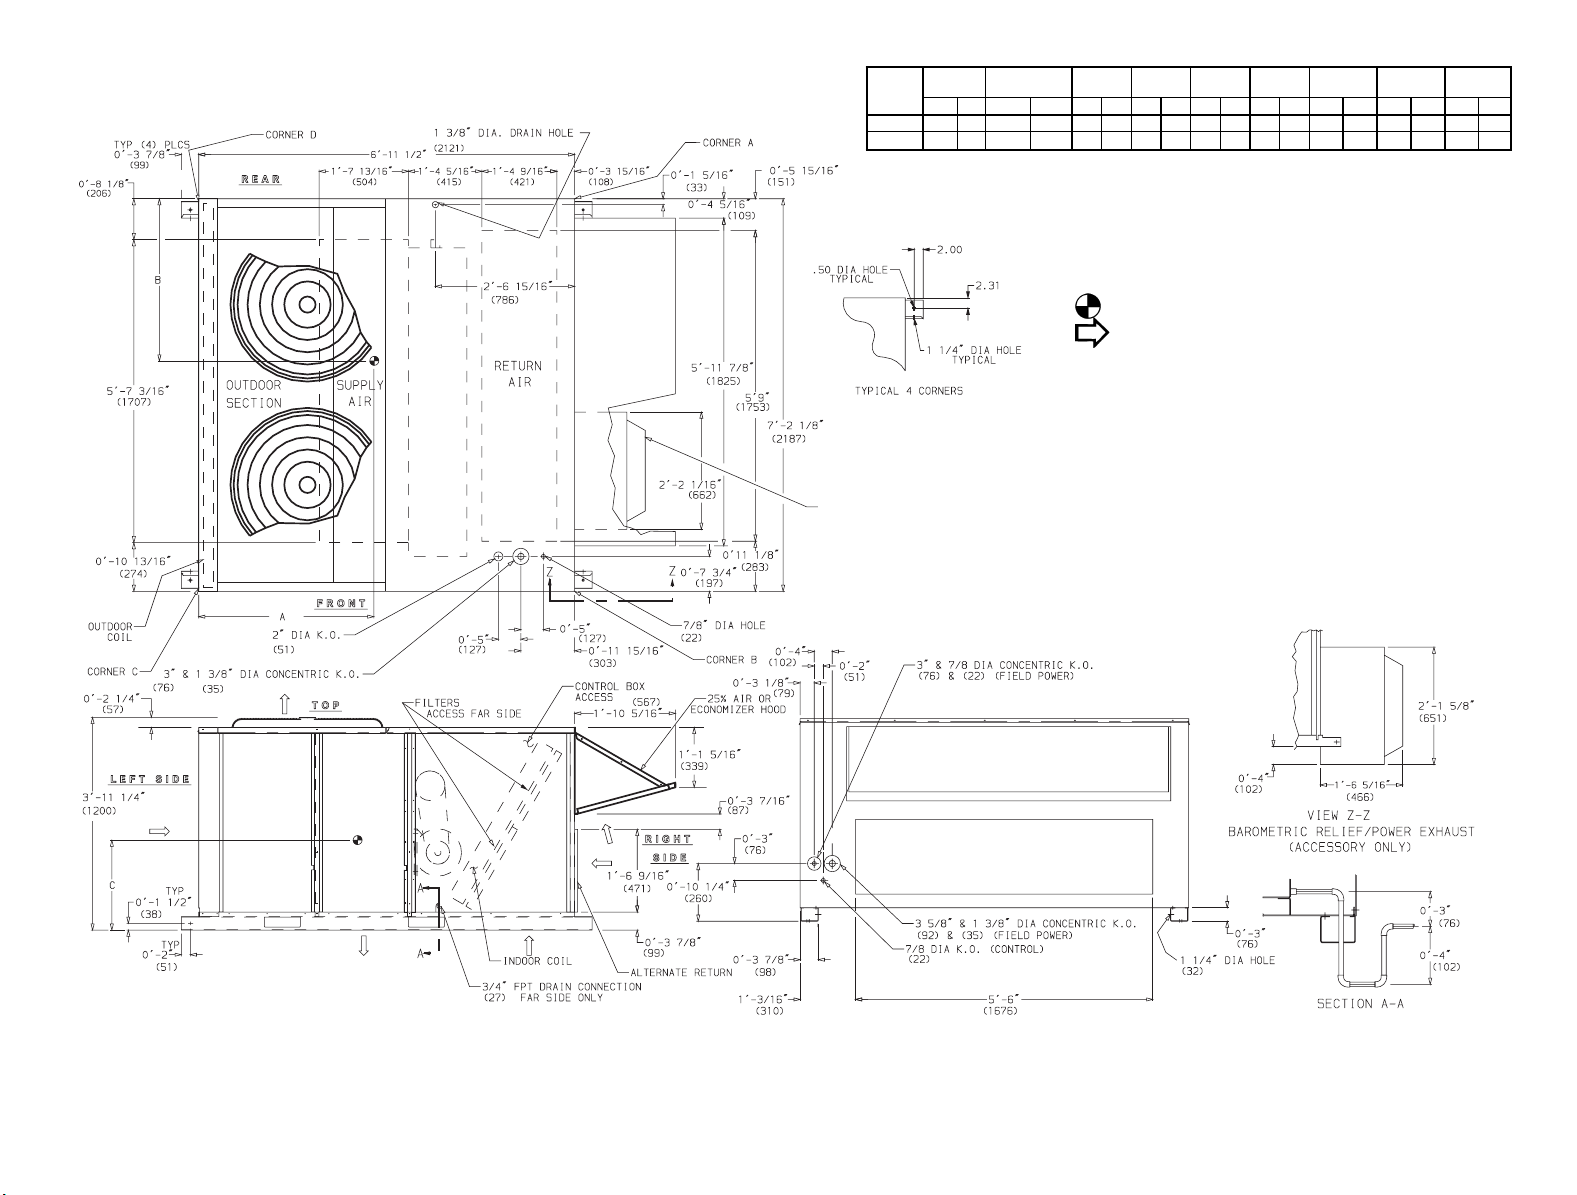
A. Positioning
Provide clearance around and above unit for airflow, safety,
and service access (Fig. 4 and 5).
Do not install unit in an indoor location. Do not locate air inlets near exhaust vents or other sources of contaminated air.
Although unit is weatherproof, guard against water from higher
level runoff and overhangs.
B. Roof Mount
Check building codes for weight distribution requirements.
1
⁄16in. per linear ft in any direction. Refer to Ac-
⁄16in. per linear ft in any direction. See Fig. 3 for addi-
Page 2
PKG.
NO. REF.
308450-201
308450-202
308450-203
CURB
HEIGHT
18-29
(305)
28-09
(610)
28-09
(610)
DESCRIPTION
Standard Curb
149 High
Standard Curb
for Units
Requiring High
Installation
Side Supply
and Return Kit
for High Installation
NOTES:
1. Roof curb accessory is shipped disassembled.
2. Insulated panels:
3. Dimensions in ( ) are in millimeters.
4. Direction of airflow.
5. Roof curb: 16 ga. (VA03-56) stl.
NOTE: To prevent the hazard of stagnant water build-up in the drain pan of the
indoor section, unit can only be pitched as shown.
1
⁄29 thick neoprene coated 2 lb density.
UNIT LEVELING TOLERANCES*
Dimensions (degrees and inches)
—2—
Fig. 1 — Roof Curb Details
UNIT
AB
DEG. IN. DEG. IN.
559F .28 .45 .28 .43
*From edge of unit to horizontal.
Page 3
NOTE: For preassembled horizontal adapter roof curb part no.
389210-201, the accessory kit includes a factory-designed, highstatic, regain transition duct. For horizontal curb part no. 308450203, a field-supplied transition duct is required.
Fig. 2 — Horizontal Adapter Roof Curb and Roof Curb
UNIT
559F
MAXIMUM
SHIPPING WEIGHT
lb kg ft-in. mm ft-in. mm
180 1625 737 6-11
216 1725 782 6-11
240 1835 832 6-11
300 1985 900 6-11
NOTES:
1. Dimensions in ( ) are in millimeters.
2. Refer to Fig. 5 and 6 for unit operating weights.
3. Remove boards at ends of unit and runners prior to rigging.
4. Rig by inserting hooks into unit base rails as shown. Use corner
post from packaging to protect coil from damage. Use bumper
boards for spreader bars.
5. Weights do not include optional economizer. See Fig. 5 and 6 for
economizer weight.
6. Weights given are for aluminum evaporator and condenser coil
plate fins. For copper condenser coil add 150 lb (68 kg). For copper condenser and evaporator coils add 280 lb (127 kg).
DIMENSIONS
AB
1
⁄22121 4- 0 1219
1
⁄22121 3-10 1168
1
⁄22121 3- 7 1092
1
⁄22121 3- 5 1041
CAUTION: All panels must be in place when rigging.
Fig. 3 — Rigging Details
—3—
Page 4

—4—
UNIT
559F180 1550 703 110 50 391 177 365 166 384 174 410 186 3-5 1041 3-6 1067 1-10 559
559F216 1650 748 110 50 399 181 384 174 402 182 439 199 3-4 1016 3-6 1067 1- 8 508
POWER EXHAUST/
BAROMETRIC RELIEF
(ACCESSORY ONLY)
STD UNIT
WEIGHT
Lb Kg Lb Kg Lb Kg Lb Kg Lb Kg Lb Kg ft-in. mm ft-in. mm ft-in. mm
ECONOMIZER
WEIGHT
CORNERACORNERBCORNERCCORNER
NOTES:
1. Refer to print for roof curb accessory dimensions.
2. Dimensions in ( ) are in millimeters.
3. Center of Gravity.
DIM A DIM B DIM C
D
4. Direction of airflow.
5. Ductwork to be attached to accessory roof curb only.
6. Minimum clearance:
• Rear: 78-09 (2134) for coil removal. This dimension can be reduced to 48-09 (1219)
if conditions permit coil removal from the top.
• Left side: 48-09 (1219) for proper condenser coil airflow.
• Front: 48-09 (1219) for control box access.
• Right side: 48-09 (1219) for proper operation of damper and power exhaust if so
equipped.
• Top: 68-09 (1829) to assure proper condenser fan operation.
• Local codes or jurisdiction may prevail.
7. With the exception of clearance for the condenser coil and the damper/power exhaust as stated in Note #6, a removable fence or barricade requires no
clearance.
8. Dimensions are from outside of corner post. Allow 08cover drip edge.
5
⁄169 (8) on each side for top
Fig. 4 — Base Unit Dimensions, 559F180 and 216
Page 5
—5—
STD UNIT
UNIT
559F240 1700 771 110 50 419 190 394 179 425 193 463 210 3-4 1016 3-5 1041 1-8 508
559F300 1850 839 110 50 428 194 412 187 511 232 499 226 3-2 965 3-7 1092 1-8 508
ECONOMIZER
WEIGHT
Lb Kg Lb Kg Lb Kg Lb Kg Lb Kg Lb Kg ft-in. mm ft-in. mm ft-in. mm
WEIGHT
CORNERACORNERBCORNERCCORNER
NOTES:
1. Refer to print for roof curb accessory dimensions.
2. Dimensions in ( ) are in millimeters.
3. Center of Gravity.
D
DIM A DIM B DIM C
4. Direction of airflow.
5. Ductwork to be attached to accessory roof curb only.
6. Minimum clearance:
• Rear: 78-09 (2134) for coil removal. This dimension can be reduced to 48-09 (1219)
if conditions permit coil removal from the top.
• Left side: 48-09 (1219) for proper condenser coil airflow.
• Front: 48-09 (1219) for control box access.
• Right side: 48-09 (1219) for proper operation of damper and power exhaust if so
equipped.
• Top: 68-09 (1829) to assure proper condenser fan operation.
• Local codes or jurisdiction may prevail.
7. With the exception of clearance for the condenser coil and the damper/power exhaust as stated in Note #6, a removable fence or barricade requires no
POWER EXHAUST/
BAROMETRIC RELIEF
(ACCESSORY ONLY)
clearance.
8. Dimensions are from outside of corner post. Allow 08cover drip edge.
5
⁄169 (8) on each side for top
Fig. 5 — Base Unit Dimensions, 559F240 and 300
Page 6
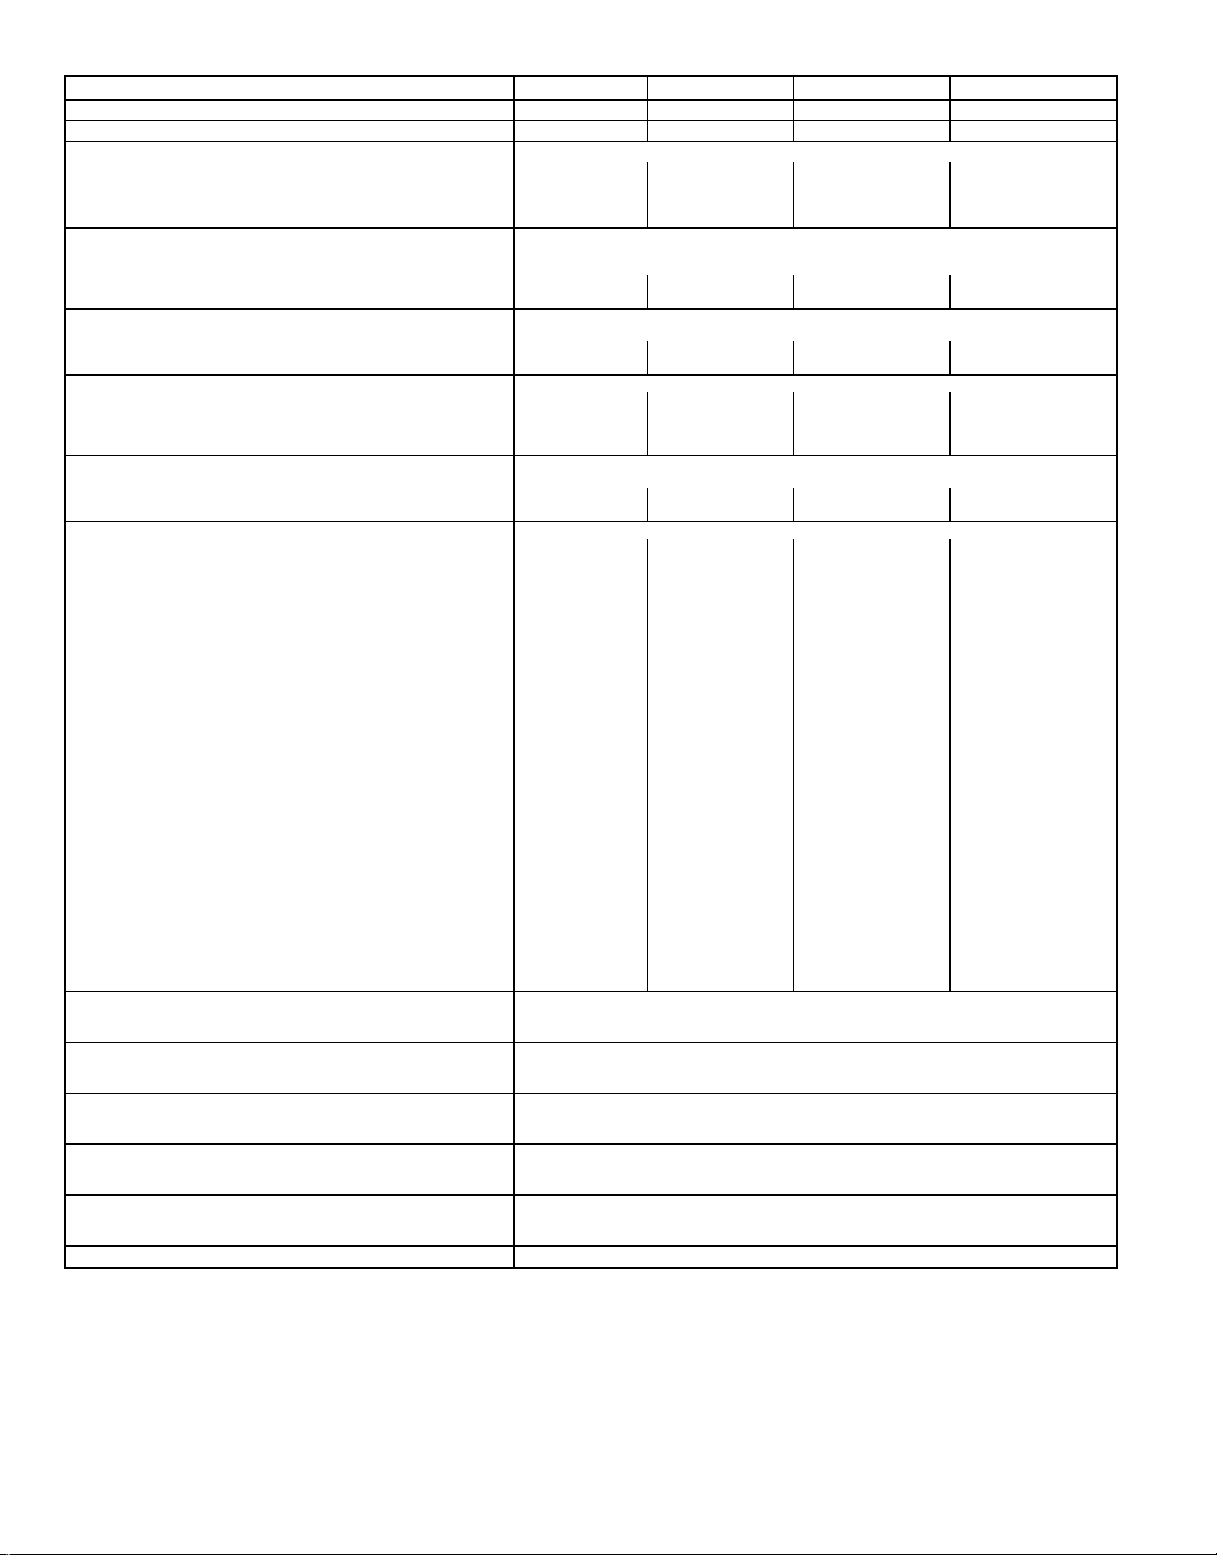
Table 1 — Physical Data
UNIT 559F 180 216 240 300
NOMINAL CAPACITY (tons) 15 18 20 25
OPERATING WEIGHT 1550 1650 1700 1850
COMPRESSOR Scroll, Copeland
Quantity ... Model (Ckt 1 , Ckt 2)
Number of Refrigerant Circuits 22 2 2
Oil (oz) (Ckt 1 , Ckt 2) 81, 81 106,81 106, 106 136, 106
REFRIGERANT TYPE R-22
Expansion Device TXV
Operating Charge (lb-oz)
Circuit 1 * 10-10 15-5 16-0 20-13
Circuit 2 10-10 12-3 13-6 13- 0
2...ZR94KC
CONDENSER COIL Cross-Hatched
Rows...Fins/in. 2...17 3...15 3...15 4...15
Total Face Area (sq ft) 21.7 21.7 21.7 21.7
CONDENSER FAN Propeller Type
Nominal Cfm 10,500 10,500 14,200 14,200
Quantity...Diameter (in.) 3...22 3...22 2...30 2...30
Motor Hp...Rpm
Watts Input (Total) 1100 1100 3400 3400
1
⁄2...1050
EVAPORATOR COIL Cross-Hatched
Rows...Fins/in. 2...17 3...15 3...15 4...15
Total Face Area (sq ft) 17.5 17.5 17.5 17.5
EVAPORATOR FAN Centrifugal Type
Quantity...Size (in.) 2...10 x 10 2...12 x 12 2...12 x 12 2...12 x 12
Type Drive Belt Belt Belt Belt
Nominal Cfm 6000 7200 8000 10,000
Motor Hp 3.7 5 7.5 10
Motor Nominal Rpm 1725 1745 1745 1740
Maximum Continuous Bhp
Motor Frame Size 56H 184T 213T 215T
Nominal Rpm High/Low —— — —
Fan Rpm Range Low-Medium Static 891-1179 910-1095 1002-1225 1066-1283
Motor Bearing Type Ball Ball Ball Ball
Maximum Allowable Rpm 1550 1550 1550 1550
Motor Pulley Pitch Diameter Low-Medium Static 3.1/4.1 4.9/5.9 5.4/6.6 4.9/5.9
Min/Max (in.) High Static 3.7/4.7 4.9/5.9 5.4/6.6 4.9/5.9
Nominal Motor Shaft Diameter (in.)
Fan Pulley Pitch Diameter (in.) Low-Medium Static 6.0 9.4 9.4 8.0
Nominal Fan Shaft Diameter (in.) 1
Belt, Quantity...Type...Length (in.) Low-Medium Static 1...BX...42 1...BX...50 1...BX...53 2...BX...50
Pulley Center Line Distance (in.) 13.5-15.5 13.3-14.8 14.6-15.4 14.6-15.4
Speed Change per Full Turn of Low-Medium Static 48 37 37 36
Movable Pulley Flange (rpm) High Static 55 34 44 45
Movable Pulley Maximum Full Turns
From Closed Position
Factory Speed 3.5 3.5 3.5 3.5
Factory Speed Setting (rpm) Low-Medium Static 1035 1002 1120 1182
Fan Shaft Diameter at Pulley (in.) 1
HIGH-PRESSURE SWITCH (psig)
Cutout 426
Reset (Auto) 320
LOW-PRESSURE SWITCH (psig)
Cutout 27
Reset (Auto) 44
FREEZE PROTECTION THERMOSTAT (F)
Opens 30±5
Closes 45±5
OUTDOOR-AIR INLET SCREENS Cleanable
Quantity...Size (in.) 2...20 x 25 x 1
RETURN-AIR FILTERS Throwaway**
Quantity...Size (in.) 4...20 x 20 x 2
High Static 1227-1550 1069-1287 1193-1458 1332-1550
High Static 5.2 8.0 7.9 6.4
High Static 1...BX...42 1...BX...48 1...BX...50 2...BX...47
High Static 1389 1178 1328 1470
POWER EXHAUST
4.25 5.90
7
⁄
8
3
⁄
16
55 5 5
3
⁄
16
1
⁄2Hp, 208/230-460 v Motor Direct Drive, Propeller-Fan (Factory-Wired for 460 v)
LEGEND
Bhp — Brake Horsepower
TXV — Thermostatic Expansion Valve
*Circuit 1 uses the lower portion of the condenser coil and lower portion of the evaporator coils; and
Circuit 2 uses the upper portion of both coils.
†The 559F300 unit requires 2-in. industrial-grade filters capable of handling face velocities up to 625 ft/min
(such as American Air Filter no. 5700 or equivalent).
NOTE: The 559F units have a low-pressure switch (standard) located on the suction side.
1...ZR108KC,
1...ZR94KC
3
Aluminum Pre-Coated, or Copper Plate Fins
⁄8-in. Copper Tubes, Aluminum Lanced,
1
⁄2...1050 1...1075 1...1075
3
⁄8-in. Copper Tubes, Aluminum Lanced or
Copper Plate Fins, Face Split
11⁄
8
17⁄
16
17⁄
16
1...ZR125KC,
1...ZR108KC
8.7 [208/230 v]
9.5 [460 v]
13⁄
8
17⁄
16
17⁄
16
10.2 [208/230 v]
1...20 x 20 x 1
4...16 x 20 x 2
1...ZR16M3,
1...ZR125KC
11.8 [460 v]
13⁄
8
17⁄
16
17⁄
16
—6—
Page 7
III. STEP 3 — FIELD FABRICATE DUCTWORK
Secure all ducts to building structure. Use flexible duct connectors between unit and ducts as required. Insulate and weatherproof all external ductwork, joints, and roof openings with
counter flashing and mastic in accordance with applicable codes.
Ducts passing through an unconditioned space must be insulated and covered with a vapor barrier.
The 559F units with electric heat require a 1-in. clearance
for the first 24 in. of ductwork.
Outlet grilles must not lie directly below unit discharge.
NOTE: A 90-degree elbow must be provided in the ductwork
to comply with UL (Underwriters’ Laboratories) codes for use
with electric heat.
WARNING:
For vertical supply and return units, tools
or parts could drop into ductwork and cause an injury.
Install a 90 degree turn in the return ductwork between the unit and the conditioned space. If a 90 degree elbow cannot be installed, then a grille of sufficient
strength and density should be installed to prevent objects from falling into the conditioned space. Due to electric heater, supply duct will require 90 degree elbow.
IV. STEP 4 — MAKE UNIT DUCT CONNECTIONS
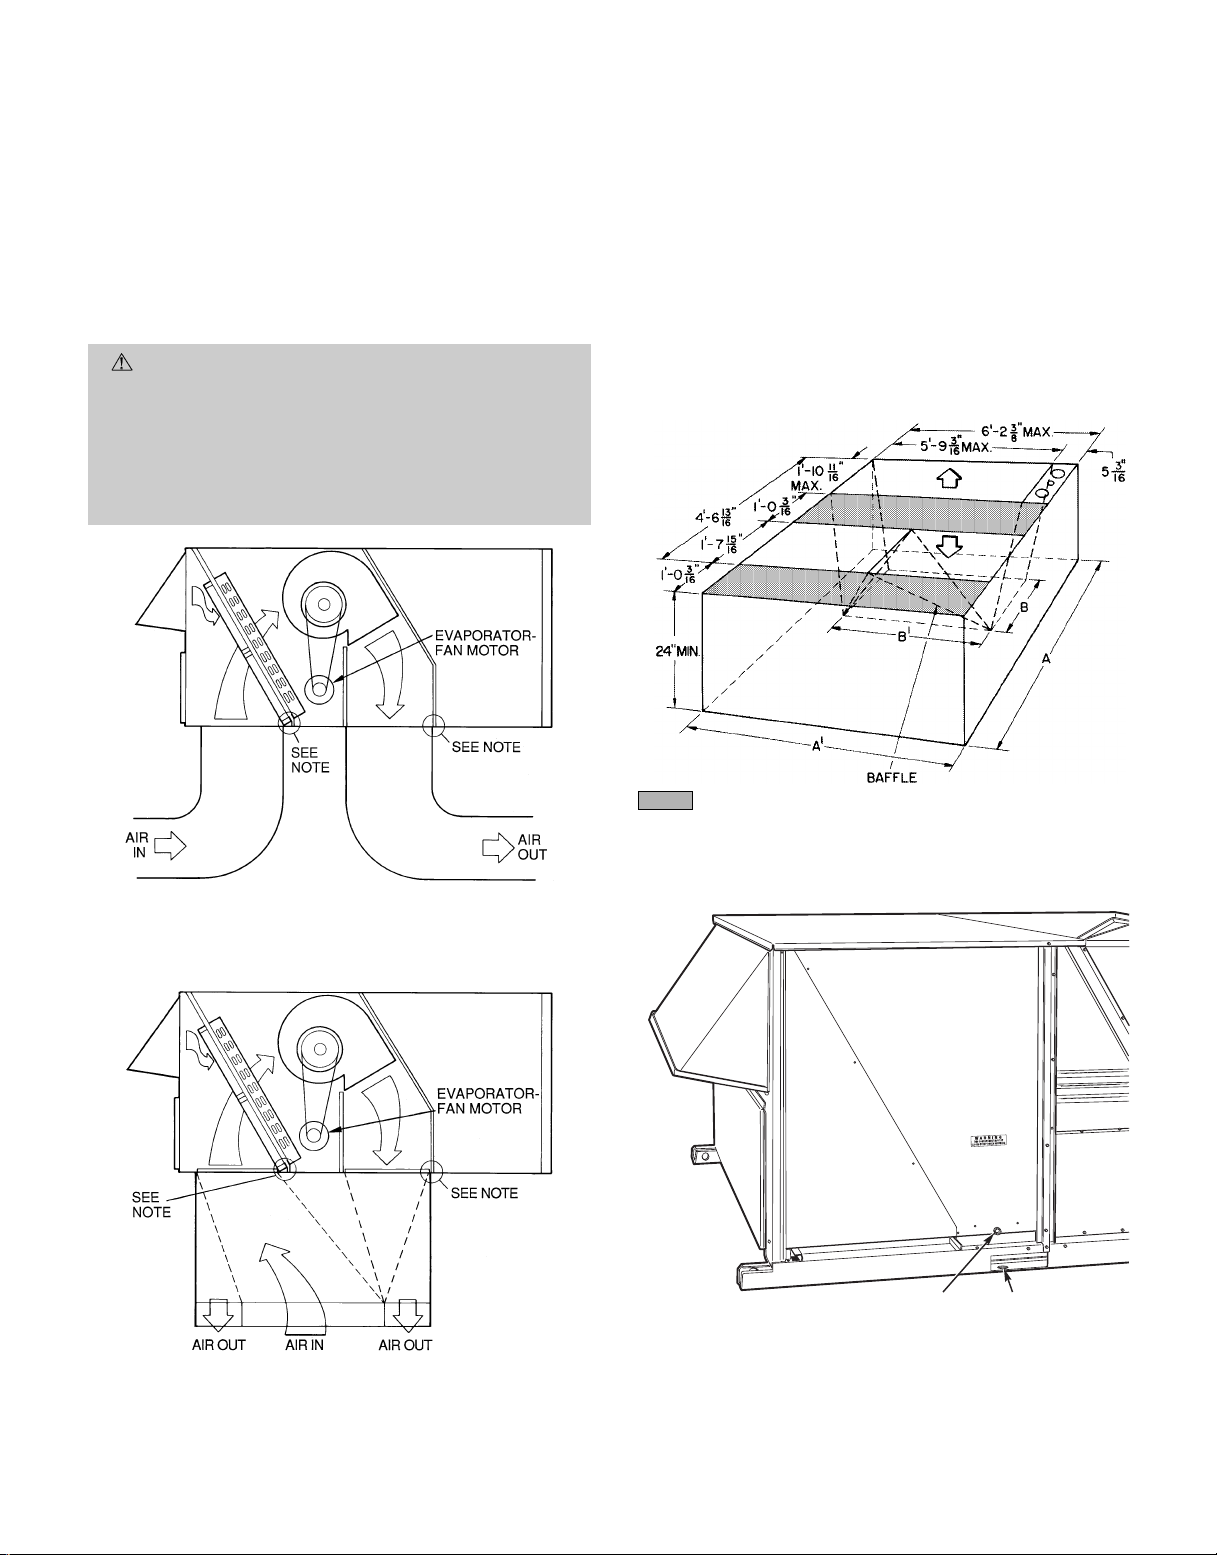
Unit is shipped for thru-the-bottom duct connections. Ductwork openings are shown in Fig. 6. Field-fabricated concentric ductwork may be connected as shown in Fig. 7 and 8.
Attach all ductwork to roof curb and roof curb basepans. Refer to installation instructions shipped with accessory roof curb
for more information.
V. STEP 5 — TRAP CONDENSATE DRAIN
See Fig. 4, 5, and 9 for drain location. Plug is provided in
drain hole and must be removed when unit is operating. One
3
⁄4-in. half coupling is provided inside unit evaporator section
for condensate drain connection. An 8
3
nipple and a 2-in. x
3
standard
⁄4-in. diameter elbows to provide a straight path
⁄4-in. diameter pipe nipple are coupled to
1
⁄2in. x3⁄4-in. diameter
down through holes in unit base rails (see Fig. 10). A trap at
least 4-in. deep must be used.
NOTE: Do not drill in this area, as damage to basepan may result in
water leak.
Fig. 6 — Air Distribution — Thru-the-Bottom
(559F216-300 Shown)
NOTE: Do not drill in this area, as damage to basepan may result in
water leak.
Fig. 7 — Concentric Duct Air Distribution
(559F216-300 Shown)
Shaded area indicates block-off panels.
NOTE: Dimension A, A8 and B, B8 are obtained from field-supplied ceil-
ing diffuser.
Fig. 8 — Concentric Duct Details
3/4" FPT DRAIN
CONNECTION
1-3/8"
DRAIN HOLES
Fig. 9 — Condensate Drain Details
(559F180,216 Shown)
—7—
Page 8
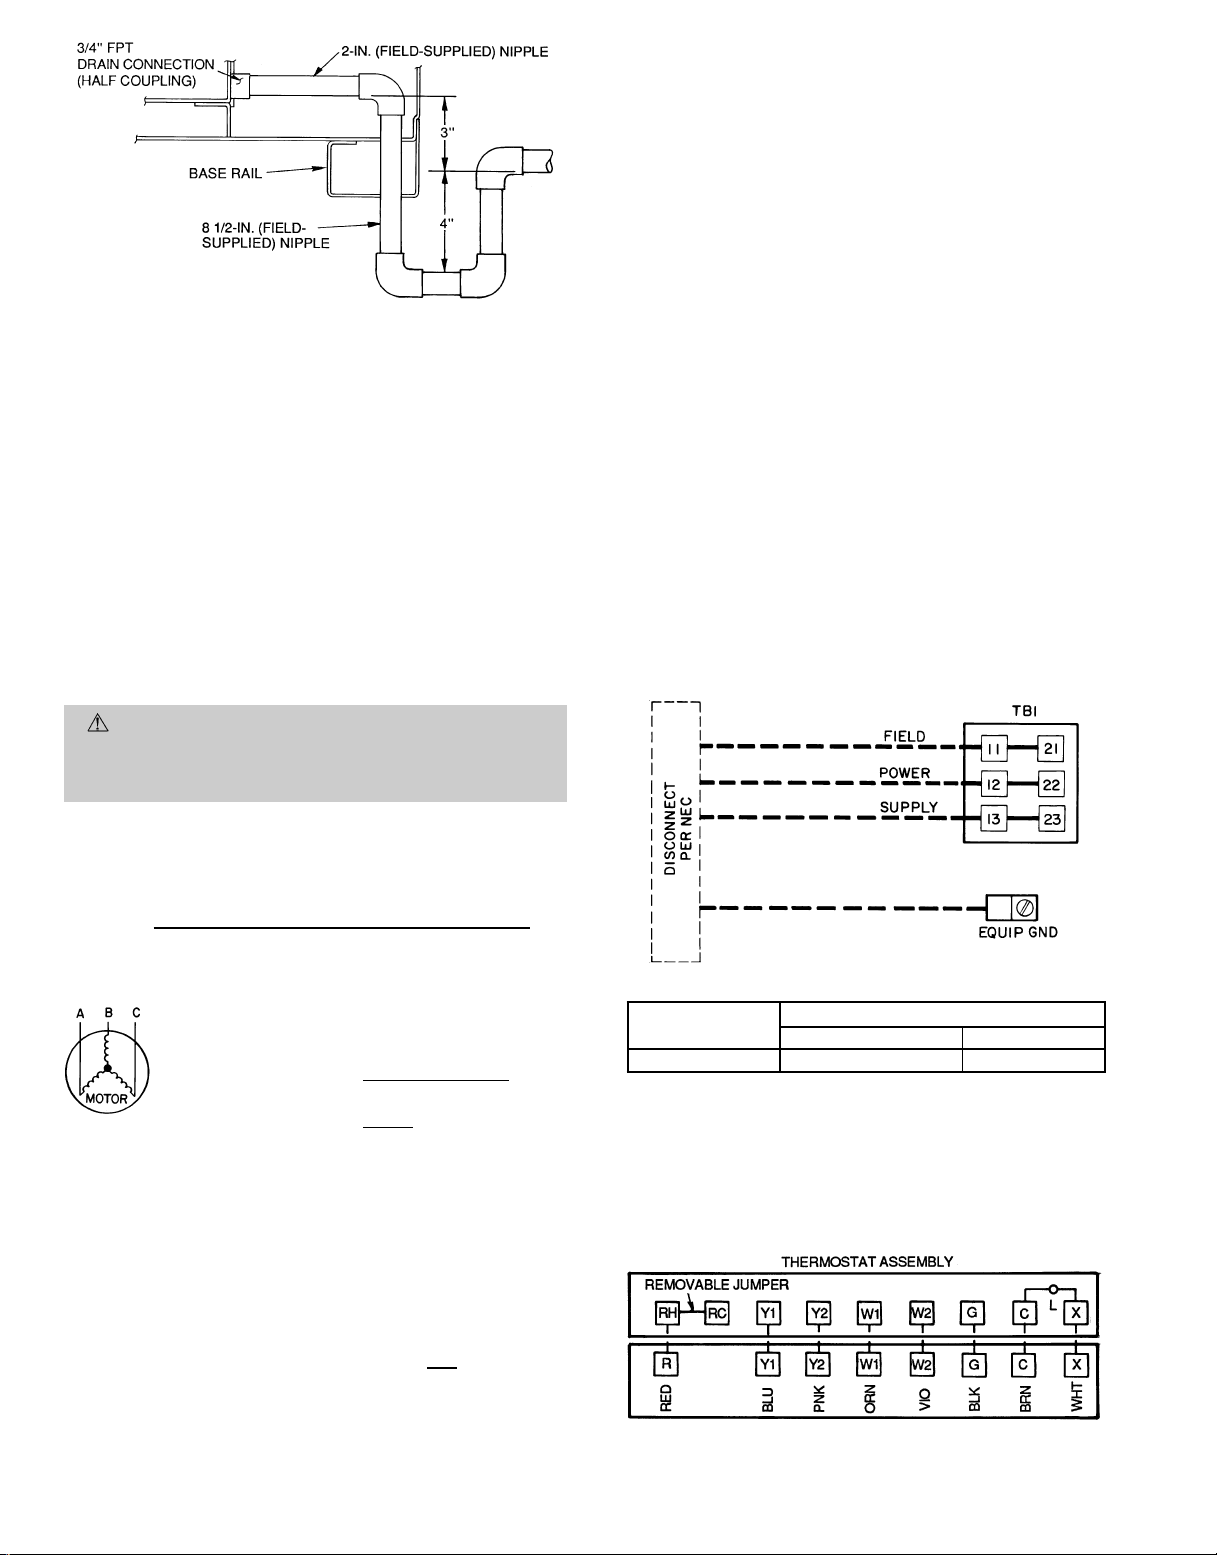
Fig. 10 — Condensate Drain Piping Details
VI. STEP 5 — MAKE ELECTRICAL CONNECTIONS
A. Field Power Supply
Unit is factory wired for voltage shown on nameplate.
When installing units, provide a disconnect, per NEC (Na-
tional Electrical Code) requirements, of adequate size
(Table 2).
All field wiring must comply with NEC and local
requirements.
Route power lines through control box access panel or unit
basepan (Fig. 4 and 5) to connections as shown on unit wiring diagram and Fig. 11.
Operating voltage to compressor must be within voltage range
indicated on unit nameplate. On 3-phase units, voltages between phases must be balanced within 2% and the current
must be balanced within 10%.
CAUTION:
The correct power phasing is critical in
the operation of the scroll compressors.An incorrect phasing will cause the compressor to rotate in the wrong direction. This may lead to premature compressor failure.
This amount of phase imbalance is satisfactory as it is below
the maximum allowable 2%.
IMPORTANT: If the supply voltage phase imbalance is
more than 2%, contact your local electric utility company
immediately.
Unit failure as a result of operation on improper line voltage
or excessive phase imbalance constitutes abuse and may cause
damage to electrical components.
B. Field Control Wiring
Install a Bryant-approved accessory thermostat assembly according to the installation instructions included with the accessory. Locate thermostat assembly on a solid wall in the
conditioned space to sense average temperature.
Route thermostat cable or equivalent single leads of
no. 18AWG(American Wire Gage) colored wire from subbase
terminals through conduit in unit to low-voltage connections
as shown on unit label wiring diagram and in Fig. 12.
NOTE: For wire runs up to 50 ft, use no. 18 AWG insulated
wire (35 C minimum). For 50 to 75 ft, use no. 16 AWG insulated wire (35 C minimum). For over 75 ft, use no. 14 AWG
insulated wire (35 C minimum). All wire larger than
no. 18 AWG cannot be directly connected to the thermostat
and will require a junction box and splice at the thermostat.
Set heat anticipator settings as indicated in Table 3. Settings
may be changed slightly to provide a greater degree of comfort for a particular installation.
Refer to accessory remote control instructions as
required.
Use the following formula to determine the percentage of voltage imbalance.
Percentage of Voltage Imbalance
= 100 x
max voltage deviation from average voltage
average voltage
EXAMPLE: Supply voltage is 460-3-60.
AB = 452 v
BC = 464 v
AC = 455 v
Average Voltage =
452 + 464 + 455
1371
=
3
3
= 457
Determine maximum deviation from average voltage:
(AB) 457 − 452 = 5 v
(BC) 464 − 457 = 7 v
(AC) 457 − 455 = 2 v
Maximum deviation is 7 v.
Determine the percentage of voltage imbalance:
Percentage of Voltage Imbalance = 100 x
7
457
= 1.53%
TB1 MAXIMUM WIRE SIZE
UNIT
559F
All 350 kcmil 2/0
EQUIP — Equipment NEC — National Electrical
GND — Ground Code
kcmil — Thousand Circular TB — Terminal Block
Mils
208/230 460
LEGEND
VOLTAGE
Fig. 11 — Field Power Wiring Connections
UNIT LOW-VOLTAGE CONNECTIONS
Fig. 12 — Field Control Thermostat Wiring
—8—
Page 9
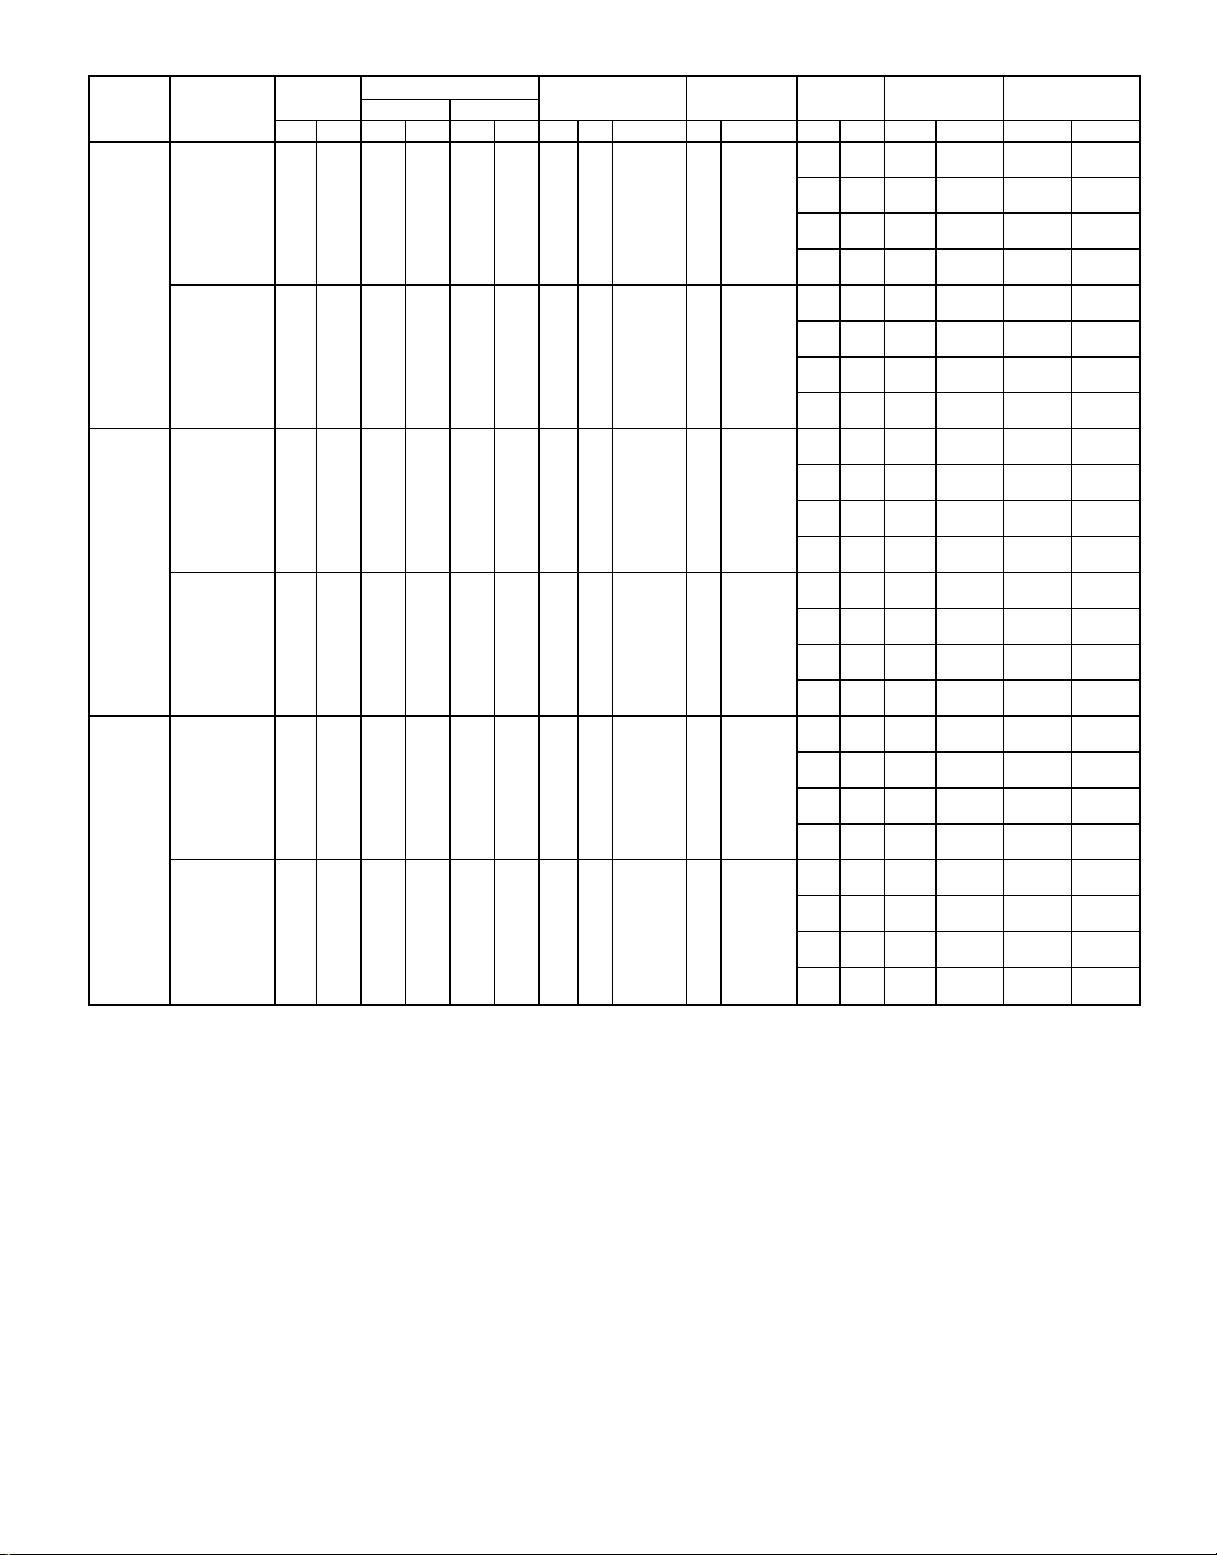
Table 2 — Electrical Data
UNIT
559F
180
(15 Tons)
216
(18 Tons)
240
(20 Tons)
NOMINAL
VOLTAGE
(3 Ph, 60 Hz)
208/230 187 253 28.8 195 28.8 195 3 0.5 1.7 3.7 10.5/11.0
460 414 508 14.7 95 14.7 95 3 0.5 0.8 3.7 4.8
208/230 187 253 30.1 225 28.8 195 3 0.5 1.7 5.0 15.8/15.8
460 414 508 15.5 114 14.7 95 3 0.5 0.8 5.0 7.9
208/230 187 253 37.8 239 30.1 225 2 1 6.6 7.5 25.0/25.0
460 414 508 17.2 125 15.5 114 2 1 3.3 7.5 13.0
VOLTAGE
RANGE
Min Max RLA LRA RLA LRA Qty Hp FLA (ea) Hp FLA FLA LRA kW FLA MCA MOCP†
COMPRESSOR
No. 1 No. 2
OFM IFM
POWER
EXHAUST
— — — — 81/81 100/100
4.6 18.8 — — 85/86 110/110
— — 26/34 71/82 102/116 110/125
4.6 18.8 26/34 71/82 108/122 110/125
— — 42/56 117/135 159/149 175/175
4.6 18.8 42/56 117/135 165/155 175/175
— — 56/75 156/180 169/194 200/225
4.6 18.8 56/75 156/180 175/200 200/225
— — — — 40 50
2.3 6.0 — — 43 50
— — 32 39 55 60
2.3 6.0 32 39 58 60
— — 55 66 72 80
2.3 6.0 55 66 75 80
— — 80 96 102 110
2.3 6.0 80 96 105 110
— — — — 87/87 110/110
4.6 18.8 — — 92/92 110/110
— — 26/34 71/82 109/122 110/125
4.6 18.8 26/34 71/82 114/128 125/150
— — 42/56 117/135 166/155 175/175
4.8 18.8 42/56 117/135 172/161 175/175
— — 56/75 156/180 176/200 200/225
4.6 18.8 56/75 156/180 182/206 200/225
— — — — 44 50
2.3 6.0 — — 47 60
— — 32 39 59 60
2.3 6.0 32 39 61 70
— — 55 66 76 90
2.3 6.0 55 66 79 90
— — 80 96 106 125
2.3 6.0 80 96 109 125
— — — — 116/116 150/150
4.6 18.8 — — 120/120 150/150
— — 26/34 71/82 120/134 150/150
4.6 18.8 26/34 71/82 126/140 150/150
— — 42/56 117/135 178/166 200/175
4.6 18.8 42/56 117/135 183/172 200/175
— — 56/75 156/180 187/211 200/225
4.6 18.8 56/75 156/180 193/217 200/225
— — — — 57 70
2.3 6.0 — — 59 70
— — 32 39 65 70
2.3 6.0 32 39 68 70
— — 55 66 82 90
2.3 6.0 55 66 85 90
— — 80 96 112 125
2.3 6.0 80 96 115 125
ELECTRIC
HEAT*
POWER
SUPPLY
—9—
Page 10
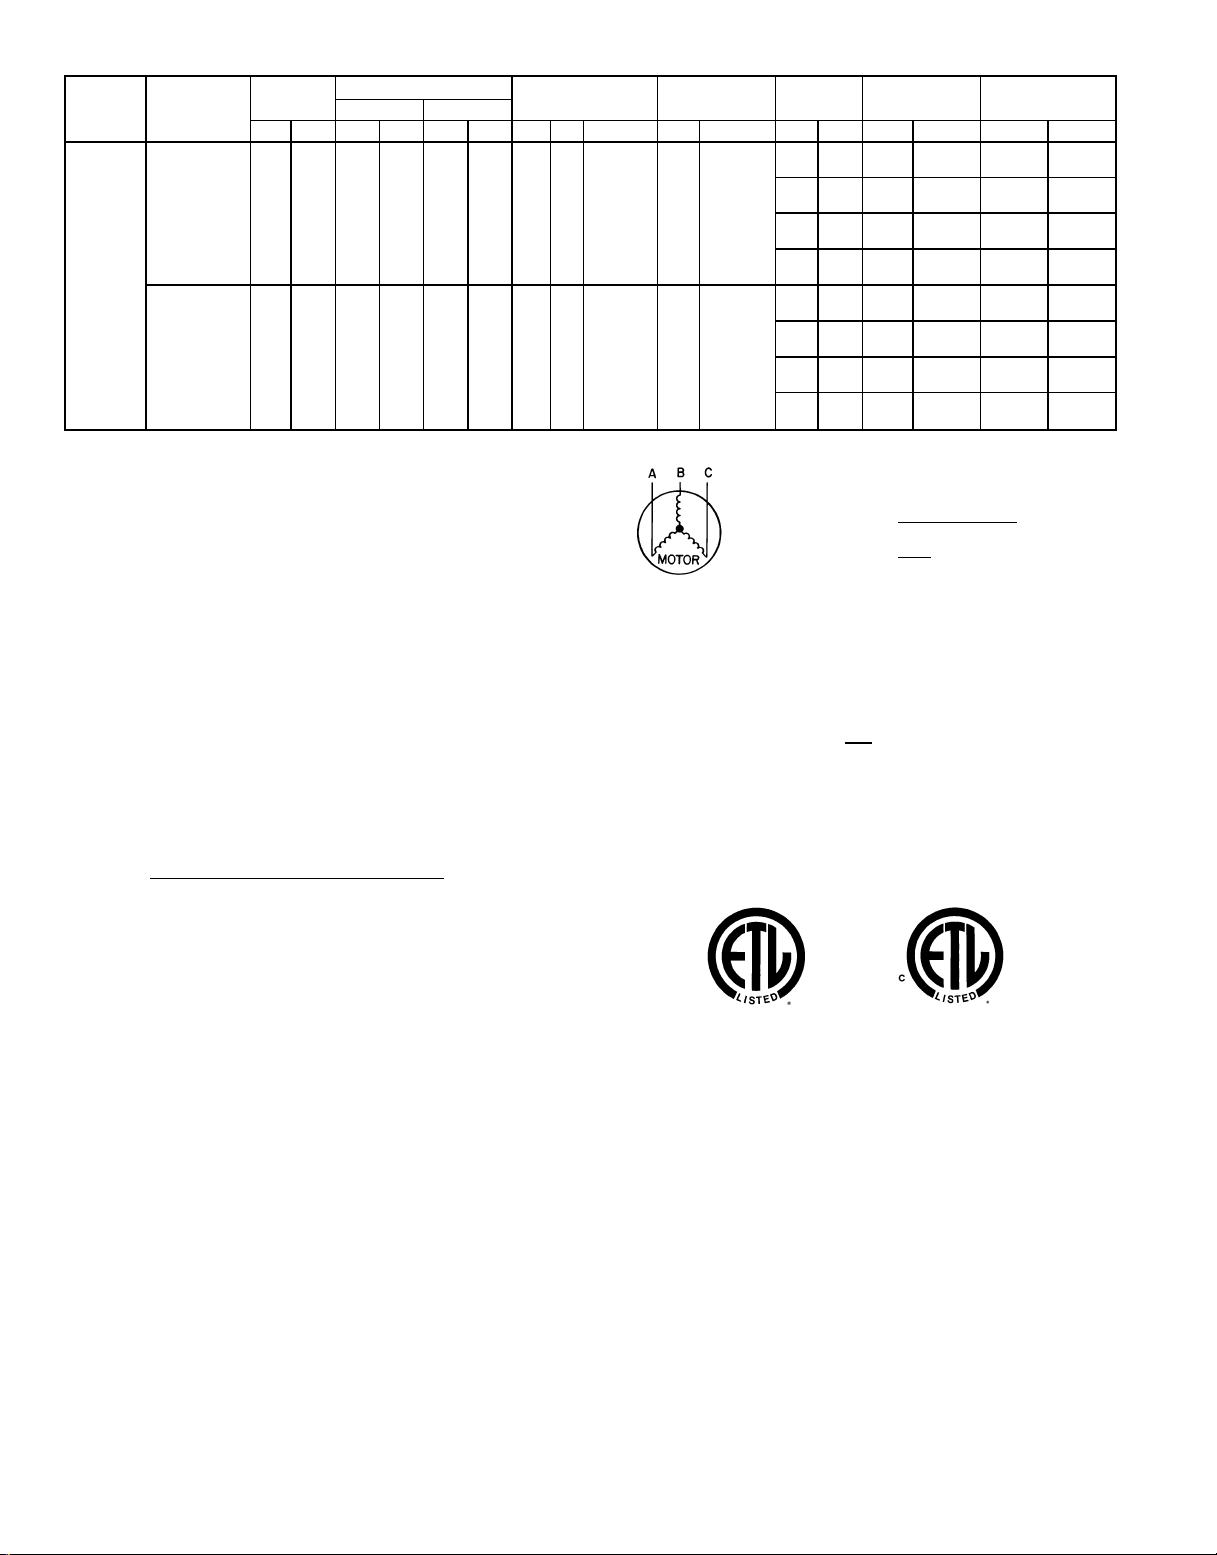
Table 2 — Electrical Data (cont)
UNIT
559F
300
(25 Tons)
FLA — Full Load Amps
HACR — Heating, Air Conditioning and Refrigeration
IFM — Indoor (Evaporator) Fan Motor
LRA — Locked Rotor Amps
MCA — Minimum Circuit Amps
MOCP — Maximum Overcurrent Protection
NEC — National Electrical Code
OFM — Outdoor (Condenser) Fan Motor
RLA — Rated Load Amps
*Heater capacity (kW) is based on heater voltage of 208 v, 240 v,
and 480 v. Heaters are rated at 240 v and 480 v. If power distribution
voltage to unit varies from rated heater voltage, heater kW will vary
accordingly.
†Fuse or HACR circuit breaker.
NOTES:
1. In compliance with NEC requirements for multimotor and combination load
equipment (refer to NECArticles 430 and 440), the overcurrent protective
device for the unit shall be fuse or HACR breaker. The Canadian units
may be fuse or circuit breaker.
2. Unbalanced 3-Phase Supply Voltage
Never operate a motor where a phase imbalance in supply voltage is greater
than 2%.
imbalance.
% Voltage Imbalance =
100 x
NOMINAL
VOLTAGE
(3 Ph, 60 Hz)
208/230 187 253 41.0 350 37.8 239 2 1 6.6 10.0 28.0/28.0
460 414 508 21.8 158 17.2 125 2 1 2.8 10.0 14.6
Use the following formula to determine the percent of voltage
max voltage deviation from average voltage
VOLTAGE
RANGE
Min Max RLA LRA RLA LRA Qty Hp FLA (ea) Hp FLA FLA LRA kW FLA MCA MOCP†
LEGEND
average voltage
COMPRESSOR
No. 1 No. 2
OFM IFM
EXAMPLE: Supply voltage is 460-3-60.
Determine maximum deviation from average voltage.
(AB) 457 − 452 = 5 v
(BC) 464 − 457 = 7 v
(AC) 457 − 455 = 2 v
Maximum deviation is 7 v.
Determine percent of voltage imbalance.
% Voltage Imbalance = 100 x
This amount of phase imbalance is satisfactory as it is below the maximum allowable 2%.
IMPORTANTIfthe supply voltage phase imbalance is more than 2%, contact
your local electric utility company immediately.
3. MCA calculation for units with electric heaters over 50 kW
= (1.25 x IFM amps) + (1.00 x heater FLA).
POWER
EXHAUST
— — — — 130/130 150/150
4.6 18.8 — — 135/135 175/175
— — 26/34 71/82 130/138 150/150
4.6 18.8 26/34 71/82 135/143 175/175
— — 42/56 117/135 181/170 200/175
4.6 18.8 42/56 117/135 187/176 200/200
— − 56/75 156/180 191/215 200/225
4.6 18.8 56/75 156/180 197/221 200/225
— — — — 66 80
2.3 6.0 — — 68 80
— — 32 39 67 80
2.3 6.0 32 39 70 80
— — 55 66 84 90
2.3 6.0 55 66 87 100
— — 80 96 114 125
2.3 6.0 80 96 117 125
AB = 452 v
BC = 464 v
AC = 455 v
Average Voltage =
= 1.53%
ELECTRIC
=
= 457
7
457
HEAT*
452 + 464 + 455
3
1371
3
POWER
SUPPLY
—10—
Page 11

VII. STEP 7 — MAKE OUTDOOR-AIR INLET ADJUSTMENTS
A. Manual Outdoor-Air Damper
All units (except those equipped with a factory-installed economizer) have a manual outdoor-air damper to provide ventilation air. Damper can be preset to admit up to 25% outdoor
air into return-air compartment. To adjust, loosen securing
screws and move damper to desired setting. Then retighten
screws to secure damper (Fig. 13).
B. Optional Economizer
Economizer Motor Control Module (Fig. 14-16)
Set to the ‘‘D’’ setting (Fig. 15). The control module is located
on the economizer motor. See Fig. 14 and 16.
Damper Vent Position Setting
1. Set fan switch at ON position (continuous fan operation) and close night switch if used.
2. Set system selector switch to OFF position.
3. Turn adjustment screw slowly until dampers assume desired vent position. Do not manually operate economizer
motor since damage to motor will result.
Table 3 — Heat Anticipator Settings
UNIT
559F
180-300
*Heater kW is based on heater voltage of 208 v, 240 v and 480 v.
UNIT
VOLTAGES
208/230-3-60
460-3-60
kW* STAGE 1 STAGE 2
26/34 .40 .66
42/56 .66 .40
56/75 .66 .66
32 .40 .40
55 .40 .66
80 .66 .66
Fig. 13 — 25% Outdoor-air Section Details
LEGEND
LED — Light-Emitting Diode
Fig. 15 — Economizer Control Module
(Part Number W7459A)
Fig. 16 — Economizer Control Module Location
Fig. 14 — Economizer Damper Assembly
— End View
—11—
Page 12

VIII. STEP 8 — INSTALL OUTDOOR-AIR HOOD
The same type of factory-installed hood is used on units with
25% air ventilation and units with an economizer.
NOTE: The hood top panel, upper and lower filter retainers,
hood drain pan, baffle (size 300), and filter support bracket
are secured opposite the condenser end of the unit. The screens,
hood side panels, remaining section of filter support bracket,
seal strip, and all other hardware are in a package located
inside the return-air filter access panel (Fig. 17).
1. Attach seal strip to upper filter retainer. See Fig. 18.
2. Assemble hood top panel and side panels, upper filter
retainer, and hood drain pan (Fig. 19).
3. Secure lower filter retainer and long section of filter support bracket to unit. See Fig. 19. Leave screws loose on
size 300 units.
4. Slide baffle (size 300) unit behind lower filter retainer
and tighten screws.
5. Loosen sheet metal screws for base unit top panel located above outdoor-air inlet opening, and remove screws
for hood side panels located on the sides of the outdoorair inlet opening.
6. Match notches in hood top panel to unit top panel screws.
Insert hood flange between unit top panel flange and unit.
Tighten screws.
7. Hold hood side panel flanges flat against unit, and install screws removed in Step 5.
8. Insert outdoor-air inlet screens and spacer in channel
created by lower filter retainer and filter support bracket.
9. Attach remaining short section of filter support bracket.
BAFFLE (300 ONLY)
LOWER FILTER
RETAINER
FILTER SUPPORT
BRACKET
HOOD SIDE
HOOD TOP
PANEL
HOOD DRAIN PAN
UPPER FILTER RETAINER
NOTE: The outdoor-air hood comes with a baffle which is used on
size 300 units only; discard baffle for 180-240 units.
PANELS (2)
BAFFLE
(300
ONLY)
LOWER
FILTER
RETAINER
FILTER SUPPORT
BRACKET
Fig. 19 — Outdoor-Air Hood Details
Fig. 17 — Outdoor-Air Hood Component Location
Fig. 18 — Seal Strip Location (Air Hood Cross-Sectional View)
A. Enthalpy Control Installation
NOTE: The accessory outdoor-air enthalpy sensor must be
installed BEFORE the economizer hoods are installed on the
unit or hoods will have to be removed.
1. Remove and discard the factory-installed jumper assembly containing the 800-ohm resistor on the economizer
control module (between terminals S
and +). See Fig. 15.
R
2. Remove black wire assembly containing the 620-ohm resistor from between economizer control module termi-
and the outdoor-air thermostat (OAT). Place this
nal S
O
wire assembly (containing the 620-ohm resistor) between economizer control module terminals S
and +,
R
replacing the jumper removed in Step 1. See Fig. 15.
3. Disconnect the blue wire from the OAT.
4. Remove OAT from the outside of the economizer (see
Fig. 14).
5. Mount the enthalpy sensor (Fig. 20) to the economizer
on the outside of the unit (in the same location from which
the OAT was removed) using the 2 screws provided. See
Fig. 14.
6. Reconnect the blue wire removed in Step 3 to the enthalpy sensor terminal +.
7. Cut the violet wire provided to desired length and terminate with quick-connect terminal provided. Route the
violet wire from the enthalpy sensor terminal S, through
the snap bushing, and to the economizer control module
terminal S
. See Fig. 15.
O
8. Set changeover set point to the desired location.
See Fig. 21.
—12—
Page 13

NOTE: For maximum benefit of outdoor air,set the enthalpy
control to the ‘‘A’’ setting. At this setting, when the relative
humidity is 50% and the outdoor air is below 74 F, the relay
contacts on the sensor will be closed.
9. Reinstall economizer hoods if removed.
IMPORTANT: Be sure all seal strips and RTV sealant are intact. A watertight seal to inside of unit must be maintained.
+
Fig. 20 — Outdoor-Air and Return-Air
Enthalpy Sensor
CONTROL
CURVE
CONTROL POINT
(Approx Deg)
A 73
B 68
C 63
D 58
AT 50% RH
3. Remove OAT and black wire assembly containing the
620-ohm resistor from the outside of the economizer
(see Fig. 14).
4. Mount the outdoor-air enthalpy sensor (first sensor) to
the economizer on the outside of the unit (in the same
location from which the OAT was removed) using the
2 screws provided. See Fig. 14.
5. Reconnect the blue wire removed in Step 2 to the enthalpy sensor terminal +.
6. Cut the violet wire provided to desired length and terminate with quick-connect terminal provided. Route the
violet wire from the enthalpy sensor terminal S, through
the snap bushing, and to the economizer control module terminal S
.
O
7. Mount the second enthalpy sensor in the return-air duct
(return-air sensor).
8. Route the blue wire (provided) from terminal + on the
return-air enthalpy sensor to the economizer control
module terminal +.
9. Route the violet wire (provided) from terminal S on the
return-air enthalpy sensor to the economizer control
module terminal S
.
R
10. Turn changeover set point dial clockwise past the ‘‘D’’
setting, or the control will not operate on a differential. See Fig. 15.
11. Reinstall economizer hood if removed.
IMPORTANT: Be sure all seal strips and RTV sealant are intact. A watertight seal to inside of unit must be maintained.
IX. STEP 9 — INSTALL ALL ACCESSORIES
After all the factory-installed options have been adjusted, install all field-installed accessories. Refer to the accessory installation instructions included with each accessory.
A. MotormasterT I Control Installation (559F180 and 216)
Install Field-Fabricated Wind Baffles
Wind baffles must be field-fabricated for all units to ensure
proper cooling cycle operation at low ambient temperatures.
See Fig. 22 for baffle details. Use 20-gage, galvanized sheet
metal, or similar corrosion-resistant metal for baffles. Use fieldsupplied screws to attach baffles to unit. Screws should be
1
⁄4-in. diameter and5⁄8-in. long. Drill required screw holes for
mounting baffles.
CAUTION:
To avoid damage to the refrigerant coils
and electrical components, use recommended screw sizes
only. Use care when drilling holes.
RH — Relative Humidity
Fig. 21 — Psychrometric Chart for Solid-State
Enthalpy Control
B. Differential Enthalpy Control
NOTE: The accessory outdoor-air enthalpy sensor must be
installed BEFORE the economizer hoods are installed on the
unit or hoods will have to be removed.
1. Remove and discard the factory-installed jumper assembly containing the 800-ohm resistor on the economizer control module (between terminals S
and +. See
R
Fig. 15.
2. Disconnect black wire from economizer control module
terminal S
and blue wire from the OAT (outdoor-air
O
thermostat).
Install Motormastert I Controls
Only one Motormaster I control is required per unit. The Motor-
master I control must be used in conjunction with the Accessory 0° F Low Ambient Kit (purchased separately). The
Motormaster I device controls outdoor fan no. 1 while outdoor fans no. 2 and 3 are sequenced off by the Accessory 0° F
Low Ambient Kit.
Accessory 0° F Low Ambient Kit — Install the Accessory
0° F Low Ambient Kit per instruction supplied with
accessory.
Motor Mount — To ensure proper fan height, replace the existing motor mount with the new motor mount provided with
accessory.
—13—
Page 14

Install Motormaster III Controls
Only one Motormaster III control is required per unit.
Sensor — Install the sensor for thermistor input control in
the location shown in Fig. 24. Connect sensor leads to the
purple and grey control signal leads on the Motormaster III
control.
Signal Selection Switch — Remove the cover of the Motormaster III control. Set the switch to accept the thermistor
sensor input signal. Set the frequency to match the unit power
supply (60 Hz).
Motormaster III Control — Recommended mounting location
is beneath the control box, mounted to the partition that separates the control box section from the indoor section.
NOTE: If unit power is supplied through the roof curb and
basepan of the unit, mount the Motormaster III control on
the corner post adjacent to the conduit running from the basepan to the bottom of the control box.
NOTE: Dimensions in ( ) are in mm.
Fig. 22 — Wind Baffle Details
Transformer (460-v Units Only) — On 460-v units, a transformer is required. The transformer is provided with the accessory and must be field-installed.
Sensor Assembly — Install the sensor assembly in the location shown in Fig. 23.
Motormastert I Control — Recommended mounting location
is on the inside of the panel to the left of the control box. The
control should be mounted on the inside of the panel, vertically, with leads protruding from bottom of extrusion.
B. Motormaster III Control Installation (559F240 and 300)
Install Field-Fabricated Wind Baffles
Wind baffles must be field-fabricated for all units to ensure
proper cooling cycle operation at low ambient temperatures.
See Fig. 22 for baffle details. Use 20-gage, galvanized sheet
metal, or similar corrosion-resistant metal for baffles. Use fieldsupplied screws to attach baffles to unit. Screws should be
1
⁄4-in. diameter and5⁄8-in. long. Drill required screw holes for
mounting baffles.
CAUTION:
To avoid damage to the refrigerant coils
and electrical components, use recommended screw sizes
only. Use care when drilling holes.
SENSOR
LOCATION
HAIRPIN END
559F180 559F216
NOTE: All sensors are located on the eighth hairpin up from the bottom.
SENSOR
LOCATION
HAIRPIN END
Fig. 23 — Motormaster I Sensor Locations
Replace Outdoor Motor
Replace outdoor fan motor no. 1 with motor included in
accessory kit. Existing motor is not Motormaster III
compatible.
—14—
Page 15

SENSOR
LOCATION
HAIRPIN END
559F240 559F300
NOTE: All sensors are located on the eighth hairpin up from the bottom.
SENSOR
LOCATION
HAIRPIN END
Fig. 24 — MotormasterT III Sensor Locations
START-UP
Use the following information and Start-Up Checklist on
page CL-1 to check out unit PRIOR to start-up.
I. UNIT PREPARATION
Check that unit has been installed in accordance with these
installation instructions and all applicable codes.
II. SERVICE VALVES
Ensure that optional suction, discharge, and standard liquid
line service valves are open. Damage to the compressor could
result if they are left closed.
III. INTERNAL WIRING
Check all electrical connections in unit control boxes; tighten
as required.
IV. CRANKCASE HEATER(S)
Heater(s) is energized as long as there is power to unit and
compressor is operating.
IMPORTANT: Unit power must be on for 24 hours prior to
start-up. Otherwise, damage to compressor may result.
V. COMPRESSOR MOUNTING
Compressors are internally spring mounted. Do not loosen or
remove compressor holddown bolts.
VI. REFRIGERANT SERVICE PORTS
Each refrigerant system has a total of 3 Schrader-type service gage ports. One port is located on the suction line, one on
the compressor discharge line, and one on the liquid line. In
addition, Schrader-type valves are located underneath the lowpressure switches. Be sure that caps on the ports are tight.
VII. COMPRESSOR ROTATION
It is important to be certain the compressors are rotating in
the proper direction. To determine whether or not compressors are rotating in the proper direction:
1. Connect service gages to suction and discharge pressure fittings.
2. Energize the compressor.
3. The suction pressure should drop and the discharge pressure should rise, as is normal on any start-up.
If the suction pressure does not drop and the discharge pressure does not rise to normal levels:
1. Note that the evaporator fan is probably also rotating
in the wrong direction.
2. Turn off power to the unit.
3. Reverse any two of the incoming power leads.
4. Turn on power to the compressor.
The suction and discharge pressure levels should now move
to their normal start-up levels.
NOTE: When compressors are rotating in the wrong direction, the unit will have increased noise levels and will not
provide heating and cooling.
After a few minutes of reverse operation, the scroll compressor internal overload protection will open, which will activate the unit’s lockout and requires a manual reset. Reset is
accomplished by turning the thermostat on and off.
VIII. EVAPORATOR FAN
Fan belt and variable pulleys are factory installed. Remove
tape from the fan pulley. See Table 4 forAir Quantity Limits.
See Tables 5-7 for Fan Performance data. Be sure that fans
rotate in the proper direction. See Tables 8 and 9 for Static
Pressure information for accessories and options. See
Table 10 for fan rpm at various fan motor pulley settings. To
alter fan performance, see Evaporator-Fan Performance Adjustment section, page 21.
Table 4 — Air Quantity Limits
UNIT 559F MINIMUM CFM MAXIMUM CFM
180 4500 7,500
216 5400 9,000
240 6000 10,000
300 7000 11,250
IX. CONDENSER FANS AND MOTORS
Fans and motors are factory set. Refer to Condenser-Fan Adjustment section (page 22) as required.
X. RETURN-AIR FANS
Check that correct filters are installed in filter tracks. See
Table 1. Do not operate unit without return-air filters.
XI. OUTDOOR-AIR INLET SCREENS
Outdoor-air inlet screens must be in place before operating
unit.
XII. ACCESSORY ECONOMIZER ADJUSTMENT
Remove filter access panel. Check that outdoor-air damper is
closed and return-air damper is open.
Economizer operation and adjustment is described in Base
Unit Operation and Economizer Adjustment sections
(pages 20 and 22), respectively.
—15—
Page 16

Table 5 — Fan Performance — 559F180
559F180 (15 TONS)
Airflow
(Cfm)
4500 684 1.28 1102 791 1.49 1283 887 1.70 1466 977 1.92 1652 1061 2.13 1841 1139 2.36 2034
4800 715 1.47 1265 817 1.68 1451 910 1.90 1638 997 2.12 1828 1078 2.34 2021 1155 2.57 2217
5100 747 1.67 1442 844 1.89 1633 934 2.12 1825 1018 2.34 2019 1097 2.57 2216 1171 2.80 2416
5400 779 1.90 1635 872 2.12 1831 959 2.35 2027 1040 2.58 2226 1117 2.81 2426 1189 3.05 2629
5700 812 2.14 1844 901 2.37 2044 985 2.60 2245 1063 2.84 2448 1138 3.07 2652 1209 3.31 2858
6000 845 2.40 2068 931 2.64 2273 1011 2.87 2478 1087 3.11 2685 1160 3.35 2893 1229 3.60 3103
6300 878 2.68 2309 961 2.92 2518 1039 3.16 2728 1112 3.41 2939 1183 3.65 3151 1250 3.90 3365
6600 912 2.98 2566 992 3.22 2780 1067 3.47 2994 1138 3.72 3209 1207 3.97 3425 1273 4.22 3642
6900 946 3.29 2841 1023 3.55 3059 1096 3.80 3277 1165 4.05 3496 1232 4.31 3716 — — —
7200 981 3.63 3133 1055 3.89 3355 1125 4.15 3578 — — — — — — — — —
7500 1016 3.99 3443 1087 4.25 3669 — — — — — — — — — — — —
559F180 (15 TONS) (cont)
Airflow
(Cfm)
4500 1214 2.59 2230 1285 2.82 2430 1353 3.05 2633 1386 3.17 2736 1418 3.29 2839
4800 1228 2.80 2417 1297 3.04 2619 1364 3.27 2825 1396 3.40 2928 1428 3.52 3033
5100 1243 3.04 2618 1311 3.27 2823 1376 3.51 3031 1408 3.64 3136 1439 3.76 3242
5400 1259 3.29 2835 1326 3.53 3043 1390 3.77 3254 1421 3.90 3360 1452 4.02 3467
5700 1277 3.56 3067 1342 3.80 3278 1405 4.05 3492 1435 4.17 3600 1466 4.30 3708
6000 1295 3.84 3316 1359 4.09 3530 1421 4.34 3746 — — — — — —
6300 1315 4.15 3580 — — — — — — — — — — — —
6600 —— — —— — —— — —— — —— —
6900 —— — —— — —— — —— — —— —
7200 —— — —— — —— — —— — —— —
7500 ————————————————
Bhp — Brake Horsepower
FIOP — Factory-Installed Option
Watts — Input Watts to Motor
NOTES:
1. Standard low-medium static drive range is 891 to 1179 rpm. Alternate high-static drive range is 1227 to 1550. Other rpms require a
field-supplied drive.
2. Maximum continuous bhp is 4.25 and the maximum continuous watts
are 3775. Do not adjust motor rpm such that motor maximum bhp
and/or watts is exceeded at the maximum operating cfm.
Rpm Bhp Watts Rpm Bhp Watts Rpm Bhp Watts Rpm Bhp Watts Rpm Bhp Watts Rpm Bhp Watts
Rpm Bhp Watts Rpm Bhp Watts Rpm Bhp Watts Rpm Bhp Watts Rpm Bhp Watts
LEGEND
0.2 0.4 0.6 0.8 1.0 1.2
Available External Static Pressure (in. wg)
1.4 1.6 1.8 1.9 2.0
Available External Static Pressure (in. wg)
3. Static pressure losses (i.e., economizer) must be added to external
static pressure before entering Fan Performance table.
4. Interpolation is permissible. Do not extrapolate.
5. Fan performance is based on wet coils, clean filters, and
casing losses. See Table 8 for accessory/FIOP static pressure
information.
6. Extensive motor and drive testing on these units ensures that the full
horsepower and watts range of the motor can be utilized with confidence. Using your fan motors up to the watts or bhp rating shown
will not result in nuisance tripping or premature motor failure. Unit
warranty will not be affected.
7. Use of a field-supplied motor may affect wiring size. Contact your
Bryant representative for details.
—16—
Page 17

Table 6 — Fan Performance — 559F216 and 240
559F216 and 240 (18 and 20 TONS)
Airflow
(Cfm)
5,500 682 1.99 1675 760 2.29 1922 832 2.59 2177 901 2.90 2441 965 3.22 2712 1027 3.56 2990
6,000 730 2.38 2005 802 2.68 2257 871 2.99 2516 935 3.31 2783 997 3.63 3057 1056 3.97 3337
6,500 778 2.82 2373 846 3.13 2630 911 3.44 2893 972 3.76 3164 1031 4.09 3440 1087 4.43 3722
7,000 828 3.31 2780 892 3.62 3042 953 3.94 3310 1011 4.26 3583 1067 4.59 3863 1121 4.93 4148
7,500 878 3.84 3227 938 4.15 3494 996 4.48 3766 1051 4.81 4043 1105 5.14 4326 1156 5.49 4613
8,000 928 4.42 3715 985 4.74 3986 1040 5.07 4263 1093 5.40 4544 1144 5.74 4830 1194 6.09 5120
8,500 979 5.05 4245 1033 5.38 4521 1085 5.71 4801 1136 6.05 5086 1185 6.39 5375 1232 6.74 5669
9,000 1030 5.73 4817 1082 6.06 5098 1131 6.40 5382 1180 6.74 5671 1227 7.09 5964 1272 7.44 6260
9,500 1082 6.46 5433 1131 6.80 5718 1178 7.14 6007 1225 7.49 6299 1270 7.84 6595 1313 8.20 6895
10,000 1134 7.25 6093 1180 7.59 6382 1226 7.94 6675 1270 8.29 6971 1313 8.65 7271 1356 9.01 7574
559F216 and 240 (18 and 20 TONS) (cont)
Airflow
(Cfm)
5,500 1086 3.89 3275 1142 4.24 3567 1197 4.59 3864 1223 4.77 4015 1249 4.96 4167
6,000 1112 4.31 3623 1167 4.66 3915 1219 5.01 4213 1245 5.19 4364 1270 5.37 4516
6,500 1142 4.77 4010 1194 5.12 4304 1245 5.47 4602 1270 5.65 4754 1294 5.83 4906
7,000 1173 5.28 4438 1224 5.63 4733 1273 5.98 5033 1296 6.17 5184 1320 6.35 5337
7,500 1207 5.83 4906 1255 6.19 5203 1302 6.55 5504 1326 6.73 5657 1348 6.91 5810
8,000 1242 6.44 5415 1289 6.80 5714 1334 7.16 6018 1357 7.34 6171 1379 7.52 6325
8,500 1279 7.10 5966 1324 7.45 6268 1368 7.82 6573 1389 8.00 6728 1411 8.18 6883
9,000 1317 7.80 6561 1360 8.16 6865 1403 8.53 7173 1424 8.71 7328 1445 8.90 7484
9,500 1356 8.56 7198 1398 8.93 7505 1440 9.29 7815 1460 9.48 7972 1480 9.67 8129
10,000 1397 9.37 7881 1438 9.74 8190 1477 10.11 8503 — — — — — —
Bhp — Brake Horsepower
FIOP — Factory-Installed Option
Watts — Input Watts to Motor
NOTES:
1. Standard low-medium static drive range for the 216 size is 910 to
1095 rpm. Standard low-medium static drive range for the 240 size
is 1002 to 1225 rpm. Alternate high-static drive range for the
216 size is 1069 to 1287. Alternate high-static drive range for the
240 size is 1193 to 1458 rpm. Other rpms require a field-supplied
drive.
2. Maximum continuous bhp for the 216 size is 5.90. Maximum continuous bhp for the 240 size is 8.7 (208/230 v) or 9.5 (460 v). The
maximum continuous watts for the 216 size is 5180. The maximum
continuous watts for the 240 size is 7915 (208/230 v) or 8640
(460 v). Do not adjust motor rpm such that motor maximum bhp and/or
watts is exceeded at the maximum operating cfm.
Rpm Bhp Watts Rpm Bhp Watts Rpm Bhp Watts Rpm Bhp Watts Rpm Bhp Watts Rpm Bhp Watts
Rpm Bhp Watts Rpm Bhp Watts Rpm Bhp Watts Rpm Bhp Watts Rpm Bhp Watts
LEGEND
0.2 0.4 0.6 0.8 1.0 1.2
Available External Static Pressure (in. wg)
1.4 1.6 1.8 1.9 2.0
Available External Static Pressure (in. wg)
3. Static pressure losses (i.e., economizer) must be added to external
static pressure before entering Fan Performance table.
4. Interpolation is permissible. Do not extrapolate.
5. Fan performance is based on wet coils, clean filters, and
casing losses. See Table 9 for accessory/FIOP static pressure
information.
6. Extensive motor and drive testing on these units ensures that the full
horsepower and watts range of the motor can be utilized with confidence. Using your fan motors up to the watts or bhp rating shown
will not result in nuisance tripping or premature motor failure. Unit
warranty will not be affected.
7. Use of a field-supplied motor may affect wiring size. Contact your
Bryant representative for details.
—17—
Page 18

Table 7 — Fan Performance — 559F300
559F300 (25 TONS)
Airflow
(Cfm)
7,000 845 3.26 2693 909 3.60 2979 969 3.96 3272 1028 4.32 3574 1083 4.70 3883 1137 5.08 4,200
7,500 896 3.82 3156 956 4.17 3450 1014 4.54 3752 1069 4.91 4060 1123 5.29 4375 1174 5.68 4,698
8,000 948 4.43 3667 1005 4.80 3969 1060 5.17 4278 1112 5.56 4593 1163 5.94 4915 1213 6.34 5,243
8,500 1001 5.11 4226 1054 5.49 4537 1106 5.87 4853 1156 6.26 5175 1205 6.66 5504 1253 7.06 5,838
9,000 1053 5.85 4836 1104 6.23 5155 1154 6.63 5478 1202 7.02 5808 1248 7.43 6142 1294 7.84 6,483
9,500 1106 6.65 5498 1155 7.04 5824 1202 7.44 6155 1248 7.85 6492 1293 8.26 6833 1336 8.68 7,179
10,000 1159 7.52 6214 1206 7.92 6547 1251 8.33 6886 1295 8.74 7229 1338 9.16 7577 1380 9.59 7,929
10,500 1213 8.45 6984 1257 8.86 7325 1300 9.28 7671 1342 9.70 8020 1384 10.13 8375 1424 10.56 8,733
11,000 1266 9.45 7810 1309 9.87 8159 1350 10.29 8511 1391 10.73 8868 1431 11.16 9229 1470 11.60 9,594
11,250 1293 9.97 8245 1334 10.40 8597 1375 10.83 8953 1415 11.26 9313 1454 11.70 9677 1493 12.15 10,045
559F300 (25 TONS) (cont)
Airflow
(Cfm)
10,000 1421 10.02 8,286 1461 10.46 8,648 1501 9.70 9014
10,500 1464 11.00 9,096 1503 11.45 9,464 1541 10.73 9835
11,000 1508 12.05 9,963 1546 12.50 10,336 — — —
11,250 1530 12.60 10,417 — — — — — —
Bhp — Brake Horsepower
FIOP — Factory-Installed Option
Watts — Input Watts to Motor
NOTES:
1. Standard low-medium static drive range is 1066 to 1283 rpm. Alter-
2. Maximum continuous bhp is 10.2 (208/230 v) or 11.8 (460 v) and the
Rpm Bhp Watts Rpm Bhp Watts Rpm Bhp Watts
7,000 1189 5.47 4,524 1239 5.87 4,854 1288 4.91 5191
7,500 1224 6.08 5,026 1272 6.48 5,362 1320 5.56 5703
8,000 1261 6.75 5,577 1307 7.16 5,917 1353 6.26 6263
8,500 1299 7.47 6,177 1344 7.89 6,523 1388 7.02 6873
9,000 1338 8.26 6,828 1382 8.68 7,179 1424 7.85 7534
9,500 1379 9.11 7,530 1421 9.54 7,887 1462 8.74 8247
nate high-static drive range is 1332 to 1550. Other rpms require a
field-supplied drive.
maximum continuous watts are 9510 (208/230 v) or 11,000 (460 v).
Do not adjust motor rpm such that motor maximum bhp and/or watts
is exceeded at the maximum operating cfm.
0.2 0.4 0.6 0.8 1.0 1.2
Rpm Bhp Watts Rpm Bhp Watts Rpm Bhp Watts Rpm Bhp Watts Rpm Bhp Watts Rpm Bhp Watts
Available External Static Pressure (in. wg)
1.4 1.6 1.8
LEGEND
Available External Static Pressure (in. wg)
3. Static pressure losses (i.e., economizer) must be added to external
static pressure before entering Fan Performance table.
4. Interpolation is permissible. Do not extrapolate.
5. Fan performance is based on wet coils, clean filters, and
casing losses. See Table 9 for accessory/FIOP static pressure
information.
6. Extensive motor and drive testing on these units ensures that the full
horsepower and watts range of the motor can be utilized with confidence. Using your fan motors up to the watts or bhp rating shown
will not result in nuisance tripping or premature motor failure. Unit
warranty will not be affected.
7. Use of a field-supplied motor may affect wiring size. Contact your
Bryant representative for details.
—18—
Page 19

Table 8 — Accessory/FIOP Static Pressure (in. wg) — 559F180
COMPONENT
4500 5000 6000 7200 7500
CFM
Economizer 0.04 0.05 0.07 0.09 0.10
Glycol Coil 0.22 0.26 0.35 0.44 0.46
Electric Heat (kW)
26/34 0.06 0.07 0.09 0.11 0.12
32 0.06 0.07 0.09 0.11 0.12
42/56 0.07 0.08 0.12 0.16 0.17
55 0.07 0.08 0.12 0.15 0.17
56/75 0.09 0.10 0.15 0.20 0.21
80 0.09 0.10 0.15 0.20 0.21
LEGEND
FIOP — Factory-Installed Option
NOTES:
1. The static pressure must be added to external static pressure. The
sum and the evaporator entering-air cfm should then be used in conjunction with the Fan Performance tables to determine blower rpm
and watts.
2. Heaters are rated at 208/240 v and 480 v.
Table 9 — Accessory/FIOP Static Pressure (in. wg) — 559F216-300
COMPONENT
5400 6000 7200 9000 10,000 11,250
Economizer 0.06 0.07 0.09 0.11 0.12 0.14
Glycol Coil 0.30 0.35 0.44 0.58 0.66 0.77
Electric Heat (kW)
26/34 0.08 0.09 0.11 0.15 0.17 0.20
32 0.08 0.09 0.11 0.15 0.17 0.20
42/56 0.11 0.12 0.15 0.19 0.21 0.24
55 0.11 0.12 0.15 0.19 0.21 0.24
56/75 0.14 0.15 0.20 0.24 0.26 0.29
80 0.14 0.15 0.20 0.24 0.26 0.29
LEGEND
FIOP — Factory-Installed Option
NOTES:
1. The static pressure must be added to external static pressure. The
2, Heaters are rated at 208/240 v and 480 v.
CFM
sum and the evaporator entering-air cfm should then be used in conjunction with the Fan Performance tables to determine blower rpm
and watts.
Table 10 — Fan Rpm at Motor Pulley Settings*
UNIT
559F
1
0
⁄
2
11
1
⁄
2
180† †† †† 1179 1150 1121 1093 1064 1035 1006 978 949 920 891
180** †† †† 1559 1522 1488 1455 1422 1389 1356 1323 1289 1256 1227
216† †† †† 1095 1077 1058 1040 1021 1002 984 965 947 928 910
216** †† †† 1287 1265 1243 1222 1200 1178 1156 1134 1112 1091 1069
240† †† †† 1225 1209 1187 1165 1143 1120 1098 1076 1053 1031 1002
240** †† †† 1458 1434 1407 1381 1354 1328 1301 1275 1248 1222 1193
300† †† †† 1283 1269 1247 1225 1203 1182 1160 1138 1116 1095 1066
300** †† †† — — 1551 1524 1497 1470 1443 1415 1388 1361 1332
*Approximate fan rpm shown.
†Indicates standard drive package.
**Indicates alternate drive package.
††Due to belt and pulley size, pulley cannot be set to this number of turns open.
NOTE: For speeds not listed above, field-supplied drives are required.
MOTOR PULLEY TURNS OPEN
22
1
⁄
2
33
1
⁄
2
44
1
⁄
2
55
1
⁄
2
6
—19—
Page 20

XIII. BASE UNIT OPERATION
A. Cooling, Units Without Economizer
When thermostat calls for cooling, terminals G and Y1 are
energized. The indoor (evaporator) fan contactor (IFC), and
compressor contactor no. 1 (C1) are energized and evaporatorfan motor, compressor no. 1 and condenser fans start. The
condenser-fan motors run continuously while unit is cooling.
If the thermostat calls for a second stage of cooling by energizing Y2, compressor contactor no. 2 (C2) is energized and
compressor no. 2 starts.
B. Heating, Units Without Economizer (If Accessory or Optional Heater is Installed)
Upon a call for heating through terminal W1, IFC and heater
contactor no. 1 (HC1) are energized. On units equipped for
2 stages of heat, when additional heat is needed, HC2 is energized through W2.
C. Cooling, Units With Economizer
Upon a call for cooling, when outdoor ambient temperature
is above the outdoor-air temperature control setting, the evaporator and condenser fans and compressor energize. The economizer damper moves to VENT position.
Upon a first-stage call for cooling, when outdoor ambient
temperature is below the temperature control setting, the evaporator fan starts and economizer damper modulates to maintain mixed-air temperature. The compressor(s) remains off.
Upon a second-stage call for cooling, compressor no. 1 is energized and mechanical cooling is integrated with economizer cooling. Compressor no. 2 is locked out. If the outdoorair temperature is below 50 F ,a cooling lockout switch prevents
the compressor(s) from running.
When supply-air temperature drops below a fixed set point,
the economizer damper modulates to maintain the temperature at the fixed set point.
D. Freeze Protection Thermostat
A freeze protection thermostat (FPT) is located on the evaporator coil. It detects frost build-up and turns off the compressor,allowing the coil to clear.Once frost has melted, the compressor can be reenergized by resetting the compressor lockout.
E. Heating, Units With Economizer (If Accessory or Optional Heater Is Installed)
The outdoor air damper stays at VENT position while the evaporator fan is operating. Upon a call for heating through terminal W1, the indoor (evaporator) fan contactor (IFC) and
heater contactor no. 1 (HC1) are energized. On units equipped
for 2 stages of heat, when additional heat is needed, HC2 is
energized through W2.
SERVICE
WARNING:
Before performing service or maintenance operations on unit, turn off main power switch
to unit. Turn off accessory heater power switch if applicable. Electrical shock could cause personal injury.
I. CLEANING
Inspect unit interior at beginning of each heating and cooling season and as operating conditions require. Remove unit
top panel and/or side panels for access to unit interior.
A. Evaporator Coil
Clean as required with a commercial coil cleaner.
NOTE: The 559F300 unit has a mist eliminator screen
attached to the evaporator coil to prevent condensate runoff
at high wet-bulb conditions. Check periodically and clean as
necessary.
B. Condenser Coil
Clean condenser coil annually and as required by location
and outdoor-air conditions. Inspect coil monthly — clean as
required.
C. Condensate Drain
Check and clean each year at start of cooling season.
D. Filters
Clean or replace at start of each heating and cooling season,
or more often if operating conditions require. Refer to
Table 1 for type and size.
NOTE: The 559F300 unit requires industrial grade throwaway filters capable of withstanding face velocities up to
625 fpm. Ensure that replacement filters for the 559F300 units
are rated for 625 fpm.
E. Outdoor-Air Inlet Screens
Clean screens with steam or hot water and a mild detergent.
Do not use throwaway filters in place of screens.
II. LUBRICATION
A. Compressors
Each compressor is charged with the correct amount of oil at
the factory. Conventional white oil (Sontext 200LT) is used.
White oil is compatible with 3GS oil, and 3GS oil may be used
if the addition of oil is required. See compressor nameplate
for original oil charge. A complete recharge should be
four ounces less than the original oil charge. When a compressor is exchanged in the field it is possible that a major
portion of the oil from the replaced compressor may still be
in the system. While this will not affect the reliability of the
replacement compressor,the extra oil will add rotor drag and
increase power usage. To remove this excess oil, an access
valve may be added to the lower portion of the suction line at
the inlet of the compressor. The compressor should then be
run for 10 minutes, shut down, and the access valve opened
until no oil flows. This should be repeated twice to make sure
the proper oil level has been achieved.
B. Fan Shaft Bearings
For size 180 units, bearings are permanently lubricated. No
field lubrication is required. For size 216-300 units, the bearings are of the pillow block type and have grease fittings. The
bearing opposite the motor end has an extended tube line so
it can be lubricated from the motor side. Lubricate the bearings twice annually.
Typical lubricants are given below:
MANUFACTURER LUBRICANT
Texaco Regal AFB-2*
Mobil Mobilplex EP No. 1
Sunoco Prestige 42
Texaco Multifak 2
*Preferred lubricant because it contains rust and oxidation inhibitors.
C. Condenser and Evaporator-Fan Motor Bearings
The condenser and evaporator-fan motors have permanentlysealed bearings, so no field lubrication is necessary.
—20—
Page 21

III. EVAPORATOR FAN PERFORMANCE ADJUSTMENT
(Fig. 25-27)
Fan motor pulleys are factory set for speed shown in Table 1.
To change fan speeds:
1. Shut off unit power supply.
2. a. Size 180 Only: Loosen belt by loosening fan motor
mounting plate nuts.
b. Size 216-300 Only: Loosen nuts on the 2 carriage bolts
in the motor mounting base. Install jacking bolt and
plate under motor base (bolt and plate are shipped
in installer’ spacket). See Fig. 25. Using bolt and plate,
raise motor to top of slide and remove belt. Secure
motor in this position by tightening the nuts on the
carriage bolts.
3. Loosen movable-pulley flange setscrew (see Fig. 25).
4. Screw movable flange toward fixed flange to increase speed
and away from fixed flange to decrease speed. Increasing fan speed increases load on motor.Do not exceed maximum speed specified in Table 1.
See Table 4 for air quantity limits.
5. Set movable flange at nearest keyway of pulley hub and
tighten setscrew. (See Table 1 for speed change for each
full turn of pulley flange.)
6. Replace and tighten belts. See Belt TensionAdjustment
section on page 22.
To align fan and motor pulleys:
1. Loosen fan pulley setscrews.
2. Slide fan pulley along fan shaft.
3. Make angular alignment by loosening motor from mounting plate.
Fig. 25 — Evaporator-Fan Pulley Alignment
and Adjustment
IV. EVAPORATOR FAN SERVICE AND REPLACEMENT
A. 559F180 Units (See Fig. 26)
NOTE: To remove belts only, follow Steps 1-6.
1. Remove filter and supply-air section panels.
2. Remove unit top panel.
3. Loosen carriage nuts Aand B holding motor mount assembly to fan scroll side plates.
4. Loosen screw C.
5. Rotate motor mount assembly (with motor attached)
as far as possible away from evaporator coil.
6. Remove belt.
7. Rotate motor mount assembly back past original position toward evaporator coil.
8. Remove motor mounting nuts D and E (both sides).
9. Lift motor up through top of unit.
10. Reverse above procedure to reinstall motor.
11. Check and adjust belt tension as necessary.
B. 559F216-300 Units (See Fig. 27)
The 559F216-300 units use a fan motor mounting system that
features a slide-out motor mounting plate. Toreplace or service the motor, slide out the bracket.
1. Remove the evaporator-fan access panel and the heating control access panel.
2. Remove the center post (located between the evaporator fan and heating control access panels) and all screws
securing it.
3. Loosen nuts on the two carriage bolts in the motor mounting base.
Fig. 26 — 559F180 Evaporator-Fan
Motor Section
—21—
Page 22

4. Using jacking bolt under motor base, raise motor to top
of slide and remove belt. Secure motor in this position
by tightening the nuts on the carriage bolts.
5. Remove the belt drive.
6. Remove jacking bolt and tapped jacking bolt plate.
7. Remove the 2 screws that secure the motor mounting
plate to the motor support channel.
8. Remove the 3 screws from the end of the motor support channel that interfere with the motor slide path.
9. Slide out the motor and motor mounting plate.
10. Disconnect wiring connections and remove the 4 mounting bolts.
11. Remove the motor.
12. To install the new motor, reverse Steps 1-11.
VI. CONDENSER-FAN ADJUSTMENT
A. 559F180-216 Units (Fig. 28)
1. Shut off unit power supply.
2. Remove access panel(s) closest to the fan to be adjusted.
3. Loosen fan hub setscrews.
4. Adjust fan height on shaft using a straightedge placed
across the fan orifice.
5. Tighten setscrews and replace panel(s).
6. Turn on unit power.
B. 559F240,300 Units (Fig. 29)
1. Shut off unit power supply.
2. Remove fan top-grille assembly and loosen fan hub screws.
3. Adjust fan height on unit, using a straightedge placed
across the fan orifice.
4. Tighten setscrews and replace rubber hubcap to prevent hub from rusting to motor shaft.
5. Fill hub recess with permagum if rubber hubcap is
missing.
NOTE: A21⁄2-in. bolt and threaded plate are included in the installer’s
packet. They should be added to the motor support channel below the
motor mounting plate to aid in raising the motor. The plate part number
is 50DP503842. The adjustment bolt is
3
⁄8-16x13⁄4-in. LG.
Fig. 27 — 559F216-300 Evaporator-Fan
Motor Section
V. BELT TENSION ADJUSTMENT
To adjust belt tension:
1. Loosen fan motor bolts.
2. Adjust belt tension:
a. Size 180 Units: Move motor mounting plate up or
1
down for proper belt tension (
⁄2in. deflection with
one finger).
b. Size 216-300 Units: Turn motor jacking bolt to move
motor mounting plate up or down for proper belt
3
tension (
⁄8in. deflection at midspan with one finger
[9 lb force]).
3. Tighten nuts.
4. Adjust bolts and nut on mounting plate to secure motor
in fixed position.
NOTE: Dimensions are in inches.
Fig. 28 — Condenser Fan Adjustment, 559F180,216
NOTE: Dimensions are in inches.
Fig. 29 — Condenser-Fan Adjustment, 559F240,300
VII. ECONOMIZER ADJUSTMENT
See Tables 11 and 12 for checkout and outdoor-air temperature simulation. Make certain the outdoor-air damper is fully
closed and the return-air damper is fully open before completing the following steps.
1. Turn on power to the unit.
2. Turn the thermostat fan switch to the ON position. The
damper will go to the vent position.
3. Adjust the vent position with the minimum damper position adjustment on the module. See Fig. 15.
4. Set the system selector switch to COOL position
and set the cooling temperature selector to its lowest
setting.
NOTE: The Cooling mode may also be simulated by removing the thermostat wires from terminals Y1 and Y2 and installing a jumper between terminals R and Y1. Refer to unit
label diagram for terminal locations.
—22—
Page 23

Table 11 — Economizer Checkout Procedures
TEST PROCEDURE RESULTS
A. Disconnect power at TR
and TR1.
Disconnect jumper
between P and
P1. See Fig. 15.
B. Jumper TR to 1.
C. Jumper T1 to T.
D. Disconnect outdoor-air
thermostat connections
from S
Factory-installed
800 ohm resistor
should remain connected
to S
E. Reconnect power to
terminals TR and TR1.
A. Disconnect
and +.
O
and +.
R
1. LED (light-emitting diode)
should be off.
2. Motor is in closed position.
TEST PROCEDURE RESULTS
factory-installed
resistor from
terminals S
and +.
R
1. LED (light-emitting diode)
should be on.
2. Motor drives toward open.
Table 12 — High and Low Outdoor-Air
Temperature Simulation
TEST PROCEDURE RESULTS
A. Reconnect factory-
installed 800 ohm resistor between terminals
S
and +.
R
B. Connect 1200 ohm
checkout resistor
between terminals
S
and +.
O
C. Turn set point poten-
tiometer to position A.
D. Turn set point poten-
tiometer to position D.
E. Disconnect 1200 ohm
checkout resistor.
Low outdoor-air temperature
test results:
1. LED (light-emitting diode)
should be on.
2. Motor drives toward open.
High outdoor-air temperature
test results:
1. LED should be off.
2. Motor drives toward closed.
5. Set the outdoor-air thermostat (OAT)located in the economizer section of the unit (see Fig. 14) to 75 F.
6. If the outdoor temperature is below 75 F, the economizer will control the mixed air with the mixed-air sensor. If the outdoor air is above 75 F, place a jumper
around the contacts of the OAT.
7. Jumper terminal T to terminal T1 on the module (see
Fig. 15). The economizer will go to the full open position. The outdoor-air damper will go to the full open
position, and the return-air damper will go to the full
closed position.
8. Adjust mechanical linkage, if necessary, for correct positioning. It may be necessary to remove the filters to
adjust the linkage.
9. Remove the jumper from around the contacts of the OAT
if installed in Step 6. Remove the jumper from terminals T and T1 installed in Step 7.
10. If the Cooling mode was simulated to operate the unit
in Step 4, remove the jumper and reconnect the thermostat wires to terminals Y1 and Y2.
VIII. POWER FAILURE
Dampers have a spring return. In event of power failure, dampers will return to fully closed position until power is restored.
Do not manually operate damper motor.
IX. REFRIGERANT CHARGE
Amount of refrigerant charge is listed on unit nameplate and
in Table 1. Refer to GTAC II; Module 5; Charging, Recovery,
Recycling, and Reclamation section for charging methods and
procedures. Unit panels must be in place when unit is operating during charging procedure.
NOTE: Do not use recycled refrigerant as it may contain
contaminants.
A. No Charge
Use standard evacuating techniques. After evacuating
system, weigh in the specified amount of refrigerant (refer to
Table 1).
B. Low Charge Cooling
Using cooling charging chart (see Fig. 30), add or remove refrigerant until conditions of the chart are met. Note that charging chart is different from those normally used. An accurate
pressure gage and temperature-sensing device is required.
Charging is accomplished by ensuring the proper amount of
liquid sub-cooling. Measure liquid line pressure at the liquid
line service valve using pressure gage. Connect temperature
sensing device to the liquid line near the liquid ine service
valve and insulate it so that outdoor ambient temperature
does not affect reading.
C. To Use the Cooling Charging Chart
Use the above temperature and pressure readings, and find
the intersection point on the cooling charging chart. If intersection point on chart is above line, add refrigerant. If intersection point on chart is below line, carefully recover some of
the charge. Recheck suction pressure as charge is adjusted.
NOTE: Indoor-air CFM must be within normal operating range
of unit. All outdoor fans must be operating.
The TXV (thermostatic expansion valve) is set to maintain
between 15 and 20 degrees of superheat at the compressors.
The valves are factory set and should not require
re-adjustment.
X. FILTER DRIER
Replace whenever refrigerant system is exposed to
atmosphere.
XI. PROTECTIVE DEVICES
A. Compressor Protection
Overtemperature
Each compressor has an internal protector to protect it against
excessively high discharge gas temperatures.
Overcurrent
Each compressor has internal line break motor protection,
except circuit no. 1 on the 559F300 unit. Compressor
no. 1 on the 559F300 unit uses an electronic module, located
with the compressor junction box, to provide motor protection. This electronic module monitors winding and discharge
temperatures. If these temperatures reach the trip values,
the module interrupts the control line and causes the compressor to switch off.
—23—
Page 24

BOTH CIRCUITS
REDUCE CHARGE IF BELOW CURVE
150
200
250
300
350
400
140
120
100
80
60
LIQUID TEMPERATURE AT LIQUID VALVE (DEG F)
40
50
ALL OUTDOOR FANS MUST BE OPERATING
ADD CHARGE IF ABOVE CURVE
100
LIQUID PRESSURE AT LIQUID VALVE (PSIG)
Fig. 30 — Cooling Charging Chart — All Units
Crankcase Heater
Only the 559F300 unit is equipped with a 70-watt crankcase
heater to prevent absorption of liquid refrigerant by oil in the
crankcase when the compressor is idle. The crankcase heater
is energized whenever there is a main power to the unit and
the compressor is not energized.
IMPORTANT: After prolonged shutdown or servicing, energize the crankcase heaters for 24 hours before starting the
compressors.
Compressor Lockout
If any of the safeties (high-pressure, low-pressure, freeze pro-
tection thermostat, compressor internal thermostat) trip, or
if there is loss of power to the compressors, the CLO (compressor lockout) will lock the compressors off. Toreset, manually move the thermostat setting.
B. Evaporator Fan Motor Protection
Amanual reset, calibrated trip, magnetic circuit breaker protects against overcurrent. Do not bypass connections or increase the size of the breaker to correct trouble. Determine
the cause and correct it before resetting the breaker.
C. Condenser-Fan Motor Protection
Each condenser-fan motor is internally protected against
overtemperature.
D. High- and Low-Pressure Switches
If either switch trips, or if the compressor overtemperature
switch activates, that refrigerant circuit will be automatically locked out by the CLO. To reset, manually move the thermostat setting.
E. Freeze Protection Thermostat
An FPT is located on the top and bottom of the evaporator
coil. It detects frost build-up and turns off the compressor, allowing the coil to clear. Once the frost has melted, the compressor can be reenergized by resetting the compressor
lockout.
XII. RELIEF DEVICES
All units have relief devices to protect against damage from
excessive pressures (e.g., fire). These devices protect the high
and low side.
XIII. CONTROL CIRCUIT, 24-V
This control circuit is protected against overcurrent by a
3.2-amp circuit breaker. Breaker can be reset. If it trips, determine cause of trouble before resetting.
XIV. REPLACEMENT PARTS
A complete list of replacement parts may be obtained from
any Carrier distributor upon request.
—24—
Page 25

TROUBLESHOOTING
Refer to Table 13 for troubleshooting details.
Table 13 — Cooling Service Analysis
PROBLEM CAUSE REMEDY
Compressor and
condenser fan
will not start.
Compressor will not start
but condenser fan runs.
Compressor cycles
(other than normally
satisfying thermostat).
Compressor operates
continuously.
Excessive head pressure. Dirty air filter. Replace filter.
Head pressure too low. Low refrigerant charge. Check for leaks, repair, and recharge.
Excessive suction
pressure.
Suction pressure too low. Dirty air filter. Replace filter.
Compressor no. 2
will not run.
Power failure. Call power company.
Fuse blown or circuit breaker tripped. Replace fuse or reset circuit breaker.
Defective thermostat, contactor, transformer, or control
relay.
Insufficient line voltage. Determine cause and correct.
Incorrect or faulty wiring. Check wiring diagram and rewire correctly.
Thermostat setting too high. Lower thermostat setting below room temperature.
Faulty wiring or loose connections in compressor circuit. Check wiring and repair or replace.
Compressor motor burned out, seized, or internal
overload open.
Defective overload. Determine cause and replace.
Compressor locked out. Determine cause for safety trip and reset lockout.
One leg of 3-phase power dead. Replace fuse or reset circuit breaker.
Refrigerant overcharge or undercharge. Recover refrigerant, evacuate system, and recharge
Defective compressor. Replace and determine cause.
Insufficient line voltage. Determine cause and correct.
Blocked condenser. Determine cause and correct.
Defective overload. Determine cause and replace.
Defective thermostat. Replace thermostat.
Faulty condenser-fan motor. Replace.
Restriction in refrigerant system. Locate restriction and remove.
Dirty air filter. Replace filter.
Unit undersized for load. Decrease load or increase unit size.
Thermostat set too low. Reset thermostat.
Low refrigerant charge. Locate leak, repair, and recharge.
Air in system. Recover refrigerant, evacuate system, and recharge.
Condenser coil dirty or restricted. Clean coil or remove restriction.
Dirty condenser coil. Clean coil.
Refrigerant overcharged. Recover excess refrigerant.
Faulty TXV. 1. Check TXV bulb mounting and secure tightly to
Air in system. Recover refrigerant, evacuate system, and recharge.
Condenser air restricted or air short-cycling. Determine cause and correct.
Restriction in liquid tube. Remove restriction.
High heat load. Check for source and eliminate.
Faulty TXV. 1. Check TXV bulb mounting and secure tightly to
Refrigerant overcharged. Recover excess refrigerant.
Low refrigerant charge. Check for leaks, repair, and recharge.
Metering device or low side restricted. Remove source of restriction.
Faulty TXV. 1. Check TXV bulb mounting and secure tightly to
Insufficient evaporator airflow. Increase air quantity. Check filter and replace if
Temperature too low in conditioned area. Reset thermostat.
Field-installed filter drier restricted. Replace.
Unit in economizer mode. Proper operation; no remedy necessary.
Replace component.
Determine cause. Replace compressor.
Determine cause.
to nameplate.
suction line.
2. Replace TXV if stuck open or closed.
suction line.
2. Replace TXV if stuck open or closed.
suction line.
2. Replace TXV if stuck open or closed.
necessary.
—25—
Page 26

Fig. 31 — Typical Wiring Schematic (559F180, 460-v Shown)
—26—
Page 27

Fig. 31 — Typical Wiring Schematic (559F180, 460-v Shown) (cont)
LEGEND AND NOTES FOR FIG. 31 AND 32
AHA — Adjustable Heat Anticipator
BKR W/AT — Breaks with Amp Turns
C—Contactor, Compressor
CAP — Capacitor
CB — Circuit Breaker
CC — Cooling Compensator
CLO — Compressor Lockout
CLS — Compressor Lockout Switch
COMP — Compressor Motor
CT — Current Transformer
DM — Damper Motor
DU — Dummy Terminal
EQUIP — Equipment
FL — Fuse Link
FPT — Freeze Protection Thermostat
FU — Fuse
GND — Ground
HC — Heater Contactor
HPS — High-Pressure Switch
HTR — Heater
NOTES:
1. Compressor and fan motors thermally protected; 3-phase motors protected against
primary single-phasing conditions.
2. If any of the original wire furnished must be replaced, it must be replaced with
type 90 C wire or its equivalent.
3. Jumpers are omitted when unit is equipped with economizer.
4. The CLO locks out the compressor to prevent short cycling on compressor overload and safety devices. Before replacing CLO, check these devices.
5. Number(s) indicates the line location of used contacts. A bracket over (2) numbers signifies a single-pole, double-throw contact. An underlined number signifies a normally-closed contact. A plain (no line) number signifies a normallyopen contact.
IFC — Indoor-Fan Contactor
IFCB — Indoor-Fan Circuit Breaker
IFM — Indoor-Fan Motor
IFR — Indoor-Fan Relay
L—Light
LOR — Lockout Relay
LPS — Low-Pressure Switch
LS — Limit Switch
MAT — Mixed-Air Thermostat
OAT — Outdoor-Air Thermostat
OFC — Outdoor-Fan Contactor
OFM — Outdoor-Fan Motor
OP — Overcurrent Protector
PL — Plug Assembly
PRI — Primary
QT — Quadruple Terminal
SR — Solenoid Relay
SW — Switch
TB — Terminal Block
TC — Thermostat Cooling
TH — Thermostat Heating
TRAN — Transformer
Terminal (Marked)
Terminal (Unmarked)
Terminal Block
Splice
Factory Wiring
Field Wiring
To Indicate Common
Potential Only, Not
To Represent Wiring
Option/Accessory Wiring
—27—
Page 28

Fig. 32 — Typical Component Arrangement (559F180 Shown)
—28—
Page 29

Page 30

SERVICE TRAINING
Packaged Service Training programs are an excellent way to increase your knowledge of the
equipment discussed in this manual, including:
• Unit Familiarization
• Installation Overview
• Maintenance
• Operating Sequence
A large selection of product, theory, and skills programs are available, using popular video-based
formats and materials. All include video and/or slides, plus companion book.
Classroom Service Training which includes ‘‘hands-on’’ experience with the products in our labs
can mean increased confidence that really pays dividends in faster troubleshooting and fewer callbacks. Course descriptions and schedules are in our catalog.
CALL FOR FREE CATALOG 1-800-962-9212
[ ] Packaged Service Training [ ] Classroom Service Training
Copyright 1998 Bryant Heating & Cooling Systems CATALOG NO. 5355-900
Page 31

Page 32

START-UP CHECKLIST
MODEL NO.:
DATE:
SERIAL NO.:
TECHNICIAN:
I. PRE-START-UP:
M VERIFY THAT ALL PACKING MATERIALS HAVE BEEN REMOVED FROM UNIT
M VERIFY INSTALLATION OF INDOOR FAN MOTOR ADJUSTMENT BOLT (180 UNITS) OR ADJUSTMENT
BOLT AND PLATE (216-300 UNITS)
M OPEN ALL SERVICE VALVES (SUCTION, DISCHARGE, AND LIQUID)
M VERIFY INSTALLATION OF ECONOMIZER HOOD
M VERIFY THAT CONDENSATE CONNECTION IS INSTALLED PER INSTRUCTIONS
M VERIFY THAT ALL ELECTRICAL CONNECTIONS AND TERMINALS ARE TIGHT
M CHECK THAT INDOOR-AIR FILTER IS CLEAN AND IN PLACE
M VERIFY THAT UNIT IS LEVEL
M CHECK FAN WHEEL AND PROPELLER FOR LOCATION IN HOUSING/ORIFICE, AND VERIFY SET SCREW
IS TIGHT
M VERIFY THAT FAN SHEAVES ARE ALIGNED AND BELTS ARE PROPERLY TENSIONED
M VERIFY THAT SCROLL COMPRESSOR IS ROTATING IN THE CORRECT DIRECTION
II. START-UP:
ELECTRICAL
SUPPLY VOLTAGE L1-L2 L2-L3 L3-L1
COMPRESSOR AMPS — COMPRESSOR NO. 1 L1 L2 L3
— COMPRESSOR NO. 2 L1 L2 L3
SUPPLY FAN AMPS EXHAUST FAN AMPS
ELECTRIC HEAT AMPS (IF SO EQUIPPED) L1 L2 L3
TEMPERATURES
OUTDOOR-AIR TEMPERATURE F DB (Dry-Bulb)
RETURN-AIR TEMPERATURE
COOLING SUPPLYAIR
ELECTRIC HEAT SUPPLY AIR (IF SO EQUIPPED)
FDB F WB (Wet-Bulb)
F
F
PRESSURES
REFRIGERANT SUCTION CIRCUIT NO. 1 PSIG CIRCUIT NO. 2 (216-300 ONLY) PSIG
REFRIGERANT DISCHARGE CIRCUITNO. 1
M VERIFY REFRIGERANT CHARGE USING CHARGING CHART ON PAGE 24
PSIG CIRCUIT NO. 2 (216-300 ONLY) PSIG
GENERAL
M ECONOMIZER MINIMUM VENT AND CHANGEOVER SETTINGS TO JOB REQUIREMENTS
M VERIFY INSTALLATION OF ALL OPTIONS AND ACCESSORIES
CUT ALONG DOTTED LINE CUT ALONG DOTTED LINE
Copyright 1998 Bryant Heating & Cooling Systems CATALOG NO. 5355-900
CL-1
----------------------------------------------------------------------------------------
 Loading...