

Page 1
CRE-2110E
OUTDOOR
ELITE CURVE
CUSTOM CURVED RAIL STAIRLIFT
Operator’s Manual
Retail Customers
Please contact your Bruno dealer with any questions or service concerns,
using the contact information shown below:
(Dealer: Place contact information below.)
Dealer Name:
Address:
Telephone No.:
REV. 04-02-2018
1
Page 2
PRODUCT REGISTRATION FORM
Product Registration Form
Please print in
capital
letters.
*First Name ______________________________________________________ M.I._____
*Last Name _______________________________________________________________
*Street Address ________________________________________________ Apt. No._____
*City _____________________________________________ *State/Province _________
*Zip/Postal Code ___________________________________________________________
Email Address _____________________________________________________________
Telephone No. _____________________________________________________________
Date of Purchase (mm/dd/yy) _________________________________________________
Dealer: Locate the Model No. and Serial
No. decal on the decal sheet
shipped with the unit and
place it here.
Model No.___________
*Serial No._________________
Please be assured that Bruno does not share or sell the information you provide.
©2014,2005 Bruno Independent Living Aids, Inc.®
Please rate your satisfaction with your Bruno dealer:
excellent good average poor
Please rate your satisfaction with your Bruno product:
excellent good average poor
Bruno reserves the right to use information indicated on this form in its online, video, audio and printed
materials. Names will be abbreviated to ensure the privacy and anonymity of the individual.
Online registration available at http://www.bruno.com/warranty.html
P/N PROD REG STD
Rev. 04-17-2014
* = required eld
End-User: For faster registration,
please go to the website
shown above.
SAMPLE
Bruno is pleased to provide you with this
mobility-enhancing product.
The Product Registration Form is shipped in
a plastic bag with this manual. It is very
important that you ll out and return this
form at your earliest convenience so that we
may complete the warranty registration process
for your unit.
The serial number is found on labels afxed
to the manual, as well as on the unit itself.
Serial and model numbers must be provided
when ling a warranty claim, requesting service
or ordering parts. We encourage you to keep
this information readily available at all times.
Please Note: The warranty for the CRE-2110E
is rendered null and void if the
unit is installed or maintained by
anyone other than an authorized
Bruno dealer.
©B Bruno Independent Living Aids, Inc.® CRE-2110E Operator 04-02-2018
Best wishes from the Bruno Team.
2
Page 3

Table of Contents
Regulatory Information and Specications .............4
Safety ....................................5-7
Parts of the CRE-2110E ..........................8
Circuit Breaker ................................9
Seating ....................................10
Operation ................................ 11-13
Diagnostic Codes ..............................14
Charging ...................................15
Battery Charger............................ 16-17
Maintenance/Transmitter Battery Replacement .........18
Troubleshooting............................ 19-20
Vacation and Long-Term Storage ...................21
Warranty ................................ 22-23
Declarations of Conformity .................... 24-25
©B Bruno Independent Living Aids, Inc.® CRE-2110E Operator 04-02-2018
3
Page 4

FCC REGULATIONS
This equipment has been tested and found to comply with the limits for a Class B digital device, pursuant
to Part 15 of the FCC rules. These limits are designed to provide
reasonable protection against harmful interference in a residential installation. This equipment generates,
uses, and can radiate radio frequency energy, and if not installed and used in accordance with the in-
structions, may cause harmful interference to radio communications. However, there is no guarantee that
interference will not occur in a particular installation. If this equipment does cause harmful interference to
radio or
television reception, which can be determined by turning the equipment off and on, the user is encouraged
to try to correct the interference by one or more of the of the
following measures:
• Reorient or relocate receiving antenna.
• Increase separation between equipment and receiver.
• Consult your dealer.
SPECIFICATIONS
Weight Capacity: 400 lbs. (181 kg)
Control: constant pressure (armrest and two remotes)
Maximum Incline: 45 degrees
Seat Swivel: 0, 60 and 90 degrees at top; optional at bottom
Power Supply: 24VDC battery charger powered by 120V outlet
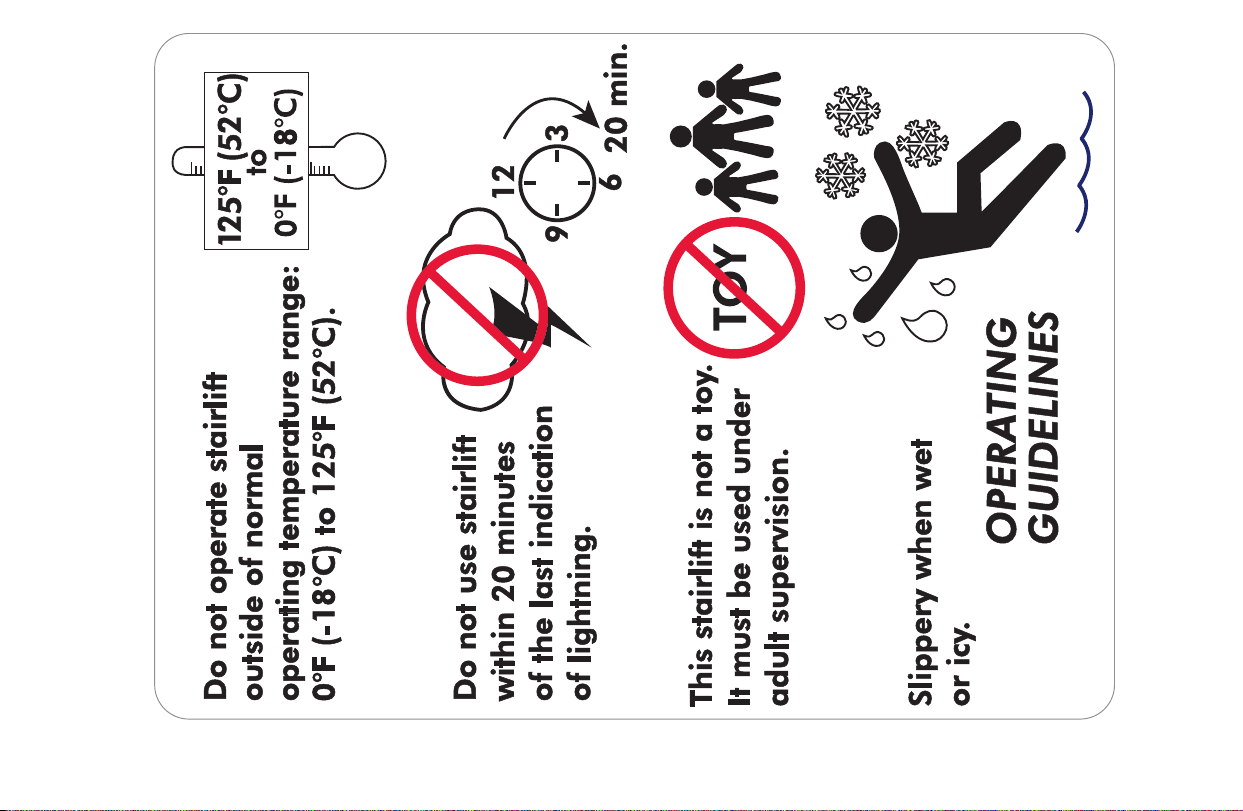
This custom curved rail stairlift has been tested to perform within the operating
temperature range of 0˚F (-18˚C) to 125˚F (52˚C).
©B Bruno Independent Living Aids, Inc.® CRE-2110E Operator 04-02-2018
4
Page 5
DEC-00507
©B Bruno Independent Living Aids, Inc.® CRE-2110E Operator 04-02-2018
5
Page 6

FOR YOUR SAFETY
• Read and understand the operating instructions, and all safety precautions prior to using the CRE-2110E.
• Be sure stairs are clear of objects before operating the stairlift.
• Always be aware of the surface onto which you are stepping as you get on and off the stairlift.
Be especially careful in the presence of ice and/or snow.
• Never use the stairlift in conditions where lightening has occurred within the previous 20 minutes.
• Avoid carrying items with you on the stairway elevator which could hinder movement of the stairlift up
and down the stairs.
• Do not wear LOOSE clothing that could interfere with stairlift movement.
• Always wear the seat positioning belt.
• Fasten your positioning belt before operating the stairlift.
• Make sure the seat is locked in the correct riding position.
• Be certain the seat swivel is locked in place before attempting to get on or off the stairlift.
• Do not clean the stairlift with a high-pressure washer.
• NON-AMBULATORY USERS: Bruno recommends carrying a cellular or cordless telephone or an emergency
communication device when riding the stairlift while alone.
• If you cannot remain seated upright, please lean towards the upstairs side for the smoothest ride.
NOTE: After a harsh winter, especially when the stairlift has not been used for an extended period of time,
have the stairlift inspected by an authorized Bruno dealer before putting the stairlift back into service.
©B Bruno Independent Living Aids, Inc.® CRE-2110E Operator 04-02-2018
6
Page 7

FOR YOUR SAFETY
Each stairlift is designed to travel down the stairway at a slightly slower speed than is the
case when travelling UP.
The footrest is equipped with obstruction sensors which stop the carriage if an obstacle is
encountered on the stairs.
If this should occur, press the opposite side of the UP/DOWN rocker control switch (on
the armrest) to run the carriage in the opposite direction. Clear the obstacle from the
stairway or rail then resume travel in the desired direction.
Your CRE-2110E is battery powered and will continue to operate for some time during a
power outage. The length of operation will depend on the battery condition, the length of
the stairs and the weight of the rider.
Only in the event of a prolonged power outage (more than one hour) will it be necessary
to turn the power off (circuit breaker switch on the carriage) and unplug the charger from
the wall outlet to conserve battery charge.
©B Bruno Independent Living Aids, Inc.® CRE-2110E Operator 04-02-2018
7
Page 8
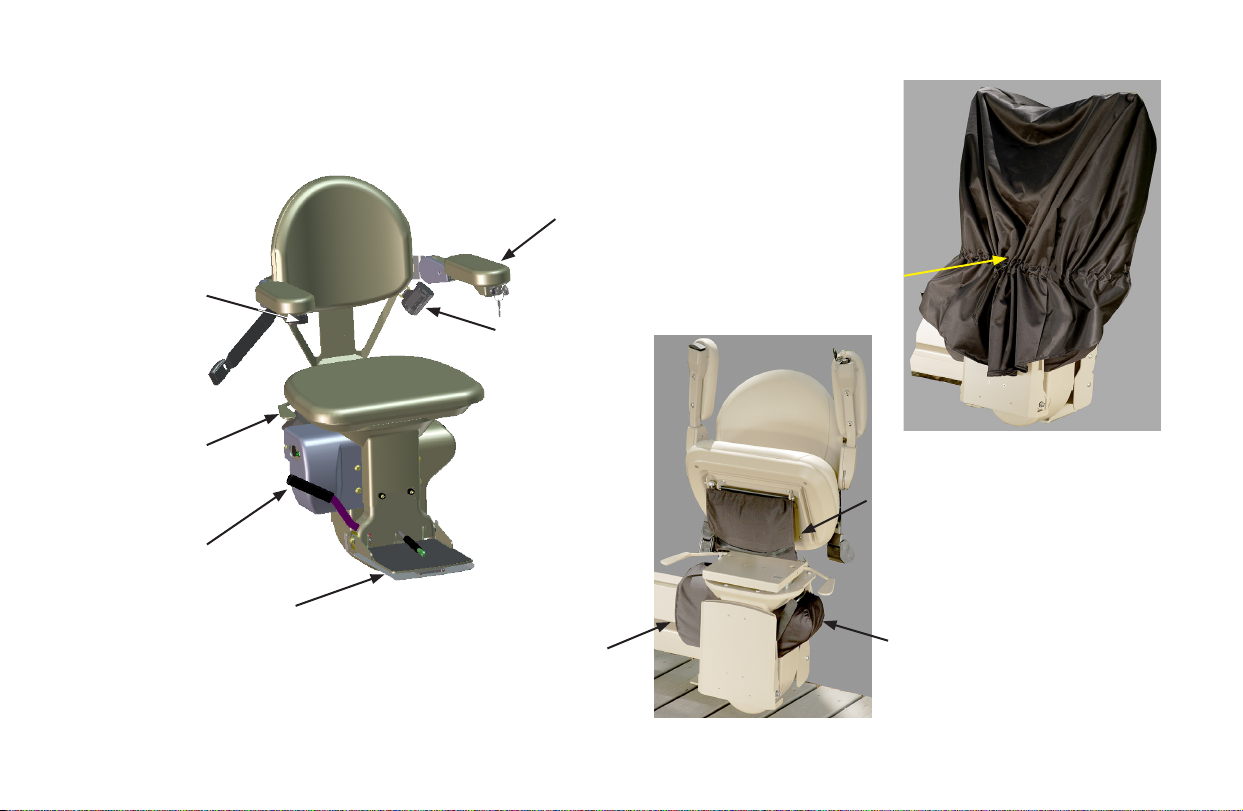
CRE-2110E
armrest with
keyswitch
top cover in position
over seat
UP-DOWN
rocker switch
drawstring
positioning
belt
swivel release
handle
storage pouch for seat
cover
footrest lever
obstruction
sensors
bottom cover in position
over control panel
DO NOT REMOVE!
©B Bruno Independent Living Aids, Inc.® CRE-2110E Operator 04-02-2018
8
bottom covers in position
over motor
DO NOT REMOVE!
Page 9

CIRCUIT BREAKER
ON/OFF switch
with built-in
circuit breaker
The CRE-2110E includes an ON/OFF switch
with a built-in circuit breaker located on the
back of the carriage (carriage cover removed
for illustration purposes).
The circuit breaker protects the battery,
controller and motor circuits in the stairway
elevator carriage.
It is unlikely that this circuit breaker will trip
during normal use. However, if the elevator
becomes inoperative, check the circuit breaker
as a rst troubleshooting step. Reset it, if
necessary.
Possible causes of circuit breaker tripping:
• foreign object jamming the rail or gear
rack;
• exceeding the rated weight capacity of the
stairway elevator.
©B Bruno Independent Living Aids, Inc.® CRE-2110E Operator 04-02-2018
9
Page 10

SEATING
swivel release
handle
The CRE-2110 seat assembly (with standard armrests)
is designed to swivel a total of 135 degrees.
It locks in the center (home) position, and in positions
60 and 90 degrees to the up side and 45 degrees to
the down side*.
*NOTE: Down-side 45-degree swivel may not work
on all applications.Lift up on the swivel
release lever located under the seat (either
side) to swivel the seat to a convenient
position for transferring into or out of the
seat.
Once you release the swivel lever, the seat will lock
in the closest of the four positions indicated above.
The seat also ips up to facilitate storage.
NOTE: If you cannot remain seated upright, please
lean towards the upstairs side for the
smoothest ride.
©B Bruno Independent Living Aids, Inc.® CRE-2110E Operator 04-02-2018
10
Page 11

OPERATION
The CRE-2110E includes a “soft-start”
feature which prevents the unit from moving
abruptly the instant the UP/DOWN switch is
pressed.
Press and hold the switch for a moment to
begin the gentle acceleration of the stairway
elevator to operating speed.
Depressing and holding the rocker
switch will cause the carriage to move
until the carriage stops automatically at
the upper or lower end of the stair rail,
or until the switch is released.
STANDARD SWIVEL SEAT
1. To remove the top seat cover, loosen the
draw string (see photo page 8) and pull up
on the cover.
2. Raise and hold the seat swivel lever.
3. Rotate the seat to the transfer position.
4. Lower the seat, footrest and armrests.
5. Position yourself in the seat.
6. Fasten the positioning belt.
7. Using the seat swivel lever, rotate the seat
to the “riding” position (with your back to
the stairway wall).
A safety switch prevents operation of the
CRE-2110E unless the seat is locked in position
at right angles to the rail (the “riding” position).
8. Position both feet securely on the footrest and
place your arms on the armrest cushions.
9. Turn the armrest key switch to ON.
10. Press and hold the rocker switch (located
on the front edge of one of the armrests) to
travel UP / DOWN the rail.
©B Bruno Independent Living Aids, Inc.® CRE-2110E Operator 04-02-2018
11
Page 12

OPERATION
Two (2) remote call / send
transmitters enable you
to move the carriage to or
from either end of the stair
rail.
DO NOT use the
call / send transmitters
to move the carriage
when a rider is on the
seat.
top cover storage bag
carriage covers
DO NOT REMOVE!
11. Once you have reached the top or bottom
landing, release the rocker switch.
12. Raise and hold the seat swivel lever as you
rotate to the position for transfer from the
seat.
13. Release the seat swivel lever and allow the
seat to lock in this position.
14. Unbuckle the positioning belt and carefully exit
the seat.
15. If the seat will not be used in the near future,
raise the seat, armrests and footrest.
16. Turn off the keyswitch.
17. Using the seat swivel lever, rotate the seat to
the “riding” position.
18. To keep the seat dry, place the cover over the
seat and tighten the drawstring.
19. If the top seat cover will not be used, fold and
store in the bag attached to the underside of
the seat (see left).
NOTE: Never remove the bottom carriage covers,
except for service.
©B Bruno Independent Living Aids, Inc.® CRE-2110E Operator 04-02-2018
12
Page 13

OPERATION
Optional Mid-Park Position
The mid-park is available as an option. This
feature will let you park and charge the unit
at a position between the two ends of the rail.
This allows for more room at the top and
bottom of the stairs.
1. Push either the seat rocker switch or the
remote call/send to move the stairway
elevator up or down the rail.
2. Turn the key to the ON position, then push
the rocker switch.
NOTE: The seat will always stop and beep
once when it reaches the mid-park
position.
3. To resume travel to the end of the rail (top
or bottom), release the switch (or remote
button).
4. Press again and hold until the unit arrives
at the top or bottom of the rail.
NOTE: The seat will again stop and beep once
to indicate end of travel.
©B Bruno Independent Living Aids, Inc.® CRE-2110E Operator 04-02-2018
13
Page 14

DIAGNOSTIC CODES
(UNDER SEAT)
C1 Charging
C2 Off Charge
C3 Off Charge and Not Parked
C4 Parked and Charger Not Detected
C5 Battery Voltage Critical
C6 Battery Voltage Low
L1 Seat Safety Switch Open
L2 Up Limit Switch Open
L3 Down Limit Switch Open
L6 Mid-Rail Park Active
L8 Soft Stop Switch
©B Bruno Independent Living Aids, Inc.® CRE-2110E Operator 04-02-2018
14
Page 15

CHARGING
LED
glowing LED = parked at
charge station
Keep the batteries charged to ensure optimal operation
of your CRE-2110E.
The batteries are charging whenever the carriage is parked
tightly against the brackets at either end of the rail. Whenever the carriage does not contact the upper or lower charge
bracket, the batteries will slowly discharge.
Failure to keep the batteries charged, or allowing them
to fully discharge, will signicantly shorten the life of the
batteries.
Therefore, when the stairway elevator is not in use, park the
carriage at either end of the rail, making sure it touches the
charge bracket contacts.
The green LED on the carriage conrms that the unit is
charging.
If your application prevents parking the carriage at one or
the other end of the stairs (for example, a door at the top of
the stairs), ALWAYS use the call/send transmitter to move
the carriage to the end of the rail where the carriage can
contact the charge bracket. Using the transmitter, call it
back to the other end of the stairs when needed.
©B Bruno Independent Living Aids, Inc.® CRE-2110E Operator 04-02-2018
15
Page 16

BATTERY CHARGER LED’S
charging
ready
power
on
NOTE:
The battery charger is
designed to be
mounted in a
temperature-controlled,
dry location.
If it has to be exposed
to water, do not use
until inspected.
RED YELLOW GREEN BLUE STATUS
ON ON (< 1 sec.)
OFF
ON (<5 sec.)
ON
ON
ON ON OFF OFF charger delivering maximum
ON ON OFF OFF charger at maximum voltage;
ON OFF ON OFF batteries fully charged;
ON BLINKS
BLINKS
ALTERNATELY
ON
ON (<5 sec.)
OFF
OFF
ALTERNATELY
BLINKS
ALTERNATELY
OFF FAST BLINK OFF
OFF OFF charger not connected to bat-
tery
ON (<5 sec.)
BLINK (5 sec.)
OFF
BLINKS
ALTERNATELY
OFF OFF battery defective or heavily
OFF battery disconnect situation
detected; 5-second delay until
yellow and green LED’s
completely off
current (2.2A)
current continues to drop
yellow LED occasionally turns off
OFF low voltage indication
sulfated
partially open circuit; bad
contact or battery sulfation
ON battery connector reversed
©B Bruno Independent Living Aids, Inc.® CRE-2110E Operator 04-02-2018
16
Page 17

BATTERY CHARGER FUSE REPLACEMENT
If the charger is subject to a power line
fuse
surge, the AC input fuse may blow. Refer to
the illustration to the left for fuse location.
To replace fuse:
1. Turn OFF the battery charger power
switch.
2. Remove power cord from wall outlet.
charger power switch
3. Twist the fuseholder cap and pull out to
remove the fuse.
4. Replace with the same size and type
fuse: (Bussmann GMD-2A or equivalent)
2A, Slo-Blow, 5 x 20mm.
©B Bruno Independent Living Aids, Inc.® CRE-2110E Operator 04-02-2018
17
Page 18

MAINTENANCE
Your CRE-2110E is designed to provide many years of reliable
service with minimal maintenance.
NOTE: Scratches to paint during handling,
installation or normal use should be
retouched using paint available through
the Bruno Technical Service Department.
Inspect painted surfaces for scratches
upon receipt, after installation, and once
a year. Failure to touch up scratches that
cause limited rusting may void the
warranty.
For best service life:
• Keep the rail channel clean and free of debris.
• Always park the carriage at one end of the rail so that the
batteries charge when the elevator is not in use.
• Keep the battery charger plugged into a live outlet at all
times.
• At least once a year, have the elevator examined, cleaned
and lubricated by a qualied, authorized Bruno service
rear of transmitter
technician.
TRANSMITTER BATTERY REPLACEMENT
• Detach the transmitter from the wall.
• Remove the rear cover (see left).
• Remove the old battery and replace with a new one.
One 9V battery required. Change batteries annually.
• Re-mount the transmitter rear cover.
rear of transmitter
with 1 rear cover
removed
©B Bruno Independent Living Aids, Inc.® CRE-2110E Operator 04-02-2018
9V battery
• Reposition the transmitter on the wall.
18
Page 19

TROUBLESHOOTING
Your CRE-2110E is not operating correctly. What should you do?
Before calling your Bruno dealer, refer to the solutions listed below. This could save you an unnecessary service call!
• Key switch. Is the rocker switch inoperative?
Make sure the key is in the ON position.
• Seat swivel. Is the seat locked in the riding position?
• Footrest. Is there an obstruction on the stairway that the footrest is contacting?
• Carriage safety panels. Is there an obstruction on the stairway that the carriage safety
panels are contacting?
• Main circuit breaker (or fuse) panel of residence. Has a breaker tripped or a fuse blown?
• Battery charger. A discharged battery will cause the carriage to move more slowly until the
voltage drops to the point where the controller will shut off. If this should
occur, pause for a moment, then run the carriage down until the unit contacts the upper or lower charge bracket.
Partially charged batteries will run the carriage down, but not up.
continued on next page
©B Bruno Independent Living Aids, Inc.® CRE-2110E Operator 04-02-2018
19
Page 20

TROUBLESHOOTING (CONTINUED)
• Battery charger (continued). Conrm that the charger is plugged into a live outlet
and wait for the batteries to charge.
Is the charger plugged into a functional outlet? Do not
use outlets which are controlled by a wall switch.
Is the power light on?
• Visual check. Do you notice anything about your elevator that is different or out of
place?
If your CRE-2110E continues to function improperly or not at all after completing the
preceding checklist, contact an authorized Bruno dealer to perform all required service,
repair and maintenance operations.
©B Bruno Independent Living Aids, Inc.® CRE-2110E Operator 04-02-2018
20
Page 21

VACATION AND LONG-TERM STORAGE
If the CRE-2110E will remain unused for an extended period of time:
• turn off the circuit breaker (ON/OFF switch) located on the stairlift carriage;
• remove all keys (remotes, armrest keyswitch) and store in a safe location;
• have the batteries removed and stored according to battery manufacturer’s instructions;
• turn off the battery charger power switch, unplug it from the wall outlet and store indoors;
• place the cover over the seat and tighten the drawstring.
To put the CRE-2110E back into service:
• have the batteries reinstalled in the CRE-2110E;
• loosen the seat cover drawstring and remove the cover;
• clean dirt and moisture from the seat and carriage;
• have a fresh coat of grease applied to the gear rack;
• insert the keys in the armrest keyswitch and remotes;
• turn on the circuit breaker (ON/OFF switch) located on the stairlift carriage;
• reconnect the battery charger to an AC outlet and turn on the charger;
• run the CRE-2110E up and down the rail several times to verify correct operation.
NOTE: The batteries may require recharging before normal use if the stairway elevator
remained unused for an extended period of time.
To recharge, simply turn on the circuit breaker, reconnect the charger to the wall outlet
and wait until the charger LED’s indicate that the batteries are fully recharged.
©B Bruno Independent Living Aids, Inc.® CRE-2110E Operator 04-02-2018
21
Page 22

BRUNO GOLD LIMITED WARRANTY FOR STAIRLIFT
5 Years Major Components — 2 Year Parts
Bruno Independent Living Aids, Inc. is so con dent in our USA-designed and -built units that we provide
every original buyer with the following “Industry Leading” warranty for your peace of mind.
The quality of parts we use and the care our employees take allow Bruno to provide the original buyer of its
Bruno Stairlift with a 2-year warranty that all parts are free of defects in material and workmanship.
Because of the reliability found in Bruno’s Stairlift product Bruno is able to provide the original buyer with an
extended 5-year warranty of the Major Components of the product, to include the motor/gearbox drive train
and rail system. Bruno’s warranty periods begin with the date of the installation of the Bruno Stairlift.
Bruno Authorized Dealers are trained to evaluate your unique situation and then install the best Bruno product
to meet your needs. The trained installation and service technicians employed by an Authorized Dealer have the
appropriate equipment and resources needed to correctly install and maintain your new stairlift and are the rst
contact for any warranty or service needs.
SPECIFICS OF THE WARRANTY COVERAGE:
◊ All Parts are free of defects in material and workmanship for a period of two years after the date of installation.
◊ All MAJOR COMPONENTS are free of defects in material and workmanship for a period of ve years after
the date of installation.
◊ All labor to address any product defect by a Bruno Authorized Dealer is covered for the rst 30 days after
installation.
22
Page 23

SPECIFICS OF THE WARRANTY COVERAGE:
◊ All Parts are free of defects in material and workmanship for a period of two years after the date of installation.
◊ All MAJOR COMPONENTS are free of defects in material and workmanship for a period of ve years after
the date of installation.
◊ All labor to address any product defect by a Bruno Authorized Dealer is covered for the rst 30 days after
installation.
◊ Damage to units caused by misuse, abuse, accidents, neglect or modi cations NOT made by a Bruno Authorized
Dealer.
WHAT IS NOT WARRANTY COVERAGE:
◊ Consumable items such as remote batteries.
◊ All labor by a Bruno Authorized Dealer after the rst 30 days since installation.
◊ Reasonable wear and tear.
ADDITIONAL NOTES:
All Service and Warranty issues are handled through the Bruno Authorized Dealer that installed the unit.
◊ In no event shall Bruno be responsible for indirect, incidental or consequential damages, whether such
damages arise based on claims based on contract, warranty, tort (including negligence, strict liability or product
liability).
◊ Bruno reserves the right to replace, repair or, if not commercially practical and/or feasible, to elect to refund the
purchase price at its sole discretion.
◊ This warranty gives the original buyer speci c legal rights, and you may also have other rights which vary from
state to state. Bruno speci cally does not authorize any person to extend the time or scope of this warranty.
For further information regarding this limited warranty, please contact Bruno by using the contact information shown
below:
In North America
Bruno Independent Living Aids, Inc.
Attn: Service Department
1780 Executive Drive
Oconomowoc, Wisconsin 53066
United States
Tel. 1-800-882-8183 toll free
®
Bruno
Unit 5, Millennium Court,
Clayhill Industrial Park
Neston, Wirral CH64 3UZ
United Kingdom
Tel. 0151 559 0732
In the UK and Europe
rev. 04-18
23
Page 24

EN 60204 Part 1:2006 EN ISO 12100-1:2003 + AI:2009
EN 60335 Part 1:1994 EN 61000
EN ISO 12100-2:2003 CISPR 11
CE DECLARATION OF CONFORMITY CERTIFICATE
1780 Executive Drive Unit 5, Millennium Ct
Oconomowoc, WI 53066 USA Clayhill Industrial Park
We:
Bruno Independent Living Aids, Inc.®Headquartered at : EU Facility:
An IS0-9001:2008 registered company Neston, Wirral, CH64 3UZ UK
Declare that under our sole responsibility, our manufactured product:
MODEL: CRE-2110E
Serial Number: Data for the section to the left are applied at the factory on the date of manufacture by the assembly
line.
Date of Manufacture:
has been designed and tested to meet (where applicable) the following laws, directives, specications and standards
pertaining to the Machinery Directive:
DIRECTIVES STANDARDS
2004/108/EC Electromagnetic CompatibilityDirective
2006/42/EC Machinery Directive
2006/95/EC Low Voltage Directive
When installed in accordance to the manufacturer’s specications and operated in accordance with manufacturer’s
operating instructions.
We hereby appoint:
Bruno
Unit 5, Millennium Count
Clayhill Industrial Park
Neston, Wirral CH64 3UZ
United Kingdom
To act as Responsible Manufacturer’s Representative and holder of Technical Files.
Date of Issue: 02 April 2018
Location: Oconomowoc, WI USA Neston, United Kingdom
BY: William W. Belson, III Robert J. Hambleton
Director of Engineering General and Technical Manager
REVISION:
BY:
Page 25

EN 60204 Part 1:2006 EN ISO 12100-1:2003 + AI:2009
EN 60335 Part 1:1994 EN 61000
EN ISO 12100-2:2003 CISPR 11
®
CERTIFICAT DE DÉCLARATION DE CONFORMITÉ CE
1780 Executive Drive Unit 5, Millennium Ct
Oconomowoc, WI 53066 É.-U. Clayhill Industrial Park
Nous:
Bruno Independent Living Aids, Inc.
dont le siège social se situe à : Facilité UE:
Entreprise certiée selon ISO 9001:2008 Neston, Wirral, CH64 3UZ R.-U.
déclarons que sous notre seule responsabilité, notre produit fabriqué:
MODÈLE: CRE-2110E
Numéro de série: Les données de la section à gauche sont apposées en usine à la date de fabrication sur la chaîne de fabrica-
tion.
Date de fabrication:
a été conçu et testé afin de répondre (le cas échéant) aux lois, directives, caractéristiques et normes suivantes ayant
trait à la Directive Machines:
DIRECTIVES NORMES
2004/108/EC Directive relative à la compatibilité
électromagnétique
2006/42/EC Directive relative aux machines
2006/95/EC Directive relative à la basse tension
lorsqu’il est installé conformément aux indications du fabricant et que l’on le fait fonctionner en conformité avec les
instructions de fonctionnement du fabricant.
Nous désignons par les présentes :
Bruno
Unit 5, Millennium Count
Clayhill Industrial Park
Neston, Wirral CH64 3UZ
Royaume-Uni
d’agir en qualité de représentant autorisé du fabricant et de détenteur de fiches techniques.
Date de délivrance: 02 avril 2018
Lieu: Oconomowoc, WI É.-U. Neston, Royaume-Uni
PAR: William W. Belson, III Robert J. Hambleton
Directeur de l’ingénierie Directeur général et technique
RÉVISION:
PAR:
Page 26

Page 27

Page 28

First in Performance. Built to Last!
Straight and Custom
Curved-Rail Stairlifts
Vertical Platform Lift
Bruno Independent Living Aids, Inc
1780 Executive Drive, Oconomowoc, WI 53066
www.bruno.com
®
©Bruno Independent Living Aids, Inc.
Bruno Independent Living Aids, Inc
All illustrations and specications in this document are based on the latest product information available at the time of publication.
®
. reserves the right to make changes at any time without notice. Manual Back Cover 09/13.
Over 25 Different
Vehicle Lift Solutions
®
Valet® Signature Seating
P/N 2110E-O
 Loading...