

Page 1
SRE-2010 ELITE
Straight Rail Stairlift
OPERATOR’S MANUAL
Please contact your Bruno dealer with any questions or service concerns, using
the contact information shown below:
(Dealer: Place contact information below.)
Dealer Name:
Address:
Telephone No.:
(Español 19-36)
(Français 37-56)
P/N 2010-O
08 FEBRUARY 2019
Page 2
Product Registration Form
Please print in
capital
letters.
*First Name ______________________________________________________ M.I._____
*Last Name _______________________________________________________________
*Street Address ________________________________________________ Apt. No._____
*City _____________________________________________ *State/Province _________
*Zip/Postal Code ___________________________________________________________
Email Address _____________________________________________________________
Telephone No. _____________________________________________________________
Date of Purchase (mm/dd/yy) _________________________________________________
Dealer: Locate the Model No. and Serial
No. decal on the decal sheet
shipped with the unit and
place it here.
Model No.___________
*Serial No._________________
Please be assured that Bruno does not share or sell the information you provide.
©2014,2005 Bruno Independent Living Aids, Inc.®
Please rate your satisfaction with your Bruno dealer:
excellent good average poor
Please rate your satisfaction with your Bruno product:
excellent good average poor
Bruno reserves the right to use information indicated on this form in its online, video, audio and printed
materials. Names will be abbreviated to ensure the privacy and anonymity of the individual.
Online registration available at http://www.bruno.com/warranty.html
P/N PROD REG STD
Rev. 04-17-2014
* = required eld
End-User: For faster registration,
please go to the website
shown above.
PRODUCT REGISTRATION FORM
SAMPLE
Bruno is pleased to provide you with this
mobility-enhancing product.
The Product Registration Form is shipped
in a plastic bag with this manual. It is very
important that you ll out and return this form
at your earliest convenience so that we may
complete the warranty registration process for
your unit.
The serial number is found on labels afxed
to the manual, as well as on the unit itself.
Serial and model numbers must be provided
when ling a warranty claim, requesting service
or ordering parts. We encourage you to keep
this information readily available at all times.
Please Note:
The warranty for the SRE-2010 Stairlift
is rendered null and void if the unit is
installed or maintained by anyone other
than an authorized Bruno dealer.
©Bruno Independent Living Aids, Inc.® SRE-2010 OPERATOR 02-08-2019
2
Page 3

TABLE OF CONTENTS
Regulatory Information and Specications ................................4
Safety..........................................................5
Circuit Breaker....................................................6
Seating.........................................................6
Operation ....................................................7-12
Standard Swivel Seat ............................................7
Optional Power Swivel Seat .......................................8
Optional Power Footrest..........................................9
Optional Folding Rail ...........................................10
Optional Power Folding Rail ................................... 11-12
Diagnostic Codes .................................................13
Charging.......................................................13
Battery Charger ..................................................14
Maintenance/Transmitter Battery Replacement and Interference ................15
Troubleshooting ..................................................16
Vacation and Long-Term Storage ......................................17
Warranty.......................................................18
©Bruno Independent Living Aids, Inc.® SRE-2010 OPERATOR 02-08-2019
3
Page 4
REGULATORY INFORMATION and SPECIFICATIONS
4004689 4004689
This lift is intended to be installed in accordance with the current edition of:
• EN 81-40:2008 Safety rules for the construction and installation of lifts - Special lifts for the
transport of persons and goods - Part 40: Stairlifts and inclined lifting platforms intended for
persons with impaired mobility
• ASME A18.1:2017 Safety Standard for Platform Lifts and Stairway Chairlifts - Units with
overspeed assembly
• ASME A18.1:2014 Safety Standard for Platform Lifts and Stairway Chairlifts - Units without
overspeed assembly
• CAN/CSA-B613-00 (R2005) - Private Residence Lifts for Persons With Physical
Disabilities
• ASME A17.5/CSA B44.1 - 2014 Elevator and Escalator Electrical Equipment
• NFPA 70: National Electrical Code®
• CSA C22.1 Canadian Electrical Code
Veriy applicable local codes with the appropriate regulatory authorities.
SPECIFICATIONS
Weight Capacity: 400 lbs. (181 kg)
Control: constant pressure (armrest and two remotes)
Maximum Incline: 45 degrees
Seat Swivel: 0, 60 and 90 degrees at the top; (optional) 45 degrees at the bottom
Battery Charger: 24VDC battery charger powered by 120V wall outlet
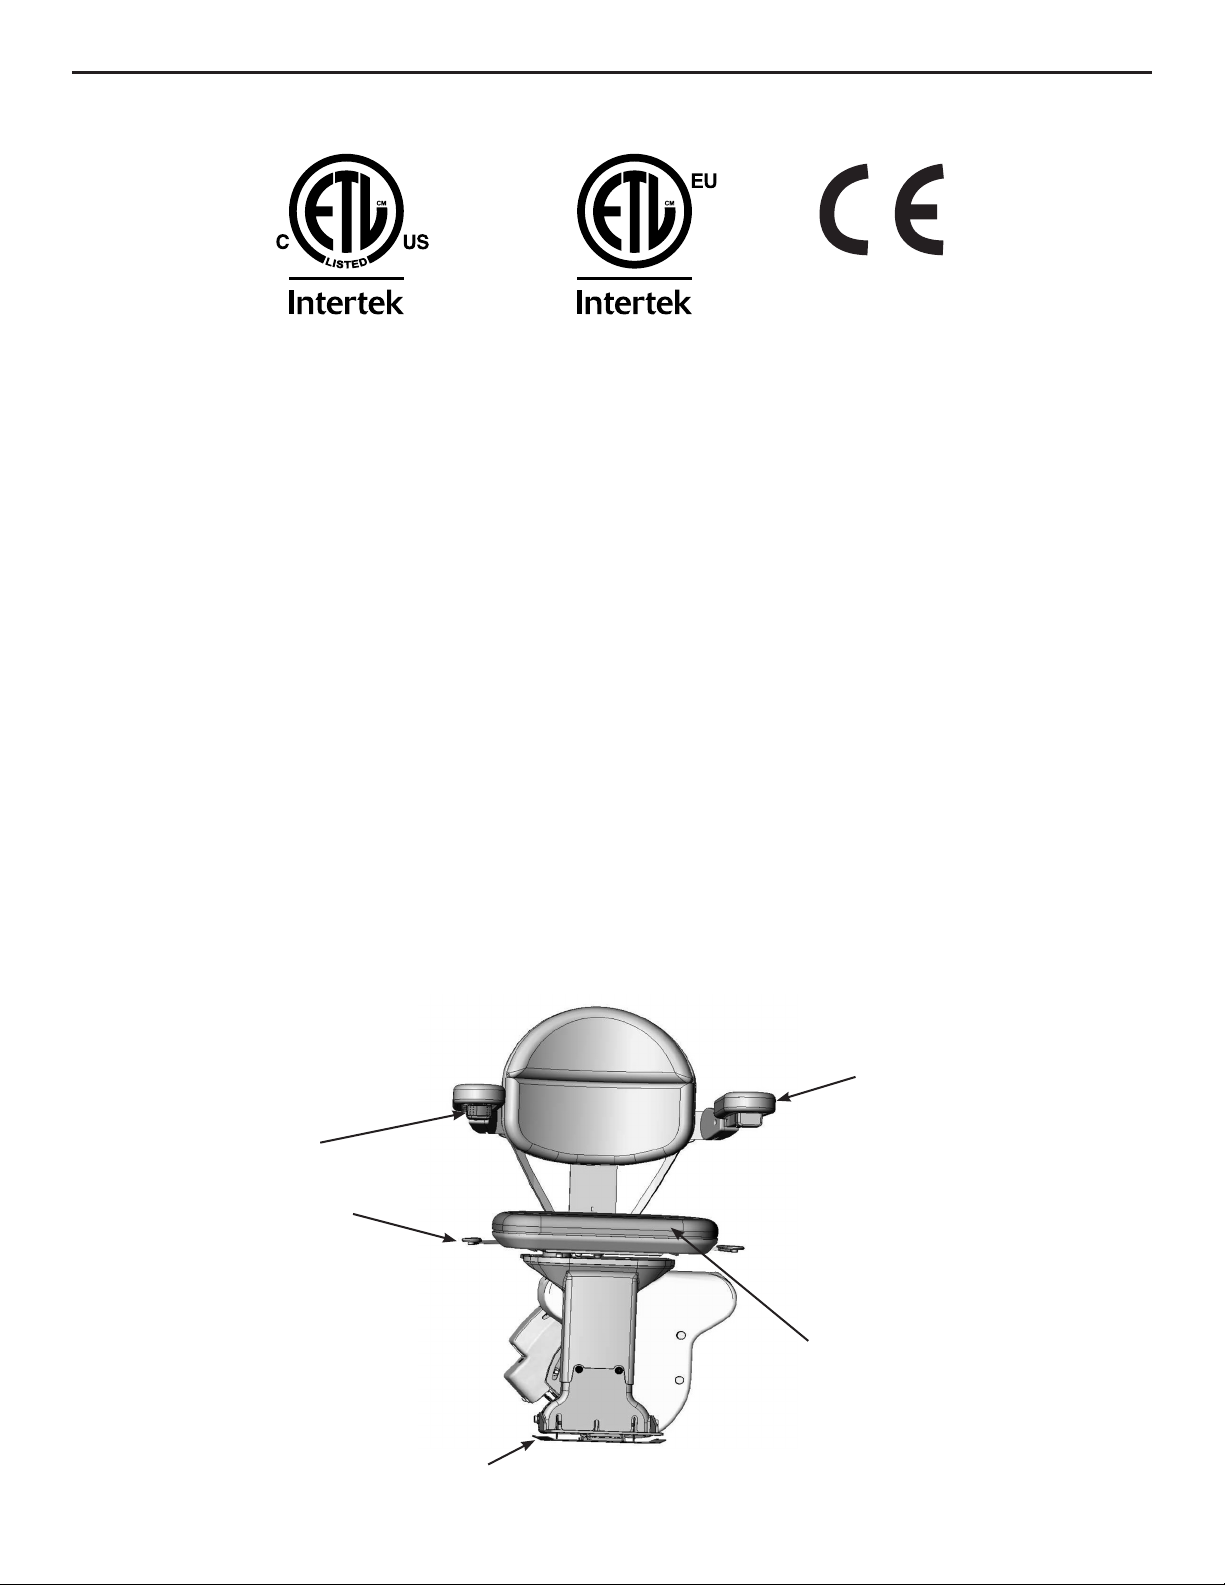
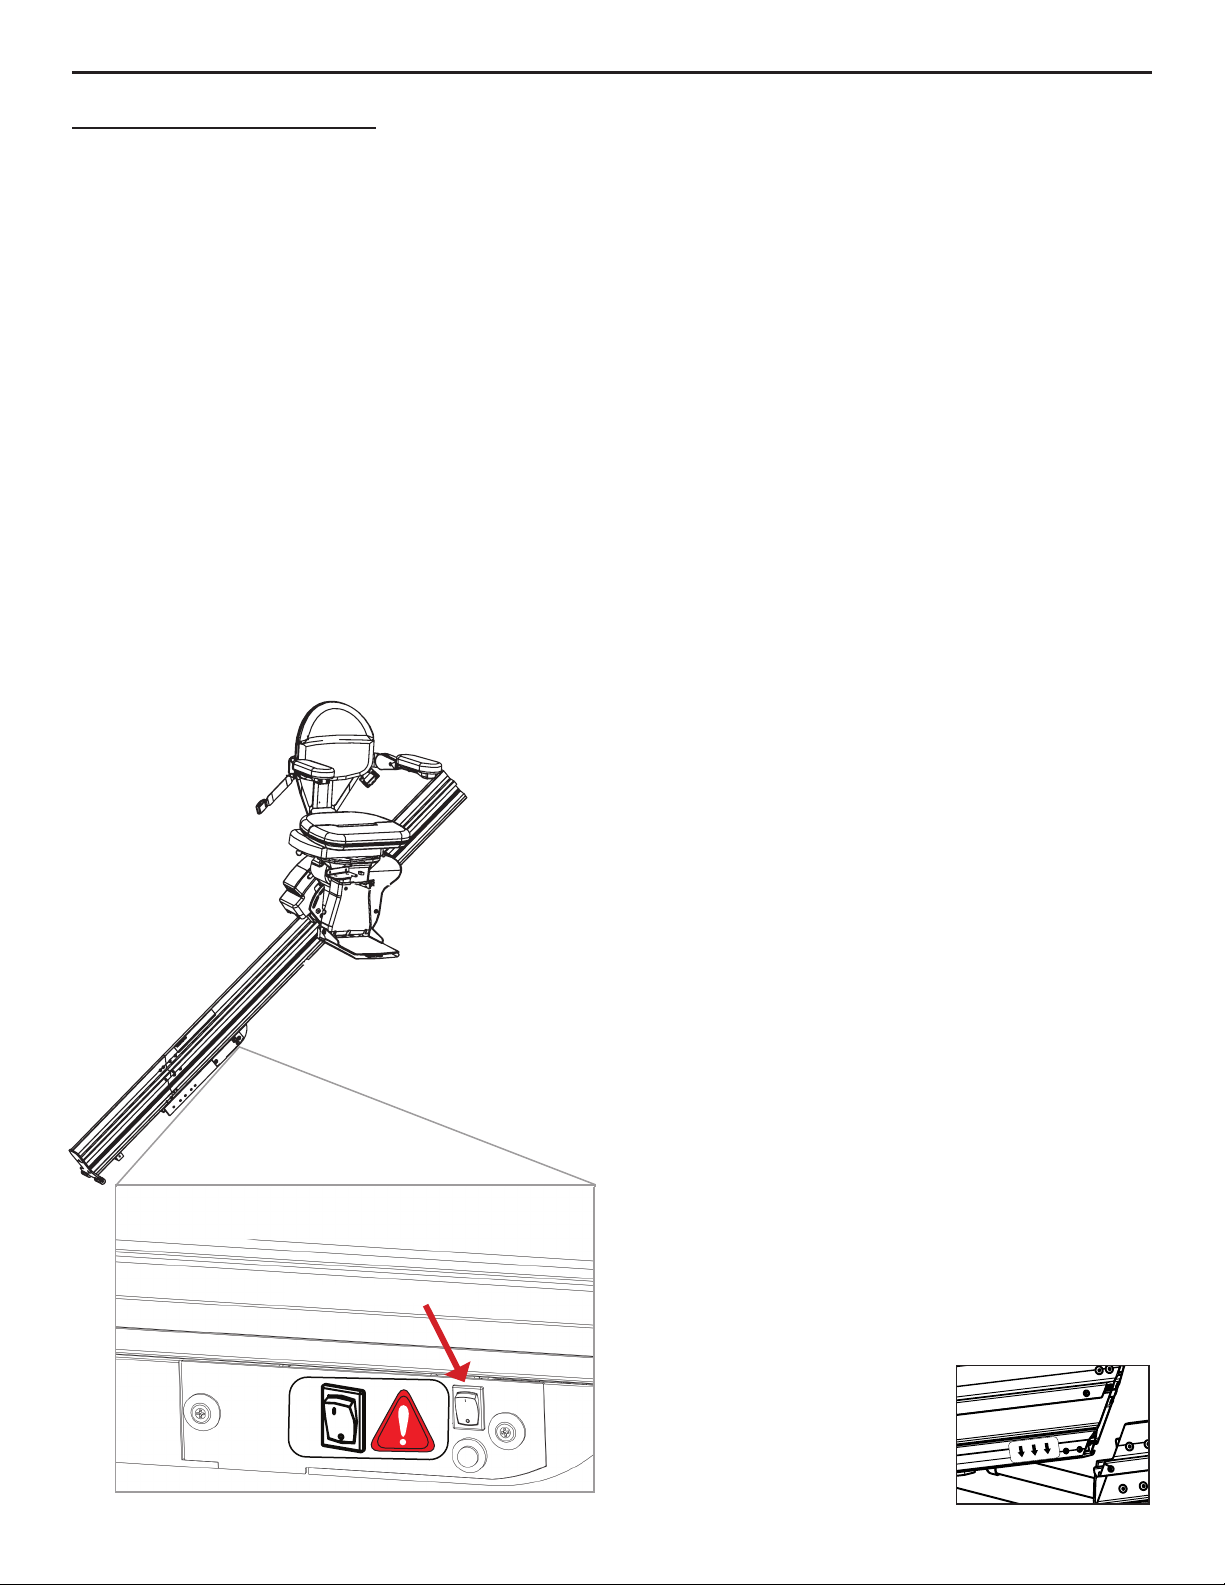
COMPONENTS OF THE SRE-2010
armrest
UP / DOWN
rocker
switch
swivel
release
folding seat
in riding position
folding footrest
with obstruction sensors
©Bruno Independent Living Aids, Inc.® SRE-2010 OPERATOR 02-08-2019
4
Page 5

SAFETY
FOR YOUR SAFETY
• Read and understand the operating instructions, and all safety precautions prior to
using the SRE-2010.
• Be sure stairs are clear of objects before operating the stairlift.
• Always be aware of the surface onto which you are stepping as you get on and off the
stairlift.
• Avoid carrying items with you on the stairlift which could hinder movement of the
stairlift up and down the stairs.
• Do not wear LOOSE clothing that could interfere with stairlift movement.
• Fasten your positioning belt before operating the stairlift.
• Make sure the seat is locked in the correct riding position.
• Be sure that the seat swivel path is clear before swiveling in or out of the ride position,
and before repositioning the seat.
• Be certain the seat swivel is locked in place before attempting to get on or off the
stairlift.
• Make certain that there are no obstacles that would prevent complete raising/lowering
of the optional power footrest (if unit is so equipped).
• NON-AMBULATORY USERS: Bruno recommends carrying a cellular or cordless
telephone or an emergency communication device when riding the stairlift while alone
in the house.
Each stairlift is designed to travel down the stairway at a slightly slower speed than is
the case when travelling UP.
The footrest is equipped with obstruction sensors which stop the carriage if an obstacle
is encountered on the stairs.
If this should occur, press the opposite side of the UP/DOWN rocker control switch (on
the armrest) to run the carriage in the opposite direction. Clear the obstacle from the
stairway or rail then resume travel in the desired direction.
Your SRE-2010 is battery powered and will continue to operate for some time during a
power outage. The length of operation will depend on the battery condition, the length of
the stairs and the weight of the rider.
Only in the event of a prolonged power outage (more than one hour) will it be necessary
to turn the power off (circuit breaker switch on the carriage) and turn off or unplug the
charger from the wall outlet to conserve battery charge.
The power swivel seat option is equipped with current overload sensing to prevent
further seat swivel if a jam is detected.
The power footrest option is equipped with current overload sensing that will cause
the footrest to return to its last position if a jam is detected.
The power folding rail option is equipped with current overload sensing to prevent
damage if an obstruction or jam is detected.
©Bruno Independent Living Aids, Inc.® SRE-2010 OPERATOR 02-08-2019
5
Page 6
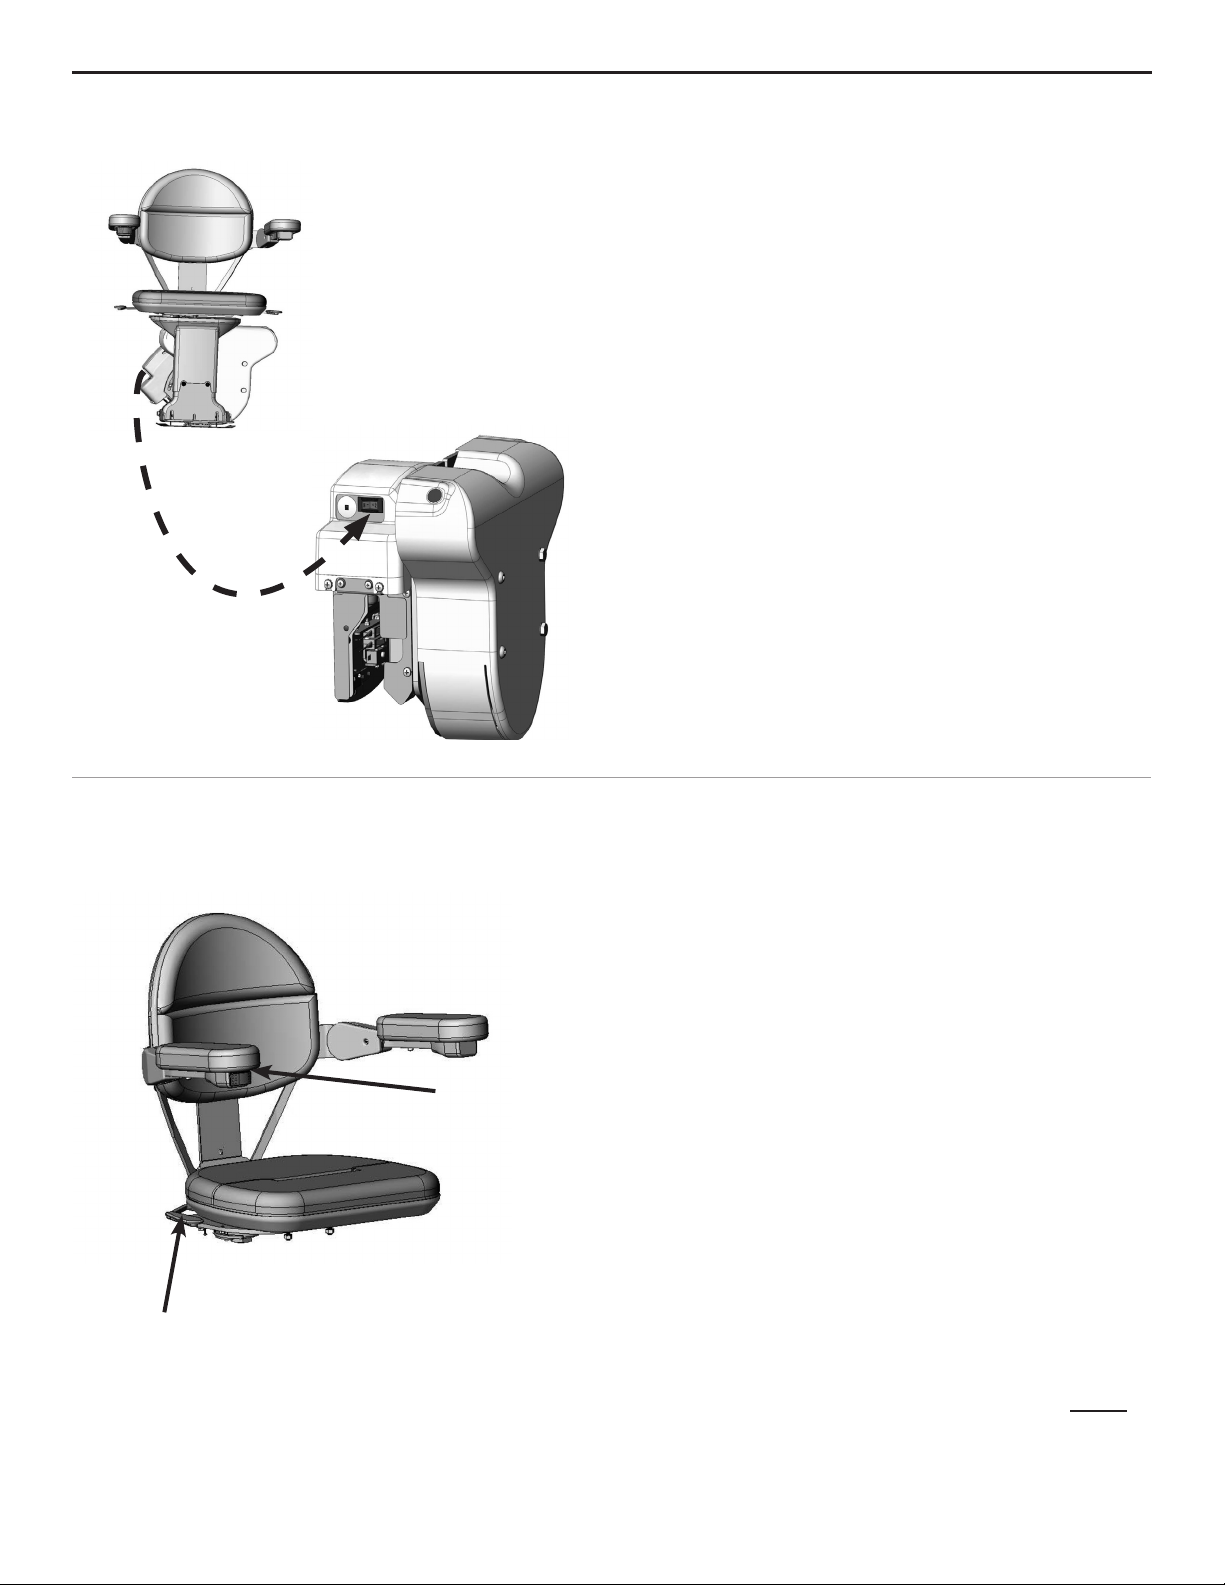
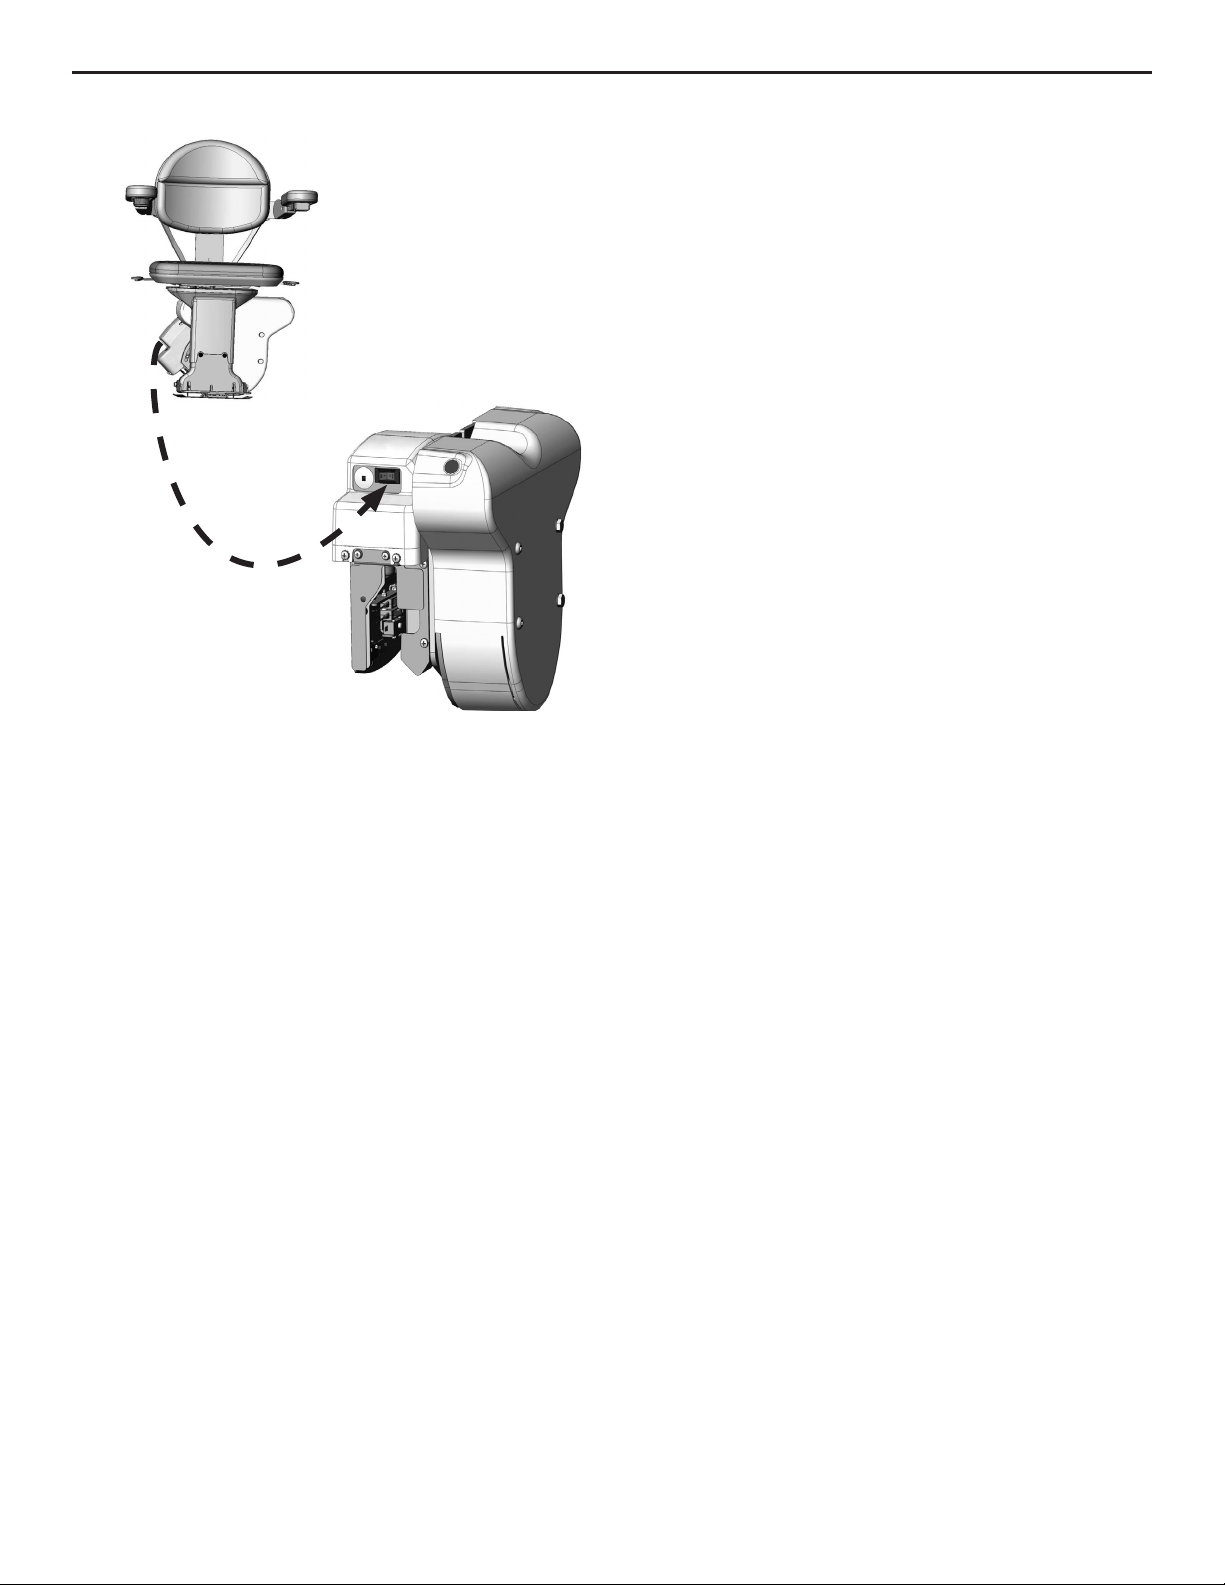
CIRCUIT BREAKER and SEATING
The SRE-2010 includes a circuit breaker
with a built-in ON/OFF switch located on
the back side of the carriage.
The circuit breaker protects the battery,
controller and motor circuits in the stairlift
carriage.
It is unlikely that this circuit breaker will trip
during normal use. However, if the stairlift
becomes inoperative, check the circuit
breaker as a rst troubleshooting step. Reset
it, if necessary.
Possible causes of circuit breaker tripping:
• foreign object jamming the rail or gear
rack;
• exceeding the rated weight capacity of
the stairlift.
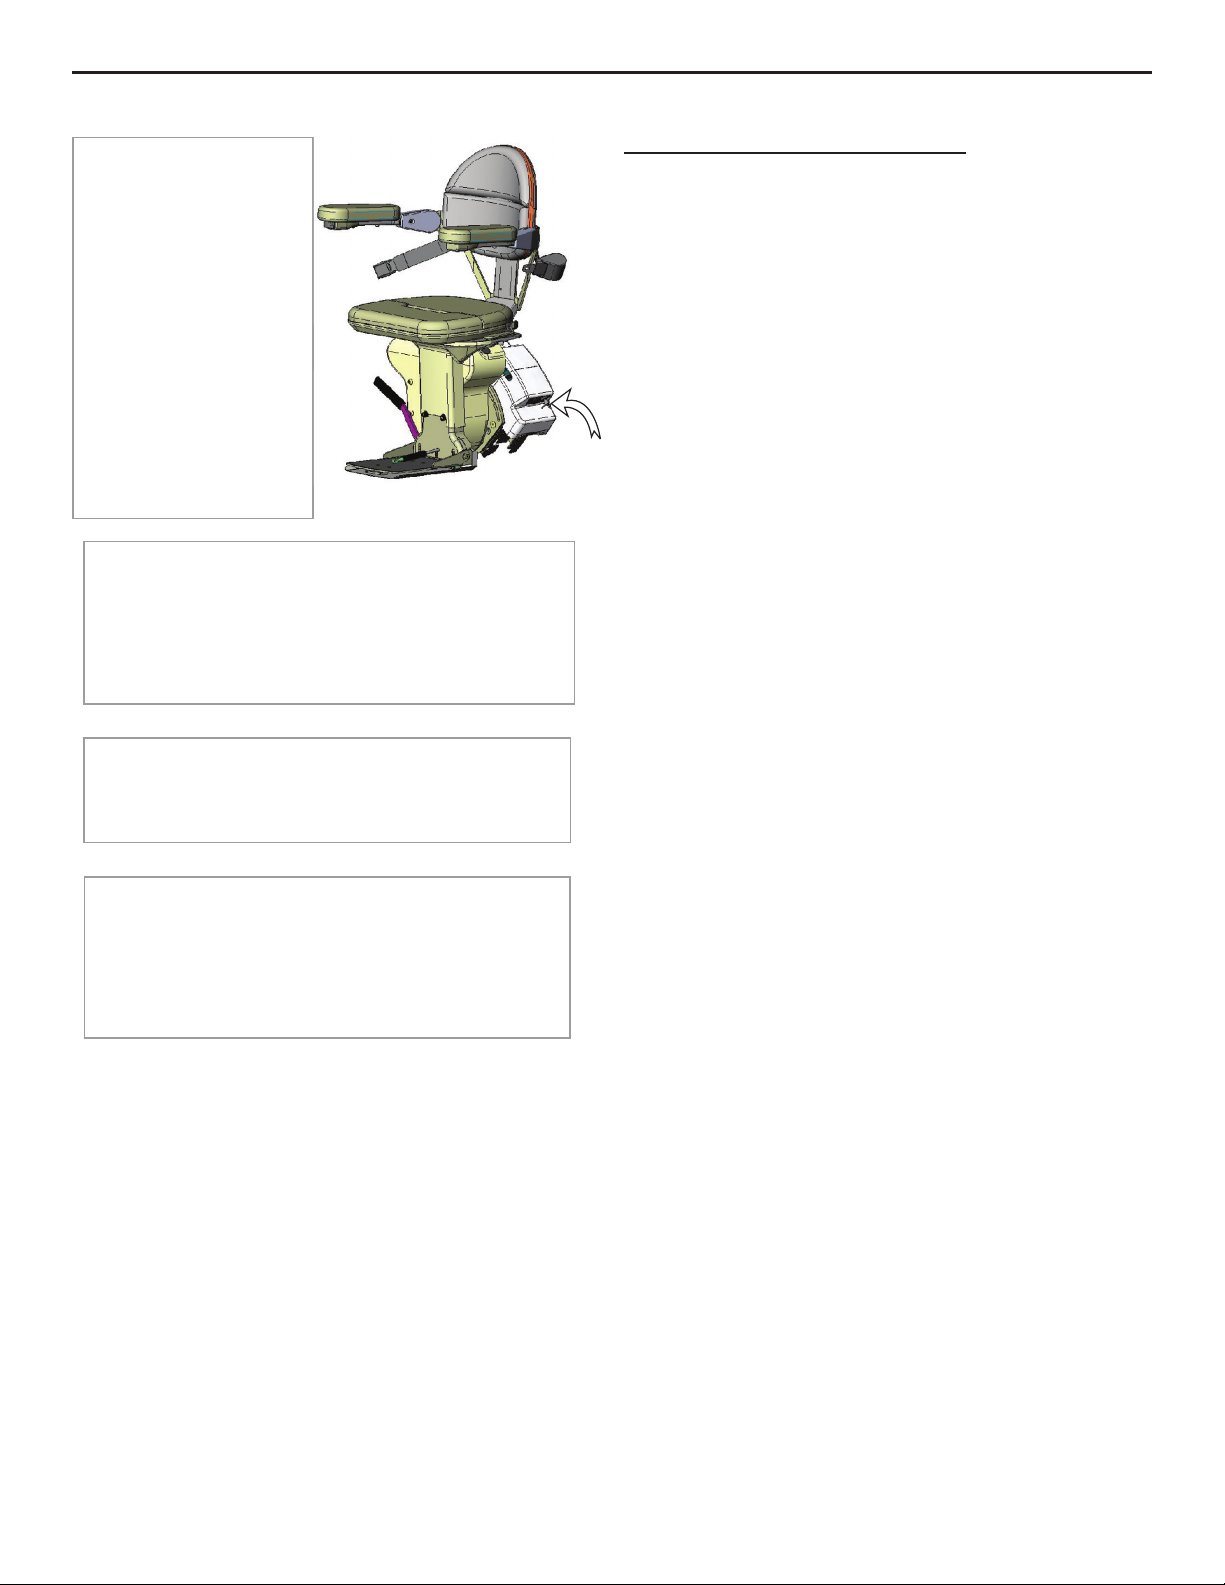
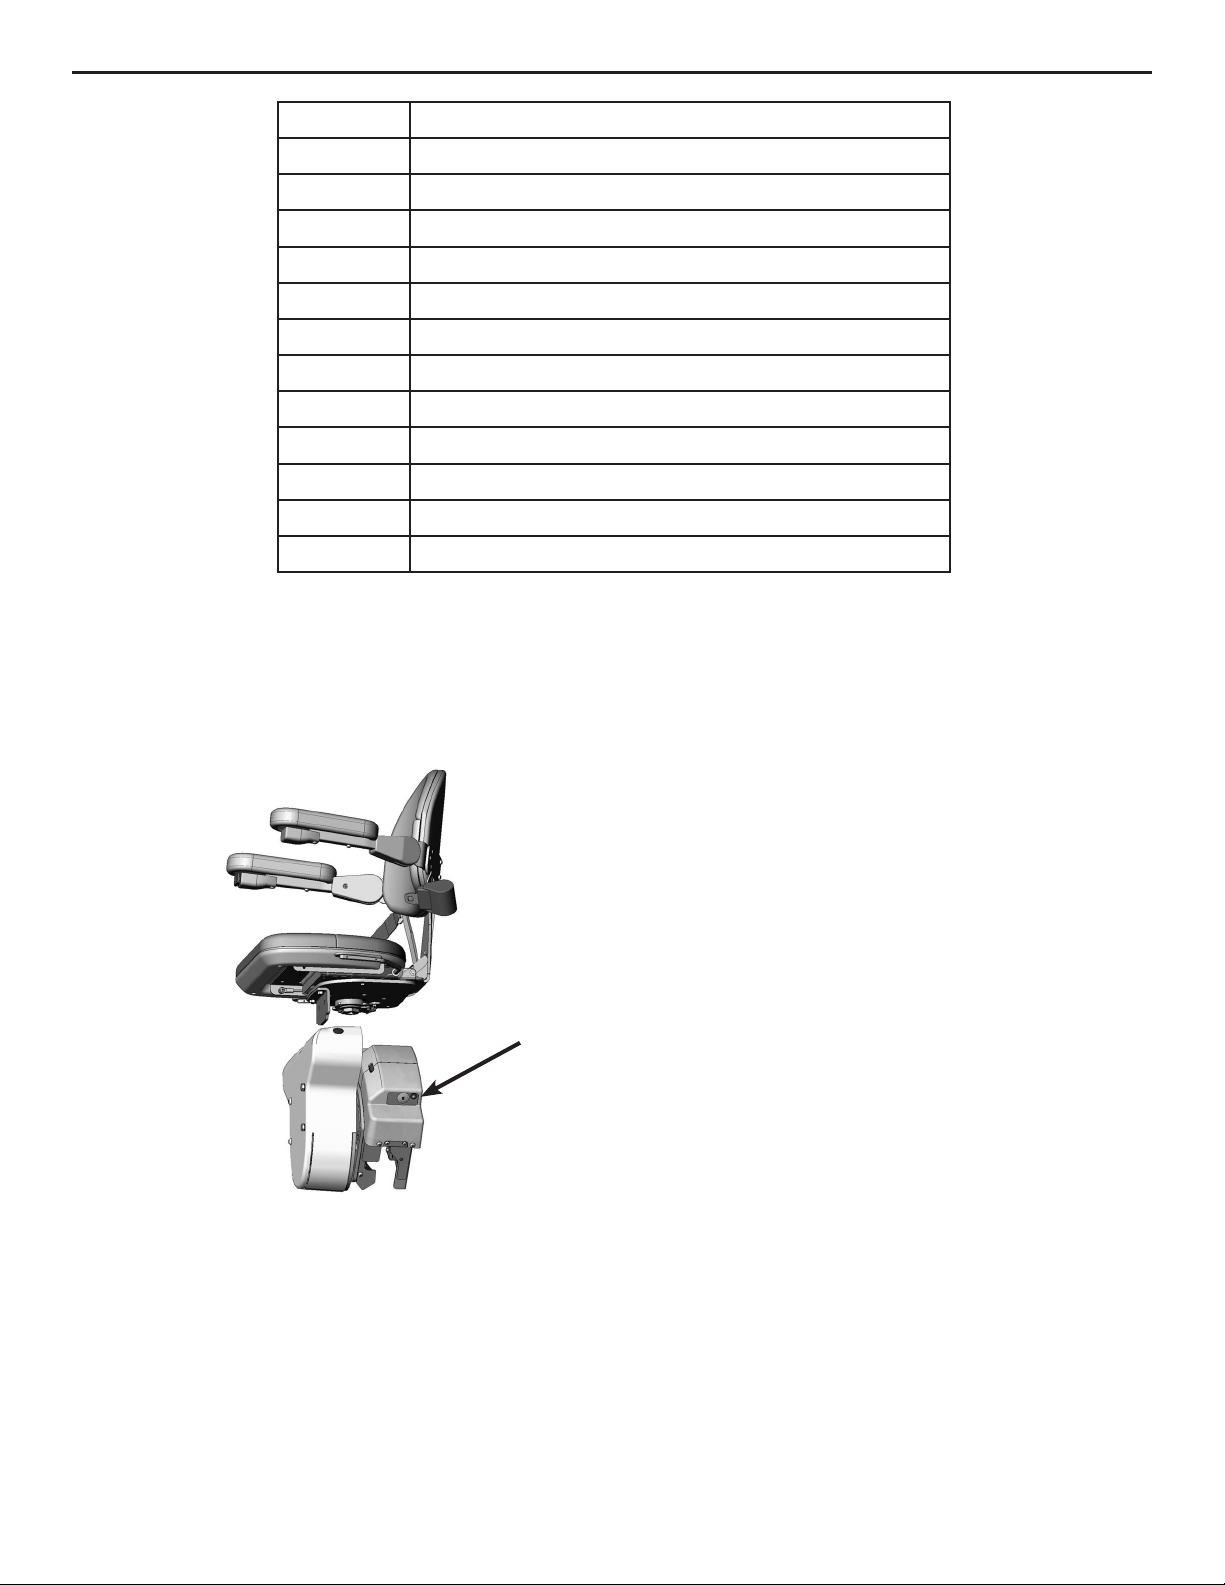
SEATING
seat swivel lever
(one on each armrest)
UP/DOWN
rocker switch
The seat assembly on the SRE-2010 is
designed to swivel 90 degrees (with standard
armrests), and to lock in one of the following
positions:
0, 60, and 90 degrees at the top,
and (optional) 45 degrees at the
bottom*.
Pull up on either the right- or left-side
swivel lever located under the seat to
swivel the seat to a convenient position for
transferring into or out of the seat.
Once you release the swivel lever, the seat
will lock in the closest of the three positions
indicated above.
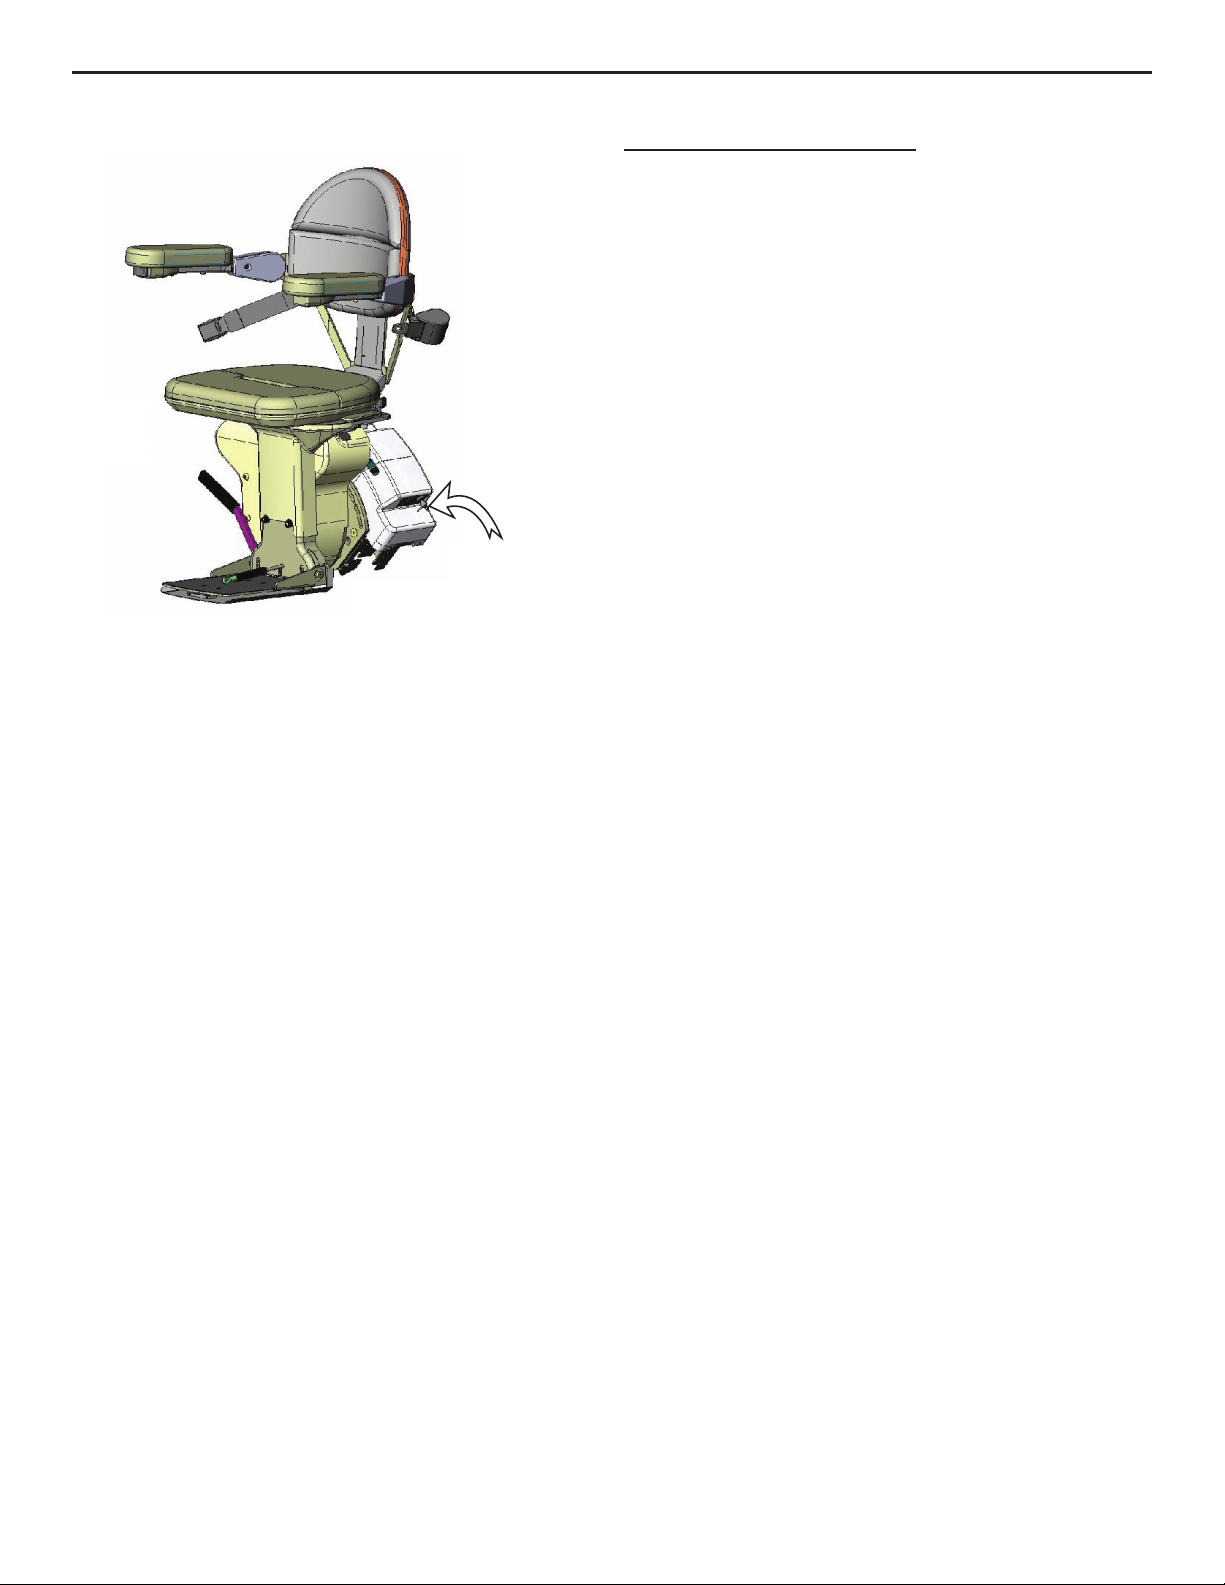
To lower the seat assembly from a folded-up
position, simply push down on the seat
cushion to lower it to the riding position.
* If you have the power swivel option, the
seat will swivel from 0-90 degrees only
at the top of the stairway.
©Bruno Independent Living Aids, Inc.® SRE-2010 OPERATOR 02-08-2019
6
Page 7
STANDARD SWIVEL SEAT
OPERATION
The SRE-2010 includes
a “soft-start” feature
which prevents the
unit from moving
abruptly the instant
the UP/DOWN switch
is pressed.
Press and hold the
switch for a moment
to begin the gentle
acceleration of the
stairlift to operating
speed.
Depressing and holding the rocker
switch will cause the carriage to move
until the carriage stops
automatically at the upper or lower
end of the stair rail, or until the switch
is released.
Two (2) remote transmitters enable
you to move the carriage to or from
either end of the stair rail.
keyswitch
1. Turn the carriage keyswitch to ON.
2. At the top of the stairs, swivel the seat.
a. Position yourself in the seat.
b. Fasten the positioning belt.
c. Rotate the seat so that you are at
right angles to the rail (with your
back to the stairway wall).
A safety switch prevents operation
of the SRE-2010 unless the seat is
locked in position at right angles
to the rail (the “riding” position).
3. Position both feet securely on the footrest
and place your arms on the armrest
cushions.
4. Press and hold the rocker switch (located
on the front edge of one of the armrests)
to travel UP / DOWN the rail.
5. Once you have reached the top or bottom
landing, and the unit has stopped, release
the rocker switch.
6. Swivel the seat to prepare for exiting the
unit.
Remote transmitters are designed to
call / send an empty seat only!
The transmitters are NOT designed to
move a seat with a person on board.
7. Unbuckle the positioning belt and carefully
exit the seat.
8. Swivel the empty seat back to its locked
position.
©Bruno Independent Living Aids, Inc.® SRE-2010 OPERATOR 02-08-2019
7
Page 8
OPERATION: power swivel seat (optional)
POWER SWIVEL SEAT
1. Turn the carriage keyswitch to ON.
2. At the top of the stairs, swivel the seat.
a. Position yourself in the seat.
b. Fasten the positioning belt.
c. Rotate the seat so that you are at
right angles to the rail (with your
back to the stairway wall).
A safety switch prevents operation of
the SRE-2010 unless the seat is locked
in position at right angles to the rail
(the “riding” position).
keyswitch
3. Position both feet securely on the footrest
and place your arms on the armrest cushions.
4. Press and hold the rocker switch (located
on the front edge of one of the armrests)
to travel UP / DOWN the rail.
5. Once you have reached the top or bottom
landing, release the rocker switch.
6. To rotate the seat at the top landing,
press the rocker switch again on the
same side.
7. Release the rocker switch when you have
fully rotated out.
8. Unbuckle the positioning belt and carefully
exit the seat.
NOTES:
• You may use the remote transmitters to
return the rotated power seat back to
the ride position.
• If the unit stops unexpectedly while
traveling, check for obstructions or
excessive loading. You will only be able
to run the unit in the opposite direction
until the overload is cleared.
©Bruno Independent Living Aids, Inc.® SRE-2010 OPERATOR 02-08-2019
8
Page 9

OPERATION: power footrest (optional)
POWER FOOTREST
If your unit is equipped with an optional
power footrest, follow the operating
instructions indicated below.
1. Raise the seat to raise the footrest to its
stored position.
2. Lower the seat to lower the footrest to
the ride position.
NOTES:
• Do not try to manually raise or lower the
footrest. Always raise/lower the footrest
by raising/lowering the seat. Failure to
follow this instruction could damage the
unit.
• If a jam occurs while raising or lowering the footrest, the footrest will
attempt to return to its last position.
This will produce a sequence error.
To restore normal footrest operation:
◊ ▫ Clear the jam.
◊ ▫ Move the seat up and down until
the footrest moves again.
◊ ▫ If normal footrest operation is not
restored, contact a Bruno Service
Representative.
©Bruno Independent Living Aids, Inc.® SRE-2010 OPERATOR 02-08-2019
9
Page 10
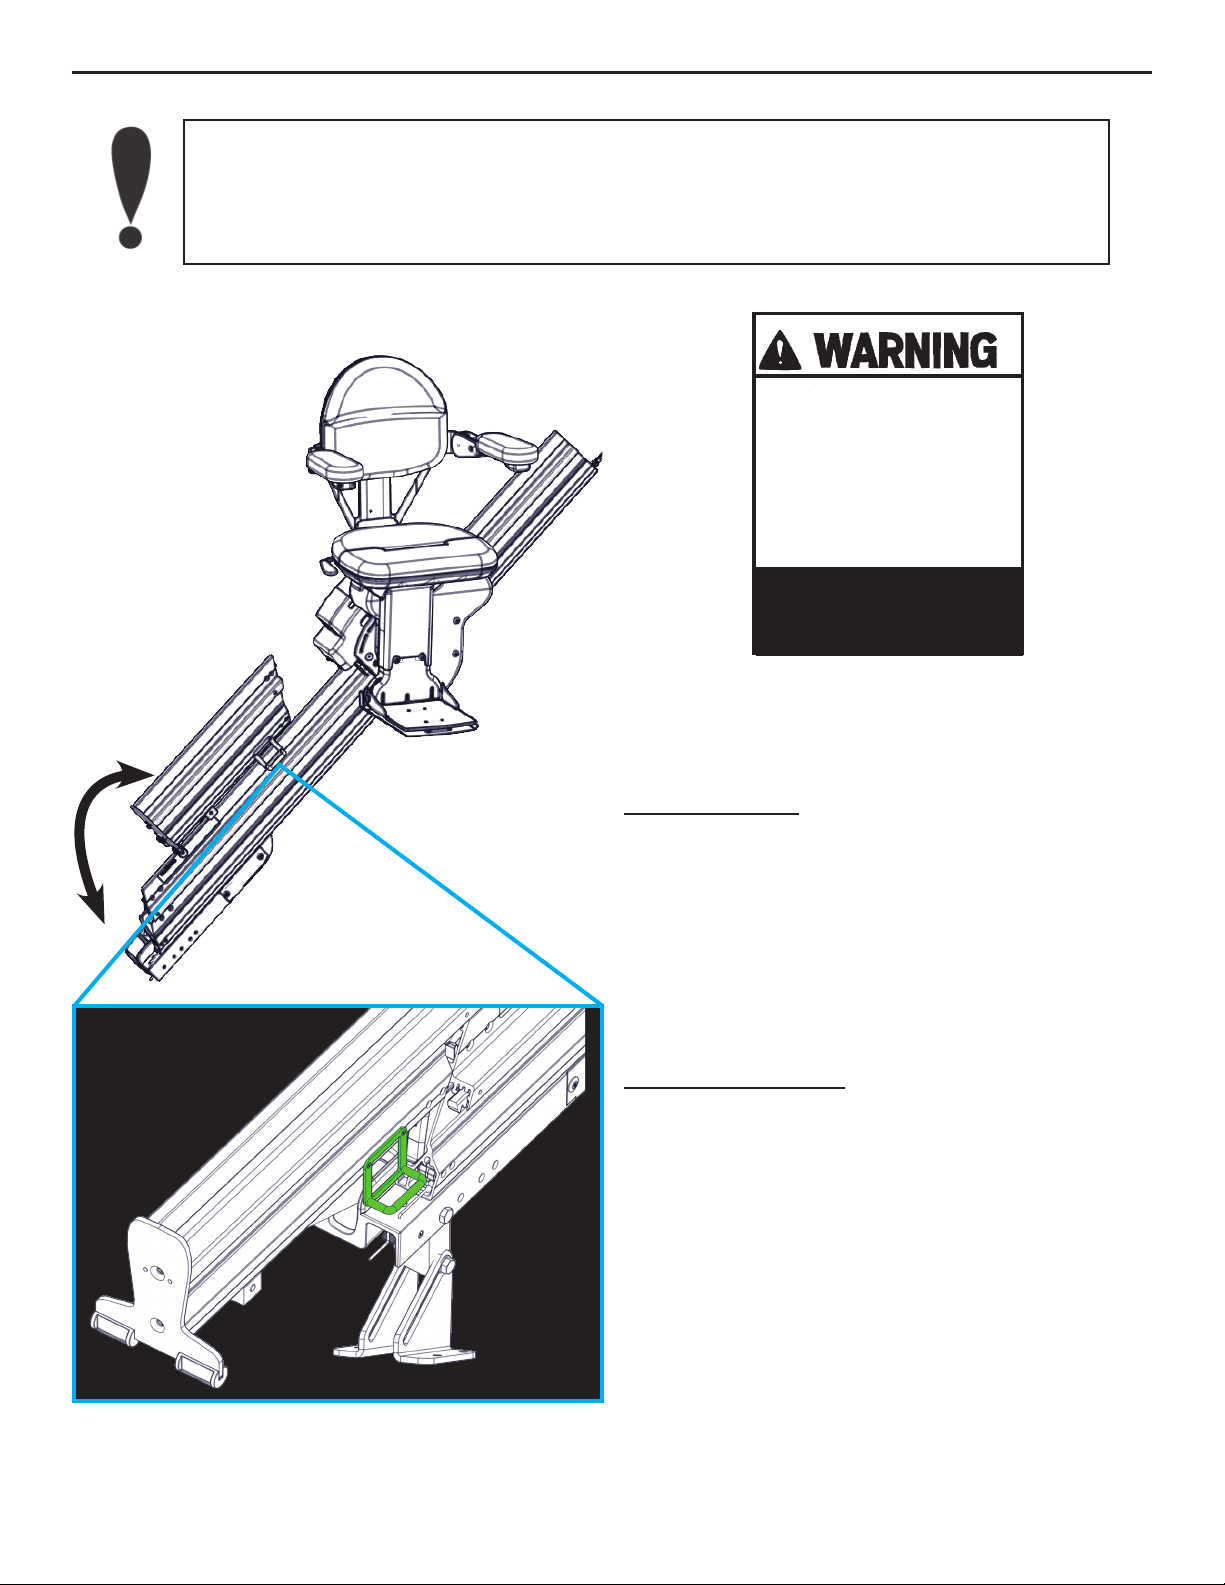
OPERATION: MANUAL folding rail (optional)
When folding the rail UP, the carriage MUST be either at the mid-park position
or parked at the top position!
Damage to the carriage WILL occur if the carriage is below the mid-park
position when the rail is folded up.
PINCH POINT!
Make sure the areas above and
below the folding rail are clear
before operating the
folding rail.
Keep children and pets at a safe
distance.
Failure to observe this warning
could result in injury or
damage to equipment.
To fold rail UP:
1. Using the handle, gently pull up and toward
the top of the rail.
2. Using the handle, gently lower the folding
rail section to the position shown to the
right.
To fold rail DOWN:
1. Using the handle, gently pull up and toward
the bottom of the rail.
2. Using the handle, gently lower the folding
rail section to the ground.
©Bruno Independent Living Aids, Inc.® SRE-2010 OPERATOR 02-08-2019
10
Page 11
PINCH POINT!
Make sure the areas above and
below the folding rail are clear
before operating the
folding rail.
Keep children and pets at a safe
distance.
Failure to observe this warning
could result in injury or
damage to equipment.
OPERATION: POWER folding rail (optional)
The power folding rail is very similar to the manual folding rail
except it has a motorized actuation built into the rail hinge to
automatically raise and lower the folding section of the rail.
The power folding rail includes a mid-travel stop position.
• If you are above this stop, the rail should always be folded up.
• If you are below this stop the rail should be folded down.
Do not attempt to manually fold the power rail!
Using power from the carriage, fold or unfold the rail:
• by riding the stairlift, or
• by using the remote transmitters
Riding the stairlift:
If you are at the top of the staircase,
press the armrest switch to ride down the
rail until you contact the mid-stop, then
release the switch. Look down the staircase
to be sure there are no obstructions to
prevent the rail from lowering!
LED
1. DISABLE/
POWER OFF
DEC-00616
Note
You will hear a continuous beep whenever
the folding rail is in motion. This is to warn
people nearby of rail operation.
Press the armrest switch again, in the
down direction. The folding rail will lower.
The stairlift will not move down until the
rail folds down completely and touches the
ground. Release the armrest switch once
the rail reaches the ground.
Once the rail is folded down, press and
hold the armrest switch again until you
reach the bottom of the staircase.
If you are at the bottom of the staircase,
ride up until you contact the mid stop, then
release the armrest switch. Look down the
staircase to be sure there are no obstructions
to prevent the rail from folding up!
Press the armrest switch again, in the up
direction. The rail will rise up. The stairlift
will not continue up until the folding rail is
completely folded up.
When the rail is in its fully up position,
release the UP armrest switch, then press
it again to travel the rest of the way up the
staircase.
In addition, the yellow LED on the control
panel ashes.
©Bruno Independent Living Aids, Inc.® SRE-2010 OPERATOR 02-08-2019
11
Page 12
OPERATION: POWER folding rail (optional)
2. LIFT SLOWLY
DEC-00617
LIF T
HER E
Using the transmitters:
If you are at the bottom of the staircase, use the transmitter to power the stairlift
down.
If the stairlift is above the mid-stop position, the folding rail will not lower
until the chair contacts the mid-stop position.
Once the stairlift has reached the mid-stop position, press the transmitter DOWN
button again to unfold the rail.
Be sure to stand clear of the rail as it unfolds!
If you are at the bottom of the staircase and want to store the stairlift with the rail
folded up, use the transmitter to send the stairlift up to the mid-stop position. Then
press the transmitter UP button again to raise the rail.
Be sure to stand clear of the rail while it folds up!
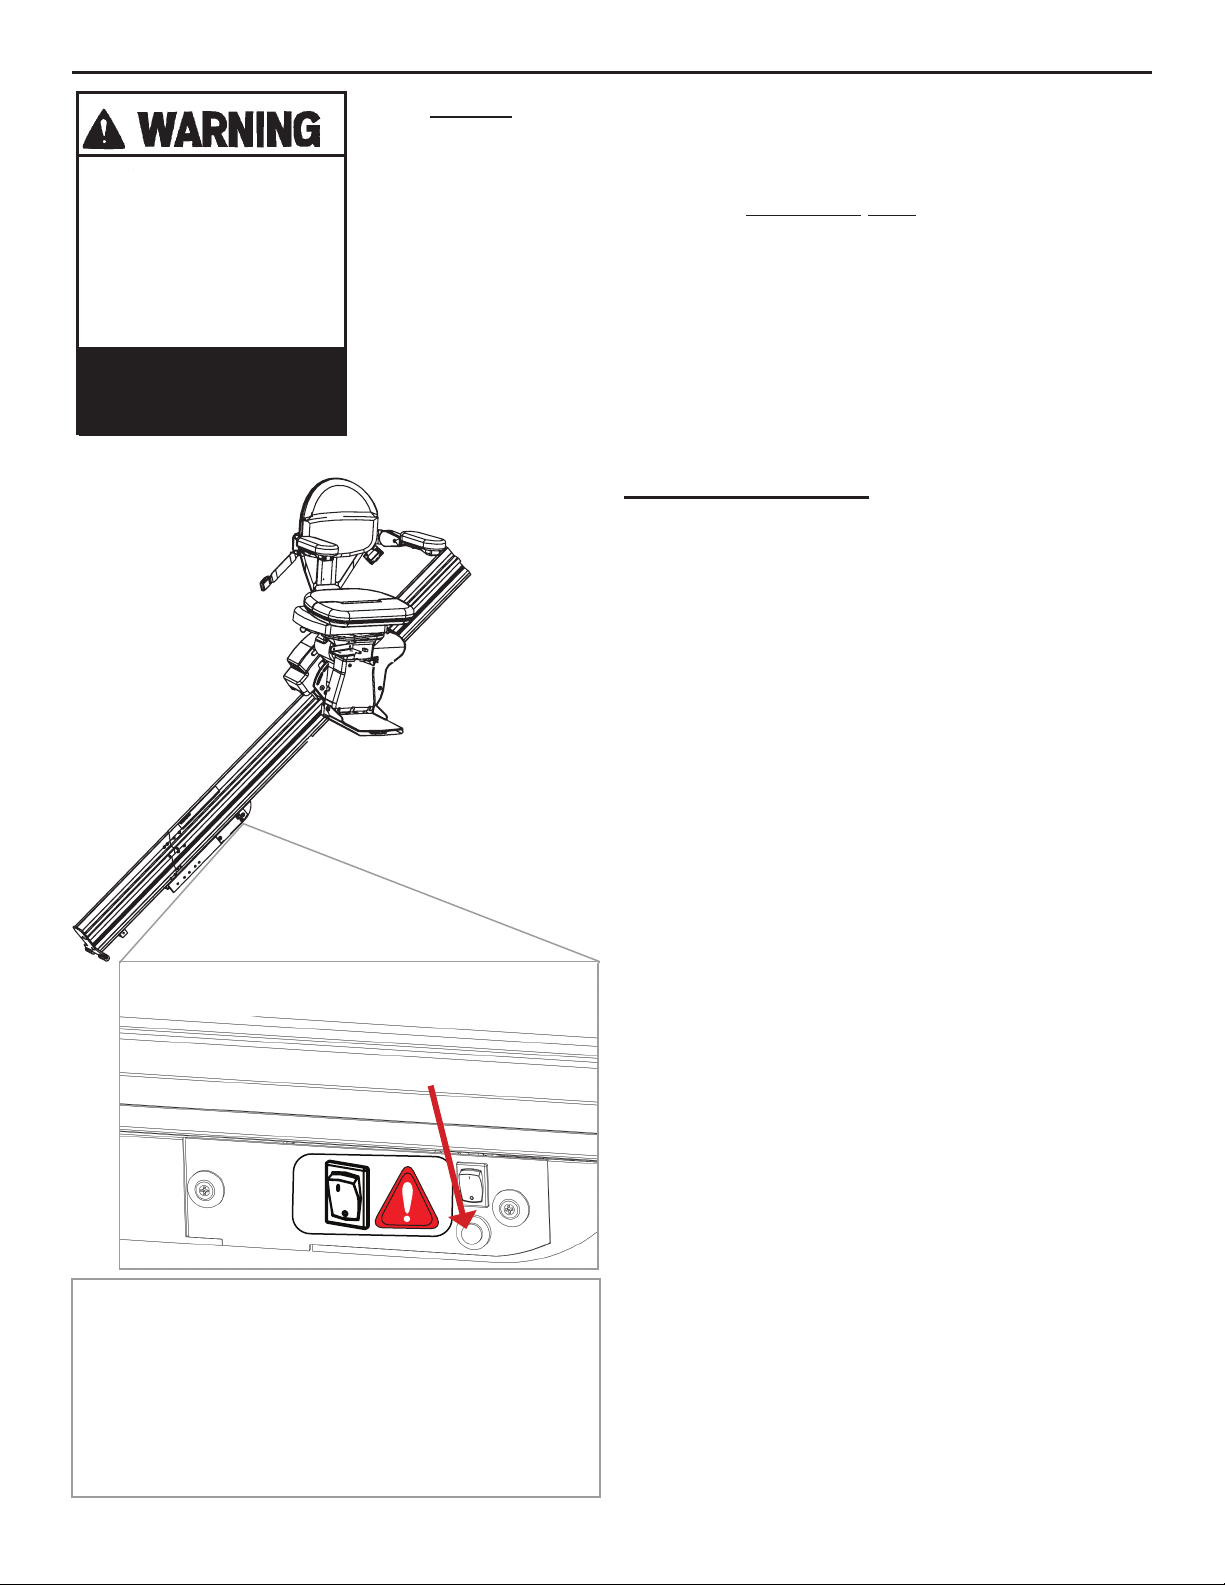
The power folding rail is equipped with safety features to reduce the chance of injury to
people and pets, as well as damage to property.
If the power folding rail detects an obstruction,
the rail will stop and briey reverse direction.
DISABLE switch
To resume operation in the desired direction,
1. clear the obstruction,
2. press the armrest switch or transmitter
button in the opposite direction,
3. press the armrest switch again, in the
desired direction.
Disable switch
The control panel includes a disable switch.
Pressing this switch ON prevents the rail from
folding up or down. You would use this
function if you wished to keep the rail folded
down for an extended period of time.
Be sure to press the switch to OFF allow the
rail to fold and unfold correctly under power!
IN AN EMERGENCY ONLY!
Should you need to raise or lower the power
folding rail, and you are unable to do so with
the armrest switch or the transmitter, switch
the disable switch to OFF. Manually, and GENTLY, raise or lower the rail.
Make sure to lift slowly where indicated by
the “LIFT HERE” decal on
the short rail. Lifting the rail in
1. DISABLE/
POWER OFF
DEC-00616
a quick, sudden motion may
result in damage to the
folding rail gearbox.
©Bruno Independent Living Aids, Inc.® SRE-2010 OPERATOR 02-08-2019
12
Page 13
DIAGNOSTIC CODES (underseat) and CHARGING
A2 Seat in UP Position (Seat Fold Switch Closed)
A3 Seat Out of Riding Position (Swivel Limit Open)
A7 Seat or Footrest Jammed (Actuator Stalled)
C1 Charging
C2 Off Charge (Running)
C4 Parked and Charger Not Detected
C5 Battery Voltage Critical (Charge Immediately)
C6 Battery Voltage Low
L1 Seat Safety Switch Open
L2 Up Limit Switch Open
L3 Down Limit Switch Open
L6 Mid-Rail Park Active
L8 Soft Stop Switch
CHARGING
Keep the batteries charged to ensure
optimal operation of your SRE-2010.
The batteries are charging whenever the
carriage is at any location on the rail.
Failure to keep the batteries charged, or
allowing them to fully discharge, will
signicantly shorten the life of the batteries.
The green LED on the carriage (see left)
conrms that the unit is charging.
©Bruno Independent Living Aids, Inc.® SRE-2010 OPERATOR 02-08-2019
13
Page 14
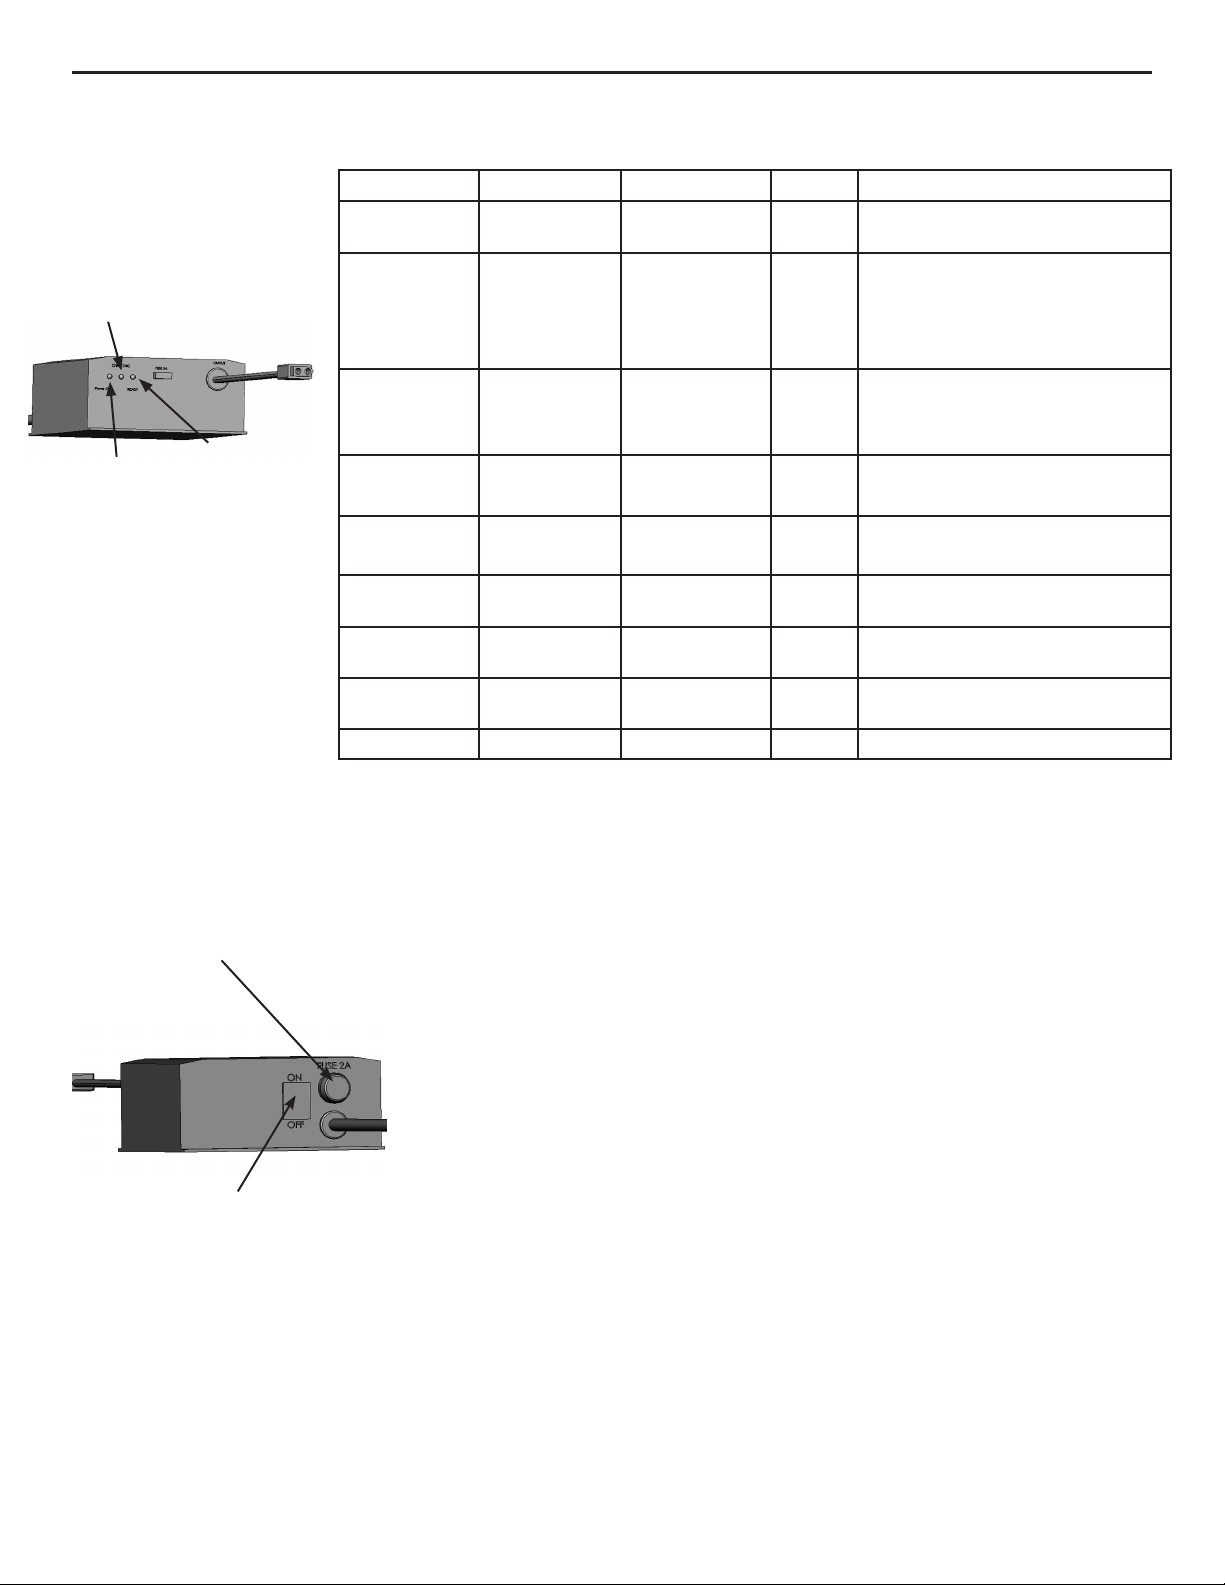
BATTERY CHARGER
LEDS
charging
RED YELLOW GREEN BLUE STATUS
ON ON (< 1 sec.)
OFF
ON (<5 sec.)
ON
ON
ON ON OFF OFF charger delivering maximum
ON (<5 sec.)
OFF
OFF
OFF OFF charger not connected to battery
ON (<5 sec.)
BLINK (5 sec.)
OFF
OFF battery disconnect situation
detected; 5-second delay until
yellow and green LED’s
completely off
current (2.2A)
power
ready
ON ON OFF OFF charger at maximum voltage;
on
ON OFF ON OFF batteries fully charged;
ON BLINKS
BLINKS
ALTERNATELY
ON OFF FAST BLINK OFF partially open circuit; bad
REPLACING THE FUSE
fuse
ALTERNATELY
BLINKS
ALTERNATELY
current continues to drop
yellow LED occasionally turns off
BLINKS
ALTERNATELY
OFF OFF battery defective or heavily
OFF low voltage indication
sulfated
contact or battery sulfation
ON battery connector reversed
If the charger is subject to a power line
surge, the AC input fuse may blow. Refer to
the illustration to the left for fuse location.
To replace fuse:
1. Turn OFF the battery charger power
switch.
2. Remove power cord from wall outlet.
charger power switch
3. Twist the fuseholder cap and pull out to
remove the fuse.
4. Replace with the same size and type
fuse: (Bussmann GMD-2A or equivalent)
2A, Slo-Blow, 5 x 20mm.
©Bruno Independent Living Aids, Inc.® SRE-2010 OPERATOR 02-08-2019
14
Page 15
TRANSMITTERS and MAINTENANCE
TRANSMITTERS
The SRE-2010 hand-held transmitter may experience certain types of interference
caused by portable and mobile radio frequency (RF) communications equipment.
However, the SRE-2010 uses infrared (IR) communications to minimize the possibility of
interference.
Also, receivers are mounted on both sides of the SRE-2010 carriage to minimize interference.
Should interference occur, the unit will stop. This feature has been integrated into the
SRE-2010 to ensure your safety.
The direct line between the transmitter to either of the (2) transmitters should be clear of
obstacles for optimal operation. It may be necessary to reposition the transmitters so that
they are aimed at the carriage.
To reduce the possibility of interference:
• While riding in the seat, ALWAYS operate the elevator using the rocker switch on the
armrest.
• Operating the SRE-2010 with a transmitter while riding in the seat can lead to signal
interference.
• DO NOT mount the transmitters behind an obstacle such as a rail post or around a
corner.
• DO NOT allow direct sunlight to shine on the receivers (blinding the receivers on the
carriage).
• DO replace transmitter batteries regularly.
• Depleted or nearly-depleted batteries alter the effective range of the transmitter.
• DO keep the transmitter and receiver lens free of dirt and debris.
• Use a non-abrasive cleaner suitable for glass or acrylic surfaces.
• Do not use polishes or cleaning products containing wax. These products will leave
a lm on the lens that will reduce the signal transmission range.
MAINTENANCE
The SRE-2010 is designed to provide many years of reliable service with minimal maintenance.
For best service life:
• Keep the rail channel clean and free of debris.
• Keep the battery charger plugged into a live outlet at all times.
• At least once a year, have the stairlift
examined, cleaned and lubricated by a
qualied, authorized Bruno service technician.
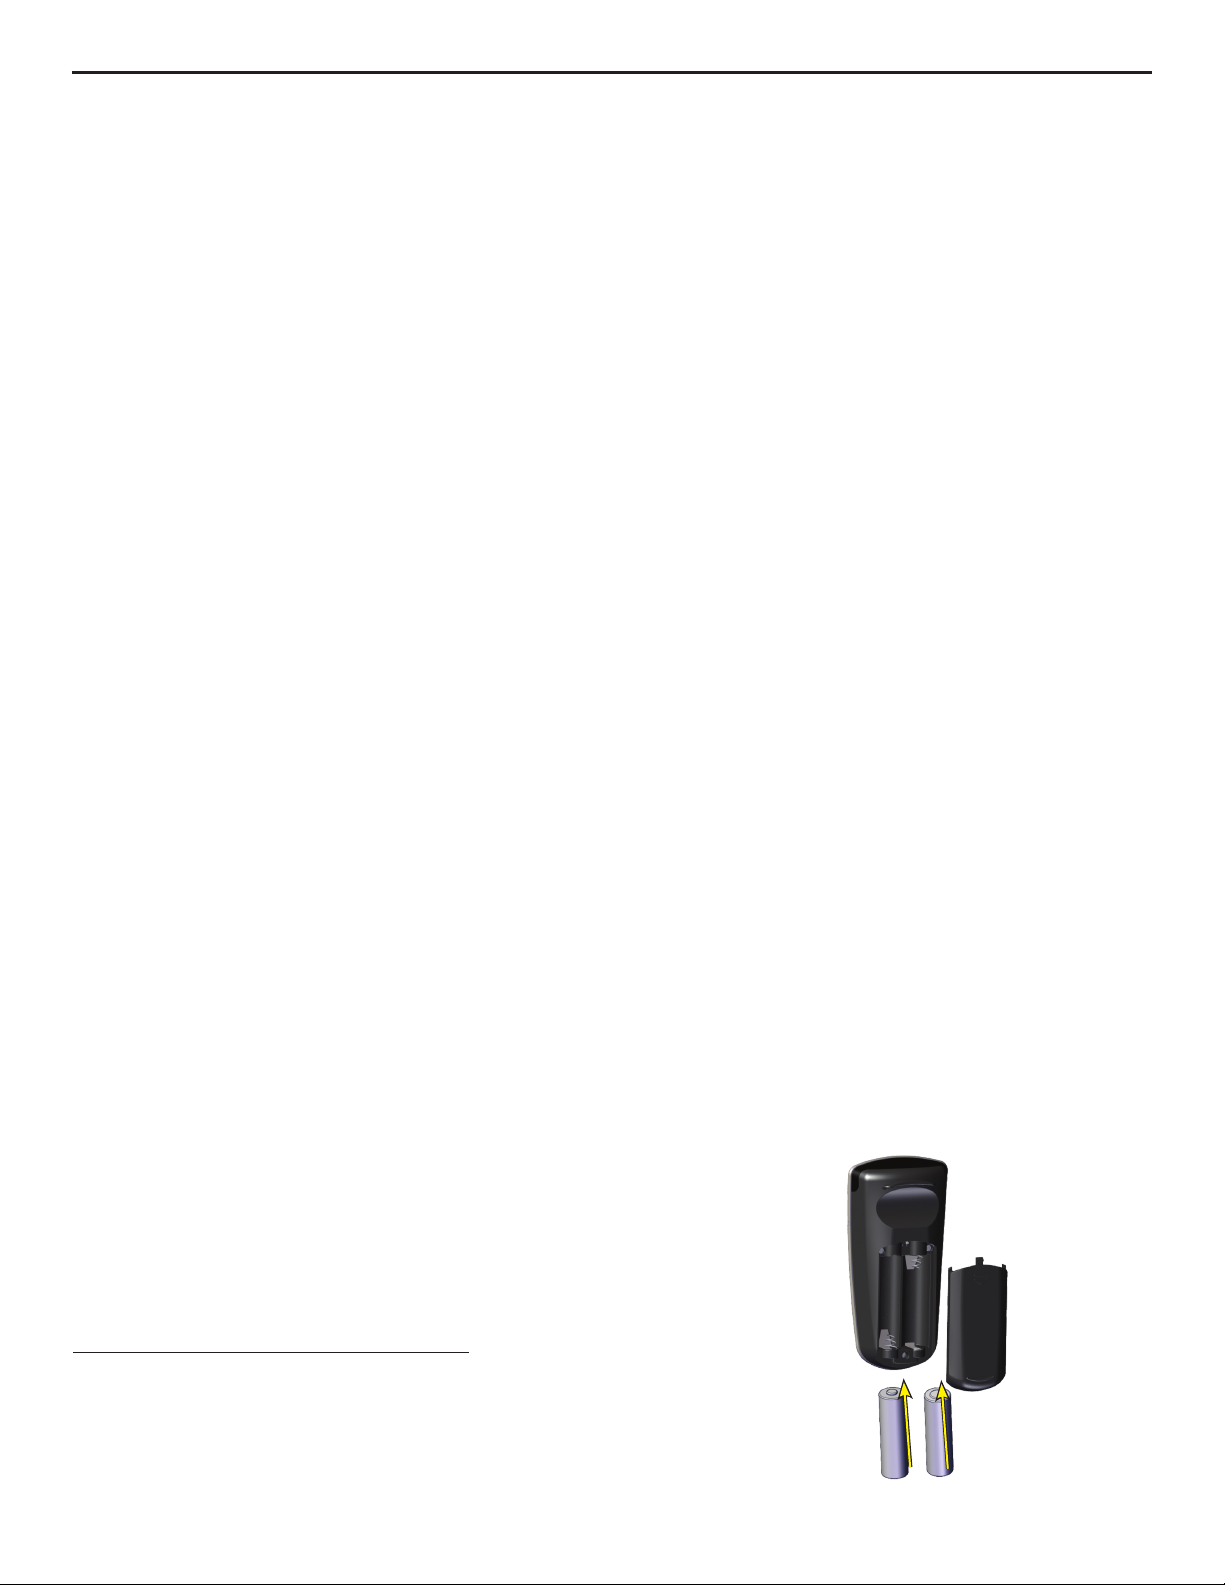
Transmitter Battery Replacement
To replace the batteries in the remote transmitters,remove
the access panel on the back of the transmitter.
Two AA alkaline batteries required.
Change batteries annually.
©Bruno Independent Living Aids, Inc.® SRE-2010 OPERATOR 02-08-2019
15
Page 16

TROUBLESHOOTING
Your SRE-2010 is not operating correctly. What should you do?
Before calling your Bruno dealer, refer to the solutions listed below. This could save you
an unnecessary service call!
• Seat swivel. Is the seat locked in the riding position?
• Footrest. Is there an obstruction on the stairway that the footrest is contacting?
• Carriage safety panels. Is there an obstruction on the stairway that the carriage
safety panels are contacting?
• Battery charger. A discharged battery will cause the carriage to move more slowly
until the voltage drops to the point where the controller will shut
off. If this should occur, pause for a moment, then run the carriage
down to exit the seat.
Partially charged batteries will run the carriage down, but not up.
Contact your Bruno dealer to have the unit serviced.
Conrm that the charger is plugged into a live outlet and wait for
the batteries to charge. Red and green LED’s are illuminated.
Is the charger plugged into a functional outlet? Do not use outlets
which are controlled by a wall switch.
Is the RED power light on?
Has the main circuit breaker or the residence tripped? Has a fuse
blown in the electrical panel of the residence?
• Visual check. Do you notice anything about your stairlift that is different or out of
place?
If your SRE-2010 continues to function improperly or not at all after completing the
preceding checklist, contact an authorized Bruno dealer to perform all required service,
repair and maintenance operations.
©Bruno Independent Living Aids, Inc.® SRE-2010 OPERATOR 02-08-2019
16
Page 17
VACATION AND LONG-TERM STORAGE
If the stairlift will remain unused for an
extended period of time, turn off the circuit
breaker (ON/OFF switch on the carriage),
turn off the battery charger power switch (if
equipped) and unplug the charger from the
wall outlet.
The batteries may require recharging
before normal use if the elevator
remained in the OFF position for an
extended period of time.
circuit breaker
(ON/OFF switch)
To recharge, turn on the circuit breaker,
reconnect the charger to the wall outlet,
and turn on the battery charger power
switch (if equipped). Then wait until the
charger LED’s indicate that the batteries
are fully recharged.
©Bruno Independent Living Aids, Inc.® SRE-2010 OPERATOR 02-08-2019
17
Page 18

BRUNO GOLD LIMITED WARRANTY FOR STAIRLIFT
All Service and Warranty claims must be brought to the attention of a Bruno Authorized Dealer. To ensure
have other rights that vary from state to state. Bruno specically does not authorize any person to extend
Limited Lifetime Major Components — 2 Year Parts
Bruno Independent Living Aids, Inc. (Bruno) is condent in its USA-designed and built stairlift units and is
pleased to provide the Original Purchaser of a Bruno Stairlift with the following “Industry Leading” warranty.
The quality of parts used, along with the care of Bruno’s employees in constructing Bruno’s products, allow
Bruno to provide the following warranty coverage to the Original Purchaser of the Bruno Stairlift:
◊ All Parts, other than Major Components, are/will be free of defects in material and workmanship for a
period of two (2) years after the date of installation by a Bruno Authorized Dealer.
◊ All Major Components, including the motor, gearbox, drivetrain, and rail system of the Bruno Stairlift,
are/will be free of defects in material and workmanship for the lifetime of the Bruno Stairlift and as long
as the Original Purchaser owns the Stairlift.
◊ All labor, to be provided by a Bruno Authorized Dealer, to address any defect of the Bruno Stairlift is covered
for the rst thirty (30) days after installation thereof by a Bruno Authorized Dealer.
◊ All Bruno warranties begin on the date of installation of the Bruno Stairlift by a Bruno Authorized Dealer,
but that date should be no later than 14 months after it was shipped from the factory.
Bruno Authorized Dealers are trained to evaluate your unique situation and then install the best Bruno
Stairlift to meet your needs. The trained installation and service technicians employed by a Bruno
Authorized Dealer have the appropriate equipment and resources needed to correctly install and maintain
the Bruno Stairlift and should be the rst contact for any warranty or service needs.
WHAT IS NOT WARRANTY COVERAGE:
◊ Damage to units caused by misuse, abuse, accidents, neglect or modications NOT made by a Bruno
Authorized Dealer.
◊ Consumable items such as remote batteries
◊ All labor by a Bruno Authorized Dealer after the rst thirty (30) days since installation.
◊ Reasonable wear and tear.
ADDITIONAL NOTES:
◊
warranty coverage, all maintenance and repair work on the Bruno Stairlift, other than maintenance
provided by the Original Purchaser as called for in the Operator’s Manual, must be performed by a Bruno
Authorized Dealer.
◊ In no event shall Bruno be responsible for indirect, incidental or consequential damages, whether such
damages arise based on claims based on contract, warranty, tort (including negligence, strict liability or
product liability).
◊ Bruno, at its sole discretion, reserves the right to replace, repair, or, if not commercially practical and/or
feasible, elect to refund the Original Purchaser the purchase price of the Bruno Stairlift.
◊ This warranty gives the Original Purchaser specic legal rights for which the Original Purchaser may also
the time or scope of this warranty.
For further information regarding this limited warranty, please contact Bruno using the contact information
shown below:
In North America: In the UK and Europe
Bruno Independent Living Aids, Inc.® Bruno
Attn: Service Department Unit 5, Millennium Court,
1780 Executive Drive Clayhill Industrial Park Neston,
Oconomowoc, Wisconsin 53066 United States Wirral CH64 3UZ United Kingdom
Tel. 1-800-882-8183 (toll free) Tel. 0151 559 0732
rev. 04-18
Page 19

SRE-2010 ELITE
Salvaescaleras de riel recto
MANUAL DEL USUARIO
Contacte a su distribuidor Bruno si tiene alguna pregunta o duda acerca del servicio,
a través de los datos de contacto a continuación:
(Distribuidor: datos de contacto a continuación).
Nombre del distribuidor:
Dirección:
N.º telefónico:
N.º de pieza 2010-O
08 de febrero 2019
Page 20

FORMULARIO DE REGISTRO DE PRODUCTO
Formulario de registro del producto
Por favor, use letra de MOLDE en MAYÚSCULAS.
Correo electrónico __________________________________________________________
Número telefónico __________________________________________________________
Fecha de compra (mm/dd/aa) _________________________________________________
Distribuidor: Localice la calcomanía con
el número de modelo y número de serie
en la hoja de calcomanías enviada
junto con la unidad y pegue aquí.
N.º de modelo______________
*
N.º de serie_______________
Tenga la seguridad de que Bruno no compartirá ni venderá la información que usted proporcione.
©2014,2005 Bruno Independent Living Aids, Inc.®
Califique su nivel de satisfacción con su distribuidor Bruno:
excelente buena regular mala
Califique su nivel de satisfacción con su producto Bruno:
excelente buena regular
mala
Bruno se reserva el derecho de usar la información indicada en este formulario en sus materiales
disponibles en línea, en video, audio e impresos. Los nombres se abreviarán para garantizar
la privacidad y anonimato del individuo.
Registro en línea disponible en http://www.bruno.com/warranty.html
Rev. 04-17-2014
N.º de pieza PROD REG STD
* = campo obligatorio
* Nombre _____________________________________________ Segundo nombre_____
* Apellidos _______________________________________________________________
* Domicilio _________________________________________________ N.º interior_____
* Ciudad _____________________________________________ *Estado ____________
* Código Postal ___________________________________________________________
Usuario final: Para agilizar el registro,
vaya al sitio web arriba indicado.
Bruno se complace en proporcionarle este
producto para mejorar la movilidad.
El Formulario de registro del producto se
envía en una bolsa de plástico adjunto a
este manual. Es muy importante que usted
llene y devuelva este formulario a su más
pronta conveniencia para que podamos
completar el proceso de registro de la
garantía para su unidad.
El número de serie se encuentra en las
etiquetas adheridas al manual, así como
en la unidad.
Los números de serie y modelo deben
proporcionarse al momento de presentar
el reclamo de una garantía, solicitar servicio
o pedidos de piezas. Le recomendamos
EJEMPLO
mantener esta información a la mano en
todo momento.
Nota que la garantía para el Salvaescaleras
SRE-2010 se anulará o invalidará en
caso de que la unidad se instale o sea
mantenida por cualquier persona ajena
a un distribuidor autorizado Bruno.
©Bruno Independent Living Aids, Inc.® SRE-2010 USUARIO 08 de FEBRERO 2019
20
Page 21

CONTENIDO
Información reglamentaria y especicaciones .............................23
Seguridad ......................................................24
Interruptor automático .............................................25
Sentarse .......................................................25
Operación ...................................................26-31
asiento giratorio estándar ........................................26
asiento giratorio eléctrico (opcional)................................27
descansapiés eléctrico (opcional) ..................................28
riel plegable (opcional) .........................................29
riel plegable eléctrico (opcional)................................ 30-31
Códigos de diagnóstico .............................................32
Carga eléctrica...................................................32
Cargador de baterías ..............................................33
Reemplazo de batería/mantenimiento del control remoto e interferencia ..........34
Solución de problemas .............................................35
Vacaciones y almacenamiento de largo plazo..............................36
Garantía .......................................................37
©Bruno Independent Living Aids, Inc.® SRE-2010 USUARIO 08 de FEBRERO 2019
21
Page 22

INFORMACIÓN REGLAMENTARIA Y ESPECIFICACIONES
4004689 4004689
Este elevador está destinado para ser instalado de acuerdo con la edición actual de:
• EN 81-40:2008 Reglamentos de seguridad para la construcción e instalación de elevadores - Elevadores especiales para el transporte de personas y mercancías - Parte 40: Salvaescaleras y
plataformas de elevación inclinadas destinadas para personas con discapacidad de movimiento
• ASME A18.1:2017 Norma de seguridad para elevadores de plataforma y sillas salvaescaleras
- Unidades con montaje de sobrevelocidad
• ASME A18.1:2014 Norma de seguridad para elevadores de plataforma y sillas salvaescaleras
- Unidades sin montaje de sobrevelocidad
• CAN/CSA-B613-00 (R2005) - Elevadores residenciales particulares para personas
con discapacidades físicas
• ASME A17.5/CSA B44.1 - 2014 Elevador y equipo de escalera eléctrica
• NFPA 70: Código eléctrico nacional de los Estados Unidos®
• CSA C22.1 Código eléctrico canadiense
Verique los códigos locales aplicables con las autoridades reguladoras correspondientes.
ESPECIFICACIONES
Capacidad de peso: 400 lbs. (181 kg)
Control: presión constante (descansabrazos y dos remotos)
Inclinación máxima 45 grados
Mecanismo giratorio del asiento: 0, 60 y 90 grados en la parte superior;
(opcional) 45 grados en la parte inferior
Cargador de baterías: 24 V CC alimentado por tomacorriente de pared de 120 voltios
COMPONENTES DEL SRE-2010
descansabrazos
interruptor de volquete
SUBIR/BAJAR
desbloqueo de
mecanismo giratorio
asiento plegable
en posición para sentarse
descansapiés plegable
con sensores de obstrucción
©Bruno Independent Living Aids, Inc.® SRE-2010 USUARIO 08 de FEBRERO 2019
22
Page 23

SEGURIDAD
POR SU SEGURIDAD
• Lea y entienda las instrucciones de operación, y todas las precauciones de seguridad
antes de usar el SRE-2010.
• Asegúrese de que las escaleras estén despejadas de objetos antes de operar el salvaescaleras.
• Siempre esté consciencia de la superficie sobre la cual está pisando al subir y bajar del
salvaescaleras.
• Evite llevar objetos consigo en el salvaescaleras, los cuales puedan estorbar el movimiento
del salvaescaleras arriba y abajo de las escaleras.
• NO use ropa suelta que pueda interferir con el movimiento del salvaescaleras.
• Abroche su cinturón de seguridad antes de operar el salvaescaleras.
• Asegúrese de que el asiento esté bloqueado en la posición para sentarse correcta.
• Asegúrese de que el recorrido del giro del asiento esté despejado antes de girar hacia
adentro o afuera de la posición de montar, y antes de reposicionar el asiento.
• Asegúrese de que el mecanismo giratorio del asiento esté bloqueado en su lugar antes
de intentar subir o bajar del salvaescaleras.
• Asegúrese de que no haya obstáculos que impidan levantar/bajar por completo el descansapiés
eléctrico opcional (si la unidad está equipada).
• USUARIOS NO AMBULANTES: Bruno recomienda llevar un teléfono celular o inalámbrico o un
dispositivo de comunicación de emergencia al subir al salvaescaleras cuando está solo en casa.
Cada salvaescaleras está diseñado para desplazarse hacia abajo de la escalera a una velocidad
más lenta que cuando se desplaza hacia ARRIBA.
El descansapiés está equipado con sensores de obstáculos los cuales detienen el carro
en caso de detectar un obstáculo en las escaleras.
Si esto ocurre, oprima el lado opuesto del interruptor de volquete UP/DOWN (arriba/abajo,
en el descansabrazos) para desplazar el carro en dirección contraria. Quite el obstáculo
de la escalera o riel y luego reanude el desplazamiento en la dirección deseada.
Su SRE-2010 funciona a baterías y continuará funcionando por un tiempo durante un apagón
de energía. La duración de su funcionamiento dependerá del estado de la batería, de la
longitud de las escaleras y del peso del pasajero.
Únicamente en caso de un apagón de energía prolongado (más de una hora) será necesario
apagar la unidad (en el interruptor automático en el carro) y apagar o desconectar el
cargador del tomacorriente de pared para conservar la carga de la batería.
El asiento giratorio eléctrico opcional está equipado con sensor de sobrecarga de
corriente para prevenir que siga girando el asiento en caso de detectarse un atascamiento.
El descansapiés eléctrico opcional está equipado con el sensor de sobrecarga de corriente
que causará que el descansapiés regrese a su última posición si se detecta un atascamiento.
El riel plegable eléctrico opcional está equipado con sensor de sobrecarga de corriente
para prevenir daños en caso de detectarse una obstrucción o atascamiento.
©Bruno Independent Living Aids, Inc.® SRE-2010 USUARIO 08 de FEBRERO 2019
23
Page 24

INTERRUPTOR AUTOMÁTICO Y ASIENTO
El SRE-2010 incluye un interruptor automático con un interruptor de encendido/
apagado integrado ubicado en el lado trasero del carro.
El interruptor automático protege los circuitos
de la batería, del controlador y motor en el
carro del salvaescaleras.
Es improbable que este interruptor automático
se dispare durante el uso normal. No obstante,
si el salvaescaleras deja de funcionar, revise
el interruptor automático como primer
paso de solución de problemas. Reajuste el
interruptor, si es necesario.
Posibles causas del disparo del interruptor
automático:
SENTARSE
interruptor de volquete
ARRIBA/ABAJO
• materia extraña atorada en el riel o
cremallera;
• exceder el peso de carga nominal del
salvaescaleras.
El asiento en el SRE-2010 está diseñado para
girar 90 grados (con descansabrazos estándar),
y para bloquearse en una de las siguientes
posiciones:
0, 60 y 90 grados en la parte superior,
y (opcional) 45 grados en la parte inferior*.
Jale la palanca del mecanismo giratorio del
lado izquierdo o derecho debajo del asiento
para girar el asiento a una posición conveniente
para subir o bajar del asiento.
Una vez que suelte la palanca del mecanismo
giratorio, el asiento se bloqueará en la más
cercana de las tres posiciones arriba indicadas.
Para bajar el asiento de una posición plegada
palanca del mecanismo
giratorio del asiento
(una en cada
descansabrazos)
arriba simplemente empuje el asiento hacia
abajo para bajarlo a la posición para sentarse.
*Si tiene la opción de mecanismo giratorio
eléctrico, el asiento girará de 0 a 90 grados
únicamente en la parte superior de las
escaleras.
©Bruno Independent Living Aids, Inc.® SRE-2010 USUARIO 08 de FEBRERO 2019
24
Page 25

OPERACIÓN
El SRE-2010 incluye
una función de “inicio
suave” que previene
que la unidad se
mueva abruptamente
al momento en que el
interruptor ARRIBA/
ABAJO es oprimido.
Oprima y sostenga
el interruptor por un
momento para iniciar
la aceleración suave
del salavescaleras a
la velocidad operativa.
interruptor
Al oprimir y sostener el interruptor de
volquete causará que el carro se mue-
va hasta que el carro se detenga
automáticamente en el extremo superior
o inferior del riel de la escalera, o hasta
que el interruptor deje de ser oprimido.
Dos (2) controles remotos le permiten
mover el carro hacia o desde cualquiera
de los extremos del riel de escalera.
Los controles remotos están diseñados
para llamar o enviar el asiento vacío
únicamente!
Los controles NO están diseñados
para mover el asiento
con una persona a bordo.
de llave
ASIENTO GIRATORIO ESTÁNDAR
1. Encienda el interruptor de llave del carro.
2. En la parte alta de las escaleras,
gire el asiento.
a. Colóquese en el asiento.
b. Abróchese el cinturón de seguridad.
c. Gire el asiento de modo que usted
quede en los ángulos correctos
respecto al riel (con su espalda
hacia la pared de la escalera).
Un interruptor de seguridad impide
el funcionamiento del SRE-2010, excepto
cuando el asiento está bloqueado en
posición en ángulos correctos respecto
al riel (la posición para “sentarse”).
3. Coloque ambos pies rmemente sobre el
descansapiés y ponga sus brazos sobre
los descansabrazos acojinados.
4. Oprima y sostenga el interruptor de
volquete (ubicado en el borde frontal
de uno de los descansabrazos) para
desplazarse ARRIBA/ABAJO por el riel.
5. Una vez que haya llegado al rellano
de la planta alta o baja y la unidad se
haya detenido, suelte el interruptor de
volquete.
6. Gire el asiento para prepararse para bajar
de la unidad.
7. Desabroche el cinturón de seguridad
y baje con cuidado del asiento.
8. Gire el asiento vacío de regreso a su posición
de bloqueo.
©Bruno Independent Living Aids, Inc.® SRE-2010 USUARIO 08 de FEBRERO 2019
25
Page 26

OPERACIÓN: asiento giratorio eléctrico (opcional)
ASIENTO GIRATORIO ELÉCTRICO
1. Encienda el interruptor de llave del carro.
2. En la parte alta de las escaleras, gire el asiento.
a. Colóquese en el asiento.
b. Abróchese el cinturón de seguridad.
c. Gire el asiento de modo que usted
quede en los ángulos correctos
respecto al riel (con su espalda
hacia la pared de la escalera).
interruptor
de llave
Un interruptor de seguridad impide
el funcionamiento del SRE-2010, excepto
cuando el asiento está bloqueado en
posición en ángulos correctos respecto
al riel (la posición para “sentarse”).
3. Coloque ambos pies rmemente sobre el
descansapiés y ponga sus brazos sobre
los descansabrazos acojinados.
4. Oprima y sostenga el interruptor de
volquete (ubicado en el borde frontal
de uno de los descansabrazos) para
desplazarse ARRIBA/ABAJO por el riel.
5. Una vez que haya llegado al rellano de la
planta alta o baja, suelte el interruptor
de volquete.
6. Para girar el asiento en el rellano de
la planta alta, oprima el interruptor de
volquete nuevamente en el mismo lado.
7. Suelte el interruptor de volquete cuando
haya girado totalmente hacia afuera.
8. Desabroche el cinturón de seguridad
y baje con cuidado del asiento.
NOTAS:
• Puede usar los controles remotos para
regresar el asiento giratorio eléctrico
hacia la posición para sentarse.
• Si la unidad se detiene repentinamente
durante el desplazamiento, revise que no
haya obstrucciones ni exceso de carga.
Usted solo podrá desplazar la unidad en
dirección opuesta hasta que se despeje
el problema de sobrecarga.
©Bruno Independent Living Aids, Inc.® SRE-2010 USUARIO 08 de FEBRERO 2019
26
Page 27

OPERACIÓN: descansapiés eléctrico (opcional)
DESCANSAPIÉS ELÉCTRICO
Si la unidad está equipada con un descansapiés
opcional, siga las instrucciones de operación
indicadas a continuación.
1. Levante el asiento para levantar el
descansapiés a su posición de guardado.
2. Baje el asiento para bajar el descansapiés
a la posición para sentarse.
NOTAS:
• No intente levantar ni bajar el descansapiés
manualmente. Siempre levante/baje
el descansapiés levantando o bajando el
asiento. Si no cumple con seguir esta
instrucción puede causar daños a la unidad.
• Si ocurre un atascamiento mientras levanta
o baja el descansapiés, el descansapiés
intentará regresar a su última posición.
Esto producirá un error de secuencia.
Para restaurar el funcionamiento normal
del descansapiés:
◊ Elimine el atascamiento.
◊ Mueva el asiento arriba y abajo hasta
que el descansapiés se mueva nuevamente.
◊ Si el funcionamiento normal del
descansapiés no se ha restaurado,
contacte al representante de Servicio
técnico de Bruno.
©Bruno Independent Living Aids, Inc.® SRE-2010 USUARIO 08 de FEBRERO 2019
27
Page 28

OPERACIÓN: Riel plegable MANUAL (opcional)
!
Cuando despliegue el riel ARRIBA, el carro DEBE quedar en posición
de estacionamiento intermedia o estacionado en la posición alta!
OCURRIRÁN daños al carro si el carro queda abajo de la posición
de estacionamiento intermedia cuando el riel sea plegado arriba.
advertencia
¡PUNTO DE ATRAPAMIENTO!
Asegúrese de que las áreas arriba
indicadas y debajo del riel plegable
estén despejadas antes de operar
el riel plegable.
Mantenga a los niños y mascotas
a una distancia segura.
No cumplir con observar esta
advertencia puede causar lesiones
personales o daños en el equipo.
Para plegar el riel ARRIBA:
1. Usando la manija, jale suavemente
arriba y hacia la parte superior del riel.
2. Usando la manija, baje suavemente la
sección de riel desplegable a la posición
mostrada en la derecha.
Para plegar el riel ABAJO:
1. Usando la manija, jale suavemente
arriba y hacia la parte inferior del riel.
2. Usando la manija, baje suavemente
la sección de riel desplegable al piso.
©Bruno Independent Living Aids, Inc.® SRE-2010 USUARIO 08 de FEBRERO 2019
28
Page 29

advertencia
¡PUNTO DE ATRAPAMIENTO!
Asegúrese de que las áreas arriba
indicadas y debajo del riel plegable
estén despejadas antes de operar
Mantenga a los niños y mascotas
advertencia puede causar lesiones
personales o daños en el equipo.
el riel plegable.
a una distancia segura.
No cumplir con observar esta
OPERACIÓN: Riel plegable ELÉCTRICO (opcional)
El riel plegable eléctrico es muy similar al riel plegable manual,
excepto que tiene un accionamiento motorizado integrado en la bisagra
del riel para elevar y bajar automáticamente la sección plegable del riel.
El riel plegable eléctrico incluye una posición de parada intermedia de
desplazamiento.
• Si usted está por arriba de esta parada, el riel siempre debe estar
desplegado hacia arriba.
• Si usted por debajo de esta parada, el riel debe estar desplegado
hacia abajo.
¡No intente desplegar manualmente el riel eléctrico!
Usando la energía eléctrica del carro, pliegue o despliegue el riel:
• al sentarse en el salvaescaleras, o
• usando los controles remotos.
Para sentarse en el salvaescaleras:
Si usted está en la parte alta de las escaleras,
oprima el interruptor del descansabrazos
para desplazarse abajo por el riel hasta lle-
gar a la parada intermedia, luego suelte el
interruptor. ¡Mire abajo por las escaleras
para asegurarse de que no haya obstrucciones
que impidan que baje el riel!
Oprima el interruptor del descansabrazos
otra vez en dirección hacia abajo. El riel plegable
bajará. El salvaescaleras no se moverá hacia
abajo hasta que el riel se despliegue completamente
y toque el piso. Suelte el interruptor del
descansabrazos una vez que el riel llegue al piso.
Una vez que el riel esté desplegado, oprima
y sostenga el interruptor del descansabrazos
otra vez hasta que usted llegue a la parte
baja de las escaleras.
LED
Si usted está en la parte baja de las
escaleras, desplácese hacia arriba hasta
que llegue a la parte intermedia, luego
suelte el interruptor del descansabrazos.
Mire arriba por las escaleras para asegurarse
1. DISABLE/
POWER OFF
DEC-00616
de que no haya obstrucciones que impidan
que el riel se despliegue hacia arriba.
Oprima el interruptor del descansabrazos
NOTA:
Escuchará un pitido continuo siempre que
el riel plegable esté en movimiento. Esto
es para advertir a las personas alrededor
que el riel está funcionando.
Además, destella el LED amarillo
en el tablero de control.
otra vez en dirección hacia arriba. El riel
se elevará. El salvaescaleras no continuará
desplazándose hasta que el riel plegable
quede desplegado completamente.
Cuando el riel esté en su posición totalmente
arriba suelte el interruptor del descansabrazos
ARRIBA, luego oprima nuevamente para desplazarse
el resto del recorrido arriba por la escalera.
©Bruno Independent Living Aids, Inc.® SRE-2010 USUARIO 08 de FEBRERO 2019
29
Page 30

OPERACIÓN: Riel plegable ELÉCTRICO (opcional)
2. LIFT SLOWLY
DEC-00617
LIF T
HER E
Uso de los controles remotos:
Si está en la parte baja de las escaleras, use el control remoto para bajar el salvaescaleras.
Si el escaleras está por arriba de la posición de parada intermedia, el riel plegable no
bajará hasta que la silla haga contacto con la posición de parada intermedia.
Una vez que el salvaescaleras llegue a la posición de parada intermedia, oprima el botón DOWN
(bajar) en el control remoto nuevamente para desplegar el riel.
¡Asegúrese de estar alejado del riel mientras éste se despliega!
Si usted está en la parte baja de las escaleras y desea guardar el salvaescaleras con el riel
plegado arriba, use el control remoto para enviar arriba el salvaescaleras a la posición de parada
intermedia. Luego oprima el botón UP (subir) en el control remoto nuevamente para elevar el riel.
¡Asegúrese de estar alejado del riel mientras éste se pliega!
El riel plegable eléctrico está equipado con medidas de seguridad para minimizar la probabilidad
de lesiones a personas y mascotas o daños en propiedad.
Si el riel plegable eléctrico detecta una obstrucción, el riel se detendrá y retrocederá un poco.
Para reanudar su operación en la dirección deseada:
1. Elimine la obstrucción,
2. Oprima el interruptor del descansabrazos o
el botón del control remoto en la dirección
opuesta,
3. Oprima el interruptor del descansabrazos
nuevamente, en la dirección deseada.
Interruptor desconectador
El tablero de control incluye un interruptor
desconectador.
Al activar este interruptor, impide que el pliegue
o despliegue del riel. Esta función se utiliza si
usted desea mantener el riel plegado por un
periodo de tiempo prolongado.
Asegúrese de desactivar este interruptor
para permitir que el riel se pliegue y despliegue
correctamente con energía eléctrica.
¡SOLO EN CASO DE EMERGENCIA!
Si necesita subir o bajar el riel plegable eléctrico,
y no puede hacerlo con el interruptor del
Desconectador
de desactivar
descansabrazos ni con el control remoto, apague
el interruptor de deshabilitar. Manualmente,
y SUAVEMENTE, suba o baje el riel.
Asegúrese de levantar lentamente donde se
indica por la calcomanía
“LIFT HERE” en el riel corto.
1. DISABLE/
POWER OFF
DEC-00616
Levantar el riel en un movimiento rápido y
repentino puede resultar en
daño a la caja de cambios
©Bruno Independent Living Aids, Inc.® SRE-2010 USUARIO 08 de FEBRERO 2019
del riel plegable.
30
Page 31

CÓDIGOS DE DIAGNÓSTICO (bajo el asiento) y CARGA
CÓDIGOS DE DIAGNÓSTICO
A2 Asiento en posición ARRIBA (interruptor para plegar el asiento, cerrado)
A3 Asiento fuera de posición para sentarse (límite de mecanismo giratorio, abierto)
A7 Asiento o descansapiés atascado (Actuador atorado)
C1 Cargando
C2 Sin carga (funcionando)
C4 Estacionado y el cargador no detectado
C5 Voltaje de batería crítico (cargar inmediatamente)
C6 Voltaje de batería baja
L1 Interruptor de seguridad del asiento abierto
L2 Interruptor de límite arriba abierto
L3 Interruptor de límite abajo abierto
L6 Estacionamiento de riel intermedio activo
L8 Interruptor de parada suave
CARGA
Mantenga las baterías cargadas
para asegurar el funcionamiento óptimo
de su SRE-2010.
Las baterías están cargando siempre que el
carro está en cualquier ubicación en el riel.
No cumplir con mantener las baterías cargadas,
o dejar que se descarguen completamente,
reducirá signicativamente la vida útil de
las baterías.
El LED verde en el carro (ver a la izquierda)
conrma que la unidad está cargando.
©Bruno Independent Living Aids, Inc.® SRE-2010 USUARIO 08 de FEBRERO 2019
31
Page 32

CARGADOR DE BATERÍA
LUCES LED
cargando
listo
encendido
ROJO AMARILLO VERDE AZUL ESTADO
ENC ENC (< 1 seg)
APAG
ENC (<5 seg)
ENC
ENC
ENC ENC APAG APAG cargador suministrando corriendo
ENC (<5 seg)
APAG
APAG
APAG APAG Cargador no conectado a la batería
ENC (<5 seg)
DESTELLO (5 seg)
APAG
APAG APAG situación de batería desconect
ada detectada, retardo de 5 segundos
hasta que los LED amarillo y verde se
apagan completamente
máxima (2.2A)
-
ENC ENC APAG APAG cargador a voltaje máximo; la corriente
continúa bajando
ENC APAG ENC APAG baterías totalmente cargadas; LED
amarillo ocasionalmente se apaga
ENC DESTELLA
DESTELLA
ALTERNATIVAMENTE
ENC APAG DESTELLA
ALTERNATIVAMENTE
DESTELLA
ALTERNATIVAMENTE
DESTELLA
ALTERNATIVAMENTE
APAG APAG batería defectuosa o altamente
RÁPIDO
APAG indicación de bajo voltaje
impregnada de sulfato
APAG circuito parcialmente abierto; faslo
contacto o sulfatado de batería
ENC conector de batería invertido
REEMPLAZO DEL FUSIBLE
fusible
Si el cargador se somete a una sobrecarga de energía, el fusible
de entrada CA puede fundirse. Consulte la ilustración de la izquierda
para la ubicación del fusible.
Para reemplazar el fusible:
1. Apague el interruptor del cargador de baterías.
2. Desconecte el cable de alimentación del tomacorriente de pared.
3. Gire y quite la tapa del portafusibles para sacar el fusible.
interruptor de encendido
del cargador
©Bruno Independent Living Aids, Inc.® SRE-2010 USUARIO 08 de FEBRERO 2019
4. Reemplace con un fusible del mismo tipo y tamaño:
(Bussmann GMD-2A o equivalente) 2A, fundido lento, 5 x 20mm.
32
Page 33

CONTROLES REMOTOS Y MANTENIMIENTO
CONTROLES REMOTOS
El control remoto manual del SRE-2010 puede experimentar determinados tipos de interferencia
causados por equipos de comunicaciones por radiofrecuencia (RF) portátiles y móviles.
No obstante, el SRE-2010 usa comunicaciones infrarrojas (IR) para minimizar la posibilidad
de interferencia.
De igual manera, los receptores están montados en ambos lados del carro del SRE-2010
para minimizar la interferencia.
Si se presenta una interferencia, la unidad se detiene. Esta función ha sido integrada en
el SRE-2010 para garantizar su seguridad.
Para un funcionamiento óptimo, la línea recta entre el control remoto a cualquiera de los
(2) receptores debe estar libre de obstáculos. Puede ser necesario reposicionar los controles
remotos de modo que apunten al carro.
Para reducir la posibilidad de interferencia:
• Al estar sentado en el asiento, SIEMPRE opere el elevador usando el interruptor
de volquete que está en el descansabrazos.
• Al operar el SRE-2010 con un control remoto mientras está sentado en el asiento,
puede causar interferencia de señal.
• NO monte los receptores detrás de un obstáculo, tal como un poste de riel o a la
vuelta de una esquina.
• NO dirija la luz solar directa a los receptores (puede cegar los receptores en el carro).
• REEMPLACE las baterías del control remoto regularmente.
• Las baterías agotadas o casi agotadas alteran el alcance efectivo del control remoto.
• MANTENGA el lente del transmisor y receptor limpio sin suciedad.
• Use un limpiador no abrasivo que sea adecuado para supercies de cristal o de acrílico.
• No use pulidores ni productos de limpieza que contengan cera. Estos productos dejarán
una película en los lentes la cual reducirá el alcance de transmisión de la señal.
MANTENIMIENTO
El SRE-2010 está diseñado para ofrecer muchos años de servicio conable con mínimo
mantenimiento.
Para optimizar la vida útil:
• Mantenga el canal del riel limpio y libre de suciedad.
• Mantenga el cargador de baterías conectado a un tomacorriente vivo
en todo momento.
• Al menos una vez al año, solicite la inspección, limpieza y lubri-
cación del salvaescaleras por un técnico de servicio calicado y autorizado de Bruno.
Reemplazo de la batería del control remoto
Para reemplazar las baterías en los controles remotos, quite el panel
de acceso en la parte trasera del control remoto.
Se requieren dos baterías AA alcalinas.
Cambie las baterías anualmente.
©Bruno Independent Living Aids, Inc.® SRE-2010 USUARIO 08 de FEBRERO 2019
33
Page 34

SOLUCIÓN DE PROBLEMAS
Su SRE-2010 no funciona correctamente. ¿Qué debe hacer?
Antes de llamar a su distribuidor Bruno, consulte la lista de soluciones a continuación.
¡Esto podría ahorrarle una llamada de servicio innecesaria!
• Mecanismo giratorio del asiento.
¿El asiento está bloqueado en la posición para sentarse?
• Descansapiés.
¿Hay alguna obstrucción en la escalera con la cual el descansapiés esté haciendo contacto?
• Paneles de seguridad del carro.
¿Hay alguna obstrucción en la escalera con la cual los paneles de seguridad del carro
estén haciendo contacto?
• Cargador de baterías.
Una batería descargada causará que el carro se mueva más lentamente hasta que el voltaje
caiga hasta un punto donde el controlador se apagará.
Si esto sucede, haga una pausa, luego desplace el carro abajo para bajar del asiento.
Las baterías parcialmente cargadas desplazarán el carro abajo, pero no hacia arriba.
Contacte a su distribuidor Bruno para que la unidad reciba servicio.
Conrme que el cargador está enchufado a un tomacorriente vivo y espere a que se carguen
las baterías. Los LED rojo y verde están iluminados.
¿El cargador está enchufado a un tomacorriente que sí funciona? No use tomacorrientes
que sean controlados por un interruptor de pared.
¿La luz de encendido ROJA está iluminada?
¿El interruptor automático principal o residencial está disparado? ¿Hay un fusible fundido
en el tablero eléctrico de la residencia?
• Revisión visual. ¿Observa algo en su salvaescaleras que sea diferente o fuera de su lugar?
Si su SRE-2010 continúa funcionando incorrectamente o no funciona después de repasar
la lista de vericación, contacte a un distribuidor autorizado Bruno para que realice
el servicio, reparaciones y mantenimiento necesario.
©Bruno Independent Living Aids, Inc.® SRE-2010 USUARIO 08 de FEBRERO 2019
34
Page 35

interruptor
automático
(interruptor
de encendido/
apagado)
VACACIONES Y ALMACENAMIENTO DE LARGO PLAZO
Si el salvaescaleras va a permanecer sin usarse
por un periodo de tiempo prolongado,
apague el interruptor automático (interruptor
de encendido/apagado en el carro), apague
el interruptor del cargador de baterías (si
está incluido) y desenchufe el cargador del
tomacorriente de pared.
Es probable que necesite recargar las
baterías antes de volver al uso normal
si el salvaescaleras permanece en
posición de apagado por un periodo
de tiempo prolongado.
Para recargar, encienda el interruptor
automático, reconecte el cargador al
tomacorriente de pared, y encienda
el interruptor del cargador de baterías
(si está incluido). Luego espere hasta
que las luces LED del cargador indiquen
que las baterías están totalmente
cargadas.
©Bruno Independent Living Aids, Inc.® SRE-2010 USUARIO 08 de FEBRERO 2019
35
Page 36

rev. 04-18
GARANTÍA LIMITADA Bruno GOLD PARA SALVAESCALERAS
duración limitada en componentes principales — 2 años en piezas
Bruno Independent Living AIDS, Inc. (Bruno) confía en sus unidades salvaescaleras diseñadas y construidas
por Estados Unidos y se complace en proporcionar al comprador original de un salvaescaleras de Bruno
la siguiente garantía de “industria líder”.
La calidad de las piezas usadas, junto con el cuidado de los empleados de Bruno en la construcción de los
productos de Bruno, permiten a Bruno proporcionar la cobertura de garantía siguiente al comprador original
de las salvaescaleras de Bruno:
◊ Todas las piezas, excepto los componentes principales, estarán/estarán libres de defectos de material
y mano de obra por un período de dos (2) años después de la fecha de instalación por un distribuidor
autorizado de Bruno.
◊ Todos los componentes principales, que incluye el motor, la transmisión de la caja de engranajes y el
sistema ferroviario de la salvaescalera de Bruno, están/serán libres de defectos en material y la ejecución
por la vida de la salvaescalera de Bruno y mientras el comprador original posea de la salvaescalera.
◊ Todo el trabajo, a ser proporcionado por un distribuidor autorizado de Bruno, para hacer frente a cualquier
defecto de la salvaescalera de Bruno se cubre por los primeros treinta (30) días después de la instalación de
los mismos por un distribuidor autorizado de Bruno.
◊ Todas las garantías de Bruno comienzan en la fecha de la instalación de la salvaescalera de Bruno por
un distribuidor autorizado Bruno pero esa fecha debe ser no más adelante de 14 meses después de que
fuera enviada de la fábrica.
Bruno concesionarios autorizados están entrenados para evaluar su situación única y luego instalar el mejor
salvaescalera de Bruno para satisfacer sus necesidades. Los técnicos de instalación y servicio entrenados
empleados por un distribuidor autorizado de Bruno tienen el equipo y los recursos apropiados necesarios
para instalar y mantener correctamente a salvaescalera de Bruno y deben ser el primer contacto para cualquier
necesidad de la garantía o del servicio.
LO QUE NO CUBRE LA GARANTÍA:
◊ Daños a las unidades causadas por mal uso, abuso, accidentes, negligencia o modificaciones NO hechas
por un Distribuidor Autorizado Bruno.
◊ Artículos consumibles como las baterías del control remoto.
◊ Toda la mano de obra realizada por un Distribuidor Autorizado Bruno después de los primeros trenta (30)
días contados a partir de la instalación.
◊ Desgaste y deterioro razonable.
NOTAS ADICIONALES:
◊ Todos los servicios y garantías deben ser señalados a la atención de un distribuidor autorizado de Bruno.
Para asegurar la cobertura de la garantía todos los trabajos de mantenimiento y reparación en la salvaescalera
de Bruno, excepto el mantenimiento proporcionado por el comprador original como se requiere en el manual
del propietario, deben ser realizados por un distribuidor autorizado de Bruno.
◊ En ningún caso, Bruno se hará responsable por daños y perjuicios, fortuitos, directos o indirectos,
aun cuando los daños surjan a partir de reclamos basados en contratos, garantía, agravios (incluida
negligencia, responsabilidad limitada o responsabilidad de producto).
◊ Bruno, a su entera discreción, se reserva el derecho de reemplazar, reparar o, si no es comercialmente práctico
y/o factible, elegir reembolsar al comprador original el precio de compra de la salvaescalera de Bruno.
◊ Esta garantía otorga al comprador original derechos legales especícos para los cuales el comprador original
también puede tener otros derechos que varían de estado a estado. Bruno no autoriza especícamente a
ninguna persona a extender el tiempo o el alcance de esta garantía.
Para más información sobre esta garantía limitada, póngase en contacto con Bruno utilizando la información
de contacto que se muestra a continuación:
En Norteamérica: En en Reino Unido y Europa:
Bruno Independent Living Aids, Inc.® Bruno
Attn: Departamento de servicio Unit 5, Millennium Court,
1780 Executive Drive Clayhill Industrial Park Neston,
Oconomowoc, Wisconsin 53066 United States Wirral CH64 3UZ Reino Unido
Tel. (toll free) 1-800-882-8183 Tel. 0151 559 0732
Page 37

SRE-2010 ELITE
Monte-escalier droit
GUIDE DE L’UTILISATEUR
Prière de prendre contact avec votre distributeur Bruno en cas de questions ayant
trait au fonctionnement ou à l’entretien du monte-escalier. Les coordonnées du
distributeur sont indiquées ci-dessous.
(Distributeur: Apposer l’étiquette ci-dessous)
Nom du distributeur:
Adresse:
Nº de téléphone:
P/N 2010-O
08 février 2019
Page 38

FICHE DE VALIDATION DE GARANTIE
Product Registration Form
Please print in
capital
letters.
*First Name ______________________________________________________ M.I._____
*Last Name _______________________________________________________________
*Street Address ________________________________________________ Apt. No._____
*City _____________________________________________ *State/Province _________
*Zip/Postal Code ___________________________________________________________
Email Address _____________________________________________________________
Telephone No. _____________________________________________________________
Date of Purchase (mm/dd/yy) _________________________________________________
Dealer: Locate the Model No. and Serial
No. decal on the decal sheet
shipped with the unit and
place it here.
Model No.___________
*Serial No._________________
Please be assured that Bruno does not share or sell the information you provide.
©2014,2005 Bruno Independent Living Aids, Inc.®
Please rate your satisfaction with your Bruno dealer:
excellent good average poor
Please rate your satisfaction with your Bruno product:
excellent good average poor
Bruno reserves the right to use information indicated on this form in its online, video, audio and printed
materials. Names will be abbreviated to ensure the privacy and anonymity of the individual.
Online registration available at http://www.bruno.com/warranty.html
P/N PROD REG STD
Rev. 04-17-2014
* = required eld
End-User: For faster registration,
please go to the website
shown above.
EXEMPLE
Bruno est heureux de vous offrir ce produit
destiné à fournir une plus grande autonomie.
La che de validation de garantie est incluse
dans le sac en plastique avec ce manuel. Il
est très important de remplir cette che et de
la renvoyer à Bruno le plus tôt que possible
an de compléter l’enregistrement de votre
monte-escalier.
Le numéro de série se trouve sur la page
de couverture de ce manuel, ainsi que sur
le monte-escalier.
On doit obligatoirement fournir les
numéros de série et de modèle lors d’une
demande de bénéce de la garantie, d’une
intervention d’entretien ou d’une commande
de pièces. Nous recommandons de garder
ces numéros dans un lieu facilement accessible
en tout temps.
NOTER: La garantie du monte-escalier
Elite SRE-2010 est rendue nulle
et non avenir s’il est installé
par une personne quiconque
autre qu’un installateur
autorisé compétent de Bruno.
©Bruno Independent Living Aids, Inc.® SRE-2010 UTILISATEUR 08 FÉVRIER 2019
38
Page 39

TABLE DES MATIÈRES
Renseignements réglementaires et caractéristiques .........................42
Sécurité .......................................................43
Disjoncteur .....................................................44
Siège .........................................................44
Mode d’emploi ................................................ 45-50
siège pivotant standard..........................................45
siège pivotant électrique (en option) ...............................46
repose-pieds électrique (en option) ................................47
rail repliable (en option) . . . . . . . . . . . . . . . . . . . . . . . . . . . . . . . . . . . . . . . .48
rail repliable électrique (en option)..............................49-50
Codes diagnostiques...............................................51
Charge de la batterie ..............................................51
Chargeur de batterie ..............................................52
Entretien/remplacement de pile de télécommande/Interférences................53
Recherche des causes de panne.......................................54
Periodes de non utilisation/vacances ...................................55
Garantie .......................................................56
©Bruno Independent Living Aids, Inc.® SRE-2010 UTILISATEUR 08 FÉVRIER 2019
39
Page 40

RENSEIGNEMENTS RÉGLEMENTAIRES ET CARACTÉRISTIQUES
4004689 4004689
Ce monte-escalier est destiné à être installé conformément à l’édition actuelle des documents suivants:
• EN 81-40:2008 Règles de sécurité pour la construction et l’installation des élévateurs - Éléva-
teurs spéciaux pour le transport des personnes et des charges - Partie 40: Ascensièges et plates-
formes élévatrices inclinées à l’usage des personnes à mobilité réduite
• ASME A18.1:2017 Norme de sécurité pour les plates-formes élévatrices et les ascensièges - modèles
avec mécanisme de protection contre la survitesse
• ASME A18.1:2014 Norme de sécurité pour les plates-formes élévatrices et les ascensièges - modèles
sans mécanisme de protection contre la survitesse
• CAN/CSA-B613-00 (R2005) - Appareils élévateurs d’habitation pour personnes
handicapées
• ASME A17.5/CSA B44.1 - 2014 Appareillage électrique d’ascenseurs et d’escaliers
mécaniques
• NFPA 70: Code électrique national
• CSA C22.1 Code électrique canadien
Vérier les codes locaux applicables auprès des autorités réglementaires compétentes.
SPECIFICATIONS
Poids max. utilisateur: 400 lbs. (181 kg)
Commande: pression continue (interrupteur d’accoudoir et deux télécommandes)
Inclinaison max.: 45 degrés
Pivotement du siège: 0, 60 et 90 degrés en haut des escaliers; 45 degrés en bas
Chargeur des batteries: chargeur de 24VCC branché sur une prise de 120V
ÉLÉMENTS CONSTITUTIFS DU SRE-2010
accoudoir
interrupteur à bascule
MONTER/DESCENDRE
manette de
pivotement
siège repliable:
position de départ
repose-pieds repliable avec
capteurs de sécurité
©Bruno Independent Living Aids, Inc.® SRE-2010 UTILISATEUR 08 FÉVRIER 2019
40
Page 41

SÉCURITÉ
POUR VOTRE SÉCURITÉ
• Lire et comprendre tous les modes d’emploi et toutes les précautions de sécurité avant
d’utiliser le SRE-2010.
• Veiller à l’absence de tout obstacle sur l’escalier avant de faire fonctionner le monte-escalier.
• Être toujours attentif à la surface sur laquelle on marche lors de la montée et de la
descente du monte-escalier.
• Éviter de porter des objets lorsque l’on est assis sur le monte-escalier pour ne pas
nuire au mouvement ascendant et descedant du monte-escalier.
• Ne pas porter de vêtements AMPLES pouvant nuire au mouvement du monte-escalier.
• Boucler la ceinture de sécurité avant de faire fonctionner le monte-escalier.
• Veiller à ce que le siège soit convenablement verrouillé en place avant la mise en marche
du monte-escalier.
• Veiller à ce que la zone de pivotement du siège soit exempte d’obstacles avant de pivoter
le siège à partir de sa position de départ et avant de repositionner le siège.
• Veiller à ce que le siège soit convenablement verrouillé en place avant de s’asseoir sur le
siège ou de quitter le siège.
• Veiller à l’absence de tout obstacle pouvant nuire au mouvement ascendant et descedant
du repose-pieds électrique en option (si le monte-escalier en est équipé).
• UTLISATEURS NON AMULBATOIRES: Bruno recommande de porter un téléphone mobile
ou sans l, ou un dispositif de communication urgente lorsque l’on est seul dans la maison
quand on se sert du monte-escalier.
Chaque monte-escalier est conçu de façon à descendre l’escalier à une vitesse légèrement
moins vite que celle de la montée.
Le repose-pieds est équipé de capteurs sur les bords qui arrêtent le chariot en cas de
rencontre avec un objet gênant sur les escaliers.
Dans ce cas, appuyer sur l’interrupteur à bascule MONTER/DESCENDRE (situé sur l’accoudoir)
dans le sens qui dégage le chariot de l’obstacle. Enlever l’obstacle de l’escalier ou du rail
puis remettre le monte-escalier en service dans le sens désiré.
Le SRE-2010 fonctionne sur batteries et continuera à fonctionner pendant un certain
temps après une panne d’électricité. La durée du fonctionnement après la panne dépendra
de la condition des batteries, de la longueur de l’escalier de du poids le l’utilisateur.
Il ne sera nécessaire de couper l’alimentation (disjoncteur sur le chariot) et de débrancher le
chargeur de la prise murale (pour conserver la charge des batteries) que dans le cas d’une
panne prolongée (plus d’une heure).
Le siège pivotant électrique en option est doté d’un détecteur de surcharge de courant
qui empêche le pivotement du siège en cas de détection d’un blocage.
Le repose-pieds électrique en option est doté d’un détecteur de surcharge de courant
qui retourne le repose-pieds à sa position précédente en cas de détection d’un blocage.
Le repose-pieds électrique en option est doté d’un détecteur de surcharge de courant
qui empêche l’endommagement de l’appareil en cas de détection d’un blocage.
©Bruno Independent Living Aids, Inc.® SRE-2010 UTILISATEUR 08 FÉVRIER 2019
41
Page 42

DISJONCTEUR et SIÈGE
Le SRE-2010 est muni d’un disjoncteur qui
comprend un interrupteur MARCHE/ARRÊT
incorporé. Il est situé sur le dos du chariot.
Le disjoncteur sert à protéger la batterie, le
contrôleur et les circuits du moteur dans le
chariot.
Le déclenchement du disjoncteur dans des
conditions d’utilisation normales est peu
probable. Cependant, si le monte-escalier
cesse de fonctionner, examiner d’abord le
disjoncteur. Remettre celui-ci en fonction,
si nécessaire.
Causes possibles du déclenchement du
disjoncteur:
• présence d’un objet étranger qui bloque
le rail ou la crémaillère;
SIÈGE
interrupteur à bascule
MONTER/DESCENDRE
• dépassement du poids nominal admissible
du monte-escalier.
Grâce à sa conception exceptionnelle, le
bloc siège de l’Élite pivote sur 90 degrés
(modèles dotés d’accoudoirs standard), à
gauche et à droite et se verrouille en position à:
0, 60, et 90 degrés (en haut),
et à 45 degrés (en bas)*.
Tirer la manette de pivotement de siège
(soit celle de droite, soit celle de gauche)
vers le haut pour actionner
le pivotement du siège à la position conve-
nant le mieux au transfert.
Une fois la manette relâchée, le siège se
verrouillera dans la position la plus proche
des trois positions indiquées ci-dessus.
manette de pivotement
de siège
(une de chaque côté du
coussin)
Pour déplier le siège an de le remettre à sa
position de service, il suft simplement de
pousser sur le coussin du siège.
*Sur les modèles équipés d’un siège élec-
trique en option, le siège NE pivote de 0 à
90 degrés QU’EN HAUT de l’escalier.
©Bruno Independent Living Aids, Inc.® SRE-2010 UTILISATEUR 08 FÉVRIER 2019
42
Page 43

MODE D’EMPLOI
Le SRE-2010 est doté
d’une fonction “softstart” (démarrage en
douceur) qui empêche
le démarrage brutal
du monte-escalier au
moment que l’on
appuie sur l’interrupteur
MONTER/DESCENDRE.
Appuyer sur l’interrupteur
sans le relâcher pendant
un moment pour entamer
l’accélération douce
du monte-escalier
jusqu’à la vitesse de
service.
clé de contact
MARCHE/ARRÊT
Une pression ininterrompue sur l’in-
terrupteur à bascule fera déplacer le
chariot jusqu’à ce qu’il s’arrête au-
tomatiquement en haut ou en bas de
l’escalier, ou que l’on cesse d’appuyer
sur l’interrupteur.
Les deux (2) télécommandes permettent
d’appeler le chariot, ou de le renvoyer,
en haut ou en bas de l’escalier.
SIÈGE PIVOTANT STANDARD
1. Tourner la clé de contact sur ON (MARCHE).
2. En haut de l’escalier, pivoter le siège.
a. S’installer sur le siège.
b. Boucler la ceinture de sécurité.
c. Pivoter le siège jusqu’à ce qu l’on
se trouve à angle droit au rail (le
dos de l’utlisateur au mur).
Un interrupteur de sécurité empêche
le fonctionnement du SRE-2010 à
moins que le siège ne soit convenablement verrouillé en position à angle
droit au rail (position de service)
.
3. Mettre les deux pieds solidement sur le
repose-pieds et laisser reposer les bras sur
les accoudoirs.
4. Appuyer continuellement sur l’interrupteur
à bascule (situé sur le bord antérieur de
l’un des accoudoirs) pour MONTER ou
DESCENDRE le rail.
5. Dès que l’on arrive au palier en haut ou
en bas, cesser d’appuyer sur l’interrupteur
à bascule.
Les télécommandes sont conçues
uniquement pour l’appel ou le renvoi
d’un siège inoccupé!
Elles NE SONT PAS conçues pour faire
déplacer un siège avec une personne
à bord.
6. Pivoter le siège pour se préparer à quitter
le siège.
7. Déboucler la ceinture de sécurité et
quitter doucement le siège.
8. Pivoter le siège inoccupé pour le
remettre à sa position verrouillée.
©Bruno Independent Living Aids, Inc.® SRE-2010 UTILISATEUR 08 FÉVRIER 2019
43
Page 44

MODE D’EMPLOI: siège pivotant électrique (en option)
SIÈGE PIVOTANT ÉLECTRIQUE
1. Tourner la clé de contact sur ON (MARCHE).
2. En haut de l’escalier, pivoter le siège.
a. S’installer sur le siège.
b. Boucler la ceinture de sécurité.
c. Pivoter le siège jusqu’à ce qu l’on
se trouve à angle droit au rail (le
dos de l’utilisateur au mur).
clé de contact
MARCHE/ARRÊT
Un interrupteur de sécurité empêche
le fonctionnement du SRE-2010 à
moins que le siège ne soit convenablement verrouillé en position à angle
droit au rail (position de service)
.
3. Mettre les deux pieds solidement sur le repose-pieds et laisser reposer les bras sur les
accoudoirs.
4. Appuyer continuellement sur l’interrupteur
à bascule (situé sur le bord antérieur de
l’un des accoudoirs) pour MONTER ou
DESCENDRE le rail.
5. Dès que l’on arrive au palier en haut ou
en bas, cesser d’appuyer sur l’interrupteur
à bascule.
6. Pour pivoter le siège au palier en haut,
appuyer encore une fois sur l’interrupteur
à bascule du même côté.
7. Relâcher l’interrupteur à bascule après
avoir pivoté complètement le siège.
8. Déboucler la ceinture de sécurité et
quitter doucement le siège.
À NOTER:
• Il est possible de remettre le siège
électrique pivoté à sa position de départ
en se servant des télécommandes.
• En cas d’arrêt inattendu en cours de
marche, rechercher la présence d’objets
étrangers ou l’existence de une charge
excessive. Il ne sera possible que de se
déplacer dans le sens opposé, jusqu’à
l’élimination de la cause de la surcharge.
©Bruno Independent Living Aids, Inc.® SRE-2010 UTILISATEUR 08 FÉVRIER 2019
44
Page 45

MODE D’EMPLOI: repose-pieds électriques (en option)
REPOSE-PIEDS ÉLECTRIQUE
Si votre monte-escalier est doté d’un
repose-pieds électrique (en option), lire le
mode d’emploi suivant.
1. Replier le siège pour faire replier le
repose-pieds.
2. Déplier le siège pour faire déplier le
repose-pieds (position de service).
À NOTER:
• Ne pas tenter de replier ou de déplier
manuellement le repose-pieds.
L’inobservation de cette consigne risque
d’endommager le monte-escalier.
• En cas de blocage quand on déplie ou
replie le repose-pieds, le repose-pieds
tentera de retrouver sa position précé-
dente, ce qui provoquera l’afchage
d’une erreur de séquence.
Pour rétablir le fonctionnement normal:
◊ Éliminer le blocage.
◊ Déplier et replier le siège plusieurs
fois jusqu’á ce que le repose-pieds
fonctionne convenablement.
◊ Si l’on ne réussit pas à rétablir le
fonctionnement normal, prendre
contact avec un technicien Bruno.
©Bruno Independent Living Aids, Inc.® SRE-2010 UTILISATEUR 08 FÉVRIER 2019
45
Page 46

MODE D’EMPLOI: rail repliable MANUEL (en option)
Avant de replier le rail, le chariot DOIT ÊTRE GARÉ soit sur le point de stationnement
médian, soit en haut de l’escalier!
L’endommagement du chariot SE PRODUIRA si le chariot est garé au-dessous du point de
stationnement médian.
avertiSSeMent
POINT DE PINCEMENT!
S’assurer que les zones au-dessus
et au-dessous du rail repliable
sont dégagées avant de faire
fonctionner le rail repliable.
Écarter les enfants et les animaux
de compagnie à une distance sûre.
L’inobservation de cette consigne
risque de causer des blessures ou
d’endommager le matériel.
Pour REPLIER le rail:
1. À l’aide de la manette, tirer doucement vers
le haut, puis vers la partie supérieure du
rail.
2. À l’aide de la manette, abaisser doucement la
partie repliable du rail jusqu’à ce qu’elle
repose sur le rail principal (voir à gauche).
Pour DÉPLIER le rail:
1. À l’aide de la manette, tirer doucement
vers le haut, puis vers la partie inférieure
du rail.
2. À l’aide de la manette, abaisser doucement la
partie repliable du rail jusqu’à ce qu’elle
repose sur le sol (voir à gauche).
©Bruno Independent Living Aids, Inc.® SRE-2010 UTILISATEUR 08 FÉVRIER 2019
46
Page 47

MODE D’EMPLOI: rail repliable ÉLECTRIQUE (en option)
Le rail repliable électrique est très semblable au rail repliable manuel
avertiSSeMent
POINT DE PINCEMENT!
S’assurer que les zones au-dessus
et au-dessous du rail repliable
sont dégagées avant de faire
fonctionner le rail repliable.
Écarter les enfants et les animaux
de compagnie à une distance sûre.
L’inobservation de cette consigne
risque de causer des blessures ou
d’endommager le matériel.
1. DISABLE/
POWER OFF
À NOTER
Un signal sonore se fait entendre toute
fois que le rail repliable est en mouvement
pour avertir du fait que le rail est en service
toute personne à proximité.
En plus, le DEL jaune du panneau de
commande clignote.
©Bruno Independent Living Aids, Inc.® SRE-2010 UTILISATEUR 08 FÉVRIER 2019
sauf que la version électrique possède un déclenchement motorisé
intégré à l’articulation du rail servant à replier et à déplier automatiquement
la partie repliable du rail.
Le rail repliable électrique comprend un point de stationnement médian.
• Au-dessus de ce point médian, le rail doit toujours être replié.
• Au-dessous de ce point médian, le rail doit toujours should be être
déplié.
Ne pas tenter de replier ou de déplier manuellement le rail!
L’alimentation de service du rail repliable électrique provient du chariot.
On l’actionne:
• par l’intermédiaire du monte-escalier lorsque l’on est à bord;
• par l’intermédiaire des télécommandes.
À bord du monte-escalier
Si l’on se trouve en haut de l’escalier, appuyer
sur l’interrupteur de l’accoudoir pour descendre
jusqu’au point de stationnement médian, puis
relâcher l’interrupteur.
Examiner le long de l’escalier an de vérier l’absence de
tout obstacle pouvant gêner le fonctionnement du rail
repliable!
Appuyer de nouveau sur l’interrupteur de l’accoudoir,
dans le sens descendant.
Le rail repliable se déplie.
La descente du monte-escalier ne s’entame
qu’après que le rail se déplie complètement et
touche au sol.
Relâcher l’interrupteur une fois que le rail touche au
sol.
Une fois le rail déplié, appuyer encore une fois sur
l’interrupteur à bascule, sans le relâcher, jusqu’à
ce que le monte-escalier arrive à son terminal en
bas de l’escalier.
DEL
Si l’on est en bas de l’escalier, appuyer sur
l’interrupteur de l’accoudoir pour monter jusqu’au
point de stationnement médian, puis relâcher
l’interrupteur.
DEC-00616
Examiner le long de l’escalier an de vérier l’absence
de tout obstacle pouvant gêner le fonctionnement du
rail repliable!
Appuyer de nouveau sur l’interrupteur de l’accoudoir,
dans le sens ascendant.
Le rail repliable se replie.
La montée du monte-escalier ne s’entame qu’après
que le rail se replie complètement.
Une fois le rail replié, appuyer encore une fois sur
l’interrupteur, sans le relâcher, jusqu’à ce que le
monte-escalier arrive à son terminal en haut de
l’escalier.
47
Page 48

MODE D’EMPLOI: rail repliable ÉLECTRIQUE (en option)
Par télécommandes
Si l’on se trouve en bas de l’escalier, se servir de la télécommande pour appeler le
monte-escalier.
Si le monte-escalier se trouve à une position supérieure au point de stationnement
médian, le rail repliable ne se déplie qu’après le contact du siège avec le point de
stationnement médian.
Dès que le monte-escalier arrive au point de stationnement médian, appuyer encore une fois sur
le bouton DOWN (DESCENDRE) de la télécommande pour actionner le dépliage du rail.
Se tenir à l’écart du rail pendant son dépliage!
Si l’on se trouve en bas de l’escalier, voulant garer le monte-escalier avec son rail replié, se
servir de la télécommande pour renvoyer le monte-escalier au point de stationnement médian.
Appuyer encore une fois sur le bouton UP (MONTER) de la télécommande pour
actionner le repliage du rail.
Se tenir à l’écart du rail pendant son repliage!
Le rail repliable électrique est equipé de mécanismes de sécurité servant à réduire le risque de
blessures aux personnes et aux animaux de compagnie, ainsi que le risque de dégâts matériels.
Si le rail repliable électrique détecte la présence d’un objet étranger, il s’arrête et se déplace
brièvement dans le sens opposé.
Pour reprendre le mouvement dans le sens désiré:
1. enlever l’objet étranger,
2. appuyer soit sur l’interrupteur à bascule
(accoudoir), soit sur le bouton de la télécommande pour reprendre le mouvement dans le
sens opposé,
3. appuyer encore une fois sur l’interrupteur à
bascule pour reprendre le mouvement dans
le sens désiré.
Interrupteur de désactivation
Le panneau de commande comprend un interrupteur de désactivation. Si l’on met cet interrupteur sur la position ON (ACTIVER), on empêche le
repliage et le dépliage du rail. Cette fonction est
destiné à servir lorsque l’on préfère garder le rail
dans sa position dépliée pendant une période de
temps prolongée.
Veiller à remettre l’interrupteur sur OFF
(DÉSACTIVER) lors de la remise en service du rail
repliable électrique!
interrupteur de
désactivation
UNIQUEMENT EN CAS D’URGENCE!
S’il faut replier ou déplier le rail repliable électrique,
et que cette action n’est possible ni à l’aide
de l’interrupteur à bascule, ni par moyen des
télécommandes, mettre l’interrupteur de
1. DISABLE/
POWER OFF
DEC-00616
désactivation sur ON (ACTIVER). Replier ou
déplier le rail DOUCEMENT à main
©Bruno Independent Living Aids, Inc.® SRE-2010 UTILISATEUR 08 FÉVRIER 2019
48
Page 49

CODES SOUS SIÈGE ET CHARGEMENT DES BATTERIES
CODES SOUS SIÈGE
A2 siège en position REPLIÉE (interrupteur de repliage de siège fermé)
A3 siège n’est pas en position de service (interrupteur de limite de pivotement
ouvert)
A7 blocage du siège ou du repose-pieds (actionneur calé)
C1 en cours de charge
C2 pas en cours de charge (en service)
C4 monte-escalier garé et aucune détection du chargeur
C5 tension de batterie critique (charger immédiatement)
C6 basse tension de batterie
L1 interrupteur de sécurité de siège ouvert
L2 interrupteur de limite ouvert: monter
L3 interrupteur de limite ouvert: descendre
L6 point de stationnement médian activé
L8 interrupteur “soft stop”
CHARGEMENT DES BATTERIES
Garder les batteries chargées pour assurer
le fonctionnement optimal du SRE-2010.
Les batteries sont en cours de charge
chaque fois que le chariot est garé à
n’importe quelle position sur le rail.
Si l’on ne garde pas les batteries en état
de pleine charge, ou que l’on les laisse
décharger complètement, les batteries
subiront l’épuisement bien prématuré.
Le DEL vert (voir à gauche) du chariot indique
que les batteries sont en cours de charge.
©Bruno Independent Living Aids, Inc.® SRE-2010 UTILISATEUR 08 FÉVRIER 2019
49
Page 50

CHARGEUR DES BATTERIES
DEL: CHARGEUR DES BATTERIES
en cours de charge
marche
ROUGE JAUNE VERT BLEU ÉTAT
ALLUMÉ ALLUMÉ
(< 1 sec.)
ÉTEINT
ALLUMÉ
(<5 sec.)
ALLUMÉ
ALLUMÉ
ALLUMÉ
(<5 sec.)
ÉTEINT
ÉTEINT
ÉTEINT ÉTEINT chargeur déconnecté des batteries
ALLUMÉ
(<5 sec.)
CLIGNOTE
(5 sec.)
ÉTEINT
prêt
ÉTEINT détection d’une batterie déconnectée;
délai de 5 secondes jusqu’à ce que
les DEL jaune et vert s’éteignent
complètement
ALLUMÉ ALLUMÉ ÉTEINT ÉTEINT chargeur fournissant courant maxi
mum (2,2A)
ALLUMÉ ALLUMÉ ÉTEINT ÉTEINT chargeur à la tension maximum;
courant continuant à baisser
ALLUMÉ ÉTEINT ALLUMÉ ÉTEINT charge complète des batteries;
DEL jaune s’éteint de temps en
temps
ALLUMÉ CLIGNOTE
CLIGNOTE
ALTERNATIVEMENT
ALLUMÉ ÉTEINT CLIGNOTE
ALTERNATIVEMENT
CLIGNOTE
ALTERNATIVEMENT
CLIGNOTE
ALTERNATIVEMENT
ÉTEINT ÉTEINT batterie défectueuse ou fortement
RAPIDEMENT
ÉTEINT indication de basse tension
sulfatée
ÉTEINT circuit partiellement ouvert; mauvais
contact ou sulfatage des batteries
ALLUMÉ connexion inversée de la batterie
REMPLACEMENT DU FUSIBLE: CHARGEUR DES BATTERIES
fusible
Une ligne d’alimentation électrique du chargeur qui subit une
surtension risque d’entraîner la fusion du fusible d’entrée CA. Le
fusible est indiqué sur l’illustration à gauche.
-
Pour remplacer le fusible:
1. Mettre l’interrupteur MARCHE/ARRÊT du chargeur sur OFF (ARRÊT).
2. Débrancher le cordon d’alimentation de la prise.
3. Tourner le bouchon du fusible et le retirer du boîtier du chargeur.
interrupteur MARCHE/ARRÊT
4. Le fusible de remplacement doit être du même calibre et du
même type:
(Bussmann GMD-2A ou équivalent) 2A, Slo-Blow, 5 x 20mm.
©Bruno Independent Living Aids, Inc.® SRE-2010 UTILISATEUR 08 FÉVRIER 2019
50
Page 51

TÉLÉCOMMANDES et MAINTENANCE
TÉLÉCOMMANDES
La télécommande du SRE-3000 peut subir certaines interférences causées par les équipements
de communication RF portables et mobiles. Cependant, le SRE-3000 Elan se sert de
communications infrarouges (IR) pour minimiser la possibilité d’ interférences.
En plus, on a monté des récepteurs des deux côtés du chariot an de minimiser les interférences.
S’il se produisent des interférences, le monte-escalier s’arrêtera. Cette fonction fait partie
intégrante du SRE-3000 Elan pour assurer la sécurité de l’utilisateur.
La ligne de visée entre l’émetteur et l’une ou l’autre des (2) télécommandes doit être
exempte d’obstacles pour permettre le fonctionnement optimal du monte-escalier. Il peut
s’avérer nécessaire de changer la position des télécommandes pour qu’elles soient orientées
vers le chariot.
Pour réduire la possibilité d’interférences:
• Lorsque l’on est assis sur le siège, TOUJOURS se servir de l’interrupteur à bascule
(accoudoir) pour faire fonctionner le monte-escalier.
• L’utilisation d’une télécommande pour faire fonctionner le monte-escalier pendant
que l’on est assis sur le siège risque de créer des interférences.
• NE monter les télécommandes NI derrière un obstacle tel qu’un poteau NI autours
d’un coin.
• NE PAS exposer les télécommandes aux rayons directs du soleil (ce qui rend aveugle
les récepteurs faisant partie du chariot).
• CHANGER régulièrement les piles des télécommandes.
• Les piles faibles ou épuisées peuvent avoir un effet néfaste sur la zone effective de
service des télécommandes.
• GARDER les télécommandes et la lentille du récepteur exemptes de poussière et de
saletés.
• Nettoyer à l’aide d’un nettoyant recommandé pour les surfaces acryliques ou de
verre.
• Ne pas utiliser des produits de nettoyage ou de polissage qui contiennent de la
cire. Ces produits laisseront un lm sur la lentille pouvant réduire la zone effective
de transmission des signaux.
MAINTENANCE
Le SRE-2010 est conçu pour fournir de nombreuses années de service able avec un
minimum d’entretien.
Pour assurer une vie de service optimale:
• Garder le rail propre et exempt d’objets étrangers.
• Laisser branché le chargeur de batteries sur une prise sous tension en
tout temps.
• Au moins une fois par an, demander à un technicien autorisé Bruno
d’examiner, de nettoyer et de lubrier le monte-escalier.
Remplacement des piles des télécommandes
Pour remplacer les piles des télécommandes, enlever le panneau d’accès
au dos de la técommande.
Deux piles AA alcalines requises.
Changer les piles une fois par an.
©Bruno Independent Living Aids, Inc.® SRE-2010 UTILISATEUR 08 FÉVRIER 2019
51
Page 52

RECHERCHE DES CAUSES DE PANNE
Le SRE-2010 ne fonctionne pas comme il faut. Que doit-on faire?
Avant d’appeler un distributeur Bruno, consulter les solutions indiquées ci-dessous an
d’éviter une demande de service inutile.
• Pivotement du siège. Le siège, est-il convenablement verrouillé sur la position de service?
• Repose-pieds. Existe-il un objet étranger qui entre en contact avec le repose-pieds?
• Panneaux de sécurité (chariot). Existe-il un objet étranger sur les escaliers que
contacte les panneaux de sécurité du chariot?
• Chargeur de batteries. Une batterie déchargée fera que le chariot se déplace de plus
en plus lentement jusqu’à ce que la tension baisse au niveau
où le contrôleur s’arrête.
Dans ce cas, arrêter pendant un moment, puis faire descendre
le chariot.
Les batteries partiellement chargées sont capables d’alimenter
le chariot dans le sens descendant mais ne peuvent pas le faire
fonctionner dans le sens ascendant.
Vérier le branchement du chargeur sur une prise sous tension.
Atteindre jusqu’à ce que les batteries se rechargent. Les DEL
rouge et vert sont allumés.
Le chargeur des batteries, est-il branché sur en prise en bon
état? Ne pas se servir de prises contrôlées par un interrupteur
mural.
Le témoin d’alimentation ROUGE, est-il allumé?
Existe-il un disjoncteur déclenché ou un fusible fondu (boîte
à fusible principale ou panneau électrique de la résidence)?
• Vérication visuelle. Le fonctionnement du monte-escalier, semble-t-il convenable? Y
a-t-il quelque chose qui ne va pas?
Si le mauvais fonctionnement du SRE-2010 continue après avoir terminé les vérications
précédentes, ou s’il ne fonctionne plus du tout, demander à un distributeur autorisé
Bruno de faire toutes les interventions nécessaires d’entretien, de réparation et de
maintenance.
©Bruno Independent Living Aids, Inc.® SRE-2010 UTILISATEUR 08 FÉVRIER 2019
52
Page 53

circuit breaker
(ON/OFF switch)
PÉRIODES DE VACANCES ET DE NON UTILISATION
Si le SRE-2010 demeurera hors service
pendant une période prolongée, mettre
l’interrupteur ON/OFF du disjoncteur du
chariot sur OFF (ARRÊT).
Mettre l’interrupteur d’alimentation du
chargeur de batteries (s’il en est équipé)
sur OFF (ARRÊT) et débrancher le chargeur
de la prise murale.
Après une période prolongée de non
utilisation, une recharge des batteries
peut s’imposer.
Pour recharger les batteries, remettre
le disjoncteur sur ON (MARCHE),
rebrancher le chargeur dans la prise
murale et remettre l’interrupteur
d’alimentation du chargeur de batteries
sur ON (MARCHE) (s’il en est équipé).
Atteindre la recharge complète des
batteries. Vérier l’état de charge à
l’aide des DEL du chargeur de batteries.
©Bruno Independent Living Aids, Inc.® SRE-2010 UTILISATEUR 08 FÉVRIER 2019
53
Page 54

GARANTIE LIMITÉE BRUNO GOLD POUR MONTE-ESCALIERS
garantie à vie limitée: éléments constitutifs majeurs — 2 ans pièces détachées
Grâce à la confiance absolue accordée à ses produits conçus et fabriqués aux É.-U., Bruno Independent Living Aids, Inc.MD
(“Bruno”), est heureux à fournir à tout premier acheteur la garantie suivante, parmi les meilleures de l’industrie.
La qualité de nos pièces ainsi que l’exécution soignée de nos employés permettent à Bruno d’offrir au premier
acheteur de son monte-escalier Bruno la garantie suivante :
◊ que toutes les pièces, autres que les éléments constitutifs majeurs, sont/seront exemptes de vices de fabrication et
de main-d’œuvre pendant une période de 2 ans à compter de la date d’installation effectuée par un distributeur
agréé Bruno.
◊ que tous les éléments constitutifs majeurs à inclure le moteur, le système d’entraînement à moteur/boîte
d’engrenage et le rail du monte-escalier Bruno sont/seront exempts de vices de fabrication et de main-d’œuvre
pendant la vie du produit et aussi longtemps que le premier acheteur reste propriétaire du monte-escalier.
◊ que toute main-d’oeuvre nécessaire au remède d’une défectuosité du produit et effectuée par un distributeur agréé
Bruno est couverte pendant les 30 premiers jours à compter de la date d’installation effectuée par un distributeur
agréé Bruno.
◊ Toutes les garanties Bruno sont à compter de la date d’installation du monte-escalier Bruno dont l’installation a été
effectuée par un distributeur agréé Bruno .
Les distributeurs agréés Bruno ont reçu une formation leur permettant d’évaluer votre situation unique, puis d’installer
le meilleur produit Bruno qui répond à vos exigences. Les techniciens d’installation et de service forméés et employés
par les distributeurs agréés Bruno possèdent les resources et l’équipement nécessaires à la bonne installation et à
l’entretien soutenu du monte-escalier. Les distributeurs agréés Bruno sont les premières personnes à contacter pour
des questions ayant trait à la garantie ou a l’entretien.
CE QUI N’EST PAS COUVERT PAR LA GARANTIE
◊ Dommages qui résultent de l’utilisation négligente ou abusive, des accidents, ou des modifications non effectuées
par un distributeur agréé Bruno.
◊ Éléments consommables tels que les piles des télécommandes.
◊ Toute main-d’oeuvre effectuée par un distributeur agréé Bruno après les 30 premiers jours à compter de la date
d’installation.
◊ Usure habituelle.
REMARQUES SUPPLÉMENTAIRES
◊ Toute demande de garantie et d’entretien doit s’adresser au distributeur agréé Bruno ayant effectuée l’installation
du produit. Pour assurer que la couverture de la garantie reste intacte, toute intervention d’entretien et de
réparation, autre que les interventions d’entretion effectuées par le premier acheteur selon les indications du
guide de l’utilisateur, doivent être effectuées par un distributeur agréé Bruno.
◊ En aucun cas Bruno ne pourra être tenu pour responsable de tout dommage indirect, spécique ou consécutif, qu’il
s’agisse de dommages résultant de réclamations fondées sur la garantie, le contrat, le délit (y compris la négligence,
la responsabilité stricte ou du fait du produit).
◊ Bruno, à sa seule discrétion, se réserve le droit de replacer, de réparer, ou s’il n’est ni pratique ni faisable d’un point
de vue commerciale, d’opter à rembourser le prix d’achat au premier acheteur.
◊ La présente garantie accorde au premier acheteur des droits légaux spéciques, et d’autres droits, lesquels
varient d’une région à l’autre. Bruno n’autorise personne à prolonger la période de la présente garantie, ni à
élargir le cadre de la garantie.
Pour de plus amples renseignements portant sur la présente garantie limitée, prière de prendre contact avec
Bruno. Ses coordonnées sont indiquées ci-dessous.
Amérique du Nord: Royaume-Uni et Europe
Bruno Independent Living Aids, Inc.® Bruno
Attn: Service Technique Unit 5, Millennium Court,
1780 Executive Drive Clayhill Industrial Park Neston,
Oconomowoc, Wisconsin 53066 É.-U. Wirral CH64 3UZ Royaume-Uni
Tel. (sans frais ) 1-800-882-8183 Tel. 0151 559 0732
rev. 04-18
Page 55

Page 56

P/N 2010-O
 Loading...