

Page 1
Operating manual
Brune B 280
Evaporative humidifier
Read the instructions prior to performing any task!
Page 2

Brune
Luftbefeuchtung Proklima GmbH
Schwarzacher Straße 13
74858 Aglasterhausen
Germany
Telephone: +49 6262 5454
Fax: +49 6262 3255
email: [email protected]
Internet: www.brune.info
Translation of the original operating manual
Prok-25960-DE, 1, en_GB
© Brune Luftbefeuchtung Proklima GmbH 2015
Brune B 280 Evaporative humidifier2
Page 3

Use and storage of the instructions
Read these instructions carefully before operating the Brune B 280
evaporative humidifier. The non-observance of these instructions
may lead to injuries, or damage to the humidifier and the arrangement of the installation location.
Store the instructions carefully and accessibly in the vicinity of the
unit. If you pass on the humidifier to a third party, make sure that
the instructions accompany it.
Illustrations in these instructions are provided for basic understanding and could differ from the actual version.
Information on start-up
Information on cleaning and care
Accessories
The basic prerequisite for safe working is compliance with all
stated safety and handling instructions.
In order to start up the humidifier, a connection to the mains power
supply and a fill up of the water container is required (Ä Chapter
3.3 ‘Starting up the humidifier’ on page 17).
The optional connection of the humidifier to the water network
must be carried out by a qualified sanitary engineer.
To guarantee optimal operation, the evaporator filter and cleaning
filter must be changed regularly. To prevent the occurrence of conditions favourable towards the formation of germs, a regular water
change and cleaning of the water container and inner walls of the
Ä
unit are necessary (
on page 24).
The following accessories for the Brune B 280evaporative humidifier are available from Brune Luftbefeuchtung Proklima GmbH:
n Pressure hose with Aquastop
n Safety collection basin
n Waterfresh
n Descaler
n Cleaning filter
n Evaporator filter
n UV lamp
n Remote sensor system
Chapter 4 ‘Cleaning and care’
Copyright protection
The content of these instructions is protected by copyright. Its use
is permitted within the framework of the use of the unit. Any use
exceeding this purpose is not permitted without written permission
from Brune Luftbefeuchtung Proklima GmbH.
Brune B 280 Evaporative humidifier 3
Page 4

Customer service
Address Brune
Luftbefeuchtung Proklima GmbH
Schwarzacher Straße 13
74858 Aglasterhausen
Germany
Phone +49 6262 5454
E-mail [email protected]
Brune B 280 Evaporative humidifier4
Page 5

Table of contents
Table of contents
1 Product description............................................................................................................................. 6
1.1 Overview of the humidifier...................................................................................................... 6
1.2 Control and display elements................................................................................................. 7
1.3 Technical data........................................................................................................................ 8
2 Safety.................................................................................................................................................. 10
2.1 Symbols in these instructions............................................................................................... 10
2.2 Intended use......................................................................................................................... 10
2.3 Dangers resulting from the humidifier.................................................................................. 11
2.4 Environmental protection...................................................................................................... 14
3 Transport and start-up...................................................................................................................... 15
3.1 Transport and set-up............................................................................................................ 15
3.2 Preparing the humidifier for operation.................................................................................. 16
3.3 Starting up the humidifier..................................................................................................... 17
3.4 Starting up the remote sensor system (optional accessories).............................................. 19
3.5 Coding the humidifier........................................................................................................... 22
4 Cleaning and care.............................................................................................................................. 24
4.1 Maintenance table................................................................................................................ 24
4.2 Opening and closing the front.............................................................................................. 24
4.3 Changing the water and cleaning the tank........................................................................... 28
4.4 Changing the evaporator filter.............................................................................................. 29
4.5 Changing the cleaning filter.................................................................................................. 32
4.6 Changing the UV lamp (optional accessories)..................................................................... 33
5 Rectifying problems.......................................................................................................................... 37
6 Disposing........................................................................................................................................... 38
7 Index................................................................................................................................................... 39
Brune B 280 Evaporative humidifier 5
Page 6
Product description
Overview of the humidifier
1 Product description
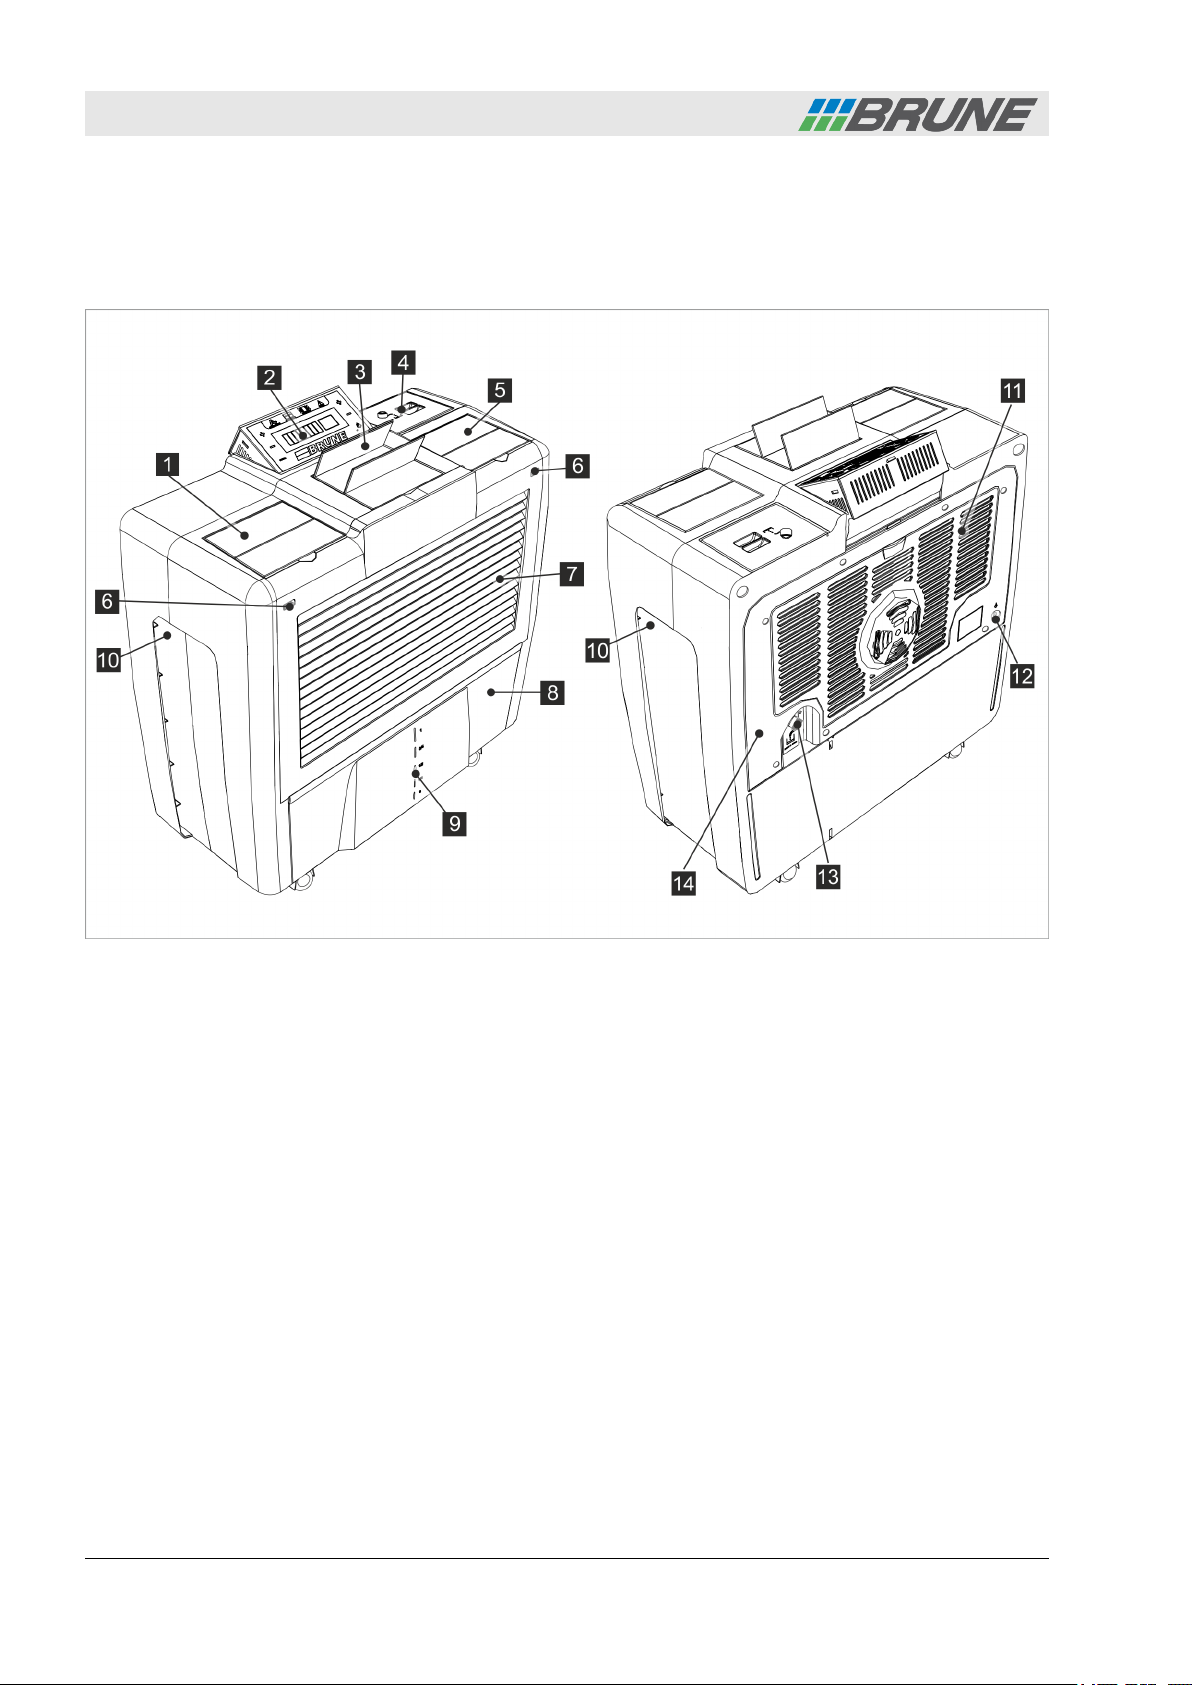
1.1 Overview of the humidifier
Fig. 1: Overview of the humidifier
1 Ventilation flaps
2 Control panel
3 Ventilation flaps
4 Filling flap
5 Ventilation flaps
6 Outlet grille locking clip
7 Outlet grille
Function
8 Water container
9 Fill-level control
10 Recessed grip
11 Intake grille
12 Connecting socket for mains power supply
13 Water connection solenoid valve
14 Rear wall of the housing
The humidifier works according to the principle of evaporation. The
interior evaporator drum turns within the water container, thus
taking up humidity. A fan sucks in room air and humidified air is
returned to the room. The air flows through the cleaning filter and
the evaporator filter. The cleaned and humidified air is blown back
into the room. A UV lamp inside the unit should reduce contamination.
Brune B 280 Evaporative humidifier6
Page 7
1.2 Control and display elements
Operation
Product description
Control and display elements
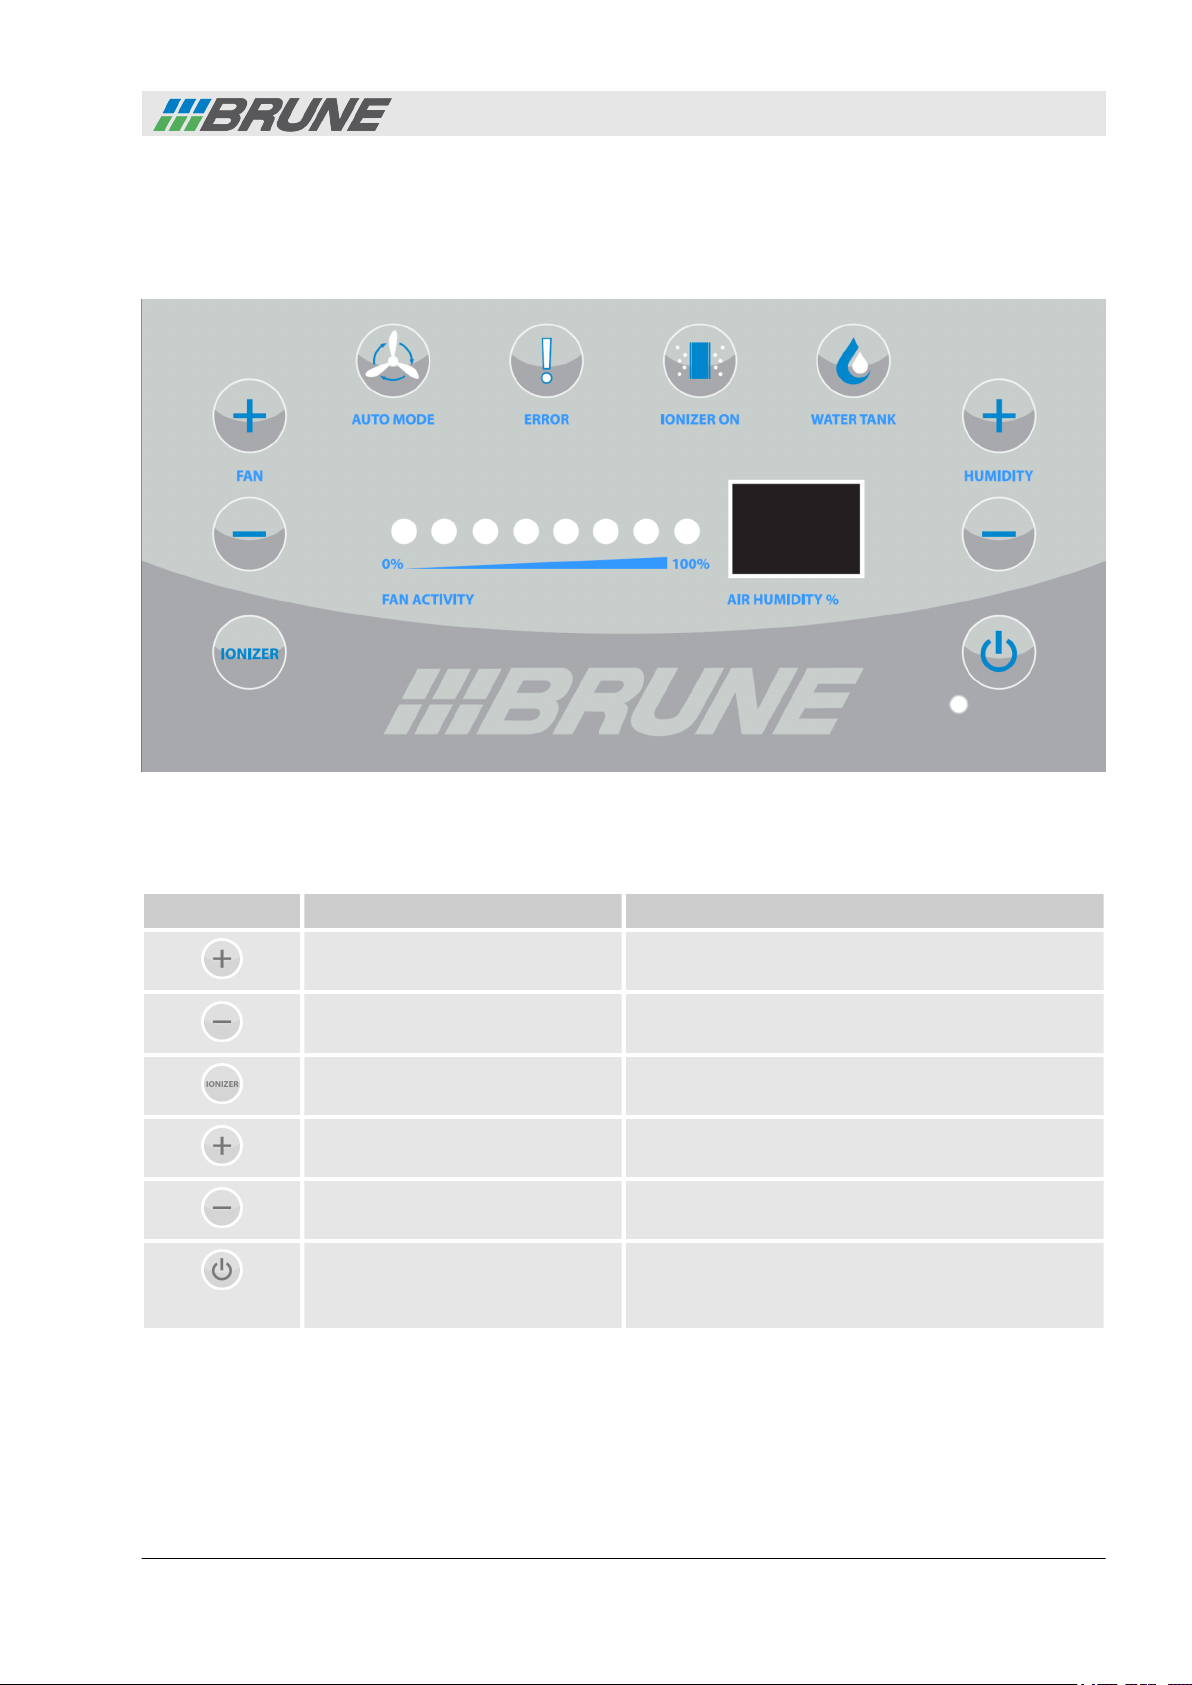
Fig. 2: Control panel
Control elements
Symbol Description Operation
FAN +
FAN -
IONIZER
HUMIDITY +
HUMIDITY -
STANDBY
n Increase fan speed.
n Decrease fan speed.
n Lowest level: switch on automatic mode.
n Switch ionisation on/off.
n Increase the target value of the relative humidity.
n Decrease the target value of the relative
humidity.
n Switch on humidifier.
n Switch to standby mode.
In standby mode, the LED lights up red.
Brune B 280 Evaporative humidifier 7
Page 8
Product description
Technical data
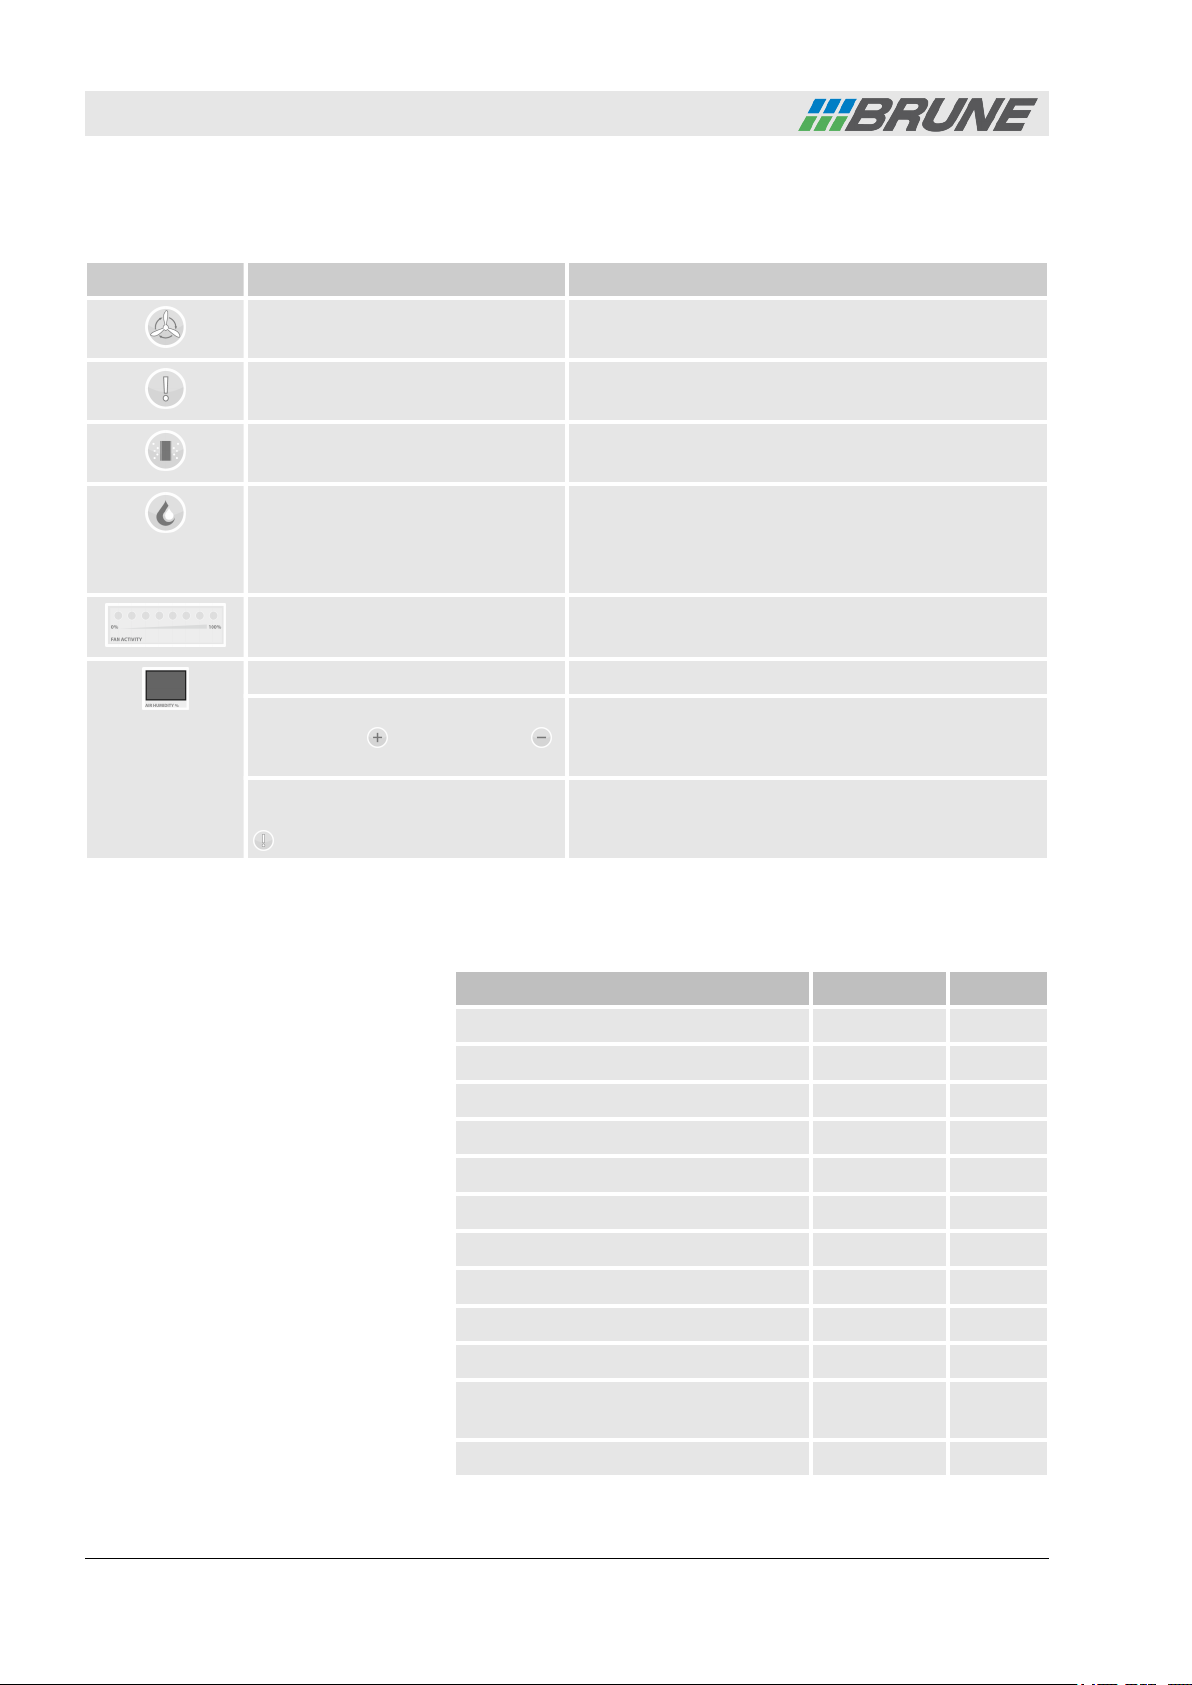
Display elements
Symbol Description Display
AUTO MODE
ERROR
IONIZER ON
WATER TANK
FAN ACTIVITY
AIR HUMIDITY %
AIR HUMIDITY % with button
HUMIDITY - or HUMIDITY pressed
AIR HUMIDITY % with simultaneous illumination of the ERROR
display
n Red: automatic mode is running Ä ‘Automatic
fan mode’ on page 18.
n Red: an error has occurred Ä ‘Fault table’
on page 37.
n Red: ionisation function is running Ä ‘Switching
ionisation on/off’ on page 19.
n Red: tank empty. Fill up with water
Ä
on page 16.
n Green: tank full. Stop filling.
n Off: fill level sufficient for operation.
n Current speed level of the fan Ä ‘Setting the fan
speed’ on page 18.
n Current value of the relative humidity.
n Set target value of the relative humidity.
n Error number Ä ‘Fault table’ on page 37
1.3 Technical data
Data Value Unit
Weight 14 kg
Width 645 mm
Height 665 mm
Depth 295 mm
Tank volume 25 l
Mains connection 100 – 240 V
Mains frequency 50/60 Hz
Power consumption 45 W
DC input, voltage 24 V
DC input, current 2.5 A
Maximum hydraulic pressure with connection to water pipe
Airflow max. 500 m³/h
8 bar
Brune B 280 Evaporative humidifier8
Page 9

Product description
Technical data
Data Value Unit
Evaporation performance max. 1.2 l/h
Noise level 32 – 44 dB(A)
Operating conditions
Data Value Unit
Temperature 10 – 40 °C
Relative humidity 15 – 80 %
Brune B 280 Evaporative humidifier 9
Page 10
Safety
Intended use
2 Safety
2.1 Symbols in these instructions
Safety information
Safety instructions are marked with symbols in these instructions.
The safety instructions are introduced by signal words which
express the extent of the danger.
DANGER!
This combination of symbol and signal word indicates
an immediately-dangerous situation which will cause
death or severe injuries if not avoided.
DANGER!
Danger to life from electric current!
This combination of symbol and signal word indicates
an immediately-dangerous situation which will cause
death or severe injuries from electric current if not
avoided.
WARNING!
This combination of symbol and signal word indicates
a possibly-dangerous situation which could cause
death or severe injuries if not avoided.
2.2 Intended use
NOTICE!
This combination of symbol and signal word indicates
a possibly-dangerous situation which could cause
material and environmental damage if not avoided.
The evaporative humidifier B 280 serves exclusively to humidify
and clean room air.
Intended use also includes adherence to all the stipulations of
these instructions.
Any application in excess of the intended use or other use is
deemed as non-intended use.
Brune B 280 Evaporative humidifier10
Page 11

Non-intended use
Safety
Dangers resulting from the humidifier
WARNING!
Danger from non-intended use!
Non-intended use of the evaporative humidifier B 280
may lead to dangerous situations or damage to the
unit and fixtures.
n Only fill up the humidifier with normal tap water (max. 30 °C) or
with treated water.
n Do not add any essential oils or other flammable liquids.
n Do not use scented or aromatic substances.
n Never cover the unit.
n Never place objects on the humidifier. This is particularly the
case for electrical equipment or containers filled with liquids.
n Do not climb or sit on the unit.
n Do not transport objects with the unit.
n Do not use the humidifier in rooms with air containing dust,
microbes or chemicals.
2.3 Dangers resulting from the humidifier
The humidifier is state-of-the-art and designed in accordance with
current safety regulations. However, residual dangers that require
careful negotiation still remain. In the following section, the residual
risks and the resulting behaviour and measures are listed.
Electric current
DANGER!
Danger to life from electric current!
Electric shock from touching voltage-carrying parts of
the power supply poses an immediate danger to life.
Damage to the insulation or individual components can
endanger life.
n Keep damp away from voltage-carrying parts. This could other-
wise lead to a short circuit.
n Always pull out the mains plug before cleaning work and fault
rectification.
n Never immerse the unit in water.
n Never point the outlet port towards electrical equipment or
sockets.
n Never touch the mains plug with damp hands. When pulling out
the mains plug, always do so by the plug and never by the
cable.
n Always locate the mains cable in such a way that it cannot
come into contact with heat sources, dampness, oil, sharp
objects, sharp corners etc.
Brune B 280 Evaporative humidifier 11
Page 12

Safety
Dangers resulting from the humidifier
Particular groups of person and
children
Insufficient cleaning
WARNING!
Danger for particular groups of person and chil-
dren!
This unit is not intended for use by persons (including
children) with restricted physical, sensory or mental
capacities or who lack the relevant experience and/or
knowledge.
n Supervise children to ensure that they do not play with the unit.
n Packaging material must not be used to play with. There is a
danger of suffocation.
n Keep batteries away from children.
WARNING!
Danger to health from insufficient cleaning!
Bacteria and germs may be released due to insufficient cleaning.
Excessive humidification
n Replace the evaporator filter after three months at the latest.
Ä
n Always adhere to the time intervals described in
4 ‘Cleaning and care’ on page 24 for cleaning, filter changes
and water changes.
n In the case of severe contamination of the room air and the
water, shorten the maintenance intervals accordingly.
WARNING!
Danger to health from excessive humidification!
Excessively humidified air favours the formation of
mould and health-damaging germs.
n Never exceed the recommended value of 50 ‒ 60 % air
humidity in living spaces.
n To prevent health damage, persons with asthma, respiratory
diseases or lung infections should consult a doctor before
using the humidifier.
n Do not place the unit in the vicinity of objects that absorb water,
such as curtains, wall-paper and carpet.
Chapter
Brune B 280 Evaporative humidifier12
Page 13
UV lamp
Safety
Dangers resulting from the humidifier
WARNING!
Danger of injury from mercury in UV lamps!
During improper transport, operation or lifting, mercury
can escape from the UV lamp. Contact with mercury
can lead to severe poisoning, skin irritation and eye
damage.
n Always lift UV lamps containing mercury carefully.
WARNING!
Danger of injury from UV light!
UV light irritates and damages the eyes and can cause
skin irritations.
n Pull out the mains plug before changing the UV lamp.
n Do not look at the switched on UV lamp.
n In the case of dazzling, sedate the eyes by covering them with
a broad, opaque bandage and take the injured person to an
eye clinic.
Batteries
WARNING!
Danger of injury from incorrect handling of bat-
teries!
If batteries are handled incorrectly, there is a danger of
the batteries exploding or health-damaging liquids
escaping from the batteries. The liquid can cause
burns to the skin if it comes into contact with skin,
severe poisoning if swallowed and blinding if it comes
into contact with eyes.
n Never attempt to charge the batteries.
n Never short-circuit the contacts (positive and negative termi-
nals) of the battery.
n Never expose the batteries to moisture or dampness (rain, salt-
water, liquids). A damp or wet battery must not be used under
any circumstances.
n Never use or store batteries in areas in which potentially explo-
sive atmospheres prevail or high temperatures could occur.
n Never attempt to solder, repair, adapt, disassemble or change
the shape of batteries.
n Always keep batteries away from unauthorised persons.
n To avoid fire, overheating, explosion or the leakage of liquids,
never expose batteries to severe shaking, high weight loads or
other harmful effects. Leaking fluids can ignite.
Brune B 280 Evaporative humidifier 13
Page 14

Safety
Environmental protection
Unsuitable installation location
n After eye contact with leaked liquid, rinse the eye immediately
with clear water for 15 minutes, including beneath the eyelid. In
doing so, aim a mild water jet directly into the eye and do not
rub it. Seek medical help immediately.
n Avoid skin contact with leaking liquid. In the event of accidental
skin contact, rinse the affected area of skin with water and
soap.
NOTICE!
Danger of material damage from the incorrect
placement of the humidifier!
n Only locate the humidifier on even, sufficiently strong, mois-
ture-resistant ground.
n Do not place the unit in the vicinity of objects that absorb water
(e.g. curtains, wall-paper, carpet).
2.4 Environmental protection
Batteries
UV lamps
NOTICE!
Danger to the environment from improper handling
of environmentally hazardous materials!
Serious environmental damage could result from the
incorrect handling of materials, particularly improper
disposal.
n Always observe the information listed below on the handling of
environmentally hazardous materials and their disposal.
The following environmentally hazardous materials are used:
Batteries contain poisonous heavy metals. They are subject to special waste treatment and must be handed over to communal collection points or disposed of by a specialist company.
UV lamps are hazardous waste and due to their mercury content,
they must not be disposed of with regular waste. Disposal must be
carried out by a certified waste disposal company.
Brune B 280 Evaporative humidifier14
Page 15
3 Transport and start-up
3.1 Transport and set-up
Transport and start-up
Transport and set-up
Installation location
Moving the humidifier
n Only locate the humidifier on even, sufficiently strong, mois-
ture-resistant ground.
n Ensure that the circulation of air is guaranteed. The air inlet
and air outlet must not be covered.
n The distance to other objects in the must be at least 10 cm to
the side and at least 20 cm above.
n To ensure optimal function, the unit can be located close to a
heat source. However, the temperature influence must not
exceed 50 °C.
A safety collection basin must be used on water-sensitive ground.
NOTICE!
Danger of material damage from tipping the
humidifier!
If the humidifier is moved, there is a danger of the unit
tipping. This can lead to material damage to the unit or
the ground.
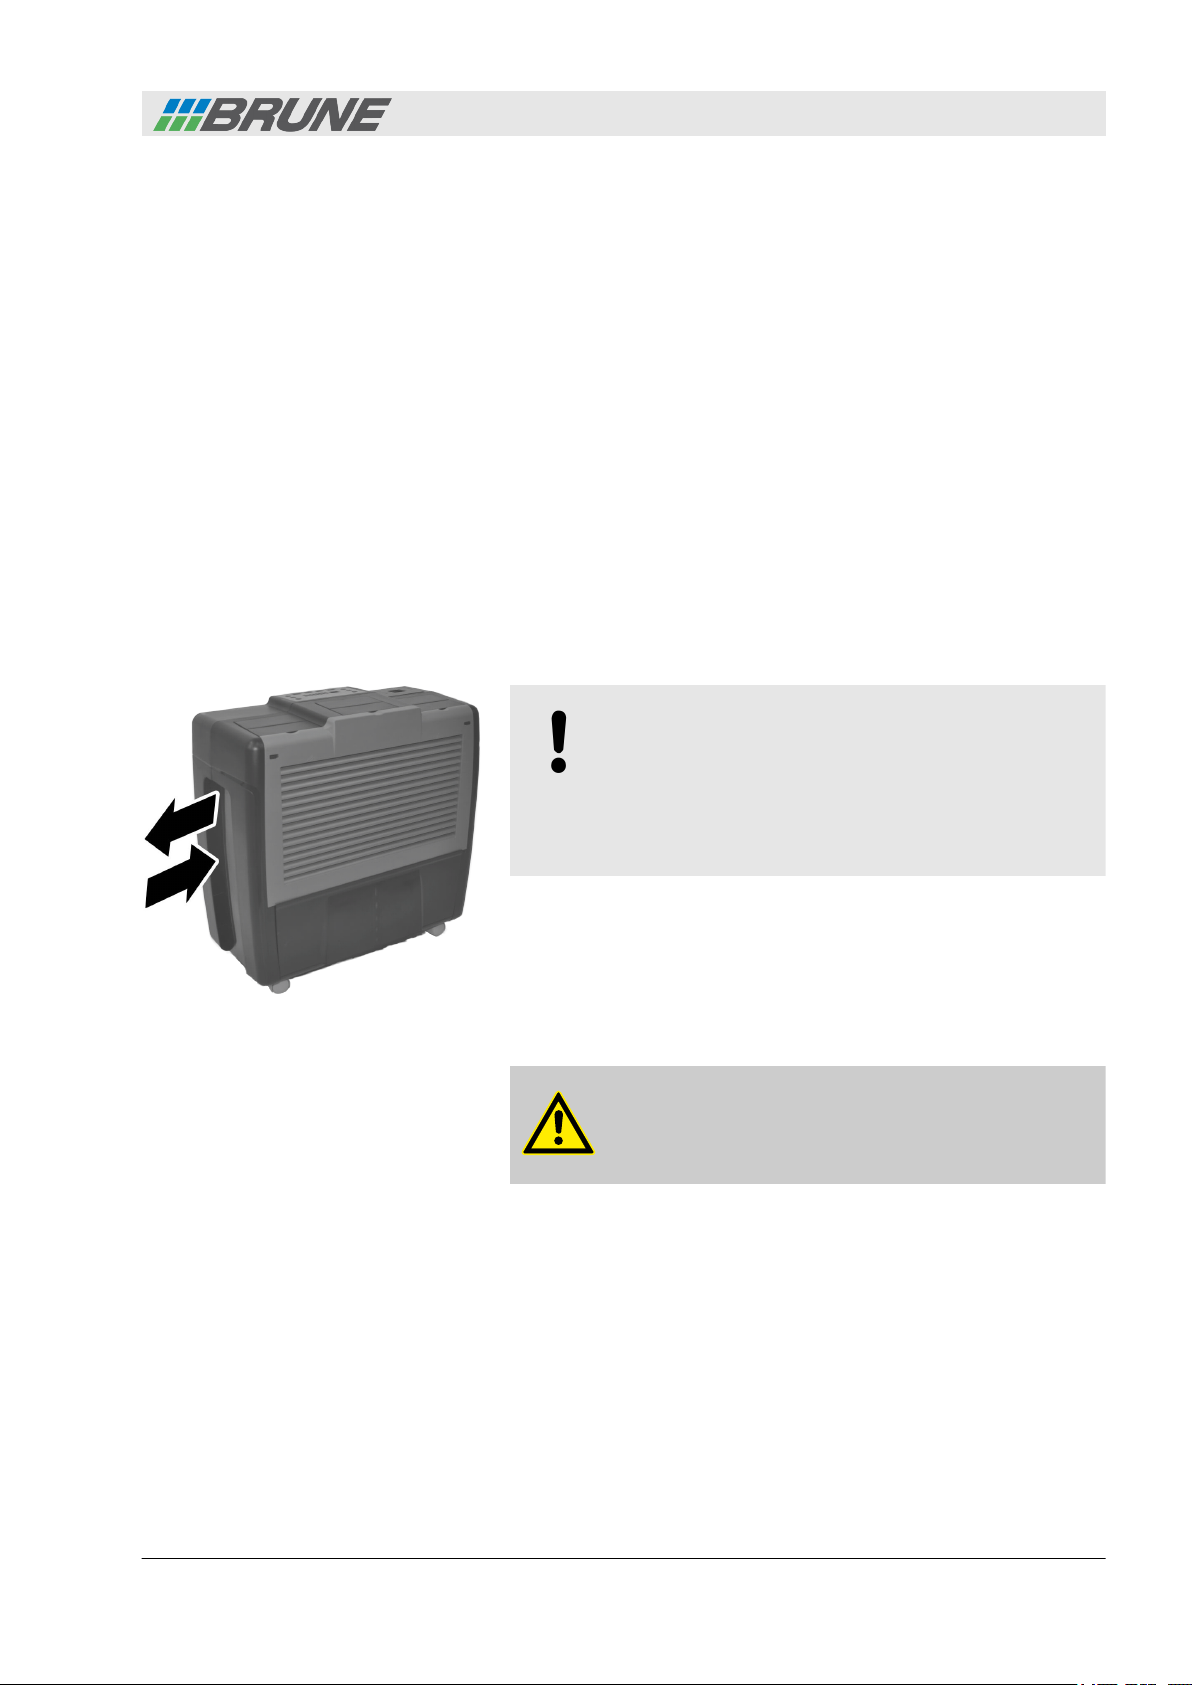
Fig. 3: Moving the humidifier
Lifting the humidifier
n Whenever possible, move the humidifier along its longitudinal
axis (Fig. 3).
n Always empty the water container before changing location.
The humidifier has four castors on the underside. To change the
location of the unit, it can be pushed or pulled.
WARNING!
Danger while lifting the humidifier!
n Always empty the water container before changing location.
n Only lift up the humidifier while working as a pair.
Brune B 280 Evaporative humidifier 15
Page 16
Transport and start-up
Preparing the humidifier for operation
3.2 Preparing the humidifier for operation
Power supply
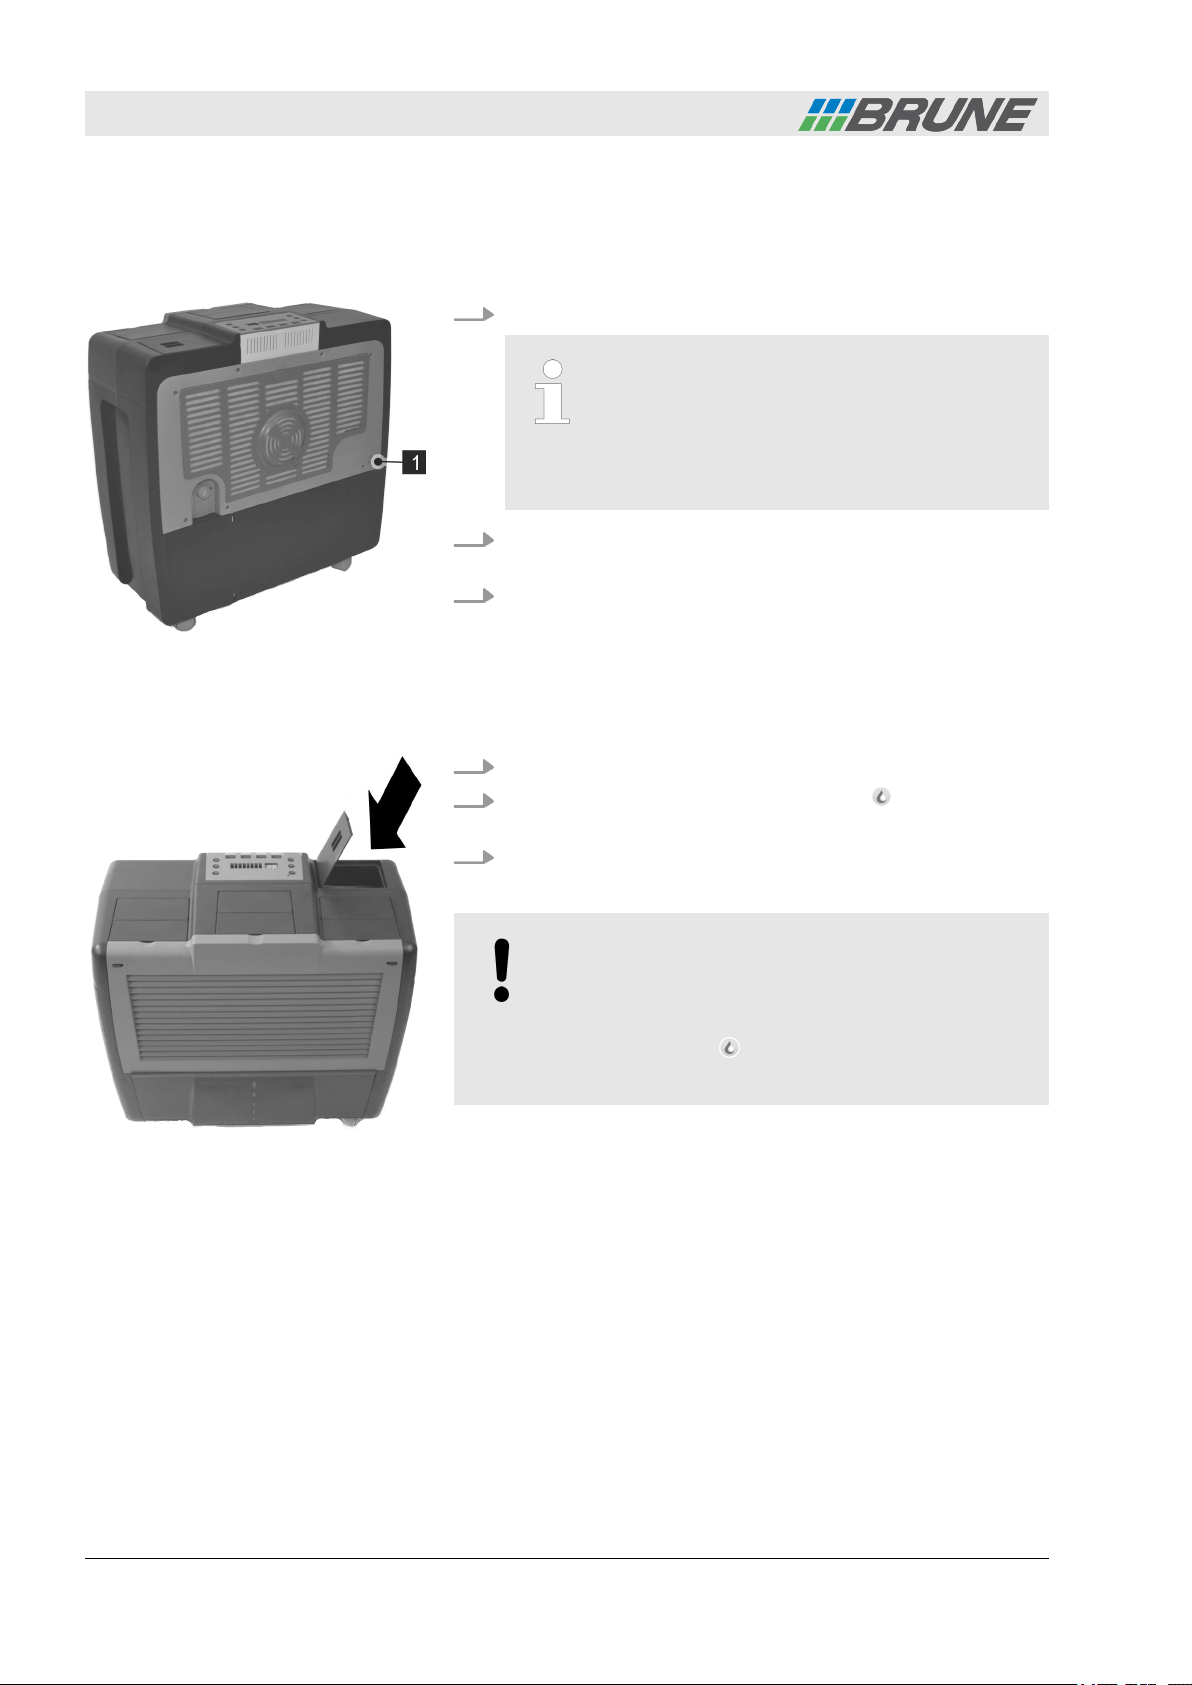
1. Check the power supply and mains plug for damage.
2. Connect the power supply to the connecting socket (Fig. 4/1)
on the humidifier.
3. Insert the mains plug.
Fig. 4: Connecting to the power
supply
Damaged mains cable!
If the mains cable of this unit is damaged, it must
be replaced by a particular connecting cable!
– This is available from the manufacturer or the
customer service department.
Filling the water container
Fig. 5: Filling the water container
Waterfresh (optional)
1. Open the filling flap (Fig. 5).
2.
Fill up with water until the WATER TANK display lights up
green.
3. Close the filling flap.
NOTICE!
Danger of material damage from over-filling the
humidifier!
There is a threat of the water container overflowing if
the WATER TANK display lights up green and filling
continues.
The water container can also be filled with Waterfresh to reduce
the build-up of germs and algae and calcifications. Observe the
information provided on the packaging of Waterfresh regarding
dosage, use and disposal.
Waterfresh can be obtained from our customer service department
Ä
‘Customer service’ on page 4).
(
Order numbers:
n 1l bottle: 9020
n 5l canister: 9022
Brune B 280 Evaporative humidifier16
Page 17

Transport and start-up
Starting up the humidifier
NOTICE!
Environmental damage from biocides!
Biocides contained in the Waterfresh are harmful to
the environment in large quantities.
n Use biocides carefully.
n Obtain information on environmentally-friendly disposal from
the local authority or a special certified waste disposal company.
n Always read the labelling and product information before use.
Water connection (optional)
Additional safety equipment
3.3 Starting up the humidifier
Switching on the humidifier
Standby
As an alternative to filling up the water container manually, the
humidifier can be connected to the water network. Have the
humidifier connected via the solenoid valve on the rear by a qualified sanitary engineer.
In order to reduce the risk of material damage, the following safety
equipment is recommended:
n Safety collection basin
n Pressure hose with Aquastop
Press the STANDBY button.
The humidifier is switched on.
ð
Press the STANDBY button.
The humidifier is on standby. In standby mode, the LED
ð
lights up red.
Switching off
Excessive humidification
To safely switch off the humidifier for maintenance or an extended
standstill:
Pull out the plug.
The humidifier is switched off.
ð
WARNING!
Danger to health from excessive humidification!
Excessively humidified air favours the formation of
mould and health-damaging germs.
Brune B 280 Evaporative humidifier 17
Page 18

Transport and start-up
Starting up the humidifier
Setting the relative humidity
Setting the fan speed
n Never exceed the recommended value of 50 ‒ 60 % air
humidity in living spaces.
The target value of the relative humidity can be set within the range
of 30 % to 90 %.
Set the relative humidity to the desired target value with the
HUMIDITY and HUMIDITY buttons.
The AIR HUMIDITY % display shows the selected
ð
value.
The air mass flow and with it, the humidifier performance can be
set via the fan speed, for example: in large rooms, select a higher
speed level.
Set the desired speed level of the fan via the FAN and
FAN buttons.
Automatic fan mode
Switching the button lock on/off
The FAN ACTIVITY
ð
speed level.
The humidifier runs at the selected fan level until the
selected target value of relative humidity is reached.
In automatic mode, the humidifier regulates the fan speed automatically according to the performance requirement until the desired
value of relative humidity has been reached.
1. Select the target value of the relative humidity with the
HUMIDITY and HUMIDITY buttons.
2.
Press and hold the FAN button until the AUTO MODE
display lights up.
Automatic mode is switched on.
ð
To switch on the button lock, press the HUMIDITY and
HUMIDITY buttons simultaneously until the display flashes
once.
The button lock is activated.
ð
display shows the selected
To switch off the button lock, press the HUMIDITY and
HUMIDITY buttons simultaneously until the display flashes
once.
The button lock is deactivated.
ð
Brune B 280 Evaporative humidifier18
Page 19
Switching ionisation on/off
Transport and start-up
Starting up the remote sensor system (optional accessories)
Ionisation cleans the room air. Ions occur naturally as positively or
negatively charged particles. The ion concentration and the ratio
between positively and negatively charged ions are decisive for the
air quality. Polluted air in living and work area is low in negatively
charged ions. Through ionisation, negatively charged ions are
emitted which combine with dust particles to form so-called clusters and are withheld in the filter.
To turn on ionisation, press the IONIZER button.
Ionisation is switched on. The IONIZER ON display
ð
illuminates.
To turn off ionisation, press the IONIZER button.
Ionisation is switched off. The IONIZER ON display
ð
goes out.
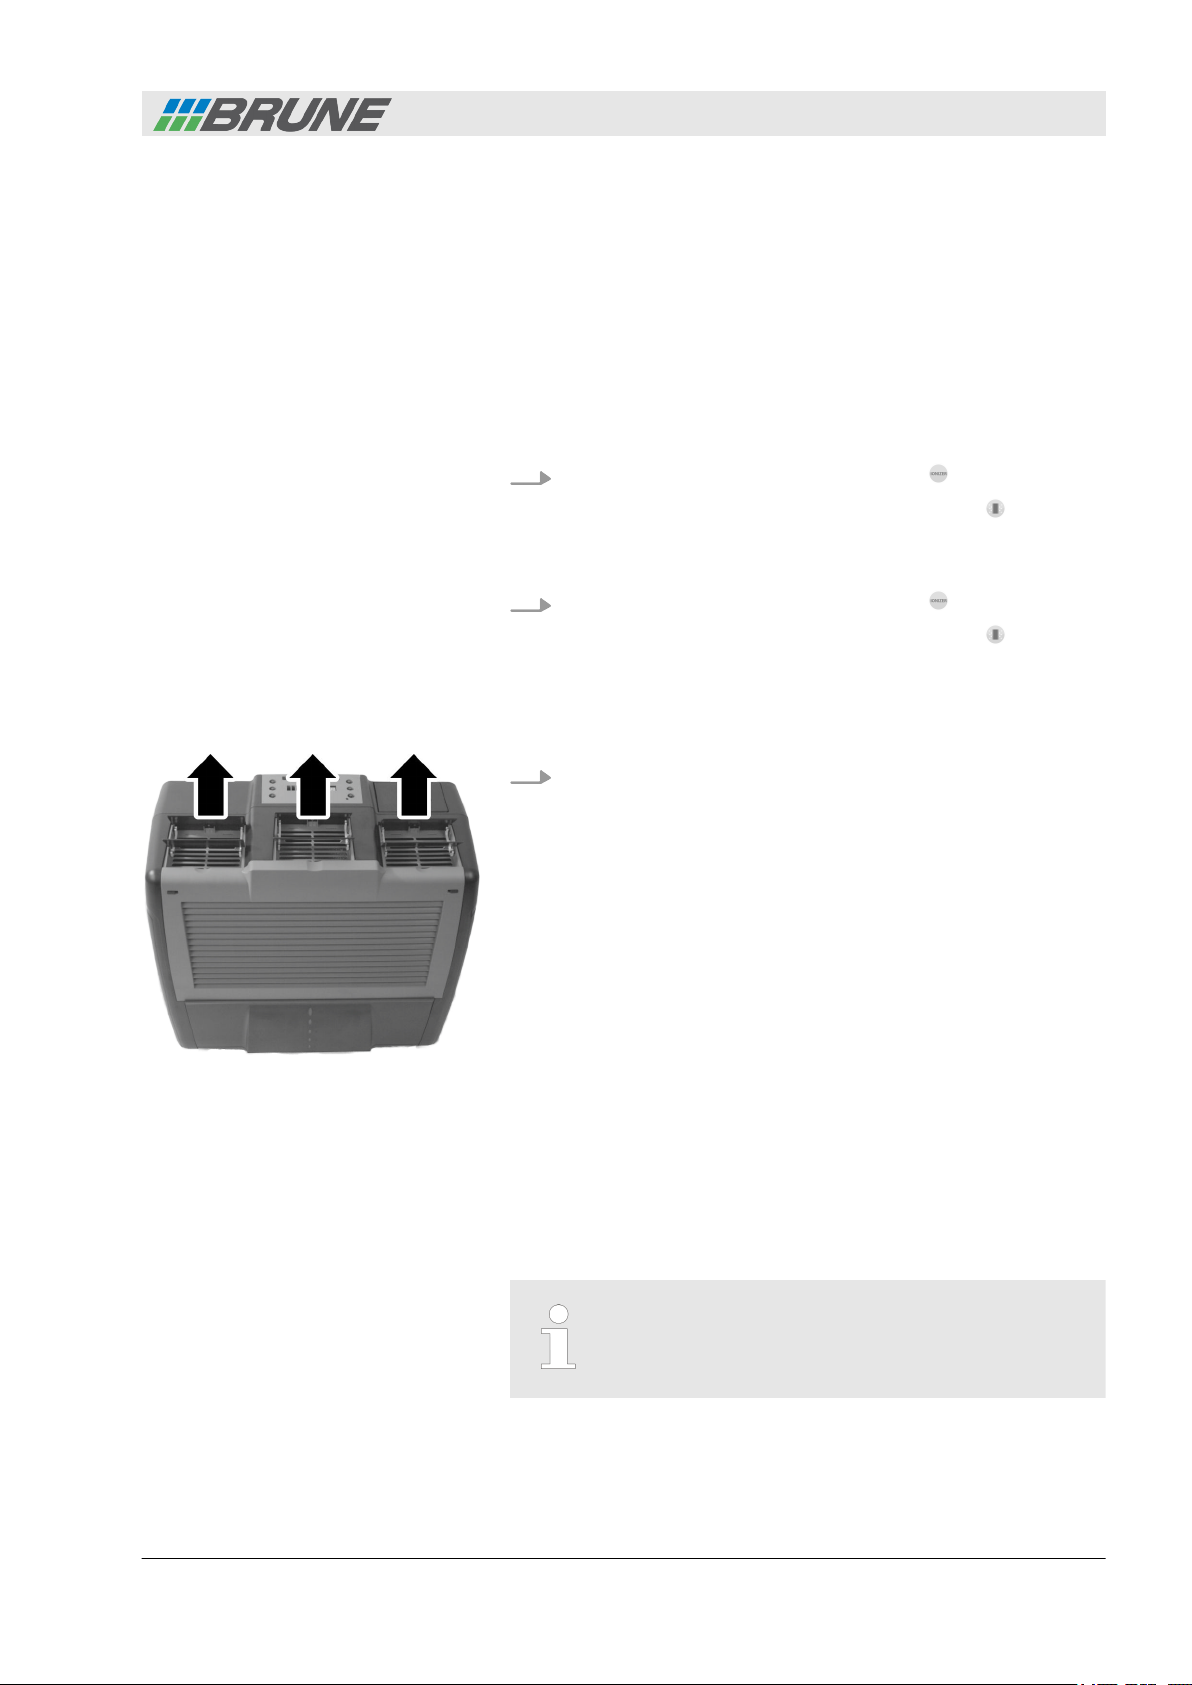
Ventilation flaps
To enable improved distribution of the humidified air in the
room, open the ventilation flaps on the upper surface of the
unit (Fig. 6).
The function of the humidifier is also guaranteed with the ventilation flaps closed.
Fig. 6: Opening the ventilation flaps
3.4 Starting up the remote sensor system (optional accessories)
Measuring the humidity
The remote sensor system measures the relative humidity in the
room and transmits this via radio to the humidifier. This enables a
more exact measurement than by measuring with the sensors
installed in the unit, with which deviating measurement results may
occur due to dampness within the unit.
Start up of the remote sensor system is recommended
if precise control of the humidity is required.
Brune B 280 Evaporative humidifier 19
Page 20
Transport and start-up
Starting up the remote sensor system (optional accessories)
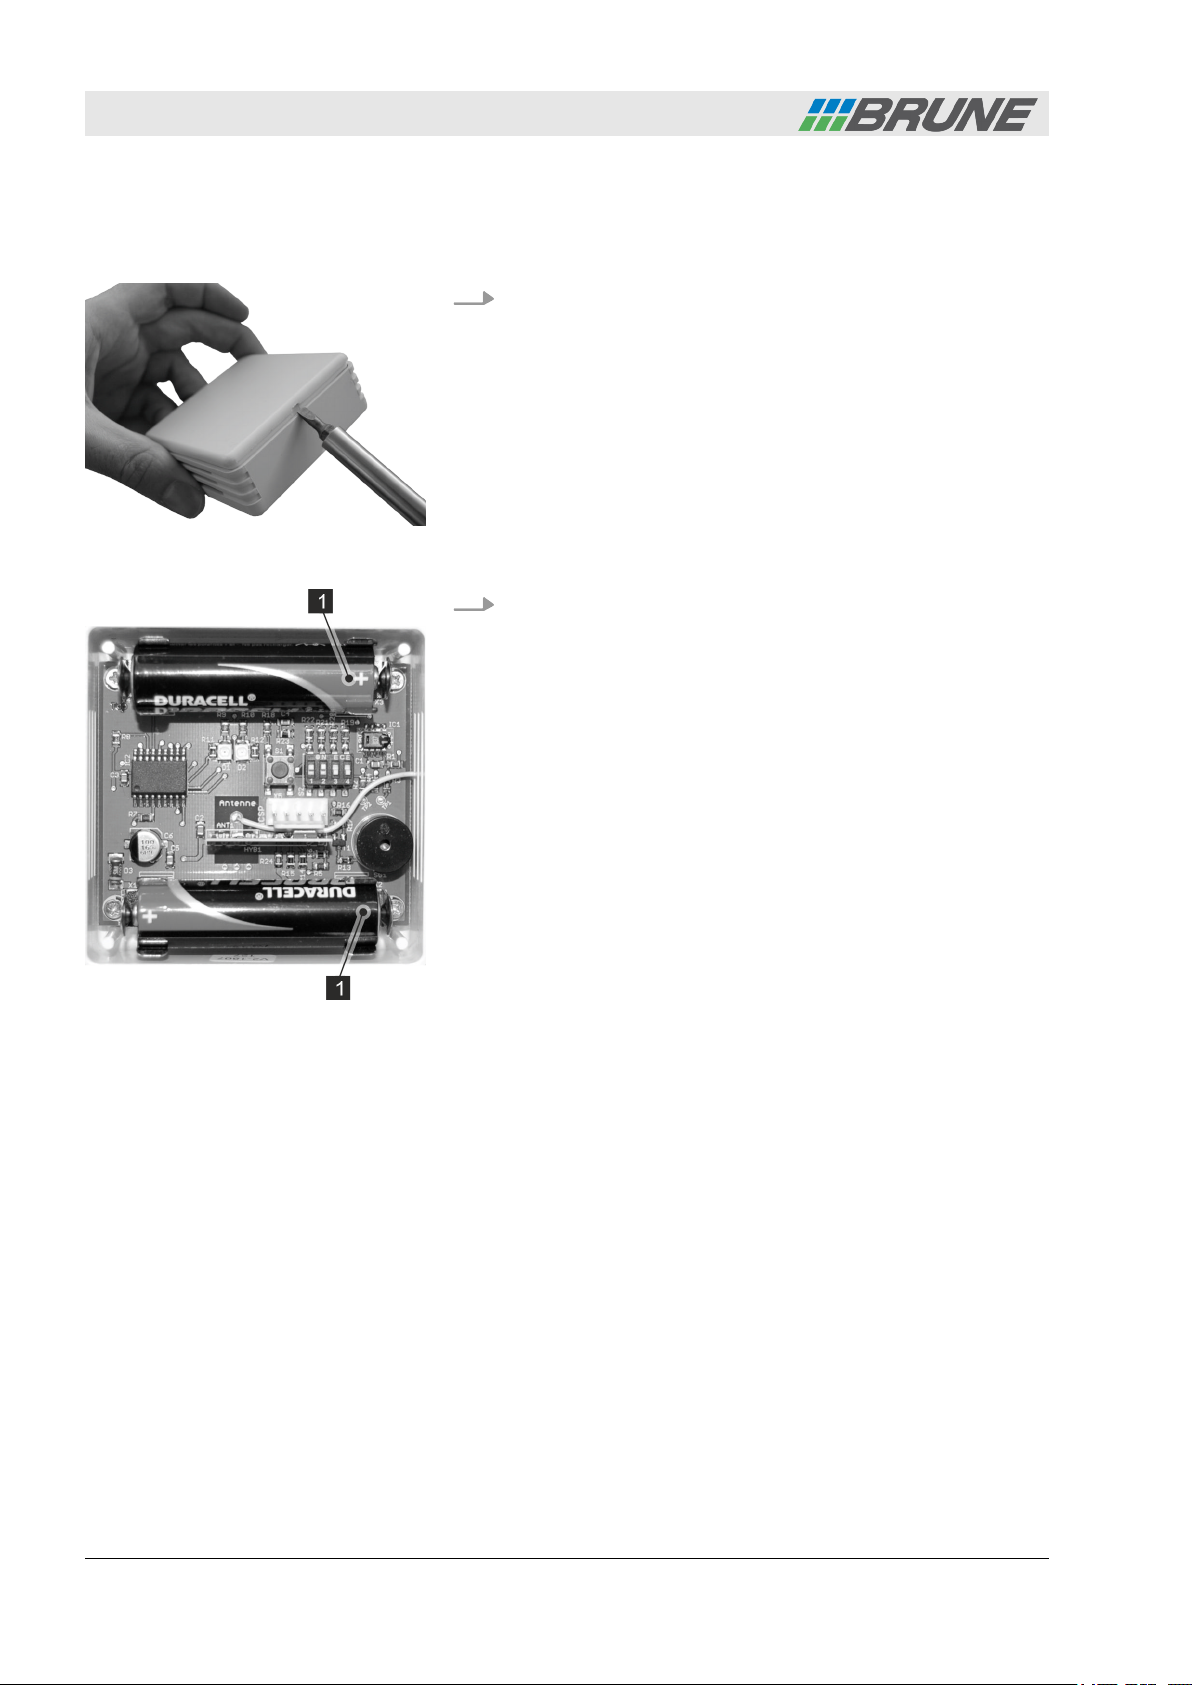
Starting up the remote sensor
system
1. Carefully lift up and remove the cover of the remote sensor
Fig. 7: Opening the cover
2. Insert the supplied 1.5 V AA batteries as illustrated (Fig. 8/1).
system with a small screwdriver (Fig. 7).
The plus and minus poles are marked on both the circuit
board and the battery. The batteries are inserted correctly if
these markings correspond.
Fig. 8: Replacing the batteries
Brune B 280 Evaporative humidifier20
Page 21
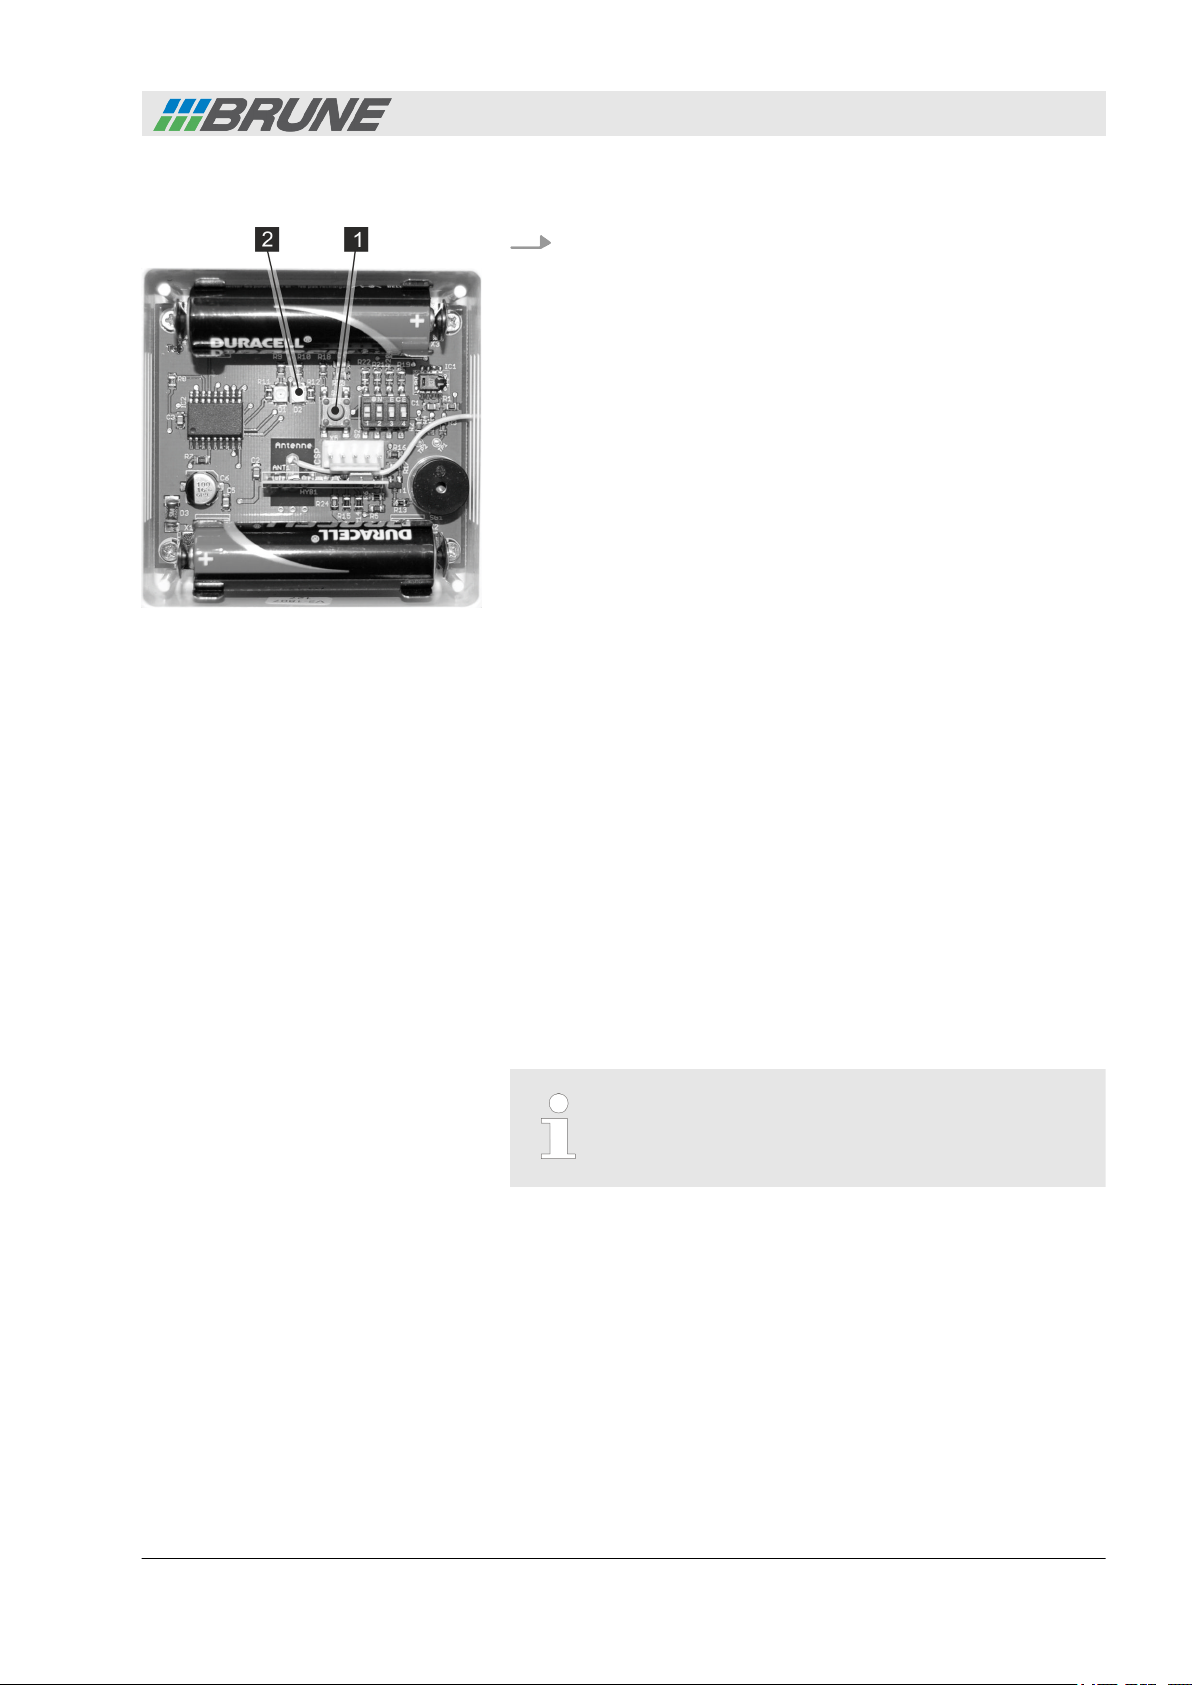
Fig. 9: Checking the functionality
Transport and start-up
Starting up the remote sensor system (optional accessories)
3. Check the functionality of the remote sensor system. To do
this, press the black button (Fig. 9/1).
If the LED (Fig. 9/2) lights up briefly, the remote sensor
ð
system is ready for operation. If the remote sensor
system emits a short signal tone at regular intervals
during operation, replace the batteries.
Possibilities of coding
Coding the remote sensor
The humidifier and the remote sensor system are coordinated with
each other via a code. The units are supplied pre-coded from the
factory. However, if two or more units are situated in close proximity to each other (0 – 30 m), a different coding may be required.
If multiple units are operated in one room, the following possibilities
are available:
n Multiple units are operated by one sensor. All units must have
the same coding.
n Each unit is controlled by a separate sensor. All units must
have different coding.
The sliders for the coding can be found on the respective circuit
boards of the humidifier and remote sensor system. Each slider
has only the “ON = above” and “OFF = below” positions. Accordingly, there are 16 different coding variations.
The coding of the humidifier and the corresponding
remote sensor system must agree exactly. Otherwise,
the function is not guaranteed.
Brune B 280 Evaporative humidifier 21
Page 22
Transport and start-up
Coding the humidifier
Coding the remote sensor system
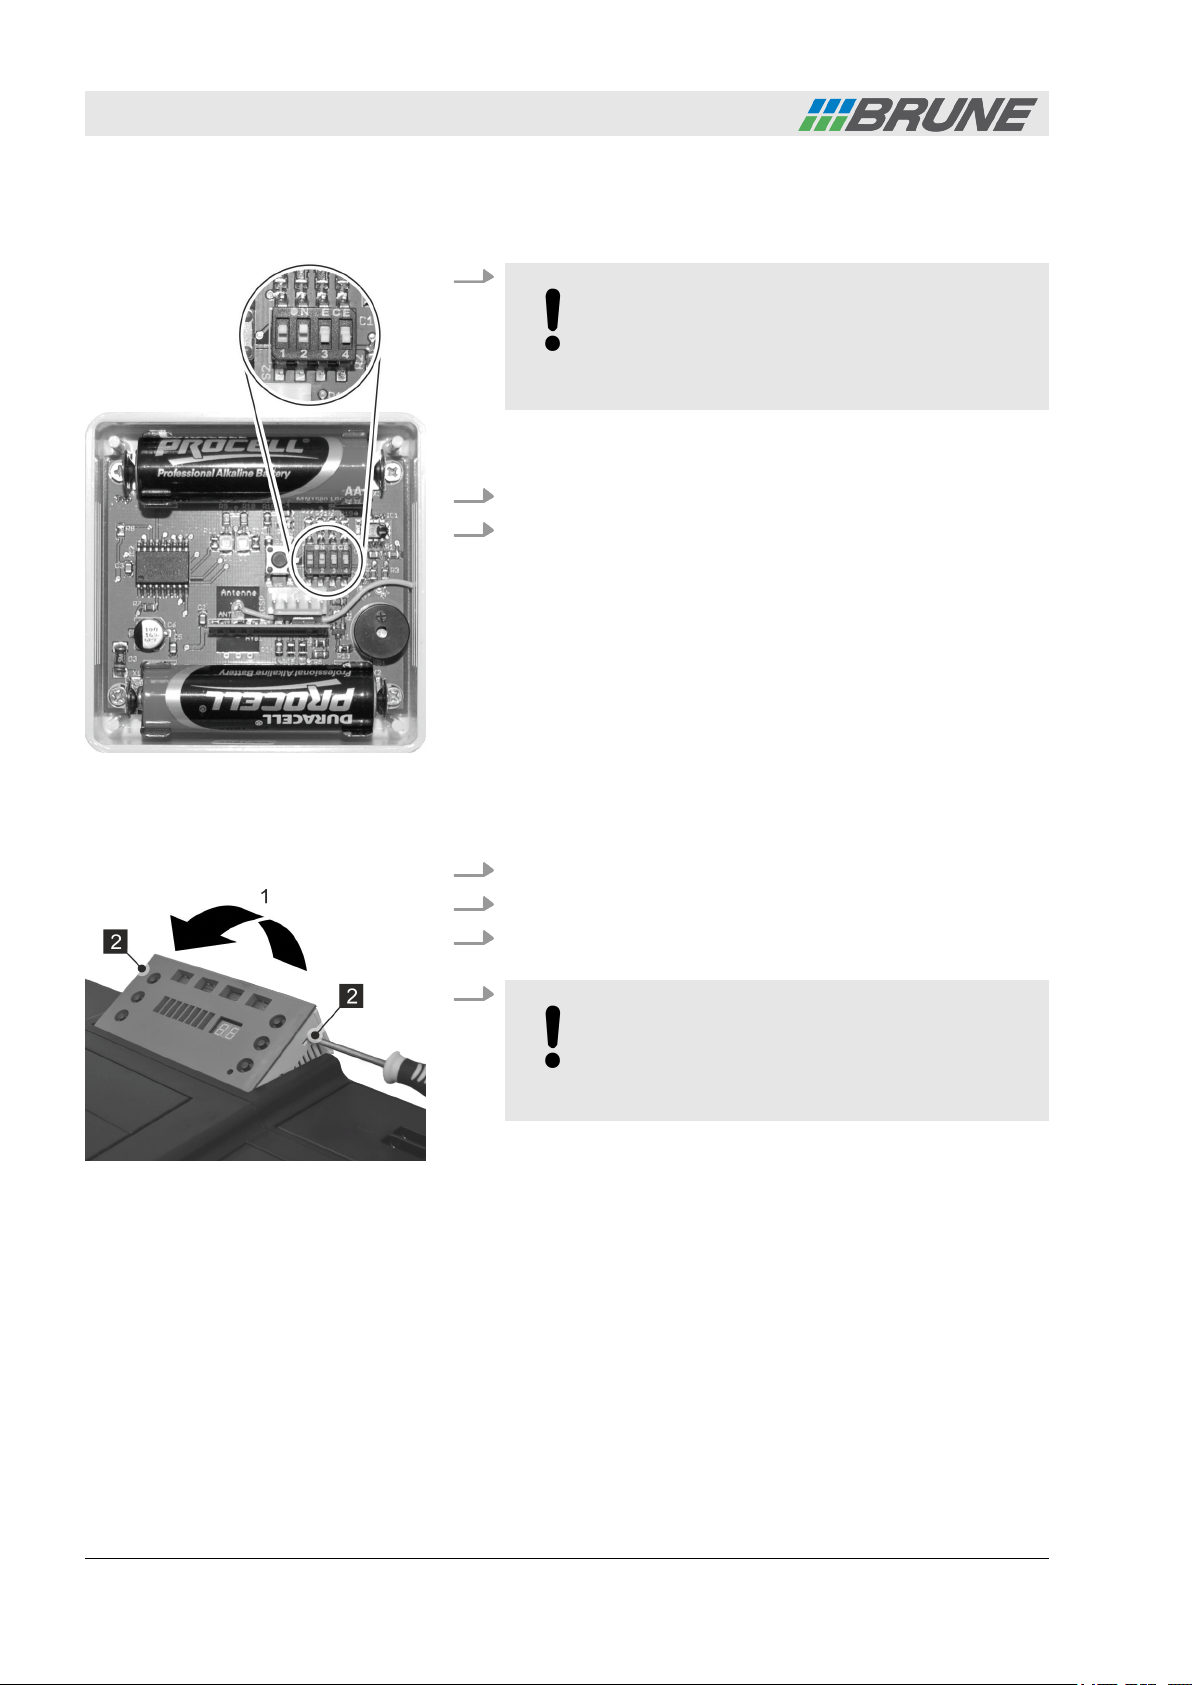
1.
NOTICE!
Material damage from short circuit!
– Only code the remote sensor system with a
non-metallic object.
Code the remote sensor system by adjusting the slider with a
suitable non-metallic object.
2. Confirm the coding by pressing the small, black button.
3. Close the cover of the remote sensor system again.
Fig. 10: Slider for coding
3.5 Coding the humidifier
Fig. 11: Opening the control panel
1. Switch off the unit and pull out the mains plug.
2. Fold up the control panel (Fig. 11/1).
3. Loosen the catches on both sides (Fig. 11/2) with a screw-
driver.
4.
NOTICE!
The electronics of the control panel are very sensitive. Ensure that you do not touch the electronics and damage components.
Open the control panel.
Brune B 280 Evaporative humidifier22
Page 23
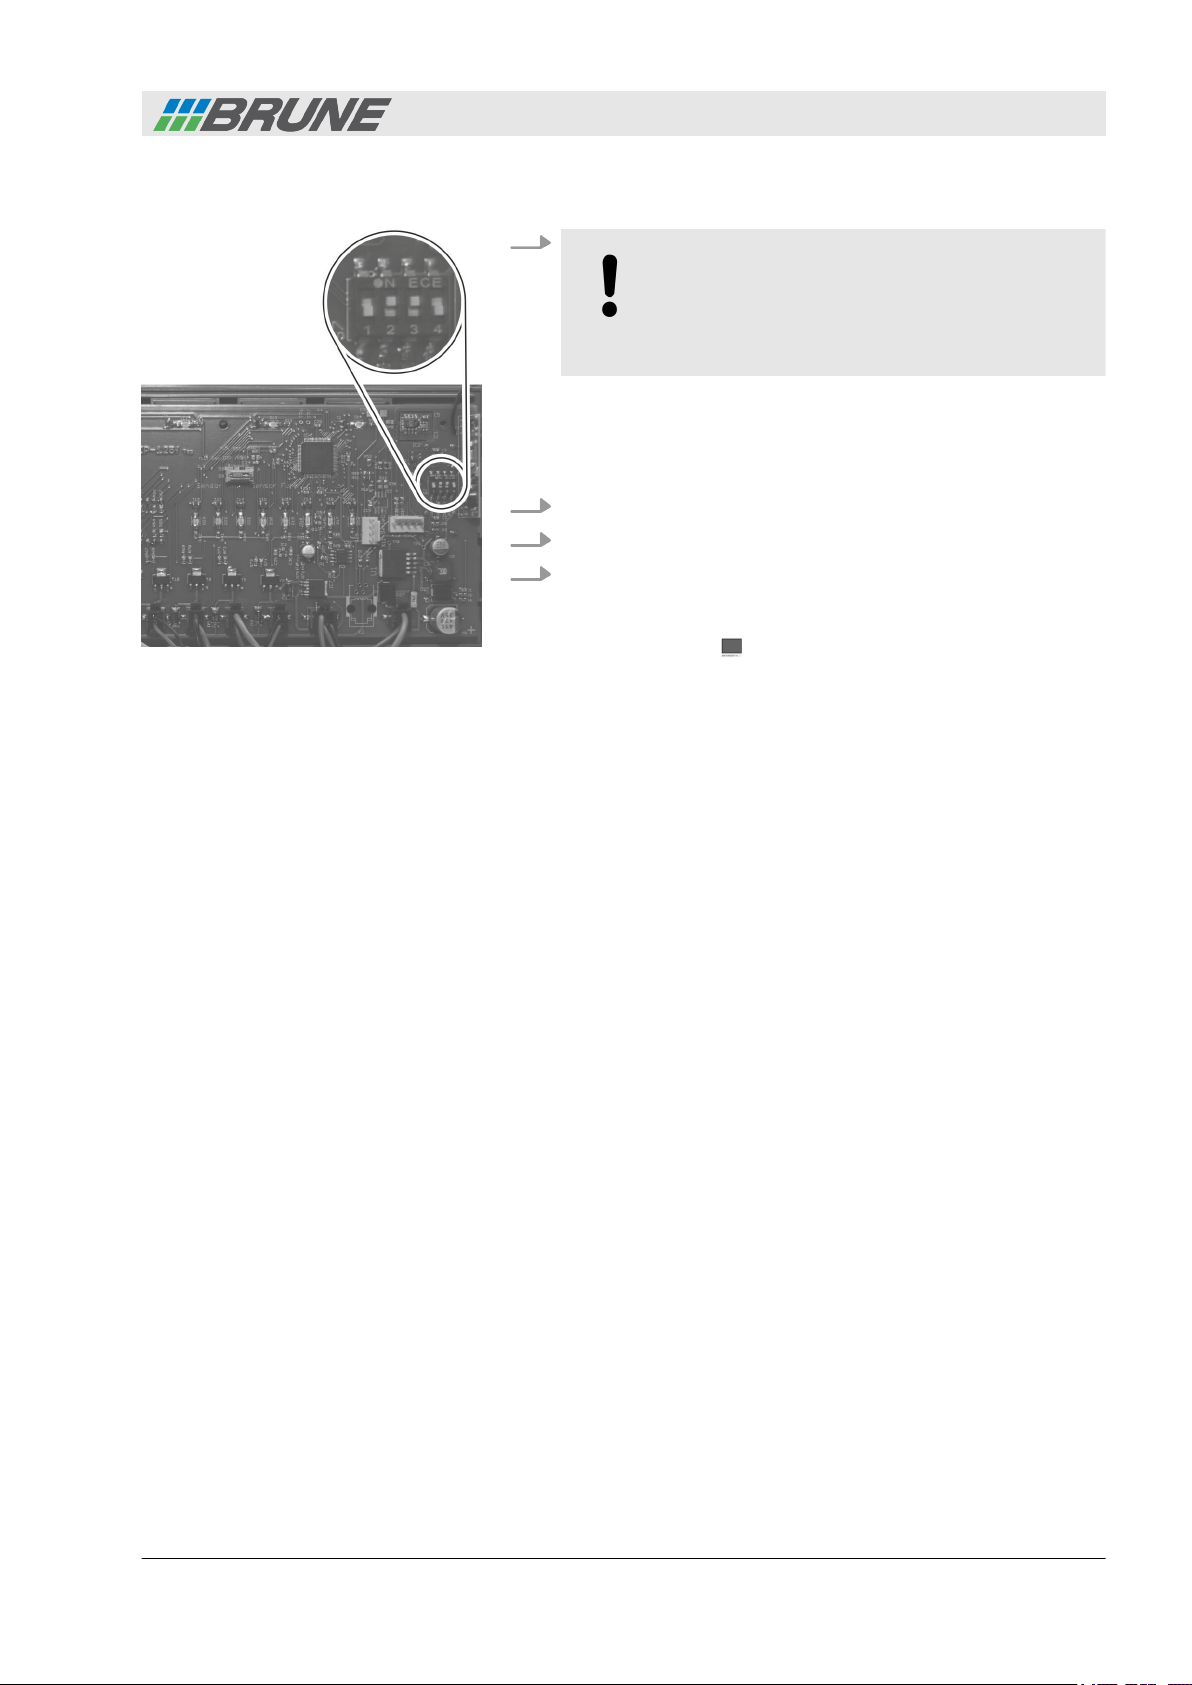
Fig. 12: Coding the humidifier
Transport and start-up
Coding the humidifier
5.
NOTICE!
Material damage from short circuit!
– Only code the humidifier with a non-metallic
object.
Code the humidifier (Fig. 12). To do so, carefully move the
slider on the rear of the circuit board to the same position as
that of the remote sensor system using a suitable, non-metallic object.
6. Close the control panel again.
7. Insert the mains plug and switch on the unit.
8. Check the function of the system. To do so, carefully breathe
into an opening in the housing of the remote sensor system.
The current value of the relative humidity of the AIR
ð
HUMIDITY % display changes. The remote sensor
system is ready for operation.
If the value of the relative humidity does not change,
check the batteries and coding.
Brune B 280 Evaporative humidifier 23
Page 24

Cleaning and care
Opening and closing the front
4 Cleaning and care
4.1 Maintenance table
UV light
Moving parts
WARNING!
Danger of injury from UV light!
UV light irritates and damages the eyes and can cause
skin irritations.
WARNING!
Danger of injury from moving parts!
The rotating fan can cause hand injuries.
Maintenance work
Interval Maintenance work
Monthly
Every 3 months
Every 6 months Only at the water connection via the pressure pipe:
Change the water and clean the tank (Ä Chapter 4.3 ‘Changing the water and
cleaning the tank’ on page 28).
Clean the inner side walls with a damp cloth (Ä Chapter 4.3 ‘Changing the water
and cleaning the tank’ on page 28).
From the outside, carry out a visual inspection of the UV lamps on the rear.
Change the evaporator filter (Ä Chapter 4.4 ‘Changing the evaporator filter’
on page 29).
Change the cleaning filter (Ä Chapter 4.5 ‘Changing the cleaning filter’
on page 32).
Carry out a visual inspection of the solenoid valve for the water connection.
Remove any contamination.
In the case of significant contamination, have the solenoid valve changed by a
qualified sanitary engineer.
Before maintenance work, disconnect the unit from the mains.
The frequency of the maintenance work depends upon the air and
water quality at the installation location. Where appropriate,
observe the recommended maintenance intervals.
Annually
Clean thoroughly with descaler (Ä Chapter 4.3 ‘Changing the water and cleaning
the tank’ on page 28).
4.2 Opening and closing the front
The front must be opened for the following maintenance work:
Brune B 280 Evaporative humidifier24
Page 25
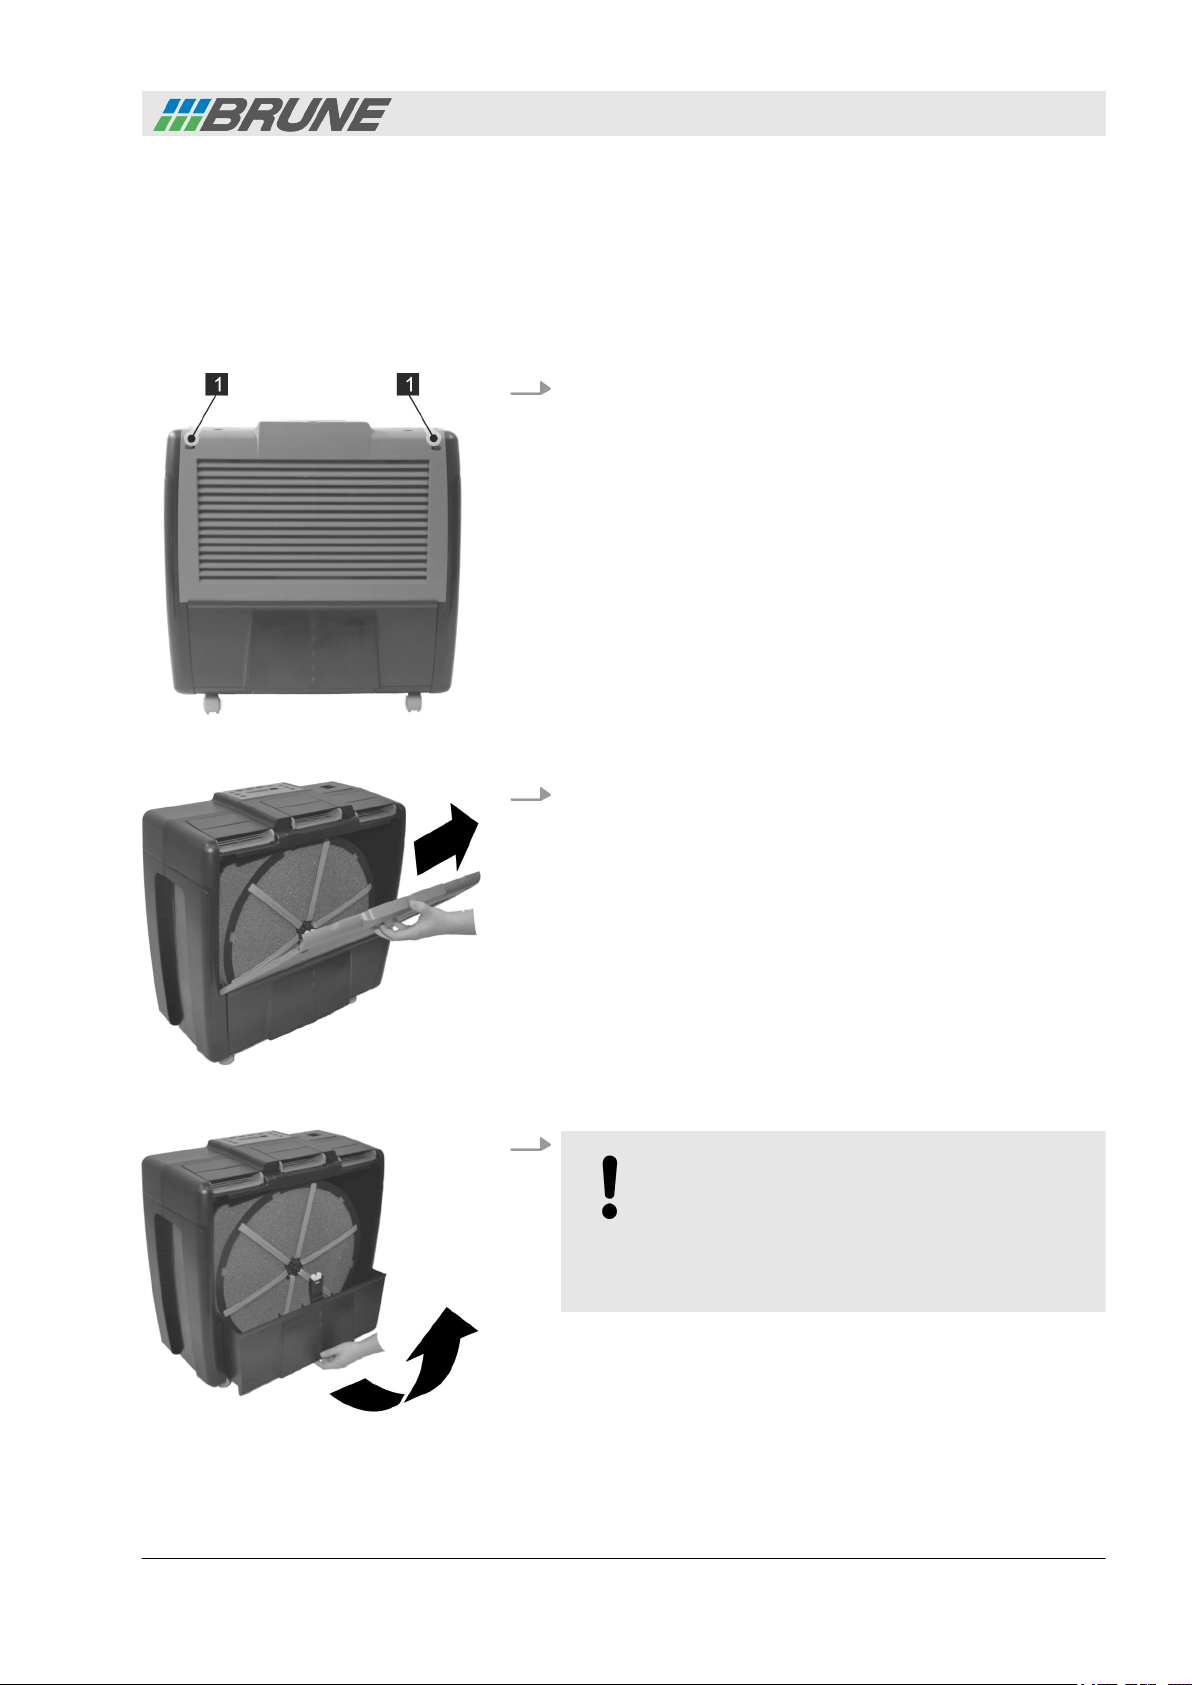
Opening the front
Cleaning and care
Opening and closing the front
n Changing the water.
n Cleaning the tank.
n Cleaning the inner side walls.
n Changing the evaporator filter.
1. Slide the locks (Fig. 13/1) of the outlet grille inwards on both
sides.
Fig. 13: Releasing the locks
Fig. 14: Lifting off the outlet grille
2. Lift off the outlet grille outwards (Fig. 14).
3.
NOTICE!
Danger of tipping!
Danger of material damage from leaking water.
– While pulling out the water tank, ensure that
the unit does not tip up.
Fig. 15: Pulling out the tank and filter
drum
Lift the tank from below and pull it out to the front with the
filter drum (Fig. 15).
Brune B 280 Evaporative humidifier 25
Page 26
Cleaning and care
Opening and closing the front
Closing the front
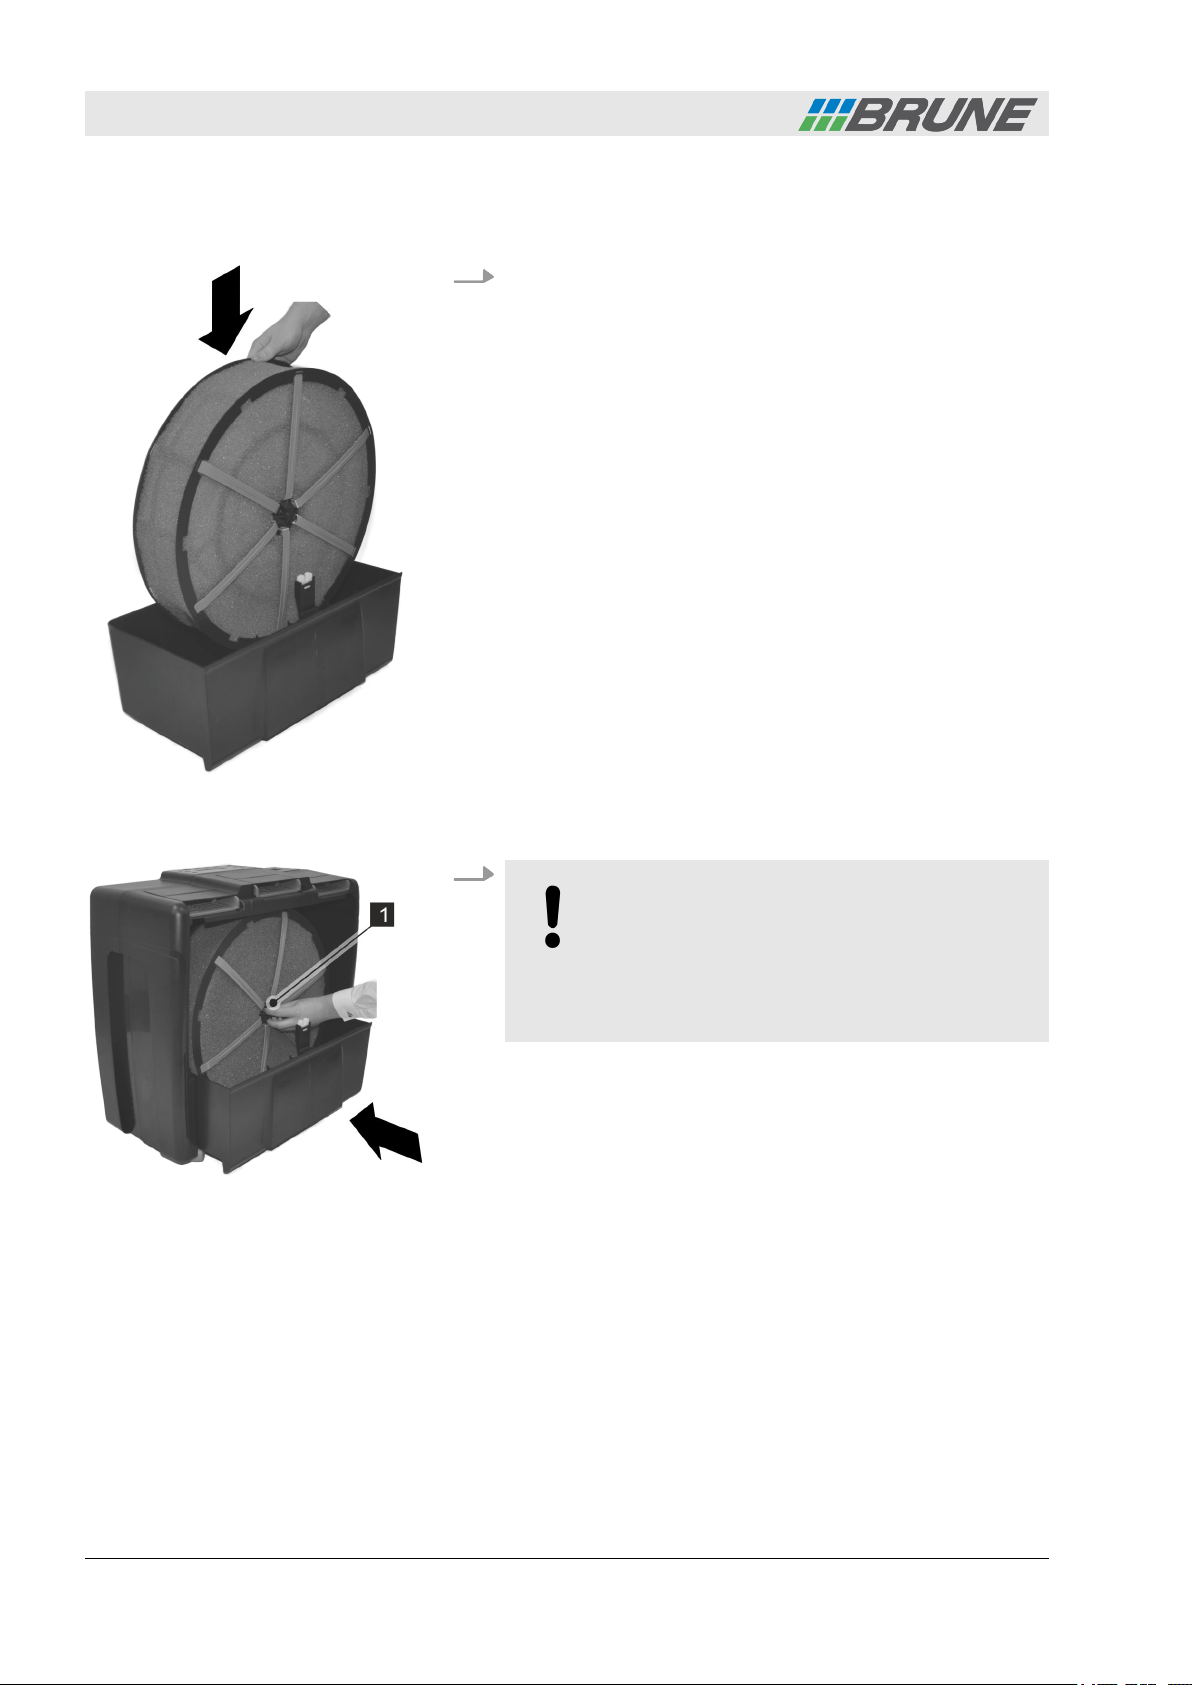
1. Place the filter drum in the water container (Fig. 16).
Fig. 16: Placing the filter drum in the
water container
Fig. 17: Sliding the filter drum onto the
drive
2.
NOTICE!
Danger of tipping!
Danger of material damage from leaking water.
– While inserting the water tank, ensure that
the unit does not tip up.
Slide the water container into the unit and simultaneously
slide the filter drum onto the drive (Fig. 17/1).
Brune B 280 Evaporative humidifier26
Page 27
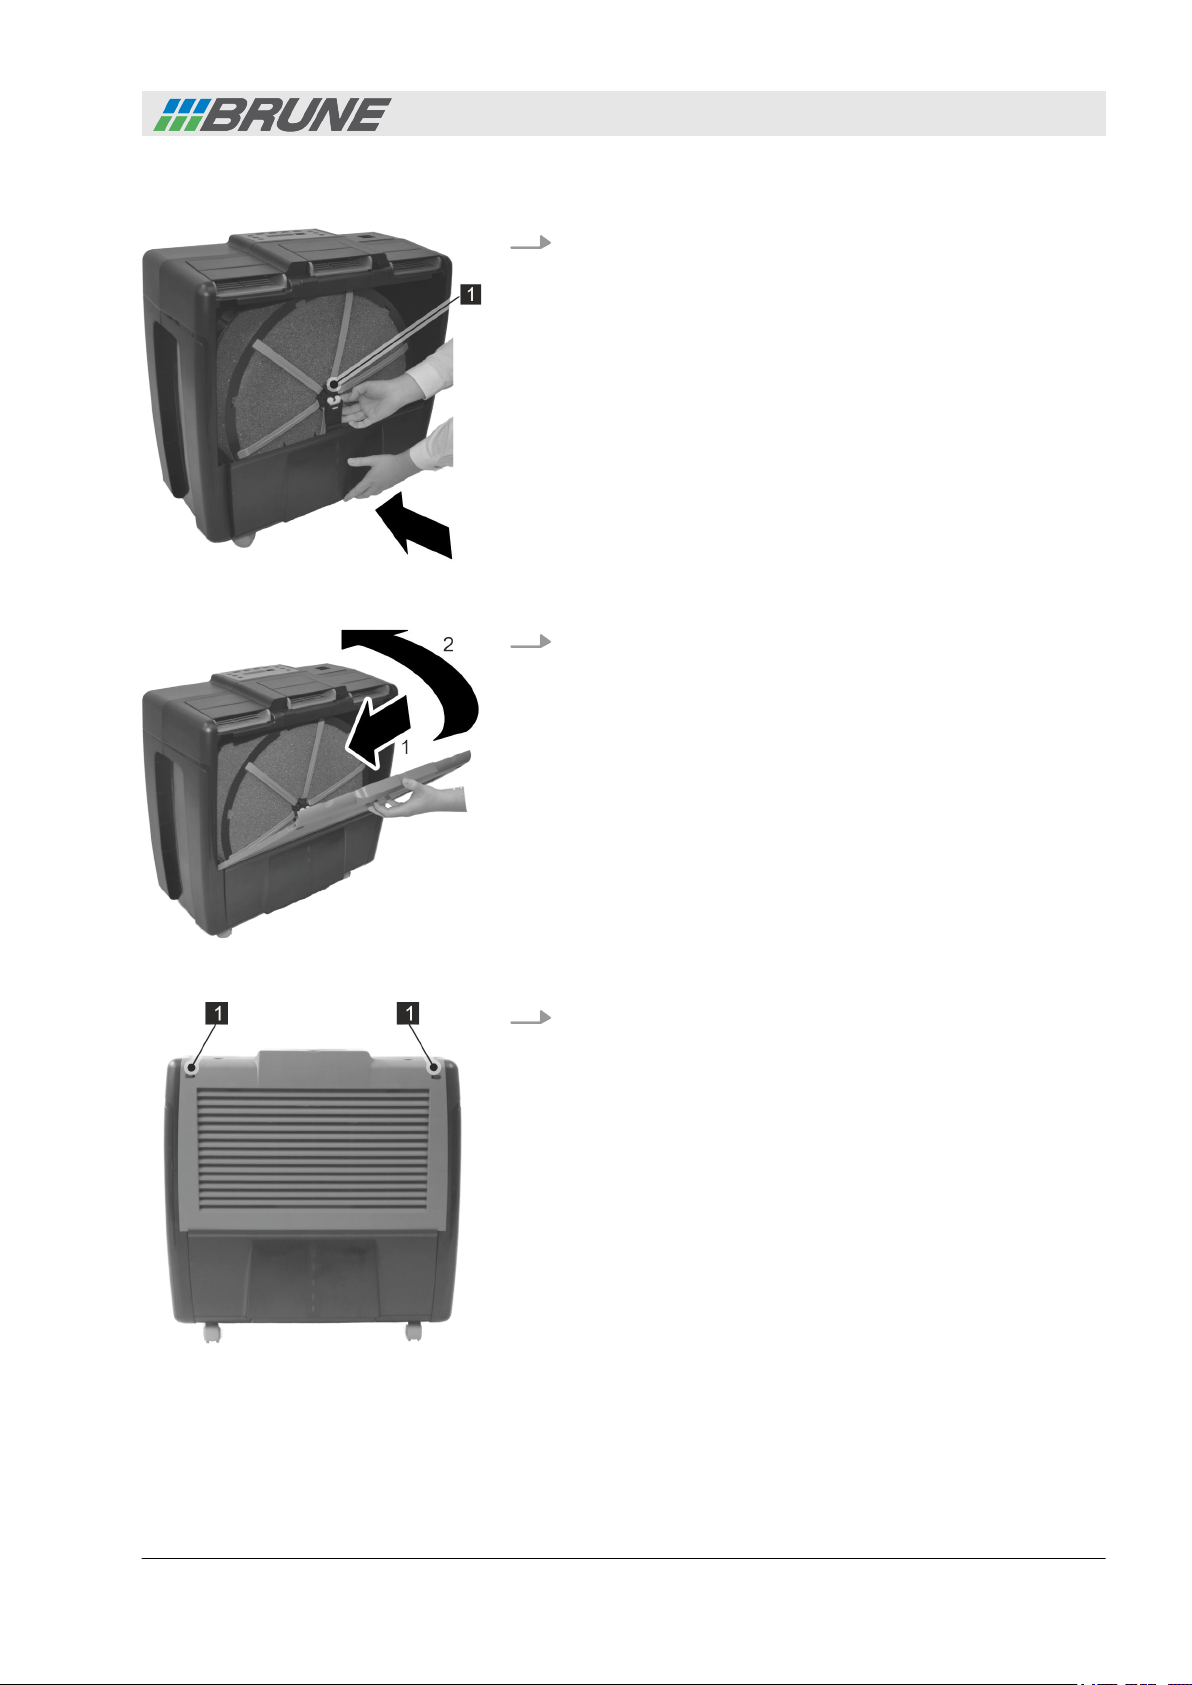
Fig. 18: Fixing the filter drum in place
Cleaning and care
Opening and closing the front
3. Press the water container in place and in doing so, fix the
hub of the water drum in place with the mounting of the tank
(Fig. 18/1).
4. Insert the outlet grille into the guides (Fig. 19/1) and press it
onto the unit (Fig. 19/2).
Fig. 19: Closing the outlet grille
Fig. 20: Locking the front
5. Slide the locks (Fig. 20/1) of the outlet grille outwards on both
sides.
Brune B 280 Evaporative humidifier 27
Page 28

Cleaning and care
Changing the water and cleaning the tank
4.3 Changing the water and cleaning the tank
NOTICE!
Do not use abrasive, corrosive or soap-containing
cleaners.
In the case of severe contamination and calcification, use a descaler for cleaning. A suitable descaler can be obtained from our
customer service department (
Observe the dosage and usage instructions on the packaging of
the descaler.
Optima descaler
n Order number: 9016
1.
Open the front (
2. Empty the water container.
3. Clean the water container with a damp cloth.
4. Clean the inner walls of the humidifier with a damp cloth.
Ä
Ä
on page 24).
‘Customer service’ on page 4).
5. Clean the filter drum of the evaporator filter with a damp
cloth.
6.
Close the front (
7.
Fill up the water container (Ä on page 16).
Ä
on page 26).
Brune B 280 Evaporative humidifier28
Page 29
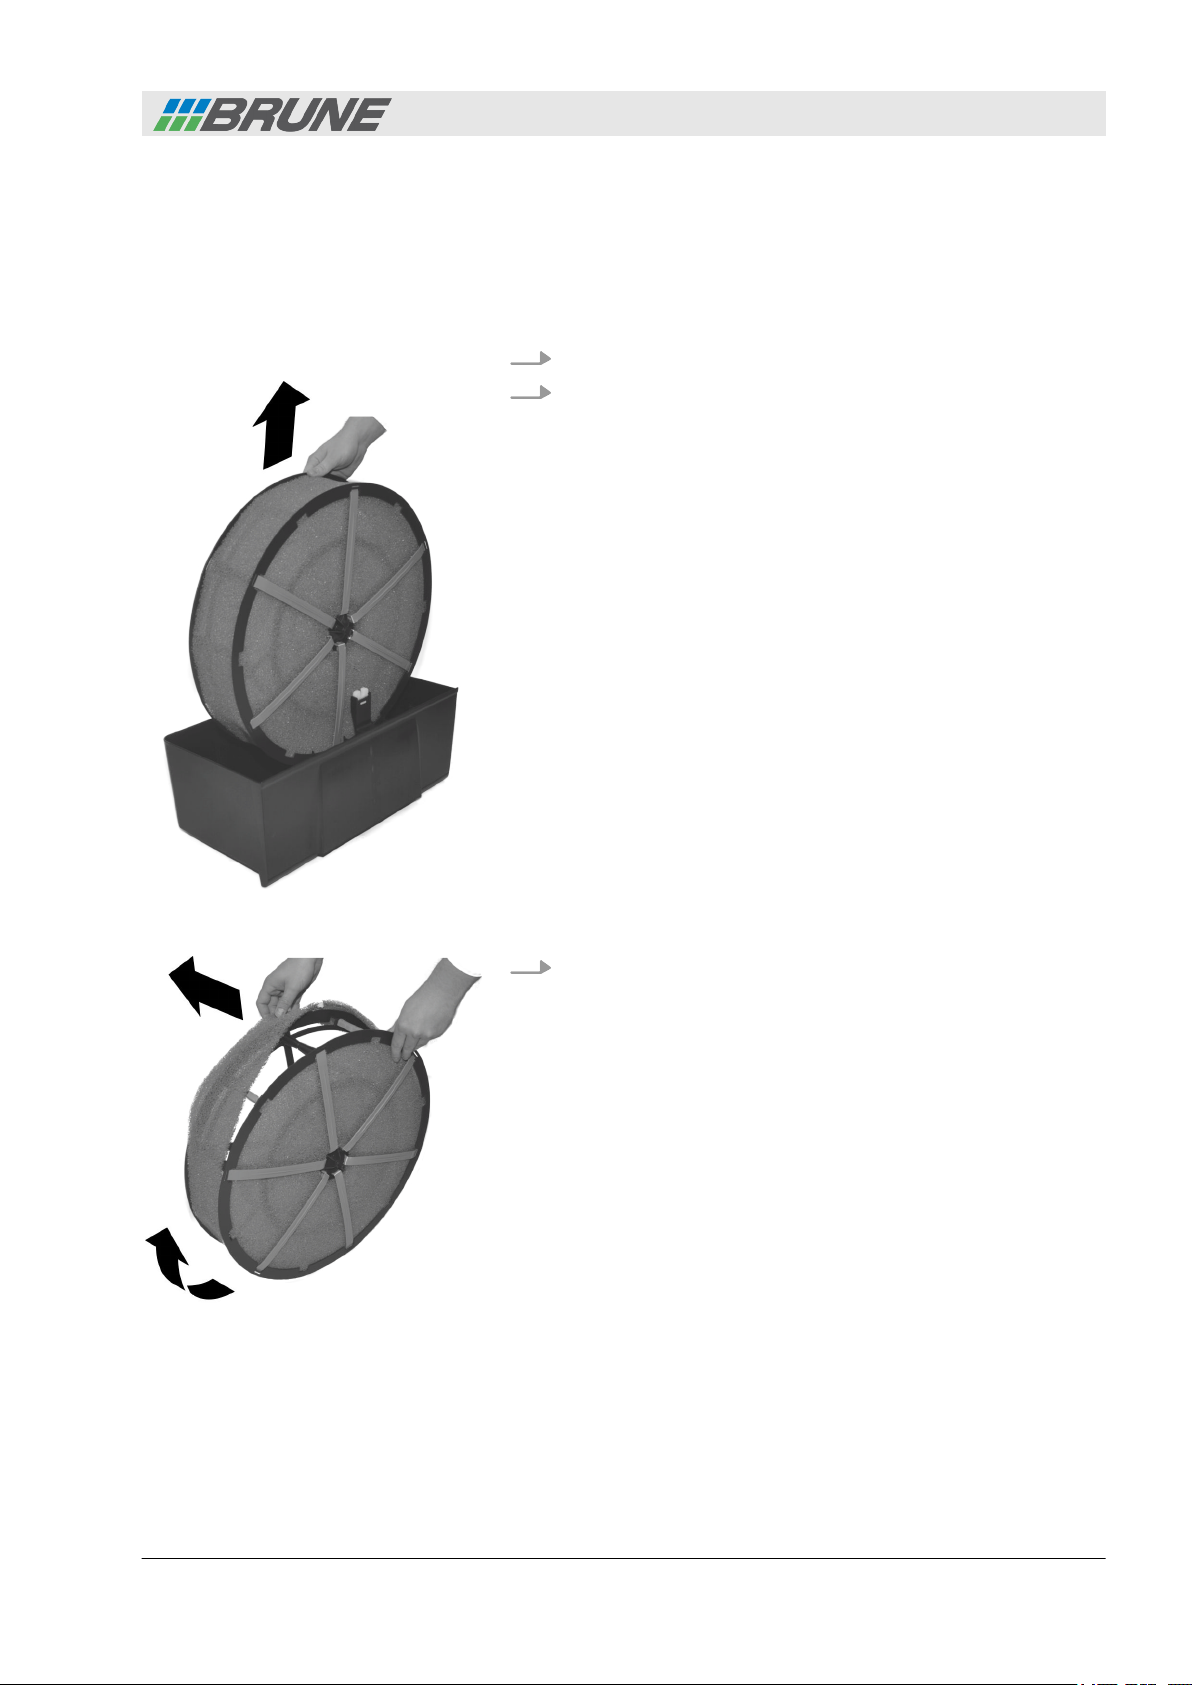
4.4 Changing the evaporator filter
The suitable evaporator filter (order number: 6550) can be
obtained from our customer service department (Ä ‘Customer
service’ on page 4).
1.
2. Remove the filter drum (Fig. 21).
Open the front (
Ä
on page 24).
Cleaning and care
Changing the evaporator filter
Fig. 21: Removing the filter drum
Fig. 22: Removing the outer evaporator filter
3. Remove the outer evaporator filter (Fig. 22).
Brune B 280 Evaporative humidifier 29
Page 30
Cleaning and care
Changing the evaporator filter
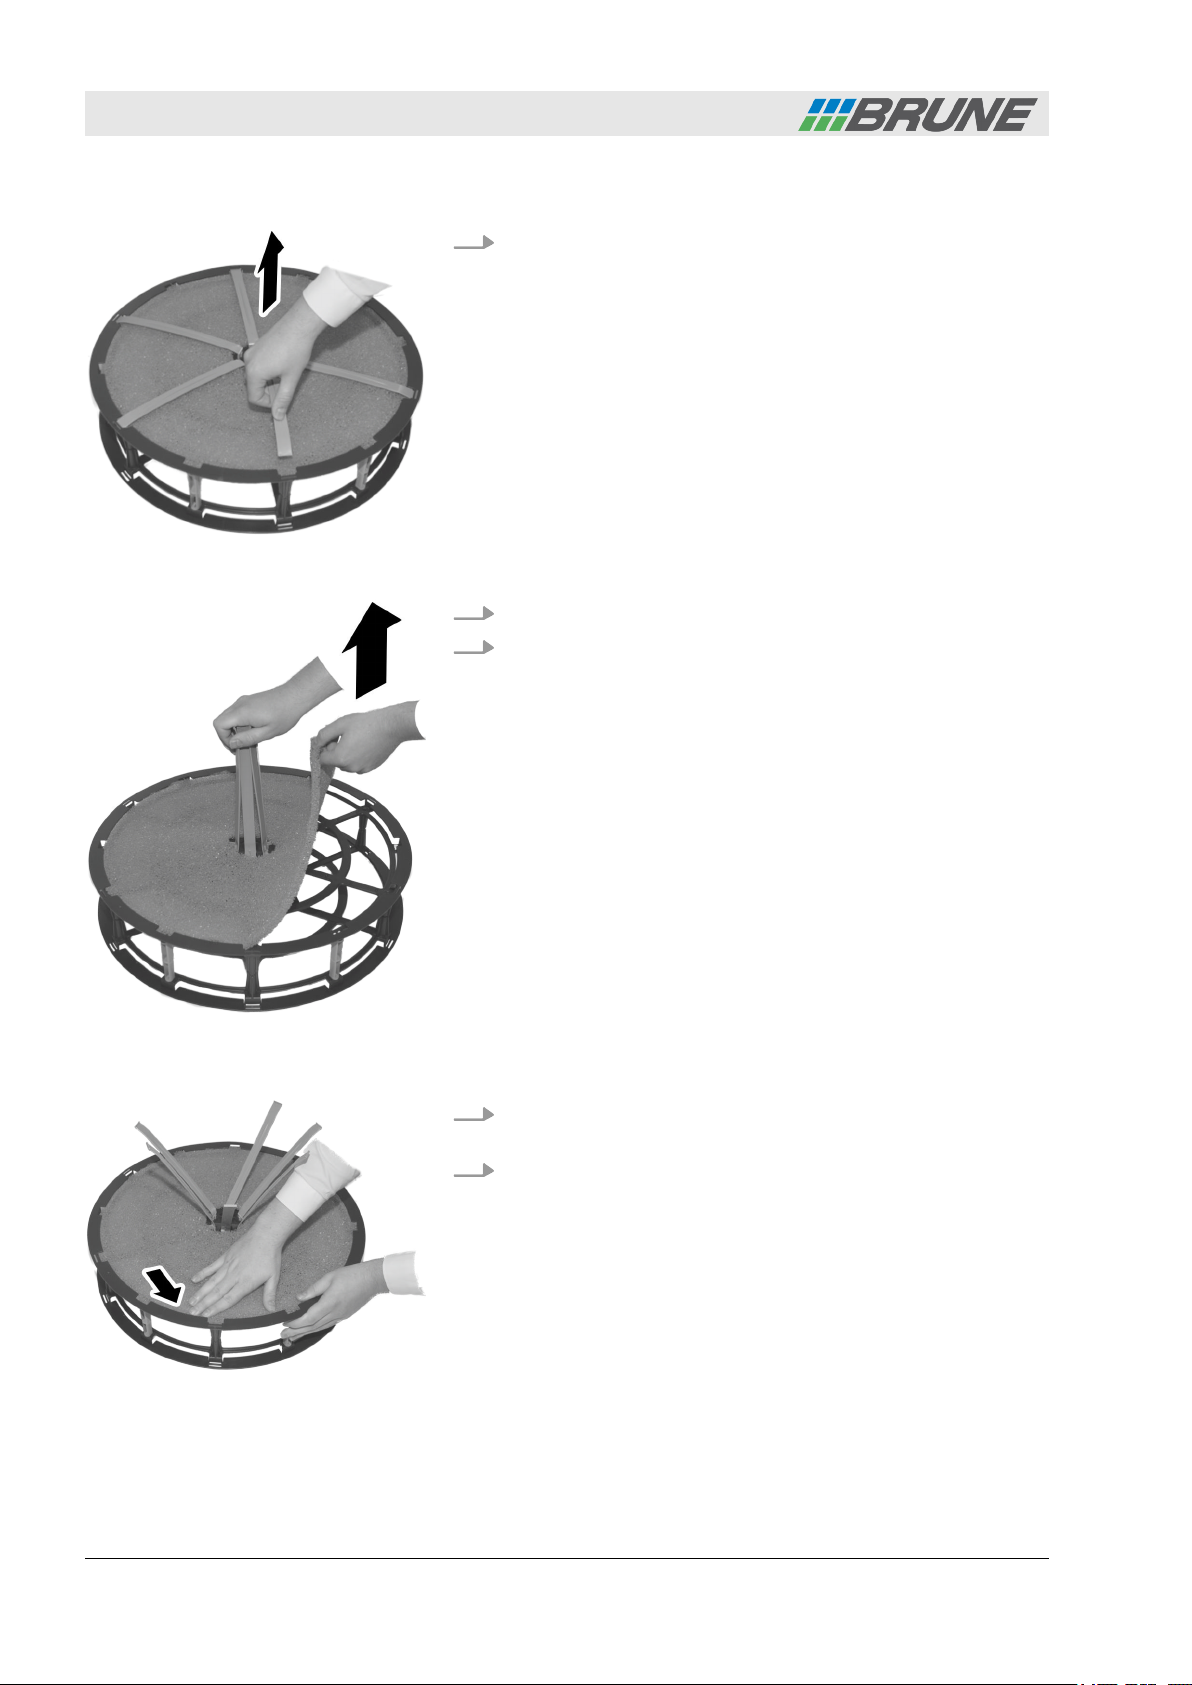
Fig. 23: Releasing the terminal strips
4. Release the terminal strips from the filter drum and fold them
up (Fig. 23).
5. Remove the inner evaporator filter (Fig. 24).
6. If the filter drum is contaminated, clean it with a damp cloth.
Fig. 24: Removing the inner evaporator filter
Fig. 25: Laying down the evaporator
filter and fixing it in place
7. Pull the new inner evaporator filter tight with the terminal
strips (Fig. 25).
8. Slide the outer edge of the evaporator filter beneath the edge
of the filter drum.
Brune B 280 Evaporative humidifier30
Page 31
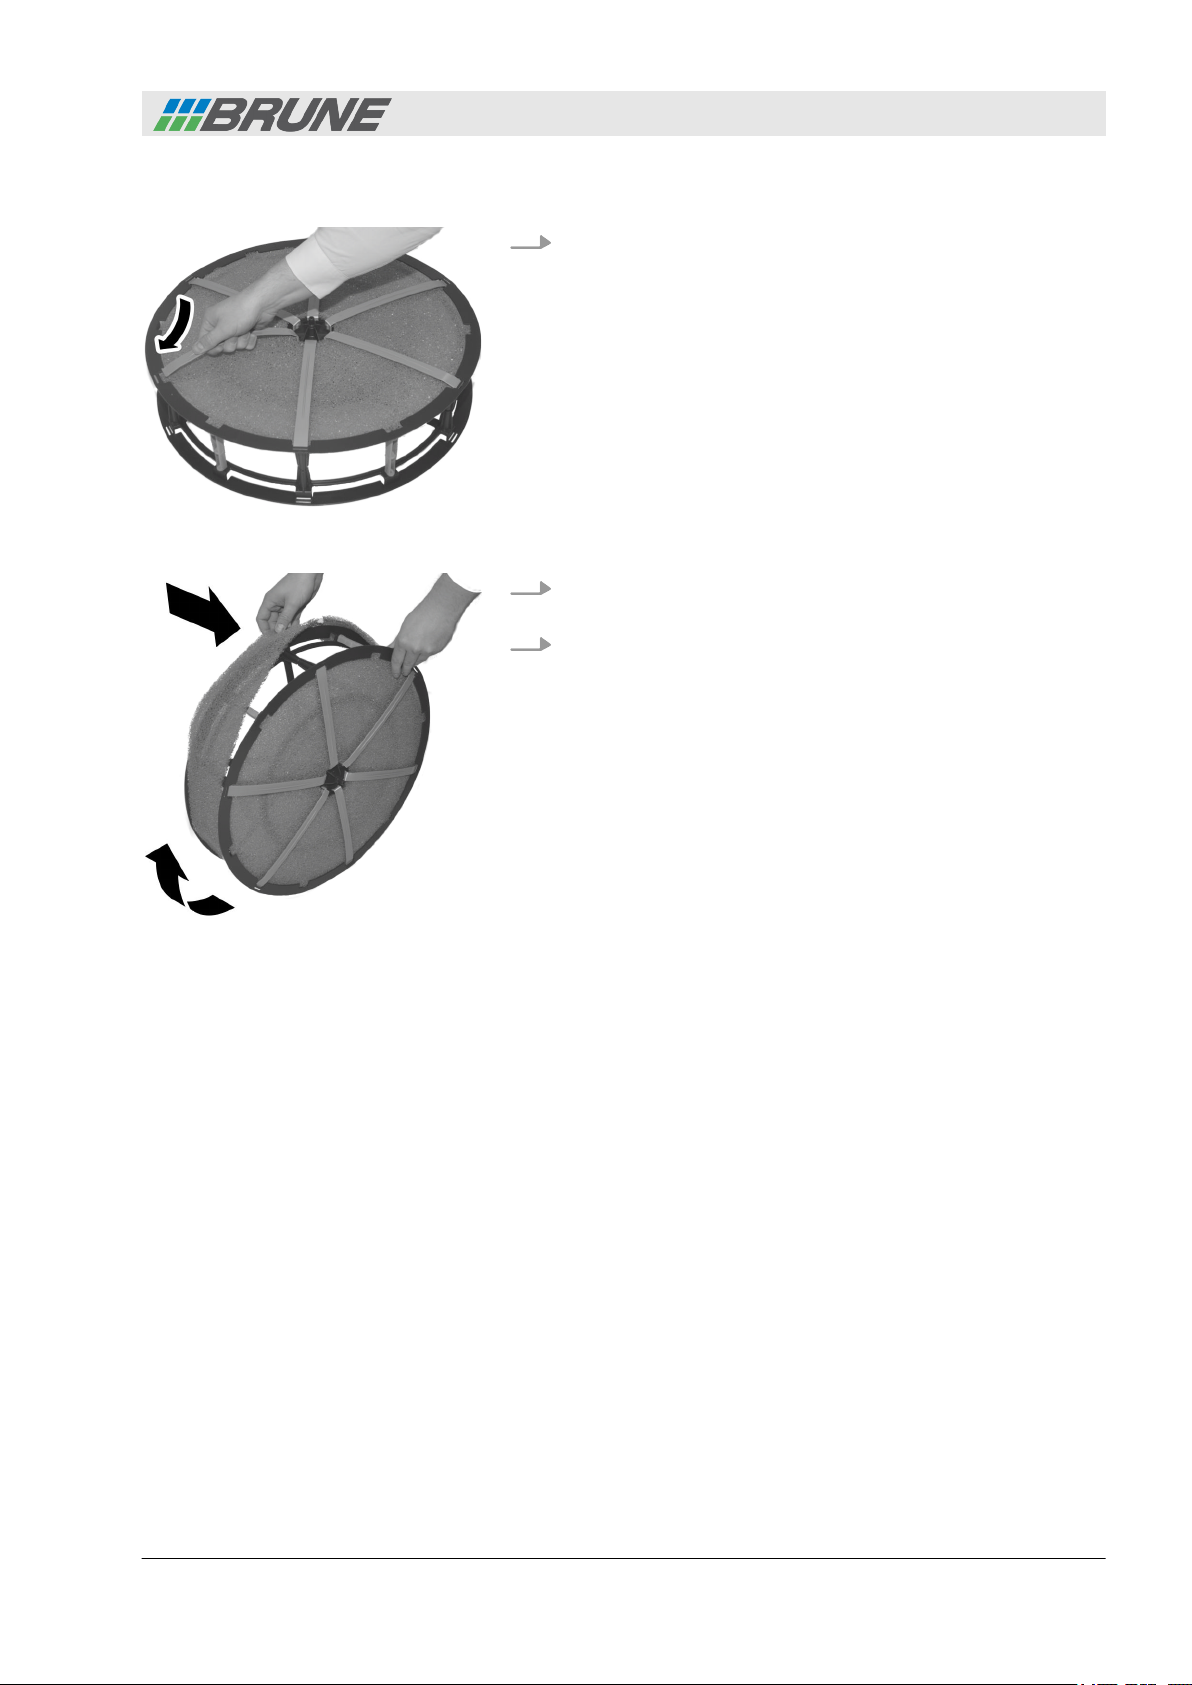
Fig. 26: Fastening the terminal strips
Cleaning and care
Changing the evaporator filter
9. Fold down the terminal strips and lock them into place
(Fig. 26).
10. Carefully pull the new outer evaporator filter over the filter
drum (Fig. 27); it may tear.
11.
Close the front (Ä on page 26).
Fig. 27: Laying the outer evaporator
filter
Brune B 280 Evaporative humidifier 31
Page 32
Cleaning and care
Changing the cleaning filter
4.5 Changing the cleaning filter
The suitable cleaning filter (order number: 6551) can be obtained
from our customer service department (Ä ‘Customer service’
on page 4).
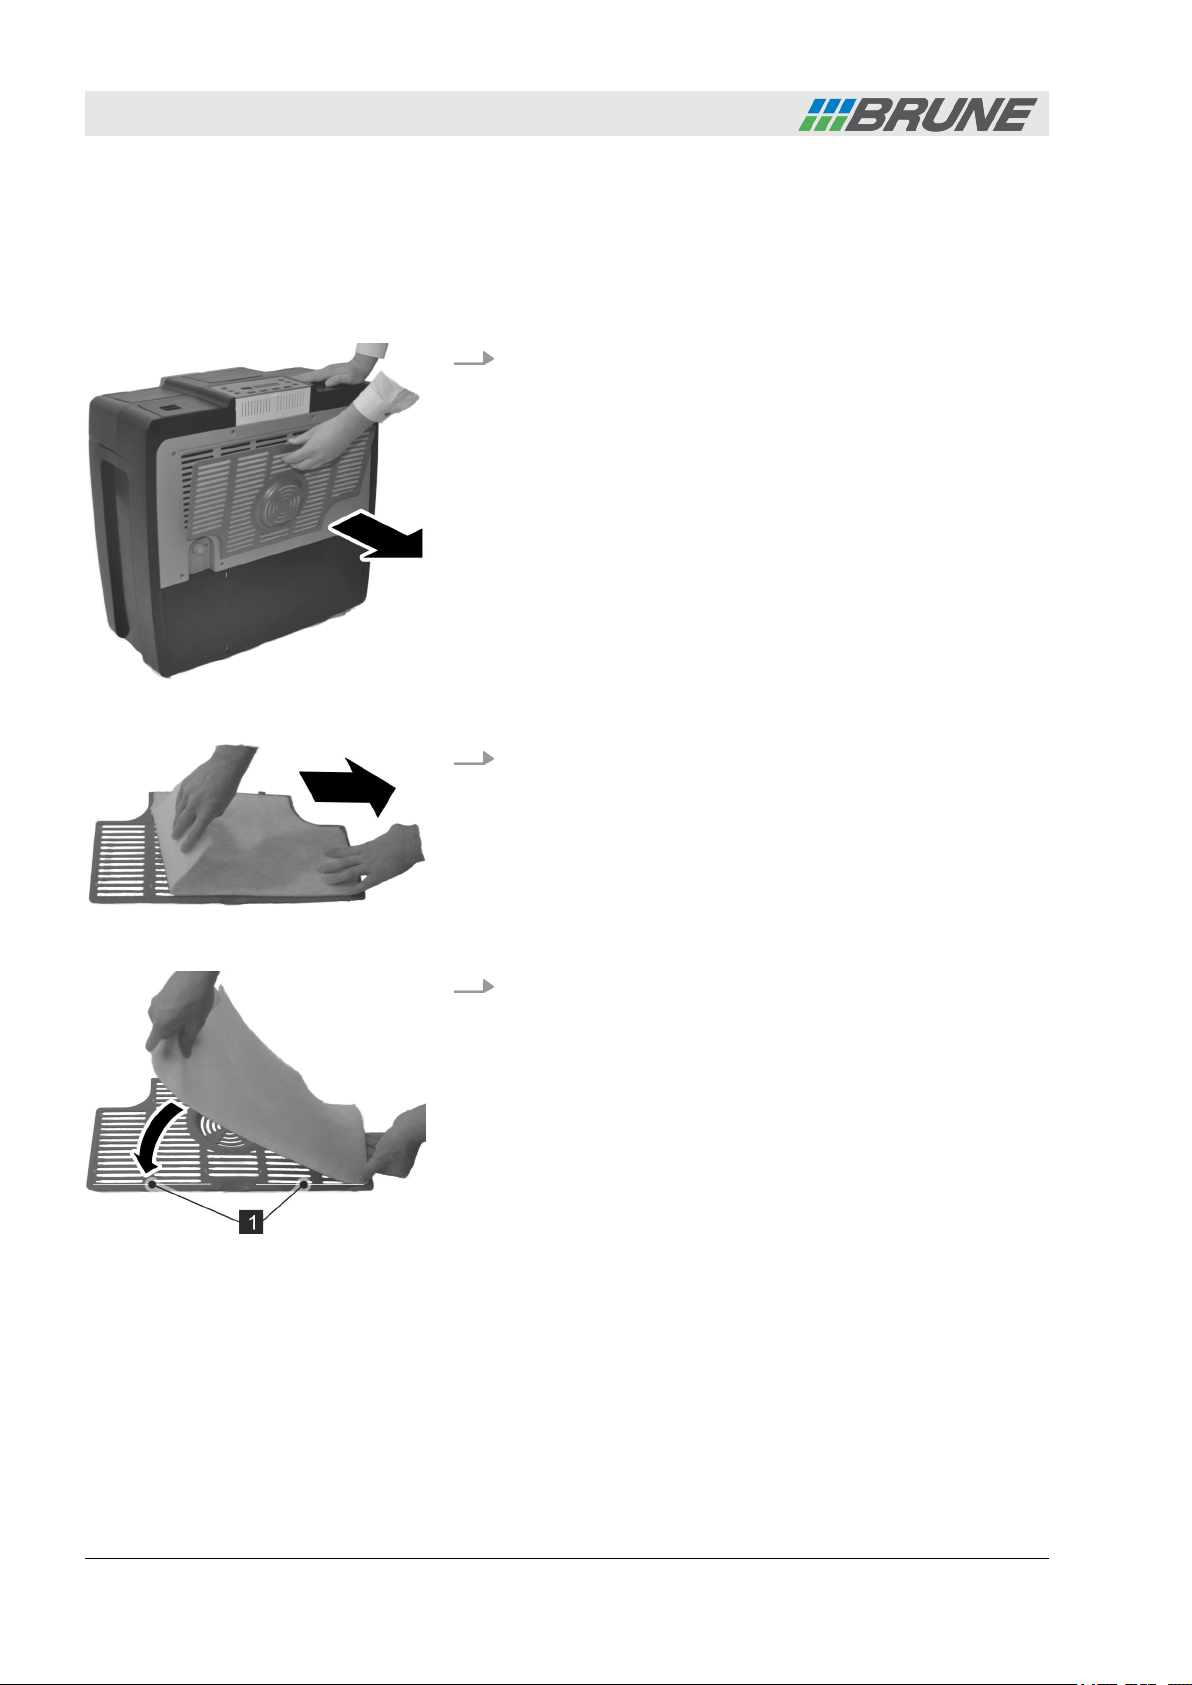
1. Open the intake grille by pulling it (Fig. 28).
Fig. 28: Opening the intake grille
Fig. 29: Removing the cleaning filter
Fig. 30: Sticking down the cleaning
filter
2. Remove the old cleaning filter (Fig. 29).
3. Stick the new cleaning filter onto the intake grille with the
sticky side along the marking (Fig. 30/1).
Brune B 280 Evaporative humidifier32
Page 33
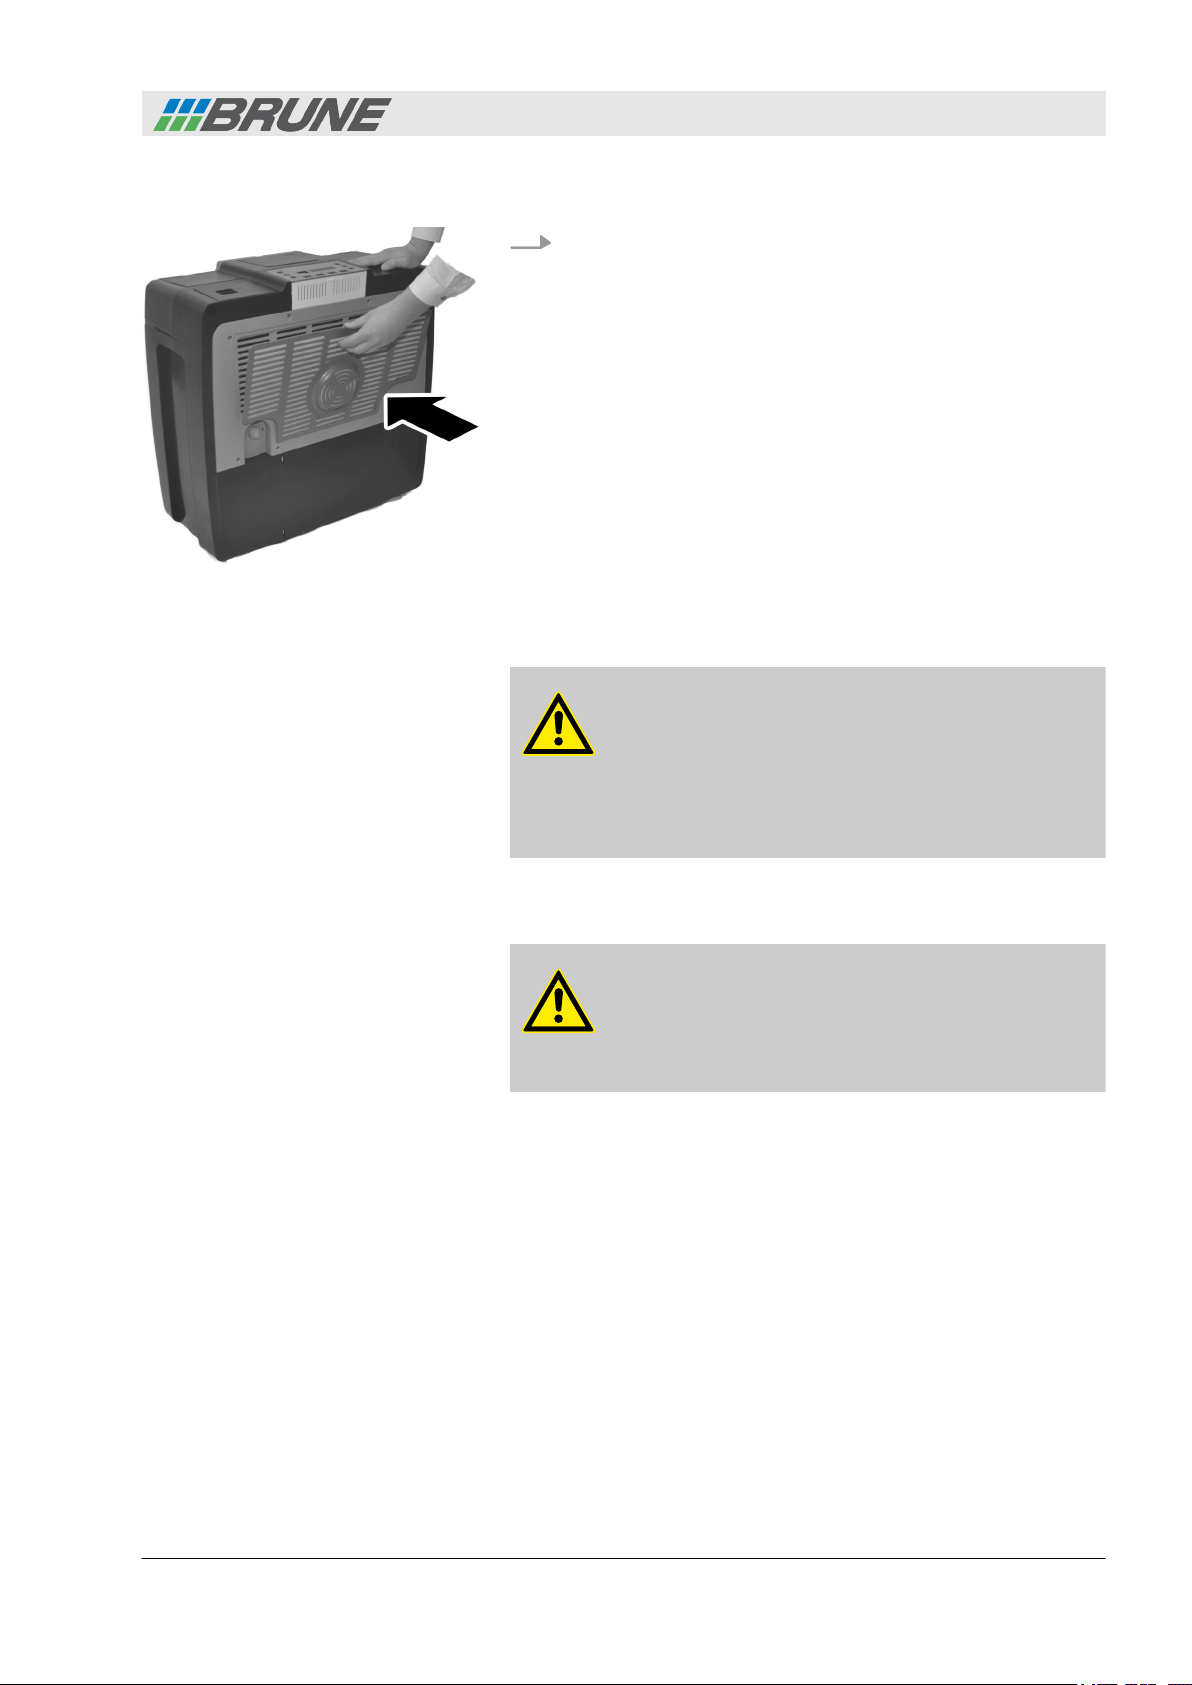
4. Close the intake grille. To do so, insert the two lower guides
into the respective holes and press on the individual fixing
points until they engage (Fig. 31).
Fig. 31: Closing the intake grille
4.6 Changing the UV lamp (optional accessories)
UV lamp
WARNING!
Danger of injury from mercury in UV lamps!
During improper transport, operation or lifting, mercury
can escape from the UV lamp. Contact with mercury
can lead to severe poisoning, skin irritation and eye
damage.
Cleaning and care
Changing the UV lamp (optional accessories)
n Always lift UV lamps containing mercury carefully.
WARNING!
Danger of injury from UV light!
UV light irritates and damages the eyes and can cause
skin irritations.
n Pull out the mains plug before changing the UV lamp.
n Do not look at the switched on UV lamp.
n In the case of dazzling, sedate the eyes by covering them with
a broad, opaque bandage and take the injured person to an
eye clinic.
Brune B 280 Evaporative humidifier 33
Page 34
Cleaning and care
Changing the UV lamp (optional accessories)
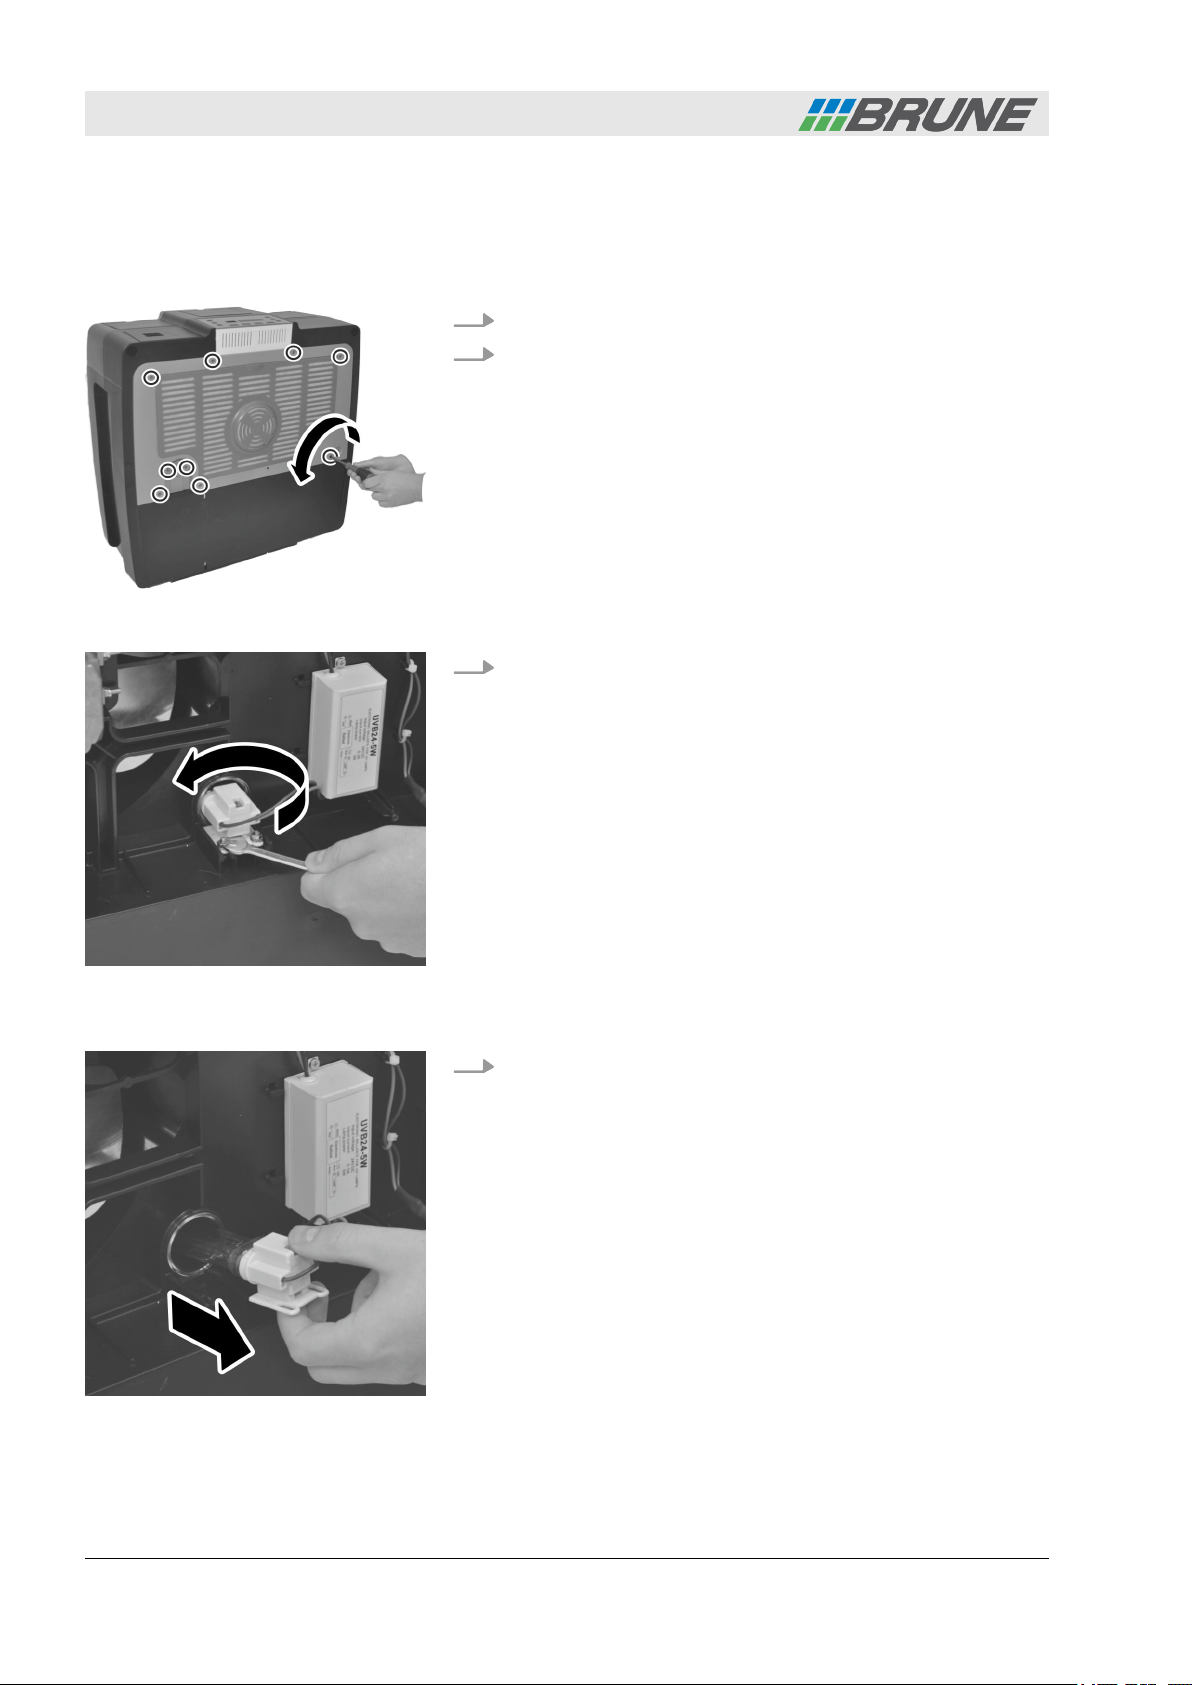
Fig. 32: Opening the rear
The suitable UV lamp (order number: 6210) can be obtained from
our customer service department (Ä ‘Customer service’
on page 4).
1. Loosen the screws of the rear wall of the housing (Fig. 32).
2. Place the rear wall of the housing to one side.
3. Loosen the nuts of the lamp holder with a wrench SW 7
(Fig. 33).
Fig. 33: Loosening the nuts of the
lamp holder
Fig. 34: Removing the UV lamp
4. Carefully remove the lamp holder from the back (Fig. 34).
Brune B 280 Evaporative humidifier34
Page 35
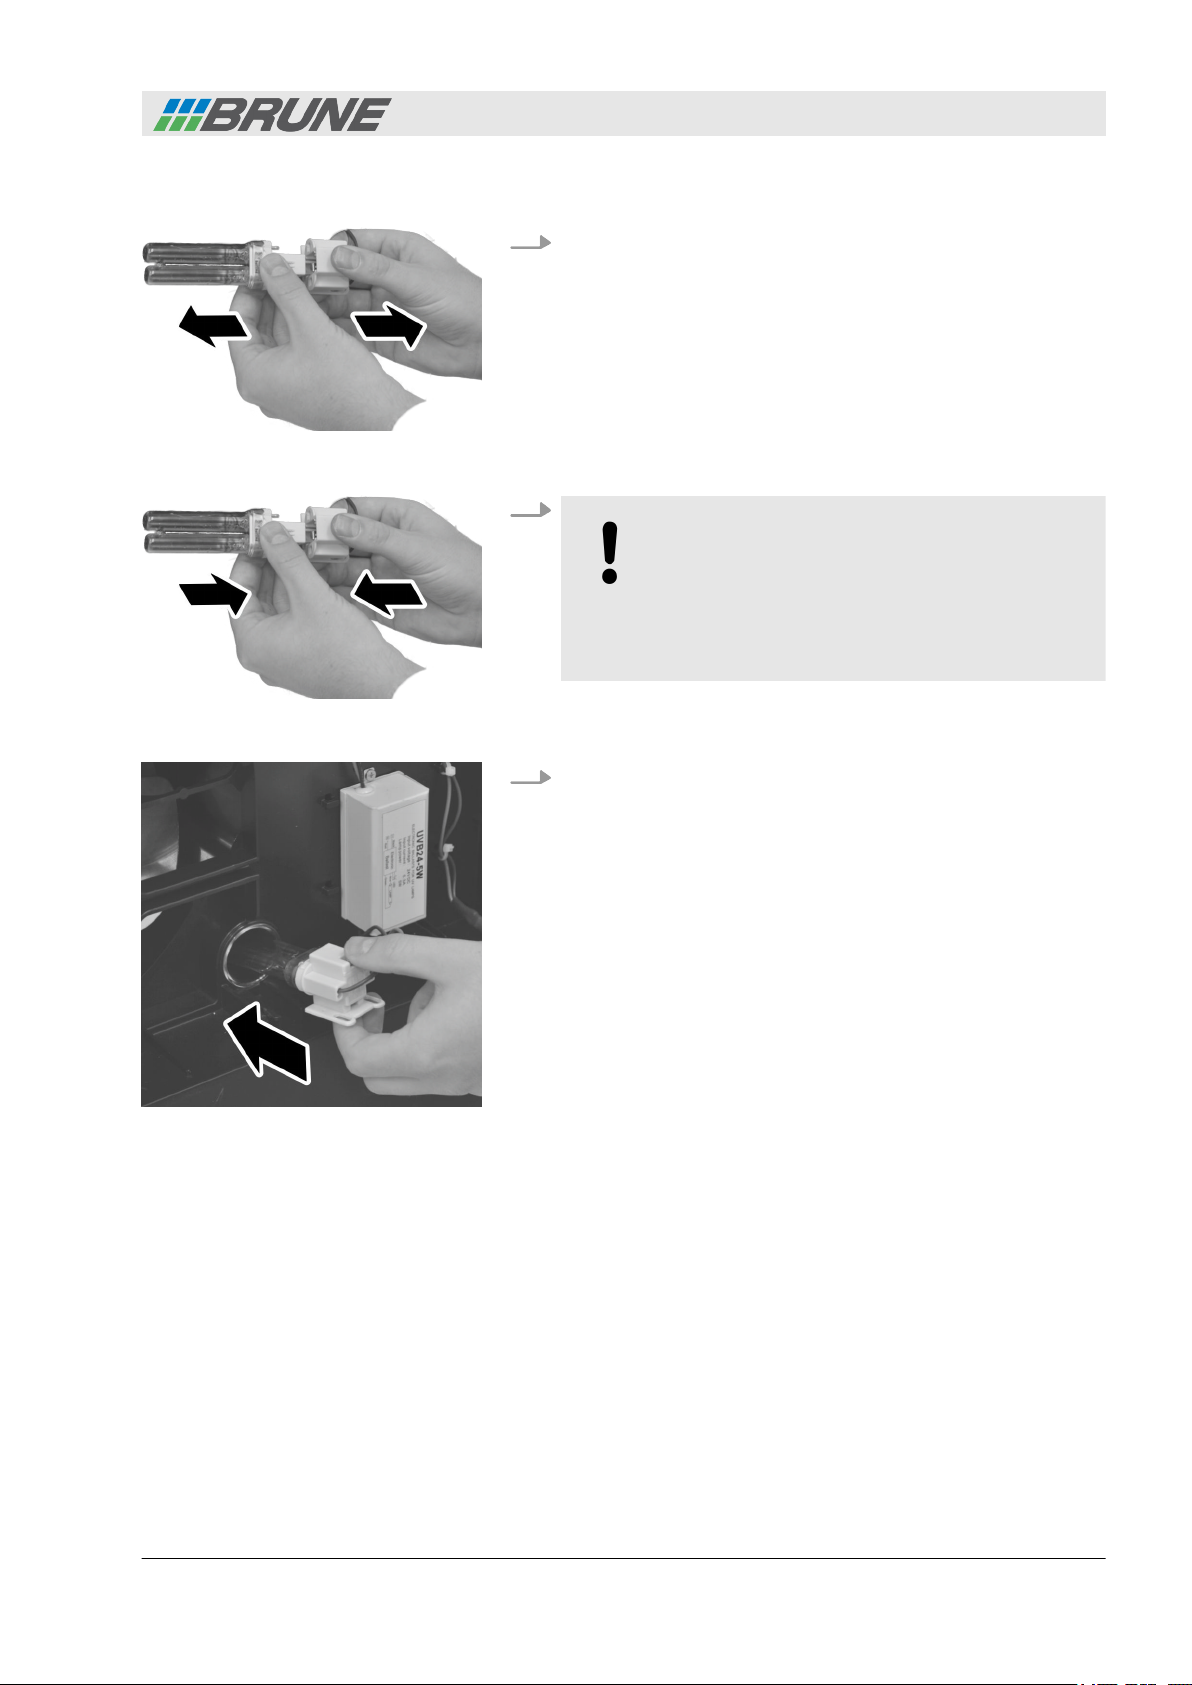
Fig. 35: Pulling out the UV lamp
Cleaning and care
Changing the UV lamp (optional accessories)
5. Pull the old UV lamp out of the holder (Fig. 35).
6.
NOTICE!
Danger of damage to the UV lamp!
Touching the bulb can damage the UV lamp
– Do not touch the bulb!
– Only touch the UV lamp on the base
Fig. 36: Inserting the UV lamp
Fig. 37: Sliding a new UV lamp into
the opening
Insert a new UV lamp into the holder (Fig. 36).
7. Slide the UV lamp and holder into the opening (Fig. 37).
Brune B 280 Evaporative humidifier 35
Page 36
Cleaning and care
Changing the UV lamp (optional accessories)
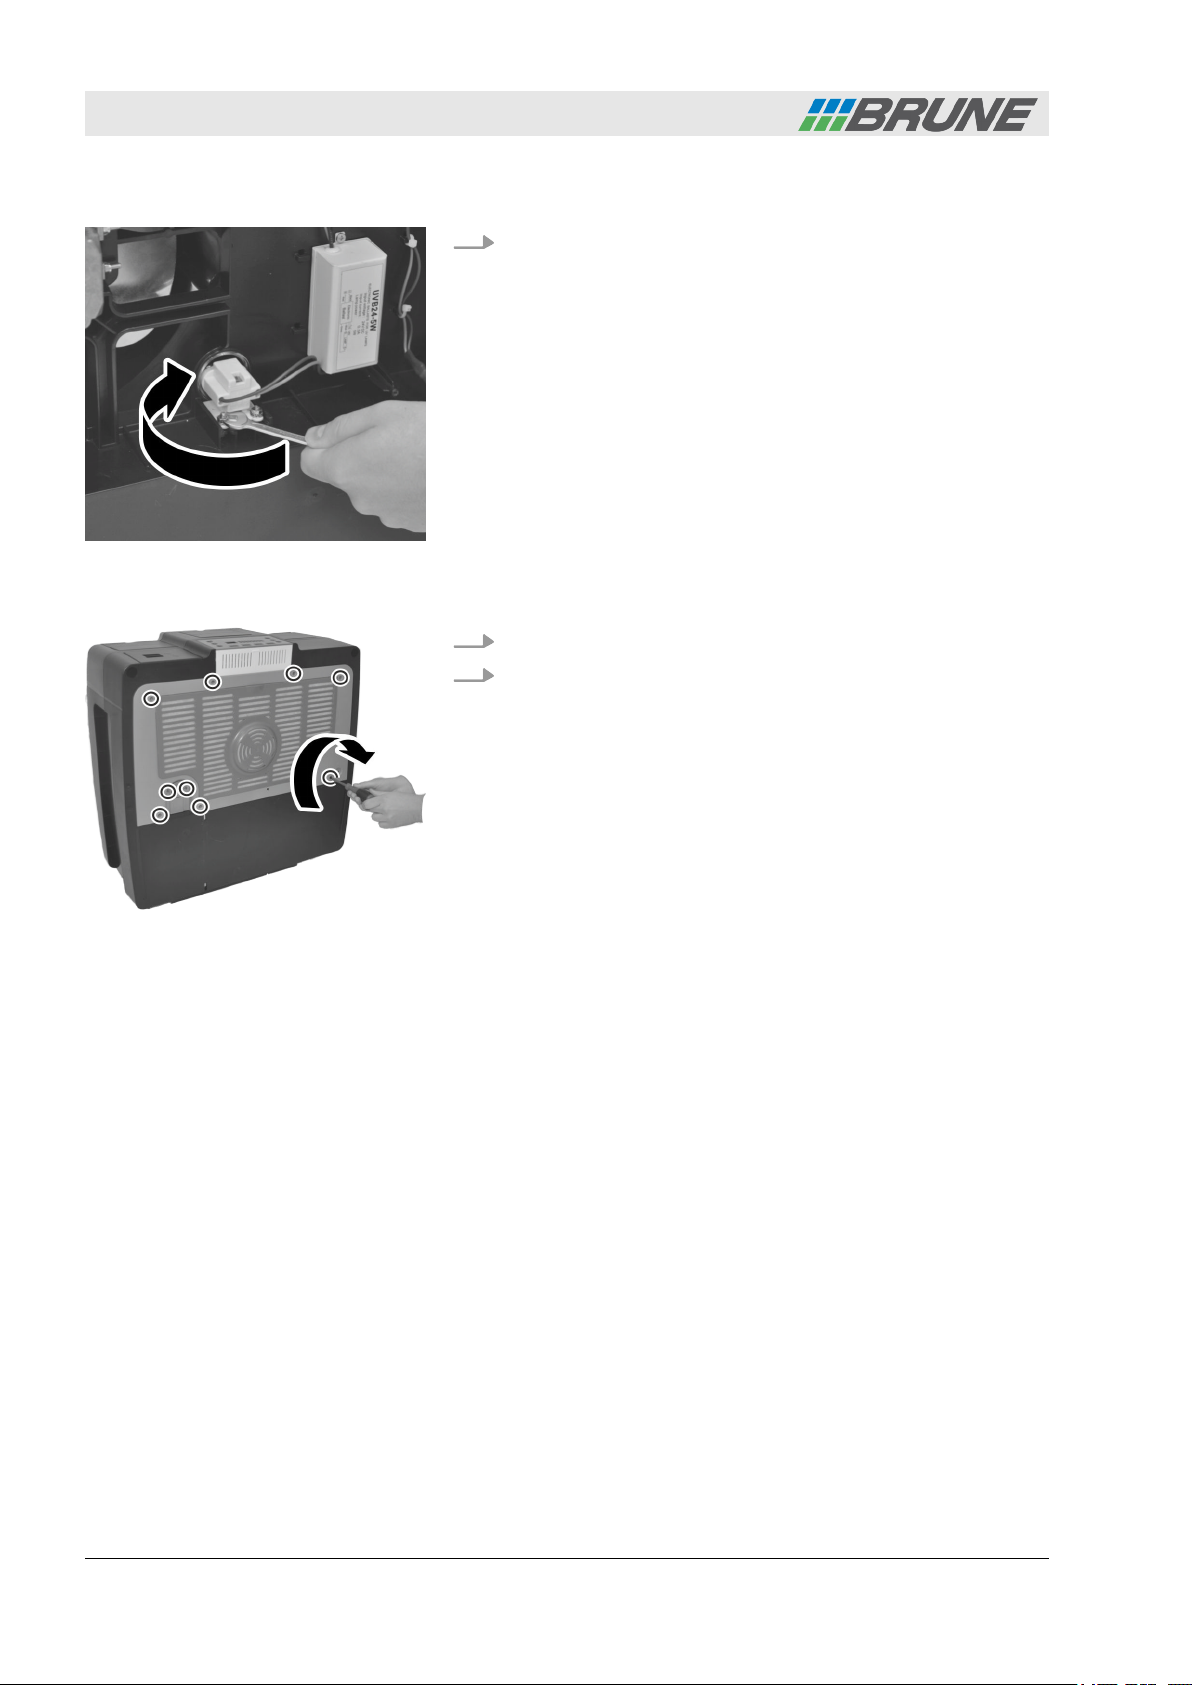
Fig. 38: Tightening the nuts of the
lamp holder
8. Tighten the nuts with a wrench SW 7 (Fig. 38).
9. Close the rear wall of the housing.
10. Close the rear wall of the housing and tighten the screws
(Fig. 39).
Fig. 39: Closing the rear
Brune B 280 Evaporative humidifier36
Page 37

5 Rectifying problems
Rectifying problems
Fault table
If the operation of the humidifier is interrupted, an error message
appears in the AIR HUMIDITY % display panel.
Error
number
F1 Front housing cover not
F2 Tank empty Fill up with water.
F3 Tank sensor faulty Contact the customer
F4 Humidity sensor faulty Contact the customer
F5 No radio reception
F9 Multiple faults present Carry out the remedies
Description Remedial action
Close the housing cover.
closed
service department.
service department.
Check the radio trans(remote sensor system,
optional accessories)
mitter and if necessary,
change the batteries.
for faults F1 to F5.
If the fault still exists,
contact the customer
service department.
Repairs
Other malfunctions Remedial action
Water leak
Severe calcification
Development of odours
Repairs may only be carried out by the service department of the
Ä
manufacturer (
tricians.
‘Customer service’ on page 4) or by trained elec-
n Pull out the mains plug.
n Empty the water container.
n Contact the customer service
department.
n Clean the humidifier more regu-
larly.
n Use descaler during cleaning.
n Use treated water instead of tap
water.
n Change the water more regularly.
n Clean the humidifier more regu-
larly.
n Use Waterfresh.
n Replace the filter.
Brune B 280 Evaporative humidifier 37
Page 38
Disposing
6 Disposing
If no return or disposal agreement was made, send dismantled
components to be recycled:
n Scrap metals.
n Hand over plastic components to be recycled.
n Sort and dispose of other components according to the mate-
rial properties.
ENVIRONMENTAL PROTECTION!
Danger to the environment from improper dis-
posal!
Improper disposal may endanger the environment.
n Batteries and mercury-containing UV lamps must not be dis-
posed of in domestic waste.
n Dispose of batteries and mercury-containing UV lamps at local
collection points.
n Have approved specialist companies dispose of electrical
waste and electronic components.
n If in doubt, obtain information on environmentally-friendly dis-
posal from the local authority or a special certified waste disposal company.
Brune B 280 Evaporative humidifier38
Page 39

7 Index
Index
A
Automatic mode .........................18
B
Blower .................................18
Blower speed ...........................18
Button lock .............................18
C
Changing the UV lamp ....................33
Changing the water .......................28
Cleaning ...............................28
Closing the outlet grille ....................26
Coding
Humidifier ............................22
Remote sensor ........................21
Copyright protection .......................3
Customer service .........................4
D
Dangers ...............................11
Descaler ...............................28
Display elements ..........................8
Disposal
Batteries .............................38
Humidifier ............................38
UV lamp .............................38
E
Electric current ..........................11
Environmental protection
Batteries .............................14
UV lamp .............................14
Error message ..........................37
F
Fan speed ..............................18
Fault rectification .........................37
Filter change
Cleaning filter .........................32
Evaporator filter .......................29
Function description .......................6
M
Maintenance ............................24
Measuring the relative humidity ..............19
N
Non-intended use ........................10
O
Opening the outlet grille ...................24
Operating conditions .......................9
Operation
Control elements .......................7
Control panel ..........................7
Overview ................................6
R
Rectifying problems .......................37
Relative humidity .........................18
Remote sensor system ....................19
Replacing the batteries ....................20
Residual risks ...........................11
S
Safety .................................10
Standby ................................17
Start-up
Automatic mode .......................18
Filling the tank ........................16
Ionisation ............................19
Power connection ......................16
Remote sensor system ..................20
Setting the fan speed ...................18
Setting the relative humidity ..............18
Ventilation flaps .......................19
Switching off ............................17
Switching on ............................17
T
Technical data ............................8
Transport
Lifting ...............................15
Moving ..............................15
H
Humidity ...............................18
I
Installation location .......................15
Intended use ............................10
Ionisation ..............................19
Brune B 280 Evaporative humidifier 39
U
Use ...................................10
W
Water connection ........................17
Waterfresh .............................16
Page 40

Luftbefeuchtung Proklima GmbH - Schwarzacher Str. 13 - 74858 Aglasterhausen - Germany
Tel.: 06262-5454 - Fax: 06262-3255 - Mail: [email protected] - Web: www.brune.info
 Loading...