

Page 1
INSTRUKCJA OBSŁUGI
WĘDZARNIA ELEKTRYCZNA OGRODOWA dragON WOOD 60 E
USER MANUAL
dragON ELECTRIC SMOKER WITH SMOKE GENERATOR
BEDIENUNGSANLEITUNG
Elektrischer Gartenräucherofen dragON wood 60 E
NOTICE D’UTILISATION
FUMOIR ÉLECTRIQUE DE JARDIN dragON WOOD 60 E
No 330340
*zdjęcie poglądowe | illustrative photo
1
Page 2

INSTRUKCJA OBSŁUGI
WĘDZARNIA ELEKTRYCZNA OGRODOWA dragON WOOD 60 E
UWAGA!
W celu zapewnienia bezpiecznej eksploatacji urządzenia prosimy o uważne zapoznanie się
i stosowanie w całości do zaleceń niniejszej instrukcji obsługi.
UWAGA!
Każda inna forma wykorzystania i użytkowania urządzenia niezgodna z formą opisaną w treści
niniejszej instrukcji obsługi jest zabroniona.
UWAGA!
Urządzenie zasilane jest niebezpiecznym dla życia napięciem 230 V.
1. Informacje ogólne
DragON Wood 60 E z generatorem dymu to ogrodowa wędzarnia elektryczna, drewniana,
przeznaczona do wędzenia, suszenia, podgrzewania lub podpiekania artykułów spożywczych.
2. Wskazówki bezpieczeństwa
Ogólne wskazówki dotyczące bezpieczeństwa pracy z urządzeniami elektrycznymi.
OSTRZEŻENIE
Należy zapoznać się ze wszystkimi ostrzeżeniami i wskazówkami dotyczącymi bezpieczeństwa
użytkowania oraz ilustracjami i danymi technicznymi dostarczonymi wraz niniejszym
urządzeniem. Nieprzestrzeganie poniższych wskazówek może stać się przyczyną porażenia prądem
elektrycznym, pożaru i/lub poważnych obrażeń ciała.
Należy zachować wszystkie przepisy i wskazówki bezpieczeństwa dla dalszego stosowania.
Pojęcie „urządzenie elektryczne” odnosi się do urządzenia elektrycznego zasilanego energią
elektryczną z sieci (z przewodem zasilającym).
Bezpieczeństwo w miejscu użytkowania
UWAGA: używać tylko na zewnątrz budynku pod zadaszeniem / wiatą.
Zabrania się narażania urządzenia na oddziaływanie czynników atmosferycznych,
takich jak deszcz, mróz, nadmierne nasłonecznienie itp.
Miejsce użytkowania należy utrzymywać w czystości. Zabrania się pozostawiania
urządzenia bez nadzoru.
Urządzenia nie należy używać w pobliżu łatwopalnych cieczy, gazów lub pyłów.
Podczas pracy grzałka zainstalowana w urządzeniu rozgrzewa się do wysokiej temperatury,
która może spowodować zapłon pyłów lub oparów i doprowadzić do wybuchu.
Należy zachować szczególną ostrożność przy wykonywaniu czynności wewnątrz
komory wędzarniczej w bliskim sąsiedztwie grzałki i elementów gorących. Bezpośredni
kontakt bez odpowiedniego zabezpieczenia grozi poparzeniem.
Zakazuje się obsługi urządzenia bez użycia odpowiednich środków ochrony
indywidualnej.
Podczas użytkowania urządzenia należy zwracać uwagę na to, aby dzieci i inne osoby
postronne nie znajdowały się zbyt blisko gorących elementów zewnętrznych, np.
generatora dymu. Kontakt bezpośredni z korpusem generatora dymu może powodować
poparzenia.
Zabrania się obsługi urządzenia przez osoby niepełnoletnie oraz osoby dorosłe o
ograniczonych zdolnościach zdrowotnych.
Należy unikać nienaturalnych pozycji pracy urządzenia. Należy dbać o stabilne
usytuowanie urządzenia.
Nie przenosić urządzenia podczas pracy. Należy odczekać aż wędzarnia ostygnie.
Bezpieczeństwo elektryczne
2
Page 3

Urządzenie zasilane jest napięciem 230 V AC. Wszelkie działania naprawcze mogą być
1
Drewniana komora
2
Skrzynka z panelem sterowania
3
Stelaż metalowy
4
Skrzynka z silnikiem wentylatora
5
Generator dymu
6
Panel sterowania z sondą
7
Zespół grzałki termoobiegu
wykonywane jedynie przez wyspecjalizowane jednostki serwisowe.
Zabrania się samodzielnego wykonywania drobnych napraw.
Wszelkie czynności konserwacyjne muszą być przeprowadzone, gdy urządzenie jest
odłączone od źródła zasilania.
Wtyczka urządzenia elektrycznego musi pasować do gniazd. Nie wolno w żadnej
sytuacji i w żaden sposób modyfikować wtyczki. Podczas użytkowania urządzenia
elektrycznego z uziemieniem ochronnym nie wolno stosować żadnych wtyków
adaptacyjnych.
Zaleca się, aby urządzenie zasilane było z gniazdka posiadającego w instalacji
bezpiecznik różnicowo-prądowy.
Urządzenia nie wolno narażać na kontakt z deszczem.
Nie używać przewodu zasilającego do innych celów. Nie wolno używać przewodu do
przesuwania urządzenia; nie wolno też wyciągać wtyczki z gniazda pociągając za
przewód. Przewód należy chronić przed wysokimi temperaturami, należy go trzymać z
dala od ostrych krawędzi.
Nie podłączać wędzarni elektrycznej, dopóki nie będzie całkowicie złożona i gotowa do
użycia.
Używać tylko uziemionego gniazdka elektrycznego.
Nigdy nie używać urządzenia, które działa nieprawidłowo lub jest uszkodzone.
Podczas obsługi wędzarni elektrycznej należy zawsze mieć pod ręką gaśnicę
proszkową.
Nigdy nie używać urządzenia elektrycznego z uszkodzoną wtyczką lub przewodem.
Jeśli przewód zasilający zostanie uszkodzony, musi zostać wymieniony przez
producenta.
ZALECENIA
Przez rozpoczęciem wędzenia upewnij się, że komin jest w pełni drożny.
Nie przykrywaj rusztów folią aluminiową, ponieważ nie pozwoli to na prawidłowy przepływ
ciepła.
Nie przeciążaj wędzarni nadmierną ilością produktów do uwędzenia za jednym razem. Bardzo
duże ilości wsadu mogą uwięzić ciepło, wydłużyć czas i spowodować nierównomierne
wędzenie. Pozostaw przestrzeń między produktami, aby zapewnić prawidłowy obieg ciepła.
Bardzo niskie temperatury mogą wydłużyć czas wędzenia.
Po użyciu przechowuj wędzarnię w suchym miejscu.
Główne elementy wędzarni:
3
Page 4
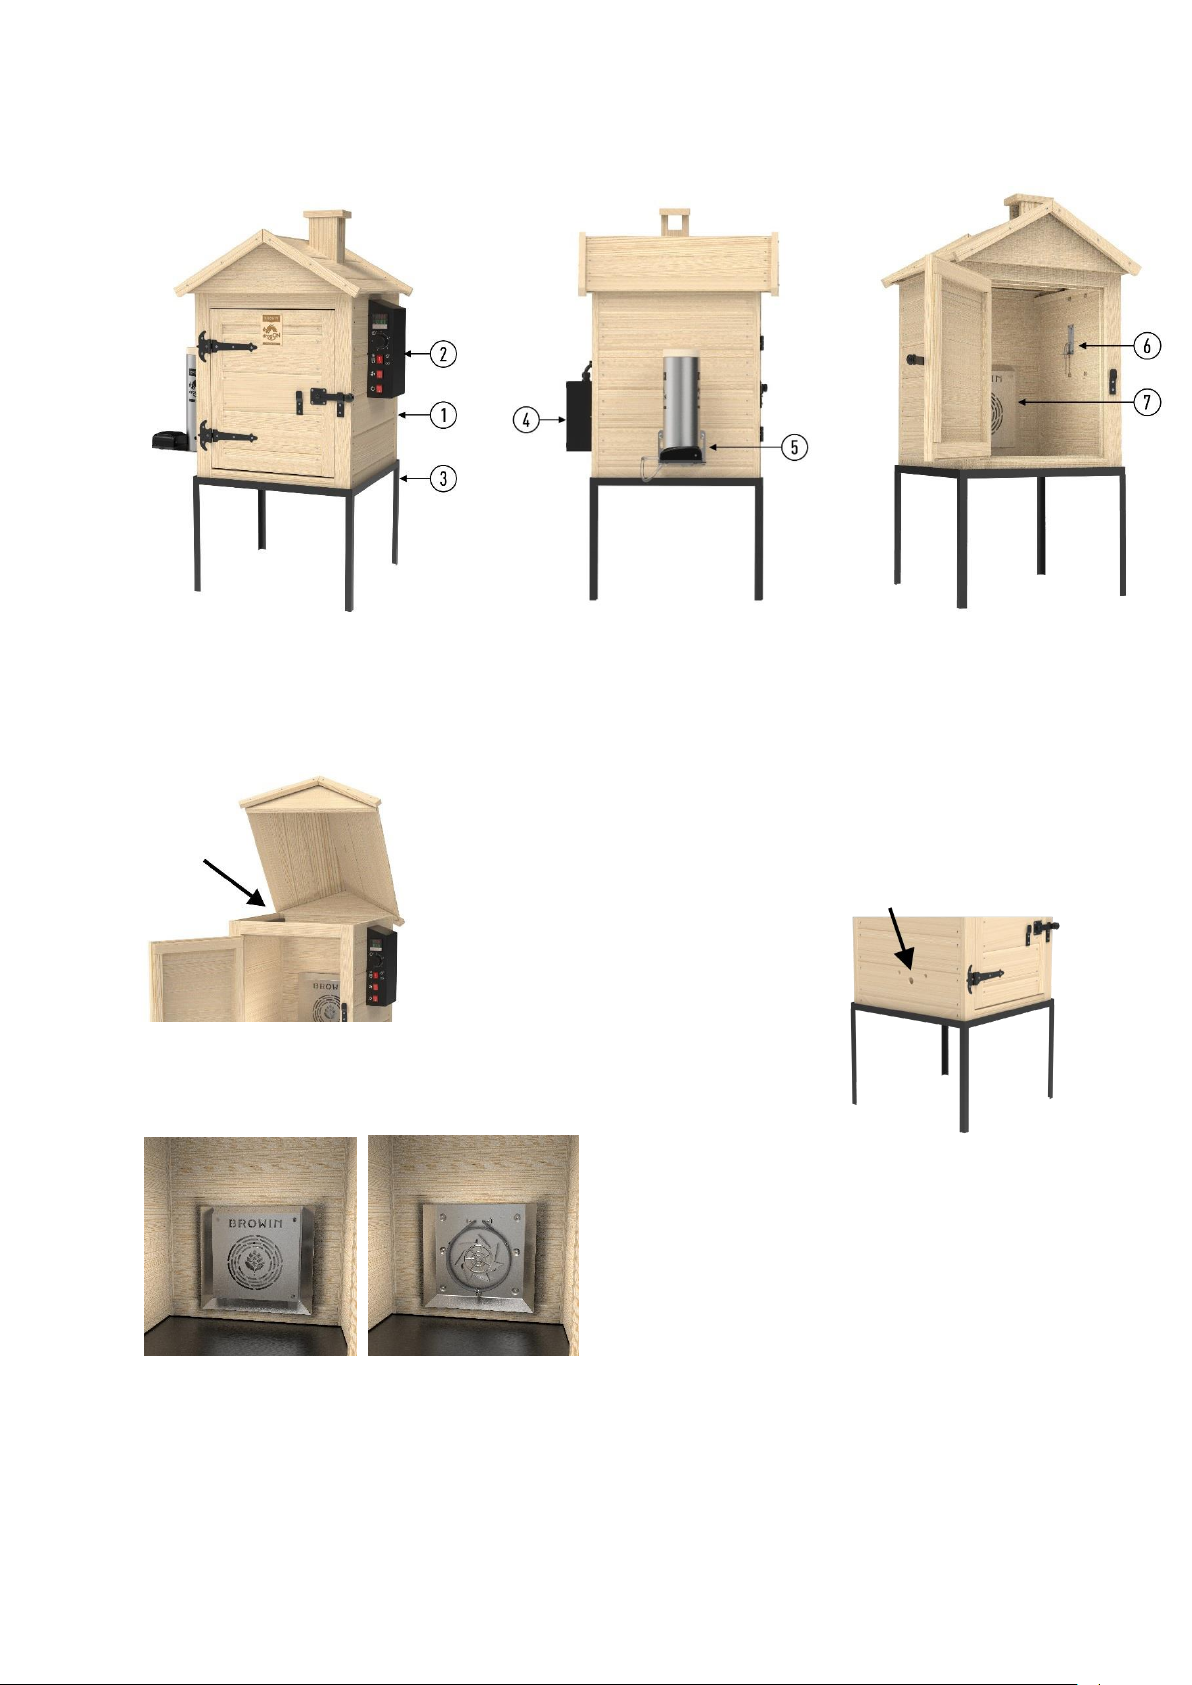
3. Opis budowy
Rys. 1
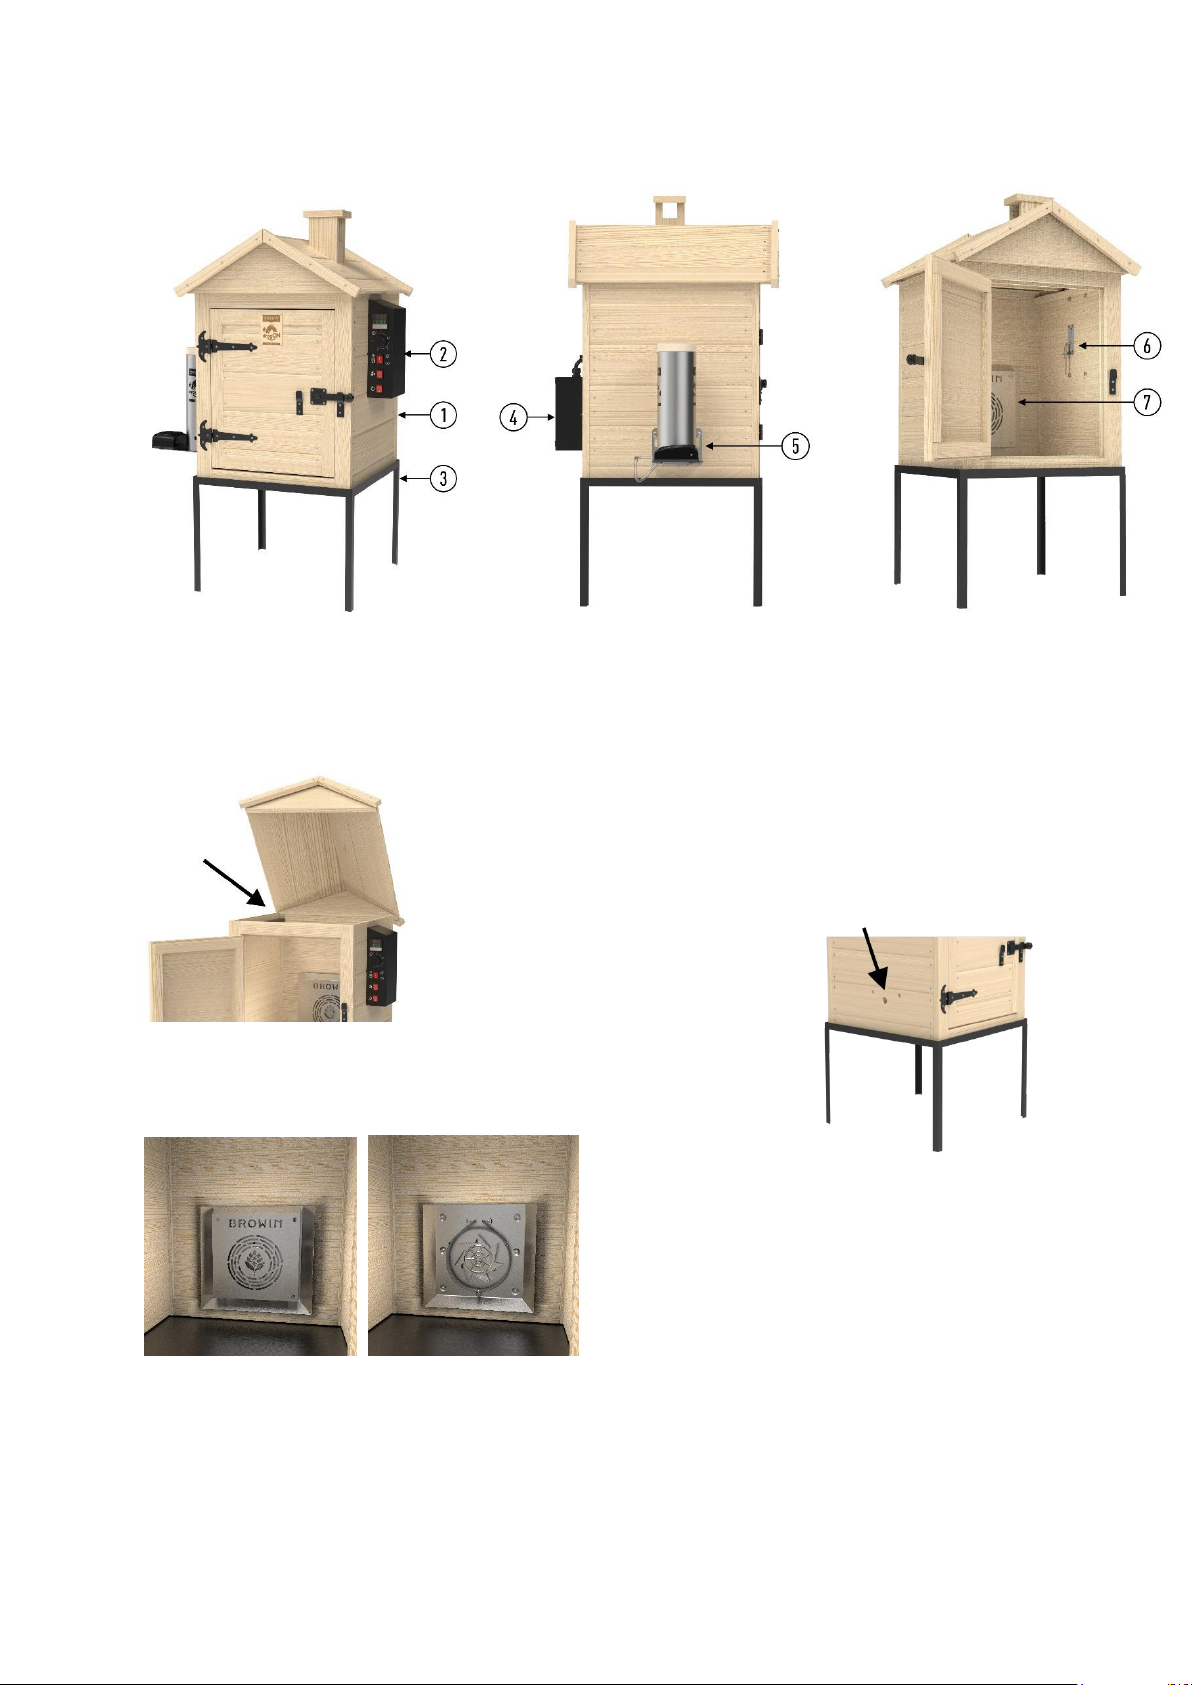
Proces wędzenia odbywa się w przestrzeni drewnianej komory (1) zamykanej drzwiczkami z ryglem
oraz dachem (otwieralnym), na zawiasach. (Rys. 2)
W lewej bocznej ścianie drewnianej komory wykonane są otwory
przewidziane do zamontowania generatora dymu dragON JET 1 z
pompką elektryczną (5). (Rys. 3)
Rys. 2
Rys. 3
Wewnątrz drewnianej komory znajduje się zespół
grzałki termoobiegu, gdzie po zdjęciu osłony
głównej znajduje się grzałka oraz wentylator. (Rys.
4)
Rys. 4
UWAGA !!!
Elementy zespołu grzałki termoobiegu oraz generatora dymu podczas pracy wędzarni nagrzewają się
do bardzo wysokich temperatur. Należy zachować szczególną ostrożność, ponieważ dotyk bez
rękawic grozi poparzeniem.
4
Page 5
4. Opis działania
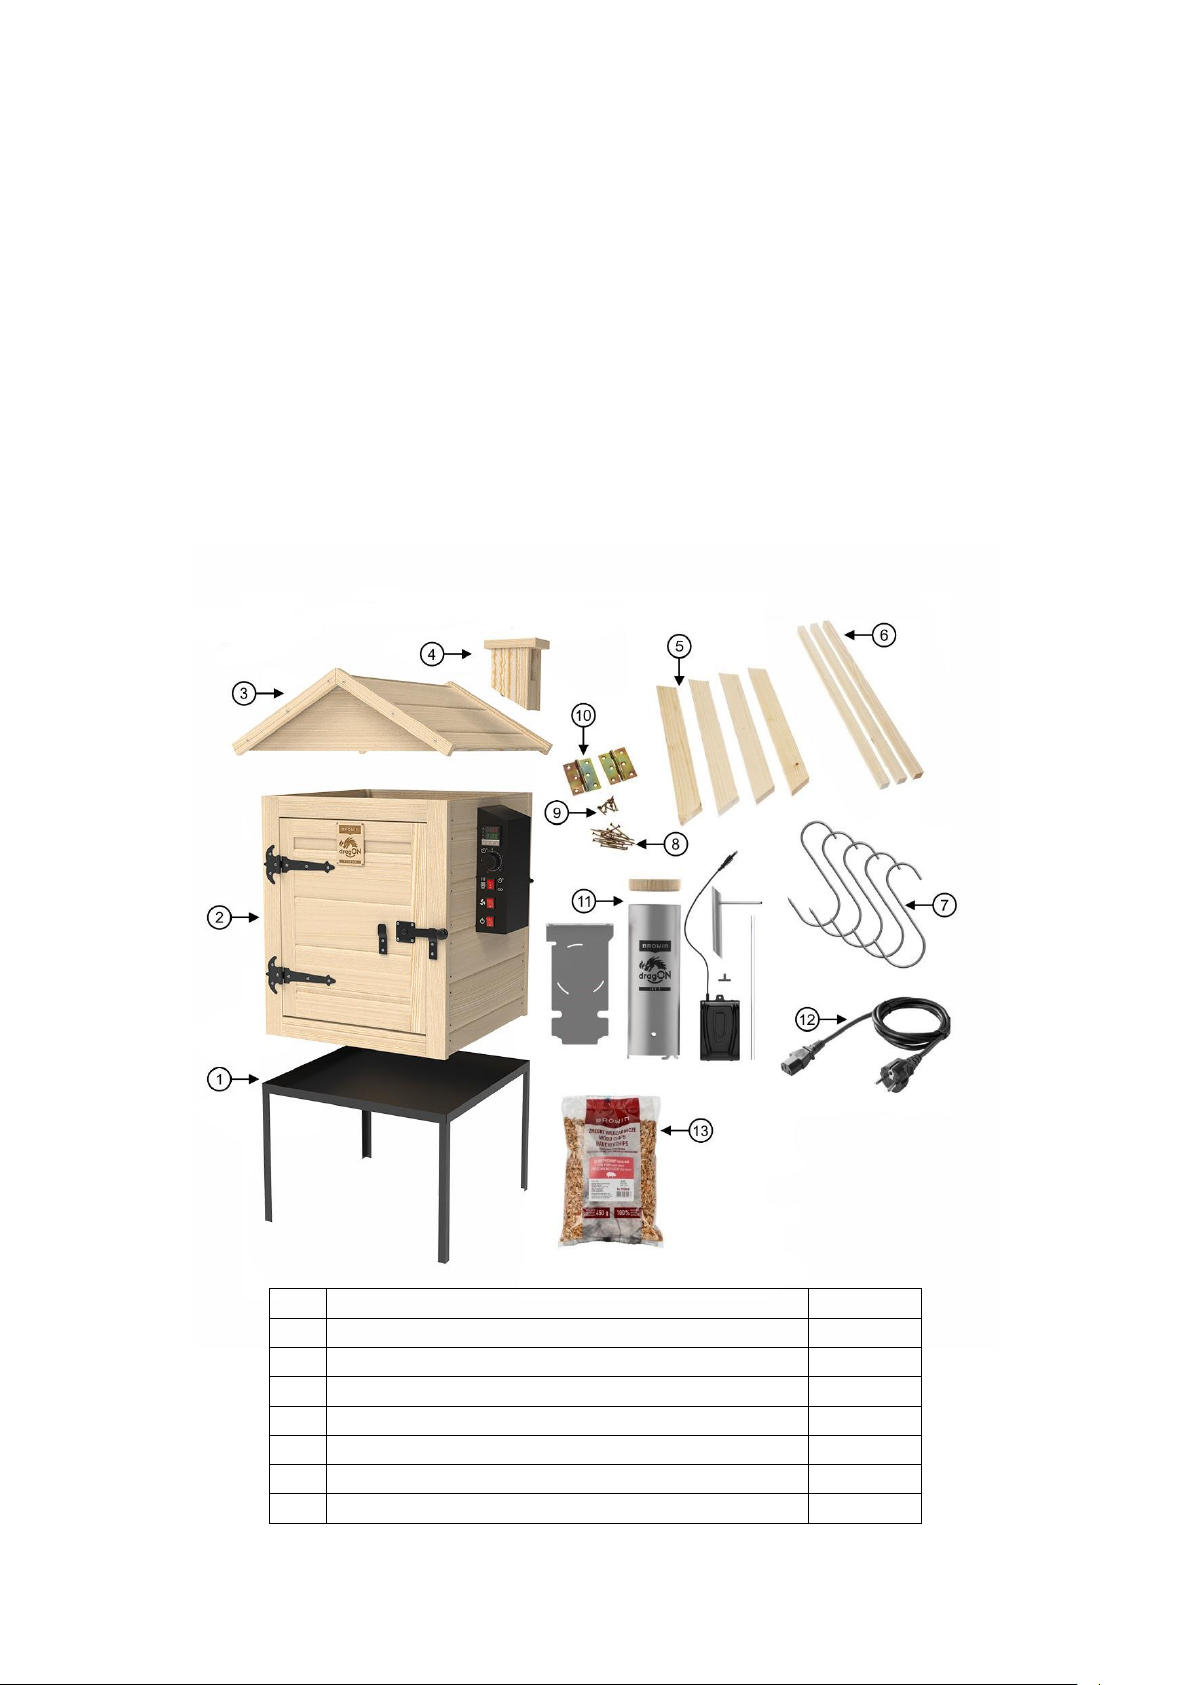
Nr
Opis
Ilość
1
Stelaż metalowy
1
2
Drewniana komora
1
3
Dach
1
4
Kominek
1
5
Listwy do daszku
4
6
Belki drewniane do zawieszania produktów
3
7
Haki wędzarnicze
5
Drewniana, elektryczna wędzarnia ogrodowa zapewnia profesjonalne prowadzenie procesu wędzenia,
suszenia lub podpiekania produktów spożywczych. Zainstalowana grzałka z termoobiegiem
rozprowadza ciepło w całej przestrzeni drewnianej komory, a to sprawia, że proces wędzenia staje się
dużo szybszy i efektywniejszy. Innowacyjny generator dymu umożliwia wykorzystanie wszystkich
walorów wędzenia z użyciem zrębków wędzarniczych.
Praca wędzarni nadzorowana jest przez sterownik PID za pomocą termostatu, który w sytuacji
niebezpiecznej,
tj. temperaturze powyżej 110⁰C, odłączy zasilanie.
5. Montaż i przygotowanie urządzenia do pracy
Miejsce ustawienia urządzenia powinno znajdować się na zewnątrz budynku oraz być
zadaszone.
Powinno również zapewniać zasilanie energią elektryczną z uziemieniem.
Wędzarnia powinna być ustawiona na stabilnym podłożu. Ze względu na instalację elektryczną oraz
nagrzewające się elementy należy z dużą starannością dobrać jak najbardziej płaskie, trudnopalne
podłoże, aby nie wystąpiło ryzyko przewrócenia się urządzenia i spowodowania pożaru. Wędzarnię
należy przenosić w min. 2 osoby – ze względu na jej ciężar i gabaryty.
Rys. 5
5
Page 6
8
Zestaw wkrętów do montażu kominka
i listew przydachowych
16
9
Zestaw wkrętów do montażu zawiasów
10
10
Zawiasy do dachu
2
11
Generator dymu dragON Jet 1 z pompką
1
12
Przewód zasilający
1
13
Zrębki wędzarnicze
1
Instrukcja – wędzarnia
1
Instrukcja generatora dymu
1
Montaż
1. Przygotuj miejsce pracy i narzędzia.
Przed montażem uważnie przeczytaj załączoną instrukcję.
Potrzebne narzędzia: wkrętarka, wiertarka, śrubokręt krzyżakowy.
2. Montaż korpusu wędzarni
Drewnianą komorę (2) ustaw na metalowym stelażu (1). Dach (3) połóż na płaskim podłożu i
odwróć wewnętrzną stroną do góry. Odrysuj kontur podstawy kominka (4) w miejscu
wyfrezowanego w daszku otworu tak, aby oznaczyć miejsce mocowania kominka. Od spodu
daszku, w obrysie kominka wkręć 4 wkręty (8) w taki sposób, aby ich czubki nieco wystawały
poza daszek. Odwróć daszek, nałóż kominek i dociskając go dokręć wkręty. Dach umieść na
komorze. Do przedniej oraz tylnej krawędzi dachu dokręć listwy (5) – za pomocą wkrętów (8),
używając 3 wkrętów na każdą listwę. Listwy te stanowią jedynie element dekoracyjny. Daszek
możesz przymocować do komory wędzarni za pomocą zawiasów (10), mocowanych najlepiej w
równych odstępach od brzegu komory (ok. 2 cm). Do montażu zawiasów użyj wkrętów (9).
Środkowy otwór w zawiasie pozostaw pusty – w celu uniknięcia rozwarstwienia drewna.
3. Montaż generatora dymu dragON Jet 1
Montaż generatora dymu dragON Jet 1 opisany jest w instrukcji obsługi generatora zawartej w
zestawie.
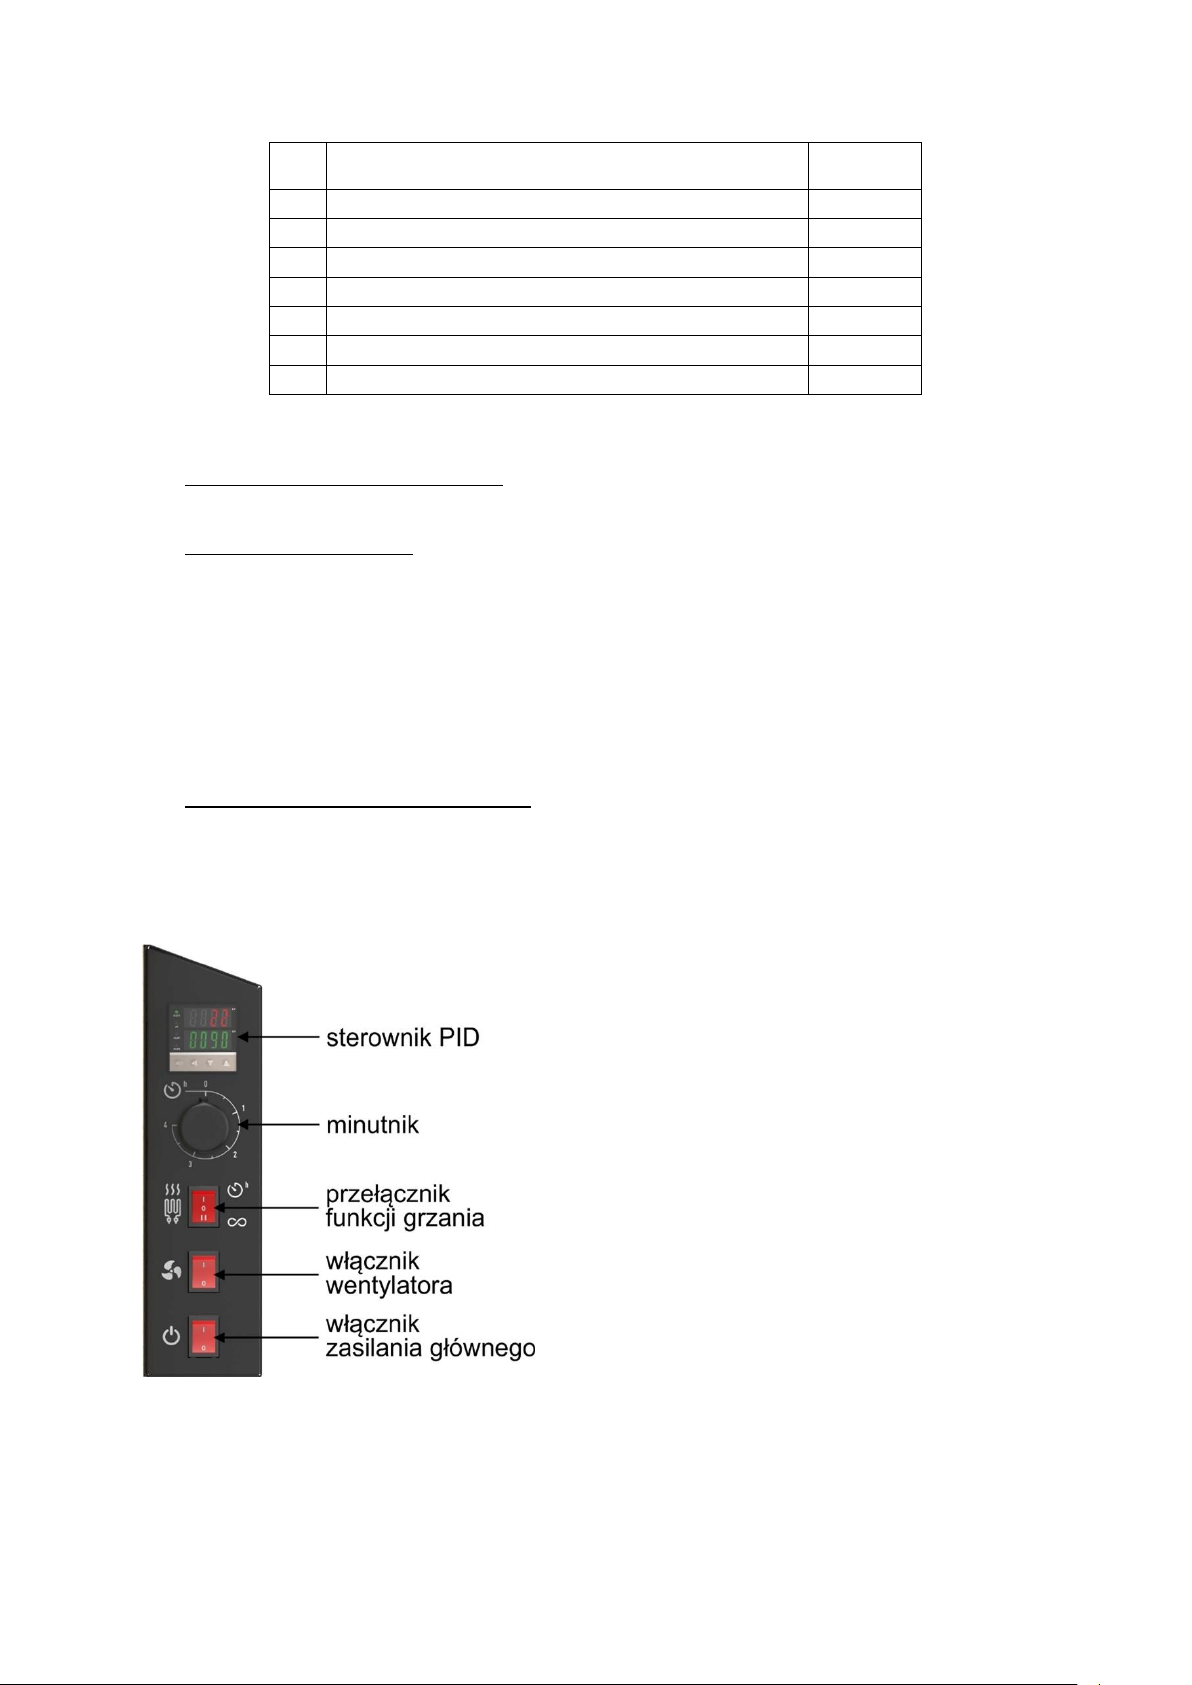
6. Panel sterowania
Opis elementów panelu sterowania:
Sterownik – wyświetla temperatury, zadaną i
aktualną oraz umożliwia ustawienie temperatury w
zakresie 0-90oC,
Minutnik – poprzez jego przekręcenie do
zadanej pozycji uruchamia się praca grzałki oraz
odliczanie czasu w zakresie 0-4 h,
Włącznik zasilania głównego – włącz / wyłącz
główne zasilanie,
Włącznik wentylatora – włącz / wyłącz
wentylator,
Przełącznik funkcji grzania – przełącznik funkcji
zasilania grzałki pomiędzy grzaniem stałym (poz. II)
oraz grzaniem czasowym (poz. I).
Rys. 6
6
Page 7
7. Obsługa
Przed przystąpieniem do procesu wędzenia jakichkolwiek produktów spożywczych należy dokonać
“wypalenia” wędzarni. Proces ten powinien potrwać około 30 minut, a przeprowadza się go w celu
spalenia wszelkich pozostałości produkcyjnych.
Wypalenia / Uruchomienia wędzarni elektrycznej ogrodowej drewnianej należy dokonywać zgodnie z
następującą procedurą:
1. Opróżnij drewnianą komorę wędzarni z zabezpieczeń transportowych.
2. NIE wykonuj procesu wypalania w pomieszczeniu, proces ten MUSI być
wykonywany na zewnątrz.
3. Podczas procesu wypalania używaj tylko temperatury i wentylatora.
4. Zamknij przednie drzwiczki.
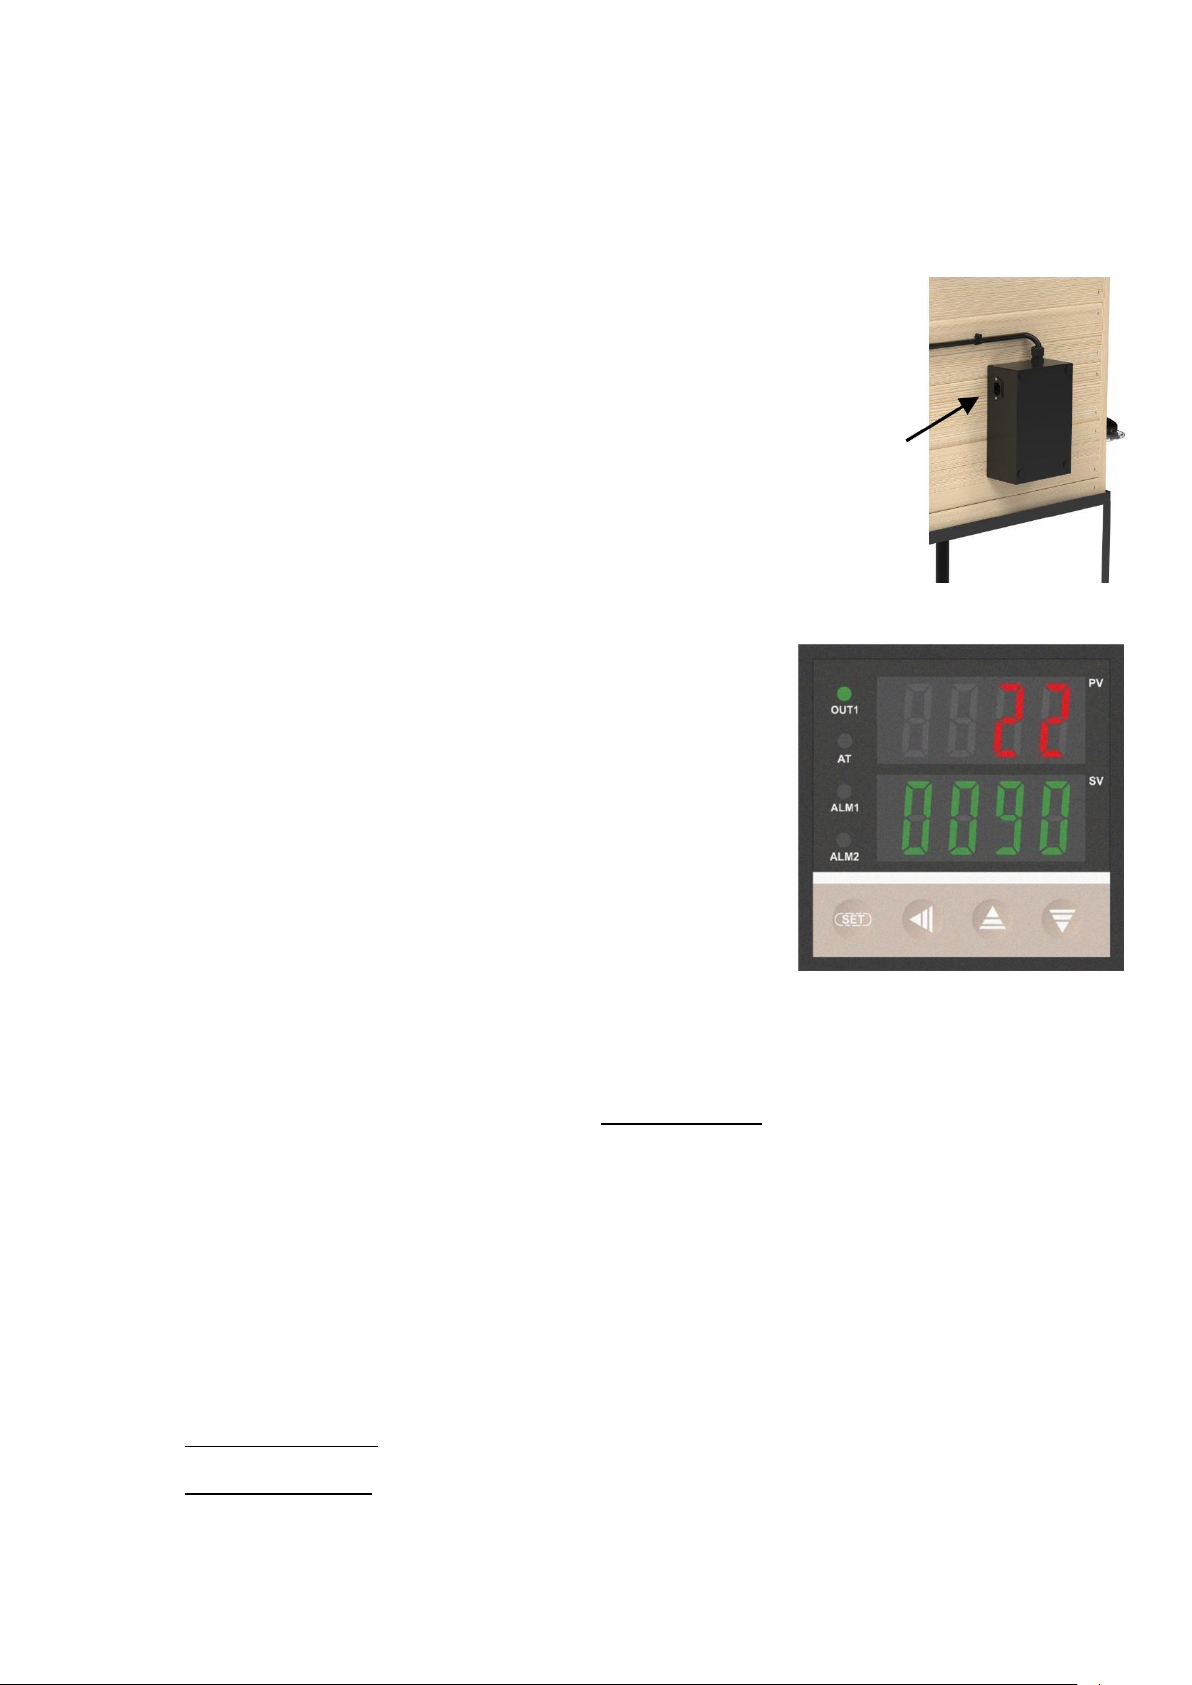
5. Podłącz przewód zasilający do gniazda w skrzynce silnika
wentylatora, a następnie do gniazda elektrycznego ze źródłem zasilania i
uziemieniem (Rys. 7).
6. Naciśnij przycisk “włącznik zasilania głównego”. (Rys. 6)
Rys. 7
7. Na sterowniku ustaw maksymalną możliwą temperaturę
(900C) według następującej procedury (Rys. 8):
a) Naciśnij przycisk z napisem “SET” – edycja wartości
zadanej (jaką chcesz uzyskać) w dolnej części wyświetlacza
(ZIELONA).
b) Naciskaj przycisk oznaczony strzałką w lewo, aby ustawić
się kursorem w odpowiedniej pozycji do zmiany cyfry.
c) Ustaw wartość kolejno 0090 przy pomocy przycisków ze
strzałkami w górę i w dół, a następnie zatwierdź ponownie,
naciskając przycisk “SET”.
d) Wartość temperatury pokazana w górnej części
wyświetlacza (CZERWONA) jest wartością odczytaną przez
czujnik temperatury – temperatura aktualna.
Rys. 8
8. Przełącznik funkcji grzania (Rys. 6) ustaw w pozycję “1”, co oznacza, że grzałka będzie
włączona przez czas określony pracą minutnika. Przełącznik funkcji grzania ustawiony w
pozycji “2” oznacza ciągłą pracę grzałki, bez sterowania czasem.
9. Przekręć pokrętło minutnika (Rys. 6) na pierwszą “kreskę” – oznacza to włączenie pracy
grzałki na 30 minut.
10. Uruchom wentylator (Rys. 6) włącznikiem wentylatora.
11. Odczekaj 30 minut na rozgrzanie się urządzenia – po tym czasie usłyszysz sygnał dźwiękowy
(dzwonek) z minutnika i grzałka automatycznie wyłączy się.
12. Poczekaj parę minut aż urządzenie się wychłodzi, aby móc je przenieść czy wykonywać inne
czynności wewnątrz komory (dla efektywniejszego wychłodzenia komory otwórz dach i
pozostaw włączony wentylator).
UWAGA !!!
Pamiętaj, aby podczas czynności wykonywanych wewnątrz rozgrzanej wędzarni zabezpieczyć
dłonie rękawicami ochronnymi odpornymi na wysoką temperaturę.
Propozycje – etapy wędzenia:
Wędzenie na zimno – odbywa się przy użyciu termoobiegu ustawionego na 25oC oraz
dymogeneratora,
Wędzenie na ciepło – odbywa się przy użyciu termoobiegu ustawionego na 30-50oC oraz
dymogeneratora,
7
Page 8

Wędzenie na gorąco – odbywa się przy użyciu termoobiegu ustawionego na 55-60oC oraz
dymogeneratora,
Suszenie – odbywa się przy użyciu termoobiegu ustawionego na 60oC bez dymogeneratora,
Podpiekanie – odbywa się przy użyciu termoobiegu ustawionego na 85oC w czasie 0,5-1,5 h bez
dymogeneratora,
Praca wędzarni bez termoobiegu w temperaturze maksymalnej, tj. 90
o
C, dozwolona jest nie dłużej niż
4 godziny.
UWAGA! Nie pozostawiaj urządzenia bez nadzoru
8. Dane techniczne
1. Gabaryty:
wysokość całkowita: 1225 mm
szerokość całkowita: 572 mm (810 mm z generatorem dymu)
głębokość całkowita: 640 mm
wysokość komory: 600 mm
szerokość komory: 500 mm
głębokość komory: 500 mm
ciężar całkowity: ~ 30 kg
2. Zasilanie elektryczne:
Napięcie: 230 V 50 Hz
Moc: 1500 W
3. Zabezpieczenie: 10A / KSD301 - 110oC
4. Stopień ochrony: IP31
9. Konserwacja i czyszczenie
Czyść wędzarnię po każdym użyciu, przedłuży to życie wędzarni oraz zapobiegnie powstawaniu
pleśni i rdzy.
Czyszczenie wędzarni zacznij od odłączenia jej od zasilania, wygaszenia generatora dymu oraz
wystudzenia wszystkich elementów metalowych do temperatury otoczenia. Kolejny krok to odłączenie
generatora dymu. Generator umyj zgodnie z zaleceniami podanymi w instrukcji jego użytkowania.
Następnie zdejmij z metalowej podstawy drewnianą komorę i wyczyść jej powierzchnię. W celu
utrzymania prawidłowego funkcjonowania wędzarni zaleca się czyszczenie także jej wnętrza. Mokrą
ścierką usuń pozostałości brudu na dnie wędzarni. Nie zaleca się użycia żadnej chemii do
czyszczenia drewna we wnętrzu wędzarni. Szczególnie ważne jest dokładne wyczyszczenie sondy
panelu sterowania po każdym użyciu – najlepiej dostępnym w Browinie specjalistycznym, bardzo
skutecznym Płynem do czyszczenia wędzarni.
Przebarwienia drewna powstające podczas wędzenia są wynikiem naturalnych procesów.
.
USER MANUAL
dragON WOOD 60 E ELECTRIC SMOKER FOR THE BACKYARD
PLEASE NOTE!
In order to ensure the safe operation of the unit, please read this manual carefully and follow all
instructions included in this manual.
PLEASE NOTE!
8
Page 9

Any form of use and utilisation of the device that is not in accordance with the form described in the
contents of this manual is prohibited.
PLEASE NOTE!
The device is powered by life-threatening 230 V of voltage.
1. General information
DragON Wood 60 E with smoke generator is a wooden electric smoker for the backyard, intended for
smoking, drying, heating or roasting food products.
2. Safety tips
General guidelines regarding safety of working with electrical devices.
WARNING
It is necessary to familiarise oneself with all warnings, safety-related instructions for use and
the illustrations and technical data supplied with this device. Failure to observe the following
instructions could result in electric shock, fire and/or serious injury.
Keep all regulations and safety instructions for further reference. The term 'electrical device'
refers to an electrical device powered by electricity from the mains (with a power cable).
Safety at the place of use
PLEASE NOTE: use only outdoors under a roof / canopy / shed.
It is forbidden to expose the device to weather conditions such as rain, frost, excessive
sunlight, etc.
The place of use should be kept clean. It is forbidden to leave the device unattended.
The device should not be used near flammable liquids, gases or dust. During operation,
the heater installed in the unit heats up to a high temperature, which may ignite dust or fumes
and lead to an explosion.
Particular care should be taken when carrying out operations inside the smoking
chamber in close proximity to the heater and hot elements. Direct contact without
adequate protection poses a risk of burns.
It is forbidden to operate the device without wearing appropriate personal protective
equipment.
When using the appliance, care should be taken to ensure that children and other
bystanders are not too close to hot external components, such as the smoke generator.
Direct contact with the body of the smoke generator may cause burns.
It is forbidden for minors and adults with limited physical abilities to operate the device.
Unnatural working positions of the device should be avoided. Care should be taken to
ensure that the device is placed in a stable position.
Do not move the device when it is operating. Allow the smoker to cool down.
Electrical safety
The unit is supplied with 230 V AC. Any repair work must only be carried out by specialised service
units.
It is prohibited to carry out minor repairs yourself.
All maintenance must be carried out when the unit is disconnected from the power
source.
The plug of the electrical device must fit into the sockets. The plug must not be
modified in any situation or in any way. No adaptor plugs may be used when using an
electrical appliance with protective earthing.
It is recommended that the device is powered from an outlet that has a residual current
fuse in the system.
The device must not be exposed to rain.
Do not use the power cord for other purposes. Do not use the cord to move the device.
Do not pull the plug out of the socket by pulling on the cord. The power cord should be
protected against high temperatures and kept away from sharp edges.
9
Page 10

Do not connect the electric smoker until it is completely assembled and ready for use.
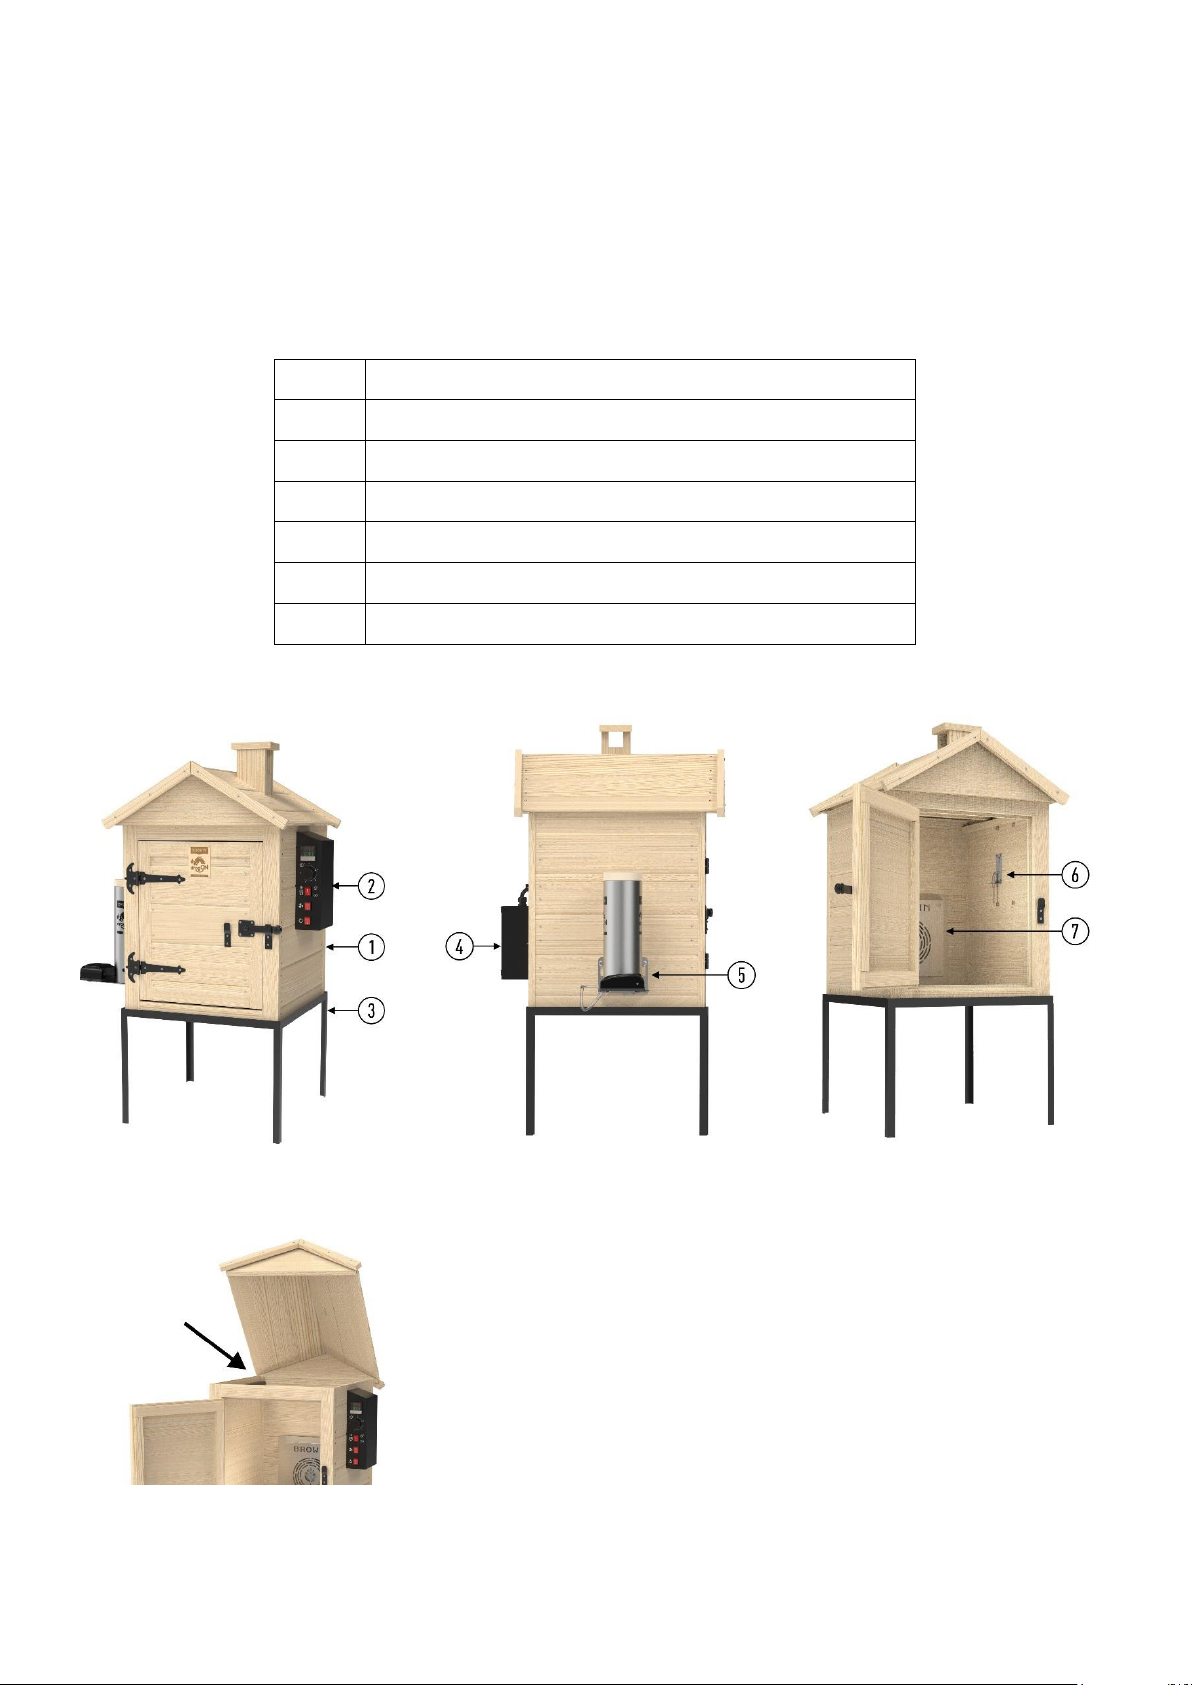
1
Wooden chamber
2
Control panel box
3
Metal rack
4
Fan motor box
5
Smoke generator
6
Control panel with probe
7
Air circulation heater unit
Use only grounded power sockets.
Never use a device that operates incorrectly or is damaged.
Always have a powder extinguisher on hand when operating an electric smoker.
Never use an electric device having a damaged plug or cable.
If the power supply cable is damaged, it has to be replaced by the manufacturer.
RECOMMENDATIONS
Before smoking, make sure the chimney is fully unobstructed.
Do not cover the grills with aluminium foil, as this will not allow the heat to flow properly.
Do not overload the smoker with too many products to smoke at one time. Very large batches
can trap heat, increase the smoking duration required and cause uneven smoking. Leave
some space between products to ensure proper heat circulation.
Very low temperatures can increase smoking duration required.
Store the smoker in a dry place.
Main elements of the smoker:
10
Page 11
3. Description of the structure
Fig. 1
The smoking process takes place within the space of a wooden chamber (1) closed by a door with a
transom and a hinged (opening) roof. (Fig. 2)
In the left side wall of the wooden chamber, holes are made for
mounting the dragON JET 1 smoke generator with electric pump (5).
(Fig. 3)
Fig. 2.
Fig. 3
Inside the wooden chamber is the air circulation
heater unit, where the heater and fan can be found
once the main cover is removed. (Fig. 4)
Fig. 4
PLEASE NOTE !!!
The elements of the air circulation heater unit and the smoke generator heat up to very high
temperatures when the smoker is in operation. Special care should be taken, as touching them without
gloves poses a risk of burns.
11
Page 12
4. Description of functioning
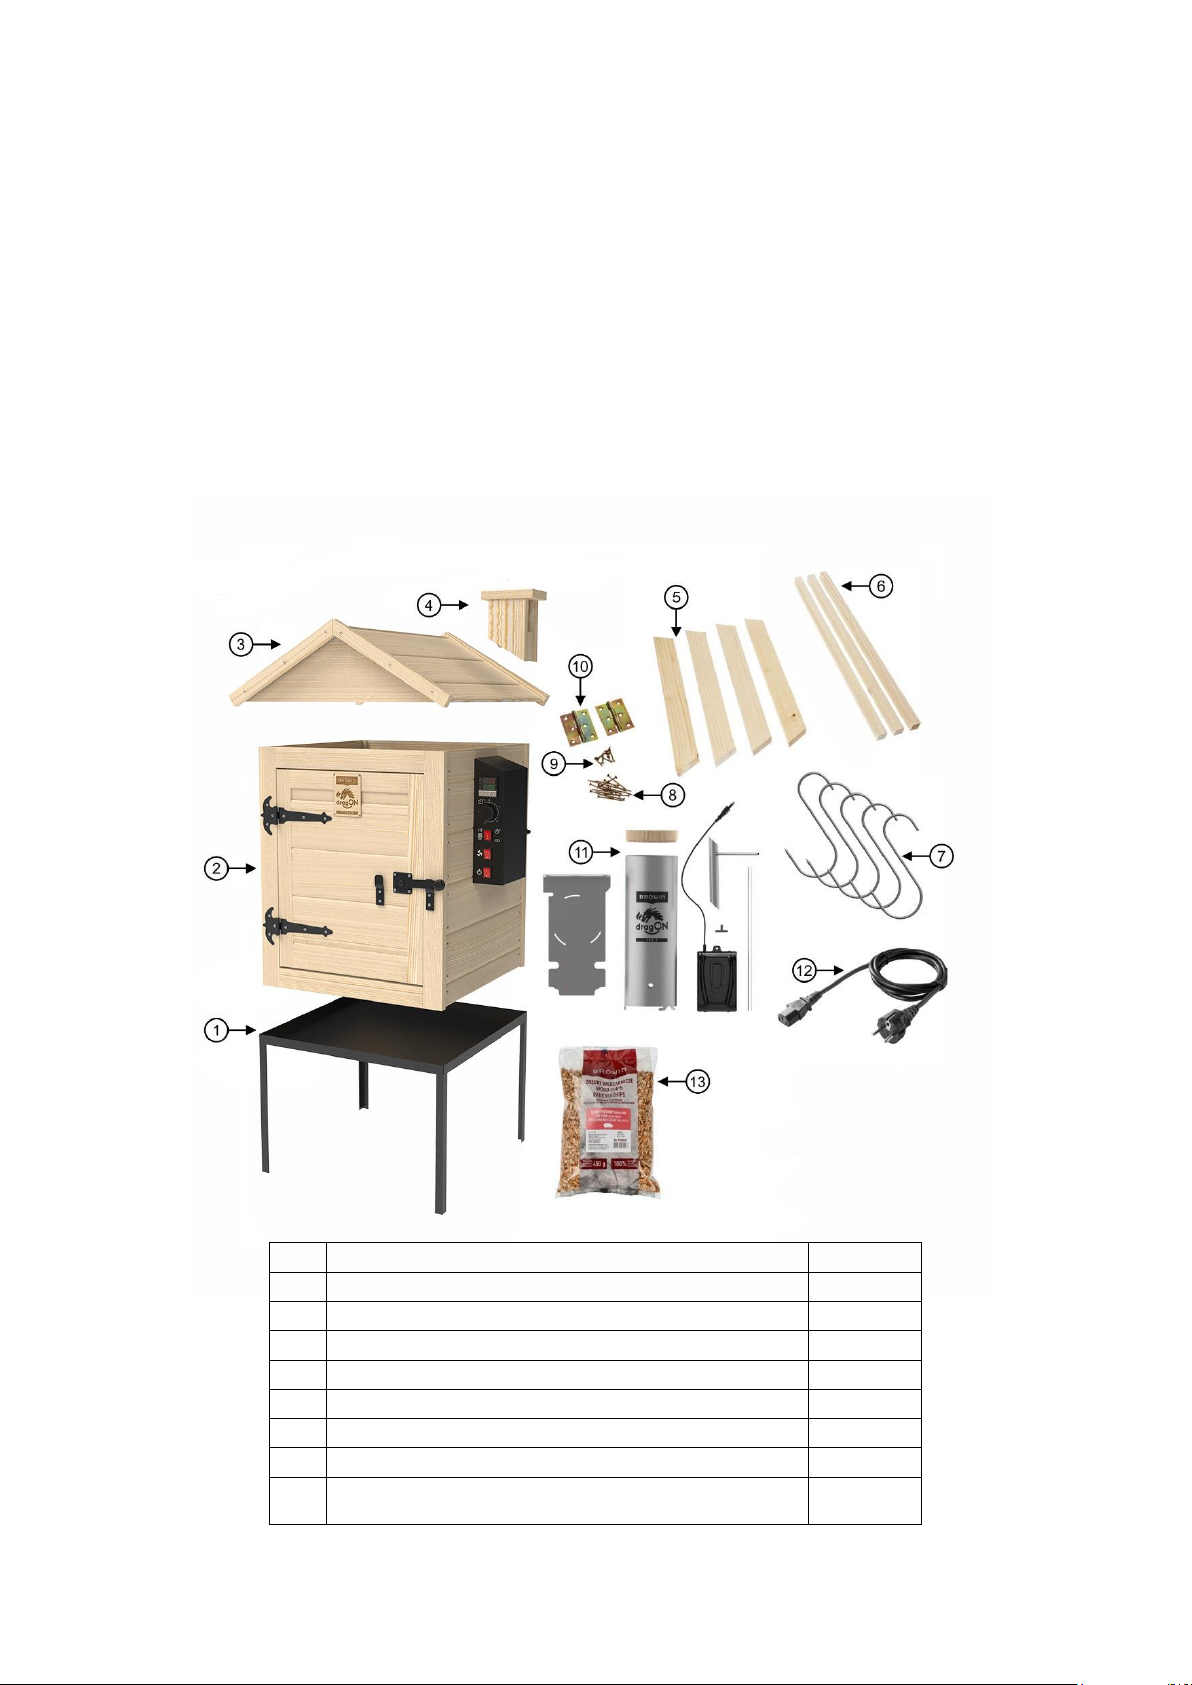
No.
Description
Number
1
Metal rack
1
2
Wooden chamber
1
3
Roof
1
4
Chimney
1
5
Roof slats
4
6
Wooden beams for hanging products for smoking
3
7
Hooks for smoking
5
8
Set of screws for installing the chimney
and roof slats
16
The wooden electric garden smoker provides a professional way of smoking, drying or roasting food
products. The installed air circulation heater distributes heat throughout the wooden chamber, and this
makes the smoking process much faster and more efficient. The innovative smoke generator makes it
possible to take advantage of all the benefits of smoking with the use of wood chips.
The operation of the smoker is supervised by a PID controller with the help of a thermostat, which will
cut off power supply in an emergency situation - i.e. temperature exceeding 110⁰C.
5. Assembly and preparation of the device for operation
The location of the device should be outside the building and under cover.
It should also provide a grounded power supply.
The smoker should be placed on a stable surface. Due to the presence of electrical wiring system and
heated components, great care must be taken to select as flat, flame-retardant a surface as possible
so that there is no risk of the device tipping over and causing a fire. The smokehouse should be
moved by at least 2 people in view of its weight and size.
Fig. 5
12
Page 13
9
Set of screws for installing hinges
10
10
Roof hinges
2
11
dragON Jet 1 smoke generator with a pump
1
12
Power supply cable
1
13
Wood chips for smoking
1
Manual – smoker
1
Manual for the smoke generator
1
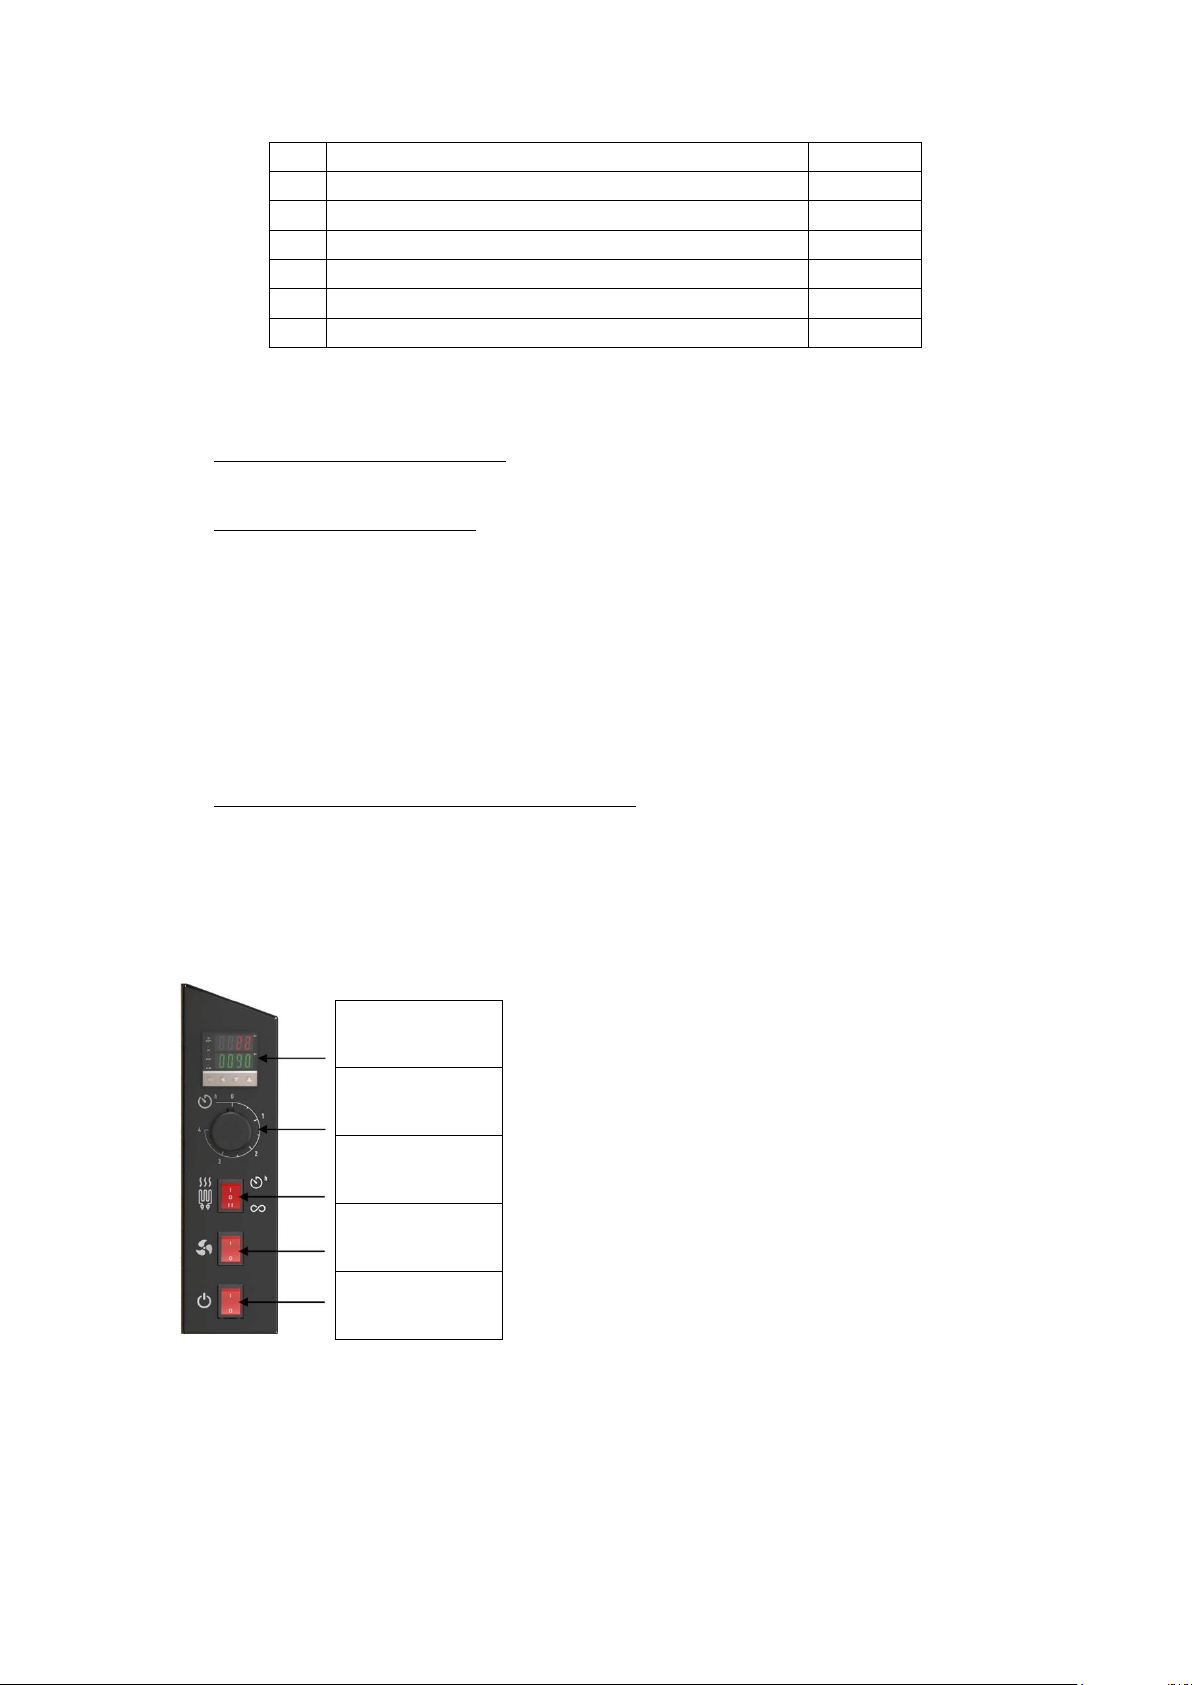
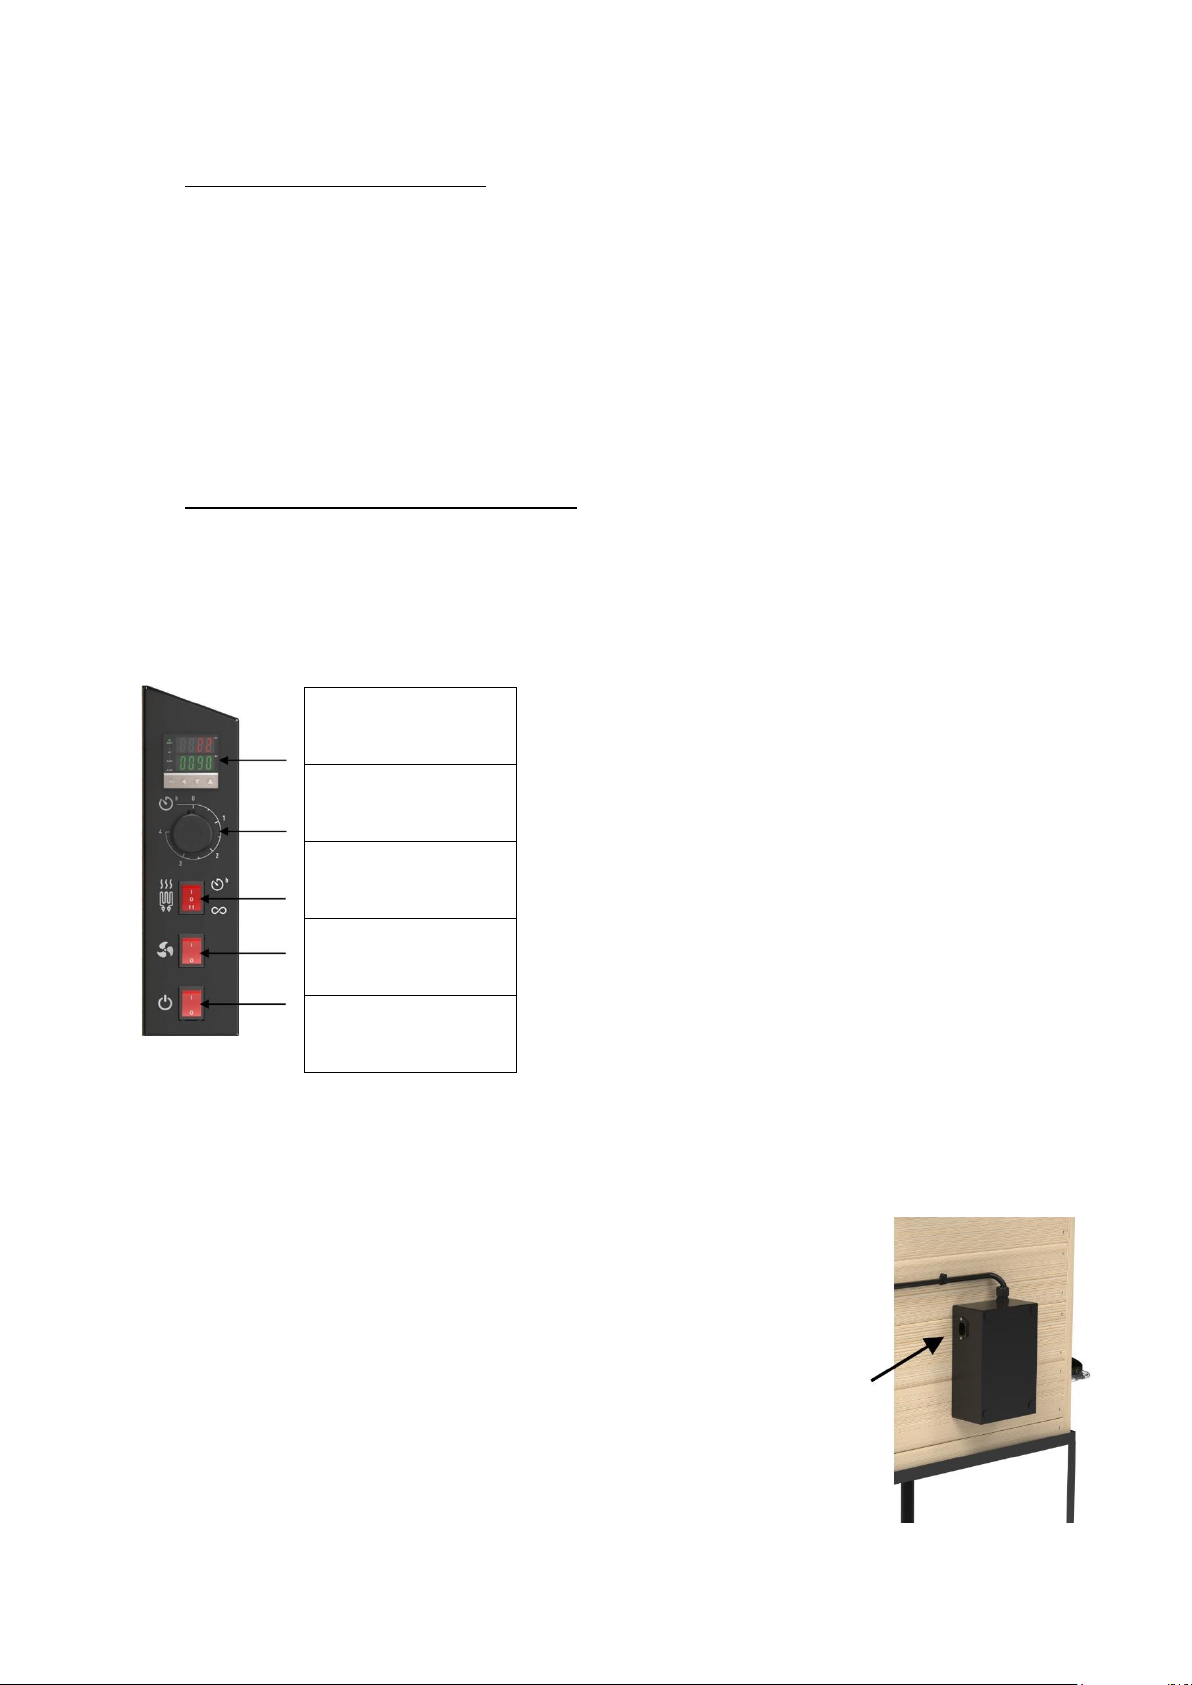
PID controller
Minute timer
Heating function
switch
Fan switch
Main power
switch
Assembly
1. Prepare the workplace and tools.
Before assembling the smoker, read the attached manual carefully.
The tools required are: screw gun, drill and cross-head screwdriver.
2. Assembly of the smoker body
Place the wooden chamber (2) on the metal rack (1). Place the roof (3) on a flat surface and
turn it upside down. Trace the outline of the chimney base (4) at the location of the hole milled
in the roof so as to mark the place where the chimney needs to be attached. On the bottom of
the roof, within the outline of the chimney, drive the 4 screws (8) in such a manner as to have
their tips protrude above the roof. Turn the roof upside down and install the chimney. Then
press it to the roof and drive the 4 screws in all the way. Place the roof on the chamber. Screw
the slats (5) to the front and rear edge of the roof using screws (8) - use 3 per slat. These slats
serve a decorative purpose only. You can attach the roof to the smoker chamber using hinges
(10), which are best installed with application of equal spacing from the chamber edge (about
2 cm). Use screws (9) for installing hinges. Leave the middle opening in the hinge empty to
avoid delamination of the wood.
3. Assembly of the dragON Jet 1 smoke generator
Assembly of the dragON Jet 1 smoke generator is described in the user manual for the
generator, included in the kit.
6. Control panel
Description of control panel elements:
Controller – displays temperatures, set and current,
and allows temperature setting within the range of 0-90oC,
Minute timer – by turning it to the desired position,
heater operation and countdown within the range of 0-4 h is
started,
Main power switch – switches the main power
supply on/off,
Fan switch – switches the fan on/off,
Heating function switch – switches heater power
supply function between permanent heating (pos. II) and
timed heating (pos. I).
Fig. 6
7. Operation
Prior to commencing the process of smoking any food products it is always necessary to “fire” the
smoker. This process should take about 30 minutes and is carried out to burn off any production
residues.
13
Page 14
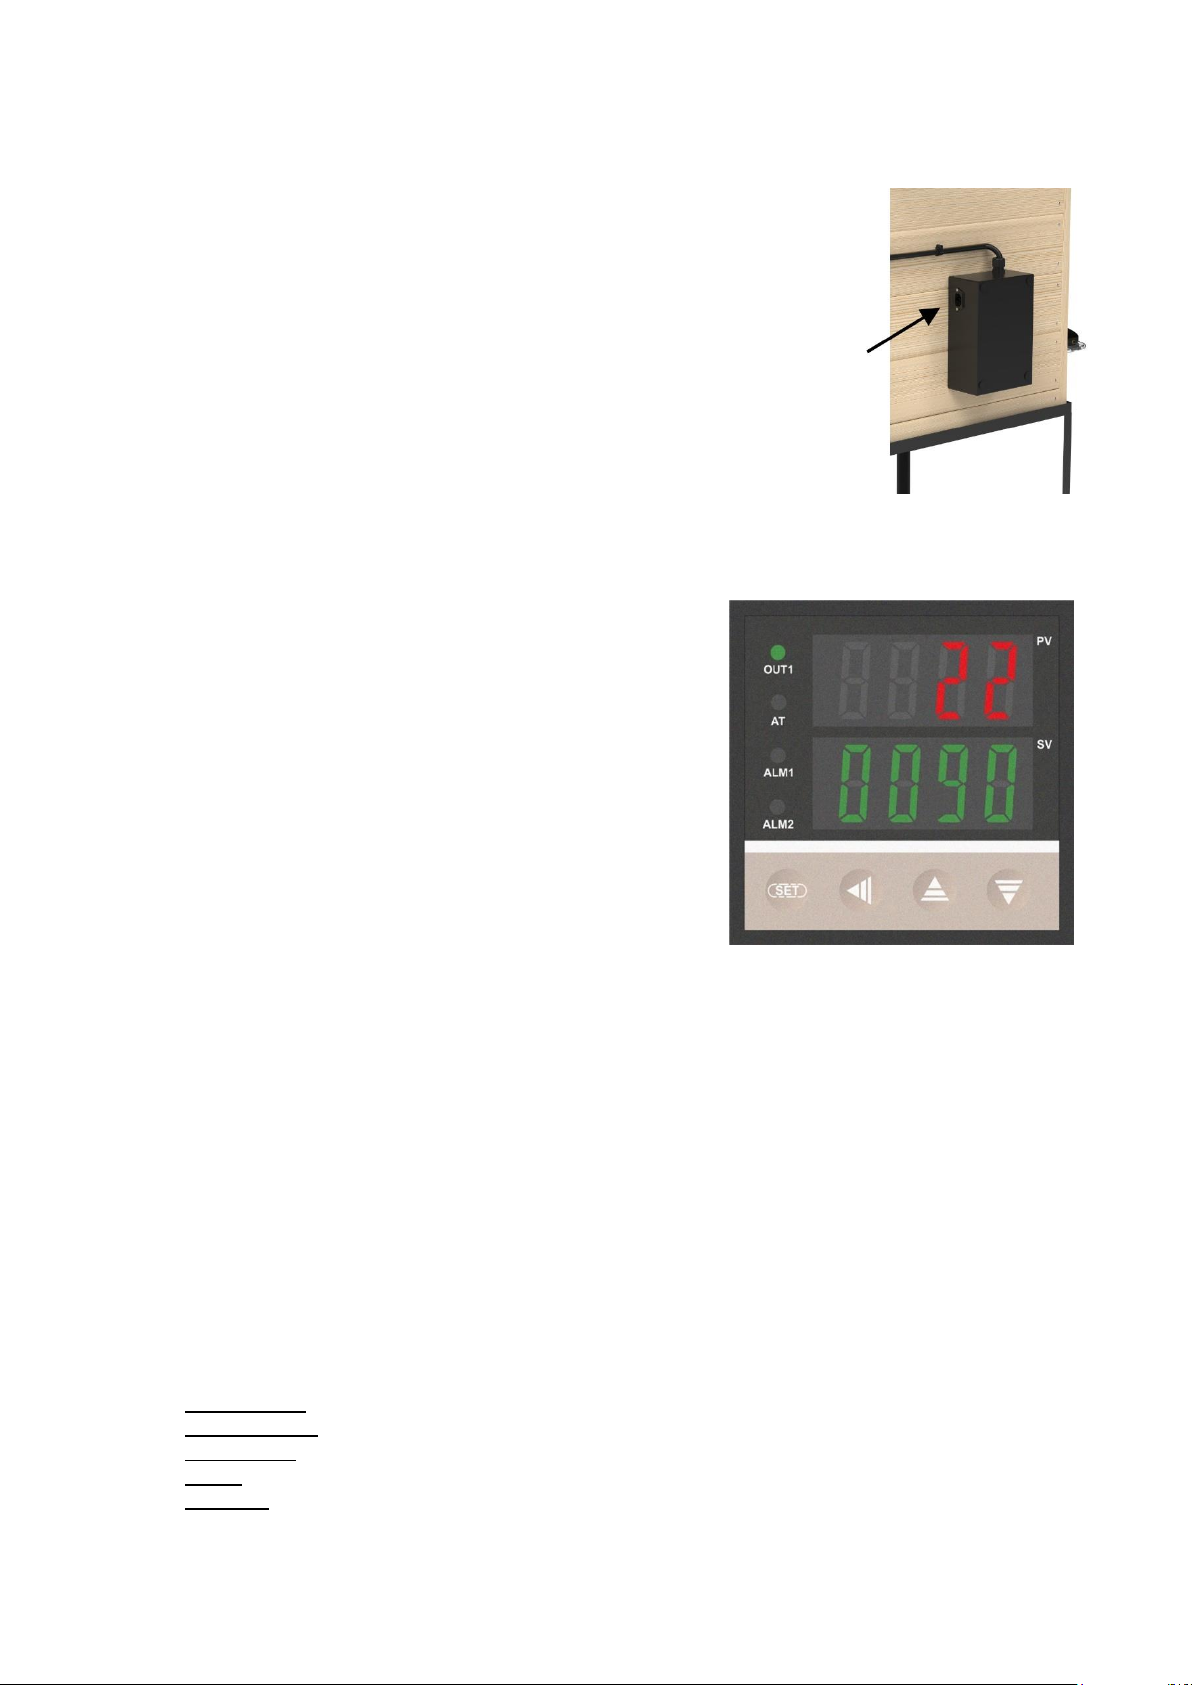
The firing / starting up of the electric wooden smoker for the backyard must be carried out according to
the following procedure:
1. Remove the transport restraints from the wooden chamber of the
smoker.
2. DO NOT perform the firing process indoors, the process MUST be
performed outdoors.
3. Use only the temperature and fan during the firing process.
4. Close the front door.
5. Connect the power cord to the socket in the fan motor box, and
then to a power socket with a power source and grounding (Fig. 7).
6. Press the "main power switch" button. (Fig. 6)
Fig. 7
7. Set the maximum possible temperature on the controller (90
0
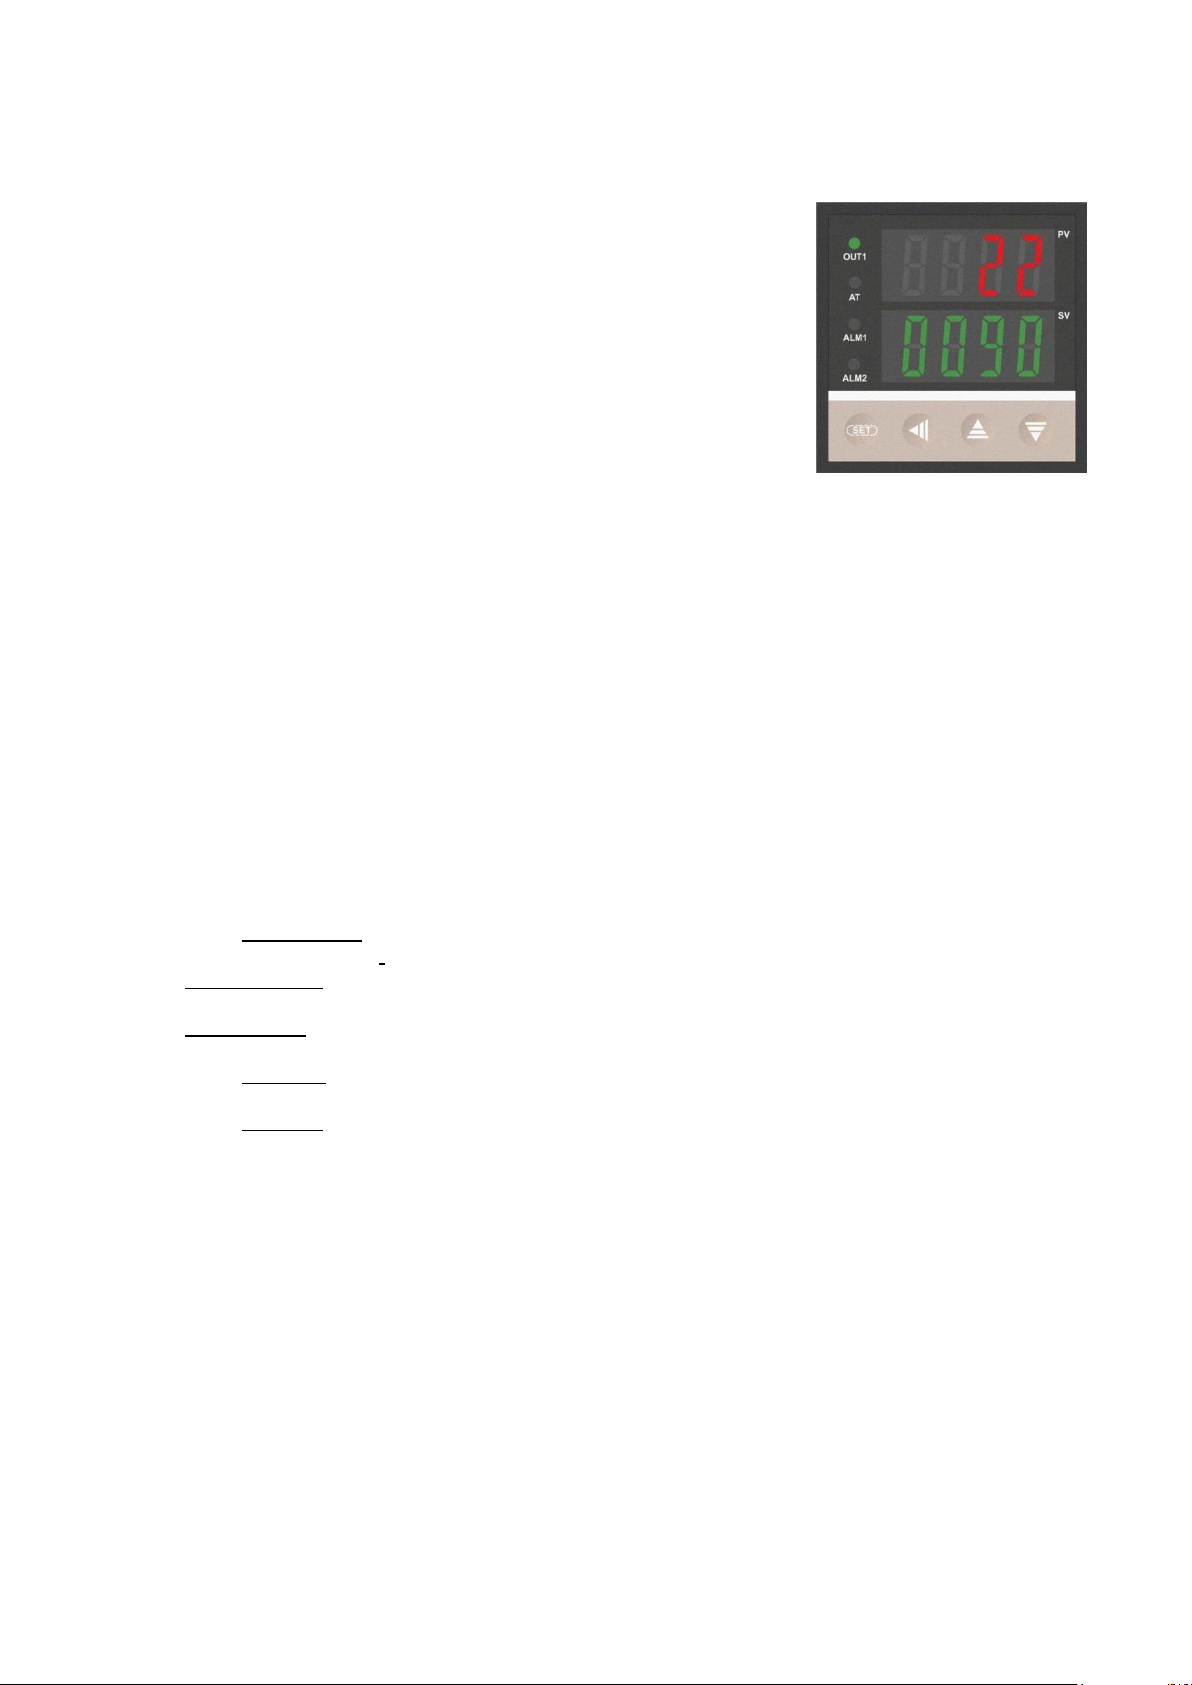
C) in accordance with the
following procedure (Fig. 8):
a) Press the "SET" button - edit the setpoint (that
you want to achieve) at the bottom of the
display (GREEN).
b) Press the left arrow button to move the cursor
to the correct position for changing the digit.
c) Set the value of 0090 sequentially using the
up and down arrow keys, then confirm again by
pressing the "SET" button.
c) The temperature value shown at the top of the
display (RED) is the value read by the
temperature sensor – the current temperature.
Fig. 8
8. Set the heating function switch (Fig. 6) to position "1", which means that the heater will be on
for the time determined by the minute timer operation. A heating function switch set to position
"2" means continuous operation of the heater, without time control.
9. Turn the timer knob (Fig. 6) to the first "dash" - this means the heater will remain switched on
for 30 minutes.
10. Start the fan (Fig. 6) using the fan switch.
11. Wait 30 minutes for the device to warm up - after this time you will hear a sound (ringing) from
the timer and the heater will automatically switch off.
12. Wait a few minutes for the device to cool down so that you can move it or carry out other
activities inside the chamber (for more effective cooling of the chamber, open the roof and
leave the fan on).
PLEASE NOTE !!!
Remember to protect your hands with heat-resistant protective gloves when working inside a
heated smoker.
Suggestions - smoking stages:
Cold smoking – it is carried out with the air circulation set to 25oC and smoke generator,
Warm smoking – it is carried out with the air circulation set to 30 - 50oC and smoke generator,
Hot smoking – it is carried out with the air circulation set to 55 - 60oC and smoke generator,
Drying – it is carried out with the air circulation set to 60oC without smoke generator,
Roasting – it is carried out with the air circulation set to 85oC, for 0.5 - 1.5 h, without smoke
generator,
14
Page 15

Operation of the smoker without air circulation at the maximum temperature, i.e. 90oC, is not permitted
for more than 4 hours.
PLEASE NOTE! Do not leave the device unattended
8. Technical data
1. Dimensions:
total height: 1225 mm
total width: 572 mm (810 mm with smoke generator)
total depth: 640 mm
chamber height: 600 mm
chamber width: 500 mm
chamber depth: 500 mm
total weight: ~ 30 kg
2. Power supply:
Voltage: 230 V 50 Hz
Power: 1500 W
3. Protection: 10A / KSD301 - 110oC
4. Protection class: IP31
9. Maintenance and cleaning
Clean the smoker after each use, this will prolong the life of the smoker and prevent the formation of
mould and rust.
Start cleaning the smoker by unplugging it from the power supply, extinguishing the smoke generator
and cooling all metal parts to ambient temperature. The next step is to disconnect the smoke
generator. Wash the generator according to the instructions given in its user manual. Then remove the
wooden chamber from the metal base and clean its surface. In order to maintain the proper
functioning of the smoker, it is recommended to clean the inside of it as well. Using a wet cloth,
remove any dirt remaining on the bottom of the smoker. It is not recommended to use any chemicals
to clean the wood inside the smoker. It is particularly important to clean the control panel probe
thoroughly after each use - preferably with the specialist, highly effective 'Smoker cleaning liquid'
available from Browin.
The discolouration of wood that occurs during smoking is the result of natural processes.
.
BEDIENUNGSANLEITUNG
ELEKTRISCHER GARTENRÄUCHEROFEN dragON WOOD 60 E
HINWEIS!
Um den sicheren Betrieb des Geräts zu gewährleisten, lesen Sie bitte diese Anleitung sorgfältig durch
und befolgen Sie die Anweisungen vollständig.
HINWEIS!
Jede andere Verwendung und Nutzung des Geräts, die nicht der im Inhalt dieser Anleitung
beschriebenen Form entspricht, ist verboten.
HINWEIS!
Das Gerät wird mit lebensgefährlichen 230 Volt betrieben.
1. Allgemeine Informationen
15
Page 16

Der DragON Wood 60 E mit Raucherzeuger ist ein elektrischer Gartenräucherofen aus Holz
zum Räuchern, Trocknen, Erwärmen oder Anbraten von Lebensmitteln.
2. Sicherheitshinweise
Allgemeine Sicherheitshinweise für die Arbeit mit elektrischen Geräten.
WARNUNG
Bitte machen Sie sich mit allen Warn- und Sicherheitshinweisen sowie Abbildungen und
technischen Daten, die diesem Gerät beiliegen, vertraut. Die Nichtbeachtung der folgenden
Anweisungen kann zu einem elektrischen Schlag, Brand und/oder schweren Verletzungen führen.
Bewahren Sie alle Vorschriften und Sicherheitshinweise zur weiteren Verwendung auf. Der
Begriff "Elektrogerät" bezieht sich auf ein elektrisches Gerät, das über das Stromnetz (mit einem
Netzkabel) mit Strom versorgt wird.
Sicherheit am Ort der Nutzung
HINWEIS: nur im Freien unter einem Vordach/Unterstand verwenden.
Es ist verboten, das Gerät Witterungseinflüssen wie Regen, Frost, übermäßige
Sonneneinstrahlung usw. auszusetzen.
Halten Sie den Ort der Verwendung sauber. Es ist verboten, das Gerät unbeaufsichtigt zu
lassen.
Das Gerät sollte nicht in der Nähe von entflammbaren Flüssigkeiten, Gasen oder Staub
verwendet werden. Während des Betriebs erhitzt sich der im Gerät eingebaute Heizstab auf
eine hohe Temperatur, die Staub oder Dämpfe entzünden und zu einer Explosion führen
kann.
Besondere Vorsicht ist geboten, wenn Arbeiten in der Räucherkammer in unmittelbarer
Nähe des Heizstabs und der heißen Elemente durchgeführt werden. Bei direktem Kontakt
ohne ausreichenden Schutz besteht Verbrennungsgefahr.
Es ist verboten, das Gerät ohne geeignete persönliche Schutzausrüstung zu betreiben.
Bei der Verwendung des Geräts ist darauf zu achten, dass sich Kinder und andere
Unbeteiligte nicht zu nahe an heißen Außenteilen, wie z. B. dem Raucherzeuger,
aufhalten. Direkter Kontakt mit dem Gehäuse des Raucherzeugers kann zu Verbrennungen
führen.
Die Bedienung des Gerätes ist für Minderjährige und Erwachsene mit gesundheitlichen
Einschränkungen verboten.
Vermeiden Sie unnatürliche Arbeitspositionen des Geräts. Stellen Sie sicher, dass das
Gerät in einer stabilen Position ist.
Bewegen Sie das Gerät während des Betriebs nicht. Lassen Sie den Räucherofen
abkühlen.
Elektrische Sicherheit
Das Gerät wird mit 230 V AC versorgt. Jegliche Reparaturarbeiten dürfen nur von spezialisierten
Servicestellen durchgeführt werden.
Es ist verboten, kleinere Reparaturen selbst auszuführen.
Alle Wartungsarbeiten müssen bei von der Stromquelle getrenntem Gerät durchgeführt
werden.
Der Stecker des Elektrogeräts muss in die Steckdosen passen. Der Stecker darf in
keiner Situation und auf keine Weise verändert werden. Bei Verwendung eines
schutzgeerdeten Elektrogeräts dürfen keine Zwischenstecker verwendet werden.
Es wird empfohlen, das Gerät über eine Steckdose zu versorgen, die über eine
Fehlerstromsicherung in der Installation verfügt.
Das Gerät darf nicht dem Regen ausgesetzt werden.
Verwenden Sie das Netzkabel nicht für andere Zwecke. Verwenden Sie das Kabel nicht,
um das Gerät zu bewegen; ziehen Sie den Stecker nicht aus der Steckdose, indem Sie
am Kabel ziehen. Schützen Sie das Kabel vor hohen Temperaturen; halten Sie es von
scharfen Kanten fern.
Schließen Sie den elektrischen Räucherofen erst an, wenn er vollständig montiert und
betriebsbereit ist.
Verwenden Sie nur eine geerdete Steckdose.
16
Page 17
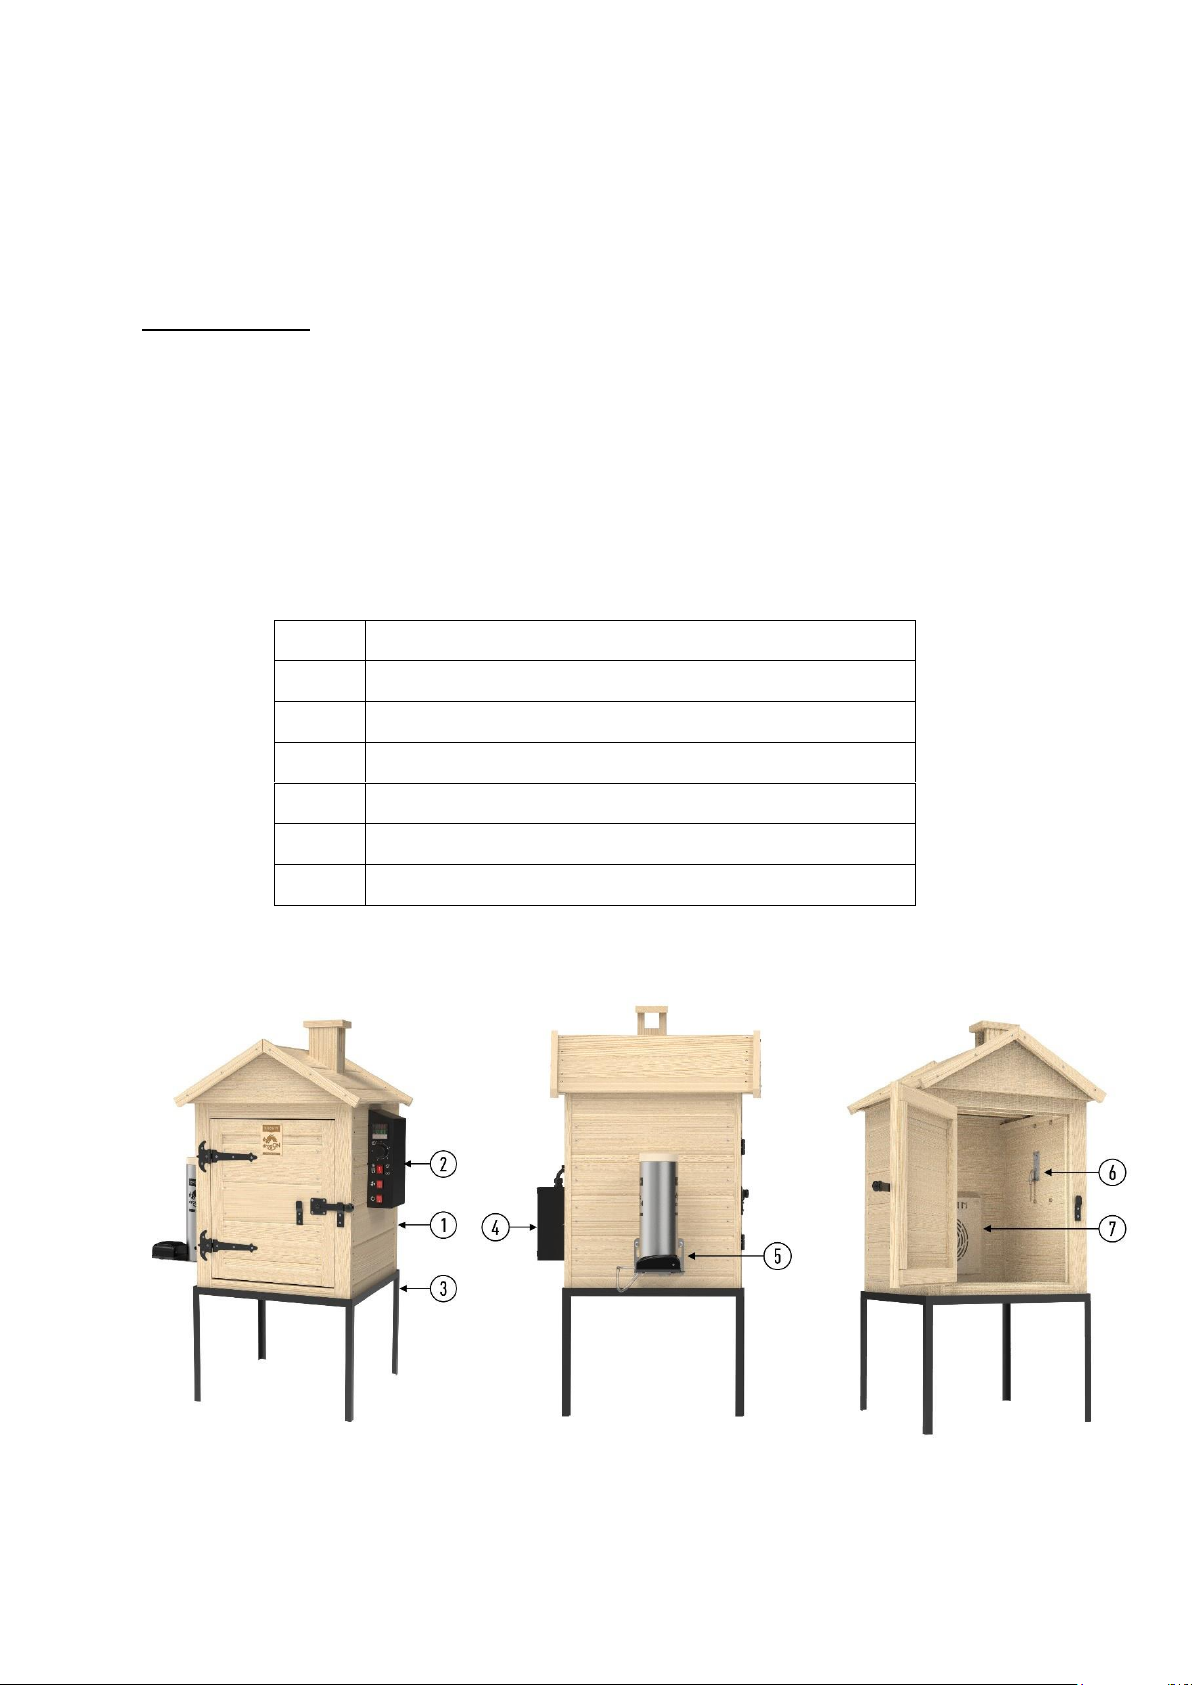
Benutzen Sie niemals ein Gerät, das nicht richtig funktioniert oder beschädigt ist.
1
Hölzerne Kammer
2
KASTEN MIT BEDIENFELD
3
Metallrahmen
4
Gehäuse des Ventilatormotors
5
Raucherzeuger
6
Bedienfeld mit Sonde
7
Baugruppe des Heizstabs des Thermokreislaufs
Halten Sie immer einen Pulverfeuerlöscher bereit, wenn Sie einen elektrischen
Räucherofen betreiben.
Verwenden Sie niemals ein elektrisches Gerät mit einem beschädigten Stecker oder
Kabel.
Wenn das Netzkabel beschädigt ist, muss es vom Hersteller ersetzt werden.
EMPFEHLUNGEN
Vergewissern Sie sich vor dem Räuchern, dass der Schornstein nicht verstopft ist.
Decken Sie die Roste nicht mit Alufolie ab, da sonst die Hitze nicht richtig fließen kann.
Überladen Sie den Räucherofen nicht mit zu viel zu räuchernden Produkten auf einmal. Sehr
große Chargen können Hitze einschließen, die Räucherzeit verlängern und zu
ungleichmäßigem Räuchern führen. Lassen Sie Platz zwischen den Produkten, um eine gute
Wärmezirkulation zu gewährleisten.
Sehr niedrige Temperaturen können die Räucherzeit verlängern.
Lagern Sie der Räucherofen nach Gebrauch an einem trockenen Ort.
Hauptelemente des Räucherofens:
3. Beschreibung der Konstruktion
Abb. 1
17
Page 18
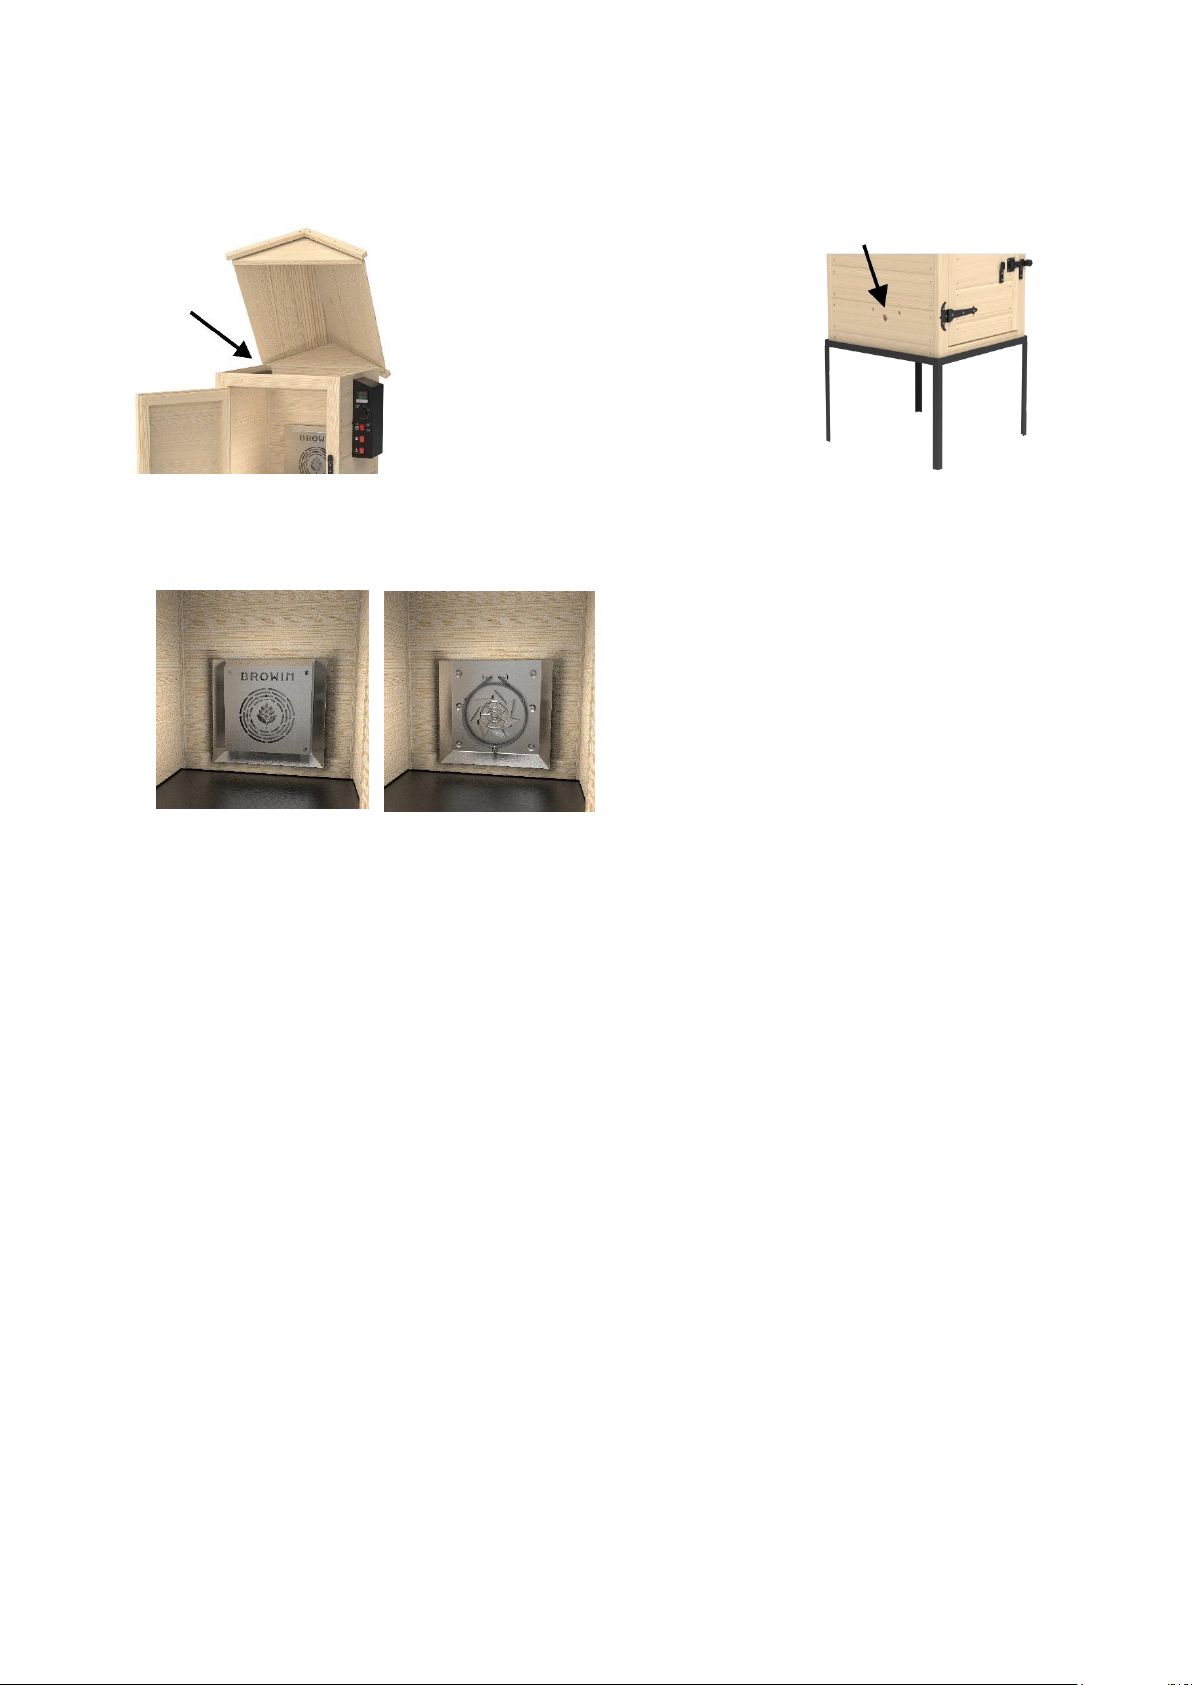
Der Räuchervorgang findet in einer hölzernen Kammer (1) statt, die mit einer Tür mit Querbalken und
einem aufklappbaren Dach verschlossen ist. (Abb. 2)
In der linken Seitenwand der hölzernen
Kammer befinden sich Löcher für die
Montage des Raucherzeugers dragON
JET 1 mit elektrischer Pumpe (5). (Abb.
3)
Abb. 2
Abb. 3
Im Innern der hölzernen Kammer befindet sich
die Baugruppe des Heizstabs, in der sich der
Heizstab und der Ventilator befinden, wenn die
Hauptabdeckung entfernt wird. (Abb. 4)
Abb. 4
HINWEIS !!!
Die Teile der Baugruppe des Heizstabs und des Raucherzeugers werden beim Betrieb des
Räucherofens sehr heiß. Besondere Vorsicht ist geboten, da beim Berühren ohne Handschuhe
Verbrennungsgefahr besteht.
4. Beschreibung des Betriebs
Dieser elektrische Gartenräucherofen aus Holz bietet eine professionelle Möglichkeit zum Räuchern,
Trocknen oder Anbraten von Lebensmitteln. Der eingebaute Heizstab mit Thermokreislauf verteilt die
Wärme im gesamten Raum der hölzernen Kammer, wodurch der Räuchervorgang viel schneller und
effizienter wird. Der innovative Raucherzeuger ermöglicht es, alle Eigenschaften des Räucherns unter
Verwendung von Räucherspänen zu nutzen.
Der Betrieb der Räucherkammer wird von einem PID-Regler mit Hilfe eines Thermostats überwacht,
der in gefährlichen Situationen,
d. h. bei Temperaturen über 110⁰C, die Stromzufuhr unterbricht.
5. Zusammenbau und Vorbereitung des Geräts für den Betrieb
Der Standort des Geräts sollte sich außerhalb von Gebäuden befinden und überdacht sein.
Außerdem sollte das Gerät über eine geerdete Stromversorgung verfügen.
Der Räucherofen sollte auf einen stabilen Untergrund gestellt werden. Wegen der Elektroinstallation
und der Heizelemente ist darauf zu achten, dass eine möglichst ebene, schwer entflammbare
Unterlage gewählt wird, damit die Gefahr des Umkippens und der Entstehung eines Brandes
ausgeschlossen ist. Der Räucherofen sollte aufgrund seines Gewichts und seiner Größe von
mindestens zwei Personen getragen werden.
18
Page 19
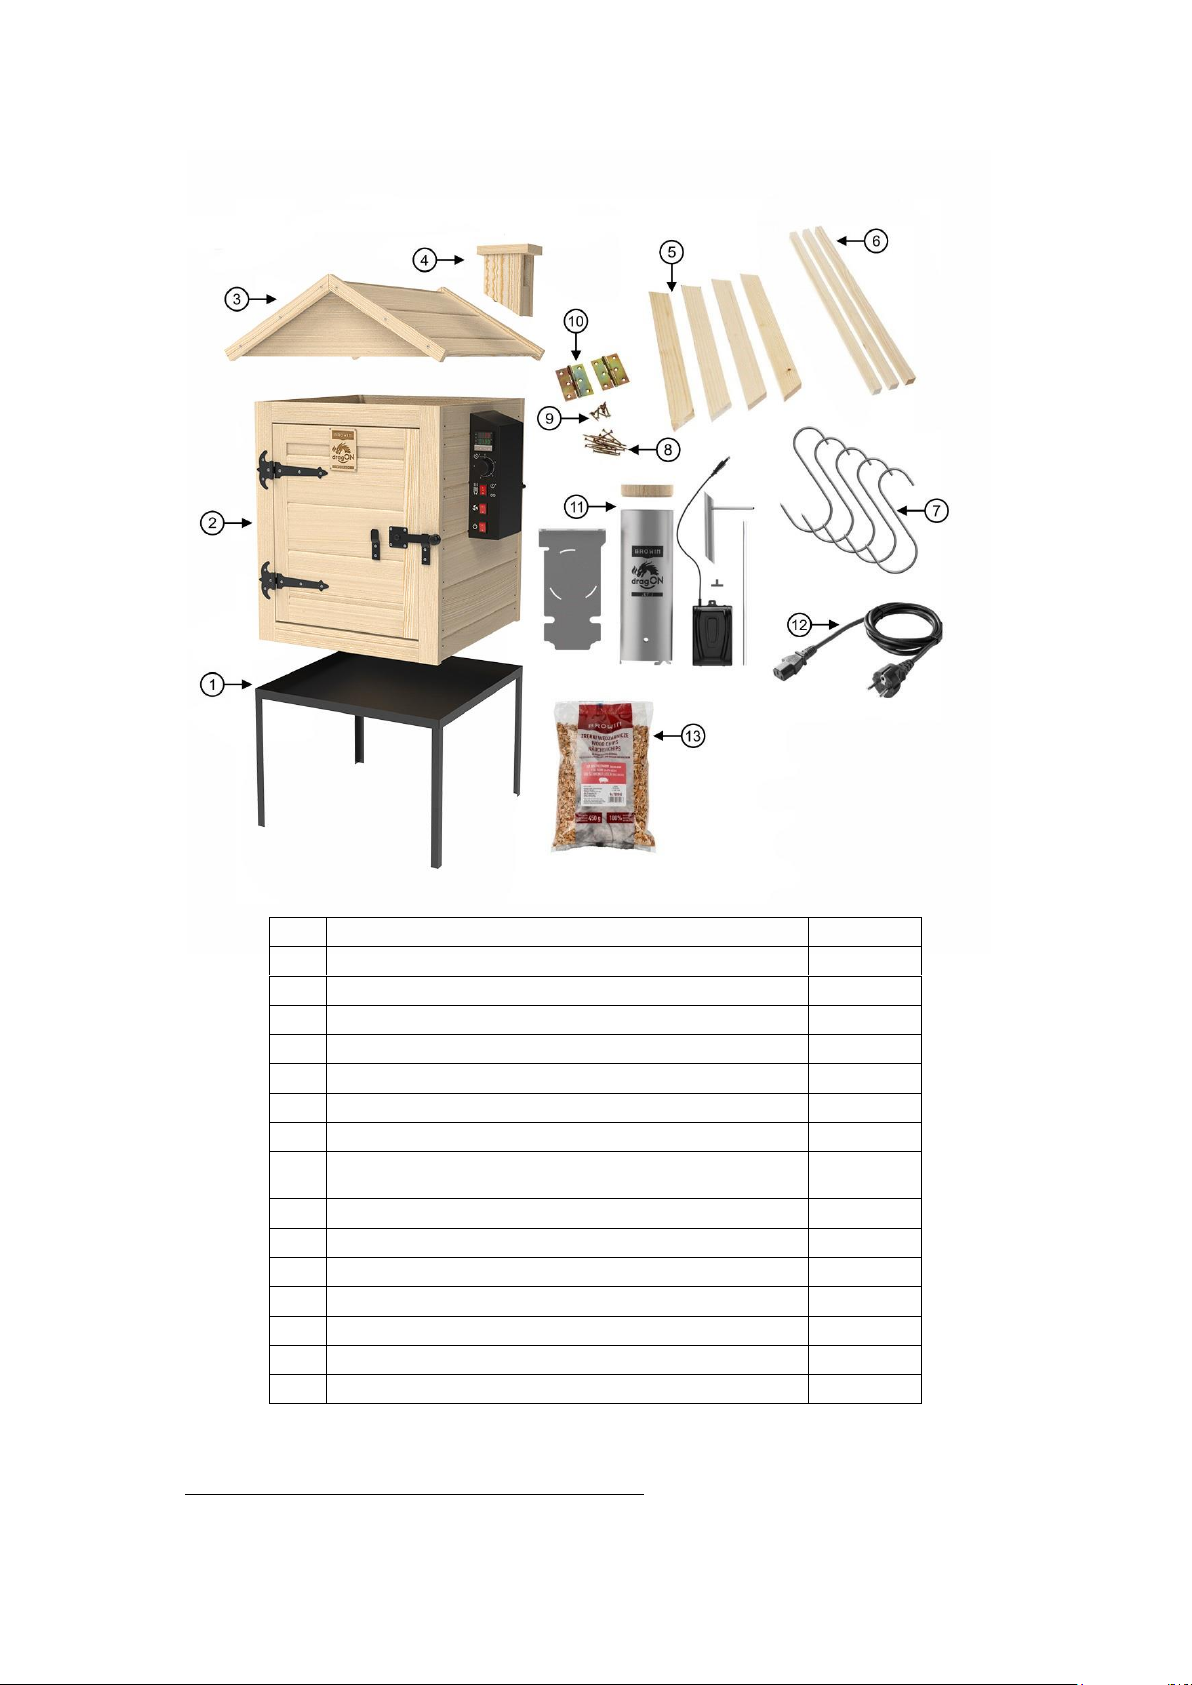
Abb. 5
Nr.
Beschreibung
Anzahl
1
Metallrahmen
1
2
Hölzerne Kammer
1
3
Dach
1
4
Schornstein
1
5
Dachleisten
4 6 Holzbalken für hängende Produkte
3
7
Räucherhaken
5
8
Schraubensatz für die Montage von Schornstein
und Dachleisten
16
9
Satz von Scharnierbefestigungsschrauben
10
10
Dachscharniere
2
11
Raucherzeuger dragON Jet 1 mit Pumpe
1
12
Stromkabel
1
13
Räucherspäne
1
Anleitung – Räucherofen
1 Anleitung zum Raucherzeuger
1
Montage
1. Den Arbeitsbereich und die Werkzeuge vorbereiten.
Lesen Sie vor der Montage die beiliegende Anleitung sorgfältig durch.
19
Page 20
Erforderliches Werkzeug: Schraubendreher, Bohrmaschine, Kreuzschlitzschraubendreher.
PID-Regler
Timer
Heizfunktionsschalter
Ventilatorschalter
Hauptnetzschalter
2. Zusammenbau des Räucherofens
Setzen Sie die hölzerne Kammer (2) auf den Metallrahmen (1). Legen Sie das Dach (3) auf eine
ebene Fläche und drehen Sie die innere Seite nach oben. Zeichnen Sie den Umriss des
Schornsteinsockels (4) an der Stelle des in das Dach gefrästen Lochs nach, um die Stelle für die
Befestigung des Schornsteins zu markieren. Schrauben Sie die 4 Schrauben (8) auf der
Unterseite des Dachs innerhalb des Umrisses des Schornsteins so ein, dass ihre Spitzen leicht
aus dem Dach herausragen. Drehen Sie das Dach um, setzen Sie die Kammer darauf und
ziehen Sie die Schrauben fest. Setzen Sie das Dach auf die Kammer. Schrauben Sie die Leisten
(5) mit den Schrauben (8) an der Vorder- und Hinterkante des Daches fest, wobei Sie für jede
Leiste 3 Schrauben verwenden. Diese Leisten sind nur ein dekoratives Element. Sie können das
Dach mit Scharnieren (10) an der Räucherkammer befestigen, vorzugsweise in gleichem
Abstand vom Rand der Räucherkammer (ca. 2 cm). Befestigen Sie die Scharniere mit Schrauben
(9). Lassen Sie das mittlere Loch im Scharnier frei, um eine Delaminierung des Holzes zu
vermeiden.
3. Montage des Raucherzeugers dragON Jet 1
Der Zusammenbau des Rauchgenerators dragON Jet 1 ist in der beiliegenden
Gebrauchsanleitung des Raucherzeugers beschrieben.
6 Bedienfeld
Beschreibung der Elemente des Bedienfelds:
Regler - Zeigt die eingestellten und aktuellen
Temperaturen an und ermöglicht die Einstellung der
Temperatur zwischen 0 und 90 °C,
Timer - durch Drehen in die Soll-Position wird der
Heiz-betrieb und der Countdown im Bereich von 0-4 h
aktiviert,
Hauptnetzschalter - schaltet die Hauptstromversorgung ein/aus,
Ventilatorschalter - schaltet den Ventilator ein/aus,
Heizfunktionsschalter - Umschaltung der
Heizfunktion zwischen konstantem Heizen (Pos. II) und
zeit-gesteuertem Heizen (Pos. I).
Abb. 6
7. Bedienung
Vor dem Räuchern von Lebensmitteln sollte der Räucherofen r "ausgebrannt" werden. Dieser Vorgang
dauert etwa 30 Minuten und dient dem Verbrennen von Produktionsrückständen.
1. Das Ausbrennen bzw. die Inbetriebnahme dieses elektrischen Gartenräucherofens aus Holz
2. Der Brennvorgang darf NICHT in geschlossenen Räumen durchgeführt
3. Während des Brennvorgangs nur die Temperatur und den Ventilator
4. Schließen Sie die Vordertür.
5. Schließen Sie das Netzkabel an die Steckdose des Gehäuses des
6. Drücken Sie die Taste "Hauptnetzschalter". (Abb. 6)
sollte folgenderweise durchgeführt werden:Aus der hölzernen Kammer
des Räucherofens die Transportsicherung entfernen.
werden, sondern MUSS im Freien erfolgen.
verwenden.
Ventilatormotors und dann an eine Steckdose mit Stromquelle und
Erdung an (Abb. 7).
Abb. 7
20
Page 21
7. Stellen Sie die maximal mögliche Temperatur (90 °C ) auf dem Bedienfeld
folgenderweise ein (Abb. 8):
a) Drücken Sie die Taste mit der Aufschrift "SET" - editieren Sie
den (gewünschten) Sollwert am unteren Rand des Displays
(GRÜN).
b) Drücken Sie die Taste mit dem Pfeil nach links, um den
Cursor an die richtige Stelle zum Ändern der Ziffer zu bewegen.
c) Stellen Sie mit den Pfeiltasten nach oben und unten den Wert
nacheinander auf 0090 ein und bestätigen Sie erneut mit der
Taste "SET".
d) Der im oberen Teil des Displays angezeigte Temperaturwert
(ROT) ist der vom Temperatursensor gelesene Wert – die
aktuelle Temperatur.
8. Stellen Sie den Heizfunktionsschalter (Abb. 6) auf die Position "1", was bedeutet, dass der
Heizstab für die von der Zeitschaltuhr vorgegebene Zeit eingeschaltet ist. Ein auf Position "2"
gestellter Heizfunktionsschalter bedeutet Dauerbetrieb des Heizstabs ohne Zeitsteuerung.
9. Drehen Sie den Timer-Drehknopf (Abb. 6) auf den ersten "Strich " - das bedeutet, dass der
Heizstab für 30 Minuten eingeschaltet ist.
10. Starten Sie den Ventilator (Abb. 6) mit dem Ventilatorschalter.
11. Warten Sie 30 Minuten, bis das Gerät aufgewärmt ist - nach dieser Zeit ertönt das Tonsignal
(Glocke) des Timers und das Gerät schaltet sich automatisch aus.
12. Warten Sie einige Minuten, bis das Gerät abgekühlt ist, damit Sie es bewegen oder andere
Arbeiten im Inneren der Kammer durchführen können (für eine effektivere Abkühlung der
Kammer öffnen Sie das Dach und lassen Sie den Ventilator eingeschaltet).
Abb. 8
HINWEIS !!!
Denken Sie daran, Ihre Hände mit hitzebeständigen Schutzhandschuhen zu schützen, wenn Sie
Arbeiten im erhitzen Räucherofen durchführen.
Vorschläge – Räucheretappen:
Kalträuchern - dies geschieht mit einem auf 25°C eingestellten Thermokreislauf und einem
Raucherzeuger,
Warmräuchern - dies geschieht mit einem auf 30-50 °C eingestellten Thermokreislauf und einem
Raucherzeuger,
Heißräuchern - dies geschieht mit einem auf 55-60 °C eingestellten Thermokreislauf und einem
Raucherzeuger,
Trocknen - dies geschieht mit einem auf 60°C eingestellten Thermokreislauf ohne
Raucherzeuger,
Anbraten - dies geschieht mit einem Thermokreislauf bei 85°C für 0,5-1,5 Stunden ohne
Raucherzeuger.
Der Betrieb des Räucherofens ohne Thermokreislaufs bei der Höchsttemperatur, d. h. 90°C, ist nicht
länger als 4 Stunden zulässig.
VORSICHT: Lassen Sie das Gerät nicht unbeaufsichtigt.
8 Technische Daten
1. Abmessungen:
Gesamthöhe: 1225 mm
Gesamtbreite: 572 mm (810 mm mit Raucherzeuger)
Gesamttiefe: 640 mm
Höhe der Kammer: 600 mm
Breite der Kammer: 500 mm
21
Page 22
Tiefe der Kammer: 500 mm
Gesamtgewicht: ~ 30 kg
2. elektrische Versorgung:
Spannung: 230 V 50 Hz
Leistung: 1500 W
3 Schutz: 10A / KSD301 - 110oC
4. Schutzart: IP31
9. Wartung und Reinigung
Reinigen Sie den Räucherofen nach jedem Gebrauch, dadurch wird seine Lebensdauer und
Schimmel und Rost verhindert.
Beginnen Sie mit der Reinigung des Räucherofens, indem Sie den Stecker ziehen, den
Raucherzeuger löschen und alle Metallteile auf Umgebungstemperatur abkühlen. Im nächsten Schritt
wird der Raucherzeuger abgetrennt. Waschen Sie den Raucherzeuger wie in der
Bedienungsanleitung empfohlen. Nehmen Sie dann die Holzkammer vom Metallsockel ab und
reinigen Sie ihre Oberfläche. Um die Funktionstüchtigkeit des Raucherzeugers zu erhalten, ist es
ratsam, auch das Innere zu reinigen. Entfernen Sie mit einem feuchten Tuch den restlichen Schmutz
auf dem Boden des Räucherofens. Es wird nicht empfohlen, das Holz im Inneren des Räucherofens
mit Chemikalien zu reinigen. Besonders wichtig ist es, die Sonde des Bedienfelds nach jedem
Gebrauch gründlich zu reinigen – am besten mit einem speziellen, hochwirksamen RäucherofenReiniger, der bei Browin erhältlich ist.
Die Verfärbung des Holzes, die während des Räucherns auftritt, ist das Ergebnis eines natürlichen
Prozesses.
NOTICE D’UTILISATION
FUMOIR ÉLECTRIQUE DE JARDIN dragON WOOD 60 E
ATTENTION!
Afin de garantir un fonctionnement sûr de l'appareil, veuillez lire attentivement cette notice et suivre
les instructions dans leur intégralité.
ATTENTION!
Toute autre forme d'utilisation de l'appareil non conforme à celle décrite dans la présente noticeest
interdite.
ATTENTION!
L'appareil est alimenté par une tension de 230 volts, cela constitue un danger de mort.
1. Informations générales
Le DragON Wood 60 E avec générateur de fumée est un fumoir électrique de jardin en bois pour
fumer, sécher, chauffer ou cuire des aliments.
2. Consignes de sécurité
Instructions générales de sécurité pour travailler avec des équipements électriques.
AVERTISSEMENT
Consultez tous les avertissements et les consignes de sécurité pour l'utilisation, ainsi que les
illustrations et les données techniques fournies avec cet appareil. Le non-respect des
instructions suivantes peut entraîner un choc électrique, un incendie et/ou des blessures graves.
22
Page 23

Conservez toutes les instructions et toutes les consignes de sécurité pour une utilisation
ultérieure. Le terme « appareil électrique » désigne un appareil électrique alimenté par le réseau
électrique (avec un câble d'alimentation).
Sécurité au lieu d'utilisation
ATTENTION: à utiliser uniquement à l'extérieur, sous un auvent ou dans un abri.
Il est interdit d'exposer l'appareil à des conditions météorologiques telles que la pluie,
le gel, la lumière excessive du soleil, etc.
Maintenir le lieu d'utilisation propre. Il est interdit de laisser l'appareil sans surveillance.
Ne pas utiliser l'appareil à proximité de liquides, de gaz ou de poussières inflammables.
Pendant le fonctionnement, la résistance installée dans l'appareil atteint une température
élevée qui peut enflammer les poussières ou les fumées et provoquer une explosion.
Des précautions particulières doivent être prises lors des opérations effectuées à
l'intérieur de la chambre de fumage, à proximité de la résistance et des éléments
chauds. Un contact direct sans protection adéquate risque de provoquer des brûlures.
Il est interdit d'utiliser l'appareil sans porter l'équipement de protection individuelle
approprié.
Lors de l'utilisation de l'appareil, il faut veiller à ce que les enfants et les autres tierces
personnes ne restent pas trop près des composants externes chauds, tels que le
générateur de fumée. Le contact direct avec le corps du générateur de fumée peut
provoquer des brûlures.
Il est interdit aux mineurs et aux adultes ayant des capacités de santé limitées d'utiliser
l'appareil.
Éviter les positions de fonctionnement non naturelles de l'appareil. Veiller à ce que la
position de l'appareil soit stable.
Ne pas déplacer l'appareil pendant son fonctionnement. Laisser refroidir le fumoir.
Sécurité électrique
L'appareil est alimenté en 230 V CA. Toute réparation ne peut être effectuée que par des unités de
maintenance spécialisées.
Il est interdit d'effectuer soi-même des réparations mineures.
Tout entretien doit être effectué lorsque l'appareil est mis hors tension.
La fiche de l'appareil électrique doit être adaptée aux prises. La fiche ne doit en aucun
cas être modifiée. Aucune fiche d'adaptation ne doit être utilisée lors de l'utilisation
d'un appareil électrique avec mise à la terre.
Il est recommandé d'alimenter l'appareil à partir d'une prise de courant munie d'un
disjoncteur à courant résiduel dans l'installation.
L'appareil ne doit pas être exposé à la pluie.
Nepas utiliser le câble d'alimentation à d'autres fins. Ne pas utiliser le câble pour
déplacer l'appareil; ne pas retirer la fiche de la prise en tirant sur le câble. Protéger le
câble contre les températures élevées; le tenir éloigné des bords tranchants.
Ne pas brancher le fumoir électrique avant qu'il ne soit complètement assemblé et prêt
à l'emploi.
N'utiliser qu'une prise électrique mise à la terre.
N'utiliser jamais un appareil qui fonctionne mal ou qui est endommagé.
Avoir toujours un extincteur à poudre à portée de main pendant l’utilisation du fumoir
électrique.
Ne jamais utiliser un appareil électrique dont la fiche ou le câble est défectueux.
Si le câble d'alimentation est défectueux, il doit être remplacé par le fabricant.
RECOMMANDATIONS
Avant de commencer le fumage, s’assurer que la cheminée n'est pas obstruée.
Ne pas recouvrir les grilles avec du papier d'aluminium, car cela empêcherait la chaleur de
circuler correctement.
23
Page 24
Ne pas surcharger le fumoir avec une trop grande quantité de produits à fumer en même
1
Chambre en bois
2
Boîtier du panneau de contrôle
3
Cadre métallique
4
Boîtier du moteur du ventilateur
5
Générateur de fumée
6
Panneau de contrôle avec sonde
7
Unité de la résistance du circuit thermique
temps. De très grandes quantités peuvent retenir la chaleur, augmenter la durée de fumage et
entraîner un fumage non uniforme. Laisser de l'espace entre les produits pour assurer une
bonne circulation de la chaleur.
Les températures très basses peuvent augmenter la durée de fumage.
Stocker le fumoir dans un endroit sec après utilisation.
Principaux éléments du fumoir:
3. Description de la structure
Fig. 2
Fig. 1
Le processus de fumage se déroule dans une chambre en bois (1)
fermée par une porte avec un verrou et un toit à charnières (ouvrable).
(Fig. 2)
24
Page 25
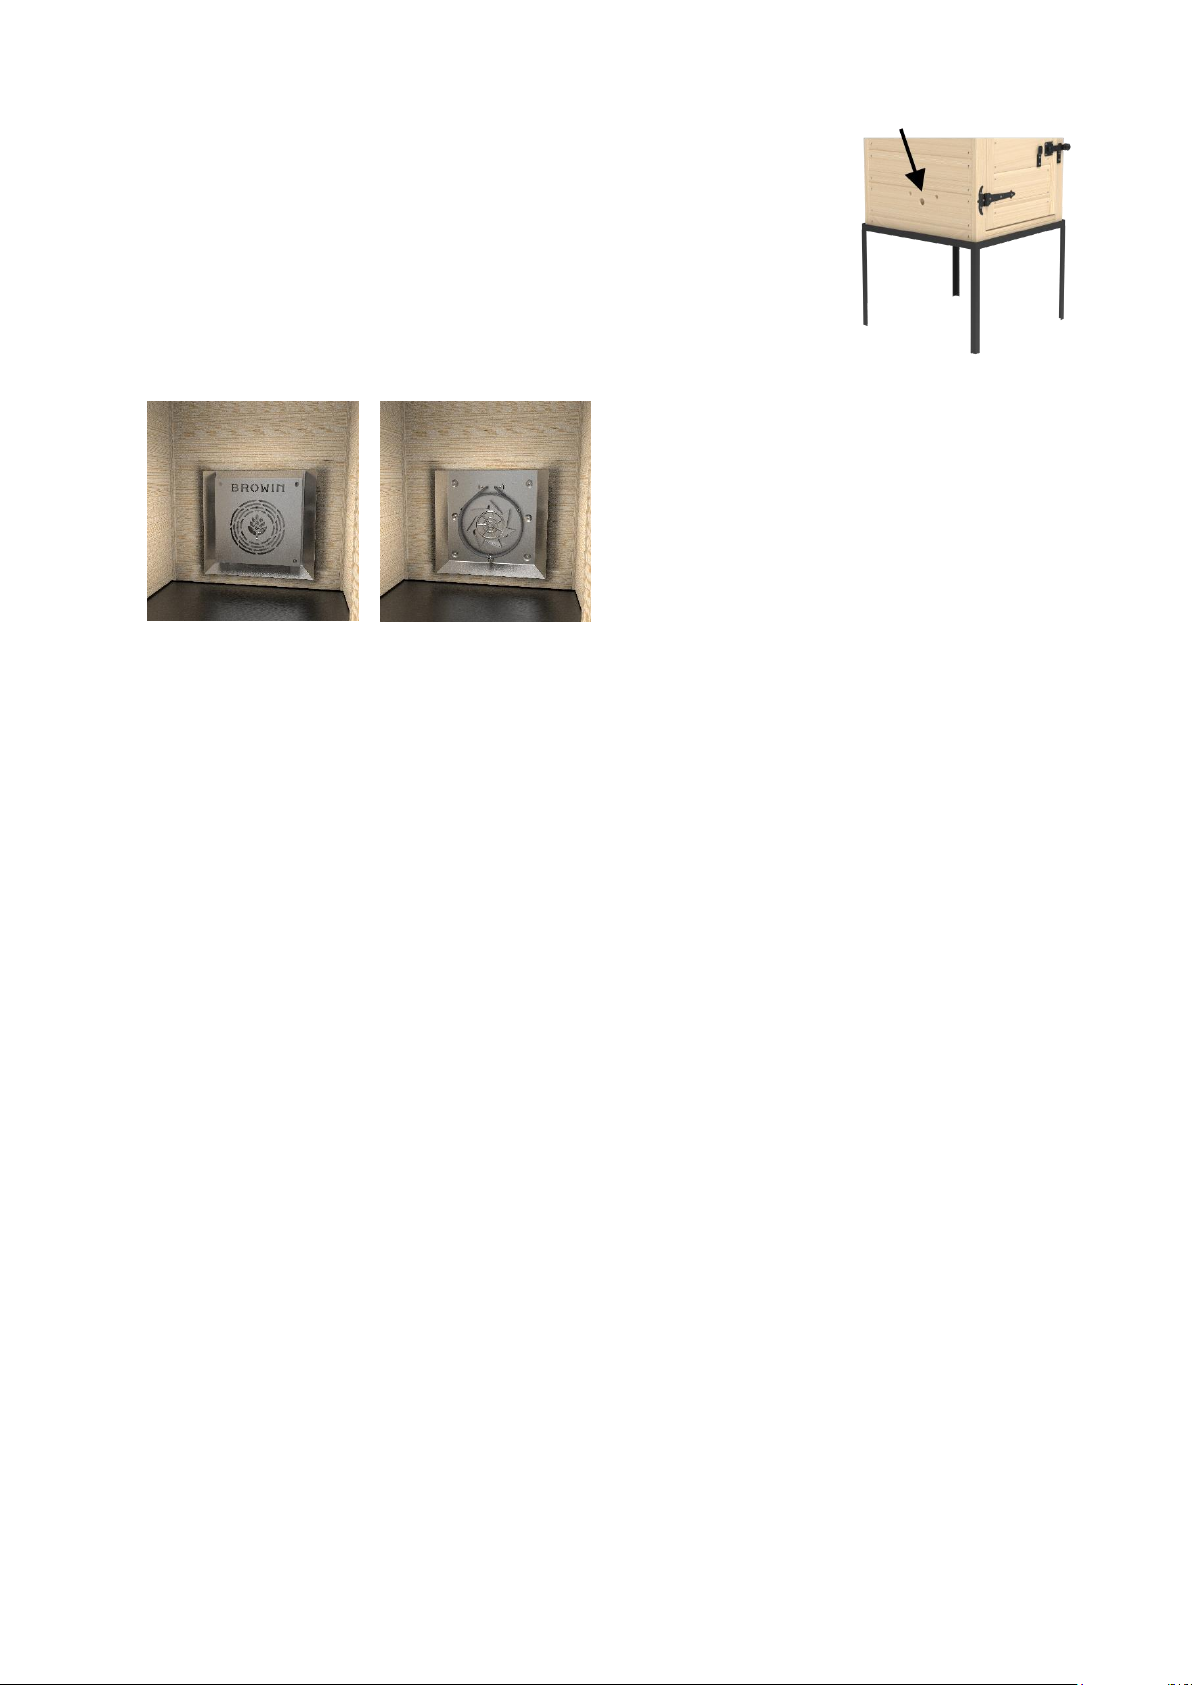
Dans la paroi latérale gauche de la chambre en bois, des trous sont
pratiqués pour le montage du générateur de fumée dragON JET 1 avec une
pompe électrique (5). (Fig. 3)
À l'intérieur de la chambre en bois, l'unité de la
résistance du circuit thermique est installée,
lorsque le couvercle principal est retiré, vous
pouvez voir la résistance etle ventilateur. (Fig. 4)
Fig. 4
ATTENTION!!!
Fig. 3
Les composants de l'unité de la résistance du circuit thermique et du générateur de fumée deviennent
très chauds pendant le fonctionnement du fumoir. Il faut être particulièrement vigilant, car en les
touchant sans gants, vous êtes exposé à des brûlures.
4. Description du fonctionnement
Le fumoir de jardin électrique en bois permet de fumer, sécher ou cuire les aliments de manière
professionnelle. La résistance avec le circuit thermique distribue la chaleur dans tout l'espace de la
chambre en bois, ce qui rend le processus de fumage beaucoup plus rapide et efficace. Le générateur
de fumée innovant permet d'exploiter toutes les qualités du fumage utilisant des copeaux de fumée.
Le fonctionnement du fumoir est contrôlé par un régulateur PID à l'aide d'un thermostat qui, dans les
situations dangereuses, c'est-à-dire une température supérieure à 110⁰C, coupe l'alimentation
électrique.
5. Montage et préparation de appareil pour le fonctionnement
L'emplacement de l'appareil doit être situé à l'extérieur du bâtiment et couvert.
Il doit également disposer d'une alimentation électrique avec mise à la terre.
Le fumoir doit être placé sur un supportstable. En raison de l'installation électrique et des éléments
chauffants, il faut veiller à choisir une surface aussi plane et ininflammable que possible, afin d'éviter
tout risque de basculement de l’appareil et d'incendie. Le fumoir doit être déplacé par au moins deux
personnes, en raison de son poids et de ses dimensions.
25
Page 26
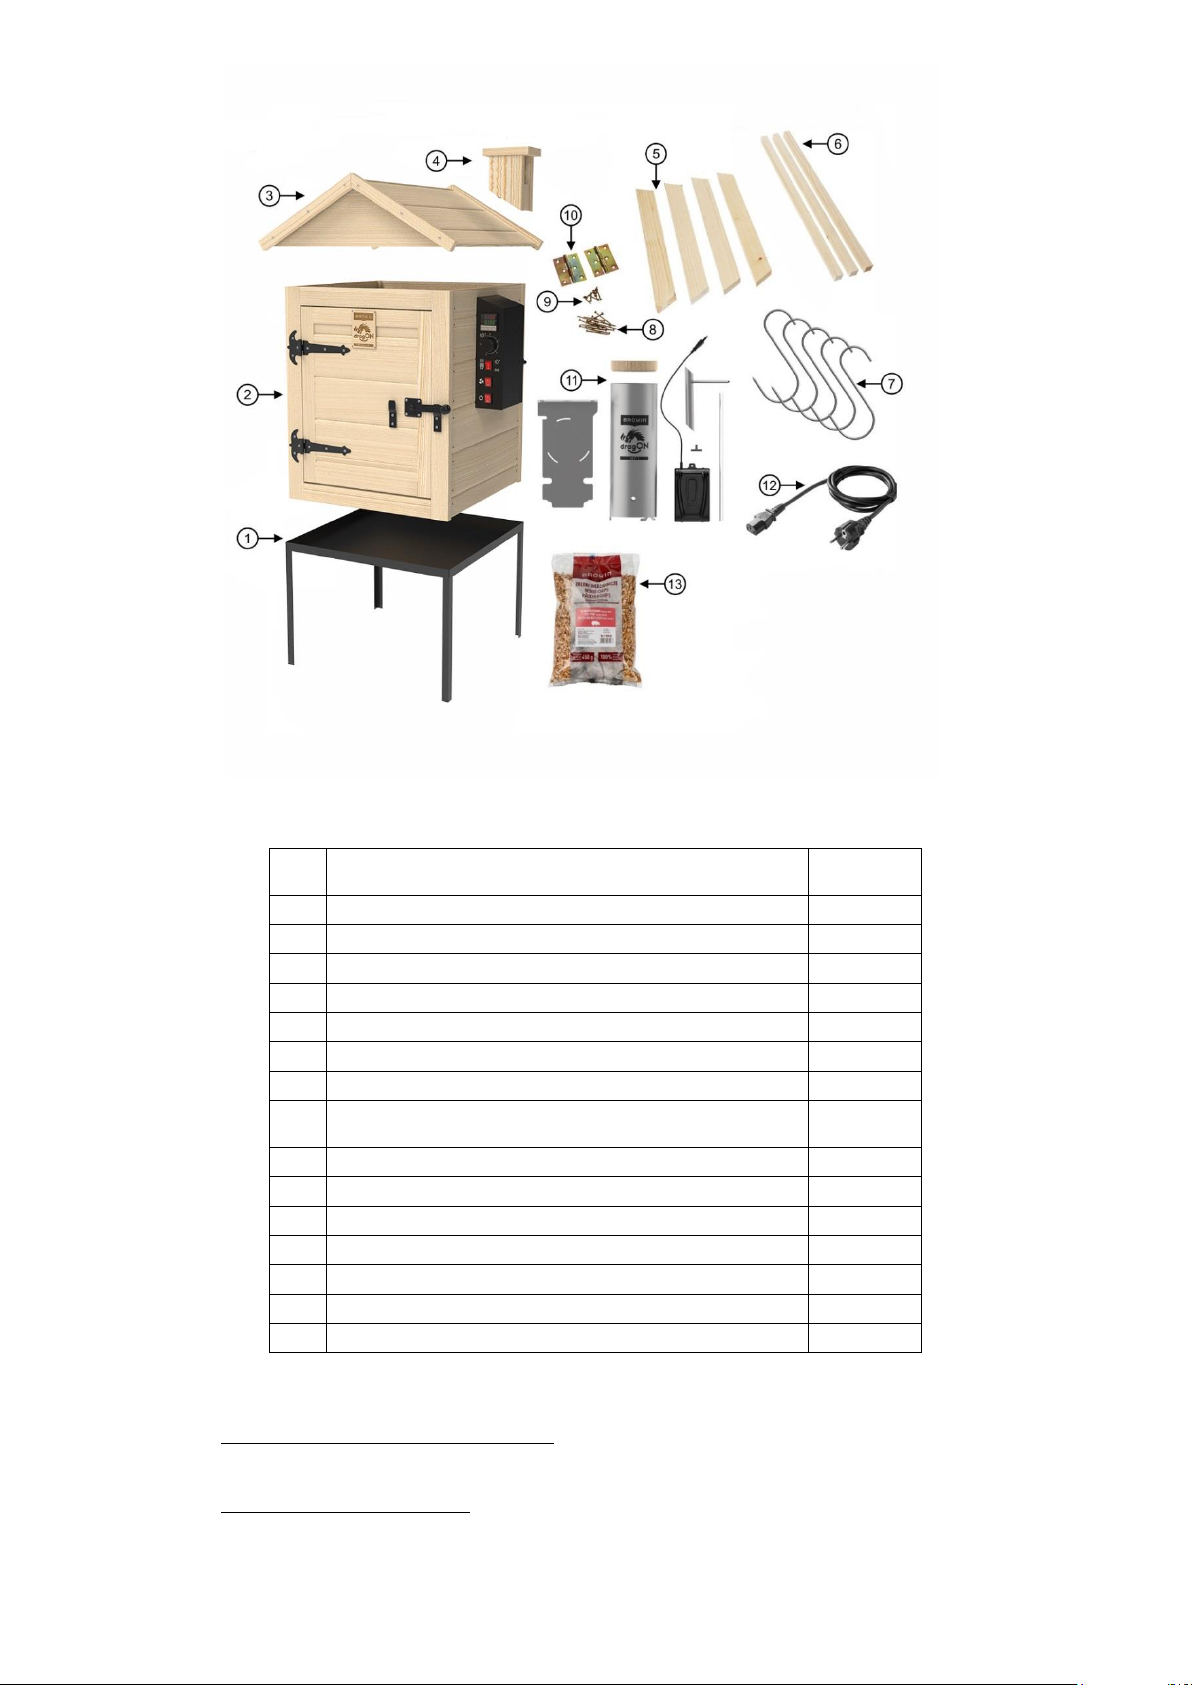
Nr
Description
Quantité
1
Cadre métallique
1
2
Chambre en bois
1
3
Toit
1
4
Cheminée
1
5
Lamelles du toit
4
6
Poutres en bois pour accrocher les produits
3
7
Crochets de fumage
5
8
Jeu de vis pour l'installation de la cheminée
et des lamelles du toit
16
9
Jeu de vis de fixation des charnières
10
10
Charnières de toit
2
11
Générateur de fumée dragON Jet 1 avec pompe
1
12
Câble d'alimentation
1
13
Copeaux de fumée
1
Notice d’utilisation - fumoir
1 Notice d’utilisation du générateur de fumée
1
Fig. 5
Montage
1. Préparer le lieu de travail et les outils.
Lire attentivement la notice ci-jointe avant de procéder au montage.
Outils nécessaires: visseuse, perceuse, tournevis cruciforme.
2. Montage du corps du fumoir
26
Page 27
Placer la chambre en bois (2) sur le cadre métallique (1). Placer le toit (3) sur une surface plane
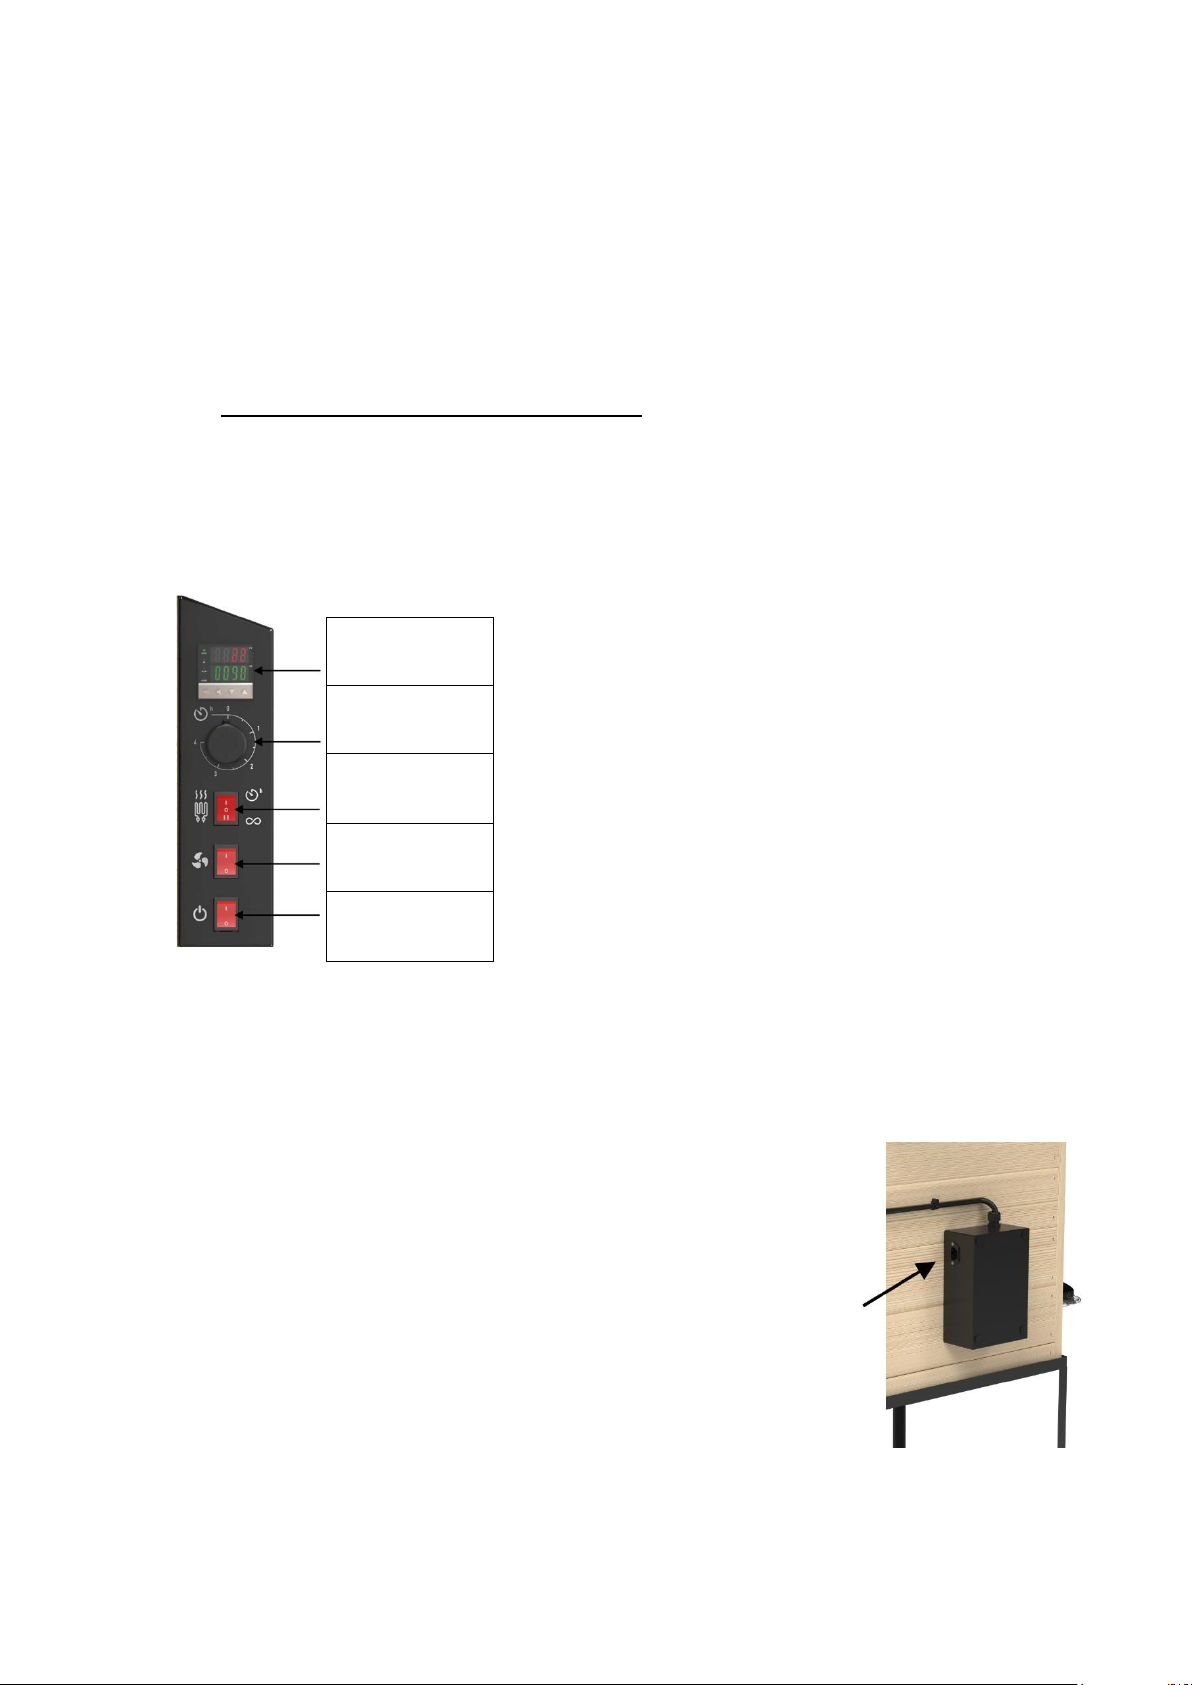
Contrôleur PID
Compte
à rebours
Commutateur
de fonction de
chauffage
Interrupteur du
ventilateur
Interrupteur
d'alimentation
principal
et retourner sa face intérieure vers le haut. Tracer le contour de la base de la cheminée (4) à
l'emplacement du trou percé dans le toit, afin de marquer l'emplacement de la fixation de la
cheminée. Sur la face inférieure du toit, à l'intérieur du contour de la cheminée, visser les 4 vis (8)
de façon à ce que leurs pointes dépassent légèrement du toit. Retourner le toit, placer la
cheminée dessus et serrer les vis. Placer le toit sur la cheminée. Visser les lamelles (5) aux
bords avant et arrière du toit à l'aide des vis (8), en utilisant 3 vis par lamelle. Ces lamelles ne
sont qu'un élément décoratif. Vous pouvez fixer le toit à la chambre de fumage à l'aide de
charnières (10), de préférence à égale distance du bord de la chambre de fumage (environ 2
cm). Utiliser des vis (9) pour installer les charnières. Laisser le trou central de la charnière vide pour éviter la délamination du bois
3. Montage du générateur de fumée dragON Jet 1
Le montage du générateur de fumée dragON Jet 1 est décrit dans la notice d’utilisation du
générateur fournie.
6. Panneau de contrôle
Description des éléments du panneau de contrôle:
Régulateur - affiche les températures, de consigne et
actuelle, et permet de régler la température dans une plage
de 0 à 90oC,
Minuterie - en le tournant en position de consigne, le
fonctionnement de la résistance et le compte à rebours
entre 0 et 4 heures démarrent,
Interrupteur d'alimentation principale - permet
d'allumer et d'éteindre l'alimentation principale,
Interrupteur du ventilateur - permet d'allumer et
d'éteindre le ventilateur,
Interrupteur de fonction de chauffage - commutateur
de la fonction d’alimentation de la résistance entre le
chauffage permanent (pos. II) et le chauffage temporel (pos.
I).
Fig. 6
7. Utilisation
Avant de fumer des produits alimentaires, le fumoir doit être brûlé”. Ce processus dure environ 30
minutes et sert à brûler tout résidu de fabrication.
Le brûlage et la mise en service du fumoir électrique à bois de jardin doivent
être effectués selon la procédure suivante:
1. Vider la chambre en bois du fumoir de toute protection contre le
transport.
2. NE PAS effectuer le processus de brûlage à l'intérieur, le processus
DOIT être effectué à l'extérieur.
3. N'utiliser que la température et le ventilateur pendant le processus de
brûlage.
4. Fermer la porte avant.
5. Brancher le câble d'alimentation sur la prise située dans le boîtier
du moteur du ventilateur, puis sur une prise de courant avec une
source d'alimentation et une mise à la terre (Fig. 7).
6. Appuyer sur le bouton “interrupteur général”. (Fig. 6)
Fig. 7
27
Page 28
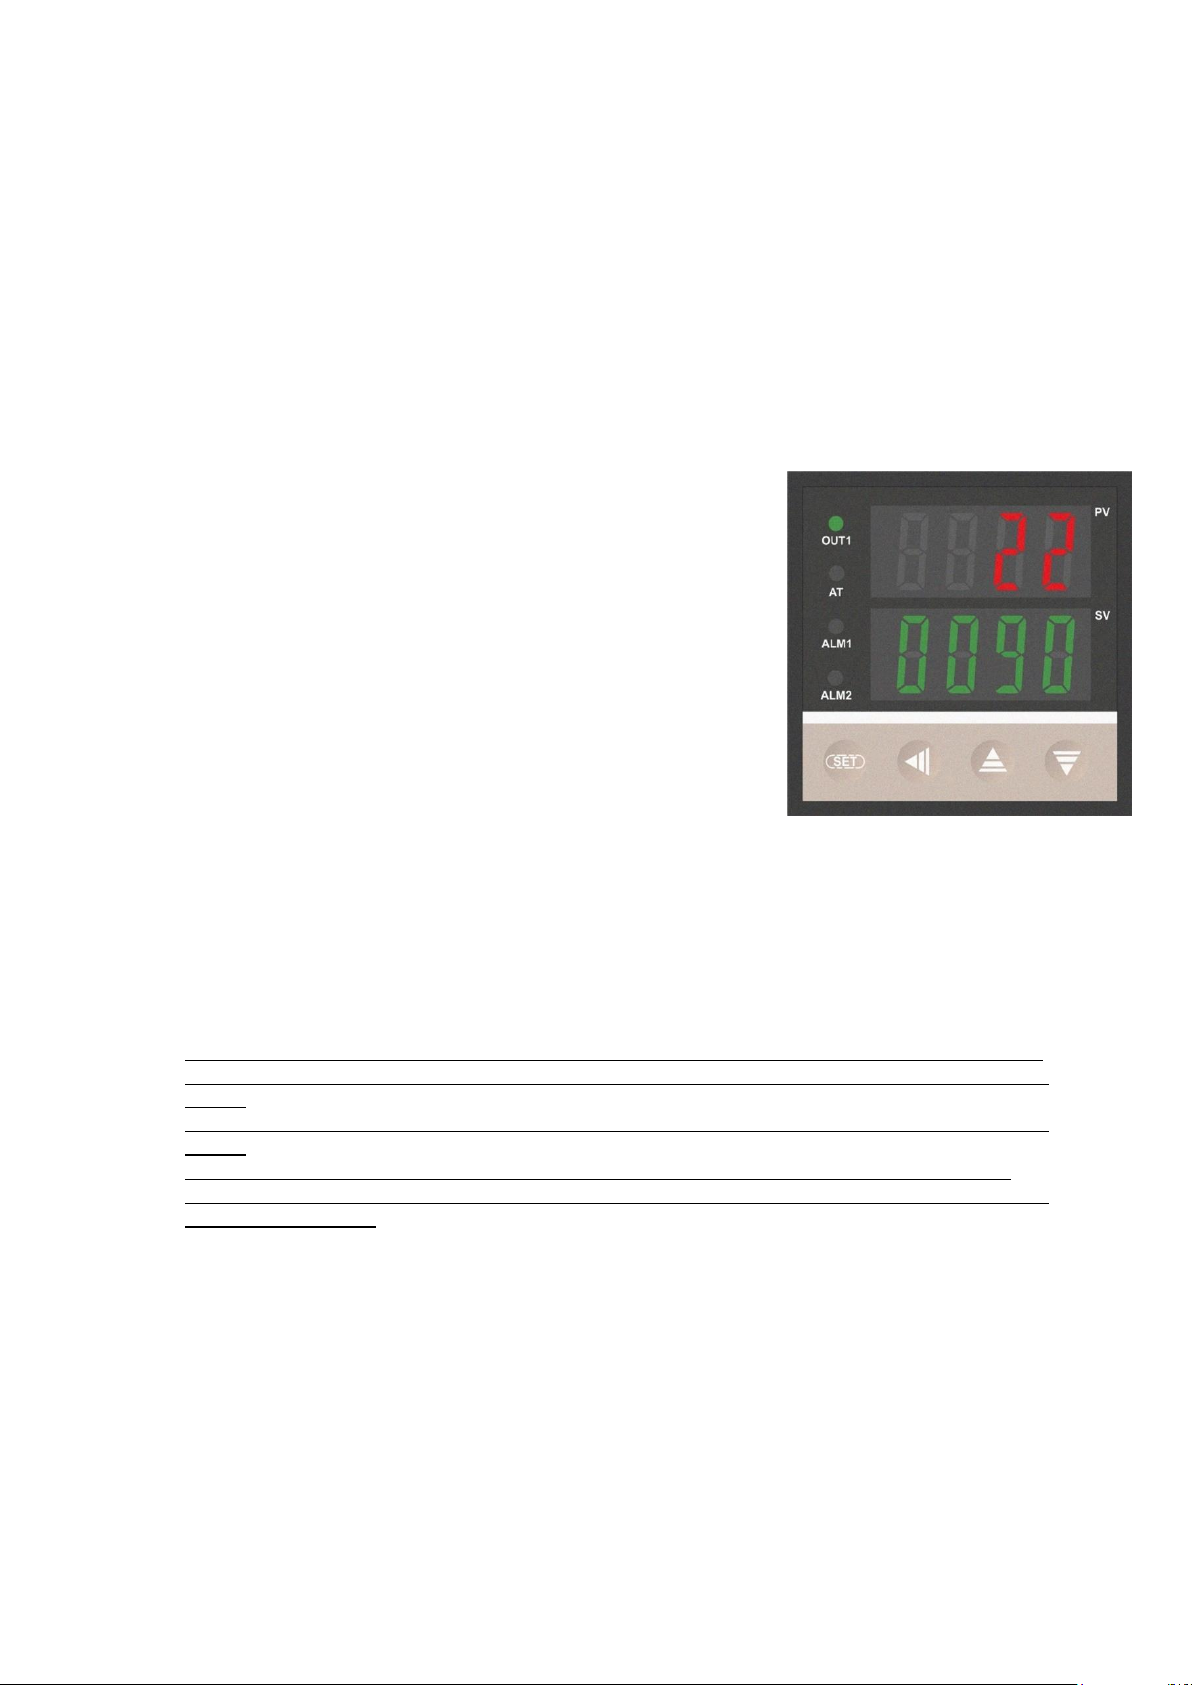
7. Régler la température maximale possible (90
o
C) sur le régulateur en suivant la
procédure ci-dessous (Fig. 8):
a) Appuyer sur le bouton marqué "SET" - modifier le point de consigne (souhaité) en bas de
l'écran (VERT).
b) Appuyer sur le bouton marqué d'une flèche vers la gauche pour déplacer le curseur à la
position correcte pour modifier le chiffre.
c) Régler la valeur séquentiellement sur 0090 à l'aide des boutons fléchés vers le haut et
vers le bas et confirmer à nouveau en appuyant sur le bouton "SET".
d) La valeur de la température affichée dans la partie supérieure de l'écran (ROUGE) est la
valeur lue par la sonde de température - température actuelle.
8. Placer le commutateur de fonction de chauffage (Fig. 6) en
position "1", ce qui signifie que la résistance sera allumée
pendant la durée définie par le fonctionnement de la minuterie.
Le commutateur de fonction de chauffage en position "2"
signifie que la résistance fonctionne en continu, sans contrôle
du temps.
9. Tourner le bouton de la minuterie (Fig. 6) sur le premier "tiret "
- cela signifie que la résistance est allumée pendant 30
minutes.
10. Activer le ventilateur (Fig. 6) à l'aide de l'interrupteur du
ventilateur.
11. Attendre 30 minutes pour que l'appareil se réchauffe - après
cette période, vous entendrez un bip (sonnette) de la minuterie
et la résistance s'éteindra automatiquement.
12. Attendre quelques minutes jusqu’à ce que l'appareil refroidisse
pour pouvoir le déplacer ou effectuer d'autres activités à l'intérieur de la chambre (pour un
refroidissement plus efficace de la chambre, ouvrir le toit et laisser le ventilateur en marche).
Fig. 8
ATTENTION!!!
N'oubliez pas de protéger vos mains avec des gants de protection résistants à la chaleur
lorsque vous effectuez des opérations à l'intérieur du fumoir chauffé.
Suggestions - étapes du tabagfumageisme :
Fumage à froid - il s'effectue à l'aide du circuit thermique réglé à 25oCet du générateur de fumée,
Fumage à chaud - il s'effectue à l'aide du circuit thermique réglé à 30-50
fumée,
Fumage à chaud - il s'effectue à l'aide du circuit thermique réglé à 55-60
o
C et du générateur de
o
C et du générateur de
fumée,
Séchage - il s'effectue à l'aide du circuit thermique réglé à 60oC sans le générateur de fumée,
Le cuisson est réalisé à l'aide du circuit thermique réglé à 85
o
C pendant 0,5 à 1,5 h sans le
générateur de fumée,
Le fonctionnement du fumoir sans le circuit thermique à la température maximale, c'est-à-dire 90oC,
n'est pas autorisé pendant plus de 4 heures.
ATTENTION : Ne pas laisser l'appareil sans surveillance.
28
Page 29

8. Données techniques
1. Dimensions:
hauteur totale: 1225 mm
largeur totale: 572 mm (810 mm avec le générateur de fumée)
profondeur totale: 640 mm
hauteur de la chambre: 600 mm
largeur de la chambre: 500 mm
profondeur de la chambre: 500 mm
poids total: ~ 30 kg
2. Alimentation électrique:
Tension: 230 V 50 Hz
Puissance: 1500 W
3. Protection: 10A / KSD301 - 110oC
4. Indice de protection : IP31
9. Entretien et nettoyage
Nettoyer le fumoir après chaque utilisation pour prolonger sa durée de vie et éviter les
moisissures et la rouille.
Commencer par nettoyer le fumoir en le débranchant, en éteignant le générateur de fumée et en
refroidissant toutes les parties métalliques à la température ambiante. L'étape suivante consiste à
débrancher le générateur de fumée. Laver le générateur conformément aux instructions de sa notice
d'utilisation. Retirer ensuite la chambre en bois de la base métallique et nettoyer sa surface. Pour que
le fumoir fonctionne correctement, il est conseillé de nettoyer également sonn intérieur. À l'aide d'un
chiffon humide, enlever les restes de saleté du fond du fumoir. Il n'est pas recommandé d'utiliser des
produits chimiques pour nettoyer le bois à l'intérieur du fumoir. Il est particulièrement important de
nettoyer soigneusement la sonde du panneau de contrôle après chaque utilisation - de préférence
avec un nettoyant pour fumoir spécialisé et très efficace disponible chez Browin.
La décoloration du bois qui se produit pendant le fumage est le résultat de processus naturels.
29
Page 30

30
Page 31

WARUNKI GWARANCJI
1. Niniejsza gwarancja jest udzielana przez firmę
BROWIN Spółka z ograniczoną odpowiedzialnością Sp. k. z siedzibą przy ul.
Pryncypalnej 129/141; 93-373 Łódź, nazywaną w dalszej części gwarancji Gwarantem.
2. Niniejsza gwarancja dotyczy wyłącznie sprzętu używanego na terytorium Polski.
3. Okres gwarancji na produkt wynosi 12 miesięcy od daty zakupu sprzętu.
4. W przypadku wad uniemożliwiających korzystanie ze sprzętu, okres gwarancji ulega
przedłużeniu o czas od dnia zgłoszenia wady do dnia wykonania naprawy.
5. Gwarancja uprawnia do bezpłatnych napraw nabytego sprzętu, polegających na
usunięciu wad fizycznych, które ujawniły się w okresie gwarancyjnym, z zastrzeżeniem
punktu 11.
6. Zgłoszenie wady sprzętu powinno zawierać:
dowód zakupu towaru;
nazwę i model towaru wraz ze zdjęciami uzasadniającymi reklamację.
7. Reklamujący powinien spakować produkt, odpowiednio zabezpieczając go przed
uszkodzeniem w czasie transportu.
8. Gwarant w terminie 14 dni od daty zgłoszenia wady ustosunkuje się do zgłoszonej
reklamacji. Jeżeli do dokonania naprawy wystąpi konieczność sprowadzenia części
zamiennych z zagranicy, termin naprawy może ulec przedłużeniu do czasu sprowadzenia
niezbędnej elementów, lecz maksymalnie do 30 dni roboczych od daty otrzymania
towaru do naprawy.
9. Gwarancja obejmuje wszelkie wady materiałowe i produkcyjne ujawnione w czasie
normalnej eksploatacji zgodnie z przeznaczeniem sprzętu i zaleceniami podanymi na
opakowaniu lub w instrukcji użytkowania. Warunkiem udzielenia gwarancji jest
użytkowanie sprzętu zgodnie z instrukcją.
10. Zakres czynności naprawy gwarancyjnej nie obejmuje czyszczenia, konserwacji,
przeglądu technicznego, wydania ekspertyzy technicznej.
11. Gwarancja nie obejmuje:
uszkodzeń mechanicznych, chemicznych, termicznych i korozji, zalania cieczą
urządzenia oraz jeżeli posiadają akcesoria.
uszkodzeń spowodowanych działaniem czynników zewnętrznych, niezależnych od
producenta, a w szczególności wynikłych z użytkowania niezgodnego z instrukcją
obsługi;
usterek powstałych w wyniku niewłaściwego montażu sprzętu;
samowolnych, dokonywanych przez użytkownika lub inne nieupoważnione osoby
napraw, przeróbek lub zmian konstrukcyjnych;
użytkowanie poza normalnym zakresem konsumenckiego zastosowania w
warunkach domowych.
31
Page 32

12. Powyższe oświadczenie nie ma wpływu na statutowe prawa konsumenta wynikające z
odpowiednich praw krajowych i na prawa konsumenta w stosunku do sprzedawcy, u którego
zakupiono ten produkt. Niniejsza gwarancja na sprzedany towar konsumpcyjny nie wyłącza,
nie ogranicza ani nie zawiesza uprawnień kupującego wynikających z niezgodności towaru z
umową.
13. Gwarancja nie nadaje Kupującemu prawa do domagania się zwrotu utraconych zysków
związanych z uszkodzeniem urządzenia oraz strat związanym z powodu uszkodzenia
sprzętu.
14. W przypadku zapotrzebowania na usługi serwisu, w ramach gwarancji lub bez, należy
skontaktować się ze sprzedawcą, u którego zakupiono produkt. Przed skontaktowaniem się
ze sprzedawcą lub serwisem zalecamy dokładnie przeczytanie broszury z instrukcjami
dołączonej do produktu.
15. W przypadku zakupu bezpośrednio u producenta reklamacje można składać
bezpośrednio na stronie www.browin.pl w zakładce Zgłaszanie reklamacji lub za
pośrednictwem drogi elektronicznej pod adresem [email protected].
W przypadku zakupu u dystrybutora zaleca się dokonanie zgłoszenia za jego
pośrednictwem.
Życzymy satysfakcji z użytkowania zakupionego produktu
i zachęcamy do zapoznania się z bogatym asortymentem dostępnym w ofercie naszej Firmy.
BROWIN Sp. z o.o. Sp. K.
ul. Pryncypalna 129/141
PL, 93-373 Łódź
tel: +48 42 232 32 00
www.browin.pl
ODWIEDŹ NAS NA:
32
 Loading...