

Page 1
INSTRUKCJA OBSŁUGI
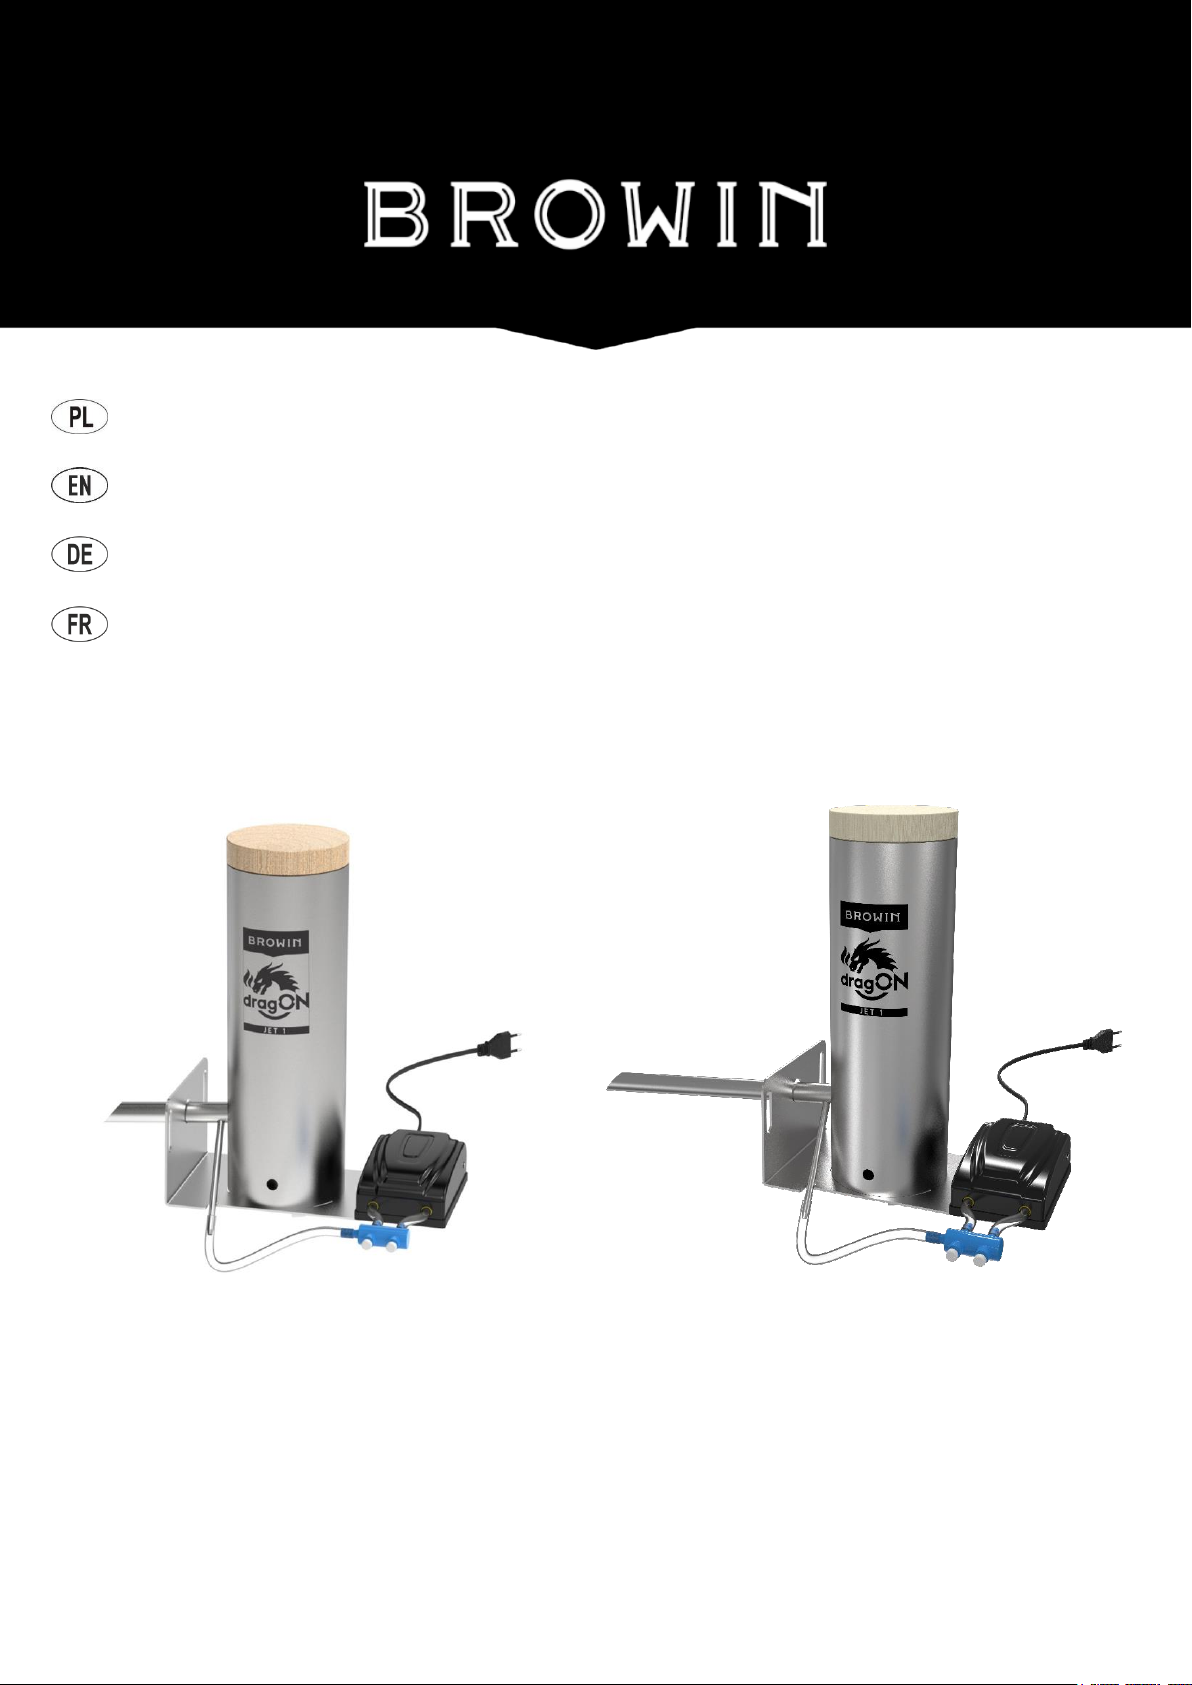
GENERATOR DYMU dragON Jet 1 oraz dragON Jet Long Z POMPKĄ ELEKTRYCZNĄ dragON Air
USER MANUAL
dragON Jet 1 and dragON Jet Long SMOKE GENERATOR WITH A dragON Air ELECTRIC PUMP
BEDIENUNGSANLEITUNG
RAUCHGENERATOR DRAGON JET 1, dragON Jet Long MIT ELEKTROPUMPE dragON Air
MANUEL DE L'UTILISATEUR
dragON Jet 1, dragON Jet Long GÉNÉRATEUR DE FUMÉE AVEC POMPE ÉLECTRIQUE dragON Air
*zdjęcie poglądowe | sample photo for illustrative purposes only
No 330143, 330144
1
Page 2
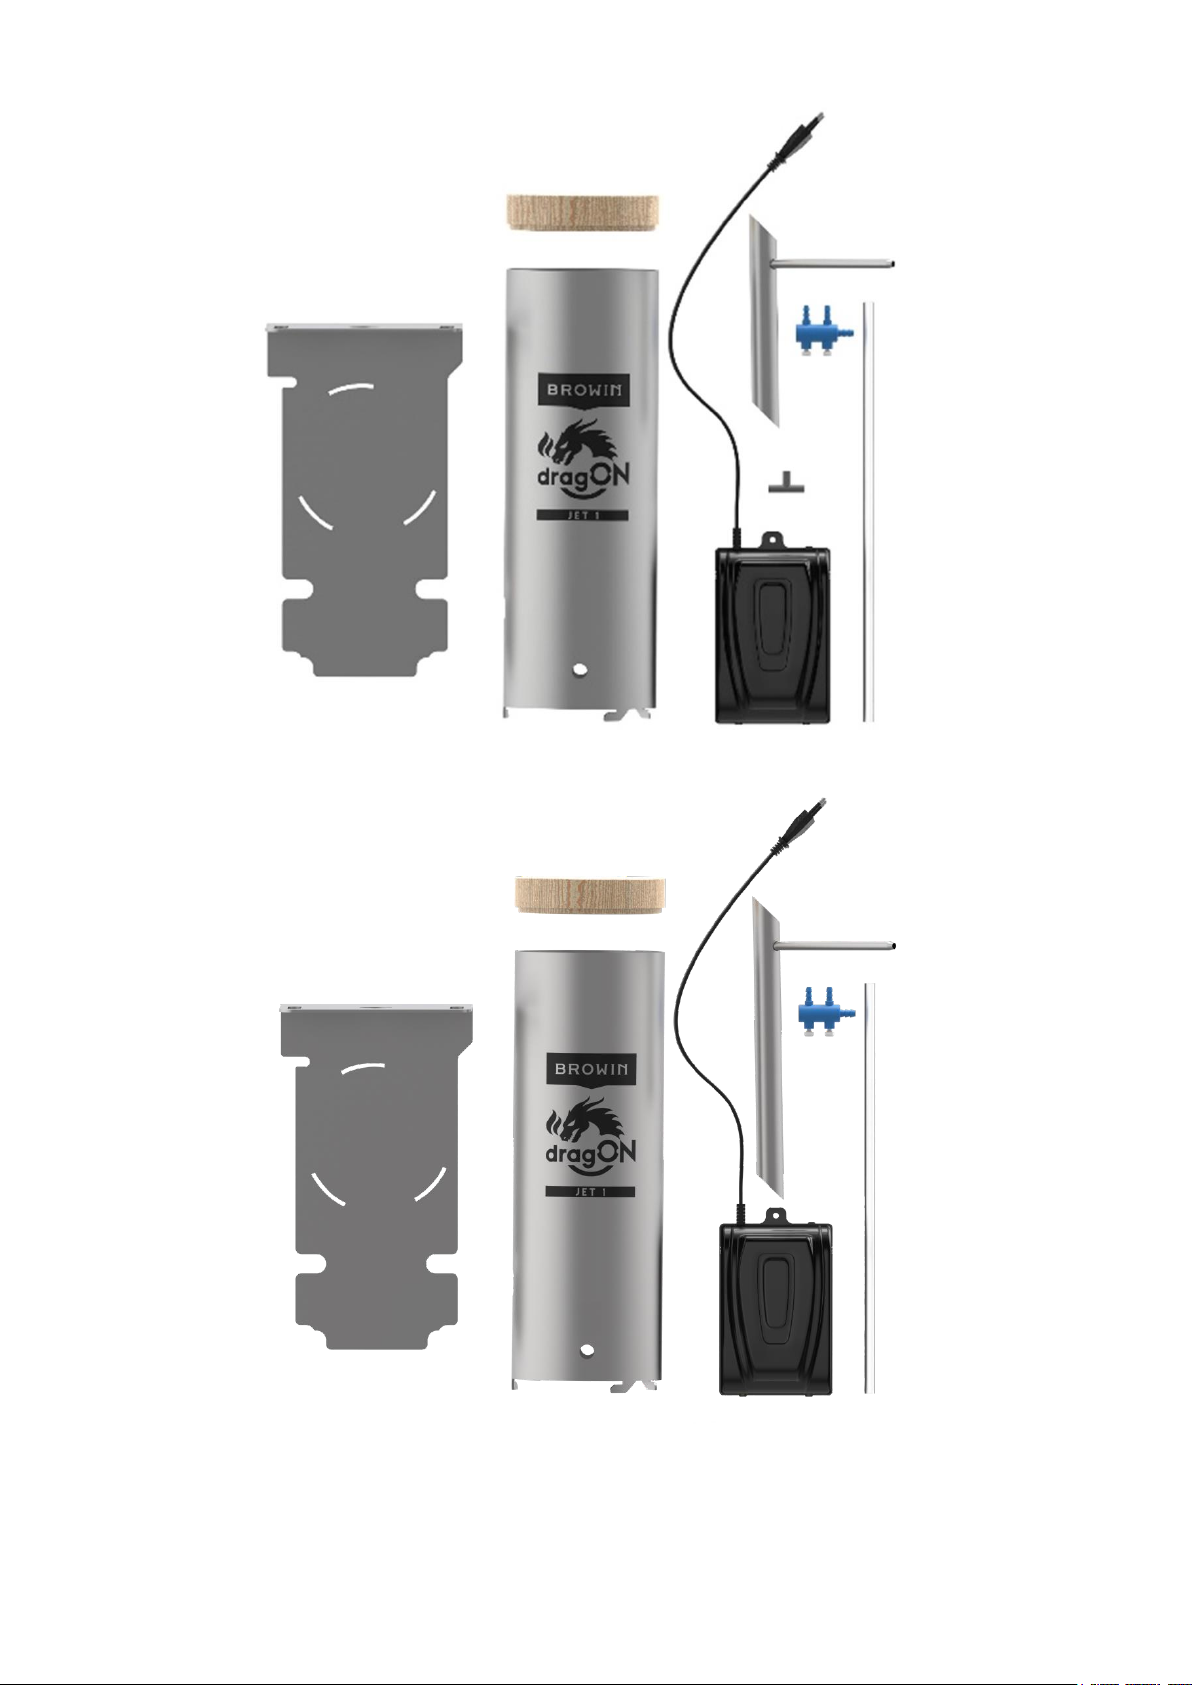
ELEMENTY ZESTAWU | COMPONENTS OF THE KIT | BESTANDTEILE DES BAUSATZES | COMPOSANTS DU KIT
2
Page 3
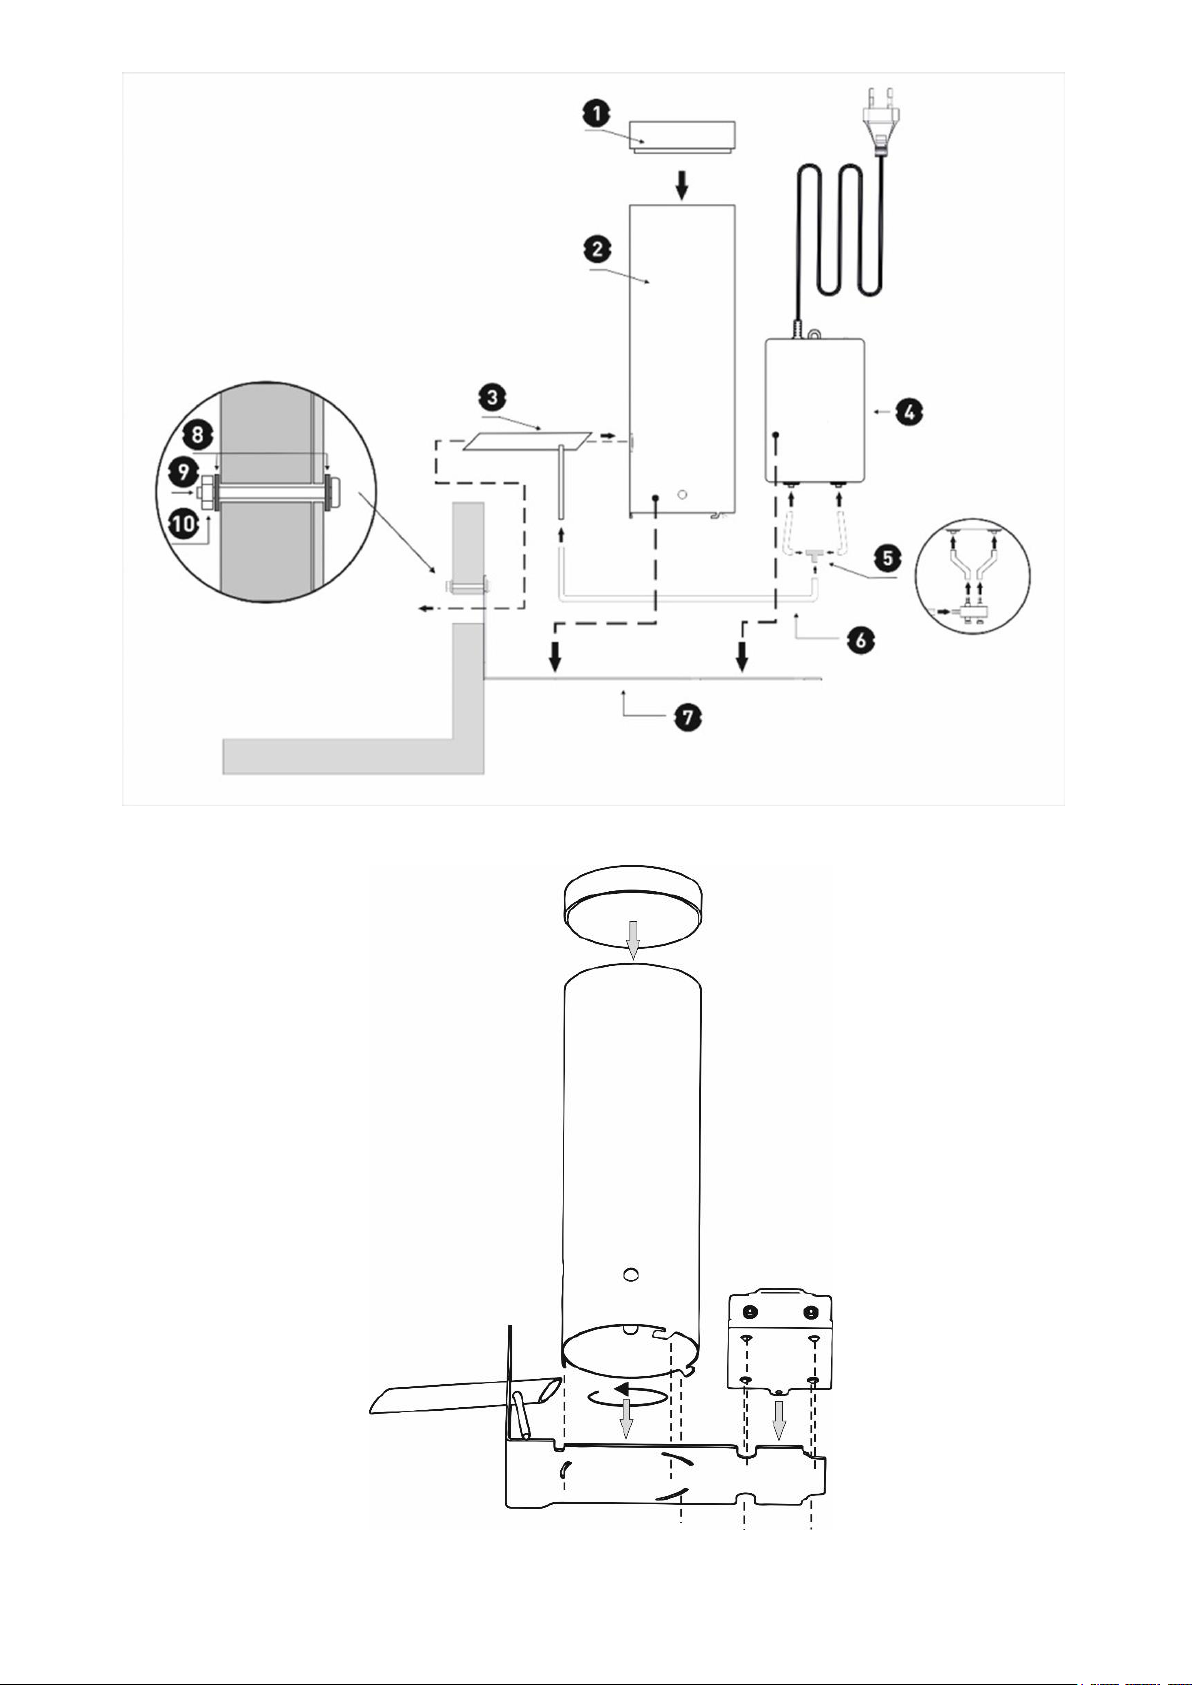
MONTAŻ | ASSEMBLY | MONTAGE | ASSEMBLAGE
3
Page 4
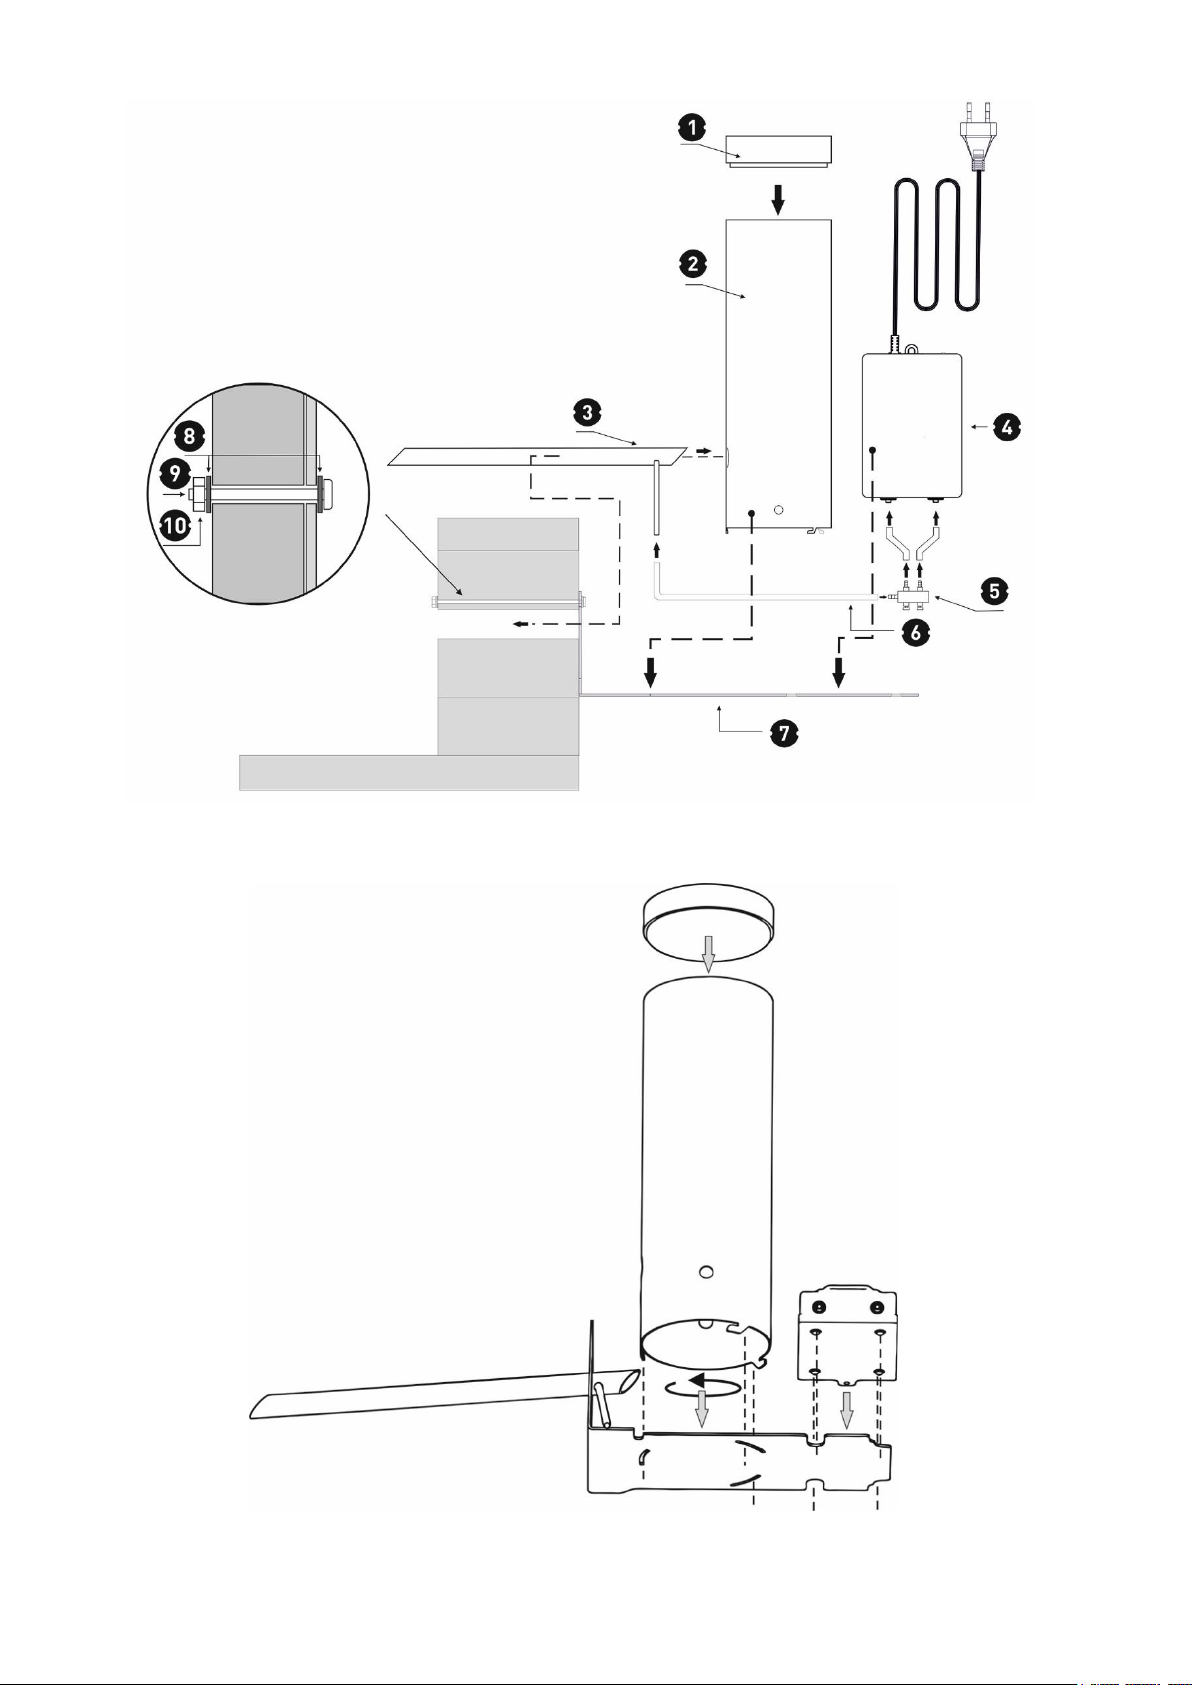
4
Page 5
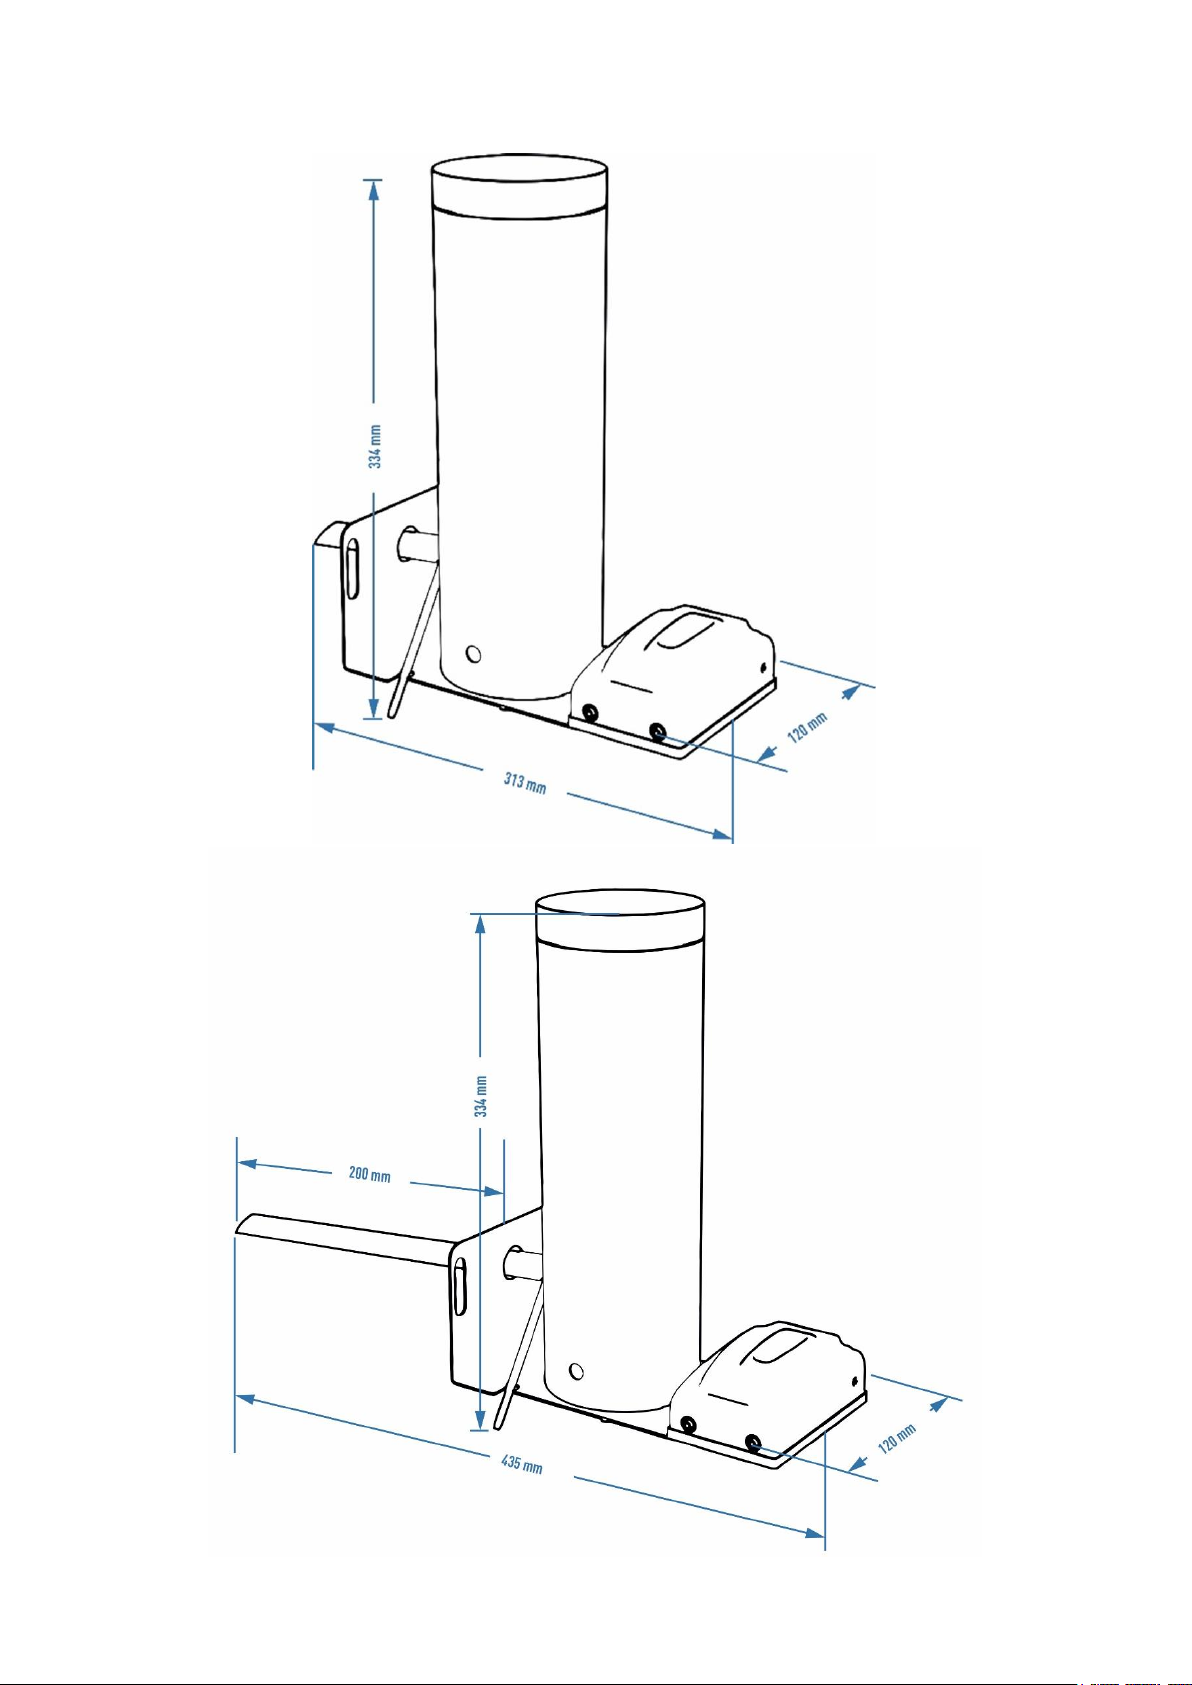
WYMIARY | DIMENSIONS | ABMESSUNGEN | DIMENSIONS
5
Page 6
─ INSTRUKCJA OBSŁUGI ─
GENERATOR DYMU dragON Jet 1 oraz dragON Jet Long – Z POMPKĄ ELEKTRYCZNĄ dragON Air
Dziękujemy za wybór naszego produktu.
Przed jego użyciem koniecznie zapoznaj się z niniejszą instrukcją, co pozwoli Ci właściwie i bezpiecznie korzystać z
urządzenia oraz zapewnić mu optymalną żywotność.
Instrukcję zachowaj i zawsze postępuj zgodnie z zawartymi w niej zaleceniami.
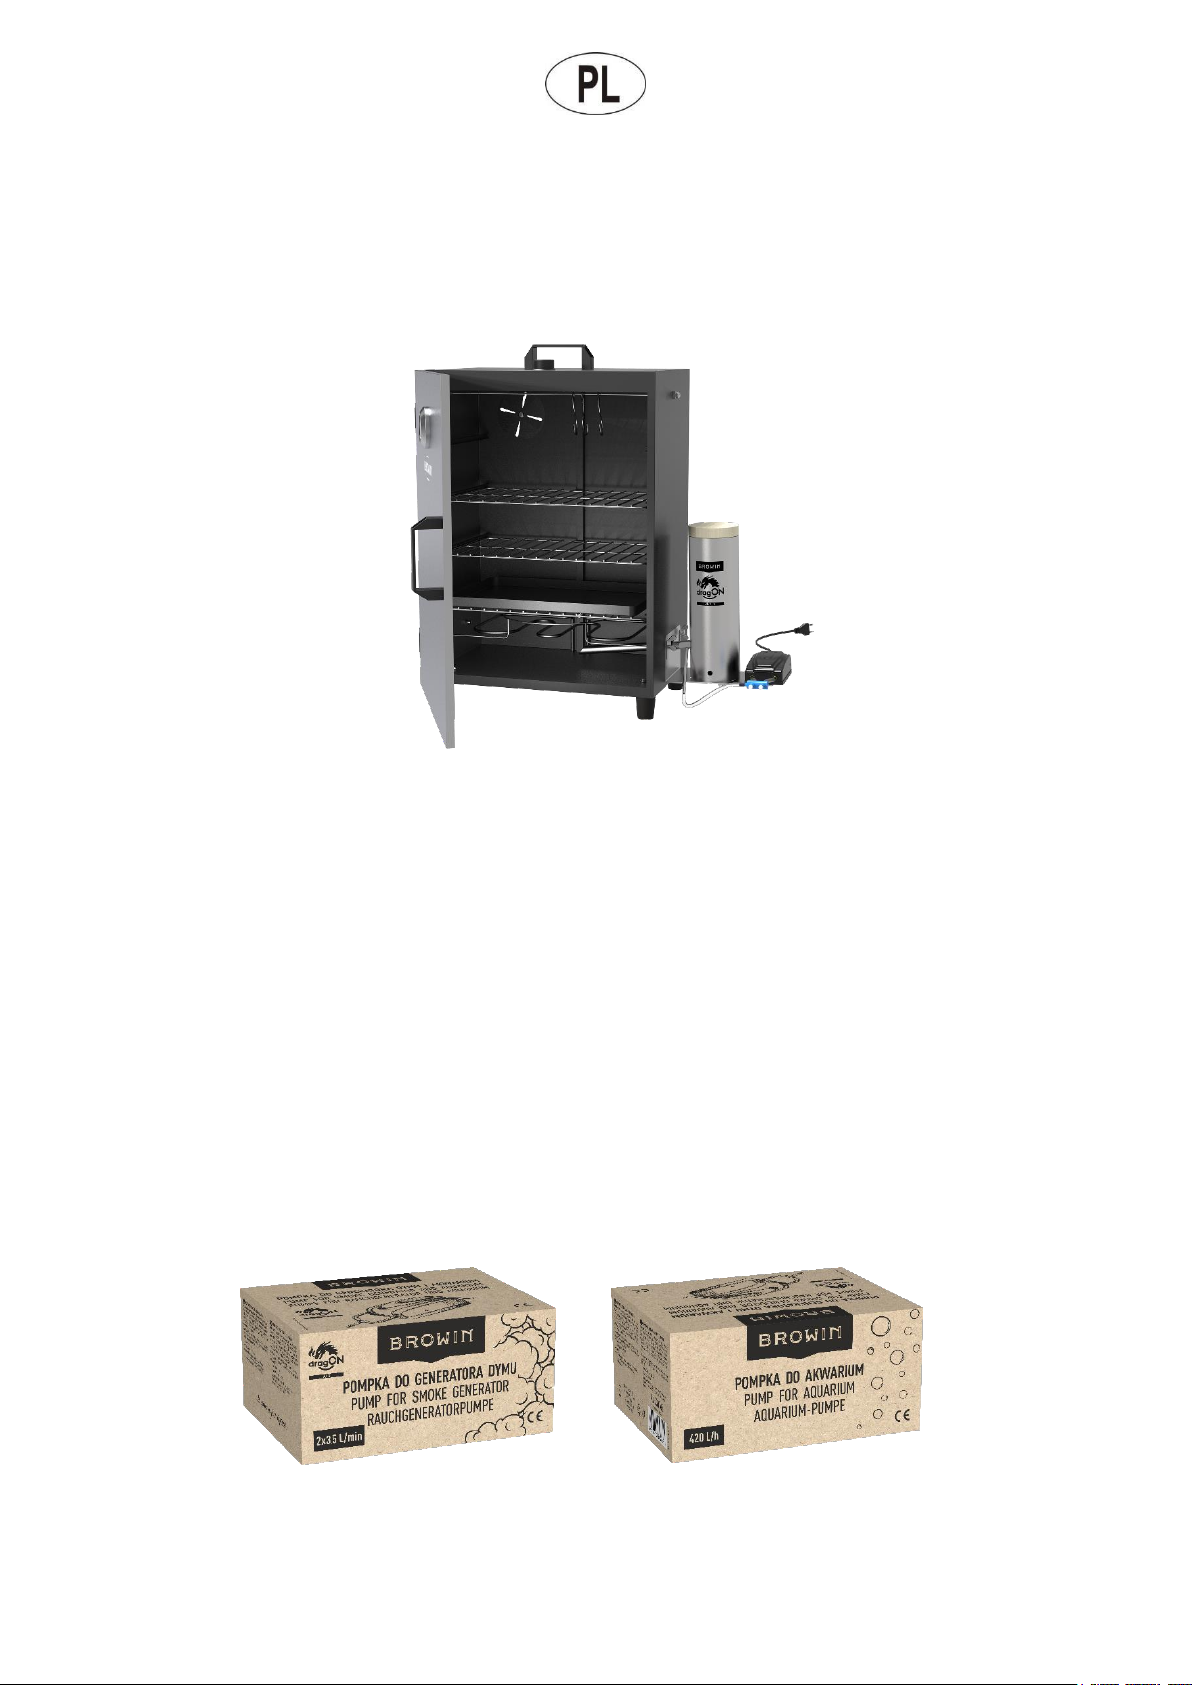
Przykładowe połączenie – generator dymu z wędzarnią elektryczną
Opis produktu:
Innowacyjny generator dymu – przeznaczony do wędzenia zarówno na zimno, jak i na ciepło/gorąco w każdym
rodzaju wędzarni. Dymogenerator ten możesz zamontować zarówno do wędzarni dużej, jak i małej – stalowej,
drewnianej lub murowanej.
Dla wędzarni z grubością ścianki powyżej 3 cm wybierz wersję dragON Jet Long (dedykowaną do wędzarni o
grubości ściany do 15 cm).
Testy przeprowadzono z wędzarnią o poj. 300 L.
Zastosowanie tego urządzenia to efektywny, a zarazem stylowy sposób na profesjonalne wędzenie.
Całość konstrukcji wykonana jest ze stali nierdzewnej, co pozwala na wędzenie nawet w niesprzyjających
warunkach atmosferycznych i wydłuża żywotność urządzenia.
Generator można montować z obu stron wędzarni, zależnie od potrzeb.
Generator dymu wyprodukowano w Polsce – patent firmy Browin.
Generator dymu wyposażony jest w elektryczną pompkę Browin Dragon Air o mocy 5 W i wydajności 2x3,5 L/min.
Pompkę możesz zastosować nie tylko w procesie wędzenia, ale także w akwarystyce. Doskonale sprawdzi się do
napowietrzania akwariów o różnych pojemnościach (zapewniając wydajność 420 L/h).
Przemyślana, opatentowana konstrukcja pozwoliła na połączenie niewielkich gabarytów generatora z wysoką wydajnością
i możliwością regulowania ilości wytwarzanego dymu za pomocą pompki – odpowiednio do potrzeb
6
Page 7
i wielkości używanej wędzarni (pojemności komory wędzarniczej). Cylinder zasypowy zamykany jest drewnianym
wieczkiem, które zapewnia właściwą cyrkulację dymu i zabezpiecza zrębki w procesie ich wyżarzania (m.in. przed kroplami
deszczu). Długi (4 m) wężyk można przycinać na odcinki potrzebne do połączenia pompki z dyszą dymogeneratora.
Jedną z istotnych zalet tego generatora z elektryczną pompką jest jego wysoka wydajność przy niskim zużyciu
zrębków. Wystarczy w generatorze umieścić niewielką ilość zrębków, aby osiągnąć nawet dużą ilość dymu (jeśli jest taka
potrzeba). Zasypanie generatora do pełna pozwala dostarczać dym do wędzarni w sposób ciągły przez około
3-4 godziny, bez konieczności dosypywania zrębków. Wydajność generatora jest zasługą unikatowej konstrukcji dyszy
połączonej z pompką regulującą wtłaczanie wygenerowanego dymu do komory wędzarniczej.
Innowacyjna dysza generatora dymu dragON Jet 1 jest krótsza niż w typowych modelach i z obu stron ścięta – na
jednym pod takim kątem, który ułatwia wydostawanie się dymu w wędzarni, a na drugim pod takim, który zabezpiecza
dyszę przed zapychaniem się zrębkami. Dysza wprowadzana jest do wędzarni pod odpowiednim kątem, zwiększającym
przepływ dymu z wyżarzanych zrębków. Dysza przechodzi tylko przez część komory spalania zrębków, co pozwala na
idealne zasysanie dymu, a jednocześnie odpowiednio chroni dyszę przed zapychaniem się podczas wyżarzania się
zrębków. Do wędzarni o grubszych ściankach (do 15 cm), np. murowanych, wskazane jest zastosowanie
generatora dymu dragON Jet Long, z długą dyszą.
Zastosowanie wydajnej pompki i umieszczenie jej na odpowiednio wydłużonej podstawie dymogeneratora pozwala
przenosić wibracje z pompki na korpus komory zasypowej, poprawiając osypywanie się zrębków w procesie ich
wyżarzania i zwiększając efektywność wędzenia. Precyzyjne ustawienie ilości generowanego dymu pozwala uniknąć
przekwaszenia wyrobów. Pompka podłączana jest do dymogeneratora za pomocą wężyka i specjalnej, zintegrowanej z
dyszą rurki, przez którą wtłaczane jest powietrze. Rurka pełni ponadto rolę konstrukcyjną – wchodzi w wycięcie podstawy,
zapewniając idealne ustawienie dyszy względem wędzarni i korpusu generatora.
Montaż i demontaż generatora jest bardzo prosty, a czyszczenie urządzenia
bardzo łatwe. Urządzenie możesz z łatwością rozebrać i wyczyścić, bez
konieczności odkręcania jego podstawy od wędzarni i bez używania jakichkolwiek
narzędzi. Wystarczy wysunąć dyszę z korpusu generatora, przekręcić korpus
pojemnika zasypowego i zdjąć go z podstawy, z którą jest stabilnie łączony za
pomocą zaczepów i dopasowanych do nich otworów w podstawie. Rozwiązanie
to zapewnia odpowiednią szczelność, jednocześnie stabilizując korpus w
podstawie.
Otwory umieszczone w dolnej części korpusu generatora pozwalają na łatwe
rozpalenie zrębków i zapewniają odpowiedni dopływ tlenu.
Do cylindra generatora zmieścisz ok. 450 g zrębków wędzarniczych.
Możesz użyć każdego rodzaju zrębków, jednak zalecamy zrębki o
stopniu rozdrobnienia (kalibrze) 8-12 mm, co pozwoli na uzyskanie
najlepszego efektu zadymienia wewnątrz wędzarni.
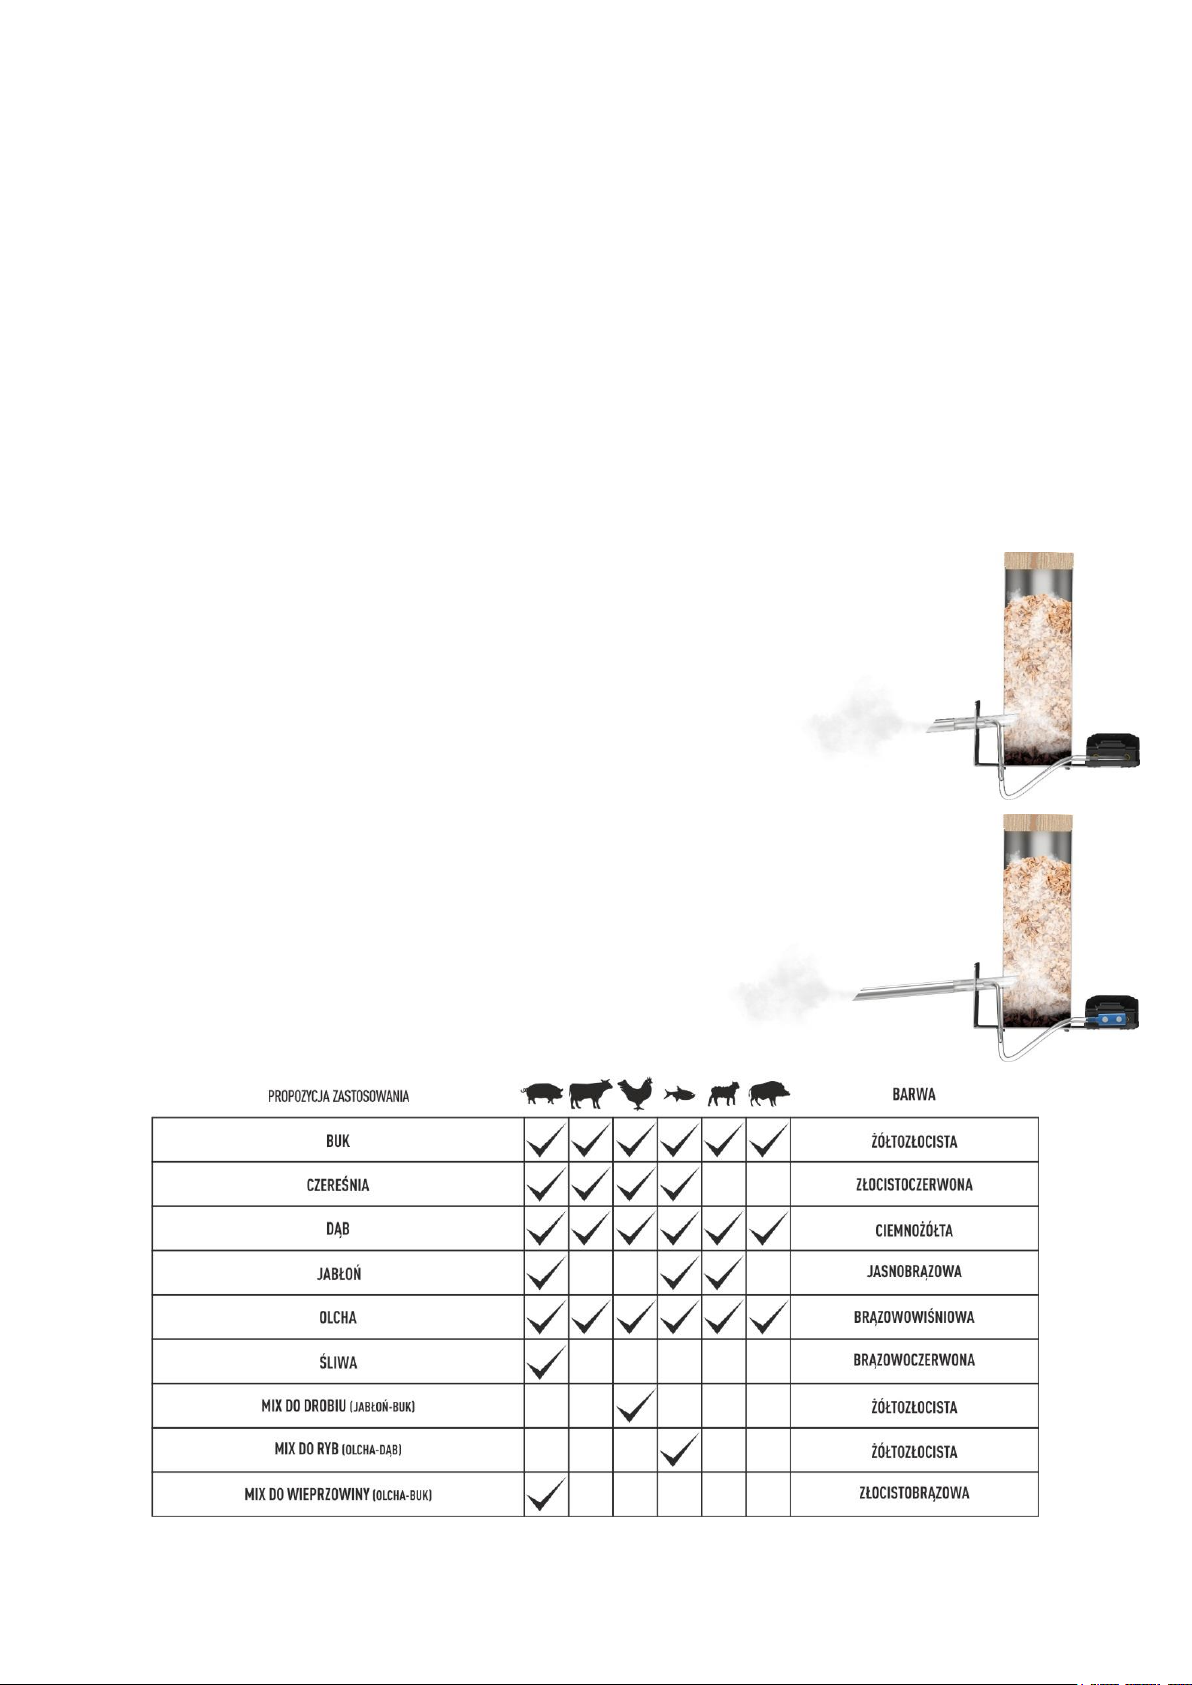
W cylindrze generatora należy umieścić zrębki dedykowane
do danego rodzaju wędzonych produktów. W naszej ofercie
znajdziesz zrębki, które idealnie sprawdzą się do przygotowania różnego
rodzaju mięs czy ryb:
7
Page 8

Elementy zestawu i przykładowy montaż do wędzarni:
LP.
NAZWA
ILOŚĆ
SZTUK
LP.
NAZWA
ILOŚĆ
SZTUK
1
Wieczko drewniane
1
6
Silikonowy wężyk Ø 6/4 mm,
o długości 4 m
1
2
Cylinder (korpus zasypowy)
generatora dymu ze stali
nierdzewnej 304
1
7
Podstawa montażowa ze stali nierdzewnej –
do zamocowania cylindra generatora i
pompki
1
3
Dysza generatora z rurką
1 8 Podkładka nierdzewna M8
4
4
Pompka elektryczna (5 W)
1 9 Śruba nierdzewna M8x40
2
5
Trójnik i zaworek
do łączenia wężyków*
1 + 1
10
Nakrętka nierdzewna M8
2
Uwaga: Śruba nierdzewna M8x40 (2 szt.) – do grubości ścianki 3 cm. W przypadku większych grubości wymagane jest
dobranie odpowiednich śrub.
* Pompkę z wężykami można połączyć na dwa sposoby.
- za pomocą trójnika.
- za pomocą zaworka.
Obie opcje pokazane są na schemacie montażu zamieszczonym powyżej.
Więcej informacji na temat podłączania pompki znajdziesz w instrukcji znajdującej się w opakowaniu pompki.
Zapoznaj się z nią dokładnie przed przystąpieniem do montażu całego zestawu.
W skład zestawu wchodzi także opakowanie zrębków wędzarniczych
Do zestawu dołączona jest instrukcja obsługi generatora dymu.
Sposób przygotowania wędzarni do montażu generatora
By zamontować generator do wędzarni bez otworów potrzebne są: miarka, punktak, młotek, pilnik do metalu, śrubokręt
krzyżakowy oraz 3 wiertła odpowiednie do materiału, z jakiego wykonana jest Twoja wędzarnia:
- wiertło Ø 5 do 2 otworów montażowych,
- wiertło Ø 9 do powiększenia otworów montażowych,
- wiertło Ø 20 do otworu na dyszę generatora.
Przydatny będzie także środek antykorozyjny do otworów w ściance wędzarni metalowej.
Do montażu wykorzystaj podstawę generatora [7]. Przyłóż podstawę w miejscu montażu generatora i zaznacz
na ściance wędzarni otwory montażowe. Generator możesz zamontować z prawej lub z lewej strony wędzarni, według
potrzeb wynikających np. z ustawienia wędzarni.
Zależnie od rodzaju i rozmiaru wędzarni wymierz na środku dolnej części jej bocznej ściany miejsce
do zamocowania generatora, tak by dysza znalazła się w odpowiednim miejscu komory wędzarni
(jak na przykładowym rysunku poniżej).
Używając flamastra, punktaka oraz młotka zaznacz środkowy punkt miejsc, w których będą nawiercone otwory
montażowe.
W zaznaczonych punktakiem miejscach wywierć – używając odpowiednich, wskazanych powyżej wierteł – 2
mniejsze otwory na śruby (wiertło Ø 5, następnie Ø 9) i 1 większy środkowy (wiertła: Ø 5, Ø 9 i na koniec Ø 20) do
wprowadzenia dyszy.
Przy pomocy pilnika usuń zadziory po wierceniu.
Otwory zabezpiecz środkiem antykorozyjnym (dotyczy wędzarni metalowej).
Po przygotowaniu otworów wg schematu przykręć podstawę generatora [7] do ścianki wędzarni, używając
podkładek [8], śrub [9] i nakrętek [10] znajdujących się w zestawie. Użyj po jednej podkładce zarówno od strony
łba śruby, jak i od strony nakrętki.
Sposób montażu
Poprzez otwór w podstawie [7] i w ściance wprowadź jeden koniec dyszy generatora [3] do komory wędzarniczej.
Na podstawę nałóż cylinder [2] – zaczepy dolnej części cylindra wprowadź w trzy wąskie, łukowate wycięcia w
podstawie i po spasowaniu z wyczuciem przekręć korpus cylindra, by stabilnie połączyć obydwa elementy.
Następnie w boczny otwór w cylindrze (ten o większej średnicy) wsuń dyszę – tak, aby rurka powietrzna
(rurka o mniejszej średnicy) opadła w wycięcie w podstawie.
8
Page 9

Na końcu podstawy umieść pompkę [4] – wg załączonego poniżej schematu (pokazana opcja z połączeniem za
pomocą trójnika).
Dotnij wężyk [6] na 3 odcinki i za ich pomocą połącz generator dymu z pompką .
Bezpieczeństwo użytkowania generatora dymu
Uwaga! Należy bezwzględnie przestrzegać wymienionych poniżej zasad.
Przed użyciem upewnij się, że wszystkie elementy są do siebie odpowiednio dopasowane.
Urządzenie nie może być używane w pobliżu materiałów łatwopalnych.
Urządzenie podczas pracy jest gorące i utrzymuje ciepło przez długi czas po wygaszeniu. Generator należy
obsługiwać w rękawicach ochronnych. Nie wolno dotykać urządzenia w czasie pracy oraz
po wygaszeniu, aż do jego samoczynnego wystygnięcia.
Nie przenosić urządzenia w trakcie pracy.
W czasie pracy generatora dymu niedopuszczalne jest pozostawienie dzieci bez nadzoru osoby dorosłej.
Zabrania się obsługi urządzenia osobom nieletnim.
Produkt nie jest zabawką – chronić przed dostępem ze strony dzieci.
Niniejszy sprzęt nie może być użytkowany przez dzieci i przez osoby o obniżonych możliwościach fizycznych,
umysłowych oraz przez osoby, które nie zaznajomiły się z zasadami działania sprzętu oraz korzystania z niego w
prawidłowy i bezpieczny sposób.
Sposób użycia generatora:
Po podłączeniu zestawu do wędzarni cylinder generatora wypełnij zrębkami – zaleca się zasypanie większą ich
ilością, by zapewnić optymalną pracę generatora przez dłuższy czas.
Zamknij cylinder drewnianym wieczkiem.
Podłącz pompkę do źródła zasilania i ustaw maksymalną moc.
Do małych otworów po obu stronach dolnej części cylindra przyłóż kolejno płomień zapalarki/zapalniczki
i poczekaj chwilę, aby został on zassany do wewnątrz i by zrębki zaczęły się wyżarzać.
Kiedy dym zacznie być równomiernie wytwarzany, możesz ustawić jego natężenie, używając w tym celu pokręteł
zaworka – do momentu uzyskania pożądanego efektu.
Należy również dokładnie zapoznać się z zasadami bezpiecznego użytkowania pompki i bezwględnie ich
przestrzegać. Postepowanie zgodne z niniejszą instrukcją oraz instrukcją korzystania z pompki zapewni odpowiednio
efektywną pracę zestawu.
Porada – jaką metodę wędzenia wybrać?
Można wyróżnić trzy podstawowe metody wędzenia:
wędzenie na zimno
wędzenie na ciepło/gorąco
wędzenie z podpiekaniem (charakterystycznym dla BBQ [barbecue])
Wędzenie na zimno:
Odbywa się zazwyczaj w temperaturze do 25⁰C i trwa od kilku godzin do 14 dni. W zależności od potrzeb stosuje
się odpowiednią gęstość dymu. Zazwyczaj prędkość jego przepływu powinna mieścić się w granicach 6-15 m na minutę.
Ten sposób wędzenia stosuje się głównie do produktów, które mają być długo przechowywane lub dojrzewać, gdyż dym
wnika w produkt głęboko i powoli go konserwuje. Wędzonki poddane tej metodzie obróbki schną równomiernie, a efekt jest
doskonały także przy dojrzewaniu długoterminowym.
Wędzenie na ciepło/gorąco:
Jest to oddziaływanie na produkt dymem o temperaturze powyżej 25⁰C. Można tutaj mówić o dwóch przyjętych górnych
granicach temperaturowych – wędzenie do ok. 45⁰C nazywamy wędzeniem na ciepło, a do 60⁰C wędzeniem
na gorąco. W przypadku wędzenia na gorąco produkty możemy podpiec w samej wędzarni, podnosząc temperaturę w
komorze wędzarniczej nawet do 80-90⁰C.
W przypadku podpiekania można odłączyć generator dymu i oddziaływać na produkt tylko samą temperaturą.
Bez względu na to, jaki typ wędzenia wybierzesz, pamiętaj, iż jest to proces końcowy, a podstawą jest odpowiednie
przygotowanie wyrobów do wędzenia oraz bardzo dobre ich osuszenie przed wędzeniem (ewentualnie dosuszenie
w wędzarni), co bardzo pozytywnie wpływa na jakość wędzonek oraz zapobiega ich zakwaszeniu.
Gospodarowanie odpadami
Zużytego sprzętu elektrycznego i elektronicznego nie należy wyrzucać do śmietnika. Selekcjonowanie i prawidłowa
utylizacja tego typu odpadów przyczynia się do ochrony środowiska naturalnego. Użytkownik jest odpowiedzialny
za dostarczenie zużytego sprzętu do wyspecjalizowanego punktu zbiórki, gdzie będzie on przyjęty bezpłatnie. Informację o
takim punkcie można uzyskać u władz lokalnych lub w punkcie zakupu.
9
Page 10
Uwaga!
Każde gospodarstwo jest użytkownikiem sprzętu elektrycznego i elektronicznego, a co za tym idzie potencjalnym wytwórcą
niebezpiecznego dla ludzi i środowiska odpadu, z tytułu obecności w sprzęcie niebezpiecznych substancji, mieszanin oraz
części składowych. Z drugiej strony zużyty sprzęt to cenny materiał, z którego możemy odzyskać surowce takie jak miedź,
cyna, szkło, żelazo i inne.
Symbol przekreślonego kosza na śmieci umieszczany na sprzęcie, opakowaniu lub dokumentach do niego
dołączonych oznacza, że produktu nie wolno wyrzucać łącznie z innymi odpadami. Oznakowanie oznacza
jednocześnie, że sprzęt został wprowadzony do obrotu po dniu 13 sierpnia 2005 r.
Obowiązkiem użytkownika jest przekazanie zużytego sprzętu do wyznaczonego punktu zbiórki w celu
właściwego jego przetworzenia. Informacje o dostępnym systemie zbierania zużytego sprzętu elektrycznego można
znaleźć w punkcie informacyjnym sklepu oraz w urzędzie miasta/gminy. Odpowiednie postępowanie ze zużytym sprzętem
zapobiega negatywnym konsekwencjom dla środowiska naturalnego i ludzkiego zdrowia!
─ USER MANUAL ─
dragON Jet 1 SMOKE GENERATOR WITH A dragON Air ELECTRIC PUMP
Thank you for your choosing our product.
Before using it, make sure to become familiar with this manual, which will allow you to use the device properly
and safely and ensure its optimal lifetime.
Retain the manual and always proceed in line with recommendations included in it.
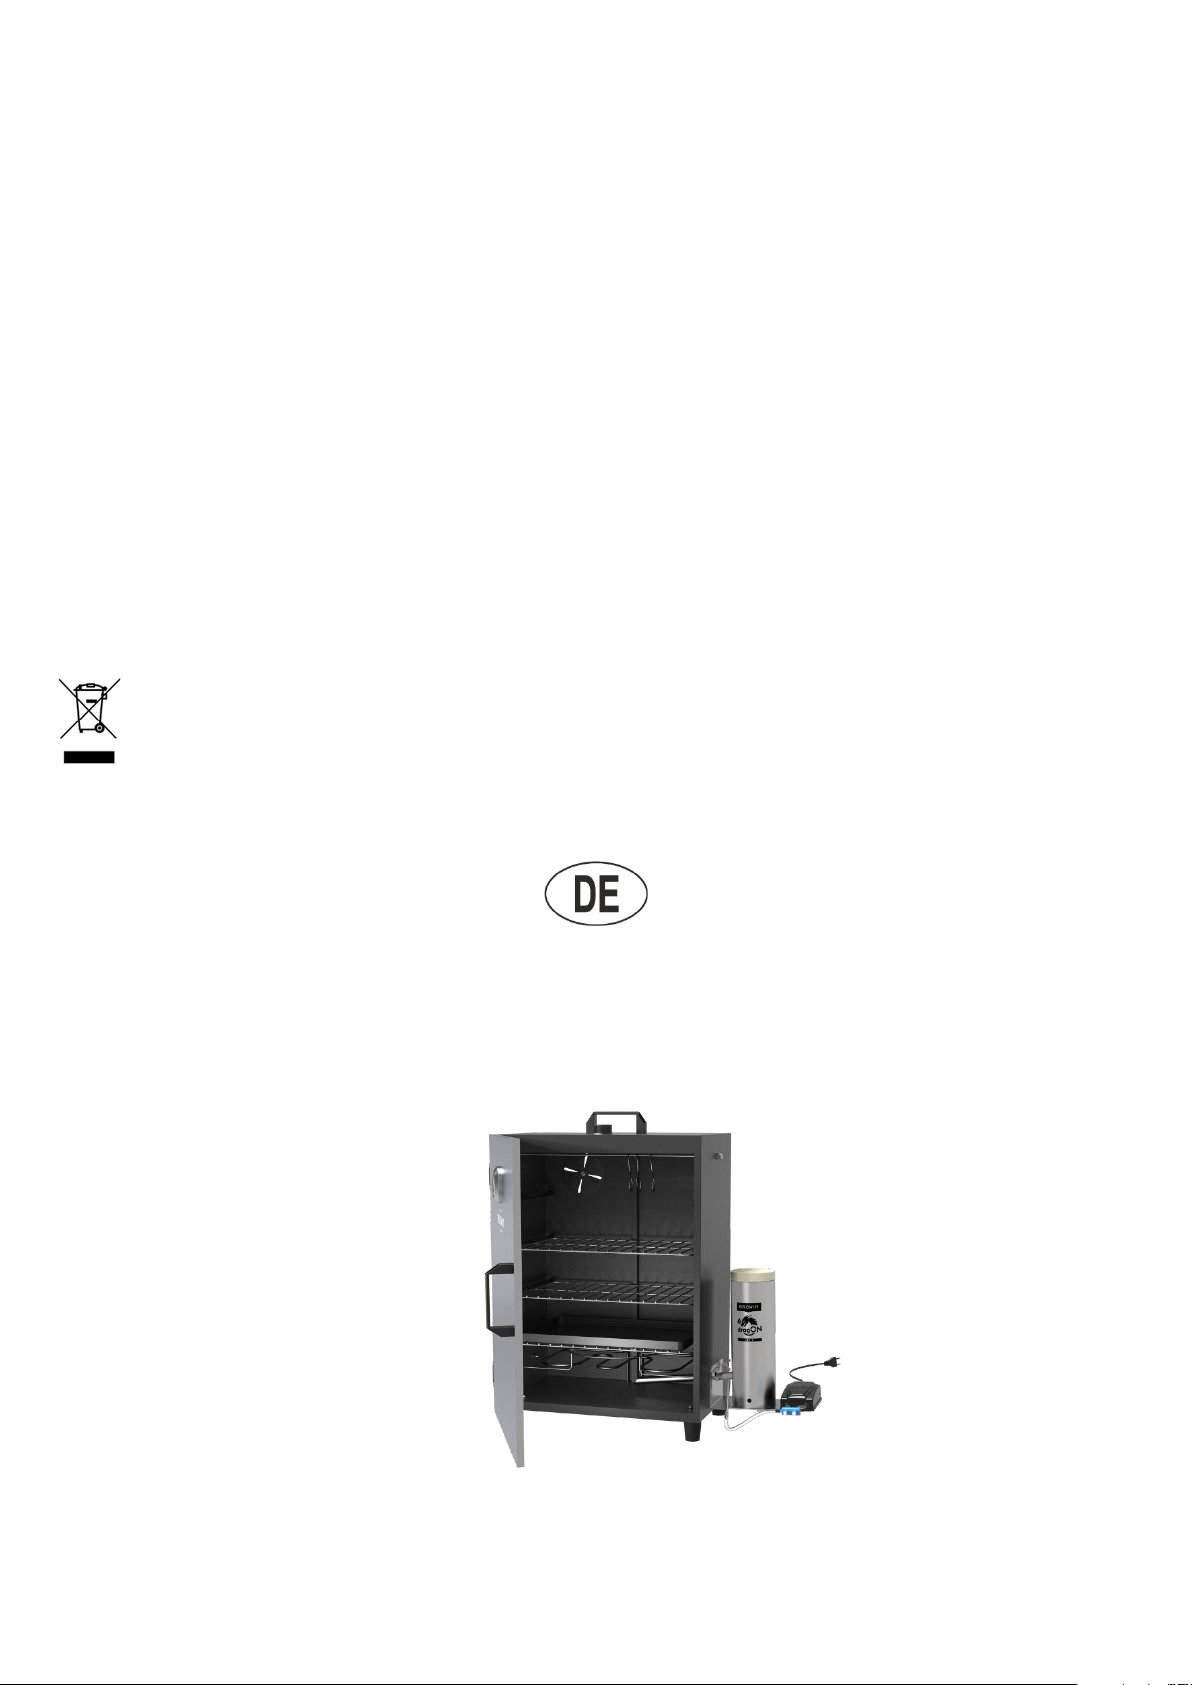
Example combination – smoke generator with electric smoker
Product description:
Innovative smoke generator – intended for both cold and warm/hot smoking in any type of smoker.
You can install this smoke generator either on a large or small smoker – steel, wooden or brick one.
For smokehouses with a wall thickness above 3 cm, choose the dragON Jet Long version (dedicated to smokehouses with
a wall thickness of up to 15 cm).
The tests were carried out with a smoker with capacity of 300 L.
Using this appliance is an effective yet stylish way to carry out professional smoking.
Its whole structure is made of stainless steel, which allows smoking even in unfavourable atmospheric conditions
and extends the lifetime of the device.
The generator can be mounted on either side of the smoker, as required.
This smoke generator is made in Poland – it has been patented by the Browin company.
The smoke generator is fitted with a Browin Dragon Air electric pump with power of 5 W and efficiency
of 2x3,5 L/min.
10
Page 11
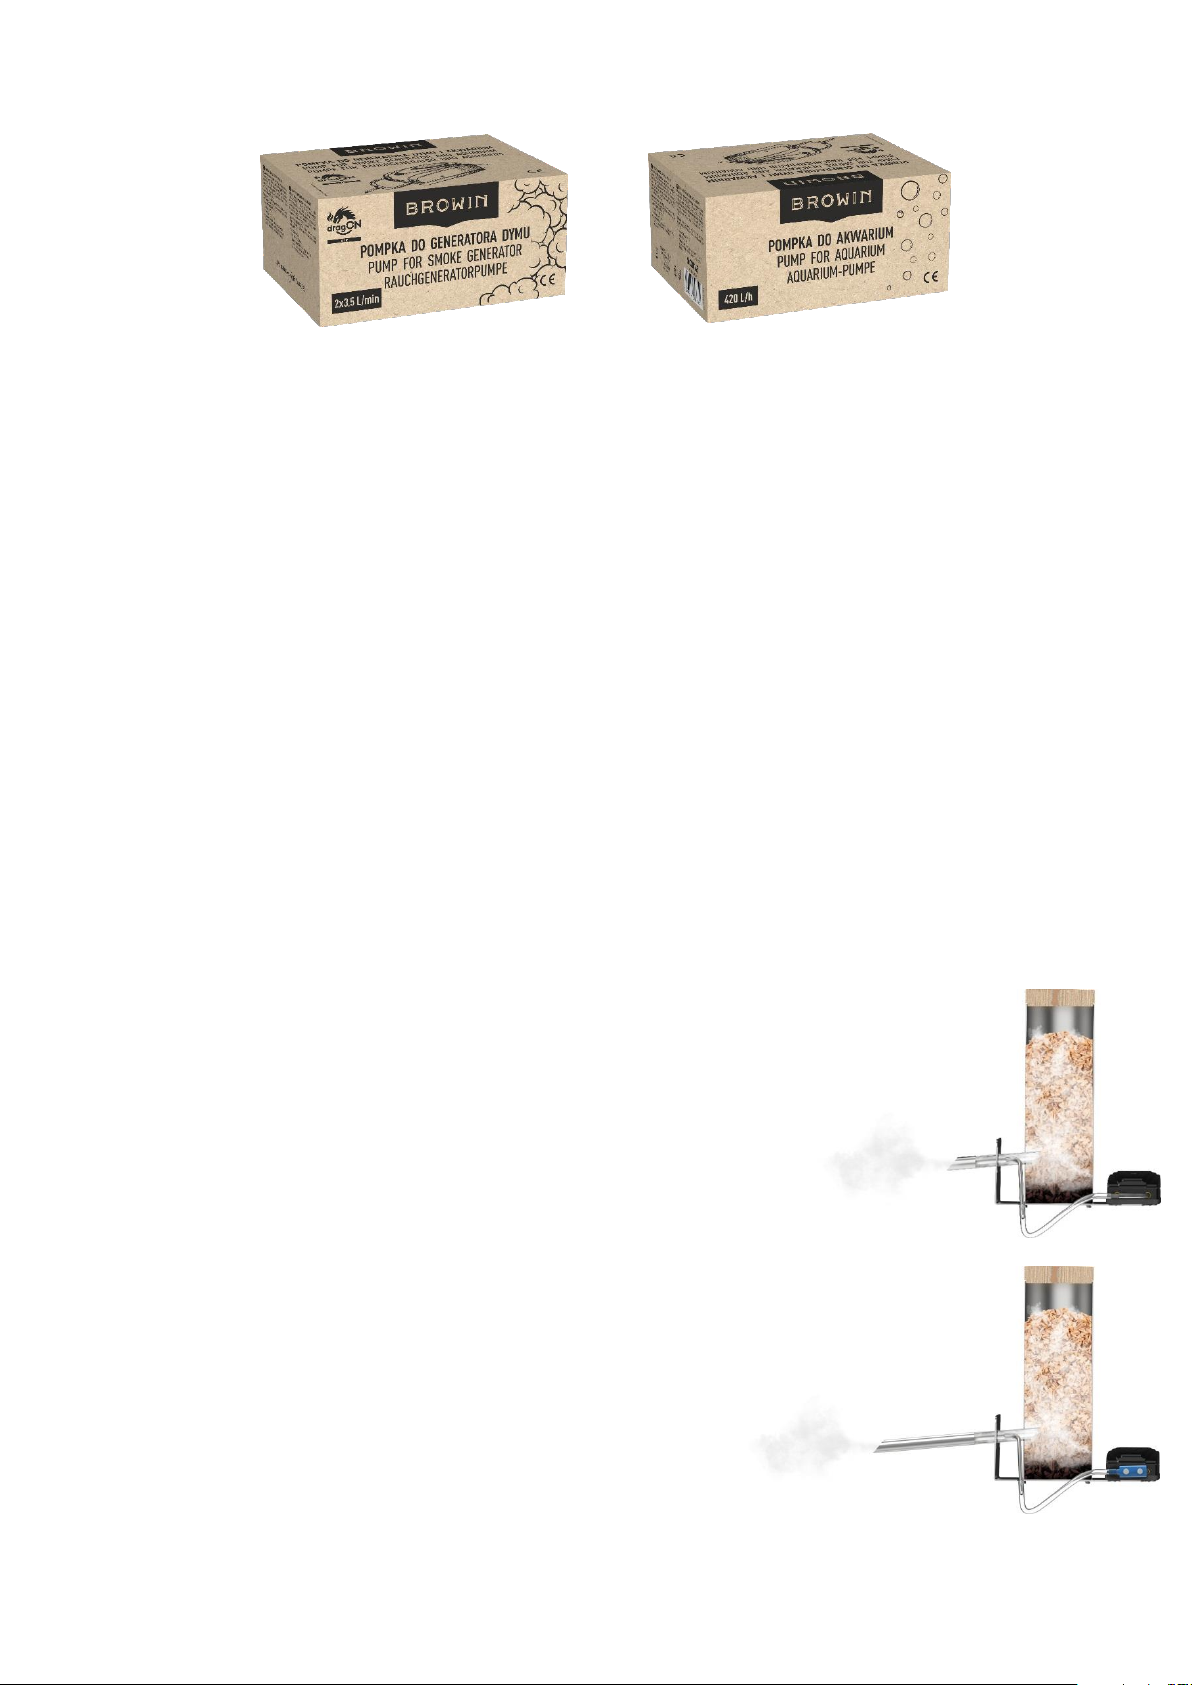
You can use the pump not only in the smoking process, but also in aquaristics. It is perfect for aeration
of aquaria with various capacities (ensuring the efficiency of 420 L/h).
Its thoughtful, patented design enables combining the small form factor of the generator with high efficiency
and possibility of adjusting the amount of smoke generated using the pump – according to the needs and the size
of the smoker used (capacity of the smoking chamber). The charging cylinder is closed with a wooden lid, which ensures
proper smoke circulation and protects the chips during the burning process (e.g., against raindrops). The long (4 m) hose
can be cut into sections needed to connect the pump to the smoke generator nozzle.
One of the important advantages of this generator with electric pump is its high efficiency with simultaneous
low consumption of wood chips. It is enough to place a small amount of wood chips in the generator in order
to obtain even a large amount of smoke (if necessary). Filling the generator full enables providing smoke to the smoker
continuously for about 3-4 hours, without having to add wood chips frequently. The efficiency of the generator is owed to
the unique design of the nozzle combined with a pump that adjusts the injection of the generated smoke into the smoking
chamber.
The innovative nozzle of the smoke generator dragON Jet 1 is shorter than on typical smoker models and bevelled on
both sides – on one of them at an angle that makes it easier for smoke to be released in the smoker, and on the other at
an angle that protects the nozzle from clogging with wood chips. The nozzle is introduced into the smoker at an
appropriate angle, increasing the flow of smoke from the wood chips burnt. The nozzle only passes through part of the
wood chip burning chamber, which allows for ideal smoke aspiration while also protecting the nozzle adequately from
clogging when the wood chips are burnt. For smokehouses with thicker walls (up to 15 cm), e.g. brick ones, it is
recommended to use the dragON Jet Long smoke generator with a long nozzle.
The use of a high-performance pump and its placement on the suitably elongated base of the smoke generator allows
vibrations from the pump to be transmitted to the body of the feed chamber, which improves the flow of chips during the
burning process and increases the efficiency of smoking. Precise adjustment of amount of the smoke generated makes it
possible to avoid making the products too acidic. The pump is connected to the smoke generator by means of a hose and
a special tube integrated with the nozzle, through which air is forced. The tube also has a structural role – it enters the
notch in the base, ensuring that the nozzle is perfectly aligned with the smoker and generator body.
The assembly and disassembly of the generator is very simple and cleaning it
is very easy too. The device can be easily taken apart and cleaned without having
to unscrew its base from the smoker and without using any tools. Simply slide the
nozzle out of the body of the generator, twist the body of the feed chamber and
remove it from the base, to which it is securely connected by hooks and matching
holes in the base. This solution ensures adequate tightness while stabilising the
body in the base.
The openings located in the bottom part of the generator body allow easy ignition of
wood chips and ensure proper access to oxygen.
The smoke generator cylinder can hold up to about 450 g of wood chips for
smoking. While you can use any kind of wood chips, we recommend
using those fragmented to 8-12 mm pieces, as it allows achieving the
best quality of smoke insider the smoker.
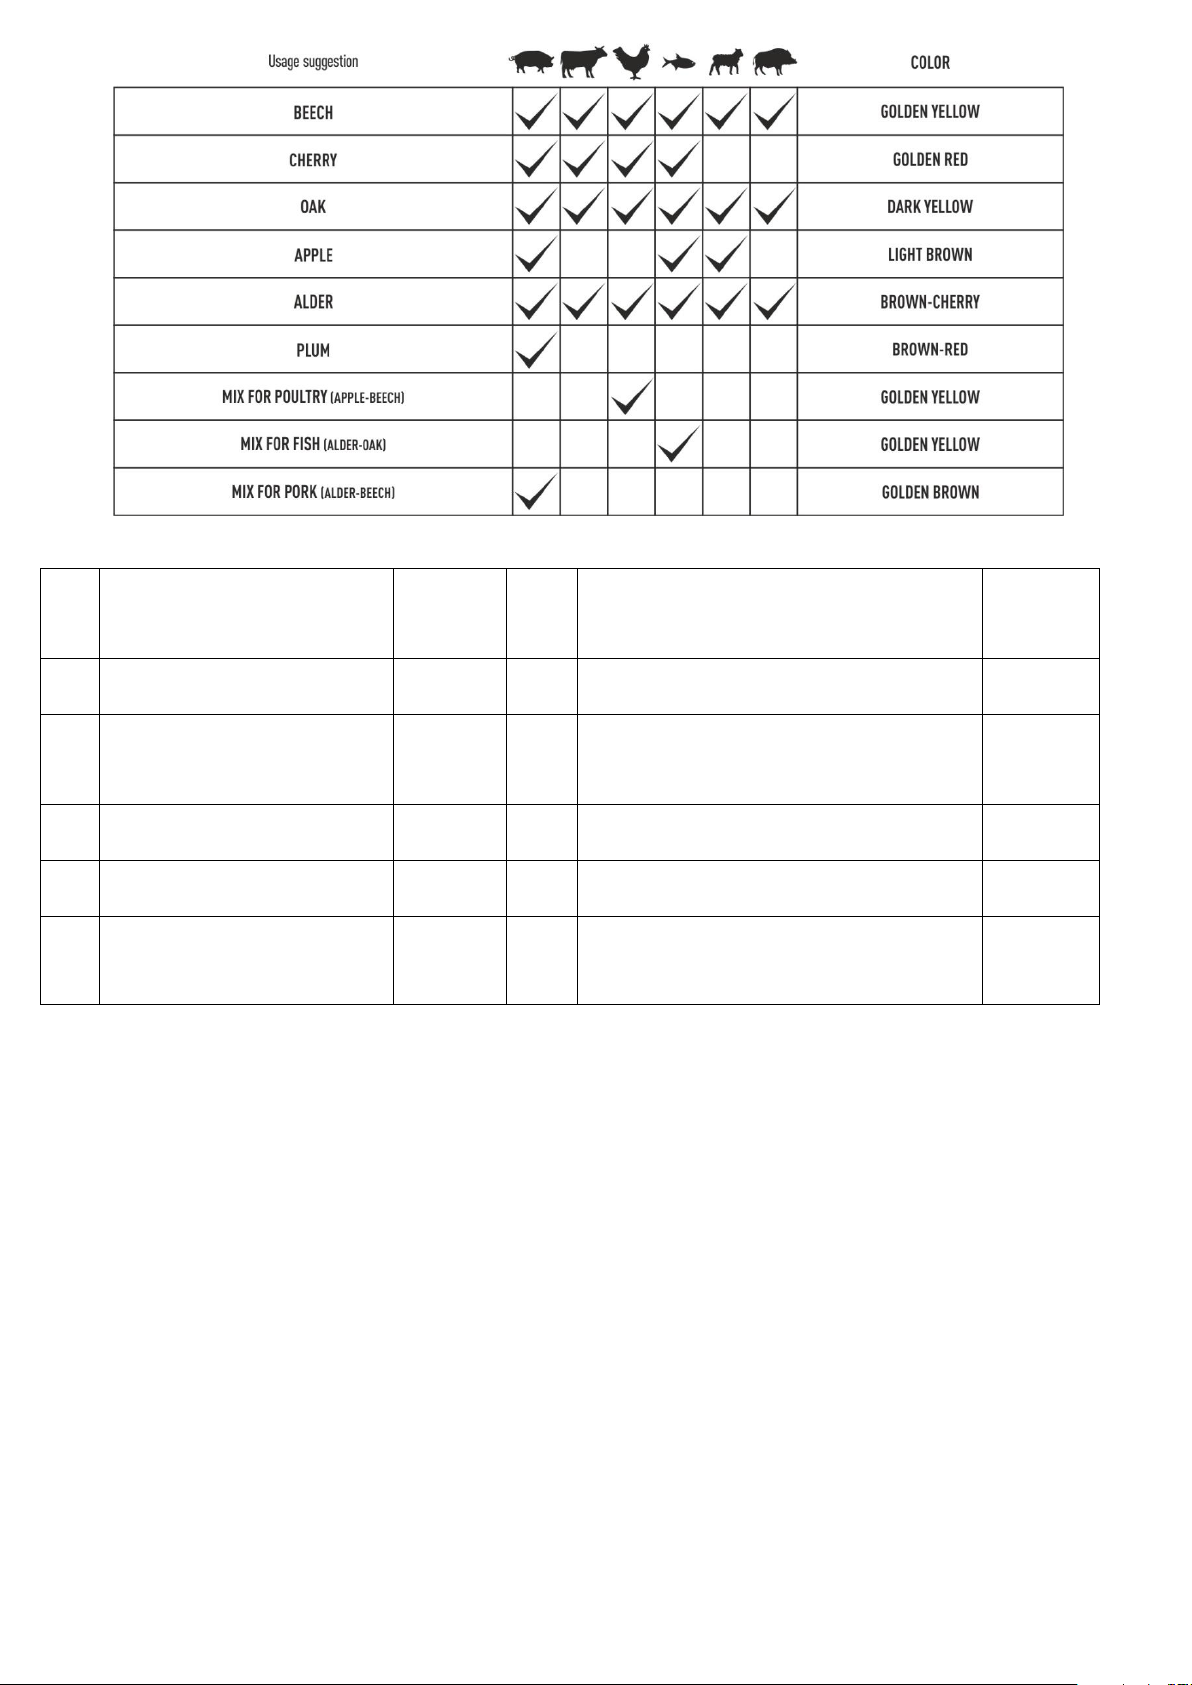
It is best to place in the generator cylinder the wood chips dedicated
for a given type of products smoked. You can find in our offer the wood
chips that will be perfect for preparing various types of meat and fish:
11
Page 12
NO.
NAME
NUMBER
OF
PIECES
NO.
NAME
NUMBER
OF
PIECES
1
Wooden lid
1
6
Silicone hose Ø6/4 mm,
with length of 4 m
1
2
Cylinder (feeding chamber
body) of the smoke generator,
made of stainless steel 304
1
7
Stainless steel installation base – for fixing
the generator cylinder and pump
1
3
Generator nozzle with tube
1
8
M8 stainless washer
4
4
Electric pump (5 W)
1
9
M8x40 stainless bolt
2
5
Tee and a valve for
connecting hoses*
1 + 1
10
Stainless M8 nut
2
Please note: M8x40 stainless bolt (2 pcs ) – for wall thickness of 3 cm; if the wall thickness is greater, it is necessary to use
bolts of appropriate type.
* The pump can be connected with hoses in two ways.
- using the tee.
- using the valve.
Both options are shown in the installation diagram above.
For more information on connecting the pump, refer to the instructions included in the pump packaging. Read it
carefully before assembling the entire set.
The set also includes a pack of wood chips for smoking.
An operation manual for the smoke generator is included.
Preparation of the smoker for the installation of the generator
In order to install the generator for a smoke without opening, the following tools necessary: a measure, a punch,
a hammer, a file for metal, a cross-head screwdriver, and 3 drill bits suitable for the material of which your smoker
is made:
- a Ø5 drill bit for 2 guiding holes,
- a Ø9 drill bit for enlarging the mounting holes,
- a Ø20 drill bit for the generator nozzle hole.
12
Page 13

Some anti-corrosion agent for holes in the metal smoker wall will also come in handy.
Use the generator base [7] for the assembly. Place the base where the generator is mounted and mark the mounting holes
on the wall of the smoker. You can mount the generator on the right or left side of the smoker, according to your needs
resulting, for example, from the positioning of the smoker.
Depending on the type and size of the smoker, measure out a space in the middle of the lower part of its side wall
for the attachment of the generator, so that the nozzle is in the right place in the smoker chamber
(as on the example drawing below).
Using the marker, punch, and hammer, mark the central point of places where the mounting holes will
be drilled.
At the spots marked with the punch, use the appropriate drill bits indicated above to drill 2 smaller holes
for bolts (Ø 5 drill bit and then Ø 9) and 1 larger (central) hole (drill bits: Ø 5, Ø 9 and finishing with Ø 20)
for inserting the nozzle.
Using the file, remove the burrs left after drilling.
Secure the holes with the anti-corrosion agent (in the case of a metal smoker).
After preparing the openings according to the diagram, screw the generator base [7] to the smoker wall using the
washers [8], bolts [9], and nuts [10] included in the set. Use one washer on the side of the bolt head
and one on the side of the nut.
Installation method
Through the opening in the base [7] and in the wall, insert one end of the generator nozzle [3] into the smoking
chamber.
Place the cylinder [2] on the base – insert the catches of the lower part of the cylinder into the three narrow,
arched cut-outs in the base and, after fitting together, carefully twist the body of the cylinder to join
the two parts firmly.
Then insert the nozzle into the side hole in the cylinder (the one with the larger diameter) – so that
the air tube (the smaller diameter tube) drops into the notch in the base.
Place a pump [4] at the end of the base – according to the diagram attached below (the option shown features
connection via tee).
Cut the hose [6] into 3 section and use them to connect the smoke generator with the pump.
Safety of using the smoke generator
Please note! The rules listed below must be strictly adhered to.
Prior to using the generator make sure that all the elements fit one another well.
The device must not be used when in proximity to flammable materials.
During operation, the device is hot and retains heat for a long time after the burning is stopped. The generator
should be operated in protective gloves. It is forbidden to touch the device when it is operating
and after the burning is stopped, until it cools down on its own.
Do not move the device when it is operating.
When the smoke generator is working, it is not allowed to leave children without attention of an adult.
It is forbidden to allow underage persons to operator the device.
The product is not a toy – keep it away from children.
This equipment must not be used by children, persons with physical and mental disabilities, and persons who have not
become familiar with principles of equipment functioning and correct and safe operation thereof.
How to use the generator:
After connecting the set to the smoker, fill the generator cylinder with wood chips – it is recommended
to use a larger quantity in order to ensure optimal functioning of the generator for a longer time.
Close the cylinder with a wooden lid.
Connect the pump to a power source and set the maximum power.
Put the lighter flame to the small openings on both sides of the lower part of the cylinder subsequently and wait for
a moment for it to be aspirated to the inside and for the wood chips to start burning.
Once the smoke starts being produced at an even rate, you can adjust its intensity by using valve knobs – until you
obtain the effect desired.
The rules for the safe use of the pump should also be carefully read and strictly adhered to. Following these
instructions and the operating manual for the pump will ensure that the set works properly.
Tip – which smoking method to choose?
Three main methods of smoking can be distinguished:
cold smoking
warm/hot smoking
smoking with roasting (characteristic for BBQ)
13
Page 14
Cold smoking:
It usually takes place in the temperature of up to 25⁰C and takes from several hours to 14 days. The smoke density used
depends on the needs. Its flow rate should usually be within 6-15 m per minute. This method of smoking is used mainly for
products that are supposed to be stored for a long time or matured, as the smoke penetrates the product deeply and
preserves it slowly. The products smoked using this method dry uniformly and the effect is perfect even in case of longterm maturing.
Warm/hot smoking:
It consists in using smoke with temperature of more than 25⁰C on the product. Here we can distinguish two upper
temperature limits adopted – smoking up to about 45⁰C is called warm smoking, and up to 60⁰C – hot smoking. In case of
hot smoking, we can roast the products inside the smoker by raising the temperature in the smoking chamber even up to
80-90⁰C.
In case of roasting, it is possible to disconnect the smoke generator and process the products using temperature only.
Irrespective of the type of smoking you select, remember that it is the final process, and the basis consists in properly
preparing the products for smoking, including drying them very well prior to it (it is possible for the final stage of drying to
take place inside the smoker), which has a very positive impact on the quality of smoked products and prevents their
acidification.
Waste management
Waste electrical and electronic equipment must not be discarded into a waste bin. Selection and correct disposal of waste
of this type contributes to protection of the natural environment. The user is liable for delivering the waste equipment to a
specialised collection point, where it will be accepted without charging any fee. Information on such collection point can be
obtained from local authorities or at the point of purchase.
Caution!
Every household uses electrical and electronic appliances, and thus is a potential source of waste, hazardous to humans
and the environment, due to the presence of hazardous substances, mixtures, and components in the equipment. On the
other hand, discarded equipment is a valuable resource from which raw materials like copper, tin, glass, iron, and others
can be recovered.
The symbol of the crossed out wheelie bin placed on the equipment, packaging, or documentation attached to it,
means that the product must not be disposed of together with other waste. The labelling simultaneously means
that the equipment was introduced to the market after the date of August 13th, 2005.
It is the responsibility of the user to transfer the used equipment to a designated collection point for proper
recycling. Information on the available collection system for electrical equipment can be found in the shop’s information and
at the municipal office. Proper handling of discarded equipment prevents negative consequences for the environment and
human health!
─ BEDIENUNGSANLEITUNG ─
RAUCHGENERATOR DRAGON JET 1 MIT ELEKTROPUMPE
dragON Air
Vielen Dank, dass Sie unser Produkt gewählt haben. Lesen Sie vor der Verwendung diese Bedienungsanleitung unbedingt
durch, damit Sie das Gerät richtig und sicher verwenden und seine optimale Lebensdauer gewährleisten können.
Bewahren Sie die Bedienungsanleitung auf und befolgen Sie stets die darin enthaltenen Anweisungen.
Verwendungsbeispiel – Rauchgenerator mit Elektroräucherofen
14
Page 15
Produktbeschreibung:
Innovativer Rauchgenerator - bestimmt fürs Kalt-, Warm- und Heißräuchern in jeder Art von Räucherofen. Diesen
Rauchgenerator können Sie sowohl in einem großen, als auch kleinen Räucherofen, aus Stahl, Holz oder Ziegeln,
montieren.
Für Räucherkammern mit einer Wandstärke von über 3 cm wählen Sie die Version dragON Jet Long (für
Räucherkammern mit einer Wandstärke von bis zu 15 cm).
Die Tests wurden mit einem Räucherofen mit einem Fassungsvermögen von 300 L durchgeführt.
Die Verwendung dieses Geräts ist eine effektive und stilvolle Art des professionellen Räucherns.
Die gesamte Konstruktion besteht aus Edelstahl, was das Räuchern auch bei ungünstigen Wetterbedingungen
ermöglicht und die Lebensdauer des Geräts verlängert.
Der Generator kann auf beiden Seiten des Räucherofens montiert werden, je nach Bedarf.
Der Rauchgenerator wurde in Polen hergestellt – patentiert von der Firma Browin.
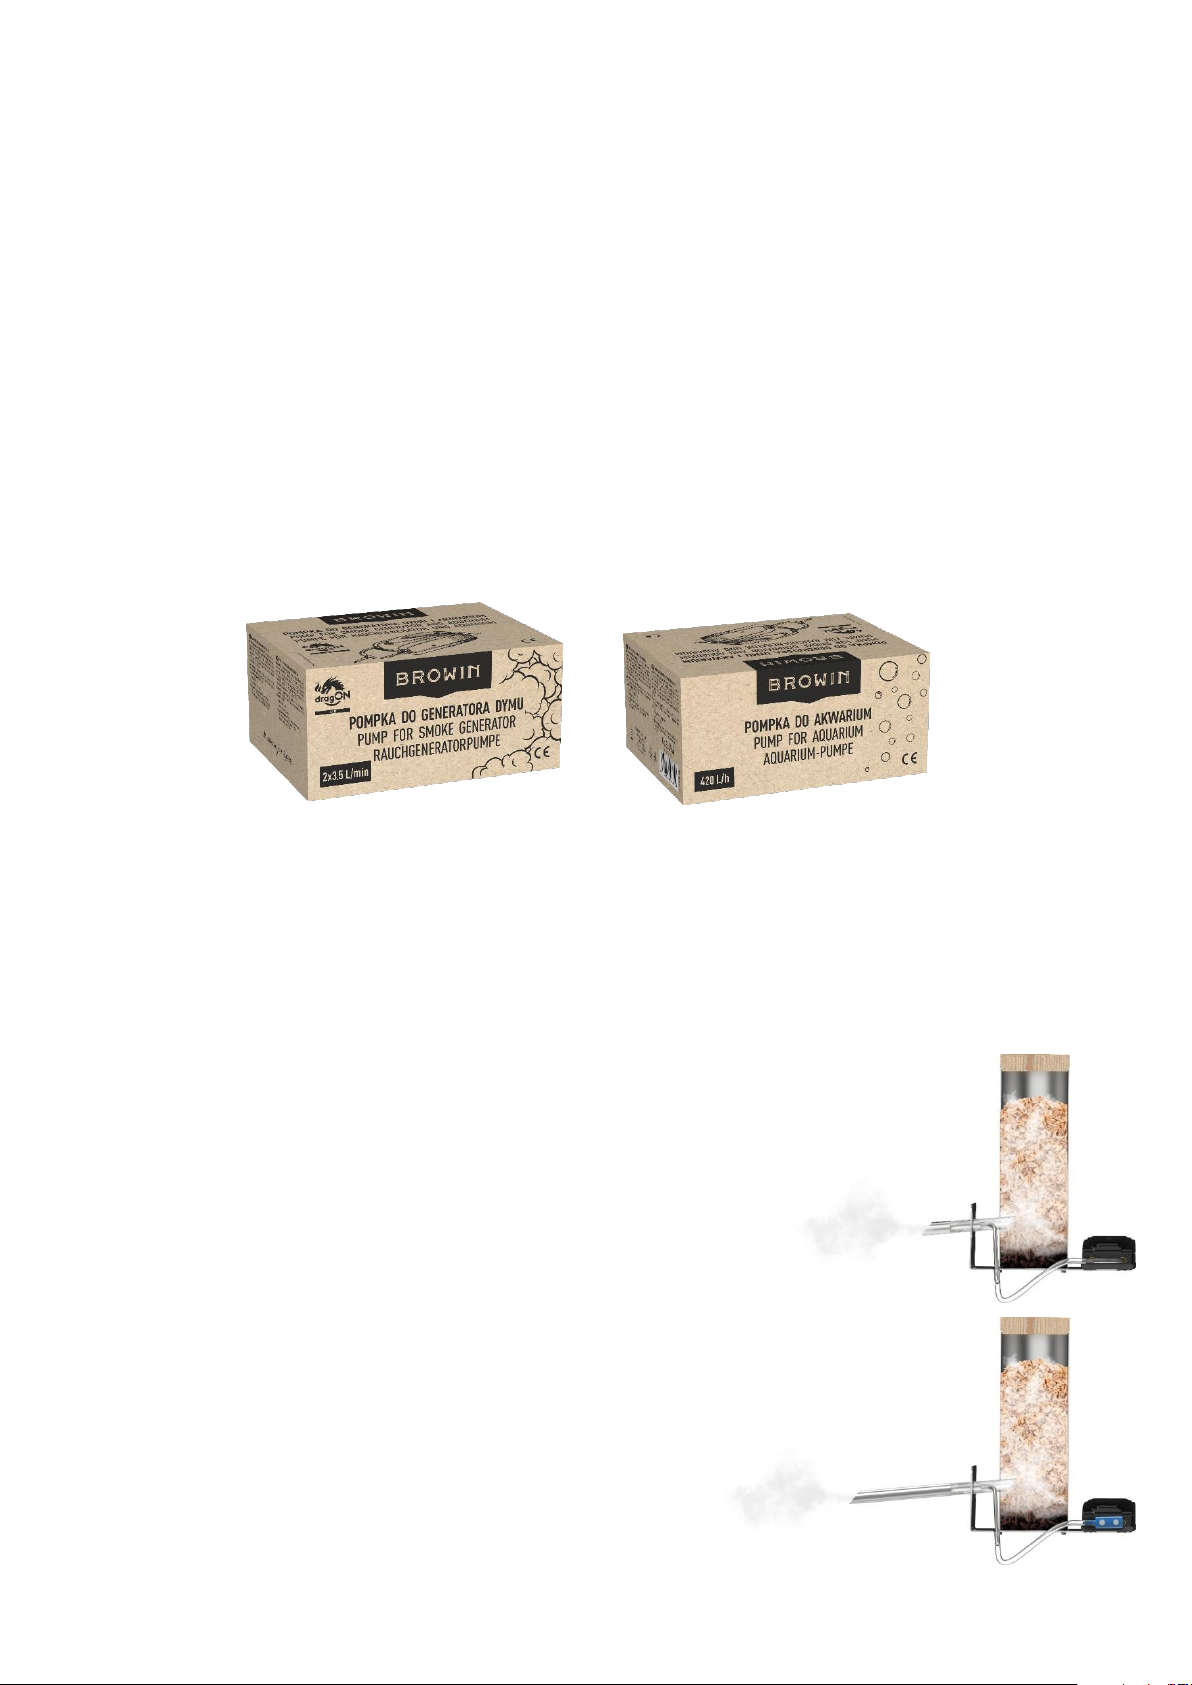
Der Rauchgenerator ist mit der Elektropumpe Browin Dragon Air mit einer Leistung von 5 W und einer Kapazität von
2x3,5 L/min ausgestattet.
Sie können die Pumpe nicht nur im Räucherprozess, sondern auch in der Aquaristik einsetzen. Sie eignet sich
perfekt zum Belüften von Aquarien mit unterschiedlichen Fassungsvermögen (und gewährleistet eine Kapazität von
420 L/h).
Die durchdachte, patentierte Konstruktion ermöglichte es, die geringe Größe des Generators mit hoher Effizienz und der
Möglichkeit, die erzeugte Rauchmenge mit einer Pumpe zu regulieren, zu kombinieren - je nach Bedarf und Größe des
verwendeten Räucherofens (je nach dem Fassungsvermögen des Räucherofens). Der Zuführzylinder ist mit einem
Holzdeckel verschlossen, der für eine gute Rauchzirkulation sorgt und die Späne im Glühprozess schützt (z. B. vor
Regentropfen). Der lange (4 m) Schlauch kann in Abschnitte geschnitten werden, die für den Anschluss der Pumpe an die
Düse des Rauchgenerators benötigt werden.
Einer der wesentlichen Vorteile dieses Generators mit Elektropumpe ist seine hohe Effizienz bei geringem Verbrauch
von Räucherspänen. Es reicht aus, eine kleine Menge Räucherspäne in den Generator zu geben, um sogar eine große
Rauchmenge zu erzielen (falls erforderlich). Bei vollständiger Befüllung des
Generators kann der Räucherofen ununterbrochen 3 bis 4 Stunden lang mit
Rauch versorgt werden, ohne dass Räucherspäne dazugeschüttet werden
müssen. Die Effizienz des Generators beruht auf der einzigartigen Konstruktion
der Düse in Kombination mit einer Pumpe, die Menge des in den Räucherofen
hineingelassenen Rauchs reguliert.
Die innovative Düse des Rauchgenerators dragON Jet 1 ist kürzer als bei
typischen Modellen und beidseitig abgeschnitten –
an einer Seite in einem Winkel, der den Rauchaustritt im Räucherofen erleichtert,
und an der anderen Seite in einem Winkel, der die Düse vor Verstopfung mit
Räucherspänen schützt. Die Düse wird in einem entsprechenden Winkel
in den Räucherofen eingeführt, wodurch der Rauchfluss aus den
verglühenden Räucherspänen erhöht wird. Die Düse geht nur durch
einen Teil der Verbrennungskammer für Räucherspäne durch, was eine
perfekte Rauchabsaugung ermöglicht und gleichzeitig die Düse
ausreichend vor Verstopfung während des Verglühens der
Räucherspäne schützt. Für Räucherkammern mit dickeren Wänden (bis
zu 15 cm), z.B. aus Ziegeln, empfiehlt sich der Einsatz des
Raucherzeugers dragON Jet Long mit einer langen Düse.
Die Verwendung einer effizienten Pumpe und deren Platzierung auf einer
entsprechend verlängerten Basis des Rauchgenerators ermöglicht die
15
Page 16
Übertragung von Vibrationen von der Pumpe auf den Körper der Zuführkammer, wodurch das Abfallen von Spänen
OZ
BEZEICHNUNG
STÜCKZ
AHL
OZ
BEZEICHNUNG
STÜCKZA
HL
1
Holzdeckel
1
6
Silikonschlauch Ø 6/4 mm,
mit einer Länge von 4 m
1
2
Zylinder (Zuführkörper) des
Rauchgenerators aus
Edelstahl 304
1
7
Montagebasis aus rostfreiem Stahl – für
die Befestigung des Zylinders des
Generators und der Pumpe
1
3
Düse des Generators mit
Röhrchen
1 8 Rostfreie Unterlegscheibe M8
4
4
Elektropumpe (5 W)
1 9 Rostfreie Schraube M8x40
2
5
T-Stück und Ventil für die
Verbindung der Schläuche *
1 + 1
10
Rostfreie Mutter M8
2
während ihres Ausglühens und die Effektivität des Räucherns verbessert werden. Durch die genaue Einstellung der
erzeugten Rauchmenge wird eine Übersäuerung der Erzeugnisse vermieden.
Die Pumpe wird über einen Schlauch und ein spezielles Rohr, das in die Düse integriert ist und durch das Luft eingeblasen
wird, an den Rauchgenerator angeschlossen. Das Rohr spielt auch eine strukturelle Rolle - es tritt in den Ausschnitt der
Basis ein und gewährleistet die perfekte Positionierung der Düse zum Räucherofen und zum Generatorkörper.
Die Montage und Demontage des Generators und seine Reinigung sind sehr einfach. Sie können das Gerät einfach
zerlegen und reinigen, ohne seine Basis vom Räucherofen abschrauben zu müssen und ohne Werkzeug zu verwenden.
Es genügt, die Düse aus dem Generatorkörper herauszuziehen, den Körper des Zuführbehälters zu drehen und ihn von
der Basis herunterzunehmen, mit der er durch Rasten und passende Löcher in der Basis stabil verbunden ist. Diese
Lösung sorgt für eine ausreichende Dichtheit und stabilisiert gleichzeitig den Körper in der Basis.
Löcher im unteren Teil des Generatorkörpers ermöglichen ein einfaches Anzünden der Räucherspäne und sorgen für eine
ausreichende Sauerstoffversorgung.
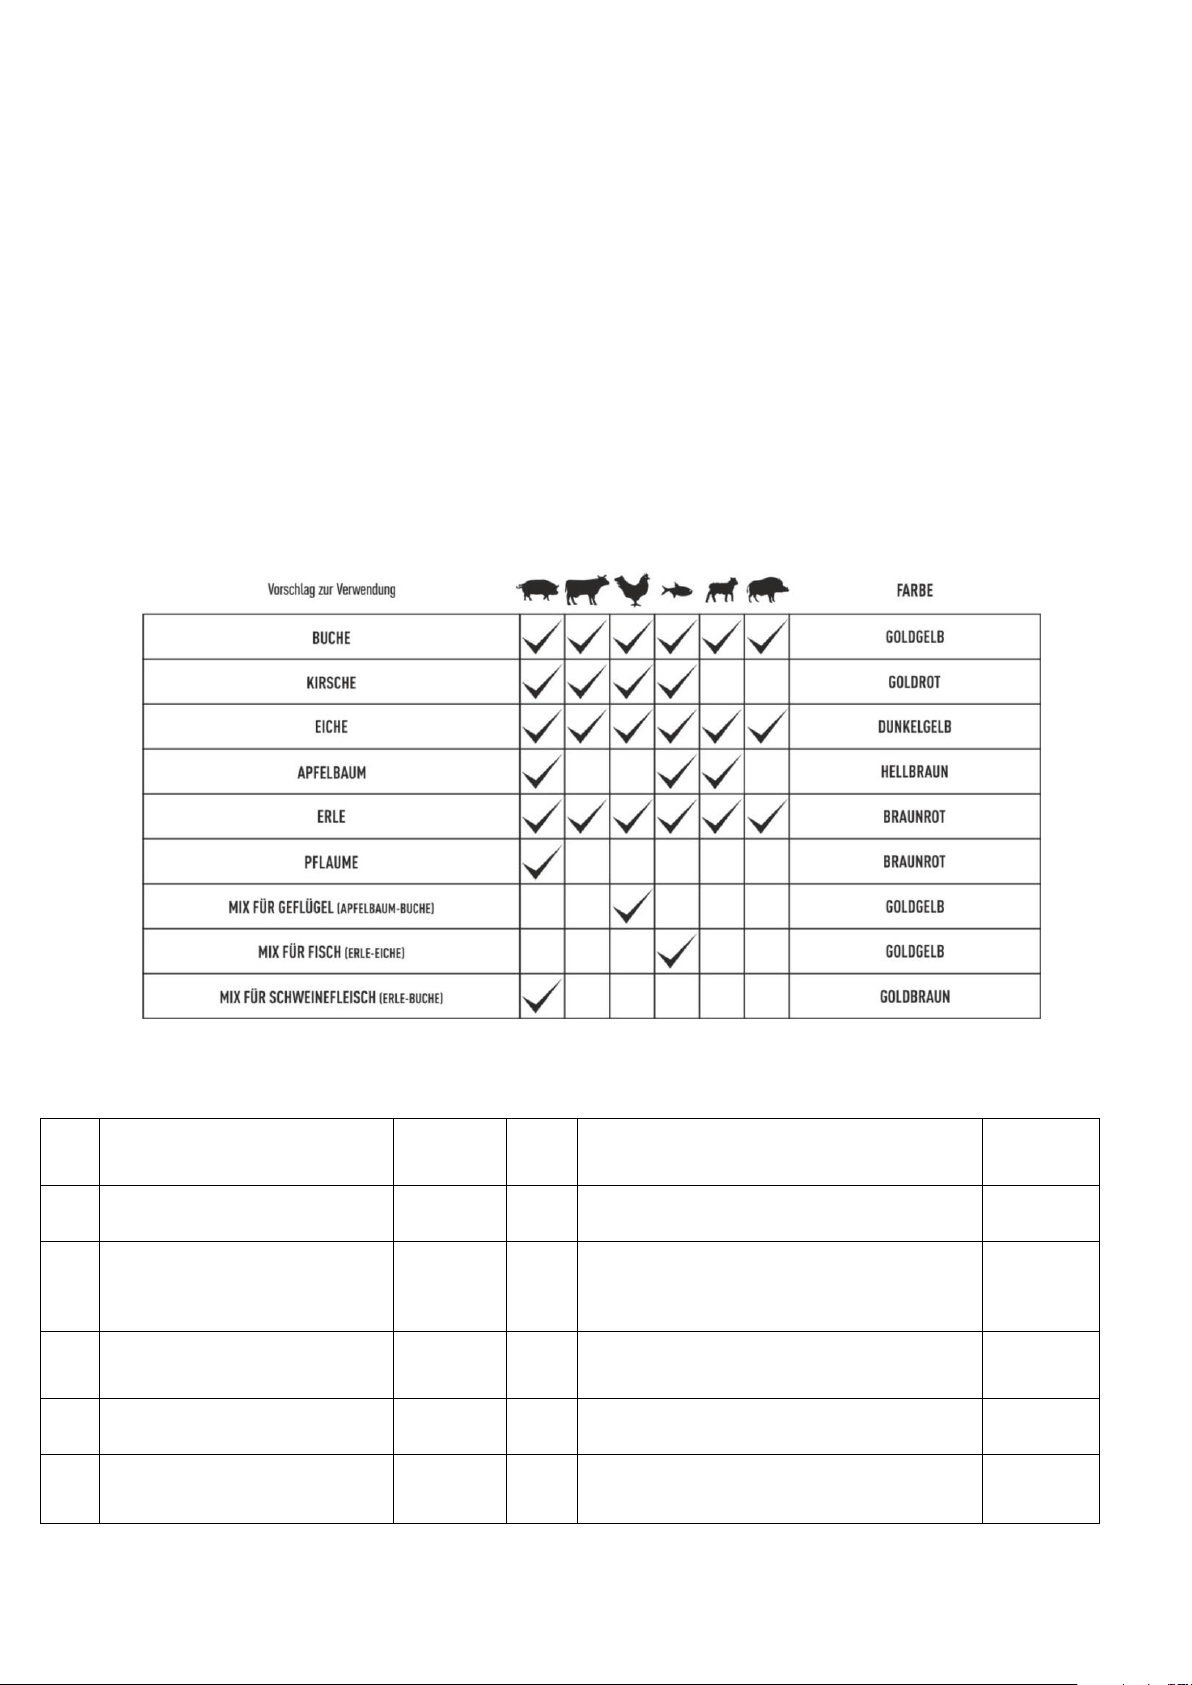
Im Zylinder des Generators finden ca. 450 g Räucherspäne Platz. Sie können jede Art von Räucherspänen verwenden,
aber
wir empfehlen Räucherspäne mit einem Zerkleinerungsgrad von 8-12 mm, mit denen Sie den besten Raucheffekt
im Räucherofen erzielen.
In den Zylinder des Generators sollten Räucherspäne platziert werden, die für die jeweilige Art der zu räuchernden.
Produkte bestimmt sind. In unserem Angebot finden Sie Räucherspäne, die sich ideal für die Zubereitung von
verschiedenen Fleisch- und Fischsorten bewähren:
16
Page 17

Achtung: Rostfreie Schraube M8x40 (2 St.) – für die Wandstärke 3 cm. Im Fall von größeren Stärken ist die Wahl
von entsprechenden Schrauben erforderlich.
* Pumpe und Schläuche können auf zwei Arten verbunden werden.
- mit einem T-Stück.
- mit einem Ventil.
Beide Optionen sind im Montageschema oben dargestellt.
Weitere Informationen zum Anschließen der Pumpe finden Sie in der Anleitung, die sich in der Verpackung der
Pumpe befindet. Lesen Sie sie sorgfältig durch, bevor Sie mit der Montage des gesamten Sets beginnen.
Im Set ist auch eine Packung von Räucherspänen enthalten
Dem Set wurde auch eine Bedienungsanleitung des Rauchgenerators beigefügt.
Vorbereitung des Räucherofens für die Montage des Generators
Um den Generator ohne Löcher am Räucherofen zu montieren, benötigen Sie: Maßband, Körner, Hammer, Metallfeile,
Kreuzschlitzschraubendreher und 3 Bohrer, die für das Material Ihres Räucherofens geeignet sind:
- Bohrer Ø 5 für 2 Montageöffnungen
- Bohrer Ø 9 zum Vergrößern der Montageöffnungen
- Bohrer Ø 20 für die Öffnung der Generatordüse
Ein Korrosionsschutzmittel für Löcher in Wänden von Metallräucheröfen ist ebenfalls nützlich.
Nutzen Sie für die Montage die Basis des Generators [7]. Legen Sie die Basis an die Stelle an, an der der Generator
montiert werden soll, und markieren Sie die Montagelöcher an der Wand des Räucherofens. Der Generator kann auf der
rechten oder linken Seite des Räucherofens montiert werden, je nach den Bedingungen, die sich beispielsweise aus der
Aufstellung des Räucherofens ergeben.
Messen Sie je nach Art und Größe des Räucherofens in der Mitte des unteren Teils seiner Seitenwand eine Stelle
für die Montage des Generators aus, damit sich die Düse an der richtigen Stelle des Räucherofens befindet (wie
im Beispielbild unten).
Markieren Sie mit einem Filzstift, einem Körner und einem Hammer den Mittelpunkt der Stellen, an denen die
Montagelöcher gebohrt werden.
An den mit dem Körner markierten Stellen bohren Sie mit den oben angegebenen, geeigneten Bohrern 2 kleinere
Löcher für Schrauben (Ø 5, dann Ø 9 Bohrer) und 1 größeres zentrales Loch (Bohrer: Ø 5, Ø 9 und zum Schluss
Ø 20) für die Einführung der Düse.
Grate nach dem Bohren mit einer Feile entfernen.
Die Öffnungen mit einem Korrosionsschutzmittel sichern (betrifft Metallräucheröfen).
Nachdem Sie die Löcher gemäß Schema vorbereitet haben, schrauben Sie die Basis des Generators [7] mit den
im Set enthaltenen Unterlegscheiben [8], Schrauben [9] und Muttern [10] an die Wand des Räucherofens.
Verwenden Sie je eine Unterlegscheibe sowohl auf der Seite des Schraubenkopfs als auch auf der Seite der
Mutter.
Montageweise
Führen Sie ein Ende der Generatordüse [3] durch das Loch in der Basis [7] und in der Wand in die
Räucherkammer ein.
Setzen Sie den Zylinder [2] in den Sockel – stecken Sie die Rasten des unteren Teils des Zylinders in die drei
schmalen, bogenförmigen Kerben in der Basis und drehen Sie nach sorgfältigem Einpassen den Zylinderkörper,
um die beiden Elemente stabil zu verbinden.
Stecken Sie dann die Düse in das seitliche Loch im Zylinder (das mit dem größeren Durchmesser) – so dass das
Luftrohr (das Rohr mit dem kleineren Durchmesser) in die Kerbe in der Basis fällt.
Platzieren Sie die Pumpe [4] am Ende der Basis – gemäß dem Schema unten (dargestellt ist die Option der
Verbindung mittels T-Stück).
Schneiden Sie den Schlauch [6] in 3 Teile und verbinden Sie damit den Rauchgenerator mit der Pumpe.
Sichere Verwendung des Rauchgenerators
Achtung! Die unten aufgeführten Anweisungen sind strikt einzuhalten.
Vergewissern Sie sich vor der Verwendung, dass alle Komponenten zu einander passen.
Das Gerät darf nicht in der Nähe von brennbaren Materialien verwendet werden.
Das Gerät wird während des Betriebs heiß und behält die Wärme noch lange nach dem Ausschalten.
Der Generator muss mit Schutzhandschuhen bedient werden. Das Gerät darf während des Betriebs und
nach dem Ausschalten nicht berührt werden, bis es von selbst abgekühlt ist.
Das Gerät während der Arbeit nicht an einen anderen Platz bringen.
Während des Betriebs des Rauchgenerators müssen Kinder von einem Erwachsenen beaufsichtigt werden.
Das Gerät darf nicht durch Minderjährige bedient werden.
17
Page 18
Das Produkt ist kein Spielzeug - es muss von Kindern ferngehalten werden.
Dieses Gerät darf nicht von Kindern und Personen mit eingeschränkten körperlichen und geistigen Fähigkeiten und
von Personen, die mit der Funktionsweise des Geräts sowie seiner korrekten und sicheren Verwendung nicht vertraut
sind, bedient werden.
Verwendungsweise des Generators:
Nachdem Sie das Set an den Räucherofen angeschlossen haben, füllen Sie den Generatorzylinder
mit Räucherspänen – wir empfehlen, mehr von ihnen hineinzugeben, um einen optimalen Betrieb
des Generators für eine lange Zeit zu gewährleisten.
Verschließen Sie den Zylinder mit dem Holzdeckel.
Schließen Sie die Pumpe an die Stromquelle an und stellen Sie die maximale Leistung ein.
An den kleinen Löchern auf beiden Seiten des unteren Teils des Zylinders die Flamme eines Zünders
der Reihe nach ansetzen und einen Moment warten, damit sie angesaugt wird und die Räucherspäne
zu glühen beginnen.
Sobald der Rauch gleichmäßig generiert wird, können Sie seine Intensität mit den Drehknöpfen des Ventils
regulieren - bis Sie den gewünschten Effekt erzielen.
Lesen Sie die Anweisungen für die sichere Verwendung der Pumpe sorgfältig durch und befolgen Sie sie strikt.
Eine Vorgehensweise gemäß dieser Anleitung und der Benutzungsanleitung der Pumpe gewährleistet einen effektiven
Betrieb des Sets.
Tipp – welche Räuchermethode wählen?
Es gibt drei grundlegende Räuchermethoden:
Kalträuchern
Warmräuchern/Heißräuchern
Räuchern mit Anbraten (für BBQ charakteristisch)
Kalträuchern:
Findet in der Regel bei einer Temperatur von bis zu 25⁰C statt und dauert mehrere Stunden bis 14 Tage. Je nach Bedarf
wird entsprechend dichter Rauch verwendet. Für gewöhnlich sollte seine Durchflussgeschwindigkeit im Bereich von 6–15
m pro Minute liegen. Diese Art des Räucherns wird hauptsächlich für Produkte verwendet, die lange gelagert oder reifen
sollen, da der Rauch tief in das Produkt eindringt und es langsam haltbar macht. Produkte, die dieser
Verarbeitungsmethode unterzogen werden, trocknen gleichmäßig, und das Räucherergebnis ist auch bei langer Reifung
ausgezeichnet.
Warmräuchern/Heißräuchern:
Dies ist die Einwirkung auf das Produkt mit Rauch mit einer Temperatur von über 25⁰C. Wir können hier von zwei oberen
Temperaturgrenzen sprechen – Räuchern bis ca. 45⁰C nennt man Warmräuchern, bis 60⁰C Heißräuchern. Beim
Heißräuchern können die Produkte im Räucherofen angebraten werden, wobei die Temperatur
in der Räucherkammer bis sogar 80-90⁰C erhöht wird.
Beim Anbraten kann der Rauchgenerator abgeschaltet werden, so dass nur die Temperatur auf das Produkt einwirkt.
Unabhängig davon, für welche Räuchermethode Sie sich entscheiden, denken Sie daran, dass dies ein Endprozess ist
und die Grundlage die richtige Vorbereitung der Produkte zum Räuchern und das gute Abtrocknen der Produkte vor dem
Räuchern (eventuell können die Produkte im Räucherofen angetrocknet werden) ist, was sich sehr positiv
auf die Qualität der Räucherprodukte auswirkt und ihre Übersäuerung verhindert.
Abfallwirtschaft
Gebraucht elektrische und elektronische Geräte sollten nicht mit dem Hausmüll entsorgt werden. Die ordnungsgemäße
Entsorgung dieser Abfallart trägt zum Umweltschutz bei. Der Benutzer ist dafür verantwortlich, das gebrauchte Gerät an
einer spezialisierten Sammelstelle abzugeben, wo es kostenlos angenommen wird. Informationen zu einem solchen Punkt
erhalten Sie bei der örtlichen Behörde oder Verkaufsstelle.
Achtung!
Jedes Haushalt ist Benutzer der elektrischen und elektronischen Geräte, und was danach folgt der potenzielle Erzeuger
der gefährlichen für die Menschen und die Umwelt Abfälle, aus dem Titel des Anwesenheit in den Geräten der
gefährlichen Substanzen, Mischungen und Bestandteile. Von der zweiten Seite ist das verbrauchte Gerät das wertvolle
Material, aus dem wir solche Rohstoffe wie Kupfer, Zinn, Glas, Eisen und andere Rohstoffe gewinnen können.
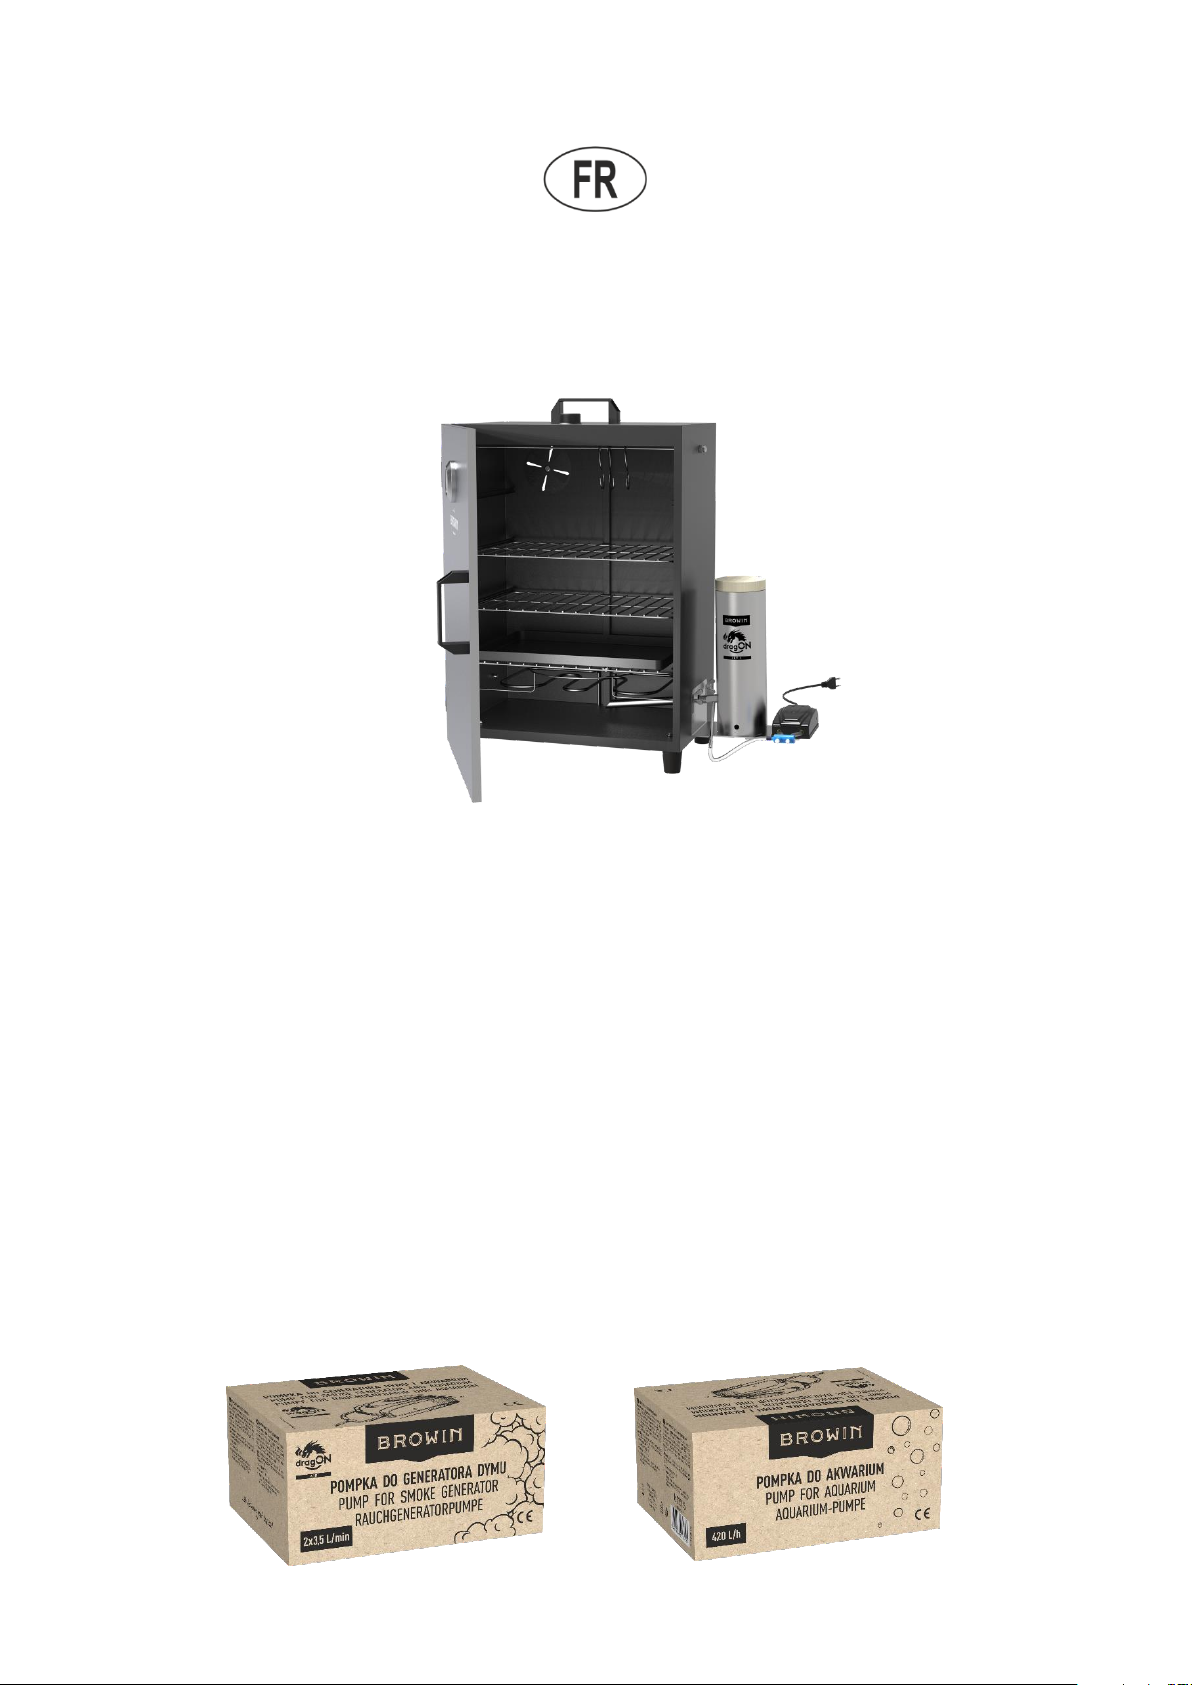
Dieses Symbol, das auf dem Gerät, Verpackung oder den beigefügten Unterlagen untergebracht wird, bedeutet,
dass das gekaufte Produkt nicht zusammen mit den gewöhnlichen Abfällen aus dem Haushalt beseitigt sein soll.
Die Kennzeichnung bedeutet gleichzeitig, dass das Gerät zum Umsatz nach dem 13. August 2005 eingeführt
worden ist.
Die Pflicht des Benutzers ist, es in die entsprechende Stelle abgeben, die sich mit der Sammlung und Recycling der
elektrischen und elektronischen Geräten beschäftigt. Informationen über das zugängliche System der Sammlung der
18
Page 19
verbrauchten elektrischen Geräte kann man im Informationspunkt des Geschäfts und im Amt der Stadt/der Gemeinde
finden. Die Beseitigung der Geräte auf die richtige Weise und ihr Recycling helfen gegenüber den potentiell negativen
Folgen für die Umwelt und menschliche Gesundheit.
─ NOTICE D’UTILISATION ─
dragON Jet 1 GÉNÉRATEUR DE FUMÉE AVEC POMPE ÉLECTRIQUE dragON Air
Merci pour l'achat de notre produit.
Avant de l'utiliser, il est indispensable de lire cette notice qui vous permettra d'utiliser l'appareil correctement
et en toute sécurité et de lui assurer une durée de vie optimale.
Conservez la notice et suivez toujours les instructions qu'elle contient.
Exemple de combinaison - générateur de fumée avec fumoir électrique
Description du produit:
Générateur de fumée innovant – conçu pour le fumage à froid et à chaud dans tout type de fumoir.
Ce générateur defumée peut être installé dans un petit ou un grand fumoir - en acier, en bois ou en briques.
Des tests ont été effectués avec un fumoir d'une capacité de 300 L.
Pour les fumoirs dont l'épaisseur des murs est supérieure à 3 cm, choisissez la version dragON Jet Long (dédiée aux
fumoirs dont l'épaisseur des murs est supérieure à 15 cm).
L'utilisation de cet appareil est une façon efficace de fumer professionnellement.
L'ensemble de la structure est en acier inoxydable, ce qui permet de fumer même dans des conditions
météorologiques défavorables et prolonge la durée de vie de l'appareil.
Le générateur peut être monté d'un côté ou de l'autre du fumoir, selon les besoins.
Le générateur de fumée a été fabriqué en Pologne et breveté par Browin.
Le générateur de fumée est équipé d'une pompe électrique Browin Dragon Air d'une puissance de 5 W et d'un débit
de 2x3,5 L/min.
La pompe peut être utilisée non seulement dans le processus de fumage, mais aussi en aquariophilie.
Il est idéal pour l'aération d'aquariums de différentes capacités (débit de 420 L/h).
19
Page 20
Une conception brevetée bien pensée a permis de combiner les dimensions réduites du générateur avec un rendement
élevé et la possibilité de réguler la quantité de fumée produite au moyen d'une pompe – en fonction des besoins et de la
taille du fumoir utilisé (volume de la chambre de fumage). Le cylindre de chargement est fermé par un couvercle en bois
qui assure une bonne circulation de la fumée et protège les copeaux pendant le processus de recuit (par exemple contre
les gouttes de pluie). Le long tuyau (4 m) peut être coupé à la longueur nécessaire pour relier la pompe à la buse du
générateur de fumée.
L'un des principaux avantages de ce générateur à pompe électrique est son rendement élevé et sa faible
consommation de copeaux de bois. Il suffit de placer une petite quantité de copeaux de bois dans le générateur pour
obtenir une grande quantité de fumée (si nécessaire). Le fait de remplir le générateur à pleine capacité permet
d'acheminer la fumée vers le fumoir en continu pendant environ 3 à 4 heures, sans qu'il soit nécessaire de recharger les
copeaux de bois. L'efficacité du générateur est due à la conception unique de la buse combinée à une pompe qui régule
l'injection de la fumée générée dans la chambre de combustion.
La buse innovante du générateur de fumée dragON Jet 1 est plus courte que sur les modèles habituels et biseautée
des deux côtés: d'un côté, un angle qui facilite l'évacuation de la fumée dans le fumoir, et de l'autre, un angle qui empêche
la buse de s'obstruer avec les copeaux de bois. La buse est introduite dans le fumoir à un angle approprié, ce qui
augmente le flux de fumée provenant des copeaux de bois recuits. La buse ne traverse qu'une partie de la chambre de
combustion des copeaux de bois, ce qui permet une aspiration idéale de la fumée tout en protégeant adéquatement la
buse contre le colmatage pendant le recuit des copeaux de bois. Pour les fumoirs dont les murs sont plus épais (jusqu'à
15 cm), par exemple ceux en briques, il est recommandé d'utiliser le générateur de fumée dragON Jet Long avec une buse
longue.
L'utilisation d'une pompe puissante et son placement sur la base allongée du générateur de fumée permet
de transmettre les vibrations de la pompe au corps de la chambre de chargement, ce qui améliore le tassement
des copeaux pendant le processus de recuit et augmente l'efficacité du fumage. Le réglage précis de la quantité
de fumée générée permet d'éviter une acidification excessive des produits. La pompe est reliée au générateur de fumée
par un tuyau et un tube spécial intégré à la buse, à travers lequel l'air est forcé. Le tube a également un rôle structurel: il
entre dans la découpe de la base, ce qui garantit que la buse est parfaitement
alignée avec le corps du fumoir et du générateur.
Le montage et le démontage du générateur sont très simples et le nettoyage
de l'appareil est très facile. Vous pouvez facilement démonter l'appareil et le
nettoyer, sans avoir à dévisser sa base du fumoir et sans utiliser d'outils. Il suffit de
retirer la buse du corps du générateur, de tourner le corps de la trémie et de le
retirer de la base à laquelle il est solidement relié par des crochets et des trous
correspondants dans la base. Cette solution assure une étanchéité adéquate tout
en stabilisant le corps dans la base.
Les trous situés au bas du corps du générateur permettent d'enflammer
facilement les copeaux de bois et d'assurer un apport d'oxygène suffisant.
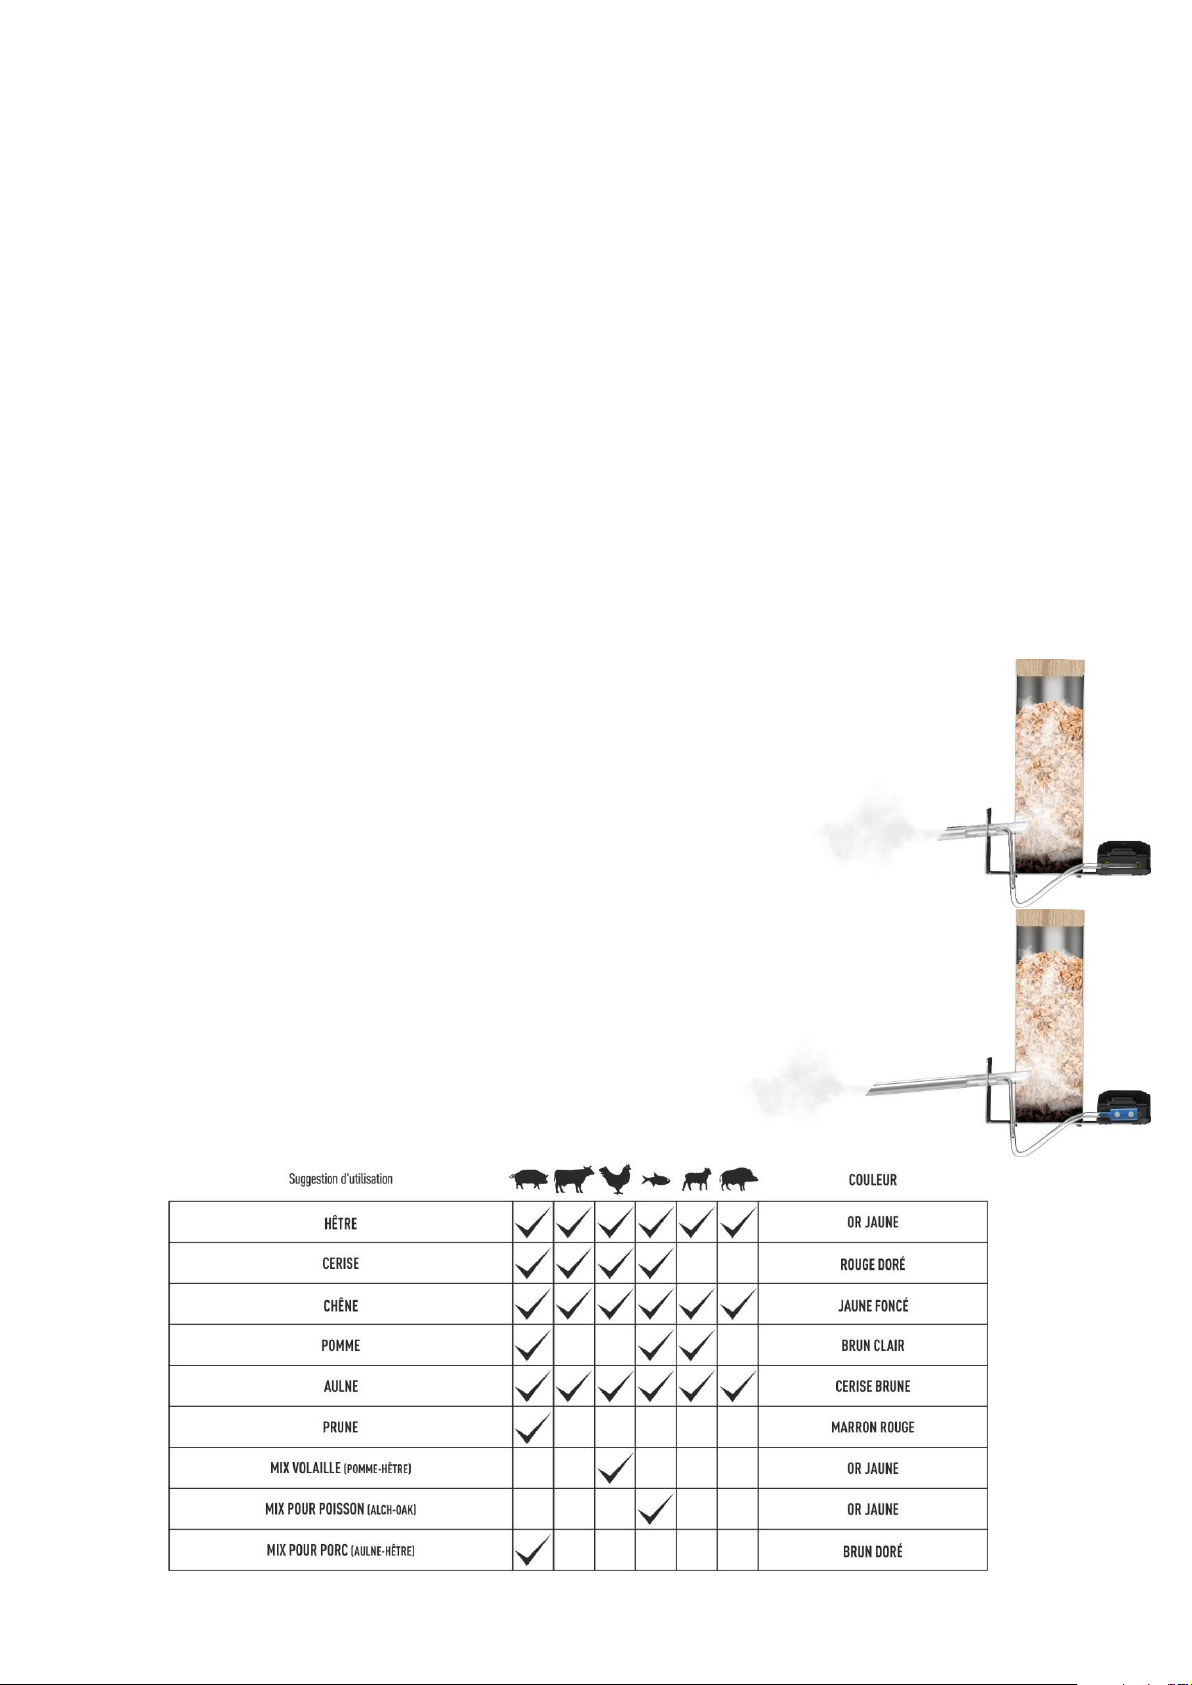
Le cylindre du générateur peut contenir environ 450 g de copeaux de
fumée. Vous pouvez utiliser n'importe quel type de copeaux, mais
nous recommandons des copeaux d'une finesse (calibre) de 8 à 12
mm, qui donneront le meilleur effet de fumée à l'intérieur du fumoir.
Placez dans le cylindre du générateur des copeaux correspondant au
type de produits fumés. Dans notre gamme, vous trouverez des copeaux
de bois idéaux pour la préparation de différents types de viande ou de
poisson :
20
Page 21

No
NOM
NOMBRE
D'UNITÉ
S
No
NOM
NOMBRE
D'UNITÉS
1
Couvercle en bois
1
6
Tuyau en silicone Ø 6/4 mm,
longueur 4 m
1
2
Cylindre (trémie) du
générateur de fumée
en acier inoxydable 304
1
7
Base de montage en acier inoxydable -
pour la fixation du cylindre du générateur
et de la pompe
1
3
Buse du générateur avec tube
1
8
Rondelle inox M8
4
4
Pompe électrique (5 W)
1 9 Vis en acier inoxydable M8x40
2
5
Pièce en T et valve pour
le raccordement des tuyaux*
1 + 1
10
Écrou inox M8
2
Note: Vis en acier inoxydable M8x40 (2 pièces) – jusqu'à une épaisseur de paroi de 3 cm. Pour des épaisseurs plus
importantes, il est nécessaire de choisir des vis appropriées.
* La pompe et les tuyaux peuvent être raccordés de deux manières.
- avec la pièce en T
- avec la valve
Les deux options sont illustrées dans le schéma de montage ci-dessus.
Pour plus d'informations sur le raccordement de la pompe, reportez-vous au mode d’emploi inclus dans
l'emballage de la pompe. Lisez-le attentivement avant d'assembler l'ensemble du kit.
Le kit comprend également un paquet de copeaux de fumage.
Le mode d’emploi du générateur est fourni avec le kit.
Préparation du fumoir pour l'installation du générateur
Pour installer le générateur sur un fumoir sans trous, vous aurez besoin d'un mètre, d'un pointeau, d'un marteau, d'une
lime à métaux, d'un tournevis Phillips et de 3 mèches adaptées au matériau de votre fumoir :
- mèche Ø 5 pour 2 trous de fixation,
- mèche Ø 9 pour agrandir les trous de fixation,
- mèche Ø 20 pour le trou de la buse du générateur.
Un inhibiteur de corrosion pour les trous dans la paroi du fumoir métallique sera également utile.
Utilisez la base du générateur [7] pour l'assemblage. Placez la base sur laquelle le générateur est monté et repérez les
trous de montage sur la paroi du fumoir. Vous pouvez monter le générateur à droite ou à gauche du fumoir,
en fonction de vos besoins résultant, par exemple, du positionnement du fumoir.
En fonction du type et de la taille du fumoir, mesurez un espace au milieu de la partie inférieure de sa paroi
latérale pour la fixation du générateur, de sorte que la buse se trouve au bon endroit dans la chambre
du fumoir (comme dans l'exemple ci-dessous).
À l'aide d'un marqueur, d'un pointeau et d'un marteau, repérez le point central de l'endroit où les trous
de fixation seront percés.
À l'aide des mèches appropriées indiquées ci-dessus, percez 2 petits trous de vis (mèche Ø 5, puis Ø 9)
et 1 grand trou central (mèches: Ø 5, Ø 9 et enfin Ø 20) pour l'insertion de la buse.
Utilisez une lime pour éliminer les bavures après le perçage.
Protégez les trous avec un produit anticorrosion (pour les fumoirs en métal).
Après avoir préparé les trous selon le schéma, vissez la base du générateur [7] à la paroi du fumoir à l'aide des
rondelles [8], des vis [9] et des écrous [10] inclus dans le kit. Utilisez une rondelle de chaque côté
de la tête de vis et du côté de l'écrou.
Méthode de montage
Par le trou de la base [7] et de la paroi, insérez une extrémité de la buse du générateur [3] dans la chambre de
fumage.
Placez le cylindre [2] sur la base – insérez les crochets de la partie inférieure du cylindre dans les trois découpes
étroites et arquées de la base et, après l'emboîtement, tournez soigneusement le corps du cylindre pour joindre
fermement les deux parties.
Insérez ensuite la buse dans le trou latéral du cylindre (celui qui a le plus grand diamètre) – de manière
à ce que le tube d'air (le tube de plus petit diamètre) tombe dans l'encoche de la base.
21
Page 22

Placez la pompe [4] à l'extrémité de la base – selon le schéma ci-joint (option montrée avec raccordement
par la pièce en T).
Coupez le tuyau [6] en 3 sections et utilisez-les pour connecter le générateur de fumée à la pompe.
Sécurité de l'utilisation du générateur de fumée
Attention ! Les règles énumérées ci-dessous doivent être strictement respectées.
Assurez-vous que tous les éléments s'emboîtent correctement avant de les utiliser.
L'appareil ne doit pas être utilisé à proximité de matériaux inflammables.
L'appareil est chaud pendant son fonctionnement et conserve sa chaleur pendant une longue période après son
extinction. Le générateur doit être manipulé avec des gants de protection. Ne pas toucher l'appareil
pendant son fonctionnement ou après son extinction, jusqu'à ce qu'il ait refroidi.
Ne déplacez pas l'appareil lors du fonctionnement.
Il est interdit de laisser les enfants sans surveillance d'un adulte lorsque le générateur de fumée fonctionne.
Il est interdit d'utiliser l'appareil par des mineurs.
Le produit n'est pas un jouet – tenir hors de portée des enfants.
Cet équipement ne doit pas être utilisé par des enfants et des personnes dont les capacités physiques ou mentales sont
réduites, ni par des personnes qui ne sont pas familiarisées avec le fonctionnement de l'équipement
et son utilisation correcte et sûre.
Mode d’emploi du générateur:
Une fois l'ensemble raccordé au fumoir, remplissez le cylindre du générateur avec des copeaux de bois – il est
conseillé d’y mettre beaucoup de copeaux de bois pour garantir un fonctionnement optimal du générateur pendant
une période plus longue.
Fermez le cylindre avec le couvercle en bois.
Branchez la pompe à la source d'alimentation et réglez la puissance maximale.
Appliquez la flamme d'un briquet sur les petits trous situés de part et d'autre du fond du cylindre, l'un après l'autre,
et attendez un moment pour qu'elle soit attirée vers l'intérieur et que les copeaux de bois commencent à se
recuire.
Une fois que la fumée commence à être produite de manière uniforme, vous pouvez régler l'intensité
de la fumée à l'aide des boutons de la valve – jusqu'à ce que l'effet désiré soit atteint.
Les règles d'utilisation en toute sécurité de la pompe doivent également être lues attentivement et respectées à la
lettre. Le respect de ces instructions et du mode d'emploi de la pompe garantit le bon fonctionnement
de l'ensemble.
Conseil - Quelle méthode de fumage choisir ?
Nous pouvons distinguer trois méthodes de fumage de base:
fumage à froid
fumage à chaud
fumage avec rôtissage (caractéristique du BBQ [barbecue])
Fumage à froid:
Il se produit généralement à des températures allant jusqu'à 25⁰C et dure de quelques heures à 14 jours. Une densité de
fumée appropriée est utilisée selon les besoins. En règle générale, son débit doit être compris entre 6 et 15 m par minute.
Cette méthode de fumage est principalement utilisée pour les produits qui doivent être stockés ou affinés pendant une
longue période, car la fumée pénètre profondément dans le produit et le conserve lentement. Les viandes fumées
soumises à cette méthode de traitement sèchent uniformément et l'effet est également excellent pour la maturation à long
terme.
Fumage à chaud:
Il s'agit de l'action de la fumée à une température supérieure à 25⁰C sur le produit. Il existe deux limites supérieures de
température acceptées : le fumage jusqu'à environ 45⁰C est appelé fumage à chaud et le fumage jusqu'à 60⁰C est appelé
fumage à température élevée. Dans le cas du fumage à chaud, les produits peuvent être grillés dans le fumoir lui-même,
ce qui permet d'augmenter la température de la chambre de fumage jusqu'à 80-90⁰C.
En cas de rôtissage, le générateur de fumée peut être déconnecté et le produit peut être affecté par la seule température.
Quel que soit le type de fumage choisi, n'oubliez pas qu'il s'agit d'un processus final et que la base est la préparation
correcte des produits à fumer et un très bon séchage avant le fumage (ou un nouveau séchage dans le fumoir), ce qui a
un effet très positif sur la qualité des produits fumés et les empêche d'aigrir.
22
Page 23
Gestion des déchets
Les déchets d'équipements électriques et électroniques ne doivent pas être jetés dans la poubelle. Le tri et l'élimination
correcte de ce type de déchets contribuent à la protection de l'environnement. Il incombe à l'utilisateur de remettre le
matériel usagé à un point de collecte spécialisé, où il sera accepté gratuitement. Les informations relatives à ce point
peuvent être obtenues auprès de l'autorité locale ou du point de vente.
Attention!
Chaque ménage utilise des appareils électriques et électroniques et constitue donc une source potentielle de déchets
dangereux pour les humains et l'environnement, en raison de la présence de substances dangereuses, de mélanges et de
composants dans l'équipement. D'autre part, l'équipement mis au rebut est une ressource précieuse à partir de laquelle
des matières premières comme le cuivre, l'étain, le verre, le fer et d'autres peuvent être récupérées.
Le symbole de la poubelle barrée sur l'équipement, l'emballage ou la documentation qui y est attachée signifie
que le produit ne doit pas être jeté avec les autres déchets. L'étiquetage signifie simultanément que l'équipement
a été mis sur le marché après la date du 13 août 2005.
Il est la responsabilité de l'utilisateur de transférer l'équipement utilisé à un point de collecte désigné pour un
recyclage approprié. Des informations sur le système de collecte disponible pour les équipements électriques peuvent être
trouvées dans les informations du magasin et au bureau municipal.
23
Page 24

WARUNKI GWARANCJI
1. Niniejsza gwarancja jest udzielana przez firmę BROWIN Spółka z ograniczoną odpowiedzialnością Sp. k. z siedzibą przy ul.
Pryncypalnej 129/141; 93-373 Łódź, nazywaną w dalszej części gwarancji Gwarantem.
2. Niniejsza gwarancja dotyczy wyłącznie sprzętu używanego na terytorium Polski.
3. Okres gwarancji na produkt wynosi 12 miesięcy od daty zakupu sprzętu.
4. W przypadku wad uniemożliwiających korzystanie ze sprzętu, okres gwarancji ulega przedłużeniu o czas od dnia zgłoszenia
wady do dnia wykonania naprawy.
5. Gwarancja uprawnia do bezpłatnych napraw nabytego sprzętu, polegających na usunięciu wad fizycznych, które ujawniły się w
okresie gwarancyjnym, z zastrzeżeniem punktu 11.
6. Zgłoszenie wady sprzętu powinno zawierać:
dowód zakupu towaru;
nazwę i model towaru wraz ze zdjęciami uzasadniającymi reklamację.
7. Reklamujący powinien spakować produkt, odpowiednio zabezpieczając go przed uszkodzeniem w czasie transportu.
8. Gwarant w terminie 14 dni od daty zgłoszenia wady ustosunkuje się do zgłoszonej reklamacji. Jeżeli do dokonania naprawy
wystąpi konieczność sprowadzenia części zamiennych z zagranicy, termin naprawy może ulec przedłużeniu do czasu
sprowadzenia niezbędnej elementów, lecz maksymalnie do 30 dni roboczych od daty otrzymania towaru do naprawy.
9. Gwarancja obejmuje wszelkie wady materiałowe i produkcyjne ujawnione w czasie normalnej eksploatacji zgodnie z
przeznaczeniem sprzętu i zaleceniami podanymi na opakowaniu lub w instrukcji użytkowania. Warunkiem udzielenia gwarancji
jest użytkowanie sprzętu zgodnie z instrukcją.
10. Zakres czynności naprawy gwarancyjnej nie obejmuje czyszczenia, konserwacji, przeglądu technicznego, wydania ekspertyzy
technicznej.
11. Gwarancja nie obejmuje:
uszkodzeń mechanicznych, chemicznych, termicznych i korozji;
uszkodzeń spowodowanych działaniem czynników zewnętrznych, niezależnych od producenta, a w szczególności
wynikłych z użytkowania niezgodnego z instrukcją obsługi;
usterek powstałych w wyniku niewłaściwego montażu sprzętu;
samowolnych, dokonywanych przez użytkownika lub inne nieupoważnione osoby napraw, przeróbek lub zmian
konstrukcyjnych;
użytkowanie poza normalnym zakresem konsumenckiego zastosowania w warunkach domowych.
12. Powyższe oświadczenie nie ma wpływu na statutowe prawa konsumenta wynikające z odpowiednich praw krajowych i na
prawa konsumenta w stosunku do sprzedawcy, u którego zakupiono ten produkt. Niniejsza gwarancja na sprzedany towar
konsumpcyjny nie wyłącza, nie ogranicza ani nie zawiesza uprawnień kupującego wynikających z niezgodności towaru z
umową.
13. Gwarancja nie nadaje Kupującemu prawa do domagania się zwrotu utraconych zysków związanych z uszkodzeniem
urządzenia oraz strat związanym z powodu uszkodzenia sprzętu.
14. W przypadku zapotrzebowania na usługi serwisu, w ramach gwarancji lub bez, należy skontaktować się ze sprzedawcą, u
którego zakupiono produkt. Przed skontaktowaniem się ze sprzedawcą lub serwisem zalecamy dokładnie przeczytanie
broszury z instrukcjami dołączonej do produktu.
15. W przypadku zakupu bezpośrednio u producenta reklamacje można składać bezpośrednio na stronie www.browin.pl w
zakładce Zgłaszanie reklamacji lub za pośrednictwem drogi elektronicznej pod adresem [email protected]. W przypadku
zakupu u dystrybutora zaleca się dokonanie zgłoszenia za jego pośrednictwem.
BROWIN Spółka z ograniczoną odpowiedzialnością Sp. k.
ul. Pryncypalna 129/141
PL 93-373 Łódź
tel. +48 42 23 23 230
www.browin.pl
ODWIEDŹ NAS NA:
24
 Loading...