

Page 1
en
User Guide
Intelligent digital controller with App control
IDA
RUB IDA
ISR IDA
OT IDA
Page 2

Dear end user,
Thank you for choosing this IDA. You can control your home heating using the IDA or also by using an app. With this IDA, you
are in the driver’s seat to control the temperature of your home. It’s all about your comfort, just the way you want it.
This manual contains easy to use information and is intended for installers and end users.
Use the manual menu to get quick access to the instructions you need. For your own safety and optimum performance of the
IDA, we advise you to read the manual first.
The manual is subject to change, the online version is always the latest. If you are using a printed copy, please check the
website for the latest version. See contact details on the front or back cover.
We hope you will enjoy working with the IDA.
Page 3

Contents
7726708 - v.01 - 18012019 3
Contents
1 Manual menu . . . . . . . . . . . . . . . . . . . . . . . . . . . . . . . . . . . . . . . . . . . . . . . . . . . . . . . . . . . . . . . . . . . . . . . . . . . . . . . . . . . . . . .5
2 Introduction . . . . . . . . . . . . . . . . . . . . . . . . . . . . . . . . . . . . . . . . . . . . . . . . . . . . . . . . . . . . . . . . . . . . . . . . . . . . . . . . . . . . . . . . 6
2.1 Symbols used in the manual . . . . . . . . . . . . . . . . . . . . . . . . . . . . . . . . . . . . . . . . . . . . . . . . . . . . . . . . . . . . . . . . . . . . . .6
2.2 Introducing the IDA . . . . . . . . . . . . . . . . . . . . . . . . . . . . . . . . . . . . . . . . . . . . . . . . . . . . . . . . . . . . . . . . . . . . . . . . . . . . . 6
2.3 The IDA and its app . . . . . . . . . . . . . . . . . . . . . . . . . . . . . . . . . . . . . . . . . . . . . . . . . . . . . . . . . . . . . . . . . . . . . . . . . . . . 7
2.4 What's new for the IDA . . . . . . . . . . . . . . . . . . . . . . . . . . . . . . . . . . . . . . . . . . . . . . . . . . . . . . . . . . . . . . . . . . . . . . . . . . 7
2.5 How to use the IDA . . . . . . . . . . . . . . . . . . . . . . . . . . . . . . . . . . . . . . . . . . . . . . . . . . . . . . . . . . . . . . . . . . . . . . . . . . . . . 7
2.5.1 Using the rotary dial and buttons . . . . . . . . . . . . . . . . . . . . . . . . . . . . . . . . . . . . . . . . . . . . . . . . . . . . . . . . . . .7
2.5.2 Entering the main menu and menu items . . . . . . . . . . . . . . . . . . . . . . . . . . . . . . . . . . . . . . . . . . . . . . . . . . . . 7
2.5.3 Entering the Quick Access menu and menu items . . . . . . . . . . . . . . . . . . . . . . . . . . . . . . . . . . . . . . . . . . . . . 8
2.5.4 Returning to the previous step or home screen . . . . . . . . . . . . . . . . . . . . . . . . . . . . . . . . . . . . . . . . . . . . . . . .8
2.5.5 Scrolling through menu items and changing settings . . . . . . . . . . . . . . . . . . . . . . . . . . . . . . . . . . . . . . . . . . . 8
2.5.6 Screen shows no information . . . . . . . . . . . . . . . . . . . . . . . . . . . . . . . . . . . . . . . . . . . . . . . . . . . . . . . . . . . . . 9
2.6 Description of the display . . . . . . . . . . . . . . . . . . . . . . . . . . . . . . . . . . . . . . . . . . . . . . . . . . . . . . . . . . . . . . . . . . . . . . . . 9
2.6.1 Description of the icons in the display . . . . . . . . . . . . . . . . . . . . . . . . . . . . . . . . . . . . . . . . . . . . . . . . . . . . . . . 9
2.6.2 Customising the main screen display . . . . . . . . . . . . . . . . . . . . . . . . . . . . . . . . . . . . . . . . . . . . . . . . . . . . . . 11
2.7 Messages on the display . . . . . . . . . . . . . . . . . . . . . . . . . . . . . . . . . . . . . . . . . . . . . . . . . . . . . . . . . . . . . . . . . . . . . . . 12
2.8 Zone selection . . . . . . . . . . . . . . . . . . . . . . . . . . . . . . . . . . . . . . . . . . . . . . . . . . . . . . . . . . . . . . . . . . . . . . . . . . . . . . . .12
2.9 Presence detection . . . . . . . . . . . . . . . . . . . . . . . . . . . . . . . . . . . . . . . . . . . . . . . . . . . . . . . . . . . . . . . . . . . . . . . . . . . . 12
3 General use . . . . . . . . . . . . . . . . . . . . . . . . . . . . . . . . . . . . . . . . . . . . . . . . . . . . . . . . . . . . . . . . . . . . . . . . . . . . . . . . . . . . . . .13
3.1 Changing the mode quickly . . . . . . . . . . . . . . . . . . . . . . . . . . . . . . . . . . . . . . . . . . . . . . . . . . . . . . . . . . . . . . . . . . . . . .13
3.2 Changing the room temperature . . . . . . . . . . . . . . . . . . . . . . . . . . . . . . . . . . . . . . . . . . . . . . . . . . . . . . . . . . . . . . . . . . 13
3.2.1 Changing the temperature in manual mode . . . . . . . . . . . . . . . . . . . . . . . . . . . . . . . . . . . . . . . . . . . . . . . . . 13
3.2.2 Changing the temperature for a short period in scheduling mode . . . . . . . . . . . . . . . . . . . . . . . . . . . . . . . . .14
3.3 Creating a temperature schedule to control the room temperature . . . . . . . . . . . . . . . . . . . . . . . . . . . . . . . . . . . . . . . 14
3.3.1 Changing the weekdays of a temperature schedule . . . . . . . . . . . . . . . . . . . . . . . . . . . . . . . . . . . . . . . . . . . 14
3.3.2 Copying a weekday of a temperature schedule . . . . . . . . . . . . . . . . . . . . . . . . . . . . . . . . . . . . . . . . . . . . . . .16
3.3.3 Selecting another temperature schedule . . . . . . . . . . . . . . . . . . . . . . . . . . . . . . . . . . . . . . . . . . . . . . . . . . . .16
3.4 Changing the zone temperatures . . . . . . . . . . . . . . . . . . . . . . . . . . . . . . . . . . . . . . . . . . . . . . . . . . . . . . . . . . . . . . . . . 17
3.5 Topping up . . . . . . . . . . . . . . . . . . . . . . . . . . . . . . . . . . . . . . . . . . . . . . . . . . . . . . . . . . . . . . . . . . . . . . . . . . . . . . . . . . 17
3.5.1 Topping up manually . . . . . . . . . . . . . . . . . . . . . . . . . . . . . . . . . . . . . . . . . . . . . . . . . . . . . . . . . . . . . . . . . . . 17
3.5.2 Topping up automatically . . . . . . . . . . . . . . . . . . . . . . . . . . . . . . . . . . . . . . . . . . . . . . . . . . . . . . . . . . . . . . . .17
3.6 Setting a holiday schedule . . . . . . . . . . . . . . . . . . . . . . . . . . . . . . . . . . . . . . . . . . . . . . . . . . . . . . . . . . . . . . . . . . . . . . 17
3.6.1 Creating a holiday schedule . . . . . . . . . . . . . . . . . . . . . . . . . . . . . . . . . . . . . . . . . . . . . . . . . . . . . . . . . . . . . 18
3.6.2 Changing a holiday schedule . . . . . . . . . . . . . . . . . . . . . . . . . . . . . . . . . . . . . . . . . . . . . . . . . . . . . . . . . . . . .18
3.6.3 Deleting a holiday schedule . . . . . . . . . . . . . . . . . . . . . . . . . . . . . . . . . . . . . . . . . . . . . . . . . . . . . . . . . . . . . .19
3.7 Activating fireplace mode . . . . . . . . . . . . . . . . . . . . . . . . . . . . . . . . . . . . . . . . . . . . . . . . . . . . . . . . . . . . . . . . . . . . . . . 19
3.8 Activating antifrost mode . . . . . . . . . . . . . . . . . . . . . . . . . . . . . . . . . . . . . . . . . . . . . . . . . . . . . . . . . . . . . . . . . . . . . . . .19
3.9 Switching the central heating on/off . . . . . . . . . . . . . . . . . . . . . . . . . . . . . . . . . . . . . . . . . . . . . . . . . . . . . . . . . . . . . . . 20
3.9.1 Switching to cooling mode . . . . . . . . . . . . . . . . . . . . . . . . . . . . . . . . . . . . . . . . . . . . . . . . . . . . . . . . . . . . . . .20
3.10 Switching to auto mode . . . . . . . . . . . . . . . . . . . . . . . . . . . . . . . . . . . . . . . . . . . . . . . . . . . . . . . . . . . . . . . . . . . . . . . . .20
4 Customisation . . . . . . . . . . . . . . . . . . . . . . . . . . . . . . . . . . . . . . . . . . . . . . . . . . . . . . . . . . . . . . . . . . . . . . . . . . . . . . . . . . . . . 21
4.1 Hot water settings . . . . . . . . . . . . . . . . . . . . . . . . . . . . . . . . . . . . . . . . . . . . . . . . . . . . . . . . . . . . . . . . . . . . . . . . . . . . . 21
4.1.1 Changing the hot water temperature . . . . . . . . . . . . . . . . . . . . . . . . . . . . . . . . . . . . . . . . . . . . . . . . . . . . . . . 21
4.1.2 Setting the hot water comfort mode . . . . . . . . . . . . . . . . . . . . . . . . . . . . . . . . . . . . . . . . . . . . . . . . . . . . . . . .21
4.1.3 Setting the hot water reduced (energy-saving) mode . . . . . . . . . . . . . . . . . . . . . . . . . . . . . . . . . . . . . . . . . . 21
4.1.4 Changing the hot water schedule . . . . . . . . . . . . . . . . . . . . . . . . . . . . . . . . . . . . . . . . . . . . . . . . . . . . . . . . . 21
4.2 IDA settings . . . . . . . . . . . . . . . . . . . . . . . . . . . . . . . . . . . . . . . . . . . . . . . . . . . . . . . . . . . . . . . . . . . . . . . . . . . . . . . . . .22
4.2.1 Setting the date and time . . . . . . . . . . . . . . . . . . . . . . . . . . . . . . . . . . . . . . . . . . . . . . . . . . . . . . . . . . . . . . . .22
4.2.2 Setting country and language . . . . . . . . . . . . . . . . . . . . . . . . . . . . . . . . . . . . . . . . . . . . . . . . . . . . . . . . . . . . 22
4.2.3 Main screen setting . . . . . . . . . . . . . . . . . . . . . . . . . . . . . . . . . . . . . . . . . . . . . . . . . . . . . . . . . . . . . . . . . . . . 23
4.2.4 Show help messages . . . . . . . . . . . . . . . . . . . . . . . . . . . . . . . . . . . . . . . . . . . . . . . . . . . . . . . . . . . . . . . . . . .23
4.2.5 Presence sensor . . . . . . . . . . . . . . . . . . . . . . . . . . . . . . . . . . . . . . . . . . . . . . . . . . . . . . . . . . . . . . . . . . . . . . 23
4.2.6 Display current or target temperature . . . . . . . . . . . . . . . . . . . . . . . . . . . . . . . . . . . . . . . . . . . . . . . . . . . . . . 23
4.2.7 Child lock . . . . . . . . . . . . . . . . . . . . . . . . . . . . . . . . . . . . . . . . . . . . . . . . . . . . . . . . . . . . . . . . . . . . . . . . . . . . 24
4.2.8 Changing the name of an activity . . . . . . . . . . . . . . . . . . . . . . . . . . . . . . . . . . . . . . . . . . . . . . . . . . . . . . . . . 24
4.2.9 Changing the name of a zone . . . . . . . . . . . . . . . . . . . . . . . . . . . . . . . . . . . . . . . . . . . . . . . . . . . . . . . . . . . . 25
4.2.10 Changing the display settings . . . . . . . . . . . . . . . . . . . . . . . . . . . . . . . . . . . . . . . . . . . . . . . . . . . . . . . . . . . . 25
4.2.11 Enabling time synchronization by internet . . . . . . . . . . . . . . . . . . . . . . . . . . . . . . . . . . . . . . . . . . . . . . . . . . . 26
4.2.12 Enabling daylight saving . . . . . . . . . . . . . . . . . . . . . . . . . . . . . . . . . . . . . . . . . . . . . . . . . . . . . . . . . . . . . . . . 26
4.2.13 Changing unit system . . . . . . . . . . . . . . . . . . . . . . . . . . . . . . . . . . . . . . . . . . . . . . . . . . . . . . . . . . . . . . . . . . 26
Page 4

Contents
4 7726708 - v.01 - 18012019
4.3 IDA connections . . . . . . . . . . . . . . . . . . . . . . . . . . . . . . . . . . . . . . . . . . . . . . . . . . . . . . . . . . . . . . . . . . . . . . . . . . . . . . 26
4.3.1 Establishing the wi-fi connection . . . . . . . . . . . . . . . . . . . . . . . . . . . . . . . . . . . . . . . . . . . . . . . . . . . . . . . . . . 26
4.3.2 Downloading the app . . . . . . . . . . . . . . . . . . . . . . . . . . . . . . . . . . . . . . . . . . . . . . . . . . . . . . . . . . . . . . . . . . .27
4.3.3 Connecting the app with the IDA . . . . . . . . . . . . . . . . . . . . . . . . . . . . . . . . . . . . . . . . . . . . . . . . . . . . . . . . . . 28
4.3.4 Connecting your home automation application with the IDA . . . . . . . . . . . . . . . . . . . . . . . . . . . . . . . . . . . . . 28
4.3.5 Registering installer access . . . . . . . . . . . . . . . . . . . . . . . . . . . . . . . . . . . . . . . . . . . . . . . . . . . . . . . . . . . . . .28
4.4 Advanced settings . . . . . . . . . . . . . . . . . . . . . . . . . . . . . . . . . . . . . . . . . . . . . . . . . . . . . . . . . . . . . . . . . . . . . . . . . . . . .29
4.4.1 Resetting to default settings . . . . . . . . . . . . . . . . . . . . . . . . . . . . . . . . . . . . . . . . . . . . . . . . . . . . . . . . . . . . . 29
4.4.2 Check for software update . . . . . . . . . . . . . . . . . . . . . . . . . . . . . . . . . . . . . . . . . . . . . . . . . . . . . . . . . . . . . . .29
4.4.3 Temperature calibration . . . . . . . . . . . . . . . . . . . . . . . . . . . . . . . . . . . . . . . . . . . . . . . . . . . . . . . . . . . . . . . . .29
4.4.4 Activating Preheat . . . . . . . . . . . . . . . . . . . . . . . . . . . . . . . . . . . . . . . . . . . . . . . . . . . . . . . . . . . . . . . . . . . . . 30
4.4.5 Setting the threshold for auto mode . . . . . . . . . . . . . . . . . . . . . . . . . . . . . . . . . . . . . . . . . . . . . . . . . . . . . . . .30
4.5 Installer settings . . . . . . . . . . . . . . . . . . . . . . . . . . . . . . . . . . . . . . . . . . . . . . . . . . . . . . . . . . . . . . . . . . . . . . . . . . . . . . 30
4.5.1 Changing the heating curve . . . . . . . . . . . . . . . . . . . . . . . . . . . . . . . . . . . . . . . . . . . . . . . . . . . . . . . . . . . . . .30
4.5.2 Setting the control strategy . . . . . . . . . . . . . . . . . . . . . . . . . . . . . . . . . . . . . . . . . . . . . . . . . . . . . . . . . . . . . . 31
4.5.3 Setting the heat up speed . . . . . . . . . . . . . . . . . . . . . . . . . . . . . . . . . . . . . . . . . . . . . . . . . . . . . . . . . . . . . . . 31
4.5.4 Setting the cool down speed . . . . . . . . . . . . . . . . . . . . . . . . . . . . . . . . . . . . . . . . . . . . . . . . . . . . . . . . . . . . . 32
4.5.5 Setting the minimum central heating power . . . . . . . . . . . . . . . . . . . . . . . . . . . . . . . . . . . . . . . . . . . . . . . . . .32
4.5.6 Setting the maximum central heating power . . . . . . . . . . . . . . . . . . . . . . . . . . . . . . . . . . . . . . . . . . . . . . . . . 33
4.5.7 Setting maximum domestic hot water power . . . . . . . . . . . . . . . . . . . . . . . . . . . . . . . . . . . . . . . . . . . . . . . . .33
4.5.8 Register predictive maintenance . . . . . . . . . . . . . . . . . . . . . . . . . . . . . . . . . . . . . . . . . . . . . . . . . . . . . . . . . . 34
5 Messages and data . . . . . . . . . . . . . . . . . . . . . . . . . . . . . . . . . . . . . . . . . . . . . . . . . . . . . . . . . . . . . . . . . . . . . . . . . . . . . . . . .35
5.1 Outside temperature . . . . . . . . . . . . . . . . . . . . . . . . . . . . . . . . . . . . . . . . . . . . . . . . . . . . . . . . . . . . . . . . . . . . . . . . . . . 35
5.2 Energy consumption . . . . . . . . . . . . . . . . . . . . . . . . . . . . . . . . . . . . . . . . . . . . . . . . . . . . . . . . . . . . . . . . . . . . . . . . . . . 35
5.3 Installer details . . . . . . . . . . . . . . . . . . . . . . . . . . . . . . . . . . . . . . . . . . . . . . . . . . . . . . . . . . . . . . . . . . . . . . . . . . . . . . . 35
5.4 Appliance data . . . . . . . . . . . . . . . . . . . . . . . . . . . . . . . . . . . . . . . . . . . . . . . . . . . . . . . . . . . . . . . . . . . . . . . . . . . . . . . 35
5.5 Technical information . . . . . . . . . . . . . . . . . . . . . . . . . . . . . . . . . . . . . . . . . . . . . . . . . . . . . . . . . . . . . . . . . . . . . . . . . . 36
5.6 Error messages overview . . . . . . . . . . . . . . . . . . . . . . . . . . . . . . . . . . . . . . . . . . . . . . . . . . . . . . . . . . . . . . . . . . . . . . . 36
5.7 Service message . . . . . . . . . . . . . . . . . . . . . . . . . . . . . . . . . . . . . . . . . . . . . . . . . . . . . . . . . . . . . . . . . . . . . . . . . . . . . .37
5.8 Sending error information to manufacturer . . . . . . . . . . . . . . . . . . . . . . . . . . . . . . . . . . . . . . . . . . . . . . . . . . . . . . . . . . 37
6 Installation . . . . . . . . . . . . . . . . . . . . . . . . . . . . . . . . . . . . . . . . . . . . . . . . . . . . . . . . . . . . . . . . . . . . . . . . . . . . . . . . . . . . . . . . 39
6.1 System overview . . . . . . . . . . . . . . . . . . . . . . . . . . . . . . . . . . . . . . . . . . . . . . . . . . . . . . . . . . . . . . . . . . . . . . . . . . . . . .39
6.1.1 Systems with gateway . . . . . . . . . . . . . . . . . . . . . . . . . . . . . . . . . . . . . . . . . . . . . . . . . . . . . . . . . . . . . . . . . . 39
6.1.2 System without gateway . . . . . . . . . . . . . . . . . . . . . . . . . . . . . . . . . . . . . . . . . . . . . . . . . . . . . . . . . . . . . . . . 39
6.2 Standard delivery . . . . . . . . . . . . . . . . . . . . . . . . . . . . . . . . . . . . . . . . . . . . . . . . . . . . . . . . . . . . . . . . . . . . . . . . . . . . . 39
6.3 Preparation . . . . . . . . . . . . . . . . . . . . . . . . . . . . . . . . . . . . . . . . . . . . . . . . . . . . . . . . . . . . . . . . . . . . . . . . . . . . . . . . . . 39
6.4 Installation of the gateway . . . . . . . . . . . . . . . . . . . . . . . . . . . . . . . . . . . . . . . . . . . . . . . . . . . . . . . . . . . . . . . . . . . . . . 40
6.5 Location of the IDA . . . . . . . . . . . . . . . . . . . . . . . . . . . . . . . . . . . . . . . . . . . . . . . . . . . . . . . . . . . . . . . . . . . . . . . . . . . . 40
6.6 Installation of the IDA . . . . . . . . . . . . . . . . . . . . . . . . . . . . . . . . . . . . . . . . . . . . . . . . . . . . . . . . . . . . . . . . . . . . . . . . . . 41
6.7 Setup procedure . . . . . . . . . . . . . . . . . . . . . . . . . . . . . . . . . . . . . . . . . . . . . . . . . . . . . . . . . . . . . . . . . . . . . . . . . . . . . . 41
6.8 Software update . . . . . . . . . . . . . . . . . . . . . . . . . . . . . . . . . . . . . . . . . . . . . . . . . . . . . . . . . . . . . . . . . . . . . . . . . . . . . . 41
7 Troubleshooting . . . . . . . . . . . . . . . . . . . . . . . . . . . . . . . . . . . . . . . . . . . . . . . . . . . . . . . . . . . . . . . . . . . . . . . . . . . . . . . . . . . .42
7.1 Error messages . . . . . . . . . . . . . . . . . . . . . . . . . . . . . . . . . . . . . . . . . . . . . . . . . . . . . . . . . . . . . . . . . . . . . . . . . . . . . . .42
7.2 Other problems or questions . . . . . . . . . . . . . . . . . . . . . . . . . . . . . . . . . . . . . . . . . . . . . . . . . . . . . . . . . . . . . . . . . . . . .42
8 Appendix . . . . . . . . . . . . . . . . . . . . . . . . . . . . . . . . . . . . . . . . . . . . . . . . . . . . . . . . . . . . . . . . . . . . . . . . . . . . . . . . . . . . . . . . . 43
8.1 Terms and conditions . . . . . . . . . . . . . . . . . . . . . . . . . . . . . . . . . . . . . . . . . . . . . . . . . . . . . . . . . . . . . . . . . . . . . . . . . . 43
8.2 Disposal . . . . . . . . . . . . . . . . . . . . . . . . . . . . . . . . . . . . . . . . . . . . . . . . . . . . . . . . . . . . . . . . . . . . . . . . . . . . . . . . . . . . 43
8.3 Technical specifications . . . . . . . . . . . . . . . . . . . . . . . . . . . . . . . . . . . . . . . . . . . . . . . . . . . . . . . . . . . . . . . . . . . . . . . . 43
8.4 ErP information . . . . . . . . . . . . . . . . . . . . . . . . . . . . . . . . . . . . . . . . . . . . . . . . . . . . . . . . . . . . . . . . . . . . . . . . . . . . . . . 44
8.4.1 Product fiche . . . . . . . . . . . . . . . . . . . . . . . . . . . . . . . . . . . . . . . . . . . . . . . . . . . . . . . . . . . . . . . . . . . . . . . . . 44
Page 5
1 Manual menu
AD-3001023-01
AD-3001024-01
AD-3001025-01
AD-3001026-01
AD-3001027-01
AD-3001028-01
AD-3001029-01
7726708 - v.01 - 18012019 5
Fig.1
Introduction
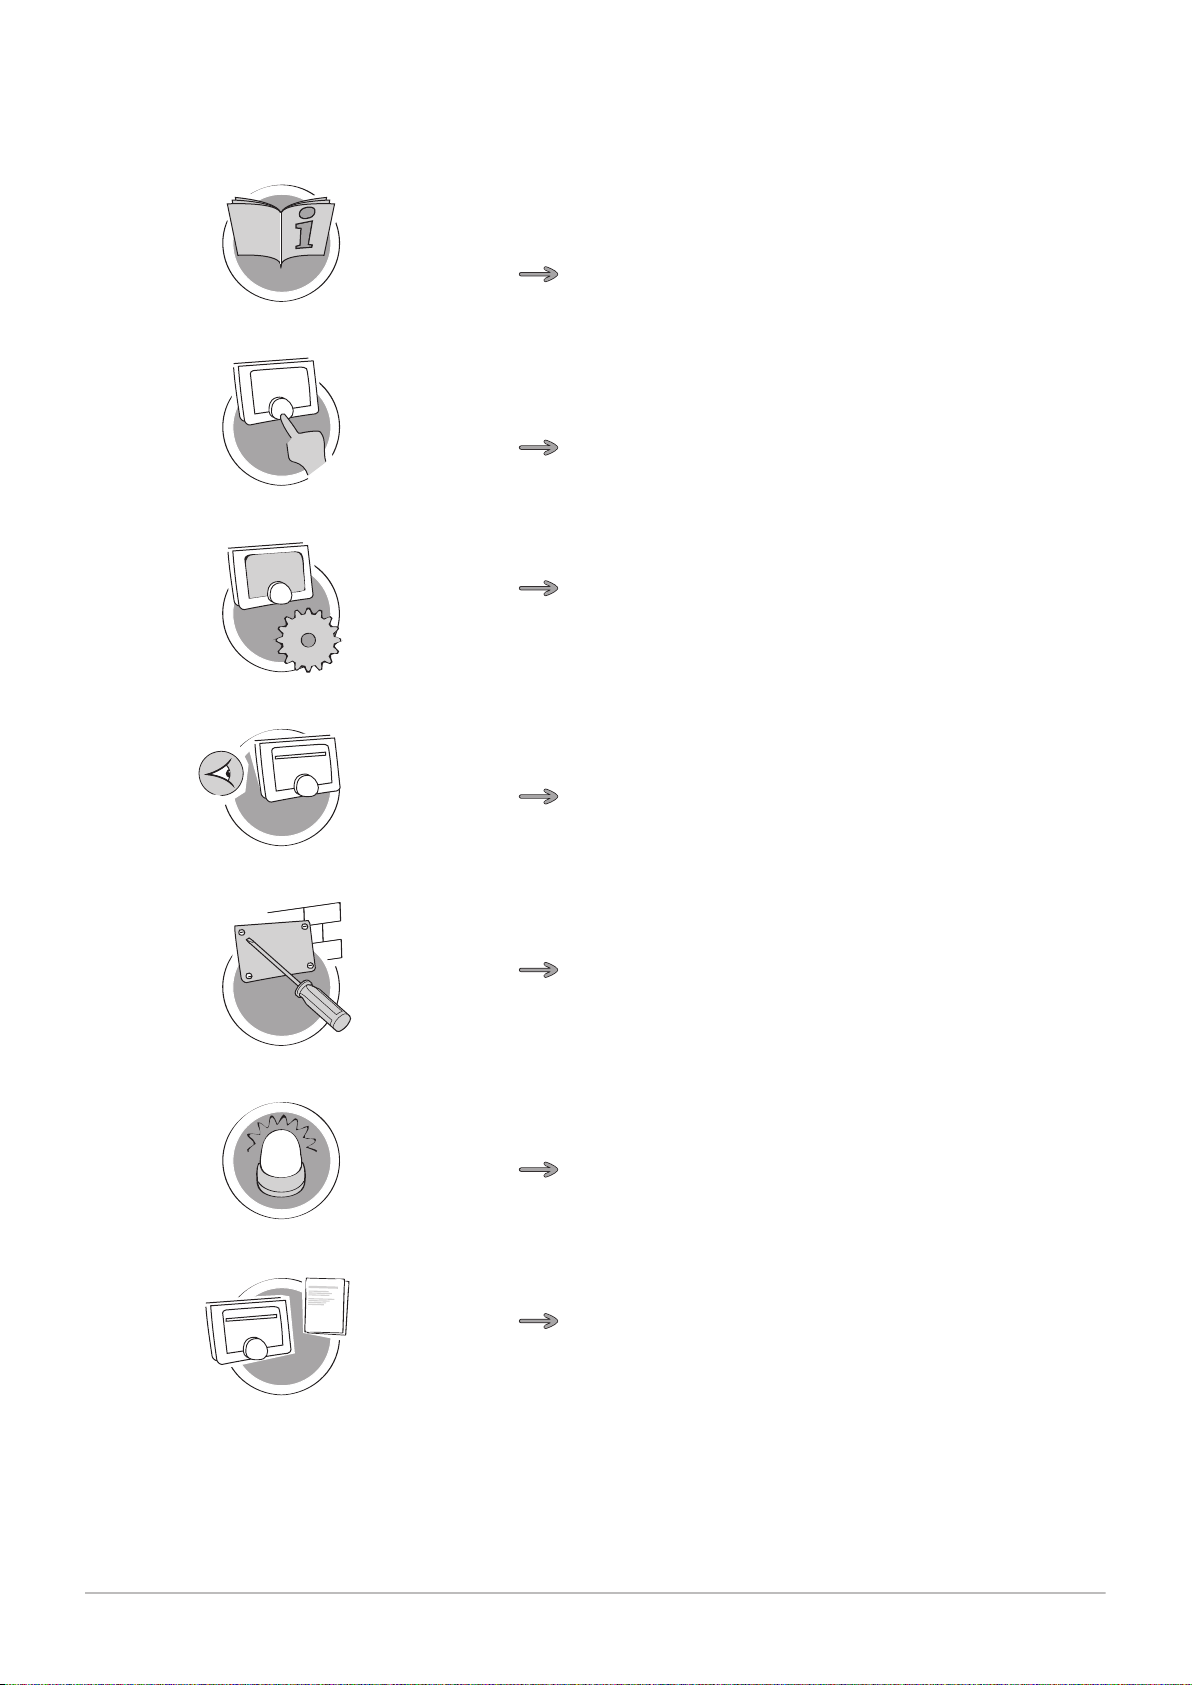
1 Manual menu
Introduction
This chapter introduces you to the thermostat. You will find basic
information, e.g. how to use the rotary dial and buttons plus how to
interpret the information on the screen.
Chapter: Introduction, page 6
Fig.2 General use
Fig.3 Customisation
Fig.4 Messages and data
Fig.5 Installation
General use
This chapter helps you with the daily use of the thermostat. You will find
instructions for daily use like how to change temperatures in different
modes, changing control modes.
Chapter: General use, page 13
Customisation
This chapter helps you with customising the thermostat.
Chapter: Customisation, page 21
Messages and data
This chapter helps you with navigating to information and data of the
thermostat and system.
Chapter: Messages and data, page 35
Installation
This chapter helps you with the installation and commissioning of the
thermostat.
Chapter: Installation, page 39
Fig.6 Troubleshooting
Fig.7 Appendix
Troubleshooting
This chapter helps you when there is a problem with the thermostat, an
error message will appear on the home screen.
Chapter: Troubleshooting, page 42
Appendix
This chapter gives you more technical information about the thermostat.
Chapter: Appendix, page 43
Page 6
AD-3001023-01
2 Introduction
6 7726708 - v.01 - 18012019
2 Introduction
2.1 Symbols used in the manual
This chapter introduces you to the thermostat. You will find basic
information, e.g. how to use the rotary dial and buttons plus how to
interpret the information on the screen.
Next chapter: General use, page 13
First chapter: Manual menu, page 5
This manual contains special instructions, marked with specific symbols.
Please pay extra attention when these symbols are used.
Warning
Risk of dangerous situations that may result in minor personal
injury.
Caution
Risk of material damage.
Important
Please note: important information.
2.2 Introducing the IDA
See
Reference to other manuals or pages in this manual.
Intended use. The IDA is designed as a modulating room thermostat with
which you can control your heating and cooling system in an efficient way.
It has a cable connection to the appliance. You can connect it to the
internet via a wi-fi connection, so you can operate the IDA with an app on
your mobile device.
Warning
Do not use the IDA for systems that are not in accordance with the
intended use.
A simple user interface. You scroll through menus, select and enter
options and confirm changes. The IDA has only two buttons that you can
either short-press or long-press. There is one rotary dial to scroll up or
down in the menu. It’s as easy as that!
Controlling the temperature. Your plans change. No problem, control the
temperature as you wish, in manual mode or schedule mode. You can
even be flexible by switching between three schedules. Do you prefer
using your mobile device anywhere in the house or outside? The IDA app
is available for iOS and Android.
What do I do when I …? I want to …? How do I …? Are you going away
for a holiday? Do you want to make a fire in your fireplace? Do you need a
hot water boost? Or do you want a short temperature change? You can
find most answers in the "General use" chapter.
For more information, see
General use, page 13
Page 7
2.3 The IDA and its app
AD-3001125-01
App
App
21.0 °C
5.0 30.0
AD-3000988-01
<1 >1
>1<1
AD-3000989-01
<1
...
.....
.......
.........
7726708 - v.01 - 18012019 7
2 Introduction
Fig.8
2.4
2.5
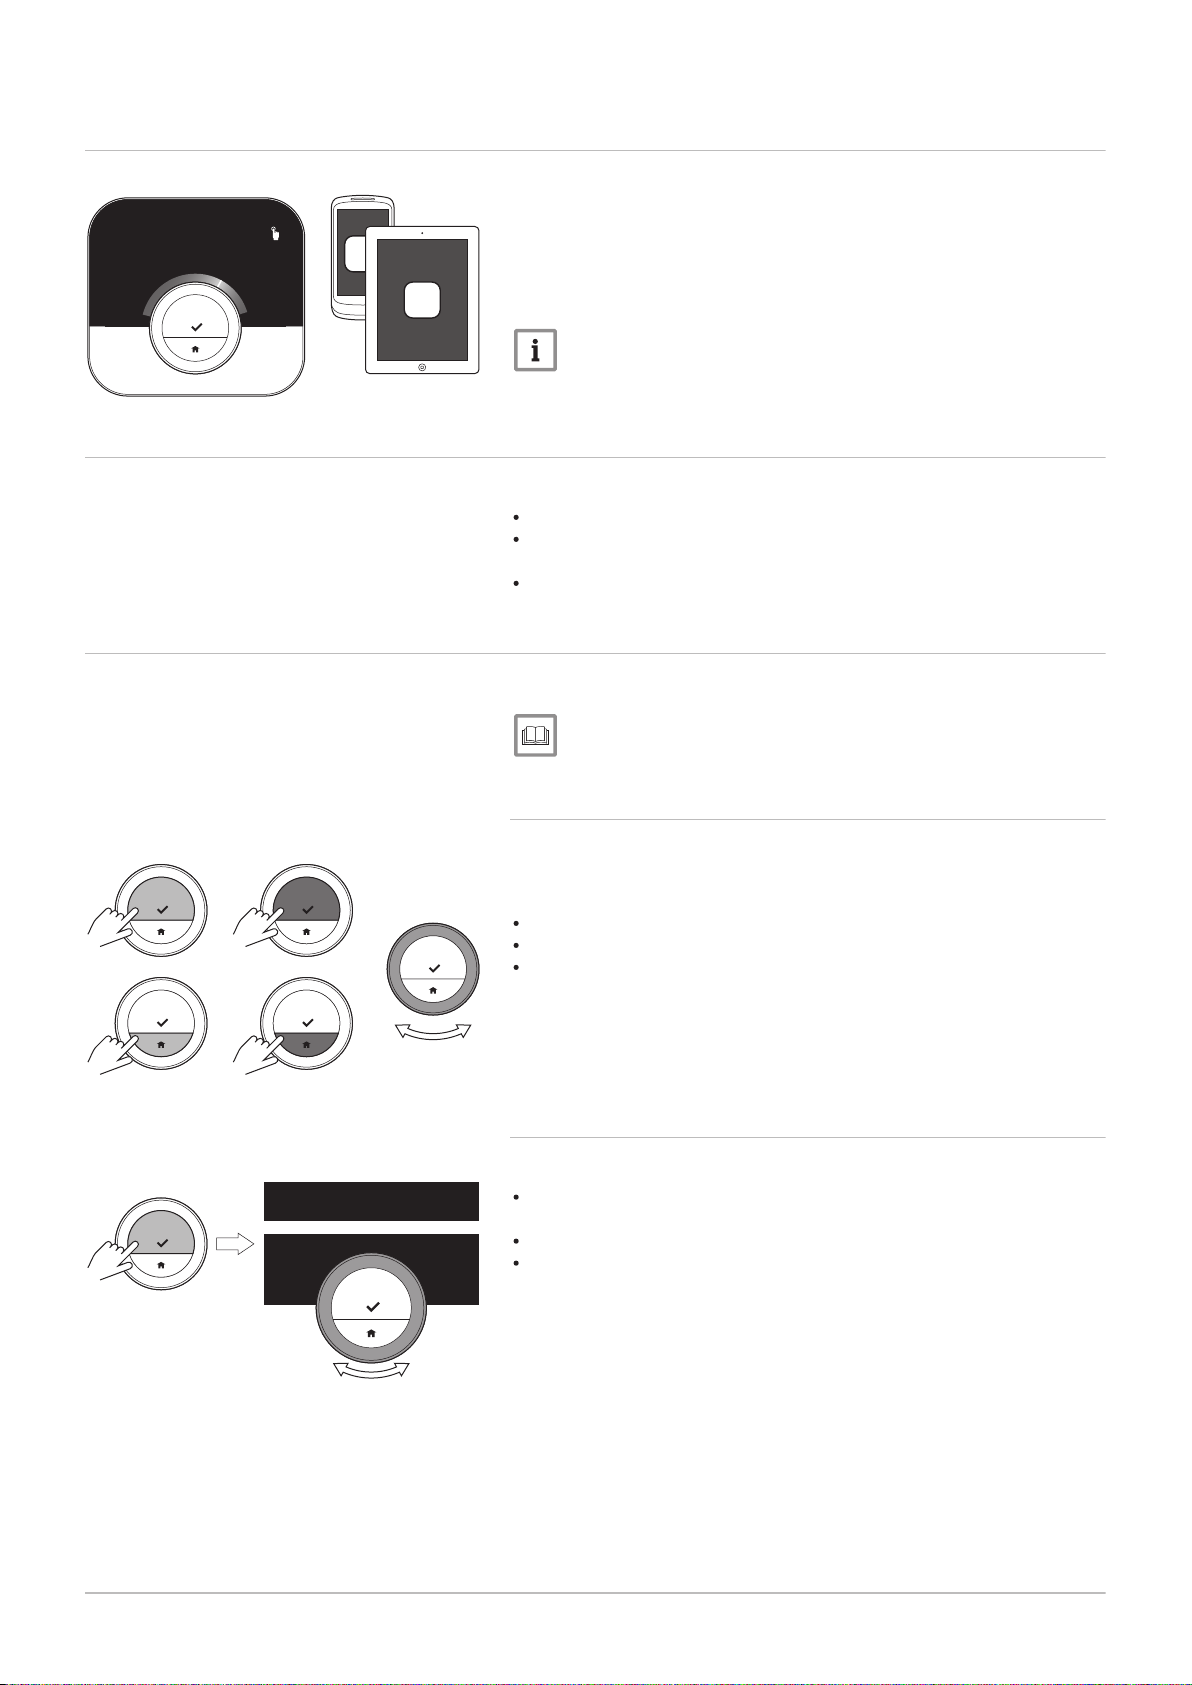
The climate in your home contributes to your comfort; with the IDA you are
able to control the temperature in your home the way you want it.
In case you prefer to control your climate with your mobile device (e.g.
smartphone or tablet) you can download the IDA app and connect it with
your IDA. You can also connect your home automation application with the
IDA.
Important
The IDA needs a reliable connection with other devices (e.g.
appliance, wi-fi router) in your home.
What's new for the IDA
This document is based on software version 1.56 for the IDA.
The zone function of the IDA has been extended.
The structure of the manual has been changed to reflect all functions or
the IDA
Some language issues have been solved.
How to use the IDA
Before you can use the IDA, it first needs to be installed.
For more information, see
Installation, page 39
Fig.9
Fig.10
2.5.1
Using the rotary dial and buttons
The rotary dial has two buttons: the top button is the select button, the
bottom button is the home button. Pressing a button for a shorter or longer
time will start different actions, as shown in this manual.
Short button press: Press less than a second on the button (<1).
Long button press: Press longer than a second on the button (>1).
Rotary dial: Turn the rotary dial to choose and adjust menus, submenus
and settings.
2.5.2 Entering the main menu and menu items
The main menu gives you access to all submenus and settings.
Short-press the select button to enter the main menu from the home
screen.
Turn the rotary dial forward or backward to select a menu item.
Short-press the select button to confirm the selection.
Page 8
AD-3000990-01
>1
.
.
.
.
.
.
.
.
.
.
.
.
.
.
.
.
.
21.0 °C
AD-3000991-01
<1
21.0 °C
23.0
...
.....
.......
.........
AD-3000992-01
>1
21.0 °C
23.0
AD-3000993-01
...
.....
.......
.........
<1
AD-3000994-01
21.0 °C
23.0
<1
2 Introduction
8 7726708 - v.01 - 18012019
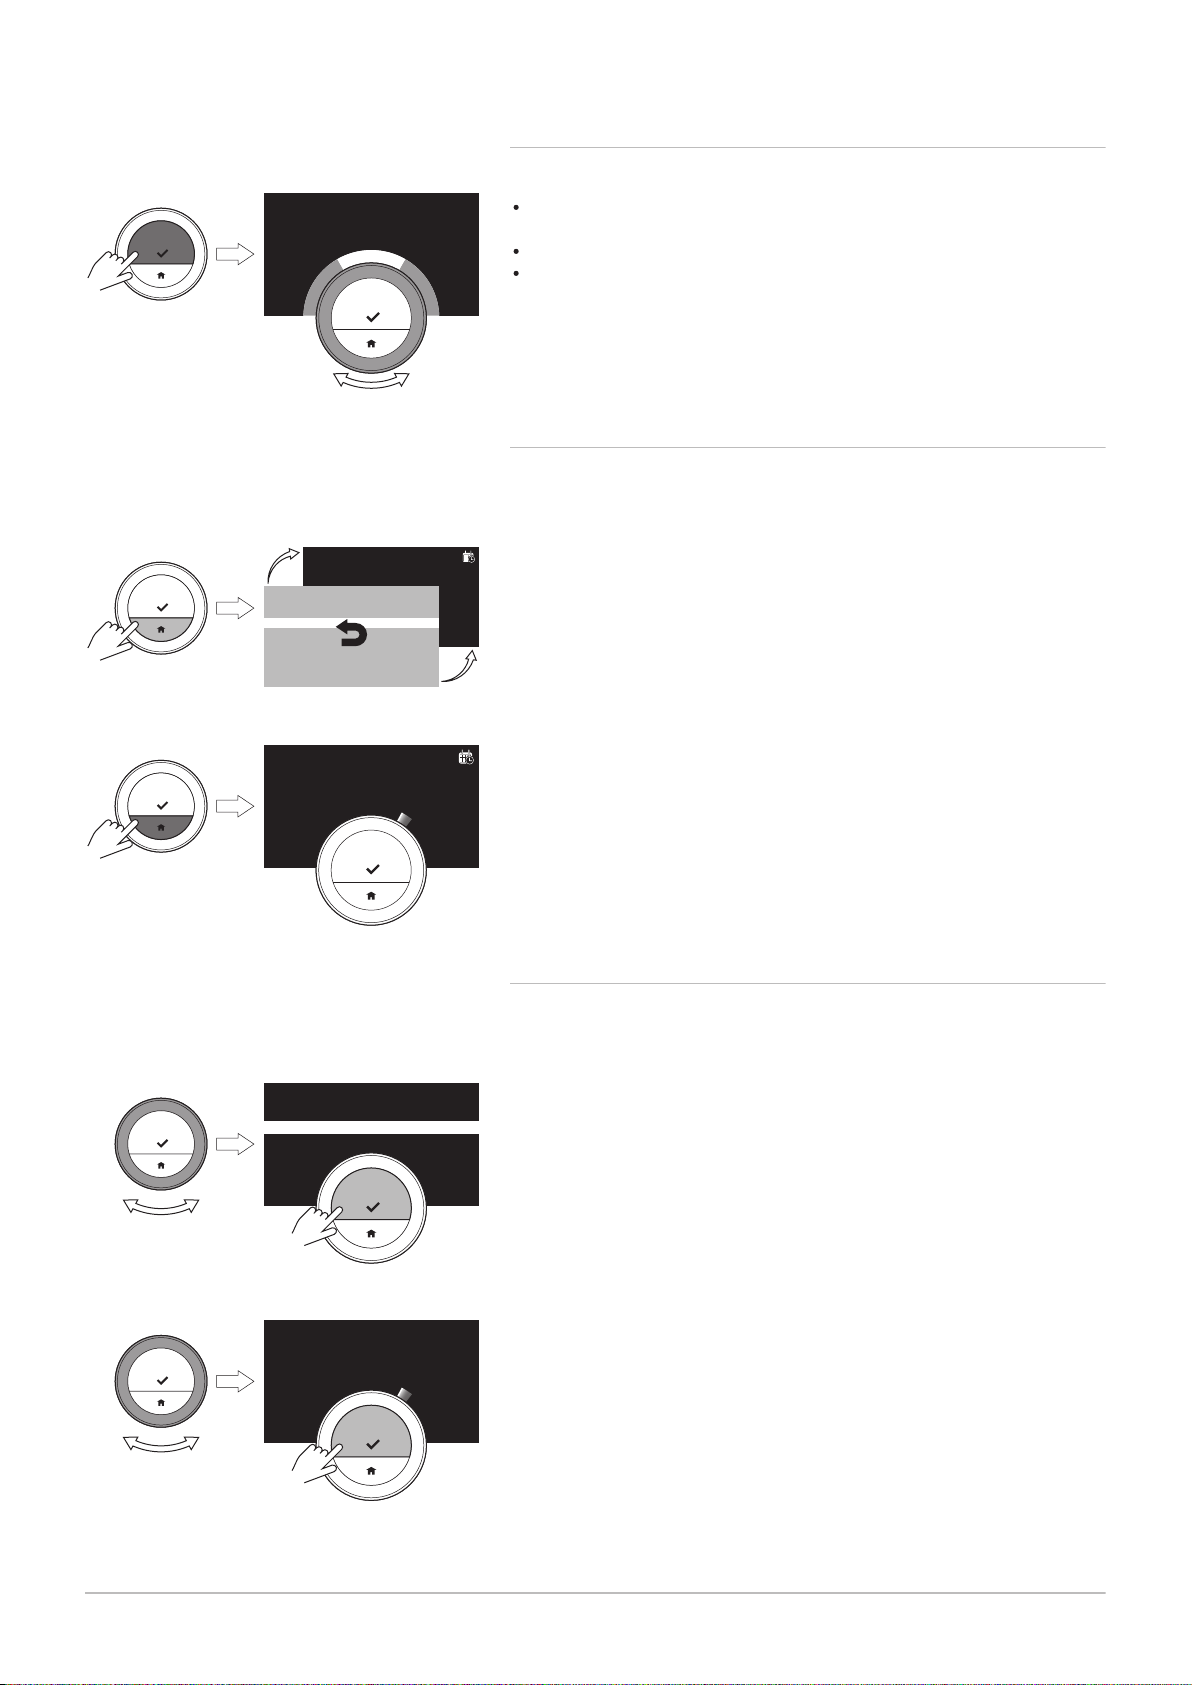
2.5.3 Entering the Quick Access menu and menu items
Fig.11
Fig.12
Fig.13
The Quick Access menu gives you access to a selection of menu items.
Long-press the select button to enter the Quick Access menu from the
home screen.
Turn the rotary dial forward or backward to select a menu item.
Short-press the select button to confirm the selection.
2.5.4 Returning to the previous step or home screen
You can return to the previous step of the menu or return immediately to
the home screen.
1. Short-press the home button to return to the previous step.
2. Long-press the home button to return to the home screen.
Fig.14
Fig.15
2.5.5
Scrolling through menu items and changing settings
With the rotary dial you can scroll through menu items and change values,
temperatures and time settings.
1. Turn the rotary dial to scroll through the menu items.
2. Select the menu item you want to change.
3. Short-press the select button to confirm the selection.
4. Turn the rotary dial to scroll through the submenu items.
5. Select the submenu item you want to change.
6. Short-press the select button to confirm the selection.
7. Turn the rotary dial to change the setting.
8. Short-press the select button to confirm the selection.
Page 9
2.5.6 Screen shows no information
AD-3000995-01
>30
AD-3001126-01
21.0 °C
5.0 30.0
3
4
1
6
2
5
7726708 - v.01 - 18012019 9
2 Introduction
Fig.16
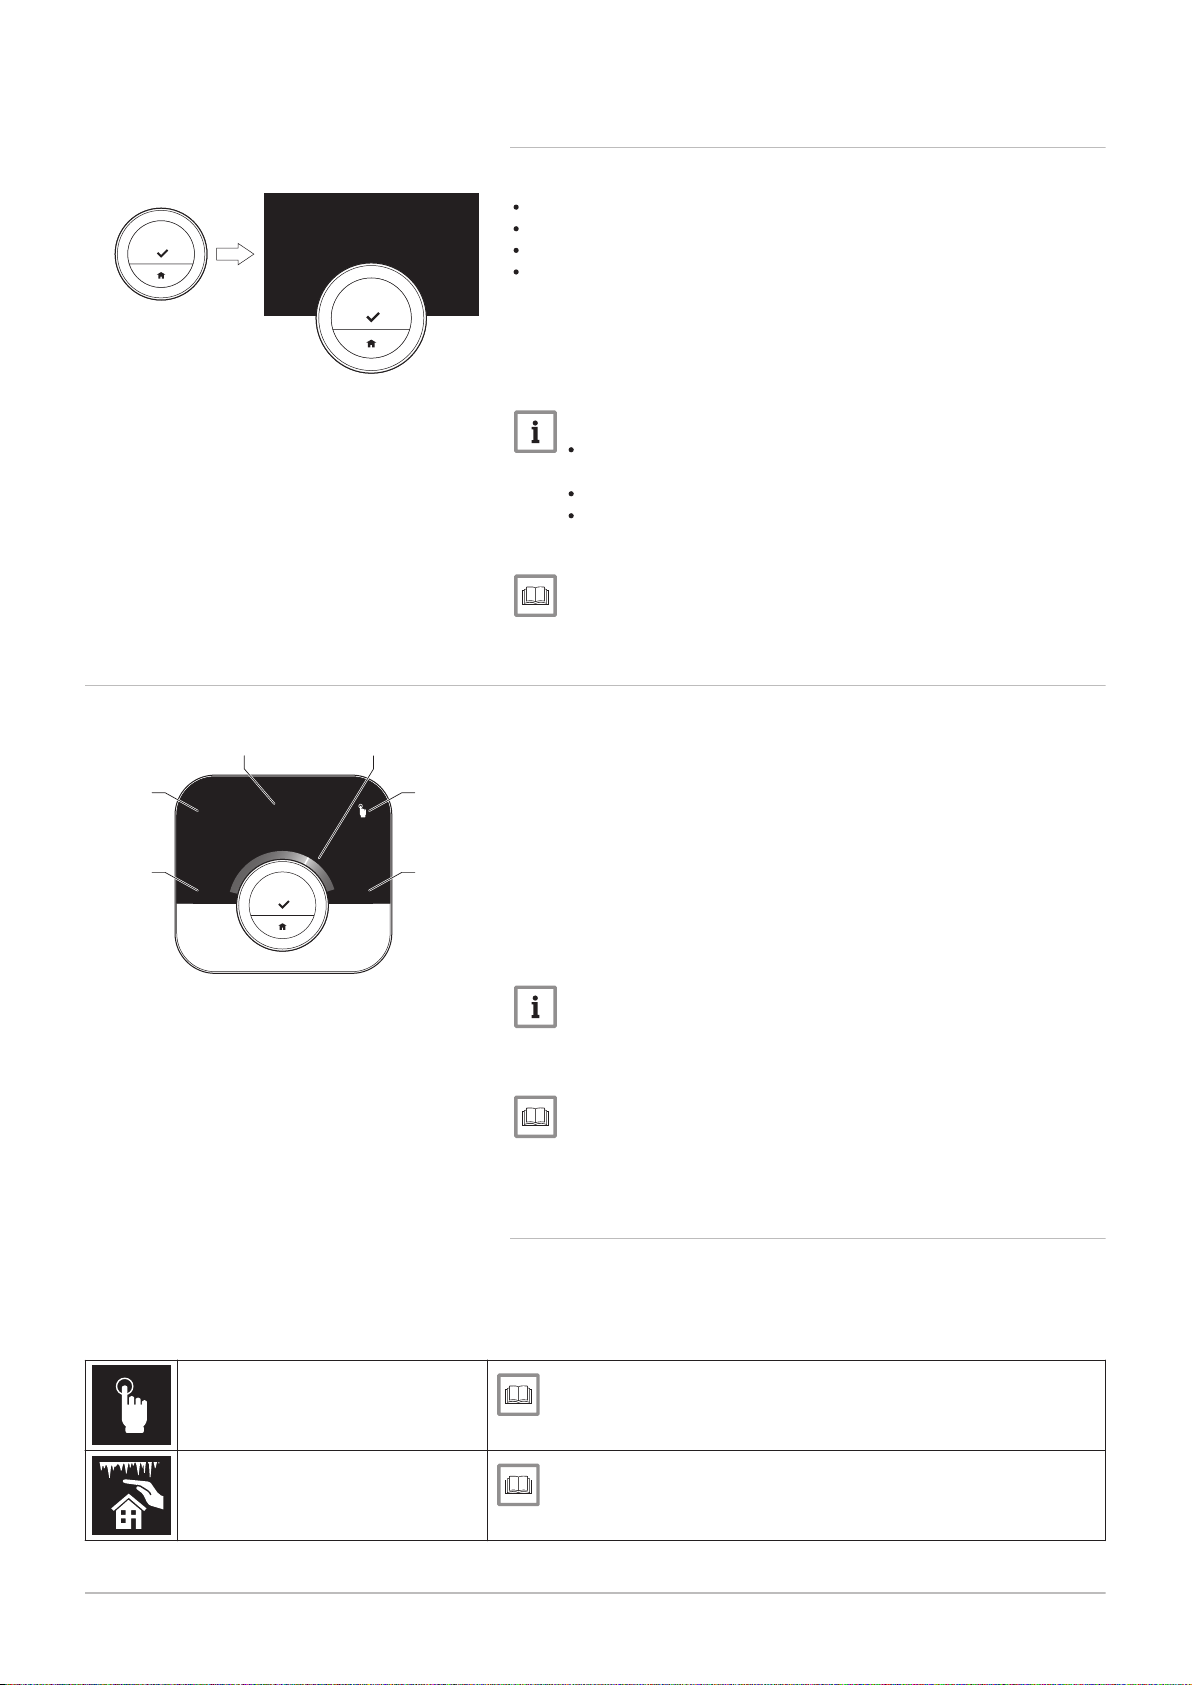
2.6 Description of the display
Fig.17
The display turns black when for 30 seconds:
the rotary dial is not operated,
the select button is not operated,
the home button is not operated, and
no person moves in front of the IDA.
After these 30 seconds the display is black, but the IDA is still active and
no information is lost.
If the IDA is not operated for 3 minutes in total, it goes in stand-by mode.
Any unconfirmed setting or selection is lost now.
Important
Press a button, turn the rotary dial or use the presence sensor
to activate the display.
The IDA will display the home screen after activation.
On delivery the presence sensor is active. You can switch off
the presence detection.
For more information, see
Presence sensor, page 23
1
Current temperature (or target temperature)
2
Temperature scale
3
Control mode icon
4
Main screen information box
5
Main screen information box
6
Filling needed icon, Zone icon or Error icon
The temperature scale in the main screen shows the difference between
the current and target temperature. The white line represents the current
temperature. The target temperature is displayed in small digits next to the
scale. The temperature scale is visible when the current temperature
differs from the target temperature.
Tab.1 Control mode icons
Manual mode: Manual mode is ac
tive
Anti-frost mode: Anti-frost mode is
active
Important
The IDA displays the current temperature in a large font by
default. You can change the display of the temperature to show
the target temperature.
For more information, see
Screen shows no information, page 9
Main screen setting, page 23
Changing the display settings, page 25
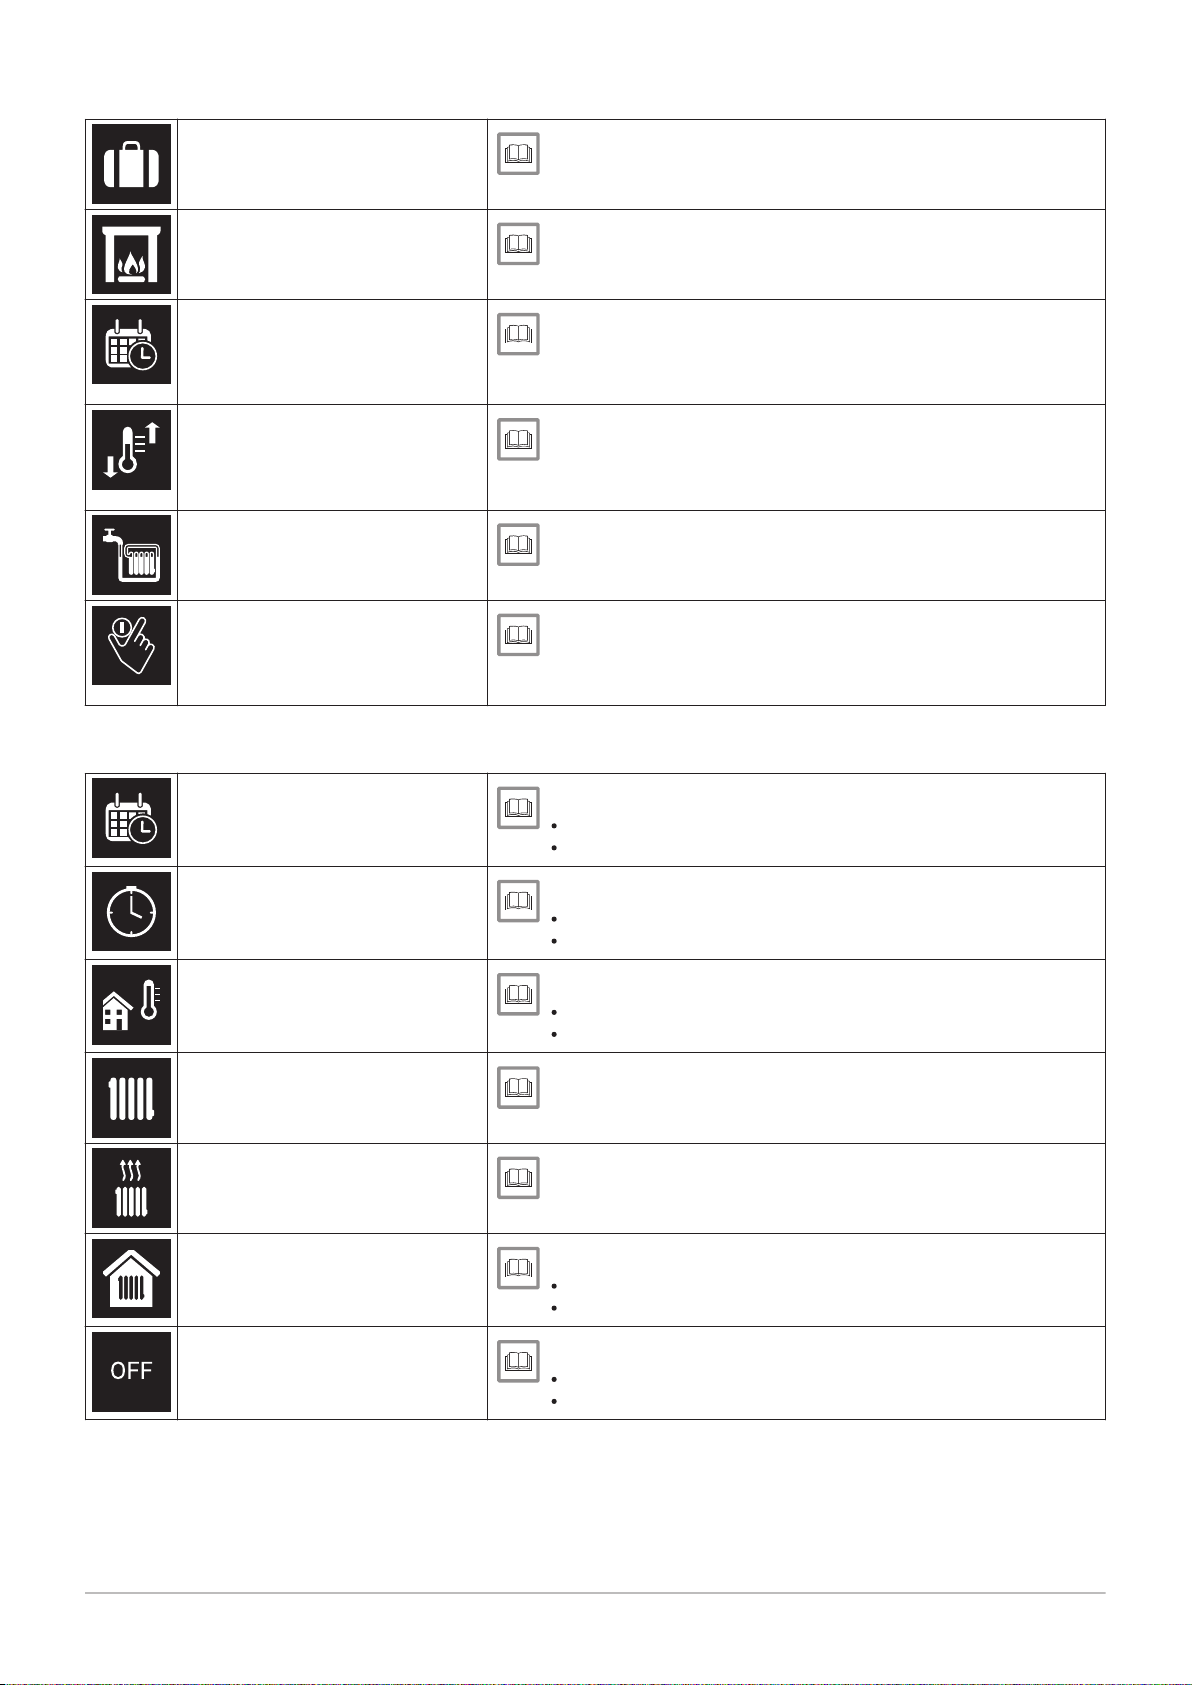
2.6.1 Description of the icons in the display
Possible icons in the display (depending on the configuration of your
installation).
See
Changing the mode quickly, page 13
Changing the temperature in manual mode, page 13
See
Changing the mode quickly, page 13
Activating antifrost mode, page 19
Page 10
2 Introduction
10 7726708 - v.01 - 18012019
Holiday period: Holiday period is ac
tive
Fireplace mode: Fireplace mode is
active
Temperature scheduling: Tempera
ture scheduling is active
Short temperature change: Schedul
ing mode is interrupted for a short
temperature change
Topping up: manual or automatic re
fill for the installation.
Rotary dial: You are turning the rota
ry dial to set the temperature
See
Changing the mode quickly, page 13
Setting a holiday schedule, page 17
See
Changing the mode quickly, page 13
Activating fireplace mode, page 19
See
Changing the mode quickly, page 13
Creating a temperature schedule to control the room tem
perature, page 14
See
Changing the mode quickly, page 13
Changing the temperature for a short period in scheduling
mode, page 14
See
Topping up, page 17
See
Changing the temperature in manual mode, page 13
Changing the temperature for a short period in scheduling
mode, page 14
Tab.2 Main screen icons
Date
Time
Outdoor temperature
Boiler status: Heating demand
Boiler status: Heating active
Appliance mode: On
Appliance mode: Off
See
Setting the date and time, page 22
Main screen setting, page 23
See
Setting the date and time, page 22
Main screen setting, page 23
See
Main screen setting, page 23
Outside temperature, page 35
See
Main screen setting, page 23
See
Main screen setting, page 23
See
Switching the central heating on/off, page 20
Main screen setting, page 23
See
Switching the central heating on/off, page 20
Main screen setting, page 23
Page 11
2 Introduction
7726708 - v.01 - 18012019 11
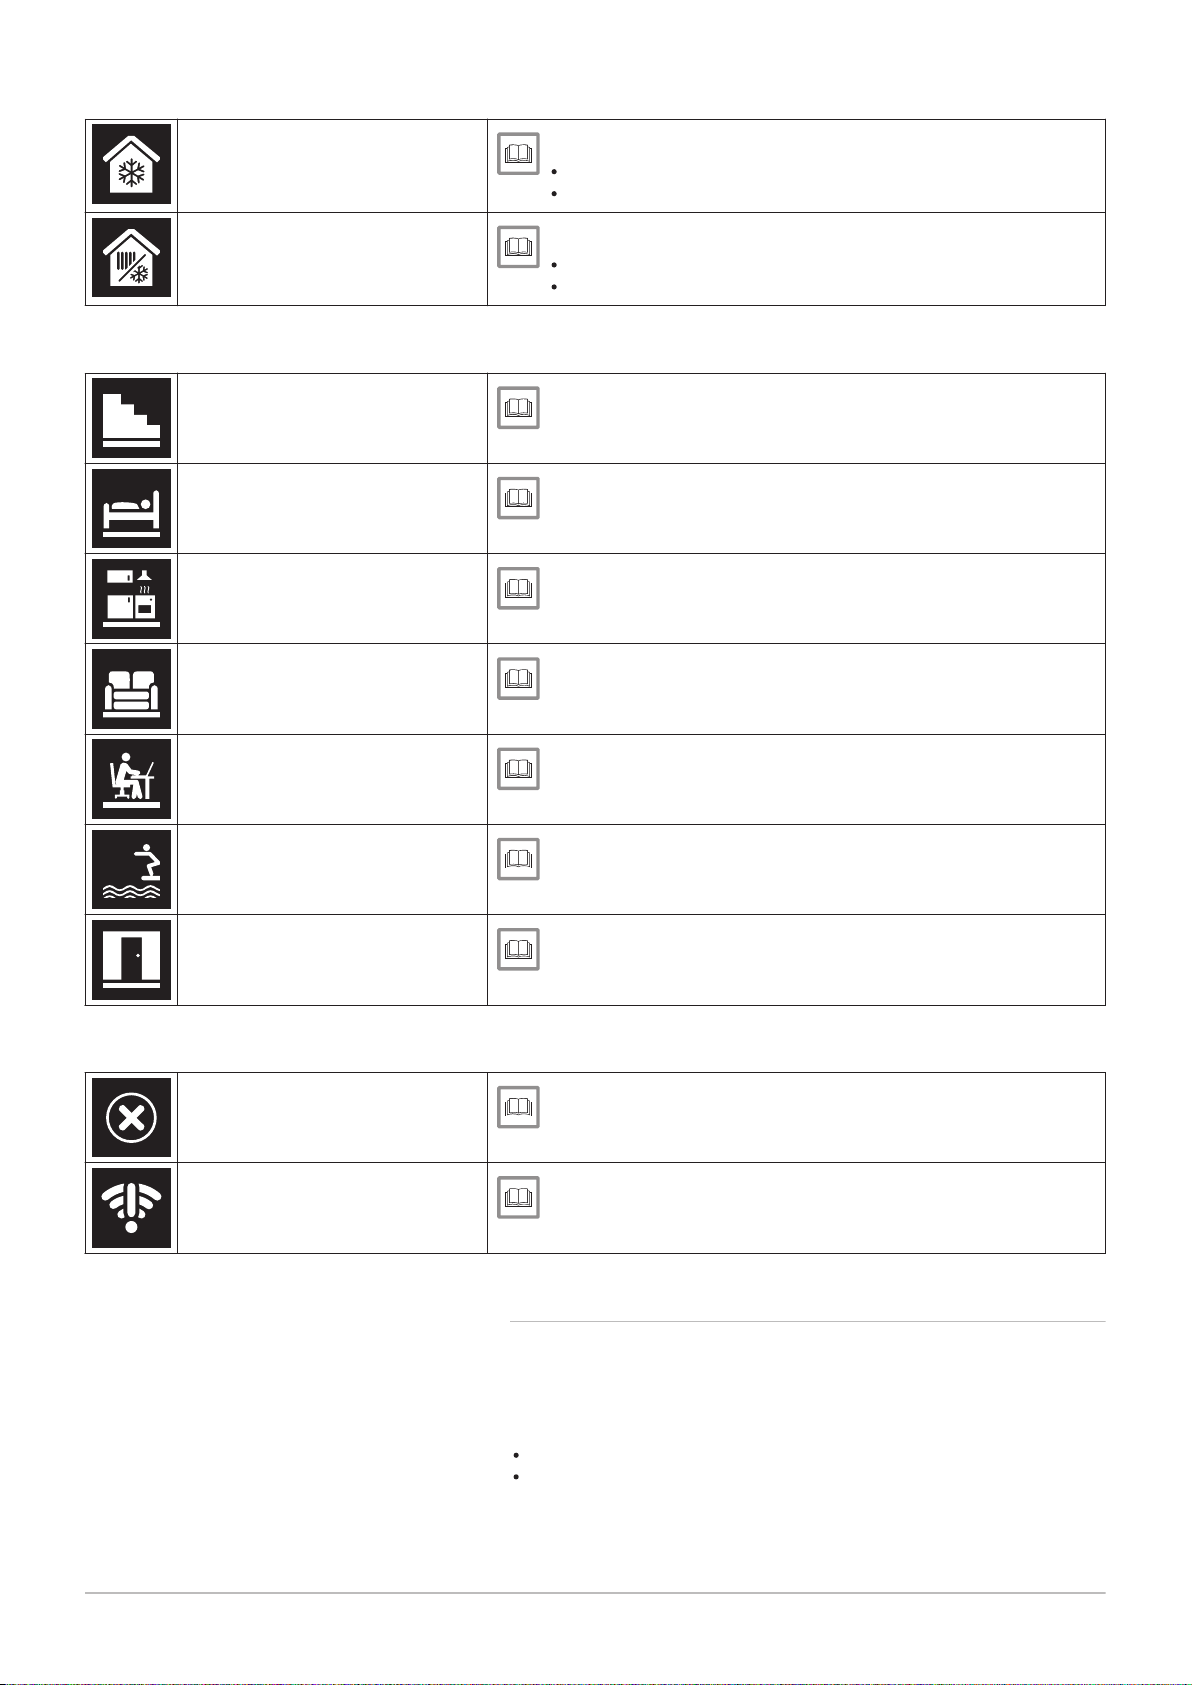
Appliance mode: Cooling
Appliance mode: Auto
Tab.3 Zone icons
Basement
Bedroom
Kitchen
Living room
See
Switching to cooling mode, page 20
Main screen setting, page 23
See
Switching to auto mode, page 20
Main screen setting, page 23
See
Changing the zone temperatures, page 17
Changing the name of a zone, page 25
See
Changing the zone temperatures, page 17
Changing the name of a zone, page 25
See
Changing the zone temperatures, page 17
Changing the name of a zone, page 25
See
Changing the zone temperatures, page 17
Changing the name of a zone, page 25
Study
Swimming pool
Generic
Tab.4 Error icon
Error display: The appliance reports
an active error
Error display: The IDA has no inter
net connection
See
Changing the zone temperatures, page 17
Changing the name of a zone, page 25
See
Changing the zone temperatures, page 17
Changing the name of a zone, page 25
See
Changing the zone temperatures, page 17
Changing the name of a zone, page 25
See
Error messages overview, page 36
Troubleshooting, page 42
See
IDA connections, page 26
2.6.2 Customising the main screen display
You can configure the main screen of the display by adding two
information boxes on the screen, one to the left and one to the right of the
rotary dial.
The information boxes can show:
Time and date
Detailed information about your system
You can also change the display of the temperature to show the current or
target temperature.
Page 12
AD-3001127-01
21.0
°
C
10.0
2 Introduction
12 7726708 - v.01 - 18012019
For more information, see
Main screen setting, page 23
Display current or target temperature, page 23
2.7 Messages on the display
The display of the IDA can show several messages:
Tab.5 Messages on the display
Message Meaning
Help message The display can show a help message after you change to a different mode. The message in
forms you about the use of the quick access menu.
Service message The display shows a service message when the appliance needs maintenance.
Error message The display shows an error message when the appliance has an error.
Important
The error code in the error message comes from the appliance.
For more information, see
Show help messages, page 23
Service message, page 37
Error messages overview, page 36
2.8 Zone selection
2.9 Presence detection
Fig.18
If you have multiple zones in your heating installation, you can control the
temperature in every zone. A zone can be a specific room or, for example
a floor. If there is an IDA in every zone, you can control a zone only with
its own IDA.
If there is an external temperature sensor and one IDA in the installation,
you can control the temperatures in the zones with this IDA.
The zones are named CircA, CircB etc. by default. You can change the
names on the IDA or in the app.
For more information, see
Changing the zone temperatures, page 17
Changing the name of a zone, page 25
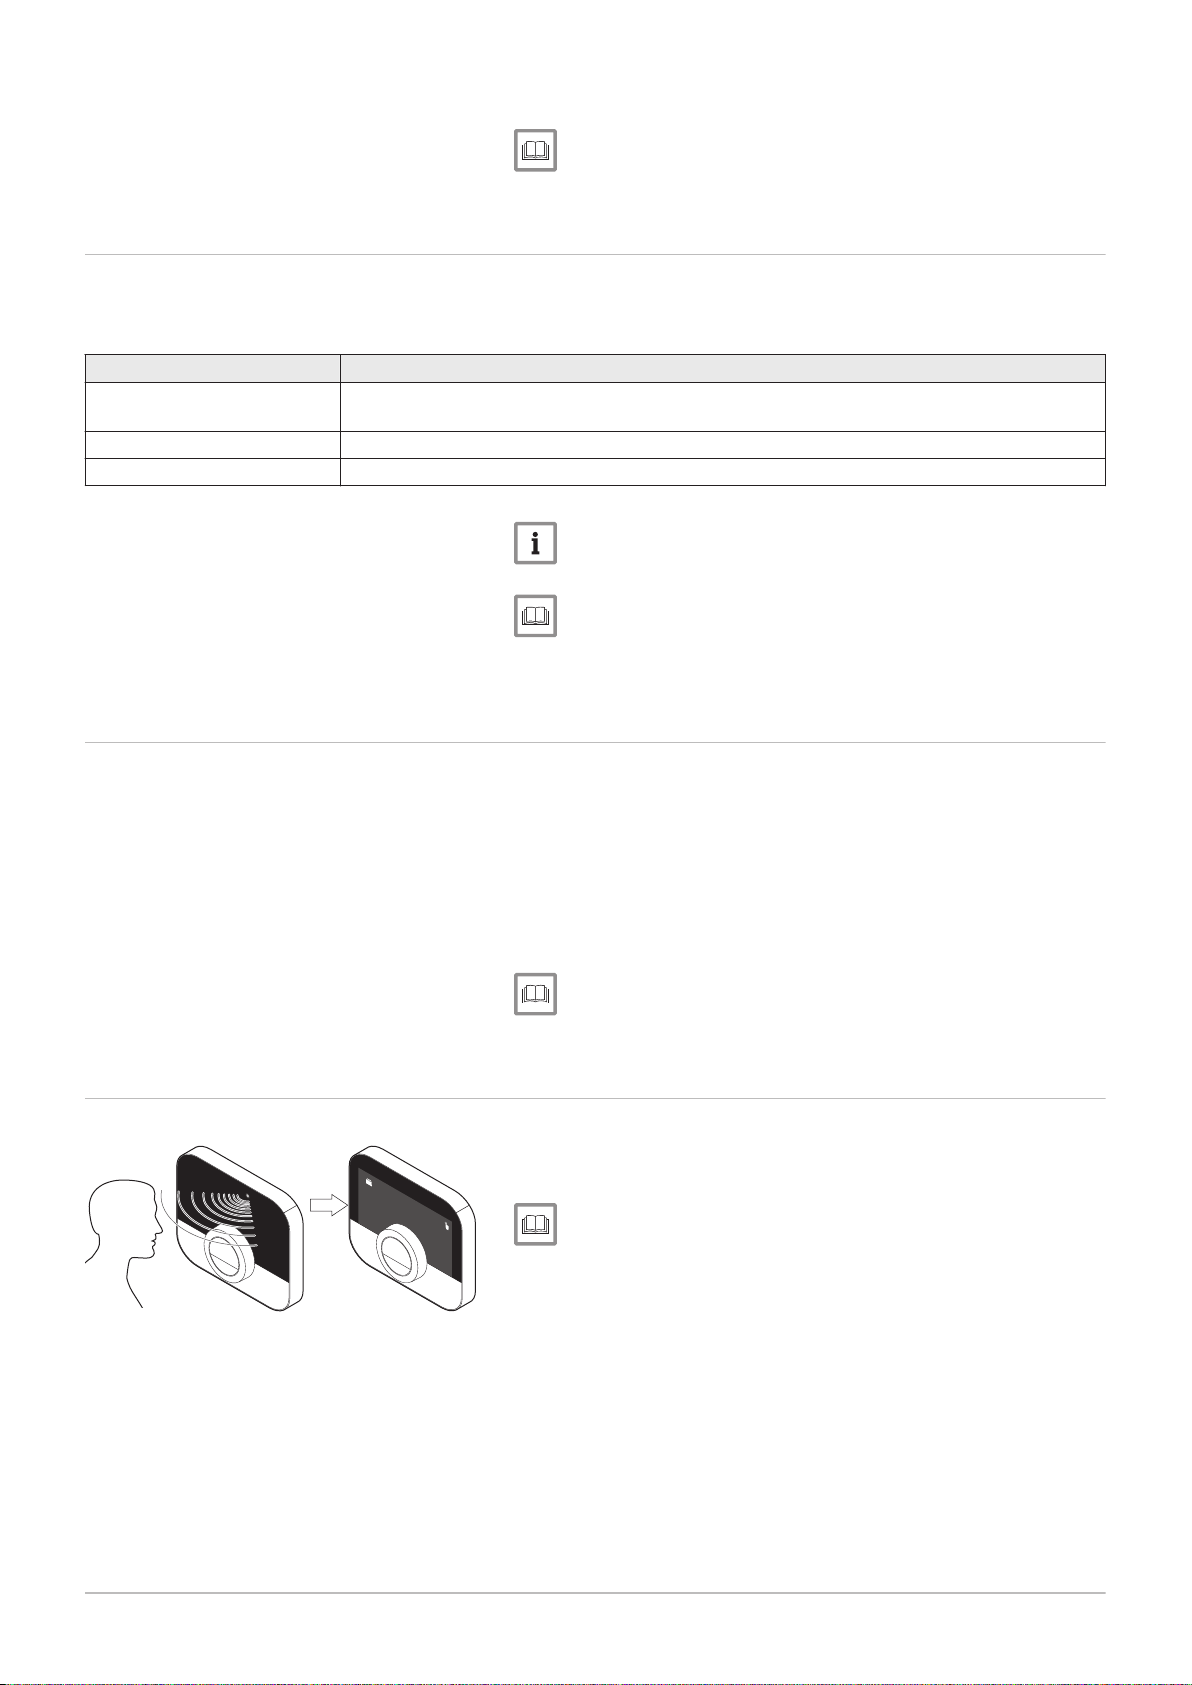
The main screen of the display will light up (for 5 seconds) if the presence
sensor detects that you are in front of the IDA or pass by. You can disable
the presence sensor in the settings menu.
For more information, see
Presence sensor, page 23
Page 13
3 General use
AD-3001024-01
AD-3000990-01
>1
.
.
.
.
.
.
.
.
.
.
.
.
.
.
.
.
.
21.0 °C
AD-3000998-01
23.0 °C
23.0
?
7726708 - v.01 - 18012019 13
3.1 Changing the mode quickly
3 General use
This chapter helps you with the daily use of the thermostat. You will find
instructions for daily use like how to change temperatures in different
modes, changing control modes.
Next chapter: Customisation, page 21
Previous chapter: Introduction, page 6
First chapter: Manual menu, page 5
Fig.19
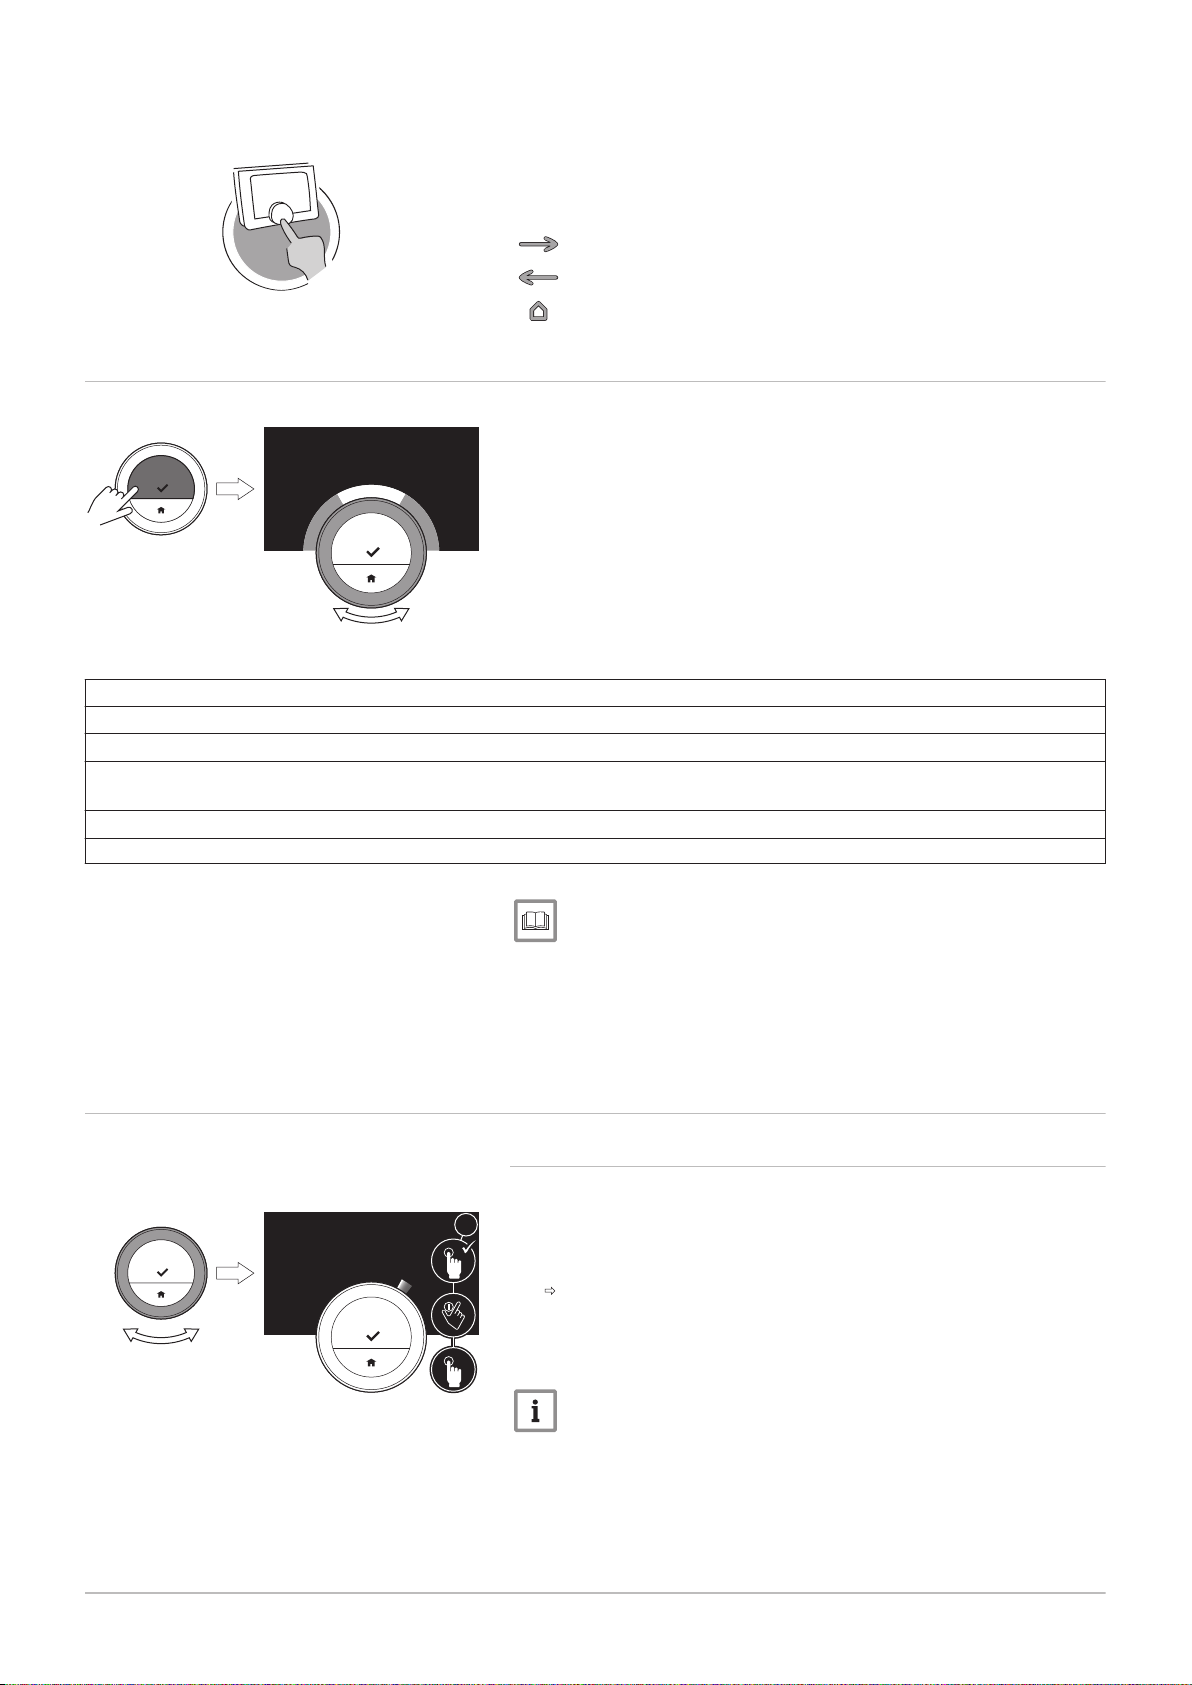
You can change the control mode quickly from the access menu.
1. Long-press the select button to enter the Quick Access menu.
2. Turn the rotary dial to select the desired mode.
3. Short-press the select button to confirm your choice.
Tab.6 Possible mode and description
Manual: The room temperature can be set instantly with the rotary dial.
Antifrost: The room temperature is set to the antifrost temperature setting.
Holiday: The room temperature is set to the holiday temperature setting.
Fireplace: Continue heating other rooms in the same zone while an additional heat source heats the room where the IDA is
located.
Scheduling: The room temperature is controlled by a temperature schedule.
(1) When multiple schedules are enabled, Schedules 1 to 3 are shown.
(1)
For more information, see
Changing the temperature in manual mode, page 13
Changing the temperature for a short period in scheduling mode,
page 14
Setting a holiday schedule, page 17
Activating fireplace mode, page 19
Activating antifrost mode, page 19
3.2
Fig.20
Changing the room temperature
3.2.1
Changing the temperature in manual mode
In manual mode you can easily change the room temperature.
1. Check that the IDA operates in manual mode (see icon in top-right
corner of main screen).
2. Turn the rotary dial to change the temperature.
While you turn the rotary dial, the target temperature is displayed in
light digits. After a few seconds, the IDA shows the home screen
again with the current temperature (or target temperature) in bold
digits.
Important
When the IDA is in manual mode, only a scheduled holiday period
can automatically change the room temperature.
Page 14
AD-3000999-01
23.0 °C
23.0
?
3 General use
14 7726708 - v.01 - 18012019
3.2.2 Changing the temperature for a short period in scheduling mode
Fig.21
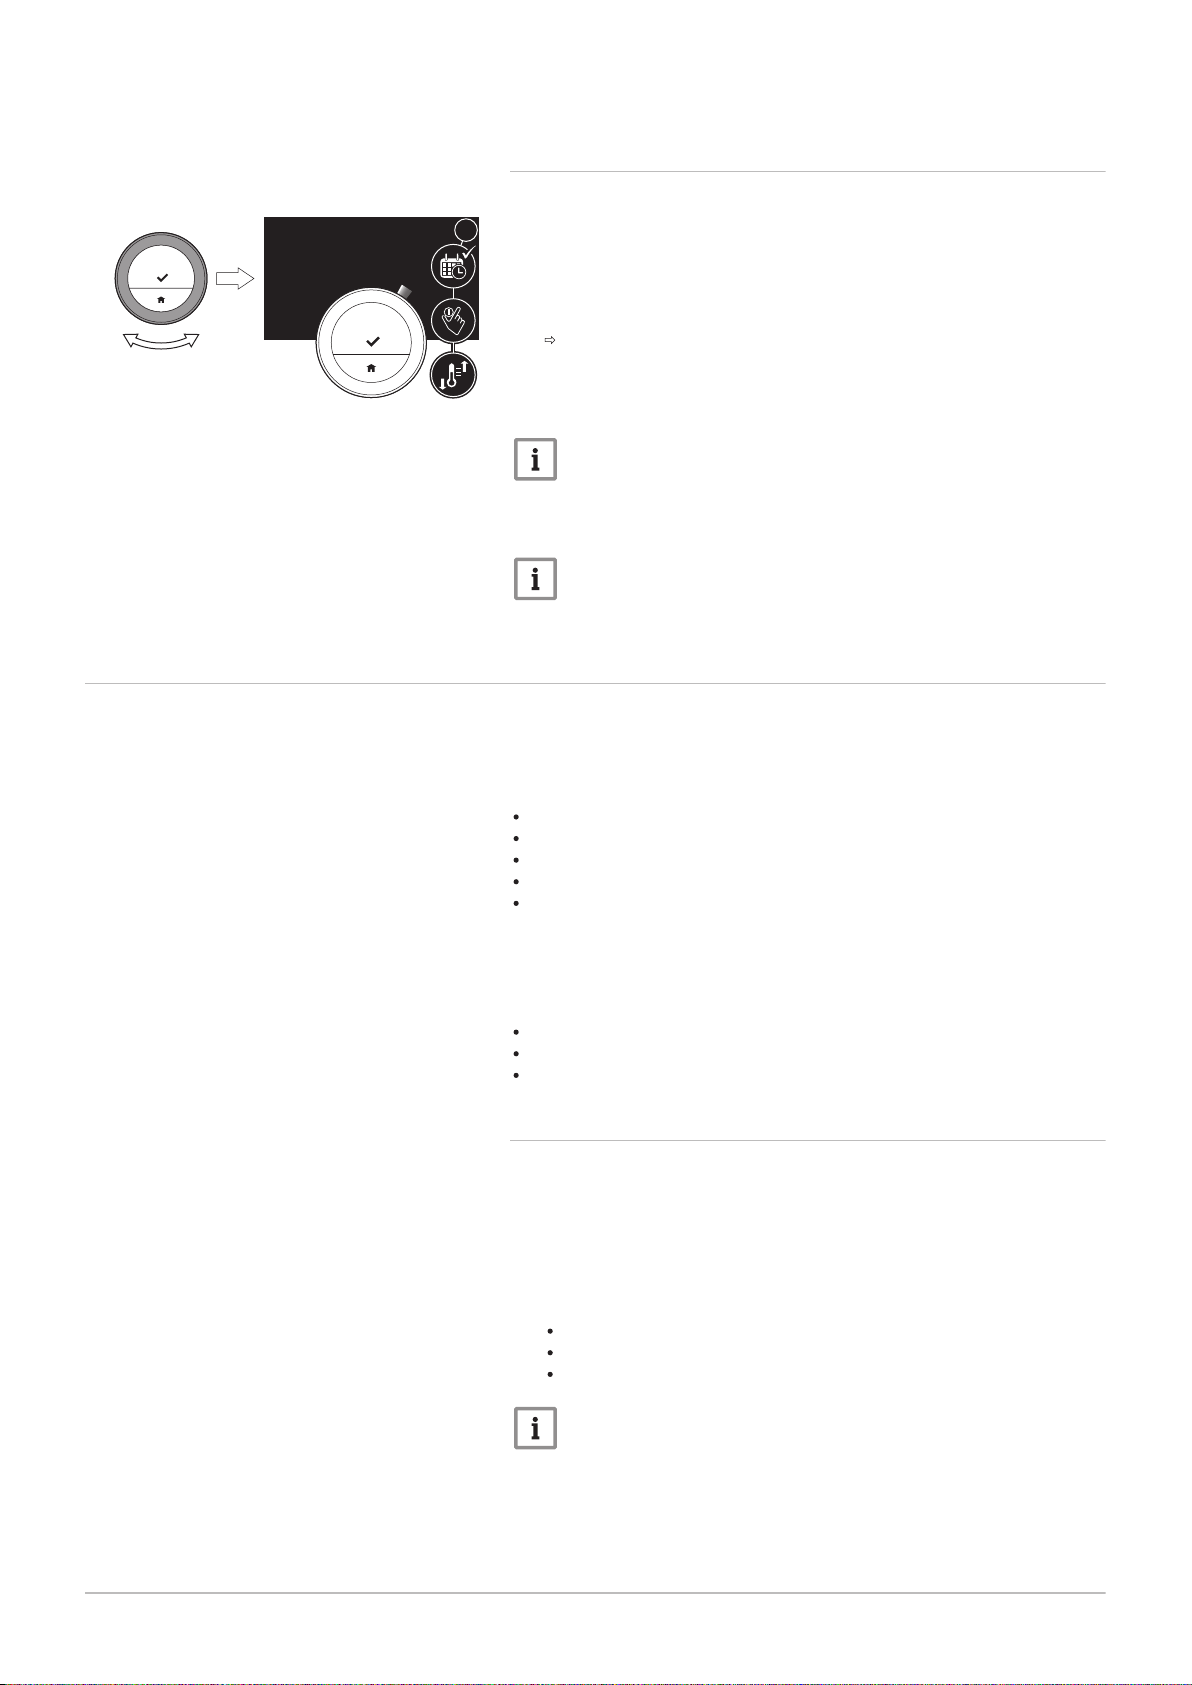
You can change the temperature for a short set period when the IDA is in
scheduling mode. At the end of the period the IDA will return to the
scheduled temperature.
1. Check that the IDA operates in scheduling mode: see the icon in the
top-right corner of the main screen.
2. Change the temperature with the rotary dial.
The display shows the selected temperature and the end time (max
24 hours from now).
3. Long-press the select button if you want to change the end time.
4. Change the period between 0 and 24 hours.
Important
If you change it to 0 hours, the short temperature change is
deleted.
5. Confirm the change.
Important
You can delete the set temperature change by selecting Clear
Short Temperature Change in the main menu.
3.3 Creating a temperature schedule to control the room temperature
A temperature schedule enables you to change the target temperature at
any moment that you choose. You can set a different schedule for each
day of the week.
You can customise each day schedule to your own preference:
Change the switch time.
Choose another activity between two switch times.
Change the temperature of an activity.
Add up to a maximum of 6 switch times per day.
Remove switch times to a minimum of none (resulting in constant
temperature all day long based on the last activity from the previous
day).
You can create up to three week schedules. For example, you can create
time schedules for:
A week with normal working hours.
A week with different working hours.
A week when you are at home most of the time.
3.3.1 Changing the weekdays of a temperature schedule
You can change, add or delete temperature intervals in one or more
weekdays of a timer program. For example, you can lower the temperature
during the night and when you are out of the house. You can set the
switch point and the activity (with its temperature) for each interval of the
schedule.
1. Enter the main menu.
2. Select
Change Temperature Scheduling
Change Heating Temperature Scheduling
Change Cooling Temperature Scheduling
Important
Availability of these options depends on your appliance.
3. If multiple schedules is enabled: Select Schedule 1, Schedule 2 or
Schedule 3.
Page 15
AD-3001000-01
....... .......
....... ....... ....... ....... ....... ....... ....... ....... ....... .......
....... ....... ....... ....... ....... ....... ....... ....... ....... .......
.
.
.
.
.
.
.
.
.
.
.
.
.
.
.
.
.
.
.
.
.
.
.
.
.
<1
AD-3001001-01
....... .......
....... ....... ....... ....... ....... ....... ....... ....... ....... .......
....... ....... ....... ....... ....... ....... ....... ....... ....... .......
.
.
.
.
.
.
.
.
.
.
.
.
.
.
.
.
.
.
.
.
.
.
.
.
.
<1
AD-3001002-01
1
8
.
0
º
1
9
.
5
º
1
9
.
5
º
2
1
.
5
º
1
8
.
0
º
.
.
.
.
.
.
.
.
.
.
.
.
.
.
.
.
.
.
.
.
.
.
0
7
:
4
5
1
0
:
2
5
1
6
:
1
5
2
2
:
4
5
.......
<1
AD-3001003-01
1
8
.
0
º
1
9
.
5
º
1
9
.
5
º
2
1
.
5
º
1
8
.
0
º
.
.
.
.
.
.
.
.
.
.
.
.
.
.
.
.
.
.
.
.
.
.
0
7
:
4
5
1
0
:
2
5
1
6
:
1
5
2
2
:
4
5
.......
<1
3 General use
7726708 - v.01 - 18012019 15
Fig.22
Fig.23
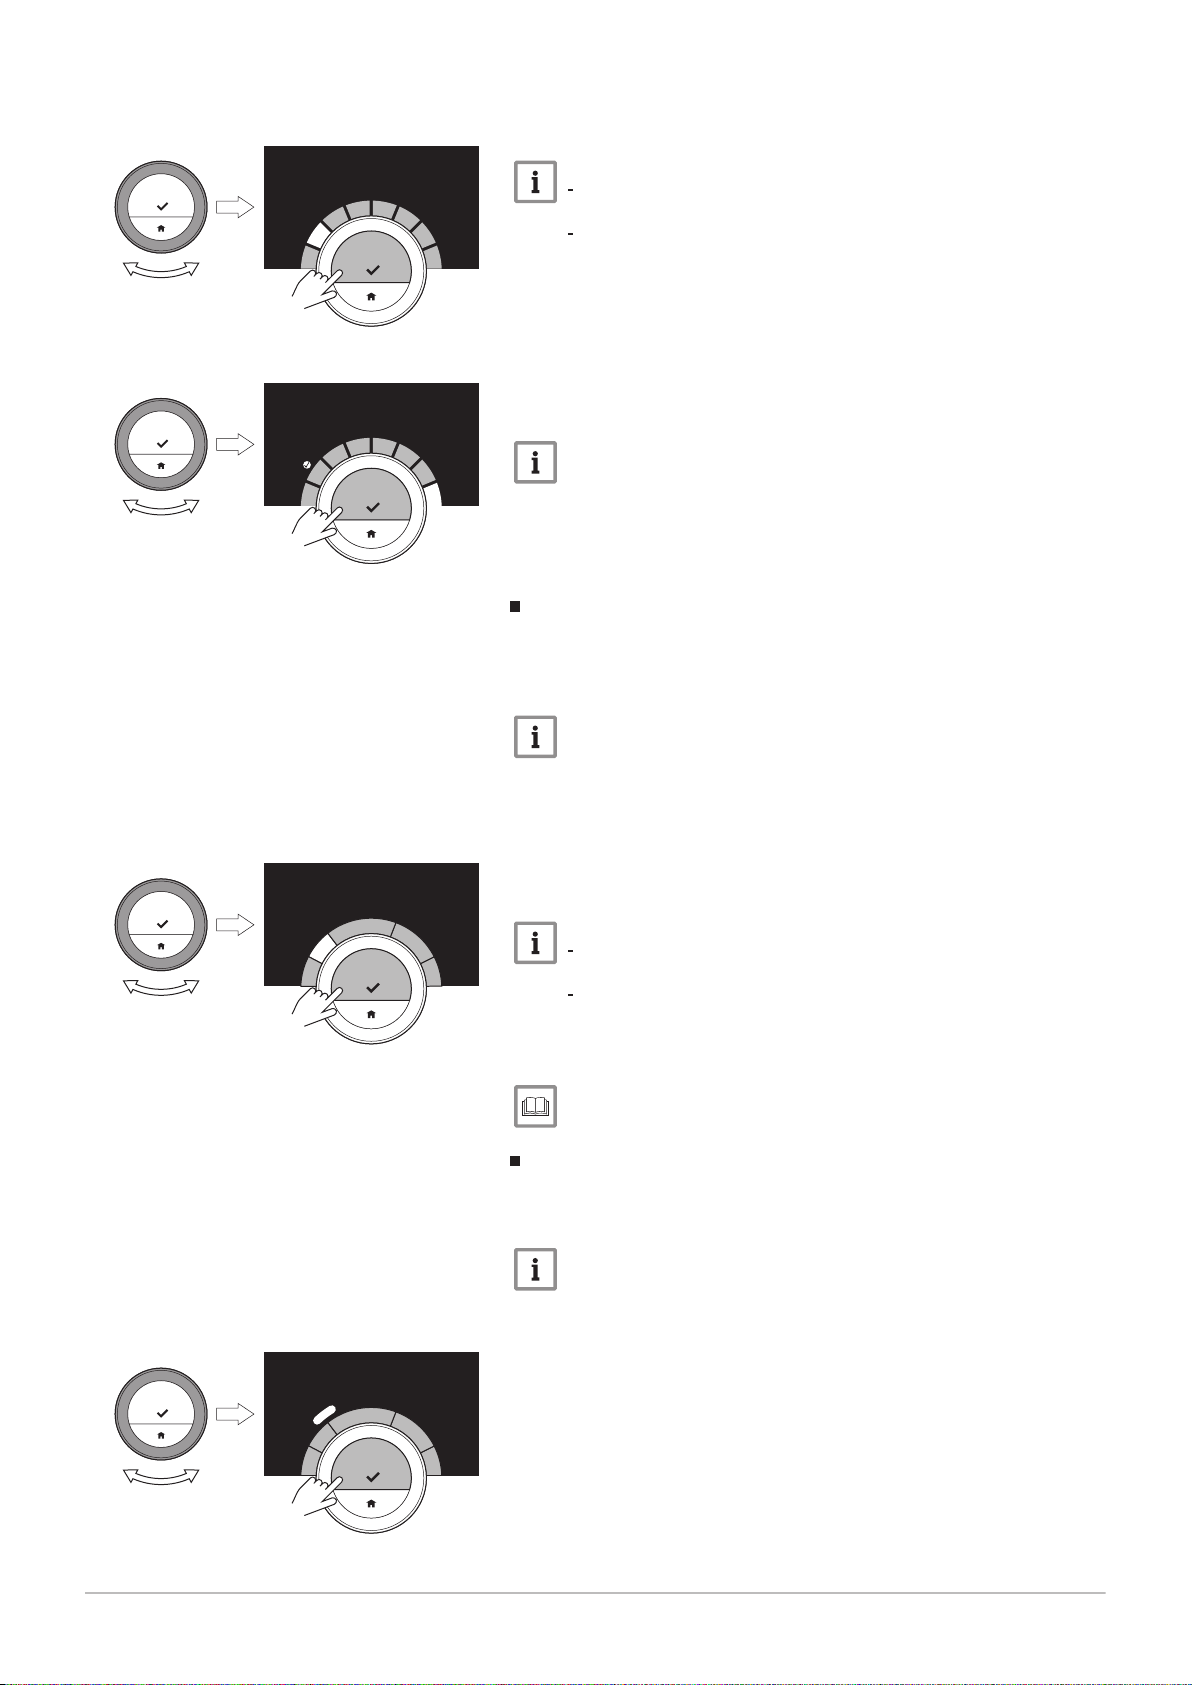
4. Select and confirm the day(s) that you want to program.
Important
When you select more than one day, the days will be assigned
the same day schedule.
Help text on the display above the schedule helps you perform
changes.
5. Confirm the selected day(s) by rotating the rotary dial to DONE and
pressing the select button.
6. Change, add or delete activities and switch times.
Important
You can short-press the home button to go back one step.
Changing an activity
The temperature of a time interval in the day schedule is set by the
selected activity. By changing the activity another target temperature is
set.
Fig.24
Important
When you change an activity the cursors mark the item you are
changing.
1. Select the activity with the rotary dial.
2. Confirm the selection.
3. Choose another activity with the rotary dial or leave it as is.
4. Confirm the selection.
5. Change the temperature of the activity or leave it as is.
Important
The temperature you set for an activity is the same for every
day of the week where you use this activity.
The Custom activity, however, can have a different temperature
on each day of the week.
6. Confirm the selection.
For more information, see
Changing the name of an activity, page 24
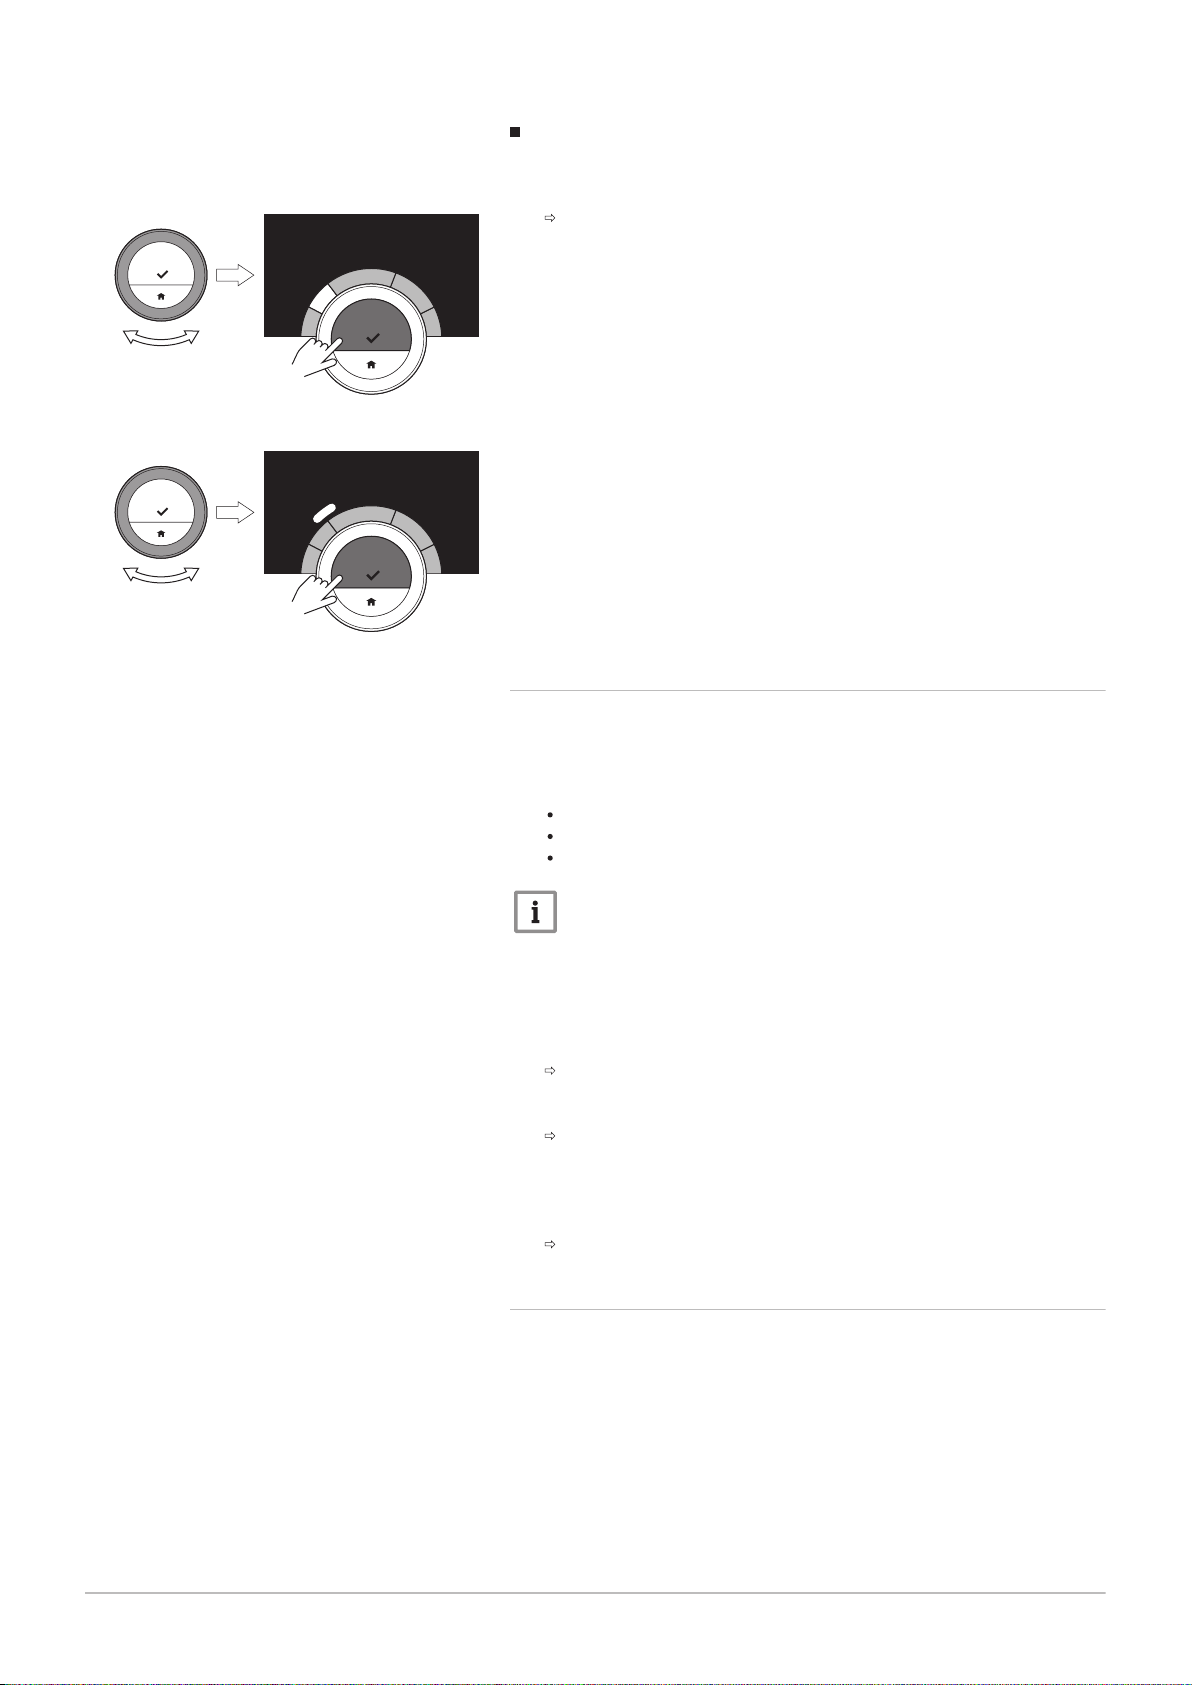
Changing a switch time
The switch time is the start time of new activity interval in the day
schedule.
Important
When you change a switch time the cursors mark the item you are
changing.
Fig.25
1. Select the switch time with the rotary dial.
2. Confirm the selection.
3. Change the switch time.
4. Confirm the selection.
Page 16
AD-3001030-01
1
8
.
0
º
1
9
.
5
º
1
9
.
5
º
2
1
.
5
º
1
8
.
0
º
.
.
.
.
.
.
.
.
.
.
.
.
.
.
.
.
.
.
.
.
.
.
0
7
:
4
5
1
0
:
2
5
1
6
:
1
5
2
2
:
4
5
.......
>1
AD-3001031-01
1
8
.
0
º
1
9
.
5
º
1
9
.
5
º
2
1
.
5
º
1
8
.
0
º
.
.
.
.
.
.
.
.
.
.
.
.
.
.
.
.
.
.
.
.
.
.
0
7
:
4
5
1
0
:
2
5
1
6
:
1
5
2
2
:
4
5
.......
>1
3 General use
16 7726708 - v.01 - 18012019
Fig.26
Adding or deleting activities and switch times
You can add or remove activity intervals from the day schedule.
1. Select an activity and long-press the select button to add an interval.
An new interval is created within the start and end time of the
existing activity interval.
2. Repeat step 1 to add more intervals, if required.
3. Change the activity of the new interval(s).
4. Change the switch time of the new interval(s), if required.
Fig.27
5. Select a switch time and long-press the select button to delete an
interval.
6. Select DONE using the rotary dial to save the day schedule.
3.3.2
Copying a weekday of a temperature schedule
You can copy the schedule of one weekday to other weekdays, to speed
up the creation of a temperature schedule.
1. Enter the main menu.
2. Select
Change Temperature Scheduling
Change Heating Temperature Scheduling
Change Cooling Temperature Scheduling
Important
Availability of the submenus depends on your appliance.
3. If multiple schedules is enabled: Select Schedule 1, Schedule 2 or
Schedule 3.
4. Select the weekday you want to copy.
5. Confirm the selected day(s) by rotating the rotary dial to DONE and
pressing the select button.
The day schedule is opened.
6. Select Copy using the rotary dial.
7. Confirm the selection.
The week schedule is opened.
8. Select and confirm the weekday(s) on which you want to copy the day
schedule.
9. Confirm the selected day(s) by rotating the rotary dial to DONE and
pressing the select button.
The day schedule is copied to the selected day(s).
3.3.3 Selecting another temperature schedule
Your weekly programme can differ from week to week. The IDA offers you
three possible schedules to program. You can set which temperature
schedule is active. First you have to enable the use of multiple schedules.
1. Enter the main menu.
2. Select Settings.
3. Select Enable multiple schedules.
4. Enter the main menu.
5. Select Select Active Temperature Schedule.
6. Select Schedule 1, Schedule 2 or Schedule 3.
Page 17
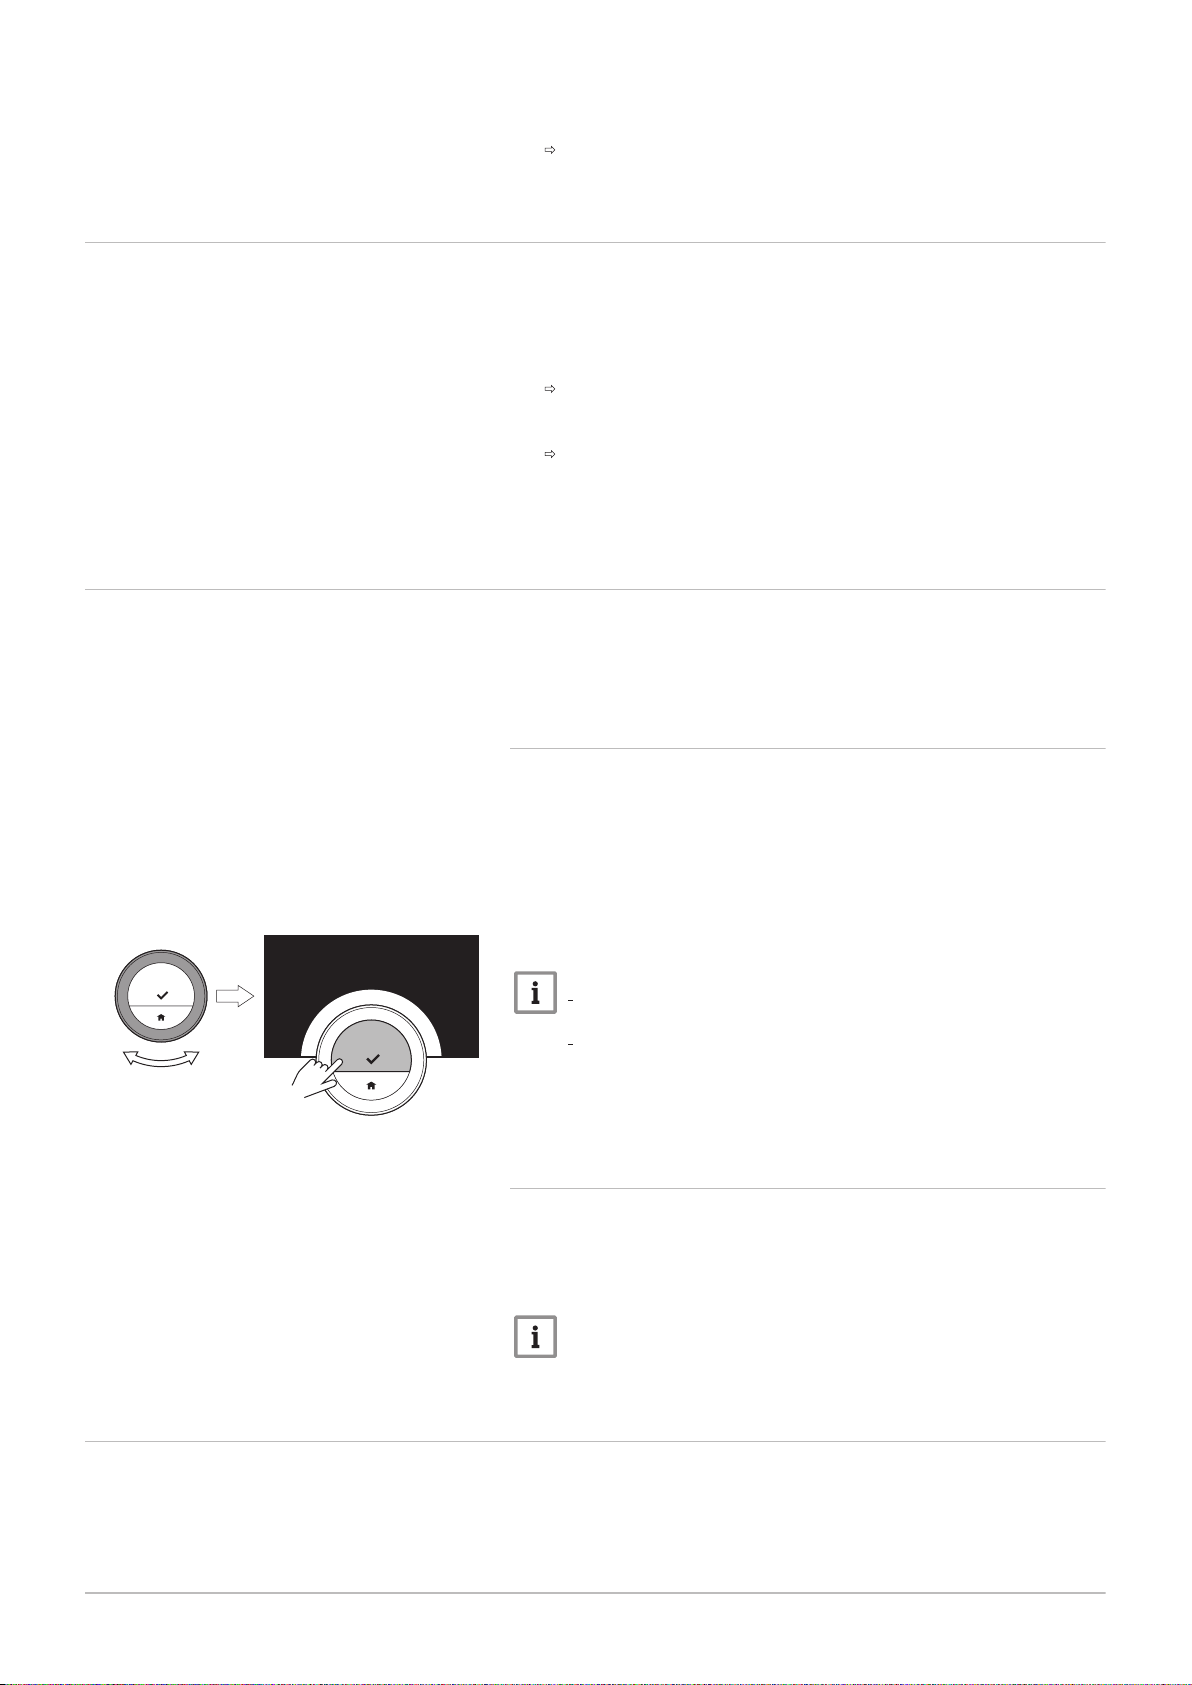
3.4 Changing the zone temperatures
AD-3001248-01
....... .......
....... ....... ....... ....... ....... ....... ....... ....... ....... .......
}
.
.
.
<1
7726708 - v.01 - 18012019 17
3 General use
7. Confirm the selection.
The selected temperature schedule becomes active, which is shown
by the icon in the top-right corner of the main screen.
If you have multiple zones in your heating system you can control the
temperature in each zone.
1. Enter the main menu.
2. Select Zone Selection.
3. Confirm the selection.
The available zones are displayed.
4. Select a zone.
5. Confirm the selection.
The main screen is displayed with the icon and the name of the
selected zone.
6. Change the temperature using the rotary dial.
7. Confirm the selection.
3.5
Fig.28
Topping up
When your appliance is fitted with a refilling unit, you can top up your
installation in two ways: automatic and manual. You select the automatic
or manual topping up option via the IDA app or the control panel on your
appliance.
3.5.1 Topping up manually
As soon as the water pressure becomes too low, the display shows a
warning: Water pressure is too low. Top up your installation via the auto-fill
menu.
1. Enter the main menu.
2. Select Water pressure low.
3. Confirm the selection.
4. Select Ok to confirm that the appliance can start topping up the
installation.
Important
Topping up stops automatically when the maximum water
pressure is reached.
Topping up stops automatically and the display shows an error
message when topping up takes too long.
5. Select Abort when you want to stop topping up before the maximum
water pressure is reached.
3.5.2 Topping up automatically
As soon as the water pressure becomes too low, the refilling unit starts
topping up the installation. Topping up stops automatically when the
maximum water pressure is reached. The display shows a message
Congratulations! Your installation has been topped up successfully..
Important
When topping up takes too long it stops automatically and the
display shows an error message.
3.6
Setting a holiday schedule
When you will be away for a longer period you can decrease the room
temperature to save energy. The holiday mode temperature overrules the
temperature(s) set in scheduling mode or manual mode.
Page 18
AD-3001249-01
.. .
.........
...... ... .. ..
..... ... .. :
......... .. ..
..... ... .. :
....... .......
<1
3 General use
18 7726708 - v.01 - 18012019
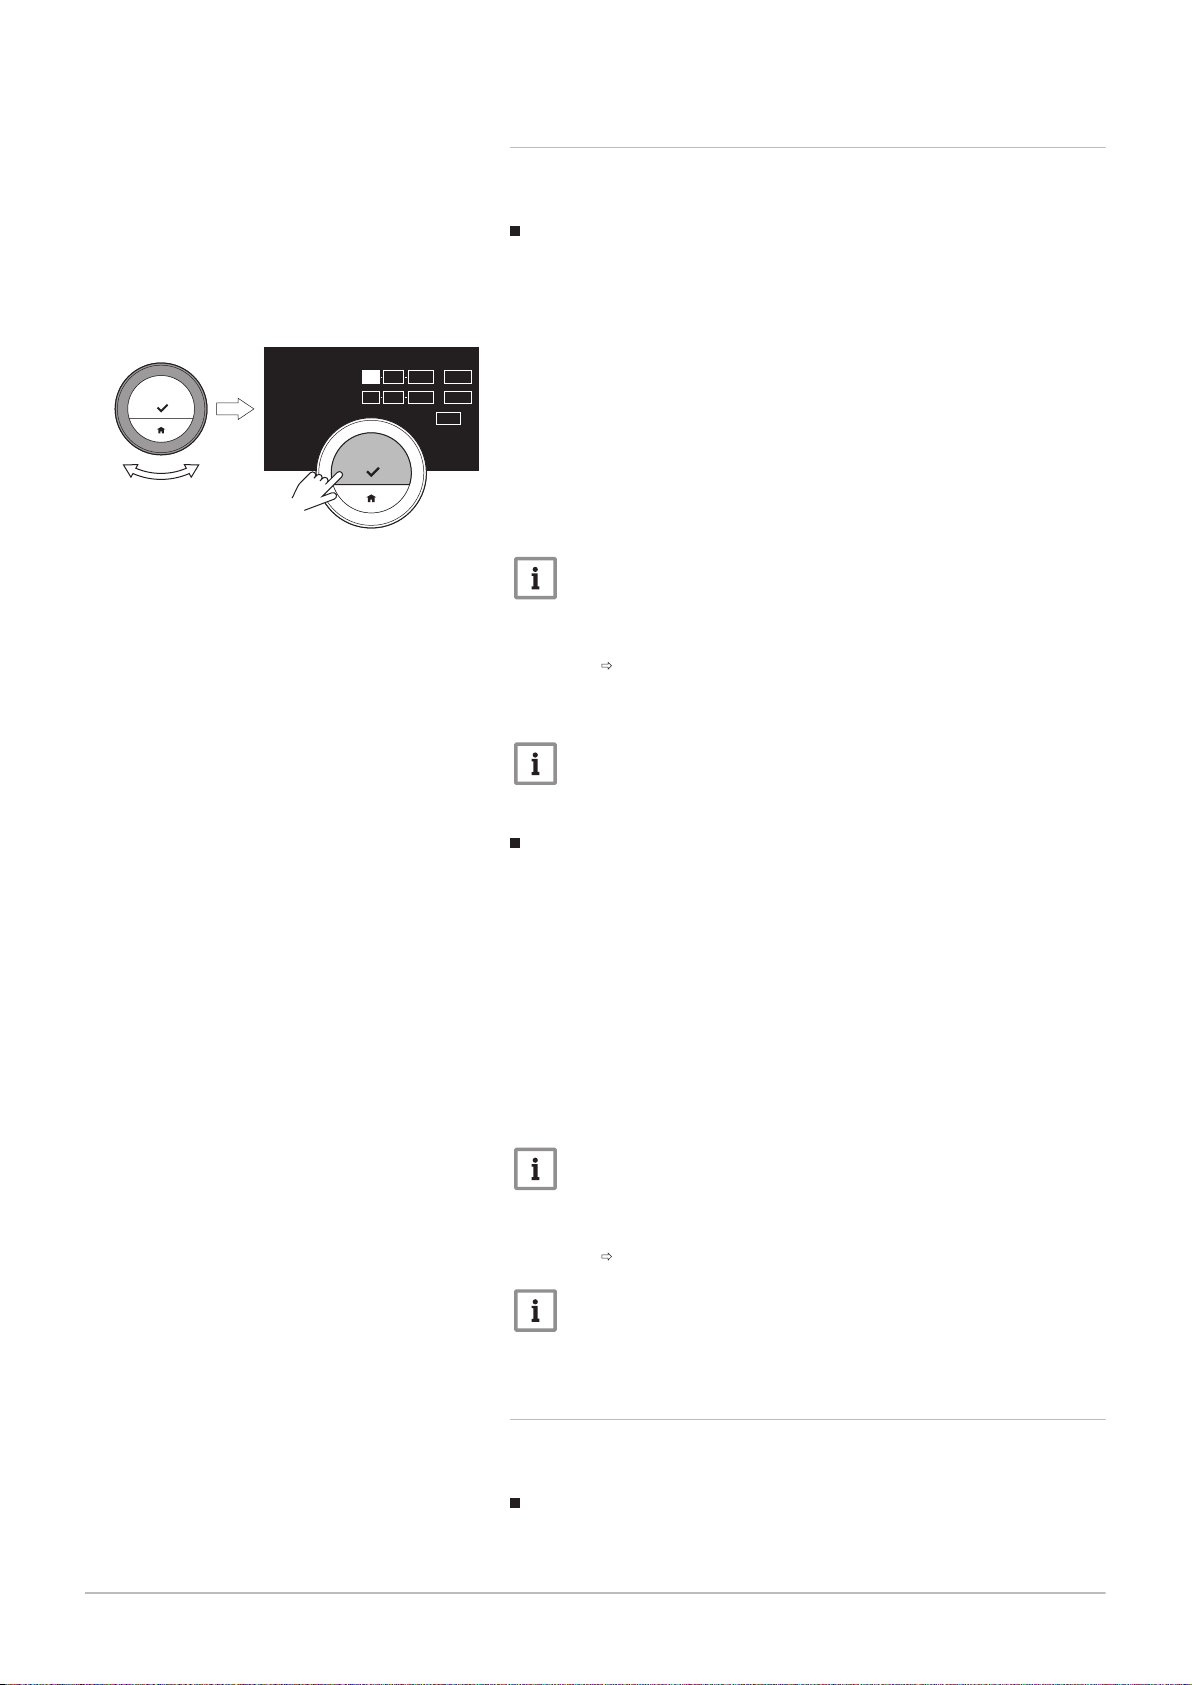
Fig.29
3.6.1 Creating a holiday schedule
You can create a holiday schedule via the main menu or via the quick
access menu.
Creating a holiday schedule via the main menu
1. Enter the main menu.
2. Select Input Holiday Period.
3. Confirm the selection.
4. Set the starting date and end date of the holiday period:
4.1. Select an item.
4.2. Confirm the selection.
4.3. Turn the rotary dial to change the item.
4.4. Confirm the change.
5. Set the room temperature for the holiday period:
5.1. Turn the rotary dial to select Temperature.
5.2. Confirm the selection.
5.3. Turn the rotary dial to change the temperature.
Important
The heating device in your installation determines what is the
minimum temperature for the holiday period.
5.4. Confirm the change.
The display shows: Holiday period set.
The main screen will show the holiday icon in the top right
corner when the holiday period starts.
Important
The holiday mode can also be set for any other appliance in your
installation, such asa cooling unit or a hot water generator.
Creating a holiday schedule via the quick access menu
1. Long-press the Select button.
2. Select Holiday.
3. Confirm the selection.
4. Set the starting date and end date of the holiday period:
4.1. Select an item.
4.2. Confirm the selection.
4.3. Turn the rotary dial to change the item.
4.4. Confirm the change.
5. Set the room temperature for the holiday period:
5.1. Turn the rotary dial to select Temperature.
5.2. Confirm the selection.
5.3. Turn the rotary dial to change the temperature.
Important
The heating device in your installation determines what is the
minimum temperature for the holiday period.
5.4. Confirm the change.
The display shows: Holiday period set.
Important
The holiday mode can also be set for any other appliance in your
installation, such as a cooling unit or a hot water generator.
3.6.2
Changing a holiday schedule
You can change the holiday schedule via the main menu and via the quick
access menu..
Changing the holiday schedule via the main menu
1. Enter the main menu.
2. Select Input Holiday Period.
Page 19
3 General use
7726708 - v.01 - 18012019 19
3. Confirm the selection.
4. Select Edit.
5. Confirm the selection.
6. Change the period and/or temperature.
7. Select Save.
8. Confirm the change.
Changing the holiday schedule via the quick access menu
1. Long-press the Select button to enter the quick access menu.
2. Select Holiday.
3. Confirm the selection.
4. Select Edit.
5. Confirm the selection.
6. Change the period and/or temperature.
7. Select Save.
8. Confirm the change.
3.6.3 Deleting a holiday schedule
You can delete the holiday schedule via the main menu and via the quick
access menu.
Deleting the holiday schedule via the main menu
1. Enter the main menu.
2. Select Input Holiday Period.
3. Confirm the selection.
4. Turn the rotary dial to the left to select Clear.
5. Confirm the selection.
3.7 Activating fireplace mode
Deleting the holiday schedule via the quick access menu
1. Long-press the Select button to enter the quick access menu.
2. Select Holiday.
3. Confirm the selection.
4. Turn the rotary dial to the left to select Clear.
5. Confirm the selection.
Fireplace mode enables you to continue heating other rooms that are
controlled by your system while another heat source heats the room where
the IDA is. For instance a fire lighted in your fireplace or a large number of
people can heat the room so much, that the appliance stops heating all the
rooms.
Important
Activate the Fireplace mode before the other heat source
becomes active.
1. Enter the main menu.
2. Select Enable Fireplace.
3. Confirm the selection.
The fireplace icon appears in the top right corner of the main
screen.
Important
You can switch off fireplace mode by selecting Fireplace disabled
in the main menu.
3.8
Activating antifrost mode
You can activate the antifrost mode for central heating and domestic hot
water production, when you will be out of the house in winter for a longer
period of time. The heating system will keep the temperature just high
enough to avoid frost damage and thus save the maximum amount of
energy.
Page 20
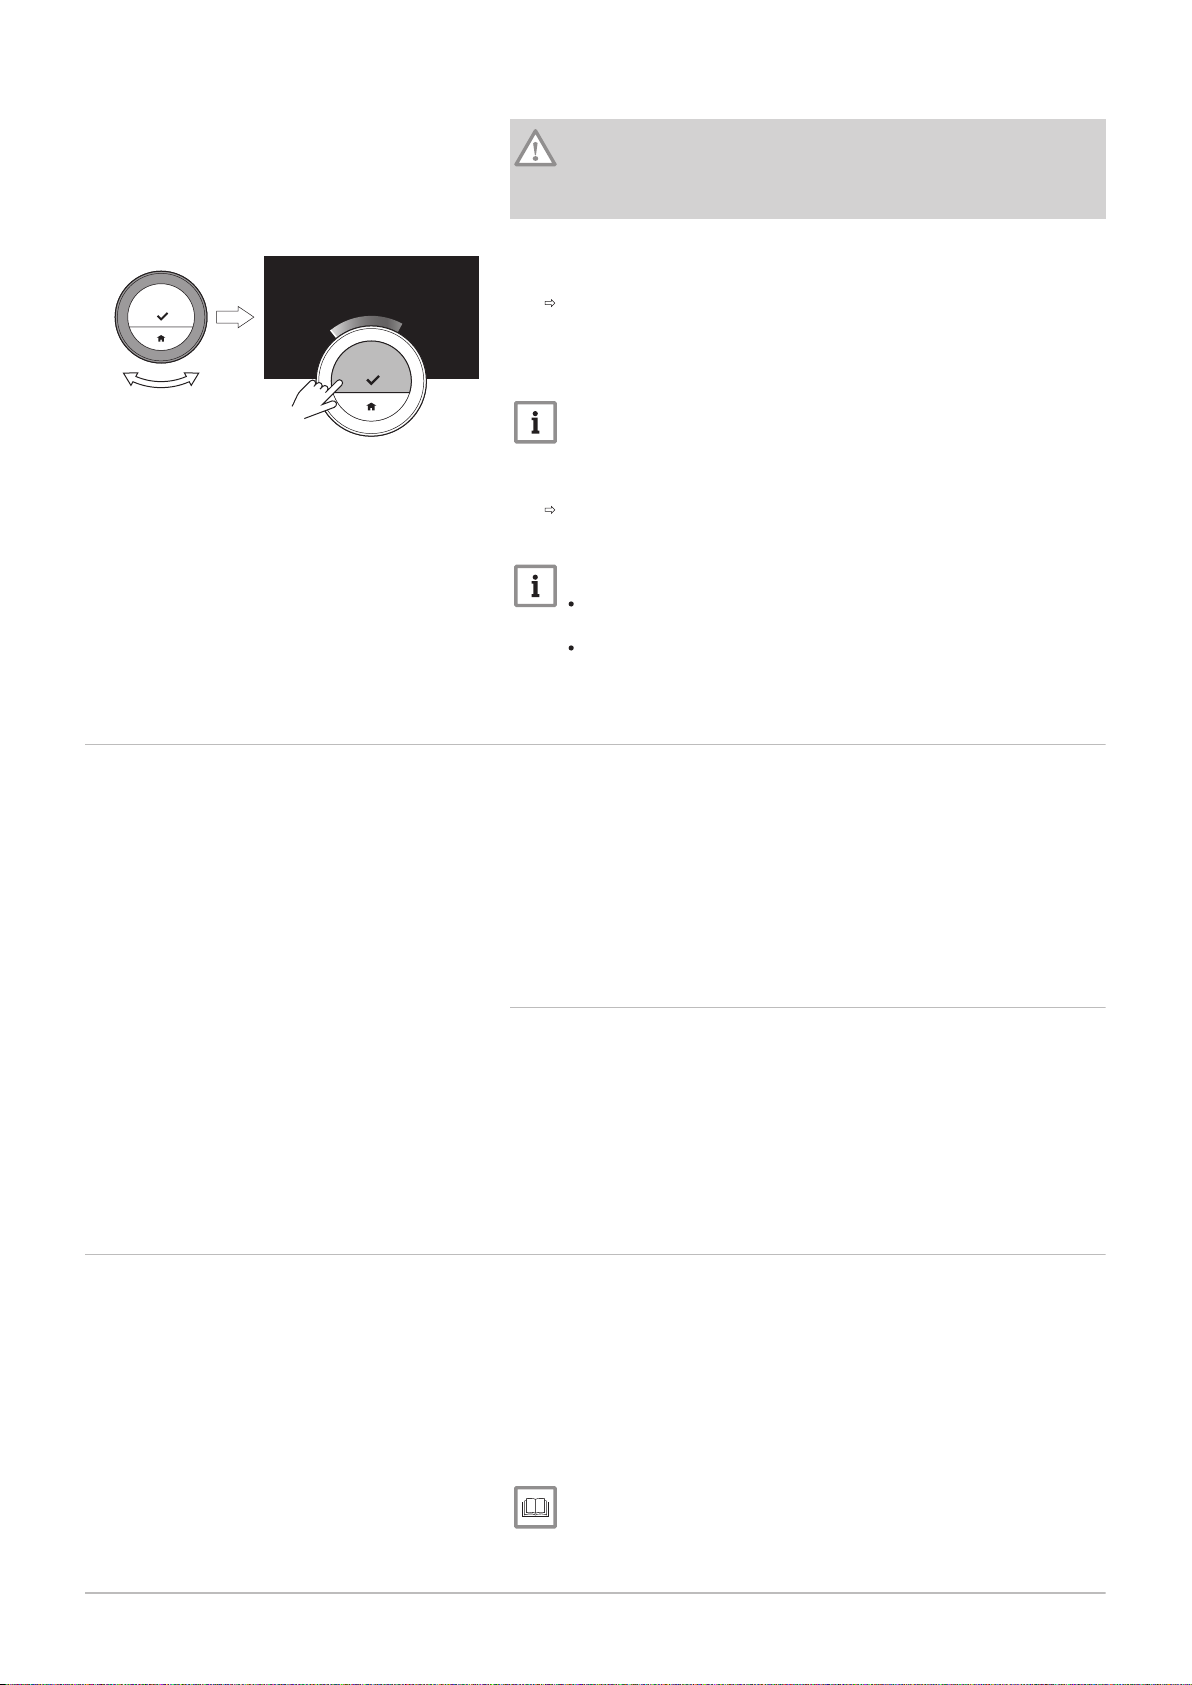
AD-3001250-01
7.0
....... .......
....... ....... ....... ....... ....... ....... ....... ....... ....... .......
<1
3 General use
20 7726708 - v.01 - 18012019
Caution
Freezing can still occur in rooms that are not heated. Open all
radiators and zones of the central heating system to prevent
freezing.
Fig.30
3.9
1. Enter the main menu.
2. Select Enable Frost Protection.
3. Confirm the selection.
The display shows a message that you can change the frost
protection temperature.
4. Long-press the select button while the message is visible.
5. Turn the rotary dial to change the temperature.
Important
The appliance in your installation determines what is the minimum
temperature for the antifrost mode.
6. Confirm the change.
Antifrost mode is on and the display shows the antifrost icon in the
top right corner of the main screen.
Important
In antifrost mode you cannot change the room temperature. If
you try to do so, the display shows a message.
You can deactivate the antifrost mode by selecting Enable
Manual Mode or Enable Temperature Scheduling.
Switching the central heating on/off
You can switch off the central heating function of the installation, to save
energy during e.g. the summer period.
If heating is switched off, the appliance will continue providing hot tap
water (depending on the configuration of your system).
1. Enter the main menu.
2. Select Operating mode.
3. Select and confirm OFF to switch off the heating function.
4. Select and confirm ON to switch the heating function on again.
3.10
Switching to auto mode
3.9.1 Switching to cooling mode
If your installation has a cooling unit, you can activate the cooling mode
via the IDA.
If cooling is switched on, the appliance will continue providing hot tap
water (depending on the configuration of your system).
1. Enter the main menu.
2. Select Operating mode.
3. Select COOLING to switch to the cooling mode.
If your installation has a cooling unit and an outside temperature sensor,
you can activate the auto mode via the IDA.
In auto mode, the IDA can automatically adjust the inside temperatures by
activating the heating and/or cooling function of the installation. Switching
between heating and/or cooling depends on the set threshold.
1. Enter the main menu.
2. Select Operating mode.
3. Select AUTO to switch to the auto mode.
For more information, see
Setting the threshold for auto mode, page 30
Page 21
4 Customisation
AD-3001025-01
7726708 - v.01 - 18012019 21
4 Customisation
This chapter helps you with customising the thermostat.
Next chapter: Messages and data, page 35
Previous chapter: General use, page 13
First chapter: Manual menu, page 5
4.1
Hot water settings
Important
The hot water settings can only be changed for combi
appliances. An appliance that can produce both central heating
water and hot tap water.
This menu item is not available for appliances with an on/off
communication protocol.
4.1.1 Changing the hot water temperature
If you want to change the maximum temperature of the hot tap water, you
have to change the hot water setpoint.
1. Enter the main menu.
2. Select Hot Water.
3. Select the option Hot water setpoint.
4. Use the rotary dial to change the hot tap water temperature.
5. Confirm the selection.
4.1.2 Setting the hot water comfort mode
If you need hot water immediately when you open the hot water tap, you
can select the comfort setting. The appliance permanently keeps the tap
water heated, even when you are not using the taps.
1. Enter the main menu.
2. Select Hot Water.
3. Select the submenu Enable permanent comfort.
4. Confirm the selection.
4.1.3 Setting the hot water reduced (energy-saving) mode
If you want to save energy, you can set the appliance to the hot water
energy-saving mode. The appliance will only start heating tap water when
you open the hot tap. In this case it will take more time before the tap
water reaches the maximum temperature.
The energy saving mode can be active permanently or at scheduled times.
1. Enter the main menu.
2. Select Hot Water.
3. Select the submenu Enable permanent reduced to activate the
energy-saving mode permanently.
4. Select the submenu Enable scheduling to activate the energy-saving
mode at scheduled times.
5. Confirm the selection.
4.1.4 Changing the hot water schedule
In the hot water schedule you can set at which times the appliance must
deliver hot water in comfort mode or reduced mode. In comfort mode hot
water is delivered immediately, in reduced mode you have to wait shortly.
You can can set the comfort mode during periods when you need hot
water immediately (e.g. for taking a shower or bath) and the reduced
mode to save energy during periods when you don’t need hot water
(immediately).
Page 22
AD-3001005-01
.
.
.
.
.
.
.
.
.
.
.
.
.
.
.
.
.
.
.
.
.
.
0
7
:
4
5
1
0
:
2
5
1
6
:
1
5
2
2
:
4
5
.......
<1
AD-3001251-01
..
..
..
..
..
.....
..
..
..
..
..
.....
.....
..
..
..
..
..
..
..
..
..
..
.....
.....
....
....
....
....
....
<1
4 Customisation
22 7726708 - v.01 - 18012019
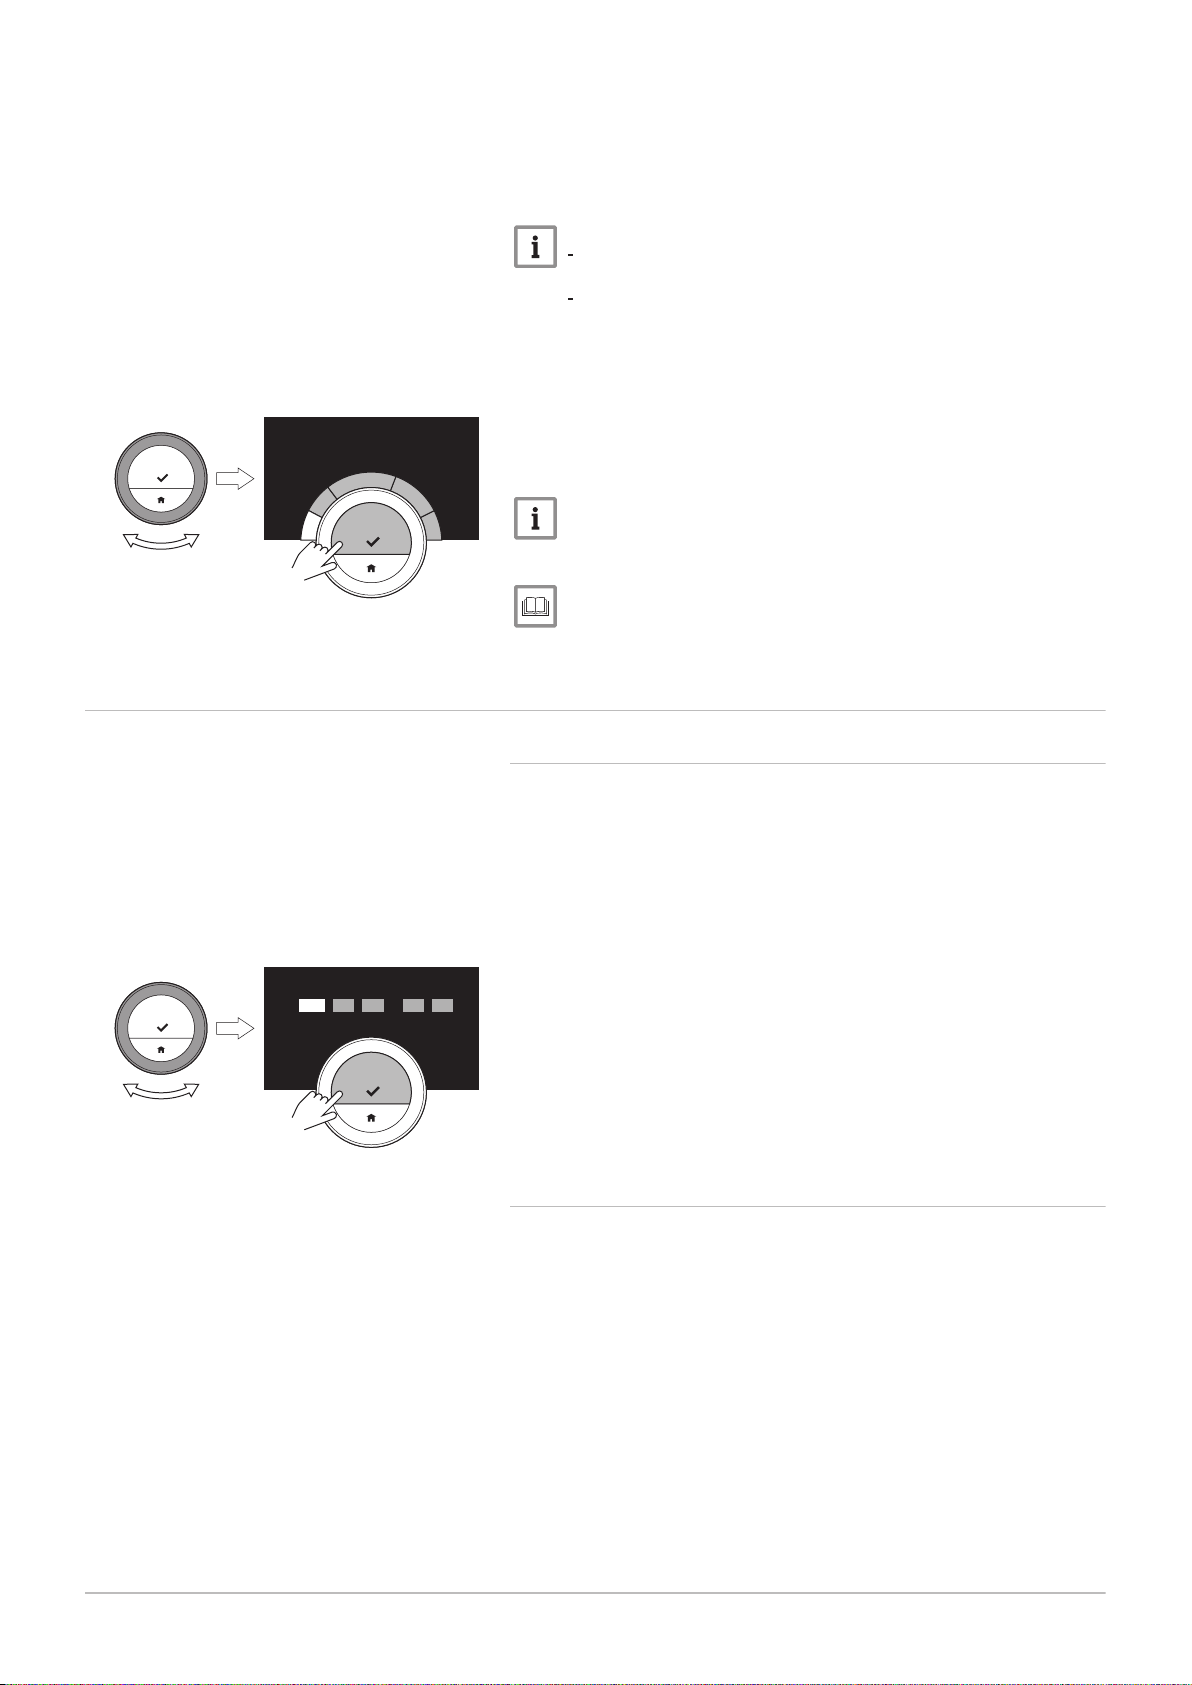
Fig.31
1. Enter the main menu.
2. Select Hot Water.
3. Select the submenu Change hot water scheduling.
4. Select and confirm the day(s) that you want to program.
Important
When you select more than one day, the days will be assigned
the same day schedule.
Help text on the display above the schedule helps you perform
changes.
5. Confirm the selected day(s) by rotating the rotary dial to DONE and
pressing the select button.
6. Create the day schedule with the switching times and hot water
settings (comfort or reduced).
7. Confirm the selection.
8. Copy the schedule to other weekdays, if required.
Important
You can change the hot water schedule in a similar way to the
temperature schedules for heating.
For more information, see
Creating a temperature schedule to control the room temperature,
page 14
4.2 IDA settings
Fig.32
4.2.1 Setting the date and time
When you start up the IDA for the first time, you enter automatically the
menu to set the time and date.
You enter this menu also when there has been a power outage and the
IDA has no internet connection.
During normal operation you can change the date and time settings by
navigating to the menu.
1. Enter the main menu.
2. Select Settings.
3. Confirm the selection.
4. Select Date time settings.
5. Confirm the selection.
6. Select Date time.
7. Confirm the selection.
8. Change the date and time setting.
9. Confirm the change.
4.2.2 Setting country and language
You select the country where you are and the language for the text on
your display.
When you start up the IDA for the first time, you enter automatically the
menu to set the country and language.
During normal operation of the IDA you can change the country and
language settings at a later moment by navigating to the menu.
1. Enter the main menu.
2. Select Settings.
3. Confirm the selection.
4. Select Country and language.
5. Confirm the selection.
6. Select your country.
7. Confirm the selection.
8. Select your language.
9. Confirm the selection.
Page 23
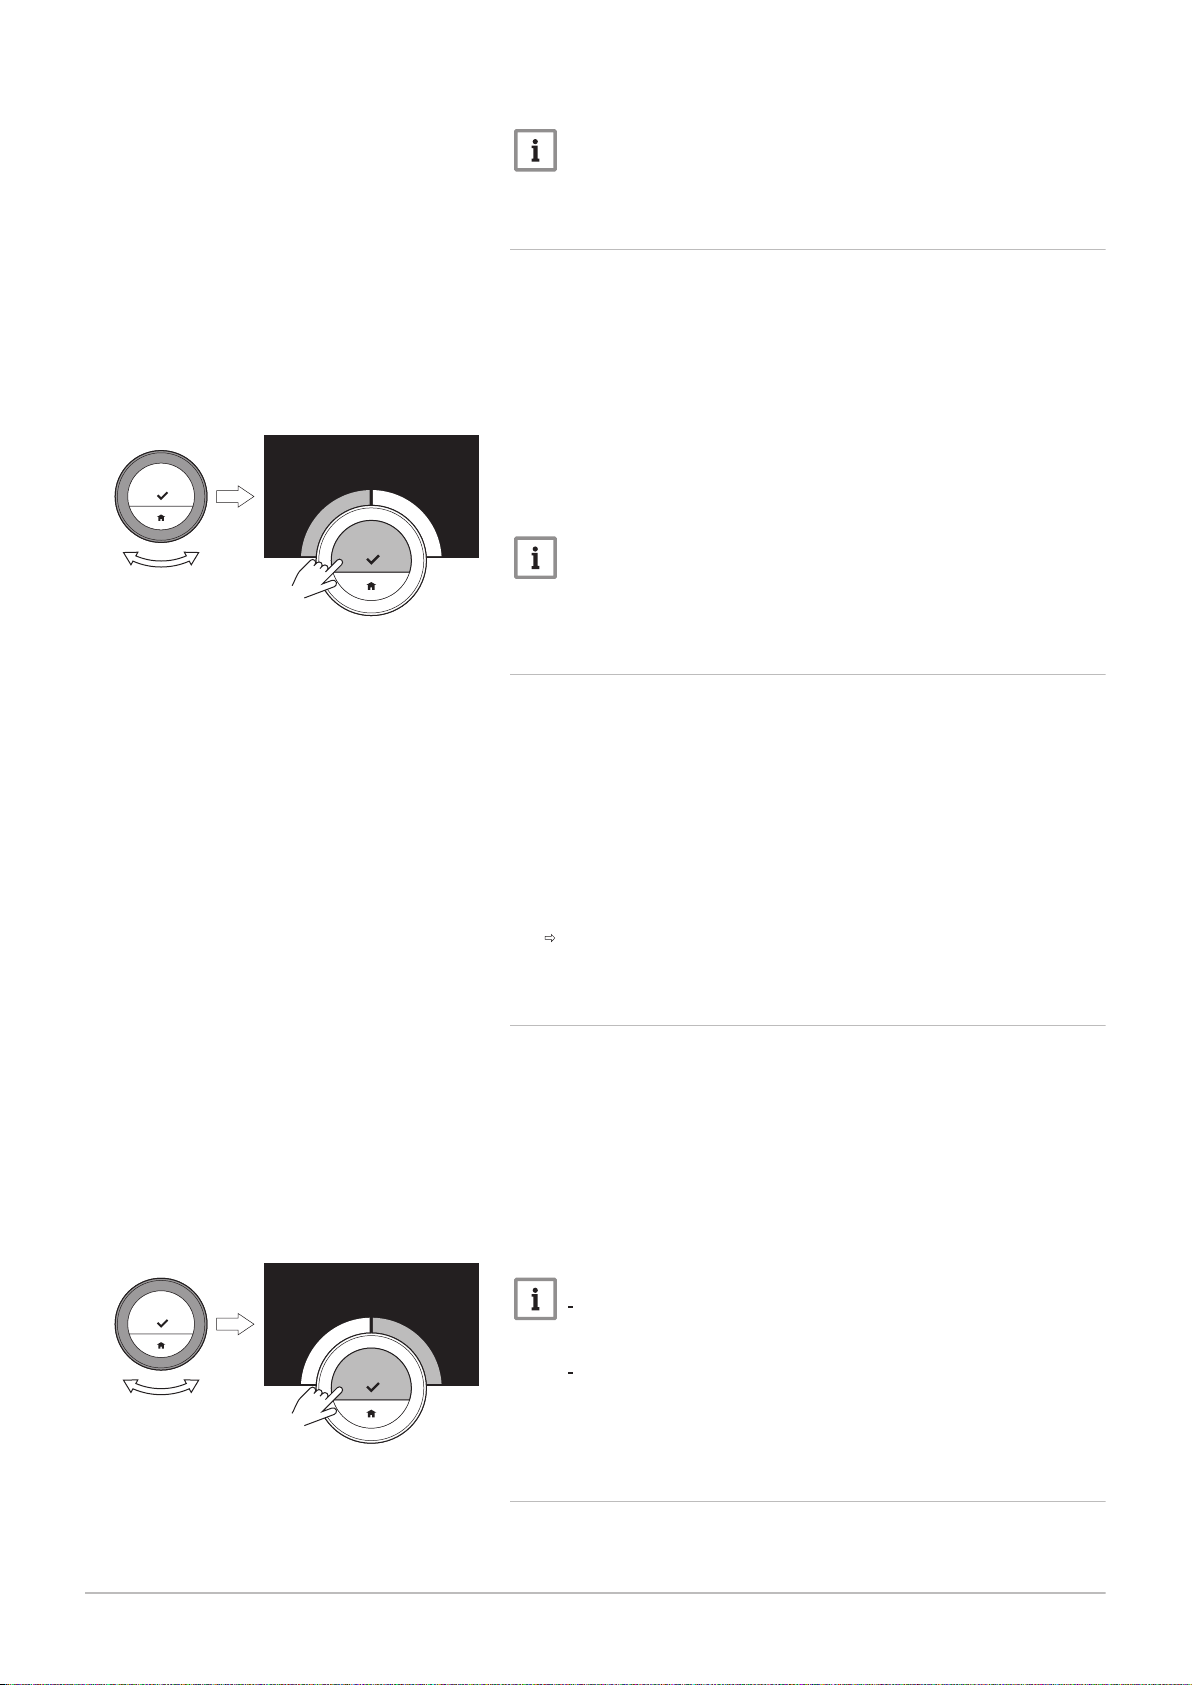
Fig.33
AD-3001006-01
....... .......
....... ....... ....... ....... ....... ....... ....... ....... ....... .......
.
.
.
|
.
.
.
}
<1
AD-3001007-01
....... .......
....... ....... ....... ....... ....... ....... ....... ....... ....... .......
<1
7726708 - v.01 - 18012019 23
4 Customisation
Important
The IDA uses the selected country for the selection of the current
time zone, when connected to the internet.
4.2.3 Main screen setting
You can add two information boxes on the main screen, one to the left and
one to the right of the rotary dial.
1. Enter the main menu.
2. Select Settings.
3. Select the submenu Mainscreen settings.
4. Use the rotary dial to select the left information box.
5. Select one of the options.
6. Confirm the selection.
7. Use the rotary dial to select the right information box.
8. Select one of the options.
9. Confirm the selection.
Important
You can short-press the home button to go back one step.
Fig.34
4.2.4 Show help messages
When you have just started to use the IDA, the display shows a help
message after you change to a different mode. The message informs you
about the use of the quick access menu. The display will stop showing
these messages after some time.
If you wish to see the messages again:
1. Enter the main menu.
2. Select Settings.
3. Confirm the selection.
4. Select Show help messages.
5. Confirm the selection.
The display shows Show help messages enabled and the help
messages will appear again for some time.
4.2.5 Presence sensor
The IDA has a sensor for presence detection. When you pass by or
approach the IDA, the main screen of the display will light up for 5
seconds. This setting is on by default.
You can switch off the presence detection.
1. Enter the main menu.
2. Select Settings.
3. Select the submenu Presence sensor detection.
4. Select Off.
5. Confirm the selection.
Important
With the presence sensor switched off you need to press a
button or turn the rotary dial to activate the display. The main
screen of the display will light up for 30 seconds.
Set Presence sensor detection to On to activate the presence
sensor again.
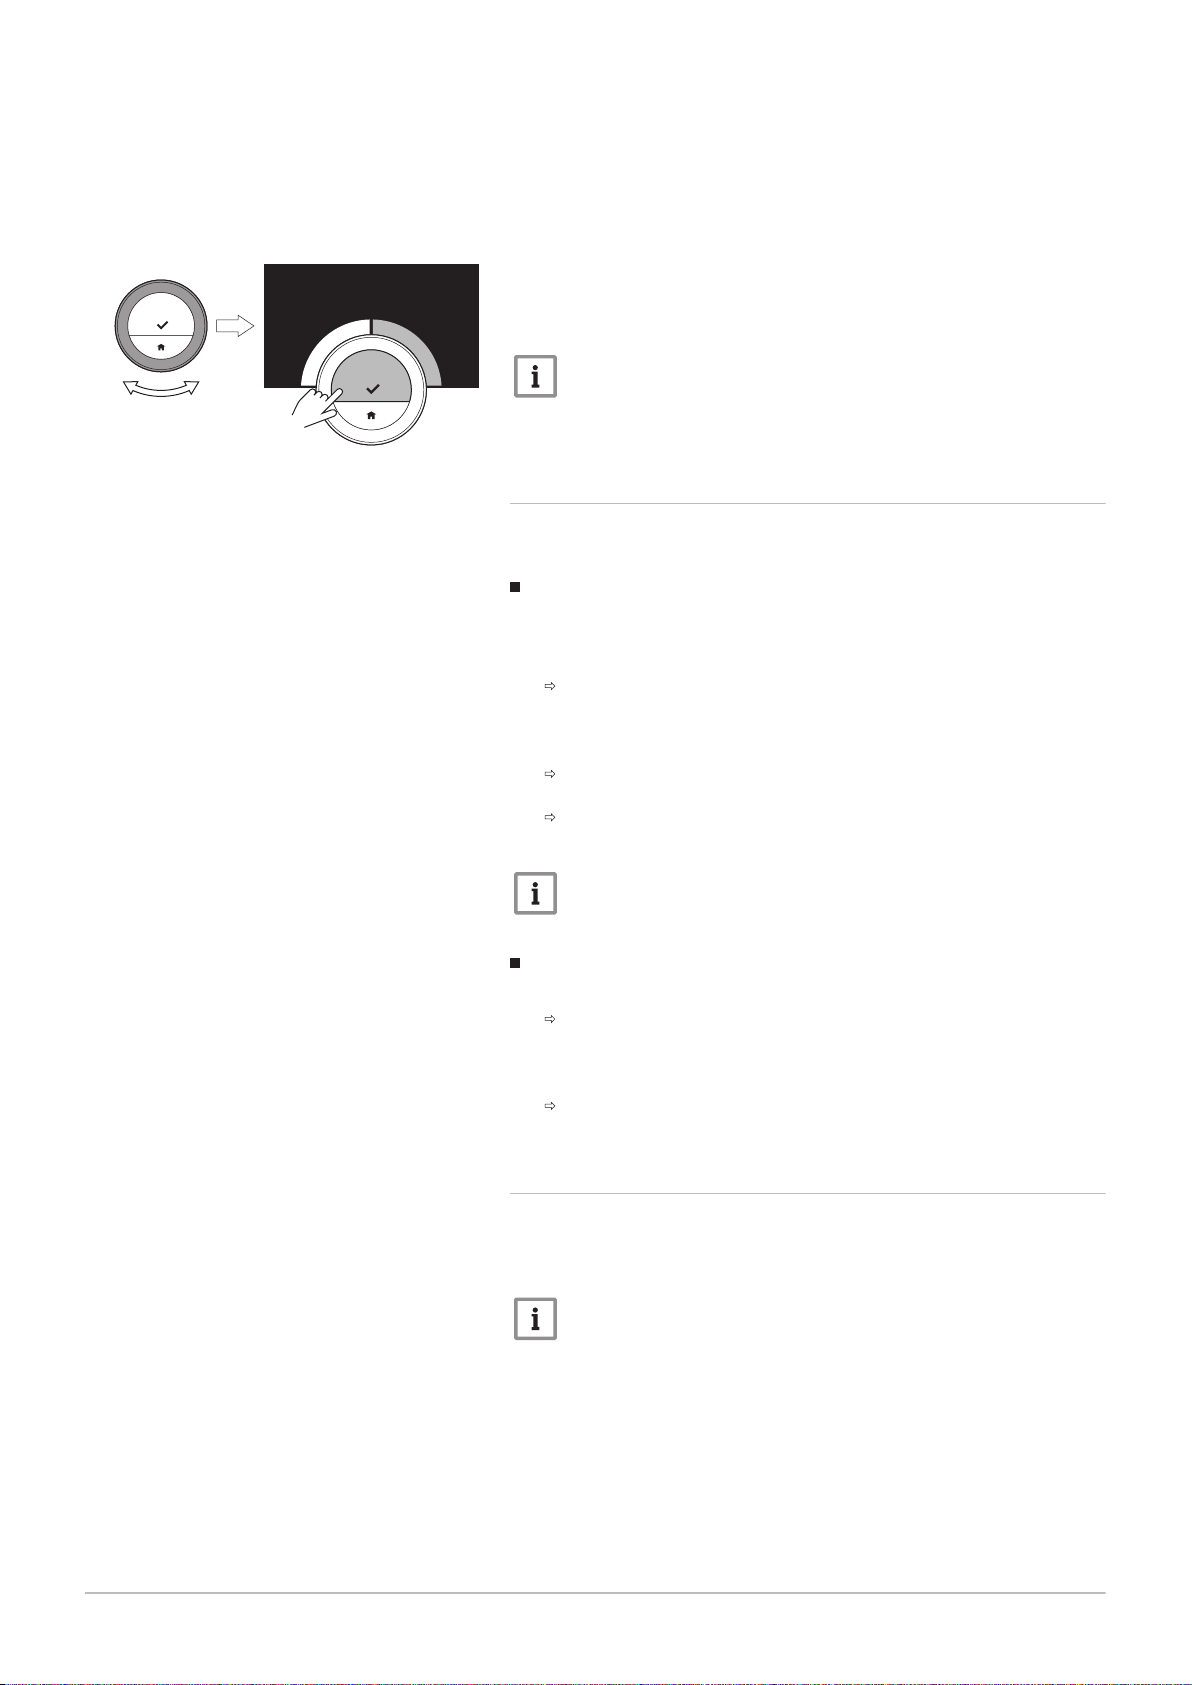
4.2.6 Display current or target temperature
The IDA displays the current temperature in a large font by default. The
target temperature is in a small font near the temperature scale.
Page 24
AD-3001010-01
}
.
.
.
.
.
.
21.0 °C
<1
4 Customisation
24 7726708 - v.01 - 18012019
Fig.35
You can change the display of the temperature to show the target
temperature in large font and the current temperature in a small font.
1. Enter the main menu.
2. Select Settings.
3. Select the submenu Display current or target temperature.
4. Select Current Temperature or Target Temperature.
5. Confirm the selection.
This setting will stay until you change this setting again or reset the IDA to
factory settings.
Important
The instructions in this manual are based on the default setting for
current temperature. Changing the display of the temperature
influences the instructions given.
4.2.7 Child lock
The IDA has a child lock that can be activated to prevent children
changing the settings like the room temperature.
Activating the child lock
1. Enter the main menu.
2. Select Settings.
3. Select and confirm Enable child lock.
The message Child lock enabled will appear of the screen. The
screen will be locked when the display of the IDA goes in stand-by
mode.
4. Short-press a button or turn the rotary dial to reactivate the display.
The message Screen locked will appear of the screen.
5. Press the select button for more than 5 seconds to unlock the screen.
The message Screen unlocked will appear of the screen. The IDA
can be operated.
Important
The child lock can also be used to prevent unwanted access to
the IDA in public buildings.
Deactivating the child lock
1. Press the select button for more than 5 seconds to unlock the screen.
The message Screen unlocked will appear on the screen.
2. Enter the main menu.
3. Select Settings.
4. Select and confirm Disable child lock.
The message Child lock disabled will appear on the screen. The
screen is permanently unlocked.
4.2.8 Changing the name of an activity
You can change the names of the activities for the temperature schedules.
The default activity names are dependant on the appliance in your
installation.
Important
The Custom activity can be set to a different temperature on each
day of the week.
1. Enter the main menu.
2. Select Settings.
3. Confirm the selection.
4. Select Change activity names.
5. Confirm the selection.
6. Select the name you want to change.
7. Confirm the selection.
Page 25
AD-3001008-01
1
2
3
a
b
c
A
B
C
A
B
C
D
E
....... .......
....... .......
<1
AD-3001009-01
X
Y
Z
ü
ß
V
á
ä
à
!
@
#
....... .......
........
<1
AD-3001008-01
1
2
3
a
b
c
A
B
C
A
B
C
D
E
....... .......
....... .......
<1
AD-3001009-01
X
Y
Z
ü
ß
V
á
ä
à
!
@
#
....... .......
........
<1
4 Customisation
7726708 - v.01 - 18012019 25
Fig.36
Fig.37
Fig.38
Fig.39
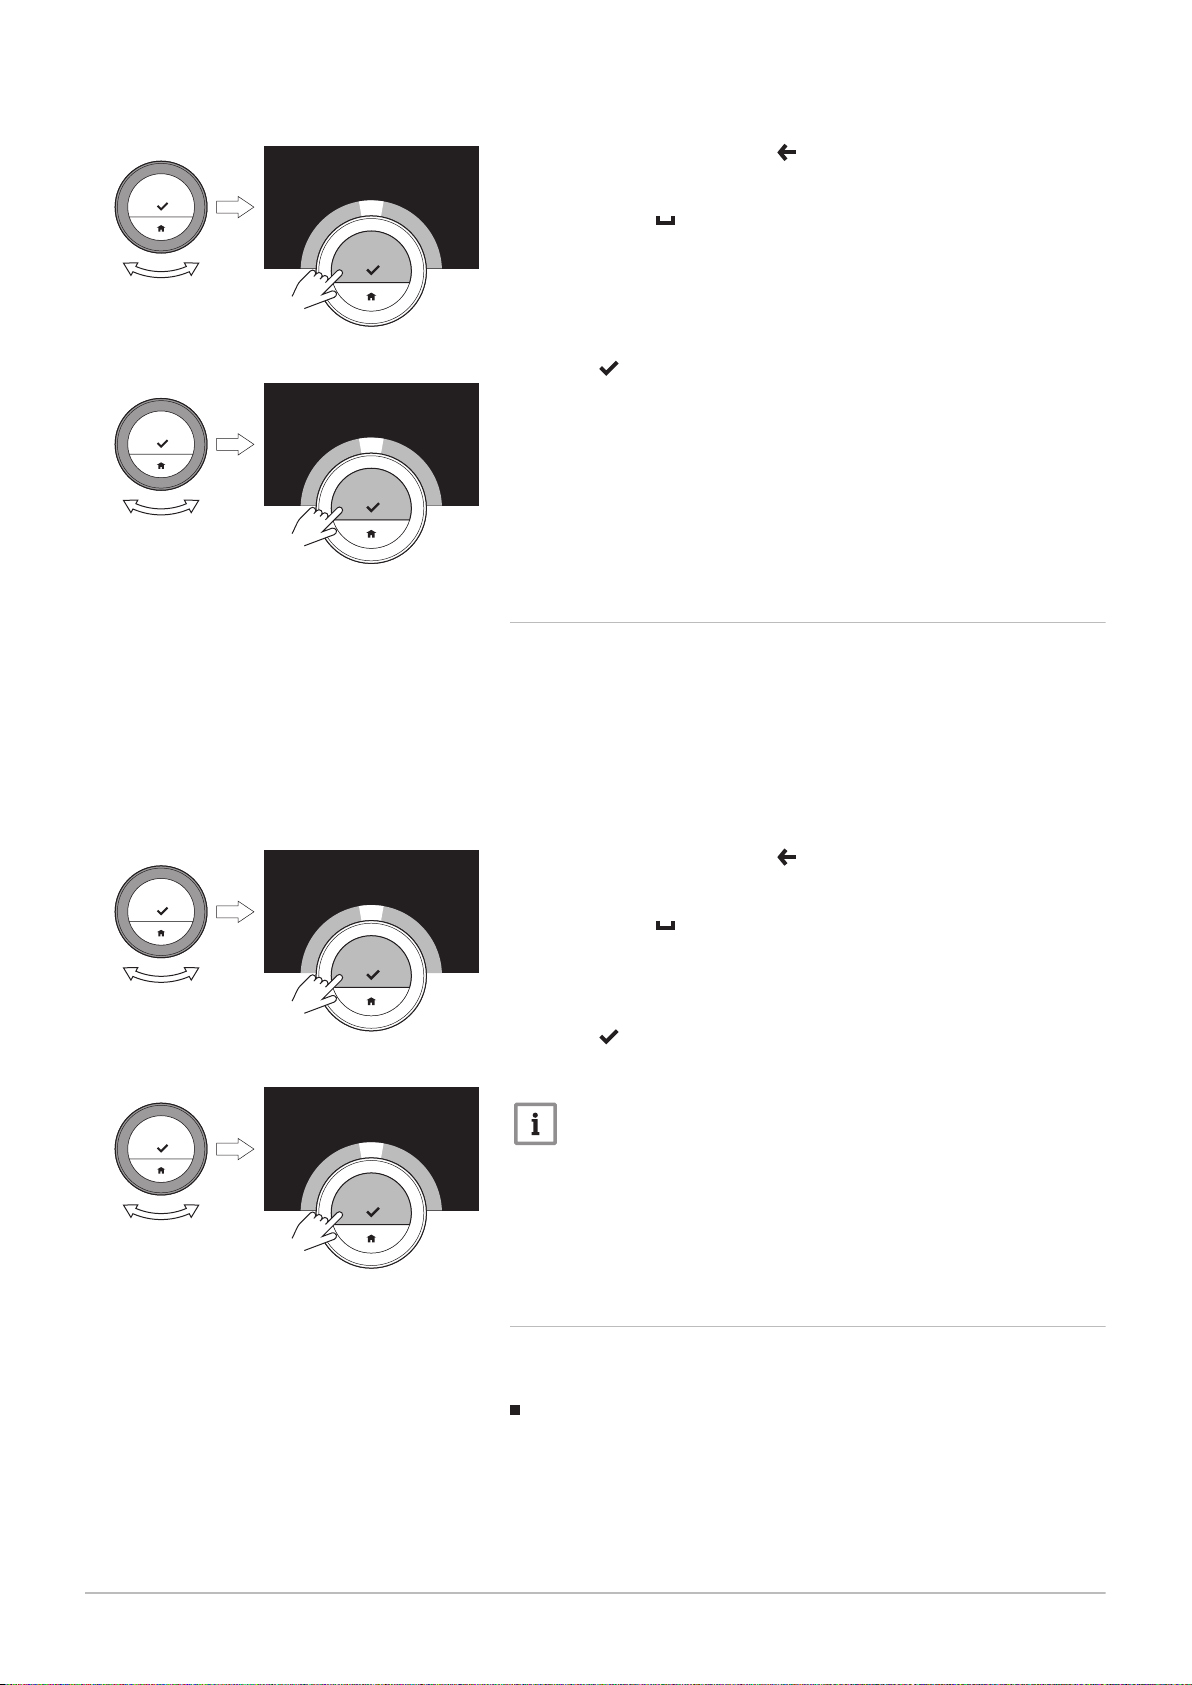
8. Change the name:
8.1.
Select the backspace in the character selection menu.
8.2. Confirm the selection to delete the character.
8.3. Delete more characters until you can start with the new name.
8.4.
Select in the character selection menu.
8.5. Confirm the selection to add a space to the name.
8.6. Select a character for the new name.
8.7. Confirm the selection to add the character to the name.
8.8. Add more characters until you finish the name.
9. Select in the character selection menu.
10. Confirm to save the new name.
4.2.9
Changing the name of a zone
You can change the names of the zone(s) of your heating system.
1. Enter the main menu.
2. Select Settings.
3. Confirm the selection.
4. Select Change %1Zone friendly Name.
5. Confirm the selection.
6. Select the zone name you want to change.
7. Confirm the selection.
8. Change the name:
8.1.
Select the backspace in the character selection menu.
8.2. Confirm the selection to delete the character.
8.3. Delete more characters until you can start with the new name.
8.4.
Select in the character selection menu.
8.5. Confirm the selection to add a space to the name.
8.6. Select a character for the new name.
8.7. Confirm the selection to add the character to the name.
8.8. Add more characters until you finish the name.
9. Select in the character selection menu.
10. Confirm to save the new name.
Important
You can choose another zone icon for the IDA with the app on
your mobile device.
4.2.10
Changing the display settings
You can change the screen brightness and click sound of the rotary dial of
the display.
Changing the display brightness
You can change the brightness of the display. The brightness can be set
to any value between 10% and 100%.
1. Enter the main menu.
2. Select Settings.
3. Select the submenu Display brightness.
Page 26

4 Customisation
26 7726708 - v.01 - 18012019
4. Choose a brightness level between 10% and 100% using the rotary
dial.
5. Confirm the setting.
Turning the click sound on/off
When you turn the rotary dial the IDA makes a click sound at every
change. You can choose to turn this click sound off (or on again).
1. Enter the main menu.
2. Select Settings.
3. Select the submenu Click sound.
4. Select Off or On.
5. Confirm your setting.
4.2.11
You can enable or disable the time synchronization of your IDA with an
NTP server on the internet.
1. Enter the main menu.
2. Select Settings.
3. Confirm the selection.
4. Select Date time settings.
5. Confirm the selection.
6. Select NTP.
7. Confirm the selection.
8. Select On or Off.
9. Confirm the setting.
4.2.12
You can enable or disable automatic switching to summer time and winter
time if your appliance system is fit for this option.
1. Enter the main menu.
2. Select Settings.
3. Confirm the selection.
4. Select Date time settings.
5. Confirm the selection.
6. Select Enable daylight save
7. Select On or Off.
8. Confirm the setting.
Enabling time synchronization by internet
Enabling daylight saving
4.3
IDA connections
4.2.13 Changing unit system
You can choose the unit system in the display: the metric system shows
temperature in °C and water pressure in bar. The imperial system shows
temperature in °F and pressure in psi.
1. Enter the main menu.
2. Select Settings.
3. Confirm the selection.
4. Select Change unit system.
5. Confirm the selection.
6. Turn the rotary dial to select Metric or Imperial.
7. Confirm the selection.
You can operate the IDA with the IDA app on a mobile device or with a
home automation application. This allows you to control the appliance(s) in
your installation when you are not near the IDA. You need a wi-fi network
and a mobile device with Apple iOS or Android to make the connection.
4.3.1
To be able to connect the IDA to your mobile device, you must first
connect the IDA to your wi-fi network.
Establishing the wi-fi connection
Page 27
4 Customisation
7726708 - v.01 - 18012019 27
When you start up the IDA for the first time, you enter automatically the
menu to connect to your wi-fi network. Before you start to set your wi-fi
connection you have to approve the Terms and Conditions.
See
Terms and conditions, page 43
During normal operation of the IDA you can decide to change or reconnect
to your wi-fi network at a later moment.
1. Enter the main menu.
2. Select Settings.
3. Confirm the selection.
4. Select Wi-fi.
5. Confirm the selection.
6. Accept the Terms and Conditions.
Important
The display only shows the option to accept the Terms and
Conditions when you declined them or when you reset the IDA to
default settings.
7. Read the Privacy Policy.
Important
The display only shows the Privacy Policy if it showed the option
to accept the Terms and Conditions.
8. Select your wi-fi network in the list of available networks.
9. Confirm the selection.
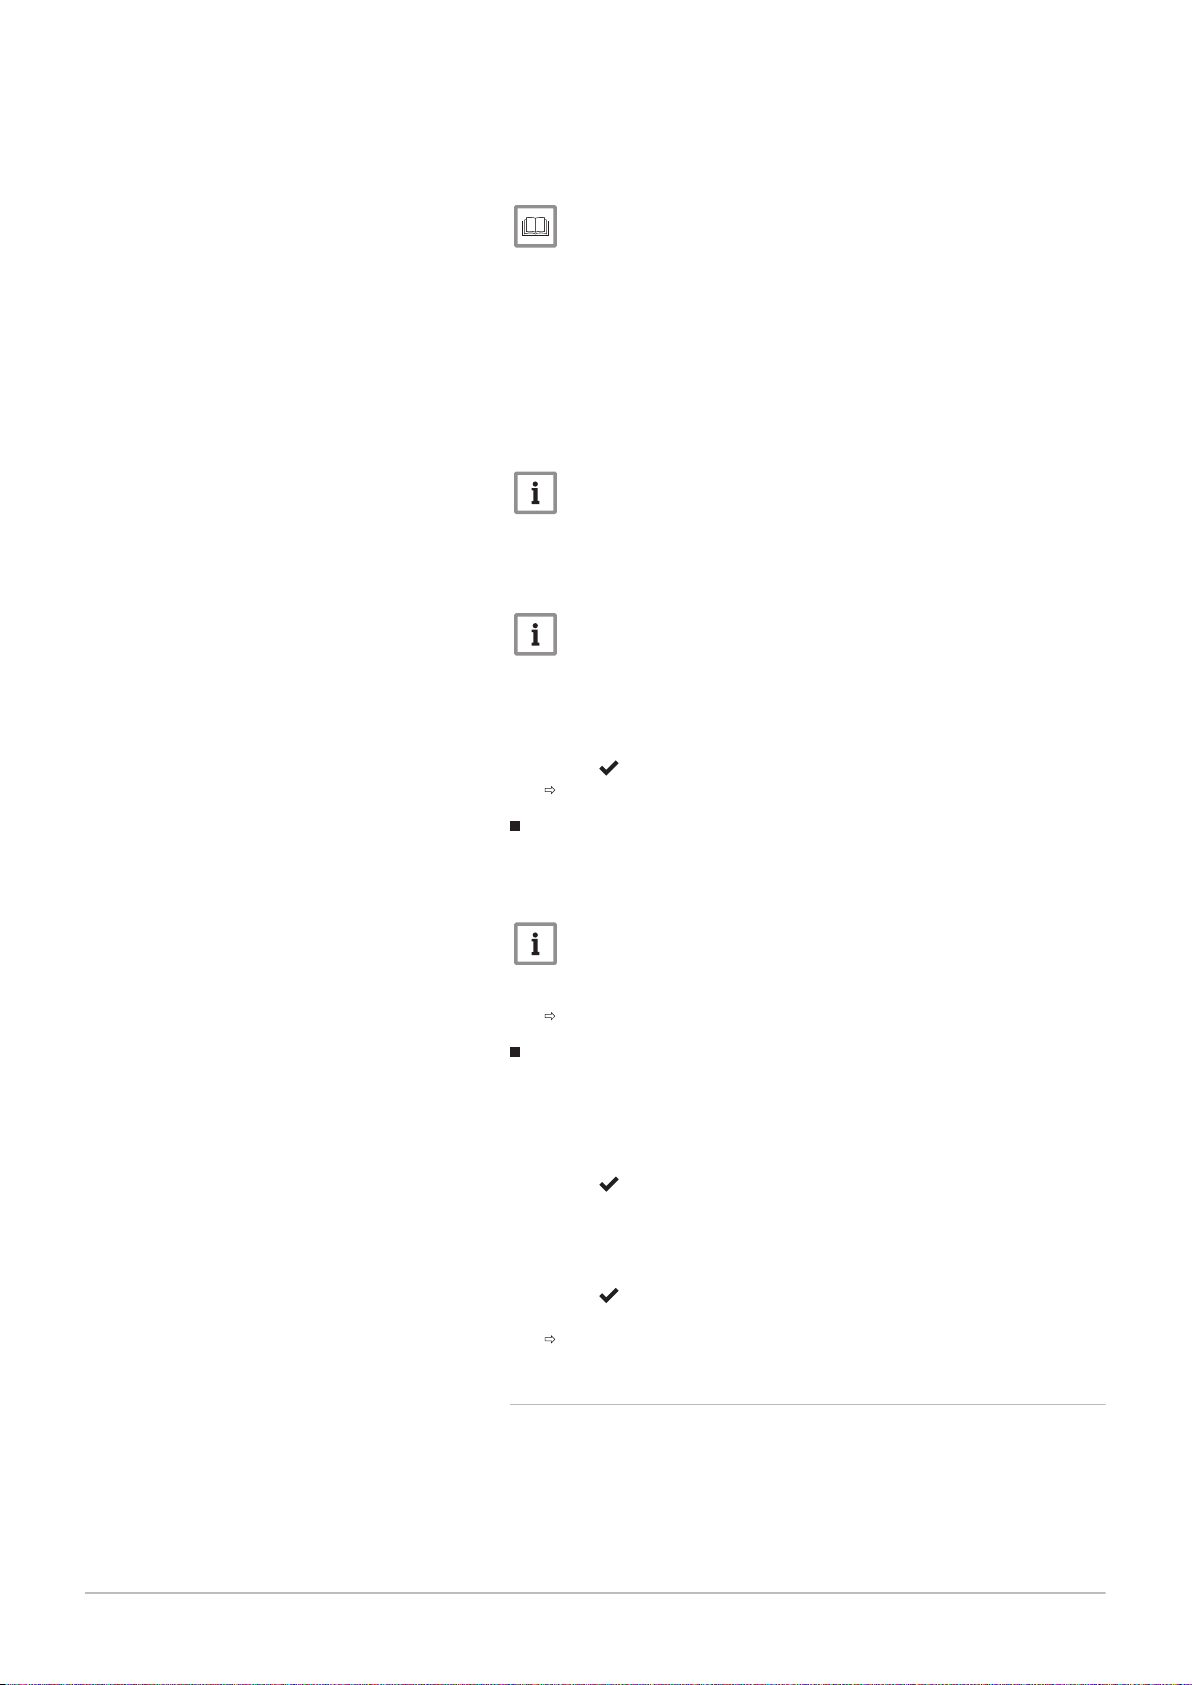
10. Enter the password with the rotary dial and the select button.
11. Select in the character selection menu to confirm the password.
The IDA is now connected to the wi-fi network.
Connecting the IDA to an access point
You can connect the IDA to an access point in your wi-fi network.
1. Select WPS Button in the list of available networks.
Important
If you select Back, the display shows the previous screen.
2. Activate the WPS on your router (if the router has this option).
The IDA is now automatically connected to the access point.
Connecting the IDA to a hidden network
You can connect to a hidden wi-fi network, if you know the name and
password.
1. Select Other... in the list in the list of available networks.
2. Enter the network name with the rotary dial and the select button.
3. Select in the character selection menu.
4. Confirm the selection to save the network name.
5. Select the security mode.
6. Confirm the selection.
7. Enter the password with the rotary dial and the select button.
8. Select in the character selection menu.
9. Confirm the selection to save the password.
The IDA is now connected to the hidden wi-fi network.
4.3.2
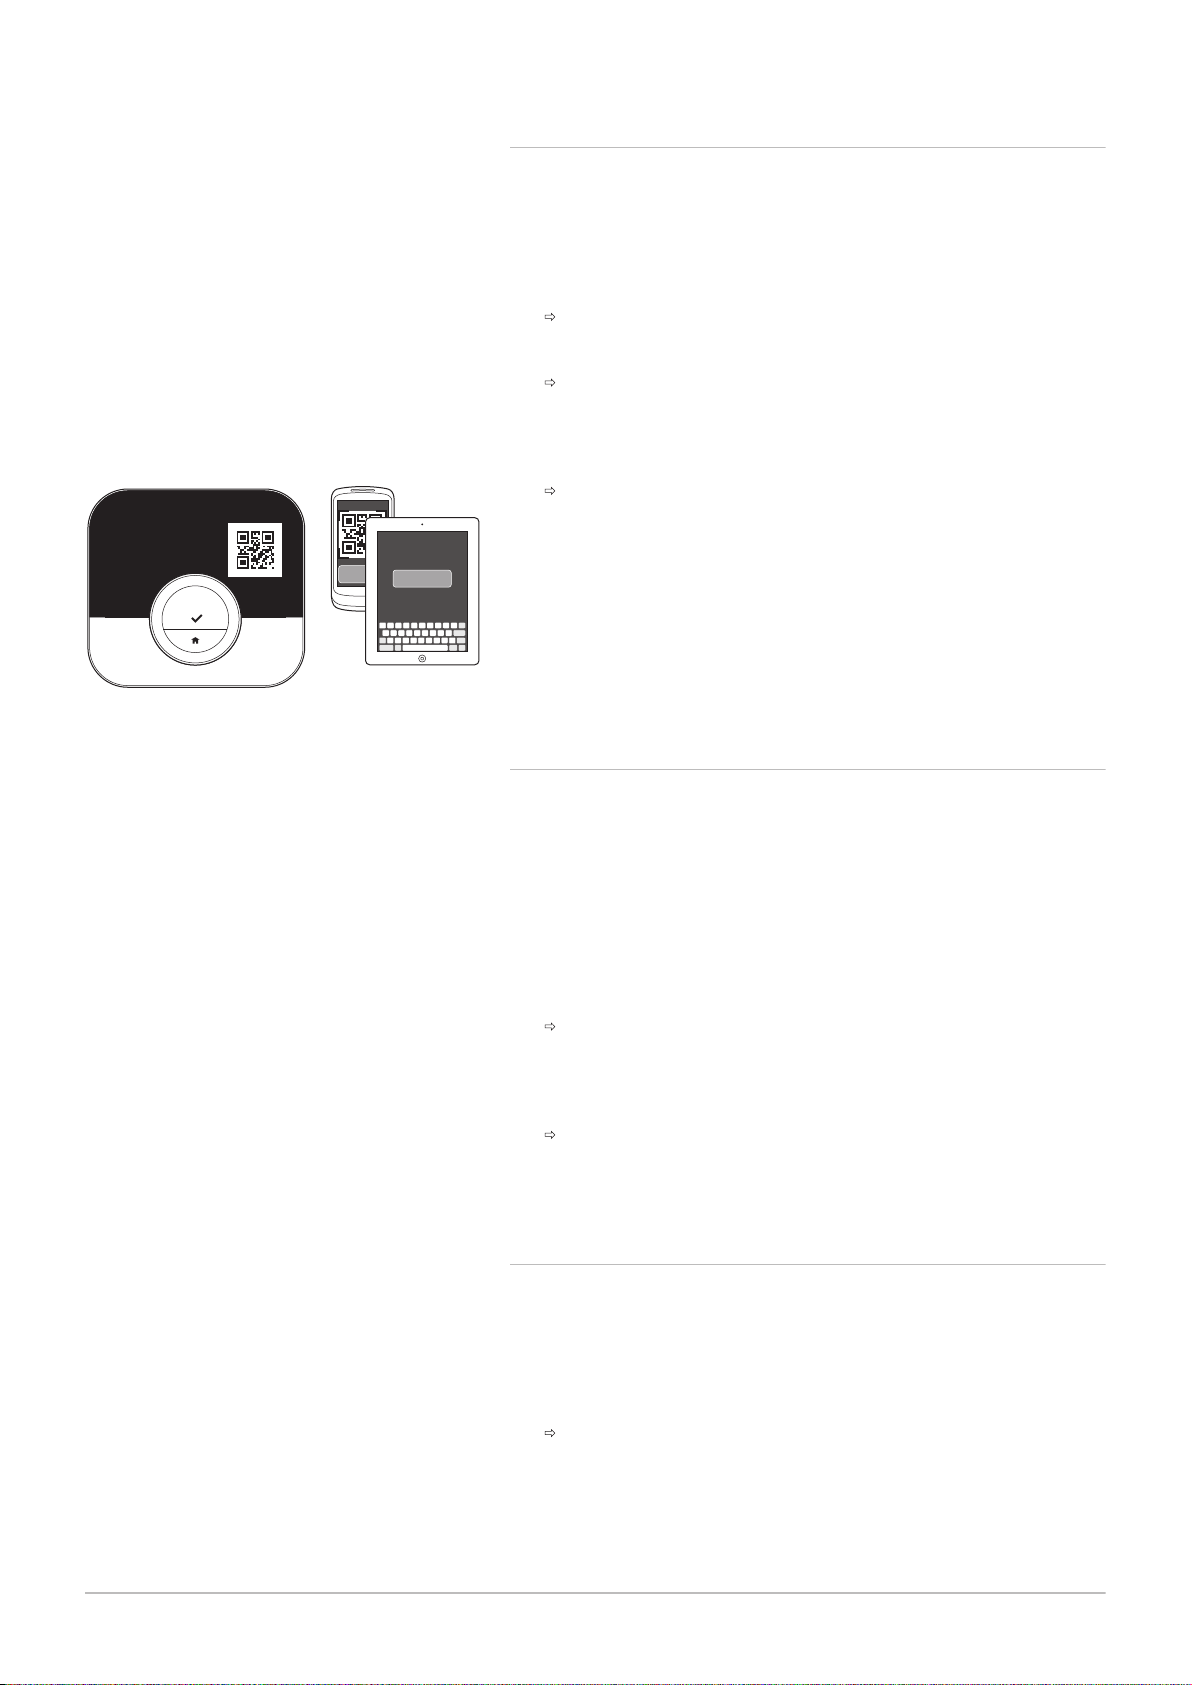
You can install the IDA app on your mobile device.
1. Download the free app in the App Store, Google Play or Mircosoft
2. Start the app and follow the instructions on your mobile device until
Downloading the app
Store. Refer to the information on the IDA box.
the app requests a registration code from the IDA.
Page 28
AD-3001128-01
SCAN
.?123
CODE...
....... .......
........ ........ ........ ........ ........ ........
........ ........
........ ........ : CODE
4 Customisation
28 7726708 - v.01 - 18012019
Fig.40
4.3.3 Connecting the app with the IDA
When you start up the IDA for the first time, you enter automatically the
menu to register your IDA app or home automation application. You need
an account based on your email address for the connection. During
normal operation of the IDA you can decide to connect or reconnect the
app with the IDA at a later moment.
1. Open the IDA app and create an account in the settings menu.
If you create a new account, you will receive an email message for
confirmation.
2. Read the email message.
Check your spam folder if the email does not appear in your inbox.
3. Confirm your account on the website.
4. Enter the main menu of the IDA.
5. Select Settings.
6. Select Register device or service.
The IDA displays a registration code and QR code.
7. Enter the registration code in the app or scan the QR code with your
mobile device.
8. Complete the registration process.
4.3.4 Connecting your home automation application with the IDA
When you start up the IDA for the first time, you enter automatically the
menu to register your app or home automation application. If your home
automation application can communicate with the IFTTT protocol, you can
connect it with the IDA. You need an account based on your email
address for the connection. During normal operation of the IDA you can
decide to connect or reconnect the home automation application with the
IDA at a later moment.
1. Open the home automation application and create an account for the
IDA.
2. Read the email message.
Check your spam folder if the email does not appear in your inbox.
3. Confirm your account on the website of the manufacturer of the IDA.
4. Enter the main menu of the IDA.
5. Select Settings.
6. Select Register device or service.
The IDA displays a registration code and a QR-code.
7. Enter the registration code in the home automation application or scan
the QR-code with your mobile device.
8. Complete the registration process.
4.3.5 Registering installer access
If you want your installer to make any changes, you can allow the installer
to log in to your device.
1. Enter the main menu.
2. Select Settings.
3. Select the submenu Register installer access.
4. Confirm the installer access.
This gives your installer access for up to 72 hours.
Page 29
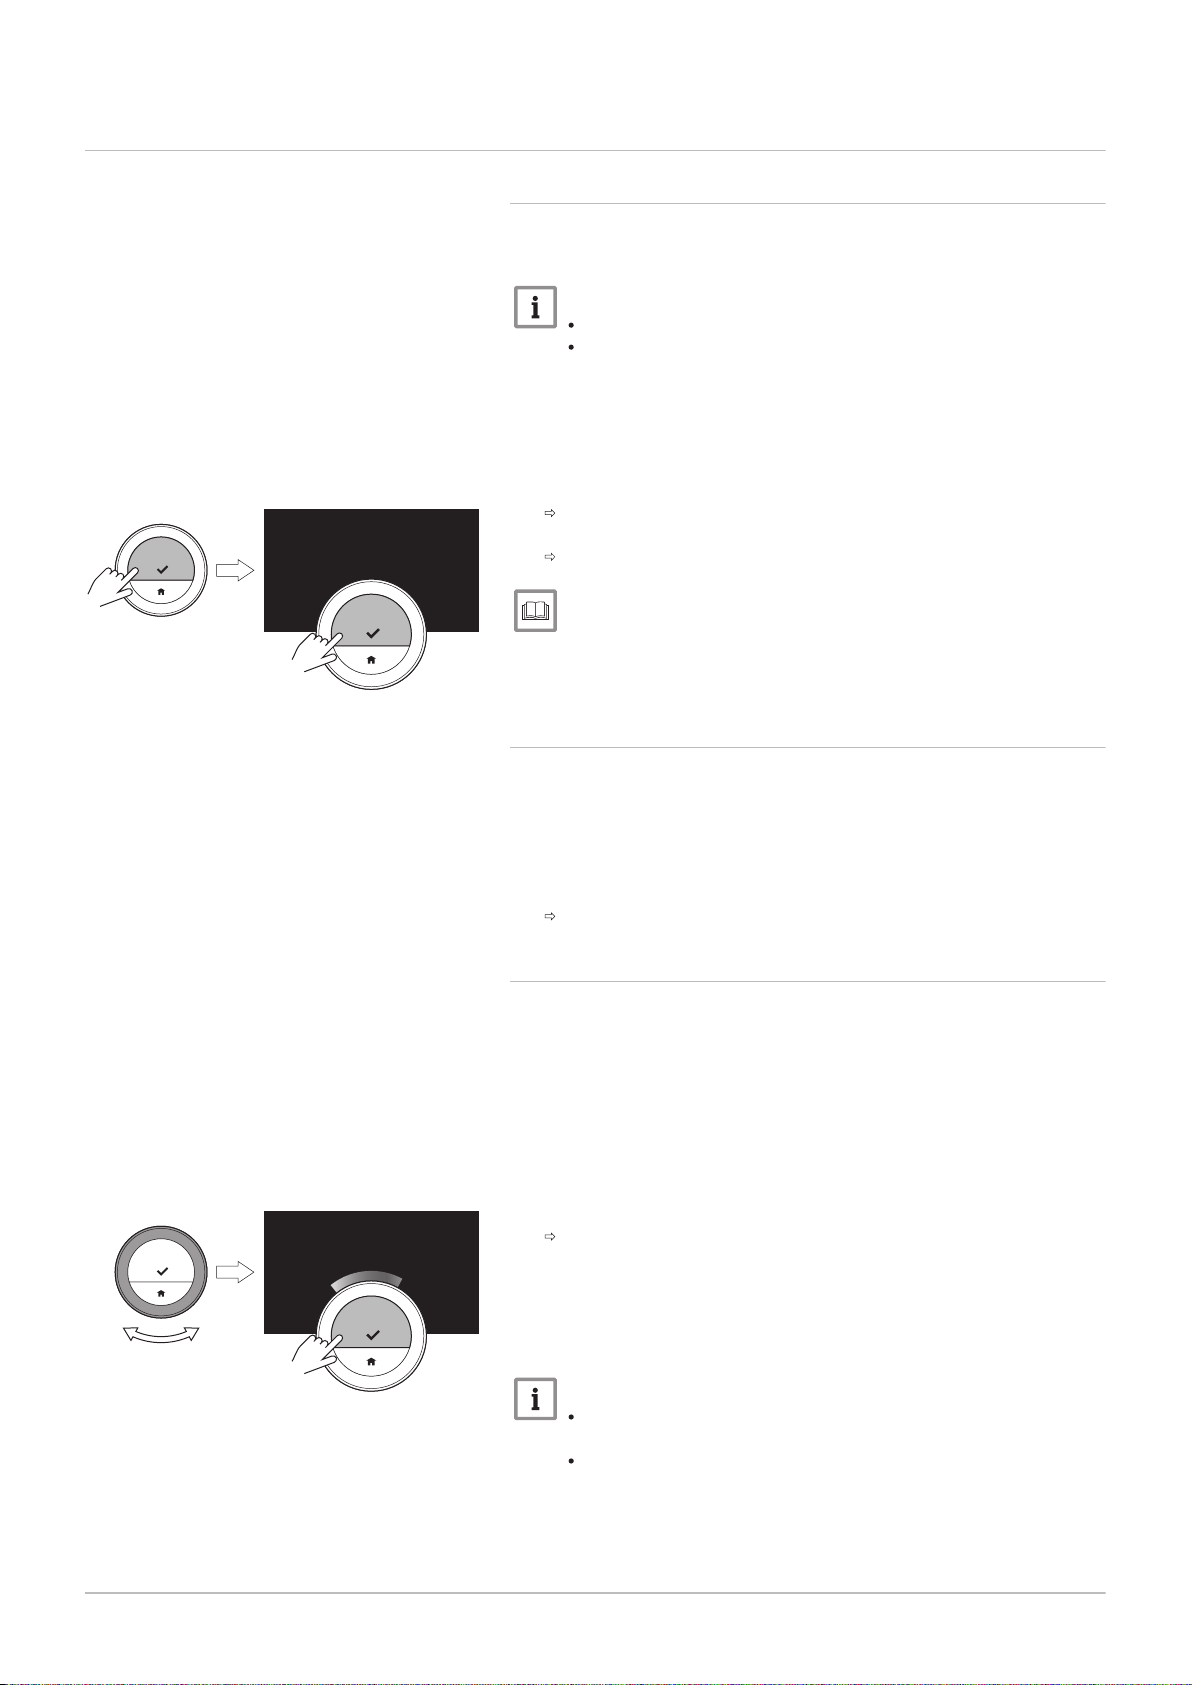
4.4 Advanced settings
AD-3001012-01
<1
bienvenido
welkom
welcome
benvenuto
velkommen
willkommen
bienvenue
<1
AD-3001252-01
....... ....... : 0.0 ..
<1
....... ....... : 0.0 ..
7726708 - v.01 - 18012019 29
Fig.41
4 Customisation
4.4.1 Resetting to default settings
You can reset most of the IDA settings to their default settings at the same
time.
Important
All connection settings for communication will be deleted too!
The temperature schedules, control mode and holiday period
will not be reset.
1. Enter the main menu.
2. Select Settings.
3. Select the submenu Reset to default settings.
4. Select Reset.
5. Confirm the selection.
The display will show ‘welcome’ in all languages.
6. Press the select button to continue.
The setup procedure will start.
For more information, see
Setup procedure, page 41
Fig.42
4.4.2
Check for software update
If your IDA is connected to Wi-Fi, the internet and the server, software will
be updated automatically. It’s possible to manually check the status of the
software:
1. Enter the main menu.
2. Select Settings.
3. Select the submenu Check for software update.
The status of the software appears on the screen.
4.4.3 Temperature calibration
You can manually calibrate the temperature if the IDA displays a
temperature that does not correspond with the actual room temperature.
This procedure should normally not be necessary.
1. Wait for at least 30 minutes after installation of the IDA.
2. Measure the actual room temperature.
3. Enter the main menu.
4. Select Settings.
5. Confirm the selection.
6. Select Temperature calibration.
7. Confirm the selection.
The display shows the temperature measured by the IDA as
Temperature detected.
8. If the detected temperature does not match with the temperature you
have measured: turn the rotary dial to change the temperature at
Calibrate this temperature to.
9. Confirm the change.
Important
It may take some time before the IDA shows the new offset on
the Current Temperature.
The new offset will be used over the entire temperature range.
Page 30
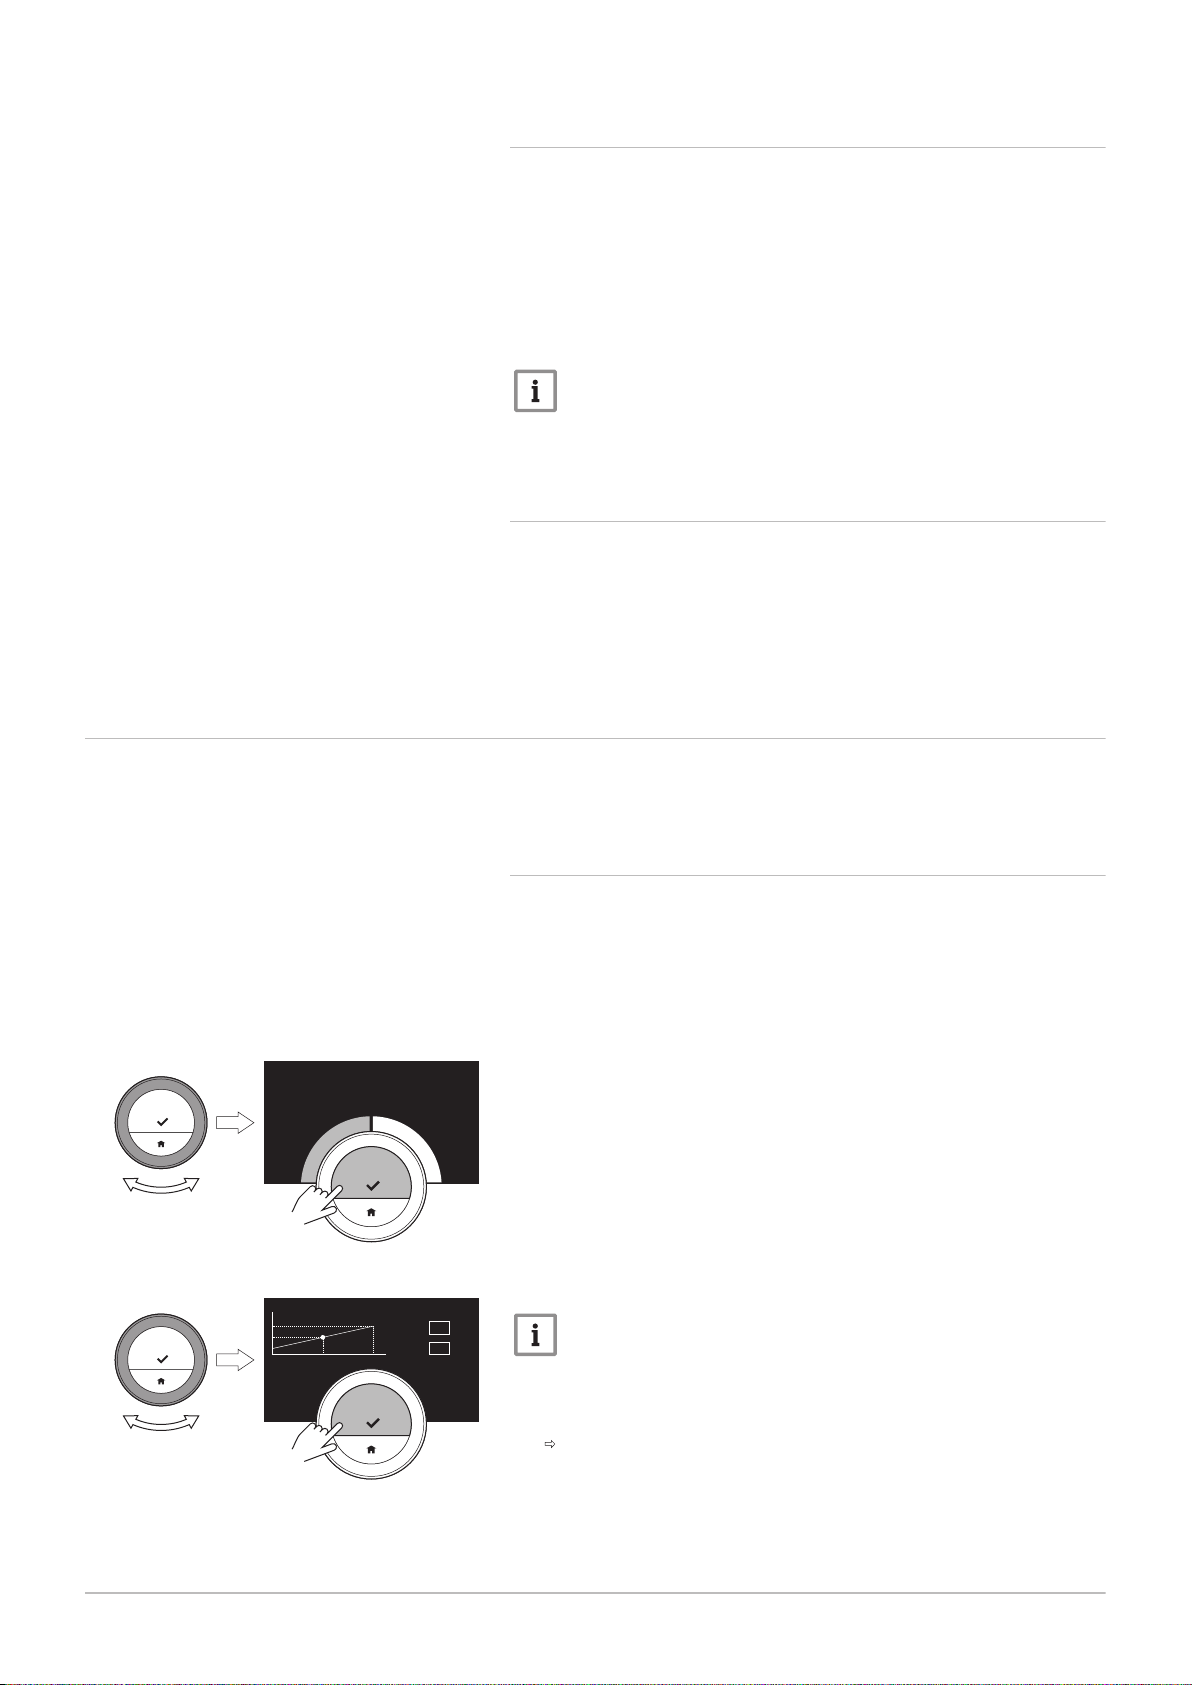
AD-3001006-01
....... .......
....... ....... ....... ....... ....... ....... ....... ....... ....... .......
.
.
.
|
.
.
.
}
<1
AD-3001253-01
....
..... :
....
..... :
....... : .. ..
....... : .. ..
.......
<1
4 Customisation
30 7726708 - v.01 - 18012019
4.4.4 Activating Preheat
You can choose to preheat the room or a zone for a set period to give it a
set temperature at the start time of the scheduled heating period.
1. Enter the main menu.
2. Select Settings.
3. Confirm the selection.
4. Select Pre heat.
5. Confirm the selection.
6. Turn the rotary dial to change the preheat period.
Important
If you turn the rotary dial to 0 minutes, the preheat function is
deactivated.
7. Confirm the change.
4.4.5 Setting the threshold for auto mode
You can set the threshold temperature for switching between heating
and/or cooling.
1. Enter the main menu.
2. Select Settings.
3. Select RedRoomTempCool Zone.
4. Use the rotary dial to change the threshold setpoint.
4.5 Installer settings
Fig.43
Fig.44
When you enter the Installer menu, the display shows a warning that the
settings in the Installer Menu may affect the performance of your
appliance. It may be a better idea that your installer does these settings.
4.5.1
Changing the heating curve
The heating curve relates the water temperature of the heating system to
the outside temperature. With a good heating curve the installation can
maintain a constant temperature in the room.
1. Enter the main menu.
2. Select Installer.
3. Confirm the selection.
4. Select Yes to continue.
5. Confirm the selection.
6. Select Heating Curve.
Important
The display shows Heating Curve only if your installation is fit for
this option.
7. Confirm the selection.
The display shows the heating curve diagram.
8. Short-press the select button to select the central curve point.
9. Use the rotary dial to move the central curve point over the oblique
line in order to see the outside temperatures and the related water
temperatures in the bottom-left corner.
10. Short-press the select button to deselect the central curve point.
Page 31
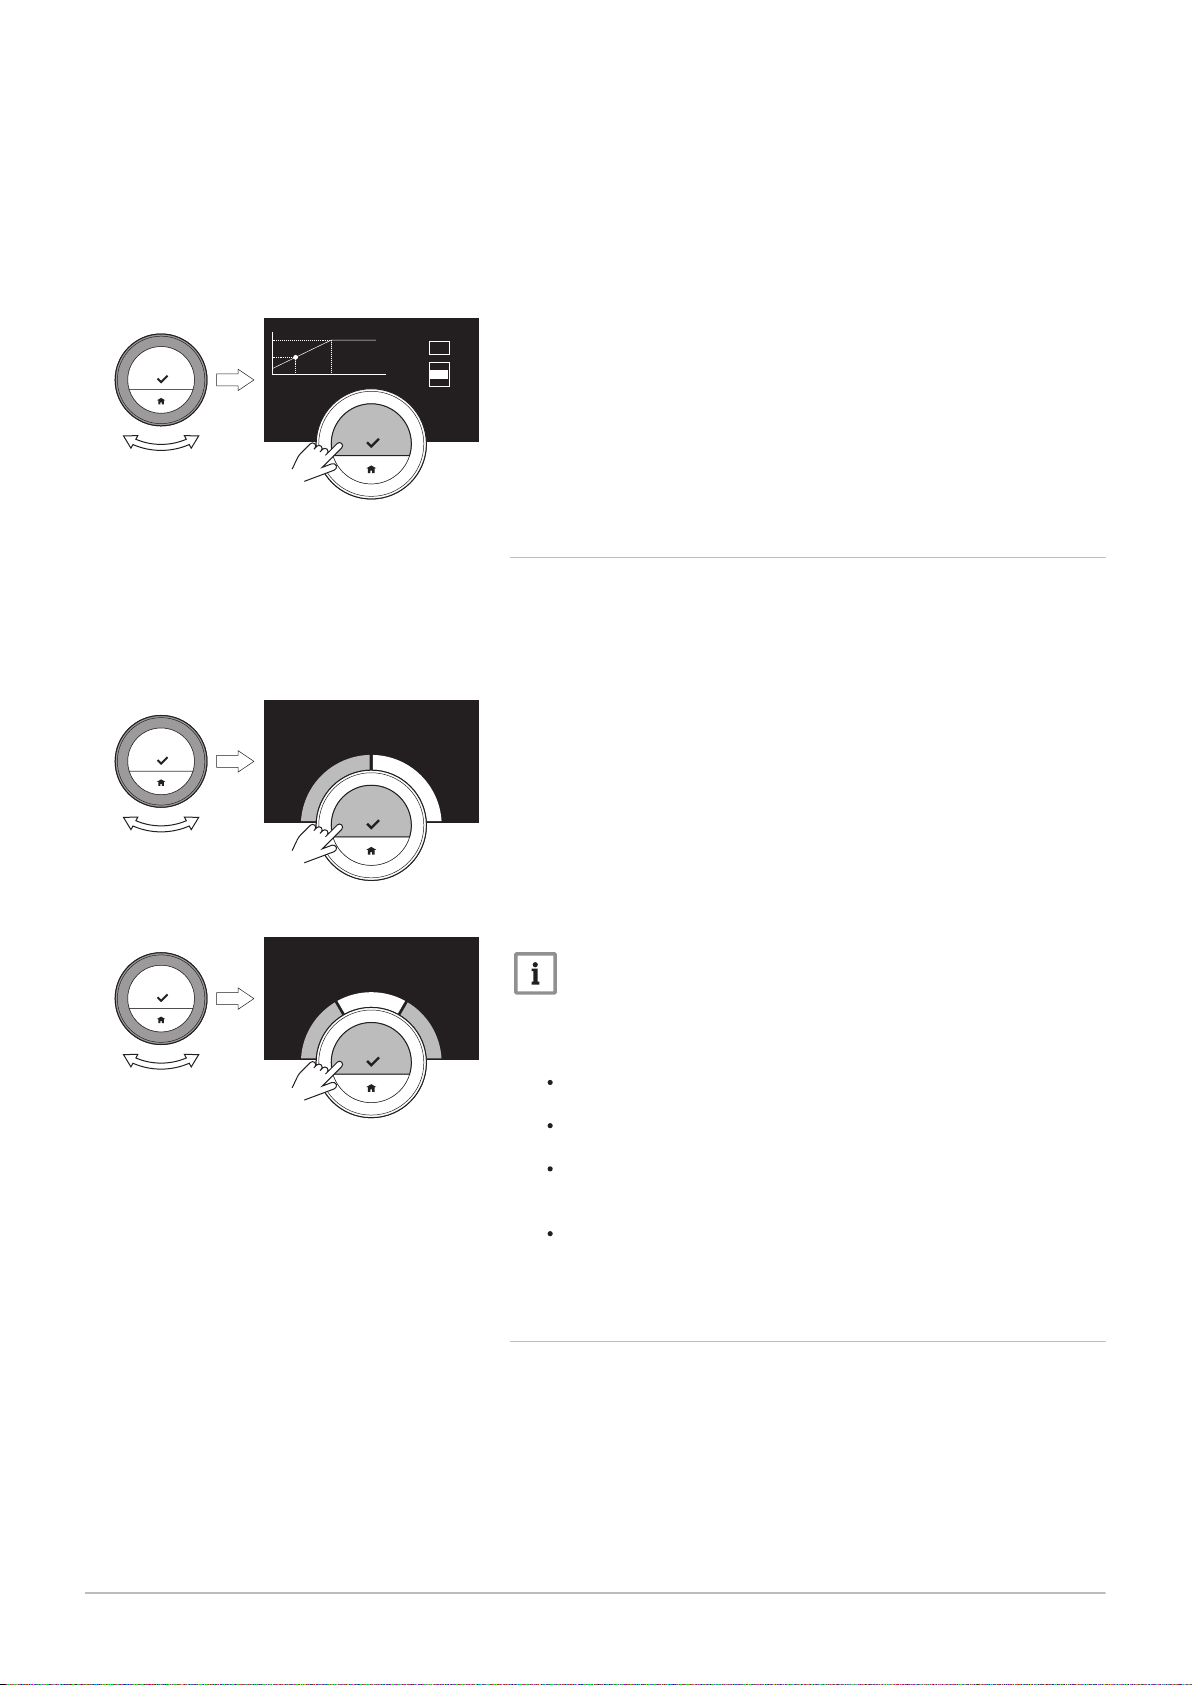
Fig.45
AD-3001254-01
....
..... :
....
..... :
....... : .. ..
....... : .. ..
.......
<1
AD-3001006-01
....... .......
....... ....... ....... ....... ....... ....... ....... ....... ....... .......
.
.
.
|
.
.
.
}
<1
AD-3001255-01
....... .......
....... ....... ....... ....... ....... ....... ....... ....... ....... .......
....... ....... ....... ....... ....... ....... .......
.
.
.
.
.
.
.
.
.
<1
7726708 - v.01 - 18012019 31
Fig.46
4 Customisation
11. Use the rotary dial to select Min: (the minimum water temperature of
the appliance).
12. Confirm the selection.
13. Use the rotary dial to change the temperature.
14. Confirm the change.
15. Use the rotary dial to select Slope: (the steepness of the heating
curve).
16. Confirm the selection.
17. Use the rotary dial to change the steepness.
18. Confirm the change.
19. Use the rotary dial to select Save at the bottom-right corner of the
display.
20. Confirm to save the changes in the heating curve.
4.5.2 Setting the control strategy
The control strategy determines the way in which the IDA controls the
heating of the room or a zone.
1. Enter the main menu.
2. Select Installer.
3. Confirm the selection.
4. Select Yes to continue.
5. Confirm the selection.
Fig.47
6. Select Control strategy.
Important
The display shows Control strategy only if your installation is fit for
this option.
7. Confirm the selection.
8. Select the Control strategy that you want:
Room temperature: the IDA controls the heating on the basis of the
room thermostat.
Outside temperature: the IDA controls the heating on the basis of
the outside thermometer.
Room & Outside: the IDA controls the heating on the basis of a mix
of the outside thermometer and for a minor part on the basis of the
room thermostat.
Automatic: the IDA chooses one of the three control strategies on
the basis of the connected sensors.
9. Confirm the selection.
4.5.3 Setting the heat up speed
The heat up speed determines how slow or fast the installation will heat up
the room or zone at the start time of the scheduled heating period.
1. Enter the main menu.
2. Select Installer.
Page 32
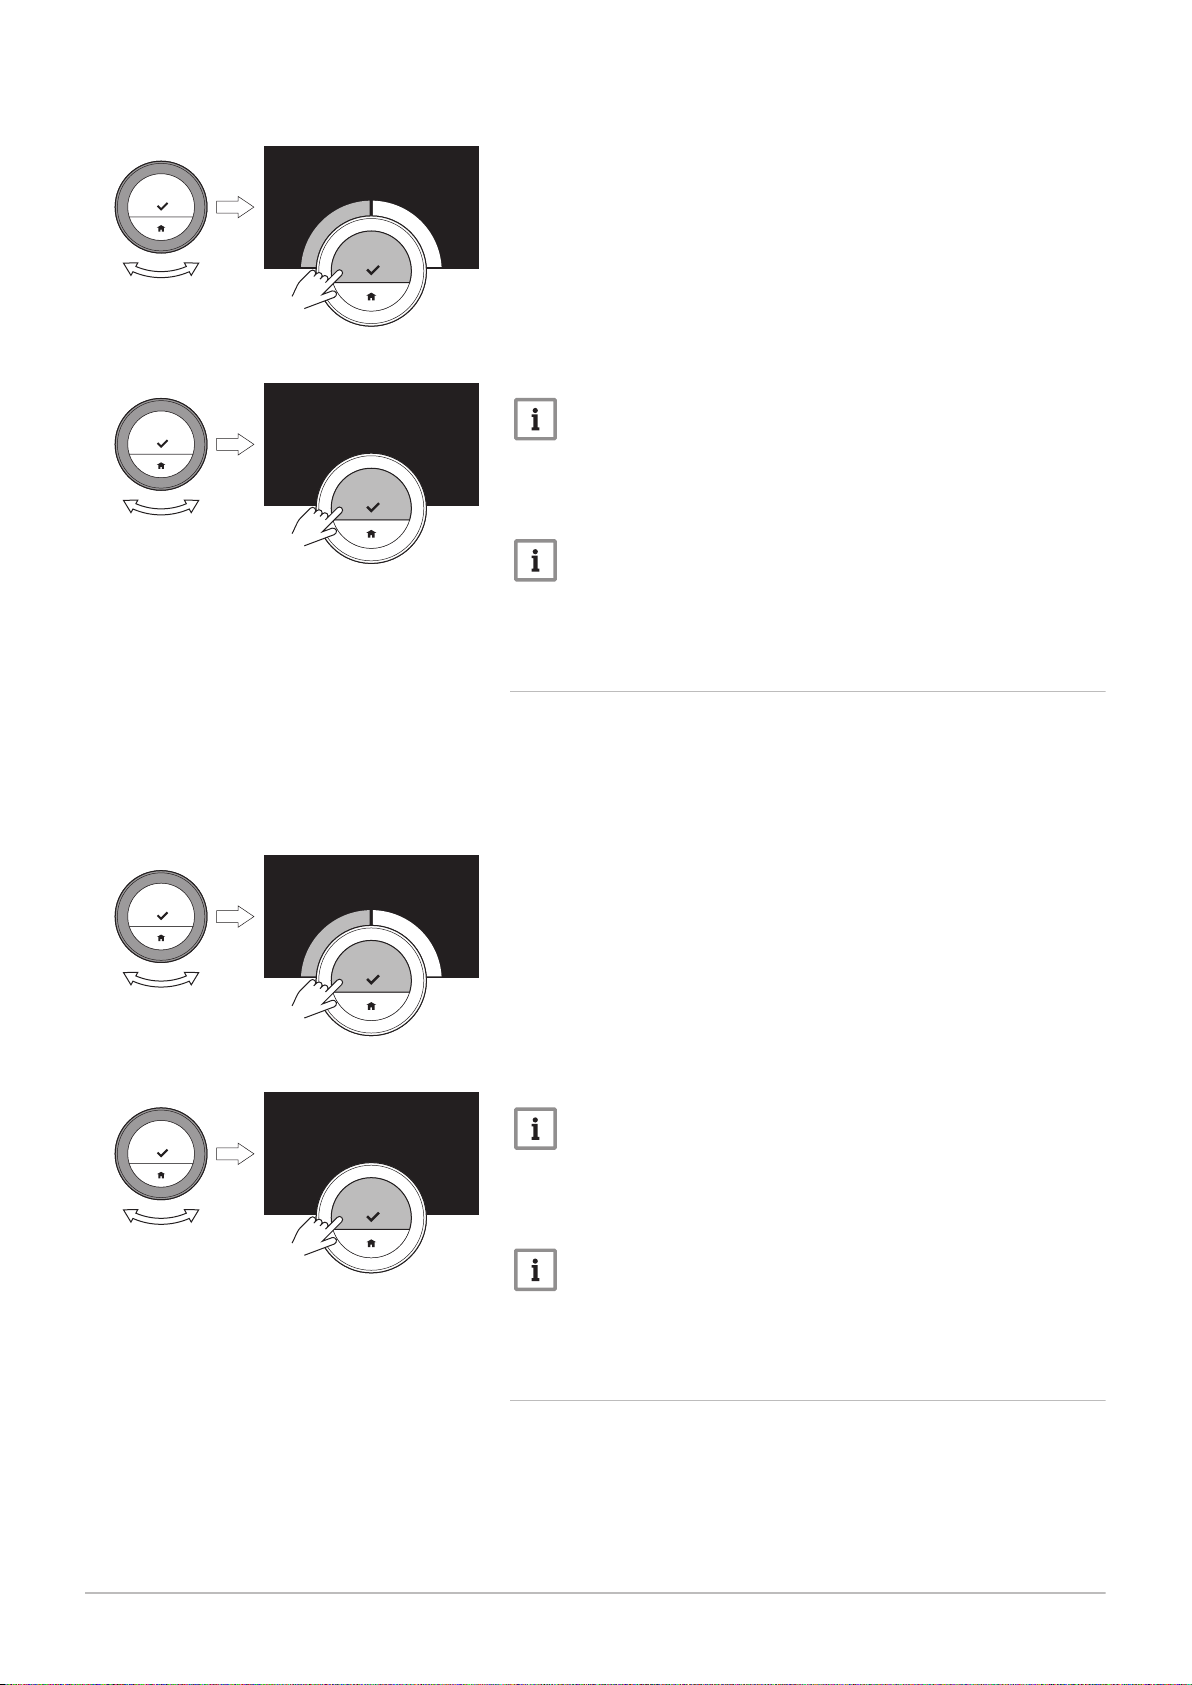
AD-3001006-01
....... .......
....... ....... ....... ....... ....... ....... ....... ....... ....... .......
.
.
.
|
.
.
.
}
<1
AD-3001256-01
....... .......
.......
<1
AD-3001006-01
....... .......
....... ....... ....... ....... ....... ....... ....... ....... ....... .......
.
.
.
|
.
.
.
}
<1
AD-3001256-01
....... .......
.......
<1
4 Customisation
32 7726708 - v.01 - 18012019
Fig.48
Fig.49
3. Confirm the selection.
4. Select Yes to continue.
5. Confirm the selection.
6. Select Heatup speed.
Important
The display shows Heatup speed only if your installation is fit for
this option.
7. Confirm the selection.
8. Select the heat up speed that you want.
Important
The list of available speed indications depends on the appliance in
your installation.
9. Confirm the selection.
4.5.4 Setting the cool down speed
Fig.50
Fig.51
The cool down speed determines how slow or fast the installation will cool
down the room or zone at the switch time in the cooling schedule.
1. Enter the main menu.
2. Select Installer.
3. Confirm the selection.
4. Select Yes to continue.
5. Confirm the selection.
6. Select Cool down speed.
Important
The display shows Cool down speed only if your installation is fit
for this option.
7. Confirm the selection.
8. Select the cool down speed that you want.
Important
The list of available speed indications depends on the appliance in
your installation.
9. Confirm the selection.
4.5.5
Setting the minimum central heating power
The minimum central heating power determines what is the lowest heating
capacity of your appliance.
1. Enter the main menu.
2. Select Installer.
3. Confirm the selection.
Page 33
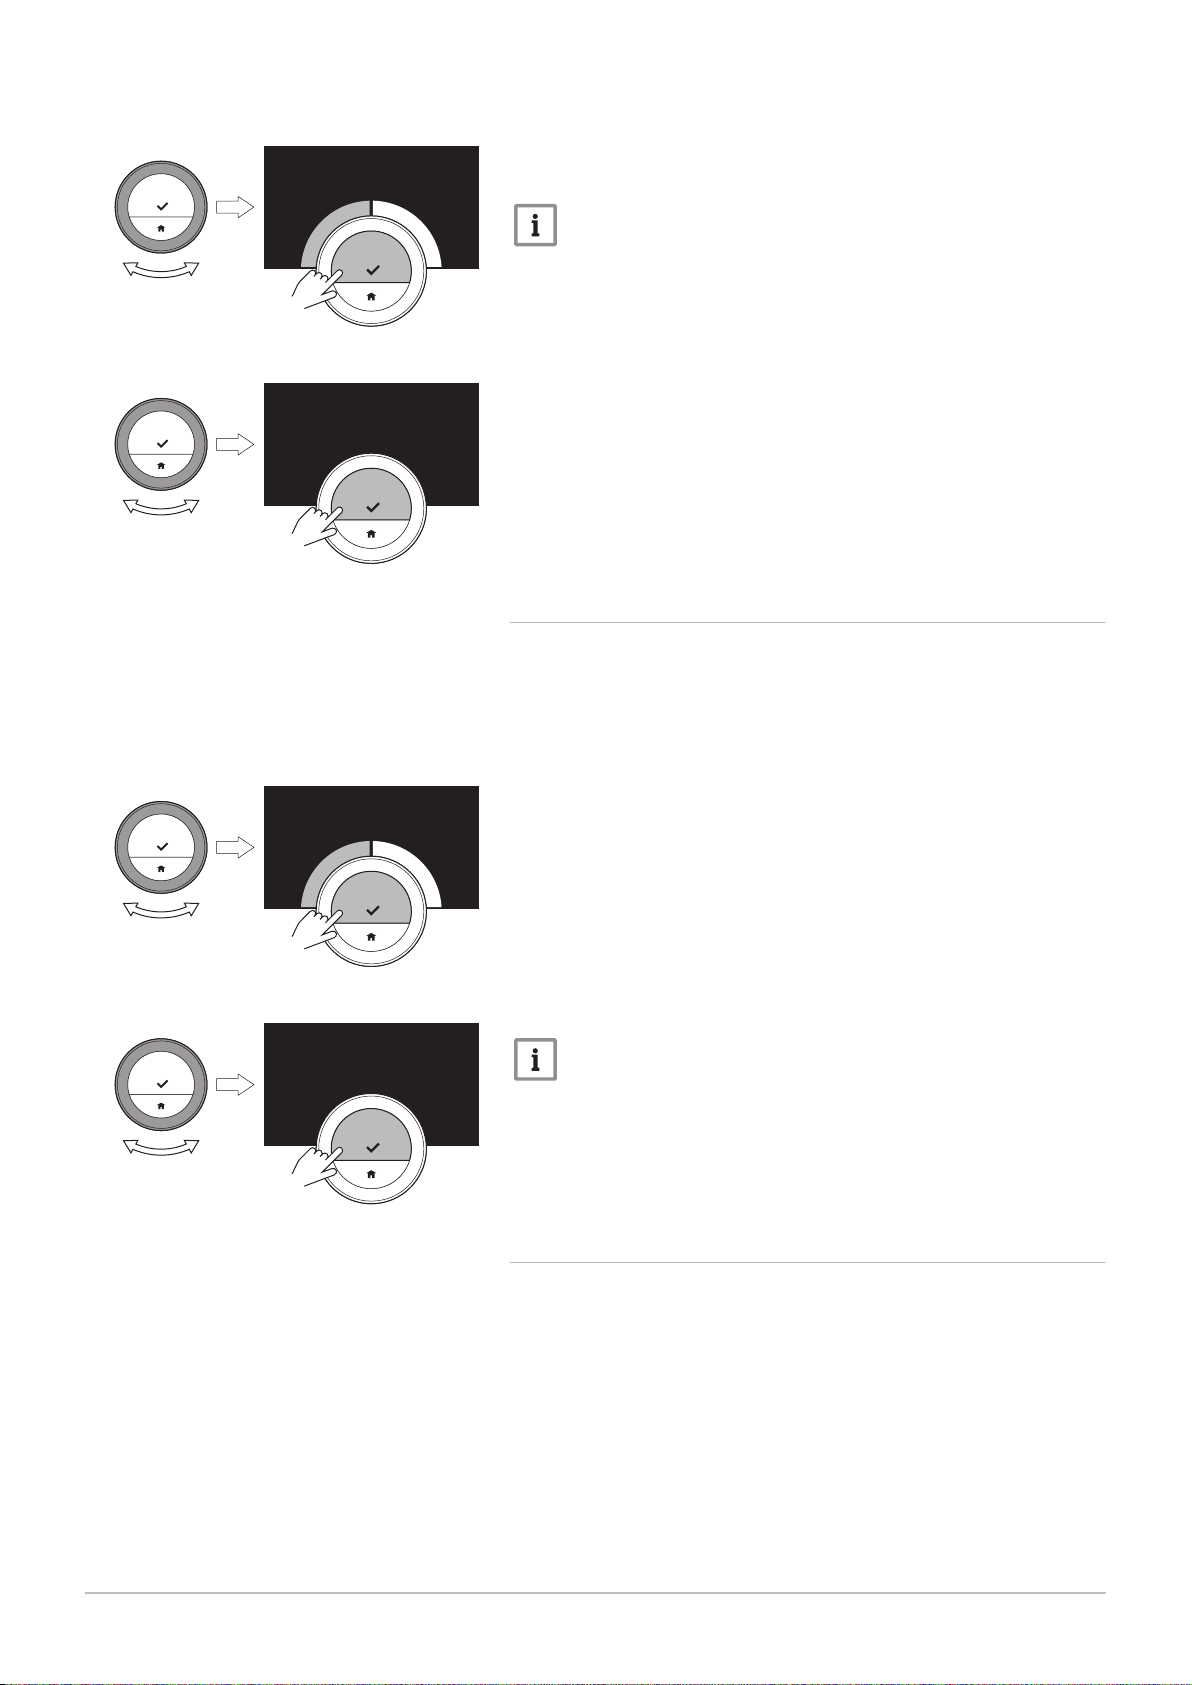
AD-3001006-01
....... .......
....... ....... ....... ....... ....... ....... ....... ....... ....... .......
.
.
.
|
.
.
.
}
<1
AD-3001257-01
....... .......
.. .. kW
<1
AD-3001006-01
....... .......
....... ....... ....... ....... ....... ....... ....... ....... ....... .......
.
.
.
|
.
.
.
}
<1
AD-3001257-01
....... .......
.. .. kW
<1
4 Customisation
7726708 - v.01 - 18012019 33
Fig.52
Fig.53
Fig.54
4. Select Yes to continue.
5. Confirm the selection.
6. Select Min. power.
Important
The display shows Min. power only if your installation is fit for this
option.
7. Confirm the selection.
8. Turn the rotary dial to select the number of kW.
9. Confirm the selection.
4.5.6
Setting the maximum central heating power
The maximum central heating power determines what is the highest
heating capacity of your appliance.
1. Enter the main menu.
2. Select Installer.
3. Confirm the selection.
4. Select Yes to continue.
5. Confirm the selection.
Fig.55
6. Select CH Max. power.
Important
The display shows CH Max. power only if your installation is fit for
this option.
7. Confirm the selection.
8. Turn the rotary dial to select the number of kW.
9. Confirm the selection.
4.5.7
Setting maximum domestic hot water power
The maximum domestic hot water power determines what is the highest
capacity of your appliance for producing hot tap water.
1. Enter the main menu.
2. Select Installer.
3. Confirm the selection.
Page 34
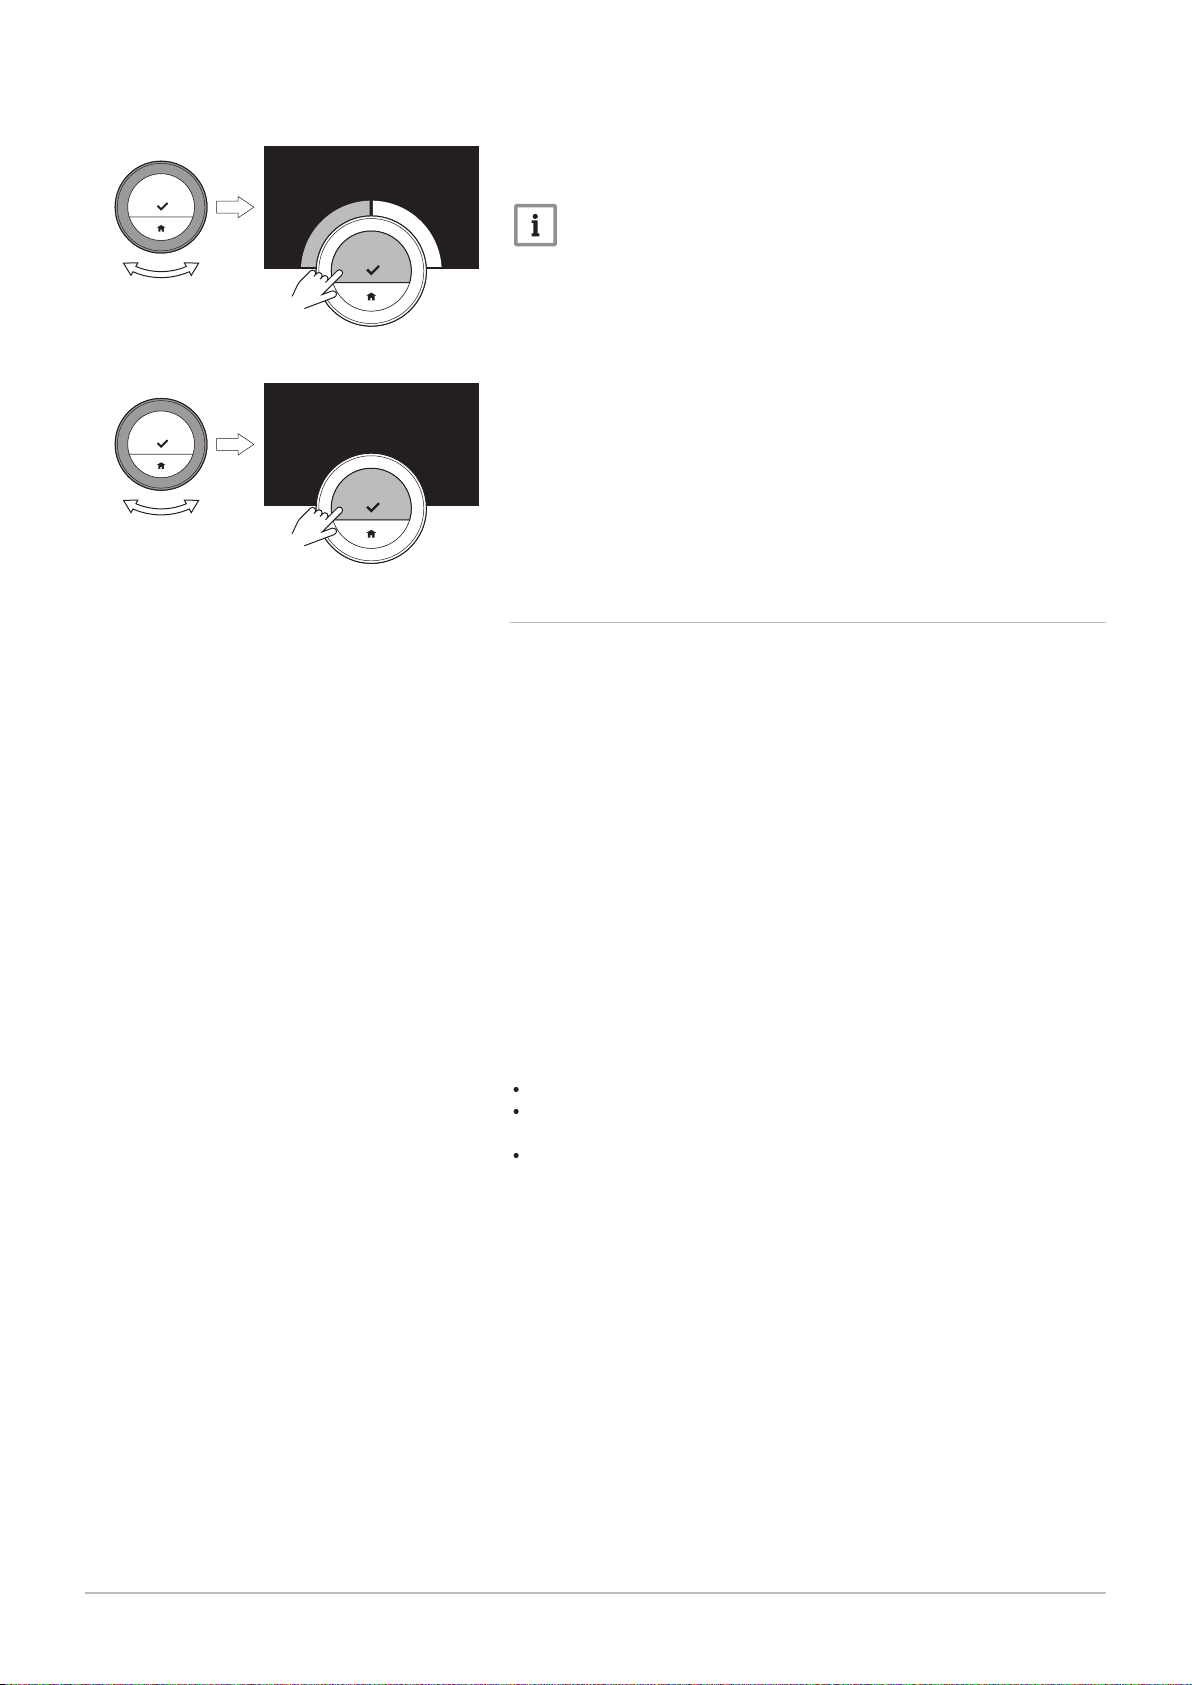
AD-3001006-01
....... .......
....... ....... ....... ....... ....... ....... ....... ....... ....... .......
.
.
.
|
.
.
.
}
<1
AD-3001257-01
....... .......
.. .. kW
<1
4 Customisation
34 7726708 - v.01 - 18012019
Fig.56
Fig.57
4. Select Yes to continue.
5. Confirm the selection.
6. Select DHW Max. power.
Important
The display shows DHW Max. power only if your installation is fit
for this option.
7. Confirm the selection.
8. Turn the rotary dial to select the number of kW.
9. Confirm the selection.
4.5.8
Register predictive maintenance
The installler can register the IDA to the central server. The server will
receive data from the IDA and the appliance. At some moment the server
will give a signal to the installer that he should execute a timely
maintenance activity. In this way good functioning of the appliance is
ensured and unnecessary costs for the user are prevented.
Instruction for the installer:
1. Enter the main menu.
2. Select Settings.
3. Confirm the selection.
4. Select Register predictive maintenance.
5. Read the registration code or scan the QR code.
6. Register the code in the app connected to the central server.
Once a month the IDA will send data about the functioning of the
appliance to the server. For instance the number of operating hours, water
pressure, temperature, etc. The IDA will send instantly a message to the
server when the appliance has an error. The server will send a signal to
the installer when maintenance is necessary.
The data and messages are only sent to the server if:
The appliance is fit for this option.
The user has agreed on the data exchange after reading the Privacy
Policy.
The user has connected the IDA to the app.
Page 35
5 Messages and data
AD-3001026-01
7726708 - v.01 - 18012019 35
5 Messages and data
This chapter helps you with navigating to information and data of the
thermostat and system.
Next chapter: Installation, page 39
Previous chapter: Customisation, page 21
First chapter: Manual menu, page 5
5.1
5.2
Outside temperature
You can read the outside temperature if an external temperature sensor is
connected to your installation.
1. Enter the main menu.
2. Select Outside Temperature.
3. Confirm the selection.
The display shows the current outside temperature.
Energy consumption
The IDA can display the energy that was used for heating and hot tap
water supply from the moment of first use of the appliance.
Important
This menu item is only available for combi appliances. An
appliance that can produce both central heating water and hot
tap water.
This menu item is not available for appliances with an on/off
communication protocol.
1. Enter the main menu.
2. Select Energy Consumption.
3. Confirm the selection.
The IDA will now display the current energy consumption.
5.3 Installer details
5.4
Appliance data
The IDA can display the name and telephone number of the installer for
ease of contact.
1. Enter the main menu.
2. Select Installer Contact Details.
The IDA will now display the contact details of your installer.
Important
The installer contact details can be edited in the app on your
mobile device.
The IDA can display some appliance data from your heating system. If
your appliance supports this function, you can read the water pressure
and water temperature.
Important
This menu item is not available for appliances with an on/off
communication protocol.
1. Enter the main menu.
2. Select Heater.
3. Select the submenu Water Pressure or Current Boiler Temperature.
The IDA will now display the appliance data.
Page 36
5 Messages and data
36 7726708 - v.01 - 18012019
5.5 Technical information
The IDA can display various built-in properties and parameters.
1. Enter the main menu.
2. Select Technical Information.
3. Confirm the selection.
The display shows:
Tab.7 Device Information
Serial Number:
Software Version:
Wifi SSID:
Wifi Connection:
Internet Connection:
Server Connection:
Register Status:
IP Address:
MAC Address:
Server up time:
Wifi up time:
date:
time:
Time server:
5.6 Error messages overview
Tab.8 Appliance Information
Name:
Software Version:
Connection:
date:
time:
Tab.9 Miscellaneous
License Information Open
Logging Sent to Server
You can open the error messages list from the main menu to get an
overview of all error messages.
1. Enter the main menu.
2. Select Error History.
3. Confirm the selection.
The display shows the list of error messages.
Important
The list contains the complete history of error messages.
Only one error message can be active at a time and it is
situated at the top of the list.
Page 37
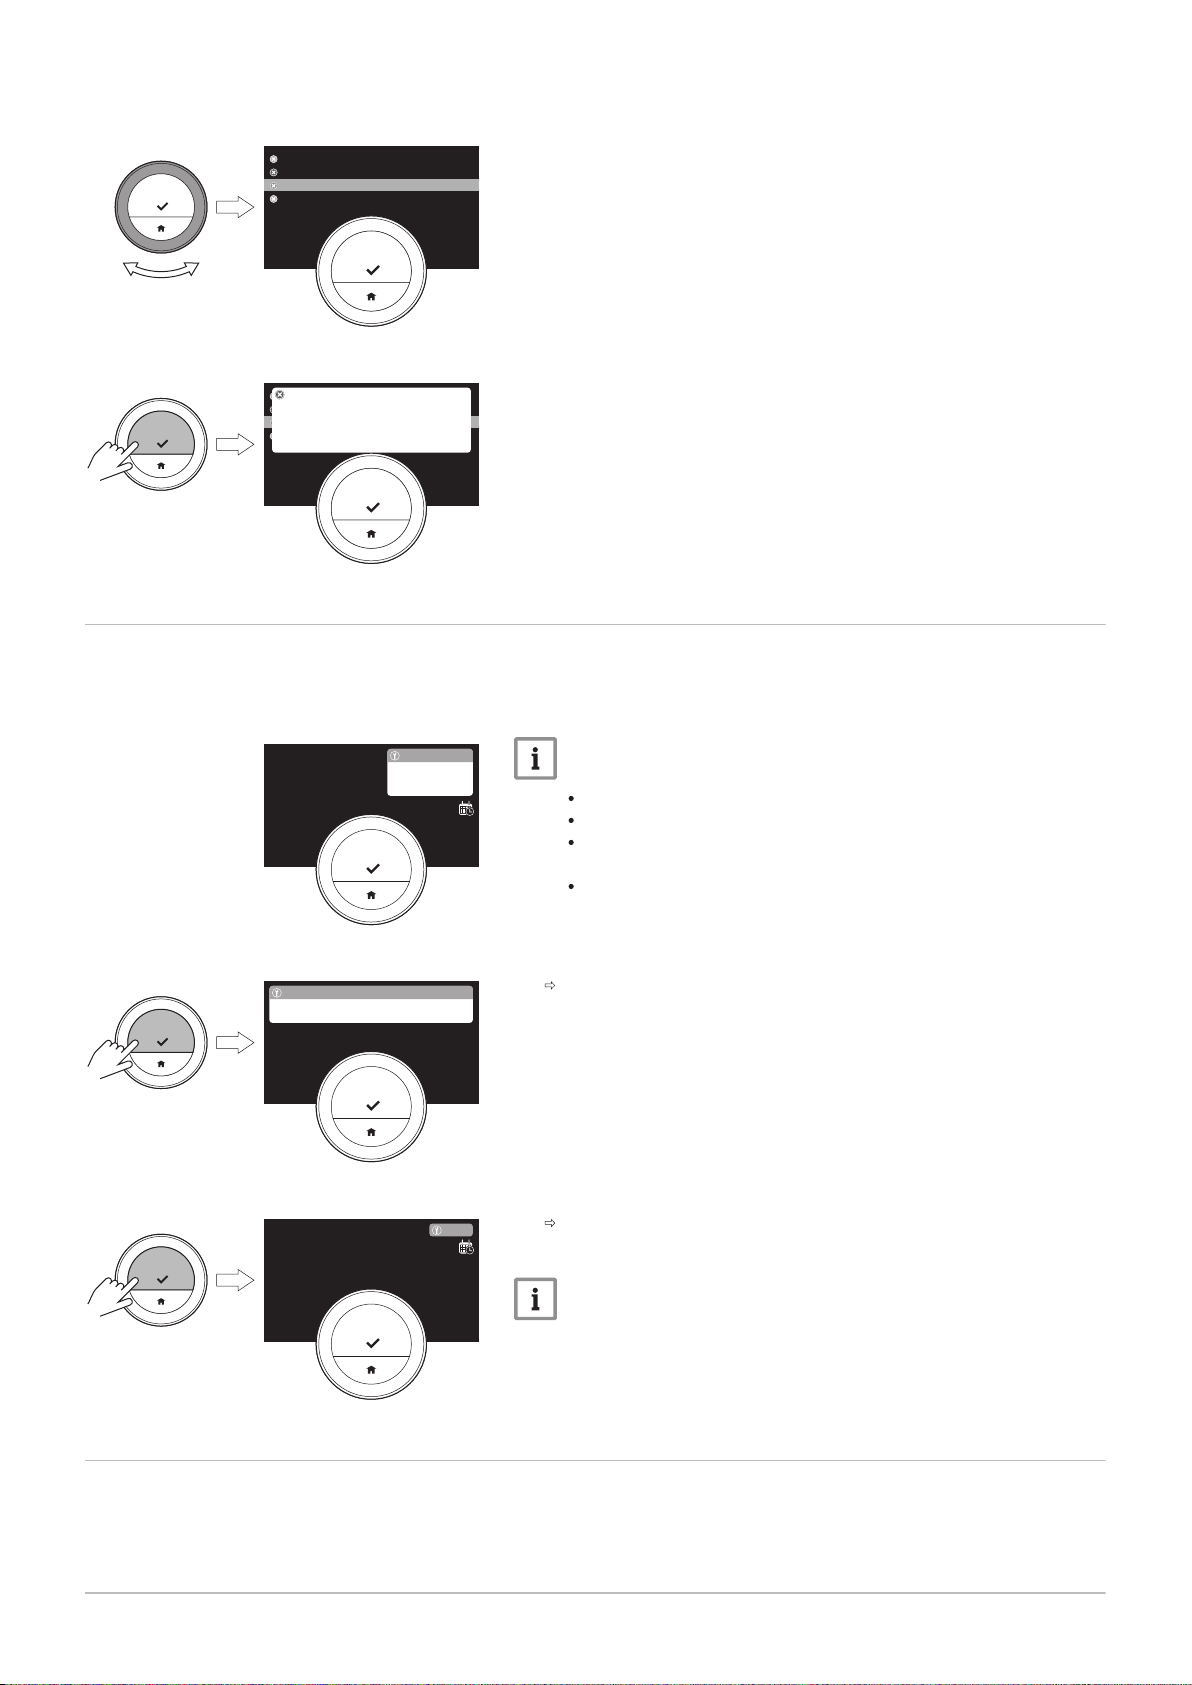
AD-3001013-01
1 E.09.14 ... ... 04 ... 2017
1 A.02.04 ... ... 03 ... 2016
1 E.09.14 ... ... 02 ... 2015
1 E.09.14 ... ... 01 ... 2014
AD-3001014-01
1 E.09.14 ... ... 04 ... 2017
1 A.02.04 ... ... 03 ... 2016
1 E.09.14 ... ... 02 ... 2015
1 E.09.14 ... ... 01 ... 2014
.... .... .... : 1 .... .... .... : 9 .... .... .... : 14
.......... ... ........ ..... : 14
...... ..... : 02 ... 2015 02:23:43
<1
AD-3001321-01
21.0 °C
.........
.......... ... ........
...... .....
.... .......
AD-3001322-01
.........
...... ..... : ...
<1
AD-3001323-01
21.0 °C
.........
<1
5 Messages and data
7726708 - v.01 - 18012019 37
Fig.58
Fig.59
5.7
Fig.60
4. Select the active error message.
5. Confirm the selection and read the message for more details.
6. If you cannot solve the problem yourself: Note down the error
message code and contact your installer.
Service message
The IDA shows a service message Please contact maintainer with service
code: %1 in the top right hand corner of the display when the appliance
needs maintenance.
Important
The service code is:
A: Minor maintenance required.
B: Medium maintenance required.
C: Major maintenance required, including component
replacement.
Custom: The appliance is from an unknown brand. The extent of
the required maintenance is unknown.
Fig.61
Fig.62
5.8
1. Short-press the select button.
2. Short-press the select button.
Sending error information to manufacturer
When the IDA or the appliance has an error, you can send error
information to the manufacturer.
The IDA shows the message in the top of the display.
The IDA shows a small message in the top right hand corner of the
display.
Important
Every time you start the IDA, it will show the service message in
the top right hand corner of the display again until the
maintenance has been executed. Repeat the steps to view the
content of the service message.
Page 38

5 Messages and data
38 7726708 - v.01 - 18012019
Important
If predictive maintenance has been registered, the IDA sends an
automatic message when the appliance has an error.
1. Enter the main menu.
2. Select Technical Information.
3. Confirm the selection.
4. Select Sent to Server.
5. Confirm the selection.
The IDA sends information to the manufacturer:
The error code.
Usage data of the IDA and the appliance from maximum the last
four days.
The display shows a message: The logging will be sent to the
server.
6. Inform the customer service center of your manufacturer about the
problem.
The customer service center can analyse the error code and usage
data to assess the problem and advise about the solution.
Page 39
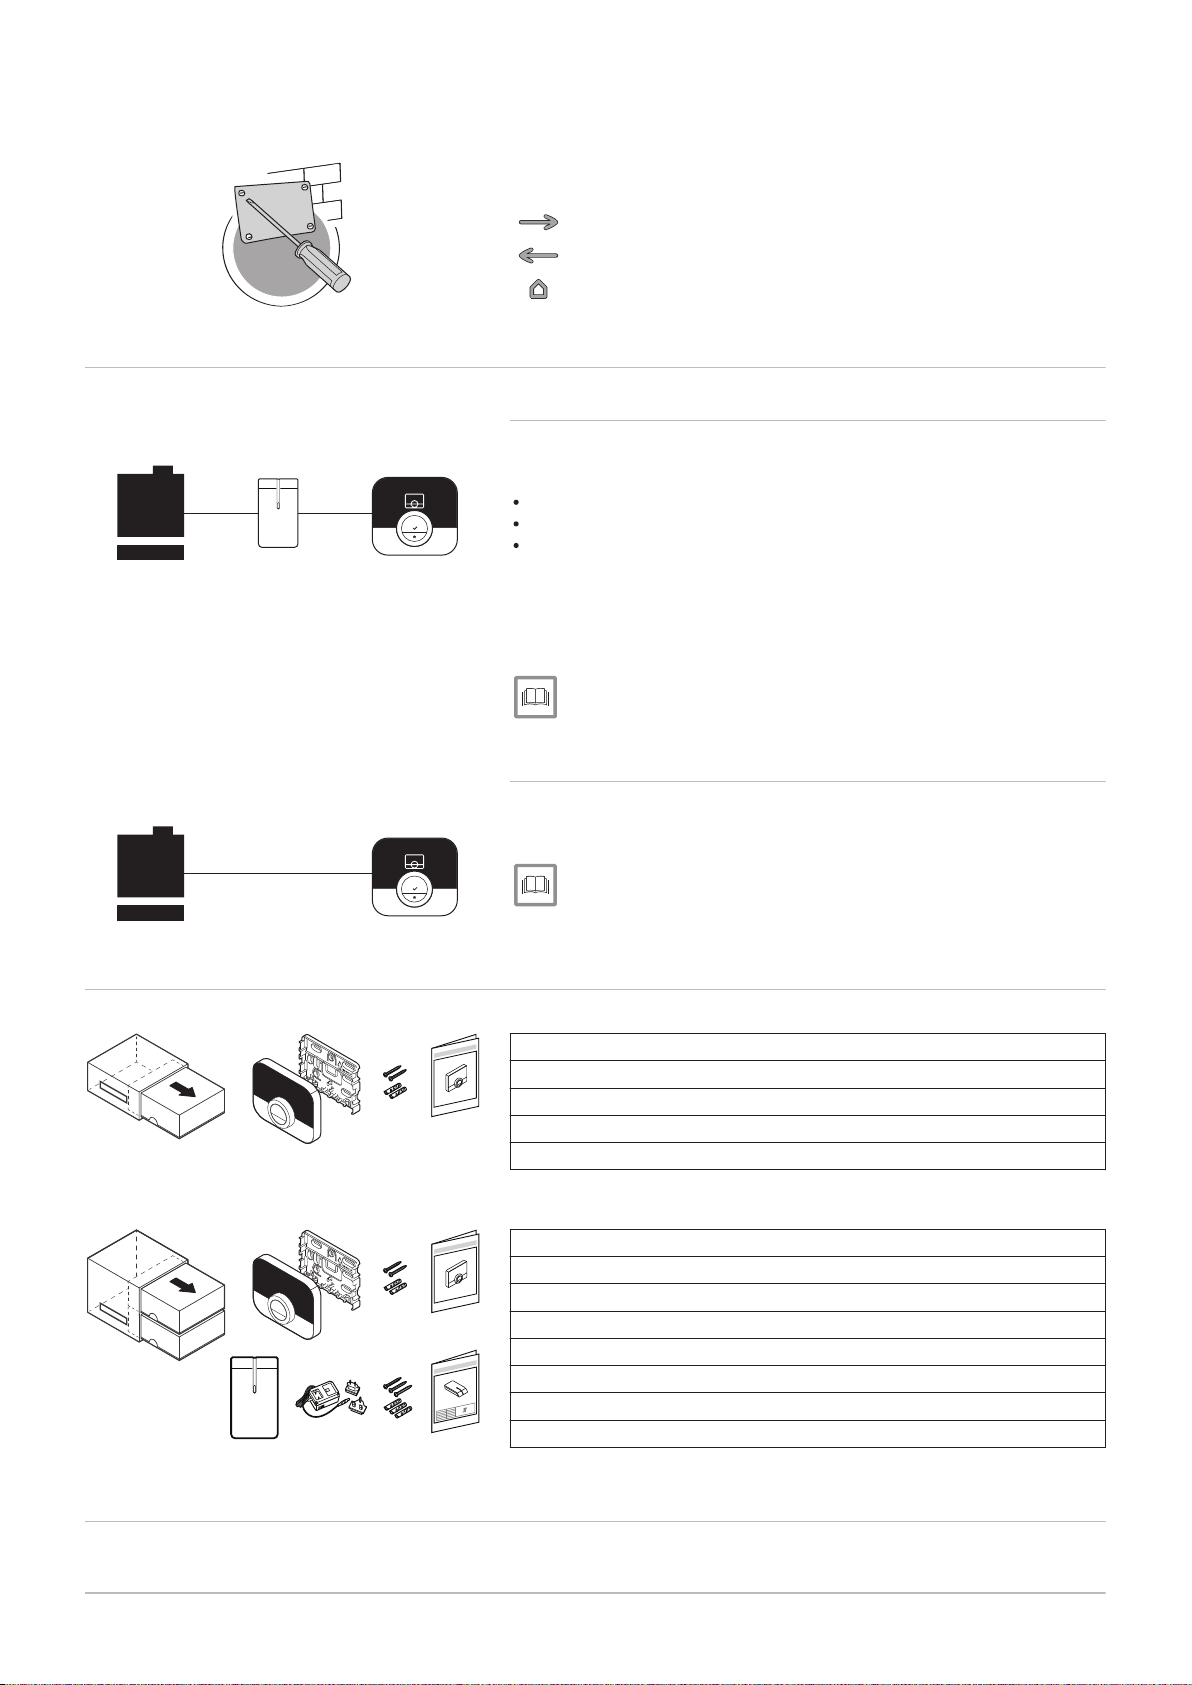
6 Installation
AD-3001027-01
AD-3001129-01
R-bus
AD-3001130-01
R-bus
AD-3001131-01
AD-3001132-01
7726708 - v.01 - 18012019 39
6 Installation
This chapter helps you with the installation and commissioning of the
thermostat.
Next chapter: Troubleshooting, page 42
Previous chapter: Messages and data, page 35
First chapter: Manual menu, page 5
6.1
Fig.63
Fig.64
System overview
6.1.1 Systems with gateway
The IDA can be connected to three types of appliances (based on the
communication protocol):
On/off protocol
OpenTherm protocol
BSB protocol
The communication protocol depends on the type of appliance used in
your system. Consult your installer for technical details about your
appliance and information how to connect the IDA with the appliance. You
can connect the IDA yourself, or ask your installer.
For more information, see
Setup procedure, page 41
6.1.2 System without gateway
Appliances with built-in gateway are available. The IDA can be directly
connected to the appliance.
See
The website of the manufacturer to find information about the
available appliances.
6.2 Standard delivery
Fig.65
Fig.66
6.3
Preparation
Tab.10 IDA package
IDA room thermostat
Mounting bracket
Fasteners
Plug fittings
Quick reference guide
Tab.11 IDA and gateway package
IDA room thermostat
Mounting bracket
Fasteners
Plug fittings
Quick reference guide
Gateway
230V Power supply
Installation instructions
You must check which gateway is needed for the communication between
the IDA and your appliance.
Page 40
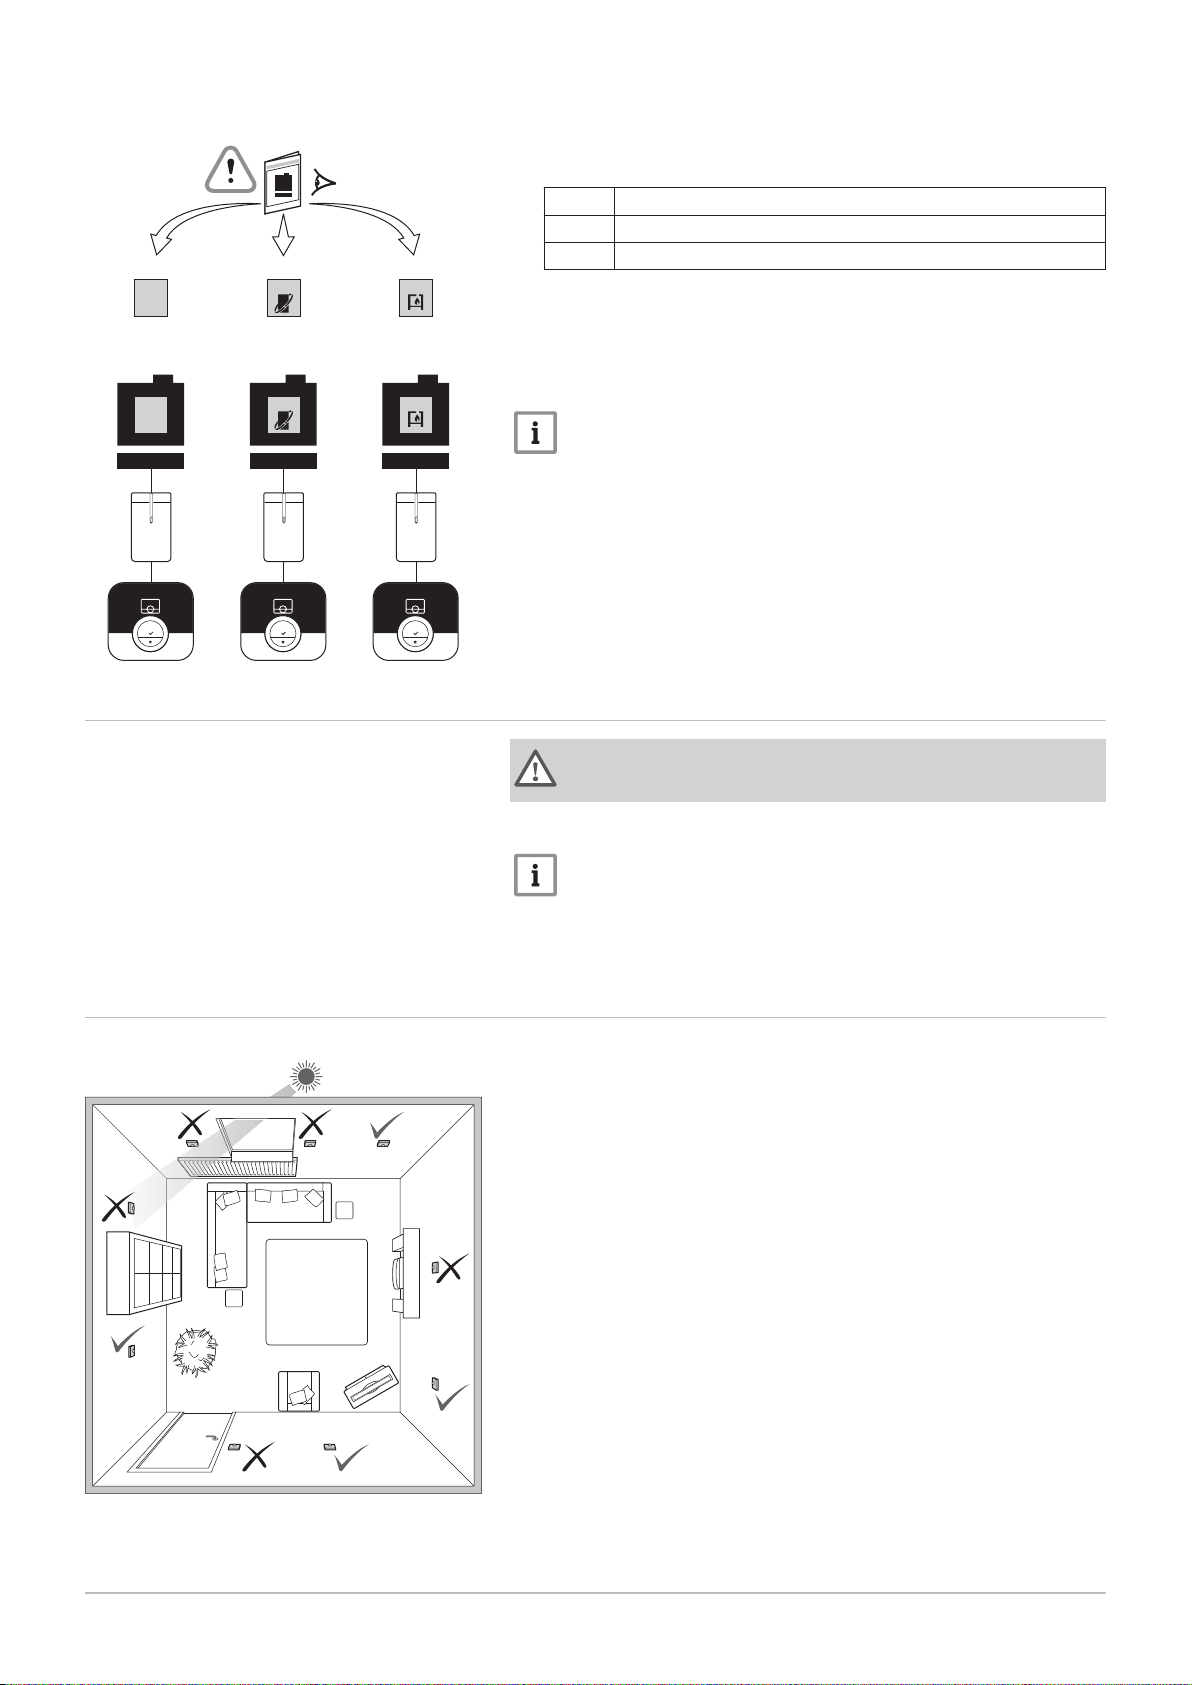
AD-3001015-01
A
OO
B
OT
C
BSB
AD-3001133-01
R-bus
16
OO
R-bus
16
OT
R-bus
17
BSB
AD-3001017-01
6 Installation
40 7726708 - v.01 - 18012019
Fig.67
Fig.68
6.4 Installation of the gateway
1. Check the documentation to know which communication protocol is
used for the control of your appliance:
Tab.12 Communication protocol
A On/off protocol
B OpenTherm protocol
C BSB protocol
2. Use the diagram to determine which gateway matches the
communication protocol of your appliance: Gateway 16 or 17
Important
If your appliance supports the R-bus communication protocol, you
don’t need a gateway.
6.5 Location of the IDA
Fig.69
Warning
The installation must be performed by a qualified professional.
1. Switch off the appliance.
Important
Refer to the documentation of the appliance.
2. Install the gateway following the instructions in the gateway
documentation.
Choose the right location for the IDA.
1. Choose the room where you spend most of your time.
2. Choose a suitable place on the wall:
2.1. Away from heat sources (fire place, radiator, light, candles,
direct sunlight, etc.)
2.2. Away from draughts
3. Check that the distance between the IDA and the appliance or
gateway does not exceed 50 m (maximum cable length).
Page 41
6.6 Installation of the IDA
7726708 - v.01 - 18012019 41
6.7 Setup procedure
6 Installation
The installation of the IDA is described in the Quick Start Guide that is
delivered in the IDA package.
1. Mount the mounting bracket to the wall following the instructions in the
Quick Start Guide.
2. Install the IDA on the mounting bracket following the instructions in the
Quick Start Guide.
When the IDA is connected to the electrical power, the display shows the
welcome screen within one minute. The IDA guides you through the setup
procedure.
1. Select the country.
2. Select the language.
3. Accept the Terms and Conditions.
Important
If you decline the legal Terms and Conditions you proceed to the
date and time setting and finish the setup procedure. At a later
time you can still accept the Terms and Conditions and set up
your wi-fi connection and app connection.
6.8
4. Read the Privacy Policy.
5. Establish a wi-fi connection.
6. Download the app.
7. Connect your mobile device and/or home automation application with
the IDA.
For more information, see
How to use the IDA, page 7
Setting the date and time, page 22
Setting country and language, page 22
IDA connections, page 26
Terms and conditions, page 43
Software update
Software updates are available for your IDA. To update the software the
IDA must be connected to:
Wi-Fi
The internet
The server
When all the connections are made the IDA will automatically update the
software.
Important
The first software update will be available within one day.
It’s also possible to manually check the status of the software.
See
Check for software update, page 29
Each time the software has been successfully updated:
The IDA will restart.
A message will appear on the home screen.
Page 42
AD-3001028-01
7 Troubleshooting
42 7726708 - v.01 - 18012019
7 Troubleshooting
This chapter helps you when there is a problem with the thermostat, an
error message will appear on the home screen.
Next chapter: Appendix, page 43
Previous chapter: Installation, page 39
First chapter: Manual menu, page 5
7.1
Error messages
If there is a problem, an error message will appear in the display of the
IDA.
1. Press the select button to see more details about the error.
The error icon will remain visible in the display until the problem is
solved.
2. Open the error messages list to find details on the active error.
3. Solve the problem(s).
4. Reset the error on the appliance. Refer to the manual of the appliance
for more information.
The error icon will disappear from the home screen.
For more information, see
Error messages overview, page 36
7.2 Other problems or questions
If you have problems or questions about certain situations, please refer to
the table below before you contact your installer for help.
Tab.13 Problems and solutions
Problem Possible cause Solution or answer
The display does not show the tempera
ture ring.
The IDA shows a wrong date and time
setting.
The display does not go black after 30
seconds.
The target temperature cannot be set
with the rotary dial.
The Energy Consumption menu shows
no consumption information or a value
that seems to be incorrect.
The IDA is in antifrost mode. In antifrost mode the temperature does
not show.
The current temperature is equal to the
target temperature.
The power supply of the appliance
was interrupted for more than 2 mi
nutes,
or the wifi connection does not func
tion,
or the IDA has no connection to time
synchronisation on the internet (NTP).
The presence sensor is set to On and an
object is in front of the IDA.
The IDA is in antifrost or holiday mode. Set the IDA to manual mode or tempera
The minimum and maximum power of
the appliance is not set correctly in the
Installer menu.
Your installation is not fit for this op
tion.
The display will show the temperature
ring when the temperatures are different.
Connect the IDA to the wi-fi network
and to the internet
and to the time synchronization
Or: set the current date and time.
Put the object at a larger distance.
Set the presence sensor to Off.
ture scheduling mode.
Ask for the correct power settings of
your appliance.
Enter the Installer menu and set:
minimum power for central heating.
maximum power for central heating.
maximum power for domestic hot
water.
Page 43
8 Appendix
AD-3001029-01
AD-3001134-01
=
=
7726708 - v.01 - 18012019 43
8 Appendix
This chapter gives you more technical information about the thermostat.
Previous chapter: Troubleshooting, page 42
First chapter: Manual menu, page 5
8.1
Terms and conditions
The legal Terms and Conditions are for the wi-fi connection and use of the
IDA app. Before you start to setup your wi-fi connection and app
connection you have to approve the Terms and Conditions.
The Terms and Conditions cannot be viewed on the IDA. You have two
options to view them:
Visit the website of the manufacturer.
Open the IDA app on your mobile device.
Approve the Terms and Conditions after you have read and agreed to
them.
If you decide to accept the Terms and Conditions you have four extra
features with the IDA:
You can control your heating (and cooling) system via your mobile
device and/or home automation application.
The IDA automatically restores the right date and time after a power
outage.
The IDA will receive automatic updates with new functions.
You can report errors of your system to the manufacturer.
Important
You have to accept the Terms and Conditions only once, unless
you reset the default settings of the IDA.
8.2 Disposal
Fig.70
8.3
Tab.14 Dimensions
Width x height x depth (maximum dimensions) 117 x 107 x 29 mm
Tab.15 Power supply
Bus connection voltage 24 V ± 5%
Maximum power consumption 2 W
Technical specifications
The IDA is a regular electronic device.
Dispose of the IDA in an environmentally friendly way and in accordance
with local regulations.
Page 44
8 Appendix
44 7726708 - v.01 - 18012019
Tab.16 Electrical connection
Maximum cable length for dedicated IDA bus 50 m
Maximum cable resistance 2 x 5 ohm
Tab.17 Wi-Fi connection
Supported frequency band 2.4 Ghz (802.11b/g)
Tab.18 Ambient conditions
Storage temperature from - 25 °C to 70 °C
Relative humidity from 5 % to 95 %
Condensation is not allowed
Operating conditions from 0 °C to 60 °C
Tab.19 Temperature
Room temperature measurement range
Temperature control area
(1) Depends on appliance.
from 0 °C to 50 °C
from 10 °C to 30 °C
(1)
(1)
Tab.20 Compliant with standards
EMC: 108/2004/EC, EN 55022, 55014
Immunity: EN2-6-61000
EN2-6-61000 (EMC part 6.2 Generic Standards)
ETSI-EN 17-489 301 (Electromagnetic compatibility and radio spectrum matters)
R&TTE Directive 5/1999/EC
EN 1-60950 (ITE – Safety – Part 1: General Requirements)
Low voltage directive (95/2006/EC)
WEEE directive (96/2002/EC) (disposal requirements)
Drop test: IEC 32-2-60068
Protection classification: IP21
8.4 ErP information
8.4.1 Product fiche
Tab.21 Product fiche
BRÖTJE - IDA
IDA
(1)
Class IV V VI
Contribution to space heating energy efficiency % 2 3 4
(1) Combined with On/Off appliance
(2) Combined with modulating appliance
(3) Combined with modulating appliance and outdoor sensor
IDA
(2)
IDA
(3)
Page 45

8 Appendix
7726708 - v.01 - 18012019 45
Page 46

8 Appendix
46 7726708 - v.01 - 18012019
Page 47

© Copyright
All technical and technological information contained in these technical instructions, as well as any drawings and technical
descriptions supplied, remain our property and shall not be multiplied without our prior consent in writing. Subject to alterations.
Page 48

August Brötje GmbH | 26180 Rastede | broetje.de
7726708 - v.01 - 18012019
7726708
 Loading...