

Page 1

btotheiL
WORD PROCESSOR
WP-700D
OWNER’S MANUAL
AMERICAN
Page 2

Please read this manual carefully and keep it in a safe place for future reference. We
recommend that you write the unit’s model number and serial number in the blank space
below. These numbers can be found on the rear panel of the word processor.
MODEL NO.:
© 1994 by Brother Industries. All rights reserved.
SERIAL NO.:
Copyright Notice
Spelling Corrector licensed from Houghton Mifflin Company. Spelling U.S. PAT. Nos.
4,580,241 and 4,730,269. Copyright 1985, 1987 by Houghton Mifflin. All rights reserved.
Reproduction or disassembly of embodied programs or database prohibited. Based upon
The American Heritage Dictionary.
FCC NOTiCE
This equipment has been tested and found to comply with the limits for a Class B digital
device, pursuant to Part 15 of the FCC Rules. These limits are designed to provide rea
sonable protection against harmful interference in a residential installation. This equip
ment generates, uses and can radiate radio frequency energy and, if not installed and
used in accordance with the instructions, may cause harmful interference to radio com
munications. However, there is no guarantee that interference will not occur in a particu
lar installation. If this equipment does cause interference to radio or television reception,
which can be determined by turning the equipment off and on, the user is encouraged to
try to correct the interference by one or more of the following measures:
— Reorient or relocate the receiving antenna.
— Increase the separation between the equipment and receiver.
— Connect the equipment into an outlet on a circuit different from that to which the
receiver is connected.
— Consult the dealer or an experienced radio/TV technician for help.
This equipment has been certified to comply with FCC standards, which are applied to
the U.S.A. only. A shielded interface cable should be used according to FCC 15.27 (a).
Changes or modifications not expressly approved by Brother International Corp. could
void the user’s authority to operate the equipment.
Page 3

Table of Contents
Getting Started..........................................................................i
How to Use this Manual 1
Part Names............................................................................................................................................. 2
Setting Up................................................................................................................................................4
Removing the Packing Pieces............................................................................................................4
Switching the Word Processor On/Off................................................................................................5
Power Cord....................................................................................................................................5
Power Switch.................................................................................................................................5
Transporting the Word Processor.......................................................................................................6
Inserting Paper....................................................................................................................................6
Paper Support................................................................................................................................6
Automatic Insertion........................................................................................................................7
Manual Insertion............................................................................................................................7
Precautions..............................................................................................................................................8
Keyboard Layout......................................................................................................................................9
The Character Keys............................................................................................................................9
The Keyboard Control Keys.............................................................................................................. 9
The Function Keys......................................................................................................................... 10
The Function Menu Key....................................................................................................................11
On-Screen Help Information........................................................................................................... 11
Diskettes................................................................................................................................................12
Inserting and Removing a Diskette...................................................................................................12
Caring for Your Diskettes..................................................................................................................12
Write-Protecting Your Diskettes........................................................................................................13
Initializing New Diskettes..................................................................................................................14
Backing up a Diskette.......................................................................................................................14
Operation Overview...............................................................................................................................15
The Main Menu................................................................................................................................ 15
Self-Demonstration...........................................................................................................................16
Differences between Word Processing and Typewriting
The Return Function.........................................................................................................................17
The Cancel Function.........................................................................................................................17
On-Screen Symbols..........................................................................................................................17
Automatic Page Breaks....................................................................................................................17
Caps Lock vs. Shift Lock...................................................................................................................18
The Keyboard Shift Function.......................................................................................................18
The Shift Lock Function...............................................................................................................18
The Caps Lock Function............................................................................................................. 18
......................................................................
17
Word Processing.....................................................................19
Starting the Word Processing Application.............................................................................................20
WRITE/EDIT Screen.............................................................................................................................21
Status Line........................................................................................................................................21
Scale.................................................................................................................................................22
Text Area...........................................................................................................................................22
Text and Scale Cursors....................................................................................................................22
Message Line....................................................................................................................................23
Menu.................................................................................................................................................23
Example 1: You selected CTFt/RMF......................................................................................... 24
Example 2: You selected FORM................................................................................................24
Page 4

Typing on the Display
Hot Zone............................................................................................................................................25
Word Wrap........................................................................................................................................25
Space vs. Permanent Space............................................................................................................25
Hyphen vs. Permanent Hyphen........................................................................................................26
Superimposed Characters (Permanent Backspace)...................................................................... 26
Subscripts and Superscripts........................................................................................................... 27
Extra Characters...............................................................................................................................27
Accents (“Dead” Keys)......................................................................................................................28
Automatic Page Breaks....................................................................................................................28
Revising Text - Basic Functions............................................................................................................29
Moving the Text Cursor.....................................................................................................................29
Moving One Position at a Time...................................................................................................29
Jumping Left and Right................................................................................................................30
Jumping to the Top or Bottom of the Text...................................................................................30
GOTO Page.................................................................................................................................30
Inserting Text.................................................................................................................................. 31
Deleting Text.................................................................................................................................. 31
Deleting a Character....................................................................................................................32
Deleting a Word...........................................................................................................................32
Deleting a Line.............................................................................................................................32
Splitting and Joining Paragraphs......................................................................................................32
Revising Text - Advanced Functions................................................................................................... 33
Block Operations...............................................................................................................................33
Copying a Block within the Document.........................................................................................33
Copying a Block into a Different File...........................................................................................34
Recalling the Temporary File.......................................................................................................35
Deleting a Block...........................................................................................................................35
Moving a Block.............................................................................................................................36
Searching for Text.............................................................................................................................37
Starting a Search.........................................................................................................................37
Defining a Search String..............................................................................................................38
Search and Replace....................................................................................................................39
Hyphen Scan............................................................................................................................... 40
Formatting the Page..............................................................................................................................42
Format Change Symbol....................................................................................................................42
Left and Right Margins......................................................................................................................42
Tabs and Decimal Tabs....................................................................................................................43
Setting Tabs.................................................................................................................................43
Clearing Tabs.............................................................................................................................. 44
Using Tabs while Typing............................................................................................................. 44
Using Decimal Tabs while Typing...............................................................................................44
Inserting Tabs............................................................................................................................ 45
Removing Tabs............................................................................................................................45
Line Indent........................................................................................................................................45
Paragraph Indent..............................................................................................................................46
Setting the Temporary Left Margin..............................................................................................46
Returning to the Original Left Margin..........................................................................................46
Centering...........................................................................................................................................47
Centering Between Margins........................................................................................................47
Centering Between Tabs.............................................................................................................48
Undoing Centering.......................................................................................................................49
Right Margin Flush........................................................................................................................... 49
Undoing a Right Margin Flush Format........................................................................................50
Automatic Justification......................................................................................................................50
Entering Justified Text.................................................................................................................50
Justifying Existing Text................................................................................................................50
........
...................................................................................................................25
Page 5

Text Emphasis..................................................................................................................................51
Bold Face Characters................................................................................................................. 51
Underline......................................................................................................................................52
Expand.........................................................................................................................................53
Character Set....................................................................................................................................54
Switching the Keyboard.............................................................................................................. 54
Changing the Daisy Wheel..........................................................................................................54
Horizontal Positioning.......................................................................................................................55
Screen Width vs. Paper Width.....................................................................................................55
Changing the Pitch.......................................................................................................................55
Vertical Layout.................................................................................................................................. 56
Page Breaks............................................................................................................................... 56
Line Spacing................................................................................................................................ 56
Paper Size Setting.......................................................................................................................57
Header and Footer.
....
........................................................................................................... 58
File Operation.....................................................................................................................................60
Viewing the WP INDEX Screen........................................................................................................60
Saving a File................................................................................................................................... 61
Saving a New File.......................................................................................................................61
Saving an Edited file....................................................................................................................62
Entering a File Name...................................................................................................................63
Automatic Save Function.............................................................................................................63
Returning to the Main Menu............................................................................................................. 64
Retrieving a File................................................................................................................................64
Printing a Document....................................................................................................................... 65
Starting Page Print.......................................................................................................................65
Starting File Print.........................................................................................................................65
Pausing/Resuming Printing.........................................................................................................67
Daisy Wheel Changes.................................................................................................................68
Stop Symbols...............................................................................................................................68
Diskette Utility Functions..................................................................................................................70
Copying a File..............................................................................................................................70
Deleting a File..............................................................................................................................71
Renaming a File.......................................................................................................................... 72
Disk Copy................................................................................................................................... 72
Deleting All Files..........................................................................................................................74
Diskette Write-Protect..................................................................................................................74
Advanced Functions..........................................................................................................................75
Double Column Printing....................................................................................................................75
Data Merge.......................................................................................................................................76
Creating the Merge File............................................................................................................. 77
Creating a Document with Merge Symbols.................................................................................77
Merge Printing..............................................................................................................................78
Abbreviated Phrases.........................................................................................................................79
Increasing Your Typing Speed....................................................................................................79
Understanding the Abbreviated Phrase Memory........................................................................79
Abbreviated Phrase Maintenance................................................................................................80
Using the Function Menu for Other Options...............................................................................81
Loading an Abbreviated Phrase File...........................................................................................82
Saving the Abbreviated Phrase Memory................................................................................... 82
Page 6

Typewriting.............................................................................................................................................83
Starting the Typewriter Application................................................................................................84
From the Main Menu.........................................................................................................................84
From the Word Processing Application............................................................................................84
The Typewriter Application Screen................................................................................................85
Status Line........................................................................................................................................85
The Hot Zone.................................................................................................................................. 85
Manual Return..................................................................................................................................85
Automatic Return..............................................................................................................................86
Line-by-Line Mode............................................................................................................................86
Justification Mode............................................................................................................................. 87
Basic Typing........................................................................................................................................88
Inserting Paper..................................................................................................................................88
The Cursor Keys...............................................................................................................................88
Setting Margins.................................................................................................................................88
Selecting the Pitch............................................................................................................................89
Selecting the Line Space..................................................................................................................89
Changing the Keyboard....................................................................................................................90
Using Shift Lock and Capital Lock....................................................................................................90
Backspacing.....................................................................................................................................91
Normal Backspace......................................................................................................................91
Fractional Backspace..................................................................................................................91
Permanent Backspace.................................................................................................................92
Express Backspace.....................................................................................................................92
Subscripts and Superscripts............................................................................................................ 93
Accents and Special Symbols (“Dead” Keys)...................................................................................93
Corrections..........................................................................................................................................94
Automatic Correction........................................................................................................................94
Correcting One Character........................................................................................................... 94
Erasing One Word.......................................................................................................................94
Erasing One Line.........................................................................................................................95
Relocation of the Carrier..............................................................................................................95
Manual Corrections...........................................................................................................................96
Formatting the Page..........................................................................................................................97
On-Screen Editing.............................................................................................................................97
Tabs and Decimal Tabs....................................................................................................................97
Setting Tabs and Decimal Tabs..................................................................................................98
Clearing Tabs...............................................................................................................................98
Typing with Tabs..........................................................................................................................98
Typing with Decimal Tabs...........................................................................................................98
Line Indent........................................................................................................................................99
Paragraph Indent..............................................................................................................................99
Text Emphasis (Style)................................................................................................................. 100
Bold........................................................................................................................................... 100
Underline....................................................................................................................................100
Expand..................................................................................................................................... 101
Centering and Right Margin Flush Functions................................................................................ 102
Centering Between Margins or Between Tabs
Right Margin Flush (RMF)........................................................................................................ 103
........................................................................
102
Page 7

Speii Checker................................................................................................................................105
Description of the Speii Checker..................................................................................................106
Speii Checker (Word Speii)........................................................................................................... 107
Checking Existing Text (WP Application)...................................................................................... 108
Starting the Spell Checker.........................................................................................................108
While Checking (Suspect & Repeated Words).........................................................................108
Example 1................................................................................................................................. 109
Example 2................................................................................................................................. 110
Checking While Typing (WP or TW Application)
Starting the Spell Checker........................................................................................................111
..........................................................................
111
The User Dictionary.........................................................................................................................112
How the User Dictionary Works..................................................................................................... 112
Maintaining the User Dictionary.....................................................................................................112
Using the Function Menu......................................................................................................... 113
Loading a User Dictionary............................................................................................................. 114
Saving the User Dictionary............................................................................................................ 115
Mail Merge..........................................................................................m
Starting the Maii Merge Application.............................................................................................118
The MERGE Screen...................................................................................................................... 118
The Structure of a Merge File.........................................................................................................118
Creating and Editing a Merge File................................................................................................120
Entering Data................................................................................................................................. 120
Creating a New Label.................................................................................................................... 120
Changing the Width of a Label...................................................................................................... 120
Creating a New Record................................................................................................................. 121
Moving the Cursor......................................................................................................................... 121
Copying Data................................................................................................................................. 122
Inserting a Blank Record............................................................................................................... 122
Deleting a Record...........................................................................................................................123
Printing the Current Record........................................................................................................... 123
Preparing the Record for Merge Printing
File Operations.................................................................................................................................125
Saving the Merge File.................................................................................................................... 125
Retrieving a Merge File................................................................................................................. 125
Printing a Merge File..................................................................................................................... 125
Using the Merge Function Menu....................................................................................................126
......................................................................................
124
Appendix............................................................................................127
Character Keys.................................................................................................................................128
Standard (I) and International (II) Keyboard...................................................................................128
Symbol (III) Keyboard.................................................................................................................... 129
Function Keys.................................................................................................................................. 130
Function Menus................................................................................................................................135
WP WRITE/EDIT Screen............................................................................................................. 135
ABBREVIATED PHRASE Screen................................................................................................. 136
USER DICTIONARY Screen......................................................................................................... 136
INDEX Screens.............................................................................................................................. 136
TW Application............................................................................................................................... 137
Mail Merge......................................................................................................................................137
Symbois.............................................................................................................................................138
Symbols Displayed on the Scale....................................................................................................138
Symbols Displayed in the Text...................................................................................................... 138
Page 8

Indicators............................................................................................................................................140
Error Messages................................................................................................................................142
Troubleshooting Chart................................................................................................................... 144
Accessories.....................................................................................................................145
Changing the Daisy Wheel Cassette............................................................................................. 145
Changing Ribbons....................................................................................................................... 146
Changing Correction Tapes............................................................................................................147
Compatibie Accessories.................................................................................................................150
Starter Kits and Accessories.......................................................................................................... 150
Cassette Ribbons / Correction Tapes............................................................................................ 150
Daisy Wheel Cassettes..................................................................................................................151
Daisy Wheel Samples.....................................................................................................................152
Specifications....................................................................................................................................153
Glossary............................................................................................................................................ 154
Index...............................................................................................................................161
Page 9

Getting Started
Ноги to Use this Manual
In order to allow first-time owners to learn about the many sophisticated functions
that this word processor offers, this manual has been organized as a tutorial
rather than a reference book. You are encouraged to go through the manual in a
step-by-step fashion, learning about each of the functions and features one at a
time. In this way you will be able to gain a full understanding of what this word
processor can do and be able to make full use of its capabilities.
The last Section, “Appendix”, provides an alphabetic index, a glossary, and a
quick reference guide for later reference.
Page 10

co
CD
ЕЕ
_Ç0
+-»
со
ÛL
Page 11

(T) Paper Support
@ Platen Knob
@ Power Switch
(4) Keyboard
© Carrying Handle
(6) Disk Drive
(7) Disk Eject Button
(8) LCD
(9) Brightness Controller
@ Acoustic Cover
@ Paper Release Lever
(1g) Carrier
Cassette Daisy Wheel
@ Cassette Ribbon
Correction Tape
@ Daisy Wheel Lock
Lever
Power Cord
Compartment
Supports paper for insertion / power cord compartment
cover.
Feeds paper manually.
Turns the word processor ON and OFF.
Contains character and function keys.
Pulls out for easy transportation.
Holds data or program diskettes.
Releases an inserted diskette.
Displays text and messages.
Controls the display brightness.
Suppresses printing sounds and protects the printing
carrier.
Unlocks the platen for paper positioning.
Supports the printing unit.
Contains print characters for each style of print.
Transfers the characters to the paper.
Erases characters.
Releases the cassette daisy wheel.
Stores the power cord when transporting the word pro
cessor.
Page 12
J Setting Up
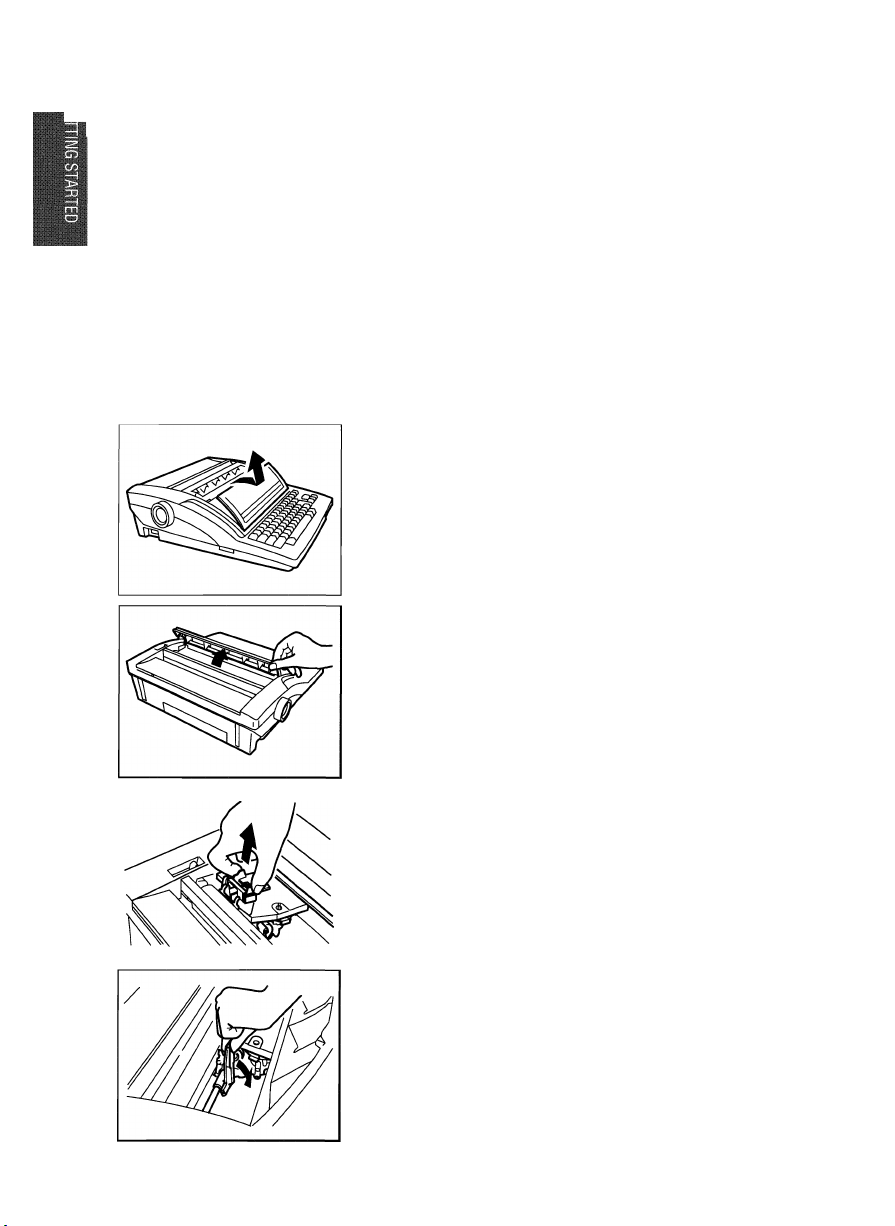
Removing the Packing Pieces
Before you plug in the word processor, open the acoustic cover and remove the
yellow plastic pieces shown in the illustrations below.
NOTES:
• If the plastic pieces are not removed, damage to the word processor may
occur when the power is turned on.
• The yellow plastic pieces do not need to be re-installed unless you are re
packing the word processor for shipping.
Remove the protective cover.
NOTE:
Replace the protective cover when the word
processor is not in use.
Lift the acoustic cover.
Remove the yellow plastic pieces.
NOTE:
Be sure to reinstall the display and cover.
The acoustic cover is equipped with a safety
switch. Your word processor will not operate
unless the acoustic cover is securely closed.
Page 13
Switching the Word Processor On/Ojf
Power Cord
NOTE:
Please be sure both yellow plastic packing pieces have been removed from
the word processor before the power is turned on.
The power cord is stored in a compartment on the
back of the word processor. The cover of that
compartment is also used as a paper support.
NOTE:
It is a good idea to disconnect the AC plug
when the word processor is not used for a
long period. Always disconnect the power
cord during thunderstorms.
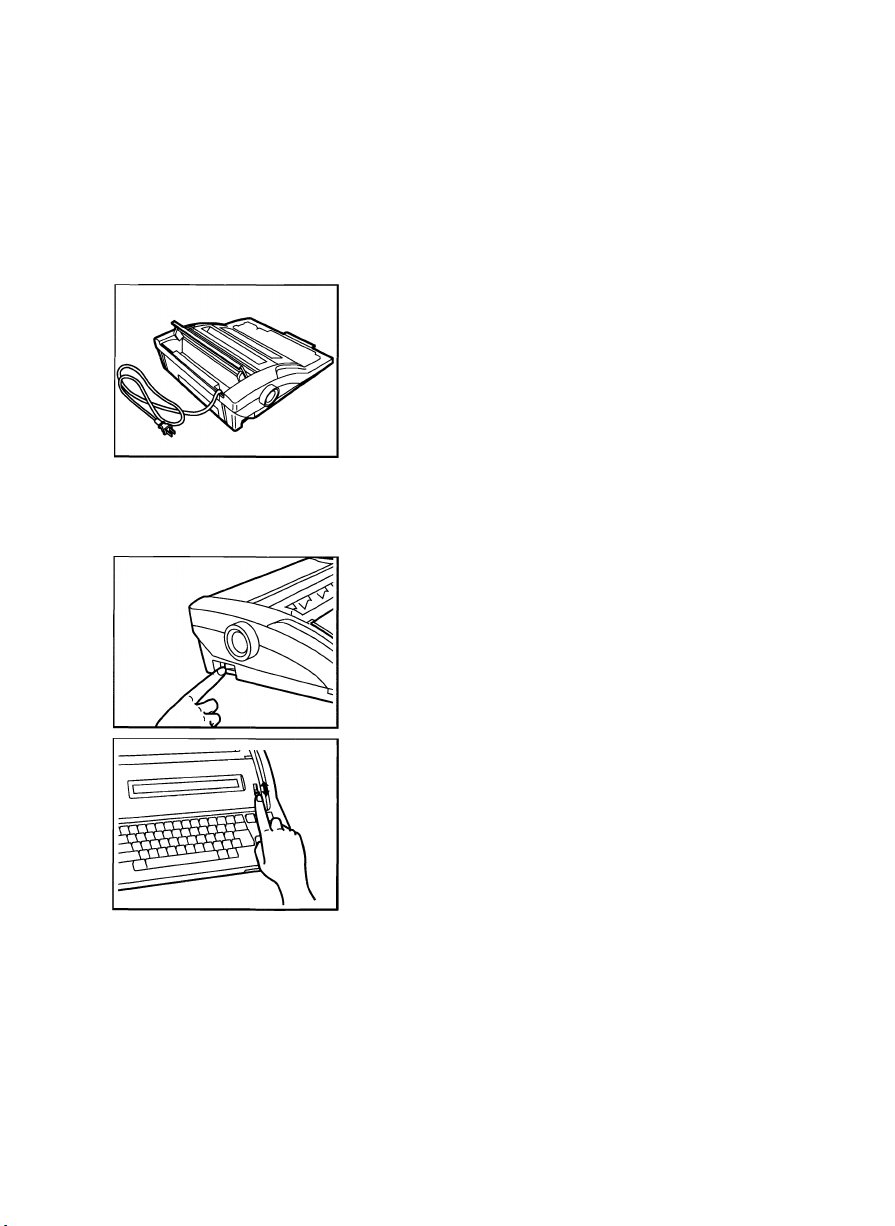
Power Switch
Flip the power switch on. The switch is located on
the left side toward the rear of the word proces
sor.
NOTE:
If the word processor does not respond,
check the power cord and then make sure
that the acoustic cover is securely latched.
Adjust the display brightness with the brightness
controller next to the screen.
NOTE:
If you switch the word processor off, wait at
least 10 seconds before switching it on again.
Failure to wait 10 seconds may disrupt the
start-up sequence, resulting in faulty
operation and possible equipment dam
age.
Page 14

Transporting the Word Processor
To prepare the word processor for transportation or storage:
Disconnect the AC plug, and carefully fit the
power cord into its compartment as shown in the
illustration. Close the power cord compartment
cover (paper support).
Install the protective cover. Fit the front of the
cover into the holes, and lower the back part of
the protective cover.
Pull out the carrying handle.
Inserting Paper
NOTE:
When using the machine as a word processor, you do not have to insert
paper untii you have finished editing your document and are ready to print.
Paper Support
Lift the paper support.
Page 15
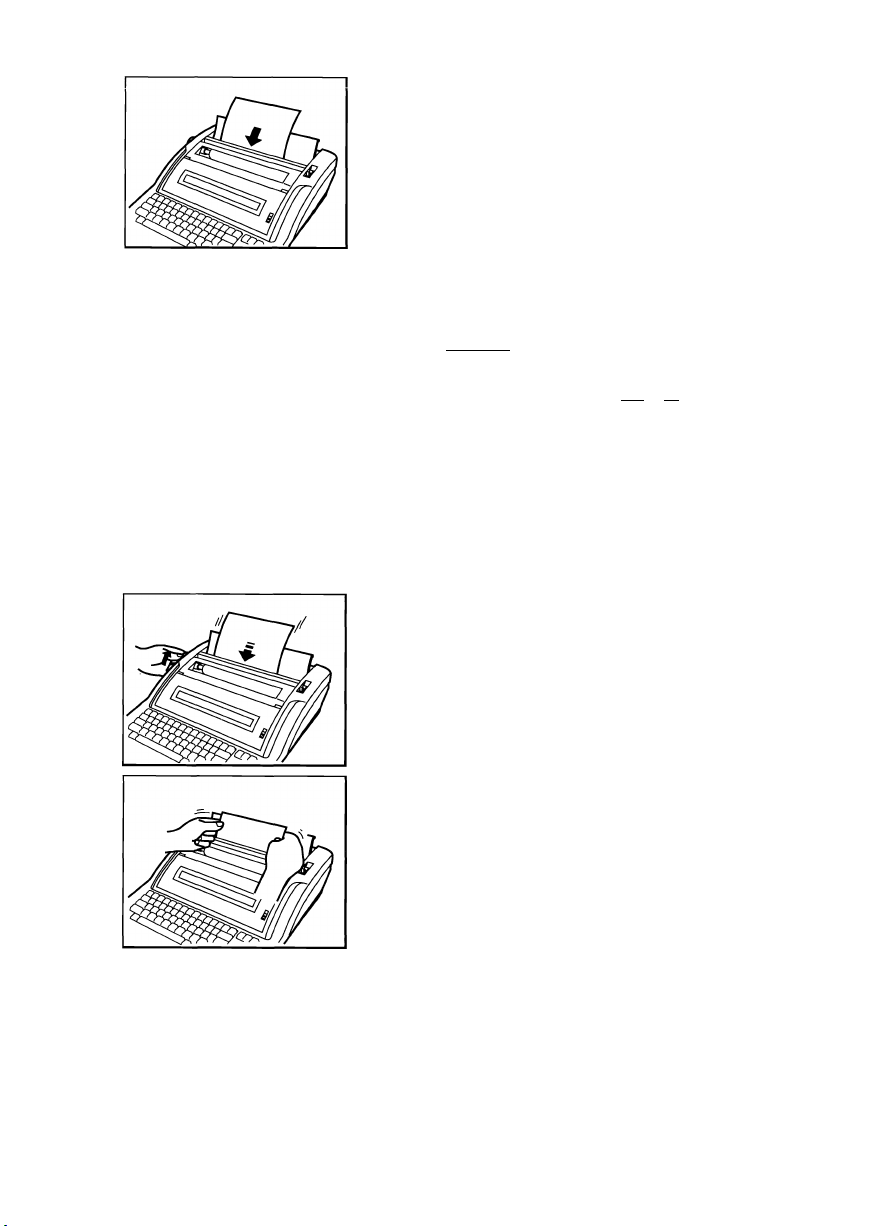
Automatic Insertion
.PBREAK,
Manual Insertion
!ns©rt papsr as
r ilQ Qhn\A/n
Press IP »>^1 to automatically advance the paper
to the printing position (one inch from the top).
To change that position, use iiM + M or
Rotate the platen knob to advance the paper.
If the paper is not properly aligned, advance the
sheet half way, push the paper release lever
toward the rear and manually match the corners
of the paper. Pull the paper release lever back to
its original position and turn the platen knob until
the paper is In the desired position.
Page 16

Precautions
Although this word processor is ruggedly constructed, it should not be exposed to
extreme conditions. To ensure many years of reliable operation, please follow
these recommendations:
In case of malfunction, overheating, or other problems, immediately discon
nect the AC plug and consult your dealer.
Do not attempt to disassemble the word processor. It has no user-service
able parts inside.
Avoid dropping the word processor.
Avoid direct exposure to sunlight and other sources of heat.
Avoid spills. If any liquid enters the word processor, immediately disconnect
the AC plug and consult your dealer.
Avoid locations where excessive moisture or dust collect.
Do not use sprays in the vicinity of the word processor. Aerosols are
extremely harmful to the disk drive.
Disconnect the AC plug during thunderstorms.
Do not place heavy objects on the keyboard.
Always keep the air vents free from obstruction to avoid overheating the word
processor.
Clean the machine housing with a soft, dry cloth only. Avoid using chemicals,
solvents and detergents.
To avoid electrical interference, do not place the word processor too close to
a radio receiver or television. If the word processor is too close to a television
set, the disk drive may not work properly.
If you switch the word processor off, wait at least 10 seconds before switching
it on again. Failure to wait 10 seconds may disrupt the start-up sequence,
resulting In faulty operation and possible equipment damage.
Page 17
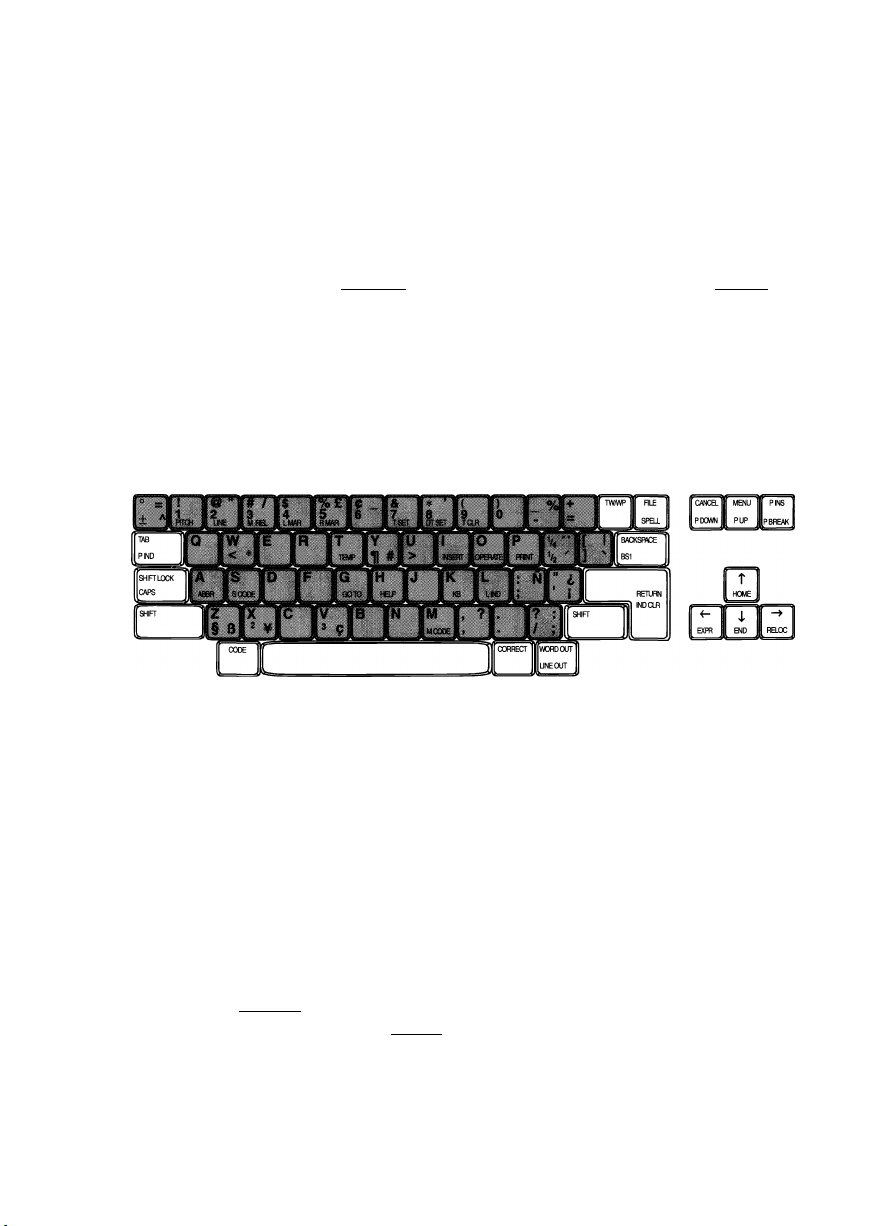
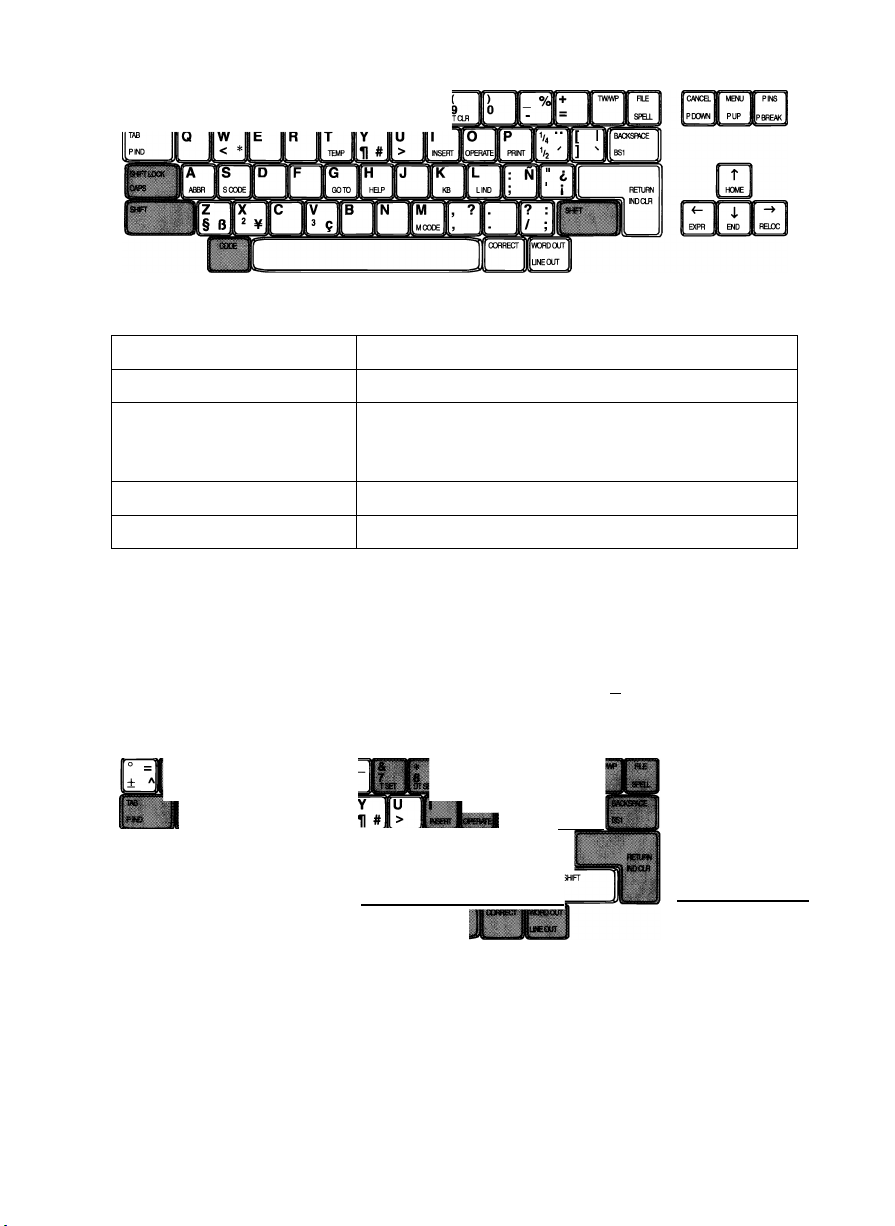
Keyboard Layout
This word processor has more keys than a typewriter. In order to get a clear
understanding of the keyboard, we will distinguish three classes of keys as
described below. Most keys are auto-repeat; if you hold down the key, it repeats
until you release the key.
In this Owner’s Manual, ICODEI + a second key indicates that the №aaw key
must be held down while the second key is pressed.
The Character Keys
The character keys are used to type text. They are very similar to the character
keys of a typewriter, except that this word processor accepts different daisy
wheels, and therefore makes available a greater number of characters.
NOTES:
The characters available when the keyboard Is set to I (standard) appear on
the left of the key tops.
The characters available when the keyboard Is set to II (International) appear
on the right of the key tops.
The characters available when the keyboard Is set to III (symbol) are not
shown on the key tops.
The Keyboard Control Keys
The keyboard control keys are used to modify the effect of the other keys. Press
ing or ICODEI alone will not produce any effect. To modify the effect of
another key, you must hold down [SHlRl or while pressing the key to be
modified.
In this Manual, such a double keystroke will be symbolized by the “+” sign.
Page 18
^fnnrnoFPTnn
Key Function
WjH + character key Used to type an uppercase character.
+ another key
iCAH
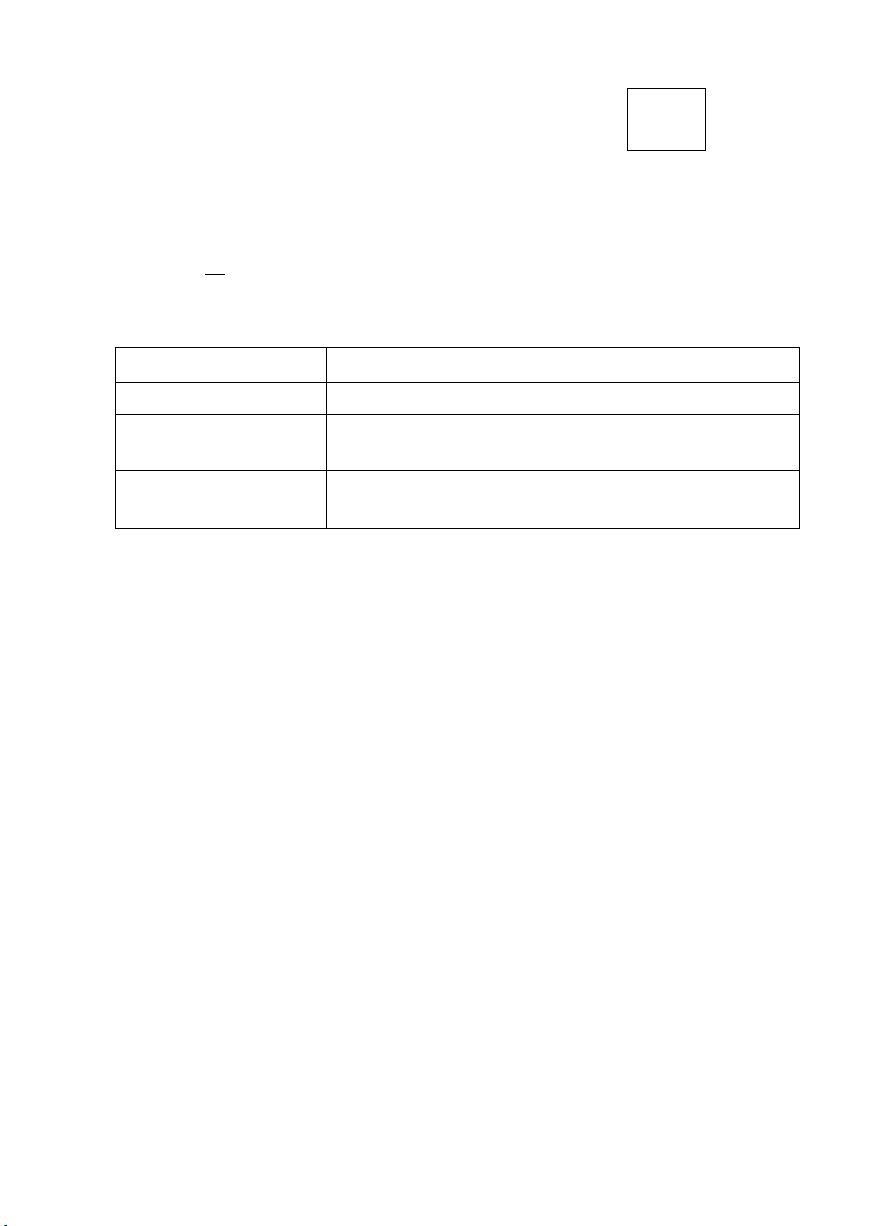
The Function Keys
The function keys are used to activate the various functions of the word proces
sor. In contrast to the character keys, their effect does not depend on which daisy
wheel is installed. Many functions can be activated with — + a character key.
However, not all of these functions are indicated in green on the key top.
Used to type the character indicated in green on
the key top, or to activate a function (see “Function
Keys” below).
Locks the keyboard in uppercase mode.
Locks the keyboard in capital mode.
10
oornoin
o IP fv, "IE I
Ih? r CLWinir
jv. J] I
[<^ I I««
Page 19

The Function Menu Key
Most of the functions of this word processor are activated by selection from a
menu.
Once you get acquainted with the word processor, however, you might find that
the selection from a menu is time-consuming. For faster operation, many func
tions of the menus can also be activated by “short-cut” keys.
MENU
On-Screen Help Information
Since this product is designed to last for many years, you may need to review the
meaning of a function you have not used in a while. Press — + (8)Short definitions of the functions will appear on the screen. The different keys that
are used for scanning the information and to return to your work are also indi
cated on the screen.
NOTE:
(r.
H
HELP
Since the details of operation are not provided, the help information is not a
replacement for careful reading of this Manual.
11
Page 20
i_J Diskettes
This word processor accepts only the following type of 3.5-inch diskettes:
MF-2DD (Double Sided/Double Density/Double Track)
MF-1DD (Single Sided/Double Density/Double Track)
NOTE:
Your word processor cannot use high density (“HD”) diskettes, so be sure to
purchase only double density double track (“DD”) diskettes. It is recom
mended that you use Brother brand diskettes.
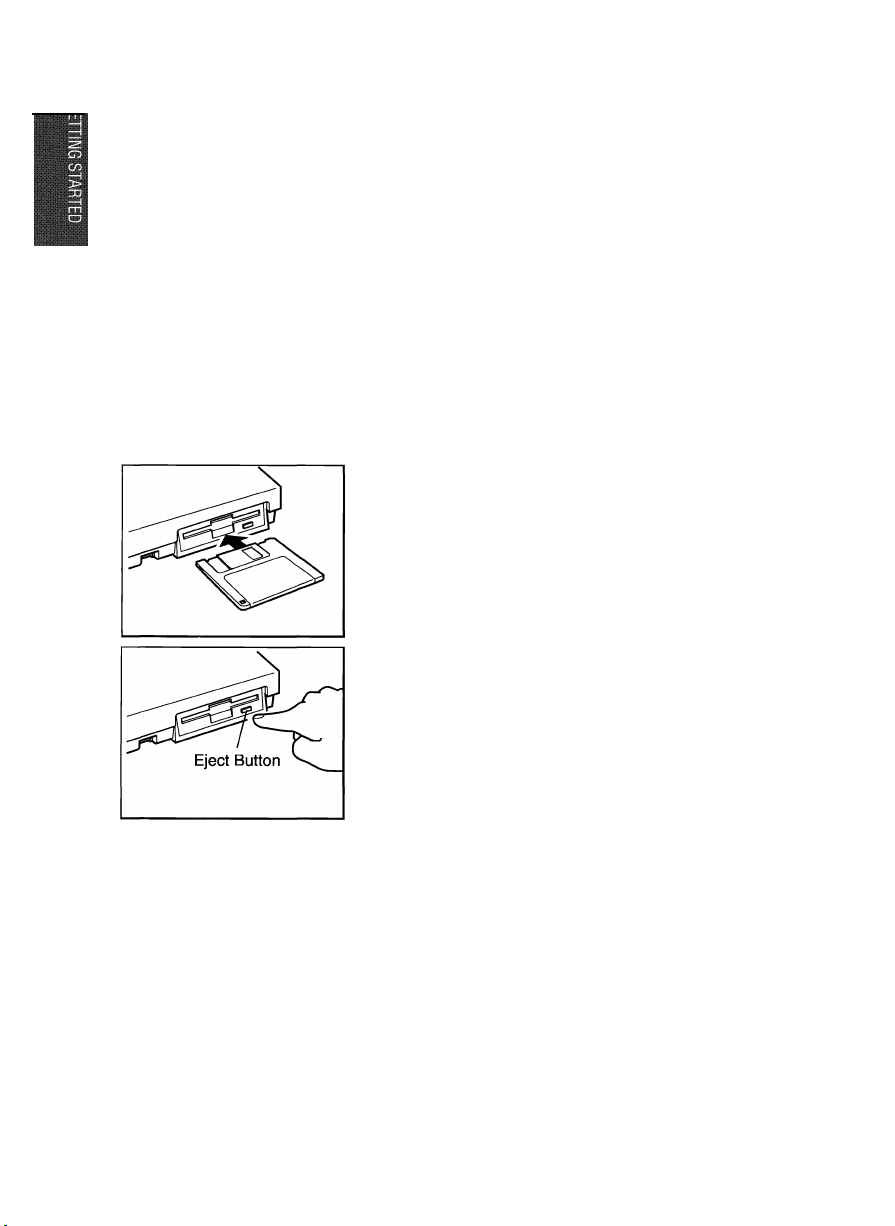
Inserting and Removing a Diskette
Insert the diskette as shown in the illustration.
To remove the diskette, press the eject button.
CAUTION - The diskette may be inserted and
removed when the power is either on or off. It may
also be left in the drive while transporting the
word processor. However, you should never
insert or remove it while a message indicates
that a diskette operation is in progress.
Caring for Your Diskettes
The slightest damage, such as a scratch, or a small amount of dust on a diskette
can spoil an entire file and make it unusable. The protective case of the 3.5-inch
diskette protects the sensitive disk surface. (The metallic shutter automatically
opens and exposes this sensitive surface only when the diskette is inserted into
the drive.) Additional precautions must be taken in order to ensure reliable main
tenance of your files.
12
Page 21
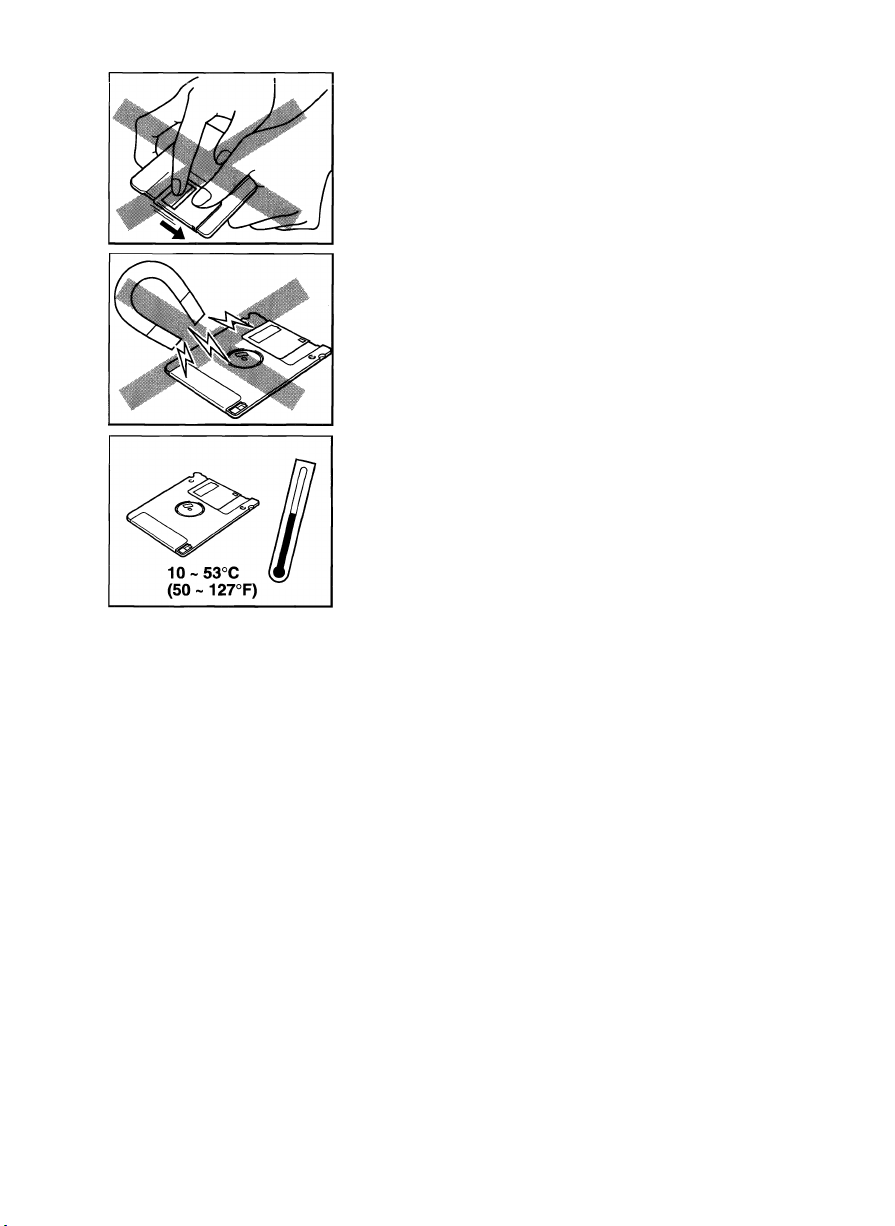
Never open the shutter of the diskette and never
touch the surface directly.
Do not use magnetic materiais near the diskette.
Never expose the diskette to extremeiy high or
iow temperatures.
Write-Protecting Your Diskettes
The diskettes are write-protected by software that comes with the word processor
and is set through the INDEX screen menu. When write-protect is ON, you cannot
erase oid information or store new information on the diskette.
NOTE:
The switch on the diskette does not determine read/write capabiiity.
13
Page 22

Initializing New Diskettes
A diskette can be used by a system only after being “formatted” - that is, initial
ized by the system for specific use by that system. One frequently used analogy
is that the magnetic coating on the diskette is like a blank sheet of paper.
Although you can write anything anywhere on the blank sheet, things are much
more organized if you add ruled lines. The initiaiizing program creates the elec
tronic equivalent of ruled lines on the diskette. Different systems use different for
mats. Standards exist, but, in general, systems cannot share diskettes without
special conversion of hardware or software.
When a diskette is accessed, the word processor checks the format of the dis
kette. If the diskette is unformatted or has a different format, the following prompt
appears:
Initialize? Press RETURN(yes) or CANCEL(no).
WARNING:
Initializing a diskette erases any data that might be on it. If you initialize
a diskette from a personal computer, for example, the files will be com
pletely destroyed. Press [CANCEL L if you do not wish to initialize, and
insert another diskette.
If the diskette is new or contains unimportant data, press IRETUNNI to format the
diskette. The word processor asks for confirmation:
Delete all files on this disk? Press Y(yes) or N(no).
Press B to format the diskette, or press B and insert another diskette.
NOTE:
• This word processor can recognize and read data from diskettes that have
been used with some other Brother word processors. For more detaiis about
compatibiiity, piease contact your deaier.
Backing up a Diskette
The best insurance against losing important data is to make backups (duplicate
copies) of each important file. With this word processor, you can copy individual
files of your choice to another diskette, or copy the entire contents of a diskette to
another diskette.
14
Page 23

Operation Overview
The Main Menu
When you switch the word processor on, the Main menu appears:
Word Processing 2
The Main Menu displays the list of the available applications in the form of icons.
To start working with an application, use the cursor keys to select an icon, and
press —1. You can also press the number key indicated on the upper left
side of each icon for Word processing, etc.).
The following applications are available:
Word Processing
Typewriter
Maii Merge
The Word Processing application (WP application) is
used to type and format documents on screen. You can
save the document on diskette or print it at any time.
In the Typewriter application (TW application), the word
processor becomes an electronic typewriter with many
advanced features normally available only on word pro
cessors. You will use the TW application most often for
typing envelopes, short notes, and for filling in forms.
The Mail Merge application is used to create and save
the data that can be merged into a Word Processing
document.
I Typewriter
15
Page 24
Self-Demonstration
^ CODE
'll
—
This built-in program shows you examples of what you can do with your word pro
cessor.
1. Turn the power on to display the Main menu.
2. Press aa + m.
3. Proceed according to the instructions displayed on the screen. The following
is a summary of available operations:
Key Operation
—1
№
To advance one screen at a time.
To go back to the first screen of the self-demonstra
tion.
To end the demonstration and return to the MAIN
MENU.
16
Page 25

Differences between Word Processing and
Typewriting
The Return Function
RETURN
This word processor will return automatically at the end of each line. Type a para
graph as a single long line.
You still get a paragraph because of a feature called “Word Wrap”. Words that do
not fit on the line will “wrap” to the next line. When you press IMMBM, a little sym
bol appears. This symbol is never printed. It is your signal to the word proces
sor that “paragraph ends here”.
The Cancel Function
The ICANCElI key allows you to cancel a selected function. It is handy when you
have pressed the wrong key, or when you change your mind as to how you wish
the command executed after you have selected the mode
CANCEL
PDOWN
On-Screen Symbols
Special symbols appear in the text to remind you that you used a format function
there. (Example: the symbol that appears when you press IRETURW to start a
new paragraph.) Such symbols are never printed on paper. (For a complete list,
see “Symbols” on page 138.)
Automatic Page Breaks
The word processor automatically breaks your text up into pages according to
your specifications. The position of these automatic page breaks is flexible and
will be re-adjusted for you by the machine if you modify the text.
You may also decide to force the word processor to start a new page at any point
by pressing jgiiM + . This inserts a symbol ^ in the text.
CODE
A)
PBREAK,
^====H
17
Page 26

Caps Lock vs. Shift Lock
The caps lock function is not the same as the shift lock function on a common
typewriter. Both eliminate the need to reach for ISHffrI to type an uppercase (cap
ital) letter, but they differ in their effect on other keys.
The Keyboard Shift Function
Vb=
You aiready know that hoiding down laWTI and pressing B gives you the
exclamation mark.
Whiie fFTI is pressed, the SHIFT indicator appears on the screen. The indicator
disappears as soon as you reiease IB—.
The Shift Lock Function
SHIR LOCK
CAPS
If you press MHUFTloai, the SHIFT indicator is displayed permanently, and all the
characters you type are uppercase = “A”, ® To release this mode,
press BM.
The Caps Lock Function
^ CODE
4------------
'll
^HIR LOCK^
. CAPS
When you need to type long strings of both capital letters and numbers, such as
“ACCT NO. BC104”, press JlM + W- The CAPS indicator will appear on the
screen to tell you that the keyboard is locked in capital mode (B = “A”, but B =
“1”). To release this mode, press — + MM again.
18
Page 27

Word Processing
19
Page 28

Starting the Word Processing Application
Word Processing [ Typewriter
1. Switch the power on to display the Main Menu.
2. Use the cursor keys (fSFl, fH, and ffi) to select the icon for Word
Processing and press iiEiiM, or press ®. The WP INDEX screen appears:
<< WP INDEX >> REMAIN:XXX.XK
♦NEWFILE TEXTl (XX.X) TEXT2 (XX.X)
TEXT3 (XX.X) TEXT4 (XX.X) TEXTS (XX.X)
Select d file and pres^ RETURN. Press CANCEL to display MAIN MENU.
Use the cursor keys to select *NEWFILE and press jiWBi. The WRITE/
EDIT screen shown on the next page appears, and you can start creating
your document.
20
Page 29
WRITE/EDIT Screen
The WRITE/EDIT screen shown below appears when you start the WP applica
tion. This is the main display of your word processor. All text input and editing is
done here.
When the scale is OFF
> Format Symbol & Dead Column . Status Line
Text Area
hxXXXXX P:^X L:XXX C0L:XXX PITCH:XX L. ^P: X . X KB:XX SHIFT INS EXP 8LD CNT JST SP
start typin^^our text* Press Flit to finish^
Text Cursor
When the scale is ON
Message Area
/Format Symbol & Dead Column
Scale
Text Cursor
Press FILE
Text Area
t$h. K
\
Message Area Hot Zone
The following reminder appears on the message line (and remains until you press
any key):
start typing your text. Press FILE to finish.
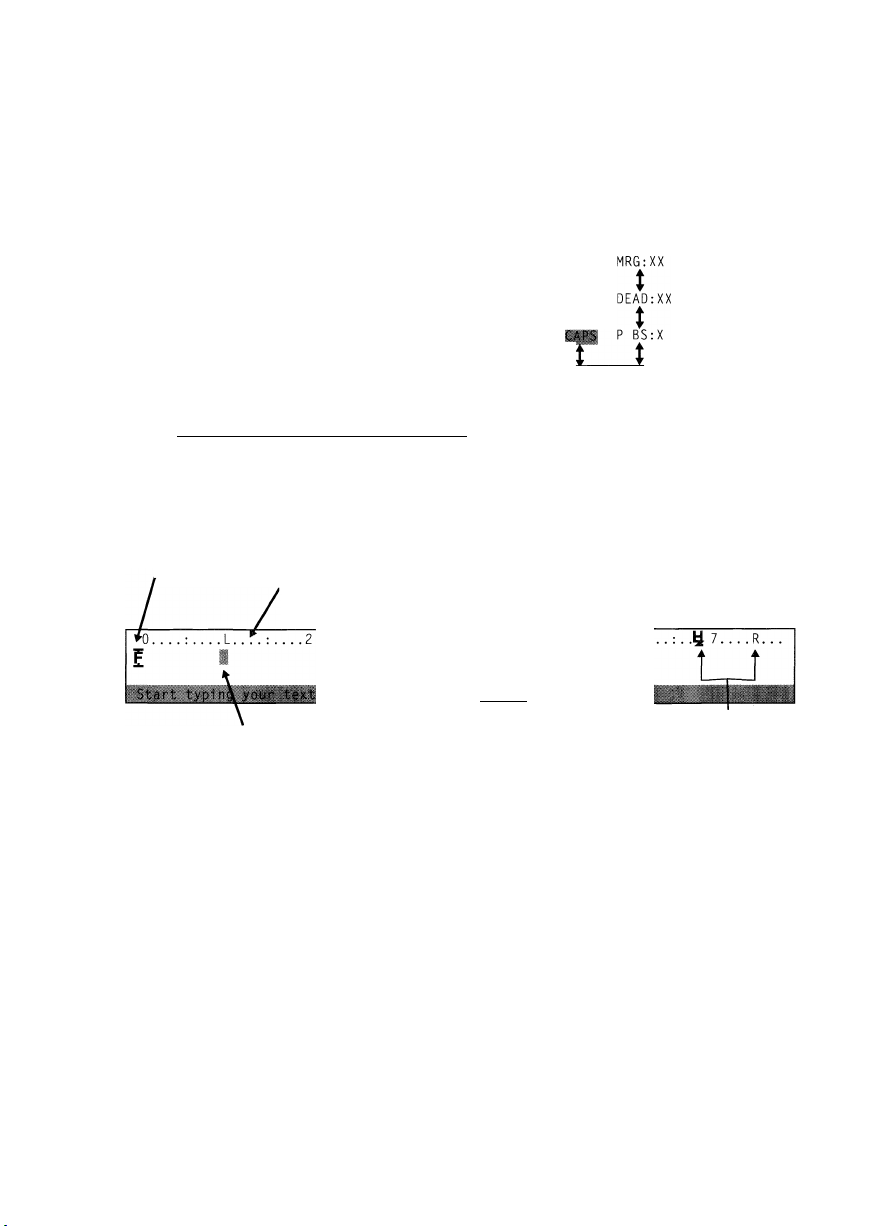
Status Line
The status line reminds you where you are and how you have told the word pro
cessor to format your text. Most indicators are followed with a value (example:
PITCH: 10) and are always displayed. The ones on the right appear (in reversed
color) only when the corresponding function has been activated because they are
on/off indicators (example: BLD when the bold function is on). (For a complete list,
see “Indicators” on page 140.)
21
Page 30
Scale
The scale on the screen of the word processor is the electronic equivalent of the
scale on the top of a typewriter, which assists the operator in determining the
position of characters on a page. The numbers indicate the position from the left
edge of the paper. Other symbols remind you of some format settings (example: L
and R indicate the position of the left and right margin). (For a complete list, see
“Symbols” on page 138.)
NOTES:
• By default, the scale is disabled. To display the scale, see the example under
the title “Menu” on page 24.
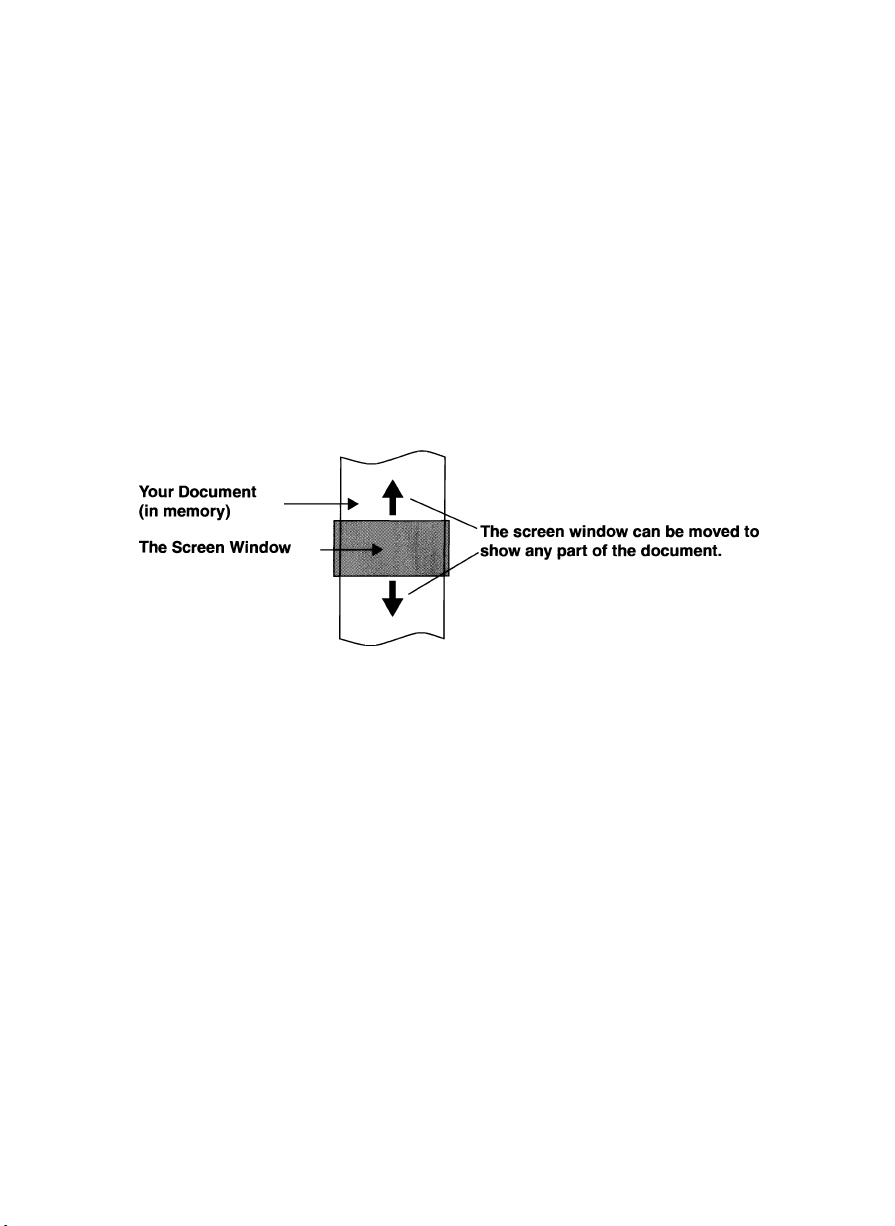
Text Area
The bulk of the screen is your work area, a window into your document. Although
it only shows a few lines of 79 characters at a time, if your document is longer or
wider, you can move the window up, down, left, and right. The only part you can
not use is the “dead column” (to the left of column 0), which the word processor
reserves for the “format change” symbol g . Other symbols appear in the text to
remind you of the format functions that you used, but will not be printed. (For a
complete list, see “Symbols” on page 138.)
Text and Scale Cursors
A lighted square, the text cursor, indicates your current position in the text area.
Another cursor, the scale cursor, is an underline that indicates your position rela
tive to the left of the scale and follows horizontal movement of the text cursor.
22
Page 31

Message Line
This line is reserved for guide messages (prompts) that ask you a question, give
direction or display error messages that warn you when something is wrong.
When no prompt and no error message are displayed, this line is used for your
text.
NOTE:
For a list of error messages, see “Error Messages” on page 142.
Menu
When you press MMlM, the upper line of the screen is temporarily replaced with a
menu of functions. The use of the menu is very simple and will be briefly
described here. As an example, we will see how to disable and enable the scale.
1. To display the menu, press —. The leftmost function (STYLE) is automati
cally selected and appears in reverse colors (we will call this the selection
cursor).
STY It BLOCK CTR/RMF SPELL PHRASE FORM SEARCH PAGE PRINT
NOTE:
______
(r.
V PUP ,
Pressing —B allows you to return to the normal screen.
2. To move the selection cursor to the right or the left, use ^
3. When the selection cursor Is on the desired function, press f
sub-menu appears below the selected function.
NOTES:
• The PAGE PRINT function is an exception: pressing B produces a beep,
and pressing — executes the function without displaying a sub-menu.
• Once you get acquainted with the menu, you can use “accelerators” instead
of steps (2) and (3). The accelerator for each function is displayed in bold on
the menu. Accelerators allow you to select and execute a function without
first moving the selection cursor. For example, the accelerator for CTR/RMF is
“C”. Typing “C” (either lower or upper case) while the “main menu” is dis
played immediately shows the CTR/RMF sub-menu regardless of the position
of the selection cursor.
23
Page 32

Example 1 : You selected CTR/RMF
STYLE BLOCK
NOTES:
TTlGlTr HARGTFTDJ
FORM SEARCH PAGE PRINT
• This sub-menu is used to center the text or to align it flush to the right margin.
(For details see “Centering” on page 47, and “Right Margin Flush” on
page 49.)
• New bold characters indicate the accelerators for the functions of the sub
menu. For example, to select and activate the right margin flush function, you
can type “R”.
• Pressing will return you to the “main menu”. However, when a sub
menu is displayed, you can select another function without returning to the
“main menu”. Simply use Q and @.
• Instead of the menu process, you can access the right margin flush function
by pressing [CODE I + ® af the WRITE/EDIT screen. This quick access is
called a “short-cut”. (See “Function Menus” on page 135 for a complete list of
short-cut keys.)
Example 2: You selected FORM
STYLE BLOCK
Let’s use this example to show how to turn the scale on/off.
CTR/RMF SPELL PHRASE 1 FORH PAPER SIZE lINT
1 HEADER
1 FOOTER
SCALE LINE ON/OFF
1. Move the selection cursor to FORM and press »etubhi , or type “F”.
2. Use ® and ® to select SCALE LINE ON/OFF and press —w. You are
back to the WRITE/EDIT screen. If the scale was displayed, it is now dis
abled, and vice-versa.
• Accelerator: Instead of (2), type “S”.
When the scale is OFF
XXXXXXXX P:XX L:XXX COLiXXX PITCHiXX L.SPiX.X KB:XX
E
When the scale is ON
0. .L_________:
___2___:___3___:___
4 5 . :
: ....6. . .
...tt 7..
..R...
E
When the scale line is ON, the status line is displayed by pressing |C0№|.
24
Page 33

Typing on the Display
Type your text just as you would on a typewriter. The text appears on the screen
instead of being printed on paper.
If you make a mistake, use ISACKSI^i or la^TOECrl to delete. For more details
about corrections, see “Revising Text - Basic Functions” on page 29.
You can print your text after you have created it. See “Printing a Document” on
page 65.
When your text is complete, see “Saving a File” on page 61.
Hot Zone
The last six columns before the right margin are defined as the “hot zone”. The
li symbol on the scale corresponds to the point at which a typewriter bell would
ring to warn you that you are about to run into the right margin. The word proces
sor knows how to break text so that it automatically “wraps” to the next line.
Word Wrap
The “word wrap” function allows you to type a paragraph continuously without
being concerned about carrier returns. In the hot zone, when a word is going to
extend beyond the right margin, the word and the cursor will be moved to the next
line automatically. You need only to press [returnI to break a line and start a new
paragraph.
The word wrap function is always active on the word processor. This feature per
mits continuous typing and helps build typing speed. The text cursor automati
cally moves to the next line whenever a space or hyphen is typed in the hot zone.
Space vs. Permanent Space (f^
(SPACE BAR)
CODE
Vk
-------
Spaces entered by pressing ((SPACEBAR)! are word separators called “soft”
spaces. When entered in the hot zone, they force the cursor to move to the next
line. In justify mode, the “soft” spaces are adjusted to produce an even right mar
gin. (See “Automatic Justification” on page 50.)
Permanent spaces entered by pressing ICOPEl + [(SPACE BAR)! are special spaces
that link words together, protecting them from being separated on different lines.
A permanent space is displayed with the symbol j;j and is considered part of the
two words it links. Such a space is never adjusted by the automatic justification
function - and does not cause the cursor to jump to the next line when entered in
the hot zone.
(T
^
(SPACE BAR)
25
Page 34

Hyphen vs. Permanent Hyphen
'r
T CODE ^
i
---------------
r %1
----------
1
-y
Typing a hyphen (B) in the hot zone automatically sends the cursor to the next
line. This becomes a “soft” hyphen, displayed as a dotted hyphen, and will disap
pear if subsequent revisions or re-formatting - a change of margins, for instance
- moves the word out of the hot zone.
A permanent hyphen, entered with + ©, is for those words that always
require a hyphen (mother-in-law, for example). In the hot zone, a permanent
hyphen does not send the cursor to the next line. Outside the hot zone, all
hyphens are permanent, so it is not necessary to use —.
Superimposed Characters
(Permanent Backspace)
CODE ^
--------------
BACKSPACE
+
BS1
-
---------
i
It is possible to create characters that are not available on the keyboard (“¥”, for
example) by superimposing two characters.
1. Type the first character (“Y” in our example).
NOTE:
Enter the characters in either order, but start with the one you want to appear
in the text area.
2. Press — + aMH^. The first character appears now in reversed color,
and the cursor moves next to the P BS indicator on the status line. If the Scale
was displayed, the Status Line is automatically displayed.
3. Type the second character (“=” in our example) on the status line. As soon as
the second character is typed, the cursor moves back to the text area and
you are ready to resume normal typing.
NOTES:
• When you move the cursor back to the first character (press 0 at this point,
for example), the second character re-appears next to the P BS indicator (if
the Status Line is currently displayed).
• To delete superimposed characters, delete the first character (use
^
26
Page 35

't I ^ y-4 LT* y* !y*^ ^y*A/^ y^y*Ay*y*^-í
o ^
--
uu^Cr Lpi:y unu oupcr:yLrLpi:y
'r CODE
-----------
CODE ^
The word processor allows you to enter and print subscripts and superscripts.
The procedure parallels what you would do on a typewriter except that, instead of
physically rotating the platen, you press |C(M)El + [PDOMMI and ICOEM + [PUW.
NOTES:
• Characters in subscript and superscript are displayed on the same line as
normal characters. When you input a subscript or superscript or move the
cursor to a subscript or superscript, however, only half of the cursor appears
(lower-half for subscripts, and upper-half for superscripts).
• The word processor prints subscripts and superscripts the same distance (1/
12 inch) below or above the line, regardless of the current line spacing.
Try to enter “e=mc^”.
1. Type “e=mc”.
2. Press ICOrei + IPDOWNI.
3. Type “2”.
4. Press +
NOTES:
To enter subscripts, proceed in the same way as above, but reverse the
ic^ + iPtX)WNl and + E2) keys.
Each pair of keys (ICCTOe] + {PPMWII and 1G№I + PW»i ) cancels the other,
and the two pairs must always be used in combination. If you try to press one
of the pairs more than once, the word processor beeps.
JJ
(Y ^
+
< CANCEL'
, PDOWN,
Extra Characters
The extra characters are those marked in green on your keyboard (for example,
To enter such a character, hold down and press the character key.
NOTE:
If a green character appears on the right of a key (for example “3”), it means
that the character is available only with KB II (international keyboard).
27
Page 36

Accents ("uead" Keys)
This word processor’s multilingual keyboard supports the accented vowels of
such languages as French, German, and Spanish.
1.
When typing, you must press lCOX\ + ® (B) to switch the KB indicator on
the status line to II (international) or III (symbol). (See “Character Set” on
page 54.)
2.
When printing, you must have the appropriate daisy wheel. (See “Changing
the Daisy Wheel Cassette” on page 145.) Remember that the accented char
acters and other special characters on the international or symbol keyboards
can be printed only if you install the appropriate daisy wheel.
Only the base character is entered in the text area. The accent is entered
3.
next to the indicator DEAD on the status line.
If you have ever used a typewriter, you already know the basic procedure: Type
the accent and then the base character. Unlike regular keys, the accent keys are
“dead” - that is, the cursor does not move afterward so the base character
appears under the accent. Make sure that the keyboard is set to KB:II (interna
tional), and try the following example.
1. Type the accent The accent appears next to the indicator dead. If the
Scale was displayed, the Status Line is automatically displayed. The cursor is
reversed and waits for a base character to be input. You are allowed to input
a maximum of two dead characters. If you make a mistake, press [CANCELI or
ICCM^ECTl to delete the dead character(s) and retype.
2. Type the letter “o”. The letter with its accent “6” now appears in the text area.
NOTES:
• With some combinations of accents and base characters (such as Y and ^),
the base character appears alone and in reverse color in the text area. When
you move the cursor to the base character (press @ at this point, for exam
ple), the accent re-appears next to the DEAD indicator (only when the status
line is displayed).
• To delete an accented character, proceed as you would for a normal charac-
Automatic Page Breaks
The word processor automatically breaks your text up into pages according to
your specifications. (See “Vertical Layout” on page 56.) The position of these
automatic page breaks is flexible and will be re-adjusted for you by the word pro
cessor if you modify the text.
You may also decide to force the word processor to start a new page at any point
[P BREAK! ■ This inserts a symbol ^ in the text (and forcesby pressing +
any text beyond that point to the next page).
28
CODE ^
i
--------------
i
PINS
PBREAK^
Page 37

Revising Text - Basic Functions
Moving the Text Cursor
To make a revision, you must first go to that part of the document. A word proces
sor uses a text cursor to indicate your current position in the document.
Moving One Position at a Time
The cursor keys @ and move the text cursor one position in the
direction of the arrow on their key tops.
NOTES:
• Q and (3 noi move the cursor beyond the margins.
• Pressing (3 ai the end of a iine sends the cursor to the beginning of the
next iine; pressing (3 sends it back to the end of the previous iine.
• if the cursor is at the top or bottom of the text area, cursor up and down keys,
m and , automaticaiiy shift (“scroii") the text down or up to show you
more - uniess there is no more text because you are at the beginning or the
end of the document.
One Line Up
t
HOME
29
Page 38

Jumping Left and Right
The Express Backspace and Relocation functions take you to the beginning and
end of the current line of text, respectively.
^ CODE
H—
fr
CODE
■41
EXPR
NOTES:
+ tewil moves the cursor to the left margin. If you press UaMCl +
first at the left margin position, however, it goes all the way to the left
end. When you are in the middle of an indented paragraph (See “Paragraph
Indent” on page 46), it goes back to the temporary left margin.
[CODE I + [RELOCl moves the cursor to the end of the current line but does not
jump past a symbol that signals the end of a paragraph ( <J , , and ^ ).
If you press IKHMEl + lii HB.1 at the right margin position, the cursor goes all
the way to the right end.
Jumping to the Top or Bottom of the Text
Y CODE
___
-Jj
T CODE
-4)
-----------
ICOtMEI + (жми scrolls the text all the way to the top of the document. [СЭДЕ1 +
scrolls the text all the way to the bottom of the document.
GOTO Page
The GOTO Page function moves the cursor immediately to the beginning of any
page of the document with a single operation.
1. Press (K^EI + iGOroi (1)). The word processor asks you to type in the num
ber of the page you wish to move the cursor to.
PAGE: I
2.
Type the desired page number, then press IBETURNI to move the cursor to that
page.
^ CODE
-----------
4)
30
Page 39

NOTES:
If you enter an incorrect page number, you may change it using \
stop the operation with
iWfWSm
3-
If you enter a page number that is higher than the number of the last page,
the cursor will jump to the last page.
Instead of typing a page number, you may press one of the cursor keys just
after pressing [CODE I + ('®);
, then
Œ3
(3
Moves the cursor to the beginning of the current page;
moves to the beginning of the previous page when the
cursor is at the beginning of the current page.
Moves the cursor to the beginning of the next page.
Moves the cursor to the beginning of the document.
Moves the cursor to the end of the document.
Inserting Text
Pressing ICWMEI + IIHSBffI (0) switches the word processor between insert and
overwrite modes, and turns the INS indicator on and off accordingly.
In overwrite mode (indicator INS off), each character you type replaces the cur
rent character. You type over the existing data and your new data replaces the old
data. (Overwrite is the “default,” that is, every time power is turned ON, the word
processor starts in overwrite.)
In insert mode (indicator INS on), the characters you type appear in front of the
cursor, the rest of the line automatically moves to the right and, if necessary, the
last word moves to the next line.
NOTE:
Function
^ CODE
-----------
'll
J)
I
INSERT
Since deleting unnecessary characters is usually easier than retyping char
acters that have been deleted, it’s a good idea to make sure that the word
processor is in the insert mode before you start revising.
Deleting Text
You can delete text at four different levels:
• a character at a time
• a word at a time
• a line at a time
• a block at a time (See “Deleting a Block” on page 35.)
Whichever level you choose, the word processor automatically closes up the gap
and reformats the text to fit the margins and the page length.
31
Page 40

Deleting a Character
1 CORRECT
-Jj
--------------
Press [8ACKSPACE1 or iooRRECTl to delete one character to the left of the cursor.
NOTE:
These keys also delete paragraph end symbols <J , kJ , and ^ except
when these symbols are located just before a format symbol f ora center
ing symbol M .
Deleting a Word
LINE OUT
-AJ
To delete a word, position the cursor on the space immediately following the word
and press RpaWlWI. Pressing MPiPIWI removes any portion of a word to the
left of the cursor, up to the previous blank space.
NOTE:
Use this feature when you mistype a word and typing it over is faster than
otherwise correcting it
Deleting a Line
^ CODE
i
-------------
in
WORD OUT
LINE OUT ^
V
To delete a line, position the cursor anywhere after the last character of the line
and press I CODE] + lUME OUT]. Pressing [CODE! + [LIHEOirrj removes any portion of
a line to the left of the cursor, up to the beginning of the line.
Splitting and Joining Paragraphs
1. Press [C0№1 + W№EKTI (0) if the INS indicator is off.
2. Position the cursor at the point you want to split and press ItglWM to insert a
symbol.
Position the cursor at the beginning of the second paragraph,'and press
[BACKSPACE] or [CORRECT! to delete the ^ symbol of the first paragraph.
NOTE:
It is not possible to join two paragraphs that have two different formats (e.g.
margin settings).
32
Page 41

Revising Text - Advanced Functions
Block Operations
A block can be copied, deleted, or moved to another part of the document.
A block can also be copied into a different file.
Copying a Block within the Document
г
i—
-4
STYLE
1. Position the cursor on the first character of the biock you want to copy.
2. Press IMBWI to display the menu.
3. Use (3 and Q to select BLOCK, and press IRETURNI or iXI.
• Accelerator: Instead of (3), type “B”.
4. Use [J] and Q3 to select COPY and press fBETURNI.
• Accelerator: Instead of (4), type “C”.
BLOCK COPY (F
DELETE
■ MOVE
SPELL PHRASE
FORM SEARCH
PAGE PRINT
• Short cut: Instead of (2), (3) and (4), press fCODEl + ©.
Move cursor to block end. Press RETURN or to store temporary file press TEMP.
5. Move the cursor to the end of the block to be copied. As you move the cursor,
the block is seiected (reverse image). You may move the cursor back toward
the beginning of the block to deselect it. All key combinations used to move
the text cursor can be used when selecting a block, (See “Moving the Text
Cursor” on page 29.)
6. When the block to be copied is selected, press
Move cursor to destination for blocked text and press RETURN.
7. Move the cursor to the location where you want to insert the selected block
and press iRETlfflNl. The block is automatically copied to that position and the
document is reformatted to conform to the modified sections of the docu
ment. (See “Formatting the Page” on page 42.)
NOTES:
iMll
• The block is inserted regardless of the current mode (insert or overwrite).
This means that the block will never overwrite text at the destination position.
• Press at any step to cancel the function.
33
Page 42
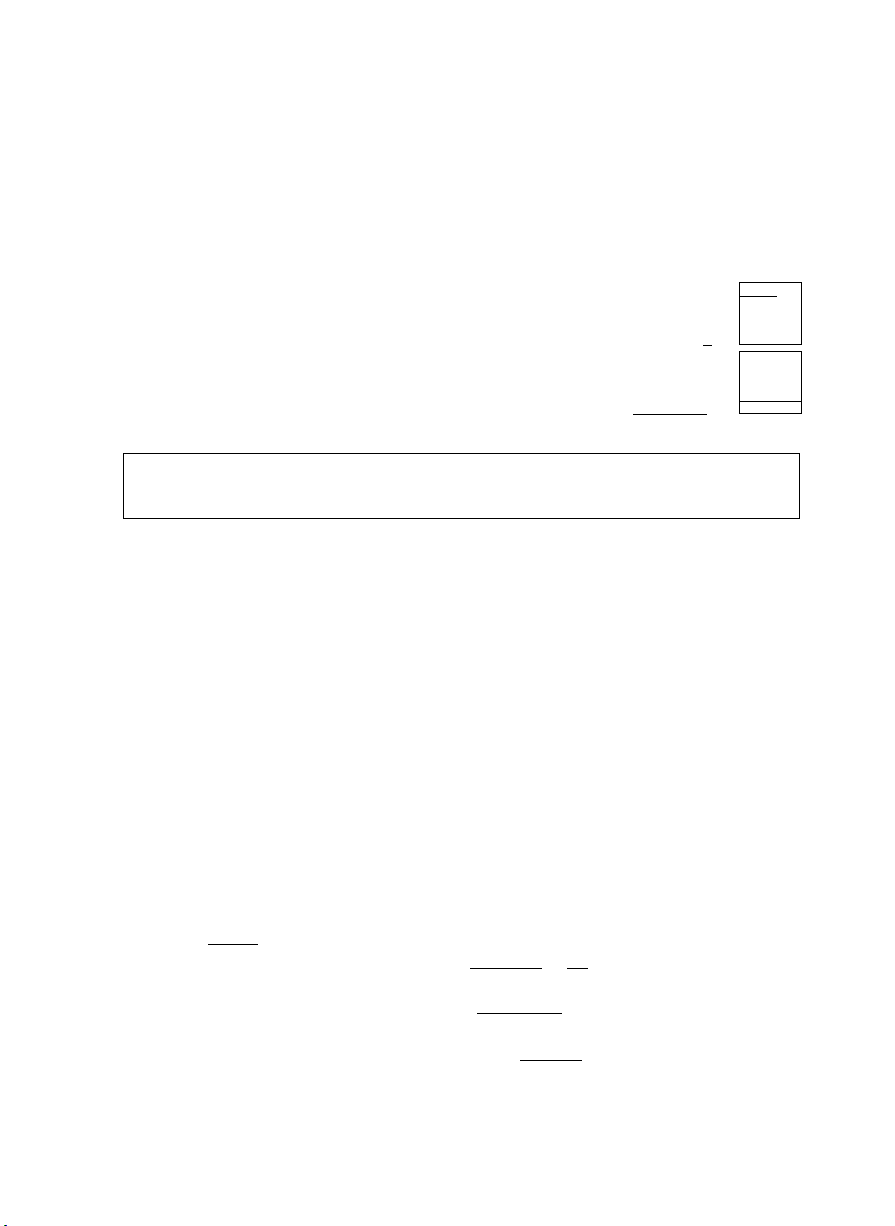
Since the block copy operation increases the size of your document, the word
processor may run out of memory If this happens, the copy operation is can
celled and the following message appears:
Not enough memory remaining.
You must either first delete a portion of the document to free some space, or
try to copy only a smaller block.
Copying a Block into a Different File
STYLE BLOCK COPY 'K
DELETE
MOVE
SPELL
PHRASE FORM SEARCH
CODE
If
CODE
^ -¿J
PAGE PRINT
c
— -Ji
^
r-r
TEMP
---------
A portion of the memory is reserved for a temporary file in which you may copy a
block of the current document. Later, the contents of the temporary file can be
recalled for insertion in the same document or in any other document you are
working on. This means that the temporary file can be used to copy a block of text
from one file into another file.
You may copy a block stored in the temporary file as many times as you want.
Each time you store a new block in the temporary file, you will erase the previous
contents of the temporary file.
On the other hand, you can recall the contents of the temporary file as many
times as you want without altering it.
NOTES:
• The temporary file is erased after the power is turned off, a DISK COPY func
tion or a Mail Merge operation is completed.
• The temporary file may contain up to 4K bytes (about 4,000 characters).
1. Position the cursor on the first character of the block you want to copy.
2. Press BWiiill to display the menu.
3. Use and (3 to select BLOCK, and press HgrUBNI or fTI.
• Accelerator: Instead of (3), type “B”.
4. Use (D and [0 to select COPY and press IRETURNI.
• Accelerator: Instead of (4), type “C”.
• Short cut: Instead of (2), (3) and (4), press ICOOEl + (c).
Move cursor to block end. Press RETURN or to store temporary file press TEMP.
34
Page 43

5. Move the uUTSur tu the end uf the block to be copied. As yOU iiiOve the CUrSOr,
the block is selected (reverse image). You may move the cursor back toward
the beginning of the block to deselect. All key combinations used to move the
text cursor can be used when selecting a block, (See “Moving the Text Cur
sor” on page 29.)
____
6. When the block is selected, press + HHI (B) to store the file in tem
porary memory. DO NOT press ||||||||.
NOTE:
______
Press 0HB any step to cancel the function.
Recalling the Temporary File
f CODE
-----------
"T
+
d
The contents of the temporary file can be recalled and inserted into any fiie.
1. Position the cursor on the location where you want to insert the contents of
the temporary file.
2. Press Ullll -I- —a (B)' The following message appears:
You can recall temporary file. To recall temporary file press RETURN.
3. Press WW. The text saved into the temporary file will now be inserted
into the document at the cursor position.
Deleting a Block
STYLE BLOCKTTÜPŸ 1f SPELL
mint
-< MOVE y
PHRASE
FORM SEARCH PAGE PRINT
^ ÌTw
1. Position the cursor on the first character of the block you want to delete.
2. Press I— to display the menu.
3. Use H and B to select BLOCK, and press 1— or fTI.
• Accelerator: Instead of (3), type “B”.
4. Use and B to select delete and press IMWii.
• Accelerator: Instead of (4), type “D”.
• Short cut: Instead of (2), (3) and (4), press \
4—
V
I™"
r
"1
4
-4
Move cursor to end of block to delete and press RETURN.
35
Page 44

Move the cursor to the end of the block to be deleted. As you move the cur
sor, the block is selected (reverse image). You may move the cursor back
toward the beginning of the block to deselect. All key combinations used to
move the text cursor can be used when selecting a block, (See “Moving the
Text Cursor” on page 29.)
When the block to be deleted is selected, press IRETUI^I. The word processor
asks for confirmation:
Delete? Press RETURN(yes) or CANCEL(no).
7. If you press fRETURNi, the block (displayed in reverse image) is deieted, and
any text foliowing the block is reformatted to conform to commands in force
for that section of the document. (See “Formatting the Page” on page 42.)
Moving a Block
^ CODE ^
1
STYLE
BtOCK COPY IE
DELETE
NOVE
SPELL PHRASE
1. Position the cursor on the first character of the block you want to move.
2. Press IMEWUI to display the menu.
3. Use 0 and @ to select BLOCK, and press IRETURNI or fTI.
• Accelerator: Instead of (3), type “B”.
4. Use [J] and Q] to select MOVE and press IWETURNI.
• Accelerator: Instead of (4), type “M”.
• Short cut: Instead of (2), (3) and (4), press ICODEI + (I).
Move cursor to end of block to move and press RETURN.
Move the cursor to the end of the block to be moved. As you move the cursor,
the block is selected (reverse image). You may move the cursor back toward
the beginning of the block to deselect. All key combinations used to move the
text cursor can be used when selecting a block, (See “Moving the Text Cur
sor” on page 29.)
6.
When the block to be moved is selected, press
EORM
SEARCH PAGE PRINT
mmm
Te
'L—
Move cursor to destination for blocked text and press RETURN.
7. Move the cursor to the location where you want to insert the selected block
and press [RETURN! ■ The selected block is automatically transferred to that
position and the document is reformatted to conform to the modified sections
of the document. (See “Formatting the Page” on page 42.)
36
Page 45

NOTES:
The block is inserted regardless of the current mode (insert or overwrite).
This means that the block will never overwrite text at the destination position.
Press ¡CANCEL I at any step to cancel the function.
Searching for Text
In addition to using the cursor keys to move throughout your text, you may find
any position in your file quickly by using the search function.
The word processor allows you to automatically scan the document for all occur
rences of a specific piece of text (called a “string”) and, at your option, replace all
or some of those occurrences with another string. (See “Search and Replace” on
page 39.)
A string may be up to 63 characters long, and may include “dead” and superim
posed characters. (See “Defining a Search String” on page 38.)
Starting a Search
STYLE BLOCK
CTR/RMF
SPELL
PHRASE FORM
SEARCH Шкт
“REPLACE ?
■ hyphen scan c
This function scans the text from the current text cursor position and pauses
when the string is found, waiting for you to tell it whether to stop there or proceed
to the next occurrence.
1.
Position the cursor at the beginning of the section that you wish to scan. If
you want to scan the entire document, for example, move the cursor to the
beginning of the text.
2.
Press ШШМ to display the menu.
3.
Use @ and Q to select SEARCH, and press ИШМ or Ш-
•
Accelerator: Instead of (3), type “R”.
4.
4. Use Ш and Ш to select SEARCH and press
Accelerator: Instead of (4), type “S".
Type .search worcUsK Press RETURN to start search.
SEARCH _____________________________________________
5. Enter the text you are looking for and press iCIWNI.
6. Wait for the word processor to find the first occurrence. The following prompt
will appear:
Press RETURN to search again, or press CANCEL to stop search.
7. If this is the place you are looking for, press WHH and do the necessary
editing. If you wish to proceed to the next occurrence, press 1—1 to con
tinue the search.
37
Page 46

NOTE:
When there are no more occurrences, the following message appears, and
the prompt will disappear when you hit a key.
Word(s) not found.
8. Resume normal word processor operation or go back to step (1) to search for
another string - or for the same string again. Since the search string remains
in memory until you define another or turn the power off, you will not have to
re-enter it in step (5) when you search repeatedly for the same string, and
exit to make changes.
Defining a Search String
• The 63-character iimit refers to the number of characters you see on the
screen. An accented character (made with a dead key) or superimposed
characters (made with a permanent backspace) count as a single character
even if it takes two or more keystrokes to type.
• The search function distinguishes between upper and lower case letters. For
example, if you specify “ALPHA”, it will not stop at “alpha” or “Alpha”.
• Each space that you type (with B8BiC£B<yJ ) in the string or in the text counts
as one character.
• The string input area initially appears as a continuous underline. Everything
before the trailing underline is considered part of the string. The string shown
beiow, for example, is five characters long because it ends with two spaces.
Type search wordCs)* Press RETURN to start search*
SEARCH :AAA |_______________________________
________
The search function stops at every string that matches the specified string even if the match is inside a word. If the specified string is “at”, it stops at “at”
of “hat”, “attention”, etc. If you wish to search only for the word “at”, specify
“_at_”, leaving a space on each side of the word.
The search function ignores “soft spaces” that are added by the justify func
tion and hyphens other than permanent ones. If “word processor” is the spec
ified string, the function will stop at “word
______
processor” if there is an extra
space inserted by the justify function and at “word pro-cessor” if the hyphen
was typed in the hot zone.
The search string cannot contain styles such as bold, underline, subscript, or
superscripts because the search function ignores them. If you specify “A2”, it
stops at “A2”, “A^”, “A2” - and all combinations with bold and underline as
well.
Pressing iOlfcl during string input stops the search function, but the string
remains in memory until you define another search string, or turn the power
off.
38
Page 47

Search and Replace
STYLE BLOCK
CTR/RMF SPELL
PHRASE FORM
The search and replace function is just the search function with the option of
replacing some or all occurrences with another text string. Applications include
quick correction of a misspelled or mistyped word everywhere that it occurs (from
“conveyer” to “conveyor” or vice-versa), replacement of key words (from “brother”
to “sister”), and capitalizing key words for emphasis (from “word processor” to
“WORD PROCESSOR”).
The word processor automatically reformats your document if the replacement
word is not the same length as the original.
1.
Position the cursor at the beginning of the section that you wish to scan. If
you want to scan the entire document, for example, move the cursor to the
beginning of the text.
2.
Press WIM to display the menu.
3.
Use (3 and ^ to select SEARCH, and press [REmiHII or CD-
Accelerator: Instead of (3), type “R”.
Use [J3 and B to select REPLACE and press [RETURNI.
Accelerator: Instead of (4), type “R”.
Type search and replace mr4 (s). Press t, i to select, RETURN to start search*
SEARCH :|_____________________________________________________
REPLACE:
_____________________________________________________
5. Enter both the text that you wish to look for and the replacement text. Use
m and QJ to shift between the two input areas and press Wi when
input is completed.
Global? Press RETURN(yes) or TAB(no).
If you press iRETURdNl, all occurrences from the cursor position to the end of
the document will be automatically replaced. When the function has been
completed, the cursor will move to the end of the file and return to the normal
edit mode. To stop the function in progress, press MMiaEll.
If you press (taw, the word processor will stop at the first occurrence, and
display the following message:
Press RETURN to replace word(s), TAB not to replace word(s), CANCEL to exit.
7. To replace this occurrence, press IRETURNI. The word processor carries out
the change, then stops at the next occurrence and displays the above mes
sage again.
39
Page 48

To search for the next occurrence without replacing, press \WB]. The word
processor stops at the next occurrence and displays the above message
again.
To stop searching and return to the normal edit mode, press [CANCELI. If you
mistakenly press this key, you may re-start from step (1). Since the search
and replace strings remain in memory until you define others, you will not
have to re-enter them in step (5).
NOTE:
When there are no more occurrences, the following message appears, and
will automatically disappear when you hit any key
Word(s) not found.
NOTE:
If you repeatedly replace strings with longer ones In a very long document,
you may run out of memory. In such a case, the function Is cancelled and the
following message appears:
Memory ful 1.
The message will remain until you delete some portion of the document to free
some memory space.
Hyphen Scan
STYLE
BLOCK
CTR/RMF
SPELL
PHRASE
FORM 'SEARCH SEARCH ■
' REPLACE
HYPHEN SCAN
A problem arises with the word wrap function when the distance between margins
is small, or when typing a text in languages like German using very long words.
Since the word wrap function automatically transfers a word that cannot fit in the
current line to the next line, excessively long blank spaces may appear, resulting
in a poor layout.
The hyphen scan function automatically detects such long blank spaces and
gives you a chance to hyphenate the long words. It allows you to type your text
without making any manual hyphenations (except, of course, a permanent
hyphen).
1.
After your text is typed, position the cursor at the beginning of the section that
you wish to scan. If you want to scan the entire document, for example, move
the cursor to the beginning of the text.
2.
Press imm] to display the menu.
3.
Use ^ and @ to select SEARCH, and press IRETURNI or IT1.
Accelerator: Instead of (3), type “R”.
40
Page 49

4. Use 33 and fj) to select HYPHEN SCAN and press
• Accelerator: Instead of (4), type “H".
5. The hyphen scan function will scan your text down from the cursor position
and search for lines containing blank spaces longer than the six columns of
the hot zone. The long word that has been transferred to the next line by the
word wrap function is displayed in reverse colors. The following message
appears:
Move cursor, press RETURN to hyphenate, TAB to continue, CANCEL to exit.
6. If you want to hyphenate this word, position the cursor at the most suitable
position and press [№TURN|. The word will be hyphenated and the portion of
the word to the left of the hyphen will be transferred to the previous line. The
hyphen scan function will search for the next occurrence of a long blank
space.
If you want to skip this occurrence and keep the word without a hyphen,
press [1^1. The whole word will be transferred to the next line, where it was
originally, and the hyphen scan function will search for the next occurrence of
a long blank space.
Press if you want to end the hyphen scan function.
41
Page 50

rumicuuiiQ uit; rciyti
An important advantage to a word processor is that it allows you to change the
left, right, top, and bottom margins, tab stops, and other layout parameters on the
screen without having to retype. The word processor automatically adjusts the
text to fit the new width and page length.
Format Change Symbol
The word processor reserves the dead column of the text area (column 0) for the
format change symbol f . Each time you change the format, - that is, the left or
right margin, tab stops, justification, etc. - this symbol appears in the dead col
umn at the beginning of the paragraph, and the word processor automatically
adjusts the text to fit the new setting. These new settings affect not only the cur
rent paragraph, but also all subsequent text up to the next format change symbol.
The text above the symbol remains unchanged.
Left and Right Margins
^ CODE
T CODE
___
+ 4
/
+ 5
T$ t
7% £ t
|rmar^
f CODE
+
3
M REL J
---
J.
The left and right margins are set to columns 10 and 75 respectively each time
you start with a *NEWFILE. Margins can be relocated at any time, before, during,
or after typing the text. Each time you move the left or right margin, a f symbol
appears in the dead column of the first line of the current paragraph. A I sym
bol always follows the , kJ , or ^ symbols. The new setting affects the
whole document from the current line up to the next f symbol. If there is some
text already input in the affected portion, it will automatically be readjusted to fit
between the new margins. The text above the f symbol remains untouched.
1. Move the cursor to the new position for the left or right margin while observ
ing the scale. (See “Moving the Text Cursor” on page 29.) If the new position
is beyond the current margins, press ^^1 + IM RELl when the cursor is on
the margin to allow the cursor to move freely.
2. Press to set the new left margin, or [CODEI + [RMARl to set the
new right margin. The L or R symbol on the scale will move accordingly.
^
42
Page 51

NOTES:
When setting new left or right margins, tabs or decimal tabs, we recom
mended that the scale line be displayed.
if you mistakenly press MIfel -r [MREi! when there is no need to modify the
margins, press to resume normal editing.
The minimum distance between margins is set to two inches. The maximum
distance is nine inches (maximum printing width of the word processor) and,
in terms of columns, depends on the pitch as indicated in the following table:
Pitch
(characters per inch)
10 (Pica)
12 (Elite)
Minimum # characters Maximum # characters
Distance Between Margins (columns)
20
24
90
108
15 (Micron) 30 135
Tabs and Decimal Tabs
If you have been using a typewriter, you already know how convenient tabs are for
aligning text. Decimal tabs provide additional convenience when typing numbers.
Decimal tabs automatically align a column of numbers at the decimal point
instead of the first character. The scale indicates these two types of tabs with T
for normal tabs, and D for decimal tabs.
Setting Tabs
You may change tab stops at any time - before, while, or after typing the text.
1. Move the cursor to the position where you want a tab. (See “Moving the Text
Cursor” on page 29.)
2. Press teHBII + R'Wn to set a normal tab stop, or + IPTSETI to set a
decimal tab stop at the current cursor position. The corresponding symbol T
or D appears on the scale. Up to 30 tab and decimal tab stops can be set.
Setting a tab stop where you already had a decimal tab stop replaces the D
with a T and vice-versa.
NOTES:
• When i/7e * N EW FIL E /s opened, there are no tab stops set.
• Since the pitch determines the actual position on the printed page, the col
umns may appear at undesired positions if you change the pitch of a table
formatted with tabs and decimal tabs.
^ CODE
______
T CODE
4::^
----
"lì
7
-Jj
* ’
8
DTSET
43
Page 52

clearing Tabs
^ CODE
+ 9
,TCLR
------
--
1. To clear a single tab or decimal tab, move the cursor to that position and
press icopa + ifUl.
2. To clear all tabs and decimal tabs, hold down [CODEI + [TCLFM until the follow
ing message appears:
All tabs cleared.
■4)
Using Tabs while Typing
'1'
—J)
1. Press [T/ai to move the cursor to the next tab stop to the right. A symbol —>
appears on the screen just before the new text cursor position to remind you
that there is now a tab in the text.
NOTE:
If there is no tab stop to the right, the cursor moves to the right margin.
2. Type your text.
3. Repeat the above procedure for each column in your table.
Using Decimal Tabs while Typing
Decimal tab stops are a convenient feature unique to word processors. When you
move the cursor there with the cursor remains fixed in that column, and
each character that you type appears to the left of the tab stop. Once you type the
decimal point, however, the point appears at the tab stop, and the cursor returns
to normal operation. The primary use, of course, is to align columns of numbers
with decimal points.
1. Press I1MI to move the cursor to the next decimal tab stop to the right. A
symbol —> appears on the screen just before the new text cursor position to
remind you that there is now a tab in the text.
NOTE:
If there is no tab stop to the right, the cursor moves to the right margin.
2. Type the number.
3. Repeat the above procedure for each column in your table.
NOTE:
The cursor also returns to normal operation if you press mnm6 or .
44
Page 53

inserting Tabs
^ CODE
Vk
---------------
(i—11
+
.insert]
(fz
You may type your number or text first, and then align the columns with tabs and
decimal tabs.
1. If the INS indicator off, press fcODEl + [INSERTI (Q]) to switch to the insert
mode.
NOTE:
If the insert mode is not on,
will just move to the next tab stop without
aligning the text.
2. Position the cursor on the beginning of the word that you want to align.
3. Press [ms|. The word processor automatically adjusts the text to fit the mar
gins and page length.
Removing Tabs
You may also remove a tab or decimal tab in order to change tabulated text to a
paragraph.
1. Position the cursor just after the tab symbol —> on the screen.
2. Press [BACKSPACE] or [CORRECT]■ The word processor automatically adjusts the
text to fit the margins and page length.
Line Indent
^ CODE
V:
-------------------
ÌL —t
+
A L'N“ ]
--
Pressing {CODE] + HINDI ((0) is the same as typing five permanent spaces. (See
“Space vs. Permanent Space” on page 25.) The primary application is indenting
the first line of a paragraph.
NOTE:
If the word processor is not in insert mode, these five spaces overwrite the
five characters at the cursor location.
45
Page 54

LìiìG li ident
This letter was typed on this new Word Processor
to show you some of the many outstanding feats it can
perform.
Paragraph Indent
The paragraph indent function may be considered as a temporary left margin.
Setting the Temporary Left Margin
^ CODE ^
vk
----------------
TAB
FIND
~1i
-J
+
1
J
When you will need to indent text from the left margin, the paragraph indent fea
ture indents text to a tab stop. When the indent is released, the cursor returns to
the original left margin. (See “Setting Tabs” on page 43.)
1. Set the tabs you will need for any of the indented paragraphs.
NOTE:
If your document has multiple levels of paragraph indentation, it is a good
idea to set ail the tabs together at one point near the beginning.
2. If you have text, such as a section number, that you wish outside the indented
block, type that data.
3. Press (codeI + [PiNDl as many times as necessary to move the cursor to the
tab setting you want to be the new temporary margin. The word processor
displays a —>i symbol just before the new cursor position to remind you that
the following text is indented.
NOTE:
if you change your mind, use [BACKSPACE! or (COBRECTl to remove the para
graph indent symbol —>i .
Returning to the Original Left Margin
fr
CODE
RETURN
IND CLR
At the end of the indented paragraph, press + HNDCLRl to restore the origi
nal left margin. The word processor marks the end of the indented paragraph with
a ifJ symbol to indicate that the paragraph indent mode has been exited.
46
Page 55

NOTE:
To indent a paragraph after it has been typed, position the cursor on the first
character of the paragraph to be indented and press ifcoDEl + IP indI to repo
sition it at the tab position. At the end of the indented biock, press +
[IND CLRl to restore the originai ieft margin.
This letter was typed on this new Word Processor
to show you some of the many outstanding feats it can
perform.
In fact, you have seen some of these features in
this letter: Centering has placed the title right
in the center of the left and right margins, and
Paragraph Indent
Centering
The centering function is used to center a line as characters are typed, or to cen
ter a line already typed. You may center text either between margins or between
tab stops.
Centering Between Margins
STYLE
BLOCK
CTR/RHf CtNItKiWe FORM
R'lG'HT MARGIN FLUSH :
^ CODE
-----------
SEARCH PAGE PRINT
r
1—
—i
When you center between margins, the position of the cursor in the line does not
matter.
1.
Press IMEWI to display the menu.
2.
Use Q and @ to select CTR/RMF, and press @
•
Accelerator: Instead of (2), type “C”.
3.
Use 33 and 3) to select CENTERING and press liCSiW. The cursor moves
or Q3.
to the center point between your margins. The symbol for centering between
margins M appears in the line. If the text has already been typed, it is auto
matically centered and you may skip step (4).
Accelerator: Instead of (3), type“C”.
Shortcut: Instead of (1), (2), and (3), press ICODEI + ®.
4.
Type the text.
5.
Press Bgrowil to finish the centering operation.
47
Page 56

Centering between Margins
Left Margin
i
Institute of Chemistry and Physics
Right Margin
1
100 Metro Street
New York, N.Y.
Centering Between Tabs
STYLE
1.
BLOCK
CTR/RMF OTFERING
RIGHT MARGIN FLUSH
FORM SEARCH
Press tTAil as many times as necessary to reach the desired tab position
/9
-------
f CODE
-----------
--
PAGE PRINT
(the position that will become the left end of the centering range).
2.
Press imm] to display the menu.
3.
Use 0 and [3 to select CTR/RMF, and press iREtURNl or fTI.
•
Accelerator: Instead of (3), type “C”.
4.
Use [J] and (X) to select CENTERING and press [RETURN]. The cursor moves
to the center point between the tab position where the cursor was in (1) and
the next tab to the right - or the right margin if there are no more tabs set. A
centering symbol jtj appears on the line. If the text has already been typed,
it is automatically centered and you may skip step (5).
Accelerator: Instead of (4), type “C”.
Short cut: Instead of (2), (3), and (4), press [CODE! + 0.
5.
Type the text.
6.
Press [RETURN] to finish the centering operation, or [tA8] to move to the next
tab.
NOTES:
Centering between a tab and the right margin is possible, but not between
the left margin and a tab.
Centering between a tab and a decimal tab is not possible.
Tf
ly—
Centering Between Tabs
48
Page 57

Undoing Centering
To exit the centering function, press KanKaSLI (you may also select CENTERING
from the menu, or press + 0 To bring centered text flush with the left
margin of the centering range, position the cursor just after the centering symbol
M or jii and press or ICORRECTI to delete it.
Right Margin Flush
STYLE
BLOCK
CTR/RNF-j CtNIERING
RIGHT MARGIN FLUSH
FORM
SEARCH
[ CODE
v>—
PAGE PRINT
r
-J)
The right margin flush function is used to adjust a line automatically to end on the
right margin.
1. If the text to be aligned flush with the right margin has not been typed yet,
skip this step. If you want to align existing text, position the cursor on the first
character of that text. If you want to align the whole line, position the cursor
on the first character of the line.
2- Press iwmsi to display the menu.
3. Use 0 and (3 select CTR/RMF, and press IRETURNI or m.
• Accelerator: Instead of (3), type “C”.
4. Use m and CJ3 to select RIGHT MARGIN FLUSH and press iRETURNl■ The
cursor moves to the right margin. A right margin flush symbol appears in
the line. If the text has already been typed, it is automatically aligned flush
with the right margin (any blank space at the end of the shifted line will be cut
off) and you may skip step (5).
• Accelerator: Instead of (4), type “R”.
• Short cut: Instead of (2), (3), and (4), press ICODEI + (0.
5. Type the text. The cursor will not move, but the text that you type is scrolled to
the left.
6. Press [RETURN] to finish the right margin flush operation and bring the cursor
to the beginning of the next line.
Right Margin
May 26, 1994
49
Page 58

Undoing a Right Margin Flush Format
To exit the margin flush mode, press imiai^ (you may also select RIGHT MARGIN
FLUSH from the menu, or press MM + Q). To undo an existing right margin
flush format, delete the right margin flush symboi <h using IBAdcSMHfl or
Automatic Justification
The justify function adjusts the spacing between words so that every complete
line of text is aligned with both left and right margins.
Entering Justified Text
Press ICXH^ + (0) to turn the JST indicator on and start typing.
When you type a space or a hyphen in the hot zone, the cursor moves to the
next line and the current line is justified.
To resume normal typing, press B0№1 + (OPERAM (B) again to turn the JST
indicator off.
Justifying Existing Text
1. Position the cursor at the first paragraph that you want to justify.
2. Press Mm + — (B) to turn the JST indicator on. A f symbol
appears in the dead column of the first line of the paragraph and the text is
automatically justified from this line down to the next f symbol (if any
exists) or down to the end of the document. If your document contains many
^ symbols you will need to repeat these steps in order to justify the whole
text.
Left Margin
r
¡Using the Boldface is a way of making a Word,
f CODE
vk
----------
^ CODE
-4
k—
Right Margin
/
+
+
^operate]
b 1'
,OPERATE I
-------
-y
¡'Phrase or entire Paragraph stand out and catch
¡the reader's eye. The Boldface feature has a
50
Page 59

Text Emphasis
You can add special emphasis to text in your document with bold face type,
underlining, and the expand function which automatically inserts a blank space
between each character.
/Ç
Bold Face Characters
Off 7RMF SPELL PHRASE FORM SEARCH PAGE PRINT
■expand off¥
1.
If you want to turn the bold function on before typing, skip this step. If you
want to change the type face of a portion of text already typed, position the
cursor at the beginning of that portion.
2.
Press iW to display the menu.
3.
Use B and H to select STYLE, and press Wi
•
Accelerator: Instead of (3), type "S”.
4.
Use fS and to select BOLD.
5.
Use to turn the bold function ON.
•
Accelerator: Instead of (4) and (5), type “B”.
6.
Press Ml. The BLD indicator is now on.
Short cut: Instead of (2), (3), (4), (5), and (6), press \______ _
the bold function 0 N / 0 F F.
7.
The text you now type or the text you select by moving the cursor right/down
is displayed in bold. If you move the cursor past the desired position, move
back to deselect. To move the cursor one line at a time, use ^ and B.
To return to normal typing, repeat steps (2), (3), (4), (5) and (6) to turn the
8.
bold function OFF, or press MM + 0.
NOTE:
To remove bold characters, position the cursor just after the last bold charac
ter, turn the bold function on, and move the cursor left/up. Turn the bold func
tion off to remove bold emphasis.
o'ffI
------------
i CODE
ii
-------------
or (X).
-4)
to switch
'fi-
"1
-jj
Using the Boldface is a way of making a Word,
Phrase or entire Paragraph stand out and catch
the reader's eye. The Boldface feature has a
51
Page 60

Underline
Tn
--
"‘STYLC''BOLD OFF '"Î/RMF
ummim mr :
«EXPAND OFF '
1. If you want to turn the underline function on before typing, skip this step. If
you want to underline a portion of text already typed, position the cursor at
the beginning of that portion.
2. Press IMENUI to display the menu.
3. Use (3 and Q to select STYLE, and press IBETURNI or m.
SPELL PHRASE
FORM
SEARCH
PAGE PRINT
• Accelerator: Instead of (3), type “S”.
4. Use 30 and Q] to select UNDERLINE.
5. Use IBWaaEaMtH to select CNT (continuous underlining) or WRD (word underlin
ing).
• Accelerator: Instead of (4) and (5), type “U”.
6. Press iRETORNl. The corresponding indicator is now on^
• Short cut: Instead of (2), (3), (4), (5), and (6), press ICODEI + (n) to switch
the underline function CNT/WRD/OFF. NOTE:
If you select continuous underlining, all will be underlined, including blank
spaces. With word underlining, blank spaces are not underlined.
7. The text you now type or the text you scan by moving the cursor right/down is
underlined. If you move the cursor past the desired position, move back to
remove the underline. To move the cursor one line at a time, use 33 ^nd
m-
8. To return to normal typing, repeat steps (2), (3), (4), (5) and (6) to turn the
underline function off, or press imM + ®.
NOTE:
To remove underlining, position the cursor just after the last underlined char
acter, select either option fCNT or WRDJ, and move the cursor left/up. Turn the
underline function off to stop removing underlining.
___
Continuous Underline
Using the Underline is a way of making a Word,
Phrase or entire Paragraph stand out and catch
the reader's eye. The Underline feature has a
52
Page 61

Word UnderUne
Expand
Using the Underline is a way of making a Word,
Phrase or entire Paragraph stand out and catch
the reader's eye. The Underline feature has a
STYLE BOLD OFFf/RMF SPELL
UNDERLINE OFF
- EXPA^
____
OFL
PHRASE FORM SEARCH
PAGE PRINT
The expand function is available only while entering text. You cannot use it to
reformat text that has been typed.
1. Press [MgNUl to display the menu.
2. Use (3 si^cl (3 fo select STYLE, and press [returnI or m.
• Accelerator: Instead of (2), type “S”.
3. Use Q3 Q3 to select EXPAND.
4. Use liaWttEam)l to turn the function ON.
• Accelerator: Instead of (3) and (4), type “E”.
5. Press [BiTWNI. The EXP indicator is now on.
6. The text you now type is expanded - that is, a permanent space is automati
cally inserted after each text character (See also “Space vs. Permanent
Space” on page 25.)
7. To return to normal typing, repeat steps (1), (2), (3), (4) and (5) to turn the
expand function OFF.
NOTE:
The permanent spaces inserted with the expand function cannot be removed
automatically. To undo the expand format, delete the permanent spaces one
by one using fawacswtCEl or fCCTRECTi.
COPY
Expand
This letter was typed on this new Word Processor
to show you some of the many outstanding feats it can
perform.
53
Page 62
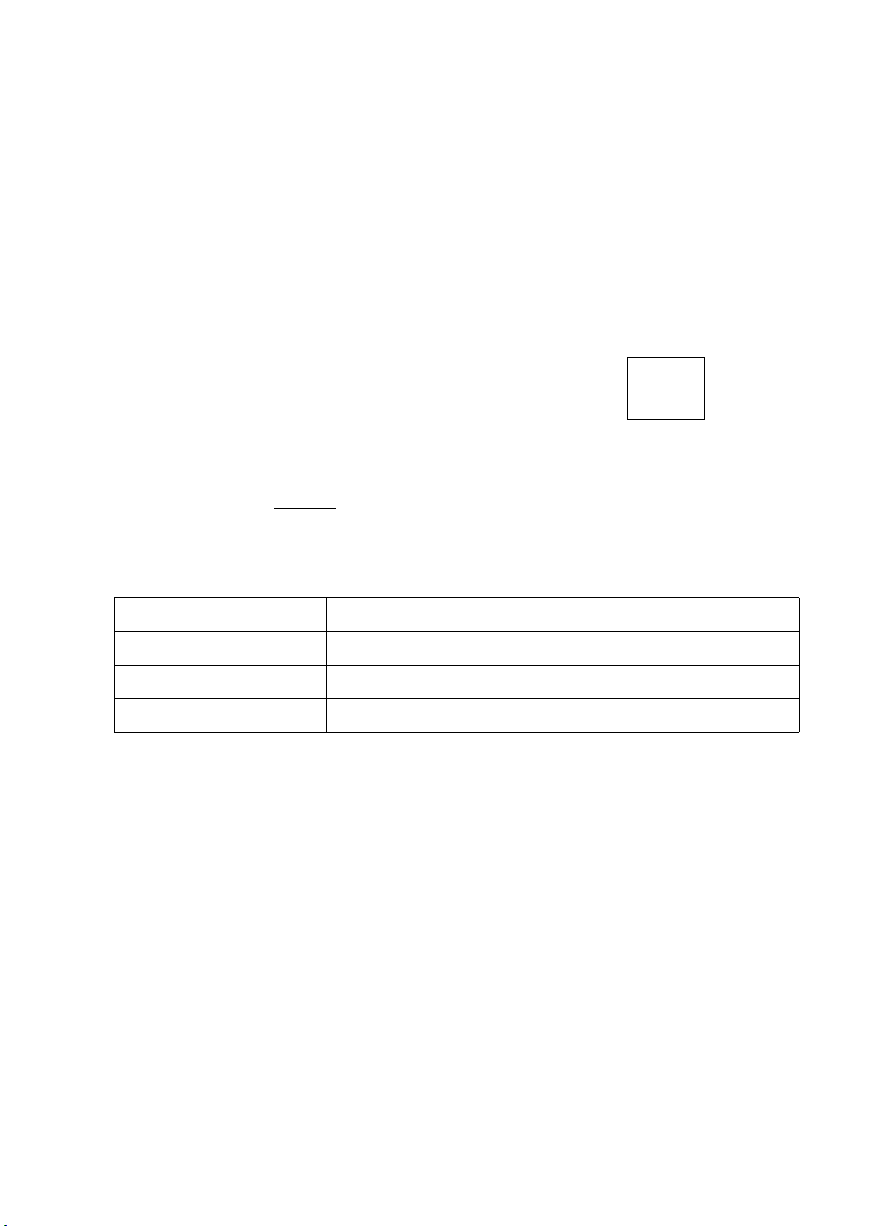
Character Set
The display on this multilingual word processor supports all European languages
written with the Roman alphabet, Greek and mathematical symbols. To type
English text, all you need is the standard daisy wheel which comes with your word
processor. There are other styles and pitches available. (See “Compatible Acces
sories” on page 150.)
However, if you have to type French text, or text requiring mathematical symbols,
you need the corresponding Daisy Wheel(s) to have all the special characters
correctly printed.
Switching the Keyboard
While typing your text with the WP application, you must select the desired key
board in order to have the characters properly displayed on the screen. This is
done by pressing ICODEI +B (@). These keys switch the KB indicator through
the following cycle;
KB: I
Keyboard Selection
I (Standard) For English text.
II (International) For European languages using Roman alphabet.
III (Symbol)
NOTE:
For more details regarding the characters available in each keyboard, see
“Character Keys” on page 128.
For Greek letters and mathematical symbols.
n ni
Use
CODE
-----------
IK
K
Changing the Daisy Wheei
The word processor will remember which keyboard selection was used to enter
your text, and will prompt you to insert the corresponding daisy wheel when you
print your document.
54
Page 63
Horizontal Fositioning
The display indicates the left margin and all other horizontal distances in terms of
columns. On paper, however, the width of these columns depends on the
selected pitch. This word processor supports three character widths:
Character Spacing
Pica
Elite
Micron
Name
10 characters per inch (cpi)
12 cpi
15 cpi
Screen Width vs. Paper Width
The distance between the left and right margins must be smaller than the paper
width. Suppose your paper is 8.5 inches wide and you are using Pica pitch (10
cpi). You can fit a maximum of 85 characters per line. The distance between mar
gins should therefore be smaller than 85 columns on the screen (check the COL
indicator on the status line). The following table indicates the maximum distance
between margins for letter-size paper:
Width Maximum Characters Between Margins
Letter Size
8.5 inch
Changing the Pitch
The pitch is automatically set to 10 when the power is turned on. Pressing
+ iPtTCHl will cycle the PITCH indicator through the following values;
10 (Pica) 12 (Elite) 15 (Micron)
85 102 127
T CODE
----
f \
1
+
V PITCH ^
i
PITCH: 10 12
When the pitch is changed, a format symbol ^ appears in the dead column of
the first line of that paragraph. The text is automatically reformatted down from
the format symbol.
15 10
55
Page 64

Vertical Layout
Just as the word processor formats your lines to fit within the desired ieft and right
margins, it aiso automaticaiiy breaks your text up so that the maximum number of
iines fit onto the page with the desired iine spacings, top and bottom margins, and
other formatting instructions that you specify.
Page Breaks
^ CODE
vL-
+
^ PINS ^
P BREAK
The text is aiways automatically formatted so that a maximum number of lines
Can fit on one page. Each time you want to start a new page, press l<K>EBI +
fP BREAKI. A page break symboi ^ wili indicate that point, the cursor wiii move to
the next iine. The page count (P indicator) is incremented and the line count (L
indicator) restarts from 1. if you change your mind, you can aiways erase this
symboi (and eliminate the page break) with [backswce] or [CORRECTI.
Line Spacing
Pressing
+ cycles the L.SP indicator through the following values:
If
CODE
2
, LINE ,
LSP: 1.0 ^ 1.5 ^ 2.0 ^ 1.0
1.0
Line Spacing
6 lines/inch
Number of Lines per inch
1.5 4 lines/inch
2.0
3 lines/inch
To keep the maximum amount of text in view at all times, the word processor uses
only single spacing on the screen. The number next to the L indicator, however,
reflects the actual line count on paper. If you are at the top of your text with the
cursor on line 1, for example, each time that you press [J], the number that
appears next to the L indicator depends on the line spacing as follows:
Line Spacing Line Numbers
1.0
1.5 1,2 (2.5), 4, 5 (5.5), 7, 8 (8.5), 10
2.0
56
1,2, 3, 4, 5, 6,7
..........
1,3, 5, 7, 9, 11, 13,
............
.....
Page 65

Paper Size Setting
STYLE
BLOCK CTR/RMF
SPELL PHRASE
FORM PAPER SI/F
H ^DER
" FOOTER
SCALE LINE
on/offI
:INT
The paper size function aiiows you to specify ail verticai layout parameters except
line spacing (which you may change anywhere on the page). This feature is used
to adjust your top and bottom margins.
1.
Press IMENUI to dispiay the menu.
2.
Use and Q to seiect FORM, and press freturn! or (T1.
Accelerator: Instead of (2), type “F”.
Use (J) and Q3 to seiect paper size and press [returnI .
Accelerator: Instead of (3), type “P”.
The PAPER SIZE screen shown below appears.
PAPER SIZE XXI (LINES)
TEXT AREA XX HEADER X FOOTER
Set each itefii and press t, 1.
TOP MARGIN
TOP SPACE
Press RETURN toXf 1m' sh.
X
BOTTOM SPACE
BOTTOM MARGIN
X
X
X
Settings Definition
PAPER SIZE
The total length of the paper. The default, 66 lines, is
suitable for letter-size paper (70 iines for A4-size
paper).
TOP MARGIN
The distance between the top edge of the paper and
the header (if present) or the top of the text (when
there is no header). The default is 6 lines, which is one
inch.
HEADER
An optionai running header. (See “Header and Footer”
on page 58.)
TOP SPACE
The distance between the header (if present) and the
first line of the text. If you store a header, you must
enter a number for this selection.
TEXT AREA
BOTTOM SPACE
The number of lines reserved for the body of the text.
The distance between the last line of the text and the
footer (if present). If you store a footer, you must enter
a number for this selection.
FOOTER
An optionai running footer. (See “Header and Footer”
on page 58.)
BOTTOM MARGIN
The distance between the footer (if present) or the last
line of the text and the bottom edge of the paper. The
default is 6 lines, which is one inch.
57
Page 66

NOTE:
The text cursor cycles through only five of the eight fields on the screen.
HEADER, FOOTER and TEXT AREA are automatically updated by the word pro
cessor. The numbers for HEADER and FOOTER are automatically set to 1 line if
you store a header or footer, or О lines if there is no header or footer. The
length of the text AREA is defined as the paper size less the lines reserved
for TOP MARGIN, HEADER, TOP SPACE, BOTTOM SPACE, FOOTER, апс/BOTTOM
MARGIN.
5.
Press Щ or Щ until you reach the parameter that you wish to change.
Type the new value and press Щ or Ш to move to the next parameter that
6.
you want to change. Notice how the text area value will change to accommo
date your selections.
7.
When all the desired changes have been entered, press IBETUfll. Alterna
tively, press ICANCELI to return without saving the new settings.
NOTE:
Your text will be divided into pages automatically according to the settings for
the paper size. If you wish to begin a new page prior to reaching the line set
by the paper size setting, press КЮРИ + > BREAK).
Header and Footer
STYLE BLOCK CTR/RMF SPELL PHRASE
STYLE BLOCK CTR/RMF SPELL
PHRASE M
FORM PAPERSIZE :INT
MEAOER
1 FOOTER -i
t. SCALE LINE ON/OFF«
PAPER SIZE fJNT
^EHEADEF
A header is a title line and/or page number that will be automatically printed at the
top of every page. A footer is a similar line at the bottom of the page.
1. Press MM to display the menu.
2. Use B and @ to select FORM, and press — or (Xl.
• Accelerator: Instead of (2), type T”.
3. Use ® and ® to select HEADER or FOOTER, and press MTIMi.
• Accelerator: Instead of (3), type “H” or “F”.
4. Type the header or footer and press wmmm. The text of the header or footer
cannot exceed one line. It will disappear from the screen when I—I is
pressed, but will print on the line determined by the paper size setting when
the text is printed. Pressing at this step returns the system to the
normal mode without entering the header or footer in memory.
NOTES:
• As mentioned before, entering a header or footer automatically updates the
setting of the paper size screen.
58
Page 67

® You may have page numbering automatically included in the header or footer.
If you type a number enclosed in double quotes, this number will be incre
mented for each page when printed. (The double quotes are not printed.)
Begin with number 1 or with a different number if needed. This is useful if, for
instance your document is the third chapter of a book. If chapter 3 starts at
page 23, enter “23”. Any number up to four digits in length (9999) is
accepted.
• Example of header and footer with page numbering:
MONTHLY REPORT MAY 1994 - page "10"
• Printing effects (BOLD and UNDERLINE) can also be used with a header
and footer. You may also center the header or footer or make it flush to the
right margin.
Header
Left Margin
¡MONTHLY REPORT MAY 1994
Automatic Page Numbering
^ Top Margin
page 10^^
Right Margin
--
Header
Top Space
¡Using the Boldface is a way of making a Word,!
¡Phrase or entire Paragraph stand out and catch
¡the reader's eye. The Boldface feature has a!
Footer
Left Margin Right Margin
Using the Boldface is a way of making a Word,
Phrase or entire Paragraph stand out and catch!
the reader's eye. The Boldface feature has aj
Bottom Space
MONTHLY REPORT MAY 1994 - page 10
Automatic Page Numbering
/i
- Footer
Bottom Margin
59
Page 68

File Operation
The word processor stores each document in a separate “file” on a diskette and
under an individual “file name” of up to eight characters that you choose when
you store the document for the first time.
You are ailowed to save your document at any moment during editing. Once your
document is saved, you may start working with another document, or switch the
word processor off. The next time you switch the word processor on, you may
retrieve your document to complete editing. You may also decide to print a docu
ment that has been completed and previously saved, or the document you are
working on.
This word processor also includes several File Utility functions such as file copy,
delete, and rename that allow for easy maintenance of your text files.
(y
Viewing the WP INDEX Screen
To view the list of your WP files on a particular diskette, switch from the WRITE/
EDIT screen to the WP INDEX screen, insert that diskette, and press [№11.
The word processor assumes that you might wish to save the data that is cur
rently displayed on the WRITE/EDIT screen. (For details, see “Saving a File” on
page 61.)
NOTE:
If you are using a brand new diskette or a diskette that has been used with
another word processor or computer, please read “initializing New Diskettes”
on page 14.
The WP INDEX screen lists all the WP files on the current diskette. Example:
f FILE '
*
-----
<< WP INDEX >> REMAIN:XXX.XK
♦NEWFILE
TEXT3
Select a file and
(XX.X) TEXT4 (XX.X) TEXTS (XX.X)
press
TEXTl
RETURN. Press CANCEL to display MAIN MENU.
(XX.X) TEXT2 (XX.X)
*NEWFI LE is not a file stored on the diskette. This is an empty file that allows you
to start from scratch.
The numbers displayed in parentheses at the right of the file names- indicate the
size of the files (in kilobytes).
The number following the indicator REMAIN shows the remaining space on the dis
kette.
A file name can be selected by moving the block cursor (reverse display of the file
name) with the cursor keys. If you have more files on the diskette than the amount
that can be displayed on the screen, [J] and [J] will scroll the display.
60
Page 69

Saving a File
When you have completed typing and formatting a document, you will want to
save it on the diskette.
Although the word processor allows you to type and print documents without sav
ing them to diskette, saving is a good idea. You might, for example, find a mistake
or change your mind just as you put the letter in the envelope. You can always
delete unwanted documents later if you need more room. (See “Deleting a File”
on page 71.)
Saving a New File
After creating a new file (the file name that appears on the upper-left corner of the
screen is *NEWFILE), you have the options of saving or abandoning the file.
1. Press IWUEI to display the following prompt on the message line:
Save file? Press RETURN to save, CORRECT to abandon.
2. Press [RETURNl if you want to save the file, or [CORRECTI if the file is not worth
saving.
WARNING:
If you press [CWWECTI, the word processor switches to the WP INDEX
screen without saving, and your work Is lost.
NOTE:
Press IC^Nmi instead of fRETURNI or [cORreal to abandon saving and return
to the WRITE/EDIT screen.
3. If you have pressed [RETUWil, the word processor asks you to input a file
name:
Type filename and press RETURN.
FIEENAME:
Type the file name (See “Entering a File Name” on page 63) and press
[RETURNl. The word processor returns to the WP INDEX screen and you can
confirm that the new file appears in the list.
61
Page 70

Saving an Edited fiie
After editing an old file (the file name that appears on the upper-left corner of the
screen is not *newfile), you have the options of replacing the old version on the
diskette with the new version (overwriting), abandoning the new version, or saving
the new version under a separate file name.
1. After editing the file, press
Save file? Press RETURN to save, CORRECT to abandon.
to display the following prompt:
NOTE:
If iraJI is pressed without editing the document, the word processor pro
ceeds directly to the WP INDEX screen without prompting you to save the
file.
2.
Press IffituRiSS if you want to save the file, or ICOBRECB if you do not want to
save the new version of the file.
WARNING:
If you press ICORRECTl. the word processor switches to the WP INDEX
screen, and your last editing is lost. The old version of the file will
remain untouched on the diskette.
NOTE:
Press [CANCEM instead of (betoRNI or ICORWECTI to abandon saving and return
to the WRITE/EDIT screen.
3.
If you have pressed iREHIRNl, the word processor asks you to enter a new file
name:
Type filename and press RETURN.
FILENAME: XXXXXXXX
If you want to keep both the old and new version of your file, type a new file
name and press The current version is saved under this new file
name. If you want the current version of the file to replace the old one, press
IreturnI without modifying the file name. This message will appear:
Filename already exists. Type new filename and press RETURN.
FILENAME: XXXXXXXX
NOTE:
The above message also appears if you have mistakenly typed a file name
already in use.
5.
Press MMiW to overwrite (update) the old file. You can also type a new file
name and press WMiiW if you decide that you want to keep the old file.
62
Page 71

Entering a File Name
When you are prompted to enter a file name, the WP INDEX screen shows only a
list of the text files already saved on the diskette. The list of text files is displayed
so that you can easily avoid entering a file name that is already used for another
file. When typing a file name, please keep the following rules in mind:
1.
A file name is made of up to eight characters. A beep sounds if you try to
input more.
The word processor accepts only the following characters in file names:
upper and lower case letters of the alphabet (A-Z and a-z), the digits (0 to 9),
and the hyphen (-). All others are refused and trigger a beep.
The word processor distinguishes between upper and lower case letters. This
means that you can have a file called “Letter”, and a file called “letter” on the
same diskette.
4.
To correct an error, use [b^kspaceI , (CX)OTOT], or iwORSlfflB to erase the pre
ceding letter or use (3 and Q fo move the text cursor back over the name
and retype.
5.
Check the list of file names to avoid typing a file name which already exists. If
you have more files than can be displayed on the screen, use and ^ to
scroll the file names on the WP INDEX when typing a new file name.
Automatic Save Function
This word processor is equipped with an Automatic Sav,
the loss of a document if the power is accidentally t rned oi
*!on that prevents
ifore you save the
file.
When you have created a file and input up to 2,000 key strokes of data, your word
processor will automatically create an AUTO SAVE FILE, which will be updated
every 2,000 strokes. Thus, in the event of an accidental power outage, all but the
last input of your file (those after the last updating of the AUTO SAVE FILE) are
safe.
When you turn the power on with a diskette inserted in the drive, the system auto
matically searches for the AUTO SAVE FILE. If such a file exists, the system rec
ognizes that a power loss occurred during the last session with that diskette, and
the following message telling you how to recover the lost file will appear:
POWER FAILURE
___
recover AUTO SAVE FILE? Press RETURN(yes) or CANCEL(no).
Press iRETUiS to recover the contents of the file, or to delete the AUTO
SAVE FILE from the diskette.
When you save a file, the AUTO SAVE FILE is deleted so that the next time you
turn the power on, the AUTO SAVE FILE will not be found, and the above mes
sage will not appear.
63
Page 72

Returning to the Main Menu
EXIT COPY DELETE RENAME DISK COPY DISK DELETE PROTECT ON/OFE PRINT
1. Press miEim to display the function menu.
2. Use (3 and 0 to select EXIT and press IRETUF
• Accelerator: Instead of (2), type “E”.
• Short cut: Instead of (1) and (2), press fCWKBH.
Retrieving a File
A)
To retrieve an old file in order to complete typing or resume editing, you must first
display the WP INDEX screen. The WP INDEX screen always appears when you
select the WP application from the MAIN MENU. That screen also appears after
you save a WP file, so that you can continue working with another file.
Once the WP INDEX screen is displayed, select the name of the file that you want
to retrieve by moving the block cursor with (E)> S' S' and 3] to its name on
the screen and pressing |№nil^l. The file will be loaded from the diskette into the
word processor’s memory and the beginning of the document will be displayed on
the WRITE/EDIT screen.
64
Page 73

Printing a Document
You may either print the page currently displayed on the WRITE/EDIT screen or
print an entire file after saving it.
Starting Page Print
STYLE BLOCK CTR/RMF
SPELL
PHRASE FORM SEARCH
CODE
-----------
PAGE PRINT
-X
+
. PRINT
When you print a single page from the WRITE/EDIT screen, all settings like
header, footer, and keyboard changes are effective. The stop symbols, however,
do not cause printing to stop, but instead are printed as blank spaces.
1.
Insert a sheet of paper. (See “Inserting Paper” on page 6.)
2.
Position the cursor on the page that you want to print.
3.
Press IMENUI to display the menu.
4.
Use @ and @ to select PAGE PRINT, and press (RETUfiNl.
Accelerator: Instead of (4), type “P”.
Short cut: Instead of steps (3) and (4), press + iPRiNTi ).
5.
For next operation, see page 67.
Starting Fiie Print
EXIT COPY DELETE RENAME DISK COPY DISK DELETE PROTECT ON/OEE
[ CODE
vy
-----------
p
PRINT
---------
X
J
If you wish to print the entire document, you must use the WP INDEX screen.
1. Move the block cursor to the file that you want to print.
2. Press Mirt to display the menu.
3. Use @ and Q to select PRINT, and press Ml
. The print menu screen
shown below appears.
• Accelerator: Instead of (3), type “P”.
• Short cut: Instead of steps (2) and (3), press ICCHlgl +
STARTING PAGE
ENDING PAGE
Type number. Insert
1
99^^ FOOTER
paper, i to start printing.
PRINT YES MERGE PRINT
HEADER
PRINT
PAUSE FOR KB
CHANGE YES SPACE BET. COLUMNS
YES DOUBLE COLUMNS
(■)'
_J
NO
NO
5
65
Page 74

The definiiion of each setting is explained in the next table.
Option Definition
STARTING PAGE
ENDING PAGE
NUMBER OF COPIES
HEADER PRINT
FOOTER PRINT
PAUSE FOR KB CHANGE
MERGE PRINT
DOUBLE COLUMNS
SPACE BET. COLUMNS
The page number of the file on which printing is to
start. The setting must be greater than zero and less
than 1000. The default is 1 (starting from the first
page).
The page number of the file on which printing is to
end. Must not be lower than the STARTING PAGE num
ber. If the number is higher than the total number of
pages, printing stops after the last page. The default is
999.
The number of copies you want to print. Must be
greater than zero and less than 100. The default is 1
(the pages are printed once).
Use KSMCEBAR)! to toggle between YES and N0. If YES,
any existing header will be printed on each page. If N0,
no header will be printed, even if you have entered
one.
Use tfmdntail to toggle between yes and N0. If YES.
any existing footer will be printed on each page. If N0,
no footer will be printed, even if you have entered one.
Use to toggle between YES and N0. If YES,
pauses will be made for changing the daisy wheel
when necessary. If N0, all pages will be printed out
using the same keyboard that is used for the first char
acter to be printed. However, if the character pitch had
been changed during the WRITE/EDIT mode, pauses
will be made for changing the daisy wheel even if N0 is
selected.
This should be left as N0 when printing ordinary docu
ment files. (See “Merge Printing” on page 78.)
This should be left as N0 when printing ordinary docu
ment files. (See “Double Column Printing” on
page 75.)
This is used together with the above double columns
printing and should be ignored when printing ordinary
document files. (See “Double Column Printing” on
page 75.)
NOTE:
The default values for STA RT IHG PAGE, ENDING PAGE, and NUMBER OF
IES are displayed each time the print menu screen is called up.
66
COP-
Page 75

4. Move the cursor with ^ and ® to any values you would like to change,
and change using for YES/NO setting, or by typing the desired
value for the other options.
5. Insert a sheet of paper and press WiETUflWl.
NOTES:
• Press tCANCELl at any time to terminate seiection and return to the WP
INDEX screen.
• If there is a wrong setting, the following message appears and you have to
correct it to the right setting.
Incorrect setting.
NOTE:
An error will occur if the setting for STARTING PAGE is greater than the last
page of the document.
Incorrect page number. Press CANCEL to exit.
6. If this is the first time you are printing the file, or you have previously printed a
file using a different pitch, you will be prompted to install the proper daisy
wheel to match the pitch setting selected. Insert the correct wheel, if neces
sary, and press WETURNl. As soon as printing starts, the following message is
displayed:
Printing. Press SPACE to pause.
Pausing/Resuming Printing
iT
(SPACE BAR)
L
Sometimes you may wish to temporarily interrupt printing - to adjust the paper
position, for example.
1. Press [(SPACE BAR)l to stop the printer. A message indicating that the printer is
paused will be displayed.
Printing paused. Press SPACE to continue.
2. Press [(SPACE BAR)] to restart the printer. The above message reappears:
Printing. Press SPACE to pause.
NOTES:
Printing in progress can be terminated by pressing |
67
Page 76

When printing is compieteci (or canceiled with the ICA?№EL1 key), the system
returns to the WRiTE/EDiT screen (page printing) or to the WP ÍNDEX
screen (fiie printing).
Daisy Wheel Changes
Each time the word processor finds a pitch change in the file, and, if you have set
the PAUSE FOR KB CHANGE option to YES, each time the word processor finds a
keyboard change, printing is interrupted and a message similar to the following
will appear;
Change to KB;II 12 wheel and press RETURN.
This means that an international daisy wheel of pitch 12 is required at this point.
Change the wheel and press to resume printing.
NOTE:
If PAUSE FOR KB CHANGE is set to NO in the print menu screen, printing will
stop for pitch changes, but not for keyboard changes.
Stop Symbols
Í CODE
il------------------
(r^
-4 ^
Stop symbols s can be placed in your file to instruct the printing to stop at a
particular point. When printing stops, your word processor automatically switches
to the typewriter application and you are able to Insert text at that position. This
feature is primarily used for applications using form letters with minor changes.
For example, if you need to send out two identical letters and the only information
that is different is the name and address of the person the letter is being sent to,
proceed as follows:
1.
When creating the letter, press — + (£) to insert a stop code at
the point where the name and address appears. During printing, you will be
able to manually type In the appropriate name and address when the printing
stops.
2.
Save your file and start file printing as explained above.
3.
When the word processor finds a stop code, printing is interrupted and the
following message appears:
stop code. Type text and press PRINT to continue.
4. Type your text (name and address in our example). This will not be stored in
memory. The remainder of the file will, however, be reformatted to accommo
date the inserted text.
5. Press ICOrei + fPtWi (®) to resume printing.
68
Page 77

NOTES:
Stop codes are ignored and replaced as a space during page printing. They
are only effective during file printing through the WP INDEX screen. You may
print the fUe as many times as required, each time inserting different informa
tion.
When printing has temporarily stopped after a stop code has been encoun
tered, the printing mode may be canceled entirely by pressing ICAWCELI, at
which tim e the display will return to the WP INDEX screen.
When a stop code for direct typing is encountered at the end of the text area
defined in the P SIZE setting (54 lines is default) and additional typing will
exceed this setting, a beep will sound and the word processor will go into
PAGE END status. The following message will appear on the display:
Page end. 'Press CORRECT to type one more line.
NOTE:
In order to type one more line, press ICORRECTI and begin typing. Or press
to change to a new page.
69
Page 78

Diskette Utility Functions
To help you keep your document files in order, there are utility functions for dis
carding out-of-date files and making copies. (See also “Initializing New Diskettes”
on page 14.)
NOTES:
• The following descriptions ail assume that you have saved your current docu
ment and are already at the WP INDEX screen. (See “Saving a File” on
page 61.)
• The functions that are available in the WP INDEX screen are displayed when
you press (menuI .
Copying a File
EXIT DELETE RENAME DISK COPY DISK DELETE PROTECT ON/OFF PRINT
You may wish to edit a file and keep both the old and new version on the diskette.
(Make a copy of the file before editing It). You can also copy Important files onto a
different diskette to back up your work.
1. Move the block cursor to the file that you want to copy.
2- Press HMM to display the menu.
3. Use 0 and to select COPY, and press (rct
appears:
Insert destination disk and press RETURN.
• Accelerator: Instead of (3), type “C”.
• Short cut: Instead of (2) and (3), press ICOPft + (c).
4. You may create this copy on the same diskette or on a different diskette. To
copy on to the same diskette, just press If you want to copy the file
to another diskette, remove the source (original) diskette and Insert the desti
nation diskette and press . The following message appears:
T CODE
---
The following message
-4)
'[c
i
--
Type filename and press RETURN.
FILENAME: XXXXXXXX
Input the new file name and press If you copy the file on a different
diskette, you can use the same file name. The following message is displayed
during the copy operation and disappears after completion. The system then
returns to the WP INDEX screen, with the block cursor on *NEWFI LE.
70
Page 79

Copying the f11e....pi ease wait.
NOTE:
If the specified new file name already exists on the inserted diskette when
you press MMW in step (5), the following message appears:
Filename already exists. Type new filename and press RETURN.
FILENAME; UnUU
NOTE:
______
To avoid overwriting the oid fiie, type a new fiie name and press , or
press WBWWi without changing the file name to ovenvrite the old file.
Deleting a File
/V_
D
---
EXIT COPY
RENAME DISK COPY DISK DELETE PROTECT ON/OFF PRINT
File deletion is useful when the diskette is full and saving cannot be carried out.
You may delete unwanted files to make room for your new document.
1. Move the block cursor to the file that you want to delete.
2. Press MM to display the menu.
3. Use Q and 9 select delete, and press MflUWI.
The following mes-
sage appears:
Delete? Press Y(yes) or N(no).
• Accelerator: Instead of (3), type “D”.
• Short cut: Instead of (2) and (3), press W + B.
4. Press 0 to delete the file. The file is deleted and the block cursor moves
back to the WP INDEX screen. If you press 0, the message disappears and
the system goes back to the WP INDEX screen without deleting the file. The
cursor will be on the file which was to have been deleted.
71
Page 80

Renaming a File
EXIT COPY DELETE %mkm.' DISK COPY DISK DELETE PROTECT ON/OFF PRINT
f CODE
---------
---
-i
To change the name of a file, follow these steps.
1. Move the block cursor to the file that you want to rename.
2. Press IMENUI to display the menu.
3. Use (3 and (3 to select RENAME, and press [RETURN]. The following mes
sage appears:
Type filename and press RETURN.
FII FNAML: XXXXXXXX
• Accelerator: Instead of (3), type “R”.
• Short cut: Instead of (2) and (3), press
4. Input the new file name and press IRETURNI.
• If the specified new fiie name aiready exists when you press
step (4), the foiiowing message appears:
Filename already exists. Type new filename and press RETURN.
FII FNAMt: XXXXXXXX
Tr
>
---
in
• Type a new fiie name and press IreturnI .
NOTE:
Pressing [CANCEL I while a message is displayed cancels the operation and
returns the system to the WP INDEX screen.
Disk Copy
EXIT COPY DELETE RENAME DISK COPY DISK DELETE PROTECT ON/OFF PRINT
This function allows you to copy all files contained on a diskette to another dis
kette (back up copy).
WARNINGS:
• The Disk Copy function erases the Temporary file from the memory.
• Copying an entire diskette to another destroys any data that may be on
the destination diskette. Check the destination diskette before starting.
Be sure your destination diskette has been initialized.
72
Page 81

1. Press II— to display the menu.
2. Use ® and Q to select DISK COPY, and press
j. The following
message appears:
Insert source disk and press RETURN.
• Accelerator: Instead of (2), type “O”.
3. Insert the source (original) diskette and press [RETURN]. The word processor
will start reading files from the source diskette. Since the memory space is
limited, the word processor may not be able to read all files in one step. After
a while, this message will appear:
Insert destination disk and press RETURN.
4. Insert the destination diskette and press IreturM . The word processor will
transfer the files that have been read from the source diskette onto the desti
nation diskette. If all the files of the source diskette have not been transferred
yet, the word processor will ask you to re-insert the source diskette, repeat
steps (2) and (3) until all files have been transferred to the destination dis
kette. You may need to swap these diskettes a number of times before all of
the files are copied to the destination diskette.
NOTE:
The word processor “knows” which diskette is the source diskette and which
one is the destination diskette. If you mistakenly insert a wrong diskette, one
of these messages will appear:
Incorrect
Incorrect
disk.
disk.
Insert destinati ondisk and press RETURN.
Insert
source disk and press REiURN.
NOTE:
You may press [CANCEL I at any time (except during diskette access) to cancel
the operation.
When copying is complete, the INDEX screen reappears.
73
Page 82

Deleting AM Files
ifL'
LIND
---------
EXIT COPY DELETE RENAME DISK COPY DISK OFLFIF PROTECT ON/OFF PRINT
1. Press IMENUI to display the menu.
2. Use O and [3 to select DISK DELETE, and press [RETURN]. The following
message appears:
Delete all files on this disk? Press Y(yes) or N(no).
• Accelerator: Instead of (2), type “L”.
• Short cut: Instead of (1) and (2), press ICODEI + (Q.
3. If you press ®, all the files on the inserted diskette are deleted, the message
disappears, and the block cursor moves to *NEWFILE. Pressing B interrupts
deieting and returns the system to the WP INDEX screen.
NOTE:
The disk delete function Is to delete all of the files on the diskette. This
Includes all WP files, MERGE files, ABBREVIATED PHRASE files, and
USER DICTIONARY files. Be sure that there are no files that you want to
keep before you start this function.
Diskette Write-Protect
The disk drive does not recognize the switch on the diskette for write-protection of
the diskette.
EXIT COPY DELETE RENAME DISK COPY DISK DELETE PROTECT ON/Ofr PRINT
1. Press IMEWI to display the menu.
2. Use O and g) to select PROTECT ON/OFF, and press IRETURNI.
The write-protect mode is turned on and the diskette is protected from accidental
erasing.
NOTE:
• The remaining diskette free space will be displayed in reverse image when
the diskette is “WRITE-PROTECT ON”.
• The remaining diskette free space will be displayed in normal image when
the diskette is “WRITE-PROTECT OFF”.
3. To turn WRITE-PROTECT OFF select PROTECT ON/OFF from the menu
and press RETURN.
74
Page 83

Advanced Functions
This section deals with the most advanced functions available on this word pro
cessor with the WP application. These functions will enable you to further
improve the overall quality of your documents and eliminate most of the mechani
cal tasks.
Double column printing is used to automatically print a document in two columns.
The merge function is used to automatically print many copies of a document,
each copy including individual changes such as names and addresses.
Double Column Printing
This function allows you to print your text in magazine style, with two columns
across the page. A page on the screen will be printed as a column on paper. In
other words, two pages will be printed on a single sheet of paper, the first page as
the left column and the second page as the right column.
When formatting your document for double column printing, reduce the distance
between margins so that both columns and the space between columns can fit on
the paper. The margins for the document should be set for one column. Use 12 or
15 pitch in order to fit more text on a line.
NOTES:
• Double column printing does not work with merge printing. Merge symbols as
well as stop symbols are ignored during double column printing, and
replaced with blank spaces.
• To ensure proper column alignment, the document must not contain any mar
gin, pitch, or line-spacing changes. It may, however, contain any number of
tab stop changes.
1. Proceed as you would to print a text file in standard format. (See “Starting
File Print” on page 65.)
2. When the print menu screen appears, set the DOUBLE COLUMNS to YES. If nec
essary, set the SPACE BET(ween) COLUMNS (the default is five blank spaces
and the available range is from 1 to 50). At this point, you may also change
other settings on the menu as well, but you must not set the MERGE PRINT
option to YES.
3. Press WiTURW to start printing.
Right Margin Setting for Double Column Printing
E
...........................................................
Riaht Marain
75
Page 84

Double Column Printout
The data merge function is useful when a similar letter is to be sent to numerous
addresses, each letter to be typed with a different name and address and different
contents. To save you from having to recall, edit, and print the same letter over
and over, the merge file function does the job automatically. The following steps
summarize the use of this function:
1.
To use the data merge function, you must first create a file containing the
data to be inserted in the letters (the Merge file). For details, see “Mail Merge”
on page 117. The data to be inserted into a single letter Is called a record. A
record is made of different labels (label 1, label 2, label 3, etc.) that corre
spond to the different pieces of information you need to insert in a single let
ter (name, address, etc.). You must organize your Merge file logically: the
same label of each record must contain the same type of information. For
example, label 1 will contain a name, label 2 an address, label 3 a phone
number, etc.
2.
Next, you must create a Word Processing file containing the text that will be
common to all letters (the master document). Wherever a piece of variable
information has to be inserted in that text, you insert a “merge symbol” and
input a label number.
3.
When you print the master document, the text is printed until a merge symbol
is encountered. At that point, the word processor compares the number that
you have input with the merge symbol, and automatically replaces the merge
symbol with the data contained in the corresponding label of the first record.
When the whole document is printed, the word processor checks the Merge
file to see if there are more records. If there are no more records, merge
printing is completed. Otherwise printing of the master document starts
again, and this time, the next record of the Merge file is used. The process is
repeated until all records of the Merge file have been used.
76
Page 85

Crsating the Marge File
To use the Data Merge function, you must first create a Merge file, which is a file
containing the names, addresses or other data to be inserted into the document.
You create that file using the Mail Merge application. For details, see “Mail Merge”
on page 117.
Also be sure to remember which label numbers (columns) in the Merge file corre
spond to the different pieces of information you want to insert.
Creating a Document with Merge Symbois
Y CODE
-----------
T m
'll
+
, M CODE
/
Your next step is to create the master document with the Word Processing appli
cation.
1. Begin typing your document.
2. Once you reach a point in your document where data from the Merge file
needs to be inserted, press [fife! + ((D). A merge symbol M
appears in the document. The MRG: indicator appears and the cursor rests
to its right waiting for your input. If the Scale was displayed, the Status Line is
automatically displayed. The following message appears:
Type number and press RETURN.
3. Type the number of the label that you need at that position of the document.
Using the above example, type “1” If you need a name, “2” If you need an
address, or “3” if you need a phone number.
4. To resume normal operation, press IreturnI . The cursor returns to the text
area.
5. Continue typing your document, inserting merge symbols wherever you need
variable data from the Merge file.
NOTES:
• A mistake when inserting a merge symbol can be corrected by pressing
I CORRECT), and retyping the correct number.
• A merge symbol is not available in the Centering or the Right Margin Flush
function.
6. Press pLEI to finish the master document.
J
77
Page 86

Merge Printing
When copies of the same letter must be sent to a number of people, the merge
printing function extracts the different data, such as addresses and salutations,
from the Merge file you want to use and incorporates it into the master letter. It
then prints as many different copies as there are lines of data (records) with an
asterisk in the Merge file. Proceed as follows:
1. Refer to “Starting File Prinf on page 65 to print the master document.
2. When the print menu screen appears, set the merge print option to YES.
(See “Starting File Prinf on page 65.) At this point, you may also change
other settings on the menu as well. Pressing IreturwI to exit the print menu
screen when the merge print option has been set to YES will display the
MAIL MERGE INDEX screen, listing all the Merge files on the current dis
kette. If the Merge file you want to use is not on the current diskette, insert the
correct diskette.
<< MERGE INDEX >>
ADDRESS4.MRG
Select a file and
(ХХЛ) ADDRESS2.MRG (XX.X)
(XX.X)
press RETURN to start printing*
PRINT FILEiXXXXXXXX REMAINiXXX.XK
ADDRESS3.MRG (XX.X)
Select the Merge file that you want to use with the master document and
press to start printing. You may also press at this point to
return the system to the WP INDEX screen. All the functions available during
normal file printing are also available during merge printing. (See “Printing a
Documenf on page 65.)
NOTES:
• If there is no data in the Merge file corresponding to a merge symbol in the
text file, a single space will be printed.
• Printing of merge data is done according to the mode (NORMAL, BOLD,
UNDERLINE, etc.) in effect when the merge symbol was entered.
78
Page 87

Abbreviated Phrases
Increasing Your Typing Speed
The abbreviated phrase function is provided to help you increase your typing
speed when you have to frequentiy type iong strings of words (“phrases”). You
may store the phrases in the abbreviated phrase memory, along with a short
abbreviation (the “name” of the phrase). For instance, you may store the phrase
“United States of America” together with the name “USA”. Once this has been
done, ail you have to do to enter “United States of America” in your document is
to type “USA” and press ICODEI + tailiMB (®). “USA” wiii automaticaliy be
replaced with “United States of America”, if you type a name that does not exist in
the abbreviated phrase memory, and press (@), you will hear a
beep.
The abbreviated phrase memory can store a maximum of 30 phrases and names.
Each phrase can consist of up to 67 characters, while a name is limited to 8 char
acters. The totai amount of data in the abbreviated phrase memory may not
exceed 1,000 characters.
The abbreviated phrase memory can be saved on diskette and, of course,
retrieved from the diskette. You may create as many abbreviated phrase fiies as
you want, but you may have only one abbreviated phrase fiie on a diskette.
f CODE
-----------
A
Understanding the Abbreviated Phrase Memory
The abbreviated phrase memory is stored in the word processor for as long as
the unit remains on. if you have created phrases and wouid iike to use these
phrases in other fiies you wiii be creating iater on, you wiil need to SAVE this
phrase memory onto a diskette. (See “Saving the Abbreviated Phrase Memory”
on page 82.) Later, when you want to use the phrases that are stored on a dis
kette, you may LOAD the fiie into the memory of the unit. (See “Loading an
Abbreviated Phrase File” on page 82.)
NOTES:
• Each diskette can hold only one abbreviated phrase file. If you save an
abbreviated phrase memory onto a diskette that already contains an abbrevi
ated phrase file, that file will be overwritten by the new abbreviated phrase
file.
• The memory of the word processor can hold only one abbreviated phrase
memory. If you create an abbreviated phrase memory, and then load an
abbreviated phrase file from a diskette, the abbreviated phrase memory will
be overwritten by the loaded file.
79
Page 88

Abbreviated Phrase Maintenance
STYLE BLOCK CTR/RMF
SPELL
PHRASE MAINTENANCE ^RCH
4 LOAD L
■ SAVE
PAGE PRINT
This section explains how to input and edit data in the abbreviated phrase mem
ory.
1. Press [MENUI to display the function menu.
2. Use O ^*^cl ® to select PHRASE, then press m or [RETUBHI to display the
sub-menu.
• Accelerator: Instead of (2), type “A”.
3. Use [2 and 33 to select MAINTENANCE and press IHETURMI. The following
display appears:
« ABBREVIATED PHRASE » KB:XX
ts : Tom Smith
To add, type phrase. To edit, press RETURN* For other options, press NENU*
• Accelerator: Instead of (3), type “M”.
4. To enter new data, type the name, press fliMM to switch to the phrase area,
then type the phrase and press tBETWW.
NOTE:
Use only letters, numbers and periods for the name.
5. To edit an existing line of data, select the line and press fBCruRW. The data
will appear in the input area. Edit the data, then press BBETWHl again.
6. To return to the WP screen and resume typing, press (FllH or press IHENM to
display the menu and select EXIT.
NOTES:
• If you have added phrases, you will need to save the abbreviated phrase
memory onto the diskette.
• To recall a phrase into the WP text file, type the assigned name and press
80
Page 89

Using the Function Menu for Other Options
fri
PUP //
EXIT
ts
Select from menu and press RETURN.
PRINT DELETE
: Tom Smith
1. From the ABBREVIATED PHRASE screen, press
LOAD SAVE
•
to display a menu of
functions:
NOTES:
• To return to the input screen shown in step (3) above, press [CANCELl.
• To select a function from the menu, use and Q or type the letter dis
played in bold.
• When the menu is displayed, it is not possible to select a line of data.
2. To exit the abbreviated phrase maintenance screen and return to the input
screen, select EXIT and press [RETURNI.
• Accelerator: To select EXIT, type “E”.
• Short cut: To exit without displaying the menu, press tlM.
3. To print the list of phrases and names, select PRINT and press [returnI.
• Accelerator: To select PRINT, type “P”.
• Short cut: To print without displaying the menu, press + ftWHI fE).
4. To delete a line of data, you must select the data before you display the func
tion menu. When the data to be deleted is selected, press HBNUI, then select
DELETE and press |RETURN! • A message will ask for confirmation:
Delete? Press RETURN(yes) or CANCEL(no).
• Accelerator: To select DELETE from the menu, type “D”.
• Short cut: To delete without displaying the menu, press IcODil + ®.
Press |№TURN| to delete the line or to keep it in memory.
5. To load an abbreviated phrase file, insert the diskette, select LOAD and press
[RETURNI. Remember that loading an abbreviated phrase file will overwrite the
abbreviated phrase memory.
• Accelerator: To select LOAD, type ‘V.
6. To save the abbreviated phrase memory, select SAVE and press [RETURNI.
Remember that turning the power off clears the abbreviated phrase memory,
and that saving the abbreviated phrase memory into a diskette that already
contains an abbreviated phrase file will overwrite the file on that diskette.
• Accelerator: To select SAM E, type “S”.
81
Page 90

Loading an Abbreviated Phrase File
STYLE BLOCK CTR/RMF SPELL MAINTENANCE »RCH PAGE PRINT
LOAD
SAVE
_______
E
1. Insert the diskette which contains the abbreviated phrase file that you want to
use.
2. Press ImenuI to display the function menu.
3. Use ® and Q to select PHRASE, then press or ■EMtii to display the
sub-menu.
• Accelerator: Instead of (3), type “A”.
4. Use ^ and ® to select LOAD and press BEIUBNI. The abbreviated phrase
file is loaded into the abbreviated phrase memory and you can now use the
abbreviated phrases as explained above.
• Accelerator: Instead of (4), type “L”.
NOTE:
If you had already Input data in the abbreviated phrase memory (see “Abbre
viated Phrase Maintenance” above), that data will be overwritten when you
load a file. To avoid this, first save the current abbreviated phrase data.
Saving the Abbreviated Phrase Memory
STYLE
BLOCK
CTR/RME SPELL fWMSf-' MAINTENANCE iRCH
Ï LOAD
SAVE
________
PAGE PRINT
Since the abbreviated phrase memory is cleared when the power is turned off,
you should always save its contents before you switch the power off.
1. Insert the diskette in which you want to save the abbreviated phrase memory.
2. Press IMM to display the function menu.
3. Use @ and Q to select PHRASE, then press ® or [RETURHl to display the
sub-menu.
• Accelerator: Instead of (3), type “A”.
4. Use m and ^ to select SAVE and press [RETliil■ This message will
appear:
Press RETURN to save.
Accelerator: Instead of (4), type “S”.
^ to save the abbreviated phrase memory on the diskette.5. Press I
NOTE:
Since the system accepts only one abbreviated phrase file per diskette, sav
ing the file will overwrite any old abbreviated phrase file on diskette.
82
Page 91

Typewriting
When you start the Typewriter application, you will find that the word processor
works just like an electronic typewriter. All your typing will be immediately printed
on paper and will not affect the memory. The text you type is not stored in mem
ory. If you already have some text in the memory (this is possible because you
are allowed to switch to the typewriter application while editing a file), that text will
not be changed by the operations done with the typewriter application. The type
writer is equipped with a separate line memory, allowing for easy correction of the
current line of text. If a line has to be processed before printing (when centering,
for example), the line is temporarily displayed on the screen, and is printed when
you press IRETURNB or ITABI.
83
Page 92

btarting the Typewriter Application
From the Main Menu
\ Word Processing
1. Switch the power on to display the Main menu.
2. Use the cursor keys to select the icon for Typewriter and press WJ
press @ or . The Typewriter screen shown next page appears.
REMAINiXXX PIND DTA8 PITCH:XX L.SP:X.X KB:XX SHIFT INS EXP 8LD CNT JST SP
<< TYPE MODE >>
Typewriter
, or
From the Word Processing Application
While using the WP application, you can immediately switch to the TW application
by pressing |tw/wp| .
NOTE:
When the word processor finds a stop symbol in a file during file printing, it
switches automatically to the typewriter application to allow you to manually
add text in the document being printed. For details, see “Stop Symbols” on
page 68.
Settings such as left/right margins, tabs, etc. are independent in the Word Pro
cessing and Typewriter applications. That is, if you set the left margin to column 5
with the word processor, then switch to the typewriter and set the left margin to
column 10, this does not modify your setting for the word processor. If you switch
the system back to the word processor, the left margin is still in column 5.
The typewriter application is divided into four modes: the normal mode, where all
you type is printed directly, with no auto return; the auto mode, which is like the
normal mode but with auto return; the line-by-line mode, which has a one-line
memory displayed on the screen as well as auto return; and the justify mode,
which also has a one-line memory (with screen display) in addition to justified
right margins. These modes are switched by pressing [CODEI + [OPERATEI ((o|) in
the sequence shown below.
TYPE TYPE (Auto) L/L (Auto) L7L (Justify) TYPE
84
Page 93

The lypewriter Application Screen
The following screen appears when you switch the system to the typewriter appli
cation. This screen displays the value of various settings, and a line of text when
the line in question has to be processed before printing, or when you want to use
the line-by-line mode.
RMF
t
CTR
REMAINiXXX ?im 0TA8 PITCH:XX L.SP:X.X KB:XX SHIFT INS EXP 8LD CNT J$T SP
T
<< TYPE MODE >>
CAPS H.C
Л-Л.
Status Line
The status line indicators show you where you are and what settings are
selected. (For a complete list of the indicators, see “Indicators” on page 140.)
The Hot Zone
The hot zone starts six spaces before the right margin. The typewriter will beep
when the carrier enters that zone. The REMAIN indicator tells you the number of
characters that you can still type on the current line.
WRO лит
i_T.
Hot Zone
Right Margin
In fact, you have seen some of these features already
in this letter: Centering places the title rig;ht in
the center of the left and right margins, and Bjcld
Manual Return
Pressing (RETURNl advances the paper by the current line space and moves the
carrier to the left margin.
85
Page 94

Automatic Return
^ (SPACEBAR) ^
fr
Pressing ICODEI + [OPERATE] (©) sets the typewriter in the auto mode. The carrier
is automatically returned to the left margin if you type a space or a hyphen within
the hot zone.
NOTES:
• If you do not want the carrier to return when you type a space (the next word
can still fit in the hot zone), press iOHMEl + KSPAiCEBAR)] instead of
If you don’t want the carrier to return when you type a hyphen (the hyphen is
part of the word and the characters following this hyphen can still fit in the hot
zone-example: '‘built-in”), press + 0 instead of 0.
If you reach the right margin, the typewriter stops. Press [RETURN! to return
the carrier, or [CODE] + [MREll to continue typing beyond the margin.
Line-by-Line Mode
RMF
t
CTR CAPS WRD AUT
REMAIN-.XXX ?im DTA8 PITCHiXX L.SPiX.X KH:XX SHIFT IH$ EXP BID CNT JST $■
<< L/L MODE >>
* •
^ CODE ^
i
----------------
+
^operate)
i
t L-
You can enter the line-by-line mode and switch between the other sub-modes
with S) + iOPrtifel (i)).
1. Press ICODEI + lOPERATEl (®) while in the auto mode of the type mode to dis
play the l_/L mode screen. A text area limited to a single line appears in the
middle of the screen.
NOTES:
• In UL mode, automatic return is always activated. (See “Automatic Return”
on page 86.)
• If you need to justify your text, press 10^1 + lOPEffiffEI ('(o)) again to activate
the justify function and display the JSJ indicator.
86
Page 95

2.
Type your text. The text is displayed on the screen and the carrier moves as
you type, although nothing is printed. If you press a dead key, the carrier does
not move untii you have pressed the base character.
To print what you have typed, press ITHBI. IW + >nai. IOC +
3.
fcilM (®), or MilB + mil'—. Printing wiii also be done automatically after
you type a character following a hyphen or a space in the hot zone.
/9
Justification Mode
------------
[ CODE
vk
------------
+
\6~]
joperateJ
----------
The Justification mode allows you to print text aligned to both left and right mar
gins.
1.
Press ICODEI + lOPERATEl (@) until the JST indicator appears.
2.
Type your text. The text is displayed on the screen first and the carrier moves
simultaneously as you type. If you type a space in the hot zone, justified text
is printed and the carrier is automatically returned. Typing a hyphen in the hot
zone justifies after typing the next character.
NOTES:
_______
Pressing iWBttWM aligns the line with the left margin only.
The carrier will not return automatically if you type a space when the last
entered character of a word reaches the right margin. In this case, you must
press irerWNl.
"y
Left Margin
Right Margin
Using the Boldface is a way of making a Word,;
Phrase or entire Paragraph stand out and catch;
the reader's eye. The Boldface feature has al
87
Page 96

Basic Typing
Inserting Paper
,P BREAK,
Insert a sheet of paper and press IPINSI. Paper is automatically fed. You can start
typing at approximately one inch from the top of the paper. Since the carrier is
positioned at the center after automatic insertion, press [REmwl to move the car
rier to the left margin.
NOTES:
• Paper cannot be inserted this way while in display mode (centering, right
margin flush, decimal tab mode).
• Paper can be inserted this way in UL mode only before entering text on the
screen.
The Cursor Keys
The cursor keys can be used to move the carrier (except when the text of the line
is temporarily displayed). @ and @ nnove the carrier one character pitch to the
left or the right. and ® move the carrier up or down by 1/12 of an inch (the
paper moves), except when the text is displayed on the screen.
Setting Margins
Move the carrier by using KSPftCEBArtl or ITAW (to move to the right) or
IMCKSRACEI or [CCM№I + lEXPBl (to move to the left).
If you want to set the new margins beyond the old ones, press l(»CCl -r
when the carrier reaches the current margin.
To set a margin at the carrier position, press IC(K)EI -r iLMARI or fCODil
88
f CODE
-------------
U)
Page 97

NOTES:
• Margins cannot be set while in display mode (centering, right margin flush,
decimal tab) or in UL mode.
• There must be at least two inches between margins.
• The margin settings are reset to their default values when you switch the
power off, then on.
Selecting the Pitch ^ CODE
^ in
-----------
Pressing [CODE] + [PITCHI changes the pitch through the following cycle:
PITCH:10 ^ 12 ^ 15 ^ 10
Pitch
10 (PICA)
12 (ELITE)
15 (MICRON)
10 characters per inch
12 characters per inch
15 characters per inch
Number of Characters per inch
NOTES:
The pitch cannot be changed while in display mode (centering, right margin
flush, decimal tab mode).
The pitch can be changed in UL mode only before entering text on the
screen.
The pitch setting is reset to its default value when you switch the power off,
then on.
Selecting the Line Space
^ CODE
il
-------------
Vb
1
2
LINE
Pressing ICODEI +
changes the line space through the following cycle:
L.SP:1.0 ^ 1.5 ^ 2.0 ^ 1.0
1.0
1.5
Line Spacing
6 lines per inch
4 lines per inch
Number of Lines per inch
2.0 3 lines per inch
NOTE:
The line space setting is reset to its default value when you switch the power
off, then on.
89
Page 98

Changing the Keyboard
Jj
If you need to print characters that are not available on the current daisy wheel,
change the daisy wheel and press ICOPEI + B (®)-
(K
----
KB:I n III -> I
Keyboard Selection
I (Standard)
II (International)
III (Symbol)
NOTES:
• Please refer to “Character Keys” on page 128 for details.
• The keyboard setting cannot be changed while in display mode (centering,
right margin flush, decimal tab mode).
• The keyboard setting can be changed in UL mode only before entering text
on the screen.
• The keyboard setting is reset to its default value when you switch the power
off, then on.
English text
Languages using extra characters
Mathematical symbols and Greek characters
Use
Using Shift Lock and Capital Lock
(f=.
Uppercase characters will be printed if you hold awffl down while pressing any
character key.
To type an entire string of uppercase characters, press MIIFTiJMi once. The
SHIFT indicator appears and all characters you type will be uppercase characters.
To cancel, press
If you want to enter strings of capital letters in combination with numbers, press
icoPEl + (capsI. The CAPS indicator will appear and all alphabetic keys will type
capitals while other keys produce lower case characters. To cancel, press BBM
+ [caps! again. When the CAPS indicator is on, holding down imFti temporarily
changes the CAPS indicator to the SHIFT indicator. Pressing i^FTLOCKl in the
same circumstance switches to SHIFT. Pressing MKSi switches back to CAPS.
90
Page 99

Shift Lock Capital Lock
There are four types of backspace keys: normal, fractional, permanent, and
express.
Normal Backspace
* •
(П
BACKSPACE
Pressing IbackspaceI moves the carrier one space to the left. Hold the key down
for quick movement to the left.
NOTES:
_________
• When the text is displayed, ШюшшШ deletes the character to the left.
• If the carrier is positioned in the middle of a character (see “Fractional Back
space'' next), pressing ШШШШШ moves the carrier to the beginning of the
current character.
• If [BACKSPACE] is pressed when the carrier is on the left margin or on the left
end, the typewriter beeps. Pressing I СОРЯ + ИШШ allows the carrier to go
beyond the left margin.
• IBACKSPACEI is used in type mode to combine two characters like “O" and “/" to
create “0". Type the first character, press ЖЮШЯЙ. and finally type the
second character. This will not work, however, when the text is displayed.
(See “Permanent Backspace" on page 92.)
Fractional Backspace
T CODE
i
----------------
+
i
^ BACKSPACE ]
--------------
i
+ (bsiI moves the carrier back by 1/60 inch and allows you to precisely
position the carrier for corrections when you have to reinsert your draft or when
you want to correct a previous line with uneven spaces between words. This key
is also useful to line up your carrier exactly on a point on a preprinted form. The
following table relates the 1/60 inch backspace with the selected pitch. You can
also use this function to type Roman numerals (which need unusually small
spaces between characters).
91
Page 100

Pitch Relative Amount of Backspace
10 (PICA)
12 (ELITE)
15 (MICRON)
NOTES:
• If №€№l + [BSlI is pressed when the carrier is on the left margin or on the left
end, the typewriter beeps. Pressing ICODEI + M№L| allows the carrier to go
beyond the left margin.
• When the text is displayed (centering, right margin flush, decimal tab or UL
mode) is used to superimpose characters. (See “Permanent
Backspace” next)
1/6 of a character
1/5 of a character
1/4 of a character
Permanent Backspace
^ CODE ^
]
^BACKSPACE ]
+
ii*’
J
The permanent backspace function is used to print superimposed characters in
the display mode (centering, right margin flush, decimal tab, and UL mode). For
example, “0” and T are used to produce a “strike-over” zero (0), or “Y” and “=” to
produce a Japanese Yen currency symbol (¥).
1. Type the base character “Y”.
2. Press [CODEI + [BACKSPACE[ ■ The cursor will move one space to the left.
3. Type the character which is to be imposed The base character “Y”, a per
manent backspace symbol <■■ , and the character to be imposed “=” will be
displayed side by side.
NOTE:
In type mode, you do not need to press . Pressing [BACKSPACE! alone
moves the carrier back to the last character and you can superimpose
another character.
Express Backspace
Pressing (CODE) + [EXPRl moves the carrier all the way to the left margin. If you
press + IM WEl\ , the carrier moves all the way to the left end.
NOTES:
• When you have a paragraph indent and the carrier is located at its right,
pressing [CODE I + BOTH once moves the carrier to the paragraph indent;
pressing the same keys again moves the carrier to the left margin.
• If [CQ[%j + lEXPRl is pressed when the carrier is on the left margin or on the
left end, the typewriter will beep.
• Pressing -h [BMi moves the cursor to beginning of the line in the dis
play mode.
92
(Y
---------
'1 CODE
L=
-1
■4)
 Loading...