


User's Guide WD-370B
WD-370B
User's Guide
This guide contains precautions
and operation methods for use
with this product.
Read the whole guide before using
your product and keep it for later
reference.
Troubleshooting
If you have any problems
with this product, to find a
solution see
Page 35
Version 0
UK ENG

1. Introduction
Symbols and conventions used in this document
We use the following symbols and conventions throughout this
User's Guide:
Important
Note
Explains precautions that must be observed
when using this product.
Provides supplementary information about
using this product.
2

Contents
1. Introduction .......................................................................2
Symbols and conventions used in this document .............2
Names and functions of key components .........................5
2. Before using the AiRScouter...........................................11
How to assemble the AiRScouter ...................................11
How to wear the AiRScouter ...........................................14
3. Adjusting the display .......................................................15
Turn the power on ...........................................................15
Adjust the position of the Head Display ..........................15
Adjust the focus of the image..........................................17
4. Adjusting the Settings .....................................................18
Adjust brightness.............................................................18
Lock the buttons of the control panel ..............................18
Enlarge or reduce the size of the image .........................19
Rotate the image.............................................................20
Change colour mode.......................................................20
Attach the rear band........................................................21
Switch the head display to be
viewed with the right eye.................................................22
Replace the Eyecup ........................................................27
Power supply...................................................................29
Using an External Battery.....................................30
Introduction
5. Maintenance....................................................................33
Clean the Lens ................................................................33
Clean the Head Band......................................................34
Clean the Control Box .....................................................34
6. Troubleshooting ..............................................................35
3

Appendix ..............................................................................44
The Li-ion Rechargeable Battery.....................................44
Product specification .......................................................47
Requesting repairs ..........................................................50
4

Names and functions of key components
Head Display
a
1Focus Adjustment Dial
Adjusts the focus of the image on the head display by
changing the focal length of the optics (from 30 cm to
infinity).
2Head Display Cable
Connects the head display to the control box and
transmits power and video signals to the head display.
3Eyecup
When attached, prevents the head display from touching
the user’s eye.
b
c
Introduction
5
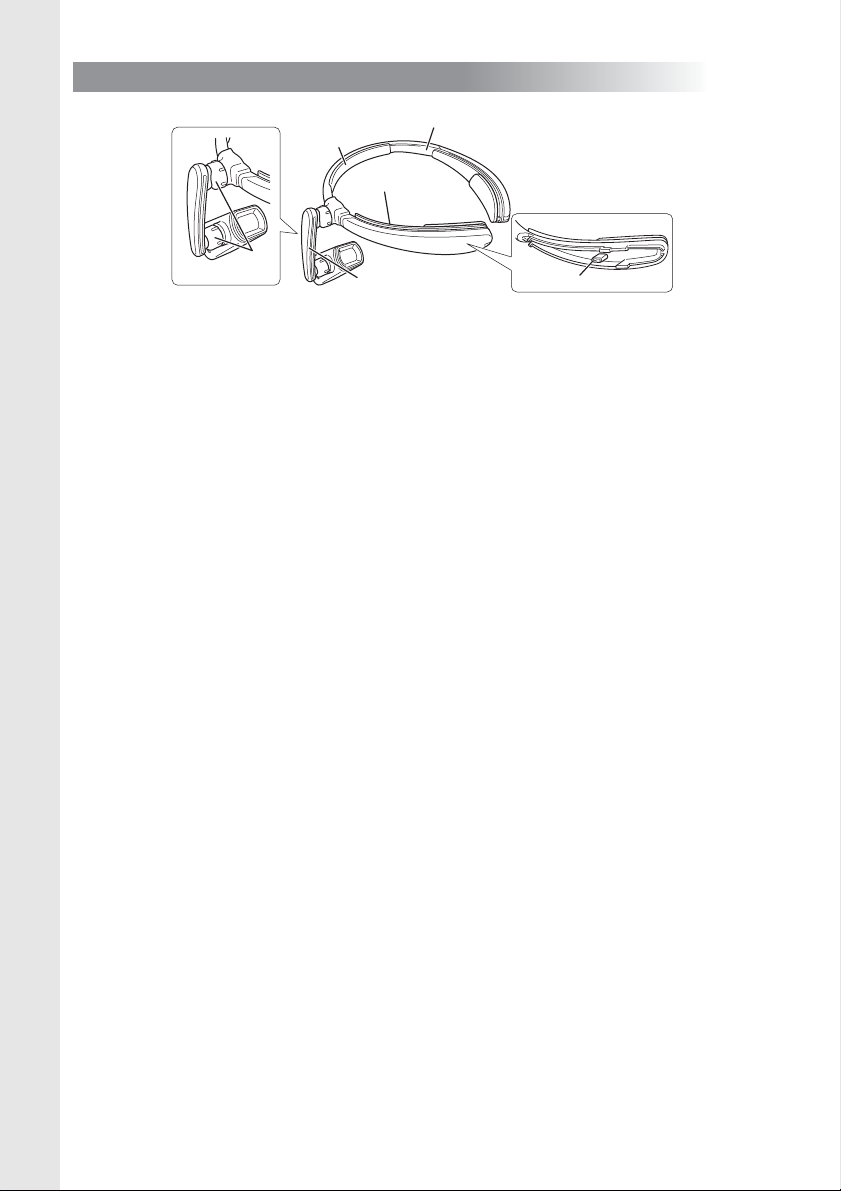
Harness
b
a
f
e
d
c
1Head Band
Attaches the AiRScouter to the user’s head and
distributes the weight of the unit.
2Forehead Pad
Cushions the headband and prevents it from slipping
down the user’s forehead.
3Cable Channel
Holds the head display cable in place along the head
band.
4Rear Band Attachment Post
Allows the user to attach the rear band and tighten the
head band around the head to prevent slippage.
5Flexible Arm
Allows the user to adjust the position and angle of the
head display relative to the eye.
6Joint Dial
Loosens the ball joint to allow for adjustment of the
flexible arm, or tightens it to fix the flexible arm's position
and angle.
6

Control Box
b
a
c
d
e
1Control Panel
Includes control buttons, status LEDs, and a battery level
indicator.
2AC Adapter Port
Allows the user to connect the included AC adapter to
power the control box, or to recharge the internal battery.
3SDI Input Port
Allows the user to connect the control box to
SDI-compatible devices, using a BNC coaxial cable.
4Head Display Cable Port
Allows the user to connect the head display to the control
box.
Introduction
5Micro-USB B Port
Allows the user to connect a third-party USB battery to
power the control box (note that this port cannot be used
to charge the internal battery).
Control Panel Buttons
a b c d
7

1Power Button
Press this button to power on the AiRScouter, and press
and hold this button for two seconds to power off the
AiRScouter (note that the AiRScouter will automatically
power off if there is no input from a video source.)
2Mode Button
Press this button to select the zoom mode.
3Image Rotation Button
Press this button to rotate the image by 180°.
4Brightness Button
Press this button to select the next brightness level; note
that the AiRScouter has five levels of brightness. To
toggle between the full-colour and monochrome display,
press and hold this button for two seconds.
Control Panel Status LEDs
cd
a
b
1Display LED (Green)
Lights up when the AiRScouter is on and an image is
being projected onto the display.
2Key Lock LED (Orange)
Lights up when button operation on the control box is
disabled.
3Internal Battery LED (Orange)
Lights up when the control box is being powered by the
internal battery.
4External Power LED (Orange)
Lights up when the control box is being powered by the
AC adapter or by an external battery (for example, a
third-party USB battery).
8

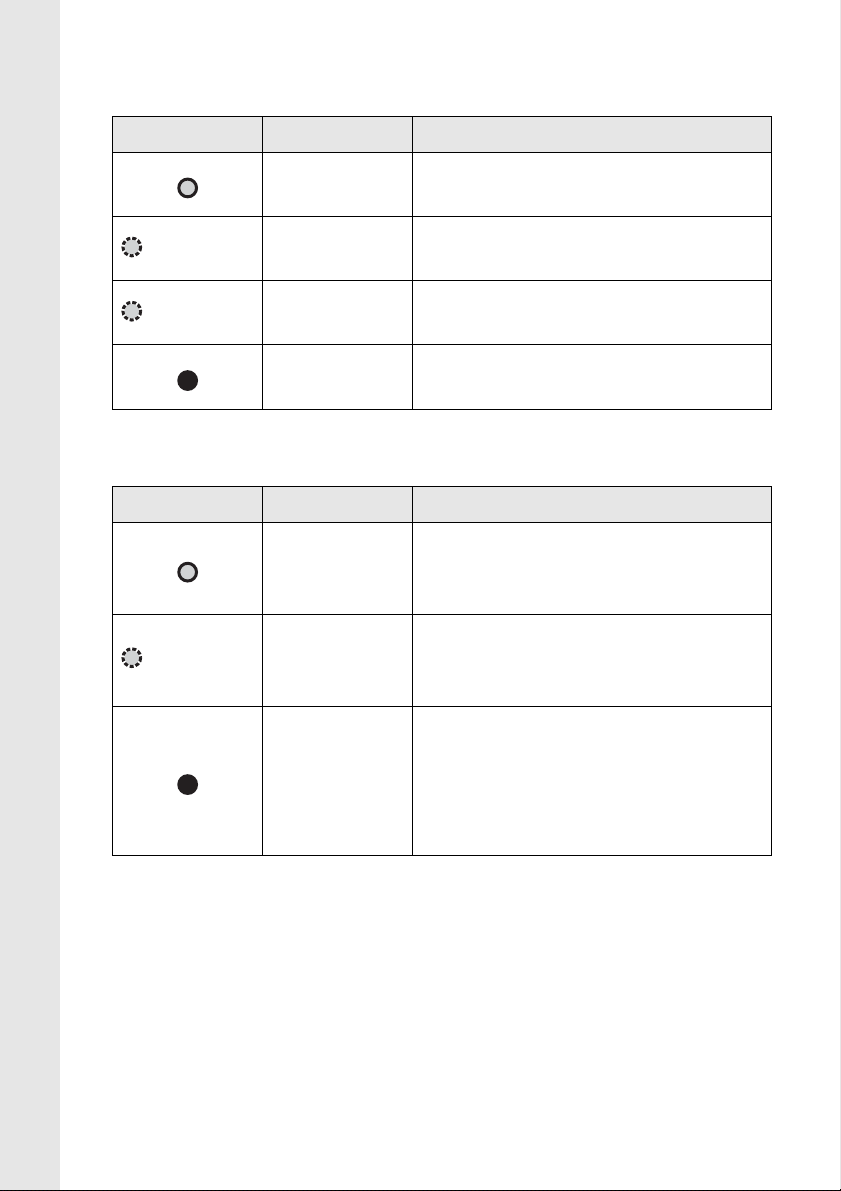
LED Indications
lit flashing off
1Display LED (Green)
State Name Explanation
The AiRScouter is receiving a
Display ON
compatible video signal from
an external device.
(Slowly) Operating
The control box is processing
the video signal.
The AiRScouter is not
(Quickly) No input
receiving a compatible video
signal from an external device.
The AiRScouter is powered off.
Power OFF
To power it on, press the power
button.
2Key Lock LED (Orange)
State Name Explanation
Key lock
ON
Key lock
OFF
Button operation on the control
box is disabled.
Button operation on the control
box is enabled.
Introduction
3Internal Battery LED (Orange)
State Name Explanation
(Slowly)
(Quickly)
Battery
level high
Battery
level
medium
Battery
level low
No battery
The internal battery is fully
charged.
The internal battery is half
charged.
The internal battery is almost
completely discharged.
The internal battery is fully
discharged.
9
4External Power LED (Orange)
When the AC adapter is connected:
State Name Explanation
Working
(Slowly) Charging
(Quickly)
Charging
error
Full charge
The AiRScouter is being
powered by the AC adapter.
The internal battery is being
charged by the AC adapter.
An error occurred while the
internal battery was charging.
The internal battery is fully
charged.
4External Power LED (Orange)
When an external battery is connected:
State Name Explanation
The AiRScouter is being
Working
powered by an external
battery.
An error occurred while an
external battery was supplying
power.
(Quickly)
Connection
error
The external battery’s capacity
is low. If the internal battery is
No battery
charged, the AiRScouter will
switch to using it for power
(see
3 Internal battery LED).
10

2. Before using the
1
2
3
AiRScouter
How to assemble the AiRScouter
Ensure the AiRScouter is powered and correctly connected
according to the following procedure:
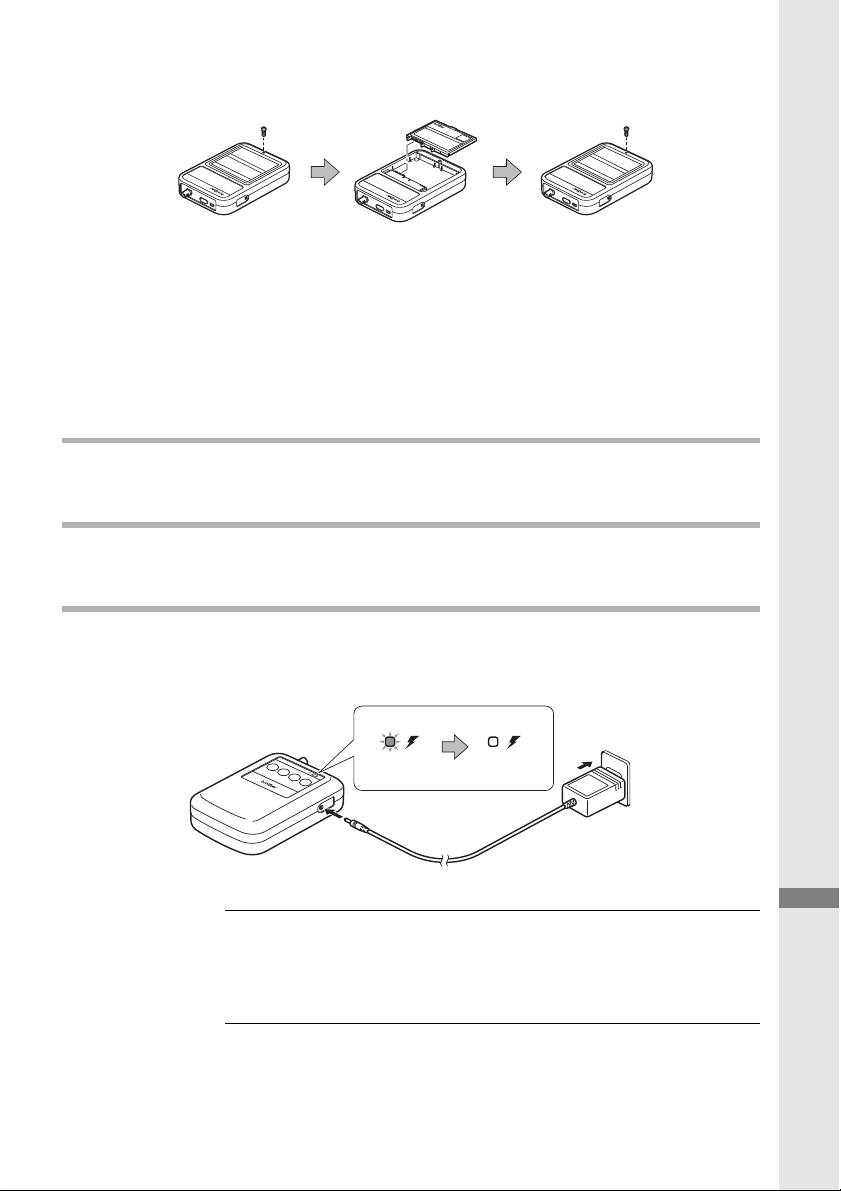
Insert the internal battery into the control box:
a) Remove the screw from
the back of the control
box and slide open the
cover panel.
b) Insert the Li-ion
rechargeable battery.
c) Replace the cover panel
and tighten the screw on the back of the control box.
Connect the AC adapter to the AC adapter port on the
control box, and fully charge the internal battery.
Before using the AiRScouter
Open the belt pouch and slide the control box into it as
shown, so that the ports are still accessible when the flap
is closed.
11

Pass your belt through the belt loop on the rear of the belt
4
5
6
pouch.
Attach the control box firmly to your body as shown
below.
Connect the head display cable from the head display to
the head display cable port on the control box.
12
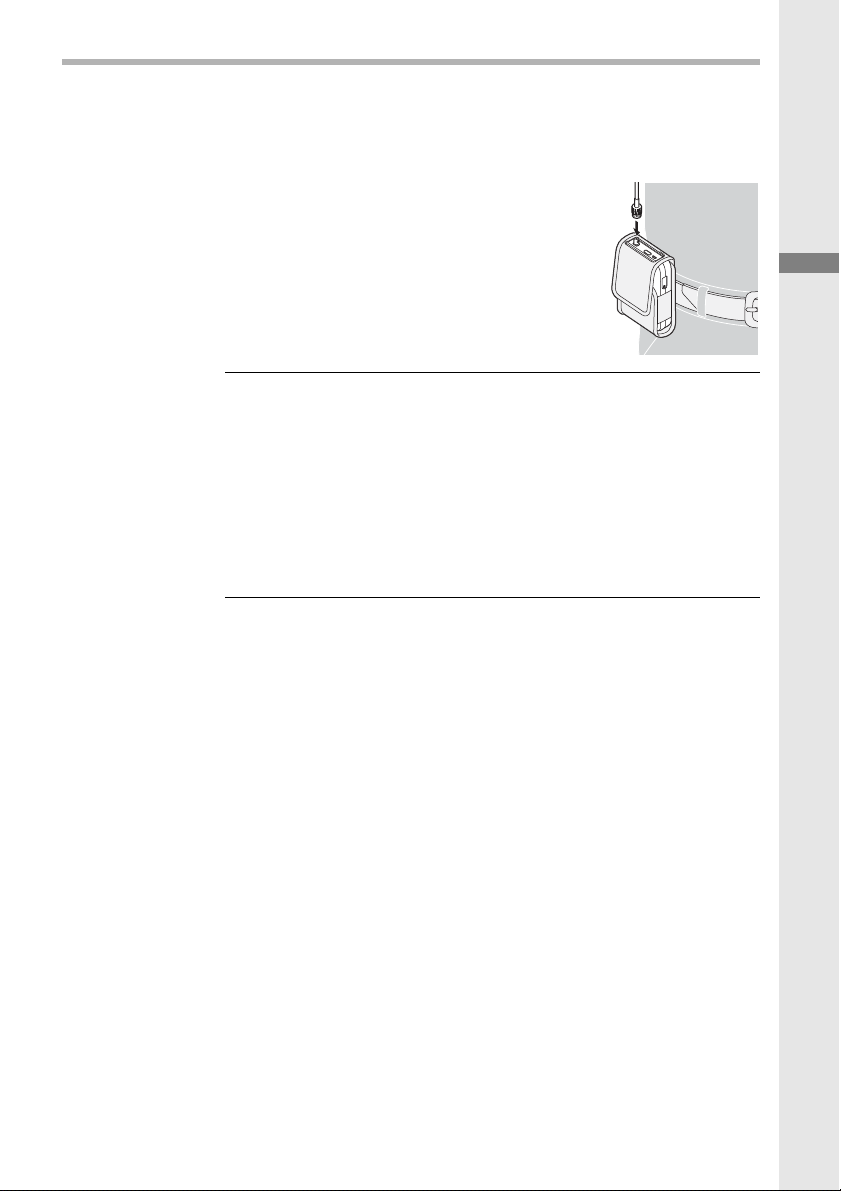
Attach the video input cable to the SDI input port on the
7
control box, and the BNC connector on the other end to
the SDI port of an input source.
Note The only supported resolutions for input
sources are those covered by the HD-SDI
standard. If an input source with a higher or
unsupported resolution is connected, the
image may not display correctly on the head
display screen. If this occurs, check the
output resolution of the video source.
Before using the AiRScouter
13

How to wear the AiRScouter
1
If you wear glasses
2
Place the head band onto the head as shown. The band
should be positioned just above the forehead.
Note If the head band feels loose or starts to slip
down the forehead, it is recommended that
you attach the rear band and use it to tighten
the fit on your head.
To secure the head display cable to your clothing, use the
cable clip.
14

3. Adjusting the display
Turn the power on
Press the power button to
turn the AiRScouter on.
(The LED under the power
button will turn green.)
Adjust the position of the Head Display
Loosen the ball joints by turning the
dials on either end of the flexible
arm counter-clockwise. Adjust the
position and angle of the head
display so that it is easy to view.
Tighten the ball joints by turning the
dials on either end of the flexible
arm clockwise, to fix the head
display in place.
Adjusting the display
15

Note
Adjust the position of the display to fit your
application
Depending on your activity, you can position the head
display so that the image takes up the whole field of
vision, or you can keep it in your peripheral vision to
keep both eyes on your work. Follow these tips to
ensure that you can see the whole image:
• To keep the image in your field of view
at all times, position the head display
right in front of your eye and make sure
that the lens is facing towards the eye.
• To keep the image in your peripheral
vision (so that it is only seen when you
move your eyes in that direction),
position the head display at the edge of
your field of view and make sure that
the lens is facing your eye. If the entire
image is not visible, change the angle
of the head display or switch to Reduce mode.
• If the ball joints become loose after adjusting
the position of the head display, turn the dials
on either end of the flexible arm clockwise to
fix the head display in place.
• If you cannot see the full image after adjusting
the flexible arm, you may have to adjust the
position of the head band to bring the display
into your field of view.
16

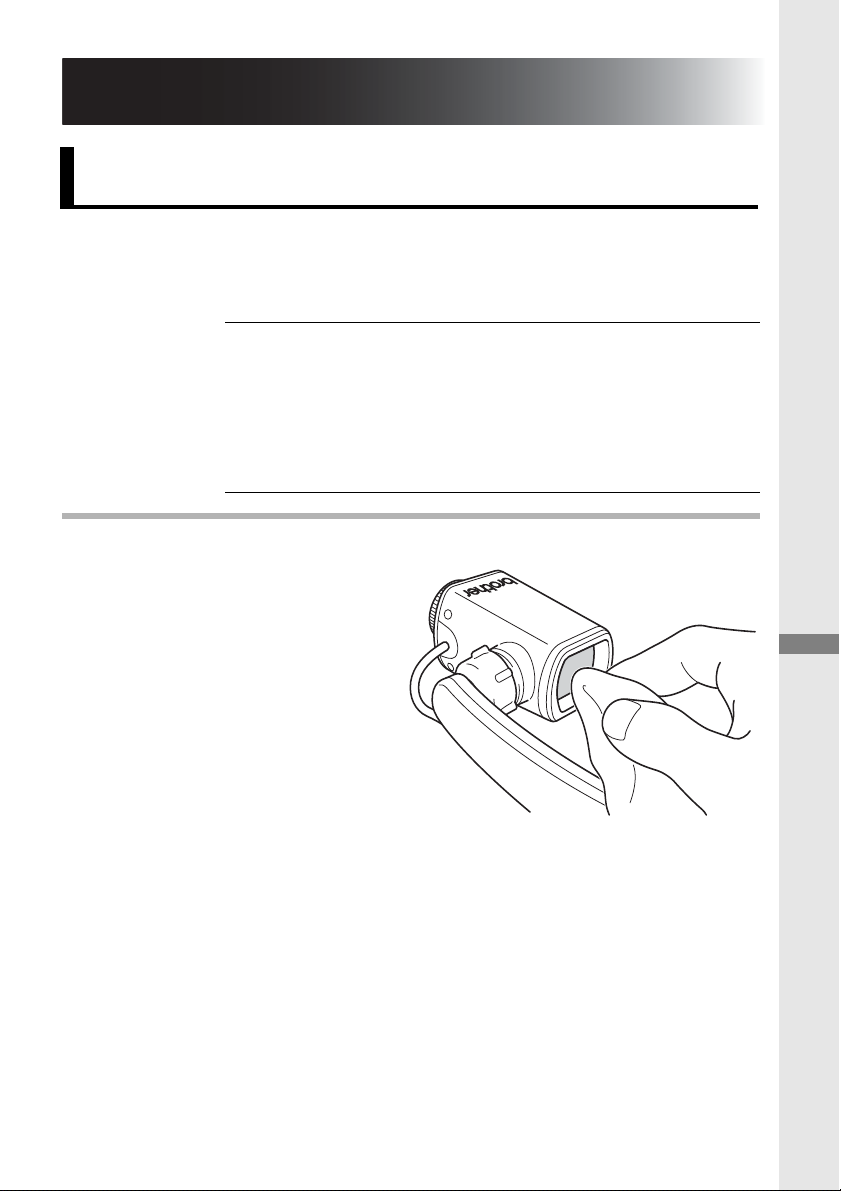
Adjust the focus of the image
Turn the focus adjustment dial to
either side until the image on the
head display is in focus. The focal
length of the optics can be changed
from 30 cm to infinity.
Adjusting the display
17

4. Adjusting the Settings
Adjust brightness
Press the brightness button on the control panel to adjust
the brightness of the image on the head display. There
are five levels of brightness, and each press will increase
the brightness by one level. If the button is pressed while
at maximum brightness, the brightness will return to the
lowest level.
Lock the buttons of the control
18
panel
To prevent unintentional operation, activate the key lock
function by pressing the mode button and the image
rotation button on the control panel simultaneously.
The key lock LED will turn orange when the control panel
buttons are disabled.

Note To disable the key lock function, press the
Normal→Enlarge→Reduce
mode button and the image rotation button on
the control panel simultaneously again.
Enlarge or reduce the size of the image
Press the mode button to
enlarge or reduce the size
of the image on the head
display. The following
zoom modes are available:
• Normal - the image is
displayed at the original
resolution
• Enlarge - the centre
portion of the image is enlarged to fit the head display
screen. This mode is useful for focussing or to check
fine details in the image
• Reduce - the image is reduced in size to fit the head
display screen; this mode is useful if you cannot clearly
see details around the edges of the image in Normal
mode
Pressing the mode button will change the zoom mode in
the following order: Normal, Enlarge, Reduce, Normal...
Note The zoom modes use a fixed percentage to
resize the image, which is not userconfigurable.
Adjusting the Settings
19

Rotate the image
Press the image rotation button on the control panel to
rotate the image by 180°.
Change colour mode
Press and hold the brightness button for two seconds to
change the head display from full-colour to monochrome.
Press and hold the brightness button for two seconds
again to return to full-colour mode. The shades of white
vary on each head display.
20

Attach the rear band
1
2
3
4
Press the area highlighted in the
image below, and slide the head
band cover towards the end of the
band to remove it.
Slide the loop at one end of the
rear band over the attachment
post as shown in the illustration,
and feed the rear band through the
opening at the end of the head
band.
Adjusting the Settings
Replace the head band cover as
shown, ensuring that the rear
band is fed through the cut-out on
the end of the cover. Press the
area highlighted in the illustration
and slide the cover back into
place.
Repeat Steps 1-3 to attach the other end of the rear band
to the other end of the head band.
21

Adjust the rear band's length using
5
1
the slider.
Switch the head display to be viewed with the right eye
While the AiRScouter is supplied with the head display
screen on the left side of the head band, the flexible arm
may be switched to allow the head display to be positioned
over the right eye instead.
Note The flexible arm for left eye and the flexible
arm for right eye are two separate parts that
are included in the AiRScouter box. Because
of its design, the flexible arm for right eye
cannot be used for left-eyed viewing, and vice
versa.
Ensure that the AiRScouter is powered off and that the
head display cable is disconnected from the control box
before continuing.
22

Remove the head display cable from the cable channel
2
3
4
on the head band, and from the cable channel on the
flexible arm.
Rotate the dial on the ball joint between the flexible arm
and the head band clockwise, until the flexible arm is
separated from the head band.
Adjusting the Settings
Rotate the dial on the ball joint between the flexible arm
and the head display clockwise, until the flexible arm is
separated from the head display.
23

Turn the head band over so that the threads of the ball
5
6
7
joint face to the other way, and the AiRScouter logos on
the head band covers are upside-down.
Remove the two head band covers as shown, by
pressing the area highlighted in the image below and
sliding the cover to the end of the head band. Swap the
two covers and replace them as shown, so that the
AiRScouter logos are now facing the correct direction.
Attach the flexible arm for right-eyed viewing (the other
arm that is included in the box) to the head display, by
lining up the narrow end of the flexible arm with the
threads on the head display, and rotating the dial on the
ball joint clockwise to tighten.
24

Attach the flexible arm to the head band by lining up the
8
9
wide end of the flexible arm with the threads on the head
band, and rotating the dial on the ball joint clockwise to
tighten.
Note To increase the stiffness of the arm during
operation, you can tighten one or both ball
joints by rotating their respective dials
clockwise.
Run the head display cable through the cable channel on
the flexible arm, and then through the cable channel on
the top of the head band. Secure the head display cable
into the clip on the end of the head band, to prevent it
from coming loose during operation.
Adjusting the Settings
25

Note When attaching the head display cable to the
10
flexible arm and head band, ensure that you
leave enough slack so that you do not pull the
head display cable during adjustment and
operation.
Connect the head display cable to the control box and
press the power button to turn the AiRScouter on. Press
the image rotation button to rotate the image by 180° so
that it is no longer upside-down.
Note To return the AiRScouter to left-eyed viewing,
follow the same instructions, using the flexible
arm for left eye instead of the flexible arm for
right eye.
26

Replace the Eyecup
1
2
Depending on your task or environment, you may want to
replace the small eyecup attached to the head display with
the large eyecup that is included in the box. The large
eyecup will isolate your eye and the screen from your
working environment.
Carefully remove the small eyecup from the head display
as shown.
Correctly align the large eyecup, and then gently press
the eyecup to attach it to the head display.
Adjusting the Settings
27

Important
• Be careful to avoid touching the lens while
changing the eyecup. You may dirty or
damage the lens if you touch it.
• Be careful to align and attach the eyecup
correctly. The eyecup or head display may be
damaged if it is incorrectly aligned or forced
into place.
28

Power supply
Important • The AiRScouter can use the following power
supplies:
- The AC adapter supplied in the box
- The internal battery supplied for use
inside the control box
- An external battery (for example a thirdparty USB battery) that supplies a voltage
of DC 5 V and a current of at least 1 A
• If multiple power supplies are connected to
the AiRScouter at the same time, they will be
prioritised in this order:
1 AC adapter
2 External battery
3 Internal battery
Example:
- If an external battery is disconnected
while the AiRScouter is in use, the
system will switch to using the internal
battery.
- If an external battery is connected while
the AiRScouter is using the internal
battery, the system will switch to using
the external battery.
Adjusting the Settings
• The internal battery will not charge while the
AiRScouter is turned on. To charge the
internal battery, you must power off the
AiRScouter and connect the AC adapter.
• The external battery cannot be used to
charge the internal battery. The internal
battery can only be charged by the AC
adapter.
29

Important • You cannot charge the AiRScouter by
connecting it to a computer with a USB cable.
• If a USB-AC conversion adapter is used as
the external power supply for the AiRScouter,
ensure that the adapter supplies a voltage of
DC 5 V and a current of at least 1 A.
• If the AiRScouter becomes hot to the touch
due to continuous use, or if the environmental
conditions are outside of the recommended
range, the external power LED will begin to
flash quickly. While the AiRScouter is in this
state, the internal battery cannot be charged.
Using an External Battery
You can use a third-party USB battery as an external power
source to extend the operating time of the AiRScouter
beyond that supported by the internal battery.
Important • Only use a third-party external battery that
can supply a voltage of DC 5 V and a current
of at least 1 A.
• The external battery cannot be used to
charge the internal battery. The internal
battery can only be charged by the AC
adapter while the AiRScouter is powered off.
30

Before connecting an external battery to the control box,
1
2
3
ensure that the external battery has been fully charged.
(For more information on charging a third-party USB
battery, see the battery’s manual.)
Connect the Micro-USB B plug of a USB Type-A to MicroUSB B cable to the Micro-USB B port of the control box.
Adjusting the Settings
Connect the USB Type-A plug to the USB Type-A port of
the external battery.
31

The external power LED on the control panel will turn
4
orange when an external battery is connected and
supplying power to the AiRScouter.
• The external power LED will turn off when the external
battery is discharged.
• If the internal battery is charged, the system will
automatically switch to use the internal battery.
32
5. Maintenance
Clean the Lens
If the lens becomes smudged or dirty, you may not be able
to clearly see the image on the head display. If this occurs,
clean the lens as described below.
Important Use a soft cloth for cleaning the lens. Never
use ethanol, organic solvents, or organic
chemicals. Such substances could cause the
lens coating to peel off the anti-reflection film,
so that the image will not be seen correctly.
Use a soft cloth to wipe away dirt and dust from the lens.
Maintenance
33

Clean the Head Band
If the head band pads become dirty, they can be wiped
clean with a dry cloth. If this is insufficient to clean the
pads, they may be cleaned with ethanol, but take care to
prevent any splashing onto the lens.
Clean the Control Box
Dirt and dust can be removed from the control box by
wiping it clean with a dry cloth. If this is insufficient, you
can use a moistened cloth, but make sure that it is well
wrung to minimise the risk of getting water into the control
box.
34
6. Troubleshooting
If a problem occurs while you are using this product, resolve
it by using the following methods:
Problem Check Action Page
The screen
is blank.
Is the head
display cable
connected
correctly?
Is the
AiRScouter
turned off?
Has the
internal
battery for the
control box
discharged?
Have both the
internal
battery and
the external
battery
discharged?
Check that the
head display cable
is connected
correctly, and that
the connector is
fully inserted.
Press the power
button to turn the
AiRScouter on.
Connect the AC
adapter to the
AiRScouter to
charge the internal
battery.
Connect the AC
adapter to the
AiRScouter to
charge the internal
battery.
Alternatively, try
using a charged
external battery.
12
15
-
30
Troubleshooting
35

Problem Check Action Page
The screen
is blank.
Pressing
and
holding the
power
button
does not
switch the
control box
OFF.
Is the
resolution of
the input
device set to
the input
resolution of
Check the product
specification and
set the resolution of
the input device to
the input resolution
of the AiRScouter.
the
AiRScouter?
Is the video
input cable
connected
correctly?
Disconnect the
cable from the
AiRScouter and
from the input
device, and then
reconnect it.
- Press and hold the
power button for
eight seconds to
force the power to
turn off.
-
13
-
36

Problem Check Action Page
The image
has frozen.
Is the video
input cable
connected
correctly?
Disconnect the
cable from the
control box and the
input device, and
then reconnect it.
- Reset the control
box by powering it
off and back on
again. Press and
hold the power
button for eight
seconds until the
control box powers
off, and then press
the power button to
turn the control box
back on.
12
-
Troubleshooting
37

Problem Check Action Page
The
internal
battery
cannot
charge.
Is the internal
battery
overheating?
If the internal
battery overheats
from continuous
use or for any other
reason, it cannot
charge even when
the AC adapter is
plugged in (the
external power
LED flashes
quickly). Unplug
the AC power cord
and check the
amount of charge
on the internal
battery LED. After
the battery has
cooled down,
reconnect the
power cord to
resume charging.
-
38
Is the external
environment
suitable for
charging?
Is the
AiRScouter
turned on?
Charging is
possible in an
environment with
temperature
between 10°C and
33°C.
Turn the
AiRScouter OFF
while charging the
internal battery.
44
-
Problem Check Action Page
The
internal
battery
cannot
charge.
The
internal
battery
cannot be
charged
from an
external
battery.
Is the internal
battery
over-discharged?
If the internal
battery has been
left unused at a low
or zero charge for
too long, it may be
over-discharged.
An over-discharged
battery cannot be
recharged and
must be replaced.
Contact your
Brother dealer for
more information
about purchasing a
replacement
battery.
- Connect the AC
adapter to the
AiRScouter to
charge.
-
-
Troubleshooting
39

Problem Check Action Page
There is no
power
supply,
even when
an external
battery is
connected
(the
external
power LED
(orange)
does not
light).
The internal battery
discharges
almost
immediately.
Does the
external
battery
provide the
current of at
least 1 A?
Is the internal
battery fully
charged?
Does the
internal
battery
discharge very
quickly after it
was fully
charged?
Use an external
battery that
provides a voltage
of 5 V DC and
current of at least
1A.
Fully charge the
internal battery
before using it.
The internal battery
has reached the
end of its service
life and must be
replaced. Contact
your Brother dealer
for more
information about
purchasing a
replacement
battery.
29
-
-
40
The edges
or corners
of the
image on
the display
screen are
not visible.
Has the
position of the
head display
unit been
correctly
adjusted?
Adjust the position
and angle of the
flexible arm and
head display until
you can see the
complete image.
15

Problem Check Action Page
The
display
screen is
blurry.
The
display
screen is
too dark, or
too bright.
The
display
screen is
too dark to
see.
The
display is
monochrome.
Is the focal
length
adjusted
correctly?
Is the
brightness set
correctly?
Is the current
environment
extremely
bright?
Is
monochrome
mode set?
Turn the focus
adjustment dial on
the head display
right and left to
adjust the focal
length.
Press the
brightness button
to adjust the
brightness.
Check whether
direct sunlight is
getting in, and
whether anything in
the surrounding
area is emitting
extremely bright
light.
Press and hold the
brightness button
for two seconds to
return to the colour
screen.
-
18
-
20
Troubleshooting
The full
image is
not
displayed
on the
screen.
Is the zoom
mode set to
Enlarge?
Press the mode
button.
19
41

Problem Check Action Page
The image
displayed
on the
screen is
too small.
The image
displayed
appears to
have dirt
on it.
The fit of
the head
band feels
loose.
Is the zoom
mode set to
Reduce?
Is there dirt on
the lens of the
head display
unit?
If you are
using a
camera as an
input device,
is there dirt on
the lens of the
camera?
Are you using
the rear band?
Is the fit still
loose when
you are using
the rear band?
Press the mode
button.
Clean the lens of
the head display
unit with a soft
cloth.
Clean the lens of
the camera.
Use the rear band
to tighten the head
band.
If the head band
has been overstretched, it will not
return to its original
shape and may
have to be
replaced. Contact
your Brother dealer
for more
information on
purchasing a
replacement part.
19
33
-
21
-
42

Problem Check Action Page
The head
band fits
poorly on
the head
when
wearing
glasses.
The
movement
of the
flexible
arm is too
tight or too
loose.
Does the head
band touch
the arms of
your glasses?
Has the
tightness of
the ball joint
been
adjusted?
If possible, use
glasses with curved
arms (that follow
the shape of the
ears) so that they
do not touch the
head band.
Turn the dials of the
ball joints between
the flexible arm and
the head band, and
between the
flexible arm and the
head display, to
14
16
adjust their
tightness.
If, after reading the troubleshooting tips, you are unable to
resolve your problem, visit the Brother Solutions Center at
support.brother.com
Troubleshooting
43

Appendix
The Li-ion Rechargeable Battery
Important notes on charging and using the Li-ion
Rechargeable Battery
• Make sure to completely charge the Li-ion battery
before using the AiRScouter.
• The Li-ion battery is designed to be charged and used
within specific ranges of environmental conditions. The
Li-ion rechargeable battery included with the
AiRScouter can only be charged in an environment
between 10°C and 33°C. If you attempt to charge the
battery at higher temperatures, the external power LED
will flash rapidly and the battery will not charge.
Characteristics of the Li-ion Rechargeable Battery
When you know the characteristics of the Li-ion
rechargeable battery, you are able to use the Li-ion
rechargeable battery provided with the product correctly.
• Using or storing the Li-ion rechargeable battery in
places that are too hot or cold may cause them to
deteriorate more quickly. In particular, usage at a high
charge rate (90% or more) in a hot place greatly
accelerates the deterioration of the Li-ion rechargeable
battery.
• If this product will not be used for a month or more, take
the Li-ion rechargeable battery out of the control box,
and store it in a cool place out of direct sunlight.
• Charge the Li-ion rechargeable battery every six months
if it is left unused for a long period.
• The device may feel warmer if it is touched while the
Li-ion battery is charging. This is normal, and the device
can be used safely. Stop using the device if the control
box gets extremely hot.
44
Inserting the Li-ion Rechargeable Battery into the
1
2
3
Charging Fully charged
(Slowly flashing
in orange)
(Off)
Control Box
If the Li-ion rechargeable battery was removed, perform
the steps listed above in reverse to insert it again.
How to charge the Li-ion Rechargeable Battery
The Li-ion rechargeable battery can be charged only by
using the included AC adapter. To charge the battery,
follow these steps:
Power off the control box (note that the battery will not
charge while the AiRScouter is operating).
Plug the included AC adapter into the correct electrical
socket.
Connect the AC adapter to the AC adapter port on the
control box.
Note It takes about three hours to fully charge the
Li-ion rechargeable battery after it is
completely discharged.
Appendix
45

Stopping the charging of the Li-ion Rechargeable
Battery
To stop the Li-ion rechargeable battery charging, unplug
the cable from the AC adapter.
46
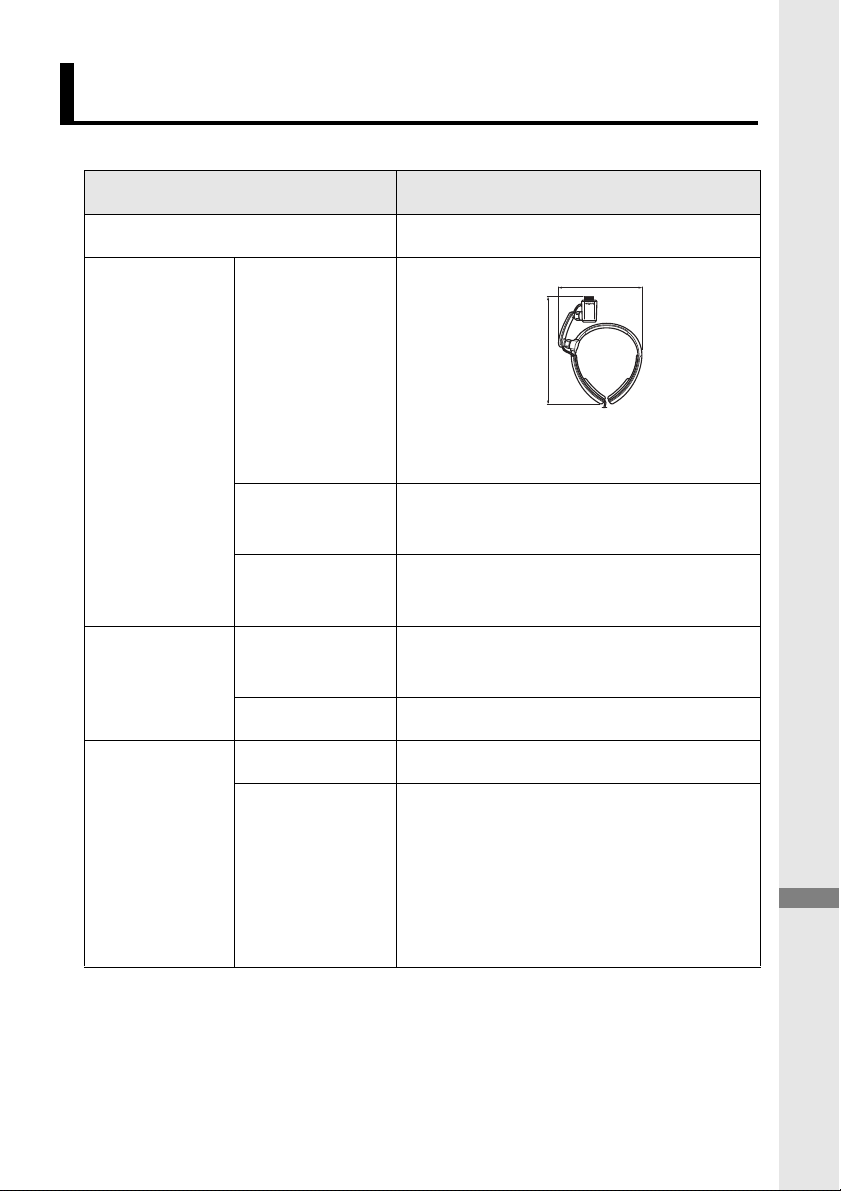
Product specification
Model Name WD-370B
Form Factor Monocular (single eye)
Dimensions Head
Display Unit
264 mm (H) x 183 mm (W) x
26 mm (D)
Control Box
Size
Cable
125 mm (H) x 84 mm (W) x
29 mm (D)
2 m
Length
Weight Head
Display Unit
Approx. 155 g
(including cable)
Control Box Approx. 170 g
Video Input Input Type HD-SDI
Supported
Resolution
720p / 60 Hz, 59.94 Hz, 50 Hz
*1
1080i / 60 Hz, 59.94 Hz, 50 Hz
1080p / 30 Hz, 29.97 Hz,
25 Hz, 24 Hz, 23.98 Hz
*3G-SDI input is not supported.
W
H
Appendix
47
Model Name WD-370B
Display
Properties
Resolution 720p (1280 x 720 pixels)
Colour
24-bit (16.7 million colours)
Reproduction
Adjustable
Approx. 30 cm - Infinity
Focal Length
Field of View 25.6°
Virtual
Approx. 19 in. at 1 m distance
Screen Size
Operating
Environment
Dust and Water
Temperature 0-40°C (operation) /
10-33°C (battery charging)
Humidity 20-80%
IP54 (Head display unit only)
Resistance
Functions Adjustable brightness
(5 levels) / Screen rotation /
Key lock / Magnify mode
Reduction mode
*3
Monochrome mode
*2
/
48
Wearing Style Headband style with flexible
arm
Power Options AC adapter / Internal
rechargeable battery / USB
micro-B port
*4
Battery Life Approx. 3 h
Power Consumption
Approx. 3 W
*5
External Power Input DC 5 V 1 A+

Model Name WD-370B
In-Box Components ● Display Unit
● Head Band
● Control Box
● Flexible Arm for right eye
● Flexible Arm for left eye
● Lithium Ion Rechargeable
Battery
● AC Adapter
● Rear Band
● Cable Clip
● Quick Setup Guide
● Product Safety Guide
● Case
● Belt Pouch
● Large Eyecup
*1 Resolutions other than those listed and included in the HD-SDI
standard are not currently supported. Make sure that your video
source can support the selected resolution.
*2 This function enlarges the centre part of the screen by a fixed
magnification. The user cannot change or specify the area or
percentage of magnification.
*3 This function scales down the screen size by a fixed percentage. The
user cannot change or specify the percentage of reduction.
*4 You may connect a third-party USB charger or mobile power bank via
micro-USB to supply power to the AiRScouter; however, this will not
charge the internal battery. Only the AC adapter will charge the
battery.
*5 This is measured while the AiRScouter is displaying video and is
powered via the AC adapter.
Appendix
49
Requesting repairs
Before requesting repairs make sure you have performed the
tasks listed in the Troubleshooting section.
If that does not solve the problem, note the following
information and contact your Brother dealer:
• Your AiRScouter's serial number
• Problem symptoms
• Problem context (for example, what you did and what
you expected to happen)
• Problem occurrence frequency (for example, always or
intermittently)
Part retention period:
The minimum part retention time of functional parts for
repair of this product is five years from the end of
manufacturing (two years for printed materials).
For FAQs, troubleshooting and more, visit the Brother
Solutions Center at support.brother.com
50

 Loading...