

Page 1
-p
042
OA
INSTRUCTION
MANUAL
T-8720A
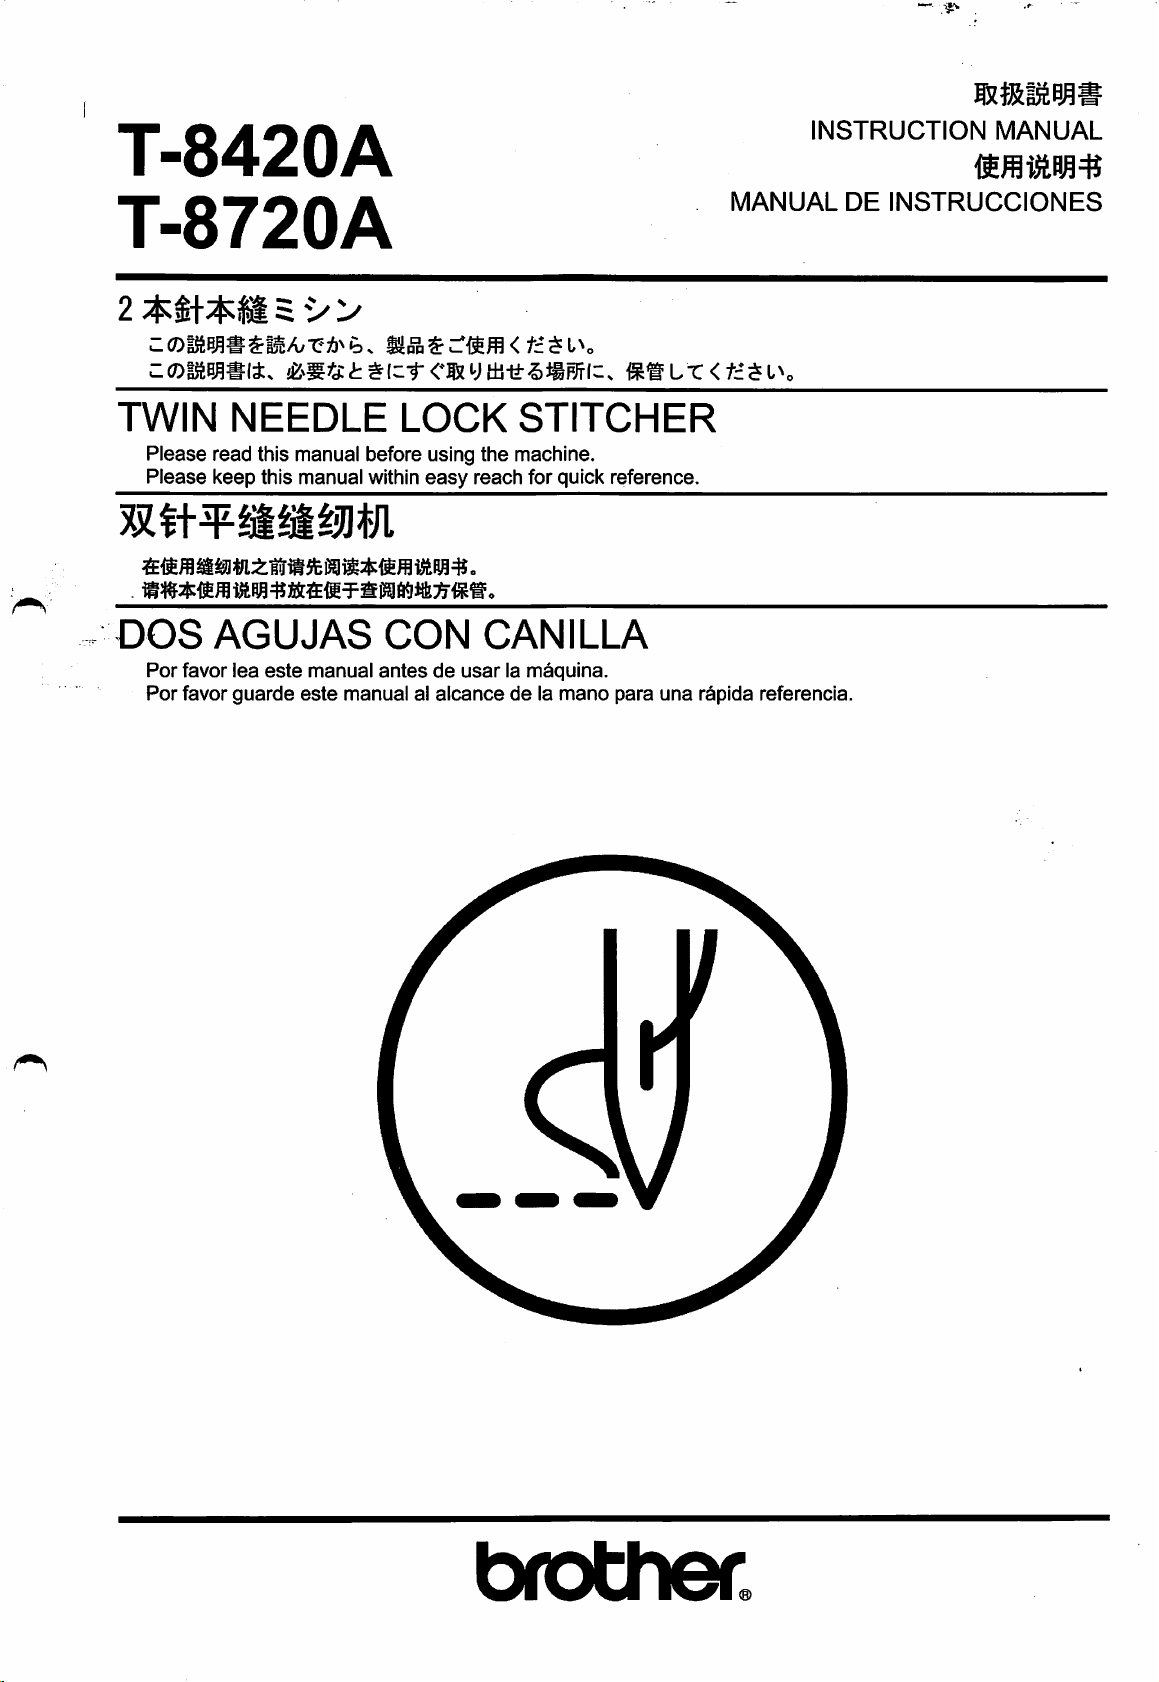
TWIN
Please
Please
DOS
Por
Per
NEEDLE
read
this manual before using
keep
this manual within
AGUJAS
favor
lea
favor
guarde
este
manual
este
LOCK
easy
CON
antesdeusarlamaquina.
manualalalcancedela
STITCHER
the
machine.
reach
for quick reference.
CAMILLA
mano
ik<SLX<tm\
para
una
MANUAL
rapida
referenda.
DE
INSTRUCCIONES
brother.
Page 2
T-8420A
T-8720A
2
Page 3
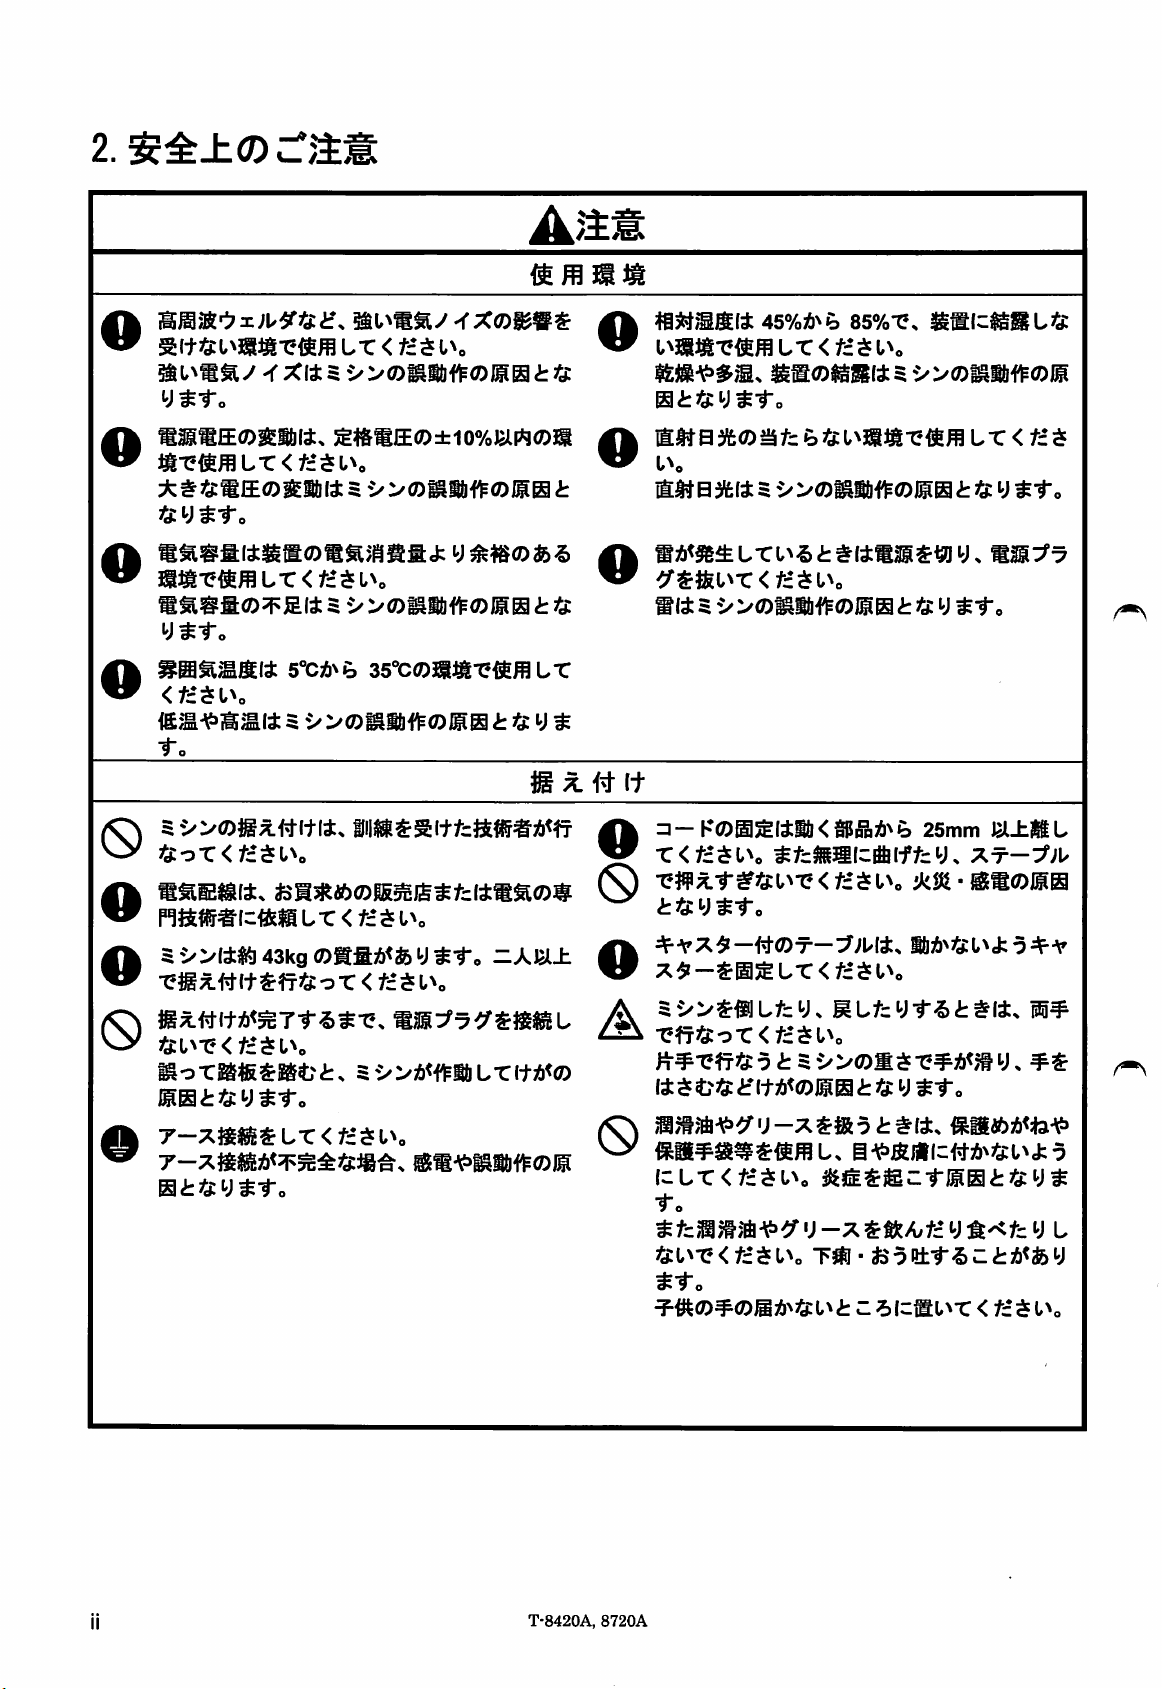
:f^-^f-xmit.
A^&gg^s-e.
C<DJft«A<l^oST•^l^§A^JS:Jfe•e^»^J:5. rs^acDgBfl
s^(ciB®Lfcti-^<
yj$s*t
Ltzmmisii^^ib.
«&««
L•ce^^tl(0«l31lci|#glJ<D:^®^^^fcf£#S•r
il
X<tztl\
"
tLX9mLx<tzii\
•ssm^m^mnmtt^tzHi.
J: 5 fe6il,^l^fc
iHiiiR®#i=®a
LS-r.
attii=sas}T%«)
itffifisattt.
-®ssa©ffl«isa»t«fcfti=itn5!&isa-e-r.
ya,s®
s
l-ci^s-r.
Page 4
c©fctftt:?7-s'-x®ffls-»$j3i±ifufcfc*i?SLr.
:rfi6ffl©«rl=.
fc»l=]feJ:tf«^lRl^®KW^J:
scti=fcyA<i:5:r^?i.^s-r.
<
S3iS^<
fcSl^.
1.
7I\
0iH*§-
A
$^ICfcfi6t\tVfcf£<
^ fe(D t (7)-el-o
t
X'ir^
fcftic
0
O
r
(D|E-^(D
(&(Dm-t.
4" HI t T V^
T-^mm^'r^:it)
-fo
T-8420A,
8720A
Page 5
2.
a
«3i^a^tt
ai+'S:t^sa-effifflL-c<fcSi,\. " ^,^«a•cffifflL•c<fiSl,^.
Siu«a/-i'Xii5-»®aaf^®iiHi:!!c
45%a^&
sa®ss(i5-»®Bai^®ii
85%-e,
aai=®SL.!S:
Oaams®aaii>£«ms®±io%ein®a
a-eaffl
x#!S:aii®Baii
Lr <
fc*sl,^.
5 •>
v®»af^®®H
a
V tx.
t
Os^$attsa®«Baafi<ty^«®i6'& a
aaafi®
ysi".
Oansaaid:
<<•=51^.
•f.
0
5-»®gA#ittt>»iasai+fcfta#<i<fTaa-K®s$tta<®aA^&
ftor<fc*SLv
Oaasistt.
naffi#i=ttsaLr<f:$iv
0 5
e/Vtti®
•eaji«itSlTfto-c<f=st-v
^aii
s
•»®^af^®
bs
t
ft
35%®®a-?a®LT
a s •>
43kg
:/®Maf^®
«i*®®asg®sfci4aa®B
®«gA<fcy
® B
^1".
ft
y $
^ X # 1+
V
O "
-AI2l±
A f
^ x5.-^0^L,T<fc$l^,
BitB%®3tc&«;i^sia-c;afflL.r<f=$
aitajfetts
•»®aaft®HHi:'S:
y
tt,
SA<a£LTo«£:#ij:ma$ay.aa:^7
stts'»®Maft®®
Sfc®aicfliffcy,
h tfty
25mm
s-r.
ia±«L
xt-X;u
®®®®®
tJa-jsT.
aA^ftL^J:O4r-V
^
aA«itA<0T-r.5«t?.asx7i?$ajSL
^
ft:L^-^?<fc•^l,^.
MoTaasafct.
®Ht fty
St.
5-»A<<^aLTi+A<®
A
^
®r-xaasur<«^i,^. Q
r-xaaA<^0^ft«^.
as^saf^®®
s^v^fflufcy,
SLfcy-r^t^ii. h#
^tiftor<fc$l,V
14
s t ftt
i+s<®®
Ht fty
St.
f22^2*«5fS?ff>-
•^O
^•To
^^(D^0@35>J5:L^<b
C <
f£$
l^o
T-8420A,
8720A
Page 6
(S)
\itzXa)M<^m
c0
5i/>(±,
o
fflL^^L^"^<f£$l^o
X<tztsi\
^SrMzm^BizX
^(Dii^lclimssx
A
frf£
Lmsix>r
(^b<a)fel^f£1I1t•r?Illy^Sl(t^•ro
ro^^c±^or/)^^).
L^o
ust^py^-To
•
^®L
LX<tzt^l\
LX(Dmm\>j,mz^
y y
>r ^ o r <t£$
^o
fc^t
f^^^fr'&ror
^ L
^-To
<f£$
LNo
#€«
A
A
<tz^l\
tiSi^J^to
i!i<gPp°«(w5xtLfcy.
tdil'^X<tz^l\
5i/>^f9Lfcy>
•efr^cor
(i
t?>5:ifIt
4" ^ f=
-r
L^o
^LT.
<f£$i^o
A<a)lisi:/cfy
lima'S:
ci^S3Sx>r
tsm^i^o^mjsi^tzimm^^
^-r
W-\;>
-v^^^^ior
^xi^Ltz^)
o
ICfcl^^ ^
u
<
f£$
O+A'X^—SlIA^^^:L^J:5+•V
fc ^ ^ ^
f^ll0fr(::m35X>(
Lmux^ofc^t
fztz
[iP><(DfeL>t£ii14-eiHiy«|lt^-ro
L>o
I^Si:«:y^-ro
A5i/>$®Ltcy.
•Cft^^:or<f£$L^o
(i
$ t;j&:if(tX)<a)lgS
v^-^^-dX
5i/>A<f^illL-C(t;()^0
<tztsi\
A<
SiJb*
MLfcy-r^ir^fi.
i:
y
^-r
o
Iifin^^sittcfi[{^#(c:r5i$&<
0
L
lcLr<f£$l>o
to
stc;li7l;'^^^y-x^0:^t£y^^fcy
^|:l^r'<f£$l^o
tto
=f-^(D^(Dmi3^ti:i\t
l^o
ife^^ec-rj^SirJEfy^
T^-fc5i!fr5Ci:;&<fey
Z^izm^X
t£$l^o
<
t£$
LT<fztS
l
l^o
T-8420A,
8720A
Page 7

3.
^W^=7<)\^(D^^mm.
^fzs
1
A ^
!S6<ffl«-T'(t3!»<St--5<,
^^mmm-Difx.
it^Zto
Moving
Operate with safety devices.
Turn
threading, changing bobbin
and
®3S$«Io•CA^c>,
A
CAUTION
parts may
off
main
switch
needle, cleaning etc.
(A)
(B)
(C)
cause
^o
asf^s
injury.
before
r
f^H
^tr^S:
o r <tzts
^^J(sLi^tJi<tJ:'Dtz^^its
l\
tsm^ii)<ommj^\z;rmm<tztsi\
T-xl^jSl^Lr<f£$l^o
0
2955M
m
jfflSIt
2954M
IV
T-8420A,
8720A
2956M
Page 8
1.
2.
3.
f—^lcoL^r
6.
1
2
3
mm
6-1.
mU(D:^^
6-2.
3Ib^V^<79;^^fe
6-3.
19
19
19
20
4.
4-2.
4-3.
^^yy^-V(Dmuij\^(Dmm
4-4.
T7
—Ax-r
(-tr^
5.
mmmomm
5-1.
5-2.
5-3.
5-4.
5-5.
5-6.
5-7.
aK
±^OjiL;^
i^v>
t9
\fy<D^19^
@ ^ <DmW<D:}7m 18
^•^l^4'{COV^T
t;^
19
11
i3
13
m
14
14
15
16
17
18
4
5
7-1.
7-2.
7-3.
xuAy^mcomw
8.
8-1.
^0(79jo^Atl
8-2.
8-3.
jvt!(Q^MU)
(-Ir^
9.
10.
z^3S:i:#lc(i
21
21
22
23
24
24
25
26
29
30
T-8420A,
8720A
Page 9
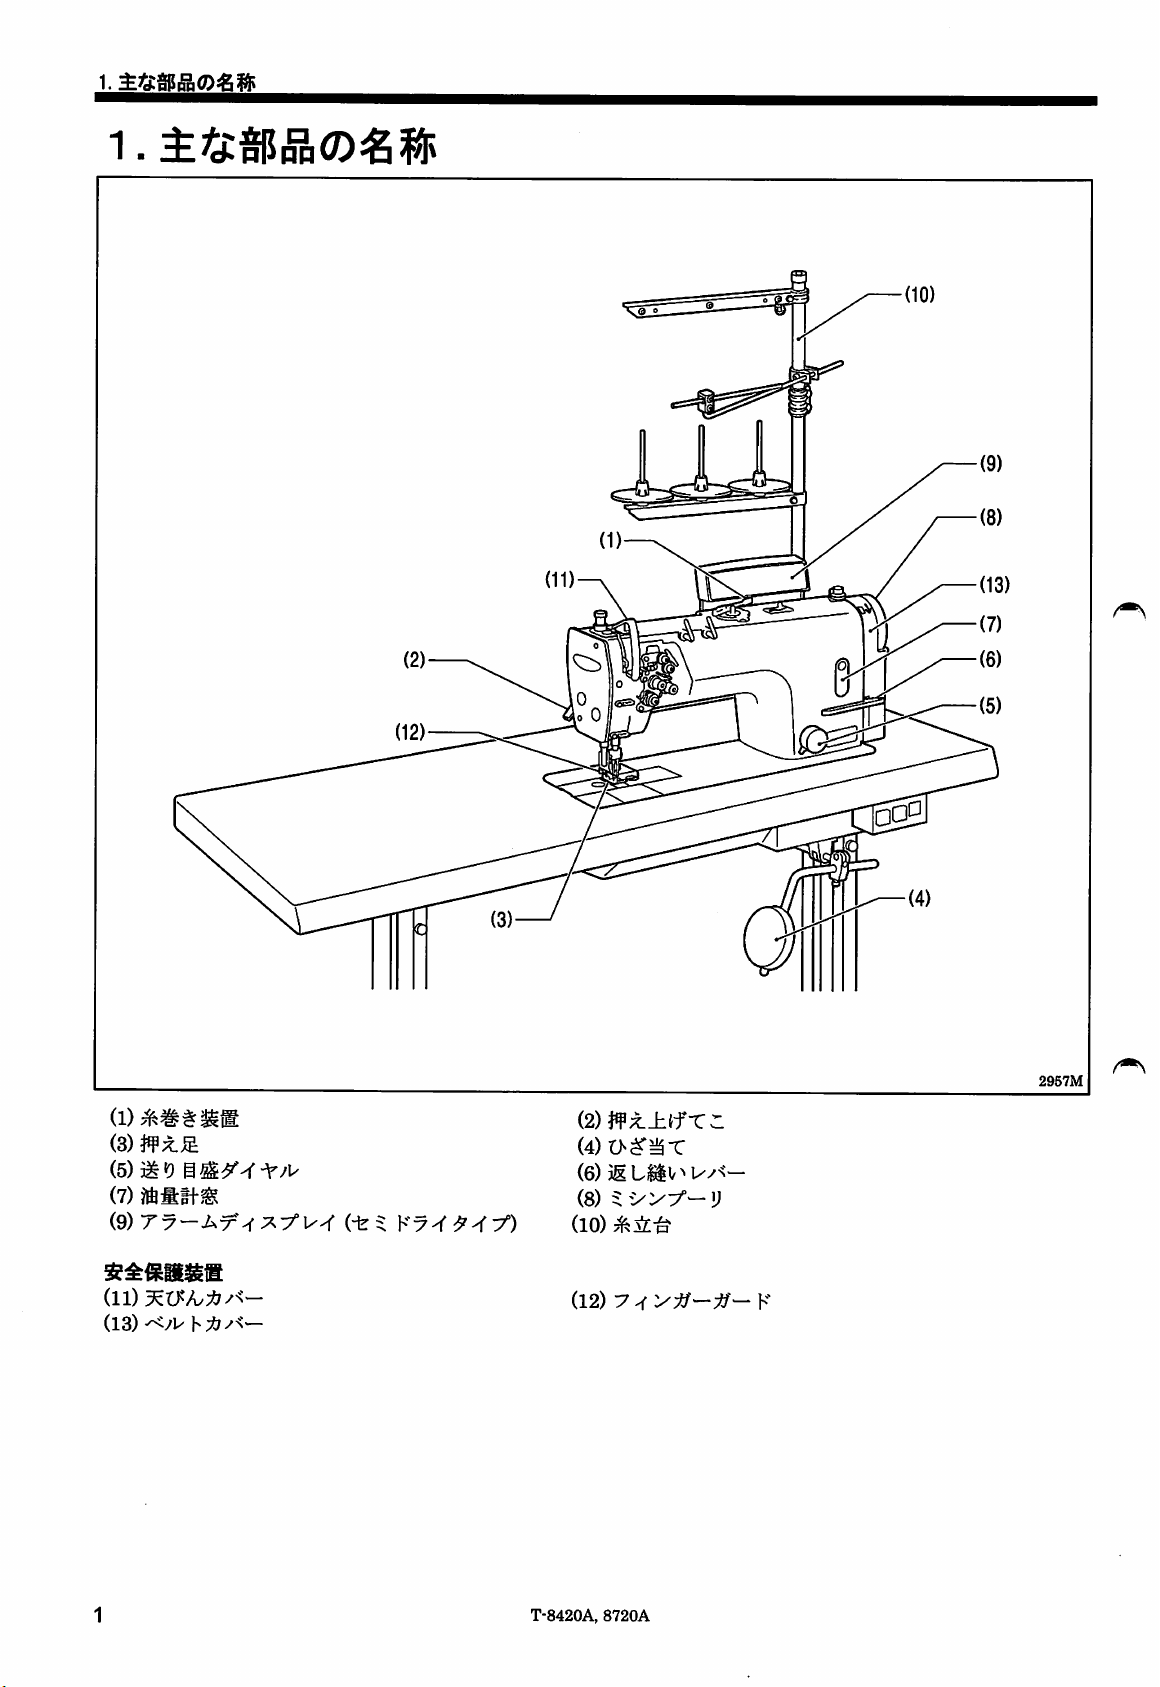
1.
1.
(1)
(3)
#X.JS
(5)3^«9
(7)
(2)W^±ifx:i
(4)
t>^^T
(6) —
(8)
(10)
0
2957M
(11)
(13)
(12)
T-8420A,
8720A
Page 10
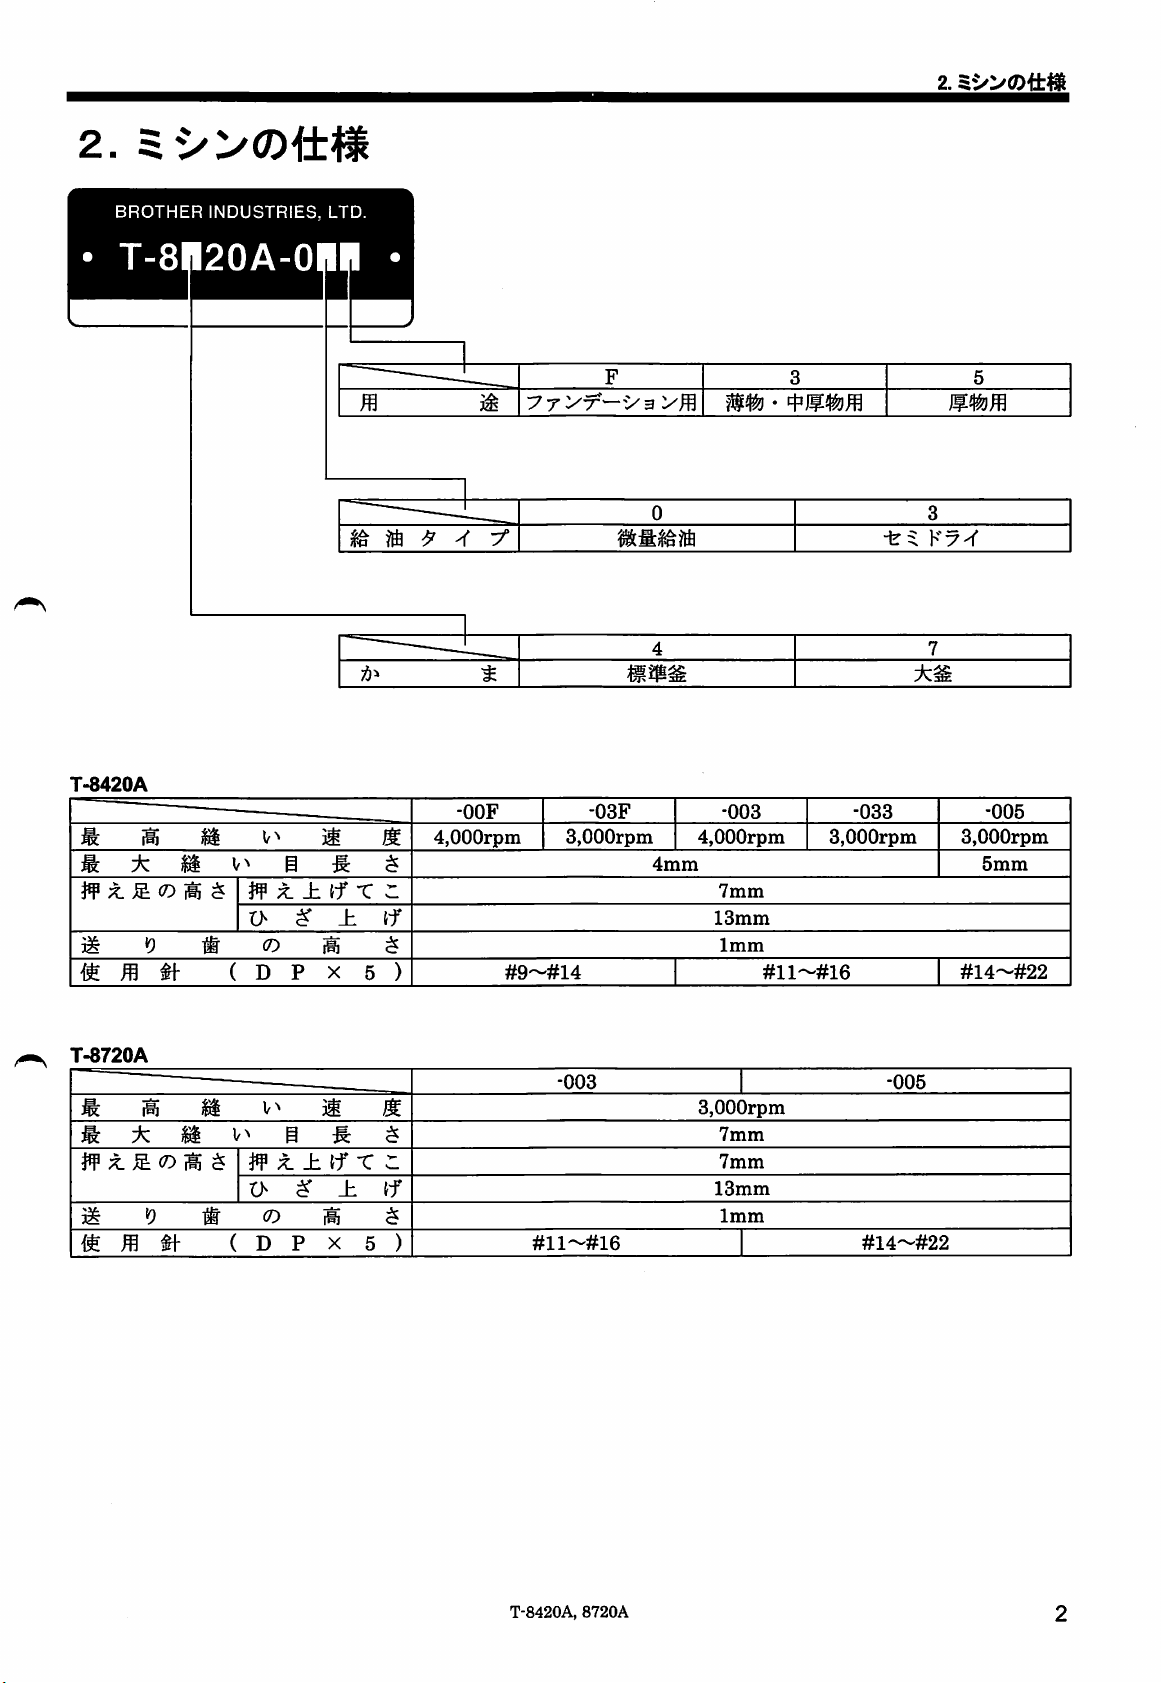
2.
2.
BROTHER
T-8n20A-0
T-8420A
^ ^ ^ $
^ 1^ ^
ill
^ m
«9
INDUSTRIES,
•
H ^
;t
t>
#
a-
CD
( D p X 5 )
±
^
1^ $
LTD.
(f
Ji
m
T r
~
tf
-OOF
4,000rpm
#9'-#14
F 3 5
0 3
4 7
-03F
3,000rpm
4mm
-003
4,000rpm
7mm
13mm
1mm
-033 -005
3,000rpm
#11~#16
mmm
:k^
3,000rpm
5mm
#14~#22
T-8720A
^ H
^ ^ §
^
iH
^
"9
tf
if
t>
<?:>
;t±{f
^ _h
t^
$
#
( D P X 5 )
ii
5:
T r
1^ $
-003 -005
^
^
Jf
#11~#16
T-8420A,
8720A
3,000rpm
7mm
7mm
13mm
1mm
#14~#22
Page 11
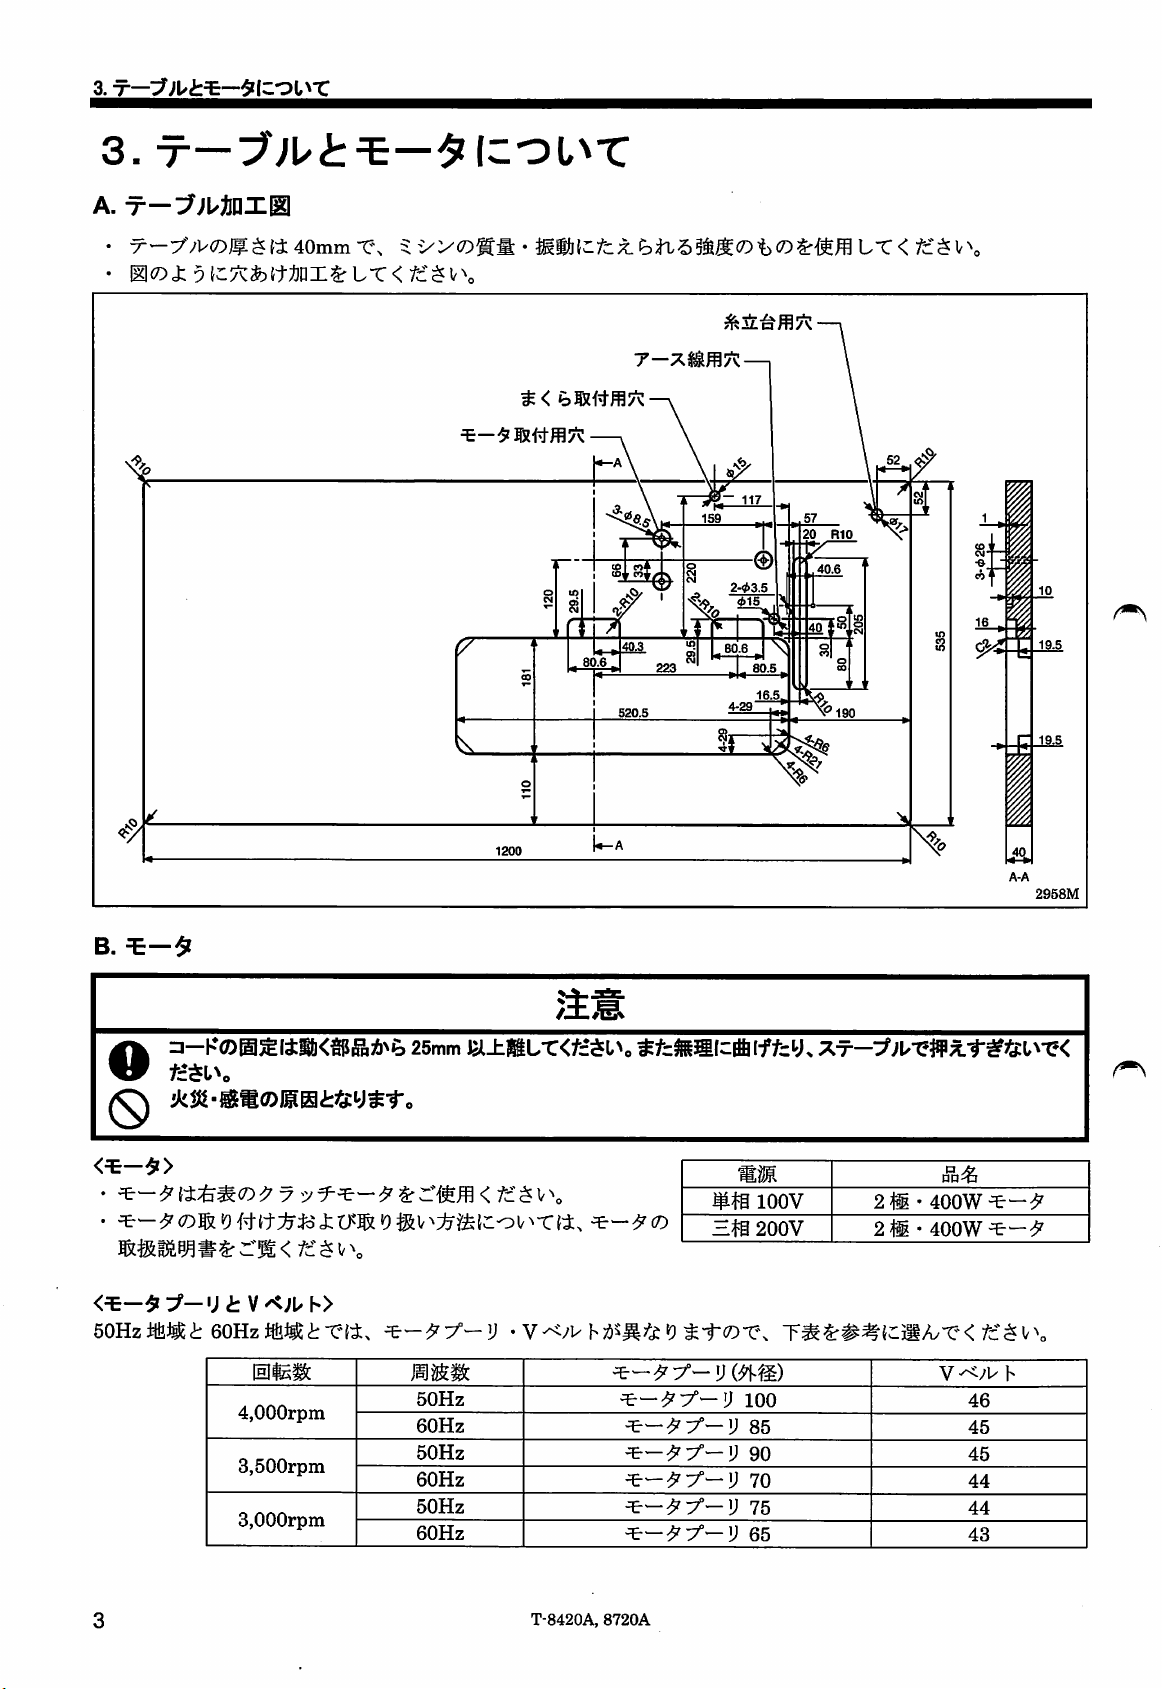
3.
3.
'r—-^}lt=E—^\zr>[,\x
A.
x-3f;uj!inxg|
•7^—:7VK7)jf:^fi40mm-t:\
11(^0:
9t-/t$){t^PX^LT<
/c^v\
t:
520.5
T—7.mmn—
2-«3.5
•m\^
bT<
^c:$V\
20
RIO
19.5
19.5
I
B.
=E—9
3—25mm
Q
tz^l\
;k|g-®Sa)I^S<!:35:y^fo
0
<^—^:^-y
50Hz±ll2^<}r
t
v^;u
h>
60Hz«ir-r:1i.
4,000rpin
3,500rpin
3,000rpm
i2l±filLr<f£^L^o
50Hz
60Hz
50Hz
60Hz
50Hz
60Hz
•
V-</V
^7"—y
HIi
Wi)
y
y
y
lOOV
200V
100
85
90
70
75
65
2g58M
7.^—'^)\^XWX-t^fS:l^X<
pp^
2®•400W^—
2^•400W^—^
;^c$V\
V
-</I^
h
46
45
45
44
44
43
T-8420A,
8720A
Page 12
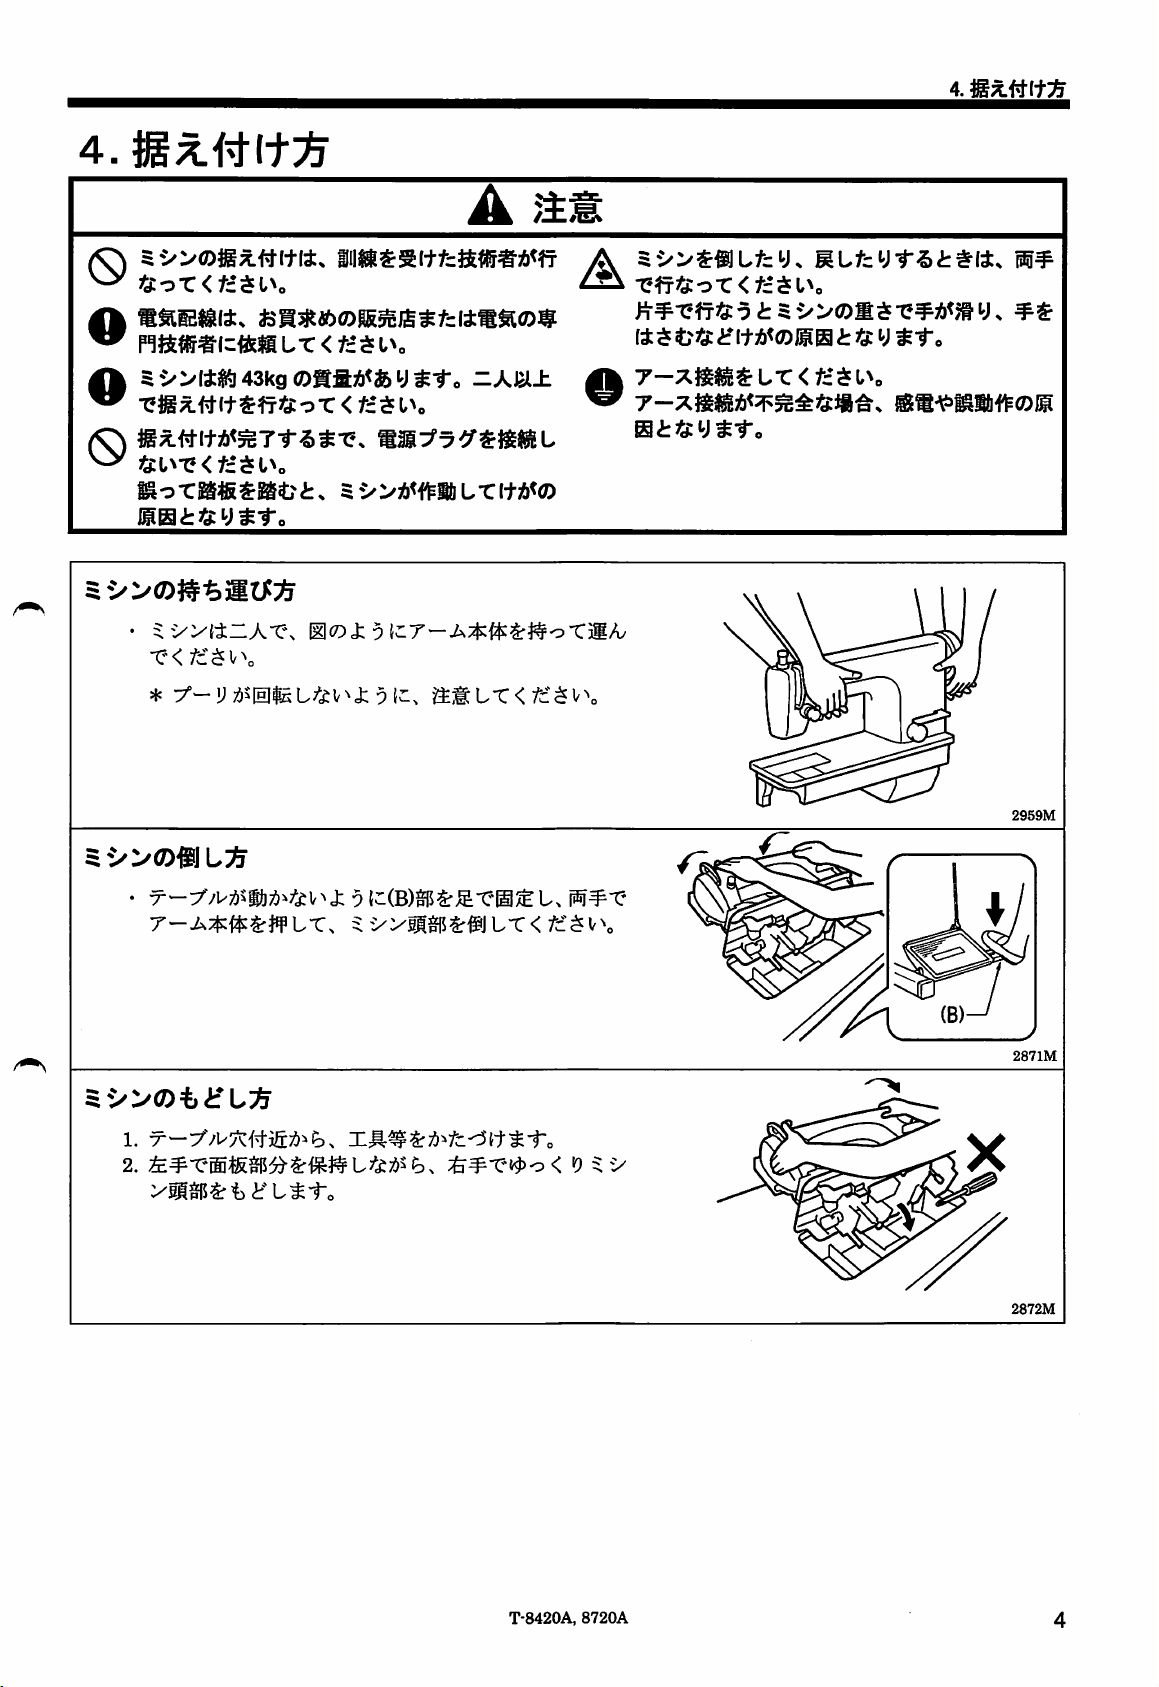
4.
0
nEor<fc*si,%
iiui$si+fcaffi#A<iT
OSSieaiis
0
5->:/ttl|!l43kg®*fiA<fcy«f.
•es
jtWI+^ffiEs^T
0S^#lt3!i<^T-r.5«-C.
!ai,>-e<fc*$u.
e^rSiffiSKfei:.
5
•
5;v':/(irAT\
<
fiS
U.
aS:^5<^SS«SL
5-»A<f^aiiLri+A<ffl
-Am±
A5-»SfflLfcy. i
•efT'S:o7:<f=Sl.\
I4S
fc«i:ifltA<©HHift
A
7-xa®^L.r<fc•SL^
Htftys-r.
y
S-f.
2959M
Si/XDfflLS
T-A^flcSrifLT,
5
">>01)4,ifLS
2.
:fe#T-BSa»^»«FLifc;4Se),
VfflaSrtt'ttl-o
5->i-a®^0LT<ffS^\
2871M
9
5->
2872M
T-8420A
8720A
Page 13
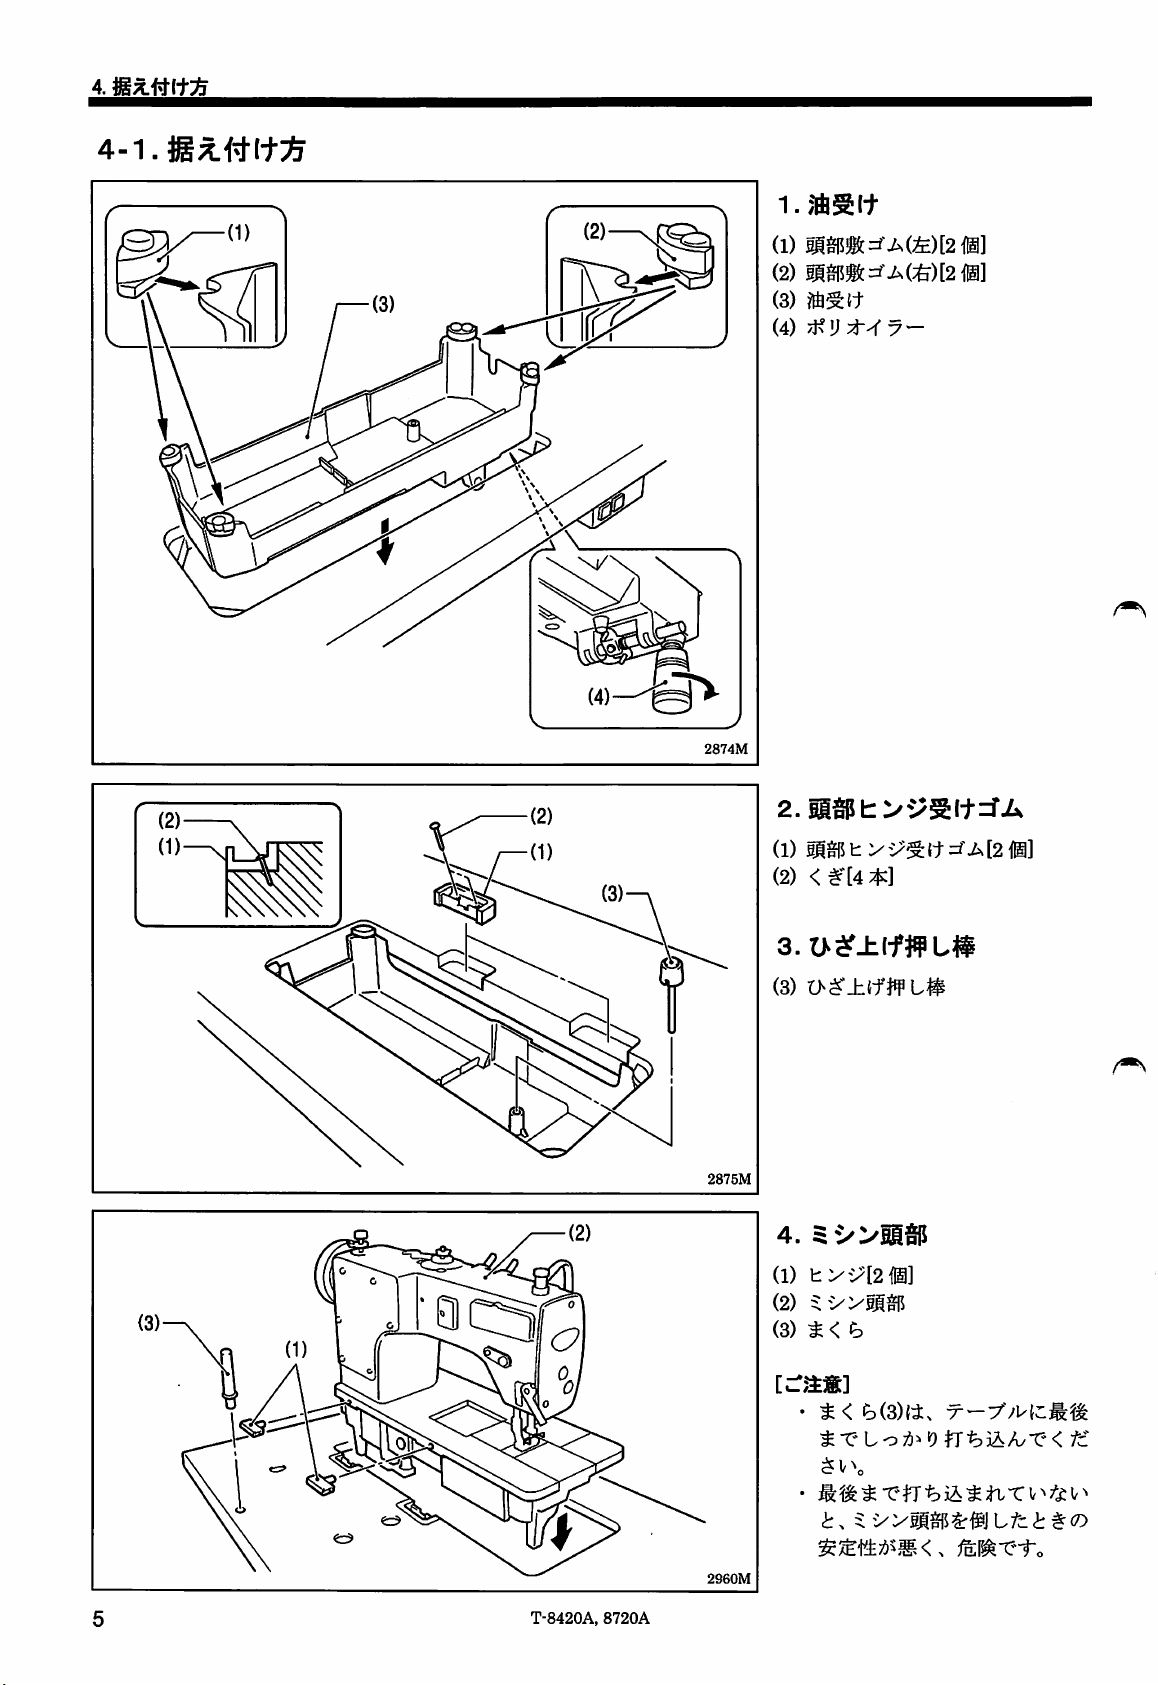
4-1.
i.jisit
(1)
«M=fAte)[2«]
(2)
aa5®:=iAte)[2fi]
(3)
iftSit
(4) jKI) 7 —
2874M
2.ii®t>i?sit=rA
(1)
wait
(2) <
Vv=SW=fA[2®]
#'[4
*]
3.U^?±(fffL#
0
2875M
(3)
O-S'ilfffL#
4.
$i/:
(1)
(2)
(3) ^ < lb
^
2960M
T-8420A,
8720A
T't
o 0
fi*•b5A^r'
<
fc
Page 14
5.
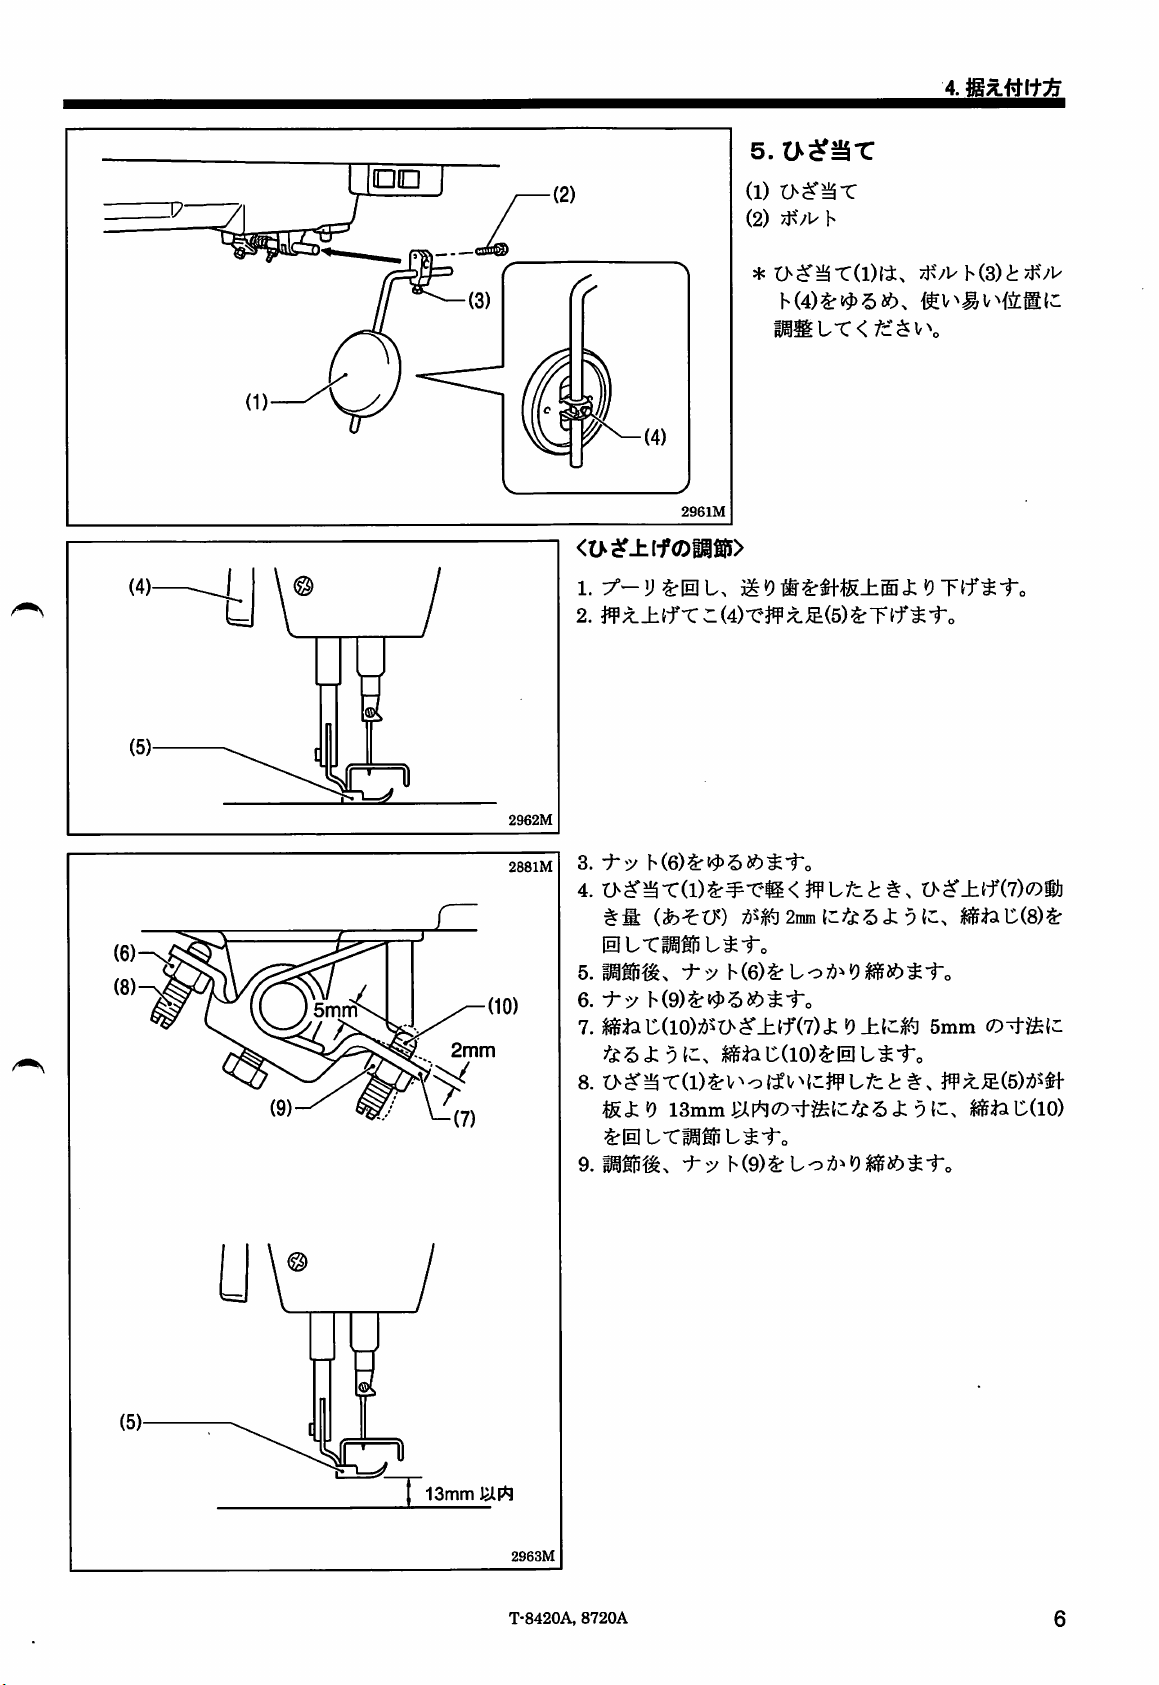
(1)
t>^^T
(2) h
\—r
2962M
2881M
I^Str
2961M
<t>i?±if®iiSiJ>
1.
^-USriaL,
2.
ff;t±lfrr(4)-Cff^JE(5)SrTlfS-r.
3.
-t-y
K6)%i^5«f)i-t'o
4.
t>S'aT(l)4r¥T-e<i¥Lfcti:,
{him
lHlL-Cli»Li-r„
5.
P»«,
6.
•:^•y
K9)^i^-5«)t-r„
7.
SSlaC(10);!iS!>S'±lf(7)J;
'is
4:51-,
8.
Si
9
ISmmWrtW-tfelCiSJ:
SrlElt-CH»Li-fo
9.«»a,
;ii5^2imii(::;fe.5J;5t;:.
K6)SrLo)i>?)«i5»t-ro
SSlaC(lO)SrlHlt^-f„
•4-5'K9)%LoA>i9«i5fcS-f-.
<
/c:^V\
Ufci#,
0-S"±lf(7)i»ti
iBlali(8)Sr
5mm
o-+fe(c
if;iS(5)i4S#t
5IC,
»fcC(io)
U
13mm
IsiW
2963M
T-8420A,
8720A
Page 15
4.
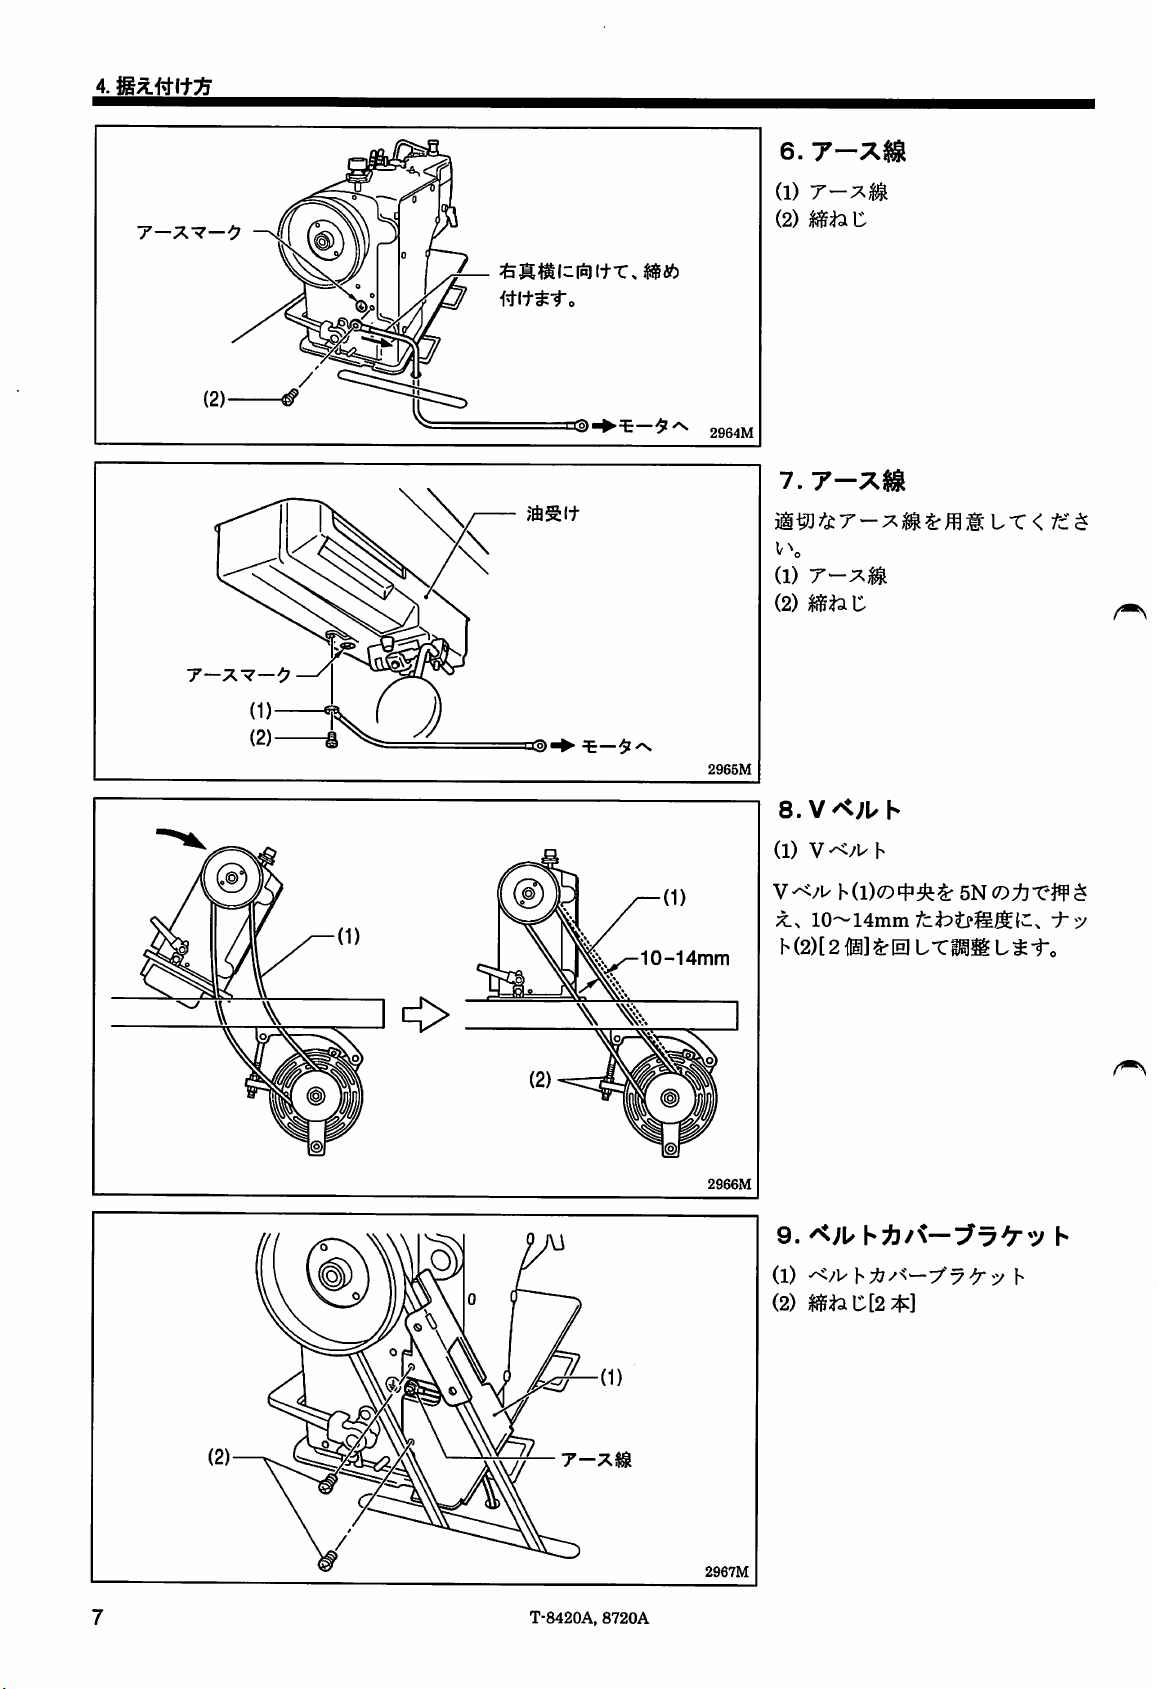
6.7-
(1)
T-Tsi
(2)
mi3.
i:
(tr.
(2) ^
3®^^
— ^
2S64M
7.
v\
(1)
(2)
7-
tT<
If^^C
T-X-7—<7
m
m
\ %
10-14mm
m
2965M
2966M
8.VK;uh
(1)
V-</l-h
10~14mm
h(2)[2
9.
^;u
^0
LTM
h^/^—h
L
•:^5/
^-fo
(1) h y ^ y h
(2) |fi5:j3iC[2;2^]
1^7
(2)—^
V
T-8420A,
8720A
2967M
Page 16
4.
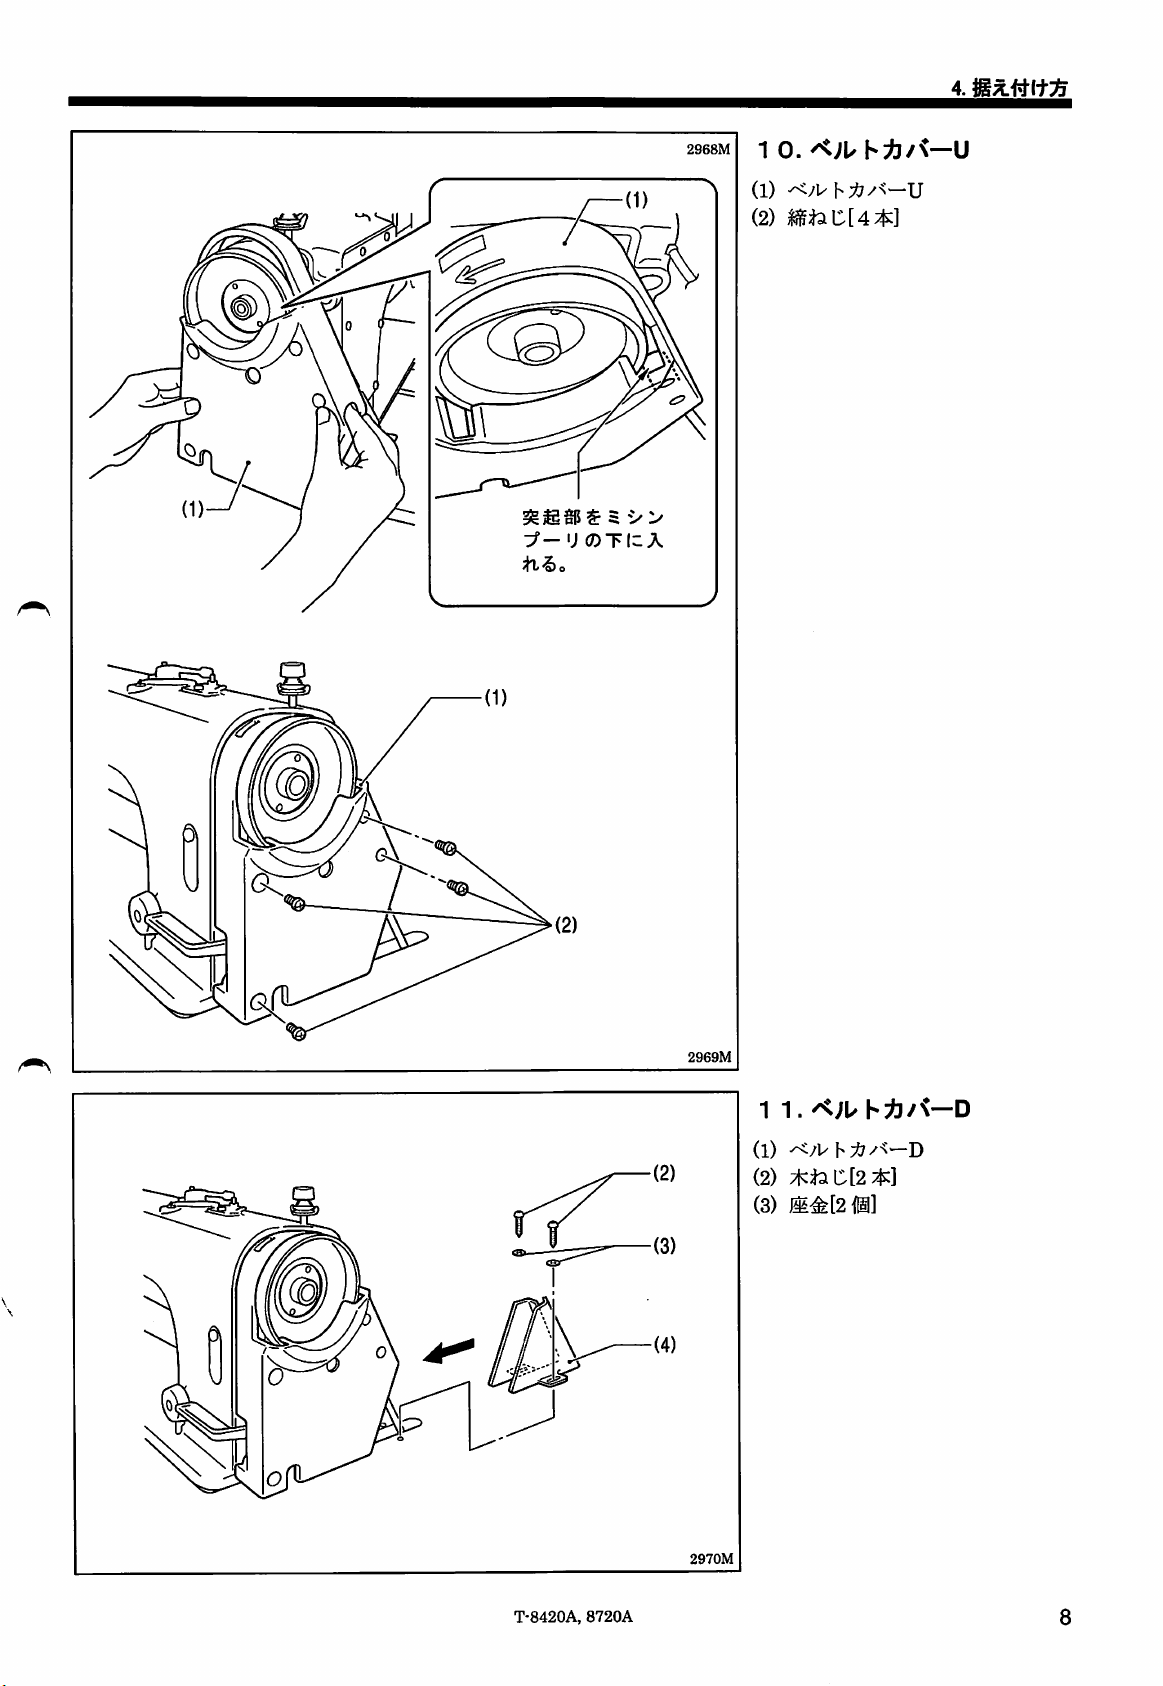
3^-'J0TlcA
tL^o
2968M
1
0.
^;uh:b/<—u
(1) U
(2)
l^laC[4:^]
5
V>
T-8420A,
8720A
2g69M
2970M
1
1.
(1) D
(2)
:^UC[2^]
(3)
mM2m]
D
Page 17

2971M
1
2.^;Uh^/^-D^Sxfc
(1) h D
^fz
0mm
2972M
2973M
h;^7/<-D(2)^^B^^^C§|V^T.
h
:fy
U(3)
t h
;^7
t^-to
D
/
2974M
T-8420A,
8720A
Page 18
2975M
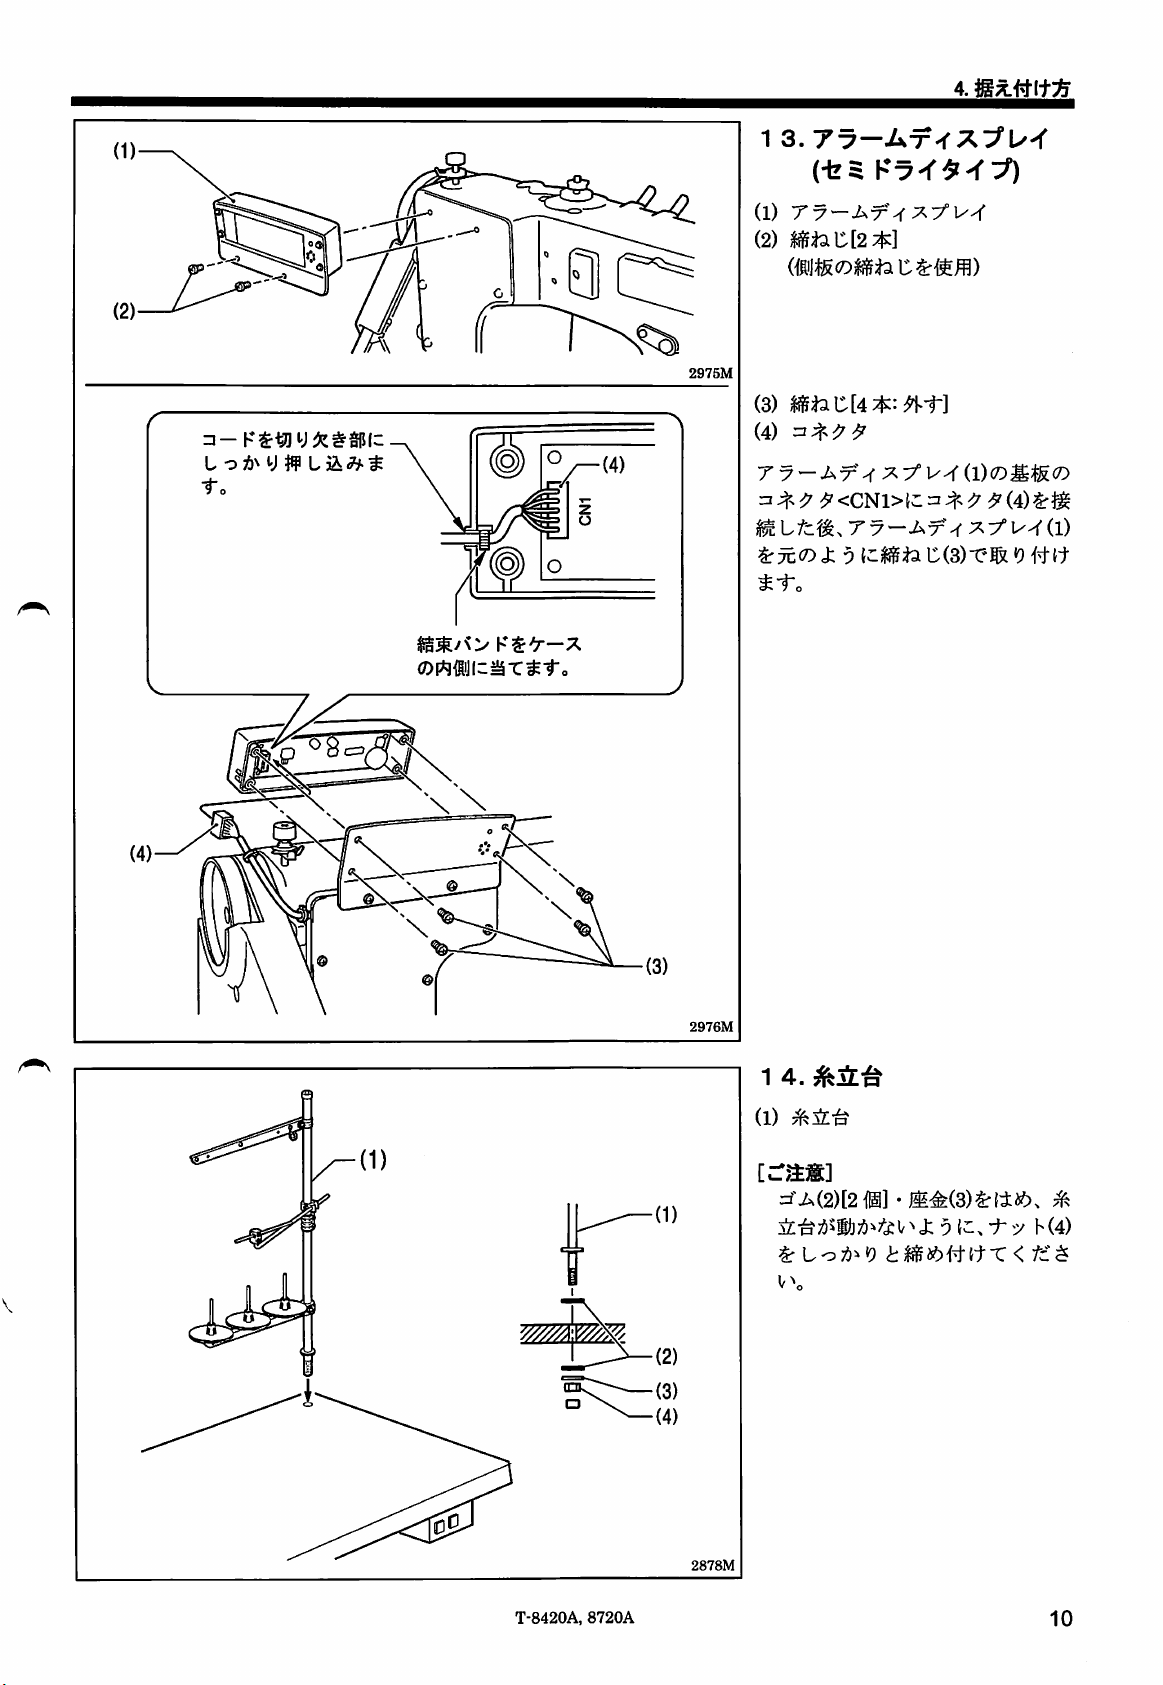
13.
tt—Ax-fx::#'U'r
(•bs
(1)
r?—
(2)
«iftoc[2*]
(3)
l^t3iC[4;2^:
(4)
h''y-<9^:f)
^-f]
•To
(DP«q{iij(c^-c^-ro
2976M
T 7 — A
^ <CN1>{C =I (4)
^7C<7)J; 0
^•to
X-r
^ 1/--r (1)
CO
(-l?if:JaC(3)T'®l«9#(t
(7)
T-8420A,
8720A
2878M
1
4.
(1)
^aE-^
[:r?^iS]
=f'A(2)[2{@] • ^
{31,
•:h>;/
^
Lo;6^«9
V\
J: 5
h(4)
<
fz^
10
Page 19
4.
4-2.
0
M o
xassat?
t,
s •>>A<<wii L r
M.
ItA<o5iis
t ift y
s-r.
0
fcSlV
«fca5»a-¥>yy-x$fi)!A,fc*y6'«t:y
WJ?)T5iK.-fffia
Mfiait.
*
jftSSiEc-rBHi:«:yS-r.
i c ?>
:^7it*-JB^t--l'/K
#»;i-'l'/i-it-C<3;i'yv^-f/i-3;y7'y^;«.SM10;VG10>«frtt)ii<fc'St\
tai^r
05HSV—(
< t= $
L!!i:tNx<t=si.^
i,\.
ION;
1. 5:
2.
3. V
[:r?^3i]
»?a?rSII(4)J:
S<b/ce«9^-t-o
4.
5.
^L^-fo
T«•fedtt-rsctA^&ys-r.
VG10>^ffiffl
tT<
t^1-o
y^(2)X\
f9
±{c?^AL;:^V^T'<
LT<
tcSVo
(3)
v\
2977M
2978M
1.
2.
#M(D7Ky
Sll(4)^-e?i
fz^l\
;^-r
A t ^ -fo
y-{2)x\
^im^ft^^*f^^.(3)(D±
11
T-8420A,
8720A
Page 20
Page 21

4-3.
A
^
5b>:^—'J®lHlfe^l^®fiil[
M<SS»l=.5»*i.fcy.
«<.
$fctt5-»<D5Si«®®Hi:iS:y*-ro
A
jJj
i|SlT?ff
2980M
u
ji*r,
cm
Lfcy
L.<i:l.^t?</£Sl.A
1.
S:Aix4-f«
2.
Lr<fc'$v\
i->yy'-l):ii^W(l)<0
iE|ie;^iS)5riEL<K
4-4.
T7—Ax-f
X-^b'f
lcoL^•C
2981M
(-bs
K^'T^'T:^
(1)POWER7>:^(J!ife)
POWER
(2)
if—;{)5b|o^c^,
(P.26^m)
7 ^
GREASE
7
power
POWERyyX'(lWM'):J
/c:U«(C
GREASE7yX{2WMl
—x^MIpLT<
L.
t
X
13
T-8420A,
8720A
Page 22
5.
iHMfrcDiiii
5.
A
«
tf&<®fcufiiitt-ciHiy«ii+s-r.
. 5 LTita<®igH^:iSy
5-2.7l?e>(D®y^1>Lj^
«
j)?e>sffiy#i--ri:#ij:,
aSX-f>y^S«or<fc$Uo
=E-aiib<^^i=±sora^&.
an©
9
2894M
A
asx-i'-v5^s«o-c<fi^Uo
fcfc*L®iX-l'
^-r.
t^1-o
3.
fl-(2)(D:g:ft^i^jliJ{::[^{t.
fcttuasx-l'•vf'^«Iofcat^-^'A<
C^V^o
2g82M
® -3r
^L^t-0
ass
^i:.
5 •>>A<ftML-T lti6<©]SBai:jSy
(2)
3001M
3.
T-8420A,
8720A
14
Page 23
5.
A
A
2897M
.V
il<Si&K&ht:y,
l+A<.
Sfctt5-»®«a®liHt'S:yS-f.
t|-C»Lfcy
L«:t,\T?<
1.
5.
^i"„
-To
tztSl\
$ V
"*o
^¥;x±(fTr-e±(rt1-,
(6)
^^i()
2123M
15
80%
2124M
T-8420A,
$V
[:r?^ift]
8720A
> 1-„
:^A80%^-Ci;iLT<fc:$V\
Page 24
5-4.
5.
A
A
♦x
A<LI^6<©fcl.^/^tttt•elsl^JmS•r.
Ko
TSiffiSSSt?
i.
ssx-f'y^s«ooT<esLv
5 •>
»!i<(^ll
(3)
L X
c:^
2898M
2983M
tztzLmm^-c
ft#SlT'S:or<f£$lV
1. 9
2.
/5^^cOo^;^(3)^#JL^1-o
75^^(2)^0
4.
5.
6.
50mm
ir^^U^mci^iro
L^-To
{J#
ttl
{-LT.
l^^{f:fe(4)(DT^<
L^"f"o
Ch
2902M
50
mm
50
mm
2900M
1. 9
7'(2){CAtt^1"o
2.
^^^fi(3)(ciib.
3.
^^;^A(5)(;iiit.
4.
=^^5/9^(2)^;0^^(cAtl^-fo
6.
|)^i^{t*;Ja(4)(^T^<
50mm{5^^^l#l±lL^-r„
f-tr.
5/
2999M
T-8420A,
8720A
16
Page 25
s.gim(o«(e
5-5.±^i(DiiL:^
A
if?><fl5fcufc*«ttT5iay«si+«-r.
SoTSs^aiitt,
<:77>x—a
eSX-C-y^$«lor<fc*Sl,^
^-^^6<^±l=±^orA^6..
s
•»A<4^a
LT
i+A<©®Ht
fefe'LaSX-C'V^SaofeSt^-^A^L
f^asiT!S:o-c<fc*$u.
ftys-r.
2984M
5^0J:5 (c ^
^±(fr c r
ii^JI110FBllz?ii||(c^
i, i,i:^
T'tt
L
^-r
(2)
^
50mm
17
50mm
T-8420A,
8720A
Page 26
5-6.
5.
fflfgiitfrtnanis
5-7.
u^aT<7)fi6L^:^
2985M
1.
(31(11
-V/WP
LT^
p
{nmtB^X\
mnivx<tc^\^\
l^i"i:#fi.31
Ui'^X^t.iTo
3. 5/i^
L^i"o
tc^\^\
^v^±;^)S!9
19
^-To
)
L^V^
w<-(i)^toj?)^i9
0^v^g;S$(«(D
19
(3)^4':^c»fig^X
XM2)^^'r
i::fc(::lH]LT.
t
M<
2907M
x^t.i-o
2S08M
T-8420A,
8720A
18
Page 27
6.mm
A
A
lx<kh-k
33s:0ii^(c(im3SX-f
A
A
W£©tt-eiHiy|^(t^-ro
•
i6<SP^(c.Sxtitcy.
(t35<.
^f=ii5i/>a)5SMa)iis.tJ&:y^-ro
5i/>$tJLfcy.
A
G-i.m.m<oi5^
.
5LTrtA<a)iisi:jS:y^-To
HLfcy-r-Sir^tt.
y.
2914M
fcfcL®3SX>r'Ve><Ofe
f^ll$ft35:o-C<f£^LNo
LJ5:L^T?<f£$l^o
(l^'e1T^^-^•C<f£$l^o
1.
±M2^]^tSX-^-lof£i'^b,
2.
T*^#Bf|ii§lV^T,
5r
tiJrii|gLi-to
3.
MU^'f
4.
-yi-^Atit-Xo
tuy^to
T;^^^!XA-X|C<
5
i/VT"—y
f#
l9mSi^
6-2.
19
JIL^L^0:&^£
J
2915M
T-8420A,
f
8720A
Page 28

6.
6-3.
=1
i
o o
jI
! >
(1)
«iL^:^ISl
=l>x>7.i||L\
2987M
2g88M
1.
yVir/l^n
4. |f|f:^C(4)^|?if2se)-C.
1~o
ifb^-fo
•fo
3.
4. (1)
ts(6)
5/^:7
W^—(2)^^f(ClHlLT.
^ ^ ±jf^-ro
2g89M
T-8420A,
}:i, h
fz
h V^'^4®^
8720A
^y/^°(5)^3SL^V^
r-Ttf
T
<tz^^
\
20
Page 29
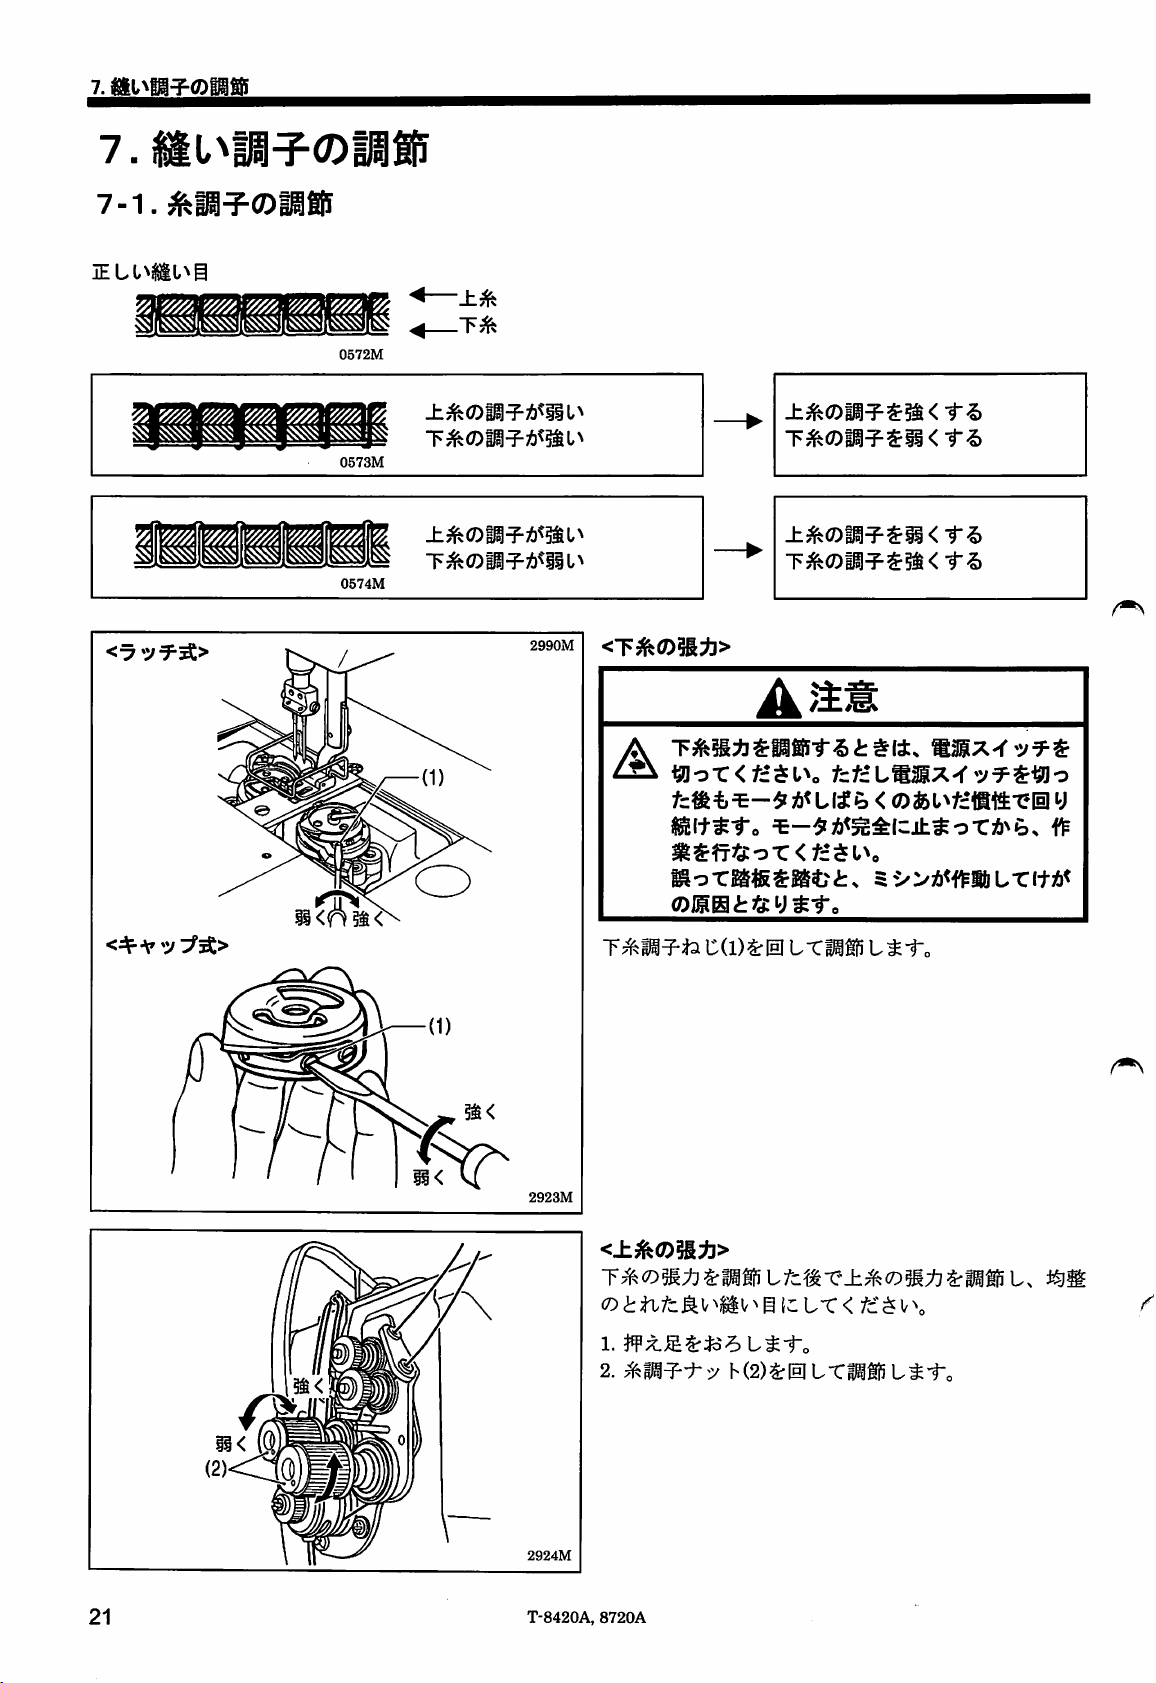
7.
lELtmNg
_ _
11
——<#
ii
11'
0572M
ii
* *
0573M
0574M
&
±^®ia^-)!i'ai.^
T^<®ffl^-)!i<^l.^
-S)
2990M
2923M
<Tj^a)3i^>
A
«or<fc*SlV
jSl+Sf.
ie^ffftor<KSL\
iSoTKffigKiJi:.
®li0i:iS:y^-r.
C(l)%|g
/±.m
fefcU^SX-f-y^SWo
A<Ltf
& < ®&l^fc*1Itt^?lHl y
$A<^^(=JtSorib\6.
5-»i6<f^»L-CltA<
LTMffi
LS-r.
<±^a)3i^>
21
2924M
T-8420A,
1.
2.
8720A
L^-fo
h(2)^|HlL-C»L^-tc
Page 30
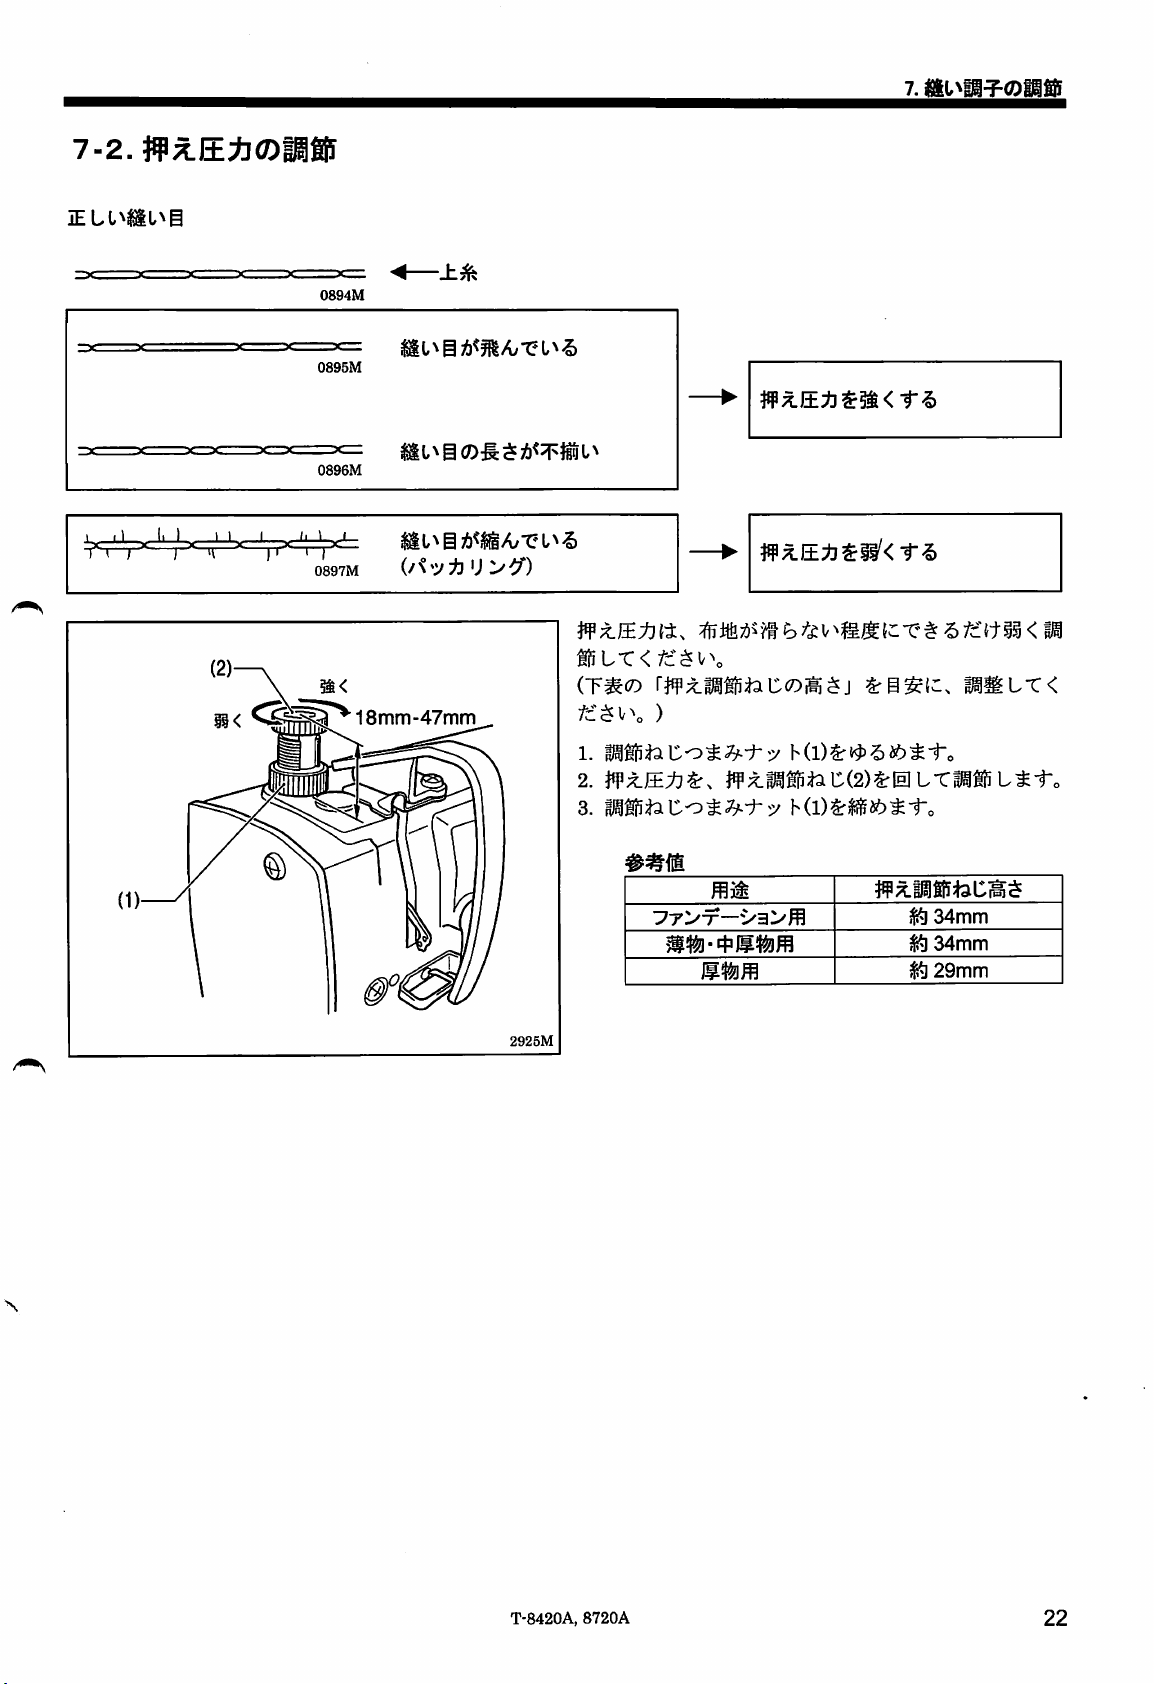
7-2.
7.
0894M
0895M
0896M
^
P
ir^
0897M
[I ^@ L^
iL^iA<IS^-ca^'S
(/ ^'V^ U >
>^)
t-C<
18mm-47mm
(rm(D
fc$v\
1.
2.
W^}±tl^.
3.
)
h(l)^t4>^ib^iro
Jfx.i^gH:fei:(2)^0L-CML^1-o
h(l)5rlfi5a6^-ro
iiML-c<
mm
34mm
^
34mm
^
w-^m
29mm
2925M
N
T-8420A,
8720A
22
Page 31

7.
2928M
1"o
<;^li0^fi:illS(1)(D^^l^:^>
y r
>-T—i/
5/
<^^;^^fi<7)iisf^>
a
<:77>X—
2g29M
g{^-fe
•:77'i/3
5/ h -f-^
. X h n ^'/ce<!f.
•
m\r^n^^^2mm^rx-mo
(51\
{p'fj: <
<9
^ 1*0
23
T-8420A,
8720A
/"
Page 32

00
00
4H
>-
•
4H
MT
^ntb
i+i^
I"
w
m
g>
0
9»f
4J
IiP III
S
(tt
0
^
ru*
^ft-
V"
4H
dSS^
iP
^
° i3f
sm
d V
1^11^
d f 1
SI
SM)eeN5;
>4
w-
cf
rt-
niHU
1
i^-^p^^=
r
ft-
vE
/«
rv
Of
Pi*n
^ 1
V
vS
Wf-^
III ^
'
^ Of
pjir 1
nr >J ^4 8?
5BI1
V
S r
v" " s*
^ H rv
v>*
msrt
Pi}
rf*
V
n Or nfr
vi:
FM-
0
^
1 jS
N^i-
^1&
9;
r
;!F
g^d
5&
9H-
^'
^
)3i^
c-
d
PSrft9?-9+
r^
«3;fv
d ^
Mtt
^
04-
M- n
a*
® & d H>rft
sE
ntrt
fM-
^ H
ar
r
!:
rt
0
s w
Si
if
•*
<-
«•
"
w- d
P?HH
nt
r
rt-»
0 d
4H
m
f5
/V.
OUffi
N
Pi*-v2
1^14*
0 2$
»5-Pit
rt
d 0
>N
rt*
d»-
S
rft ^
fM-
r
tu*
H
S
\i|-
C
/s
8}
" 1
®
r
4
m
«•»
e-
it
Ol-
0
lU
rr» d
£». T&
M- ^
^ 0
3S
•tI
S m-
•
H"
mi
Of
fV
n
if
m
53}
p?
d<
9H-
4
<-
«•
n
Or
9;
0
8^
n
d
/\
9t
vE
r
Of
n
0
)
I
v=
{O J-»
CO
^ ^
n; rx ): K'
ffl-
V V
vs
a F^ ^ H
3V
r:
2
2 /\
h 4 r n 1]
3 ^ ^
o ^ S r
o
v
r
'S
or
rt
(Vc A
^
)
y
A
<r
ft
r\
0^
^•c|<
O
✓
%
^
fx-
to
^ vs W
'h-.
<-
00
/\
S c W- 0
T1 W
® ^ »
vS
✓
O -"r-
i/
<r-
0
r
?4t-
0
ii-
o<
a
(^
r
?4f
it
n
r\
ho
Page 33

8.
8-2.
{6
3002M
1.
2.
jKy^r-f-y-w^iftSittcfccii^y-i-ro
*BSiaiife^(cffiv\
<4z5
{-/iMLT
7-(i)ic)Si#iiS;6Sfcs-oTv^fcib,
igjE(ci®aL-C<fc"Si<'
< $
V\
ION;
VGlO>^^ffiLT<;^c$v\
*
1.
X y y X
^
SMIO;
(P.iiM)
3.
5:
VGIO>
$r <
L^-fo
L'C<:j^:}'y
fc'^
I \
f/p
niy
y
25
T-8420A,
8720A
Page 34

8.
8-3.
•i/--GREASE
K«Sr®i9-iAtffcOTc
<nm>
o @
POWER
ffit>pioAditr.
Whenthe lamp When the temp Bumtnstes and the alarm sounds, the ipoofiod
Buminatosdu^
the opacBllon(**/. an
:*^Aa.
Cusnjobilfflparaie Cuando la tempara sa
endodeioladmle
•Itrtbrunrieiej. un aoddonta. (Consulta d Manualdo Instruodonos.)
7("feS
GREASE 7
9>?a«flffur9-Ai'iaofc6.
-eoxsEaeuaitstanogEB^Gyxf.
mustberoptenlshod.tfoporatianisoontlnuod
acddant
might be
i!ir(Kfla«aBttnM.fli-£s«r»«SMjn)»a.
tasKamaatnnadai^atsmnannsia.
lubricanto especlficado. Si se ccntlnria usando sin lubricar,tepcdtia
V^(1)AS^«"L,
o-»*
GREASE
fi*fflsy'j-xsai4LT<fc*si«.
caused.
(See
ins'juction manual.)
endendeysuena
la atarma, se
(naHnssts)
wttlwut
grease
<•«««)«««)
debe
ropteRlshlng,
asregar
grease
el
causar
-;^SrW;^•r•5ll#«^ftfe^S^rv^
2994M
2995M
GREASE
2.
*
^U
'j
10<9^1-0
5
t.5i/>0St®<OllS
)
"tomtit.
t tj: U
^"To
T-8420A,
8720A
26
Page 35

8.
GREASE
(SA2694-001)
mM
•
^ 1
"
1
30
1.
j-D.—y(o^i\y5
® ^
2.
<riJ-X05fflje^ra
TIEro;&?4-c\
BZL-301
broBaef •
m
^3
mm
7
o ©
»:-<—:^ro^5fn(DS0fc^y-;^SrttlSLS-r.
(2)
2934M
•
(SA2694-001)W(7)^3.—:/>
•
•
<GREASE
it.
-7.lt
r<
GREASE
<GREASE
BZL-301
r^fg-X3|i§(SA2693-001)J
©
GREASE
BZL-300(SA2355-001)
fc:$V\
(SA2694-OOl)#0^rL-:f
BZL-301
•V.
LT
< fc ^ V\
^fcll^^a6
(2)
BZL-301
>
2935M
2936M
yX;u(i)(D5fe^.5^0a0SP
1.
2.
^;fei:(2)^^L^i-o
3.
5/^"^
OFF
Xy-7;^/>Lfe^tt^ait{c:aAt^-r„
L^-to
y 3
(1)
icaA-r^o
5.
lfif^i:(2)(7)j^iS(cfe^ti/cXy
ti-o
^rmx.
•
xy-xfi,
He
)
—
^'e^#5i«9
^i~o
A
2937M
27
•r<DX\ )
T-8420A
8720A
Page 36

8.
29g6M
*
mmz.
(2)
O©
POWER
9>^aKV>
f»Bipe«^dff.
??sgf
t>()\^i3^^-\zmmf6i^^ii^Lx<tz^i\
(3)
{•4«liK««)
«oraoir
brother
*1
O ®
POWER
9:/?«(AOL79-^099fS^,
««««xiitiirr«£Kn»tafeovfrr.
KMSIIStKtltatlUISailllttltllSB.
Cuanda
la Mmpars M
•btjati
ium«rt»«iptdlcMa.AttcenMiuBtndoainiuBnetr.a*pednacM
«ndwi0«
C8RBABBUPALARM
o^%
QREASe
Arit>{f9-RHUSLT<I2«1«,
(BSttiivcm
VtMA* It •Mmw. M «*b«
(1)
(p.h^m)
1.
L^-fo
*
2.
n^V-ty
-to
5 'J ^ 0
^^WiizL^to
ZtX'7^^-{2)\Z
)
V-^y
L.
\^^'</<-<D
5~10mm
5-10mm
^C^(3)0±T2E^
a)4A^Rlr
VTLi^i-o
y^(D^m5WnWLmni^i-o
2 ^ y
V±y
rmmt^Tx
2939M
h:^4
<^ur^7a)5iii^^>
2997M
[:^^m]
•
-hLV^y
•
v±y
h^4
h:^-(
y^ilM.
y'^(l)^WLXh.
GREASE
7
T-8420A,
/c$v\
8720A
POWER
y>':f(2)(D^
—
0-
28
Page 37

9.
9.
}±.m.
\zLX<tzt^l\
\fii<<Ommti^^)^to
/}
[9-14mm
2942M
1. 5:
2.
t^1-o
<$&»>a><i@>
1.
WM^'f
2.
3.
t\-t^\^'yi:JS.'OS^L^'i',
4.
ff;i±lf-CrT-}f^SSr±lfS1-„
5.
6. 5 5
s'^SrW?
S-fo
i^Sr^il-LS-f-o
-yym^».X'm
te[iiSife»fsa^5]4^T^fcv^^-r,
7. iS
i:5tK-ffltt(2)
^VAtixmh,
T\
swAi-^v^ateLj-ro
^
*lSic®®^fT''£5
9~
14mm
i
»Pfl<DSil
l±(c
=;->v|Hie»
(ttfiii»ffltt(2)(i
1^1
^
29
wiivwiwitPwi;?
3000M
T-8420A,
<mfAm(om^>
^
t.i-o
^1*0
3.
JilB
-to
4. m 2 mrn^<Dmm'ik.
8720A
«9agLT</f$V\
Page 38

5
6
y<^y:fy V
<0
i-^i
2948M
• ii^'9
•
V^/i^
3^i9itcOi^
h(D^f9
V h
<
fd^^\
^
^mxW^.
UT<y^c$V\
lO'-Hmm
LT<yf$v\
10.
#BS^—i/
22
*
LT
7
21
7
Hv^-fti
8
^ -5
^W"90#(7)7K
X^^ti^X^^tz\m<
19
{i*:fe;^ h
$ V
"*0
LT</c$V\
r'#6/f(ti^<
LX<fz
if;tj^;^^MLT<fc:$V\
LT<ff^v\
2949M
2950M
>-(7)015;^
If
v\
tr
<
21
*
*
22
23
22
16
2951M
T:^##fi:{t
{ctT<
•
#tr^^(7)'?ti9;JiS|i<
«9
80%^T'
fc$V\
h'V
T-8420A,
^^9
8720A
«9
# ^ T
</f
f9#;t"t
^ V\
c^S.
<
fc$V\
15
16
2124M
32
Page 39

10.
-C<
^c:^V\
14
10
niffti
0471M
t.-h^>:k.X\^^fztt\-t.
^&$m(Drmm^xmmm^^rr^^x\^^fzh.
T<fc^V\
±^tr^(Dmti
Ay-^\
^;{iSoV
^fcft.
tfcft.
^
^-CV
^6 i: #
ft.
'®;^|Sov^-CV^'5§|5p"p^®l^9#;iT<
^;65oV^TV^'5lfPp"p^®i^9#;tT<fc:$V^o
ftftii^
T-t
;0^o
X-aAy^m^mWLX<tz^\^\
11^4"^
«9
tf-^^f9#;tr
19
(c5lv^;fci9^f
<
/f$V\
iEL<^^aiLT<
Lx<fz^^\
L/c«9
^T<iTc
;rc:$v\
15-17
11
21
24
$ V\
*
*
23
14
11
12
oT
(O
GREASE
:I:TL.
Lt
V
\
s»
)S0^Lrv^-5
LT<
i+^^^^^^LT<
/
ff
^c:^V\
t^ft.
iii9lt<^$f:A:4^/il4cff;5S^
*
ff1$^0LTiELV44gfC
*
1®j4^JtLr<f£$LNo
^fz^hho^^mmizmtms
0469M
9
ii#.
X y
7
^
^?SIS
t r <
;^c:
LX<fz^\^\
$ V
pl
ti"o
)
26
33
T-8420A,
8720A
Page 40

T-8420A
TWIN
TWIN
NEEDLE
NEEDLE
LOCK
STITCHER
T-8720A
LOCK
STITCHER
WITH
LARGE
HOOK
Page 41

Thank
you
very
much
for
buyingaBROTHER
instructions below and the explanations given in the Instruction manual.
With
industrial sewing machines, it is
needle and thread take-up, and consequently there is always a danger of
the instructions fromtraining personnel and Instructors regarding safe and correct operation before operating the machine so
that you
will
know how to
use
Itcorrectly.
normal
sewing
machine.
to carryout work
while
Before
positioned
using
your
new
machine,
directlyinfrontofmoving
injury
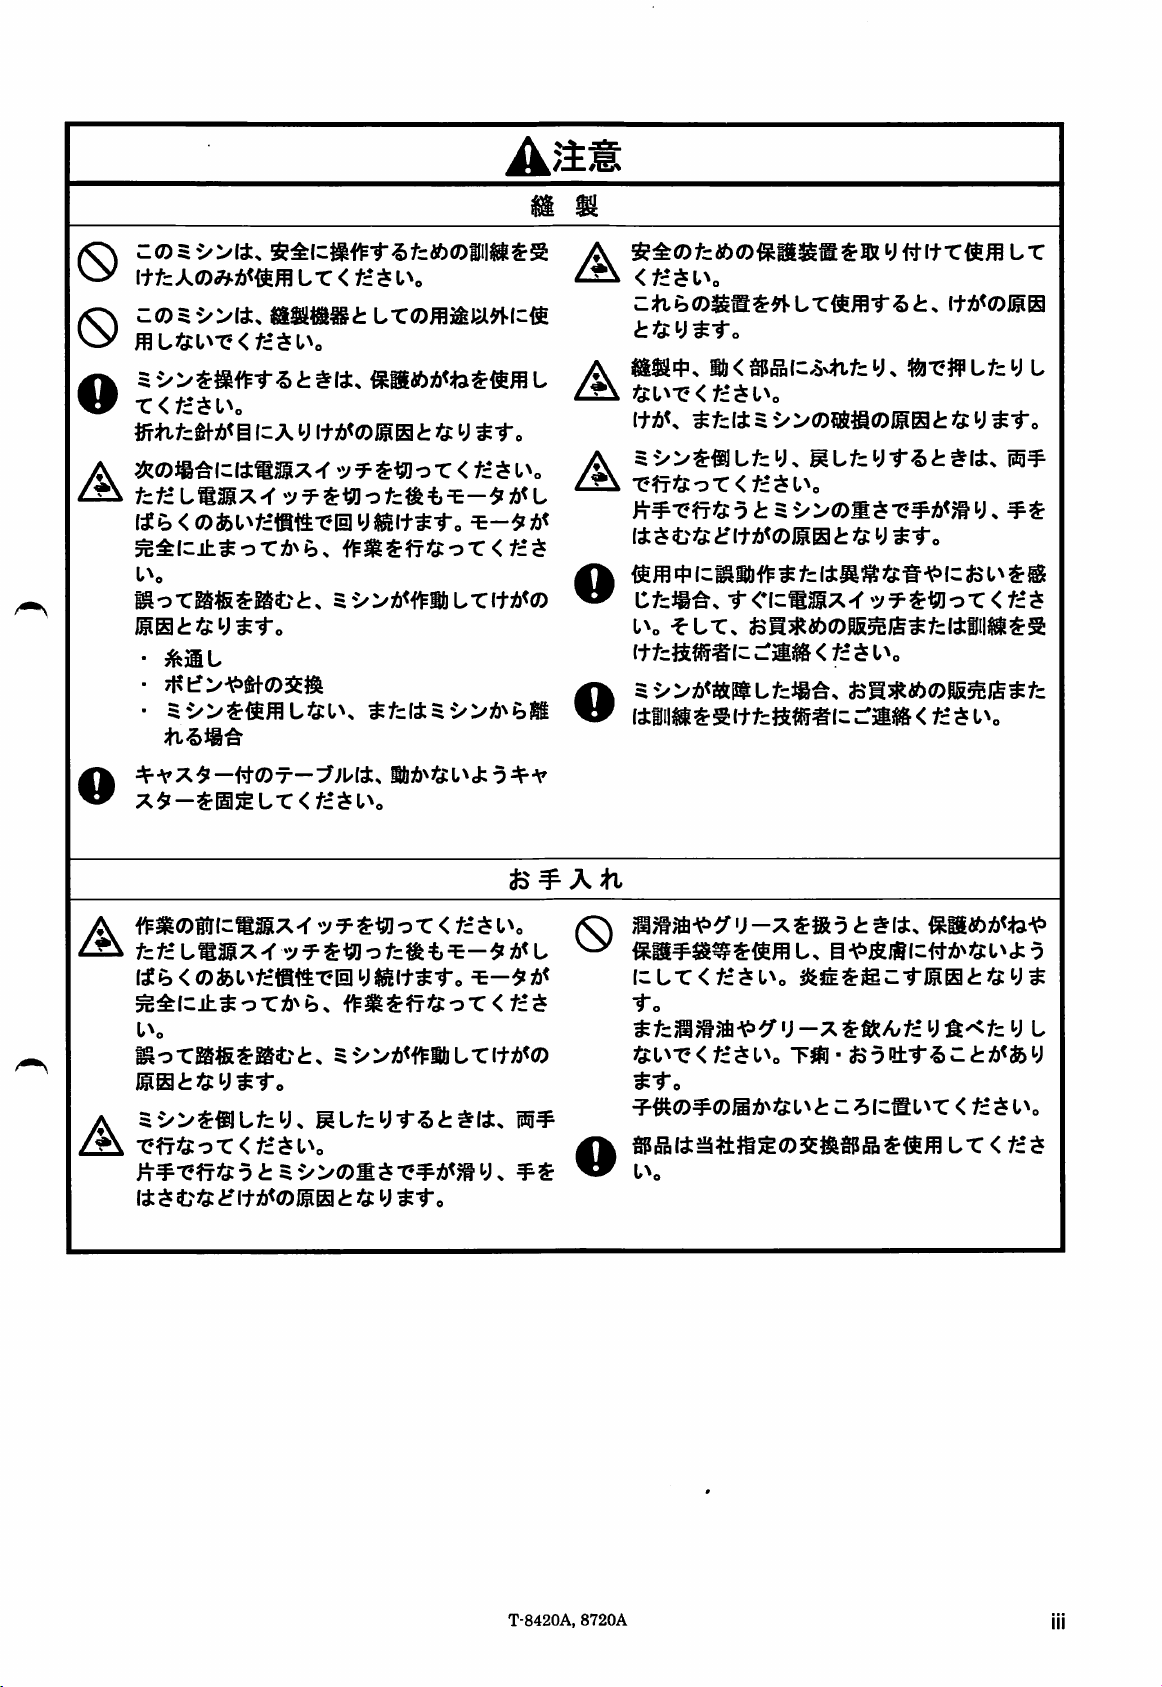
that can be caused bythese parts.
please read the
parts such as the
safety
Follow
SAFETY
1.
Safety
This instruction manual
safe
indications
indications
operation of this machine and to prevent accidents and Injuryto yourself or other people.
and
and
the indications
their
meanings
and
The
Instructions
instructions could
equipment and surroundings.
INSTRUCTIONS
symbols that
which
cause
are
usedonthe
follow
this
injury when using
term
machine itself
indicate
Symbols
A
symbol ( ) Indicates
indicates
(For example,
This
the
natureofthe
the
symbolatleft
symbol((S))Indicates
something
caution
means
something
that
you
that
mustbetaken.
"beware of injury".)
that
vou
shouldbecareful of.
must
not
This
G
This
Q
symbol
natureofthe
(For example, the symbolatleft
( ^ )
thing
Indicates
that
mustbedone.
something
means
"you must
that
you
must
do.
make
the ground connection".)
are
situations
the
machine or physical
do.
The
picture
provided in order to
where
failuretofollow
The
picture Inside
Inside
the
circle
ensure
damage
the
triangle
indicates
the
to
the
T-8420A,
8720A
Page 42

2.
Notes
on
safety
Use
the
sewing
from
sources
high-frequency welders.
Sources
problems
Any fluctuations in
should be within ±10% of
o
o
machine.
Voltage fluctuations which
may
The
the
electrical
Insufficient power supply capacity may
problems
The
rangeof5°Cto35°C
Temperatures
may
of
with
cause
power supply capacity should be
requirements for
consumption.
with
ambient
cause
A
Environmental
machineinan
of
strong
strong
problems
problems with correctoperation.
electrical
correct
operation.
the
with
correct
operation.
temperature
during
which
are
area
which is
electrical
power
the
correct
the
lower or higher than this
noise
noise
may
supply
rated voltage for the
are
greater
operation.
sewing machine's
should
use.
than this
greater
be within
CAUTION
requirements
free
such
as
o
cause
voltage
o
than
cause
Installation
Q
the
The
relative humidity should be within
45%to85%
should
occurinany
Excessively dryorhumid
formation may
operation.
Avoid
exposure
Exposure
with
correct
the
eventofan
In
and
disconnect
Lightning
operation.
during
to direct sunlight
operation.
may
use,
devices.
cause
to direct sunlight during
electrical storm, turn off
the
power
cord
cause
the
range
and
no
dew
formation
environments
problems with correct
may
from
problems with correct
cause
the
and
dew
use.
problems
the
power
wall outlet.
of
Machine installation should only be carried out by
a qualified
Q
Contact your Brother dealer or a qualified
electrician for any electrical work that may
be
done.
technician.
The sewing machine weighs approximately 43 kg.
The installation should be carried out by two or
more
people.
0
Do not
complete.
is
injury.
connent
The
depressed
the
power
cord until installation is
machine
by mistake, which could result in
may
operateifthe
Be sure to connect the ground. If the ground
connection is not
O
secure,
you run a high risk of
receiving a serious electric shock, and problems
with correct operation may
also
occur.
need
treadle
All
cords should be
from
any
moving parts. Furthermore, do not
excessively
firmly
0
to
that
fireorelectric
If using a work table which
should be
o
cannot
Use
both
tilting it back or returning it to its original position. If
A
one
only
head may
may
get
Be
sure
when handling the lubricatingoiland grease, so that
0
bend
with staples, otherwise there is the
secured
move.
hands
hand is used, the weight of the machine
cause
caught.
to wear protective goggles and gloves
they do not get into your
otherwise
inflammation
Furthermore, do not drink the oil or
under
any
circumstances,
vomiting
Keep
the
and
oil
outofthe
diarrhea.
secured
the
shocks
in such a way so that they
to
hold
at least 25 mm away
cords
or
secure
could
occur.
has
casters,
the
machine
the
head
them
danger
casters
too
when
your hand to slip, and your hand
eyes
or onto your skin,
can
result.
eat
the
grease
as
they
can
cause
reach
of children.
T-8420A,
8720A
Page 43

This sewing machine should only be
operators who
0
in
safe
use
The
sewing machine should not be
applications
0
Be
suretowear
machine.
O
If
goggles
needle
enter
your
Turn off
The
A
O
motor will
switched
until
the
machine
mistake, which could result in injury.
•
When
•
When
•
When
the
machine
If using a work
should be
cannot
move.
have
beforehand.
other
than sewing.
protective
are
not worn,
breaks,
the
offasa
motor
may
threading
replacing
partsofthe
eyes
and
power
switchatthe
keep
resultofthe
stops
operateifthe
the
not
using
unattended
table
securedinsuch
received
injury
tuning
fully
the
needle
bobbin
the
which
thereisthe
machine
A
the
necessary
used
goggles
may
even
before
treadleisdepressed
has
when
danger
broken
result.
following times.
motor's
and
a way
needle
after
the
inertia.
starting work.
needle
and
when
casters,
the
so
CAUTION
Sewing
used
by
training
for
using
that ifa
power
Wait
leaving
casters
that
any
the
may
The
by
they
A
is
O
Attach all safety devices before using
machine.
devices
Do not touch
objects
may
machine.
Use
tilting it back or returning it to its original position. If
only
head
may
Ifanerror
or
power
dealerora qualified
If
the
nearest
If
the
attached,
anyofthe
against
resultinpersonal
both
one
may
get
caught.
smells
switch.
machine
Brother
the
hands
to
handisused,
cause
your
occursinmachine,orif
are
noticed, immediately turn off
Then
develops
dealer
machine
injury
machine
technician.
is
used
may
result.
moving parts or
while sewing,asthis
injuryordamage
hold
the
machine
the
weightofthe
hand
to slip,
contact
your
a problem,
or a qualified technician.
the
without
head
and
your
abnormal
nearest
contact
sewing
these
press
to
when
machine
noises
Brother
any
the
hand
the
your
Tum
off
the
A
cleaning.
The
motor will
switched
untii
the
machine
mistake,
Use
both
power
keep
offasa
motor
stops
may
operateifthe
which could result in injury.
hands
switch
turning
resultofthe
fully before starting work.
to
hold
before
even
after
motor's
treadleisdepressed
the
machine
tilting it back or retuming it to its original position. If
only
one
head
may
may
get
hand is
caught.
used,
the
weight of the machine
cause
your hand to slip, and your hand
Cleaning
carrying
the
inertia.
head
out
power
Wait
The
when
by
Be
0
is
suretowear
when handling
they do not
otherwise
Furthermore, do
under
vomiting
Keep
Use
by Brother.
inflammation
any
and
the
oil
only the proper replacement partsasspecified
protective
the
iubricating oil
get
into your
can
not
drink
circumstances,
diarrhea.
outofthe
reach
goggles
and
grease,sothat
eyes
or onto your skin,
result.
the
oil or
eat
as
they
of children.
and
the
can
gloves
grease
cause
T-8420A,
8720A
Page 44

3.Waming
The
following warning labels
Please
labels
follow
difficultto read,
1
the
instructions on
please
appearonthe
the
contact your
sewing machine.
labelsatall
nearest
Brother dealer.
times
when
using
the
machine.Ifthe
Be
sure
connection is not
receiving a
with
correct
to
connect
serious
operation
labels
the
secure,
electric
may
have
been
removedorare
ground. If
the
ground
you run a high risk of
shock,
also
occur.
and
problems
A ^ S
A
CAUTION
Moving
parts may
Operate
Turn
threading, changing bobbin
and
Safety
(A)
with safety devices.
off
main
needle, cleaning etc.
devices:
Finger
(B) Thread take-up cover
(C) Belt
cover
guard
cause
switch
before
injury.
Direction of
operation
2g55M
0
Oil pan
2954M
IV
T-8420A,
8720A
2956M
Page 45

CONTENTS
1.
NAMES
2.
MACHINE
3.
TABLE
4.
INSTALLATION
4-1.
Installation
4-2.
Lubrication
4-3. Checking the machine pulleyrotatingdirection.... 13
4-4. Alarm display (Semi dry
5.
PREPARATION
5-1. Installing
5-2. Removing
5-3. Winding
5-4. Installing
5-5. Threading
5-6. Adjusting
5-7. Using
OF
MAJOR
SPECIFICATIONS
AND
the
MOTOR
the
needle
the
bobbin 14
the
lower
the
bobbin 16
the
upper
the
stitch length 18
knee
lifter 18
PARTS
type)
BEFORE
thread
thread
SEWING
....14
11
13
14
15
17
1
2
3
4
5
6.
SEWING
6-1.
Sewing
6-2. Backtacking 19
6-3.
Sewing
7.
THREAD
7-1. Adjusting
7-2. Adjusting
7-3. Adjusting
8.
CLEANING
8-1. Daily cleaning
8-2. Lubricating via
(every 6
8-3. Applying
condensed
TENSION
the
the
the
stitches
thread
presser
thread
procedures
the
oil
months)
grease-When
tension
foot
take-up
cover
the
pressure
amount
GREASE
19
19
20
21
21
22
23
24
24
25
indicator illuminates (Semi dry type) 26
9.
ADJUSTING
LUBRICATION
10.
TROUBLESHOOTING
THE
AMOUNT
ROTARY
HOOK
29
30
T-8420A,
8720A
Page 46

1.
NAMES
1.
NAMES
OF
MAJOR
PARTS
OF
MAJOR
PARTS
(1) Bobbin winder
(3)
Presser
(5) Stitch length dial
(7) Oil
(9)
Alarm
Safety
devices
(11) Thread take-up cover
(13) Belt
foot
gauge
window
display (semi dry type)
cover
(2)
(4)
(6)
(8)
(10)
(12)
Lifting
lever
Knee lifter
Reverse
Machine pulley
Cotton
Finger guard
assembly
lever
stand
0
2957M
T-8420A,
8720A
Page 47

2.
MACHINE
SPECIFICATIONS
2.
MACHINE
SPECIFICATIONS
BROTHER
INDUSTRIES,
T-8n20A-0
LTD.
Rotary
Use
Lubrication
hook
type
For
Minimum
F
foundation
Standard
3 5
For
light-weight
medium-
materials
0 3
lubrication
4
hook
weight
and
For
Semi
Large
heavy-weight
materials
dry
7
hook
T-8420A
Max.
Max.
Presser
height
Feed
Needle
T-8720A
Max.
Max.
Presser
height
Feed
Needle
sewing
stitch
foot
dog
(DPx5)
sewing
stitch
foot
dog
(DPx5)
speed
length
height
speed
length
height
Lifting
Knee
Lifting
Knee
lever
lifter
lever
lifter
-OOF
4,000
rpm
-03F
3,000
rpm
#9-#14
•"UUO 1
#11-#16
-003
4,000
rpm
4
mm
7
mm
13
mm
1
mm
#11-#16
3,000
rpm
7
mm
7
mm
13
mm
1
mm
-033
3,000
rpm
uuo
#14-#22
-005
3,000
5
#14-#22
rpm
mm
T-8420A,
8720A
Page 48

3.
3.
A.
•
TABLE
The
AND
TABLE
Table
processing
top of
vibration of
• Drill
holesasindicatedinthe
MOTOR
the
the
AND
table
sewing
diagram
shouldbe40
machine.
illustration
MOTOR
mm In
thickness
below.
and
shouldbestrong
Ground
Head
rest
hole
Cotton
wire
enough
stand
hole
—
to hold
hole
the
weight
and
with-stand
the
B.
Motor
Motor mounting
holes
520.5
2-«3.5
20
RIO
A-A
2958M
A
CAUTION
All
cords should be secured at least 25 mm away from any movingparts. Furthermore, do not excessively bend
the cords or secure them too
occur.
firmly
with staples, otherwise there is the danger that fire or electric shocks could
0
<Motor>
• Use one ofthe clutch motors given in the table at rightasthe motor.
• Refer to the instruction manual for the motor for details on installing
and
using
the
motor.
<Motor
Select the correctmotor
pulley
and
Sewing
V-belt>
4,000
3,500
3,000
pulley
speed
rpm
rpm
rpm
and
V-beltbyreferring
Freguency
50
60
50
60
50
60
Hz
Hz
Hz
Hz
Hz
Hz
to the tablebelowto suitthe powerfrequencyofyourarea.
Motor
pulley
Motor
Motor
Motor
Motor
Motor
Motor
Power
Single-phase
Three-phase
(Outer
pulley
pulley
pulley
pulley
pulley
pulley
diameter)
100
85
90
70
75
65
2-pole.
2-pole,
Motor
400Wmotor
400Wmotor
V-belt
46
45
45
44
44
43
T-8420A,
8720A
Page 49

4.
INSTALLATION
A
CAUTION
4.
INSTALLATION
Machine installation should only be carried out by a
0
qualified
Contact
O
for
The
O
The
people.
Do not
0
compiete.
depressed
Carrying
•
The
machine
showninthe
* Make
Tilting
• Hold section (B) with your footsothat
and
then
head.
technician.
your
any
electricai work
sewing
installation
connect
the
illustration.
sure
that
back
the
push
Brother
machine
The
by mistake, which could result in injury.
dealer
or a qualified electrician
that
may
weighs
shouldbecarried
the
power
cord
machine
may
operateifthe
needtobe
approximately 43 kg.
out
until installation is
machine
shouldbecarried by
the
machine
machine
the
arm
with both
pulley
head
the
does
the
hands
by two or
arm
by two
not turn.
table
to tilt
done.
treadle
does
back
more
is
peopie
not move,
the
machine
Use
tilting it
only
head
may
Be
o
connectionisnot
receiving a
correct
as
both
back
one
handisused,
may
get
caught.
sure
to
operation
hands
to
hoid
the
machine
or retuming it to its original position. If
the
weightofthe
cause
your
hand
to slip,
connect
serious
secure,
electric
may
the
ground.Ifthe
you run a high risk of
shock,
also
occur.
and
head
and
your
problems
machine
when
hand
ground
with
2969M
Returning
1.
Clear
2. While holding the face plate with your left hand, gently return
machine
the
away
any
headtothe
machine
tools, etc. which may be
headtothe
upright position with your right hand.
upright
near
the
table holes.
position
2871M
the
2872M
T-8420A,
8720A
Page 50

4.
INSTALLATION
4-1.
Installation
2874M
1. Oil
(1)
Head
(2)
Head
(3) Oil
(4) Oiler
pan
cushions
cushions
pan
(left) [2 pcs]
(right) [2 pcs]
2875M
2
Rubber
(1)
Rubber
(2) Nails [4 pcs]
3.
Knee
(3)
Knee
4
Machine
(1)
Hinges
(2) Machine
(3)
Head
NOTE:
Tap
the
not
machine
stable
cushions
lifter
lifter complying
[2 pcs]
head
rest
the
head
table
hole. If
pushedinas
head
whenitis
cushions
[2 pcs]
compiying
bar
head
rest
(3)
securely
the
head
rest
farasit will go,
will notbesufficiently
tilted
back.
bar
into
(3) is
the
2960M
T-8420A,
8720A
Page 51

5.
Knee
(1)
Knee
(2) Bolt
lifter
lifter
plate
4.
INSTALLATION
plate
<Knee
1. Turn
topofthe
2. Lower
lifter
the
the
machine
* Loosen
2961M
adjustment>
pulleysothat
needle
plate.
presser
foot (5) by using
and
move
a position
the
where
bolt (3)
the
the
the
and
knee
lifter plate (1) to
it is
easytouse.
feed
dog
lifting
the bolt (4),
is below
lever (4).
the
U
2S62M
2881M
3.
Loosen
4. Turn
the
lifter plate (1) is gently
5.
Securely
6.
Loosen
7. Turn the screw (10) until the distance between
the
nut
(6).
the
screw
(8) to adjustsothat
knee
lifter (7) is approximately 2 mm when
pressed.
tighten
the
nut (6).
the
nut (9).
the
amount of play in
the
the
knee
end of
the screw (10) and the knee lifter (7) is approximately 5
mm.
8. Turn
the
adjusting screw (10) to adjustsothat
foot (5) is at the desired position
mm of
fully
the
needle plate when the knee liter plate (1) is
pressed.
within
a distance of 13
the
presser
9. After adjustment is completed, securely tighten the nut
(9).
Within13mm
2963M
T-8420A,
8720A
Page 52

4.
INSTALLATION
Ground
symbol
^ L
6.
Ground
(1) Ground wire
(2)
Screw
wire
(2) ^
Ground
symbol
— Align horizontally to
right
and
—
Oil
=0^
then
uS>
pan
tighten.
Motor
Motor
the
i!y64M
2965M
7.
Ground
Useasuitable
(1)
Ground
(2)
Screw
8.
V-belt
(1) V-belt
wire
wire
ground
wire.
m
m
O
\
Ground
(1)
wire
0-14mm
2966M
Turn
the
two nuts (2) to adjustsothat
thereis10-14
V-belt (1) when it is
midway point with a force of 5 N.
9.
Belt
(1) Belt
(2)
Screws
mmofdeflection
cover
cover
bracket
[2 pcs]
pressedatthe
bracket
in
the
2967M
T-8420A,
8720A
Page 53

Insert
part
underneath
machine
the
pulley.
projecting
the
2968M
10.
Belt
(1) Belt
(2)
Screws
cover
cover
U
[4 pcs]
4.
INSTALLATION
U
T-8420A,
8720A
2969M
2970M
11.
Belt
(1) Belt
(2)
Wood
(3)
Washers
cover
cover
screws
D
D
[2 pcs]
[2 pcs]
Page 54

4.
INSTALLATION
2971M
0
12
Belt
(1) Belt
cover
cover
D lid
D
lid
X X O
2972M
2973M
Pull belt
so
that
cover
there
U (3)
cover
D (2) forward to
Is no
and
the
belt
gap
between
cover
adjust
belt
D lid (1).
Re-tighten
the
T-8420A,
wood
8720A
screws.
2974M
Page 55

2975M
13.
Alarm
(semi
display
dry
(1) Alarm display
(2)
Screws
[2 pcs]
(Use for tightening
(3)
(4)
Screws
Connector
[4 pcs: removed]
4.
INSTALLATION
type)
rear
cover)
Place the cord securely
Into
the
notch.
Place
against
the
box.
the
the
cable
Inside of
After connecting
connector
alarm display (1), return
display (1) to its original position
then
tighten
tie
<CN1>
the
the
on
screws
connector
the
P.C.B.ofthe
the
(3).
(4) to
alarm
and
2976M
2878M
14
Cotton
(1) Cotton
NOTE:
Securely
the
two
washer
so
that
move.
stand
tighten
rubber
(3)
are
the
stand
securely
cotton
the
nut (4)sothat
cushions
stand
{2}
and
clamped
(1)
does
the
and
not
T-8420A,
8720A
10
Page 56

4.
INSTALLATION
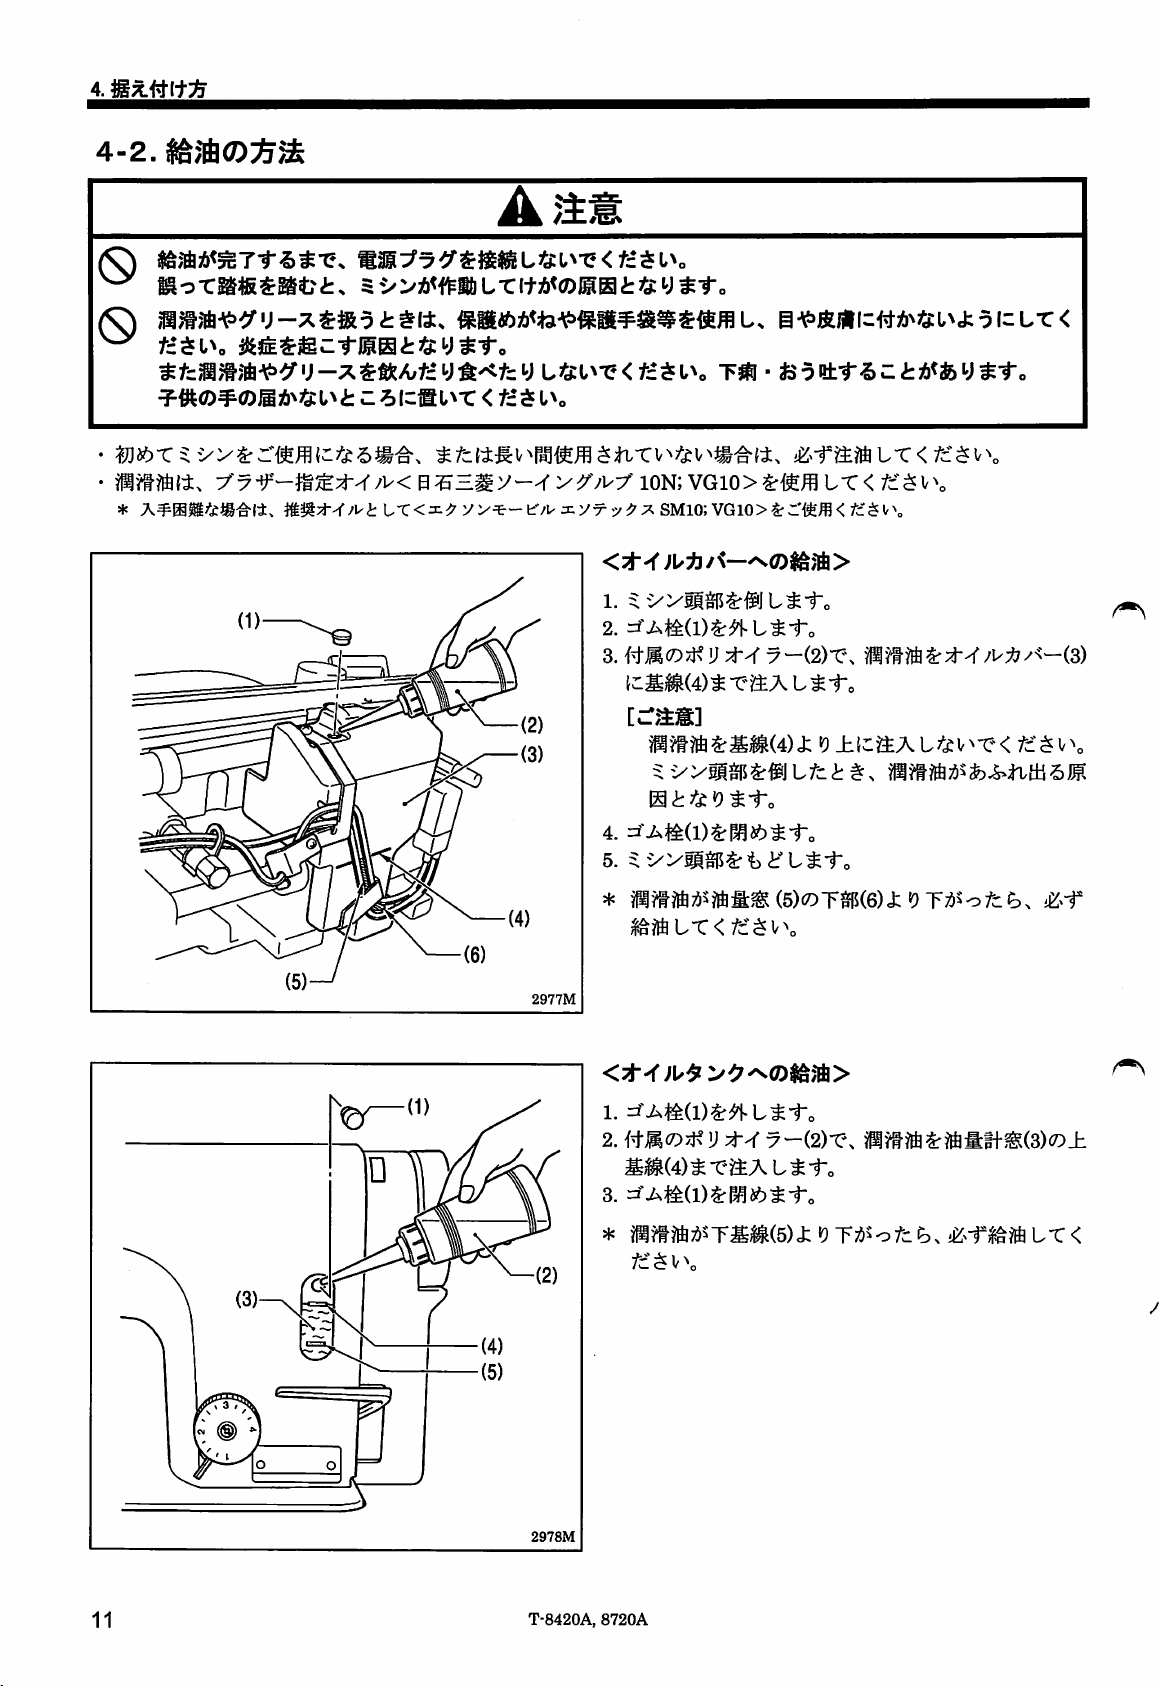
4-2.
Lubrication
A
CAUTION
0
Do not connect the power cord until lubrication
treadle is
depressed
by mistake, which could result in injury.
has
Be sure to wear protective goggles and gloves when handling the lubricating oil and grease, so that they do not
0
into your
Furthermore, do not drink the oil or
diarrhea.
Keep
The sewing machine should always be lubricated
after
long
Use
only
* Ifthis type of lubricating oil Is difficult to obtain, the recommended oilto
eyes
or onto your skin, otherwise inflammation
eat
the
grease
the
oil
outofthe
periodsofnon-use.
the
lubricating oil (Nissekl Mitsubishi Sewing Lube ION; VG10) specified by Brother.
reach
of children.
and
the
oil supply replenished before itis
been completed, othenwise the machine may operate if the
get
can
result.
under any circumstances,asthey can
used
use
Is <Exxon
<Lubrlcatlng
1.
Tilt
back
2.
Remove
3.
Use
the
oil
cover
(4).
NOTE:
Do not
If you
when
4.
Replace
5. Return
* If
the
lubricating oil level drops below the bottom (6) of
oil
gauge
Mobil
Essotex SM10; VG10>.
via
the
oil
cover>
the
machine
the
rubber
accessory
(3) until
fill
with lubricating oil
pourintoo
the
machine
the
rubber
the
machine
window (5),besuretoadd
head.
cap
(1).
oiler (2) to
the
oil level
much
headistilted
cap
(1).
head
lubricating oil, it
to its original position.
cause
vomiting and
for the first time, and
pour
lubricating oil into
reaches
past
the
back.
more
the
reference line
reference
may
oil.
also
line (4).
spill
the
out
the
2977M
<Lubricating
1. Remove
Use
2.
the
gauge
3.
Replace
* if the lubricating oil level
(6),besuretoadd
the
the
accessory
oil level
window (3).
the
via
rubber
reaches
ruliber
the
oil
tank>
cap
(1).
oiler (2) to pour in lubricating oil until
the
top reference line (4) of
cap
(1).
drops
below
the
more
oil.
bottom reference line
the
oil
7
2978M
11
T-8420A,
8720A
Page 57

•
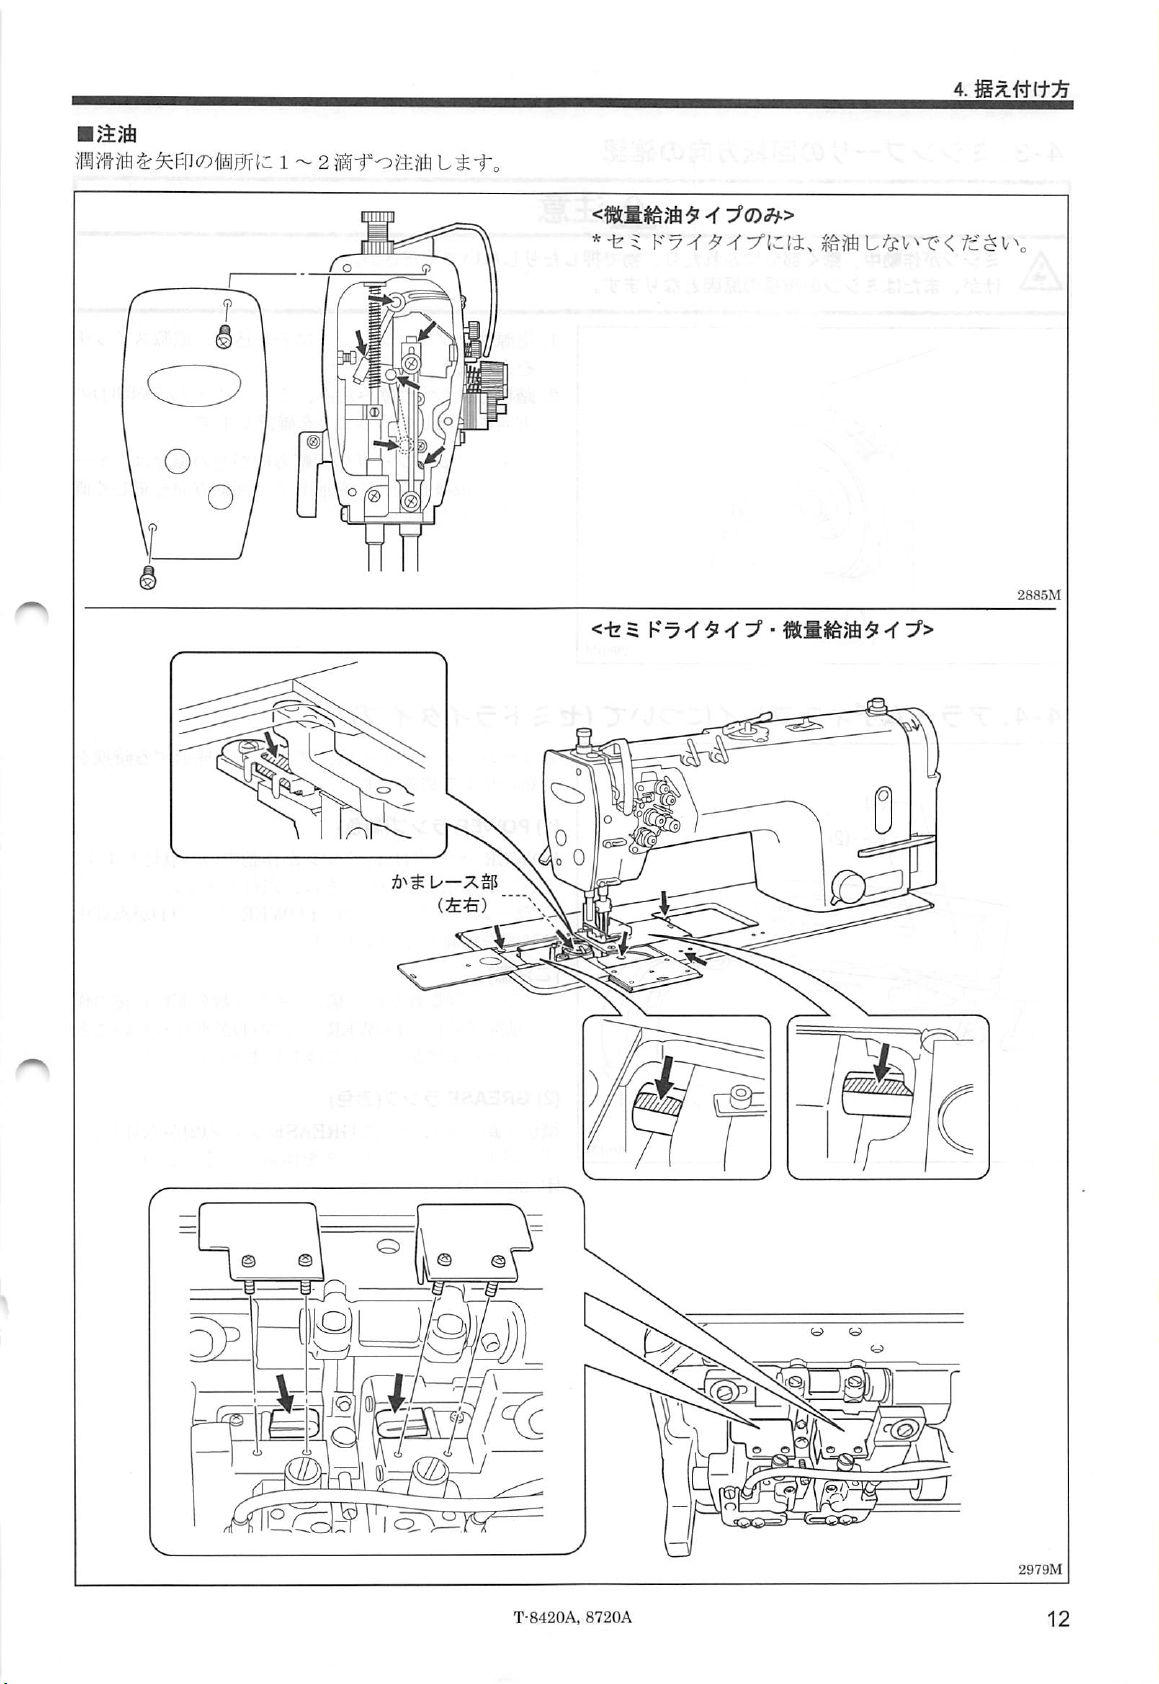
Lubrication
Apply 1 - 2 drops of oil to the places indicated by the arrows.
<Minimum
* Do not apply oil for semi dry types.
lubrication
type
only>
4.
INSTALLATION
I
m
T-8420A,
8720A
Page 58

4.
INSTALLATION
4-3.
Checking
Do not touch any of the moving parts or press any objects against the machine while sewing,asthis may result in
personai injury or
A
the
machine
damagetothe
puiiey
machine.
rotating
A
CAUTION
direction
4-4.
Alarm
display
(Semi
dry
type)
2980M
1. Insert
2.
The alarm display is a device that
next
(1)
The
machine is operating. It
machineisstopped.
(The alarm display
indicator (1) is lit.)
NOTE:
the
power cord plug into
turn on
the
power
Depress
pulley
* If
greasing
POWER
The
such
speed,orwhen
stopped
the
the
starts
the
direction
referring to
indicator
POWER
POWER
asifthe
for
sign
of a malfunction.
to turn in
direction of rotation is
of
is required.
indicator (1) only illuminates while
several
switch.
treadle slightly
the
direction of
rotation
the
instruction
makes
indicator (1)
sewing
operation
to
(green)
does
a total of
machine
minutes,
and
the
manual
not illuminate while
may
starts
but
the
wall outlet,
check
that
the
arrow (1).
reversed,
correct
for
the
shows
the
the
time
not illuminate at
is operating at a slow
again
after
this is
normal
the
direction
motor.
time until
that
and
machine
change
the
sewing
the
sewing
the
POWER
having
andisnot
then
the
while
the
times
been
13
2981M
T-8420A,
(2)
GREASE
If
the
sounds
grease.
(See
8720A
P. 26.)
indicator
GREASE indicator (2) illuminates
each
time
the
(red)
treadle is
depressed,
and
the
buzzer
it is time to apply
Page 59

5.
PREPARATION
5-1.
Installing
^
Turn
off
the
power
A
as
a result of the motor's inertia. Wait until the motor
The machine may operate ifthe treadle is depressed by mistake, which could result in
the
needle
switch
before
BEFORE
A
installing
the
needle.
SEWING
CAUTION
The
motor
will
stops
fullybefore starting work.
keep
5.
turning
PREPARATION
even
after
the
injury.
BEFORE
SEWING
powerisswitched
off
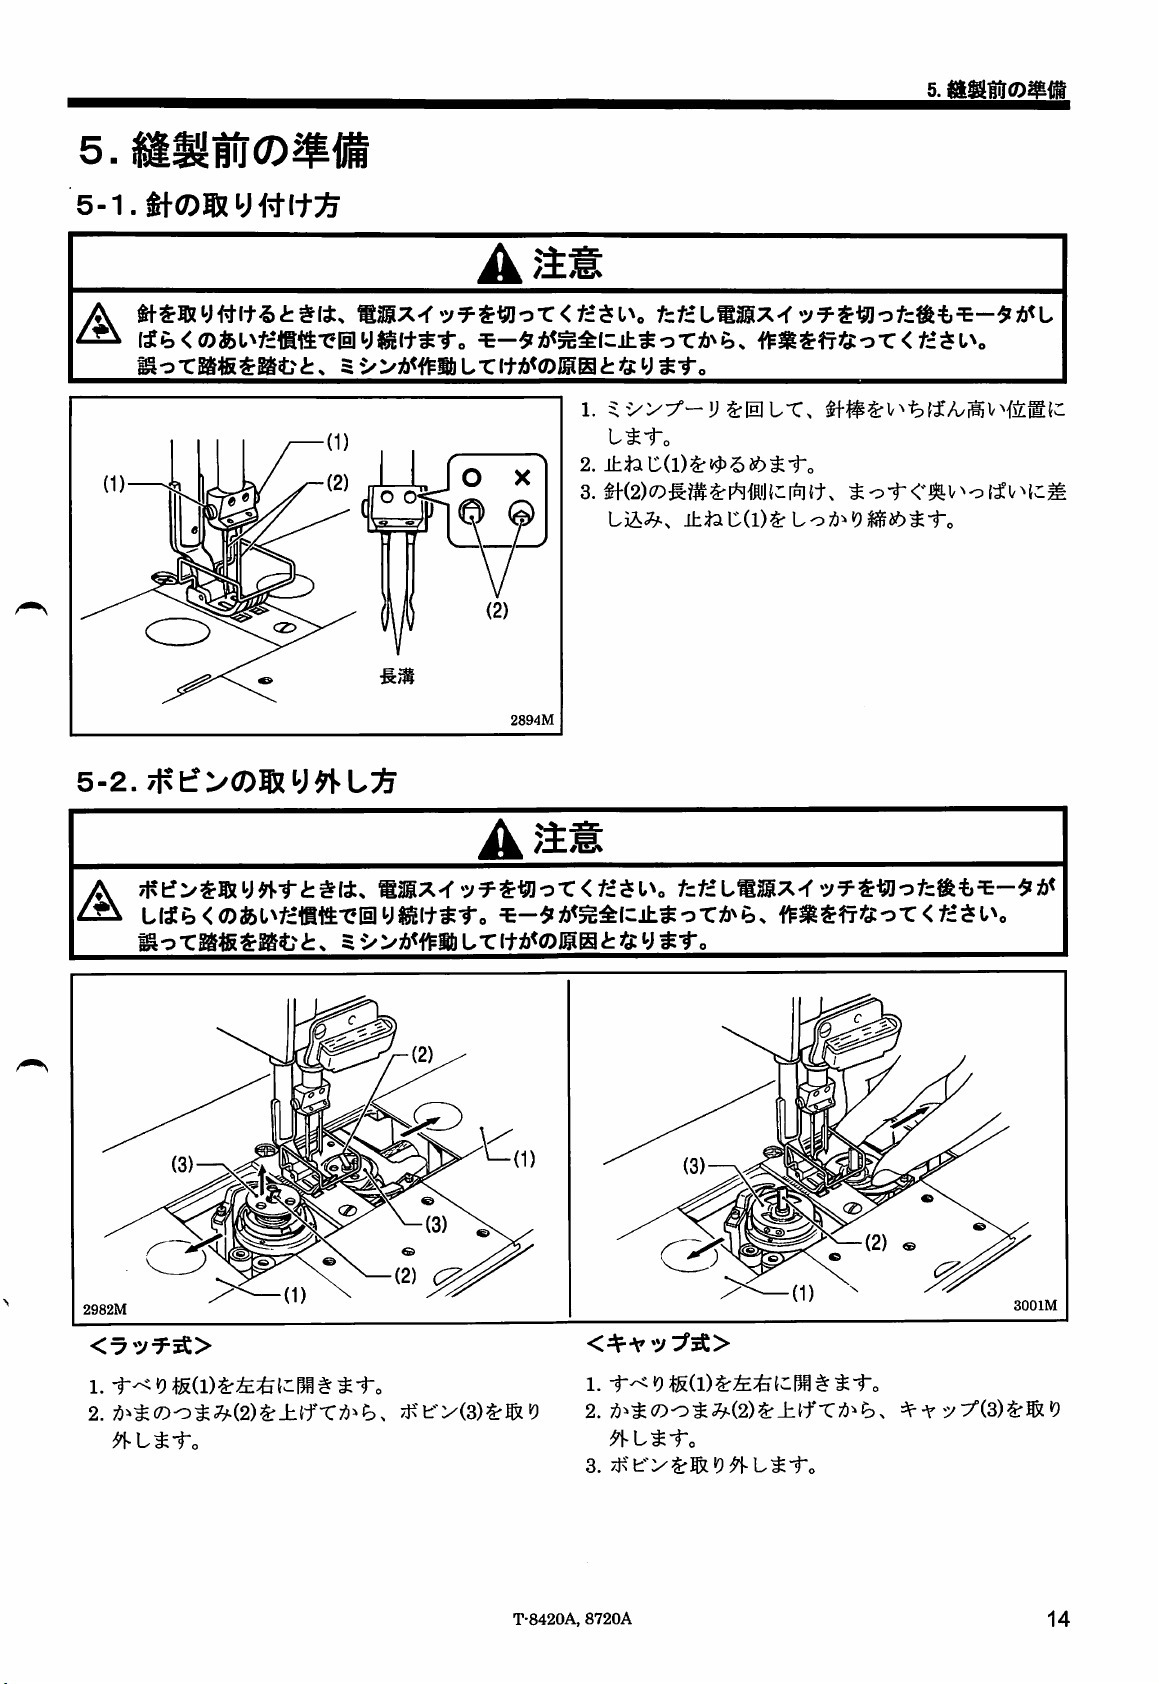
5-2.
A
1. Turn the machine pulley to move the needle
highest position.
2. Loosen
3. Insert
long
screws
2
Long
groove
2894M
Removing
Turn offthe power switch before removing the bobbin. The motor
as
a resultof
The machine may operate if
the
the
motor's
bobbin
inertia. Wait until
the
treadle is
A
CAUTION
the
motor
stops
depressed
by mistake, which could result in injury.
fully
the
screws
the
needle
groove
(1).
will
keep turningeven after the power is switched off
before
starting work.
(1).
(2) straight inasfarasitwillgosothat
is facing inward,
and
then
securely
bar
tighten
to its
the
the
(2)
c:^
2g82M
<Latch
1.
Open
and
2. Pull
remove
type>
the
left.
the
rotary hook
the
slide
bobbins
plates
(1) by moving them to
latches
(3).
(2) upward,
and
the
right
them
T-8420A,
<Bobbin
1. Open the slide plates (1) by moving them to the right and
2.
3.
8720A
case
left.
Liftupthe
bobbin
case
Remove
type>
latch (2) of
(3).
the
bobbin.
the
rotary hook,
and
then remove the
3001M
14
Page 60

5.
PREPARATION
5-3.
Winding
BEFORE
the
SEWING
iower
thread
A
CAUTION
Do not touch any ofthe moving parts or
may result in personal injuryor
A
2897M
press
damagetothe
any
objects againstthe machine while winding
machine.
1. Turn on
2.
Place
3. Wind
direction indicated by
* Check that
4.
Push
5.
Raise
6.
Depress
7.
Once
presser
8.
After
and
the
power
switch.
the
bobbin (1)
the
thread several times around the bobbin (1) in
thread
path.
the
bobbin
the
presser
the
treadle. Lower
winding of
arm
(3) willreturn automatically.
the
thread
cut
the
thread
onto
the
the
thread is not loose anywhere along
presser
foot with
the
lower
has
been
with
the
lower thread,asthis
the
bobbin winder
arrow.
arm (3) toward
the
lifting lever.
thread
winding will
threadiscompleted,
the
wound
knife (4).
on,
the
remove
shaft
(2).
bobbin(1).
then
start.
the
bobbin
the
bobbin
the
the
Loosen the screw (5) and move the bobbin presser (6) to
adjust
the
amountofthread
More
thread
NOTE:
The
amountofthread
wound
a maximum of80 % ofthe bobbin capacity.
Less
thread
80%
2123M
15
2124M
T-8420A,
8720A
wound
onto
onto
the
the
bobbin
bobbin.
should
be
Page 61

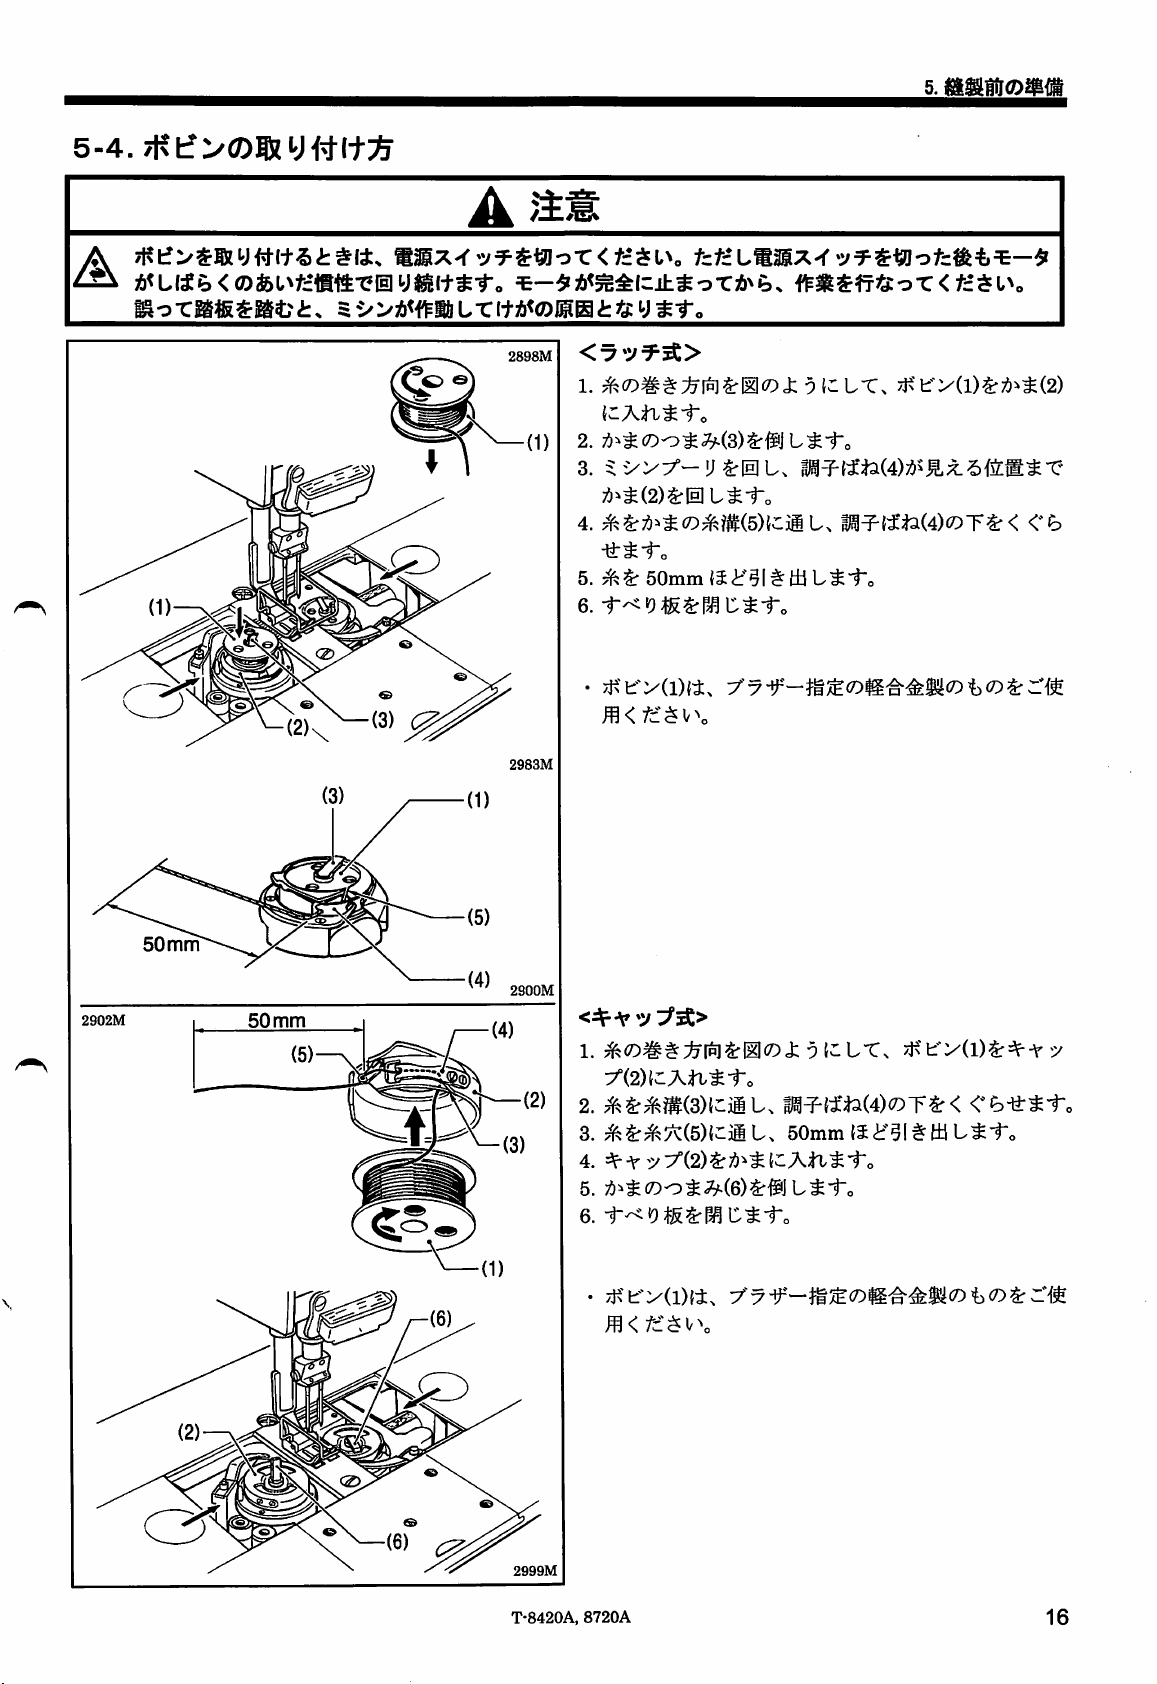
5-4.
Installing
the
bobbin
CAUTION
A
5.
PREPARATION
BEFORE
SEWING
Turn offthe power switch before Installing the bobbin. The motor
as
A
a result of the motor's Inertia. Walt untilthe motor stops
The machine may operate Ifthe treadle is
depressed
2898M
2983M
will
keep turning even after the power Is switched off
fully
before starting work.
by mistake, which could result In
<Latch
1. Insert
2. Return
3. Turn
4.
5. Pull
6.
type>
the
bobbin (1) into the rotary hook (2)sothat
winding direction Isasshowninthe
the
rotary hook latch (3) to Its original position.
the
machine pulley to rotate
the
tension
Pass
passItunder
Close
Use
BROTHER.
spring (4) Is visible.
the
thread
the
out
the
thread
the
slide plates.
bobbins (1)
through slit (5) In
thread
tension
to a length of approximately 50 mm.
made
Injury.
Illustration.
the
the
rotary hook
spring.
of light alloy
the
rotary hook (2) until
and
then
as
specified by
50
mm
50
mm
2900M
<Bobbin
1. Insert
2.
3.
4. Insert
5.
6.
• Use bobbins (1)
case
type>
the
bobbin (1) Into
winding direction IsasshownInthe
Pass
the
thread
spring (4).
Pass
the thread through
about
50
mm.
the
bobbin
Push
latch (6) of
Close
the
slide
BROTHER.
through slot (3)
case
the
plates.
the
the
(2) Into
rotary hook flat.
made
of light alloy
bobbin
thread hole (5)
the
case
Illustration.
and
under
rotary hook.
as
(2)sothat
the
tension
and
pull out
specified by
the
(6)
^
2999M
T-8420A,
8720A
16
Page 62

5.
PREPARATION
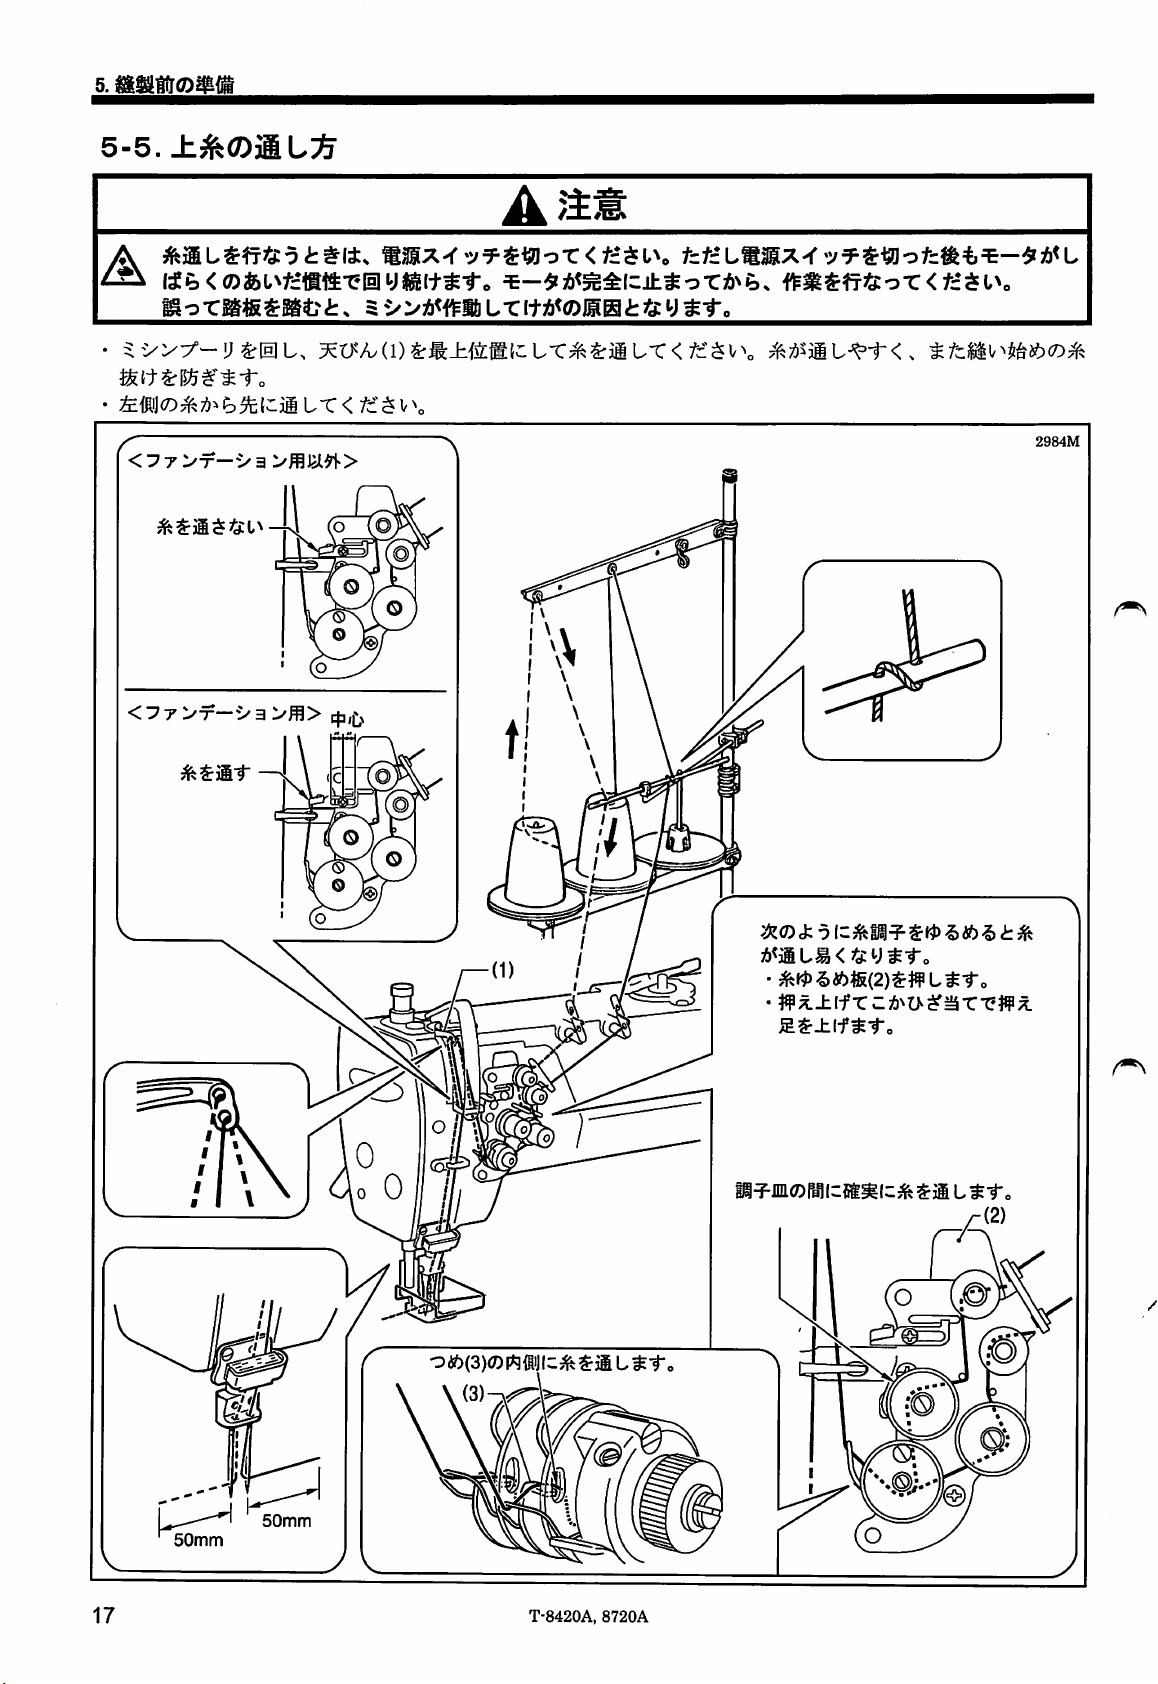
5-5.
Threading
BEFORE
the
SEWING
upper
thread
A
CAUTION
Turn offthe powerswitch before threading the upperthread.
switched offasa result of
A
The
machine
may
operateifthe
Turn the machine pulley
This will
Thread
<For non-foundation specifications> ^
Do
not
thread
make
the
pass
through.
threading
left-side
the
thread
the
motor's inertia. Wait until
treadleisdepressed
and
raise the thread take-up (1) before threading the
easier
anditwill
first.
prevent the thread from coming out at
N
<Forfoundation specifications>
Center
Pass
the
through.
thread
The
motor
will
keep
tuming
the
motor
stops
fully before starting work.
by mistake, which could result in injury.
upper
thread.
the
sewing start.
even
after
the
power is
2984M
(Refer
to p.33)
Pass
the
thread on the inside of the tab (3)
If
the
tension
follows,
to
thread.
•
Press
•
Operate
the
thread
the tension
the
lifterto raise
The thread can be
the
tension
discs.
discs
are
will
become
release
lifting
lever or the
the
presser
passed
securely in between
opened
plate (2).
foot.
^ (2)
as
easier
knee
50mm
17
50mm
T-8420A,
8720A
Page 63

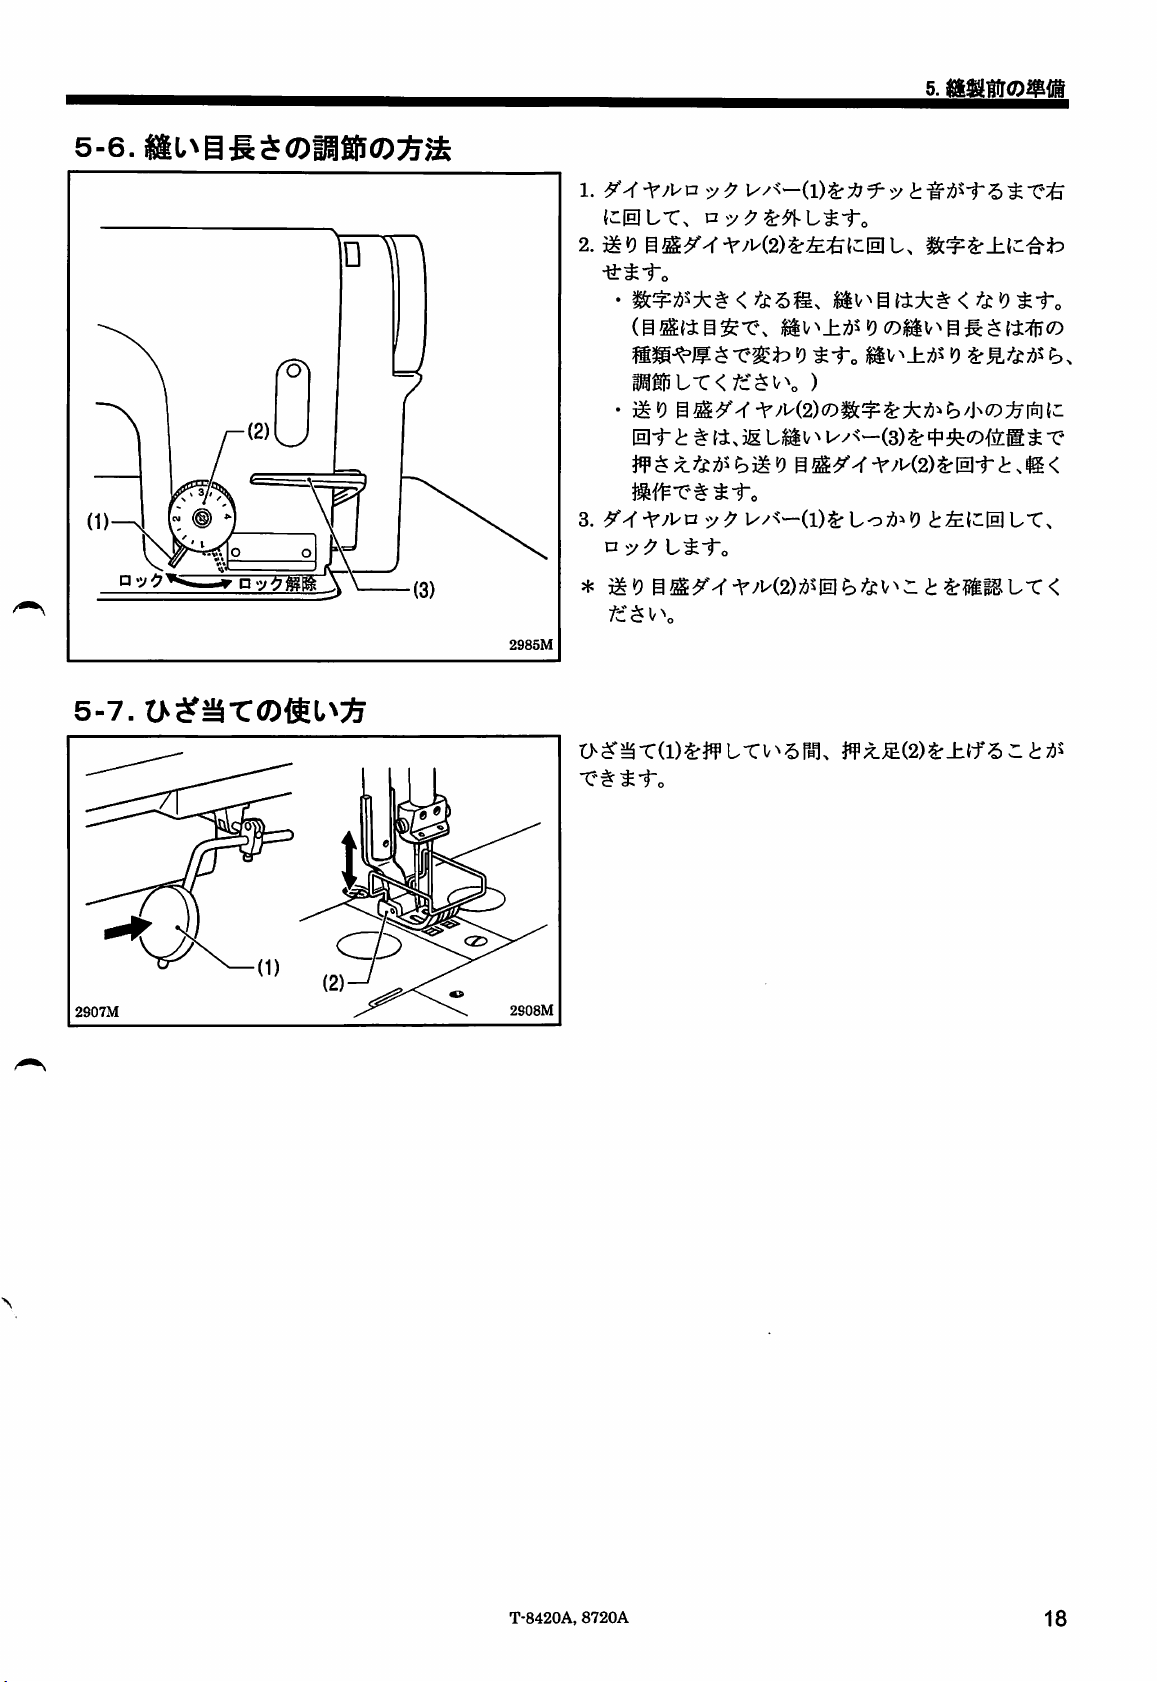
5-6.
Adjusting
the
stitch
1d~1
length
5.
PREPARATION
BEFORE
SEWING
1. Unlockthe stitch length dial (2) by turning the dial lock lever
(1) to
the
right untila click is heard.
2. Turn the stitch length dial(2) clockwise or counterclockwise
so that
the
desired stitch length Isat
on
the
dial.
•
The
largerthe number, the longer
(The numbers on
length of
type
lookingatthe
• When tuming the stitch length dial (2) from a larger
setting to a smallersetting, itwillbe
if
position.
3. Turn
length dial (2).
*
Check
the
and
thickness of material being sewn. Adjust while
the
reverse lever (3) is
the
dial lock lever (1) firmlyto the left to lock
that
the
the
dial
finished stitches may vary depending on
finished
stitch length dial (2)
stitches.)
are
for
pushed
the
uppermost position
the
stitch length
useasa guide.
easiertotum
to the halfwaydown
the
does
not rotate.
will
the
be.
The
the
dial
stitch
5-7.
2907M
Locked
Using
the
Unlocked
knee
lifter
2g85M
2g08M
The
plate
presser
(1).
foot (2)
canberaised by pressing
the
knee
lifter
T-8420A,
8720A
18
Page 64

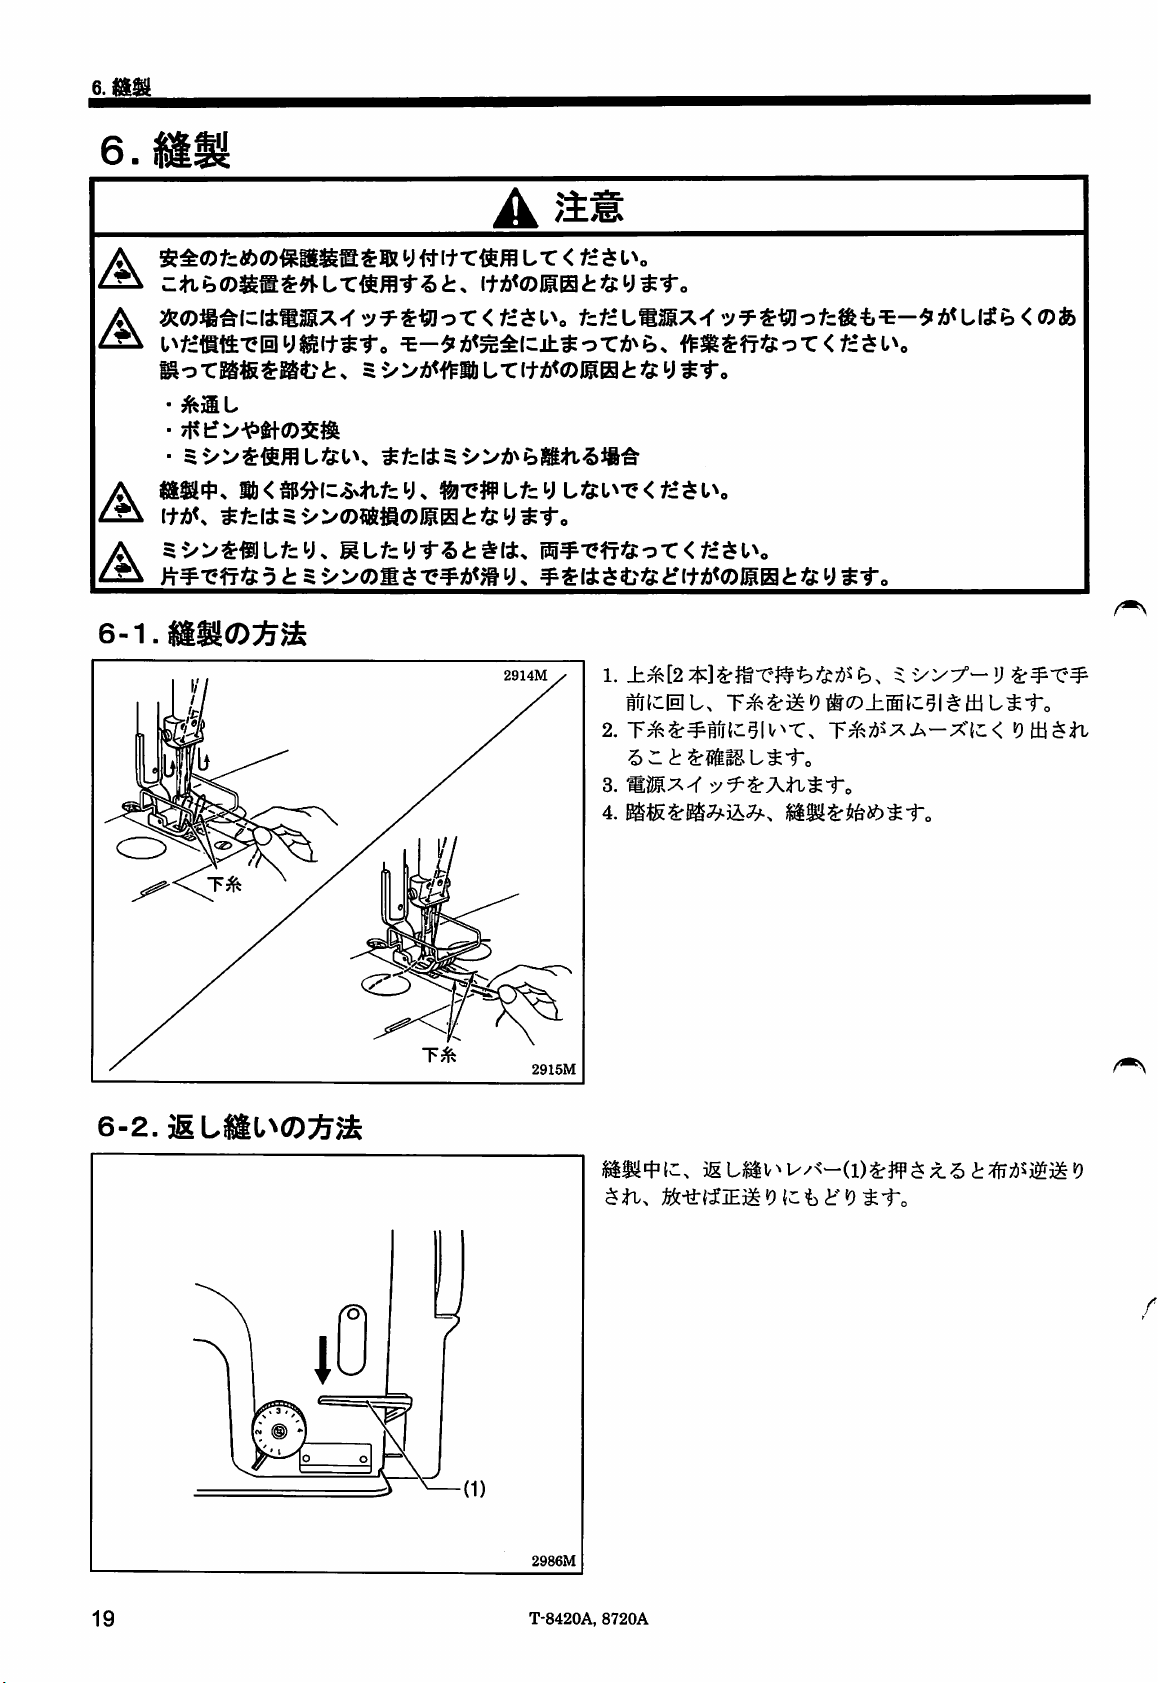
6.
SEWING
6.
SEWING
Attach
Turnoffthe powerswitchat the
A
The machine may operate ifthe treadle is
A
A
6-1.
Sewing
A
CAUTION
all safety devices before using the sewing machine. Ifthe machine is used
injury
may
result.
a result of
•
When
• When replacing
• When not using
the
motor's inertia. Wait until
threading
the
the
the
needle
bobbin
machine
following
and
and
times. The motor
the
motor
depressed
needle
when leaving
will
keep
stops
fully before starting work.
by mistake, which could result in injury.
the
machine unattended
turning
without
these devices attached,
even after the poweris switchedoffas
Do not touch any of the moving parts or press any objects against the machine while sewing,asthis may result in
personal
Use both
is
used,
injury or
hands
the
weight of
damagetothe
to hold
the
the
machine
machine.
machine
head
head
when tilting it back or returning it to its original position. Ifonly
may
cause
2914M
your hand to slip,
1. While holding
the
threads
2. Pull
out
3. Turn on
4.
Depress
and
machine
come
the
lower
smoothly.
the
the
your hand may
the
two
upper
pulley by
out
onto
the
threads
power
treadletostart
toward you
switch.
get
threads
hand
toward you until
feed
dog.
sewing.
caught.
with
and
check
your
that
one
hand
fingers, turn
the
lower
they pull
6-2.
Backtacking
Lower
thread
Lower
thread
2915M
When
the
reverse lever (1) is
feed
direction willbereversed.
direction
will
returntonormal.
pressed
When
during sewing,
it is
released,
the
the
feed
2986M
19
T-8420A,
8720A
Page 65

6-3.
Sewing
condensed
I
Sewing
stitches
direction
6.
SEWING
If you press the reverse lever (1) while sewing is In
progress, you
small stitch lengths.
Before carrying out sewing,
condensed
can
sew
stitches (forward direction) with
stitchesasfollows.
set
the stitch length for
Locked
Unlocked
Condensed
I
stitches
2987M
2988M
<Settlng>
1. Unlock
lever (2) to
2. Turn
used
3.
Loosen
touches
4. Tighten
<Sewlng>
1. Return
normal
2. Turn
stitch length dial (3).
3.
Start
4. At
condensed
the
stitch length dial (3) by turning
the
right.
the
stitch length dial (3) to
for
condensed
the
screw
the
reverse
the
screw
the
stitch length dial (3) to
sewing.
the
dial lock
sewing.
the
position
stitches,
(Condensed stitches
is being
To
stop
pressed.)
sewing
backtack function, lower
touch
the
reverse
the
stitches.
(4)
and
lift up
the
stitching
(4) to
lever
where
press
are
condense
stitching lever plate (6).
lever
plate
secure
the
(2) firmly to
you would like to
the
reverse
sewn
while
stitches
the
and
stopper
stitch length to
stopper
(6).
stopper
(5).
the
stitch length for
the
left to lock
lever
(1).
the
reverse lever (1)
retumtousing
(5)sothat it
the
dial lock
(5) until it
start
does
be
the
sewing
the
not
2989M
T-8420A,
8720A
20
Page 66

7.
THREAD
7.
THREAD
7-1.
Adjusting
Good
even
TENSION
stitches
TENSION
the
thread
0572M
tension
Upper
Lower
thread
thread
<Latch
<Bobbln
type>
case
Becomes
type>
weaker"
Upper
0573M
0574M
> Becomes stronger
lower
Upper
or
lower
thread
thread
thread
thread
tension too
tension
too
tension
tension
2990M
weak
strong
too
too
<Lower
Turn
strong
weak
thread
Turn off
lower
even
the
before
The
depressed
the
adjusting
or
motor's
Increase
Decrease
Decrease
Increase
tenslon>
A
CAUTION
the
power
switch
thread
tension.
after
the
power is switched offasa result of
inertia. Wait until
starting work.
machine
may
by mistake, which could
screw
(1) to adjust.
the
upper
the
the
the
lower
The
motor
operate
lower
upper
before
the
thread
thread
thread
thread
will
motor
if
adjusting
keep
the
result
tension.
tension.
tension.
tension.
tuming
stops
treadle
in injury.
the
fully
is
2923M
21
Becomes
Becomes
weaker
(2)
stron
^^^es
I
Becomes
Becomes
Becomes
weaker
stronoer—
stronger
weaker
2924M
T-8420A,
<Upper
After
upper
1. Lower
2. Adjust by turning
8720A
thread
the
tenslon>
lower thread tension
thread tensionsothat a good,
the
presser
the
foot.
tension nut (2).
has
been
adjusted, adjust
even
stitch is obtained.
the
Page 67

7-2.
Adjusting
the
presserfoot
pressure
7.
THREAD
TENSION
Correct
stitches
1 li
Becomes
weaker
0894M
0895M
0896M
0897M
Becomes
18mm-47mm
Upper
Skipped
Uneven
Stitches
stronger
thread
stitches
stitch length
are
occur
puckered
The
presser
but strong
foot
pressure
enoughsothat
(Referto"Adjusting
guide
to adjustment.)
1.
Loosen
2. Turn
foot
3. Tighten
the
the
pressure.
the
Reference
For
medium-
For
adjusting
presser
adjusting
adjusting nut (1).
values
Use
For
foundation
light-weight
materials
heavy-weight
materials
Increase
Decrease
the
the
pressure.
pressure.
should beasweakaspossible,
the
screw
nut
weight
material
height"inthe
(1).
screw
and
does
(2) to
Adiusting
Approx.
Approx.
Approx.
not slip.
table
adjust
screw
34mm
34mm
29mm
tielow
the
presser
height
as a
2925M
T-8420A,
8720A
22
Page 68

7.
THREAD
7-3.
<For
TENSION
Adjusting
non-foundation
the
thread
speclficatlons>
take-up
amount
2928M
The
passed
thread take-up
through
the
amount
thread amount adjuster (1).
is adjusted by how
the
thread is
Do not
thread
<For
Pass
through.
pass
the
through.
foundation
the
thread
speclficatlons>
Center
<Using
adjuster
For
non-foundation
Do not
(1).
Loosen
adjuster
For
foundation
Pass
the
pass
(1) to
thread
the
standard
(1)>
specifications
the
thread
the
screw
the
right-side position.
specifications
through
through
(2)
and
the
thread
the
slide
amount
thread
thread
the
amount
thread
adjuster
amount
adjuster
amount
(1).
The standard position of the thread amount adjuster (1) is
when
the
screw
<Adjusting
When
the
thread
amount
less
right.
It is
amount
when
better
adjuster
the
adjuster
(2) is in
the
thread amount adjuster (1) is moved to the
nottopass
has
(1),
(1):
the
centerofthe
thread
been
the
thread
the
take-up
passed
take-up
thread
adjustment range.
amount>
through
through
amount
the
becomes
the
thread
thread
• When sewing heavy materials using a sewing machine
with foundation specifications
• When the thread take-up amount is not enough, such
when
the
stitch length is
increased
as
2929M
It is
bettertopass
adjuster
(1):
• When sewing with slippery threads such
yarns
• When sewing light materials
• When sewing with a stitch length of 2 mm or
• When sewing under
the
thread
any
of the
through
above
the
thread
amount
as
synthetic
less
three conditions
you would like to prevent skipped stitches, thread
tightening problems suchaslooping,or thread breakages
and
23
T-8420A,
8720A
Page 69

8.
CLEANING
8.
CLEANING
Turn offthe power switch before carrying out cleaning. The motor
offasa result of the motor's Inertia. Walt untilthe motor
A
The machine may operate Ifthe treadle Is depressed by mistake, which could result In
Be
0
suretowear
Into your
protective goggles and gloves when handling the lubricating oil and grease, so that they do not get
eyes
or ontoyour skin, otherwise Inflammation
Furthermore, do not drink the oil or
diarrhea.
Keep
the
oil
outofthe
Use both
used,
Is
8-1. Daily
The
following cleaning operations should be carried out
ensure
a long
Furthermore, if
before
usingItagain.
hands
the weight of the machine
cleaning
service
the
life.
sewing
reach
to hold
the
procedures
machine
of children.
machine
head
has
not
A
CAUTION
will
stops
fully
before starting work.
keep turningeven after the power is switched
injury.
can
result.
eat
the
grease
head
when tilting Itback or returning It to Its original position. Ifonly
may
cause
been
used
under any circumstances,asthey can
your hand to slip,
each
day
Inorder to maintain
for a long period of time, carry
and
your
the
hand
may
get
performance of this machine
out
the
following cleaning
<Cleanlng>
1. Turn
2.
3.
4.
5. Install
up
stop
Open
Remove
Clean
the
machine pulley to move
position.
the
slide
platesatthe
the
bobbin.
the
thread
scraps
the
bobbin
(and
the
from
bobbin
left
the
cause
caught.
the
needletothe
and
right.
rotary hook.
case).
vomiting and
one
hand
and
procedures
needle
to
'^1
2930M
2g9lM
<Filling
Use
10N; VG10) specified by Brother.
* Ifthis type of lubricating oil is
oil to
1. If
reference line (2) of
add
the
oil
only
the
lubricating oil (Nisseki Mitsubishi
useis<Exxon
the
lubricating oil level
more
oil.
(Refer
tank>
Mobil
the
to p.11.)
difficult
Essotex
oil
to obtain, the recommended
SM10:
VG10>.
drops
gauge
window (1), be
<Checking>
1. Replace
2. Check that the upper threads have
correctly. (Referto
3.
Carry
the
needle if it is bent or if
page
outatest
sewing.
the
17.)
Sewing
below
the
tip is broken.
been
Lube
bottom
sure
threaded
to
2992M
T-8420A,
8720A
24
Page 70

8.
CLEANING
8-2.
Lubricating
via
the
oil
cover
<Draining
lubricating
1. if the oiler (1) has
disposeofthe
2.
Screw
the
oiler (1)
3002M
(every6months)
<Minimum
Pour
lubricating oil into
months.
<Semi
Pour
grease
dry
type>
lubricating oil into
is applied.
filled
withoil, unscrew the oiler (1) and
oil inside it.
back
into
lubrication
the
oil
the
oii>
cover
oil
the
oil pan.
type>
cover
(1)
about
(1)
aboutasoften
once
every
six
as
2g93M
Use
only
the
lubricating oil (Nisseki Mitsubishi Sewing Lube
10N: VG10) specified by Brother.
* If this type of lubricating oil is difficultto obtain,
oil to
useis<Exxon
1.
Tilt
back
2.
Pour
reaches
3. Return
the
lubricating oil into
the
the
Mobil
Essotex
machine
reference line (2). (Refer to p.11.)
machine
head.
head
SM10;
VG10>.
the
oil
cover
(1) until
to its normal position.
the
recommended
the
oil level
25
T-8420A,
8720A
Page 71

8.
CLEANING
8-3. Applying
grease
-When
the
GREASE Indicator illuminates (Semi dry type)
ifthe GREASE indicator (1) illuminates and the buzzer sounds
apply
grease
to the sewing machine. Apply
<Rear>
o ©
POWER
nu<p(DH&a.
Whontho lamp When tho lamp tflumavatesand (ho alarm sounds, the specified
Eurnnatos during must bo rcplenlshod. Ifoporstion to oortttnuedwithout
the operationonly, an ocddont mightbe caused.
Cuaidotittr!)pnse
endfindesobdmb lubricanteespedOcado. S secondrtuausandosinlubricar,se podrfacausar
«l
LndonatnenDaunooddorte.
sAoaflaaqm.gi-sffiMiasDnAa.
Cu8ndototomp8rBseeneiervtoysuonat8elarma.8edsbeagte88rel
(Consutte el Manual do instrucdortes.)
grease
GREASE
(See
tftotrucflonmarHisL)
whilereferring to the
(caisinsevBi)
grease
grease
replenishing,
each
time the treadle is depressed, it means that it is time to
following
page.
Buzzer
2994M
<To
continue
1.
Press
(Thebuzzer
the
sewing
RESET switch (2) for approximately
will
stop
sounding
*Use an object witha sharp pointto
2.
Sewing
buzzer
procedureonthe
* Ifyou continue to
problems
can
continue
will
start sounding again. If this happens, apply grease and then reset the alarm display by
with
following
use
the
sewing
inthis
page.
the sewing machine after carrying out the reset procedure but without applying grease,
temporarily
butthe
condition,
machine
GREASE
firmly
butifthe
may
without
one
second.
indicator
applying
(1)
will
remain
grease>
illuminated
push Inthe RESET switch(2) as far as it
cumulative
result.
sewing
machine
operating
even
will
time
when
the treadleIsdepressed.)
go.
reaches a
further10hours,
referring
2995M
the
to the
T-8420A,
8720A
26
Page 72

8.
CLEANING
<Applying
GREASE
(SA2694-001)
30
1.
Using
the
grease>
BZL-301
Blue
mm
tube
2934M
NOTE:
• Use only the
tube>
specified by Brother.
not
for
use
tube
use
any
the
grease.
with
the
• Do not
white
• Do
tube
with "Use only
specified by Brother".
Purchase
applying
grease
the
models
<BZL-301 (SA2694-001) in the
BZL-300 (SA2355-001)
this
sewing
BZL-301 (SA2694-001)
the
grease
except
grease
unit
machine.
for
<BZL-301 (SA2694-001 )>
(SA2693-001)
those
greaseInthe
greaseinthe
which
are
to
blue
blue
Indicated
use
for
2935M
2.
Applying
Follow
Li
Insert
(1) all
in
1. Turn
2.
Remove
3.
Apply
grease
the procedure belowto apply grease to the places Indicatedby arrows on the next page.
(2)
Grease
P"
the
tip of
the
nozzle
the
way into the hole
the
part.
the
power
switch to "OFF".
the screw
(2).
(Referto the nextpage forgreasinglocations.)
grease to each of the holes
until
Apply
letting It spill out.
the grease
grease
overflows
without
slightly.
4. Tighten the screw (2) to push Inthe grease.
5. Use a cloth to wipe away any
(2).
6.
Apply
grease to all locations shown on the next page Inthe
7. Carry out the reset procedure given on the next page.
NOTE:
•
Once
the
grease
tube
has
tube, attach the cap securely and store the tube Ina cool dark place.
• The
grease
should be usedasquicklyaspossible.
• When using the grease again, remove any old grease from inside the
nozzle
first.
(Store the tube away carefully once the tube
grease remaining inside the tube may deteriorate, and this may affect its
performance.)
been
Tighten
the
excess
opened,
(2)
C=^
the
screwtopush
grease.
grease
from around the
remove
has
the
nozzle from
been opened, othen/vlse the
in
2936M
screw
same
lubricating
way.
the
2937M
27
T-8420A,
8720A
Page 73

Turn
the
screw
(1)
canbeseen.
Use
the
tip of a
apply 5-10 mm
block slider (2).
machine
pulley until
screwdriver
or similar to
beadsofgreasetothe
8.
CLEANING
the
slide
2gg6M
Pour
oil
into
<Resetting
(2)
A©
POWER
rawtn
<iD«o*A(T.
VNHniwiBip
MflpaNiBAO'tiFstttiACJiH
the
oil
coveratthe
the
cumulative
(3)
A-«i
GREASE
focAssutnttBOcaatevAr.
Vfteii»ebmpB«wwaw«ndr»ewiettndKeieipeoaidgFW*
HMUbMUpllK^llUBgOTlBHlBOai^WAwOWMlgl
•AiediMiNeMb*cauMd.(aMtnMwianfww^)
aAflavasmo(.ii-sH»xstfkM«.
kcncani*
MpadleMa.
a M
Md4ir«».
<Con««» cl Manuii d»
«ri
coninte
oatAU
uMMa
MkuedonM.)
GREASB
OKumatMD
Hn k
same
time.
operating
txother
UP
ALARM
(Refertop.11.)
time>
Once the
applications.
2.
<Checking
out
2gg7M
5-10mm
4
places
at top,
and
the
slide block (3)
follow
time
about5seconds
will
go.
right
the procedure
between
firmly
push in the
ggsgM
grease
until a
more for approximately
sound, and the reset
below
1.
Press
short
switch
grease
to
the
beep
once
has
reset
the
RESET switch (1) for
(about 0.5 seconds) sounds. (Release the
the
buzzer
* Use an object with a
RESET switch (1)asfarasit
Press
the
RESET switch (1)
5
seconds.
A long
procedure
beep
(about 2 seconds)
willbe carried out.
method
been applied,
cumulative
sounds.)
sharp
after
resetting>
bottom, left
of
point to
once
will
Ifonly the POWER indicator (2) illuminates when the sewing
machine is next
successfully.
used,
the
reset
procedure
has
been
carried
NOTE:
Ifthe reset procedure has not been carried out successfully, repeat steps 1 and 2 above.
If
the
GREASE
indicator
(3)does not
illuminate
and the buzzerdoes notsound when the
RESET
operate the sewingmachinefor morethan 30 seconds, and then carryout the reset procedureagain.
The
RESET
switch
(1)shouldnever be pressed exceptwhen
T-8420A,
carrying
8720A
outthe reset procedureaftergrease
switch
(1) is pressed,
application.
28
Page 74

9.
ADJUSTING
9.
ADJUSTING
THE
AMOUNT
ROTARY
HOOK
LUBRICATION
THE
AMOUNT
ROTARY
A
CAUTION
HOOK
LUBRICATION
« Be careful not to touch your fingers or the lubrication amount check
^
A
Use
when
2998M
hookorthe
result.
the
following procedure to
changing
More
01
the
feed
sewing
|0|
Less
oil
mechanism
check
speed.
when
checking
the amount of oil being supplied to
-d)
f)
the
amountofoil
[9-14mm
2942M
<Guldetolubrication
1.
Tilt
2. Turn
within
<Checking
1. Turn off
2.
Remove
to
3.
Remove
4. Use
5. Turn on
6. Run
approximately 1 minute without sewing
(following the
sewing).
7. Place the lubrication amount check
the
hook), and hold it in place while running the sewing
machine at the normal sewing
seconds.
lubrication amount
8. Check the amount of oil which has spattered onto the
Spattered
oil
sheet.
sheet
against moving parts suchasthe rotary
suppliedtothe
the
rotary hook when replacing
back
the
the
oil adjusting
9-14
mm.
the
the
the
the
needle.
the
the
lifting
the
the
machine at the normal sewing
machine
lubrication
power
thread
needle
lever to lift
power
same
rotary
adjustment>
head.
screw
amount>
switch.
from all points from
and
the
the
switch.
start/stop patternaswhen actually
rotary hook (the right side is
(Any type of
check
sheet
hook,
(1) to
bobbin.
presser
paper
otherwise
adjust
foot.
injury
the
rotary hook or
the
height
the
thread
any
sheet
(2) to the left of
the
right side of the rotary
speed
for approximately 8
can
be
used
(2).)
to
take-up
speed
material
as
may
for
the
<Adjustlng
1.
Tilt
back
the
the
machine
lubrication
head.
amount>
2. Tum the adjusting screw (1) to adjust the lubrication
amount.
• If the rotary hook adjusting screw (1) is turned
Too
much
Correct
Too
little
counterclockwise,
greater.
the
• If the rotary hook adjusting screw (1) is turned
clockwise,
the
lubrication
3. Check the lubrication amount again according to the
procedure given in "Checking
above.
* Turn the adjusting screw (1) and check the lubrication
amount
correct.
repeatedly
until
4. Check the lubrication amount again after the sewing
3000M
T-8420A,
machine
8720A
has
been
used
for approximately two hours.
lubrication
amount
the
the
lubrication
amount
becomes
lubrication amount"
becomes
smaller.
amount
is
Page 75

10.
TROUBLESHOOTING
10.
TROUBLESHOOTING
Please
check
Ifthe
following
purchase.
Turn off
turning
A
starting
The
machine
Items with a In
Problem
Upper
thread
the following points before calling for repairs or service.
remedies do not fixthe problem, turn offthe power switch and consult a qualified technician or the place of
A
CAUTION
the
power
switch
and
even
after
the
power is switched offasa result of
work.
may
operateifthe
the
"Page" column should only be
is not tight.
disconnect
treadleisdepressed
Has
Is
the
Is the thread take-up spring operating
the
checked
the
thread
If
the
threadisthreaded
upper
thread tension or lower thread tension too
Adjust
the
Lower
the
power
cord before carrying
the
motor's inertia. Wait until
by mistake, which could result in injury.
out
by a qualified technician.
Possible
been
threaded
upper
thread tension or lower thread tension.
position of
the
cause
incorrectly?
incorrectly,
range
stopper.
thread
too small?
troubleshooting.
the
motor
it correctly.
weak?
The
stops
motor will
fully before
Page
15-17
21
keep
Lower
thread
Loops
appearinseam.
is not tight.
0573M
0574M
0977M
If using a sewing machine with medium-weight material
specifications, poor thread tightening may occur depending on
type
of material
In
such
cases,
the
underside, or replace
Is
the
thread path not smooth
Use a file with a fine grain or
thread
Is
the
bobbin
Pull
the
Is the thread take-up
Adjust
being
sewn.
replace
the
presser
the
feed dog with a grooved feed dog.
Slot
enough?
path.
not
out
turning
the
lower
threadtocheck
smoothly?
thread tension, or replace
amount
the
thread take-up amount.
too large?
foot with
one
sandpaper
that
thereisno
the
bobbin or bobbin
that
has
to poiish smooth the
the
slots on
Grooves
2944M
slackness
case.
in
23
T-8420A,
8720A
30
Page 76

10.
TROUBLESHOOTING
Skipped
while
sewing
stitches
occur
2945M
Skipped stitches at sewing
start
Thread
sewing
unravelling
start
Is
the
needle
tip
bent?Isthe
If
the
needle
tip is
Is
the
needle
properly
Ifit is incorrect, install
the
machine
Is
Ifit is incorrect,
Is
the
presser
Adjust
Is
the
needle
Replace
Is
the
presser
Adjust
Is
the
thread
properly
foot
the
presser
too
the
foot
the
height of
take-up
thread
pressure
thin?
needle
too
spring
Adjust the tension of
the
thread take-up
Is
Adjust
the
Is
the
thread take-up spring tension too strong?
Reduce
at
Is
the
Raise
Is
the
Set
Is
the
short?
the
thread take-up spring operating range too large?
the
thread
lake-up
the thread take-up to its highest positionat the sewing start.
length of the upper thread trailing from the needle hole too
amount
thread
tension of the thread take-up spring.
position of
at its highest position at
needle
bent
or broken,
installed?
the
threaded?
the
too
foot
pressure.
with a
high?
the
presser
too
the
too large?
take-up
the
tip blunt?
needle
correctly.
thread
weak?
needle
foot.
weak?
thread take-up spring.
amount.
stopper.
Pull about 50 mm of thread through
Is
the
sewing
Try using a
current
needle
start.
too
needle.
wide?
needle
with a
count
If sewing light or medium-weight materials, is a presser foot with
slots on the underside or grooved feed dog being used?
Useapresser
Use
a feed dog without grooves.
foot without
slots.
replace
correctly.
thatIsone
the
the
thatisone
the
needle.
rank
thicker.
sewing start?
needle hole at
lower
than
14
15-17
22
23
17
the
17
the
2946M
Grooves
Slot
•
2944M
31
T-8420A,
8720A
Page 77

10.
TROUBLESHOOTING
5
Uneven
Large
(excess
Material
Problem
seam
degree
tension)
slippage
2948M
of puckering
2949M
Is
Is
Is
Is
the
the
the
the
presser
Adjust
feed
Adjust
bobbin
If
the
replace
V-belt
foot
pressure
the
presser
dog too low?
the
feed dog height.
scratched?
bobbin is
damaged,
it.
tension
too
Possible
foot
low?
too
weak?
pressure.
smooth
cause
It withanoiled
Adjustsothat there is 10-14 mm of deflection In
when
it is
Is
Is
Are
Is
Is
Is
Is
the
the
the
the
the
the
upper
Make
lower
Make
the
thread
Make
thread
Move
presser
Adjust the
thread
Adjust
presser
Adjust
pushed
thread tension too
the
upper
thread
the
lower
take-up
the
thread
take-up
the
stoppertoas
foot
take-up
the
foot
the
with a finger.
strong?
thread
tensionasweakaspossible.
tension too
thread
spring
take-up
spring
strong?
tensionasweakaspossible.
tensions
spring
tensionasweakaspossible.
operating
high a positionaspossible.
pressure
presser
foot
amount
too strong?
pressure.
too
small?
thread take-up amount.
pressure
presser
too
strong?
foot pressure.
too
range
strong?
too
large?
grindstone
the
V-belt
Page
22
or
21
21
22
23
32
2950M
Lower
threadistangled
the
sewing
start.
Spinning of bobbin during
thread
trimming
Lower
thread
2951M
at
Is the bobbin spinning direction correct when the lower thread is
being
pulled?
Set
the
bobbinsothatitturnsinthe
rotary hook.
Is
there
too
much
wound onto the bobbin?
The
amount
Is
the
bobbin winding
should
more
that80%.
bobbin turning smoothly?
If
the
bobbin is not turning smoothly, replace
Is a bobbin other that
being
used?
Use
only bobbins which
thread
not
be
the
light-alloy bobbins specified by Brother
are
specified by Brother.
opposite
•.
direction to
^ — 80%
the
bobbin.
the
2124M
16
15
16
T-8420A,
8720A
32
Page 78

10.
TROUBLESHOOTING
Upper
are
Problem
and
breaking.
lower
threads
Is
Is
the
the
needle
Replace
needle
bent
the
properly installed?
or is
needle
Possible
the
ifit is
Ifit is incorrect, install
the
machine
Is
Ifit is incorrect,
Is
the
oil
If
the
add
Is
the
upper
Adjust
Is
the
rotary hook blocked with
Clean
the
upper
Is
operating
Adjust
Is
the
rotary hook, feed dog or other part
Ifthey
replace
Is
the
thread
If
the
replace
Is
the
thread
0471M
10
Broken
needles
Adjust
Is the material being pushed or pulled with excessive force during
properly
threaded?
thread
tank
filled with lubricating oil?
level of lubricating oil is below
more
oil.
or lower
the
the
thread
rangeistoo
the
are
the
path
thread
upper
threadorlower
rotary hook.
maybeloose
small?
position of
damaged,
damaged
damaged?
the
thread path is
the
damaged
take-up
the
thread
amount
take-up
cause
needle
tip
broken?
bent
or broken.
the
needle
correctly.
the
thread
correctly.
the
tension
too
dustorthread
because
weakortoo
thread
tension.
scraps?
the
bottom
thread
reference
strong?
take-up
line,
spring
stopper.
damaged?
smooth them with an oiled grindstone or
parts.
damaged,
smooth it with
sandpaper
part.
correct?
amount.
Page
14
15-17
11
21
24
or
23
sewing?
Is
the
needle
blocked?
Replace
Does
the
V
\
dog?
Check the needle drop position. Ifthe needle
the
/
dog.
If
correct
Caution
needle
center of
the
needle
position.
bent, is
the
needle.
drop into
the
the
needle
the
tip broken, or is
centerofthe
needle
the
hole in
does
needle
the
not drop into
needle hole in the feed dog, reinstall the feed
bar
has
rotated,
rotate
the
needle
bartothe
hole
14
feed
It is extremely dangerous to leave any pieces of broken
needle
sticking in
the
material. If
the
needle
breaks,
for all pieces untilthe whole of the needle is found again.
Furthermore, we recommend we recommend that through
steps
be taken to account for such needles to comply with
11
Machine
sewing.
stops
0469M
during
Is
product
the
Check
liability regulations.
power supply voltage too low?
the
power
supply.
(Ifthe power cord is too long or too many appliances are being
run from a single outlet, this may
in tum
cause
the reset function to activate and stop the
cause
voltage drops which
machine, even ifthe power supply itself is normal.)
The
33
12
GREASE
the
illuminates
sounds
depressed.
indicator
alarm display
and
the
buzzer
when
the
treadle
on
This is a notificationthat it is time to apply grease.
Apply
greasetothe
is
T-8420A,
sewing machine.
8720A
search
will
26
Page 79

T-8420A
T-8720A
Page 80

1.
S^ffifflWeiBSKSX
'eaE»iK".
0
(«sp.
(e«j4n.
tia«)Bsg*w
:£js«iBS*^
"»Jt"
'&m'
.
"smmm"
. )
.)
T-8420A,
8720A
Page 81

2.
W)wwififfiffl
*4|SIta, ^
Oasaiifi<)%^ai$fti9aaiie<i±io%
a#KPisiag!imwjEi«»<^. ^
3Ei;«aaia4
s'c
-sax:
0®ii;Sj3tJgiiiiMa#Ara5i5«sa^m.
OMSia*«4^
jfeSa.
jFSi,si8)ma<t#«S[sa.
A
43Kg,
^^Xl-^iijaBMAWAVft.
wsiiaas.
saanaisteaf^aiis.
inaasigai
A «)t=tisafizs45%-85%w?£Brt.
^^^aigSWSFlTffiffl.
A
afflR4a)ijtsi?aita<iPs^T.
A
?i-aasfeSMMW.
sa5«:Mflia±aT.
A
sfwaaesattaasigiittMa;
V St.
sJh.
^sastftasustffl+fTHSffa
JnSffifflffi'hWIfeWHtS.
=F«at?iSM3Epa
sfefflasjF*.
sfepia^wnfiiagiimM
#s.ia#rt
25mm
»)Ea@a'h«
#»a
wjih
o
A
^^®i^t«Tasew.
^ ii¥ai^WH®g!ittfl<i««7j-aa§#as
a.
-affliRTaffat^.
¥s^.
aKMaaaABB+aasaKx.
iiaaaaa^aaa.
&
i^!i!ij#fijSiiE[it
T-8420A,
8720A
Page 82

ffl.
m m
A
^7S±iEffl.
^ jasji5S8a®s±^aaffifflas!itt,
ffl
jrhMttwxffiffliS.
Aa-tessasataMSF.
(S)
Q A SSSS:t:^SSSiSSJ£
jinS7afi!#"Bgs.
ffiairS»Wig#»ABR»#^«ft
A
SJT5iJ1iaW,
•iiC5#aa»«(),«s^)S^±i?±g,waff<t
• lasam^a^ffiffl.
,„r,^
tatttaw
Kttwa^wfeK.
mWBrfeS.
aA^JFasiimw.
tati-M
•fS
tM
A
Siai«l«:®Ta!geW.
^
#¥S<^WB^4!!imW*«53-!tSS#aS
XF
^PaSi^aasaaifllM^T^ASKS.
••*
/R
«ffl5R¥iafTS<f.
eJEMWRt®.
±,
Jpma«as(li8?(l9F56W.
sste,
Mg!l«ia<f##aA
Aasom^tffiiTaigiew.
a¥s<tWBas!imw*a73-?i»s#as
a.
A
"
a?iigaasM®s.
^$h.
»Mif.
sRijdfiSBgiii
T-8420A, 8720A jji
Page 83

3.
A^m
A
CAUTION
Moving
parts may
Operate
Turn
off
main
threading, changing bobbin
and
needle,
cause
with safety devices.
switch
cleaning
injury.
before
etc.
2
(CQi
So
^
(1
(A)
(B)
(0
2955M
0
2954M
IV
T-8420A,
8720A
2956M
Page 84

2.
6.
1
2
3
Mtm
6-i.mtin
6-2.
6-3.
19
19
19
20
4.
4-1.
4-2.
J[in^:^jS
4-3.
4-4.^^i?JS^
5.
mmrni^m^
5-2.
5-3.
5-4.
5-5.
5-6.
5-7.
(^^M)
11
13
13
14
14
14
15
16
17
18
18
4
7.
Hgo^^
5
7-1.
7-2.
7-3.
8.
8-1.
8-2.
8-3.
9.
mmimm&imm
10.
GREASE
21
21
22
23
24
24
25
26
29
30
T-8420A,
8720A
Page 85

1.
#gi#gii!
1.
-saiitsis!
(1)
(3)
(5)
(7)
(9)
(15)
(16)
B.m
n-mmm
iftSltffiB
15®®
(ttff9cM)
(2)
(4)
(6)
(8)
(10)
(16)
T-8420A,
2957M
EMfi#
mm&^
ttS
8720A
Page 86

2.
MSomSSIS
BROTHER
INDUSTRIES,
T-8n20A-0
LTD.
m ^
—
m m
F 3 5
mn
0 3
4 7
mn
T-8420A
m M ^ m m ^
m ± ^ m
m m m ^
ffi ^ ¥
m ^
^ ^ ^ m ^
^ #i- ( D
T-8720A
P-
-
X 5 )
M M ^ ^
m ± ^ m
m m M m
^ ^
m m u ^
M}
a ^ ( D P X 5 )
-OOF
4,
000rpm
#9~#14
3,
-003
-03F
OOOrpm
4inm
-003
4,
OOOrpm
7inm
13mm
Imm
#11~#16
-033
3,
OOOrpm
-005
-005
3,
OOOrpm
5mm
#14~#22
3,OOOrpm
7mm
7mm
13mm
^
#11'-#16
1mm
#14~#22
T-8420A,
8720A
Page 87

3.
3.
^isa^J¥®iM3i40mm,
80.6
40.3
520.5
[-
117
1S9
<t>1S
223
4-29
80.5
16.S.
20
RIO
40.6
10
16
19.5
190
19.5
B.
0f«feS£fi0$4g5a?(i®ttMd?25iniilitJhSfc.
o
0
<^ji>
<^as6»va!i®»>
4,
000
rpm
3,SOOrpm
3, 000rpm
50Hz
60Hz
50Hz
60Hz
50Hz
60Hz
1200
SJh.
^Sjafi«ftfe§J^fflHJtI0S#aSR.
im.
100
^3i$fe90
^iif&70
65
i
2958M
#?IS
400W^3i
400W^3i
VMJ^^
46
45
45
44
44
43
T-8420A,
8720A
Page 88

4.
0
^ihSaiSi
^ JFJI.
tiS!i#is(nt##astt.
O «sft«ssiigmt^#!ikAHafT%nffi«. a agnm^tftiTatSigw.
tS'^
43K0,
S^HtifaaMAWAjfc
o
4.
ia%^3ig3!t
iL&OitLm.
2871M
2872M
T-8420A,
8720A
Page 89

4.
4-1.
1./1
2874M
(1)
(2)
(3)
(4)
2.um^m
(^)
(^)
(2>h)
(2^)
(1)
(2^)
(2)fr(4^)
0
2875M
(3)
(1)
(2)
(3)
m
(2^)
mm^n^
m>'
(3)
mx^umio
(3)
wmtm
2g60M
T-8420A,
8720A
Page 90

5.
(1)
(2)
4.
2S62M
2961M
<i)ISJ&liCff>
2.
fflEWfi#
(4)
*
ttTEM
(5)
(3)
(1)
.
mmn
(4)
, ^
u
f\>
2881M
3.
»MS
4.
tta!8tT(8)affi@=ff.
WfeEttff
5.
«=»««
6.
(6)
(6)
(9)
7. ( 10)
39
Srarae
8.
«aiial5!®tr
atft
(1)
W,
(ica.
9.
^Mt71h,
.
(7)
mmSPO^lmrn.
.
.
(10)
EM
(5)
««
iSfi-iSI?.
SkftW'fi±:&
(9)
tfK.
(7)
lOitim
iSHrtW
13mm
Wrt
T-8420A,
8720A
Page 91

4.
6.
(1)
(2)
istr
(2)
2964M
7.
mm
(1)
mm
(2)
iiff
gisaie^
m m
10-14mm
m
296SM
2g66M
8.
Vl!i6»
(1)
VMK®
ffl
5N6ti;'3iSE
ftas«(2)
9.
:?'J
10^14nmi&^
V 1
[21-]
itfi-iaa.»
)«)'♦'
=
(1)
KWffiffr
(2)
«ft(21-)
(2)—^
2967M
T-8420A,
8720A
Page 92

4.
2968M
1
(1)
(2)
0.
uMi£»:
(4^)
1 1 .
(1)
DMJgffiJ
(2)
T-8420A,
(3)
2970M
8720A
[2
[2
4^]
it]
Page 93

2971M
1
(1)
2.
2972M
#j^^^D(2)
(3)
N
SV
0mm
\>m
(1)
(1)
(2)
2973M
2974M
T-8420A,
8720A
Page 94

Jixtjipsh.
2975M
1
3.
SffiH
(1)
(2)
(3)
S^!^fr[4^:^?T]
(4)
mmmm
(4)
<cni>
4.
±b,
2976M
2878M
1
(3)
4.
mm
mmM
mmu)
mm
(4)
(2)
mmtm
(3)
m
T-8420A,
8720A
10
Page 95

4.
4-2.
^
•
*
ip?s:^35i
2S2Mi^.@o
trn^m'fmm.
A)±M
(Exxon Mobil ^^^fi^ESSOTEX
1.
2.
3.
ION;
VGIO)
SM10:VG10>
^^mmmm
}±®
•
=
.
(Do
(2) (3)
(4)
itm.
Mmm
er
2977M
4.
mwD^m
5.4#^ti]0m^^MIlIMli&o
(O
*
l^TW.
1.
2.
mm
3.
*
(3)
(O
(2)
^±mmm
(O
o
(4)
(itio
(5)
mrm
i
(5)
\>1TM,
(6)
im
2978M
11
T-8420A,
8720A
Page 96

4.
Page 97

4.
4-3.
1.
2.
mmm^i^rmmm,
(i)
/^\
4-4.
(ti-ff?cM)
2981M
(1)
POWER
POWER
Jg^'j:T
0t,
POWER
(2)
GREASE
(#Mm26K)
(1)
POWER
?§^'j:T
(^fe)
tg^']:T
(1)
(SEfe)
GREASE
(1)
tg^'j:T
(2)
13
T-8420A,
8720A
Page 98

5-1.
1?±g,
ass?(ie?(i?F3SW.
asitas(ii^##s
5.
5-3.
2897M
mmmnm'p.
^sttsef5rii?(iaittSt«#itt*4gs!iSB#±.
HJ»ig##«AasfMsisssttMSF
1.
2.
3.
&Sikminifyi3\'mmibm:s.
4.
5.
6.
KTMK®,
(1)
a-T1$Stt«3)ll
(3)
7.
8.
#«35»T.
JiiiiifeS
®£;£EW«
(2)
±.
(o
(1)
.
(3)
7041173
±«gs«.
ttaaiMig.
(4)
mmm
/*N
15
2123M
2124M
T-8420A,
*
8720A
(5),
(6)
Page 100

5-4.
A
5.
SSOmISSS:
aigSa)ig?!)?FScW.
4SS!ims(>lt##SEASSffi.
2898M
1.
2.
3.
4.
6.
•
m
(4)
fitJTSo
(2)
l^ =
mm.
BROTHER
(3)
mr.
imm
(5)
(i)
(2)
m^mmm-m
.
(4)
(1)0
2902M
50
mm
50
mm
2900M
1.
A1^^^S
2.
3.
4.
5.
6.
•
lliA^
BROTHER
(2)
(2)
F^o
(3),
(5)
. ^^4i±i^^50mmo
(6)
mr.
(4)
(1)0
mrm.
2999M
T-8420A,
8720A
16
 Loading...