

Page 1
S-6200A
THREAD WIPER DEVICE
扫线装置
DISPOSITIVO LIMPIAHILOS
CAUTION /注意/ ATENCION
Turn off the power switch and disconnect the power
cord before installing any optional parts.
The machine may operate if the treadle is
depressed by mistake, which could result in injury.
作业前请先关闭电源开关,并将电源插头从插座上拔
下。
当误按动起动开关时,缝纫机动作会导致人员受伤。
Desconectar el interrouptor principal y desconectar
el cable de alimentación antes de cambiar las
piezas opcionales. La máquina podría comenzar a
funcionar si por descuido se pisara el pedal, lo que
podría resultar en heridas.
4510M
Always be sure to turn off the power switch and
then wait one minute before opening the motor
cover. If you touch the surface of the motor or the
motor bracket, it may cause burns.
打开马达罩盖前,务必先关闭电源,等待一分钟后,
再执行操作。
触摸马达表面或马达架可能会导致烫伤。
Asegúrese de desconectar el interruptor principal y
luego espere un minuto más antes de abrir la
cubierta del motor. Si toca la superficie del motor o
la ménsula del motor, se podría quemar.
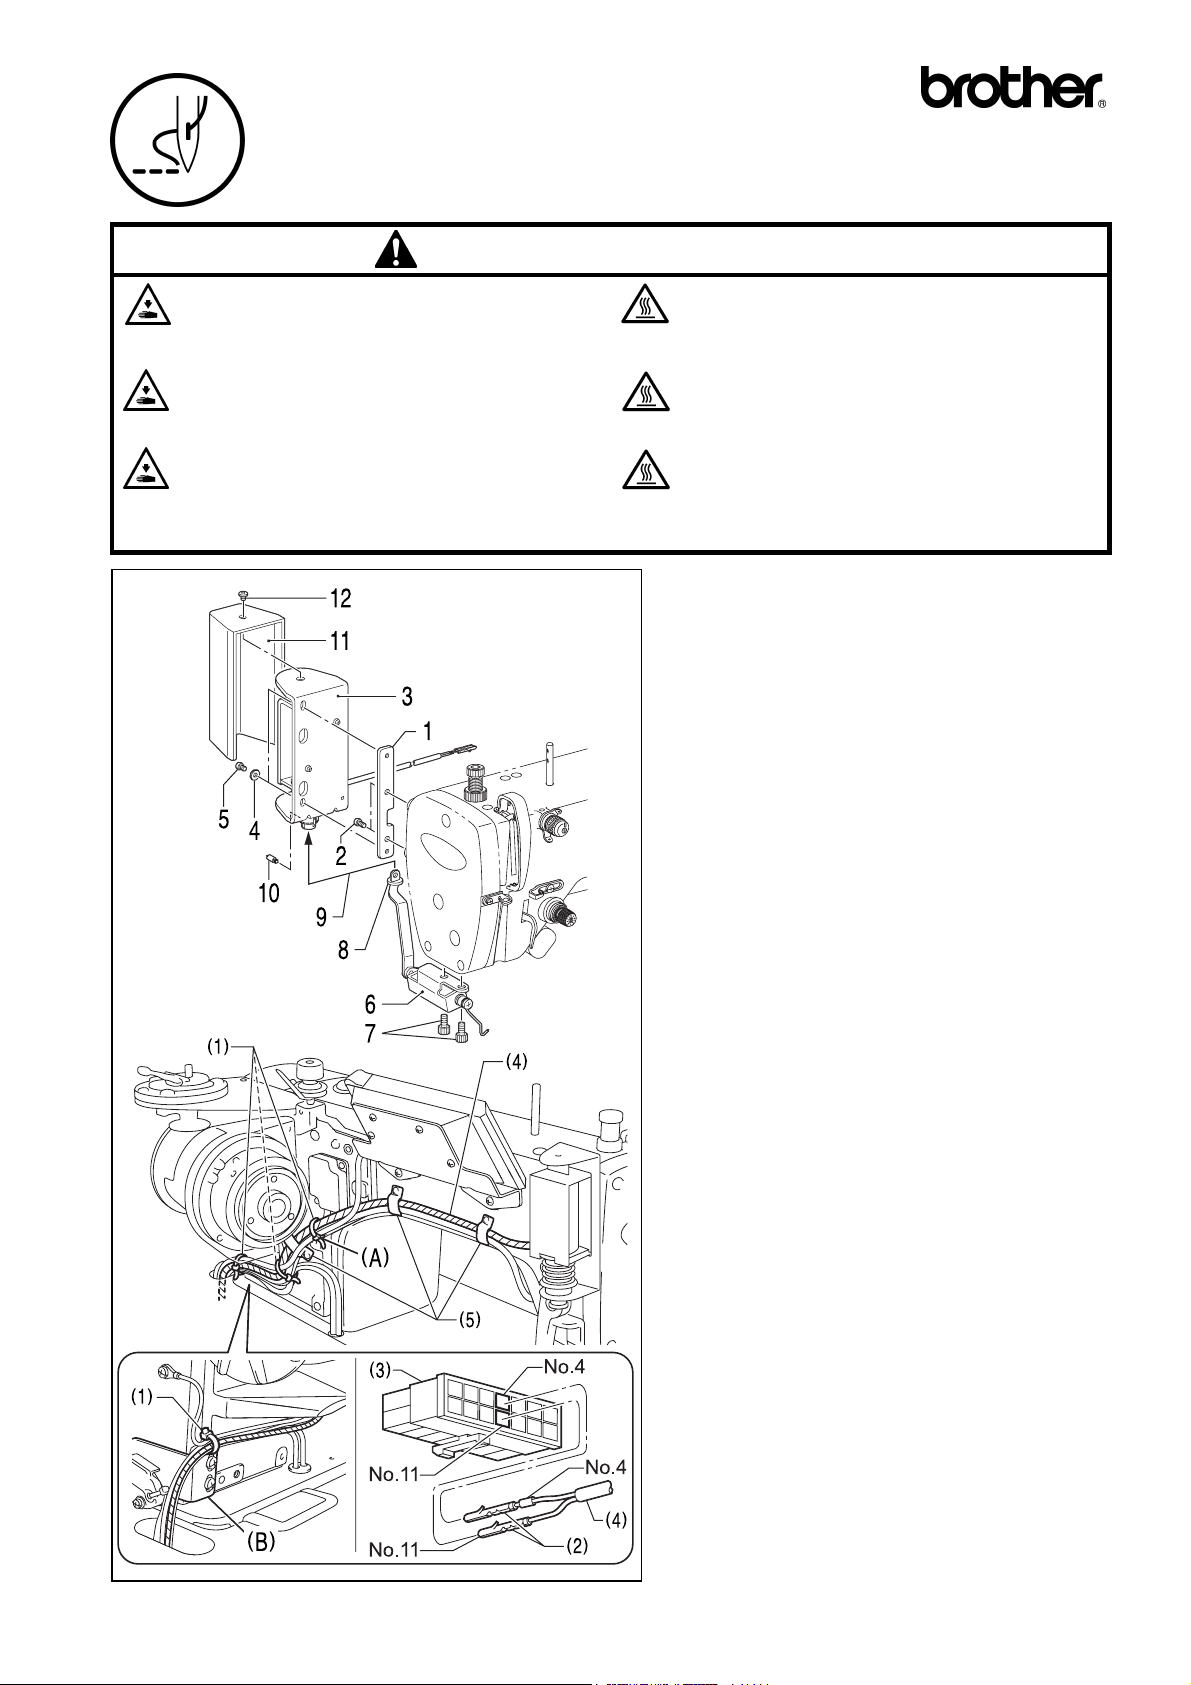
Installation
1. Remove the motor cover.
2. Install the thread wiper to the sewing machine
according to the sequence shown in the illustration.
* Adjust the thread wiper as indicated on the other side of
this page before installing the cover 11 and the screw 12.
3. Cut and remove the three bands (1).
4. Insert the terminal pins (2) into terminals No. 4 and
No. 11 of the 14-pin plug (3) according to the
numbers shown on the terminal pins (2).
5. Secure the cord (4) to the back of the sewing
machine with the three cord clamps (5).
6. Use the new accessory two bands (1) to bind the
cords together, and then secure it somewhere near
(A) and at the hole of the safety switch plate (6).
7. Install the motor cover.
安装方法
1. 取下马达罩盖。
2. 按图的顺序,将扫线装置安装到缝纫机上。
* 在安装盖 11 和螺钉 12 之前先按照本页另一边所示调整扫
线器。
3. 剪开并取下三个线夹(1)。
4. 根据插头上插针(2)上表示的 No.,将其插入到 14P 插
头(3)上的 No.4 和 No.11。
5. 使用缝纫机背面的电线夹(5)[3 个]将电线(4)固定。
6. 使用新的辅助线夹(1)将电线捆扎到一起,然后将其固
定在安全开关板(6)孔和(A)旁边的位置。
7. 安装马达罩盖。
Instalacion
1. Desmonte la cubierta del motor.
2. Instale el limpiahilos en la máquina de coser de
acuerdo con la secuencia que se indica en la figura.
* Ajuste el limpiahilos tal como se indica del otro lado de
esta página antes de instalar la cubierta 11 y el tornillo
12.
3. Corte y desmonte las tres bandas (1).
4. Inserte las clavijas de terminal (2) en los terminales
No. 4 y No. 11 del conector de 14 clavijas (3) de
acuerdo con los números indicados en las clavijas
de terminal (2).
5. Asegure el cable (4) en la parte de atrás de la
máquina de coser con las tres abrazaderas de cable
(5).
6. Use las dos nuevas bandas accesorias (1) para unir
los cables entre sí, y luego asegurarlos próximo a
(A) y en el agujero de la placa del interruptor de
seguridad (6).
7. Instale la cubierta del motor.
Page 2
Aligne
对齐
Alinee
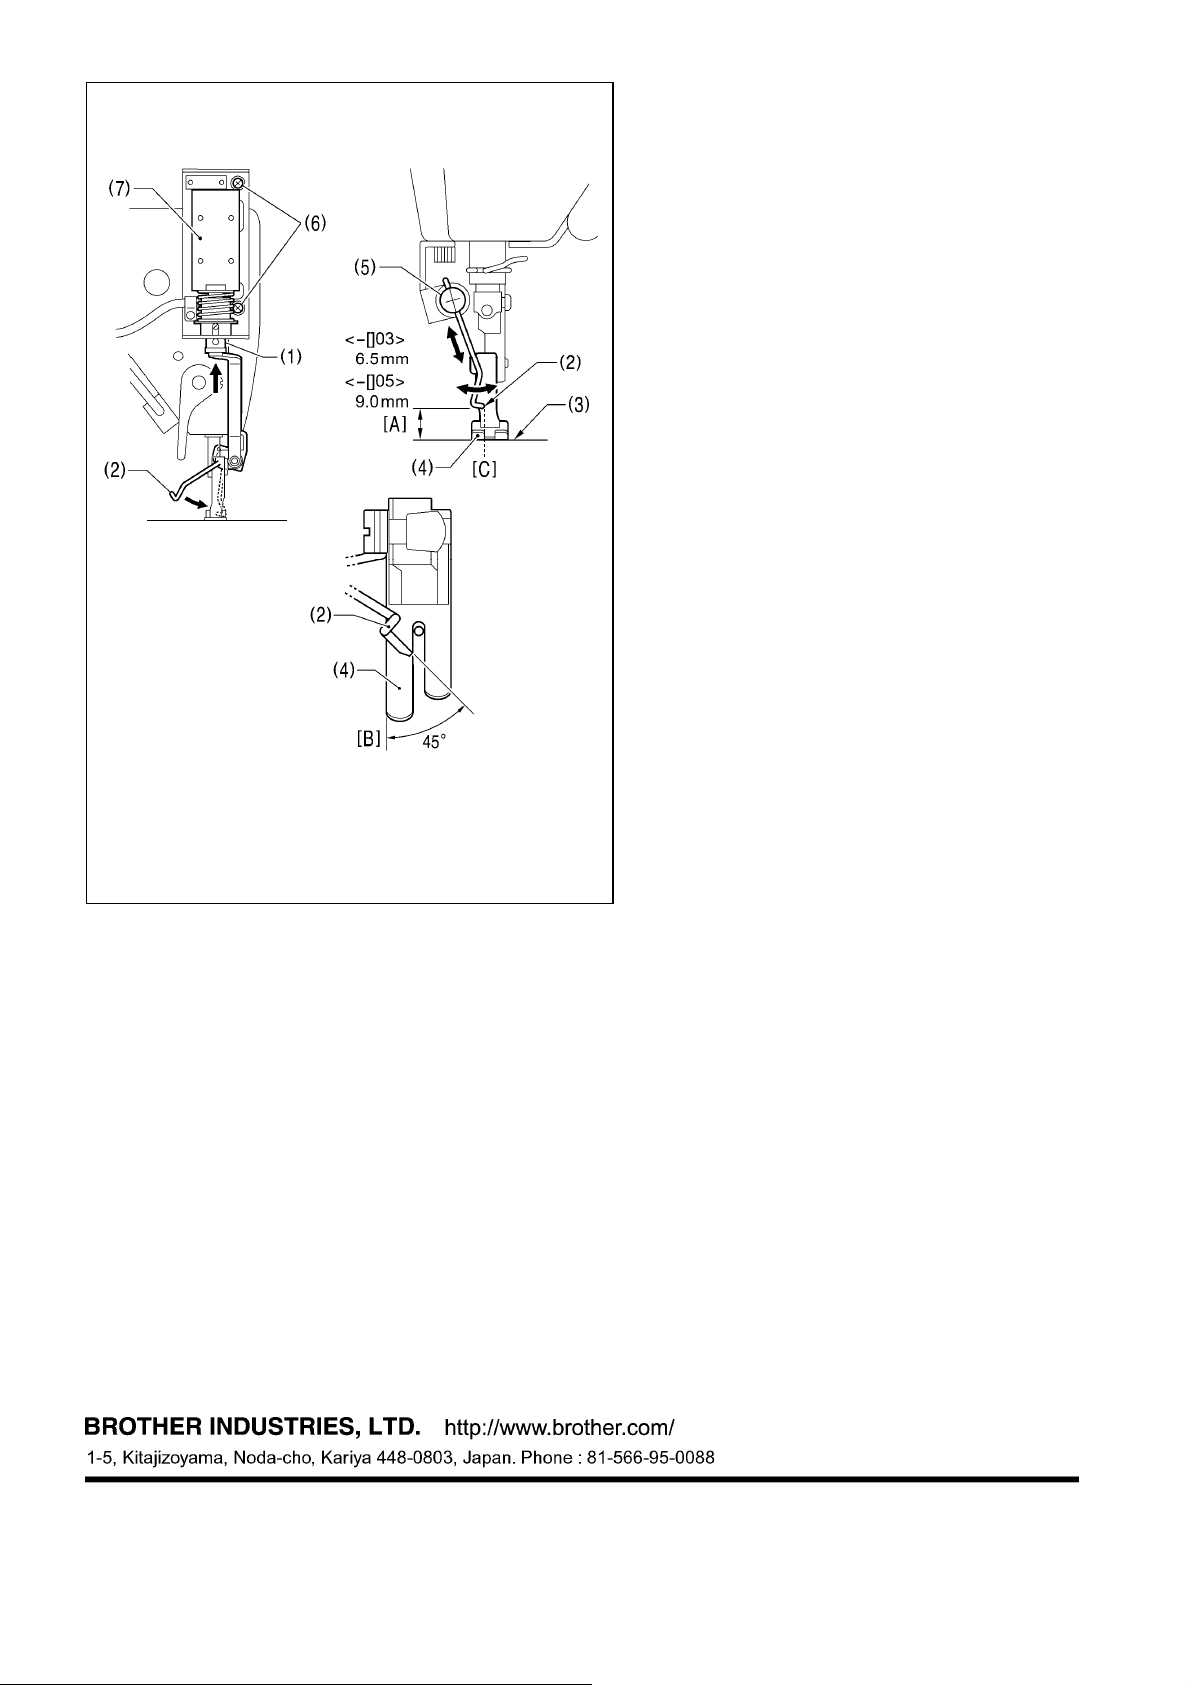
Adjusting the thread wiper
■Vertical position and angle
[A] Distance from end of thread wiper (2) to top of
needle plate (3) when solenoid plunger (1) is
pushed up as far as it will go
<-[]03> 6.5 mm, <-[]05> 9.0 mm
[B] Front edge of thread wiper (2) at angle of 45° to
presser foot (4)
1. Loosen the screw (5), and then adjust the thread
wiper (2) by moving it up and down and turning it.
2. Tighten the screw (5).
■Sideways position
[C] Front edge of thread wiper (2) aligned with left side
of groove in presser foot (4) when solenoid plunger
(1) is pushed up as far as it will go
1. Loosen the two screws (6), and then move the
solenoid (7) up and down to adjust.
2. Tighten the screws (6).
扫线器的调整
■上下位置和角度
[A] 将电磁铁柱塞(1)按到最上时的扫线杆(2)的尖端到针
板(3)表面的尺寸为
<-[]03> 6.5mm, <-[]05> 9.0mm
[B] 相对压脚(4)的说,扫线杆(2)的尖端的角度为 45°
1. 松开螺钉(5),将扫线杆(2)上下移动及回转进行调整。
2. 将螺钉(5)拧紧。
■左右位置
[C] 将电磁铁柱塞(1)按到最上时,扫线杆(2)的尖端和压
脚(4)上的槽的左边应一致
4468M
Ajustando el limpiahilos
■Posición y ángulo vertical
[A] Distancia desde el extremo del limpiahilos (2) a la parte superior de la placa de agujas (3) cuando el émbolo del
solenoide (1) se empuja hacia arriba tanto como sea posible.
<-[]03> 6.5 mm, <-[]05> 9.0 mm
[B] Borde delantero del limpiahilos (2) en ángulo de 45° al prensatelas (4).
1. Afloje el tornillo (5), y luego ajuste el limpiahilos (2) moviéndolo hacia arriba y abajo y girándolo.
2. Apriete el tornillo (5).
■Posición lateral
[C] Borde delantero del limpiahilos (2) alineado con el lado izquierdo de la ranura del prensatelas (4) cuando el émbolo del
solenoide (1) se empuja hacia arriba tanto como sea posible.
1. Afloje los dos tornillos (6), y luego ajuste el solenoide (7) moviéndolo hacia arriba y abajo para ajustarlo.
2. Apriete los tornillos (6).
1. 松开螺钉(6)[2 个],将电磁铁(7)上下移动进行调整。
2. 将螺钉(6) [2 个]拧紧。
© 2009 Brother Industries, Ltd. All Rights Reserved.
This is the original instructions.
Este es el original de las instrucciones.
Thread wiper device
SB1244-001
2009.12.ZC (1)
 Loading...