

Page 1
ITALIANO
FRANÇAIS DEUTSCH
Setup & Operation Guide
Introduction
STEP
1
printer
Before using the
STEP
2
(No PC)
You must set up the hardware and install the driver before you can use the printer.
Please read this manual before you use the printer. Keep the CD-ROM in a
convenient place so you can use it quickly if you need to.
Using only this printer
STEP
3
For WindowsFor Mac
Connecting to your PC
STEP
4
Troubleshooting
Maintenance and
Page 2
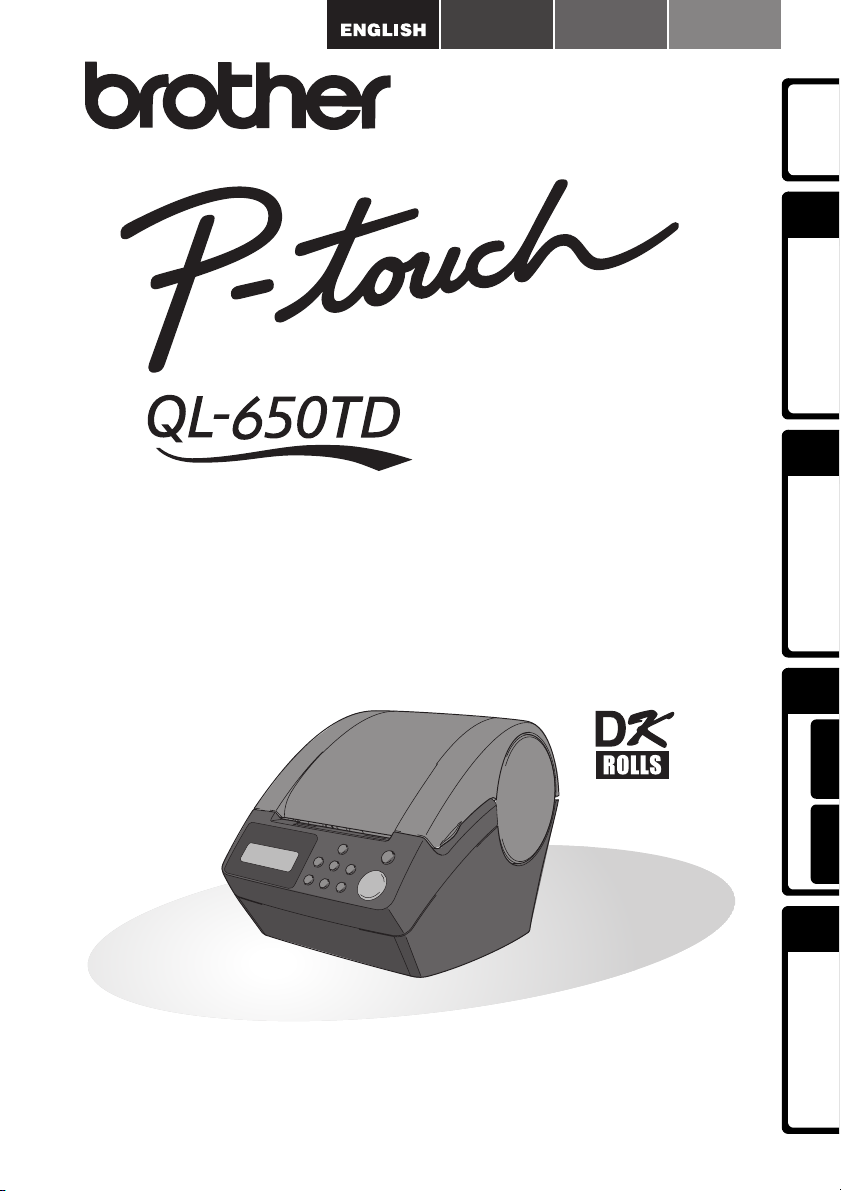
Congratulations on purchasing the QL-650TD.
Your new QL-650TD is a label printer that connects to your personal computer, enabling you to
quickly and easily print professional custom labels that you have created on your personal computer
using the label editing software provided.
We strongly recommend that you read this manual carefully before using your QL-650TD, and then
keep it nearby for future reference.
We provide service & support for users who register their products on our website.
We recommend that you take this opportunity to register with us by visiting us at:
Online User Registration
http://register.eu.brother.com/
Online Support Page
http://solutions.brother.com/
NOTE: It is also possible to access the above sites from the online user registration
window of the CD-ROM installer disk which is included with the printer. We look
forward to your registration.
• No part of this manual may be reproduced in any form, including photocopying or
reprinting, without prior consent.
• The rights and copyrights of bundled software (including but not limited to the program,
images, clip art, templates and text incorporated into the software) and attached
manuals and other documents, and any copies of the software, are owned by Brother
Industries, Ltd. and its suppliers.
Page 3
Table of Contents
Introduction ••••••••••••••••••••••••••••••••••••••••••••••••••••••••••••••••••••• 1
Manuals ••••••••••••••••••••••••••••••••••••••••••••••••••••••••••••••••••••••••••••••••••• 2
Symbols Used in this Manual ••••••••••••••••••••••••••••••••••••••••••••••••••••••••• 2
Safety Precautions •••••••••••••••••••••••••••••••••••••••••••••••••••••••••••••••••••••• 3
General Precautions •••••••••••••••••••••••••••••••••••••••••••••••••••••••••••••••••••• 6
STEP
1
STEP1
STEP1
STEP2
STEP2
Before using the printer••••••••••••••••••••••••••••••••••••••• 9
Parts Checklist ••••••••••••••••••••••••••••••••••••••••••••••••••••••••••••••••• 10
Parts Description••••••••••••••••••••••••••••••••••••••••••••••••••••••••••••••• 11
Main Printing Unit•••••••••••••••••••••••••••••••••••••••••••••••••••••••••••••••••••••••• 11
Connecting the power supply ••••••••••••••••••••••••••••••••••••••••••••••• 12
LCD •••••••••••••••••••••••••••••••••••••••••••••••••••••••••••••••••••••••••••••••••••••••• 13
Manual operation button ••••••••••••••••••••••••••••••••••••••••••••••••••••••••••••••• 15
Installing the DK Roll•••••••••••••••••••••••••••••••••••••••••••••••••••••••••• 16
Applicable DK Rolls ••••••••••••••••••••••••••••••••••••••••••••••••••••••••••••••••••••• 16
Installing the DK Roll•••••••••••••••••••••••••••••••••••••••••••••••••••••••••••••••••••• 16
Attaching the paper guide•••••••••••••••••••••••••••••••••••••••••••••••••••• 17
Setting clock/language/units••••••••••••••••••••••••••••••••••••••••••••••••• 18
Procedure for creating a label ••••••••••••••••••••••••••••••••••••••••••••••• 20
Creating and printing a label without using your computer •••21
Creating a label •••••••••••••••••••••••••••••••••••••••••••••••••••••••••••••••• 22
1.Selecting a template•••••••••••••••••••••••••••••••••••••••••••••••••••••••••••••••••• 22
2.Printing a label••••••••••••••••••••••••••••••••••••••••••••••••••••••••••••••••••••••••• 23
Other convenient functions •••••••••••••••••••••••••••••••••••••••••••••••••• 24
Editing a template: Menu 1/12 •••••••••••••••••••••••••••••••••••••••••••••••••••••••• 24
Changing the date used for templates: Menu 2/12 ••••••••••••••••••••••••••••••• 25
Preview the label content before printing: Menu 3/12 •••••••••••••••••••••••••••• 26
Specifying the number of copies: Menu 4/12 •••••••••••••••••••••••••••••••••••••• 27
Printing labels with label numbers: Menu 5/12 •••••••••••••••••••••••••••••••••••• 27
Printing a list of templates: Menu 6/12 •••••••••••••••••••••••••••••••••••••••••••••• 28
Setting the clock: Menu 7/12 •••••••••••••••••••••••••••••••••••••••••••••••••••••••••• 28
Setting Daylight Saving Time: Menu 8/12 •••••••••••••••••••••••••••••••••••••••••• 29
Cut the roll automatically when printing: Menu 9/12 •••••••••••••••••••••••••••••• 29
Setting the language: Menu 10/12 ••••••••••••••••••••••••••••••••••••••••••••••••••• 30
Set the unit of measure (inch or mm): Menu 11/12 ••••••••••••••••••••••••••••••• 30
Adjusting the contrast of LCD: Menu 12/12 •••••••••••••••••••••••••••••••••••••••• 31
Locking the Menu button••••••••••••••••••••••••••••••••••••••••••••••••••••••••••••••• 31
Uploading templates / messages from your computer ••••••••••••••••••••••••••• 31
Concerning the download of message •••••••••••••••••••••••••••••••••••••••••••••• 31
printer
Before using the
STEP
2
(No PC)
Using only this printer
STEP
3
For WindowsFor Mac
Connecting to your PC
STEP
4
STEP3
STEP3
Connecting the printer to your PC •••••••••••••••••••••••••••• 33
For Windows•••••••••••••••••••••••••••••••••••••••••••••••••••••••••••••••••••• 34
1. Software description ••••••••••••••••••••••••••••••••••••••••••••••••••••••••••••••••• 34
2. Notes on installation ••••••••••••••••••••••••••••••••••••••••••••••••••••••••••••••••• 35
3. Installing the software ••••••••••••••••••••••••••••••••••••••••••••••••••••••••••••••• 35
For Mac •••••••••••••••••••••••••••••••••••••••••••••••••••••••••••••••••••••••••• 39
Troubleshooting
Maintenance and
Page 4

1. Software description ••••••••••••••••••••••••••••••••••••••••••••••••••••••••••••••••• 39
2. Notes on installation ••••••••••••••••••••••••••••••••••••••••••••••••••••••••••••••••• 39
3. Software installation ••••••••••••••••••••••••••••••••••••••••••••••••••••••••••••••••• 40
STEP4
STEP4
Maintenance and Troubleshooting •••••••••••••••••••••••••• 45
Maintenance •••••••••••••••••••••••••••••••••••••••••••••••••••••••••••••••••••• 46
Print head maintenance •••••••••••••••••••••••••••••••••••••••••••••••••••••••••••••••• 46
Roller maintenance ••••••••••••••••••••••••••••••••••••••••••••••••••••••••••••••••••••• 46
Label outlet maintenance •••••••••••••••••••••••••••••••••••••••••••••••••••••••••••••• 47
Replacing the cutter unit ••••••••••••••••••••••••••••••••••••••••••••••••••••••••••••••• 48
Replacing the lithium clock battery••••••••••••••••••••••••••••••••••••••••••••••••••• 49
Troubleshooting •••••••••••••••••••••••••••••••••••••••••••••••••••••••••••••••• 51
Potential types of problems•••••••••••••••••••••••••••••••••••••••••••••••••••••••••••• 51
Error messages (what they mean) ••••••••••••••••••••••••••••••••••••••••••••••••••• 52
Reset the Printer••••••••••••••••••••••••••••••••••••••••••••••••••••••••••••••••••••••••• 53
Main specifications •••••••••••••••••••••••••••••••••••••••••••••••••••••••••••••••••••••• 54
Consumables list •••••••••••••••••••••••••••••••••••••••••••••••••••••••••••••••••••••••• 55
Page 5
Introduction
Compilation and Publication Notice
Under the supervision of Brother Industries Ltd., this manual has been compiled and
published, covering the latest product’s descriptions and specifications.
The contents of this manual and the specifications of this product are subject to change
without notice.
Brother reserves the right to make changes without notice in the specifications and
materials contained herein and shall not be responsible for any damages (including
consequential) caused by reliance on the materials presented, including but not limited to
typographical and other errors relating to the publication.
© 2005 Brother Industries Ltd.
Trademarks
The Brother® logo is a registered trademark of Brother Industries, Ltd.
Microsoft®, MS-DOS®, Windows® and Windows NT® are registered trademarks of
Microsoft Corporation in the U.S. and other countries.
®
Apple
, the Apple® Logo, Mac® and TrueType® are registered trademarks of Apple
Computer, Inc in the United States and other countries.
The printer includes the software module "USBPRINT.SYS" and "USBMON.DLL" in
which Microsoft Corporation wholly retains its rights and interests.
®
Adobe
Adobe Systems Incorporated.
, Adobe® logo, Acrobat® and Adobe® Reader® are registered trademarks of
1
Introduction
STEP
1
printer
Before using the
STEP
2
(No PC)
Using only this printer
STEP
3
For WindowsFor Mac
QR code is a registered trademark of DENSO WAVE INCORPORATED.
All other terms and brand and product names mentioned in this User’s Guide are
registered trademarks of their respective companies.
Shipment of the Printer
If for any reason you must ship your printer, carefully package the printer to avoid any
damage during transit.
We recommend that you save and use the original packaging. The printer should also be
adequately insured with the carrier.
Connecting to your PC
STEP
4
Troubleshooting
Maintenance and
Page 6
Introduction
2
Manuals
The following manuals are provided to help you use the printer correctly and to utilize its
features. Be sure to read this manual before using the printer.
Setup & Operation Guide (This manual)
Read this manual first.
It gives information which should be read before using the printer, such as cautions,
installation and setup, and the procedures for printing labels without using your
computer.
It describes the installation of the bundled software to be used on a personal computer.
It also explains how to clean the printer, and how to perform some troubleshooting.
Software User's Guide (PDF Manual)
It explains how to create labels using the software supplied with the printer, by installing it
on a computer before connecting the printer to the computer.
• To browse the Software User's Guide (PDF Manual), you need to install Adobe
• When using Windows
• When using Mac, refer to the PDF files in the [Manuals] folder on the CD-ROM
®
Reader
(For Mac
application when it is run from the CD-ROM.
Additionally, this manual may be viewed from the Start menu if it is installed on the
computer.
supplied with the printer.
or Adobe® Acrobat® Reader®.
®
, the standard "Preview" program bundled with the OS can also be used.)
®
, this manual can be viewed from the P-touch Setup
Symbols Used in this Manual
The symbols used throughout this guide are as follows:
®
This symbol indicates information or directions that should be followed. If ignored, the
result may be injury, damage, or failed operations.
This symbol indicates information or directions that can help you better understand
and use the printer more efficiently.
Page 7
Safety Precautions
To prevent injury and damage, important notes are explained using various symbols.
The symbols and their meanings are as follows:
Warning
Caution
The symbols used in this manual are as follows:
The incorrect setup icon alerts you to devices and operations that are not compatible with
the printer. (e.g. the figure on the left indicates a warning against disassembly).
The special instructions icon indicates operations to be carried out. (e.g. the figure on the
left shows removal of the power plug from the power outlet).
Tells you what to do to avoid the risk of injury.
Tells you about procedures you must follow to prevent damage to the printer.
3
Introduction
STEP
1
printer
Warning
The Printer
Follow these guidelines to avoid fire, electric shock, or other damage.
Do not disassemble the printer.
For inspection, adjustment and repair of
the printer contact the retail outlet where
the printer was purchased or your local
authorized service center.
Do not drop, hit or otherwise bang the
printer.
Do not hold and lift the printer by the DK
Roll cover. The cover could come off
and the printer could fall and become
damaged.
Do not touch any metal parts near the
print head. The print head becomes very
hot during use and remains very hot
immediately after use. Do not touch it
directly with your hands.
Do not allow the printer to get wet in any
way.
Do not use the printer with foreign
objects in it. If water or any foreign
objects should enter the printer, unplug
the power cord from the electric outlet
and remove the foreign object. If
necessary, contact the retail outlet
where the printer was purchased or your
local authorized service center.
Dispose of plastic bags correctly and
keep away from babies and children. Do
not wear or play with plastic bags.
Unplug the power cord immediately and
stop using the printer if you notice any
abnormal odor, heat, discoloration,
deformation or anything unusual whilst the
printer is in use or storage.
Before using the
STEP
2
(No PC)
Using only this printer
STEP
3
For WindowsFor Mac
Connecting to your PC
STEP
4
Maintenance and
Troubleshooting
Page 8
Introduction
4
Warning
Follow these guidelines to avoid fire, electric shock, or other damage.
Power Cord
Use only the authorized power source
(220 - 240 V AC) for the printer.
Use only the power cord included with
the printer.
Do not overload the power outlet socket
with too many appliances or insert the
power cord into a damaged outlet
socket.
Do not cut, damage, alter or place heavy
objects on the power cord.
Battery
Only use the correct type of battery for
the printer.
Do not attempt to disassemble, alter,
apply heat or expose to a direct flame,
direct sunlight or extremely high
temperatures and humidity.
Immediately flush with water any area of
the body that comes into contact with the
inner contents of the battery. Seek
medical assistance should the contents
come into contact with the eyes or
mouth.
Insert the battery ensuring the correct
polarity is observed.
Do not allow the battery to get wet.
Remove the battery from the printer
immediately at the end of its life.
Do not solder the battery directly.
Do not use the power cord if it is
damaged.
Do not handle the power cord or plug if
your hands are wet.
Ensure the power plug is correctly
inserted into the power outlet.
If the printer will not be used for an
extended period, remove the power
supply cord from the electrical outlet.
Use of incorrect batteries for this printer
may cause leakage or explosion, which
could result in fire, injury or damage to
the surroundings of the machine.
Dispose of used batteries according to
the instructions.
Do not short-circuit the battery terminals
with metallic objects.
The supplied battery is not
rechargeable. Do not attempt to
recharge it.
Keep the battery away from children.
Seek medical assistance immediately if
the battery is swallowed.
Avoid dropping or subjecting the battery
to severe impacts that can damage it.
Avoid subjecting the battery to
ultrasound vibration. This could cause
an internal short-circuit to occur.
Caution
Follow these guidelines to avoid fire, electric shock, or other damage.
The Printer
The standard electrical outlet should be close to the printer and be easily accessible.
Power Cord
Always hold the power plug when removing the power cord from or inserting it into
the outlet. Pulling on the power cord cable could cause problems with the power cord.
Page 9
Caution
Follow these guidelines to avoid fire, electric shock, or other damage.
Cutter
Do not touch the blade of the cutter unit.
Do not open the top cover when the
cutter is operating.
Installation/Storage
Place the printer on a flat, stable surface
such as a desk.
DK Roll (DK Label, DK Tape)
Be careful not to drop the DK Roll.
DK Rolls use thermal paper and thermal
film. Both the label and print will fade
with sunlight and heat. Do not use DK
Rolls for outdoor use that requires
durability.
Do not apply excessive pressure to the
cutter unit.
Do not place any heavy objects on top of
the printer.
Depending on the location, material, and
environmental conditions, the label may
unpeel or become irremovable, the
colour of the label may change or be
transferred to other objects.
Before applying the label, check the
environmental condition and the
material. Test the label by affixing a
small piece of it to an inconspicuous
area of the intended surface.
5
Introduction
STEP
1
printer
Before using the
STEP
2
(No PC)
Using only this printer
STEP
3
For WindowsFor Mac
Connecting to your PC
STEP
4
Troubleshooting
Maintenance and
Page 10

Introduction
6
General Precautions
The Printer
• The printer is a precision machine. Do not drop, hit or otherwise bang the printer.
• Do not lift the printer by the DK Roll compartment cover. The cover could come off and
the printer could fall and become damaged.
• The printer may malfunction if left near a television, radio, etc. Do not use the printer near
any machine that can cause electromagnetic interference.
• Do not expose the printer to direct sunlight or near heaters or other hot appliances, in
any location exposed to extremely high or low temperatures, high humidity or dusty
locations. Doing so could cause the machine to malfunction.
• Do not use paint thinner, benzene, alcohol or any other organic solvents to clean the
printer. Doing so may cause damage to the surface finish. Use a soft, dry cloth to clean
the printer.
• Do not place any heavy objects or objects containing water on top of the printer. If water
or any foreign object enters the printer, contact the retail outlet where the printer was
purchased or your local authorized service center. If you continue to use the printer with
water or a foreign object in the printer, the printer may be damaged or personal injury
could result.
• Do not touch the cutter. Personal injury could result. Take special care when changing
the cutter unit.
• Do not insert any objects into or block the label output slot, USB port, or serial port.
• Do not place any metal parts near the print head. The print head becomes very hot
during use and remains very hot immediately after use. Do not touch it directly with your
hands.
• Use only the interface cable (USB cable) included with the printer.
• When not in use for an extended period, remove the DK Roll from the printer.
• Do not attempt to print labels while the DK Roll cover is open.
• Never disassemble the printer or allow it to get wet to avoid possible fire or electrical
shock. Do not remove the power cord from or insert it into the electrical outlet with wet
hands. Doing so could cause an electrical shock or fire.
• If a paper jam should occur due to a build up of adhesive on the paper guide surface,
unplug the power cord from the electrical outlet and wipe away the adhesive buildup on
the paper guide surface with a cloth dipped in ethanol or isopropyl (rubbing) alcohol. It is
recommended that you clean the paper guide when replacing the cutter unit.
Power Cord
• Use only the AC power cord included with the printer.
• If the printer will not be used for an extended period, remove the power supply cord from the
electrical outlet.
• Always hold the plug when removing the power cord from or inserting it into the outlet. Do not pull
on the cord. The wire in the cord may become damaged.
• You should position the printer near an easily accessible, standard electrical socket.
DK Roll (DK Label and DK Tape)
• Use only genuine Brother accessories and supplies (with , marks). Do not use any
unauthorized accessories or supplies.
• If the label is attached to a wet, dirty, or oily surface, it may peel off easily. Before
applying the label, clean the surface to which the label will be applied.
• DK Roll uses thermal paper and thermal film so that ultraviolet rays, wind, and rain may
cause the colour of the label to fade and the ends of the label to peel off.
• Do not expose the DK Rolls to direct sunlight, high temperatures, high humidity, or dust.
Store in a cool, dark place. Use the DK Rolls soon after opening the package.
Page 11
• Scratching the printed surface of the label with your finger nails or metal objects, or
touching the printed surface with hands dampened by water, sweat, or medicated cream,
etc., can cause the colour to change or fade.
• Do not apply labels to any persons, animals, or plants.
• As the end of the DK Roll is designed to not adhere to the label spool, the last label may
not be cut properly. If this happens, remove the remaining labels, insert a new DK Roll,
and reprint the last label.
Note: To account for this, the number of DK Labels included on each DK Roll may be
more than indicated on the package.
• When peeling a DK Label, some portion of the label may remain. Remove the remaining
portion before attaching a new label.
• Some DK Rolls use permanent adhesive for their labels. These labels cannot be easily
peeled off once attached.
• Prior to using CD/DVD labels, be sure to follow the instructions in your CD/DVD player's
instruction manual regarding applying CD/DVD labels.
• Do not use CD/DVD labels in a slot loading CD/DVD player, for example a CD player in
a car where the CD is slid into a slot in the CD player.
• Do not peel off the CD/DVD label once it is applied to the CD/DVD, a thin surface layer
may come off, resulting in damage to the disk.
• Do not apply CD/DVD labels to CD/DVD disks designed for use with ink jet printers.
Labels peel off these disks easily and using disks with peeled labels can result in loss or
damage of data.
• When applying CD/DVD labels, use the applicator included with the CD/DVD label rolls.
failure to do so could cause damage to the CD/DVD player.
• User's shall take full responsibility for applying CD/DVD labels. Brother accepts no
responsibility for any loss or damage of data caused by the inappropriate use of CD/DVD
labels.
CD-ROM and Software
• Do not scratch or subject the CD-ROM to high or low temperatures.
• Do not put heavy objects on the CD-ROM or apply force to the CD-ROM.
• The software contained on the CD-ROM is meant for use with the printer only. See License on CD
for further details. This software may be installed on multiple personal computers for use in an
office, etc.
Battery
• Do not use the battery in any other products.
• Dispose of a used battery in accordance with all applicable
federal, state, and local regulations.
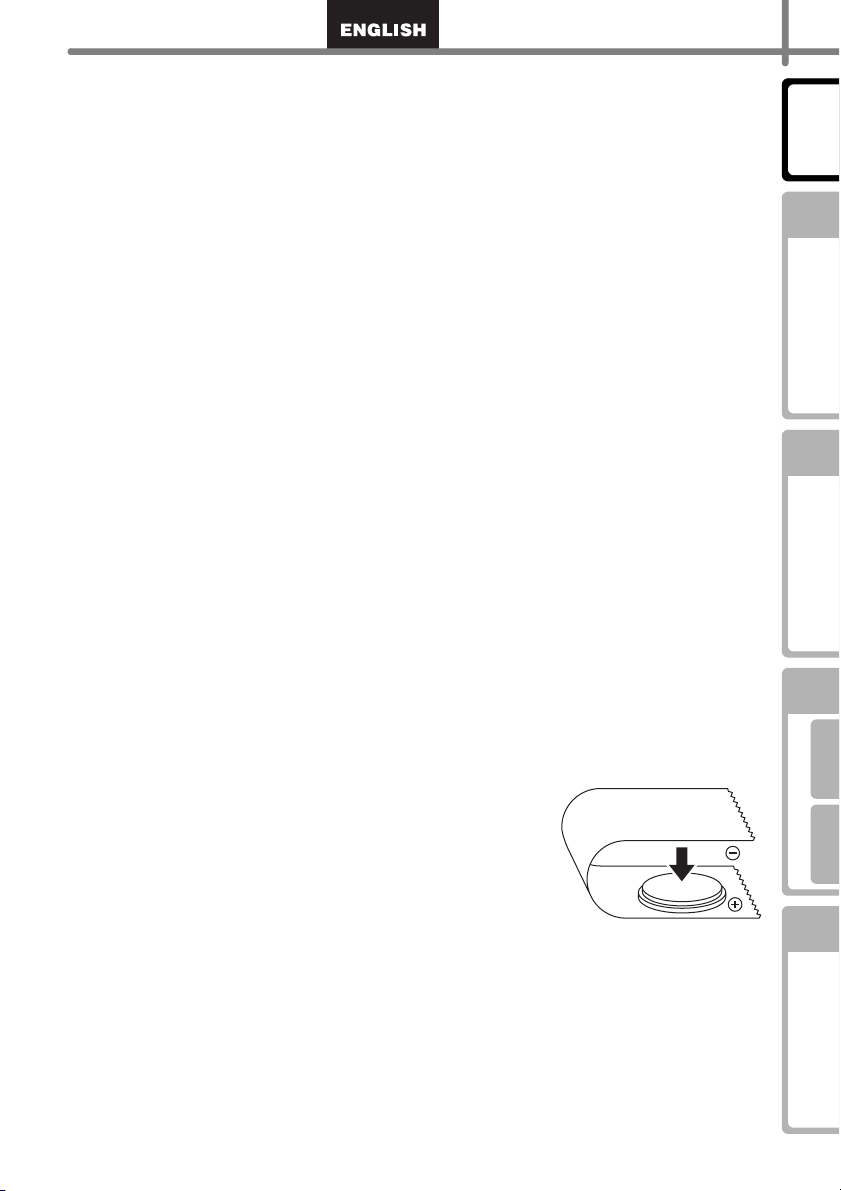
• When storing or discarding the battery, wrap it with
adhesive cellophane tape or similar material. to prevent
short circuit of the battery.
• It is recommended to replace the battery every two years.
Example of grounding of battery
Adhesive cellophane tape etc.
Battery
7
Introduction
STEP
1
printer
Before using the
STEP
2
(No PC)
Using only this printer
STEP
3
For WindowsFor Mac
Connecting to your PC
STEP
4
Maintenance and
Troubleshooting
Page 12
Introduction
8
Cutter unit
• The cutter unit contains a very sharp blade. To
prevent injury from a broken cutter blade:
• Make sure the top cover is closed when using the
cutter unit.
• Don't apply too much pressure when fitting or
removing the cutter unit.
• When the cutter unit becomes blunt you should
replace it with a new one.
• If you break the cutter unit, unplug your printer
from the power and remove the cutter unit
carefully with a pair of tweezers.
• If the machine jams due to a build up of adhesive, you
should clean the surface of the paper guide. Unplug
the printer from the power and wipe away the
adhesive build up from the surface of the paper guide
using a cloth or tissue dipped in isopropyl alcohol. We
recommend that you clean the paper guide when replacing the cutter unit.
• The cutter unit should give you an average number of 5000 cuts or more, depending on how you
use the machine. If your printer does not cut the labels properly or starts to jam often, the cutter
might have reached the end of its life; you should replace the cutter.
Paper guide surface
Page 13
STEP1
STEP1
Before using the printer
9
Introduction
STEP
1
printer
Before using the
Parts Checklist
1
Parts Description
2
3
Connecting the power supply
Installing the DK Roll
4
Attaching the paper guide
5
Setting clock/language/units
6
Procedure for creating a label
7
Page 10
Page 11
Page 12
Page 16
Page 17
Page 18
Page 20
STEP
2
(No PC)
Using only this printer
STEP
3
For WindowsFor Mac
Connecting to your PC
STEP
4
Troubleshooting
Maintenance and
Page 14
STEP1 Before using the printer
10
1 Parts Checklist
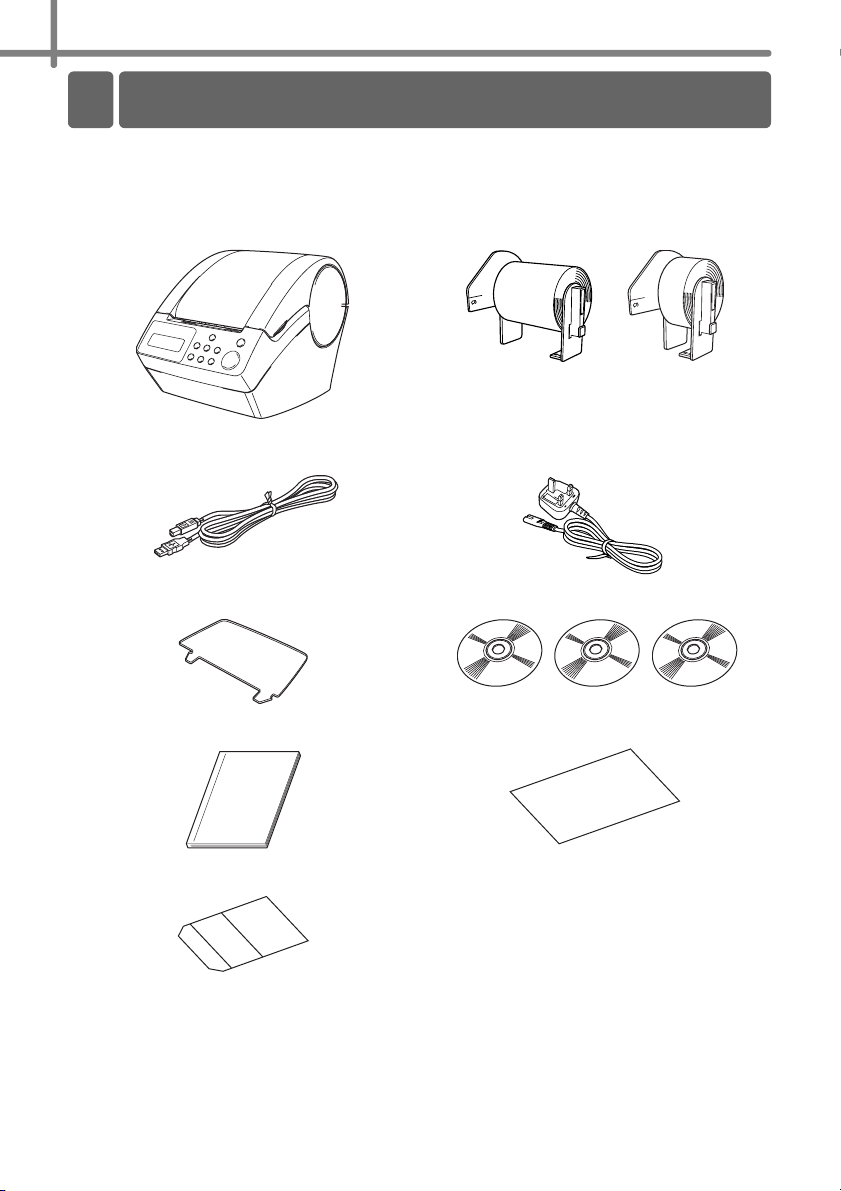
When you unpack the printer, check to see that you have all of the following parts. If any
of the parts are missing or faulty, contact the dealer or brother authorised service
representative where you purchased the printer from.
Brother QL-650TD DK Roll (Starter roll)
•
Continuous Length Paper Tape, 62mm
(8 meters)
• Round Paper Labels, 24mm (250 labels)
USB cable Power cord
Paper guide CD-ROM
Setup & Operation Guide DK Label & Tape Guide
Cleaning sheet
Page 15
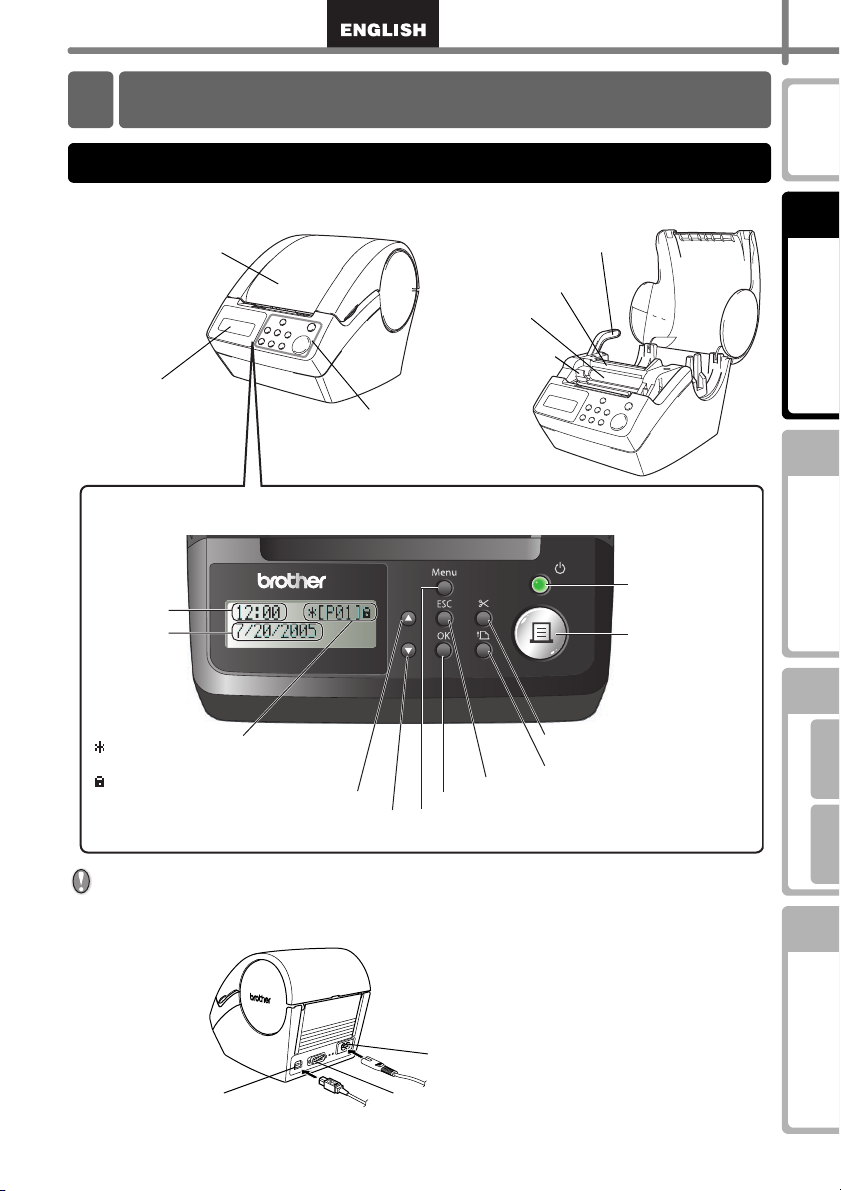
Parts Description
2
11
Main Printing Unit
Front View
DK Roll cover
LCD
LCD and manual operation button
(For details, see Next page.)
Time display
Date display
Template number
: addition and subtraction settings are
available
: Menu button has been locked
Up arrow button
Down arrow button
Roll release lever
Printing unit
Roller
Cutter unit
Manual operation button
ESC button
OK button
Menu button
Cut button
Feed button
ON/OFF button
Print button
Introduction
STEP
1
printer
Before using the
STEP
2
(No PC)
Using only this printer
STEP
3
For WindowsFor Mac
When not in use, close the DK Roll cover to prevent dust and debris from
accumulating inside the printer.
Back View
Power cord slot
USB port
Serial port
Connecting to your PC
STEP
4
Troubleshooting
Maintenance and
Page 16

STEP1 Before using the printer
12
3
Connecting the power supply
Connect the AC power cord into the
1
printer.
Insert the power plug into the AC outlet.
2
• Before inserting the plug, check the outlet is 220 - 240
V AC.
• Locate the printer near the outlet so that the power
plug can be pulled out easily if required.
• When inserting or pulling out the power cord, be sure
to hold the power plug and not the cable.
When using the printer on Windows®, do not connect the printer to the PC
before installing the software on the PC.
Do not connect the printer to the PC until the you see the message that prompts for
the connection when installing the printer driver.
If you connect the printer to the PC before
installing the printer driver, the dialog box
shown right is displayed. At that time, click
[Cancel] and disconnect the USB cable.
Then, install the printer driver. For details,
see "3. Installing the software" on page 35.
Power cord Slot
Power cord
Page 17

LCD
The LCD display is used for both Time Display mode and Menu Selection mode
operations.
Time Display mode
The LCD will display the date and time when the
machine is switched on and not in use.
Manual operation menu table
12:34 [P01]
20/07/2005
13
Introduction
STEP
1
printer
Before using the
STEP
2
(No PC)
Each button is indicated by the
following marks.
Menu
Menu button
ESC
ESC button
Print button
OK button
OK
Up arrow button
Down arrow button
You can easily create labels that show the date, time and a message without using a
computer.
Select the template
Print
For details, see "Creating a label" on page 22.
Using only this printer
STEP
3
For WindowsFor Mac
Connecting to your PC
STEP
4
Troubleshooting
Maintenance and
Page 18
STEP1 Before using the printer
14
Menu Selection mode
The LCD will display the menu title when editing the
templates or when changing settings.
Menu 1/12
Edit Template
Page 19
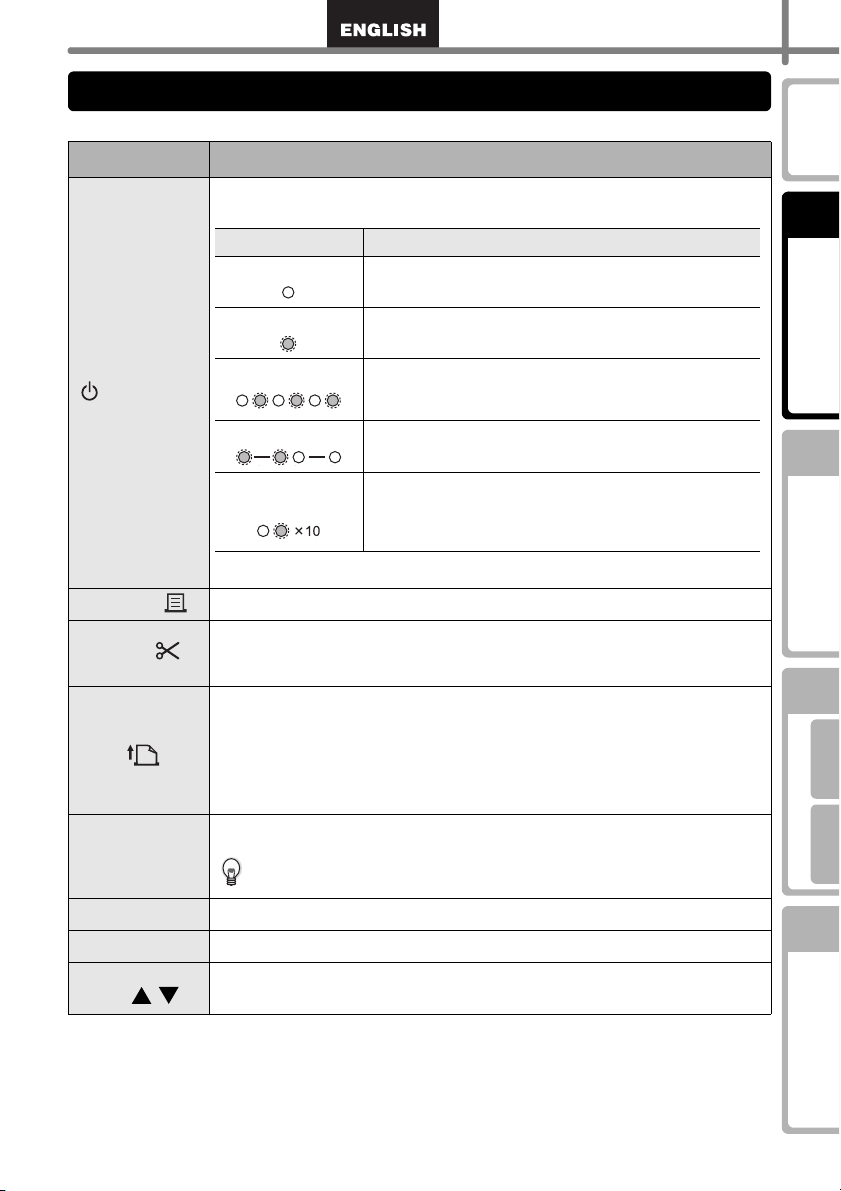
Manual operation button
The function of each button is shown below:
Name Function
Turns the printer ON or OFF. The button also lights up or blinks depending on
the printer status.
LED lamp Status
OFF
The power is turned OFF.
15
Introduction
STEP
1
ON
ON/OFF button
()
Print button( ) Starts printing.
Cut button( )
Feed
button( )
Menu button
ESC button The setting is canceled and the screen returns to the previous mode or screen.
OK button Accepts the selected mode or setting value.
Up/down arrow
button ( / )
Blinks rapidly
Blinks slowly
Turns OFF after
blinking 10 times
Cuts the printed label. This button is used when "Auto Cut" is set to "OFF".
For details, see "Cut the roll automatically when printing: Menu 9/12" on page
29.
• When using DK Die-cut Labels: feeds the DK Label Roll to the beginning of
the first label. If this button is held for more than one second, the DK Label
Roll is fed to the beginning of the next label.
• When using DK Continuous Tapes: feeds 25.4 mm of the DK Label Roll.
• If there is no DK Label Roll installed, the mode changes to a cleaning mode
and the roller rotates for 8 mm. If this button is held for more than one
second, the roller rotates for 100 mm.
Switch between the Time Display mode (normal mode) and Menu Selection
mode (when making settings).
In order to avoid changing the template setting, the Menu button can be
locked. For details, see "Locking the Menu button" on page 31.
Changes the menu or setting value.
The power is turned ON.
An error has occurred.
For details on troubleshooting, see "Troubleshooting"
on page 51.
The printer is processing data.
A system error has occurred. Turn the printer OFF, wait
30 seconds and then turn it ON again. If this does not
clear the error you should contact your dealer or a
Brother authorised service centre.
printer
Before using the
STEP
2
(No PC)
Using only this printer
STEP
3
For WindowsFor Mac
Connecting to your PC
STEP
4
Troubleshooting
Maintenance and
Page 20
STEP1 Before using the printer
16
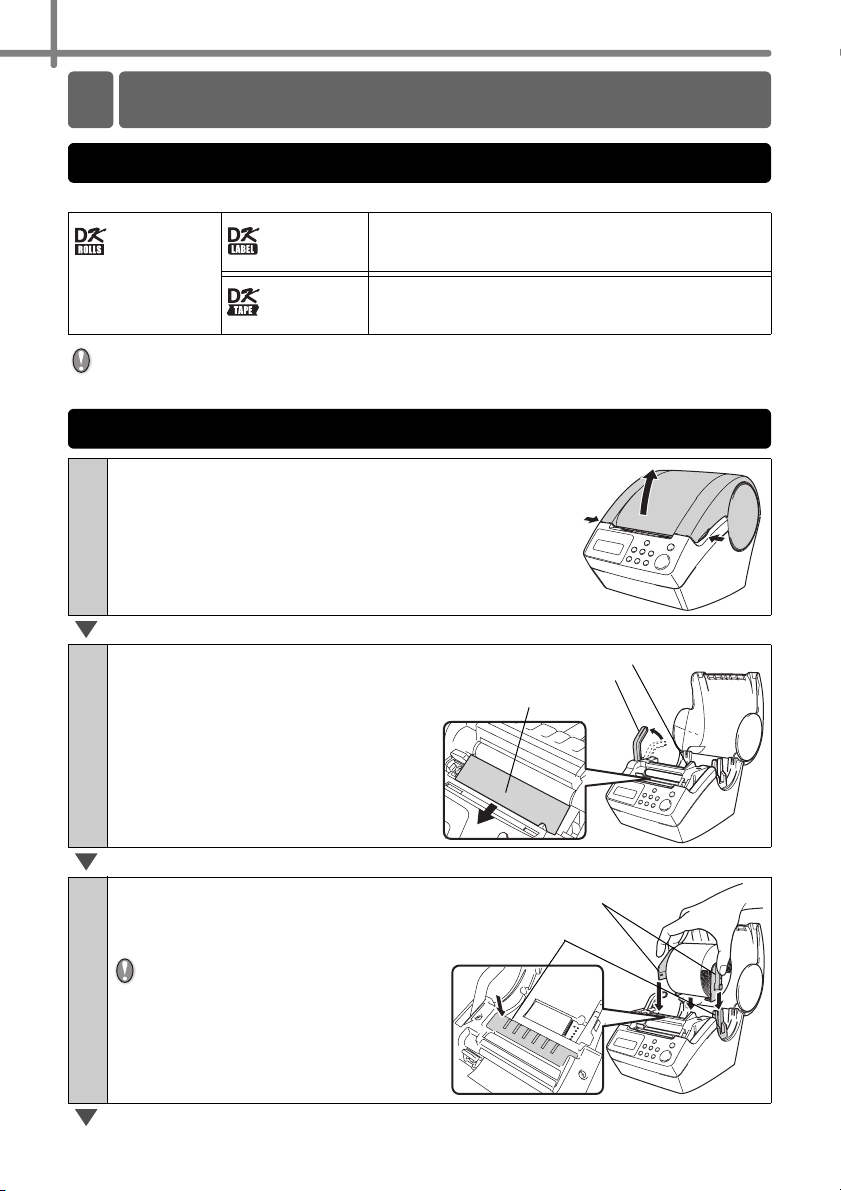
Installing the DK Roll
4
Applicable DK Rolls
The usable types of DK Roll for the printer are shown below.
DK Roll
General name for
DK Label and DK
Tape.
• For the full list of available DK Rolls, see "List of consumable items" shown at the
back of this User Guide.
• Be sure to use only genuine DK Rolls in the printer.
DK Label
DK Tape
This is a pre-cut label roll.
Thermal recording paper and thermal recording film are
available.
This is a freely cuttable full-page adhesive tape.
Thermal recording paper and thermal recording film are
available.
Installing the DK Roll
Press the ON/OFF button to turn the printer
1
OFF.
Hold the DK Roll compartment cover at the
sides near the front of the printer and lift firmly
upwards to open the cover.
Pull up the roll release lever and
2
remove the protection sheet
from the printing unit.
Remove the battery protection
sheet.
Place the spool into the spool
3
guides in the DK Roll
compartment.
• Make sure that the spool arms are
inserted firmly in the spool guides
on both sides.
• Insert the spool with the DK Roll
locator into the guide on the right
hand side of the printer.
Battery protection sheet
Roll release lever
Printing unit protection sheet
Spoo l
Spool guide
Page 21
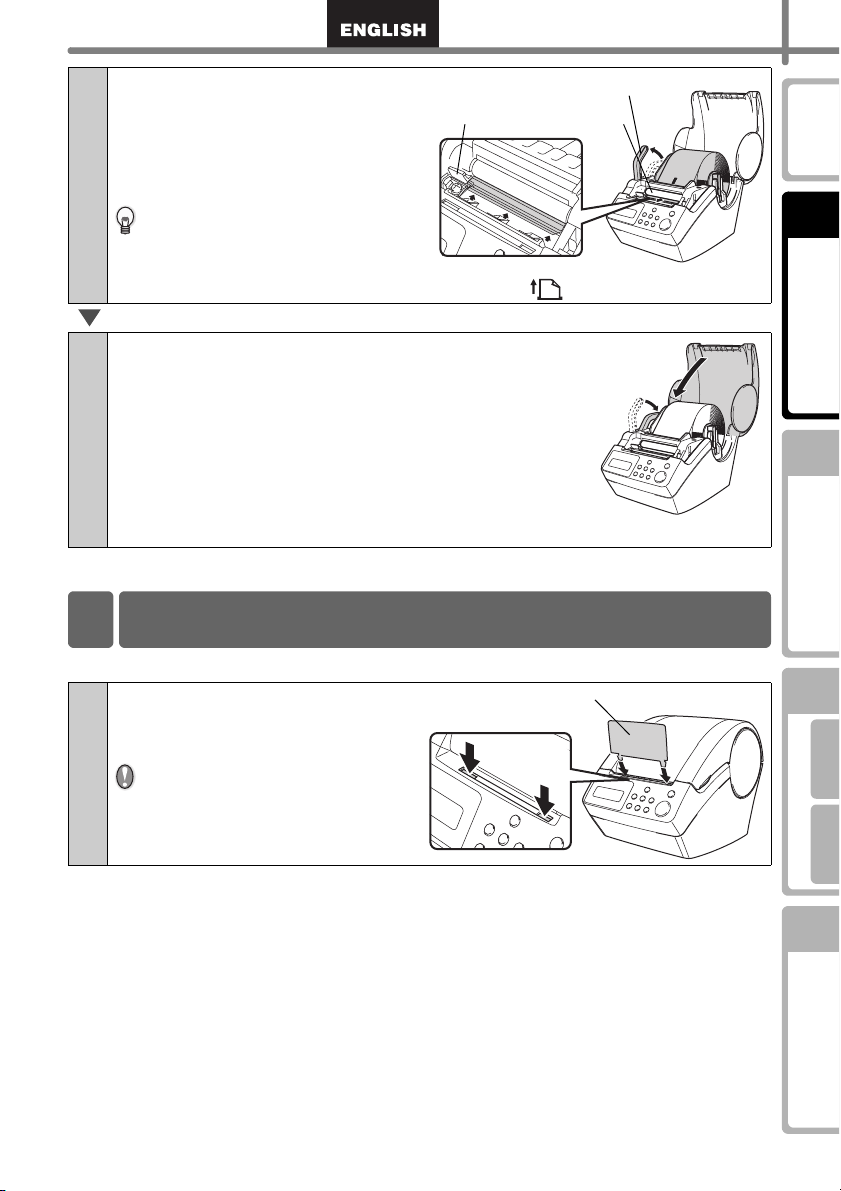
17
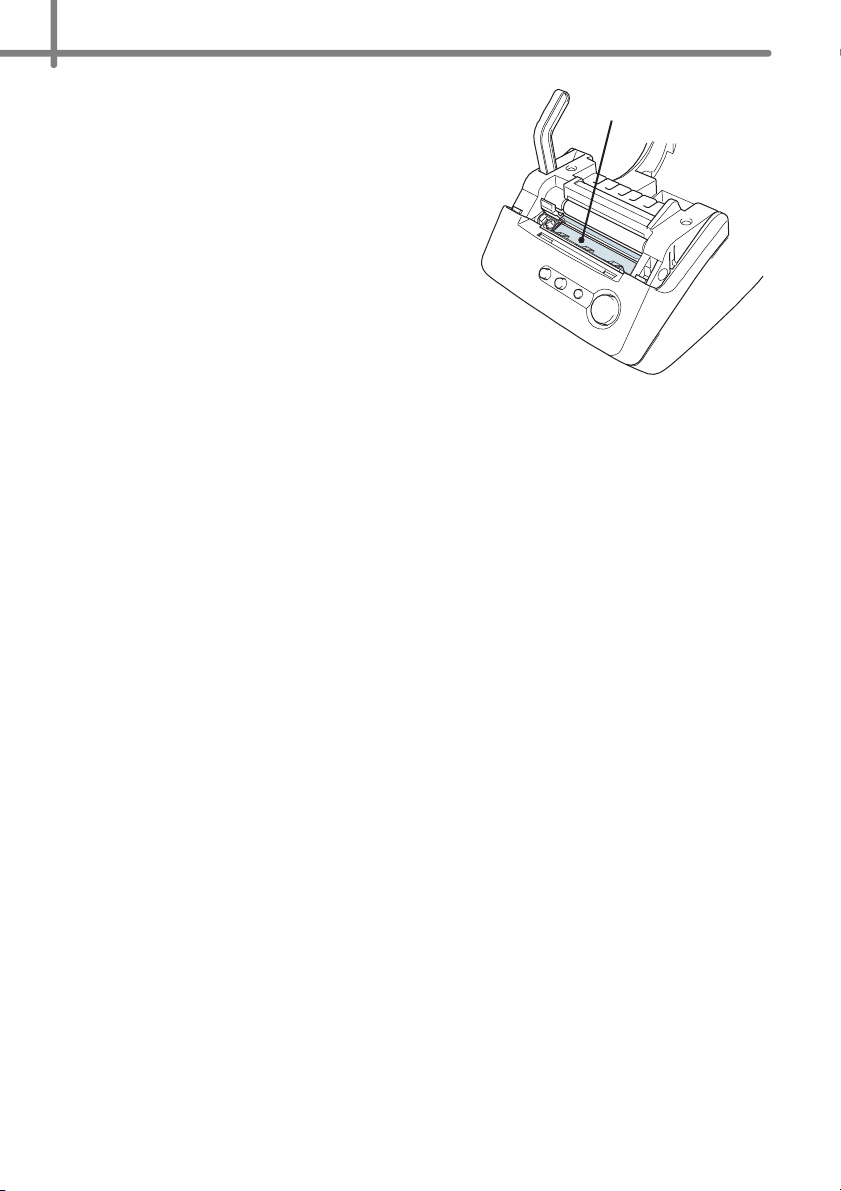
Check that the roll release lever
4
is in the up position.
Thread the end of the DK Roll
Cutter
Roll release lever
Printing unit
into the slot immediately in front
of the cutter.
When unable to thread the end of
the DK Roll fully into the slot, thread it as
far as possible. Lower the roll release
()
lever and close the cover, then press the Feed button
Push down the roll release lever and close the
5
DK Roll cover.
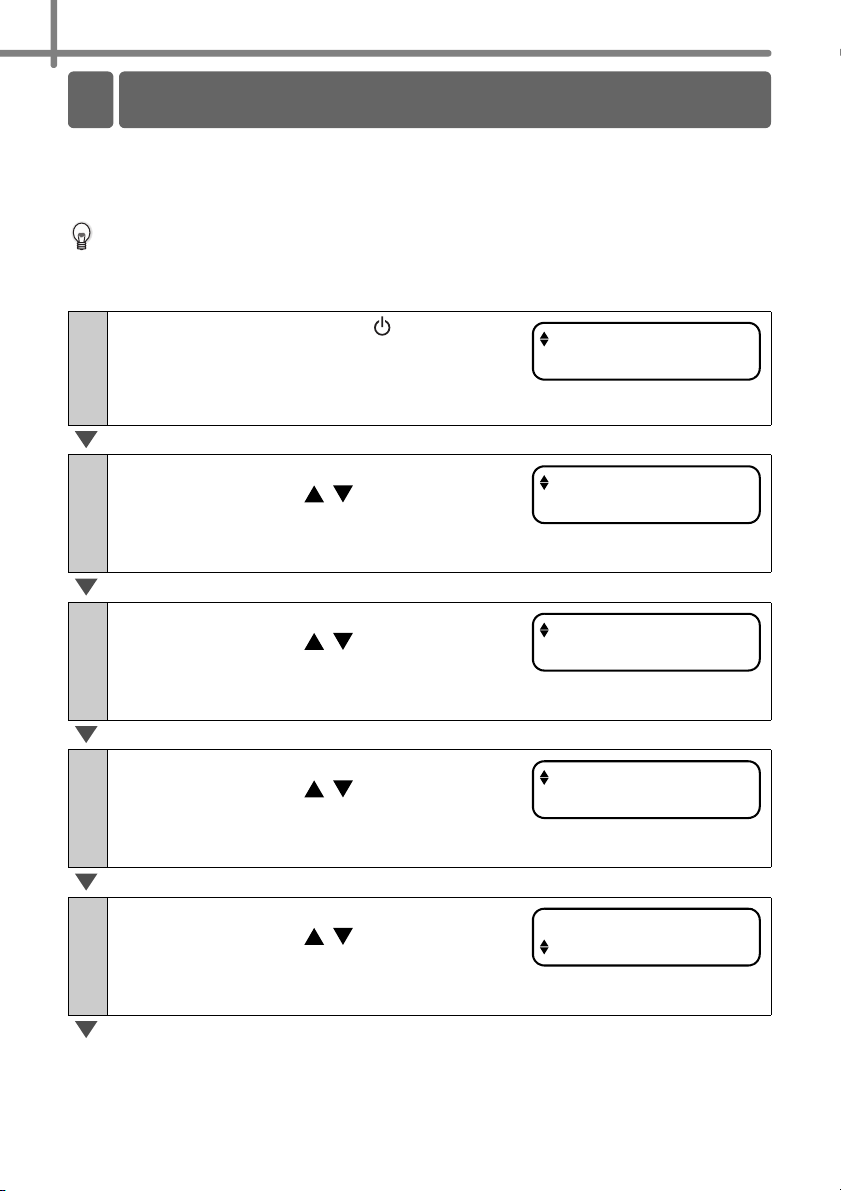
Attaching the paper guide
5
The printer contains a paper guide which can hold up to 10 individual label sheets.
Attach the paper guide to the
1
front of the printer as shown
to set the roll.
Paper guide
on the right.
You will need to remove the
paper guide if you wish to print
and cut more than 10 labels at a
time.
Introduction
STEP
1
printer
Before using the
STEP
2
(No PC)
Using only this printer
STEP
3
For WindowsFor Mac
Connecting to your PC
STEP
4
Troubleshooting
Maintenance and
Page 22
STEP1 Before using the printer
18
6
Setting clock/language/units
Before using the printer you will need to setup the date and time, the language and the
unit of measurement your printer will use.
• If you disconnect your machine from the power and remove the battery any settings
you have changed will be reset. See "Setting the clock: Menu 7/12" on page 28.
• For replacing the battery, see "Replacing the lithium clock battery" on page 49.
Press the ON/OFF button ( ) to turn the
1
printer on.
The time setting screen is displayed on the LCD,
and then the year "05" and "YY" are alternately
displayed.
Select the year by pressing the up or
2
down arrow button ( / ) and then press
the OK button.
The year is set and then the month "01" and "MM"
are alternately displayed.
2005/01/01
00:00
20YY/01/01
00:00
Select the month by pressing the up or
3
down arrow button ( / ) and then press
the OK button.
The month is set and then the date "01" and "DD"
are alternately displayed.
Select the date by pressing the up or
4
down arrow button ( / ) and then press
the OK button.
The date is set and then the hour "00" and "hh" are
alternately displayed.
Select the hour by pressing the up or
5
down arrow button ( / ) and then press
the OK button.
The hour is set and then the minute "00" and "mm"
are alternately displayed.
2005/MM/01
00:00
2005/07/DD
00:00
2005/07/20
hh:00
Page 23
Select the minute by pressing the up or
6
down arrow button ( / ) and then press
the OK button.
The minute is set and the language setting screen
is displayed.
Select the language by pressing the up or
7
down arrow button ( / ) and then press
the OK button.
The language is set and the units setting screen is
displayed.
Select the units by pressing the up or
8
down arrow button ( / ) and then press
the OK button.
The units are set and the Time Display mode is
displayed.
Your machine will now display the date
9
and time when switched on and not in
use.
Every process such as creating or printing a label
and making settings in each function is done in this mode.
For details, see "STEP 2 Creating and printing a label without using your
computer" on page 21.
The clock, language or unit setting can be changed later. See Sections:
• "Setting the clock: Menu 7/12" on page 28
• "Setting Daylight Saving Time: Menu 8/12" on page 29
• "Setting the language: Menu 10/12" on page 30
• "Set the unit of measure (inch or mm): Menu 11/12" on page 30
2005/07/20
12:mm
Language
English - UK
Unit
mm
12:34 [P01]
20/07/2005
19
Introduction
STEP
1
printer
Before using the
STEP
2
(No PC)
Using only this printer
STEP
3
For WindowsFor Mac
Connecting to your PC
STEP
4
Troubleshooting
Maintenance and
Page 24
STEP1 Before using the printer
20
7
Procedure for creating a label
The general procedure for creating a label with the printer is shown below.
Decide on the type of label you want to create.
1
Label images
Prepare the appropriate DK Roll.
2
Prepare the appropriate DK Roll to the
label image
Set the DK Roll
ÎPage 16
Create a label and print it.
3
You can find more detailed instructions on creating labels in the next chapter.
By installing the included software, it is possible to design and print labels on
your PC, or to download the designed label to the printer to print it. For how to
install the software, see "STEP3 Connecting the printer to your PC" on page 33,
for using the software, see "Software User's Guide (PDF Manual)". You can
also change the content and printing format.
Select the template
Print
ÎPage 16
ÎPage 23ÎPage 22
Page 25
STEP2
STEP2
Creating and printing a label
without using your computer
This printer has eight built-in templates for your convenience, you may select the
template you want from these templates by scrolling up or down ( / ) and
then press the Print button. You may also download additional templates created
in P-touch Editor 4.2.This is for PC only and not available for Mac.
1
Creating a label
1.Selecting a template
2.Printing a label
Page 22
Page 23
21
Introduction
STEP
1
printer
Before using the
STEP
2
(No PC)
Using only this printer
2
Other convenient functions
Editing a template: Menu 1/12
Changing the date used for templates: Menu 2/12
Preview the label content before printing: Menu 3/12
Specifying the number of copies: Menu 4/12
Printing labels with label numbers: Menu 5/12
Printing a list of templates: Menu 6/12
Setting the clock: Menu 7/12
Setting Daylight Saving Time: Menu 8/12
Cut the roll automatically when printing: Menu 9/12
Setting the language: Menu 10/12
Set the unit of measure (inch or mm): Menu 11/12
Adjusting the contrast of LCD: Menu 12/12
Locking the Menu button
Uploading templates / messages from your computer
Page 24
Page 25
Page 26
Page 27
Page 27
Page 28
Page 28
Page 29
Page 29
Page 30
Page 30
Page 31
Page 31
Page 31
STEP
3
For WindowsFor Mac
Connecting to your PC
STEP
4
Troubleshooting
Maintenance and
Page 26
STEP2 Creating and printing a label without using your computer
22
1
Creating a label
After deciding the type of label you want to create you need to choose a suitable DK Roll
(See "Installing the DK Roll" on page 19.)
1.Selecting a template
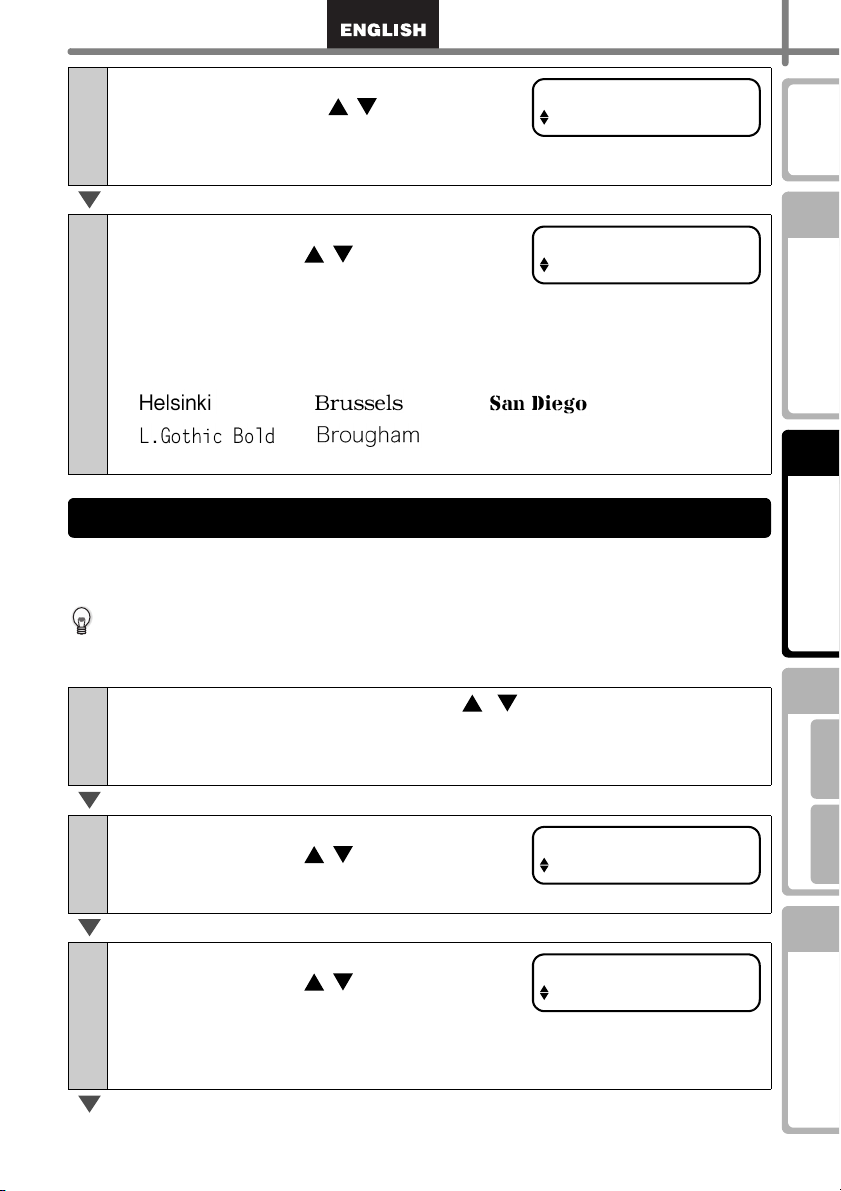
Select the template for the label you want to create, from one of the eight built-in
templates.
It is also possible to create templates with your own PC. For details, see the "Software
User's Guide (PDF Manual)".
Press the ON/OFF button ( ) to turn on
1
the power.
The Time Display mode is displayed.
Select a template by scrolling up or down
2
with the arrow button ( / ) and then
press the OK button.
When selecting a template which includes a
particular message (Msg), select the message and then press the OK button.
The selected template is chosen, and the screen returns to the Time Display mode.
For details on available templates, see "Types of templates" below.
12:34 [P01]
20/07/2005
[P07]Msg+D+T
Types of templates
Name of template Content Sample of print outs
[P01]Date Date
[P02]Time Time
[P03]Message Message
[P04]Date+Time Date + time
[P05]Msg+Date Message + date
[P06]Msg+Time Message + time
20/07/2005
12:34
Received
20/07/2005
12:34
Received
20/07/2005
Received
12:34
Page 27
Name of template Content Sample of print outs
23
[P07]Msg+D+T Message + date + time
[P08]Msg+Num Message + numbering
When a template is downloaded from a PC, the screen is displayed as shown below.
Received
20/07/2005
12:34
Received
001
• [D01] Sample1
• [D02] Sample2
•
•
•
2.Printing a label
Printing only one label
Press the Print button () while in Time
1
Display mode.
The contents of the template are printed.
For a preset template, the content of the label
is automatically adjusted for the size of the DK
Roll.
The machine will display an error if the content
does not fit into the print area even when the
font size is at minimum.
Specifying the number of copies to be printed
Press and hold down the Print button
1
The screen shown on the right is displayed. The
number of copies will increase for as long as the print
button is pressed.
()
12:34 [P07]
20/07/2005
Printing...
.
Copies
1
Introduction
STEP
1
printer
Before using the
STEP
2
(No PC)
Using only this printer
STEP
3
For WindowsFor Mac
When the number of copies (1 to 999)
2
that you want to print is displayed,
release the Print button
The number of copies displayed when releasing
the Print button
It is also possible to select the number of copies to be printed from the menu.
see "Specifying the number of copies: Menu 4/12" on page 27.
() will be printed.
() immediately.
Copies
3
Printing...
Connecting to your PC
STEP
4
Troubleshooting
Maintenance and
Page 28
STEP2 Creating and printing a label without using your computer
24
Other convenient functions
2
You can easily customize many functions of your machine, for example you can edit the
contents of the built in templates.
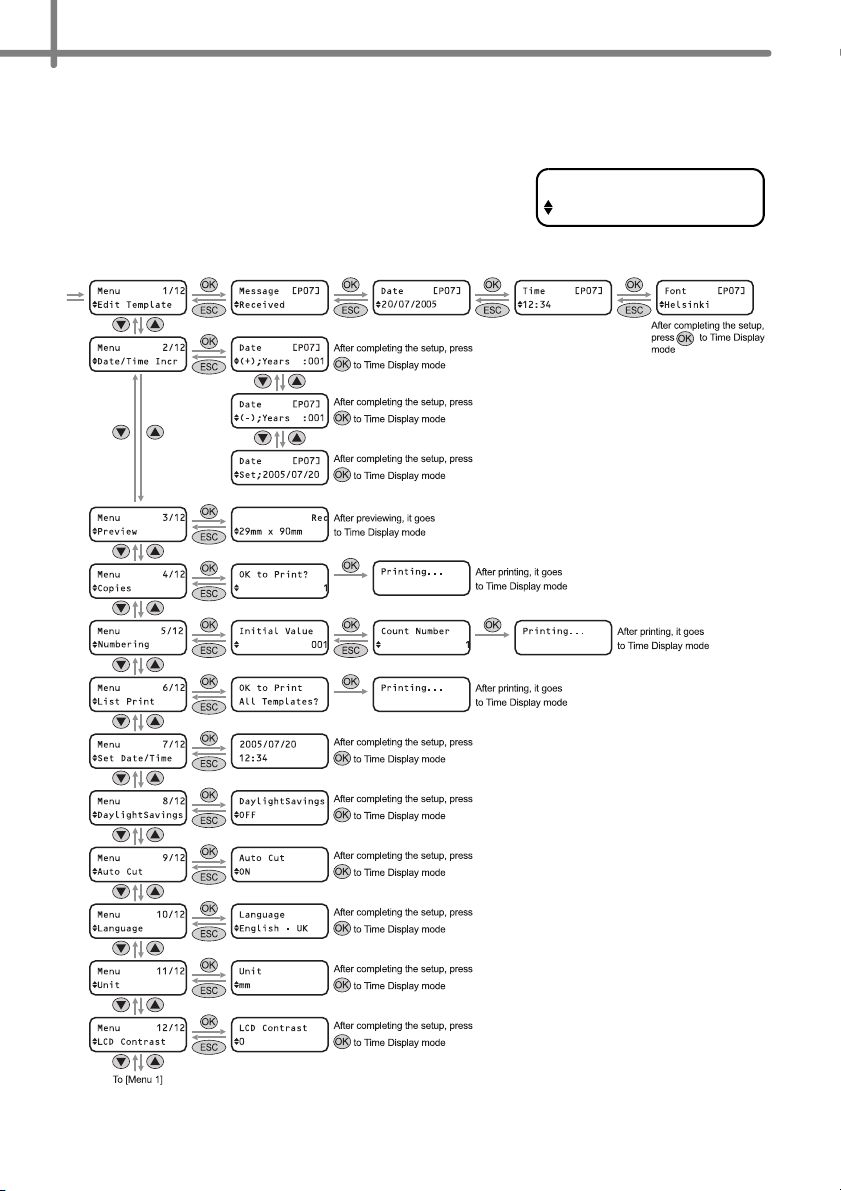
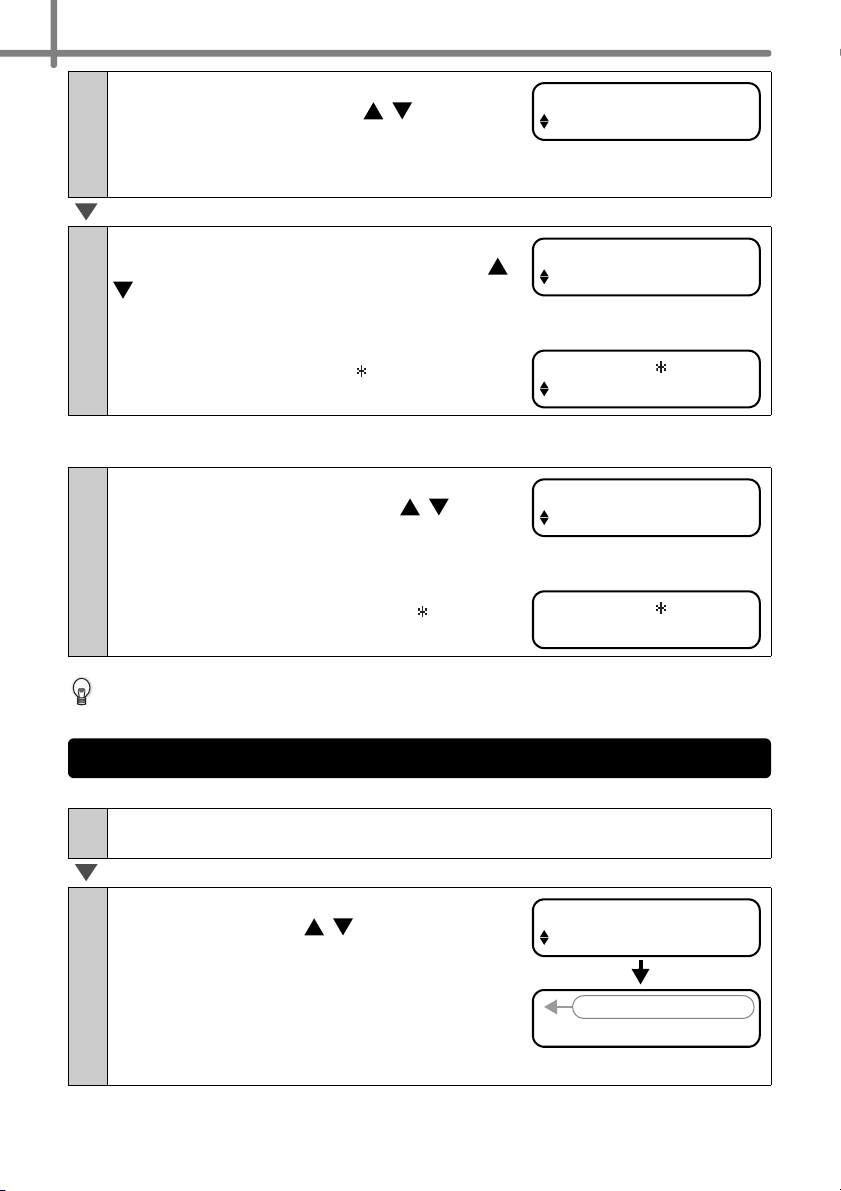
Editing a template: Menu 1/12
By editing a selected template, it is possible to change the label to your own format.
The editable content varies depending on the selected template.
The following explains an example when selecting template "[P07]Msg+D+T".
Press the up or down arrow button ( / )until [P07] is shown on
1
the display, then press the OK button twice.
Press the Menu button in the Time
Display mode.
Menu Selection mode is displayed.
Select "Menu 1/12" by pressing the up or
2
down arrow button ( / ) and then press
the OK button.
Message selection mode is displayed.
12:34 [P07]
20/07/2005
Menu 1/12
Edit Template
Select the message by pressing the up or
3
down arrow button ( / ) and then press
the OK button.
The message is selected, and then the date format
selection mode is displayed.
Type of message
Received • Inspected • Approved
•
• Delivered By • Service Before • Best Before
• Expires • Date Installed • Next Test
• Completed • None
You can also upload new messages from your computer.
"None" can be selected only when using the template [P08].
Select the date format by pressing the up
4
or down arrow button ( / ) and then
press the OK button.
The date format is selected, and then the time
format selection mode is displayed.
Message [P07]
Received
Date [P07]
20/07/2005
Page 29
Select the time format by pressing the up
5
or down arrow button ( / ) and then
press the OK button.
The time format is selected, and then the font
selection mode is displayed.
Select the font by pressing the up or
6
down arrow button ( / ) and then press
the OK button.
The setting is saved and the screen returns to the
Time Display mode.
Type of font
•••
••
Time [P07]
12:34 (24)
Font [P07]
L.Gothic Bold
Changing the date used for templates: Menu 2/12
For the date printed on your template you can add or subtract from the current date, or
you can fix it to a specific date. This can be useful if you need to print best before labels
for food, for example.
• Your machine will still display the current date when in Time Display mode.
• The values you can change may vary depending on the template content.
25
Introduction
STEP
1
printer
Before using the
STEP
2
(No PC)
Using only this printer
The following explains an example when selecting the template "[P01]Date".
Press the up or down arrow button ( / )until [P01] is shown on
1
the display, then press the OK button.
Press the Menu button in the Time Display mode.
Menu Selection mode is displayed.
Select "Menu 2/12" by pressing the up or
2
down arrow button ( / ) and then press
the OK button.
The Date addition selection mode is displayed.
Select (+)/(-)/set by pressing the up or
3
down arrow button ( / ) and then press
the OK button.
• (+) : Addition (adds the specified value to the current date.)
• (-) : Subtraction (reduces the specified value from the current date.)
• Set : Fix (specifies the arbitrary date.)
When selecting addition or subtraction
Menu 2/12
Date/Time Incr
Date [P01]
(+);Years :000
STEP
3
For WindowsFor Mac
Connecting to your PC
STEP
4
Troubleshooting
Maintenance and
Page 30
STEP2 Creating and printing a label without using your computer
26
When (+)/(-) has been selected press the
4
up or down arrow button ( / ) to
choose either Years, Months, Weeks,
Days, Hours or Minutes and then press
the OK button.
Select a value between 000 and 999 by
5
pressing the up or down arrow button ( /
) and then press the OK button.
• The setting is saved and the screen returns to the
Time Display mode.
• If you set an addition or subtraction to the current
date, or if you fix the date, a " " will be displayed
when in the Time Display mode.
When selecting a fixed date:
Set the year, month and day by pressing
4
the up or down arrow button ( / ) and
then press the OK button.
• The setting is saved and the screen returns to the
Time Display mode.
• If you set an addition (+) or subtraction (-) to the
current date, or if you fix the date, a " " will be
displayed when in the Time Display mode.
Date [P01]
(+);Months :000
Date [P01]
(+);Months :003
12:34 [P01]
20/07/2005
Date [P01]
Set;2006/01/20
12:34 [P01]
20/07/2005
When you want to use the current time for printing, select addition (+) or subtraction
(-) and reset all the values back to "000".
Preview the label content before printing: Menu 3/12
You can check your label content before printing by using the preview function.
Press the Menu button in the Time Display mode.
1
Menu Selection mode is displayed.
Select "Menu 3/12" by pressing the up or
2
down arrow button ( / ) and then press
the OK button.
• The label content will scroll from right to left on the
first line of the display.
• The second line will show the size of DK Roll
installed
• When the display is completed, the screen returns
to the Time Display mode.
Menu 3/12
Preview
Received 20
17mm X 87mm
Page 31

Specifying the number of copies: Menu 4/12
Press the Menu button in the Time Display mode.
1
Menu Selection mode is displayed.
27
Introduction
Select "Menu 4/12" by pressing the up or
2
down arrow button ( / ) and then press
the OK button.
Select the number of copies to print
3
between 1 and 999 by pressing the up or
down arrow button ( / ) and then press
Menu 4/12
Copies
OK to Print?
3
the OK button.
The specified number of copies are printed, and the screen returns to the Time
Display mode.
Printing labels with label numbers: Menu 5/12
When you choose a template that includes numbering you need to enter the starting
number and how much you want that number to increase each time you print the label.
For details on downloaded templates, see the "Software User's Guide (PDF Manual)".
Press the up or down arrow button ( / ) until [P08] is shown on
1
the display, then press the OK button twice. Press the Menu button
in the Time Display mode.
Menu Selection mode is displayed.
Select "Menu 5/12" by pressing the up or
2
down arrow button ( / ) and then press
the OK button.
Menu 5/12
Numbering
STEP
1
printer
Before using the
STEP
2
(No PC)
Using only this printer
STEP
3
For WindowsFor Mac
Select the first label number (000 to 999)
3
by pressing the up or down arrow button
( / ) and then press the OK button.
If you hold down or the value increases
or decreases in units of 10.
Select the number of labels to print (1 to
4
999) by pressing the up or down arrow
button ( / ) and then press the OK
Initial Value
010
Count Number
5
button.
The label is printed for the specified number of times, and the screen returns to the
Time Display mode.
Connecting to your PC
STEP
4
Troubleshooting
Maintenance and
Page 32

STEP2 Creating and printing a label without using your computer
28
Printing a list of templates: Menu 6/12
It is possible to print a sample of every template (including downloaded templates) for
reference.
For details on downloaded templates, see "Software User's Guide (PDF Manual)".
Choose a DK tape that print labels up to 62mm in width. If the DK label is too narrow
the machine will indicate an error. See the back of this User Guide for DK tapes.
Press the Menu button in the Time Display mode.
1
Menu Selection mode is displayed.
Select "Menu 6/12" by pressing the up or
2
down arrow button ( / ) and then press
the OK button.
Press the OK button or the Print button
3
().
The list of templates is printed and the screen
returns to the Time Display mode.
Menu 6/12
List Print
OK to Print
All Templates?
Setting the clock: Menu 7/12
Press the Menu button in the Time Display mode.
1
Menu Selection mode is displayed.
Select "Menu 7/12" by pressing the up or
2
down arrow button ( / ) and then press
the OK button.
Set the clock by pressing the up or down
3
arrow button ( / ) and press the OK
button.
Adjust the Year(YY), Month(MM), Day(DD),
Hours(hh) and Minute(mm) by pressing the
) and then press the OK button.
When you have set the clock the screen will return to the Time Display mode.
If the time and date has not been kept after the power cord has been removed,
replace the battery. As the battery is no longer holding a charge and the clock will
need to be reset upon installation of a new battery.
Menu 7/12
Set Date/Time
2005/01/01
00:00
up or down arrow button ( /
Page 33

Setting Daylight Saving Time: Menu 8/12
Adjust the internal clock by one hour by turning Daylight Savings Time ON.
Press the Menu button in the Time Display mode.
1
Menu Selection mode is displayed.
Select "Menu 8/12" by pressing the up or
2
down arrow button ( / ) and then press
the OK button.
Menu 8/12
DaylightSavings
29
Introduction
STEP
1
Select "ON" by pressing the up or down
3
arrow button ( / ) and then press the
OK button.
The setting is saved and the screen returns to the
Time Display mode.
DaylightSavings
ON
Cut the roll automatically when printing: Menu 9/12
If you turn on the auto cut function your printer will automatically cut each label after it
prints them.
Press the Menu button in the Time Display mode.
1
Menu Selection mode is displayed.
Select "Menu 9/12" by pressing the up or
2
down arrow button ( / ) and then press
the OK button.
Select "ON" by pressing the up or down
3
arrow button ( / ) and then press the
OK button.
The setting is saved and the screen returns to the
Time Display mode.
Menu 9/12
Auto Cut
Auto Cut
ON
printer
Before using the
STEP
2
(No PC)
Using only this printer
STEP
3
For WindowsFor Mac
Connecting to your PC
STEP
4
Troubleshooting
Maintenance and
Page 34

STEP2 Creating and printing a label without using your computer
30
Setting the language: Menu 10/12
Press the Menu button in the Time Display mode.
1
Menu Selection mode is displayed.
Select "Menu 10/12" by pressing the up
2
or down arrow button ( / ) and then
press the OK button.
Select the language by pressing the up or
3
down arrow button ( / ) and then press
the OK button.
The setting is saved and the screen returns to the
Time Display mode.
Menu 10/12
Language
Language
English - UK
Set the unit of measure (inch or mm): Menu 11/12
The default unit setting for English-US is “inch”. For all other Languages the default
setting is “mm”.
Press the Menu button in the Time Display mode.
1
Menu Selection mode is displayed.
Select "Menu 11/12" by pressing the up
2
or down arrow button ( / ) and then
press the OK button.
Select the unit by pressing the up or
3
down arrow button ( / ) and then press
the OK button.
The setting is saved and the screen returns to the
Time Display mode.
Menu 11/12
Unit
Unit
mm
Page 35

Adjusting the contrast of LCD: Menu 12/12
Press the Menu button in the Time Display mode.
1
Menu Selection mode is displayed.
31
Introduction
Select "Menu 12/12" by pressing the up
2
or down arrow button ( / ) and then
press the OK button.
Select the contrast by pressing the up or
3
down arrow button ( / ) and then press
the OK button.
The setting is saved and the screen returns to the
Time Display mode.
Menu 12/12
LCD Contrast
LCD Contrast
+1
Locking the Menu button
You can prevent accidental changes to templates by locking the menu button.
Press the Menu button for more than one
1
second in Time Display mode.
• When the Menu button is locked, " " is displayed
in the Time Display mode as shown on the right.
• When pressing the Menu button for more than one second again, the Menu button
is unlocked.
12:34 [P07]
20/07/2005
Uploading templates / messages from your computer
You can upload templates or message content you
create in P-touch editor 4.2 to your printer by using the
P-touch Transfer Manager.
STEP
1
printer
Before using the
STEP
2
(No PC)
Using only this printer
STEP
3
For WindowsFor Mac
This is for PC only. Not available for Mac.
Concerning the download of message
It is possible to add the item selected for Message to the
main unit using P-touch Transfer Manager.
It will be convenient to set the name or company name.
For details, refer to
Manual)".
Î"Software User's Guide (PDF
Connecting to your PC
STEP
4
Troubleshooting
Maintenance and
Page 36

STEP2 Creating and printing a label without using your computer
32
Page 37

STEP3
STEP3
Connecting the printer to
your PC
33
Introduction
STEP
1
printer
Before using the
By using the software included with this printer, you can create a variety of labels
quickly and easily using your personal computer.
For details on the software included with this printer and additional hardware/
software requirements you may need, see the back of this User Guide and the
"Software User's Guide (PDF Manual)".
1
For Windows
1. Software description
2. Notes on installation
3. Installing the software
2
For Mac
1. Software description
2. Notes on installation
3. Software installation
Page 34
Page 35
Page 35
Page 39
Page 39
Page 40
STEP
2
(No PC)
Using only this printer
STEP
3
For WindowsFor Mac
Connecting to your PC
STEP
4
Troubleshooting
Maintenance and
Page 38

STEP3 Connecting the printer to your PC
34
For Windows
1
The software included with your printer is compatible with the following operating systems.
Microsoft® Windows® 98 SE/Me/2000 Professional/XP
For details on software, See the "Software User's Guide (PDF Manual)".
1. Software description
The CD-ROM included with this printer contains the following software and printer driver.
P-touch Editor 4.2
You can create various types of labels such as address labels and CD/DVD labels. It is
also possible to link previously created databases (database function) and to manage
information such as names and addresses (label list function).
The following tools will also be installed.
• P-touch Transfer Manager 1.2
The template data and image data created by exporting the label created by P-touch
Editor can be transferred to the printer. The data transferred to the printer can be
printed by the printer only as a downloaded template. The text which will be used as the
Message of the preset template can be transferred as well.
• P-touch Library 1.0
Labels created by P-touch Editor can be printed again quickly and easily.
• P-touch 4.2 Add-In Utility
By using the Add-In icon set for Microsoft
Outlook® 2000/2002/2003, Microsoft® Excel 97/2000/2002/2003, it is possible to create
a label using data from these applications.
• P-touch Backup Manager 1.2
Data can be freely moved between this printer and a PC. Data can be safely stored
(backed-up) as an added safety measure.
®
Word 97/2000/2002/2003, Microsoft®
P-touch Address Book 1.0
Lets you easily manage your addresses for printing address labels.
You can import contact information from Microsoft
®
Outlook®.
Printer Driver
Lets you print from your PC.
Software User's Guide (PDF Manual)
Gives you instructions for using the software included with your machine. It can be
referenced by using Adobe
It is also possible to reference it directly from the CD-ROM.
®
Acrobat® Reader® or Adobe® Reader®.
Page 39

2. Notes on installation
• Do not connect this printer to a PC until you are prompted to do so. If this printer is
already connected to a PC prior to the software installation, remove the USB plug from
the PC and wait for the software prompt.
• When installing on Windows 2000/XP, make sure you are logged in with administrator
rights.
•
Make sure that you close all applications before installing the software, so that the Add-Ins
included with the software can be installed.
3. Installing the software
This section explains how to install P-touch Editor 4.2, P-touch Address Book 1.0, Printer
Driver, and the Software User's Guide.
The procedure for installing them varies depending on the OS of your PC.
The installation example given is for Windows XP.
Start up the PC and put the CD-ROM into the CD-ROM drive.
1
QL-series Installer starts up and the P-touch Setup screen is displayed.
• It may take a short time to display the screen.
• If it does not start up automatically, double click the "Setup.exe" icon on the
CD-ROM.
Click "Standard Installation".
2
The preparation for installing the software
starts and the License Agreement screen
is displayed.
Each button selects the following
operations.
1
Standard Installation
P-touch Editor 4.2,
P-touch Address Book 1.0,
Printer Driver, and User's Guide are
all installed.
2
Custom Installation
P-touch Editor 4.2, P-touch Address Book 1.0, Printer Driver, and User's
Guide can be installed individually.
3
Show User's Guide
Software User's Guide (PDF Manual) can be viewed without actually
installing it.
4
Install Acrobat Reader
®
"Adobe
Software User's Guide (PDF Manual).
Adobe
already installed you do not have to install it.
Acrobat® Reader®" can be installed so that you can view the
®
Acrobat® Reader® 5.1 will be installed. If you have a later version
1
2
3
4
35
Introduction
STEP
1
printer
Before using the
STEP
2
(No PC)
Using only this printer
STEP
3
For WindowsFor Mac
Connecting to your PC
STEP
4
Troubleshooting
Maintenance and
Page 40

STEP3 Connecting the printer to your PC
36
Read the license agreement carefully. If
3
you agree with the terms and conditions
of the license agreement, click [Yes] to
continue the installation.
The Customer Information screen is displayed.
Input "User Name" and "Company
4
Name", and click [Next].
Choose the Destination Location screen is
displayed.
Click [Next].
5
Add shortcut screen is displayed.
To instaIl to a different folder click [Browse]
and select another folder.
Check the locations where you want the
6
installer to add the program shortcuts
and click [Next].
The Start Copying Files screen is displayed.
Page 41

Check the settings, and if they are set
7
correctly, click [Next].
37
• It may take some time to display this screen.
• If it is not set correctly, click [Back] and set it
again.
The Add-In settings screen is displayed.
Check the Microsoft® Office® application
8
that want to the Add-In to work with, and
click [Next].
Make sure that you have closed all Microsoft®
®
Office
applications.
For details on Add-In setting, See the
"Software User's Guide (PDF Manual)".
The Driver Setup (Brother P-touch) screen is displayed.
When the message "Connect P-touch, and then turn it on" is
9
displayed in the set-up screen, connect the USB cable and power
cord to the printer.
Remove the caution label from over the USB port of the printer, and then
connect the USB cable.
Introduction
STEP
1
printer
Before using the
STEP
2
(No PC)
Using only this printer
STEP
3
Power cord slot
USB port
USB cable
Connect the USB cable to the USB port of the PC.
10
Press the ON/OFF button ( ) of the printer to turn the power on.
When the PC recognizes the printer and the installation of the driver is completed,
the User Registration screen is displayed.
If you are using a USB hub and your PC has problems recognizing the printer,
try connecting the printer directly to your PC.
Power cord
For WindowsFor Mac
Connecting to your PC
STEP
4
Troubleshooting
Maintenance and
Page 42

STEP3 Connecting the printer to your PC
38
Select if you want to register your printer
11
and then [Next].
• If you select "Yes, display the page", you will be
directed to the online user registration page. After
user registration, continue with the installation
(registration is recommended).
• When selecting "No, do not display the page", the
installation will continue.
Click [Finish].
12
The installation of the software is now completed.
When the installation is completed, the
message which prompts you to reboot the PC
may be displayed. In this case, select
"Restart" and click [Finish].
Starting up the installed software.
13
• When starting P-touch Editor, click [Start]-[All Programs (Programs)]-[Brother P-
touch]-[P-touch Editor 4.2].
• When starting P-touch Address Book, click [Start] - [All Programs (Programs)] -
[Brother P-touch] - [P-touch Address Book 1.0].
For details on software, See the "Software User's Guide (PDF Manual)".
The Software User's Guide (PDF Manual) can be displayed by clicking [Start]-[ALL
Programs (Programs)]-[Brother P-Touch]-[Manuals]-[QL-Series User's Guide
(English)].
Page 43

For Mac
2
39
You will need to install the software from the included CD-ROM to use the printer with
your Mac
The software is available for the following OS’s.
Mac OS® X 10.1 ~ 10.4.1
®
.
For details on software, See the "Software User's Guide (PDF Manual)".
1. Software description
The CD-ROM included with the printer contains the following software and printer driver.
P-touch Editor 3.2
You can create various labels such as address labels and CD/DVD labels.
Fonts
A selection of English fonts.
Auto Format Templates
A selection of label template layouts for use with P-touch Editor 3.2.
Clip Art
A selection of illustrations for use with P-touch Editor 3.2.
Printer Driver
Lets you print from your Mac®.
2. Notes on installation
• Until the installation of the printer driver is completed, do not connect the printer to the
®
Mac
. If it has been connected to the Mac®, pull out the USB cable from the Mac®.
• When installing, log in as the administrator.
Introduction
STEP
1
printer
Before using the
STEP
2
(No PC)
Using only this printer
STEP
3
Connecting to your PC
STEP
4
Maintenance and
For WindowsFor Mac
Troubleshooting
Page 44

STEP3 Connecting the printer to your PC
40
3. Software installation
This section explains how to install the P-touch Editor 3.2, Fonts, Auto Format Templates,
and Clip Art as a whole, and to install the printer driver and set it for the printer.
The procedure for installing this varies depending on the OS version of your Mac®.
®
This is an example of Mac OS
Start up your Mac®, and put the CD-ROM into the CD-ROM drive.
1
The QL-Series screen is displayed.
If it does not start up automatically, double click the QL-Series
(CD-ROM) icon.
Click [Mac OS X] folder.
2
Double click [P-touch Editor 3.2 Installer].
3
P-touch Editor 3.2 Installer starts up and the Introduction screen is
displayed.
Check the content and click [Next].
4
The Important Information screen is displayed.
X 10.3.9.
Check the content and click [Next].
5
Page 45

Click [Next].
6
7
8
You can choose which programs are
installed. Uncheck any programs that you do
not want to install.
Choose Alias Folder screen is displayed.
Select the location where you want to
create the alias, and click [Next].
For other than Mac OS® X 10.1, do not select
"In the Dock". The alias is not created in the
doc, and the icon of doc may be changed
back to the default.
Pre-Installation Summary screen is displayed.
Click [Install].
The installation starts.
41
Introduction
STEP
1
printer
Before using the
STEP
2
(No PC)
After the installation is completed and
9
the screen shown on the right is
displayed, click [Done].
The software installation is now complete.
Next, install the printer driver.
Double click [QL-500 550 650TD Driver.pkg] in [Mac OS
10
X] folder.
The Driver Installer starts up and the Driver Setup screen is displayed.
Using only this printer
STEP
3
Connecting to your PC
STEP
4
Maintenance and
For WindowsFor Mac
Troubleshooting
Page 46

STEP3 Connecting the printer to your PC
42
Click [Continue].
11
The Important Information screen is displayed.
Click [Continue].
12
The Software License Agreement screen is
displayed.
Check the content and select "English",
13
then click [Continue].
The License agreement screen is displayed.
When continuing the installation, click
14
[Agree].
The Select a Destination screen is displayed.
Select the destination you want to
15
install, and click [Continue].
The Easy Install screen is displayed.
Select the drive where the Mac OS
installed.
®
X is
Page 47

Select the drive where you want to
16
install the driver, and click [Install].
The screen in which the name and password of
the administrator is now displayed.
Input the "Name" and the "Password" of
17
the administrator and click [OK].
The screen to check the installation is displayed.
43
Introduction
STEP
1
printer
Before using the
When continuing the installation, click
18
[Continue Installation].
The installation starts.
When the installation is completed and
19
the message "The software was
successfully installed" is displayed, click
[Restart].
Your Mac® will restart.
The installation of the printer driver is now
complete.
After rebooting, connect the USB
20
cable and power cord to the
printer.
Remove the caution label before
connecting the USB cable.
USB port
Connect the USB cable to the USB port of the Mac®.
21
Press the ON/OFF button ( ) of the printer to turn on the power.
If you are using a USB hub and your Mac® has problems recognizing the
printer, try connecting the printer directly to your Mac
USB cable
®
.
Power cord
slot
Power cord
STEP
2
Using only this printer
STEP
3
Connecting to your PC
STEP
4
Maintenance and
(No PC)
For WindowsFor Mac
Troubleshooting
Page 48

STEP3 Connecting the printer to your PC
44
Double click the drive where Mac OS® X is installed, and click in
22
order [Applications]-[Utility]-[Printer Setup Utility (Print Center)].
The Printer List screen is displayed.
When the screen shown on the right is displayed,
click [Add].
Click [Add] (Add Printer).
23
Click [USB].
24
Click "QL-650TD" and then click [Add].
25
The screen returns to Printer List screen.
Check the "QL-650TD" is added, and close
26
the Printer List screen.
Now you can use the printer.
27
Double click from the [Applications] folder - [P-touch
Editor 3.2] folder and the P-touch Editor will start.
For details on software, See the "Software User's Guide (PDF Manual)". For Software
User's Guide (PDF Manual), refer to the PDF file stored in "Manuals" folder of
included CD-ROM.
Page 49

STEP4
STEP4
Maintenance and Troubleshooting
45
Introduction
STEP
1
printer
This section of the guide explains how to properly maintain this printer so as to
ensure many years of reliable service.
This section also covers how to troubleshoot potential problems and how to read
and understand error messages.
Maintenance
1
Print head maintenance
Roller maintenance
Label outlet maintenance
Replacing the cutter unit
Replacing the lithium clock battery
2
Troubleshooting
Potential types of problems
Error messages (what they mean)
Reset the Printer
Main specifications
Page 46
Page 46
Page 47
Page 48
Page 49
Page 51
Page 52
Page 53
Page 54
Before using the
STEP
2
(No PC)
Using only this printer
STEP
3
For WindowsFor Mac
Connecting to your PC
STEP
4
Troubleshooting
Maintenance and
Page 50

STEP4 Maintenance and Troubleshooting
46
1
Maintenance
Maintenance of the printer needs only to be done when required. However, some
environments will require that maintenance should be done more frequently (e.g. in dusty
conditions).
Print head maintenance
The DK Roll (thermal recording paper type) used with the printer is designed to clean the
print head automatically. When the DK Roll passes the print head during printing and
label feeding, the print head is cleaned.
Roller maintenance
Clean the roller using the cleaning sheet (available separately).
The printer contains only one cleaning sheet.
When doing maintenance on the roller, be sure to use the cleaning sheet supplied
exclusively for this printer.
If using other cleaning sheets, the surface of the roller may be damaged and may
cause a malfunction.
Turn OFF the power to the printer.
1
Hold the DK Roll compartment cover at the
2
sides near the front of the printer and firmly lift
up to open the cover.
Pull up the roll release lever and remove the
3
DK Roll.
Be sure to remove the DK Roll before cleaning the
roller. The roller cleaning function will not operate
correctly if the DK Roll is not removed.
Page 51

Insert edge (A) of the cleaning sheet into the printing unit and guide
4
it out to just in front of the cutter.
• Do not remove part (A) of the cleaning sheet.
• The printed side of the cleaning sheet should be facing upwards.
After inserting the cleaning sheet into the
5
printing unit, push down the roll release lever
and remove the part B of the cleaning sheet.
Close the DK Roll cover and turn ON the power to the printer.
6
47
Introduction
STEP
1
printer
Before using the
STEP
2
(No PC)
Using only this printer
Press the Feed button () for more than one
7
second.
The roller rotates for 100 mm.
The adhesive face of the cleaning sheet removes any
stains or dust on the roller.
• If you do not press the Feed button for more than
one second, the roller rotates for only 8 mm.
• Dispose of the cleaning sheet after use.
Label outlet maintenance
When glue is attached to the label
outlet (metallic plate part and resin
guide part) and the printer damages
the label, pull out the power plug from
the outlet and clean the label outlet
with a cloth dipped into ethanol or
isopropyl alcohol.
It is recommended to clean the label
outlet when replacing the cutter unit.
Feed button
Label outlet
STEP
3
For WindowsFor Mac
Connecting to your PC
STEP
4
Troubleshooting
Maintenance and
Page 52

STEP4 Maintenance and Troubleshooting
48
Replacing the cutter unit
Eventually the cutting blade on the cutter unit will become dull (blunt) and need to be
replaced. At the appropriate time, purchase a new replacement cutter unit and install it
according to the following procedure. For purchasing a replacement cutter unit, See the
back of this User Guide.
Check that the cutter unit is located at the home position.
1
Turn OFF the power to the printer and pull out the power cord from
2
the wall outlet.
Open the DK Roll cover and pull the roll
3
release lever to the up position. Remove the
DK Roll.
Using a cross-head screwdriver, loosen the
4
screw which holds the cutter blade unit inplace.
The screw securing the cutter unit should not be
completely removed. Simply loosen it to remove
the cutter unit from the printer.
Grip the tab and lift out the cutter unit.
5
Take care not to touch the blade of the cutter.
Set the new cutter unit in the correct position.
6
Page 53

Once set in the correct position, tighten the
7
screw which holds the cutting blade unit in
place.
Set the DK Roll and close the DK Roll cover.
8
For details, See "Installing the DK Roll" on page 16.
49
Introduction
STEP
1
printer
Replacing the lithium clock battery
A lithium battery is supplied in order to maintain the settings for the internal clock when
the printer unit is not plugged in to a normal power supply. If the clock settings need to be
reset every time the printer unit is unplugged from its normal power source, then the
battery must be replaced.
For the replacement lithium battery, purchase CR2032 (recommended manufacturer:
Hitachi Maxell, Ltd., FDK Corporation, Matsushita Electric Industrial Co.,Ltd., Sony
Corporation, Toshiba Corporation and VARTA Microbattery Inc.).
• Use only the authorized battery for the printer.
• Dispose of the used battery in accordance with all
applicable federal, state and local regulations.
• When storing or discarding the battery, wrap it with
adhesive cellophane tape or similar material. to
prevent it from short-circuiting.
• It is recommended to replace the battery every two
years.
Turn OFF the power to the printer and pull the power cord out of the
1
outlet.
Open the DK Roll cover and pull up the roll
2
release lever to the up position and remove
the DK Roll.
Example of grounding of battery
Adhesive cellophane tape etc.
Battery
Before using the
STEP
2
(No PC)
Using only this printer
STEP
3
For WindowsFor Mac
Connecting to your PC
STEP
4
Maintenance and
Troubleshooting
Page 54

STEP4 Maintenance and Troubleshooting
50
Turn the mark (A) on cover to mark (B) on the printer using a
3
coin and remove the battery cover.
When turning the battery cover, do not rotate it past the position of mark (B)
on the printer, as this may cause a malfunction.
As shown below, press C part of battery and remove the battery.
4
By pressing C part of battery, the battery lifts up, so it can be removed easily.
Install the new battery, taking care to ensure the correct polarity of
5
the battery.
Refit the battery cover matching mark (A) on the cover and
6
mark (B) on the printer. Turn the mark (A) on the cover to
mark (D) on the printer using a coin to lock the cover.
When turning the battery cover, do not rotate it past the position of mark (D)
on the printer, it may cause a malfunction.
Set the DK Roll and close the DK Roll cover.
7
For details, See "Installing the DK Roll" on page 16.
Page 55

Troubleshooting
2
If problems occur while using this printer, the following may help you to solve the
problems:
51
Introduction
Potential types of problems
Problem Solution
• Is the USB cable disconnected?
Check the USB cable is connected properly.
• Is the DK Roll properly set?
• Cannot print
• Printing error
is displayed
• LED lamp
does not light
up
• LED lamp is
blinking
• The print
quality is poor
• Data
transmission
error is
displayed on
PC
If it is not set properly, remove the DK Roll and set it again.
• Is the DK Roll used up?
• Is the DK Roll cover open?
Check the roll cover is closed properly.
• Are both the USB cable and RS-232C cables connected to the
printer at the same time?
Connect only one cable which is used to communicate with the
printer.
• Is the power cord connected properly?
Check the power cord is connected properly. If it is connected
properly, try to connect it to another outlet.
* If the problem is not resolved after trying these solutions, contact your local
distributor or Brother Call Center.
• For details, See "Manual operation button" on page 15.
• Does a system error (the LED turns off after blinking 10 times)
occur?
Turn OFF the power to the printer wait 30 seconds and then turn it
ON again.
If the problem is not resolved after trying this solution, contact your
local distributor or Brother Call Center.
• Is the print head or roller damaged or stained?
The print head is cleaned when using the DK Roll (thermal recording
paper), however, dust or stains from the roller may collect on the
print head. In this case, clean the roller. For details, See "Roller
maintenance" on page 46.
• Is the correct port selected?
Check that the correct port is selected from [print to the port below]
in printer property dialog box.
STEP
1
printer
Before using the
STEP
2
(No PC)
Using only this printer
STEP
3
For WindowsFor Mac
Connecting to your PC
STEP
4
• The clock
stops when
unplugging
the power
cord
• Is the battery protection sheet removed?
Remove the battery protection sheet.
• Is the battery installed?
Put a new battery in the machine.
• The battery has run out of power.
Replace it with a new battery.
Maintenance and
Troubleshooting
Page 56

STEP4 Maintenance and Troubleshooting
52
Problem Solution
• Is the cutter blade getting dull (blunt)?
• The label gets
jammed
around the
cutter unit
• The label is
not ejected
properly after
printing
•
The icon of
P-touch Add-In
is not
displayed on
Microsoft®
Word
Does the cutter error occur frequently?
Replace the cutter unit. For details, See "Replacing the cutter unit"
on page 48.
• Have foreign objects or dust got onto the roller?
Clean the roller using the cleaning sheet. For details, See "Roller
maintenance" on page 46.
• Is the label outlet stained?
Remove stains from the label outlet. For details, See "Label outlet
maintenance" on page 47.
• Is Microsoft
Have you selected Microsoft
Due to limitations of the program, the Add-In of Microsoft
unable to be used with above settings. Quit Microsoft
and restart Microsoft
®
Outlook® running?
Error messages (what they mean)
®
Word.
®
Word as your email editor?
®
Word® is
®
Outlook®,
Error message
System Error
No.*!
Please Close
Cover!
Cutter Error!
Paper Cannot
be Fed!
Roll End!
Please Insert
Label Roll!
Please Insert
*****!
Please Insert
62mm!
Cause Solution
A system error has occurred.
The DK Roll cover is open. Close the DK Roll cover and
The cutter is not located at the
home position.
The DK Roll is misfeeding or has
run out.
The DK roll has run out. Set a new DK Label Roll.
Printing or cutting is operated
without setting DK Roll.
The printing is being operated
without setting DK Roll or without
setting the DK Roll of the correct
size.
List Print is applicable for 62 mm
continuous length roll.
Contact your service representative.
repeat the operation.
Turn off the printer, wait 30
seconds and then turn the printer
on again.
If the problem cannot be
corrected, contact your service
representative.
Set the DK Roll properly again. If
the DK Tape has run out, fit a
new roll.
Set the DK Roll.
Make sure you have set the
correct size DK Roll for the
template or label layout you are
trying to print.
Set 62 mm DK Tape.
Page 57

53
Error message
Cause Solution
When selecting the template
No Setting
Applicable Data!
which does not include the date
and time settings, it is not
possible to set addition or
subtraction of date and time.
When selecting the template
No Numbering
Applicable Data!
which does not include the
numbering object, the numbering
printing cannot be operated.
An error has occurred when
Transmission
Error!
No Editing
Applicable Data!
Length Limit!
]
receiving data from your
computer.
The selected template does not
include items for which it is
possible to change the settings.
The data which is about to print
does not fit the label size.
Reset the Printer
Problem Solution
•
I would like to
clear the
printer settings
and the data
transferred
from the PC
Turn the printer OFF by pressing the ON/OFF button. Hold the Up
arrow button ( ) and the Feed button
OFF button. Release all the buttons when the display shows “OK to
initialize ?” then press the OK button. All downloaded data and
setting transferred from the PC are cleared.
The printer is reset.
The clock and date settings are not cleared with this action.
Select the template which
includes date and time object
and then set it.
Select the template which
includes the numbering object.
Check that the cable is properly
connected and ensure the power
is turned on. Then repeat the
operation.
Unable to change the settings.
Select bigger label size or modify
its contents and settings.
() while pressing the ON/
Introduction
STEP
1
printer
Before using the
STEP
2
(No PC)
Using only this printer
STEP
3
For WindowsFor Mac
Connecting to your PC
STEP
4
Troubleshooting
Maintenance and
Page 58

STEP4 Maintenance and Troubleshooting
54
Main specifications
Product specifications
Item Specifications
Display LED lamp (green), LCD (16 digits × 2 lines)
Printing method Thermal recording type
Speed of printing Max. 90 mm/second, 56 labels/minute (address label)
Print
Print head 300 dpi/720 dots
Max. printing width 59 mm
Min. printing length 25.4 mm
9 Buttons: ON/OFF button ( ), Feed button ( ),
Buttons
Interface USB, serial (RS-232C)
Power supply 220 - 240 VAC 50/60 Hz (0.9 A)
Size 146 (W) × 196 (D) × 152 (H) mm
Weight 1.3 kg (excluding DK Roll)
Cutter Auto cutter
Operating environment
Item Specifications
OS
Interface
Hard
Disk
Memory
Monitor
Others CD-ROM drive
Operating temperature 10°C to 35°C
Operating humidity 20% to 80% (no condensation)
*1 It is necessary to install the OS into the PCs which are recommended by Microsoft®.
*2 RS-232C interface is required only when using ESC/P command.
*3 Required available space when installing the software with all of the options.
Windows
®
Mac
Windows
®
Mac
Windows
®
Mac
Windows
®
Mac
Windows
®
Mac
Cut button ( )Print button ( ), Menu button, ESC button,
OK button, Up arrow button ( ), Down arrow button( )
®
Windows® 98 SE/Me/2000 Professional/XP
*1
Mac OS® X 10.1 ~ 10.4.1
®
Compliant with USB Ver.1.1 or 2.0, serial (RS-232C)
Compliant with USB Ver.1.1 or 2.0
®
Disk space more than 70 MB
Disk space more than 100 MB
Windows® 98 SE/Me: 64 MB or more
®
Windows
®
2000 Professional/XP: 128 MB or more
*3
*3
32 MB or more
®
Graphics card SVGA, High colour or greater
256 colors or more
*2
Page 59

Consumables list
55
Below is a complete listing of the consumables for the QL-650TD
DK-11201 Standard Address Labels
DK-11208 Large Address Labels
DK-11209 Small Address Labels
DK-11202 Shipping Labels
DK-11203 File Folder Labels
DK-11204 Multi Purpose Labels
DK-11207 CD/DVD Labels
DK-11219 Round Paper Labels 12mm
DK-11218 Round Paper Labels 24mm
DK-11214 White Continuous Length Paper Tape 12mm
DK-22210 White Continuous Length Paper Tape 29mm
DK-22205 White Continuous Length Paper Tape 62mm
DK-22211 White Continuous Length Film Tape 29mm
DK-22212 White Continuous Length Film Tape 62mm
DK-22606 Yellow Continuous Length Film Tape 62mm
DK-22113 Clear Continuous Length Film Tape 62mm
DK-44205 White Continuous Length Removable Paper Tape 62mm
DK-44605 Yellow Continuous Length Removable Paper Tape 62mm
DK-BU99 QL Cutter Unit (2x Piece)
DK-CL99 QL Cleaning Sheets (10x Sheets)
Introduction
STEP
1
printer
Before using the
STEP
2
(No PC)
Using only this printer
STEP
3
For WindowsFor Mac
Connecting to your PC
STEP
4
Troubleshooting
Maintenance and
Page 60

ITALIANO
FRANÇAIS DEUTSCH
Guida per l’installazione e l’uso
Introduzione
FASE
1
stampante
Prima di utilizzare la
FASE
2
Uso della sola
stampante (senza PC)
È necessario configurare l’hardware e installare il driver prima di poter utilizzare la
stampante.
Leggere il presente manuale prima di utilizzare la stampante. Mantenere il CDROM a portata di mano per una rapida consultazione in caso di necessità.
FASE
3
Collegamento al PC
FASE
4
Manutenzione e
Per Windows
Per Mac
risoluzione dei problemi
Page 61

Congratulazioni per l’acquisto della stampante QL-650TD.
La nuova QL-650TD è una stampante per etichette che si collega direttamente al PC, consentendo
la stampa rapida e facile di etichette personalizzate professionali create sul computer con il software
di elaborazione etichette allegato.
Raccomandiamo caldamente di leggere il presente manuale prima di utilizzare la stampante QL650TD e di tenerlo sempre a portata di mano per future consultazioni.
Offriamo assistenza e supporto per gli utenti che registrano i loro prodotti sul
nostro sito web. Si raccomanda di non perdere l’opportunità di registrare i propri
prodotti con noi visitando il sito:
Registrazione utente in linea
http://register.eu.brother.com/
Pagina per l’assistenza in linea
http://solutions.brother.com/
NOTA: È inoltre possibile accedere alle pagine Web suddette dalla finestra di
registrazione in linea presentata dal CD-ROM di installazione incluso con la
stampante. Rimaniamo in attesa della vostra registrazione.
Dichiarazione di conformità
Noi Brother Industries, Ltd.
dichiariamo che questo prodotto è in conformità ai seguenti documenti normativi:
Sicurezza: EN 60950:2000
EMC: EN 55022:1998 / A1:2000 / A2:2003 Classe B
In base alle disposizioni della direttiva 73/23/CEE sulle Basse Tensioni (modificata
dalla direttiva 93/68/CEE) e della direttiva sulla Compatibilità Elettromagnetica 89/
336/CEE (modificata dalle direttive 92/31/CEE e 93/68/CEE).
Emesso da: Brother Industries, Ltd.
Utilizzare i cavi di interfaccia forniti in modo da garantire la conformità ai limiti definiti
dalla Compatibilità Elettromagnetica (CEM)
15-1, Naeshiro, Mizuho-ku,
Nagoya 487-8561, Japan
EN 55024:1998 / A1:2001
EN 61000-3-2:2000
EN 61000-3-3:1995 / A1:2001
Personal & Home Company
Development & Production Dept.
• La riproduzione di una qualunque parte del presente manuale in qualsiasi forma,
compreso fotocopiatura e ristampa, senza previo consenso, è assolutamente vietata.
• Tutti i diritti e i copyright relativi al software allegato (incluso ma non limitato a
programmi, immagini, clip-art, modelli e testi incorporati nel software), ai manuali
acclusi, agli altri documenti e a tutte le copie del software sono di proprietà di Brother
Industries, Ltd. e dei suoi fornitori.
Page 62

Indice
ITALIANO
Introduzione••••••••••••••••••••••••••••••••••••••••••••••••••••••••••••••••••••• 1
Manuali •••••••••••••••••••••••••••••••••••••••••••••••••••••••••••••••••••••••••••••••••••• 2
Simboli Utilizzati in questo Manuale ••••••••••••••••••••••••••••••••••••••••••••••••• 2
Misure di sicurezza•••••••••••••••••••••••••••••••••••••••••••••••••••••••••••••••••••••• 3
Precauzioni generali •••••••••••••••••••••••••••••••••••••••••••••••••••••••••••••••••••• 6
FASE
1
FASE1
FASE1
FASE
FASE
Prima di utilizzare la stampante •••••••••••••••••••••••••••••• 9
Lista di controllo dei componenti•••••••••••••••••••••••••••••••••••••••••••• 10
Descrizione dei componenti ••••••••••••••••••••••••••••••••••••••••••••••••• 11
Unità principale di stampa ••••••••••••••••••••••••••••••••••••••••••••••••••••••••••••• 11
Collegamento dell’alimentazione ••••••••••••••••••••••••••••••••••••••••••• 12
Display LCD •••••••••••••••••••••••••••••••••••••••••••••••••••••••••••••••••••••••••••••• 13
Pulsanti per il funzionamento manuale•••••••••••••••••••••••••••••••••••••••••••••• 15
Installazione del Rullo DK•••••••••••••••••••••••••••••••••••••••••••••••••••• 16
Rulli DK utilizzabili••••••••••••••••••••••••••••••••••••••••••••••••••••••••••••••••••••••• 16
Installazione del Rullo DK•••••••••••••••••••••••••••••••••••••••••••••••••••••••••••••• 16
Collegamento della guida per la carta ••••••••••••••••••••••••••••••••••••• 17
Impostazioni di orologio/lingua/unità ••••••••••••••••••••••••••••••••••••••• 18
Procedura per la creazione di un’etichetta•••••••••••••••••••••••••••••••• 20
2
2
Creazione e stampa di un’etichetta utilizzando
esclusivamente questa stampante •••••••••••••••••••••••••• 21
Creazione di un’etichetta••••••••••••••••••••••••••••••••••••••••••••••••••••• 22
1. Selezione di un modello••••••••••••••••••••••••••••••••••••••••••••••••••••••••••••• 22
2. Stampa di un’etichetta••••••••••••••••••••••••••••••••••••••••••••••••••••••••••••••• 23
Altre funzioni utili••••••••••••••••••••••••••••••••••••••••••••••••••••••••••••••• 24
Modifica di un modello: Menu 1/12••••••••••••••••••••••••••••••••••••••••••••••••••• 24
Modifica della data dei modelli: Menu 2/12••••••••••••••••••••••••••••••••••••••••• 25
Anteprima del contenuto della stampa prima di stampare: Menu 3/12 ••••••• 26
Specificare il numero di copie: Menu 4/12•••••••••••••••••••••••••••••••••••••••••• 27
Stampa di etichette numerate: Menu 5/12•••••••••••••••••••••••••••••••••••••••••• 27
Stampa di un elenco di modelli: Menu 6/12 •••••••••••••••••••••••••••••••••••••••• 28
Impostazione dell’orologio: Menu 7/12 •••••••••••••••••••••••••••••••••••••••••••••• 28
Impostazione dell’ora legale: Menu 8/12•••••••••••••••••••••••••••••••••••••••••••• 29
Taglio automatico del rullo durante la stampa: Menu 9/12 •••••••••••••••••••••• 29
Impostazione della lingua: Menu 10/12 ••••••••••••••••••••••••••••••••••••••••••••• 30
Impostazione dell’unità di misura (pollici o mm): Menu 11/12 •••••••••••••••••• 30
Regolazione del contrasto del display LCD: Menu 12/12•••••••••••••••••••••••• 31
Pulsante di blocco del Menu •••••••••••••••••••••••••••••••••••••••••••••••••••••••••• 31
Caricare modelli o messaggi dal computer••••••••••••••••••••••••••••••••••••••••• 31
Informazioni sullo scaricamento dei messaggi •••••••••••••••••••••••••••••••••••• 31
Prima di utilizzare la
FASE
2
Uso della sola
FASE
3
Collegamento al PC
FASE
4
stampante
stampante (senza PC)
Per Windows
Per Mac
FASE3
FASE3
Collegamento della stampante al PC •••••••••••••••••••••••• 33
Per Windows ••••••••••••••••••••••••••••••••••••••••••••••••••••••••••••••••••• 34
1. Descrizione del programma •••••••••••••••••••••••••••••••••••••••••••••••••••••••• 34
2. Note sull’installazione ••••••••••••••••••••••••••••••••••••••••••••••••••••••••••••••• 35
3. Installazione del software••••••••••••••••••••••••••••••••••••••••••••••••••••••••••• 35
Manutenzione e
risoluzione dei problemi
Page 63

Per Mac•••••••••••••••••••••••••••••••••••••••••••••••••••••••••••••••••••••••••• 39
1. Descrizione del programma •••••••••••••••••••••••••••••••••••••••••••••••••••••••• 39
2. Note sull’installazione ••••••••••••••••••••••••••••••••••••••••••••••••••••••••••••••• 39
3. Installazione Software ••••••••••••••••••••••••••••••••••••••••••••••••••••••••••••••• 40
FASE4
FASE4
Manutenzione e risoluzione dei problemi ••••••••••••••••••• 45
Manutenzione •••••••••••••••••••••••••••••••••••••••••••••••••••••••••••••••••• 46
Manutenzione della testina di stampa ••••••••••••••••••••••••••••••••••••••••••••••• 46
Manutenzione del rullo di trascinamento•••••••••••••••••••••••••••••••••••••••••••• 46
Manutenzione del sistema di uscita delle etichette ••••••••••••••••••••••••••••••• 47
Sostituzione della taglierina ••••••••••••••••••••••••••••••••••••••••••••••••••••••••••• 48
Sostituzione della batteria al litio dell’orologio ••••••••••••••••••••••••••••••••••••• 49
Risoluzione dei problemi ••••••••••••••••••••••••••••••••••••••••••••••••••••• 51
Tipi di problemi potenziali•••••••••••••••••••••••••••••••••••••••••••••••••••••••••••••• 51
Messaggi di errore (significato specifico) ••••••••••••••••••••••••••••••••••••••••••• 52
Azzeramento della stampante •••••••••••••••••••••••••••••••••••••••••••••••••••••••• 53
Caratteristiche tecniche principali •••••••••••••••••••••••••••••••••••••••••••••••••••• 54
Elenco dei prodotti consumabili••••••••••••••••••••••••••••••••••••••••••••••••••••••• 55
Page 64

ITALIANO
Introduzione
Avviso riguardo a stesura e pubblicazione
Con la supervisione di Brother Industries Ltd., il presente manuale è stato redatto e
pubblicato in base alle più recenti descrizioni e specifiche del prodotto.
Il contenuto del presente manuale e le specifiche del prodotto sono soggetti a modifica
senza preavviso.
1
Introduzione
FASE
1
Brother si riserva il diritto di apportare modifiche senza preavviso alle specifiche e ai
materiali contenuti nel presente manuale e declina ogni responsabilità per eventuali
danni (anche conseguenti) causati dal fare affidamento sui materiali presentati, incluso
ma non limitato a errori tipografici o altri tipi di errori correlati alla pubblicazione.
© 2005 Brother Industries Ltd.
Marchi commerciali
Il logo Brother® è un marchio registrato di Brother Industries, Ltd.
Microsoft®, MS-DOS®, Windows® e Windows NT® sono marchi registrati di Microsoft
Corporation negli Stati Uniti e in altri paesi.
®
Apple
, il logo Apple®, Mac® e TrueType® sono marchi registrati di Apple Computer, Inc
negli Stati Uniti e in altri paesi.
La stampante include i moduli software "USBPRINT.SYS" e "USBMON.DLL" di cui
Microsoft Corporation detiene in toto diritti e interessi.
®
Adobe
Systems Incorporated.
QR code è un marchio registrato da DENSO WAVE INCORPORATED.
Tutti gli altri termini e marchi e nomi di prodotti riportati nella presente Guida per l’utente
sono marchi registrati delle rispettive società.
, il logo di Adobe®, Acrobat® e Adobe® Reader® sono marchi registrati da Adobe
Spedizione della stampante
stampante
Prima di utilizzare la
FASE
2
Uso della sola
stampante (senza PC)
FASE
3
Per WindowsPer Mac
Collegamento al PC
FASE
4
Se per qualunque motivo la stampante deve essere spedita, imballarla accuratamente
per evitare danni durante il trasporto.
Consigliamo di conservare e di riutilizzare l’imballaggio originale. È inoltre necessario
assicurare la stampante con il corriere.
Manutenzione e
risoluzione dei problemi
Page 65

Introduzione
2
Manuali
I seguenti manuali sono forniti per facilitare l’utilizzo corretto della stampante e delle sue
funzioni. Leggere il presente manuale prima di utilizzare la stampante.
Guida per l’installazione e l’uso (il presente manuale)
Leggere questo manuale per primo.
Questo manuale fornisce informazioni che devono essere lette prima di utilizzare la
stampante, fra cui: indicazioni di attenzione, istruzioni di installazione e configurazione e
procedure per la stampa di etichette senza l’impiego del computer.
Inoltre descrive la procedura d’installazione del software allegato che deve essere
installato sul personal computer.
Guida all’uso del programma (Manuale in formato PDF)
Questo manuale descrive come realizzare etichette utilizzando il software fornito con la
stampante, installandolo su un personal computer prima di aver collegato la stampante al
computer.
• Per leggere la Guida all’uso del programma (manuale in formato PDF), è necessario
installare Adobe
(Per Mac
sistema operativo.)
• Utilizzando Windows
l’applicazione P-touch Setup eseguendola direttamente dal CD-ROM.
Inoltre, è possibile visualizzare questo manuale dal menu Start se è installato sul
computer.
• Utilizzando Mac, fare riferimento ai file PDF presenti nella cartella [Manuals]
(Manuali) sul CD-ROM incluso con la stampante.
®
®
Reader® oppure Adobe® Acrobat® Reader®.
, è possibile utilizzare il programma "Preview" standard incluso con il
®
, questo manuale può essere visualizzato tramite
Simboli Utilizzati in questo Manuale
Nella presente guida sono utilizzati i seguenti simboli:
Questo simbolo segnala informazioni o istruzioni che devono essere seguite con
attenzione. La mancata osservanza di tali istruzioni può causare lesioni, danni o errati
funzionamenti.
Questo simbolo segnala informazioni o istruzioni che possono agevolare la
comprensione o l’utilizzo con maggiore efficienza della stampante.
Page 66

ITALIANO
Misure di sicurezza
Allo scopo di prevenire lesioni o danni, le indicazioni importanti sono evidenziate
utilizzando vari simboli.
Di seguito sono descritti tali simboli ed il relativo significato:
Avvertenza
Attenzione
I simboli utilizzati nel presente manuale sono i seguenti:
L’icona di configurazione errata segnala dispositivi e operazioni non compatibili con la
stampante. (ad es. la figura sulla sinistra avvisa di non smontare la macchina).
Le istruzioni speciali indicano le operazioni che possono essere eseguite. (ad es. la figura
sulla sinistra mostra lo scollegamento della spina dalla presa di alimentazione).
La stampante
Osservare le seguenti linee guida per evitare incendi, scosse elettriche o altri danni.
Non smontare la stampante.
Per ispezionare, regolare e riparare la
stampante contattare il punto vendita in
cui è stata acquistata la stampante o
rivolgersi presso il locale centro di
assistenza.
Non lasciar cadere, urtare o altrimenti
colpire la stampante.
Non afferrare e sollevare la stampante
dal coperchio del vano per il Rullo DK. Il
coperchio potrebbe staccarsi e la
stampante potrebbe cadere e
danneggiarsi.
Non toccare le parti metalliche vicino
alla testina di stampa. La testina di
stampa raggiunge elevate temperature
durante e immediatamente dopo
l’utilizzo. Evitare di toccarla direttamente
con le mani.
Spiega cosa fare per evitare il rischio di lesioni.
Spiega le procedure da seguire per evitare danni alla stampante.
Avvertenza
Non bagnare in alcun modo la stampante.
Non utilizzare la stampante con oggetti
estranei al suo interno. Qualora acqua o
corpi estranei siano penetrati nella
stampante, estrarre il cavo di
alimentazione dalla presa della rete
elettrica e rimuovere il corpo estraneo.
Se necessario, contattare il punto
vendita in cui è stata acquistata o il
centro di assistenza autorizzato locale.
Smaltire i sacchetti di plastica
correttamente e conservarli fuori dalla
portata dei bambini. Non indossare o
giocare con sacchetti di plastica.
Cessare immediatamente l’utilizzo della
stampante e scollegare il cavo di
alimentazione, qualora si notino
condizioni anomale come odori,
surriscaldamenti, decolorazioni,
deformazioni o simili durante l'uso o la
conservazione della stampante.
3
Introduzione
FASE
1
stampante
Prima di utilizzare la
FASE
2
Uso della sola
stampante (senza PC)
FASE
3
Per WindowsPer Mac
Collegamento al PC
FASE
4
Manutenzione e
risoluzione dei problemi
Page 67

Introduzione
4
Avvertenza
Osservare le seguenti linee guida per evitare incendi, scosse elettriche o altri danni.
Cavo di alimentazione
Utilizzare solo una fonte di
alimentazione autorizzata (220 - 240 V
CA) per la stampante.
Utilizzare soltanto il cavo di
alimentazione fornito in dotazione con la
stampante.
Non sovraccaricare la presa di
alimentazione collegandovi troppi
apparecchi insieme e non collegare il
cavo di alimentazione ad una presa
danneggiata.
Non tagliare, danneggiare, alterare o
posizionare oggetti pesanti sul cavo di
alimentazione.
Batteria
Utilizzare soltanto batterie del tipo
autorizzato per la stampante.
Non cercare di smontare, alterare,
riscaldare, esporre ad una fiamma
libera, ai raggi solari, a temperature
estremamente elevate o all’umidità le
batterie.
Sciacquare immediatamente con acqua
le parti del corpo che fossero entrate in
contatto con il liquido interno della
batteria. Consultare un medico in caso
di contatto del liquido con gli occhi o la
bocca.
Inserire la batteria verificando di
rispettare la corretta polarità.
Non bagnare la batteria.
Una volta esaurita la batteria, rimuoverla
immediatamente dalla stampante.
Non saldare direttamente la batteria.
Non utilizzare il cavo di alimentazione se
risulta danneggiato.
Non toccare il cavo di alimentazione o la
spina con le mani umide.
Verificare che la spina sia correttamente
inserita nella presa.
In caso di prolungato inutilizzo della
stampante, scollegare il cavo di
alimentazione dalla presa della rete
elettrica.
Un uso di batterie non adatte per la
stampante può causare perdite o
esplosioni che possono generare
incendi, lesioni o danni nell’area
circostante alla macchina.
Smaltire le batterie esaurite seguendo le
istruzioni.
Non cortocircuitare i terminali della
batteria con oggetti metallici.
Le batterie fornite in dotazione non sono
ricaricabili. Non tentare di ricaricare tali
batterie.
Conservare le batterie fuori dalla portata
dei bambini. Qualora sia stata
accidentalmente ingoiata una batteria,
contattare immediatamente un medico.
Non far cadere o urtare con forza la
batteria per non danneggiarla.
Non sottoporre la batteria a vibrazioni a
ultrasuoni che potrebbero causare un
cortocircuito interno.
Attenzione
Osservare le seguenti linee guida per evitare incendi, scosse elettriche o altri danni.
La stampante
La presa elettrica standard deve trovarsi in prossimità della stampante ed essere
facilmente accessibile.
Cavo di alimentazione
Per collegare o scollegare il cavo di alimentazione dalla presa elettrica, agire sempre
sulla spina di alimentazione. Tirando il cavo di alimentazione, si possono causare danni
al cavo stesso.
Page 68

ITALIANO
Attenzione
Osservare le seguenti linee guida per evitare incendi, scosse elettriche o altri danni.
Taglierina
Non toccare la lama della taglierina.
Non aprire il coperchio superiore
durante l’utilizzo della taglierina.
Installazione / Conservazione
Collocare la stampante su una
superficie piana, stabile come una
scrivania.
Rullo DK (Etichetta DK, Nastro DK)
Porre attenzione a non lasciare cadere il
Rullo DK.
I Rulli DK impiegano carta o film termici.
Sia l’etichetta che le stampe possono
sbiadirsi con la luce del sole ed il calore.
Non utilizzare i Rulli DK per usi in esterni
che richiedano una lunga durata delle
etichette.
Non esercitare una pressione eccessiva
sulla taglierina.
Non appoggiare oggetti pesanti sopra la
stampante.
A seconda della disposizione, del
materiale e delle condizioni ambientali,
può risultare difficoltoso applicare o
staccare l’etichetta, o il colore
dell’etichetta può alterarsi o essere
trasferito su altri oggetti.
Prima di applicare l’etichetta, verificare
le condizioni ambientali e il materiale.
Provare l'etichetta applicandone un
pezzetto su una parte nascosta della
superficie desiderata.
5
Introduzione
FASE
1
stampante
Prima di utilizzare la
FASE
2
Uso della sola
stampante (senza PC)
FASE
3
Collegamento al PC
FASE
4
Manutenzione e
Per WindowsPer Mac
risoluzione dei problemi
Page 69

Introduzione
6
Precauzioni generali
La stampante
• La stampante è una macchina di precisione. Non lasciar cadere, urtare o altrimenti
colpire la stampante.
• Non sollevare la stampante tramite il coperchio del vano per il Rullo DK. Il coperchio
potrebbe staccarsi e la stampante potrebbe cadere e danneggiarsi.
• La stampante può avere difetti di funzionamento se collocata in prossimità di televisori,
radio, ecc. Non utilizzare la stampante in prossimità di macchine che possono causare
interferenze elettromagnetiche.
• Non collocare la stampante alla luce solare diretta, o in prossimità di termosifoni o altri
elettrodomestici caldi, o in posizioni esposte a temperature estremamente elevate o
ridotte, o in ambienti con elevato tasso di umidità o particolarmente polverosi. Tali
condizioni possono causare malfunzionamenti della macchina.
• Non usare solventi per vernici, benzene, alcool o altri solventi organici per pulire la
stampante. Ciò può danneggiare la finitura superficiale della stampante. Utilizzare un
panno morbido e asciutto per pulire la stampante.
• Non appoggiare oggetti pesanti o oggetti contenenti acqua sopra la stampante. Se
acqua o corpi estranei penetrano nella stampante, contattare il punto vendita in cui è
stata acquistata o il centro di assistenza autorizzato locale. Continuando a utilizzare la
stampante anche quando corpi estranei o acqua sono penetrati al suo interno, si
possono provocare danni alla stampante o lesioni personali.
• Non toccare la taglierina. Esiste il rischio di ferirsi. Procedere con particolare cautela per
la sostituzione della taglierina.
• Non inserire alcun oggetto e non ostruire la fessura di uscita delle etichette, la porta USB
o la porta seriale.
• Non posizionare parti metalliche vicino alla testina di stampa. La testina di stampa
raggiunge elevate temperature durante e immediatamente dopo l’utilizzo. Evitare di
toccarla direttamente con le mani.
• Utilizzare solo il cavo di interfaccia (cavo USB) fornito in dotazione con la stampante.
• In caso di lunghi periodi di inutilizzo, togliere il Rullo DK dalla stampante.
• Non cercare di stampare etichette con il coperchio del vano per il Rullo DK aperto.
• Non smontare né bagnare con acqua la stampante per evitare rischi di incendio o di
scosse elettriche. Non collegare o scollegare la presa dalla spina elettrica con le mani
bagnate. Tale abitudine può causare scosse elettriche o pericolo di incendio.
• In caso di inceppamento della carta dovuto all’adesivo accumulato sulla superficie della
guida per la carta, scollegare il cavo di alimentazione dalla presa elettrica ed eliminare
l’adesivo dalla guida con un panno imbevuto di alcol etilico o isopropilico (strofinando).
Sostituendo la taglierina, si consiglia di pulire la guida per la carta.
Cavo di alimentazione
• Utilizzare soltanto il cavo di alimentazione fornito in dotazione con la stampante.
• In caso di prolungato inutilizzo della stampante, scollegare il cavo di alimentazione dalla presa
della rete elettrica.
• Per collegare o scollegare il cavo, agire sempre sulla presa. Non tirare il cavo. I conduttori
all’interno del cavo potrebbero danneggiarsi.
• Posizionare la stampante vicino ad una presa elettrica standard, facilmente accessibile.
Rullo DK (Etichetta DK e Nastro DK)
• Utilizzare soltanto accessori e parti consumabili originali Brother (con i marchi , ).
Non utilizzare accessori o forniture non autorizzati.
• Applicando l’etichetta su una superficie bagnata, sporca o oleosa, potrebbe staccarsi
facilmente. Prima di applicare l’etichetta, pulire la superficie su cui verrà applicata.
Page 70

ITALIANO
• Il Rullo DK impiega carta o film termici, pertanto raggi ultravioletti, vento e pioggia
possono causare sbiadimenti del colore e il distacco dei bordi dell’etichetta.
• Non esporre i rulli DK alla luce solare diretta, a temperature o umidità elevate, o alla
polvere. Conservare in un luogo fresco, al buio. Utilizzare velocemente i rulli DK dopo
l’apertura del pacchetto.
• Graffiando la superficie stampata dell’etichetta con le unghie o con oggetti metallici, o
toccandola con le mani bagnate, sudate o dopo aver utilizzato creme medicinali, ecc., il
colore può alterarsi o sbiadirsi.
• Non applicare le etichette su persone, animali o piante.
• Dato che l’estremità del Rullo DK è progettata per non aderire alla bobina delle etichette,
l’ultima etichetta può non risultare tagliata correttamente. In tal caso, rimuovere le
restanti etichette, inserire un nuovo Rullo DK e stampare nuovamente l’ultima etichetta.
Nota: per tenere conto di tale condizione, il numero di etichette DK presenti in ciascun
Rullo DK può essere superiore a quanto indicato sulla confezione.
• Staccando un’etichetta DK, una piccola parte dell’etichetta potrebbe rimanere attaccata.
Togliere la parte rimasta prima di far aderire una nuova etichetta.
• Alcuni rulli DK utilizzano adesivi permanenti per le etichette. Tali etichette non possono
essere staccate facilmente, una volta applicate.
• Prima di utilizzare etichette per CD/DVD, seguire attentamente le istruzioni contenute
nel manuale del lettore di CD/DVD riguardo all’applicazione di etichette.
• Non utilizzare etichette per CD/DVD nei lettori a slot, ad esempio in un lettore di CD per
auto in cui il CD viene inserito nello slot.
• Non rimuovere l’etichetta per CD/DVD dopo averla applicata, potrebbe distaccarsi un
sottile strato, con conseguenti danni per il disco.
• Non applicare etichette a CD/DVD progettati per l’uso con stampanti a getto d’inchiostro.
Le etichette si separano facilmente da tali dischi. L’uso di un disco con l’etichetta
staccata può causare perdita o danneggiamento dei dati.
• Per applicare le etichette a CD/DVD, utilizzare l’apposito applicatore in dotazione con i
rulli di etichette per CD/DVD, altrimenti si possono causare danni al lettore di CD/DVD.
• L'utente dovrà assumersi la piena responsabilità per applicare etichette su CD/DVD.
Brother declina ogni responsabilità per perdite o danneggiamenti di dati causati da un
uso inadeguato delle etichette di CD/DVD.
CD-ROM e Software
• Non graffiare il CD-ROM e non esporlo a temperature estremamente elevate o troppo basse.
• Non appoggiare oggetti pesanti e non applicare pressione sul CD-ROM.
• Il software contenuto nel CD-ROM è previsto per essere utilizzato esclusivamente con la
stampante. Consultare la Licenza sul CD per ulteriori informazioni. Questo programma può
essere installato su vari personal computer per l'utilizzo in ufficio, ecc.
Batteria
• Non utilizzare la batteria fornita con altri prodotti.
• Smaltire le batterie esaurite in conformità con tutte le leggi
federali, nazionali e locali, applicabili.
• Per la conservazione o lo smaltimento della batteria,
avvolgerla con nastro adesivo in cellophane o simile, per
prevenire cortocircuiti della batteria.
• Si raccomanda di sostituire la batteria ogni due anni.
Esempio di collegamento a
massa della batteria.
Nastro adesivo in cellophane,
ecc.
Batteria
7
Introduzione
FASE
1
stampante
Prima di utilizzare la
FASE
2
Uso della sola
stampante (senza PC)
FASE
3
Per WindowsPer Mac
Collegamento al PC
FASE
4
Manutenzione e
risoluzione dei problemi
Page 71

Introduzione
8
Taglierina
• La taglierina contiene una lama molto affilata. Per
evitare lesioni da contatto con lame spezzate:
• Verificare che il coperchio superiore sia chiuso
durante l’uso della taglierina.
• Non applicare una pressione eccessiva per
inserire o togliere la taglierina.
• Quando la taglierina è usurata è necessario
sostituirla con una nuova.
• Se la taglierina si spezza, scollegare la
stampante dalla presa di alimentazione e
rimuoverla con attenzione utilizzando delle
pinzette.
• Se la macchina si inceppa a causa all’adesivo
accumulato, è necessario pulire la superficie della
guida per la carta. Scollegare la stampante dalla
presa di alimentazione ed eliminare l’adesivo
accumulato dalla guida per la carta con un panno imbevuto di alcol isopropilico. Sostituendo la
taglierina, si consiglia di pulire la guida per la carta.
• La taglierina dovrebbe garantire un numero medio di tagli di 5.000 o superiore, a seconda di come
viene utilizzata la macchina. Se la stampante non taglia le etichette correttamente o inizia a
incepparsi spesso, la taglierina potrebbe aver esaurito la sua durata in servizio. Sarà pertanto
necessario sostituire la taglierina.
Superficie della guida per
la carta
Page 72

ITALIANO
FASE1
FASE1
Prima di utilizzare la stampante
9
Introduzione
FASE
1
stampante
Prima di utilizzare la
Lista di controllo dei componenti
1
Descrizione dei componenti
2
3
Collegamento dell’alimentazione
Installazione del Rullo DK
4
Collegamento della guida per la carta
5
Impostazioni di orologio/lingua/unità
6
Procedura per la creazione di un’etichetta
7
Pagina10
Pagina11
Pagina12
Pagina16
Pagina17
Pagina18
Pagina20
FASE
2
Uso della sola
stampante (senza PC)
FASE
3
Per WindowsPer Mac
Collegamento al PC
FASE
4
Manutenzione e
risoluzione dei problemi
Page 73

FASE1 Prima di utilizzare la stampante
10
1
Lista di controllo dei componenti
Togliendo la stampante dall’imballaggio, verificare che siano presenti tutti i seguenti
componenti. Qualora uno o più componenti risultassero mancanti o danneggiati, si prega
di rivolgersi al centro assistenza autorizzato Brother o al distributore di zona presso il quale
è stato effettuato l’acquisto.
Brother QL-650TD Rullo DK (Rullo iniziale)
•
Nastro di carta continua di larghezza 62 mm
(8 metri)
• Etichette ad angoli arrotondati, 24mm (250
etichette)
Cavo USB Cavo di alimentazione
Guida per la carta CD-ROM
Guida per l’installazione e l’uso Guida per etichette DK e Nastro
Foglio di pulizia
Page 74

ITALIANO
Descrizione dei componenti
2
11
Unità principale di stampa
Vista anteriore
Coperchio del
Rullo DK
Display LCD
Pulsante per il
funzionamento manuale
Display LCD e pulsante per il funzionamento manuale
(Per maggiori informazioni, vedere Pagina successiva).
Ora
Data
Numerazione modello
: Sono disponibili le impostazioni per
aumentare e diminuire il numero
: Il pulsante Menu è stato bloccato
Pulsante freccia Su
Pulsante freccia Giù
Leva di rilascio del rullo
Pulsante ESC
Pulsante OK
Pulsante Menu
Unità di stampa
Rullo
Taglierina
Pulsante ON/OFF
Pulsante ‘Stampa’
Pulsante di taglio
Pulsante di avanzamento carta
Introduzione
FASE
1
stampante
Prima di utilizzare la
FASE
2
Uso della sola
stampante (senza PC)
FASE
3
Per Windows
Quando non è utilizzato, chiudere il coperchio del Rullo DK per evitare l’accumulo di
polvere e sporco all’interno della stampante.
Vista posteriore
Presa per il cavo di alimentazione
Porta USB
Porta seriale
Collegamento al PC
FASE
4
Manutenzione e
Per Mac
risoluzione dei problemi
Page 75

FASE1 Prima di utilizzare la stampante
12
3
Collegamento
Collegare il cavo di alimentazione alla
1
stampante.
Inserire la spina del cavo di alimentazione nella
2
presa elettrica.
• Prima di inserire la spina, verificare che la presa sia a
220 - 240 VCA.
• Posizionare la stampante vicino alla presa in modo da
poter scollegare facilmente il cavo di alimentazione,
se necessario.
• Per collegare o scollegare il cavo di alimentazione,
agire sempre sulla spina e non tirare mai il cavo.
Per utilizzare la stampante con Windows®, non collegarla al PC prima di aver
installato il software.
Non collegare la stampante al PC finché non compare il messaggio che ne richiede il
collegamento durante l’installazione del driver di stampa.
Se si collega la stampante al PC prima di
aver installato il driver di stampa, viene
visualizzata la finestra di dialogo raffigurata
a destra. Fare clic su [Annulla] e scollegare
il cavo USB. Quindi installare il driver di
stampa. Per maggiori informazioni, vedere
"3. Installazione del software" a pagina 35.
Presa per il cavo
di alimentazione
Cavo di
alimentazione
Page 76

ITALIANO
Display LCD
Il display LCD è utilizzato per la modalità di visualizzazione di data e ora e per la modalità
di selezione dei menu.
Modalità di visualizzazione di data e ora
Il display LCD visualizza data e ora quando la macchina
è accesa e non è in fase di stampa.
Tabella dei menu relativi ai pulsanti per il
funzionamento manuale
12:34 [P01]
20/07/2005
Ogni pulsante viene indicato con i
seguenti simboli.
Menu
Pulsante Menu
ESC
Pulsante ESC
Pulsante ‘Stampa’
Pulsante OK
OK
Pulsante freccia Su
Pulsante freccia Giù
13
Introduzione
FASE
1
Prima di utilizzare la
FASE
2
Uso della sola
FASE
3
Collegamento al PC
stampante
stampante (senza PC)
Per Windows
Per Mac
È possibile creare facilmente etichette in cui sia indicata la data, l'ora e un messaggio,
senza usare un computer
Selezionare il modello
Stampa
Per maggiori informazioni, vedere "Creazione di un’etichetta" a pagina 22.
FASE
4
Manutenzione e
risoluzione dei problemi
Page 77

FASE1 Prima di utilizzare la stampante
14
Modalità di selezione dei menu
Il display LCD visualizzerà il titolo del menu quando si
apportano modifiche ai modelli o alle impostazioni.
Menu 1/12
Modif.Modello
Page 78

ITALIANO
Pulsanti per il funzionamento manuale
Le funzioni di ciascun pulsante sono descritte di seguito:
Nome Funzione
ACCENDE o SPEGNE la stampante. Inoltre, il pulsante si illumina o
lampeggia a seconda dello stato della stampante.
Spia LED Stato
OFF
La stampante è spenta.
15
Introduzione
FASE
1
ON
Pulsante ON/
OFF ( )
Pulsante
‘Stampa’( )
Pulsante per il
taglio ( )
Pulsante di
avanzamento carta
()
Pulsante Menu
Pulsante ESC
Pulsante OK Conferma la modalità selezionata o il valore dell’impostazione.
Pulsante freccia
Su/Giù ( / )
Lampeggio rapido
Lampeggio lento
Spegnimento dopo
10 lampeggi
Inizia la stampa.
Taglia l’etichetta stampata. Utilizzare questo pulsante quando l’opzione
“Taglio Automatico” è disabilitata (“OFF”).
Per maggiori informazioni, vedere "Taglio automatico del rullo durante la
stampa: Menu 9/12" a pagina 29.
• Utilizzando le etichette fustellate DK: fa avanzare il rullo di etichette DK
all’inizio della prima etichetta presente nel rullo. Tenendo premuto questo
pulsante per più di un secondo, il rullo di etichette DK avanzerà all’inizio
dell'etichetta successiva.
• Utilizzando i nastri continui DK: fa avanzare il rullo di etichette DK di 25,4
mm.
• Se non è presente alcun rullo di etichette DK, la stampante entra in modalità
di pulizia e il rullo ruoterà di 8 mm. Tenendo premuto questo pulsante per più
di un secondo, il rullo ruoterà di 100 mm.
Passa dalla modalità di visualizzazione di data e ora (in stato normale) alla
modalità di selezione dei menu (durante le impostazioni).
Per evitare eventuali modifiche ai modelli, è possibile bloccare il pulsante
Menu. Per maggiori informazioni, vedere "Pulsante di blocco del Menu" a
pagina 31.
L’impostazione viene annullata e il display torna alla modalità o alla schermata
precedente.
Cambia il menu o il valore dell’impostazione.
La stampante è accesa.
Si è verificato un errore.
Per maggiori informazioni sulla risoluzione dei problemi,
vedere "Risoluzione dei problemi" a pagina 51.
La stampante è in fase di elaborazione o di attesa.
Si è verificato un errore di sistema. Spegnere la
stampante, attendere 30 secondi, quindi accenderla
nuovamente. Tuttavia, se l’errore dovesse ripetersi,
contattare il distributore locale o il centro assistenza
autorizzato Brother.
Prima di utilizzare la
FASE
2
Uso della sola
FASE
3
Collegamento al PC
FASE
4
Manutenzione e
stampante
stampante (senza PC)
Per Windows
Per Mac
risoluzione dei problemi
Page 79

FASE1 Prima di utilizzare la stampante
16
Installazione del Rullo DK
4
Rulli DK utilizzabili
I tipi di rulli DK utilizzabili con la stampante sono elencati di seguito.
Rullo DK
Nome generico per
Etichette DK e
Nastro DK.
• Per l’elenco completo dei Rulli DK, consultare “l’elenco dei prodotti consumabili”
riportato sul retro di questa Guida per l’utente.
• Utilizzare esclusivamente Rulli DK originali per questa stampante.
Etichette DK
Nastro DK
E’ un rotolo di etichette fustellate.
Sono disponibili carta e film termici.
E’ un nastro interamente adesivo e può essere
tagliato secondo necessità.
Sono disponibili carta e film termici.
Installazione del Rullo DK
Premere il tasto ON/OFF per spegnere la
1
stampante.
Afferrare il coperchio dello scomparto del Rullo
DK ai lati, vicino alla parte anteriore della
stampante, e sollevarlo con decisione per
aprirlo.
Sollevare la leva di rilascio del
2
rullo e togliere il foglio di
protezione dall’unità di stampa.
Togliere il foglio di protezione
della batteria.
Posizionare la bobina nelle
3
relative guide all’interno del
vano per il Rullo DK.
• Verificare che i bracci portarotolo
siano ben inseriti nelle relative
guide da entrambi i lati.
• Inserire la bobina con il
posizionatore del Rullo DK
inserito nella guida sul lato destro
della stampante.
Foglio protettivo della batteria
Leva di rilascio del rullo
Foglio di protezione dall’unità
di stampa
Bobina
Guida della bobina
Page 80

ITALIANO
17
Verificare che la leva di rilascio
4
del rullo sia posizionata in alto.
Inserire l’estremità del Rullo DK
Taglierina
Leva di rilascio del rullo
Unità di stam
nell’apposita fessura, a filo della
taglierina.
Se non si riesce ad inserire
completamente l’estremità
del Rullo DK nella fessura, inserirla il
più possibile. Abbassare la leva delle etichette, chiudere il coperchio e premere il
pulsante di avanzamento carta
Premere verso il basso la leva di rilascio del rullo
5
e chiudere il coperchio del Rullo DK.
Collegamento della guida per la carta
5
La stampante è dotata di una guida per la carta, in grado di contenere 10 fogli di etichette
singoli.
Collegare la guida per la carta
1
alla parte anteriore della
() per posizionare correttamente il rullo.
Guida per la carta
stampante come illustrato
nella figura riportata a destra.
Per stampare e tagliare
automaticamente più di 10
etichette in continuo, è
necessario togliere la guida per
la carta.
Introduzione
FASE
1
Prima di utilizzare la
FASE
2
Uso della sola
FASE
3
Collegamento al PC
FASE
4
stampante
stampante (senza PC)
Per Windows
Per Mac
Manutenzione e
risoluzione dei problemi
Page 81

FASE1 Prima di utilizzare la stampante
18
6
Impostazioni di orologio/lingua/unità
Prima di usare la stampante, impostare la data, l'ora, la lingua del display e le unità di
misura della stampante.
• Se si scollega la macchina dalla presa elettrica e si rimuove la batteria, verranno
ripristinate le impostazioni predefinite. Vedere
12" a pagina 28.
• Per la sostituzione della batteria vedere "Sostituzione della batteria al litio
dell’orologio" a pagina 49.
Premere il tasto ON/OFF ( ) per
1
accendere la stampante.
Sul display LCD compare la schermata delle
impostazioni per data e ora, quindi anno "05" e
"AA" in alternanza.
Impostare l’anno tramite le frecce Su o
2
Giù ( / ) e premere il pulsante OK.
A questo punto l’anno è impostato e vengono
visualizzati il mese "01" e "MM" in alternanza.
"Impostazione dell’orologio: Menu 7/
2005/01/01
00:00
20AA/01/01
00:00
Impostare il mese tramite le frecce Su o
3
Giù ( / ) e premere il pulsante OK.
A questo punto il mese è impostato e vengono
visualizzati la data "01" e "GG" in alternanza.
Impostare la data tramite le frecce Su o
4
Giù ( / ) e premere il pulsante OK.
A questo punto la data è impostata e vengono
visualizzati l’ora "00" e "oo" in alternanza.
Impostare l’ora tramite le frecce Su o Giù
5
( / ) e premere il pulsante OK.
L’ora è impostata e vengono visualizzati i minuti
"00" e "mm" in alternanza.
Impostare i minuti tramite le frecce Su o
6
Giù ( / ) e premere il pulsante OK.
I minuti sono impostati e viene visualizzata la
schermata delle impostazioni per la lingua.
2005/MM/01
00:00
2005/07/GG
00:00
2005/07/20
OO:00
2005/07/20
12:mm
Page 82

Impostare la lingua tramite le frecce Su o
7
Giù ( / ) e premere il pulsante OK.
La lingua è impostata e viene visualizzata la
schermata delle impostazioni per le unità.
ITALIANO
19
Lingua
Italiano
Introduzione
Impostare le unità tramite le frecce Su o
8
Giù ( / ) e premere il pulsante OK.
Le unità sono impostate e si passa alla modalità di
visualizzazione di data e ora.
Quando si accende e non si utilizza la
9
stampante, la macchina visualizzerà la
data e l'ora impostate.
Ogni processo, quale la creazione o la stampa di
un’etichetta e le impostazioni delle singole funzioni, viene attivato in questa
modalità.
Per maggiori informazioni, vedere "FASE 2 Creazione e stampa di un’etichetta
utilizzando esclusivamente questa stampante" a pagina 21.
Sarà possibile modificare le impostazioni di orologio/lingua/unità anche in seguito.
Vedere le sezioni:
• "Impostazione dell’orologio: Menu 7/12" a pagina 28
• "Impostazione dell’ora legale: Menu 8/12" a pagina 29
• "Impostazione della lingua: Menu 10/12" a pagina 30
• "Impostazione dell’unità di misura (pollici o mm): Menu 11/12" a pagina 30
Unità
mm
12:34 [P01]
20/07/2005
FASE
1
stampante
Prima di utilizzare la
FASE
2
Uso della sola
stampante (senza PC)
FASE
3
Collegamento al PC
FASE
4
Manutenzione e
Per Windows
Per Mac
risoluzione dei problemi
Page 83

FASE1 Prima di utilizzare la stampante
20
7
Procedura per la creazione di un’etichetta
La procedura generale per la creazione di un’etichetta con la stampante viene mostrata
di seguito.
Decidere il tipo di etichetta che si desidera creare.
1
Immagini di etichette
Preparare il Rullo DK adatto.
2
Preparare il Rullo DK adatto
all’immagine dell’etichetta
Installare il Rullo DK
ÎPagina16
Creare e stampare un’etichetta.
3
Il capitolo successivo contiene istruzioni dettagliate sulla creazione delle etichette.
Installando il software fornito, è possibile creare l’etichetta con il PC e stamparla
o inviare l’etichetta scelta alla stampante per stamparla. Per la procedura di
installazione del software, vedere
PC" a pagina 33, per le istruzioni sull’utilizzo del software, vedere "Guida all’uso
del programma (Manuale in formato PDF )". È inoltre possibile modificare il
contenuto e il formato di stampa.
Selezionare il modello
"FASE3 Collegamento della stampante al
Stampa
ÎPagina16
ÎPagina23ÎPagina22
Page 84

ITALIANO
FASE2
FASE2
Creazione e stampa di un’etichetta utilizzando
21
Introduzione
FASE
1
esclusivamente questa stampante
Questa stampante è fornita con otto modelli incorporati per facilitarne l’uso. È
possibile selezionare il modello desiderato fra questi, scorrendo la lista con le
frecce su/giù ( / ) e premendo il pulsante “Stampa”. È inoltre possibile
scaricare modelli aggiuntivi creati in P-touch Editor 4.2. Questo programma è
disponibile solo per PC e non per Mac.
1
Creazione di un’etichetta
1. Selezione di un modello
2. Stampa di un’etichetta
2
Altre funzioni utili
Modifica di un modello: Menu 1/12
Modifica della data dei modelli: Menu 2/12
Anteprima del contenuto della stampa prima di stampare: Menu 3/12
Specificare il numero di copie: Menu 4/12
Stampa di etichette numerate: Menu 5/12
Stampa di un elenco di modelli: Menu 6/12
Impostazione dell’orologio: Menu 7/12
Impostazione dell’ora legale: Menu 8/12
Taglio automatico del rullo durante la stampa: Menu 9/12
Impostazione della lingua: Menu 10/12
Impostazione dell’unità di misura (pollici o mm): Menu 11/12
Regolazione del contrasto del display LCD: Menu 12/12
Pulsante di blocco del Menu
Caricare modelli o messaggi dal computer
Pagina22
Pagina23
Pagina24
Pagina25
Pagina26
Pagina27
Pagina27
Pagina28
Pagina28
Pagina29
Pagina29
Pagina30
Pagina30
Pagina31
Pagina31
Pagina31
Prima di utilizzare la
FASE
2
Uso della sola
FASE
3
Collegamento al PC
FASE
4
Manutenzione e
stampante
stampante (senza PC)
Per Windows
Per Mac
risoluzione dei problemi
Page 85

FASE2 Creazione e stampa di un’etichetta utilizzando esclusivamente questa stampante
22
1
Creazione di un’etichetta
Dopo aver deciso il tipo di etichetta da creare, selezionare un Rullo DK adatto (vedere
“Installazione del Rullo DK” a pagina 19).
1. Selezione di un modello
Dall’elenco degli otto modelli incorporati, selezionare il modello adatto per l’etichetta che
si desidera creare.
E’ inoltre possibile creare nuovi modelli con il PC. Per ulteriori informazioni,
consultare la “Guida all’uso del programma (Manuale in formato PDF)".
Premere il pulsante di ON/OFF ( ) per
1
accendere la stampante.
Il display è in modalità di visualizzazione di data e
ora.
Selezionare un modello scorrendo
2
l’elenco con le frecce Su o Giù ( / ) e
premendo il pulsante OK.
Selezionando un modello che comprende un
particolare messaggio (Msg), selezionare il messaggio e premere il pulsante OK.
Dopo la selezione del modello, la schermata torna in modalità di visualizzazione di
data e ora.
Per ulteriori informazioni sui modelli disponibili, vedere i “Tipi di modelli” riportati di
seguito.
12:34 [P01]
20/07/2005
[P07]Msg+D+O
Tipi di modelli
Nome del modello Contenuto Esempio di stampa
[P01]Data Data
[P02]Ora Ora
[P03]Messaggio Messaggio
[P04]Data+Ora Data + ora
[P05]Msg+Data Messaggio + data
20/07/2005
12:34
Ricevuto
20/07/2005
12:34
Ricevuto
20/07/2005
Page 86

ITALIANO
Nome del modello Contenuto Esempio di stampa
23
[P06]Msg+Ora Messaggio + ora
[P07]Msg+D+O Messaggio +data + ora
[P08]Msg+Num Messaggio + numerazione
Quando un modello è stato scaricato da un PC, compare la schermata raffigurata
sotto.
Ricevuto
12:34
Ricevuto
20/07/2005
12:34
Ricevuto
001
• [D01] Esempio1
• [D02] Esempio2
•
•
•
2. Stampa di un’etichetta
Stampa di un’unica etichetta
Premere il pulsante “Stampa” () in
1
modalità di visualizzazione di data e ora.
Il contenuto del modello viene stampato.
Per un modello preimpostato, il contenuto
dell’etichetta viene automaticamente adattato
alla dimensione del Rullo DK.
Se il contenuto non rientra nell’intervallo di
stampa nemmeno con la dimensione minima di
font, sarà generato un errore.
12:34 [P07]
20/07/2005
In Stampa…
Introduzione
FASE
1
stampante
Prima di utilizzare la
FASE
2
Uso della sola
stampante (senza PC)
FASE
3
Selezione del numero di copie da stampare.
Tenere premuto il pulsante “Stampa”
1
Compare la schermata raffigurata a destra. Il numero
di copie aumenta finché il pulsante “Stampa” rimane
premuto.
Quando è visualizzato il numero di copie
2
(da 1 a 999) che si desidera stampare,
rilasciare immediatamente il pulsante
“Stampa”
Verrà stampato il numero di copie visualizzato
quando è stato rilasciato il pulsante “Stampa”
È inoltre possibile selezionare il numero di copie da stampare tramite menu.
Vedere "Specificare il numero di copie: Menu 4/12" a pagina 27.
().
()
.
()
.
Copie
1
Copie
3
In Stampa…
Collegamento al PC
FASE
4
Manutenzione e
Per Windows
Per Mac
risoluzione dei problemi
Page 87

FASE2 Creazione e stampa di un’etichetta utilizzando esclusivamente questa stampante
24
Altre funzioni utili
2
È possibile personalizzare facilmente le funzioni della stampante, come ad esempio
modificare il contenuto dei modelli.
Modifica di un modello: Menu 1/12
Modificando un modello selezionato, è possibile cambiare l’etichetta in un proprio
formato.
Il contenuto modificabile varia a seconda del modello selezionato.
Segue un esempio selezionando il modello "[P07]Msg+D+O".
Premere le frecce su o giù ( / ) finché sul display non compare
1
[P07], quindi premere il pulsante OK due volte.
Premere il pulsante Menu in modalità di
visualizzazione di data e ora.
Viene visualizzata la modalità di selezione dei
menu.
Selezionare "Menu 1/12" tramite le frecce
2
Su o Giù ( / ) e premere il pulsante
OK.
Viene visualizzata la modalità di selezione dei
menu.
12:34 [P07]
20/07/2005
Menu 1/12
Modif.Modello
Selezionare il messaggio tramite le
3
frecce Su o Giù ( / ) e premere il
pulsante OK.
Il messaggio è selezionato, quindi viene
visualizzata la modalità di selezione del formato data.
Tipo di messaggio
•
Ricevuto • Ispezionato • Approvato
• Consegnato Da • Ass. Prima Del • Consum. Entro
• Scadenza • Data Installaz. • Prossimo Test
• Completato • Nessuno
È inoltre possibile caricare nuovi messaggi dal computer.
E’ possibile selezionare "Nessuno" solo utilizzando il modello [P08].
Impostare il formato della data tramite le
4
frecce Su o Giù ( / ) e premere il
pulsante OK.
Il formato della data è impostato e si passa alla
modalità di selezione del formato per l’orario.
Messaggio [P07]
Ricevuto
Data [P07]
20/07/2005
Page 88

Impostare il formato dell’orario tramite le
5
frecce Su o Giù ( / ) e premere il
pulsante OK.
Il formato dell’orario è selezionato, quindi viene
visualizzata la modalità di selezione del font.
Selezionare il font tramite le frecce Su o
6
Giù ( / ) e premere il pulsante OK.
Le impostazioni vengono salvate e la schermata
torna in modalità di visualizzazione di data e ora.
ITALIANO
25
Ora [P07]
12:34 (24)
Introduzione
FASE
1
Font [P07]
L.Gothic Bold
Tipo di font
•••
••
Modifica della data dei modelli: Menu 2/12
È possibile incrementare o ridurre la data del modello rispetto alla data corrente, o
impostare una data specifica. Questa funzione è particolarmente utile se si devono
stampare etichette del tipo "Da consumarsi preferibilmente entro...", come quelle alimentari.
• In modalità di visualizzazione di data e ora, la macchina continua a visualizzare la
data corrente.
• Le voci modificabili variano a seconda del contenuto del modello.
Segue un esempio con la selezione del modello "[P01]Data".
Premere le frecce su o giù ( / ) finché sul display non compare
1
[P01], quindi premere il pulsante OK.
Premere il pulsante Menu in modalità di visualizzazione di data e ora.
Viene visualizzata la modalità di selezione dei menu.
Selezionare "Menu 2/12" tramite le frecce
2
Su o Giù ( / ) e premere il pulsante
OK.
Viene visualizzata la modalità di selezione per
l’incremento della data.
Impostare (+)/(-)/ tramite le frecce Su o
3
Giù ( / ) e premere il pulsante OK.
• (+) : Incremento (aggiunge il valore specificato
alla data corrente.)
• (-) : Riduzione (riduce la data corrente del valore specificato.)
• Impostazione: Impostazione (per specificare una data arbitraria.)
Menu 2/12
Data/Ora Increm
Data [P01]
(+);Anni :000
Prima di utilizzare la
FASE
2
Uso della sola
FASE
3
Collegamento al PC
FASE
4
Manutenzione e
stampante
stampante (senza PC)
Per Windows
Per Mac
risoluzione dei problemi
Selezionando incremento o riduzione
Page 89

FASE2 Creazione e stampa di un’etichetta utilizzando esclusivamente questa stampante
26
Dopo aver selezionato (+)/(-) premere le
4
frecce Su/Giù ( / ) per selezionare
Anni, Mesi, Settimane, Giorni, Ore o
Data [P01]
(+);Mesi :000
Minuti, quindi premere il pulsante OK.
Impostare un valore compreso fra 000 e
5
999 tramite le frecce Su o Giù ( / ) e
premere il pulsante OK.
• Le impostazioni vengono salvate e la schermata
torna in modalità di visualizzazione di data e ora.
• Durante la configurazione di incremento,
riduzione o impostazione della data, compare il
simbolo " " in modalità di visualizzazione di data
e ora.
Selezionando una data fissa:
Impostare data e ora tramite le frecce Su
4
o Giù ( / ) e premere il pulsante OK.
• Le impostazioni vengono salvate e la schermata
torna in modalità di visualizzazione di data e ora.
• Durante la configurazione di incremento (+),
riduzione (-) o impostazione della data, compare il
simbolo " " in modalità di visualizzazione di data
e ora.
Se si desidera utilizzare l’ora corrente nelle impostazioni per la stampa, selezionare
l’incremento (+) o la riduzione (-) e riportare tutti i valori a "000".
Data [P01]
(+);Mesi :003
12:34 [P01]
20/07/2005
Data [P01]
Imp;20/01/2006
12:34 [P01]
20/07/2005
Anteprima del contenuto della stampa prima di stampare: Menu 3/12
Se necessario, è possibile verificare e confermare il contenuto di quanto si desidera
stampare prima di eseguire la stampa.
Premere il pulsante Menu in modalità di visualizzazione di data e
1
ora.
Viene visualizzata la modalità di selezione dei menu.
Selezionare "Menu 3/12" tramite le frecce
2
Su o Giù ( / ) e premere il pulsante
OK.
• Il contenuto dell’etichetta scorre da destra verso
sinistra sulla prima riga del display.
• Sulla seconda riga viene visualizzata la
dimensione del Rullo DK installato
• Quando la visualizzazione è completa, la
schermata torna in modalità di visualizzazione di
data e ora.
Menu 3/12
Anteprima
Ricevuto 20
17mm X 87mm
Page 90

ITALIANO
Specificare il numero di copie: Menu 4/12
Premere il pulsante Menu in modalità di visualizzazione di data e
1
ora.
Viene visualizzata la modalità di selezione dei menu.
Selezionare "Menu 4/12" tramite le frecce
2
Su o Giù ( / ) e premere il pulsante
OK.
Selezionare il numero di copie da
3
stampare fra 1 e 999 tramite le frecce Su
o Giù ( / ) e premere il pulsante OK.
Viene stampato il numero di copie specificato e la
schermata torna in modalità di visualizzazione di data e ora.
Menu 4/12
Copie
OK Per Stampa?
3
Stampa di etichette numerate: Menu 5/12
Quando si sceglie un modello che include una numerazione, inserire la cifra di inizio e la
quantità di cui si desidera aumentare ogni volta che si stampa un'etichetta.
Per ulteriori informazioni su come scaricare i modelli, consultare la "Guida all’uso del
programma (Manuale in formato PDF)".
Premere le frecce su o giù ( / ) finché sul display non compare
1
[P08], quindi premere il pulsante OK due volte. Premere il pulsante
Menu in modalità di visualizzazione di data e ora.
Viene visualizzata la modalità di selezione dei menu.
27
Introduzione
FASE
1
stampante
Prima di utilizzare la
FASE
2
Uso della sola
stampante (senza PC)
FASE
3
Selezionare "Menu 5/12" tramite le frecce
2
Su o Giù ( / ) e premere il pulsante
OK.
Impostare il primo numero di etichetta (fra
3
000 e 999) tramite le frecce Su o Giù ( /
) e premere il pulsante OK.
Tenendo premuto o , il valore aumenta/
diminuisce di 10 unità.
Selezionare il numero di etichette da
4
stampare (fra 1 e 999) tramite le frecce
Su o Giù ( / ) e premere il pulsante
Menu 5/12
Numerazione
Valore Iniziale
010
Numero Cont.
5
OK.
Viene stampato il numero di etichette specificato e la schermata torna in modalità
di visualizzazione di data e ora.
Collegamento al PC
FASE
4
Manutenzione e
Per Windows
Per Mac
risoluzione dei problemi
Page 91

FASE2 Creazione e stampa di un’etichetta utilizzando esclusivamente questa stampante
28
Stampa di un elenco di modelli: Menu 6/12
E’ possibile stampare un esempio di ciascun modello (compresi i modelli scaricati) come
riferimento.
Per ulteriori informazioni su come scaricare i modelli, consultare la "Guida all’uso del
programma (Manuale in formato PDF)".
Selezionare un nastro DK su cui sia possibile stampare con una larghezza massima
di 62 mm. Se il nastro è troppo stretto, verrà visualizzato un messaggio di errore.
L’elenco dei nastri DK è riportato sul retro di questa Guida per l’utente.
Premere il pulsante Menu in modalità di visualizzazione di data e
1
ora.
Viene visualizzata la modalità di selezione dei menu.
Selezionare "Menu 6/12" tramite le frecce
2
Su o Giù ( / ) e premere il pulsante
OK.
Premere il pulsante OK o il pulsante
3
Stampa
Viene stampato l’elenco dei modelli, quindi la
schermata torna in modalità di visualizzazione di
data e ora.
().
Menu 6/12
Lista Stampe
OK Per Stampa
Tutti Modelli?
Impostazione dell’orologio: Menu 7/12
Premere il pulsante Menu in modalità di visualizzazione di data e
1
ora.
Viene visualizzata la modalità di selezione dei menu.
Selezionare "Menu 7/12" tramite le frecce
2
Su o Giù ( / ) e premere il pulsante
OK.
Impostare l’orologio tramite le frecce Su o
3
Giù ( / ) e premere il pulsante OK.
Impostare Anno(YY), Mese(MM), Giorno(DD),
Ore(hh) e Minuti(mm) tramite le frecce Su o
Giù ( / ), quindi premere il pulsante OK.
Quando l’impostazione dell’orologio è completa, la schermata torna in modalità di
visualizzazione di data e ora.
Se le impostazioni di data e ora non vengono mantenute dopo aver scollegato il cavo
di alimentazione dalla presa, sostituire la batteria. Se la batteria è scarica, sarà
necessario reimpostare l’orologio dopo l’inserimento di una nuova batteria.
Menu 7/12
Imp. Data/Ora
2005/01/01
00:00
Page 92

ITALIANO
Impostazione dell’ora legale: Menu 8/12
L’orologio interno viene portato avanti di un’ora impostando l’ora legale su "ON".
Premere il pulsante Menu in modalità di visualizzazione di data e
1
ora.
Viene visualizzata la modalità di selezione dei menu.
Selezionare "Menu 8/12" tramite le frecce
2
Su o Giù ( / ) e premere il pulsante
OK.
Menu 8/12
Ora Legale
29
Introduzione
FASE
1
Selezionare "ON" tramite le frecce Su o
3
Giù ( / ) e premere il pulsante OK.
Le impostazioni vengono salvate e la schermata
torna in modalità di visualizzazione di data e ora.
Ora Legale
ON
Taglio automatico del rullo durante la stampa: Menu 9/12
Impostando il taglio automatico su "ON", il rotolo viene tagliato automaticamente durante
la stampa delle etichette.
Premere il pulsante Menu in modalità di visualizzazione di data e
1
ora.
Viene visualizzata la modalità di selezione dei menu.
Selezionare "Menu 9/12" tramite le frecce
2
Su o Giù ( / ) e premere il pulsante
OK.
Selezionare "ON" tramite le frecce Su o
3
Giù ( / ) e premere il pulsante OK.
Le impostazioni vengono salvate e la schermata
torna in modalità di visualizzazione di data e ora.
Menu 9/12
Taglio Autom.
Taglio
Autom.
ON
Prima di utilizzare la
FASE
2
Uso della sola
FASE
3
Collegamento al PC
FASE
4
stampante
stampante (senza PC)
Per Windows
Per Mac
Manutenzione e
risoluzione dei problemi
Page 93

FASE2 Creazione e stampa di un’etichetta utilizzando esclusivamente questa stampante
30
Impostazione della lingua: Menu 10/12
Premere il pulsante Menu in modalità di visualizzazione di data e
1
ora.
Viene visualizzata la modalità di selezione dei menu.
Selezionare "Menu 10/12" tramite le
2
frecce Su o Giù ( / ) e premere il
pulsante OK.
Impostare la lingua tramite le frecce Su o
3
Giù ( / ) e premere il pulsante OK.
Le impostazioni vengono salvate e la schermata
torna in modalità di visualizzazione di data e ora.
Menu 10/12
Lingua
Lingua
Italiano
Impostazione dell’unità di misura (pollici o mm): Menu 11/12
L’unità di misura predefinita per English-US è “Pollici”. Per tutte le atre Lingue,
l’impostazione predefinita è “mm”.
Premere il pulsante Menu in modalità di visualizzazione di data e
1
ora.
Viene visualizzata la modalità di selezione dei menu.
Selezionare "Menu 11/12" tramite le
2
frecce Su o Giù ( / ) e premere il
pulsante OK.
Impostare le unità tramite le frecce Su o
3
Giù ( / ) e premere il pulsante OK.
Le impostazioni vengono salvate e la schermata
torna in modalità di visualizzazione di data e ora.
Menu 11/12
Unità
Unità
mm
Page 94

ITALIANO
Regolazione del contrasto del display LCD: Menu 12/12
Premere il pulsante Menu in modalità di visualizzazione di data e
1
ora.
Viene visualizzata la modalità di selezione dei menu.
Selezionare "Menu 12/12" tramite le
2
frecce Su o Giù ( / ) e premere il
pulsante OK.
Regolare il contrasto tramite le frecce Su
3
o Giù ( / ) e premere il pulsante OK.
Le impostazioni vengono salvate e la schermata
torna in modalità di visualizzazione di data e ora.
Menu 12/12
Contrasto LCD
Contrasto LCD
+1
Pulsante di blocco del Menu
Per evitare eventuali modifiche accidentali dei modelli è possibile bloccare il pulsante
Menu.
Tenere premuto il pulsante Menu per più
1
di un secondo in modalità di
visualizzazione di data e ora.
• Quando il pulsante Menu è bloccato, compare il
simbolo " " in modalità di visualizzazione di data e ora come illustrato a destra.
• Premere nuovamente il pulsante Menu per più di un secondo per sbloccarlo.
12:34 [P07]
20/07/2005
Caricare modelli o messaggi dal computer
È utile per scaricare il logo e l'indirizzo dell'azienda e la
lista di controllo.
P-touch Transfer Manager.
31
Introduzione
FASE
1
stampante
Prima di utilizzare la
FASE
2
Uso della sola
stampante (senza PC)
FASE
3
Per Windows
Questo programma è disponibile solo per
PC e non per Mac.
Informazioni sullo scaricamento dei messaggi
È possibile aggiungere la voce selezionata come
Messaggio nell’unità principale utilizzando il programma
P-touch Transfer Manager.
È utile per impostare il proprio nome o quello
dell’azienda.
Per ulteriori informazioni, consultare la
formato PDF)".
Î"Guida all’uso del programma (Manuale in
Collegamento al PC
FASE
4
Manutenzione e
Per Mac
risoluzione dei problemi
Page 95

FASE2 Creazione e stampa di un’etichetta utilizzando esclusivamente questa stampante
32
Page 96

ITALIANO
FASE3
FASE3
Collegamento della
33
Introduzione
FASE
1
stampante al PC
Utilizzando il programma fornito con la stampante, è possibile creare una vasta
gamma di etichette e usare facilmente il PC.
Per ulteriori informazioni sul software fornito con questa stampante e per
requisiti hardware e software aggiuntivi, consultare il retro di questa “Guida per
l’utente” e la "Guida all’uso del programma (Manuale in formato PDF)".
1
Per Windows
1. Descrizione del programma
2. Note sull’installazione
3. Installazione del software
2
Per Mac
1. Descrizione del programma
2. Note sull’installazione
Pagina34
Pagina35
Pagina35
Pagina39
Pagina39
Prima di utilizzare la
FASE
2
Uso della sola
FASE
3
Collegamento al PC
FASE
4
stampante
stampante (senza PC)
Per Windows
Per Mac
3. Installazione Software
Pagina40
Manutenzione e
risoluzione dei problemi
Page 97

FASE3 Collegamento della stampante al PC
34
Per Windows
1
Il software fornito con questa stampante è compatibile con i seguenti sistemi operativi:
Microsoft® Windows® 98 SE/Me/2000 Professional/XP
Per ulteriori informazioni sul programma, consultare la "Guida all’uso del programma
(Manuale in formato PDF)".
1. Descrizione del programma
Il CD-ROM fornito con questa stampante contiene i seguenti programmi e driver di stampa.
P-touch Editor 4.2
Consente di creare vari tipi di etichette, quali etichette per indirizzi e per CD/DVD.
Consente inoltre di collegare i database creati in precedenza (funzione database) e di
gestire informazioni quali nomi e indirizzi (funzione di elenco etichette).
Verranno installati i seguenti programmi di utilità.
• P-touch Transfer Manager 1.2
È possibile trasferire alla stampante i dati relativi a modelli e immagini generati
dall’esportazione delle etichette create con P-touch Editor. I dati trasferiti potranno
essere stampati solo come modelli scaricati. Anche il testo utilizzato come Messaggio
del modello preimpostato potrà essere trasferito.
• P-touch Library 1.0
È possibile ristampare le etichette create con P-touch Editor con facilità e rapidità.
• P-touch 4.2 Add-In Utility (Utilità Componenti Aggiuntivi)
Utilizzando l’icona del componente aggiuntivo per Microsoft
Microsoft® Outlook® 2000/2002/2003, Microsoft® Excel 97/2000/2002/2003, è possibile
creare un’etichetta utilizzando i dati di queste applicazioni.
• P-touch Backup Manager 1.2
I dati possono essere liberamente trasferiti fra stampante e PC. Inoltre i dati possono
essere memorizzati in modo affidabile (creando una copia di back-up) come ulteriore
misura di sicurezza.
®
Word 97/2000/2002/2003,
P-touch Address Book (Rubrica) 1.0
E’ possibile gestire gli indirizzi in modo da stampare facilmente le etichette di indirizzi.
E’ possibile importare le informazioni sui contatti da Microsoft
®
Outlook®.
Driver di stampa
Permette di stampare dal PC.
Guida all’uso del programma (Manuale in formato PDF)
Contiene istruzioni per l'utilizzo del software incluso con la stampante. Può essere
consultato utilizzando Adobe
È inoltre possibile lanciarlo direttamente dal CD-ROM.
®
Acrobat® Reader® o Adobe® Reader®.
Page 98

ITALIANO
2. Note sull’installazione
• Non collegare la stampante al PC finché non compare il messaggio che ne richiede il
collegamento. Se la stampante è già stata collegata al PC prima dell’installazione del
software, scollegare il cavo USB dal PC e attendere la richiesta del programma.
• Per installarlo su Windows® 2000/XP, accedere come amministratore.
•
Accertarsi di aver chiuso tutte le applicazioni prima di installare il programma, in modo da
permettere l’installazione dei Componenti aggiuntivi presenti nel software.
3. Installazione del software
Questa sezione spiega come installare P-touch Editor 4.2, P-touch Address Book
(Rubrica) 1.0, il driver di stampa e la Guida all’uso del programma.
La procedura per l’installazione varia a seconda del sistema operativo del PC.
Segue l’esempio per Windows XP.
Avviare il PC, quindi inserire il CD-ROM nell’unità CD-ROM.
1
Si avvia il programma di installazione QL-series e compare la schermata di
installazione del P-touch.
• La visualizzazione della schermata può richiedere alcuni secondi.
• Se il programma non si avvia automaticamente, fare doppio clic sull’icona
"Setup.exe" nel CD-ROM.
Fare clic su “Installazione
2
standard”.
Inizia la preparazione per l’installazione del
software e compare la schermata del
Contratto di licenza.
I vari pulsanti selezionano le seguenti
operazioni.
1
Installazione standard
Vengono installati: P-touch Editor
4.2,
P-touch Address Book (Rubrica)
1.0,
Driver di stampa e Guida all’uso del programma.
2
Installazione personalizzata
P-touch Editor 4.2, P-touch Address Book (Rubrica) 1.0, Driver di stampa e
Guida all’uso del programma possono essere installati singolarmente.
3
Visualizzazione della Guida all’uso del programma
È possibile consultare la Guida all’uso del programma (Manuale in formato
PDF) anche senza installarla.
4
Installazione di Acrobat Reader
E’ possibile installare "Adobe
consultare la Guida all’uso del programma (Manuale in formato PDF).
Verrà installato Adobe
installata una versione successiva, non è necessario installare quella fornita.
®
Acrobat® Reader® versione 5.1. Se sul PC è già
®
Acrobat® Reader®" in modo da poter
1
2
3
4
35
Introduzione
FASE
1
stampante
Prima di utilizzare la
FASE
2
Uso della sola
stampante (senza PC)
FASE
3
Per Windows
Per Mac
Collegamento al PC
FASE
4
Manutenzione e
risoluzione dei problemi
Page 99

FASE3 Collegamento della stampante al PC
36
Leggere con attenzione il contratto di
3
licenza. Se si desidera accettare i termini
e le condizioni del contratto di licenza,
fare clic su [Sì] per continuare
l’installazione.
Compare la schermata per le informazioni
dell’utente.
Inserire "Nome utente" e "Nome società"
4
e fare clic su [Avanti].
Viene visualizzata la schermata: “Selezionare la
posizione di destinazione”.
Fare clic su [Avanti].
5
Compare la schermata per l’installazione dei
programmi.
Per installare i programmi in una cartella
diversa fare clic su [Sfoglia] e selezionare
un’altra cartella.
Verificare la posizione in cui si desidera
6
aggiungere il collegamento al
programma e fare clic su [Avanti].
Compare la schermata di avvio della copia dei file.
Page 100

Verificare le impostazioni e se sono
7
corrette fare clic su [Avanti].
• La visualizzazione della schermata può
richiedere alcuni secondi.
• Se le impostazioni non sono corrette, fare
clic su [Indietro] e modificarle.
Viene visualizzata la schermata: Impostazioni dei
componenti aggiuntivi.
ITALIANO
37
Introduzione
FASE
1
Verificare le applicazioni di Microsoft®
8
Office
®
per cui si desidera installare i
componenti aggiuntivi, e fare clic su
[Avanti].
Verificare che tutte le applicazioni di
Microsoft
Per ulteriori informazioni sulle impostazioni dei
componenti aggiuntivi, consultare la "Guida
all’uso del programma (Manuale in formato
PDF)".
Compare la schermata per l’installazione del Driver (Brother P-touch) .
Quando viene visualizzato il messaggio "Collegare P-touch e quindi
9
accenderla." nella schermata del programma di installazione,
®
Office® siano chiuse.
collegare il cavo USB e il cavo di alimentazione alla stampante.
Togliere l’etichetta di avvertenza apposta sulla porta USB della stampante e
collegare il cavo USB.
Presa per il cavo di
alimentazione
Porta USB
Cavo USB
Cavo di
alimentazione
Prima di utilizzare la
FASE
2
Uso della sola
FASE
3
Collegamento al PC
FASE
4
stampante
stampante (senza PC)
Per Windows
Per Mac
Collegare il cavo USB alla porta USB del PC.
10
Premere il pulsante di ON/OFF ( ) per accendere la stampante.
Quando il PC riconosce la stampante e l’installazione del driver è completa,
compare la schermata per la Registrazione Utente.
Collegando la stampante al PC tramite un hub USB, il collegamento potrebbe
non funzionare. In questo caso, collegare la stampante direttamente al PC.
Manutenzione e
risoluzione dei problemi
 Loading...