

Page 1
brother«
UN8173001
Printed in Japan
Please read this instruction leaflet before using the
P-Touch. Keep it in a handy place for future reference.
This model uses Brother's M-TAPE line (tape bearing
the logo).
MODEL:PT-110
YHth the P-Toitch Home& Hobby Ж you can маке labc!^ eiurpiy nmi en^ily. iii}uvly o~,i the P-Touch. keu in your ff/cssiiyc
mdy/ess the Print key/You\cm mefourd^^^ oftexi, vm-iou^ si J//n-isrio'r;is boid, italic, undalinc.. muI irnnie. .Vlessitycs
can be an either ane or two lines. You caii alsa inchiiic |7Сй';Ь'о7 characters and special synihois in your message, biiv diffcreni
tape color$4silver, ^oldy pink, green апФЫие) muI -хоо xoidlhs ('9 rmn and 12 mm\ are агчп1аЫе.
FCC NOTICE
This equipment has been tested and found to comply with the limits for a Class B
digital device, pursuant to Part IS of the FCC Rules. These limits are designed to
provide reasonable protection against harmful interference in a residential instal
lation, This equipment generates, uses, and can radiate radio frequency energy
and, if not installed and used in accordance with the Instructions, may cause harm
ful interference to radio communications. However, there is no guarantee that in
terference will not occur in a particular installation. If this equipment does cause
harmful interference to radio or television reception, which can be determined by
turning the equipment off and on, the user is encouraged to try to correct the in
terference by one or more of the following measures:
- Reorient or relocate the receiving antenna
- Increase the separation between the equipment and receiver.
- Connect the equipment into an outlet on a circuit different from
that to which the receiver is connected.
- Consult the dealer or an experienced radio/television technician
for help.
Care and precautions
1) Use a soft dry cloth to clean the machine.
2) Use only AA size alkaline batteries.
3) Do not expose the machine or the tape cassette to
high temperature, high humidity or excessive dust.
4) If you do not intend to use the machine for an
extended period of time, remove the batteries.
5) Do not touch the cutter lever when printing or while
replacing the cutter unit.
6) Do not touch the cutter blade.
7) Do not put the tapes in your mouth.
8) Do not stick tapes onto your skin.
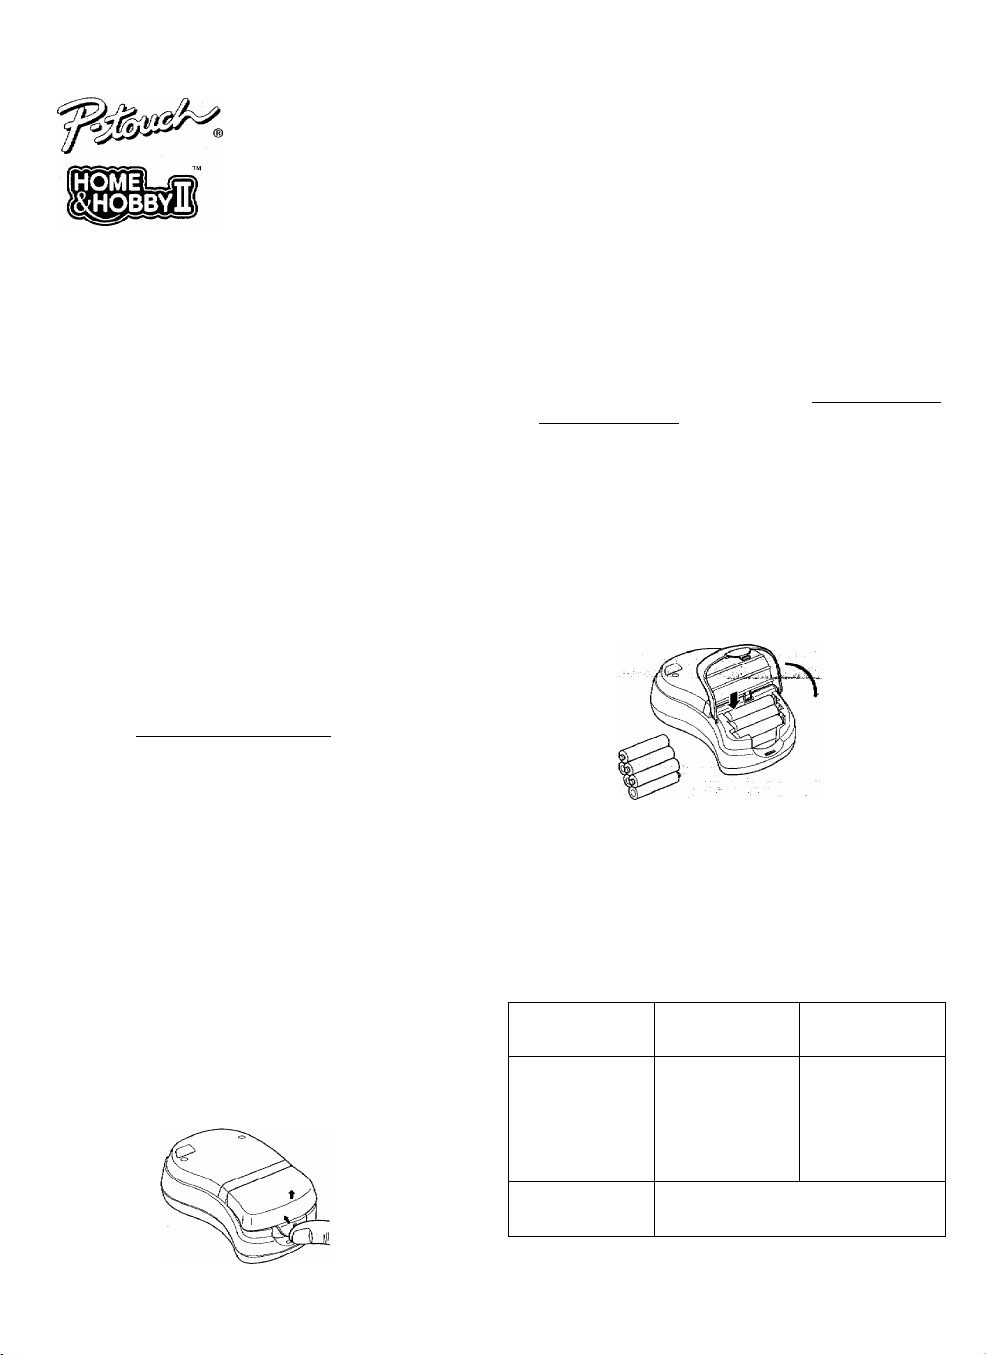
2) Remove the old batteries and insert six new AA size
alkaline batteries, miaking sure that their orientation
is as shown in the illustration engraved on the inside
of the case. The three batteries on top all point in one
direction, while the three underneath point in the
opposite direction.
When inserting new batteries, always insert them posi
tive end first. When removing old batteries, always
remove them negative end first.
Always replace worn out ba tteries with brand new ones,
and always replace all six at once.
3) To replace the cover, fit the tabs on the cover into the
slots in the P-Touch case and push down firmly on
the catch at the opposite end of the cover so that the
cover snaps securely back into place,
Accessories
Putting in the batteries
1) To remove the battery compartment cover, press
down firmly on the triangular catch located on the
end of the machine furthest from the tape cutter, and
pull the battery compartment cover away from the
P-Touch so that it disengages.
The following accessories are availáblb:
Tape cassettes 1/2" (12mm)
$9.89 (SRP)
Black on silver
Black on gold
Black on blue
Black on green
Black on pink
Replacement
cutter unit
M-931
M-831
M-531
M-731
M-E31 М-Е21
TC7 $9.95 (SRP)
м-921
м-821
м-521
М-721
Most retailers and distributors carry a full line of tape
cassettes. If you wish to order accessories for your PTouch direct from Brother, please refer to the "Acces
sory Order Form" included separately.
Page 2
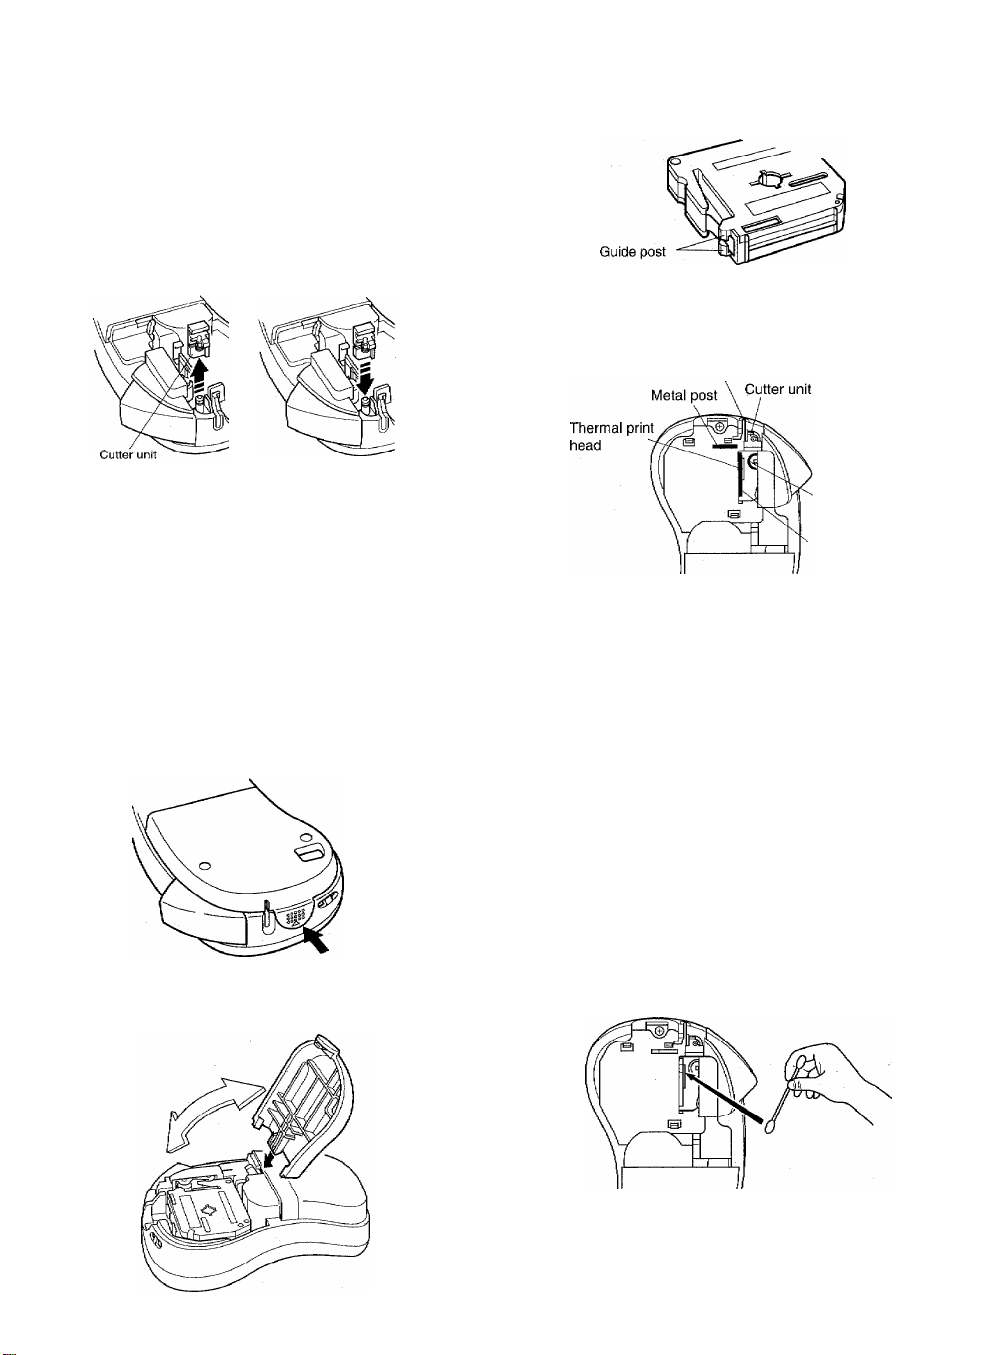
Changing the cutter unit
If the cutter becomes blunt and ceases to cut the tape
cleanly, replace it.
1) Open the cassette compartment.
2) Grasp the tab on the cutter unit and lift it out, taking
care not to touch the blade or the cutter lever.
Insert a new cutter unit. If the cutter lever is stuck in
3)
the pushed-in position, rotate the new cutter unit as
you insert it, to push the lever back into its normal
position.
3) Lift out the old cassette. Remove the paper tab from
the new tape cassette. Make sure that the end of the
tape in the new cassette feeds through the guide
posts on the cassette.
4) Insert the tape cassette, making sure that it clicks into
place. Ensure that the cassette sits properly on the
two metal posts.
Tape exit slot
CAUTION
When changing the cutter unit, be sure
not to touch the cutter blade.
Make sure that small children do not try
to put the cutter unit in their mouths.
Changing the tape cassette
1) To remove the tape cassette compartment cover,
press the textured area of the catch located on the end
of the machine closest to the tape cutter.
2) Press down firmly on the catch so that the cover
hinges up, then remove it.
Rubber
pinch roller
Metal
post
To replace the cover, fit the tab on the cover into the
5)
slots in the P-Touch case and push down firmly on
the cover so that it snaps securely back mto place.
Hold down the 0> key and press the ^ key, then
6)
cut the tape.
The amount of tape left is visible through the zvindoiv in the back of the P-Touch.
When there is only a little tape remaining, the tape
becomes green.
Cleaning
If dust accumulates on the print head, one or more un
printed horizontal lines may appear on your labels.
Should this happen, clean the P-Touch as follows,
1) Turn off the P-Touch.
Open the cassette compartment and remove the cas
2)
sette.
Wipe the print head and pinch roller up and down
3)
using a dry cotton swab.
Replace the cassette, replace the cover, switch on,
4)
hold down the @ key and press the key to
feed the tape, and try a test print.
If the tape is still speckled with dust, repeat steps 1-4,
5)
this time using a cotton swab dipped in rubbing alco
hol.
Page 3

Function keys
To conserve battery power, the P-Touch automatically
switches itself off if no key is pressed for five minutes.
When the batteries are low, ^'BATT" appears on the dis
play when you try to print or toTeed the tape. If the bat
teries are very low, the P-Touch will switch itself off.
If the P-Touch is switched off and on again, the current
message, text style, text size setting, framing setting and
label length are retained.
•) CAPS and SHIFT keys - © + 0 and ©
To use all capitals, hold down and press 0; a small
triangle appears above CAPS on the display. From now
on, each letter typed will be upper case^ To revert to
lower case, hold down and press 0 again; the trian
gle disappears.
To enter a single capital letter (or a character on the top
half of a key), hold down ^ and press the letter's key.
•) DELETE key - ©
TOP FIELOC,
Use 0 or 0 to move the cursor under the letter to the
right of the one you want to delete, then press ©.
•) CODE key - ©
Use 0 to access the functions printed in blue above the
keys (e.g. STYLE).
For example, to select the character style for your mes
sage, hold down
0 and pressing
is displayed.
and press Keep holding down
until the name of your desired style
CAPS
•) Cursor keys - 0 and ©
As you press each key, a character appears on the dis
play. The horizontal bar cursor indicates where the next
letter typed will appear. Move the cursor back and forth
using 0 and Q. The message moves on the display as
you scroll through it. If you try to scroll past the start or
end of the message, the error message "ERR" appears. To
move straight to the start or end of the message, hold
down 0 and press 0 or ,Q .
To delete the current message, hold down 0 and press
^ TOP RELOa ^
CLEAR
©
+ 0
•) SPACE key
Use to separate words in your message.
FEED
•) FEED key - © + ©
Flold down 0 and press 0 to feed the tape out
approx. 20 rrun at a time.
Do not press the tape cutter lever while the P-Touch is feeding
the tape, as this will cause the tape to jam.
Hold down ,0, press Q and press Q again to toggle
between Insert and Overwrite modes. In Insert mode
new characters are added into the message above the
cursor. In Overwrite mode a typed letter replaces the let
ter above the cursor.
When you select Insert mode, the indicator ( ▼ ) below'
INS. appears.
When you select Overwrite mode, the indicator ( ▼ )
goes off.
INSERT
©
+ ©
INSERT WSEflT
Steps to make a label
1) Insert batteries.
2} Insert tape cassette.
3) Press the © key.
4) Type in and format your text.
Your message can be up to 55 characters long including
spaces. See the Advanced functions section for a descrip
tion of how to format your text.
5) Press the key.
6) Cut the tape off.
7) Peel off the backing.
Advanced functions
•) Change letter size - © + ©
The four available text sizes are: regular ( A ), double
width (A), double height { ^ ) and double width and
height ). A small triangle on the message display
points to the currently selected type size: A , A , j[ or
^ . Hold down 0 and keep pressing q until the tri
angle points to the size you want, then release the 0
key
SIZE
Page 4

The four text sizes appear as follows.
A A A A
•} Change style - © + ®
To select a text style, hold down 0 and press . The
name of the currently selected style appears on the
message display. The six available styles are: NORMAL,
OUTLINE, BOLD, SHADOW, ITALIC and VERTICAL.
Hold down 0 and keep pressing Q until the name of
the style you want to select is displayed. The selected
style applies to the entire message. When a style other
than NORM is selected, the indicator above STL appears.
To cancel the style selection, hold down 0 and press
^ until NORM is displayed.
The six styles appear as follows.
NORMAL
©UTLllflll
BOLD
•} Add underline/frame - © + ©"
To select franaing or imderlining, hold down 0 and
press ^ . The current style is shown on the display,
either: TEXT (plain text), UNDL (underline), FRAM
(rounded frame). Hold down 0 and keep pressing
until the name of the style you want to select is dis
played. If framing or underlining is selected, the indica
tor above UNDL/FRM appears.- -
i ITALIC
> HI QC I
-------------
O < -
TEXT
UNDERLINE
(FRAME]
•) Input symbol/accented character - © + ©
To enter a symbol or an accented character, hold down
— Sfl^BOL
0 and press @"A-O?" appears. Choose the letter
matching the special character's row (below). The row's
special characters are displayed. Use 0 and 0 to posi
tion the cursor under the special character you want and
press 0, Your message reappears with the selected
character added.
Symbols
i
,\
B i 6 u
c
D
E +
F
G
H
c 9
U
•
t
[S’
L
ii
X
a e
0
N n K
JE ae
=
[ ]
2
§
I
J
L
M
N
O
3
© ©
1
Symbols
2
0
A
# W
&
1>
3 4
m
6.
m
V
TM
*
★
•) D.Line - © + 0
To make a two-line label, tj^pe the first line of text, then
holddown 0 and press 0. After a marker (▼)
appears, type the second line of text.
Two-line messages are printed with regular letter
size, normal text style.
To convert a message back to a single-line, delete the
marker by pressing 0.
•) Length - © + @
To set the label length, hold down © and press @ .
The message "L-------' appears. Press ,0 again. The
current setting appears. Release ^ and enter a
length in inches or use 0 and 0, to increase or
decrease the value displayed, then press 0 . Labels
will now be of the length set.
To revert to the automatic length setting, first hold
down © and press 0 to display the current length
setting, then press 0 again; the message "L
appears in the message display. Release © .
•) Repim^-
■ — REP£AT
Hold down 0 and press -9?" appears. Spec
ify the number of copies you want and press .
LiNUTH
-----------
...
"
•) Numbering - © + ©
Position the cursor underneath the digit you want to
increment using 0 or 0 . Hold down © and press
-9?" appears on the display. Specify the value
at which you want automatic incrementation to stop
and press
IMPORTANT WARRANTY INFORMATION
Thank you for purchasing this Brother Product. We hope that you will
enjoy using it. We suggest that you keep all packing and other materials.
SHOULD YOU ENCOUNTER ANY PROBLEMS WITH YOUR PRODUCT,
PLEASE DO NOT RETURN YOUR
PRODUCT TO THE STORE!
After referring to the instruction manual, if you still need assistance, call
Brother’s “HELP” line at;
1-901-373-6256
(Please refer to PROGRAM 2251
 Loading...