

Before using this printer, be sure to read this User’s Guide.
We suggest that you keep this manual in a handy place for future
reference.
Mobile Printer
User’s Guide
MW-260MFi
English


Introduction
Introduction
Thank you for pu rchasing the MPrint MW-260MFi (hereinafter
referred to as "the printer").
This is a slim, lightweight thermal black-and-white mobile printer,
which, by connecting to a computer or mobile device, can print
via simple operations.
This document contains precautions regarding use and
operation of the printer. Before using this printer, be sure to read
this document to ensure correct use of the printer.
After reading this document, store it carefully in an easily
accessible location for future reference.
The contents of this document are subject to change without
prior notice.
The contents of this document may not be duplicated or
reproduced, either partially or in full, without permission.
Any discrepancies or errors should be communicated to the
manufacturer. The contact information is provided at the end
of this section.
We assume no responsibility for damage arising from
earthquakes, fire, other disasters, actions of third parties, the
user's intentional or negligent operation, misuse, or operation
under other special conditions.
We assume no responsibility for damage (such as losses, loss
of business profits, lost profits, business disruptions, or a lost
means of communication) possibly resulting from the use or
inability to use this printer.
If this printer is found to be defective due to faulty
manufacturing, we shall replace it during the warranty period.
We assume no further responsibility.
We assume no responsibility for damage resulting from a
malfunction or other abnormal operations of this printer through
the use of incompatible equipment and incompatible software.
I

Introduction
Brother website information
The latest information is provided on our website.
Yo u are invited to visit the Brother website to view the latest
product information, and download the updated printer driver
and instruction manuals.
·Mobile printer products:
www.brother.com
· Service and support:
Support website (Brother Solutions Center)
support.brother.com
Yo u can download the software installer from the Brother
website (www.brother.com/inst
On the information page for developers, you can download SDK
and development information supporting each host free of
charge.
·Mobile printer information for developers:
www.brother.com/product/dev
).
II

Contents
Introduction ...................................................... I
Contents ........................................................... 1
Composition of Instruction Manuals ............. 2
Package Contents ........................................... 2
Part Names ...................................................... 3
Operating Procedures .................................... 5
Removing the protective film .....................................5
Inserting/removing the rechargeable battery .............5
Charging ....................................................................6
Indicator lights ...........................................................9
Turning on/off the printer .........................................12
Using IrDA (infrared) ................................................13
Using Bluetooth .......................................................14
Preparing the paper .................................................17
Loading the paper cassette .....................................19
Using the printer ......................................................21
Feeding paper .........................................................22
Using the paper guide .............................................23
Maintenance ............................................................24
Appendix ........................................................ 26
Troubleshooting .......................................................26
Product specifications .............................................29
Frequently Asked Questions ....................... 30
1
Composition of Instruction Manuals
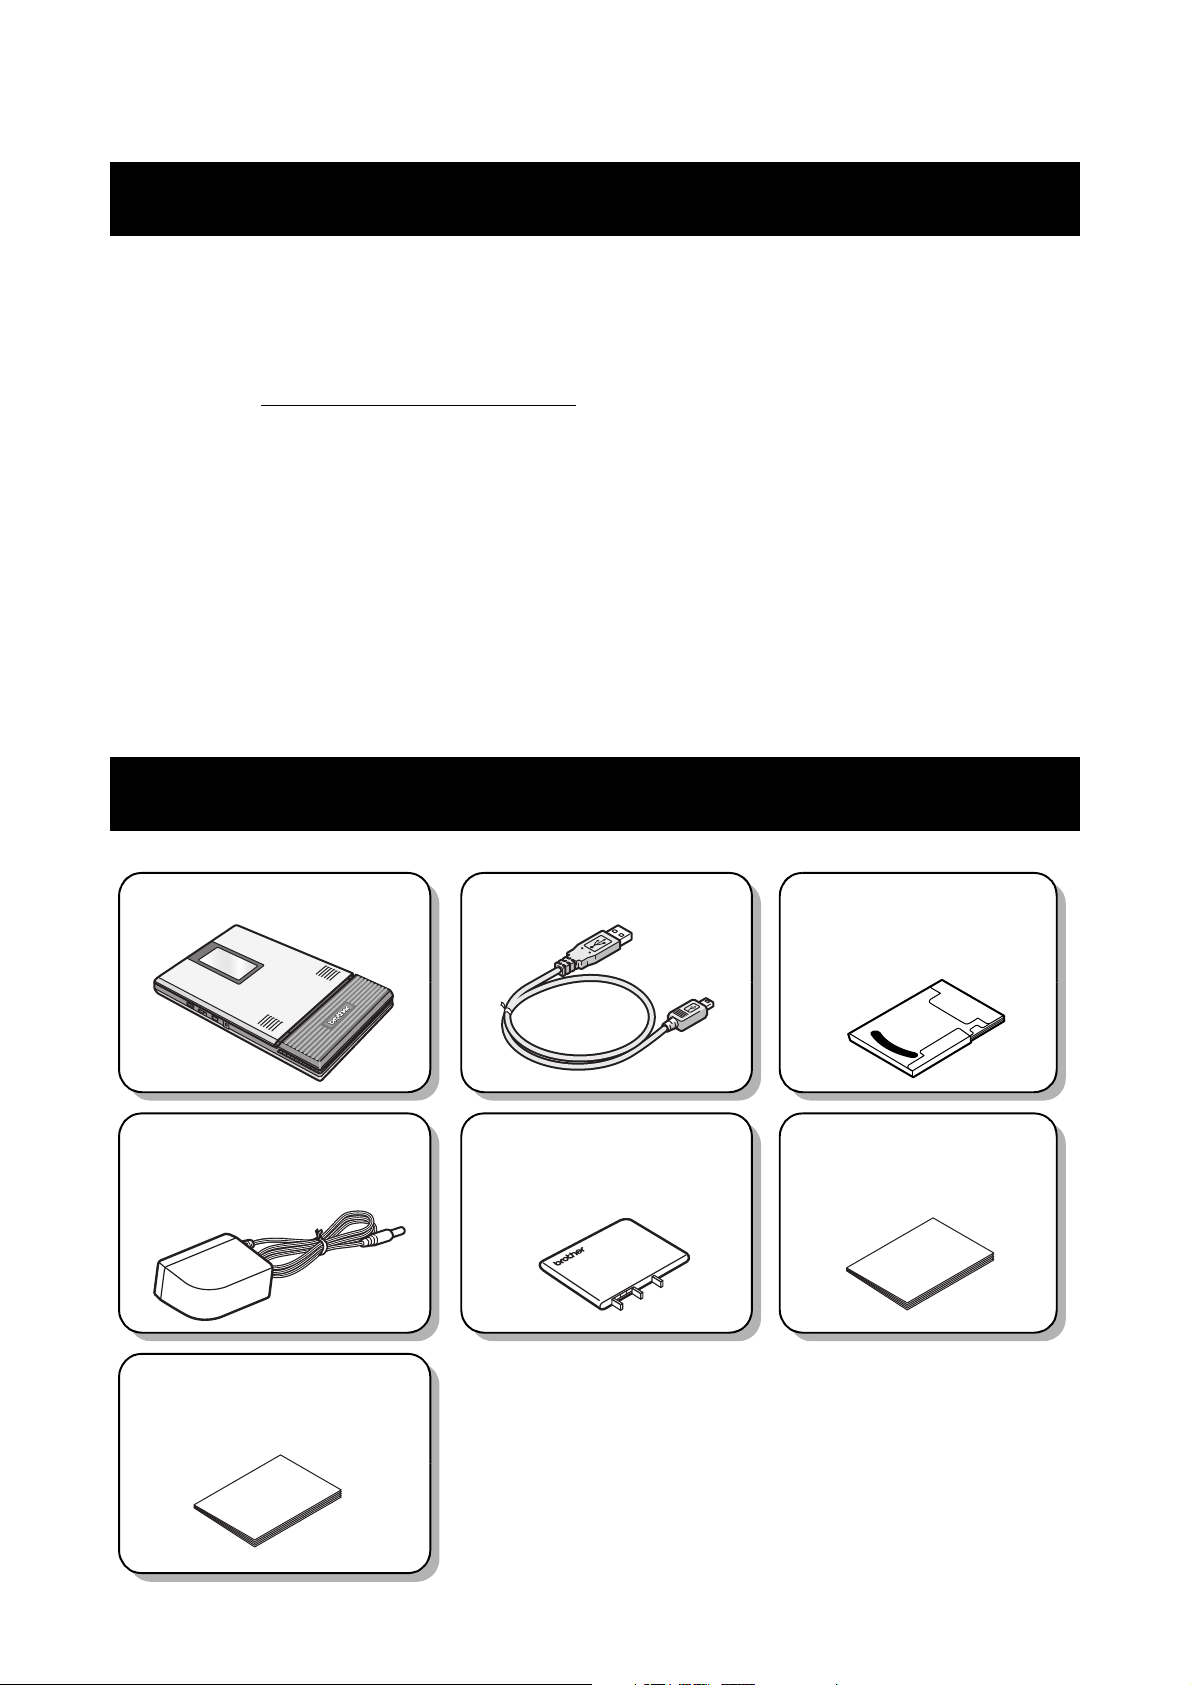
Printer
USB cable
Paper cassette
Thermal paper C-211
(50 sheets)
Battery charger
(AC adapter)
Li-ion battery
(BT-200)
User's Guide
(This document)
Product Safety Guide
1 Composition of Instruction Manuals
The Safety Instructions, User's Guide, and Software User's
Guide are provided for this printer.
Download the Software User's Guide from Brother Solutions
Center at support.brother.com.
The outline of each document is as follows:
Product Safety Guide
Describes precautions for handling the printer.
User's Guide
Describes how to set up the printer, and how to install the driver
and software.
Software User's Guide
Describes how to use the software.
2 Package Contents
2
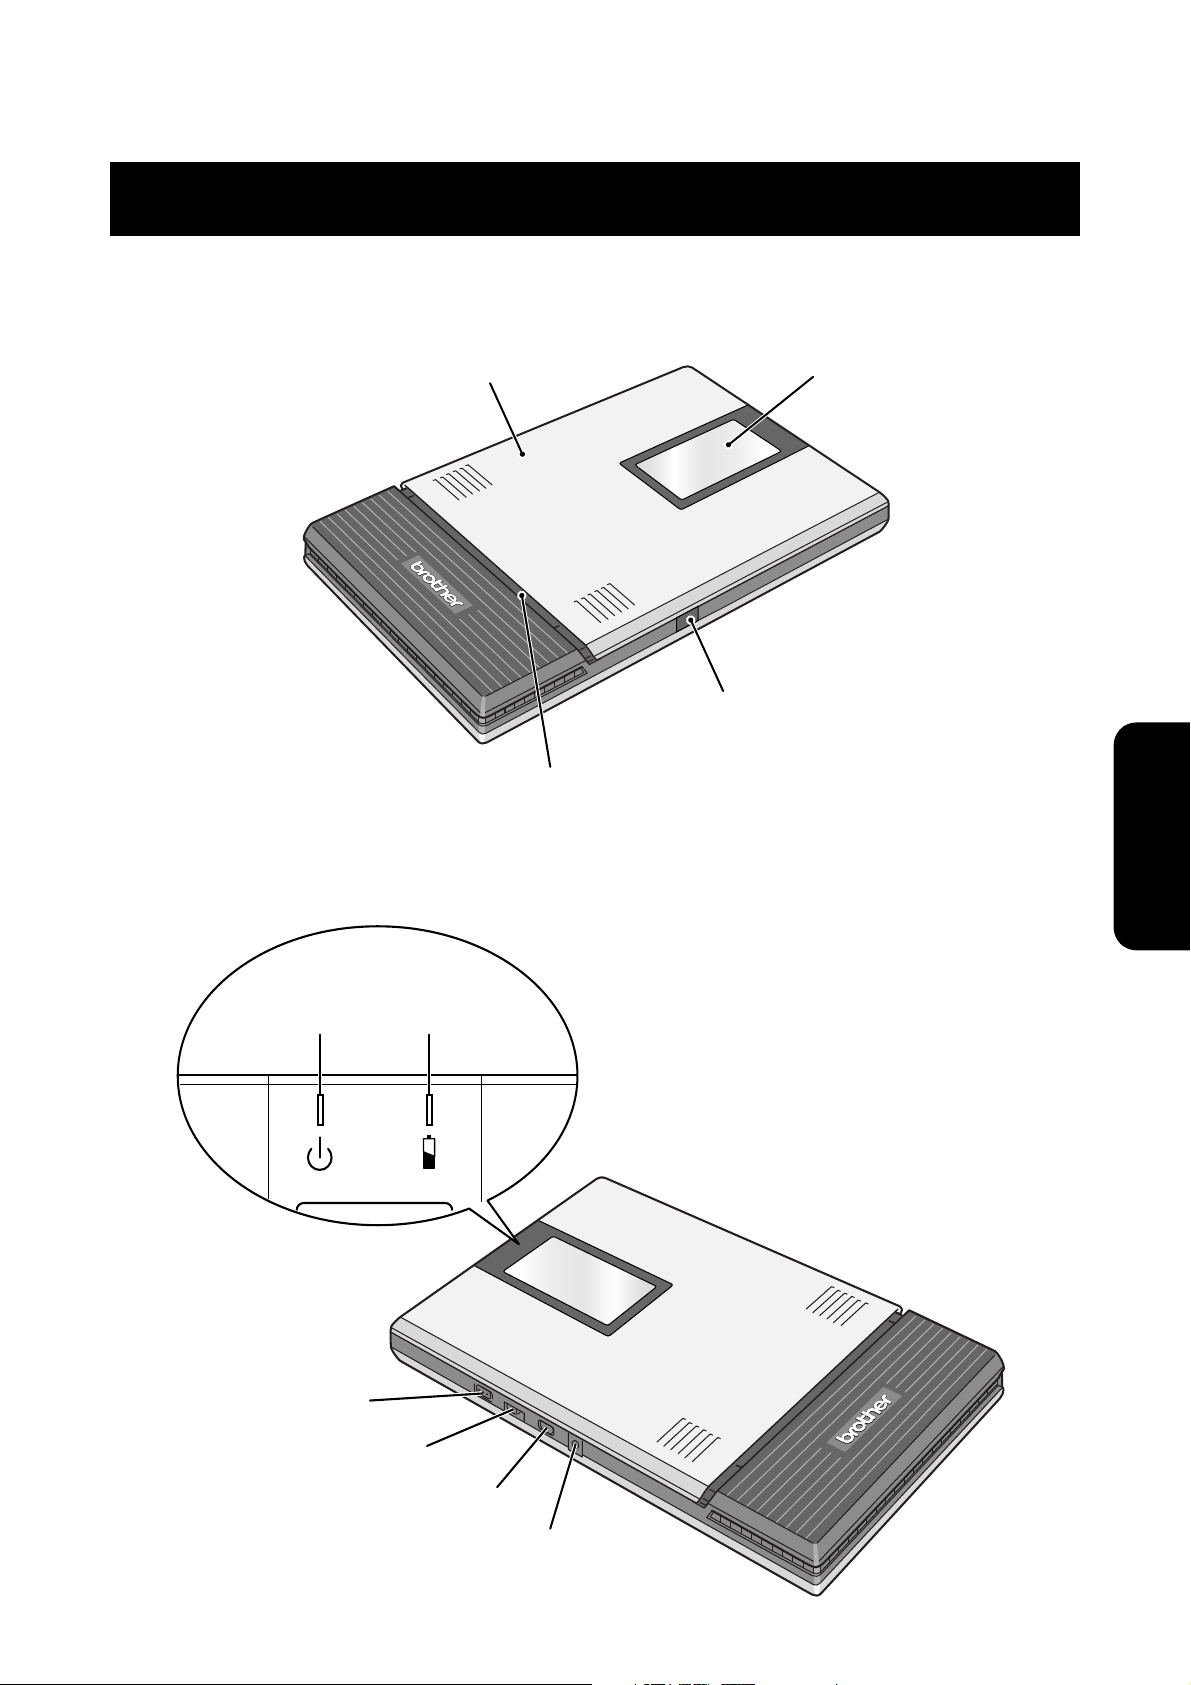
3Part Names
Paper cassette cover
Paper check window
Paper output slot
IrDA infrared port
Status
indicator
light
AC adapter connector
Power switch
USB connector
Charging
indicator
light
Interface switch (selector)
Right side
Part Names
Left side
3
Part Names
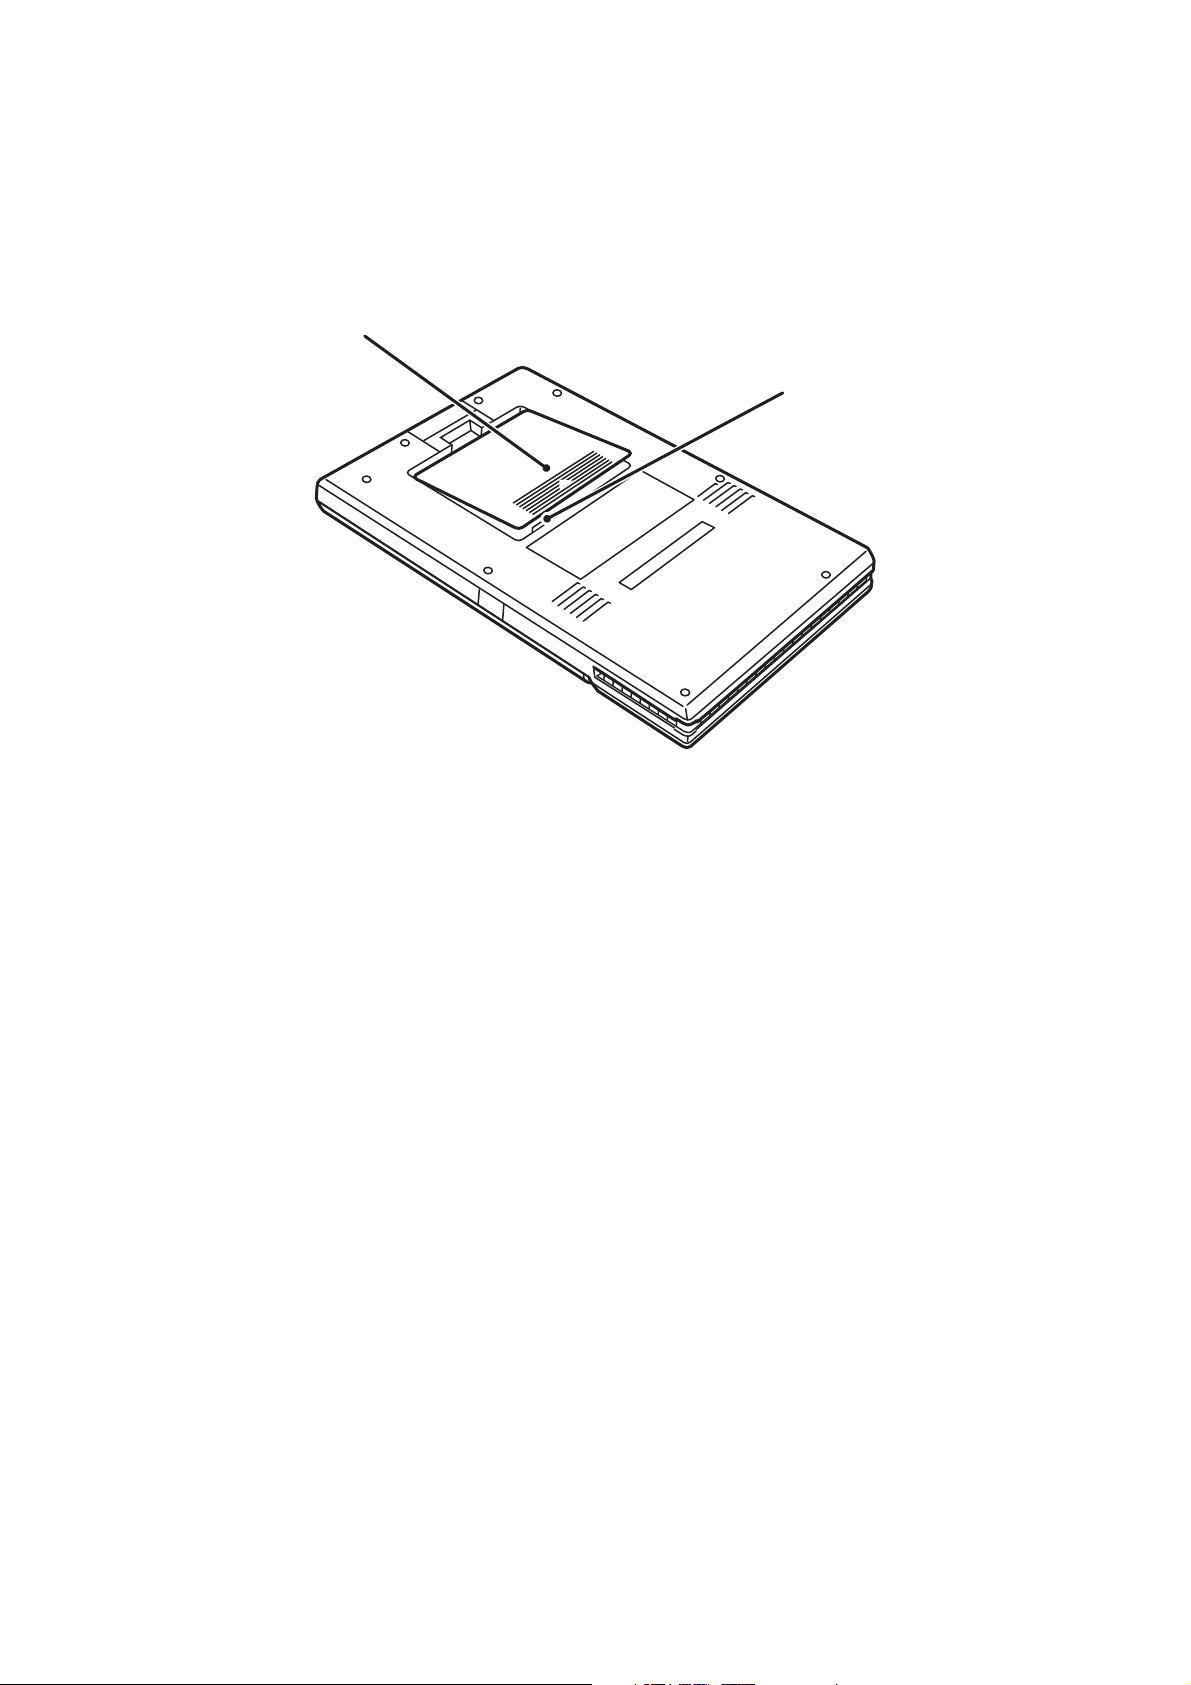
Battery cover
Battery connector
Back
4
Operating Procedures
Li-ion battery
(1)
(2)
(3)
4 Operating Procedures
Removing the protective film
When the printer is shipped from the manufacturer, a protective
film is affixed to the paper check window. Before using the
printer, remove the protective film.
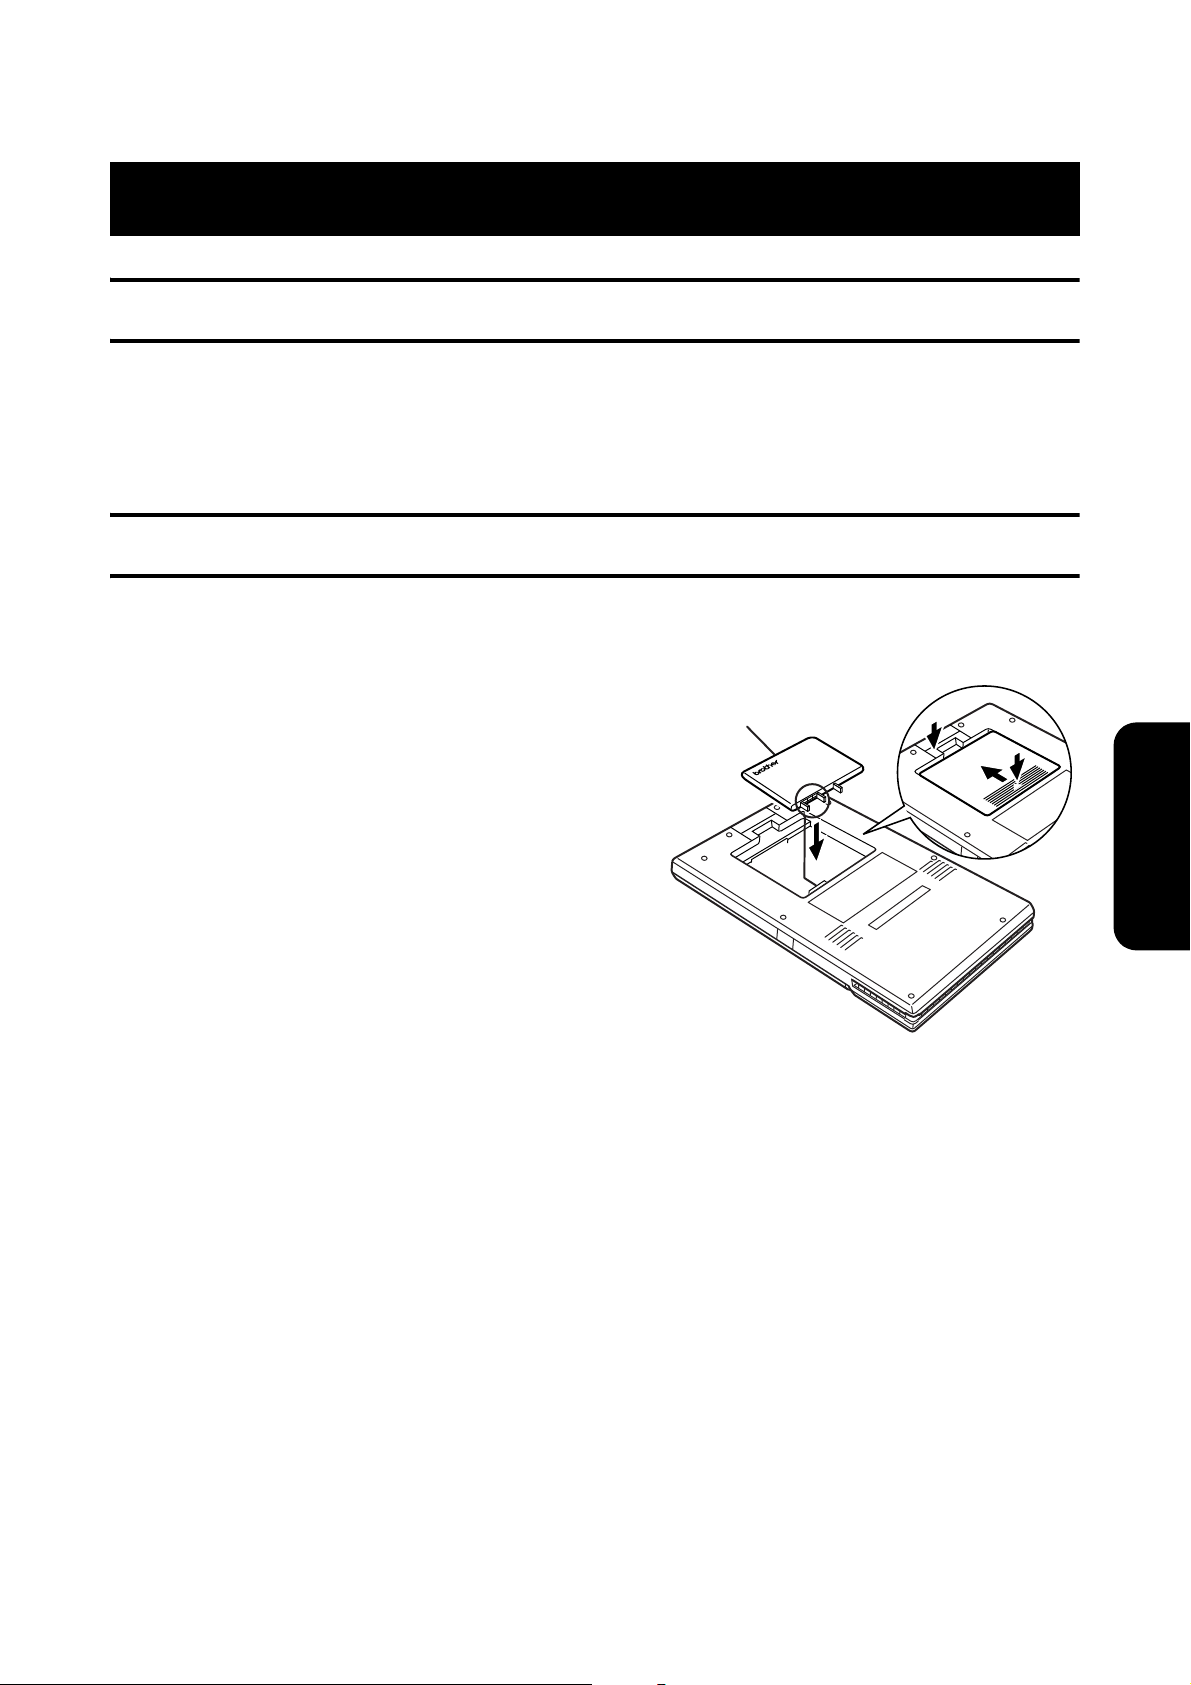
Inserting/removing the rechargeable battery
Inserting the rechargeable battery
1
Slide the rechargeable
battery cover (at the back
of the printer) in the
direction indicated by (1).
2
Remove the cover and
battery by lifting the edge
at (2) with your finger.
3
Align the battery with the
connector (3), and then
install the rechargeable Li-ion battery.
4
Re-attach the cover.
Removing the rechargeable battery
1
Slide the rechargeable battery cover (at the back
2
3
4
of the printer) in the direction indicated by (1).
Remove the cover and battery by lifting the edge
at (2) with your finger.
Remove the rechargeable battery.
Re-attach the cover.
5
Operating Procedures
When handling the rechargeable battery, see the
Product Safety Guide.
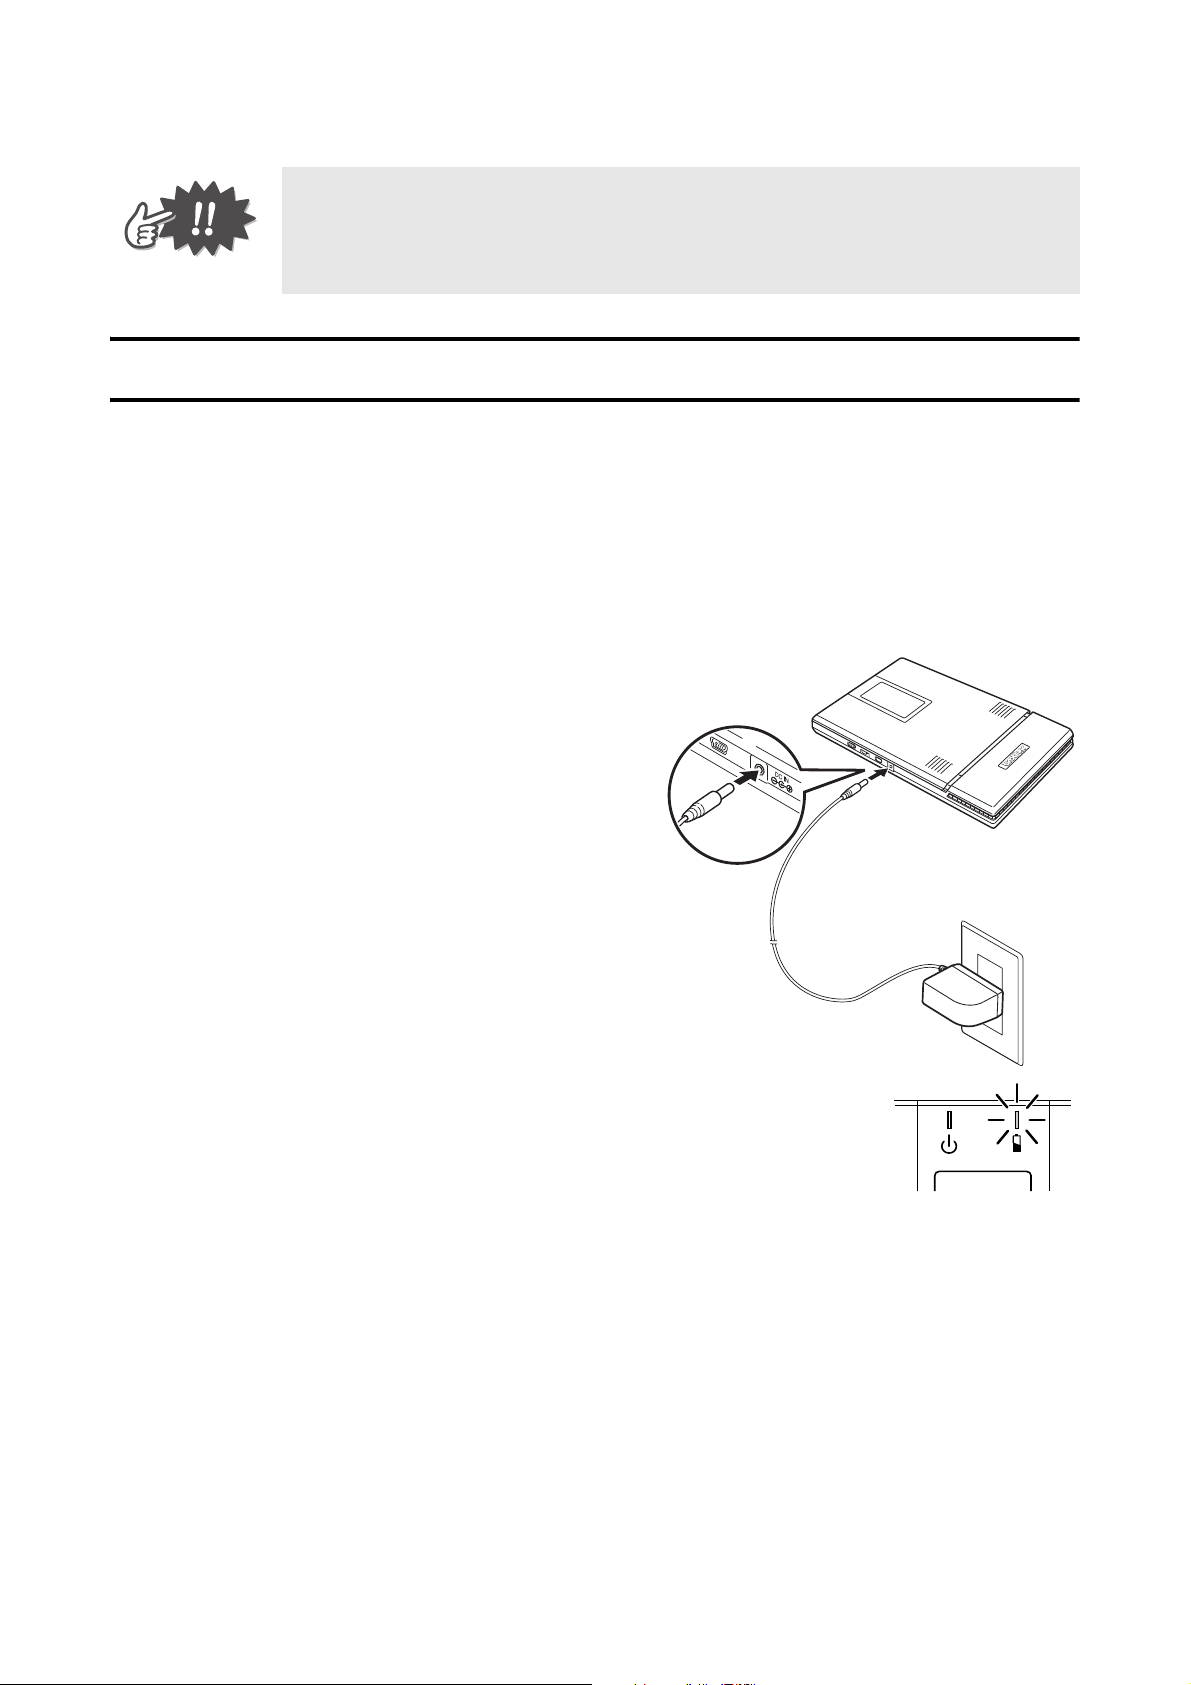
Charging
This printer is equipped with a Li-ion battery. Use the AC adapter
designed specifically for the printer to charge the battery.
After purchasing this printer, be sure to charge the battery fully
before using it (the charging indicator light lights up in orange
while charging).
1
Plug the AC adapter cord
into the AC adapter
connector on the printer.
2
Plug the AC adapter plug
into an AC power outlet
(AC 110 V-120 V).
Charging of the Li-ion battery
automatically begins.
The charging indicator light lights up in
orange.
When charging has finished, the charging
indicator light goes off.
If the charging indicator light does not light up in
6
orange, the battery may not be correctly installed.
Operating Procedures
It takes approximately three hours for the battery
to recharge from a completely empty state to a
fully charged state (with the printer turned off).
Charge the battery at an ambient temperature of
5-40°C/41-104°F. (Otherwise, the battery cannot
be charged.)
If the temperature moves out of the above range
during the charging process, the charging stops
and the charging indicator light goes off.
When you use the printer with Bluetooth, we
recommend turning off the power during the
charging process. When the printer enters Bluetooth
sleep mode, the sleep mode continues to consume
battery power even after battery charging has
finished and the battery is fully charged.
3
When finished, disconnect the AC adapter.
The printer cannot be operated solely with the AC
adapter. The rechargeable Li-ion battery must be
installed.
To protect the circuitry, the battery cannot be
charged if the unit is in a location exposed to
extremely high or extremely low temperatures.
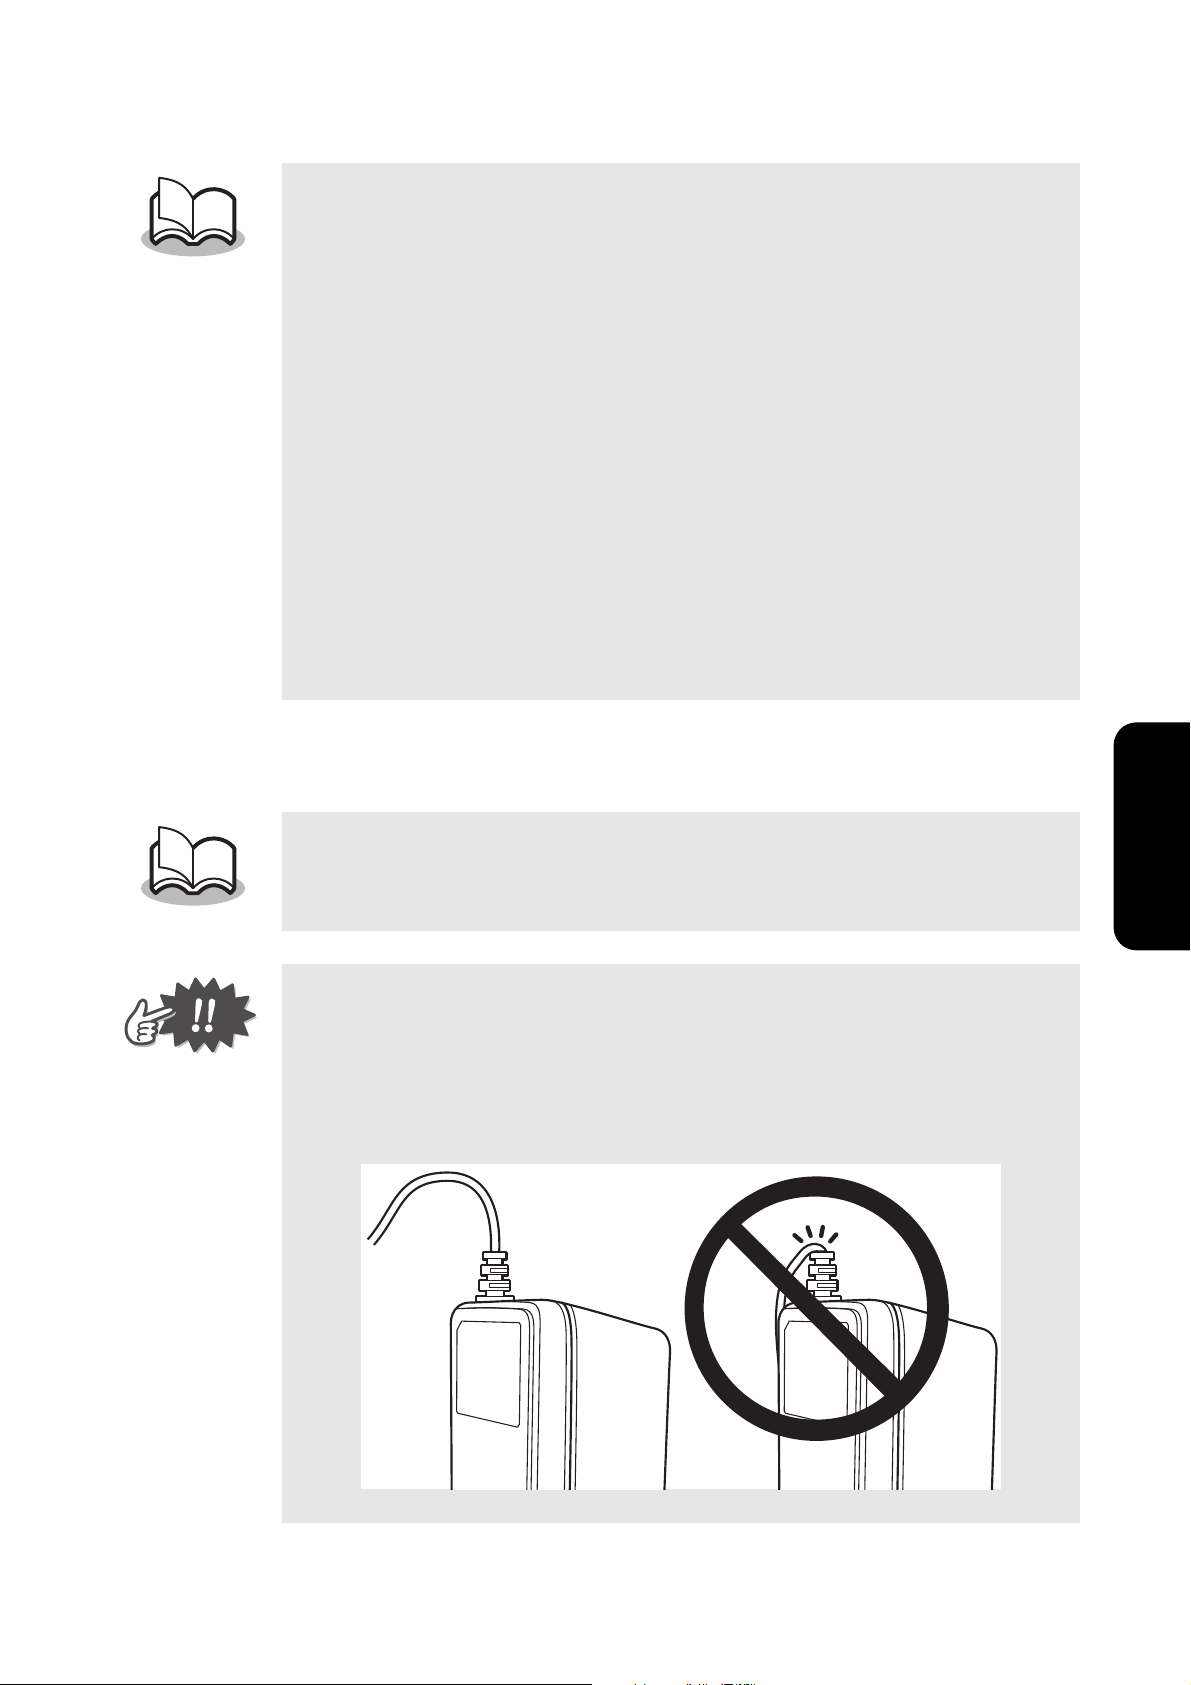
Do not wind the AC adapter cord around the adapter or
bend the cord, otherwise the cord may be damaged.
7

Operating Procedures
Storing the rechargeable Li-ion battery when the
printer is not in use
When storing the rechargeable Li-ion battery,
remove it from the printer, and then store the
battery in a location where it is not exposed to
high humidity or fluctuating temperatures (a
temperature between 15-25°C and 59-77°F and
humidity between 40% and 60% are
recommended).
*
Storing the rechargeable Li-ion battery in a location
exposed to high temperatures will cause it to
deteriorate. Do not store the battery in a location
exposed to direct sunlight or high temperatures (such
as inside a vehicle, near a heater, or on a heated
carpet).
If you do not intend to use the printer for a long
period of time, remove the rechargeable Li-ion
battery from the printer, and then store the battery
in a cool, dark place.
Avoid storing the battery when it is fully charged.
We recommend using the printer until the
charging indicator light flashes once, and then
storing the battery.
*Make sure the AC adapter is unplugged from the
printer before storing it.
*Do not allow metal to come in contact with the
terminals. The battery may be damaged if the
8
terminals are short-circuited.
· To prevent deterioration due to over-discharging
of the battery, charge it once every six months
during storage, and use it until the charging
indicator light flashes once.

Operating Procedures
Indicator lights
Status indicator light
A blue or green status indicator light indicates the printer is
operating correctly, while a red light indicates an error has
occurred.
When the status indicator light is green, the USB
or IrDA interface can be used. When the light is
blue, the Bluetooth and USB interfaces are
available for communication; however, when a
connection has been established using one of
the interfaces, data cannot be received using the other
interface until printing has finished.
Indicator
light color
Blue
Green
Indicator light
status
Waiting for incoming data
Constantly lit
(via Bluetooth or USB)
Communicating (receiving print
Flashing
data)
Sleep mode (power-saving standby
Flashing in long
state, available only when receiving
intervals
data with Bluetooth)
Waiting for incoming data
Constantly lit
(via IrDA or USB)
Communicating (receiving print
Flashing
data)
Printer status
Red
Flashing An error has occurred.
Constantly lit A system error has occurred.
9

Operating Procedures
If an error has occurred, check for the following causes:
Error description Remedy
No paper cassette has been
loaded.
The paper cassette has been
loaded facing in the wrong
direction.
There is no more paper.
A paper misfeed occurred.
Correctly load a paper cassette
containing paper
(
see page 17).
Remove the paper cassette
once, or turn off and on the
printer to clear the error.
Remove the misfed paper
(
see
If you do not remove the misfed
paper after turning off and on
the printer, the error persists.
Clean the paper feed roller and
remove paper powder
see page 25
(
page 22).
).
A transmission error occurred.
An overheat error occurred.
Check the transmission status
(
see
Wait for a few seconds. If the
printer has recovered from the
error, resend the data to resume
printing.
If the printer does not recover
during a Bluetooth connection,
re-establish the connection.
The inside of the printer has
started to overheat. Wait until it
cools down.
If an overheat error has occurred
during the printing process, the
paper being printed is fed and
discharged.
page 14).
If a system error has occurred:
The printer may be damaged. Contact your Brother dealer or
Brother Customer Support.
10

Charging indicator light
Yo u can check the status of the power supply
by observing the charging indicator light.The
charging indicator light has two functions.
(1) Indicating the charging status
(when the AC adapter is connected)
Operating Procedures
Indicator
Indicator light
Printer status
light color
Orange
(2) Indicating the battery level
(while running with the Li-ion battery)
status
Constantly lit Charging
Off Finished charging
Flashing Malfunctioning battery
Indicator light status Battery level
Off 30% or more charged
Flashing once Less than 30% charged
Flashing twice Less than 20% charged
Continues to flash three times Almost empty
Try to discharge the battery completely before
recharging it, to increase battery lifetime.
Wait to recharge the battery until the light
continues to flash three times.
11

Operating Procedures
Turning on/off the printer
1
Press and hold the power
switch for a short while
until the green or blue
status indicator light is lit.
When the printer is turned on, the
status indicator light lights up in
blue (when the interface switch is
set to Bluetooth) or in green
(when the interface switch is set
to IrDA)
( see Indicator lights on page 9).
To prevent the printer from accidentally being
turned on, it does not turn on if the power switch
is lightly pressed. Therefore, if the printer does
not turn on, hold the power switch down for a
short while.
To conserve the power of the rechargeable Li-ion
battery, the following printer functions work during
operation.
When the interface switch is set to Bluetooth:
If there is no operation or data transmission for a set
time period, the printer automatically enters the
sleep mode (
see page 9). The length of time until
12
the printer automatically enters the sleep mode can
be specified from Printer Properties > Device Setup
> Utilities (
When the interface switch is set to IrDA:
If there is no operation or data transmission for a set
time period, the printer automatically turns off. The
length of time until the printer automatically turns off
can be specified from Printer Properties > Device
Setup > Utilities (
see the Software User's Guide).
see the Software User's Guide).

Using IrDA (infrared)
1
Select IrDA (infrared) using the interface switch.
When the power is turned on, the status indicator light
lights up in green.
2
Position the printer and the mobile device so that
their IrDA infrared ports are facing each other and
are 20 cm/7.9" or less apart.
When IrDA (infrared) is selected, you cannot use
the Bluetooth function.
Operating Procedures
During transmission, do not move the printer or the mobile
device.
Make sure there are no obstacles between the printer and the
mobile device.
If the printer is connected with a USB cable or if the mobile
device is connected using a serial interface, the infrared
transmission cannot be used.
IrDA infrared transmission between computers is not
supported.
For more information, see the instru
mobile device.
ction manual for the
13

Operating Procedures
Using Bluetooth
About Bluetooth
Precautions for using Bluetooth
Wireless connections are used in a wide range of fields.
To prevent malfunctions, therefore, turn off Bluetooth in the
following areas or locations:
· Hospitals
· Aircraft
· Locations with inflammable substances, such as gasoline or
petrol stations
· During fire alarms
For better transmission
Bluetooth connectivity varies greatly according to the operating
environment. If a good connection c
annot be achieved, try
connecting again. Connections are difficult to achieve in the
following locations:
·Near electronic equipment
·Near broadcasting stations or wireless base stations
·Near a wireless LAN (IEEE 802.11)
Other features of Bluetooth technology
Equipment using Bluetooth technology may take a few seconds
until the Bluetooth functionality can be used after it is turned on.
The length of time differ
s depending on the equipment.
Precautions for printing data using Bluetooth
If using a computer, make sure the Bluetooth function is available for
the computer or mobile device before installing the printer driver for
the printer.
The following describes the basic procedure for setting up
transmission between the printer and the mobile device using
Bluetooth. For more information, see the instruction manual for the
mobile device.
14

1
Bluetooth mode
Switch the interface
switch to activate
Bluetooth.
The status indicator
light lights up in
blue.
Operating Procedures
When Bluetooth is selected, you cannot use the
IrDA (infrared) function.
2
Run the Bluetooth connection software on the
computer or mobile device.
3
Search for Bluetooth devices using the Bluetooth
connection software.
"MW-260MF_****" will be found, where "****" is the last
four digits of the serial number (PIN).
4
Select this printer from the list of Bluetooth
devices found, and establish the connection.
When connecting the computer or mobile device
to this printer for the first time, you are requested
to enter the PIN (or password).
15

Operating Procedures
5
Enter the PIN (or password or passcode) (at the
time of shipment from the factory, the last four
digits of the printer serial number are specified as
the PIN).
The printer is registered as connected via the
Bluetooth connection software.
6
When a computer is used, select "serial port" as
the connection method to the printer in the
Bluetooth connection software.
Depending on the Bluetooth device, you may also
be requested to enter the PIN at the second and
following connections.
Depending on the type of computer or mobile
device you use, you need the COM port number
to print.
If the printer becomes disconnected because the
iPad/iPad Air/iPad mini/iPhone/iPod touch is
moved away from the printer, select "Bluetooth" in
the device settings, and then tap the device you
want to connect to from the list of Bluetooth
devices.
16

Operating Procedures
Front
Back
Preparing the paper
Use only the paper cassette designed exclusively for this printer.
Use of any other paper may cause paper misfeeds or damage
the printer.
Preparing the paper cassette
Prepare the paper cassette before loading it into the printer.
Be careful not to drop any paper while the paper cassette is
being prepared.
1
Firmly fold the lid
back along the fold
(1).
2
Insert the tab on the lid into the slit (2) at the back
of the cassette.
17

Operating Procedures
Handling the paper cassette
This printer determines the paper type depending
on the loaded paper cassette, then automatically
selects the settings appropriate for that type of
paper. Do not transfer paper to a different paper
cassette.
Do not try to reuse paper that has already passed
through the printer.
The paper cassette is made of cardboard. After
finishing using the paper cassette, dispose of it
according to local regulations.
Do not use a torn or deformed paper cassette,
otherwise damage may result.
Do not prepare the paper cassette in extremely
humid locations, otherwise a malfunction may
result.
Do not touch paper cassettes or paper with wet
hands, otherwise a malfunction may result.
Store the paper cassette out of extremely hot,
extremely humid, or extremely dusty locations,
and out of direct sunlight.
When storing the paper cassette, be sure to close
its lid.
Do not leave paper cassettes in a closed vehicle
under a hot sun.
Use the paper as quickly as possible, otherwise it
18
may become discolored.

Loading the paper cassette
Paper type indication
1
Slide the paper cassette
cover (on the top of the
printer) in the direction
indicated by (1).
The paper cassette cover
opens in the direction
indicated by (2).
2
Insert the paper cassette.
The paper type indication on the
Operating Procedures
paper cassette should face up.
The end of the paper should
point toward you.
When loading the paper cassette, make sure it is
correctly aligned and the end of the paper is not
folded, otherwise a paper misfeed may result.
When exchanging the paper cassette, disconnect
the AC adapter and USB cable in advance.
19

Operating Procedures
Paper check window
Paper type indication
Paper
output slot
3
Close the paper cassette
cover in the direction
indicated by (3).
4
Slide the paper cassette
cover in the direction
indicated by (4).
If the paper cassette is correctly
loaded, the paper type indication
on the cassette can be seen
through the paper check window.
The paper cassette cover is locked.
Do not remove the paper from the paper cassette
and load it directly into the printer.
To c h ange the paper type, load a different paper
cassette.
While the printer is printing, do not apply pressure
to the paper output slot or place anything on the
printer.
If paper is not correctly fed, see page 25.
20

Operating Procedures
Using the printer
Before using the printer, install software, such as the printer driver
and P-touch Editor label creation software.
Installable software and documents:
· P-touch Editor
P-touch Editor 5.1 enables you to create various labels with
complex layouts using fonts, templates, and clip art.
· P-touch Update Software
Use this software when updating P-touch Editor.
· Printer Setting Tool
Use this tool to set up P-touch templates.
· Printer driver
Use this driver to print data from the printer.
· Manuals
1
Yo u can download the software installer from the
Brother website (www.brother.com/inst
2
Double-click the downloaded ".exe" file and follow
the on-screen instructions to start installation.
Before installation begins, you are prompted to
select software and manuals in the dialog box
presenting items to be installed. Recommended
software and manuals have been selected by
default.
).
3
Follow the on-screen instructions to complete
installation.
21

Operating Procedures
Feeding paper
If a paper misfeed occurs, remove the paper by the following
procedure:
If the paper has been fed out of the paper output slot:
1
Pull the paper out of the
paper output slot.
Clean the paper feed roller
and remove paper powder
( see page 25).
When pulling the paper out, be careful not to tear
it.
If the paper has not been fed out of the paper output slot:
1
Open the paper cassette cover.
2
Remove the paper cassette.
3
Pull out the misfed paper.
Clean the paper feed roller
and remove paper powder
( see page 25).
When pulling the paper out, be careful not to tear
22
it.
Pulling the paper out does not adversely affect the
printer's operation.

Using the paper guide
(1)
Installing the paper guide*
The paper guide (PG-200) is sold separately.
*
1
Position the paper guide so that the paper check
window is visible.
2
Align the tabs on the left and
right sides with the slots, and
then press down until they are
locked into place.
Operating Procedures
The paper guide is not intended to be frequently
installed and removed. Frequently installing and
removing the paper guide may damage the
printer or cause the cover or paper guide to warp.
Removing the paper guide
1
Open the paper cassette cover.
2
One side at a time, use a
standard (slotted)
screwdriver to unhook the
paper guide tabs near the
areas indicated by (1).
23

Operating Procedures
sensors
Maintenance
Turn off the printer before cleaning it.
Cleaning the printer
Clean the printer's surface.
1
Clean off any dus t or other dirt from the printer by
wiping it using a soft, dry cloth.
If the printer is extremely dirty, wipe it using a slightly
damp cloth.
Do not use benzene, paint thinners, or any other
solvents, otherwise the printer may become
discolored or deformed.
Cleaning the sensors
If the sensors are dirty, they cannot correctly detect the paper
cassette, and a malfunction may result.
1
Clean the sensors using a dry cleaning tool, such
as a cotton swab.
24

Operating Procedures
Paper feed roller
Scotch
tape
Cleaning the paper feed roller
If the paper feed roller is dirty, paper may not be fed correctly.
1
Affix a piece of Scotch
tape to the paper feed
roller.
2
Remove the Scotch tape
from the paper feed roller.
Any dirt on the paper feed roller is removed with the
tape.
Rotate the paper feed roller, and repeat the procedure to
clean the entire surface of the roller.
25

Appendix
5 Appendix
Troubleshooting
Symptoms and remedies
Problem Solution
The printer
cannot be turned
on.
Although the
print command
was issued, the
printer does not
print.
Press and hold the power switch for a short while
( see page 12).
The rechargeable Li-ion battery needs
recharging ( see page 6).
The rechargeable Li-ion battery is not installed.
Install the rechargeable Li-ion battery.
With an IrDA connection:
Make sure there are no obstacles between the
printer and the mobile device. or infrared
communication port of a portable telephone, and
check that they are 20 cm/7.9" or less apart
( see page 13).
Disconnect the USB cable if connected.
If the AC adapter is connected, noise from the
AC power outlet may be stopping the
communication. Unplug the AC ad
When the interface switch is set to Bluetooth,
IrDA cannot be used. Set the switch to IrDA, and
check that the status indicator light lights up in
green.
With a Bluetooth connection:
Make sure a valid Bluetooth connection is
available to the computer or mobile device (see
the instruction manual for the computer or mobile
device).
Make sure another computer or mobile device is
not transmitting data to the printer using USB or
Bluetooth ( see page 14).
When the interface switch is set to IrDA,
Bluetooth cannot be used. Set the switch to
Bluetooth, and check that the status indicator
light lights up in blue.
apter.
26

Problem Solution
B
Appendix
Although the
print command
was issued, the
printer does not
print.
There is a paper
misfeed.
Even after the
misfed paper
was removed,
the error cannot
be cleared.
An indicator light
is lit or flashing.
The paper
cassette cover
came off.
With a USB connection:
Check that the printer is securely connected to
the computer with the USB cable.
Make sure another computer or mobile device is
not transmitting data to the printer using USB or
Bluetooth ( see page 14).
Remove the misfed paper
(
see page 22).
There may still be some torn paper in the printer.
Contact your Brother dealer or Brother Customer
Support.
See Indicator lights on page 9.
Insert the pins into the white paper cassette
cover holders (at the areas indicated by "B"
below) until they are locked into place.
The pins fit smoothly if the two parts are angled
to form a "V".
27

Appendix
Problem Solution
The paper does
not feed.
Make sure the lid of the paper cassette is firmly
folded along the fold (1) ( see page 17).
Make sure the paper cassette cover is securely
closed ( see page 20).
The paper may be dirty. Pull out the first sheet
from the back of the paper cassette, and then
load the paper cassette again
( see pages 17 and 19).
Clean the paper feed roller ( see page 25).
Slide two movab le parts from position (1) to (2)
as shown below, and then close the cover.
(When the cover is closed, the movable parts
move back to position (1).)
(This symptom may occur if you do not use the
printer over a long period of time.)
28

Product specifications
Printer specifications
Model name MW-260MFi
Status indicator light (blue/green/red)
Indicators
Charging indicator light (orange)
Appendix
Method
Resolution 300 dpi x 300 dpi
Print speed
Printing
Number of
printable
pages
Paper supply
method
Paper
Direct thermal printing with a line thermal
print head
20 seconds/sheet approx.
(standard text on thermal paper with 7% coverage
at an ambient temperature of 25°C/77°F)
Up to 50 during continuous printing with a
fully charged battery.
Using Bluetooth sleep mode affects this
figure. (Based on 7% coverage at an ambient
temperature of 25°C/77°F) (Standard paper
manufactured by Brother: A6 thermal)
Brother paper cassette, automatic paper
feed mechanism
Brother A6 cut paper (105 mm x 148 mm/4.5" x 5.8")
*1
Print area
Power supply
Interface
Dimensions
Weight
*1
Continuous printing of the Brother standard pattern (7% coverage)
on A6 thermal paper C-211 with a new fully charged battery, using
the USB interface at an ambient temperature of 25°C/77°F. At a
lower ambient temperature, fewer pages can be printed.
97.5 mm x 140.6 mm/3.8" x 5.5"
Li-ion battery (BT-200: 7.4 V), charging adapter
Complies with USB Ver. 2.0 (Full Speed),
Bluetooth Ver. 2.1 + EDR class 2 S P P, i A P,
and IrDA (infrared) Ver. 1.3
130 mm (W) x 210 mm (D) x 18.5 mm (H)/
5.1" (W) x 8.3" (D) x 0.7" (H)
approximately 520 g/1.15 lbs (including
rechargeable Li-ion battery and a paper cassette
containing 50 sheets of plain thermal paper)
29

Frequently Asked Questions
6 Frequently Asked Questions
I often wound the cord of the
charging AC adapter around the
adapter or bent the cord to move
the adapter. This often causes
the cord to break and the
adapter to stop working.
When carrying the AC adapter, securely bind the cord using a
tie wrap to prevent any load from being applied to the cord.
I often carried the printer with the USB cable connected to
it. Doing so caused the USB connector to break and
subsequently there is no USB connection available now.
Disconnect the USB cable when carrying the printer. Even if
you put the printer in a bag, if the USB cable is connected to it,
a large amount of pressure will be applied to the USB
connector when the cable moves inside the bag.
When I left the printer in my car, the printer was affected
by the high interior temperature and became deformed.
Consequently, a malfunction occurred. Furthermore, the
thermal paper turned black.
The temperature inside a car may become extremely high. Do
not leave the printer inside a vehicle.
·The printer can be used in the following environment:
30
Te mp erature: 0-40°C/32-104°F
Humidity: 20% to 80%
(Maximum wet-bulb temperature: 27°C/80°F)

Frequently Asked Questions
· Do not operate or store the printer in a location exposed to
extremely high or extremely low temperatures, extreme humidity,
clogging dust, or extreme vibrations, such as those:
Inside a vehicle (particularly in a closed car under a hot sun)
Near water, such as in a bathroom or near a water heater, or
in an extremely humid location
In a location where it is exposed to moisture, such as rain or mist
In an extremely hot location, such as near naked flames,
heaters, or in direct sunlight
In a location where condensation may form
An optional car adapter is
provided but it is only for the
purpose of charging the battery.
Exposing the printer to high
temperatures causes the paper to
become discolored and the
battery to deteriorate. Do not
leave the printer inside a vehicle.
I often pressed the power switch using a sharp object,
such as the tip of a pen, which might apply high pressure
to the switch. The switch subsequently broke and did not
function from that point.
Press the power switch with your finger.
I stamped a seal on printed text. The ink did not dry
completely, and printed text was erased when I rubbed it
with my finger.
Stamping a seal on the heat-sensitive surface is not
recommended. In addition, all stamp manufacturers do not
recommend stamping a seal on heat-sensitive surfaces. Make
sure you check this before using stamps. As is the case with
ink, pens or adhesives, such as Scotch t
text to be erased.
ape may cause printed
31

Frequently Asked Questions
Paper feed roller
Scotch
tape
Paper cannot be fed, although there is still paper left in
the cassette.
Contamination of the paper feed roller may prevent some
sheets of paper from being picked up.
Use Scotch tape to remove dirt on the paper feed roller.
To increase the life of the Li-ion battery:
· We recommend discharging the Li-ion battery completely
before recharging it. Avoid recharging the battery frequently
before it is completely discharged.*
· Storing the rechargeable Li-ion battery in a location exposed
to high temperatures will cause it to deteriorate. Do not store
the rechargeable Li-ion battery in a location exposed to high
temperatures (such as inside a closed car under a hot sun)
or direct sunlight.
· If you do not intend to use the printer for a long period of
time, remove the rech
printer, and then store the battery in a cool, dark place (at a
temperature of 20°C/68°F or less) to maintain performance.
As the battery discharges naturally, charge it once every six
months while storing it in a cool, dark place.*
argeable Li-ion battery from the
32
* Caution: About the battery level
When the charging indicator light flashes once repeatedly, the
battery level is less than 30%.

Frequently Asked Questions
The AC adapter connector on the printer has broken, and
the battery cannot be recharged.
If you carry the printer with
the AC adapter plug
connected, the AC adapter
connector on the printer may
be damaged. To prevent this
problem, remove the AC
adapter plug from the
connector whenever carrying the printer.
Carrying the printer with the AC adapter plug connected applies
a periodic force to the plug. The force applied to the plug
generates a load on the connector on the printer, and solder in
the connector may fracture and result in disconnection.
As the printer is a precision device, pay carefu
removing or inserting the AC adapter plug.
l attention when
Using paper other than that genuine Brother paper may
cause frequent paper feed errors.
For Brother mobile printers, make sure you use paper supplied
by Brother. If other paper has been used, paper feed failures
may occur frequently, which cannot be solved by cleaning the
paper feed mechanism.
For any failures caused by paper other than Brother paper, you
will be liable for repair costs even if the charge-free warranty
period is
Incidentally, certain types of paper from other suppliers may
not cause failures.
still in effect.
Handling the paper cassette
The Brother mobile printer determines the paper type depending on
the loaded paper cassette, then automatically selects the settings
that are appropriate for that type of paper.
Do not transfer paper to a different paper cassette. Do not try to
reuse paper that has already passed through the printer. Doing so
may cause double feeding, empty feeding, or other types of paper
feed errors, or cause a print head failure.
33

Frequently Asked Questions
If the printer has been moved to a cool temperature
environment:
The printer may not work when the ambient temperature is
lower than 0 °C/32 °F. In an ultralow temperature environment
(at -10 °C/14 °F or lower), the number of printable pages
becomes less.
Print data from the printer in a location with an ambient
temperature of 0 °C/32 °F or higher. If the printer has been
moved to a cool temperature environment, gradually increase
the temperature to be closer to the external temperature to
prevent condensation from forming.
Storing thermal paper
[Storing before printing]
Store thermal paper inside its packaging (protected from light
and air) at an ambient temperature of 25 °C/77 °F and a
humidity of 65% RH or lower. Use the paper within one year
after the purchase date.
[Storing after printing]
Store the (filed or unfiled) thermal paper in a cool and dark
location at 25 °C/77 °F or lower.
[Precautions for storage]
Do not allow the following items to come in contact with the
heat-sensitive su
1) Back carbon and carbonless paper, and diazotype paper
2) Flexible polyvinyl chloride products, rubber mats, rubber
erasers, and other materials containing plasticizer
Adhesive tapes, correction fluids, permanent markers, and felt
3)
rface or back surface:
pens
4) Organic compounds containing alcohol, ketone, ester, or the
ether group
5) Leather products, hand creams, hair products, and cosmetics
Do not soak the thermal paper in rain, water, sweat, or other liquids.
·
· Do not touch the thermal paper with wet or sweaty hands.
Do not glue the heat-sensitive surface. When gluing the back
·
surface, use starch, poval, CMC, or other waterborne adhesives.
34

Frequently Asked Questions
·
When the heat-sensitive surface or back surface is stamped with a
seal, the white heat-sensitive surface will become discolored or the
printed part will fade due to a chemical reaction with the ink contents.
·
Do not scratch the heat-sensitive surface or apply frictional heat to it.
·
Copy your important documents and store the copies separately.
[Precautions regarding thermal paper]
1. Descriptions concerning short- and long-term storage of the
thermal pa per after being printed are primarily intended as
general information. Brother does not guarantee the relevant
numeric values, service life, or other descriptions.
2. The printing performance described herein may be affected by
the paper storage environment, the presence of grease or
contamination, printing environment, and other fa
Therefore, check the actual printing performance in your
environment after you purchase the printer, and then use the
printer under your own responsibility.
3. Brother assumes no responsibility for any damage or lost
profits that result from observing the contents of this
document.
ctors.
35

Printed in Japan
LBF086001
 Loading...