

Page 1
MPrint-series
Software User's Guide
IntroductionCreating DesignsAppendix
The contents of this guide and the specifications of this product are subject to change without notice.
Brother reserves the right to make changes without notice in the specifications and materials contained herein
and shall not be responsible for any damages (including consequential) caused by reliance on the materials
presented, including but not limited to typographical and other errors relating to the publications.
The screen images in this guide may differ depending on your OS or printer.
Version 0
1
Page 2

Contents
Contents . . . . . . . . . . . . . . . . . . . . . . . . . . . . . . . . . . . . . . . . . . . . . . . . . . . . . . . . . . . . . . . . . . . . . . . . . . . . . . . . . . . .2
Introduction . . . . . . . . . . . . . . . . . . . . . . . . . . . . . . . . . . . . . . . . . . . . . . . . . . . . . . . . . . . . . . . . . . . . . . . . . . . . . . . .3
Trademarks ................................................................................................................... 3
About this Guide ............................................................................................................ 3
Symbols used in this Guide ...........................................................................................3
Creating Designs . . . . . . . . . . . . . . . . . . . . . . . . . . . . . . . . . . . . . . . . . . . . . . . . . . . . . . . . . . . . . . . . . . . . . . . . . .4
How to use P-touch Editor for Windows® ......................................................................... 4
Starting P-touch Editor ..................................................................................................4
Start P-touch Editor Help ...............................................................................................9
How to use Brother Mobile Printing Software (Brother MPrint) .......................................11
Printing ........................................................................................................................11
Changing Printer Settings ...............................................................................................20
Changing the settings ..................................................................................................20
Introduction
Creating DesignsAppendix
Appendix . . . . . . . . . . . . . . . . . . . . . . . . . . . . . . . . . . . . . . . . . . . . . . . . . . . . . . . . . . . . . . . . . . . . . . . . . . . . . . . . . 23
Printing directly from other applications ..........................................................................23
Setting the Printer Driver .............................................................................................23
Printing from other applications ................................................................................... 24
2
Page 3
Introduction
The Brother mobile printer (hereafter referred to as "the machine") enables you to quickly and easily print
custom designs created with the software, P-touch Editor.
Trademarks
The Brother logo is a registered trademark of Brother Industries, Ltd.
Brother is a registered trademark of Brother Industries, Ltd.
© 2009 Brother Industries, Ltd. All rights reserved.
Microsoft, Windows, Windows Mobile and Windows Vista are registered trademarks of Microsoft Corporation
in the United States and other countries.
The Bluetooth word mark and logos are owned by the Bluetooth SIG, Inc. and any use of such marks by
Brother Industries, Ltd. under license.
BarStar Pro Encode Library (PDF417) Copyright © 2007 AINIX Corporation. All rights reserved.
QR Code is registered trademark of DENSO WAVE INCORPORATED in JAPAN and other countries.
Portion of graphics filter software are based in part on the work of Group 42, Inc.
Portion of graphics filter software are based in part on the work of the Independent JPEG group.
VS-FlexGrid Pro Copyright © 2002 VideoSoft Corporation.
The names of other software or products used in this document are trademarks or registered trademarks of
the respective companies that developed them.
Each company whose software title is mentioned in this guide has a Software License Agreement specific to
its proprietary programs.
All other brand and product names mentioned in this Software User's Guide are registered trademarks of
their respective companies.
About this Guide
IntroductionCreating DesignsAppendix
This guide (PDF) is included on the CD-ROM.
In this guide, when the mouse pointer changes to you can just click to jump to the corresponding pages.
For the basic functions of Adobe® Reader®, see the Adobe® Reader® Help files.
Symbols used in this Guide
The symbols used throughout this guide are as follows:
This symbol shows information or directions that should be followed. Ignoring them may result in injury,
damage, or failed operations.
This symbol shows information or directions that can help you better understand and use the machine
more efficiently.
3
Trademarks
Page 4

Creating Designs
How to use P-touch Editor for Windows
®
This section explains the procedure for starting P-touch Editor. With P-touch Editor, you can create various
kinds of designs.
See the P-touch Editor Help for samples of various kinds of designs and details on creating, printing, and
saving the designs. The following is the example for Windows Vista
as your purchased machine model name.
Starting P-touch Editor
1
Click [Start]-[All Programs (Programs)]-
[Brother P-touch]-[P-touch Editor 5.0].
You can also start P-touch Editor using the
following methods (only if you created the
shortcut during installation):
• Double-click the shortcut icon on the
desktop.
• Click the shortcut icon on the Quick
Launch bar.
®
. Read the printer name in each image
IntroductionCreating DesignsAppendix
When P-touch Editor is launched, the [New/Open] dialog box appears, allowing you to choose whether
you want to create a new layout or open an existing design.
To specify how the P-touch Editor works when it starts, click [Tools]-[Options] of the menu bar on
the P-touch Editor to display the [Options] dialog box. In the [General] tab, you can choose the
setting in the [Operations] list box in the [Startup Settings]. Normally, choose [Display New/Open
Dialog Box].
Starting P-touch Editor
4
Page 5
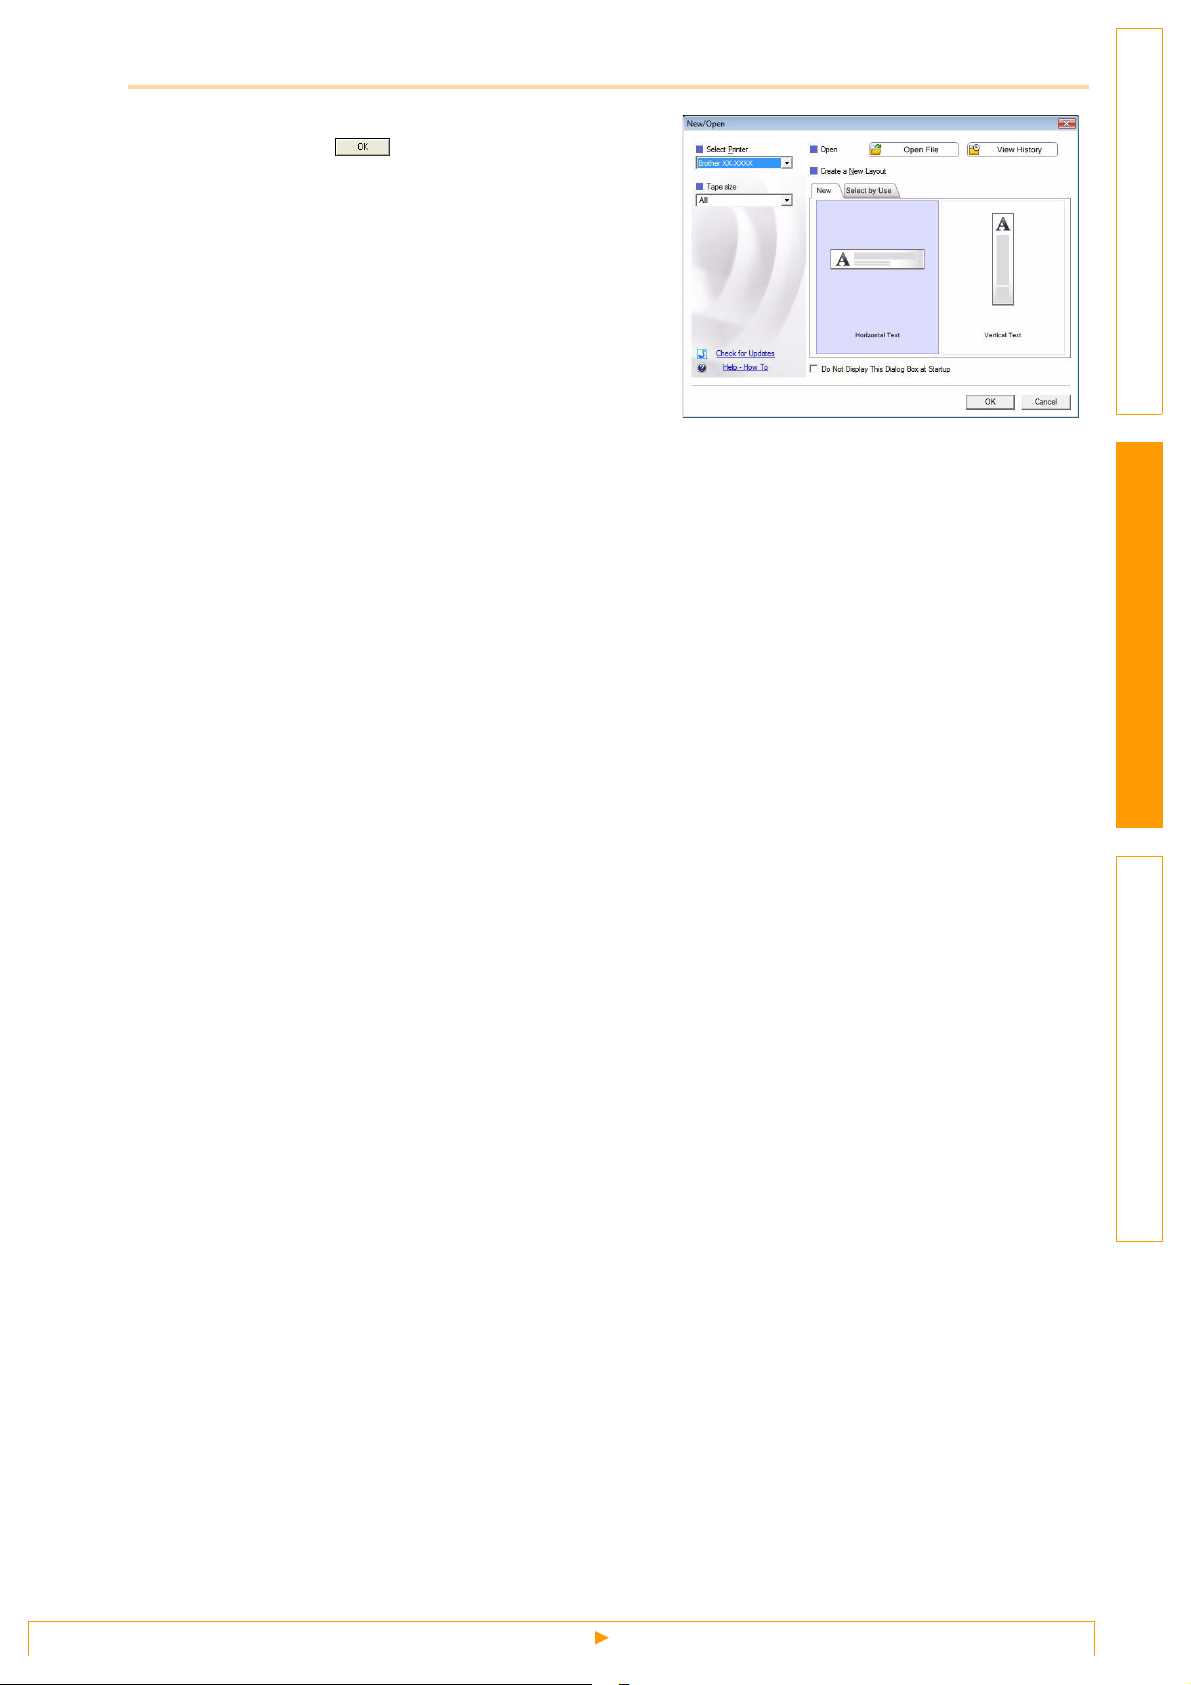
2
Choose an option in the [New/Open] dialog
box and click .
• You can choose the printer and media size.
• When you choose [Open File], the [Open] dialog
box appears. You can choose and open the file you
have created and stored previously.
• When you choose [View History], the [History]
dialog appears. You can choose from recently
created designs.
• When you choose [New], choose either vertical
writing style or horizontal writing style.
• When you choose [Select by Use], you can choose
by applications.
• When you choose [Help-How To], the P-touch
Editor Help appears.
The Help files allow you to learn step by step how
to create a layout.
• When you choose [Check for Updates] with a
computer connected to the Internet, you will be
taken to the Brother Solutions Center. Use the
Brother Solutions Center to check for the latest
software downloads and FAQs.
IntroductionCreating DesignsAppendix
Starting P-touch Editor
5
Page 6
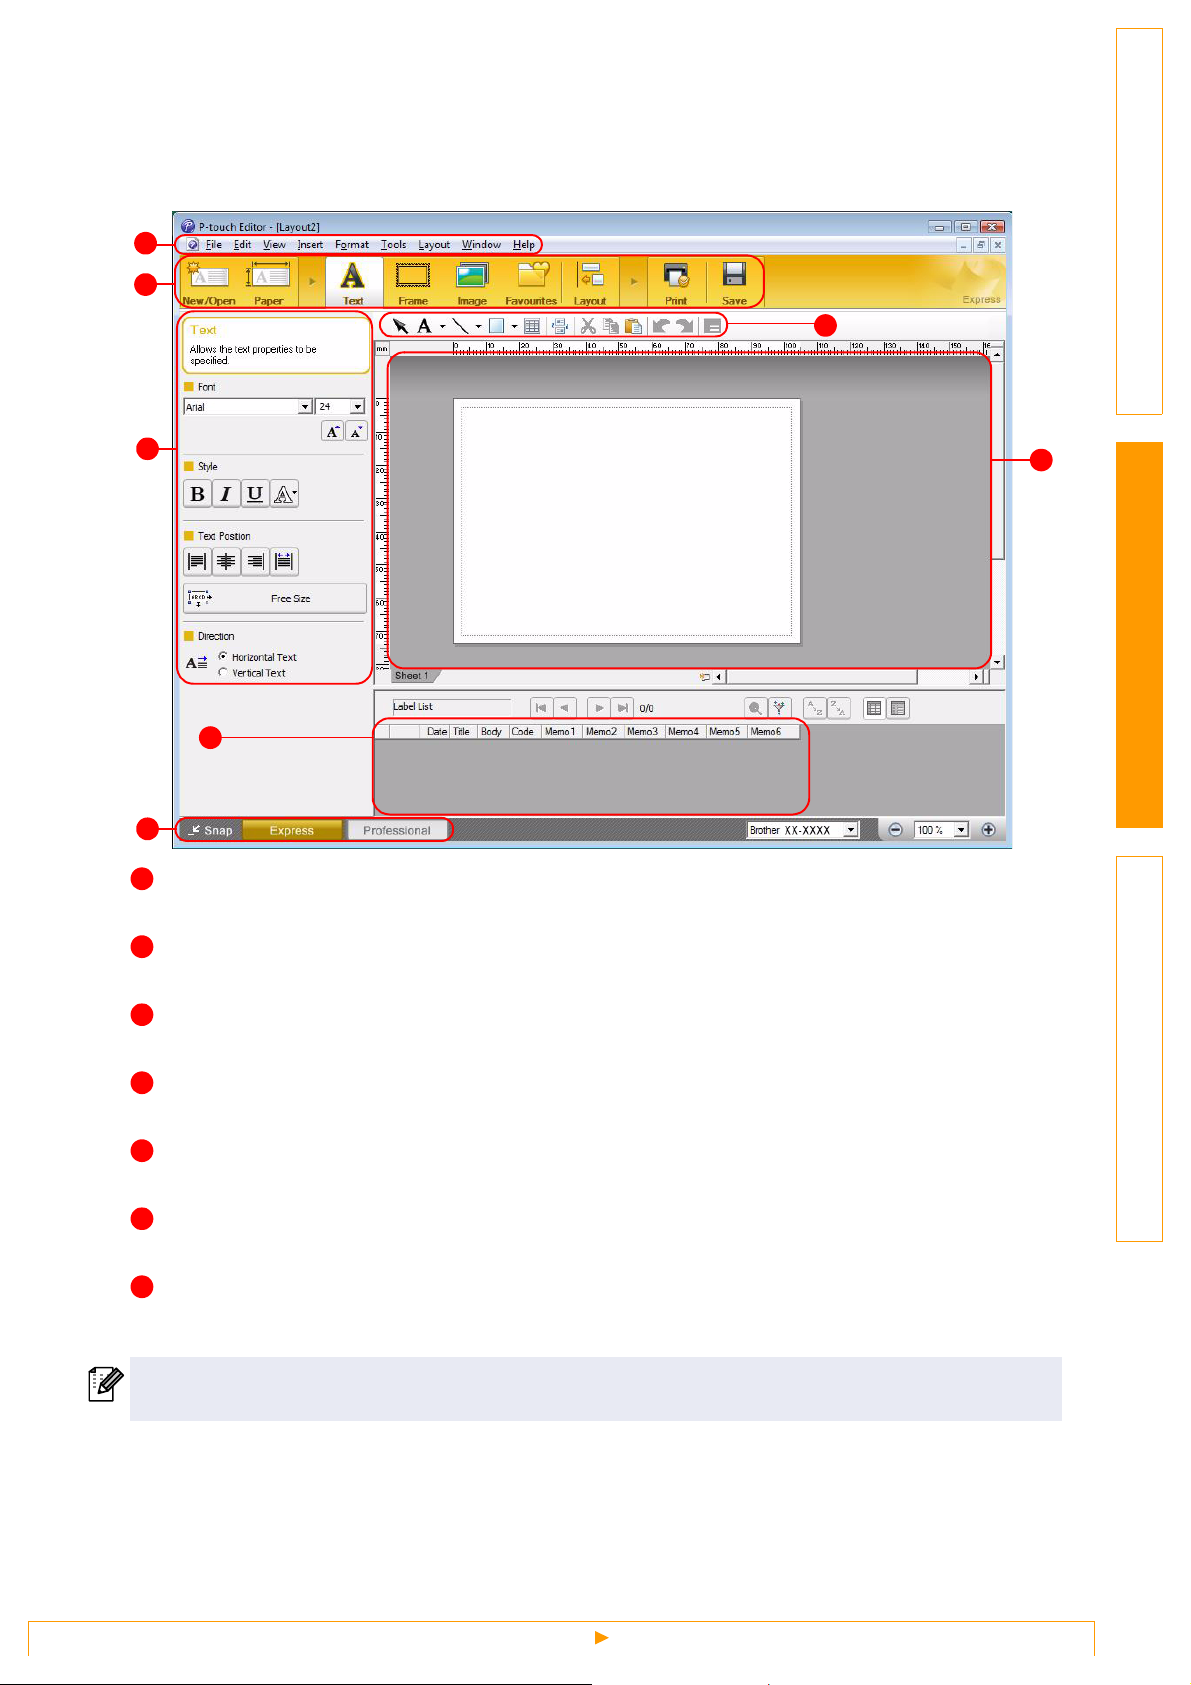
Layout window
Express Mode
This mode provides easy design creation with text and images.
The layout window consists of the following sections:
1
2
IntroductionCreating DesignsAppendix
3
4
6
7
1
Menu bar
Commands are categorized under each menu (File, Edit, View, and Insert, etc.) by function.
2
Command bar
The command bar contains New/Open, Paper, Text, Frame, Image, etc.
3
Draw/Edit toolbar
Provides tools for choosing an object, entering text, drawing graphics, etc.
5
4
Property bar
You can easily insert and format text, images, etc.
5
Layout window
The layout window is used to display and edit objects.
6
Database window
Displays a connected database.
7
Mode selection buttons
Switch between the Editor's modes.
• The [View] menu allows you to show/hide the toolbars and windows.
• See the P-touch Editor Help for details.
Starting P-touch Editor
6
Page 7
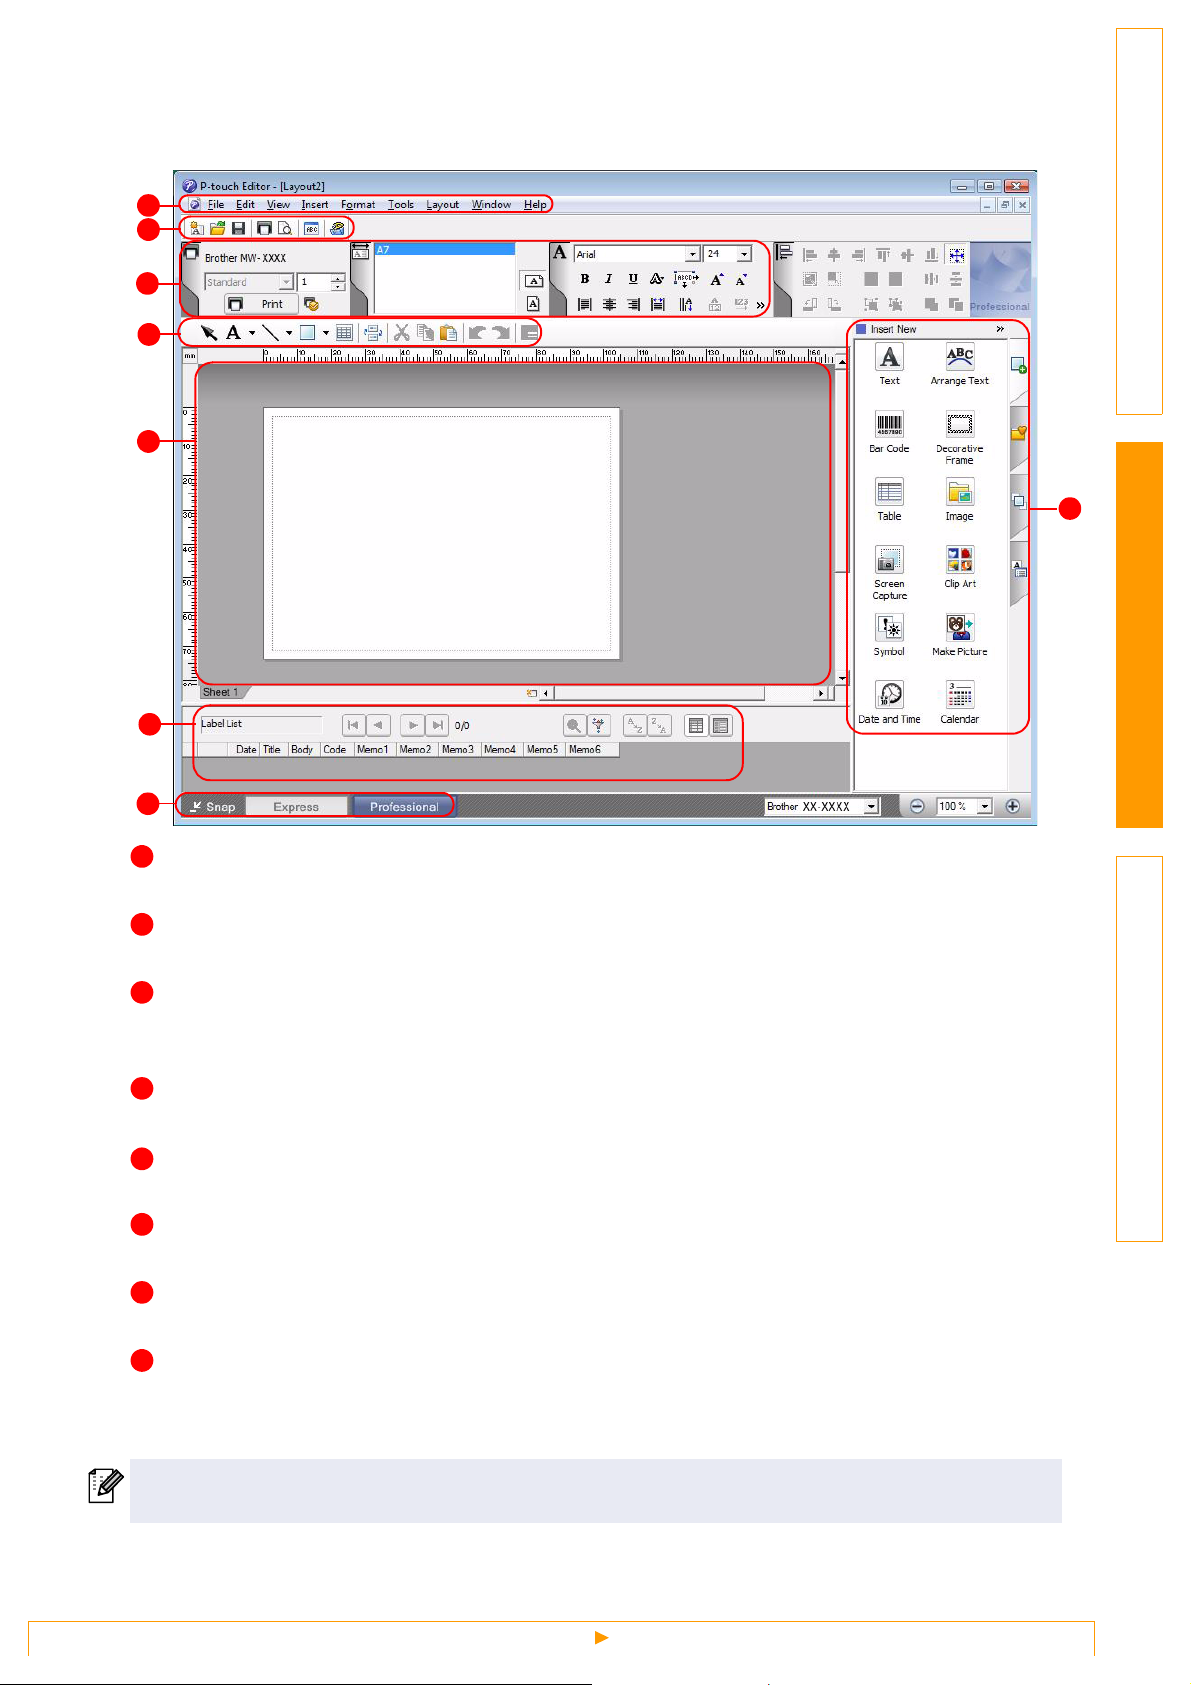
Professional Mode
This mode provides full-scale design creation.
The layout window consists of the following sections:
1
2
3
4
5
8
6
7
IntroductionCreating DesignsAppendix
1
Menu bar
Commands are categorized under each menu (File, Edit, View, and Insert, etc.) by function.
2
Standard toolbar
A group of frequently used commands (New Layout, Open, Save, Print, etc.) are provided in this toolbar.
3
Property palette
The property palette contains the Print, Paper, Text, and Layout property boxes. Click on the left side of
each palette to show/hide the box.
4
Draw/Edit toolbar
Provides tools for choosing an object, entering text, drawing graphics, etc.
Layout window
5
The layout window is used to display and edit objects.
6
Database window
Displays a connected database.
7
Mode selection buttons
Switch between the Editor's modes.
8
Side bar
By selecting the tab, you can easily insert and format text, bar codes, tables, etc., change the order of the
objects to create a template, or change the advanced settings.
• The [View] menu allows you to show/hide the toolbars, palettes, and windows.
• See the P-touch Editor Help for details.
Starting P-touch Editor
7
Page 8
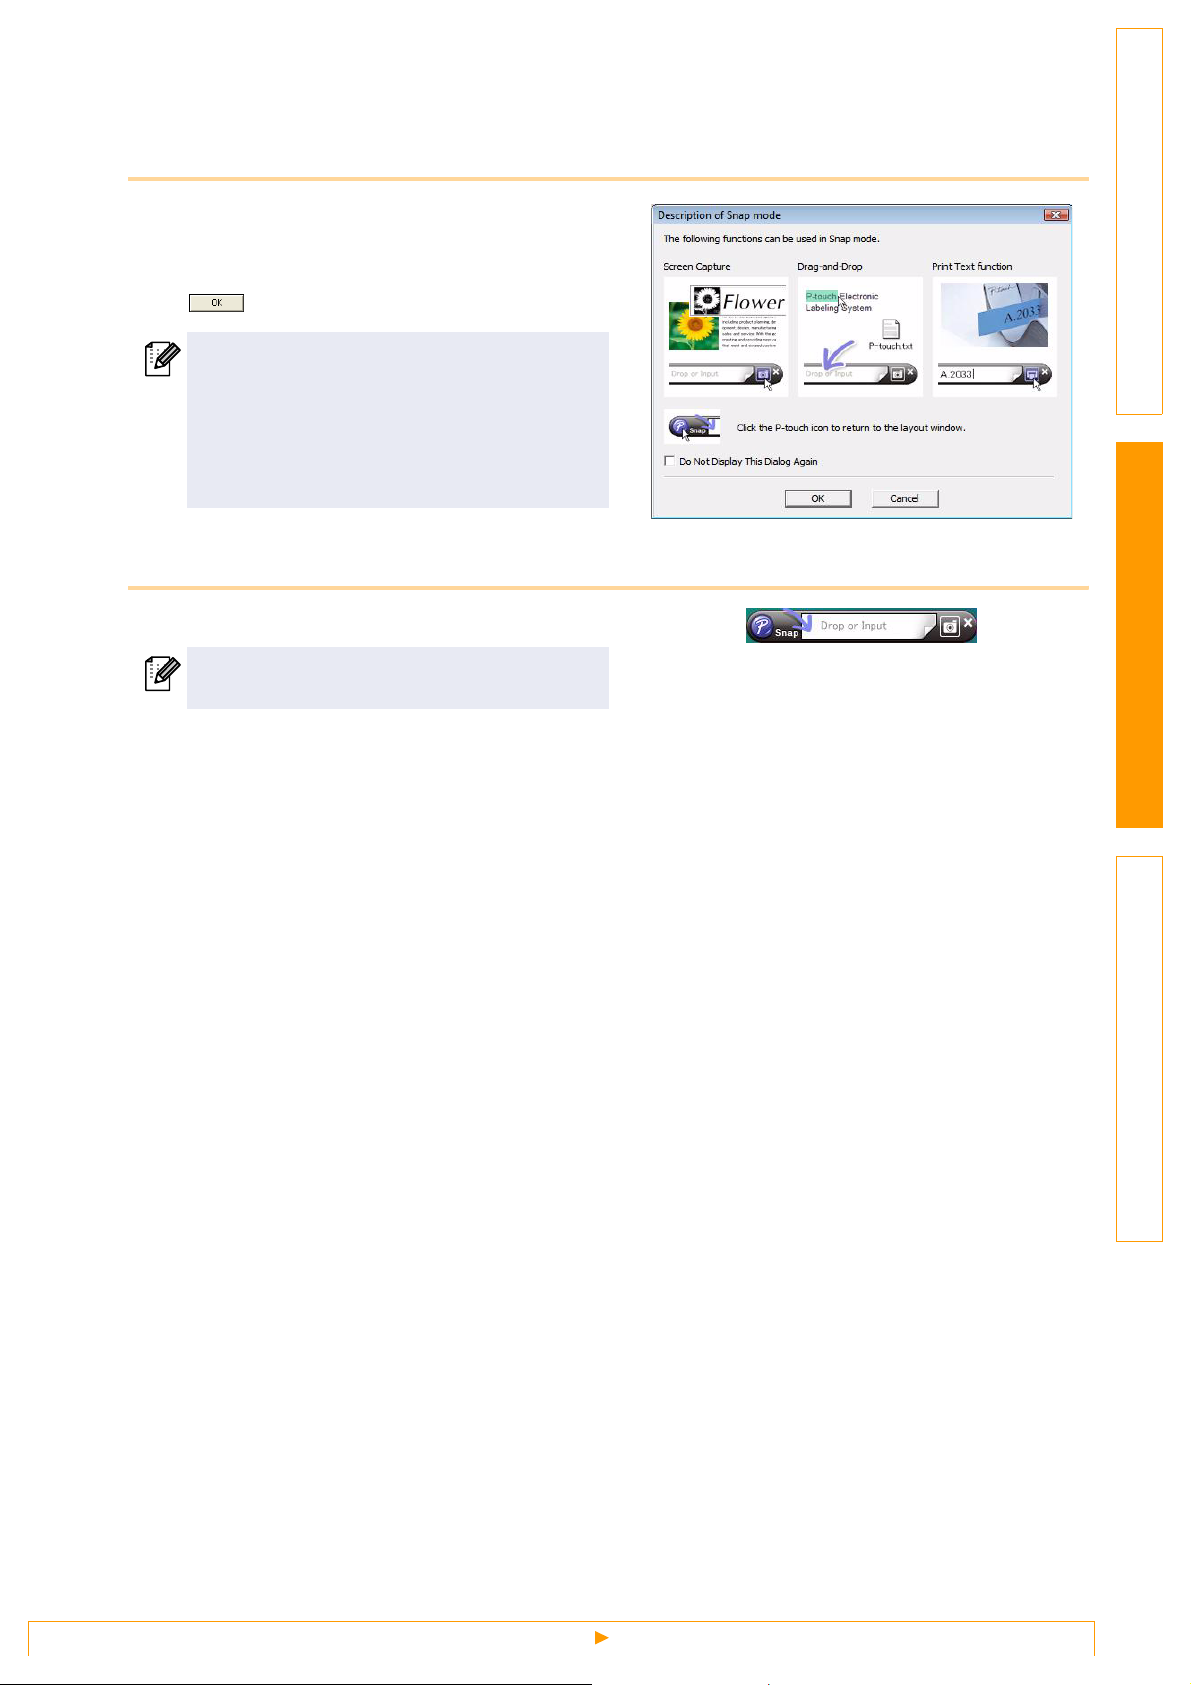
Snap Mode
With this mode, you can capture the screen, print it as an image, and save it for future use. To start Snap
mode, follow the steps below.
1
When you select [Snap] from the mode
selection buttons, the Snap mode
description dialog box appears. Click
.
• If you put a checkmark in [Do Not Display
This Dialog Again], you can go to Snap
mode directly from next time.
• You can also start from [Start]-[All Programs
(Programs)]-[Brother P-touch]-[P-touch
Editor 5.0 (Snap mode)].
2
Snap mode appears.
IntroductionCreating DesignsAppendix
See the P-touch Editor Help for details.
Starting P-touch Editor
8
Page 9

Start P-touch Editor Help
This section explains how to start P-touch Editor Help for Windows®. The following is the example for
Windows Vista
Start from Start button
®
.
To start P-touch Editor Help, click the Start
button on the task bar, point to [All Programs
(or Programs)]. Click [Brother P-touch] and
[P-touch Editor 5.0 Help].
Start from [New/Open] dialog
When you start the P-touch Editor 5.0 and the
[New/Open] dialog box appears, click Help-
How To.
IntroductionCreating DesignsAppendix
Start from P-touch Editor
Click Help menu and choose P-touch Editor Help.
Right click the mouse and choose P-touch Editor Help.
Professional ModeExpress Mode
Snap Mode
Start P-touch Editor Help
9
Page 10

Printing the Help description
The information given in P-touch Editor Help can be printed. Use your normal printer to print the P-touch
Editor Help information.
1
In the [Contents] tab, choose any topic you want to print.
2
Click on the Toolbar.
3
Choose the range of topics to be printed,
and click .
4
Specify the [Printer] and click .
IntroductionCreating DesignsAppendix
Choose a normal printer that supports general paper sizes, such as A4.
10
Start P-touch Editor Help
Page 11

How to use Brother Mobile Printing Software (Brother MPrint)
Printing
This printer has eight different printing functions.
1
Select on the [Program] screen.
The [Brother MPrint] screen appears.
Windows Mobile® 5.0 / 6 Professional / 6 Classic
2
Check that , ,
, , ,
, ,
and appear
on the screen.
Windows Mobile® 6 Standard
IntroductionCreating DesignsAppendix
Note Print → Refer to page 12
Schedule Print → Refer to page 15
E-mail Print → Refer to page 19
Task Print → Refer to page 16
Contact Print → Refer to page 17
Clipboard Print → Refer to page 17
Screen Capture Print → Refer to page 17
Image File Print → Refer to page 18
MPrint Utility → Refer to page 20
2
Check that , ,
, , and
appear on the screen.
• Note Print, Clipboard Print and
Screen Capture Print is not available
with Windows Mobile
®
6 Standard.
Schedule Print → Refer to page 15
E-mail Print → Refer to page 19
Task Print → Refer to page 16
Contact Print → Refer to page 17
Image File Print → Refer to page 18
MPrint Utility → Refer to page 20
11
Printing
Page 12

Note Print
Memos saved with Notes can be printed.
1
Select on the [Brother MPrint] screen.
A list of memos appears in the [Note Print] screen.
2
Select the memo that you wish to print. Only one
memo can be selected.
The selected memo is highlighted.
To display the memos in each previously categorized
folder, select the folder list.
3
Select [Preview] in the Printer menu.
The [Print preview] screen appears.
IntroductionCreating DesignsAppendix
Folder list
If [Print] was selected, printing will begin without the [Print
preview] screen being displayed.
4
Position the printer and the device running Windows
Mobile
other less than 20 cm/7.9" apart (MW-120/260 only).
5
Select the Print button.
After the Windows Mobile® device detects the printer,
printing begins.
®
so that their IrDA infrared ports are facing each
• Make sure that the printer is turned on.
• The IrDA infrared port is in the middle on the right side
of the printer (MW-120/260 only)
• Step 4 is not necessary when communicating with
Bluetooth.
20cm/7.9"
• The printed layout may differ depending on the size of
paper selected with [Printer setting].
• The [Print preview] screen allows you to view an image
of the data as it will be printed. Text may be difficult to
read.
• The first time you use Bluetooth communication, select
a COM port for the printer, as shown on the next page.
12
Printing
Page 13

Advanced settings
Precise print settings can be specified.
Printer settings
1
Select [Printer setting] in the [Print preview] screen.
The [Printer setting] screen appears.
IntroductionCreating DesignsAppendix
2
The following settings can be specified.
•Printer:
Select the printer model which you are using.
•Port:
Specify the settings depending on the COM port where the
Bluetooth connection was established.
(For details, refer to the User's Guide.)
• Paper size:
Select the paper size which you want to use.
The setting is adjusted according to the paper cassette that is
loaded into the printer.
• Printing orientation: Portrait/Landscape
• Print mode: Normal/Global
• Number of copies: 1 through 50/Collate
3
Select .
The printer settings are applied.
Graphics-processing settings
ok button
1
Select Graphics in the [Print preview] screen.
The [Graphics process setting] screen appears.
2
The following settings can be specified.
• Half-tone:
Dithering/Error Diffusion/None
• Image processing:
Full-size printing/Fit to paper
3
Select .
The graphics-processing settings are applied.
ok button
13
Printing
Page 14

Text format settings
The font and size of the printed text can be changed.
1
Tap [Font] in the Settings menu of the [Note Print]
screen.
The [Font setting] screen appears.
IntroductionCreating DesignsAppendix
2
The following text settings can be specified.
• Font name:
Tahoma/Courier New/Frutiger Linotype/Bookdings
The fonts that can be used differ depending on the
device.
•Size:
Largest/Larger/Standard/Smaller/Smallest
• Effects:
Bold/Underline/Italic/Strikethrough
3
Select .
The text format settings are applied.
ok button
14
Printing
Page 15

Schedule Print
Schedules saved with Calendar can be printed.
1
Select on the [Brother MPrint] screen.
A list of schedules appears in the [Schedule Print] screen.
2
Select the box to the left of the schedule that you
wish to print.
• More than one schedule can be selected.
The selected file is indicated by a check mark.
• The period of time to be printed can be specified.
(→ “Printing a specified date” on page 16)
• To display the schedules in each previously specified category, tap [Filter] in the menu.
3
Select [Preview] in the Printer menu.
The procedure continues in the same way as with the Note Print (→ page 12).
Template setting
The layout in which data is printed can be specified.
1
Select [Template] in the Settings menu of the [Schedule
Print] screen.
The [Template] screen appears.
IntroductionCreating DesignsAppendix
Category list
2
Select the template that you wish to use.
3
Select
The selected template is applied.
.
Example of an A6 portrait template
Various templates are available for A7-size paper.
Template menu
ok button
15
Printing
Page 16

Printing a specified date
The period of time to be printed can be specified.
1
Select [Date] in the Settings menu of the [Schedule
Print] screen.
The [Date] screen appears.
2
Change the date setting.
• Start date/End date/In progress
•Date
3
Select
The schedules included in the specified time period are
displayed in the [Schedule Print] screen.
.
IntroductionCreating DesignsAppendix
ok button
Task Print
Tasks and appointments saved with Tasks can be printed.
1
Select on the [Brother MPrint] screen.
A list of tasks appears in the [Task Print] screen.
2
Select the box to the left of the task that you wish to
print. More than one task can be selected.
A check mark appears.
• The period of time to be printed can be specified.
(→ “Printing a specified date” on page 16)
• The layout in which data is printed can be specified.
(→ “Template setting” on page 15)
The procedure continues in the same way as with the Note Print (→ page 12).
16
Printing
Page 17

Contact Print
Names, address and telephone numbers saved with Contacts can be printed.
1
Select on the [Brother MPrint] screen.
A list of contacts appears in the [Contact Print] screen.
2
Select the box to the left of the contact that you wish to
print. More than one name can be selected.
A check mark appears.
The layout in which data is printed can be specified.
(→ “Template setting” on page 15)
The procedure continues in the same way as with the Note Print (→ page 12).
Clipboard Print
The images and text moved to the Clipboard can be printed.
The Clipboard is the name of the location where data that was cut or copied is stored.
1
Select on the [Brother MPrint] screen.
The contents of the Clipboard appear in the [Clipboard Print] screen.
The procedure continues in the same way as with the Note Print (→ page 12).
IntroductionCreating DesignsAppendix
Screen Capture Print
The currently displayed screen of the Pocket PC can be printed.
1
Select on the [Brother MPrint] screen.
A toolbar appears in the upper-right corner of the screen.
2
Display the screen that you wish to print.
3
Select on the toolbar.
The captured screen appears in the [Print preview] screen.
The procedure continues in the same way as with the Note Print
(→ page 12).
Toolbar
17
Printing
Page 18

Screen capture print settings
The time until the data is imported and the size of the captured area can be specified.
1
Select
The [Screen capture print settings] screen appears.
2
The following settings can be specified.
• Capture delay time:
• Capture range:
3
Select .
The screen capture settings are applied.
on the toolbar.
0 to 10 seconds
Specifies the length of time until the image is imported after is
selected.
Selection range (Use the stylus to select the desired area.)/Client
(Area indicated by
screen)
in the illustration at the right)/Desktop (Entire
IntroductionCreating DesignsAppendix
ok button
Image File Print
Saved image files (in BMP, JPEG or PNG format) can be printed.
1
Select on the [Brother MPrint] screen.
The [Image File Print] screen appears.
2
Tap the image file that you wish to print. Only one file
can be selected.
The selected file is highlighted.
3
Select
The [Print preview] screen appears.
The procedure continues in the same way as with the Note
Print (→ page 12).
.
ok button
18
Printing
Page 19

E-mail Print
Saved e-mails can be printed.
1
Select on the [Brother MPrint] screen.
A list of e-mails appears in the [Email Print] screen.
2
Select the e-mail that you wish to print. Only one e-mail
can be selected.
The selected e-mail is highlighted.
The layout in which data is printed can be specified.
(→ “Template setting” on page 15)
The procedure continues in the same way as with the Note Print (→ page 12).
IntroductionCreating DesignsAppendix
19
Printing
Page 20

Changing Printer Settings
The following settings for this printer can be specified through the printer driver on a Windows® PC, or using
the MPrint Utility on a Windows Mobile
• Auto power-off time
• Print command setting (default)
• Auto sleep time
• Auto sleep/power-off time
• Power-saving setting
• Device name
• Pass key (PIN code)
• Communications Security Settings
®
device.
Changing the settings
Windows® PC:
1
Click the [Start] button, and then click [Printers and Faxes].
2
Right-click .
IntroductionCreating DesignsAppendix
A menu appears.
3
Select [Properties].
4
Click [Device Settings] tab and click Properties button on [Utility...].
The [Brother MW-XXX Utility] screen appears.
5
Change the settings referring to "Setting Items" on pages 21 to 22.
6
Click [Close] button to complete the setting changes.
The [Brother MW-XXX Utility] screen will close.
Windows Mobile® device:
1
Select on the [Brother MPrint] screen.
The [Brother MPrint Utility] screen appears.
2
Change the settings referring to "Setting Items" on pages 21 to 22.
3
Select the button to complete the setting changes.
The MPrint Utility will close.
20
Changing the settings
Page 21

The screens may vary depending on the model. The following is the example for the MPrint Utility on a
Windows Mobile
®
device.
Setting Items
General
1 Auto power-off time
The length of time [auto power-off time] until the printer
automatically powers off can be specified. If "0" is specified, the
printer will not automatically power off.
The available parameters differ depending on the
printer model being used.
2 Print command setting (default)
You can select the default print setting, from 3 options, "ESC/P",
"Raster" and "P-touch Template". You should not need to change
this setting. "ESC/P" is selected by default, although "Raster" will
be automatically chosen by the Brother mobile printing software
when appropriate.
Bluetooth (1)
3 Auto sleep time
When the Bluetooth switch is set to ON, the length of time [auto
sleep time] until the printer automatically enters the sleep mode can
be specified.
4 Auto sleep/power-off time
When the Bluetooth switch is set to ON, the length of time [auto
sleep/power-off time] until the printer powers off after entering the
sleep mode can be specified. If "0" is specified for the auto sleep
time, the unit will not enter the sleep mode.
5 Power-saving setting
The power-saving setting can be specified.
1
IntroductionCreating DesignsAppendix
2
3
4
5
Bluetooth (2)
6 Device name
The device name can be changed.
Specify a name that contains 1-12 alphanumeric characters.
21
Changing the settings
6
Page 22

Bluetooth (3)
7 Communications Security Settings
Select required communications security settings.
Specify a four to sixteen digit alphanumeric code only if "PIN code:
Enable" has been selected.
Select whether or not to enable Secure Simple Pairing.
7
Secure Simple Pairing (SSP) is a feature for
establishing a connection via Bluetooth ver. 2.1
without entering a PIN code.
Between SSP-compatible devices, it is not necessary
to enter the PIN code for establishing a connection
with a Bluetooth device. However, security is not
particularly high since there are no limitations on
compatible devices establishing a connection.
To prohibit printing by others, select "Disable".
In addition, devices incompatible with SSP or where
SSP is disabled will require pairing with PIN codes
specified and encryption enabled.
8 Accessibility
Select whether or not to search from another device.
Select this setting from the computer when the printer cannot be found.
IntroductionCreating DesignsAppendix
8
22
Changing the settings
Page 23

Appendix
Printing directly from other applications
You can use this machine to print directly from most Windows® applications, by installing the printer driver.
Setting the Printer Driver
In the following steps, you will see XX-XXXX. Read "XX-XXXX" as your printer name. The printer names in
the following screens may differ from your printer name.
The screens may vary depending on the model. The following is the example for Windows Vista
IntroductionCreating DesignsAppendix
®
.
1
For Windows Vista
From [Control Panel], go to [Hardware and Sound] and open [Printers].
For Windows
From [Control Panel], go to [Printers (2000) / Printers and Faxes (XP)].
For details, see Windows® Help.
2
For Windows Vista
Choose "Brother XX-XXXX", and click
[Select printing preferences].
The [Brother XX-XXX printing preferences]
dialog box appears.
For Windows® 2000/XP
Choose "Brother XX-XXXX", and click
[File] - [Printing Preferences]
The [Printer Properties] dialog box appears.
®
®
2000/XP
®
3
Choose each item and click .
• [Layout] Tab
This tab is used to set the Format and Width.
You can change the paper orientation and page
order.
4
Close the [Printers] window.
23
Setting the Printer Driver
Page 24

Printing from other applications
We will use Microsoft® Word 2007 as an example.
1
Click and .
The [Print] dialog box appears.
2
Choose "Brother XX-XXXX".
You can change the settings of the Printer Driver
from the [Properties] dialog box which appears by
clicking .
IntroductionCreating Designs
3
Click to close the [Print] dialog box.
4
When you click [Page Layout] the ribbon appears. Then click the mark to the right of
Page Setup.
The [Page Setup] dialog box appears.
5
Click the [Paper] tab, and choose the
paper size that you want to print.
Set page margins and layout in the [Margins] and
[Layout] tab as well.
Appendix
6
Click .
The size of the Microsoft® Word window is adjusted to the paper size that you have just chosen. Edit
the document as needed.
7
Click and , then click .
The specified designs are printed.
24
Printing from other applications
Page 25

 Loading...