

Page 1
Quick Reference Guide
MW-145BT
Guide de référence rapide
Kurzanleitung
Mobile Printer
Guida di riferimento rapido
Guía de referencia rápida
Beknopte bedieningsgids
Hurtigveiledning
Snabbguide
Kort vejledning
● Before using this printer, be sure to read this Quick Reference Guide.
● Lisez sans faute ce Guide de référence rapide avant d'utiliser cette imprimante.
● Vor der Inbetriebnahme des Druckers das Kurzanleitung gründlich lesen.
● Prima di usare questa stampante, assicurarsi di leggere questa Guida Rapida.
● Antes de utilizar esta impresora, asegúrese de haber leído esta Guía de
referencia rápida.
● Lees deze Snelgids voordat u de printer gebruikt.
● Pass på å lese denne hurtigveiledningen før du tar skriveren i bruk.
● Se till att läsa snabbreferensen, innan skrivaren tas i bruk.
● Læs Hurtig vejledning, inden denne printer tages i anvendelse.
www.brother.com
Page 2

English
Declaration of Conformity
(Europe/Turkey only)
We, BROTHER INDUSTRIES, LTD.
declare that this product is in compliance with the essential requirements
and other relevant provisions of Directives 1999/5/EC and 2005/32/EC.
The Adapter AD-210 is in compliance with the essential requirements and
other relevant provisions of Directive 2006/95/EC.
The Declaration of Conformity (DoC) is on our Web site. Please go to
http://solutions
country -> choose your model -> choose “Manuals”-> choose Declaration
of Conformity (*Select Language when required).
15-1, Naeshiro-cho, Mizuho-ku,
Nagoya, 467-8561, Japan
.brother.com -> choose region (eg. Europe) -> choose
1-1
Page 3

CAUTION
RISK OF EXPLOSION IF BATTERY IS REPLACED BY AN
DISPOSE OF USED BATTERIES ACCORDING TO THE
Trademarks
The Brother logo is a registered trademark of
Brother Industries, Ltd.
Brother is a registered trademark of Brother Industries, Ltd.
© 2009 Brother Industries, Ltd.
Microsoft, Windows, Windows Mobile and Windows Vista are
registered trademarks of Microsoft Corporation in the United
States and other countries.
The Bluetooth word mark and logos are owned by the Bluetooth
SIG, Inc. and a
under license.
All other software and product names mentioned are
trademarks or registered trademarks of their respective
companies.
For the latest infomation and updates on the Brother mobile
printer feature, visit http://solutions.brother.com
INCORRECT TYPE.
INSTRUCTIONS.
ny use of such marks by Brother Industries, Ltd.
.
1-2
Page 4
Manual structure
A User’s Guide and a Software User’s Guide are provided
on the CD-ROM included with this printer.
Read the User’s Guide before operating the printer.
It is recommended you save the User’s Guide onto your
Windows PC for future reference.
User’s Guide
The User’s Gui de provides precautions
for using this printer, details on the
printer’s setup, the procedures for
installing and uninstalling the software
onto a Windows
Windows Mobile
®
PC or onto a
®
device.
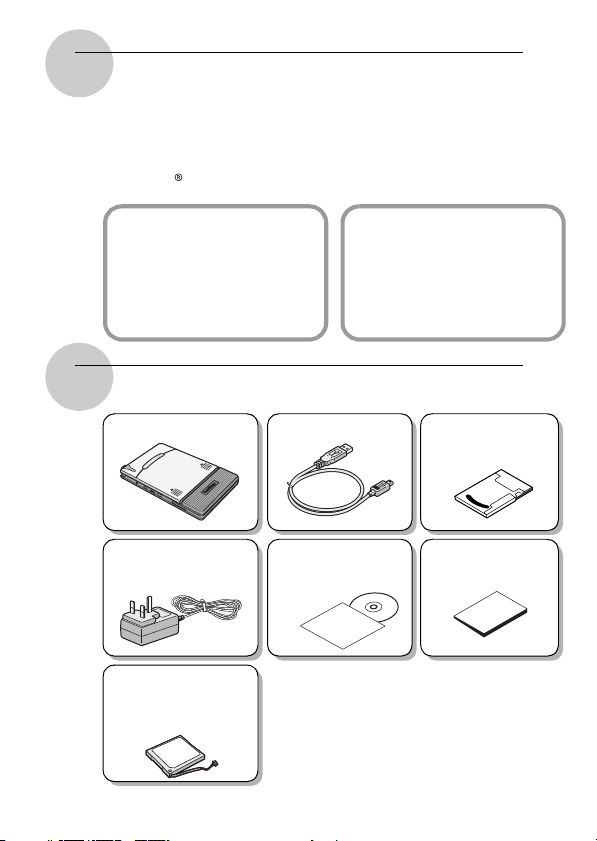
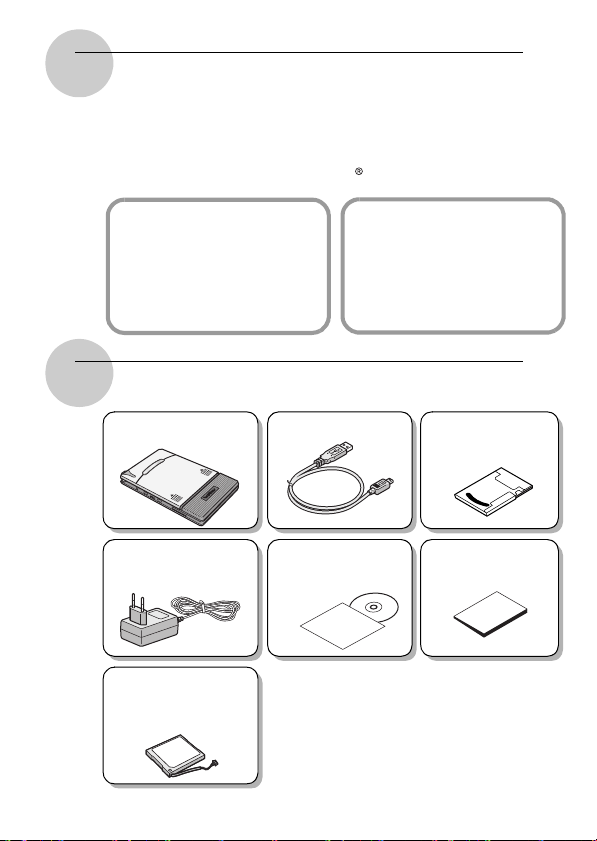
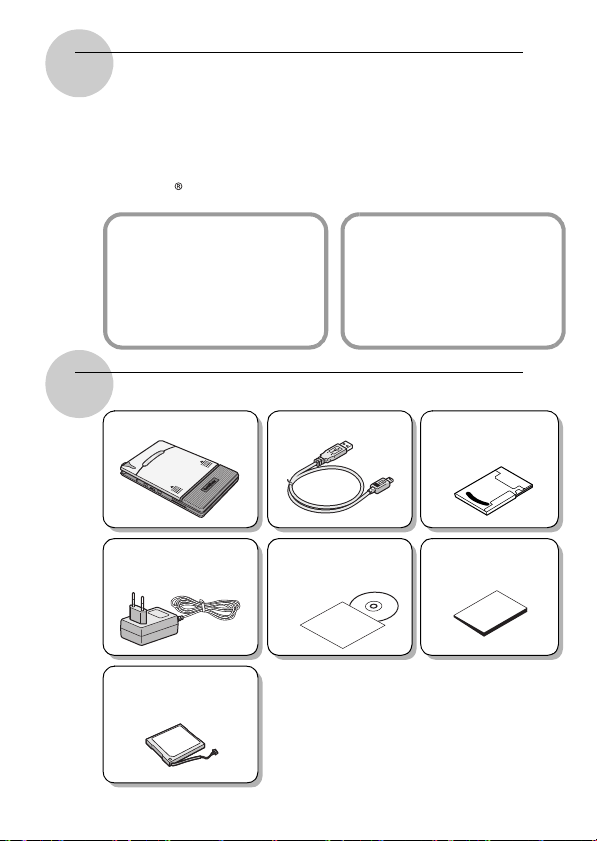
Enclosed accessories
MW-145BT mobile printer
AC adapter
(AD-210UK)
Brother Industries, Ltd.
Lithium ion Rechargeable
battery pack
(BT-100)
Brother Industries, Ltd.
USB cable
CD-ROM
(contains the software, the
User’s Guide and the Software User’s
Guide)
Software User’s Guide
The Software User’s Guide
describes how to use the software
for Windows
Mobile
procedures.
®
PC or Windows
®
device and their printing
Paper cassette
filled with C-11 thermal
paper (50 sheets).
Quick Reference Guide
(This guide)
1-3
Page 5
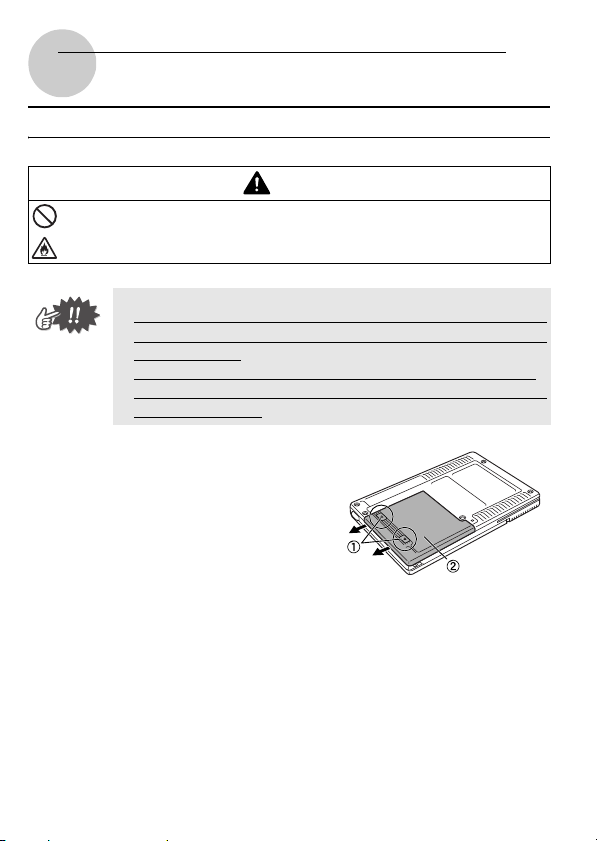
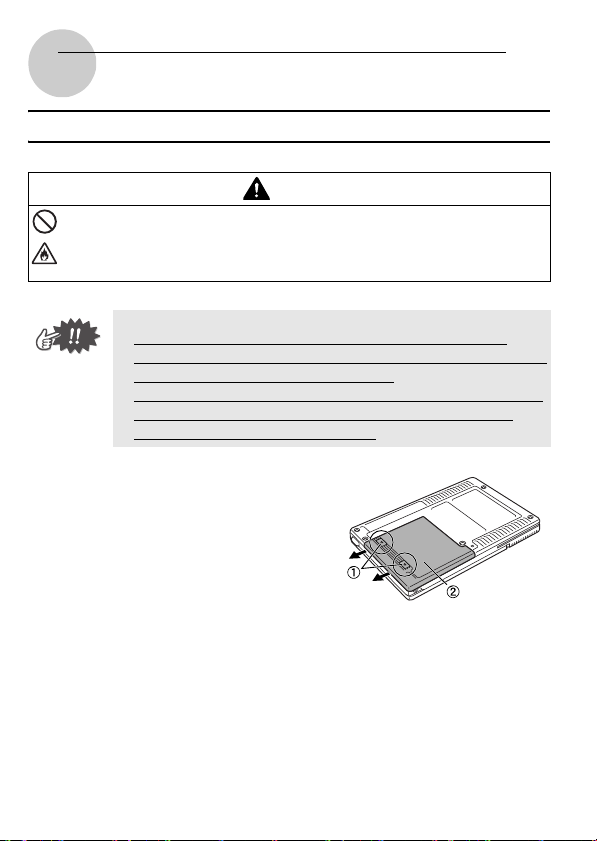
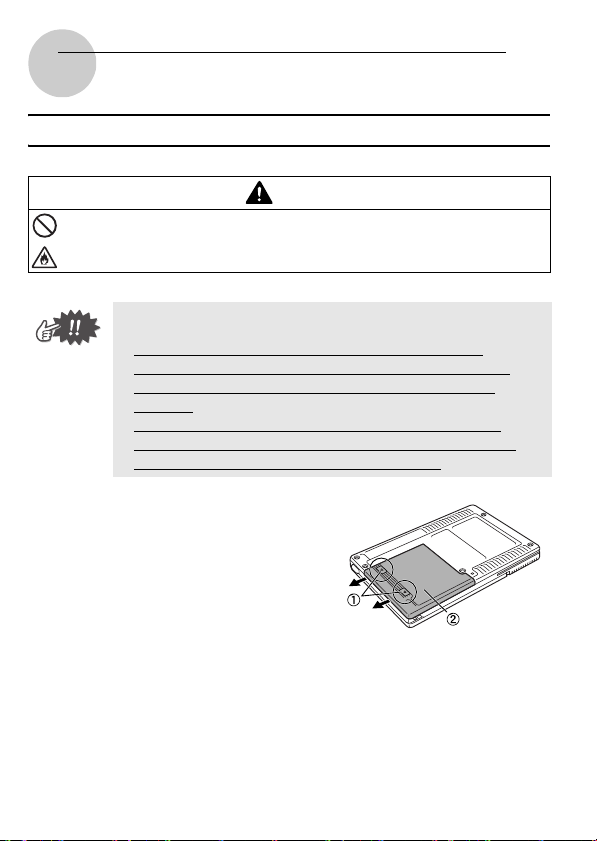
Getting Started
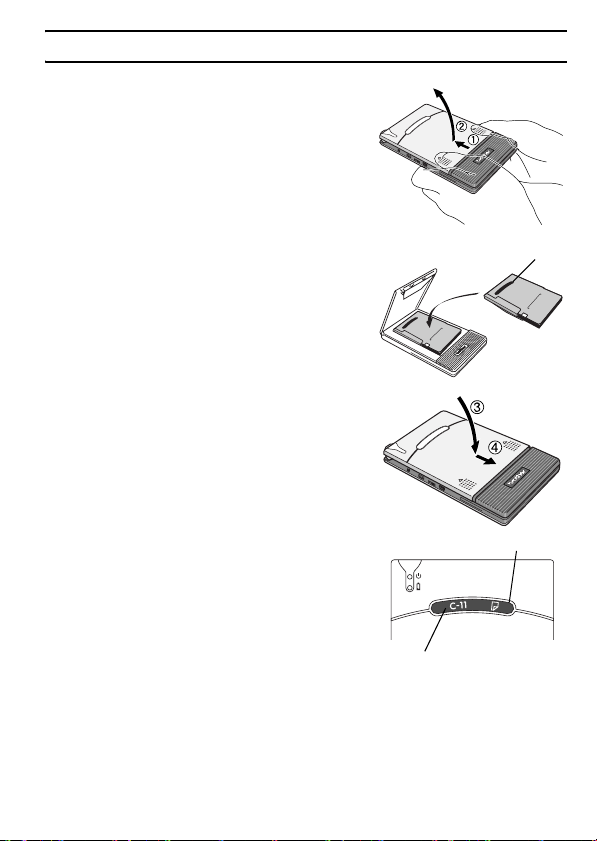
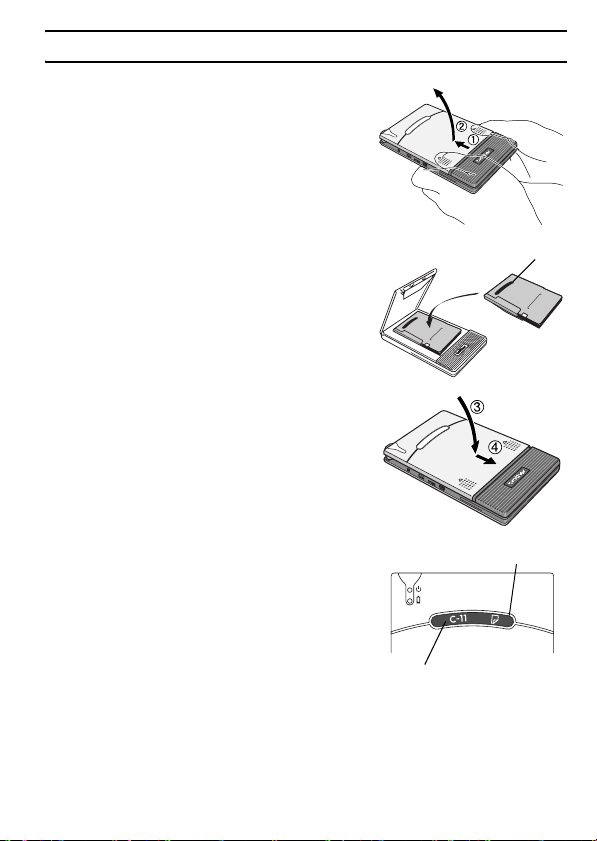
Installing the battery
Do not use this printer with any rechargeable battery other than
that specified (BT-100), otherwise a fire or damage may result.
y DO NOT take off the black plastic that covers the battery.
y The battery connector should not be frequently unplugged and
reconnected, otherwise it may become damaged or the battery
cord may break.
The battery should only be removed when replacing it at the
end of its service life, or when the printer will not be used for a
long period of time.
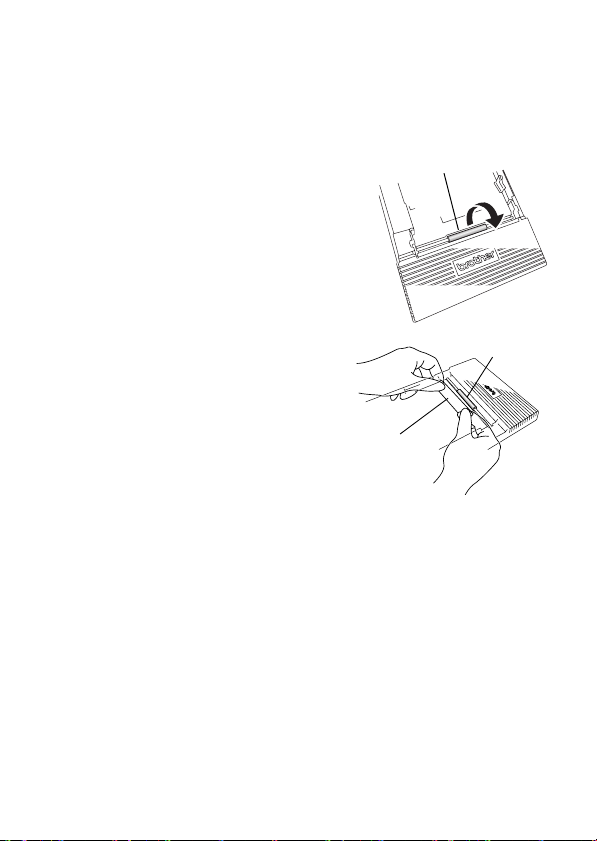
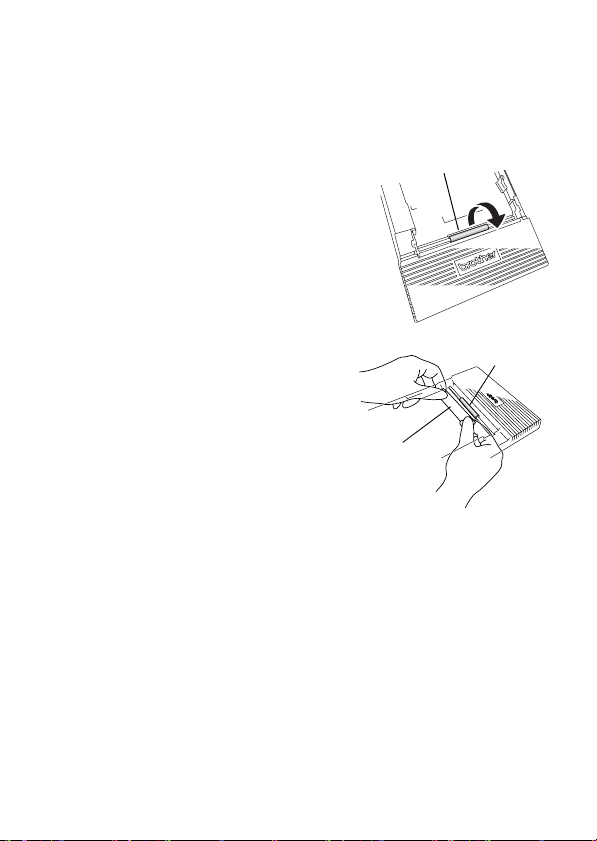
1
Press the area indicated 1 on
the battery cover 2 and slide
it off the MW-145BT.
Danger
1-4
Page 6
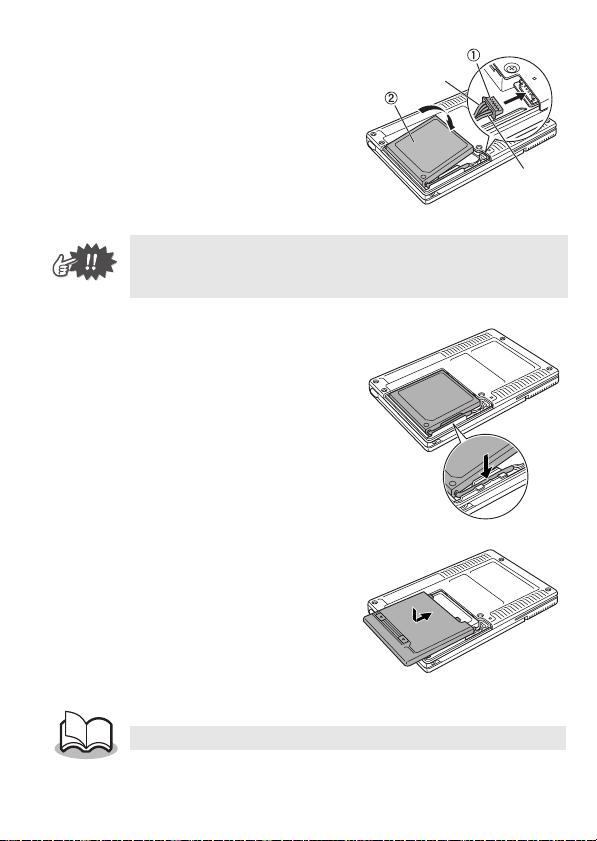
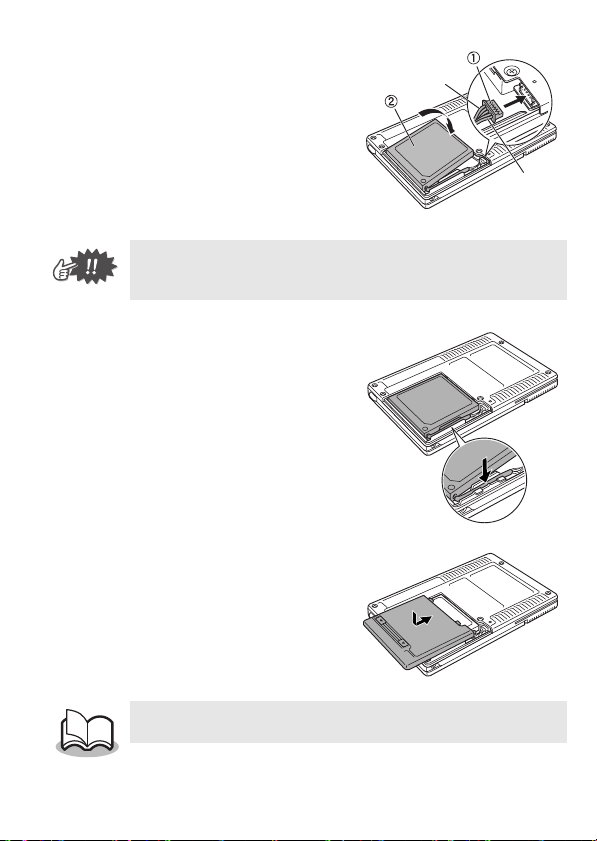
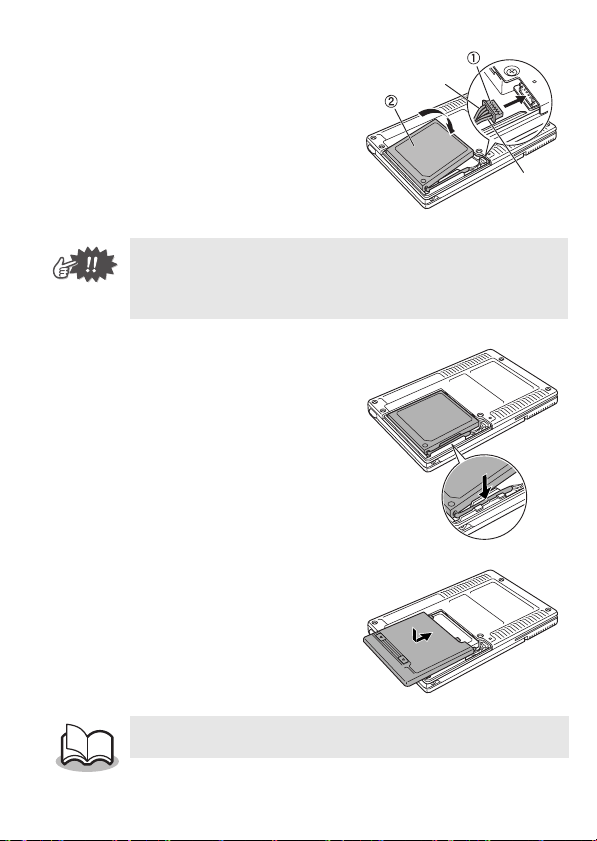
2
Insert the connector 1 of the
battery 2 in the direction
shown right.
y
Insert the connector fully, without using excessive force.
y
Be sure you insert the connector in the correct orientation,
otherwise it may be damaged.
3
Fit the battery cord into the
groove as shown in the
illustration.
4
Install the battery cover by
sliding it onto the back of the
MW-145BT.
Black
Red
Be careful that you do not catch the battery connector cord.
1-5
Page 7
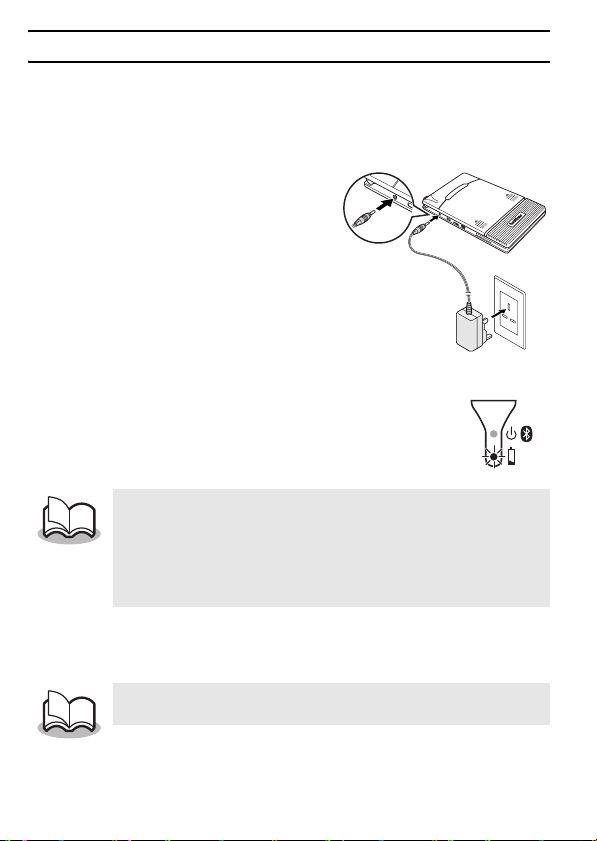
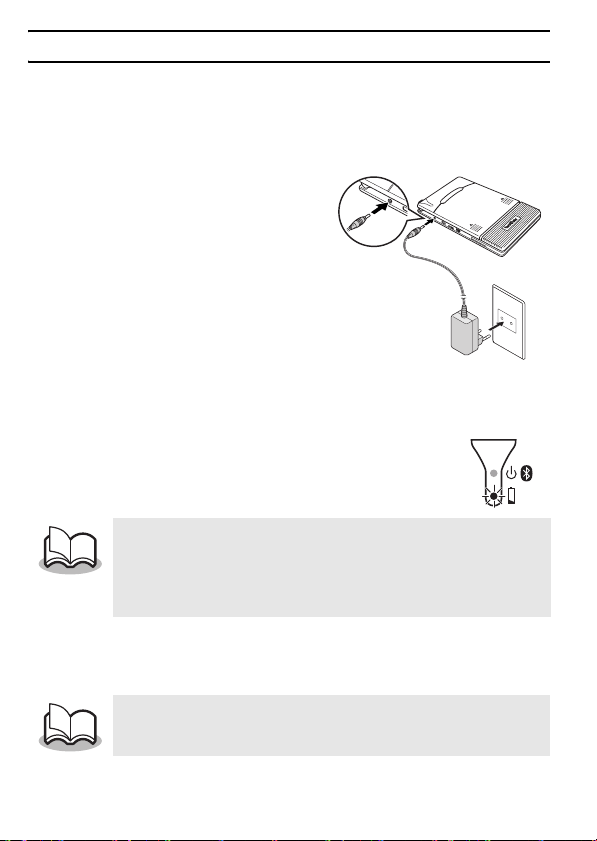
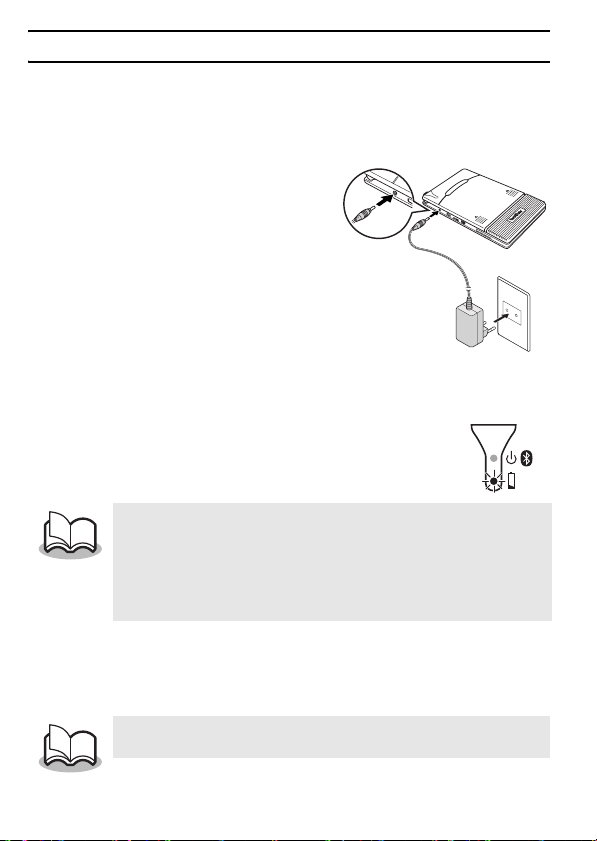
Charging
Use the AC adapter designed specifically for this printer to charge the
battery.
After purchasing this printer, be sure to charge the battery fully before
using it.
1
Plug the AC adapter cable
into the printer.
2
Plug the AC adapter plug into
a household electrical outlet
(AC 220 V
Charging of the lithium ion battery
automatically begins.
→
→ When charging is finished, the charging LED
- 240 V).
The plug may differ
The orange charging LED is lit.
goes off.
y
It takes approximately three hours for the battery to be
recharged from completely empty to fully charged (with the
printer turned off).
y
Recharge the battery in an environment with a temperature
between 5 °C and 40 °C. (The battery will not recharge if the
ambient temperature is outside of this range.)
by country.
3
After charging is finished, disconnect the AC adapter.
The MW-145BT cannot be operated solely with the AC adapter.
The rechargeable battery must be installed.
1-6
Page 8
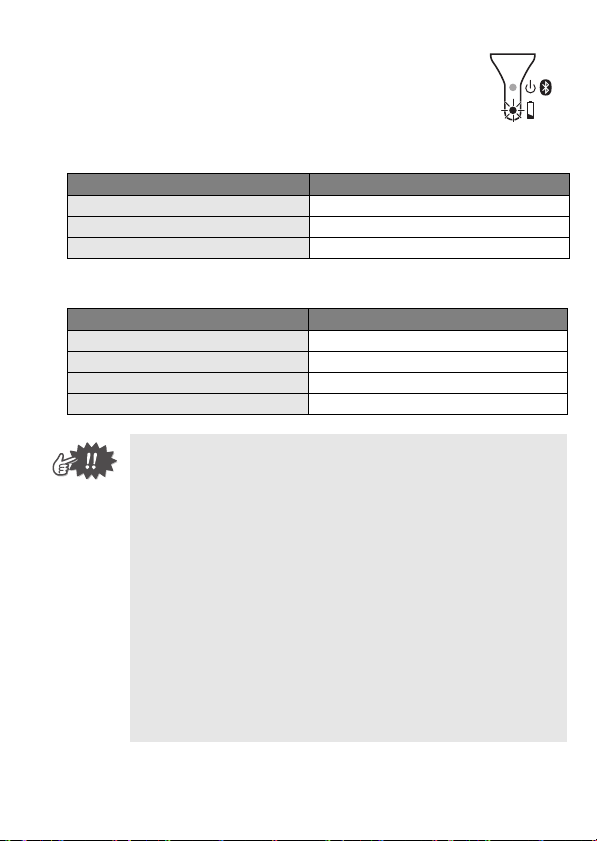
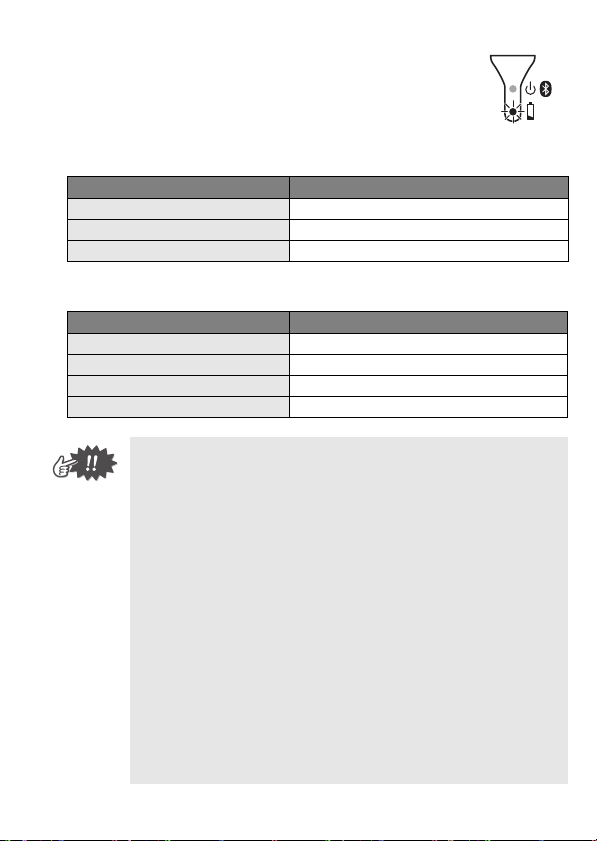
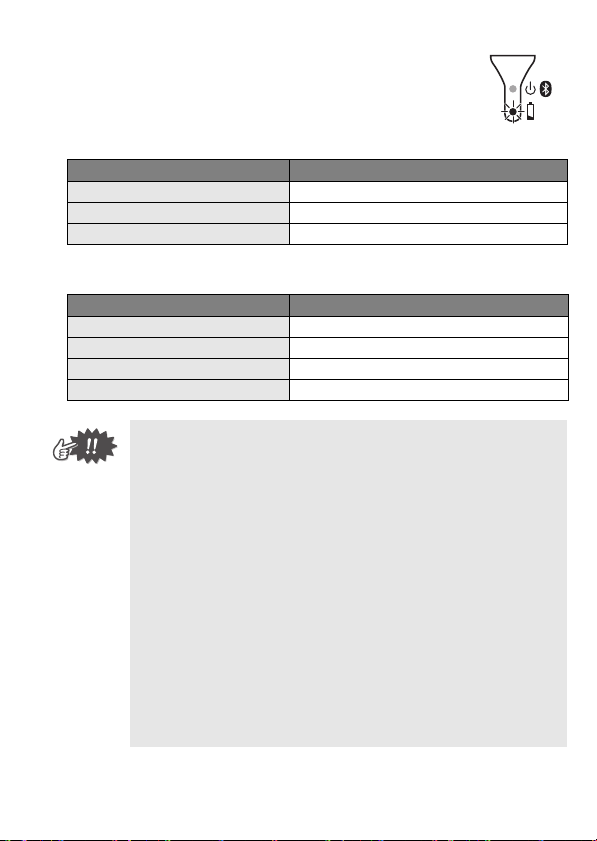
Charging LED (Orange)
With the charging LED, the status of the power sup-
ply can be checked.
The charging LED has two functions.
(1) Checking the charging status
(when the AC adapter is connected)
LED status Printer status
Constantly lit Charging
Off Finished charging
Flashing Malfunctioning battery
(2) Checking the battery level
(while running off the lithium ion battery)
LED status Battery level
Off More than 60% charged
Flashes once Less than 60% charged
Flashes twice Less than 30% charged
Continues to flash 3 times Almost empty
• Please try to discharge the battery completely before recharg-
ing it, to increase battery lifetime.
• If the charging LED flashes while the printer is printing, imme-
diately connect the AC adapter and charge the battery. The
printer may stop printing.
• Due to the characteristics of batteries, even though the battery
is fully charged, using them in locations at low temperatures
greatly reduces the number of prints po
• In order to maintain the efficiency and life of the rechargeable
battery, remove the AC adapter from the printer when charging
is completed.
• In order to maintain the efficiency and life of the rechargeable
battery, do not place or use the printer in direct sunlight, near
heaters or other hot appliances, in any location exposed to
extremely high temperatures (e.g. on the dashboard or in the
back of your car).
ssible.
1-7
Page 9
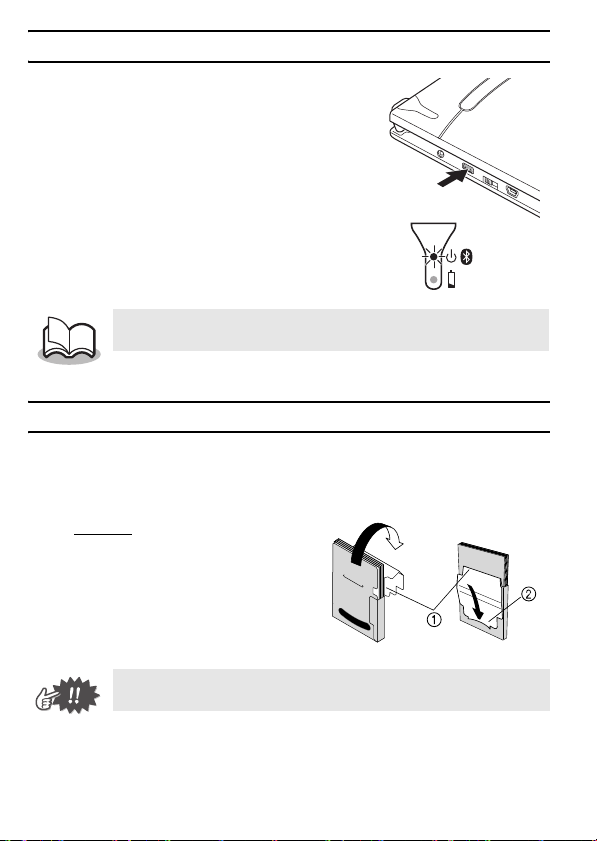
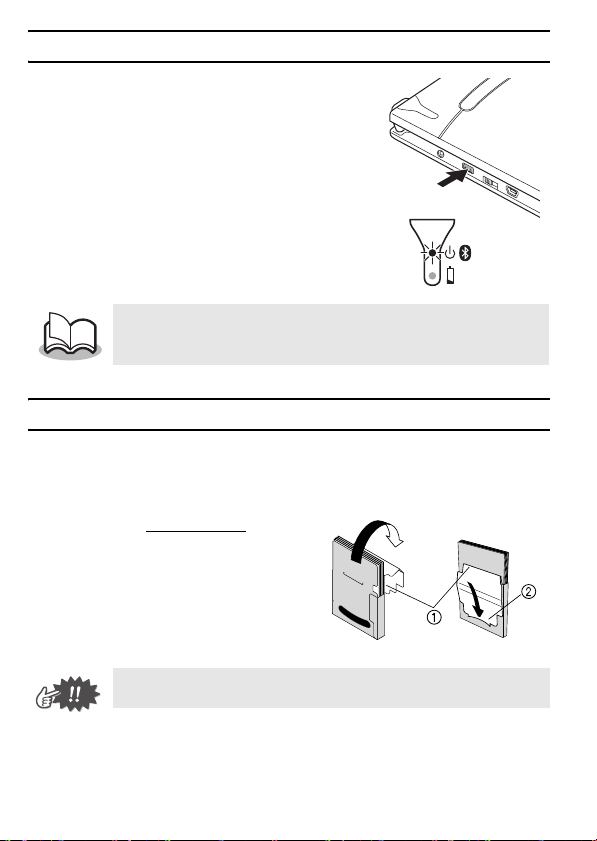
Turning on/off the printer
Press and hold the power button for
a short while, until the green or blue
status LED illuminates.
Power button
→ When the printer is turned on,
the status LED is:
Green (if Bluetooth is switched off)
Blue (if Bluetooth is switched on)
In order to prevent this printer from accidentally being turned on,
it will not come on if the power button is lightly pressed.
Preparing the paper cassette
Use only the paper cassette designed exclusively for this printer. Use
of any other paper will result in damage.
Prepare the paper cassette before installing it into the printer.
1
Firmly
fold the lid back
1
along the fold (
).
Front
Make sure that the lid is firmly folded, otherwise a paper misfeed
may result.
2
Insert the tab on the lid into the slit (2) at the back of
the cassette.
1-8
Back
Page 10
Installing the paper cassette
1
Slide the paper cassette cover
(on the top of the printer) in the
direction shown in 1.
→ The paper cassette cover will
open in the direction indicated
by 2.
2
Insert the paper cassette.
The paper type indication on the
paper cassette should face up. The
end of the paper should point toward
you.
3
Close the paper cassette cover
in the direction shown in 3.
4
Slide the paper cassette cover
in the direction shown in 4.
If the paper cassette is correctly
loaded, the paper type indication on
the cassette can be seen through the
paper check window, and the paper
cassette cover will be locked.
Paper type indication
Paper check window
Paper type indication
1-9
Page 11
If the paper is not fed correctly
Clean the pick-up roller.
1
Open the paper cassette cover.
2
Rotate the pick-up roller in the
Pick-up roller
feed direction until it stops.
3
Attach a piece of cellophane
Pick-up roller
tape to the rubber pick-up
roller.
Cellophane tape
4
Remove the cellophane tape, and turn the pick-up
roller 3 to 4 mm in the opposite direction of the feed
direction.
→ Any dirt on the pick-up roller is removed with the tape.
5
Repeat steps 3 and 4 until the pick-up roller is clean.
1-10
Page 12

Français
Déclaration de conformité
(Europe/Turquie uniquement)
Nous, BROTHER INDUSTRIES, LTD.
déclarons que ce produit est conforme aux principales exigences et autres
dispositions pertinentes des directives 1999/5/CE et 2005/32/CE.
L'adaptateur AD-210 est conforme aux principales exigences et autres
dispositions pertinentes de la directive 2006/95/CE.
La Déclaration de conformité s
à l'adresse http://solutions.brother.com -> choisissez une région (par ex.
Europe) -> sélectionnez votre pays -> choisissez votre modèle ->
cliquez sur « Manuels » -> cliquez sur Déclaration de conformité
(*Sélectionnez la langue le cas échéant).
15-1, Naeshiro-cho, Mizuho-ku,
Nagoya, 467-8561, Japon
e trouve sur notre site Web. Visitez notre site
2-1
Page 13

ATTENTION
RISQUE D'EXPLOSION SI LA PILE EST REMPLACÉE PAR UN
METTRE AU REBUT LES PILES SELON LES INSTRUCTIONS.
Marques de commerce
Le logo Brother est une marque déposée de Brother Industries, Ltd.
Brother est une marque déposée de Brother Industries, Ltd.
© 2009 Brother Industries, Ltd.
Microsoft, Windows, Windows Mobile et Windows Vista sont
des marques déposées de Microsoft Corporation aux
États-Unis et dans d'autres pays.
La marque et les logos Bluetooth sont la propriété de Bluetooth
SIG, Inc. et ces marqu
Brother Industries, Ltd.
To us les autres noms de logiciels et de produits mentionnés
sont des marques commerciales ou des marques déposées de
leurs sociétés respectives.
Pour obtenir les informations et les mises à jour les plus récentes
concernant les fonctionnalités de l'imprimante portable Brother,
visitez http://solutions.brother.com.
AUTRE TYPE DE PILE.
es sont utilisées sous licence par
2-2
Page 14
Organisation du manuel
Le Guide de l'utilisateur et le Guide utilisateur - Logiciel se
trouvent sur le CD-ROM fourni avec cette imprimante.
Lisez le Guide de l'utilisateur avant d'utiliser l'imprimante.
Nous vous conseillons de conserver les données du
manuel dans votre PC Windows pour pouvoir le consulter.
Guide de l'utilisateur
Le Manuel de l'utilisateur présente
les précautions d'utilisation de cette
imprimante, et les procédures
d'installation et de désinstallation des
logiciels sur un ordinateur Windows
ou sur un appareil Windows Mobile
Accessoires inclus
Imprimante portable
MW-145BT
Chargeur
(adaptateur secteur: AD-210EU)
Brother Industries, Ltd.
Batterie rechargeable
ion-lithium
(BT-100)
Brother Industries, Ltd.
Câble USB
CD-ROM
(Contient le logiciel, le Guide de
l'utilisateur et le Guide utilisateur -
Logiciel.)
Guide utilisateur - Logiciel
Le Manuel de l'utilisateur relatif aux
logiciels décrit comment utiliser le
logiciel sur un ordinateur Windows
ou sur un appareil Windows
®
®
.
®
Mobile
ainsi que les opérations
d'impression correspondantes.
Cassette de papier
contenant du papier
thermique C-11 (50 feuilles).
Guide de référence rapide
(Ce manuel)
®
2-3
Page 15
Mise en route
Installation de la batterie
N'utilisez pas cette imprimante avec une autre batterie
rechargeable que la batterie spécifiée (BT-100). Dans le cas
contraire, vous pourriez provoquer un incendie ou des
dommages.
y N'enlevez PAS le plastique noir qui recouvre la batterie.
y Le connecteur de la batterie ne doit pas être branché et
débranché fréquemment, sinon il pourrait être endommagé ou
le cordon de la batterie pourrait casser.
La batterie ne doit être retirée que pour la remplacer à l'issue
de sa durée de service ou lorsque l'imprimante n'est pas
utilisée pendant une longue période.
1
Appuyez à l'endroit indiqué
par le numéro 1 sur le
couvercle de la batterie 2 et
faites-le glisser pour le
détacher de l'imprimante
MW-145BT.
Danger
2-4
Page 16
2
Insérez le connecteur 1 de
la batterie 2 dans le sens
illustré à droite.
y Insérez le connecteur à fond sans effort excessif.
y Veillez à insérer le connecteur dans le bon sens, sinon il pour-
rait être endommagé.
3
Placez le cordon de la
batterie dans la rainure,
comme représenté sur
l'illustration.
4
Installez le couvercle de la
batterie en le faisant coulisser
sur le dos de l'imprimante
MW-145BT.
Noir
Rouge
Veillez à ne pas accrocher le cordon du connecteur de la
batterie.
2-5
Page 17
En charge
Utilisez l'adaptateur secteur conçu spécifiquement pour le
chargement de la batterie de l'imprimante.
Après avoir acheté l'imprimante, veillez à charger complètement la
batterie avant de l'utiliser.
1
Branchez le câble de
l'adaptateur secteur dans le
connecteur de l'adaptateur
secteur de l'imprimante.
2
Branchez la fiche de
l'adaptateur secteur dans
une prise électrique
ordinaire
(c.a. 220 V
La charge de la batterie
ion-lithium commence automatiquement.
→
→ Lorsque la charge est terminée, le témoin
- 240 V).
Le témoin de charge orange s'allume.
s'éteint.
y
La charge complète d'une batterie complètement déchargée
prend environ trois heures (l'imprimante étant éteinte).
y
Rechargez la batterie dans un environnement où la température
est comprise entre 5 °C et 40 °C (la batterie ne se rechargera
pas si la température est située à l'extérieur de cette plage).
La fiche peut varier
suivant le pays.
3
Une fois la charge terminée, débranchez l'adaptateur
secteur.
L'imprimante MW-145BT ne peut pas être utilisée uniquement
avec l'adaptateur secteur. La batterie rechargeable doit être
installée.
2-6
Page 18
Témoin de charge (orange)
Vous pouvez vérifier l'état de l'alimentation à l'aide du
témoin de charge.
Le témoin de charge a deux fonctions.
(1)
Vérification de l'état de charge
(quand l'adaptateur secteur est branché)
Etat du témoin Etat de l'imprimante
To ujours allumé En charge
Eteint Charge terminée
Clignotant Dysfonctionnement de la batterie
(2) Vérification du niveau de la batterie
(quand l'appareil fonctionne sur la batterie ion-lithium)
Etat du témoin Niveau de la batterie
Eteint Chargée à plus de 60 %
Clignote une fois Chargée à moins de 60 %
Clignote deux fois Chargée à moins de 30 %
Continue à clignoter 3 fois Presque épuisée
• Pour augmenter la durée de vie de la batterie, essayez de la
décharger entièrement avant de la recharger.
• Si le témoin de charge clignote pendant que l'imprimante
travaille, branchez immédiatement l'adaptateur secteur et
chargez la batterie. L'imprimante peut cesser le travail
d'impression en cours.
• Du fait des caractéristi
dernières sont entièrement chargées, leur utilisation dans des
environnements soumis à de basses températures peut
réduire considérablement le nombre d'impressions réalisables.
• Afin de préserver la capacité et la durée de vie de la batterie
rechargeable, veillez à débra
l'imprimante lorsque la charge est terminée.
• Afin de préserver la capacité et la durée de vie de la batterie
rechargeable, veillez à ne pas placer ou utiliser l'imprimante
au soleil, à proximité de radiateurs ou d'appareils dégageant
de la chaleur et dans des endroits exposés
tures extrêmement élevées (par exemple sur le tableau de
bord ou la plage arrière d'une voiture).
ques des batteries, même si ces
ncher l'adaptateur secteur de
à des tempéra-
2-7
Page 19
Mise sous tension/hors tension de l'imprimante
Appuyez sur le bouton d'alimentation
et maintenez-le brièvement enfoncé
jusqu'à ce que le témoin d'état vert
ou bleu s'allume.
Bouton
d'alimentation
→ A la mise sous tension de
l'imprimante, le témoin d'état est :
vert (si Bluetooth est désactivé)
bleu (si Bluetooth est activé)
Pour éviter que l'imprimante ne s'allume accidentellement, elle
est configurée pour ne pas s'allumer si le bouton d'alimentation
est pressé légèrement.
Préparation de la cassette de papier
N'utilisez que la cassette de papier conçue exclusivement pour cette imprimante.
L'utilisation de tout autre type de papier peut provoquer des pannes.
Préparez la cassette de papier avant de l'installer dans l'imprimante.
1
Repliez
couvercle le long de la
marque (
fermement
1
).
le
Face
Veillez à bien replier le couvercle afin d'éviter tout problème
d'entraînement du papier.
2
Insérez l'onglet du couvercle dans l'encoche (2) à
l'arrière de la cassette.
2-8
Dos
Page 20
Installation de la cassette de papier
r
r
1
Faites glisser le couvercle de la
cassette de papier (en haut de
l'imprimante) dans le sens
illustré en 1.
→ Le couvercle de la cassette de
papier s'ouvre dans le sens
indiqué en 2.
2
Insérez la cassette de papier.
L'indication du type de papier sur la
cassette doit être tournée vers le
haut. L'extrémité du papier doit être
dirigée vers vous.
3
Fermez le couvercle de la
cassette de papier dans le sens
illustré en 3.
4
Faites glisser le couvercle de la
cassette de papier dans le sens
illustré en 4.
Si la cassette de papier est
correctement chargée, l'indication du
type de papier est visible à travers la
fenêtre de contrôle du papier. En
outre, le couvercle de la cassette de
papier est verrouillé.
Indication du type de papier
Fenêtre de contrôle du papie
Indication du type de papie
2-9
Page 21
Si le papier n'est pas entraîné correctement
Nettoyez le rouleau d'entraînement.
1
Ouvrez le couvercle de la cassette de papier.
2
Faites tourner le rouleau dans
Rouleau d'entraînement
le sens de l'entraînement
jusqu'à ce qu'il s'arrête.
3
Fixez un morceau de ruban
Rouleau d'entraînement
adhésif sur le rouleau
d'entraînement en caoutchouc.
Ruban
adhésif
4
Retirez le ruban adhésif et faites tourner le rouleau
d'entraînement de 3 à 4 mm dans le sens opposé au
sens d'entraînement.
→ To ute saleté sur le rouleau d'entraînement est retirée avec le
ruban.
5
Répétez les étapes 3 et 4 jusqu'à ce que le rouleau
d'entraînement soit propre.
2-10
Page 22

Deutsch
Konformitätserklärung
(Nur Europa/Türkei)
Wir, BROTHER INDUSTRIES, LTD.
erklären, dass sich dieses Produkt in Übereinstimmung mit den
grundlegenden Anforderungen und anderen relevanten Bestimmungen der
Richtlinien 1999/5/EG und 2005/32/EG befindet.
Der Netzadapter AD-210 befindet sich in Übereinstimmung mit den
grundlegenden Anforderungen und anderen relevanten Bestimmungen der
Richtlinie 2006/95/EG.
Die Konformitätserklärung befindet sich au
bitte zu http://solutions.brother.com -> wählen Sie Ihre Region
(z. B. Europe) -> wählen Sie Ihr Land -> wählen Sie Ihr Modell ->
wählen Sie „Handbücher“ -> wählen Sie Konformitätserklärung
(*Wählen Sie Ihre Sprache, falls erforderlich).
15-1, Naeshiro-cho, Mizuho-ku,
Nagoya, 467-8561, Japan
f unserer Website. Gehen Sie
3-1
Page 23

VORSICHT
EXPLOSIONSGEFAHR BEI EINSETZEN EINER
ALTE BATTERIEN MÜSSEN ENTSPRECHEND DEN
Warenzeichen
Das Brother-Logo ist ein eingetragenes Warenzeichen von
Brother Industries, Ltd.
Brother ist ein eingetragenes Warenzeichen von
Brother Industries, Ltd.
© 2009 Brother Industries, Ltd.
Microsoft, Windows, Windows Mobile und Windows Vista sind
eingetragene Warenzeichen der Microsoft Corporation in den
USA und anderen Ländern.
Die Wortmarke Bluetooth und die zugehörigen Logos sind
Eigentum von Bluetooth SIG, Inc. und jegliche Verwendung
dieser Markieru
Rahmen der Lizenz.
Etwaige bestehende Warenzeichen oder sonstige gewerbliche
Schutzrechte an hier zitierten Software- oder
Produktbezeichnungen erkennen wir an.
Neueste Informationen und Updates zu den Funktionen des Brother
Mobile Printers finden Sie unter http://solutions.brother.com
UNGEEIGNETEN BATTERIE.
ANWEISUNGEN ENTSORGT WERDEN.
ngen durch Brother Industries, Ltd. geschieht im
.
3-2
Page 24
Dokumentationen
Auf der mitgelieferten CD-ROM befindet sich ein
Benutzerhandbuch und ein Software-Handbuch für diesen
Drucker.
Lesen Sie das Benutzerhandbuch vor Verwendung des Druckers.
Wir empfehlen, es zum späteren Nachschlagen auf dem
Windows PC zu speichern.
Benutzerhandbuch
In diesem Handbuch finden Sie
Sicherheitshinweise, eine allgemeine
Beschreibung und wichtige Informationen zur
Bedienung des Gerätes sowie die Pr ozeduren
zur Installation und Deinstallation der
Software auf einem Windows®-PC oder
einem Windows Mobile
®
-Gerät.
Lieferumfang
MW-145BT Mobile Printer
Netzadapter
(Ladegerät: AD-210EU)
Brother Industries, Ltd.
Lithium-Ionen-Akku
(BT-100)
Brother Industries, Ltd.
Software-Handbuch
In diesem Software-Handbuch
wird die Bedienung der Software
für einen Windows
Windows Mobile
jeweiligen Druckverfahren
beschrieben.
USB-Datenkabel
CD-ROM
(enthält Software, das
Benutzerhandbuch und das Software-
Handbuch)
®
-PC oder ein
®
-Gerät und die
Papierkassette
mit Thermopapier
(C-11, 50 Blatt)
Kurzanleitung
(diese Anleitung)
3-3
Page 25
Vor der Verwendung
Akku einlegen
Der Mobile Printer darf nur mit dem spezifizierten Akku BT-100
betrieben werden. Andernfalls kann es zu Brandentwicklung
oder einer Beschädigung des Gerätes kommen.
y Entfernen Sie keinesfalls die schwarze Kunststoffbeschichtung
des Akkus.
y Der Anschlussstecker des Akkus sollte nicht ständig
herausgezogen und wieder eingesteckt werden, er kann
dadurch beschädigt werden oder das Akkukabel kann
brechen.
Der Akku sollte nur beim Austauschen am Ende seiner
Lebensdauer entfernt werden, oder wenn der Drucker für
einen längeren Zeitraum nicht verwendet wird.
1
Zum Entfernen der
Akkuabdeckung 2 drücken
Sie auf den markierten
Bereich 1 und schieben Sie
sie in Pfeilrichtung.
Gefahr
3-4
Page 26
2
Schließen Sie den
Anschlussstecker 1 des
Akkus 2 an wie rechts
dargestellt.
y Stecken Sie den Anschlussstecker, ohne übermäßige Kraft
anzuwenden, vollständig hinein.
y Stellen Sie sicher, dass Sie den Anschlussstecker richtig
herum einführen, da er sonst beschädigt werden kann.
3
Legen Sie den Akku ein wie
angezeigt.
4
Schieben Sie die
Akkuabdeckung wieder
auf die Rückseite des
MW-145BT.
Schwarz
Rot
Achten Sie darauf, dass Sie nicht das Anschlusskabel des Akkus
einklemmen.
3-5
Page 27
Akku aufladen
Benutzen Sie ausschließlich den mitgelieferten, speziell für diesen
Drucker entwickelten Netzadapter, um den Akku aufzuladen.
Nach dem Kauf müssen Sie den Akku voll aufladen, bevor Sie den
Drucker benutzen können.
1
Stecken Sie das
Netzadapterkabel in den
entsprechenden Anschluss
am Drucker.
2
Stecken Sie den Netzstecker
des Adapters in eine
Netzsteckdose
(220 V
Der Ladevorgang des Lithium-
Ionen-Akkus beginnt automatisch.
- 240 V).
Der Stecker kann je nach
Land unterschiedlich sein.
→
Die orangefarbene LED-Ladeanzeige leuchtet.
→ Die LED-Ladeanzeige erlischt, wenn der
Ladevorgang abgeschlossen ist.
y Es dauert ca. drei Stunden, um den vollkommen entleerten
Akku wieder voll aufzuladen (bei ausgeschaltetem Drucker).
y Laden Sie den Akku in einer Umgebung mit einer Temperatur
zwischen 5 °C und 40 °C auf. (Der Akku lässt sich nicht
aufladen, wenn die Umgebungstemperatur außerhalb dieses
Bereichs liegt.)
3
Ziehen Sie den Netzadapter vom Drucker ab, wenn
der Ladevorgang beendet ist.
Der MW-145BT lässt sich nicht ausschließlich mit dem Netza-
dapter betreiben. Der Akku muss eingebaut sein.
3-6
Page 28
LED-Ladeanzeige (Orange)
Sie können anhand der LED-Ladeanzeige den
Status der Stromversorgung überprüfen.
LED-Ladeanzeige hat zwei Funktionen:
(1) Ladestatus überprüfen (mit angeschlossenem Netzadapter)
Status der LED-Anzeige Gerätestatus
Leuchtet Akku aufladen
Aus Laden beendet
Blinkt Akku-Fehlfunktion
(2) Ladestatus überprüfen
(während des Betriebes mit dem Lithium-Ionen-Akku)
Status der LED-Anzeige Akkustatus
Aus Mehr als 60 % aufgeladen
Blinkt einmal Weniger als 60 % aufgeladen
Blinkt zweimal weniger als 30% aufgeladen
Blinkt kontinuierlich dreimalBeinahe leer
• Um die Akku-Nutzungsdauer zu erhöhen, versuchen Sie, den
Akku vor dem Aufladen vollständig zu entladen.
• Wenn die LED-Ladeanzeige während des Druckens blinkt,
schließen Sie sofort den Netzadapter an und laden Sie den
Akku auf. Der Druckprozess wird möglicherweise gestoppt.
• Aufgrund der Eigenschaften des Akkus ist die Anzahl der
möglichen Ausdrucke an Orten mit
auch bei voll aufgeladenem Akku stark vermindert.
• Ziehen Sie den Netzadapter nach dem Ladevorgang vom
Drucker ab, um die Effizienz und Lebensdauer des Akkus zu
erhalten.
• Stellen Sie den Drucker nicht an Orten mit direkter
Sonneneinstrahlung auf, in der Nähe von Heizgeräten oder
anderen heißen Geräten sowie in Umgebungen mit extrem
hoher Temperatur (z. B. auf dem Armaturenbrett oder auf dem
Autorücks
Effizienz und Lebensdauer des Akkus zu erhalten.
itz) und verwenden Sie ihn dort auch nicht, um die
sehr niedriger Temperatur
3-7
Page 29

Mobile Printer ein-/ausschalten
Halten Sie den Ein/Aus-Knopf kurz
gedrückt, bis die LED-Statusanzeige
grün oder blau leuchtet.
Ein/Aus-Knopf
→ Wird der Drucker eingeschaltet,
leuchtet die LED-Statusanzeige:
Grün (wenn Bluetooth
ausgeschaltet ist)
Blau (wenn Bluetooth
eingeschaltet ist)
Um ein versehentliches Einschalten des Druckers zu vermeiden,
wird er nicht durch kurzes Drücken der Ein/Aus-Taste eingeschaltet.
Papierkassette vorbereiten
Benutzen Sie nur die speziell für diesen Mobile Printer hergestellten Papierkassetten.
Die Verwendung von anderem Papier kann das Gerät beschädigen.
Sie müssen die Papierkassette vorbereiten, bevor Sie sie in den Drucker einlegen.
1
Falten Sie den Deckel
entlang der Markierung
(
1) fest
um.
Vor ne
Stellen Sie sicher, dass der Deckel richtig gefaltet ist. Es kann
sonst ein Papierstau auftreten.
2
Schieben Sie das Ende des Deckels in den Schlitz
(2) auf der Rückseite der Kassette.
3-8
Hinten
Page 30

Papierkassette einlegen
1
Schieben Sie die
Papierkassettenabdeckung auf
der Oberseite des Druckers in die
durch den Pfeil
Richtung.
→ Klappen Sie dann die
Papierkassettenabdeckung wie
durch den Pfeil 2 angezeigt auf.
1
angezeigte
2
Legen Sie die Papierkassette
ein.
Der Papiertyp-Aufdruck muss nach
oben zeigen. Die Unterkante der
Blätter sollte zu Ihnen zeigen.
3
Schließen Sie die
Papierkassettenabdeckung in
Pfeilrichtung 3.
4
Schieben Sie die
Papierkassettenabdeckung in
Pfeilrichtung 4.
Wenn die Papierkassette richtig
eingelegt ist, rastet die Abdeckung
richtig ein und der Papiertyp kann
durch das Sichtfens ter in der
Abdeckung abgelesen werden.
Papiertyp
Sichtfenster
Papiertyp
3-9
Page 31

Wenn das Papier nicht richtig eingezogen wird
Reinigen Sie die Aufnahmerolle.
1
Öffnen Sie die Papierkassettenabdeckung.
2
Drehen Sie die
Aufnahmerolle
Aufnahmerolle bis zum
Anschlag in Einzugsrichtung.
3
Befestigen Sie ein Stück
Aufnahmerolle
Klebeband an der GummiAufnahmerolle.
Klebeband
4
Ziehen Sie das Klebeband wieder ab und drehen Sie
die Aufnahmerolle 3 bis 4 mm entgegen der
Einzugsrichtung.
→ Der Schmutz auf der Aufnahmerolle wird mit dem Klebeband
entfernt.
5
Wiederholen Sie die Schritte 3 und 4 bis die
Aufnahmerolle sauber ist.
3-10
Page 32

Italiano
Dichiarazione di conformità
(Solo Europa/Turchia)
Noi, BROTHER INDUSTRIES, LTD.
dichiariamo che questo prodotto è conforme ai requisiti essenziali e ad
altre disposizioni rilevanti delle Direttive 1999/5/CE e 2005/32/CE.
L'adattatore AD-210 è conforme ai requisiti essenziali e ad altre
disposizioni rilevanti della Direttiva 2006/95/CE.
La Dichiarazione di Conformità è disponibile nel nostro sito Web. Accedere
a http://
scegliere un Paese -> scegliere il modello -> scegliere "Manuali" ->
scegliere Dichiarazione di conformità (*Selezionare la lingua, se richiesto).
15-1, Naeshiro-cho, Mizuho-ku,
Nagoya, 467-8561, Giappone,
solutions.brother.com -> scegliere una regione (ad es. Europe) ->
4-1
Page 33

ATTENZIONE
RISCHIO DI ESPLOSIONE SE SI SOSTITUISCE LA
BATTERIA CON UNA DI TIPO NON CORRETTO.
ELIMINARE LE BATTERIE SCARICHE IN
OTTEMPERANZA ALLE ISTRUZIONI FORNITE.
Marchi
Il logo Brother è un marchio registrato di Brother Industries, Ltd.
Brother è un marchio registrato di Brother Industries, Ltd.
© 2009 Brother Industries, Ltd.
Microsoft, Windows, Windows Mobile e Windows Vista sono
marchi di fabbrica registrati di Microsoft Corporation negli Stati
Uniti d'America e in altri Paesi.
Il nome e il logo di Bluetooth appartengono a Bluetooth SIG,
Inc. e l'uso di tali nome e logo è concesso a
Brother Indus
Tutti gli altri nomi di software o di prodotto di seguito menzionati
sono marchi di fabbrica o marchi di fabbrica registrati delle
rispettive società.
Per le informazioni più recenti e gli aggiornamenti sulla stampante
portatile Brother, visitare il sito http://solutions.brother.com
tries, Ltd. in licenza.
.
4-2
Page 34

Struttura del manuale
Una Guida dell'utente e una Guida software dell'utente vengono
fornite sul CD-ROM in dotazione con questa stampante.
Leggere la Guida dell'utente prima di usare la stampante. Consigliamo
di salvare il manuale sul PC per un consulto futuro.
Guida dell'utente
La Guida dell'utente indica le precauzioni
a cui attenersi per utilizzare la stampante,
i dettagli relativi alla preparazione della
stampante e le procedure per
l'installazione e la disinstallazione del
software su un PC Windows
dispositivo Windows Mobile
®
o su un
®
.
Accessori in dotazione
Stampante portatile MW-145BT
Caricabatterie
(adattatore CA: AD-210EU)
Brother Industries, Ltd.
Batteria ricaricabile agli
ioni di litio
(BT-100)
Brother Industries, Ltd.
Cavo USB
CD-ROM
(contenente il software, la Guida
dell'utente e la Guida software
dell'utente)
Guida software dell'utente
Nella Guida software dell'utente
sono descritte le procedure per
l'utilizzo del software su un PC
®
Windows
Windows Mobile
procedure di stampa.
o su un dispositivo
®
e le relative
Cassetto carta
riempito con carta
termica C-11 (50 fogli).
Guida di riferimento rapido
(questa guida)
4-3
Page 35

Operazioni preliminari
Installazione della batteria
Pericolo
Non utilizzare questa stampante con una batteria ricaricabile
diversa da quella specificata (BT-100); in caso contrario, ciò può
provocare incendi o danni di altra natura.
y NON staccare la copertura di plastica nera della batteria.
y Evitare di collegare e scollegare il connettore della batteria
troppo spesso, altrimenti potrebbe danneggiarsi o il cavo della
batteria potrebbe rompersi.
La batteria dovrebbe essere rimossa solo alla fine della sua
vita utile, quando è necessario sostituirla, o quando la
stampante non viene utilizzata per un lungo periodo di tempo.
1
Premere l'area
contrassegnata con 1 sul
coperchio della batteria 2 e
farlo scorrere fuori dalla
MW-145BT.
4-4
Page 36

2
Inserire il connettore 1 della
batteria 2 nella direzione
mostrata a destra.
y Inserire completamente il connettore senza esercitare una
forza eccessiva.
y Assicurarsi di inserire il connettore nella direzione corretta, alt-
rimenti potrebbe danneggiarsi.
3
Inserire il cavo della batteria
nella scanalatura come
indicato in figura.
4
Installare il coperchio della
batteria facendolo scorrere
sul retro della MW-145BT.
Nero
Rosso
Prestare attenzione a non impigliare il cavo del connettore della
batteria.
4-5
Page 37

Caricamento
Per caricare la batteria, utilizzare l'adattatore CA appositamente
progettato per questa stampa nte.
Dopo aver acquistato la stampante, assicurarsi di caricare
completamente la batteria prima di utilizzarla.
1
Collegare il cavo
dell'adattatore CA al
connettore dell'adattatore CA
sulla stampante.
2
Inserire la spina dell'adattatore
CA in una presa elettrica di
tipo tradizionale (CA 220 V
240 V).
La batteria agli ioni di litio
comincerà a caricarsi
automaticamente.
Il LED di caricamento arancione si accende.
→
→ Una volta caricata la batteria, il LED di
caricamento si spegne.
y
Quando la batteria è completamente scarica, sono necessarie
circa tre ore per una ricarica completa (a stampante spenta).
y
Ricaricare la batteria in un ambiente con temperatura
compresa tra 5°C e 40°C. (Se la temperatura ambiente non
rientra in questo intervallo la batteria non viene ricaricata.)
-
La spina potrebbe
essere diversa in base
al paese.
3
Dopo aver caricato la batteria, scollegare l'adattatore
CA dalla presa.
La stampante MW-145BT non funziona soltanto con l'adattatore
CA. È necessario installare la batteria ricaricabile.
4-6
Page 38

LED di caricamento (arancione)
Il LED di caricamento consente di controllare lo stato
dell'alimentazione elettrica.
Il LED di caricamento ha due funzioni.
(1) Verific a dello stato di caricamento
(quando è collegato l'adattatore CA)
Stato del LED Stato della stampante
Sempre accesoCaricamento
Spento Caricamento terminato
Lampeggiante Malfunzionamento della batteria
(2) Verifica del livello della batteria
(con alimentazione a batteria agli ioni di litio)
Stato del LED Livello della batteria
Spento Carica superiore al 60%
Lampeggia una volta Carica inferiore al 60%
Lampeggia due volte Carica inferiore al 30%
Continua a lampeggiare per
3 volte
• Provare a scaricare completamente la batteria prima di
ricaricarla per aumentare la vita utile della batteria.
• Se il LED di caricamento lampeggia mentre la stampa è in
corso, collegare immediatamente l'adattatore CA e caricare la
batteria. È possibile che la stampa
• Date le caratteristiche delle batterie, nonostante la batteria sia
completamente carica, il loro utilizzo in ambienti a temperature
basse riduce sensibilmente il numero di stampe possibili.
• Per mantenere l'efficienza e la vita utile della batteria
ricaricabile, rimuovere l'adattatore CA da
avere caricato la batteria.
• Per mantenere l'efficienza e la vita utile della batteria
ricaricabile, non collocare o utilizzare la stampante in
prossimità di luce solare diretta, caloriferi o altri apparecchi
caldi, in luoghi esposti a temperature estremamente elevate
(come ad e
dell'automobile).
sempio sul cruscotto o sul lunotto posteriore
Quasi scarica
si interrompa.
lla stampante dopo
4-7
Page 39

Accensione/spegnimento della stampante
Tenere premuto brevemente il
pulsante di accensione fino a
quando il LED di stato verde o
blu si accende.
Pulsante di
→
Quando la stampante viene accesa,
il LED di stato è:
verde (con Bluetooth disattivato)
blu (con Bluetooth attivato)
Il pulsante di accensione è tarato in modo tale che una leggera pressione
dello stesso non è sufficiente ad accendere la stampante. In questo modo
si evita un'eventuale accensione indesiderata dell'apparecchio.
accensione
Preparazione del cassetto carta
Utilizzare esclusivamente il cassetto carta appositamente progettato per questa
stampante. L'utilizzo di qualsiasi altro tipo di carta danneggerà l'apparecchio.
Preparare il cassetto carta prima di installarlo nella stampante.
1
Ripiegare in
coperchio lungo la piega
1
).
(
modo deciso
il
Vista anteriore
Accertarsi che il coperchio sia saldamente ripiegato onde evitare
problemi di alimentazione carta.
2
Inserire la linguetta del coperchio nella fessura (2)
posta sul retro del cassetto.
4-8
Vista posteriore
Page 40

Installazione del cassetto carta
1
Far scorrere il coperchio del
cassetto carta (sulla parte
superiore della stampante) nella
direzione indicata da 1.
→ Il coperchio del cassetto carta si
aprirà nella direzione indicata da
2.
2
Inserire il cassetto carta.
L'indicatore del tipo di carta deve
essere orientato verso l'alto.
L'estremità finale della carta deve
essere orientata verso l'utente.
3
Chiudere il coperchio del
cassetto carta nella direzione
indicata da 3.
4
Far scorrere il coperchio del
cassetto carta nella direzione
indicata da 4.
Se il cassetto carta è caricato
correttamente, l'indicatore del tipo di
carta sul cassetto sarà visibile
attraverso la finestrella per il controllo
della carta e il coperchio del cassetto
carta sarà chiuso.
Indicatore del tipo di carta
Finestrella di controllo carta
Indicatore del tipo di carta
4-9
Page 41

Se la carta non viene alimentata correttamente
Pulire il rullo di trascinamento.
1
Aprire il coperchio del cassetto carta.
2
Ruotare il rullo di
Rullo di trascinamento
trascinamento nella dire
zione di alimentazione fino
all'arresto.
3
Applicare una striscia di cello-
Rullo di trascinamento
fan alla parte in gomma del
rullo di trascinamento.
Striscia di
cellofan
4
Rimuovere la striscia di cellofan e ruotare il rullo di
trascinamento di 3 o 4 mm nella direzione opposta
alla direzione di alimentazione.
→ La sporcizia presente sul rullo di trascinamento viene
rimossa con la striscia di cellofan.
5
Ripetere i passaggi 3 e 4 finché il rullo di
trascinamento non risulta pulito.
4-10
Page 42

Español
Declaración de conformidad
(Solamente Europa/Turquía)
Nosotros, BROTHER INDUSTRIES, LTD.
declaramos que este producto cumple con los requisitos principales y otras
disposiciones relevantes de las Directivas 1999/5/CE y 2005/32/CE.
El adaptador AD-210 cumple con los requisitos principales y otras
disposiciones relevante
La Declaración de conformidad se encuentra en nuestro sitio web. Vaya a
http://solutions.brother.com -> seleccione la región (por ej., Europe) ->
seleccione el país -> seleccione el modelo -> seleccione "Manuales" ->
seleccione Declaración de conformidad (*Seleccione el idioma cuando así
se solicite).
15-1, Naeshiro-cho, Mizuho-ku,
Nagoya, 467-8561, Japón,
s de la Directiva 2006/95/CE.
5-1
Page 43

ATENCIÓN
RIESGO DE EXPLOSIÓN SI LA BATERÍA SE REEMPLAZA
DESHÁGASE DE LAS BATERÍAS USADAS DE ACUERDO
Marcas comerciales
El logotipo de Brother es una marca comercial registrada de
Brother Industries, Ltd.
Brother es una marca comercial registrada de
Brother Industries, Ltd.
© 2009 Brother Industries, Ltd.
Microsoft, Windows, Windows Mobile, y Windows Vista son
marcas comerciales registradas de Microsoft Corporation en
los Estados Unidos de América y en otros países.
La marca de palabra y los logotipos Bluetooth son propiedad de
Bluetooth SIG, Inc. y cualquier utilización de tales
parte de Brother Industries, Ltd. se realiza bajo licencia.
To do s los demás nombres de software y productos
mencionados son marcas comerciales o marcas comerciales
registradas de sus respectivas compañías.
POR OTRA DE TIPO INCORRECTO.
CON LAS INSTRUCCIONES.
marcas por
Para obtener la información y las actualizaciones
de la función de impresora móvil de Brother, visite
http://solutions.brother.com.
5-2
más recientes
Page 44

Estructura del manual
El CD-ROM suministrado con esta impresora incluye una
Guía del usuario y una Guía del usuario de software.
Lea la Guía del usuario antes de poner en funcionamiento
la impresora. Le recomendamos guardar una copia de los
datos del manual en su Windows PC para
su referencia.
Guía del usuario
La Guía del usuario presenta
precauciones para el uso de la impresora,
detalles pertinentes para la preparación
de la impresora y los procedimientos de
instalación y desinstalación del software
en un equipo con Windows® o en un
dispositivo con Windows Mobile
®
.
Accesorios adjuntos
Impresora móvil MW-145BT
Cargador
(Adaptador de CA: AD-210EU)
Brother Industries, Ltd.
Batería de ión-litio
recargable
(BT-100)
Brother Industries, Ltd.
Cable USB
CD-ROM
(contiene el software, la Guía del
usuario y la Guía del usuario de
software)
Guía del usuario de software
La Guía del usuario de software
describe cómo utilizar el software
en un equipo con Windows
un dispositivo con Windows
®
, así como los
Mobile
procedimientos de impresión.
Paquete de papel
contiene papel térmico
C-11 (50 hojas).
Guía de referencia rápida
(Esta guía)
®
o en
5-3
Page 45

Procedimientos iniciales
Instalación de la batería
Peligro
No utilice esta impresora con otra batería recargable que no
sea la especificada (BT-100), de lo contrario, puede producirse
un incendio u otros daños.
y NO retire el plástico negro que cubre la batería.
y No se debe desconectar y conectar este conector de la
batería con demasiada frecuencia. De lo contrario, el conector
puede resultar dañado o el cable se puede romper.
La batería solo debería retirarse cuando sea necesario
sustituirla una vez que haya finalizado su vida útil, o bien,
cuando no se vaya a utilizar la impresora durante un periodo
de tiempo prolongado.
1
Presione el área indicada 1
en la cubierta de la batería 2
y deslícela fuera de la unidad
MW-145BT.
5-4
Page 46

2
Inserte el conector 1 de la
batería 2 en la dirección que
se muestra en la imagen de
la derecha.
y
Inserte completamente el conector, sin ejercer demasiada fuerza.
y
Asegúrese de que el conector se inserta con la orientación correcta;
de no ser así, puede resultar dañado.
3
Coloque el cable de la batería
en la ranura como se muestra
en la figura.
4
Instale la cubierta de la
batería deslizándola hacia la
parte trasera de la unidad
MW-145BT.
Negro
Rojo
Tenga cuidado de que el cable del conector de la batería no
quede atrapado.
5-5
Page 47

En carga
Utilice el adaptador de CA diseñado específicamente para esta
impresora para cargar la batería.
Tr as adquirir esta impresora y antes de usarla, cargue
completamente la batería.
1
Inserte el cable del adaptador
de CA en el conector
correspondiente de la
impresora.
2
Inserte el enchufe del
adaptador de CA en la toma
de corriente de la pared
(CA 220 V
La carga de la batería de ión-litio
comienza automáticamente.
→
→ Cuando se termina de cargar, el LED de
-
240 V).
Se enciende el LED de carga naranja.
carga se apaga.
y
La batería tarda unas tres horas en recargarse
completamente desde un estado de descarga total (con la
impresora apagada).
y
Recargue la batería en un entorno con una temperatura que
oscile entre los 5 °C y los 40 °C. (La batería no se recargará si
la temperatura ambiente no se encuentra dentro de este
intervalo).
El enchufe puede ser distinto
según el país.
3
Cuando se haya terminado de cargar, desenchufe el
adaptador de CA.
La unidad MW-145BT no puede utilizarse únicamente con el
adaptador de CA. Es necesario insertar la batería recargable.
5-6
Page 48

LED de carga (naranja)
El LED de carga permite comprobar el estado del
suministro eléctrico.
El LED de carga tiene dos funciones.
(1) Comprobación del estado de carga
(cuando el adaptador de CA está conectado)
Estado del LED Estado de la impresora
Encendido permanentemente En carga
Apagado Carga completada
Parpadeando Fallo en la batería
(2) Comprobación del nivel de la batería
(cuando la batería de ión-litio se está agotando)
Estado del LED Nivel de la batería
Apagado Nivel de carga superior al 60%
Parpadea una vez Nivel de carga inferior al 60%
Parpadea dos veces Nivel de carga inferior al 30%
Continúa parpadeando
3 veces
• Para aumentar la vida útil de la batería, pruebe a descargarla
completamente antes de volverla a cargar.
• Si el LED de carga parpadea mientras la impresora está
imprimiendo, conecte inmediatamente el adaptador de CA y
cargue la batería. La impresora pu
• Debido a las características de las baterías, incluso si la
batería está completamente cargada, el uso de las mismas en
lugares con bajas temperaturas reduce enormemente el
número de impresiones posibles.
• Para prolongar el rendimiento y la vida útil de la batería
recargable, extraiga el adaptador de CA de la impresora una
vez finalizada la carga.
• Para prolongar el rendimiento y la vida útil de la batería
recargable, no se debe exponer ni utilizar la impresora bajo la
luz del sol directa, cerca de calentadores u otros apa
emisores de calor, así como en lugares expuestos a
temperaturas excesivamente elevadas (p.ej. en el salpicadero
o en la parte trasera de un coche).
Casi vacía
ede dejar de imprimir.
ratos
5-7
Page 49

Encendido y apagado de la impresora
Pulse y mantenga pulsado el botón
de encendido durante unos
segundos hasta que el LED de
estado verde o azul se ilumine.
→
Cuando la impresora está encendida,
el LED de estado se enciende de color:
Verde (si Bluetooth está desactivado)
Azul (si Bluetooth está activado)
Con el fin de impedir el encendido accidental, la impresora no se
encenderá si el botón de encendido se pulsa levemente. Por
tanto, si la impresora no se enciende, mantenga pulsado el
botón de encendido durante unos segundos.
Botón de encendido
.
Preparación del paquete de papel
Utilice sólo el paquete de papel diseñado exclusivamente para esta impresora.
El uso de cualquier otro tipo de papel ocasionará daños a la unidad.
Prepare el paquete de papel antes de instalarlo en la impresora.
1
Con firmeza
vuelva a
colocar la tapa a lo largo del
pliegue (
2
Inserte la pestaña de la tapa dentro de la ranura (2)
1
).
Parte
delantera
Asegúrese de que la tapa esté correctamente cerrada o, de lo
contrario, puede producirse un fallo en la alimentación del papel.
Parte
trasera
situada en la parte trasera del paquete.
5-8
Page 50

Instalación del paquete de papel
1
Deslice la cubierta del paquete
de papel (situada en la parte
superior de la impresora) en la
dirección que se muestra en 1.
→ La cubierta del paquete de papel
se abrirá en la dirección indicada
por 2.
2
Inserte el paquete de papel.
La indicación del tipo de papel que
aparece en el paq uete debe quedar
hacia arriba. El extremo del papel
debe apuntar hacia usted.
3
Cierre la cubierta del paquete
de papel en la dirección que se
muestra en 3.
4
Deslice la cubierta del paquete
de papel en la dirección que se
muestra en 4.
Si el paquete de papel se ha cargado
correctamente, se podrá ver la
indicación del tipo de papel situada
en el paquete a través de la ventana
de comprobación de papel y la
cubierta del paquete estará bloquea da.
Indicación del tipo de papel
Ven tana de comprobación
de papel
Indicación del tipo de papel
5-9
Page 51

Si se produce un error de alimentación de papel
Limpie el rodillo de captación.
1
Abra la cubierta del paquete de papel.
2
Gire el rodillo de captación en
Rodillo de captación
la orientación de alimentación
hasta que se detenga.
3
Fije un trozo de cinta
Rodillo de captación
adhesiva en el rodillo de
captación de goma.
Cinta
adhesiva
4
Quite la cinta adhesiva y gire el rodillo de captación
de 3 a 4 mm en la dirección contraria a la orientación
de alimentación.
→ La suciedad que pudiera haber en el rodillo de captación se
elimina al despegar la cinta.
5
Repita los pasos 3 y 4 hasta que el rodillo de
captación esté limpio.
5-10
Page 52

Nederlands
Conformiteitsverklaring
(Alleen Europa/Turkije)
BROTHER INDUSTRIES, LTD.
15-1, Naeshiro-cho, Mizuho-ku,
Nagoya, 467-8561, Japan
verklaart dat dit product voldoet aan de essentiële vereisten en andere
relevante bepalingen van richtlijn 1999/5/EG en 2005/32/EG.
De adapter AD-210 voldoet aan de essentiële vereisten en andere
relevante bepalingen van richtlijn 2006/95/EG.
De conformiteitsverklaring bevindt zich op onze website. Ga naar
http://solutions.brother.com -> kies regio (bijvoorbeeld Europe) ->
kies
land -> kies uw model -> kies "Handleidingen" ->
kies Conformiteitsverklaring (*Selecteer indien nodig een taal).
6-1
Page 53

Waarschuwing
EEN VERVANGENDE BATTERIJ VAN EEN ONJUIST TYPE
WERP OPGEBRUIKTE BATTERIJEN WEG VOLGENS DE
Handelsmerken
Het Brother-logo is een gedeponeerd handelsmerk van
Brother Industries, Ltd.
Brother is een gedeponeerd handelsmerk van
Brother Industries, Ltd.
© 2009 Brother Industries, Ltd.
Microsoft, Windows, Windows Mobile en Windows Vista zijn
gedeponeerde handelsmerken van Microsoft Corporation in de
Verenigde Staten en andere landen.
De term Bluetooth en bijbehorende beeldmerken zijn eigendom
van Bluetooth SIG, Inc. en worden door Brother Industries, Ltd.
toegepast onder licentie.
Alle andere vermelde software en productnamen zijn
handelsmerken of gedeponeerde handelsmerken van hun
respectieve bedrijven.
Ga naar http://solutions.brother.com voor de meest recente
informatie en updates voor de mobiele printerfunctie van Brother.
ZOU KUNNEN ONTPLOFFEN.
GELDENDE VOORSCHRIFTEN.
6-2
Page 54

Structuur van de handleiding
Bij deze printer wordt een cd-rom geleverd waarop een
Gebruikershandleiding en een Software-gebruikershandleiding staan.
Lees de gebruikershandleiding voordat u de printer in gebruik neemt.
Wij raden u aan de handleiding op de Windows PC op te slaan
zodat u deze steeds snel bij de hand hebt.
Gebruikershandleiding
In deze handleiding staan
voorzorgsmaatregelen voor het gebruik
van de printer, installatieaanwijzingen
en procedures voor het installeren en
verwijderen van de software op/van
een Windows
Windows Mobile
®
- computer of een
®
- apparaat.
Software-gebruikershandleiding
I
n deze software-
gebruikershandleiding worden de
procedures beschreven voor het
gebruiken van software voor een
Windows
Mobile
bijbehorende afdrukprocedures.
Bijgeleverde accessoires
Mobiele printer MW-145BT
Lader
(netvoedingsadapter: AD-210EU)
Brother Industries, Ltd.
Lithium-ion-accu
(BT-100)
Brother Industries, Ltd.
USB-kabel
Cd-rom
(bevat de software, de
Gebruikershandleiding en de Softwaregebruikershandleiding)
®
- computer of een W indows
®
- apparaat, inclusief
Papiercassette
gevuld met thermisch
papier C-11 (50 vellen).
Beknopte bedieningsgids
(deze gids)
6-3
Page 55

Aan de slag
De accu plaatsen
Gebruik deze printer niet met enige andere oplaadbare accu
dan het opgegeven type (BT-100), anders bestaat het risico van
brand of schade.
y Verwijder NIET het zwarte plastic dat de accu bedekt.
y De aansluitkabel van de accu mag niet te vaak losgemaakt en
weer aangesloten worden, anders kan deze beschadigd raken
of breken.
De accu moet alleen verwijderd worden als deze vervangen
wordt aan het einde van de levensduur of als de printer
langere tijd niet gebruikt gaat worden.
1
Druk op het aangegeven
gedeelte 1 op de klep
van het accuvak 2 en
schuif deze van de
MW-145BT af.
Gevaar
6-4
Page 56

2
Steek de stekker 1 van de
accu 2 in de richting die
rechts wordt aangegeven.
y Steek de stekker er volledig in zonder buitensporig veel kracht
te zetten.
y Steek de stekker er in de juiste richting in om beschadiging te
voorkomen.
3
Leg de aansluitkabel van de
accu in de uitsparing (zie
figuur).
4
Bevestig de klep van het
accuvak door deze op de
achterzijde van de
MW-145BT te schuiven.
Zwart
Rood
Zorg dat de aansluitkabel van de accu niet klem komt te zitten.
6-5
Page 57

Laden
Gebruik de speciaal voor deze printer ontworpen netvoedingsa dapter
voor het laden van de accu.
Laad, na aankoop van de printer, eerst de accu volledig op voordat u
deze gaat gebruiken.
1
Steek de netvoedingskabel in
de aansluiting van de
netvoedingsadapter op de
printer.
2
Steek de netstekker in het
stopcontact (220
wisselstroom).
De lithium-ion-accu wordt nu
automatisch opgeladen.
Het oranje oplaadlampje brandt.
→
→ Als het opladen is voltooid, gaat het
oplaadlampje uit.
y
Het duurt ongeveer drie uur om een geheel lege accu volledig
op te laden (als de printer is uitgeschakeld).
y
Laad de accu op in een omgeving met een temperatuur van 5 °C
tot 40 °C. (De accu laadt niet op als de omgevingstemperatuur
buiten deze waarden valt.)
- 240 V
De stekker kan per
land verschillen.
3
Haal de netvoedingsadapter los als de accu is
opgeladen.
De MW-145BT kan niet alleen met de netvoedingsadapter
worden gebruikt. De oplaadbare accu moet geïnstalleerd zijn.
6-6
Page 58

Oplaadlampje (oranje)
Via het oplaadlampje kunt u de status van de voeding
controleren.
Het oplaadlampje heeft twee functies.
(1) De laadstatus controleren
(als de netvoedingsadapter is aangesloten)
To estand van lampje Printerstatus
Brandt constant Laden
Uit Klaar met laden
Knippert De accu werkt niet goed
(2) Het accuniveau controleren
(als de voeding van de lithium-ion-accu komt)
To estand van lampje Accuniveau
Uit Voor meer dan 60% geladen
Knippert eenmaal Voor minder dan 60% geladen
Knippert tweemaal Voor minder dan 30% geladen
Blijft driemaal achter elkaar
knipperen
•
Probeer de accu volledig te ontladen voordat u deze opnieuw
oplaadt. Zo gaat de accu langer mee.
• Als het oplaadlampje gaat branden tijdens het afdrukken op de
printer, sluit u de netvoedingsadapter meteen aan en laadt u
de accu op. Het kan zijn dat het afdrukken stopt.
Als gevolg van de eigenschappen van accu's kan het aantal
•
mogelijke afdrukken aanzienlijk worden verkleind bij gebruik op
locaties met lage temperaturen, zelfs wanneer de accu volledig is
opgeladen.
• Verwijder na het opladen de netvoedingsadapter uit de printer,
zodat de efficiëntie en levensduur van de oplaadbare accu
behouden blijven.
• Plaats of gebruik de printer niet in de volle zon, in de buurt van
de verwarming of warme apparatuur, of op een locatie waar de
printer blootstaat aan extreem hoge temperaturen (op het
dashboard van een auto of achter in een auto bijvoorbeeld),
zodat de efficiëntie en levens
behouden blijven.
Bijna leeg
duur van de oplaadbare accu
6-7
Page 59

De printer in- en uitschakelen
Druk op de Aan/uit-knop en houd
deze even ingedrukt totdat het
groene of blauwe statuslampje gaat
branden.
Aan/uit-knop
→ Wanneer de printer wordt
ingeschakeld, wordt het statuslampje:
groen (als Bluetooth uitgeschakeld is);
blauw (als Bluetooth ingeschakeld is).
Om te voorkomen dat de printer per ongeluk wordt ingeschakeld,
gaat de printer niet aan als de Aan/uit-knop zachtjes wordt ingedrukt. Houd de Aan/uit-knop dus even vast als de printer het niet
meteen doet.
De papiercassette voorbereiden
Gebruik alleen de papiercassette die speciaal voor deze printer is ontworpen.
Door ander papier kan de printer beschadigd raken.
Bereid de papiercassette voor voordat u deze in de printer installeert.
1
Vouw het klepje
terug over de vouwlijn (
stevig
1
).
Voo rkant
Zorg ervoor dat het klepje goed is gevouwen, want anders kan
een papierstoring optreden.
2
Plaats het lipje op de klep in de sleuf (2) aan de
achterkant van de cassette.
6-8
Achterkant
Page 60

De papiercassette installeren
1
Schuif de kap van de
papiercassette (boven op de
printer) in de aangegeven
richting 1.
→ De kap van de papiercassette
opent in de aangegeven richting
2.
2
Plaats de papiercassette.
De aanduiding van de papiersoort
wordt aan de bovenzijde van de
papiercassette aangegeven. De
onderkant van het papier wijst naa r u.
3
Sluit de papiercassette in de
aangegeven richting 3.
4
Schuif de papiercassette in de
aangegeven richting 4.
Als de papiercassette juist is
geplaatst, kunt u de papiersoort
aflezen via het papiercontrolevenster
op de cassette en wordt de kap van
de papiercassette vergrendeld.
Aanduiding papiersoort
Papiercontrolevenster
Aanduiding papiersoort
6-9
Page 61

Als het papier niet goed wordt ingevoerd
Maak de papierrol schoon.
1
Open de kap van de papiercassette.
2
Draai de papierrol zo ver
mogelijk in de invoerrichting.
3
Plak een stuk plakband op de
rubberen papierrol.
4
Verwijder de plakband en draai de papierrol 3 à 4 mm
in de tegenovergestelde richting van de invoerrichting.
→ Met het plakband wordt eventueel vuil op de rol verwijderd.
5
Herhaal stap 3 en 4 totdat de papierrol schoon is.
Papierrol
Papierrol
Plakband
6-10
Page 62

Norsk
Konformitetserklæring
(Kun Europa /Tyrkia)
Vi, BROTHER INDUSTRIES, LTD.
erklærer at dette produktet er i samsvar med grunnleggende krav og andre
relevante bestemmelser i direktiv 1999/5/EF og 2005/32/EF.
Adapteren AD-210 er i samsvar med grunnleggende krav og andre
relevante bestemmelser i direktiv 2006/95/EF.
Konformitetserklæringen finnes på vår webside. Gå til
http://solutions.brother.com -> velg region (f.eks. Europe) -> velg land ->
velg modell -> velg "Håndbøker" -> velg Konformitetserklæring
(*velg om n
15-1, Naeshiro-cho, Mizuho-ku,
Nagoya, 467-8561, Japan,
ødvendig språk).
7-1
Page 63

FORSIKTIG
EKSPLOSJONSFARE HVIS BATTERIET SKIFTES UT MED
BRUKTE BATTERIER MÅ AVHENDES I HENHOLD TIL
Varemerker
Brother-logoen er et registrert varemerke for Brother Industries, Ltd.
Brother er et registrert varemerke for Brother Industries, Ltd.
© 2009 Brother Industries, Ltd.
Microsoft, Windows, Windows Mobile og Windows Vista
er registrerte varemerker tilhørende Microsoft Corporation i
USA og andre land.
Ordmerket og logoene Bluetooth eies av Bluetooth SIG,
Inc. og enhver bruk av slike merker av Brother Industries, Ltd.
under lisens.
Alle andre programvare- og produktnavn nevnt er varemerker
eller registrerte varemerker tilhørende sine respektive selskaper.
Du finner ny informasjon og oppdateringer om Brothers
mobilskriverfunksjon på http://solutions.brother.com
FEIL TYPE BATTERI.
ANVISNINGENE.
.
7-2
Page 64

Håndbøker
En Brukerhåndbok og en Programvarehåndbok er å finne på CDROMen som følger med skriveren.
Les brukerhåndboken før du tar skriveren i bruk.
Vi anbefaler at du lagrer håndboken i Windows PC for senere referanse.
Brukerhåndbok
Brukerhåndboken inneholder
forholdsregler for bruk av skriveren,
samt detaljer om skriveroppsett og
fremgangsmåtene for å installere og
avinstallere programvaren på en
®
-PC eller en Windows
Windows
®
Mobile
-enhet.
Medfølgende tilbehør
MW-145BT mobil skriver
Lader
(AC-adapter:AD-210EU)
Brother Industries, Ltd.
Lithium ion oppladbar
batteripakke
(BT-100)
Brother Industries, Ltd.
USB-kabel
CD-ROM
(innehol der programvaren, Brukerhåndboken
og Programvarehåndboken)
Programvarehåndbokenen
Programvarehåndbokenen
beskriver fremgangsmåtene for
bruk av programvaren på en
®
Windows
Mobile
fremgangsmåten ved utskrift.
-PC eller en Windows
®
-enhet samt
Papirkassett
fylt med C-11 termisk papir
(50 ark)
Hurtigveiledning
(Denne håndboken)
7-3
Page 65

Komme i gang
Sette inn batteriet
Ikke bruk denne skriveren med andre oppladbare batterier enn
dem som er angitt (BT-100). Det kan føre til brann eller skader.
y IKKE ta av den svarte plasten som dekker batteriet.
y Batterikontakten må ikke tas ut og settes inn igjen ofte, da den
kan bli skadet eller batterikabelen kan ryke.
Batteriet skal kun fjernes når det byttes ut ved slutten av
levetiden, eller når skriveren ikke skal brukes i en lengre
tidsperiode.
1
Trykk på det angitte området
1 på batteridekslet 2, og
skyv det av MW-145BT.
Fare
7-4
Page 66

2
Sett inn kontakten 1 til
batteriet 2 i den angitte
retningen.
y
Sett kontakten helt inn, uten å bruke overdreven makt.
y Påse at du setter kontakten inn riktig vei, ellers kan den bli
skadet.
3
Sett batteriledningen inn i
fugen som vist i
illustrasjonen.
4
Sett på batteridekslet ved å
skyve det på plass på
baksiden av MW-145BT.
Svart
Rød
Vær forsiktig så du ikke setter fast batterikontaktledningen.
7-5
Page 67

Lader
Lad opp batteriet ved hjelp av AC-adapteren som er spesielt utformet
for denne skriveren.
Lad opp batteriet helt før du tar i bruk skriveren.
1
Plugg strømadapterkabelen
inn i strømadapterkontakten
på skriveren.
2
Sett strømadapterpluggen inn
i en vanlig
husholdningskontakt
(AC 220 V
Ladingen av litiumionbatteriet
starter automatisk.
→
→ Når ladingen er ferdig, slukkes lampen.
3
Koble fra AC-adapteren når oppladingen er fullført.
– 240 V).
Pluggene kan variere i
ulike land.
Den oransje ladelampen tennes.
y
Full opplading av et helt tomt batteri tar ca. tre timer (med
skriveren slått av).
y
Batteriet må lades når omgivelsestemperaturen er mellom
5 °C og 40 °C. (Batteriet blir ikke oppladet hvis
omgivelsestemperaturen er høyere eller lavere enn dette.)
7-6
MW-145BT kan ikke brukes bare med AC-adapteren. Det
oppladbare batteriet må være installert.
Page 68

Ladelampe (Oransje)
Ladelampen angir strømforsyningsstatusen.
Ladelampen har to funksjoner.
(1) Kontrollere ladestatusen (når strømadapteren er tilkoblet)
Lampestatus Skriverstatus
Konsta nt tent Lader
Av Ferdig oppladet
Blinker Feil ved batteri
(2) Kontrollere batterinivået (når litiumionbatteriet brukes)
Lampestatus Batterinivå
Av Over 60 % oppladet
Blinker én gang Under 60 % oppladet
Blinker to ganger Mindre enn 30% er ladet
Fortsetter å blinke tre ganger Nesten tomt
• Forsøk å la batteriet tømmes helt før det lades opp igjen. Det
forlenger batteriets levetid.
• Hvis ladelampen blinker under utskrift, må strømadapteren
kobles til med én gang for å lade opp batteriet. Utskriften kan
stoppe.
• Batterienes egenskaper gjør at antall utskrifter reduseres
betraktelig hvis de brukes
er fulladet.
• Når ladingen er fullført, bør du fjerne AC-adapteren fra
skriveren for å opprettholde det oppladbare batteriets
effektivitet og levetid.
• For å opprettholde det oppladbare batteriets effektivitet og
levetid må du unngå å plassere eller bruke skriveren i direkte
sollys, i nærheten av varmeovner eller andre varme apparater,
og på steder som utsettes for ekstremt høye temper
(f.eks. på dashbordet eller bak i bilen).
i lave temperaturer, selv om batteriet
aturer
7-7
Page 69

Slå skriveren på eller av
Trykk på og hold inne på/av-knappen
en kort stund til den grønne eller blå
statuslampen tennes.
Av/på-knapp
→ Når skriveren slås på er
LED-indikatorstatus:
grønn (hvis Bluetooth er slått av)
blå (hvis Bluetooth er slått på)
For å hindre at skriveren blir slått på ved et uhell er det ikke nok
med et lett trykk på på/av-knappen for å slå den på.
Klargjøre papirkassetten
Bruk bare papirkassetten som er beregnet for denne skriveren. Bruk
av annen type papir vil skade skriveren.
Klargjør papirkassetten før du setter den i skriveren.
1
Brett lokket
langs bretten (
godt
1
bakover
).
Foran
Kontroller at lokket er godt brettet, ellers kan det oppstå
papirmatingsfeil.
2
Stikk klaffen på lokket inn i spalten (2) på baksiden
av kassetten.
7-8
Bak
Page 70

Sette inn papirkassetten
1
Skyv papirkassettdekselet (på
toppen av skriveren) i retningen
vist på 1.
→ Dekselet åpnes i retningen angitt
på 2.
2
Sett inn papirkassetten.
Papirtypeangivelsen på
papirkassetten skal vende opp.
Enden av papiret skal peke mot deg.
3
Lukk papirkassettdekselet i
retningen vist på 3.
4
Skyv papirkassettdekselet i
retningen vist på 4.
Når papirkassetten er riktig satt inn,
vises papirtypeangivelsen på
kassetten i papirkontrollvinduet og
papirkassettdekselet lukkes.
Papirtypeangivelse
Papirkontrollvindu
Papirtypeangivelse
7-9
Page 71

Hvis papiret ikke mates inn som det skal
Rengjør fremføringsvalsen.
1
Åpne papirkassettdekselet.
2
Drei fremføringsvalsen i
materetningen til den stopper.
3
Fest en bit cellofantape på
fremføringsvalsens gummio-
verflate.
4
Fjern cellofantapen, og drei fremføringsvalsen tre til
fire mm i motsatt retning av materetningen.
→ Eventuelt smuss på fremføringsvalsen fjernes med tapen.
5
Gjenta trinn 3 og 4 til fremføringsvalsen er ren.
Fremføringsvalse
Fremføringsvalse
Cellofantape
7-10
Page 72

Svenska
Konformitetsförklaring
(Endast Europa/Turkiet)
BROTHER INDUSTRIES, LTD.
15-1, Naeshiro-cho, Mizuho-ku,
Nagoya, 467-8561, Japan
försäkrar att den här produkten överensstämmer med gällande krav och
övriga aktuella villkor i direktiv 1999/5/EG och 2005/32/EG.
Adaptern AD-210 överensstämmer med gällande krav och övriga aktuella
villkor i direktiv 2006/95/EG.
En försäkran om överensstämmelse finns på vår webbplats. Gå till
http://solutions.brother.com -> välj region (t.ex. Europe) -> välj land ->
välj din modell -> välj ”Bruksanvis
(*Välj språk där så krävs).
ningar” -> välj Konformitetsförklaring
8-1
Page 73

Viktigt
RISK FÖR EXPLOSION OM BATTERIET BYTS UT MOT EN
KASSERA ANVÄNDA BATTERIER I ENLIGHET MED
Varumärken
Brother-logotypen är ett registrerat varumärke som tillhör
Brother Industries, Ltd.
Brother är ett registrerat varumärke som tillhör Brother Industries, Ltd.
© 2009 Brother Industries, Ltd.
Microsoft, Windows, Windows Mobile och Windows Vista
registrerade varumärken som tillhör Microsoft Corporation i
USA och andra länder.
Ordet och märket Bluetooth ägs av Bluetooth SIG, Inc. och all
användning av sådana märken av Brother Industries, Ltd. sker
under licens.
Alla andra mjukvaru- och produktnamn nämnda är varumärken
eller regi
Gå till Brother Solutions Center på http://solutions.brother.com
för senaste information och uppdateringar av funktionen
Brother mobile printer.
strerade varumärken tillhöra nde respektive företag.
FELAKTIG TYP.
INSTRUKTIONERNA.
8-2
Page 74

Handböckerna
En Användarhandbok och en handbok för Programanvändare
finns på den cd-rom-skiva som följer med skrivaren.
Läs användarhandboken innan skrivaren tas i bruk.
Vi rekommenderar att handbokens Windows PCsparas på
datorn som referens.
Användarhandbok
Användarhandboken beskriver
försiktighetsåtgärder vid användning av
denna skrivare, information om
skrivarens funktion samt procedurer för
installation och avinstallation av
programvaran på en Windows
eller en Windows Mobile
®
-enhet.
®
-dator
Medföljande tillbehör
MW-145BT bärbar skrivare
Laddare
(nätadapter: AD-210EU)
Brother Industries, Ltd.
Laddningsbart
litiumjonbatteri
(BT-100)
Brother Industries, Ltd.
USB-kabel
Cd-rom-skiva
(innehåller programvaran,
Användarhandboken och handboken för
Programanvändare)
Programanvändare
Handboken för programanvändare
beskriver hur du använder
programvaran på en Windows
eller en Windows Mobile
utskriftsprocedurerna.
Papperskassett
fylld med C-11 termiskt papper
(50 ark).
Snabbguide
(denna handledning)
®
-dator
®
-enhet och
8-3
Page 75

Komma igång
Installera batteriet
Använd inte skrivaren med andra uppladdningsbara batterier än
det angivna (BT-100). I annat fall kan det resultera i eldsvåda
eller skada.
y TA I N TE bort den svarta plasten som täcker batteriet.
y Batterikontakten bör inte kopplas bort och anslutas ofta,
eftersom den kan skadas eller batterisladden kan gå sönder.
Batteriet ska endast tas ut vid batteribyte eller när skrivaren
inte kommer att användas på en längre tid.
1
Tr yck p å p unkterna
markerade med 1 på
batteriskyddet 2 och skjut
av det från MW-145BT.
Fara
8-4
Page 76

2
Stoppa i kontakten 1 från
batteriet 2 i den riktning som
visas till höger.
y Sätt in kontakten helt utan att tvinga den.
y Kontrollera att du sätter in kontakten i rätt riktning, annars kan
den skadas.
3
Placera batterisladden i
skåran så som visas på
bilden.
4
Montera batteriskyddet
genom att skjuta tillbaka det
på MW-145BT.
Svart
Röd
Var försiktig så att du inte klämmer batterisladden.
8-5
Page 77

Laddning
Ladda batteriet med hjälp av den medföljande nätadaptern som är
speciellt avsedd för denna skrivare.
När du köpt denna skrivare ska du se till att la dda batteriet helt innan
det används.
1
Anslut nätadapterkabeln i
dess anslutning på skrivaren.
2
Anslut nätadapterns kontakt
till ett vägguttag (AC 220 V
240 V).
Laddning av litiumjonbatteriet
börjar automatiskt.
→ Laddnings-LED börjar lysa orange.
→ När laddningen är klar slocknar laddnings-
LED.
y
Det tar ungefär tre timmar att helt ladda upp ett tomt batteri
(med skrivaren avstängd).
y
Ladda batteriet på en plats med en temperatur mellan 5 °C
och 40 °C. (Batteriet laddas inte om temperaturen ligger
utanför detta område.)
-
Kontakten kan skilja sig
mellan olika länder.
3
När laddningen är klar ska du koppla bort nätadaptern
från vägguttaget.
MW-145BT kan inte användas med enbart nätadaptern.
Det laddningsbara batteriet måste vara monterat.
8-6
Page 78

Laddnings-LED (orange)
Med hjälp av laddnings-LED kan status för
strömförsörjningen kontrolleras.
Laddnings-LED har två funktioner.
(1) Kontrollera laddningsstatus (när nätadaptern är ansluten)
LED-status Skrivarstatus
Tänd Laddning
Av Avslutad laddning
BlinkarFelaktigt batteri
(2) Kontrollera batterinivån (medan litiumjonbatteriet töms)
LED-status Batterinivå
Av Mer än 60 % laddat
Blinkar en gång Mindre än 60 % laddat
Blinkar två gånger Mindre än 30 % laddat
Fortsätter att blinka 3 gånger Nästan tomt
• Försök ladda ur batterierna helt innan de laddas igen. Detta
förlänger batteriets livslängd.
• Om laddnings_LED blinkar medan skrivaren håller på att
skriva ut ska du omedelbart ansluta nätadaptern och ladda
batteriet. Skrivaren kan avbryta utskriften.
• På grund av
minska avsevärt om batterier används på platser med låg
temperatur, trots att batterierna är fulladdade.
• Koppla bort nätadaptern från skrivaren när laddningen är klar
för att bevara det laddningsbara batteriets effektivitet och
livslängd.
• Placera
värmekällor eller heta apparater eller på platser som utsätts
för mycket höga temperaturer (t.ex. instrumentbrädet eller
baksätet i en bil) för att bevara det laddningsbara batteriets
effektivitet och livslängd.
batteriegenskaperna kan antalet utskrifter
inte skrivaren i direkt solljus, i närheten av
8-7
Page 79

Slå på och stänga av skrivaren
Håll på/av-knappen intryckt tills den
gröna eller blå status-LED tänds.
På/Av-knapp
→ När skrivaren är på, är status-
LED:n:
Grön (om Bluetooth är inaktiverat)
Blå (om Bluetooth är aktiverat)
Skrivaren slås inte på om du trycker lätt på knappen. Den har
utformats så i syfte att förhindra att skrivaren slås på oavsiktligt.
Förbereda papperskassetten
Använd endast den papperskassett som är avsedd för just denna skrivare.
Användning av en annan papperskassett kommer att resultera i skada.
Förbered papperskassetten innan du installerar den i skrivaren.
1
Vik locket
längs vecket (
ordentligt bakåt
1
).
Framsidan
Kontrollera att locket är ordentligt stängt annars kan papperet
fastna.
2
Stick in fliken på locket i öppningen (2) på kassettens
baksida.
8-8
Baksidan
Page 80

Installera papperskassetten
1
Skjut papperskassettlocket
(ovanpå skrivaren) i riktningen
som visas i 1.
→ Papperskassettlocket kommer att
öppnas i den riktning som anges
av 2.
2
Sätt in papperskassetten.
Papperstypen som anges på
papperskassetten ska vara uppåt.
Änden på papperet ska vara vänd mot
dig.
3
Stäng papperskassettlocket i
riktningen som visas i 3.
4
Skjut papperskassettlocket i
riktningen som visas i 4.
Om papperskassetten har satts in
korrekt kan papperstypen som anges
på kassetten ses genom fönstret för
papperskontroll och
papperskassettens lock kommer att
låsas.
Papperstyp
Fönster för papperskontroll
Papperstyp
8-9
Page 81

Om papperet inte matas på rätt sätt
Rengör pappersmatningsvalsen.
1
Öppna locket på papperskassetten.
2
Vrid pappersmatningsvalsen i
matningsriktningen tills det tar
stopp.
3
Fäst en bit tejp på pappers-
matningsvalsen av gummi.
4
Ta bort tejpen och vrid pappersmatningsvalsen 3 till 4
mm i motsatt riktning till matningsriktningen.
→ All smuts på pappersmatningsvalsen fastnar på tejpen.
5
Upprepa stegen 3 och 4 tills pappersmatningsvalsen
är ren.
Pappersmatningsvalsen
Pappersmatningsvalsen
Cellofantejp
8-10
Page 82

Dansk
Overensstemmelseserklæring
(Kun Europa/Tyrkiet)
Vi, BROTHER INDUSTRIES, LTD.
erklærer, at dette produkt er i overensstemmelse med de grundlæggende
krav og andre relevante bestemmelser i direktiverne 1999/5/EF og 2005/
32/EF.
Adapteren AD-210 er i overensstemmelse med de grundlæggende krav og
andre relevante bestemmelser i direktivet 2006/95/EF.
Overensstemmelseserklæringen findes på vores webside. Gå til
http://solutions.brother.com -> vælg område (f.eks. Europe) -> vælg land ->
vælg din model -> vælg ”Manualer” -> vælg Overensstemmelseserklæring
(*Vælg sprog efter behov).
15-1, Naeshiro-cho, Mizuho-ku,
Nagoya, 467-8561, Japan,
9-1
Page 83

FORSIGTIG
DER ER RISIKO FOR EKSPLOSION, HVIS BATTERIET
UDSKIFTES MED EN FORKERT TYPE.
BORTSKAF BRUGTE BATTERIER I HENHOLD TIL
Varemærker
Brother-logoet er et registreret varemærke tilhørende
Brother Industries, Ltd.
Brother er et registreret varemærke tilhørende
Brother Industries, Ltd.
© 2009 Brother Industries, Ltd.
Microsoft, Windows, Windows Mobile og Windows Vista er
registrerede varemærker tilhørende Microsoft Corporation i
USA og andre lande.
Bluetooth ordmærket og logoer ejes af Bluetooth SIG, Inc., og
enhver brug af sådanne mærker af Brother Industries, Ltd. er
under licens.
Alle andre nævnte softwa
eller registrerede varemærker tilhørende deres respektive
firmaer.
Du kan få de seneste oplysninger og opdateringer vedrørende
funktionen Brother mobile printer ved at gå ind på
http://solutions.brother.com
INSTRUKTIONERNE.
re- eller produktnavne er varemærker
.
9-2
Page 84

Manualstruktur
Der følger en Brugsanvisning og en Softwarebrugsanvisning
med denne printer på cd-rom'en.
Læs brugsanvisningen, inden printeren tages i anvendelse.
Det anbefales at gemme den manuelle data i din Windows
PC som reference.
Brugsanvisning
Brugsanvisningen indeholder
sikkerhedsforanstaltninger ved brug
af printeren og oplysninger om
installation af den, procedurer for
installation og afinstallation af
softwaren på en Windows
på en Windows Mobile
®
®
-enhed.
-pc eller
Medfølgende tilbehør
MW-145BT Mobile Printer
Oplader
(AC-adapter: AD-210EU)
Brother Industries, Ltd.
Genopladeligt litium ionbatteripakke
(BT-100)
Brother Industries, Ltd.
USB-kabel
Cd-rom
(indeholder softwaren, Brugsanvisningen
og Softwarebrugsanvisningen)
Softwarebrugsanvisningen
Softwarebrugsanvisningen, hvordan
softwaren bruges på en Windows
pc eller en Windows Mobile
samt udskrivningsprocedurerne for
disse.
Papirkassette
fyldt med C-11 termisk papir
(50 ark).
Kort vejledning
(Denne vejledning)
®
-enhed,
®
-
9-3
Page 85

Sådan kommer du i gang
Isætning af batteriet
Undlad at bruge et andet genopladeligt batteri end det anførte
(BT-100) til denne printer, da der ellers kan opstå brand eller
skader.
y Fjern IKKE den sorte plast, der omslutter batteriet.
y Batteristikket bør ikke tages ud og sættes i hyppigt, det kan
blive beskadiget, eller batterikablet kan knække.
Batteriet bør kun fjernes, når det skal udskiftes ved levetidens
ophør, eller hvis printeren ikke skal bruges i længere tid.
1
Tryk på det anførte område 1
på batteridækslet 2 og skyd
det af MW-145BT.
Fare
9-4
Page 86

2
Isæt stikket 1 på batteriet 2
i den retning, der er vist til
højre.
y Sæt stikket helt i, men uden at bruge magt.
y Vend stikket rigtigt, når det sættes i, eller kan det blive beska-
diget.
3
Læg batteriledningen ind i
rillen som vist i illustrationen.
4
Påsæt batteridækslet ved at
skyde det på plads på
bagsiden af MW-145BT.
Sort
Rød
Pas på du ikke fanger batteriets forbindelsesledning.
9-5
Page 87

Opladning
Brug den AC-adapter, der er designet specielt til denne printer, til
opladning af batteriet.
Når du har købt denne printer, skal du sørge for at oplade batteriet
helt, før du bruger det.
1
Sæt AC-adapterkablet i AC-
adapterstikket i printeren.
2
Sæt adapterens AC-stikket i
en almindelig stikkontakt
(AC 220 V
Genopladningen af litium-ionbatteriet begynder automatisk.
→
→ Når opladning er afsluttet, slukkes
-240 V).
Stikket kan variere
afhængig af land.
Den orange opladningslysdiode tændes.
opladningslysdioden.
y
Det tager ca. tre timer at genoplade batteriet helt, hvis det er
helt afladet (med slukket printer).
y
Genoplad batteriet ved en omgivende temperatur på mellem
5°C og 40°C (batteriet oplades ikke, hvis temperaturen ligger
uden for dette område).
3
Afbryd forbindelsen til AC-adapteren, når opladningen
er afsluttet.
MW-145BT kan ikke bruges med AC-adapteren alene. Det genopladelige batteri skal være sat i.
9-6
Page 88

Opladningslysdiode (Orange)
Strømforsyningens status kan kontrolleres med
opladningslysdioden.
Opladningslysdioden har to funktioner.
(1) Kontrol af opladningsstatus (når AC-adapteren er tilsluttet)
Lysdiodestatus Printerstatus
Konsta nt tændt Opladning
Slukket Opladningen er afsluttet
Blinker Batterifejlfunktion
(2) Kontrol af batteriniveauet
(mens enheden kører på litium-ion-batteriet)
Lysdiodestatus Batteriniveau
Slukket Mere end 60 % opladet
Blinker én gang Mindre end 60 % opladet
Blinker to gange Mindre end 30 % opladet
Fortsætter med at blinke 3 gange Næsten tomt
• Aflad helst batteriet helt før det genoplades for at forlænge
dets levetid.
• Hvis opladningslysdioden blinker, mens printeren udskriver,
skal AC-adapter straks tilsluttes og batteriet oplades. Printeren
standser muligvis udskrivningen.
• Pga. batteriers egenskaber reduceres antallet af mulige
udskrifter betydeligt, hvis de anvendes på steder med lave
temperaturer, også selvom batteriet er helt opladet.
• Fjern AC-adapteren fra printeren, når den er opladet, af
hensyn til det genopladelige batteriets effektivitet og levetid.
• Af hensyn til det genopladelige batteris effektivitet og levetid
må printeren ikke placeres i direkte sollys, i nærheden af
varmeapparater eller andre varme genstande eller på steder,
hvor temperaturen kan blive meget høj (f.ek
instrumentbrættet eller bag i en bil).
s. på
9-7
Page 89

Tænd/sluk printeren
Tr yk på strømknappen, og hold den
kortvarigt nede, indtil den grønne
eller blå statuslysdiode tændes.
Strømknap
→ Når printeren er slukket, er status-
LED'en:
grøn (hvis Bluetooth er deaktiveret)
blå (hvis Bluetooth er aktiveret)
Printeren tænder ikke ved et let tryk på strømknappen, for at
forhindre at den tændes ved et uheld. Derfor skal du, hvis printeren ikke tændes, holde strømknappen nede i lidt længere tid.
Klargøring af papirkassetten
Brug kun den papirkassette, der er specielt designet til denne printer.
Brug af andet papir vil forårsage skade.
Klargør papirkassetten før den installeres i printeren.
1
Buk
låget godt tilbage langs
1
folden (
).
Front
Kontroller, at låget er helt foldet, eller kan papiret indføres forkert.
2
Sæt fanen på låget ind i slidsen (2) på kassettens
bagside.
9-8
Bagside
Page 90

Installation af papirkassetten
1
Skub låget til papirkassetten
(oven på printeren) i den
retning, der er vist i 1.
→ Papirkassettens låg åbnes i den
retning, der er angivet med 2.
2
Isæt papirkassetten.
Papirtypeangivelsen på
papirkassetten skal vende med
forsiden opad. Enden af papiret skal
vende mod dig.
3
Luk låget til papirkassetten i den
retning, der er vist i 3.
4
Skub låget til papirkassetten i
den retning, der er vist i 4.
Når papirkassetten er sat rigtigt i, kan
papirtypeangivelsen på kassetten ses
gennem papirkontrolvinduet, og
papirkassettens låg vil være låst.
Papirtypeangivelse
Papirkontrolvindue
Papirtypeangivelse
9-9
Page 91

Hvis papiret ikke indføres korrekt
Rengøring af opsamlingsrullen.
1
Åbn låget til papirkassetten.
2
Drej opsamlingsrullen så
langt som muligt i indføringsretningen.
3
Sæt et stykke cellofantape på
gummiopsamlingsrullen.
4
Fjern cellofantapen, og drej opsamlingsrullen 3-4 mm
modsat indføringsretningen.
→ Eventuelt snavs på opsamlingsrullen fjernes med tapen.
5
Gentag trin 3 og 4, til opsamlingsrullen er ren.
Opsamlingsrulle
Opsamlingsrulle
Cellofantape
9-10
Page 92

Printed in Japan
LBA241001A
 Loading...