

Brother Multi-protocol On-board Ethernet Multi-function Print Server, Multi-protocol On-board Multi- Network User's Manual
Page 1

Multi-Protocol On-board Ethernet Multi-function Print Server and
Wireless (IEEE 802.11b/g) Ethernet Multi-function Print Server
NETWORK
USER’S GUIDE
Please read this manual thoroughly before using this machine on
your network. You can view this manual in HTML format from the
CD-ROM at any time, please keep the CD-ROM in a convenient
place for quick and easy reference at all times. You can also
download the manual in PDF format from the Brother Solutions
Center. (http://solutions.brother.com/)
The Brother Solutions Center (http://solutions.brother.com/) is
your one stop resource for all your printing needs. Download the
latest drivers and utilities for your machine, read FAQs and
troubleshooting tips or learn about special printing solutions.
Version A
ENG
Page 2
Definitions of notes
We use the following icon throughout this User’s Guide:
IMPORTANT
Note
IMPORTANT describes procedures you must follow or avoid to prevent possible
machine problems or damage to other objects.
Notes tell you how you should respond to a situation that may arise or give tips
about how the operation works with other features.
Trademarks
The Brother logo is a registered trademark of Brother Industries, Ltd.
Brother is a registered trademark of Brother Industries, Ltd.
Microsoft, Windows, Windows Server and Internet Explorer are registered trademarks of Microsoft
Corporation in the United States and/or other countries.
Windows Vista is either a registered trademark or a trademark of Microsoft Corporation in the United States
and other countries.
Apple, Macintosh, Safari and TrueType are trademarks of Apple Inc., registered in the United States and
other countries.
®
Linux
UNIX is a registered trademark of The Open Group in the United States and other countries.
Adobe, Flash, PageMaker, Photoshop, PostScript and PostScript 3 are either registered trademarks or
trademarks of Adobe Systems Incorporated in the United States and/or other countries.
is the registered trademark of Linus Torvalds in the U.S. and other countries.
BROADCOM, SecureEasySetup and the SecureEasySetup logo are trademarks or registered trademarks of
Broadcom Corporation in the United States and/or other countries.
Wi-Fi, WPA, WPA2, Wi-Fi Protected Access and Wi-Fi Protected Setup are either trademarks or registered
trademarks of Wi-Fi Alliance in the United States and/or other countries.
AOSS is a trademark of Buffalo Inc.
OpenLDAP is a registered trademark of the OpenLDAP Foundation.
Each company whose software title is mentioned in this manual has a Software License Agreement specific
to its proprietary programs.
All other trademarks are the property of their respective owners.
i
Page 3

Compilation and publication notice
Under the supervision of Brother Industries Ltd., this manual has been compiled and published, covering the
latest product’s descriptions and specifications.
The contents of this manual and the specifications of this product are subject to change without notice.
Brother reserves the right to make changes without notice in the specifications and materials contained
herein and shall not be responsible for any damages (including consequential) caused by reliance on the
materials presented, including but not limited to typographical and other errors relating to the publication.
©2009 Brother Industries Ltd.
IMPORTANT NOTE
This product is approved for use in the country of purchase only.
Do not use this product outside the country of purchase as it may violate the wireless telecommunication
and power regulations of that country.
Windows
Edition and Windows
Windows Server
x64 Edition.
Windows Vista
®
XP in this document represents Windows® XP Professional, Windows® XP Professional x64
®
XP Home Edition.
®
2003 in this document represents Windows Server® 2003 and Windows Server® 2003
®
in this document represents all editions of Windows Vista®.
The machine illustrations are based on MFC-8890DW.
Not all models are available in all countries.
ii
Page 4

Brother numbers
IMPORTANT
For technical and operational assistance, you must call the country where you purchased the machine.
Calls must be made from within that country.
For Customer Service
In USA 1-877-BROTHER (1-877-276-8437)
In Canada 1-877-BROTHER
In Brazil [email protected]
In Europe Visit http://www.brother.com/
for contact information on your local Brother office.
Service center locator (USA)
For the location of a Brother authorized service center, call 1-877-BROTHER (1-877-276-8437).
Service center locations (Canada)
For the location of a Brother authorized service center, call 1-877-BROTHER.
If you have any comments or suggestions, please write to us at:
In USA Customer Support
Brother International Corporation
100 Somerset Corporate Boulevard
Bridgewater NJ 08807-0911
In Canada Brother International Corporation (Canada), Ltd.
- Marketing Dept.
1 Hôtel de Ville
Dollard des Ormeaux, QC
H9B 3H6
Canada
In Brazil Brother International Corporation do Brasil Ltda.
Av. Paulista, 854 - 15 and. - Ed. Top Center
CEP: 01310-100 - São Paulo - SP - Brasil
In Europe European Product & Service Support
1 Tame Street
Audenshaw
Manchester, M34 5JE, UK
iii
Page 5
Internet address
Brother Global Web Site: http://www.brother.com/
For Frequently Asked Questions (FAQs), Product Support, Driver Updates and Utilities:
http://solutions.brother.com/
Ordering accessories and supplies
In USA: 1-877-552-MALL (1-877-552-6255)
1-800-947-1445 (fax)
http://www.brothermall.com/
In Canada: 1-877-BROTHER
http://www.brother.ca/
iv
Page 6

Table of Contents
1 Introduction 1
Overview....................................................................................................................................................1
Network features........................................................................................................................................2
Network printing...................................................................................................................................2
Network scanning ................................................................................................................................2
Network PC Fax (Not available for DCP-8080DN and DCP-8085DN) ................................................2
Fax to Server (For MFC-8880DN and MFC-8890DW) ........................................................................2
Management utilities............................................................................................................................2
Internet fax/scan to E-mail server (MFC-8880DN and MFC-8890DW only)........................................4
Types of network connections ...................................................................................................................5
Wired network connection example.....................................................................................................5
Wireless network connection examples (For MFC-8890DW only) ......................................................7
Protocols....................................................................................................................................................8
TCP/IP protocols and functionalities....................................................................................................8
Other protocol....................................................................................................................................11
2 Configuring your machine for a network 12
Overview..................................................................................................................................................12
IP addresses, subnet masks and gateways ............................................................................................12
IP address .........................................................................................................................................12
Subnet mask......................................................................................................................................13
Gateway (and router).........................................................................................................................14
Step by step chart....................................................................................................................................14
Setting the IP address and subnet mask .................................................................................................15
Using the BRAdmin Light utility to configure your machine as a network printer ..............................15
Using the control panel to configure your machine for a network......................................................17
Using other methods to configure your machine for a network .........................................................17
Changing the print server settings ...........................................................................................................18
Using the BRAdmin Light utility to change the print server settings ..................................................18
Using the BRAdmin Professional 3 utility to change print server settings
(for Windows
Using the control panel to change the print server settings...............................................................19
Using Web Based Management (web browser) to change the print/scan server settings ................20
Using Remote Setup to change the print server settings
(Not available for Windows Server
(Not available for DCP-8085DN and DCP-8080DN) .....................................................................20
Using other methods to change print server settings ........................................................................20
®
) ..............................................................................................................................18
®
2003/2008)
3 Configuring your machine for a wireless network (For MFC-8890DW) 21
Overview..................................................................................................................................................21
Wireless network terms and concepts .....................................................................................................22
SSID (Service Set Identifier) and channels .......................................................................................22
Authentication and encryption ...........................................................................................................22
Step by step chart for wireless network configuration ............................................................................25
For Infrastructure mode .....................................................................................................................25
For Ad-hoc mode...............................................................................................................................26
v
Page 7

Confirm your network environment..........................................................................................................27
Connected to a computer with an access point in the network (Infrastructure mode).......................27
Connected to a wireless capable computer without an access point in the network (Ad-hoc mode)
Confirm your wireless network setup method..........................................................................................28
Configuration using the machine’s control panel Setup Wizard to configure your machine for a
wireless network ............................................................................................................................28
Configuration using the SES/WPS/AOSS™ control panel menu
(Automatic Wireless mode) (Infrastructure mode only) .................................................................28
Configuration using the PIN Method of Wi-Fi Protected Setup (Infrastructure mode only) ...............29
Configuration using the Brother installer application on the CD-ROM to configure your wireless
network machine ...........................................................................................................................30
Configure your machine for a wireless network.......................................................................................31
Using the Setup Wizard from the control panel .................................................................................31
Using the SES/WPS/AOSS™ control panel menu to configure your machine for a wireless
network (Automatic Wireless mode)..............................................................................................36
Using the PIN Method of Wi-Fi Protected Setup ...............................................................................39
Using the Brother installer application on the CD-ROM to configure your machine for a wireless
network..........................................................................................................................................40
4 Wireless configuration for Windows® using the Brother installer application
(MFC-8890DW only) 41
Configuration in Infrastructure mode .......................................................................................................41
Before configuring the wireless settings ............................................................................................41
Configure the wireless settings..........................................................................................................43
Configuration using the SES/WPS or AOSS™ from the control panel menu (Automatic Wireless mode)
Before configuring the wireless settings ............................................................................................51
Configure the wireless settings..........................................................................................................51
Configuration in Ad-hoc mode .................................................................................................................56
Before configuring the wireless settings ............................................................................................56
Configure the wireless settings..........................................................................................................57
........27
......51
5 Wireless configuration for Macintosh® using the Brother installer application
(MFC-8890DW only) 67
Configuration in Infrastructure mode .......................................................................................................67
Before configuring the wireless settings ............................................................................................67
Configure the wireless settings..........................................................................................................69
Configuration using the SES/WPS or AOSS™ from the control panel menu (Automatic Wireless mode)
Configuration in Ad-hoc mode .................................................................................................................82
Before configuring the wireless settings ............................................................................................82
Configure the wireless settings..........................................................................................................83
......77
6 Control panel setup 92
Network menu..........................................................................................................................................92
TCP/IP ...............................................................................................................................................92
Ethernet (wired network only)..........................................................................................................100
Setup Wizard (MFC-8890DW wireless network only) .....................................................................100
SES/WPS/AOSS™ (MFC-8890DW wireless network only) ............................................................101
WPS w/PIN Code (MFC-8890DW wireless network only)...............................................................101
WLAN Status (MFC-8890DW wireless network only) .....................................................................101
Set to Default (MFC-8890DW only).................................................................................................103
vi
Page 8

Wired Enable (MFC-8890DW wired network only)..........................................................................104
WLAN Enable (MFC-8890DW wireless network only) ....................................................................104
E-mail / IFAX (MFC-8880DN and MFC-8890DW only) ...................................................................105
How to set a new default for Scan to E-mail (E-mail server)
(MFC-8880DN and MFC-8890DW only) .....................................................................................116
How to set a new default for Scan to FTP .......................................................................................117
How to set a new default for Scan to Network ................................................................................118
Fax to Server (For MFC-8880DN and MFC-8890DW) ....................................................................119
Time Zone .......................................................................................................................................121
Restoring the network settings to factory default...................................................................................122
Printing the Network Configuration List .................................................................................................122
7 Driver Deployment Wizard
(Windows® only) 123
Overview................................................................................................................................................123
Connection methods..............................................................................................................................123
Peer-to-peer ....................................................................................................................................123
Network Shared...............................................................................................................................124
How to install the Driver Deployment Wizard software..........................................................................124
Using the Driver Deployment Wizard software ......................................................................................125
8 Network printing from Windows®:
basic TCP/IP Peer-to-Peer printing 128
Overview................................................................................................................................................128
Configuring the standard TCP/IP port....................................................................................................129
Printer driver not yet installed ..........................................................................................................129
Printer driver already installed .........................................................................................................130
Other sources of information .................................................................................................................130
9 Internet printing for Windows
Overview................................................................................................................................................131
IPP printing for Windows
For Windows Vista
For Windows
Specifying a different URL...............................................................................................................135
Other sources of information .................................................................................................................135
®
®
2000/XP, Windows Vista® and Windows Server® 2003/2008 ....................131
®
and Windows Server® 2008 ...........................................................................131
2000/XP and Windows Server® 2003 .....................................................................133
®
131
10 Network printing from Macintosh® using the BR-Script 3 driver 136
Overview................................................................................................................................................136
How to choose the BR-Script 3 printer driver (TCP/IP) .........................................................................136
For Mac OS
For Mac OS
Other sources of information .................................................................................................................139
®
X 10.3.9 to 10.4.x users ............................................................................................136
®
X 10.5.x.....................................................................................................................138
11 Web Based Management 140
Overview................................................................................................................................................140
How to configure the machine settings using Web Based Management (web browser).......................141
Password information ............................................................................................................................142
vii
Page 9

Secure Function Lock 2.0 .....................................................................................................................143
How to configure the Secure Function Lock 2.0 settings using Web Based Management
(web browser)..............................................................................................................................144
Changing the Scan to FTP configuration using a web browser.............................................................147
Changing the Scan to Network configuration using a web browser ......................................................148
Changing the LDAP configuration using a web browser .......................................................................150
12 LDAP operation (For MFC-8880DN and MFC-8890DW) 151
Overview................................................................................................................................................151
Changing the LDAP configuration using a Browser ........................................................................151
LDAP operation using the control panel ..........................................................................................151
13 Internet fax and Scan to E-mail
(E-mail server)
(For MFC-8880DN and MFC-8890DW) 152
Internet fax Overview.............................................................................................................................152
Getting connected ...........................................................................................................................152
Control panel key functions .............................................................................................................153
Sending an Internet fax ...................................................................................................................153
Manually entering text .....................................................................................................................154
Receiving E-mail or Internet fax ......................................................................................................154
Receiving an Internet fax to your computer.....................................................................................155
Forwarding received E-mail and fax messages...............................................................................155
Relay broadcasting..........................................................................................................................155
TX Verification Mail..........................................................................................................................158
Setup Mail TX ..................................................................................................................................158
Setup Mail RX..................................................................................................................................158
Error mail .........................................................................................................................................158
Important information on Internet fax...............................................................................................159
Scan to E-mail (E-mail server) overview................................................................................................160
How to operate Scan to E-mail (E-mail server) ...............................................................................160
Using One Touch or Speed Dial number.........................................................................................161
14 Security features 162
Overview................................................................................................................................................162
Security terms..................................................................................................................................162
Security protocols ............................................................................................................................163
Security methods for E-mail notification ..........................................................................................163
Configuring the protocol settings ...........................................................................................................164
Managing your network printer securely................................................................................................165
Secure Management using Web Based Management (web browser) ............................................165
Secure Management using BRAdmin Professional 3 (for Windows
Printing documents securely using IPPS...............................................................................................168
Specifying a different URL...............................................................................................................168
Using E-mail notification with user authentication
(For MFC-8880DN and MFC-8890DW)..............................................................................................169
Creating and installing a certificate........................................................................................................171
Creating and installing a self-signed certificate ...............................................................................173
Creating CSR and installing a certificate .........................................................................................186
Import and export the certificate and private key.............................................................................188
®
) ............................................167
viii
Page 10

15 Troubleshooting 189
Overview................................................................................................................................................189
General problems ..................................................................................................................................189
Network print software installation problems .........................................................................................190
Printing problems...................................................................................................................................192
Scanning and PC Fax problems ............................................................................................................194
Wireless network troubleshooting (MFC-8890DW only)........................................................................196
Wireless setup problems .................................................................................................................196
Wireless connection problem ..........................................................................................................197
Protocol-specific troubleshooting...........................................................................................................198
Windows
Web Based Management (web browser) troubleshooting (TCP/IP)................................................198
LDAP troubleshooting......................................................................................................................198
®
2000/XP, Windows Vista® and Windows Server® 2003/2008 IPP troubleshooting.......198
A Appendix A 199
Using services .......................................................................................................................................199
Other ways to set the IP address (for advanced users and administrators) ..........................................199
Using DHCP to configure the IP address ........................................................................................199
Using BOOTP to configure the IP address......................................................................................200
Using RARP to configure the IP address ........................................................................................201
Using APIPA to configure the IP address........................................................................................201
Using ARP to configure the IP address ...........................................................................................202
Using the TELNET console to configure the IP address .................................................................203
Using the Brother Web BRAdmin server software for IIS to configure the IP address ....................204
Installation when using web services
(For Windows Vista
Installation when using a Network Print Queue or Share (printer driver only) .......................................206
®
users) ...............................................................................................................205
B Appendix B 207
Print server specifications......................................................................................................................207
Ethernet wired network....................................................................................................................207
Wireless network ............................................................................................................................208
Function table and default factory settings ............................................................................................210
DCP-8080DN, DCP-8085DN and MFC-8480DN ............................................................................210
MFC-8880DN ..................................................................................................................................213
MFC-8890DW..................................................................................................................................217
Entering Text .........................................................................................................................................223
C Appendix C 225
Open Source Licensing Remarks ..........................................................................................................225
Part of the software embedded in this product is gSOAP software. ................................................225
This product includes SNMP software from WestHawk Ltd. ..........................................................225
MIT Kerberos statements ................................................................................................................226
Cyrus SASL statements ..................................................................................................................229
OpenSSL statements ......................................................................................................................230
OpenLDAP Statements ...................................................................................................................232
D Index 235
ix
Page 11

1
Introduction 1
Overview 1
1
Your Brother machine can be shared on a 10/100 Mb wired or IEEE 802.11b/802.11g wireless Ethernet
network using the internal network print server. The print server supports various functions and methods of
connection depending on the operating system you are running on a network supporting TCP/IP. These
functions include printing, scanning, PC Fax send, PC Fax receive, Remote Setup and Status Monitor. The
following chart shows what network features and connections are supported by each operating system.
Operating Systems
10/100BASE-TX wired Ethernet
(TCP/IP)
IEEE 802.11b/g wireless
Ethernet (TCP/IP)
Printing rrr
BRAdmin Light rrr
BRAdmin Professional 3
Web BRAdmin
BRPrint Auditor
Web Based Management
(web browser)
Internet Printing (IPP) rr
Scanning rr
PC Fax Send
PC Pax Receive
Remote Setup
Status Monitor rr
Driver Deployment Wizard rr
1
2
2
3
4
4
4
Windows® 2000/XP
®
Windows
Professional x64
Edition
Windows Vista
XP
®
rrr
rrr
rr
rr
rr
rrr
rr
r
rr
Windows Server®
2003/2008
Windows Server
x64 Edition
®
Mac OS® X 10.3.9 or
greater
2003
1
Only the MFC-8890DW has IEEE 802.11b/802.11g wireless Ethernet (TCP/IP) available.
2
BRAdmin Professional 3 and Web BRAdmin are available as a download from http://solutions.brother.com/.
3
Available when using BRAdmin Professional 3 or Web BRAdmin with devices that are connected to your client PC via the USB or parallel interface.
4
Not available for DCP-8080DN and DCP-8085DN
To use the Brother machine through a network, you need to configure the print server, and set up the
computers you use.
1
Page 12

Introduction
Network features 1
Your Brother machine has the following basic network features.
Network printing 1
The print server provides printing services for Windows® 2000/XP, Windows Vista® and Windows Server®
®
2003/2008 supporting the TCP/IP protocols and Macintosh
TCP/IP.
(Mac OS® X 10.3.9 or greater) supporting
Network scanning 1
You can scan documents over the network to your computer (See Network Scanning in the Software User’s
Guide).
Network PC Fax (Not available for DCP-8080DN and DCP-8085DN) 1
You can directly send a file from your computer as a PC Fax over your network (See Brother PC-FAX
®
Software for Windows
description). Windows
and Sending a Fax for Macintosh® in the Software User’s Guide for a complete
®
users can also PC Fax receive (See PC-FAX receiving in the Software User’s Guide).
1
Fax to Server (For MFC-8880DN and MFC-8890DW) 1
The Fax to Server feature allows the machine to scan documents and send them via a separate fax server.
Unlike Internet fax or I-Fax, the Fax to Server feature utilizes a server to send the documents as fax data over
phone or T-1 lines.
Management utilities 1
BRAdmin Light 1
BRAdmin Light is a utility for initial setup of Brother network connected devices. This utility can search for
Brother products on your network, view the status and configure basic network settings, such as IP address.
®
The BRAdmin Light utility is available for Windows
®
2003/2008 and Mac OS
see the Quick Setup Guide provided with the machine. For Macintosh
automatically when you install the printer driver. If you have already installed the printer driver, you don’t have
to install it again.
For more information on BRAdmin Light, visit us at http://solutions.brother.com/
X 10.3.9 or greater computers. For installing BRAdmin Light on Windows®, please
2000/XP, Windows Vista® and Windows Server®
®
users, BRAdmin Light will be installed
.
2
Page 13

Introduction
BRAdmin Professional 3 (for Windows®) 1
BRAdmin Professional 3 is a utility for more advanced management of network connected Brother devices.
This utility can search for Brother products on your network and view the device status from an easy to read
explorer style window that changes color identifying the status of each device. You can configure network
®
and device settings along with the ability to update device firmware from a Windows
computer on your LAN.
BRAdmin Professional 3 can also log activity of brother devices on your network and export the log data in
an HTML, CSV, TXT or SQL format.
For users who want to monitor locally connected printers, install the Print Auditor Client software on the client
PC. This utility allows you to monitor printers that are connected to a client PC via the USB or parallel interface
from BRAdmin Professional 3.
For more information and to download the software, visit us at http://solutions.brother.com/
Web BRAdmin (for Windows
®
) 1
.
Web BRAdmin is a utility for managing network connected Brother devices. This utility can search for Brother
products on your network, view the status and configure the network settings.
®
Unlike BRAdmin Professional 3, which is designed for Windows
only, Web BRAdmin is a server based utility
that can be accessed from any client PC with a web browser that supports JRE (Java Runtime Environment).
1
By installing the Web BRAdmin server utility on a computer running IIS
, administrators can connect to the
Web BRAdmin server using a web browser, which then communicates with the device itself.
For more information and to download the software, visit us at http://solutions.brother.com/
1
Internet Information Server 4.0 or Internet Information Services 5.0/5.1/6.0/7.0
.
1
BRPrint Auditor (for Windows®) 1
The BRPrint Auditor software brings the monitoring power of Brother network management tools to locally
connected machines. This utility allows a client computer to collect usage and status information from a MFC
or DCP connected via the parallel or USB interface. The BRPrint Auditor can then pass this information to
another computer on the network running BRAdmin Professional 3 or Web BRAdmin 1.45 or greater. This
allows the administrator to check items such as page counts, toner and drum status and the firmware version.
In addition to reporting to Brother network management applications this utility can E-mail the usage and
status information directly to a predefined E-mail address in a CSV or XML file format (SMTP Mail support
required). The BRPrint Auditor utility also supports E-mail notification for reporting warning and error
conditions.
Web Based Management (web browser)
The Web Based Management allows you to monitor Brother printer’s status or change some of its
configuration settings using a web browser.
Note
We recommend Microsoft
Safari 1.3 (or greater) for Macintosh
®
Internet Explorer® 6.0 (or greater) or Firefox 1.0 (or greater) for Windows® and
®
. Please also make sure that JavaScript and Cookies are always
enabled in whichever browser you use. If a different web browser is used, make sure it is compatible with
HTTP 1.0 and HTTP 1.1.
1
3
Page 14

Introduction
Remote Setup 1
The Remote Setup software allows you to configure network settings from a Windows® or Macintosh® (Mac
®
OS
X 10.3.9 or greater) computer. (See Remote Setup in the Software User’s Guide.)
Internet fax/scan to E-mail server (MFC-8880DN and MFC-8890DW only) 1
The Brother machine can be assigned an E-mail address allowing you to send, receive or forward documents
over a Local Area Network or the Internet to PC’s or other Internet fax machines. Before using this function,
you have to configure the necessary machine settings by using the machine’s control panel. (For details, see
Internet fax and Scan to E-mail (E-mail server) (For MFC-8880DN and MFC-8890DW) on page 152.) You
can also configure these settings using Web Based Management (web browser) see Web Based
Management on page 140, or Remote Setup see Using Remote Setup to change the print server settings
®
(Not available for Windows Server
on page 20.)
2003/2008) (Not available for DCP-8085DN and DCP-8080DN)
1
4
Page 15
Introduction
Types of network connections 1
Wired network connection example 1
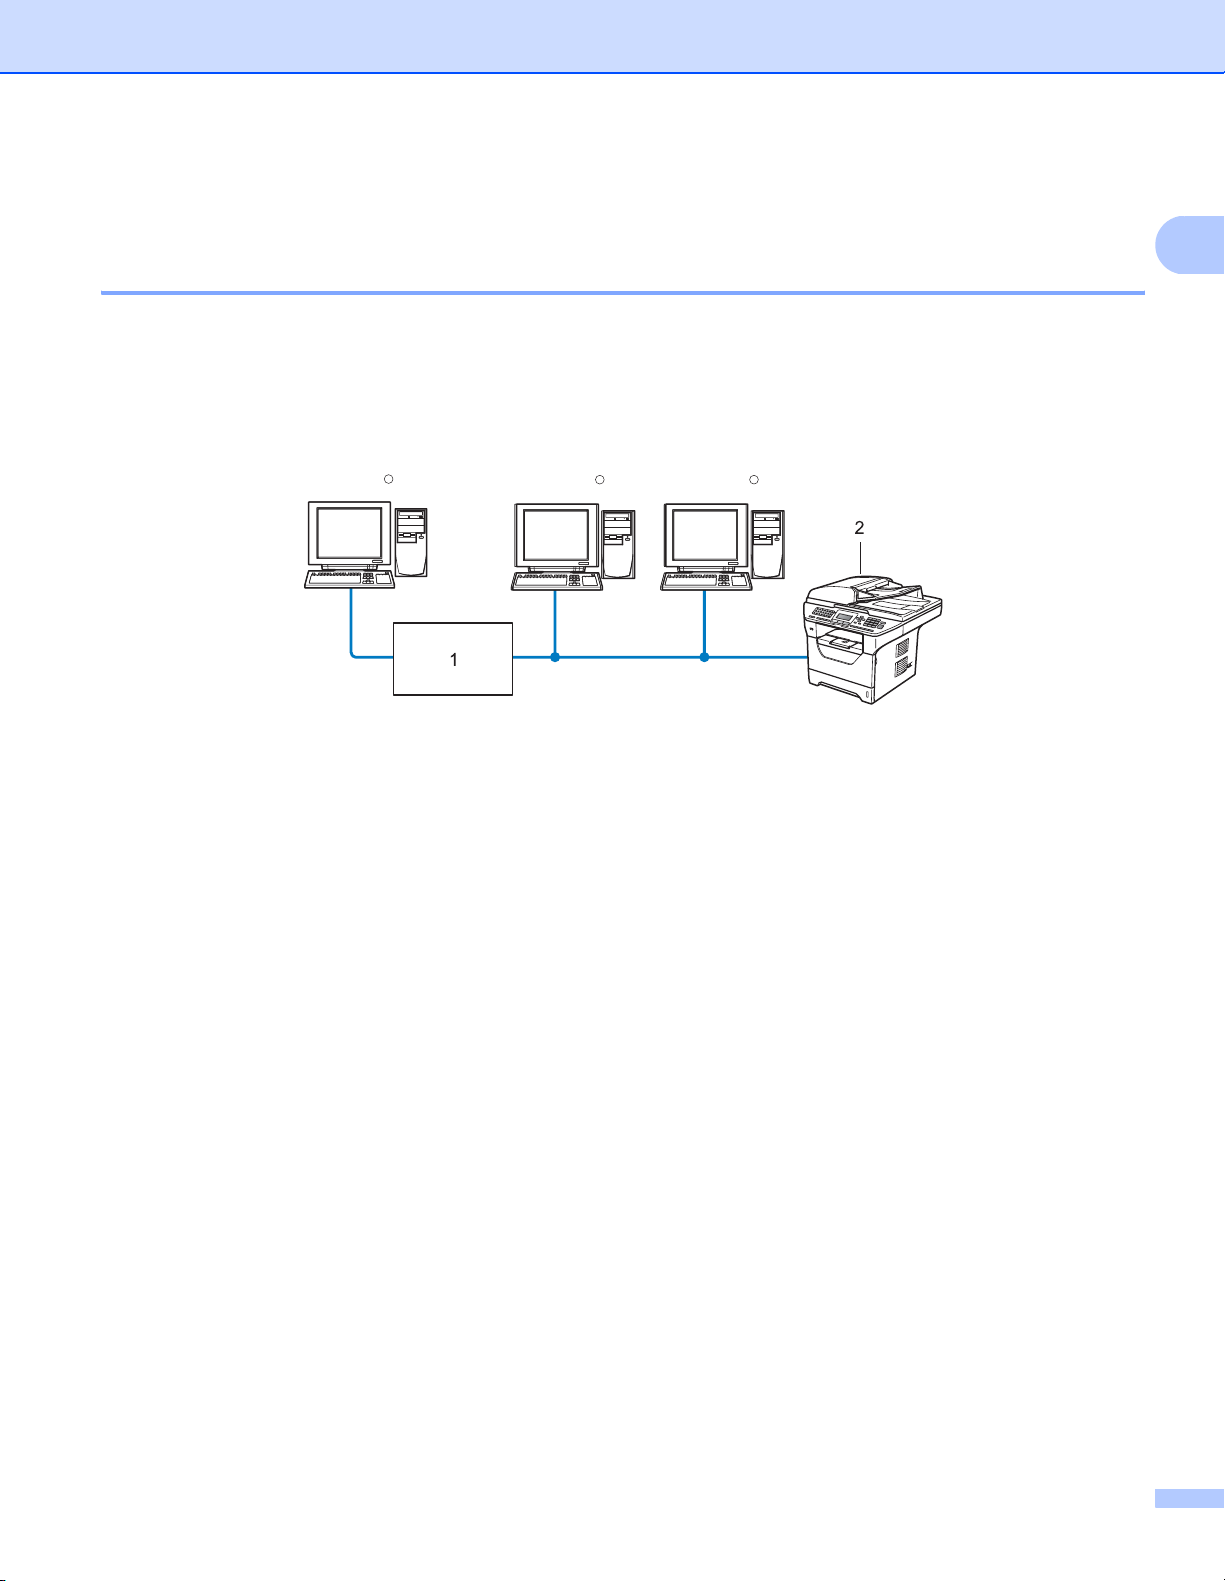
Generally there are two types of network connections: Peer-to-Peer and Network Shared environment.
Peer-to-Peer printing using TCP/IP 1
In a Peer-to-Peer environment, each computer directly sends and receives data to each device. There is no
central server controlling file access or printer sharing.
Windows
R
Windows
R
Windows
R
TCP/IPTCP/IP
1
1Router
2 Network printer (your machine)
In a smaller network of 2 or 3 computers, we recommend the Peer-to-Peer printing method as it is easier
to configure than the Network Shared printing method described on the following page. See Network
Shared printing on page 6.
Each computer must use the TCP/IP Protocol.
The Brother machine needs to have an appropriate IP address configuration.
If you are using routers, the Gateway address must be configured on the computers and the Brother
machine.
The Brother machine can also communicate with Macintosh
®
(TCP/IP compatible operating systems).
5
Page 16
Introduction
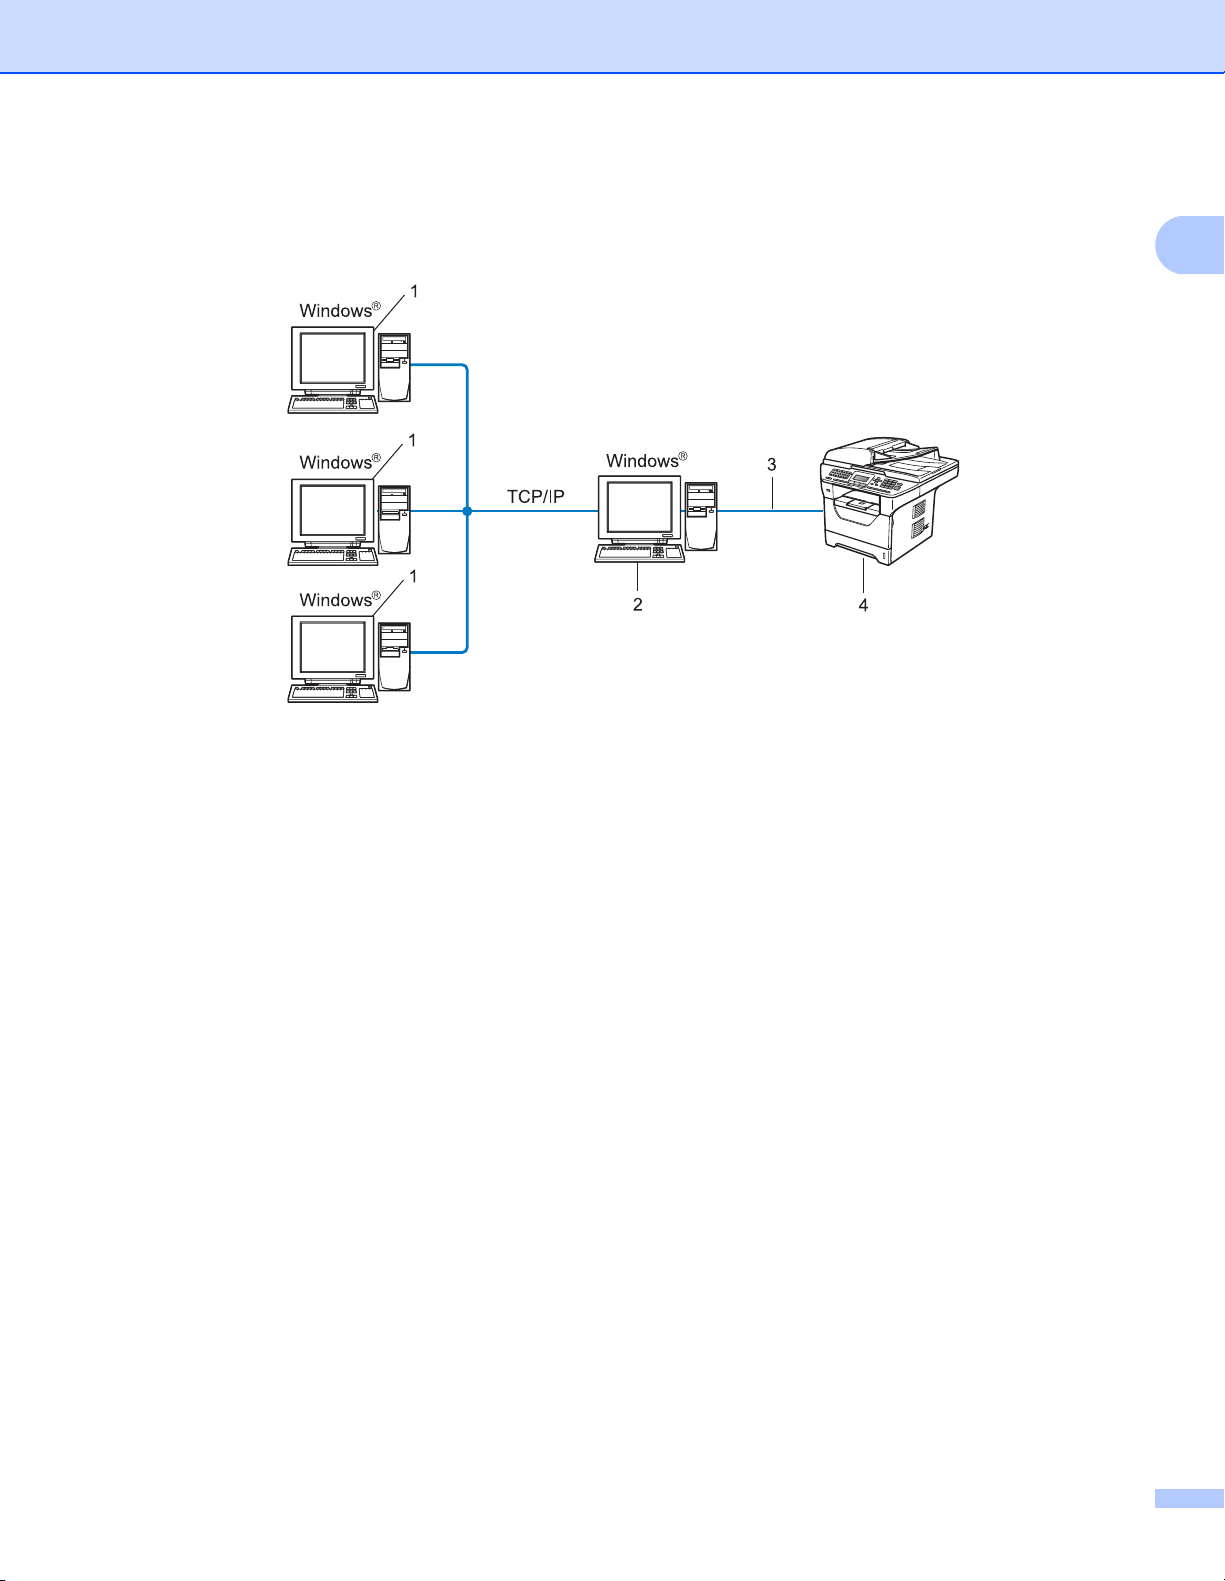
Network Shared printing 1
In a Network Shared environment, each computer sends data via a centrally controlled computer. This type
of computer is often called a “Server” or a “Print Server”. Its job is to control the printing of all print jobs.
1 Client computer
2 Also known as “Server” or “Print server”
3 TCP/IP, USB or parallel (where available)
4 Printer (your machine)
1
In a larger network, we recommend a Network Shared printing environment.
The “server” or the “print server” must use the TCP/IP print protocol.
The Brother machine needs to have an appropriate IP address configuration unless the machine is
connected via the USB or the parallel interface at the server.
6
Page 17
Introduction
Wireless network connection examples (For MFC-8890DW only) 1
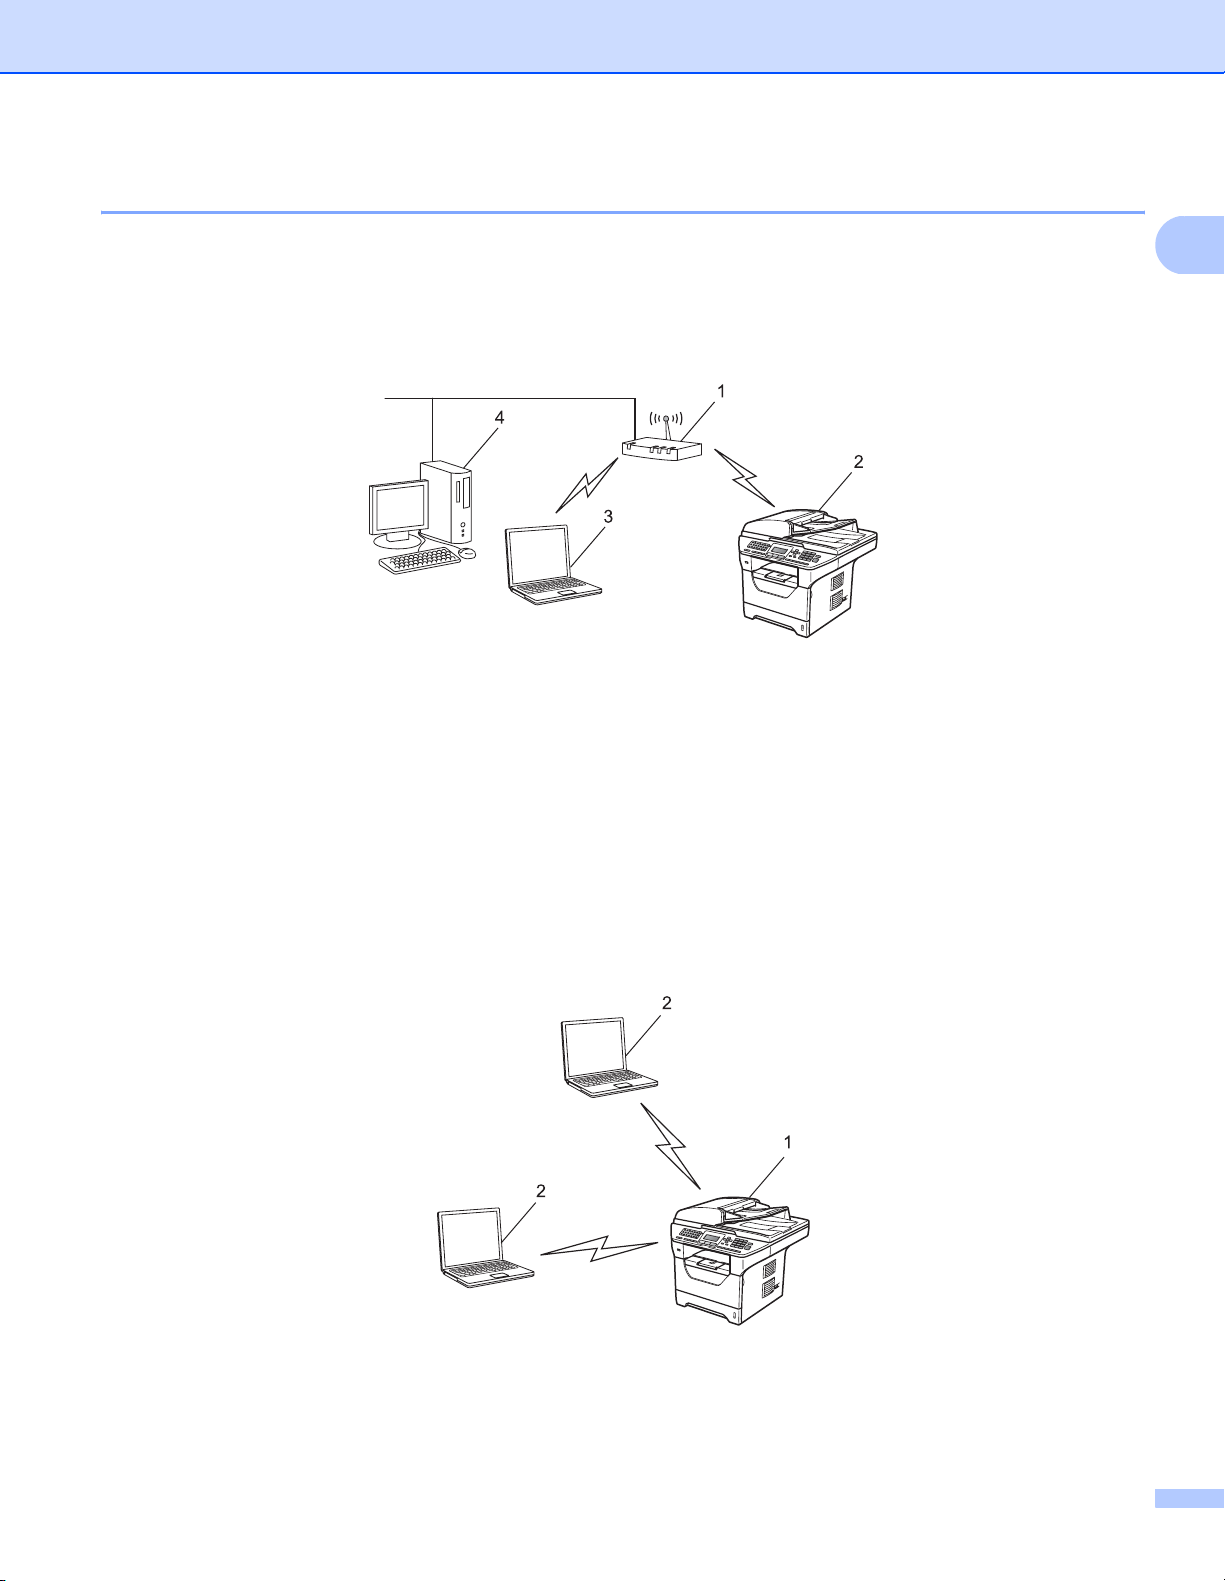
Connected to a computer with an access point on the network (Infrastructure mode) 1
This type of network has a central access point at the heart of the network. The access point can also act as
a bridge or a gateway to a wired network. When the Brother wireless machine (your machine) is part of this
network, it receives all print jobs via an access point.
1 Access point
2 Wireless network printer (your machine)
3 Wireless capable computer communicating with the access point
4 Wired computer which is not wireless capable connected to the access point with the Ethernet
cable
1
Connected to a wireless capable computer without an access point on the network (Ad-hoc mode) 1
This type of network does not have a central access point. Each wireless client communicates directly with
each other. When the Brother wireless machine (your machine) is part of this network, it receives all print jobs
directly from the computer sending the print data.
1 Wireless network printer (your machine)
2 Wireless capable computer
7
Page 18

Introduction
Protocols 1
TCP/IP protocols and functionalities 1
Protocols are the standardized sets of rules for transmitting data on a network. Protocols allow users to gain
access to network connected resources.
The print server used on this Brother product supports the TCP/IP (Transmission Control Protocol/Internet
Protocol) protocol.
TCP/IP is the most popular set of protocols used for communication such as Internet and E-mail. This protocol
can be used in almost all operating systems such as Windows
The following TCP/IP protocols are available on this Brother product.
Note
• You can configure the protocol settings by using the HTTP interface (web browser).
See How to configure the machine settings using Web Based Management (web browser) on page 141.
• For information about supported security protocols, see Security protocols on page 163.
®
, Windows Server®, Macintosh® and Linux.
1
DHCP/BOOTP/RARP 1
By using the DHCP/BOOTP/RARP protocols, the IP address can be automatically configured.
Note
To use the DHCP/BOOTP/RARP protocols, please contact your network administrator.
APIPA 1
If you do not assign an IP address manually (using the control panel of the machine or the BRAdmin software)
or automatically (using a DHCP/BOOTP/RARP server), the Automatic Private IP Addressing (APIPA)
protocol will automatically assign an IP address from the range 169.254.1.0 to 169.254.254.255.
ARP 1
Address Resolution Protocol performs mapping of an IP address to MAC address in a TCP/IP network.
DNS client 1
The Brother print server supports the Domain Name System (DNS) client function. This function allows the
print server to communicate with other devices by using its DNS name.
NetBIOS name resolution 1
Network Basic Input/Output System name resolution enables you to obtain the IP address of the other device
using its NetBIOS name during the network connection.
8
Page 19

Introduction
WINS 1
Windows Internet Name Service is an information providing service for the NetBIOS name resolution by
consolidating an IP address and a NetBIOS name that is in the local network.
LPR/LPD 1
Commonly used printing protocols on a TCP/IP network.
SMTP client 1
Simple Mail Transfer Protocol (SMTP) client is used to send E-mails via the Internet or Intranet.
Custom Raw Port (Default is Port 9100) 1
Another commonly used printing protocol on a TCP/IP network. It enables interactive data transmission.
IPP 1
The Internet Printing Protocol (IPP Version 1.0) allows you to print documents directly to any accessible
printer via the internet.
Note
For the IPPS protocol, see Security protocols on page 163.
mDNS 1
1
mDNS allows the Brother print server to automatically configure itself to work in a Mac OS® X Simple Network
®
Configured system. (Mac OS
X 10.3.9 or greater).
TELNET 1
The Brother print server supports TELNET server for command line configuration.
SNMP 1
The Simple Network Management Protocol (SNMP) is used to manage network devices including computers,
routers and Brother network ready machines. The Brother print server supports SNMPv1, SNMPv2c and
SNMPv3.
Note
For the SNMPv3 protocol, see Security protocols on page 163.
LLMNR 1
The Link-Local Multicast Name Resolution protocol (LLMNR) resolves the names of neighboring computers,
if the network does not have a Domain Name System (DNS) server. The LLMNR Responder function works
in both the IPv4 or IPv6 environment when using a computer that has the LLMNR Sender function such as
®
Windows Vista
.
9
Page 20

Introduction
Web services 1
The Web Services protocol enables Windows Vista® users to install the Brother printer driver by right clicking
the machine icon from the Start / Network selection.
®
See Installation when using web services (For Windows Vista
users) on page 205.
The Web Services also lets you check the current status of the machine from your computer.
Web server (HTTP) 1
The Brother print server is equipped with a built in web server that allows you to monitor its status or change
some of its configuration settings using a web browser.
Note
®
• We recommend Microsoft
Safari 1.3 (or greater) for Macintosh
Internet Explorer® 6.0 (or greater) or Firefox 1.0 (or greater) for Windows® and
®
. Please also make sure that JavaScript and Cookies are always
enabled in whichever browser you use. If a different web browser is used, make sure it is compatible with
HTTP 1.0 and HTTP 1.1.
• For the HTTPS protocol, see Security protocols on page 163.
FTP 1
The File Transfer Protocol (FTP) allows the Brother machine to scan black and white or color documents
directly to an FTP server located locally on your network or on the internet.
1
SNTP 1
The Simple Network Time Protocol is used to synchronize computer clocks on a TCP/IP network. You can
configure the SNTP settings using Web Based Management (web browser). (For the details, see Web Based
Management on page 140.)
CIFS 1
The Common Internet File System is the standard way that computer users share files and printers in
®
Windows
.
LDAP (For MFC-8880DN and MFC-8890DW only) 1
The Lightweight Directory Access Protocol (LDAP) allows the Brother machine to search for information such
as fax numbers and E-mail addresses from an LDAP server.
IPv6 1
This machine is compatible with IPv6, the next generation internet protocol. For more information on the IPv6
protocol, visit http://solutions.brother.com/
.
10
Page 21

Introduction
Other protocol 1
LLTD 1
The Link Layer Topology Discovery protocol (LLTD) lets you locate the Brother machine easily on the
®
Windows Vista
The default setting for this protocol is Off. You can activate LLTD using the BRAdmin Professional 3 utility
software. Visit the download page for your model at http://solutions.brother.com/
Professional 3.
network map. Your Brother machine will be shown with a distinctive icon and the node name.
to download BRAdmin
1
11
Page 22

2
Configuring your machine for a network 2
Overview 2
Before using your Brother machine in a network environment, you must install the Brother software and also
configure the appropriate TCP/IP network settings on the machine itself. In this chapter, you will learn the
basic steps required to print over the network using TCP/IP protocol.
We recommend that you use the Brother installer on the Brother CD-ROM to install the Brother software as
this will guide you through the software and network installation. Please follow the instructions in the supplied
Quick Setup Guide.
Note
If you do not wish to, or are unable to use the Brother installer or any of Brother’s software tools, you can
also use the machine’s control panel to change network settings.
For more information, see Control panel setup on page 92.
IP addresses, subnet masks and gateways 2
To use the machine in a networked TCP/IP environment, you need to configure the IP address and subnet
mask. The IP address you assign to the print server must be on the same logical network as your host
computers. If it is not, you must properly configure the subnet mask and the gateway address.
IP address 2
An IP address is a series of numbers that identifies each computer connected to a network. An IP address
consists of four numbers separated by dots. Each number is between 0 and 255.
2
Example: In a small network, you would normally change the final number.
• 192.168.1.1
• 192.168.1.2
• 192.168.1.3
12
Page 23

Configuring your machine for a network
How the IP address is assigned to your print server: 2
If you have a DHCP/BOOTP/RARP server in your network (typically a UNIX®/Linux or Windows® 2000/XP,
®
Windows Vista
address from the DHCP server and register its name with any RFC 1001 and 1002-compliant dynamic name
services.
Note
On smaller networks, the DHCP server may also be the router.
For more information on DHCP, BOOTP and RARP, see:
Using DHCP to configure the IP address on page 199.
Using BOOTP to configure the IP address on page 200.
Using RARP to configure the IP address on page 201.
If you do not have a DHCP/BOOTP/RARP server, the Automatic Private IP Addressing (APIPA) protocol will
automatically assign an IP address from the range 169.254.1.0 to 169.254.254.255. For more information on
APIPA, see Using APIPA to configure the IP address on page 201.
If the APIPA protocol is disabled, the IP address of a Brother print server is 192.0.0.192. However, you can
easily change this IP address number to match with the IP address details of your network. For information
on how to change the IP address, see Setting the IP address and subnet mask on page 15.
or Windows Server® 2003/2008 network) the print server will automatically obtain its IP
2
Subnet mask 2
Subnet masks restrict network communication.
Example: Computer 1 can talk to Computer 2
• Computer 1
IP Address: 192.168. 1. 2
Subnet Mask: 255.255.255.000
• Computer 2
IP Address: 192.168. 1. 3
Subnet Mask: 255.255.255.000
Note
0 denotes that there is no limit to communication at this part of the address.
In the above example, we can communicate with anything that has an IP address that begins with
192.168.1.x. (where x.x. are numbers between 0 and 255.)
13
Page 24

Configuring your machine for a network
Gateway (and router) 2
A gateway is a network point that acts as an entrance to another network and sends data transmitted via the
network to an exact destination. The router knows where to direct data that arrives at the gateway. If a
destination is located on an external network, the router transmits data to the external network. If your network
communicates with other networks, you may need to configure the Gateway IP address. If you do not know
the Gateway IP address then contact your Network Administrator.
Step by step chart 2
a Configure the TCP/IP settings.
Configure the IP address i See page 15
Configure the subnet mask i See page 15
Configure the gateway i See page 15
b Change the print server settings.
2
Using the BRAdmin Light utility i See page 18
Using the BRAdmin Professional 3 utility i See page 18
Using the control panel i See page 19
Using the Web Based Management (web browser) i See page 20
Using the Remote Setup i See page 20
Using other methods i See page 20
14
Page 25

Configuring your machine for a network
Setting the IP address and subnet mask 2
Using the BRAdmin Light utility to configure your machine as a network printer2
BRAdmin Light 2
The BRAdmin Light utility is designed for initial setup of the Brother network connected devices. It also can
search for Brother products in a TCP/IP environment, view the status and configure basic network settings,
®
such as IP address. The BRAdmin Light utility is available for Windows
®
Server
2003/2008 and Mac OS® X 10.3.9 or greater.
How to configure your machine using the BRAdmin Light utility 2
Note
• Please use the BRAdmin Light utility that was supplied on the CD-ROM of your Brother product. You can
also download the latest Brother BRAdmin Light utility from http://solutions.brother.com/
• If you require more advanced printer management, use the latest version of BRAdmin Professional 3 utility
that is available as a download from http://solutions.brother.com/
®
Windows
users.
2000/XP, Windows Vista®, Windows
.
. This utility is only available for
2
• If you are using a firewall function of anti-spyware or antivirus applications, temporarily disable them. Once
you are sure that you can print, configure the software settings following the instructions again.
• Node name: Node name appears in the current BRAdmin Light window. The default node name of the
print server in the machine is “BRNxxxxxxxxxxxx” for a wired network or “BRWxxxxxxxxxxxx” for a wireless
network. (“xxxxxxxxxxxx” is your machine’s MAC Address / Ethernet Address.)
• The default password for Brother print servers is “access”.
a Start the BRAdmin Light utility.
For Windows
Click Start / All Programs
1
Programs for Windows® 2000 users
For Mac OS® X 10.3.9 or greater users
Double-click Mac OS X or Macintosh HD (Startup Disk) / Library / Printers / Brother / Utilities /
BRAdmin Light.jar file.
®
2000/XP, Windows Vista® and Windows Server® 2003/2008 users
1
/ Brother / BRAdmin Light / BRAdmin Light.
b BRAdmin Light will search for new devices automatically.
15
Page 26
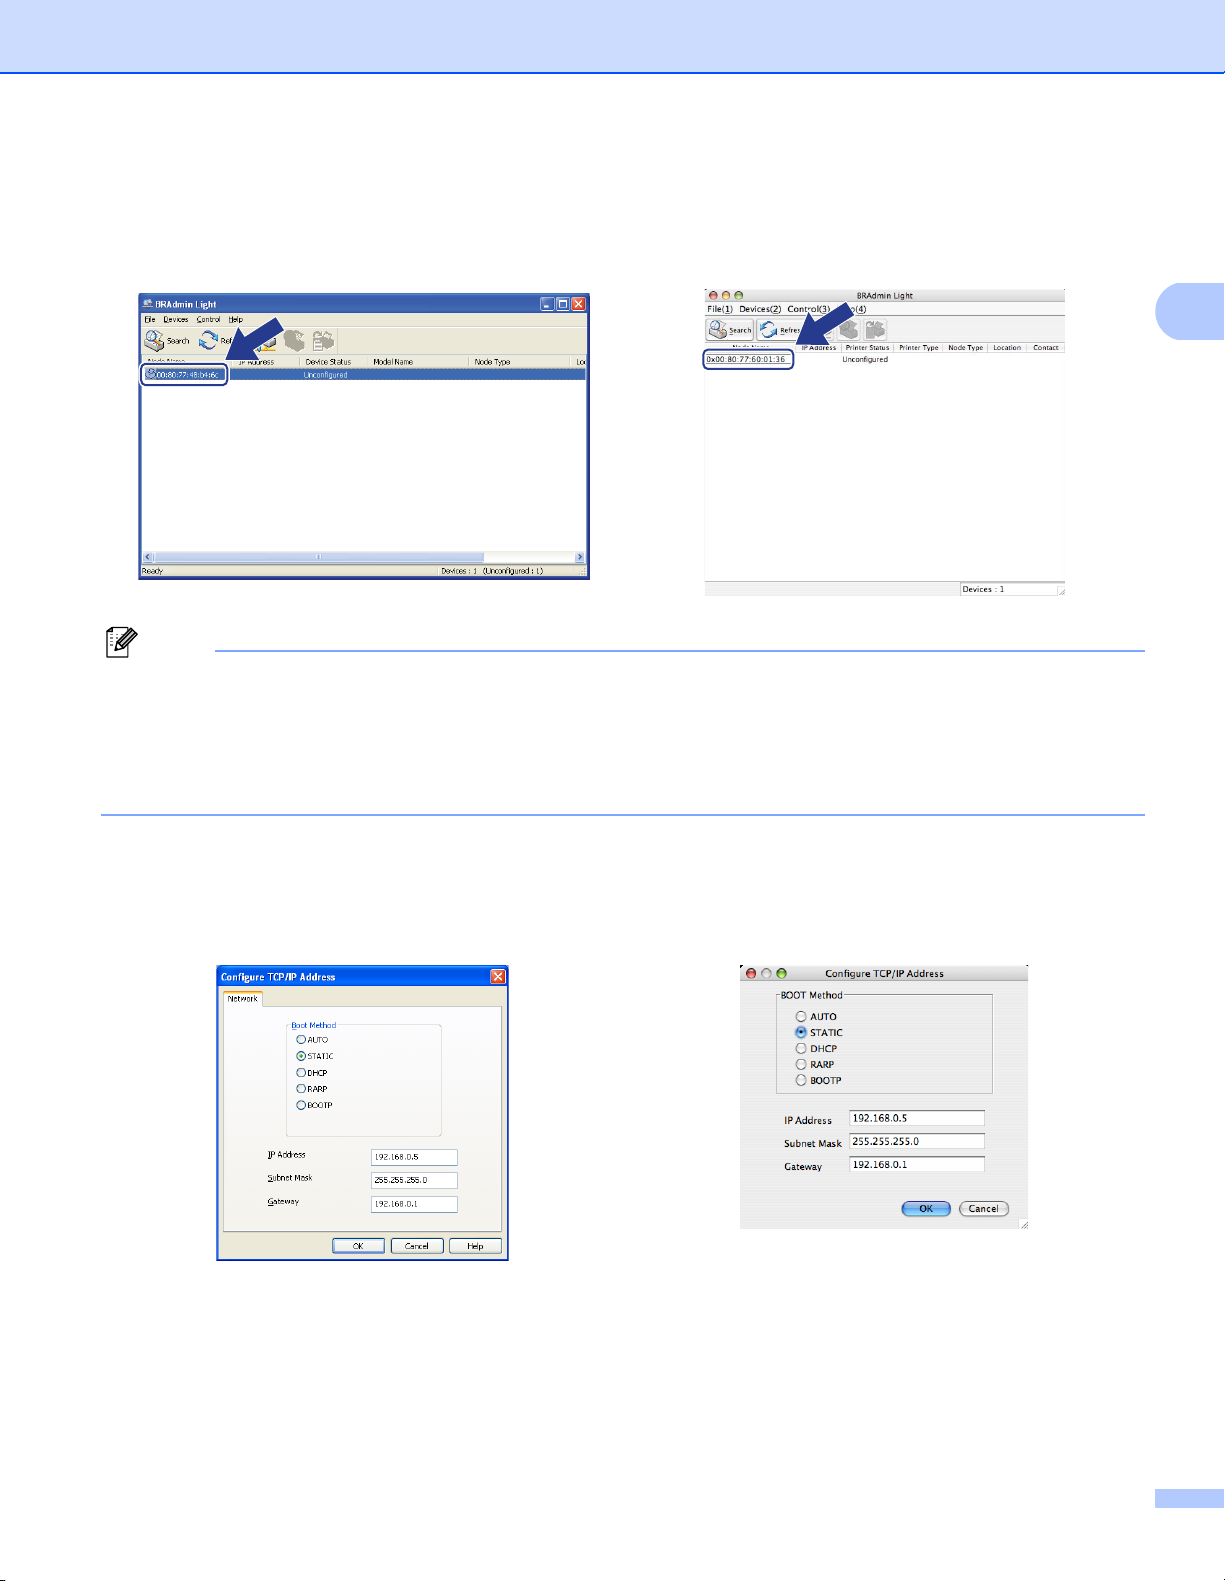
c Double-click the unconfigured device.
Configuring your machine for a network
Windows
®
Macintosh
®
Note
• If the print server is set to its factory default settings (if you do not use a DHCP/BOOTP/RARP server), the
device will appear as Unconfigured in the BRAdmin Light utility screen.
• You can find the node name and MAC Address (Ethernet Address) by printing the Network Configuration
List.
See Printing the Network Configuration List on page 122.
d Choose STATIC from Boot Method (BOOT Method). Enter the IP Address, Subnet Mask and
Gateway (if needed) of your print server.
2
Windows
®
Macintosh
®
e Click OK.
f With the correctly programmed IP address, you will see the Brother print server in the device list.
16
Page 27

Configuring your machine for a network
Using the control panel to configure your machine for a network 2
You can configure your machine for a network using the control panel Network menu.
See Control panel setup on page 92.
Using other methods to configure your machine for a network 2
You can configure your machine for a network using other methods.
See Other ways to set the IP address (for advanced users and administrators) on page 199.
2
17
Page 28

Configuring your machine for a network
Changing the print server settings 2
Note
(MFC-8890DW only) For wireless network users, you need to configure the wireless settings to change
the print server settings.
See Configure your machine for a wireless network on page 31.
Using the BRAdmin Light utility to change the print server settings 2
a Start the BRAdmin Light utility.
For Windows
Click Start / All Programs
1
Programs for Windows® 2000 users
For Mac OS® X 10.3.9 or greater users
Double-click Mac OS X or Macintosh HD (Startup Disk) / Library / Printers / Brother / Utilities /
BRAdmin Light.jar file.
®
2000/XP, Windows Vista® and Windows Server® 2003/2008 users
1
/ Brother / BRAdmin Light / BRAdmin Light.
2
b Choose the print server which you want to change the settings.
c Choose Network Configuration from the Control menu.
d Enter a password. The default password is “access”.
e You can now change the print server settings.
Note
If you want to change more advanced settings, use the BRAdmin Professional 3 utility that is available as
a download from http://solutions.brother.com/
Using the BRAdmin Professional 3 utility to change print server settings (for Windows®) 2
Note
• Please use the latest version of the BRAdmin Professional 3 utility that is available as a download from
http://solutions.brother.com/
• If you are using a firewall function of anti-spyware or antivirus applications, temporarily disable them. Once
you are sure that you can print, configure the software settings following the instructions again.
. This utility is only available for Windows® users.
. (For Windows® only)
• Node name: The Node name for each Brother device on the network appears in BRAdmin Professional 3.
The default Node name is “BRNxxxxxxxxxxxx” for a wired network or “BRWxxxxxxxxxxxx” for a wireless
network. (“xxxxxxxxxxxx” is your machine’s MAC Address / Ethernet Address.)
18
Page 29
Configuring your machine for a network
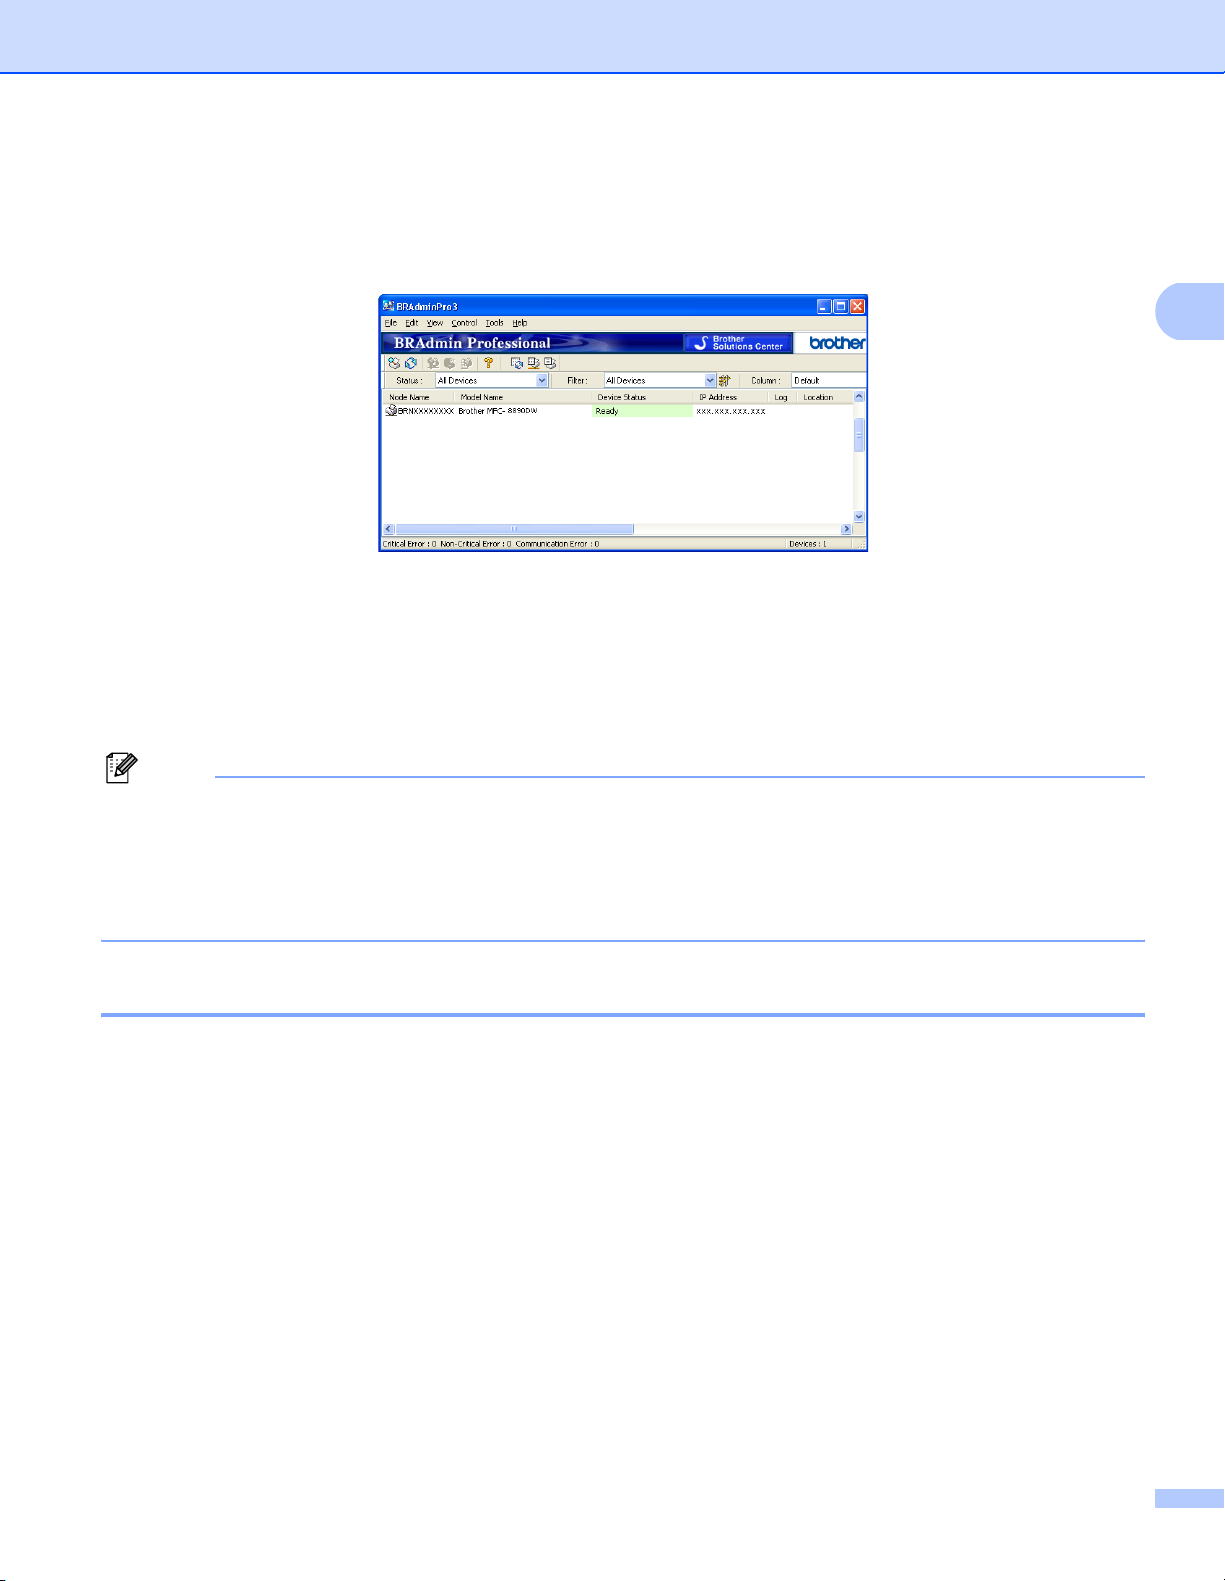
a Start the BRAdmin Professional utility (from Windows
®
Windows Server
2003/2008), by clicking Start / All Programs1 / Brother Administrator Utilities /
®
2000/XP, Windows Vista® and
Brother BRAdmin Professional 3 / BRAdmin Professional 3.
1
Programs for Windows® 2000 users
b Choose the print server which you want to configure.
c Choose Configure Device from the Control menu.
d Enter a password if you have set one. The default password is “access”.
e You can now change the print server settings.
2
Note
• If the print server is set to its factory default settings without using a DHCP/BOOTP/RARP server, the
device will appear as APIPA in the BRAdmin Professional 3 utility screen.
• You can find the node name and MAC Address / Ethernet Address by printing out the Network
Configuration List. (See Printing the Network Configuration List on page 122 for information on how to print
the Network Configuration List on your print server.)
Using the control panel to change the print server settings 2
You can configure and change the print server settings using the control panel Network menu.
See Control panel setup on page 92.
19
Page 30

Configuring your machine for a network
Using Web Based Management (web browser) to change the print/scan server settings 2
A standard web browser can be used to change your print server settings using the HTTP (Hyper Text
Transfer Protocol). (See How to configure the machine settings using Web Based Management (web
browser) on page 141.)
Using Remote Setup to change the print server settings
(Not available for Windows Server
®
2003/2008)
(Not available for DCP-8085DN and DCP-8080DN) 2
2
Remote Setup for Windows
The Remote Setup application allows you to configure network settings from a Windows® application. When
you access this application, the settings on your machine will be downloaded automatically to your PC and
displayed on your PC screen. If you change the settings, you can upload them directly to the machine.
a Click the Start button, All Programs
1
Programs for Windows® 2000 users
®
1
, Brother, MFC-XXXX LAN, then Remote Setup.
b Enter a password. The default password is “access”.
c Click TCP/IP.
d You can now change the print server settings.
Remote Setup for Macintosh
The Remote Setup application allows you to configure many MFC settings from a Macintosh® application.
When you access this application, the settings on your machine will be downloaded automatically to your
®
Macintosh
directly to the machine.
and displayed on your Macintosh® screen. If you change the settings, you can upload them
®
a Double click the Mac OS X or Macintosh HD (Startup Disk) icon on your desktop, Library, Printers,
Brother, then Utilities.
2
2
b Double click the Remote Setup icon.
c Enter a password. The default password is “access”.
d Click TCP/IP.
e You can now change the print server settings.
Using other methods to change print server settings 2
You can configure your network printer using other methods.
See Other ways to set the IP address (for advanced users and administrators) on page 199.
20
Page 31

Configuring your machine for a wireless
3
network (For MFC-8890DW)
Overview 3
To connect your machine to your wireless network, we recommend you to follow the steps in the Quick Setup
Guide using the Setup Wizard from the machine’s control panel Network menu. By using this method, you
can easily connect your machine to your wireless network.
Please read this chapter for additional methods on how to configure the wireless network settings. For
information on TCP/IP settings, see Setting the IP address and subnet mask on page 15. Then, in Network
printing from Windows
®
Macintosh
drivers into the operating system running on your computer.
Note
• To achieve optimum results with normal everyday document printing, place the Brother machine as close
to the network access point/router as possible with minimal obstructions. Large objects and walls between
the two devices as well as interference from other electronic devices can affect the data transfer speed of
your documents.
Due to these factors, wireless may not be the best method of connection for all types of documents and
applications. If you are printing large files, such as multi-page documents with mixed text and large
graphics, you may want to consider choosing wired Ethernet for a faster data transfer, or USB for the
fastest throughput speed.
using the BR-Script 3 driver on page 136, you will learn how to install the network software and
®
: basic TCP/IP Peer-to-Peer printing on page 128 or Network printing from
3
3
• Although the Brother MFC-8890DW can be used in a both wired and wireless network, only one
connection method can be used at a time.
21
Page 32

Configuring your machine for a wireless network (For MFC-8890DW)
Wireless network terms and concepts 3
If you want to use your machine in a wireless network you must configure the machine to match the settings
of the existing wireless network. This section provides some of the main terms and concepts of these settings,
which may be helpful when you configure your machine for a wireless network.
SSID (Service Set Identifier) and channels 3
You need to configure the SSID and a channel to specify the wireless network you want to connect to.
SSID
Each wireless network has its own unique network name and it is technically referred to as SSID or ESSID
(Extended Service Set Identifier). The SSID is a 32-byte or less value and is assigned to the access point.
The wireless network devices you want to associate to the wireless network should match the access
point. The access point and wireless network devices regularly send wireless packets (referred to as a
beacon) which has the SSID information. When your wireless network device receives a beacon, you can
identify the wireless network that is close enough for the radio waves to reach your device.
Channels
Wireless networks use channels. Each wireless channel is on a different frequency. There are up to 14
different channels that can be used when using a wireless network. However, in many countries the
number of channels available are restricted. (For more information, see Wireless network on page 208.)
Authentication and encryption 3
Most wireless networks use some kind of security settings. These security settings define the authentication
(how the device identifies itself to the network) and encryption (how the data is encrypted as it is sent on the
network). If you do not correctly specify these options when you are configuring your Brother wireless
device, it will not be able to connect to the wireless network. Therefore care must be taken when
configuring these options. Please refer to the information below to see which authentication and encryption
methods your Brother wireless device supports.
3
Authentication methods 3
The Brother printer supports the following methods:
Open system
Wireless devices are allowed to access the network without any authentication.
Shared key
A secret pre-determined key is shared by all devices that will access the wireless network.
The Brother wireless machine uses the WEP keys as the pre-determined key.
WPA-PSK/WPA2-PSK
Enables a Wi-Fi Protected Access Pre-shared key (WPA-PSK/WPA2-PSK), which enables the Brother
wireless machine to associate with access points using TKIP for WPA-PSK or AES for WPA-PSK and
WPA2-PSK (WPA-Personal).
22
Page 33

Configuring your machine for a wireless network (For MFC-8890DW)
LEAP
Cisco LEAP (Light Extensible Authentication Protocol) has been developed by Cisco Systems, Inc. which
uses a user ID and password for authentication.
EAP-FAST
EAP-FAST (Extensible Authentication Protocol-Flexible Authentication via Secured Tunnel) has been
developed by Cisco Systems, Inc. which uses a user ID and password for authentication, and symmetric
key algorithms to achieve a tunneled authentication process.
The Brother machine supports the following inner authentications:
• EAP-FAST/NONE
EAP-FAST authentication for CCXv3 networks. Does not use an inner authentication method.
• EAP-FAST/MS-CHAPv2
EAP-FAST authentication for CCXv4 networks. Uses MS-CHAPv2 for the inner authentication method.
• EAP-FAST/GTC
EAP-FAST authentication for CCXv4 networks. Uses GTC for the inner authentication method.
Encryption methods 3
3
Encryption is used to secure the data that is sent over the wireless network. The Brother wireless machine
supports the following encryption methods:
None
No encryption method is used.
WEP
By using WEP (Wired Equivalent Privacy), the data is transmitted and received with a secure key.
TKIP
TKIP (Temporal Key Integrity Protocol) provides per-packet key mixing a message integrity check and
rekeying mechanism.
AES
AES (Advanced Encryption Standard) is the Wi-Fi authorized strong encryption standard.
CKIP
The original Key Integrity Protocol for LEAP by Cisco Systems, Inc.
23
Page 34

Configuring your machine for a wireless network (For MFC-8890DW)
Network key 3
There are some rules for each security method:
Open system/Shared key with WEP
This key is a 64-bit or 128-bit value that must be entered in an ASCII or hexadecimal format.
• 64 (40) bit ASCII:
Uses 5 text characters. e.g. “WSLAN” (this is case sensitive).
• 64 (40) bit hexadecimal:
Uses 10 digits of hexadecimal data. e.g. “71f2234aba”
• 128 (104) bit ASCII:
Uses 13 text characters. e.g. “Wirelesscomms” (this is case sensitive)
• 128 (104) bit hexadecimal:
Uses 26 digits of hexadecimal data. e.g. “71f2234ab56cd709e5412aa2ba”
WPA-PSK/WPA2-PSK and TKIP or AES
Uses a Pre-Shared Key (PSK) that is 8 or more characters in length, up to a maximum of 63 characters.
LEAP
Uses User ID and Password.
• User ID: Up to a maximum of 64 characters in length
• Password: Up to a maximum of 32 characters in length
EAP-FAST
Uses User ID and Password.
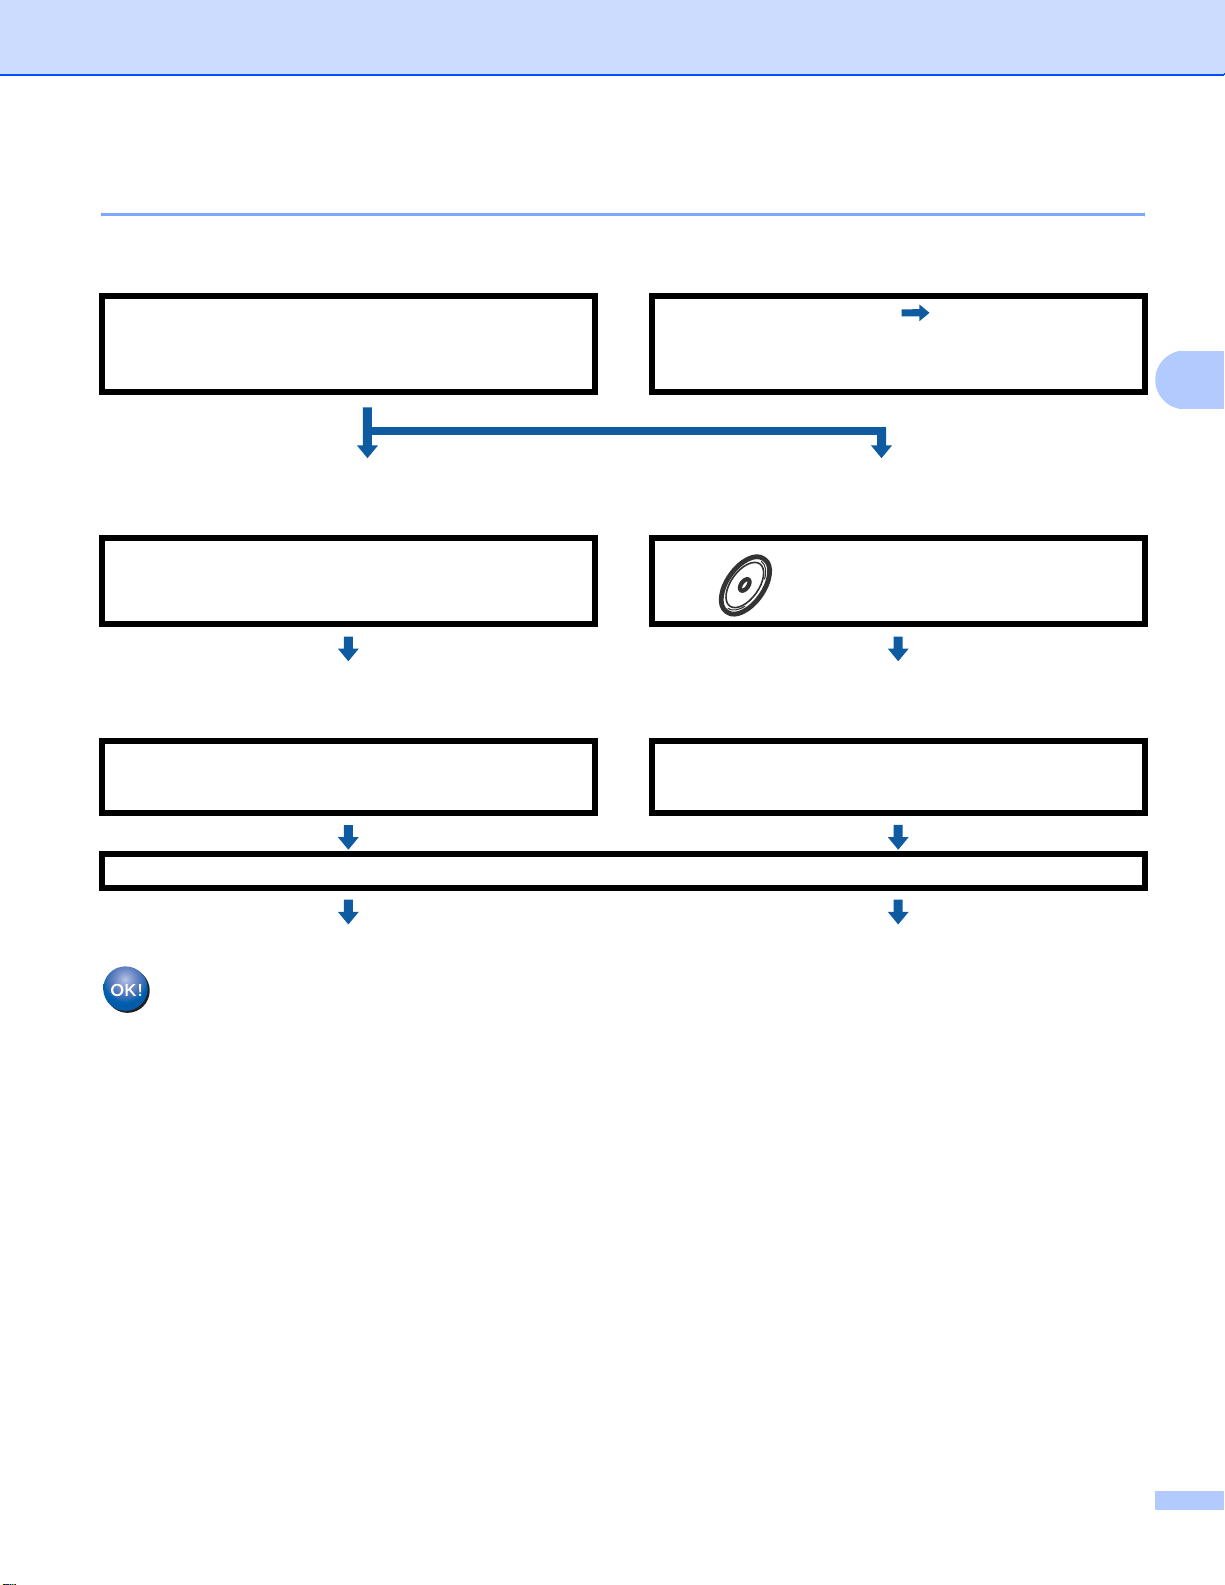
• User ID: less than 64 characters in length.
• Password: less than 32 characters in length.
3
24
Page 35
Configuring your machine for a wireless network (For MFC-8890DW)
Step by step chart for wireless network configuration 3
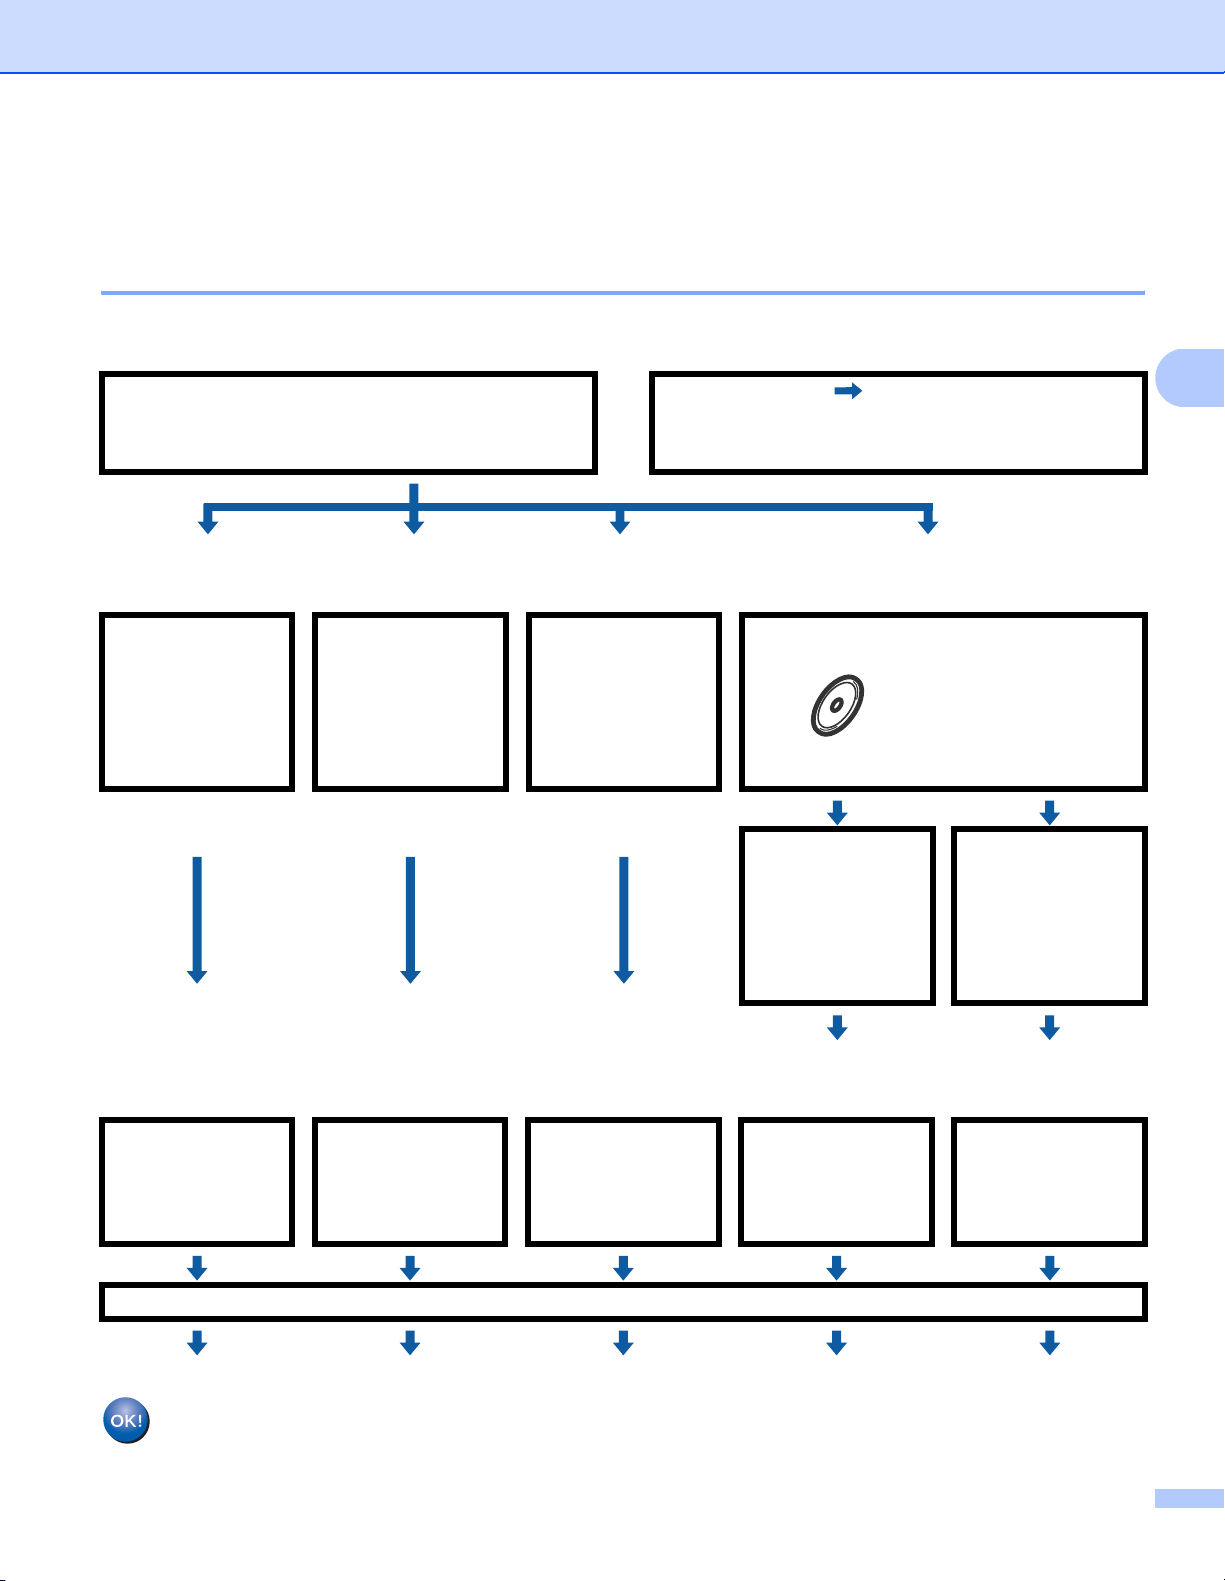
For Infrastructure mode 3
a Confirm your network environment. See page 27
Infrastructure mode
Connected to a computer with an access point
Ad-hoc mode See page 26
or
Connected to a wireless capable computer
without an access point
b Confirm your wireless network setup method. See page 28
Using the
Using the Setup
Wizard from the
control panel
(Recommended)
SES/WPS/AOSS™
control panel
menu
(Automatic
Wireless mode)
Using the PIN
Method of Wi-Fi
Protected Setup
Temporarily using
a network cable
Using the Brother
installer
application
Using the
SES/WPS/AOSS™
control panel
menu
(Automatic
Wireless mode)
3
c Configure your machine for a wireless network. See page 31
See page 31 See page 36 See page 39
Installing drivers and software (See the Quick Setup Guide)
Wireless configuration and installing drivers and software have been completed.
For Windows
See page 41
For Macintosh
See page 67
®
For Windows
®
See page 51
®
For Macintosh
®
See page 77
25
Page 36
Configuring your machine for a wireless network (For MFC-8890DW)
For Ad-hoc mode 3
a Confirm your network environment. See page 27.
Ad-hoc mode
Connected to a wireless capable computer
Infrastructure mode See page 25
or
Connected to a computer with an access point
without an access point
b Confirm your wireless network setup method. See page 28.
Using the Setup Wizard from the control panel
(Recommended)
c Configure your machine for a wireless network. See page 31
See page 31
Installing drivers and software (See the Quick Setup Guide)
For Macintosh
Using the Brother installer
application
For Windows
®
See page 56
®
See page 82
3
Wireless configuration and installing drivers and software have been completed.
26
Page 37
Configuring your machine for a wireless network (For MFC-8890DW)
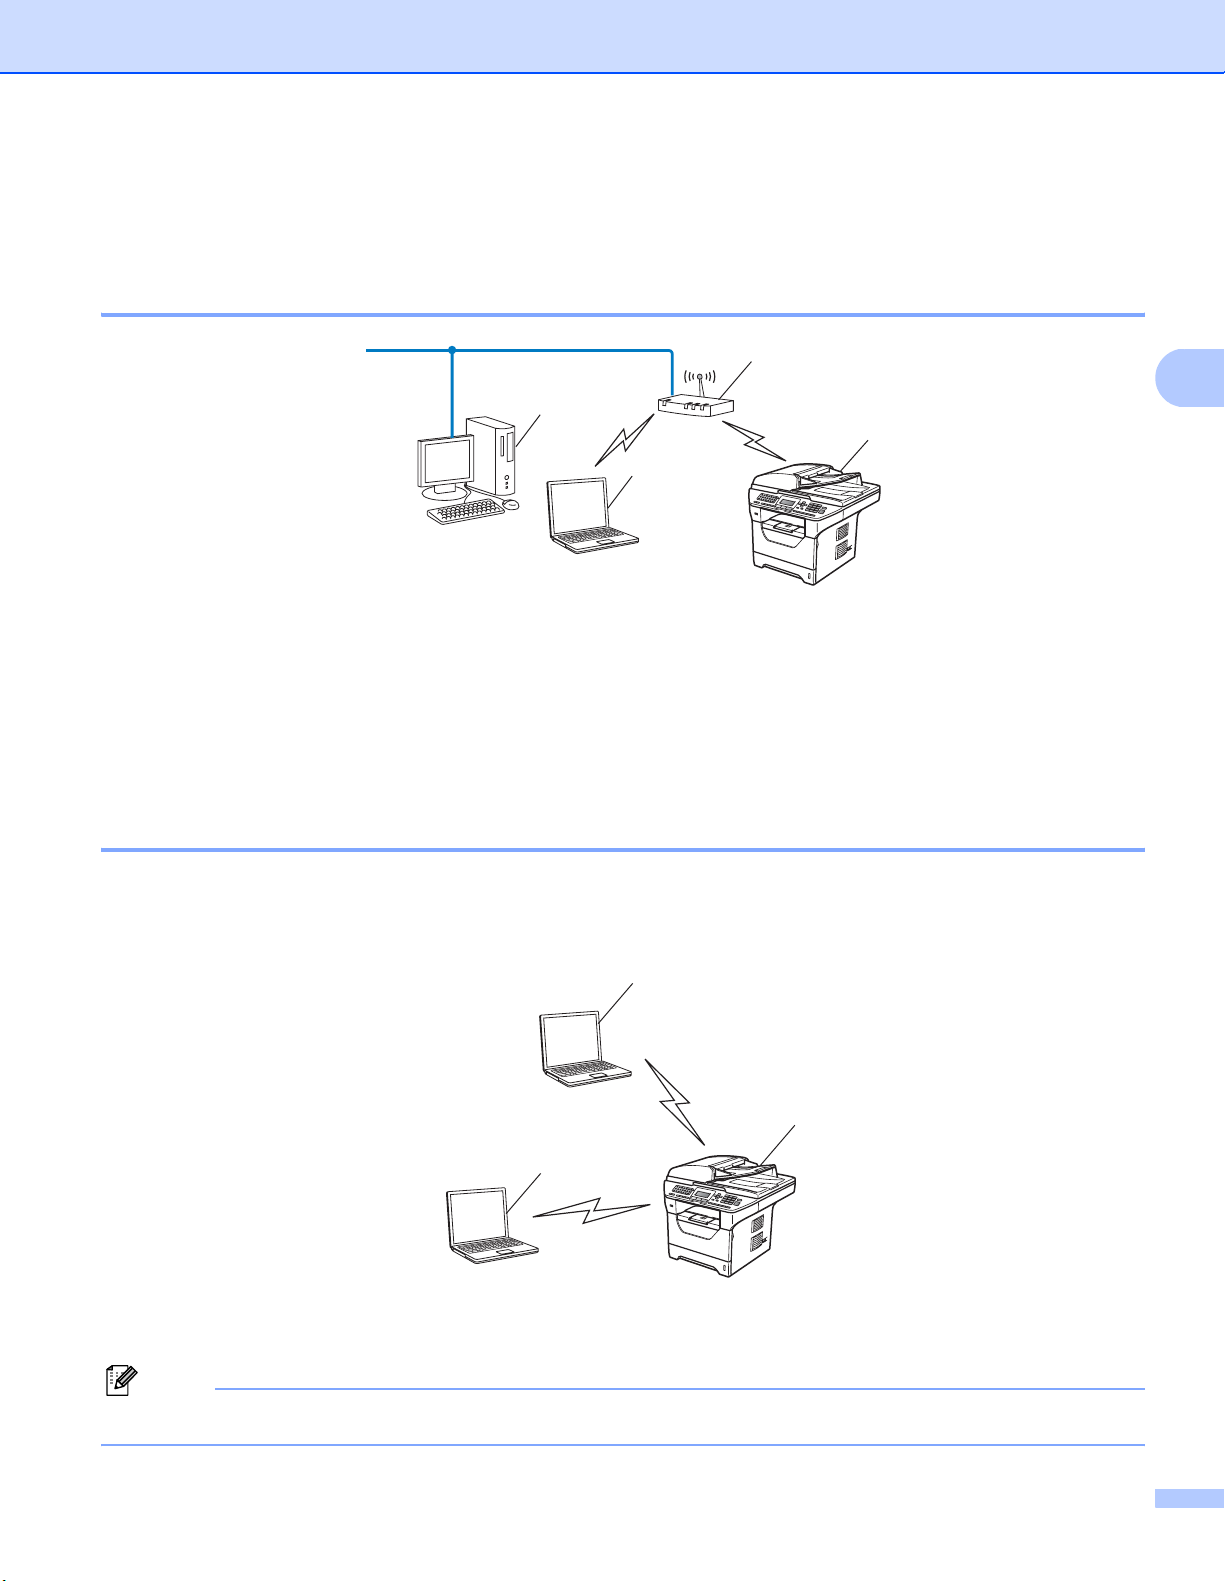
Confirm your network environment 3
Connected to a computer with an access point in the network (Infrastructure mode) 3
4
3
1
2
1 Access point
2 Wireless network printer (your machine)
3 Wireless capable computer connected to the access point
4 Wired computer which is not wireless capable connected to the access point with an Ethernet
cable
Connected to a wireless capable computer without an access point in the network (Ad-hoc mode) 3
This type of network does not have a central access point. Each wireless client communicates directly with
each other. When the Brother wireless machine (your machine) is part of this network, it receives all print jobs
directly from the computer sending the print data.
2
3
1
2
1 Wireless network printer (your machine)
2 Wireless capable computer
Note
We do not guarantee the wireless network connection with Windows Server
®
products in Ad-hoc mode.
27
Page 38
Configuring your machine for a wireless network (For MFC-8890DW)
Confirm your wireless network setup method 3
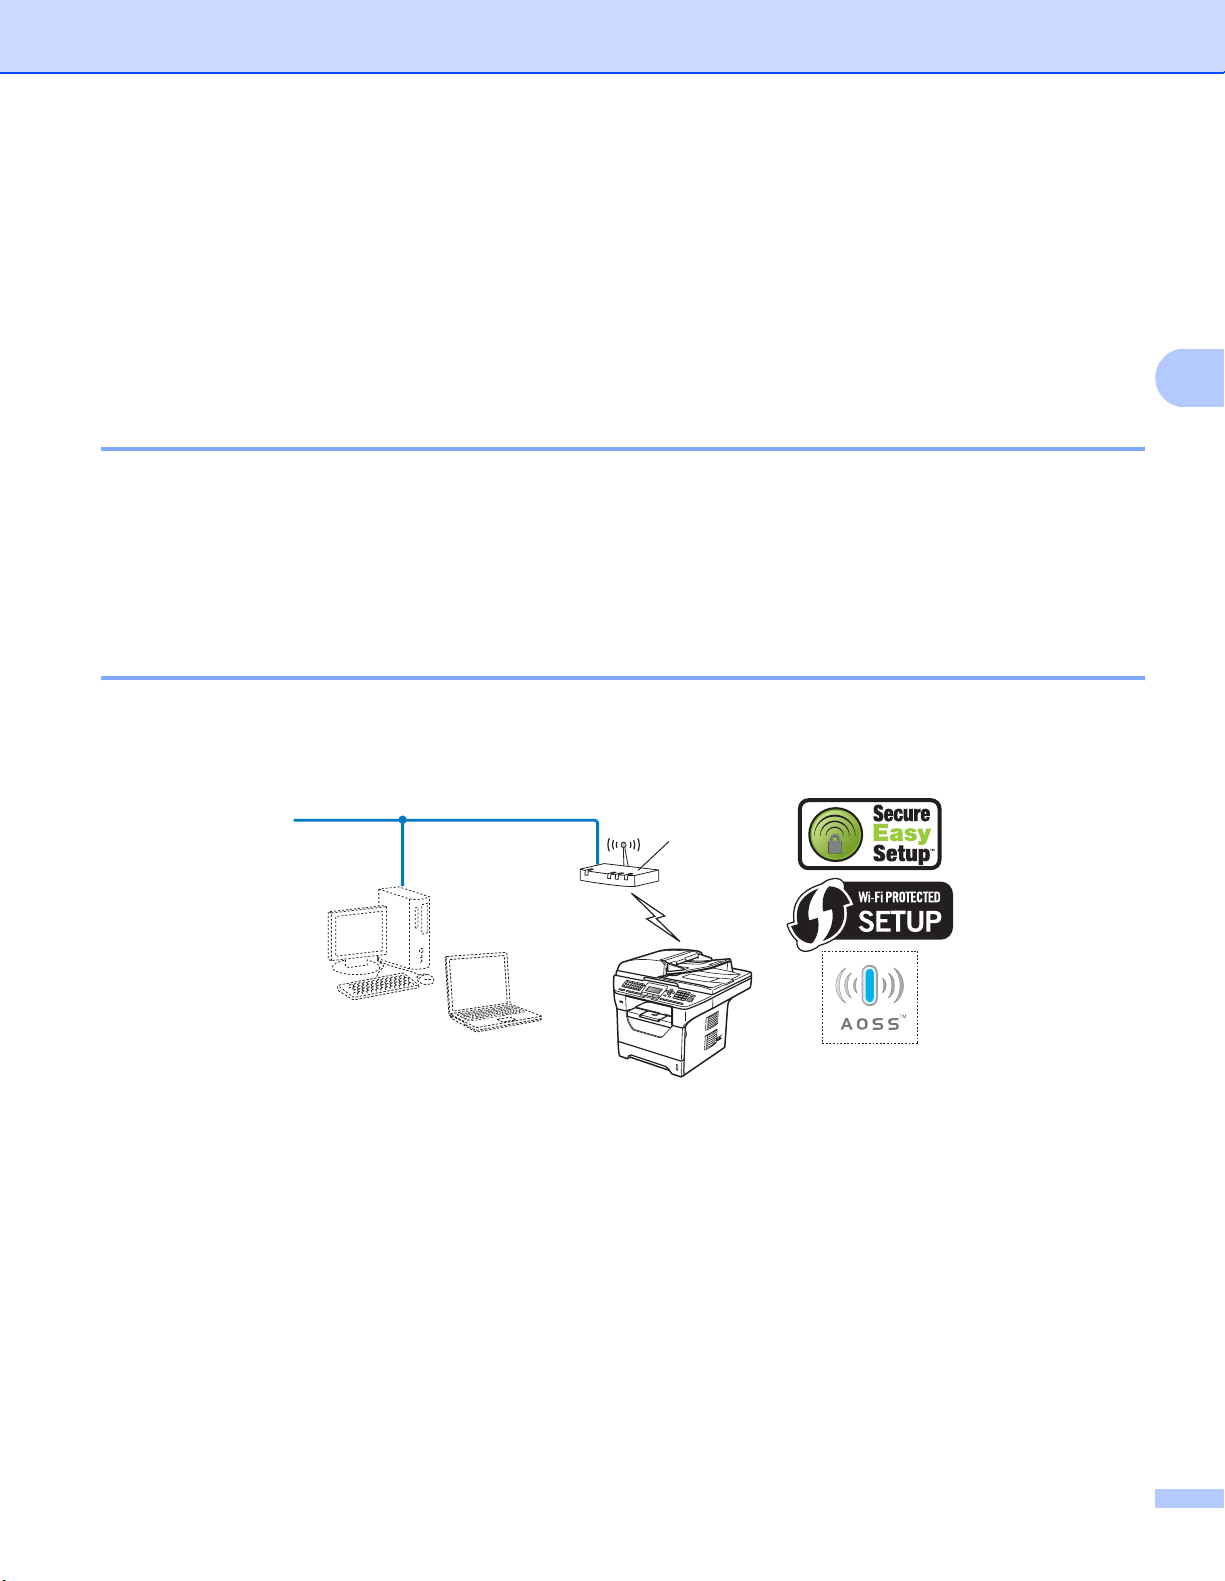
There are four methods to configure your wireless network machine. Use the machine’s control panel
(recommended), SES/ WPS/ AOSS™ from the control panel menu, the PIN Method of Wi-Fi Protected Setup
or the Brother installer application. The setup process will be different depending on your network
environment.
Configuration using the machine’s control panel Setup Wizard to configure your machine for a wireless network 3
We recommend that you use the machine’s control panel to configure your wireless network settings. By
using the control panel Setup Wizard function, you can easily connect your Brother machine to your
wireless network. You must know your wireless network settings before you proceed with this
installation. (See Using the Setup Wizard from the control panel on page 31.)
Configuration using the SES/WPS/AOSS™ control panel menu (Automatic Wireless mode) (Infrastructure mode only) 3
If your wireless access point (A) supports either SecureEasySetup™, Wi-Fi Protected Setup (PBC1) or
AOSS™, you can configure the machine without a computer. (See Using the SES/WPS/AOSS™ control
panel menu to configure your machine for a wireless network (Automatic Wireless mode) on page 36.)
A
3
1
Push Button Configuration
28
Page 39
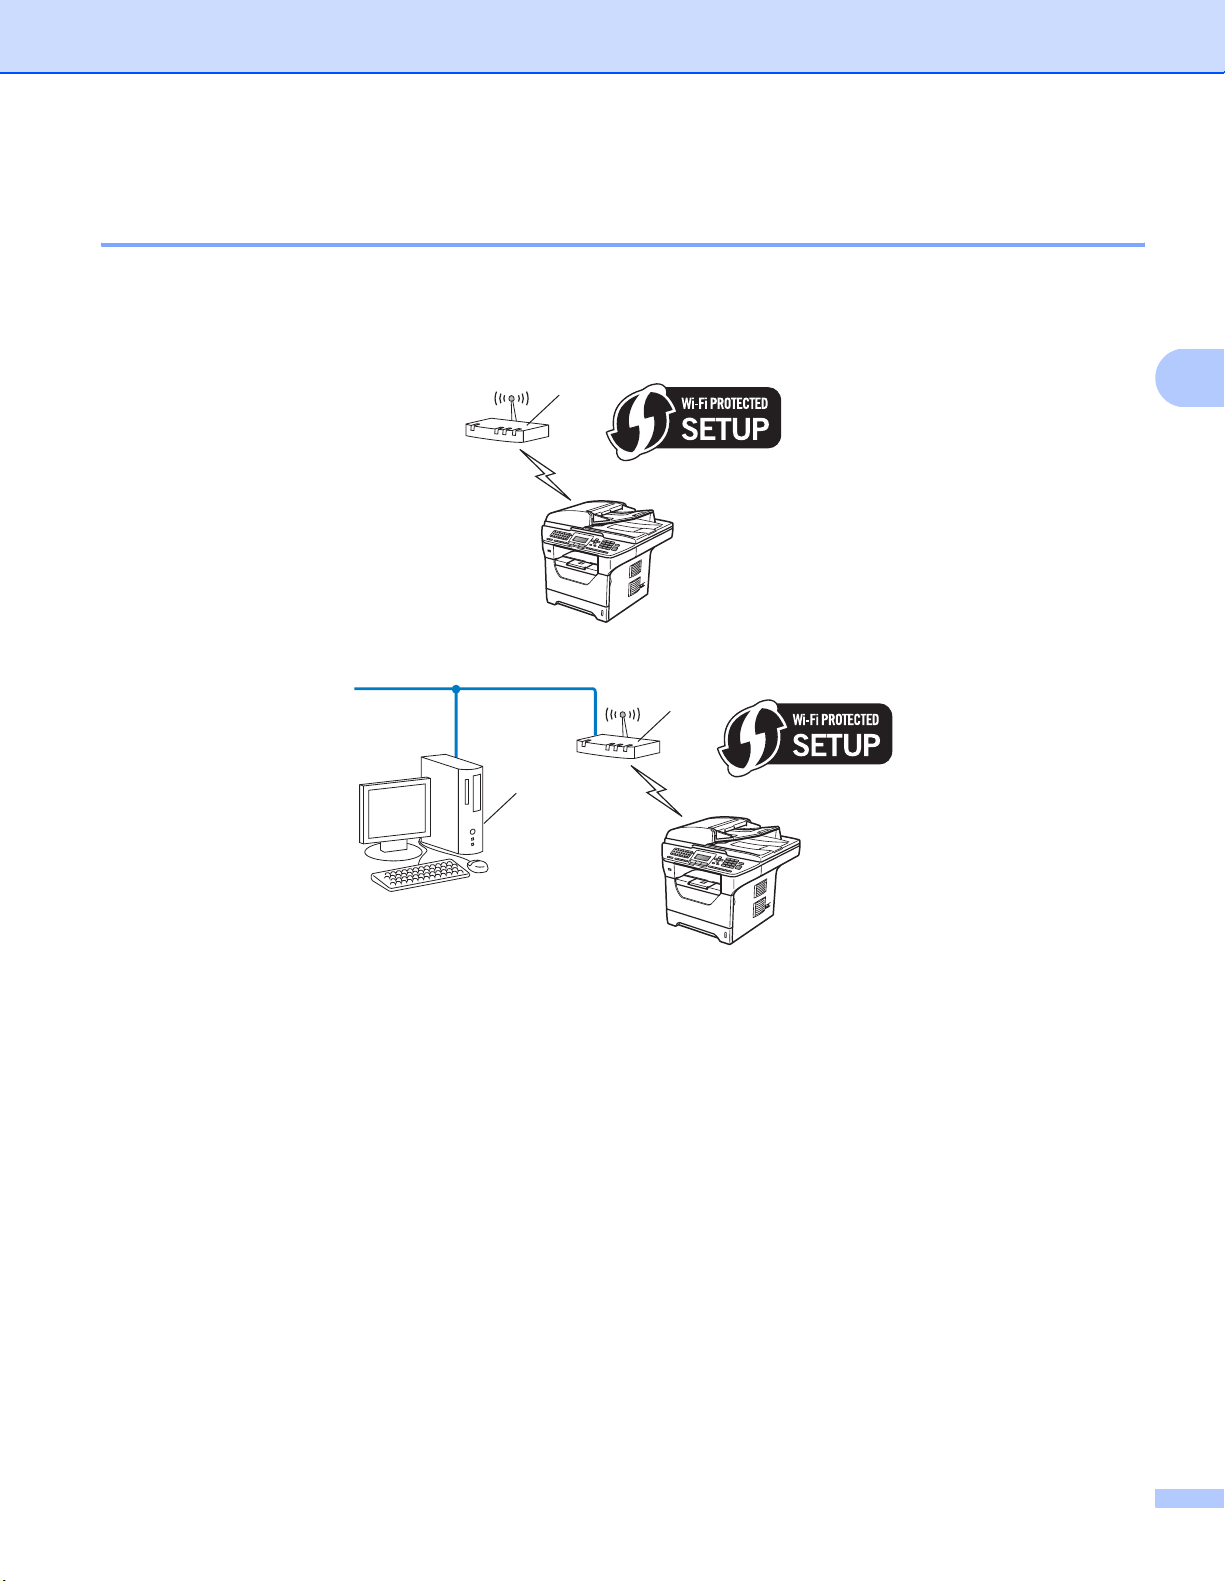
Configuring your machine for a wireless network (For MFC-8890DW)
Configuration using the PIN Method of Wi-Fi Protected Setup (Infrastructure mode only) 3
If your wireless access point (A) supports Wi-Fi Protected Setup, you can also configure using the
PIN Method of Wi-Fi Protected Setup. (See Using the PIN Method of Wi-Fi Protected Setup on page 39.)
Connection when the wireless access point/router (A) doubles as a Registrar
A
Connection when another device (C), such as a computer is used as a Registrar1.
A
1
3
1
The Registrar is a device that manages the wireless LAN.
C
29
Page 40
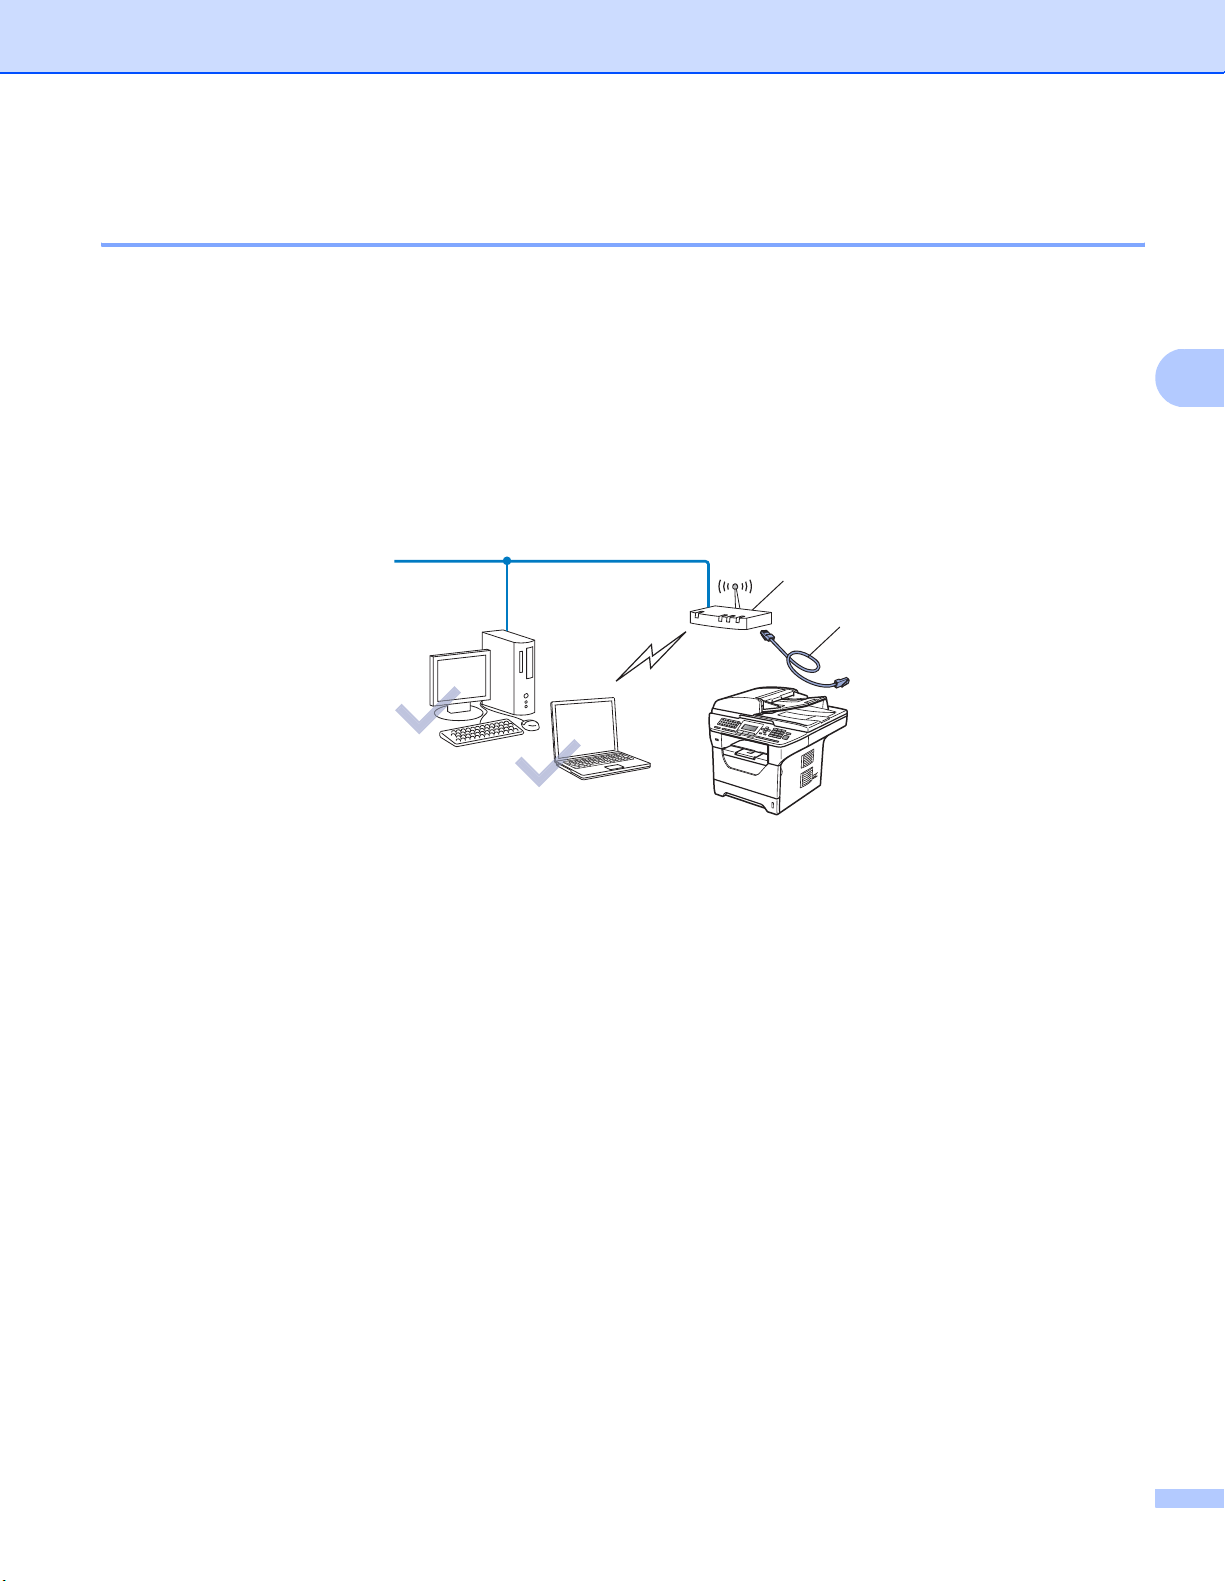
Configuring your machine for a wireless network (For MFC-8890DW)
Configuration using the Brother installer application on the CD-ROM to configure your wireless network machine 3
You can also use the Brother installer application on the CD-ROM we have provided with the printer. You will
be guided by the on-screen instructions until you are able to use your Brother wireless network machine. You
must know your wireless network settings before you proceed with this installation. (See Using the Brother
installer application on the CD-ROM to configure your machine for a wireless network on page 40.)
Configuration temporarily using a network cable 3
If there is an Ethernet Hub or Router in the same network as the wireless access point (A) of your machine,
you can temporarily connect the Hub or Router to the machine using an Ethernet cable (B), this is an easy
way to configure your machine. You can then remotely configure the machine from a computer on the
network.
A
B
3
30
Page 41
Configuring your machine for a wireless network (For MFC-8890DW)
Configure your machine for a wireless network 3
IMPORTANT
• If you are going to connect your Brother machine to your network, we recommend that you contact your
system administrator prior to installation. You must know your wireless network settings before you
proceed with this installation.
• If you have previously configured the wireless settings of the machine, you must reset the network LAN
settings before you can configure the wireless settings again. Press Menu, 7, 0 for Network Reset,
press 1 for Reset and then choose 1 for Yes to accept the change. The machine will restart automatically.
Using the Setup Wizard from the control panel 3
You can configure your Brother machine by using the Setup Wizard function. This is located in the
Network menu on the machine’s control panel. See to the steps below for further information.
a Write down the wireless network settings of your access point or wireless router. If you do not know them,
contact your network administrator or the manufacture of your access point/router.
3
Item Example Record the current wireless network settings
Communication mode: (Infrastructure) Infrastructure
Network name: (SSID, ESSID) HELLO
Authentication method:
(Open system, Shared key, WPA-PSK
1
WPA2-PSK
Encryption mode:
(None, WEP,TKIP, AES, CKIP)
Network key:
(Encryption key, WEP key
Passphrase)
1
2
, LEAP, EAP-FAST)
2
,
WPA/WPA2-PSK is a Wi-Fi Protected Access Pre-Shared Key, which lets the Brother wireless machine associate with access points using
TKIP or AES encryption (WPA-Personal). WPA/WPA2-PSK (TKIP or AES) uses a Pre-Shared Key (PSK) that is 8 or more characters in
length, up to a maximum of 63 characters.
The WEP key is for 64-bit encrypted networks or 128-bit encrypted networks and can contain both numbers and letters. If you do not know
this information you should see the documentation provided with your access point or wireless router. This key is a 64-bit or 128-bit value
that must be entered in an ASCII or HEXADECIMAL format.
For example:
64-bit ASCII: Uses 5 text characters e.g. “Hello” (this is case sensitive)
64-bit Hexadecimal: Uses 10 digits of hexadecimal data e.g. “71f2234aba”
128-bit ASCII: Uses 13 text characters e.g.
128-bit Hexadecimal: Uses 26 digits of hexadecimal data
WPA2-PSK
1
,
AES
12345678
“Wirelesscomms” (this is case sensitive)
e.g.“71f2234ab56cd709e5412aa3ba”
31
Page 42
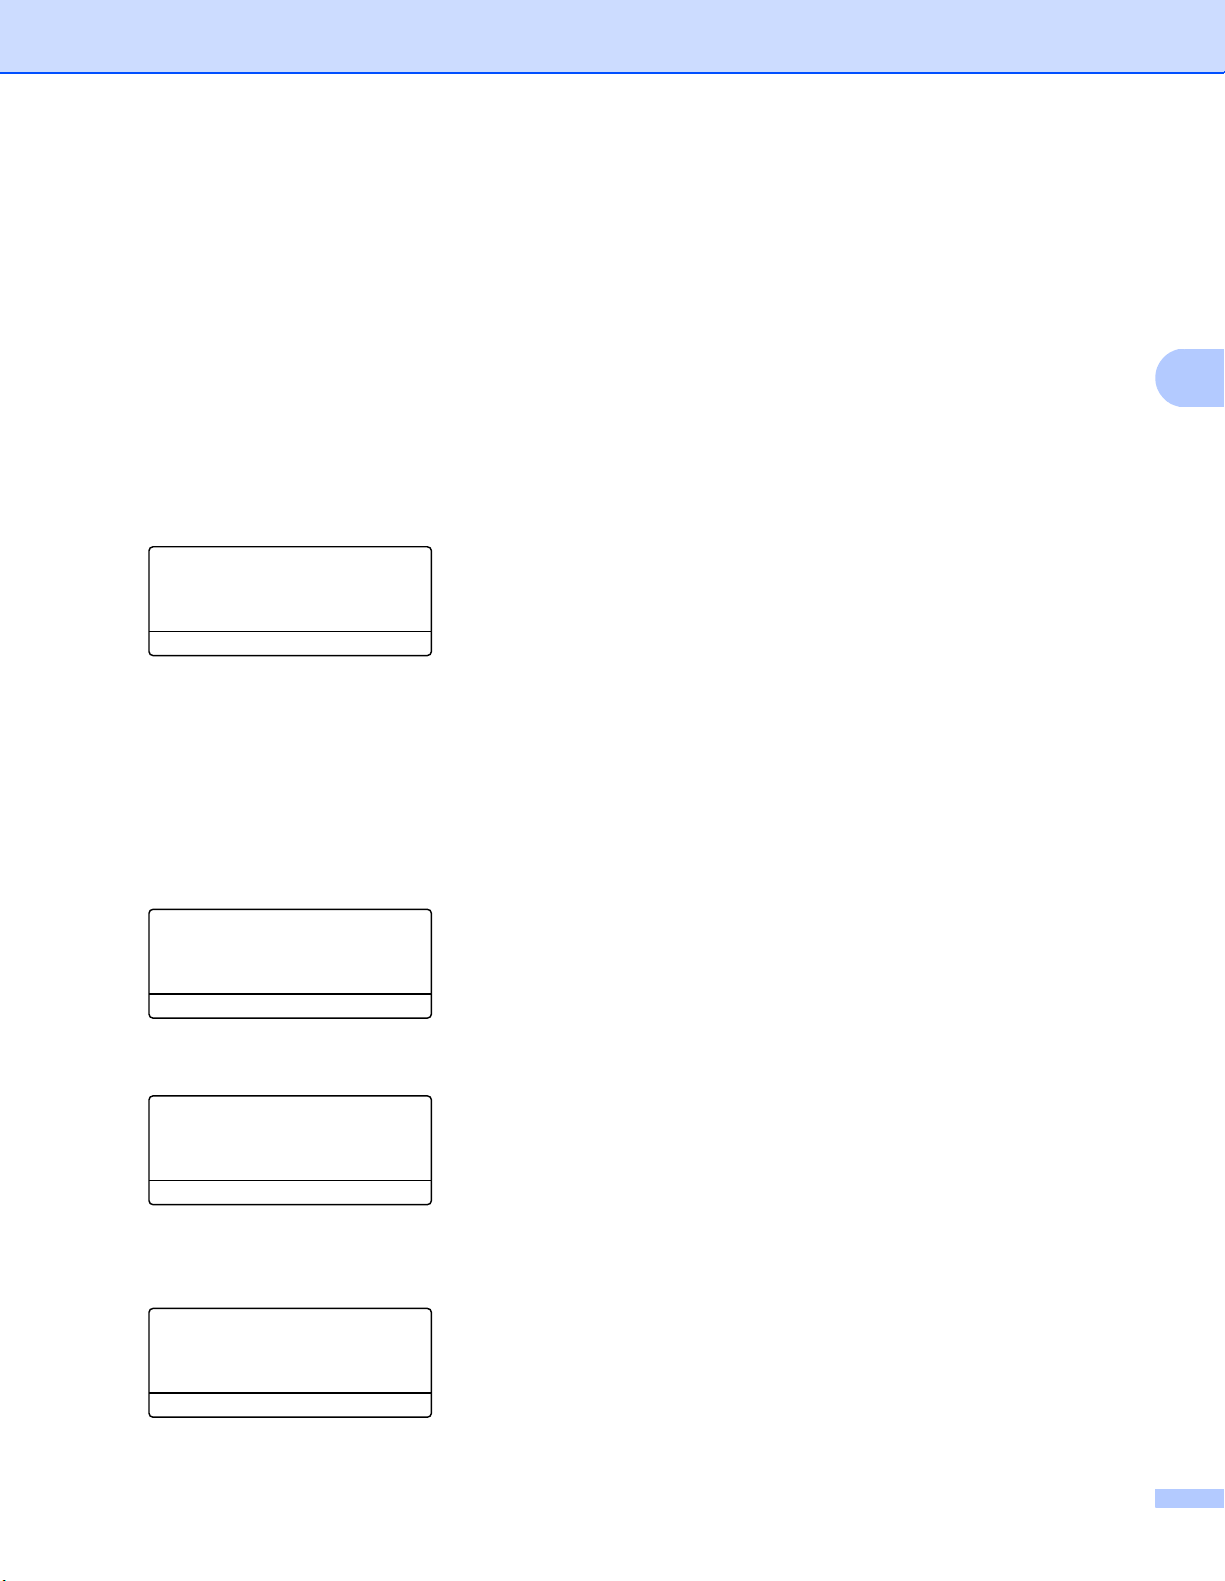
Configuring your machine for a wireless network (For MFC-8890DW)
b Plug the machine’s power cord into the AC power outlet. Turn on the machine’s power switch.
c Press Menu on the control panel of the Brother machine.
d Press a or b to choose Network.
Press OK.
e Press a or b to choose WLAN.
Press OK.
f Press a or b to choose Setup Wizard.
Press OK.
g If the following message appears, press a or b to choose On. The wired network interface will become
inactive with this setting.
72.WLAN
WLAN Enable ?
a On
b Off
Select ab or OK
h The machine will search for your network and display a list of available SSIDs. You should see the SSID
you wrote down earlier. If the machine finds more than one network use the a or b keys to choose your
network, then press OK. Go to step l.
3
If your access point is set to not broadcast the SSID, you will have to manually add the SSID name.
Go to step i.
i Choose <New SSID> using a or b.
Press OK. Go to step j.
72.WLAN
SSID
a <New SSID>
b
Select ab or OK
j Enter a new SSID name. (To manually enter the text, see Entering Text on page 223.)
Press OK.
72.WLAN
SSID:
Enter & OK Key
k Press a or b to choose Infrastructure.
Press OK. Go to step l
If you chose Ad-hoc, go to step m.
72.WLAN
Mode Select
a Ad-hoc
b Infrastructure
Select ab or OK
32
Page 43
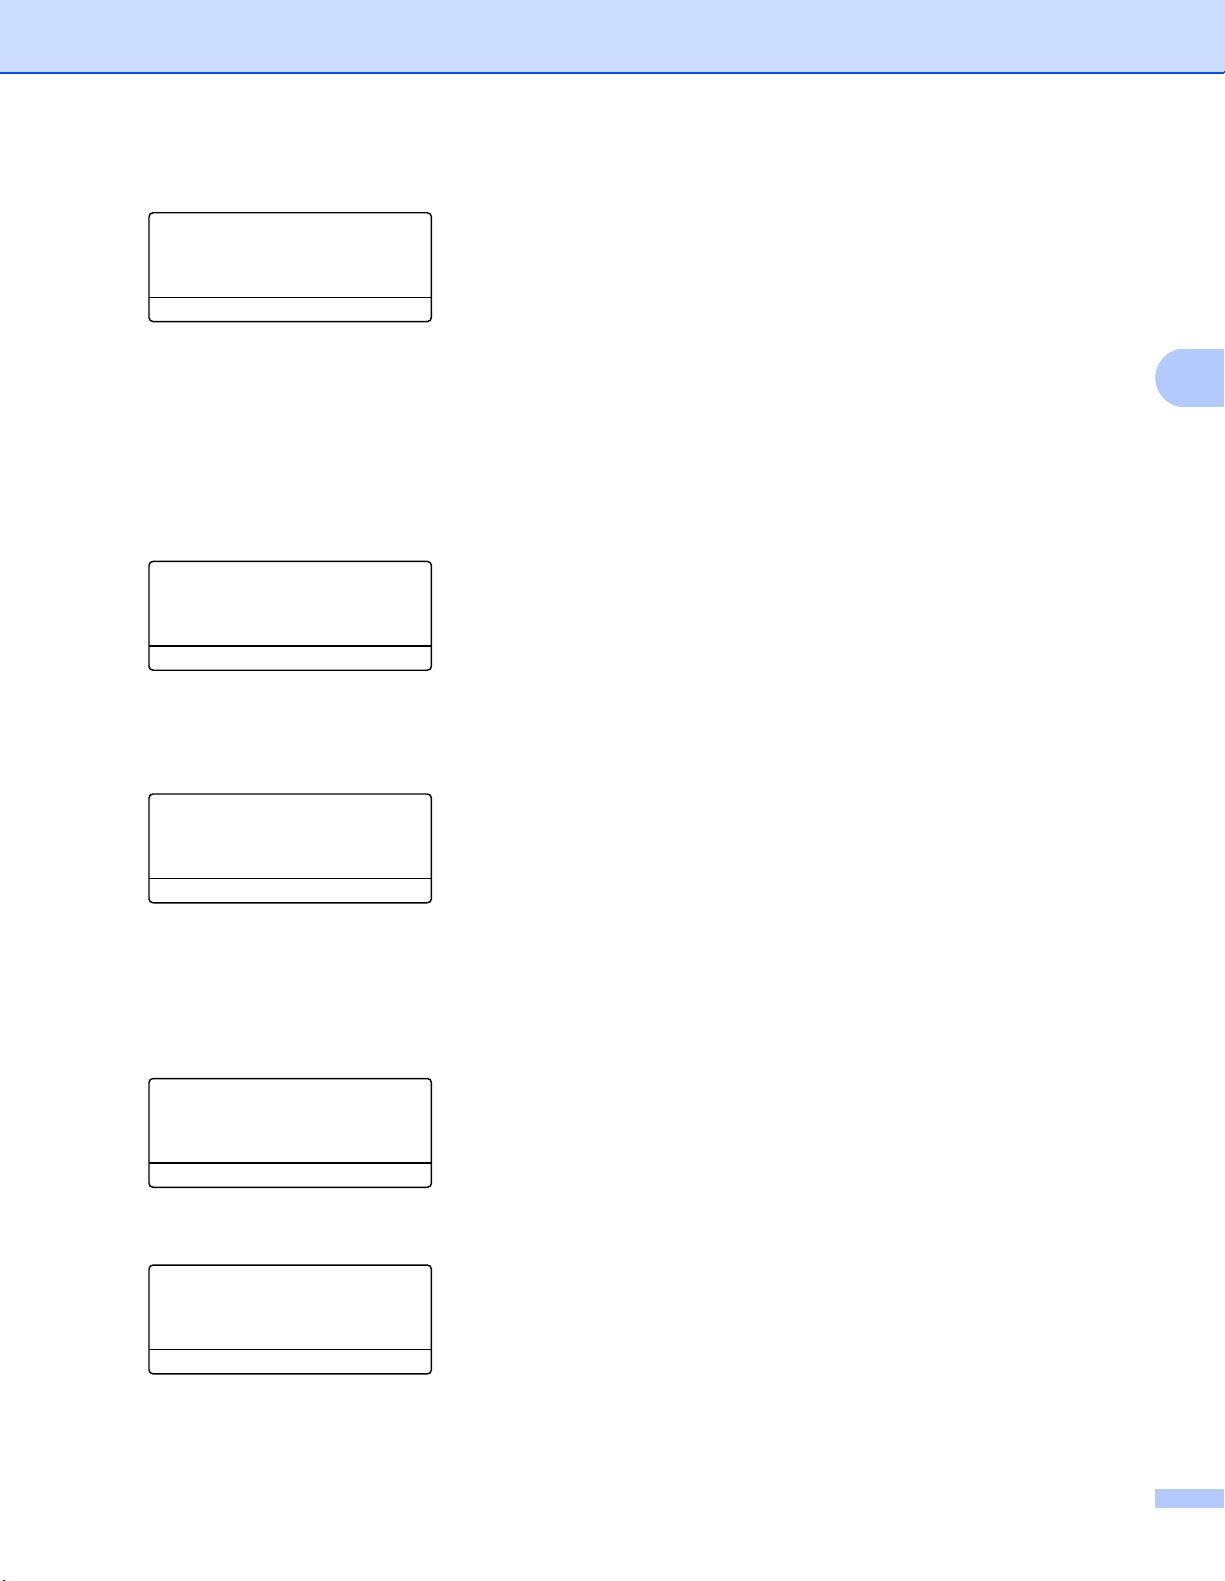
Configuring your machine for a wireless network (For MFC-8890DW)
l Choose the Authentication method using a or b, and press OK.
72.WLAN
Auth. Select
a Open System
b Shared Key
Select ab or OK
If you chose Open System, go to step m.
If you chose Shared Key, go to step n.
If you chose WPA/WPA2-PSK, go to step q.
If you chose LEAP, go to step r.
1
If you chose EAP-FAST/NONE, EAP-FAST/MSCHAP
1
It is shown here as EAP-FAST/MSCHAPv2.
m Choose the Encryption type, None or WEP using a or b, and press OK.
or EAP-FAST/GTC, go to step q.
72.WLAN
Encryption Type?
a None
b WEP
Select ab or OK
3
If you chose None, go to step t.
If you chose WEP, go to step n.
n Choose the key option; KEY1, KEY2, KEY3, KEY4 using a or b, and press OK.
72.WLAN
WEP key
a KEY1:xxxxxx
b KEY2:
Select ab or OK
If you chose the key which shows **********, go to step o.
If you chose a blank key, go to step p.
o If you want to change the key you chose in step n, press a or b to choose Change. Press OK. Go to
step p.
If you want to keep the key you chose in step n, press a or b to choose Keep. Press OK. Go to step t.
72.WLAN
KEY1:xxxxxx
a 1.Change
b 2.Keep
Select ab or OK
p Enter a new WEP key. Press OK. Go to step t. (To manually enter the text, see Entering Text
on page 223.)
72.WLAN
WEP:
Enter & OK Key
33
Page 44
Configuring your machine for a wireless network (For MFC-8890DW)
q Choose the Encryption type, TKIP or AES using a or b. Press OK.
If you have chosen WPA/WPA2-PSK in step l, go to step s.
If you have chosen EAP-FAST in step l, go to step r.
72.WLAN
Encryption Type?
a TKIP
b AES
Select ab or OK
r Enter the user name and press OK. Go to step s. (To manually enter the text, see Entering Text
on page 223.)
72.WLAN
USER:
Enter & OK Key
s Enter the password and press OK. Go to step t. (To manually enter the text, see Entering Text
on page 223.)
72.WLAN
PASS:
3
Enter & OK Key
t To apply the settings, choose Yes. To cancel, choose No.
72.WLAN
Apply Settings?
a 1.Yes
b 2.No
Select ab or OK
If you chose Yes, go to step u.
If you chose No, go back to step h.
u The machine starts to connect to the wireless device you have chosen.
v If your wireless device is connected successfully, the display shows Connected for one minute and
configuration is completed.
72.WLAN
Connected
If the connection failed, the display shows Connection Fail for one minute. See Wireless network
troubleshooting (MFC-8890DW only) on page 196.
34
Page 45

Configuring your machine for a wireless network (For MFC-8890DW)
(For Windows®)
You have completed the wireless network setup. If you would like to continue installing drivers
and software necessary for operating your device, please choose Install MFL-Pro Suite from
the CD-ROM menu.
(For Macintosh
®
)
You have completed the wireless network setup. If you would like to continue installing drivers
and software necessary for operating your device, please choose Start Here OSX from the
CD-ROM menu.
3
35
Page 46
Configuring your machine for a wireless network (For MFC-8890DW)
Using the SES/WPS/AOSS™ control panel menu to configure your machine for a wireless network (Automatic Wireless mode) 3
If your wireless access point/router supports either SecureEasySetup™, Wi-Fi Protected Setup (PBC1) or
AOSS™, you can configure the machine easily without knowing your wireless network settings. Your Brother
machine has the SES/WPS/AOSS™ menu on the control panel. This feature automatically detects which
mode your access point uses, SecureEasySetup™, Wi-Fi Protected Setup or AOSS™. By pushing a button
on the wireless access point/router and the machine, you can setup the wireless network and security
settings. See the user’s guide for your wireless access point/router for instructions on how to access
one-push mode.
1
Push Button Configuration
Note
Routers or access points that support SecureEasySetup™, Wi-Fi Protected Setup or AOSS™ have the
symbols shown below.
3
a Plug the machine’s power cord into the AC power outlet. Turn on the machine’s power switch.
b Press Menu, 7, 2, 7. Using a or b, choose On and press OK.
Press Stop/Exit.
72.WLAN
7.WLAN Enable
a On
b Off
Select ab or OK
c Press Menu, 7, 2, 3 for SES/WPS/AOSS.
This feature will automatically detect which mode (SecureEasySetup™, Wi-Fi Protected Setup or
AOSS™) your access point uses to configure your machine.
Note
If your wireless access point supports Wi-Fi Protected Setup (PIN Method) and you want to configure your
machine using the PIN (Personal Identification Number) Method, see Using the PIN Method of Wi-Fi
Protected Setup on page 39.
36
Page 47

Configuring your machine for a wireless network (For MFC-8890DW)
d The machine will search for an access point that supports SecureEasySetup™, Wi-Fi Protected Setup
or AOSS™ for 2 minutes.
72.WLAN
3.SES/WPS/AOSS
Setting WLAN
e Put your access point in the SecureEasySetup™ mode, Wi-Fi Protected Setup mode or AOSS™ mode,
depending on what is supported by your access point. Please refer to the instruction manual that came
with your access point. You will see Connecting AOSS, Connecting SES or Connecting WPS on
the LCD while the machine searches your access point.
f If the LCD shows Connected, the machine has successfully connected to your access point/router. You
can now use your machine in a wireless network.
If the LCD shows Connection Error, a session overlap has been detected. The machine has
detected more than one access point/router on your network with the SecureEasySetup™ mode, the
Wi-Fi Protected Setup mode or AOSS™ mode enabled. Make sure that only one access point/router has
the SecureEasySetup™ mode, the Wi-Fi Protected Setup mode or the AOSS™ mode enabled and try
starting from c again.
If the LCD shows No Access Point, the machine has not detected your access point/router on your
network with the SecureEasySetup™ mode, the Wi-Fi Protected Setup mode or AOSS™ mode
enabled. Move the machine closer to your access point/router and try starting from c again.
If the LCD shows Connection Fail, the machine has not successfully connected to your access
point/router. Try starting from c again. If the same message is indicated again, reset the machine back
to the default factory settings and try again. (For resetting, see Restoring the network settings to factory
default on page 122.)
3
37
Page 48

Configuring your machine for a wireless network (For MFC-8890DW)
LCD messages when using the SES/WPS/AOSS™ control panel menu 3
LCD shows Connection status Action
Searching or accessing the access
Setting WLAN
Connecting SES
Connecting WPS
Connecting AOSS
Connected Connection succeeded. —
Connection Error Session overlap has been detected.
No Access Point The access point detection failed.
point, and downloading settings from the
access point
Connecting the access point —
Check that only one router or access point has
the SecureEasySetup™ mode, the Wi-Fi
Protected Setup mode or AOSS™ mode enabled
and try starting from step c again.
Move the machine closer to your access
point/router and try starting from step c again.
1 Try starting from step c again.
—
3
Connection Fail Connection failed.
(For Windows®)
You have completed the wireless network setup. If you would like to continue installing drivers
and software necessary for operating your device, please choose Install MFL-Pro Suite from
the CD-ROM menu.
(For Macintosh
®
)
You have completed the wireless network setup. If you would like to continue installing drivers
and software necessary for operating your device, please choose Start Here OSX from the
CD-ROM menu.
2 If the same message continues, reset the
machine back to the factory settings and try
again.
38
Page 49
Configuring your machine for a wireless network (For MFC-8890DW)
Using the PIN Method of Wi-Fi Protected Setup 3
If your wireless access point/router supports Wi-Fi Protected Setup (PIN Method), you can configure the
machine easily without a computer. The PIN (Personal Identification Number) Method is one of the
connection methods developed by the Wi-Fi Alliance. By inputting a PIN which is created by an Enrollee (your
machine) to the Registrar (a device that manages the wireless LAN), you can setup the wireless network and
security settings. See the user’s guide for your wireless access point/router for instructions on how to access
the Wi-Fi Protected Setup mode.
Note
Routers or access points that support Wi-Fi Protected Setup have a symbol as shown below.
a Plug the machine’s power cord into the AC power outlet. Turn on the machine’s power switch.
b Press Menu, 7, 2, 7. Using a or b, choose On and press OK.
Press Stop/Exit.
72.WLAN
7.WLAN Enable
a On
b Off
Select ab or OK
3
c Press Menu, 7, 2, 4 for WPS w/PIN Code.
d The LCD will show an 8 digit PIN and the machine starts searching for an access point for 5 minutes.
72.WLAN
4.WPS w/PIN Code
PIN:XXXXXXXX
Connecting WPS
e Using a computer that is on the network, type “http://access point’s IP address/” into your
browser. (Where “access point’s IP address” is the IP address of the device that is used as the
Registrar
in d to the Registrar and follow the on-screen instructions.
1
The Registrar is normally the access point/router.
Note
The setting page is different, depending on the brand of access point/router. See the instruction manual
that came with your access point/router.
For Windows Vista
If you are using your Windows Vista® computer as a Registrar, follow these steps:
1
) Go to the WPS (Wi-Fi Protected Setup) setting page and input the PIN which the LCD shows
®
3
39
Page 50

Configuring your machine for a wireless network (For MFC-8890DW)
Note
To use a Windows Vista
®
computer as a Registrar, you need to register it to your network in advance. See
the instruction manual that came with your access point/router.
1 Click the button and then Network.
2 Click Add a wireless device.
3 Choose your printer and click Next.
4 Input the PIN which the LCD shows in d on page 39 and then click Next.
5 Choose your network that you want to connect to, and then click Next.
6 Click Close.
f If the LCD shows Connected, the machine has successfully connected to your access point/router. You
can now use your machine in a wireless network.
If the LCD shows Connection Fail, the machine has not successfully connected to your access
point/router. Try starting from c again. If the same message is indicated again, reset the machine back
to the default factory settings and try again. (For resetting, see Restoring the network settings to factory
default on page 122.)
If the LCD shows No Access Point, the machine has not detected your access point/router on your
network with the Wi-Fi Protected Setup mode enabled. Move the machine closer to your access
point/router and try starting from c again.
Or an incorrect PIN has typed into the WPS (Wi-Fi Protected Setup) setting page on your router or
access point. Retype the correct PIN and try starting from c again.
3
(For Windows®)
You have completed the wireless network setup. If you would like to continue installing drivers
and software necessary for operating your device, please choose Install MFL-Pro Suite from
the CD-ROM menu.
(For Macintosh
®
)
You have completed the wireless network setup. If you would like to continue installing drivers
and software necessary for operating your device, please choose Start Here OSX from the
CD-ROM menu.
Using the Brother installer application on the CD-ROM to configure your machine for a wireless network 3
For installation, see Wireless configuration for Windows® using the Brother installer application
®
(MFC-8890DW only) in Chapter 4 and Wireless configuration for Macintosh
application (MFC-8890DW only) in Chapter 5.
using the Brother installer
40
Page 51
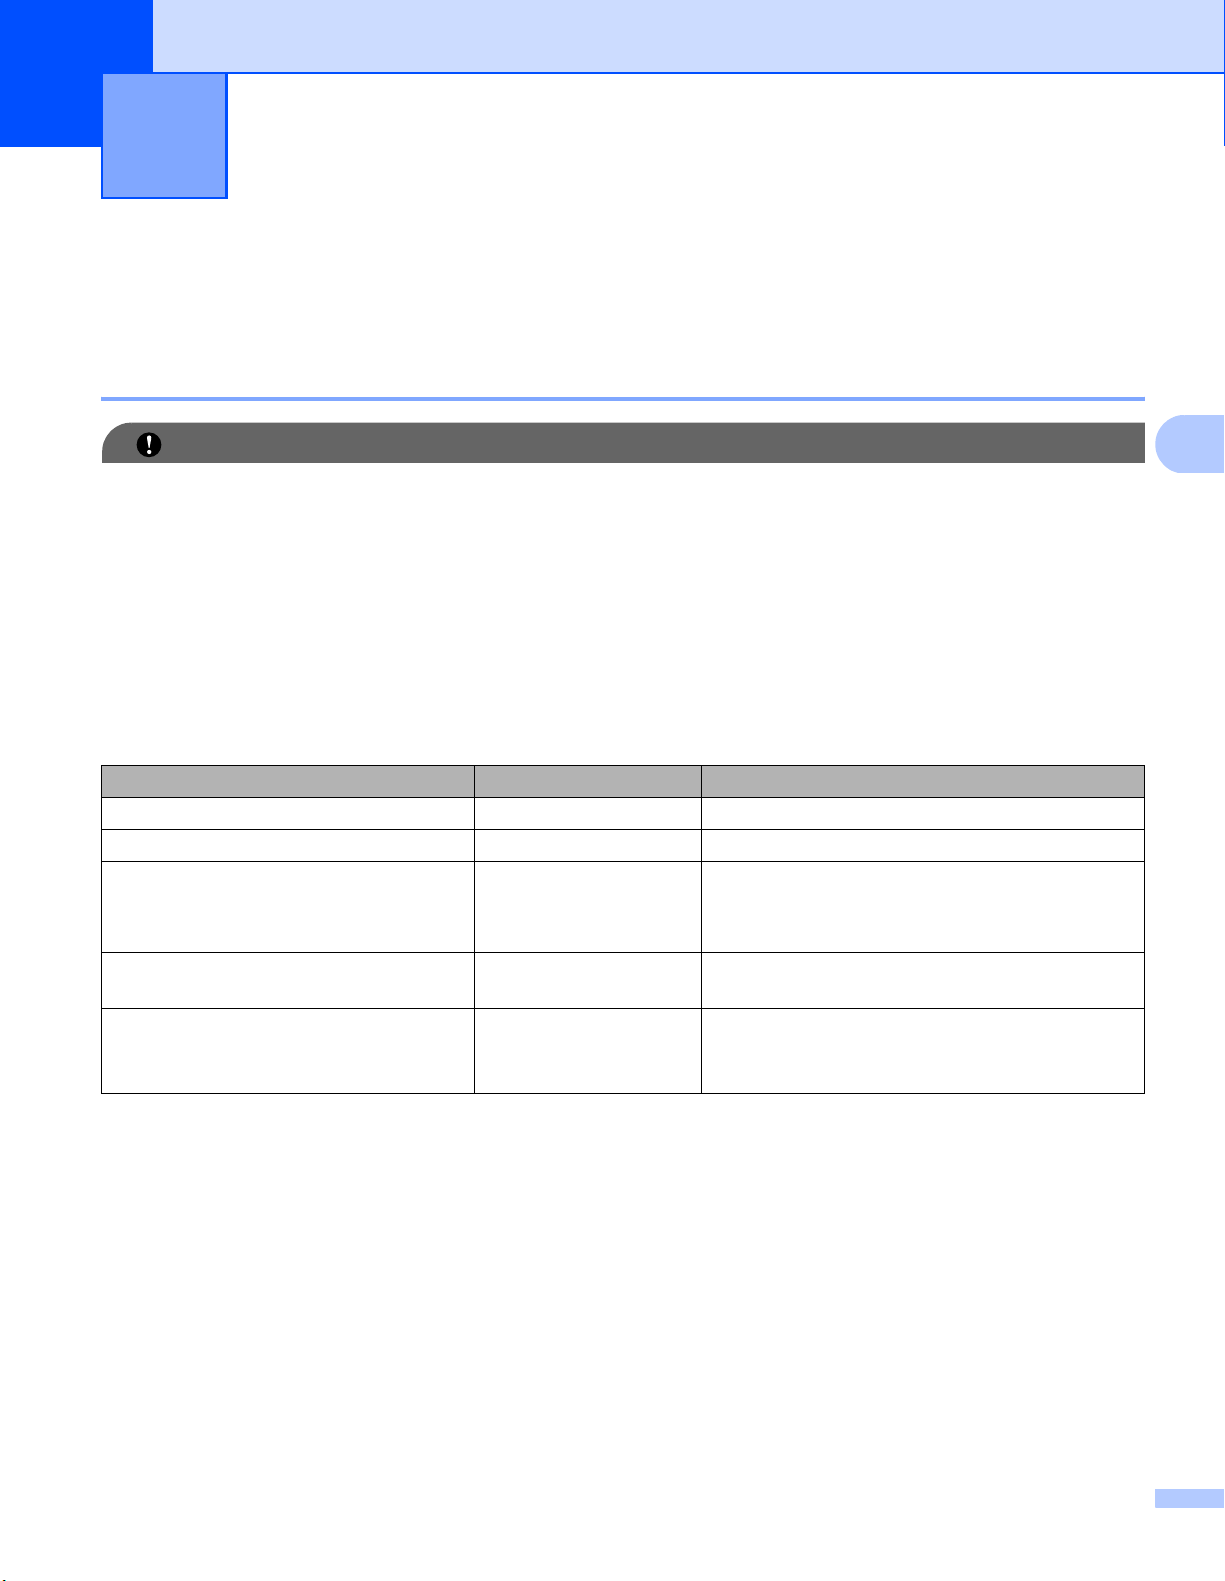
Wireless configuration for Windows®
4
using the Brother installer application
(MFC-8890DW only)
Configuration in Infrastructure mode 4
Before configuring the wireless settings 4
IMPORTANT
• The following instructions will install your Brother machine in a network environment using the Brother
®
installer application for Windows
• You can also setup your Brother machine using the machine’s control panel which we recommended. You
can find instructions in the supplied Quick Setup Guide or see Configuring your machine for a wireless
network (For MFC-8890DW) on page 21.
• You must know your wireless network settings before you proceed with this installation.
Make sure you take notes on all the current settings such as SSID, authentication and encryption of your
wireless network environment. If you do not know them, contact your network administrator or the
manufacturer of your access point/router.
found on the CD-ROM we have provided with the machine.
4
4
Item Example Record the current wireless network settings
Communication mode: (Infrastructure) Infrastructure
Network name: (SSID, ESSID) HELLO
Authentication method:
(Open system, Shared key, WPA-PSK
WPA2-PSK
Encryption mode:
(None, WEP,TKIP, AES, CKIP)
Network key:
(Encryption key, WEP key
Passphrase)
1
2
1
, LEAP, EAP-FAST)
2
,
WPA/WPA2-PSK is a Wi-Fi Protected Access Pre-Shared Key, which lets the Brother wireless machine associate with access points using
TKIP or AES encryption (WPA-Personal). WPA/WPA2-PSK (TKIP or AES) uses a Pre-Shared Key (PSK) that is 8 or more characters in
length, up to a maximum of 63 characters.
The WEP key is for 64-bit encrypted networks or 128-bit encrypted networks and can contain both numbers and letters. If you do not know
this information you should see the documentation provided with your access point or wireless router. This key is a 64-bit or 128-bit value that
must be entered in an ASCII or HEXADECIMAL format.
WPA2-PSK
1
,
AES
12345678
41
Page 52

Wireless configuration for Windows® using the Brother installer application (MFC-8890DW only)
For example:
64-bit ASCII: Uses 5 text characters e.g. “Hello” (this is case sensitive)
64-bit Hexadecimal: Uses 10 digits of hexadecimal data e.g. “71f2234aba”
128-bit ASCII: Uses 13 text characters e.g.
“Wirelesscomms” (this is case sensitive)
128-bit Hexadecimal: Uses 26 digits of hexadecimal data
e.g.“71f2234ab56cd709e5412aa3ba”
• If you have previously configured the wireless settings of the machine, you must reset the network LAN
settings before you can configure the wireless settings again. Press Menu, 7, 0 for Network Reset,
press 1 for Reset and then choose 1 for Yes to accept the change. The machine will restart automatically.
• If you are using Windows
®
Firewall or a firewall function of anti-spyware or antivirus applications,
temporarily disable them. Once you are sure that you can print, configure the software settings following
the instructions again.
• You need to temporarily use an Ethernet cable during configuration. (The Ethernet cable is not a standard
accessory.)
4
42
Page 53
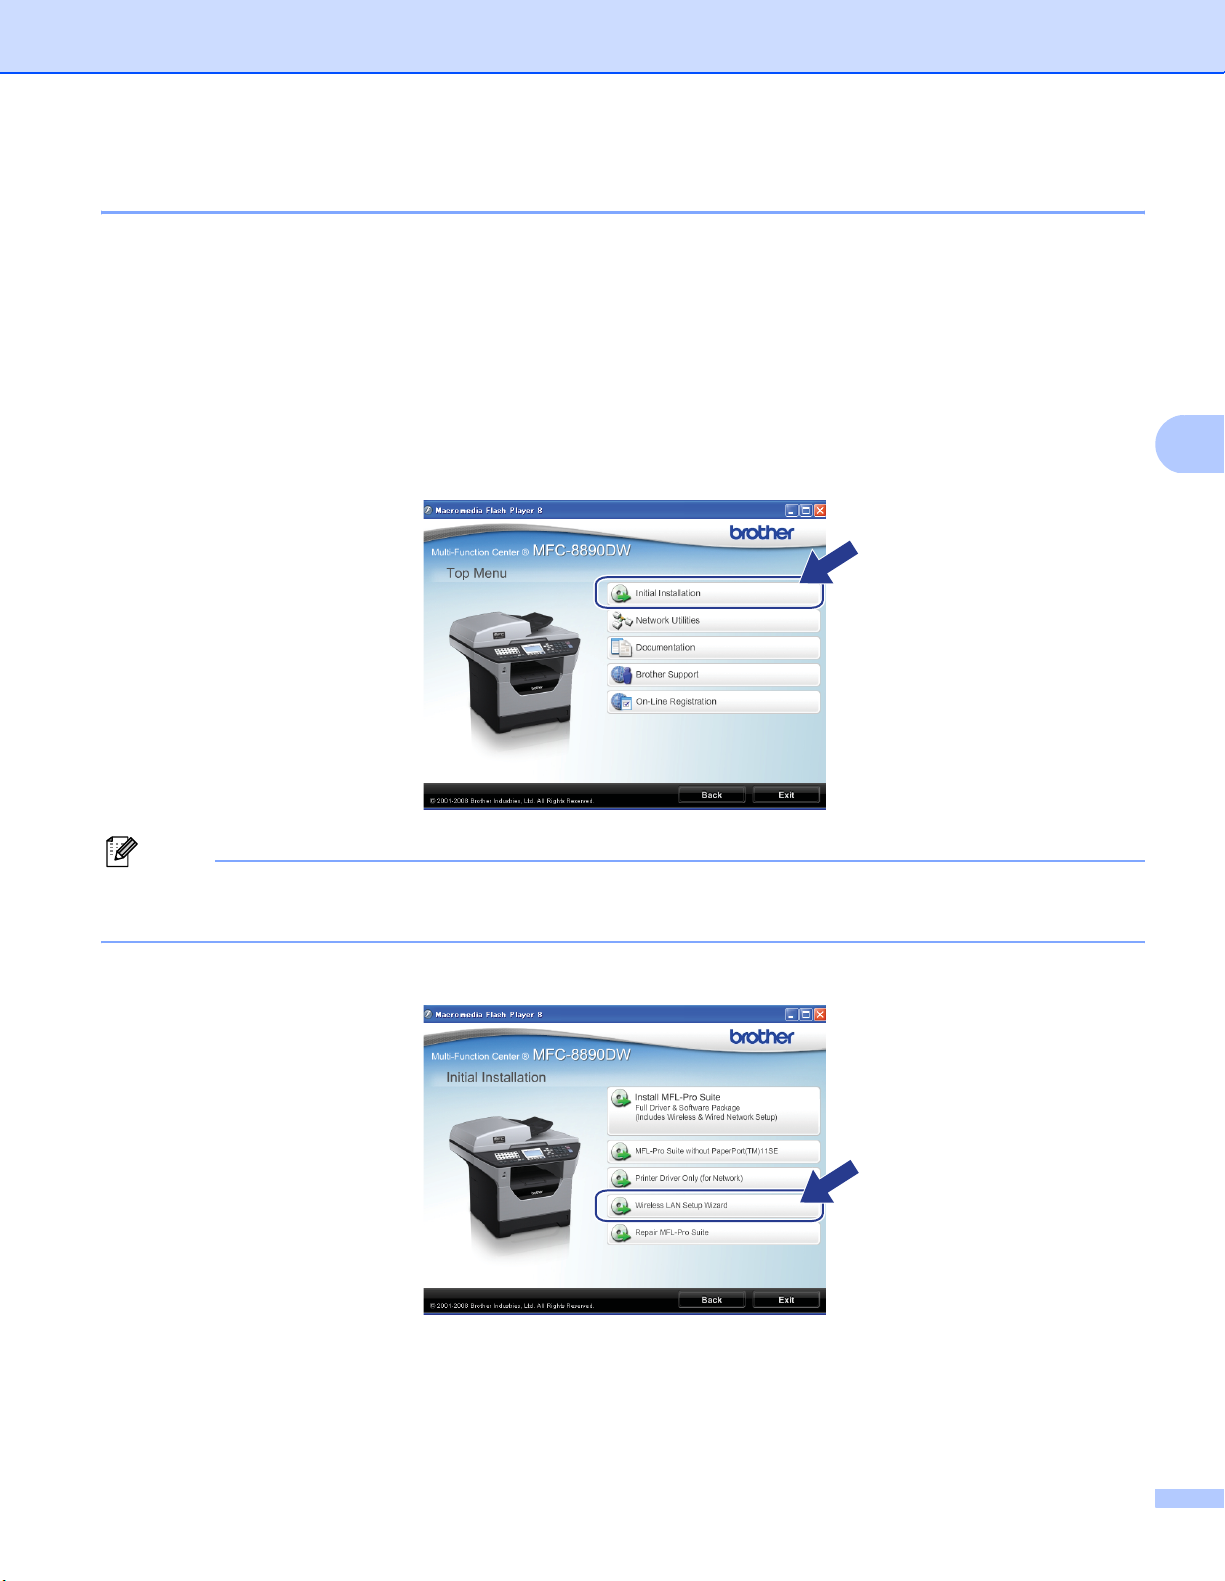
Wireless configuration for Windows® using the Brother installer application (MFC-8890DW only)
Configure the wireless settings 4
a Plug the machine’s power cord into the AC power outlet. Turn on the machine’s power switch.
b Turn on your computer.
Close any applications running before configuration.
c Put the supplied CD-ROM into your CD-ROM drive. The opening screen will appear automatically.
If the model name screen appears, choose your machine. If the language screen appears, choose your
language.
d The CD-ROM main menu will appear. Click Initial Installation.
4
Note
If this window does not appear, use Windows
of the Brother CD-ROM.
e Click Wireless LAN Setup Wizard.
®
Explorer to run the start.exe program from the root folder
43
Page 54
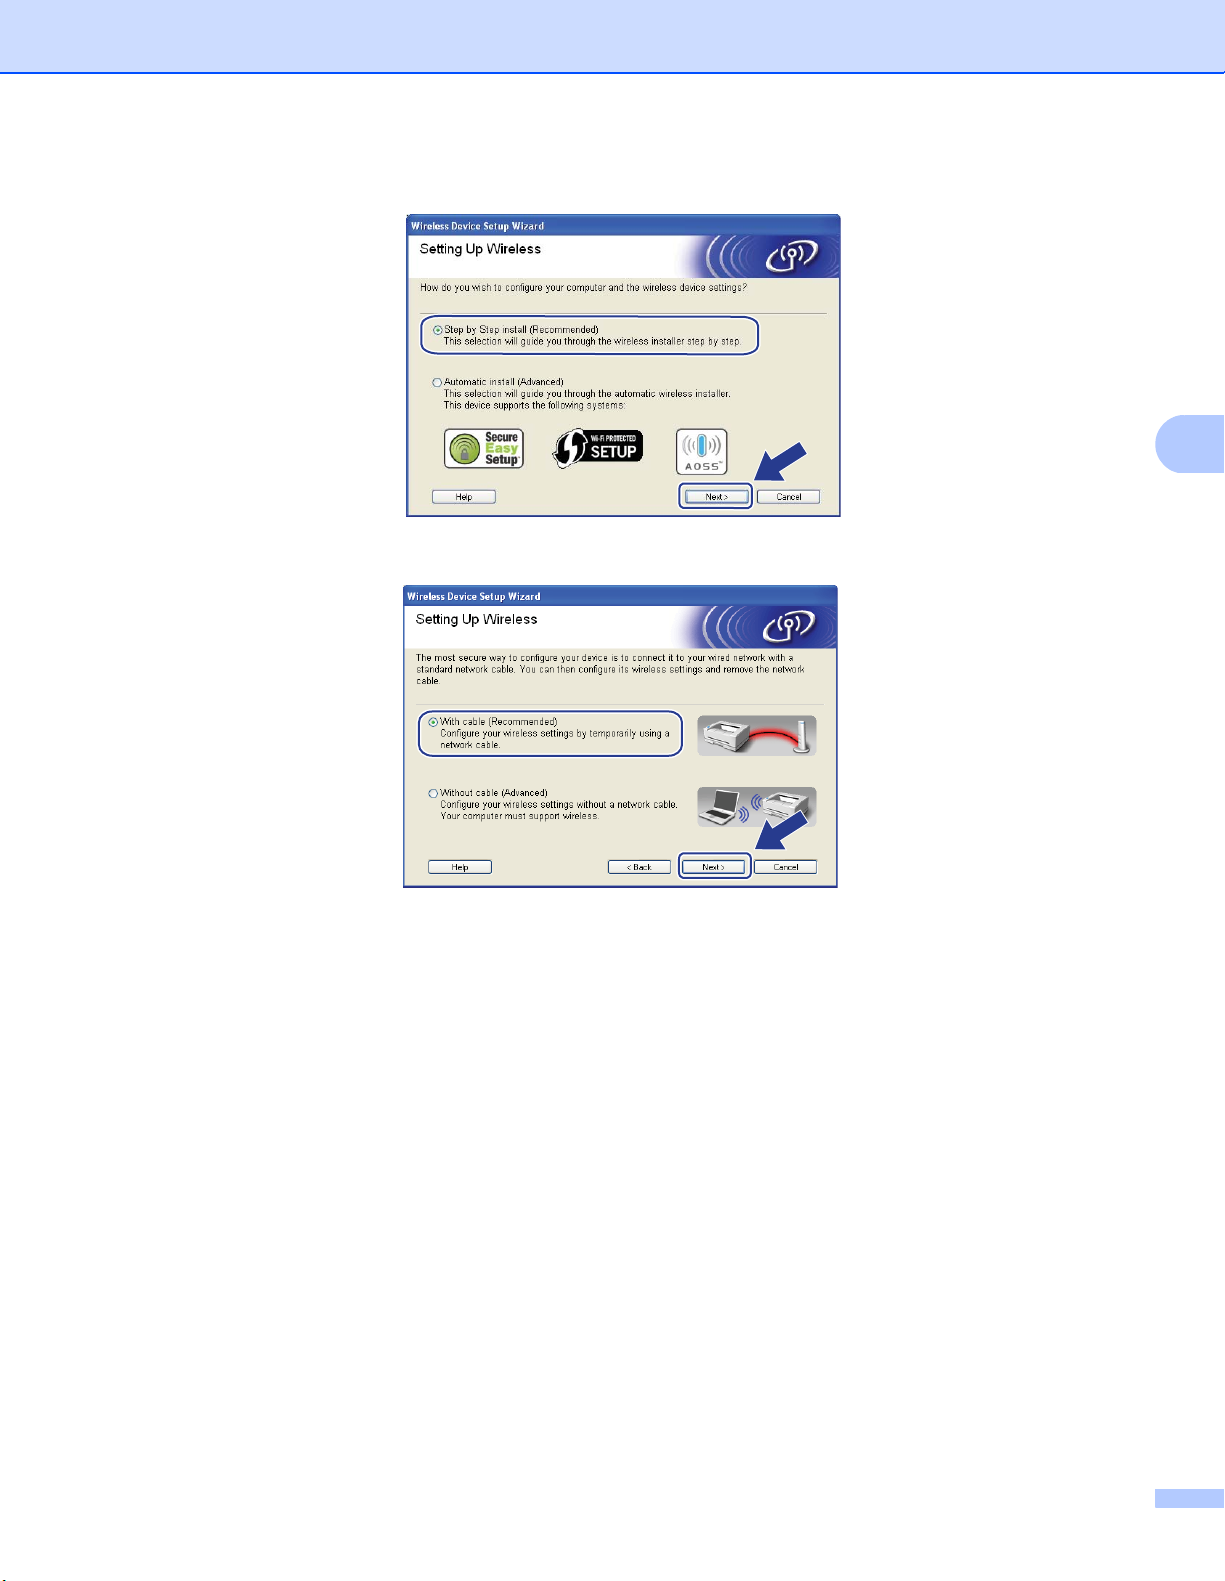
Wireless configuration for Windows® using the Brother installer application (MFC-8890DW only)
f Choose Step by Step install (Recommended) and then click Next.
g Choose With cable (Recommended) and then click Next.
4
44
Page 55
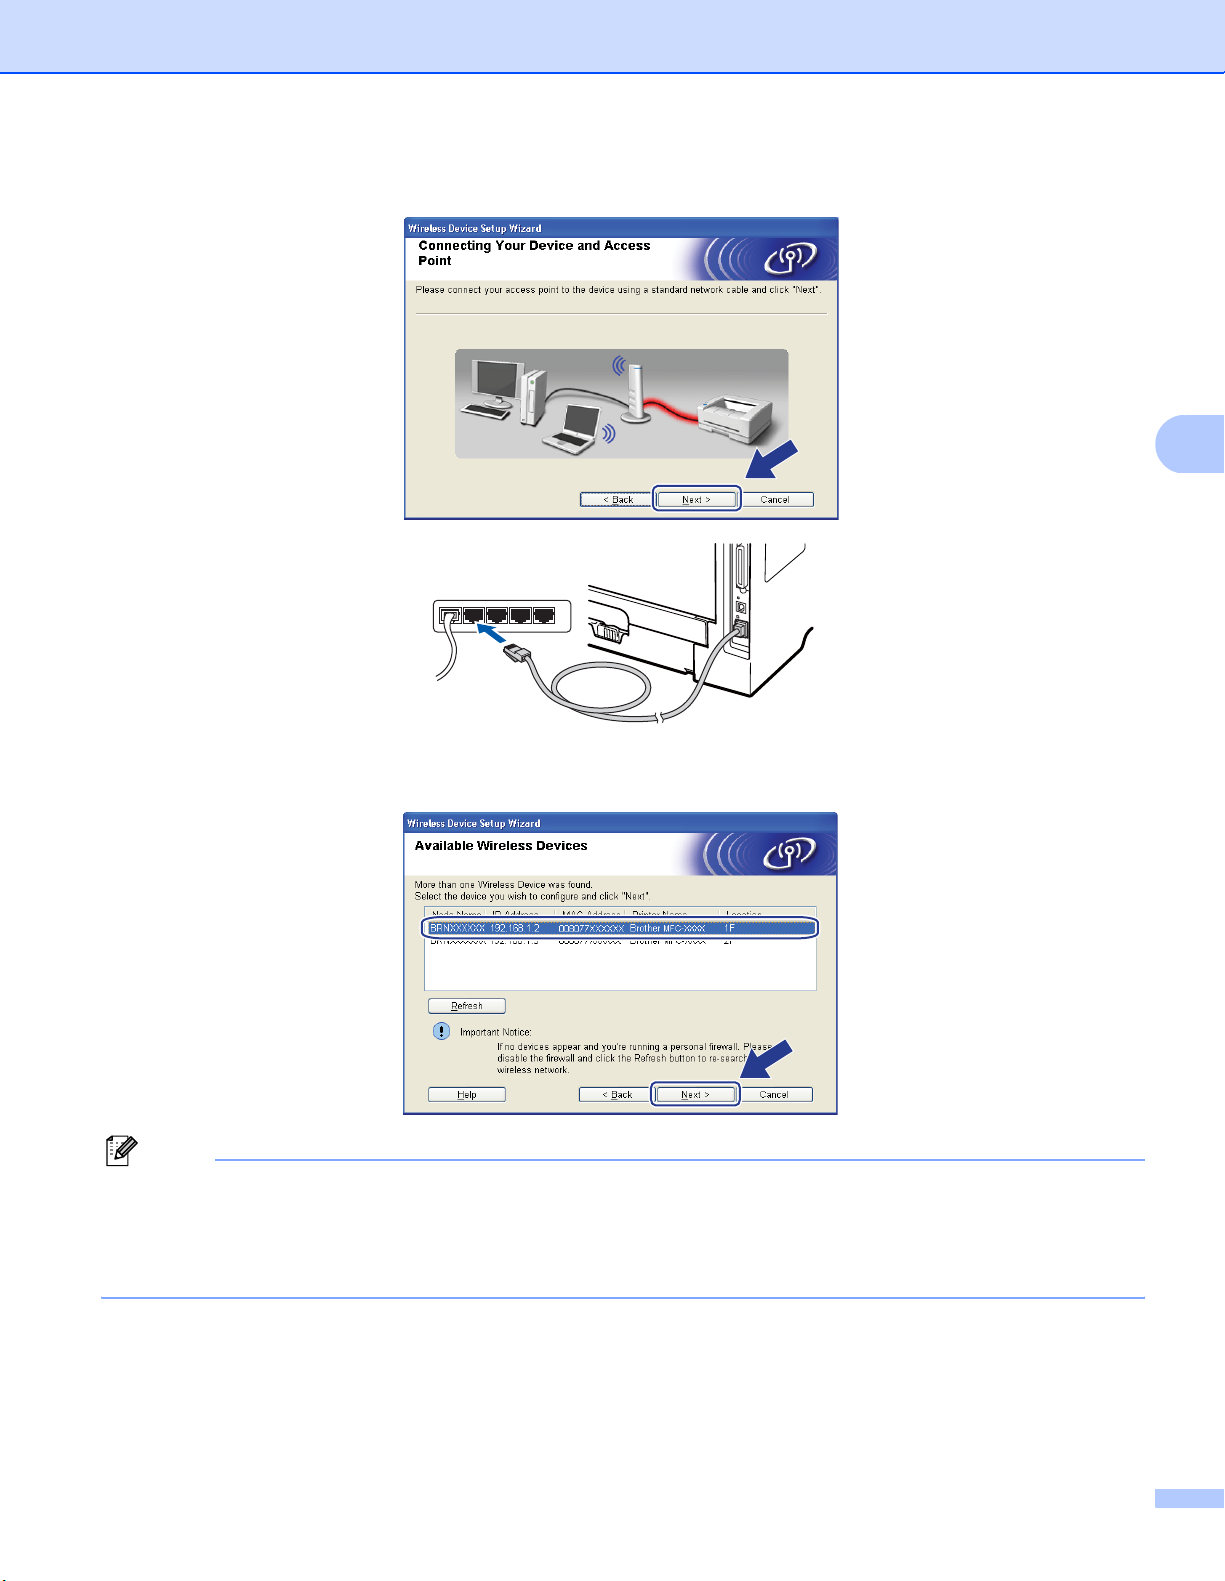
Wireless configuration for Windows® using the Brother installer application (MFC-8890DW only)
h Connect the Brother wireless device to your access point using a network cable and click Next.
4
i Choose the machine you wish to configure, and click Next. If the list is blank, check if the access point
and the machine are powered on, and then click Refresh.
Note
• The default Node name is “BRNxxxxxxxxxxxx”. (“xxxxxxxxxxxx” is your machine’s MAC Address /
Ethernet Address.)
• You can find your machine’s MAC Address / Ethernet Address by printing out the Network Configuration
List. See Printing the Network Configuration List on page 122.
45
Page 56
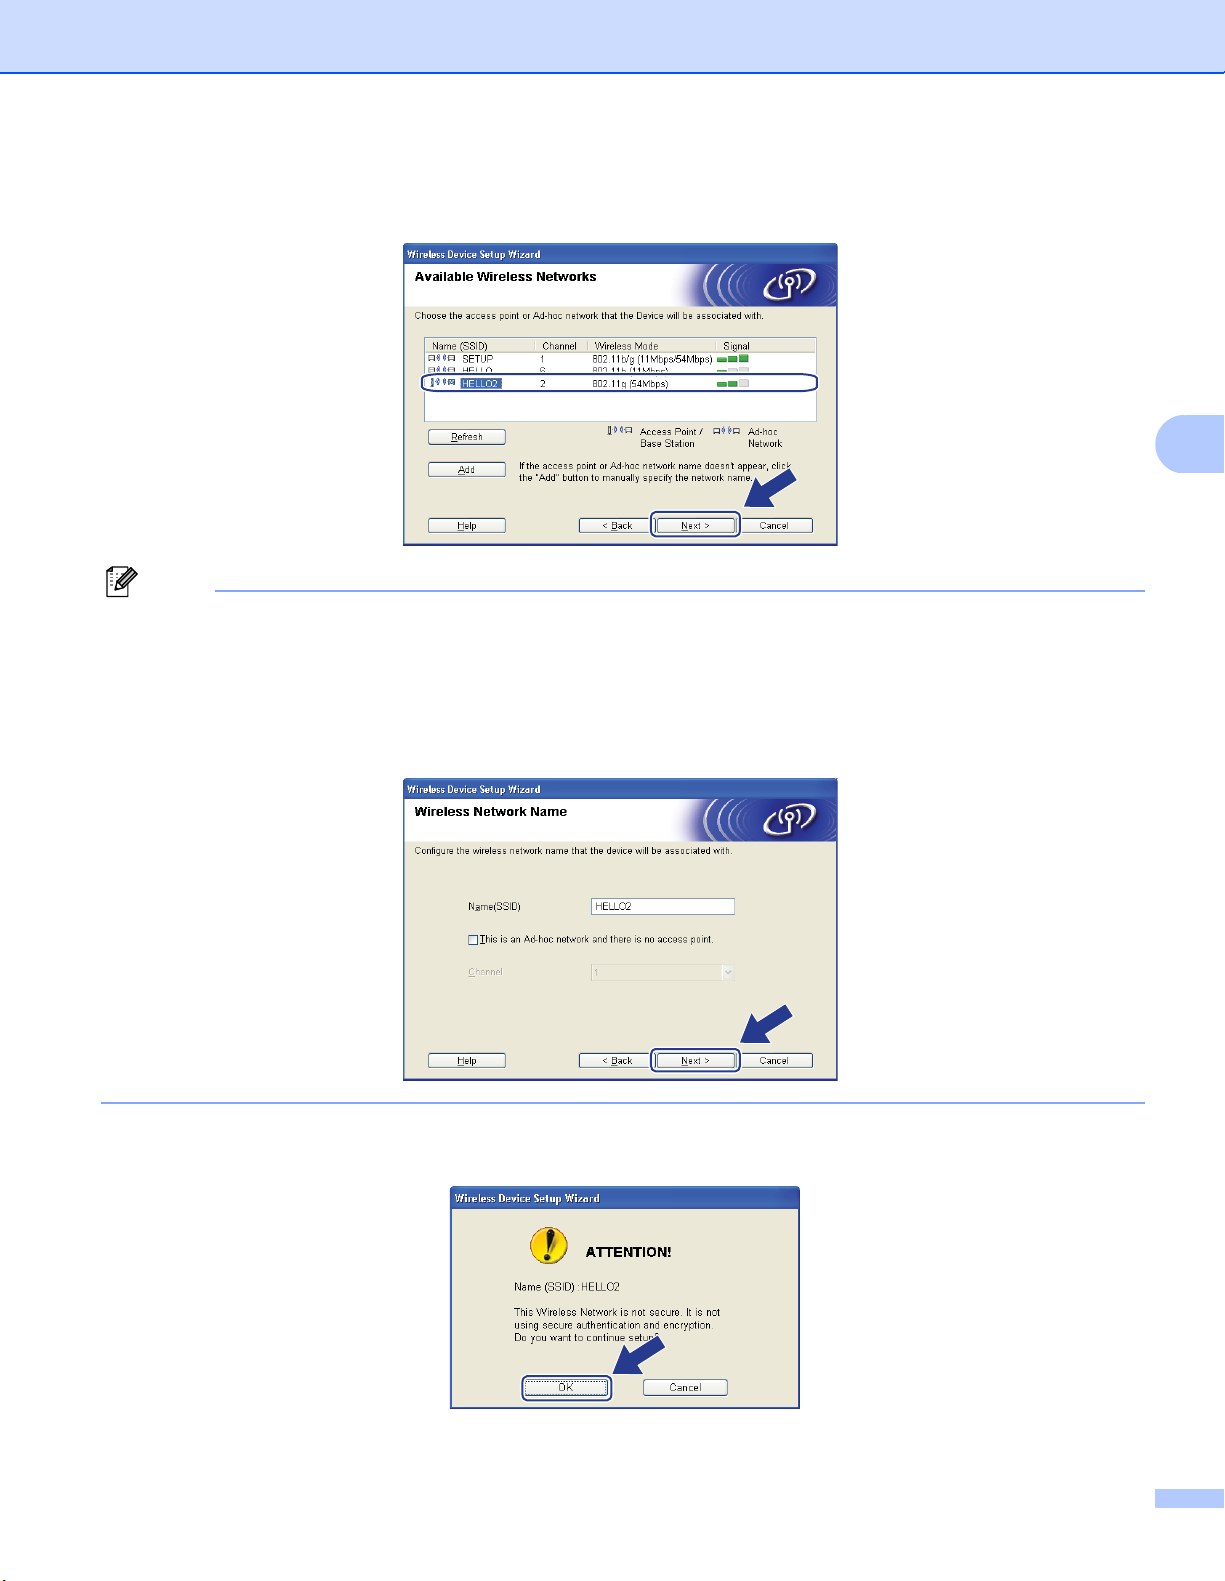
Wireless configuration for Windows® using the Brother installer application (MFC-8890DW only)
j The wizard will search for wireless networks available from your machine. Choose the access point you
wish to associate the machine with, and then click Next.
Note
• "SETUP" is the default SSID of the machine. Do not choose this SSID.
• If the list is blank, check that the access point has power and is broadcasting the SSID, and then see if the
machine and the access point are within range for wireless communication. Then, click Refresh.
4
• If your access point is set to not broadcast the SSID you can manually add it by clicking the Add button.
Follow the on-screen instructions for entering the Name (SSID), and then click Next.
k If your network is not configured for Authentication and Encryption, the following screen will appear. To
continue configuration, click OK and go to step m.
46
Page 57
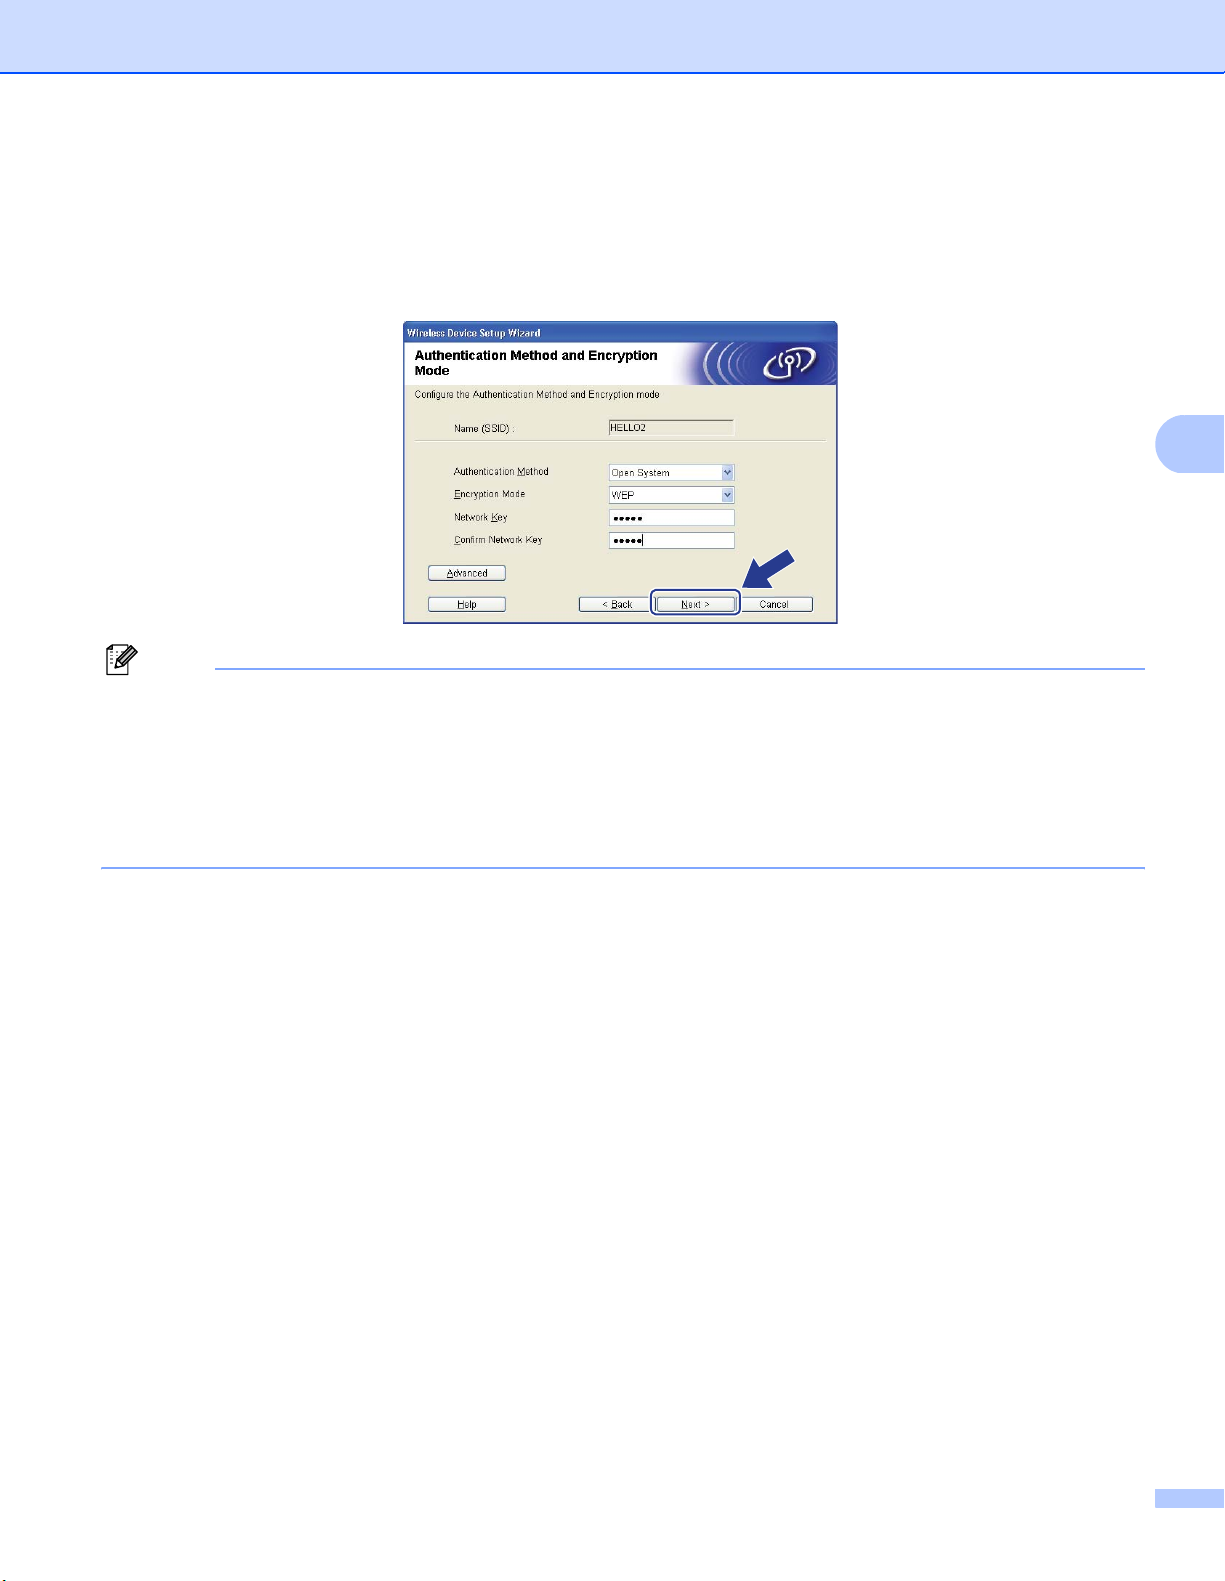
Wireless configuration for Windows® using the Brother installer application (MFC-8890DW only)
l If your network is configured for Authentication and Encryption, the following screen will appear. When
configuring your Brother wireless machine, you must configure your machine to match the
Authentication and Encryption settings you wrote down on page 41 for your existing wireless
network. Choose the Authentication Method and Encryption Mode from the pull-down list in each
setting box. Then enter the Network Key and Confirm Network Key, and then click Next.
Note
• If you want to setup or configure additional WEP key indexes other than WEP key1, click Advanced.
4
• If you do not know the Authentication or Encryption settings for your network, contact your network
administrator or the manufacture of your access point / router.
• If you are using WEP and the printed Network Configuration page in step m shows Link OK in the
Wireless Link Status, but the machine is not found on your network, make sure you entered the WEP
key correctly. The WEP key is case sensitive.
47
Page 58
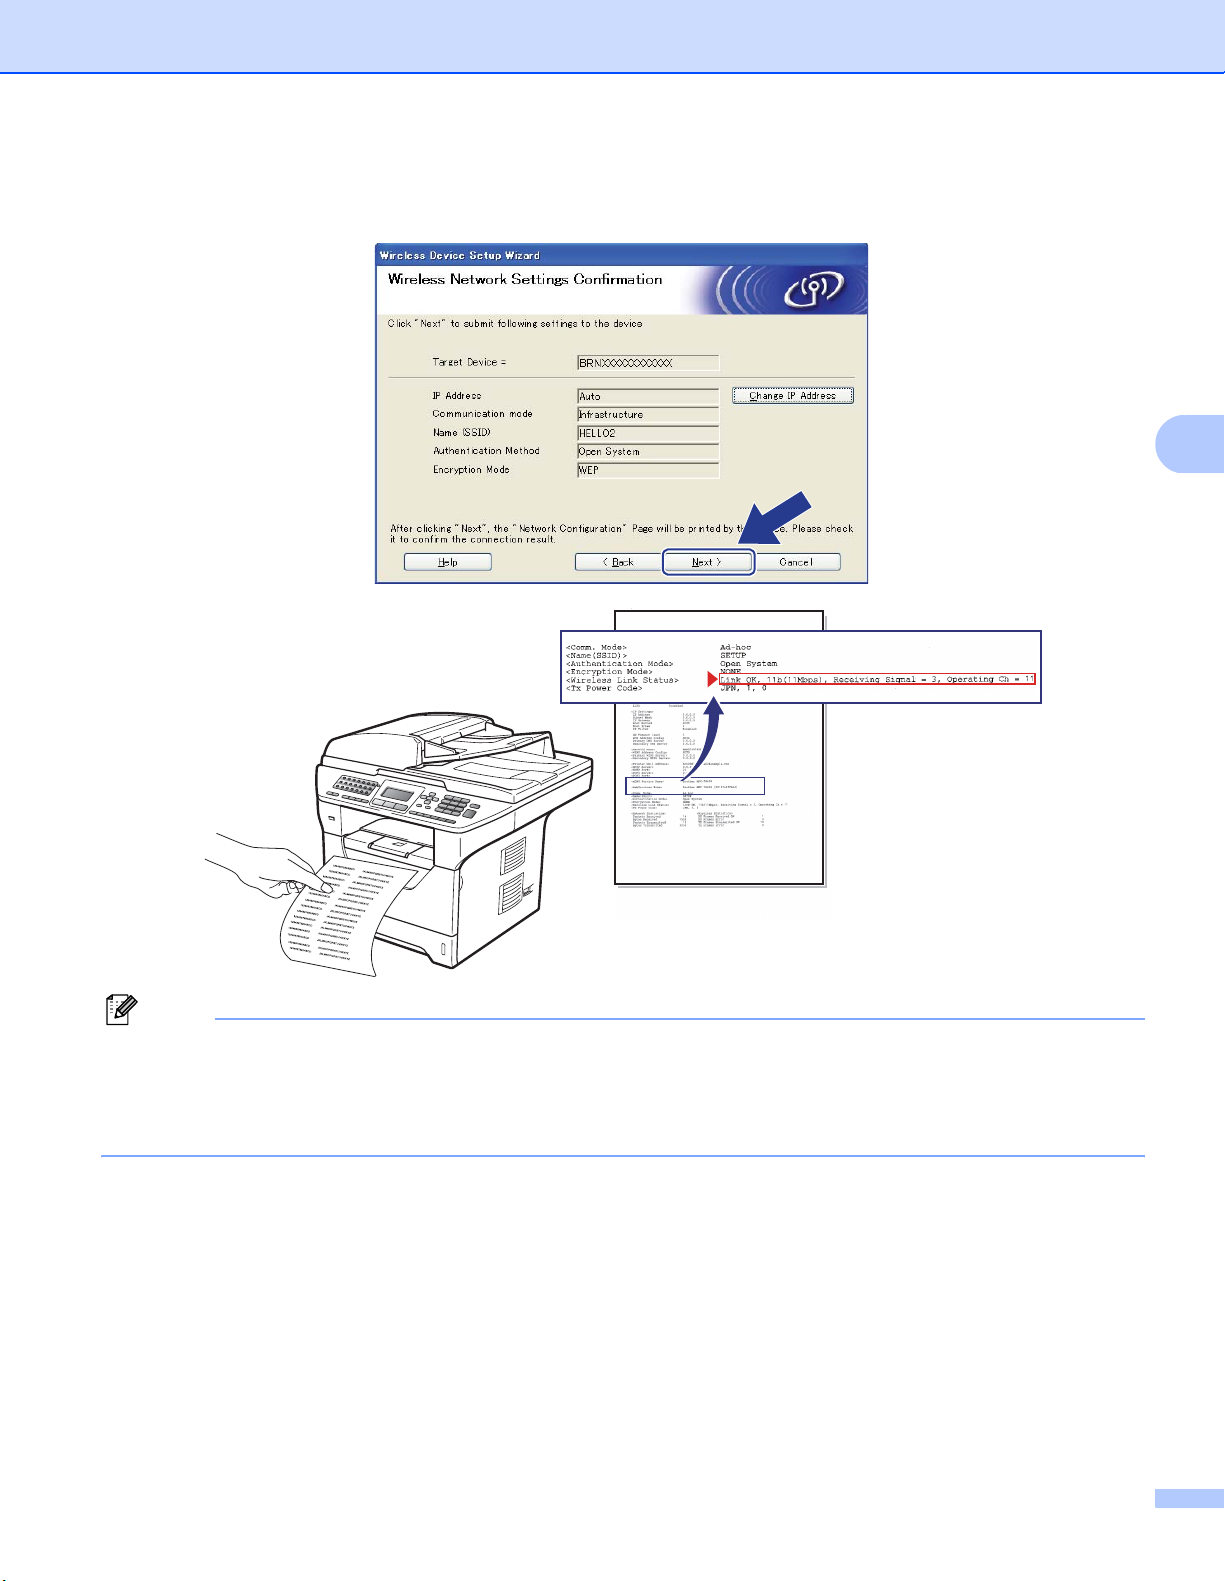
Wireless configuration for Windows® using the Brother installer application (MFC-8890DW only)
m Click Next. The settings will be sent to your machine. The settings will remain unchanged if you click
Cancel. The Network Configuration page will be printed.
4
Note
• If you want to manually enter the IP address settings of your machine, click Change IP Address and enter
the necessary IP address settings for your network.
• The control panel settings will be automatically changed to WLAN when the wireless settings are sent to
your machine.
48
Page 59
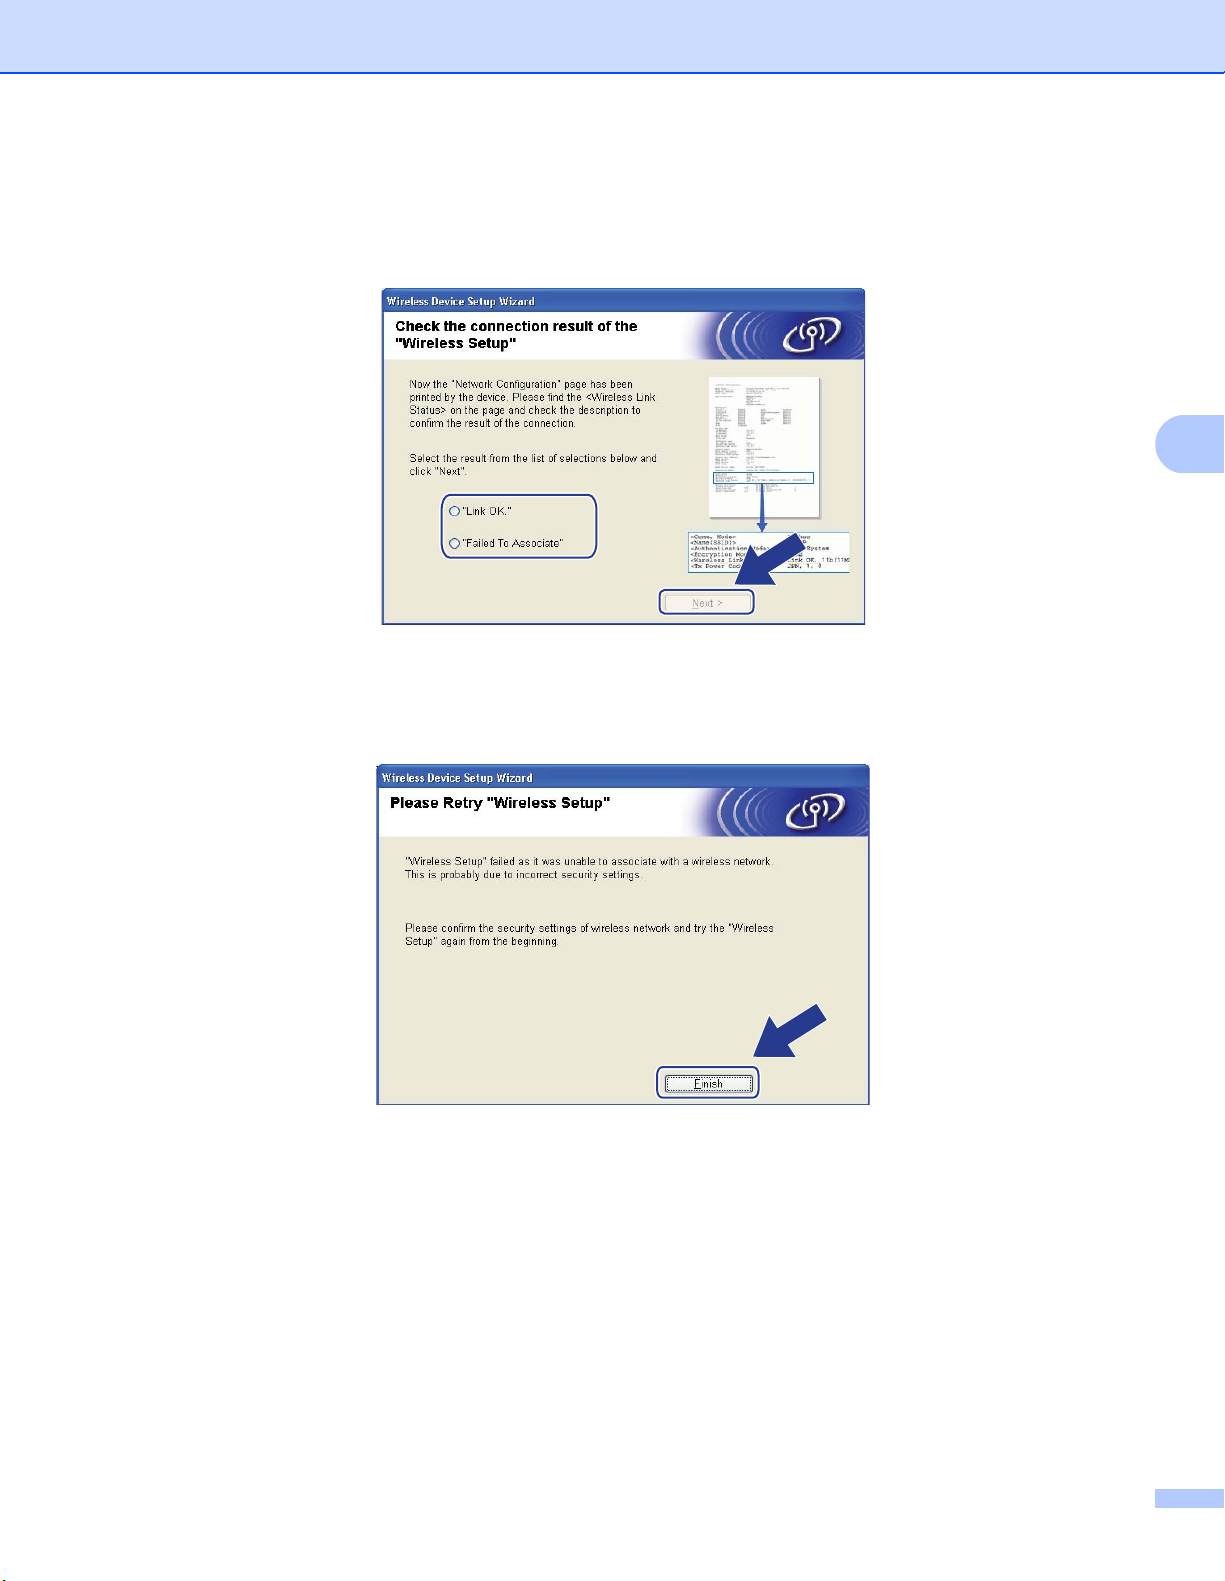
Wireless configuration for Windows® using the Brother installer application (MFC-8890DW only)
n Check the printed Network Configuration page. Choose the status as it is shown for the
Wireless Link Status on the Network Configuration page. Click Next.
If your status is "Link OK.", go to step p.
If your status is "Failed To Associate", go to step o.
o Click Finish. Wireless setup failed as it was unable to associate with a wireless network. This is probably
due to incorrect security settings. Reset the print server back to its factory default settings. (See
Restoring the network settings to factory default on pages 122) Confirm the security settings of your
wireless network and try starting from step e again.
4
49
Page 60
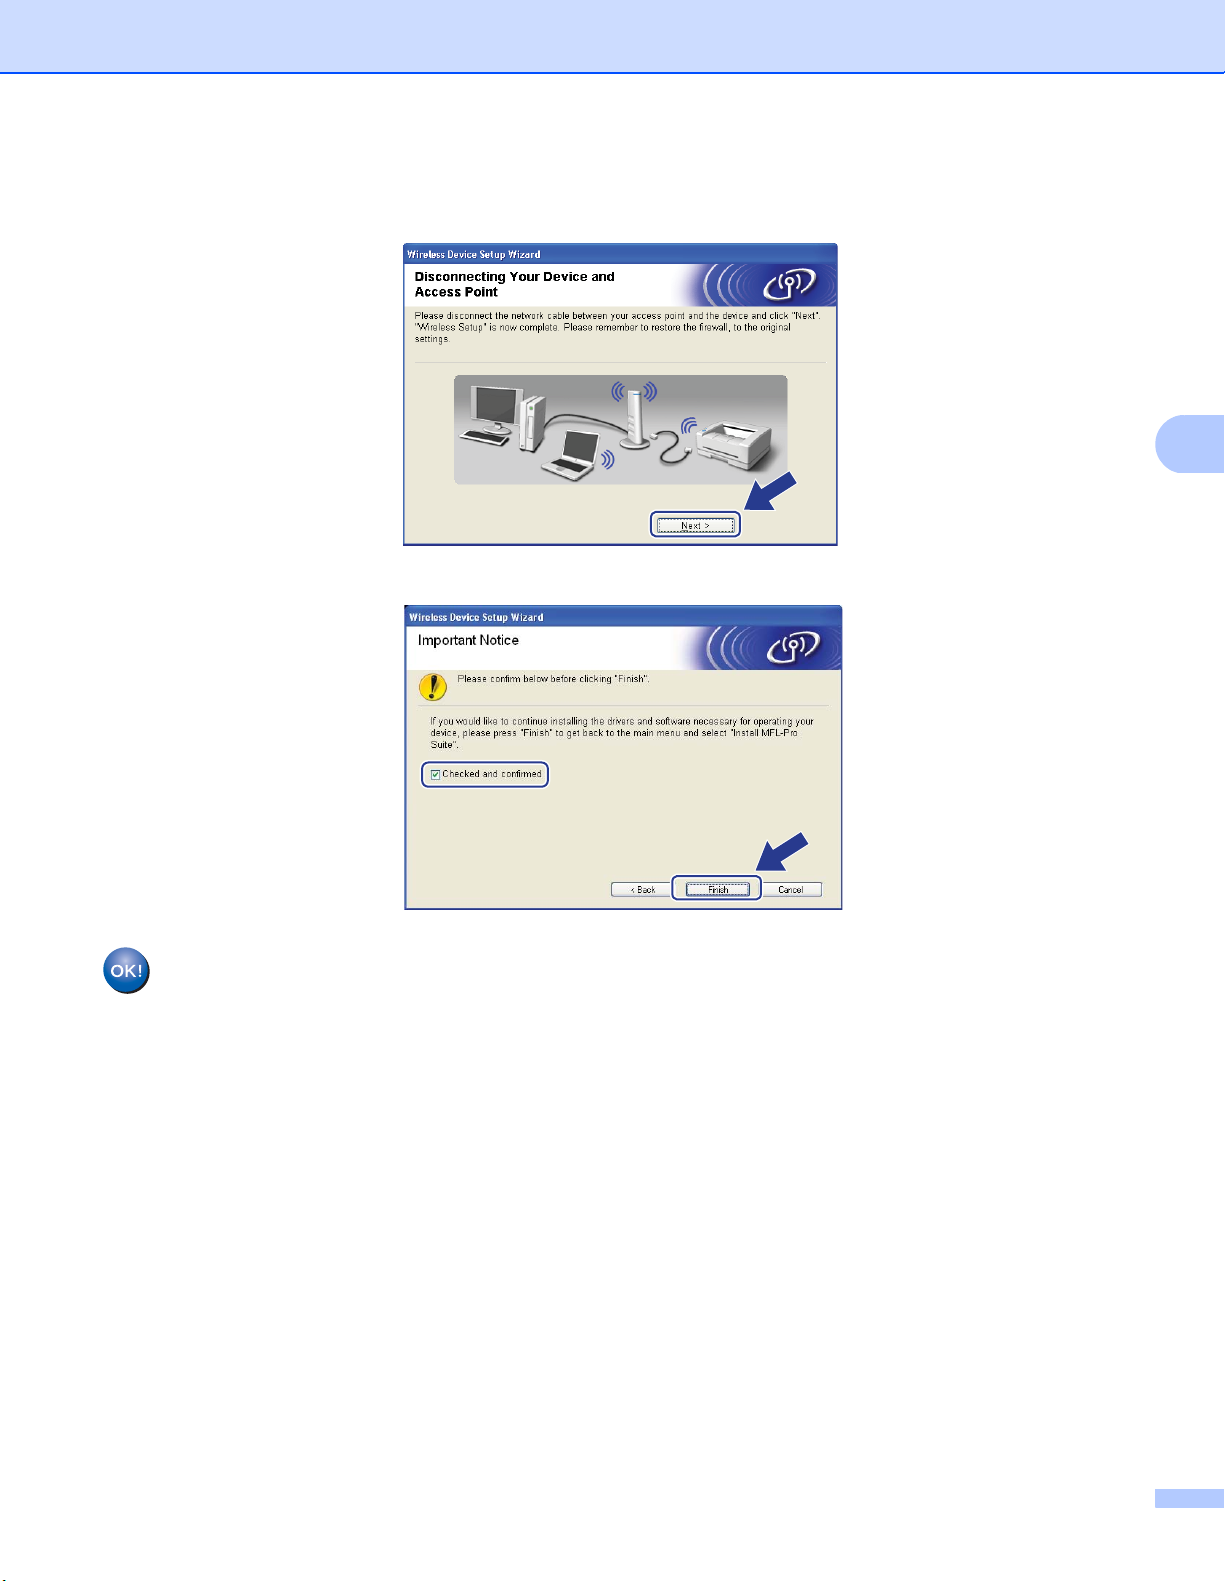
Wireless configuration for Windows® using the Brother installer application (MFC-8890DW only)
p Disconnect the network cable between your access point (hub or router) and the machine, and click
Next.
q Check the box after you confirm that you have completed the wireless settings, and then click Finish.
4
You have completed the wireless network setup. If you would like to continue installing drivers
and software necessary for operating your device, please choose Install MFL-Pro Suite from
the CD-ROM menu.
50
Page 61
Wireless configuration for Windows® using the Brother installer application (MFC-8890DW only)
Configuration using the SES/WPS or AOSS™ from the control panel menu (Automatic Wireless mode) 4
Before configuring the wireless settings 4
IMPORTANT
• If you are going to connect your Brother machine to your network, we recommend that you contact your
system administrator prior to installation. You must know your wireless network settings before you
proceed with this installation.
• If you have previously configured the wireless settings of the machine, you must reset the network LAN
settings before you can configure the wireless settings again. Press Menu, 7, 0 for Network Reset,
press 1 for Reset and then choose 1 for Yes to accept the change. The machine will restart automatically.
Configure the wireless settings 4
4
a Plug the machine’s power cord into the AC power outlet. Turn on the machine’s power switch.
b Press Menu, 7, 2, 7. Using a or b, choose On and press OK.
72.WLAN
7.WLAN Enable
a On
b Off
Select ab or OK
c Turn on your computer.
Close any applications running before configuration.
d Put the supplied CD-ROM into your CD-ROM drive. The opening screen will appear automatically.
If the model name screen appears, choose your machine. If the language screen appears, choose your
language.
51
Page 62
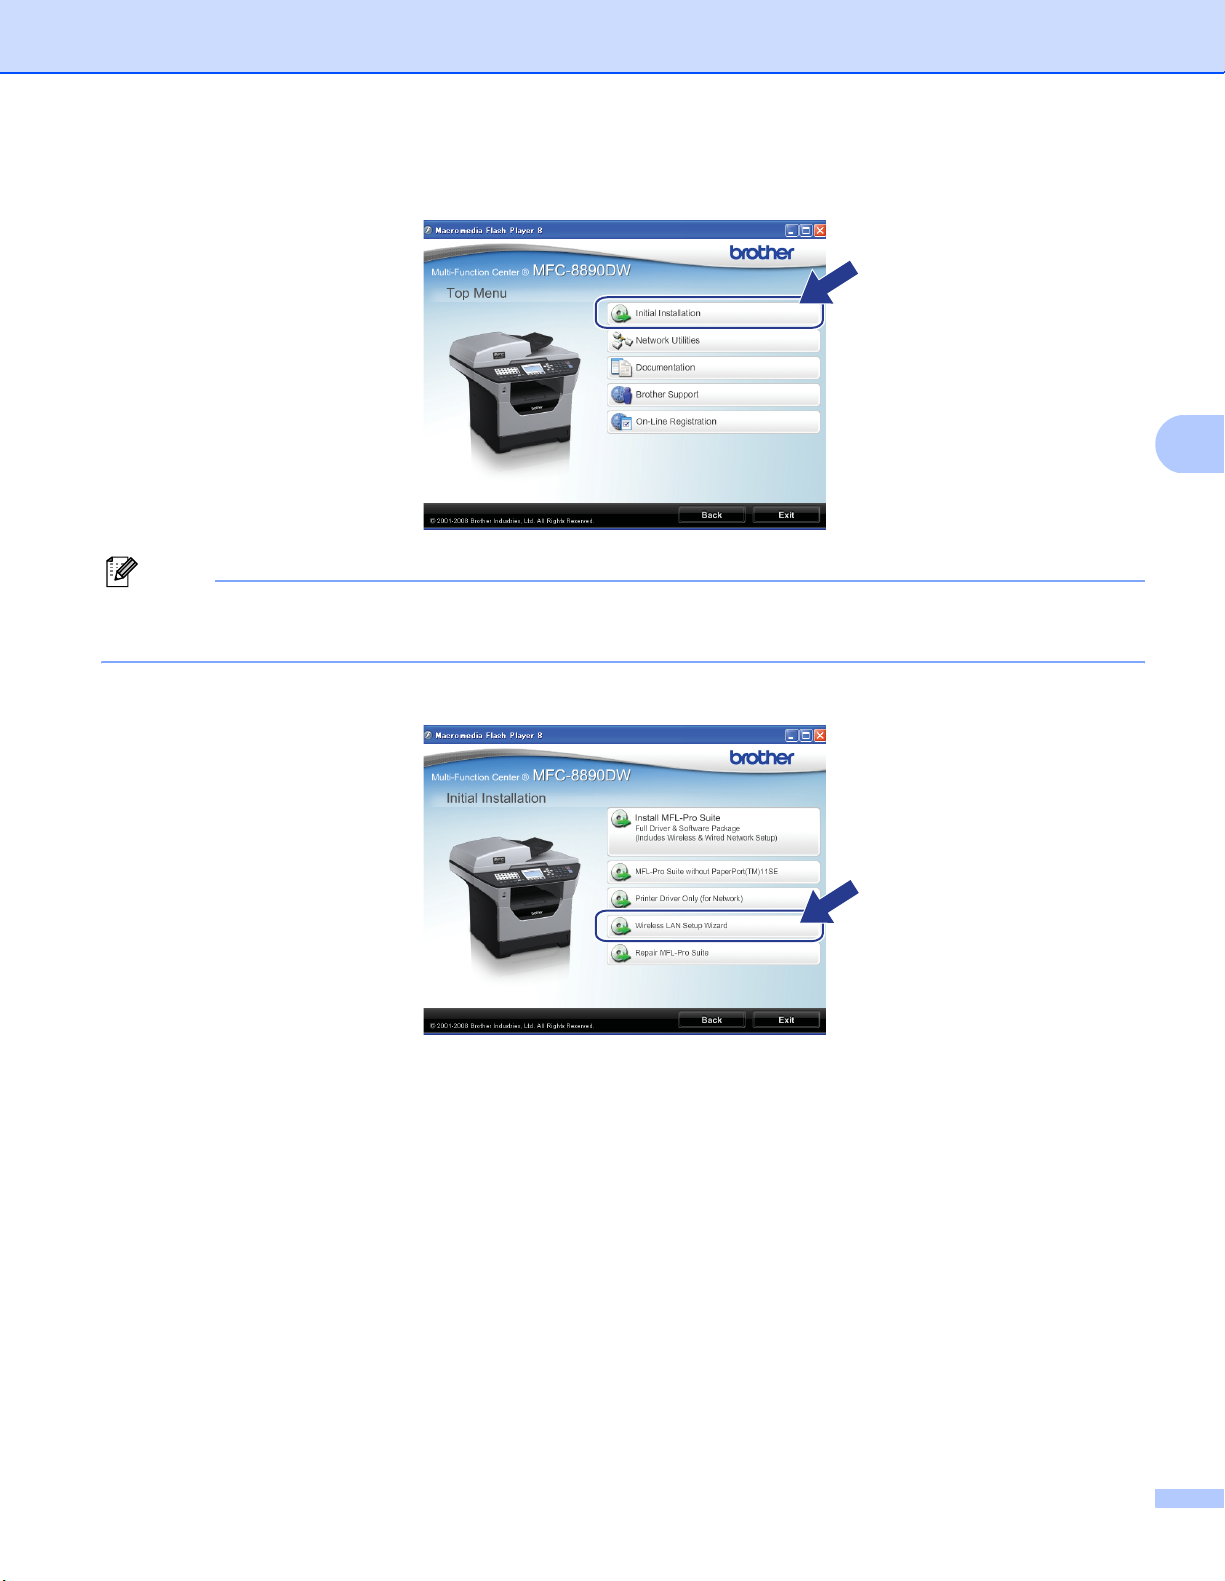
Wireless configuration for Windows® using the Brother installer application (MFC-8890DW only)
e The CD-ROM main menu will appear. Click Initial Installation.
Note
If this window does not appear, use Windows
®
Explorer to run the start.exe program from the root folder
of the Brother CD-ROM.
f Click Wireless LAN Setup Wizard.
4
52
Page 63
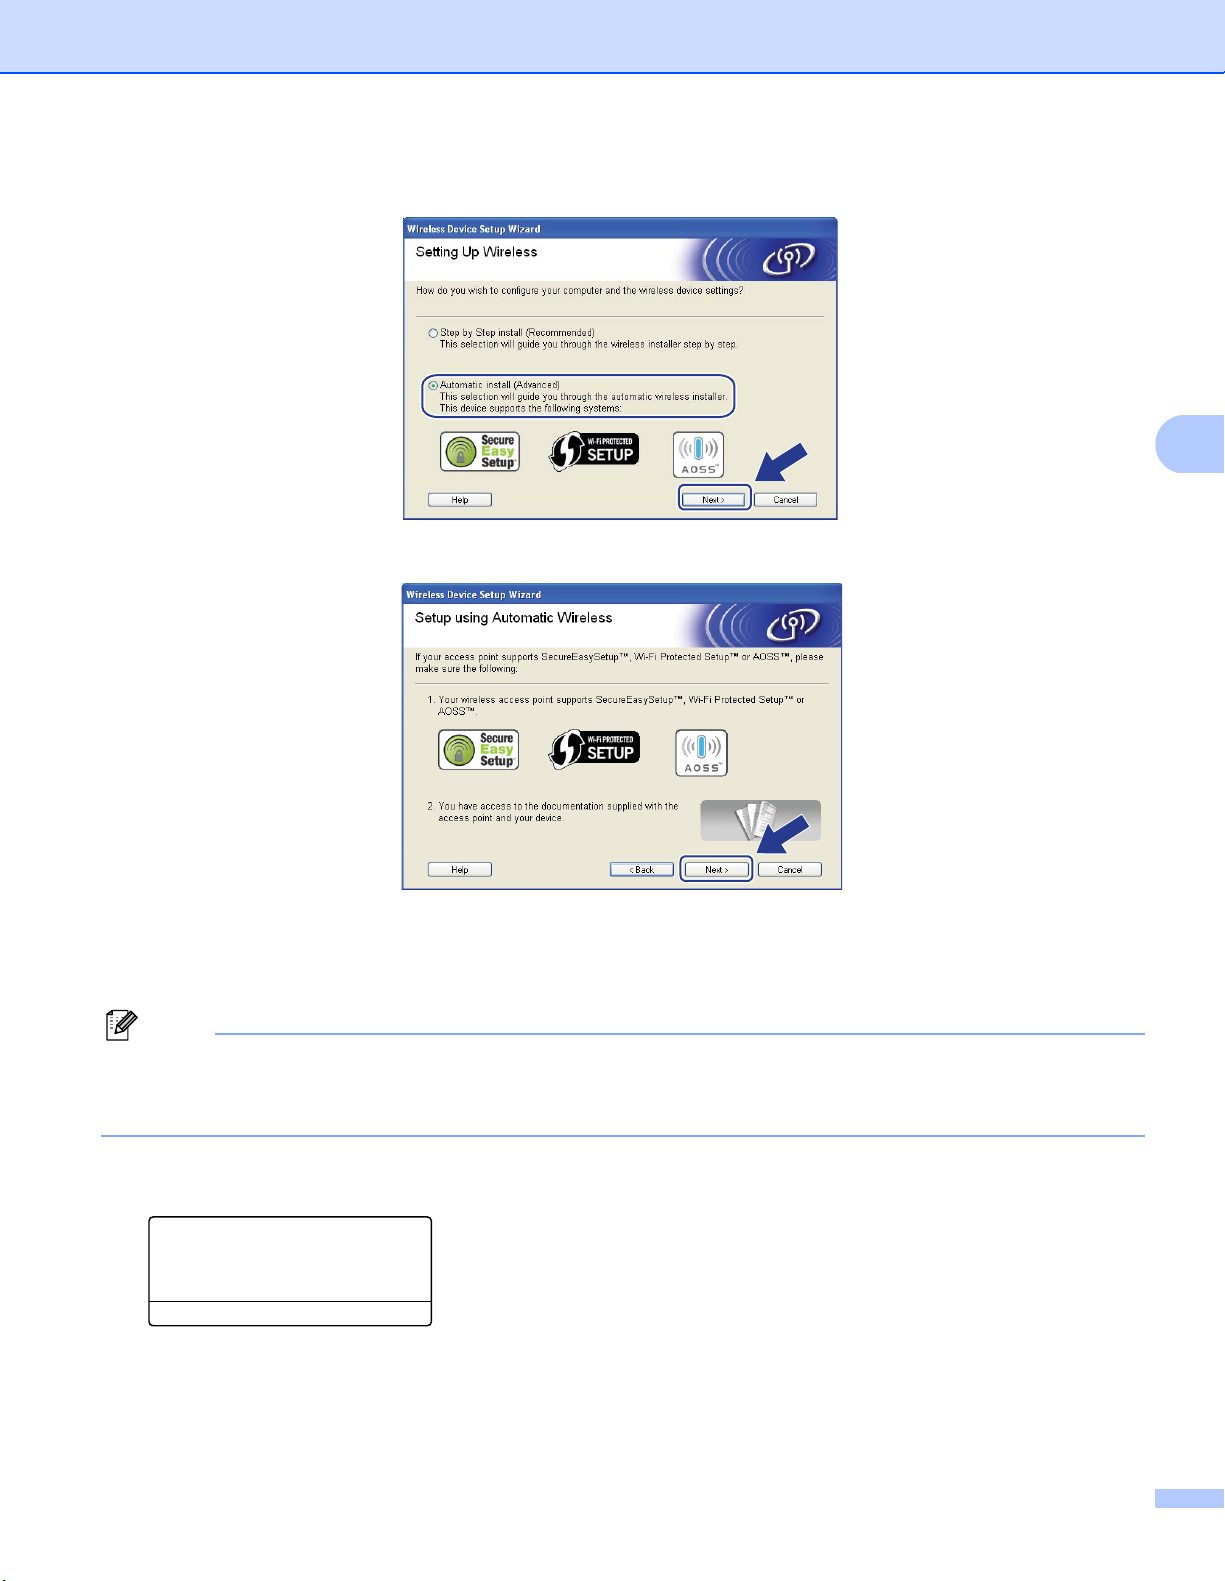
Wireless configuration for Windows® using the Brother installer application (MFC-8890DW only)
g Choose Automatic install (Advanced) and click Next.
h Confirm the on-screen message and click Next.
4
i Press Menu, 7, 2, 3 for SES/WPS/AOSS.
This feature will automatically detect which mode (SecureEasySetup™, Wi-Fi Protected Setup or
AOSS™) your access point uses to configure your machine.
Note
If your wireless access point supports Wi-Fi Protected Setup (PIN Method) and you want to configure your
machine using the PIN (Personal Identification Number) Method, see Using the PIN Method of Wi-Fi
Protected Setup on page 39.
j The machine searches for an access point that supports SecureEasySetup™, Wi-Fi Protected Setup or
AOSS™ for 2 minutes.
72.WLAN
3.SES/WPS/AOSS
Setting WLAN
k Put your access point in the SecureEasySetup™ mode, Wi-Fi Protected Setup mode or AOSS™ mode,
depending on what is supported by your access point. Please refer to the instruction manual that came
with your access point. You will see Connecting AOSS, Connecting SES or Connecting WPS on
the LCD while the machine searches your access point.
53
Page 64

Wireless configuration for Windows® using the Brother installer application (MFC-8890DW only)
l If the LCD shows Connected, the machine has successfully connected to your access point/router. You
can now use your machine in a wireless network.
If the LCD shows Connection Error, a session overlap has been detected. The machine has
detected more than one access point/router on your network with the SecureEasySetup™ mode, the
Wi-Fi Protected Setup mode or AOSS™ mode enabled. Make sure that only one access point/router has
the SecureEasySetup™ mode, the Wi-Fi Protected Setup mode or the AOSS™ mode enabled and try
starting from i again.
If the LCD shows No Access Point, the machine has not detected your access point/router on your
network with the SecureEasySetup™ mode, the Wi-Fi Protected Setup mode or AOSS™ mode
enabled. Move the machine closer to your access point/router and try starting from i again.
If the LCD shows Connection Fail, the machine has not successfully connected to your access
point/router. Try starting from i again. If the same message is indicated again, reset the machine back
to the default factory settings and try again. (For resetting, see Restoring the network settings to factory
default on page 122.)
4
LCD messages when using the SES/WPS/AOSS™ control panel menu
LCD shows Connection status Action
Searching or accessing the access
Setting WLAN
Connecting SES
Connecting WPS
Connecting AOSS
Connected Connection succeeded. —
Connection Error Session overlap has been detected.
No Access Point The access point detection failed.
Connection Fail Connection failed.
point, and downloading settings from the
access point
Connecting the access point —
Check that only one router or access point has
the SecureEasySetup™ mode, the Wi-Fi
Protected Setup mode or AOSS™ mode enabled
and try starting from step i again.
Move the machine closer to your access
point/router and try starting from step i again.
1 Try starting from step i again.
2 If the same message continues, reset the
machine back to the factory settings and try
again.
—
4
54
Page 65
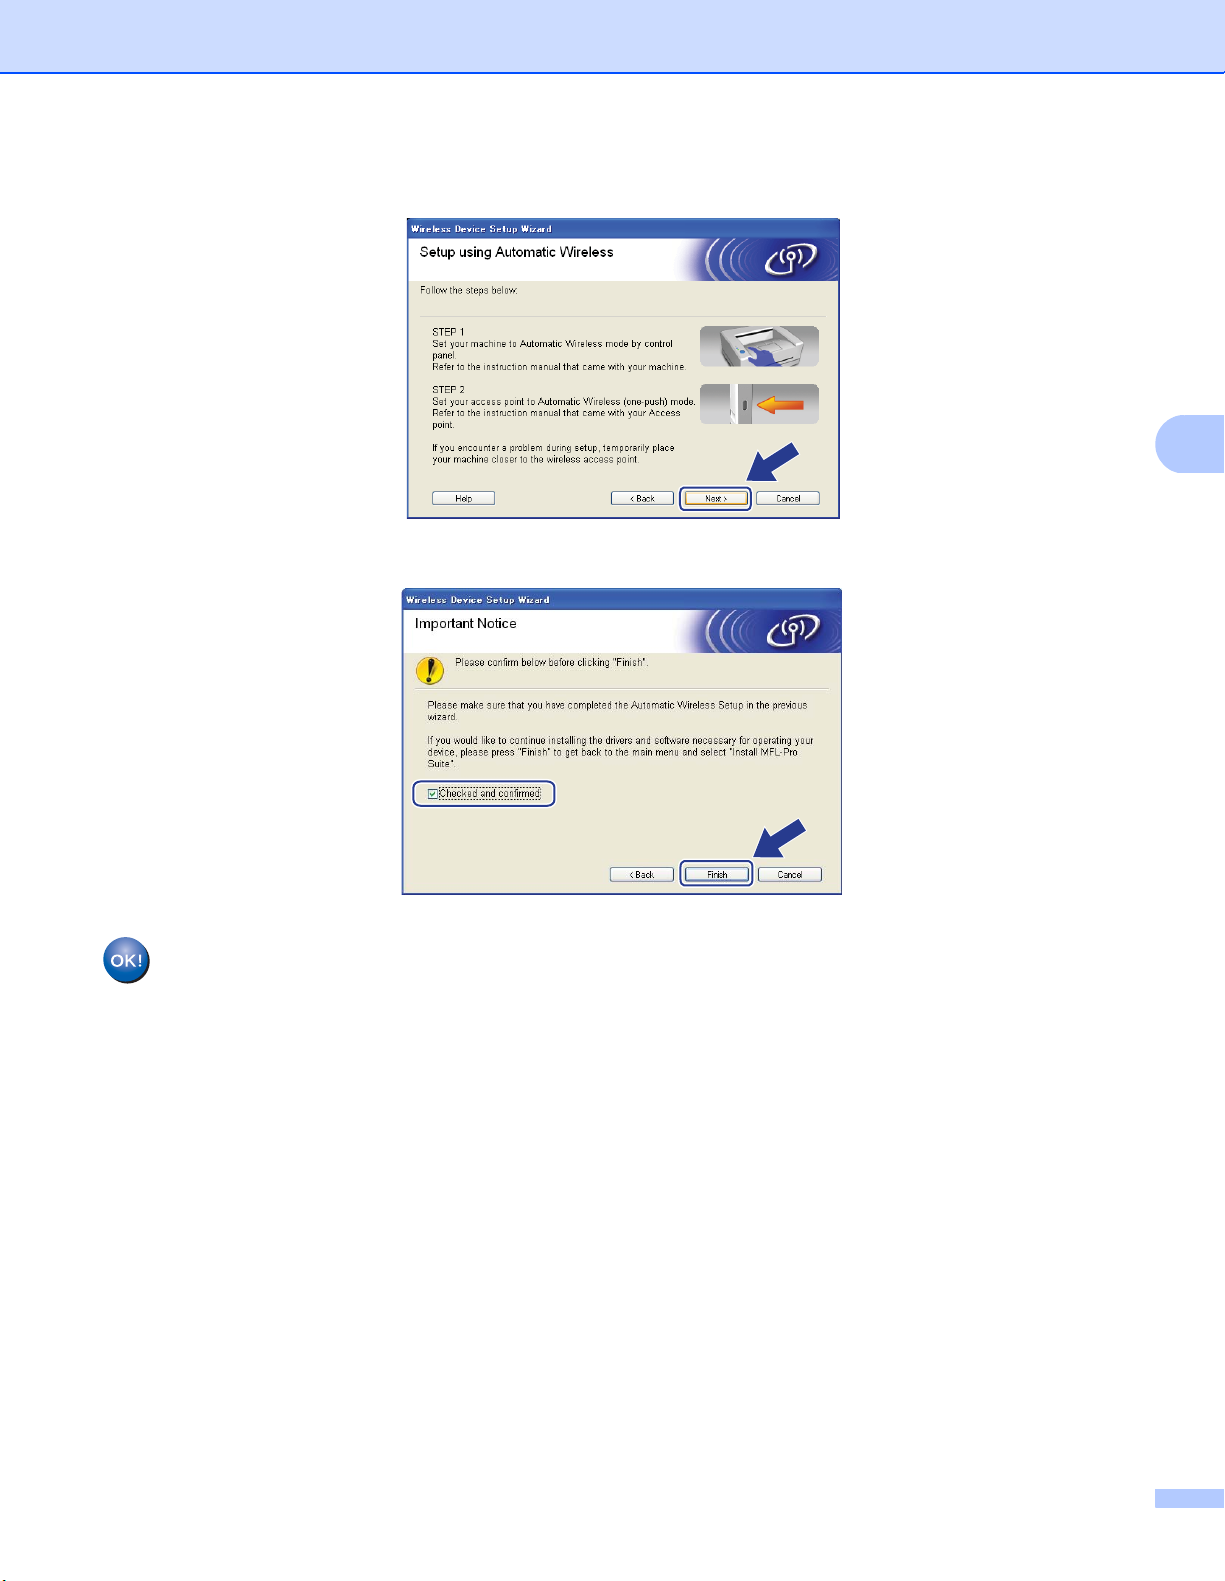
Wireless configuration for Windows® using the Brother installer application (MFC-8890DW only)
m Click Next.
n Check the box after you confirm that you have completed the wireless settings, and then click Finish.
4
You have completed the wireless network setup. If you would like to continue installing drivers
and software necessary for operating your device, please choose Install MFL-Pro Suite from
the CD-ROM menu.
55
Page 66
Wireless configuration for Windows® using the Brother installer application (MFC-8890DW only)
Configuration in Ad-hoc mode 4
Before configuring the wireless settings 4
IMPORTANT
• The following instructions will install your Brother machine in a network environment using the Brother
®
installer application for Windows
found on the CD-ROM we have provided with the machine.
• You can also setup your Brother machine using the machine’s control panel which we recommended. See
Configuring your machine for a wireless network (For MFC-8890DW) on page 21.
• You must know your wireless network settings before you proceed with this installation.
Make sure you take notes on all the current settings such as SSID, authentication and encryption of your
wireless network environment. If you do not know them, contact your network administrator or the
manufacturer of your access point/router.
Item Example Record the current wireless network
settings
Communication mode: (Ad-hoc) Ad-hoc
Network name: (SSID, ESSID) HELLO
Authentication method: (Open system) Open system
Encryption mode: (None, WEP) WEP
Network key: (Encryption key, WEP key
Passphrase)
1
The WEP key is for 64-bit encrypted networks or 128-bit encrypted networks and can contain both numbers and letters. If you do not know
this information you should see the documentation provided with your access point or wireless router. This key is a 64-bit or 128-bit value that
must be entered in an ASCII or HEXADECIMAL format.
For example:
64-bit ASCII: Uses 5 text characters e.g. “Hello” (this is case sensitive)
64-bit Hexadecimal: Uses 10 digits of hexadecimal data e.g. “71f2234aba”
128-bit ASCII: Uses 13 text characters e.g.
128-bit Hexadecimal: Uses 26 digits of hexadecimal data
1
12345
,
“Wirelesscomms” (this is case sensitive)
e.g.“71f2234ab56cd709e5412aa3ba”
4
• If you have previously configured the wireless settings of the machine, you must reset the network LAN
settings before you can configure the wireless settings again. Press Menu, 7, 0 for Network Reset,
press 1 for Reset and then choose 1 for Yes to accept the change. The machine will restart automatically.
• If you are using Windows
®
Firewall or a firewall function of anti-spyware or antivirus applications,
temporarily disable them. Once you are sure that you can print, configure the software settings following
the instructions again.
56
Page 67
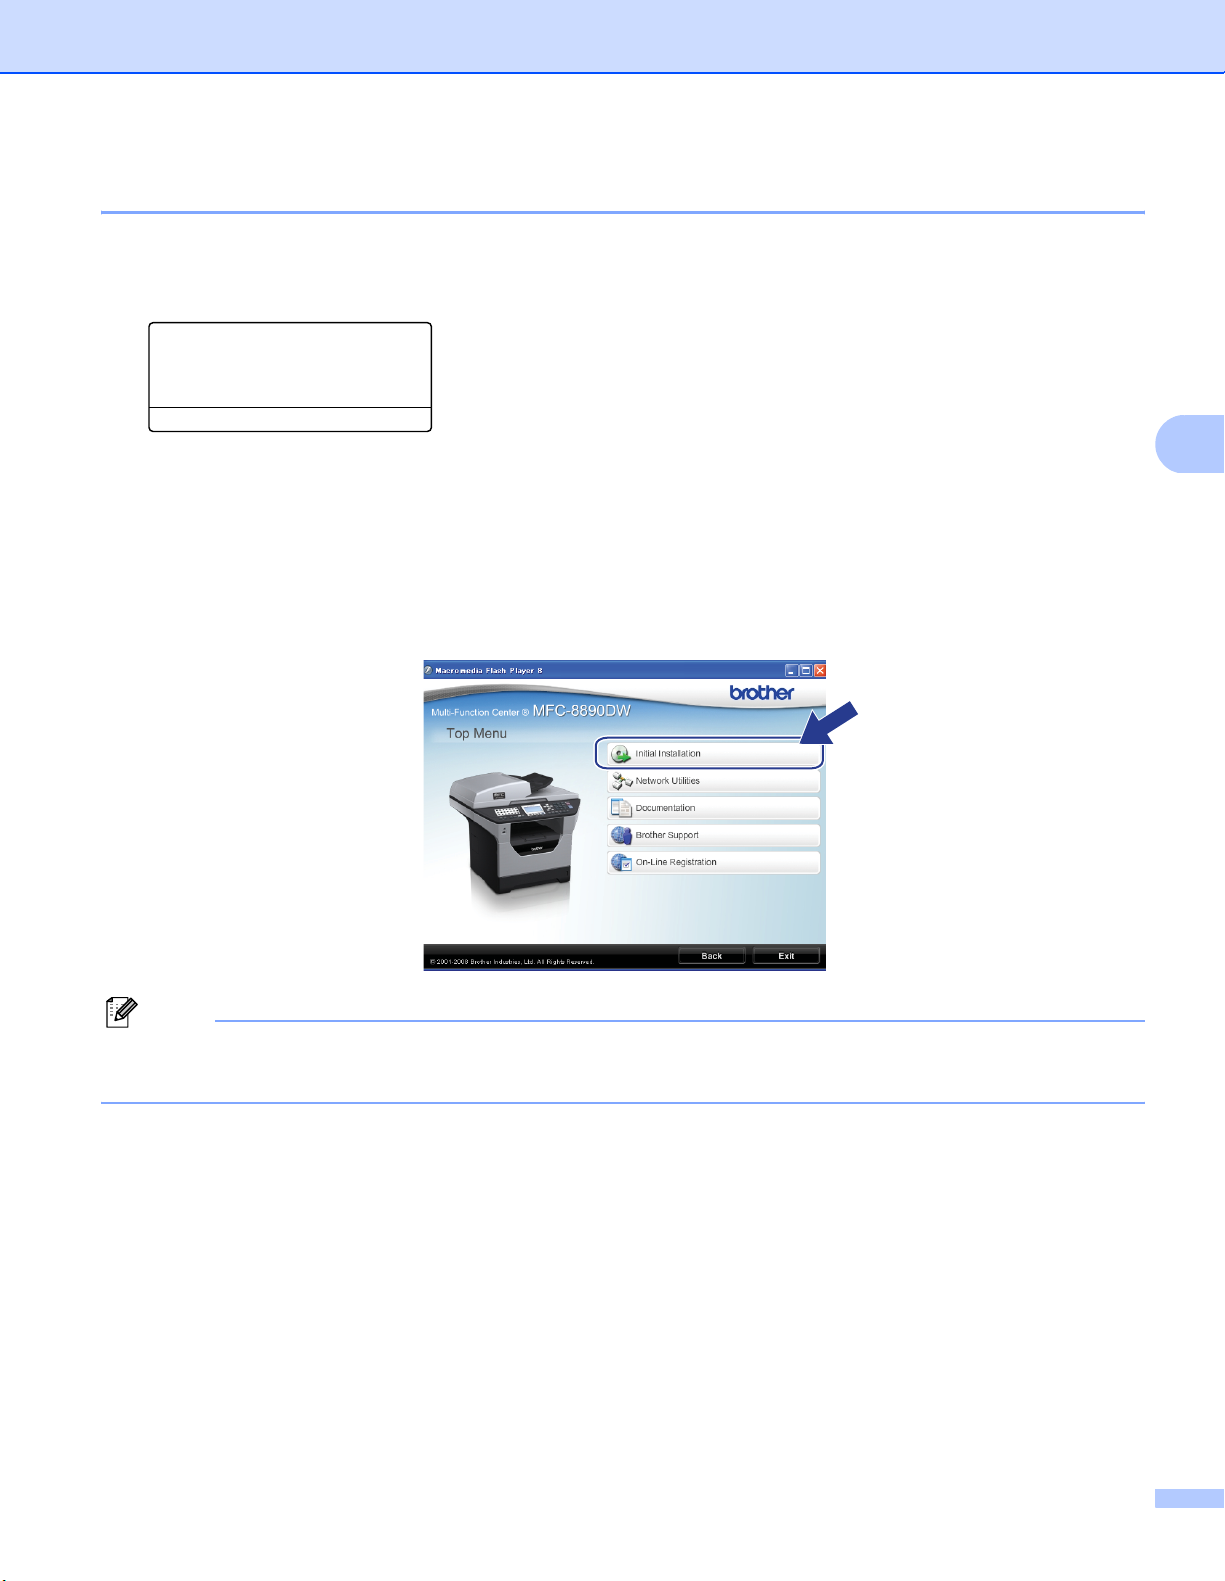
Wireless configuration for Windows® using the Brother installer application (MFC-8890DW only)
Configure the wireless settings 4
a Plug the machine’s power cord into the AC power outlet. Turn on the machine’s power switch.
b Press Menu, 7, 2, 7. Using a or b, choose On and press OK.
72.WLAN
7.WLAN Enable
a On
b Off
Select ab or OK
c Turn on your computer.
Close any applications running before configuration.
d Put the supplied CD-ROM into your CD-ROM drive. The opening screen will appear automatically.
If the model name screen appears, choose your machine. If the language screen appears, choose your
language.
e The CD-ROM main menu will appear. Click Initial Installation.
4
Note
If this window does not appear, use Windows
of the Brother CD-ROM.
®
Explorer to run the start.exe program from the root folder
57
Page 68
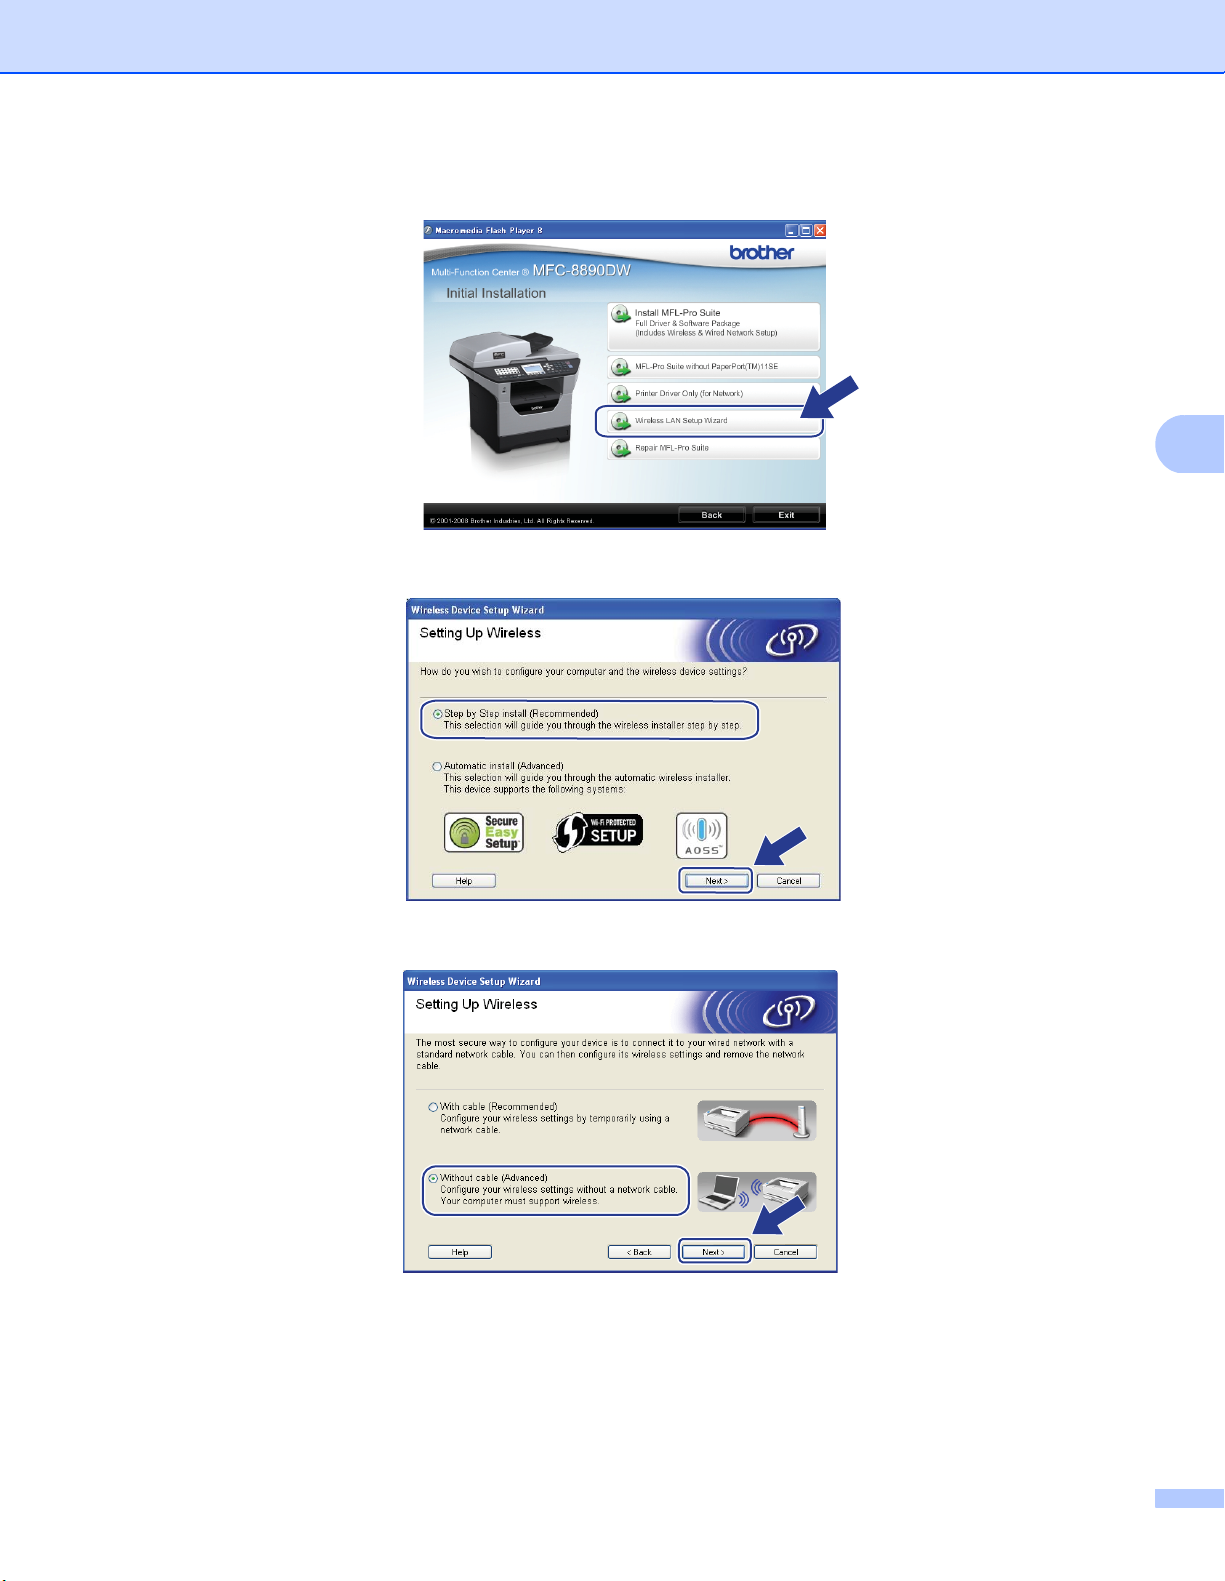
Wireless configuration for Windows® using the Brother installer application (MFC-8890DW only)
f Click Wireless LAN Setup Wizard.
g Choose Step by Step install (Recommended) and then click Next.
4
h Choose Without cable (Advanced) and then click Next.
58
Page 69
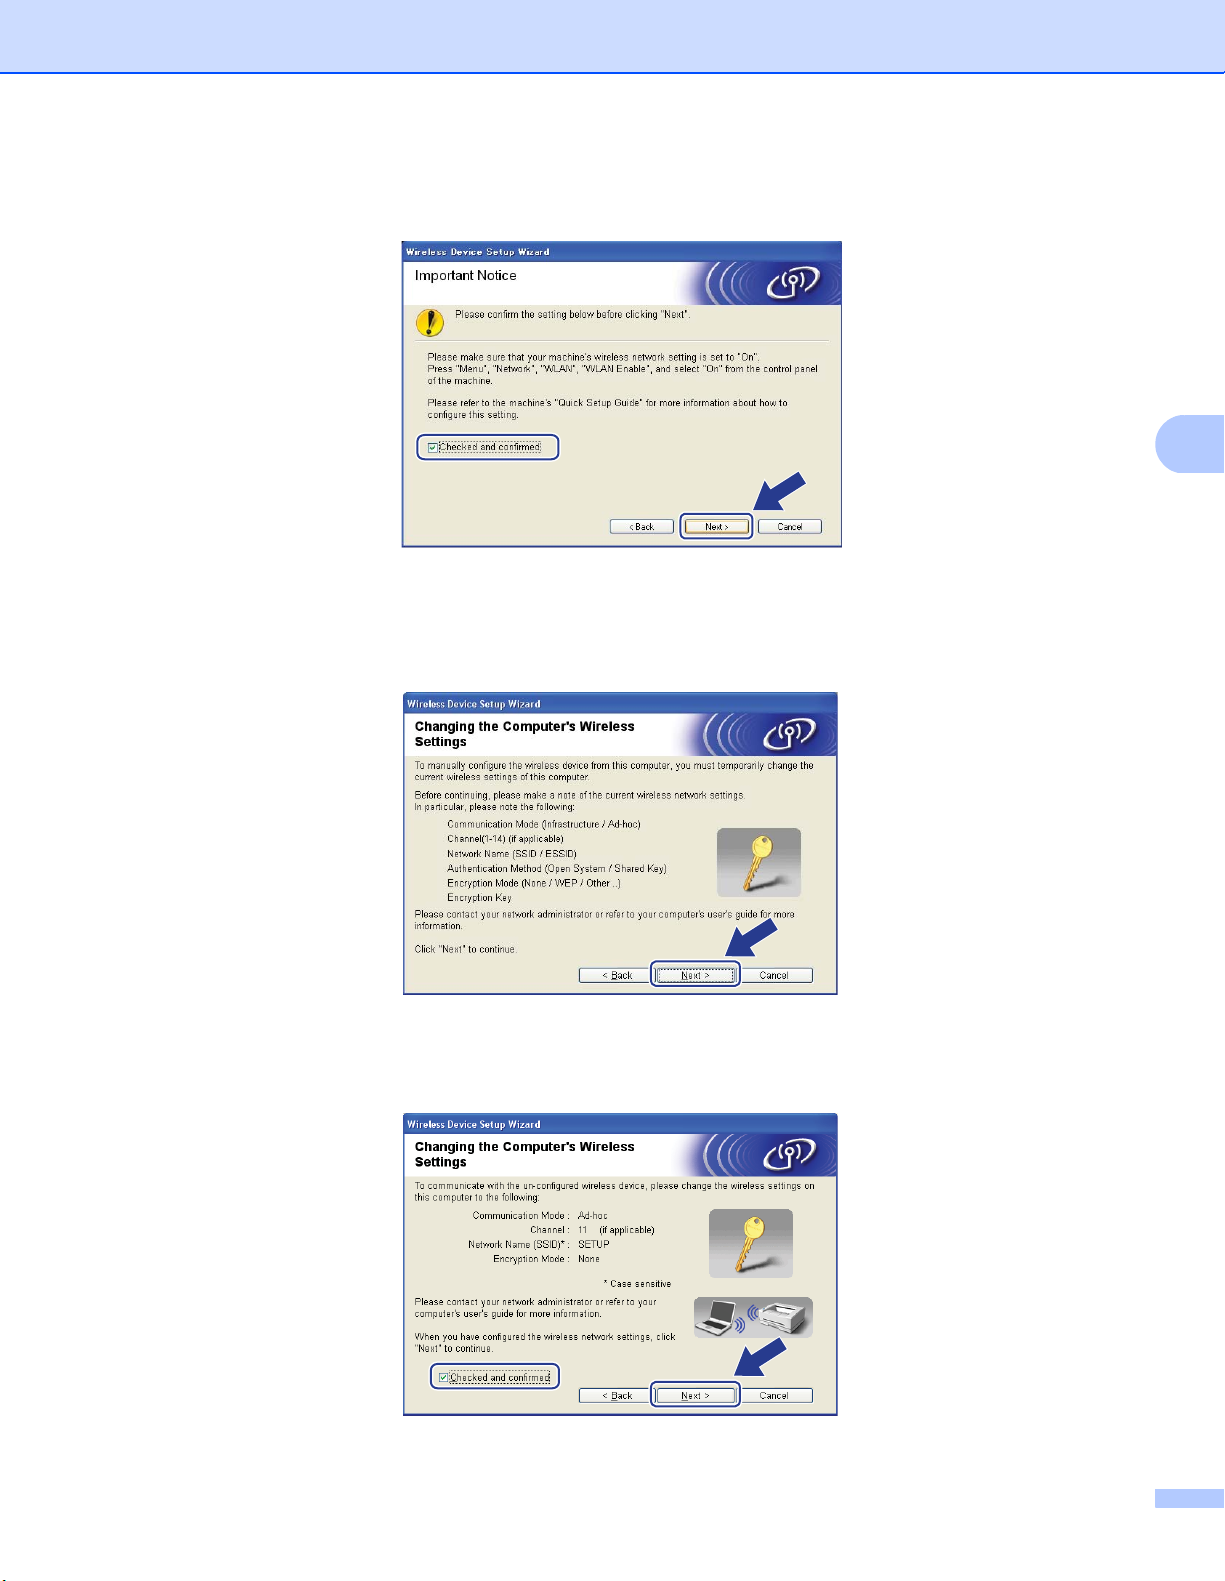
Wireless configuration for Windows® using the Brother installer application (MFC-8890DW only)
i Read the Important Notice. Check the box after you confirm the wireless setting is enabled, and then
click Next.
j You need to temporarily change your computer’s wireless settings. Follow the on-screen instructions.
Make sure you take notes on all the settings such as SSID, channel, authentication and encryption of
your computer. You will need them to return your computer back to its original wireless settings, and then
click Next.
4
k To communicate with the un-configured wireless machine, temporarily change the wireless settings on
your computer to match the machine’s default settings shown on this screen. Check the box after you
confirm these settings, and then click Next.
59
Page 70

Wireless configuration for Windows® using the Brother installer application (MFC-8890DW only)
Note
• If a message to restart your computer appears after the wireless settings have been changed, restart your
computer and then go back to step d and continue with the install skipping steps j and k.
®
• For Windows Vista
users:
You can temporarily change the wireless settings on your computer, following the steps below:
1 Click the button and then Control Panel.
2 Click Network and Internet and then the Network and Sharing Center icon.
3 Click Connect to a network.
4 You can see the SSID of the wireless printer in the list. Choose SETUP and click Connect.
5 Click Connect Anyway and then Close.
6 Click View status of Wireless Network Connection (SETUP).
7 Click Details.... and check the Network Connection Details. It may take a few minutes to change
from 0.0.0.0 to 169.254.x.x IP address to be shown on screen (where x.x. are numbers between 1
and 254).
®
• For Windows
XP SP2 users:
You can temporarily change the wireless settings on your computer, following the steps below:
1 Click Start and then Control Panel.
2 Click the Network and Internet Connections icon.
3 Click the Network Connections icon.
4 Choose and right-click Wireless Network Connection. Click View Available Wireless Networks.
4
5 You can see the SSID of the wireless printer in the list. Choose SETUP and click Connect.
6 Check the Wireless Network Connection status. It may take a few minutes to change from 0.0.0.0
to 169.254.x.x IP address to be shown on screen (where x.x. are numbers between 1 and 254).
60
Page 71
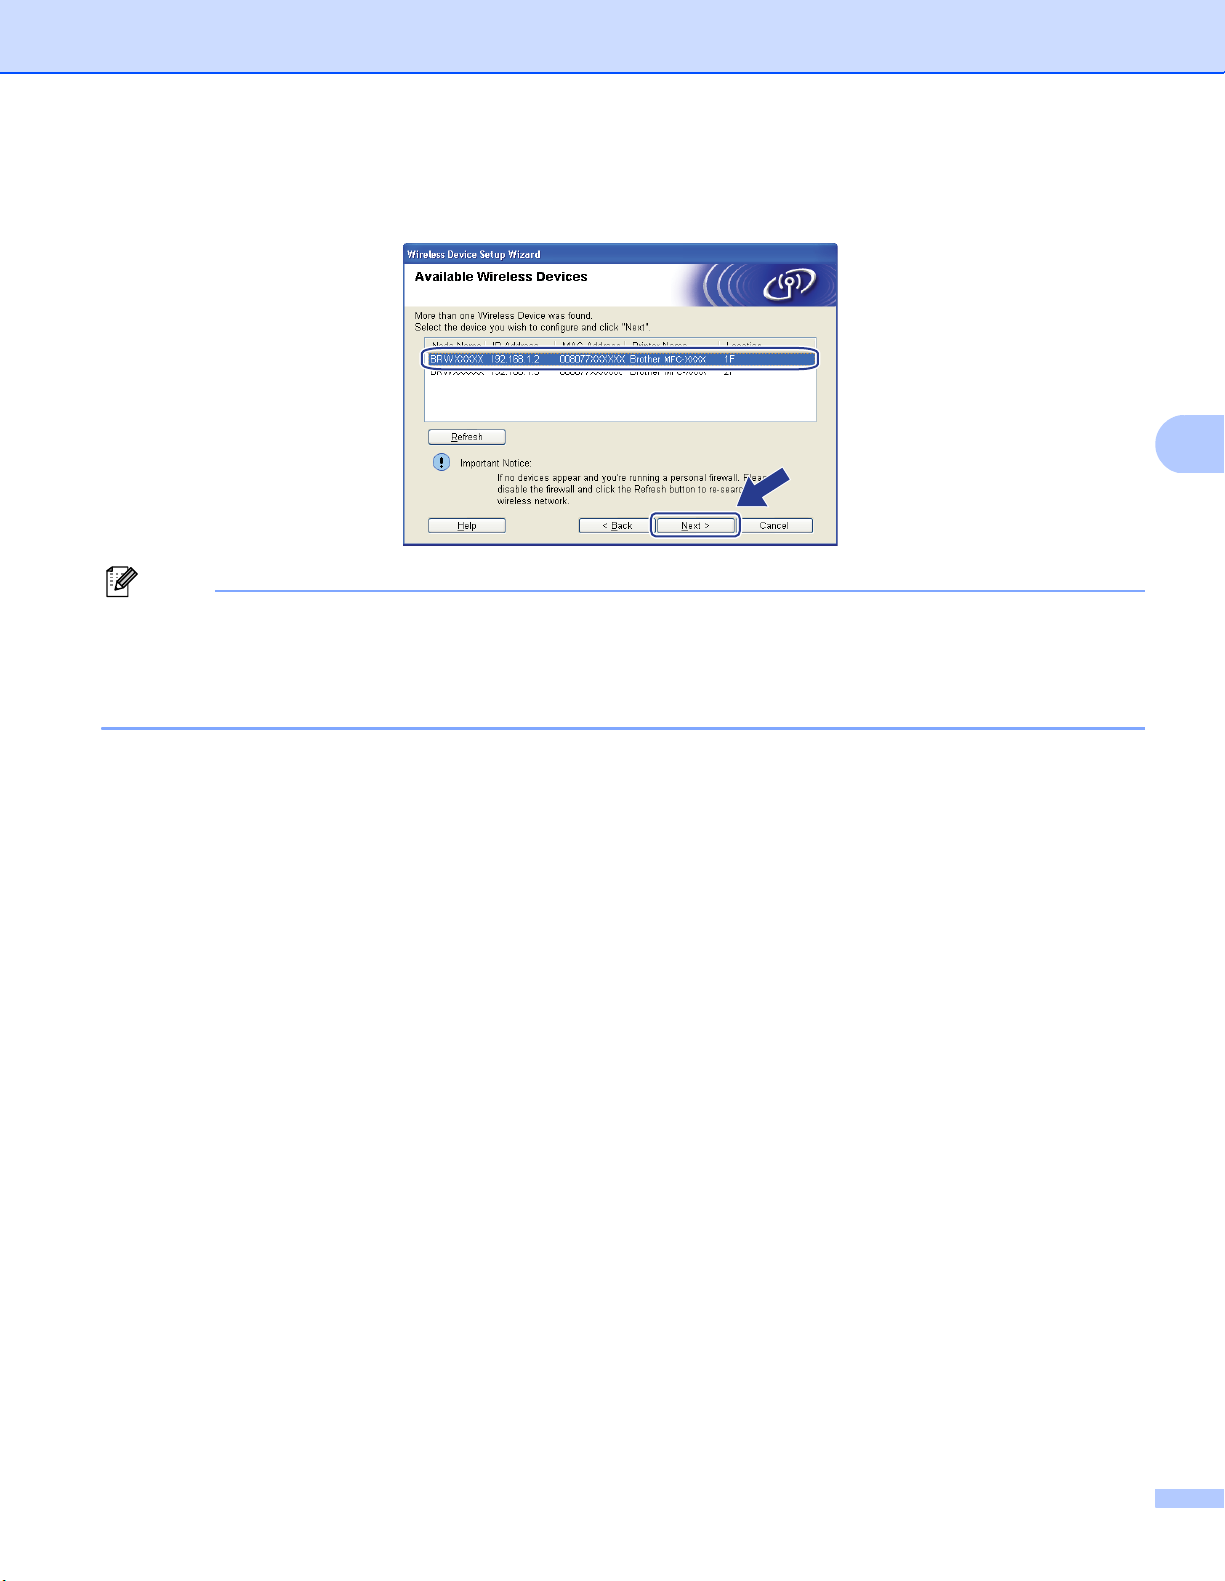
Wireless configuration for Windows® using the Brother installer application (MFC-8890DW only)
l Choose the machine you wish to configure, and click Next. If the list is blank, check if the machine is
powered on, and then click Refresh.
Note
• The default Node name is “BRWxxxxxxxxxxxx”. (“xxxxxxxxxxxx” is your machine’s MAC Address /
Ethernet Address.)
• You can find your machine’s MAC Address / Ethernet Address by printing out the Network Configuration
List. See Printing the Network Configuration List on page 122.
4
61
Page 72
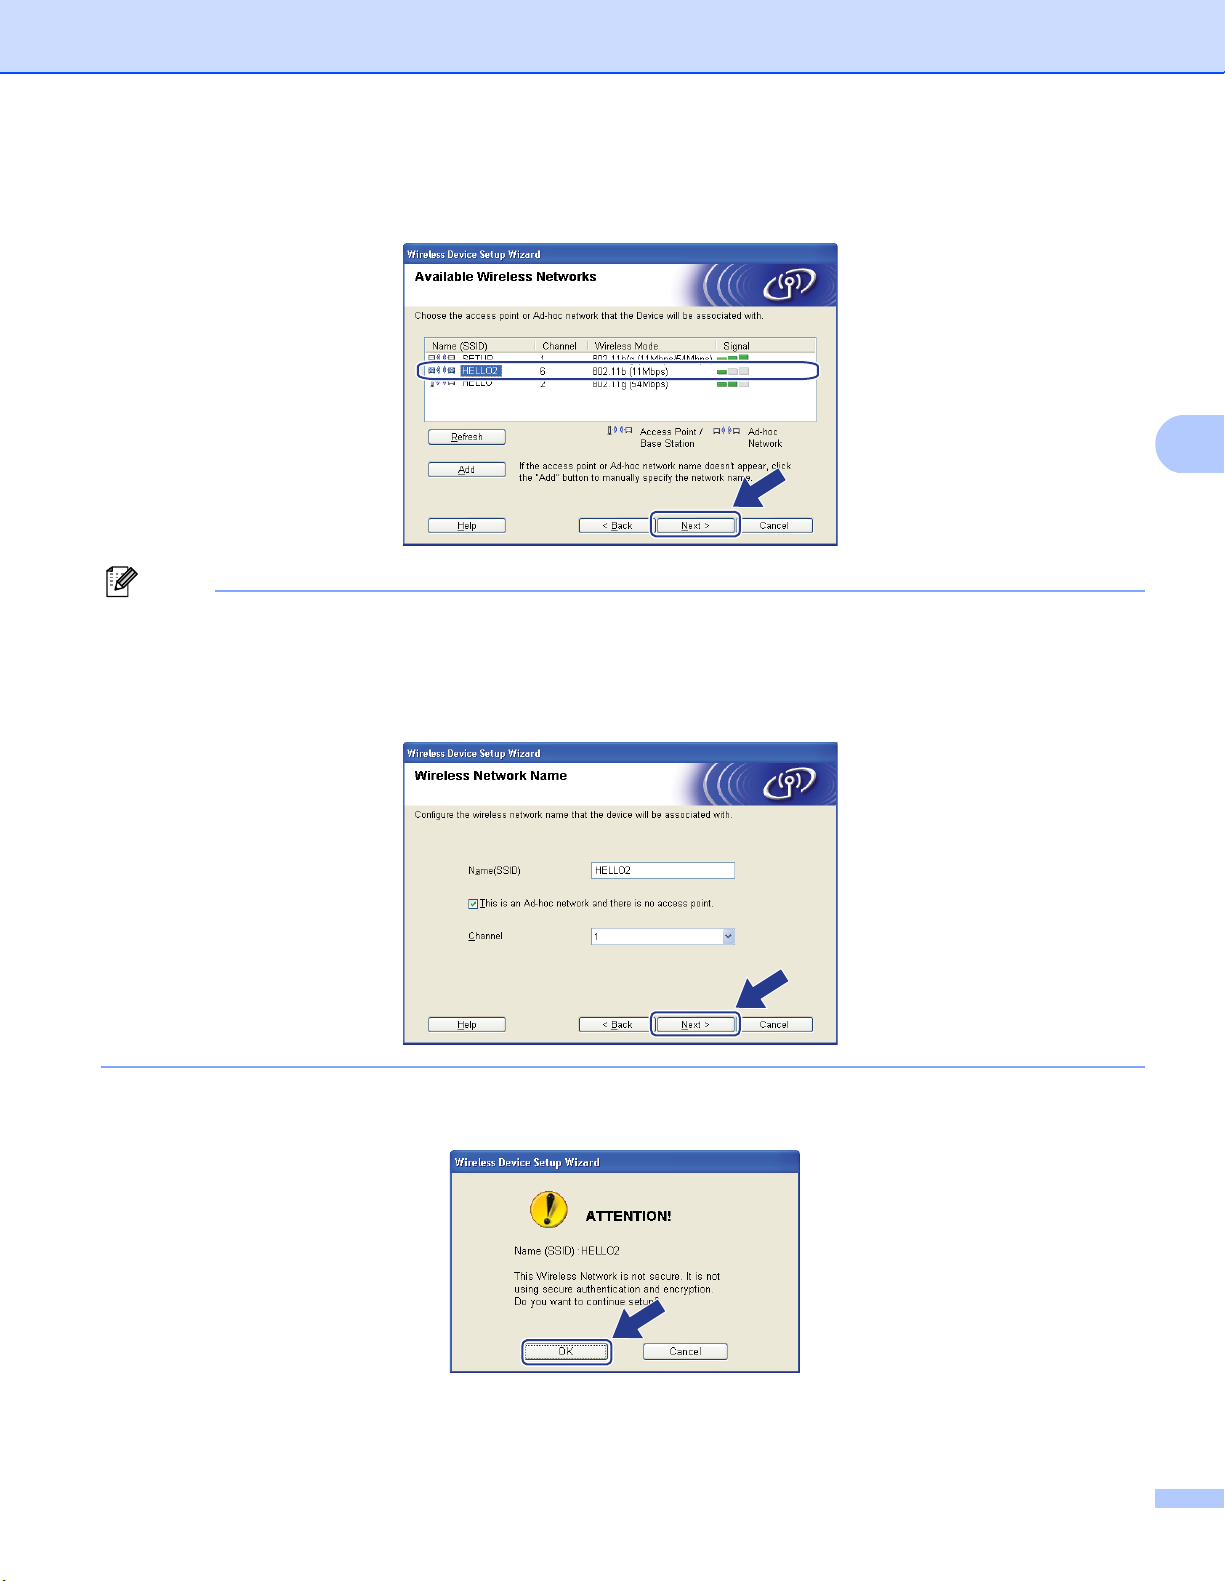
Wireless configuration for Windows® using the Brother installer application (MFC-8890DW only)
m The wizard will search for wireless networks available from your machine. Choose the Ad-hoc network
you wish to associate the machine with, and then click Next.
Note
• If the list is blank, check if the machine is within range for wireless communication. Then, click Refresh.
• If your target Ad-hoc network does not appear on the list, you can manually add it by clicking the Add
button. Check This is an Ad-hoc network and there is no access point., and then enter the
Name (SSID) and the Channel number, and then click Next.
4
n If your network is not configured for Authentication and Encryption, the following screen will appear. To
continue configuration, click OK and go to step p.
62
Page 73
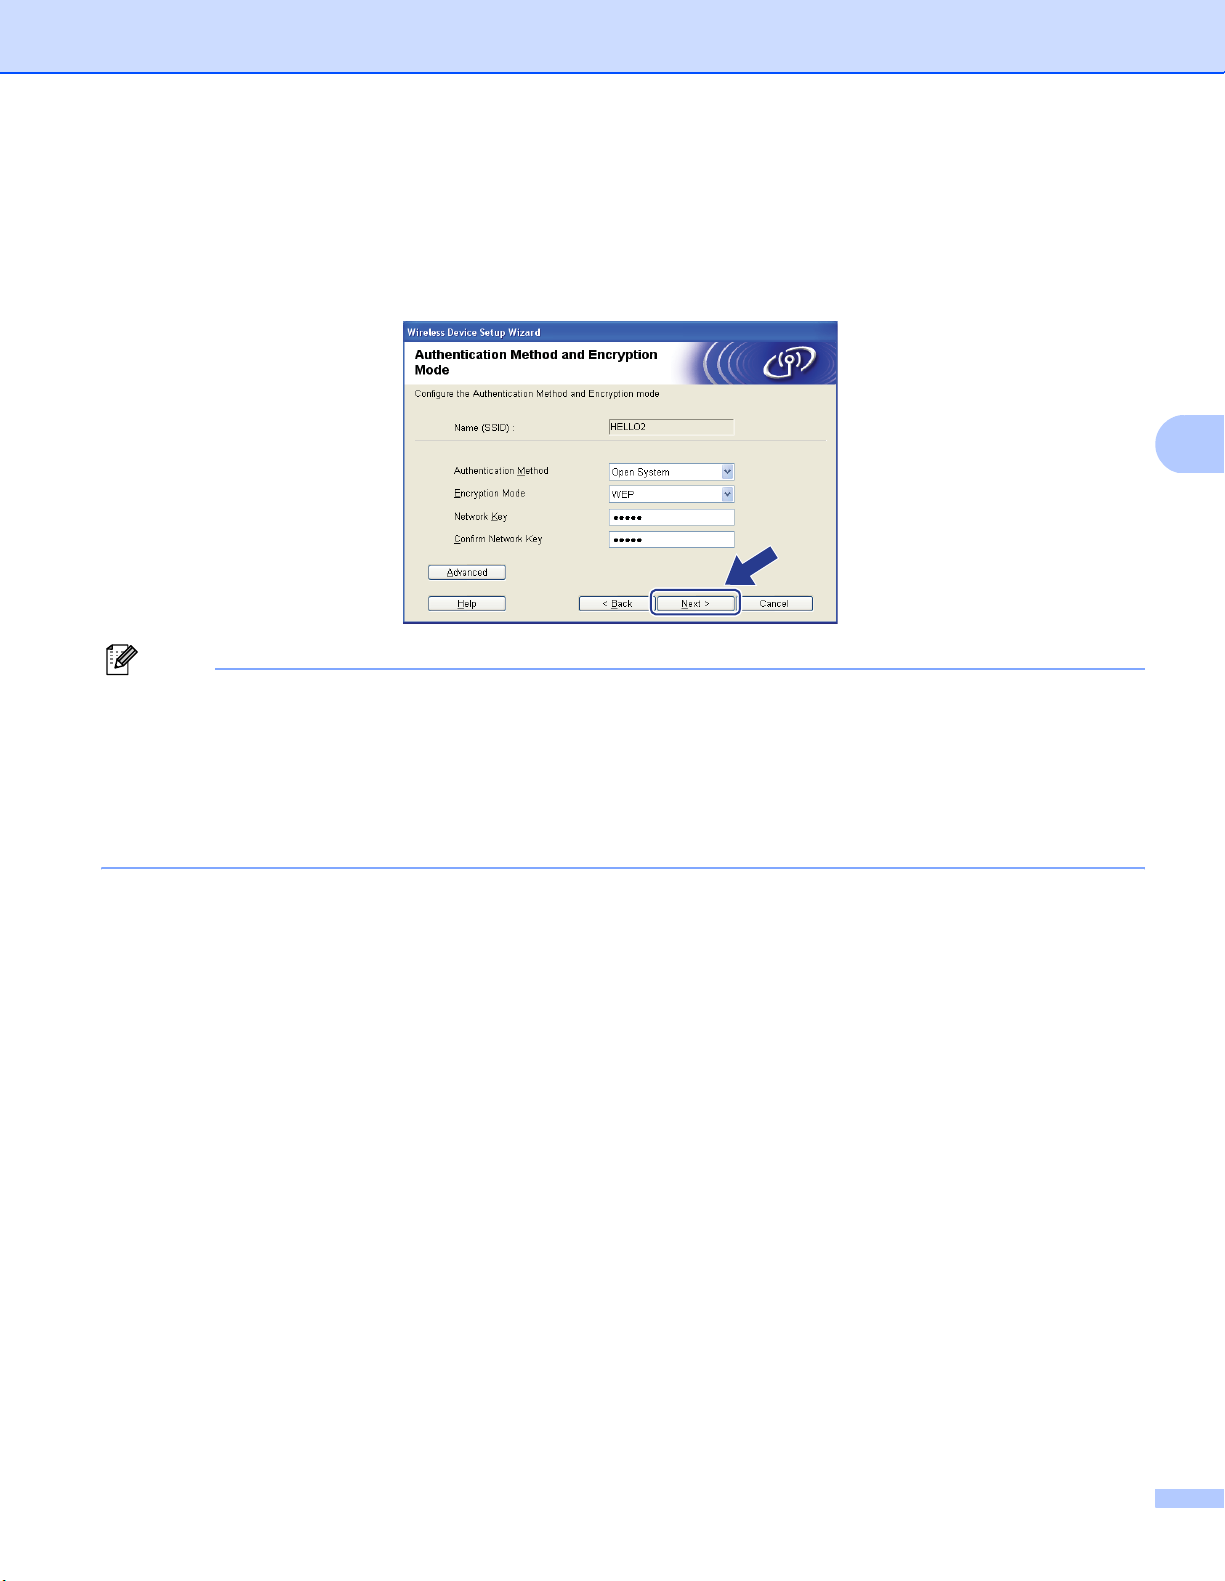
Wireless configuration for Windows® using the Brother installer application (MFC-8890DW only)
o If your network is configured for Authentication and Encryption, the following screen will appear. When
configuring your Brother wireless machine, you must configure your machine to match the
Authentication and Encryption settings you wrote down on page56 for your existing wireless
network. Choose the Authentication Method and Encryption Mode from the pull-down list in each
setting box. Then enter the Network Key and Confirm Network Key, and then click Next.
Note
• If you want to setup or configure additional WEP key indexes other than WEP key1, click Advanced.
4
• If you do not know the Authentication or Encryption settings for your network, contact your network
administrator or the manufacture of your access point / router.
• If you are using WEP and the printed Network Configuration page in step p shows Link OK in the
Wireless Link Status, but the machine is not found, make sure you entered the WEP key correctly. The
WEP key is case sensitive.
63
Page 74
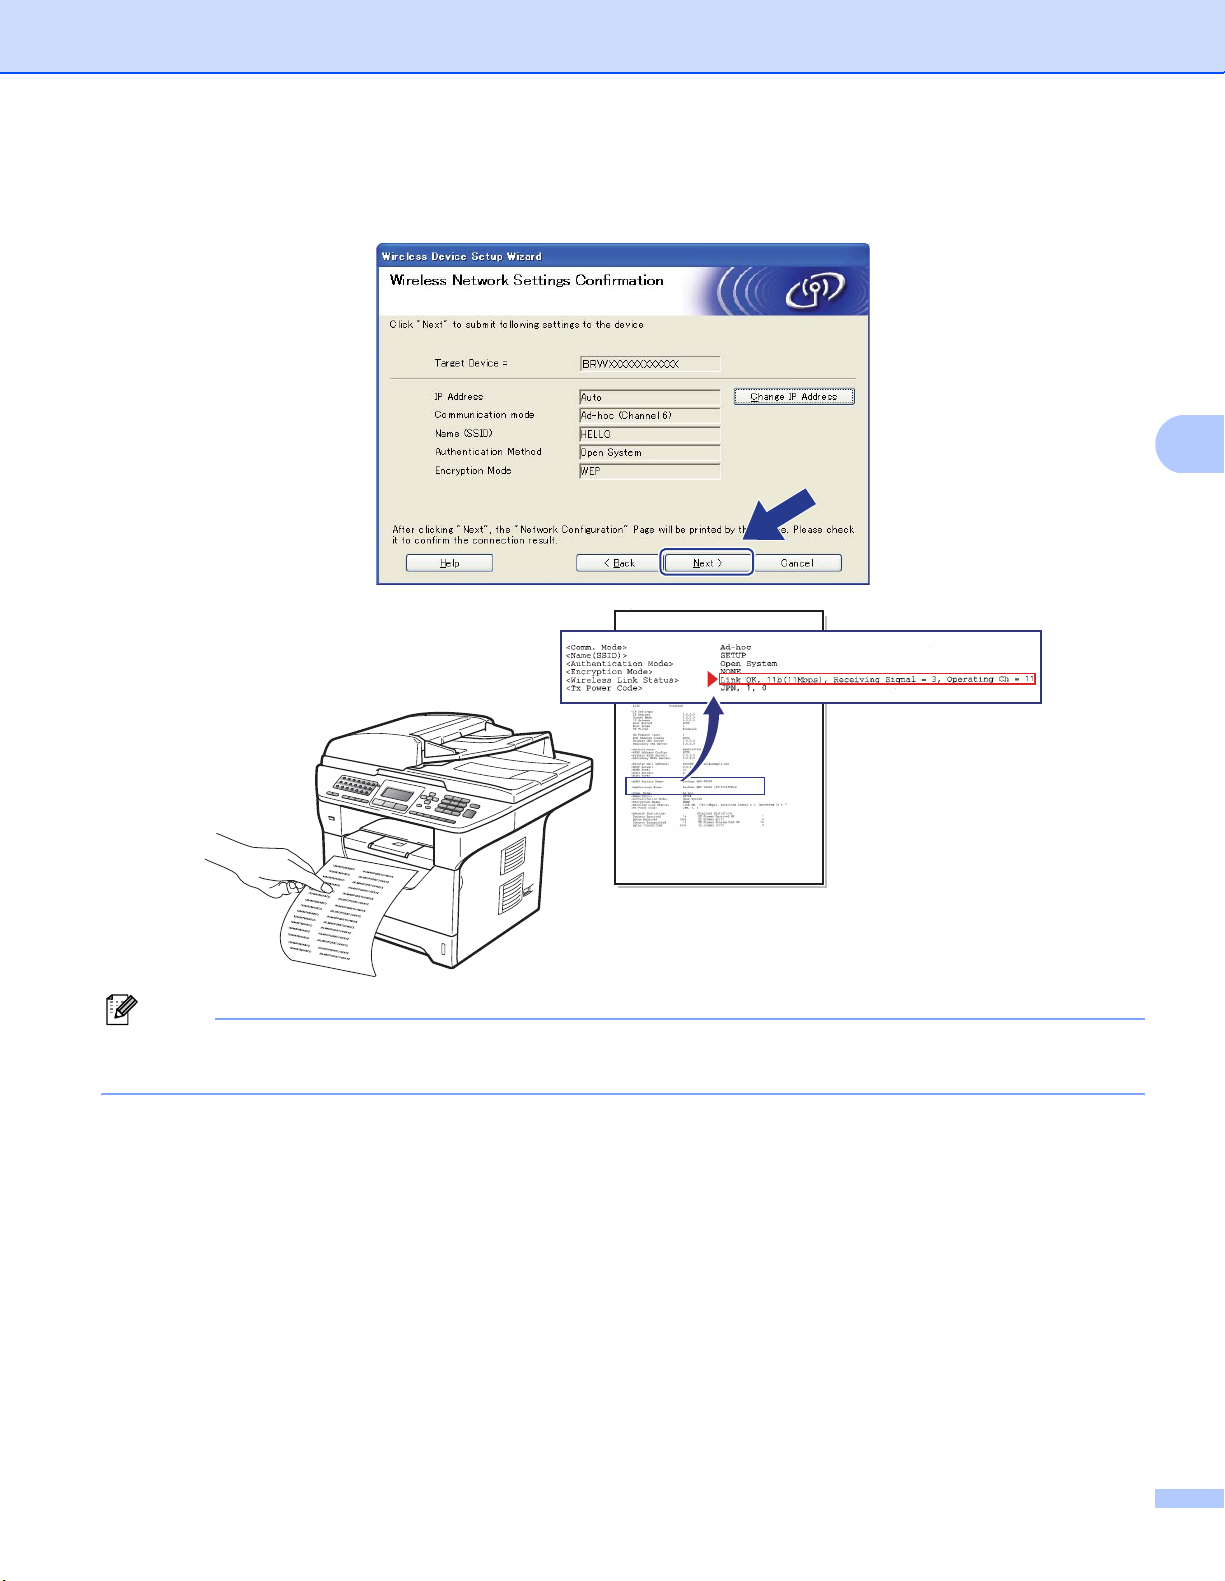
Wireless configuration for Windows® using the Brother installer application (MFC-8890DW only)
p Click Next. The settings will be sent to your machine. The settings will remain unchanged if you click
Cancel. The Network Configuration page will be printed.
4
Note
If you want to manually enter the IP address settings of your machine, click Change IP Address and enter
the necessary IP address settings for your network.
64
Page 75
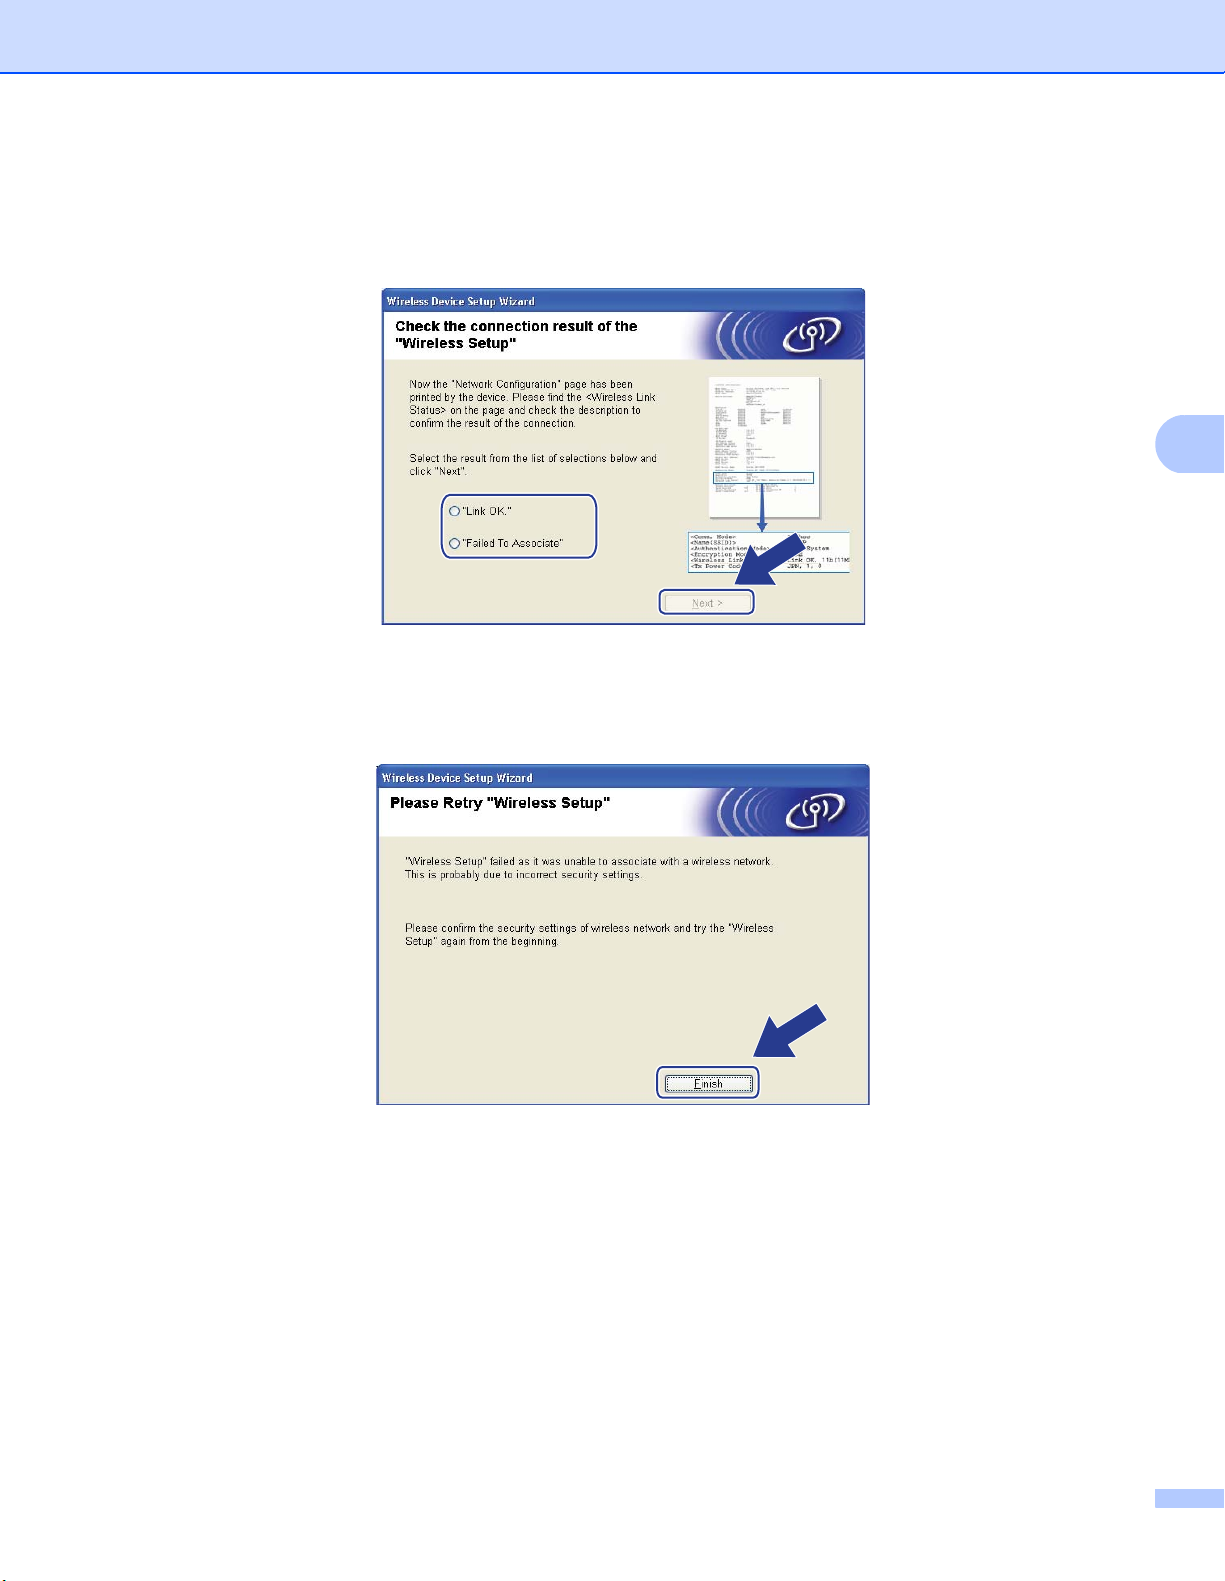
Wireless configuration for Windows® using the Brother installer application (MFC-8890DW only)
q Check the printed Network Configuration page. Choose the status as it is shown in the
Wireless Link Status on the Network Configuration page. Click Next.
If your status is "Link OK.", go to step s.
If your status is "Failed To Associate", go to step r.
r Click Finish. Wireless setup was unable to associate with a wireless network. This is probably due to
incorrect security settings. Reset the print server back to its factory default settings. (See Restoring the
network settings to factory default on pages 122) Confirm the security settings of your wireless network
and try starting from f again.
4
65
Page 76
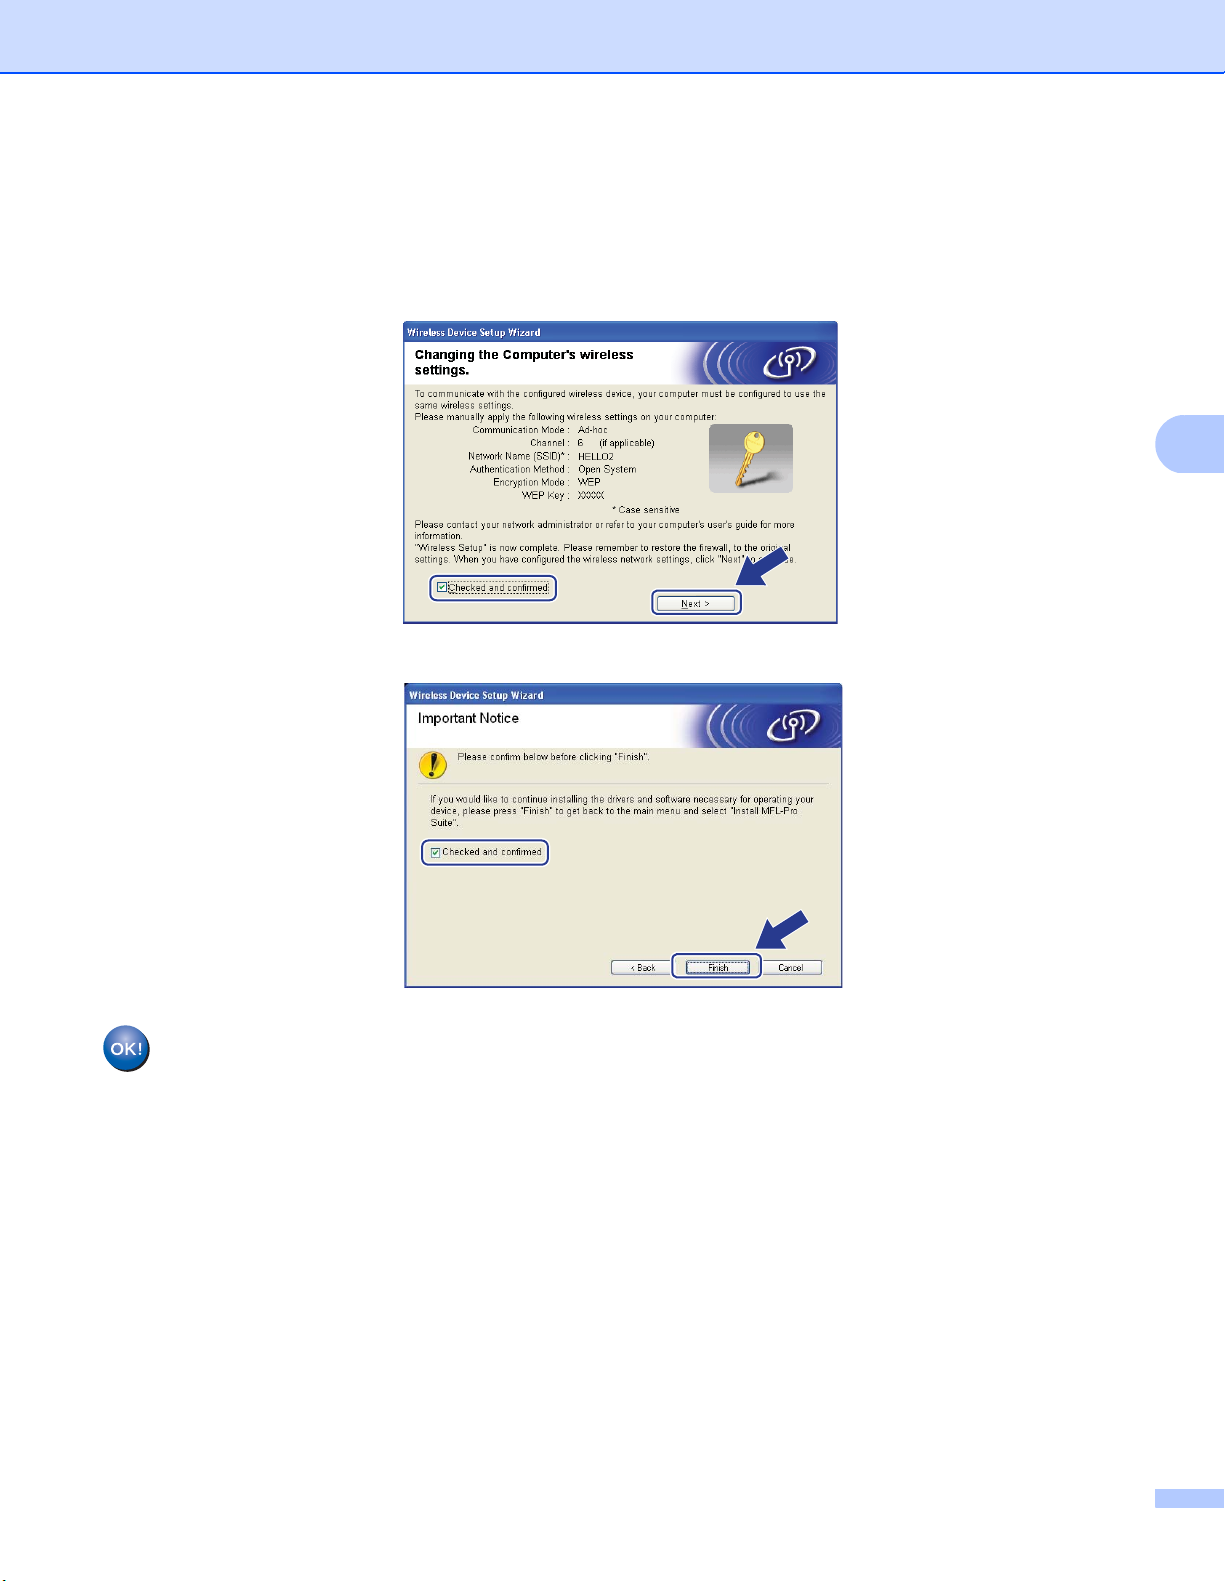
Wireless configuration for Windows® using the Brother installer application (MFC-8890DW only)
s To communicate with the configured wireless device, you must configure your computer to use the same
wireless settings. Manually change the wireless settings on your computer to match the machine’s
wireless settings shown on this screen. Check the box after you confirm these settings, and then click
Next.
(The settings shown on this screen are for example only. Your settings will not be the same.)
t Check the box after you confirm that you have completed the wireless settings, and then click Finish.
4
You have completed the wireless network setup. If you would like to continue installing drivers
and software necessary for operating your device, please choose Install MFL-Pro Suite from
the CD-ROM menu.
66
Page 77
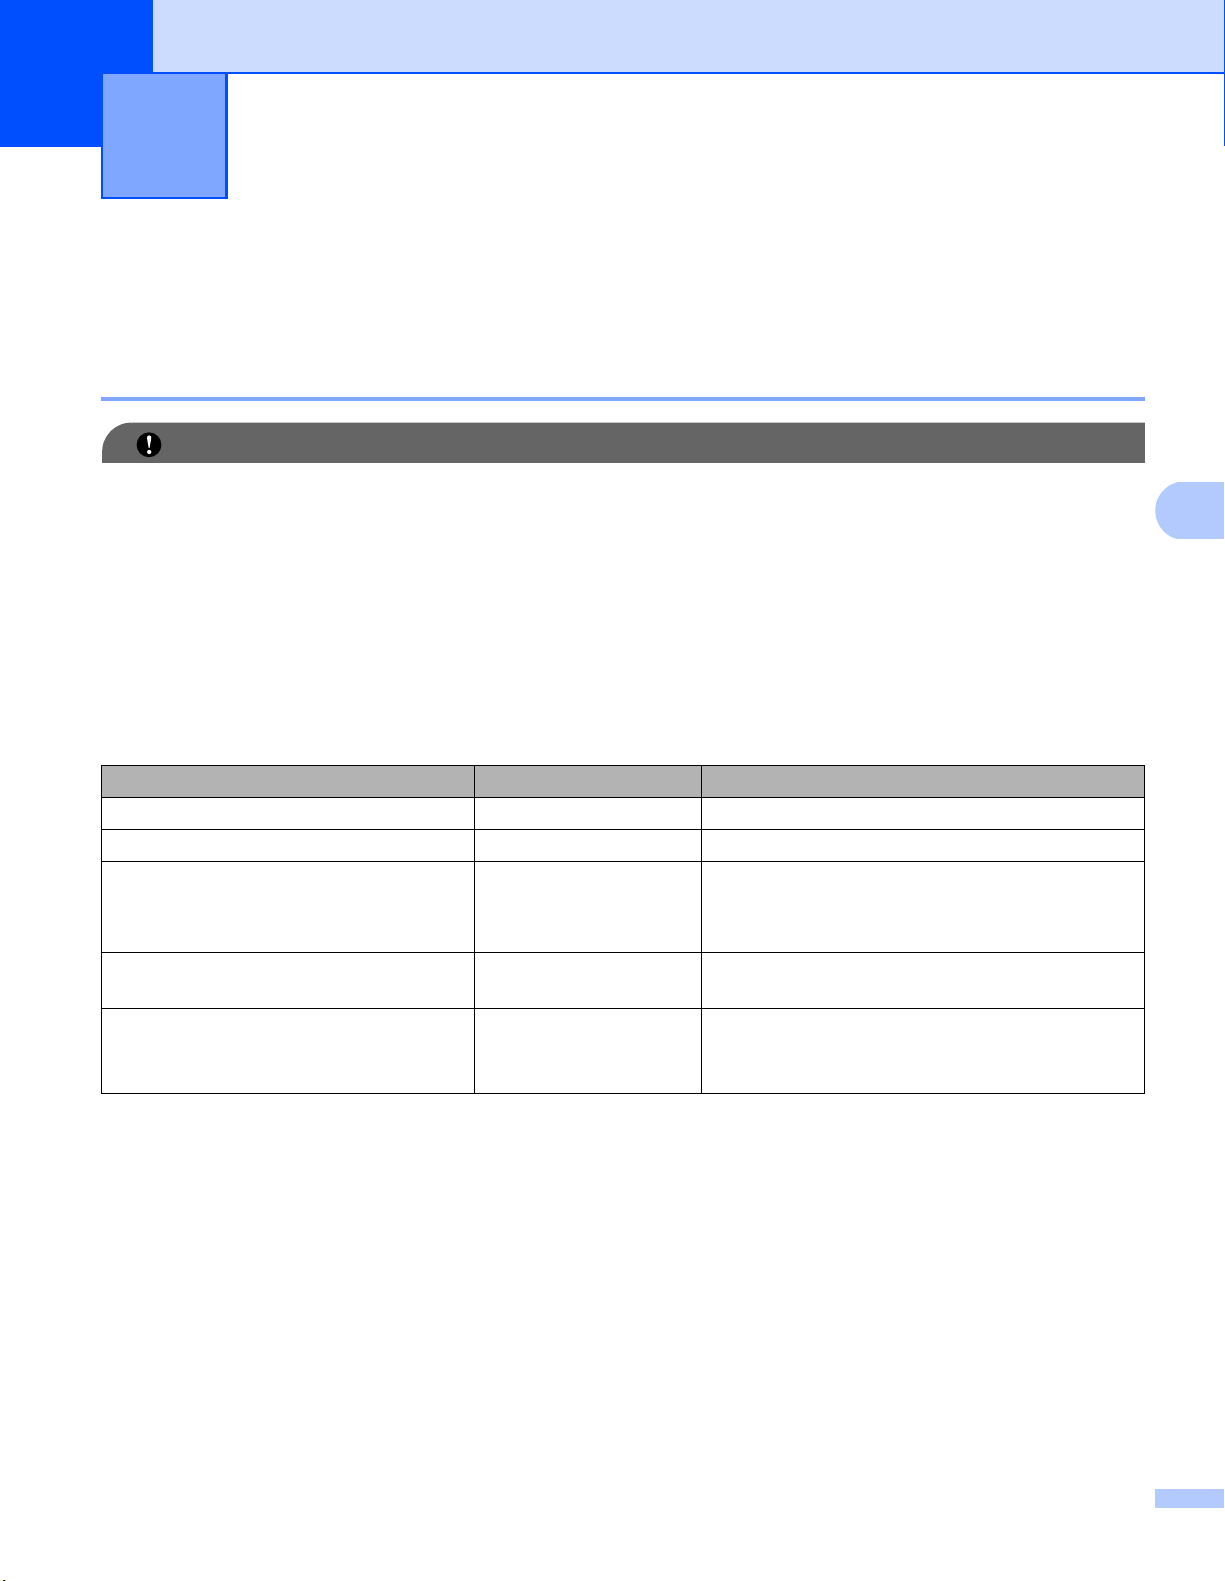
Wireless configuration for Macintosh®
5
using the Brother installer application
(MFC-8890DW only)
Configuration in Infrastructure mode 5
Before configuring the wireless settings 5
IMPORTANT
• The following instructions will install your Brother machine in a network environment using the Brother
®
installer application for Macintosh
• You can also setup your Brother machine using the machine’s control panel which we recommended. You
can find instructions in the supplied Quick Setup Guide or see Configuring your machine for a wireless
network (For MFC-8890DW) on page 21.
• You must know your wireless network settings before you proceed with this installation.
Make sure you take notes on all the current settings such as SSID, authentication and encryption of your
wireless network environment. If you do not know them, contact your network administrator or the
manufacturer of your access point/router.
found on the CD-ROM we have provided with the machine.
5
5
Item Example Record the current wireless network settings
Communication mode: (Infrastructure) Infrastructure
Network name: (SSID, ESSID) HELLO
Authentication method:
(Open system, Shared key, WPA-PSK
WPA2-PSK
Encryption mode:
(None, WEP,TKIP, AES, CKIP)
Network key:
(Encryption key, WEP key
Passphrase)
1
2
1
, LEAP, EAP-FAST)
2
,
WPA/WPA2-PSK is a Wi-Fi Protected Access Pre-Shared Key, which lets the Brother wireless machine associate with access points using
TKIP or AES encryption (WPA-Personal). WPA/WPA2-PSK (TKIP or AES) uses a Pre-Shared Key (PSK) that is 8 or more characters in
length, up to a maximum of 63 characters.
The WEP key is for 64-bit encrypted networks or 128-bit encrypted networks and can contain both numbers and letters. If you do not know
this information you should see the documentation provided with your access point or wireless router. This key is a 64-bit or 128-bit value that
must be entered in an ASCII or HEXADECIMAL format.
WPA2-PSK
1
,
AES
12345678
67
Page 78

Wireless configuration for Macintosh® using the Brother installer application (MFC-8890DW only)
For example:
64-bit ASCII: Uses 5 text characters e.g. “Hello” (this is case sensitive)
64-bit Hexadecimal: Uses 10 digits of hexadecimal data e.g. “71f2234aba”
128-bit ASCII: Uses 13 text characters e.g.
“Wirelesscomms” (this is case sensitive)
128-bit Hexadecimal: Uses 26 digits of hexadecimal data
e.g.“71f2234ab56cd709e5412aa3ba”
• If you have previously configured the wireless settings of the machine, you must reset the network LAN
settings before you can configure the wireless settings again. Press Menu, 7, 0 for Network Reset,
press 1 for Reset and then choose 1 for Yes to accept the change. The machine will restart automatically.
• If you are using a firewall function of anti-spyware or antivirus applications, temporarily disable them. Once
you are sure that you can print, configure the software settings following the instructions again.
• You need to temporarily use an Ethernet cable during configuration. (The Ethernet cable is not a standard
accessory.)
5
68
Page 79
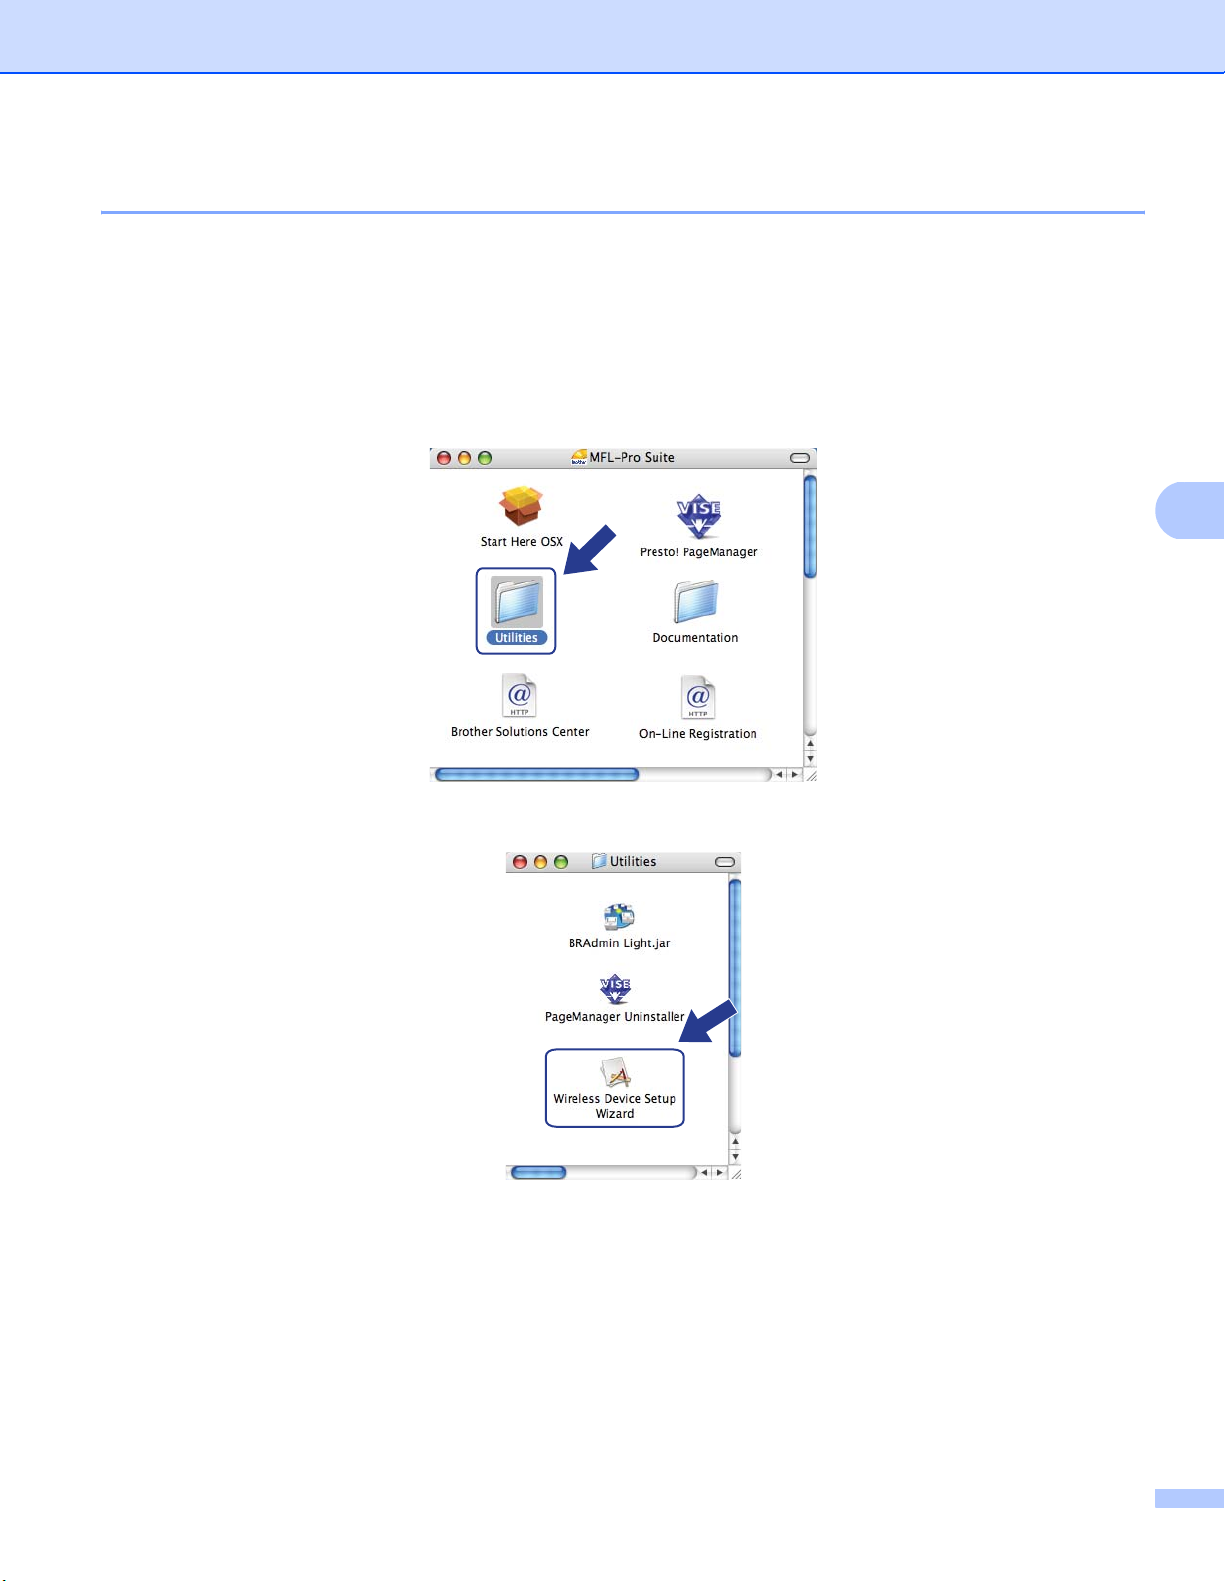
Wireless configuration for Macintosh® using the Brother installer application (MFC-8890DW only)
Configure the wireless settings 5
a Plug the machine’s power cord into the AC power outlet. Turn on the machine’s power switch.
b Turn on your Macintosh
®
.
c Put the supplied CD-ROM into your CD-ROM drive. Double-click the MFL-Pro Suite icon on your
desktop.
d Double-click the Utilities icon.
e Double-click the Wireless Device Setup Wizard.
5
69
Page 80
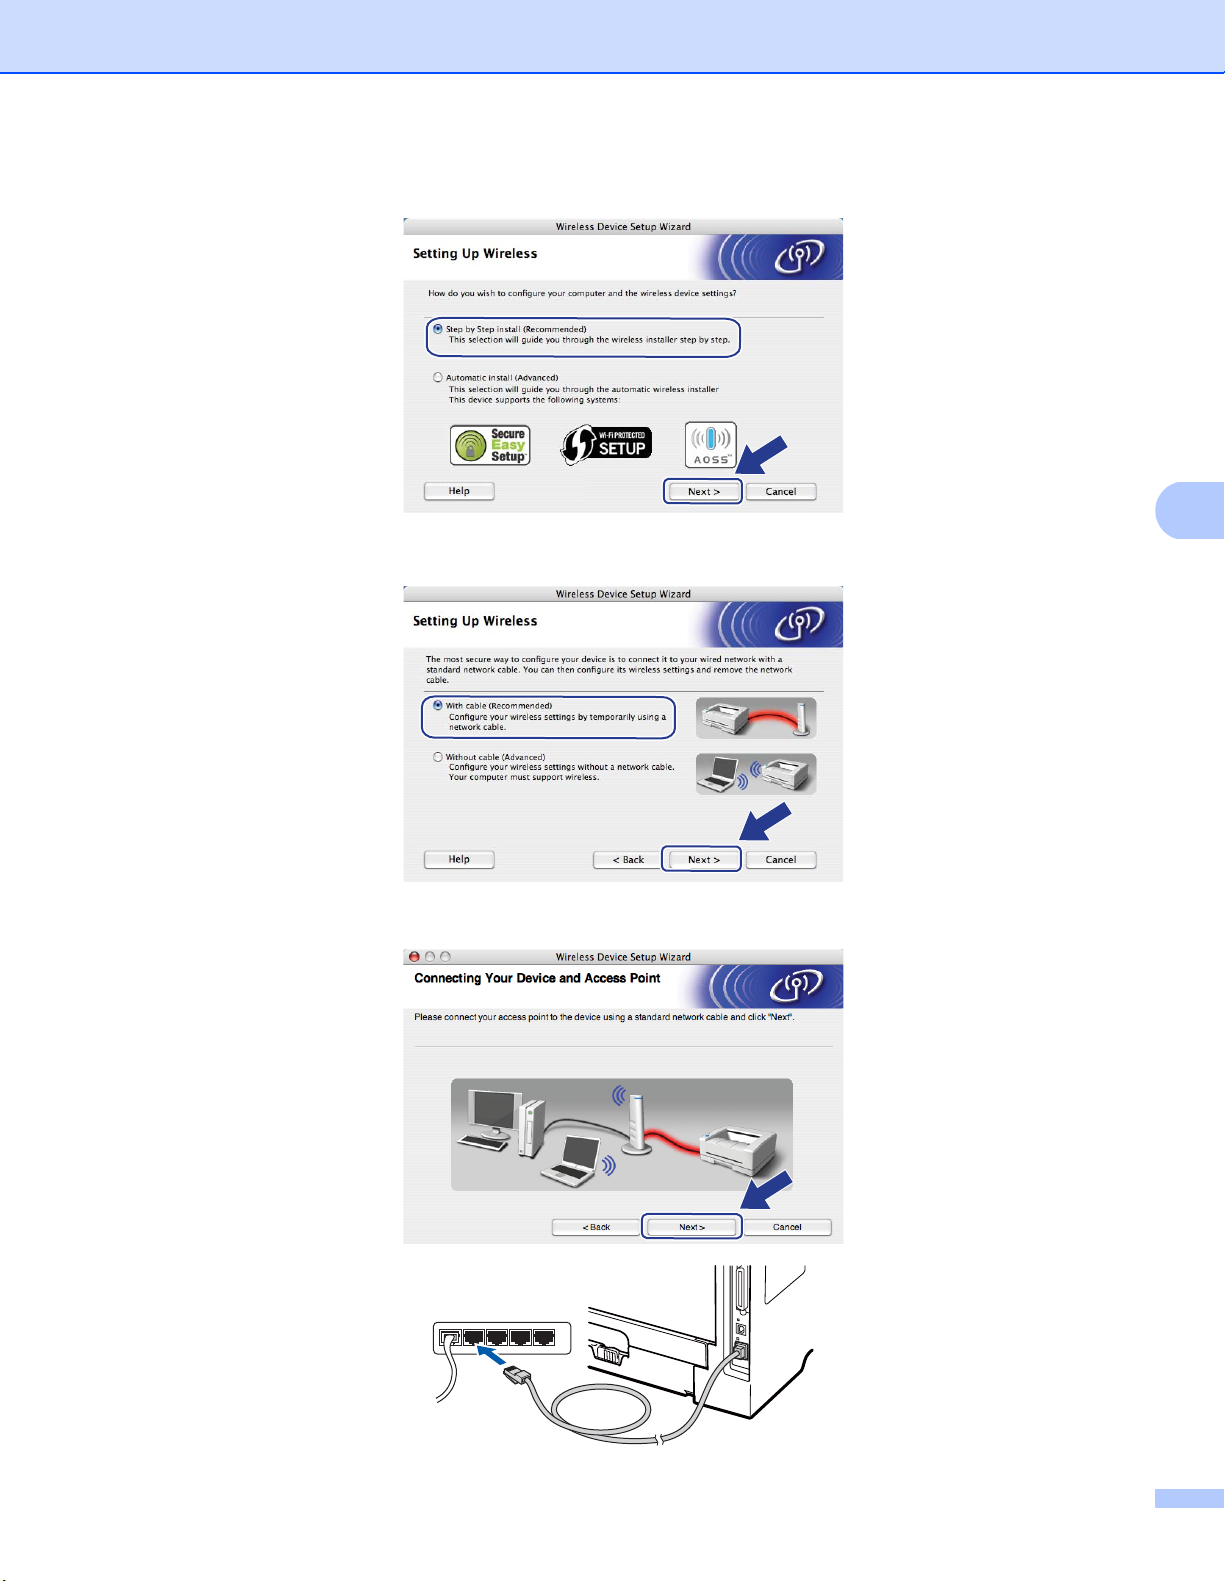
Wireless configuration for Macintosh® using the Brother installer application (MFC-8890DW only)
f Choose Step by Step install (Recommended) and then click Next.
g Choose With cable (Recommended) and then click Next.
5
h Connect the Brother wireless device to your access point using a network cable and click Next.
70
Page 81
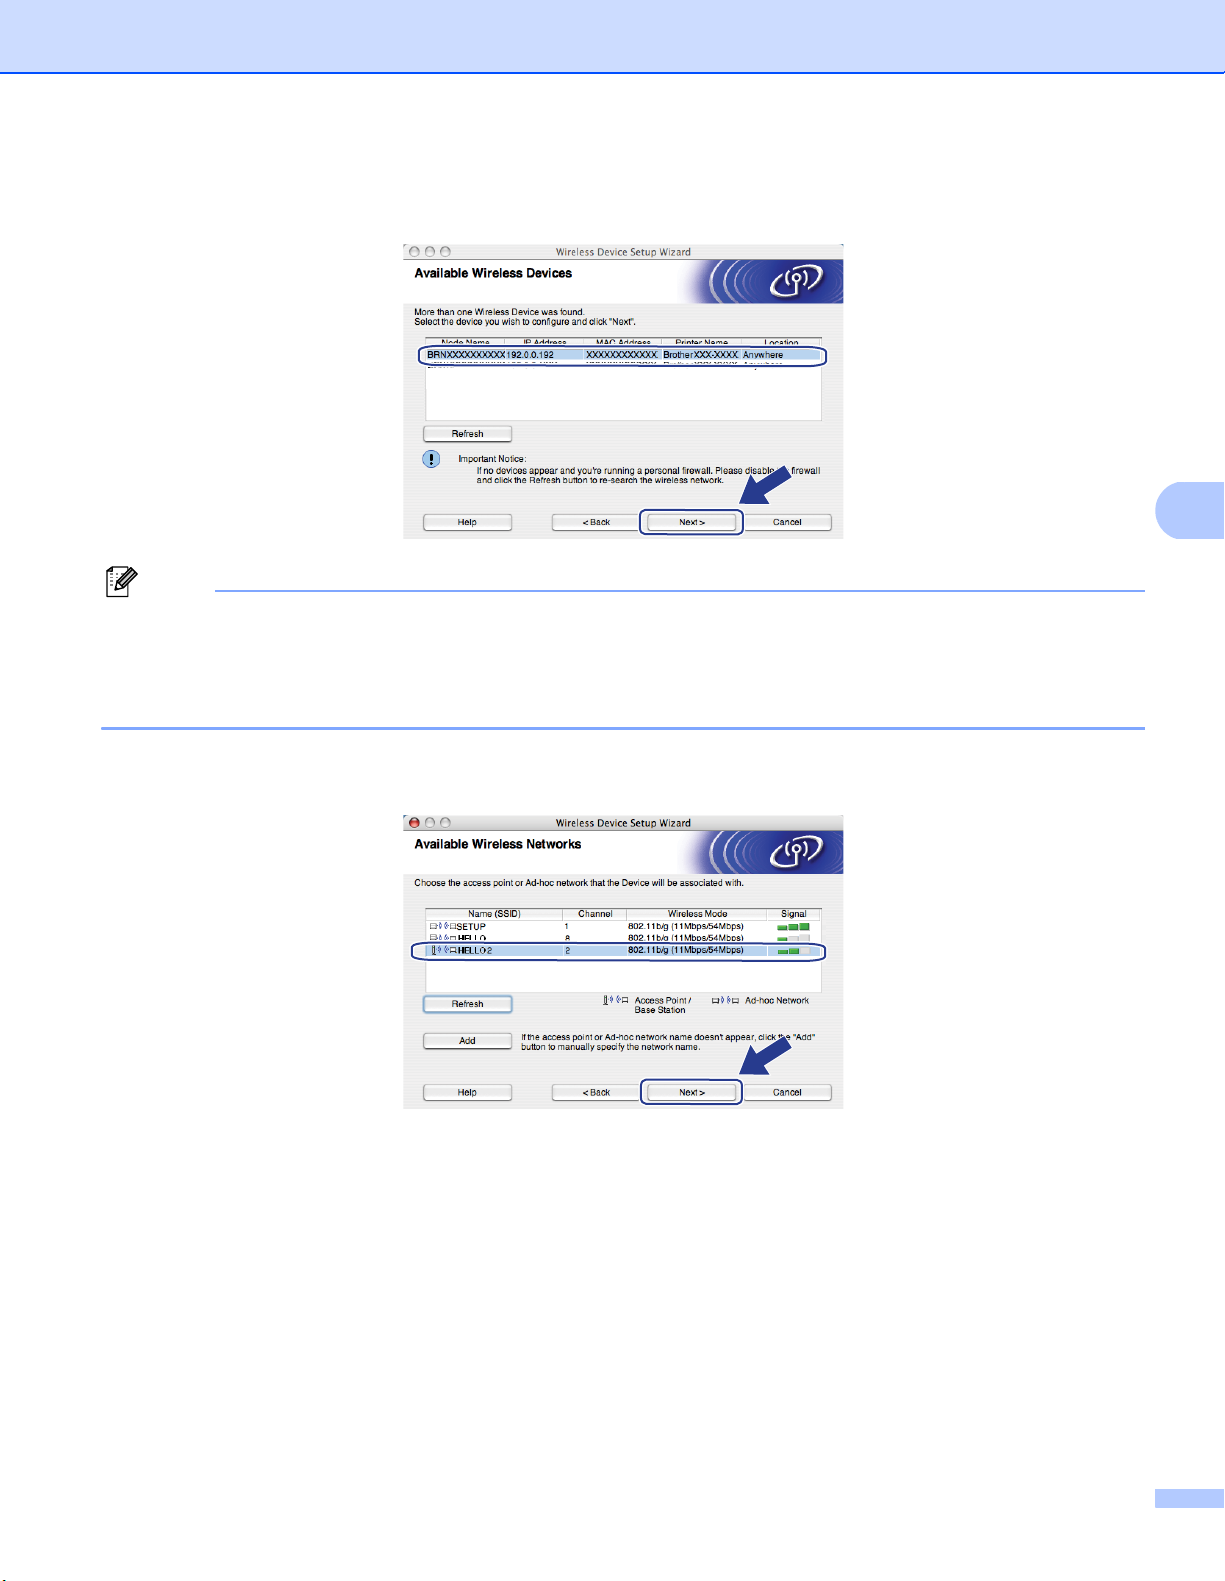
Wireless configuration for Macintosh® using the Brother installer application (MFC-8890DW only)
i Choose the machine you wish to configure, and click Next. If the list is blank, check if the access point
and the printer are powered on, and then click Refresh.
Note
• The default Node name is “BRNxxxxxxxxxxxx”. (“xxxxxxxxxxxx” is your machine’s MAC Address /
Ethernet Address.)
• You can find your machine’s MAC Address / Ethernet Address by printing out the Network Configuration
List. See Printing the Network Configuration List on page 122.
j The wizard will search for wireless networks available from your machine. Choose the access point you
wish to associate the machine with, and then click Next.
5
71
Page 82
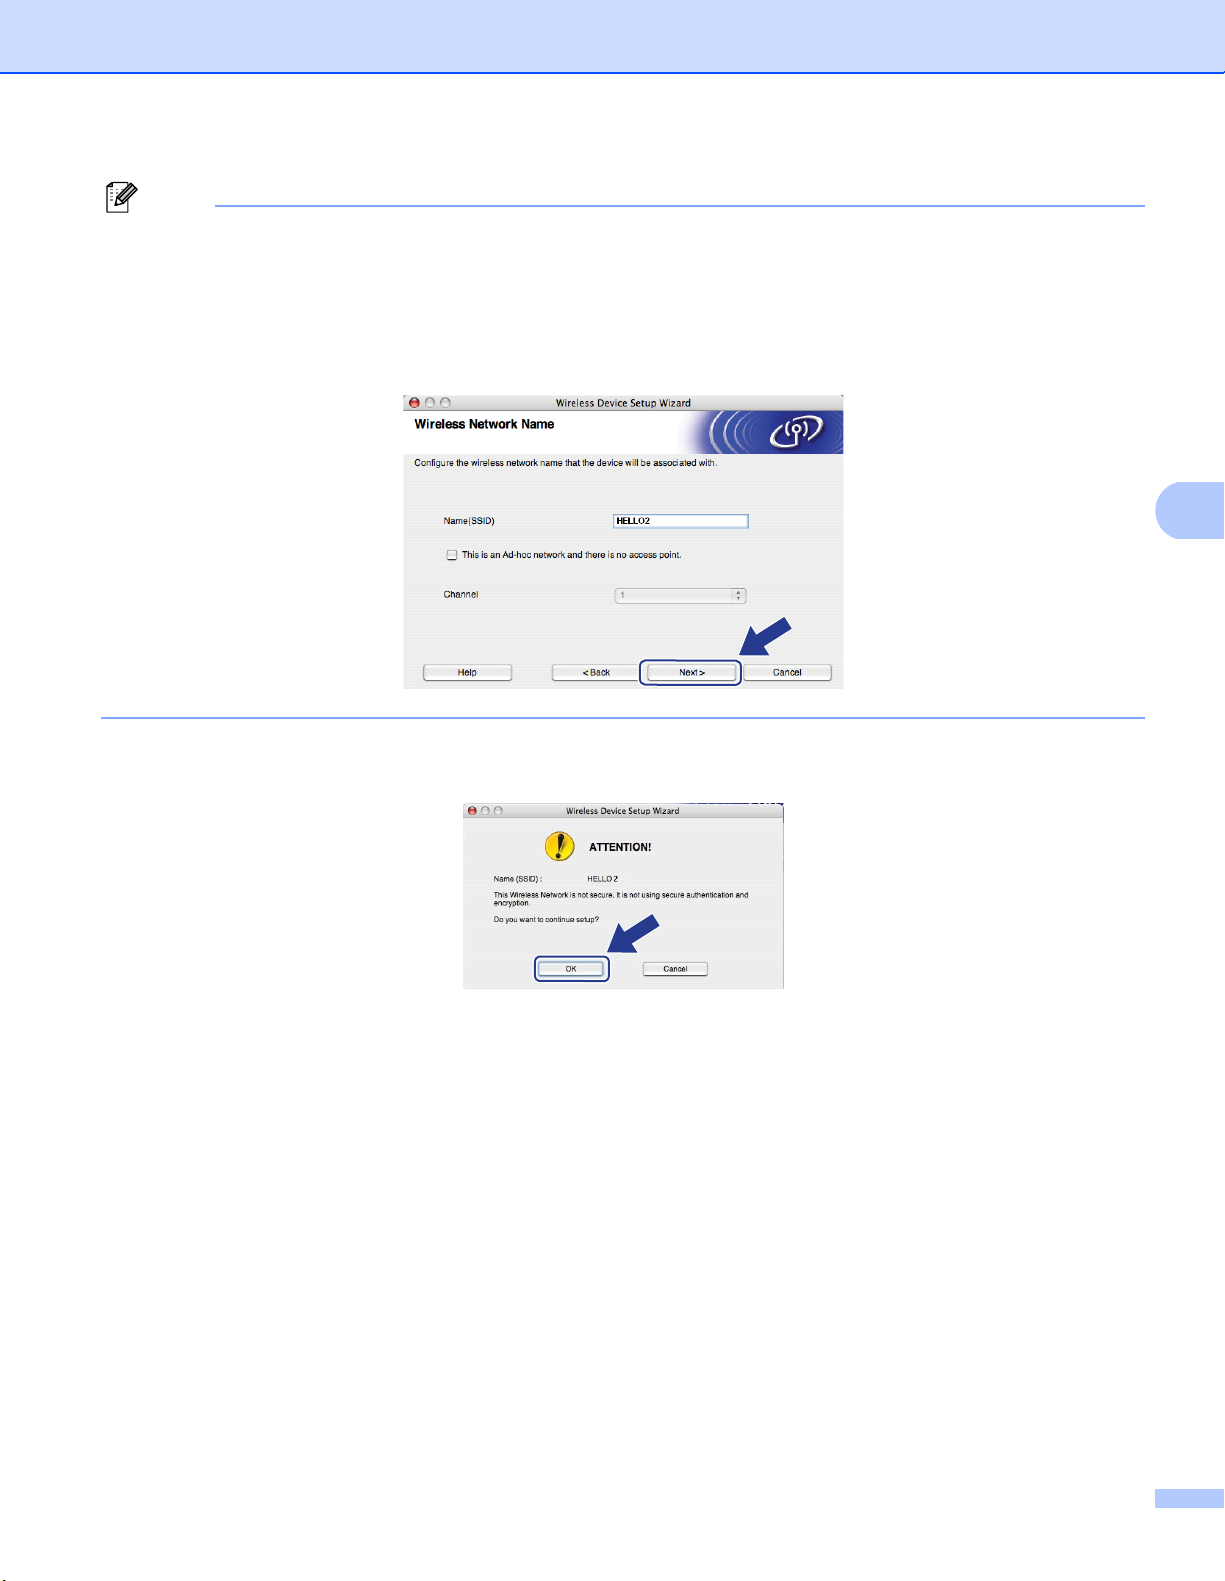
Wireless configuration for Macintosh® using the Brother installer application (MFC-8890DW only)
Note
• "SETUP" is the default SSID of the machine. Do not choose this SSID.
• If the list is blank, check that the access point has power and is broadcasting the SSID, and then see if the
machine and the access point are within range for wireless communication. Then, click Refresh.
• If your access point is set to not broadcast the SSID you can manually add it by clicking the Add button.
Follow the on-screen instructions for entering the Name (SSID), and then click Next.
5
k If your network is not configured for Authentication and Encryption, the following screen will appear. To
continue configuration, click OK and go to step m.
72
Page 83
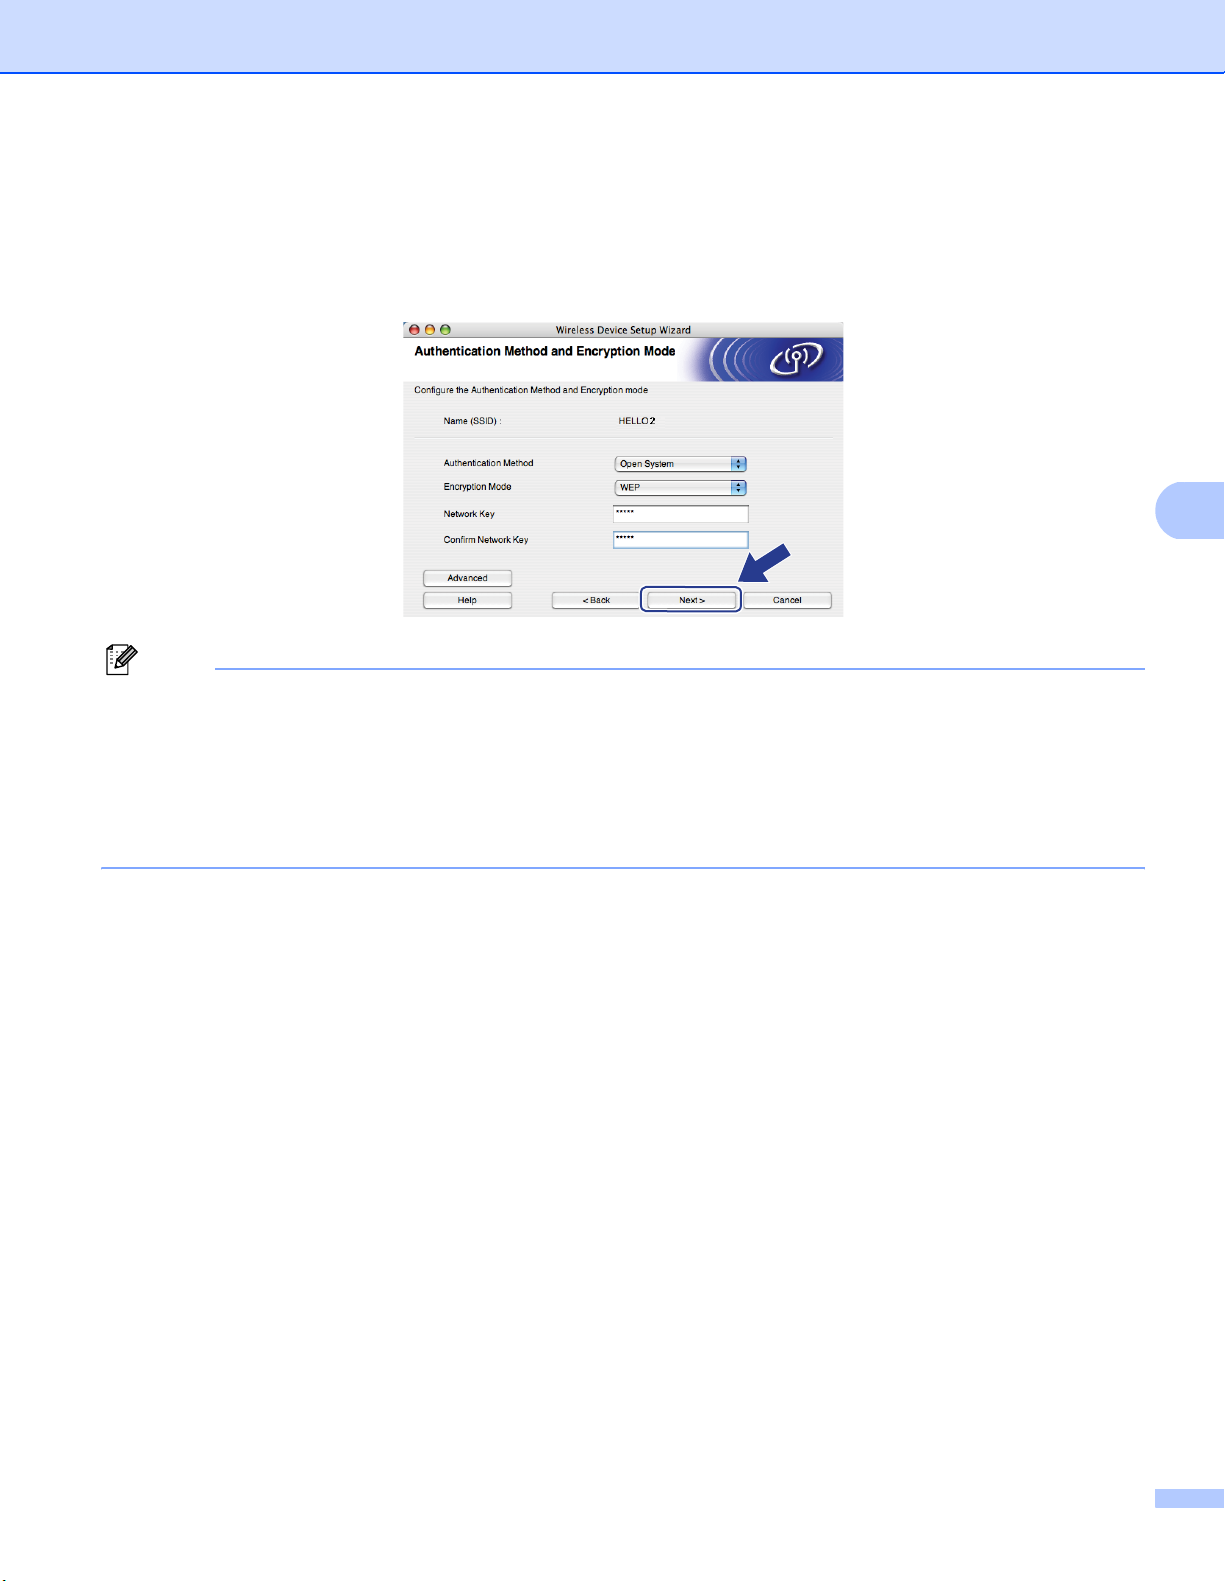
Wireless configuration for Macintosh® using the Brother installer application (MFC-8890DW only)
l If your network is configured for Authentication and Encryption, the following screen will appear. When
configuring your Brother wireless machine, you must configure your machine to match the
Authentication and Encryption settings you wrote down on page 67 for your existing wireless
network. Choose the Authentication Method and Encryption Mode from the pop-up menu in each
setting box. Then enter the Network Key and Confirm Network Key, and then click Next.
Note
• If you want to setup or configure additional WEP key indexes other than WEP key1, click Advanced.
5
• If you do not know the Authentication or Encryption settings for your network, contact your network
administrator or the manufacture of your access point / router.
• If you are using WEP and the printed Network Configuration page in step m shows Link OK in the
Wireless Link Status, but the machine is not found on your network, make sure you entered the WEP
key correctly. The WEP key is case sensitive.
73
Page 84
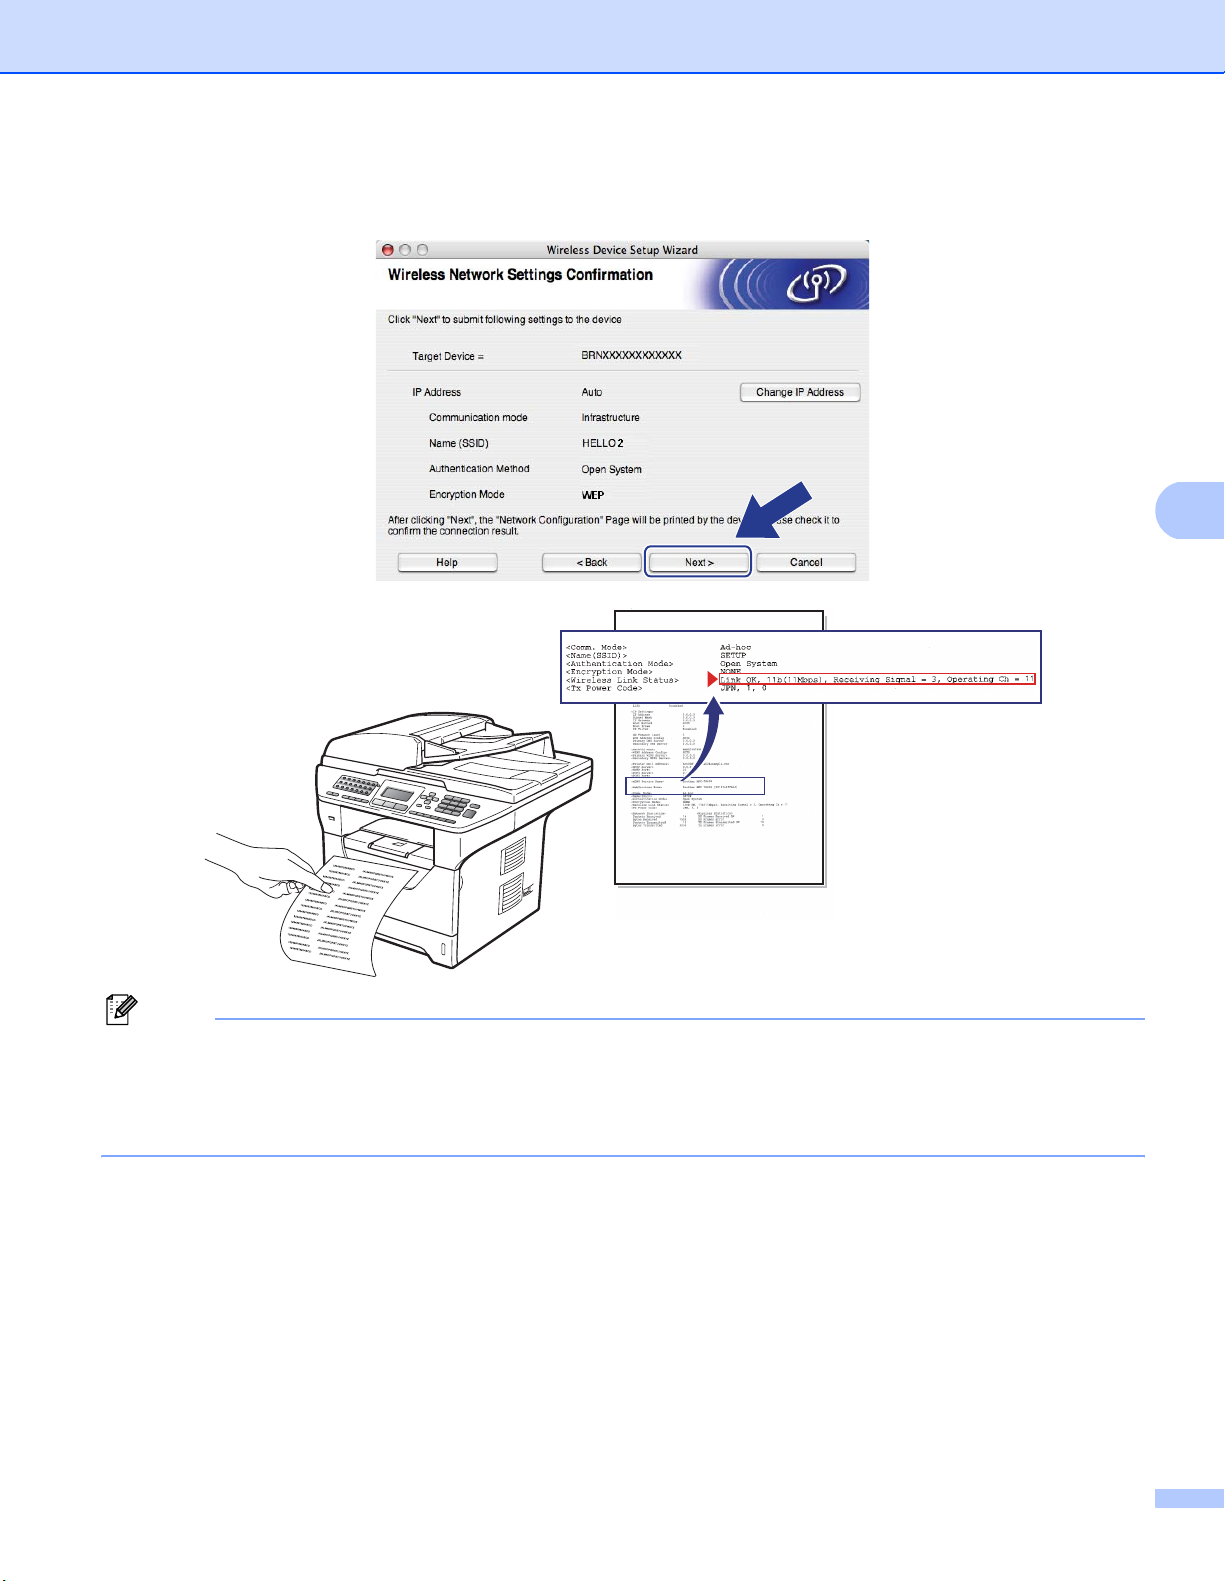
Wireless configuration for Macintosh® using the Brother installer application (MFC-8890DW only)
m Click Next. The settings will be sent to your machine. The settings will remain unchanged if you click
Cancel. The Network Configuration page will be printed.
5
Note
• If you want to manually enter the IP address settings of your machine, click Change IP Address and enter
the necessary IP address settings for your network.
• The control panel settings will be automatically changed to WLAN when the wireless settings are sent to
your machine.
74
Page 85
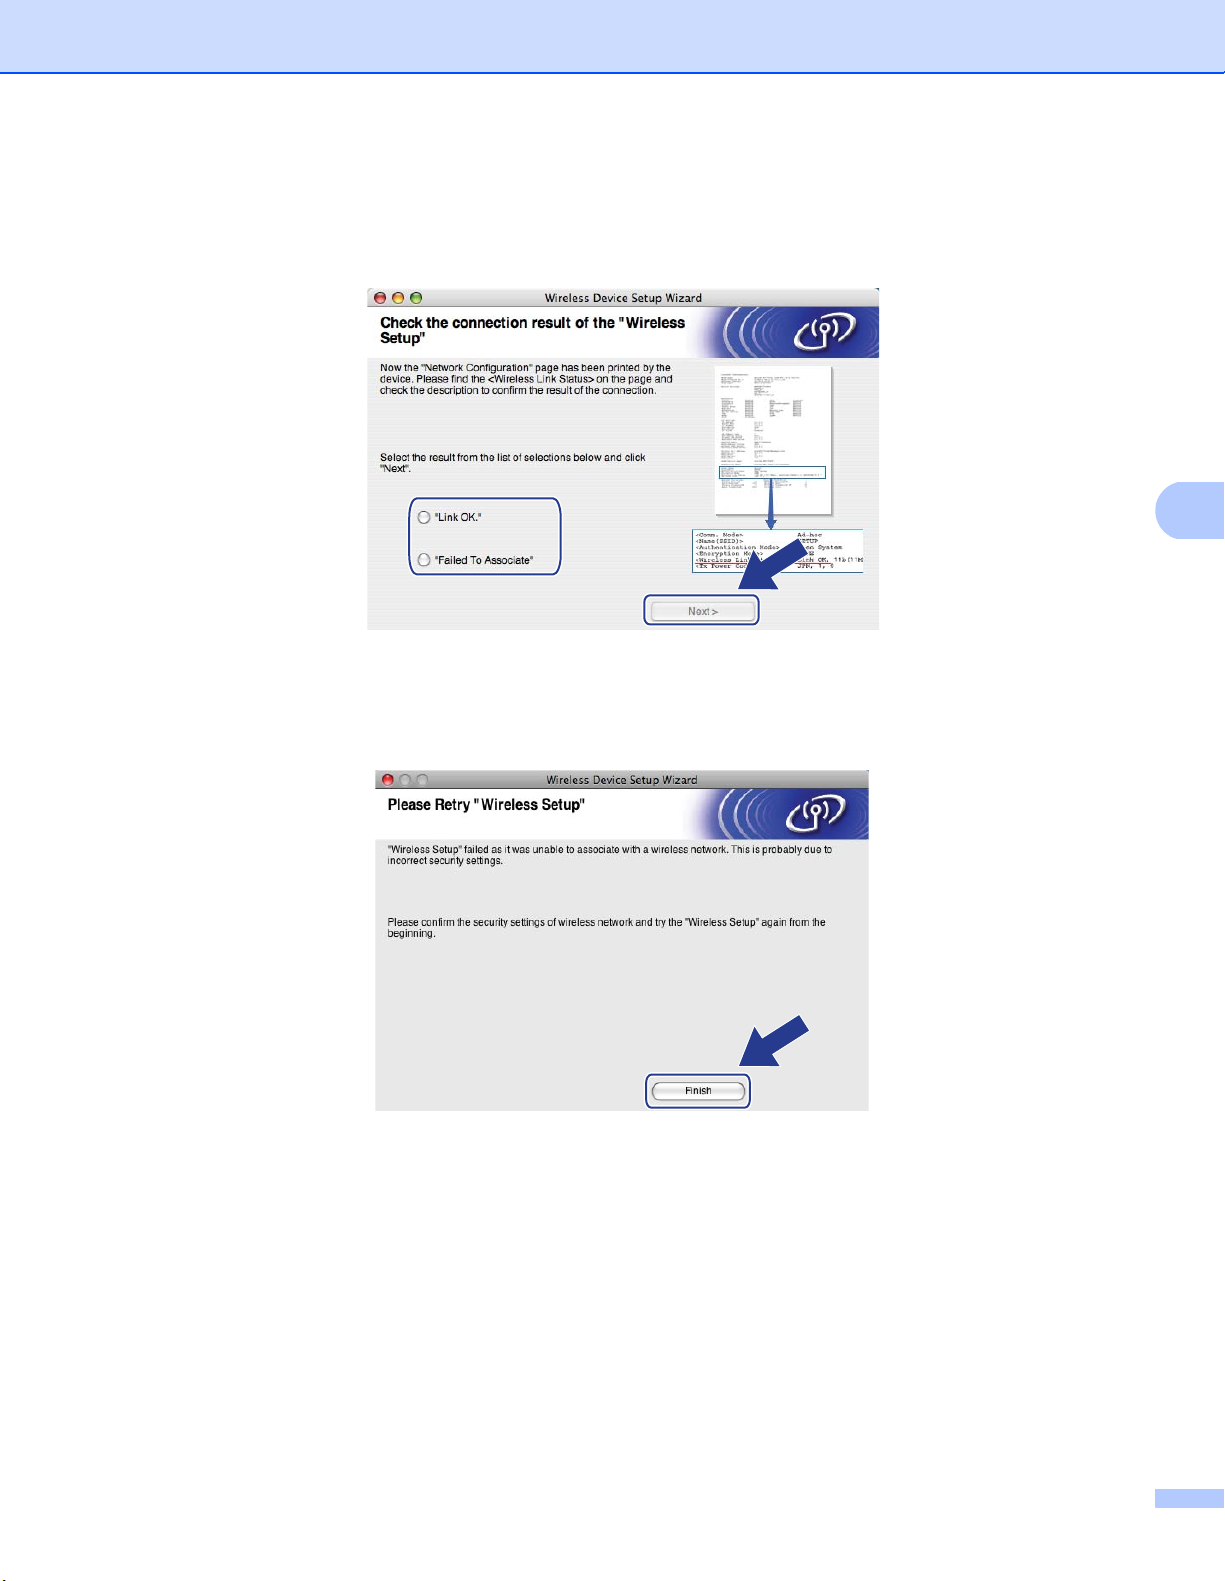
Wireless configuration for Macintosh® using the Brother installer application (MFC-8890DW only)
n Check the printed Network Configuration page. Choose the status as it is shown in the
Wireless Link Status on the Network Configuration page. Click Next.
If your status is "Link OK.", go to step p.
If your status is "Failed To Associate", go to step o.
o Click Finish. Wireless setup was unable to associate with a wireless network. This is probably due to
incorrect security settings. Reset the print server back to its factory default settings. (See Restoring the
network settings to factory default on pages 122) Confirm the security settings of your wireless network
and try starting from step e again.
5
75
Page 86
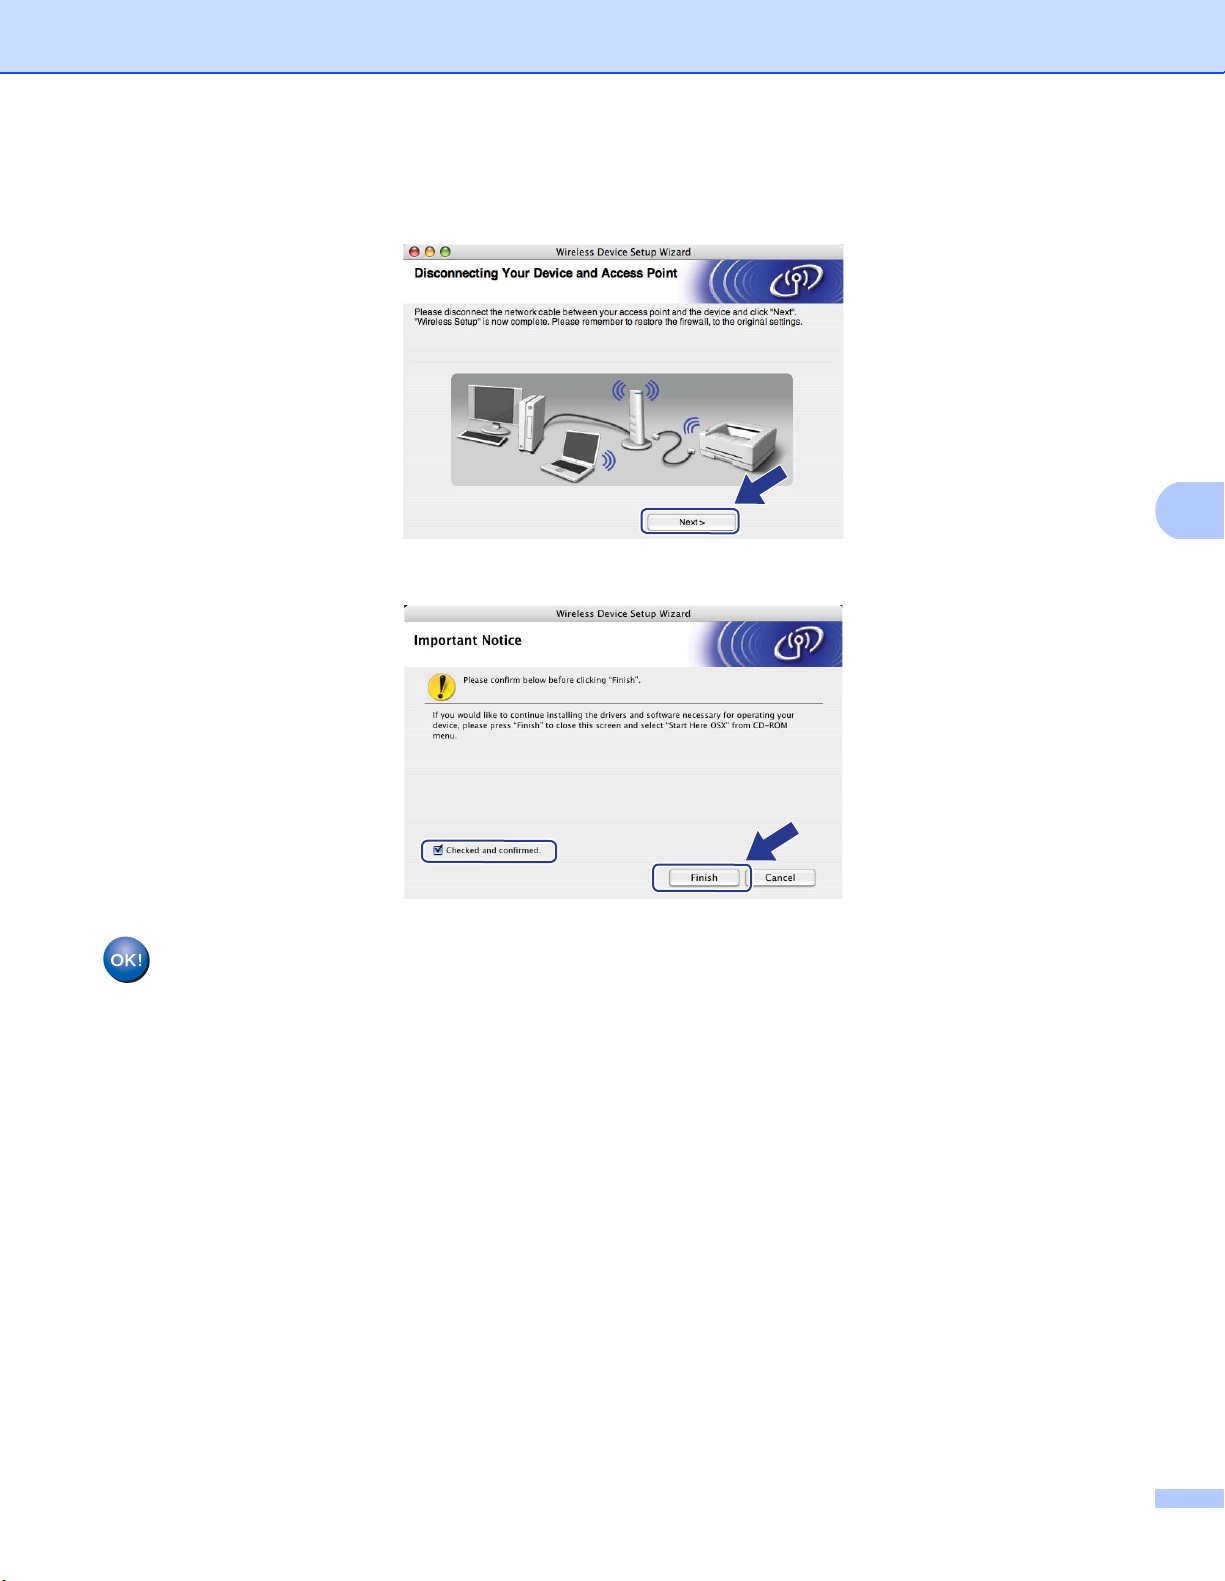
Wireless configuration for Macintosh® using the Brother installer application (MFC-8890DW only)
p Disconnect the network cable between your access point (hub or router) and the machine, and click
Next.
q Check the box after you confirm that you have completed the wireless settings, and then click Finish.
5
You have completed the wireless network setup. If you would like to continue installing drivers
and software necessary for operating your device, please choose Start Here OSX from the CDROM menu.
76
Page 87
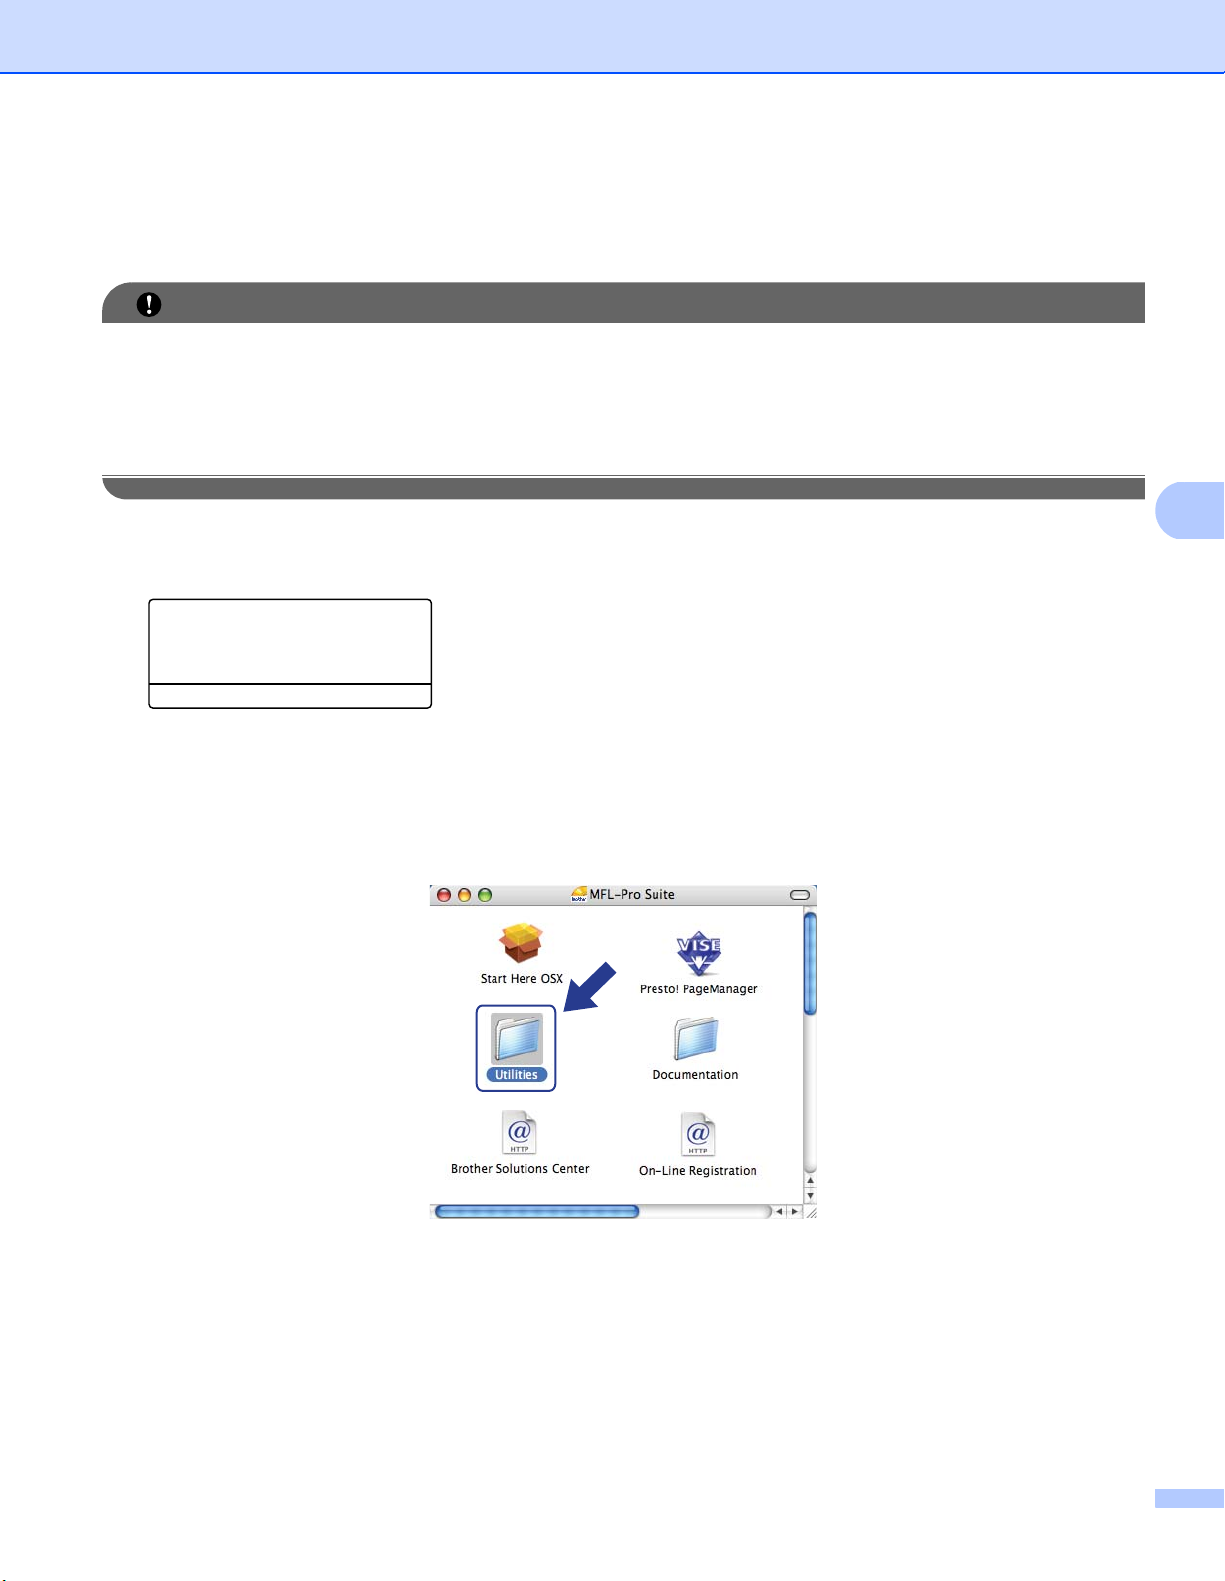
Wireless configuration for Macintosh® using the Brother installer application (MFC-8890DW only)
Configuration using the SES/WPS or AOSS™ from the control panel menu (Automatic Wireless mode) 5
IMPORTANT
• If you are going to connect your Brother machine to your network, we recommend that you contact your
system administrator prior to installation.
• If you have previously configured the wireless settings of the machine, you must reset the network LAN
settings before you can configure the wireless settings again. Press Menu, 7, 0 for Network Reset,
press 1 for Reset and then choose 1 for Yes to accept the change. The machine will restart automatically.
a Plug the machine’s power cord into the AC power outlet. Turn on the machine’s power switch.
b Press Menu, 7, 2, 7. Using a or b, choose On and press OK.
72.WLAN
7.WLAN Enable
a On
b Off
Select ab or OK
c Turn on your Macintosh
®
.
d Put the supplied CD-ROM into your CD-ROM drive. Double-click the MFL-Pro Suite icon on your
desktop.
e Double-click the Utilities icon.
5
77
Page 88
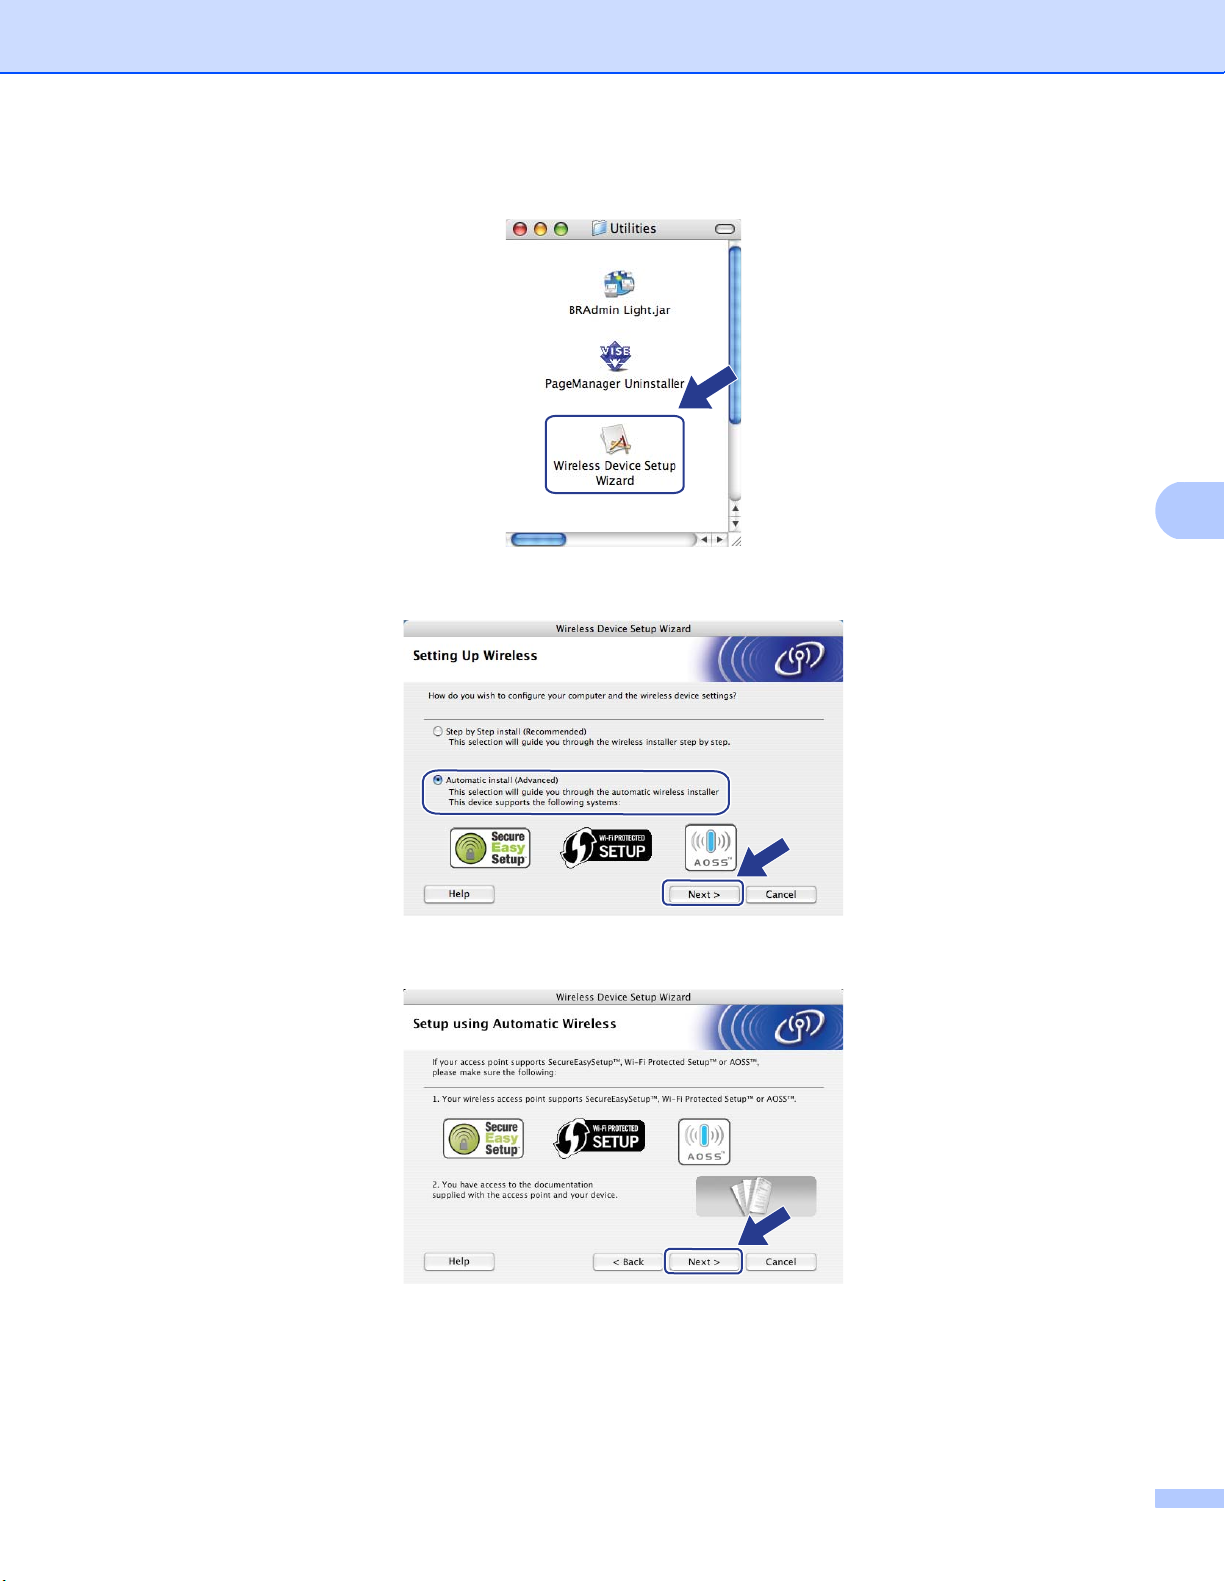
Wireless configuration for Macintosh® using the Brother installer application (MFC-8890DW only)
f Double-click the Wireless Device Setup Wizard.
g Choose Automatic install (Advanced) and click Next.
5
h Confirm the on-screen message and click Next.
78
Page 89
Wireless configuration for Macintosh® using the Brother installer application (MFC-8890DW only)
i Press Menu, 7, 2, 3 for SES/WPS/AOSS.
This feature will automatically detect which mode (SecureEasySetup™, Wi-Fi Protected Setup or
AOSS™) your access point uses to configure your machine.
Note
If your wireless access point supports Wi-Fi Protected Setup (PIN Method) and you want to configure your
machine using the PIN (Personal Identification Number) Method, see Using the PIN Method of Wi-Fi
Protected Setup on page 39.
j The machine searches for an access point that supports SecureEasySetup™, Wi-Fi Protected Setup or
AOSS™ for 2 minutes.
72.WLAN
3.SES/WPS/AOSS
Setting WLAN
k Put your access point in the SecureEasySetup™ mode, Wi-Fi Protected Setup mode or AOSS™ mode,
depending on what is supported by your access point. Please refer to the instruction manual that came
with your access point. You will see Connecting AOSS, Connecting SES or Connecting WPS on
the LCD while the machine searches your access point.
5
l If the LCD shows Connected, the machine has successfully connected to your access point/router. You
can now use your machine in a wireless network.
If the LCD shows Connection Error, a session overlap has been detected. The machine has
detected more than one access point/router on your network with the SecureEasySetup™ mode, the
Wi-Fi Protected Setup mode or AOSS™ mode enabled. Make sure that only one access point/router has
the SecureEasySetup™ mode, the Wi-Fi Protected Setup mode or the AOSS™ mode enabled and try
starting from c again.
If the LCD shows No Access Point, the machine has not detected your access point/router on your
network with the SecureEasySetup™ mode, the Wi-Fi Protected Setup mode or AOSS™ mode
enabled. Move the machine closer to your access point/router and try starting from c again.
If the LCD shows Connection Fail, the machine has not successfully connected to your access
point/router. Try starting from c again. If the same message is indicated again, reset the machine back
to the default factory settings and try again. (For resetting, see Restoring the network settings to factory
default on page 122.)
79
Page 90
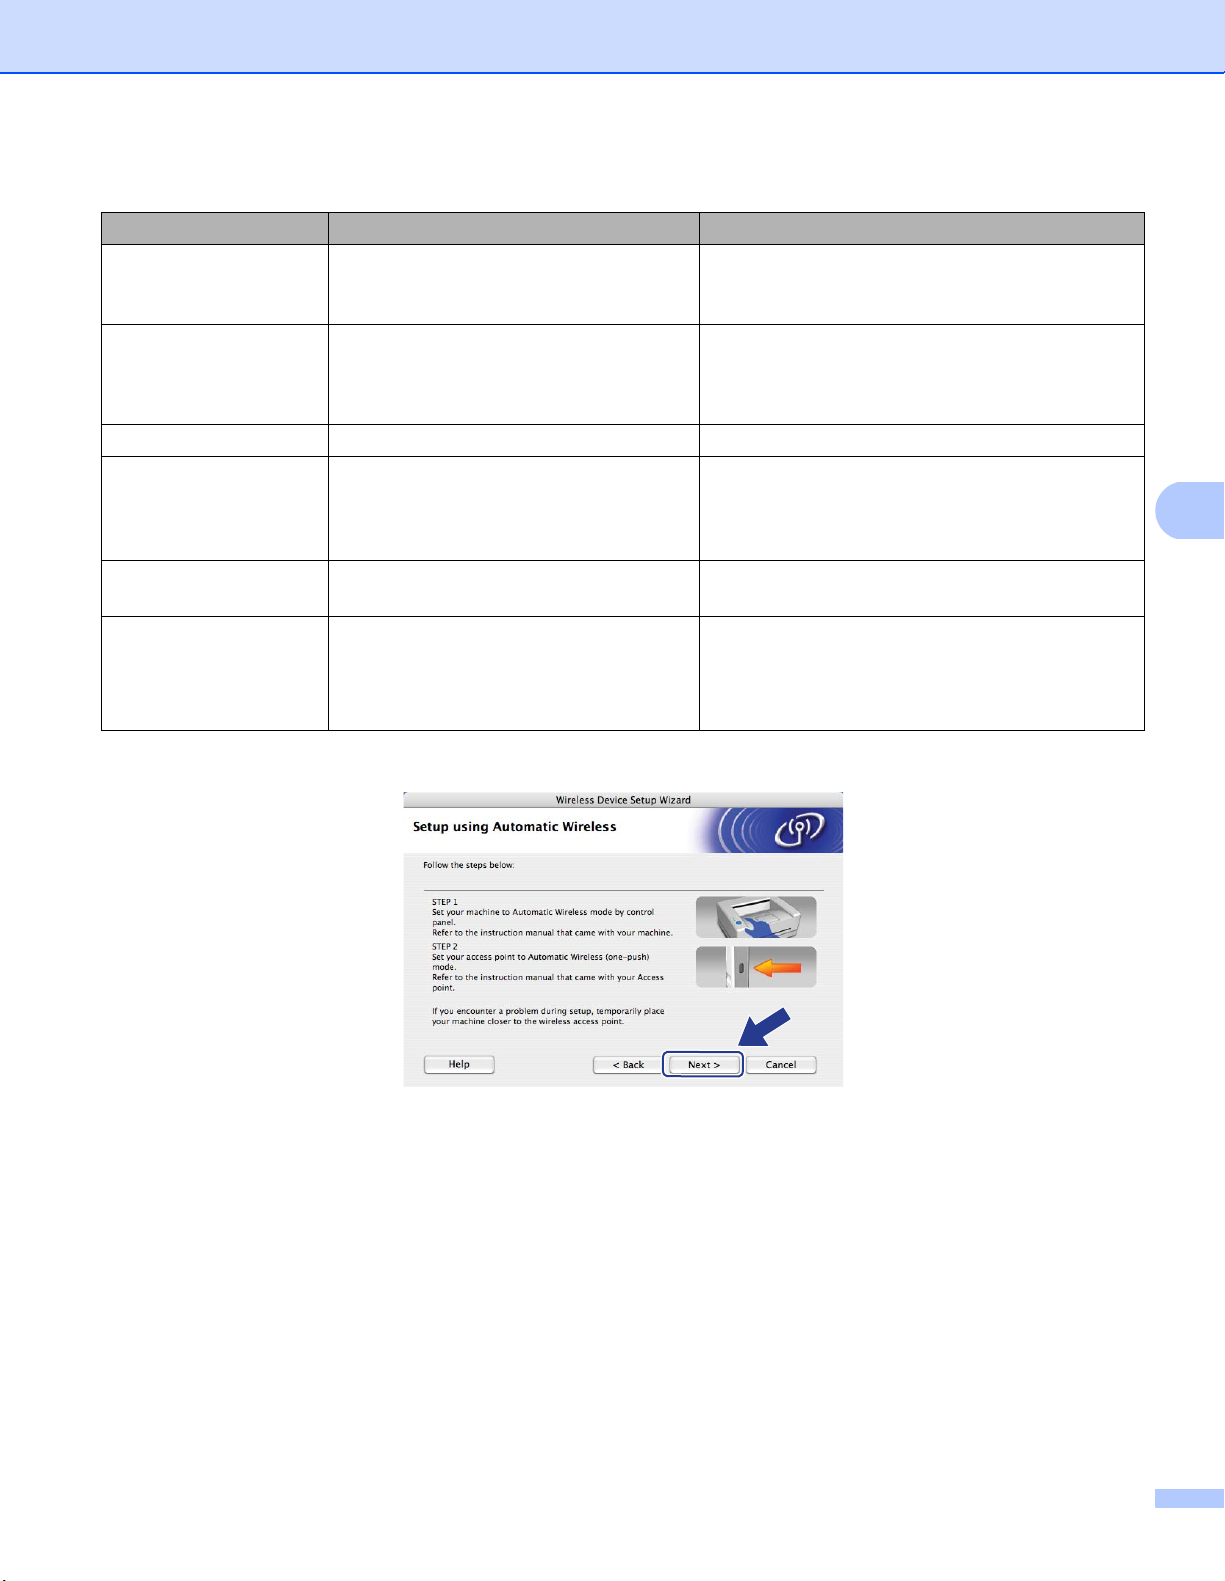
Wireless configuration for Macintosh® using the Brother installer application (MFC-8890DW only)
LCD messages when using the SES/WPS/AOSS™ control panel menu 5
LCD shows Connection status Action
Searching or accessing the access
Setting WLAN
Connecting SES
Connecting WPS
Connecting AOSS
Connected Connection succeeded. —
Connection Error Session overlap has been detected.
No Access Point The access point detection failed.
point, and downloading settings from the
access point
Connecting the access point —
Check that only one router or access point has
the SecureEasySetup™ mode, the Wi-Fi
Protected Setup mode or AOSS™ mode enabled
and try starting from step c again.
Move the machine closer to your access
point/router and try starting from step c again.
1 Try starting from step c again.
—
5
Connection Fail Connection failed.
m Click Next.
2 If the same message continues, reset the
machine back to the factory settings and try
again.
80
Page 91
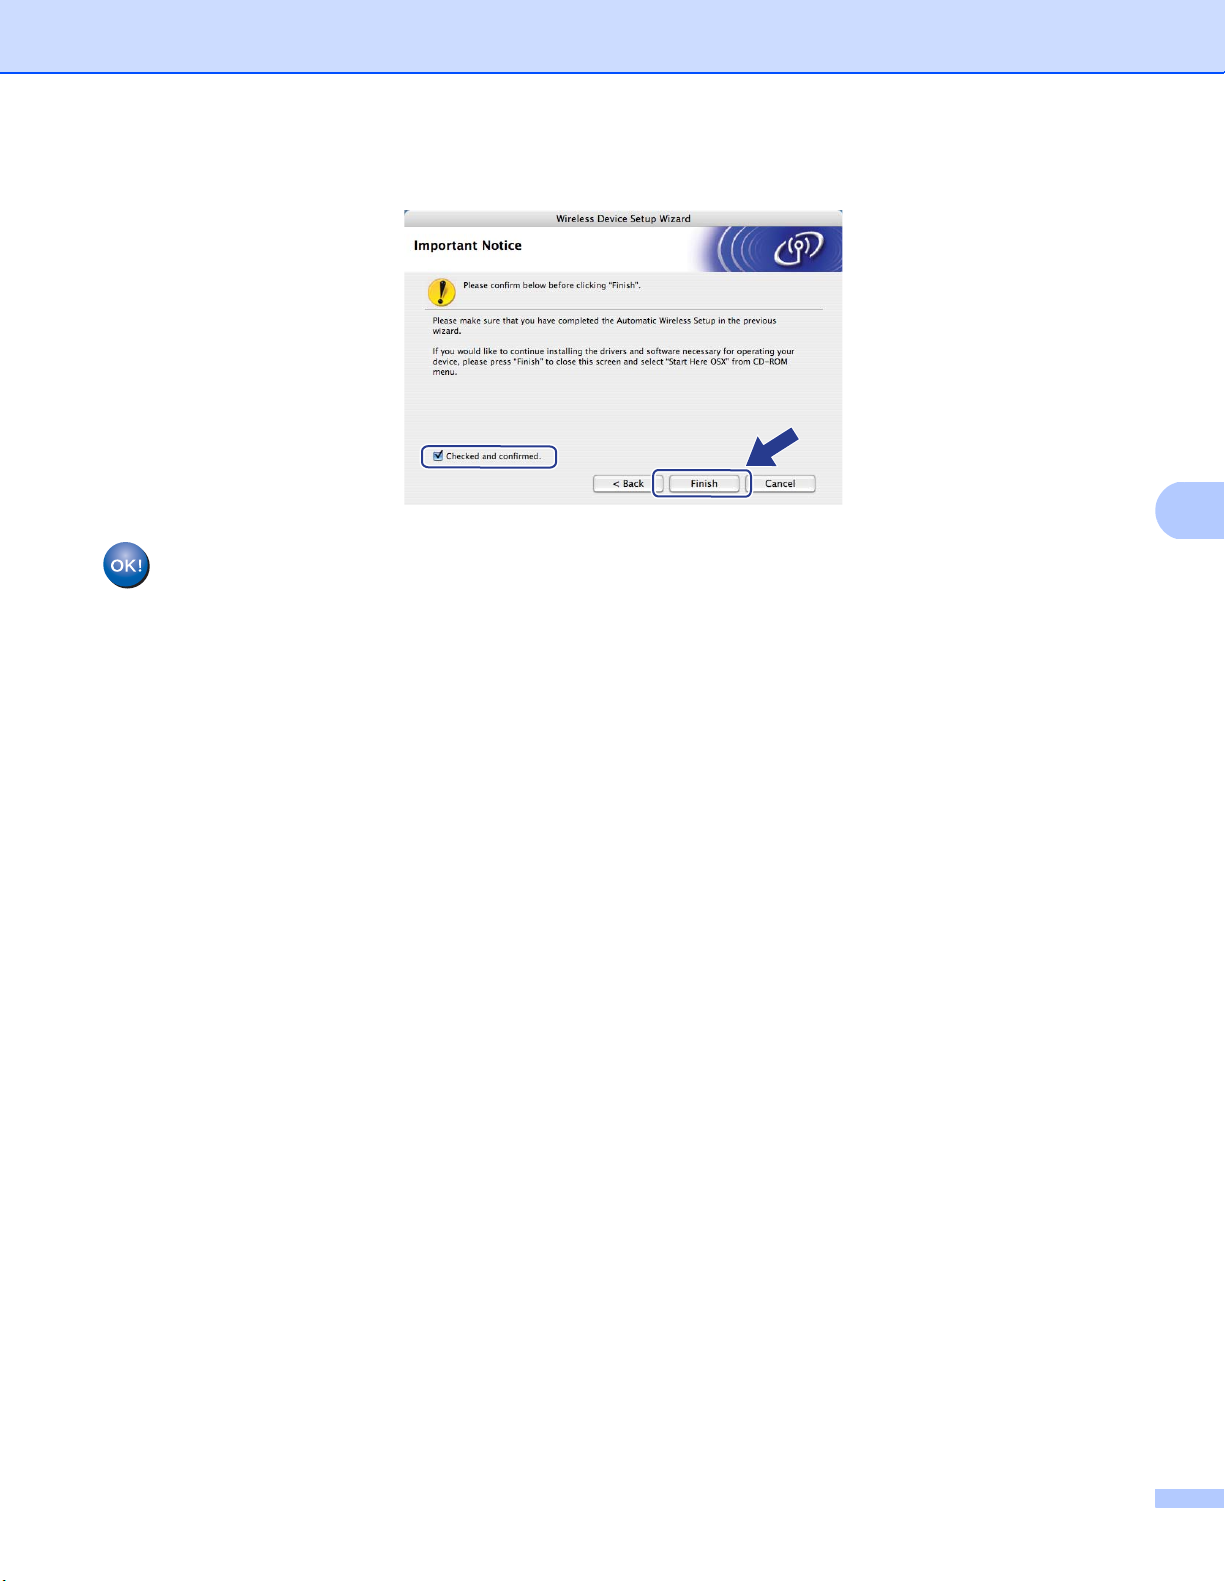
Wireless configuration for Macintosh® using the Brother installer application (MFC-8890DW only)
n Check the box after you confirm that you have completed the wireless settings, and then click Finish.
You have completed the wireless network setup. If you would like to continue installing drivers
and software necessary for operating your device, please choose Start Here OSX from the CDROM menu.
5
81
Page 92
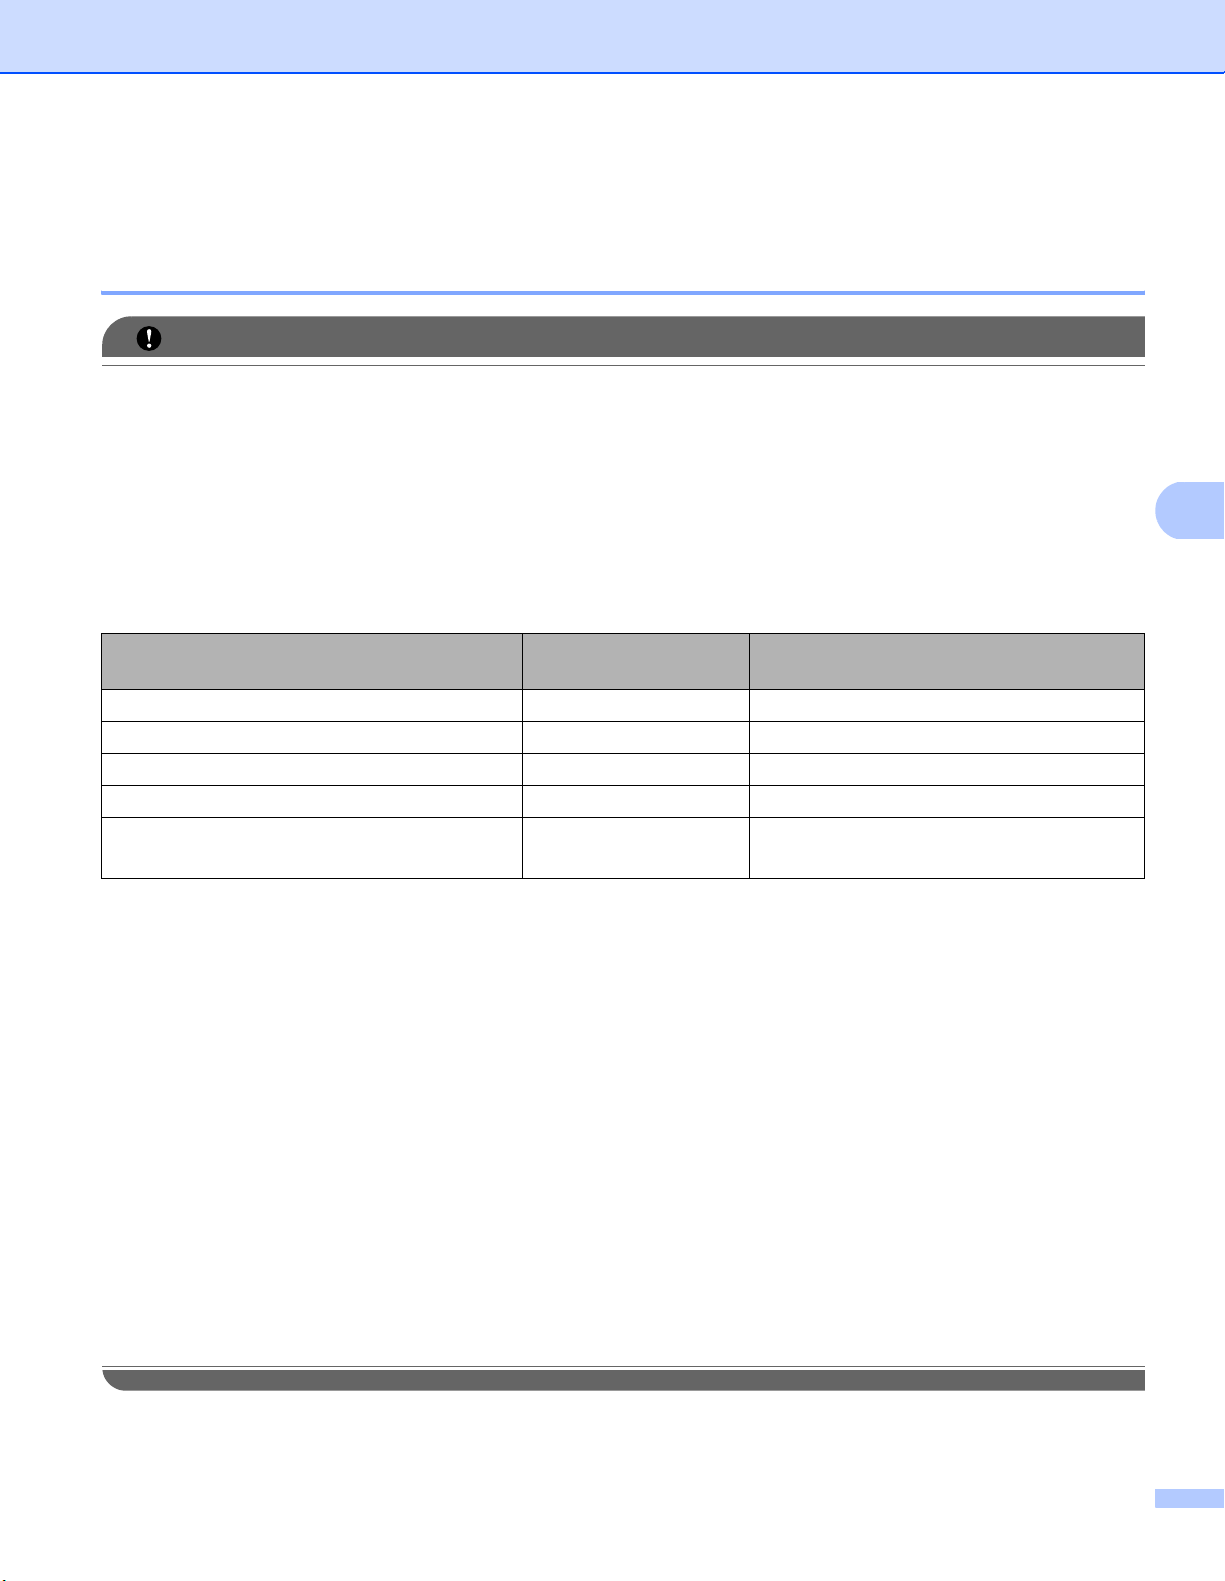
Wireless configuration for Macintosh® using the Brother installer application (MFC-8890DW only)
Configuration in Ad-hoc mode 5
Before configuring the wireless settings 5
IMPORTANT
• The following instructions will install your Brother machine in a network environment using the Brother
®
installer application for Macintosh
• You can also setup your Brother machine using the machine’s control panel which we recommended. See
Configuring your machine for a wireless network (For MFC-8890DW) on page 21.
found on the CD-ROM we have provided with the machine.
• You must know your wireless network settings before you proceed with this installation.
Make sure you take notes on all the current settings such as SSID, authentication and encryption of your
wireless network environment. If you do not know them, contact your network administrator or the
manufacturer of your access point/router.
Item Example Record the current wireless network
settings
Communication mode: (Ad-hoc) Ad-hoc
Network name: (SSID, ESSID) HELLO
Authentication method: (Open system) Open system
Encryption mode: (None, WEP) WEP
Network key: (Encryption key, WEP key
Passphrase)
1
The WEP key is for 64-bit encrypted networks or 128-bit encrypted networks and can contain both numbers and letters. If you do not know
this information you should see the documentation provided with your access point or wireless router. This key is a 64-bit or 128-bit value that
must be entered in an ASCII or HEXADECIMAL format.
For example:
64-bit ASCII: Uses 5 text characters e.g. “Hello” (this is case sensitive)
64-bit Hexadecimal: Uses 10 digits of hexadecimal data e.g. “71f2234aba”
128-bit ASCII: Uses 13 text characters e.g.
128-bit Hexadecimal: Uses 26 digits of hexadecimal data
1
12345
,
“Wirelesscomms” (this is case sensitive)
e.g.“71f2234ab56cd709e5412aa3ba”
5
• If you have previously configured the wireless settings of the machine, you must reset the network LAN
settings before you can configure the wireless settings again. Press Menu, 7, 0 for Network Reset,
press 1 for Reset and then choose 1 for Yes to accept the change. The machine will restart automatically.
• If you are using a firewall function of anti-spyware or antivirus applications, temporarily disable them. Once
you are sure that you can print, configure the software settings following the instructions again.
82
Page 93
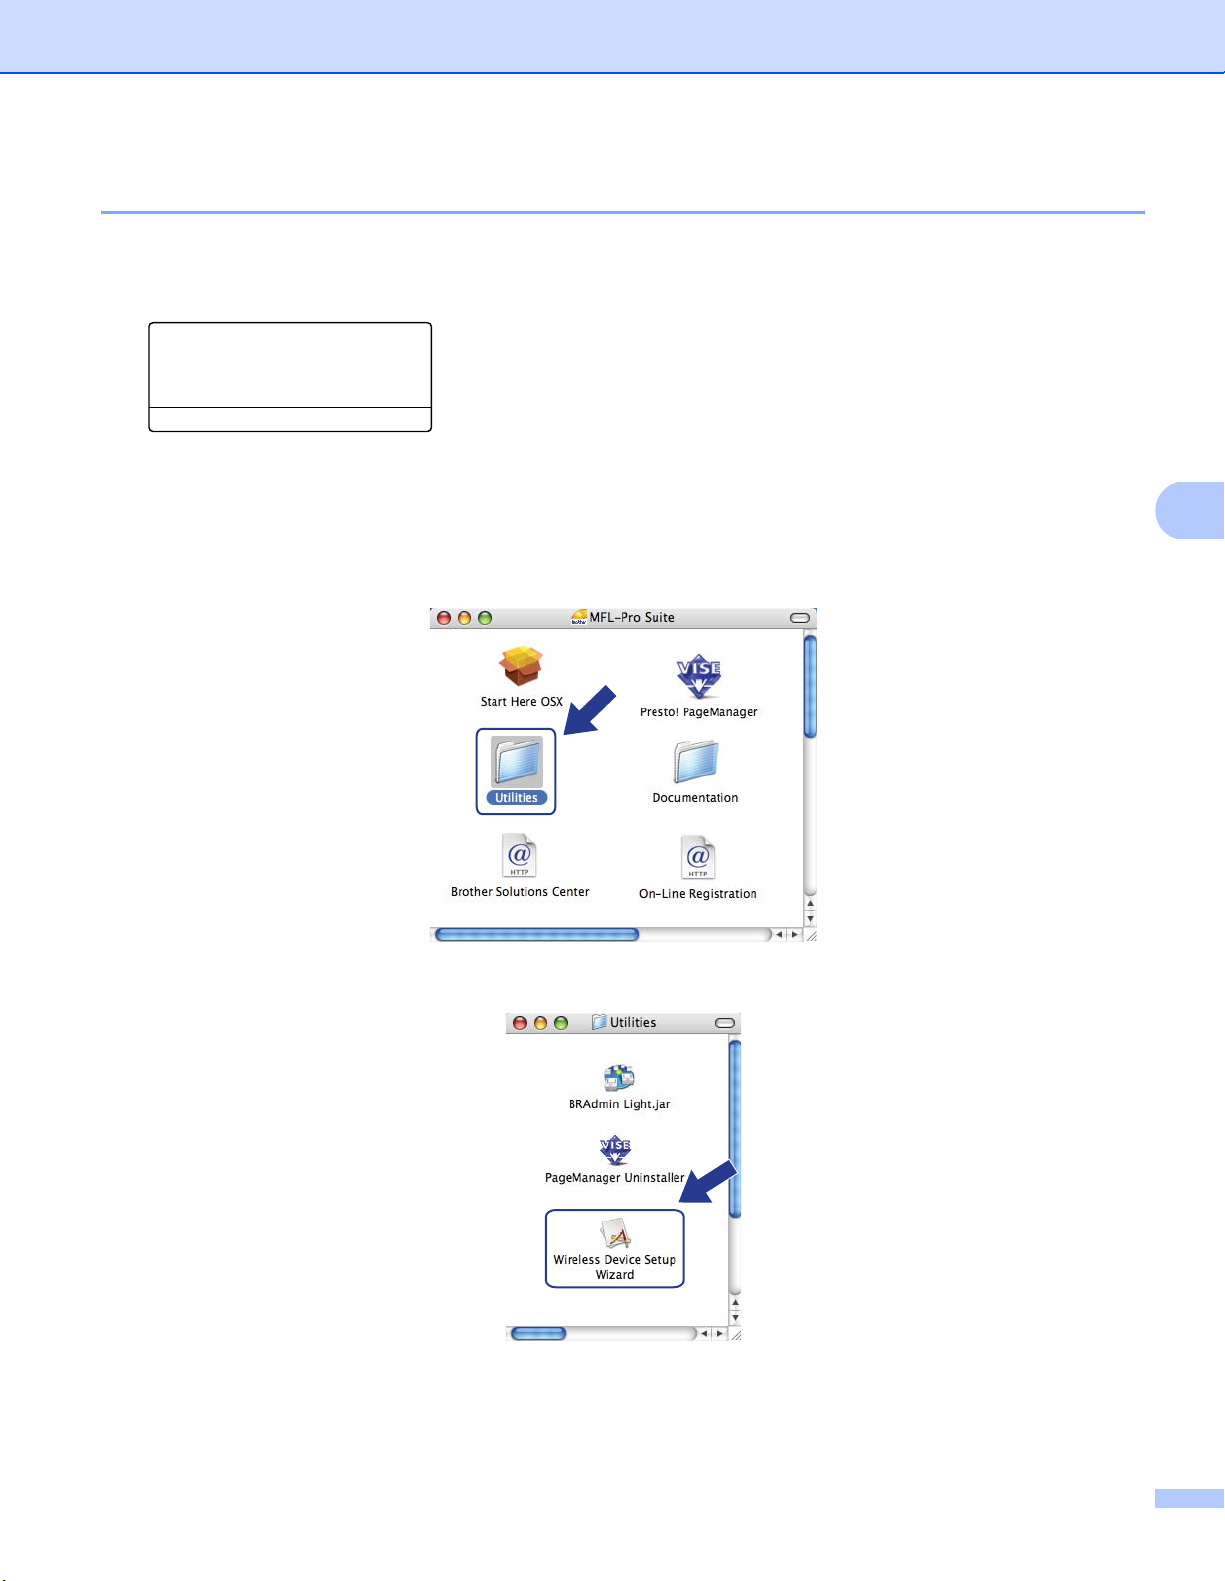
Wireless configuration for Macintosh® using the Brother installer application (MFC-8890DW only)
Configure the wireless settings 5
a Plug the machine’s power cord into the AC power outlet. Turn on the machine’s power switch.
b Press Menu, 7, 2, 7. Using a or b, choose On and press OK.
72.WLAN
7.WLAN Enable
a On
b Off
Select ab or OK
c Turn on your Macintosh
®
.
d Put the supplied CD-ROM into your CD-ROM drive. Double-click the MFL-Pro Suite icon on your
desktop.
e Double-click the Utilities icon.
f Double-click the Wireless Device Setup Wizard.
5
83
Page 94
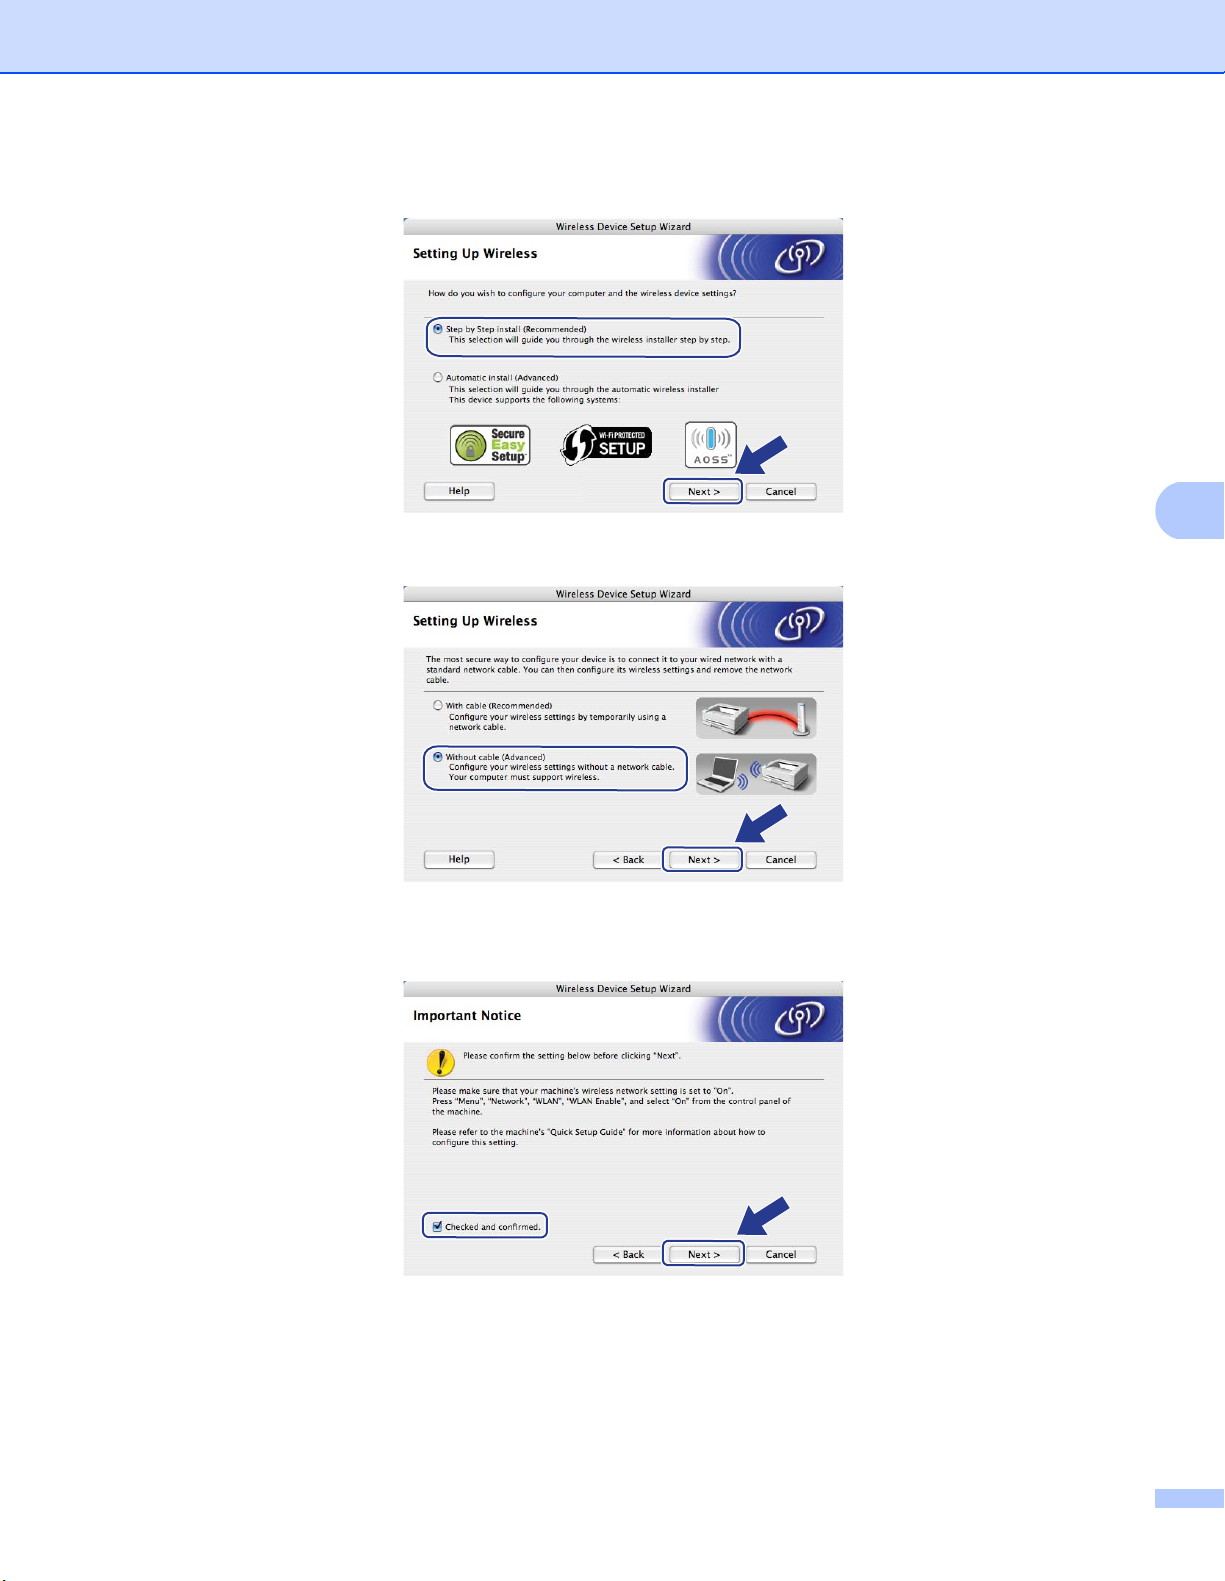
Wireless configuration for Macintosh® using the Brother installer application (MFC-8890DW only)
g Choose Step by Step install (Recommended) and then click Next.
h Choose Without cable (Advanced) and then click Next.
5
i Read the Important Notice. Check the box after you confirm the wireless setting is enabled, and then
click Next.
84
Page 95
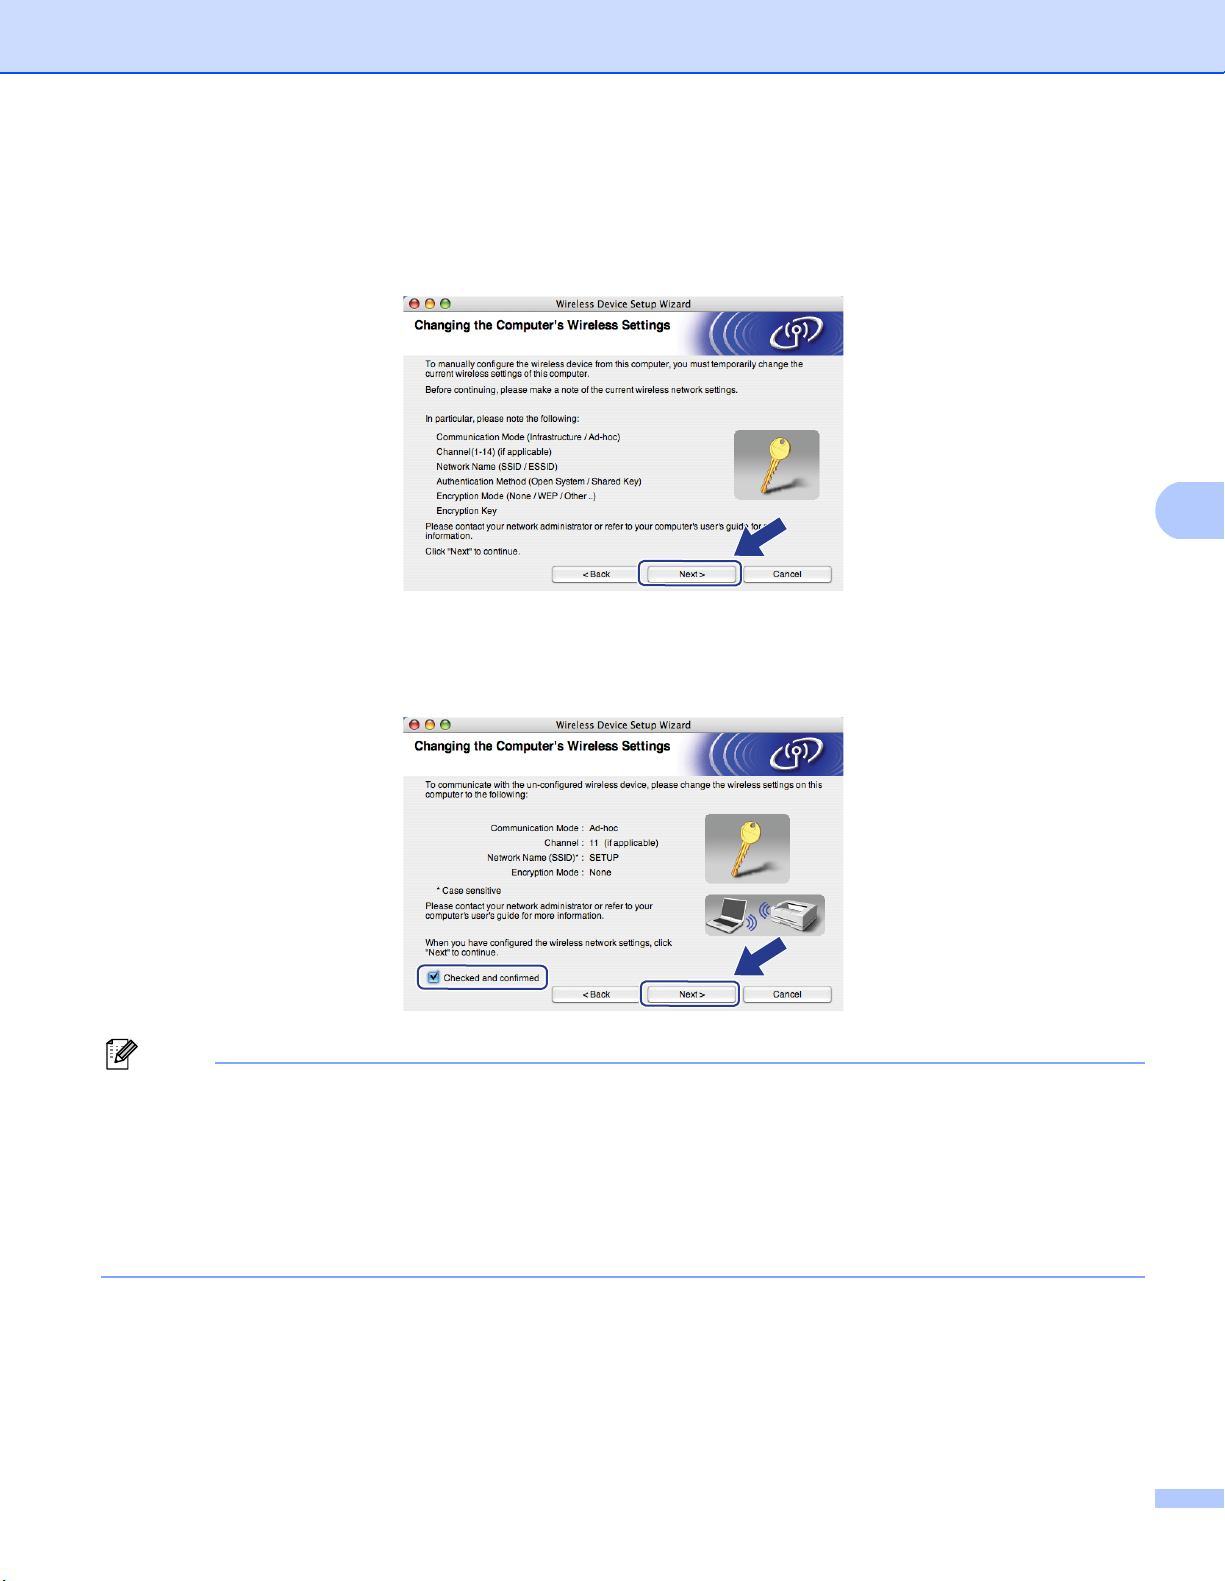
Wireless configuration for Macintosh® using the Brother installer application (MFC-8890DW only)
j You need to temporarily change your computer’s wireless settings. Follow the on-screen instructions.
Make sure you take notes on all the settings such as SSID, channel, authentication and encryption of
your computer. You will need them to return your computer back to its original wireless settings, and then
click Next.
k To communicate with the un-configured wireless machine, temporarily change the wireless settings on
your computer to match the machine’s default settings shown on this screen. Check the box after you
confirm these settings, and then click Next.
5
Note
You can temporarily change the wireless settings on your computer, following the steps below:
1 Click the AirPort status icon and choose Open Internet Connect....
2 Click the Network tab to see the available wireless devices. You can see the Brother wireless print
server in the Network option. Choose SETUP.
3 Your wireless network is connected successfully.
85
Page 96
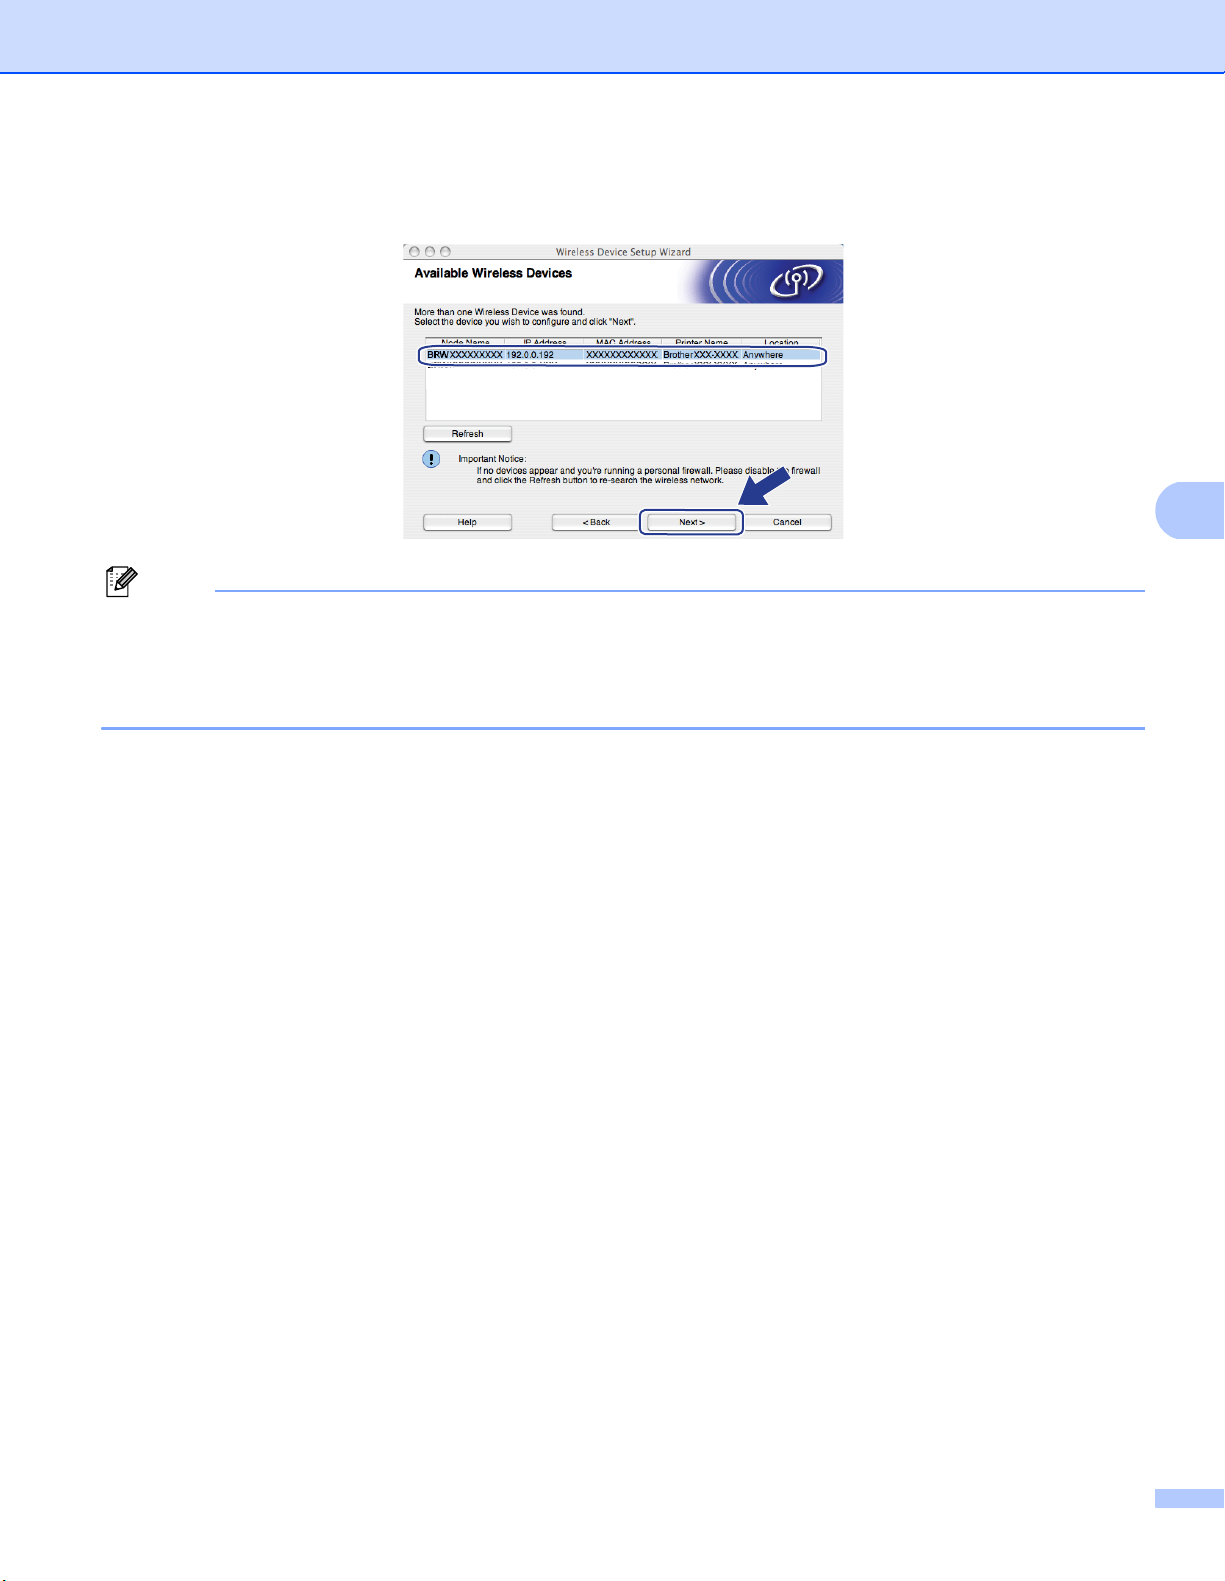
Wireless configuration for Macintosh® using the Brother installer application (MFC-8890DW only)
l Choose the machine you wish to configure, and click Next. If the list is blank, check if the machine is
powered on, and then click Refresh.
Note
• The default Node name is “BRWxxxxxxxxxxxx”. (“xxxxxxxxxxxx” is your machine’s MAC Address /
Ethernet Address.)
• You can find your machine’s MAC Address / Ethernet Address by printing out the Network Configuration
List. See Printing the Network Configuration List on page 122.
5
86
Page 97
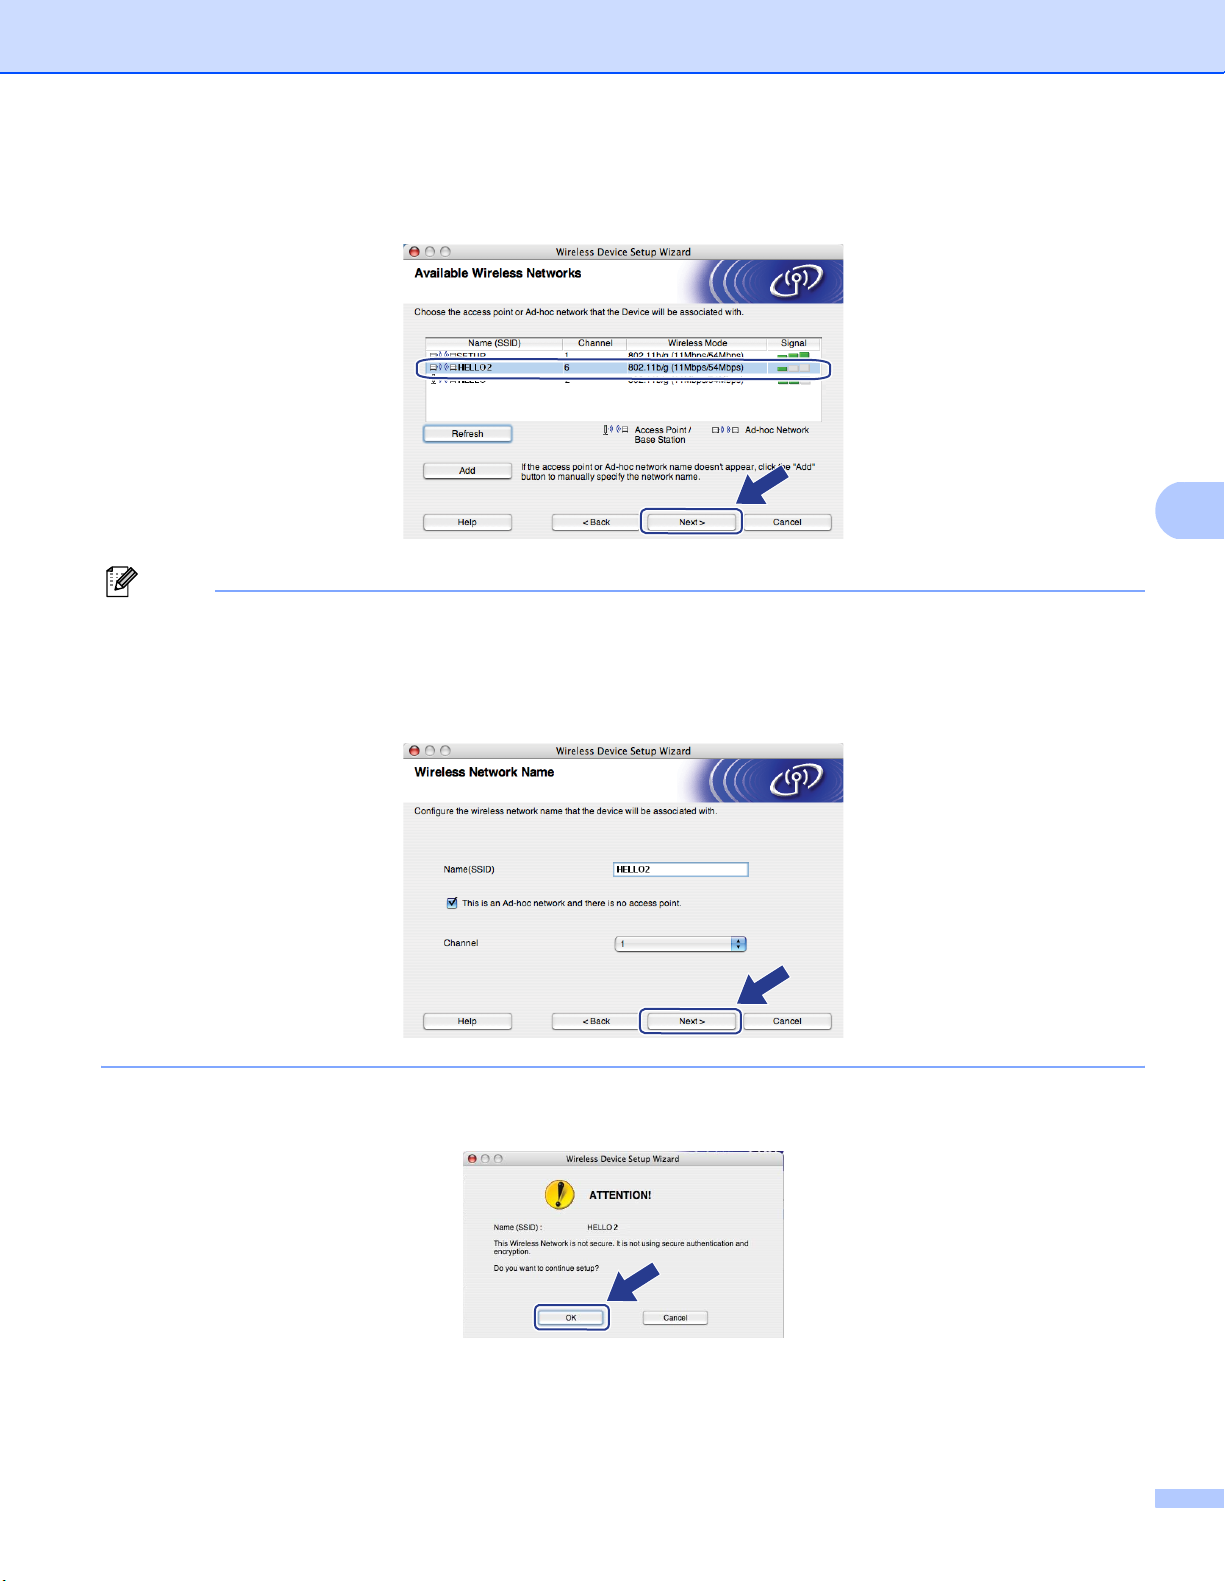
Wireless configuration for Macintosh® using the Brother installer application (MFC-8890DW only)
m The wizard will search for wireless networks available from your machine. Choose the Ad-hoc network
you wish to associate the printer with, and then click Next.
Note
• If the list is blank, check if the machine is within range for wireless communication. Then, click Refresh.
• If your target Ad-hoc network does not appear on the list, you can manually add it by clicking the Add
button. Check This is an Ad-hoc network and there is no access point., and then enter the
Name (SSID) and the Channel number, and then click Next.
5
n If your network is not configured for Authentication and Encryption, the following screen will appear. To
continue configuration, click OK and go to p.
87
Page 98
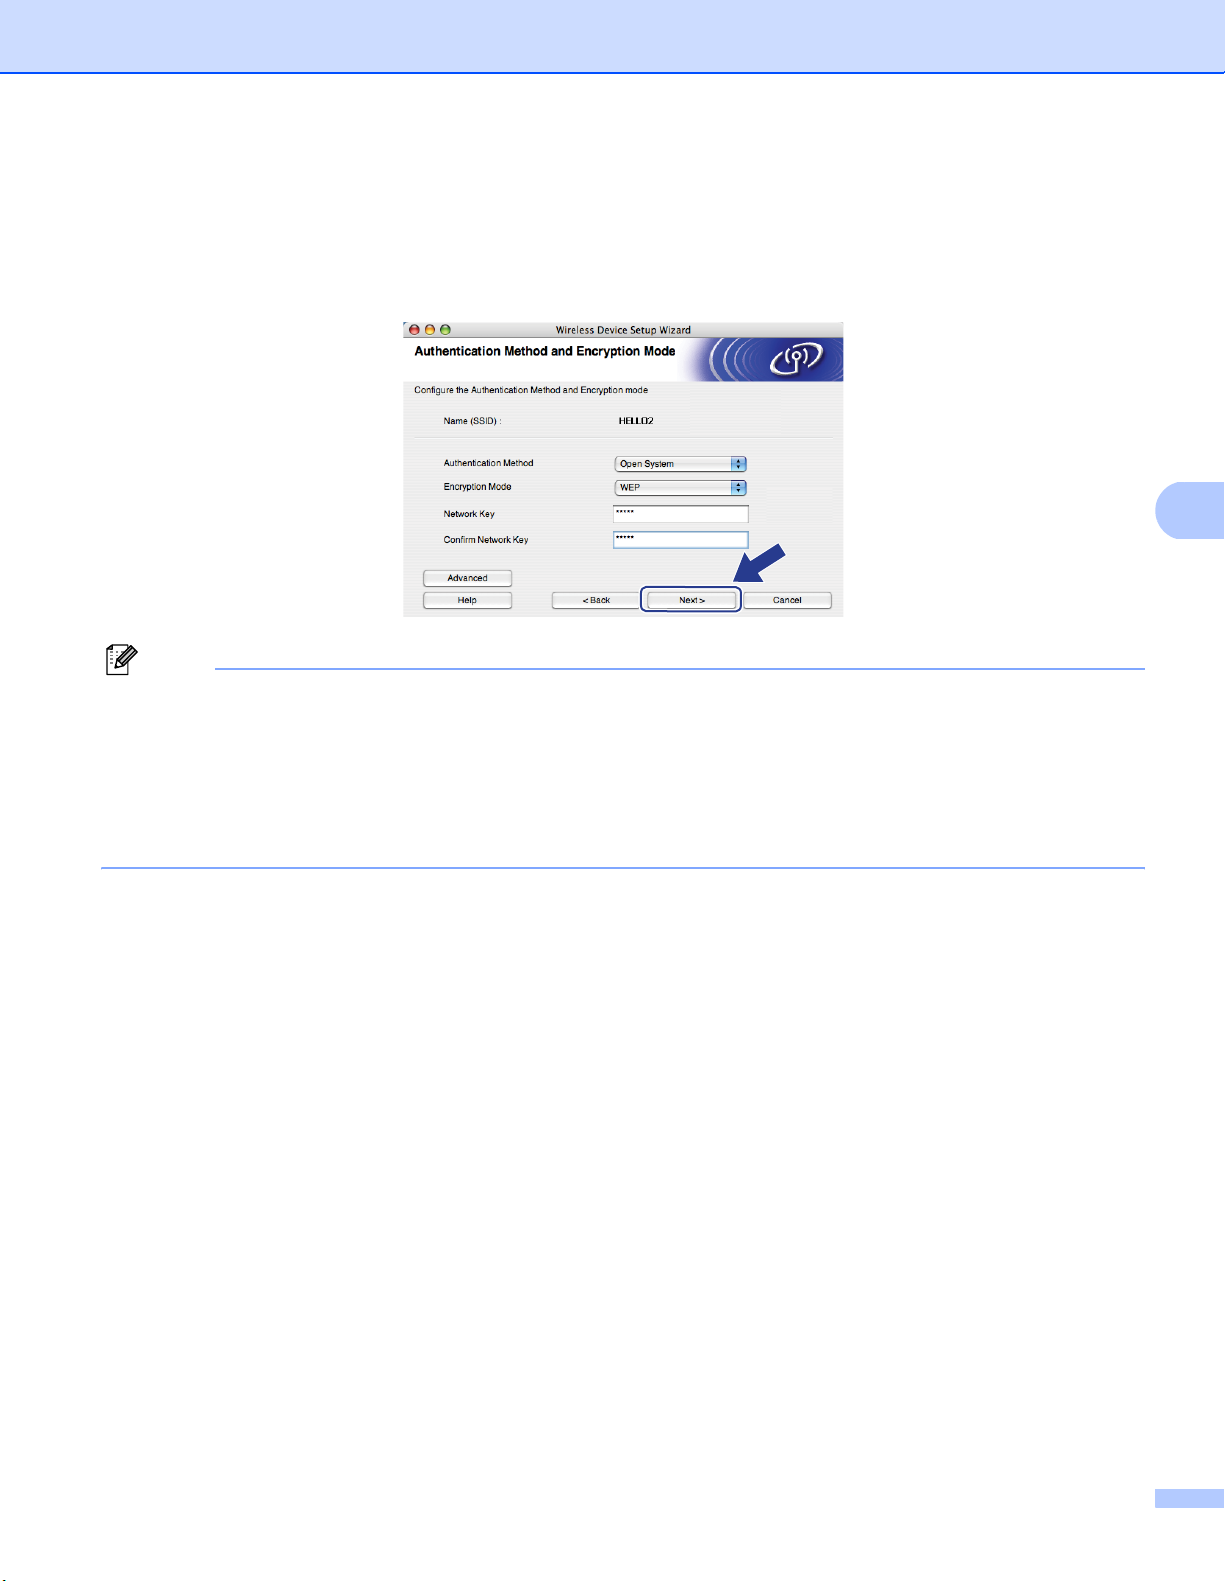
Wireless configuration for Macintosh® using the Brother installer application (MFC-8890DW only)
o If your network is configured for Authentication and Encryption, the following screen will appear. When
configuring your Brother wireless machine, you must configure your machine to match the
Authentication and Encryption settings you wrote down on page 82 for your existing wireless
network. Choose the Authentication Method and Encryption Mode from the pop-up menu in each
setting box. Then enter the Network Key and Confirm Network Key, and then click Next.
Note
• If you want to setup or configure additional WEP key indexes other than WEP key1, click Advanced.
5
• If you do not know the Authentication or Encryption settings for your network, contact your network
administrator or the manufacture of your access point / router.
• If you are using WEP and the printed Network Configuration page in step p shows Link OK in the
Wireless Link Status, but the machine is not found, make sure you entered the WEP key correctly. The
WEP key is case sensitive.
88
Page 99
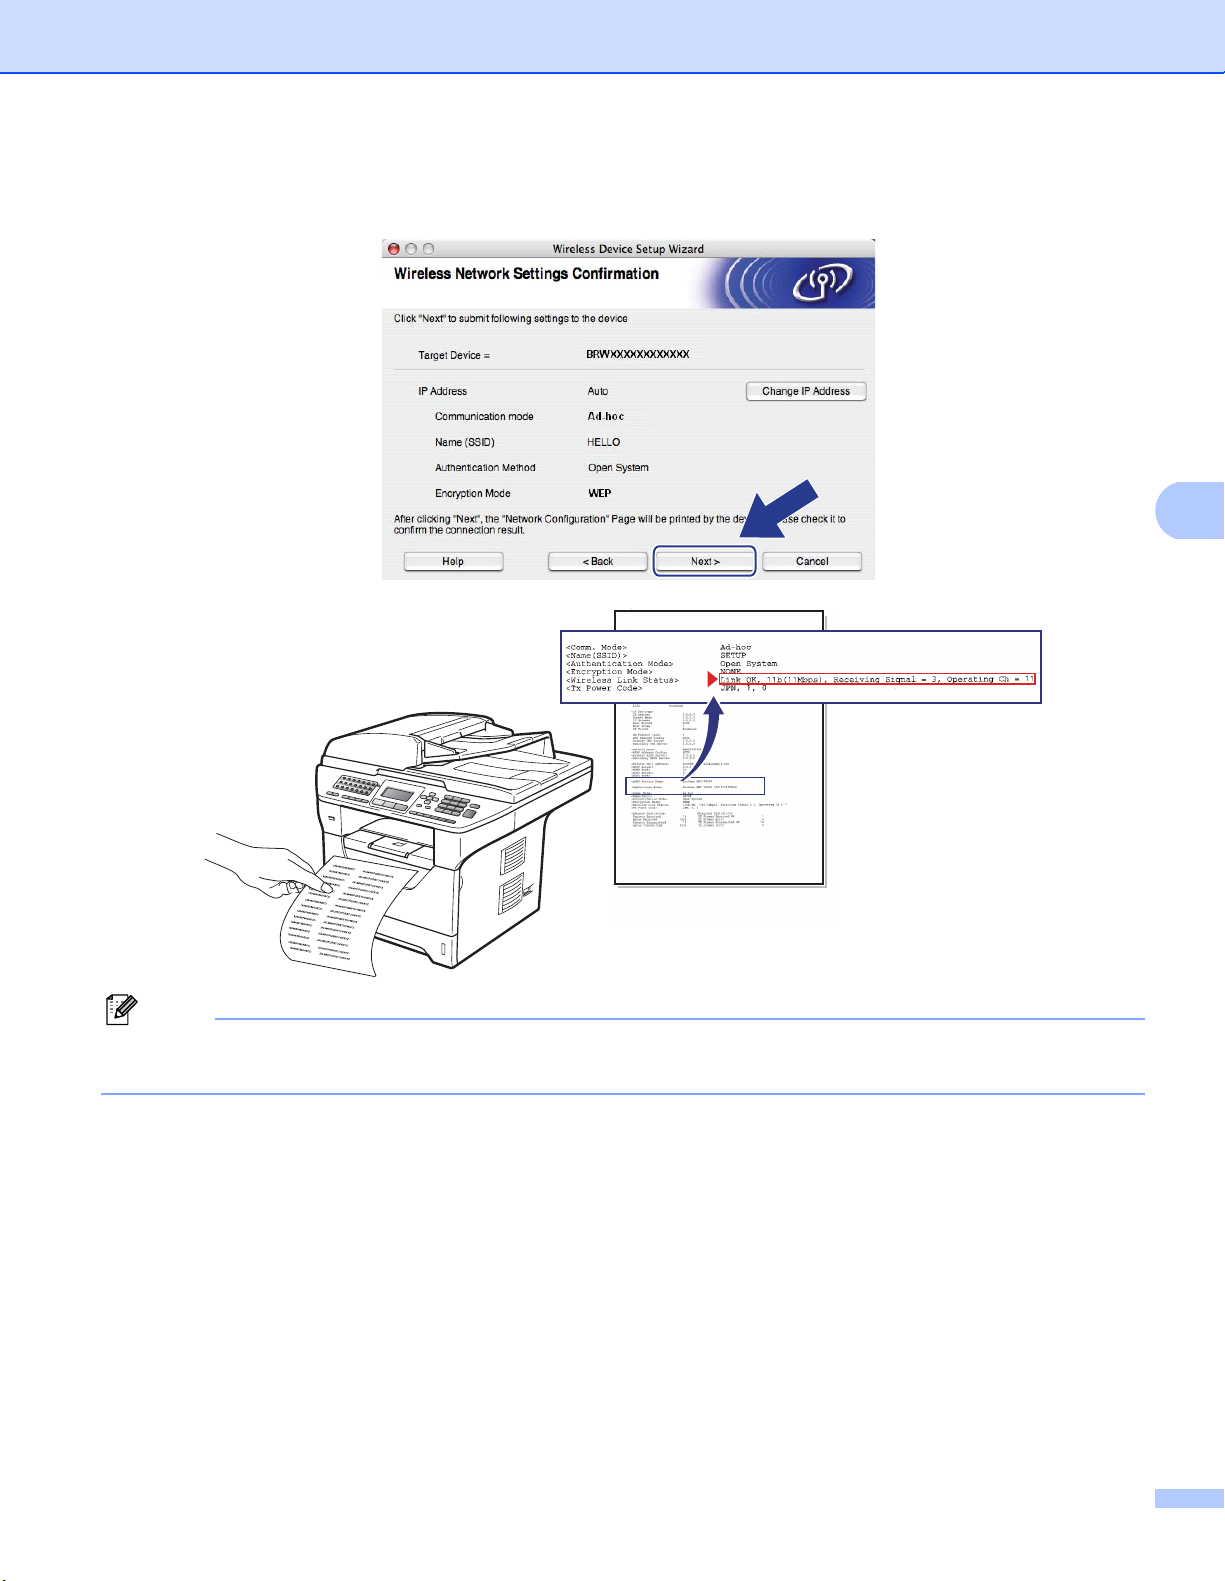
Wireless configuration for Macintosh® using the Brother installer application (MFC-8890DW only)
p Click Next. The settings will be sent to your machine. The settings will remain unchanged if you click
Cancel. The Network Configuration page will be printed.
5
Note
If you want to manually enter the IP address settings of your machine, click Change IP Address and enter
the necessary IP address settings for your network.
89
Page 100
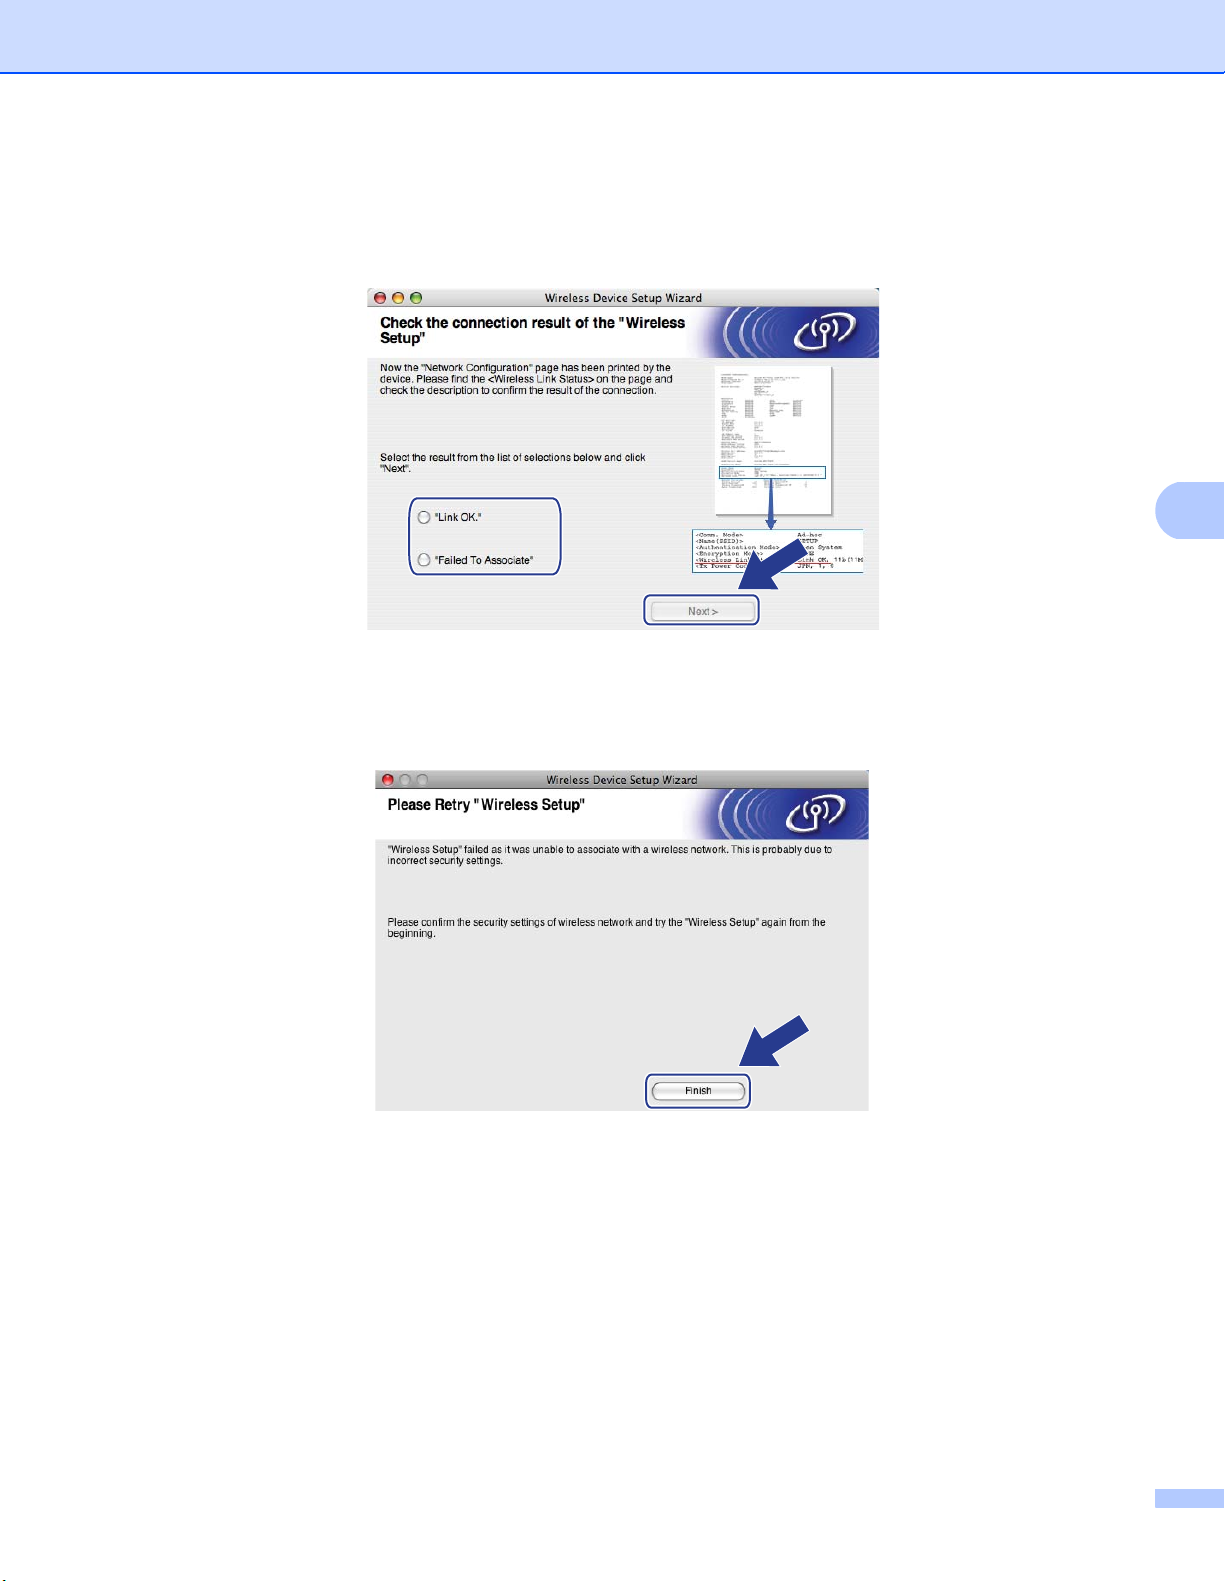
Wireless configuration for Macintosh® using the Brother installer application (MFC-8890DW only)
q Check the printed Network Configuration page. Choose the status as it is shown for the
Wireless Link Status on the Network Configuration page. Click Next.
If your status is "Link OK", go to step s.
If your status is "Failed To Associate", go to step r.
r Click Finish. Wireless setup was unable to associate with a wireless network. This is probably due to
incorrect security settings. Reset the print server back to its factory default settings. (See Restoring the
network settings to factory default on pages 122) Confirm the security settings of your wireless network
and try starting from step f again.
5
90
 Loading...