

Page 1

Online User's Guide
MFC-J491DW
MFC-J497DW
MFC-J690DW
MFC-J895DW
© 2017 Brother Industries, Ltd. All rights reserved.
Page 2

Home > Table of Contents
Table of Contents
Before You Use Your Brother Machine ............................................................................................... 1
Definitions of Notes ........................................................................................................................................ 2
Notice - Disclaimer of Warranties (USA and Canada) ................................................................................... 3
Trademarks .................................................................................................................................................... 4
Important Note ...............................................................................................................................................5
Introduction to Your Brother Machine................................................................................................. 6
Before Using Your Machine ........................................................................................................................... 7
Control Panel Overview .................................................................................................................................8
LCD Overview .............................................................................................................................................. 12
Touchscreen LCD Overview......................................................................................................................... 13
New Information from Brother ............................................................................................................ 16
Settings Screen Overview ...........................................................................................................................17
Navigate the Touchscreen............................................................................................................................ 20
Access Brother Utilities (Windows®) ............................................................................................................ 21
Uninstall the Brother Software and Drivers (Windows®) .................................................................... 22
Paper Handling.................................................................................................................................... 23
Load Paper................................................................................................................................................... 24
Load Paper in the Paper Tray ............................................................................................................ 25
Load Photo or Photo L Paper in Photo Bypass Tray.......................................................................... 40
Load Paper in the Manual Feed Slot.................................................................................................. 42
Unprintable Area ................................................................................................................................ 45
Paper Settings.................................................................................................................................... 46
Acceptable Paper and Other Print Media........................................................................................... 49
Load Documents .......................................................................................................................................... 58
Load Documents in the Automatic Document Feeder (ADF) ............................................................. 59
Load Documents on the Scanner Glass ............................................................................................ 61
Unscannable Area.............................................................................................................................. 62
Print ...................................................................................................................................................... 63
Print from Your Computer (Windows®) ........................................................................................................ 64
Print a Photo (Windows®)................................................................................................................... 65
Print a Document (Windows®)............................................................................................................ 67
Cancel a Print Job (Windows®).......................................................................................................... 68
Print More Than One Page on a Single Sheet of Paper (N in 1) (Windows®).................................... 69
Print as a Poster (Windows®)............................................................................................................. 70
Print on Both Sides of the Paper Automatically (Automatic 2-sided Printing) (Windows®) ................ 71
Print as a Booklet Automatically (Windows®)..................................................................................... 74
Print a Color Document in Grayscale (Windows®)............................................................................. 76
Prevent Smudged Printouts and Paper Jams (Windows®) ................................................................ 77
Use a Preset Print Profile (Windows®)............................................................................................... 78
Change the Default Print Settings (Windows®).................................................................................. 81
Print Settings (Windows®).................................................................................................................. 82
Print from Your Computer (Mac) ..................................................................................................................87
Print a Photo (Mac) ............................................................................................................................ 88
i
Page 3

Home > Table of Contents
Print a Document (Mac) ..................................................................................................................... 89
Print on Both Sides of the Paper Automatically (Automatic 2-sided Printing) (Mac) .......................... 90
Print More Than One Page on a Single Sheet of Paper (N in 1) (Mac) ............................................. 91
Print a Color Document in Grayscale (Mac)....................................................................................... 92
Prevent Smudged Printouts and Paper Jams (Mac) .......................................................................... 93
Print Options (Mac) ............................................................................................................................ 94
Scan...................................................................................................................................................... 99
Scan Using the Scan Button on Your Brother Machine ............................................................................. 100
Scan Photos and Graphics............................................................................................................... 101
Save Scanned Data to a Folder as a PDF File ................................................................................ 104
Save Scanned Data to a Memory Card or USB Flash Drive............................................................ 107
Scan Multiple Business Cards and Photos (Auto Crop)................................................................... 110
Scan to an Editable Text File Using OCR......................................................................................... 112
Scan to Email Attachment ................................................................................................................ 115
Web Services for Scanning on Your Network (Windows® 7, Windows® 8 and Windows® 10) ........ 118
Change Scan Button Settings from ControlCenter4 (Windows®)..................................................... 122
Change Scan Button Settings from Brother iPrint&Scan (Mac) ....................................................... 126
Scan from Your Computer (Windows®)...................................................................................................... 127
Scan Using ControlCenter4 Home Mode (Windows®)..................................................................... 128
Scan Using ControlCenter4 Advanced Mode (Windows®)............................................................... 143
Scan Using Nuance™ PaperPort™ 14SE or Other Windows® Applications..................................... 158
Scan Using Windows® Fax and Scan .............................................................................................. 163
Install BookScan Enhancer and Whiteboard Enhancer (Windows®) ...............................................167
Scan from Your Computer (Mac)................................................................................................................ 168
Scan Using Brother iPrint&Scan (Mac) ............................................................................................ 169
Scan Using TWAIN-Compliant Applications (Mac)........................................................................... 170
Copy ................................................................................................................................................... 173
Copy a Document .....................................................................................................................................174
Enlarge or Reduce Copied Images ............................................................................................................ 176
Sort Copies ................................................................................................................................................178
Make Page Layout Copies ( N in 1 or Poster)............................................................................................ 179
Copy on Both Sides of the Paper (2-sided Copy) ...................................................................................... 183
Copy an ID Card ........................................................................................................................................186
Copy in Ink Save Mode ............................................................................................................................. 188
Copy Options .............................................................................................................................................189
Fax ...................................................................................................................................................... 193
Send a Fax.................................................................................................................................................194
Send a Fax from Your Brother Machine ........................................................................................... 195
Send a Fax Manually........................................................................................................................ 198
Send a Fax at the End of a Conversation ........................................................................................ 199
Send the Same Fax to More than One Recipient (Broadcasting) .................................................... 200
Send a Fax in Real Time.................................................................................................................. 203
Send a Fax at a Specified Time (Delayed Fax)................................................................................ 204
Change the Fax Auto Redial Setting ................................................................................................ 205
Cancel a Fax in Progress ................................................................................................................. 206
Check and Cancel a Pending Fax.................................................................................................... 207
ii
Page 4

Home > Table of Contents
Fax Options ...................................................................................................................................... 208
Receive a Fax ............................................................................................................................................ 210
Receive Mode Settings .................................................................................................................... 211
Fax Preview...................................................................................................................................... 218
Shrink Page Size of an Oversized Incoming Fax ............................................................................. 222
Set the Fax Receive Stamp.............................................................................................................. 223
Receive a Fax at the End of a Telephone Conversation .................................................................. 224
Memory Receive Options ................................................................................................................. 225
Remote Fax Retrieval....................................................................................................................... 233
Voice Operations and Fax Numbers .......................................................................................................... 239
Voice Operations.............................................................................................................................. 240
Store Fax Numbers ..........................................................................................................................248
Set up Groups for Broadcasting ....................................................................................................... 254
Dial Access Codes and Credit Card Numbers ................................................................................ 259
Telephone Services and External Devices................................................................................................. 261
Voice Mail......................................................................................................................................... 262
Distinctive Ring................................................................................................................................. 263
Caller ID ........................................................................................................................................... 268
Voice Over Internet Protocol (VoIP/Telephone Line Interference)....................................................270
External TAD (Telephone Answering Device)................................................................................... 271
External and Extension Telephones ................................................................................................. 275
Fax Reports ............................................................................................................................................... 281
Set the Transmission Verification Report's Style.............................................................................. 282
Set the Fax Journal's Interval Period................................................................................................ 283
PC-FAX ...................................................................................................................................................... 285
PC-FAX for Windows® ..................................................................................................................... 286
PC-FAX for Mac ..............................................................................................................................309
PhotoCapture Center ........................................................................................................................ 312
Print Photos Directly from Media................................................................................................................ 313
Compatible Media ............................................................................................................................ 314
Important Information about Photo Printing...................................................................................... 315
Print Photos from Media on the Brother Machine ............................................................................ 316
Copy Photos from Media to a Computer....................................................................................................325
Before Copying Photos .................................................................................................................... 326
Copy Photos from Media Over a Local Connection ......................................................................... 327
Print Photos from ControlCenter4 (Windows®).......................................................................................... 328
Edit Photos Using ControlCenter4 (Windows®) ...............................................................................330
Network .............................................................................................................................................. 332
Supported Basic Network Features ........................................................................................................... 333
Network Management Software and Utilities ............................................................................................. 334
Learn about Network Management Software and Utilities ............................................................... 335
Additional Methods of Configuring Your Brother Machine for a Wireless Network ....................................336
Before Configuring Your Brother Machine for a Wireless Network................................................... 337
Configure Your Machine for a Wireless Network Using the One Push Method of Wi-Fi Protected
Setup™ (WPS).................................................................................................................................. 338
Configure Your Machine for a Wireless Network Using the PIN Method of Wi-Fi Protected
Setup™ (WPS).................................................................................................................................. 340
iii
Page 5

Home > Table of Contents
Configure Your Machine for a Wireless Network When the SSID is Not Broadcast......................... 343
Use Wi-Fi Direct®............................................................................................................................. 346
Advanced Network Features......................................................................................................................359
Print the Network Configuration Report............................................................................................ 360
Technical Information for Advanced Users................................................................................................. 361
Reset the Network Settings to Factory Default ................................................................................ 362
Print the WLAN Report..................................................................................................................... 363
Security .............................................................................................................................................. 366
Lock the Machine Settings ......................................................................................................................... 367
About Using Memory Security.......................................................................................................... 368
About Using TX Lock........................................................................................................................ 372
Mobile/Web Connect......................................................................................................................... 376
Brother Web Connect................................................................................................................................. 377
Brother Web Connect Overview....................................................................................................... 378
Online Services Used with Brother Web Connect............................................................................ 379
Conditions for Using Brother Web Connect...................................................................................... 381
Set Up Brother Web Connect........................................................................................................... 384
Scan and Upload Documents Using Brother Web Connect............................................................. 393
Upload a Document from an External Memory Device Using Brother Web Connect ...................... 395
Download and Print Documents Using Brother Web Connect ......................................................... 396
Download and Save a Document to an External Memory Device Using Brother Web Connect...... 399
FaxForward to Cloud or E-mail ........................................................................................................ 401
Google Cloud Print.....................................................................................................................................404
Google Cloud Print Overview ........................................................................................................... 405
Before Using Google Cloud Print ..................................................................................................... 406
Print from Google Chrome™ or Chrome OS™................................................................................. 411
Print from Google Drive™ for Mobile ................................................................................................ 412
Print from Gmail™ Webmail Service for Mobile................................................................................413
AirPrint .......................................................................................................................................................414
AirPrint Overview.............................................................................................................................. 415
Before Using AirPrint (macOS) ........................................................................................................ 416
Print Using AirPrint ........................................................................................................................... 417
Scan Using AirPrint (macOS)........................................................................................................... 420
Send a Fax Using AirPrint (macOS)................................................................................................. 421
Mobile Printing for Windows®.................................................................................................................... 422
Mopria® Print Service................................................................................................................................. 423
Brother iPrint&Scan for mobile...................................................................................................................424
Near-Field Communication (NFC).............................................................................................................. 425
ControlCenter .................................................................................................................................... 426
ControlCenter4 (Windows®)....................................................................................................................... 427
Change the Operation Mode in ControlCenter4 (Windows®) .......................................................... 428
Scan Using ControlCenter4 Home Mode (Windows®)..................................................................... 430
Scan Using ControlCenter4 Advanced Mode (Windows®)............................................................... 431
Set Up the Brother Machine Using ControlCenter4 (Windows®) .....................................................432
Create a Custom Tab Using ControlCenter4 Advanced Mode (Windows®)..................................... 434
iv
Page 6

Home > Table of Contents
Brother iPrint&Scan for Windows® and Mac.................................................................................. 436
Brother iPrint&Scan Overview.................................................................................................................... 437
Troubleshooting................................................................................................................................ 438
Error and Maintenance Messages ............................................................................................................. 439
Transfer Your Faxes or Fax Journal Report ..................................................................................... 453
Error Messages When Using the Brother Web Connect Feature..................................................... 458
Document Jams ......................................................................................................................................... 460
Document is Jammed in the Top of the ADF Unit ............................................................................ 461
Document is Jammed inside the ADF Unit....................................................................................... 462
Remove Paper Scraps Jammed in the ADF .................................................................................... 463
Printer Jam or Paper Jam .......................................................................................................................... 464
Paper is Jammed Inside and in the Front of the Machine (Jam A Inside/Front) .............................. 465
Paper is Jammed in the Front of the Machine (Jam B Front)........................................................... 470
Paper is Jammed in the Back of the Machine (Jam C Rear) ........................................................... 473
If You Are Having Difficulty with Your Machine .......................................................................................... 476
Paper Handling and Printing Problems ............................................................................................ 477
Telephone and Fax Problems........................................................................................................... 483
Other Problems ................................................................................................................................ 489
Network Problems ............................................................................................................................ 491
Google Cloud Print Problems........................................................................................................... 501
AirPrint Problems ............................................................................................................................. 502
Check the Machine Information .................................................................................................................503
Reset Your Brother Machine ...................................................................................................................... 504
Reset Functions Overview ............................................................................................................... 505
Routine Maintenance ........................................................................................................................ 506
Replace the Ink Cartridges......................................................................................................................... 507
Clean Your Brother Machine ...................................................................................................................... 510
Clean the Scanner............................................................................................................................ 511
Clean the Print Head from Your Brother Machine ............................................................................ 513
Clean the Print Head from Your Computer (Windows®)................................................................... 515
Clean the Print Head from Your Computer (Mac)............................................................................. 517
Clean the Machine's LCD.................................................................................................................518
Clean the Outside of the Machine .................................................................................................... 519
Clean the Machine's Printer Platen .................................................................................................. 520
Clean the Paper Feed Rollers .......................................................................................................... 521
Clean the Base Pad ......................................................................................................................... 523
Clean the Paper Pick-up Rollers ...................................................................................................... 524
Check Your Brother Machine .....................................................................................................................525
Check the Print Quality..................................................................................................................... 526
Check the Print Alignment from Your Brother Machine .................................................................... 529
Check the Ink Volume ...................................................................................................................... 531
Monitor Machine Status from Your Computer (Windows®) .............................................................. 533
Monitor Machine Status from Your Computer (Mac) ........................................................................ 538
Correct the Paper Feed to Clear Vertical Lines.......................................................................................... 540
Change the Print Setting Options When Having Printing Problems........................................................... 541
Pack and Ship Your Brother Machine ........................................................................................................543
v
Page 7

Home > Table of Contents
Machine Settings............................................................................................................................... 546
Change Machine Settings from the Control Panel ..................................................................................... 547
In the Event of Power Failure (Memory Storage) ............................................................................. 548
General Settings............................................................................................................................... 549
Save Your Favorite Settings as a Shortcut.......................................................................................564
Print Reports .................................................................................................................................... 567
Settings and Features Tables...........................................................................................................570
Change Machine Settings from Your Computer......................................................................................... 591
Change the Machine Settings Using Remote Setup ........................................................................ 592
Appendix............................................................................................................................................ 604
Specifications ............................................................................................................................................. 605
Enter Text on Your Brother Machine ..........................................................................................................613
Supply Specifications ................................................................................................................................. 615
Brother Numbers........................................................................................................................................616
vi
Page 8

Home > Before You Use Your Brother Machine
Before You Use Your Brother Machine
• Definitions of Notes
• Notice - Disclaimer of Warranties (USA and Canada)
• Trademarks
• Important Note
1
Page 9
Home > Before You Use Your Brother Machine > Definitions of Notes
Definitions of Notes
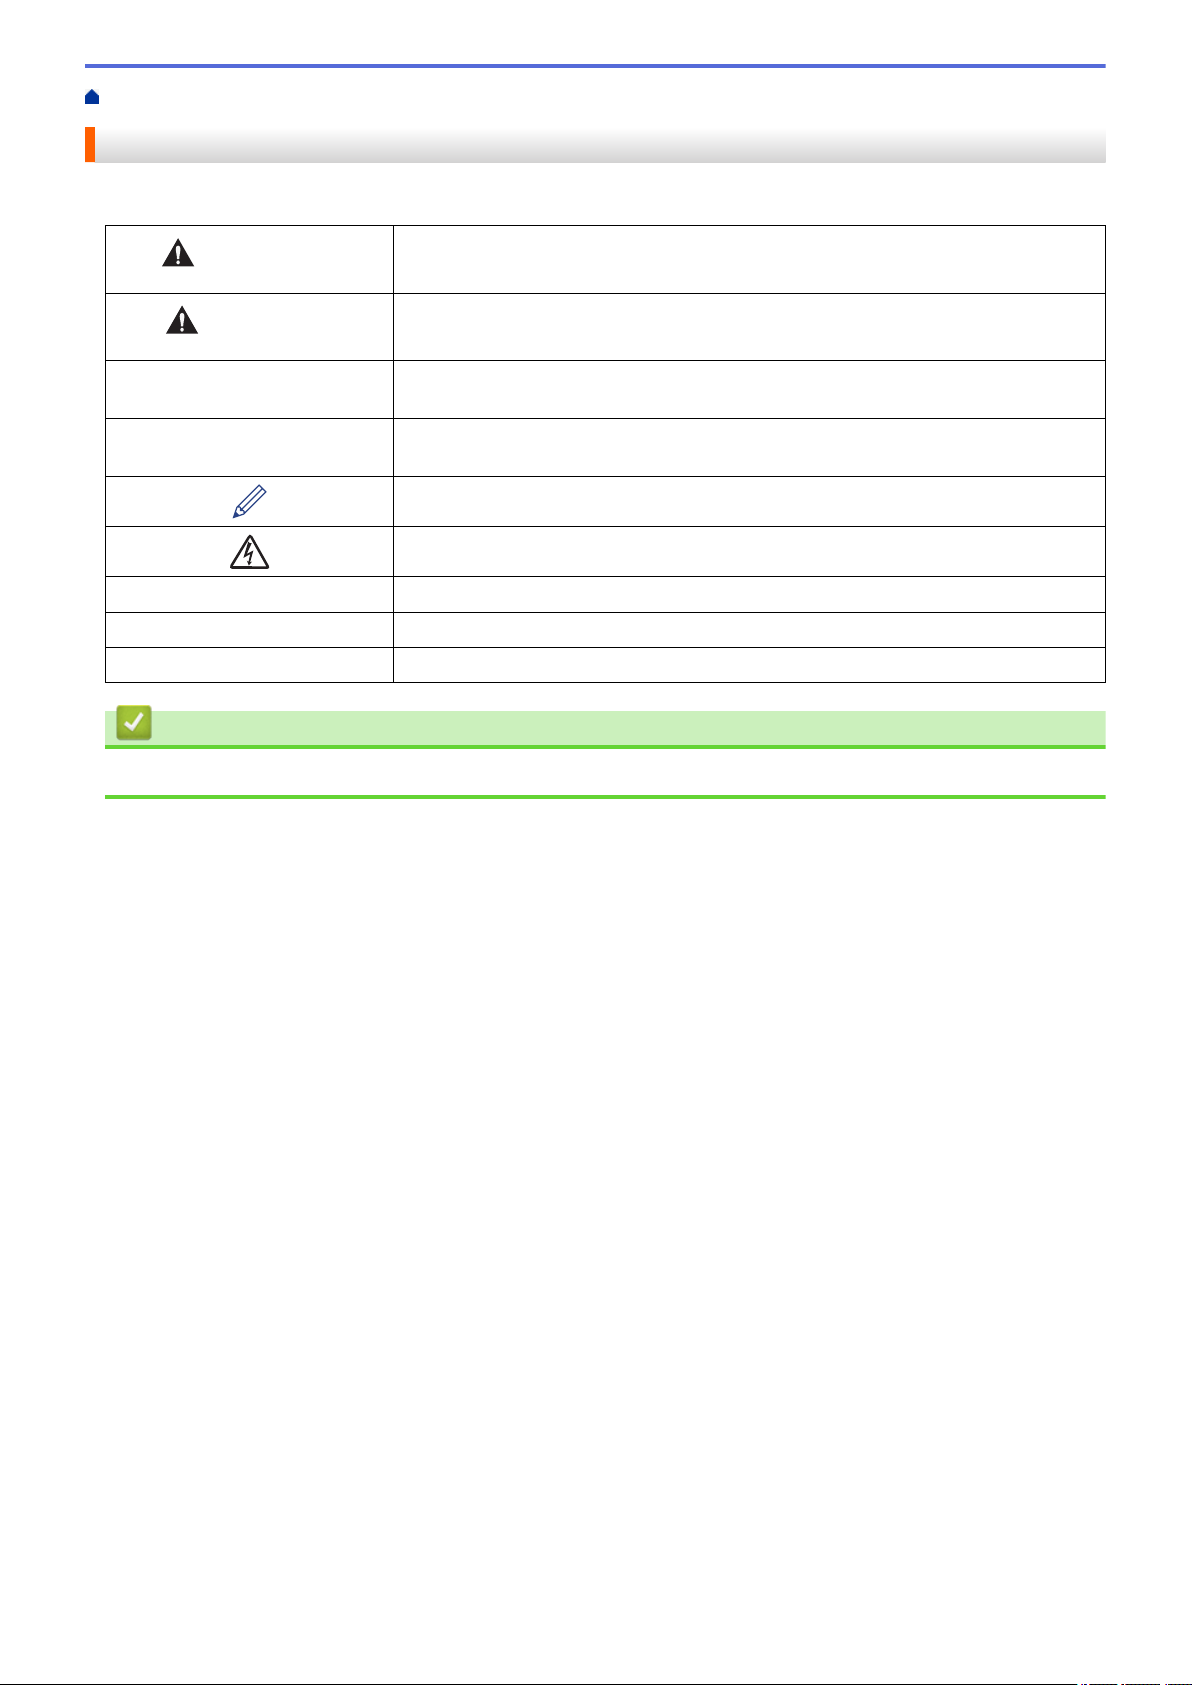
We use the following symbols and conventions throughout this User's Guide:
WARNING
CAUTION
IMPORTANT
NOTE
Bold Bold style identifies buttons on the machine's control panel or computer screen.
Italics Italicized style emphasizes an important point or refers you to a related topic.
Courier New
WARNING indicates a potentially hazardous situation which, if not avoided, could
result in death or serious injuries.
CAUTION indicates a potentially hazardous situation which, if not avoided, may
result in minor or moderate injuries.
IMPORTANT indicates a potentially hazardous situation which, if not avoided, may
result in damage to property or loss of product functionality.
NOTE specifies the operating environment, conditions for installation, or special
conditions of use.
Tips icons indicate helpful hints and supplementary information.
Electrical Hazard icons alert you to possible electrical shock.
Courier New font identifies messages shown on the machine's LCD.
Related Information
• Before You Use Your Brother Machine
2
Page 10
Home > Before You Use Your Brother Machine > Notice - Disclaimer of Warranties (USA and Canada)
Notice - Disclaimer of Warranties (USA and Canada)
BROTHER’S LICENSOR(S), AND THEIR DIRECTORS, OFFICERS, EMPLOYEES OR AGENTS
(COLLECTIVELY BROTHER’S LICENSOR) MAKE NO WARRANTIES, EXPRESS OR IMPLIED, INCLUDING
WITHOUT LIMITATION THE IMPLIED WARRANTIES OF MERCHANTABILITY AND FITNESS FOR A
PARTICULAR PURPOSE, REGARDING THE SOFTWARE. BROTHER’S LICENSOR(S) DOES NOT
WARRANT, GUARANTEE OR MAKE ANY REPRESENTATIONS REGARDING THE USE OR THE RESULTS
OF THE USE OF THE SOFTWARE IN TERMS OF ITS CORRECTNESS, ACCURACY, RELIABILITY,
CURRENTNESS OR OTHERWISE. THE ENTIRE RISK AS TO THE RESULTS AND PERFORMANCE OF THE
SOFTWARE IS ASSUMED BY YOU. THE EXCLUSION OF IMPLIED WARRANTIES IS NOT PERMITTED BY
SOME STATES IN THE USA AND SOME PROVINCES IN CANADA. THE ABOVE EXCLUSION MAY NOT
APPLY TO YOU.
IN NO EVENT WILL BROTHER’S LICENSOR(S) BE LIABLE TO YOU FOR ANY CONSEQUENTIAL,
INCIDENTAL OR INDIRECT DAMAGES (INCLUDING DAMAGES FOR LOSS OF BUSINESS PROFITS,
BUSINESS INTERRUPTION, LOSS OF BUSINESS INFORMATION, AND THE LIKE) ARISING OUT OF THE
USE OR INABILITY TO USE THE SOFTWARE EVEN IF BROTHER’S LICENSOR HAS BEEN ADVISED OF
THE POSSIBILITY OF SUCH DAMAGES. BECAUSE SOME STATES IN THE USA AND SOME PROVINCES IN
CANADA DO NOT ALLOW THE EXCLUSION OR LIMITATION OF LIABILITY FOR CONSEQUENTIAL OR
INCIDENTAL DAMAGES, THE ABOVE LIMITATIONS MAY NOT APPLY TO YOU. IN ANY EVENT BROTHER’S
LICENSOR’S LIABILITY TO YOU FOR ACTUAL DAMAGES FROM ANY CAUSE WHATSOEVER, AND
REGARDLESS OF THE FORM OF THE ACTION (WHETHER IN CONTRACT, TORT (INCLUDING
NEGLIGENCE), PRODUCT LIABILITY OR OTHERWISE), WILL BE LIMITED TO $50.
Related Information
• Before You Use Your Brother Machine
3
Page 11

Home > Before You Use Your Brother Machine > Trademarks
Trademarks
Microsoft, Windows, Windows Server, SharePoint, Internet Explorer, Excel, PowerPoint, OneNote and OneDrive
are either registered trademarks or trademarks of Microsoft Corporation in the United States and/or other
countries.
Apple, App Store, Mac, Safari, iPad, iPhone, iPod touch and macOS are trademarks of Apple Inc., registered in
the United States and other countries.
AirPrint and the AirPrint logo are trademarks of Apple Inc., registered in the U.S. and other countries.
Nuance and PaperPort are trademarks or registered trademarks of Nuance Communications, Inc. or its affiliates
in the United States and/or other countries.
The SDHC Logo is a trademark of SD-3C, LLC.
Wi-Fi®, Wi-Fi Alliance® and Wi-Fi Direct® are registered trademarks of Wi-Fi Alliance®.
WPA™, WPA2™, Wi-Fi Protected Setup™ and Wi-Fi Protected Setup™ logo are trademarks of Wi-Fi Alliance®.
Android, Gmail, Google Cloud Print, Google Drive, Google Play, Google Chrome, Chrome OS and Google are
trademarks of Google, Inc. Use of these trademarks are subject to Google Permissions.
Mozilla and Firefox are registered trademarks of the Mozilla Foundation.
The Bluetooth® word mark and logos are registered trademarks owned by the Bluetooth SIG, Inc. and any use of
such marks by Brother Industries, Ltd. and related companies is under license. Other trademarks and trade
names are those of their respective owners.
Intel is a trademark of Intel Corporation in the U.S. and/or other countries.
Evernote and the Evernote Elephant logo are trademarks of Evernote Corporation and used under a license.
Mopria® and Mopria logo are registered trademarks and service marks of Mopria Alliance, Inc. in the United
States and other countries. Unauthorized use is strictly prohibited.
WordPerfect is a trademark or a registered trademark of Corel Corporation and/or its subsidiaries in Canada, the
United States and/or other countries.
Each company whose software title is mentioned in this manual has a Software License Agreement specific to its
proprietary programs.
Any trade names and product names of companies appearing on Brother products, related documents
and any other materials are all trademarks or registered trademarks of those respective companies.
Related Information
• Before You Use Your Brother Machine
4
Page 12
Home > Before You Use Your Brother Machine > Important Note
Important Note
• Do not use this product outside the country of purchase as it may violate the wireless telecommunication and
power regulations of that country.
• Windows® 10 in this document represents Windows® 10 Home, Windows® 10 Pro, Windows® 10 Education
and Windows® 10 Enterprise.
• Windows Server® 2008 in this document represents Windows Server® 2008 and Windows Server® 2008 R2.
• In this User's Guide, the LCD messages of the MFC-J497DW/MFC-J895DW are used unless otherwise
specified.
• In this User's Guide, the illustrations of the MFC-J895DW are used unless otherwise specified.
• The screens in this User's Guide are for illustration purposes only and may differ from the actual screens.
• Unless otherwise specified, the screens in this manual are from Windows® 7 and macOS v10.12.x. Screens
on your computer may vary depending on your operating system.
• The contents of this guide and the specifications of this product are subject to change without notice.
Related Information
• Before You Use Your Brother Machine
5
Page 13

Home > Introduction to Your Brother Machine
Introduction to Your Brother Machine
• Before Using Your Machine
• Control Panel Overview
• LCD Overview
• Touchscreen LCD Overview
• Settings Screen Overview
• Navigate the Touchscreen
•
Access Brother Utilities (Windows®)
6
Page 14
Home > Introduction to Your Brother Machine > Before Using Your Machine
Before Using Your Machine
Before attempting any printing operation, confirm the following:
• Make sure you have installed the Brother software and drivers.
• For USB or network cable users: Make sure the interface cable is physically secure.
Selecting the correct type of paper
For high quality printing, it is important to select the correct type of paper. Be sure to read the information about
acceptable paper before buying paper, and to determine the printable area depending on the settings in the
printer driver.
Simultaneous printing, scanning and faxing
Your machine can print from your computer while sending or receiving a fax into memory or while scanning a
document into the computer. Fax sending will not be stopped during printing from your computer. However, when
the machine is copying or receiving a fax on paper, it pauses the printing operation, and then continues printing
when copying or fax receiving has finished.
Firewall (Windows®)
If your computer is protected by a firewall and you are unable to network print, network scan, or PC-FAX, you
may need to configure the firewall settings. If you are using the Windows® Firewall and you installed the drivers
using the steps in the installer, the necessary firewall settings have been already set. If you are using any other
personal firewall software, see the User's Guide for your software or contact the software manufacturer.
Related Information
• Introduction to Your Brother Machine
7
Page 15
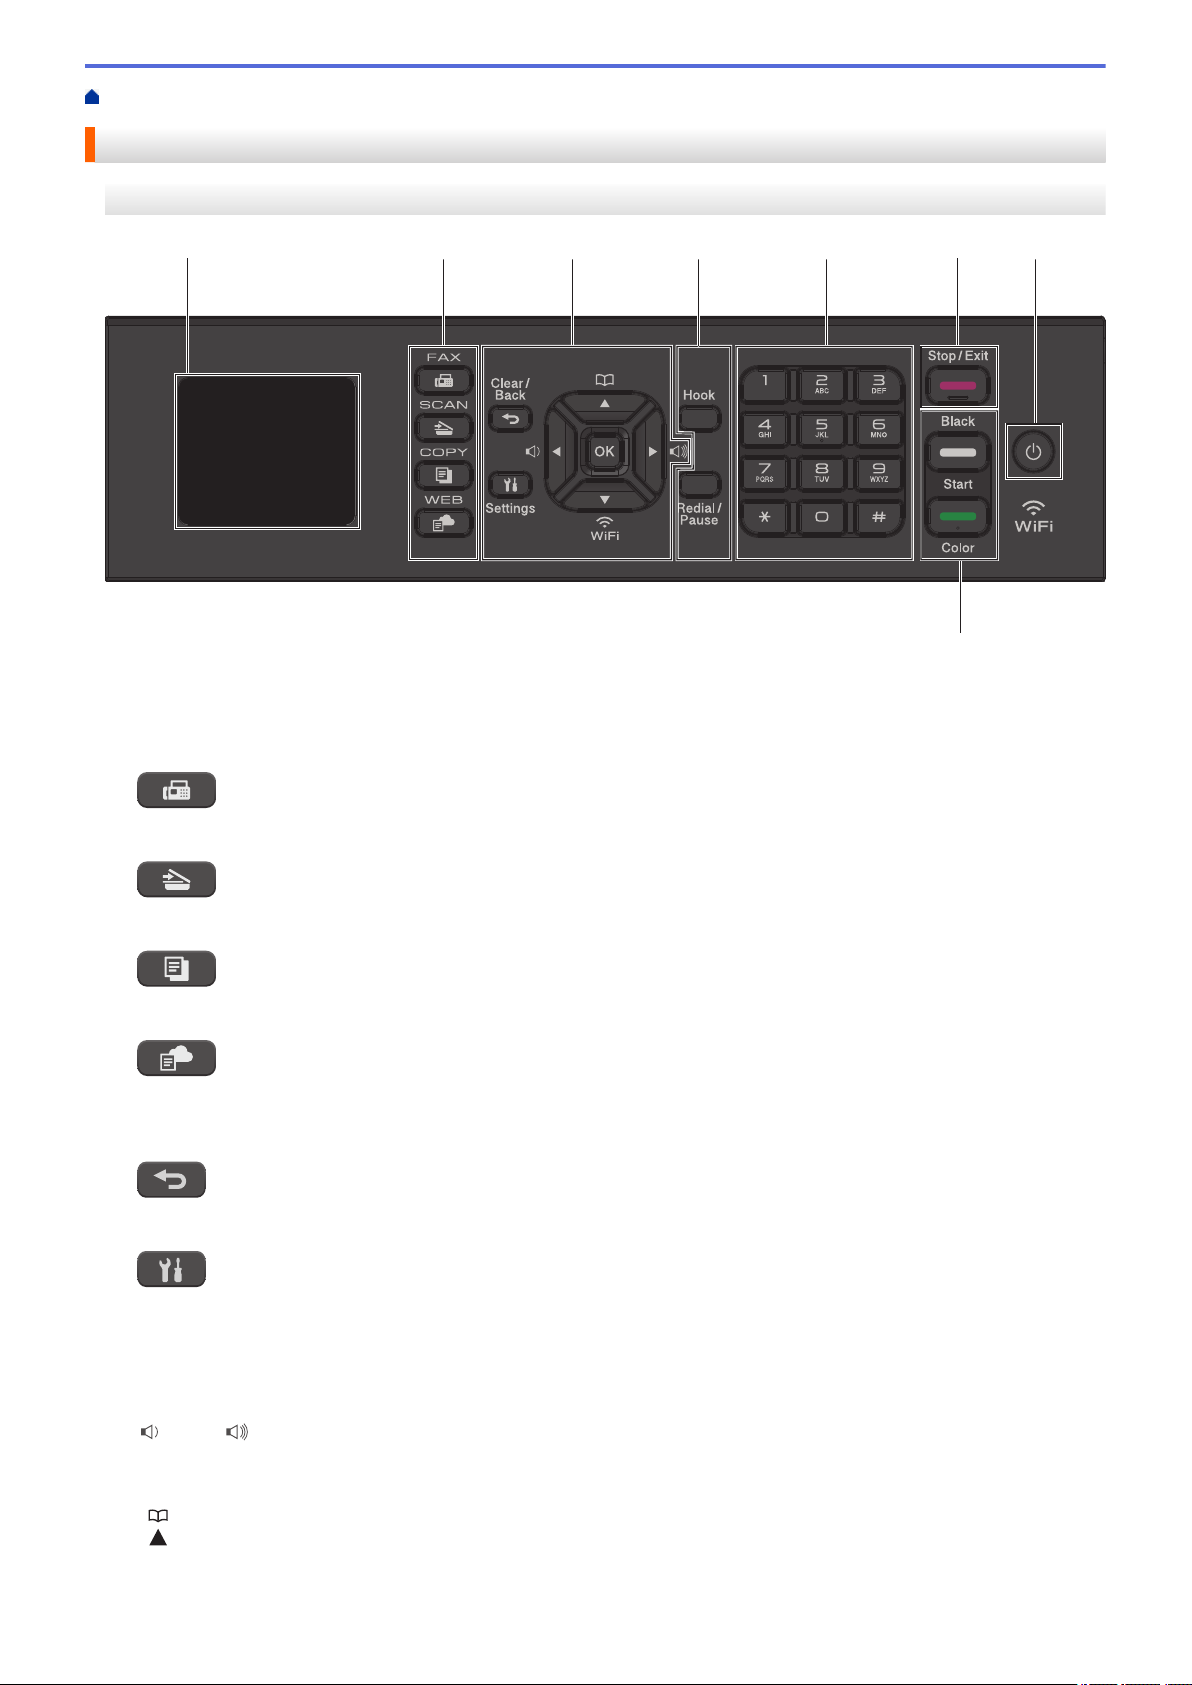
Home > Introduction to Your Brother Machine > Control Panel Overview
32
1
54
7
86
Control Panel Overview
MFC-J491DW/MFC-J497DW
1. 1.8" Liquid Crystal Display (LCD)
Displays messages to help you set up and use the machine.
2. Mode buttons
FAX
Press to switch the machine to Fax mode.
SCAN
Press to switch the machine to Scan mode.
COPY
Press to switch the machine to Copy mode.
WEB
Press to switch the machine to Web mode.
3. Settings buttons
Clear/Back
Press to go back to the previous menu level.
OK
Settings
Press to access the main menu.
Press to select a setting.
d or c
Press to adjust the ring volume while the machine is idle.
• Press to store Speed Dial and Group numbers in the machine's memory.
8
Page 16

• Press to look up and dial numbers that are stored in the machine's memory.
Press to configure the wireless settings while the machine is idle.
a or b
Press to scroll through the menus and options.
d or c
• Press to move the cursor left or right on the LCD.
• Press to either confirm or cancel a procedure which is in progress.
4. Telephone buttons
Hook
Press before dialing to ensure a fax machine answers, and then press Black Start or Color Start.
If the machine is in Fax/Tel (F/T) mode and you pick up the handset of an external telephone during the
F/T ring (pseudo/double-ring), press Hook to talk.
Redial/Pause
• Press to redial the last number you called.
• Press to select and redial the numbers from the Outgoing Call history or Caller ID history.
• Press to insert a pause when dialing numbers.
5. Dial Pad
• Use to dial fax and telephone numbers.
• Use as a keyboard to enter text or characters.
6.
• Press to stop an operation.
• Press to exit from a menu.
7. Start buttons
8.
Press to turn on the machine.
Press and hold down to turn off the machine. The LCD displays [Shutting Down] and stays on for a
few seconds before turning itself off. If you have connected an external telephone or TAD, it is always
available.
Stop/Exit
Black Start
• Press to start sending faxes in black and white.
• Press to start making copies in black and white.
• Press to start scanning documents (in color or black and white, depending on the scan setting).
Color Start
• Press to start sending faxes in full color.
• Press to start making copies in full color.
• Press to start scanning documents (in color or black and white, depending on the scan setting).
Power On/Off
If you turn off the machine using
prolong print head life, provide better ink efficiency, and maintain print quality, keep your machine connected
to a power source at all times.
, it will still clean the print head periodically to maintain print quality. To
9
Page 17
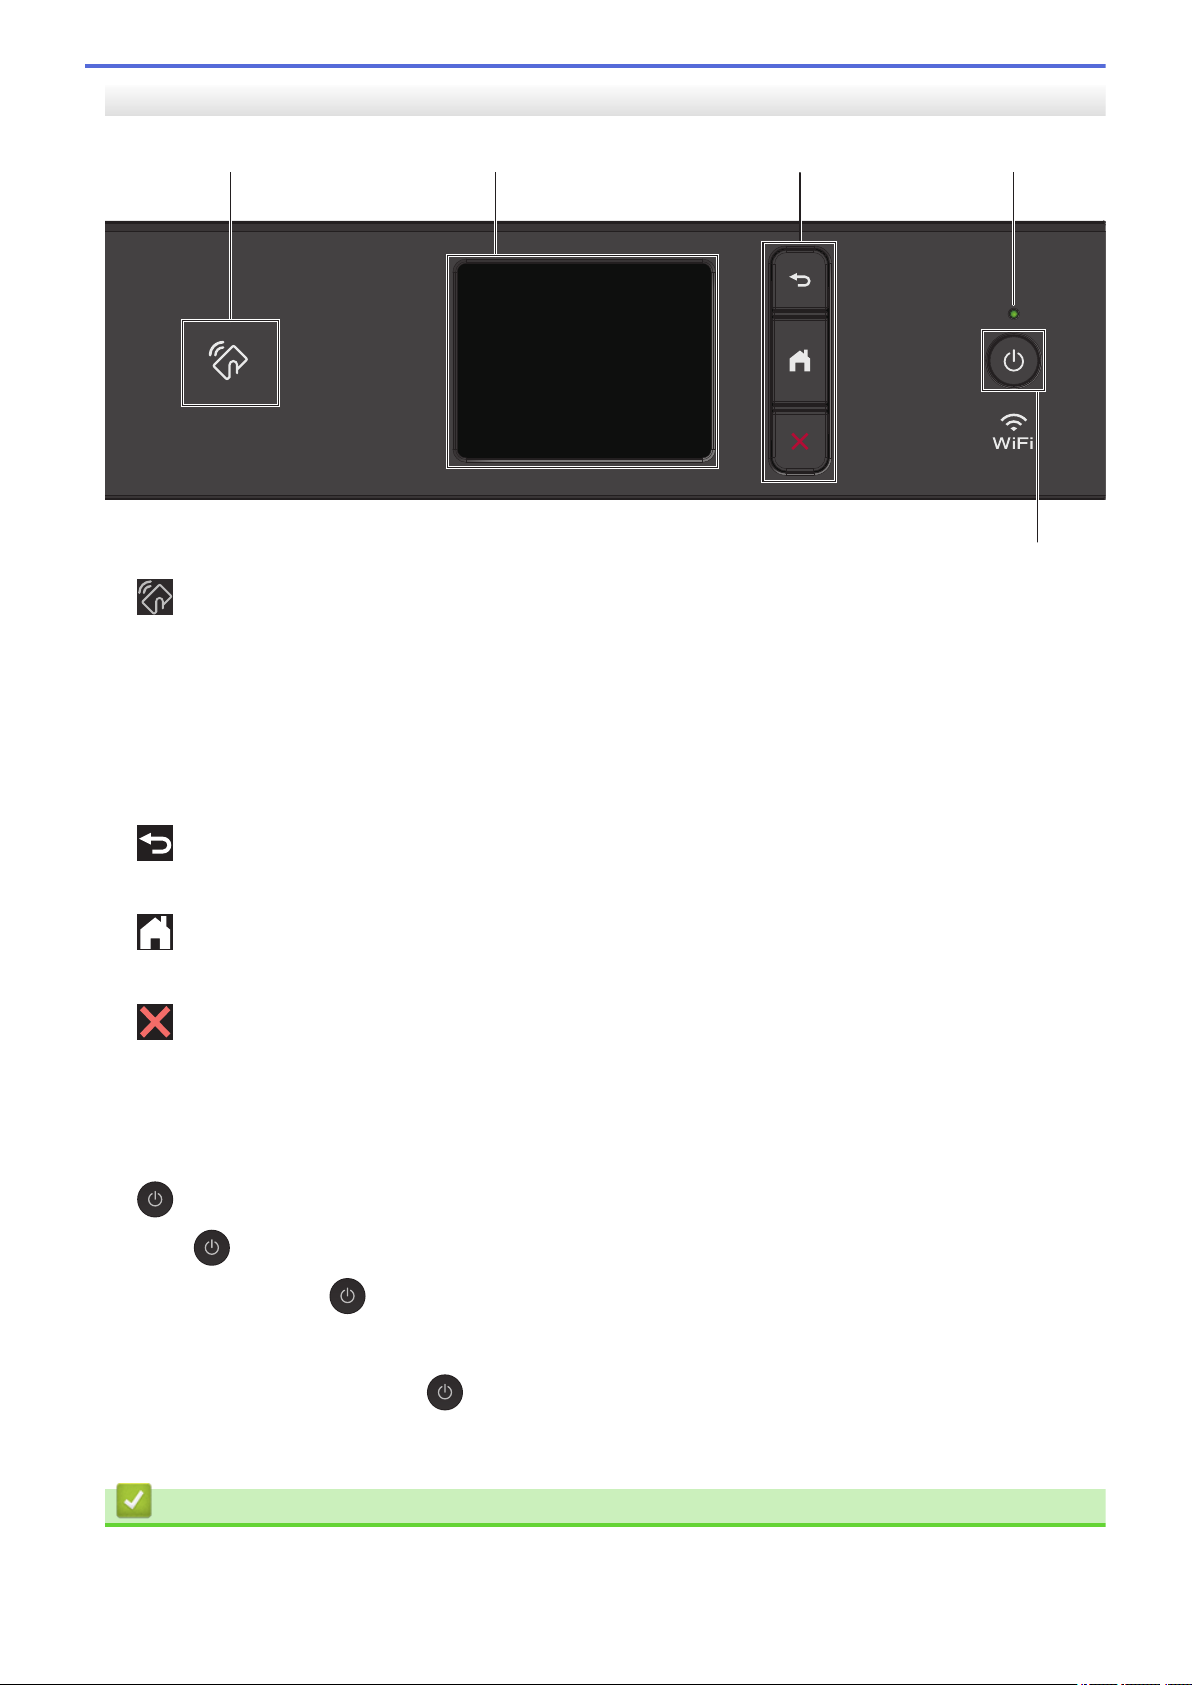
MFC-J690DW/MFC-J895DW
3
2
5
41
1. NFC (Near Field Communication) symbol
(MFC-J895DW)
If your Android™ device supports the NFC feature, you can print from your device or scan documents to your
device by touching it to the NFC logo on the control panel.
2. Touchscreen Liquid Crystal Display (LCD)
Access menus and options by pressing them on the touchscreen.
3. Menu buttons
(Back)
Press to go back to the previous menu.
(Home)
Press to return to the Home screen.
(Cancel)
Press to cancel an operation.
4. LED Power Indicator
The LED lights up depending on the machine’s power status.
When the machine is in Sleep Mode, the LED blinks.
5.
Power On/Off
Press to turn on the machine.
Press and hold down
on for a few seconds before turning itself off. If you have connected an external telephone or TAD, it is always
available.
If you turn off the machine using , it will still clean the print head periodically to maintain print quality. To
prolong print head life, provide better ink efficiency, and maintain print quality, keep your machine connected
to a power source at all times.
to turn off the machine. The touchscreen displays [Shutting Down] and stays
Related Information
• Introduction to Your Brother Machine
10
Page 18

• Near-Field Communication (NFC)
11
Page 19
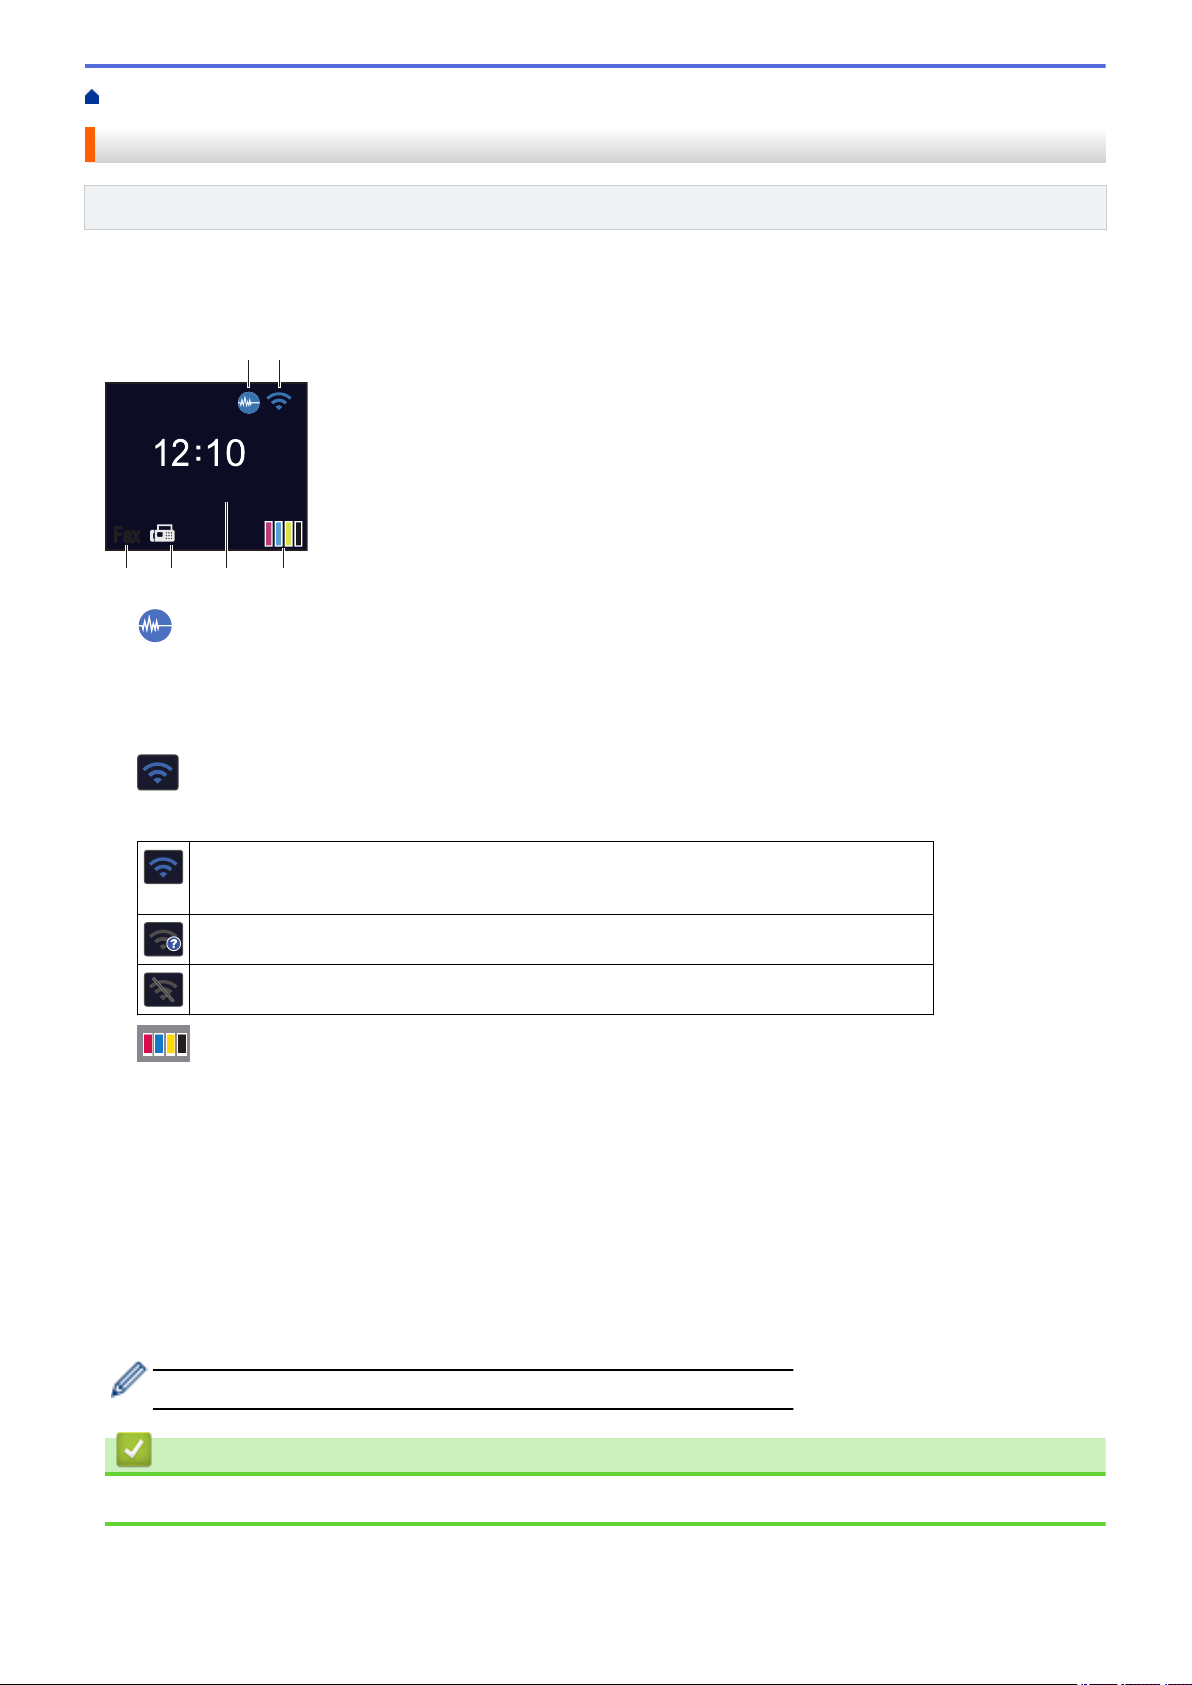
Home > Introduction to Your Brother Machine > LCD Overview
0101
01. 01. 2018
FaxFax
AM
1
2
3
46 5
LCD Overview
Related Models: MFC-J491DW/MFC-J497DW
This screen shows the machine’s status when the machine is idle. When displayed, this indicates that your
machine is ready for the next command.
Home Screen
1. Quiet Mode
This icon appears when the [Quiet Mode] setting is set to [On].
The Quiet Mode setting can reduce printing noise. When Quiet Mode is turned on, the print speed becomes
slower.
2. Wireless Status
Each icon in the following table shows the wireless network status:
The wireless network is connected.
A three-level indicator in the Home screen displays the current wireless signal strength.
The wireless access point cannot be detected.
The wireless setting is disabled.
3. [Ink]
Displays the available ink volume.
When an ink cartridge is near the end of its life or having a problem, an error icon is displayed on the ink
color.
4. Date and Time
Displays the date and time set on the machine.
5. Faxes in Memory
Displays how many received faxes are in the machine's memory.
6. Receive Mode
Displays the current Receive Mode.
When the Distinctive Ring feature is turned on, the LCD displays [D/R].
Related Information
• Introduction to Your Brother Machine
12
Page 20
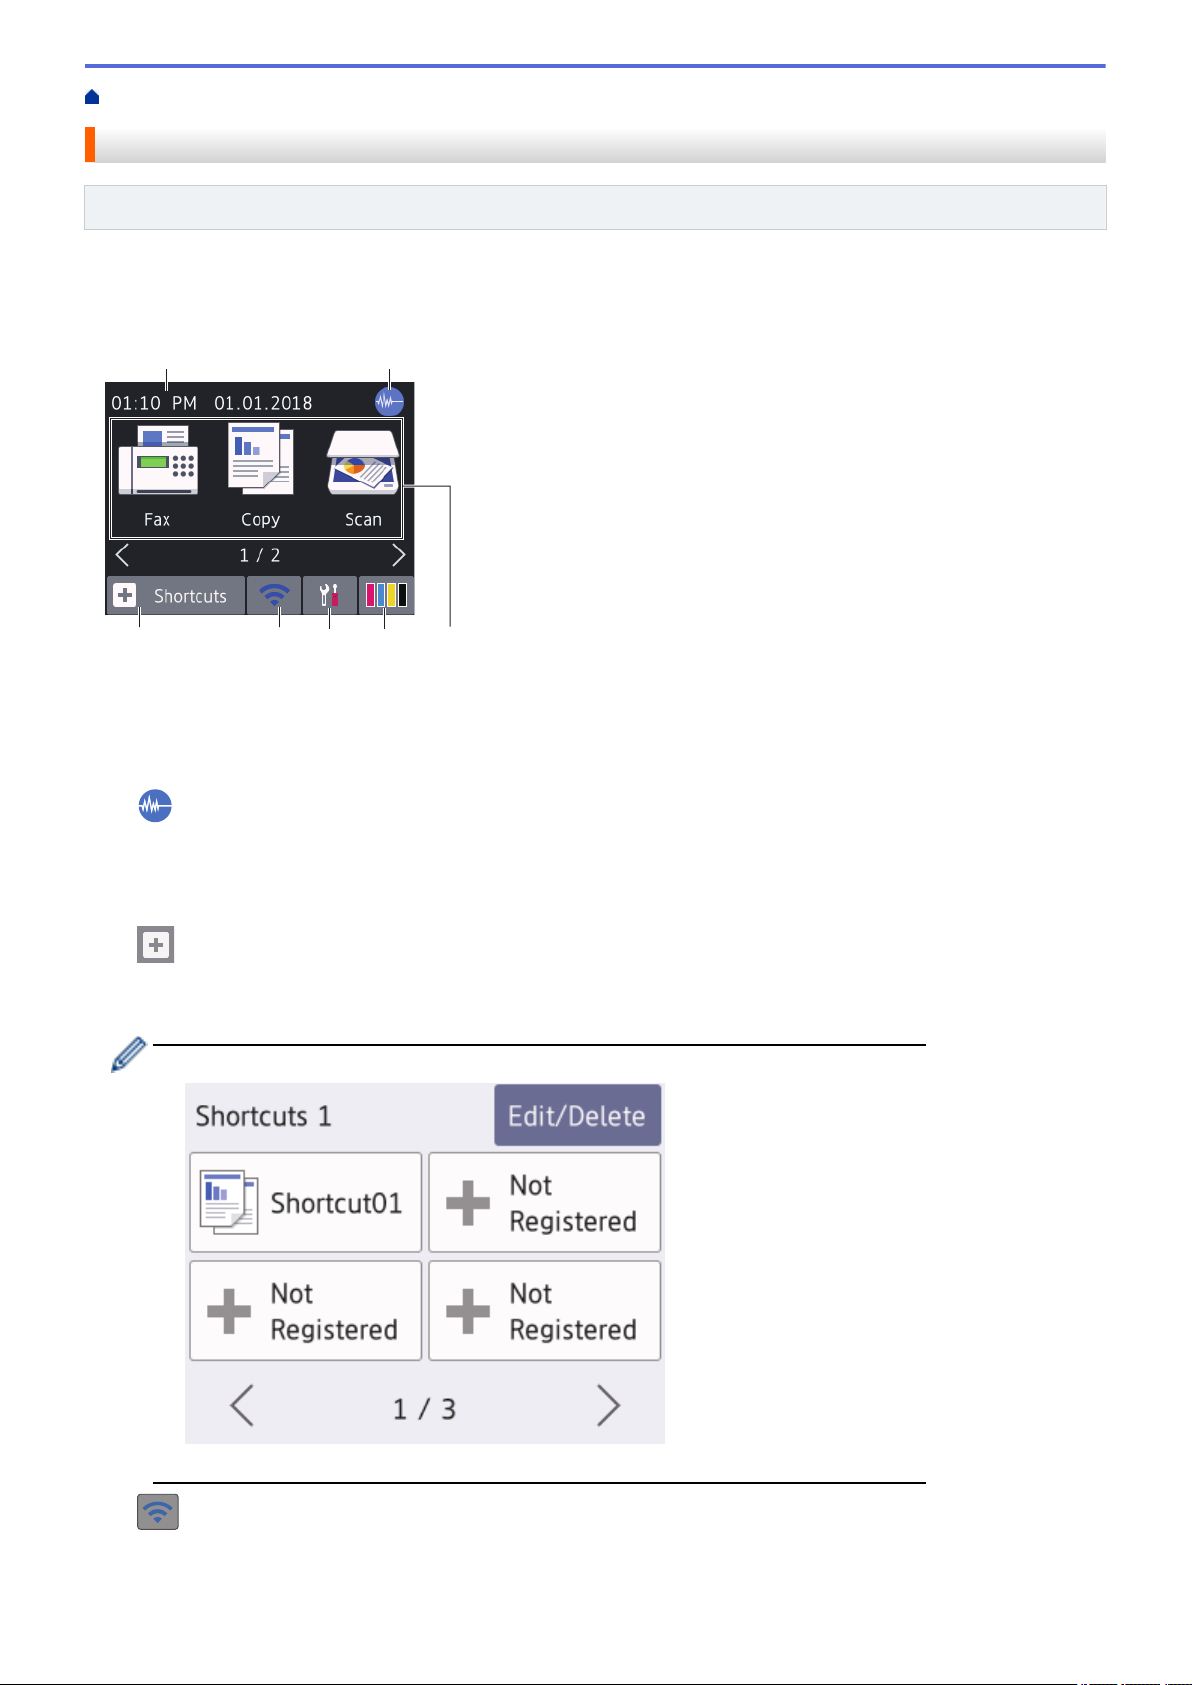
Home > Introduction to Your Brother Machine > Touchscreen LCD Overview
1
7
5
2
3
4
6
Touchscreen LCD Overview
Related Models: MFC-J690DW/MFC-J895DW
You can switch Home screens by pressing d or c.
From the Home screens, you can access Wi-Fi® setup, Shortcuts, Ink levels and Setup screens.
Home Screen
This screen shows the machine’s status when the machine is idle. When displayed, it indicates that your
machine is ready for the next command.
1. Date & Time
Displays the date and time set on the machine.
2.
3.
Quiet Mode
This icon appears when the [Quiet Mode] setting is set to [On].
The Quiet Mode setting can reduce printing noise. When Quiet Mode is turned on, the print speed becomes
slower.
[Shortcuts]
Create Shortcuts for frequently-used operations, such as sending a fax, copying, scanning, Web Connect and
Apps services.
• There are three Shortcuts screens. You can program four shortcuts on each screen.
• To display the other Shortcuts screens, press d or c.
4. Wireless Status
Each icon in the following table shows the wireless network status:
13
Page 21
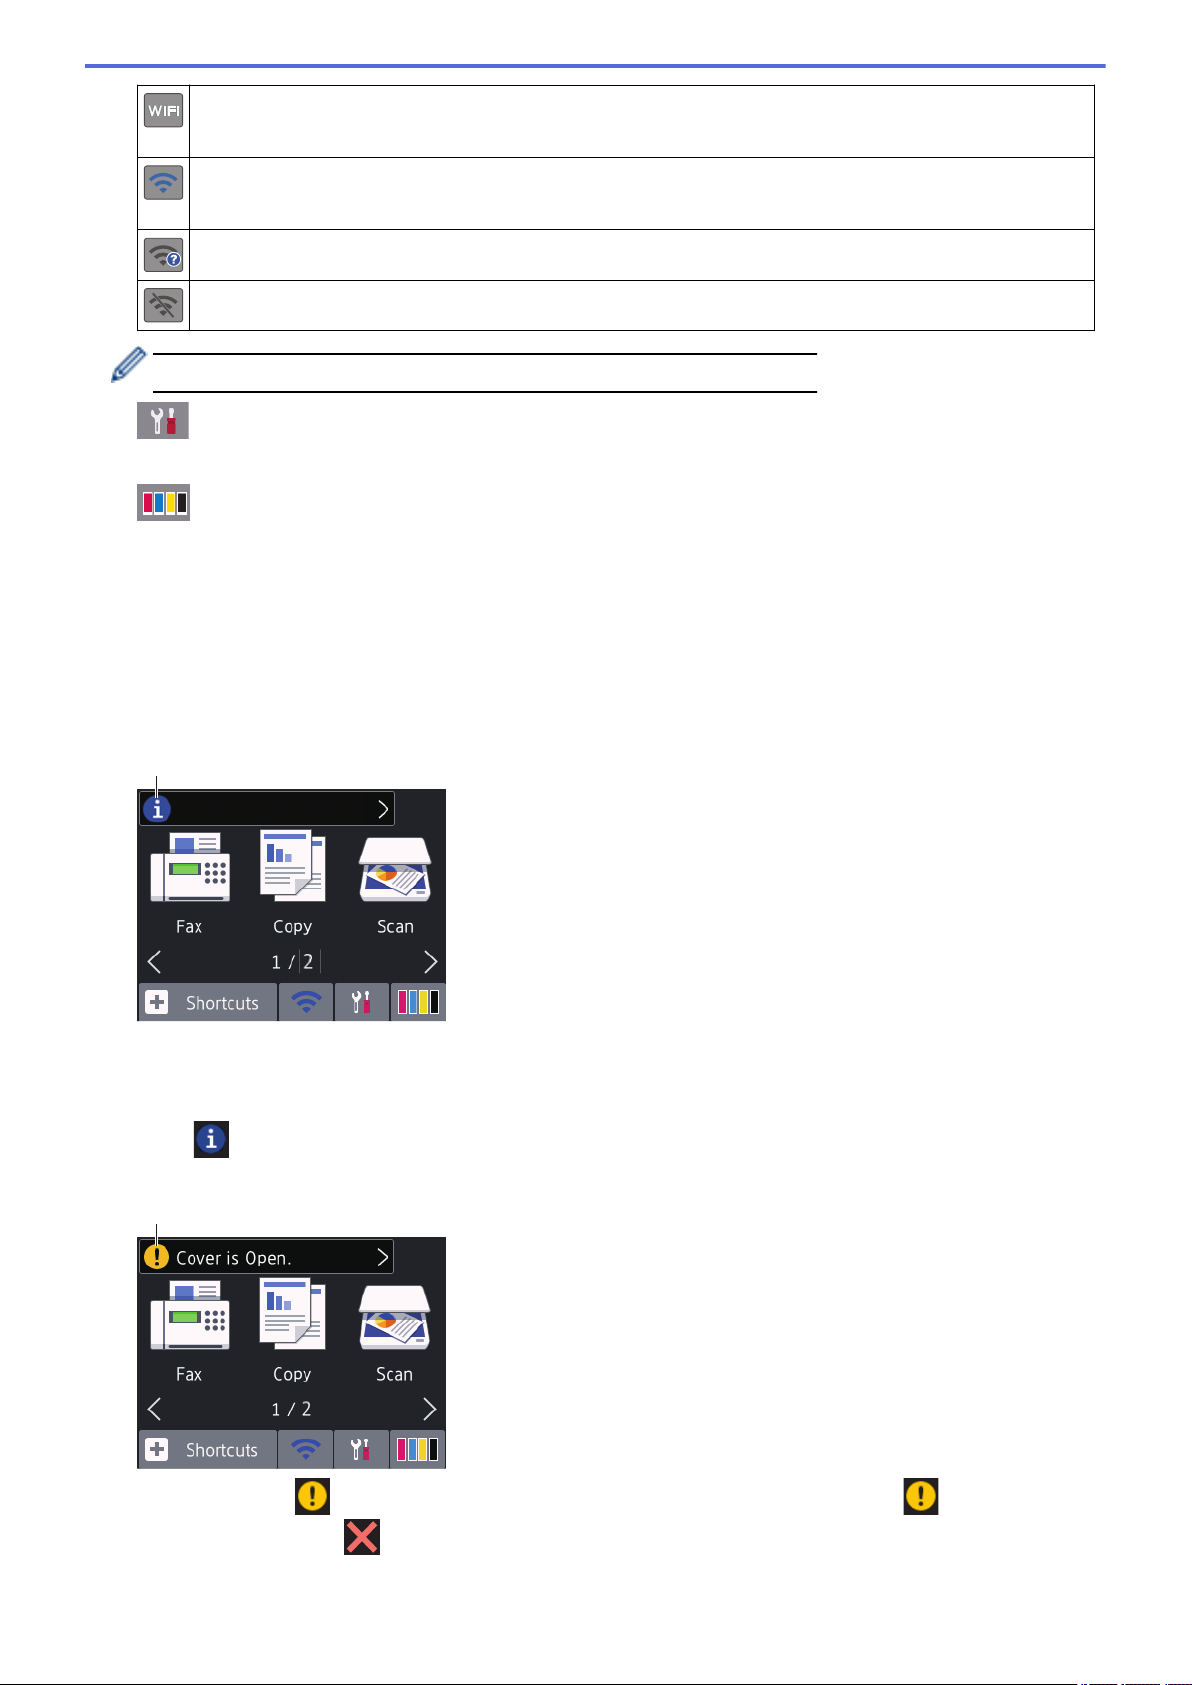
Your machine is not connected to the wireless access point/router.
8
9
Press this button to configure wireless settings. For more detailed information, see the Quick Setup Guide.
Wireless network is connected.
A three-level indicator in each of the Home screens displays the current wireless signal strength.
The wireless access point/router cannot be detected.
The wireless setting is disabled.
You can configure wireless settings by pressing the Wireless Status button.
5. [Settings]
Press to access the [Settings] menu.
6. [Ink]
Displays the available ink volume. Press to access the [Ink] menu.
When an ink cartridge is near the end of its life or having a problem, an error icon is displayed on the ink
color.
7. Modes:
Press to switch to each mode.
[Fax] / [Copy] / [Scan] / [Photo] / [Web] / [Apps]
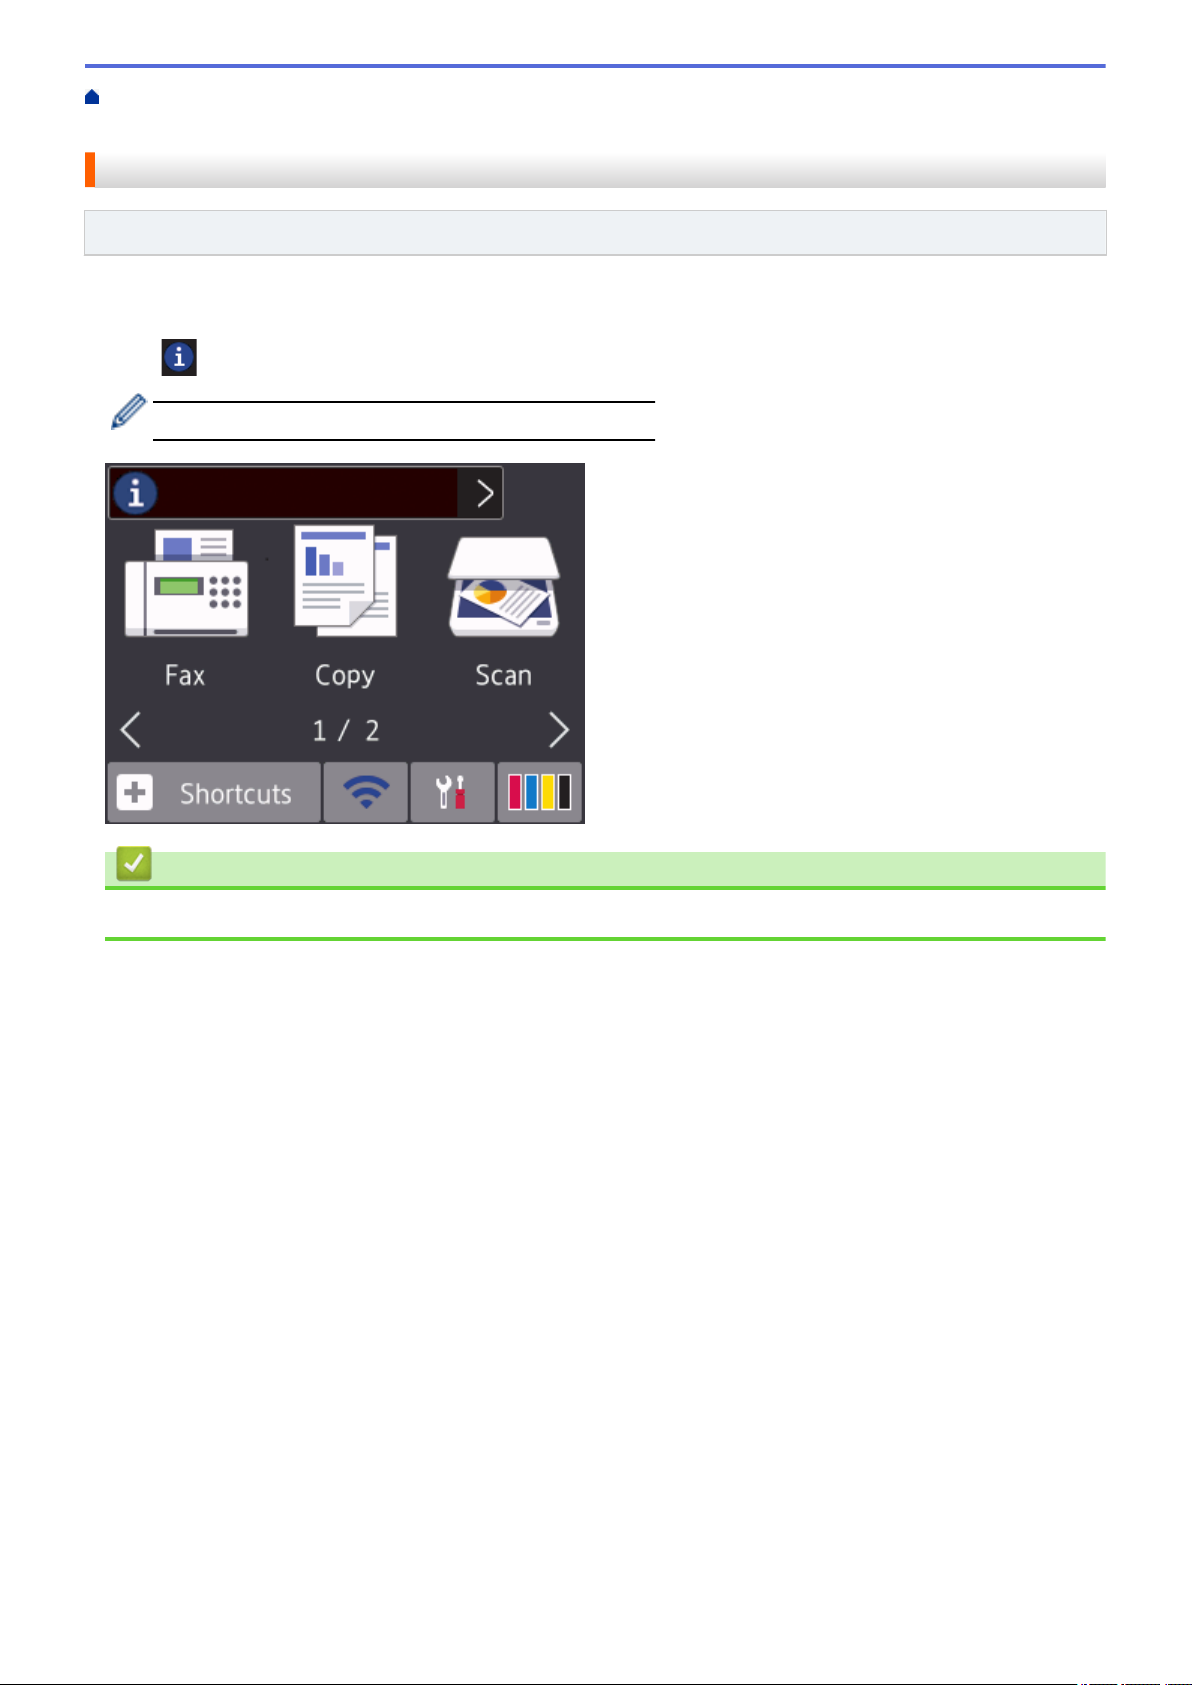
8. Information icon
New information from Brother appears in the information bar when the notification settings such as
[Message from Brother] and [Firmware Auto Check] are set to [On].
(Internet connection is needed, and data rates may apply.)
Press to view the details.
9. Warning icon
The warning icon appears when there is an error or maintenance message; press to view the
details, and then press to return to the Home screen.
14
Page 22

Related Information
• Introduction to Your Brother Machine
• New Information from Brother
• Reduce Printing Noise
• Check the Ink Volume
• Settings Screen Overview
• Error and Maintenance Messages
15
Page 23
Home > Introduction to Your Brother Machine > Touchscreen LCD Overview > New Information from
Brother
New Information from Brother
Related Models: MFC-J690DW/MFC-J895DW
New information from Brother appears in the information bar when the notification settings such as [Message
from Brother] and [Firmware Auto Check] are set to [On].
Press to view the details.
Internet connection is needed, and data rates may apply.
Related Information
• Touchscreen LCD Overview
16
Page 24
Home > Introduction to Your Brother Machine > Settings Screen Overview
4
1
3
2
6
7
8
5
Settings Screen Overview
Related Models: MFC-J690DW/MFC-J895DW
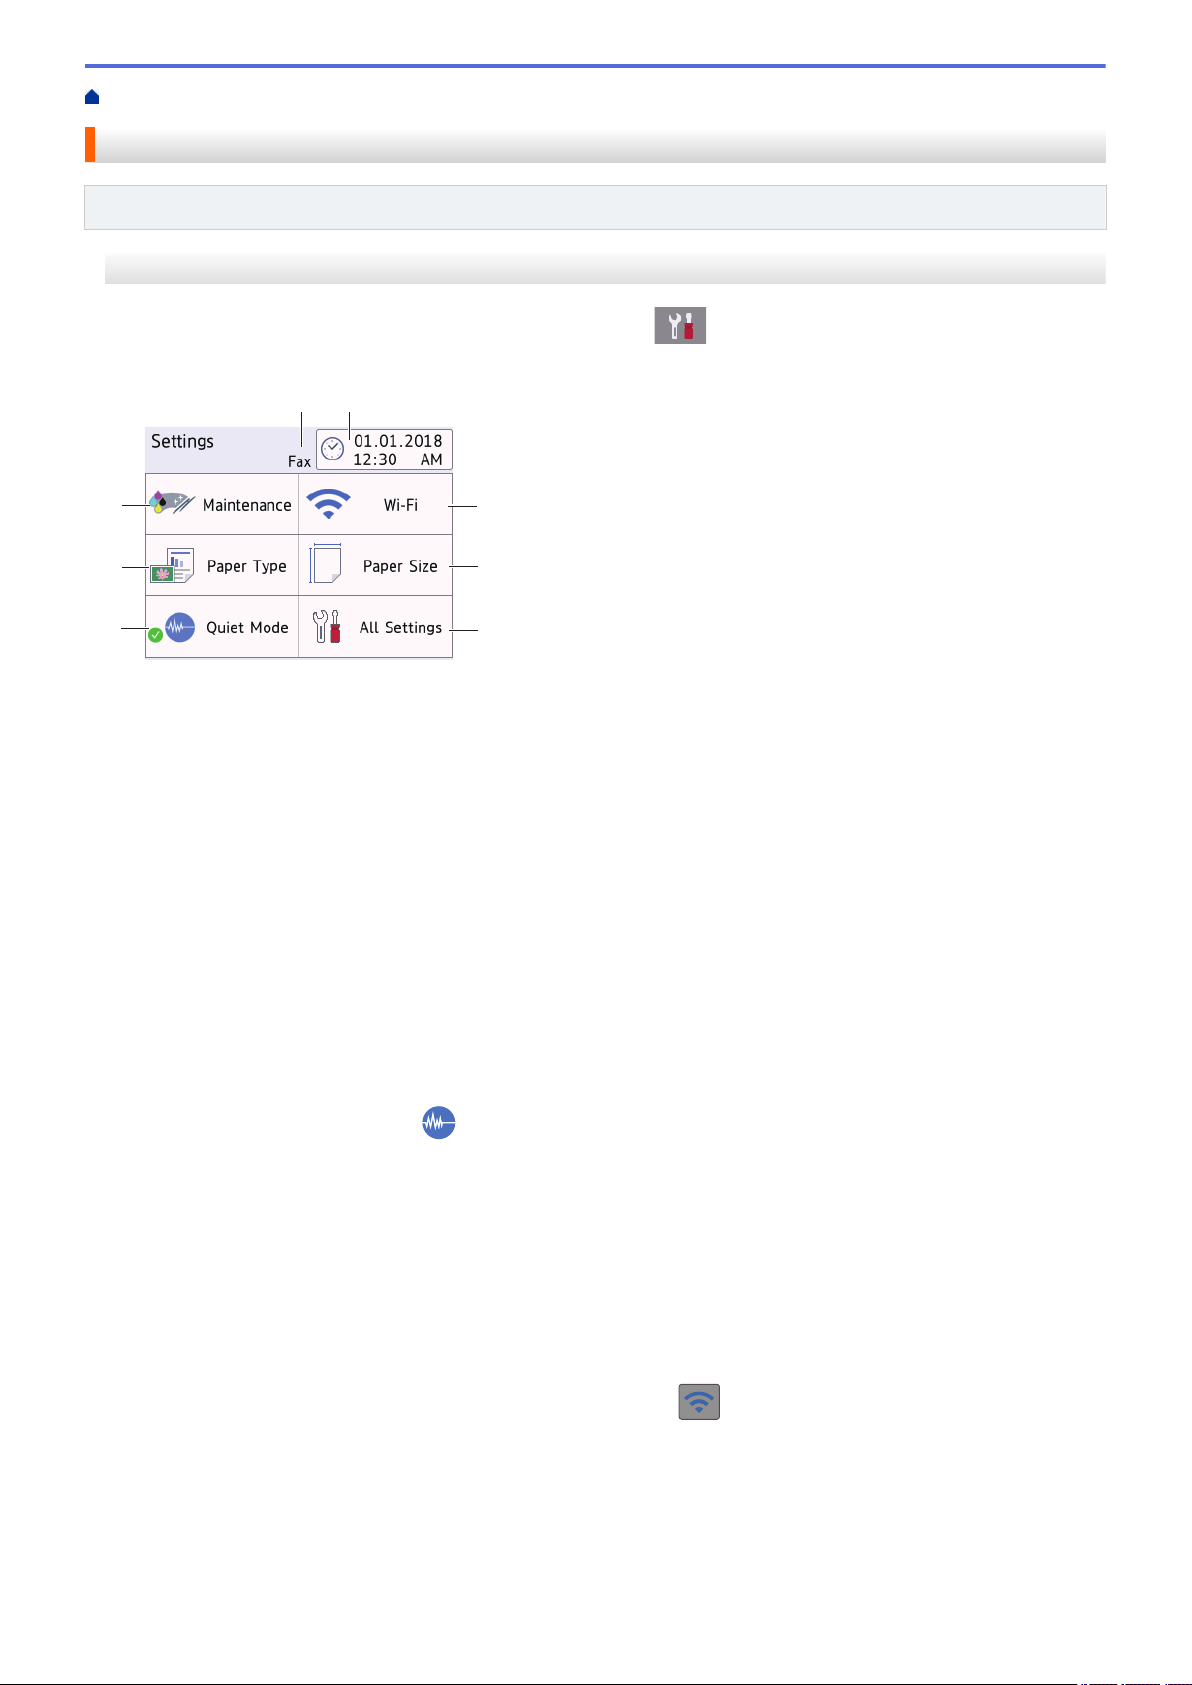
MFC-J690DW
The touchscreen shows the machine's status when you press [Settings].
Use the Settings menu to access all of your Brother machine's settings.
1. [Maintenance]
Press to access the following menus:
• [Improve Print Quality]
• [Print Head Cleaning]
• [Ink Volume]
• [Ink Cartridge Model]
• [Print Setting Options]
2. [Paper Type]
Press to access the [Paper Type] menu.
Use this option to change the paper type.
3. [Quiet Mode]
Displays the Quiet Mode setting.
Press to access the [Quiet Mode] menu.
When this menu is set to [On],
4. Receive Mode
Displays the current Receive Mode.
5. [Date & Time]
Displays the date and time.
Press to access the [Date & Time] menu.
6. [Wi-Fi]
Press to set up a wireless network connection.
is displayed on the Home screen.
If you are using a wireless connection, a three-level indicator
signal strength.
7. [Paper Size]
Press to access the [Paper Size] menu.
Use this option to change the paper size.
on the screen displays the current wireless
17
Page 25
8. [All Settings]
4
1
3
2
6
7
8
5
Press to access a menu of all of your machine's settings.
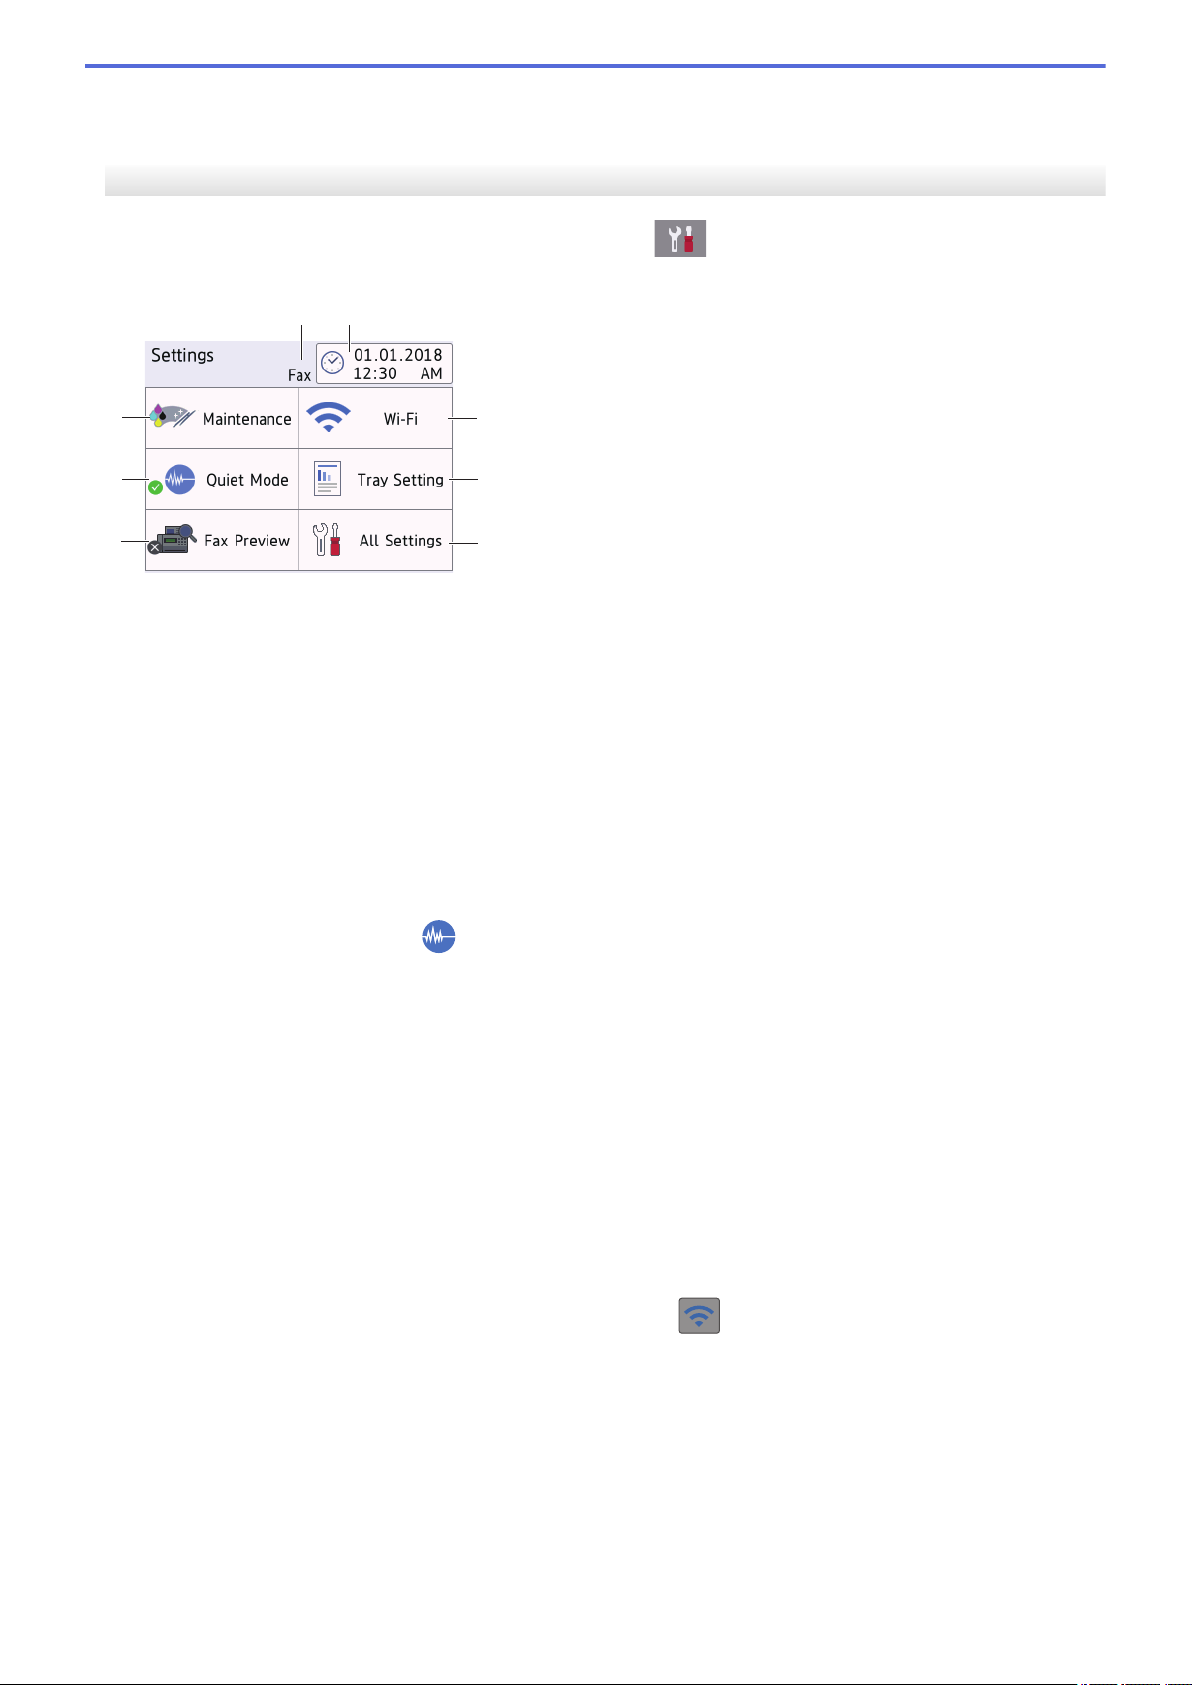
MFC-J895DW
The touchscreen shows the machine's status when you press [Settings].
Use the Settings menu to access all of your Brother machine's settings.
1. [Maintenance]
Press to access the following menus:
• [Improve Print Quality]
• [Print Head Cleaning]
• [Ink Volume]
• [Ink Cartridge Model]
• [Print Setting Options]
2. [Quiet Mode]
Displays the Quiet Mode setting.
Press to access the [Quiet Mode] menu.
When this menu is set to [On],
3. [Fax Preview]
Displays the Fax Preview setting.
Press to access the [Fax Preview] menu.
4. Receive Mode
Displays the current Receive Mode.
5. [Date & Time]
Displays the date and time.
Press to access the [Date & Time] menu.
6. [Wi-Fi]
Press to set up a wireless network connection.
If you are using a wireless connection, a three-level indicator
signal strength.
7. [Tray Setting]
Press to access the [Tray Setting] menu.
Use options in the Tray setting menu to change the paper size and type.
8. [All Settings]
Press to access a menu of all of your machine's settings.
is displayed on the Home screen.
on the screen displays the current wireless
18
Page 26

Related Information
• Introduction to Your Brother Machine
• Touchscreen LCD Overview
• Check the Ink Volume
• Distinctive Ring
19
Page 27

Home > Introduction to Your Brother Machine > Navigate the Touchscreen
Navigate the Touchscreen
Related Models: MFC-J690DW/MFC-J895DW
Press your finger on the LCD to operate it. To display and access all the options, press d c or a b on the LCD to
scroll through them.
NOTE
• This product adopts the font of ARPHIC TECHNOLOGY CO., LTD.
Related Information
• Introduction to Your Brother Machine
20
Page 28
Home > Introduction to Your Brother Machine > Access Brother Utilities (Windows®)
Access Brother Utilities (Windows®)
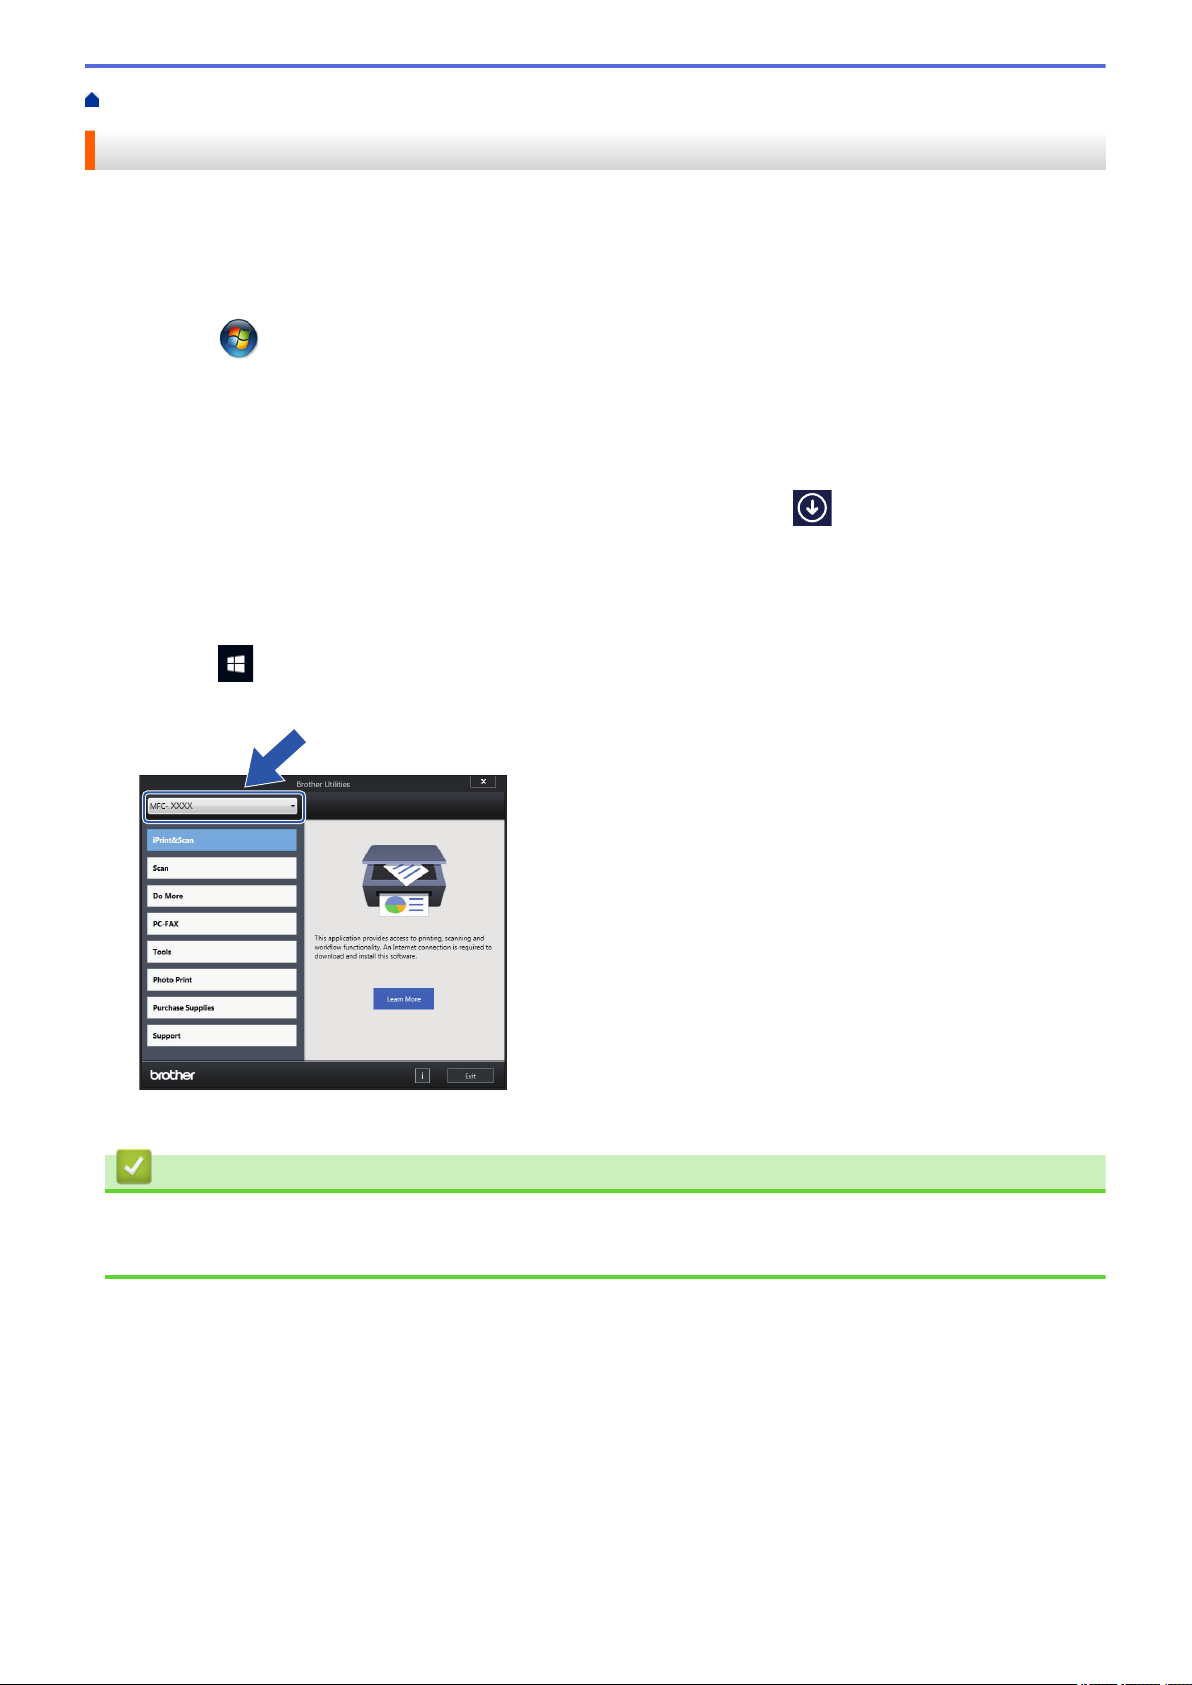
Brother Utilities is an application launcher that offers convenient access to all Brother applications installed on
your computer.
1. Do one of the following:
• Windows® 7
Click
• Windows® 8
Tap or click (Brother Utilities) either on the Start screen or the desktop.
• Windows® 8.1
Move your mouse to the lower left corner of the Start screen and click
device, swipe up from the bottom of the Start screen to bring up the Apps screen).
When the Apps screen appears, tap or click (Brother Utilities).
• Windows® 10
Click
2. Select your machine.
(Start) > All Programs > Brother > Brother Utilities.
> Brother > Brother Utilities.
(if using a touch-based
3. Select the operation you want to use.
Related Information
• Introduction to Your Brother Machine
• Uninstall the Brother Software and Drivers (Windows®)
21
Page 29
Home > Introduction to Your Brother Machine > Access Brother Utilities (Windows®) > Uninstall the Brother
Software and Drivers (Windows®)
Uninstall the Brother Software and Drivers (Windows®)
1. Do one of the following:
• Windows® 7
Click (Start) > All Programs > Brother > Brother Utilities.
• Windows® 8
Tap or click
• Windows® 8.1
Move your mouse to the lower left corner of the Start screen and click
device, swipe up from the bottom of the Start screen to bring up the Apps screen).
When the Apps screen appears, tap or click (Brother Utilities).
• Windows® 10
Click
2. Select your model from the drop-down list (if it is not already selected).
3. Click Tools in the left navigation bar.
• If the Software Update Notification icon is visible, select it, and then click Check now > Check for
Software Updates > Update. Follow the on-screen instructions.
• If the Software Update Notification icon is not visible, go to the next step.
4. Click Uninstall in the Tools section of Brother Utilities.
Follow the instructions in the dialog box to uninstall the software and drivers.
> Brother > Brother Utilities.
(Brother Utilities) either on the Start screen or the desktop.
(if using a touch-based
Related Information
• Access Brother Utilities (Windows®)
22
Page 30

Home > Paper Handling
Paper Handling
• Load Paper
• Load Documents
23
Page 31

Home > Paper Handling > Load Paper
Load Paper
• Load Paper in the Paper Tray
• Load Photo or Photo L Paper in Photo Bypass Tray
• Load Paper in the Manual Feed Slot
• Unprintable Area
• Paper Settings
• Acceptable Paper and Other Print Media
• Error and Maintenance Messages
• Paper Handling and Printing Problems
24
Page 32

Home > Paper Handling > Load Paper > Load Paper in the Paper Tray
Load Paper in the Paper Tray
• Load Cut-Sheet Paper or Photo 2L Paper in the Paper Tray
• Load Legal Size Paper in the Paper Tray
• Load Photo Paper in the Paper Tray
• Load Envelopes in the Paper Tray
25
Page 33
Home > Paper Handling > Load Paper > Load Paper in the Paper Tray > Load Cut-Sheet Paper or Photo
2
1
1
2L Paper in the Paper Tray
Load Cut-Sheet Paper or Photo 2L Paper in the Paper Tray
• If the [Check Paper] setting is set to [On] and you pull the paper tray out of the machine, a message
appears on the LCD asking if you want to change the paper type and paper size. Change the Paper Size
and Paper Type settings if needed, following the LCD instructions.
• Load only one size and type of paper in the paper tray at a time.
• When you load a different paper size in the tray, you must change the Paper Size setting in the machine or
the paper size setting on your computer.
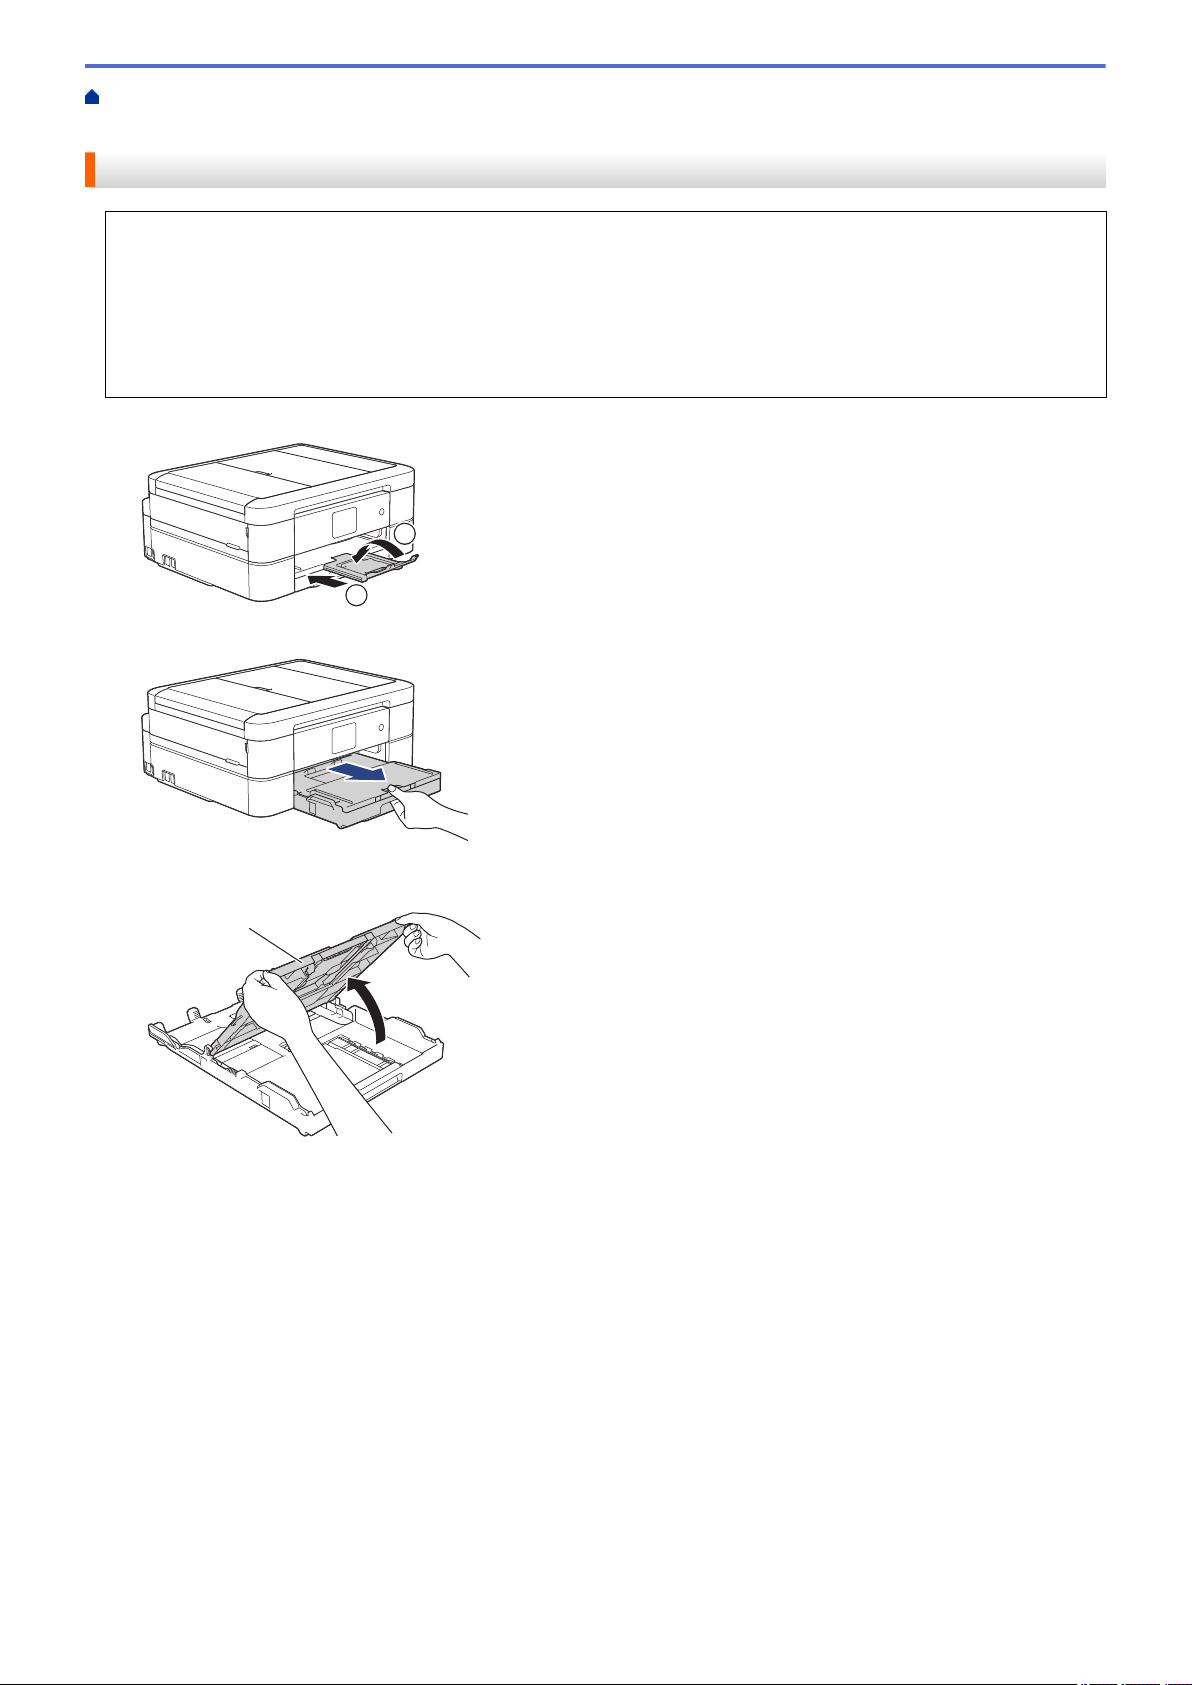
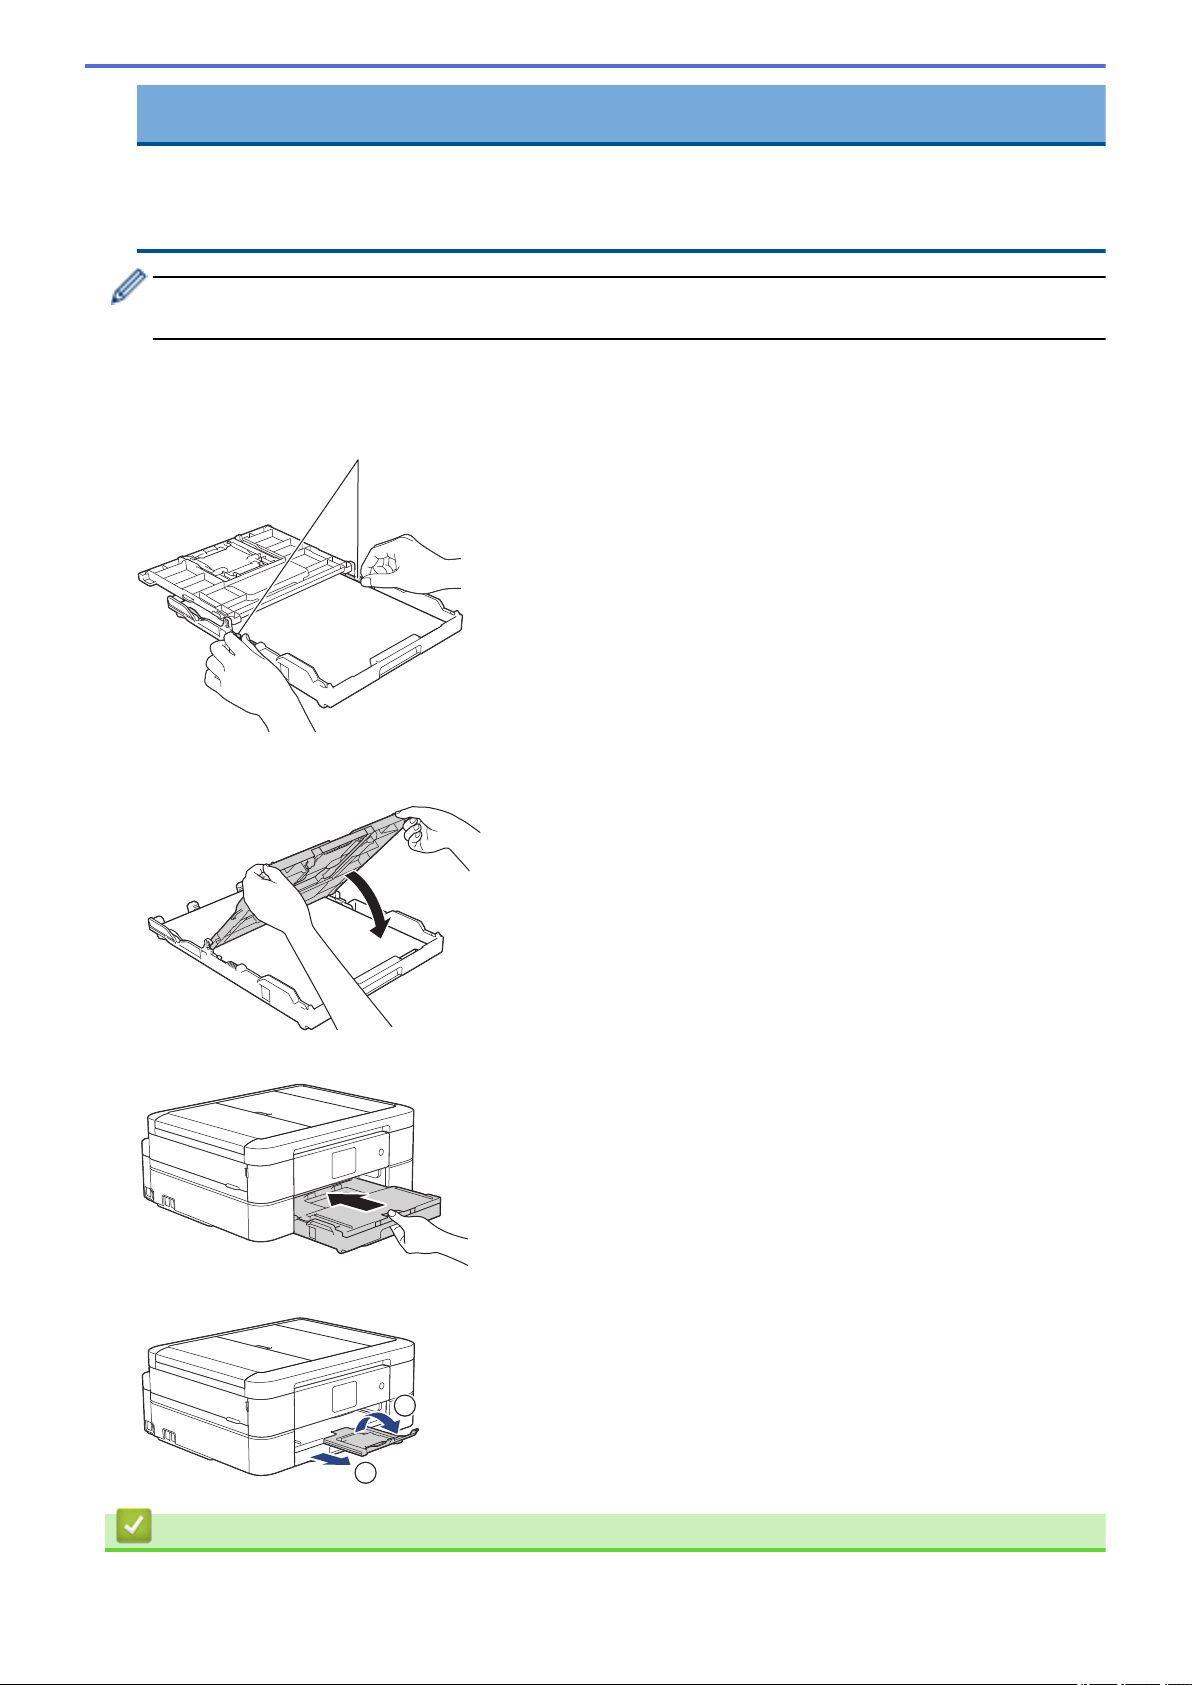
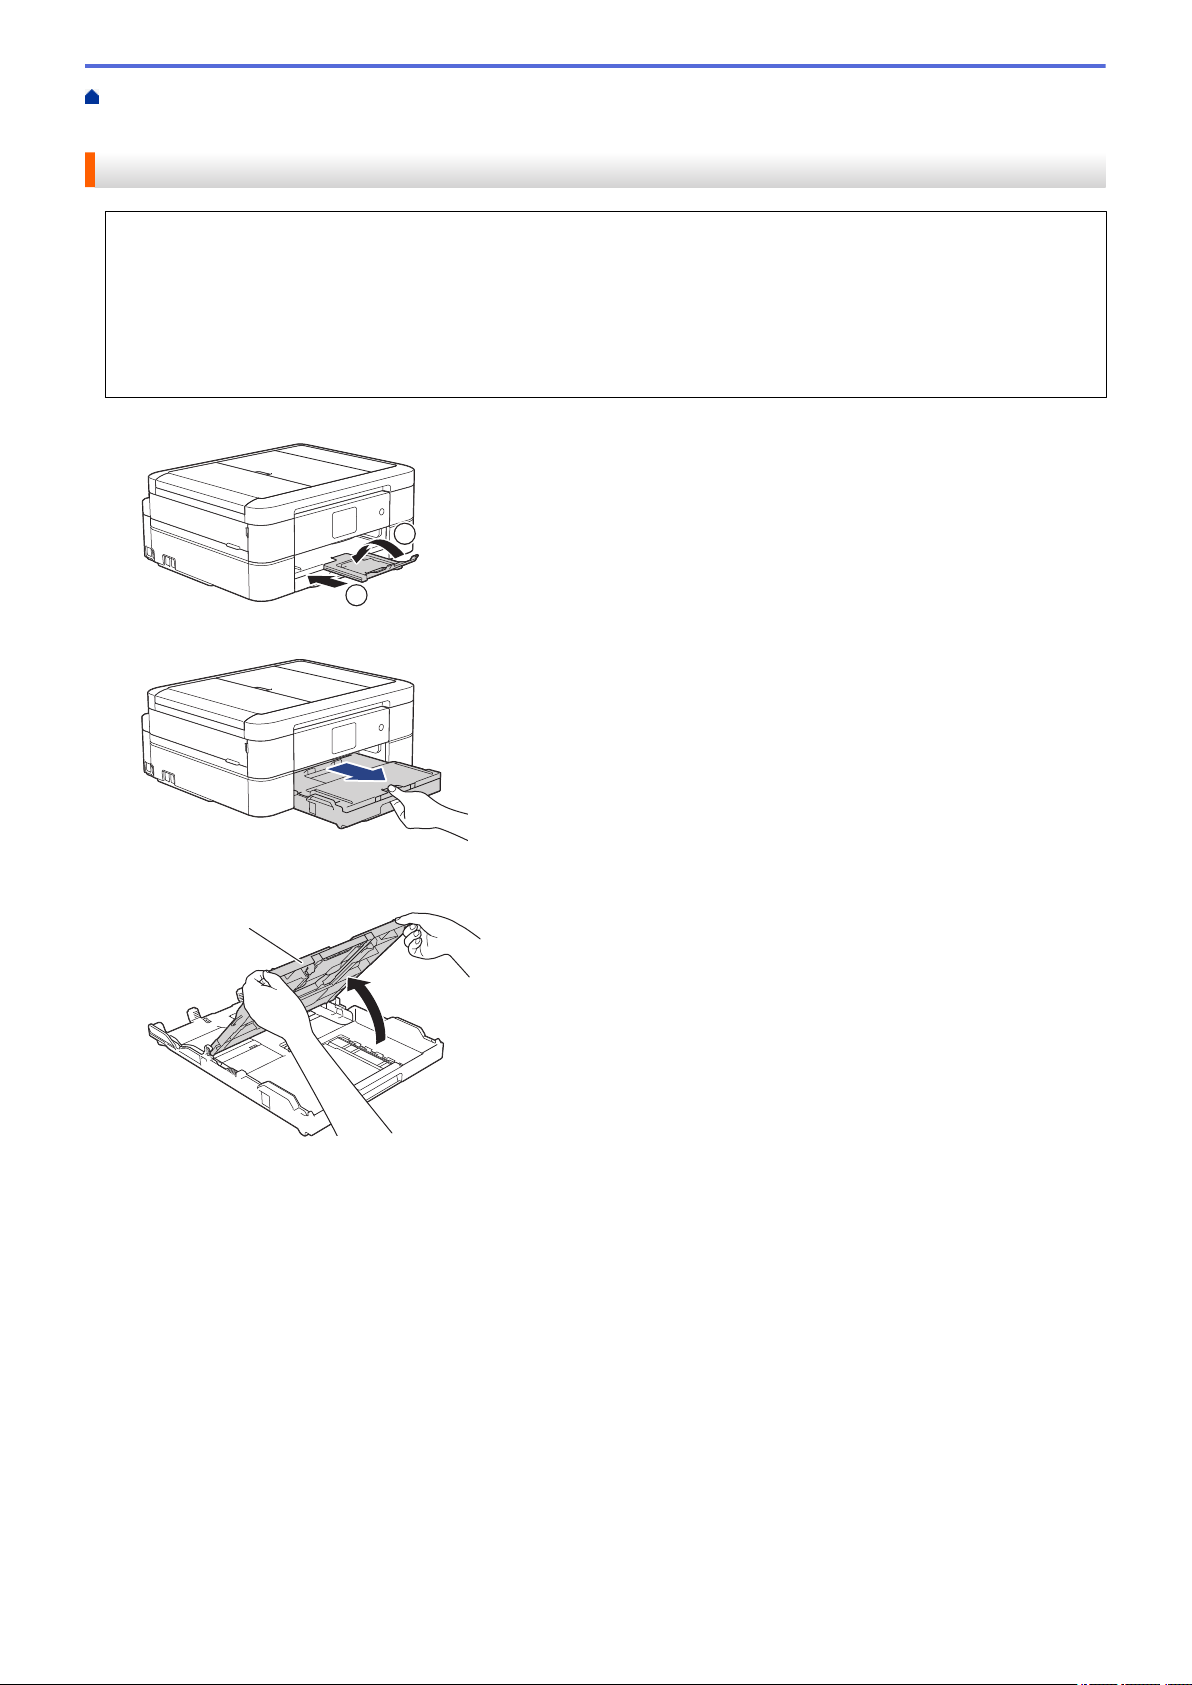
1. If the paper support flap (1) is open, close it, and then close the paper support (2).
2. Pull the paper tray completely out of the machine.
3. Open the output paper tray cover (1).
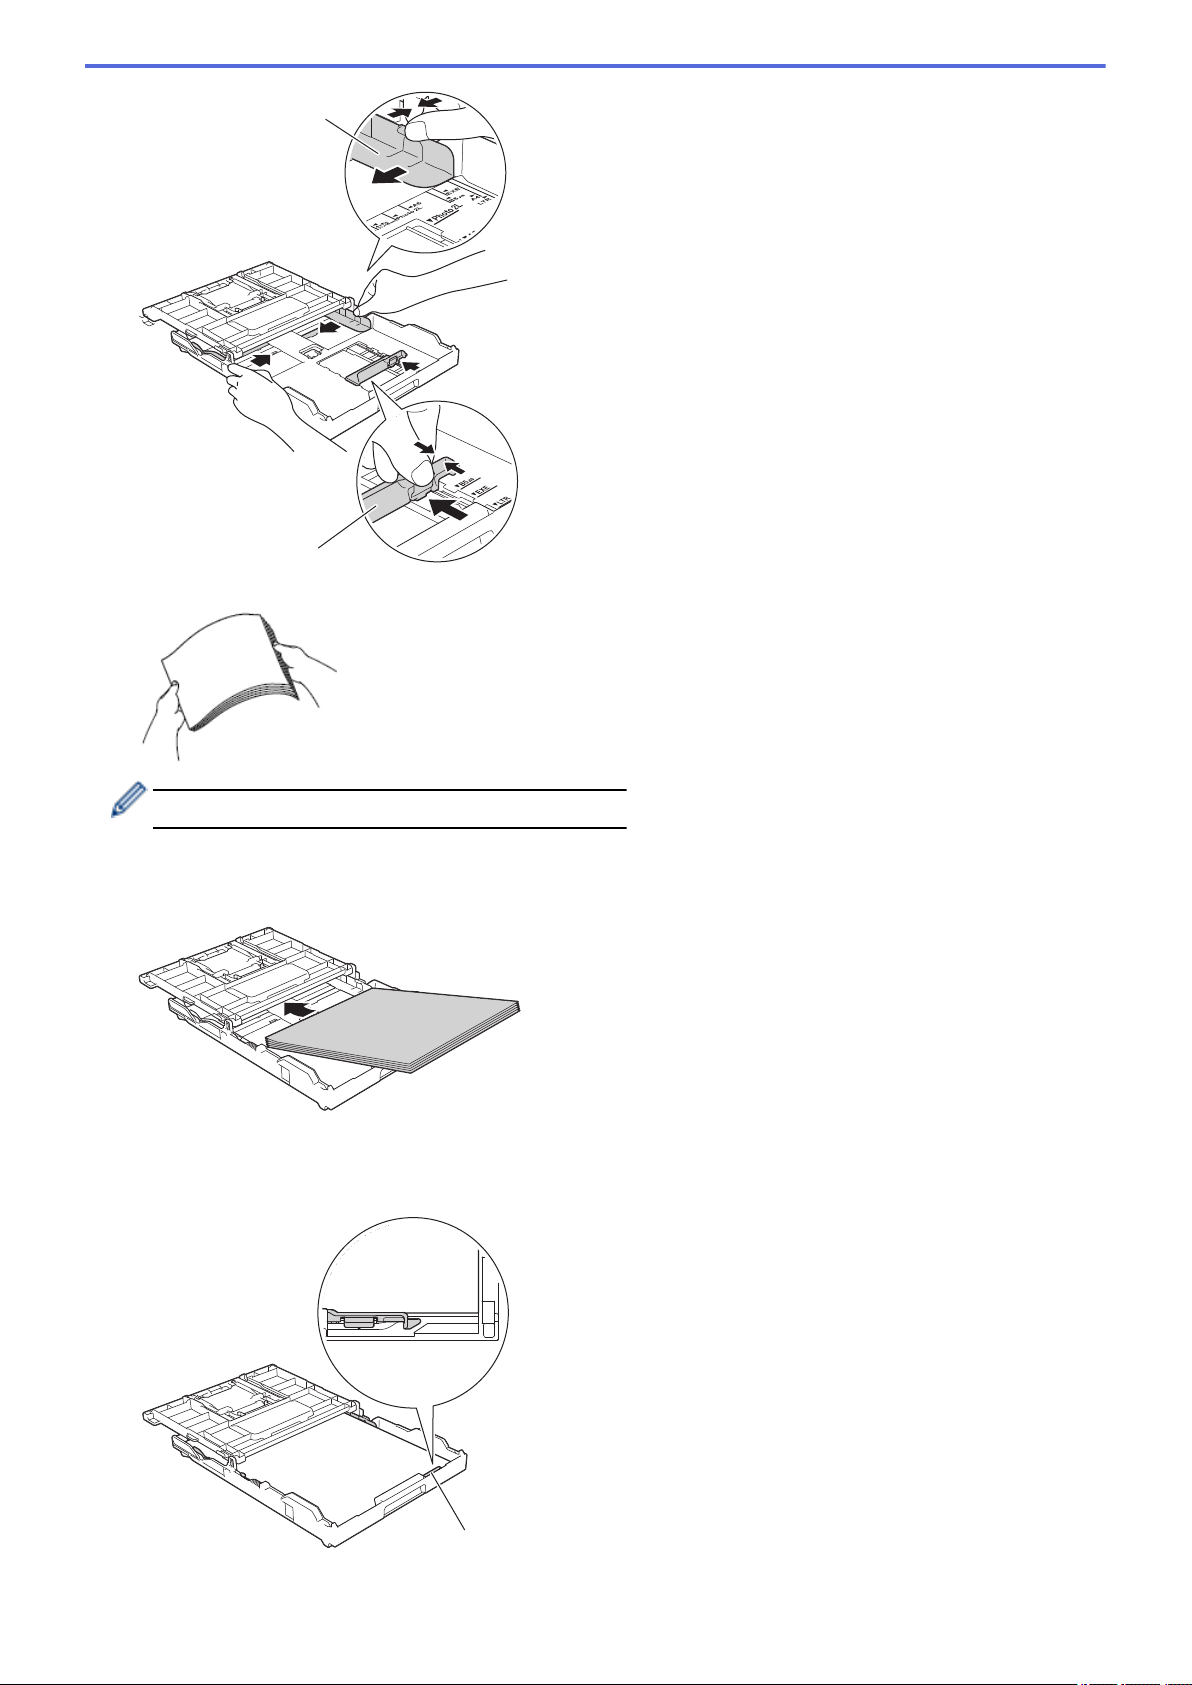
4. Gently press and slide the paper width guides (1) and then the paper length guide (2) to fit the paper size.
26
Page 34
1
2
5. Fan the stack of paper well to avoid paper jams and misfeeds.
1
Always make sure the paper is not curled or wrinkled.
6. Gently load paper in the paper tray with the printing surface face down.
Make sure the paper is flat in the tray and the paper length guide (1) touches the edges of the paper.
27
Page 35
IMPORTANT
1
2
1
• Be careful not to push the paper in too far; it may lift at the back of the tray and cause paper feed
problems.
• Loading more than 20 sheets of Photo 2L (5" x 7")/(13 x 18 cm) paper may cause paper jams.
To add paper before the tray is empty, remove the paper from the tray and combine it with the paper you
are adding. Always fan the stack of paper well to prevent the machine from feeding multiple pages.
7. Gently adjust the paper width guides (1) to fit the paper.
Make sure the paper width guides touch the edges of the paper.
8. Close the output paper tray cover.
9. Slowly push the paper tray completely into the machine.
10. Pull out the paper support (1) until it locks into place, and then unfold the paper support flap (2).
Related Information
• Load Paper in the Paper Tray
28
Page 36

• Change the Check Paper Size Setting
• Choose the Right Print Media
• Change the Paper Size and Paper Type
29
Page 37
Home > Paper Handling > Load Paper > Load Paper in the Paper Tray > Load Legal Size Paper in the
2
1
1
1
Paper Tray
Load Legal Size Paper in the Paper Tray
• If the [Check Paper] setting is set to [On] and you pull the paper tray out of the machine, a message
appears on the LCD asking if you want to change the paper type and paper size. Change the Paper Size
and Paper Type settings if needed, following the LCD instructions.
• Load only one size and type of paper in the paper tray at a time.
• When you load a different paper size in the tray, you must change the Paper Size setting in the machine or
the paper size setting on your computer.
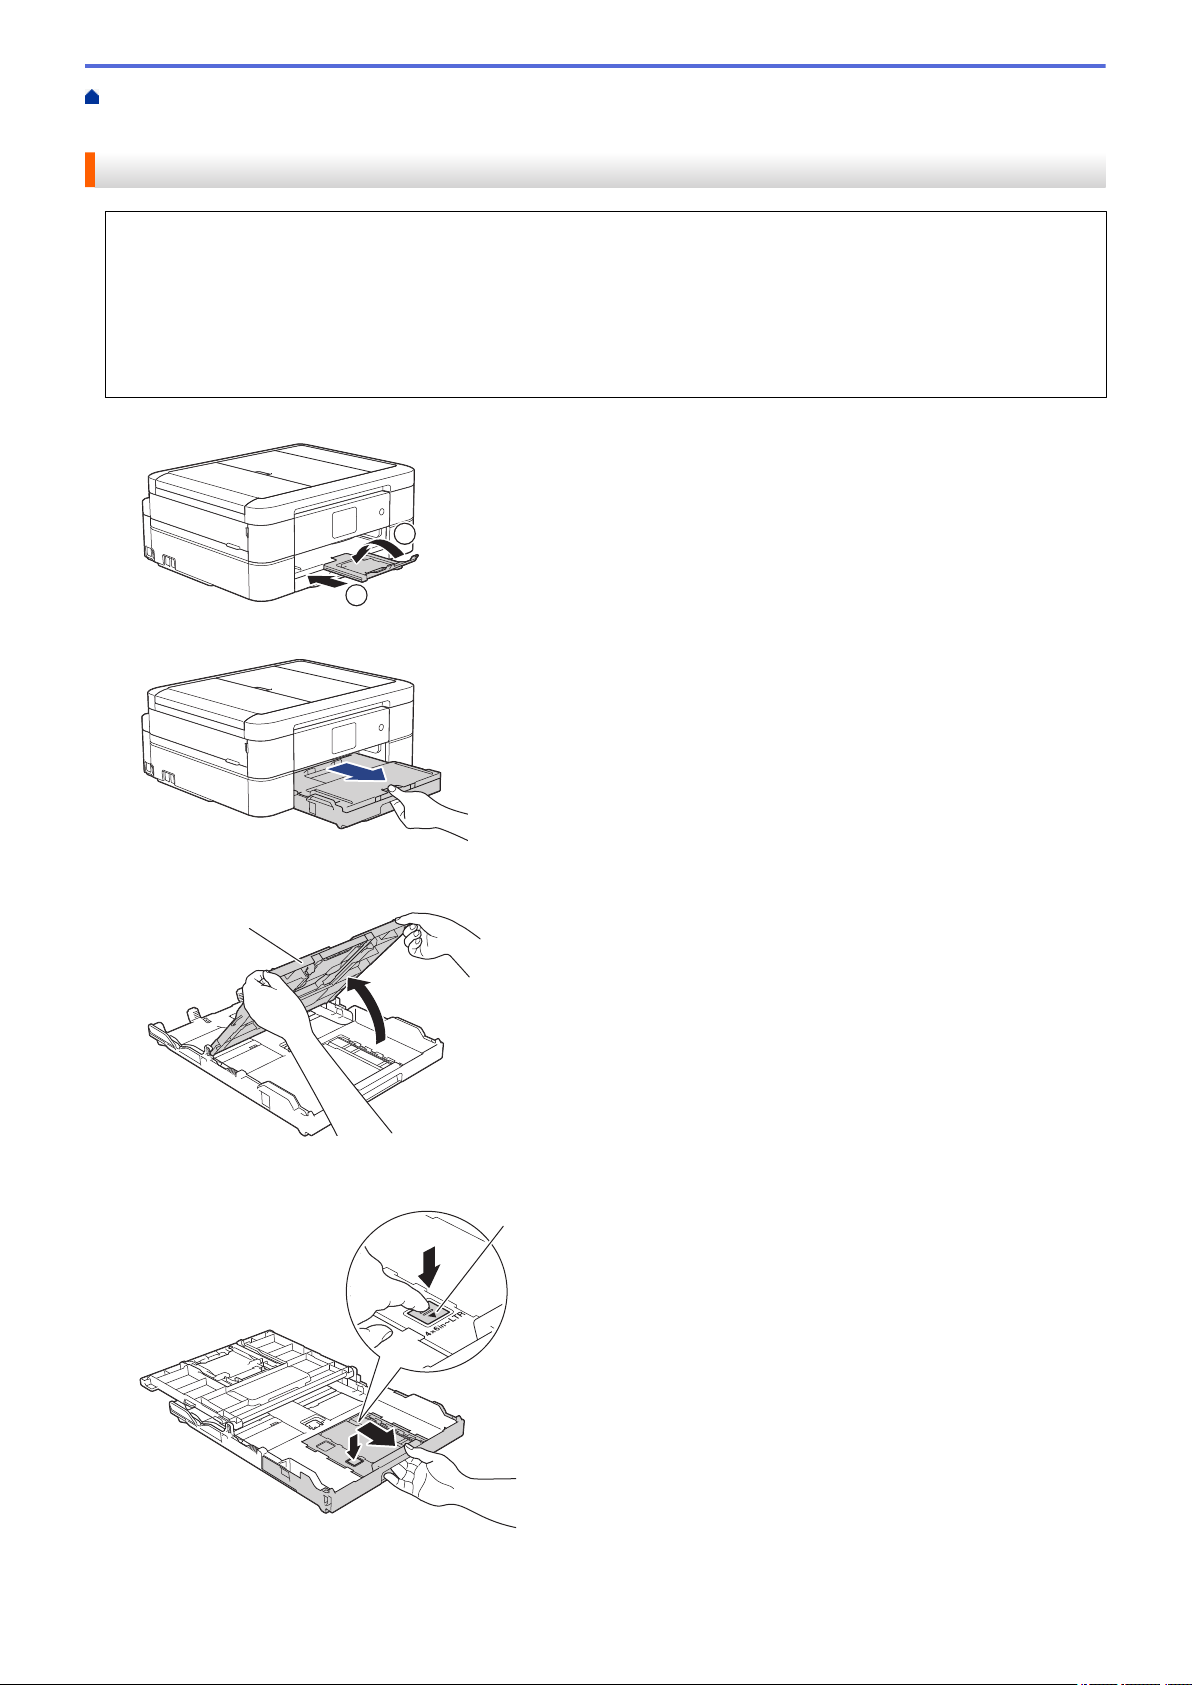
1. If the paper support flap (1) is open, close it, and then close the paper support (2).
2. Pull the paper tray completely out of the machine.
3. Open the output paper tray cover (1).
4. Press the square paper tray expansion button (1) and slide out the paper tray until the square paper tray
expansion button locks into the square LGL hole.
30
Page 38
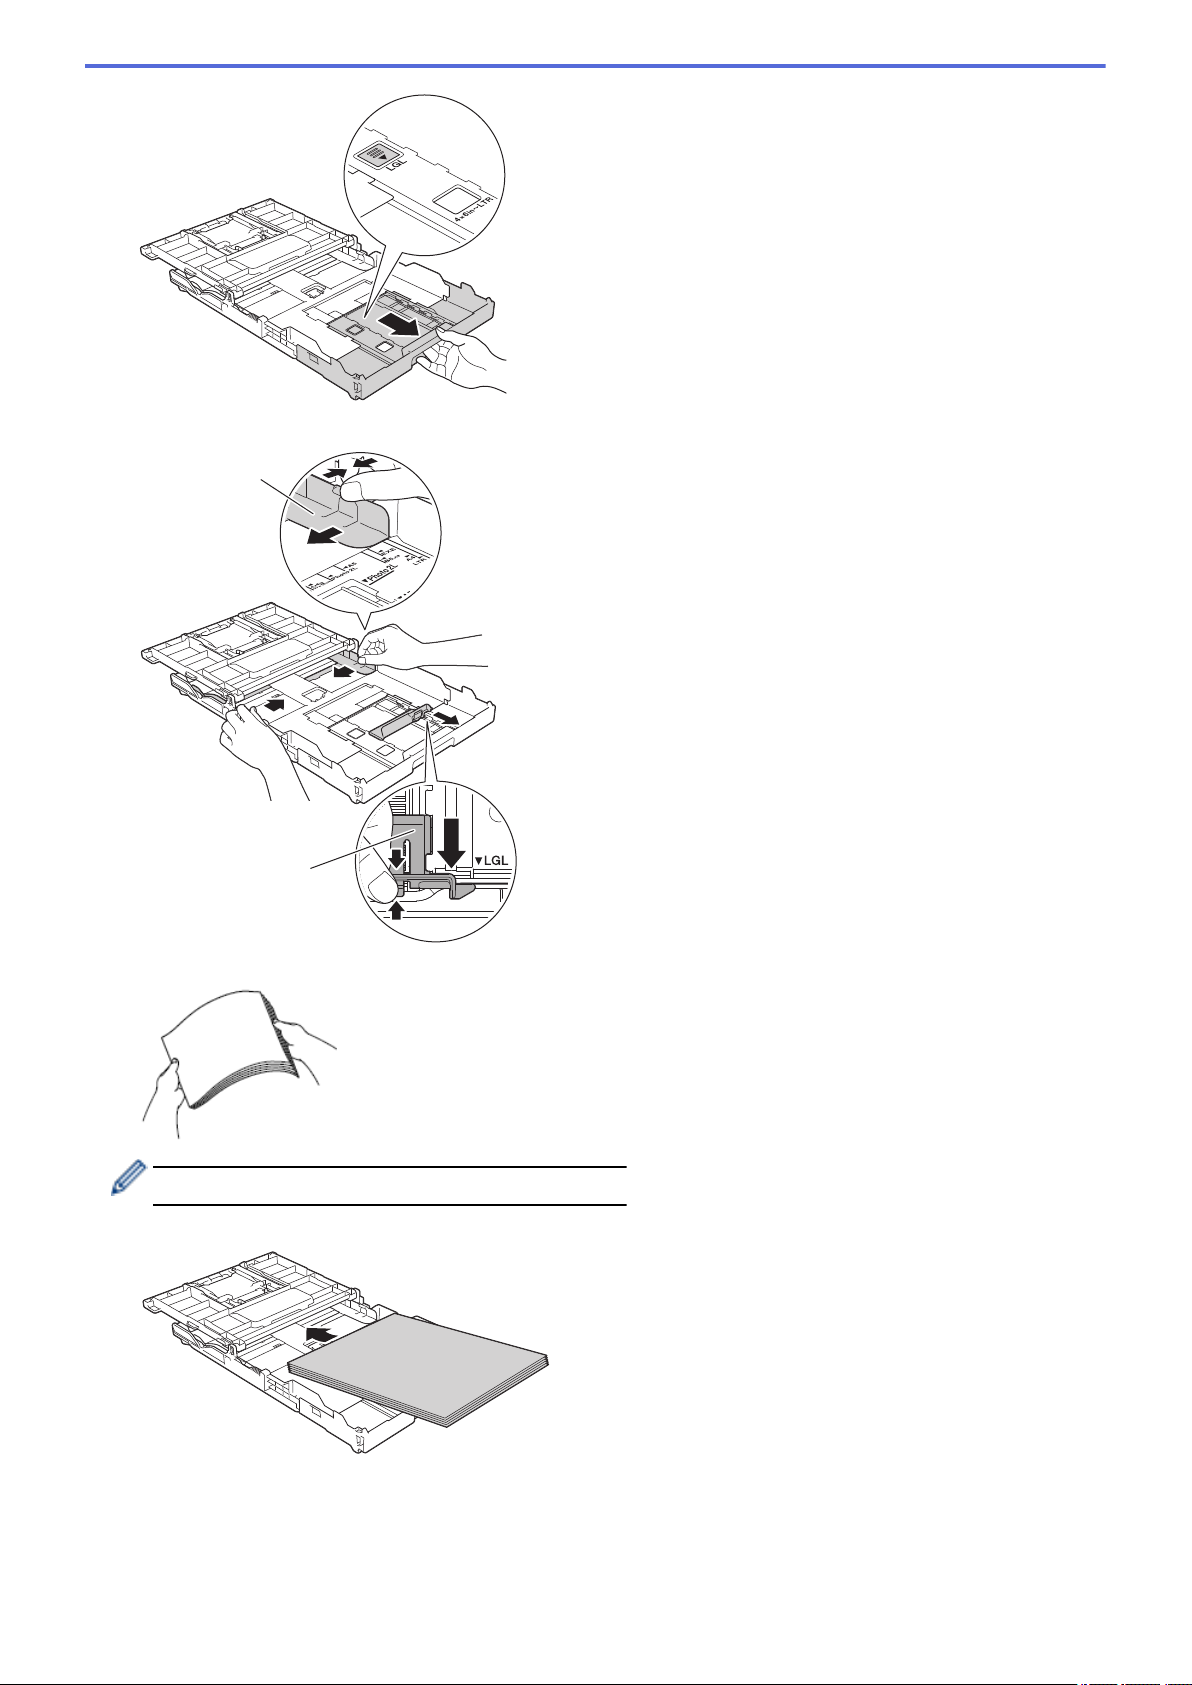
5. Gently press and slide the paper width guides (1) and the paper length guide (2) to fit the paper size.
2
1
6. Fan the stack of paper well to avoid paper jams and misfeeds.
Always make sure the paper is not curled or wrinkled.
7. Gently load paper in the paper tray with the printing surface face down.
Make sure the paper is flat in the tray and the paper length guide (1) touches the edges of the paper.
31
Page 39
1
IMPORTANT
Be careful not to push the paper in too far; it may lift at the back of the tray and cause paper feed
problems.
To add paper before the tray is empty, remove the paper from the tray and combine it with the paper you
are adding. Always fan the stack of paper well to prevent the machine from feeding multiple pages.
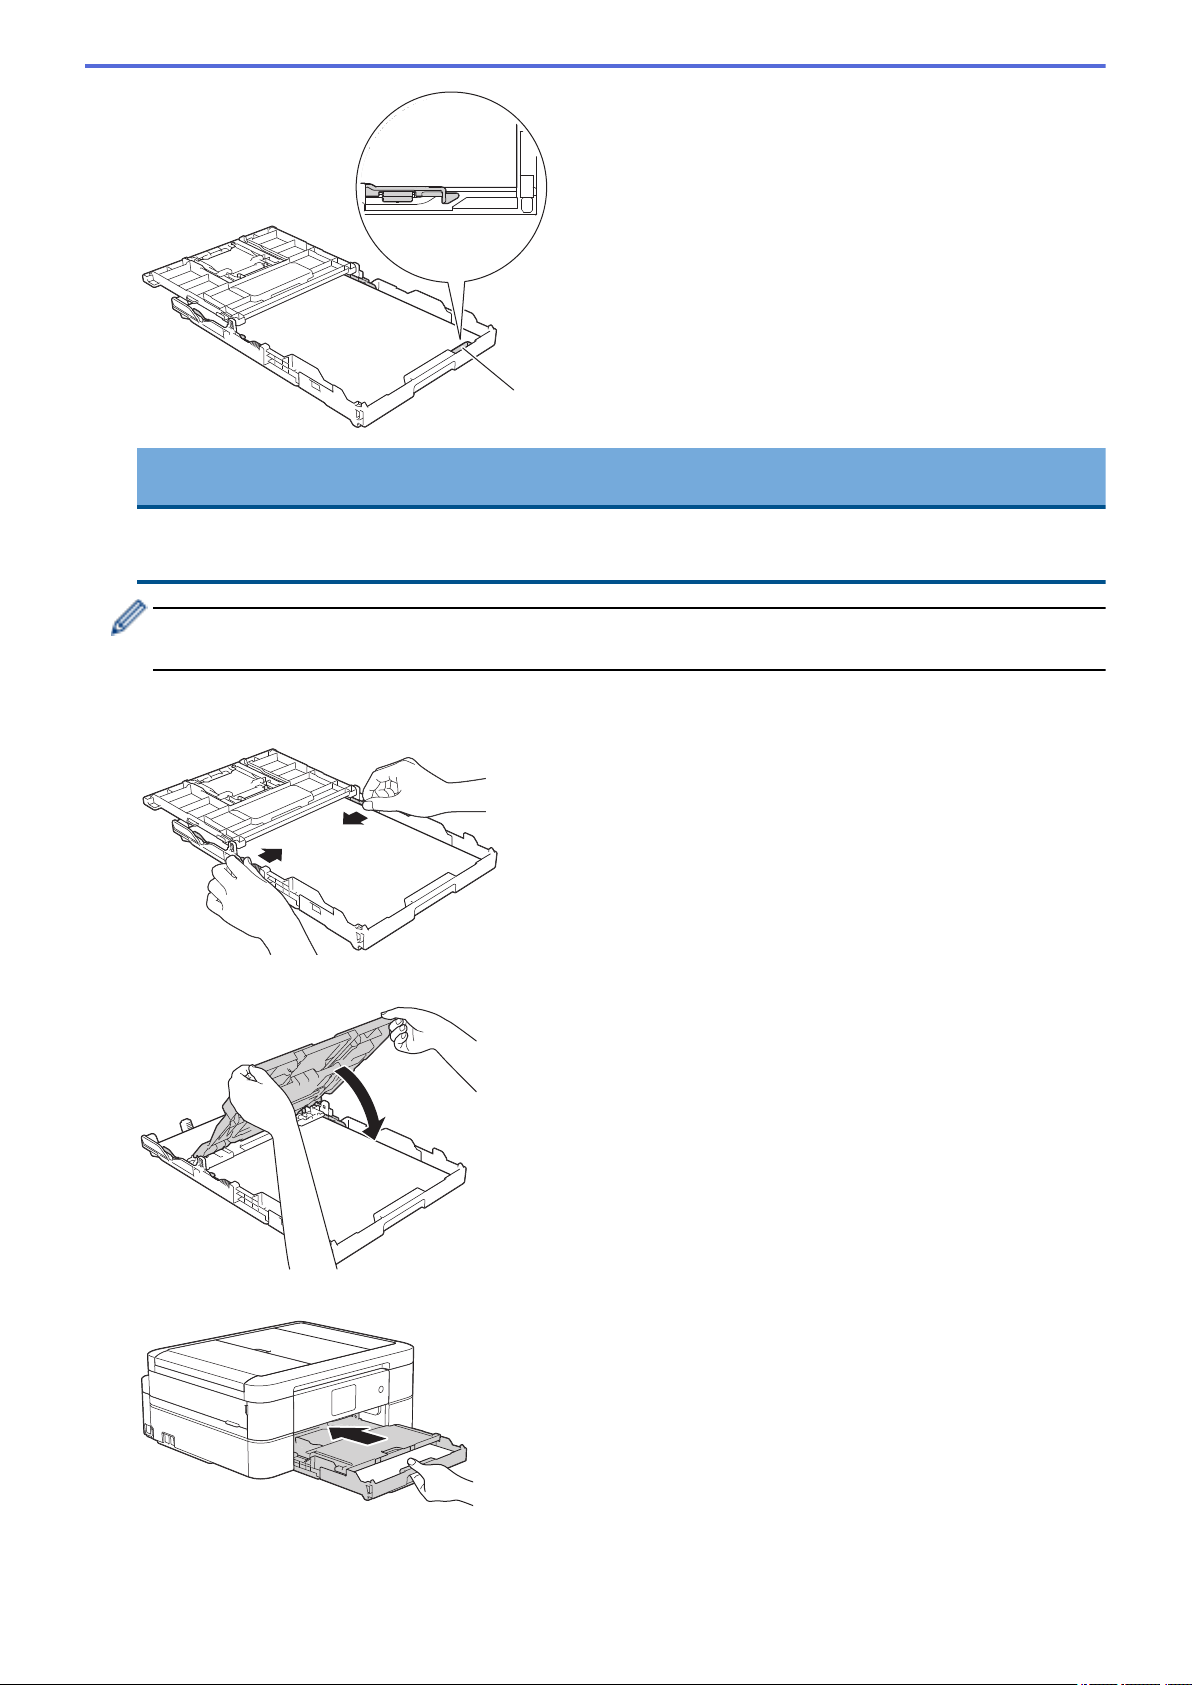
8. Gently adjust the paper width guides to fit the paper.
Make sure the paper guides touch the edges of the paper.
9. Close the output paper tray cover.
10. Slowly push the paper tray completely into the machine.
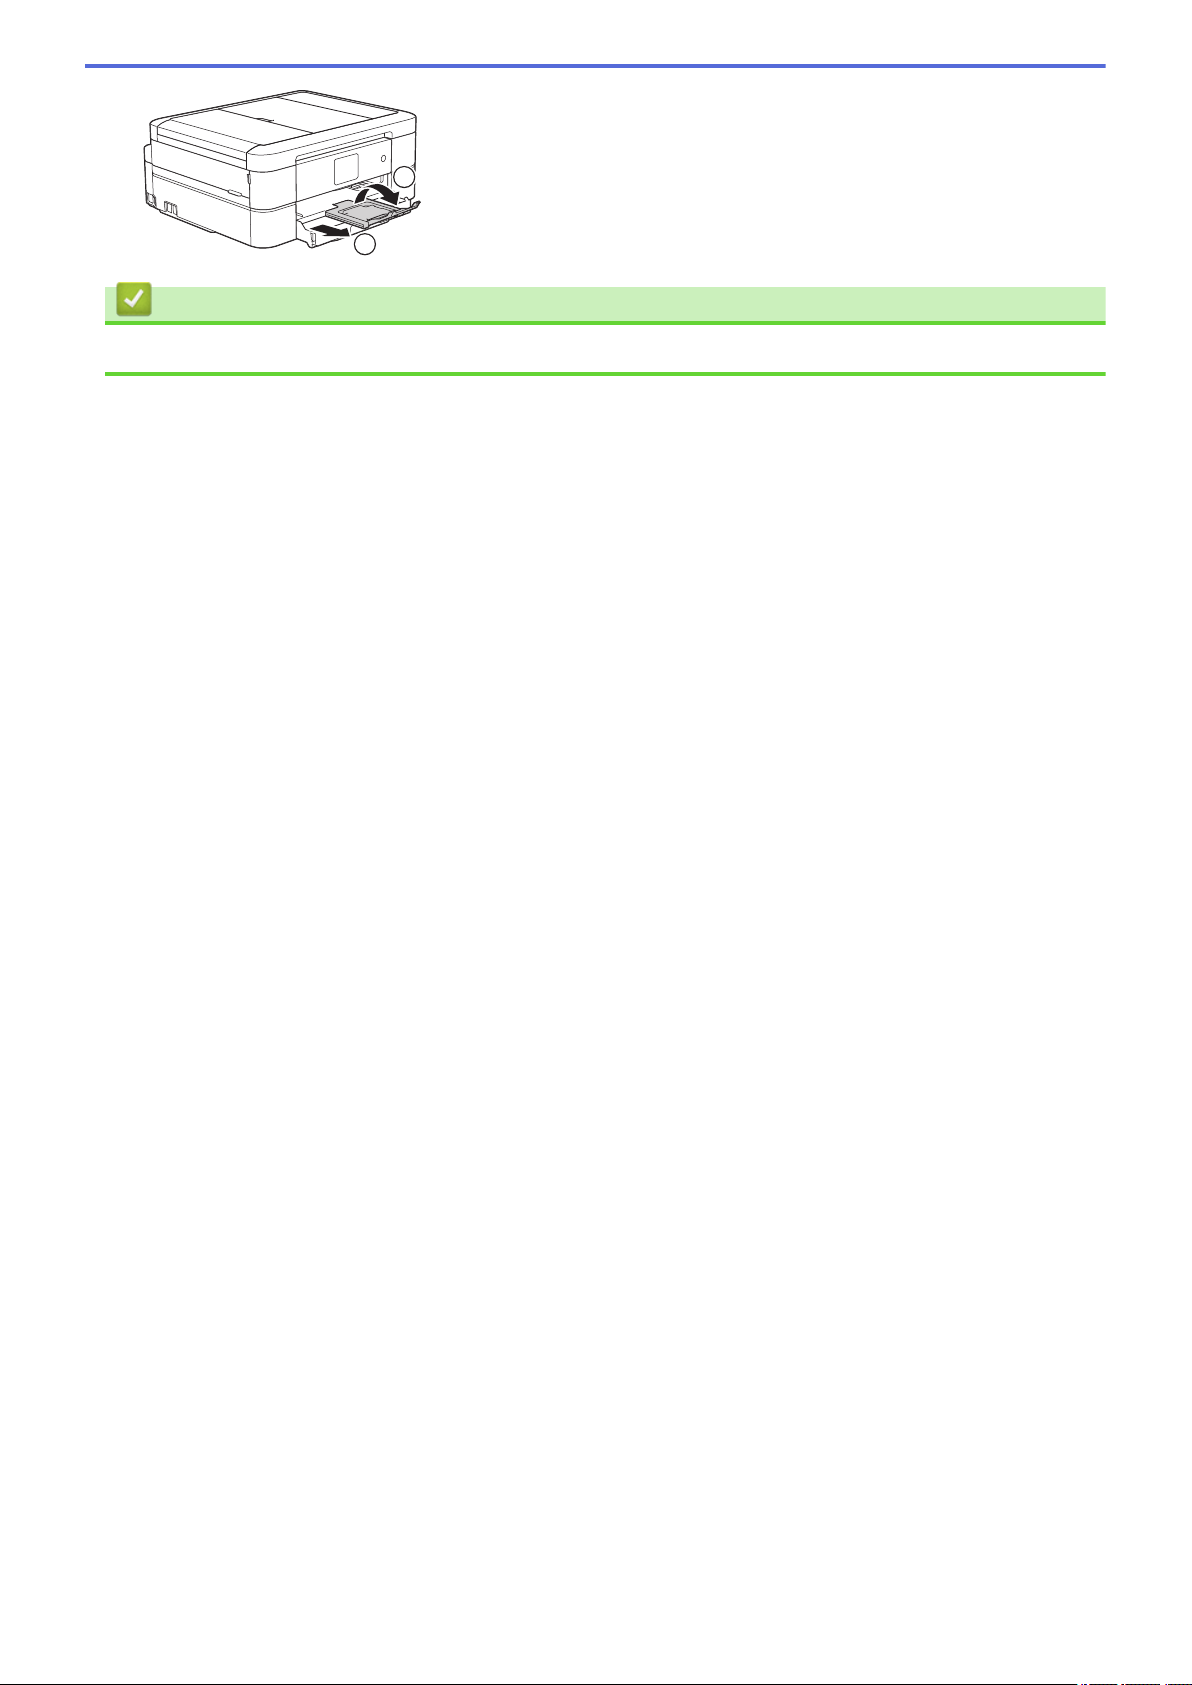
11. Pull out the paper support (1) until it locks into place, and then unfold the paper support flap (2).
32
Page 40
2
1
Related Information
• Load Paper in the Paper Tray
33
Page 41
Home > Paper Handling > Load Paper > Load Paper in the Paper Tray > Load Photo Paper in the Paper
2
1
1
Tray
Load Photo Paper in the Paper Tray
• If the [Check Paper] setting is set to [On] and you pull the paper tray out of the machine, a message
appears on the LCD asking if you want to change the paper type and paper size. Change the Paper Size
and Paper Type settings if needed, following the LCD instructions.
• Load only one size and type of paper in the paper tray at a time.
• When you load a different paper size in the tray, you must change the Paper Size setting in the machine or
the paper size setting on your computer.
1. If the paper support flap (1) is open, close it, and then close the paper support (2).
2. Pull the paper tray completely out of the machine.
3. Open the output paper tray cover (1).
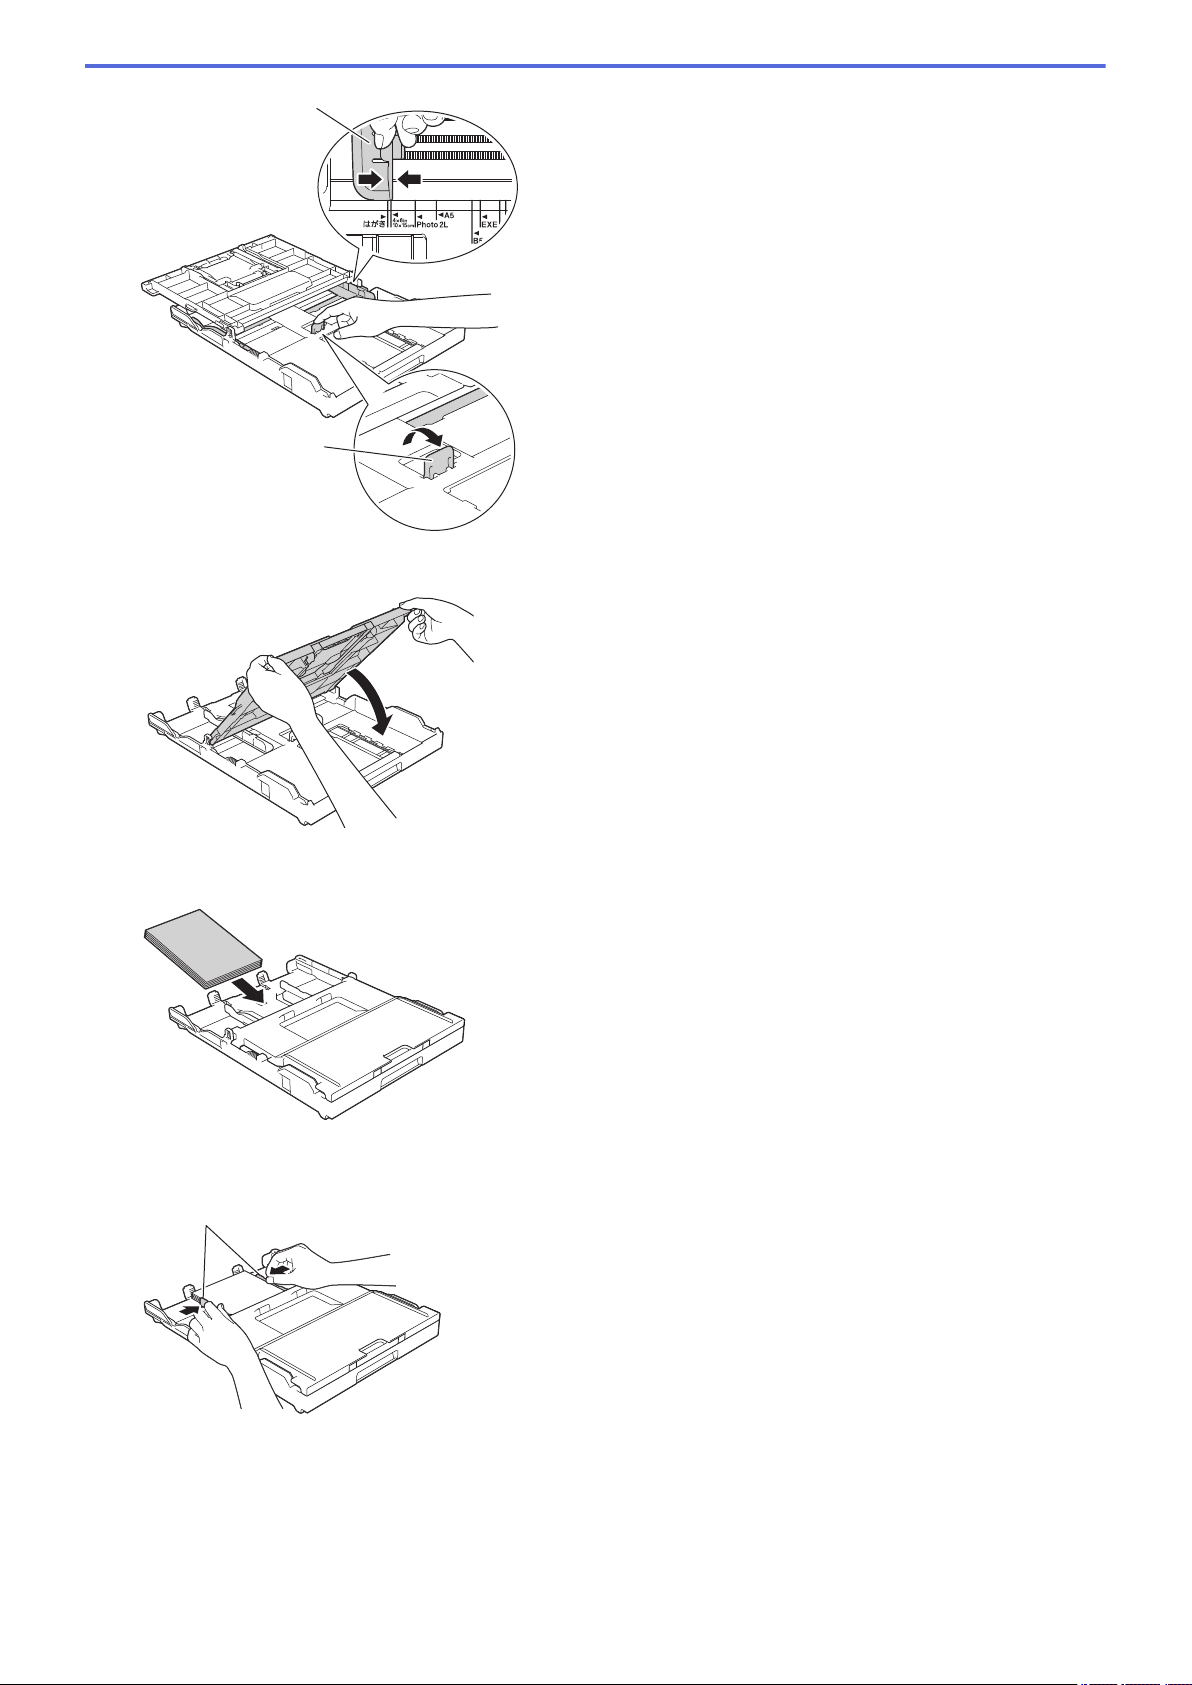
4. Gently press and slide the paper width guides (1) to fit the paper size, and then lift up the stopper (2).
34
Page 42
1
2
5. Close the output paper tray cover.
1
6. Load up to 20 sheets of photo paper with the printing surface face down.
Loading more than 20 sheets of photo paper may cause paper jams.
7. Gently adjust the paper width guides (1) to fit the paper.
Make sure the paper width guides touch the edges of the paper and the paper is flat in the tray.
8. Slowly push the paper tray completely into the machine.
35
Page 43
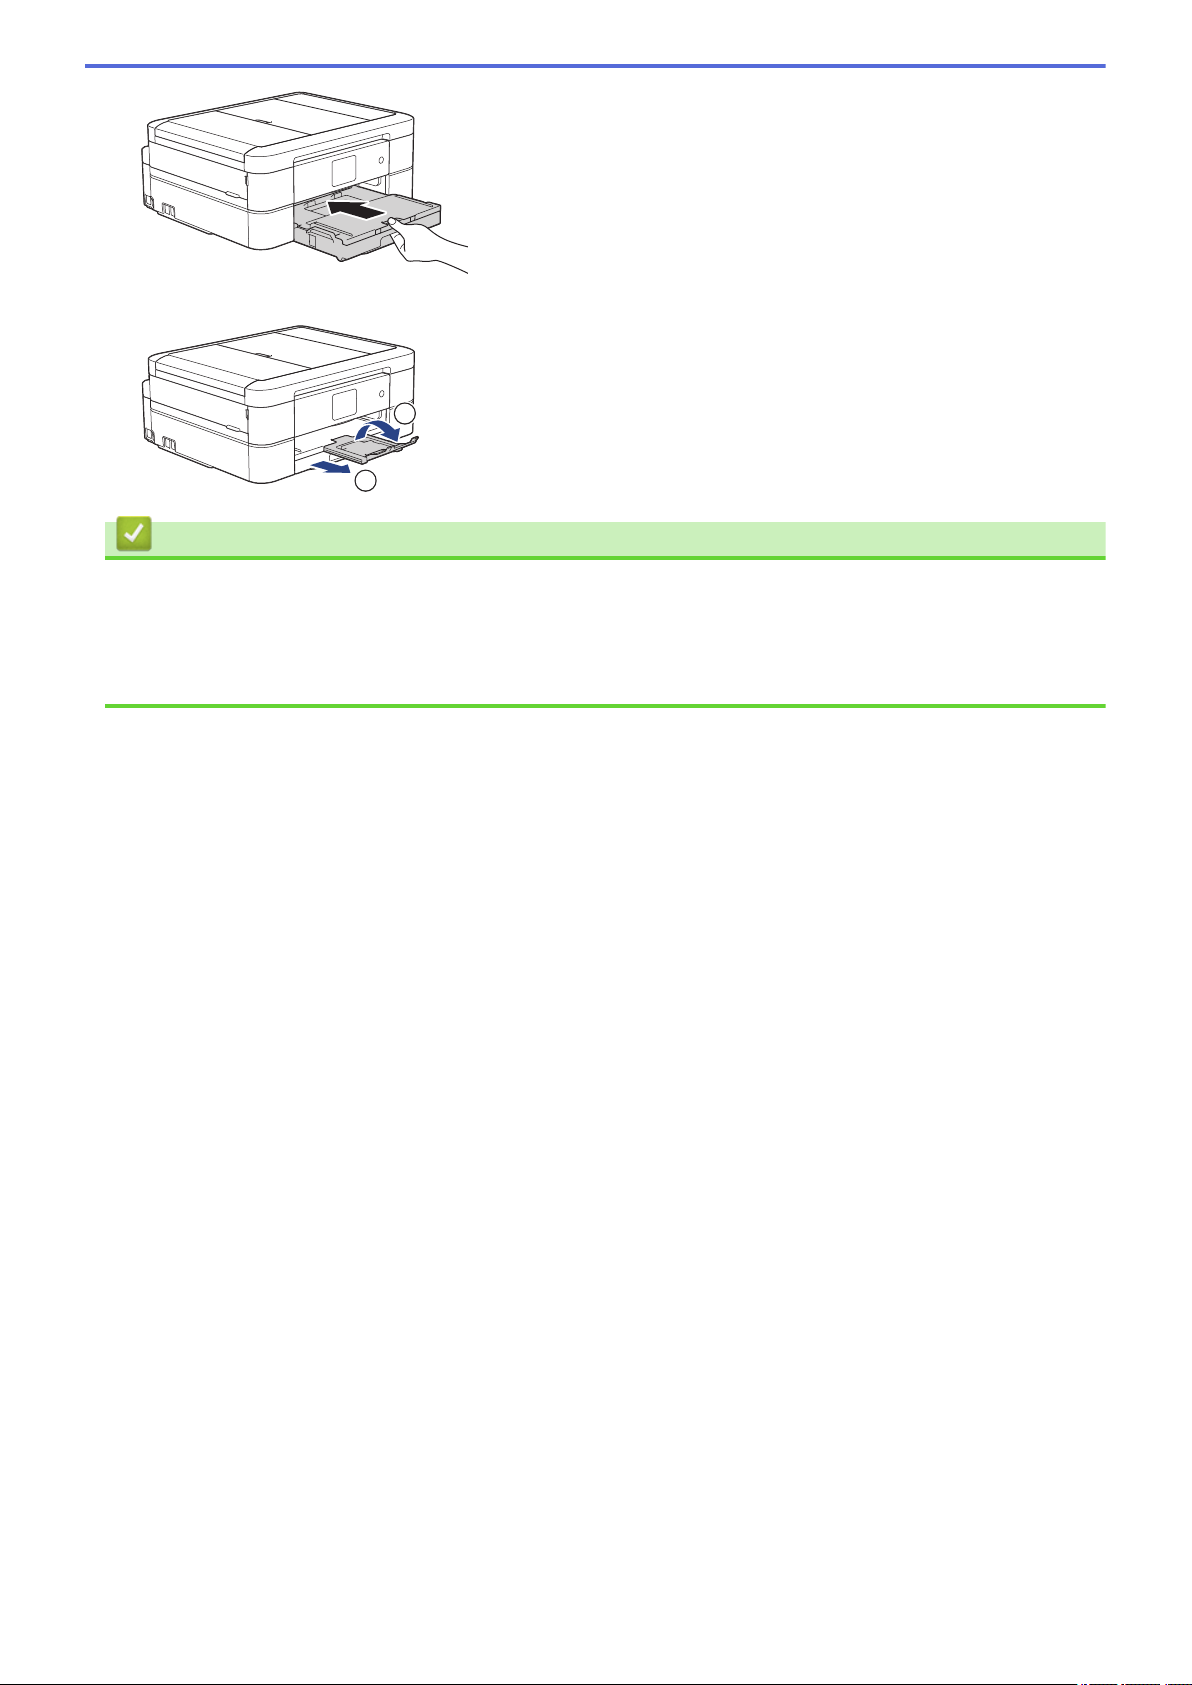
9. Pull out the paper support (1) until it locks into place, and then unfold the paper support flap (2).
2
1
Related Information
• Load Paper in the Paper Tray
• Change the Check Paper Size Setting
• Choose the Right Print Media
• Change the Paper Size and Paper Type
36
Page 44
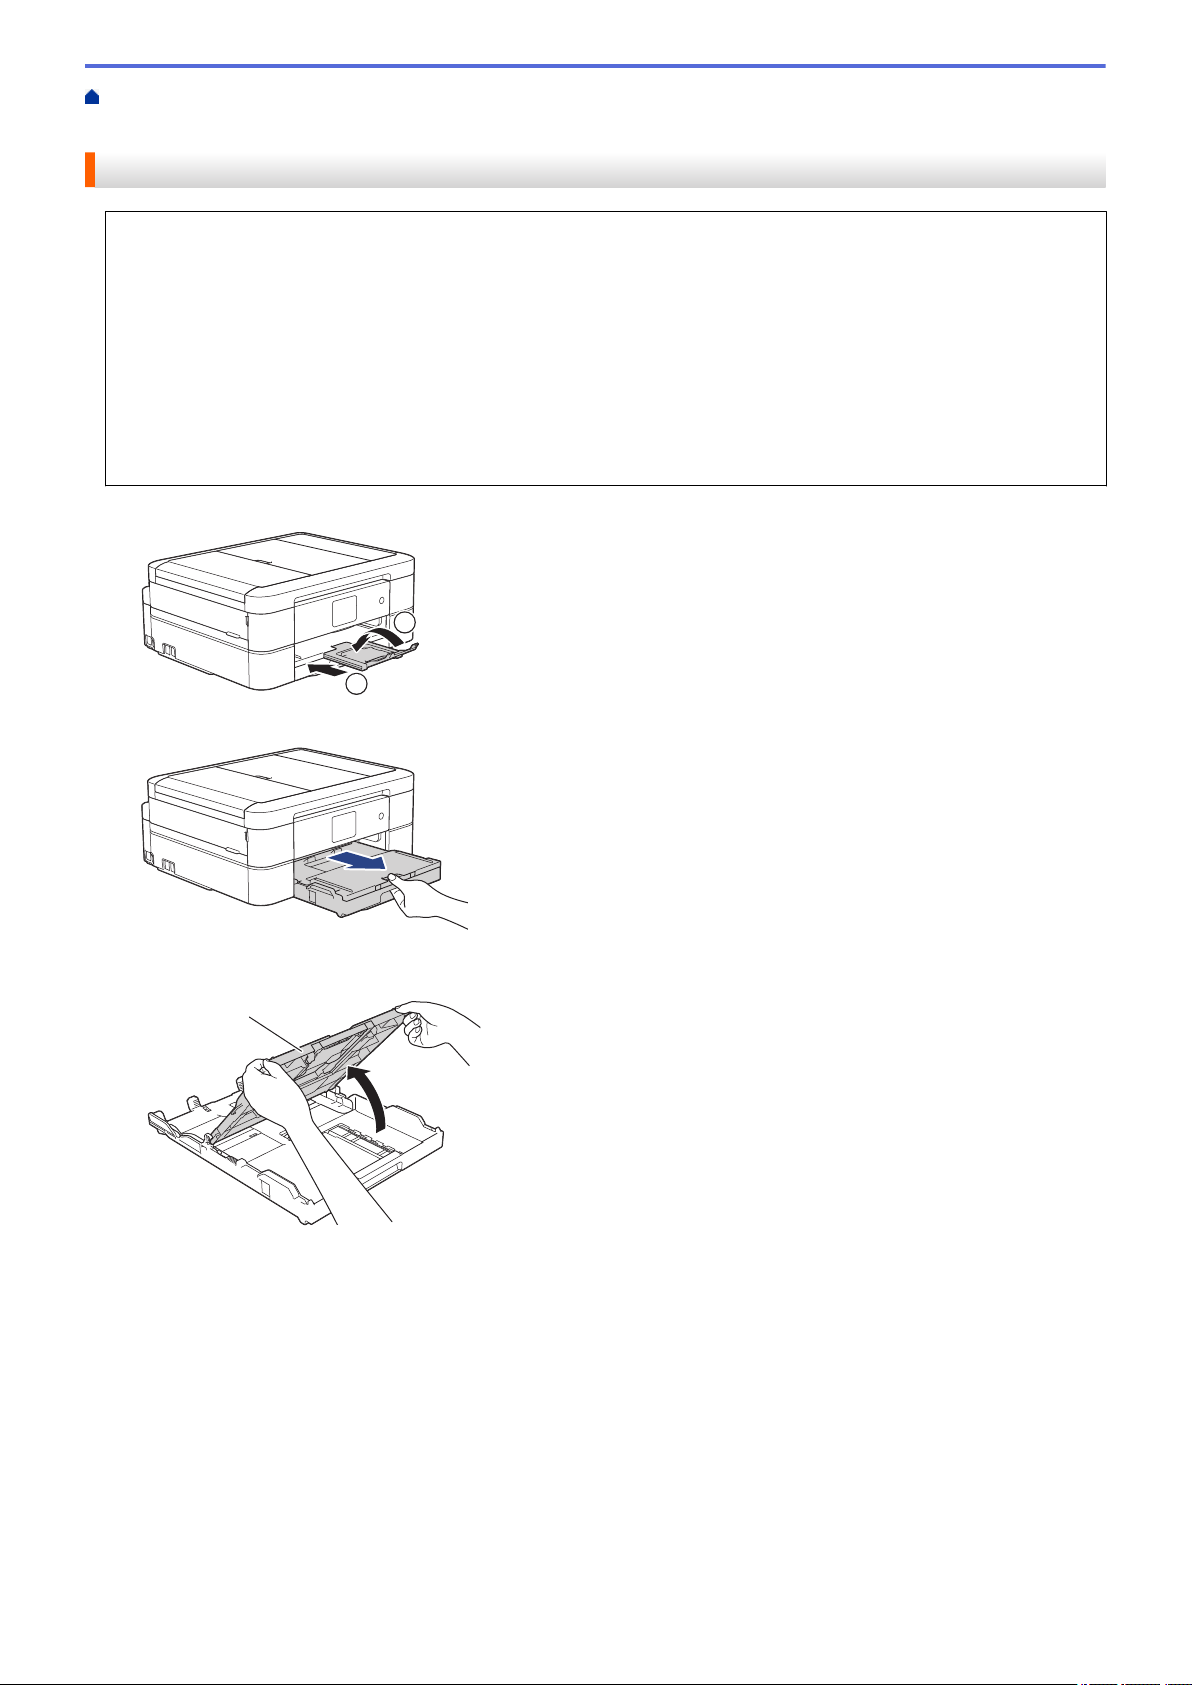
Home > Paper Handling > Load Paper > Load Paper in the Paper Tray > Load Envelopes in the Paper
2
1
1
Tray
Load Envelopes in the Paper Tray
• If the [Check Paper] setting is set to [On] and you pull the paper tray out of the machine, a message
appears on the LCD asking if you want to change the paper type and paper size. Change the Paper Size
and Paper Type settings if needed, following the LCD instructions.
• Load only one size and type of paper in the paper tray at a time.
• When you load a different paper size in the tray, you must change the Paper Size setting in the machine or
the paper size setting on your computer.
• Before loading envelopes in the tray, press the corners and sides of the envelopes to make them as flat as
possible.
See Related Information: About Envelopes.
1. If the paper support flap (1) is open, close it, and then close the paper support (2).
2. Pull the paper tray completely out of the machine.
3. Open the output paper tray cover (1).
4. Load up to 10 envelopes in the paper tray with the printing surface face down. Loading more than 10
envelopes may cause paper jams.
If the envelope flaps are on the long edge, load the envelopes with the flap on the left, as shown in the
illustration. Gently press and slide the paper width guides (1) and paper length guide (2) to fit the size of the
envelopes.
Make sure the envelopes are flat in the tray.
37
Page 45
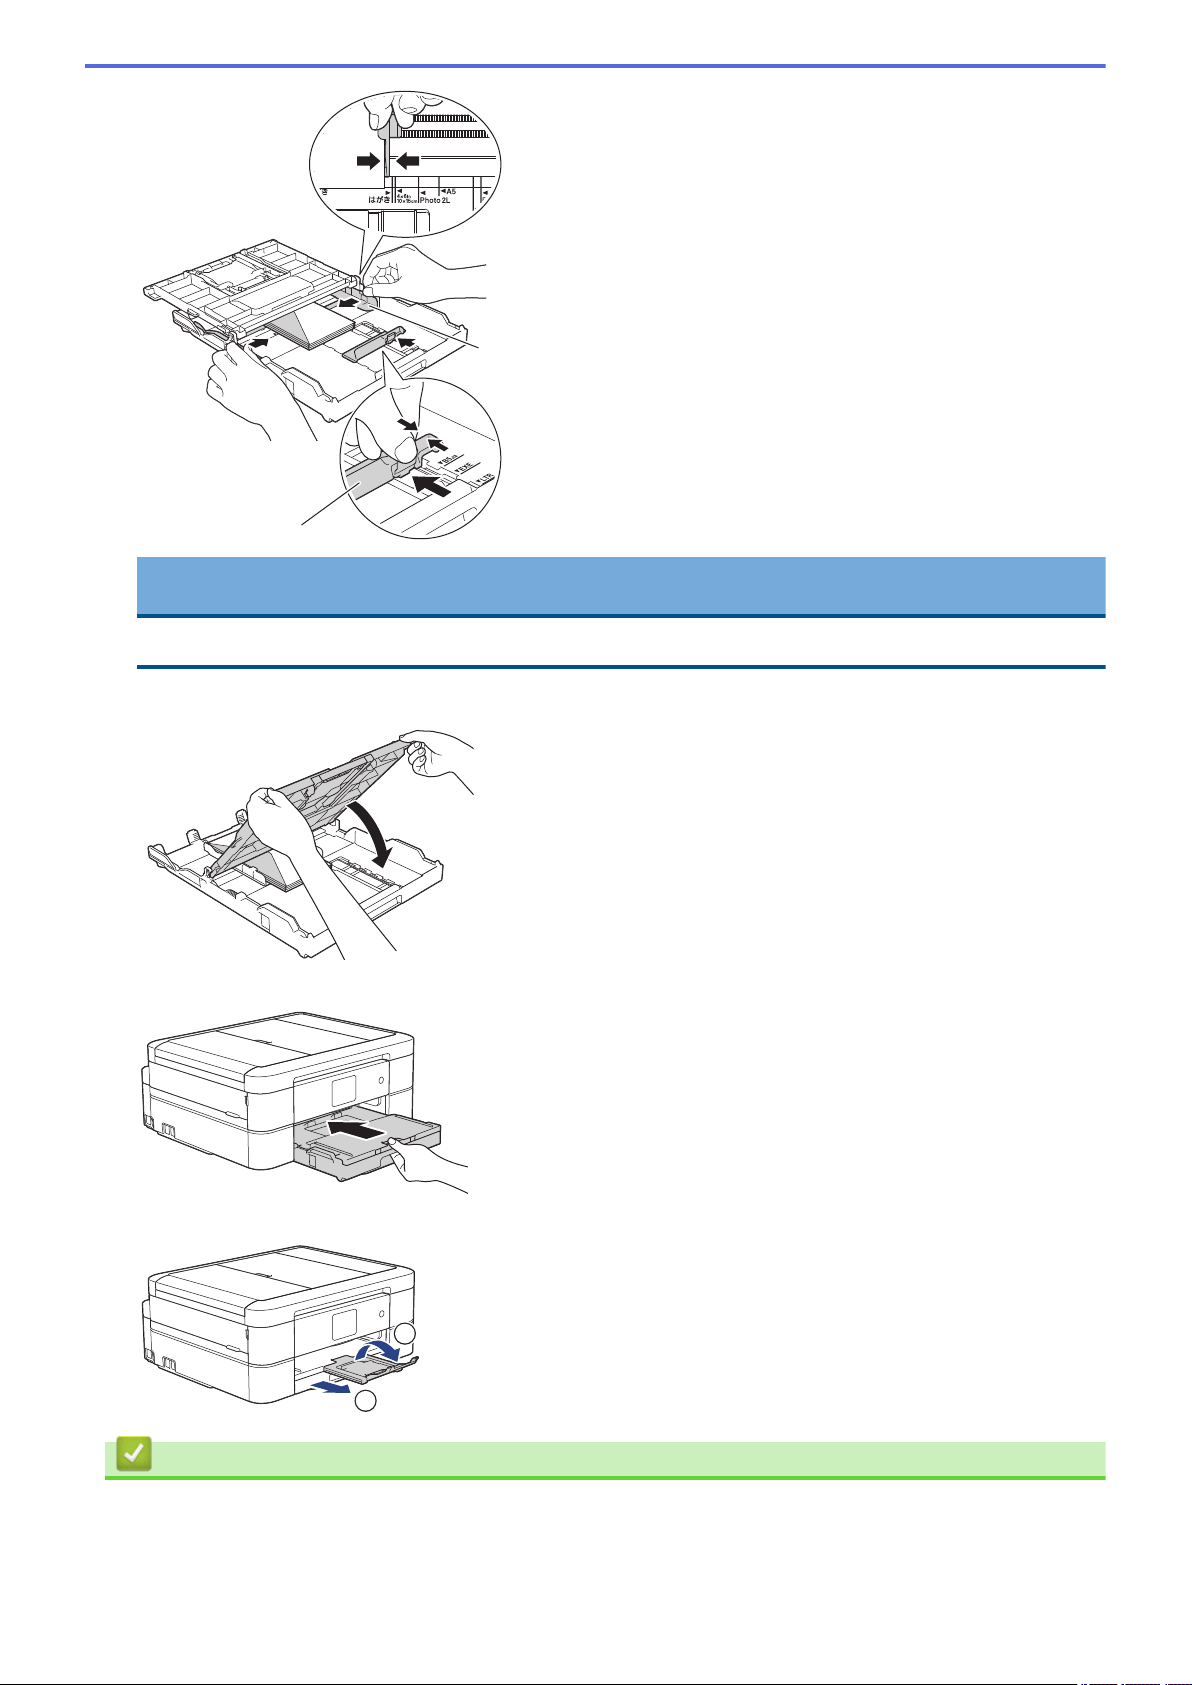
1
2
IMPORTANT
2
1
If envelopes are "double-feeding," load one envelope in the paper tray at a time.
5. Close the output paper tray cover.
6. Slowly push the paper tray completely into the machine.
7. Pull out the paper support (1) until it locks into place, and then unfold the paper support flap (2).
Related Information
• Load Paper in the Paper Tray
• About Envelopes
• Change the Check Paper Size Setting
38
Page 46

• Choose the Right Print Media
• Change the Paper Size and Paper Type
39
Page 47
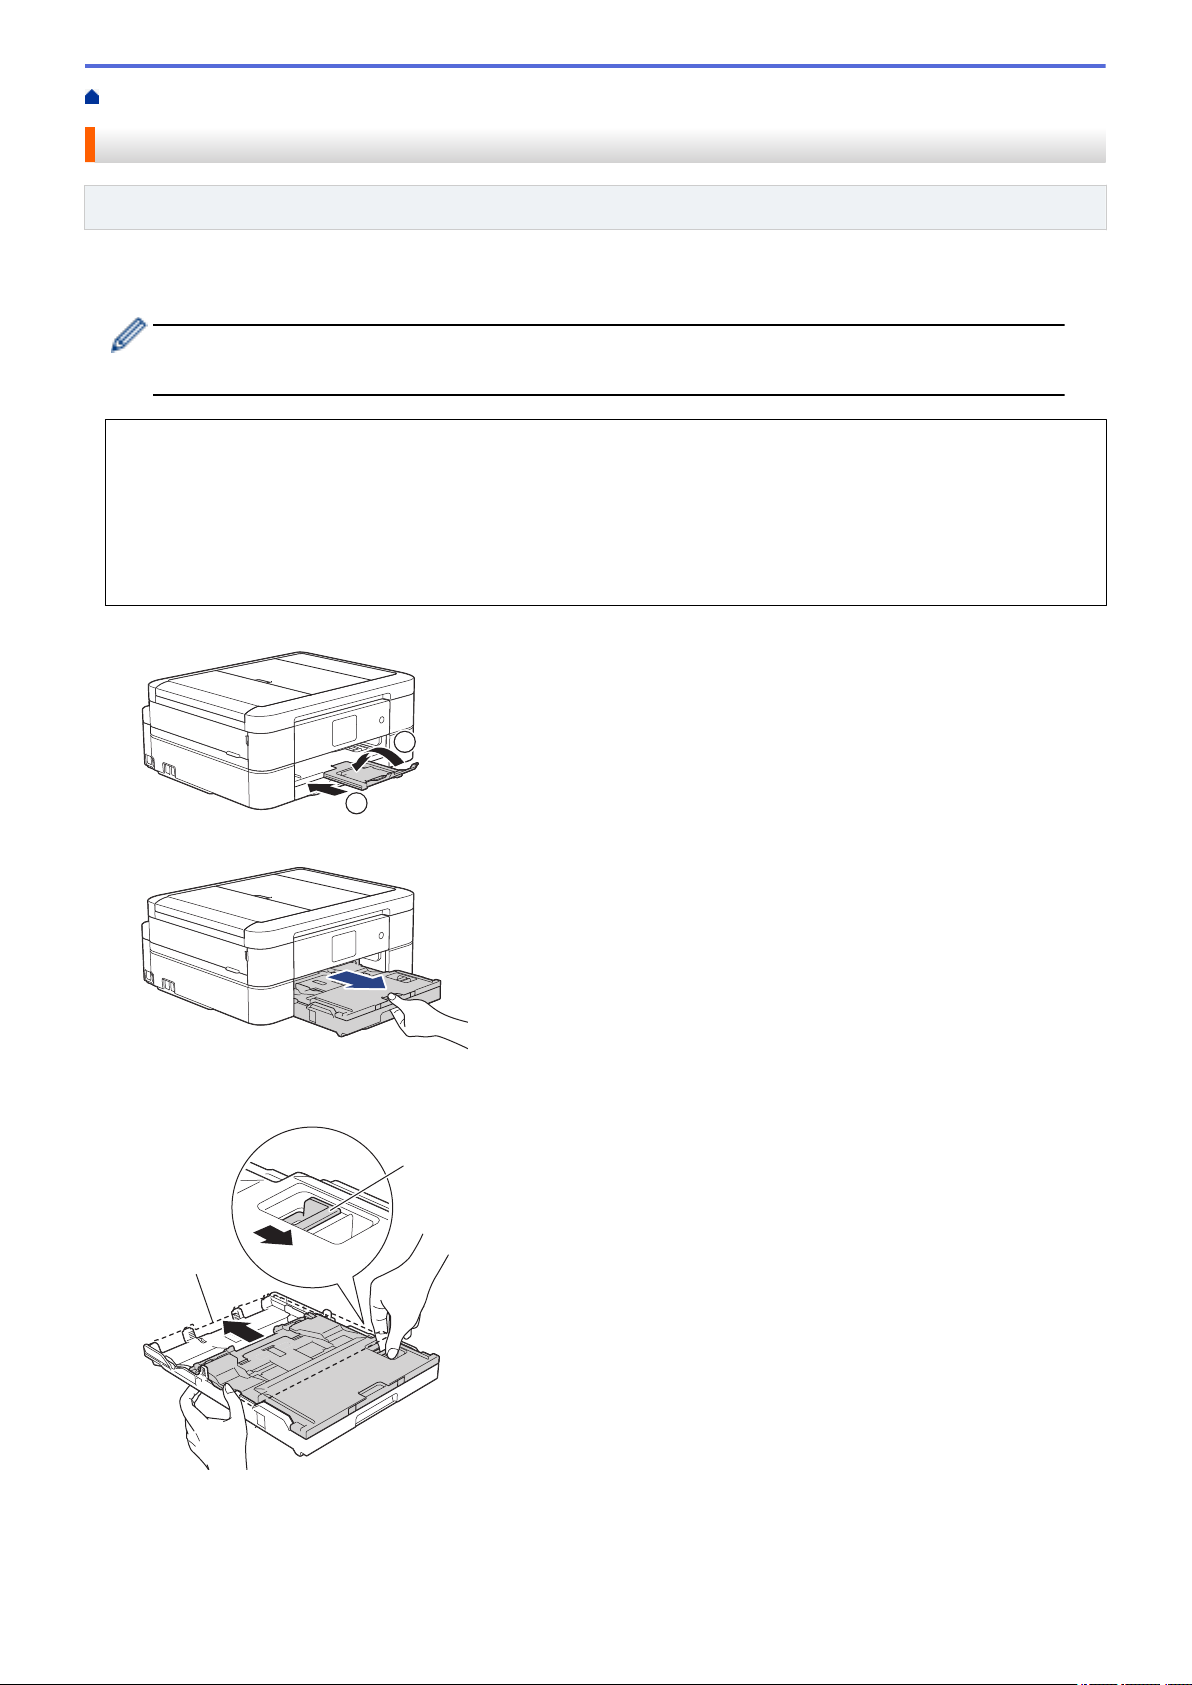
Home > Paper Handling > Load Paper > Load Photo or Photo L Paper in Photo Bypass Tray
2
1
1
2
Load Photo or Photo L Paper in Photo Bypass Tray
Related Models: MFC-J690DW
Use the photo bypass tray, which is located on the top of the output paper tray cover, to print on Photo (4" x
6")/(10 x 15 cm) or Photo L (3.5" x 5")/(89 x 127 mm) size paper.
• In Canada, the photo bypass tray is called the photo paper tray.
• When you use the photo bypass tray, you do not have to remove the paper from the tray beneath it.
• If the [Check Paper] setting is set to [On] and you pull the paper tray out of the machine, a message
appears on the LCD asking if you want to change the paper type and paper size. Change the Paper Size
and Paper Type settings if needed, following the LCD instructions.
• Load only one size and type of paper in the paper tray at a time.
• When you load a different paper size in the tray, you must change the Paper Size setting in the machine or
the paper size setting on your computer.
1. If the paper support flap (1) is open, close it, and then close the paper support (2).
2. Pull the paper tray completely out of the machine.
3. Press the blue photo bypass tray release button (1) and slide the whole output paper tray cover forward until
it locks into the photo printing position (2).
4. Load up to 20 sheets of Photo or Photo L paper in the photo bypass tray with the printing surface face down.
Loading more than 20 sheets of photo paper may cause paper jams.
40
Page 48
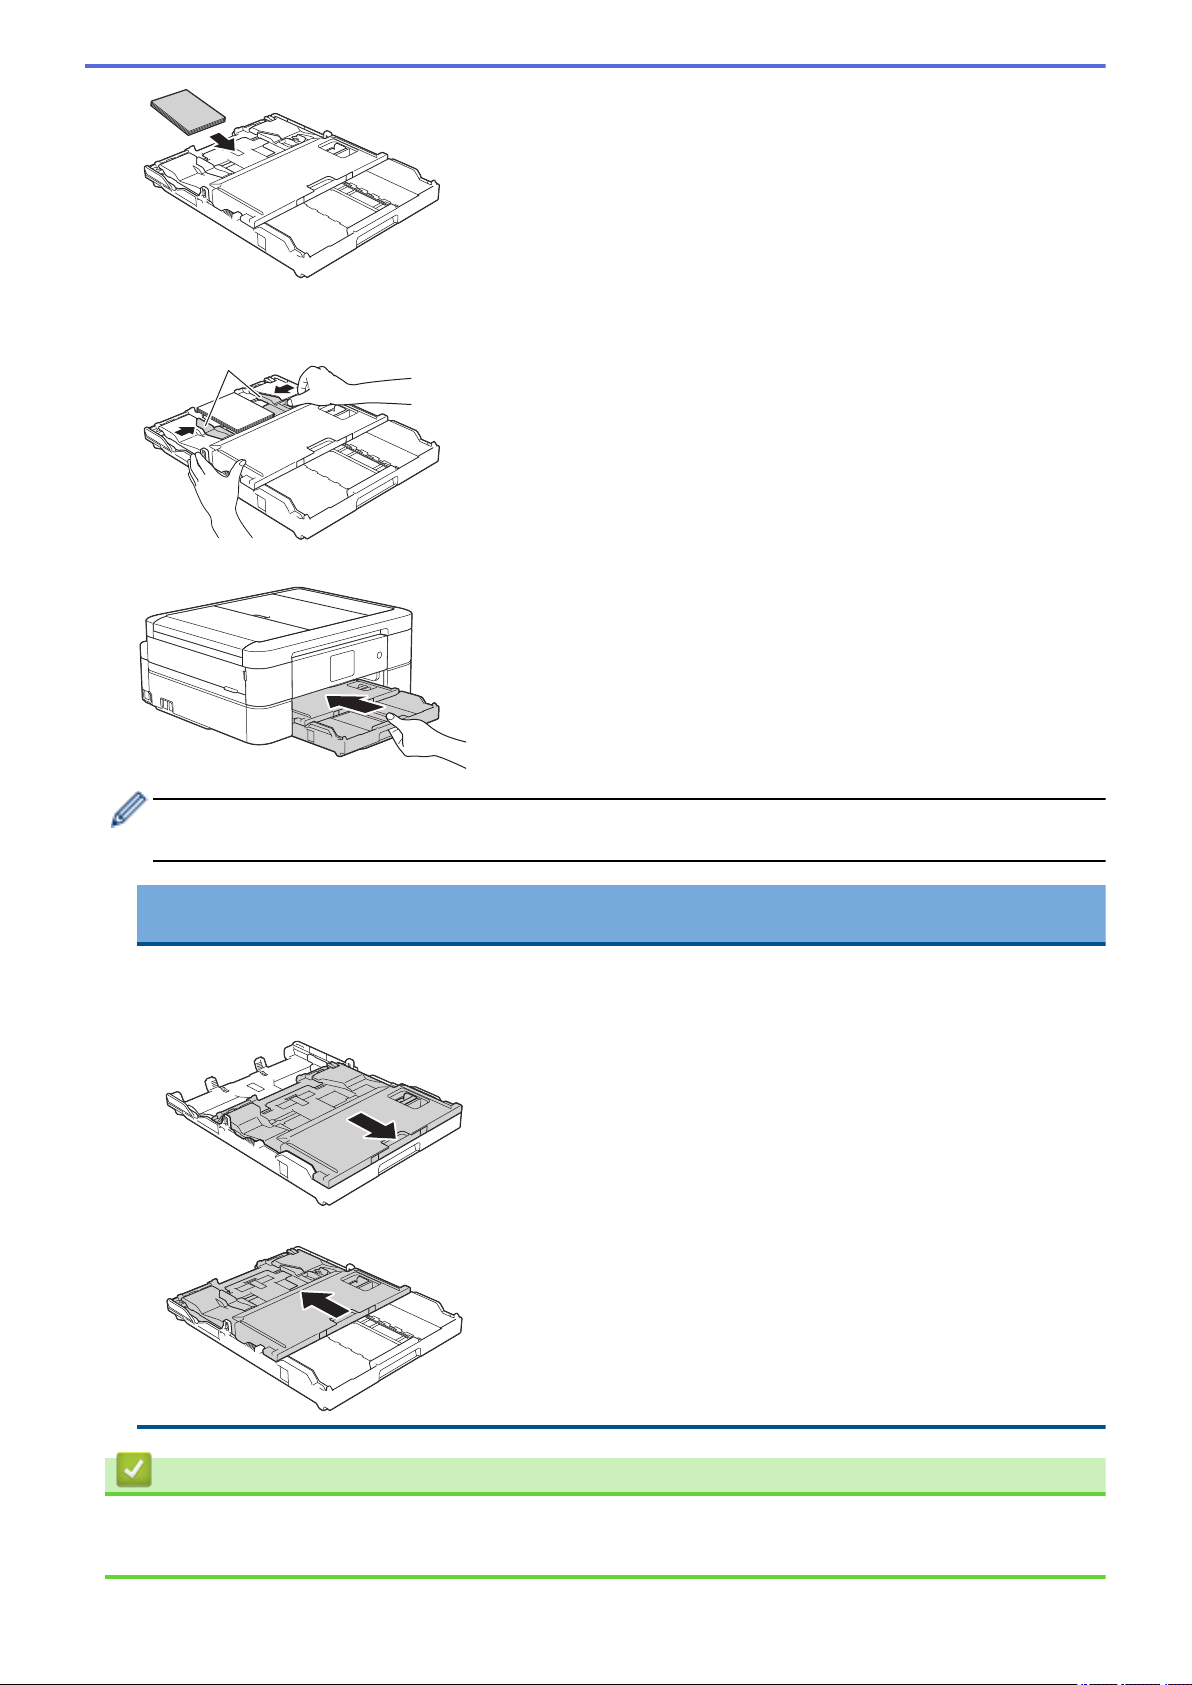
5. Gently adjust the paper width guides (1) to fit the paper. Make sure the paper width guides touch the edges of
1
the paper and the paper is flat in the tray.
6. Slowly push the paper tray completely into the machine.
Do not open the paper support and the paper support flap when using the photo bypass tray. Otherwise it is
difficult to take out the printouts.
IMPORTANT
When you have finished printing photos, return the photo bypass tray to the Normal printing position. If
you do not, you will get a [No Paper Fed] error when you use cut sheet paper.
Photo Bypass Tray in the Normal printing position
Photo Bypass Tray in the Photo printing position
Related Information
• Load Paper
• Paper Handling and Printing Problems
41
Page 49
Home > Paper Handling > Load Paper > Load Paper in the Manual Feed Slot
Load Paper in the Manual Feed Slot
Related Models: MFC-J690DW/MFC-J895DW
Load special print media in this slot, one sheet of paper at a time.
The machine automatically turns on Manual Feed mode when you put paper in the manual feed slot.
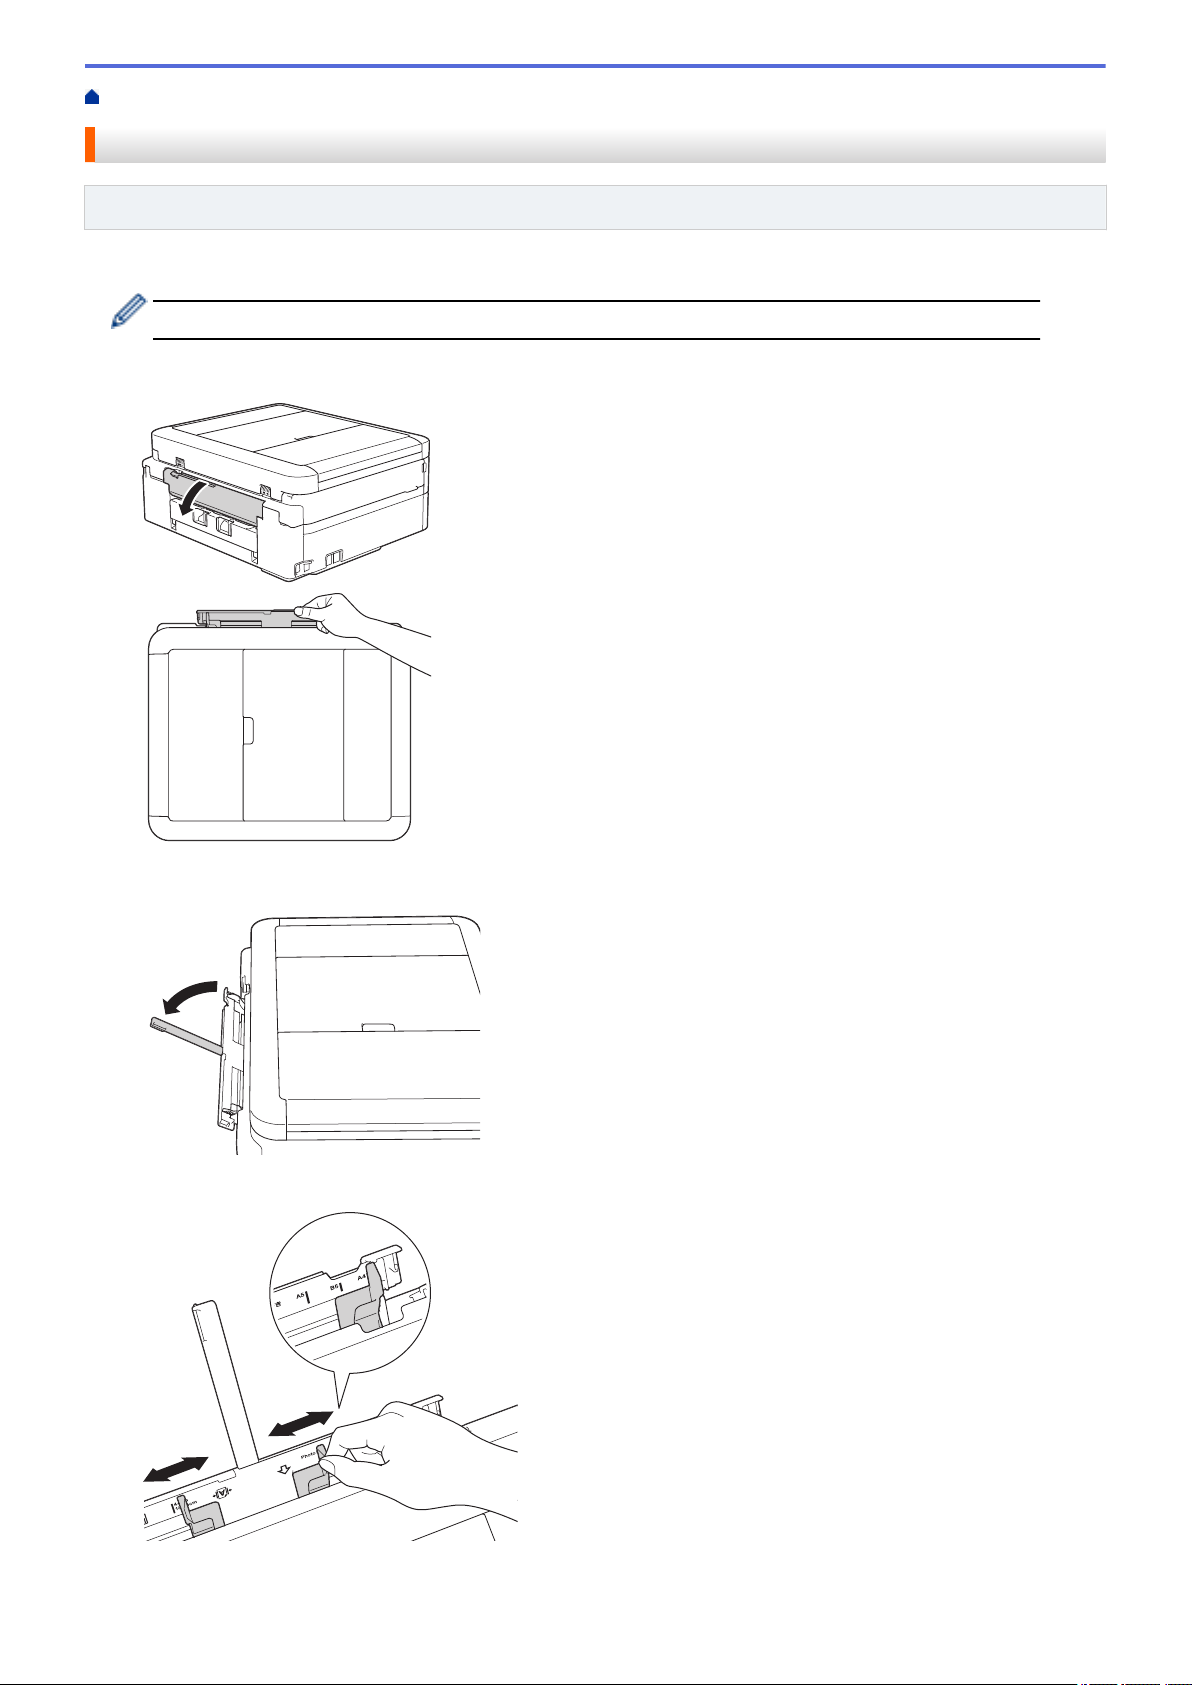
1. Open the manual feed slot cover.
2. Lift up the paper support.
3. Slide the manual feed slot paper guides to fit the width of the paper you are using.
4. Load only one sheet of paper in the manual feed slot with the printing surface face up.
42
Page 50
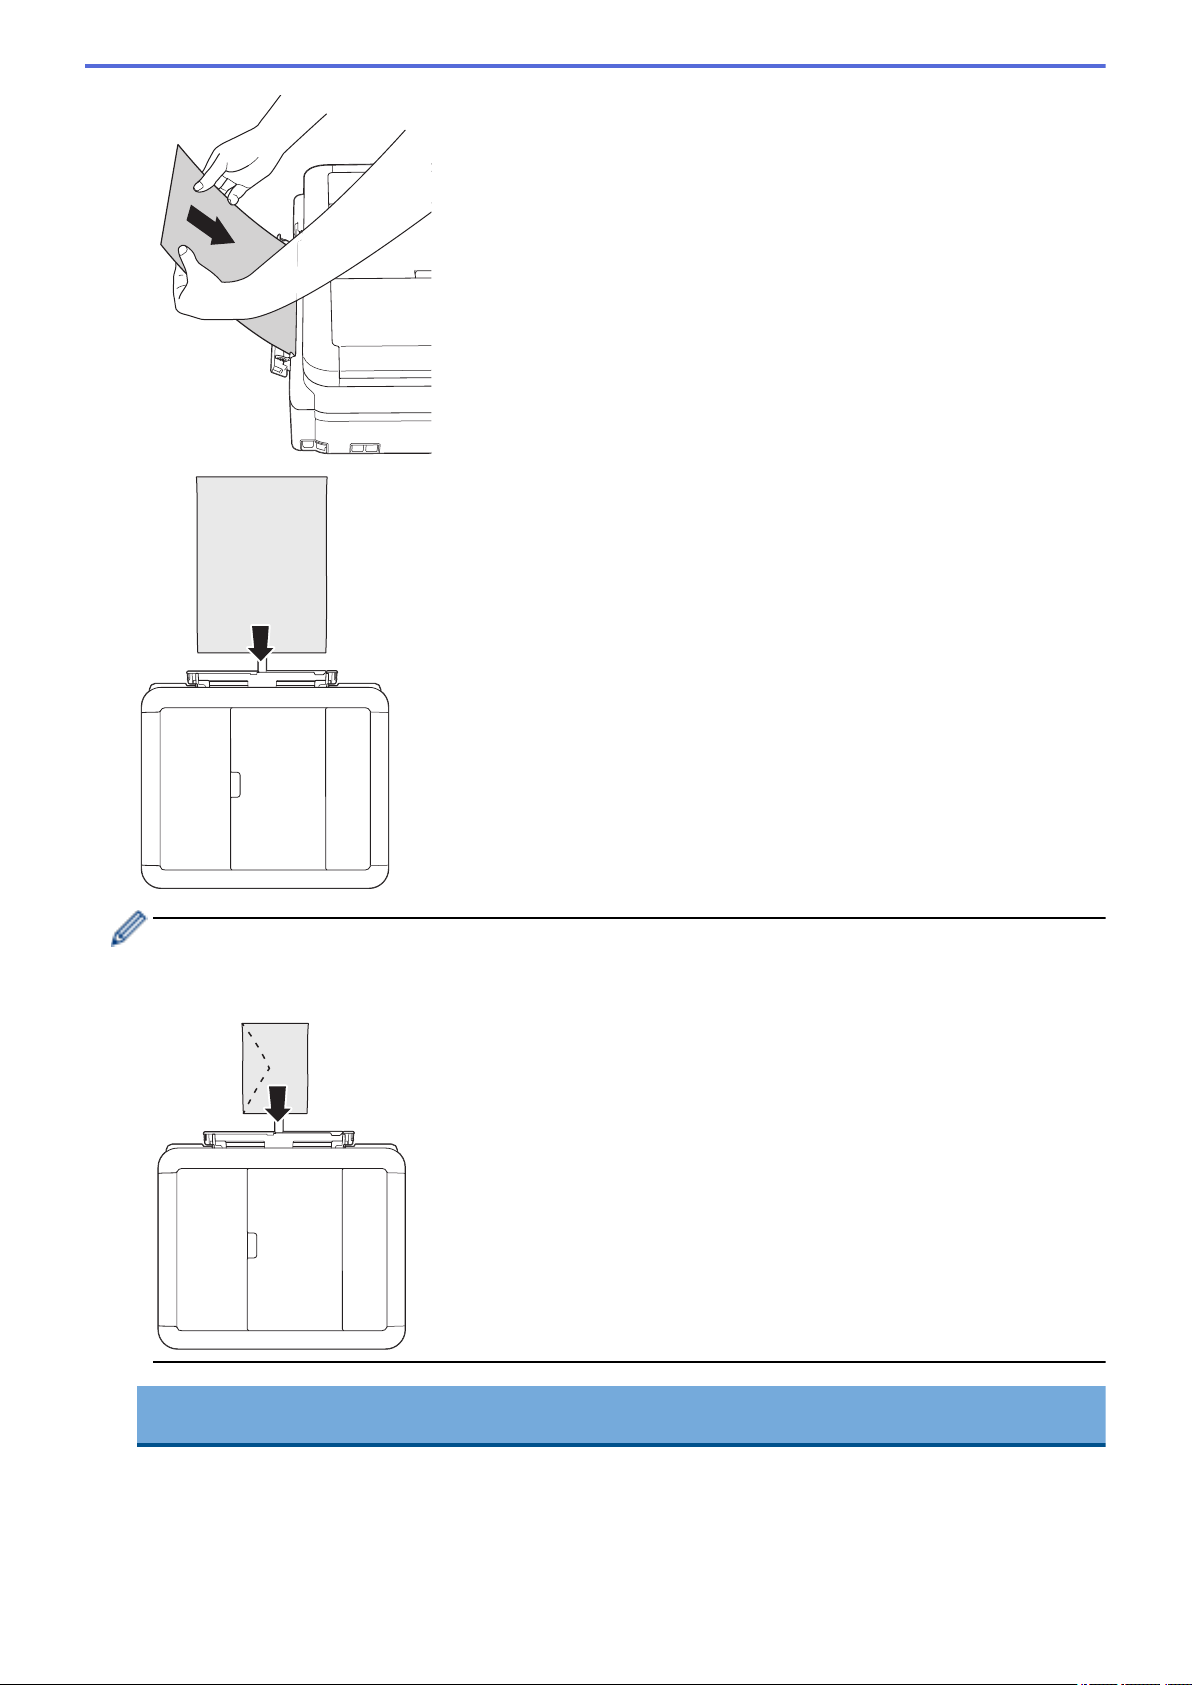
When using envelopes, load the envelopes with the printing surface face up and the flap on the left as
shown in the illustration.
See Related Information: About Envelopes.
IMPORTANT
• DO NOT load more than one sheet of paper in the manual feed slot at any time. Doing this may
cause a paper jam. When printing multiple pages, do not feed the next sheet of paper until the LCD
displays a message instructing you to feed the next sheet.
43
Page 51
• DO NOT load paper in the manual feed slot when you are printing from the paper tray. Doing this may
2
1
cause a paper jam.
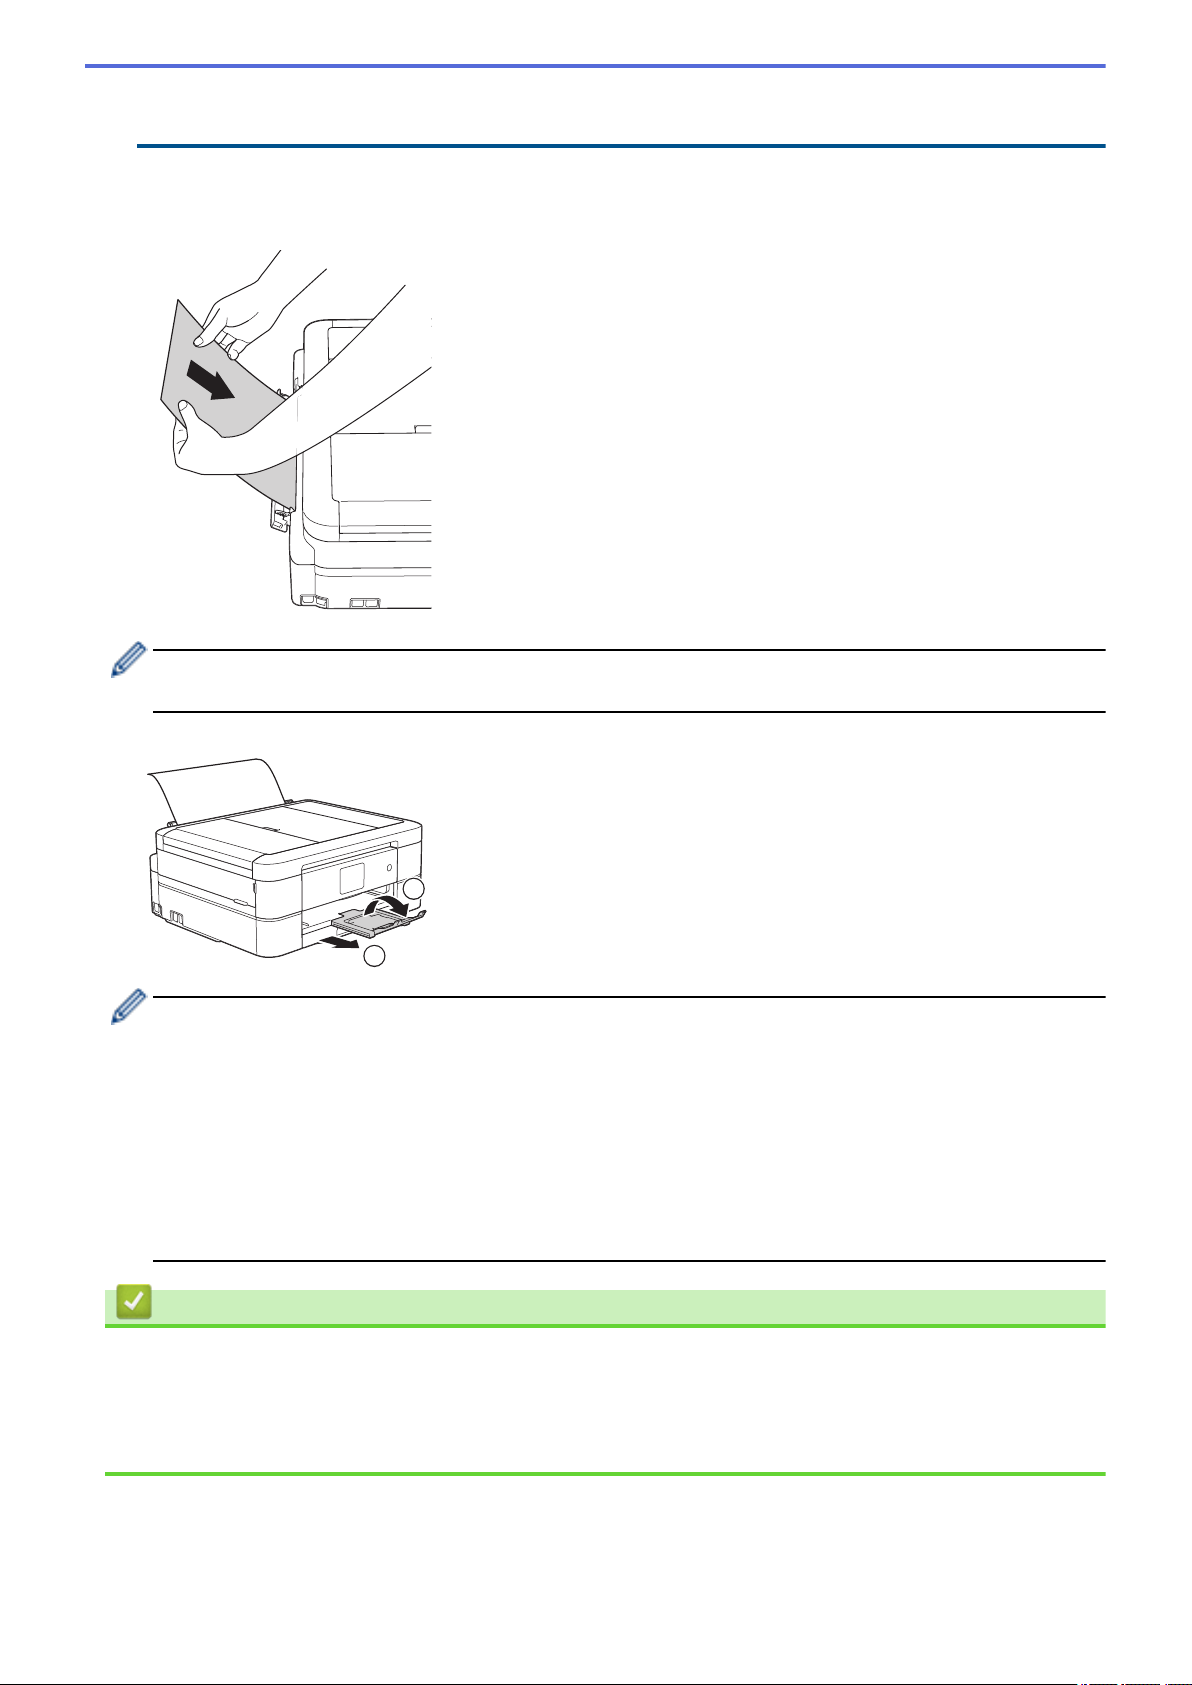
5. Using both hands, push one sheet of paper into the manual feed slot until the front edge touches the paper
feed rollers. Let go of the paper when you hear the machine pull it. The LCD displays [Manual Feed Slot
ready.]. Read the instruction displayed on the LCD, and then press [OK].
When loading an envelope, or a sheet of thick paper, push the envelope into the manual feed slot until you
feel the paper feed rollers pull it.
6. Pull out the paper support (1) until it locks into place, and then unfold the paper support flap (2).
• If the document does not fit on one sheet, the machine will prompt you to load another sheet of paper.
Place another sheet of paper in the manual feed slot, and then press [OK] on the machine's control
panel.
• Make sure printing has finished before you close the manual feed slot cover.
• When paper is placed in the manual feed slot, the machine always prints from the manual feed slot.
• The machine will eject paper loaded in the manual feed slot while a test page, fax, or report is being
printed.
• The machine will eject paper loaded in the manual feed slot during the machine's cleaning process.
Wait until the machine finishes its cleaning, and then load paper in the manual feed slot.
Related Information
• Load Paper
• About Envelopes
• Choose the Right Print Media
• Error and Maintenance Messages
44
Page 52
Home > Paper Handling > Load Paper > Unprintable Area
Unprintable Area
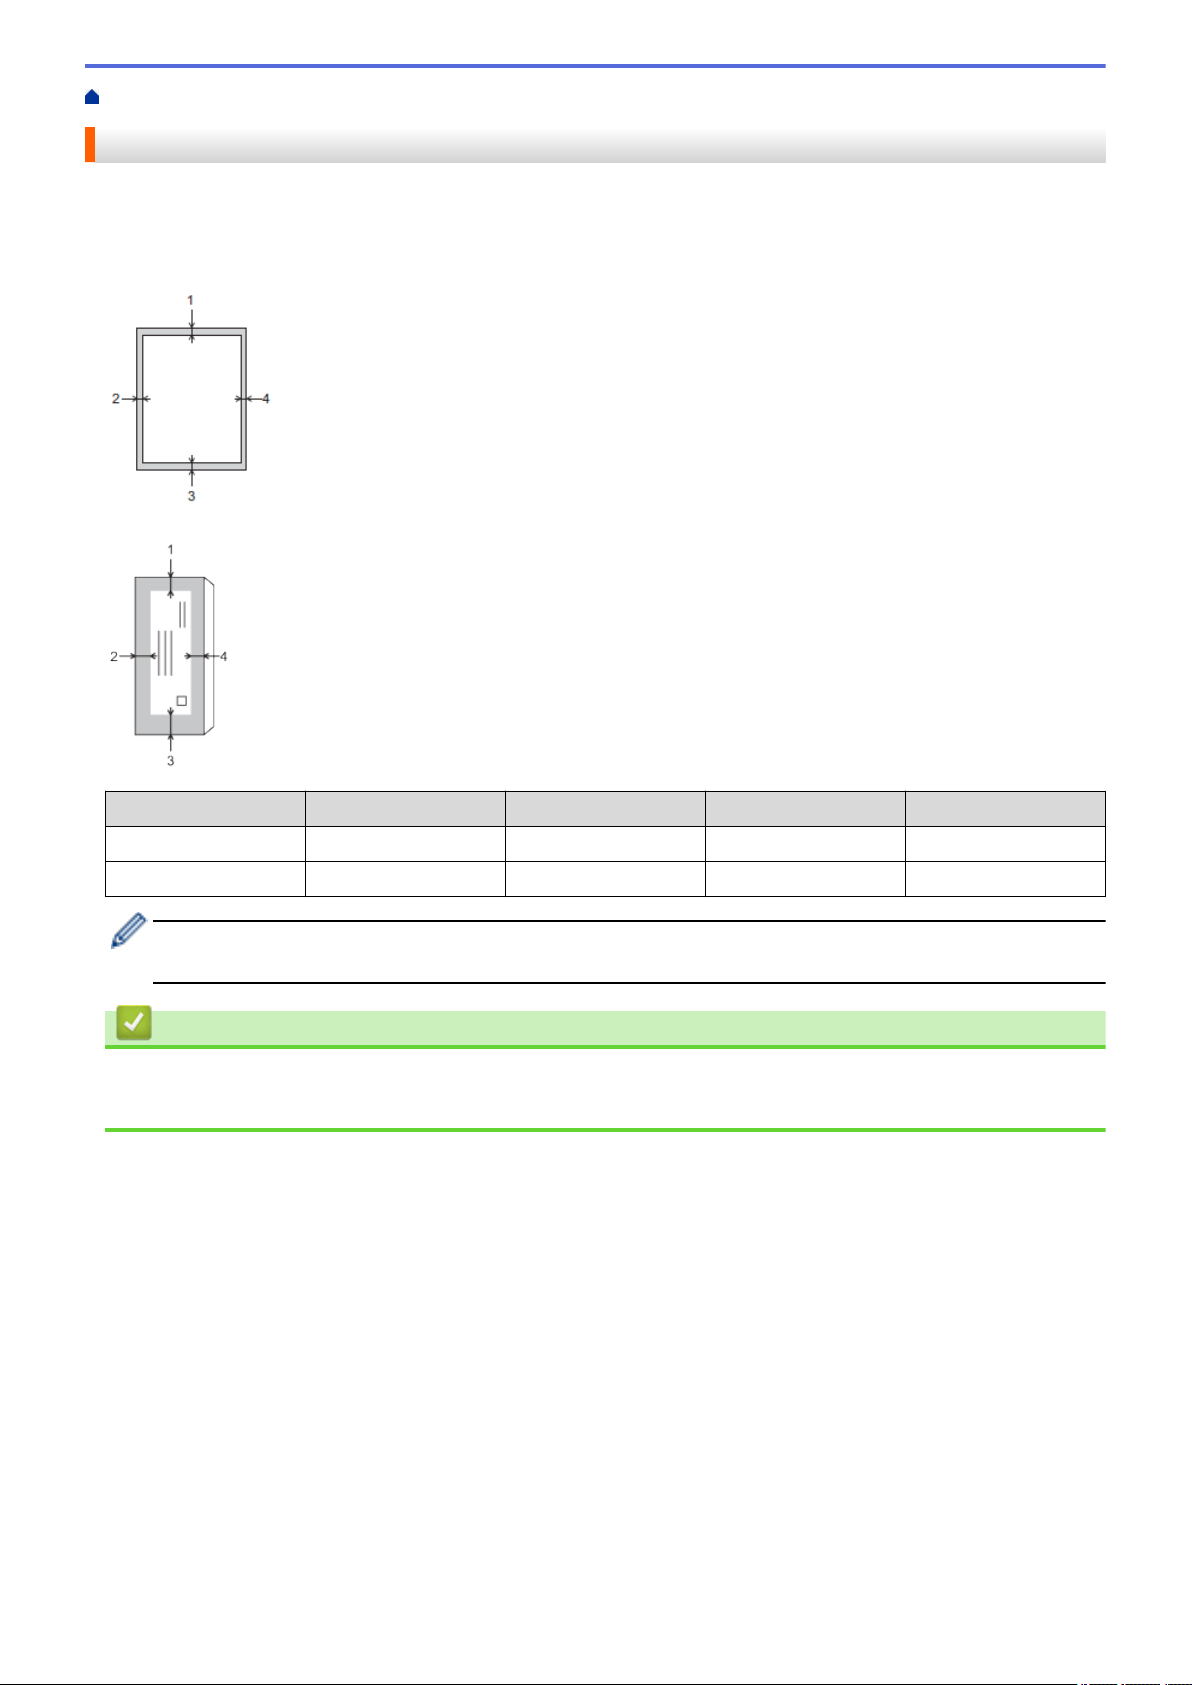
The unprintable area depends on the settings in the application you are using. The figures below show the
unprintable areas on cut-sheet paper and envelopes. The machine can print in the shaded areas of cut-sheet
paper only when the Borderless print feature is available and turned on.
Cut-Sheet Paper
Envelopes
Top (1)
Cut-Sheet 0.12 in. (3 mm) 0.12 in. (3 mm) 0.12 in. (3 mm) 0.12 in. (3 mm)
Envelopes 0.47 in. (12 mm) 0.12 in. (3 mm) 0.47 in. (12 mm) 0.12 in. (3 mm)
The Borderless print feature is not available for envelopes, 2-sided printing and some paper sizes, such as
Legal and Executive.
Left (2) Bottom (3) Right (4)
Related Information
• Load Paper
• Paper Handling and Printing Problems
45
Page 53

Home > Paper Handling > Load Paper > Paper Settings
Paper Settings
• Change the Paper Size and Paper Type
• Change the Check Paper Size Setting
• Shrink Page Size of an Oversized Incoming Fax
46
Page 54
Home > Paper Handling > Load Paper > Paper Settings > Change the Paper Size and Paper Type
Change the Paper Size and Paper Type
Set the Paper Size and Paper Type settings for the paper tray.
• To get the best print quality, set the machine for the type of paper you are using.
• When you change the size of the paper you load in the tray, you must change the Paper Size setting on the
LCD at the same time.
>> MFC-J491DW/MFC-J497DW
>> MFC-J690DW/MFC-J895DW
MFC-J491DW/MFC-J497DW
1. Press Settings.
2. Press a or b to select the following:
a. Select [General Setup]. Press OK.
b. Select [Paper Type]. Press OK.
c. Select [Plain Paper], [Inkjet Paper], [Brother BP71] or [Other Glossy]. Press OK.
d. Select [Paper Size]. Press OK.
e. Select the paper size option you want, and then press OK.
3. Press Stop/Exit.
The machine ejects paper with the printed surface face up onto the paper tray at the front of the machine.
When you use glossy paper, remove each sheet at once to prevent smudging or paper jams.
MFC-J690DW/MFC-J895DW
1. (MFC-J895DW) Press [Settings] > [Tray Setting].
2. (MFC-J690DW) Press
3. Press [Paper Type].
4. Press a or b to display the paper type options, and then press the option you want.
5. Press [Paper Size].
6. Press a or b to display the paper size options, and then press the option you want.
7. Press .
The machine ejects paper with the printed surface face up onto the paper tray at the front of the machine.
When you use glossy paper, remove each sheet at once to prevent smudging or paper jams.
[Settings].
Related Information
• Paper Settings
• Load Cut-Sheet Paper or Photo 2L Paper in the Paper Tray
• Load Photo Paper in the Paper Tray
• Load Envelopes in the Paper Tray
• Acceptable Paper and Other Print Media
• Error and Maintenance Messages
• Paper Handling and Printing Problems
47
Page 55
Home > Paper Handling > Load Paper > Paper Settings > Change the Check Paper Size Setting
Change the Check Paper Size Setting
If this setting is set to [On] and you pull the paper tray out of the machine, the LCD displays a message asking if
you want to change the Paper Size and Paper Type settings.
The default setting is [On].
>> MFC-J491DW/MFC-J497DW
>> MFC-J690DW/MFC-J895DW
MFC-J491DW/MFC-J497DW
1. Press Settings.
2. Press a or b to select the following:
a. Select [General Setup]. Press OK.
b. Select [Tray Setting]. Press OK.
c. Select [Check Paper]. Press OK.
d. Select [On] or [Off]. Press OK.
3. Press Stop/Exit.
MFC-J690DW/MFC-J895DW
1. Press [Settings] > [All Settings] > [General Setup].
2. Press a or b to display the [Check Paper] option, and then press it.
3. Press [On] or [Off].
4. Press .
Related Information
• Paper Settings
• Load Cut-Sheet Paper or Photo 2L Paper in the Paper Tray
• Load Photo Paper in the Paper Tray
• Load Envelopes in the Paper Tray
• Error and Maintenance Messages
48
Page 56

Home > Paper Handling > Load Paper > Acceptable Paper and Other Print Media
Acceptable Paper and Other Print Media
The print quality can be affected by the type of paper you use in the machine.
To get the best print quality for the settings you have selected, always set the Paper Type to match the type of
paper you load.
You can use plain paper, inkjet paper (coated paper), glossy paper, recycled paper and envelopes.
We recommend testing various paper types before buying large quantities.
For best results, use Brother paper.
• When you print on inkjet paper (coated paper) and glossy paper, be sure to select the correct print media in
the Basic tab of the printer driver or in the Paper Type setting on the machine.
• When you print on Brother Photo paper, load one extra sheet of the same photo paper in the paper tray.
• When using photo paper, remove each sheet at once to prevent smudging or paper jams.
• Avoid touching the printed surface of the paper immediately after printing; the surface may not be completely
dry and may stain your fingers.
Related Information
• Load Paper
• Recommended Print Media
• Handle and Use Print Media
• About Envelopes
• Choose the Right Print Media
• Change the Paper Size and Paper Type
• Paper Handling and Printing Problems
49
Page 57

Home > Paper Handling > Load Paper > Acceptable Paper and Other Print Media > Recommended Print
Media
Recommended Print Media
For the best print quality, we recommend using the Brother paper listed in the table.
Brother paper
Paper Type
Premium Plus Glossy Photo
Letter BP71GLTR
4" x 6" BP71GP20
Item
Related Information
• Acceptable Paper and Other Print Media
50
Page 58
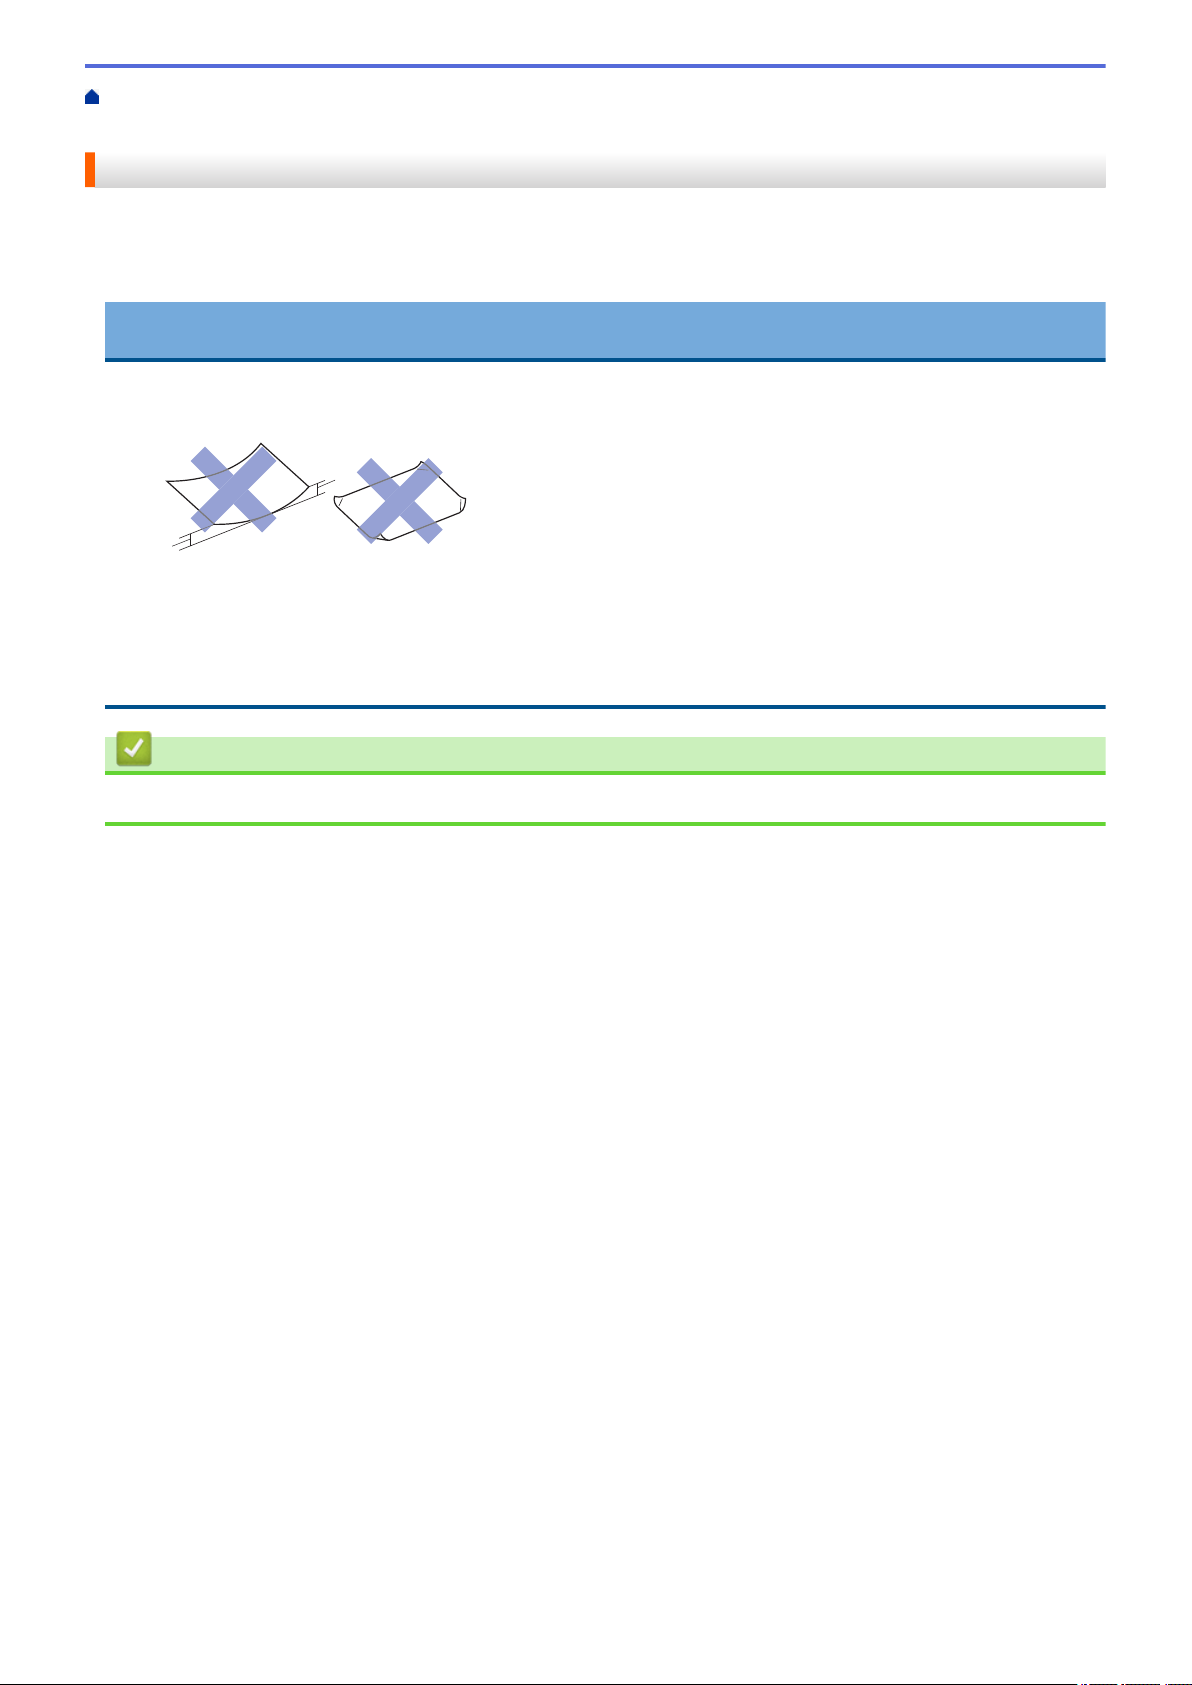
Home > Paper Handling > Load Paper > Acceptable Paper and Other Print Media > Handle and Use Print
1
1
Media
Handle and Use Print Media
• Store paper in its original packaging and keep it sealed. Keep the paper flat and away from moisture, direct
sunlight and heat.
• Avoid touching the shiny (coated) side of photo paper.
IMPORTANT
DO NOT use the following kinds of paper:
• Damaged, curled, wrinkled, or irregularly shaped
1. 0.08 in. (2 mm) or greater curl may cause jams to occur.
• Extremely shiny or highly textured
• Paper that cannot be arranged uniformly when stacked
• Paper made with a short grain
Related Information
• Acceptable Paper and Other Print Media
51
Page 59
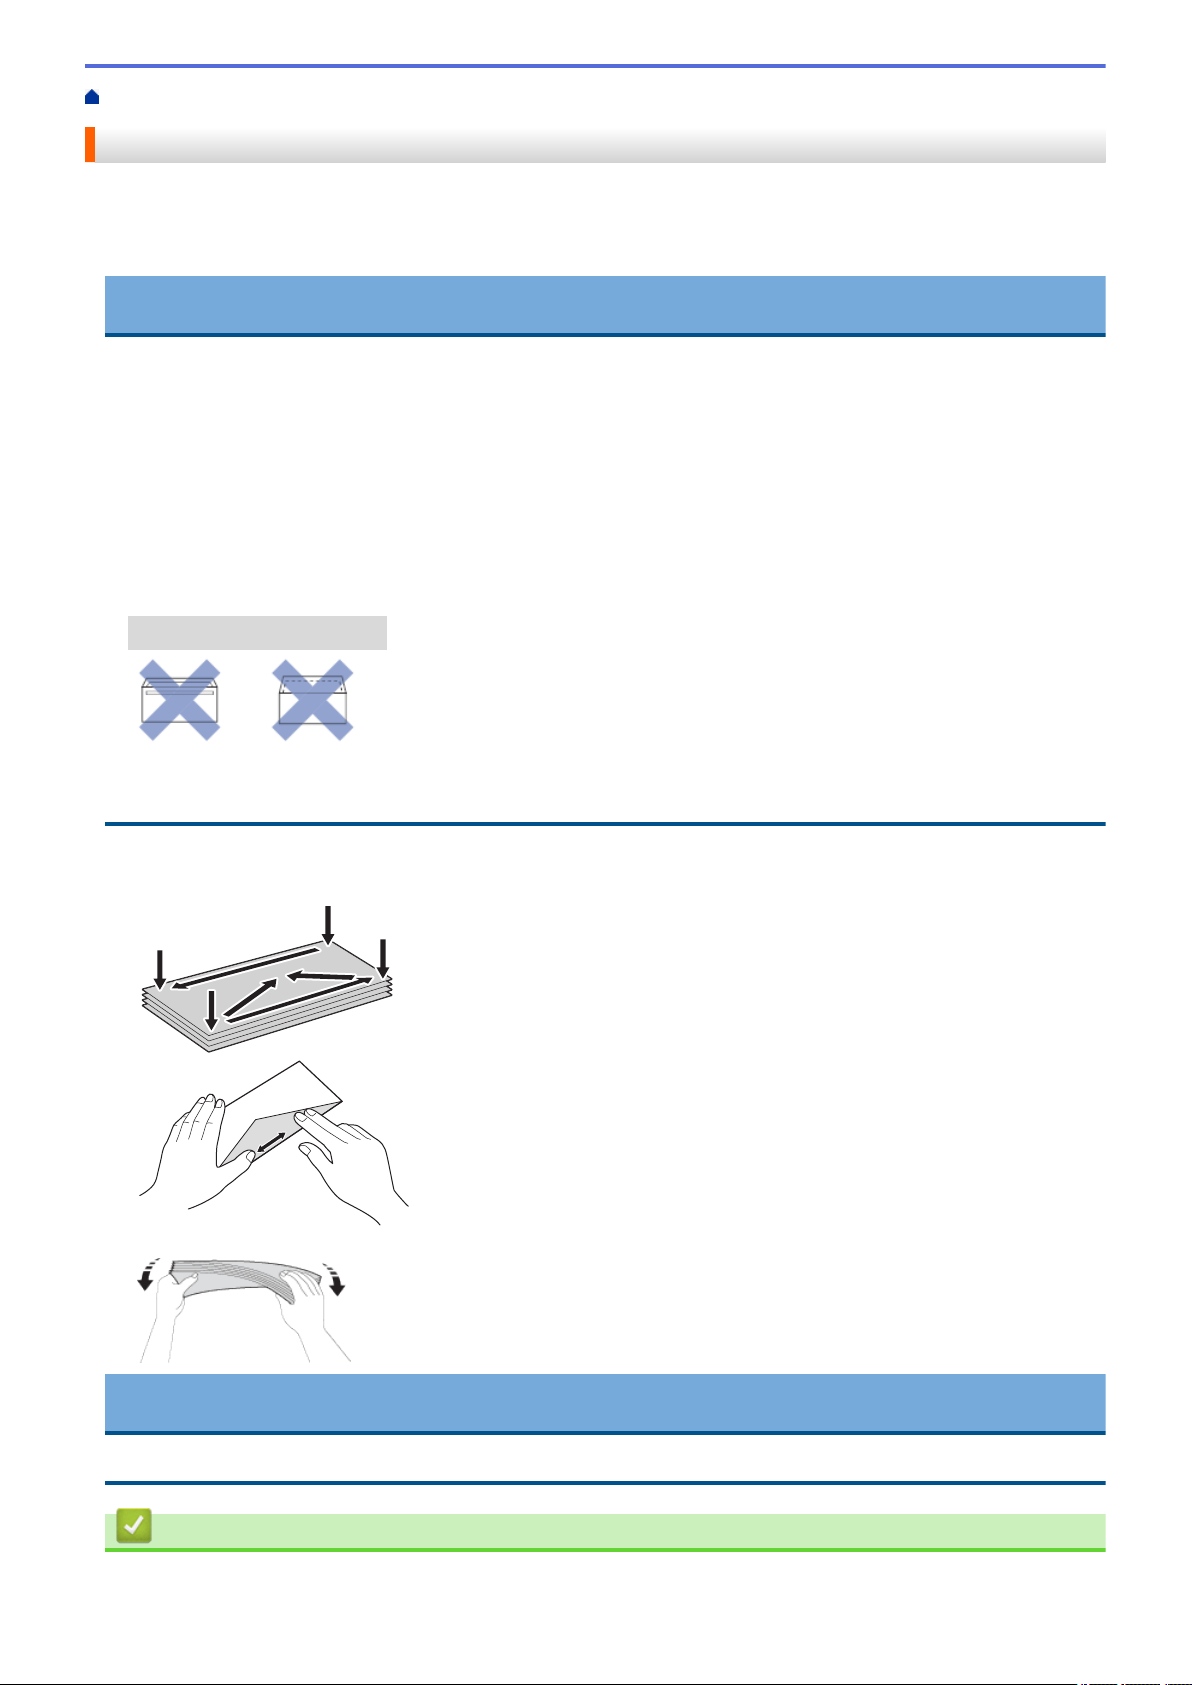
Home > Paper Handling > Load Paper > Acceptable Paper and Other Print Media > About Envelopes
About Envelopes
• Use envelopes that weigh from 20 to 25 lb (80 to 95 g/m²).
• Some envelope sizes require that you set margins in the application. Make sure you do a test print first before
printing many envelopes.
IMPORTANT
DO NOT use envelopes that:
• Are loosely constructed
• Have windows
• Are embossed (have raised writing on them)
• Have clasps or staples
• Are pre-printed on the inside
• Are self-adhesive
• Have double flaps
Self-adhesive
You may experience paper feed problems caused by the thickness, size and flap shape of the envelopes you
are using.
• Before loading envelopes in the tray, press the flaps, edges and corners to make them as flat as possible, as
shown in the illustrations.
Double flaps
Fan the stack of envelopes well to avoid paper jams and misfeeds.
IMPORTANT
If envelopes are "double-feeding," load one envelope in the paper tray at a time.
Related Information
• Acceptable Paper and Other Print Media
52
Page 60

• Load Envelopes in the Paper Tray
• Load Paper in the Manual Feed Slot
53
Page 61

Home > Paper Handling > Load Paper > Acceptable Paper and Other Print Media > Choose the Right Print
Media
Choose the Right Print Media
• Paper Type and Paper Size for Each Operation
• Paper Capacity of the Paper Trays
• Paper Weight and Thickness
• Load Cut-Sheet Paper or Photo 2L Paper in the Paper Tray
• Load Photo Paper in the Paper Tray
• Load Envelopes in the Paper Tray
• Load Paper in the Manual Feed Slot
54
Page 62
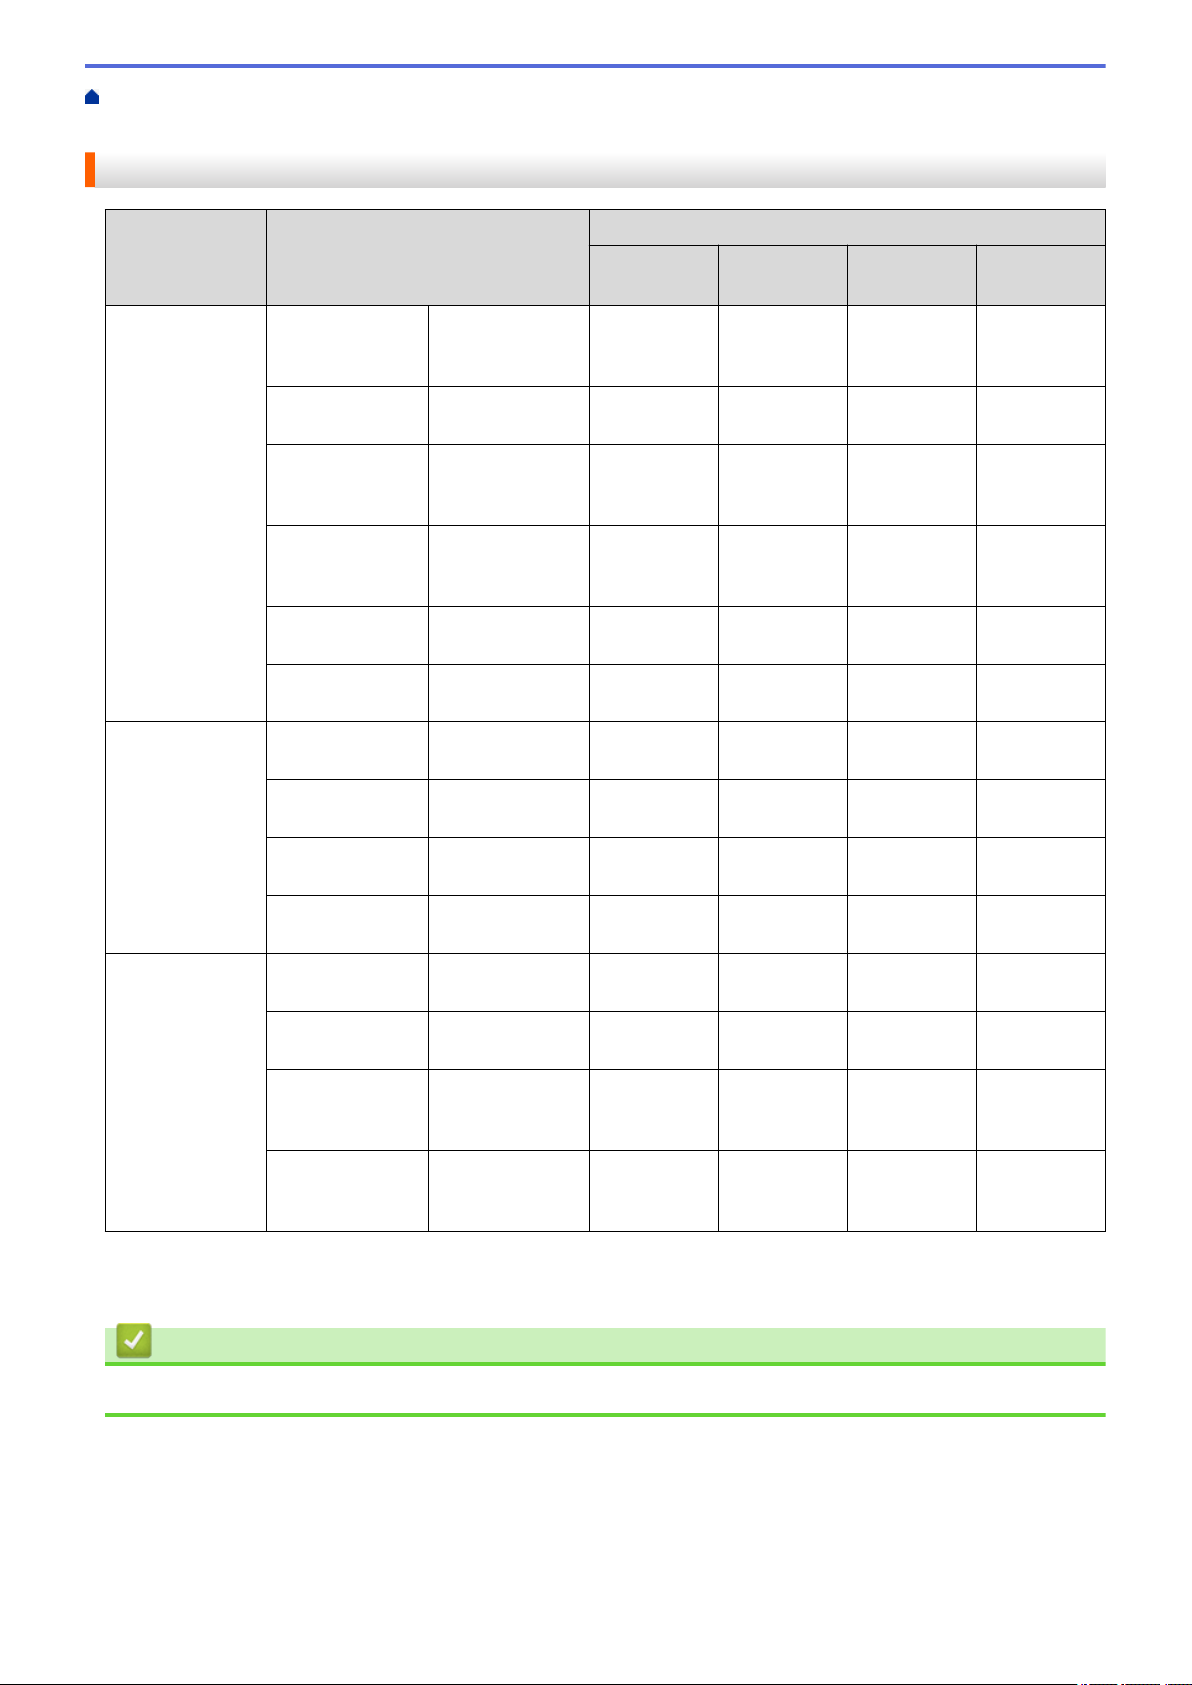
Home > Paper Handling > Load Paper > Acceptable Paper and Other Print Media > Choose the Right Print
Media > Paper Type and Paper Size for Each Operation
Paper Type and Paper Size for Each Operation
Paper Type Paper Size Usage
Fax
1
Copy Photo
Capture 2
Printer
Cut-Sheet Letter 8 1/2 x 11 in.
(215.9 x 279.4
mm)
A4 8.3 x 11.7 in.
(210 x 297 mm)
Legal 8 1/2 x 14 in.
(215.9 x 355.6
mm)
Executive 7 1/4 x 10 1/2 in.
(184.1 x 266.7
mm)
A5 5.8 x 8.3 in. (148
x 210 mm)
A6 4.1 x 5.8 in. (105
x 148 mm)
Cards Photo 4 x 6 in. (10 x 15
cm)
Photo L 3.5 x 5 in. (9 x 13
cm)
Photo 2L 5 x 7 in. (13 x 18
cm)
Yes Yes Yes Yes
Yes Yes Yes Yes
Yes Yes - Yes
- Yes - Yes
- Yes - Yes
- - - Yes
- Yes Yes Yes
- - - Yes
- - Yes Yes
Index Card 5 x 8 in. (13 x 20
cm)
Envelopes C5 Envelope 6.4 x 9 in. (162 x
229 mm)
DL Envelope 4.3 x 8.7 in. (110
x 220 mm)
Com-10 4 1/8 x 9 1/2 in.
(104.7 x 241.3
mm)
Monarch 3 7/8 x 7 1/2 in.
(98.4 x 190.5
mm)
1
MFC models only
2
MFC-J690DW/MFC-J895DW only
Related Information
• Choose the Right Print Media
- - - Yes
- - - Yes
- - - Yes
- - - Yes
- - - Yes
55
Page 63
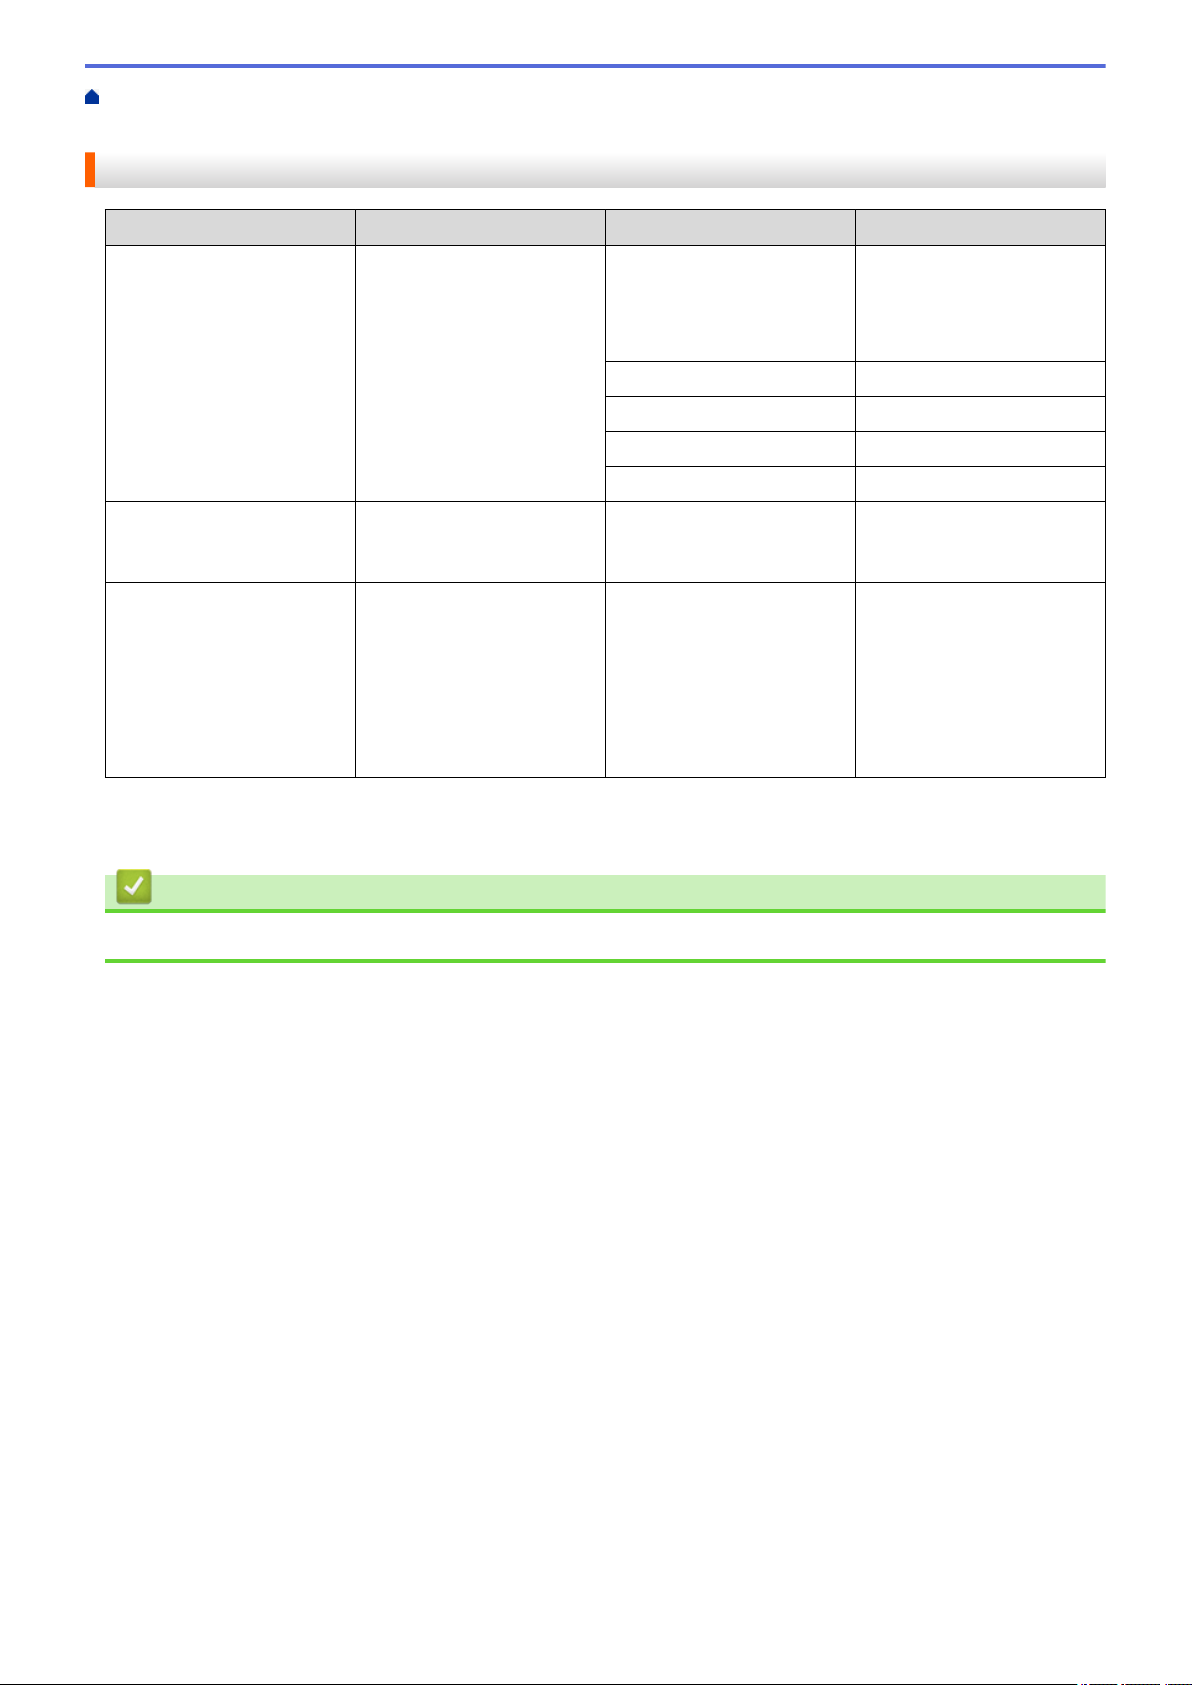
Home > Paper Handling > Load Paper > Acceptable Paper and Other Print Media > Choose the Right Print
Media > Paper Capacity of the Paper Trays
Paper Capacity of the Paper Trays
Paper Size Paper Types No. of sheets
Paper Tray Letter, A4, Legal, Executive,
A5, A6, Envelopes (C5,
Com-10, DL, Monarch),
Photo (4" x 6")/(10 x 15
cm), Photo 2L (5" x 7")/(13
x 18 cm), Index card (5" x
8")/(13 x 20 cm)
Photo Bypass Tray
(MFC-J690DW)
2
Photo (4" x 6")/(10 x 15 cm)
and Photo L (3.5" x 5")/(89
x 127 mm)
Plain Paper, Recycled
Paper
(MFC-J895DW) 150
(MFC-J491DW/
MFC-J497DW/
MFC-J690DW) 100
Inkjet Paper 20
Glossy Paper, Photo 20
Index Card 30
Envelopes 10
Plain Paper, Inkjet Paper,
20
Glossy Paper, Recycled
Paper and Photo
1
1
Manual Feed Slot
(MFC-J690DW/
MFC-J895DW)
Letter, A4, Legal, Executive,
A5, A6, Envelopes (C5,
Com-10, DL, Monarch),
Photo (4" x 6")/(10 x 15
cm), Photo L (3.5" x 5")/(9 x
13 cm), Photo 2L (5" x
7")/(13 x 18 cm), Index card
(5" x 8")/(13 x 20 cm)
1
When using plain paper 20 lb (80 g/m²)
2
In Canada, the Photo Bypass Tray is called the Photo Paper Tray.
Related Information
• Choose the Right Print Media
Plain Paper, Inkjet Paper,
Glossy Paper, Recycled
Paper, Photo and
Envelopes
1
56
Page 64
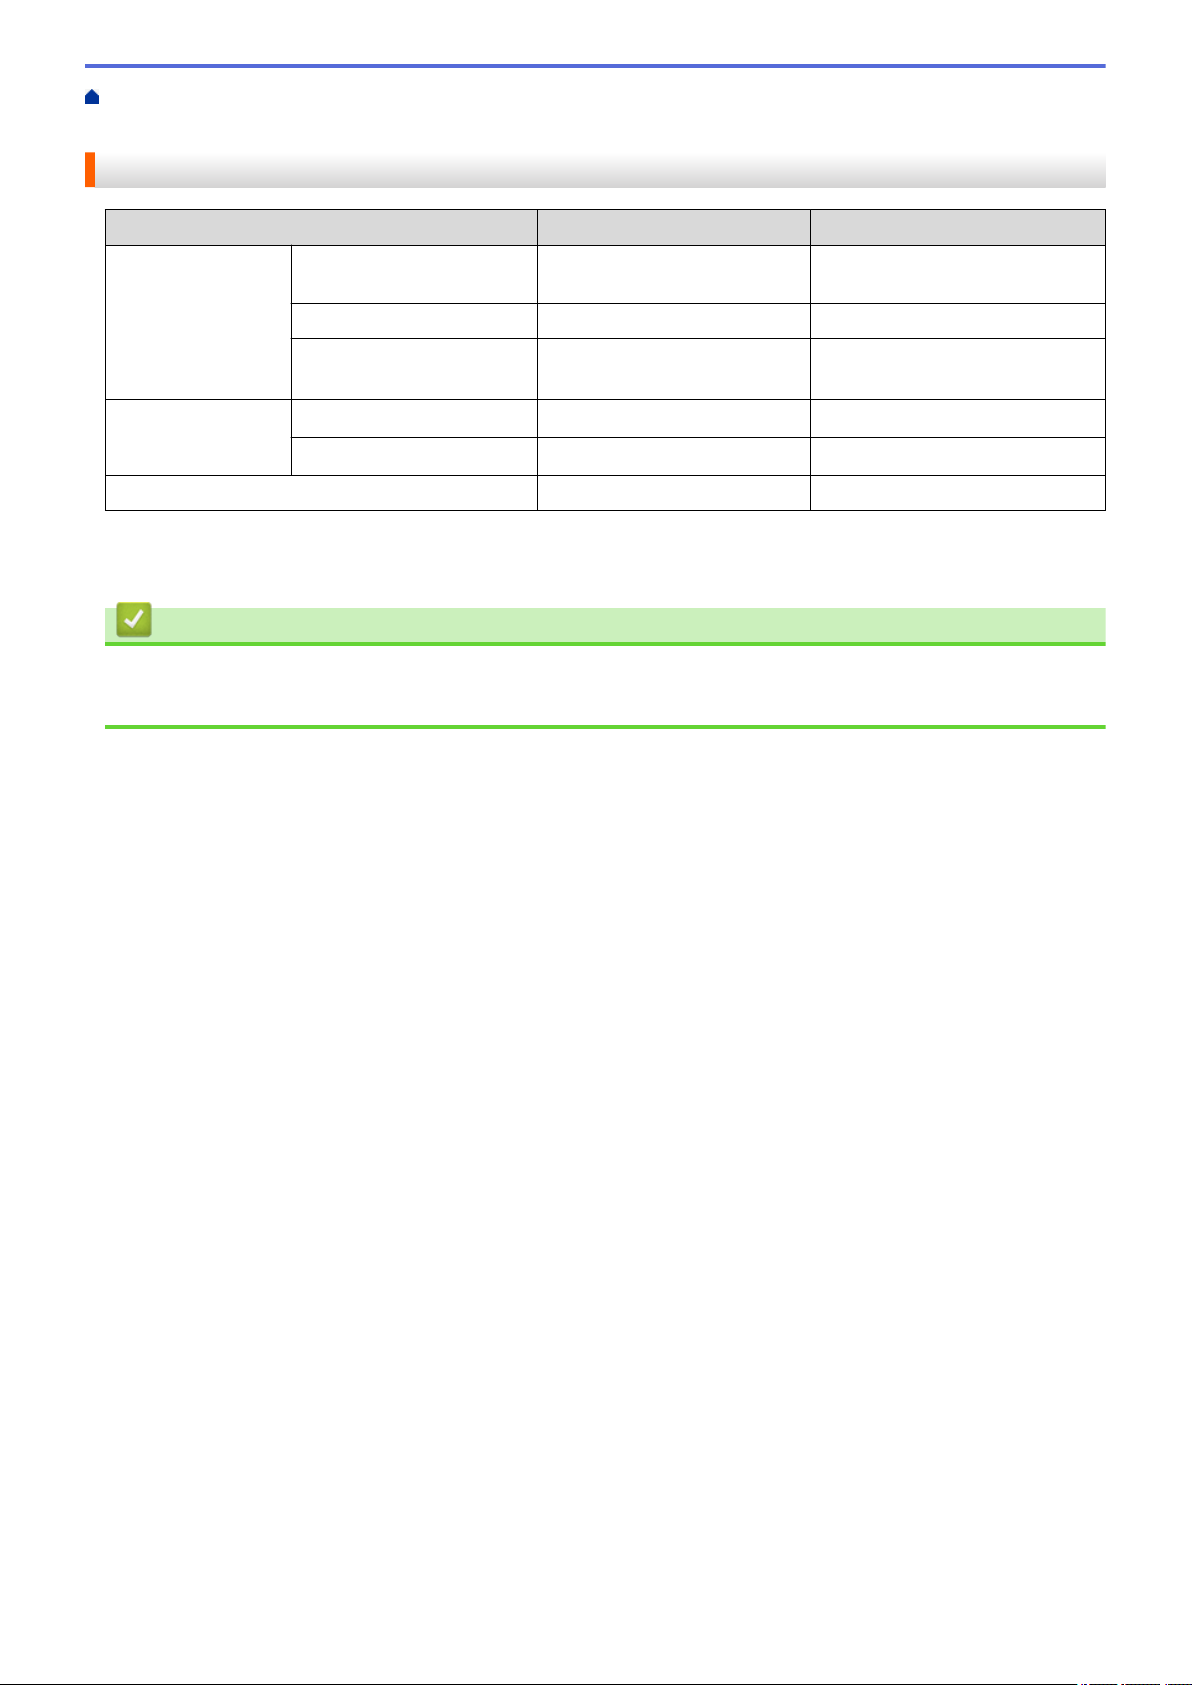
Home > Paper Handling > Load Paper > Acceptable Paper and Other Print Media > Choose the Right Print
Media > Paper Weight and Thickness
Paper Weight and Thickness
Paper Type Weight Thickness
Cut-Sheet Plain Paper, Recycled
17 to 32 lb (64 to 120 g/m²) 3 to 6 mil (0.08 to 0.15 mm)
Paper
Inkjet Paper 17 to 53 lb (64 to 200 g/m²) 3 to 10 mil (0.08 to 0.25 mm)
Cards
Glossy Paper 1
Photo Card
Index Card
1 2
2
2
Up to 58 lb (Up to 220 g/m²) Up to 10 mil (Up to 0.25 mm)
Up to 58lb (Up to 220 g/m²) Up to 10 mil (Up to 0.25 mm)
Up to 32 lb (Up to 120 g/m²) Up to 6 mil (Up to 0.15 mm)
Envelopes 20 to 25 lb (80 to 95 g/m²) Up to 20 mil (Up to 0.52 mm)
1
BP71 69 lb (260 g/m²) paper is specially designed for Brother inkjet machines.
2
Up to 79 lb (Up to 300 g/m²) for Manual Feed Slot (MFC-J690DW/MFC-J895DW)
Related Information
• Choose the Right Print Media
• Paper Handling and Printing Problems
57
Page 65

Home > Paper Handling > Load Documents
Load Documents
• Load Documents in the Automatic Document Feeder (ADF)
• Load Documents on the Scanner Glass
• Unscannable Area
58
Page 66
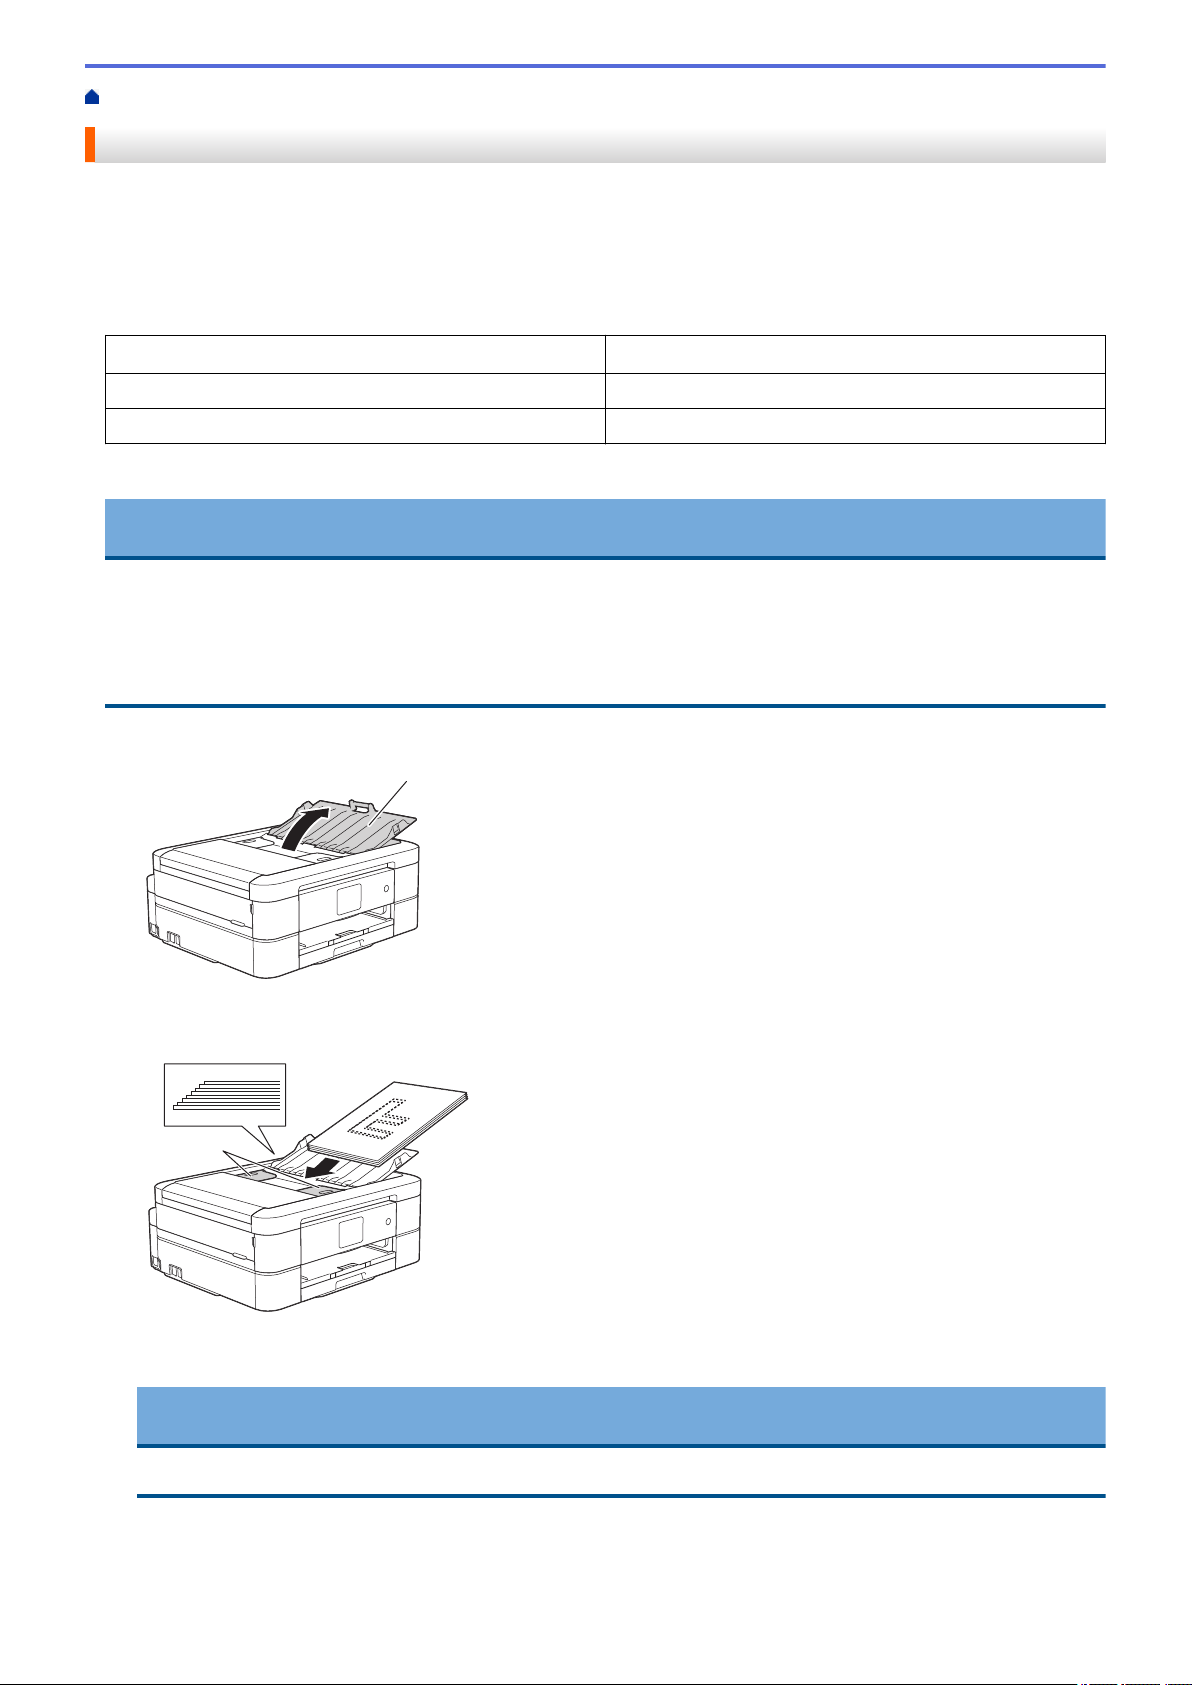
Home > Paper Handling > Load Documents > Load Documents in the Automatic Document Feeder (ADF)
1
1
Load Documents in the Automatic Document Feeder (ADF)
The ADF can hold multiple pages and feeds each sheet individually.
Use paper that is within the sizes and weights shown in the table. Always fan the pages before placing them in
the ADF.
Document Sizes and Weights
Length 1:
Width: 5.8 to 8.5 in. (148 to 215.9 mm)
Paper Weight: 17 to 24 lb (64 to 90 g/m²)
1
Documents that are longer than 11.7 in. (297 mm) must be fed one page at a time.
5.8 to 14.0 in. (148 to 355.6 mm)
IMPORTANT
• DO NOT pull on the document while it is feeding.
• DO NOT use paper that is curled, wrinkled, folded, ripped, stapled, paper clipped, pasted or taped.
• DO NOT use cardboard, newspaper or fabric.
• Make sure documents with correction fluid or written in ink are completely dry.
1. Lift up and unfold the ADF document support (1).
2. Fan the stack of paper well to avoid paper jams and misfeeds.
3. Adjust the paper guides (1) to fit the document size.
4. Place your document, face down, top edge first in the ADF underneath the paper guides until you feel the
document touch the feed rollers and the LCD displays [ADF Ready.].
IMPORTANT
DO NOT leave any documents on the scanner glass. If you do this, the ADF may jam.
59
Page 67

Related Information
• Load Documents
• Copy a Document
• Error and Maintenance Messages
• Telephone and Fax Problems
• Other Problems
60
Page 68
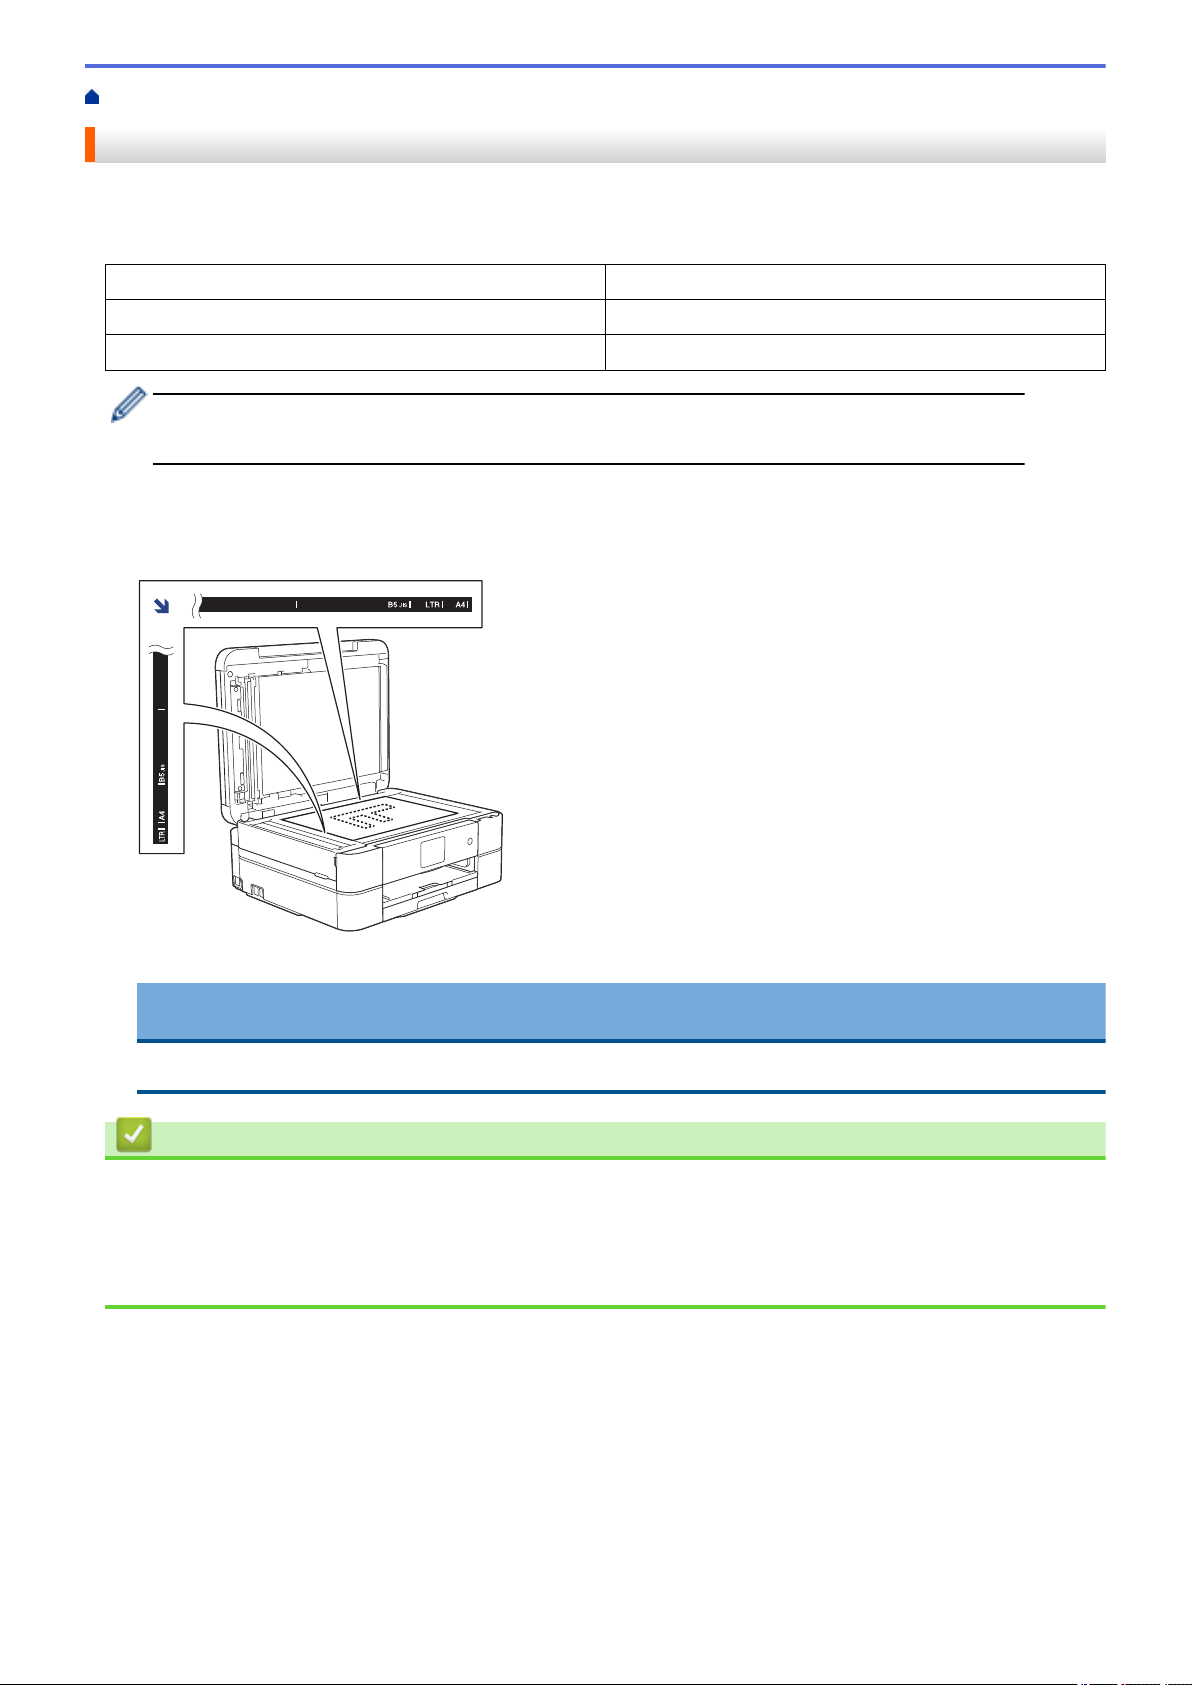
Home > Paper Handling > Load Documents > Load Documents on the Scanner Glass
Load Documents on the Scanner Glass
Use the scanner glass to fax, copy, or scan one page at a time.
Document Sizes Supported
Length:
Width: Up to 8.5 in. (215.9 mm)
Weight: Up to 4.4 lb (2 kg)
(ADF models)
To use the scanner glass, the ADF must be empty and the ADF document support must be closed.
1. Lift the document cover.
2. Place the document face down in the upper left corner of the scanner glass, aligned with the arrow as shown
in the illustration.
Up to 11.7 in. (297 mm)
3. Close the document cover.
IMPORTANT
If you are scanning a book or thick document, DO NOT slam or press on the document cover.
Related Information
• Load Documents
• Copy a Document
• Telephone and Fax Problems
• Other Problems
61
Page 69
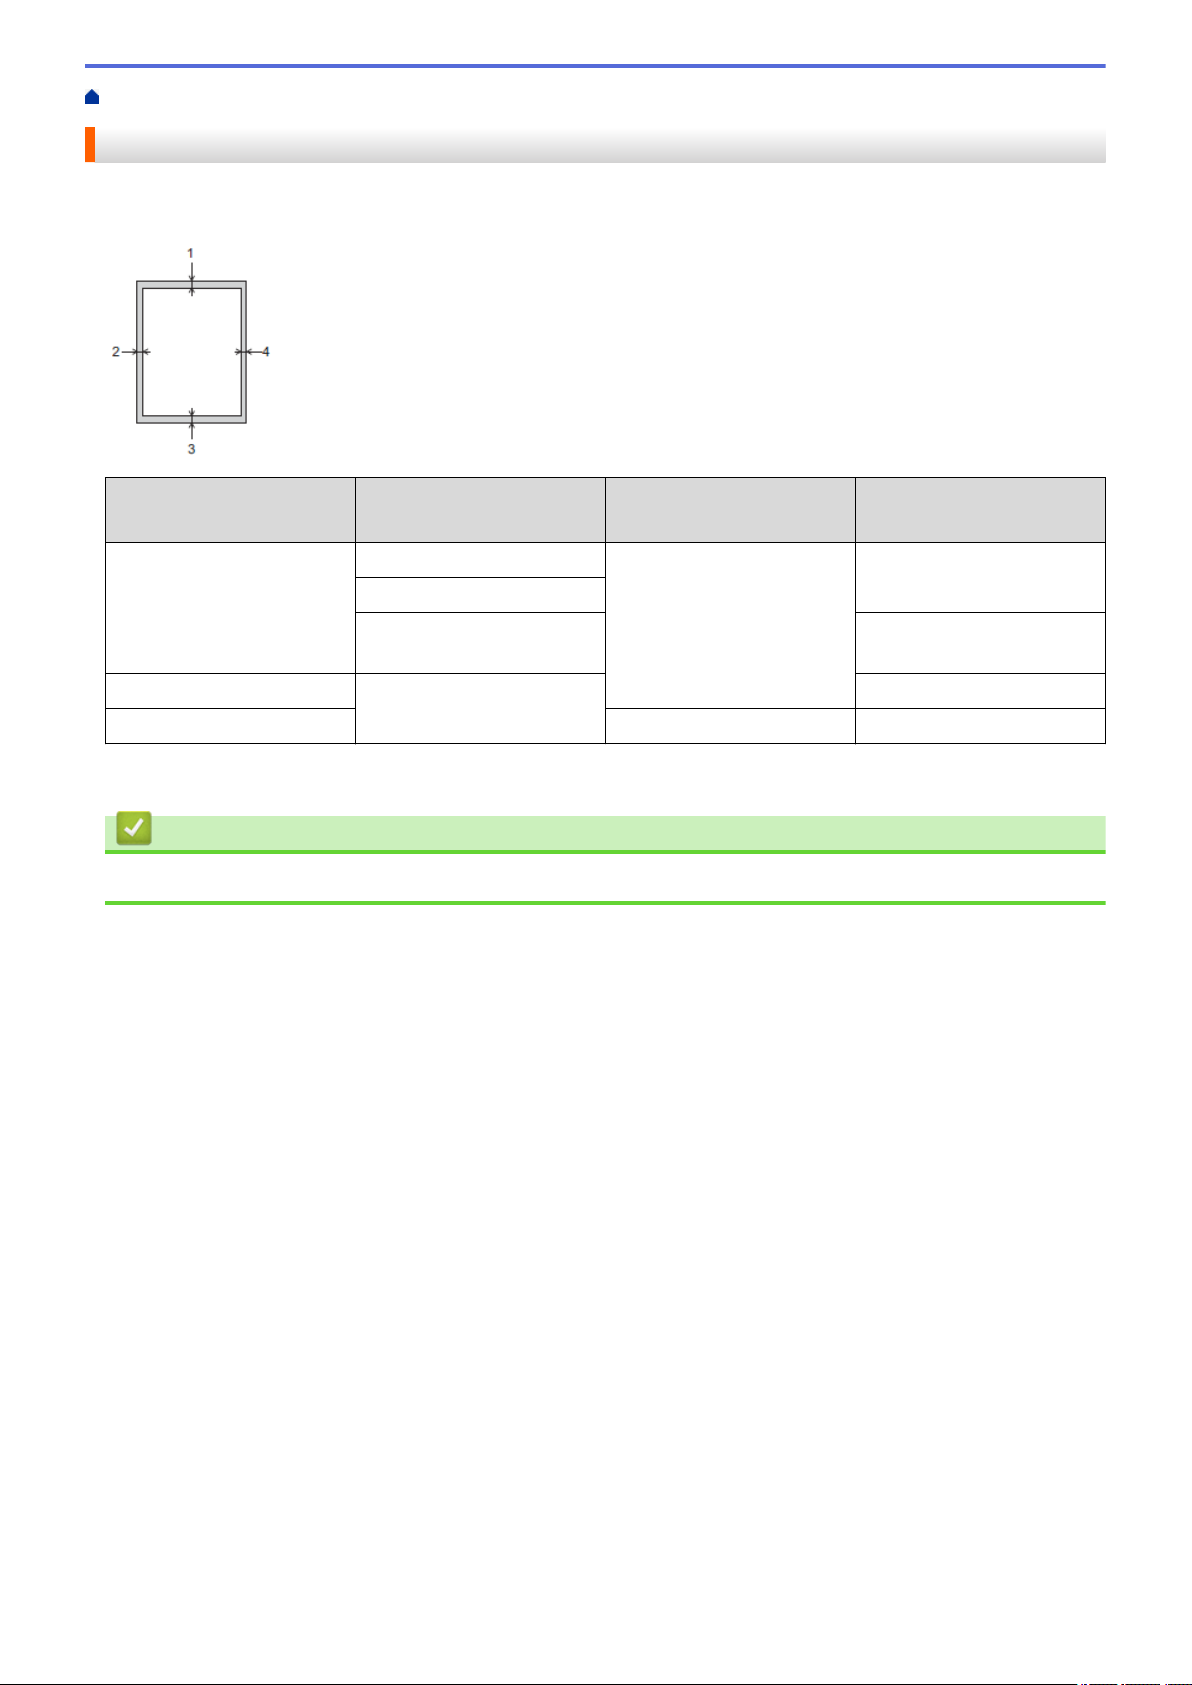
Home > Paper Handling > Load Documents > Unscannable Area
Unscannable Area
The unscannable area of a page depends on the settings in the application you are using. The figures below
show the typical unscannable measurements.
Usage Document Size Top (1)
Bottom (3)
Fax Letter 0.12 in. (3 mm) 0.16 in. (4 mm)
Legal
A4
Copy All paper sizes 0.12 in. (3 mm)
Scan 0.04 in. (1 mm) 0.04 in. (1 mm)
1
The unscannable area is 0.04 in. (1 mm) when using the ADF.
Left (2)
Right (4)
0.12 in. (3 mm)
Related Information
• Load Documents
1
62
Page 70

Home > Print
•
Print from Your Computer (Windows®)
• Print from Your Computer (Mac)
63
Page 71

Home > Print > Print from Your Computer (Windows®)
Print from Your Computer (Windows®)
•
Print a Photo (Windows®)
•
Print a Document (Windows®)
•
Cancel a Print Job (Windows®)
•
Print More Than One Page on a Single Sheet of Paper (N in 1) (Windows®)
•
Print as a Poster (Windows®)
•
Print on Both Sides of the Paper Automatically (Automatic 2-sided Printing) (Windows®)
•
Print as a Booklet Automatically (Windows®)
•
Print a Color Document in Grayscale (Windows®)
•
Prevent Smudged Printouts and Paper Jams (Windows®)
•
Use a Preset Print Profile (Windows®)
•
Change the Default Print Settings (Windows®)
•
Print Settings (Windows®)
64
Page 72
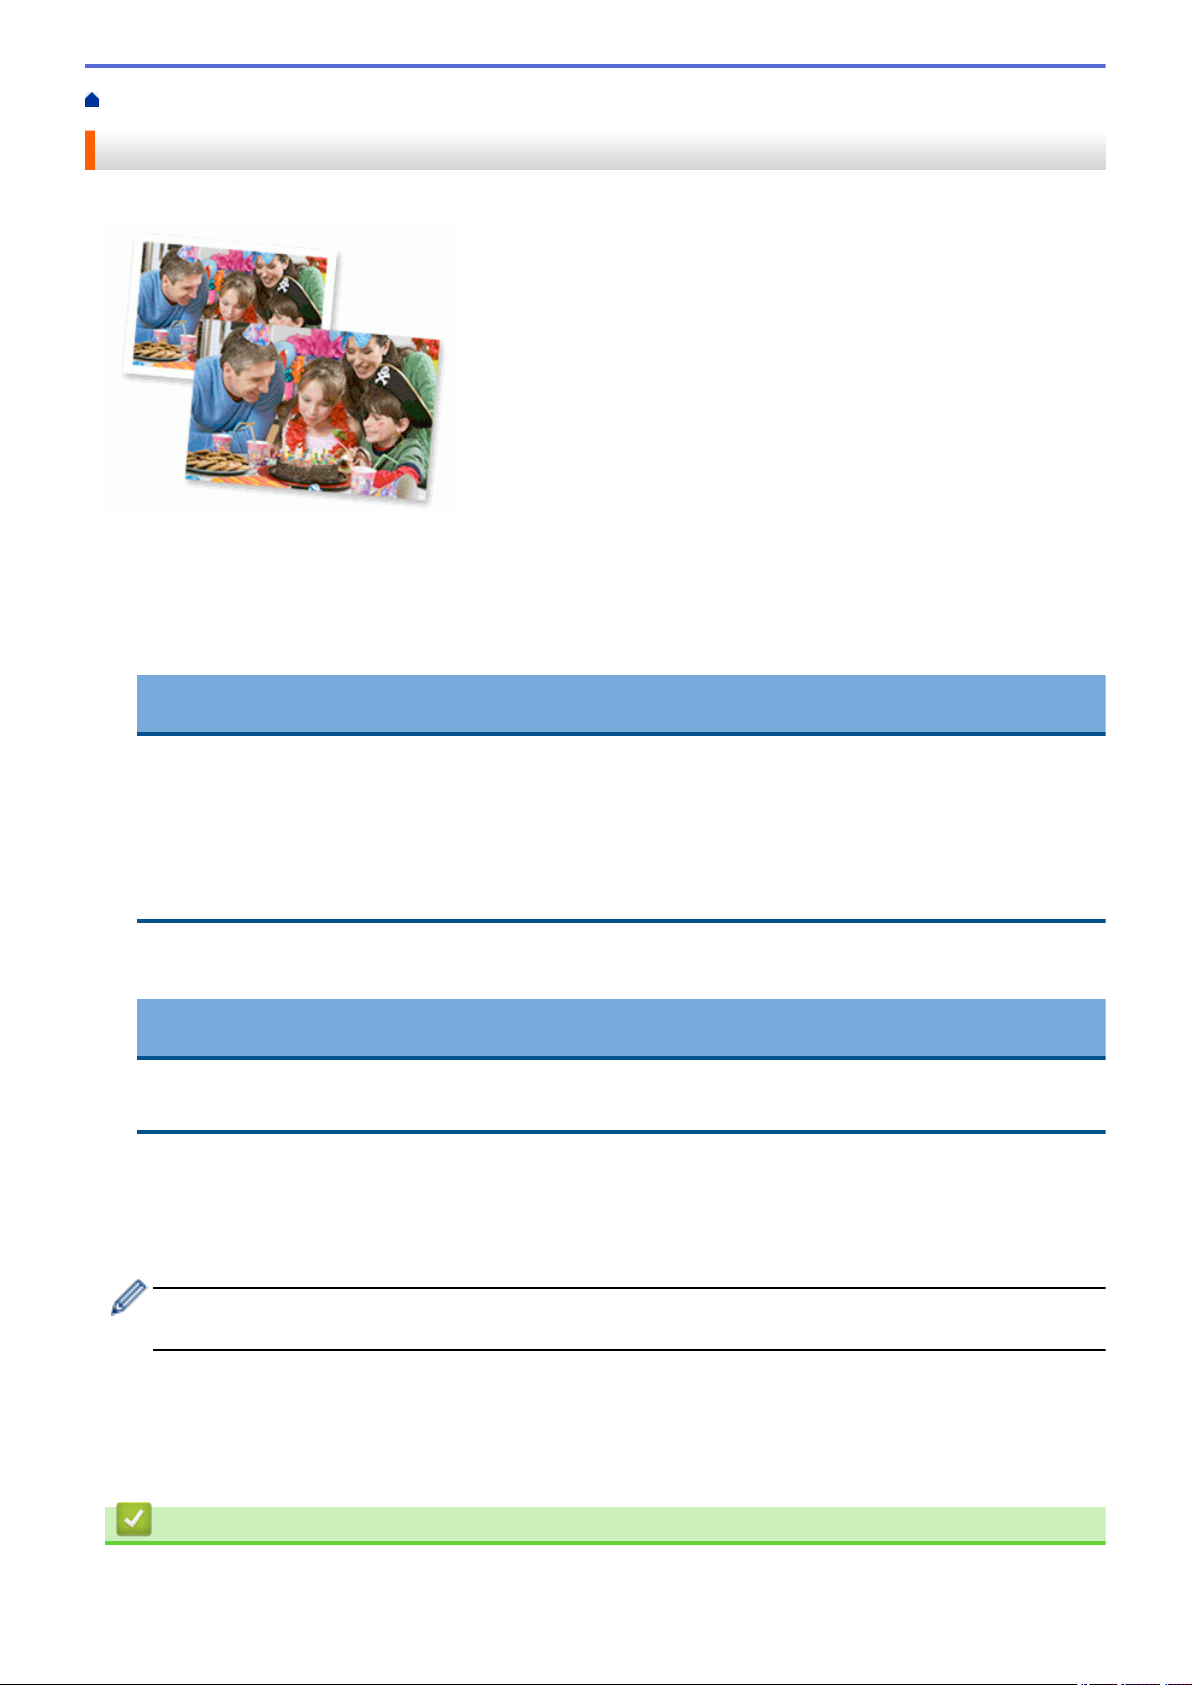
Home > Print > Print from Your Computer (Windows®) > Print a Photo (Windows®)
Print a Photo (Windows®)
1. Select the print command in your application.
2. Select Brother MFC-XXXX Printer (where XXXX is the name of your model), and then click the printing
properties or preferences button.
The printer driver window appears.
3. Make sure you have loaded the correct media in the paper tray.
IMPORTANT
• We recommend using the photo bypass tray located on the top of the output tray cover to print on
Photo (4" x 6")/(10 x 15 cm) and Photo L (3.5" x 5")/(9 x 13 cm) paper. (Available only for certain
models)
• For best results, use Brother paper.
• When you print on Brother photo paper, load one extra sheet of the same photo paper in the paper
tray.
4. Click the Basic tab.
5. Click the Media Type drop-down list, and then select the type of paper you are using.
IMPORTANT
To get the best print quality for the settings you have selected, always set the Media Type option to
match the type of paper you load.
6. Click the Paper Size drop-down list, and then select your paper size.
7. Select the Borderless check box, if needed.
8. For Color Mode, select the Natural or Vivid option.
9. In the Orientation field, select the Portrait or Landscape option to set the orientation of your printout.
If your application contains a similar setting, we recommend that you set the orientation using the
application.
10. Type the number of copies (1-999) you want in the Copies field.
11. Change other printer settings, if needed.
12. Click OK.
13. Complete your print operation.
Related Information
• Print from Your Computer (Windows®)
65
Page 73

• Print Settings (Windows®)
66
Page 74
Home > Print > Print from Your Computer (Windows®) > Print a Document (Windows®)
Print a Document (Windows®)
1. Select the print command in your application.
2. Select Brother MFC-XXXX Printer (where XXXX is the name of your model), and then click the printing
properties or preferences button.
The printer driver window appears.
3. Make sure you have loaded the correct size paper in the paper tray.
4. Click the Basic tab.
5. Click the Media Type drop-down list, and then select the type of paper you are using.
IMPORTANT
To get the best print quality for the settings you have selected, always set the Media Type option to
match the type of paper you load.
6. Click the Paper Size drop-down list, and then select your paper size.
7. For Color Mode, select the Natural or Vivid option.
8. In the Orientation field, select the Portrait or Landscape option to set the orientation of your printout.
If your application contains a similar setting, we recommend that you set the orientation using the
application.
9. Type the number of copies (1-999) you want in the Copies field.
10. To print multiple pages on a single sheet of paper or print one page of your document on multiple sheets,
click the Multiple Page drop-down list, and then select your options.
11. Change other printer settings, if needed.
12. Click OK.
13. Complete your print operation.
Related Information
• Print from Your Computer (Windows®)
• Check the Ink Volume
• Print Settings (Windows®)
67
Page 75

Home > Print > Print from Your Computer (Windows®) > Cancel a Print Job (Windows®)
Cancel a Print Job (Windows®)
If a print job was sent to the print queue and did not print, or was sent to the print queue in error, you may have to
delete it to allow subsequent jobs to print.
1. Double-click the printer icon
2. Select the print job you want to cancel.
3. Click the Document menu.
4. Select Cancel.
5. Click Yes.
in the task tray.
Related Information
• Print from Your Computer (Windows®)
• Monitor Machine Status from Your Computer (Windows®)
68
Page 76
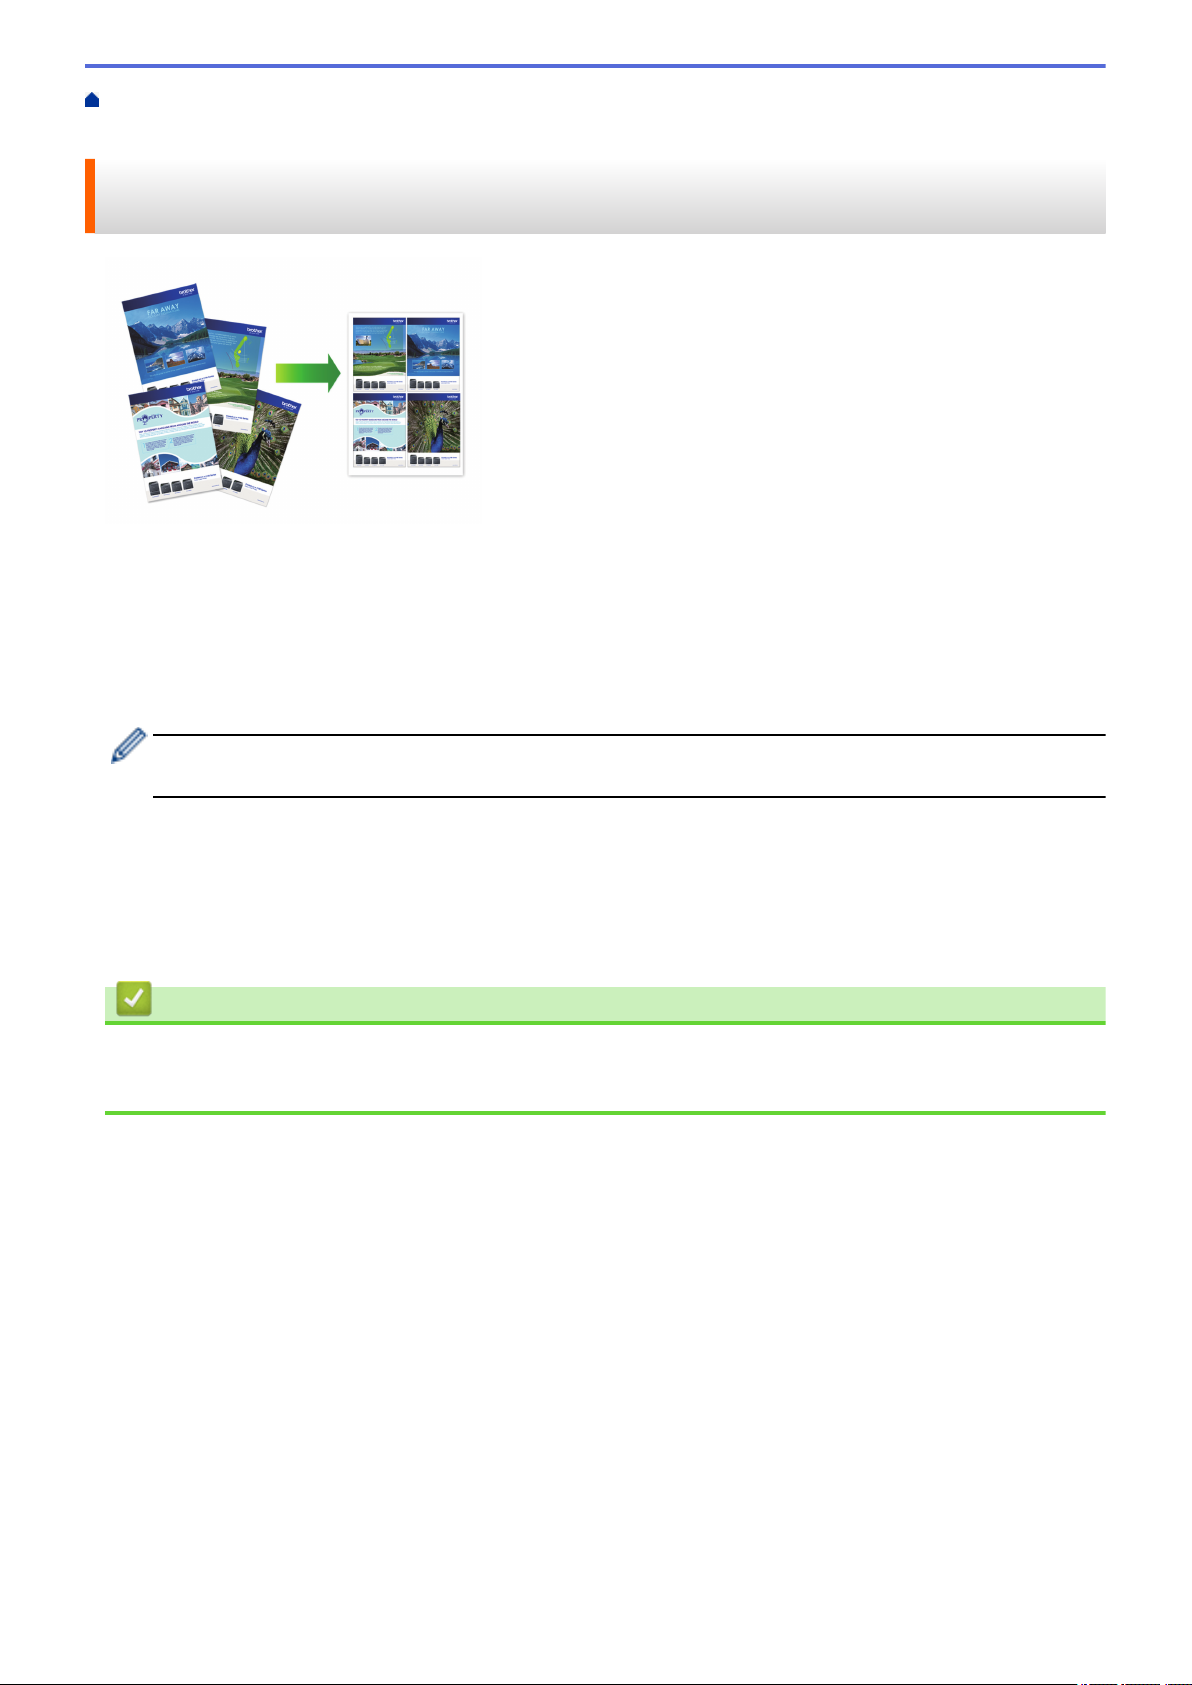
Home > Print > Print from Your Computer (Windows®) > Print More Than One Page on a Single Sheet of
Paper (N in 1) (Windows®)
Print More Than One Page on a Single Sheet of Paper (N in 1) (Windows®)
1. Select the print command in your application.
2. Select Brother MFC-XXXX Printer (where XXXX is the name of your model), and then click the printing
properties or preferences button.
The printer driver window appears.
3. Click the Basic tab.
4. In the Orientation field, select the Portrait or Landscape option to set the orientation of your printout.
If your application contains a similar setting, we recommend that you set the orientation using the
application.
5. Click the Multiple Page drop-down list, and then select the 2 in 1, 4 in 1, 9 in 1, or 16 in 1 option.
6. Click the Page Order drop-down list, and then select your page order.
7. Click the Border Line drop-down list, and then select your border line type.
8. Change other printer settings, if needed.
9. Click OK, and then complete your print operation.
Related Information
• Print from Your Computer (Windows®)
• Print Settings (Windows®)
69
Page 77
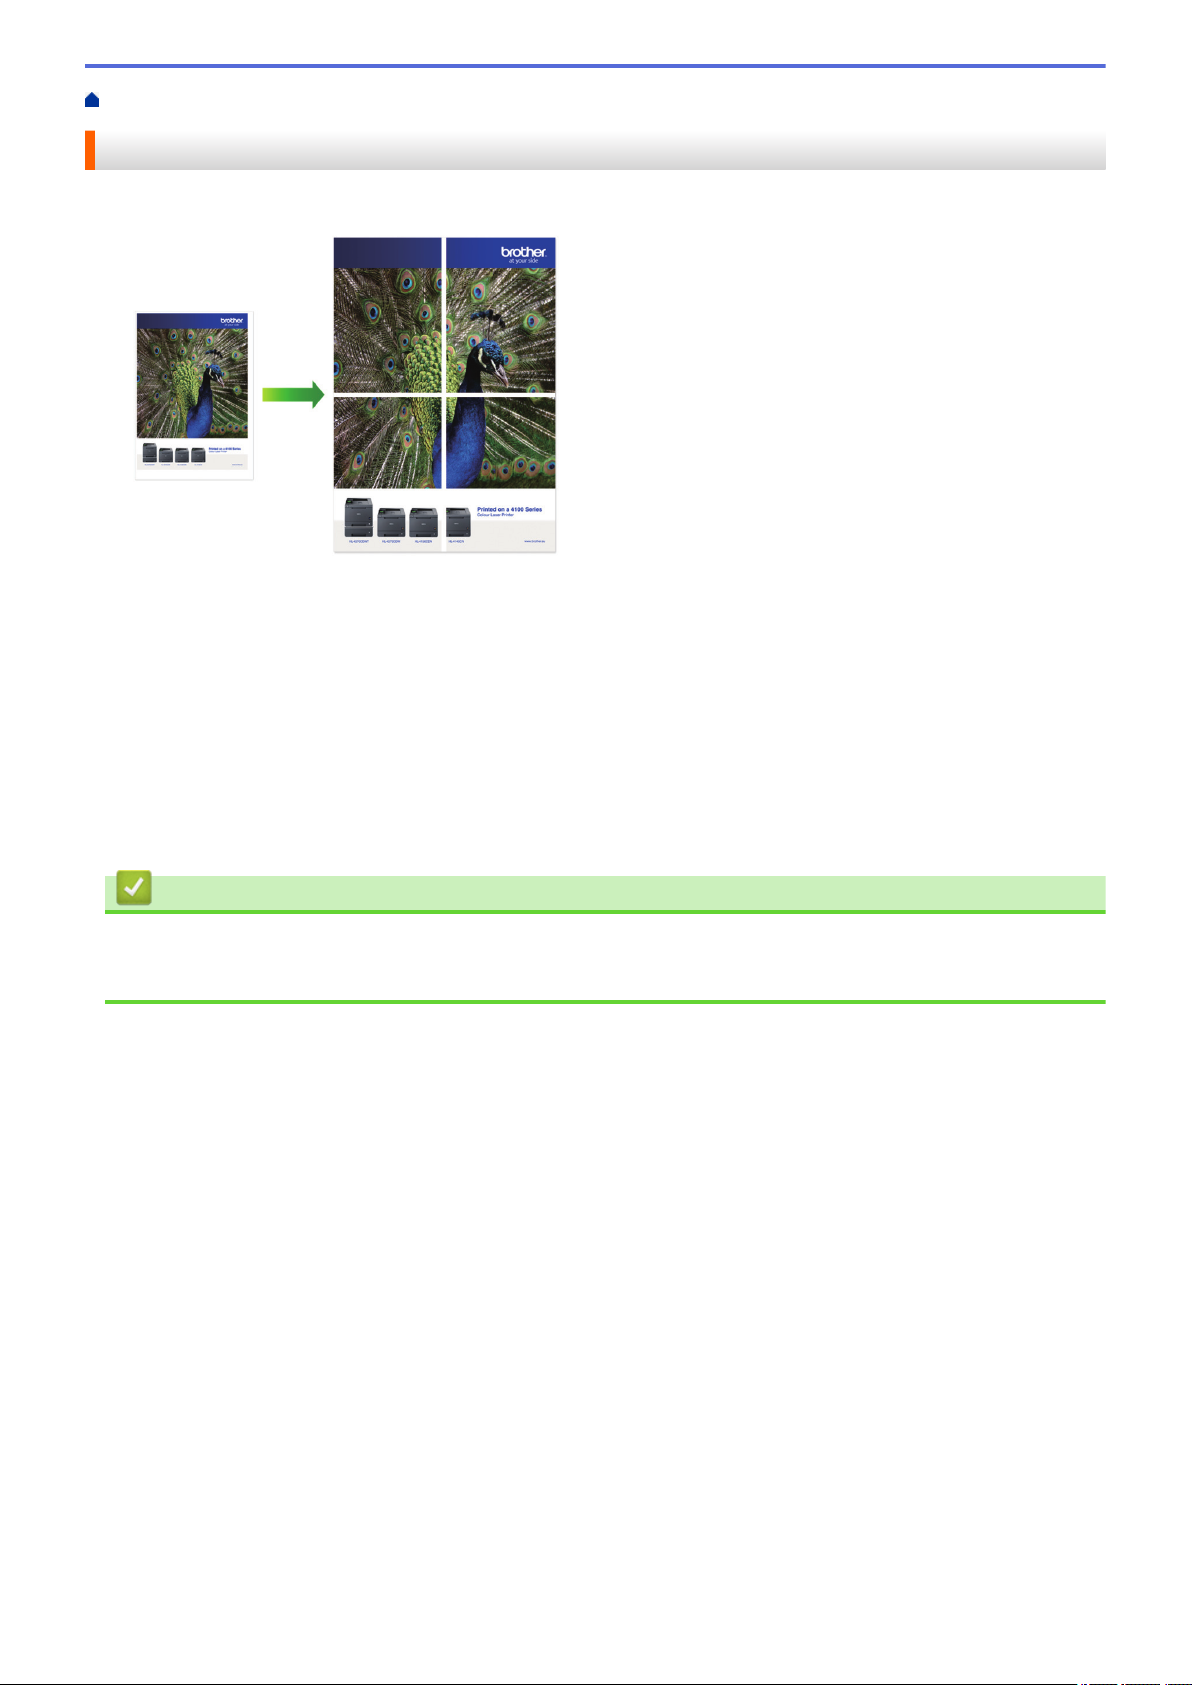
Home > Print > Print from Your Computer (Windows®) > Print as a Poster (Windows®)
Print as a Poster (Windows®)
Enlarge your print size and print the document in poster mode.
1. Select the print command in your application.
2. Select Brother MFC-XXXX Printer (where XXXX is the name of your model), and then click the printing
properties or preferences button.
The printer driver window appears.
3. Click the Basic tab.
4. Click the Multiple Page drop-down list, and then select the 1 in 2x2 pages or 1 in 3x3 pages option.
5. Change other printer settings, if needed.
6. Click OK.
7. Complete your print operation.
Related Information
• Print from Your Computer (Windows®)
• Print Settings (Windows®)
70
Page 78
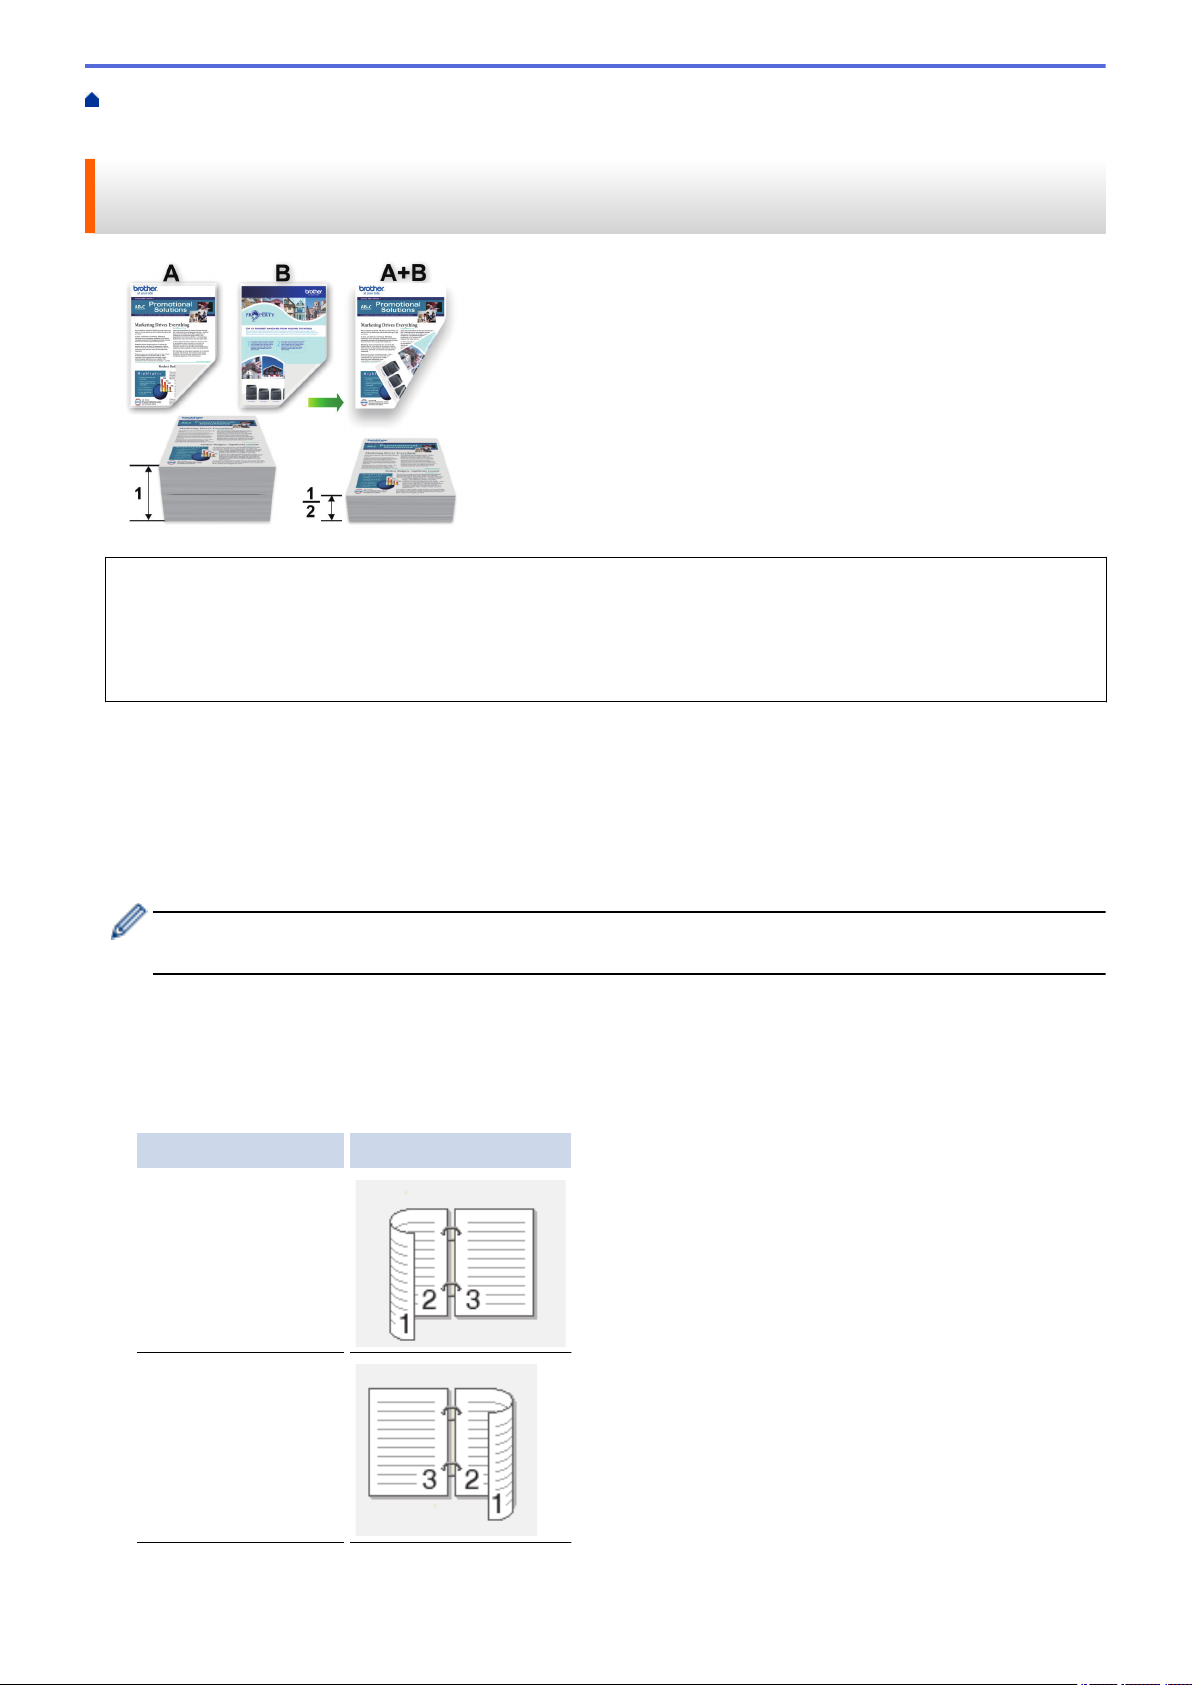
Home > Print > Print from Your Computer (Windows®) > Print on Both Sides of the Paper Automatically
(Automatic 2-sided Printing) (Windows®)
Print on Both Sides of the Paper Automatically (Automatic 2-sided Printing) (Windows®)
• Make sure the jam clear cover is closed.
• If paper is curled, straighten it and put it back in the paper tray.
• Use regular paper or thin paper. DO NOT use bond paper.
• If the paper is thin, it may wrinkle.
1. Select the print command in your application.
2. Select Brother MFC-XXXX Printer (where XXXX is the name of your model), and then click the printing
properties or preferences button.
The printer driver window appears.
3. Click the Basic tab.
4. In the Orientation field, select the Portrait or Landscape option to set the orientation of your printout.
If your application contains a similar setting, we recommend that you set the orientation using the
application.
5. Click the 2-sided / Booklet drop-down list, and then select 2-sided.
6. Click the 2-sided Settings button.
7. Select one of the options from the 2‑sided Type menu.
When 2-sided is selected, four types of 2-sided binding are available for each orientation:
Option for Portrait Description
Long Edge (Left)
Long Edge (Right)
71
Page 79
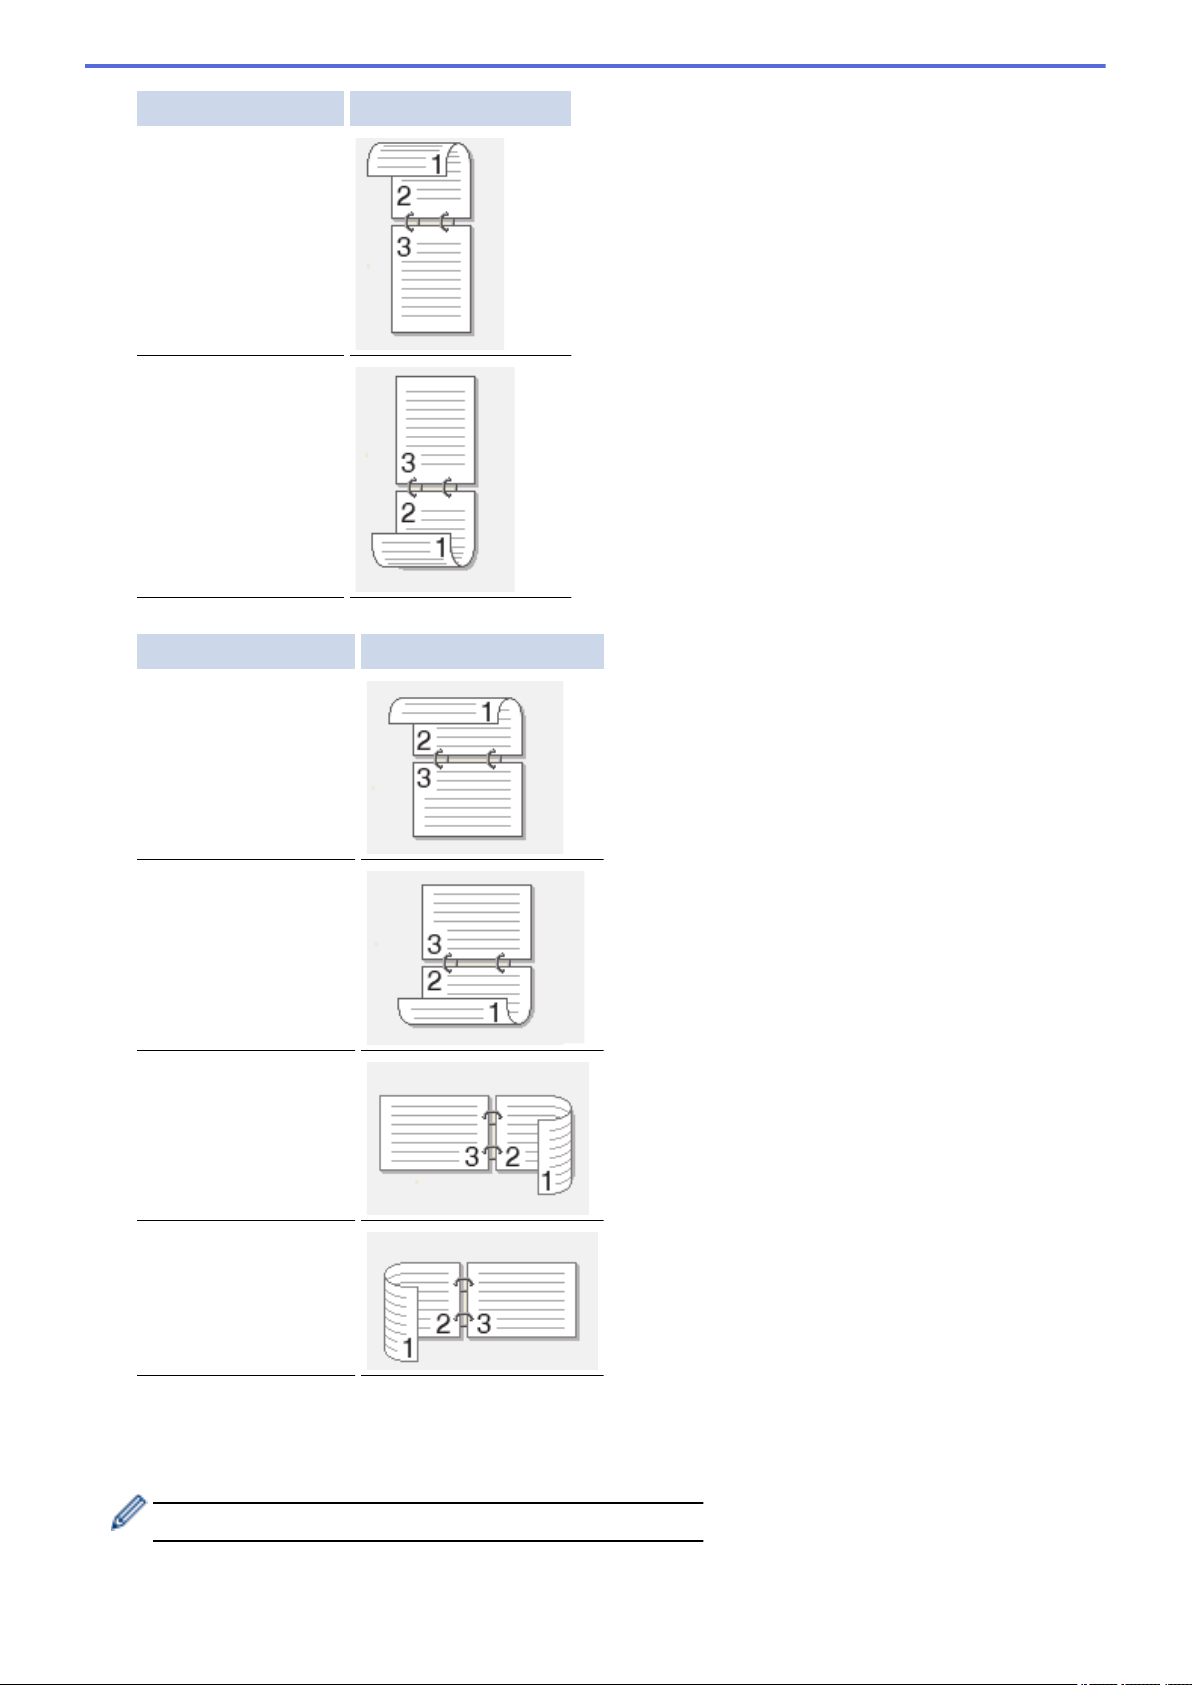
Option for Portrait Description
Short Edge (Top)
Short Edge (Bottom)
Option for Landscape Description
Long Edge (Top)
Long Edge (Bottom)
Short Edge (Right)
Short Edge (Left)
8. Select the Binding Offset check box if you want to specify the offset for binding in inches or millimeters.
9. Click OK to return to the printer driver window.
10. Change other printer settings, if needed.
The Borderless feature is not available when using this option.
11. Click OK again, and then complete your print operation.
72
Page 80

Related Information
• Print from Your Computer (Windows®)
• Print Settings (Windows®)
• Print as a Booklet Automatically (Windows®)
73
Page 81
Home > Print > Print from Your Computer (Windows®) > Print as a Booklet Automatically (Windows®)
Print as a Booklet Automatically (Windows®)
Use this option to print a document in booklet format using 2-sided printing. The document's pages will be
arranged according to the correct page number and will allow you to fold at the center of the print output without
having to change the order of the printed pages.
• Make sure the jam clear cover is closed.
• If paper is curled, straighten it and put it back in the paper tray.
• Use regular paper or thin paper. DO NOT use bond paper.
• If the paper is thin, it may wrinkle.
1. Select the print command in your application.
2. Select Brother MFC-XXXX Printer (where XXXX is the name of your model), and then click the printing
properties or preferences button.
The printer driver window appears.
3. Click the Basic tab.
4. In the Orientation field, select the Portrait or Landscape option to set the orientation of your printout.
If your application contains a similar setting, we recommend that you set the orientation using the
application.
5. Click the 2-sided / Booklet drop-down list, and then select the Booklet option.
6. Click the 2-sided Settings button.
7. Select one of the options from the 2‑sided Type menu.
There are two types of 2-sided binding directions available for each orientation:
Option for Portrait Description
Left Binding
Right Binding
74
Page 82
Option for Landscape Description
Top Binding
Bottom Binding
8. Select one of the options from the Booklet Printing Method menu.
Option Description
All Pages at
Once
Divide into
Sets
9. Select the Binding Offset check box if you want to specify the offset for binding in inches or millimeters.
10. Click OK to return to the printer driver window.
11. Change other printer settings, if needed.
The Borderless feature is not available when using this option.
12. Click OK.
13. Complete your print operation.
Every page will be printed in booklet format (four pages to every piece of paper, two pages
per side). Fold your printout in the middle to create the booklet.
This option prints the whole booklet in smaller individual booklet sets, allowing you to fold at
the center of the smaller individual booklet sets without having to change the order of the
printed pages. You can specify the number of sheets in each smaller booklet set (from
1-15). This option can be helpful when folding a printed booklet that has a large number of
pages.
Related Information
• Print from Your Computer (Windows®)
• Print Settings (Windows®)
• Print on Both Sides of the Paper Automatically (Automatic 2-sided Printing) (Windows®)
75
Page 83
Home > Print > Print from Your Computer (Windows®) > Print a Color Document in Grayscale (Windows®)
Print a Color Document in Grayscale (Windows®)
Grayscale mode makes the print processing speed faster than color mode. If your document contains color,
selecting Grayscale mode prints your document in 256 levels of grayscale.
1. Select the print command in your application.
2. Select Brother MFC-XXXX Printer (where XXXX is the name of your model), and then click the printing
properties or preferences button.
The printer driver window appears.
3. Click the Advanced tab.
4. For Color / Grayscale, select Grayscale.
5. Change other printer settings, if needed.
6. Click OK.
7. Complete your print operation.
Related Information
• Print from Your Computer (Windows®)
76
Page 84
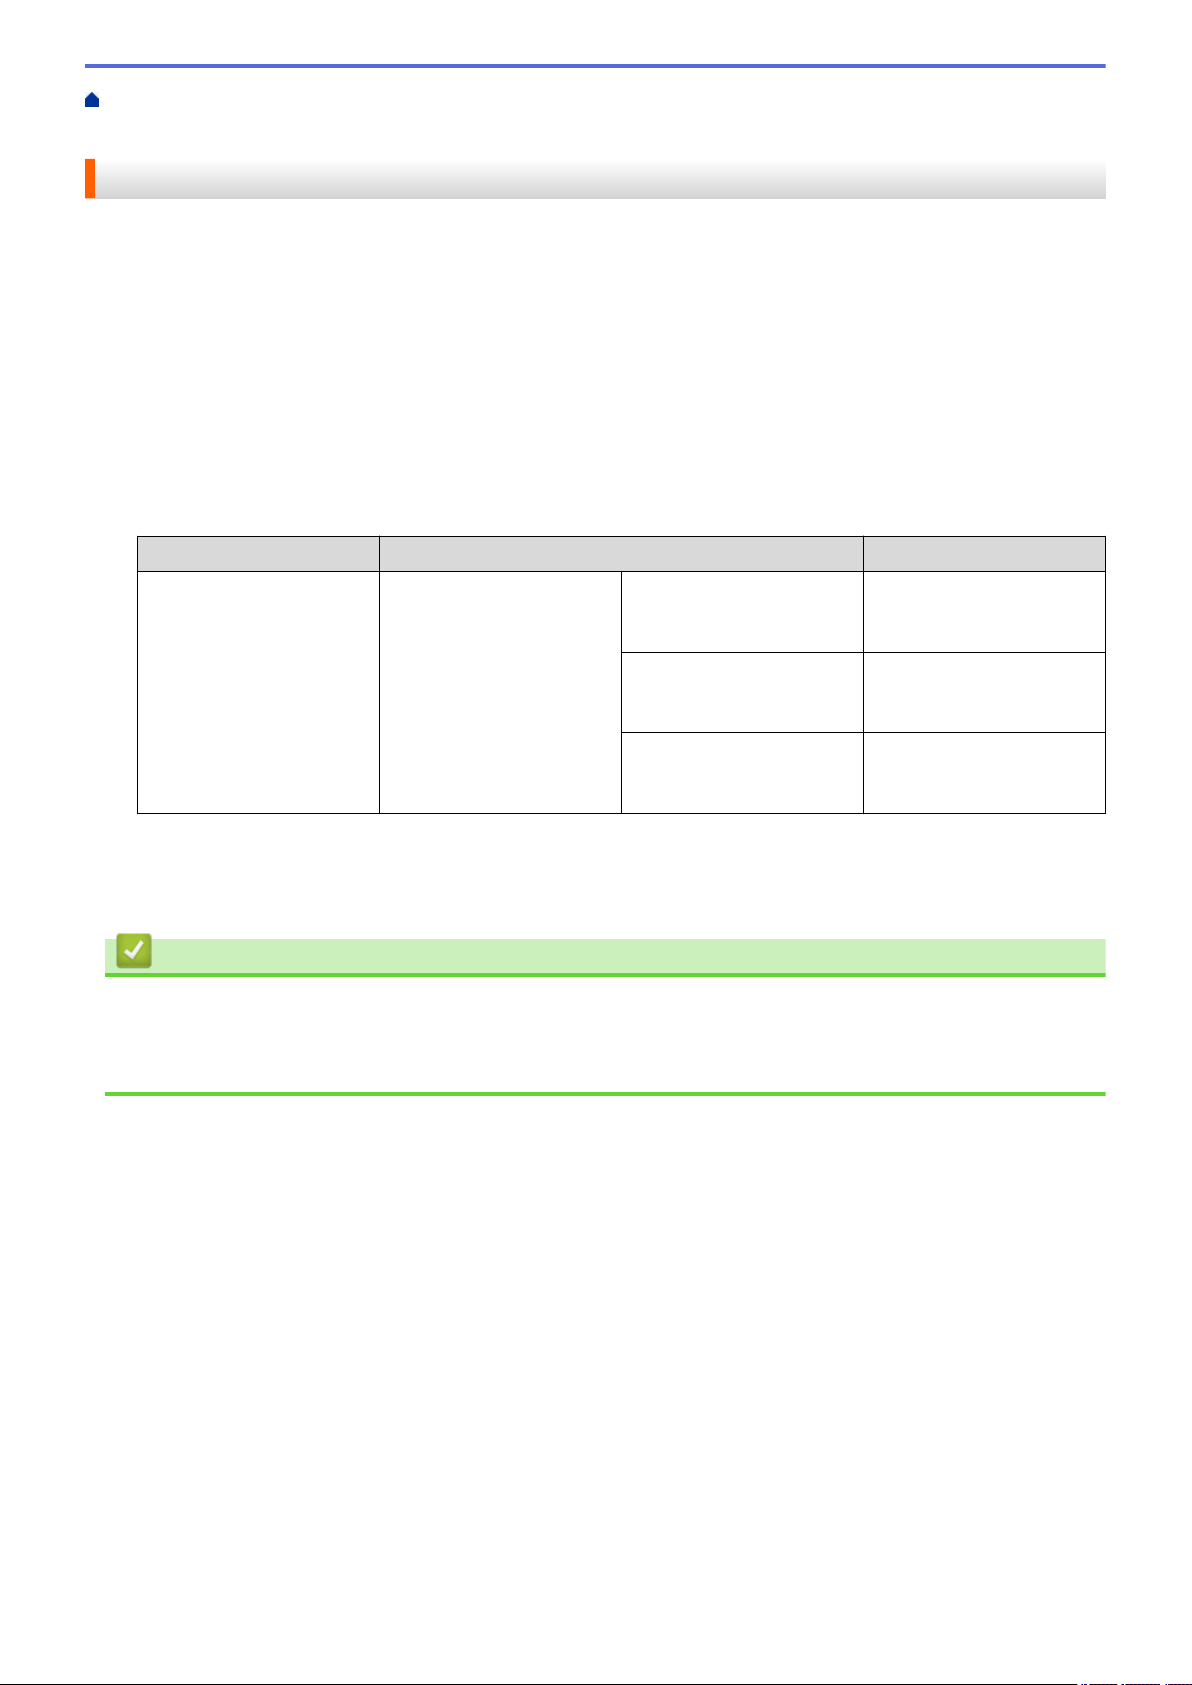
Home > Print > Print from Your Computer (Windows®) > Prevent Smudged Printouts and Paper Jams
(Windows®)
Prevent Smudged Printouts and Paper Jams (Windows®)
Some types of print media may need more drying time. Change the Reduce Smudge option if you have
problems with smudged printouts or paper jams.
1. Select the print command in your application.
2. Select Brother MFC-XXXX Printer (where XXXX is the name of your model), and then click the printing
properties or preferences button.
The printer driver window appears.
3. Click the Advanced tab.
4. Click the Other Print Options button.
5. Select the Reduce Smudge option on the left side of the screen.
6. Select one of the following options:
Media Type
Plain Paper 2-sided Printing or
7. Click OK to return to the printer driver window.
8. Click OK.
9. Complete your print operation.
Option Description
Off Select this mode to print at
Simplex Printing
Low Select this mode to print at
High Select this mode to print at
Related Information
• Print from Your Computer (Windows®)
• Paper Handling and Printing Problems
• Change the Print Setting Options When Having Printing Problems
normal speed, using a
normal amount of ink.
a slower speed, using a
normal amount of ink.
the same speed as Low,
but using less ink.
77
Page 85
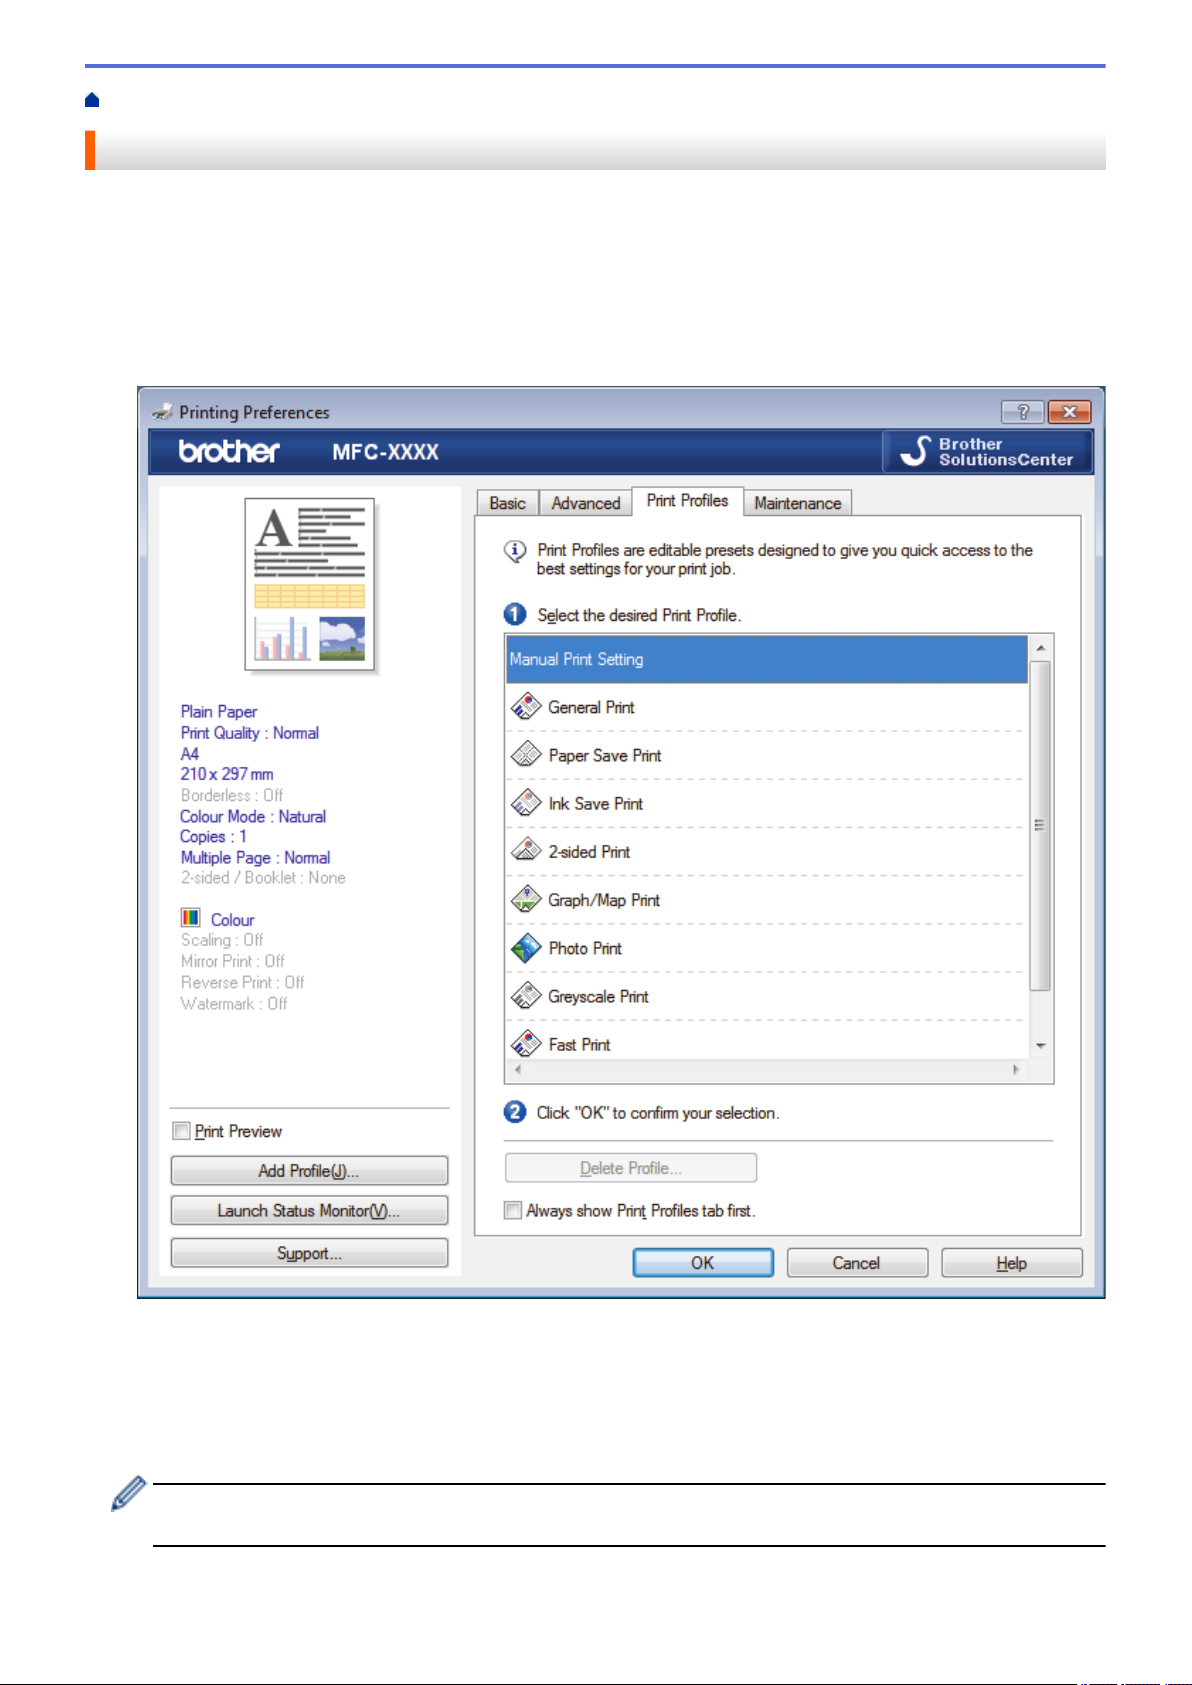
Home > Print > Print from Your Computer (Windows®) > Use a Preset Print Profile (Windows®)
Use a Preset Print Profile (Windows®)
Print Profiles are presets designed to give you quick access to frequently-used printing configurations.
1. Select the print command in your application.
2. Select Brother MFC-XXXX Printer (where XXXX is the name of your model), and then click the printing
properties or preferences button.
The printer driver window appears.
3. Click the Print Profiles tab.
4. Select your profile from the print profile list.
The profile settings are shown on the left side of the printer driver window.
5. Do one of the following:
• If the settings are correct for your print job, click OK.
• To change the settings, go back to the Basic or Advanced tab, change settings, and then click OK.
To display the Print Profiles tab at the front of the window the next time you print, select the Always show
Print Profiles tab first. check box.
78
Page 86

Related Information
• Print from Your Computer (Windows®)
• Create or Delete Your Print Profile (Windows®)
• Print Settings (Windows®)
79
Page 87
Home > Print > Print from Your Computer (Windows®) > Use a Preset Print Profile (Windows®) > Create or
Delete Your Print Profile (Windows®)
Create or Delete Your Print Profile (Windows®)
Add up to 20 new print profiles with customized settings.
1. Select the print command in your application.
2. Select Brother MFC-XXXX Printer (where XXXX is the name of your model), and then click the printing
properties or preferences button.
The printer driver window appears.
3. Click the Basic tab and the Advanced tab, and configure the print settings you want for the new Print Profile.
4. Click the Print Profiles tab.
5. Do one of the following:
To create a new print profile:
a. Click Add Profile.
The Add Profile dialog box appears.
b. Type the new profile name in the Name field.
c. Click the icon you want to use to represent this profile from the icon list.
d. Click OK.
The new Print Profile name is added to the list in the Print Profiles tab.
To delete a print profile that you created:
a. Click Delete Profile.
The Delete Profile dialog box appears.
b. Select the profile you want to delete.
c. Click Delete.
d. Click Yes.
e. Click Close.
Related Information
• Use a Preset Print Profile (Windows®)
80
Page 88
Home > Print > Print from Your Computer (Windows®) > Change the Default Print Settings (Windows®)
Change the Default Print Settings (Windows®)
When you change an application's print settings, the changes only apply to documents printed with that
application. To change print settings for all Windows® applications, you must configure the printer driver
properties.
1. Do one of the following:
• For Windows Server® 2008
Click
• For Windows® 7 and Windows Server® 2008 R2
Click (Start) > Devices and Printers.
• For Windows® 8
Move your mouse to the lower right corner of your desktop. When the menu bar appears, click Settings,
and then click Control Panel. In the Hardware and Sound group, click View devices and printers.
• For Windows® 10 and Windows Server® 2016
Click > Windows System > Control Panel. In the Hardware and Sound group, click View devices
and printers.
• For Windows Server® 2012
Move your mouse to the lower right corner of your desktop. When the menu bar appears, click Settings,
and then click Control Panel. In the Hardware group, click View devices and printers.
• For Windows Server® 2012 R2
Click Control Panel on the Start screen. In the Hardware group, click View devices and printers.
2. Right-click the Brother MFC-XXXX Printer icon (where XXXX is your model name), and then select Printer
properties. If printer driver options appear, select your printer driver.
3. Click the General tab, and then click the Printing Preferences... or Preferences... button.
The printer driver dialog box appears.
(Start) > Control Panel > Hardware and Sound > Printers.
4. Select the print settings you want to use as defaults for all of your Windows® programs.
5. Click OK.
6. Close the printer properties dialog box.
Related Information
• Print from Your Computer (Windows®)
• Print Settings (Windows®)
81
Page 89
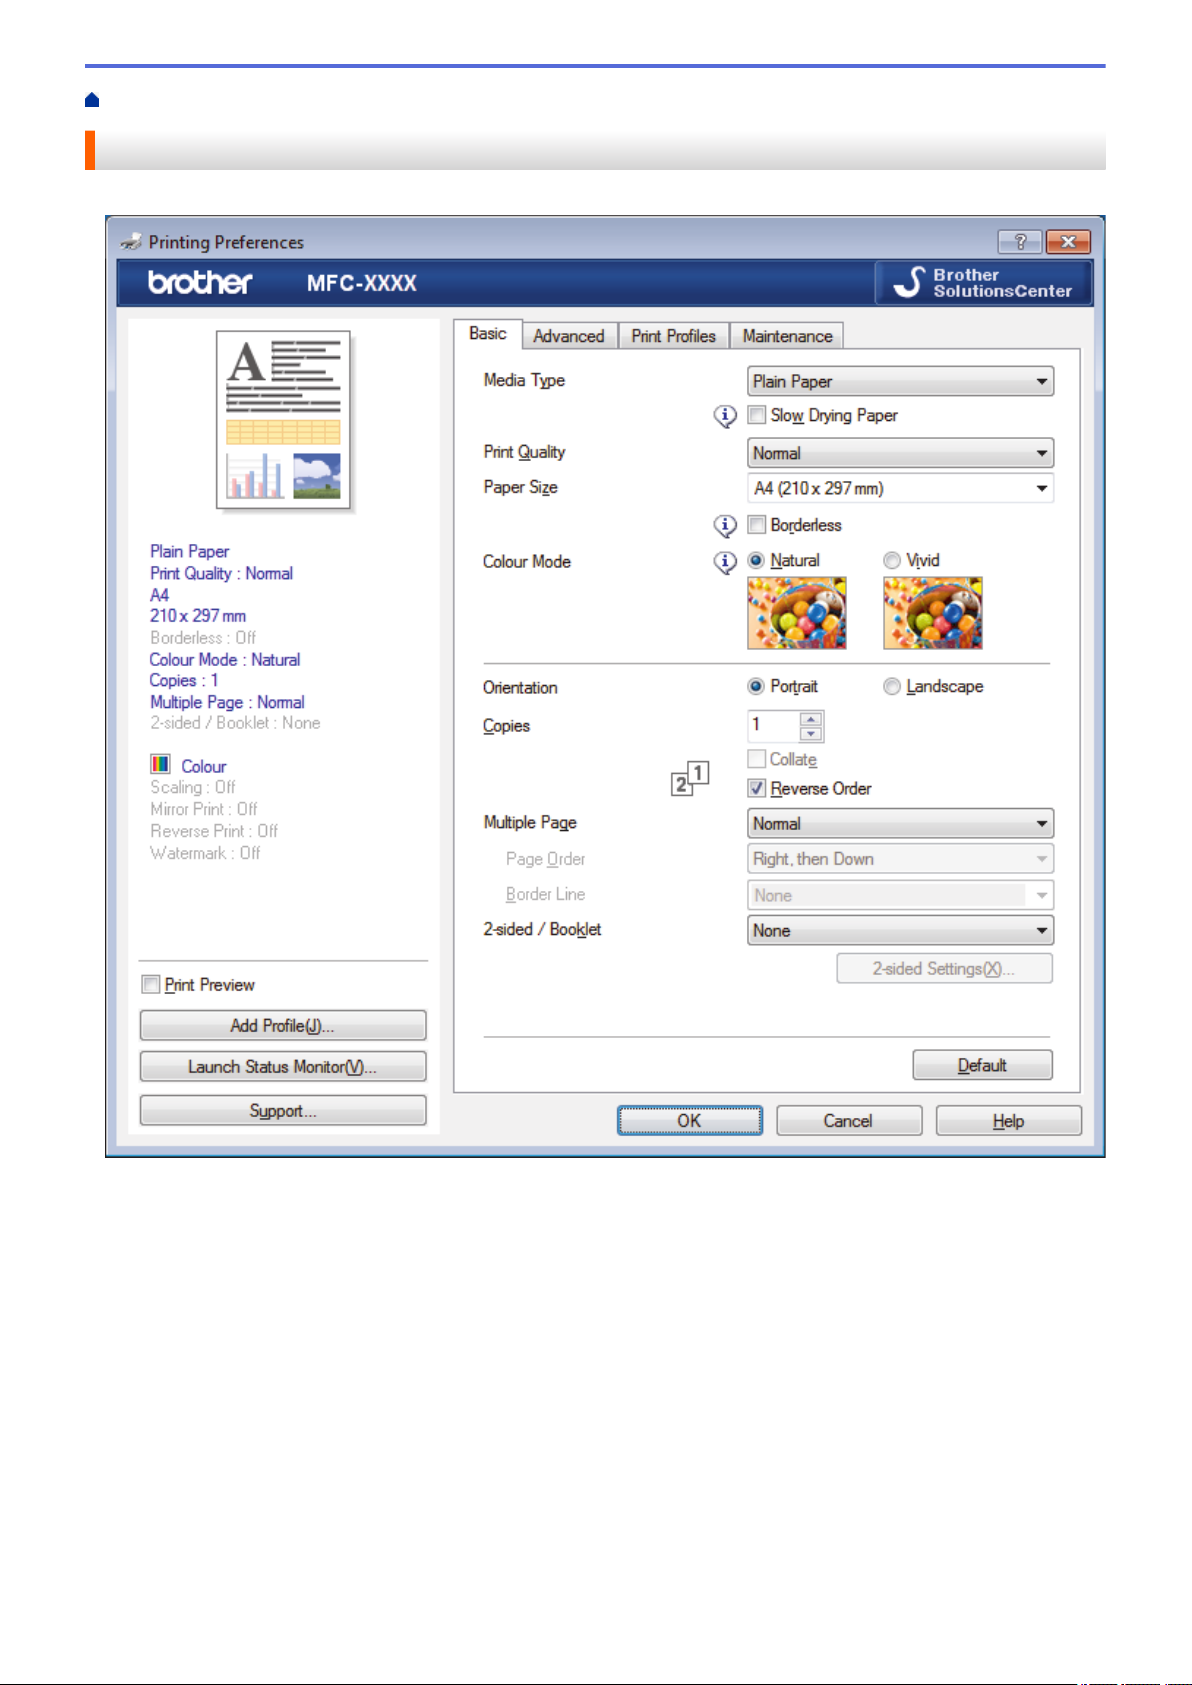
Home > Print > Print from Your Computer (Windows®) > Print Settings (Windows®)
Print Settings (Windows®)
Basic Tab
1. Media Type
Select the type of media you want to use. To achieve the best print results, the machine automatically adjusts
its print settings according to the selected media type.
Slow Drying Paper
Select this option if you use a type of plain paper on which ink dries slowly. This option may cause slight
blurring of the text.
2. Print Quality
Select the print resolution you want. Because print quality and speed are related, the higher the quality, the
longer it will take to print the document.
3. Paper Size
Select the size of the paper you want to use. You can either choose from standard paper sizes or create a
custom paper size.
82
Page 90

Borderless
Select this option to print photos without borders. Because the image data is created slightly larger than
the paper size you are using, this will cause some cropping of the photo edges.
You may not be able to select the Borderless option for some combinations of media type and quality, or
from some applications.
4. Color Mode
Select the color mode to suit your preference.
5. Orientation
Select the orientation (portrait or landscape) of your printout.
If your application contains a similar setting, we recommend that you set the orientation using the application.
6. Copies
Type the number of copies (1-999) that you want to print in this field.
Collate
Select this option to print sets of multi-page documents in the original page order. When this option is
selected, one complete copy of your document will print, and then reprint according to the number of
copies you choose. If this option is not selected, then each page will print according to the number of
copies chosen before the next page of the document is printed.
Reverse Order
Select this option to print your document in reverse order. The last page of your document will be printed
first.
7. Multiple Page
Select this option to print multiple pages on a single sheet of paper, or print one page of your document on
multiple sheets.
Page Order
Select the page order when printing multiple pages on a single sheet of paper.
Border Line
Select the type of border to use when printing multiple pages on a single sheet of paper.
8. 2-sided / Booklet
Select this option to print on both sides of the paper, or print a document in booklet format using 2-sided
printing.
2-sided Settings button
Click this button to select the type of 2-sided binding. Four types of 2-sided bindings are available for each
orientation.
83
Page 91
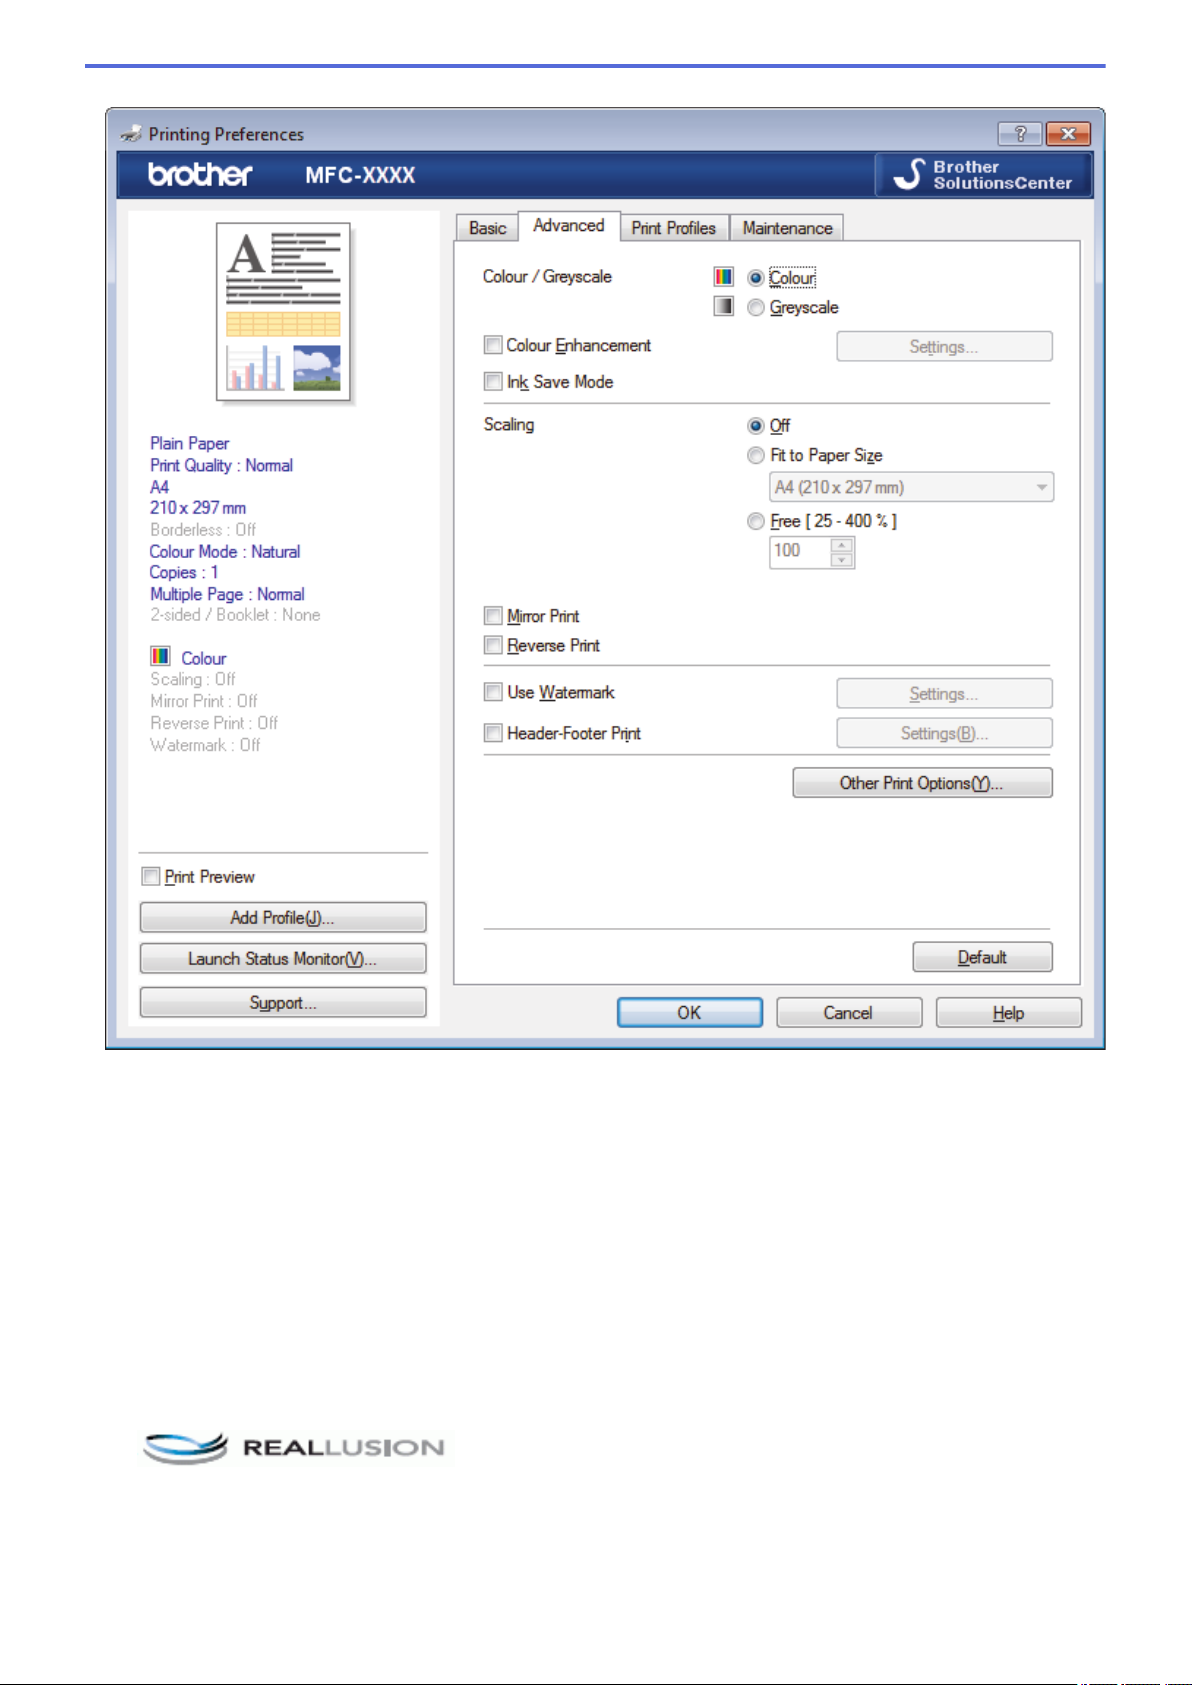
Advanced Tab
1. Color / Grayscale
Select color or grayscale printing. The print speed is faster in grayscale mode than it is in color mode. If your
document contains color and you select grayscale mode, your document will be printed using 256 levels of
grayscale.
2. Color Enhancement (True2Life)
Select this option to use the Color Enhancement feature. This feature analyzes your image to improve its
sharpness, white balance and color density. This process may take several minutes depending on the image
size and your computer's specifications.
3. Ink Save Mode
Select this option to print using lighter colors and emphasize image outlines. The amount of ink that is saved
varies, depending on the type of documents printed. Ink Save Mode may make your printouts look different
than they appear on your screen.
The Ink Save Mode feature is supported by technology from Reallusion, Inc.
4. Scaling
Select these options to enlarge or reduce the size of the pages in your document.
84
Page 92

Fit to Paper Size
Select this option to enlarge or reduce the document pages to fit a specified paper size. When you select
this option, select the paper size you want from the drop-down list.
Free
Select this option to enlarge or reduce the document pages manually. When you select this option, type a
value into the field.
5. Mirror Print
Select this option to reverse the printed image on the page horizontally from left to right.
6. Reverse Print
Select this option to rotate the printed image 180 degrees.
7. Use Watermark
Select this option to print a logo or text on your document as a watermark. Select one of the preset
watermarks, add a new watermark, or use an image file you have created.
8. Header-Footer Print
Select this option to print the date, time and PC login user name on the document.
9. Other Print Options button
(MFC-J690DW) Photo Bypass Tray Help
Select this option to display the instructions for use of the photo bypass tray.
Change Data Transfer Mode
Select the print data transfer mode to improve print quality or print speed.
Advanced Color Settings
Select the method that the machine uses to arrange dots to express halftones.
The printout color can be adjusted to achieve the closest match to what appears on your computer screen.
(MFC-J491DW/MFC-J497DW) Advanced Quality Settings
Select this option to print your documents at the highest quality.
Reduce Smudge
Some types of print media may need more drying time. Change this option if you have problems with
smudged printouts or paper jams.
Retrieve Printer's Color Data
Select this option to optimize the print quality using the machine's factory settings, which are set
specifically for your Brother machine. Use this option when you have replaced the machine or changed the
machine's network address.
Print Archive
Select this option to save the print data as a PDF file to your computer.
Related Information
• Print from Your Computer (Windows®)
• Error and Maintenance Messages
• Paper Handling and Printing Problems
• Print a Photo (Windows®)
• Print a Document (Windows®)
• Print More Than One Page on a Single Sheet of Paper (N in 1) (Windows®)
• Print as a Poster (Windows®)
• Print on Both Sides of the Paper Automatically (Automatic 2-sided Printing) (Windows®)
• Print as a Booklet Automatically (Windows®)
85
Page 93

• Use a Preset Print Profile (Windows®)
• Change the Default Print Settings (Windows®)
• Change the Print Setting Options When Having Printing Problems
86
Page 94

Home > Print > Print from Your Computer (Mac)
Print from Your Computer (Mac)
• Print a Photo (Mac)
• Print a Document (Mac)
• Print on Both Sides of the Paper Automatically (Automatic 2-sided Printing) (Mac)
• Print More Than One Page on a Single Sheet of Paper (N in 1) (Mac)
• Print a Color Document in Grayscale (Mac)
• Prevent Smudged Printouts and Paper Jams (Mac)
• Print Options (Mac)
87
Page 95
Home > Print > Print from Your Computer (Mac) > Print a Photo (Mac)
Print a Photo (Mac)
1. Make sure you have loaded the correct media in the paper tray.
IMPORTANT
• We recommend using the photo bypass tray located on the top of the output tray cover to print on
Photo (4" x 6")/(10 x 15 cm) and Photo L (3.5" x 5")/(9 x 13 cm) paper. (Available only for certain
models)
• For best results, use Brother paper.
• When you print on Brother photo paper, load one extra sheet of the same photo paper in the paper
tray.
2. From an application, such as Apple Preview, click the File menu, and then select Print.
3. Select Brother MFC-XXXX (where XXXX is your model name).
For more page setup options, click the Show Details button.
4. Click the Paper Size pop-up menu, and then select your paper size.
To print photographs without margins, select a borderless paper size option.
5. Click the Orientation button that matches the way you want the photo to print.
6. Click the application pop-up menu, and then select Print Settings.
The Print Settings options appear.
7. Click the Media Type pop-up menu, and then select the media type you want to use.
IMPORTANT
To get the best print quality for the settings you have selected, always set the Media Type option to
match the type of paper you load.
8. Change other printer settings, if needed.
9. Click Print.
Related Information
• Print from Your Computer (Mac)
• Paper Handling and Printing Problems
• Print Options (Mac)
88
Page 96
Home > Print > Print from Your Computer (Mac) > Print a Document (Mac)
Print a Document (Mac)
1. Make sure you have loaded the correct size paper in the paper tray.
2. From an application, such as Apple TextEdit, click the File menu, and then select Print.
3. Select Brother MFC-XXXX (where XXXX is your model name).
For more page setup options, click the Show Details button.
4. Click the Paper Size pop-up menu, and then select your paper size.
5. Select the Orientation option that matches the way you want the document to print.
6. Click the application pop-up menu, and then select Print Settings.
The Print Settings options appear.
7. Click the Media Type pop-up menu, and then select the media type you want to use.
IMPORTANT
To get the best print quality for the settings you have selected, always set the Media Type option to
match the type of paper you load.
8. Change other printer settings, if needed.
9. Click Print.
Related Information
• Print from Your Computer (Mac)
• Check the Ink Volume
• Print Options (Mac)
89
Page 97
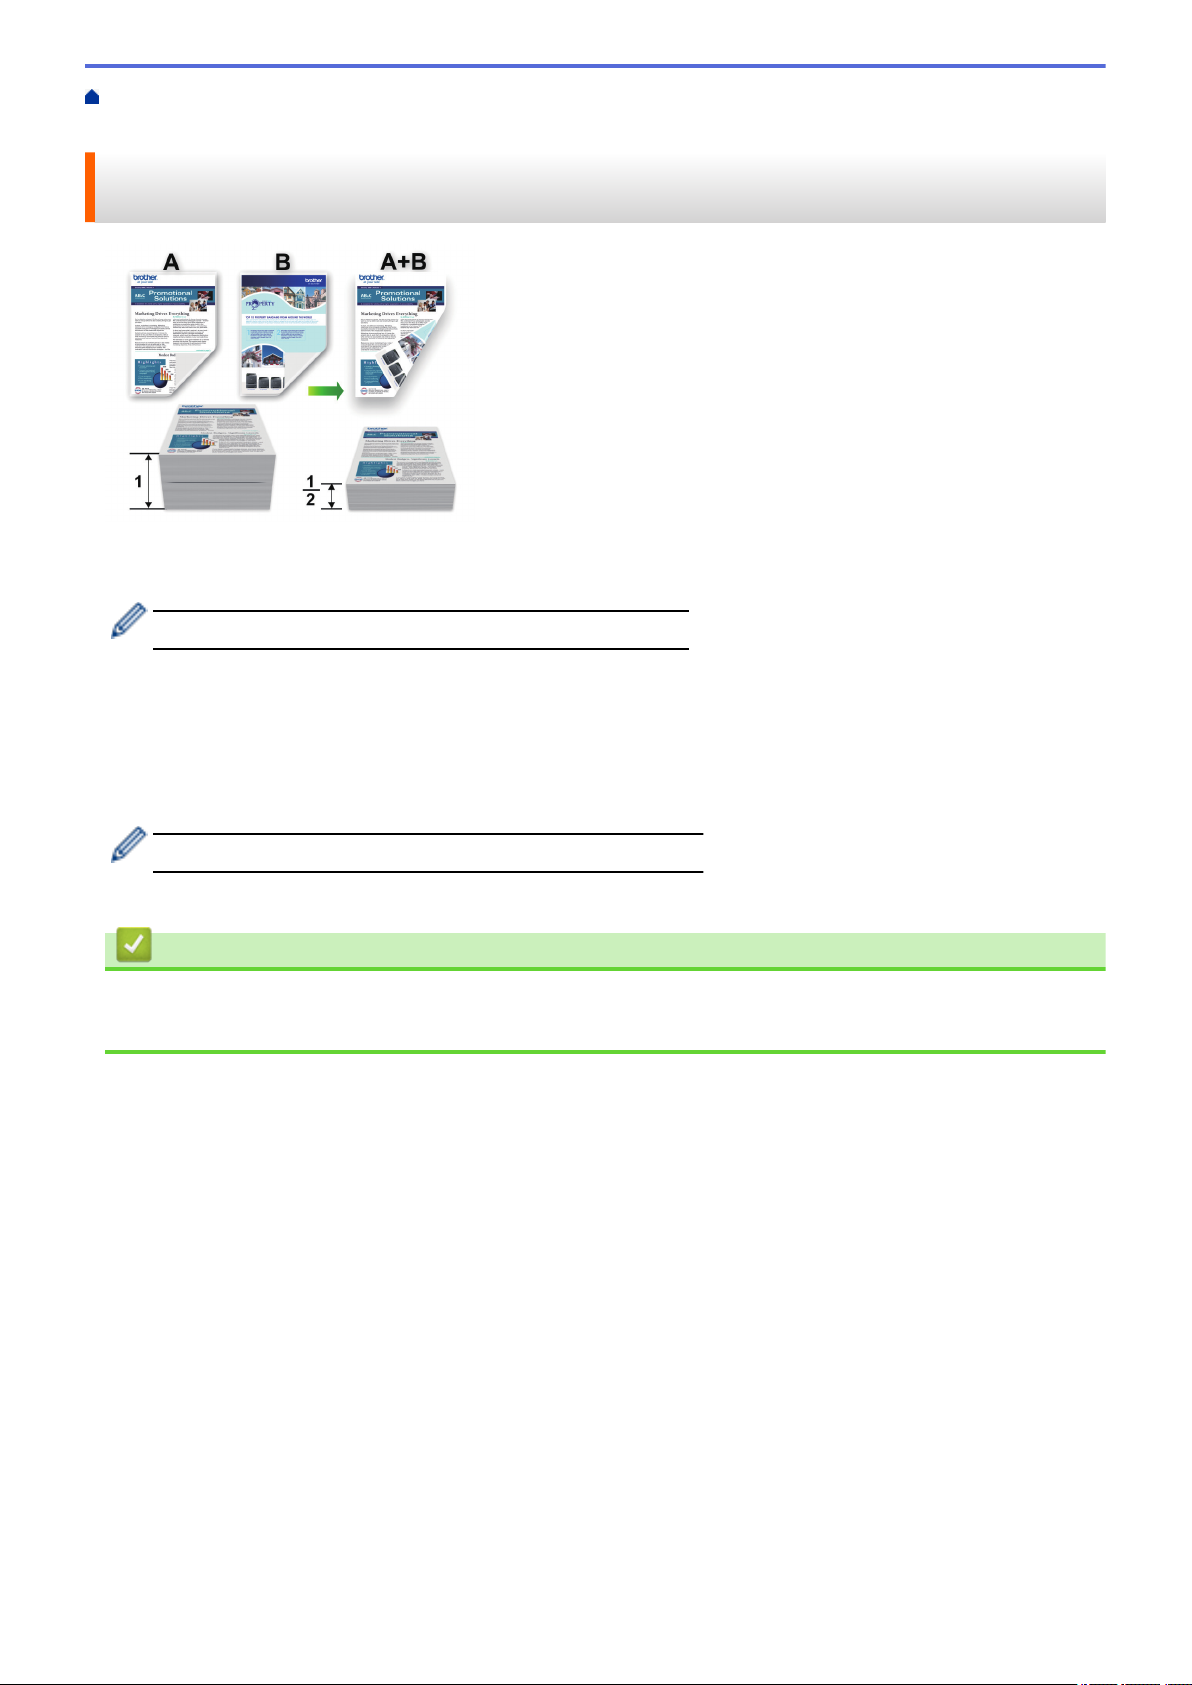
Home > Print > Print from Your Computer (Mac) > Print on Both Sides of the Paper Automatically
(Automatic 2-sided Printing) (Mac)
Print on Both Sides of the Paper Automatically (Automatic 2-sided Printing) (Mac)
1. From an application, such as Apple TextEdit, click the File menu, and then select Print.
2. Select Brother MFC-XXXX (where XXXX is your model name).
For more page setup options, click the Show Details button.
3. Select the Orientation option that matches the way you want the document to print.
4. Click the application pop-up menu, and then select Layout.
The Layout setting options appear.
5. In the Two-Sided section, select the Short-Edge binding or Long-Edge binding option.
6. Change other printer settings, if needed.
The Borderless feature is not available when using this option.
7. Click Print.
Related Information
• Print from Your Computer (Mac)
• Print Options (Mac)
90
Page 98
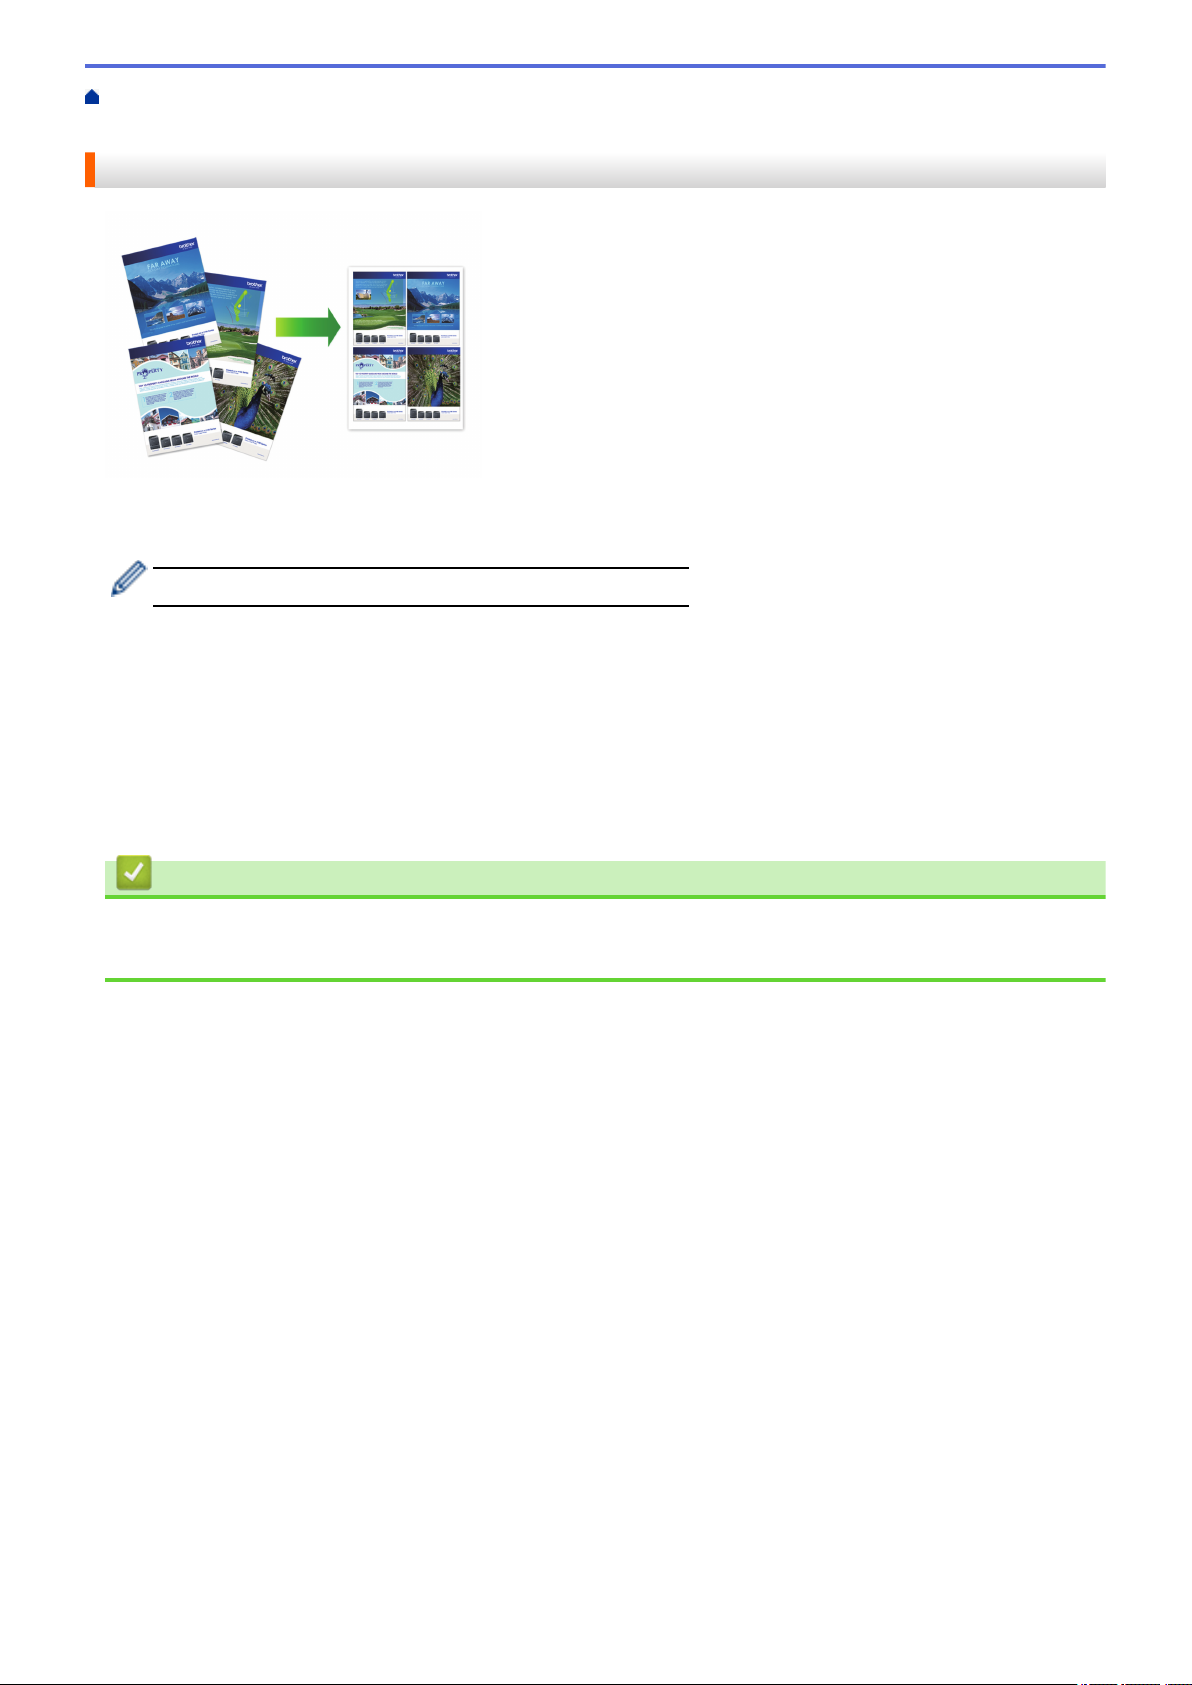
Home > Print > Print from Your Computer (Mac) > Print More Than One Page on a Single Sheet of Paper
(N in 1) (Mac)
Print More Than One Page on a Single Sheet of Paper (N in 1) (Mac)
1. From an application, such as Apple TextEdit, click the File menu, and then select Print.
2. Select Brother MFC-XXXX (where XXXX is your model name).
For more page setup options, click the Show Details button.
3. Click the application pop-up menu, and then select Layout.
The Layout setting options appear.
4. Click the Pages per Sheet pop-up menu, and then select the number of pages to print on each sheet.
5. Select the Layout Direction option.
6. Click the Border pop-up menu, and then select your border line type.
7. Change other printer settings, if needed.
8. Click Print.
Related Information
• Print from Your Computer (Mac)
• Print Options (Mac)
91
Page 99
Home > Print > Print from Your Computer (Mac) > Print a Color Document in Grayscale (Mac)
Print a Color Document in Grayscale (Mac)
Grayscale mode makes the print processing speed faster than color mode. If your document contains color,
selecting Grayscale mode prints your document in 256 levels of grayscale.
1. From an application, such as Apple TextEdit, click the
2. Select Brother MFC-XXXX (where XXXX is your model name).
For more page setup options, click the Show Details button.
3. Click the application pop-up menu, and then select Print Settings.
The Print Settings options appear.
4. Click the Color / Grayscale pop-up menu, and then select the Grayscale option.
5. Change other printer settings, if needed.
6. Click Print.
File menu, and then select Print.
Related Information
• Print from Your Computer (Mac)
92
Page 100
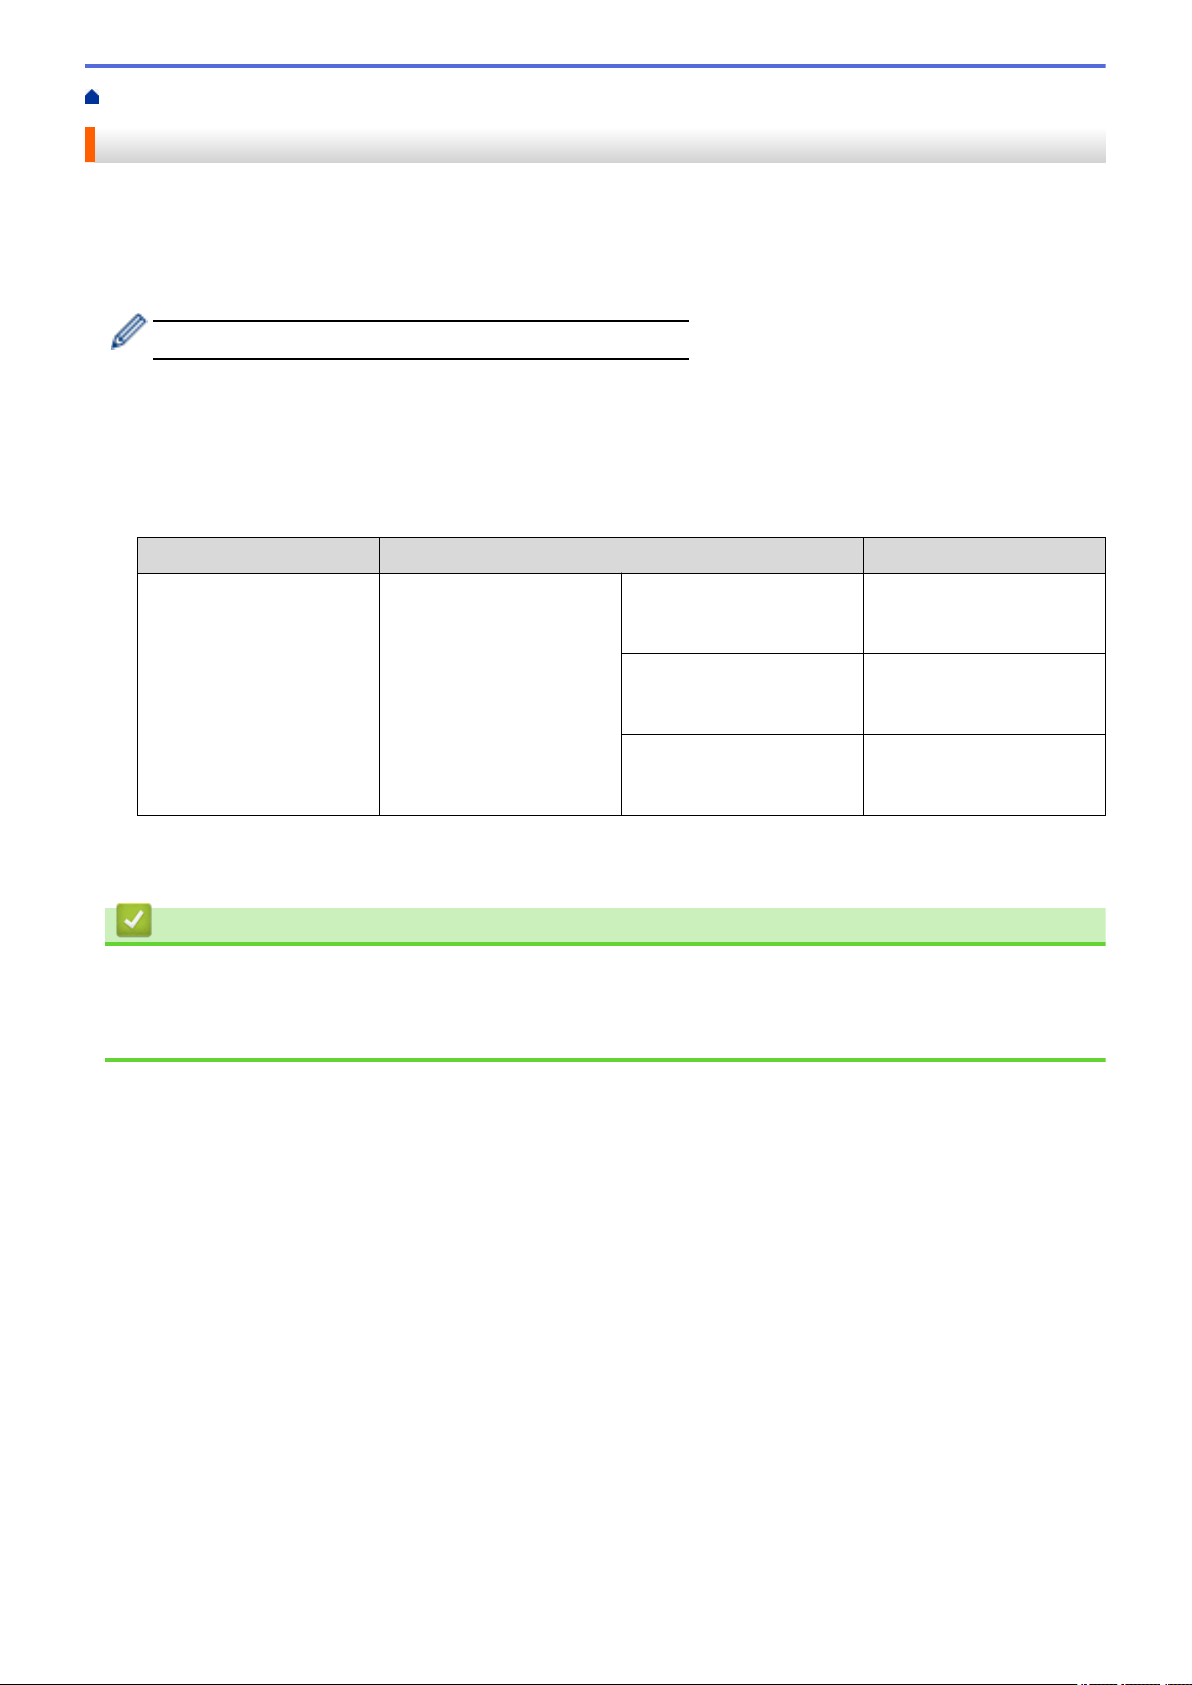
Home > Print > Print from Your Computer (Mac) > Prevent Smudged Printouts and Paper Jams (Mac)
Prevent Smudged Printouts and Paper Jams (Mac)
Some types of print media may need more drying time. Change the Reduce Smudge option if you have
problems with smudged printouts or paper jams.
1. From an application, such as Apple TextEdit, click the File menu, and then select Print.
2. Select Brother MFC-XXXX (where XXXX is your model name).
For more page setup options, click the Show Details button.
3. Click the application pop-up menu, and then select Print Settings.
The Print Settings options appear.
4. Click the Advanced print settings list.
5. Click the Reduce Smudge menu.
6. Select one of the following options:
Media Type
Plain Paper 2-sided Printing or
7. Change other printer settings, if needed.
8. Click Print.
Option Description
Off Select this mode to print at
Simplex Printing
Low Select this mode to print at
High Select this mode to print at
Related Information
• Print from Your Computer (Mac)
• Paper Handling and Printing Problems
• Change the Print Setting Options When Having Printing Problems
normal speed, using a
normal amount of ink.
a slower speed, using a
normal amount of ink.
the same speed as Low,
but using less ink.
93
 Loading...