

Page 1

USER’S GUIDE
MFC-3360C
Version A
Page 2

If you need to call Customer Service
Please complete the following information for future
reference:
Model Number: MFC-3360C
Serial Number:
1
Date of Purchase:
Place of Purchase:
1
The serial number is on the back of the unit. Retain
this User's Guide with your sales receipt as a
permanent record of your purchase, in the event of
theft, fire or warranty service.
Register your product on-line at
http://www.brother.com/registration/
By registering your product with Brother, you will be recorded as the
original owner of the product. Your registration with Brother:
may serve as confirmation of the purchase date of your product
should you lose your receipt; and
may support an insurance claim by you in the event of product loss
covered by insurance.
© 2006 Brother Industries, Ltd.
Page 3

Approval Information and Compilation and Publication Notice
THIS EQUIPMENT IS DESIGNED TO WORK WITH A TWO WIRE ANALOGUE PSTN LINE
FITTED WITH THE APPROPRIATE CONNECTOR.
APPROVAL INFORMATION
Brother advises that this product may not function correctly in a country other than where it was
originally purchased, and does not offer any warranty in the event that this product is used on
public telecommunication lines in another country.
Compilation and Publication Notice
Under the supervision of Brother Industries Ltd., this manual has been compiled and published,
covering the latest product descriptions and specifications.
The contents of this manual and the specifications of this product are subject to change without
notice.
Brother reserves the right to make changes without notice in the specifications and materials
contained herein and shall not be responsible for any damages (including consequential) caused
by reliance on the materials presented, including but not limited to typographical and other errors
relating to the publication.
i
Page 4

EC Declaration of Conformity under the R & TTE Directive
ii
Page 5

Table of Contents
Section I General
1 General Information 2
Using the documentation.......................................................................................2
Symbols and conventions used in the documentation .................................... 2
Accessing the Software User’s Guide ..................................................................2
Viewing Documentation...................................................................................2
Control panel overview ..........................................................................................4
2 Loading documents and paper 6
Loading documents ...............................................................................................6
Using the ADF .................................................................................................6
Scanning area .................................................................................................7
Acceptable paper and other media........................................................................7
Recommended media .....................................................................................8
Handling and using media ...............................................................................8
Choosing the right media.................................................................................9
Loading paper, envelopes and other media ........................................................11
Loading paper and other media ....................................................................11
Loading envelopes and post cards................................................................13
Printable Area................................................................................................15
3 General setup 16
Power Save mode ...............................................................................................16
Putting your machine in Power Save mode...................................................16
Bringing your machine out of Power Save mode ..........................................16
Power Save setting........................................................................................16
Mode Timer..........................................................................................................17
Paper settings......................................................................................................17
Paper Type ....................................................................................................17
Paper Size .....................................................................................................17
Volume Settings...................................................................................................17
Ring Volume..................................................................................................17
Beeper Volume..............................................................................................18
Speaker Volume ............................................................................................18
Automatic Daylight Savings Time........................................................................18
LCD display .........................................................................................................18
LCD Contrast.................................................................................................18
4 Security features 19
TX Lock ...............................................................................................................19
Setting and changing the TX Lock password................................................19
Turning TX Lock on/off ..................................................................................20
iii
Page 6

Section II Fax
5 Sending a fax 22
Entering Fax mode ..............................................................................................22
Faxing from the ADF ....................................................................................22
Colour fax transmission.................................................................................22
Cancelling a fax in progress..........................................................................22
Broadcasting (Monochrome only)........................................................................22
Cancelling a Broadcast in progress...............................................................23
Additional sending operations..............................................................................23
Sending faxes using multiple settings ...........................................................23
Contrast.........................................................................................................23
Changing Fax Resolution ..............................................................................23
Dual access (Monochrome only) ...................................................................24
Real time transmission ..................................................................................24
Overseas Mode .............................................................................................25
Delayed Faxing (Monochrome only)..............................................................25
Delayed Batch Transmission (Monochrome only).........................................26
Checking and cancelling waiting jobs............................................................26
Sending a fax manually .................................................................................26
Sending a fax at the end of a conversation ...................................................26
Out of Memory message ...............................................................................26
6 Receiving a Fax 27
Receive modes ....................................................................................................27
Choosing the Receive Mode .........................................................................27
Using receive modes...........................................................................................28
Fax only.........................................................................................................28
Fax/Tel...........................................................................................................28
Manual...........................................................................................................28
External TAD .................................................................................................28
Receive mode settings ........................................................................................29
Ring Delay.....................................................................................................29
F/T Ring Time (Fax/Tel mode only)...............................................................29
Fax Detect .....................................................................................................30
Additional receiving operations............................................................................30
Printing a reduced incoming fax ....................................................................30
Receiving faxes into memory ........................................................................31
Receiving a fax at the end of a conversation.................................................31
Printing a fax from the memory .....................................................................31
iv
Page 7

7 Telephone and External devices 32
Voice Operations ................................................................................................32
Making a telephone call.................................................................................32
Mute...............................................................................................................32
Tone or pulse.................................................................................................32
Fax/Tel mode ................................................................................................32
Fax/Tel mode in Power Save condition.........................................................32
Telephone services..............................................................................................33
Caller ID (For U.K. and Ireland only) .............................................................33
Setting the Phone Line Type .........................................................................34
BT Call Sign (For U.K. only) ..........................................................................34
Connecting an external TAD (telephone answering device)................................35
Connections...................................................................................................35
Recording an outgoing message (OGM) on an external TAD.......................35
Multi-line connections (PBX) .........................................................................36
External and extension phones ...........................................................................36
Connecting an external or extension telephone ............................................36
Operation from extension telephones............................................................36
Using extension telephones (For U.K. only) ..................................................37
Using a cordless external telephone .............................................................38
Using remote codes.......................................................................................38
8 Dialling and storing numbers 39
How to Dial ..........................................................................................................39
Manual dialling............................................................................................... 39
One-Touch Dialling........................................................................................39
Speed-Dialling ...............................................................................................39
Search ...........................................................................................................40
Fax Redial .....................................................................................................40
Storing numbers ..................................................................................................40
Storing a pause .............................................................................................40
Storing One-Touch Dial numbers ..................................................................41
Storing Speed-Dial numbers .........................................................................41
Changing One-Touch and Speed-Dial numbers ...........................................42
Setting up Groups for broadcasting ...............................................................42
Combining Quick-Dial numbers.....................................................................43
9 Remote fax options 44
Fax Forwarding....................................................................................................44
Fax Storage.........................................................................................................44
Changing Remote Fax Options ...........................................................................45
Turning off Remote Fax Options ...................................................................45
Remote Retrieval.................................................................................................45
Setting a Remote Access Code.....................................................................45
Using your Remote Access Code..................................................................46
Retrieving fax messages ...............................................................................46
Changing your Fax Forwarding number ........................................................47
Remote fax commands........................................................................................48
v
Page 8

10 Printing Reports 49
Fax reports...........................................................................................................49
Transmission Verification Report...................................................................49
Fax Journal (activity report) ...........................................................................49
Reports ................................................................................................................50
How to print a report......................................................................................50
11 Polling 51
Polling receive .....................................................................................................51
Setup for polling receive ................................................................................51
Setup to receive polling with a secure code ..................................................51
Setup for delayed polling receive ..................................................................52
Sequential polling ..........................................................................................52
Polled transmit (Monochrome only) .....................................................................53
Setup for polled transmit................................................................................53
Setup for polled transmit with secure code....................................................53
Section III Copy
12 Making copies 56
How to copy.........................................................................................................56
Entering Copy mode......................................................................................56
Making a single copy.....................................................................................56
Making multiple copies ..................................................................................56
Stop copying..................................................................................................56
Copy options........................................................................................................57
Changing copy speed and quality .................................................................58
Enlarging or reducing the image copied ........................................................58
Making N in 1 copies .....................................................................................59
Sorting copies using the ADF (Monochrome only)........................................60
Adjusting Brightness, Contrast and Colour....................................................60
Paper options ................................................................................................61
Section IV Software
13 Software features 64
How to read the HTML User’s Guide...................................................................64
vi
Page 9

Section V Appendixes
A Safety and Legal 66
Choosing a location.............................................................................................66
To use the machine safely...................................................................................67
Important safety instructions..........................................................................70
IMPORTANT - For your safety ......................................................................71
EU Directive 2002/96/EC and EN50419........................................................72
Legal limitations for copying ..........................................................................72
Trademarks ...................................................................................................73
B Troubleshooting and Routine Maintenance 74
Troubleshooting ...................................................................................................74
If you are having difficulty with your machine................................................74
Error messages ...................................................................................................79
Transferring your faxes or Fax Journal report ...............................................81
Document jam ..............................................................................................82
Printer jam or paper jam................................................................................83
Dial Tone detection........................................................................................84
Phone line interference..................................................................................85
Routine maintenance...........................................................................................85
Replacing the ink cartridges ..........................................................................85
Cleaning the outside of the machine .............................................................87
Cleaning the scanner.....................................................................................88
Cleaning the machine printer platen..............................................................89
Cleaning the paper pick-up roller...................................................................89
Cleaning the print head .................................................................................90
Checking the print quality ..............................................................................90
Checking the printing alignment ....................................................................91
Checking the ink volume ...............................................................................92
Machine Information............................................................................................92
Checking the serial number...........................................................................92
Packing and shipping the machine ......................................................................92
C Menu and Features 94
On-screen programming......................................................................................94
Menu table.....................................................................................................94
Memory storage.............................................................................................94
Menu keys ...........................................................................................................95
Menu Table..........................................................................................................96
Entering Text .....................................................................................................102
vii
Page 10

D Specifications 103
General..............................................................................................................103
Print media.........................................................................................................105
Fax.....................................................................................................................106
Copy ..................................................................................................................107
Scanner ............................................................................................................108
Printer ................................................................................................................109
Interface.............................................................................................................109
Computer requirements.....................................................................................110
Consumable items.............................................................................................111
E Glossary 112
FIndex 116
viii
Page 11

Section I
General I
General Information 2
Loading documents and paper 6
General setup 16
Security features 19
Page 12

1
General Information 1
Using the documentation
Thank you for buying a Brother machine!
Reading the documentation will help you
make the most of your machine.
Symbols and conventions used in the documentation 1
The following symbols and conventions are
used throughout the documentation.
Bold Bold typeface identifies specific
keys on the machine’s control
panel.
Italics Italicized typeface emphasizes
an important point or refers you
to a related topic.
Courier
New
Text in the Courier New font
identifies messages on the
LCD of the machine.
Accessing the
1
Software User’s Guide
This User’s Guide does not contain all the
information about the machine such as how
to use Printer, Scanner and PC Fax. When
you are ready to learn detailed information
about these operations, read the Software
User’s Guide that is on the CD-ROM.
Viewing Documentation 1
Viewing Documentation
(For Windows
To view the documentation, from the Start
menu, point to Brother, MFC-XXXX (where
XXXX is your model name) from the
programs group, and then select
User’s Guide.
If you have not installed the software, you can
find the documentation by following the
instructions below:
®
) 1
1
Warnings tell you what to do to
prevent possible personal injury.
Electrical Hazard icons alert you to
possible electrical shock.
Cautions specify procedures you
must follow or avoid to prevent
possible damage to the machine or
other objects.
Notes tell you how you should
respond to a situation that may arise
or give tips about how the operation
works with other features.
Improper Setup icons alert you to
devices and operations that are not
compatible with the machine.
2
a Turn on your PC. Insert the Brother
CD-ROM into your CD-ROM drive.
b If the model name screen appears, click
your model name.
Page 13

General Information
c If the language screen appears, click
your language. The CD-ROM main
menu will appear.
Note
If this window does not appear, use
Windows
program from the root directory of the
Brother CD-ROM.
®
Explorer to run the setup.exe
d Click User’s Guide to view the Software
User’s Guide in HTML format.
How to find Scanning instructions 1
There are several ways you can scan
documents. You can find the instructions as
follows:
Software User’s Guide
Scanning
(For Windows
Professional and Windows
ControlCenter3
(For Windows
Professional and Windows
PaperPort
Instructions for scanning directly from
ScanSoft
User’s Guide. The complete ScanSoft
PaperPort
can be viewed from the Help selection in
the ScanSoft
application.
®
98/98SE/Me/2000
®
XP)
®
98/98SE/Me/2000
®
XP)
®
SE with OCR User’s Guide
®
PaperPort®SE with OCR
®
SE with OCR User’s Guide
®
PaperPort®SE with OCR
®
Viewing Documentation
®
(For Macintosh
a Turn on your Macintosh
) 1
®
. Insert the
Brother CD-ROM into your CD-ROM
drive. The following window will appear.
b Double-click the Documentation icon.
c Double-click your language folder.
d Double-click the Top Page file to view
the Software User’s Guide in HTML
format.
Software User’s Guide:
Software User’s Guide in HTML
format
How to find Scanning instructions 1
There are several ways you can scan
documents. You can find the instructions as
follows:
Software User’s Guide
Scanning
(For Mac OS
ControlCenter2
(For Mac OS
®
Presto!
PageManager® User’s Guide
Instructions for scanning directly from
Presto!
Presto!
can be viewed from the Help selection in
the Presto!
®
X 10.2.4 or greater)
®
X 10.2.4 or greater)
®
PageManager®. The complete
®
PageManager®User’s Guide
®
PageManager® application.
1
3
Page 14
Chapter 1
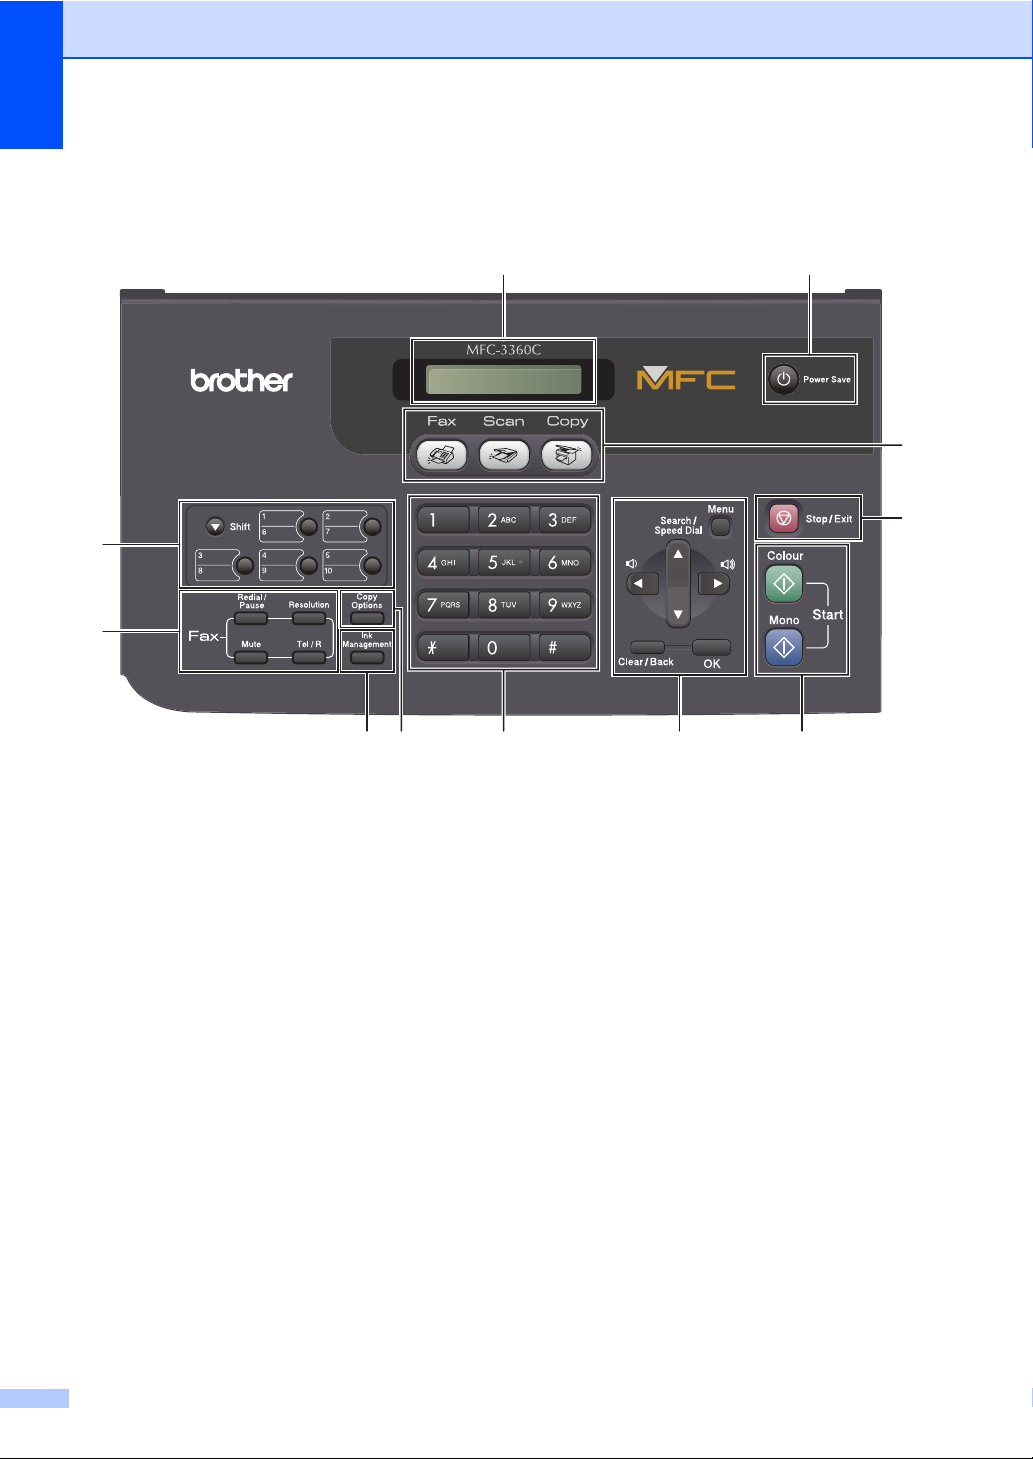
Control panel overview 1
MFC-3360C 1
2
3
4
1
11
10
5
6 7
1 Power Save
Lets you put the machine into Power Save
mode.
2 LCD (liquid crystal display)
Displays messages on the screen to help you
set up and use your machine.
3 One-Touch keys
Instantly accesses your stored Quick-Dial
numbers.
Shift
When held down, lets you access
One-Touch numbers 6 to 10.
4 Fax keys
Redial/Pause
Redials the last number called. It also
inserts a pause when programming
quick-dial numbers.
Resolution
Lets you temporarily change the resolution
when sending a fax.
Mute
Puts the current phone call on hold.
8 9
Tel/R
Use this key to gain access to an outside
line, or transfer a call to another extension
when the machine is connected to a PBX.
5 Copy key
Copy Options
Lets you temporarily change multiple copy
settings when in copy mode.
6 Ink Management
Lets you clean the print head, check the print
quality, and check the available ink volume.
7 Dial Pad
Use these keys to dial telephone and fax
numbers and as a keyboard for entering
information into the machine.
The # key lets you temporarily switch the
dialling mode during a telephone call from
Pulse to Tone.
4
Page 15

8 Menu keys:
Menu
Lets you access the menu to program your
settings into the machine.
a Search/Speed Dial
Lets you look up and dial numbers that are
stored in the memory.
Volume keys
d c
In Fax mode, you can press these keys to
adjust the ring volume.
d
Press to scroll backward to a menu
selection.
a or b
Press to scroll through the menus and
options.
Clear/Back
Press to cancel the current setting.
OK
Lets you store your settings in the machine.
9 Start keys:
General Information
1
Colour
Lets you start sending faxes or making
copies in full colour. Also lets you start a
scanning operation (in colour or mono,
depending on the scanning setting in the
ControlCenter software).
Mono
Lets you start sending faxes or making
copies in monochrome. Also lets you start a
scanning operation (in colour or mono,
depending on the scanning setting in the
ControlCenter software).
10 Stop/Exit
Stops an operation or exits from a menu.
11 Mode keys:
Fax
Lets you access Fax mode.
Scan
Lets you access Scan mode.
Copy
Lets you access Copy mode.
5
Page 16
2
Loading documents and paper 2
Loading documents 2
You can send a fax, make copies, and scan
from the ADF (automatic document feeder).
Using the ADF 2
The ADF can hold up to 20 pages and feeds
each sheet individually. Use standard
80 g/m
pages before putting them in the ADF.
Recommended environment 2
Document Sizes Supported 2
2
(20 lb) paper and always fan the
Temperature: 20 to 30° C (68 to 86° F)
Humidity: 50% to 70%
Paper:
Length: 127 to 355.6 mm (5 to 14 in.)
Width: 89 to 215.9 mm
Weight:
2
80 g/m
(3.5 to 8.5 in.)
64 to 90 g/m
A4 (20 lb LTR)
2
(17to24lb)
Make sure documents written with ink are
completely dry.
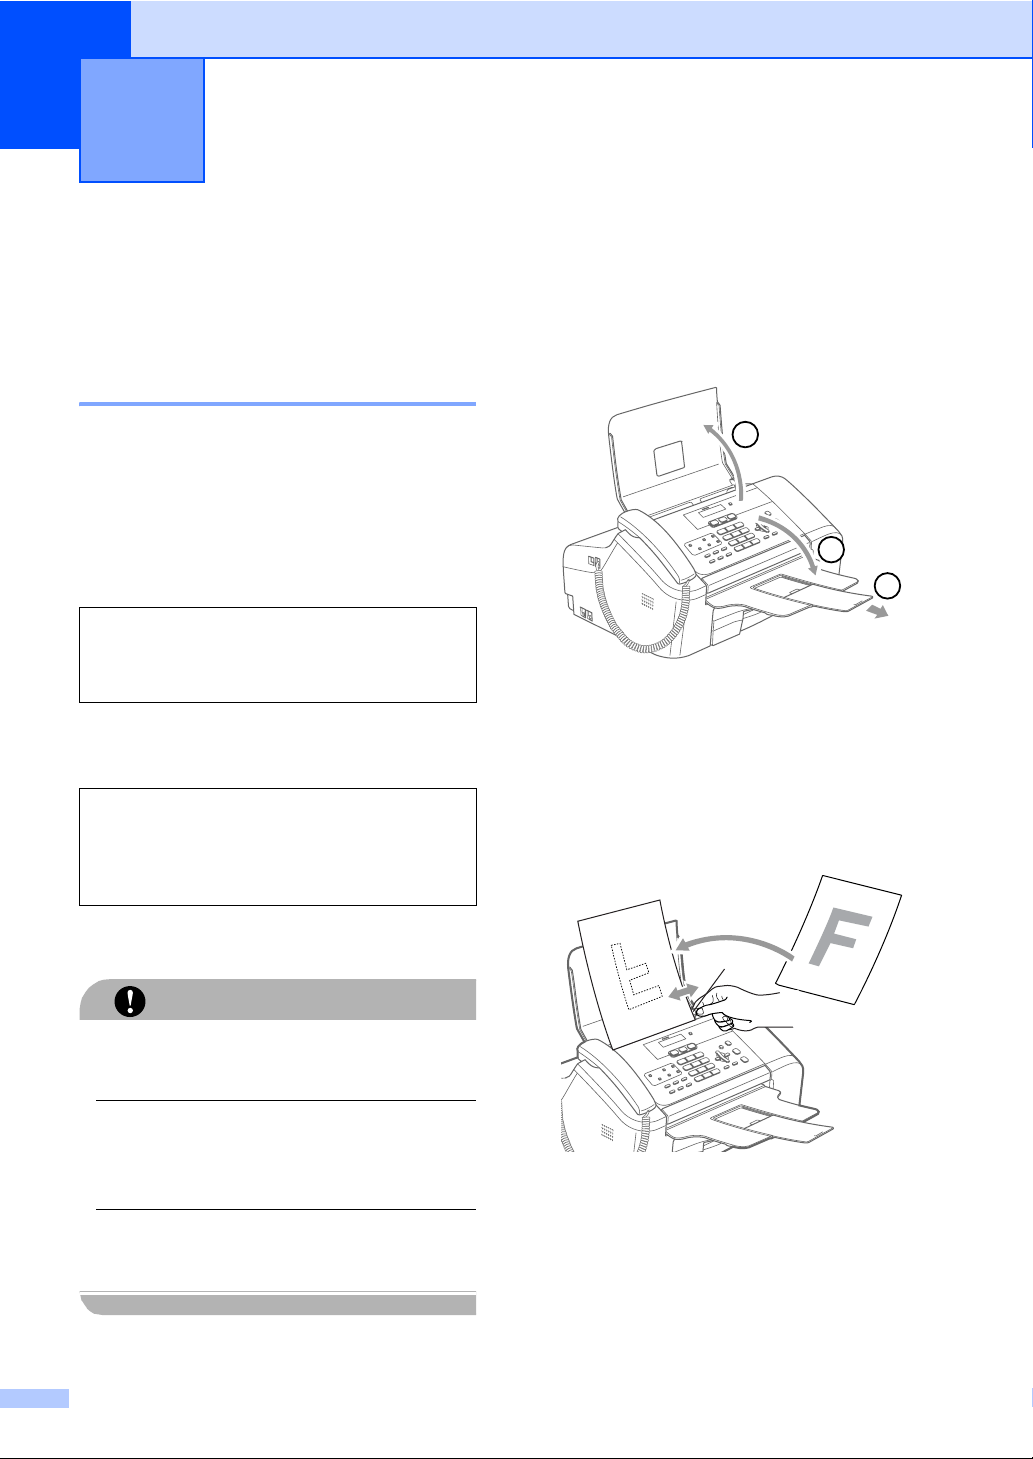
a Open the document support (1) and the
document tray (2) and then pull out the
extension (3).
1
2
3
b Fan the pages well. Make sure you put
the documents face down, top edge
first in the ADF until you feel them touch
the feed roller.
c Adjust the paper guides (1) to fit the
width of your documents.
How to load documents 2
DO NOT pull on the document while it is
feeding.
DO NOT use paper that is curled, wrinkled,
folded, ripped, stapled, paper clipped,
pasted or taped.
DO NOT use cardboard, newspaper or
fabric.
6
CAUTION
1
Page 17

Loading documents and paper
Scanning area 2
The scannable area depends on the settings
in the application you are using. The figures
below show the areas you cannot scan on
paper.
3
1
Usage Document
Size
Fax Letter 3 mm
A4 3 mm
Copy Letter 3 mm
A4 3 mm
Scan Letter 3 mm
A4 3 mm
Top (1)
Bottom (2)
(0.12 in.)
(0.12 in.)
(0.12 in.)
(0.12 in.)
(0.12 in.)
(0.12 in.)
4
2
Left (3)
Right (4)
4 mm
(0.16 in.)
1 mm
(0.04 in.)
3 mm
(0.12 in.)
3 mm
(0.12 in.)
3 mm
(0.12 in.)
0 mm
(0 in.)
Acceptable paper and other media
The print quality can be affected by the type
of paper you are using in the machine.
To get the best print quality for the settings
you have chosen, always set the Paper Type
to match the type of paper you load.
You can use plain paper, inkjet paper (coated
paper), glossy paper, transparencies and
envelopes.
We recommend testing various paper types
before buying large quantities.
For best results, use Brother paper.
When you print on inkjet paper (coated
paper), transparencies and glossy paper,
be sure to choose the correct media in the
‘Basic’ tab of the printer driver or in the
Paper Type setting of the menu. (See
Paper Type on page 17.)
When you print on Brother photo paper,
load the instruction sheet included with the
photo paper in the paper tray first, and
then put the photo paper on top of the
instruction sheet.
When you use transparencies or glossy
paper, remove each sheet at once to
prevent smudging or paper jams.
Avoid touching the printed surface of the
paper immediately after printing; the
surface may not be completely dry and
may stain your fingers.
2
2
7
Page 18

Chapter 2
Recommended media 2
To get the best print quality, we suggest using
Brother paper. (See table below.)
If Brother paper is not available in your
country, we recommend testing various
papers before purchasing large quantities.
We recommend using ‘3M Transparency
Film’ when you print on transparencies.
Brother paper
Paper Type Item
A4 Plain BP60PA
A4 Glossy Photo BP61GLA
A4 Inkjet (Matte) BP60MA
10 x 15 cm Glossy Photo BP61GLP
Handling and using media 2
Store paper in its original packaging, and
keep it sealed. Keep the paper flat and
away from moisture, direct sunlight and
heat.
The coated side of glossy paper is shiny.
Avoid touching the shiny (coated) side.
Load glossy paper with the shiny side
facing down.
Avoid touching either side of
transparencies because they absorb
water and perspiration easily, and this
may cause decreased output quality.
Transparencies designed for laser
printers/copiers may stain your next
document. Use only transparencies
recommended for inkjet printing.
Improper Setup
DO NOT use the following kinds of paper:
• Damaged, curled, wrinkled, or
irregularly shaped paper
1
1
1 2 mm (0.08 in.) or longer
• Extremely shiny or highly textured paper
• Paper already printed on by a printer
• Paper that cannot be arranged uniformly
when stacked
• Paper made with a short grain
Paper capacity of the output paper tray 2
Up to 50 sheets of 20 lb Letter or 80 g/m2 A4
paper.
Transparencies or glossy paper must be
picked up from the output paper tray one
page at a time to avoid smudging.
8
Page 19

Loading documents and paper
Choosing the right media 2
Paper type and size for each operation 2
Paper Type Paper Size Usage
Fax Copy Printer
Cut Sheet Letter 216 × 279 mm (8 1/2 × 11 in.) Yes Yes Yes
A4 210 × 297 mm (8.3 × 11.7 in.) Yes Yes Yes
Legal 216 × 356 mm (8 1/2 × 14 in.) Yes Yes Yes
Executive 184 × 267 mm (7 1/4 × 10 1/2 in.) – – Yes
JIS B5 182 × 257 mm (7.2 × 10.1 in.) – – Yes
A5 148 × 210 mm (5.8 × 8.3 in.) – Yes Yes
A6 105 × 148 mm (4.1 × 5.8 in.) – – Yes
Cards Photo 10 × 15 cm (4 × 6 in.) – Yes Yes
Photo 2L 13 × 18 cm (5 × 7 in.) – – Yes
Index Card 127 × 203 mm (5 × 8 in.) – – Yes
Post Card 1 100 × 148 mm (3.9 × 5.8 in.) – – Yes
Post Card 2
(Double)
Envelopes C5 Envelope 162 × 229 mm (6.4 × 9 in.) – – Yes
DL Envelope 110 × 220 mm (4.3 × 8.7 in.) – – Yes
COM-10 105 × 241 mm (4 1/8 × 9 1/2 in.) – – Yes
Monarch 98 × 191 mm (3 7/8 × 7 1/2 in.) – – Yes
JE4 Envelope 105 × 235 mm (4.1 × 9.3 in.) – – Yes
Transparencies Letter 216 × 279 mm (8 1/2 × 11 in.) – Yes Yes
A4 210 × 297 mm (8.3 × 11.7 in.) – Yes Yes
148 × 200 mm (5.8 × 7.9 in.) – – Yes
2
9
Page 20

Chapter 2
Paper weight, thickness and capacity 2
Paper Type Weight Thickness No. of
sheets
Cut
Sheet
Plain Paper
Inkjet Paper
Glossy Paper
Cards Photo Card
Index Card
Post Card
Envelopes
64 to 120 g/m
64 to 200 g/m
Up to 220 g/m
Up to 240 g/m
Up to 120 g/m
Up to 200 g/m
75 to 95 g/m
2
(17 to 32 lb)
2
(17 to 53 lb)
2
(Up to 58 lb)
2
(Up to 64 lb)
2
(Up to 32 lb)
2
(Up to 53 lb)
2
(20 to 25 lb)
0.08 to 0.15 mm (0.003 to 0.006 in.)
0.08 to 0.25 mm (0.003 to 0.01 in.) 20
Up to 0.25 mm (Up to 0.01 in.) 20
Up to 0.28 mm (Up to 0.01 in.) 20
Up to 0.15 mm (Up to 0.006 in.) 30
Up to 0.23 mm (Up to 0.01 in.) 30
Up to 0.52 mm (Up to 0.02 in.) 10
Transparencies – – 10
1
Up to 50 sheets for Legal size paper 80 g/m2 (20 lb).
Up to 100 sheets of 80 g/m
2
(20 lb) paper.
100
1
10
Page 21
Loading documents and paper
Loading paper, envelopes and other media
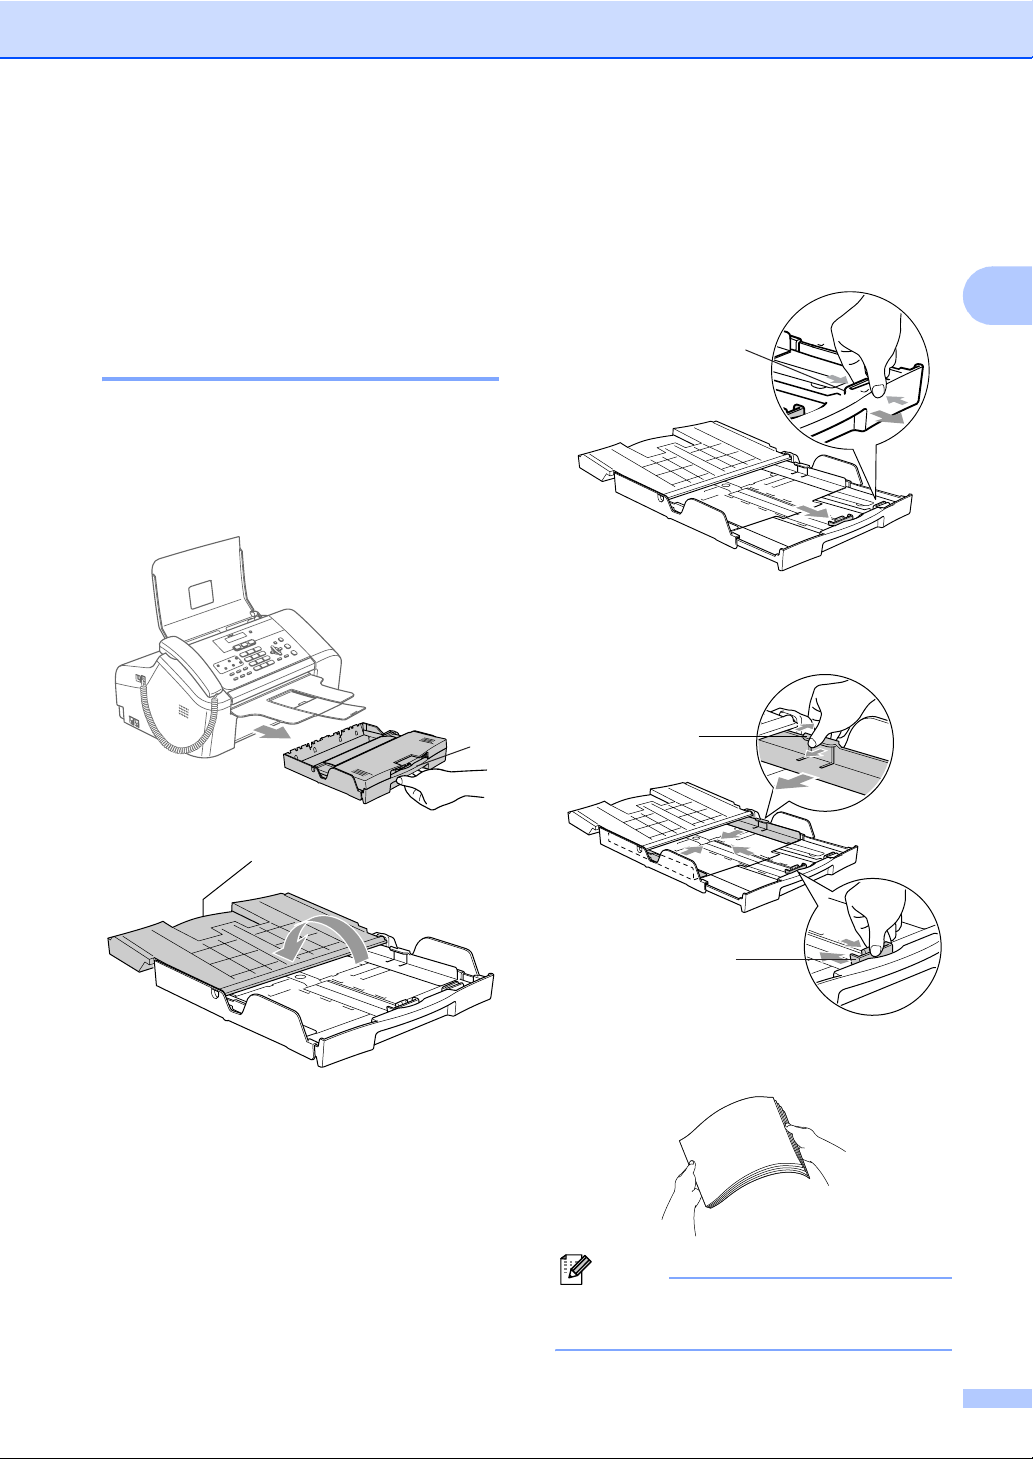
Loading paper and other media 2
a Pull the paper tray completely out of the
machine.
If the paper support flap (1) is open,
close it. Open the output paper tray
cover (2).
1
b If you are using Letter, A4 or Legal size
paper, press and hold the universal
guide release button (1) as you slide out
2
the front of the paper tray to match the
paper size you are using.
1
c Press and slide the paper side
guides (1) and paper length guide (2) to
fit the paper size.
1
2
2
2
d Fan the stack of paper well to avoid
paper jams and misfeeds.
Note
Always make sure that the paper is not
curled.
11
Page 22

Chapter 2
e Gently put the paper into the paper tray
print side down and top edge first.
Check that the paper is flat in the tray.
f Gently adjust the paper side guides with
both hands and the paper length guide
to fit the paper.
Make sure that the paper guides touch
the edges of the paper.
h Slowly push the paper tray completely
into the machine.
i While holding the paper tray in place,
pull out the paper support (1) until it
clicks and unfold the paper support
flap (2).
2
Note
Be careful that you do not push the paper
in too far; it may lift at the back of the tray
and cause feed problems.
g Close the output paper tray cover (1)
and slide it forward.
1
12
1
Note
Do not use the paper support flap for
Legal paper.
Page 23
Loading documents and paper
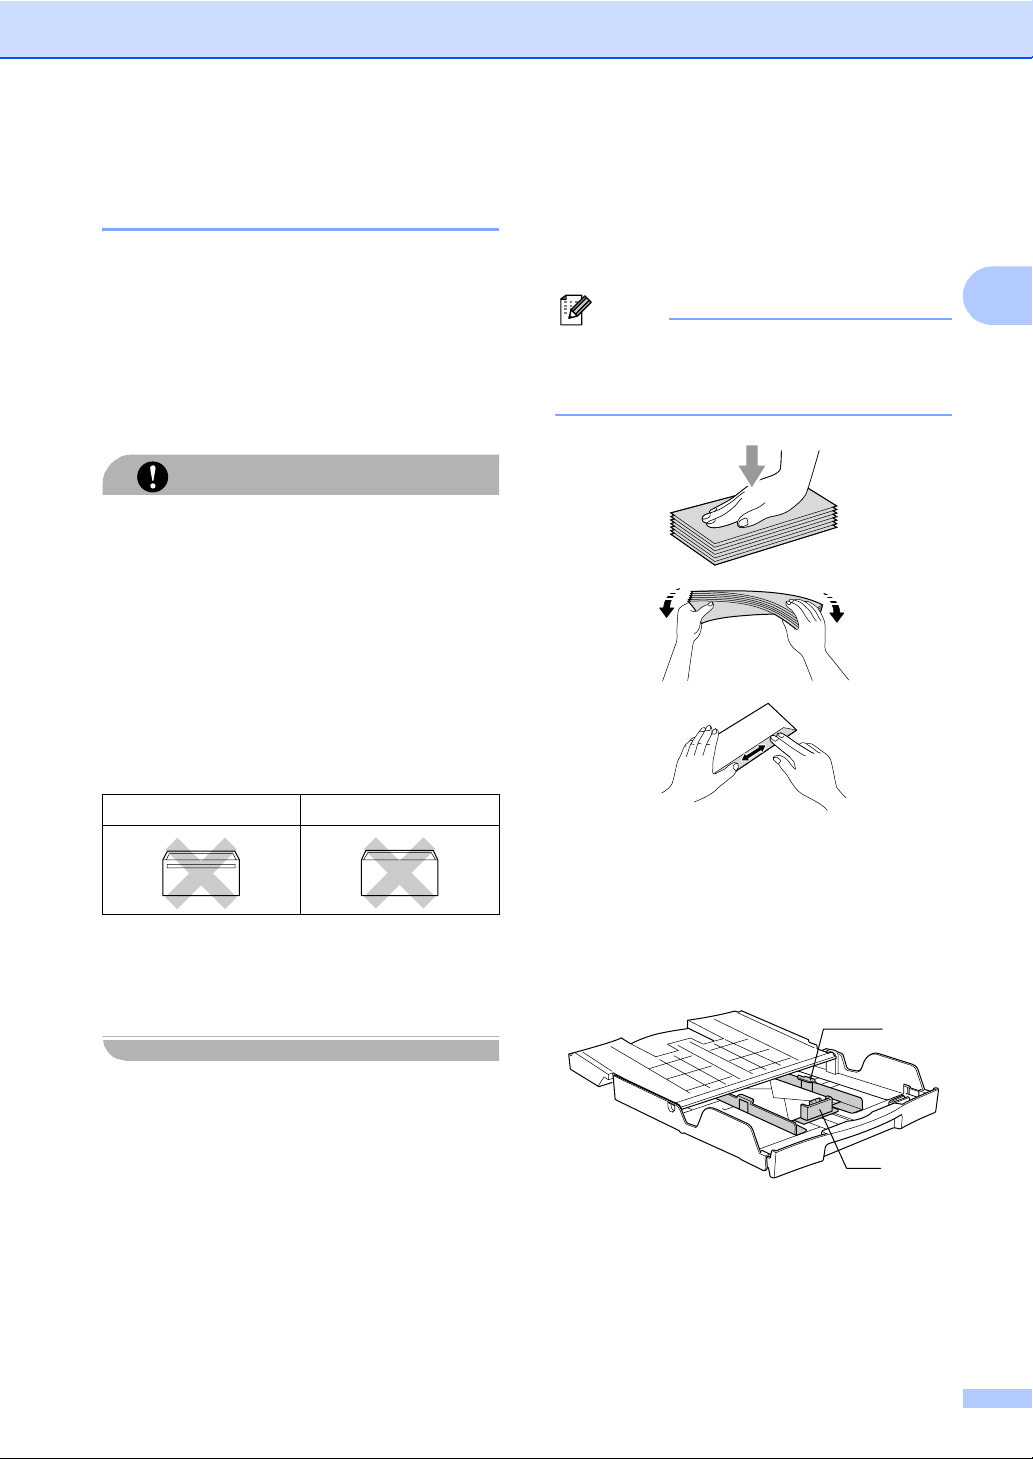
Loading envelopes and post cards 2
Loading envelopes 2
Use envelopes that weigh from 75 to
95 g/m
Some envelopes need margin settings to
be set in the application. Make sure you
do a test print first.
Do not use any of the following types of
envelopes, as they will cause paper feed
problems:
1 Envelopes with a baggy construction.
2 Embossed envelopes (those with a
3 Envelopes with clasps or staples.
4 Envelopes that are pre-printed on the
2
(20 to 25 lb).
CAUTION
raised surface).
inside.
How to load envelopes and post cards2
a Before loading, press the corners and
sides of the envelopes or post cards to
make them as flat as possible.
2
Note
If the envelopes or post cards are ‘doublefeeding,’ put one envelope in the paper
tray at a time.
Glue Double flap
Occasionally you may experience paper
feed problems caused by the thickness,
size and flap shape of the envelopes you
are using.
b Put the envelopes or post cards into the
paper tray with the address side down
and the leading edge (top of the
envelopes) in first. Slide the paper side
guides (1) and paper length guide (2) to
fit the size of the envelopes or post
cards.
1
2
13
Page 24

Chapter 2
If you have problems when printing on
envelopes, try the following suggestions:
a Open the envelope flap.
b Make sure the open flap is either to the
side of the envelope or to the back edge
of the envelope when printing.
c Adjust the size and margin in your
application.
2
Removing small prints from the machine 2
When the machine ejects small paper onto
the output paper tray, you may not be able to
reach it. Make sure printing has finished, and
then pull the tray completely out of the
machine.
14
Page 25

Loading documents and paper
Printable Area 2
The printable area depends on the settings in the application you are using. The figures below
show the unprintable areas on cut sheet paper and envelopes. The machine can only print in the
shaded areas when the Borderless print feature is available and turned on.
Cut Sheet Paper Envelopes
3
4
1
3
1
4
2
2
Top (1) Bottom (2) Left (3) Right (4)
Cut Sheet 3 mm (0.12 in.) 3 mm (0.12 in.) 3 mm (0.12 in.) 3 mm (0.12 in.)
Envelopes 12 mm (0.47 in.) 24 mm (0.95 in.) 3 mm (0.12 in.) 3 mm (0.12 in.)
2
Note
The Borderless feature is not available for envelopes.
15
Page 26
3
General setup 3
Power Save mode 3
When the machine is idle, you can put the
machine into Power Save mode by pressing
the Power Save key. You can still receive
telephone calls in Power Save mode. For
further information on receiving faxes in the
power save condition, please see the table on
page 16. If you want to do other operations,
you must take the machine out of Power Save
mode.
Note
If you have connected an external
telephone or TAD, it is always available.
Putting your machine in Power Save mode 3
a Press and hold down the Power Save
key until the LCD shows
Shutting Down.
The LCD light goes off.
Bringing your machine out of Power Save mode 3
a Press Power Save key.
Note
• Even if you have put the machine into
Power Save mode, it will periodically clean
the print head to preserve print quality.
• If you unplug the AC power cord, no
machine operations will be available.
• You can customize Power Save mode so that, apart from automatic head cleaning, no machine operations are available. (See Power Save setting on page 16.)
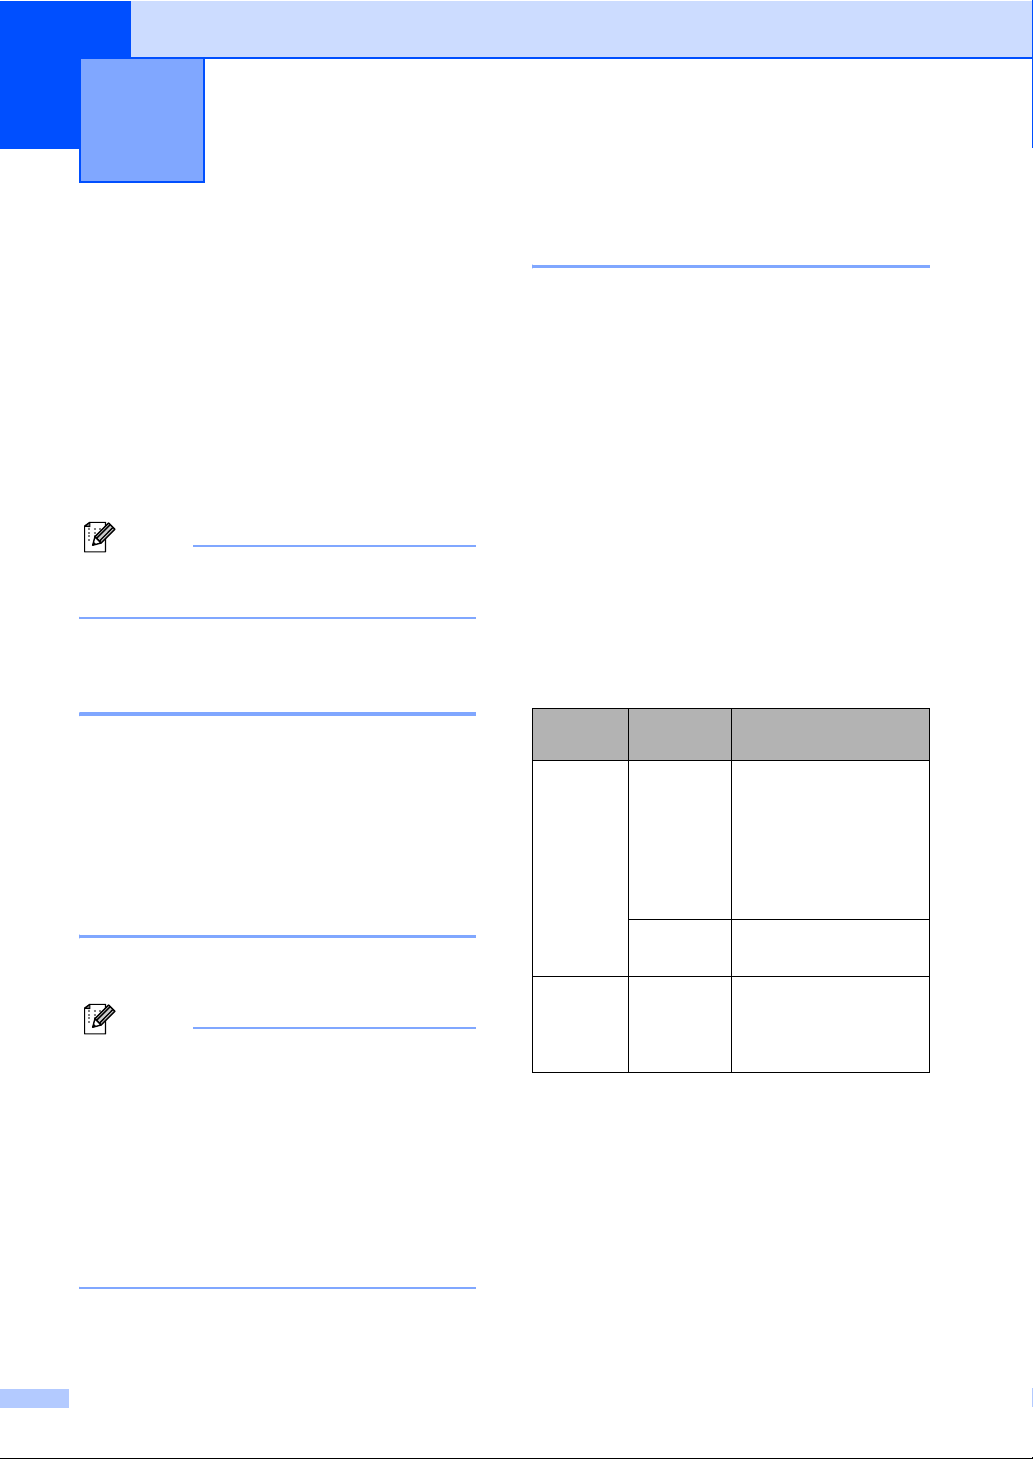
Power Save setting 3
You can customize the machine's
Power Save key. The default mode is
Fax Receive:On. Your machine can
receive faxes or calls even when the machine
is in Power Save mode. If you do not want
your machine to receive faxes or calls, turn
this setting to Fax Receive:Off. (See
Power Save mode on page 16)
a Press Menu, 1, 6.
b Press a or b to choose
Fax Receive:On, or
Fax Receive:Off.
Press OK.
c Press Stop/Exit.
On/Off
setting
Fax Receive:
12
On
(factory
setting)
Fax Receive:
Off
1
You can receive telephone calls by lifting the
handset.
2
You cannot receive a fax with Mono Start or
Colour Start.
3
Should be set before you switch off the machine.
Receive
mode
Fax Only
External
TAD
Fax/Tel
Manual Fax Detect
— No machine operations
Available operations
Fax Receive
Fax Detect
Delayed Fax
Fax Forward
Fax Storage
Remote Retrieval
Delayed Fax
will be available other
than cleaning the print
head.
3
3
3
3
3
16
Page 27
General setup
Mode Timer 3
The machine has three temporary mode keys
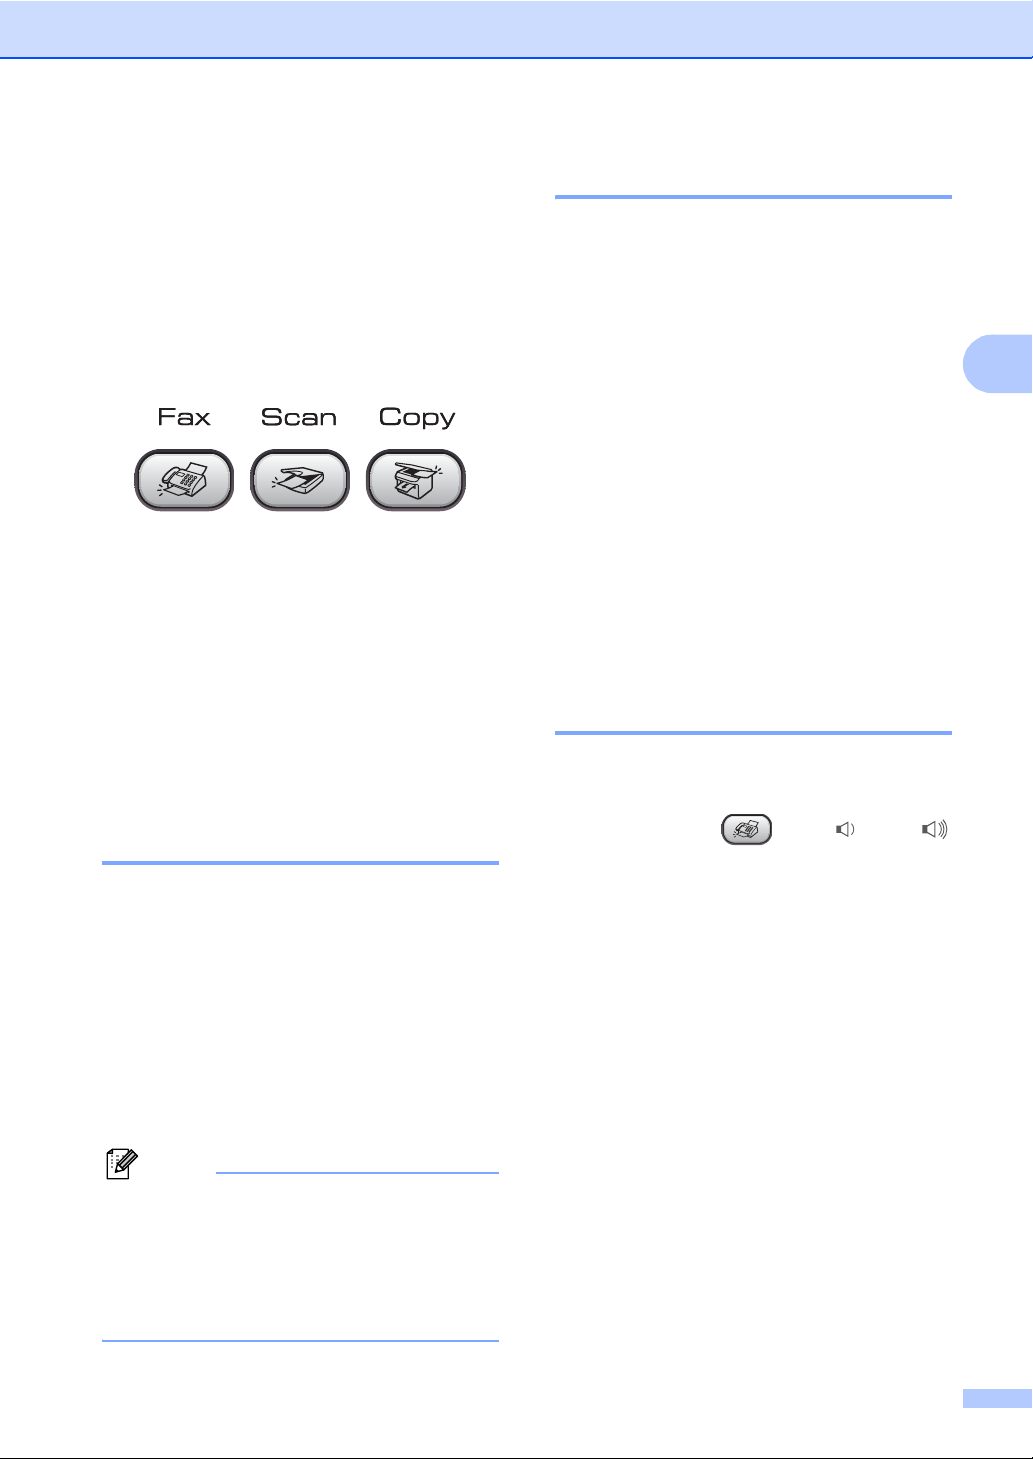
on the control panel: Fax, Scan, and Copy.
You can change the amount of time the
machine takes after the last Scan or Copy
operation before it returns to Fax mode. If you
choose Off, the machine stays in the mode
you used last.
a Press Menu, 1, 1.
b Press a or b to choose 0 Sec,
30 Secs, 1 Min, 2 Mins, 5 Mins or
Off.
Press OK.
c Press Stop/Exit.
Paper Size 3
You can use five sizes of paper for printing
copies: Letter, Legal, A4, A5, and 10 × 15 cm
(4” × 6” in.) and three sizes for printing faxes:
Letter, Legal and A4. When you change the
size of paper you load in the machine, you will
need to change the paper size setting at the
same time so your machine can fit an
incoming fax on the page.
a Press Menu, 1, 3.
b Press a or b to choose Letter,
Legal, A4, A5 or 10x15cm.
Press OK.
c Press Stop/Exit.
Volume Settings 3
Ring Volume 3
3
Paper settings 3
Paper Type 3
To get the best print quality, set the machine
for the type of paper you are using.
a Press Menu, 1, 2.
b Press a or b to choose Plain Paper,
Inkjet Paper, Brother Photo,
Other Photo or Transparency.
Press OK.
c Press Stop/Exit.
Note
The machine ejects paper with printed
surfaces face up onto the paper tray in the
front of the machine. When you use
transparencies or glossy paper, remove
each sheet at once to prevent smudging
or paper jams.
You can choose a range of ring volume
levels, from High to Off.
While in Fax mode , press d or c
to adjust the volume level. The LCD shows
the current setting, and each key press will
change the volume to the next level. The
machine will keep the new setting until you
change it.
You can also change the volume through the
menu, by following the instructions below:
Setting the Ring Volume from the menu 3
a Press Menu, 1, 4, 1.
b Press a or b to choose Low, Med,
High or Off.
Press OK.
c Press Stop/Exit.
17
Page 28

Chapter 3
Beeper Volume 3
When the beeper is on, the machine will beep
when you press a key, make a mistake or
after you send or receive a fax.
You can choose a range of volume levels,
from High to Off.
a Press Menu, 1, 4, 2.
b Press a or b to choose Low, Med,
High or Off
Press OK.
c Press Stop/Exit.
Speaker Volume 3
You can choose a range of speaker volume
levels, from High to Off.
a Press Menu, 1, 4, 3.
b Press a or b to choose Low, Med,
High or Off.
Press OK.
c Press Stop/Exit.
Automatic Daylight Savings Time
You can set the machine to change
automatically for daylight savings time. It will
reset itself forward one hour in the Spring and
backward one hour in the Autumn. Make sure
you have set the correct date and time in the
Date/Time setting.
a Press Menu, 1, 5.
b Press a or b to select On or Off.
Press OK.
c Press Stop/Exit.
LCD display 3
LCD Contrast 3
You can adjust the LCD contrast for a sharper
and more vivid display. If you are having
difficulty reading the LCD, try changing the
contrast setting.
a Press Menu, 1, 7.
3
18
b Press a or b to choose Light or
Dark.
Press OK.
c Press Stop/Exit.
Page 29

4
Security features 4
TX Lock 4
TX Lock lets you prevent unauthorized
access to the machine.
You will not be able to schedule Delayed
Faxes or Polling jobs. However, any
pre-scheduled Delayed Faxes will be sent
even if you turn on TX Lock so they will not be
lost.
While TX Lock is On, the following operations
are available:
Receiving faxes
Receiving calls
Fax Forwarding
(If Fax Forwarding was already On.)
Remote retrieval
(If Fax Storage was already On.)
While TX Lock is On, the following operations
are NOT available:
Sending faxes
Copying
PC printing
Scanning
Setting and changing the TX Lock password 4
Note
If you have already set the password, you
will not need to set it again.
4
Setting up the password 4
a Press Menu, 2, 0, 1.
b Enter a 4-digit number for the password.
Press OK.
c When the LCD shows Verify:, re-
enter the password.
Press OK.
d Press Stop/Exit.
Changing the TX Lock password 4
a Press Menu, 2, 0, 1.
b Press a or b to choose
Set Password.
Press OK.
Note
If you forget the TX Lock password,
please call your Brother dealer for service.
c Enter a 4-digit number for the current
password.
Press OK.
d Enter a 4-digit number for the new
password.
Press OK.
e When the LCD shows Verify:,
re-enter the password.
Press OK.
f Press Stop/Exit.
19
Page 30

Chapter 4
Turning TX Lock on/off 4
Turning TX Lock on 4
a Press Menu, 2, 0, 1.
b Press a or b to choose Set TX Lock.
Press OK.
c Enter the registered 4-digit password.
Press OK.
The machine goes offline and the LCD
shows TX Lock Mode.
Turning TX Lock off 4
a Press Menu.
b Enter the registered 4-digit password.
Press OK.
TX lock is automatically turned off.
Note
If you enter the wrong password, the LCD
shows Wrong Password and stays
offline. The machine will stay in TX Lock
mode until the registered password is
entered.
20
Page 31

Section II
Fax II
Sending a fax 22
Receiving a Fax 27
Telephone and External devices 32
Dialling and storing numbers 39
Remote fax options 44
Printing Reports 49
Polling 51
Page 32

5
Sending a fax 5
Entering Fax mode 5
To enter fax mode, press (Fax), and
the key will glow green.
Faxing from the ADF 5
a Make sure you are in Fax mode .
b Put the document face down in the ADF.
c Dial the fax number.
d Press Mono Start or Colour Start.
The machine starts scanning the
document.
Note
• To cancel, press Stop/Exit.
• If the memory is full, the document will be
sent in real time.
Broadcasting (Monochrome only)
Broadcasting is when the same fax message
is automatically sent to more than one fax
number. You can include Groups,
One-Touch, Speed-Dial numbers, and up to
50 manually dialled numbers in the same
broadcast.
After the broadcast is finished, a Broadcast
Report will be printed.
a Make sure you are in Fax mode .
b Load your document.
c Enter a number. Press OK.
You can use either a One-Touch, a
Speed-Dial, a Group, or a manually
entered number.
d Repeat c until you have entered all the
fax numbers you wish to broadcast to.
5
Colour fax transmission 5
Your machine can send a colour fax to
machines that support this feature.
However, colour faxes cannot be stored in
the memory. When you send a colour fax, the
machine will send it in real time (even if
Real Time TX is set to Off).
Cancelling a fax in progress 5
If you want to cancel a fax while the machine
is scanning, dialling or sending, press
Stop/Exit.
22
e Press Mono Start.
Note
• If you did not use up any of the numbers
for Groups, access codes or credit card
numbers, you can ‘broadcast’ faxes to as
many as 160 different numbers.
• The available memory will vary depending
on the types of jobs in the memory and the
number of locations used for
broadcasting. If you broadcast to the
maximum numbers available, you will not
be able to use dual access.
• Enter the long dialling sequence numbers
as you would normally, but remember that
each One-Touch and Speed-Dial number
counts as one number, so the number of
locations you can store becomes limited.
• If the memory is full, press Stop/Exit to
stop the job. If more than one page has
been scanned, press Mono Start to send
the portion that is in the memory.
Page 33

Sending a fax
Cancelling a Broadcast in progress 5
a Press Menu, 2, 6.
The LCD will show the fax number being
dialled.
b Press OK.
The LCD will show the job number:
XXXXXXXXX
1.Clear 2.Exit
c Press 1 to clear.
The LCD will then show the Broadcast
job number and 1.Clear 2.Exit.
d To cancel the Broadcast, press 1.
e Press Stop/Exit.
Additional sending operations
Sending faxes using multiple settings 5
When you send a fax you can choose any
combination of these settings: resolution,
contrast, overseas mode and real time
transmission.
a Make sure you are in Fax mode .
b Load your document.
Contrast 5
If your document is very light or very dark, you
may want to change the contrast. For most
documents the default setting Auto can be
used. It automatically chooses the suitable
contrast for your document.
Use Light when sending a light document.
Use Dark when sending a dark document.
a Make sure you are in Fax mode .
b Load your document.
c Press Menu, 2, 2, 1.
d Press a or b to choose Auto, Light
or Dark.
Press OK.
Note
Even if you choose Light or Dark, the
5
machine will send the fax using the Auto
setting in any of the following conditions:
• When you send a colour fax.
• When you choose Photo as the Fax
Resolution.
Changing Fax Resolution 5
The quality of a fax can be improved by
changing the fax resolution. Resolution can
be changed for the next fax or for all faxes.
5
c Choose a setting you want to change.
Press OK.
d Do one of the following:
Next
1.Yes 2.No
Press 1 to change another setting.
Press 2 when you have finished
choosing your settings.
e Send the fax as usual.
To change the fax resolution for the next fax
a Make sure you are in Fax mode .
b Load your document.
c Press Resolution and then a or b to
choose the resolution.
Press OK.
5
23
Page 34

Chapter 5
To change the default fax resolution 5
a Make sure you are in Fax mode .
b Press Menu, 2, 2, 2.
c Press a or b to choose the resolution
you want.
Press OK.
Note
You can choose four different resolution
settings for monochrome faxes and two
for colour.
Monochrome
Standard Suitable for most typed
documents.
Fine Good for small print and
transmits a little slower than
Standard resolution.
S.Fine Good for small print or artwork
and transmits slower than Fine
resolution.
Photo Use when the document has
varying shades of grey or is a
photograph. This has the
slowest transmission.
Colour
Standard Suitable for most typed
documents.
Fine Use when the document is a
photograph. The transmission
time is slower than Standard
resolution.
Dual access (Monochrome only) 5
You can dial a number and start scanning the
fax into memory—even when the machine is
sending from memory, receiving faxes or
printing PC data. The LCD shows the new job
number and available memory.
The number of pages you can scan into the
memory will vary depending on the data that
is printed on them.
Note
If the Out of Memory message appears
while scanning documents, press
Stop/Exit to cancel or Mono Start to send
the scanned pages.
Real time transmission 5
When you are sending a fax, the machine will
scan the documents into the memory before
sending. Then, as soon as the phone line is
free, the machine will start dialling and
sending.
If the memory is full or you are sending a
colour fax, the machine will send the
document in real time (even if
Real Time TX is set to Off).
Sometimes, you may want to send an
important document immediately, without
waiting for memory transmission. You can set
Real Time TX to On for all documents or
Next Fax Only for the next fax only.
If you choose S.Fine or Photo and then
use the Colour key to send a fax, the
machine will send the fax using the Fine
setting.
24
Page 35

Sending a fax
Sending in real time for all faxes 5
a Make sure you are in Fax mode .
b Press Menu, 2, 2, 5.
5.Real Time TX
Realtime TX:On
c Press a or b to choose
Realtime TX:On
(or Realtime TX:Off).
Press OK.
Sending in real time for the next fax only 5
a Make sure you are in Fax mode .
b Press Menu, 2, 2, 5.
c Press a or b to choose
Next Fax Only.
Press OK.
d Press a or b to choose Next Fax:On
(or Next Fax:Off).
Press OK.
Overseas Mode 5
If you are having difficulty sending a fax
overseas due to possible interference on the
phone line, we recommend that you turn on
the Overseas mode. After you send a fax
using this feature, the feature will turn itself
off.
a Make sure you are in Fax mode .
Delayed Faxing (Monochrome only) 5
During the day you can store up to 50 faxes
in the memory to be sent within 24-hours.
These faxes will be sent at the time of day you
enter in step d.
a Make sure you are in Fax mode .
b Load your document.
c Press Menu, 2, 2, 3.
3.Delayed Fax
d Do one of the following:
Press OK to accept the displayed
time.
Enter the time you want the fax to be
sent (in 24-hour format).
(For example, enter 19:45 for
7:45 PM.)
Press OK.
1.Doc 2.Memory
e Do one of the following:
Press 1 to leave the document in the
ADF.
Press 2 to scan the document into
the memory.
Note
The number of pages you can scan into
the memory depends on the amount of
data that is printed on each page.
5
b Load your document.
c Press Menu, 2, 2, 7.
d Press a or b to choose On (or Off).
Press OK.
25
Page 36

Chapter 5
Delayed Batch Transmission (Monochrome only) 5
Before sending the delayed faxes, your
machine will help you economize by sorting
all the faxes in the memory by destination and
scheduled time. All delayed faxes that are
scheduled to be sent at the same time to the
same fax number will be sent as one fax to
save transmission time.
a Make sure you are in Fax mode .
b Press Menu, 2, 2, 4.
c Press a or b to choose On (or Off).
Press OK.
d Press Stop/Exit.
Checking and cancelling waiting jobs 5
You can check which jobs are still waiting in
the memory to be sent and cancel a job. (If
there are no jobs, the LCD shows
No Jobs Waiting.)
Sending a fax manually 5
Manual transmission lets you hear the
dialling, ringing and fax-receiving tones while
sending a fax.
a Make sure you are in Fax mode .
b Load your document.
c Pick up the handset of the machine and
listen for a dial tone.
d Dial the fax number you want to call.
e When you hear the fax tone, press
Mono Start or Colour Start.
f Replace the handset.
Sending a fax at the end of a conversation 5
At the end of a conversation you can send a
fax to the other party before you both hang up.
a Ask the other party to wait for fax tones
(beeps) and then to press the Start or
Send key before hanging up.
b Make sure you are in Fax mode .
c Load your document.
a Press Menu, 2, 6.
Any waiting jobs appear on the LCD.
b Press a or b to scroll through the jobs
and choose the job you want to cancel.
Press OK.
c Do one of the following:
Press 1 to cancel the selected job.
Press 2 to exit without cancelling.
d When you have finished, press
Stop/Exit.
26
d Press Mono Start and Colour Start.
e Replace the handset.
Out of Memory message 5
If you get an Out of Memory message
while scanning the first page of a fax, press
Stop/Exit to cancel the fax.
If you get an Out of Memory message
while scanning a subsequent page, you will
have the option to press Mono Start to send
the pages scanned so far, or to press
Stop/Exit to cancel the operation.
Note
If you get an Out of Memory message
while faxing and you do not want to delete
your stored faxes to clear the memory,
you can send the fax in real time. (See
Real time transmission on page 24.)
Page 37

Receiving a Fax 6
6
Receive modes 6
You must choose a receive mode depending on the external devices and telephone services you
have on your line.
Choosing the Receive Mode 6
By default, your machine will automatically receive any faxes that are sent to it. The diagram below
will help you choose the correct mode.
For more detailed information on the receive modes. See page 28.
Do you want to use the telephone features of your machine (if available) or
an external telephone or external telephone answering device connected on the
same line as the machine?
Yes
Are you using the voice message function of
an external telephone answering device?
No
Do you want the machine to answer fax and
telephone calls automatically?
To choose or change your Receive Mode 6
a Press Menu 0, 1.
b Press a or b to choose Fax Only,
Fax/Tel, External TAD or Manual.
Press OK.
The LCD will display the current receive
mode.
1 Current receive mode
Fax: Fax Only
No
Yes
Yes
12/10 11:53 Fax12/10 11:53 Fax
6
6
No
Fax Only
Manual
Fax/Tel
External TAD
1
c Press Stop/Exit.
27
Page 38

Chapter 6
Using receive modes 6
Some receive modes answer automatically
(Fax Only and Fax/Tel). You may want to
change the ring delay before using these
modes. (See Ring Delay on page 29.)
Fax only 6
Fax only mode will automatically answer
every call. If the call is a fax your machine will
receive it.
Fax/Tel 6
Fax/Tel mode helps you automatically
manage incoming calls, by recognizing
whether they are fax or voice calls and
dealing with them in one of the following
ways:
Faxes will be automatically received.
Voice calls will start the F/T ring to tell you
to pick up the line. The F/T ring is a fast
double ring made by your machine.
External TAD 6
External TAD mode lets an external
answering device manage your incoming
calls. Incoming calls will be dealt with in one
of the following ways:
Faxes will be automatically received.
Voice callers can record a message on the
external TAD.
For more information see Connecting an
external TAD (telephone answering
device) on page 35.
Also see F/T Ring Time (Fax/Tel mode only)
and Ring Delay on page 29.
Manual 6
Manual mode turns off all automatic
answering functions unless you are using the
BT Call sign feature.
To receive a fax in manual mode press
Mono Start or Colour Start when you hear
fax tones (short repeating beeps). You can
also use the Fax Detect feature to receive
faxes by lifting a handset on the same line as
the machine.
Also see Fax Detect on page 30.
28
Page 39

Receiving a Fax
Receive mode settings6
Ring Delay 6
The Ring Delay sets the number of times the
machine rings before it answers in Fax Only
or Fax/Tel mode. If you have external or
extension phones on the same line as the
machine or subscribe to the telephone
company’s BT Call Sign service, choose the
maximum number of rings. (See Operation
from extension telephones on page 36 and
Fax Detect on page 30.)
a Press Menu, 2, 1, 1.
b Press a or b to choose how many
times the line rings before the machine
answers (00-08 UK only).
Press OK.
If you choose 00 , the line will not ring at
all.
Note
The 00 setting is not available in Ireland.
c Press Stop/Exit.
F/T Ring Time (Fax/Tel mode only) 6
If you set the Receive Mode to Fax/Tel, you
need to decide how long the machine will
signal you with its special pseudo/double-ring
when you have a voice call. If it's a fax call,
the machine receives the fax.
This pseudo/double-ring happens after the
initial ringing from the phone company. Only
the machine rings and no other phones on the
same line will ring with the special
pseudo/double-ring. However, you can still
answer the call on any telephone.
a Press Menu, 2, 1, 2.
6
b Press a or b to choose how long the
machine will ring to alert you that you
have a voice call (20, 30, 40 or 70
seconds).
Press OK.
c Press Stop/Exit.
Note
Even if the caller hangs up during the
pseudo/double-ringing, the machine will
continue to ring for the set time.
29
Page 40

Chapter 6
Fax Detect 6
If Fax Detect is On: 6
The machine receives fax calls automatically,
even if you lift the handset of an extension or
external phone. When you see Receiving
on the LCD or when you hear ‘chirps’ through
the handset of an extension phone connected
to another wall socket/phone socket, just
replace the handset and your machine will do
the rest.
If Fax Detect is Semi: 6
The machine will only receive the fax call if
you answered it using the machine’s handset.
If Fax Detect is Off: 6
When you hear a fax tone through the
handset, you have to press Mono Start or
Colour Start on the machine.
If you are not at your machine, press l 5 1 on
the extension phone. (See Operation from
extension telephones on page 36.)
Additional receiving operations
Printing a reduced incoming fax 6
If you choose On, the machine automatically
reduces each page of an incoming fax to fit on
one page of A4, Letter or Legal size paper.
The machine calculates the reduction ratio by
using the page size of the fax and your Paper
Size setting (Menu, 1, 3).
a Make sure you are in Fax mode .
b Press Menu, 2, 1, 5.
5.Auto Reduction
c Use a or b to select On or Off.
Press OK.
d Press Stop/Exit.
6
Note
• If this feature is set to On, but your
machine does not connect a fax call when
you lift an extension or external phone
handset, press the fax receive code l 5 1.
At the machine, press Mono Start or
Colour Start.
• If you send faxes from a computer on the
same phone line and the machine
intercepts them, set Fax Detect to Off.
a Press Menu, 2, 1, 3.
b Press a or b to choose On, Semi or
Off.
Press OK.
c Press Stop/Exit
30
Page 41

Receiving a Fax
Receiving faxes into memory 6
As soon as the paper tray becomes empty
during fax reception, the screen will display
No Paper Fed, asking you to put paper in
the paper tray. (See Loading paper and other
media on page 11.) If you are unable to put
paper in the paper tray the following will
happen:
If Memory Receive is On: 6
The machine will carry on receiving the fax,
with the remaining pages being stored in
memory, if enough memory is available.
Further incoming faxes will also be stored into
memory until the memory is full. When the
memory is full the machine will stop
automatically answering calls. To print the
faxes, put fresh paper in the tray.
If Memory Receive is Off: 6
The machine will carry on receiving the fax,
with the remaining pages being stored in
memory, if enough memory is available. The
machine will then stop automatically
answering calls until fresh paper is put in the
paper tray. To print the last fax you received,
put fresh paper in the tray.
a Make sure you are in Fax mode .
b Press Menu, 2, 1, 6.
Receiving a fax at the end of a conversation 6
At the end of a conversation you can ask the
other party to send you a fax before you both
hang up.
a Ask the other person to place the
document in their machine and to press
the Start or Send key.
b When you hear the CNG tones (slowly
repeating beeps), press Mono Start or
Colour Start.
c Replace the handset.
Printing a fax from the memory 6
If you are using the Fax Storage feature
(Menu, 2, 5, 1), you can still print a fax from
the memory when you are at your machine.
(See Turning off Remote Fax
Options on page 45.)
a Press Menu, 2, 5, 3.
5.Remote Fax Opt
3.Print Document
b Press Mono Start.
6
c Use a or b to select On or Off. Press
OK.
d Press Stop/Exit.
31
Page 42

7
Telephone and External devices 7
Voice Operations 7
Voice calls can be made either with the
handset, an extension or external telephone,
and by dialling manually or by using QuickDial numbers.
Making a telephone call 7
a To start a voice call, pick up the handset.
b When you hear the dial tone, enter a
number using the dial pad, One Touch,
Speed-Dial and Search.
c To hang up, replace the handset.
Mute 7
If you want to put a call on hold, press the
Mute key. To release the call from hold pick
up the handset. Picking up an extension
handset will not release the call from hold.
Tone or pulse 7
Fax/Tel mode 7
When the machine is in Fax/Tel mode, it will
use the F/T Ring Time (pseudo/doubleringing) to alert you to pick up a voice call.
If you are at the machine, you can lift the
handset to answer.
If you are at an extension phone, you'll need
to lift the handset during the F/T Ring Time
and then press #51 between the
pseudo/double rings. If no one is on the line,
or if someone wants to send you a fax, send
the call back to the machine by pressing
l 51.
Fax/Tel mode in Power Save condition 7
When the machine is in Fax/Tel mode and
F/T rings to tell you to pick up a voice call, you
can only answer by picking up the machine’s
handset .
If you answer before the machine F/T rings,
you can also pick up the call at an external or
extension phone.
If you have a Pulse dialing service, but need
to send Tone signals (for example, for
telephone banking), follow the instructions
below:
a Pick up the handset.
b Press # on the machine’s control panel.
Any digits dialled after this will send tone
signals.
When you hang up, the machine will
return to the Pulse dialling service.
32
Page 43

Telephone and External devices
Telephone services 7
Your machine supports the Caller ID
subscriber telephone service that some
telephone companies offer.
Features like Voice Mail, Call Waiting, Call
Waiting/Caller ID, answering services, alarm
systems or other custom features on one
phone line may create problems with the
operation of your machine.
Caller ID (For U.K. and Ireland only) 7
The Caller ID feature lets you use the Caller
ID subscriber service offered by many local
telephone companies. Call your telephone
company for details. This service shows the
telephone number, or name if it is available,
of your caller as the line rings.
After a few rings, the LCD shows the
telephone number of your caller (and name, if
available). Once you answer a call, the Caller
ID information disappears from the LCD, but
the call information stays stored in the Caller
ID memory.
You can see the first 16 characters of the
number (or name).
The # Unavailable message means
the call originated outside your Caller ID
service area.
The # Withheld message means the
caller has intentionally blocked
transmission of information.
Setting the Caller ID to ON 7
a Press Menu, 2, 0, 4.
4.Caller ID
b Press a or b to choose On (or Off ).
Press OK.
c Press Stop/Exit.
Viewing Caller ID List 7
If Caller ID is set to On, your machine stores
information for the last thirty calls in the Caller
ID list. You can view or print this list. When
the thirty-first call comes in to the machine, it
replaces information about the first call.
a Press Menu, 2, 0, 4.
b Press a or b to choose Display ID.
Press OK.
The Caller ID list will appear on the
display. If no ID is stored, the beeper will
sound and No Caller ID will appear
on the display.
c Press a or b to scroll through the Caller
ID memory to choose the Caller ID you
want to view, and then press OK.
The LCD shows the caller's number or
name and the date and time of the call.
d Do one of the following:
To return to the Caller ID listing,
press d.
To finish viewing, press Stop/Exit.
Printing Caller ID List 7
7
You can print a list of the Caller ID information
received by your machine. (See Printing
Caller ID List on page 33.)
Note
Caller ID service varies with different
carriers. Call your local telephone
company to find out about the kind of
service available in your area.
a Press Menu, 2, 0, 4.
b Press a or b to choose
Print Report.
Press OK.
If no ID is stored, the beeper will sound
and No Caller ID will appear on the
LCD.
c Press Mono Start or Colour Start.
d After printing has finished, press
Stop/Exit.
33
Page 44

Chapter 7
Setting the Phone Line Type 7
If you are connecting the machine to a line
that features a PBX or ISDN to send and
receive faxes, it is also necessary to change
the Phone Line Type accordingly by
completing the following steps.
a Press Menu, 0, 6.
0.Initial Setup
6.Phone Line Set
b Press a or b to select PBX, ISDN (or
Normal). Press OK.
c Press Stop/Exit.
PBX and TRANSFER 7
The machine is initially set to Normal, which
lets the machine connect to a standard PSTN
(Public Switched Telephone Network) line.
However, many offices use a central
telephone system or Private Branch
Exchange (PBX). Your machine can be
connected to most types of PBX. The
machine’s recall feature supports timed break
recall only (TBR). TBR will work with most
PBX systems allowing you to gain access to
an outside line, or transfer calls to another
extension. The feature works when Tel/R is
pressed.
BT Call Sign (For U.K. only) 7
This machine feature lets you use the BT Call
Sign subscriber service which allows you to
have at least two separate telephone
numbers on one phone line. Each phone
number has its own distinctive ringing
pattern, so you know which phone number is
ringing. This is one way you can have a
separate phone number for your machine.
Your machine has a BT Call Sign compatible
distinctive ringing function, allowing you to
dedicate a second phone number (on the
same phone line) just for receiving faxes.
Note
• You can switch BT Call Sign off
temporarily, then turn it back on. When
you get a new fax number, make sure you
reset this function. This machine will
automatically answer incoming calls that
use your new fax number.
• When you set the BT Call Sign feature to
ON, the receive mode is set to Manual
automatically. Manual mode will not
respond to incoming telephone calls,
since the number you use for telephone
calls will use the normal ring pattern.
To enable the machine to work with BT Call Sign (With your external phone only)
7
Note
You can program a Tel/R key press as part
of a number stored in a Speed-Dial location.
When programming the Speed-Dial
number (Menu, 2, 3, 1 or 2, 3, 2) press
Tel/R first (the screen displays “!”) then
enter the telephone number. If you do this,
you do not need to press Tel/R each time
before you dial using a Speed-Dial location.
(See Storing numbers on page 40.)
However, if PBX is not selected in the
Phone Line Type setting, you cannot use
the Speed-Dial number that Tel/R press is
programmed into.
34
a Press Menu, 2, 0, 3.
0.Miscellaneous
3.BT Call Sign
b Press a or b to choose On (or Off).
Press OK.
c Press Stop/Exit.
Note
If you turn off BT Call Sign, the receive
mode stays in Manual. You will need to
set receive mode again. (See Choosing
the Receive Mode on page 27)
Page 45

Telephone and External devices
Connecting an external TAD (telephone answering device)
You may choose to connect an external
answering device. However, when you have an
external
machine, the TAD answers all calls and the
machine ‘listens’ for fax calling (CNG) tones. If it
hears them, the machine takes over the call and
receives the fax. If it does not hear CNG tones,
the machine lets the TAD continue playing your
outgoing message so your caller can leave you
a voice message.
The TAD must answer within four rings (the
recommended setting is two rings). The
machine cannot hear CNG tones until the TAD
has answered the call, and with four rings there
are only 8 to 10 seconds of CNG tones left for
the fax ‘handshake’. Make sure you carefully
follow the instructions in this guide for recording
your outgoing message. We do not recommend
using the toll saver feature on your external
answering machine if it exceeds five rings.
• If you do not receive all your faxes, cut the
• Do not connect a TAD elsewhere on the
TAD on the same telephone line as the
Note
Ring Delay setting on your external TAD.
same phone line.
1
Connections 7
The external TAD must be connected as
shown in the previous illustration.
7
a Set your external TAD to one or two
rings. (The machine's Ring Delay setting
does not apply.)
b Record the outgoing message on your
external TAD.
c Set the TAD to answer calls.
d Set the Receive Mode to
External TAD. (See Choosing the
Receive Mode on page 27.)
Recording an outgoing message (OGM) on an external TAD 7
Timing is important in recording this
message. The message sets up the ways to
handle both manual and automatic fax
reception.
a Record 5 seconds of silence at the
beginning of your message. (This allows
your machine time to listen for the fax
CNG tones of automatic transmissions
before they stop.)
b Limit your speaking to 20 seconds.
7
1TAD
When the TAD answers a call, the LCD shows
Ext. Tel in Use.
Do not connect a TAD elsewhere on the
same phone line.
Improper Setup
1
We recommend beginning your OGM with
an initial 5-second silence because the
machine cannot hear fax tones over a
resonant or loud voice. You may try
omitting this pause, but if your machine
has trouble receiving, then you must rerecord the OGM to include it.
35
Note
Page 46

Chapter 7
Multi-line connections (PBX) 7
We suggest you ask the company who
installed your PBX to connect your machine.
If you have a multi line system we suggest
you ask the installer to connect the unit to the
last line on the system. This prevents the
machine being activated each time the
system receives telephone calls. If all
incoming calls will be answered by a
switchboard operator we recommend that
you set the Receive Mode to Manual.
We cannot guarantee that your machine will
operate properly under all circumstances
when connected to a PBX. Any difficulties
with sending or receiving faxes should be
reported first to the company who handles
your PBX.
Note
Make sure the Phone Line Type is set to
PBX. (See Setting the Phone Line
Type on page 34.)
External and extension phones
Connecting an external or extension telephone 7
You can connect a separate telephone to
your machine as shown in the diagram below.
1
2
1 Extension telephone
2 External telephone
When you are using an external phone, the
LCD shows Ext. Tel in Use.
7
Operation from extension telephones 7
If you answer a fax call on an extension or an
external telephone plugged into the correct
socket on the machine, you can make your
machine take the call by using the Fax
Receive Code. When you press the Fax
Receive Code l 51, the machine starts to
receive the fax.
If the machine answers a voice call and
pseudo/double-rings for you to take over, use
the Telephone Answer Code #51 to take the
call at an extension phone. (See F/T Ring
Time (Fax/Tel mode only) on page 29.)
36
Page 47

Telephone and External devices
If you answer a call and no one is on the line:
You should assume that you're receiving a
manual fax.
Press l 51 and wait for the chirp or until the
LCD shows Receiving, and then hang up.
Note
You can also use the Fax Detect feature to
make your machine automatically take the
call. (See Fax Detect on page 30.)
Using extension telephones (For U.K. only) 7
Your premises may already be wired with
parallel extension telephones, or you may
plan to add extension telephones to your line,
as well as your machine. While the simplest
arrangement is a straightforward parallel
connection, there are some problems with
this arrangement, the most obvious of which
is inadvertent interruption of a facsimile
transmission caused by someone picking up
an extension telephone to make an outgoing
call. Also, fax receive code may not operate
reliably in such a simple configuration.
This new connection configuration can be
arranged by contacting BT, Kingston upon
7
Hull Telecommunications, your PBX
maintainer or a qualified telephone
installation company as appropriate. Simply
explained, the extension telephone circuit
should be terminated on a normal modular
plug (BT 431A style), which in turn should be
put into the modular socket of the white ‘T’shaped connector provided as part of the line
cord assembly.
Inadvisable connection of extension
sockets (Fig. 1.)
11
1 Extension socket
2 Master socket
3 Incoming line
7
2
FAX
Recommended connection of extension
sockets (Fig. 2.)
7
11
3
7
2
3
This machine may also be set to make a
delayed transmission (i.e. a transmission at a
pre-set time). This pre-set job may coincide
with someone picking up an extension
handset.
These problems can easily be eliminated, if
you arrange modification of your extension
wiring circuit, such that extension devices are
connected ‘downstream’ of your machine in a
master/slave configuration (see figure 2 on
page 37). In this configuration the machine
can always detect whether a telephone is in
use. Thus it will not attempt to seize the line
during that time. This is known as ‘telephone
off-hook detection.’
The inadvisable configuration is shown in
figure 1 on page 37, and the recommended
master/slave configuration is shown in
figure 2.
FAX
1 Extension socket
2 Master socket
3 Incoming line
The fax machine must be plugged into master
socket.
Note
These phones are now connected as
external devices (see Connecting an
external or extension
telephone on page 36), because they are
connected to the fax machine via the Tconnector.
37
Page 48

Chapter 7
Using a cordless external telephone 7
Once the base unit of the cordless telephone
has been connected to the same telephone
line as the machine (see External and
extension phones on page 36), it is easier to
answer calls during the Ring Delay if you
carry the cordless handset around with you.
If you let the machine answer first, you will
have to go to the machine so you can press
Tel/R to send the call to the cordless handset.
Using remote codes 7
Fax receive code 7
If you answer a fax call on an extension or
external telephone, you can tell your machine to
receive it by
Wait for the chirping sounds then replace the
handset. (See
caller will have to press
Telephone answer code 7
If you receive a voice call and the machine is
in F/T mode, it will start to sound the F/T
(double) ring after the initial ring delay. If you
pick up the call on an extension phone you
can turn the F/T ring off by pressing #51
(make sure you press this between the rings).
Changing the remote codes 7
If you want to use Remote Activation, you
have to turn on the remote codes.
Fax Receive Code is
Answer Code is
replace them with your own codes.
dialling
the fax receive code l51
Fax Detect on page 30
Start
to send the fax.
l51. The preset Telephone
#51
. If you want to, you can
.) Your
The preset
.
a Press Menu, 2, 1, 4.
1.Setup Receive
4.Remote Codes
b Press a or b to choose On (or Off).
Press OK.
c Enter the new Fax Receive Code.
Press OK.
d Enter the new Telephone Answer Code.
Press OK.
e Press Stop/Exit.
Note
• If you are always disconnected when
accessing your external TAD remotely, try
changing the Fax Receive Code and
Telephone Answer Code to another threedigit code using the numbers 0-9, l, #.
• Remote Codes might not work with some
telephone systems.
38
Page 49

8
Dialling and storing numbers 8
How to Dial 8
Manual dialling 8
Press all of the digits of the fax number.
One-Touch Dialling 8
Press the One-Touch key that stores the
number you want to call.
To dial One-Touch numbers 6 to 10, hold
down Shift as you press the One-Touch key.
Speed-Dialling 8
a Press Search/Speed Dial, the # (hash)
key, and then the two digit Speed-Dial
number.
8
Two-digit number
Note
If the LCD shows Not Registered
when you enter a One-Touch number or a
Speed-Dial number, a number has not
been stored at this location.
39
Page 50

Chapter 8
Search 8
You can search for names you have stored in
the One-Touch and Speed-Dial memories.
Press Search/Speed Dial and the menu
keys to search numerically or use the dial pad
and then the menu keys to search
alphabetically.
1
2
Fax Redial 8
If you are sending a fax manually and the line
is busy, press Redial/Pause, and then press
Mono Start or Colour Start to try again. If
you want to make a second call to the last
number dialled, you can save time by
pressing Redial/Pause and Mono Start or
Colour Start.
Redial/Pause only works if you dialled from
the control panel.
If you are sending a fax automatically and the
line is busy, the machine will automatically
redial up to three times at five minute
intervals.
Storing numbers 8
You can set up your machine to do the
following types of easy dialling: One-Touch,
Speed-Dial and Groups for broadcasting
faxes. When you dial a Quick-Dial number,
the LCD shows the name, if you stored it, or
the number.
1 To search numerically.
2 To search alphabetically, you can use the
dial pad to enter the first letter of the name
you are looking for.
40
Note
If you lose electrical power, the Quick-Dial
numbers that are in the memory will not be
lost.
Storing a pause 8
Press Redial/Pause to put a 3.5-second
pause between numbers. If you are dialling
overseas, you can press Redial/Pause as
many times as needed to increase the length
of the pause.
Page 51

Dialling and storing numbers
Storing One-Touch Dial numbers 8
Your machine has 5 One-Touch keys where
you can store 10 fax or phone numbers for
automatic dialling. To access numbers 6 to
10, hold down Shift as you press the
One-Touch key.
a Press Menu, 2, 3, 1.
b Press the One-Touch key where you
want to store a number.
c Enter the number (up to 20 digits).
Press OK.
d Do one of the following:
Enter the name using the dial pad
(up to 16 characters). (To help you
enter letters, see Entering
Text on page 102.)
Press OK.
To store the number without a name,
press OK.
Storing Speed-Dial numbers 8
You can store up to 100 two-digit Speed-Dial
locations with a name. When you dial you will
only have to press a few keys (For example:
Search/Speed Dial #, the two-digit number,
and Mono Start or Colour Start).
a Press Menu, 2, 3, 2.
b Use the dial pad to enter a 2-digit
Speed-Dial location number (00-99).
Press OK.
c Enter the fax or telephone number (up to
20 digits).
Press OK.
d Do one of the following:
Enter the name (up to 16 characters)
using the dial pad.
Press OK. (To help you enter letters,
see Entering Text on page 102.)
To store the number without a name,
press OK.
8
e Do one of the following:
To store another One-Touch
number, go to step b.
To finish storing One-Touch
numbers, press Stop/Exit.
e Do one of the following:
To store another Speed-Dial
number, go to step b.
To finish the setting, press
Stop/Exit.
41
Page 52

Chapter 8
Changing One-Touch and Speed-Dial numbers 8
If you try to store a One-Touch or Speed-Dial
number where a number has already been
stored, the LCD will show the name or
number that has been stored there, and will
ask you to do one of the following:
Press 1 to change the stored number.
#05:MIKE
1.Change 2.Exit
Press 2 to exit without making a change.
If you chose 1, you will be able to change the
stored number and name, or enter a new one.
Follow the instructions below:
a Enter a new number. Press OK.
b Enter a new name. Press OK.
To change a character, use d or c to
position the cursor under the character
you want to change, then press
Clear/Back. Re-enter the character.
Setting up Groups for broadcasting 8
If you regularly want to send the same fax
message to many fax numbers you can set
up a Group. Groups are stored on a
One-Touch key or a Speed-Dial number.
Each group uses up a One-Touch key or a
Speed-Dial location. You can then send the
fax message to all the numbers stored in a
Group just by pressing a One-Touch key or
entering a Speed-Dial number, and then
pressing Mono Start.
Before you can add numbers to a Group, you need
to store them as One-Touch or Speed-Dial numbers.
You can have up to six small Groups, or you can
assign up to 99 numbers to one large Group.
a Press Menu, 2, 3, 3.
3.Setup Groups
b Choose an empty location where you
want to store the Group in one of the
following ways:
Press a One-Touch key.
Press Search/Speed Dial and enter
a two-digit location.
Press OK.
42
c Use the dial pad to enter a Group
number (1 to 6).
Press OK.
Setup Group:G01
d To add One-Touch or Speed-Dial
numbers to the Group follow the
instructions below:
For example, for One-Touch number
6 press One-Touch key 6.
For example, for Speed-Dial location
09, press Search/Speed Dial, and
then press 09 on the dial pad.
The LCD will display your chosen
One-Touch numbers with a l, and
Speed-Dial numbers with a # as shown
in the illustration.
G01:l06 #09
Page 53

e Press OK when you have finished
adding numbers.
f Use the dial pad to enter a name for the
Group.
Press OK.
g Press Stop/Exit.
Note
You can easily print a list of all your
Speed-Dial numbers. Numbers that are
part of a group will be marked in the
GROUP column. (See How to print a
report on page 50.)
Combining Quick-Dial numbers 8
You can combine more than one Quick-Dial
number when you dial. This feature may be
useful if you need to dial an access code for
a cheaper rate long distance carrier.
Dialling and storing numbers
8
For example, you might have stored ‘555’ on
Speed-Dial #03 and ‘7000’ on Speed-Dial
#02. You can use them both to dial ‘555-7000’
if you press the following keys:
Search/Speed Dial, #03,
Search/Speed Dial, #02, and Mono Start or
Colour Start.
Numbers can be added manually by entering
them on the dial pad:
Search/Speed Dial, #03, 7, 0, 0, 1 (on the
dial pad), and Mono Start or Colour Start.
This would dial ‘555-7001’. You can also add
a pause by pressing the Redial/Pause key.
43
Page 54

9
Remote fax options 9
Remote fax options are not available for
colour fax.
You can only use one remote fax option at a
time.
Fax Forwarding 9
The fax forwarding feature lets you
automatically forward your received faxes to
another machine. If you choose
Backup Print:On the machine will also
print the fax (this is a safety feature in case
there is a power failure).
a Press Menu, 2, 5, 1.
1.Forward/Store
b Press a or b to choose Fax Forward.
Press OK.
The LCD will ask you to enter the fax
number you want your faxes to be
forwarded to.
c Enter the forwarding number (up to 20
digits).
Press OK.
Fax Storage 9
The fax storage feature lets you store your
received faxes in the machine’s memory. You
can retrieve stored fax messages from a fax
machine at another location using the remote
retrieval commands. (See Retrieving fax
messages on page 46.) Your machine will
automatically print a copy of the stored fax.
a Press Menu, 2, 5, 1.
1.Forward/Store
b Press a or b to choose Fax Storage.
Press OK.
c Press Stop/Exit.
Note
If Fax Storage is turned on your machine
cannot receive a colour fax unless the
sending machine converts it to
monochrome.
d Press a or b to choose
Backup Print:On or
Backup Print:Off.
Press OK.
Note
When Fax Forwarding is turned on your
machine will only receive monochrome
faxes into memory. Colour faxes will not
be received, unless the sending machine
converts them to monochrome before
sending.
e Press Stop/Exit.
44
Page 55

Remote fax options
Changing Remote Fax Options
If received faxes are left in your machine's
memory when you change the remote fax
options, the LCD will ask you one of the
following messages:
Erase All Doc?
1.Yes 2.No
Print All Fax?
1.Yes 2.No
If you press 1, faxes in the memory will be
erased or printed before the setting
changes. If a backup copy has already
been printed it will not be printed again.
If you press 2, faxes in the memory will not
be erased or printed and the setting will be
unchanged.
Turning off Remote Fax Options 9
a Press Menu, 2, 5, 1.
1.Forward/Store
b Press a or b to choose Off.
Press OK.
c Press Stop/Exit.
Note
The LCD will give you more options if
there are received faxes still in your
machine’s memory. (See Changing
Remote Fax Options on page 45.)
Remote Retrieval 9
9
You can call your machine from any touch
tone telephone or fax machine, then use the
remote access code and remote commands
to retrieve fax messages.
Setting a Remote Access Code 9
The remote access code lets you access the
remote retrieval features when you are away
from your machine. Before you use the
remote access and retrieval features, you
have to set up your own code. The factory
default code is inactive code (---l).
a Press Menu, 2, 5, 2.
2.Remote Access
b Enter a three-digit code using numbers
0-9, l, or #.
Press OK. (The preset ‘l’ cannot be
changed.)
c Press Stop/Exit.
Note
Do not use the same code as your fax
receive code (l 5 1) or telephone answer
code (# 5 1). (See Operation from
extension telephones on page 36.)
You can change your code at any time by
entering a new one. If you want to make your
code inactive, press Clear/Back in step b to
restore the inactive setting (---l) and
press OK.
9
45
Page 56

Chapter 9
Using your Remote Access Code 9
a Dial your fax number from a telephone
or another fax machine using touch
tone.
b When your machine answers, enter
your remote access code (3 digits
followed by l).
c The machine signals if it has received
messages:
1 long beep — Fax messages
No beeps — No messages
d When the machine gives two short
beeps, enter a command.
The machine will hang up if you wait
longer than 30 seconds to enter a
command.
The machine will beep three times if you
enter an invalid command.
e Press 9 0 to stop Remote Access when
you have finished.
f Hang up.
Note
If your machine is set to Manual mode
and you want to use the remote retrieval
features, wait about 2 minutes after it
starts ringing, and then enter the remote
access code within 30 seconds.
Retrieving fax messages 9
a Dial your fax number.
b When your machine answers, enter
your remote access code (3 digits
followed by l). If you hear one long
beep, you have messages.
c When you hear two short beeps,
press 962.
d Wait for the long beep, use the dial pad
to enter the number (up to 20 digits) of
the remote fax machine where you want
your fax messages forwarded followed
by ##.
Note
You cannot use l and # as dial numbers.
However, press # if you want to create a
pause.
e Press 90 to reset the machine when
you have finished.
f Hang up after you hear your machine
beep. Your machine will call the other
fax machine, which will then print your
fax messages.
46
Page 57

Changing your Fax Forwarding number 9
You can change the default setting of your fax
forwarding number from another telephone or
fax machine using touch tone.
a Dial your fax number.
b When your machine answers, enter
your remote access code (3 digits
followed by l) at once. If you hear one
long beep, you have messages.
c When you hear two short beeps,
press 954.
d Wait for the long beep, and then use the
dial pad to enter the new number
(upto20digits) of the remote fax
machine where you want your fax
messages forwarded followed by # #.
Remote fax options
Note
You cannot use l and # as dial numbers.
However, press # if you want to create a
pause.
e Press 9 0 when you have finished.
f Hang up after you hear your machine
beep.
9
47
Page 58

Chapter 9
Remote fax commands 9
Follow the commands below to access features when you are away from the machine. When you
call the machine and enter your remote access code (3 digits followed by l), the system will give
two short beeps and you must enter a remote command.
Remote commands Operation details
95 Change the Fax Forwarding or Fax
Storage settings
1 OFF You can choose Off after you have retrieved or erased all
your messages.
2 Fax Forwarding If you hear one long beep, the change has been accepted.
4 Fax Forwarding number
6 Fax Storage
96 Retrieve a fax
2 Retrieve all faxes Enter the number of a remote fax machine to receive stored
3 Erase faxes from the memory If you hear one long beep, fax messages have been erased
97 Check the receiving status
1 Document You can check whether your machine has received any
98 Change the Receive Mode
1 External TAD If you hear one long beep, your change has been accepted.
2 Fax/Tel
3 Fax Only
90 Exit Pressing 9 0 will allow you to exit Remote Retrieval. Wait for
If you hear three short beeps, you cannot change it because
something has not been set up (for example, registering a
Fax Forwarding number). You can register your Fax
Forwarding number by entering 4. (See Changing your Fax
Forwarding number on page 47.)
fax messages. (See Retrieving fax messages on page 46.)
from the memory.
faxes. If yes, you will hear one long beep. If no, you will hear
three short beeps.
the long beep, then replace the handset.
48
Page 59

10
Printing Reports 10
Fax reports 10
You need to set up the Transmission
Verification Report and Journal Period using
the Menu key.
Transmission Verification Report 10
You can use the Transmission Report as
proof that you sent a fax. This report lists the
time and date of transmission and whether
the transmission was successful (OK). If you
choose On or On+Image, the report will print
for every fax you send.
If you send a lot of faxes to the same place,
you may need more than the job numbers to
know which faxes you must send again.
Choosing On+Image or Off+Image will print
a section of the fax's first page on the report
to help you remember.
When the Verification Report is turned Off or
Off+Image, the Report will only print if there
is a transmission error, with NG in the
RESULT column.
a Press Menu, 2, 4, 1.
b Press a or b to choose Off+Image,
On, On+Image or Off.
Press OK.
c Press Stop/Exit.
Fax Journal (activity report) 10
You can set the machine to print a journal at
specific intervals (every 50 faxes, 6, 12 or 24
hours, 2 or 7 days). If you set the interval to
Off, you can still print the report by following
the steps in How to print a report on page 50.
The default setting is Every 50 Faxes.
a Press Menu, 2, 4, 2.
b Press a or b to choose an interval.
Press OK.
(If you choose 7 days, the LCD will ask
you to choose the first day for the 7-day
countdown.)
6, 12, 24 hours, 2 or 7 days
The machine will print the report at
the chosen time and then erase all
jobs from its memory. If the
machine's memory becomes full with
200 jobs before the time you chose
has passed, the machine will print
the Journal early and then erase all
jobs from the memory. If you want an
extra report before it is due to print,
you can print it without erasing the
jobs from the memory.
Every 50 Faxes
The machine will print the Journal
when the machine has stored 50
jobs.
c Enter the time to start printing in 24-hour
format.
Press OK.
(For example: enter 19:45 for 7:45 PM.)
10
d Press Stop/Exit.
49
Page 60

Chapter 10
Reports 10
The following reports are available:
1.XMIT Verify
Prints a Transmission Verification Report
for your last transmission.
2.Help List
A help list about how to quickly program
your machine.
3.Quick-Dial
Lists names and numbers stored in the
One-Touch and Speed-Dial memory, in
numerical order.
4.Fax Journal
Lists information about the last incoming
and outgoing faxes. (TX: Transmit.)
(RX: Receive.)
5.User Settings
Lists your settings.
How to print a report 10
a Press Menu, 4.
b Do one of the following:
Press a or b to choose the report
you want.
Press OK.
Enter the number of the report you
want to print. For example, press 2 to
print the Help List.
c Press Mono Start.
50
Page 61

11
Polling 11
Polling lets you set up your machine so other
people can receive faxes from you, but they
pay for the call. It also lets you call somebody
else’s fax machine and receive a fax from it,
so you pay for the call. The polling feature
needs to be set up on both machines for this
to work. Not all fax machines support polling.
Polling receive 11
Polling receive lets you call another fax
machine to receive a fax.
Setup for polling receive 11
a Make sure you are in Fax mode .
b Press Menu, 2, 1, 7.
7.Polling RX
c Press a or b to choose Standard.
Press OK.
Setup to receive polling with a secure code 11
Secure Polling restricts who can retrieve the
documents you set up to be polled.
Secure Polling only works with Brother fax
machines. If you want to retrieve a fax from a
secured Brother machine you have to enter
the secure code.
a Make sure you are in Fax mode .
b Press Menu, 2, 1, 7.
7.Polling RX
c Press a or b to choose Secure.
Press OK.
d Enter a four-digit secure code.
Press OK.
This is the security code of the fax
machine you are polling.
e Enter the fax number you are polling.
d Enter the fax number you are polling.
e Press Mono Start or Colour Start.
f Press Mono Startor Colour Start.
11
51
Page 62

Chapter 11
Setup for delayed polling receive 11
Delayed polling lets you set the machine to
begin polling receive at a later time. You can
only set up one delayed polling operation.
a Make sure you are in Fax mode .
b Press Menu, 2, 1, 7.
7.Polling RX
c Press a or b to choose Timer.
Press OK.
d Enter the time (in 24-hour format) you
want to start polling.
Press OK.
For example, enter 21:45 for 9:45 PM.
e Enter the fax number you are polling.
f Press Mono Start or Colour Start.
The machine makes the polling call at
the time you entered.
Sequential polling 11
The machine can request documents from
several fax machines in one operation.
a Make sure you are in Fax mode .
b Press Menu, 2, 1, 7.
7.Polling RX
c Press a or b to choose Standard,
Secure or Timer.
Press OK.
d Do one of the following:
If you chose Standard, go to
step e.
If you chose Secure, enter a four-
digit number, press OK, go to
step e.
If you chose Timer, enter the time
(24-hour format) you want to begin
polling and press OK, go to step e.
e Specify the destination fax machines,
which you wish to poll by using OneTouch, Speed-Dial, Search, a Group or
the dial pad. You must press OK
between each location.
52
f Press Mono Start or Colour Start.
The machine polls each number or
group in turn for a document.
Press Stop/Exit while the machine is dialling
to cancel the polling process.
To cancel all sequential polling receive jobs,
see Checking and cancelling waiting
jobs on page 26.
Page 63

Polling
Polled transmit (Monochrome only)
Polled Transmit is when you set up your
machine to wait with a document so another
fax machine can call and retrieve it.
Setup for polled transmit 11
a Make sure you are in Fax mode .
b Load your document.
c Press Menu, 2, 2, 6.
6.Polled TX
d Press a or b to choose Standard.
Press OK.
1.Doc 2.Memory
e Do one of the following:
Press 1 to leave the documents
waiting in the ADF.
If you want to use the ADF before
your machine is polled, you must
cancel the job.
Press 2 to scan the document into
the memory.
Setup for polled transmit with
11
secure code 11
Secure Polling restricts who can retrieve the
documents you set up to be polled.
Secure Polling only works with Brother fax
machines. If another person wants to retrieve
a fax from your machine they will have to
enter the secure code.
a Make sure you are in Fax mode .
b Load your document.
c Press Menu, 2, 2, 6.
6.Polled TX
d Press a or b to choose Secure.
Press OK.
e Enter a four-digit number.
Press OK.
1.Doc 2.Memory
f Do one of the following:
Press 1 to leave the documents
waiting in the ADF.
If you want to use the ADF before
your machine is polled, you must
cancel the job.
11
f The LCD shows:
Next
1.Yes 2.No
g Press 2 and press Mono Start.
Press 2 to scan the document into
the memory.
g The LCD shows:
Next
1.Yes 2.No
h Press 2 and press Mono Start.
53
Page 64

Chapter 11
54
Page 65

Section III
Copy III
Making copies 56
Page 66

12
Making copies 12
How to copy 12
Entering Copy mode 12
Press (Copy) to enter Copy mode.
The default setting is Fax. You can change
the number of seconds or minutes that the
machine stays in Copy mode. (See Mode
Timer on page 17.)
The LCD shows the default copy setting:
1
2
3
Making multiple copies 12
a Make sure you are in Copy mode .
b Load your document.
c Use the dial pad to enter the number of
copies (up to 99).
d Press Mono Start or Colour Start.
Note
To sort your copies, press Copy Options.
(See Sorting copies using the ADF
(Monochrome only) on page 60.)
Stop copying 12
To stop copying, press Stop/Exit.
1 Copy Ratio
2Quality
3 No of Copies
Making a single copy 12
a Make sure you are in Copy mode .
b Load your document.
c Press Mono Start or Colour Start.
56
Page 67

Making copies
Copy options 12
When you want to quickly change the copy
settings temporarily for the next copy, use the
Copy keys.
The machine returns to its default settings
30 seconds after it finishes copying, or if the
mode timer returns the machine to Fax mode.
For more information see Mode
Timer on page 17.
Press Menu
selection/
Quality Normal
Enlarge/
Reduce
Paper Type
Paper Size
Brightness
Stack/Sort
Page Layout
No. of
Copies
Options Page
58
Fast
Best
50%/69%/78%/83%
93%/97%/100%
104%/142%/186%
198%/200%
Custom(25-400%)
Plain Paper
Inkjet Paper
Brother Photo
Other Photo
Transparency
Letter
Legal
A4
A5
10(W)x15(H)cm
- nnonn +60
Stack
Sort
Off(1 in 1)
2in1(P)
2in1(L)
4in1(P)
4in1(L)
No. of Copies:01
(01 - 99)
/
58
/
/
/
61
62
60
59
12
Note
You can save the copy settings you use
most often by setting them as default. You
can find instructions on how to do this in
the section for each feature.
57
Page 68

Chapter 12
Changing copy speed and quality 12
You can choose from a range of quality
settings. The default setting is Normal.
To temporarily change the quality settings,
follow the instructions below:
Press
and a or b
to choose
Quality
Normal Normal is the
recommended mode
for ordinary printouts.
This produces good
copy quality with good
copy speed.
Fast Fast copy speed and
lowest ink
consumption. Use to
save time printing
documents to be proofread, large documents
or many copies.
Best Use best mode to copy
precise images such
as photographs. This
provides the highest
resolution and the
slowest speed.
a Make sure you are in Copy mode .
b Load your document.
c Use the dial pad to enter the number of
copies (up to 99).
Press Copy Options and a or b to
choose Quality.
Press OK.
d Press a or b to choose Normal, Fast
or Best. Press OK.
To change the default setting, follow the
instructions below:
a Press Menu, 3, 1.
1.Quality
b Press a or b to choose Normal, Fast
or Best. Press OK.
c Press Stop/Exit.
Enlarging or reducing the image copied 12
You can select the following enlargement or
reduction ratios:
Custom(25-400%) allows you to enter a
ratio from 25% to 400%.
Press
and a or b to
choose
Enlarge/Reduce
To enlarge or reduce the next copy follow the
instructions below:
Custom(25-400%)
200%
198% 10x15cmiA4
186% 10x15cmiLTR
142% A5iA4
104% EXEiLTR
100%
97% LTRiA4
93% A4iLTR
83% LGLiA4
78% LGLiLTR
69% A4iA5
50%
a Make sure you are in Copy mode .
e Press Mono Start or Colour Start.
58
b Load your document.
c Use the dial pad to enter the number of
copies (up to 99).
d Press Copy Options and
a or b to choose Enlarge/Reduce.
Press OK.
Page 69

Making copies
e Do one of the following:
Use a or b to choose the
enlargement or reduction ratio you
want.
Press OK.
Use a or b to choose
Custom(25-400%). Press OK. Use
the dial pad to enter an enlargement
or reduction ratio from 25% to 400%.
(For example, press 5 3 to enter
53%.)
Press OK.
f Press Mono Start or Colour Start.
Note
Page Layout Options 2 in 1(P), 2 in 1(L),
4 in 1(P) or 4 in 1(L) are not available
with Enlarge/Reduce.
Making N in 1 copies 12
The N in 1 copy feature can help you save
paper by letting you copy two or four pages
onto one printed page.
e Press a or b to select Off(1 in 1),
2in1(P), 2in1(L),
4in1(P), or 4in1(L).
Press OK.
f Press Mono Start to scan the
document.
Note
If photo paper is selected as the paper
type setting for N in 1 copies, the images
will be printed as if plain paper had been
selected.
Place your document face down in the
direction shown below:
2 in 1 (P)
2 in 1 (L)
Important 12
Please make sure paper size is set to
Letter or A4.
You cannot use the Enlarge/Reduce
setting with the N in 1.
N in 1 colour copies are not available.
(P) means Portrait and (L) means
Landscape.
a Make sure you are in Copy mode .
b Load your document.
c Use the dial pad to enter the number of
copies (up to 99).
d Press Copy Options and
a or b to select Page Layout.
Press OK.
4 in 1 (P)
12
4 in 1 (L)
59
Page 70

Chapter 12
Sorting copies using the ADF (Monochrome only) 12
You can sort multiple copies. Pages will be
stacked in the order 1 2 3, 1 2 3, 1 2 3, and so
on.
a Make sure you are in Copy mode .
b Load your document.
c Use the dial pad to enter the number of
copies (up to 99).
d Press or Copy Options and
a or b to select Stack/Sort.
Press OK.
e Press a or b to select Sort.
Press OK.
f Press Mono Start.
Adjusting Brightness, Contrast and Colour 12
Brightness 12
To temporarily change the brightness setting,
follow the instructions below:
a Make sure you are in Copy mode .
b Load your document.
c Use the dial pad to enter the number of
copies (up to 99).
d Press Copy Options and
a or b to select Brightness.
Press OK.
-nnonn+ e
e Press a or b to make the copy lighter
or darker.
Press OK.
f Press Mono Start or Colour Start.
To change the default setting follow the
instructions below:
a Press Menu, 3, 2.
b Press a or b to make the copy lighter
or darker.
Press OK.
c Press Stop/Exit.
60
Page 71

Making copies
Contrast 12
Adjust the contrast to help an image look
sharper and more vivid.
To change the default setting follow the
instructions below:
a Press Menu, 3, 3.
3.Contrast
b Press a or b to change the contrast.
Press OK.
c Press Stop/Exit.
Colour saturation 12
The colour saturation can only be changed
through the default setting.
a Press Menu, 3, 4.
4.Color Adjust
b Press a or b to select 1.Red,
2.Green or 3.Blue.
Press OK.
c Press a or b to change the colour
saturation.
Press OK.
d Do one of the following:
Return to b to select the next colour.
Paper options 12
Paper type 12
If you are copying on special paper, be sure
to select the type of paper you are using so
you will get the best print quality.
a Make sure you are in Copy mode .
b Load your document.
c Use the dial pad to enter the number of
copies (up to 99).
d Press Copy Options and
a or b to select Paper Type.
Press OK.
e Press a or b to select the type of paper
you are using (Plain Paper,
Inkjet Paper, Brother Photo,
Other Photo or Transparency).
Press OK.
f Press Mono Start or Colour Start.
Note
To change the default paper type setting
see Paper Type on page 17.
Press Stop/Exit.
12
61
Page 72

Chapter 12
Paper size 12
If copying on paper other than A4 size, you
will need to change the paper size setting.
You can copy on Letter, Legal, A4, A5 or
Photo Card 10(W) × 15(H)cm paper.
a Make sure you are in Copy mode .
b Load your document.
c Use the dial pad to enter the number of
copies (up to 99).
d Press Copy Options and
a or b to select Paper Size.
Press OK.
e Press a or b to select the size of paper
you are using Letter, Legal, A4, A5
or 10(W) x 15(H)cm.
Press OK.
f Press Mono Start or Colour Start.
Note
To change the default paper type setting
see Paper Size on page 17.
62
Page 73

Section IV
Software IV
Software features 64
Page 74

Software features
13
The CD-ROM includes the Software User’s
Guide for features available when connected
to a computer (for example, printing and
scanning). The guide has easy to use links
that, when clicked, will take you directly to a
particular section.
You can find information on these features:
Printing
Scanning
ControlCenter3 (for Windows
ControlCenter2 (for Macintosh
Remote Setup
Faxing from your computer
How to read the HTML User’s Guide
This is a quick reference for using the HTML
User’s Guide.
(For Windows
®
)
Note
If you have not installed the software, see
Viewing Documentation on page 2.
a From the Start menu, point to Brother,
MFC-3360C from the programs group,
then click User’s Guide.
®
)
®
)
13
c Click the heading you would like to read
from the list at the left of the window.
(For Macintosh®)
a Make sure your Macintosh
13
on. Insert the Brother CD-ROM into your
CD-ROM drive.
®
is turned
b Double-click your Documentation icon.
c Double-click your language folder and
then double-click the top page of the
HTML file.
d Click SOFTWARE USER’S GUIDE in
the top menu, and then click the heading
you would like to read from the list at the
left of the window.
b Click SOFTWARE USER’S GUIDE
from the top menu.
64
Page 75

Section V
Appendixes V
Safety and Legal 66
Troubleshooting and Routine Maintenance 74
Menu and Features 94
Specifications 103
Glossary 112
Page 76

Safety and Legal A
A
Choosing a location A
Put your machine on a flat, stable surface that is free of vibration and shocks, such as a desk. Put
the machine near a telephone socket and a standard grounded electrical socket. Choose a
location where the temperature remains between 10° and 35° C (50° F and 95° F).
CAUTION
• Avoid placing your machine in a high-traffic area.
• Avoid placing your machine on a carpet.
• DO NOT put the machine near heaters, air conditioners, refrigerators, medical equipment,
chemicals or water.
• DO NOT expose the machine to direct sunlight, excessive heat, moisture, or dust.
• DO NOT connect your machine to electrical sockets controlled by wall switches or automatic
timers.
• Disruption of power can wipe out information in the machine's memory.
• DO NOT connect your machine to electrical sockets on the same circuit as large appliances
or other equipment that might disrupt the power supply.
• Avoid interference sources, such as other cordless telephone systems or speakers.
66
Page 77

Safety and Legal
To use the machine safely A
Please keep these instructions for later reference and read them before attempting any
maintenance.
WARNING
There are high voltage electrodes inside the machine. Before you clean the inside of the
machine, make sure you have unplugged the telephone line cord first and then the power cord
from the electrical socket. Doing this will prevent an electrical shock.
DO NOT handle the plug with wet hands. Doing this may cause an electrical shock.
DO NOT pull in the middle of the AC power cord. Doing this might cause an electrical shock.
67
Page 78

DO NOT put your hands on the edge of the machine under the panel cover or touch the
document feed rollers. Doing this may cause injury.
DO NOT put your hands on the edge of the paper tray under the output paper tray cover. Doing
this may cause injury.
DO NOT touch the paper feed roller. Doing this may cause injury.
68
Page 79

Safety and Legal
DO NOT touch the area shaded in the illustration. Doing this may cause injury.
When moving the machine you must lift it from the base, by placing a hand at each side of the
unit as shown in the illustration.
If the machine becomes hot, releases smoke or generates any strong smells, immediately
unplug the machine from the electrical socket. Call your Brother dealer.
If metal objects, water or other liquids get inside the machine, immediately unplug the machine
from the electrical socket. Call your Brother dealer.
69
Page 80

WARNING
• Use caution when installing or modifying telephone lines. Never touch telephone wires or
terminals that are not insulated unless the telephone line has been unplugged at the wall
socket. Never install telephone wiring during a lightning storm. Never install a telephone wall
socket in a wet location.
• This product must be installed near an electrical socket that is easily accessible. In case of
an emergency, you must unplug the power cord from the electrical socket to shut off the
power completely.
• Always make sure the plug is fully inserted.
WARNING
IMPORTANT SAFETY INSTRUCTIONS
When using your telephone equipment, basic safety precautions should always be followed to
reduce the risk of fire, electric shock and injury to people, including the following:
1 DO NOT use this product near water, for example, near a bath tub, wash bowl, kitchen sink
or washing machine, in a wet basement or near a swimming pool.
2 Avoid using this product during an electrical storm. There may be a remote risk of electric
shock from lightning.
3 DO NOT use this product to report a gas leak in the vicinity of the leak.
Important safety instructions A
1 Read all of these instructions.
2 Save them for later reference.
3 Follow all warnings and instructions marked on the product.
4 Unplug this product from the wall socket before cleaning the inside of the machine. Do not use
liquid or aerosol cleaners. Use a damp cloth for cleaning.
5 Do not use this product near water.
6 Do not place this product on an unstable cart, stand, or table. The product may fall, causing
serious damage to the product.
7 Slots and openings in the cabinet and the back or bottom are provided for ventilation. To
ensure reliable operation of the product and to protect it from overheating, these openings
must not be blocked or covered. The openings should never be blocked by placing the product
on a bed, sofa, rug, or other similar surface. This product should never be placed near or over
a radiator or heater. This product should never be placed in a built-in installation unless
adequate ventilation is provided.
8 This product should be operated from the type of power source indicated on the label. If you
are not sure of the type of power available, call your dealer or local power company.
70
Page 81

Safety and Legal
9 Use only the power cord supplied with this machine.
10 This product is equipped with a 3-wire grounded plug, a plug having a third (grounded) pin.
This plug will only fit into a grounded power outlet. This is a safety feature. If you are unable to
insert the plug into the outlet, call your electrician to replace your obsolete outlet. Do not defeat
the purpose of the grounded plug.
11 Do not allow anything to rest on the power cord. Do not place this product where people can
walk on the cord.
12 Do not place anything in front of the machine that will block received faxes. Do not place
anything in the path of received faxes.
13 Wait until pages have exited the machine before picking them up.
14 Unplug this product from the power socket and refer all servicing to Brother Authorized Service
Personnel under the following conditions:
When the power cord is damaged or frayed.
If liquid has been spilled into the product.
If the product has been exposed to rain or water.
If the product does not operate normally when the operating instructions are followed,
adjust only those controls that are covered by the operating instructions. Incorrect
adjustment of other controls may result in damage and will often require extensive work by
a qualified technician to restore the product to normal operation.
If the product has been dropped or the casing has been damaged.
If the product exhibits a distinct change in performance, indicating a need for service.
15 To protect your product against power surges, we recommend the use of a power protection
device (Surge Protector).
16 To reduce the risk of fire, electric shock and injury to people, note the following:
Do not use this product near appliances that use water, a swimming pool, or in a wet
basement.
Do not use the machine during an electrical storm (there is the remote possibility of an
electrical shock) or to report a gas leak in the vicinity of the leak.
IMPORTANT - For your safety A
To ensure safe operation, the supplied three-pin plug must be inserted only into a standard threepin electrical socket that is effectively grounded through the normal household wiring.
The fact that the equipment operates satisfactorily does not imply that the power is grounded and
that the installation is completely safe. For your safety, if in any doubt about the effective
grounding of the power, consult a qualified electrician.
Important - Wiring information (for UK only) A
If you need to replace the plug fuse, fit a fuse that is approved by ASTA to BS1362 with the same
rating as the original fuse.
Always replace the fuse cover. Never use a plug that does not have a cover.
71
Page 82

Warning - This machine must be earthed A
The wires in the mains lead are coloured in line with the following code:
Green and Yellow: Earth
Blue: Neutral
Brown: Live
If in any doubt, call a qualified electrician.
EU Directive 2002/96/EC and EN50419 A
European
Union Only
This equipment is marked with the above recycling symbol. It means that at the end of the life of
the equipment, you must dispose of it separately at an appropriate collection point, and not place
it in the normal domestic unsorted waste stream. This will benefit the environment for all.
(European Union only)
Legal limitations for copying A
It is an offence to make reproductions of certain items or documents with the intent to commit fraud
This memorandum is intended to be guide rather than a complete list.
We suggest you check with relevant legal authorities if in doubt about a particular item or
document.
The following are examples of documents which should not be copied:
Money
Bonds or other certificates of indebtedness
Certificates of Deposit
Armed Forces Service or Draft papers.
Passports
Postage Stamps (cancelled or uncancelled)
Immigration Papers
Welfare documents
72
Page 83

Safety and Legal
Cheques or Drafts drawn by Governmental Agencies
Identification Documents, badges or insignias
Licences and Certificates of Title to motor vehicles
Copyrighted works cannot be copied. Sections of a copyrighted work can be copied for ‘fair
dealing.’ Multiple copies would indicate improper use.
Works of art should be considered the equivalent of copyrighted works.
Licenses and Certificates of Title to motor vehicles may not be copied under certain
state/provincial laws.
Trademarks A
The Brother logo is a registered trademark of Brother Industries, Ltd.
Brother is a registered trademark of Brother Industries, Ltd.
Multi-Function Link is a registered trademark of Brother International Corporation.
© 2006 Brother Industries, Ltd. All rights reserved.
Windows and Microsoft are registered trademarks of Microsoft in the U.S. and other countries.
Macintosh and TrueType are registered trademarks of Apple Computer, Inc.
PaperPort is a registered trademark of ScanSoft, Inc.
Presto! PageManager is a registered trademark of NewSoft Technology Corporation.
Each company whose software title is mentioned in this manual has a Software License
Agreement specific to its proprietary programs.
All other brand and product names mentioned in this User's Guide and the Software User's
Guide are registered trademarks of their respective companies.
73
Page 84

Troubleshooting and Routine
B
Maintenance
Troubleshooting B
If you think there is a problem with your machine, check the chart below and follow the
troubleshooting tips.
Most problems can be easily resolved by yourself. If you need additional help, the Brother
Solutions Center offers the latest FAQs and troubleshooting tips. Visit us at
http://solutions.brother.com
If you are having difficulty with your machine B
Printing
Difficulty Suggestions
No printout Check the interface cable on both the machine and your computer. (See the Quick
Poor printing quality Check the print quality. (See Checking the print quality on page 90.)
White horizontal lines appear in
text or graphics.
The machine prints blank pages. Clean the print head. (See Cleaning the print head on page 90.)
Characters and lines are stacked. Check the printing alignment. (See Checking the printing alignment on page 91.)
.
Setup Guide.)
Make sure the machine is plugged in and not in Power Save mode.
One or more ink cartridges are empty. (See Replacing the ink
cartridges on page 85.)
Check to see if the LCD is showing an error message. (See Error
messages on page 79.)
Check that the correct printer driver has been installed and chosen.
Make sure the machine is online. Click Start and then Printers and Faxes. Right-
click and choose ‘Brother MFC-XXXX’ (where XXXX is your model name), and
make sure that ‘Use Printer Offline’ is unchecked.
Make sure the Printer Driver or Paper Type setting in the menu matches the type
of paper you are using. (See Printing for Windows
Macintosh
Type on page 17.)
Make sure that your ink cartridges are fresh. The following may cause ink to clog:
The expiration date written on the cartridge package has passed. (Cartridges
The ink cartridge was in your machine over six months.
The ink cartridge may not have been stored properly before use.
Try using the recommended types of paper. (See Acceptable paper and other
media on page 7.)
The recommended environment for your machine is between 20° C to 33° C
(68° F to 91° F).
Clean the print head. (See Cleaning the print head on page 90.)
Try using the recommended types of paper. (See Acceptable paper and other
media on page 7.)
®
in the Software User's Guide on the CD-ROM and Paper
stay usable for up to two years if kept in their original packaging.)
®
or Printing and Faxing for
B
74
Page 85

Troubleshooting and Routine Maintenance
Printing (Continued)
Difficulty Suggestions
Printed text or images are skewed. Make sure the paper is loaded properly in the paper tray and the paper side guide
is adjusted correctly. (See Loading paper and other media on page 11.)
Make sure the Lower Jam Clear Cover is set properly.
Smudged stain at the top centre of
the printed page.
Printing appears dirty or ink seems
to run.
Stains appear on the reverse side
or at the bottom of the page.
The machine prints dense lines on
the page.
The printouts are wrinkled. In the printer driver Basic tab, click the Settings, and uncheck the
Cannot perform ‘2 in 1 or 4 in 1’
printing.
Print speed is too slow. Try changing the printer driver setting. The highest resolution needs longer data
Machine feeds multiple pages Make sure the paper is loaded properly in the paper tray. (See Loading paper and
Printed pages are not stacked
neatly.
Printed pages double-feed and
cause a paper jam.
Machine does not print from Paint
Brush.
Machine does not print from Adobe
Illustrator.
The machine cannot print full
pages of a document.
Out of Memory message
occurs.
Make sure the paper is not too thick or curled. (See Acceptable paper and other
media on page 7.)
Make sure you are using the proper types of paper. (See Acceptable paper and
other media on page 7.) Don't handle the paper until the ink is dry.
Make sure the printer platen is not dirty with ink. (See Cleaning the machine printer
platen on page 89.)
Make sure you are using the paper support flap. (See Loading paper and other
media on page 11.)
Check Reverse Order in the Basic tab of the printer driver.
Bi-Directional Printing.
Check that the paper size setting in the application and in the printer driver are the
same.
processing, sending and printing time. Try the other quality settings in the printer
driver Basic tab. Also, click the Settings tab, and make sure you uncheck
Colour Enhancement.
Set the borderless feature off. Borderless printing is slower than normal printing.
®
(See Printing for Windows
or Printing and Faxing for Macintosh® in the Software
User's Guide on the CD-ROM.)
other media on page 11.)
Check that more than two types of paper are not loaded in the paper tray at any
one time.
Make sure you are using the paper support flap. (See Loading paper and other
media on page 11.)
Close the output paper tray cover and slide it forward, then push the paper tray
firmly back into the machine. While holding the paper tray in place, pull out the
paper support until it clicks and unfold the paper support flap. (See the illustrations
in Loading paper and other media on page 12.)
Try setting the Display setting to ‘256 colours.
Try to reduce the print resolution. (See Printing for Windows
®
Faxing for Macintosh
in the Software User's Guide on the CD-ROM.)
Reduce the printing resolution. (See Printing for Windows
®
for Macintosh
in the Software User's Guide on the CD-ROM.)
’
®
or Printing and
®
or Printing and Faxing
Reduce the complexity of your document and try again. Reduce the graphic
quality or the number of font sizes within your application software.
75
Page 86

Printing Received Faxes
Difficulty Suggestions
Condensed print and white streaks
across the page or the top and
bottom of sentences are cut off.
Vertical black lines when receiving. The sender's scanner may be dirty. Ask the sender to make a copy to see if the
Received colour fax prints only in
black and white.
Left an d Right margins are cut off or
a single page is printed on two
pages.
You probably had a bad connection, with static or interference on the telephone
line. Ask the other party to send the fax again.
problem is with the sending machine. Try receiving from another fax machine.
Replace the colour ink cartridges that are empty or nearly empty, and then ask the
other person to send the colour fax again. (See Replacing the ink
cartridges on page 85.)
Turn on Auto Reduction. (See Printing a reduced incoming fax on page 30.)
Phone Line or Connections
Difficulty Suggestions
Dialling does not work. (No dial
tone)
The machine does not answer
when called.
Check that the machine is plugged in and switched on.
Check all line cord connections.
Change Tone/Pulse setting. (See Quick Setup Guide.)
Lift the external phone’s handset, (or the machine’s handset if available), and then
dial the number to send a manual fax. Wait to hear fax receiving tone before
pressing Mono Start or Colour Start.
Make sure the machine is in the correct receiving mode for your setup. (See
Receive modes on page 27.) Check for a dial tone. If possible, call your machine
to hear it answer. If there is still no answer, check the telephone line cord
connection. If there is no ringing when you call your machine, ask your telephone
company to check the line.
Receiving Faxes
Difficulty Suggestions
Cannot receive a fax Check all line cord connections.
Make sure the machine is in the correct receiving mode for your setup. (See
Receive modes on page 27.)
If you connect your machine to PBX or ISDN, set the menu setting of Phone Line
Type to your phone type. (See S etting the Phone Line Type on page 34.)
76
Page 87

Troubleshooting and Routine Maintenance
Sending Faxes
Difficulty Suggestions
Cannot send a fax Check all line cord connections.
Make sure that the Fax key is illuminated. (See Entering Fax
mode on page 22.)
Ask the other party to check that the receiving machine has paper.
Print the Transmission Verification Report and check for an error. (See
Reports on page 50.)
Make sure the panel cover is completely closed.
Transmission Verification Report
says ‘Result:NG’ or
‘Result:ERROR’.
Poor fax send quality. Try changing your resolution to Fine or S.Fine. Make a copy to check your
Vertical black lines when sending. If the copy you made shows the same problem, clean the scanner. (See Cleaning
There is probably temporary noise or static on the line. Try sending the fax again.
If you send a PC FAX message and get ‘Result:NG’ on the Transmission
Verification Report, your machine may be out of memory. If the problem continues,
ask the telephone company to check your phone line.
If you often get transmission errors due to possible interference on the phone line,
try changing the menu setting of Compatibility to Basic. (See Phone line
interference on page 85.)
If you connect your machine to PBX or ISDN, set the menu setting of Phone Line
Type to your phone type. (See Setting the Phone Line Type on page 34.)
machine's scanner operation. If the copy quality is not good, clean the scanner.
(See Cleaning the scanner on page 88.)
the scanner on page 88.)
Handling Incoming Calls
Difficulty Suggestions
The machine ‘Hears’ a voice as a
CNG Tone.
Sending a fax call to the machine. If you answered at the machine, press Mono Start and hang up at once. If you
Custom features on a single line. If you have Call Waiting, Call Waiting/Caller ID, an alarm system or other custom
If Fax Detect is set to on, your machine is more sensitive to sounds. It may
mistakenly interpret certain voices or music on the line as a fax machine calling
and respond with fax receiving tones. Deactivate the machine by pressing
Stop/Exit. Try avoiding this problem by turning Fax Detect to off. (See Fax
Detect on page 30.)
answered on an external or extension phone, press your Fax Receive Code
(default setting is
feature on a single phone line with your machine, it may create a problem sending
or receiving faxes.
For example: If you subscribe to Call Waiting or some other custom service and
its signal comes through the line while your machine is sending or receiving a fax,
the signal can temporarily interrupt or disrupt the faxes. Brother's ECM feature
should help overcome this problem. This condition is related to the telephone
system industry and is common to all devices that send and receive information
on a single, shared line with custom features. If avoiding a slight interruption is
crucial to your business, a separate phone line with no custom features is
recommended.
l51). When your machine answers, hang up.
77
Page 88

Menu Setting Difficulty
Difficulty Suggestions
The ma chine beeps when you try to
access the Setup Receive menu.
If the Fax key is not illuminated, press it to turn on Fax mode. The Setup
Receive setting is available only when the machine is in Fax mode.
Copying Difficulty
Difficulty Suggestions
Cannot make a copy
Vertical streaks appear on copies If you see vertical streaks on copies, clean the scanner. (See Cleaning the
Make sure that the Copy key is illuminated. (See Entering Copy
mode on page 56.)
Make sure the panel cover is completely closed.
scanner on page 88.)
Scanning Difficulty
Difficulty Suggestions
Cannot scan Make sure the panel cover is completely closed.
TWAIN/WIA errors appear while
scanning.
Make sure the Brother TWAIN/WIA driver is chosen as the primary source. In
PaperPort®SE with OCR, click File, Scan and choose the Brother TWAIN/WIA
driver.
Software Difficulty
Difficulty Suggestions
Cannot install software or print Run the Repair MFL-Pro Suite program on the CD-ROM. This program will repair
and reinstall the software.
‘Device Busy’ Make sure the machine is not showing an error message on the LCD.
78
Page 89

Troubleshooting and Routine Maintenance
Error messages B
As with any sophisticated office product, errors may occur. If this happens, your machine identifies
the error and shows an error message. The most common error messages are shown below.
You can correct most errors by yourself. If you need more help, the Brother Solutions Center offers
latest FAQs and troubleshooting tips.
Visit us at http://solutions.brother.com.
Error Message Cause Action
BT Call Sign
On
(For UK only)
Change Unable XX
Clean Unable XX
Comm.Error Poor phone line quality caused a
Cover Open
Close all covers
Data Remaining
Disconnected The other person or other person's
Document Jam The document was not inserted or
High Temperature
BT Call Sign is set to ON. You
cannot change the Receive Mode
from Manual to another mode.
The machine has a mechanical
problem.
—OR—
A foreign objects such as a clip or
ripped paper is in the machine.
communication error.
The Upper Jam Clear Cover is not
closed completely.
The ink cartridge cover is not
closed completely.
Print data is left in the machine's
memory.
Print data is left in the machine's
memory. The USB cable was
unplugged while the computer was
sending the data to the machine.
fax machine stopped the call.
fed properly, or the document
scanned from the ADF was too
long.
The panel cover is open. Close the panel cover and press Stop/Exit.
The print head is too warm. Allow the machine to cool down.
Set BT Call Sign to OFF. (See BT Call Sign (For
U.K. only) on page 34.)
Open the Upper Clear Jam Cover and remove
any foreign objects inside the machine. If the
error message continues, see Transferring your
faxes or Fax Journal report on page 81 before
disconnecting the machine so you will not lose
any important messages. Then, disconnect the
machine from the power for several minutes and
then reconnect it.
Try sending the fax again or try connecting the
machine to another telephone line. If the
problem continues, call the telephone company
and ask them to check your phone line.
Open the Upper Jam Clear Cover and then close
it again.
Firmly close the ink cartridge cover until it clicks.
Re-start printing from your computer.
Press Stop/Exit. The machine will cancel the
job and clear it from the memory. Try to print
again.
Try to send or receive again.
See Using the ADF on page 6.
See Document jam on page 82.
79
Page 90

Error Message Cause Action
Init Unable XX
Ink Empty XX One or more of the ink cartridges is
Low Temperature
Near Empty XX One or more of the ink cartridges
No Caller ID
(U.K. and Ireland
only)
No Cartridge An ink cartridge is not installed
No Paper Fed The machine is out of paper or
No Response/Busy
The machine has a mechanical
problem.
—OR—
A foreign objects such as a clip or
ripped paper is in the machine.
empty. The machine will stop all
print operations. While memory is
available, black and white faxes will
be stored in the memory. If a
sending machine has a colour fax,
the machine's ‘handshake’ will ask
that the fax be sent as black and
white. If the sending machine has
the ability to convert it, the colour
fax will be stored in the memory as
a black and white fax.
The print head is too cold. Allow the machine to warm up.
are running out of ink. If a sending
machine has a colour fax, the
machine's ‘handshake’ will ask that
the fax be sent as black and white.
If the sending machine has the
ability to convert it, the colour fax
will be received into memory as a
black and white fax.
There is no incoming call history.
You did not receive calls or you
have not subscribed to the Caller ID
service from your telephone
company.
properly.
paper is not properly loaded in the
paper tray.
The paper is jammed in the
machine.
The number you dialed does not
answer or is busy.
Open the Upper Jam Clear Cover and remove
any foreign objects inside the machine. If the
error message continues, see Transferring your
faxes or Fax Journal report on page 81 before
disconnecting the machine so you will not lose
any important messages. Then, disconnect the
machine from the power for several minutes and
then reconnect it.
Replace the ink cartridges. (See Replacing the
ink cartridges on page 85.)
Order a new ink cartridge.
If you want to use the Caller ID feature call your
telephone company. (See Caller ID (For U.K. and
Ireland only) on page 33.)
Take out the ink cartridge and put it in again
seating it properly. (See Replacing the ink
cartridges on page 85.)
Do one of the following:
Refill the paper in the paper tray, and then
press Mono Start or Colour Start.
Remove the paper and load it again and then
press Mono Start or Colour Start.
See Printer jam or paper jam on page 83.
Verify the number and try again.
80
Page 91

Troubleshooting and Routine Maintenance
Error Message Cause Action
Not Registered
Out of Memory The machine's memory is full. Fax sending or copy operation in progress
Paper Jam Paper is jammed in the machine. Open the upper and lower jam clear covers (at
Print Unable XX
Scan Unable XX
Wrong Paper Size
You tried to access a Speed Dial
number that is not programmed.
The machine has a mechanical
problem.
—OR—
A foreign objects such as a clip or
ripped paper is in the machine.
Paper is not the correct size. Load the correct size of paper (Letter, Legal or
Set up the Speed Dial number. (See Storing
Speed-Dial numbers on page 41.)
Press Stop/Exit and wait until the other
operations in progress finish and then try
again.
Clear the data from the memory. To gain
extra memory, you can turn off Fax Storage.
(See Turning off Remote Fax
Options on page 45.)
Print the faxes that are in the memory. (See
Printing a fax from the memory on page 31.)
Printing operation in progress
Reduce print resolution. (For details, see
Printing for Windows
Macintosh
CD-ROM.)
the back of the machine) and remove the
jammed paper. (See Printer jam or paper
jam on page 83.)
Open the upper jam clear cover and remove any
foreign objects inside the machine.
If the error message continues, see Transferring
your faxes or Fax Journal report on page 81
before disconnecting the machine so you will not
lose any important messages. Then, disconnect
the machine from the power for several minutes
and then reconnect it.
A4), and then press Mono Start or Colour Start.
®
in the Software User's Guide on the
®
or Printing and Faxing for
Transferring your faxes or Fax Journal report B
If the LCD shows:
Change Unable XX
Clean Unable XX
Init Unable XX
Print Unable XX
Scan Unable XX
we recommend transferring your faxes to
another fax machine. (See Transferring faxes
to another fax machine on page 82.)
You can also transfer the Fax Journal report
to see if there are any faxes you need to
transfer. (See Transferring Fax Journal report
to another fax machine on page 82.)
Note
If there is an error message on the
machine's LCD, after the faxes have been
transferred, disconnect the machine from
the power source for several minutes, and
then reconnect it.
81
Page 92

Transferring faxes to another fax machine
If you have not set up your Station ID, you
cannot enter fax transfer mode.
a Press Stop/Exit to interrupt the error
temporarily.
b Press Menu, 9, 0, 1.
c Do one of the following:
If the LCD shows No Data, there
are no faxes left in the machine's
memory.
Press Stop/Exit.
b Pull the jammed document (1) out
B
toward the front of the machine.
c Press Stop/Exit.
1
If the LCD shows Enter Fax No.,
enter the fax number to which faxes
will be forwarded.
d Press Mono Start.
Transferring Fax Journal report to another fax machine
If you have not set up your Station ID, you
cannot enter fax transfer mode.
a Press Menu 9, 0, 2.
b Enter the fax number to which the Fax
Journal report will be forwarded.
c Press Mono Start.
Document jam B
Documents can jam if they are not inserted or
fed properly, or if they are too long. Follow the
steps below to clear a document jam.
Document is jammed inside the panel cover B
a Take out any paper from the ADF that is
not jammed.
b Open the panel cover.
B
c Pull the jammed document out.
Document is jammed inside the front of the machine B
a Take out any paper from the ADF that is
not jammed.
82
d Close the panel cover.
e Press Stop/Exit.
Page 93

Troubleshooting and Routine Maintenance
Printer jam or paper jam B
Take out the jammed paper depending on
where it is jammed in the machine. Open and
close the Upper Jam Clear Cover to clear the
error.
a Pull the paper tray (1) out of the
machine.
1
b Pull out the jammed paper (1).
c Remove the Lower Jam Clear Cover (1)
from the back of the machine. Pull the
jammed paper out of the machine.
1
1
If you cannot remove the jammed
paper from the front side, or the error
message still appears on the LCD
after you remove the jammed paper,
please go to the next step.
d Put the Lower Jam Clear Cover back on.
Make sure the cover is set properly.
83
Page 94

e Open the Upper Jam Clear Cover (1).
Make sure that there is no jammed
paper left in the corners of the machine.
1
Note
If the paper is jammed under the print
head, unplug the machine from the power
source, and then move the print head to
take out the paper.
f Close the Upper Jam Clear Cover.
Dial Tone detection B
When you send a fax automatically, by
default your machine will wait for a fixed
amount of time before it starts to dial the
number. By changing the Dial Tone setting to
Detection you can make your machine dial
as soon as it detects a dial tone. This setting
can save a small amount of time when
sending a fax to many different numbers. If
you change the setting and start having
problems with dialling you should change
back to the default No Detection setting.
a Press Menu, 0, 5.
b Press a or b to choose Detection or
No Detection.
Press OK.
c Press Stop/Exit.
g Push the paper tray firmly back into the
machine. While holding the paper tray in
place, pull out the paper support until it
clicks and unfold the paper support flap.
(See the illustrations in Loading paper
and other media on page 11.)
84
Page 95

Troubleshooting and Routine Maintenance
Phone line interference B
If you are having problems sending or
receiving a fax due to possible interference
on the phone line, we recommend that you
adjust the Equalization for compatibility to
reduce the modem speed for fax operations.
a Press Menu, 2, 0, 2.
b Press a or b to choose Normal,
Basic (or High).
Basic cuts the modem speed to
9,600 bps. Unless interference is a
recurring problem on your phone
line, you may prefer to use it only
when needed.
Normal sets the modem speed at
14,400 bps.
High ssets the modern speed at
33,600 bps. (Default)
Press OK.
c Press Stop/Exit.
Note
When you change the compatibility to
Basic, the ECM feature is only available
for colour fax sending.
Routine maintenance B
Replacing the ink cartridges B
Your machine is equipped with an ink dot
counter. The ink dot counter automatically
monitors the level of ink in each of the 4
cartridges. When the machine detects an ink
cartridge is running out of ink, the machine
will tell you with a message on the LCD.
The LCD will tell you which ink cartridge is low
or needs replacing. Be sure to follow the LCD
prompts to replace the ink cartridges in the
correct order.
Even though the machine tells you that an ink
cartridge is empty, there will be a small
amount of ink left in the ink cartridge. It is
necessary to keep some ink in the ink
cartridge to prevent air from drying out and
damaging the print head assembly.
a Open the ink cartridge cover.
If one or more ink cartridges are empty,
for example Black, the LCD shows
Ink Empty Black and
Replace Ink.
b Pull the lock release lever and take out
the ink cartridge for the colour shown on
the LCD.
85
Page 96

c Open the new ink cartridge bag for the
colour shown on the LCD, and then take
out the ink cartridge.
d Remove the protective yellow cap (1).
1
e Each colour has its own correct position.
Insert the ink cartridge in the direction of
the arrow on the label.
brother
XXXX
M
f Lift the lock release lever and gently
push it until it clicks, and then close the
ink cartridge cover.
Improper Setup
DO NOT touch the area shown in the
illustration below.
Note
If the protective yellow cap comes off
when you open the bag, the cartridge will
not be damaged.
86
g If you replaced an ink cartridge, the LCD
may ask you to verify that it was a brand
new one. (For example,
Did You Change Blck?) For each
new cartridge you installed, press 1
(Yes) to automatically reset the ink dot
counter for that colour. If the ink
cartridge you installed is not a brand
new one, be sure to press 2 (No).
If you wait until the LCD shows
Near Empty XX or Ink Empty XX,
the machine will automatically reset the
ink dot counter.
Note
If the LCD shows No Cartridge after
you install the ink cartridges, check that
the ink cartridges are installed properly.
Page 97

Troubleshooting and Routine Maintenance
WARNING
If ink gets in your eyes, wash them out with
water at once and call a doctor if you are
concerned.
CAUTION
DO NOT take out ink cartridges if you do
not need to replace them. If you do so, it
may reduce the ink quantity and the
machine will not know the quantity of ink left
in the cartridge.
DO NOT touch the cartridge insertion slots.
If you do so, the ink may stain your skin.
If ink stains your skin or clothing, wash with
soap or detergent at once.
If you mix the colours by installing an ink
cartridge in the wrong position, clean the
print head several times after correcting the
cartridge installation.
Once you open an ink cartridge, install it in
the machine and use it up within six months
of installation. Use unopened ink cartridges
by the expiration date written on the
cartridge package.
DO NOT dismantle or tamper with the ink
cartridge; this can cause the ink to leak out
of the cartridge.
Brother multifunction machines are
designed to work with ink of a particular
specification and will work to a level of
optimum performance when used with
genuine Brother Branded ink cartridges.
Brother cannot guarantee this optimum
performance if ink or ink cartridges of other
specifications are used. Brother does not
therefore recommend the use of cartridges
other than genuine Brother Branded
cartridges or the refilling of empty
cartridges with this machine or the refilling
of empty cartridges with ink from other
sources. If damage is caused to the print
head or other parts of this machine as a
result of using incompatible products with
this machine, any repairs required as a
result may not be covered by the warranty.
Cleaning the outside of the machine B
Use neutral detergents. Cleaning with
volatile liquids such as thinner or benzine
will damage the outside surface of the
machine.
DO NOT use cleaning materials that
contain ammonia.
DO NOT use isopropyl alcohol to remove
dirt from the control panel. It may crack the
panel.
CAUTION
87
Page 98

Clean the outside of the machine as
follows:
a Pull the paper tray (1) completely out of
the machine.
1
d Lift the output paper tray cover and wipe
B
the inside and outside of the paper tray
with a soft cloth to remove dust.
e Close the output paper tray cover and
put the paper tray firmly back in the
machine.
b Wipe the outside of the machine with a
soft cloth to remove dust.
c Remove anything that is stuck inside the
paper tray.
Cleaning the scanner B
a Unplug the machine, open the panel
cover (1). Clean the white bar (2) and
the glass strip (3) with isopropyl alcohol
on a soft lint-free cloth.
1
2
3
88
Page 99

Troubleshooting and Routine Maintenance
Cleaning the machine printer platen B
Unplug the machine from the AC power
outlet before cleaning the printer platen (1).
WARNING
a Clean the machine printer platen (1) and
the area around it, wiping off any
scattered ink with a soft, dry, lint-free
cloth.
1
Cleaning the paper pick-up roller B
a Pull the paper tray completely out of the
machine.
b Unplug the machine from the electrical
socket and remove the Lower Jam Clear
Cover (1).
1
c Clean the Paper Pick-up Roller (1) with
isopropyl alcohol on a cotton swab.
1
d Put the Lower Jam Clear Cover back on.
Make sure the cover is set properly.
e Put the paper tray firmly back in the
machine.
f Re-connect the power cord.
89
Page 100

Cleaning the print head B
Checking the print quality B
To ensure good print quality, the machine will
regularly clean the print head. You can start
the cleaning process manually if needed.
Clean the print head and ink cartridges if you
get a horizontal line in the text or graphics on
your printed pages. You can clean Black only,
three colours at a time
(Yellow/Cyan/Magenta), or all four colours at
once.
Cleaning the print head consumes ink.
Cleaning too often uses ink unnecessarily.
DO NOT touch the print head. Touching the
print head may cause permanent damage
and may void the print head's warranty.
CAUTION
a Press Ink Management.
b Press a or b to choose Cleaning.
Press OK.
If faded or streaked colours and text appear
on your output, some of the nozzles may be
clogged. You can check this by printing the
Print Quality Check Sheet and looking at the
nozzle check pattern.
a Press Ink Management.
b Press a or b to choose Test Print.
Press OK.
c Press a or b to choose
Print Quality.
Press OK.
d Press Colour Start.
The machine begins printing the Print
Quality Check Sheet.
e Check the quality of the four colour
blocks on the sheet.
Is Quality OK?
1.Yes 2.No
c Press a or b to choose Black, Color
or All.
Press OK.
The machine cleans the print head.
When cleaning is finished, the machine
will go back to standby mode
automatically.
Note
If you clean the print head at least five
times and the print has not improved, call
your Brother dealer for service.
f Do one of the following:
If all lines are clear and visible, press
1 to choose Yes.
Press Stop/Exit.
If you can see missing short lines as
shown below, press 2 to choose No.
OK Poor
g The LCD asks you if the print quality is
OK for black and three colours.
Black OK?
1.Yes 2.No
Press 1 (Yes) or 2 (No).
90
 Loading...