

Page 1
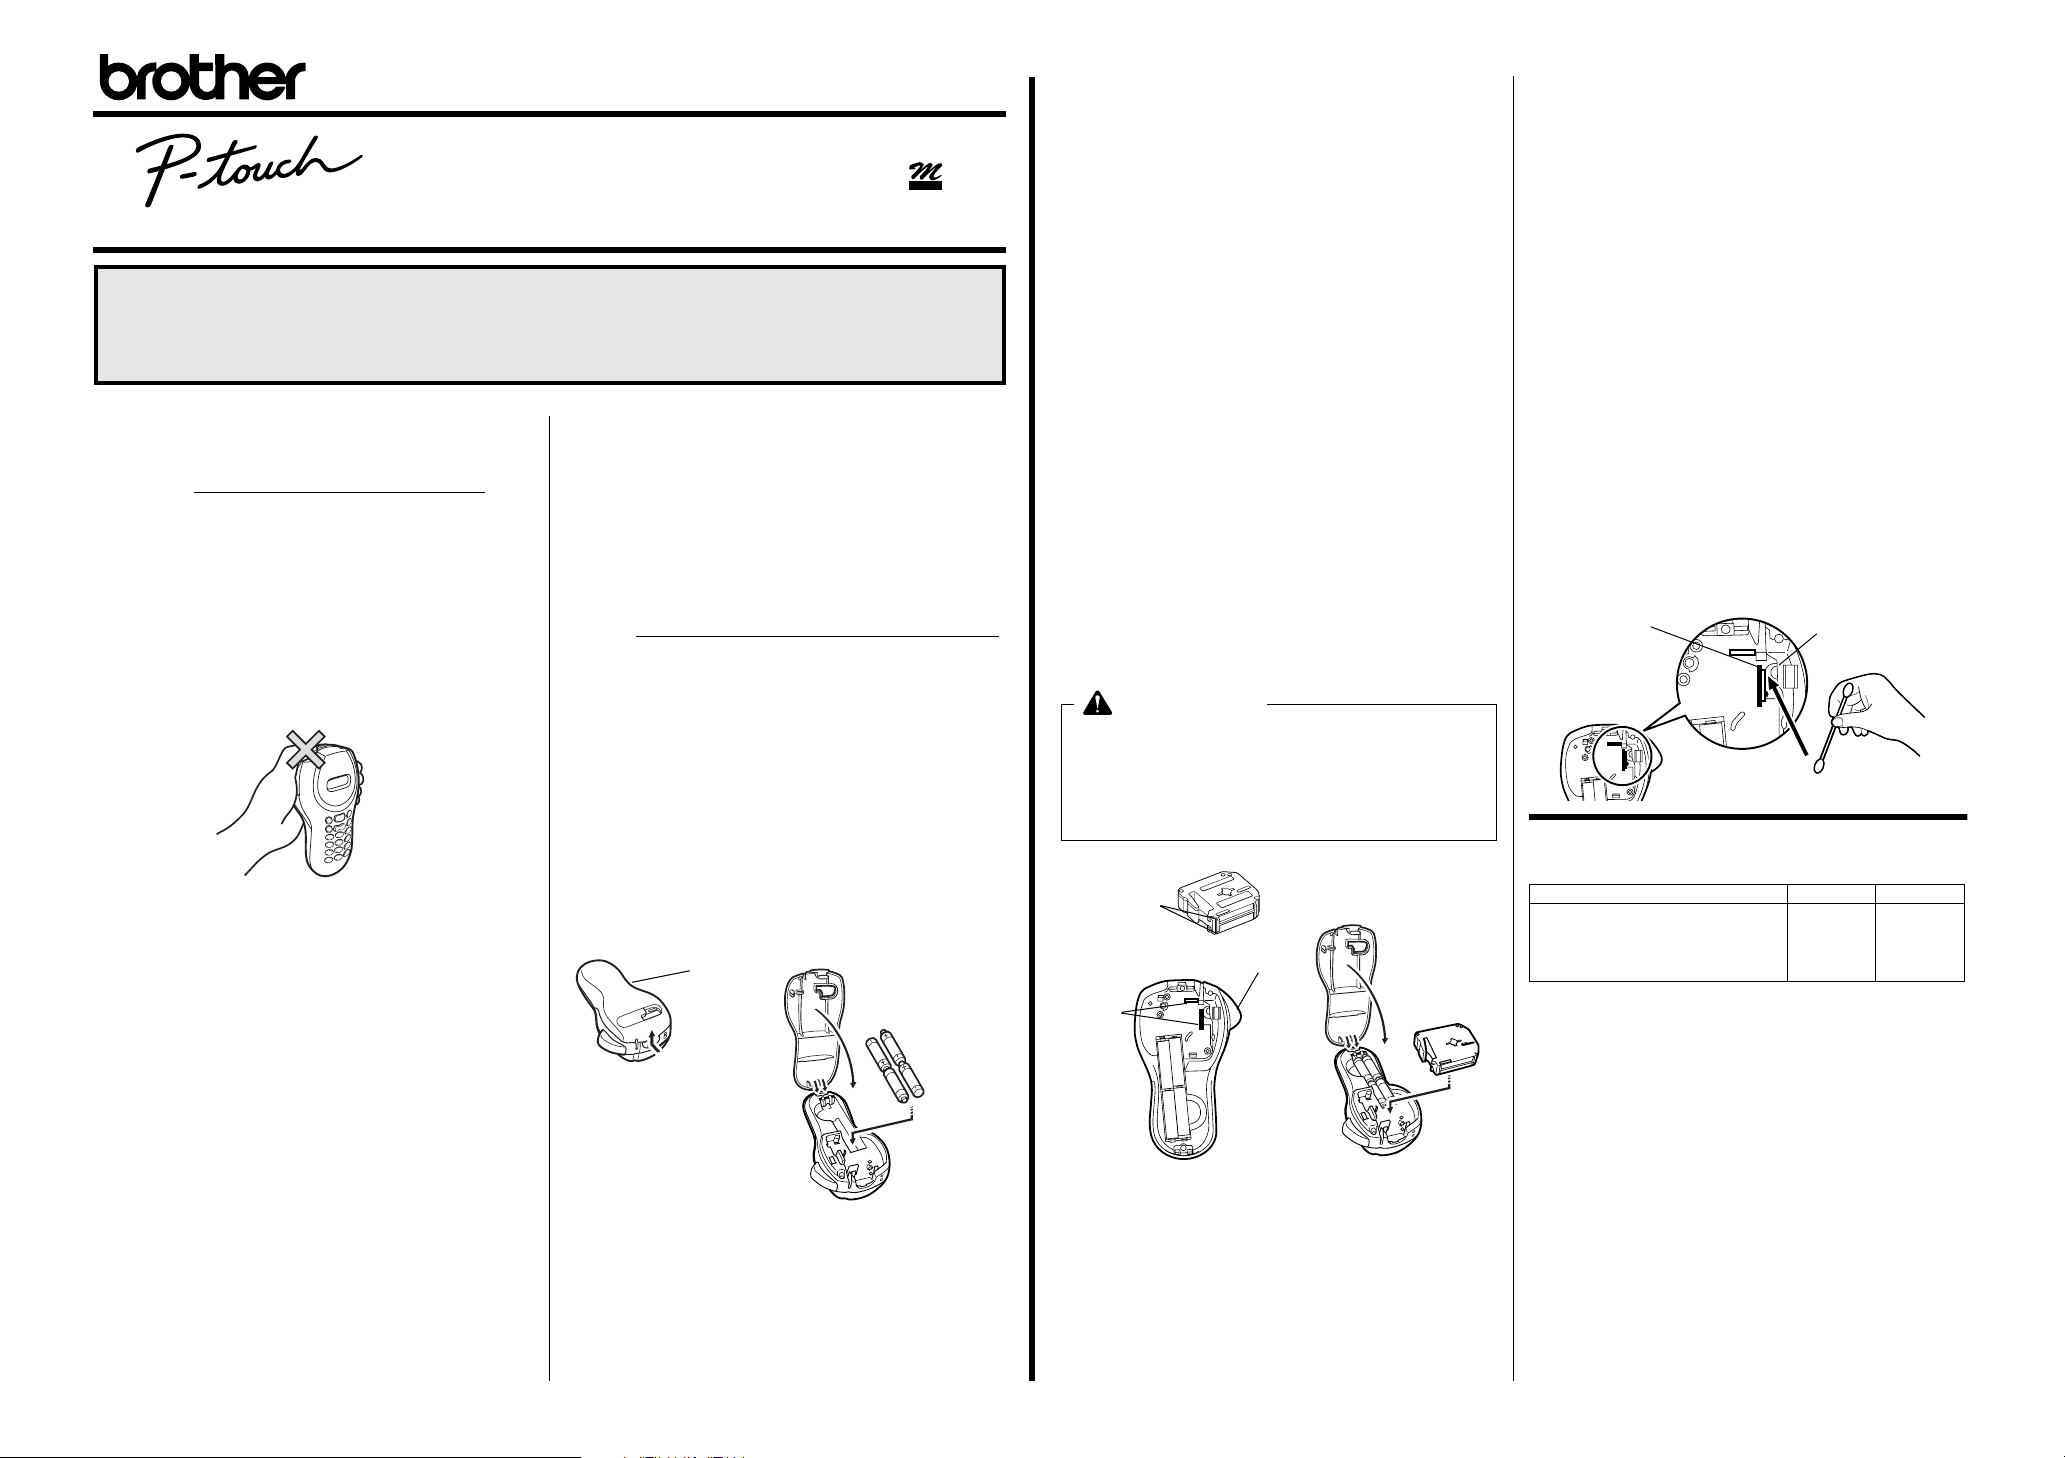
Fig. 1
Thermal print head
Rubber pinch roller
Fig. 7
®
Before using the P-touch, read this instruction leaflet, and then keep it
in a handy place for future reference.
With this machine, use only tape cassettes bearing the logo.
55
The stylish and portable PT-55 allows you to quickly and easily print labels anywhere you go. Simply switch on the P-touch,
enter the text, and then print out your label. You can also choose from various character sizes, styles, and framing/background
patterns in addition to underlining. In addition, you can specify the length of the label. The text can be printed on either one
or two lines and can include special symbols and accented characters. Various tape colours and two tape widths (9 mm and
12 mm) are available for creating personalised labels.
Care and precautions
•
Clean the machine using only a soft, dry cloth.
•
Use only
•
Do not expose the machine or the tape cassettes to
high temperatures, high humidity, or excessive dust.
•
If you do not intend to use the machine for an
extended period of time, remove the batteries.
•
Do not touch the tape cutter button while printing.
•
Do not touch the cutter blade.
•
Do not block the tape exit slot. (Fig. 1)
•
Do not put labels in your mouth.
•
Do not affix labels to skin.
AAA-siz
e (LR03) alkaline batteries
For a list of the tape cassettes that can be used with this machine,
refer to Accessories at the bottom of this page.
Installing/replacing
.
batteries
1) Remove the back cover by pressing in the rough
area at the top end of the machine and pulling off
the cover. (Fig. 2)
2) If a tape cassette is already installed, remove it.
For details on removing the tape cassette, refer
to Installing/changing the tape cassette.
3) If batteries are already installed, remove them.
4) Insert
5) Insert the tape cassette.
6) Attach the back cover by inserting the two hooks on
four new AAA-size (LR03) alkaline batteries
as shown below. (Fig. 3)
Be sure that the two batteries on the left side of
the P-touch are inserted with their positive poles
pointing toward the bottom end of the machine
and that the two batteries on the right side of the
P-touch are inserted with their positive poles
pointing to the top end of the machine.
Always replace all four batteries at the same time
using brand new ones.
For details on inserting the tape cassette, refer
to Installing/changing the tape cassette.
the bottom end of the cover into the matching slots
on the bottom end of the machine, then pushing
down firmly on the cover until it snaps into place.
Back cover
LN0617001
TAPE
Installing/changing the
tape cassette
1) Remove the back cover by pressing in the rough
area at the top end of the machine and pulling off
the cover.
2) If a tape cassette is already installed, remove it by
pulling it straight out.
3) Make sure that the end of the tape feeds under the
tape guides as shown below. (Fig. 4)
If you are installing a new tape cassette, be sure
to remove the paper tab.
4) Insert the tape cassette, making sure that it snaps
into place.
Make sure that the tape cassette fits properly
around the two guides in the cassette compartment.
(Fig. 5)
5) Attach the back cover by inserting the two hooks on
the bottom end of the cover into the matching slots
on the bottom end of the machine, then pushing
down firmly on the cover until it snaps into place.
(Fig. 6)
The amount of tape remaining in the cassette is
visible through the window in the back of the Ptouch.
When green tape is fed out, the tape cassette is
empty.
Cleaning the print
head
When dust accumulates on the print head, blank horizontal lines appear through the printed label. If this
occurs, clean the print head.
1) Turn off the P-touch.
2) Remove the back cover by pressing in the rough
area at the top end of the machine and pulling off
the cover, and then remove the tape cassette.
3) Use a dry cotton swab to gently wipe the print head
and the rubber pinch roller with an up-and-down
motion. (Fig. 7)
4) Insert the tape cassette, and then attach the back
cover by inserting the two hooks on the bottom end
of the cover into the matching slots on the bottom
end of the machine, then pushing down firmly on
the cover until it snaps into place.
5) Turn on the machine, enter some text, and then
press
R
.
6) If blank lines still appear in the printed label, repeat
steps 1 through 4 using a cotton swab dipped in
isopropyl (rubbing) alcohol.
CAUTION
• Be sure to use only the tape cassettes listed in
Accessories
be used with the PT-55 (i.e. tapes with a metallic
appearance):
M-531, M-731, M-831, M-931, M-E31, M-521, M-721,
M-821, M-921 and M-E21
. The following tape cassettes can NOT
Accessories
The following accessories are available for the PT-55.
Tape guides
Fig. 4
Tape cutter button
Guides
Cassettes with 8-meter long tape 12 mm 9 mm
Black characters on white adhesive
Red characters on white adhesive
Blue characters on white adhesive
Black characters on blue adhesive
Black characters on yellow adhesive
M-K231
M-K232
M-K233
M-K531
M-K631
M-K221
M-K222
M-K223
M-K521
M-K621
Fig. 2
Right side
Fig. 3
Left
Fig. 5
Fig. 6
Page 2
General description
★
NORM (normal-default)
SHAD (shadow)
Underline indicator
Style indicator Label length indicator
Tape cutter button
Uppercase indicator Power key
Numerals indicator Left/right arrow key
Back space key
Numeral mode/1 key
Basic operations
• Turning on/off the P-touch
To turn the P-touch on or off, press P.
The P-touch conserves battery power by automatically
switching itself off if no key is pressed within five minutes.When the batteries are low, the message "BATT"
appears in the display. When the batteries are empty,
the P-touch turns itself off and the display stays blank.
• Selecting the input mode
An indicator on the left side of the display shows the current input mode. If there is no indicator, lowercase letters
can be typed in when a character key is pressed. If the
indicator appears beside
typed in, and if the indicator appears beside
als will be typed in. To switch to the uppercase or lowercase input modes, press
is indicated. To enter the numerals input mode, press
once. When the P-touch is turned on, the input mode is
automatically reset to uppercase letters.
• Entering characters
To enter lowercase and uppercase letters, continue pressing the key for the desired letter until the letter is displayed,
and then press
the key for the desired number.
If the input of a letter is not finalized, for example by
pressing
text cannot be formatted or a symbol cannot be added.
The characters shown below are available with the various
keys and input modes:
Key
1
ab cдб ав г ежзABCДБАВГЕЖЗ
2
def ëéèê DEFËÉÈÊ
3
ghiïíìî GHIÏÍÌÎ
4
jkl JKL
5
mnoсцутфхшœMNOСЦУТФХШŒ
6
pqr s PQRS
7
tuvüúùû TUVÜÚÙÛ
8
wxyzÿ WXYZ
9
0
Space
Tape exit slot Built-in label-backing peeler
Function key Enter key
Print key Character keys
Symbol key
a
A
Frame indicator
Display
Space/0 key
Uppercase/lowercase mode key
, uppercase letters can be
n
, numer-
until the desired input mode
1
L, l
L,l
Lowercase letters
(no indicator)
or r. To enter numerals, press
or r, the label cannot be printed, the
Uppercase letters
(indicator beside
Space 0
aa
aa
)
Numerals
(indicator
beside
1
2
3
4
5
6
7
8
9
nn
nn
• Entering a space
To add a space to your text, make sure that the indicator does
not appear beside
n
(numerals), and then press
• Adding a second line of text
To end the first line of text and start the second, press L.
The marker appears to the left of the cursor. Two-line
SIZE1
text is always printed with the
NORM
(normal) style.
text size and the
To change a message back to a single line, delete the
marker . (For details on deleting the marker, refer to
Deleting a character
.)
• Moving the cursor
You can move the cursor (_) to view or edit parts of the text to
the left or right of the 6 characters shown in the display.
To move the cursor to the left, press l; to move the cursor
to the right, press
r
. Move the cursor several characters
in a row by holding down the key for the desired direction.
• Deleting a character
To delete a character, press C. The character to the left
of the cursor is deleted. To continue deleting characters,
hold down
C
until all of the desired characters are
deleted. To delete a character in the middle of the text,
move the cursor below the character to the right of the one
to be deleted before pressing
C
.
• Clearing all text and formats
To clear the current text and selected formats, press F,
press l or r until "CLEAR" is displayed, and then press
L
. All text is erased, and the text size, style, underline/frame
and label length return to their default settings, and the input
mode is reset to uppercase letters.
• Entering a symbol
To enter a symbol, press @. The first row of symbols
@
appears. Continue pressing
the desired symbol is displayed, press
until the row containing
l
or r until the
cursor is positioned under the desired symbol, and then
L
press
. Your text reappears in the display with the
selected symbol added to it.
To return to the current text without adding a symbol, press C.
The symbols shown below are available in the following order:
– _
)
/ \ : ; . , ' "
( ) [ ] < >
$ £ Fr
ß
! ? @ & #
← → ↑ ↓ °
µ
∗ % • + × ÷ ± =
♥
§ ¿ ij
• Printing
To print out the entered text, press
"PRINT" appears while printing.
Do not press the tape cutter button while printing, as
this will cause the tape to jam.
R
. The message
• Cutting off labels
Cut off the label that is fed from the tape exit slot by pressing in the tape cutter button.
0
✏
∼
Formatting the text
.
To format the text by changing the text size or style, adding
underlining/framing/shading or specifying the label length,
F
press
STYLE, FRAME
L
displayed, and then press
applied to the entire text. For more details about each function, refer to the appropriate section below.
To return to the current text without changing the formatting,
press
, press
. Next, press l, r, or F until the desired setting is
C
.
l
or r until the desired function (
or
LENGTH
) is displayed, and then press
L
. The selected formatting is
SIZE
Removing the label
backing
The PT-55 is equipped with a peeler that allows you to
,
easily remove the backing from labels. (Fig. 8)
1) Insert the label, with the printed surface facing down,
as far as possible into the built-in peeler. (Fig. 9)
2) Fold back the label to the right 180˚. (Fig. 10)
3) Quickly pull the label out to the right. The end of the
backing is separated from the label. (Fig. 11)
• Text size
The following five text sizes are available:
SIZE1
SIZE2
SIZE3
SIZE4 (default)
SIZE5
Fig. 8
Fig. 9
Fig. 10
Fig. 11
Function key operations
• Text style
The following nine text styles are available:
OUTL (outline)
ITAL (italic)
IT+B (italic + bold)
IT+S (italic + shadow)
When a text style other than
b
the indicator below
comes on.
NORM
BOLD
IT+O (italic + outline)
VERT
(normal) is selected,
• Underlining/framing/shading
The following frame settings are available:
TEXT (default) UNDL (underline)
BOX2 BOX3
BOX5 BOX6
When
UNDL
is selected, the indicator belowc comes on.
When a setting other than
indicator below
shading is not printed if the
d
TEXT
comes on. The underlining/framing/
VERT
or
(vertical) style is selected.
BOX1
BOX4
BOX7
UNDL
is selected, the
• Label length
If
L OFF
was selected, the length of the label will adjust
automatically according to the length of the entered
text. If
L ON
was selected, the current label length setting in millimetres appears. Press
character keys to enter the desired length between 50
and 300 mm, and then press L. When
selected, the indicator below scomes on.
l
or r or use the
L ON
is
Press F, press l or r to select one of the following, and then press L.
SIZE
Press l, r, or F to select a text size,
and then press L.
STYLE
Press l, r, or F to select one of the
following, and then press L.
NORM
FRAME
(normal)
IT+B
(italic + bold)
ITAL
(italic)
BOLD IT+O
VERT
(vertical)
Press l, r, or F to select one of the
SHAD
(shadow)
OUTL
(outline)
IT+S
(italic + shadow)
(italic + outline)
following, and then press L.
TEXT BOX2 BOX5
UNDL
(underline)
BOX3 BOX6
BOX1 BOX4 BOX7
LENGTH
Press l, r, or
F to select one of the
following, and then press L.
L OFF
L ON Press l, r, or F or use the
character key to enter the desired
label length, and then press L.
CLEAR
(All text is erased, and the text size, style, underline/frame and label length return to their default
settings, and the input mode is reset to uppercase letters.)
 Loading...