

Page 1
Color Printer HS-5000/5300
Quick Setup Guide
Read this guidebook first to set up your printer and
prepare your computer for the printer.
Save all packing materials and the outer carton.
TrueType is a trademark of Apple Computer, Inc.
Hewlett Packard is a registered trademar and LaserJet, Color LaserJet, DeskJet, PCL 5C and PCL5e are trademarks of
Hewlett-Packard Company.
Microsoft and MS-DOS are registered trademarks of Microsoft Corporation.
Windows, Windows 3.1 and Windows 95 are registered trademarks of Microsoft in the U.S. and other countries.
The product names in this guidebook are trademarks or registered trade marks of each manufacturer. The specifications are
subject to change without notice.
©1998 Brother Industries Ltd. UD4654001 Printed in Japan
Page 2
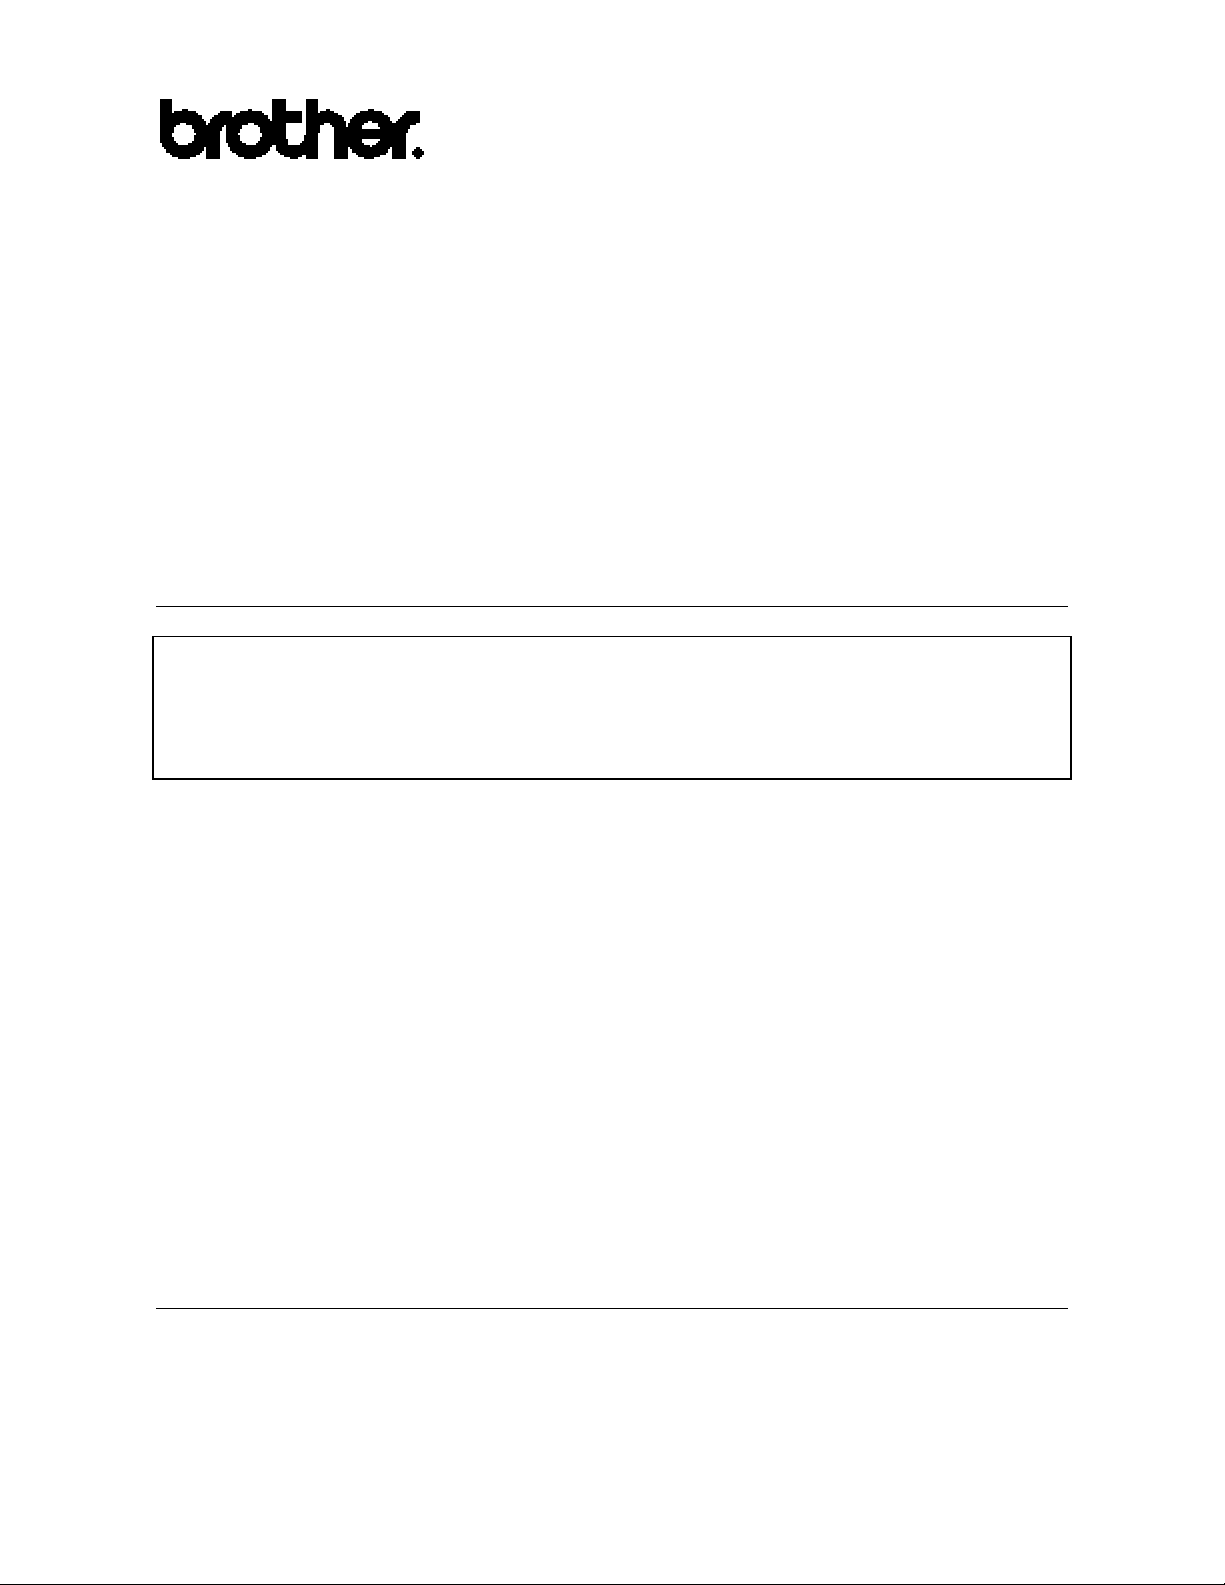
Action 1: Check the Supplied Items
3
A
After taking the printer out of the carton and removing the packing materials, make sure that the
following items are not damaged and none are missing:
1
4
2
B
5
6
7
1 Printer
2 Wires attached to the printer-- A:Paper Support Wire, B: Output Wire
(HS-5300 has two paper support wires.)
3 5 sheets of transparencies
4 Maintenance Cassette
5 Cleaning Kit
6 Ink Holders
7 Power Cord (The shape of the Power Cord varies depending on the country.)
• 3.5” floppy disks for DOS/Windows® printer driver and fonts
• Quick Setup guide (this guidebook)
2
Page 3

• User’s guide
2 NOTE
You will need to purchase an interface cable that complies with the IEEE 1284 standard and
matches the interface of your computer. If you do not know what cable you need, consult your
dealer.
3
Page 4
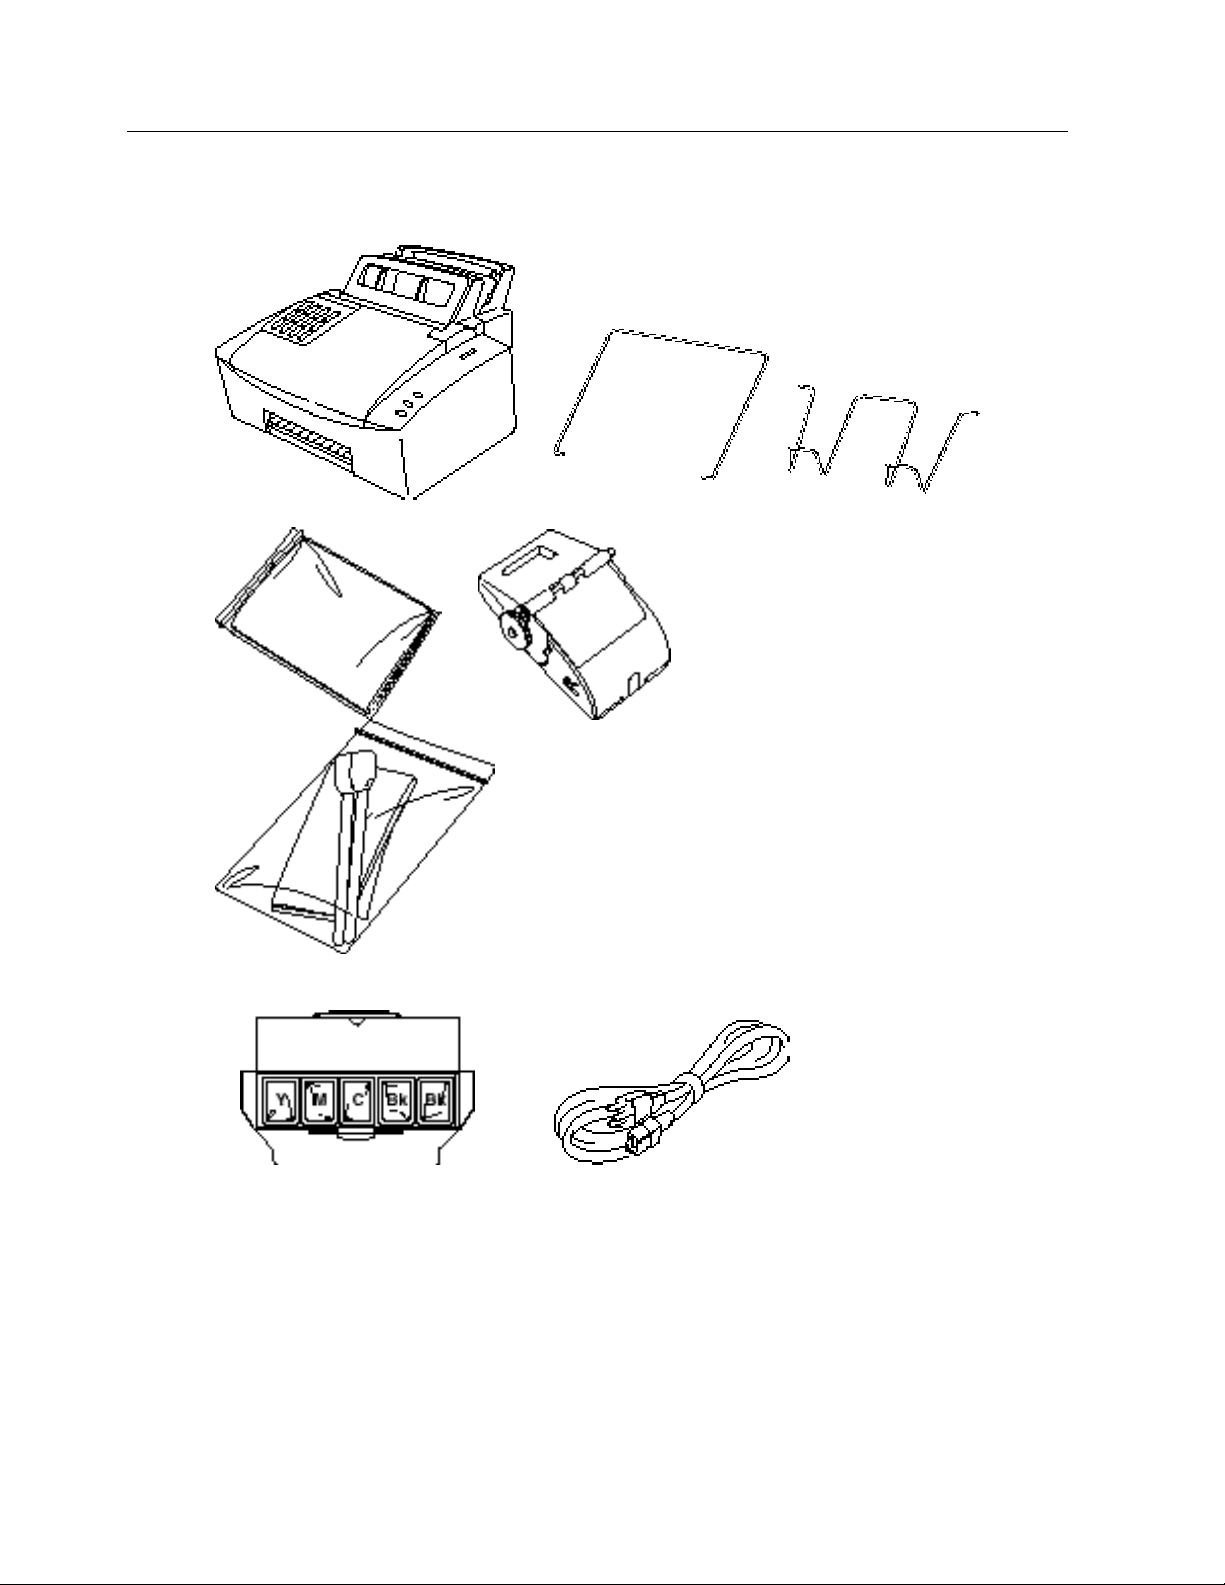
Action 2: Install the Ink Cassette
4
1
Remove the tapes, and 2 pieces of
Styrofoam supporting the print head then
open the ink reservoir cover.
2
Hold the ink holder by the sides and insert it
into the top of the matching color ink
reservoir. Be sure to add the correct color
ink holder to the correct reservoir. The ink
holders are keyed to prevent incorrect
insertion of the ink holder. Do not force the
ink holder into the top of the ink reservoir.
2 NOTE
Do not touch the surface of the ink blocks.
3
Push the center of the ink holder to drop the
ink blocks into the ink reservoir.
Install each color ink by using the same
procedure.
Close the ink reservoir cover.
Repeat steps 1 to 3 to add further holders of
ink blocks as required.
4
Page 5
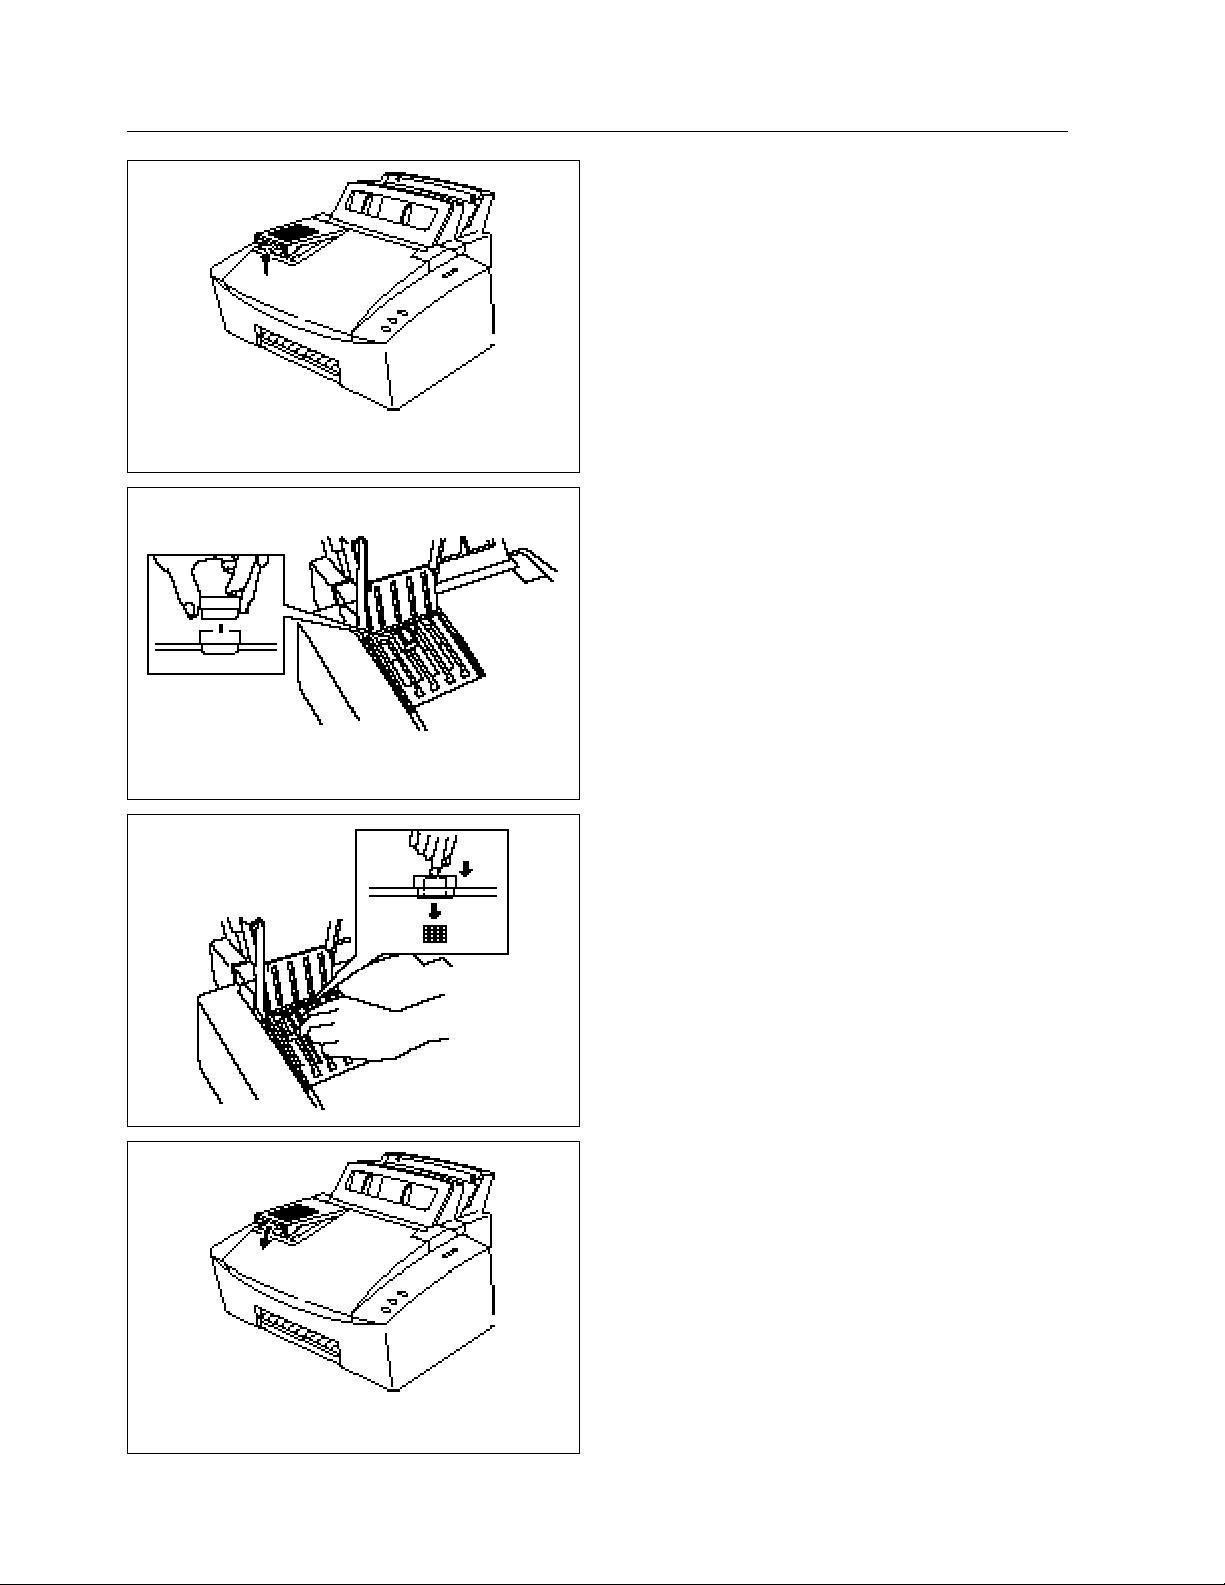
Action 3: Install the Maintenance Cassette
1
Remove the sheet feeder from the printer.
2 Slide the maintenance cassette into the right
hand side of the printer.
3 Push it all the way in until it clicks fully into
position to avoid paper jams.
2 NOTE
You need to remove two pieces of Styrofoam holding the print head down before turning the
printer ON. Do not throw away the Styrofoam, keep them for future re-packing.
5
Page 6

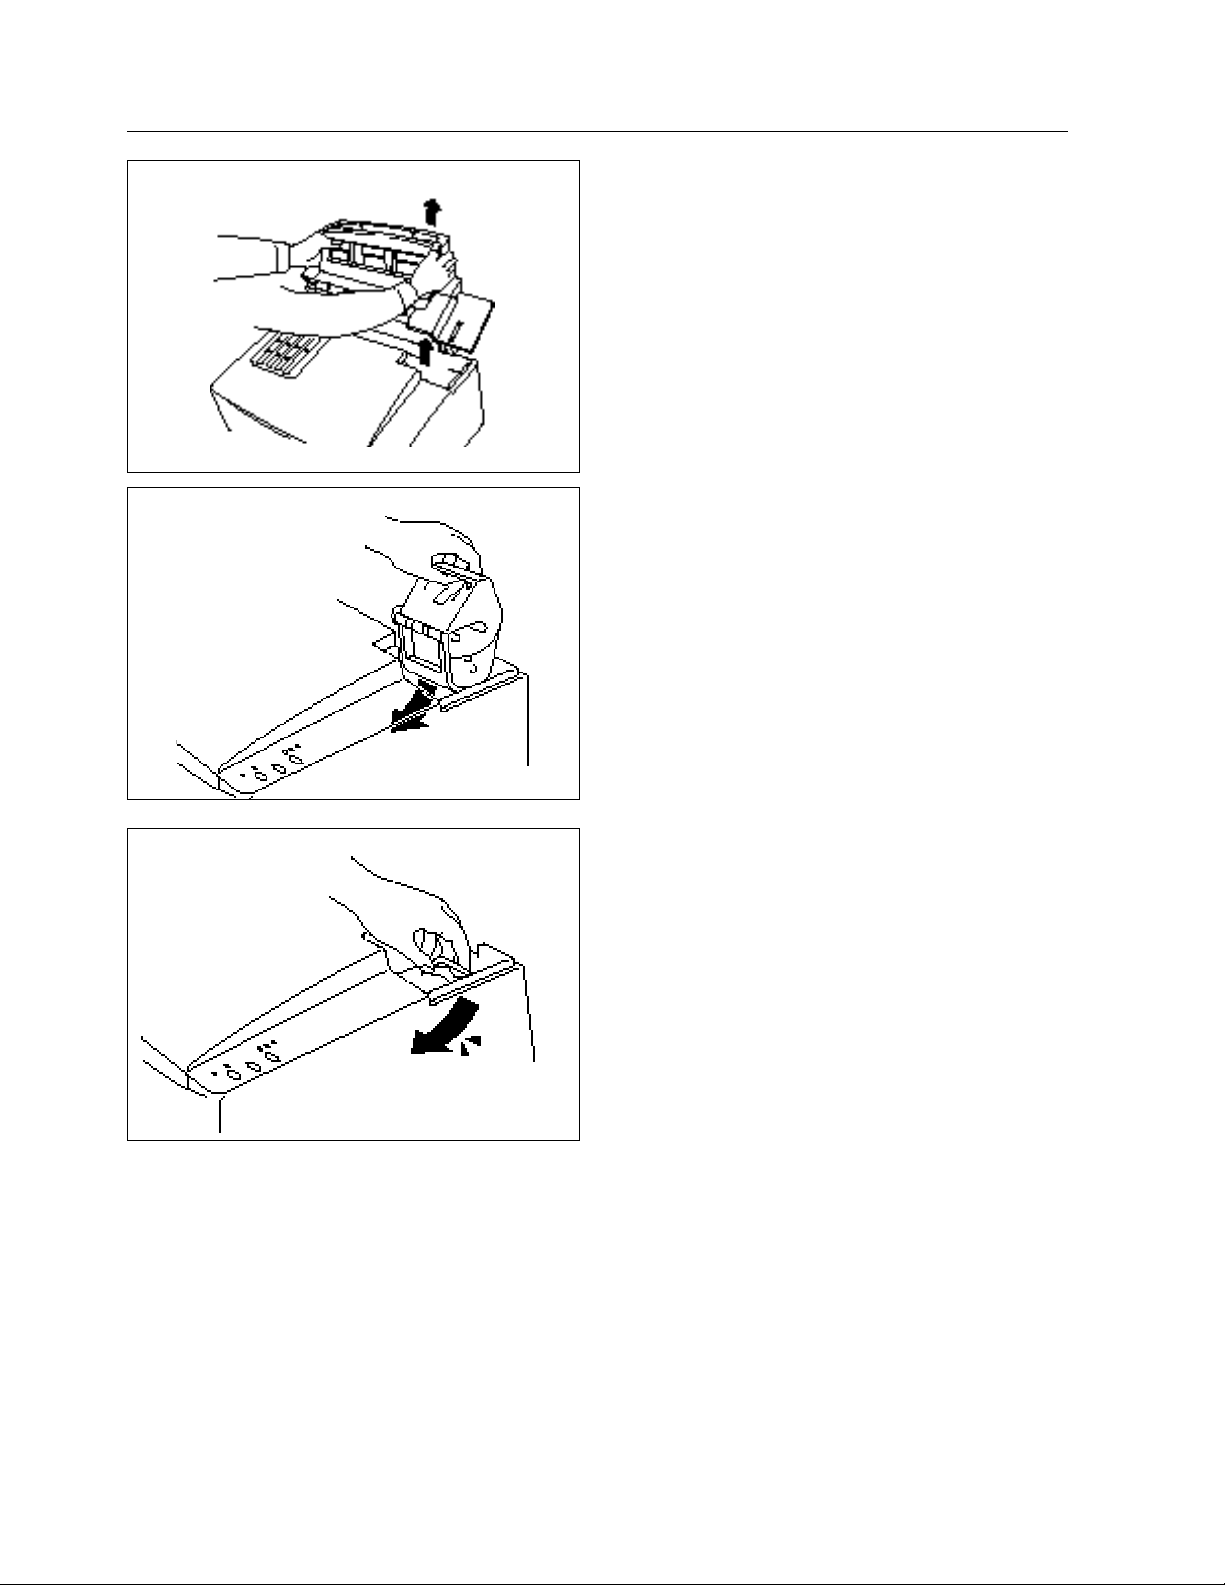
Action 4: Load Paper into Your Printer
1
Replace the sheet feeder onto the printer.
Insert the paper support wire into the holes
located at the top of the sheet feeder.
2 Pull the sheet feeder cover forward.
3 Load paper in the sheet feeder with the
printing surface face up.
2 NOTE
The feeder can hold up to 200 sheets of
plain paper or up to 10 envelopes. Excessive
sheets may cause paper jams. The paper
should be stacked below the t mark.
4 Adjust the paper guide to the paper width.
6
Page 7

5 Close the sheet feeder cover.
6 Pull the output tray out from the bottom of
(1) (2)
the printer and set the attached Output wire.
7 Pull out the Output Tray and adjust the tray
position for the loaded paper as follows:
LGL: Legal paper
A4: A4 size paper
LTR: Letter paper
7
Page 8

The printer can handle paper that has the following specifications.
See “CHAPTER 2 PAPER HANDLING” in the User’s Guide for more detailed
information.
Feeder Paper Size Capacity
Manual
Feed
A4, Letter, Legal, Custom size, Envelope (DL,
COM-10,), C5,Transparencies (A4, Letter)
sheet by sheet
(70-229 x 127-356 mm, 2.75-9 x 5-14 inches
60 - 157 g/m2, 16 - 42 lbs)
First sheet
feeder
A4, Letter, Legal, Custom size, Envelope (DL,
COM-10, C5, Transparencies (A4, Letter)
(70-229 x 127-356 mm, 2.75-9 x 5-14 inches
60 - 157 g/m2, 16 - 42 lbs)
22 mm (0.87 inch)
200 sheets of 80g/m
100 sheets of Legal size
10 envelopes,
50 transparencies
Second
sheet
feeder
A4, Letter, Legal, Custom size
(70-229 x 250-356 mm, 2.75-9 x 9.8-14 inches
60 - 135 g/m2, 16 - 36 lbs)
22 mm (0.87 inch)
200 sheets of 80g/m
100 sheets of Legal size
(HS-5300
only)
2
2
8
Page 9

Action 5: Connect Your Printer and Computer
was purchased.
You must connect the printer to your computer using an interface cable. A parallel cable that is
compliant with IEEE 1284 should be used for this connection.
1 Make sure that the power switch is turned
off before connecting or disconnecting the
interface cable.
Also, make sure that the computer is turned
off.
2 NOTE
The shape of the power cord varies
depending on the country where the printer
2 Connect the parallel interface cable to the
parallel interface port of the printer. ( ¬ )
Secure the connection with the wire clips.
( - )
(1)
Connect the interface cable to the printer
port of your computer.
(2)
2 NOTE
For the location of your computers parallel printer port, see your computers User’s Guide.
9
Page 10

Action 6: Plug in and Turn on Your Printer
1 Plug the power cord into the printer inlet
and the AC power outlet.
2 Turn on the Power button that is located
on the left hand side of your printer.
3 Make sure that the Ready LED comes on
after the printer has warmed up (about 9
minutes).
CAUTION!
When moving the printer, only move it after waiting 30 minutes with the power off to allow
the printer to cool down and be careful not to tilt the printer. Moving the printer with ink
melted will cause severe damage to the Printer and will VOID THE WARRANTY. It
takes 30 minutes for the printer ink to become completely solid.
10
Page 11

Action 7-1: Installing the Printer Driver
Computer Requirements
The following are the minimum computer requirements to setup and operate
the printer.
CPU: 80486 or higher
(Pentium recommended)
RAM: 8 MB or more for Windows 95, 3.1 / 3.11
(16 MB or more recommended)
Hard Disk Drive: 10Mbyte free space available
(more space is necessary for printing)
OS: Windows 95, 3.1x
2 Note
Use only a shielded Interface cable that is IEEE 1284 compliant and less
than 1.8m (6 feet ) long.
Prepare Windows 95 for the Printer
1. Start Windows 95. The screen
shown on the right appears.
2 Notes
If Windows 95 does not recognize your printer;
1. Click the Start button and choose Run.
2. Insert the supplied disk for Windows into your floppy disk drive.
3. Type A:SET UP and choose the OK button or press the Enter key.
After the installer starts, skip the following steps and follow the instructions
that appear on the screen.
11
Page 12

2. Make sure that the second option “Driver from disk provided by hardware manufacturer”
is checked.
3. Press the OK button. The
screen shown on the right
appears.
4. Insert the supplied disk for Windows 95 into the floppy disk drive: drive A in most cases.
5. Press the OK button.
6. Follow the instructions that appear on the screen.
Prepare Windows 3.1/3.11 for the Printer
1. Start Windows 3.1/3.11.
2. Insert the supplied disk for Windows into your floppy disk drive.
3. Choose Run from the File menu in the Program Manager.
4. Type the drive name where you
inserted the supplied disk and
“SETUP” in the box: for example,
A:\SETUP. Choose the OK button or
press the Enter key.
5. The installer starts running. Follow the instructions on the computer screen.
2 Notes
• The installer automatically updates your SYSTEM.INI Windows file by
adding DEVICE=bi-di.386 under the [386Enh] section. If any bidirectional parallel communications device driver has previously been
installed, it will be deactivated by this new driver. If you want to use the
driver that was previously installed, you should re-install your previous
driver. However, re-installing the previous driver will make the HS5000/5300 driver inactive.
• The installer makes the installed printer driver the Windows default.
• The installer automatically sets the printer port to the parallel interface,
LPT1.
• During this installation, changes have been made to the SYSTEM.INI
file. It is necessary to restart Windows so that the changes become
effective and the installed bi-directional parallel communications device
driver can take effect.
12
Page 13

Action 7-3: Prepare DOS for the Printer
How to Use the Printer in Your DOS Application Software
Before working with your application software that runs in DOS, if you cannot find a driver with
this printers name in the printer selection of your application software, you need to install a printer
driver corresponding to one of the following printer’s emulations: HP DeskJet 1600c(PCL
5c)series or Monochrome HP LaserJet series.(PCL5e)
2 NOTE
• Although you can use Monochrome HP LaserJet printer drivers, you will only get
monochrome printouts. Colors may not print as expected when you use an HP DeskJet 1600c
series driver because the color matching function is designed for the Deskjet printer and will not
work well with the HS-5000.
What Does Remote Printer Console Do?
The Remote Printer Console (RPC) is a utility program which can run in the DOS environment
and comprises the following two programs. If you are using Windows, you do not have to use
this program.
o Remote Printer Console Main Program
This program allows you to change various printer settings such as emulation, print quality,
fonts, page setup and so on from your computer screen. Since most DOS applications have a
printer settings menu which overrides the settings made by the RPC, you may not need to use
this utility program. This utility program is useful for application software which does not
control the printer’s settings and features.
o Printer Status Monitor Program
This utility program can monitor your printer’s status using bi-directional parallel
communications. For example, if your printer has no paper, this utility program displays a
“Paper Empty” error status and instructions for corrective action on your computer screen.
This utility program stays resident in your computer memory (a Terminate-and-Stay Resident
program) and runs in the background.
Installing the Remote Printer Console
Before you install the program, make sure that you have the following hardware and software to
install the program:
DOS Version 3.3 or later
Monitor EGA/VGA or compatible
Option Mouse; the mouse driver must be installed.
(You can also operate the program from the keyboard.)
Follow these steps to install the remote printer console program:
1. Make sure your printer is connected to your computer, turned on and in the on-line state.
2. Start your computer and wait for the DOS prompt. If you are in Windows, exit and return to
13
Page 14

the DOS prompt.
3. Insert the supplied disk into your floppy disk drive (A: or B:).
4. Select the drive to be used by typing A:
or B: after the DOS prompt and
C:\>A:
pressing the Enter key.
5. Type RPCSETUP and press the Enter
key.
A:\>RPCSETUP
6. Follow the instructions that the installer gives you.
Using the Remote Printer Console Main Program
Type C:\RPCX>RPCX and press the Enter
key to start the Remote Printer Console
main program.
The Main Screen will appear on your
computer screen as shown on the right.
The RPC gets the current settings information from your printer when it starts if bi-directional
communication is enabled between your computer and printer. Otherwise, the RPC shows its
default settings. If you want to change settings, move the cursor to the desired item and select the
desired setting by using the Enter and Cursor keys. Then press the Enter key to make the selected
setting valid. If you use a mouse, click the desired item to change the setting.
There are four sub-menus as shown in the table below. Select the sub-menu by clicking the
desired sub-menu with the mouse, by using the cursor key and the Enter key, or by using the keys
shown below to switch the screen to the sub menus.
Menu Press the keys Functions
Direct Access Alt + D You can directly control the printer functions such as
Print Form, Self Print, Reset Printer and Printer
immediate Sleep mode.
Printer Setup Alt + P You can enter the Setup mode to change further printer
settings such as margin settings, continue mode, reprint
function, font and sleep mode timeout.
Console Config Alt + C You can change the environment settings for the RPC
program: color, Status Monitor configuration and so
forth.
Guide Alt + G You can get into the Guide mode.
On-lineHelp F1 You can get on-line help if you press F1. You will get
information on the currently highlighted item.
14
Page 15

Using the Printer Status Monitor Program
Type C:\RPCX>STMX and press the Enter key to make the Printer Status Monitor Program stay
resident in your computer memory. If there are any changes to the printer status, it displays a
message on your computer screen.
If the printer status monitor program stays resident in your computer, you can monitor the printer
status on your computer screen immediately using the hot-key sequence (Ctrl+Alt+R).
To remove the Printer Status Monitor program from your computer memory, type
C:\RPCX>STMX/R and press the Enter key.
o The RPC works in the environment where your printer is directly connected to your computer.
If you are using any printer buffer switches which do not support bi-directional communication
between the printer and computer, the program works only in the PC to printer direction and
cannot receive printer status information.
o The program does not work with printers on a network.
o If the RPC conflicts with some application software, exit your application software and then
run the RPC.
o The RPC may work in the DOS-compatible box screen mode of Windows, however, it is
recommended that you completely exit from Windows to the DOS prompt before using the
RPC.
o The Printer Status Monitor and some other Terminate-and-Stay resident programs cannot co-
exist in the computer’s memory. If they do not work properly together, use them one at a time.
You can suspend the Printer Status monitor with any of the following methods or commands.
• Type C:\RPCX>STMX/R and press the Enter key.
• Hold the space bar down while executing the AUTOEXEC.BAT file at DOS startup to
prevent the status monitor being loaded as a TSR program.
15
Page 16

Action 8: Printing a Test Sample Page
We recommend that you print a test page. Refer to the instructions below.
1
Set the printer to off-line first by pushing the
Online button.
Press the Test button while holding down
the Shift button.
2 NOTE
If the printer does not print a test sample page, see “CHAPTER 7 TROUBLESHOOTING,
Q & A” of the User’s Guide. If your printer still cannot print the test sample page after reviewing
the information in the User’s Guide, consult your dealer.
16
Page 17

Shipment of the Printer
blocks as shownbelow:
If for any reason you must ship your Printer, carefully package the Printer to
avoid any damage during transit. It is recommended that you save and use
the original packaging. The Printer should also be adequately insured with
the carrier.
Warning
Before re-packing the printer, wait at least 30 minutes after you turn
the power off to allow the printer ink to become completely solid.
1 Turn the printer Off. Wait 30 minutes until the printer cools down.
2 Re-pack the printer.
See “REPACKING THE PRINTER” in Chapter 6.
Maintenance CassetteManuals
Ink Holders
Wires
Printer
Inside the printer, please
support the print head by
attaching the styrofoam
17
 Loading...