

Page 1
English: CS-5xxx User’s Guide, Preliminary (TOC)
Please read this manual thoroughly before using the print er.
HS-5000/5300
Brother Color Printer
User’s Guide
Keep this manual in a convenient place for quick and easy reference at all times.
Page 2
English: CS-5zxx User’s Guide, Preliminary (TOC)
USER’S GUIDE
SHIPMENT OF THE PRINTER
If for any reason you must ship your Printer, carefully package the Printer to avoid
any damage during transit. It is recommended that you save and use the original
packaging. The Printer should also be adequately insured with the carrier.
Warning
When shipping the printer, re-pack it after waitin g 30 minutes with the power off
which will allow the printer to cool down an d the ink to solidify. Moving the printer
with ink melted will cause severe damage to the Printer and will VOID THE
WARRANTY.
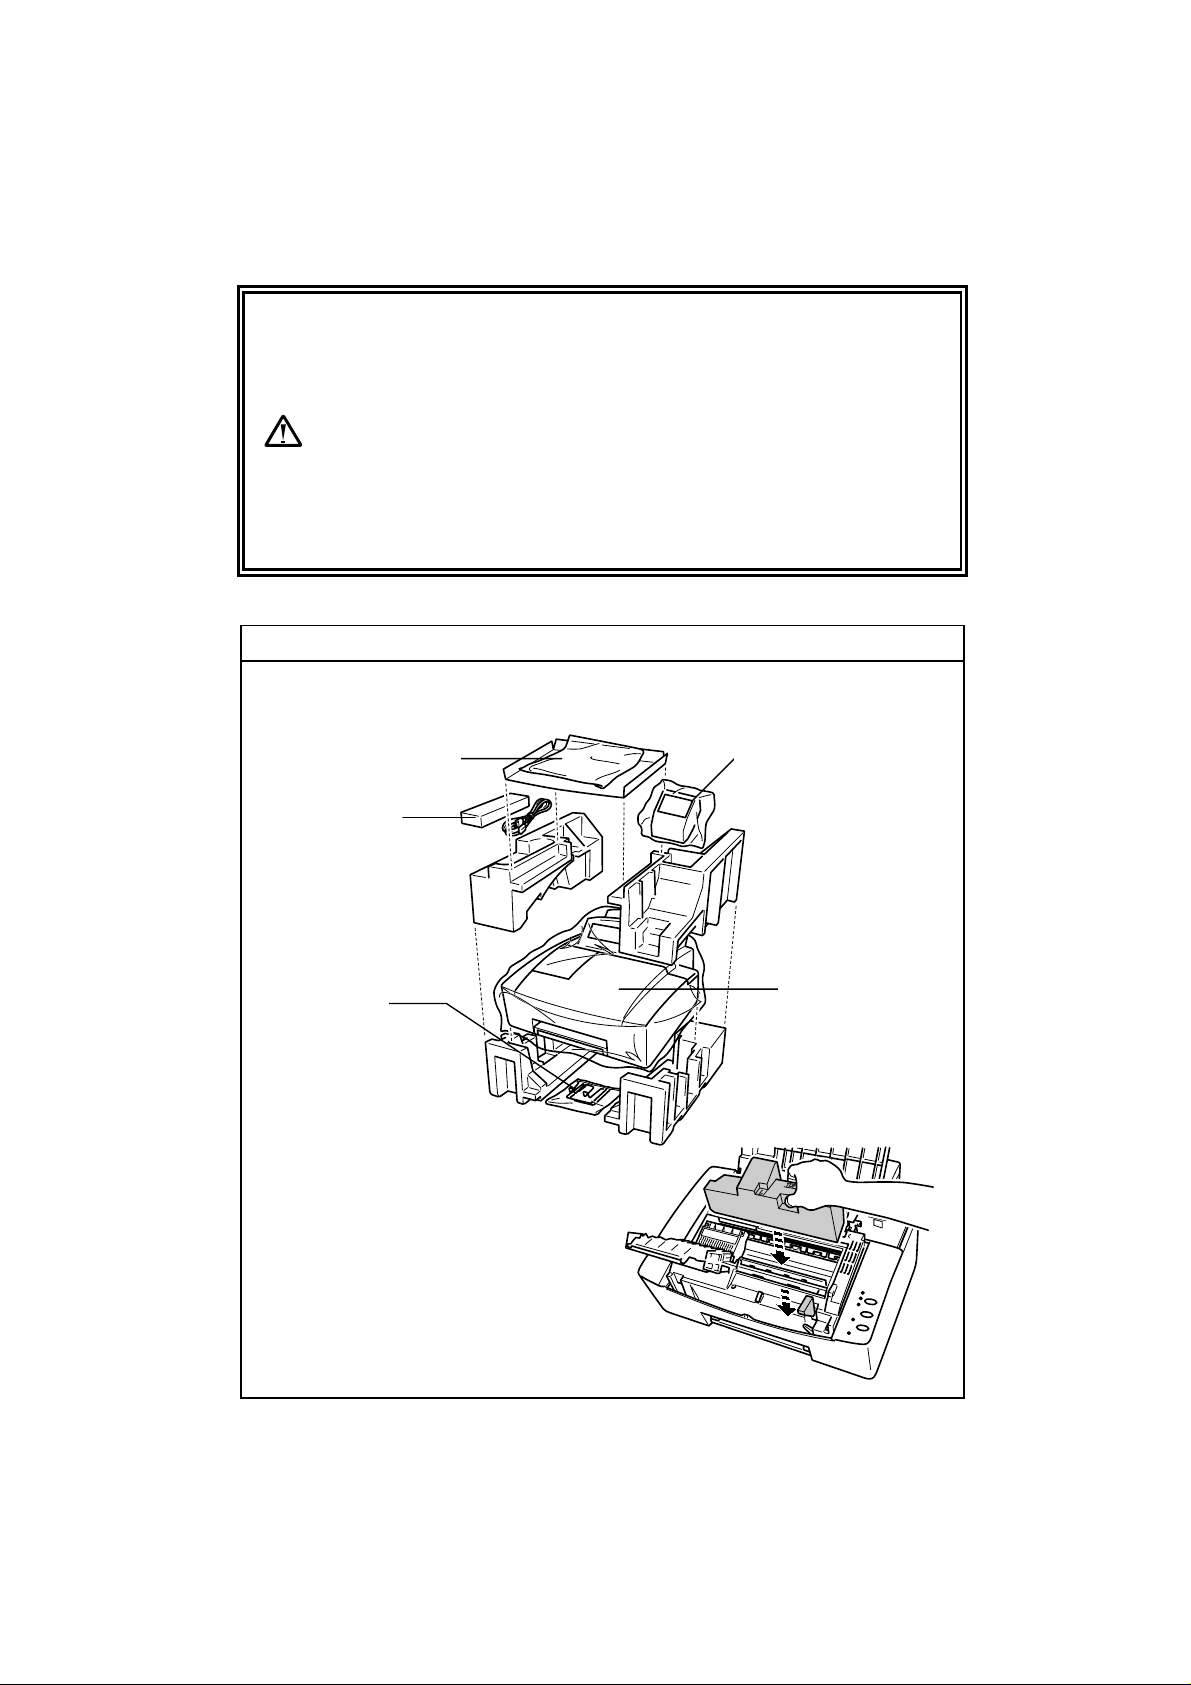
REPACKING THE PRINTER
1 Turn the printer Off. Wait 30 minutes until the printer cools down.
2 Re-pack the printer.
See “REPACKING THE PRINTER” in Chapter 6.
Ink Holders
Wires
Inside the printer, please
retain the print head in
position with the attached
styrofoam as shown (Refer to
Chapter 6, page 13.):
Maintenance CassetteManuals
Printer
Page 3

English: CS-5xxx User’s Guide, Preliminary (TOC)
(For USA & CANADA Only)
For technical and operational assistance, please call:
In USA 1-800-276-7746 (outside California)
In CANADA 1-800-853-6660
If you have comments or suggestions, please write us at:
In USA Printer Customer Support
In CANADA Brother International Corporation (Canada), Ltd.
714-859-9700 Ext. 329(within California)
514-685-6464 (within Montreal)
Brother International Corporation
15 Musick
Irvine, CA 92718
- Marketing Dept.
1, rue Hôtel de Ville
Dollard-des-Ormeaux, PQ, Canada H9B 3H6
BBS
For downloading drivers from our Bulletin Board Service, call:
In USA 1-888-298-3616
In CANADA 1-514-685-2040
Please log on to our BBS with your first name, last name and four digit
number for your password. Our BBS supports modem speeds up to 14,400,
8 bits no parity, 1 stop bit.
Fax-BackSM System (For USA and Canada only)
Brother Customer Service has installed an easy to use Fax-BackSM System
so you can get instant answers to common technical questions and product
information for all Brother products. This is available 24 hours a day, 7 days a
week. You can use the system to send the information to any fax machine,
not just the one you are calling from. Please call 1-800-521-2846 (USA) or
1-800-681-9838 (Canada) and follow the voice prompts to receive faxed
instructions on how to use the system and your index of Fax-BackSM subjects.
DEALERS/SERVICE CENTERS (USA only)
For the name of an authorized dealer or service center, call 1-800-284-4357.
SERVICE CENTERS (Canada only)
For service center addresses in Canada, call 1-800-853-6660
INTERNET ADDRESS
For technical questions and downloading drivers:
http://www.brother.com
Page 4

English: CS-5zxx User’s Guide, Preliminary (TOC)
USER’S GUIDE
UD4653001
Printed in Japan
Page 5
English: CS-5xxx User’s Guide, Preliminary (TOC)
Color Printer
HS-5000/5300 User’s Guide
(For USA & CANADA Only)
For technical and operational assistance, please call:
In USA 1-800-276-7746 (outside California)
In CANADA 1-800-853-6660
If you have comments or suggestions, please write us at:
In USA Printer Customer Support
In CANADA Brother International Corporation (Canada), Ltd.
714-859-9700 Ext. 329 (within California)
514-685-6464 (within Montreal)
Brother International Corporation
15 Musick, Irvine, CA 92718
- Marketing Dept.
1, rue Hôtel de Ville
Dollard-des-Ormeaux, PQ, Canada H9B 3H6
BBS
For downloading drivers from our Bulletin Board Service, call:
In USA 1-888-298-3616 In CANADA 1-514-685-2040
Please log on to our BBS with your first name, last name and a four digit number for
your password. Our BBS supports modem speeds up to 14,400, 8 bits no parity, 1
stop bit.
Fax-BackSM System (For USA and Canada only)
Brother Customer Service has installed an easy to use Fax-BackSM System so you
can get instant answers to common technical questions and product information for
all Brother products. This is available 24 hours a day, 7 days a week. You can use
the system to send the information to any fax machine, not just the one you are
calling from.
Please call 1-800-521-2846 (USA) or 1-800-681-9838 (Canada) and follow the voice
prompts to receive faxed instructions on how to use the system and your index of
Fax-BackSM subjects.
DEALERS/SERVICE CENTERS (USA only)
For the name of an authorized dealer or service center, call 1-800-284-4357.
SERVICE CENTERS (Canada only)
For service center addresses in Canada, call 1-800-853-6660
INTERNET ADDRESS
For technical questions and downloading drivers:
http://www.brother.com
v
Page 6
English: CS-5zxx User’s Guide, Preliminary (TOC)
!
USER’S GUIDE
Trademarks
The brother logo is a registered trademark of Brother Industries, Ltd.
Apple, the Apple Logo, and Macintosh are trademarks, registered in the United
States and other countries, and TrueType is a trademark of Apple Computer, Inc.
Hewlett Packard is a registered trademark and HP Color LaserJet, DeskJet, and
PCL are trademarks of Hewlett-Packard Company.
IBM, IBM PC, and Proprinter are registered trademarks of International
Business Machines Corporation.
Microsoft and MS-DOS are registered trademarks of Microsoft Corporation.
Windows is a registered trademark of Microsoft Corporation in the U.S. and
other countries.
All other brand and product names mentioned in this User’s Guide are registered
trademarks of their respective companies.
Compilation and Publication Notice
Under the supervision of Brother Industries Ltd., this manual has been compiled
and published, covering the latest product’s descriptions and specifications.
The contents of this manual and the specifications of this product are subject to
change without notice.
Brother reserves the right to make changes without notice in the specifications
and materials contained herein and shall not be responsible for any damages
(including consequential) caused by reliance on the materials presented,
including but not limited to typographical and other errors relating to the
publication.
©1998 Brother Industries Ltd.
Definitions of Warnings, Cautions, and Notes
The following conventions are used in this User’s Guide:
Warning
Indicates warnings that must be observed to prevent possible personal
injury.
Caution
Indicates cautions that must be observed to use the printer properly or prevent
damage to the printer.
✒ Note
Indicates notes and useful tips to remember when using the printer.
vi
Page 7
English: CS-5xxx User’s Guide, Preliminary (TOC)
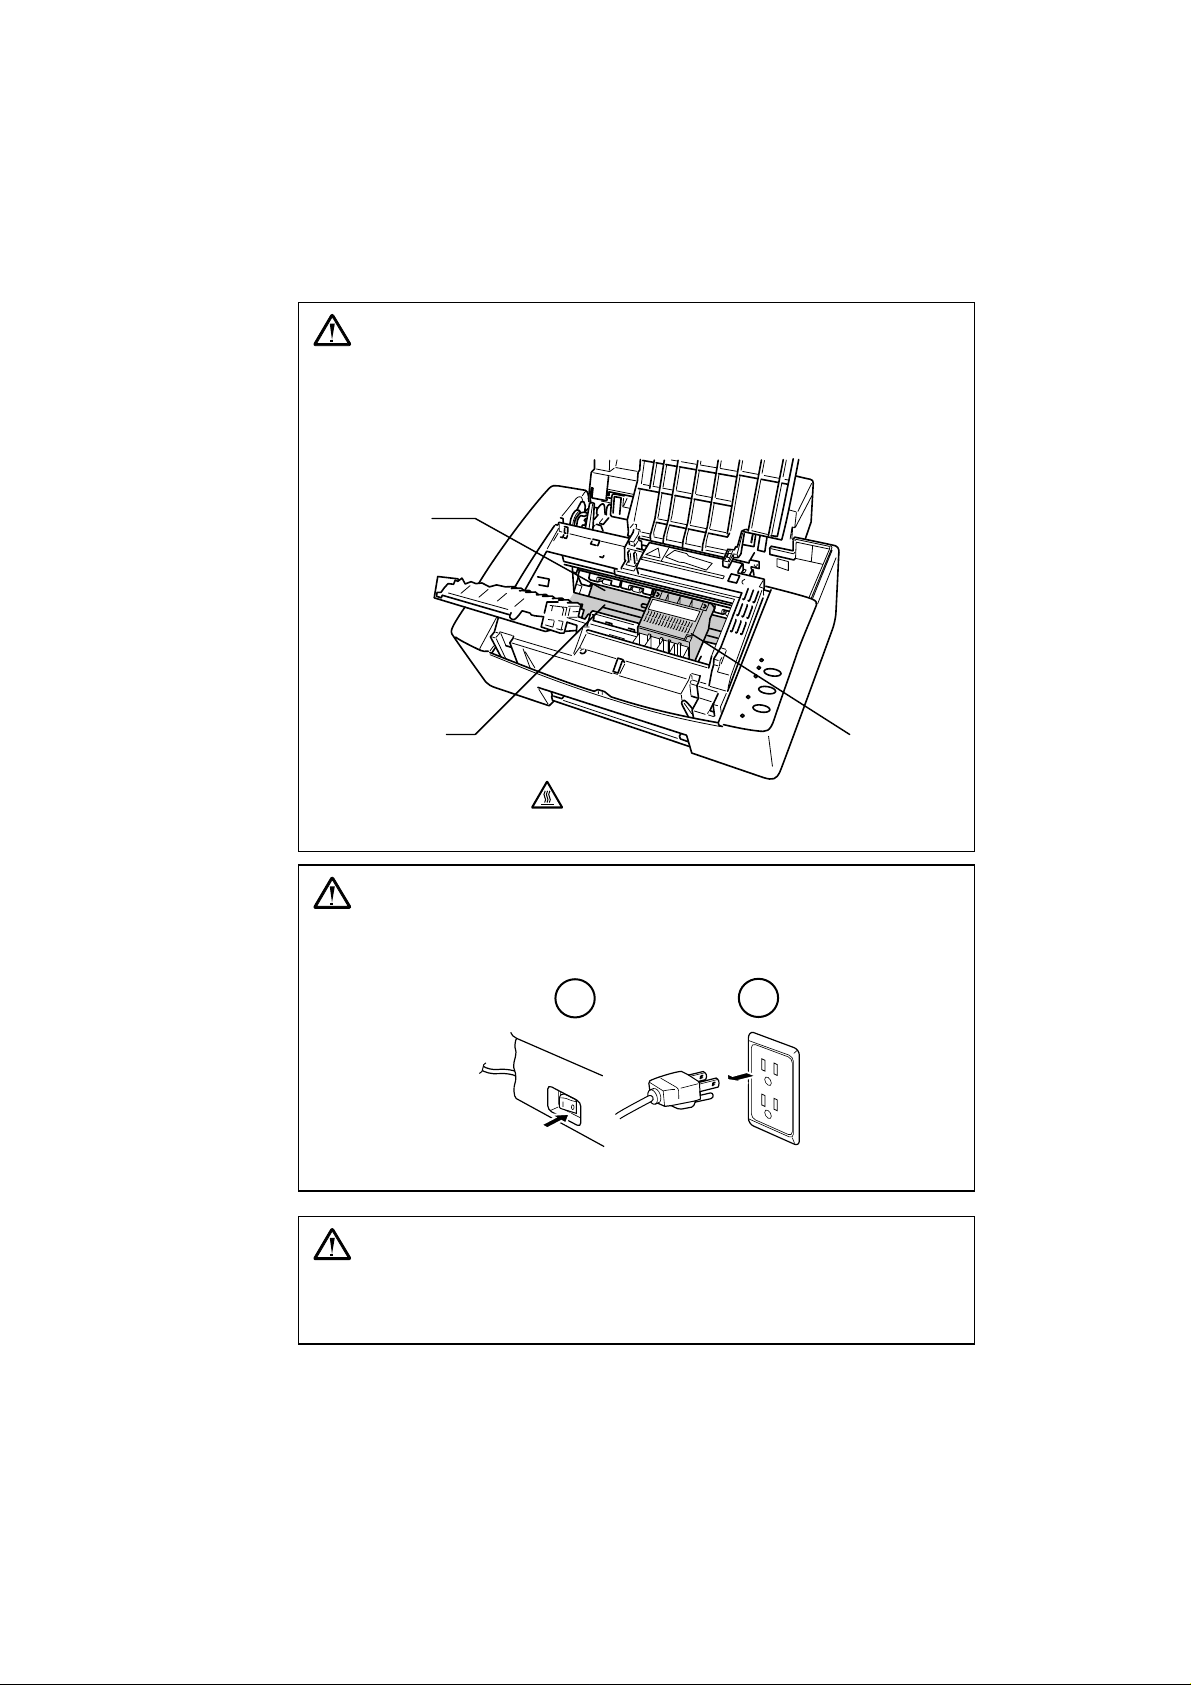
To Use the Printer Safely
Warning
After you have just used the printer, some internal parts of the printer are
extremely hot. Do not open the inside cover unnecessarily and never touch
the shaded parts (Quench Platen, Platen, and Print Hea d) shown in t he
following illustration.
Platen
Quench Platen
High Temperature
Inside the Printer
Warning
There are high voltages inside the printer. Before cleaning the printer, be
sure to turn the power off and unplug the power cord from the power
outlet.
1
Turning off the Switch and Unplugging the Printer
Warning
Keep the ink cartridge away from children. If ink is swallowed, drink
plenty of water. The ink contains no harmful substances, but if you are
concerned you should consult a doctor.
2
Print head
vii
Page 8

English: CS-5zxx User’s Guide, Preliminary (TOC)
USER’S GUIDE
TABLE OF CONTENTS
CHAPTER 1 INTRODUCTION 1-1
ABOUT THE GUIDEBOOKS 1-1
FINDING OUT HOW TO USE THE PRINTER 1-1
ABOUT YOUR PRINTER 1-2
PRINTER OVERVIEW 1-2
SYSTEM REQUIREMENTS 1-3
FEATURES 1-3
OPERATING AND STORAGE ENVIRONMENT 1-4
POWER SUPPLY 1-4
ENVIRONMENT 1-4
CHAPTER 2 PAPER HANDLING 2-1
PAPER SPECIFICATIONS 2-1
ABOUT BROTHER SPECIAL PAPERS 2-4
ABOUT BROTHER SPECIAL TRANSPARENCIES 2-4
SHEET FEEDER 2-5
ADJUST THE HEAD GAP BY PAPER THICKNESS 2-5
OADING THE PAPER
L
MANUAL FEED SLOT 2-8
OUTPUT TRAY 2-9
2-6
CHAPTER 3 PRINTER DRIVER 3-1
PAPER 3-2
MEDIA SELECTION 3-2
PAPER SOURCE 3-3
OPY
C
/PAGE ORDER 3-3
SCALING 3-3
QUALITY AND COLOR 3-4
QUALITY 3-4
COLOR CONTROL 3-5
OCUMENT TYPE
D
OLOR/MONO
C
3-5
3-5
CONTROL AND MAINTENANCE 3-6
HOW PRINTER STATUS
S
PRINTER CONTROL
3-6
3-6
POWER SAVE MODE 3-7
MAINTENANCE 3-7
COLOR ADJUSTMENT 3-7
CHAPTER 4 CONTROL PANEL 4-1
LEDS AND BUTTONS 4-1
POWER LED 4-1
READY LED 4-1
viii
Page 9

English: CS-5xxx User’s Guide, Preliminary (TOC)
DATA LED 4-2
MANUAL LED 4-2
ALARM LED 4-2
ONLINE BUTTON 4-3
RESET BUTTON 4-3
FF/CONT BUTTON 4-3
SHIFT + TEST BUTTON 4-4
SHIFT + CLEAN BUTTON 4-4
TEST PRINT MODE 4-5
RESET AND HEX DUMP PRINT MODE 4-6
OTHER CONTROL FEATURES 4-7
CHAPTER 5 OPTIONS 5-1
MODULAR I/O CARD 5-1
MEMORY EXPANSION 5-2
BR-SCRIPT 2 ROM BOARD BR-3000C 5-5
CHAPTER 6 MAINTENANCE 6-1
REPLACING THE MAINTENANCE PAPER CASSETTE 6-1
ADDING INK 6-7
CLEANING THE PRINTER INTERIOR 6-9
RE-PACKING THE PRINTER 6-13
CHAPTER 7 TROUBLESHOOTING 7-1
ALARM INDICATIONS AT A GLANCE 7-1
OPERATOR CALLS 7-1
SERVICE CALLS 7-2
PRINT QUALITY PROBLEMS 7-3
PAPER JAMS 7-4
Q & A 7-8
SETTING UP THE PRINTER HARDWARE 7-8
SETTING UP THE PRINTER FOR WINDOWS 7-8
SETTING UP THE PRINTER FOR DOS 7-9
PAPER HANDLING 7-10
PRINTING 7-11
PRINT QUALITY 7-12
CHAPTER 8 APPENDIX 8-1
PRINTER SPECIFICATIONS 8-1
PRINTING 8-1
FUNCTIONS 8-1
ELECTRICAL AND MECHANICAL 8-2
PARALLEL INTERFACE SPECIFICATIONS 8-3
RESIDENT FONTS 8-4
SYMBOL SETS/CHARACTER SETS 8-5
ix
Page 10

English: CS-5zxx User’s Guide, Preliminary (TOC)
USER’S GUIDE
REGULATIONS
Federal Communications Commission Compliance Notice (For USA Only)
This equipment has been tested and found to comply with the limits for a Class B digital device, pursuant to Part
15 of the FCC Rules. These limits are designed to provide reasonable protection against harmful interference in
a residential installation. This equipment generates, uses, and can radiate radio frequency energy and, if not
installed and used in accordance with the instructions, may cause harmful interference to radio communications.
However, there is no guarantee that interference will not occur in a particular installation. If this equipment does
cause harmful interference to radio or television reception, which can be determined by turning the equipment
off and on, the user is encouraged to try to correct the interference by one or more of the following measures:
❏Reorient or relocate the receiving antenna.
❏Increase the separation between the equipment and receiver.
❏Connect the equipment into an outlet on a circuit different from that to which the receiver is connected.
❏Consult the dealer or an experienced radio/TV technician for help.
Important
A shielded interface cable should be used in order to ensure compliance with the limits for a Class B digital
device. Changes or modifications not expressly approved by Brother Industries, Ltd. could void the user’s
authority to operate the equipment.
Industry Canada Compliance Statement (For Canada Only)
This class B digital apparatus meets all requirements of the Canadian Interference Causing Equipment
Regulations
Cet appareil numérique de la classe B respecte toutes les exigences du Réglement sur la matériel brouilleur du
Canada.
x
Page 11

English: CS-5xxx User’s Guide, Preliminary (TOC)
DECLARATION OF CONFORMITY (EUROPE)
We, Brother International Europe Ltd.,
Brother House, 1 Tame Street, Guide Bridge, Audenshaw, Manchester M34 5JE, UK.
declare that this product is in conformity with the following normative documents.
Safety: EN 60950,
EMC: EN 55022 Class B, EN 50082-1
following the provisions of the Low Voltage Directive 73/23/EEC and the Electromagnetic Compatibility
Directive 89/336/EEC (as amended by 91/263/EEC and 92/31/EEC).
Issued by:
Brother International Europe Ltd.
European Technical Services Division
Radio Interference (220-240 V Model Only)
This printer complies with EN55022 (CISPR Publication22) / Class B.
Before the product is used, ensure that you use a double-shielded cable with twisted-pair conductors and that it
is marked “IEEE1284 compliant.” The cable must not exceed 1.8 metres in length.
IMPORTANT - For Your Safety
To ensure safe operation the three-pin electrical plug supplied must be inserted only into a standard three-pin
power point which is properly grounded through normal household wiring.
Extension cords used with the equipment must be three-pin plug type and corruptly wired to provide proper
grounding. Incorrectly wired extension cords may cause personal injury and equipment damage.
The fact that the equipment operates satisfactorily does not imply that the power is grounded and that the
installation is completely safe. For your safety, if in any doubt about the effective grounding of the power,
consult a qualified electrician.
Disconnect device
This printer must be installed near a power outlet, which is easily accessible. In case of emergencies, you must
disconnect the power cord from the outlet in order to shut off power completely.
Geräuschemission / Acoustic Noise Emission (For Germany Only)
Lpa < 70 dB (A) DIN 45635 - 10 - 01 - KL2
xi
Page 12

English: CS-5zxx User’s Guide, Preliminary (TOC)
USER’S GUIDE
IMPORTANT (For U.K. only)
If the power cord supplied with this printer is not suitable for your electrical outlet, remove the plug from the
mains cord and fit an appropriate three pin plug. If the replacement plug is intended to take a fuse then fit the
same fuse as the original.
If a moulded plug is severed from the power cord then it should be destroyed because a plug with cut wires is
dangerous if plugged into a live socket outlet. Do not leave it where a child might find it.
In the event of replacing the plug fuse, fit a fuse approved by ASTA to BS1362 with the same rating as the
original fuse.
Always replace the fuse cover. Never use a plug with the cover omitted.
WARNING - THIS PRINTER MUST BE PROPERLY EARTHED.
The wires in the mains cord are coloured in accordance with the following code:
Green and yellow: Ground
Blue: Neutral
Brown: Live
The colours of the wiring in the power lead of this printer may not correspond with the markings which identify
the terminals in your plug. If you need to fit a different plug, proceed as follows.
Remove a length of the cord outer sheath, taking care not to damage the coloured insulation of the wires inside.
Cut each of the three wires to the appropriate length. If the construction of the plug permits, leave the green and
yellow wire longer than the others so that, in the event that the cord is pulled out of the plug, the green and
yellow wire will be the last to disconnect.
Remove a short section of the coloured insulation to expose the wires.
The wire which is coloured green and yellow must be connected to the terminal in the plug which is marked
with the letter “E” or by the earth symbol or coloured green or green and yellow.
The wire which is coloured blue must be connected to the terminal which is marked with the letter “N” or
coloured black or blue.
The wire which is coloured brown must be connected to the terminal which is marked with the letter “L” or
coloured red or brown.
The outer sheath of the cord must be secured inside the plug. The coloured wires should not hang out of the
plug.
xii
Page 13

English: CS User’s Guide, Chapter 1
Chapter 1 INTRODUCTION
ABOUT THE GUIDEBOOKS
Finding Out How to Use the Printer
You have two guidebooks for this printer. Read each guidebook in the following
order:
1.Read the Quick Setup Guide to set up your printer and connect it to your
2.Read the User’s Guide to get information about the following.
CHAPTER 1 INTRODUCTION
computer. It also contains information on how to set up your computer for
your printer by installing the printer driver and fonts.
•Features and operating environment requirements of the printer – Chapter 1
•Paper Handling – Chapter 2
•Printer Driver – Chapter 3
•Control Panel – Chapter 4
•Options – Chapter 5
•Maintenance – Chapter 6
•Troubleshooting – Chapter 7
•Specifications – Appendices-Chapter 8
•Index-Chapter 9
1–1
Page 14
English: HS3 User’s Guide, Chapter 2
USER’S GUIDE
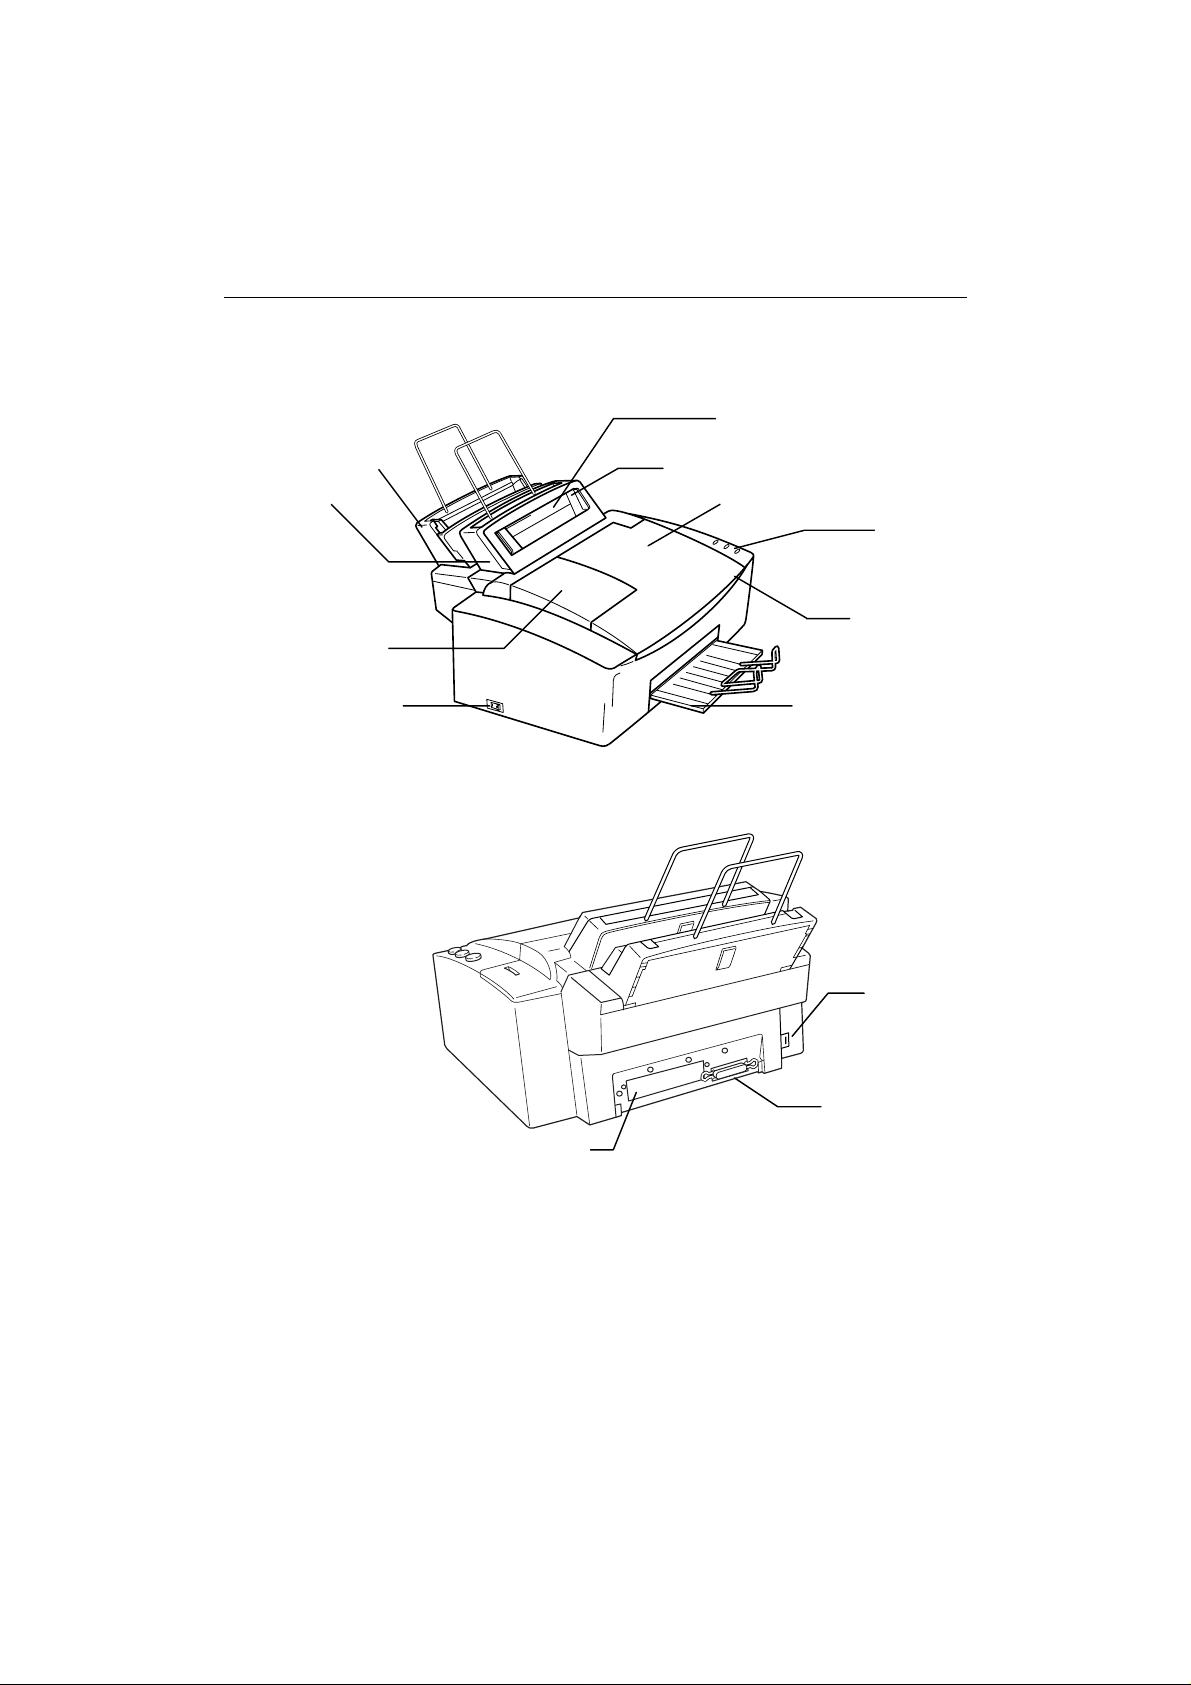
ABOUT YOUR PRINTER
Printer Overview
Second Sheet Feeder
(HS-5300 only)
Sheet Feeder
Ink Reservoir
Cover
Power Button
Manual Feed Slot
Paper Guide
Top Cover
Control Panel
Head Gap Lever
(inside)
Output Tray
Fig. 1-1 Front View
Power Inlet
1–2
Parallel Interface Port
MIO Slot
Fig. 1-2 Rear View
Page 15

English: CS User’s Guide, Chapter 1
System Requirements
Check the following system requirements to setup and operate the printer:
Features
This printer has the following features:
CHAPTER 1 INTRODUCTION
IBM PC or compatible with 80486 or higher microprocesso r
Parallel interface port (To use ECP mode, please see p.7-8, Q & A.)
4 MB or more of memory (8 MB or more recommended) for Windows
3.1x/95/98
12 MB or more of memory (16 MB or more recommended) for Windows
NT 4.0
10 MB of space available on your hard disk for installing the printer driver
and all fonts
MS-DOS or PC-DOS
❏ High Resolution and fast Printing Speed
Fine mode printing quality at 600 dots per inch (dpi) resolution and normal
output at 300 dpi resolution. Fast print speed of up to 4.5 pages per minute
(ppm) in normal Mono mode and up to 4 ppm in normal color mode (Letter
paper).
❏ High print quality
The ink is solid and water-proof so that you can get fine print quality even on
plain paper without having to use special coated paper. Solid ink provides
you with a professional print quality with sharp text and vivid color.
❏ User-Friendly Operation for Windows
®
The dedicated printer driver and TrueType™-compatible fonts for Microsoft
Windows 3.1/95/98/NT 4.0 are available on the floppy disk supplied with
your printer. You can easily install th em into your Windows system using our
installer program.
❏ Color Matching
The Brother original color matching system which is included in the printer
driver enables color matching between the monitor and printer and it offers
control of various color effects. It helps you to get fine color outputs. This
printer also supports the Windows 95/98 Image Color Matching (ICM)
system.
®
❏ Environment-Friendly
This printer has two power saving modes. Printers consume power to keep
some parts of the printer at operating (h igh) temperature, but this feature will
save electricity when the printer is ON but not being used. The factory setting
of Power Save mode 1 and mode 2 are both OFF, however, for reduced power
consumption, you can turn Power Save Mode 1 and 2 to ON. The default
time-out of each mode is one hour. This meets Energy Star power save
requirements.
1–3
Page 16
English: HS3 User’s Guide, Chapter 2
USER’S GUIDE
OPERATING AND STORAGE ENVIRONMENT
Please take note of the following information before using the printer.
Power Supply
Use the printer within the specified power range.
AC power: ±10% of the rated power voltage in your district
Frequency: 50 Hz (220 V– 240 V) or 60 Hz (110–120 V)
The power cord, including extensions, should not exceed 5 meters (16.5 feet).
Do not share the same power circuit with other high-power appliances,
particularly an air conditioner, copier, shredder and so on. If it is unavoidable
that you must use the printer with these appliances, it is recommended that you
use a voltage transformer or a high-frequency noise filter.
Use a voltage regulator if the power source is not stable.
Environment
The printer should be installed near a power outlet which is easily accessible.
Use the printer only within the following ranges of temperature and humidity.
For optimum image quality it is recommended to use this printer with in the
range:
Because the ink on printouts might flake off when rubbed or the print might
appear to be a lighter color if you use the printer out of this range, for optimum
print quality use the printer within the shaded range shown in the following
diagram.
Ventilate the room where you use the printer.
Ambient temperature: 10°C to 35°C (50°F to 95°F)
Ambient humidity: 20% to 80% (without condensation)
Temperature: 15°C to 30°C (59°F to 86°F)
Humidity: 30% to 60%
(%)
80
60
40
20
0
10
20 30
(°C)
1–4
Place the printer on a flat, horizontal surface.
Keep the printer clean. Do not place the printer in a dusty place.
Page 17

English: CS User’s Guide, Chapter 1
Do not place the printer where it is exposed to direct sunlight. Use a blind or a
heavy curtain to protect the printer from direct sunlight when the printer is
unavoidably set up near a window.
Do not place the printer near devices that contain magnets or generate magnetic
fields.
Do not subject the printer to strong physical shocks or vibrations.
Do not expose the printer to open flames or salty or corrosive gasses.
Do not place objects on top of the printer.
Do not place the printer near an air conditioner.
Do not move the printer within 30 minutes of turning the power Off.
CHAPTER 1 INTRODUCTION
1–5
Page 18

Page 19

English: HS3 User’s Guide, Chapter 2
Chapter 2 PAPER HANDLING
PAPER SPECIFICATIONS
The printer can handle paper that has the following specifications.
Feeder Paper Size Capacity
Manual Feed Paper:A4, Letter, Legal, Custom size,
First sheet
feeder
Second sheet
feeder
(HS-5300
only)
Envelope: DL, COM-10, C5,
Transparencies: A4, Letter
(70-229 x 127-356 mm,
2.75-9 x 5-14 inches,
60 - 157 g/m
2
, 16 - 42 lbs)
Paper: A4, Letter, Legal, Custom size,
Envelope: DL, COM-10, C5,
Transparencies: A4, Letter
(70-229 x 127-356 mm,
2.75-9 x 5-14 inches,
60 - 157 g/m
2
, 16 - 42 lbs)
Paper ONLY:
A4, Letter, Legal, Custom size
(70-229 x 250-356 mm,
9.8-16 x 7-14 inches,
60 - 135 g/m
2
, 16 - 36 lbs)
CHAPTER 2 PAPER HANDLING
sheet by sheet
22 mm (0.87 inch)
A4 / letter :200 sheets of 80g/ m
(20 lb.)
Legal :100 sheets
Envelopes :10
Transparencies :50
22 mm (0.87 inch)
A4 / letter :200 sheets of 80g/ m
(20 lb.)
Legal :100 sheets
2
2
Cut Sheet Envelope
Caliper
0.03 - 0.08 in. (0.09 - 0.2 mm)
0.0033 to 0.0058 in.
(0.084 to 0.14 mm)
single thickness
Moisture 4% to 6% by weight 4% to 6% by weight
Smoothness 100 to 250 (Sheffield) 100 to 250 (Sheffield)
Remarks
We recommend you to use these types of paper for plain paper as follows;
Hammermill Copy Plus (USA)-20lb
Xerox Premier (Europe)-80g/m
2
Do not use any labels.
2–1
Page 20
English: HS3 User’s Guide, Chapter 2
USER’S GUIDE
Do not use ordinary transparencies designed for photocopiers or laser printers.
Use Brother original transparencies which are designed for the HS-5000/5300
printers.
Before printing on transparencies, the printer needs to adjust its temperature for
transparencies. It may take around 1 minute.
If the paper does not load from the sheet feeder, use the manual feed slot and try
again.
When using media with holes, such as pre-punched organizer sheets, be careful
not to print on the hole. The inside of the printer will be stained with ink and it
may damage the printer.
Before using any paper, make sure that it is not curled. Feeding curled paper can
cause paper jams and misfeeds.
Some paper may become curled by the printers heat during printing. You can
prevent the paper from curling by having a top margin of 12.7 mm or more.
Do not use paper pre-printed by a laser or inkjet printer. Do not print on both
sides of the paper. The printer heat will make pre-printed laser toner / ink melt
again.
Prior to loading paper, check the type of media and select the appropriate
position of the head gap lever. Refer to “SHEET FEEDER” in this Chapter for
more information.
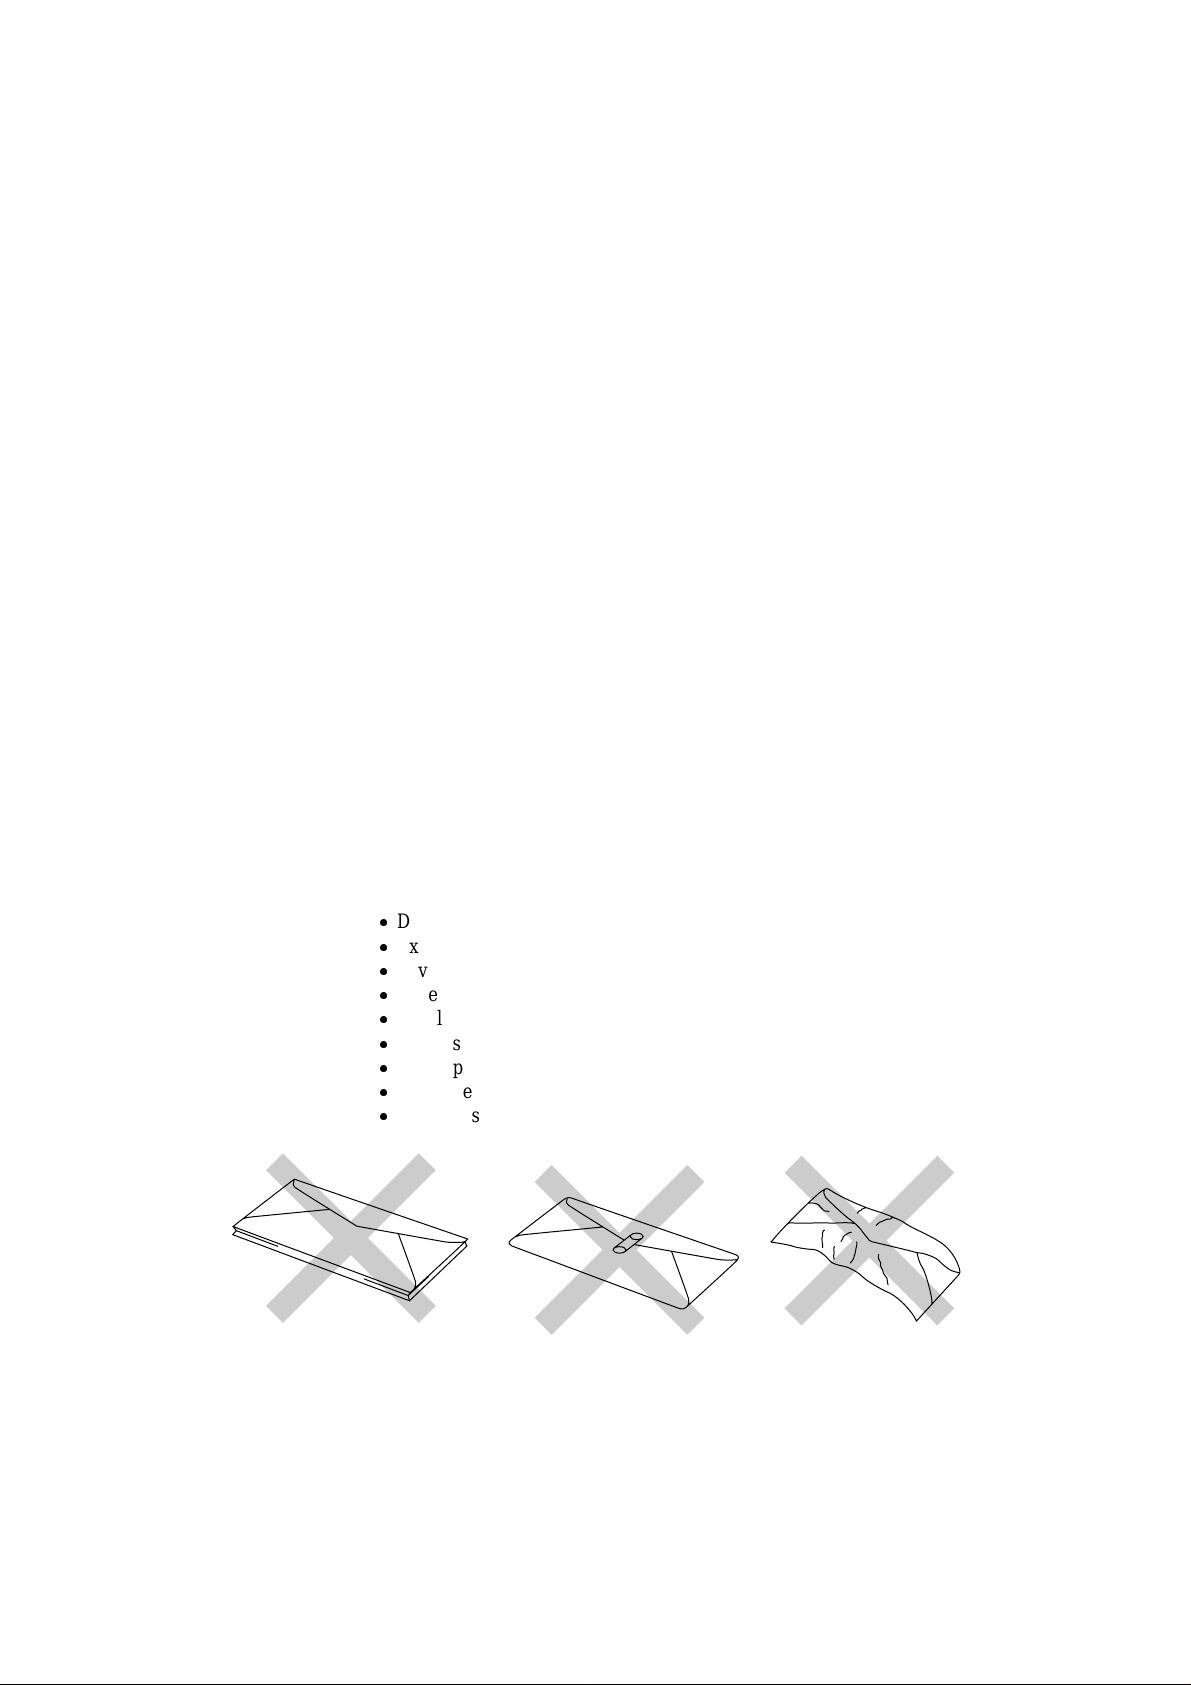
The following types of envelopes are not recommended for use.
Damaged, curled, wrinkled, or irregularly shaped envelopes
Extremely shiny or highly textured envelopes
Envelopes with clasps
Envelopes of baggy construction
Envelopes not sharply creased
Embossed envelopes
Envelopes already printed with a laser printer
Envelopes pre-printed on the inside
Envelopes that cannot be arranged uniformly when placed in a pile
2–2
Fig. 2-1 Envelopes
Page 21
English: HS3 User’s Guide, Chapter 2
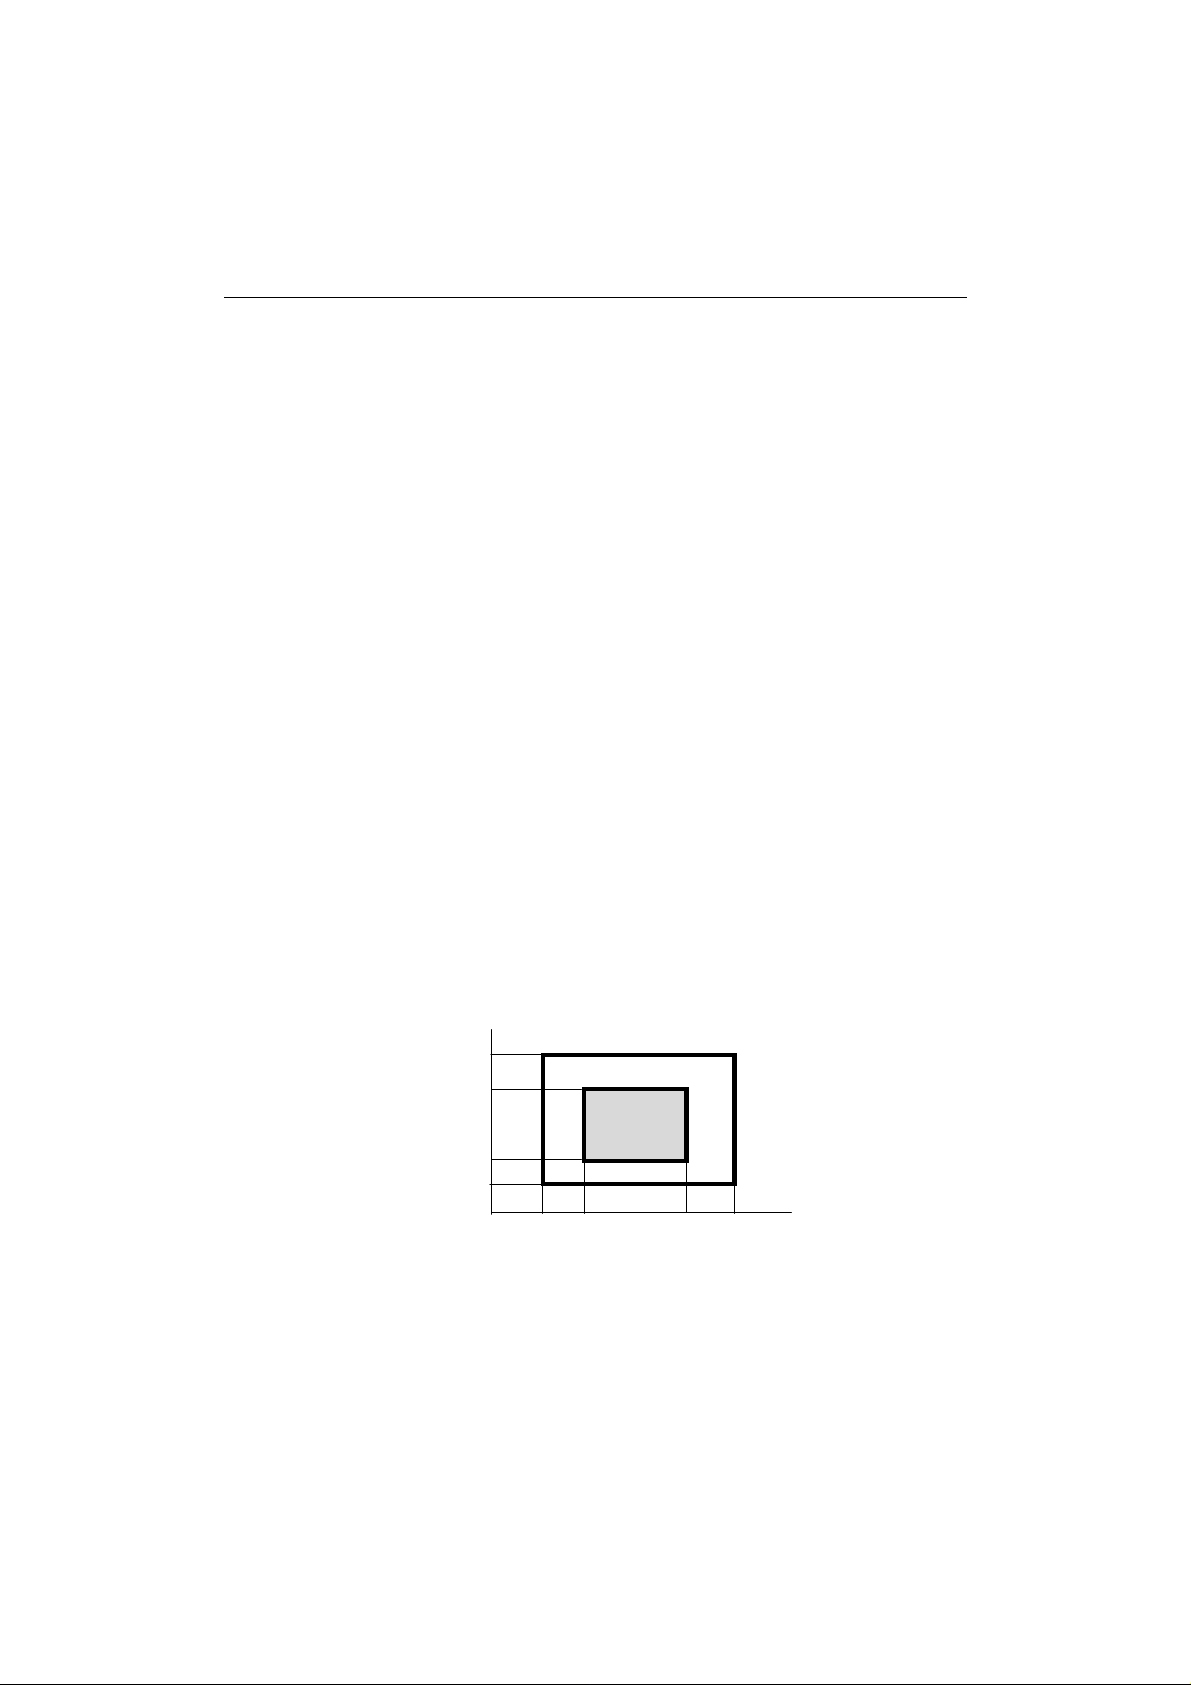
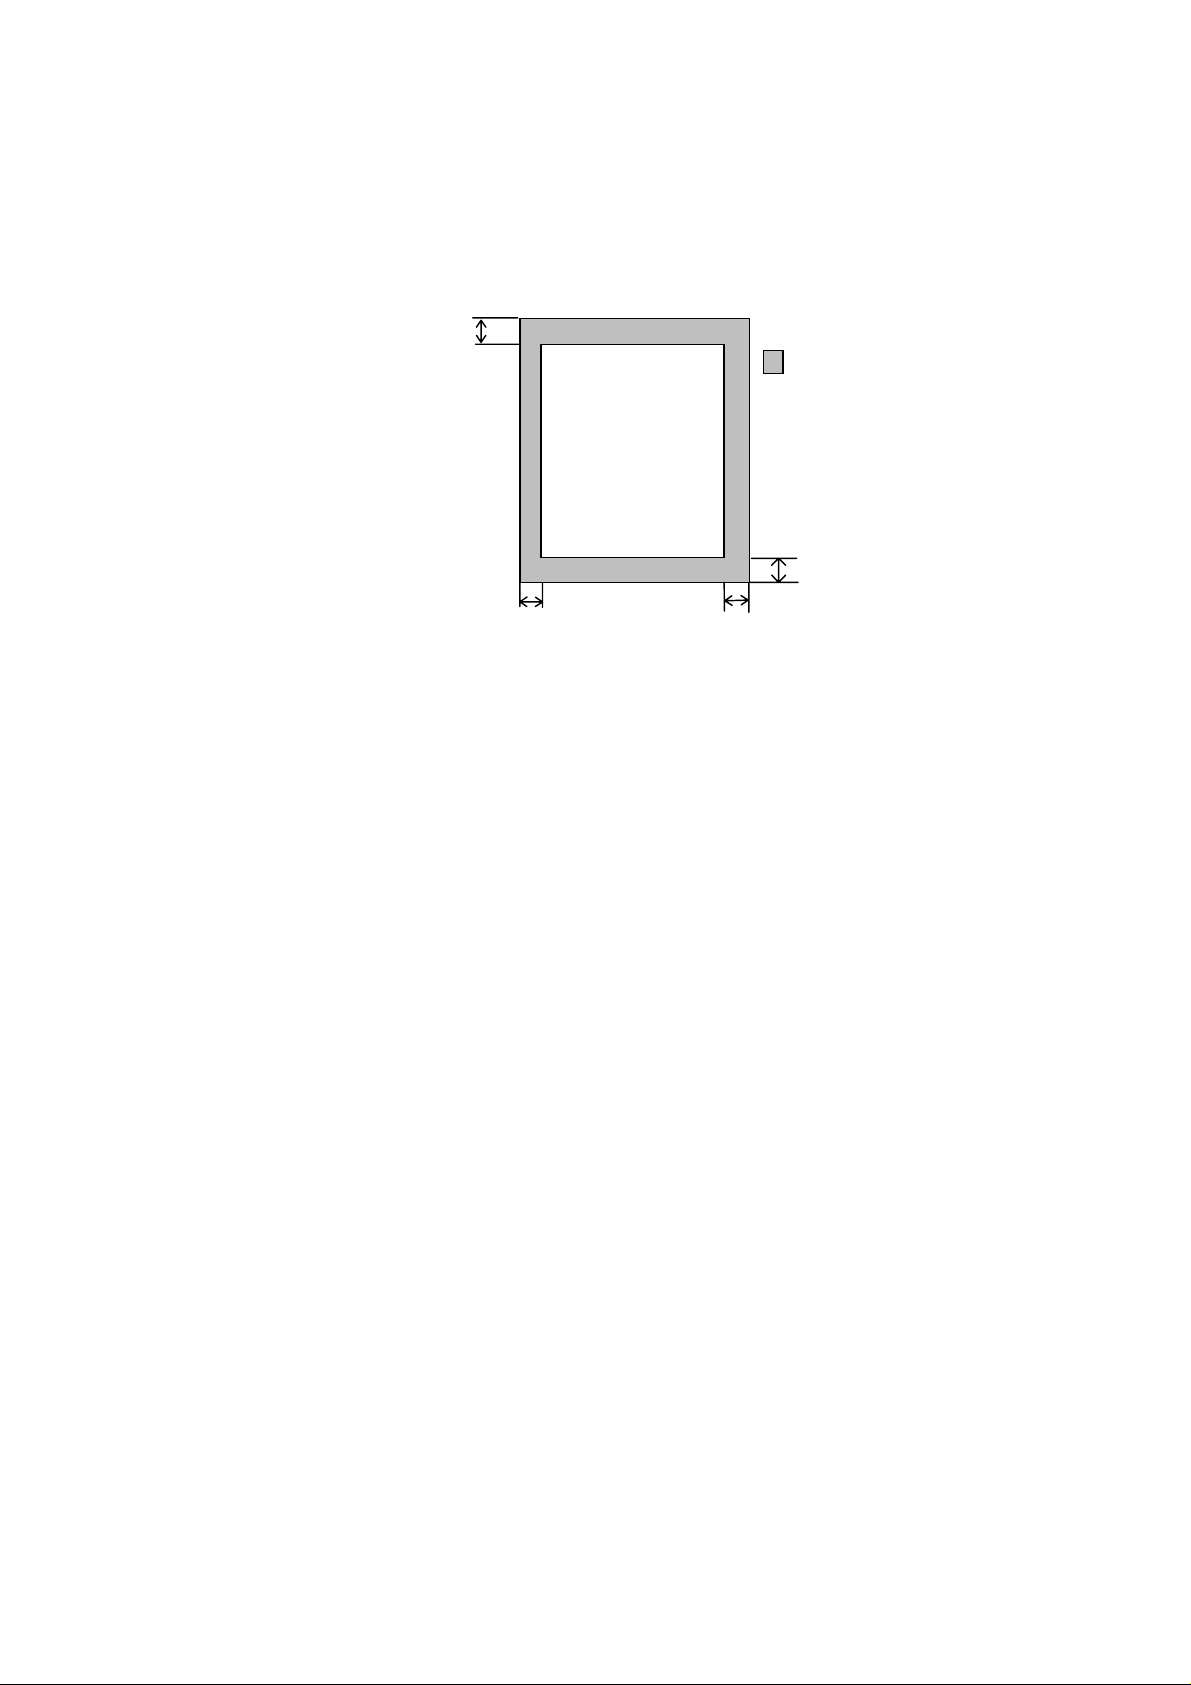
Printable Area The figure below shows the physical printable area.
Top Margin:
CHAPTER 2 PAPER HANDLING
12.7mm
plain paper
Unprintable area
transparencies
25.4mm
envelopes
Bottom Margin:
6.5mm for any kind
4 mm
Fig. 2-2 Printable Area
4 mm
of paper
The default setting of the top margin is 12.7mm for paper and transparencies,
and 25.4 mm for envelopes for optimum print quality. However, if a file you
want to print does not match the printable area, you might need to select
Recommended Paper in the printer driver (Refer to Chapter 3) and adjust the
page margins in your software to match the printable area.
2–3
Page 22
English: HS3 User’s Guide, Chapter 2
USER’S GUIDE
ABOUT BROTHER SPECIAL PAPERS
About Brother Special Transparencies
Be sure to use Brother special transparencies to avoid jamming problems. The
following transparencies are manufactured especially for this printer.
Brother special transparencies (letter size) No. HSTRL
Brother special transparencies (A4 size) No. HSTRA
Select the ‘Envelope and Transparency’ position of the head gap lever.
Do not touch the surface of the transparencies. Hold the edge of the
transparencies when you handle them.
Be sure to select the paper type in the printer driver to ‘Transparency’ when
you print on transparencies.
After finishing printing a page, remove each transparency immediately and
place it face up on a flat surface until it is completely dry. Do not pu t
anything on the printed side of the transparency.
When storing the transparencies, keep them sealed in the original plastic bag
to protect them from moisture.
Store the transparencies flat.
Keep the transparencies away from the direct rays of the sun.
✒ Note
Do not use commercially available transparencies, especially those intended
for liquid-inkjet or laser printers. The transparencies you can use for this
printer are Brother special transparencies only.
In the printer driver, set the Media selection to Transparen cy. The p r inter
alters the printing method for each media type so that an incorrect media
selection may cause poor print quality. Refer to Chapter 3.
2–4
Page 23
English: HS3 User’s Guide, Chapter 2
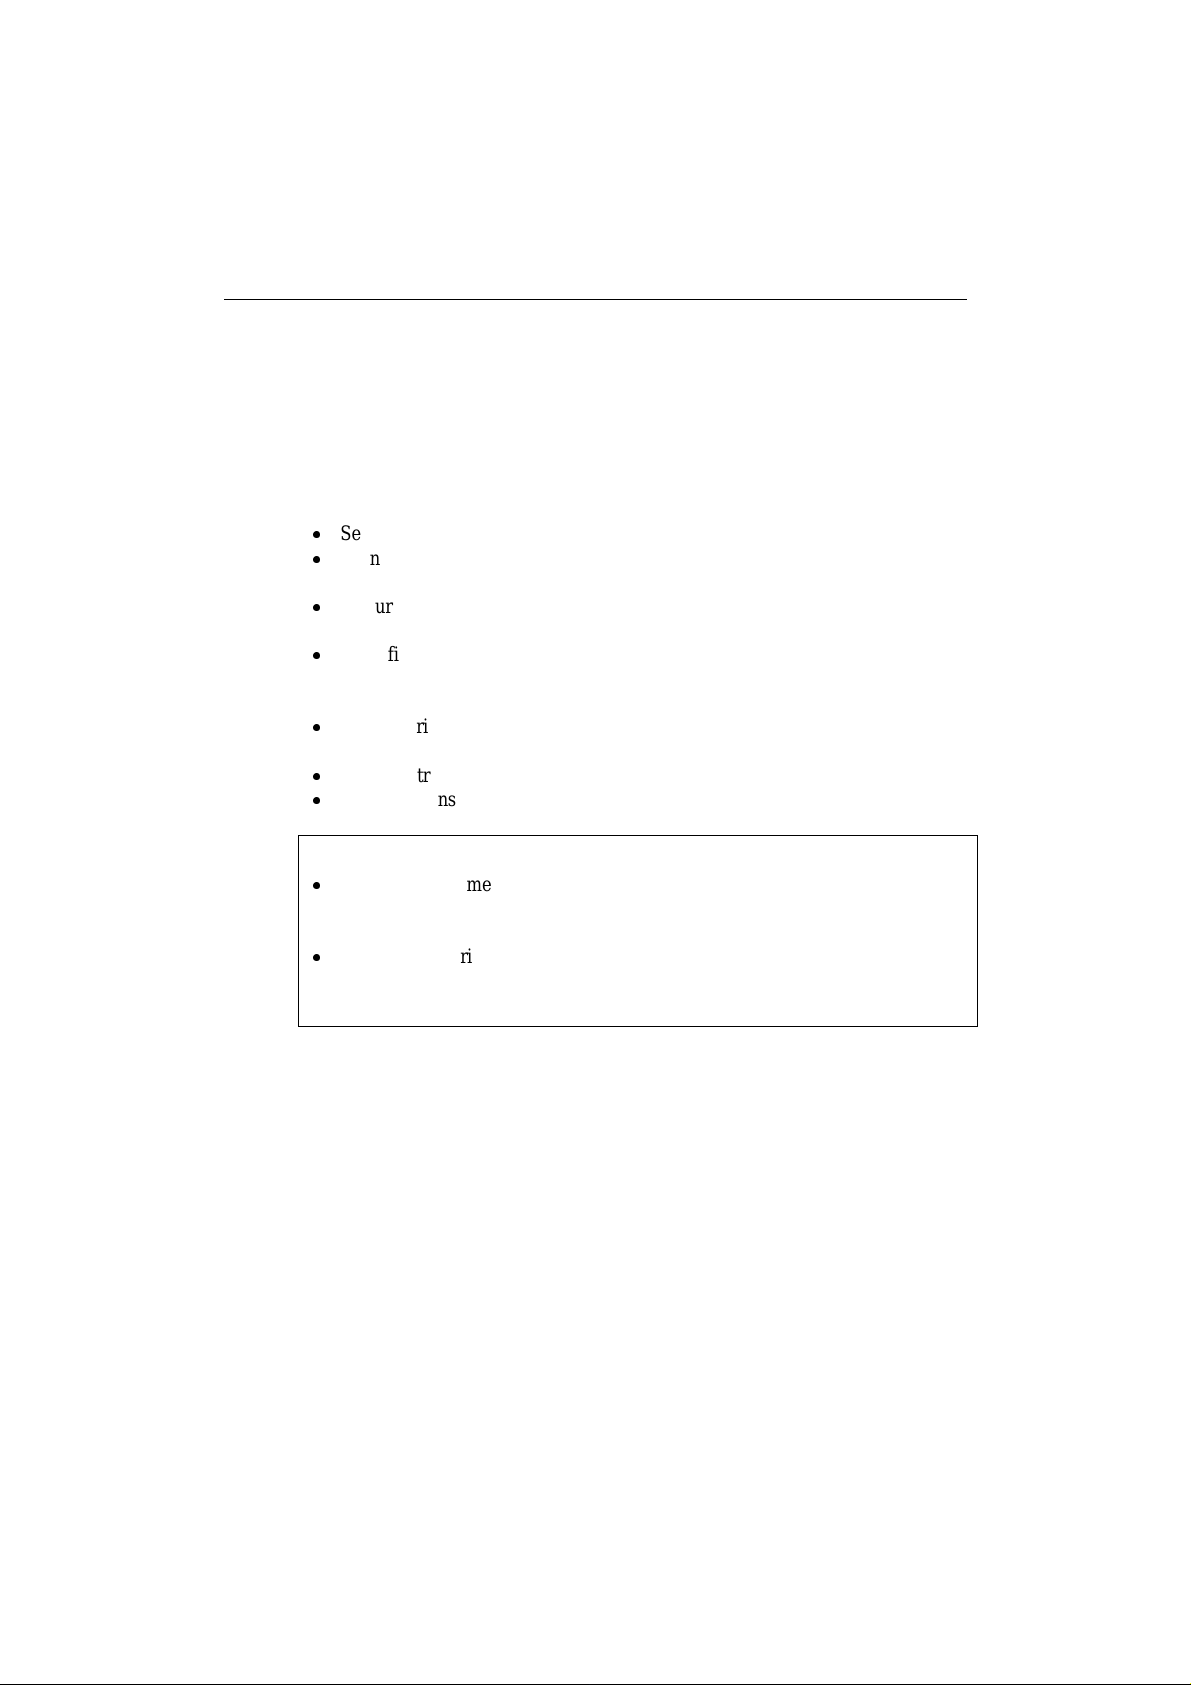
SHEET FEEDER
The printer has a sheet feeder that can feed plain paper, envelopes and
transparencies. The HS-5300 has two sheet feeders, the second one can feed
plain paper only.
Adjust the head gap for paper thickness.
There are 3 positions for the head gap lever; a ‘Regular’ position for plain paper,
a ‘Thick Paper’ position for thick paper, and an ‘Envelope and Transp arency’
position for envelopes and transparencies. Prior to setting the media you want to
use, open the top cover and set the head gap lever to the appropriate position.
Envelope
Transparency
Thick paper
Regular
CHAPTER 2 PAPER HANDLING
Fig. 2-3 Adjusting the head gap lever
2–5
Page 24
English: HS3 User’s Guide, Chapter 2
USER’S GUIDE
Loading Paper into the Feeder
To load paper into the feeder, follow these steps.
1. Pull the cover of the sheet feeder forward.
2. Load paper into the sheet feeder with the printing surface face up.
☛ Caution
The feeder can hold up to 200 sheets of 80 g/m2 (20 lb.) plain paper. If you
load too many sheets, paper jams could occur.
Make sure that the paper is stacked below the ▼ mark.
If there is still some paper left in the feeder, you must first remove it, put it
together with the new paper and then insert the stack into the feeder.
✒ Note
When you load envelopes in the feeder, make sure they are inserted in the
direction shown below. The Stamp corner at the lower right hand corner of
the envelope should face the front of the printer.
The first feeder can hold up to 10 sheets of envelopes and you can load an
envelope sheet by sheet into a manual feed slot.
Set the head gap lever to the ‘Envelope and Transparency’ position.
2–6
Fig. 2-4 Loading Envelopes in the Feeder
Page 25
English: HS3 User’s Guide, Chapter 2
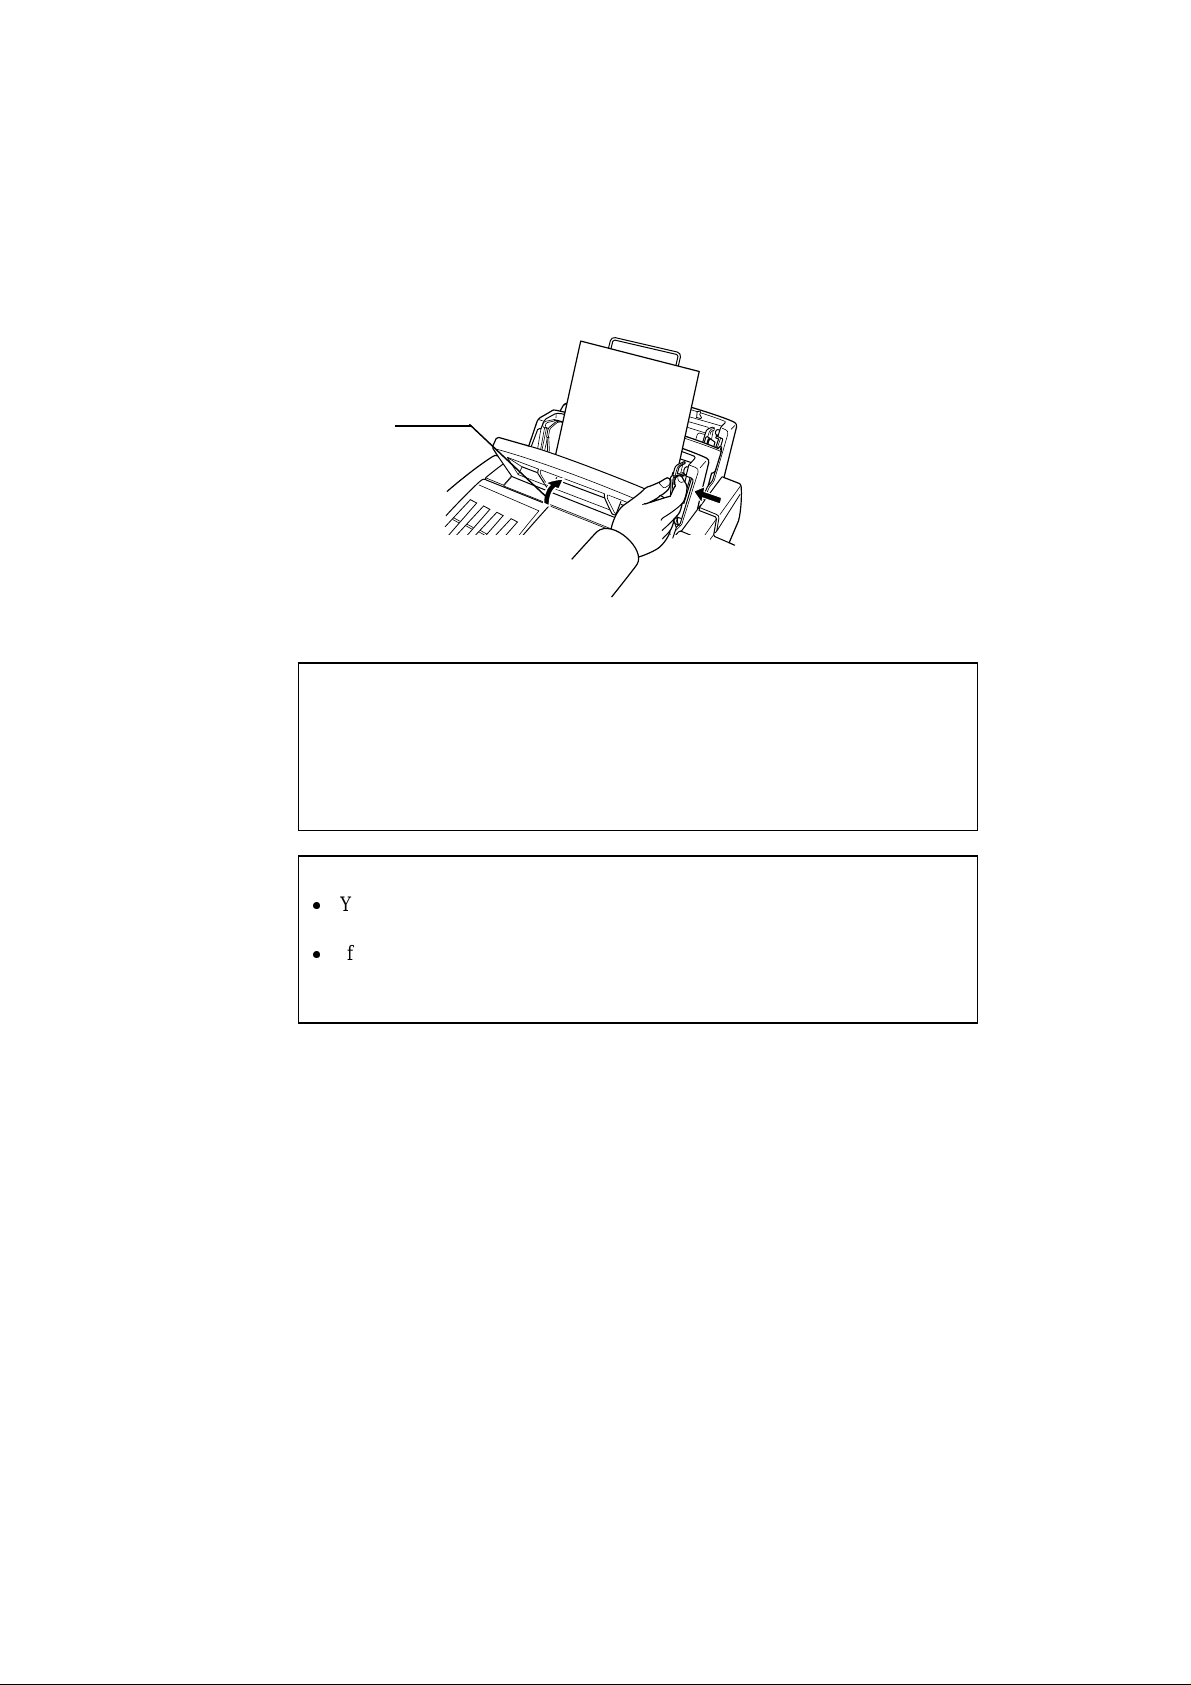
3. Move the paper guide to the paper width. ( ➀ )
4. Close the cover of the sheet feeder. ( ➁)
CHAPTER 2 PAPER HANDLING
(2)
(1)
Fig. 2-5 Moving the Paper Guide and Closing the Feeder
✒ Note
If the sheet feeder runs out of paper, the
Alarm
you to a paper empty error. You have to load paper and push the
and
Paper
LEDs blink to alert
FF/Cont
to cancel the alarm and continue printin g . If p ap e r jam s in th e p r in ter, the
Paper
and
LEDs also blink. In that case, clear it referring to “PAPER JAMS” in
Chapter 7.
✒ Note
You have to select the proper paper source, paper size, and orientation in
your application software.
If your application software does not support your custom paper size, select
the next larger paper size to the custom size, then adjust the print area by
changing the margins in your application software.
button
Alarm
2–7
Page 26
English: HS3 User’s Guide, Chapter 2
USER’S GUIDE
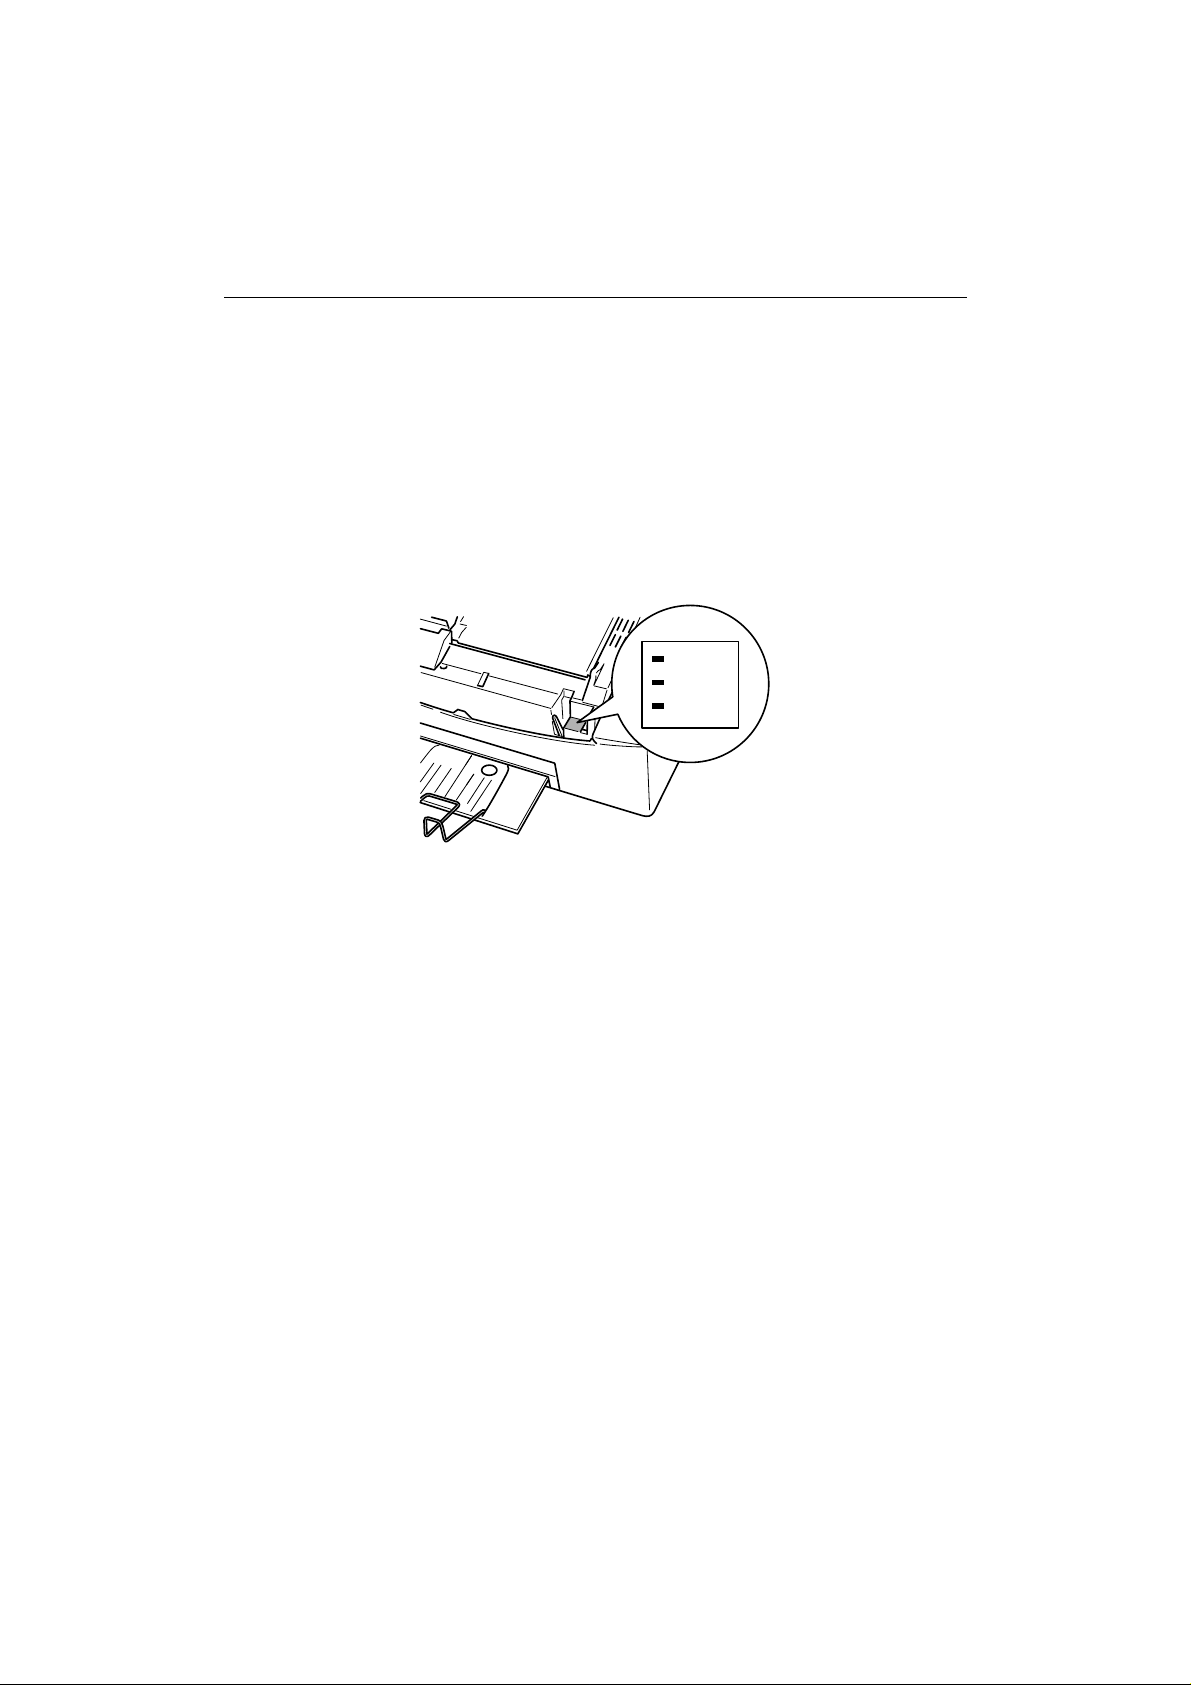
MANUAL FEED SLOT
The sheet feeder also has a manual feed slot. You can manually load paper sheet
by sheet into this slot. You do not need to remove paper from the sheet feeder
when using the manual feed slot.
Refer to “Paper Source” in Chapter 3 for information about settings in the printer
driver.
❏When you want to load one sheet of paper manually:
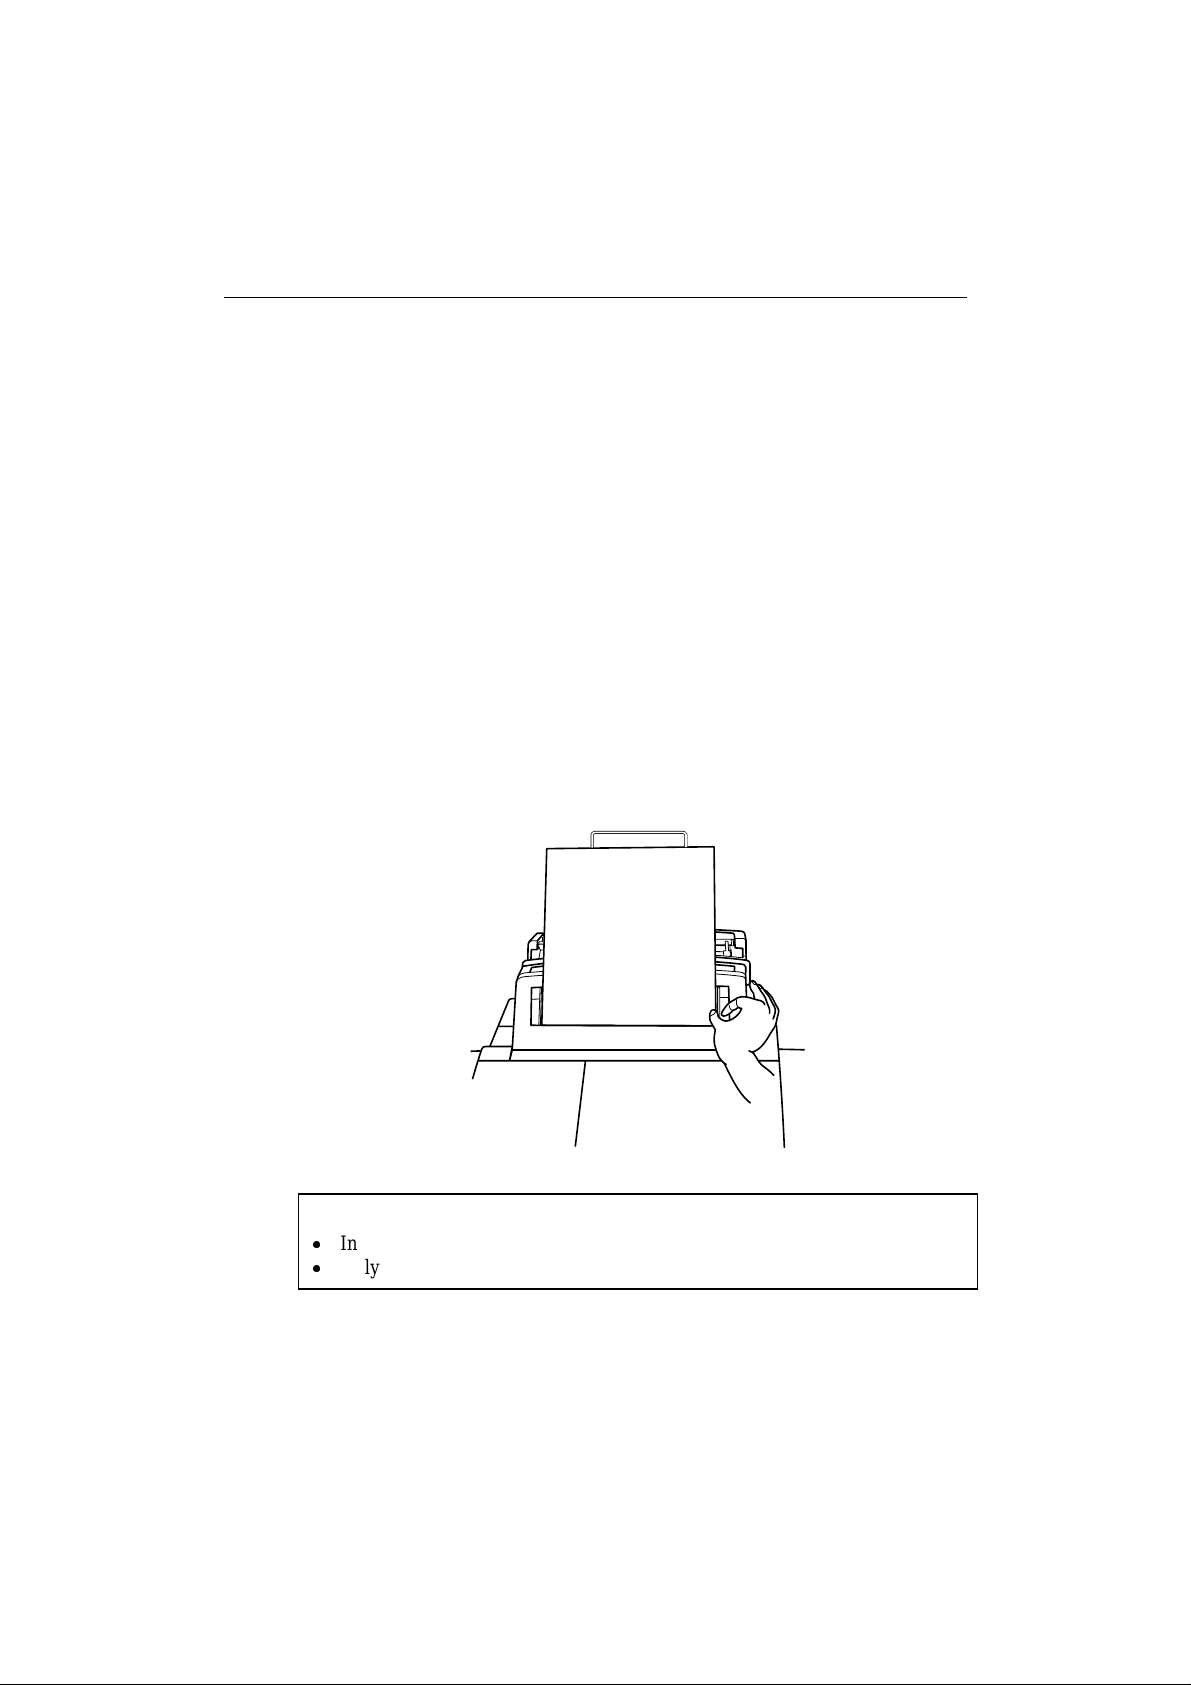
You do not need to choose manual feed in the printer driver. Place the side of
the paper you wish to print on face up into the manual feed slot. Align the
paper to the center of the manual feed slot, and be sure to insert it fully.
Move the paper guide of the manual feed slot to the paper width you are
using. (Figure 2-6)
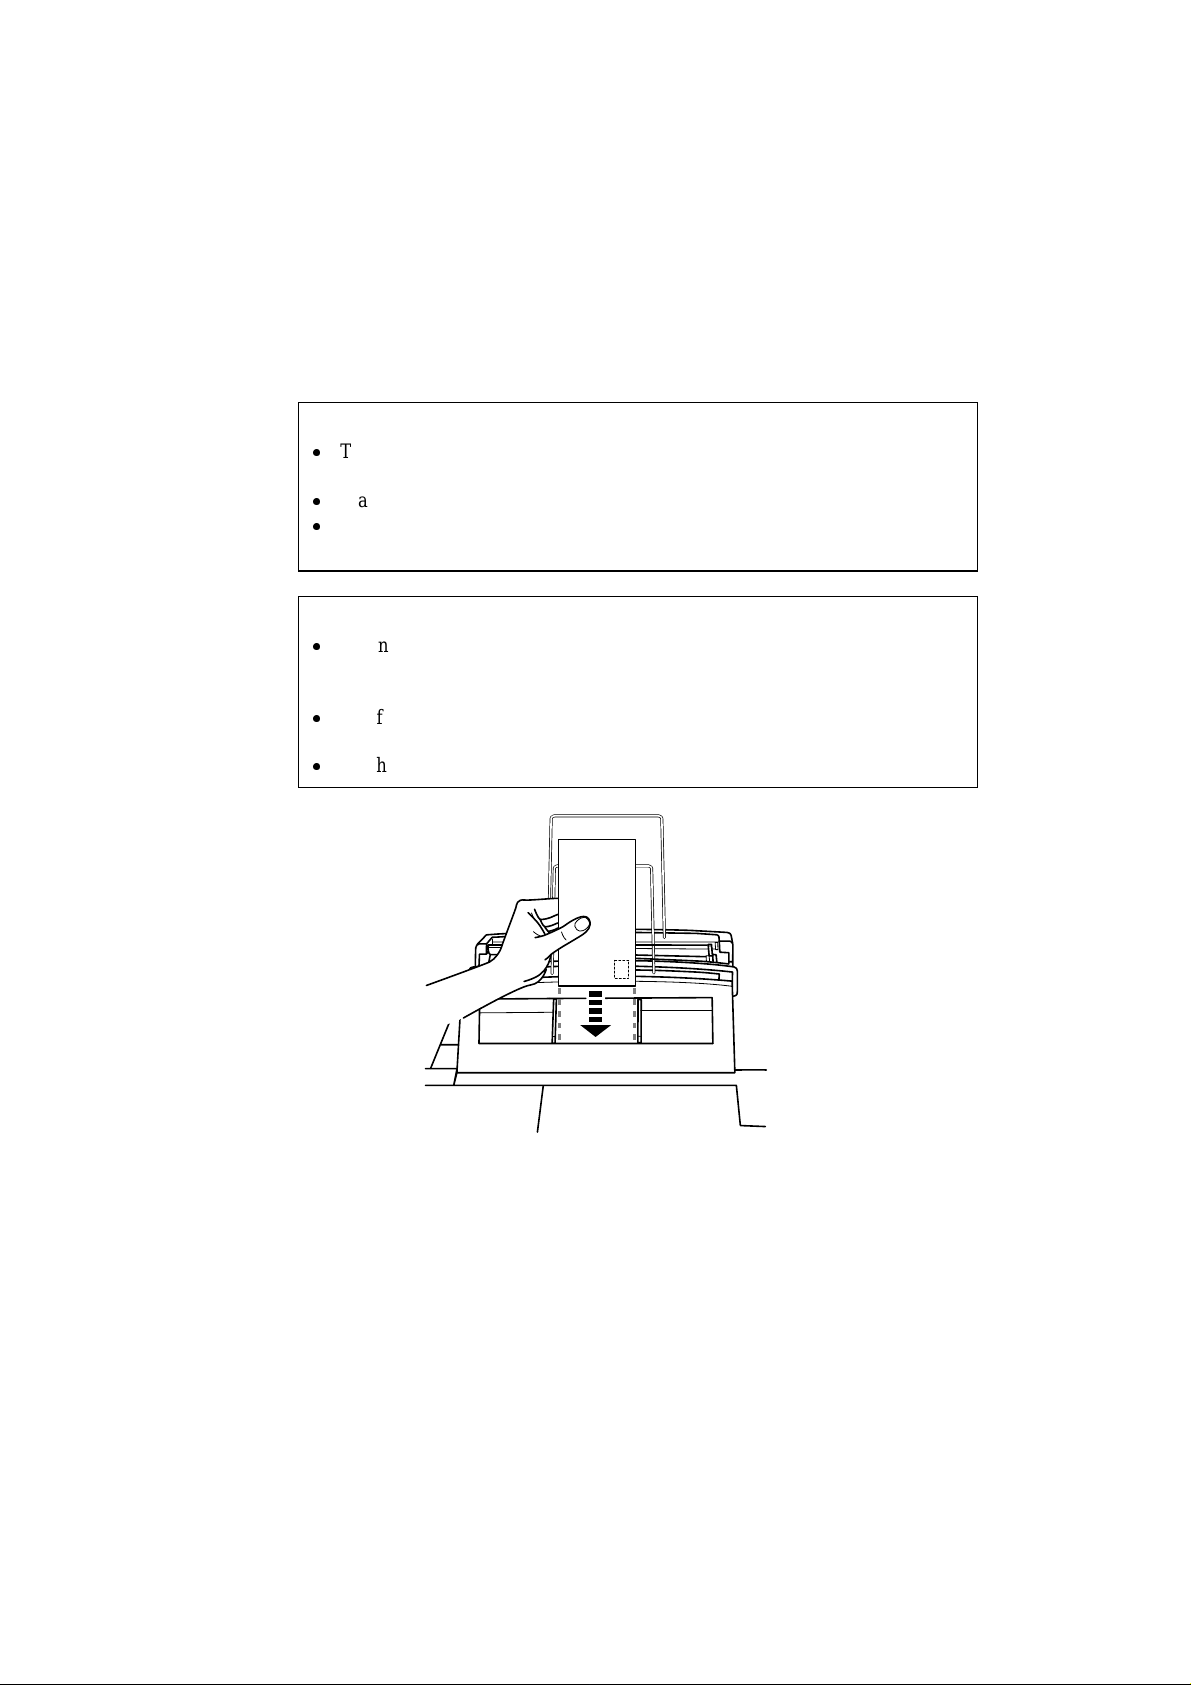
❏When you want to load more than one sheet of paper manually:
Choose Manual Feed in the Paper Source section of your printer driver or
application. Follow the instructions above to load th e first p age. After the
first page is printed, the printer stops and alerts you to load the next sheet into
the manual feed slot by blinking the Manual LED. Load another sheet and
choose OK (on your computer screen) to resume printing. Repeat these steps
until you have finished printing all the pages of your document.
2–8
Fig. 2-6 Moving the Paper Guide
✒Note
Insert paper firmly into the manual feed slot.
Only load paper one sheet at a time when using the manual feed slot.
Page 27

English: HS3 User’s Guide, Chapter 2
OUTPUT TRAY
The printer ejects paper with the printed surface face up into the output tray at
the front of the printer.
Follow these steps to set the output tray:
1.Pull the tray out from the bottom of the printer.
2.Set the Output Tray wire referring to below figures.
CHAPTER 2 PAPER HANDLING
Fig. 2-7 Set the Output Tray
You can stack up to 100 sheets of 80 g/m2 (20 lb.) paper in the output tray.
❏When you have loaded the paper you want to print on, pull out the Output
Tray and adjust the tray position for the lo aded paper as follows otherwise
paper jams might occur:
LGL: Legal Paper
A4: A4 size Paper
LTR: Letter Paper
LGL
A4
LTR
Figure 2-8 Adjust the Out put Tray position
2–9
Page 28

English: HS3 User’s Guide, Chapter 2
USER’S GUIDE
2–10
Page 29

English: HS3 User’s Guide, Chapter 2
Chapter 3 PRINTER DRIVER
The HS-5000/5300 printer driver has three settings tabs from which you can select
your printing settings for optimum print quality. The three tabs are for Paper,
Quality/Color and Control/Maintenance.
You can use this printer with all your Windows 3.1/95/98/NT 4.0 applications.
Select Options in Print Setup available from the File menu.
The following list details the settings available in each tab
CHAPTER 3 PRINTER DRIVER
Paper Paper:
Media Selection, Orientation, and Size
Paper Source
Scaling
Copy/Page Order
Quality/Color Quality
Color Control
Document Type
Control/MaintenanceShowing Printer Status
Power Save
Printer Control
Maintenance
Color Adjustment
The printer driver might be updated without notice. To upgrade the printer driver,
please download it from Brother internet address: h ttp://www.brother.com
3–1
Page 30

English: HS3 User’s Guide, Chapter 2
USER’S GUIDE
PAPER
This tab allows you to specify the paper size, type of print media, page orientation,
paper source, copy control, page order and scaling.
Media Selection
Select the media to print on in the Paper Size section . Th e printer changes the way it
places dots depending on the selected media type. To get good print output, make
sure you select the correct media type.
Use only Brother original Transparencies to get good print quality. Non-Brother
transparencies may have problems on printouts.
When the print image does not match the printing area, you may need to select the
Recommended Paper setting to get a wider printing area in Windows 3.1x/95/98.
Also, you may need to adjust the page margins in your application so ftware to
match the printable area.
3–2
Page 31

English: HS3 User’s Guide, Chapter 2
Paper Source
If your paper has difficulty feeding from the sheet feeder we recommend using the
Manual paper feed method. When using this method, you have to load paper
sheet by sheet.
When Dual is selected (HS-5300 only), the printer feeds paper from Feeder 1 first
and when paper in Feeder 1 runs out the paper source is automatically switched to
Feeder 2.
The paper source will be switched back to Feed er 1 again when the printer is turned
off and on again or the paper runs out in Feeder 2.
Copy/Page Order
Collate In multiple page jobs that are collated, for example, printing 2 copies
of a 3 page document, the printer prints Page 1, Page 2, Page 3, then Page 1, Page 2,
Page 3 in order.
In multiple page jobs that are uncollated, for example, for 2 copies of a 3 page
document, the printer prints Page1, Page1, Page 2, Page 2, Page 3, Page 3 in order.
When Collate is selected, the pr inter starts printing after processing all the p rint data
so that it takes a longer time for collated printing than uncollated copies.
CHAPTER 3 PRINTER DRIVER
Reverse Order When you want to get printouts in the correct order, use this
function. The printer spools all the job in your computer and sends the data starting
from the the last page to be printed. Sin ce th e printer prints from the last page
forwards, the printouts are stacked in the correct orderPage 1, 2, 3, ...Page 5. Please
note that this function takes more time.
Scaling
You can select the scalings as follows:
1 in 1/Free
You can reduce your document by 25%, 50%, and 75%.
Also, you can define the scaling from 25 to 100 % after selecting “Free.”
2 in 1 or 4 in 1
2 or 4 pages are printed on one sheet at a reduced size. You cannot specify
the scaling percentage manually.
1 in n
You can enlarge your document by the provided scalings.
✒ Note
If your application software contains a similar function to these, both settings
will be effective.
3–3
Page 32

English: HS3 User’s Guide, Chapter 2
USER’S GUIDE
QUALITY AND COLOR
This tab allows you to set up print quality, media, color and document type you want
to print.
3–4
Quality
Normal 300 x 300 dpi. Recommended mode for ordinary printouts. Good
print quality with reasonable print speed. This mode is the default setting.
Fine 600 x 600 dpi. The finest print mode. Use this mode to print precise
images such as photographs. Since the print data is much larger than in normal
mode, processing time, data transfer time and printing time will be longer.
Enhancement Use this mode for printing photographs or business graphics.
Enhancement mode optimizes color im ag e printing as this mode reduces the
horizontal lines or banding that is sometimes visible on Enhancement OFF. Printing
Enhancement mode is slower than doing the mode OFF.
Page 33

English: HS3 User’s Guide, Chapter 2
Color Control
Color Matching To get an accurate color matched output between the monitor
and printer, the color data should be adjusted for this printer before printing.
When you are using a software application which has its own color matching
engine, turn this setting off. The color matching system from the application is
then valid.
ICM Windows 95 has a color matching engine called ICM - Image Color
Matching - in its Operating System. ICM uses a profile of each device (monitor,
scanner, printer...) to know the characteristics of individual devices and correct the
difference between device characteristics.
When this is set to OFF, the printer driver will do the color adjustment.
Document T ype
CHAPTER 3 PRINTER DRIVER
The printer driver will select the most suitable color matching method depending on
your document type. Generally, text and business graphics are printed vividly and
photographic images are printed softly.
This is the recommended mode for each type of your file:
File Quality Enhancement Document T ype
Text only Normal OFF Auto
Text with charts Normal ON Auto
Business Graphics Normal ON Graph/Text
Presentation Sheet*
Computer Graphics
Photo Images Fine ON Photo
*If you want to print your Presentation file on transparencies, make sure that you set
your media selection of your printer driver to Transparency and adjust the head gap
lever to Envelop and Transparency position. For details, please refer to page 2-4.
✒ Note
If you want to select the color matching method and halftone method manually,
select this by pressing the Custom settin g button to access further settings such
as Halftone setting, Color Matching Method setting and Effect of Color setting.
Fine ON Graph/Text
Color / Mono
Color You can select color printing with this mode.
Mono You can print the color documen t in Black and White with high speed
such as 4.5 ppm.
3–5
Page 34

English: HS3 User’s Guide, Chapter 2
USER’S GUIDE
CONTROL AND MAINTENANCE
This tab allows you to control other printer menus such as, Maintenance, Color
Adjustment and Power Save.
Show Printer Status
The number of printed pa1axges and the status of the printer would be shown in this
mode, when using the parallel port. To see them you need to restart your PC after
selecting this option.
✒Note
For this mode to work correctly, your PC must support be-directional transfer,
and be using an IEEE-1284 compliant shielded parallel cable.
Printer Control
The printer will print the related information by clicking each menu button.
Print Config Printer default settings are printed.
Print Fonts Printer resident fonts samples are prin ted.
3–6
Page 35

English: HS3 User’s Guide, Chapter 2
Power Save Mode
The printer goes into power save mode automatically when the printer has not
received any data or there has not been any key operation for a specified time.
There are two power save modes:
Mode 1 In this mode, the printer keeps the minimum temperature (115°C) at
Mode 2 In this mode, the printer cools down and power consumption is
The factory setting of the Power Save Modes is OFF, but once you turn the Power
Save Mode ON, the default time-out of each mode is set to one hour which meets
the Energy Star power conservation requirements.
CHAPTER 3 PRINTER DRIVER
which the printer ink does not become solid. Power consumption is
higher than Mode 2, but warm-up time is shorter (2 minutes).
almost at the same level as power off. In mode 2, it requires up to 9.5
minutes to warm up.
Receiving a print file or document or pressing any button automatically wakes up
the printer to start printing.
In this mode setting box, you can set the time-out value from 3 to 99 minutes.
Maintenance
Enter this mode by clicking a menu button and the printer starts head cleaning or
printng the test page.
Color Adjustment
If you want to get the closest color match to your monitor on the printouts, calibrate
the printer for your monitor by clicking this button.
The method used to express color is different between Monitors and Printers.
The monitor uses the 3 primary colors - Red, Green, Blue - to create full colors and
the printer uses 4 colors - Cyan, Magenta, Yellow, and Black to create full colors.
To use this m o de, please click the Monitor Calibration button and follow the
instruction. In the first step, you need to select the Advanced mode not the default
Standard mode if you want to adjust each Cyan, Magenta, and Yellow color.
3–7
Page 36

Page 37

English: CS3 User’s Guide, Chapter 4
Chapter 4 CONTROL PANEL
LEDS AND BUTTONS
CHAPTER 4 CONTROL PANEL
Power LED
The
LED Printer status
Off ❍
On ●
Ready LED
The
Alarm
Manual
Filter
Data
Ink
Ready
Paper
Power
Fig. 4-1 LEDs and Buttons on the Control Panel
Power
LED indicates whether the printer is turned ON or OFF.
FF/Cont
Test
Reset
Clean
On Line
Shift
The printer is turned Off.
The printer is turned On.
Ready
LED indicates the current status of the printer.
LED Printer status
Off ❍
The printer is off-line. The printer cannot receive any print
data.
Blinking
The printer is warming up or cleaning the print head.
❍↔●
On ●
The printer is ready to print.
This LED blinks with the
Calls” in Chapter 7.
Alarm
LED to indicate a paper error. See “Operator
4–1
Page 38

English: CS3 User’s Guide, Chapter 4
USER’S GUIDE
Data LED
The
LED Printer status
Off ❍
Blinking
❍↔●
On ●
Data
LED indicates the current status of the print data process.
The printer has no print data.
The printer is receiving data from the computer or the
printer is processing data in memory.
Print data remains in the printer memory. If the
is on for a long period of time and nothing has printed,
you need to press the
remaining data.
FF/Cont
button to print the
Data
LED
This LED blinks with the
“Adding Ink” in Chapter 6 and “Operator Calls” in Chapter 7.
Manual LED
Manual
The
LED Printer status
Off ❍
Blinking
❍↔●
On ●
This LED blinks with the
no Maintenance cassette error. See “Maintenance paper” in Chapter 6 and
“Operator Calls” in Chapter 7.
Alarm LED
Alarm
The
full or interface error etc. Also, the following combination of LEDs indicate
errors.
Alarm
LED to indicate an ink empty error. See
LED indicates the current paper source.
Sheet Feeder mode
The printer is waiting for paper to be loaded in the manual
feed slot.
Manual feed mode
Alarm
LED to indicate a Maintenance paper empty or
LED blinks to indicate a printer error such as cover open, memory
4–2
Alarm
Alarm
Alarm
+
+
+
Paper
Ink
Filter
Paper empty or Paper
Jam
Ink empty Add ink into the ink reservoir and
Maintenance paper
empty or No
maintenance cassette
Add paper or Clear paper jam,
and then press the
button.
then press the
Replace Maintenance paper with a
new one or re-install the
maintenance cassette correctly.
FF/Cont
FF/Cont
button.
Page 39

English: CS3 User’s Guide, Chapter 4
Online Button
The
If you press this button during printing, the printer immediately stops printing
and ejects the paper. Pressing this button again prints the rest of the print data. If
you want to cancel printing, cancel the print job in your application first and then
reset the printer.
When the printer becomes off-line because of an error, the printer can recover
from some errors and return to on-line by pressing this button.
When performing cleaning or resetting , th e printer must be set to off-line first.
Reset Button
Online
CHAPTER 4 CONTROL PANEL
button alternately turns the printer on-line and o ff-line.
Reset
The
The printer is reset and restored to the user default settings.
✒ Note
Remember that the
FF/Cont Button
This button is valid only in the off-line mode.
Data
If the
in the printer after turning the printer off-line.
When you select manual feed in your application, the printer alerts you to load
paper in the manual feed slot by blinking the
start feeding the paper.
If a recoverable error occurs, press the
and return to the on-line state.
button is valid only in the off-line mode.
Reset
button clears data from the printer memory.
LED is on, pressing the
FF/Cont
FF/Cont
button prints any data remaining
Manual
button to recover from the error
LED. Press this button to
4–3
Page 40

English: CS3 User’s Guide, Chapter 4
USER’S GUIDE
Shift + Test Button
Set the printer to off-line by pushing the Online Button first.
Pressing the
print. Check the printed test page and if you find any printing problems,
perform the print head cleaning as described below.
Test
button while holding down the
Shift
button starts the test
Release the two buttons immediately after pressing the
DATA LED will start to blink. If it does not, the buttons were held down for too
long and you will need to start the test selection again.
✒ Note
Press the buttons gently. Do not press with too much force or hold the bu ttons
down for a long time. If you do the operation might now start.
Shift + Clean Button
Set the printer to off-line by pushing the Online Button first.
Pressing the
cleaning. If you see any problems on printouts, clean the print head and try
again.
Release the two buttons immediately after pressing the
DATA LED will start to blink. If it does not, the buttons were held down for too
long and you will need to start the test selection again.
✒ Note
Do not open the top cover during the head cleaning operation.
Press the buttons gently. Do not press with too much force or hold the
buttons down for a long time. If you do the operation might now start.
Clean
button while holding down the
T est
button and the
Shift
button starts head
T est
button and the
4–4
Page 41

English: CS3 User’s Guide, Chapter 4
Test Print Mode
The printer has the following test print mod e s.
CHAPTER 4 CONTROL PANEL
1. Keep the
Online
button depressed until all four LEDs light. Then, release
the button.
The printer enters test print mode. The
Alarm
LED blinks to indicate that
the first choice, Print Config, is selected. See the table below.
2. Press the
Online
button to select another test.
Every time you press the button, the blinking LED changes to select another
choice. See the table below.
3. Press the
FF/Cont
button to perform the selected choice.
LED Choice Function
Alarm
Manual
Print Config The printer prin ts th e current printer settings.
Print Fonts I The printer prints a list of th e printer resident
fonts.
Data
Print Fonts P The printer prints a list of the permanent
download fonts.
Ready
Test Print The printer prints a test page.
4. The printer returns to the ready status after pr in tin g .
✒ Note
Press the buttons gently. Do not press with too much force or hold the bu ttons
down for a long time. If you do the operation might now start.
4–5
Page 42

English: CS3 User’s Guide, Chapter 4
USER’S GUIDE
Reset and Hex Dump print mode
The printer has the following Reset and Hex Dump print modes.
1. Keep the
FF/Cont
button depressed until all four LEDs light. Then, release
the button.
The printer enters the reset/hex dump mode. The
Alarm
LED blinks to
indicate that the first choice, User Reset, is selected. See the table below.
2. Press the
Online
button to select another choice.
Every time you press the button, the blinking LED changes to indicate
another choice. See the table below.
3. Press the
FF/Cont
button to perform the selected choice.
LED Choice Function
Alarm
User Reset The printer is restored to the user default
settings without clearing permanent fonts and
macros.
Manual
Factory Reset The printer is restored to the factory settings
and permanent fonts and macros are cleared.
Data
Hex Dump
print
The printer can print data as hexadecimal
values, so that you can check data errors and
problems. To exit from this mode, press the
Reset button or turn the printer off.
4–6
4. The printer returns to the ready status after pr in ting
Page 43

English: CS3 User’s Guide, Chapter 4
Other Control Features
Power Save Mode
The printer goes into power save mode automatically when the printer has not
received any data or there has not been any switch panel key operation for a
specified time.
There are two power save modes.
Mode 1 In this mode, the printer keeps the minimum temperature (115°C) at
which the printer ink does not become solid. Power consumption is larger, but
warm-up time is shorter (2 minutes) than mode2.
Mode 2 In this mode, the printer cools down and power consumption is
almost at the same level as power off. In this mode, it requires up to 9.5 minutes
to warm up.
CHAPTER 4 CONTROL PANEL
The factory setting of the Power Save Mode is OFF, but once you turn the Power
Save Mode ON, the default time-out of each mode is set to one hour which
meets the Energy Star power conservation requirements.
Receiving a print file or document, or pressing any button automatically wakes
up the printer to start printing .
✒ Note
The print head cools down in the Power Save mode. When the printer wakes
up, the temperature of your room and how long the printer has been in sleep
mode affects the warm-up time.
You can change the time out fo r th is mode with the supplied printer driver.
4–7
Page 44

Page 45

English: HS3 User’s Guide, Chapter 5
Chapter 5 OPTIONS
MODULAR I/O CARD
This printer has a modular input/output (MIO) interface slot on the rear panel.
This slot allows you to install a commercial MIO-compatible sharing/network
card.
For more information about MIO cards, consult the dealer where you purchased
this printer.
When you want to install an MIO card, follow these steps:
1.Turn off the printer and unplug the power cord from the wall socket.
CHAPTER 5 OPTIONS
✒ Note
Be sure to turn off the power to the printer befo re installing or removing the
MIO card.
2.Remove the two screws and cover plate from the MIO interface slot.
3.Unpack the MIO card and hold it by the edge of the card.
✒ Note
Do not touch the card surface. If static electricity collects, it can damage the
card.
4.Insert the card until it is securely seated.
5Secure the MIO card with the two captive screws on the card.
6.Retain the cover plate and two screws removed in 2 in case you want to
remove the MIO card later.
Fig. 5-1 Installing the MIO Card
MIO Card
5–1
Page 46

English: HS3 User’s Guide, Chapter 5
USER’S GUIDE
MEMORY EXPANSION
Both of the the HS-5000 and HS-5300 have 24Mbytes, 8Mbytes on th e board
and 16Mbytes in the one of the memroy expansion slots. There are 2 slots for
optional memory and the memory can be expanded up to a total of 72 Mbytes.
You need to install commercially available single in-line memory modules
(SIMMs) in those slots to expand the memory.
In general, the SIMM you install must have th e following specifications:
The following capacity of a SIMM for installing is recommended;:
•1 Mbyte HITACHI HB56D25632B-6A, -7A,
•2 Mbyte HITACHI HB56D51232B-6A, -7A
•4 Mbyte HITACHI HB56A132BV-7A, -7AL, -7B, -7BL
•8 Mbyte HITACHI HB56A232BT-7A, -7AL, -7B, -7BL
•16 Mbyte TOSHIBA THM324000BSG-60,-70,-80
•32 Mbyte TOSHIBA THM328020BSG-60,-70,-80
Type: 72 pin and 32 bit or 36 bit output
Access Time:80 nsec. or less
Capacity: 1, 2, 4 ,8, 16, or 32 Mbyte
Height: 38 mm (1.5 inches) or less
MITSUBISHI MH25632BJ-7
MITSUBISHI MH51232BJ-7
MITSUBISHI MH1M32ADJ-7
MITSUBISHI MH2M32EJ-7, MH2M32DJ-7
5–2
There are available 40 bit output SIMMs for workstations. Such SIMMs do not
fit this printer.
For supply of SIMMs, consult the dealer where you purchased the printer.
Page 47

English: HS3 User’s Guide, Chapter 5
Installation of SIMMs
When you install SIMMs, follow these steps:
1. Turn off the printer and unplug the power cord from the wall socket.
✒ Note
Be sure to turn the printer off before installing or removing the SIMMs.
2. Remove the five marked screws holding the main controller board.
CHAPTER 5 OPTIONS
Fig. 5-2 Remove the main controller board
3. Unpack a SIMM and hold it by its edge.
✒ Note
Do not touch the memory chips or the board surface. If static electricity collects,
it can damage the memory.
5–3
Page 48

English: HS3 User’s Guide, Chapter 5
USER’S GUIDE
4. Install as many SIMMs as you need.
• Set the SIMM into the slot at an angle.
• Push the top of the SIMM gently towards the vertical until it click s in to
place.
✒ Notes
When installing SIMMs, be sure to install them in the order slot 1 then slot 2.
When you install different capacities of SIMMs, be sure to install the larg er
capacity SIMM in slot 1 and the smaller capacity SIMM in slot 2.
5–4
Fig. 5-3 Installing the SIMMs
5. Refit the main controller board and secure it with the 5 screws.
6. Plug in the power cord and turn on the printer.
If you have installed the SIMMs incorrectly, the printer prints a report to alert
you.
Page 49

English: HS3 User’s Guide, Chapter 5
BR-SCRIPT 2 ROM BR-3000C
The BR-Script 2 ROM board provides a Post Script Level 2 language emulation.
Installing this ROM board in your printer allows your printer to print PostScript
data.
With a BR-Script 2 ROM board installed, the automatic emulation switching
function will work among PCL5c and BR-Script 2.
!
Although Brother supplies two types of ROM boards, BR-3000 and BR-3000C,
this printer supports only the BR-3000C option. You cannot use the BR-3000
option with this printer.
CHAPTER 5 OPTIONS
Caution
5–5
Page 50

Page 51

English: HS3 User’s Guide, Chapter 6
Chapter 6 MAINTENANCE
REPLACING THE MAINTENANCE PAPER CASSETTE
The maintenance paper is used to wipe ink from the print head. This operation
will be done automatically as necessary. When the maintenance paper runs out,
Alarm
the
You can replace the whole maintenance cassette including the paper roll or only
replace the maintenance paper roll with a new one.
The following types of options are available for replacement;
Filter(Manual)
and
MR5( 1 maintenance cassette and 5 paper rolls )
MR1( 1 maintenance cassette with 1 paper roll )
LEDs blink once every 5 seconds.
CHAPTER 6 MAINTENANCE
✒Note
It is recommended that you always keep a new maintenance paper roll ready
for replacement.
There is an indicator on the right hand side of the sheet feeder which shows
how much maintenance paper is remaining.
Red
Green
Fig. 6-1 Maintenance paper indicator
6–1
Page 52

English: HS3 User’s Guide, Chapter 6
USER’S GUIDE
Replacing the maintenance paper cassette
1. Remove the first sheet feeder from the printer.
2. Pull the maintenance paper cassette out of the printer. ( If you replace the
maintenance paper and cassette together, skip steps 3 - 9. )
Fig. 6-2 Remove the maintenance paper cassette
✒ Caution
Do not put your hands inside the printer. Some parts may be extremely hot and
may cause burns.
3. Open the maintenance paper cassette.
2
1
Fig. 6-3 Open the maintenance cassette
6–2
Page 53

English: HS3 User’s Guide, Chapter 6
4. Remove the geared wheel with the old mainten ance paper roll from the
cassette.
CHAPTER 6 MAINTENANCE
1
2
Figure 6-4 Remove the geared wheel
5. Pull the wheel out from the old mainteance paper roll.
Figure 6-5 Pull the wheel out
6. Peel the seal from a new maintenance paper roll.
Fig. 6-6Remove the tape by holding the paper roll
6–3
Page 54

English: HS3 User’s Guide, Chapter 6
USER’S GUIDE
7. Insert the geared wheel into the cardboard core center, ensuring that the
cutouts in the cardboard core center locates onto the pegs on the geared
wheel.
Fig. 6-7 Insert geared wheel into the cardboard core
8 Set the new maintenance paper roll with the wheel into the cassette.
2
1
Figure 6-8 Set the new maintenance paper roll
6–4
Page 55

English: HS3 User’s Guide, Chapter 6
9. Close the cassette.
CHAPTER 6 MAINTENANCE
Fig. 6-9 Replace shaft into the maintenance cassette
10.Turn the paper roll shaft on the right hand side of the cassette and ensure that
the maintenance paper inside th e cassette correctly moves in the direction of
the arrow as shown.
Fig. 6-10 Turn the paper roll
6–5
Page 56

English: HS3 User’s Guide, Chapter 6
USER’S GUIDE
11.Insert the maintenance cassette into the printer an d push it into the printer
until it clicks into place and the
Alarm
and
Filter
LEDs turn off.
Figure 6-11 Insert the Maintenance cassette
✒ Note
The life of a maintenance cassette is 5 paper rolls. Replace the cassette with a
new one after using 5 paper rolls.
6–6
Page 57

English: HS3 User’s Guide, Chapter 6
ADDING INK
The expected ink life is 460 pages at 5% coverage on letter paper for each ink
cartridge ( 3 blocks of ink ).
The printer has ink reservoirs for each color and each reservoir can hold 10
blocks of ink. You can see the amount of ink remaining through the ink reservoir
cover. An ink holder contains 3 blocks of ink so that you can add ink when the
remaining ink is lower than the scale marked 2/3.
CHAPTER 6 MAINTENANCE
Y: Yellow
M: Magenta
C: Cyan
K: Black
Y M C K
Fig. 6-12 Ink Reservoir
Use only Brother genuine inks.
The following options are avilable.
HS5K 5 holders of Black ink
HS5C 5 holders of Cyan ink
HS5M 5 holders of Magenta ink
HS5Y 5 holders of Yellow ink
HS5S 2 holders of Black ink and 1 holder each of Cyan, Magenta and
Yellow ink
✒Note
Do not touch the surface of the ink blocks.
Do not put ink blocks into your mouth.
If an Ink empty error occurs, check the ink reservoir and add ink to the empty
ink reservoir. After adding the ink, press the
FF/Cont
button to recover from
the printer error.
Follow these steps to add ink blocks:
1.Open the ink reservoir cover at the left hand side of the printer.
2.Unpack an ink holder from the pack.
6–7
Page 58

English: HS3 User’s Guide, Chapter 6
USER’S GUIDE
3. Hold the side of the ink holder and place the ink holder onto the top of the
ink reservoir. Be sure to add the correct color ink cartridge to the correct
reservoir. The ink holders are keyed to prevent incorrect insertion of the ink
holder. Do not force the ink holder into the top of the ink reservoir.
Fig. 6-13 Using the ink holder
✒ Note
Add ink to the printer by using the ink holder. Do not remove ink blocks
from the holder.
4. Push the center of the ink holder. The ink blocks are dropped into the ink
reservoir.
Fig. 6-14 Adding the ink blocks
✒ Note
When you want to add two or more holders of ink, close the ink reservoir cover
after adding each holder of ink (3 blocks). Closing the cover pushes the added
ink blocks down, so that you can add the next holder full of ink blocks. Open
the cover each time you add the next holder of ink blocks. Then close the
reservoir.
6–8
5. Close the ink reservoir cover.
Page 59

English: HS3 User’s Guide, Chapter 6
CLEANING THE PRINTER INTERIOR
The following cleaning kit is supplied with the printer.
Clean Stick
CHAPTER 6 MAINTENANCE
Fig. 6-15 Cleaning Kit
Clean the printer interior when the platen or rollers are stained by ink due to
some problem such as a paper jam.
You will need to clean out the spilt ink and remove any small pieces of paper
remaining inside the printer.
1.Turn the printer power off.
2.Wait around 30 minutes after power off to allow the printer to cool down.
3.Open the top cover. Then open the inside cover.
Fig. 6-16 Open the inside cover 1
6–9
Page 60

English: HS3 User’s Guide, Chapter 6
USER’S GUIDE
(3. Open the inside cover.)
Fig. 6-17 Opening the inside cover 2
4. Dampen the cleaning stick or wipers with the IPA(Isopropyl Alcohol,
concentration is 90% or higher) or Denatured Alcohol.
5. Move the print head to the right by hand until you can see the part of the
platen and rollers that you want to clean.
Figure 6-18 Move the print head to the right
6–10
Page 61

English: HS3 User’s Guide, Chapter 6
6. Wipe up the spilt ink in the printer interior with a cleaning stick or wiper in
the shaded area in the figure below.
CHAPTER 6 MAINTENANCE
Fig. 6-19 Wiping up the ink
7. Remove any small pieces of paper remaining in the printer interior.
Figure 6-20 Remove small pieces of paper
6–11
Page 62

English: HS3 User’s Guide, Chapter 6
USER’S GUIDE
8. To clean the rollers, wipe them with a cleaning stick. The rollers can be
freed from the printer for cleaning by pulling the holders toward you.
Figure 6-21 Cleaning the rollers
Warning
NEVER touch the interior of the printer without waiting 30 minutes after
power off before commencing cleaning. This is because some parts of the
interior are extremely hot after you have used the printer.
6–12
Page 63

English: HS3 User’s Guide, Chapter 6
RE-PACKING THE PRINTER
!
Whenever you transport the printer, use the packing materials which are
provided with your printer. Also, follow the steps below to re-pack the printer, or
the printer may be damaged.
Before Re-Packing the printer
Before your starting to re-pack the printer, you need to support th e print head
and head gap lever with the Styrofoam block as shown below.
CHAPTER 6 MAINTENANCE
Caution
Figure 6-22 Insert the Styrofoam blocks
✒Note
You need to move the print head to the left by hand until it stops.
Do not insert the Styrofoam in the wrong direction as sh own below.
GOOD BAD
6–13
Page 64

English: HS3 User’s Guide, Chapter 6
USER’S GUIDE
Re-packing the printer
1. Pull the maintenance cassette out of the printer.
2. Turn off the power button and unplug the printer from the AC outlet.
3. Wait at least 30 m in utes for the printer to cool down. After that, pack the
Ink Holders
Printer
Figure 6-23 Remove the maintenance cassette
printer as illustrated below.
Manuals
Maintenance Cassette
6–14
Wires
Fig. 6-24 Repacking the Printer
Page 65

English: HS3 User’s Guide, Chapter 7
Chapter 7 TROUBLESHOOTING
ALARM INDICATIONS AT A GLANCE
Operator Calls
If a recoverable error occurs, the printer indicates an ‘operator call’ by blinking
Alarm
the
below and press the
Blinking LED Error Action
Alarm
❍↔●
Paper
❍↔●
Alarm
❍↔●
Ink
❍↔●
Alarm
❍↔●
CHAPTER 7 TROUBLESHOOTING
LED and any of the following LEDs. Clear the error as described
FF/Cont
Cover Open Close the top cover of the printer.
Paper jam Clear the paper jam referring to the next section
Paper empty Load paper in the printer referring to Chapter 2 and
Misfeed Reinstall the paper and press the
Ink Empty Ink is empty. Add ink blocks into the printer and
button to resume printing.
“PAPER JAMS” and press the
printer does not automatically resume printing.
press the
press the
FF/Cont
FF/Cont
button.
button.
FF/Cont
FF/Cont
button if the
button.
Filter
❍↔●
Alarm
❍↔●
If the following errors occur, the printer indicates the error by blinking the
Alarm
Error Action
Memory Full
SIMM error
✒Note
If the printer does not operate as you expect it to, it is recommended to reset the
printer or turn the printer off and then on again. If you still have problems,
consult your dealer or our authorized service representative.
No Maintenance
cassette or
Maintenance
paper empty
LED and printing the error message.
Press the
Reduce the resolution or reduce the complexity of your document.
Expand the printer memory by fitting a SIMM module.
Check that the optional SIMM is correctly in stalled.
Maintenance paper is empty or Maintenance cassette
is not installed correctly. Replace the maintenance
cassette or re-install the cassette.
FF/Cont
button to print the data remaining in the printer.
7–1
Page 66

English: HS3 User’s Guide, Chapter 7
USER’S GUIDE
Service Calls
If an unrecoverable error occurs, the printer indicates the need for a service call
by lighting all the LEDs and then the following combination of LEDs
alternately:
Service Call Alarm Manual Data Ready Power
Main ROM error
Main RAM error
NV-RAM error
Controller service error
Engine ROM error
Engine RAM error
Engine program error
Communication error
Paper width sensor error
Paper width level error
Paper dust error
Refill CAM position error
CR Position error/PWM error
CR Lock error
CR Initialize error
Thermistor error
Heater overheat error
Heater break error
AC heater error
Quench platen error
Encode error
LOIS error
● ON ❍ OFF
● ❍ ❍❍❍
❍ ● ❍❍❍
● ● ❍❍❍
❍❍●❍❍
❍❍❍●❍
●❍❍●❍
❍●❍●❍
●●❍●❍
❍❍●●❍
●❍●●❍
❍●●●❍
●●●●❍
●❍❍❍●
❍●❍❍●
●●❍❍●
●❍●❍●
❍●●❍●
●●●❍●
❍❍❍●●
●❍❍●●
❍❍●❍●
❍❍❍❍●
7–2
If you see any of these service call indications, reset the printer in either of the
following ways:
Reset the printer using the control pa nel button and try to print again.
Turn off and on the power button and then try to print again.
If you cannot clear the error and see the same service call indication after
resetting the printer, consult your dealer or our authorized service representative.
Report the error status and situation referring to the above table.
Page 67

English: HS3 User’s Guide, Chapter 7
Print Quality Problems
✒ Note
Press the buttons gently. Release the two buttons immediately after pressing the
Test
were held down for too long and you will need to start the test selection again.
❏Printing a test page
Set the printer to off-line first by pushing the Online Button once.
Make sure that A4 or Letter size paper is loaded in the feeder.
Print a test page by pushing the
button.
CHAPTER 7 TROUBLESHOOTING
button and the DATA LED will start to blink. If it does n o t, th e bu ttons
Test
button while holding down the
Shift
Test
Clean
Shift
Fig. 7-1 Test page
❏Cleaning the print head
If you see some horizontal lines as below, perform head cleaning.
Set the printer to offline first by pushing the
Push the
Clean
button while holding down the
The printer cleans the surface of the print head. During cleaning, the
Online
Shift
Button once.
button.
Online
LED is off. Print a test page again after the printer returns to th e Online state
and check that there are no dots missing.
Test
Clean
Shift
Fig. 7-2 Cleaning the print head
7–3
Page 68

English: HS3 User’s Guide, Chapter 7
USER’S GUIDE
PAPER JAMS
Before you can clear a paper jam error, you need to find the location of the paper
jam. Locate the position referring to the following figure. The below figure is
the route of madia going through the printer.
Fig. 7-3 Route of paper in the printer
After locating the position, clear the jammed pap er referring to the following
descriptions. If the jammed paper is removed completely, the printer may resume
printing. If the printer does not resume printing, press the
Warning
FF/Cont
button.
After you have used the printer, some internal parts of the printer are
extremely hot. When you open the inside cover of the printer, NEVER touch
the shaded parts shown in the following diagram. After turning the printer
Off, wait 30 minutes before attempting t o remove the jammed paper.
7–4
Fig. 7-4 Inside the printer
Page 69

English: HS3 User’s Guide, Chapter 7
❏ Paper Jam in the Sheet Feeder
If a paper jam has occurred inside the sheet feeder, open the feeder to pull the
jammed paper upward out of the feeder; then close the sheet feeder. Also,
open the top cover and check that a torn piece of paper is not left inside the
printer, refer to the next section.
CHAPTER 7 TROUBLESHOOTING
Fig. 7-5 Paper Jam in the Feeder
If the jammed paper cannot be pulled up, remove the sheet feeder from the
printer. Turn the paper release lever forward so that the jammed pap e r is
released.
Fig. 7-6 Turning the paper release lever forward
7–5
Page 70

English: HS3 User’s Guide, Chapter 7
USER’S GUIDE
❏ Paper Jam at the Output Tray
Remove all printouts in the output tray and pull the jammed paper out from the
printer gently. Do not pull the paper hard to avoid tearing the jammed paper
inside the printer.
Fig. 7-7 Paper Jam at the Paper Output Tray
If the jammed paper cannot be pulled out, remove the output tray as in the
following procedure to access the jammed paper.
1. Extend the output tray.
2. Lift it up so th at the hooks are released.
3. Remove the output tray.
Fig. 7-8 Removing the output tray
7–6
Page 71

English: HS3 User’s Guide, Chapter 7
❏ Paper Jam inside the printer
If a torn piece of paper remains inside the printer, first turn the printer off and
unplug the power cord from the power outlet. Wait for 30 minutes before
attempting to remove the paper because some parts inside the printer are
extremely hot immediately after printing. Open the top cover and remove the
piece of paper carefully.
CHAPTER 7 TROUBLESHOOTING
Fig. 7-9 Paper Jam inside the printer
7–7
Page 72

English: HS3 User’s Guide, Chapter 7
USER’S GUIDE
Q & A
This section contains questions and answers for using your printer. If you have
encountered a problem, find the question relating to your problem and take the
steps recommended to correct the problem.
Setting Up the Printer Hardware
Question Recommendation
The printer does not work. All
LEDs are off.
The printer does not print. Check the following:
The printer does not work in
ECP mode of your PC.
Check to see if the printer is plugged into a live power
source and the power button is on.
The printer is turned on.
All of the protective parts have been removed.
The interface cable is securely connected between
the printer and computer.
Check to see if the
LED is blinking, refer to the Operator Call section
of this chapter.
The mode in the Parallel Port setting of your PC
might not be ECP mode. You might need to change a
setting in the BIOS of your PC to use ECP mode.
Please set up ECP mode in the Parallel Port setting o f
your PC. For details, refer to your PC manual.
Alarm
LED is blinking. If the
Setting Up the Printer for Windows
Question Recommendation
I cannot print from my
application software.
Sometimes I get a Memory
Full error when printing certain
documents from Windows.
With the following error
dialog, you fail to install its
printer driver from Plug & Play
installation of Windows 98.
7–8
Reinstall the printer driver by clicking the ‘Add
Printer’ icon on the Settings-Printer dialog.
Make sure that no color ink has run out.
Make sure the supplied Windows printer driver is
installed and selected with your application
software.
Make sure the printer port is correctly selected.
Expand the printer memory by adding SIMMs.
Reduce the print resolution or reduce the
complexity of your document and try again.
Page 73

English: HS3 User’s Guide, Chapter 7
Setting Up the Printer for DOS
Question Recommendation
I cannot print from my
application software.
The printer prints, but it prints
incorrect information.
Sometimes it prints a couple of
characters and then ejects the
page, etc.
The printer prints in
Monochrome
The printer does not print when
I press the Print Screen Key.
Data
(
LED On)
The printer prints the first part
of my document but does not
print the last page.
Data
(
LED On)
How can I change the User
settings or default settings of
the printer?
CHAPTER 7 TROUBLESHOOTING
Check if the DOS application software interface
settings match that of your printer: for example, if
you are using a parallel printer cable, you would
most likely set your DOS software printer port to
LPT1.
Check if the printer has any printer alarms active.
This is an indication that your application printer
emulation setting and the printer’s emulation do not
match. Check in your application software which
printer you have selected to make sure the printer is
set up correctly. Select the HP DeskJet 1600C or
Monochrome LaserJet driver.
When you set the printer selection to HP LaserJet
xxx, it supports only monochrome printing. To get
color printing, select the HP DeskJet 1600 series.
Turn the printer offline with the
press the
FF/Cont
button. Data has been sent to the
Online
button and
printer but the printer did not receive a Page Eject
command; print screens do not send this command.
This was a common problem with database software
and spreadsheet software when not correctly set up.
The data has been sent to the printer but the printer
did not receive the Page Eject command. Turn the
printer offline with the
FF/Cont
button to eject the page. Then check with
Online
button and press the
your software supplier on how to add a Page Eject (or
Form Feed) command to the end of your print job.
Use the remote printer console (RPC) program. Refer
to Quick Setup Guide.
7–9
Page 74

English: HS3 User’s Guide, Chapter 7
USER’S GUIDE
Paper Handling
Question Recommendation
The printer does not load
paper.
The printer does not load paper
from the manual feed slot.
How can I load envelopes? You can load envelopes from either the sheet feeder
What paper can I use? You can use plain paper, envelopes and special
The Automatic Document
Feeder(ADF) of a copying
machine has paper jam
problems when you load the
printouts of this printer in the
copying machine.
How can I clear paper jams? See “PAPER JAMS” in this chapter.
Check to see if the “Paper Empty” message
appears on your computer screen or the
Alarm
and Paper LEDs are blinking on the printer
control panel. If so, the sheet feeder may be out of
paper or not properly installed. If it is empty, load
a new stack of paper into the feeder.
Remove all printouts in the outpu t tray.
If there is paper in the sheet feeder, make sure it is
straight. If the paper is curled, you should
straighten it before printing. So metimes it is
helpful to remove the paper, turn the stack over
and replace it in the paper tray.
Reduce the stack of paper in the sheet feeder, then
try again.
The maintenance cassette paper may have run out.
Check and see if there is enough maintenance
paper, replace with a new roll of paper if
necessary. Refer to “Replacing the Maintenance
Paper Cassette” in Chapter 6.
You may not have fitted the maintenance cassette
correctly. Please remove the cassette and then
replace it until it clickes fully into position. Refer
to the Quick Setup guide.
.
Re-insert the paper firmly, one sheet at a time.
or the manual feed slot. Select the ‘Envelope and
Transparency’ position of the head gap lever. Your
application software must be set up correctly to prin t
on the envelope size you are using. This is usually
done in the page setup or document setup menu of
your software. Refer to your application manual.
(For the HS-5300, do not load envelopes in the
second feeder)
transparencies. Refer to “Paper Handling” in Chapter
2.
Do not load the printouts o f this Inkjet printer into
other copying machines and ADFs. It may cause
paper jams when trying to load the inkjet p r inted
paper through them.
7–10
Page 75

English: HS3 User’s Guide, Chapter 7
Printing
Question Recommendation
The printer prints unexpectedly
or it prints garbage.
The printer cannot print full
pages of a document. A
"Memory Full" error message
occurs.
You want to print on both sides
of the paper.
My headers or footers appear
when I view my document on
screen but do not show up
when I print them.
CHAPTER 7 TROUBLESHOOTING
Reset the printer by pressing the
after turning the printer off-line.
Make sure your application software is correctly
set up to use this printer and check the pr in ter
driver settings or printer settings in your
application software.
Expand the printer memory by installing SIMMs.
Reduce the printer resolution.
Reduce the complexity of your document and try
again.
You should NEVER try to print on both sides of the
paper. If you did, contact your dealer or our
authorized service representative.
Most inkjet printers have a restricted area that cannot
be printed on. Usually the first two lines and last two
lines of text cannot print. Adjust the top and bottom
margins in your document to allow for this.
Reset
button
Warning
After you have used the printer, some internal parts of the
printer are extremely hot. When you open the inside cover
of the printer just after using the printer, NEVER touch the
interior of the printer. You need to WAIT 30 MINUTES for
it to cool down.
7–11
Page 76

English: HS3 User’s Guide, Chapter 7
USER’S GUIDE
Print Quality
Question Recommendation
Printouts are too dark or light. You can adjust the brightness in Custom setting of
The printouts are not solid. After setting the printer offline by pushing the Online
Poor Transparency print
quality.
The ink on printouts flakes off.
Some colors might be lighter
than expected.
Vertical lines are not straight. Adjust the position of the head gap lever.
your printer driver. Refer to the printer driver HELP.
Button once, execute head cleaning by pushing the
Clean button while holding the
Shift
button.
You may also need to clean the printer interior. (Refer
to “Cleaning the Printer Interior” in Chapter 6)
When you want to perform interior cleaning, WAIT
30 minutes after turning off the printer before starting
the cleaning.
Use only Brother Special Transparencies for this
printer.
Select the appropriate ‘Envelope and
Transparency’ position of the head gap lever.
You may be using thick paper. Check the type of
media in the printer driver and select the ‘Thick
paper’ position of the head gap lever.
You may be using the printer out of the
environment range shown in Chapter 1.
White horizontal lines exist or
the printed image is faint.
The print image does not
match the printing area.
7–12
After setting the printer offline by pushing the
Online Button once, execute head cleaning by
pushing the Clean button while holding the
button.
Set the Enhancement mode ON in the
Quality/Color tab of your printer driver.
Select the Recommended Paper setting of the
printer driver to get a wider printing area in
Windows 3.1x/95/98.
You may need to adjust the margins in your
software to match the printable area.
Shift
Page 77

English: HS3 User’s Guide, Chapter 7
CHAPTER 7 TROUBLESHOOTING
Printouts are stained with ink.
You may have used this printer in an environment
that is out of the specified range. Refer to
“Operating and Storage Environment” in Chapter
1.
You may have fed crumpled paper, curled paper or
folded paper. You need to replace the paper.
Select the appropriate position of the head gap
lever and select the correct media in the supplied
driver.
Clean the roller and interior of the printer. Refer
to “Cleaning the Printer Interior” in Chapter 6.
When you want to perform interior cleaning,
WAIT 3 0 minutes after turning off the printer
before starting the cleaning.
Be sure to select the Recommended Paper setting
in the printer driver.
Black vertical lines exists. You need to clean the printer interior. (Refer to
“Cleaning the Printer Interior” in Chapter 6) When
you want to perform interior cleaning, WAIT 30
minutes after turning off the printer before starting
the cleaning.
The printed color is different
from the displayed color.
Make sure that your monitor supports and is set to
full color mode (32.000 color or higher) in
Control Panel of your computer.
Set the Monitor Calibration in your printer driver
referring to “Control and Maintenance” in Chapter
3. However, the printer may not be able to
express exactly some colors on your monitor.
If your printouts are not what you expected,, please see the below diagram.
This is the recommended mode for each type of your file:
File Quality Enhancement Document T ype
Text only Normal OFF Auto
Text with charts Normal ON Auto
Business Graphics Normal ON Graph/Text
Presentation Sheet*
Fine ON Graph/Text
Computer Graphics
Photo Images Fine ON Photo
*If you want to print your Presentation file on transparencies, make sure that you set
your media selection of your printer driver to Transparency and adjust the head gap
lever to Envelop and Transparency position. For details, please refer to page 2-4.
7–13
Page 78

English: HS3 User’s Guide, Chapter 7
USER’S GUIDE
Chapter 8 Appendix
PRINTER SPECIFICATIONS
Printing
Print Method Piezo Electronic Hot Melt Ink Jet
Head nozzle 512 nozzles (128 nozzles / color)
Resolution 300 and 600 dots/inch
Print Quality Fine / Normal mode
Print Speed Up to 4 pages/minute (when loading letter-size paper from the
sheet feeder and in normal color print mode : 5% coverage)
Warm-Up Max. 9.5 minutes at 25°C (73.4°F)
Ink Black, Cyan, Magenta, Yellow
Each 3 cc x 3 blocks =9cc(1 cartridge)
Life Expectancy:460 pages/ 9cc
(when printing letter-size paper at 5% print coverage)
TrueType Fonts on disks TrueType-compatible soft-fonts for Windows on the supplied
disk
Functions
Printer Driver Windows 3.1/95/98 NT 4.0 driver, supporting Brother Native
Compression mode and bi-directional capability
Emulation
Interface Bi-directional parallel
Memory Expandable up to 72 MB with SIMMs (HS-5000/5300)
PCL5c and PCL5e with standard
BR-script Level 2 for option
Diagnostics Self-diagnostic program
8–14
Page 79

English: HS3 User’s Guide,INDEX
Electrical and Mechanical
Power Source U.S.A. and Canada: AC 110 to 120 V, 60 Hz
Power Consumption Printing: 170W or less
Noise Printing: 55 dB A or less
Temperature Operating: 10 to 35°C (50 to 90.5°F)
INDEX
Europe and Australia: AC 220 to 240 V, 50 Hz
Stand-by/Power Save 1: 100W or less
Power Save 2: 20 W or less (without
optional card / ROM / SIMM installed )
Warming up 480W or less
Stand-by: 40 dB A or less
Storage: 0 to 35°C (32 to 104°F)
for optimum quality: 15 to 30°C (59 to 86°F)
Humidity Operating: 20 to 80% (without condensation)
Storage: 10 to 85% (without condensation)
for optimum quality: 30 to 60 %
Dimensions (W x D x H) HS-5000 : 490 x 410 x 310 mm (19.3 x 16.2 x 12.2 inches)
HS-5300 : 490 x 510 x 310 mm (19.3 x 20 x 12.2 inches)
(when the output tray is closed.)
Weight HS-5000 : Approx. 12 kg (27 lb.)
HS-5300 : Approx. 13 kg (28.6 lb.)
9-1
Page 80

English: HS3 User’s Guide, Chapter 7
USER’S GUIDE
PARALLEL INTERFACE SPECIFICATIONS
Interface Connector
Printer Side:Amphenol FCN-685J036-L/X or equivalent
Pin Assignment
Pin No. Signal DirectionPin No. Signal Direction
1
2 DATA 1 Input 20 0V (S.G.) –
3 DATA 2 Input 21 0V (S.G.) –
4 DATA 3 Input 22 0V (S.G.) –
5 DATA 4 Input 23 0V (S.G.) –
6 DATA 5 Input 24 0V (S.G.) –
7 DATA 6 Input 25 0V (S.G.) –
8 DATA 7 Input 26 0V (S.G.) –
9 DATA 8 Input 27 0V (S.G.) –
10
11 BUSY Output 29 0V (S.G.) –
12 PE Output 30 0V (S.G.) –
13 SLCT Output 31
14
15 N.C. – 33 N.C. –
16 0V (S.G.) – 34 N.C. –
17 0V (S.G.) – 35 N.C. –
18 +5V – 36
An IEEE-1284 compliant shielded cable should be used to enable all
the functions of the bi-directional interface.
DATA STROBE
ACKNLG
AUTO FEED
Input 19 0V (S.G.) –
Output 28 0V (S.G.) –
INPUT PRIME
Input 32
FAULT
SLCT IN
Input
Output
Input
8–16
✒Note
To use bi-directional communication, the interface cable which has the pin
connection above should be used.
1
2
14
15
16
17
18
19
20
21
22
23
24
25
Fig. 8-1 Parallel interface cable
1
2
14
15
16
17
18
19
20
21
22
23
24
25
26
27
28
29
30
31
32
33
34
35
36
Page 81

English: HS3 User’s Guide,INDEX
RESIDENT FONTS
Intellifont Compatible Fonts: Microsoft® Windows® 3.1 / 95 / 98
Alaska, Extrabold
Antique Oakland, Oblique, Bold
Brougham, Oblique, Bold, BoldOblique
Cleveland Condensed
Connecticut
Guatemala Antique, Italic, Bold, BoldItalic
Letter Gothic, Oblique, Bold
Maryland
Oklahoma, Oblique, Bold, BoldOblique
PC Brussels Light, LightItalic, Demi,
DemiItalic
PC Tennessee Roman, Italic, Bold,
BoldItalic
Utah, Oblique, Bold, BoldObliqu e
Utah Condensed, Oblique, Bold,
BoldOblique
TrueType™ Compatible Fonts:
BR Symbol
Helsinki, Oblique, Bold,
BoldOblique
Tennessee Roman, Italic, Bold,
BoldItalic
W Dingbats
INDEX
Type 1 Font Compatible Fonts: Brot her Original Fonts:
Atlanta Book, BookOblique, Demi,
DemiOblique
Calgary MediumItalic
Copenhagen Roman, Italic, Bold, BoldItalic
Portugal Roman, Italic, Bold, BoldItalic
Bermuda Script
Germany
San Diego
US Roman
Bitmapped Fonts (Portrait and Landscape):Bar Codes :
LetterGothic16.66 Medium, Italic, Bold,
BoldItalic
OCR-A
OCR-B
Code 39
UPC-E
Interleaved 2 of 5
Codabar
EAN-8
US-PostNet
EAN-13
ISBN
UPC-A
Code 128
EAN-128
9-1
Page 82

English: HS3 User’s Guide, Chapter 7
USER’S GUIDE
SYMBOL SETS/CHARACTER SETS
ISO14 JIS ASCII
ISO57 Chinese
ISO11 Swedish
HP Spanish
ISO17 Spanish
ISO10 Swedish
ISO16 Portuguese
Roman 8
ISO Latin 1 (ECMA-94)
✒Note
If you want to know what characters are in each symbol/character set, print
CHARSETS.PRN file from “Print form” option in Direct Access Menu of the
Remote Printer Console Program.
ISO84 Portuguese
ISO85 Spanish
PC-8
PC-8 D/N
PC-8 Turkish
PC-850
PC-852
ISO60 Norwegian 1
ISO61 Norwegian 2
ISO25 French
ISO69 French
HP German
ISO21 German
ISO15 Italian
ISO6 ASCII
Legal
ISO2 IRV
ISO4 UK
8–18
Page 83

English: HS3 User’s Guide,INDEX
Chapter 9 INDEX
INDEX
—A—
Alarm LED, 4–2, 7–1
—B—
BR-Script 2 ROM Board, 5-5
—C—
character set, 8–5
button, 4–4,7-3
Clean
cleaning kit, 6–9
Cleaning the printer, 6–9
Color Adjustment, 3–7
Color Matching, 1–3, 3–5
Control Panel, 1–2, 4–1
Custom Setting, 3-5, 7-12
—D—
Data LED, 4–2
Document Type, 3-5
DOS, 7–9
dpi, 1–3
—E—
Energy Star, 1–3, 3–7, 4–7
Emulation, 8-1
envelopes, 2–2, 2–6
Environment, 1–4
error
recoverable, 7–1
unrecoverable, 7–2
—I—
ICM, 3–5
ink, 6–7, 8–1
empty, 7–1
Ink Reservoir, 6–6
Ink Reservoir cover, 1–2
interface, 8–1
error, 7–1
—J—
jammed paper, 7–4
—M—
maintenance paper, 6–1
empty, 7-1
Manual Feed slot, 1–2, 2–8
Manual LED, 4–2
manual paper feed, 2–8, 3–3
Media Selection, 2–4, 3–2
memory, 8–1
expansion, 5-2
full, 7–1
MIO Slot, 1–2, 5-1
misfeed, 7–1
modular input/output (MIO) interface, 5–1
—N—
network card, 5–1
Nozzle, 8–1
—O—
—F—
factory reset, 4–6
4–3
FF/Cont Button
LED, 6–1
Filter
FONTS, 8–4
,
—H—
Hardware, 7–8
head cleaning, 3–7, 4–4, 7-3
Head Gap Lever, 1–2, 2–5
hex dump print, 4–6
button, 4–3
Online
operator call, 7–1
optional memory, 5–2
orientation, 3-2
output tray, 2–9
Overview, 1–2
9-1
Page 84

English: HS3 User’s Guide, Chapter 7
USER’S GUIDE
Page Order, 3–3
paper
empty, 7–1
Guide, 1–2
jam, 7–1, 7–4
release lever, 7–5
size, 2–1
thickness, 2–5
parallel interface, 8-3
pin assignment, 8–3
port, 1–2
Power Button, 1–2
Power Inlet, 1–2
Power LED, 4–1
Power Save Mode, 1–3, 3–7, 4–7
ppm, 1–3
print
Config, 3–6
Fonts, 3-6, 4–5
method, 8–1
quality, 8–1
resident font lists, 4–5, 8-4
speed, 8–1
printable area, 2–3
printer driver, 1–3, 3–1
CONTROL AND MAINTENANCE, 3–6
PAPER, 3–2
QUALITY AND COLOR, 3–4
questions and answers, 7–8
Quick Setup Guide, 1–1
, 4–5
—P—
—Q—
—S—
Scaling, 3–3
service call, 7–2
Sheet Feeder, 1–2, 2–1, 2–5
Show Printer Status, 3-6
SIMM, 5–2
specifications
Electrical and Mechanical, 8–2
Functions, 8–1
interface cable, 8–3
paper, 2–1
Printing, 8–1
symbol set, 8–5
System Requirements, 1–3
—T—
button, 4–4
Test
test page, 3–7, 4–4, 7–3
test print mode, 4–5
time-out, 3–7, 4–7
Top Cover, 1–2
transparencies, 2–2, 2–4
transport, 6–13
Troubleshooting
Paper Handling, 7–10
Print Quality, 7–12
Printing, 7–11
Set up
DOS, 7–9
Hardware, 7–8
Windows, 7–8
—U—
user reset, 4–5
Ready LED, 4–1
RE-PACKING, 6–13
reset and hex dump mode, 4–6
button, 4–3
Reset
resolution, 1–3, 8–1
9-2
—R—
—W—
warm up, 3–7, 4–7, 8–1
Warnings
Windows, 7–8
, iii
 Loading...