

Page 1
FAX-1000
Owner's Manual
I
Page 2

Page 3

I This unit generates, uses and can radiate radio frequency energy and if not
i installed and used in accordance with the Owner's Manual, fnay cause inter-
I
ference to radio and television reception. It has been tested and found to
I comply with the limits for a Class A computing device in accordance with the
I
specifications of Subpart J of Part 15 of the FCC rules, which are designed to
provide reasonable protection against such interference in a residenfial
„ installation. However, there is no guarantee that interference will not occur in a
I particular installation. If this unit does cause interference (such as sfatic) fo radio j
I
or television reception, which can be determined by turning the unit off and on,
I the user is encouraged to try to correct the interference by employing one or
I
more of the following measures:
- change the location of the receiving anfenna (indoor type)
- move the unit away from the radio or TV
I
I - plug the unit into a different outlet so that the unit and the radio or TV are on
I
different branch circuits.
I If necessary, the user should consult the dealer or an experienced radio/TV
I
technician for additional suggestions. The user may find fhe following booklet
I prepared by the Federal Communications Commission helpful: "How to Identify
I and Resolve Radio-TV Interference Problems". This booklet is available from
i the U.S. Governmenf Printing Office, Washington, D.C., 20402, Stock No.
I
004-000-00345-4.
Brother cannot accept any financial or other responsibilities that may be the result of your use
of this information, including direct, indirect, special or consequential damages. There are no
warranties extended or granted by this document.
f'The serial number may be found on the label affixed to the back of the unit. ^
For your convenience, note this number below and retain this Owner's Manual
to serve as a permanent record of your purchase, in the event of a theft or fire or
for future reference.
MODEL NO. FAX-1000
NAME OF DEALER _
DATE OF PURCHASE
SERIAL NO.
Page 4

^^SSSS^SSSSSSSSSSS^s^S^^
I This equipment complies with Part 68 of the FCC Rules. On the rear panel of this equipment is a
I label that contains, among other information, the FCC Registration Number and Ringer Equivalence
I Number (REN) for this equipment. You must, upon request, provide this information to your
I telephone company.
w*
s
I Ask your telephone company or installer to install the jack suitable for your device if such is not
I available.
I The REN is useful to determine the quantity of devices you may connect to your telephone line and
I still have those devices ring when your telephone number is called. In most, but all areas, the sum
I of the RENs of all devices connected to one line should not exceed five (5.0). To be certain of the
I number of devices you may connect to your line, as determined by the REN, you should contact
I your local telephone company to determine the maximum REN for your calling area.
I If your telephone equipment causes harm to the telephone network, the Telephone Company may
I discontinue your service temporarily. If possible, they will notify you in advance. But if advanced
notice isn't practical, you will be notified as soon as possible. You will be informed of your right to
I
I file a complaint with the FCC.
I Your Telephone Company may make changes in its facilities, equipment, operations or procedures
I that could affect the proper functioning of your equipment. If they do, you will be notified in
I advance to give you an opportunity to maintain uninterrupted telephone service.
Si
I
I If you experience trouble with this telephone equipment, please contact the manufacturer's
I authorized service agency for information on obtaining service or repair. The telephone company
I may ask that you disconnect this equipment from the network until the problem has been corrected
I or until you are sure that the equipment is not malfunctioning.
I WARNING:
I For protection against the risk of electrical shock, always disconnect all cables from the wall outlet
I before servicing, modifying or installing the equipment.
I This equipment may not be used on coin service provided by the Telephone Company nor
I connected to party lines,
i
I
Page 5

TABLE OF CONTENTS
Contents
INTRODUCTION
PRE-INSTALLATION INSTRUCTIONS
Before removing the unit from the packing carton
Contents of the packing carton
Procedures for removing the unit from the packing carton
INSTALLING THE UNIT
I. Single-line telephone connections
II.
III.
IV. Inserting the recording paper into the unit
GETTING FAMILIAR WITH THE UNIT
I.
Multi-line telephone connections
Electrical connection
The FAX-1000 - parts and their functions
Page
1
2
2
2
2
4
4
4
6
II.
III.
OPERATING THE UNIT
I.
II. How to transmit documents
III.
IV.
V.
TROUBLESHOOTING
TELEPHONE DIRECTORIES
SPECIFICATIONS
The control panel
Programming the unit
The copy mode
How to receive documents
How to use the telephone handset
The journal, transmission and other reports
7
8
11
11
12
16
17
18
20
22
24
Page 6

INTRODUCTION
Thank you for purchasing the Brother FAX-1000. This Owner's Manual will help you derive the
fullest benefits from this new, powerful but compact facsimile transceiver.
The Brother FAX-1000 is a modern, compact desktop digital facsimile unit. Its performance is
compatible with CCITT Group 3 and Group 2. Therefore, your new FAX-1000 is compatible with
most modern facsimile units in the world. The FAX-1000 is the ideal mid-volume stand-alone unit
or a satellite unit in a larger facsimile network.
All of the Brother FAX-1000 features can be easily learned by following step-by-step procedures
listed on the following pages. As you become familiar with the features and operation of the unit,
keep the Owner's Manual handy for quick references and reminders.
The Owner's Manual provides a step by step description of the procedures you should employ
in unpacking, installing and learning to operate your Brother FAX-1000 facsimile unit. If you follow
these instructions, you will have no problem with either the installation or the operation of the unit.
Modern digital facsimile units are extremely reliable. If you exercise the necessary care, you will
enjoy years of totally trouble-free enjoyment of this unit.
Now, open the Owner's Manual to PRE-INSTALLATION INSTRUCTIONS (page 2) and read
the material carefully.
Page 7

PRE-INSTALLATION INSTRUCTIONS
BEFORE REMOVING THE UNIT FROM THE CARTON
The Brother FAX-1000 is designed to operate in an office environment. It is rugged, reliable and
virtually maintenance-free. However, to ensure years of trouble-free performance, please
observe the following precautions;
• Do not locate the unit near heaters, air conditioners, in direct sunlight or in extremely
dusty environments.
Install the unit on a flat level surface, such as a desk, a table, a typewriter or computer
stand.
Do not locate the unit where water or chemicals are likely to splash on it.
Select a vibration-free area of your office.
Locate the unit within 3 feet from a telephone wall jack.
Locate the unit within 3 feet of a standard, grounded outlet.
Avoid plugging in the unit into an outlet which is on the same line as an air conditioner,
a refrigeration unit, a copier, an electric typewriter or any other device that draws a lot of
current in a relatively short period of time.
CONTENTS OF THE PACKING CARTON
The packing carton contains:
1. The Brother FAX-1000 UNIT
2. One roll of thermal recording paper
3. Telephone handset
4. Telephone line cord
5. Owner's Manual
6. Warranty card
7. Test Sheet
8. Original document supporter
9. AC power cord
10. Facsimile supply order form
11. One touch lavel sheet
Note: You can order a RECEIVING CATCH TRAY (optional). Contact your dealer if interested in
ordering this part.
PROCEDURES FOR REMOVING THE UNIT FROM THE PACKING CARTON
1. Carefully open the carton (see the appropriate inscription on the carton)
2. Pull out the FAX-1000 and the other devices together with the packing trays
3. Remove all packing trays and plastic from the unit
4. Take out the telephone line cord from the plastic packaging
5. Locate and take out the paper roll
Page 8
INSTALLING THE UNIT
1.
The simplest way to connect the Brother FAX-1000 unit to the public switched telephone network
(phone company lines) is to use a single telephone line. The connection is particularly simple if
you have a modular wall jack. The most common modular jack is referred to as the RJ11C jack. If
you have such a jack, follow the instructions below. If your wall jack is not modular, it is very easy to
convert the wall plug to a modular form. Conversion is very simple and conversion kits are
available from your local phone company, an electronics / computer store (e.g.. Radio Shack) or
the AT&T phone stores.
To give you a conceptual idea of the connections, here is a diagram.
SINGLE-LINE TELEPHONE CONNECTIONS
If you have MODULAR PHONE JACKS (RJ11C), simply plug the phone cord into the wall jack.
If you have the older 4-PRONG JACK, you must use a modular 4-prong adapter USOC (RJA1X).
Plug the adapter into the wall jack and then plug the phone card into the adapter.
Page 9

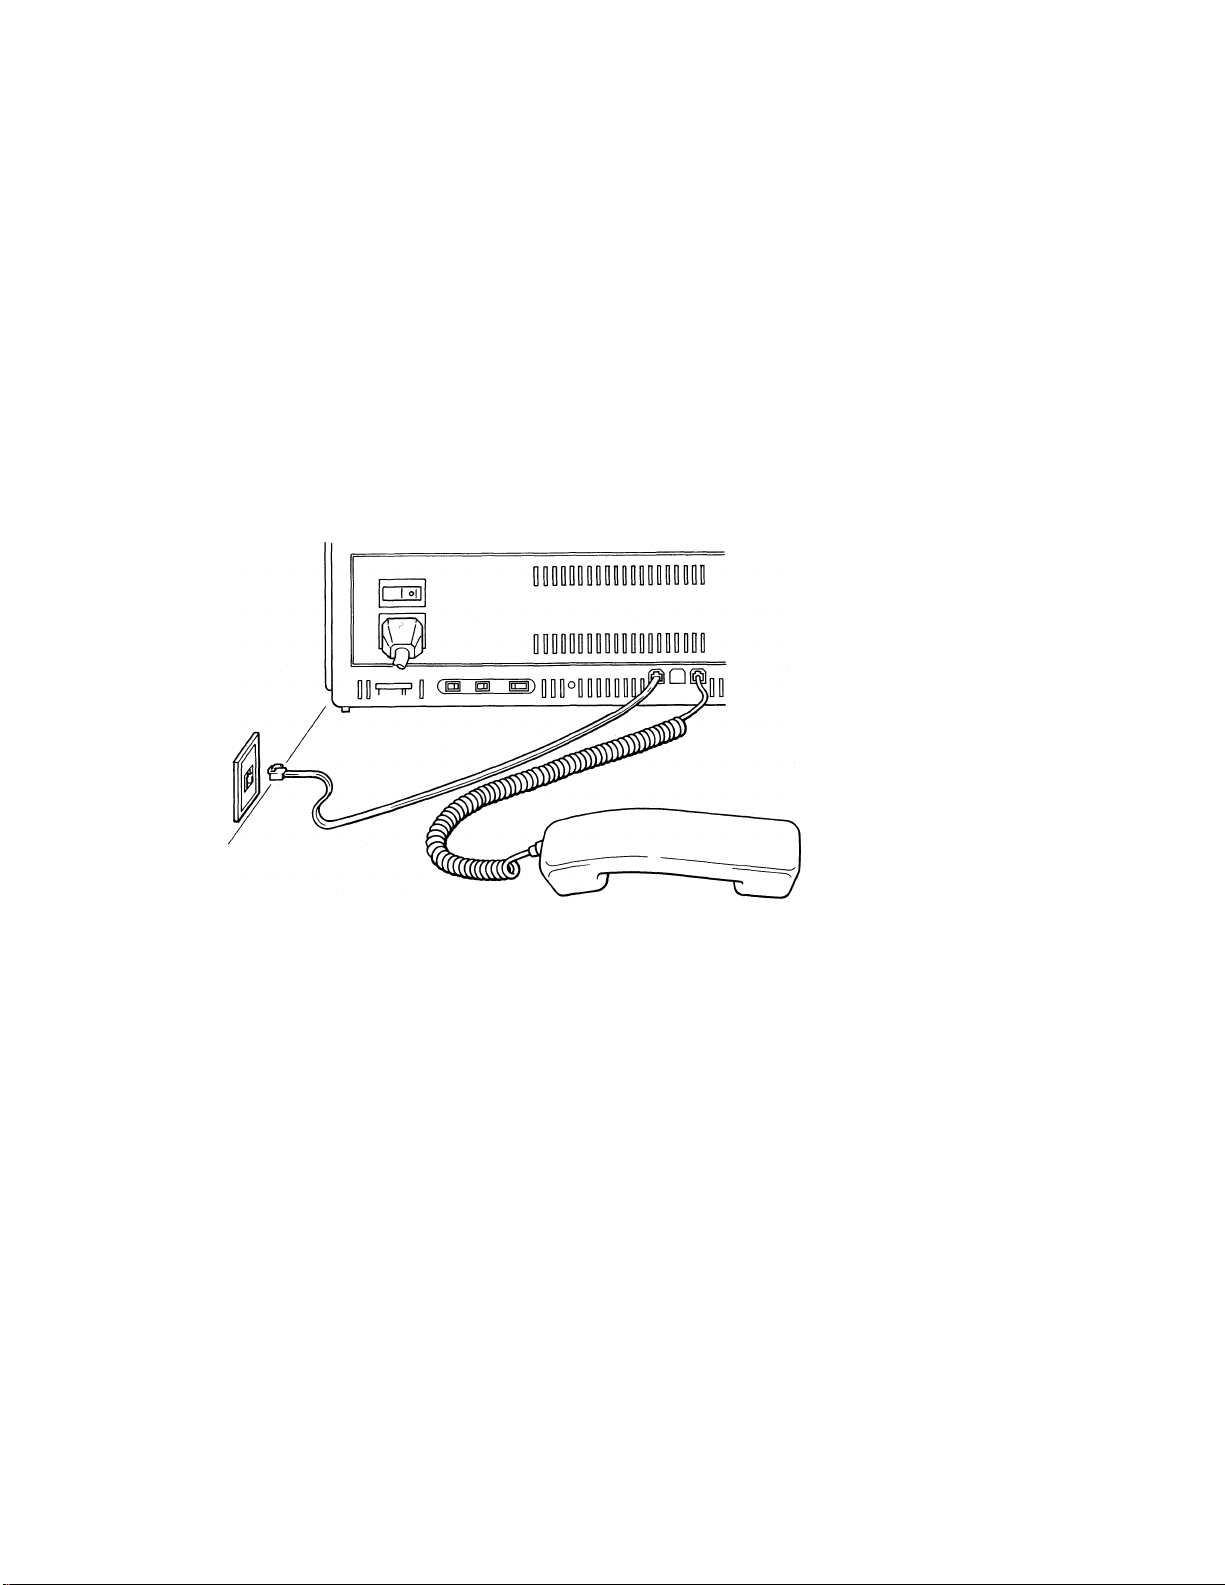
To connect your FAX-1000 to the telephone line, follow these steps:
The telephone handset which is included in the carton must be connected to the FAX-
1000 by plugging in the handset cord into the jack on the side of the FAX-1000 unit.
Take the telephone cord which is also included in the carton and connect one of its plugs
to the jack in the back of the FAX-1000 unit and the second plug to your modular wall jack
(RJ11C). Now, the FAX-1000 is connected to the telephone network.
II.
Most offices have key systems or PBXs. While in many cases it is relatively easy to connect the
FAX-1000 to a key system or a PBX, we suggest that you contact the organization which installed
your company's telephone system and ask them to connect the FAX-1000 to the system. If the
FAX-1000 is connected to a multi-line system, ask your installer to connect the FAX-1000 to the
last line on the system. This way, the FAX-1000 will not be activated by every phone call coming
into your office. The preferred solution is to ask the phone company to assign a separate line to
the facsimile unit. In this case, you can leave the unit on 24 hours a day and derive full benefits
from its automatic, unattended operations capabilities.
MULTI-LINE TELEPHONE CONNECTIONS
III. ELECTRICAL CONNECTION
The FAX-1000 can be plugged into any standard power (120 VAC) outlet. Simply make sure that
the outlet is grounded and that it is not on the same line as appliances or office machines which
tend to draw a lot of power in a very short period of time, such as refrigerators, copiers, etc. The
FAX-1000 power requirements are listed in the SPECIFICATIONS.
IV. INSERTING THE RECORDING PAPER ROLL INTO THE UNIT
To insert the paper roll, follow these directions:
1. Make sure that the POWER Switch is OFF. The switch is located on the back of
the facsimile machine.
2. Press the OPEN button which is located at the lower left front of the machine.
This opens the cover.
3. Hold the recording paper roll so that the free end of the paper points towards you
from the top of the roll.
4. Place the paper roll into the machine* and insert the edge of the recording paper
into the guide slot. Make sure that at least 1-1/2" of paper is fed into the slot.
5. Push the cover shut until you hear a click.
6. Turn the power ON.
7. Press the STOP button located on the right side of the cover for approximately
one (1) second until you see the edge of the paper coming out of the unit.
* This unit accepts two sizes of paper-A4 (8-1/2") and B4 (10.1"). You can move the adjustment
plate to accomodate the appropriate paper size.
Page 10

NOTE: The recording paper is heat-sensitive. Avoid exposure to high temperature, high
humidity or direct sunlight.
NOW, YOU ARE READY FOR THE NEXT STEP - LEARNING HOW TO USE THE
FAX-1000.
Page 11

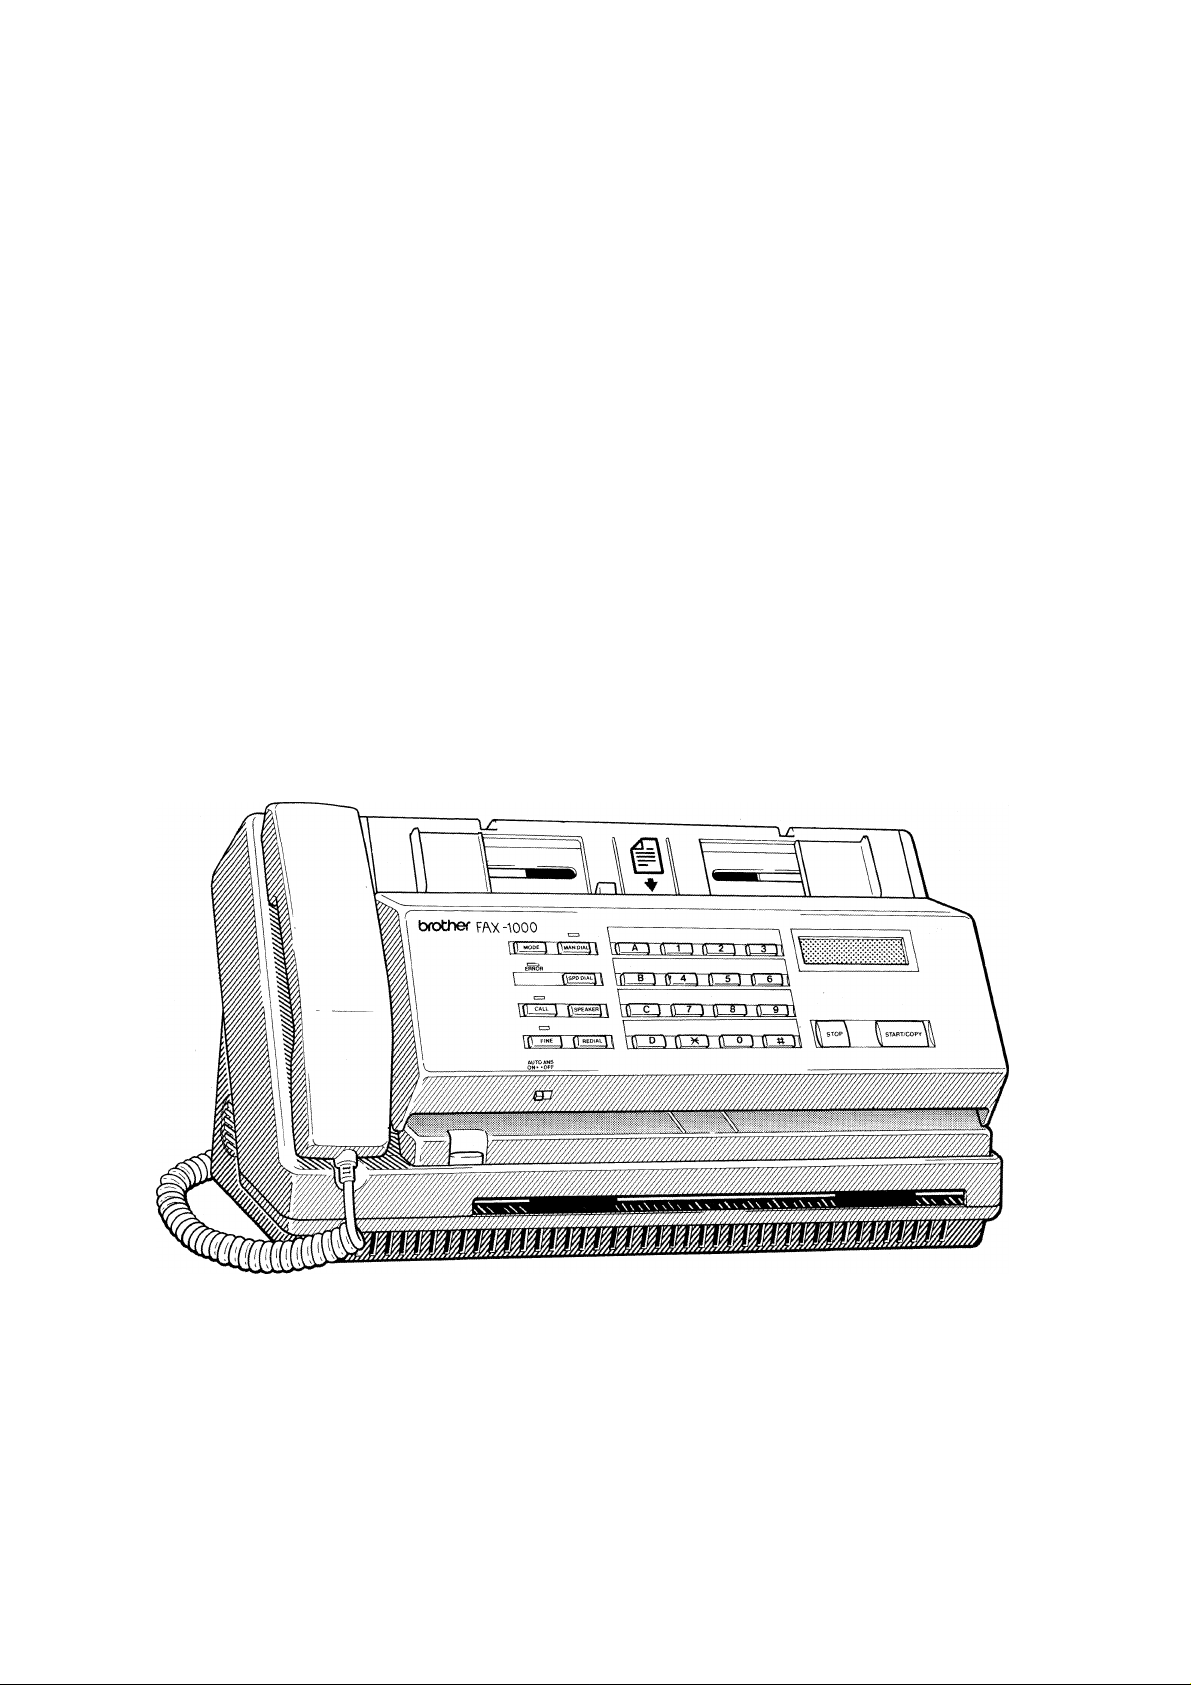
GETTING FAMILIAR WITH THE UNIT
I. THE FAX-1000 - PARTS AND THEIR FUNCTIONS
Now that the unit is connected to the telephone network and the power, take a few minutes to
become familiar with the unit. The main parts of the unit and their functions are indicated in the
diagram below:
TELEPHONE
The functions of the various switches and jacks located at the back of the unit are indicated in the
diagram below:
OPEN BUTTON FOR TRANSMITTER
OFF/ON POWER SWITCH
Page 12

II. THE CONTROL PANEL
Now, let's take a look at the control panel of the Brother FAX-1000. The layout of the control
panel and the purpose of the various buttons are shown in the diagram below:
FUNCTION SWITCHES
A-D SWITCH
TEN-KEY PAD LCD DISPLAY
START/COPY BUTTON
The proper utilization of the various buttons will be explained when we will describe the various
operating modes of the FAX-1000.
Page 13

III. PROGRAMING THE UNIT
THE FAX-1000 has many capabilities. These can be programmed by the user. The method for
programming these will be described when we address a specific capability. Here, we will adress
eight (8) fundamental operations. Important: Perform ail programming operations
without a document in the feeder.
A. Programming the date and time
B. Programming your own telephone number
C. Programming your name or other form of ID
D. Header print
E. Selecting the number of rings for the unit to answer a transmission
F. Programming one-touch and speed-dial telephone numbers
G. Turning on the automatic paper cutter
H. Reduction
A. Programming the date and time
This function is used for JOURNAL, TRANSMITTED DATE, TIME DISPLAY in the ready state and
DELAY TRANSMIT.
I. Press the MODE key six (6) times. SET UP 2 appears on the display.
2. Press the START/COPY button three (3) times. TIME appears on the display.
3 Press the # key.
4. Input the appropriate number using the alphanumeric keypad.
5. Press # before each entry except after the final entry.
6. Press* when you are finished.
B. Programming your telephone number
The telephone number, if programmed, will be printed in the journal and the transmitted data at
receiving terminals.
1. Press the MODE button six (6) times. SET UP 2 appears on the display.
2. Press the START/COPY button four (4) times. TEL. NUMBER appears on the
display.
3. Press#.
4. Input your telephone number using the alphanumeric keypad. Use "A" for
spaces. You can program up to 20 digits as your telephone number.
5. Press* when you are finished.
C. Programming your name or other form of an ID
The ID, if programmed, will appear in the LCD of the receiving terminal.
1.
2.
3.
4.
6.
7.
8.
9.
Press the MODE key six (6) times. SET UP 2 appears on the display.
Press the START/COPY button five (5) times. The display will say COMMENT.
Press the # and the FINE buttons simultaneously.
Press the MODE button until you see the desired letter. (If the MODE button
is depressed over 2 seconds, letters will appear continuously.)
Press START/COPY to program this letter. Up to 12 letters can be programmed
in the ID.
Press MODE until you see the second desired letter.
Press START/COPY to program this letter.
Continue until you've spelled out the entire name.
Press*when you are finished.
Page 14

D. Header print
The header print, if programmed, will be printed in the journal and the transmitted data at the
receiving terminals.
1. Press the MODE button six (6) times. SET UP 2 appears on the display.
2. Press the START/COPY buton six (6) times. The display will say HEADER PRINT.
3. Press#.
4. Press FINE button.
5. Press MODE button until the desired letter appears. (If the MODE button is
depressed over 2 seconds, letters will appear continuously.)
6. Hit START/COPY button to lock the letter in.
7. Continue until all desired letters (up to 31 letters) are programmed.
8. Press*to conclude the operation.
E. Selecting the number of rings when in manuai receive mode
1. Press the MODE key six (6) times. SET UP 2 appears on the display.
2. Press the START/COPY button seven (7) times. You will see on the display the
choice: TIMES OF RING 1 0:5 1:9 2:-
3. Make your selection by pressing either "0" or "1". If you press "2", the unit will
not receive automatically regardless of how many times the phone rings.
NOTE: When in the automatic receive mode, the unit will pick up after 1 or 2 rings. In MANUAL
RECEIVE case, if nobody answers after 5 or 9 rings, the mode will be changed to the FAX mode
automatically and the unit will receive the document.
F. Programming one-touch and speed-dial numbers
There are 16 one-touch and 64 speed-dial numbers. Each number has a maximum of 25
positions alphanumeric characters and spaces. To program them, follow this procedure:
1.
2.
3.
4.
5.
6.
7.
8.
9.
10.
11.
12.
13.
To input speed-dialing numbers, after step 3 press START/COPY again, then press SPD DIAL
and a two (2) digit number you wish to assign to this phone number.
Press the MODE key six (6) times. SET UP 2 appears on the display.
Press the STARt/COPY button one (1) time. You will see on the display the
words ONE TOUCH KEY.
Press FINE. The lamp will light.
Press "3" (or whatever number you wish to assign to this phone)
Press #.
Input the number; use "A" for spaces.
If you need an access code to dial outside your network you can add a pause by
hitting the letter "D" when inserting the telephone number. Every "D" entered
into the dialing sequence will add a three (3) second delay.
Press * when done.
The word NAME will appear on the display.
Press #.
Press MODE button until the desired letter appears. (If the MODE button is
depressed over 2 seconds, letters will appear continuously.)
Press the START/COPY button to record the letter.
Continue until all selections are made.
Press*.
16 one-touch numbers can be represented by the letters (A to D), numbers (0 through 9) and the
symbols (*and #). 64 speed-dial numbers of two (2) digits can be represented by(01 through 64).
Page 15

10
G. Turning off the automatic paper cutter to receive continuously
If you wish to receive continuously (say, a computer printout or a long chart or graph), follow these
procedures:
1. Press the MODE key five (5) times. SET UP 1 appears on the display.
2. Press the START/COPY button six (6) times.
3. Make your selection by pressing either "0" (no cutter) or "1" (cutter).
H. Reduction
The FAX-1000 will automatically reduce the document size to accomodate the destination
equipment. To engage the reduction mode;
1. Press the MODE button five (5) times. SET UP 1 appears on the display.
2. Press the START/COPY button five (5) times.
3. Make your selection by pressing either "0" (no reduction) or "1" (automatic
reduction).
NOTE: The display returns to the initial display if no switch is pressed for more than 30 seconds.
Page 16

11
OPERATING THE UNIT
I. THE COPY MODE
The easiest way to start using the unit is to try out the COPY MODE. To make a copy, follow the
simple instructions below:
1. Make sure the unit is plugged in and that the unit has paper inside of it.
The DISPLAY will show the year, month, day and time and the word READY.
2. Insert the document you wish to copy into the guide of the unit, as shown in
the diagram above. The edges of the guide should be adjusted to fit the
document. The text should be FACING you.
3. Press the START/COPY button on the front panel.
As soon as you press the START/COPY button, the unit will start pulling the
document through the scanning area and you will see it begin to emerge at the
bottom of the unit.
4. When the unit completes copying the document, the original will be completely
free of the unit. The copy will be cut automatically.
NOTE: HALF TONE and FINE modes are set automatically while the FAX-1000 is functioning as a
copier. For additional information about these modes, see below.
Page 17

12
II. HOW TO TRANSMIT DOCUMENTS
A. Preparing to transmit documents
To prepare for document transmission, follow these steps;
1. Make sure the power is ON and the display indicates the year, month, date and
time. The displayed prompt will read READY.
2. Insert the document into the guide face up. The display will continue showing
the year, month, date and time. The READY will prompt you with a message -
ENTER TEL NUMBER.
3. If you wish, you can set the resolution by pressing the FINE button. This will
set either the FINE resolution, in which case the lamp above the button will light,
or, if the unit was originally set to FINE, pressing the button will switch it to
standard (STD). In this case, the lamp will go off.
Use FINE resolution for transmitting pictures, small print, detailed drawings, etc.
Use STD (standard) resolution for normal documents.
4. If the document to be transmitted contains halftones, you can press the MODE
button to set half tone. The display will say FIALF TONE OFF and offer a choice 0;OFF 1:ON. To set the half tone, press "1". The display will show the year,
month, date and time and will request - ENTER TEL NUMBER.
The half tone mode is cancelled automatically when the tranmission is completed,
or after completion of copying or after a document is ejected. Flalf tone mode is
not available in the G2 mode.
B. Transmitting documents
Now, you are ready to transmit your document. The exact procedure for transmission depends on
your selection of one of four methods:
• Manual dialing
• On-hook dialing
• Speed dialing
• One-touch dialing
1. Manual dialing
Insert the document. The display shows the year, month, date and time and the
words ENTER TEL. NUMBER.
Pick up the handset.
Press MAN DIAL button. The Manual Dial lamp will light.
Dial the other party. The display will show the number dialed and the word
CALLING.
Depending on how the receiver is programmed, you may hear from one to
six rings. When the facsimile BEEP comes on, press the START/COPY button.
The display will show the telephone number and the words FIANG UP.
Hang up the handset and the FAX-1000 starts transmitting. The document
will be drawn into the unit. The display will continue to show the phone
number and will say SENDING.
When the transmission is completed, the document will emerge from the unit
and you will hear a BEEP tone to indicate a completed transmission.
Page 18

13
2. On-hook dialing
• Keep the handset on hook.
• Press MAN DIAL button. The manual dial lamp will light up.
• Dial the other party's number. The display will show the phone number.
Press the START/COPY button. The word "DIALING" will appear in display. When
dialing is complete then the word "CALLING" will appear. The word "CALLING" will
be replaced with the word "SENDING" when connection is made.
NOTE; When performing dialing in facsimile mode as stated above, the unit will automatically
REDIAL twice if no connection is made. If no connection is made after second redial, unit will alarm
and "NO ANSWER SIGNAL" will appear in screen.
3. Speed-dialing
The procedure for setting up speed dial numbers (up to 64 of them) is described on page 9.
Here, we are concentrating on transmitting documents using speed-dialing. The procedure is as
follows:
• Insert the document. The display shows the year, month, date and time and the
words ENTER TEL. NUMBER.
• Press the SPD DIAL button. A A sign appears on the display.
• Press the two-digit code representing the desired telephone number. The
display will show this code next to the A symbol. This is then replaced by the
actual preset telephone number represented by the code.
• Press the START/COPY button. The word DIALING will appear under the
telephone number.
• The rest of the operation is automatic. As the facsimile will complete the
connection and transmit the document, you will see the word CALLING appear
to be replaced by the word SENDING.
NOTE: When performing dialing in facsimile mode as stated above, the unit will automatically
REDIAL twice if no connection is made. If no connection is made after second redial, unit will alarm
and "NO ANSWER SIGNAL" will appear in screen.
4. One-touch dialing
The procedure for setting up one-touch numbers (up to 16 of them) is described on page 9.
The actual transmission procedure is:
• Insert the document. The display shows the year, month, date and time and the
words ENTER TEL. NUMBER.
• Press the letter, number or symbol representing the desired telephone number.
The display will show character. This is then replaced by the actual preset
telephone number represented by the code.
• The word DIALING will appear under the telephone number, to be replaced by
the word CALLING and then SENDING.
NOTE; When performing dialing in facsimile mode as stated above, the unit will automatically
REDIAL twice if no connection is made. If no connection is made after second redial, unit will alarm
and "NO ANSWER SIGNAL" will appear in screen.
If a "comment" was registered in the RECEIVING station, the comment will appear on the display of
your facsimile unit. This comment is the message from the receiving station.
Page 19

14
C. Transmitting multi-page documents
The FAX-1000 document feeder holds up to ten (10) pages. To transmit a multi-page document,
simply insert the pages (up to 10) into the feeder face up, select the appropriate method of dialing
and all ten pages will be transmitted one after another, starting with the top page. You may add
additional pages by inserting them behind the last page in the feeder.
To stop the transmission, simply remove the feeder pages which have not yet been transmitted
and push the STOP button.
D. Header transmission
When transmitted to a G3 unit, your documents will have a message printed at the top of the page.
This header lists the year, month, date and time of the transmission, your telephone number, the
name of your organization (or any other type of information), the serial number and the page
number. The header can be erased, when desired by turning the header off in SET UP 1.
E. Delayed transmission
The FAX-1000 is capable of delayed transmission using a timer. The procedure for setting up
delayed transmission is as follows:
1. Insert the document and press the MODE button three (3) times. The display
will read DELAYED TX 0:OFF 1 :ON.
2. Press "1" to select delayed transmission. The display will read DELAYED TX
TIME.
3. Bearing in mind that the unit utilizes a 24-hour clock, set the time by simply
pressing the appropriate numbers. These will appear in the display. Press >ieto
set.
4. Dial in the other party's phone number using any of the four methods shown
above. After you've made sure that you have the right number, press H«. The
display will show the telephone number and DELAYED TX with the desired time.
The unit will initiate the transmission at the desired time automatically.
NOTE; When performing dialing in facsimile mode as stated above, the unit will automatically
REDIAL twice if no connection is made. If no connection is made after second redial, unit will alarm
and "NO ANSWER SIGNAL" will appear in screen.
Page 20

15
F. Polling transmission
A previously inserted document can be transmitted to another facsimile unit when the receiving
unit polls the transmitting unit.
To set the FAX-1000 into a polling mode as a transmitter of documents, follow this procedure:
1. Press the MODE button until the display shows POLLING OFF 0:OFF 1:ON.
2. Insert the documents into the feeder. Set resolution and half tone if necessary.
3. Press "1" and the display will say POLLING READY.
4. At a time convenient to the other party, they will poll your unit.
If you want to use your FAX-1000 as a receiver of documents, follow this procedure;
1. Press the MODE button until the display shows POLLING OFF 0:OFF 1;ON.
Do not insert any documents into the feeder.
2. Press "1" and the display will say POLLING ENTER TEL. NUMBER.
3. Dial the polled party using any of the dialing methods discussed above.
4. If in AUTO RECEIVE mode, after confirming the telephone number, you can walk
away. The FAX-1000 will perform the operations automatically.
If you are polling manually, wait until you hear the tone from the other unit, press
START/COPY, hang up and then you can walk away.
IMPORTANT TRANSMISSION INFORMATION:
Do not transmit or copy very thick pages (over 0.12mm thick). If you have to transmit such pages,
use a photocopier (not the FAX-1000) to make a copy and transmit the copy instead.
Do not transmit or copy wrinkled, wet documents. Make a photocopy and transmit it instead.
Do not transmit or copy documents printed on thick photographic paper, metal or textile. Make a
photocopy and transmit it instead.
Do not transmit or copy documents that are too thin (tissue paper, tracing paper, etc.) The
thinnest paper suitable for transmission is 0.055mm. Make a photocopy and transmit it instead.
Remove all staples and paper clips from the documents to be transmitted.
Do not transmit or copy documents held together by scotch tape. Photocopy them and transmit
the photocopy.
Do not load the feeder with more than ten (10) documents at a time.
The following types of documents should not be multifed in the documents stacker, but fed
individually. (Documents in carrier sheets and glossy papers)
Do not transmit documents of different sizes and/or thickness together.
Minimum document size that can be transmitted is: Width - 5.8", Length - 3.5"; maximum
document size that can be transmitted is: Width - 10.1", Length — 47".
Page 21

16
III. HOW TO RECEIVE DOCUMENTS
A. Automatic reception of documents
To receive documents automatically, set the RECEIVE switch on the front of the unit to ON
position.
There is actually nothing you have to do to receive documents in this mode. When someone dials
your number, the FAX-1000 will automatically answer the phone. The display will show the year,
month, date and time and the word READY which will then change to the word RECEIVING. Very
shortly, you will hear the unit working and almost immediately, you will see the document
emerging from the unit.
The FAX-1000 will receive a transmission even if you leave documents in the feeder, provided the
RECEIVE switch is in the ON position.
The Brother FAX-1000 is capable of unattended operation. That is, you can receive
documents even when you are not there. All you have to do is leave the RECEIVE switch in the
ON setting. When you come back, you will see the received documents. This feature allows your
associates to transmit their documents to you when the phone rates are lowest, in the evening,
on weekends or at night.
B. Manual reception of documents
If the unit is not set for automatic reception, i.e., if the RECEIVE switch is set to OFF, you can
receive documents if you follow these simple instructions:
a. Pick up the phone when you hear a ring. If you hear an audio tone instead of a
voice, you know that someone is trying to transmit to you.
b. Press the START/COPY button.
d. Replace the handset.
e. The unit starts receiving the transmission.
NOTE: The FAX-1000 can count the number of rings and switch to RECEIVE mode automatically
after a specified number of rings.
C. FOOTER PRINT
The following data can be printed at the bottom of the received page: Date, Time, Page number.
This footer data can be deleted as follows:
1. Press the MODE button five (5) times. The display will read SET UP 1 START
SW.
2. Press START/COPY button twice. The display will state: FOOTER PRINT ON
0:OFF 1:ON.
3. Press "0" to delete the footer. The display will read FOOTER PRINT OFF
COMPLETED.
4. If you wish to include the footer, go through steps #1 and #2 and press "1" in
step #3.
Page 22

17
IV. HOW то USE THE TELEPHONE HANDSET
The FAX-1000 can be used as a telephone with manual, speed dialing and one-touch features. If
you wish to use this unit as a telephone, do not insert a document into the feeder.
To use the FAX-1000 as a telephone in the manual mode, pick up the handset, press the MAN.
DIAL button and dial the other party's telepone number.
To use the FAX-1000 as a telephone in the speed dialing mode, pick up the handset, press the
SPD DIAL button and press the two-digit code for the dialed number.
To use the FAX-1000 as a telephone in the one-touch dialing mode, pick up the handset and
press the one-touch key.
To dial the last number called, first press the SPEAKER button, then press the REDAIL
button. The last number dialed whether by one-touch dialing, speed dialing, on-hook dialing or
manual dialing, will be redialed. You can also use redial by picking up handset and pressing
REDIAL button.
To do on-hook dialing, press the SPEAKER button, use a dialing mode of your choice and pick
up the handset when your party responds. To clear the speaker mode, press the SPEAKER
button again.
To mute vour voice while talking, press the MUTE button on the handset and release this button
when you wish to be heard again.
To make a call reservation while receiving or transmitting, press CALL button. The indicator lamp
will light up. After a page is transmitted or received, the unit will flash an indicator lamp and emit a
seven seconds buzz. The display of the called party will indicate your name / company name and
CALLING. Pick up the handset, press the STOP button and talk. The display will show the year,
month, date and time and the word READY. If neither party picks up the phone, the call
reservation is cancelled automatically after the completion of the transmission.
To transmit the line hold tone, press the MODE button until you see the display showing MUTING.
Then, you can place the handset on the hook without disconnecting the line. To resume talking,
press the MODE button again. The hold line tone will stop, the display will indicate READY and
you can resume conversation.
Page 23

18
V. THE JOURNAL,TRANSMISSION AND OTHER REPORTS
A. The journal
The FAX-1000 prints out a Journal that lists all of the transactions, both in transmitting and
receiving modes. The Journal lists:
The serial number of the transaction
The telephone number of the transmitter/receiver
An identification as a sender (S) or receiver (R)
Number of pages in the transmission
Starting time
Total communication time
Result (indicates G3 or G2 and adds "OK"for successful communication and "NG"
for an unsuccessful one)
The identification of the transmitting or receiving party
While the Journal is printed out automatically, it is possible to request that a journal be printed out
at your convenience. To do so, press the MODE button until the display indicates PRINT 1;
JOURNAL 2: DIAL. Press "1" to start printing the Journal.
To turn otf the automatic printing of the Journal;
1. Press the MODE button until you see SET UP 1 and "MENU: START SWITCH"
on the display.
2. Press START/COPY button three (3) times so that the display states: JOURNAL
ON 0:OFF1:ON.
3. To supress the automatic printing of the Journal, press 0. The display will
indicate JOURNAL OFF COMPLETED.
B. Page counter
If you wish to know the total number of pages transmitted by the FAX-1000 since its installation,
press the MODE button four (4) times. Make sure that there is no document in the feeder when
you are requesting this report.
C. The telephone numbers report
To print out a complete list of one-touch and speed-dialing telephone numbers stored in the FAX1000, press the MODE switch three (3) times. The display will say PRINT 1: Journal 2: DIAL. By
pressing "2" you will get a one page listing of the 16 one-touch numbers and a two page printout
of the 64 speed dial numbers.
Page 24

19
D. The transmit report
If you desire, then after every transmission the FAX-1000 can print out a transmit report which lists:
The telephone number of the receiver
The receiver's name
The number of pages
Total time
The result of the transmission
Error page (shows the pages which were not transmitted due to errors on the
communication line.
To turn ON the automatic printing of the transmission report:
1. Press the MODE button until you see SET UP 1 and "MENU: START SWITCH"
on the display.
2. Press START/COPY button four (4) times so that the display states:
TX REPORT ON 0:OFF1:ON.
3. To activate the automatic printing of the REPORT, press 1. The display will
indicate TX REPORT ON COMPLETED.
Page 25

20
TROUBLESHOOTING
Please check this table of possible problems before requesting a service visit.
DISPLAY
CONNECTION BAD
PLEASE RETRY
LINE BUSY
PLEASE RETRY
CLOSE COVER
NO PAPER
PAPER JAM
DOCUMENT JAM
WAIT The temperature inside the unit is high. Wait until the unit cools off,
BUZZER & ALARM EXPLANATION
Alarm sounds for 30 sec.
Alarm sounds for 30 sec. Line is busy or the receiver does not
Alarm sounds for 30 sec. No recording paper.
Alarm sounds for 30 sec. Recording paper is jammed. Turn the POWER switch OFF
Alarm sounds for 30 sec.
Transmission cannot be completed. Press STOP to eject the
answer.
The cover is opened.
Document is jammed.
ACTION
document and retransmit.
Press STOP and resend.
Close the cover.
Insert a new paper roll.
and remove the jammed
paper.
Turn the POWER switch OFF
and remove the jammed
document.
as will be evidenced by the
display going off.
SPEAKER ON The phone line is connected to the monitor
speaker of the unit.
NONUMBER
STORED
Short alarm sounds.
No telephone number is stored in the
corresponding speed dial or one-touch
dial key.
Press the SPEAKER switch
again to cancel this mode.
Either dial manually or store
the required phone number.
Page 26

TO REMOVE JAMMED ORIGINAL DOCUMENTS:
The display shows "DOCUMENT JAM" message and the alarm beeps for 30 sec.
Press the STOP button. The alarm stops. Turn the POWER switch OFF.
Press the OPEN button at the upper right of the control panel.
Open the front cover of the unit and gently remove the jammed paper.
Using both hands, close the cover.
Turn the POWER button ON.
TO REMOVE JAMMED RECORDING PAPER:
The display shows " PAPER JAM" message and the alarm beeps for 30 sec.
Press the STOP button. The alarm stops. Turn the POWER switch OFF.
Press the OPEN button at the lower left of the control panel.
Open the rear cover of the receiver.
Remove jammed paper inside the cutter by pulling out the cutter cover.
Dismount the guide inside to remove pieces of paper. Hold the cutter cover
with both hands, sliding it into the upper cover.
Cut the edge of the recording paper with scissors to even it out.
Close the cover using both hands.
Press the STOP button for approximately one second until the edge of the
recording paper comes out.
21
Page 27

ONE-TOUCH TELEPHONE DIRECTORY
22
ONE-TOUCH
NUMBER
A
B
C
D
1
2
3
4
5
6
7
TELEPHONE NUMBER
NAME
8
9
0
*
#
Page 28

SPEED-DIAL DIRECTORY
23
Speeddial No.
01
02
03
04
05
06
07
08
09
10
11
12
13
14
15
16
17
18
19
20
21
22
23
24
25
26
27
28
29
30
31
32
Telephone
Number
Name
Speeddial No.
33
34
35
36
37
38
39
40
41
42
43
44
45
46
47
48
49
50
51
52
53
54
55
56
57
58
59
60
61
62
63
64
Telephone
Number
Name
Page 29

24
SPECIFICATIONS
Type
Lines
Connection
Transmission speed
Scanning line density
Document size
Recording paper size
Paper cutting
Transmission mode
Band compression
Recording method
Reading
Desktop transceiver
Public Switched Telephone Network (PSTN)
Direct
9600/7200/4800/2400 BPS automatic fallback
Horizontal; 8 dots/mm (203 LPI)
Vertical; 7.7 dots/mm (196 LPI), Standard 3.85 dots/mm (98LPI)
Width; 5.8" - 10.1"
Length; 3.5" to 47"
8.5"(width) X 164' (length of the roll)
10.1" (width) X 164'(length)
Automatic
G3 and G2
MH and Unique modes
Thermal head
Contact image sensor
Power consumption
Dimensions
Weight
Environment
Compatibility
Telephone Handset Dialing; Tone/Pulse (DTMF/IOpps)
AC 120V (Operation max.) 140W (normal) 30W (standby) 17W
9.0" X 15.4" x8.3"
Approximately 19.8 lb
Normal office temperature and humidity.
Excessive temperatures (both low and high) and excessive
humidity may affect the operation of the unit.
CCITT Group 3 and 2
Station memories; 80 (16 one touch 64 speed dial, 25 digits
each).
Last number redial.
Connection requirement; USOC RJ11C Modular Jack or
equivalent.
Specifications are subject to change without notice
Page 30

Page 31

Page 32

U82717001 ®
Printed in Japan
 Loading...