

Page 1
BRDR200TECH
Technical Instructions Machine Compatibility OEM Info Tools 1
CORPORATE
LOS ANGELES, USA
US 1 800 394.9900
Int’l +1 818 837.8100
FAX 1 800 394.9910
Int’l +1 818 838.7047
ATLANTA, USA
US 1 877 676.4223
Int’l +1 770 516.9488
FAX 1 877 337.7976
t’l +1 770 516.7794
In
DALLAS, USA
US 1 877 499.4989
Int’l +1 972 840.4989
FAX 1 877 774.1750
Int’l +1 972 840.1750
MIAMI, USA
US 1 800 595.429
t’l +1 305 594.3396
In
FAX 1 800 522.8640
Int’l +1 305 594.3309
NEW YORK, USA
US 1 800 431.7884
Int’l +1 631 345.0121
FAX 1 800 431.8812
t’l +1 631345.0690
In
SANFORD,USA
US 1 800 786.9049
Int’l +1 919 775.4584
FAX 1 800 786.9049
t’l +1 919 775.4584
In
ONTO, C AN
OR
T
CAN 1 877 848.0818
Int’l +1 905 712.9501
FAX 1 877 772.6773
Int’l +1 905 712.9502
G
AR
AIRES,
UENOS
B
ARG 0810 444.2656
Int’l +011 4583.5900
X +011 4584.3100
A
F
MELBOURNE, AUS
AUS 1 800 003. 100
Int’l +62 03 9561.8102
AX 1 800 004.302
F
Int’l +62 03 9561-7751
SYDNEY, AUS
AUS 1 800 003.100
Int’l +62 02 9648.2630
X 1800 004.302
A
F
Int’l +62 02 9548.2635
MONTEVIDEO,URY
URY 02 902.7206
Int’l +5982 900.8358
FAX +5982 908.3816
JOHANNESBURG, S.A.
S.A. +27 11 974.6155
FAX +27 11 974.3593
SSeeee ppaaggee 88
Photo 1
Photo 2
Photo 3
Part Number: DR-200
Yield @ 20,000 pgs
Pages/Min.: 6
Resolution: 600x600 dpi
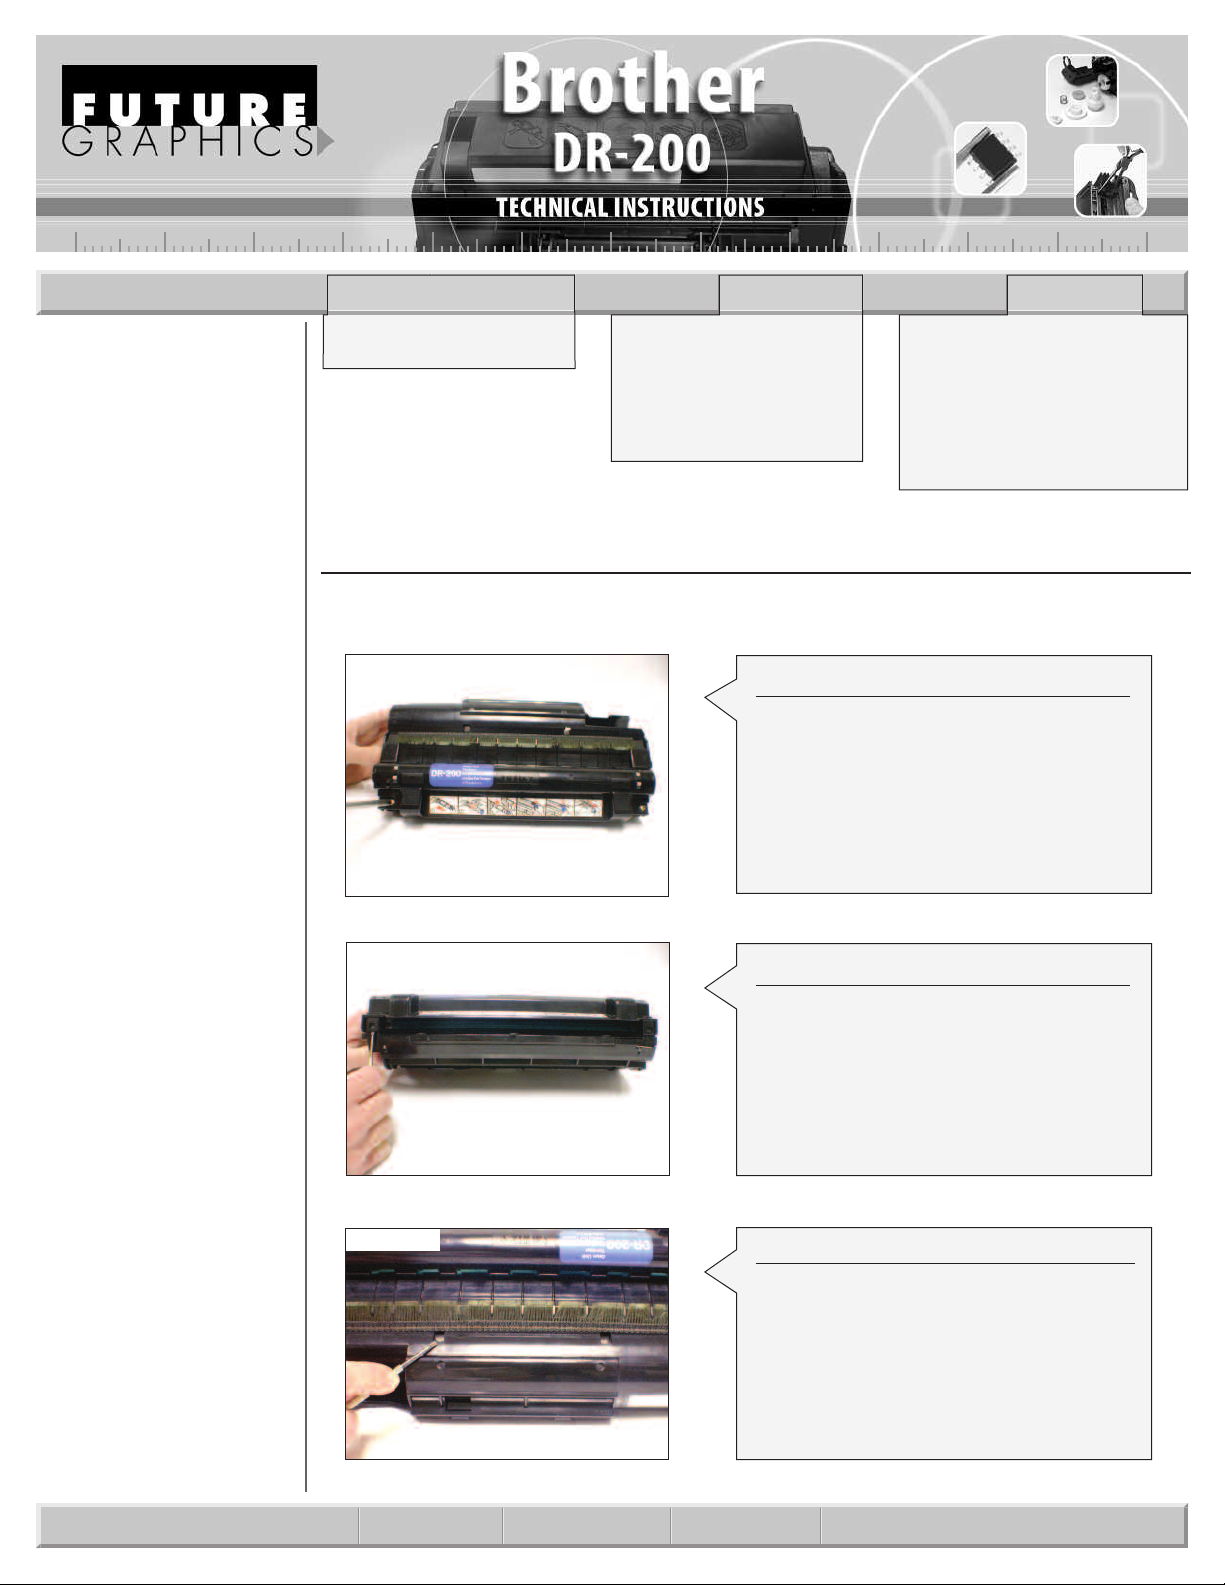
Step 1
Remove the two screws from the top of
the drum unit.
(See Photo 1)
ep 2
St
Using a small flat blade screwdriver,
elease the two locking tabs located just
r
w the two screws.
elo
b
(See Photo 2)
ep 3
St
Locate the metal toner cover in the two
slots on top of the cartridge.
(See Photo 3)
Phillips Screwdriver
mall flat blade Screwdriver
S
SSuupppplliieess RReeqquuiirreedd:
:
Cotton Swab
99% Alcohol
Replacement Drum
Page 2
2 Brother DR-200 Technical Instructions
Photo 5
Notes
Photo 4
Photo 6
Photo 7
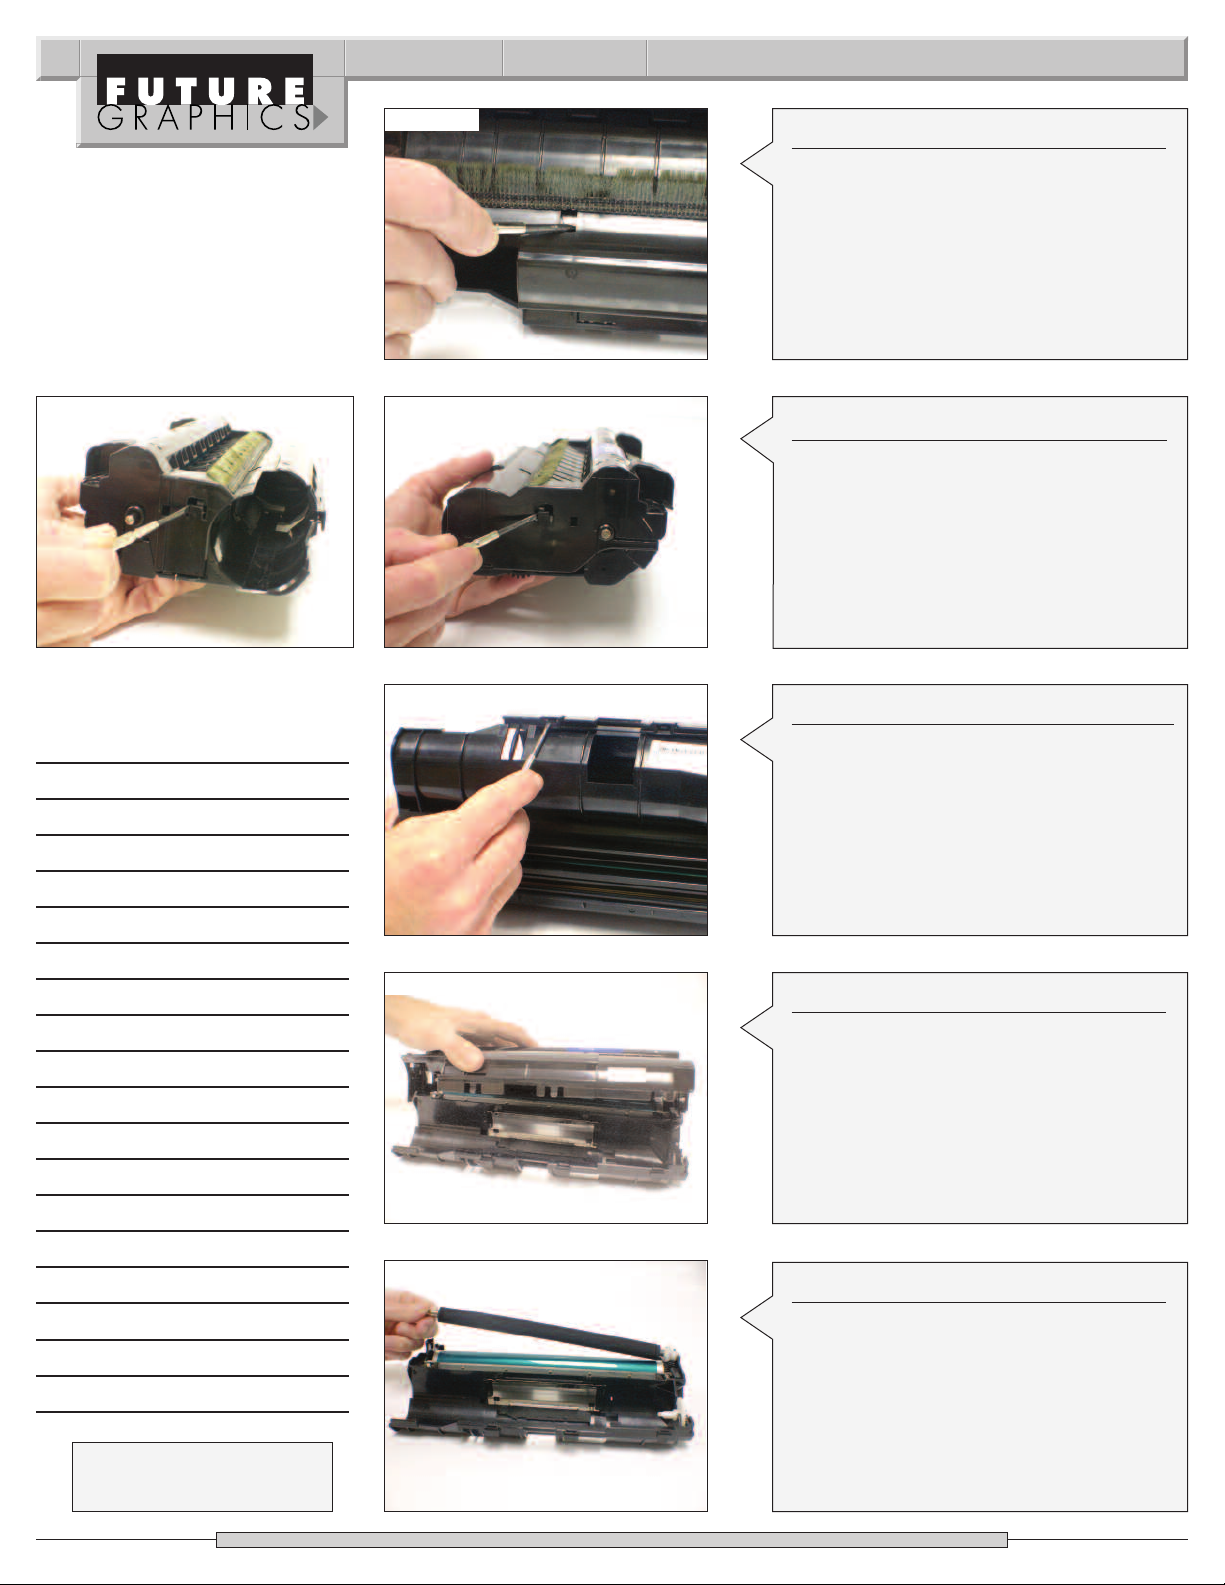
Step 4
Using a small flat blade screwdriver, push
the metal toner fill plate down (toward
the drum), until the two plastic guide tabs
re visible.
a
(See Photo 4)
Step 5
Using the flat blade screwdriver, release
the two plastic locking tabs from each
side of the cartridge.
(See Photo 5 & 6)
Step 6
Release the three plastic locking tabs from
the front of the cartridge.
o 8
hot
P
Photo 9
(See Photo 7)
Step 7
Lift the lid up to separate the two sections
tridge.
of the c
ar
(See Photo 8)
Step 8
Lift the transfer roller away from
Clean the roller using dry
ompr
um.
essed air
.
the dr
c
Need trustworthy, detailed Technical
Instructions for another engine?
Visit: www.futuregraphicsllc.com
(S
ee P
hoto 9)
Page 3
Brother DR-200 Technical Instruction 3
Photo 10
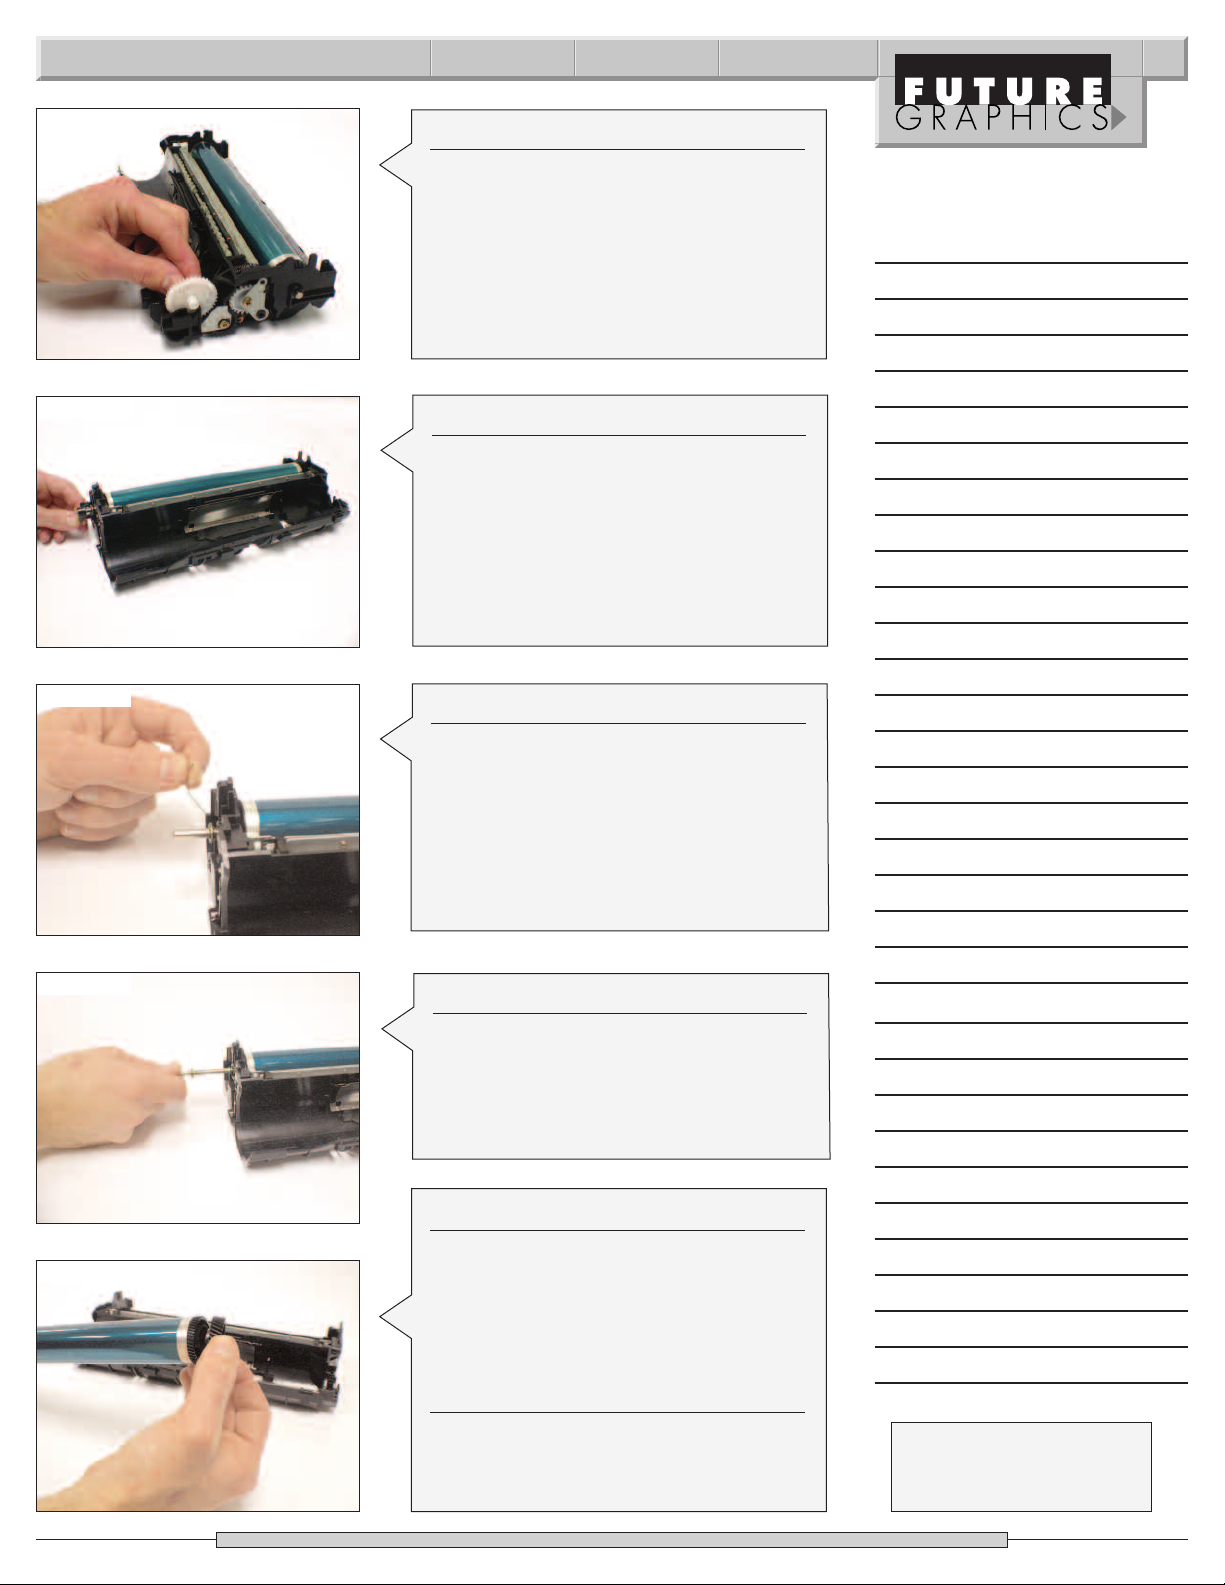
Step 9
Remove the toner hopper agitator drive
gear from the side of the cartridge.
See Photo 10)
(
Notes
Photo 11
Photo 12
o 13
hot
P
Step 10
Rotate the drum axle locking hub counter clock-wise. Slide the locking hub from
the end of the drum axle.
(See Photo 11)
Step 11
Remove the transfer roller contact wire
from the side of the cartridge.
(See Photo 12)
Step 12
Slide the drum axle out from the drum.
Photo 14
(See Photo 13)
Step 13
Lift out the drum. The drums drive gear
onsists of two separate gears. The drive
c
gear is needed when r
eplacing the dr
um.
(See Photo 14)
Step 14
ump out the toner from the cartridge.
D
essed air or a vacuum,
ompr
sing dr
U
clean the cartridge.
y c
N
eed help with a particular remanu-
facturing problem?
Call the Technical Resource Center from
8am - 5pm PST: 800 394.9900
Page 4
4 Brother DR-200 Technical Instructions
Notes
Photo 15
Photo 16
Photo 17
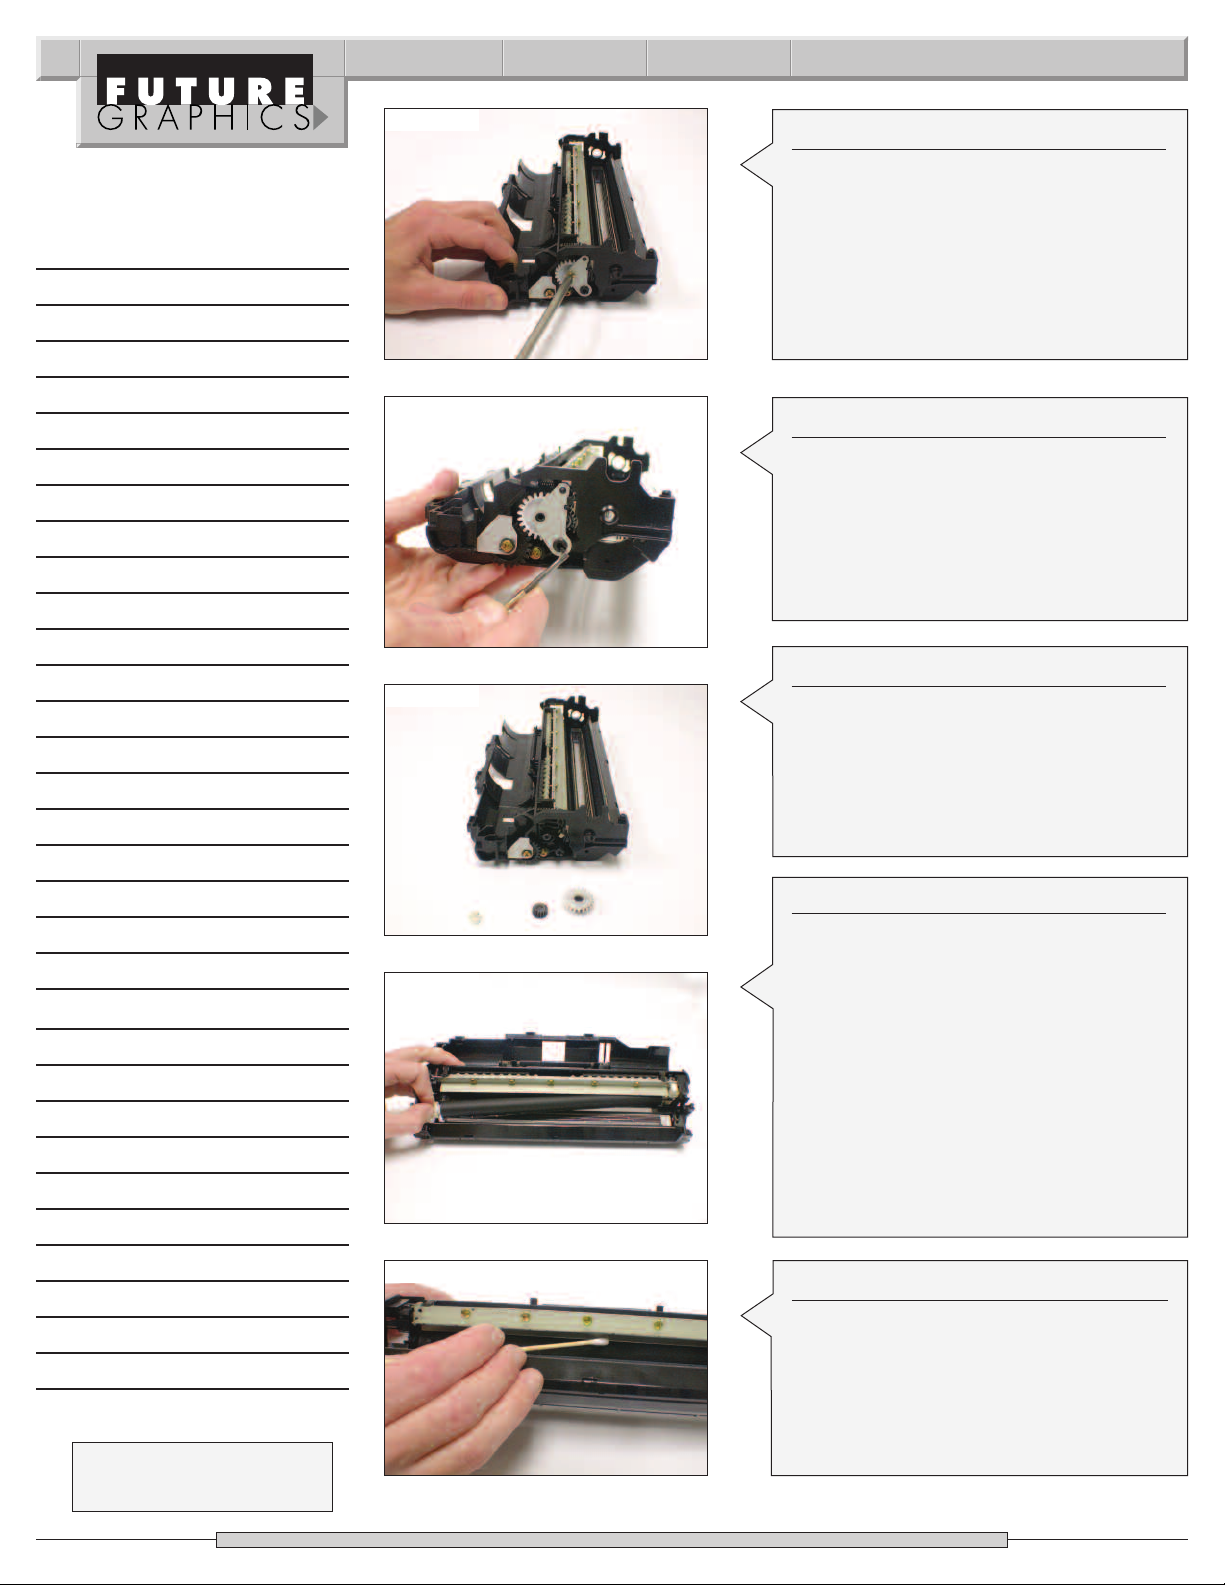
Step 15
emove the screw holding the metal
R
developer roller end plate.
(See Photo 15)
Step 16
Release the plastic locking tab that holds
the metal developer roller end plate.
(See Photo 16) Remove the end plate.
ep 17
St
Remove the large white gear, the developer roller drive gear, and the developer
roller bearing from the side of the cartridge.
o 18
hot
P
Photo 19
(See Photo 17)
Step 18
Lift the developer roller out from the
drive gear end, and slide the roller away
from the contact end of the cartridge.
(See Photo 18) Clean the roller using dry
compressed air and a lint free cloth. Clean
the developer roller bearing using a lint
NNOOTTEE:
free cloth and alcohol.
:
Visually
inspect the developer roller. These rollers
e a lot of wear and are possibly
usually ha
v
unusable for a second cycle. You may
have to go through a few cores before
finding a good roller.
Step 19
Carefully clean the doctor blade using a
cotton swab and Acetone.
(See Photo 19)
Need trustworthy, detailed Technical
Instructions for another engine?
Visit: www.futuregraphicsllc.com
Page 5
Brother DR-200 Technical Instruction 5
Photo 20
Photo 21
Photo 22
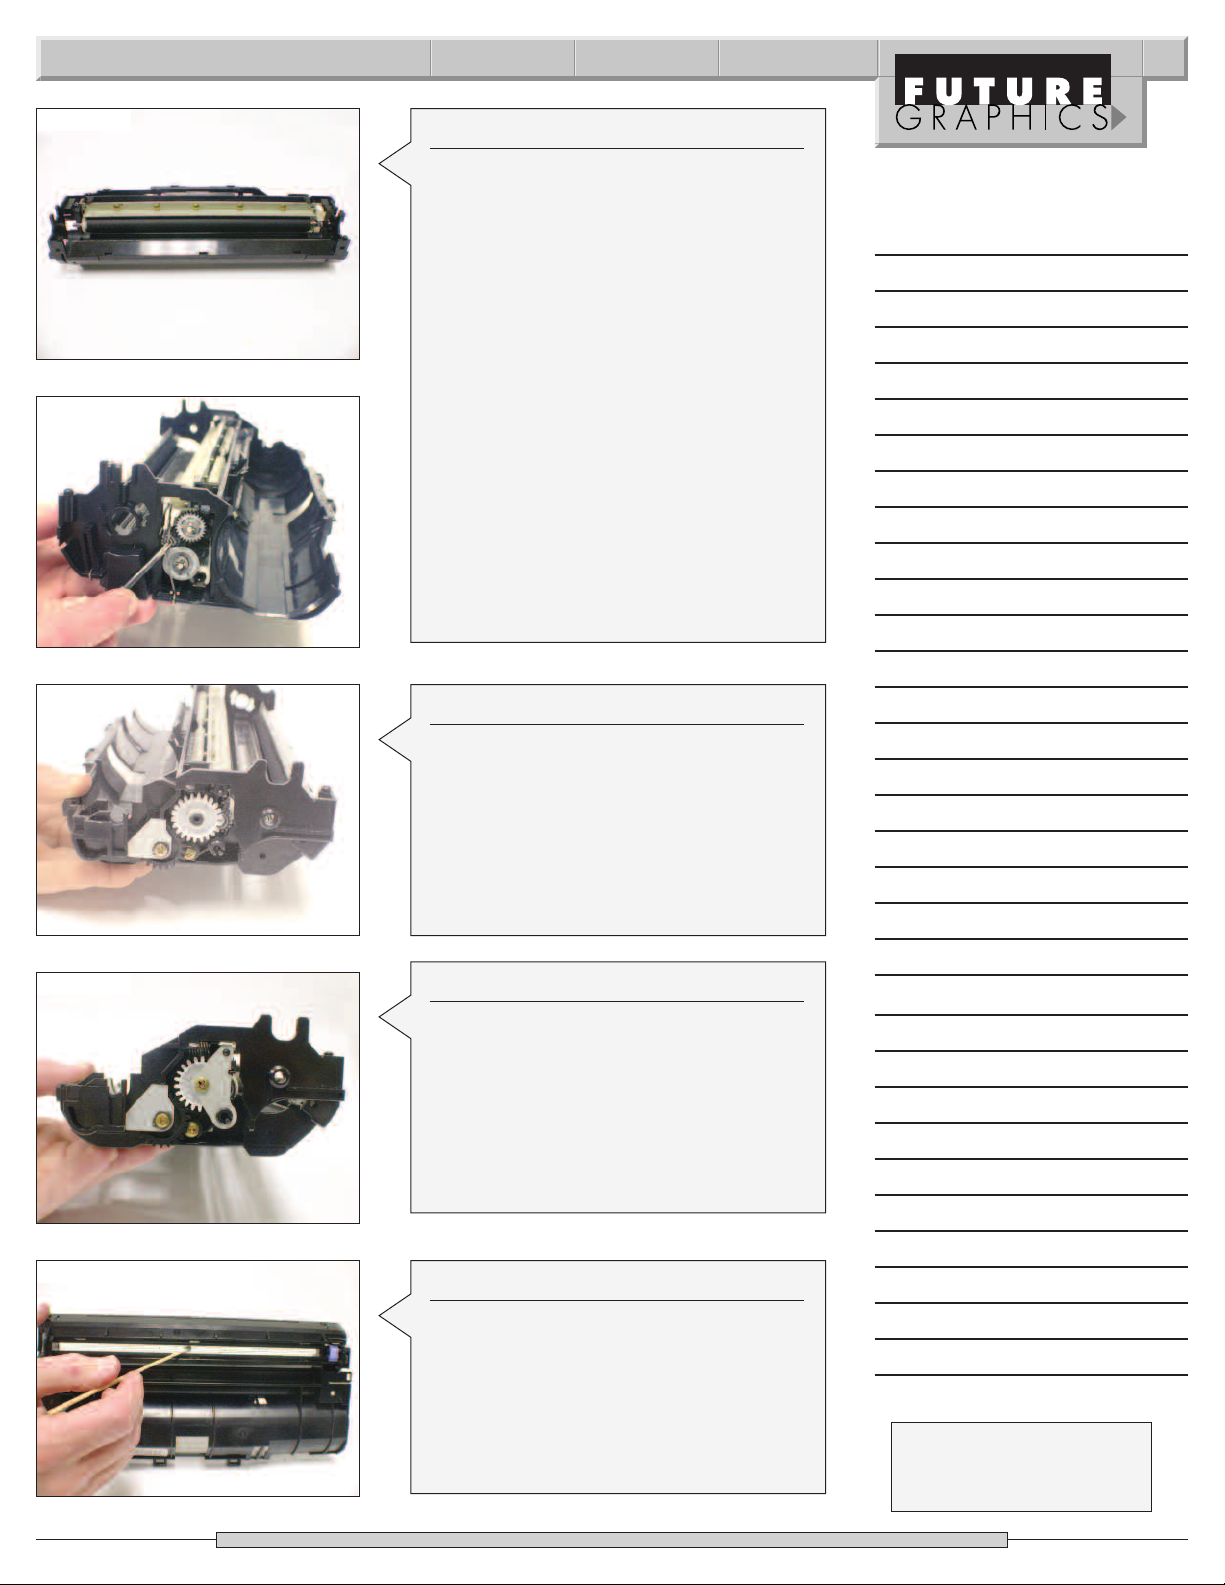
Step 20
Place the developer roller bearing back
onto the drive gear end of the developer
roller. Install the developer roller into the
artridge.(See Photo 20)
c
NNOOTTEE:
:
The developer roller has a halfmoon shape and must fit into the gear on
the end of the cartridge. (See Photo 21)
Step 21
Install the developer roller bearing, drive
gear and the large white gear onto the
end of the cartridge.
Notes
o 23
hot
P
Photo 24
(See Photo 22)
Step 22
lace the dev
P
onto the end of the cartridge. Install the
ew that holds the end plate in place.
scr
(See Photo 23)
eloper roller metal end plate
Step 23
Clean the corona cage and wire using a
on swab and alcohol.
ott
c
(See Photo 24)
N
eed help with a particular remanu-
facturing problem?
Call the Technical Resource Center from
8am - 5pm PST: 800 394.9900
Page 6
6 Brother DR-200 Technical Instructions
Notes
Photo 25
Photo 26
Photo 27
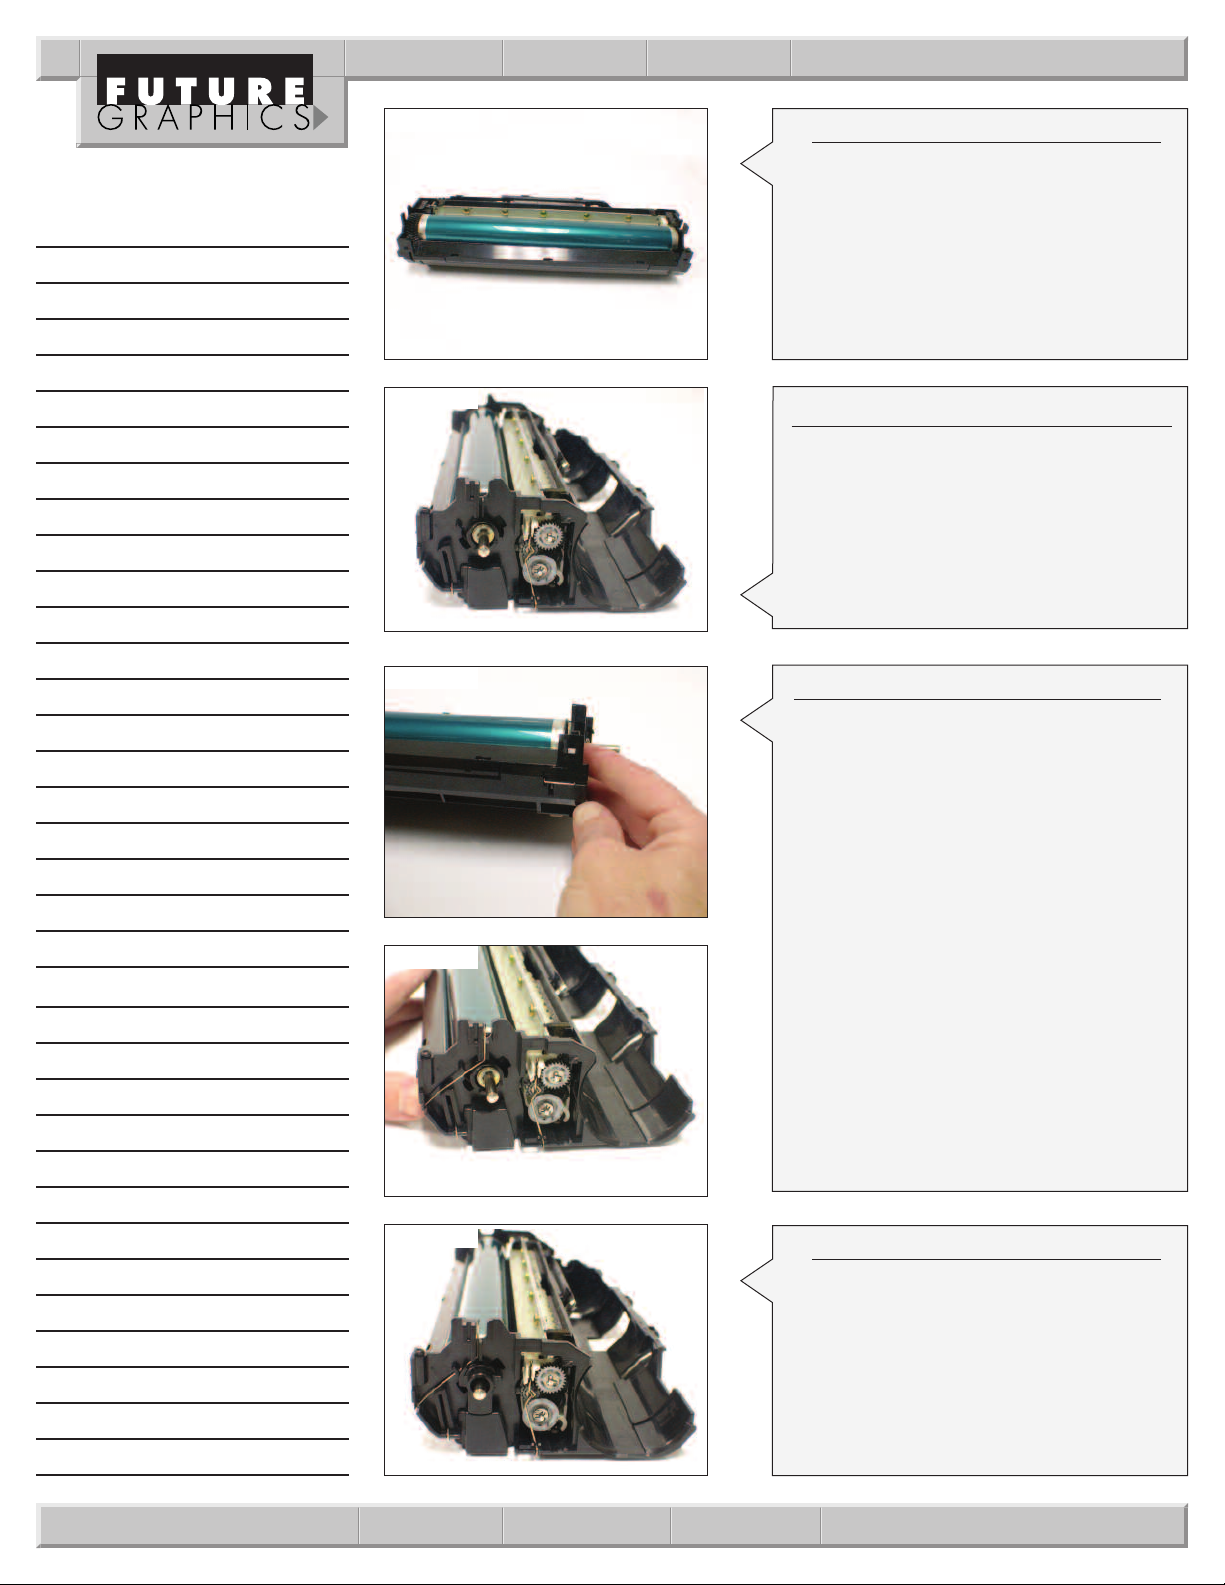
Step 24
Install the drum’s loose drive gear
onto the gear end of the drum.
Carefully place the drum into the
cartridge.
(See Photo 25)
Step 25
Slide the drum axle through the drum
beginning on the contact side of the
cartridge.
(See Photo 26)
Step 26
Place the “L” shaped end of the transfer
roller contact wire into the slot in the
cartridge as shown in photo 27.
Photo 28
The transfer roller contact wire should fit
into the end of the cartridge as shown in
photo 28.
o 29
hot
P
St
ep 27
Install the drum axle hub so the hub
holds the axle and the transfer roller
contact wire in place. (See Photo 29)
Page 7
Brother DR-200 Technical Instruction 7
Photo 30
Photo 31
Photo 32
hoto 33
P
S
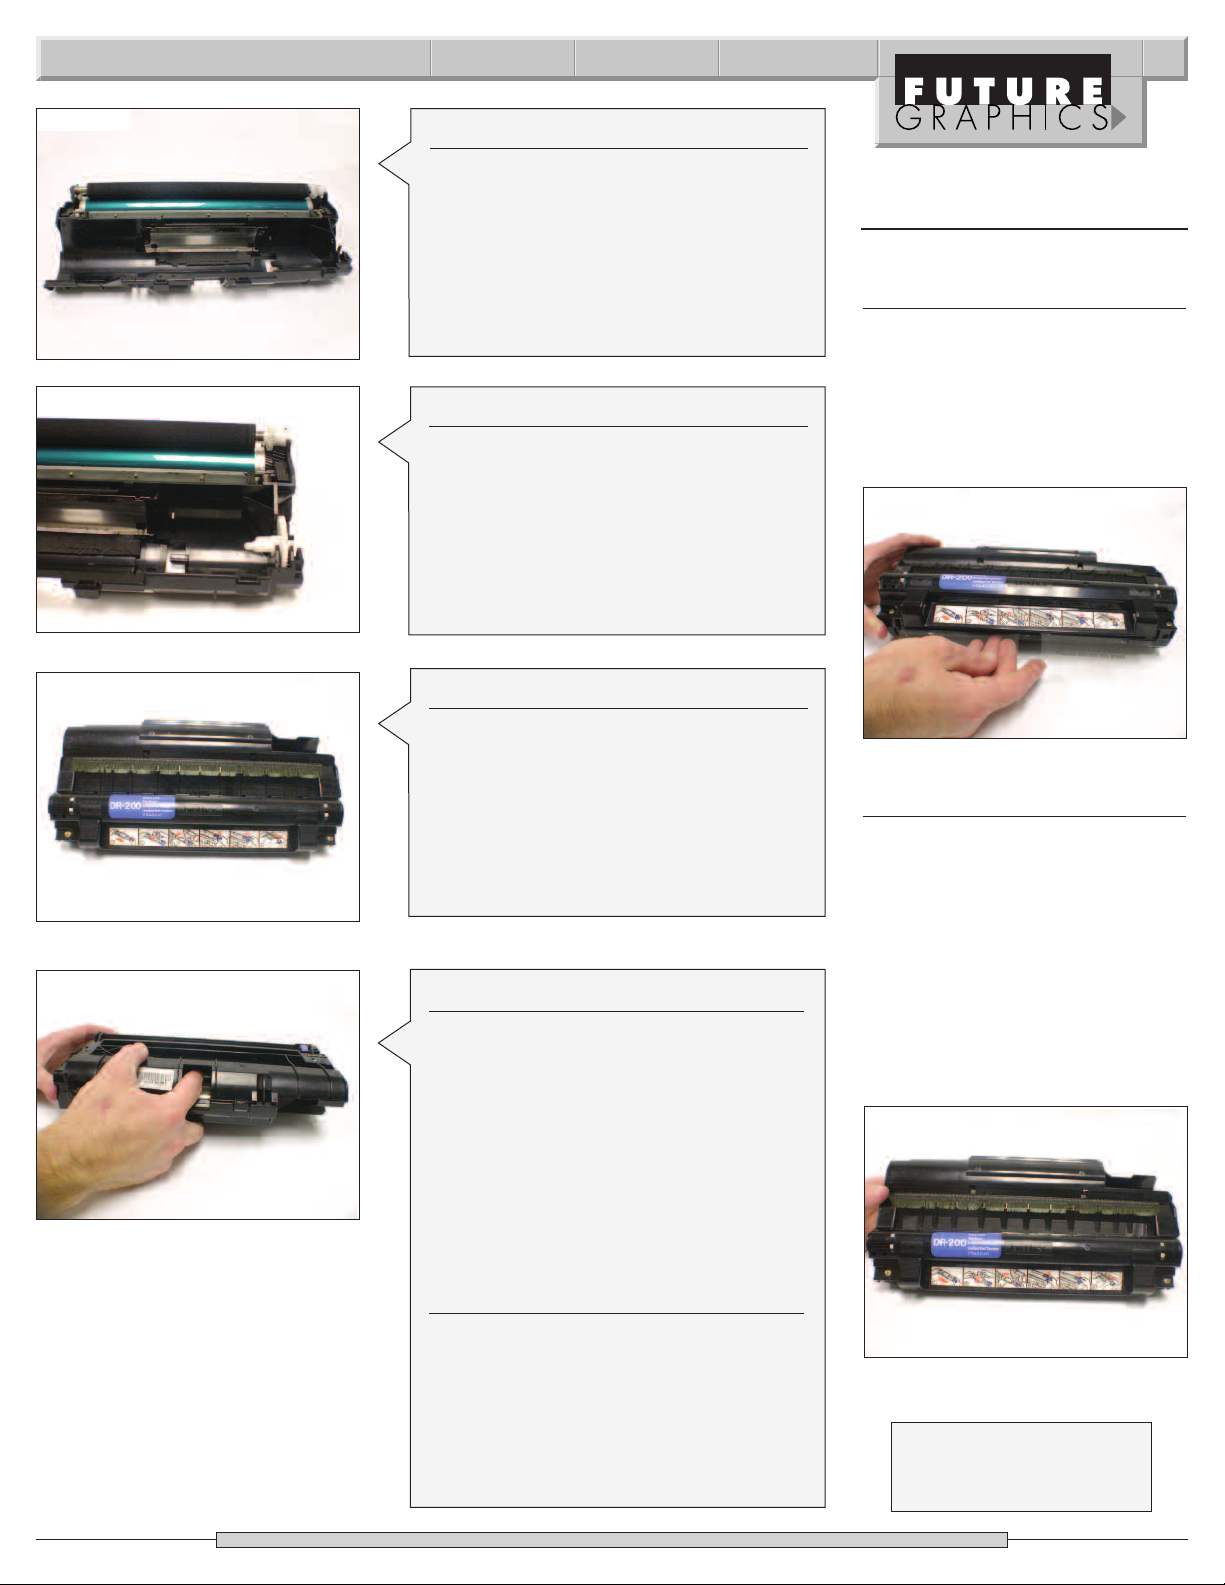
tep 28
Place the transfer roller onto the drum.
See Photo 30)
(
Step 29
Place the toner hopper agitator drive gear
onto the cartridge.
(See Photo 31)
Step 30
Place the cartridge cover on top of
the cartridge and press down until the
locking tabs hold the cover in place.
Install the two screws that also hold the
cover.
(See Photo 32)
ep 31
St
lip the cartridge upside down. Use your
F
ver
er
v
o
ing the
finger t
o slide the metal t
until the metal co
toner fill opening.
hoto 33)
ee P
(S
er is just c
v
oner fill c
o
RREESSEETTTTIINNGG TTHHEE DDRRUUMM CCOOUUNNTTEER
R
Step 1
Install the jagged end of the clear
reset sheet into the cartridge
between the drum and transfer
roller.
(See Photo 1)
Photo 1
Step 2
Rotate the drum so the reset sheet
is fed into the cartridge and the end
of the sheet is flush with the end of
the cartridge with the jagged end
of the sheet sticking out the top of
the cartridge. (See Photo 2)
NNOOTTEE:
:
Once the sheet is fed
thr
ough the pr
will reset the drum counter.
Photo 2
inter, the machine
NNOOTTEE:
:
If the cover is out of position, an
insufficient amount of toner will get to
int will
the t
oner hopp
er and ligh
t pr
occur.
Step 32
Test cartridge.
N
eed help with a particular remanu-
facturing problem?
Call the Technical Resource Center from
8am - 5pm PST: 800 394.9900
Page 8
8 Brother DR-200 Technical Instructions
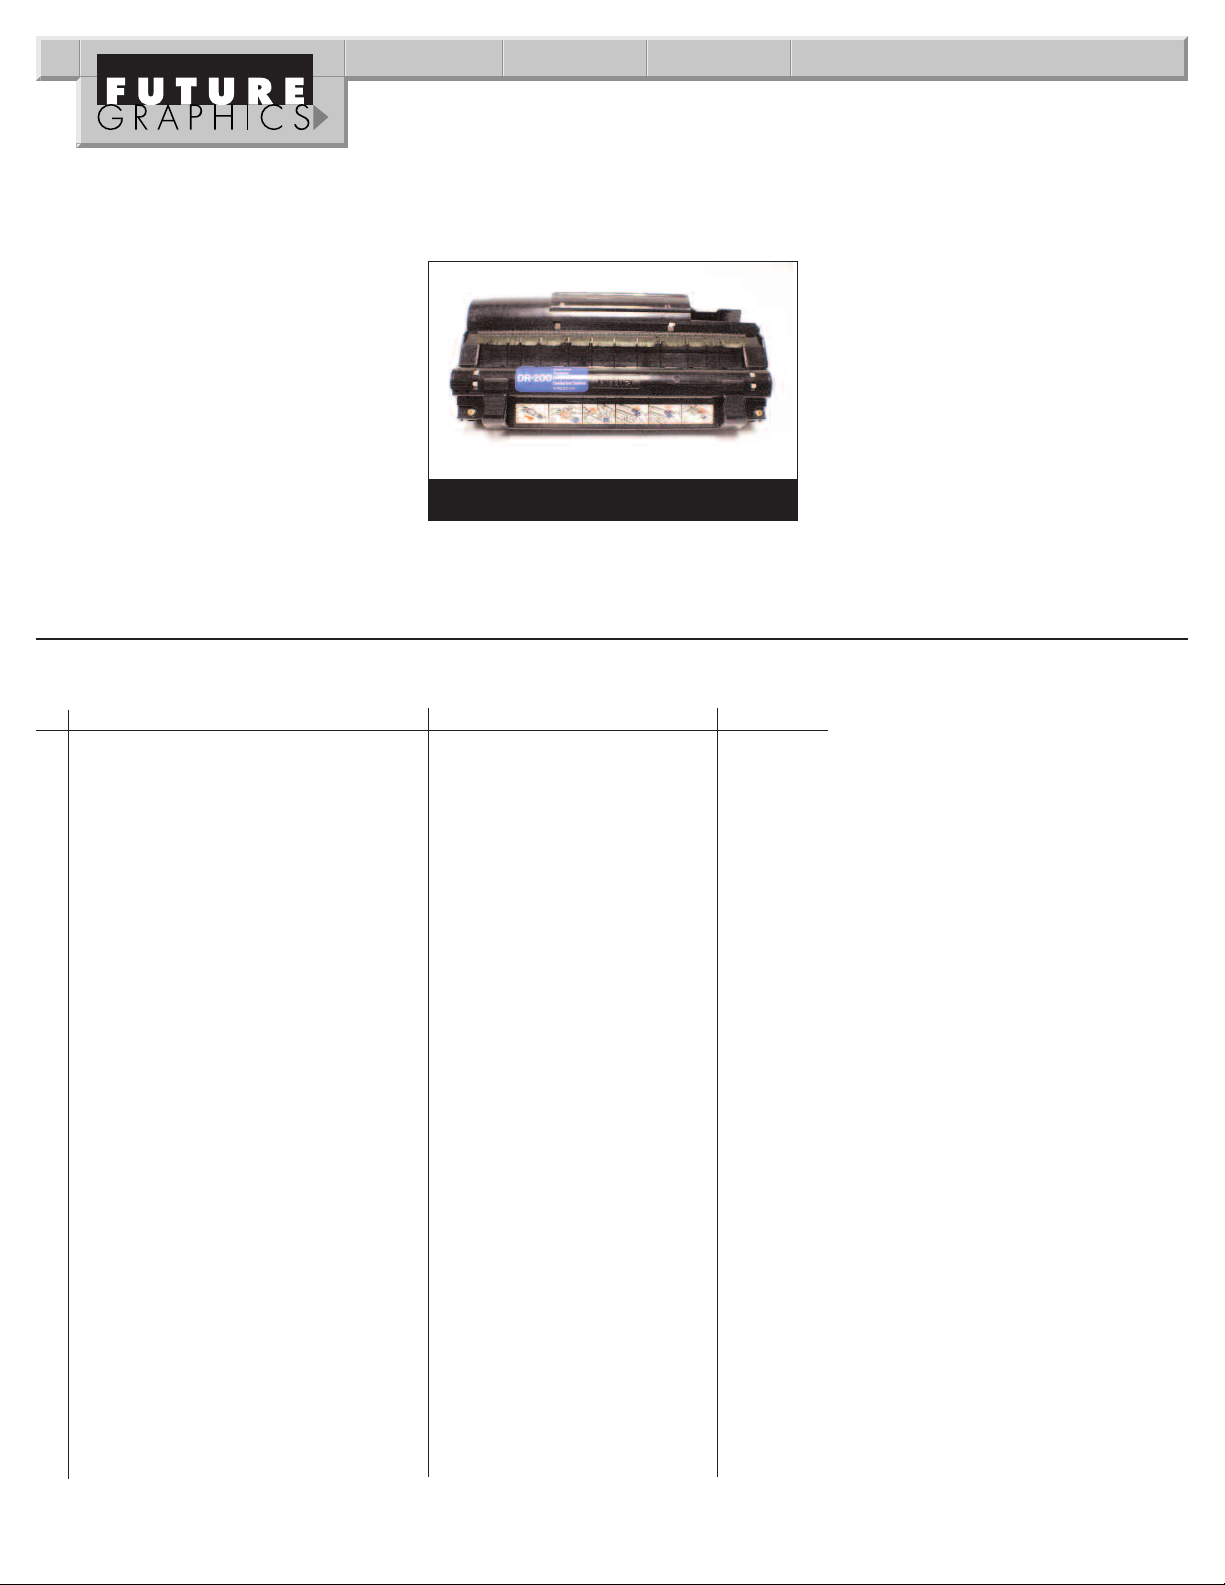
Remanufacturing the Brother 720 Drum Unit
The Brother HL 720 engine was utilized
n a wide variety of printer,fax and multi-
i
function machines. It is now discontinued but a large number of these engines
remain in the field. The Brother HL 720 is
capable of printing at only 6 pages per
minute at 600 x 600 dpi and consists of
separate toner and drum units.
The toner unit, OEM P/N TN-200 is
nothing more than a tube of toner that
DR-200
holds 90 grams of toner and yields only
2,200 pages. The drum unit, P/N DR-200
contains the developer roller, drum, and
transfer roller and yields 20,000 pages.
The biggest obstacle in the remanufac-
ing of the drum unit is trying to find a
tur
developer roller that is not damaged.
Machine Compatibility
Machine Model OEM Number Engine
Brother HL-1020 TN-200 Brother 720
Brother HL-720 TN-200 Brother 720
Brother HL-730 TN-200 Brother 720
Brother HL-730 + TN-200 Brother 720
Brother HL-730 DX TN-200 Brother 720
Brother HL-760 TN-200 Brother 720
Brother HL-760 + TN-200 Brother 720
Brother Intellifax 2550 ML TN-200 Brother 720
Brother Intellifax 2600 TN-200 Brother 720
Brother Intellifax 2660 TN-200 Brother 720
Brother Intellifax 2750 TN-200 Brother 720
Brother Intellifax 3350 TN-200 Brother 720
other MFC 4300
r
B
rother MFC 4340 TN-200 Brother 720
B
Brother MFC 4600 TN-200 Brother 720
Brother MFC 6650 MC TN-200 Brother 720
TN-200
rother 720
B
Streaking caused by worn developer
ollers is a constant problem for those
r
who remanufacture the DR-200 drum
units. Multiple cores may need to be
screened in order to find a good roller.
Due to the current unavailability of
replacement rollers, many people pass
on remanufacturing this cartridge.
Replacement parts are just now becoming available, allowing the remanufacturer to add these cartridges to their product mix. Good profit margins make it
attractive to those willing to accept the
challenge.
rother Intellifax 3550 TN-5000 Brother 720
B
Brother Intellifax 3650 TN-5000 Brother 720
Brother Intellifax 3750 TN-5000 Brother 720
Brother MFC 3750 TN-5000 Brother 720
rother MFC 4350 MC TN-5000 Brother 720
B
Brother MFC 4450 TN-5000 Brother 720
Brother MFC 4550 TN-5000 Brother 720
Brother MFC 4550 + TN-5000 Brother 720
rother MFC 4650 TN-5000 Brother 720
B
Brother MFC 6550 MC TN-5000 Brother 720
Brother MFC 7550 MC TN-5000 Brother 720
Brother MFC 7650 MC TN-5000 Brother 720
Brother MFC 7750 TN-5000 Brother 720
Brother PPF 3650 ML TN-5000 Brother 720
Danka Omnifax L620 TN-5000 Brother 720
Omnifax L620 TN-5000 Brother 720
Omnifax L620e TN-5000 Brother 720
raphics (FG) is a distributor of compatible replacement parts and products for imagining equipment.
e G
utur
F
ducts are genuine OEM replacement parts and no affiliation or sponsorship is to be implied between FG and any OEM.
None of FG's pr
o
 Loading...