

Brother P-touch 9700PC, P-touch 9800PCN, P-Touch PT-9700PC, P-Touch PT-9800PCN, 97OOPC User Manual
...Page 1
97OOPC/9
8OOPC
N
User’s Guide
STATUS
If you encounter any problems with your product, visit our Web site:
http://solutions.brother.com/
STATUS
Page 2

Introduction
Thank you for purchasing the PT-9700PC/PT-9800PCN.
The PT-9700PC/PT-9800PCN (hereafter, referred to as “printer”) is a label printer that enables you
to easily print custom labels after it is connected to a computer. Also, with a bar code reader
connected to the printer, labels and bar codes can easily be printed by scanning bar codes.
This manual contains various precautions and basic procedures for using this printer. Read this
manual carefully before starting and keep the manual in a handy place for future reference.
Declaration of Conformity (Europe Only)
We, BROTHER INDUSTRIES, LTD
15-1, Naeshiro-cho, Mizuho-ku, Nagoya, 467-8561, Japan declare that this product is
in compliance with the essential requirements and other relevant provisions of Directives
2004/108/EC and 2005/32/EC.
The Adapter AD9100ES is in compliance with the essential requirements and other relevant
provisions of Directive 2006/95/EC.
The Declaration of Conformity (DoC) is on our Web site.
Please go to http://solutions.brother.com
J choose region (eg. Europe)
J choose country
J choose your model
J choose “Manuals”
J choose Declaration of Conformity (* Select Language when required.)
®
International ENERGY STAR
The purpose of the International ENERGY STAR
development and popularization of energy-efficient office equipment.
As an ENERGY STAR
®
product meets the ENERGY STAR
Compliance Statement
Partner, Brother Industries, Ltd. has determined that this
®
guidelines for energy efficiency.
®
Program is to promote the
1
Page 3

Compilation and Publication Notice
Under the supervision of Brother Industries, Ltd., this manual has been compiled and published, covering
the latest product’s descriptions and specifications.
The contents of this manual and the specifications of this product are subject to change without notice.
If new versions of the PT-9700PC/9800PCN software become available, this manual may not reflect the
updated features. Therefore, you may find that the software and the contents in this manual are different.
Brother reserves the right to make changes without notice in the specifications and materials contained
herein and shall not be responsible for any damages (including consequential) caused by reliance on the
materials presented, including but not limited to typographical and other errors relating to the publication.
The screen images in this manual may differ depending on your OS or printer.
© 2011 Brother Industries, Ltd.
Trademarks and Copyrights
The Brother logo is a registered trademark of Brother Industries, Ltd.
Brother is a registered trademark of Brother Industries, Ltd.
© 2011 Brother Industries, Ltd. All rights reserved.
Microsoft, Windows Vista, Windows Server and Windows are registered trademarks of Microsoft Corporation
in the United States and other countries.
QR Code is a registered trademark of DENSO WAVE INCORPORATED in JAPAN and other countries.
QR Code Generating Program © 2008 DENSO WAVE INCORPORATED.
BarStar Pro Encode Library (DataMatrix, MaxiCode, PDF417, RSS) © 2007 AINIX Corporation. All rights
reserved.
The names of other software or products used in this document are trademarks or registered trademarks of
the respective companies that developed them.
Each company whose software title is mentioned in this manual has a Software Licence Agreement specific
to its proprietary programs.
Any trade names and product names of companies appearing on Brother products, related documents and
any other materials are all trademarks or registered trademarks of those respective companies.
2
Page 4
Safety precautions
To prevent injury and damage, important notes are explained using various symbols.
The symbols and their meanings are as follows:
WARNING
CAUTION
Tells you what to do to avoid accidents and the risk of injury.
Tells you about procedures you must follow to avoid minor personal injury or
damage to the printer.
The symbols used in this manual are as follows:
Action NOT allowed. DO NOT disassemble the product.
DO NOT splash the product with or
immerse the product in water.
Mandatory action. Unplugging.
Safety alert. Alerts to the possibility of electrical shock.
DO NOT touch a given portion of the
product.
WARNING
AC adapter
Follow these guidelines to avoid fire, damage, electric shock, failure or the risk of injury.
Use only the AC adapter (AD9100ES),
adapter cord, power supply cord and USB
cable designed exclusively for your printer.
Failure to observe this may result in an
accident or damage. Brother shall not assume
any responsibility for any accident or damage
resulting from not using the specified
AC adapter (AD9100ES), adapter cord,
power supply cord and USB cable.
Don't connect the enclosed AC adapter
(AD9100ES), adapter cord, power supply
cord and USB cable to other products.
Unplug the power supply cord immediately
and stop using the printer during an electrical
storm. There may be a remote risk of electric
shock from lightning.
Do not touch the AC adapter or power plug
with wet hands.
Do not use the AC adapter in places of high
humidity such as bathrooms.
Do not use a damaged adapter cord or power
supply cord.
Do not overload the power outlet.
Do not place heavy objects on, damage or
modify adapter/power supply cord or plug.
Do not forcibly bend or pull these cord.
Do not drop, hit or otherwise damage the
AC adapter.
Make sure that the plug is fully inserted in
the power outlet. Do not use an outlet that
is loose.
3
Page 5
WARNING
Printer
Follow these guidelines to avoid fire, damage, electric shock, and/or the risk of injury.
Do not allow the printer to get wet in any way.
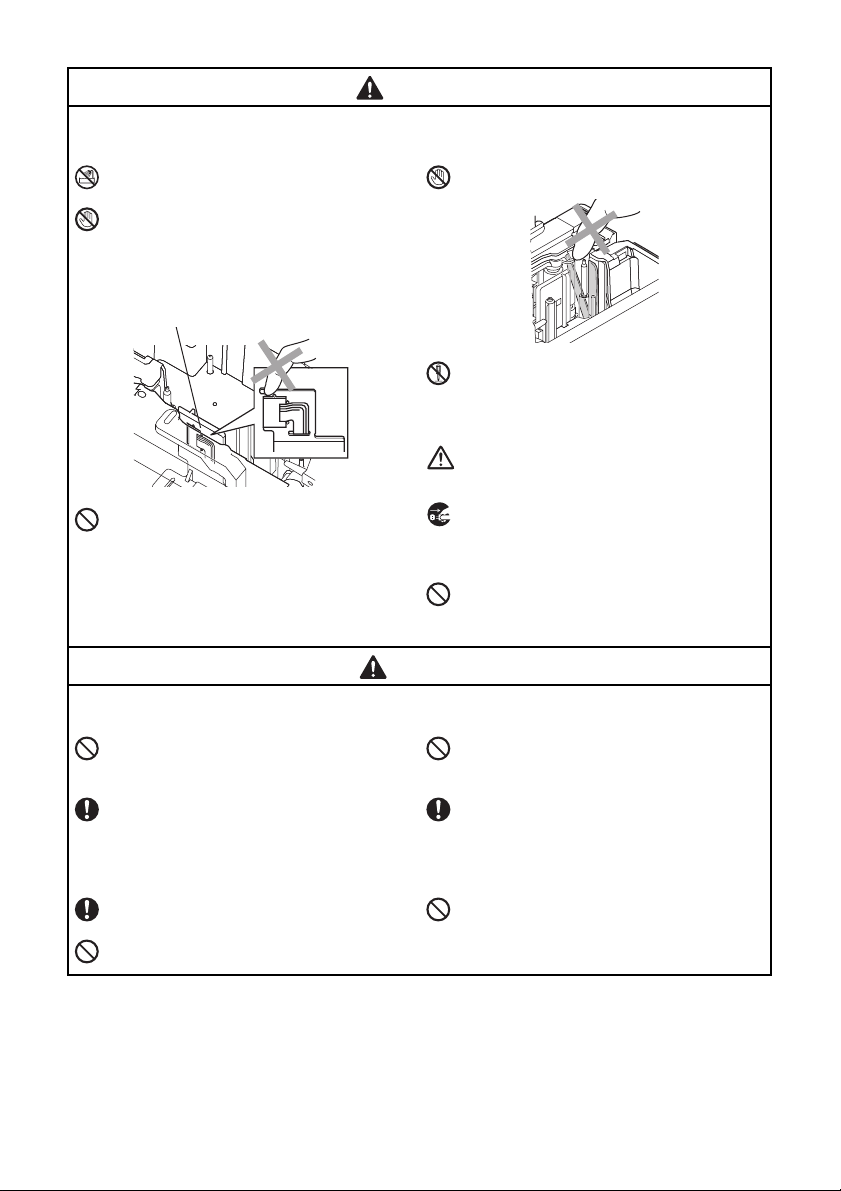
Do not touch any metal parts near the print
head. The print head becomes very hot during
use and remains very hot immediately after
use. Do not touch it directly with your hands.
Print head
Do not use the printer with a foreign object in
it. If water, metallic substance or any foreign
object enters the printer, disconnect the
AC adapter and contact the retail outlet where
the printer was purchased or your local
authorised service center.
Do not touch the blade of the cutter unit.
Do not disassemble the printer. For inspection,
adjustment, and repair of the printer, contact
the retail outlet where the printer was purchased
or your local authorised service center.
Plastic bags are used in the packaging of your
printer. To avoid danger of suffocation, keep
these bags away from babies and children.
Disconnect the AC adapter immediately and
stop using when you notice abnormal odour,
heat, discolouration, deformation or anything
unusual while using or storing it.
To prevent damage, do not drop or hit the
printer.
CAUTION
Tape cutter
Follow these guidelines to avoid minor personal injury and damage to the printer.
Do not open the tape compartment cover
when operating the cutter unit.
AC adapter
If you do not intend using the printer for an
extended period of time, please disconnect
the AC adapter from the power outlet.
Printer
Follow these guidelines to avoid minor personal injury and damage to the printer.
Place the printer on a flat, stable surface such
as a desk.
Do not leave the printer within reach of children
with the tape compartment cover open.
Do not apply excessive pressure to the
cutter unit.
Always hold the plug when disconnecting the
power supply cord from the power outlet.
Do not place any heavy objects on top of the
printer.
4
Page 6

General Precautions
● The printer may malfunction if left near a television, radio, etc. Do not use the printer near any device
that will cause electromagnetic interference.
● Do not use the printer in any way or for any purpose not described in this manual. Doing so may result
in accidents or damage to the printer.
● Do not put any foreign objects into the label outlet, AC adapter socket, USB port, serial port or LAN
port (PT-9800PCN only), etc.
● Do not touch the print head with your fingers. Use the optional print head cleaning cassette (TZ-CL6),
the self-cleaning function of the printer or a soft wipe (e.g. a cotton swab) when cleaning the print
head (→ P. 36).
● Do not clean the printer with alcohol or other organic solvents. Only use a soft, dry cloth.
● Do not place the printer in direct sunlight or rain, near heaters or other hot appliances, in any location
exposed to extremely high or low temperatures (e.g. on the dashboard or in the back of your car),
high humidity, or dusty locations. Standard operating temperature range: 10 to 30°C.
● Do not leave any rubber or vinyl on the printer for an extended period of time, otherwise the printer
may be stained.
● Depending on the environmental conditions and the applied settings, some characters or symbols
may be difficult to read.
● Use only Brother TZ tapes or Brother HG tapes with this printer. Do not use tapes that do not have the
or mark.
● Do not pull or apply pressure to the tape in the cassette. Otherwise the tape cassette or printer may
be damaged.
● Do not try to print labels using an empty tape cassette or without a tape cassette set in the printer.
Doing so will damage the print head.
● Do not attempt to cut the tape while printing or feeding since this will damage the tape.
● Be careful not to scratch the CD-ROM. Do not place the CD-ROM in any location exposed to high or
low temperatures. Do not place heavy objects on the CD-ROM or bend it.
● The software on the CD-ROM is intended for use with the printer and may be installed on more than
one computer.
● We strongly recommend that you read this User’s Guide carefully before using your printer, and then
keep it nearby for future reference.
● Depending on the location, material, and environmental conditions, the label may unpeel or become
irremovable, the colour of the label may change or be transferred to other objects. Before applying the
label, check the environmental condition and the material.
● Do not expose the tape cassettes to direct sunlight, high temperatures, high humidity, or dust. Store
tape cassettes in a cool, dark place. Use the tape cassettes soon after opening the tape cassette
package.
● Markings made with oil-based or water-based ink may be visible through a label affixed over them.
To hide the markings, use two labels layered on top of each other or use a dark-coloured label.
● Note that Brother Co., Ltd. does not assume responsibility for any damage, etc. arising from failure to
follow the precautions listed.
5
Page 7

Table of contents
Unpacking the printer .....................................................................................................7
General description ........................................................................................................8
LED lamps .......................................................................................................................................9
Getting ready to use your printer ................................................................................11
Connecting the printer .................................................................................................12
Connecting to the power source .................................................................................................... 12
Connecting to a computer .............................................................................................................13
Using the interface cables .............................................................................................................14
Installing the tape cassette ..........................................................................................15
Authorised tape .............................................................................................................................15
Installing the tape cassette ............................................................................................................15
Installing the software for PT-9700PC ........................................................................16
When using Microsoft® Windows® ................................................................................................16
Installing the software for PT-9800PCN ......................................................................18
When using Microsoft® Windows® ................................................................................................18
Uninstalling the software .............................................................................................23
When using Microsoft® Windows® ................................................................................................23
Advanced function ........................................................................................................25
Printing at a higher speed or at a higher resolution .......................................................................25
Distributed printing ........................................................................................................................26
BTP (Bar code Template Print) function ........................................................................................28
Using P-touch Editor Lite LAN (PT-9800PCN and Windows
Printing the printer settings ............................................................................................................34
Serial interface settings (Windows® only) ..................................................................35
Setting the computer baud rate .....................................................................................................35
Setting the printer baud rate ..........................................................................................................35
Maintenance ..................................................................................................................36
Troubleshooting ............................................................................................................37
Q & A .............................................................................................................................................37
Product specifications .................................................................................................40
Appendix ........................................................................................................................41
General procedure for the BTP (Bar code Template Print) function ..............................................41
List of bar codes for specifying settings .........................................................................................42
Index ...............................................................................................................................45
®
only) ..............................................33
6
Page 8
Unpacking the printer
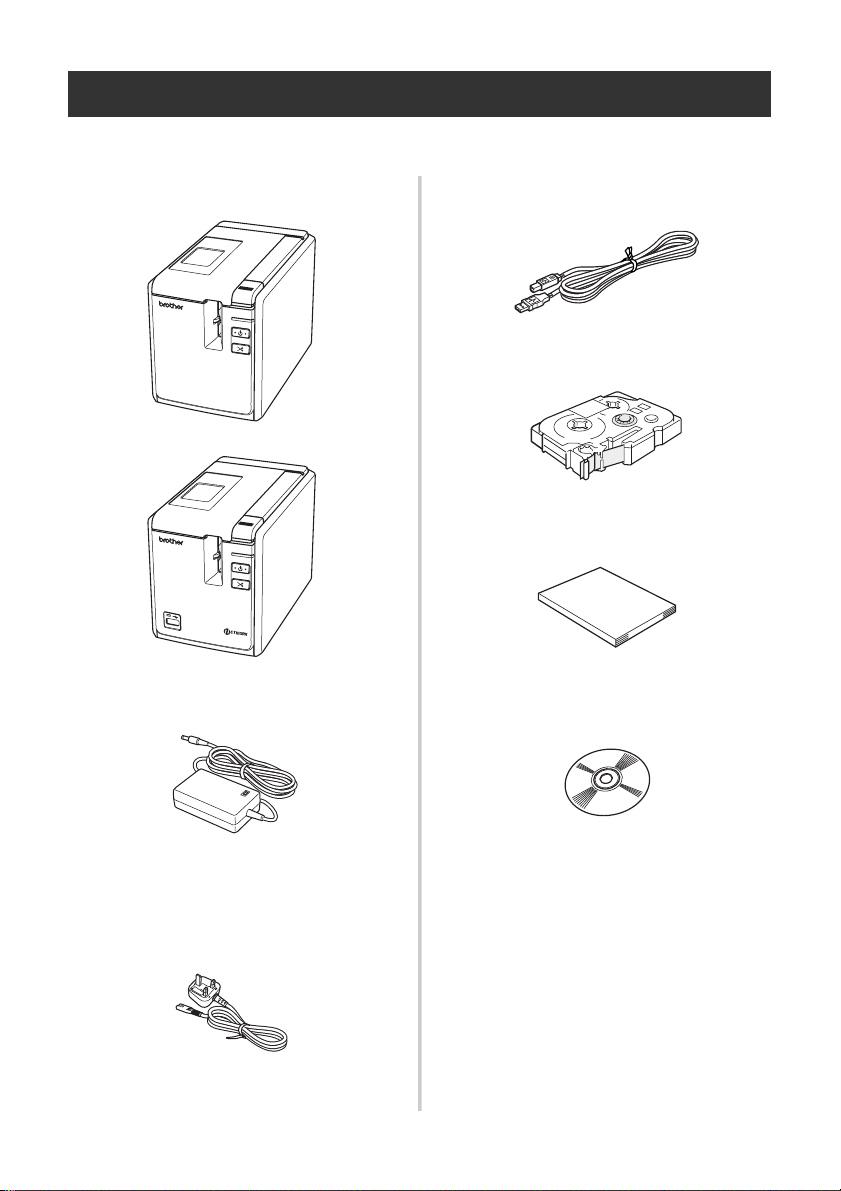
Open the box and confirm that the following items are included. If any item is missing or damaged,
please contact your Brother dealer or Brother Customer Service.
■ PT-9700PC/PT-9800PCN
Printer (PT-9700PC)
STATUS
Printer (PT-9800PCN)
STATUS
■ USB cable
■ Tape cassette
■ User’s Guide
■ AC adapter (with adapter cord)
Connect to the power supply cord.
■ Power supply cord
Connect to the AC adapter and an electrical
outlet (AC 220 to 240 V).
(The design of the AC power plug may differ
by country.)
■ CD-ROM
■ Tape catalogue
7
Page 9
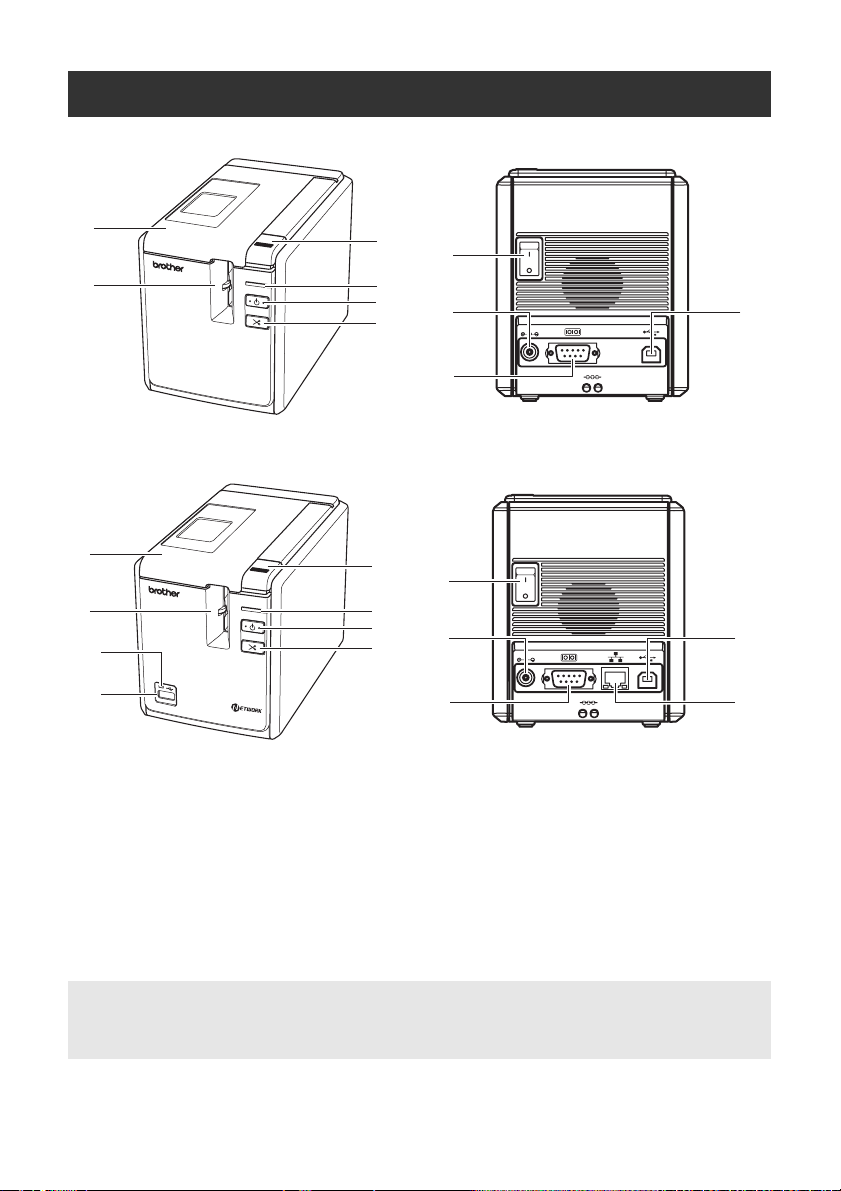
General description
■ PT-9700PC
1
2
STATUS
3
7
4
5
6
8
DC IN 24V
9
Front view Rear view
■ PT-9800PCN
1
2
STATUS
11
12
Front view Rear view
1. Tape compartment cover 9. Serial (RS-232C) port
2. Label outlet 10. USB port
3. Cover release button 11. LED lamp on USB Direct Interface
4. STATUS lamp
5. Power button (including lamp) 12. USB Direct Interface for connecting
6. Feed/Cut button
7. Main power switch 13. LAN (10/100BASE-TX Wired Ethernet) port
8. AC adapter socket
3
7
4
5
6
8
DC IN 24V
9
(PT-9800PCN only)
a Bar code Reader (PT-9800PCN only)
(PT-9800PCN only)
10
13
10
Note
● If the tape compartment cover is left open, dust will collect on the print head. Always close the
cover.
8
Page 10
LED lamps
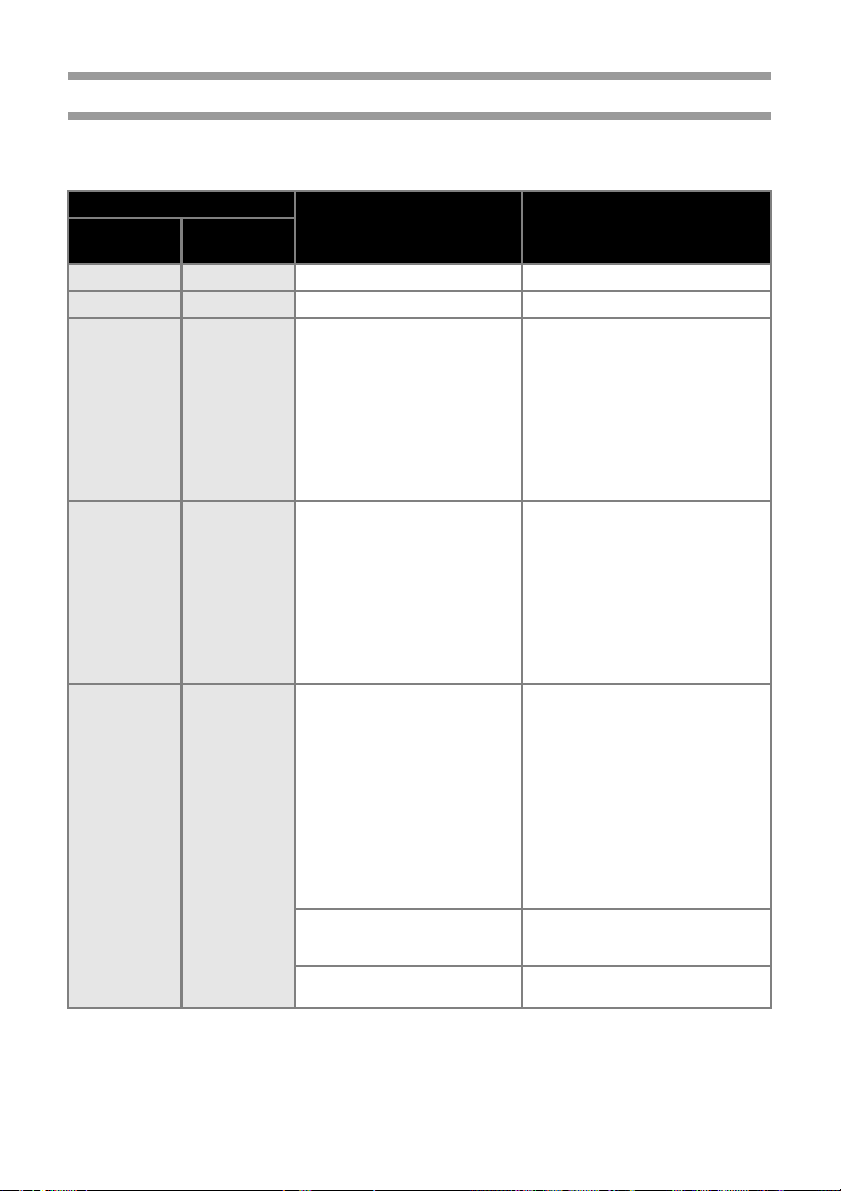
The condition of the printer shown by LED lamps on printer or USB Direct Interface (PT-9800PCN only).
■ LED lamps on printer
Lamp condition
Power lamp
(green)
On Off Printer standby condition —
Flashing Off Receiving data —
Flashing On
On On
On Flashing
STATUS
lamp (red)
During the printer receiving data
1) No tape cassette. 1) Install the tape cassette and
2) Tape compartment cover is
3) Incompatible tape cassette. 3) Install the correct tape cassette
During the printer standby
1) No tape cassette. 1) Install the tape cassette and
2) Tape compartment cover is
3) Incompatible tape cassette. 3) Install the correct tape cassette
During printing
1) No tape cassette. 1) Install the tape cassette and
2) Tape compartment cover is
3) Incorrect tape cassette. 3) Change the software setting or
4) Incompatible tape cassette. 4) Install the correct tape cassette
Empty tape cassette
Transmission error
Condition Remedy
close the tape compartment
cover.
open.
open.
open.
2) Close the cover.
and close the tape
compartment cover.
close the tape compartment
cover.
2) Close the cover.
and close the tape compartment
cover.
close the tape compartment
cover.
2) Close the cover.
install the correct tape cassette.
and close the tape compartment
cover.
Install a tape cassette containing
tape and close the tape
compartment cover.
Press the power button on the front
of the printer.
9
Page 11
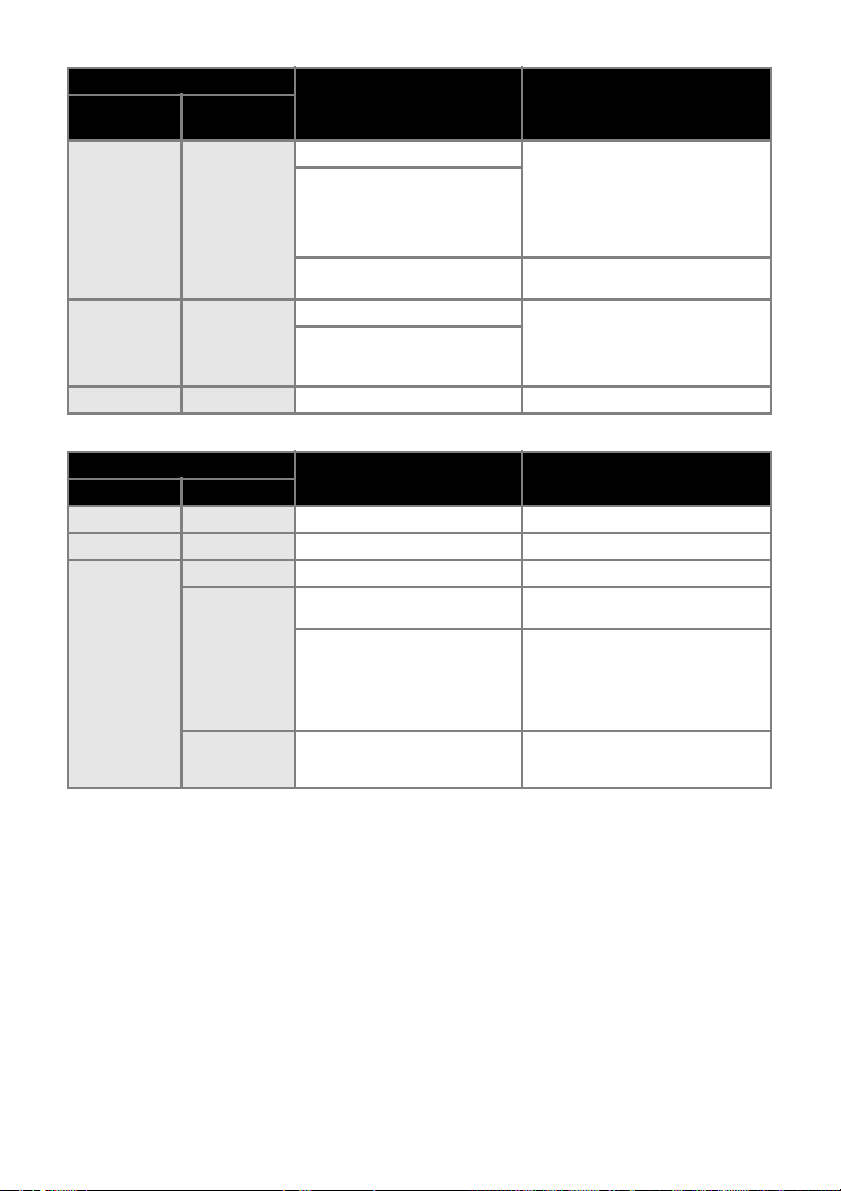
Lamp condition
Power lamp
(green)
On Flashing fast
On
Off On Booting —
STATUS
lamp (red)
Flashing very
fast
Cutter error Confirm that the tape is not
Roller holder error
Print head overheat error
EEPROM error Turn the printer off and on with the
Circuit board error
Condition Remedy
■ LED lamp on USB Direct Interface (PT-9800PCN only)
Lamp condition
Colour Condition
— Off USB device not connected —
Green On USB device connected —
Flashing HUB connected Disconnect the USB device.
Noncompliant USB device
connected
Red
Flashing fast
Flashing very
fast
“Buffer full” error with USB Direct
Interface
Overcurrent
Condition Remedy
jammed in the printer. If necessary,
turn the printer off and on with the
power button. If the STATUS lamp
continues to flash, contact your
Brother dealer or Brother Customer
Service.
Turn the printer off and on with the
power button.
power button. If the STATUS lamp
continues to flash, contact your
Brother dealer or Brother Customer
Service.
Disconnect the USB device.
Data sent from the bar code reader
is saved on the printer.
Do not use the bar code reader to
consecutively scan bar codes and
do not use the bar code reader with
multiple interfaces at the same time.
Disconnect the USB device and
turn the printer off and on with the
power button.
10
Page 12

Getting ready to use your printer
Before creating labels with the printer, the following preparations are necessary.
Note
● The connection procedures are different depending on the operating system running on the
computer. They will also vary depending on whether a USB connection, serial connection or
network connection (PT-9800 PCN only) is used. For details on connecting the printer to your
specific computer, refer to “Connecting to a computer” (→ P. 13).
Connecting the printer
Connect the printer to the power source and your computer,
and install a tape cassette. For details, refer to “Connecting
the printer” (→ P. 12) and “Installing the tape cassette”
(→ P. 15).
Installing the software
You will need to install the printer driver to use your
printer with your computer. You will also need to install
P-touch Editor label design software. For details on
installing this software, refer to “Installing the software for
PT-9700PC” (→ P. 16) or “Installing the software for
PT-9800PCN” (→ P. 18).
Creating labels
After setting up your printer you can start creating labels.
For details on how to design and create labels, refer to
the “Software User’s Guide” (PDF). For detailed feature
explanations, you may also reference the P-touch Editor
Help menu found in the software.
11
Page 13
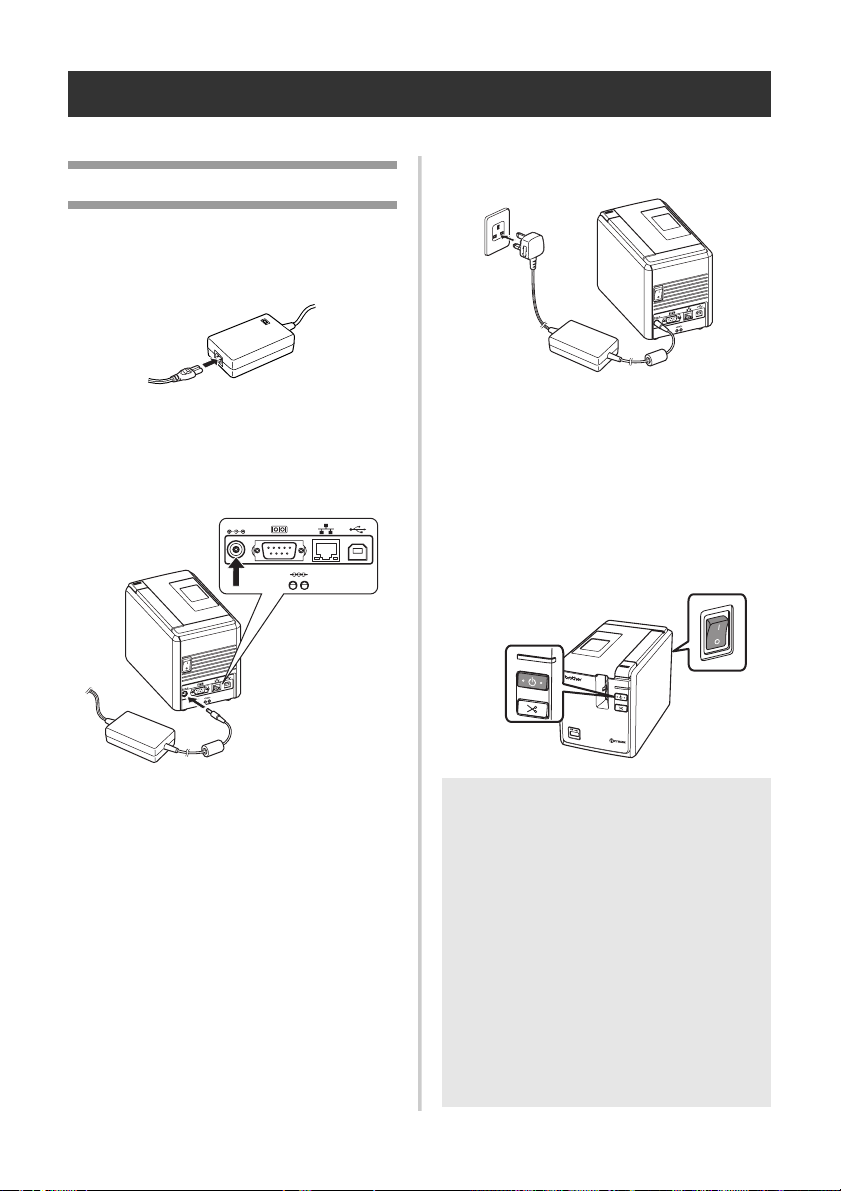
Connecting the printer
Connect the printer to the power source and a computer.
Connecting to the power source
Connect the included power supply
1
cord to the AC adapter.
Insert the AC adapter connector into
2
the AC adapter socket on the back of
the printer.
DC IN 24V
DC IN 24V
3
4
Plug the power supply cord into an
electrical outlet (AC 220 to 240 V).
DC IN 24V
Turning on the printer
Turn on the main power switch on the
back of the printer, and then press the
power button on the front of the printer.
Turning off the printer
Hold down the power button on the front
of the printer until the printer is turned off,
and then turn off the main power switch
on the back of the printer.
STATUS
STATUS
Main power
switch
12
Power
button
Note
● Always turn the power off first using the
power button on the front of the printer
before removing the AC adapter or
turning off the main power switch.
● After using the printer, disconnect the
power supply cord from the electrical
outlet and the AC adapter from the
printer and store them for future use.
● When removing the AC adapter always
pull the plug. Do not pull the AC adapter
or power supply cord. The wire in the
cords may break.
● Do not use any AC adapter other than
the one included with the printer. Failure
to observe this may result in an accident.
Page 14
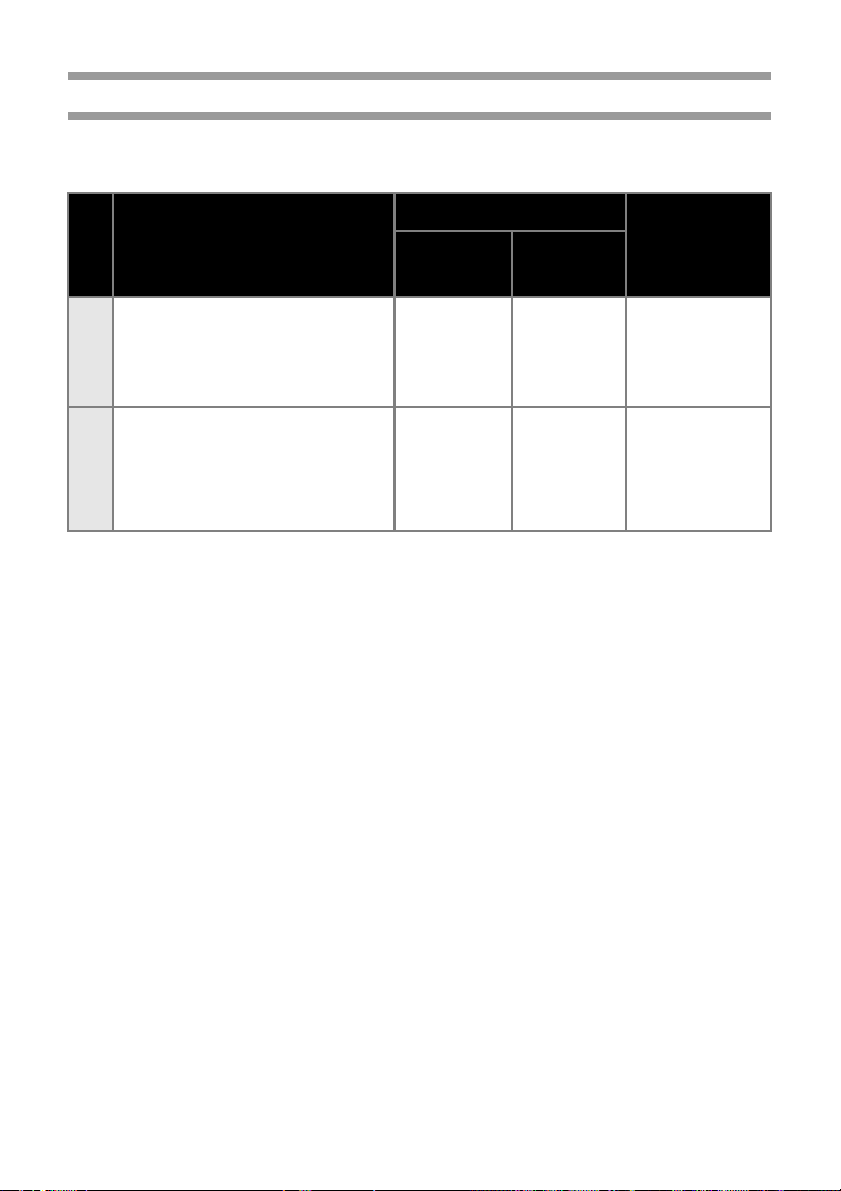
Connecting to a computer
Connect the printer to a computer using the interface cables. The interface cables used to connect
to a USB port, serial (RS-232C) port and LAN (10/100BASE-TX Wired Ethernet) port are different.
Basic Setup Serial port
Operation Systems
USB port LAN port
(ESC/P and
P-touch
Template only)
Windows® XP/Windows Vista®/
Windows® 7
PT-9700PC
Windows® XP/Windows Vista®/
Windows® 7/Windows Server®
2003/Windows Server® 2008/
2008 R2
PT-9800PCN
Yes No Yes
Yes Yes Yes
13
Page 15
Using the interface cables
Serial (RS-232C) cables and network (Ethernet) cables are not standard accessories. Use the
appropriate cable for your type of interface.
Note
● For USB interface, the included USB interface cable should be used to ensure compliance
with the limits for EMC.
● For serial and network interfaces, a shielded interface cable should be used to ensure
compliance with the limits for EMC.
● Changes or modifications not expressly approved by Brother Industries, Ltd. may affect the
performance and print quality, and damage may not be covered under the limited warranty.
■ USB cable
Use the enclosed interface cable.
■ Serial (RS-232C) cable (Windows® only)
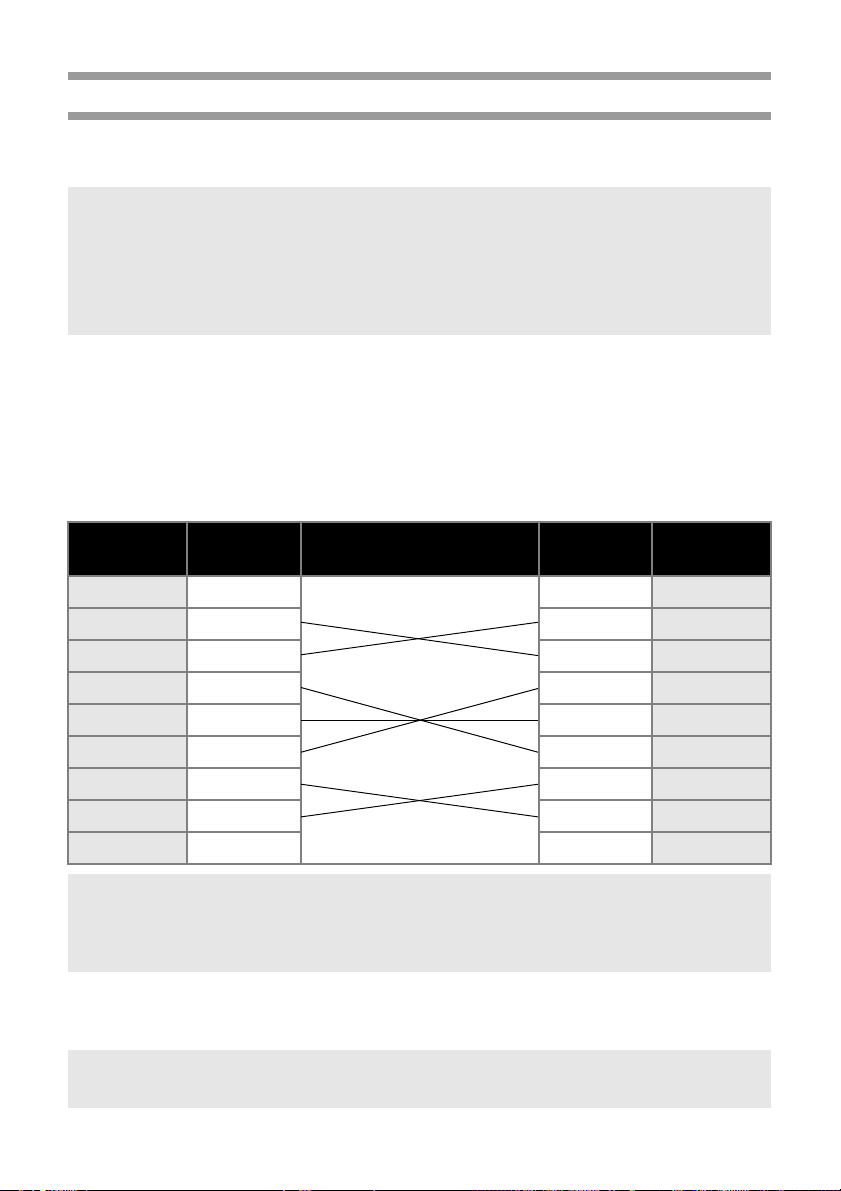
The pin assignments for the serial cables (RS-232C cables) which can be used with this printer
are shown in the table below. You can purchase the cables at an electronics store. Do not use
a serial cable that is longer than 1.8 m.
Brother printer side Computer side
(D-Sub female, lock screw #4-40 inch screw) (D-Sub9P female)
Signal
Name
DCD 1 1 DCD
RXD 2 2 RXD
TXD 3 3 TXD
DTR 4 4 DTR
GND 5 5 GND
DSR 6 6 DSR
RTS 7 7 RTS
CTS 8 8 CTS
RI 9 9 RI
Pin
Number
Pin Assignments
Pin
Number
Signal
Name
Note
● The RS-232C serial connector part of this equipment is not Limited Power Source.
● For details on serial interface settings, refer to “Serial interface settings (Windows
(→ P. 35).
®
only)”
■ Network cable (PT-9800PCN only)
Use a straight-through Category5 (or greater) twisted-pair cable for 10BASE-T or 100BASE-TX
Fast Ethernet Network.
Note
● Connect this product to a LAN connection that is not subjected to overvoltages.
14
Page 16
Installing the tape cassette
This section lists the types of tape that may be used with the printer and explains the procedures to
install the tape cassettes.
Install the tape cassette.
3
Authorised tape
The types of tape that may be used with the
printer are listed below.
■ TZ Tapes
Standard Laminated Tape
Standard Non-Laminated Tape
Strong Adhesive Tape - Laminated
Flexible ID tape - Laminated
Fabric Iron-On Tape - Non-Laminated
Security Tape - Laminated
Stencil Tape - Non-Laminated
■ HG Tapes
HG tapes enable three available
combinations of higher printing speed and
print resolutions. For details on high-speed
printing, refer to “Printing at a higher speed
or at a higher resolution” (→ P. 25).
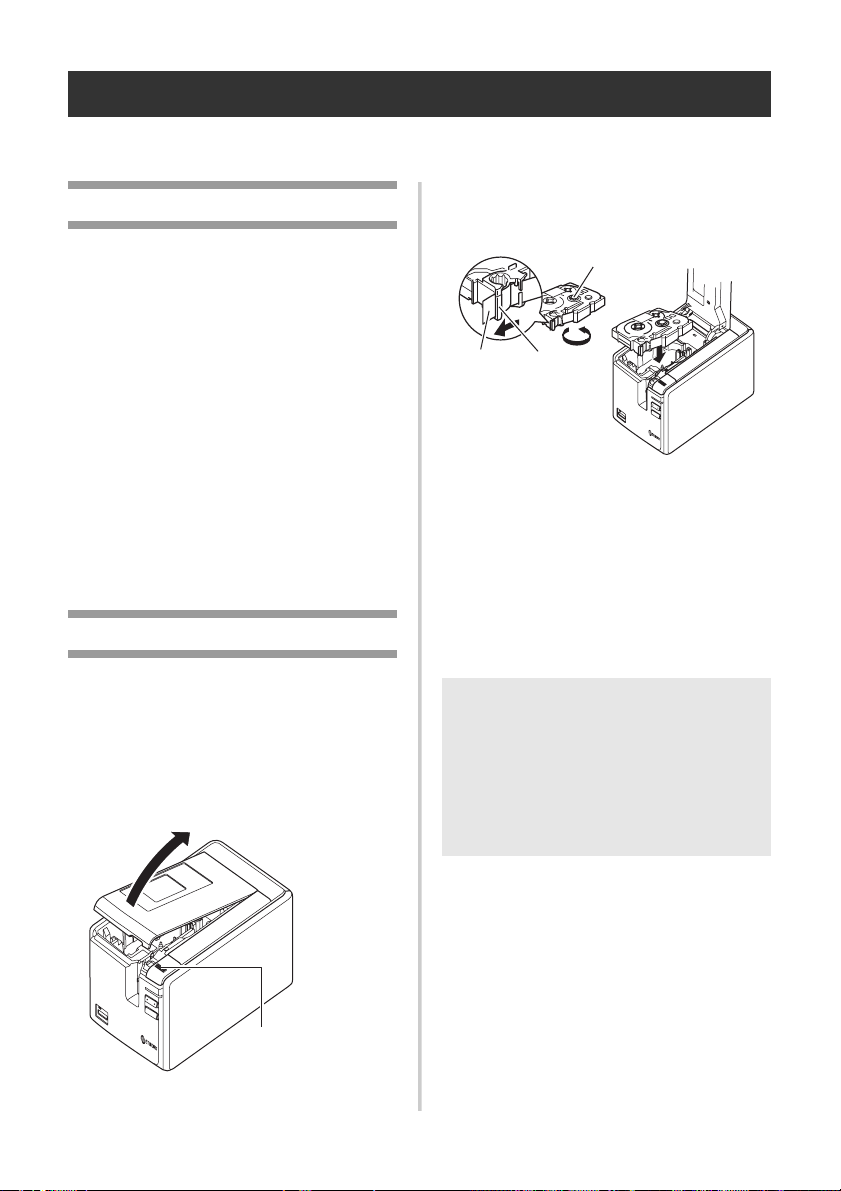
Make sure that the end of the tape feeds
under the tape guide.
Toothed wheel
End of the
tape
Tape guide
• If the ink ribbon is loose, use your
finger to wind the toothed wheel in the
direction of the arrow on the cassette.
Close the tape compartment cover
4
and press the power button on the
front of printer.
Installing the tape cassette
This section explains the procedure to install
the tape cassette.
Hold down the power button on the
1
front of the printer until the Power
lamp is off.
Press the cover release button and
2
open the tape compartment cover.
Cover release button
Press the Feed/Cut button to remove
5
the tape slack.
Note
● You can only remove the tape cassette
when the roller assembly of the printer
has been released. It will be released
automatically if you press the power
button on the front of the printer or if no
additional operation is performed within
10 minutes after printing a label.
15
Page 17
Installing the software for PT-9700PC
The procedure for installing the software varies depending on the OS of the computer. Installation
procedure is subject to change without notice.
Note
● If you will be using the models “PT-9700PC”, it is necessary to install the following versions of
P-touch Editor or b-PAC SDK to avoid printing difficulties:
[P-touch Editor] version 5.0.101 and later (included on CD).
[b-PAC SDK] version 3.0.010 and later (download from Brother Solutions Center).
● For details of the software, see the “Software User’s Guide” (PDF).
● You can find the “Software User’s Guide” (PDF) by clicking “Start” - “All Programs (Programs)” -
“Brother P-touch” - “Manuals” - “P-touch” - “Software User’s Guide”.
Display User’s Guide
When using Microsoft® Windows
This section explains how to install P-touch
Editor 5.0, the printer driver and Software
User's Guide (PDF).
Note
● Do not connect the printer to the
computer until directed to do so.
●
You must be logged on as a user with
administrator privileges to install this software.
● Turn off the printer with the power button
and then with the main power switch.
The following is the example for Windows Vista®.
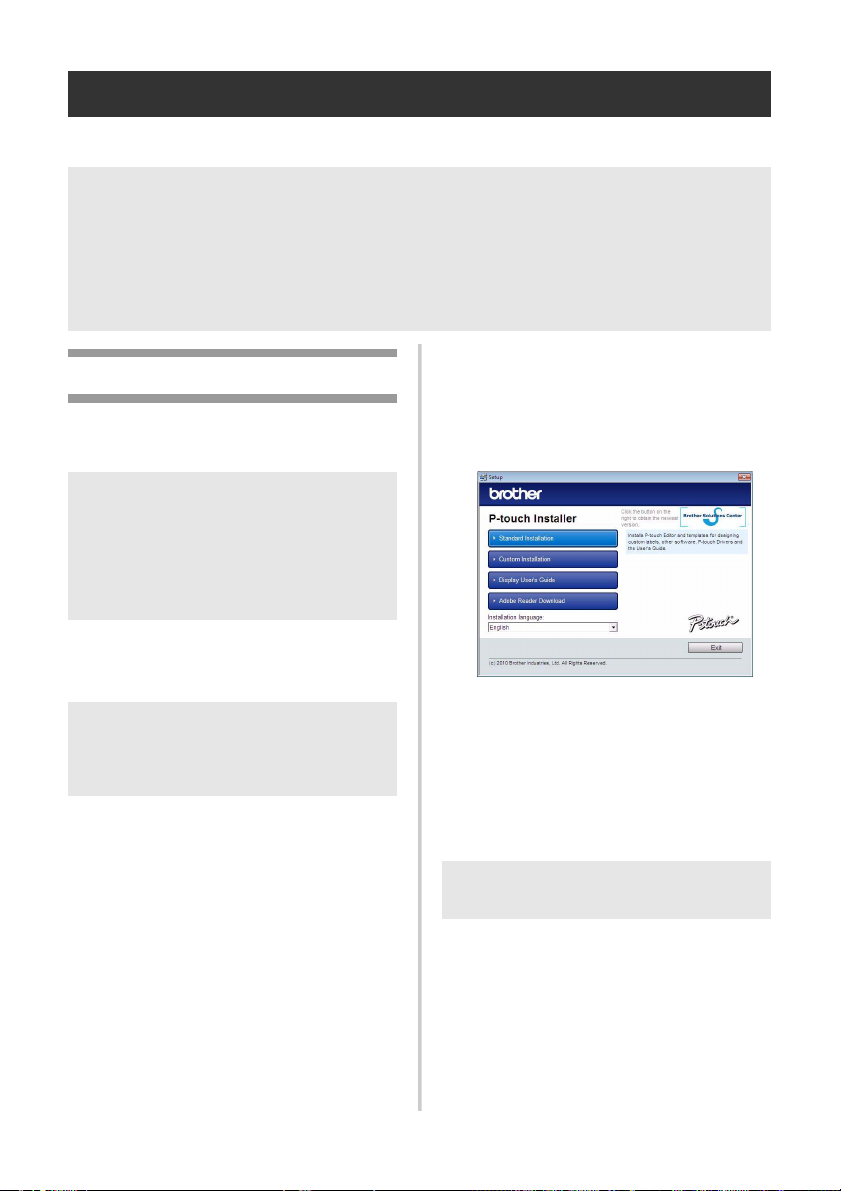
Start the computer and put the
1
CD-ROM into the CD-ROM drive.
Note
● If it does not start up automatically, open
the files on the CD-ROM and doubleclick on “Setup.exe”.
Click [Standard Installation].
2
Installation items:
Standard Installation
P-touch Editor 5.0, printer driver, and
Software User’s Guide (PDF).
Custom Installation
P-touch Editor 5.0, printer driver, and
Software User’s Guide (PDF) can all be
installed separately.
®
Software User’s Guide (PDF)
(PDF reader software required).
Adobe Reader Download
Link to the download page for Adobe
®
Reader
3
will be displayed.
Read the licence agreement and click [Yes]
if you agree with the terms and conditions.
Follow the on-screen instructions.
Put a check mark in the box next to
4
the Add-In programs you want to
install, and click [Next].
With the Add-In feature you can use
texts from those applications easily in
our label layouts.
Note
● Make sure that all Microsoft
®
applications are closed.
®
Office
16
Page 18
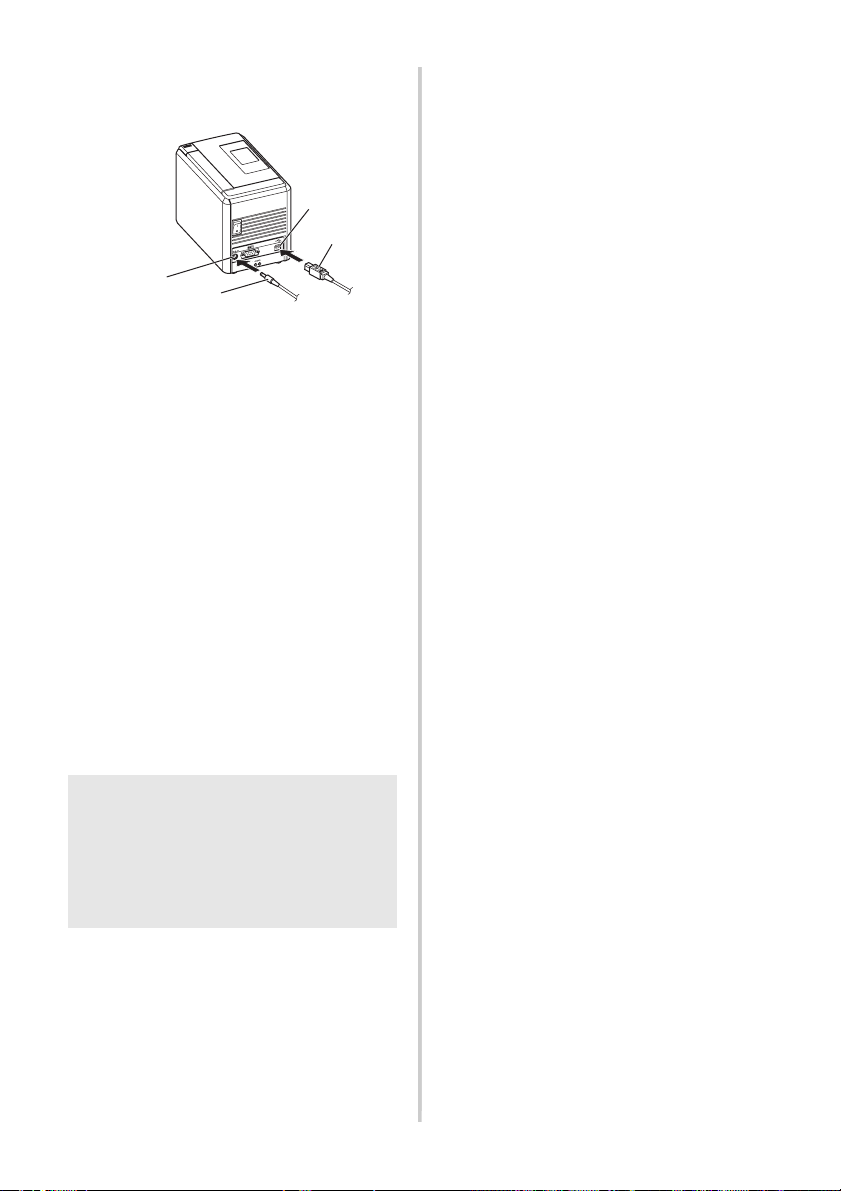
When instructed, connect your printer
5
to the computer by using the USB
cable, and then turn on the printer.
USB port
DC IN 24V
AC adapter socket
Once the printer is detected, the
6
driver will automatically be installed.
When instructed to register your
7
printer online, select a registration
AC adapter
USB cable
method and click [Next].
If you have selected to register the
product online, your default internet
browser will be launched in a new
window. Follow the instructions to
register your printer.
When instructed to download the
8
optional tools, select your choice and
click [Next].
• If you choose “Yes, display the page”,
you will go to the Brother Solutions
Center web site before finishing the
installation (recommended).
Choose your region (eg. Europe), your
country, your model and Downloads
for your model.
• If you choose “No, do not display the
page”, you will continue the installation.
Note
● To download the optional tools later, you
can find them on this Web site:
http://solutions.brother.com/
Choose your region (eg. Europe), your
country, your model and Downloads for
your model.
Click [Finish].
9
The software installation is now complete.
Restart your computer if you are instructed
to do so.
Start the software.
0
Click “Start” - “All Programs (Programs)”
- “Brother P-touch” - “P-touch Editor 5.0”
to start P-touch Editor 5.0.
17
Page 19
Installing the software for PT-9800PCN
The procedure for installing the software varies depending on the OS of the computer. Installation
procedure is subject to change without notice.
Note
● If you will be using the models “PT-9800PCN”, it is necessary to install the following versions
of P-touch Editor or b-PAC SDK to avoid printing difficulties:
[P-touch Editor] version 5.0.101 and later (included on CD).
[b-PAC SDK] version 3.0.010 and later (download from Brother Solutions Center).
● For details of the software, see the “Software User’s Guide” (PDF).
● For details of the Network, see the “Network User's Guide” (PDF).
● You can find the Software User's Guide or Network User´s Guide (PDF) by clicking “Start” -
“All Programs (Programs)” - “Brother P-touch” - “Manuals” - “PT-9800PCN” - “Software User's
Guide” or “Network User's Guide”.
When using Microsoft® Windows
This section explains how to install P-touch
Editor 5.0, the printer driver, Software User's
Guide (PDF) and Network User's Guide (PDF).
Note
● When using USB interface cable, do not
connect the printer to the computer until
directed to do so.
●
You must be logged on as a user with
administrator privileges to install this software.
● Turn off the printer with the power button
and then with the main power switch.
The following is the example for Windows Vista®.
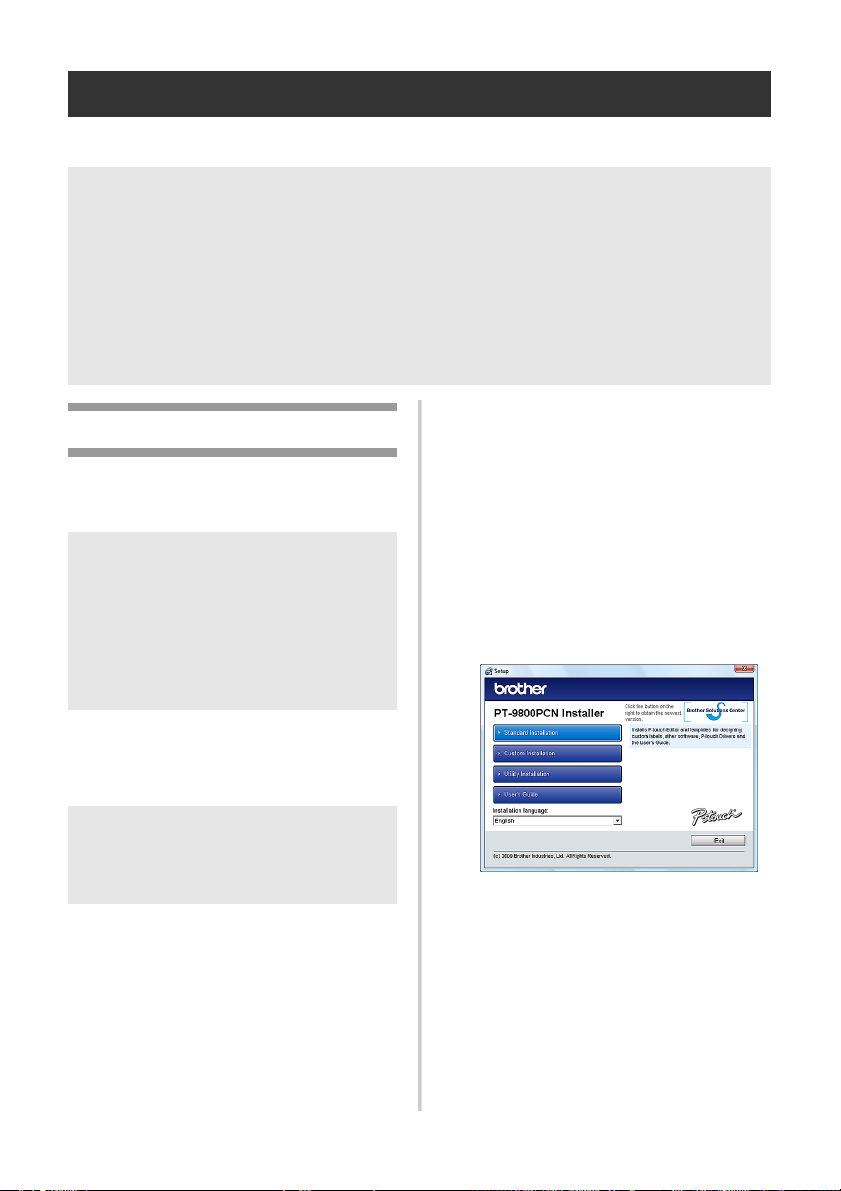
Start the computer and put the
1
CD-ROM into the CD-ROM drive.
Note
● If it does not start up automatically, open
the files on the CD-ROM and double-click
on “Setup.exe”.
Click [Standard Installation].
2
Installation items:
Standard Installation
P-touch Editor 5.0, printer driver,
Software User’s Guide (PDF), and
Network User’s Guide (PDF).
®
P-touch Editor 5.0, printer driver,
Software User’s Guide (PDF), Network
User’s Guide (PDF), and P-touch Editor
Lite LAN can all be installed separately.
Utility Installation
BRAdmin Light
How to install BRAdmin Light, see page 21.
User’s Guide
Software User’s Guide (PDF), Network
Custom Installation
User’s Guide (PDF), and link to the
download page for Adobe
Read the licence agreement and click
3
[Yes] if you agree with the terms and
®
Reader®.
conditions.
Follow the on-screen instructions.
18
Page 20
Put a check mark in the box next to
4
the Add-In programs you want to
install, and click [Next].
With the Add-In feature you can use
texts from those applications easily in
our label layouts.
Note
● Make sure that all Microsoft
applications are closed.
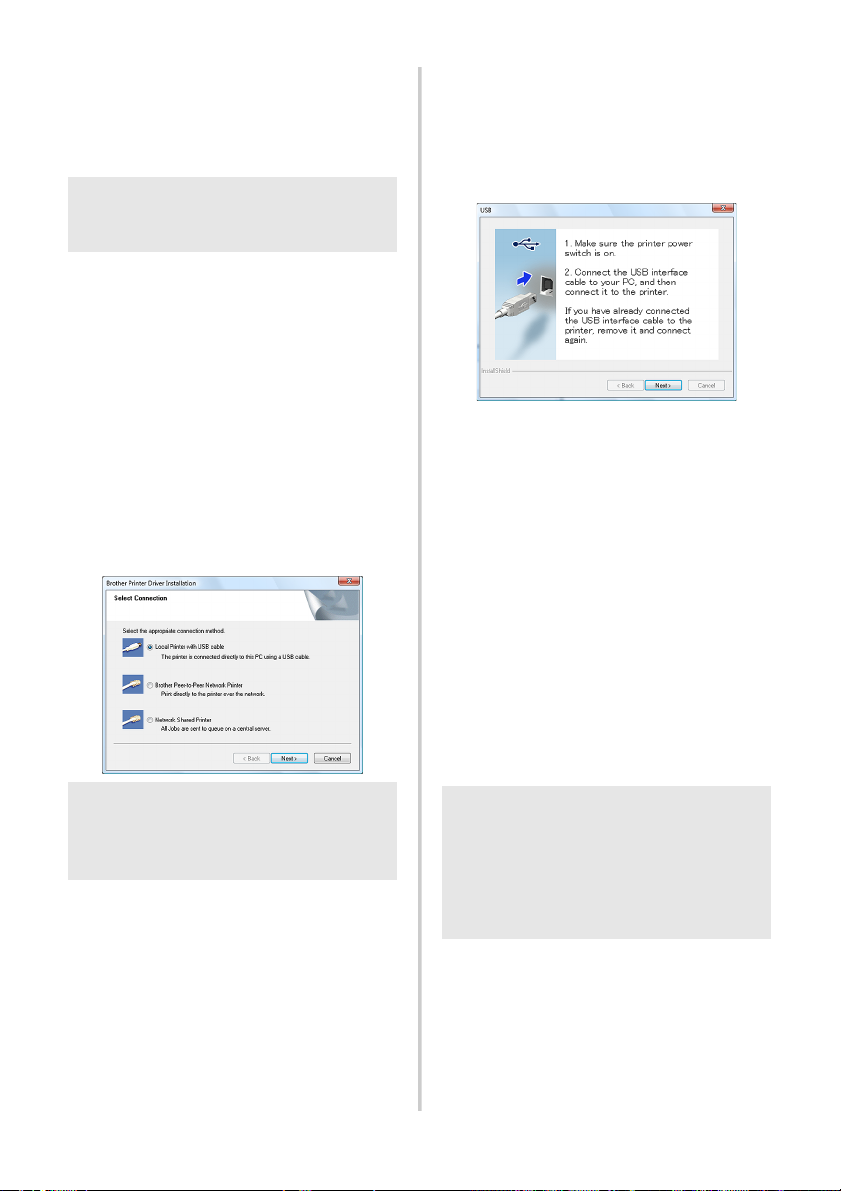
Then, choose your connection
5
method and click [Next].
Connection method:
Local Printer with USB cable
See “For USB interface cable users”
(→ P. 19).
Brother Peer-to-Peer Network Printer
Check the LAN cable is connected to the
printer.
See “For network interface cable users”
(→ P. 20).
Network Shared Printer
Check the LAN cable is connected to the
printer.
See “For shared network printer users”
(→ P. 20).
®
Office
Note
● When using USB interface cable, do not
connect the printer to the computer until
directed to do so.
■ For USB interface cable users
Follow the on-screen instructions.
6
When this screen appears, confirm the
printer is powered on. Connect the
USB interface cable to your computer,
and then connect it to the printer.
When instructed to register your
7
printer online, select a registration
method and click [Next].
If you have selected to register the product
online, your default internet browser will
be launched in a new window. Follow the
instructions to register your printer.
When instructed to download the
8
optional tools, select your choice and
click [Next].
• If you choose “Yes, display the page”,
you will go to the Brother Solutions
Center web site before finishing the
installation (recommended).
Choose your region (eg. Europe), your
country, your model and Downloads
for your model.
• If you choose “No, do not display the
page”, you will continue the installation.
Note
● To download the optional tools later, you
can find them on this Web site:
http://solutions.brother.com/
Choose your region (eg. Europe), your
country, your model and Downloads for
your model.
Click [Finish].
9
The software installation is now completed.
Restart your computer if you are instructed
to do so.
Start the software.
0
Click “Start” - “All Programs (Programs)” “Brother P-touch” - “P-touch Editor 5.0” to
start P-touch Editor 5.0.
19
Page 21

■ For network interface cable users
■ For shared network printer users
Choose “Search the network for
6
devices and choose from a list of
discovered devices (Recommended).”
Or enter your printer’s IP address or
its node name. Click [Next].
You can find your printer’s IP address
and the node name by printing out the
printer settings page. For details, refer to
“Printing the printer settings” (→ P. 34).
Choose your printer.
7
Follow the on-screen instructions.
When instructed to register your
8
printer online, select a registration
method and click [Next].
If you have selected to register the product
online, your default internet browser will
be launched in a new window. Follow the
instructions to register your printer.
When instructed to download the
9
optional tools, select your choice and
click [Next].
• If you choose “Yes, display the page”,
you will go to the Brother Solutions
Center web site before finishing the
installation (recommended).
Choose your region (eg. Europe), your
country, your model and Downloads
for your model.
• If you choose “No, do not display the
page”, you will continue the installation.
Note
● To download the optional tools later,
you can find them on this Web site:
http://solutions.brother.com/
Choose your region (eg. Europe), your
country, your model and Downloads for
your model.
Click [Finish].
0
The software installation is now completed.
Restart your computer if you are instructed
to do so.
Start the software.
a
Click “Start” - “All Programs (Programs)” “Brother P-touch” - “P-touch Editor 5.0” to
start P-touch Editor 5.0.
Choose your printer’s queue, and
6
then click [OK].
Follow the on-screen instructions.
Note
● Contact your administrator if you do not
know the location or the name of the
printer in the network.
When instructed to register your
7
printer online, select a registration
method and click [Next].
If you have selected to register the product
online, your default internet browser will
be launched in a new window. Follow the
instructions to register your printer.
When instructed to download the
8
optional tools, select your choice and
click [Next].
• If you choose “Yes, display the page”,
you will go to the Brother Solutions
Center web site before finishing the
installation (recommended).
Choose your region (eg. Europe), your
country, your model and Downloads
for your model.
• If you choose “No, do not display the
page”, you will continue the installation.
Note
● To download the optional tools later,
you can find them on this Web site:
http://solutions.brother.com/
Choose your region (eg. Europe), your
country, your model and Downloads for
your model.
Click [Finish].
9
The software installation is now completed.
Restart your computer if you are instructed
to do so.
Start the software.
0
Click “Start” - “All Programs (Programs)” “Brother P-touch” - “P-touch Editor 5.0” to
start P-touch Editor 5.0.
20
Page 22
■ Installing the BRAdmin Light
configuration utility
The BRAdmin Light is a utility for initial setup
of Brother network connected devices. It can
also search for Brother products on your
network, view the status and configure basic
network settings, such as IP address.
For more information on BRAdmin Light,
visit us at http://solutions.brother.com/
Note
● If you require more advanced printer
management, use the latest Brother
BRAdmin Professional utility version
that is available as a download from
http://solutions.brother.com/
● If you are using personal firewall software,
BRAdmin Light may fail to detect the
unconfigured device. In that case, disable
your personal firewall software, and try
using BRAdmin Light again. Restart your
personal firewall software after the
address of the unconfigured device is set.
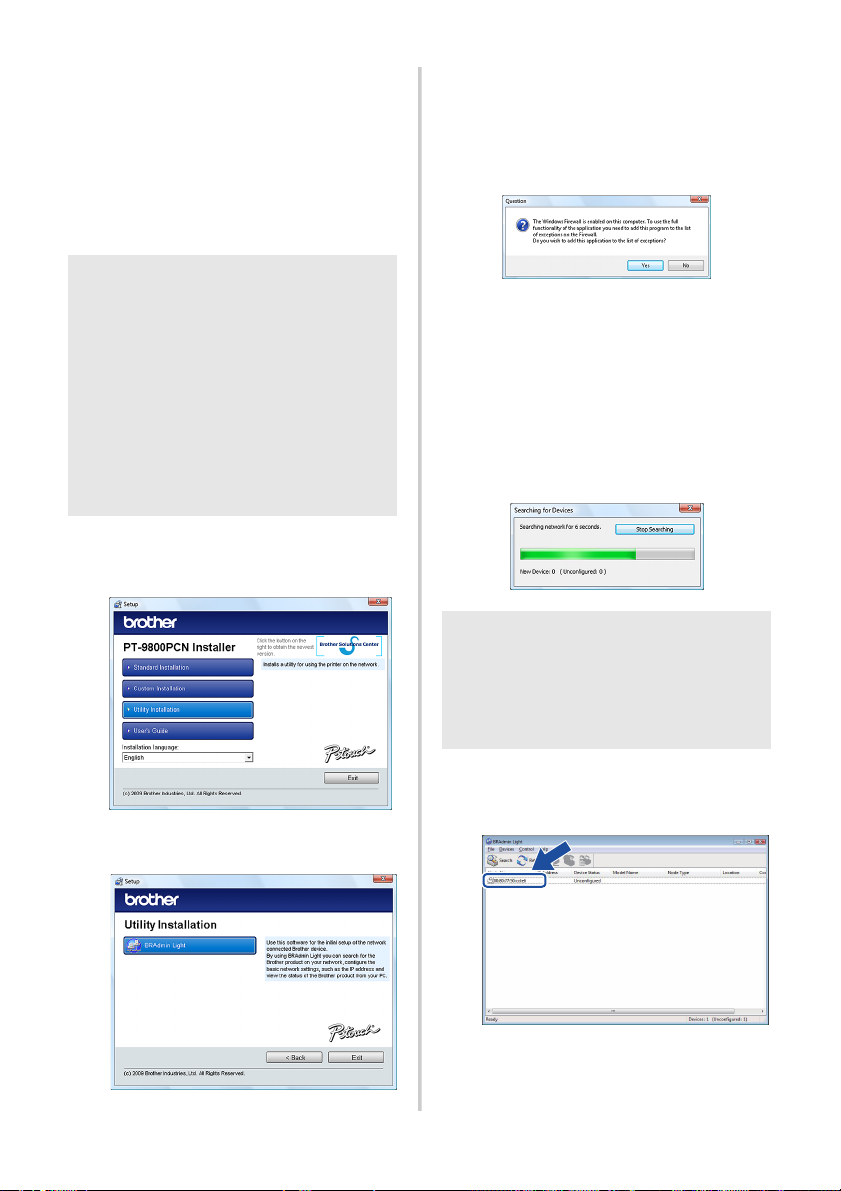
Click [Utility Installation].
1
This screen is the same screen as you
see when you insert the CD-ROM.
If the Windows Firewall is enabled on
your computer, the message “Do you
wish to add this application to the list
of exceptions?” appears. Check your
computer environment and choose
[Yes] or [No].
■ Setting your IP address, Subnet
Mask and Gateway using BRAdmin
Light
Click “Start” - “All Programs
1
(Programs)” - “Brother” “BRAdmin Light”.
BRAdmin Light will search for new
devices automatically.
Note
● If you have a DHCP/BOOTP/RARP
server in your network, you don’t have to
do the following operation, because the
print server will automatically obtain its
IP address.
Click [BRAdmin Light] and follow the
2
on-screen instructions.
Double-click the unconfigured device.
2
The default password is “access”.
21
Page 23
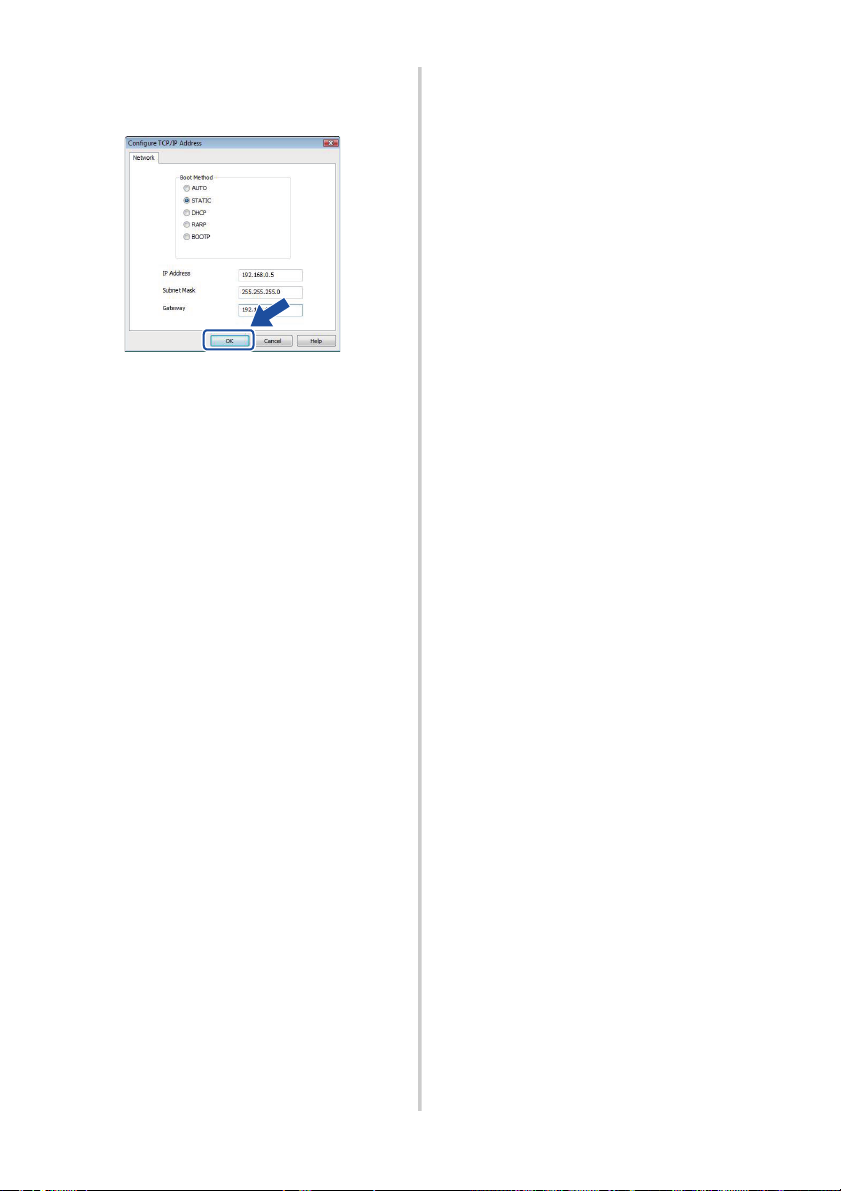
Choose STATIC for the Boot Method.
3
Enter the IP Address, Subnet Mask
and Gateway, and then click [OK].
The address information will be saved
4
to the printer.
22
Page 24

Uninstalling the software
This section describes how to uninstall the software and printer driver. In the following steps, you will
see PT-XXXX. Read “XXXX” as your printer name.
■ Uninstalling the printer driver
When using Microsoft® Windows
■ Uninstalling P-touch Editor
For Windows® XP
1
From the “Control Panel”, go to “Add or
Remove Programs”.
The “Add or Remove Programs” window
appears.
®
For Windows Vista
From the “Control Panel”, go to
“Programs” and open “Programs and
Features”.
The “Uninstall or change a program”
window appears.
For Windows® XP
2
Choose “Brother P-touch Editor 5.0”, and
click [Remove].
For Windows Vista
Choose “Brother P-touch Editor 5.0”, and
click [Uninstall].
When the “User Account Control” dialog
box appears, click [Continue]. If a
password is requested, type in the
password, and then click [OK].
Click [OK].
3
After the software is removed from your
computer, the “Maintenance Complete”
dialog box appears. Click [Finish].
Close the “Add or Remove Programs”
4
(XP) / “Programs and Features”
(Windows Vista
window.
The P-touch Editor has been uninstalled.
Note
● Software User’s Guide (PDF) and
Network User’s Guide (PDF)
(PT-9800PCN only) can also be
uninstalled by following the same
procedure.
/Windows® 7
®
/Windows® 7
®
/Windows® 7)
®
Turn off the printer.
1
For Windows® XP
2
From the “Control Panel”, open the
“Printers and Faxes” window.
For Windows Vista
®
From the “Control Panel”, go to “Hardware
and Sound” and open “Printers”.
For Windows® 7
Click the , go to [Devices and Printers].
Note
● For details, see Windows
For Windows® XP
3
Choose “Brother PT-XXXX”, and click
“File” - “Delete” or right click on the icon
and then click [Delete].
For Windows Vista
Choose “Brother PT-XXXX”, and click
[Delete this printer] or right click on the
icon, and then click [Delete] (Windows
®
)/ [Remove device] (Windows® 7).
Vista
For Windows® XP
4
Go to “File” - “Server Properties”.
The “Print Server Properties” window
appears.
For Windows Vista
In the “Printers” window, right click and
select “Run as administrator” - “Server
Properties...”.
If the authorization confirmation dialog
appears, click [Continue].
If the “User Account Control” dialog appears,
enter the password and click [OK].
The “Print Server Properties” window
appears.
®
Help.
®
/Windows® 7
®
23
Page 25

For Windows® 7
Choose [Fax] or [Microsoft XPS Document
Writer] in the [Devices and Printers] window,
and then click [Print server properties],
which appeared in the menu bar.
For Windows® XP
5
Click the “Drivers” tab and choose “Brother
PT-XXXX”. Then, click [Remove].
Go to step 7.
For Windows Vista
®
Click the “Drivers” tab and choose
“Brother PT-XXXX”. Then, click
[Remove...].
®
For Windows
7
Click the [Drivers] tab, and then click
[Change Driver Settings].
(If a User Account Control message
appears, type in the password, and then
click [OK].)
Choose “Brother XX-XXXX”, and then
click [Remove...].
For Windows® XP
6
Go to step
For Windows Vista
7.
®
Choose [Remove driver only] and click
[OK].
For Windows
®
7
Choose [Remove driver and driver
package], and then click [OK].
Close the “Print Server Properties”
7
window.
The printer driver has been uninstalled.
24
Page 26
Advanced function
After the printer has been connected to the computer, labels can be created and printed.
This section describes various useful print settings and how to use a bar code reader to print labels
without a computer.
■ Printing labels at high speed or a high resolution
See “Printing at a higher speed or at a higher resolution” (→ P. 25)
■ Printing a large number of labels distributed to multiple printers
See “Distributed printing” (→ P. 26)
■ Printing using only a bar code reader without a computer
See “BTP (Bar code Template Print) function” (→ P. 28)
■
Creating and printing simple labels by using P-touch Editor Lite LAN
(PT-9800PCN only)
See “Using P-touch Editor Lite LAN (PT-9800PCN and Windows® only)” (→ P. 33)
■ Printing a list of the current printer settings
See “Printing the printer settings” (→ P. 34)
Printing at a higher speed or at a higher resolution
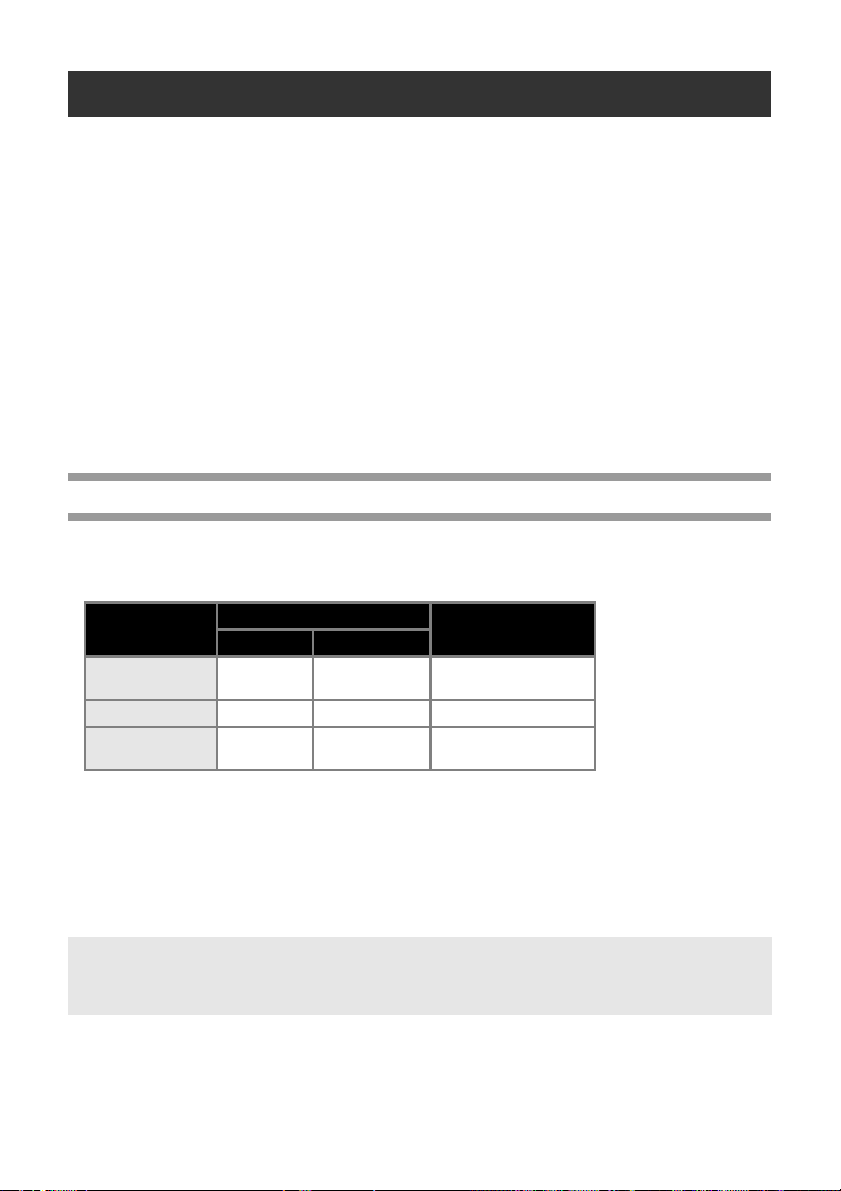
The print speed and resolution can be changed depending on the combination of the type of tape
being used and the selected output setting. With HG tape, labels can be printed at an even faster
speed or higher resolution.
Output
High Speed
(HG only)
Standard 20 mm/sec 52 mm/sec 360 × 360 dpi
High Resolution
(HG Only)
● When HG tape is used, printing can be performed at a faster speed or at a higher resolution than with
TZ tape.
● When HG tape is used with the “High Speed” setting selected, printing can be performed even faster.
However, since the resolution in the feed direction is reduced, this is not suitable for detailed printing.
● When HG tape is used with the “High Resolution” setting selected, printing can be performed with an
even higher resolution. This is suitable for detailed printing of objects such as graphics and curved lines.
● When printing bar codes, use the “Standard” setting, which has identical horizontal and vertical
resolutions.
Tape Type
TZ tape HG tape
— 80 mm/sec 360 × 180 dpi
— 20 mm/sec 360 × 720 dpi
Resolution
Note
● The print speeds listed above indicate the highest speeds possible. The actual speed may
differ depending on the operating conditions.
25
Page 27
Distributed printing
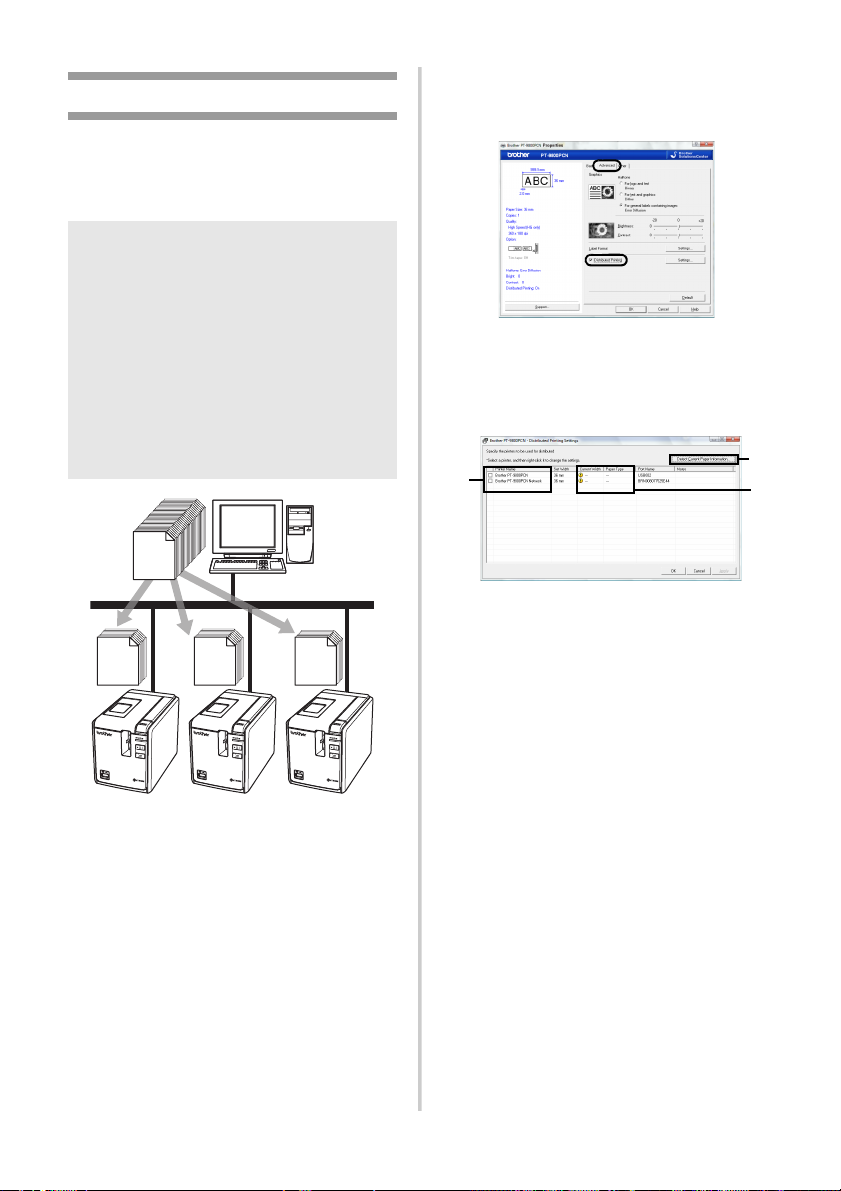
When printing a large number of labels, printing
can be distributed among multiple printers.
Since printing is performed at the same time,
the total printing time can be reduced.
Note
● Printing can be distributed to printers
connected via a USB connection or
network connection (PT-9800PCN only).
● The number of pages to be printed is
automatically divided among the selected
printers. If the specified number of pages
cannot be evenly divided among the
printers, it will be divided in the order
of the printers listed in the “Distributed
Printing Settings” dialog box when the
print settings are specified in step
4.
200
67 67
66
Select the “Advanced” tab, select the
3
“Distributed printing” check box, and
then click [Settings].
In the “Distributed Printing Settings”
4
dialog box, select the printers to be
used for distributed printing.
3
1. Click [Detect Current Paper
Information].
2. The current printer information that
was detected appears below “Current
Width” and “Paper Type”.
3. Select the check box beside the
“Printer Name” to be used for
distributed printing.
1
2
From the “File” menu in
1
P-touch Editor 5.0, click “Print”.
Click [Properties...].
2
26
Page 28
Specify the tape width to be used for
5
printing.
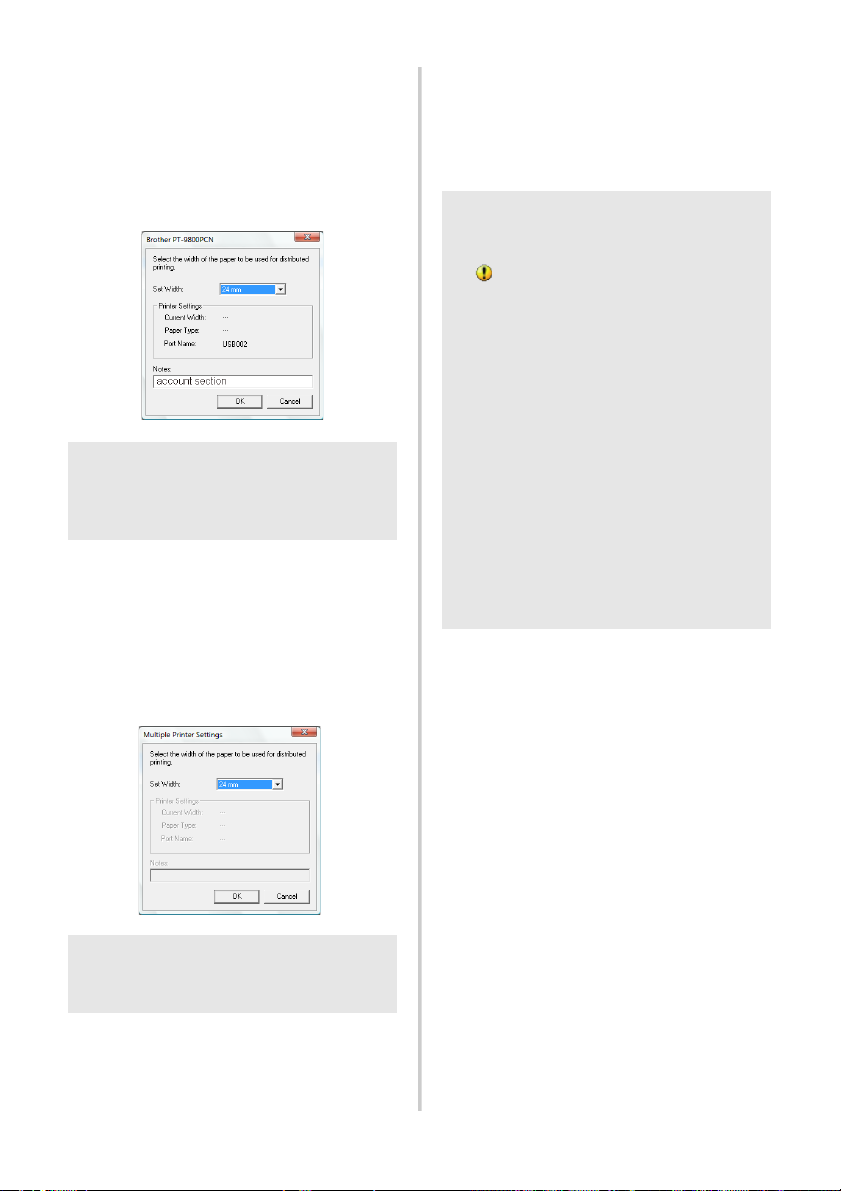
A. If only one printer has been selected.
In the dialog box from step
4, select the
printer whose setting is to be specified,
and then either double-click it or right-click
it and click “Settings”. From the “Set Width”
drop-down list, select the tape width.
Note
● Information to be displayed in the dialog
box from step
“Notes” text box.
B. If multiple printers have been selected.
In the dialog box from step 4, select the
printers whose setting are to be specified,
and right-click them and click “Settings”.
From the “Set Width” drop-down list,
select the tape width. The same tape
width setting is applied to all selected
printers.
4 can be entered in the
Click [OK] to close the “Distributed
7
Printing Settings” window.
Setup is completed.
Click [OK] to start distributed printing.
8
Note
● If the selected tape width is different from
that displayed beside “Current Width”,
appears beside the setting below
“Current Width”. Load the printer with
tape of the width specified with
“Set Width”.
● It may be impossible to detect information
for a printer connected using the PS-9000
or any common USB hub or print server.
Before printing, enter the settings
manually, and check if the printer can be
used for printing.
● Depending on whether a router is used
and the security features in use, such as
a firewall, it may not be possible to use
this function.
● We recommend performing a connection
test for your operating environment. For
more information, contact a sales
representative.
Note
● The settings below “Printer Settings”
and “Notes” are not available.
Click [OK] to close the tape width
6
setting window.
27
Page 29
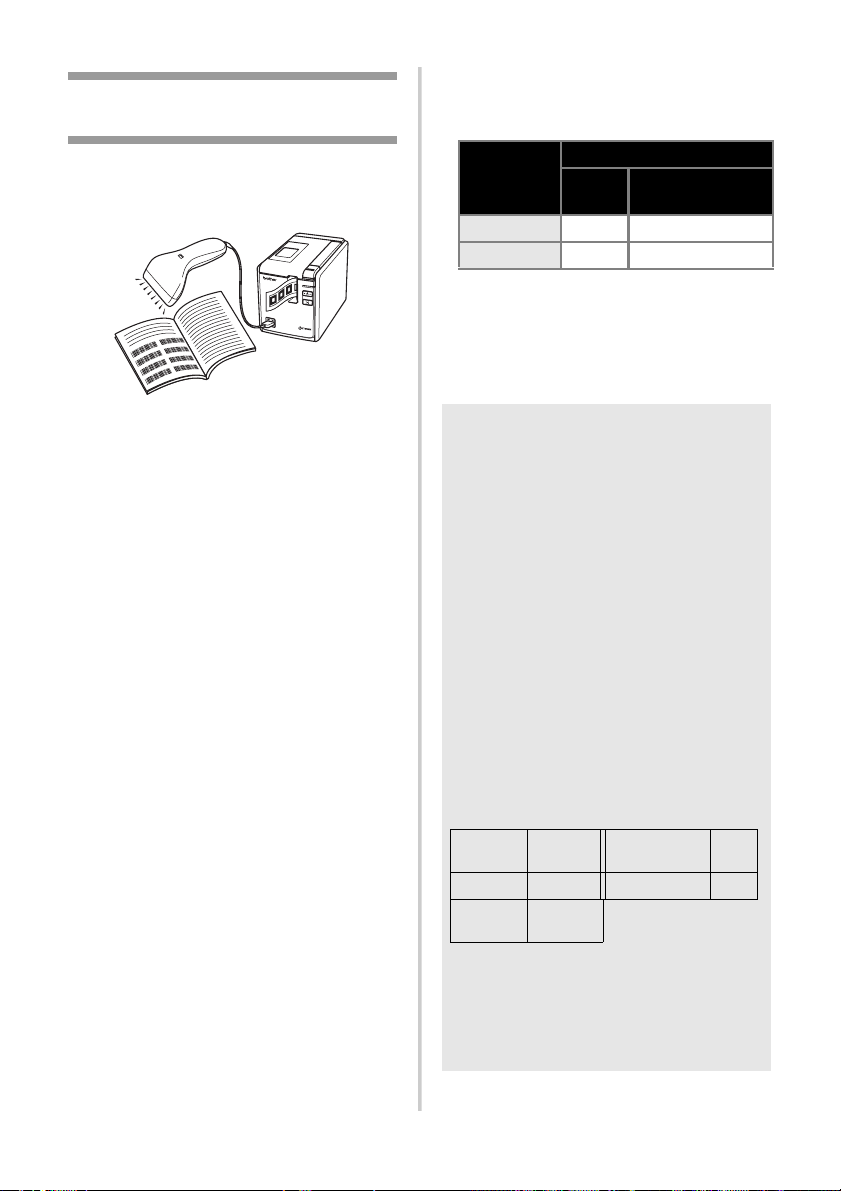
BTP (Bar code Template Print) function
With a bar code reader connected to the printer,
labels and bar codes can be easily printed
without a computer by scanning bar codes.
STATUS
Preset template printing (→ P. 29)
If a frequently used label layout is
transferred to the printer, identical labels
can be printed simply by scanning the
print settings and commands with a bar
code reader.
Bar code printing (→ P. 30)
A bar code scanned with the bar code
reader can be printed with the protocol
and with the size from a previously
created template.
Database-assisted label printing
(→ P. 31)
A object in a P-touch Editor label layout
which is connected with a database can
be replaced with bar code data scanned
by the bar code reader.
■ Preparation
Connect a bar code reader to the printer.
Bar code reader connection interfaces
Bar code reader
RS-232
PT-9700PC Yes No
PT-9800PCN Yes Yes
USB direct
interface
Bar code reader models whose
operation has been confirmed
• OPR-4001
(OPTOELECTRONICS CO., LTD.)
• LS-1203 (Motorola, Inc.)
• DS 6707 (Honeywell International Inc.)
Note
●
For the FAQ and up-to-date list of bar
code reader models whose operation has
been confirmed, visit the Brother Solutions
Center (http://solutions.brother.com/).
● Before this function can be used, the
label layout or template to be used must
be transferred with the Transfer Manager
from the computer to the printer. For
details of the Transfer Manager, see the
“Software User’s Guide” (PDF).
● The bar code reader should be set for
bar codes with no prefix or suffix.
● Various settings such as the baud rate
must be changed in order to use the
RS-232C connection. For details on
changing the settings, refer to the
operation manual for the bar code
reader. The default settings for the serial
port of this printer are listed below.
28
Baud
rate
Parity None Stop bit 1
Bit
length
● To change the printer serial interface
communications settings, refer to “Serial
interface settings (Windows
9600bps Flow control DTR
8
®
only)”
(→ P. 35) for detailed information.
● For details on using the bar code reader,
contact the manufacturer.
Page 30

■ Preset template printing
If a frequently used label layout is stored in the
printer, identical labels can be easily printed
without a computer by scanning bar codes.
<Name label>
<Address label>
Bill Anderson
Mr. Bill Anderson
4555 Cumberland Pkwy
Anytown USA 95063
Note
● For details on the various settings
that can be chosen by scanning the
appropriate bar code, refer to “List of bar
codes for specifying settings” (→ P. 42).
Transfer the label layout to be printed
1
from the P-touch Editor 5.0 to the
printer by using the Transfer Manager.
(See Software User´s Guide.)
Note
● A text object in the label layout can be
converted to an image. After being
converted to an image, the text cannot
be changed. This is useful for protecting
frequently used templates from being
accidentally edited.
In the P-touch Editor layout window,
right-click the text object, and then click
“Properties”. Click the “Expanded” tab,
and then select the “Text Cannot Be
Edited” check box.
If you cannot see the “Expanded” tab,
click “Options” in the “Tools” menu, click
the “General” tab, and then select the
“Display Expanded Tabs of Object
Properties” check box under “Others”.
When the check box is cleared, the
object is converted back to text that can
be edited.
When data is transferred to
2
“Configurations” in Transfer
Manager, the “Key Assign” number
is automatically specified.
Scan the “P-touch template command”
3
bar code to begin specifying the print
settings.
Refer to “List of bar codes for specifying
settings” (→ P. 42).
Specify the print settings by scanning
4
the bar codes with the desired settings,
from the “Basic Settings” bar codes.
Note
● It is possible to scan multiple settings.
● If no settings have been specified, a label
will be printed with the default P-touch
Template Setting (Single copy with “Auto
cut on” and “Half cut on”). For details on
P-touch Template Settings, download
“P-touch Template manual” (English only)
from the following web site:
http://solutions.brother.com/
Choose your region (eg. Europe), your
country, your model and Downloads for
your model.
● To specify the number of copies to be
printed, scan the “Number of copies”
bar code, and then scan the bar codes
under “For entering numbers” to specify
a three-digit number.
Example:
Specify numbers by scanning bar codes
as follows: 7 → [00][7], 15 → [0][1][5].
● To change the setting for the number of
copies, scan the “Number of copies” bar
code again, and then scan the bar codes
for the new three-digit number.
Scan the bar code under “Preset
5
template number” with the same
number as the “Key Assign” number
for the label layout to be printed.
The specified label is printed.
6
Note
● Specify a “Key Assign” number between
1 and 10 for label layouts to be used
with preset template printing.
29
Page 31
■ Bar code printing
A bar code scanned with the bar code
reader can be printed with the protocol and
size from a previously created template.
Note
● For details on the various settings that
can be chosen by scanning the
appropriate bar code, refer to “List of bar
codes for specifying settings” (→ P. 42).
● If the bar code to be scanned with the
bar code reader has a different protocol
than the bar code in the previously
created template, it may not be possible
to create and print the bar code.
Transfer the template to be printed
1
from the P-touch Editor 5.0 to the
printer by using the Transfer Manager.
(See Software User´s Guide.)
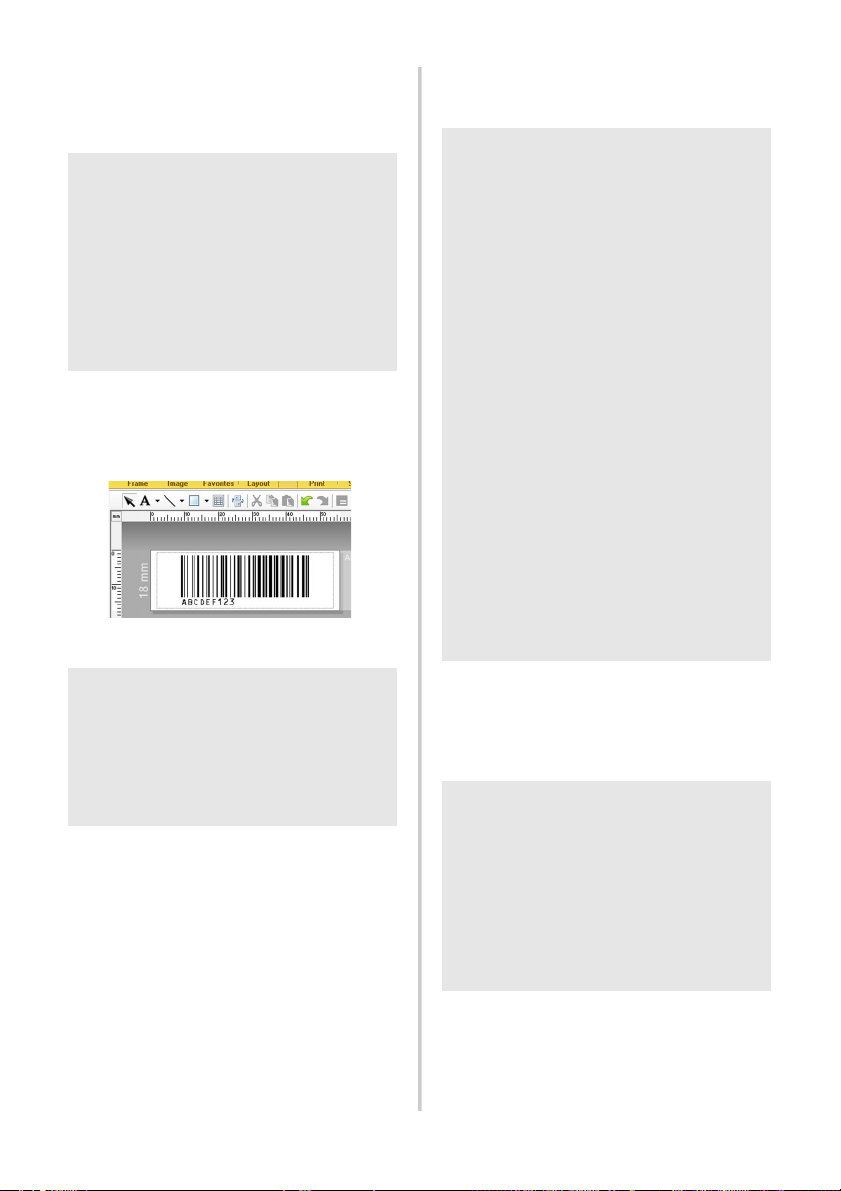
(CODE128/9-digit/69 mm × 17 mm)
Specify the print settings by scanning
4
the bar codes with the desired settings,
from the “Basic Settings” bar codes.
Note
● It is possible to scan multiple settings.
● If no settings have been specified, a label
will be printed with the default P-touch
Template Setting (Single copy with “Auto
cut on” and “Half cut on”). For details on
P-touch Template Settings, download
“P-touch Template manual” (English only)
from the following web site:
http://solutions.brother.com/
Choose your region (eg. Europe), your
country, your model and Downloads for
your model.
● To specify the number of copies to be
printed, scan the “Number of copies”
bar code, and then scan the bar codes
under “For entering numbers” to specify
a three-digit number. The setting is
automatically applied when three digits
have been specified.
Example:
Specify numbers by scanning bar codes
as follows: 7 → [00][7], 15 → [0][1][5].
● To change the setting for the number of
copies, scan the “Number of copies” bar
code again, and then scan the bar codes
for the new three-digit number.
Note
● Be sure to create bar code templates
that comply with the limits on the size
and number of digits for the bar code to
be scanned. The new bar code cannot
be created if it exceeds the number of
digits specified in the template.
When data is transferred to
2
“Configurations” in Transfer
Manager, the “Key Assign” number
is automatically specified.
Scan the “P-touch template command”
3
bar code to begin specifying the print
settings.
Refer to “List of bar codes for specifying
settings” (→ P. 42).
30
Scan the “Select template” bar code,
5
and then scan the bar codes under
“For entering numbers” to specify the
“Key Assign” number (three digits)
for the bar code template.
Note
● The setting is automatically applied
when three digits have been specified.
Example:
Specify numbers by scanning bar codes
as follows: 7 → [00][7], 15 → [0][1][5].
● To change the number, scan the “Select
template” bar code again, and then scan
the bar codes for the new three-digit
number.
Page 32
Scan the bar code whose data is to be
6
used.
(CODE128/9-digit)
Scan the “Begin printing” bar code.
7
Connect the database file to the label
1
layout to be printed.
For details on specifying the settings,
refer to the “P-touch Editor Help”.
The bar code is printed with the
8
protocol and size specified in the
template.
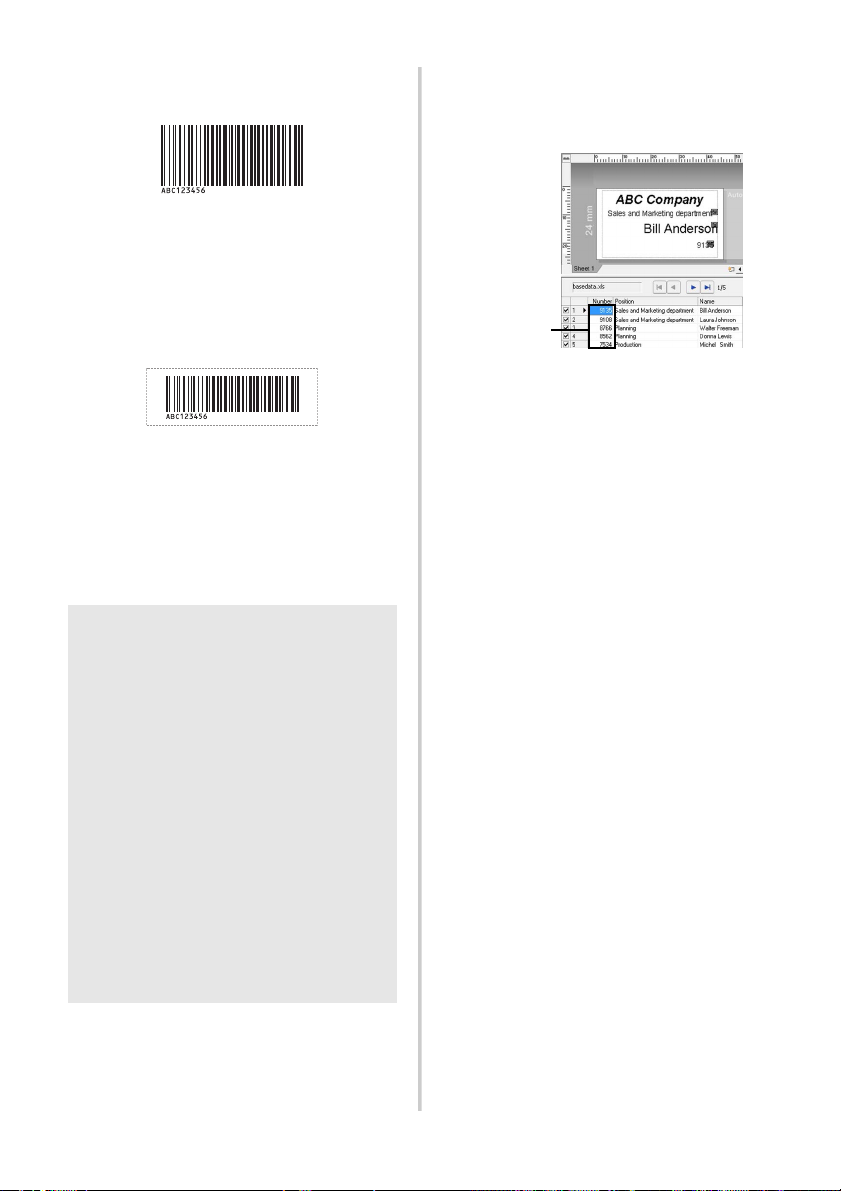
■ Database-assisted label printing
First, a database field must be connected to
an object in the label layout. Then, when a
key bar code is scanned with the bar code
reader, the bar code data can be printed
replacing data from the connected database
file in the object of the specified template.
Note
● The key bar code is the bar code for the
information appearing in the database
file at the leftmost column in record view
(field “A” in form view). These key bar
codes must be created in advance.
● The database information in field “A” of
the form view must not include any other
data. In addition, even if the information
contains two lines of data, only the first
line of data is recognised when the bar
code is scanned with the bar code
reader. Therefore, enter only one line
of data into the information in field “A”
of the form view.
● For details on the various settings that can
be chosen by scanning the appropriate
bar code, refer to “List of bar codes for
specifying settings” (→ P. 42).
Data to be
replaced by
the key bar
code data
Transfer the label layout to be printed
2
from the P-touch Editor 5.0 to the
printer by using the Transfer Manager.
(See Software User´s Guide.)
The database file is also transferred.
When data is transferred to
3
“Configurations” in Transfer
Manager, the “Key Assign” number
is automatically specified.
Scan the “P-touch template command”
4
bar code to begin specifying the print
settings.
Refer to “List of bar codes for specifying
settings” (→ P. 42).
Specify the print settings by scanning
5
the bar codes with the desired settings,
from the “Basic Settings” bar codes.
31
Page 33

Note
● It is possible to scan multiple settings.
● If no settings have been specified, a label
will be printed with the default P-touch
Template Setting (Single copy with “Auto
cut on” and “Half cut on”). For details on
P-touch Template Settings, download
“P-touch Template manual” (English only)
from the following web site:
http://solutions.brother.com/
Choose your region (eg. Europe), your
country, your model and Downloads for
your model.
● To specify the number of copies to be
printed, scan the “Number of copies”
bar code, and then scan the bar codes
under “For entering numbers” to specify
a three-digit number. The setting is
automatically applied when three digits
have been specified.
Example:
Specify numbers by scanning bar codes
as follows: 7 → [00][7], 15 → [0][1][5].
● To change the setting for the number of
copies, scan the “Number of copies” bar
code again, and then scan the bar codes
for the new three-digit number.
Scan the “Select template” bar code,
6
and then scan the bar codes under
“For entering numbers” to specify the
“Key Assign” number (three digits)
for the bar code template.
Scan the “Begin printing” bar code.
9
The object data in the specified
0
template is replaced with the database
data, and the labels are printed.
ABC Company
Planning
Walter Freeman
876 6
Note
● The setting is automatically applied
when three digits have been specified.
Example:
Specify numbers by scanning bar codes
as follows: 7 → [00][7], 15 → [0][1][5].
● To change the number, scan the “Select
template” bar code again, and then scan
the bar codes for the new three-digit
number.
Scan the key bar code whose data is
7
to be used in the database file.
Scan the “Delimiter” bar code.
8
32
Page 34
Using P-touch Editor Lite LAN (PT-9800PCN and Windows® only)
P-touch Editor Lite LAN is a basic version of
a label-editing tool.
By copying P-touch Editor Lite LAN, installed
from the enclosed CD-ROM, into a shared
folder on the server, P-touch Editor Lite LAN
on the server can be accessed by other
network users to create labels, and print
from PT-9800PCN connected to the network
without installing any PT-9800PCN driver on
the computer of each user.
Note
● In order for P-touch Editor Lite LAN to be
used, the IP address of this printer must
be correctly specified.
The IP address can be specified with
a utility such as BRAdmin Light, which
can be installed from [Utility Installation]
on the CD-ROM.
For details on using this utility, refer to
“Setting the IP address and subnet mask”
in the “Network User’s Guide” (PDF).
● On a network where the IP address is
automatically assigned, for example, with
DHCP, the IP address is automatically
assigned when the printer is connected
to the network, therefore the printer can
be used immediately. However, since the
IP address may change dynamically,
we recommend specifying a static
IP address when P-touch Editor Lite LAN
is being used. For details, contact your
network administrator.
● Specify the settings after consulting with
your network administrator.
Click [Custom Installation].
2
Click [P-touch Editor Lite LAN].
3
Follow the on-screen instructions.
4
■ How to share P-touch Editor Lite LAN
• Copy the folder containing P-touch Editor
Lite LAN from the shared folder on the
network to your computer.
• Start up P-touch Editor Lite LAN from the
shared folder on the network.
Note
● A label created using P-touch Editor
Lite LAN can only be printed from the
PT-9800PCN connected to the network.
■ How to use P-touch Editor Lite LAN
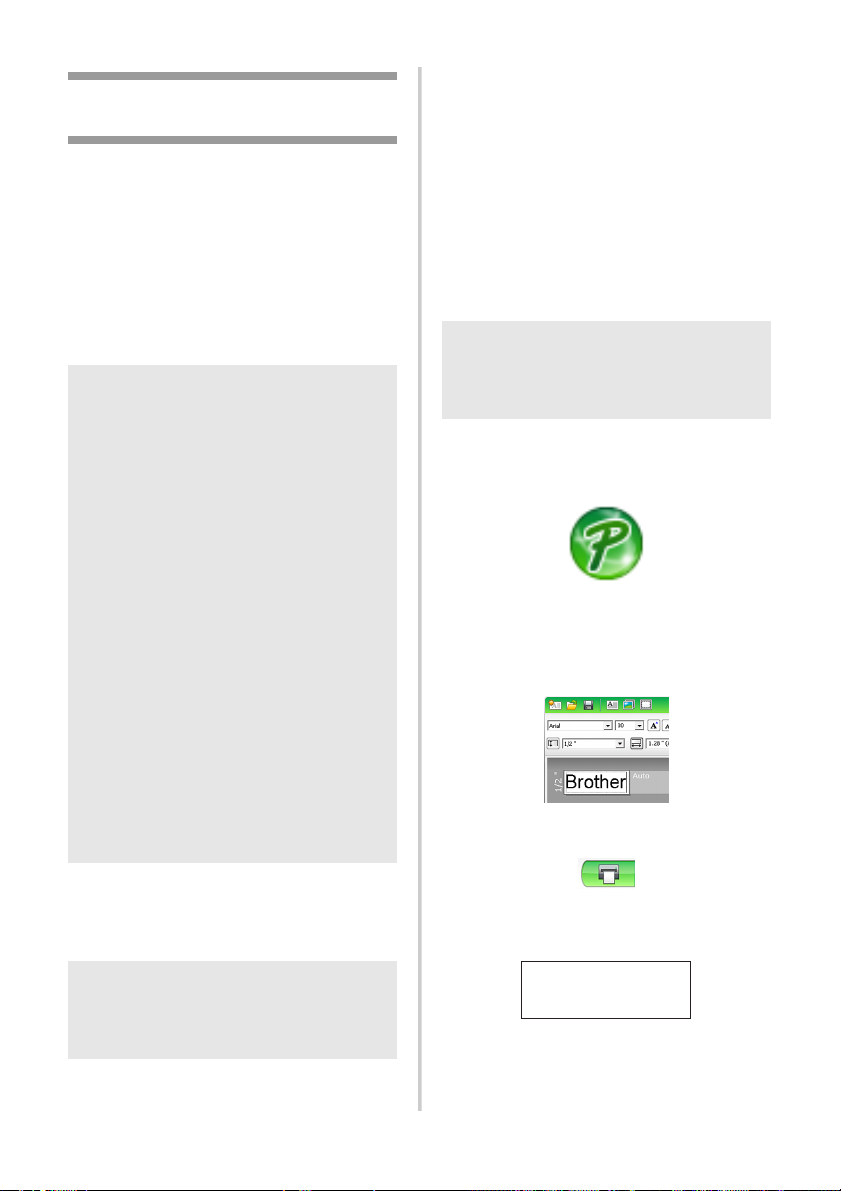
Start P-touch Editor Lite LAN.
1
Enter the label text in P-touch Editor
2
Lite LAN.
For example, click on the layout area
and then type “Brother”.
Click on the “Print” button.
3
■ How to install P-touch Editor Lite LAN
Start the computer and put the
1
CD-ROM into the CD-ROM drive.
Note
● If it does not start up automatically, open
the files on the CD-ROM and double-click
on “Setup.exe”.
The label is printed.
4
Brother
33
Page 35

Note
● P-touch Editor Lite LAN is ideal for
creating simple labels. To create labels
with more complex designs, use
P-touch Editor 5.0.
● When using P-touch Editor Lite LAN for
the first time, the “Add shortcut” dialog
box appears. Select the desired location
from “Start menu”, “Desktop” or “Quick
Launch bar”, then put a check mark in
the box, and click [OK]. You can access
P-touch Editor Lite LAN from the shortcut
next time.
● Since P-touch Editor Lite LAN uses the
network printing method and not the
driver settings, high speed printing and
high resolution printing using HG tape
are not available.
● Print jobs from the full version of P-touch
Editor sent from another computer may
interrupt your printing. P-touch Editor
Lite LAN will resume printing once the
print job from the full version has been
completed.
● For more detailed information, see the
“Software User’s Guide” (PDF).
Printing the printer settings
The printer settings page shows a report listing
the printer settings and the network settings
(PT-9800PCN only). You can print the printer
settings page using the Feed/Cut button of the
printer.
Note
● In addition to other details, the node
name and Ethernet address are printed
in the printer settings list.
● The default Node name of the network
card in the printer is
“BRNXXXXXXXXXXXXXXX” where
“XXXXXXXXXXXXXXX” is the Ethernet
address.
Make sure that the TZ or HG tape
1
cassette is installed and the tape
compartment cover is closed.
To print the printer settings page, we
recommend to use the tape wider than
24 mm.
Turn on the printer.
2
Press and hold the Feed/Cut button to
3
print out the settings.
34
Page 36
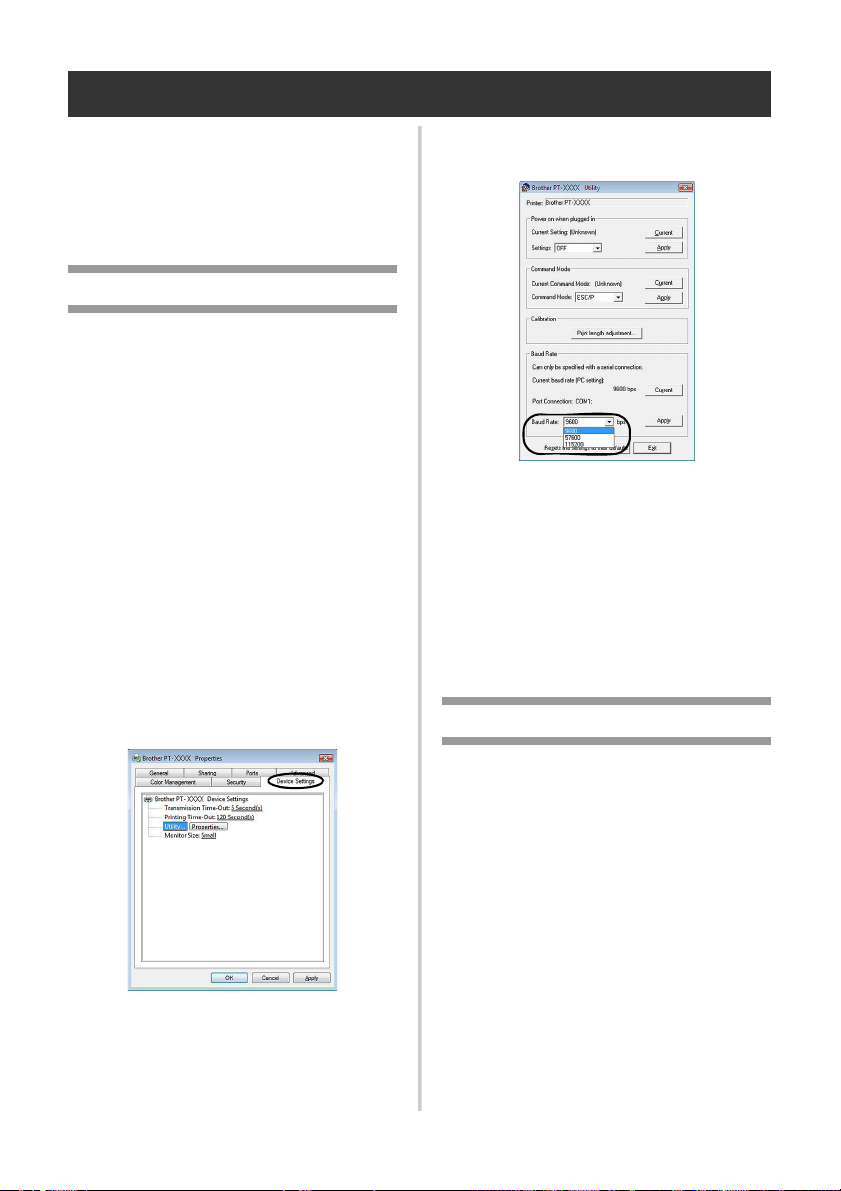
Serial interface settings (Windows® only)
Use the following steps to change or confirm the
port and the baud rate settings on the computer
and the printer. Use the same settings for the
printer and computer. The following procedure
®
is shown based on Windows Vista
.
Setting the computer baud rate
On the taskbar, click the “Start” button,
1
and then click “Control Panel”.
Select “Printers and Other Hardware”
2
(XP) / “Hardware and Sound”
(Windows Vista
then click “Printers and Faxes” (XP) /
“Printer” (Windows Vista
Windows
Right-click the “Brother PT-XXXX”
3
icon, and then select “Properties”.
Click the “Ports” tab and then select
4
the port you use from the list.
To save the settings, click [Apply].
Click the “Device Settings” tab, and
5
“Utility...”, and then click [Properties...]
that appears next to Utilities.
®
/Windows® 7) and
®
7).
®
/
Select the desired baud rate.
6
Click [Apply].
7
The baud rate will be changed.
Click [Exit].
8
Click [OK].
9
Setup is complete and the setting window
will close.
Setting the printer baud rate
For details on the setting the printer baud rate,
download “P-touch Template manual”
(English only) from the following web site:
http://solutions.brother.com/
Choose your region (eg. Europe), your country,
your model and Downloads for your model.
35
Page 37
Maintenance
Your printer should be cleaned on a regular basis to maintain its performance.
Note
● Always disconnect the AC adapter prior to cleaning the printer.
■ Cleaning the exterior of the printer
Wipe any dust and marks from the main unit
using a soft, dry cloth.
Use a slightly dampened cloth with water on
difficult to remove marks.
Note
● Do not use paint thinner, benzene,
alcohol or any other organic solvent.
These may deform the case or damage
the appearance of your printer.
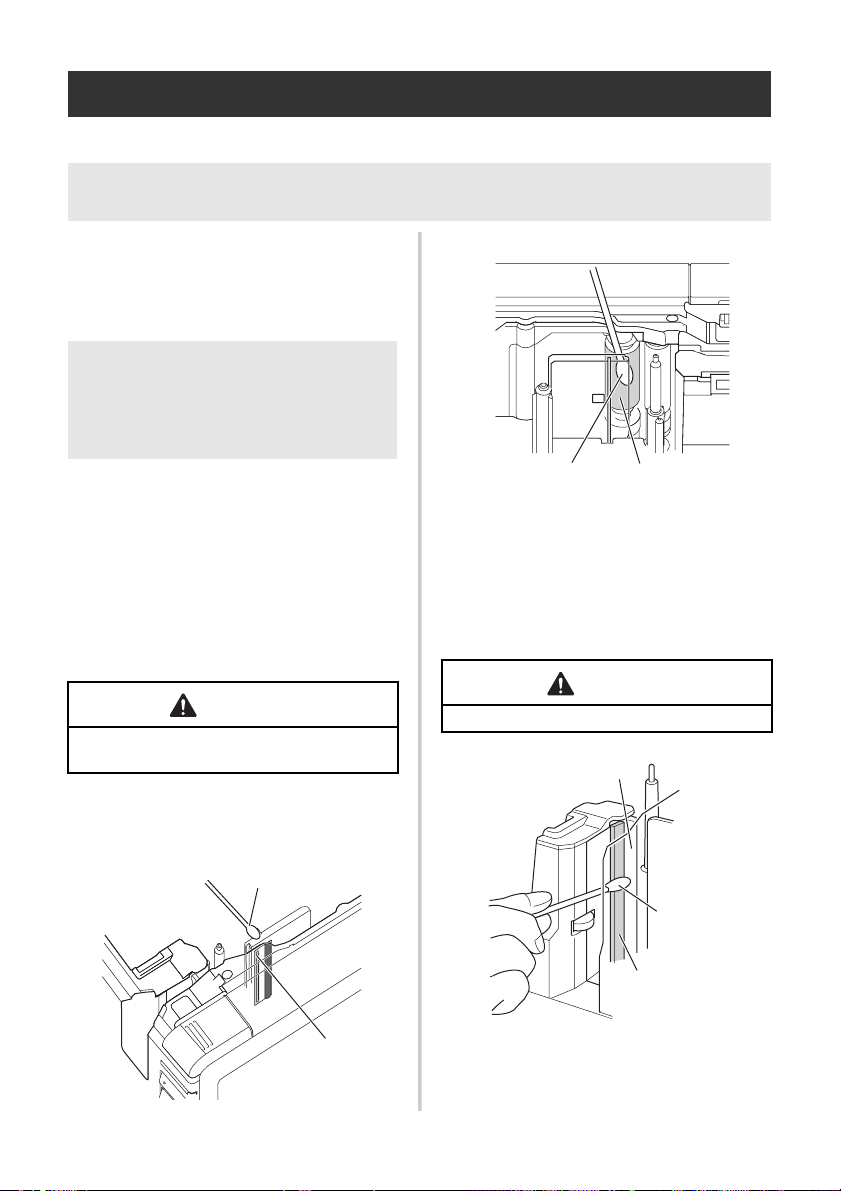
■ Cleaning the print head and head
roller
Streaks or poor quality characters on printed
labels generally indicates that the print head
and head roller are dirty. Clean the print
head using a dry cotton swab, self-cleaning
function or optional print head cleaning
cassette (TZ-CL6).
Refer to the instructions provided with the
print head cleaning cassette for directions on
how to use it.
WARNING
Do not touch the print head directly with your
bare hands. The print head may be hot.
Self-cleaning function
Remove the tape cassette, and then
press the Feed/Cut button.
Cleaning the print head manually
Cotton swab
Cleaning the head roller manually
Cotton swab
Head roller
■ Cleaning the tape cutter
About once every year, wipe the cutter
blades using a cotton swab moistened with
isopropyl alcohol (rubbing alcohol).
Tape adhesive can build up on the cutter
blade after repeated use, taking the edge
off the blade which may result in the tape
jamming in the cutter.
CAUTION
Do not touch the cutter blade with your finger.
Cutter blade
36
Cotton swab
Metal section
Print head
Page 38
Troubleshooting
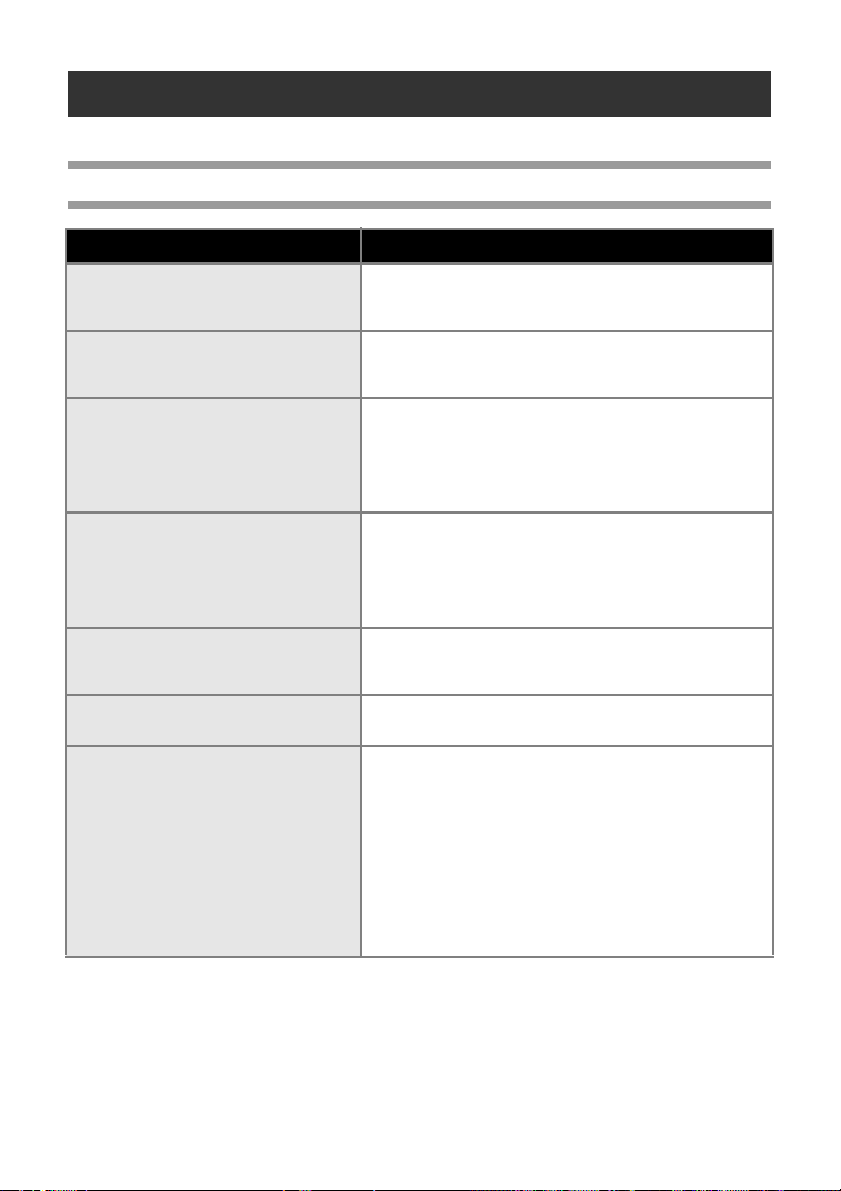
For printer troubleshooting, refer to the following list of possible problems.
Q & A
Problem Solution
The printer does not print.
A printing error is received.
While printing, striped tape appears.
There is about 1” of blank space at the
leading edge of each printed label.
The power button does not light up or
flash.
The printed label contains a blank
horizontal line.
After the labels are cut, they are not
ejected from the printer correctly.
A data transmission error appears on
the computer.
Check that the interface cable is connected correctly, the tape
cassette is installed correctly, and the tape compartment
cover is closed.
The tape cassette is empty.
Refer to “Installing the tape cassette” (→ P. 15) and install
a new tape cassette.
Most TZ labels have a clear laminate top layer. This durable
laminate helps the label withstand abrasion, fading and wet
conditions providing a crisp, readable image. The process
of adding this laminate layer results in the leading edge of
blank space. Adjusting the label’s margin or using the chain
printing feature may reduce the amount of blank space.
• Check that the main power switch on the back of printer
is on.
• Check that the power supply and adapter cord is connected
correctly. If the power button still does not light up or flash,
contact the retail outlet where the printer was purchased or
your local authorised service center.
There may be some dust on the print head.
Refer to “Maintenance” (→ P. 36) and clean the print head
and head roller.
The cutter blade may be dirty.
Refer to “Maintenance” (→ P. 36) and clean the cutter.
• The wrong port may be selected.
For Windows®, select the correct port from the “Print to
the following port” list in the printer Properties dialog box.
For a USB connection, select “USB00n”.
• Is someone printing via network?
If you try to print while other users are printing large
amounts of data, the printer is unable to accept your print
job until the ongoing printing is finished. In such situations,
restart the print job after the other jobs are completed.
• The baud rates for the computer and the printer may not
be the same. Refer to “Setting the computer baud rate”
(→ P. 35) and change the baud rate.
37
Page 39
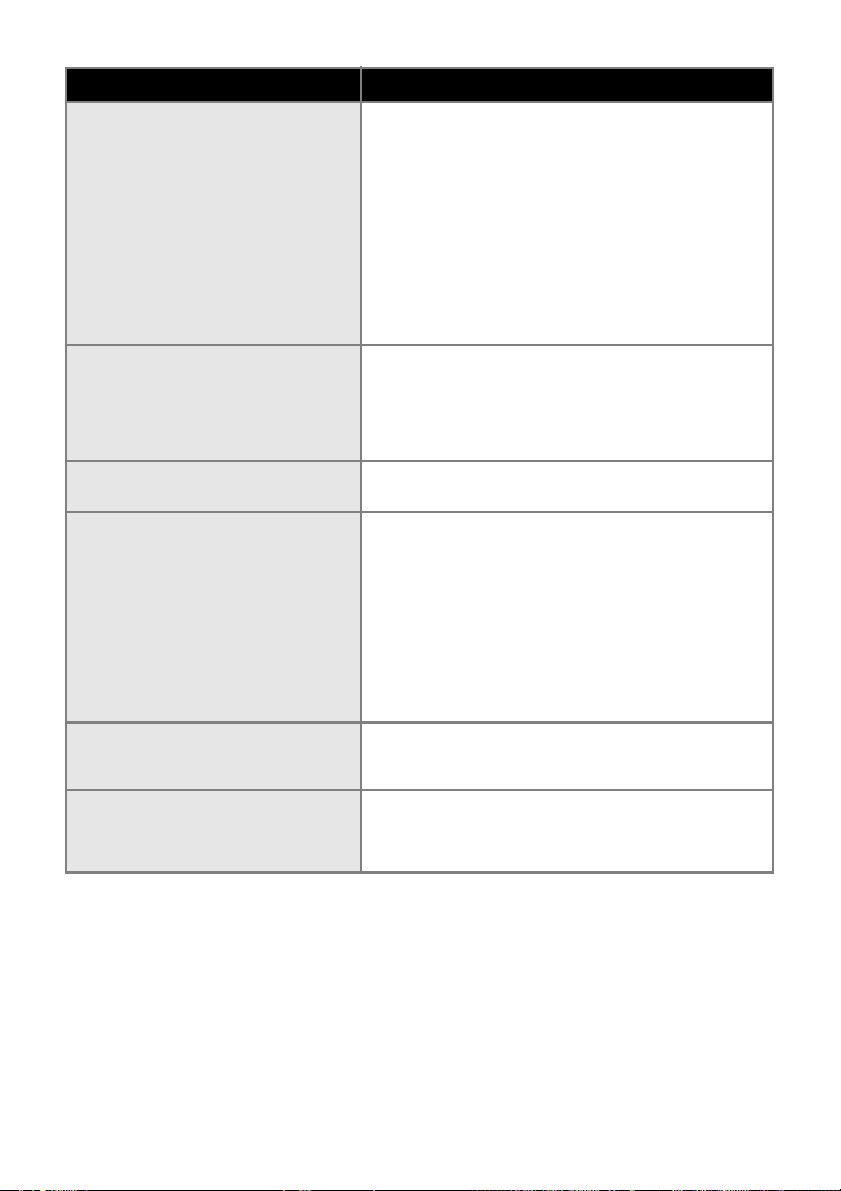
Problem Solution
The baud rate cannot be set using the
Change Baud Rate Wizard or the
Brother printer utilities.
I want to reset the printer/delete the
data transferred from computer.
• Error 99: The computer cannot detect the printer.
- Make sure that the printer is turned on.
- Make sure that the interface cable is connected correctly.
- Make sure that the COM port where the printer is connected
is the same COM port selected in the Change Baud Rate
Wizard. (Many computers have more than one COM port
and COM2 may have been mistakenly selected in the
Change Baud Rate Wizard.)
• Error 1 or Error 5: The serial port of the computer cannot
be used.
When another serial connection device is using the same
COM port, labels cannot be printed. Change the COM
port for the serial connection device or connect the printer
to a COM port that is not being used.
To reset the printer, press and hold the power button to turn
off the printer. Then, hold down the power button for two
seconds. Continue holding down the power button, and press
the Feed/Cut button six times. The printer will then reset. All
the transferred data from the computer will be deleted and all
printer settings will be reset to the factory settings.
I want to cancel the current printing job.
Data cannot be sent from a device
plugged into the USB Direct Interface
on the front of the printer, or
a connected device cannot be used
(PT-9800PCN only).
• An error occurred during installation.
• Installation cannot be performed
with the CD-ROM.
• I would like more information about
the Add-Ins.
• I do not understand how to connect
to a database.
Make sure that the printer is on, and then briefly press the
power button on the front of the printer.
• The connected device is incompatible with the
PT-9800PCN.
If the LED display on USB Direct Interface is flashing in
red, either the device is incompatible with the printer or
the device consumes too much power. In either case,
the device cannot be used with the PT-9800PCN.
• The buffer of the PT-9800PCN is full.
If the LED flashes in red while connected devices are
being used, the buffer of the PT-9800PCN may have
become full. Stop the data transmission, wait until the
data buffered in the PT-9800PCN has been processed,
and then unplug the device and plug it in again.
Visit http://solutions.brother.com/
See the “Software User’s Guide” (PDF).
38
Page 40
Problem Solution
I do not understand how to install the
second printer that I have purchased.
I do not understand how to share
a printer on a network (PT-9800PCN
only).
• With a USB connection.
When the printer is connected to the computer using
a USB cable, the driver for the second printer is
automatically installed through Plug and Play.
• With a Peer-to-Peer connection (PT-9800PCN only).
- If one PT-9800PCN is already installed:
After the second printer is connected to the LAN, the
installer starts up and the printer driver is installed. Both
printers are listed in the dialog box where the printer can
be selected. Identify the second printer by its IP address,
and then select it. The selected printer driver is registered
with the computer.
- If multiple printers are to be installed at the same time:
When the printers are connected to the LAN, the installer
starts up and the printer drivers are installed. If multiple
printers are selected in the list appearing in the dialog box
where printers are selected, the selected printer drivers
are registered with the computer.
See the “Network User’s Guide” (PDF).
39
Page 41
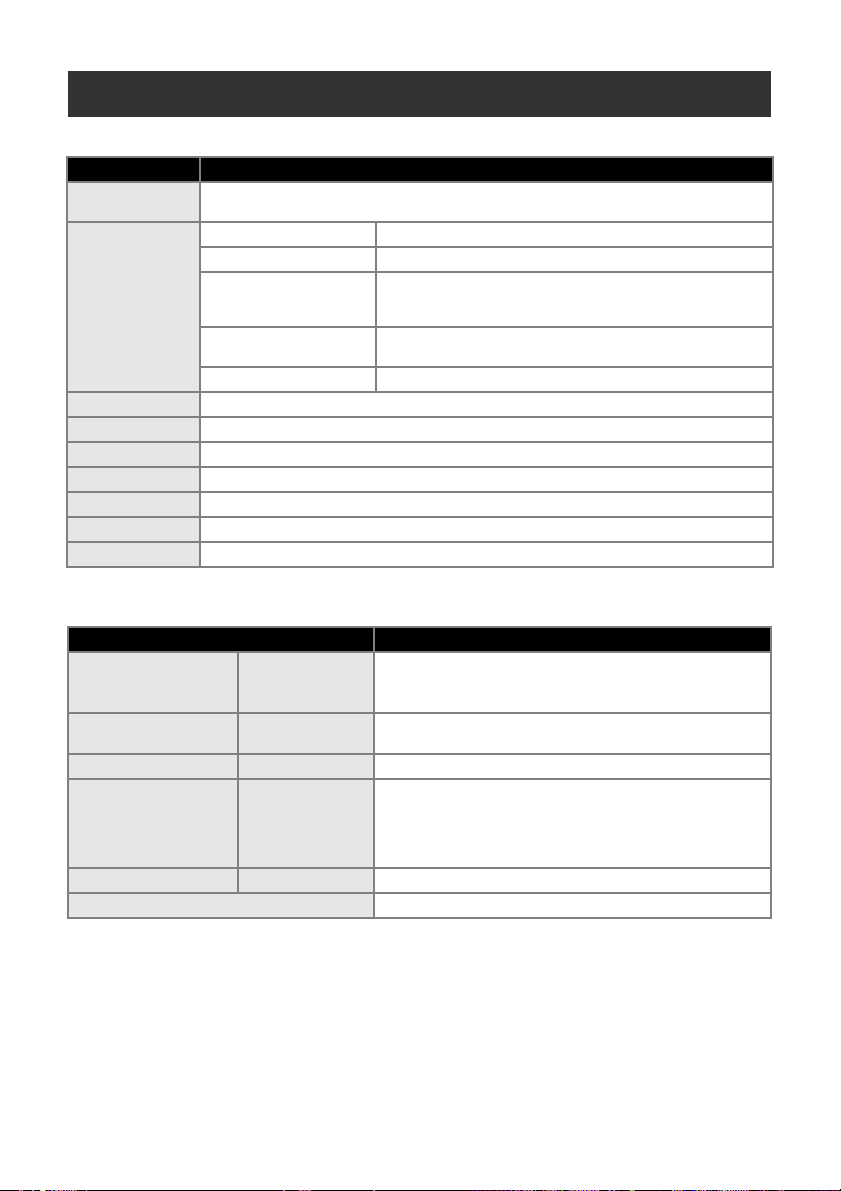
Product specifications
■ Printer specifications
Item Specification
Display
Printing
Buttons Power button, Feed/Cut button
Interface
Power source AC 220 to 240 V, 50 Hz (AC adapter)
Power consumption
Measurements 116 × 193 × 140 mm (W × D × H)
Weight Approx. 1.58 kg
Cutter Auto full cutter/auto “crack and peel” cutter
* Auto “crack and peel” cutter is available only when using laminated tape.
■ Operating environment
OS Windows
Standard Interface Windows
Hard Disk Windows
Memory Windows
Monitor Windows
Power lamp (green), STATUS lamp (red),
USB Direct Interface lamp (green/red) (PT-9800PCN only)
Printing method Heat transfer laminated printing/thermal printing
Print head 360 dpi/384 dot
Print resolution
Printing speed
Maximum printing width 27.1 mm
Serial (RS-232C), USB2.0 full speed LAN (10/100BASE-TX), USB Direct Interface (PT-9800PCN only)
Approx. 30 W (during printing)
Item Specification
Others CD-ROM drive
For TZ tape cassettes: 360 × 360 dpi
For HG tape cassettes: 360 × 180 dpi, 360 × 360 dpi or
360 × 720 dpi
For TZ tape cassettes: Up to 20 mm/sec
For HG tape cassettes: Up to 80 mm/sec
Windows® XP/Windows Vista®/Windows® 7,
®
Windows Server® 2003/Windows Server® 2008/
2008 R2 (for PT-9800PCN only) (Pre-installed device)
RS-232C, USB port (USB Spec. 1.1 or 2.0 protocol),
®
(only for PT-9800PCN) 10/100BASE-TX Wired Ethernet
®
Disk space more than 70 MB
Windows® XP: More than 128 MB
Windows Server® 2003: More than 256 MB
®
Windows Vista®/Windows Server® 2008/2008 R2:
More than 512 MB
Windows® 7: More than 1 GB (32-bit) or 2GB (64-bit)
®
SVGA, high colour or higher graphics card
40
Page 42

Appendix
General procedure for the BTP (Bar code Template Print) function
The general procedure for using the BTP (Bar code Template Print) function is described below.
For details on specifying the various settings, refer to “BTP (Bar code Template Print) function”
(→ P. 28).
Use P-touch Editor 5.0 to create a template, and then transfer it to the printer.
1
Connect the bar code reader to the printer.
2
Scan the “P-touch template command” bar code.
3
This allows the settings to be specified or clears the previous settings.
Scan the “Basic settings” bar codes.
4
Specify the cut method and the number of copies to be printed.
Specify the appropriate settings (A, B or C).
5
A. Preset template printing
1.Scan the “Preset template number” bar code.
B. Bar code printing
1.Scan the “Select template” bar code, then the bar codes under “For entering numbers”.
2.Scan the bar code whose data is to be used or copied.
3.Scan the “Begin printing” bar code.
C. Database-assisted label printing
1.Scan the “Select template” bar code, then the bar codes under “For entering numbers”.
2.Scan the key bar code to replace the database data.
3.Scan the “Delimiter” bar code.
4.Scan the “Begin printing” bar code.
The specified label is printed.
6
41
Page 43
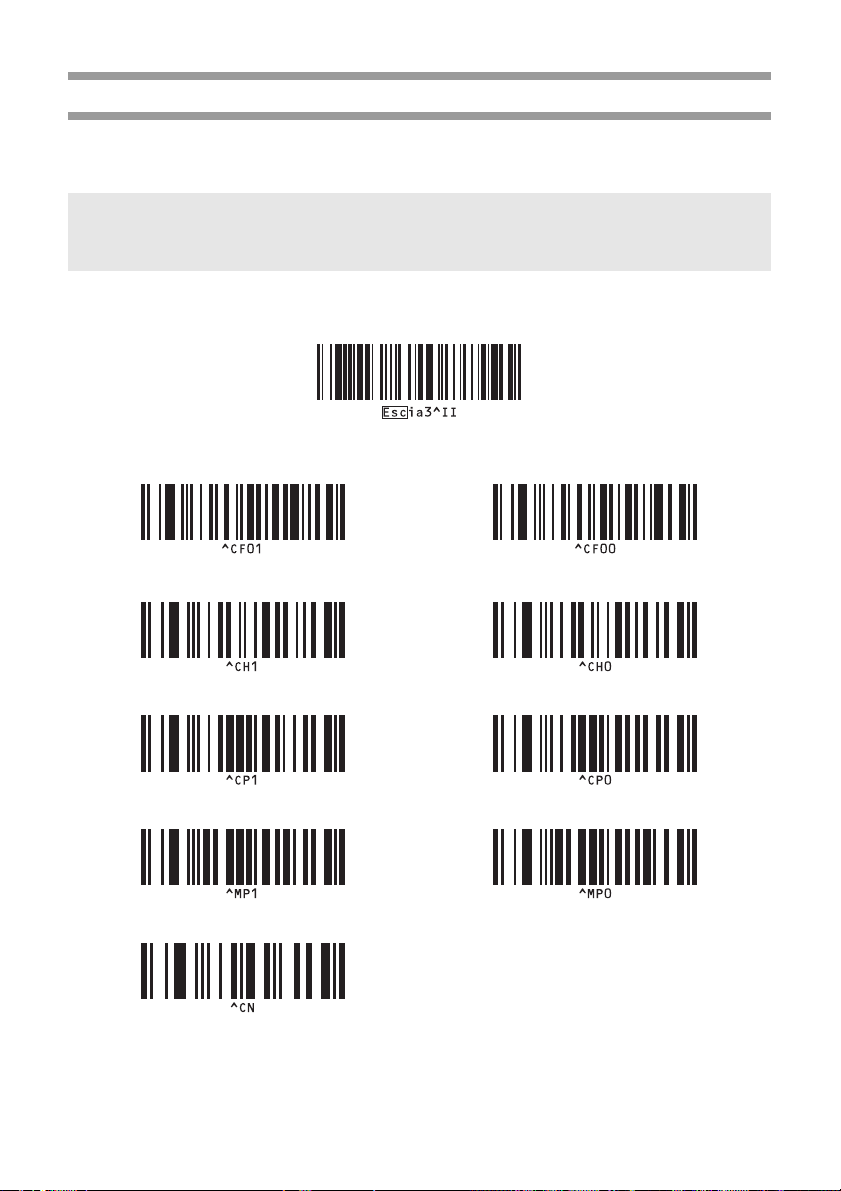
List of bar codes for specifying settings
These are the bar codes for specifying settings used with the “BTP (Bar code Template Print) function”
(→ P. 28).
Note
● When using the bar codes in this list, set “Trigger for P-touch Template Printing” and
“Command Prefix Character” to default in P-touch Template Settings.
■ P-touch template command (Initialize + begin specifying settings)
■ Basic settings
• Auto cut on*
• Half cut on*
• Chain printing on • Chain printing off*
• Mirror printing on • Mirror printing off*
• Number of copies*
1
1
2
• Auto cut off
• Half cut off
1
1
42
Page 44
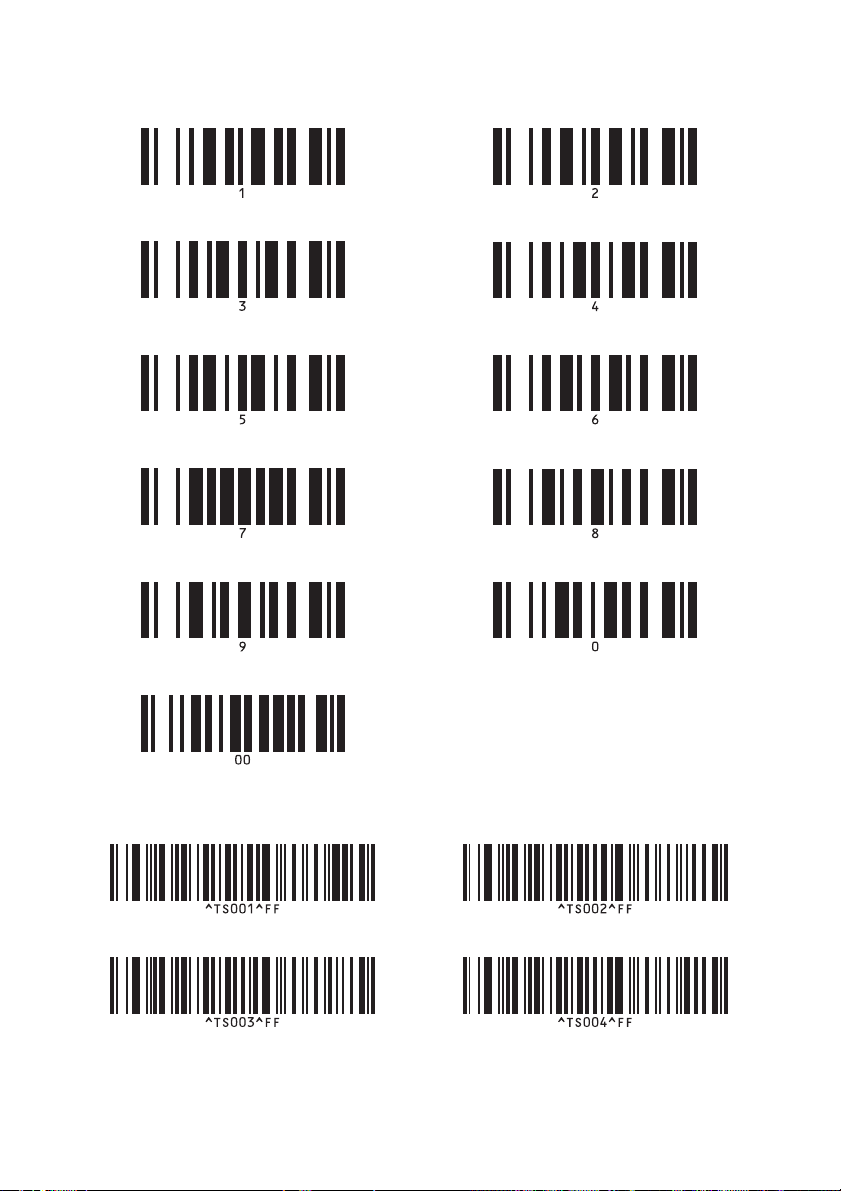
■ For entering numbers*
•1 •2
•3 •4
•5 •6
•7 •8
•9 •0
2
•00
■ Preset template number
• Preset template 1 • Preset template 2
• Preset template 3 • Preset template 4
43
Page 45
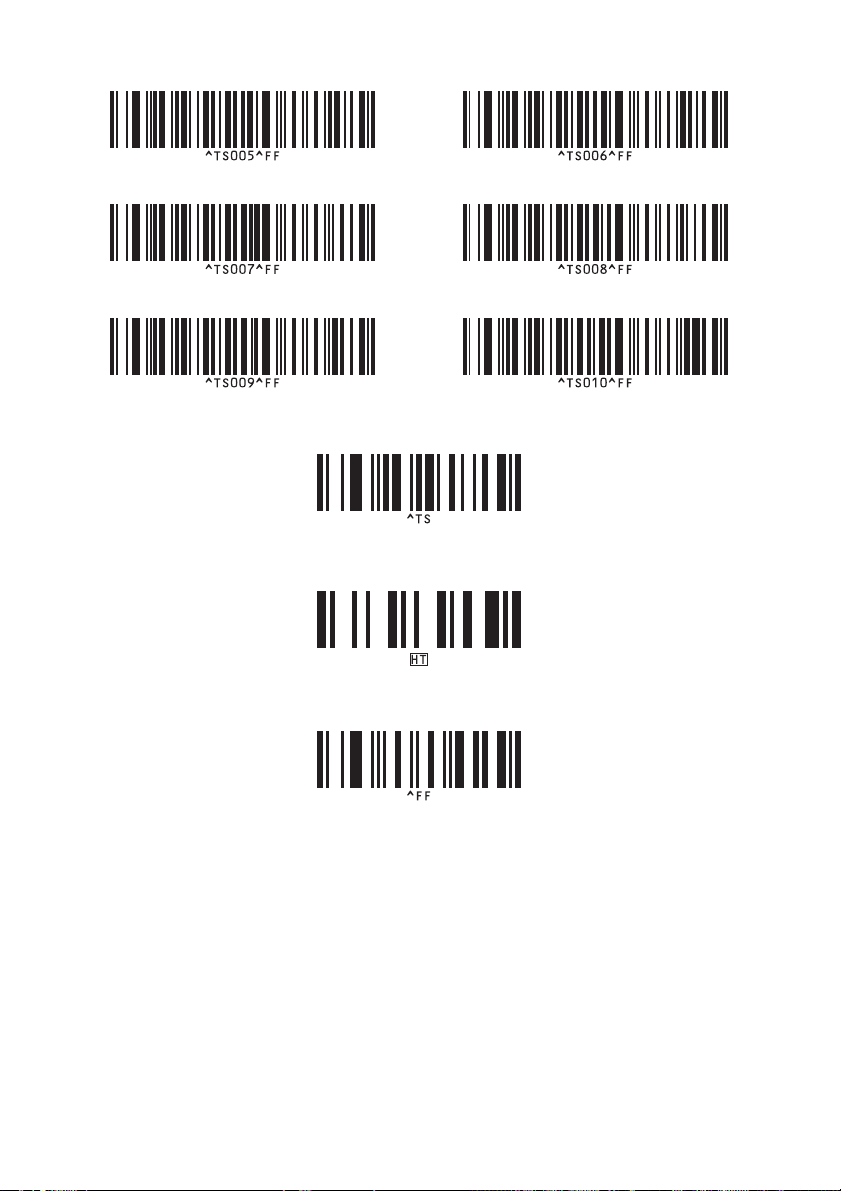
• Preset template 5 • Preset template 6
• Preset template 7 • Preset template 8
• Preset template 9 • Preset template 10
■ Select template
■ Delimiter
■ Begin printing
*1 This is the default setting.
*2 These are used when specifying the number of copies printed and when selecting a template
number.
Scan bar codes to specify a three-digit number, such as [00][7] or [0][1][5]. The setting is
automatically applied when three digits have been specified.
To change settings, scan the “Number of copies” bar code again when changing the number of
copies or scan the “Select template” bar code again when changing the template number, and
then scan the bar codes for the new three-digit number.
44
Page 46

Index
A
AC adapter .............................................. 7, 12
AC adapter socket......................................... 8
B
Bar code printing ......................................... 30
Bar code Template Print ............................. 28
Bar codes for specifying settings ................ 42
Baud rate..................................................... 35
BRAdmin Light ............................................ 21
BTP ............................................................. 28
C
CD-ROM ....................................................... 7
Cleaning the exterior of the printer.............. 36
Cleaning the print head and head roller ...... 36
Cleaning the tape cutter .............................. 36
Connecting to a computer ........................... 13
Connecting to the power source ................. 12
Cover release button............................... 8, 15
D
Database-assisted label printing ................. 31
Default Serial settings ................................. 28
Deleting data transferred to the printer ....... 38
Distributed printing ...................................... 26
F
Factory settings........................................... 38
Feed/Cut button ............................................ 8
G
General precautions...................................... 5
H
HG Tapes.................................................... 15
High resolution printing ............................... 25
High speed printing ..................................... 25
I
Installing the BRAdmin Light ....................... 21
Installing the software ........................... 16, 18
Installing the tape cassette.......................... 15
Interface cables........................................... 14
L
Label outlet ................................................... 8
LAN port........................................................ 8
LED lamp ...................................................... 9
M
Main power switch .................................. 8, 12
Maintenance ............................................... 36
N
Network cable ............................................. 14
O
Operating environment ............................... 40
P
Power button........................................... 8, 12
Power supply cord .................................. 7, 12
Preset template printing .............................. 29
Printer Settings print out ............................. 34
Printing the printer settings ......................... 34
Printing without computer ........................... 28
P-touch Editor Lite LAN .............................. 33
Q
Q & A .......................................................... 37
R
Reset to factory settings ............................. 38
S
Safety precautions ........................................ 3
Serial cable ................................................. 14
Serial interface settings............................... 35
Serial port...................................................... 8
Specifications.............................................. 40
STATUS lamp ............................................... 8
T
Tape cassette ............................................... 7
Tape compartment cover .............................. 8
Troubleshooting .......................................... 37
TZ Tapes..................................................... 15
45
Page 47

U
Uninstalling the software ............................. 23
USB cable ............................................... 7, 14
USB Direct Interface ..................................... 8
USB port........................................................ 8
User’s Guide ................................................. 7
46
Page 48
Printed in China
LAA164001
 Loading...