

Page 1

Semi-Rotary Die Cutting Unit
Technical Parameter
Max. web width: 340mm
Min. Web width: 160mm
Table of contents
Mounting of die and cylinder
Operation setting
Registration setting
Maintenance and troubleshooting
SDF-E330 Manual
Semi Rotary Die cutting unit
Page 2
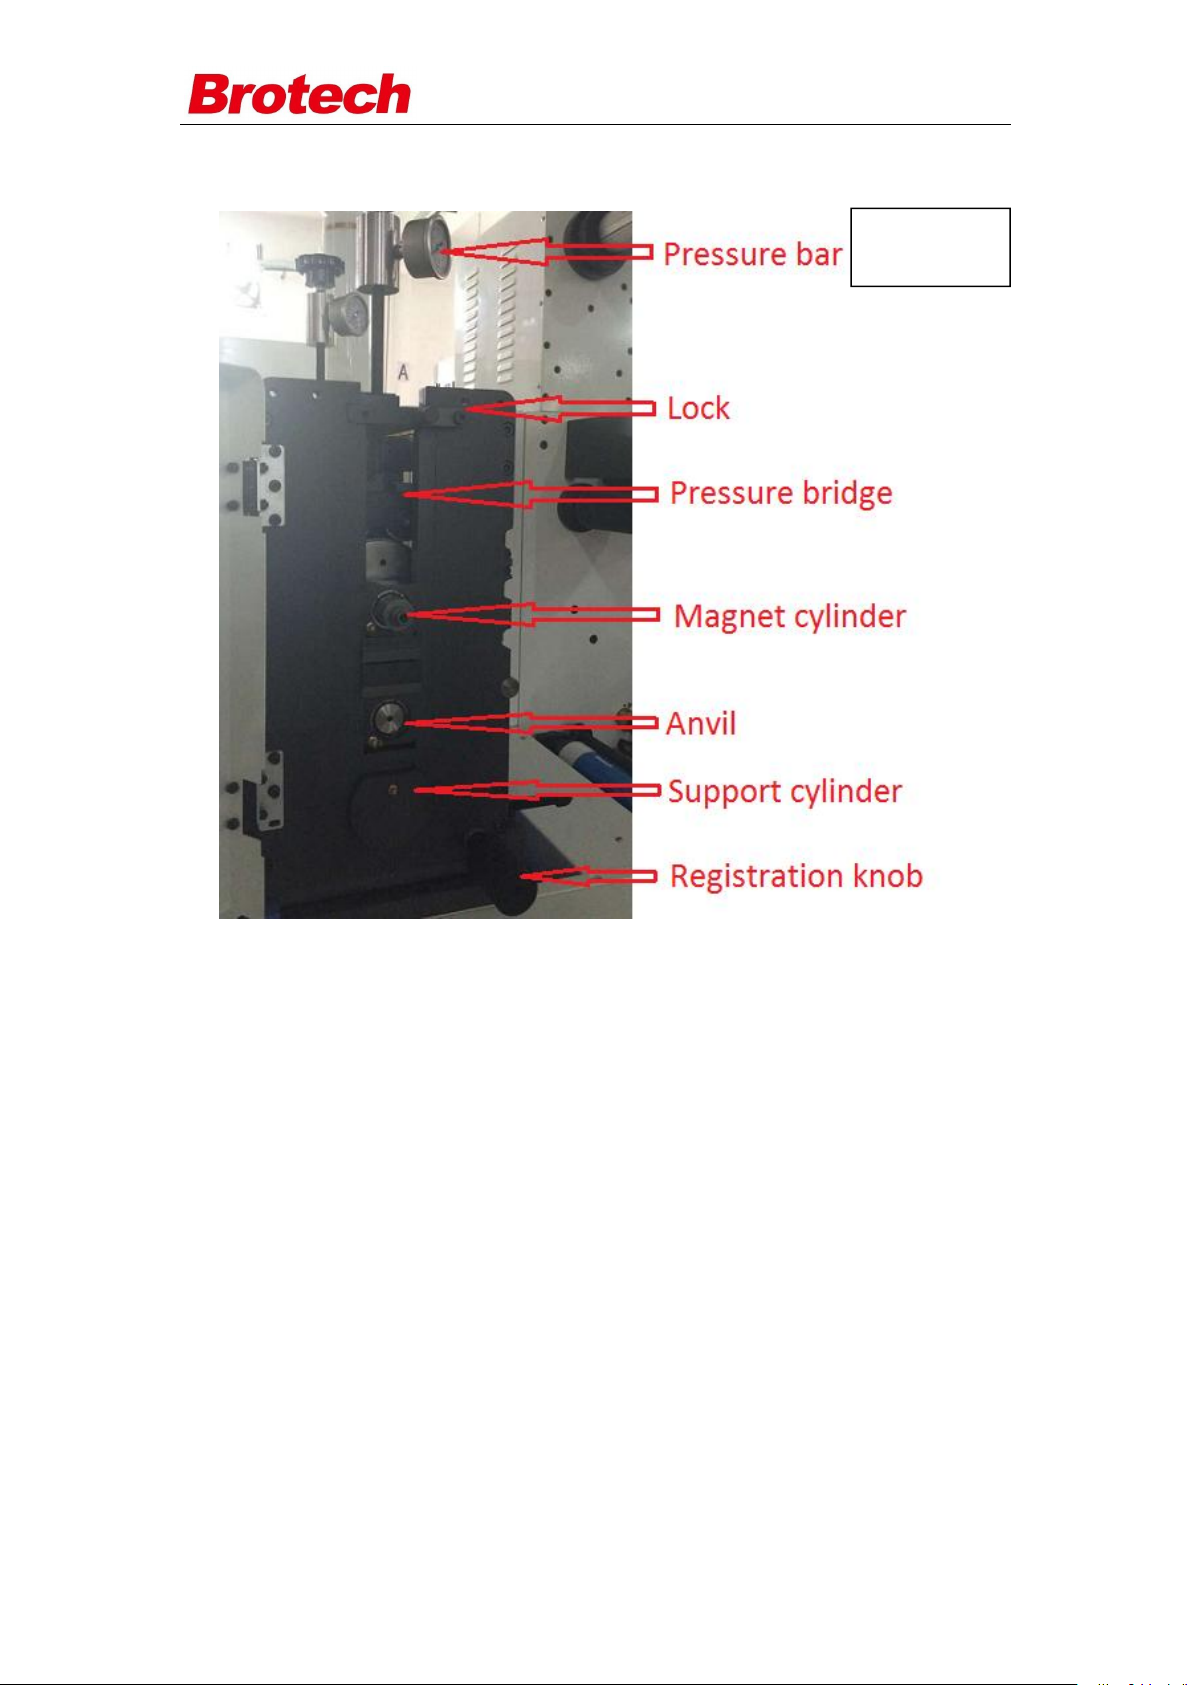
Die cutting unit:
(option)
SDF-E330 Manual
Mounting of die cutting cylinder
1. Remove the switch sensor, avoid to be damaged when change the cylinder.
2. Mount the bearing block on both side of cylinder.
3. Hang up the cylinder by using special tool.
4. Use different thickness of holding pieces into the frame rail, then put the cylinder
into die cutting unit, the bearing block need to be put down from the frame rail.
5. Mount the pressure bridge kit, them Check and make sure the gear can be
matched each other when pressure on.
6. Mount the switch sensor again, scan distance is 1mm. make sure the sensor flash
on time during cylinder turn one repeat.
Page 3

SDF-E330 Manual
Dismounting of die
1. Jog machine slowly and find the top of die.
2. Take off the die by Jog machine slowly.
Mounting of die
1. Clean the cylinder with I.P.A.,
2. Jog the machine slowly and find the mounting line.
3. Mount the die from the mounting line.
(Remark: the beginning of cutter line on the die must match the mounting
line)
4. Jog machine slowly, mounting the die on the cylinder.
Operator setting
In semi mode, the potensiometer is not availble for speed turning.need press +
and – to adjust RPM(Repeat per minute), 220RPM is the maximum speed.
In Full mode, the potensiometer is for the speed turning.
Make sure the correct web path is ready before operate this press, please follow
the web path drawing.
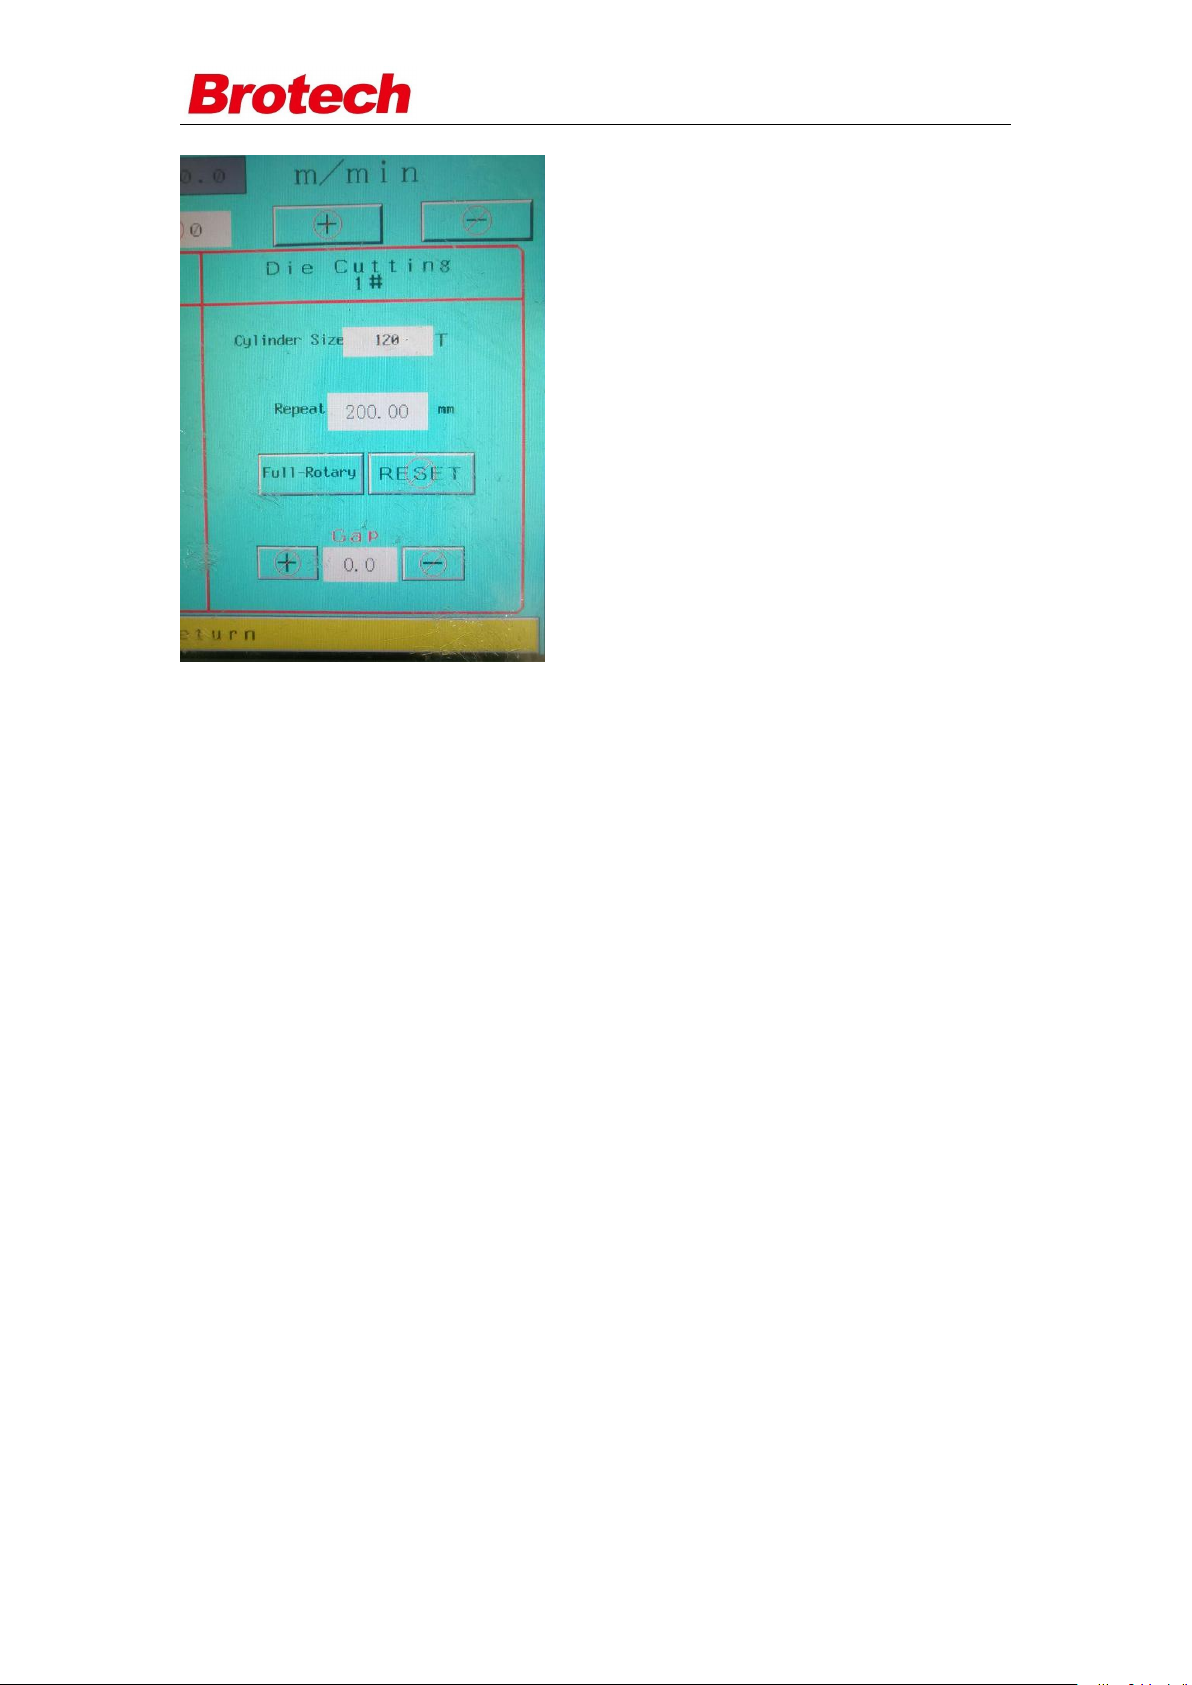
1. In touch panel, go to mode setting, press full-rotary, then change the mode to
be “Semi Mode”, input repeat length and reset.
Page 4
SDF-E330 Manual
Semi-rotary set up procedure:
1. Change to semi node
2. Write down the repeat length
3. Reset
4. Turn ON
The gap “0.00” is to use for the gap adjustment between repeats, for different
distortion and running speed.
Write length of die into “Repeat” box, then press “Reset”.
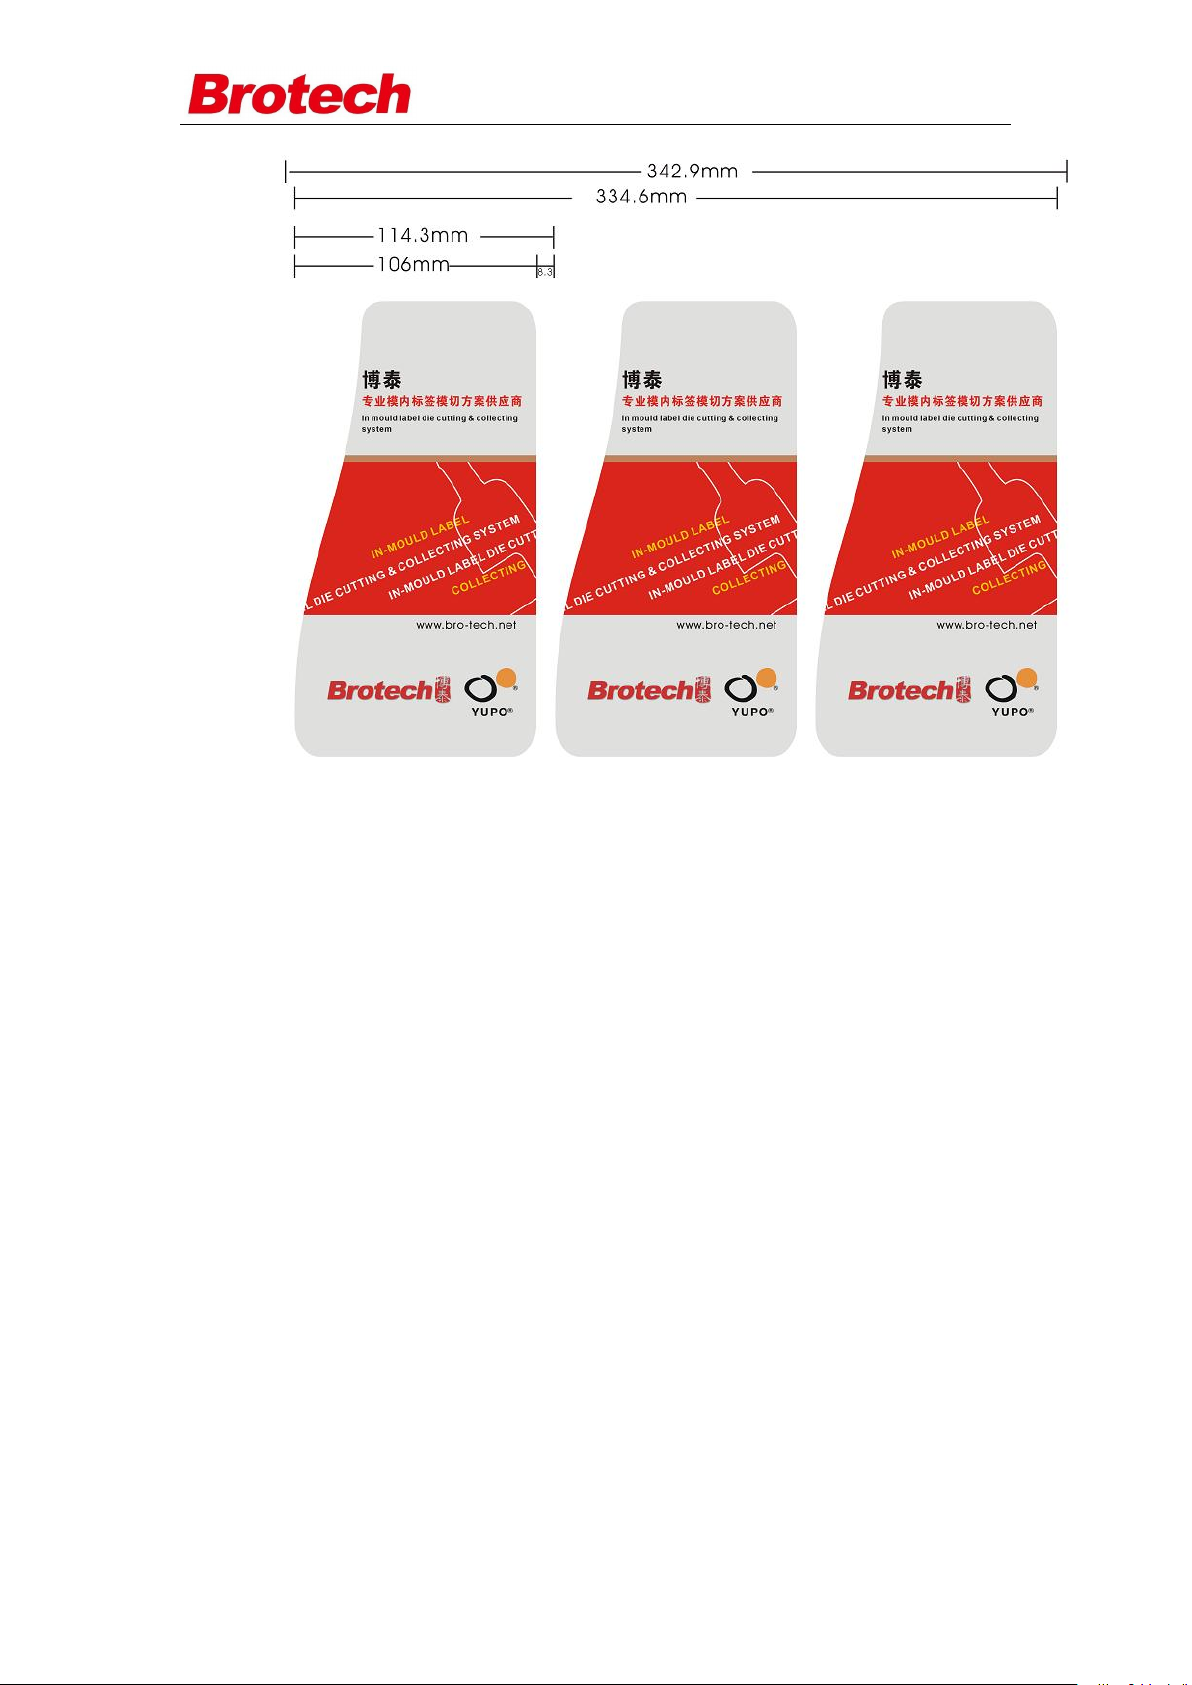
For example (Please see the image)
One label only in die, the length of label is 106mm, the gap between labels is
8.3mm, Total length is 114.3mm, So input value “114.30” into this box.
1) If two labels in die,input “228.60” to this box. and input “342.90” for three
labels.
2) Then press “Reset”,to make sure it is working, you can press 2,3 times.
3) Press ”reset”, the dancing unit start to move one cycle, stop in zero position.
7) Turn ON, Done.
Page 5
SDF-E330 Manual
Sensor setting:
Eye mark sensor
1, Make sure that web path is ready for running.
2, Jog machine, and let sensor detector scan non-printing area. press button
“BKGD” on sensor for 3 seconds, green light will off, then release.
3, Jog machine ,let sensor detector scan the mark printed on material,
4, Press button “MARK” 1 time, the orange and green light will on.
5, Jog machine, the sensor green light is always on, the orange light will twinkle
when meet marks.
6, Sensor setting is ready.
Switch pin sensor:
The distance to detect the pin is 1mm nearly. Please be careful, Do not break
the sensor by plate cylinder when run the machine.
The sensor will light on one time when cylinder turning one repeat.
Sensor setting is ready.
Remarks:
Sometime you find the actual position box always “0” or this value stable no
change, it maybe the eye mark working mode has changed.
Please change it back will be OK
Keep press the sensor’s two button more than three seconds, then release , you
will see a green light flash 3 times(must see the green light flash). so the mode
Page 6
SDF-E330 Manual
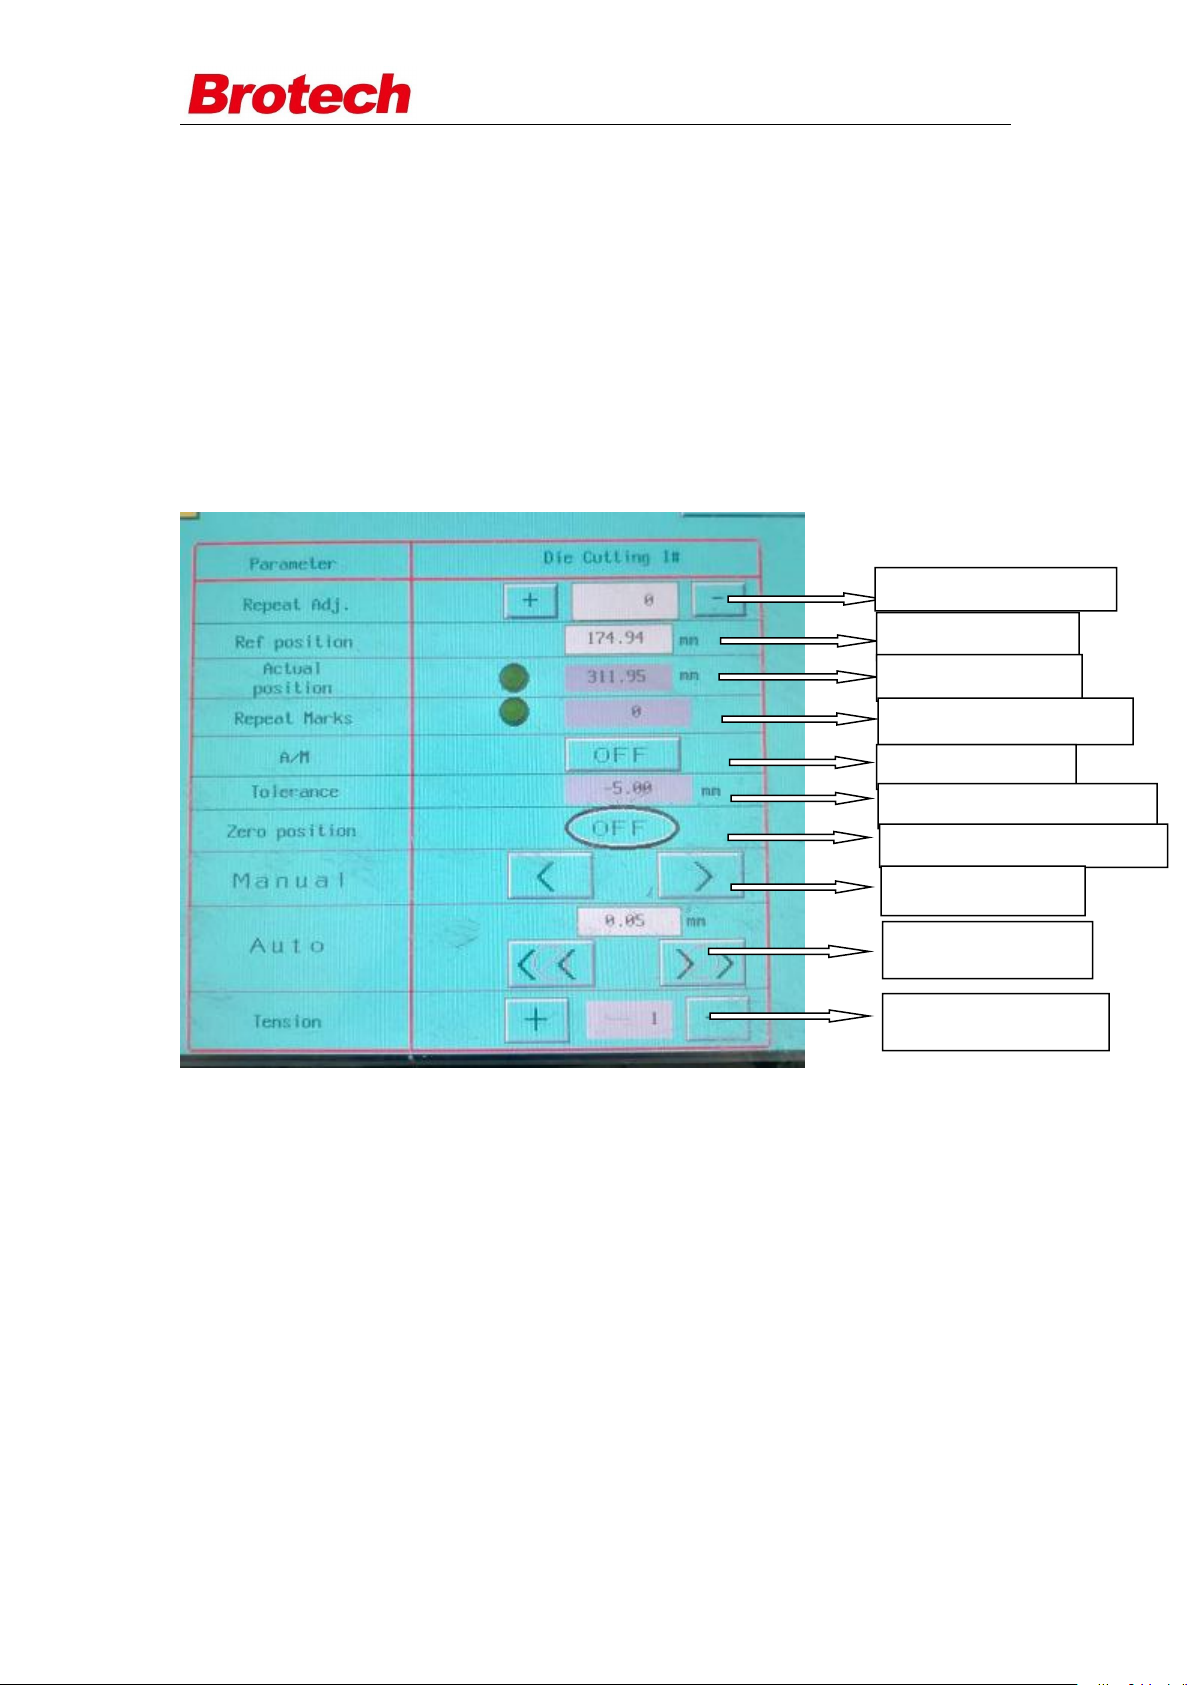
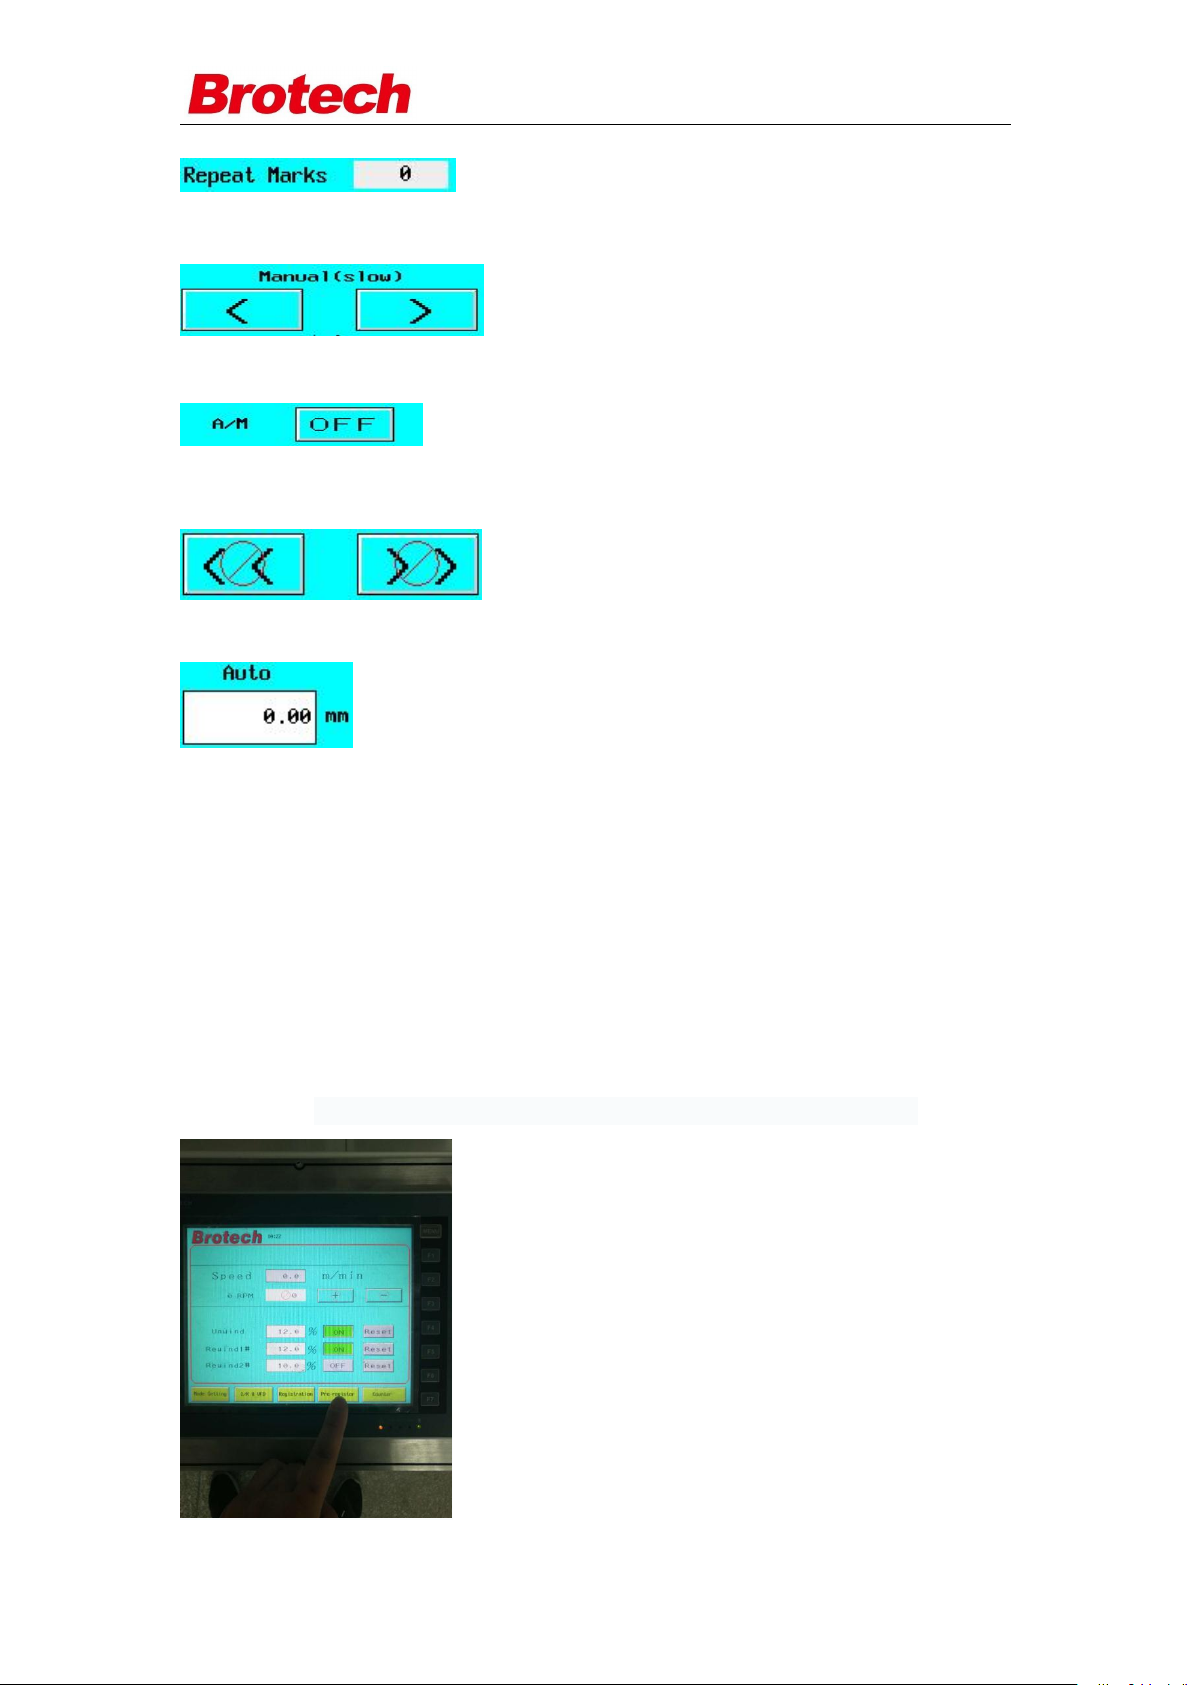
Repeat length adjust
Registration setting
Actual position
If sensor catch the mark
Auto/manual
Tolerance of registration
Special position of mark
Manual adjust
Auto adjust
Tension adjust
has change back.
There are two working mode by sensor, one is output 0v, the other one is output
24v, only the first one can be used for us.
Registration operation
Go to registration setting (this is 3units configuration).
Button description:
The repeat adjustment(±1000) is use for sometimes the die cutting repeat length
is little bit/ smaller. Do some adjust could matched it.
1, Make sure the sensor is ready.
2, In repeat mark box, check the value, meaning how many marks are detected in
one repeat(during cylinder turn one repeat)
1) Check or reset the eye mark sensor, make sure the orange light twinkle one
time when one mark coming in.
2) Check the switch sensor which detect the pin on cylinder.
3) check the eye mark sensor working mode
4) Check if the repeat of job and cylinder are matched each other.
This value must be stable. Please check below if it is not stable or always “0”.
Page 7
SDF-E330 Manual
1. Adjust the registration manually by touching both-direction arrow.
2. When the registration is ok, turn on the registration to AUTO mode.
Remark: “ON ” is auto-registration . “OFF” is manual-registration.
3. In auto-registration mode, can adjust the registration by the arrow.
This is for mm when move one step:
4. See the registration tolerance , it should be keep near around “0”.
Pre-register setting
Before using pre-register,
If you want to use full-rotary, please set machine to full-rotary.
If you want to use semi-rotary, please set semi-rotary die cut right.
(including repeat length and cylinder tooth number).
Check if the sensor catch the mark.
1. check the main interface, there is a Pre-register (as shown), press in.
Page 8
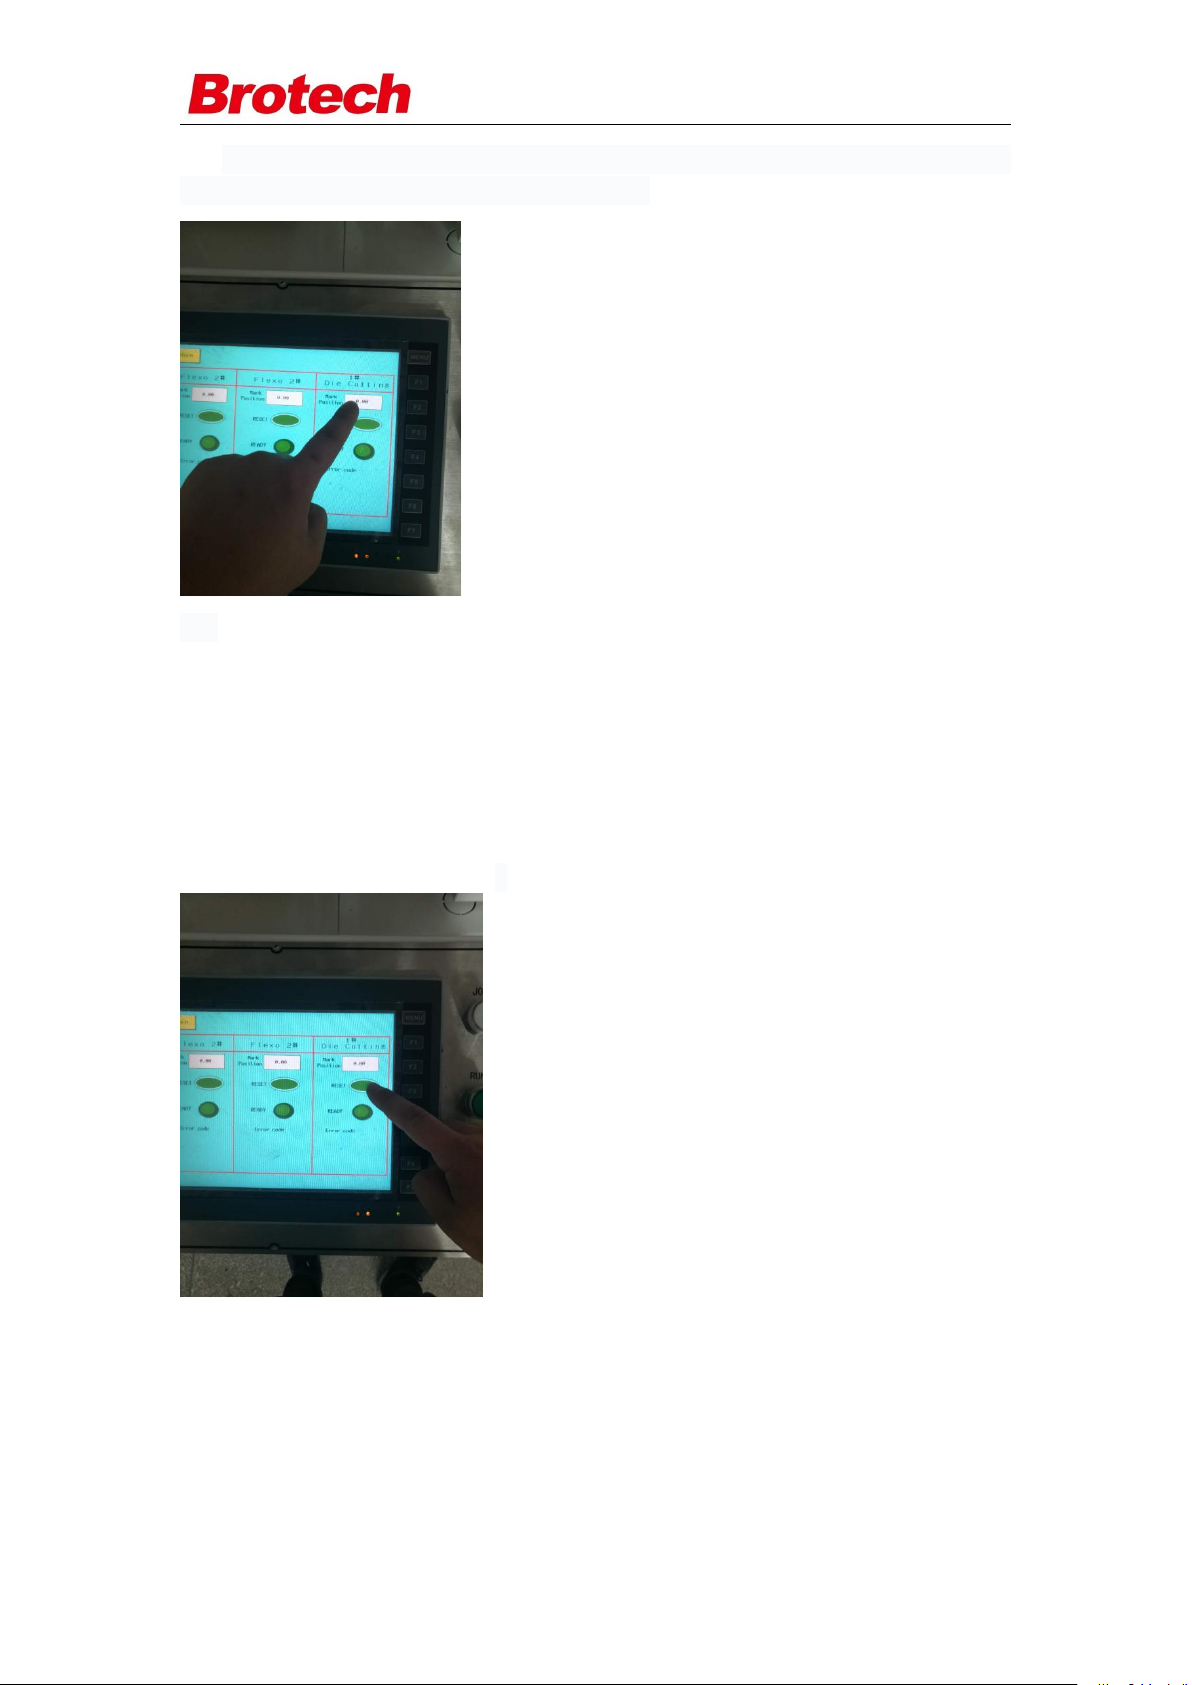
SDF-E330 Manual
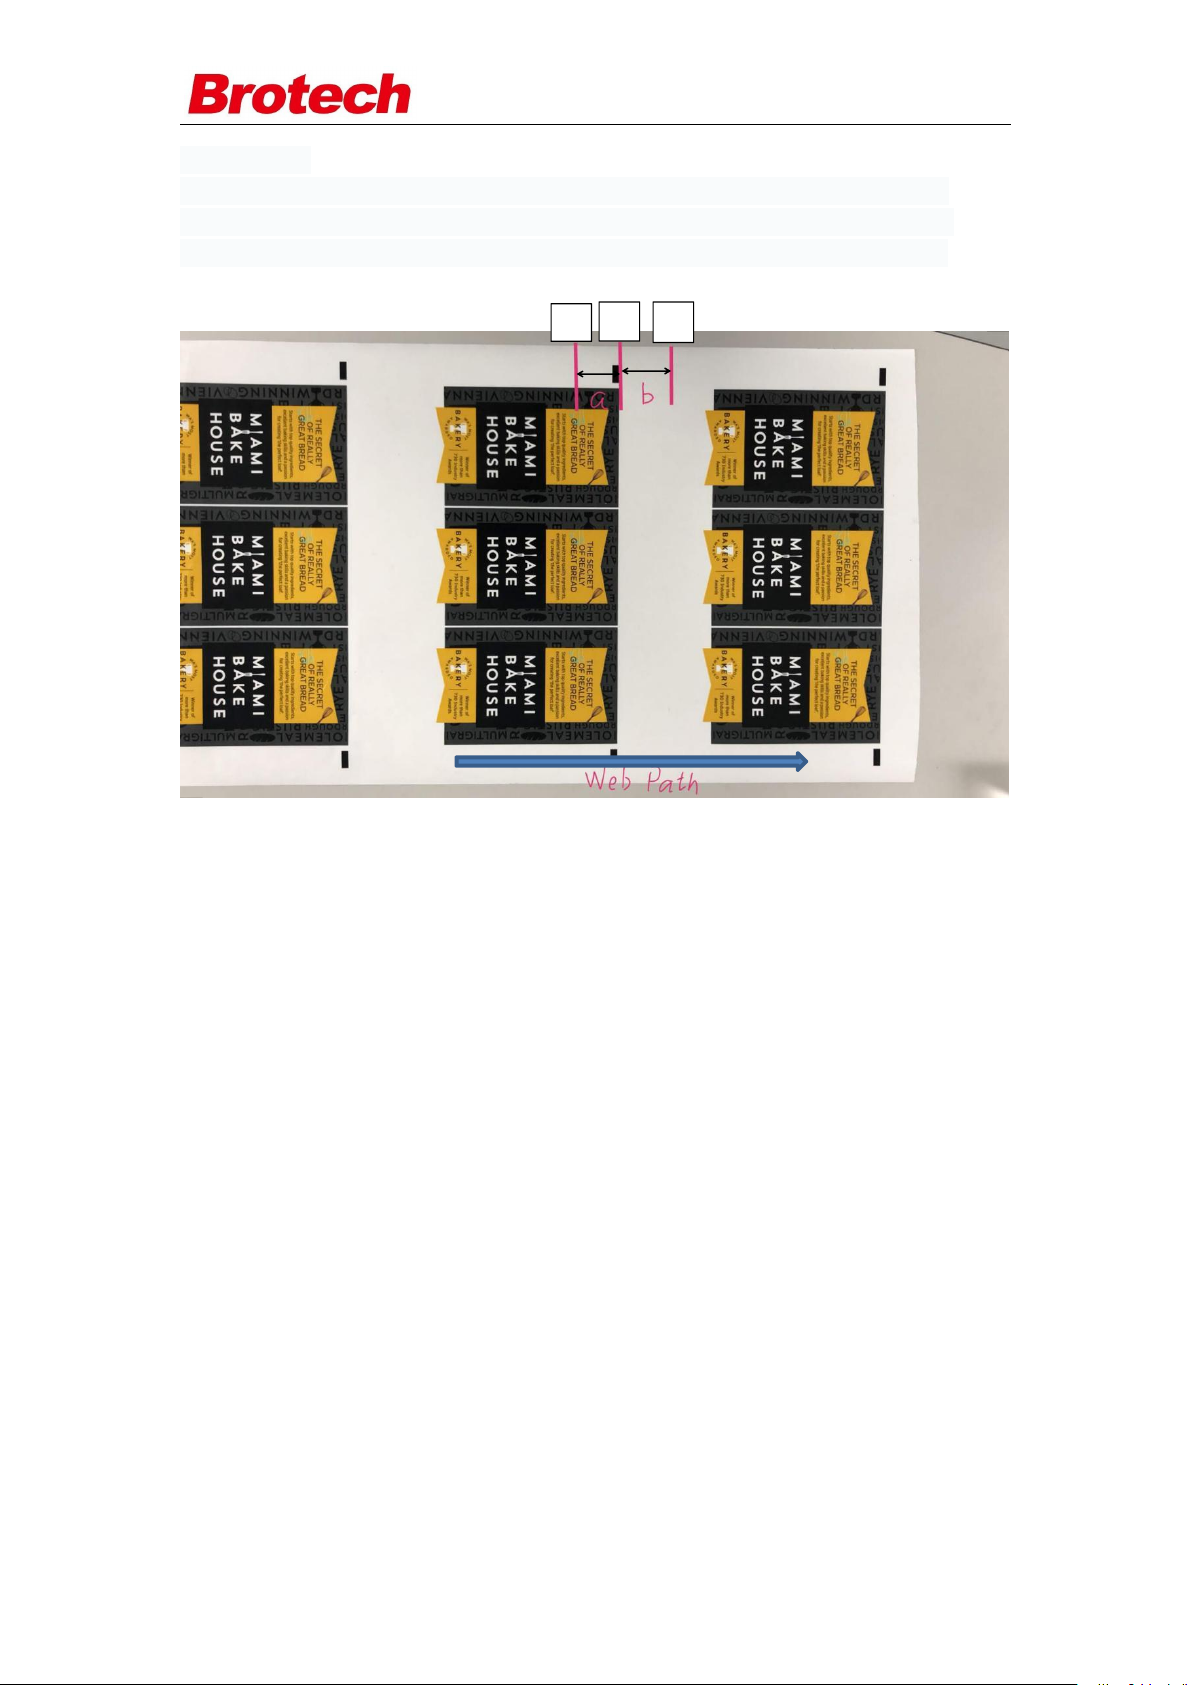
2. check the mark position(as shown), it means the distance between your first cut
line and your mark. Set it. At first, it should be 0.
3. Please make sure the magnetic cylinder engaged but not too much pressure,do
not let the knife touch the paper. Press reset, machine will auto running to find the
homing position (the magnetic cylinder rotated around while detect the cylinder
sensor, machine running little bit).When machine stop, it should be almost in the
right position which you need. Increase pressure,Then low speed to run the machine,
please pay attention to the current die cutting position and back to the registration
setting window, there has a number display in the actual value box. Running 3-5
repeat later, to check the repeat mark ,if stable,then on A/M switch,if there is a little
tolerance, use auto to adjust it.
Page 9
SDF-E330 Manual
2
3
For example,
If you need to cut from position 2, set mark position as “0”, then press reset.
If you need to cut from position 1, set mark position as “-a”, then press reset.
If you need to cut from position 3, set mark position as “b”, then press reset.
Maintenance
1. Clear
-magnet cylinder an anvil
Use UV WASH or IPA to clear, dust on surface of cylinder.--- Daily.
-Oilly
Use normal oil to lubricate the bear, on the brushes of both side of anvil ---Daily.
-Eye mark sensor
Use IPA or compression air to clear it
2. Lubrication
-Gear
Use grease for the lubrication of gear, weekly
Troubleshooting
Die cutting pressure issue
1. Check the flexible die is correct for the magnet cylinder.
Page 10

SDF-E330 Manual
2. Check the pressure, and the releasing pieces are using correctly
Printing pressure problem
1. Check the air pressure is enough for engage/disengage of plate cylinder
2. Check if the right thickness of plate is used.
3. Check the pressure arm and knob.
 Loading...