

Page 1
12/1/21, 2:03 PM
MKPro User Manual
1/48
BROOMX TECHNOLOGIES
MKPro User Manual
OVERVIEW
The MKPro
The MKPro is an immersive projection system to enjoy 360 media and interactive Virtual Reality
applications in physical spaces, socially and headset free.
It is compact, portable and easy to use. It includes a projection module, CPU, GPU, built in audio
speaker, dual ethernet connection. It is controlled using an iOS application or a cross-platform
Web Manager, enabling users to display and navigate through an extensive catalog of included
content, as well as upload and manage their personal content.
Technical Specifications
If your browser allows it, you can use [ctr] - [f] so search for keywords within this manual.
Page 2
12/1/21, 2:03 PM
MKPro User Manual
2/48
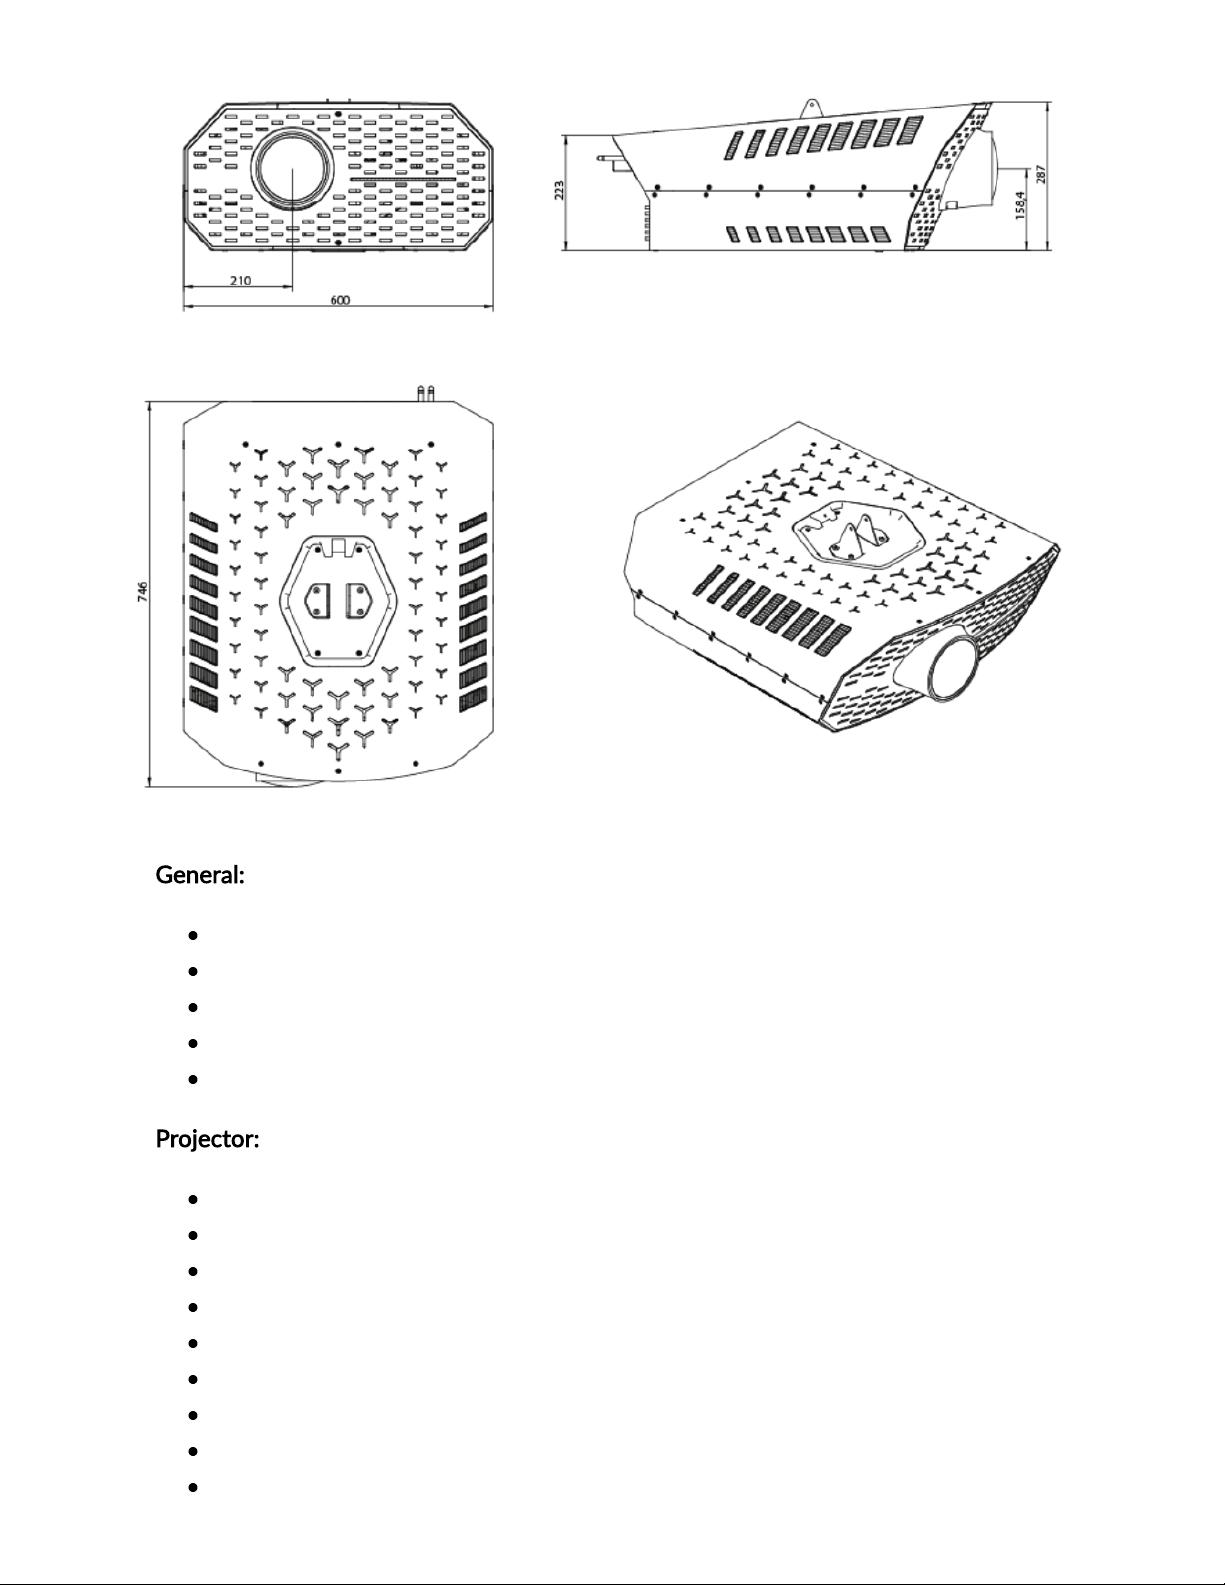
General:
Power consumption: 650 Wh
Size: 75x 60 x 29 cm
Weight: 39Kg
Size with flight case: 90 x 77 x 65 cm
Weight with flight case: 74Kg
Projector:
Technology: 3LCD
Resolution: WUXGA 1080p, 1920x1080p, 16:10
Light output: 5200 Lumens
Color Depth: 1.073 billion colors
Contrast ratio: 60,000:1
Field of View: Horizontal: 185° / Vertical: 90°
Lens Shift: Vertical
Focus: Manual
Video Processing: 12bits
Page 3
12/1/21, 2:03 PM
MKPro User Manual
3/48
Storage:
Disk: 1TB at 3400MB/S
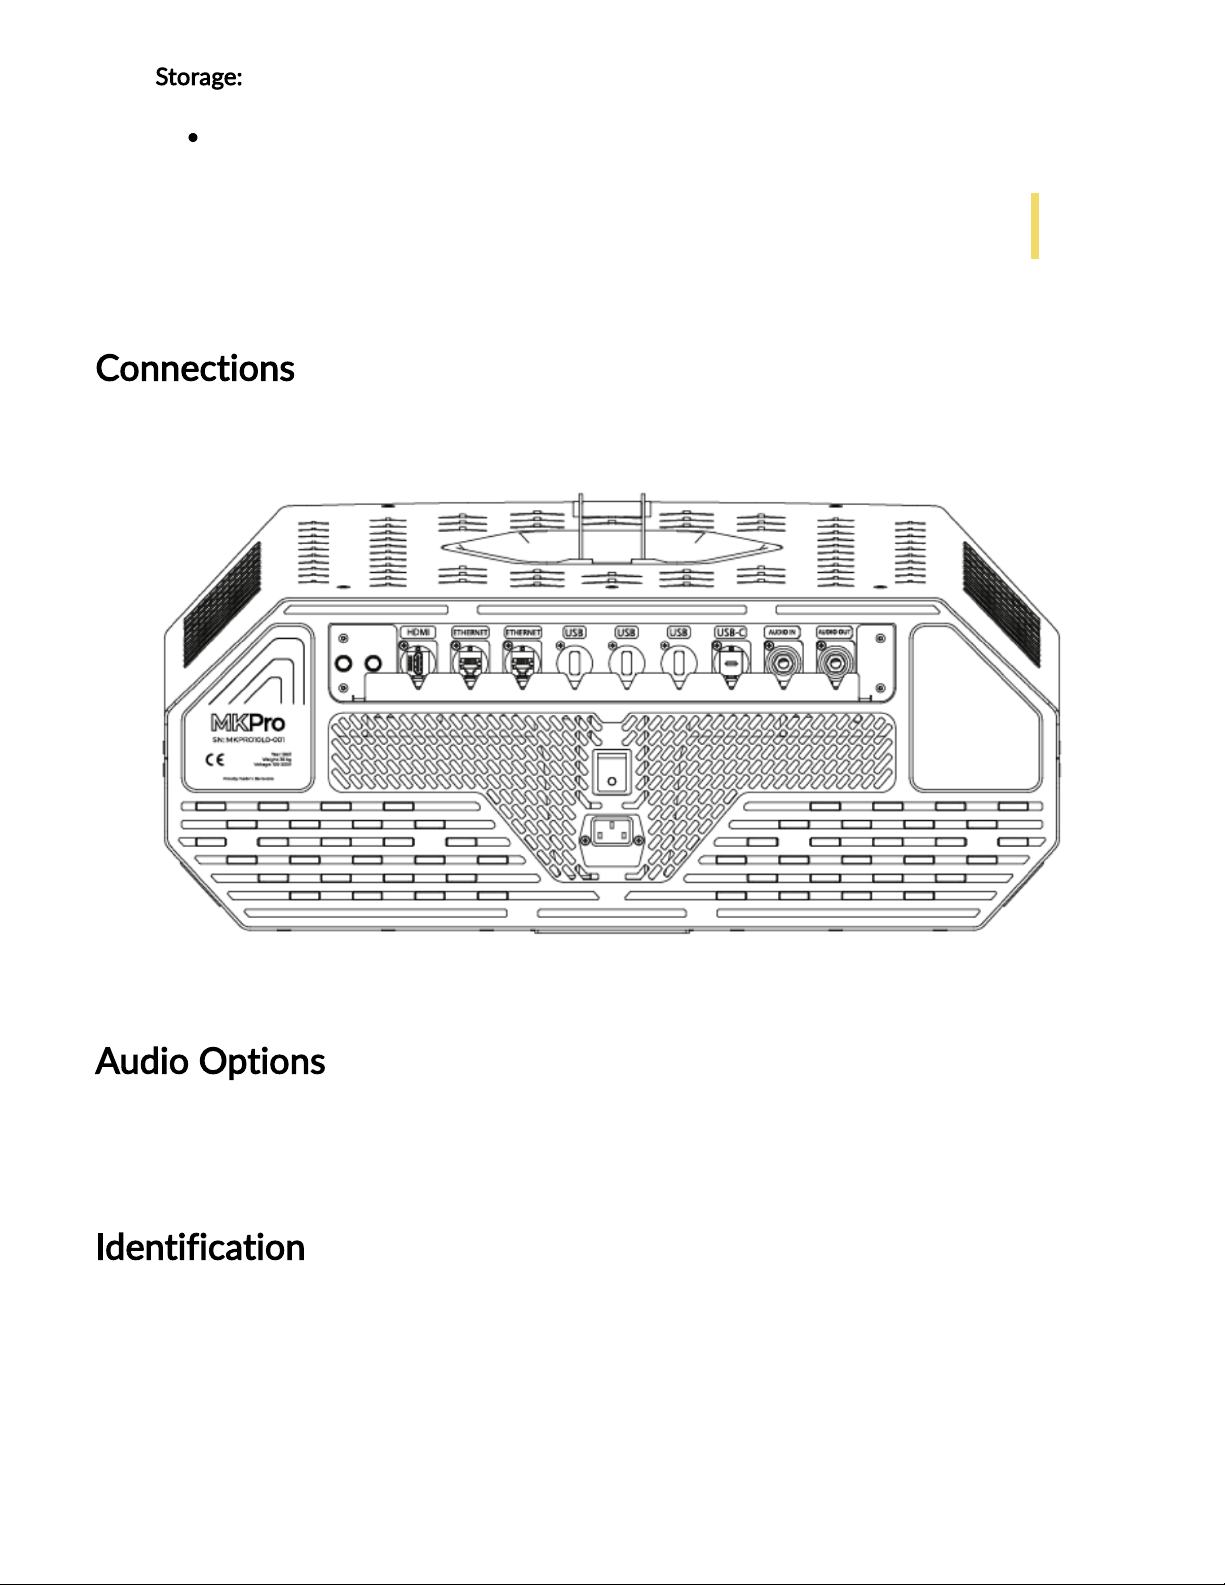
Connections
Audio Options
Please refer to theAudio Optionsarticle for the MKPro.
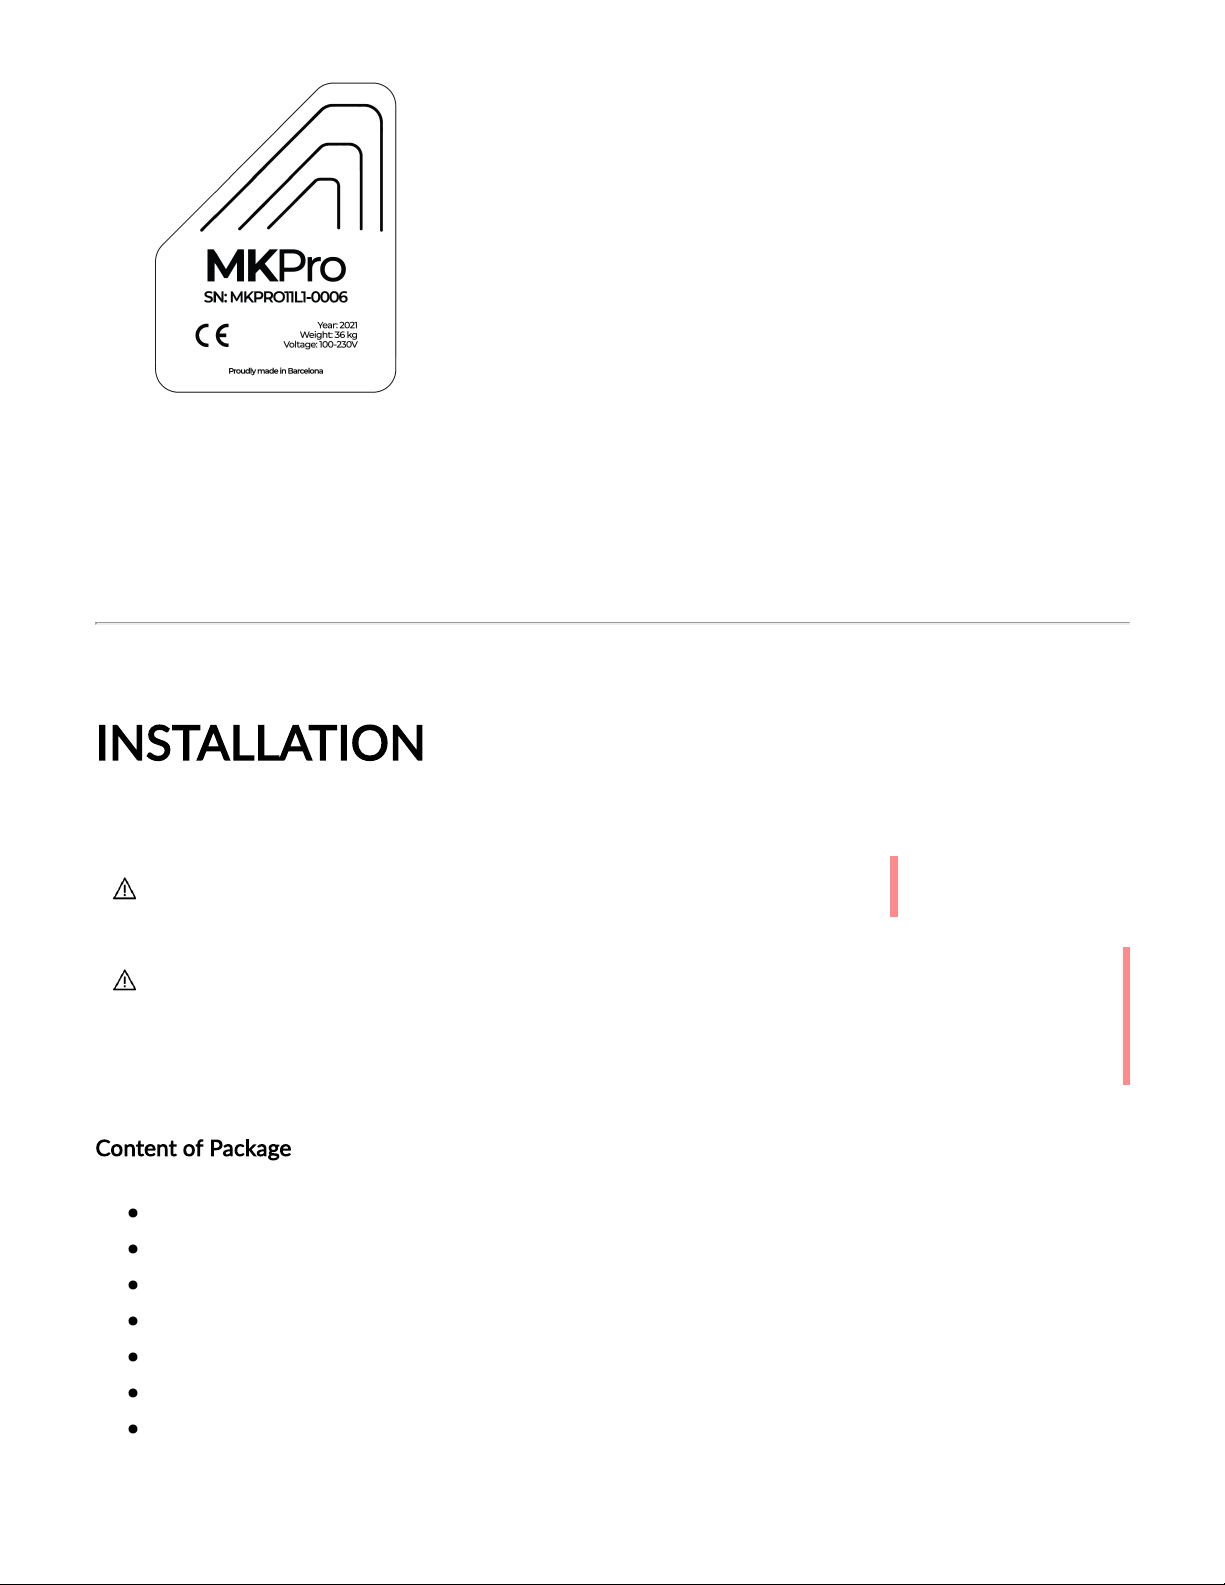
Identification
The identification plate is located on the rear panel of the MKPro. It contains useful information
for technical support operations.
Total disk space is shared between factory system and content, and user content.
Page 4
12/1/21, 2:03 PM
MKPro User Manual
4/48
1. Batch number
2. Serial number
3. Year of production
INSTALLATION
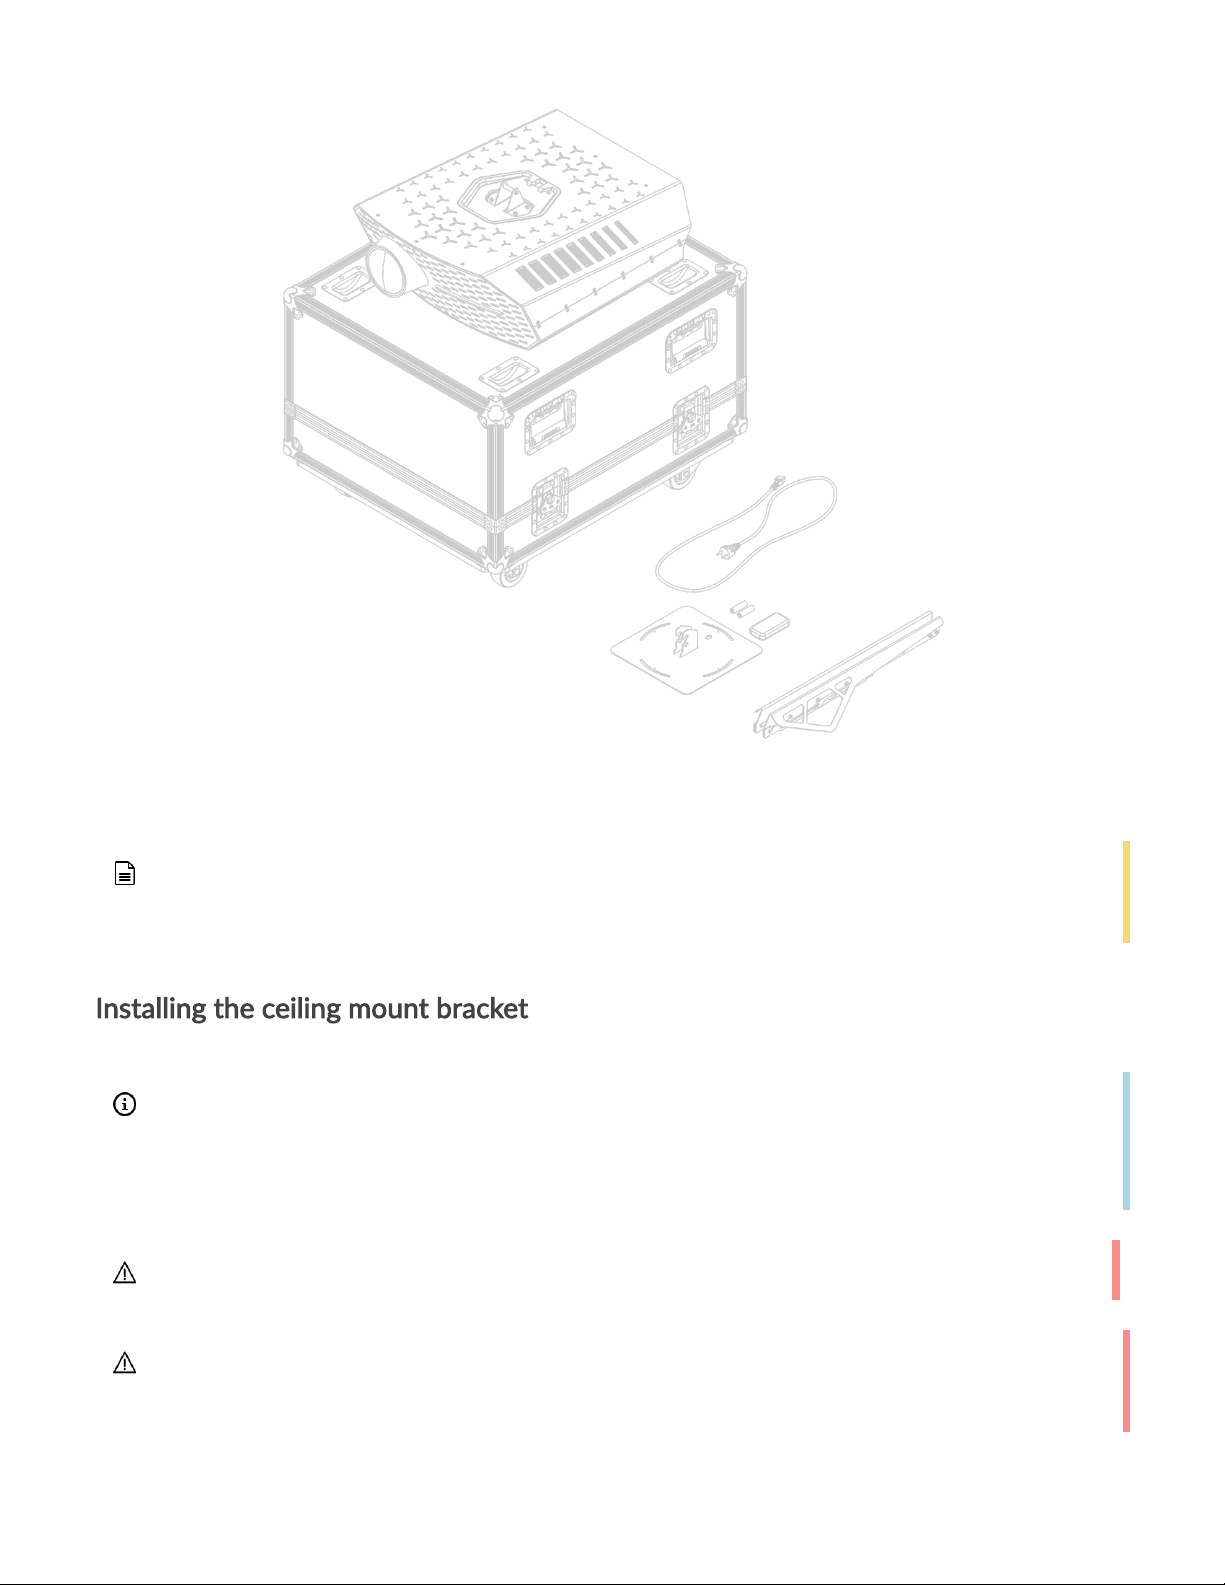
Content of Package
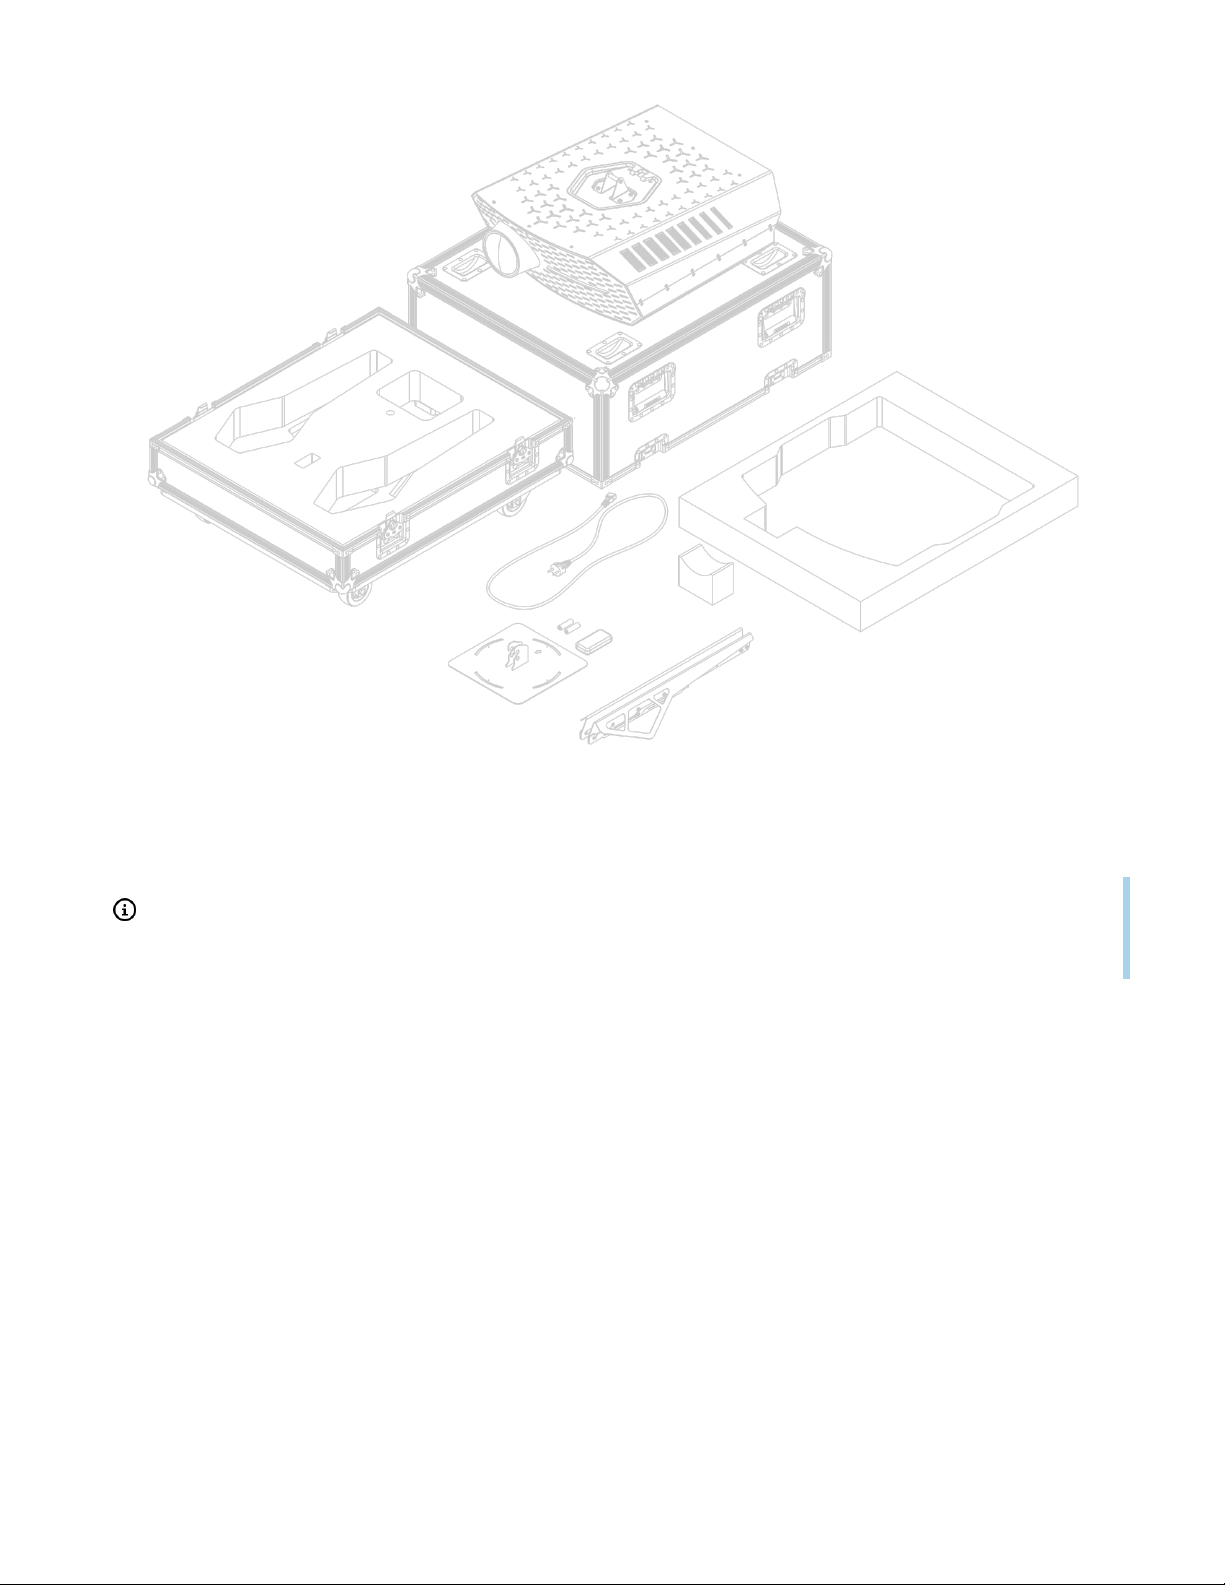
1 MKPro
Ceiling mount bracket
Set of Protective fillers
Power cord
Remote
AA Batteries
1 Flightcase
Read the complete instructions before you start installation and assembly.
Do not begin the installation until you have read and understood the instructions and
warnings contained in this part of the user manual. If you have any questions regarding
any of the instructions or warnings, please contact us.
Page 5
12/1/21, 2:03 PM
MKPro User Manual
5/48
Setup
Unpacking
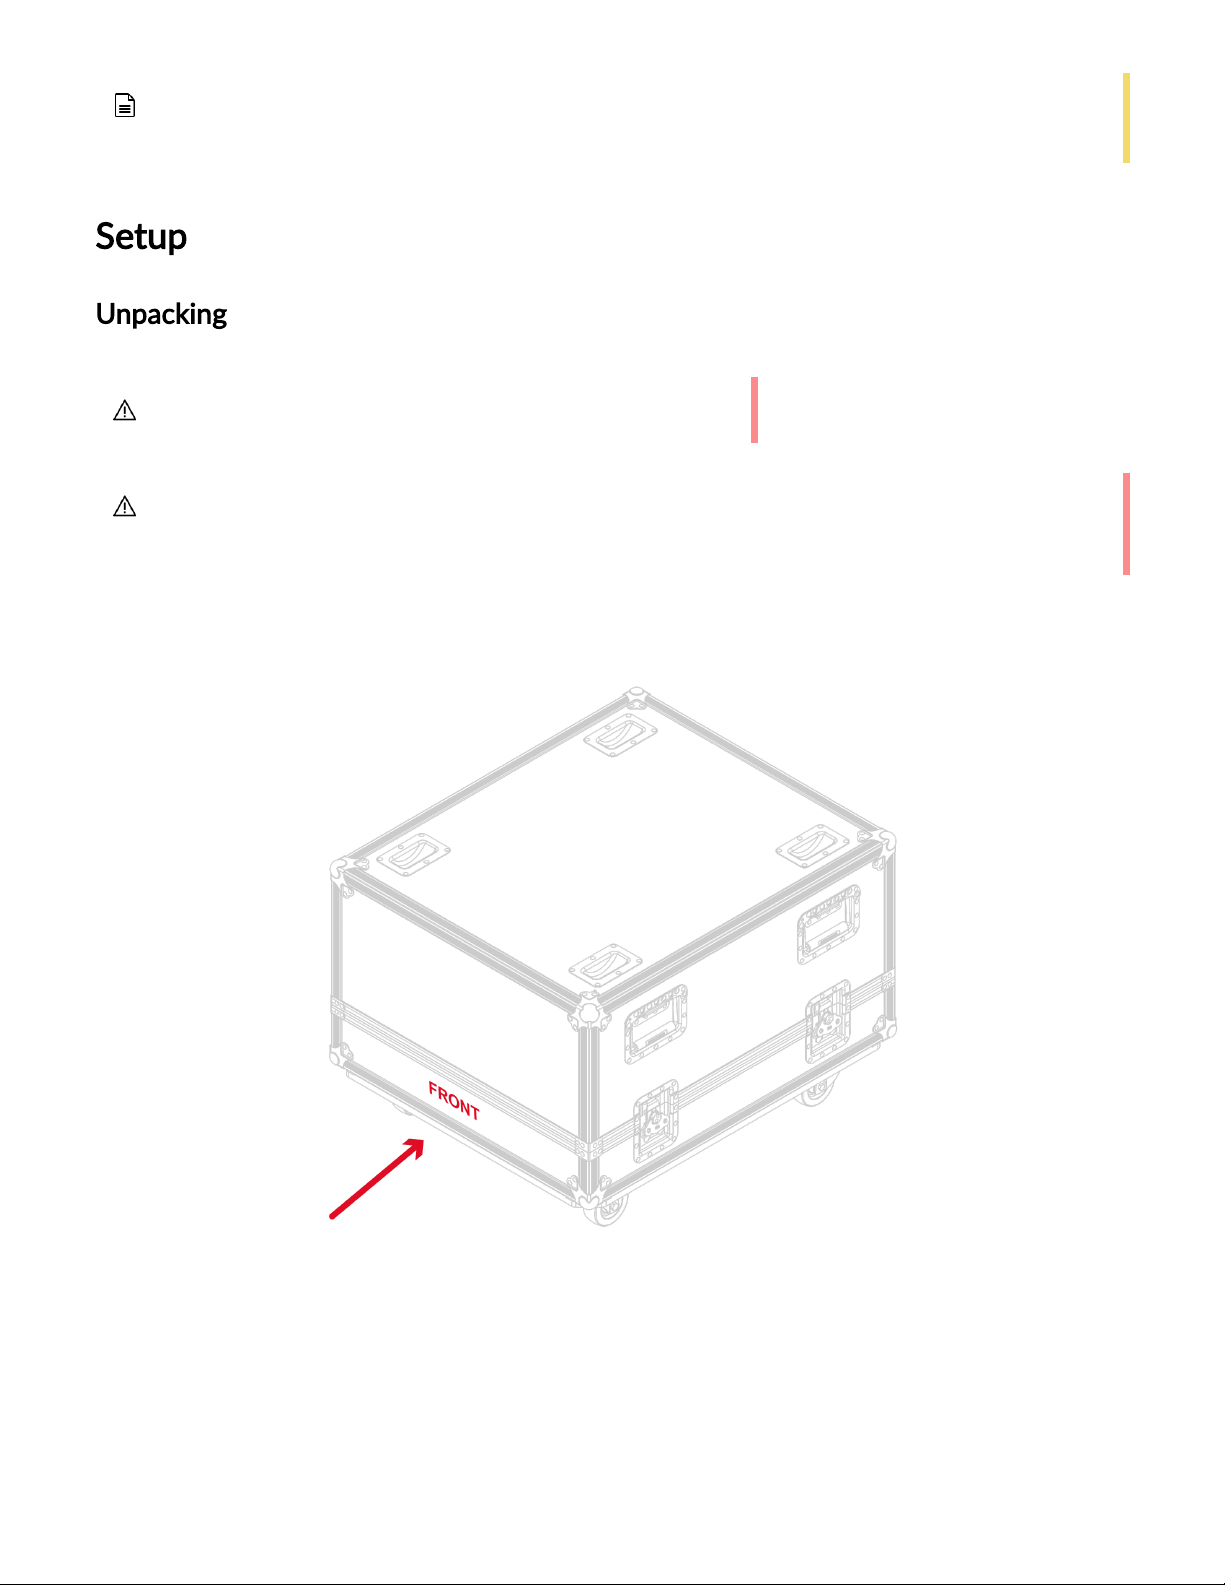
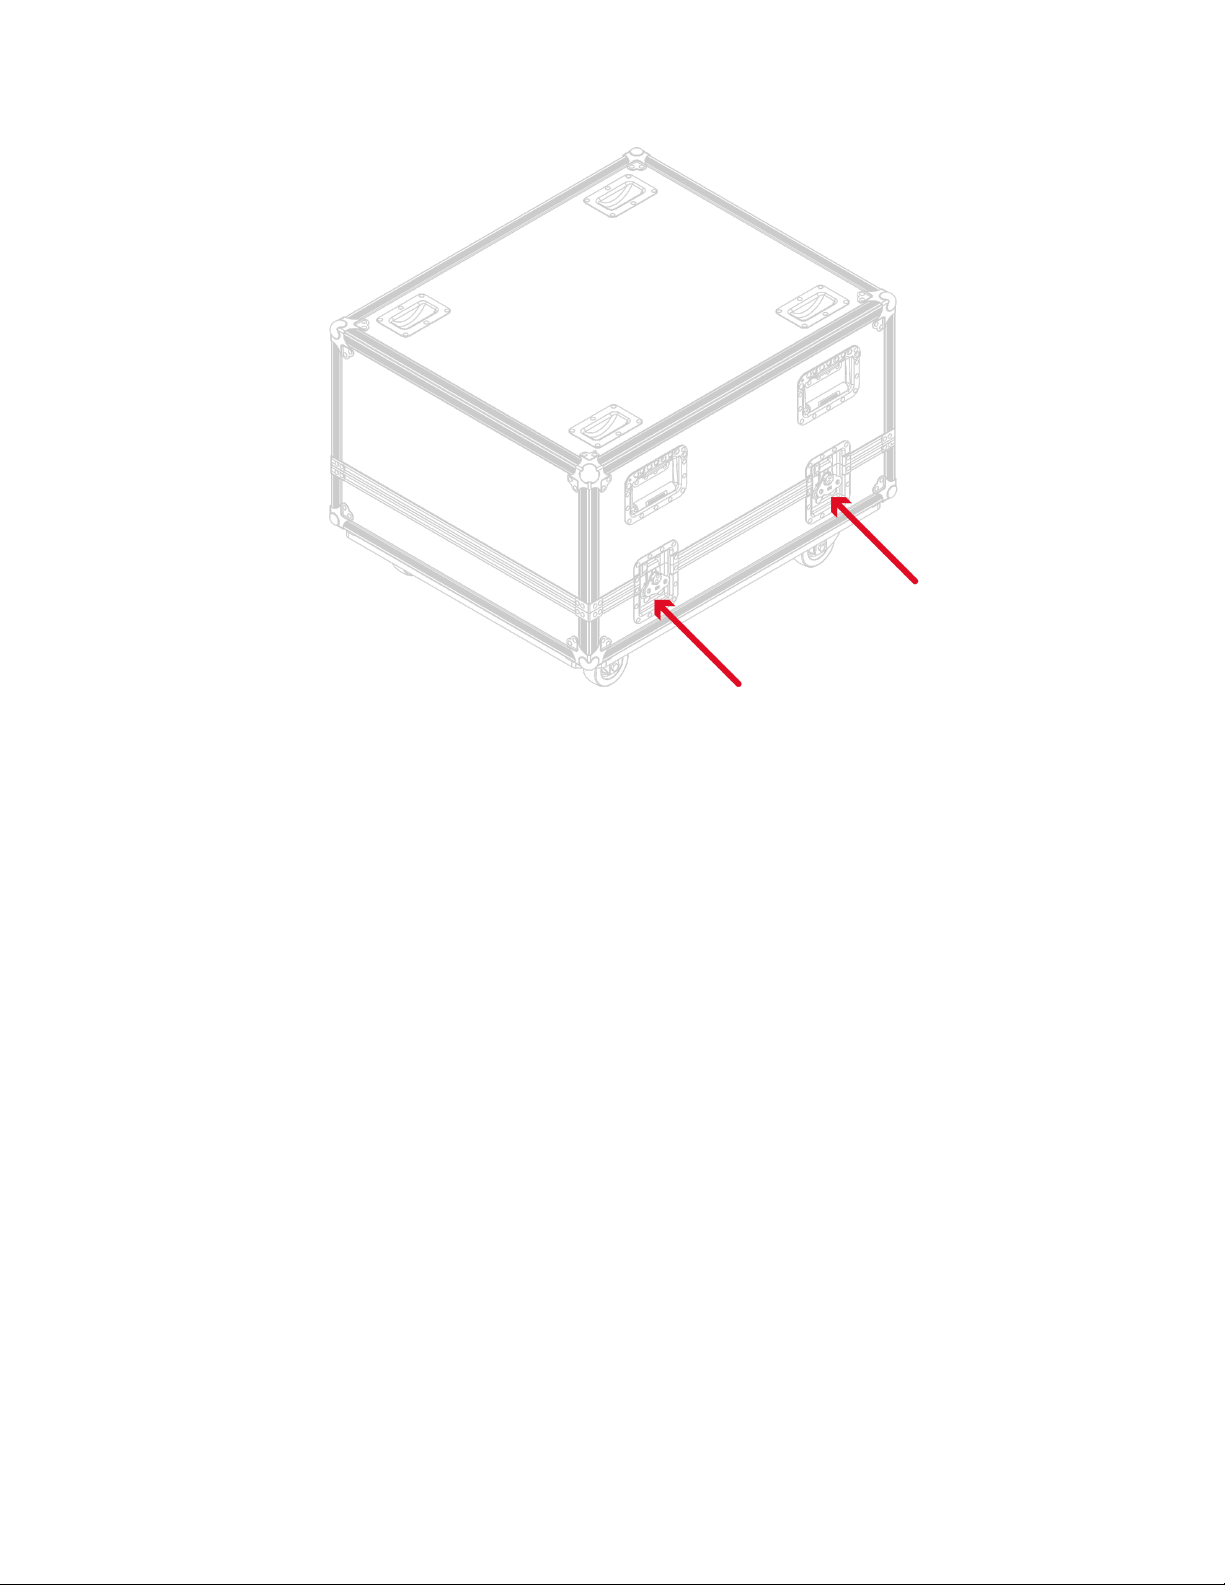
1. Open the butterfly locks located on both sides of the flight case.
Ensure that you have received all parts according to the package content list. If any parts are
missing or faulty, contact us.
Always use an assistant to proceed with the unpacking
There is an indication at the bottom of the flight case that will help you determine where
the FRONT of the MK Pro is located.
Page 6
12/1/21, 2:03 PM
MKPro User Manual
6/48
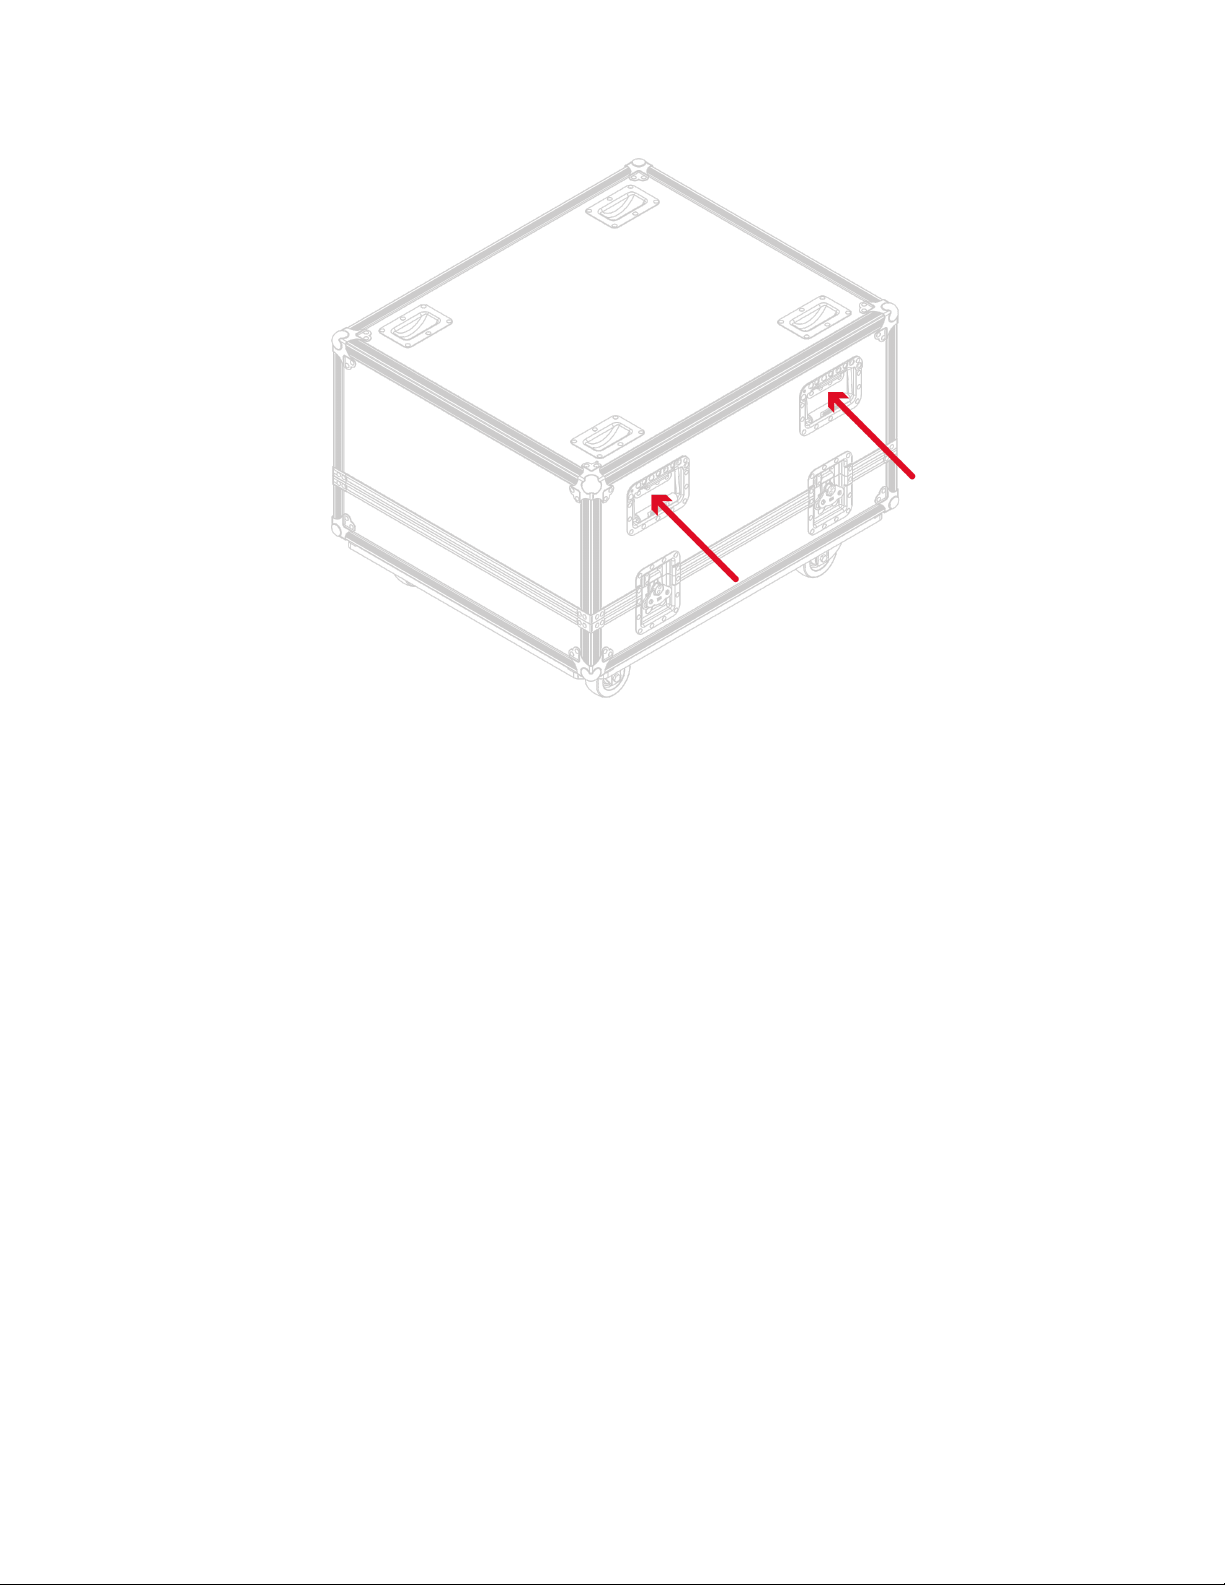
2.Use the handles on both sides to remove the top and place it on the floor.
Page 7
12/1/21, 2:03 PM
MKPro User Manual
7/48
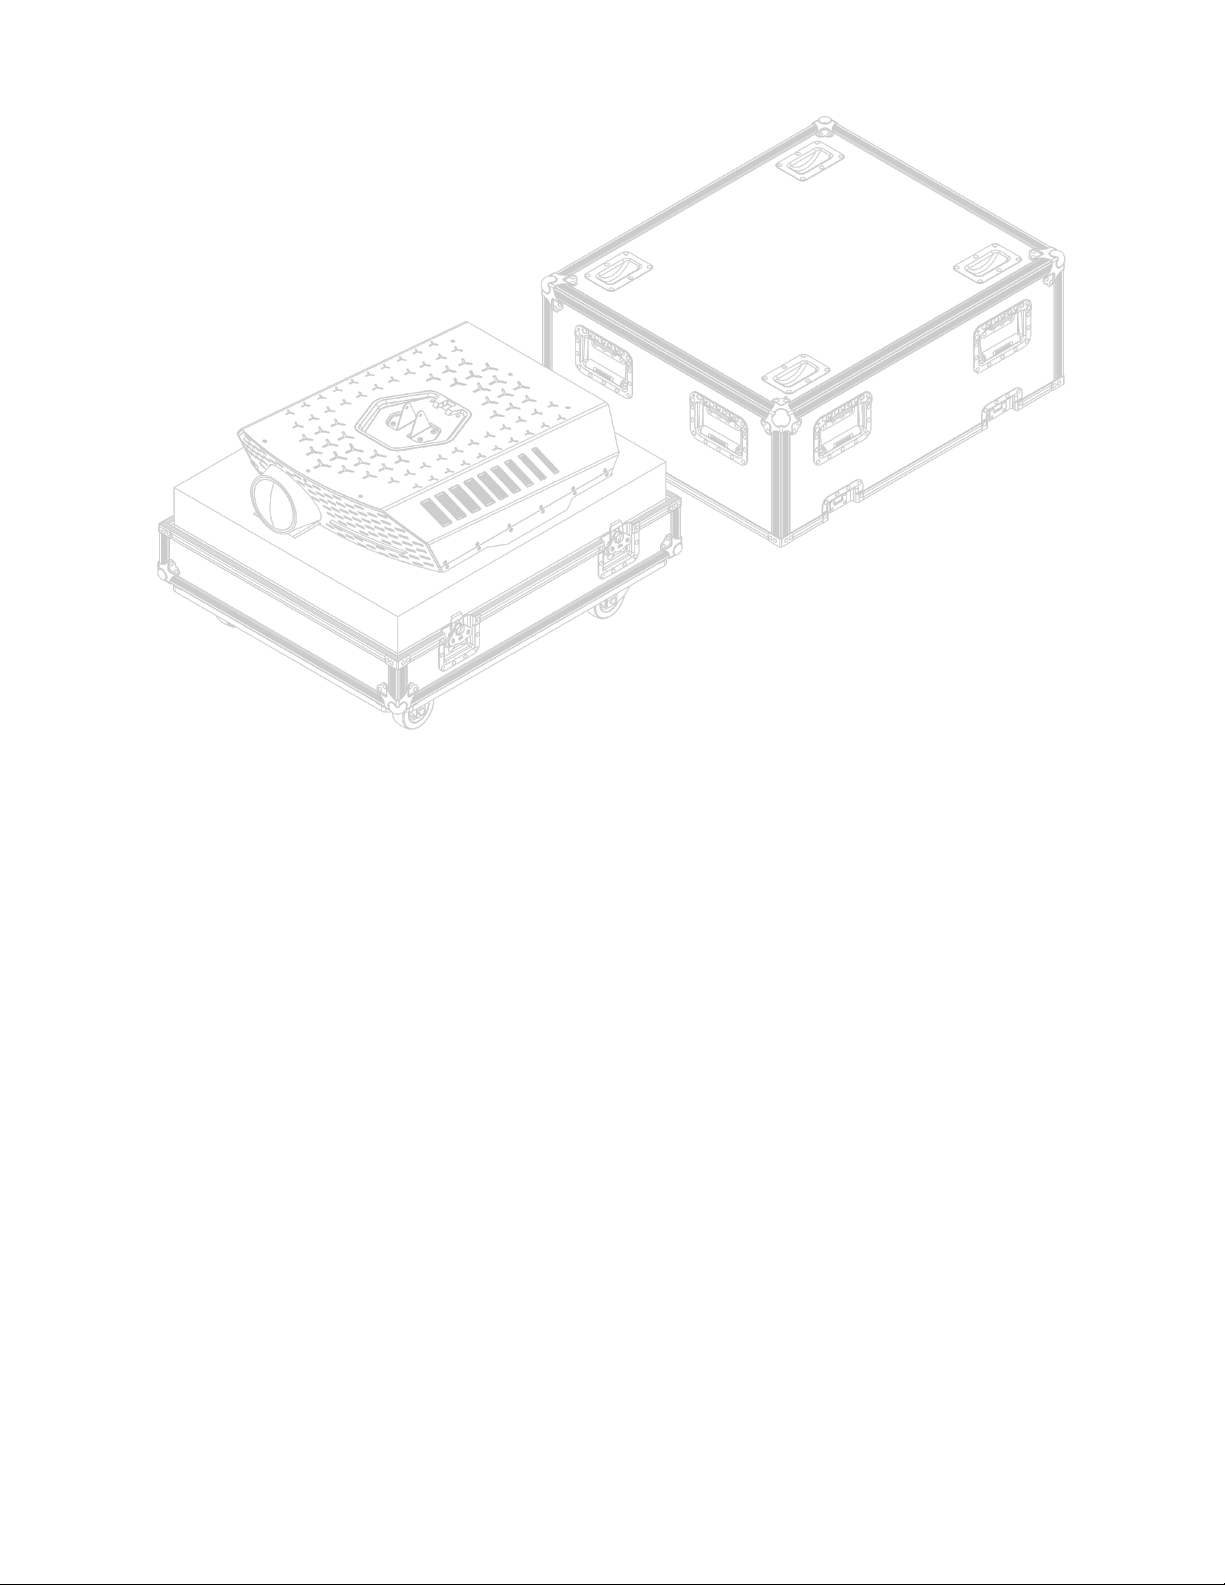
3. Ideally, place the top of the flight case right behind or in front of the flight case, as you will
have to put the MK Pro on top of it in the next step.
Page 8
12/1/21, 2:03 PM
MKPro User Manual
8/48
4.There are slots on both sides of the protection filler surrounding the MK Pro. These slots
will allow you and the person helping you to insert your hands to grab the MK Pro.
Page 9
12/1/21, 2:03 PM
MKPro User Manual
9/48
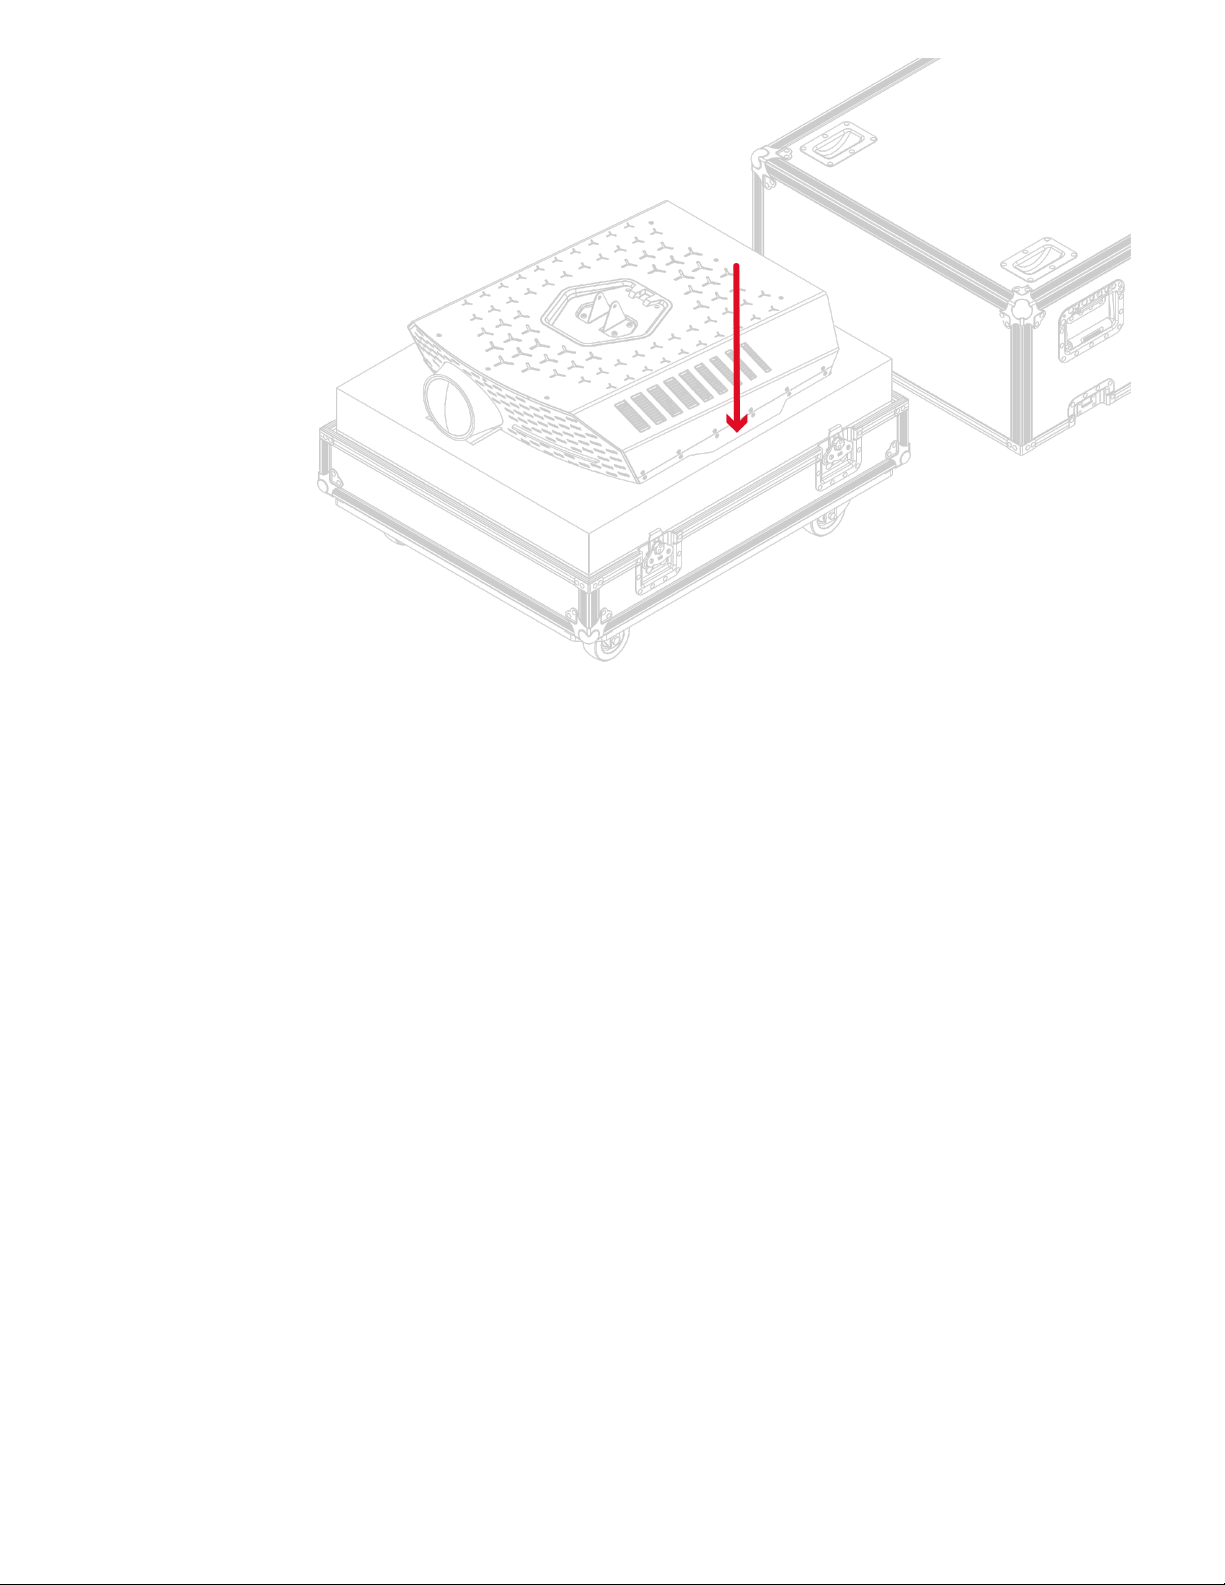
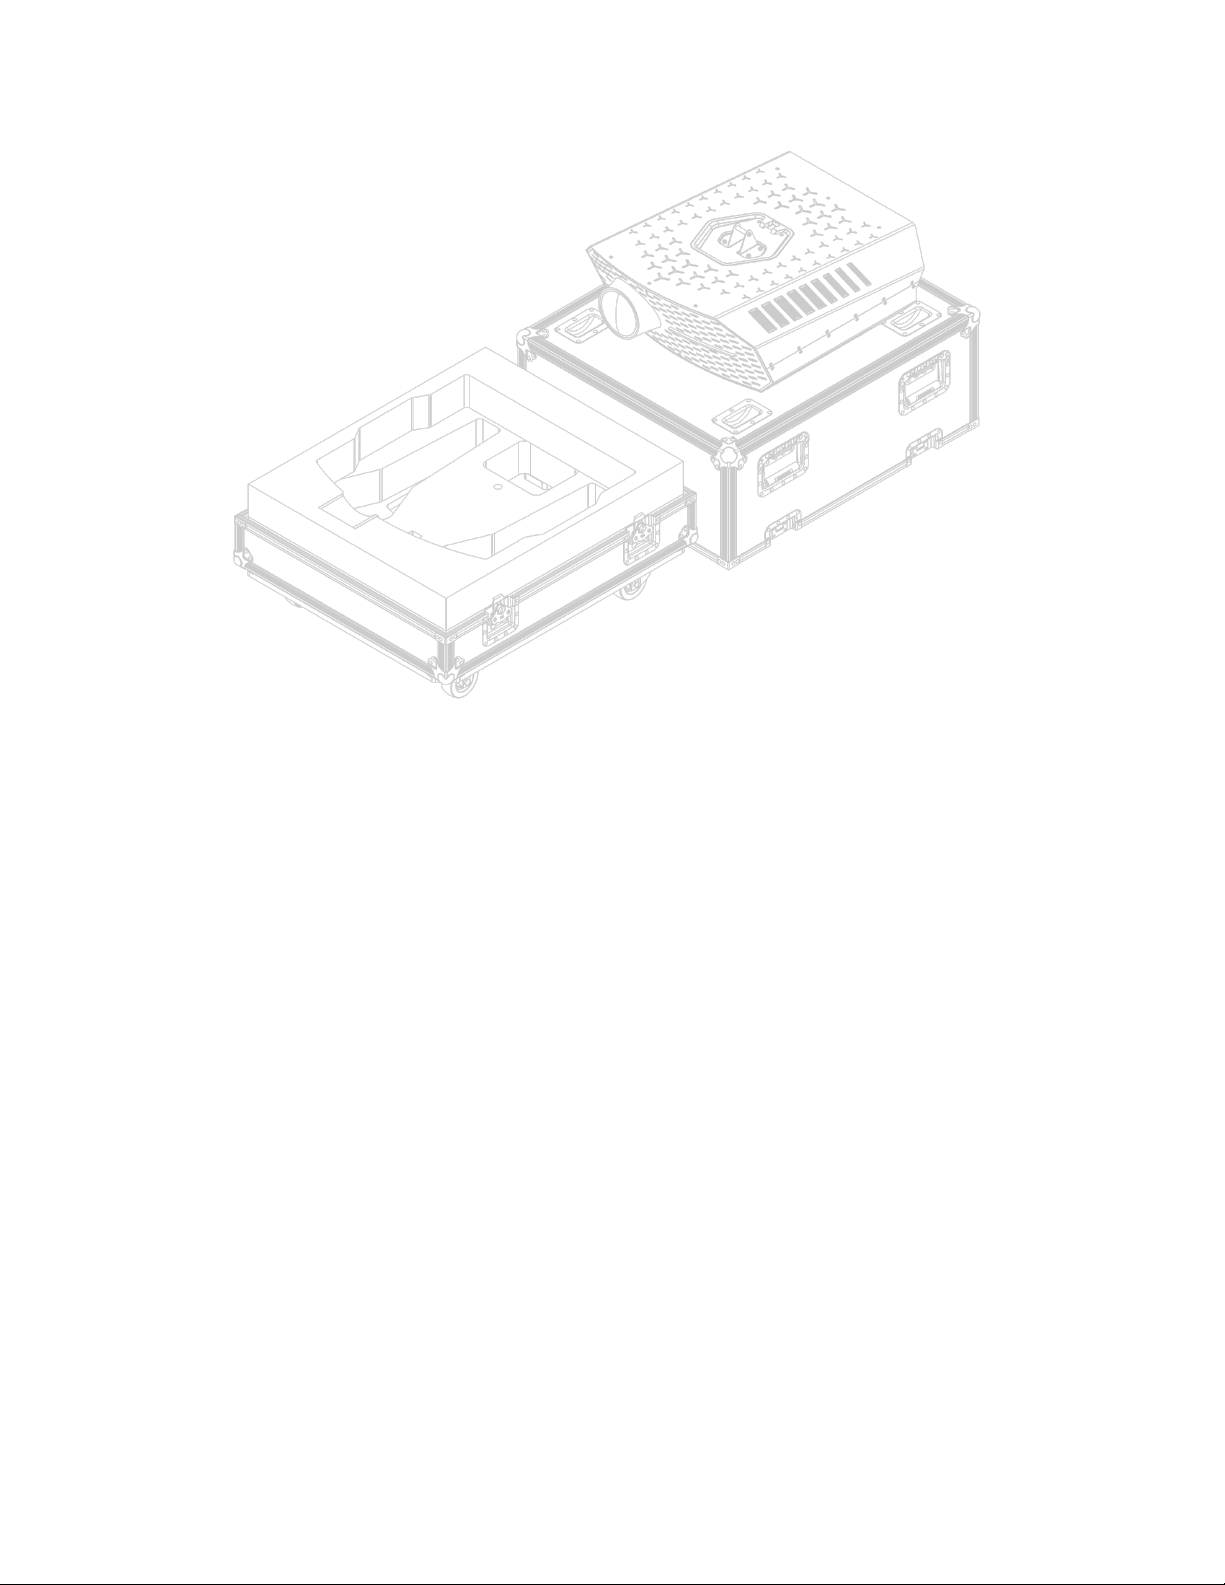
5.Carefully take the MK Pro out of the flight case and place it over the top of the flight case.
Page 10
12/1/21, 2:03 PM
MKPro User Manual
10/48
6. Remove the 1st layer of protection filler from the flight case, and take out the ceiling
support, power cord, remote controller and AA batteries from the protection filler below.
Page 11
12/1/21, 2:03 PM
MKPro User Manual
11/48
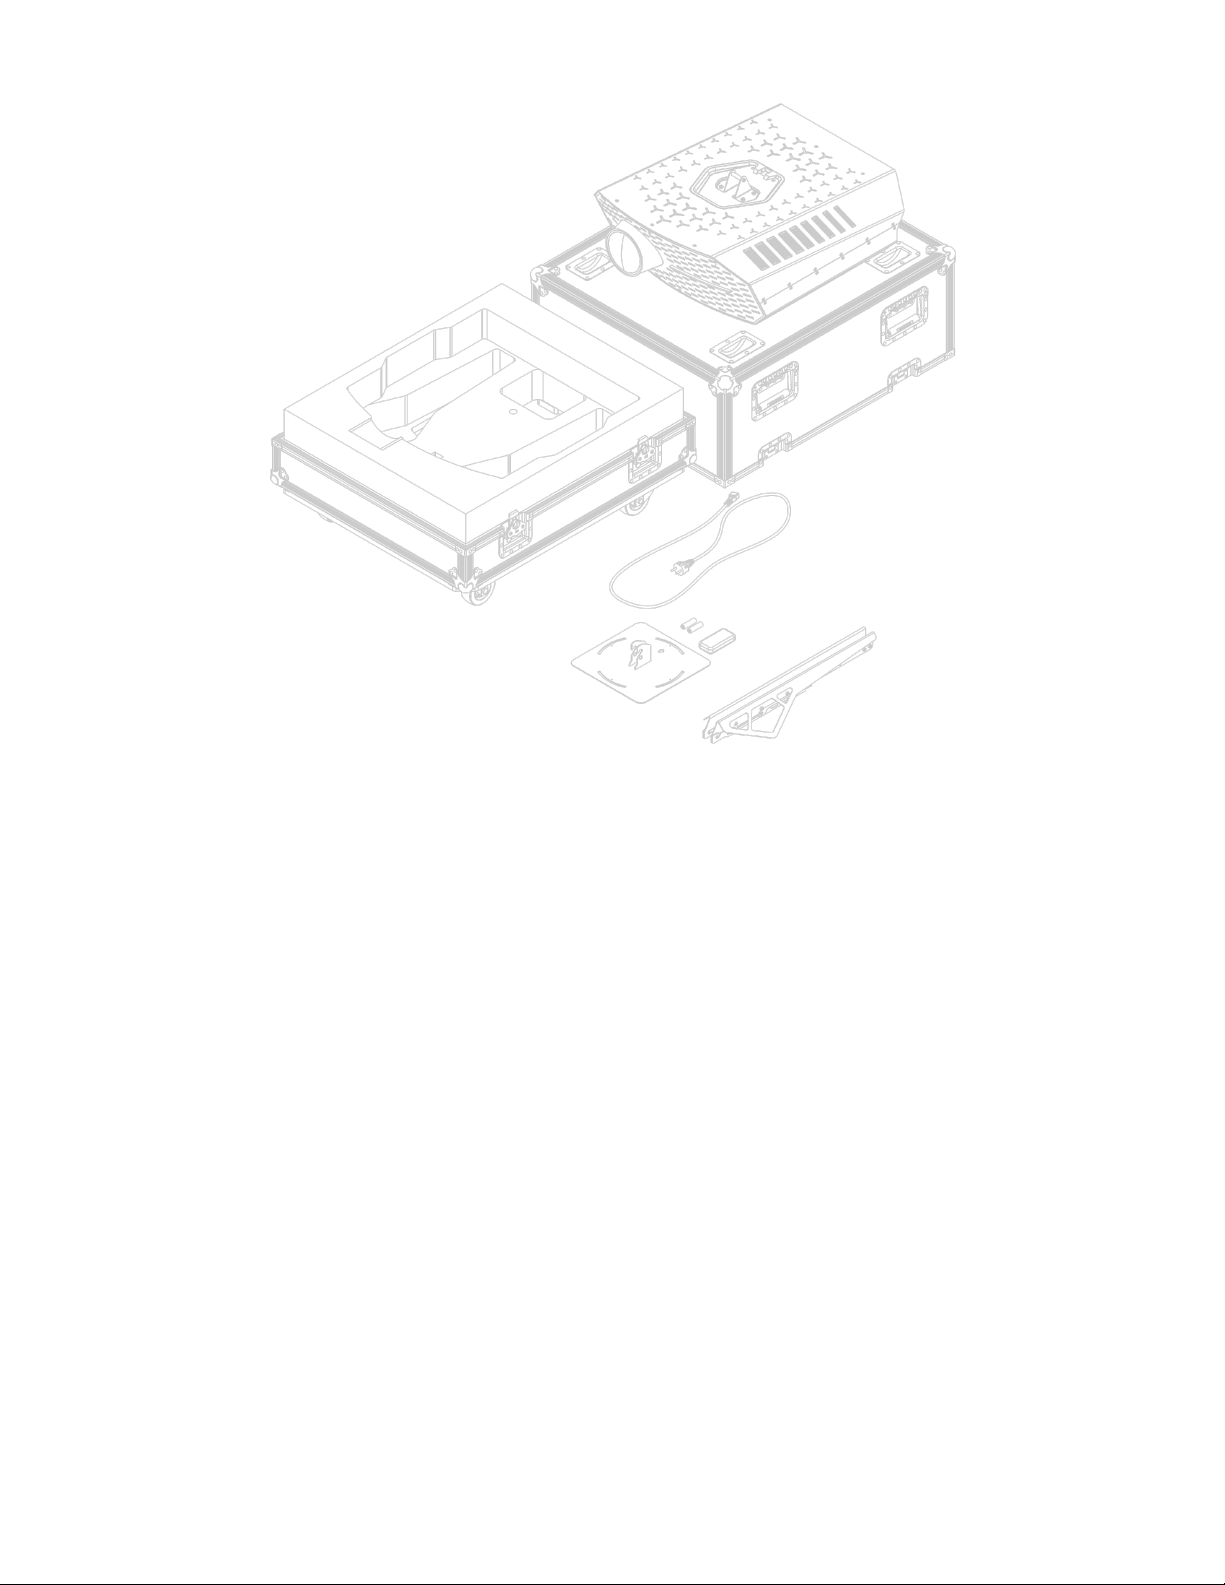
Ideally, after taking out all the items inside the flight case, you will have to put the
protection filler back in its place, as you will close the flight case in the next step.
Page 12
12/1/21, 2:03 PM
MKPro User Manual
12/48
7. Put the top of the flight case with the MK Pro back on the flight case.
Page 13
12/1/21, 2:03 PM
MKPro User Manual
13/48
Installing the ceiling mount bracket
Your MK Pro is on wheels now! This will make it easier for you to move the MK Pro
wherever you need it during the next two steps of the setup process.
Do not begin the installation until you have read and understood the instructions and
warnings contained in this part of the user manual. If you have any questions regarding
any of the instructions or warnings, please contact us
Never exceed the maximum listed weight capacity. Serious injury or property damage may occur.
This mounting bracket was designed to be installed and utilized ONLY as specified in this
manual. Improper installation of this product may cause damage or serious injury.
Page 14
12/1/21, 2:03 PM
MKPro User Manual
14/48
Ceiling mount bracket specifications
Material
Weight:
Lenght
Rotation angle:
Tilt angle:
Maxium weight capacity
Component checklist
Ceiling plate (x1)
Column (x1)
DIN 912 M6x45 Screw (x1)
Power & Configuration (x1)
M6 Nut (x1)
Mounting on solid brick and concrete mounting
This ceiling mount bracket should only be installed by someone of good mechanical
ability, with basic building experience and a full understanding of these instructions.
Always use an assistant or mechanical lifting equipment to safely lift and position equipment.
Make sure that the supporting surface will safely support the combined load of the
equipment and all attached hardware and components.
Tighten screws firmly but do not over-tighten. Over-tightening can damage the items,
greatly reducing their holding powe
If mounting to a wood joist ceiling, make sure that the mounting screws are anchored into
the centre of the joists. The use of a stud finder is highly recommended.
Ensure that you have received all parts according to the component checklist. If any parts
are missing or faulty, contact us.
Page 15
12/1/21, 2:03 PM
MKPro User Manual
15/48
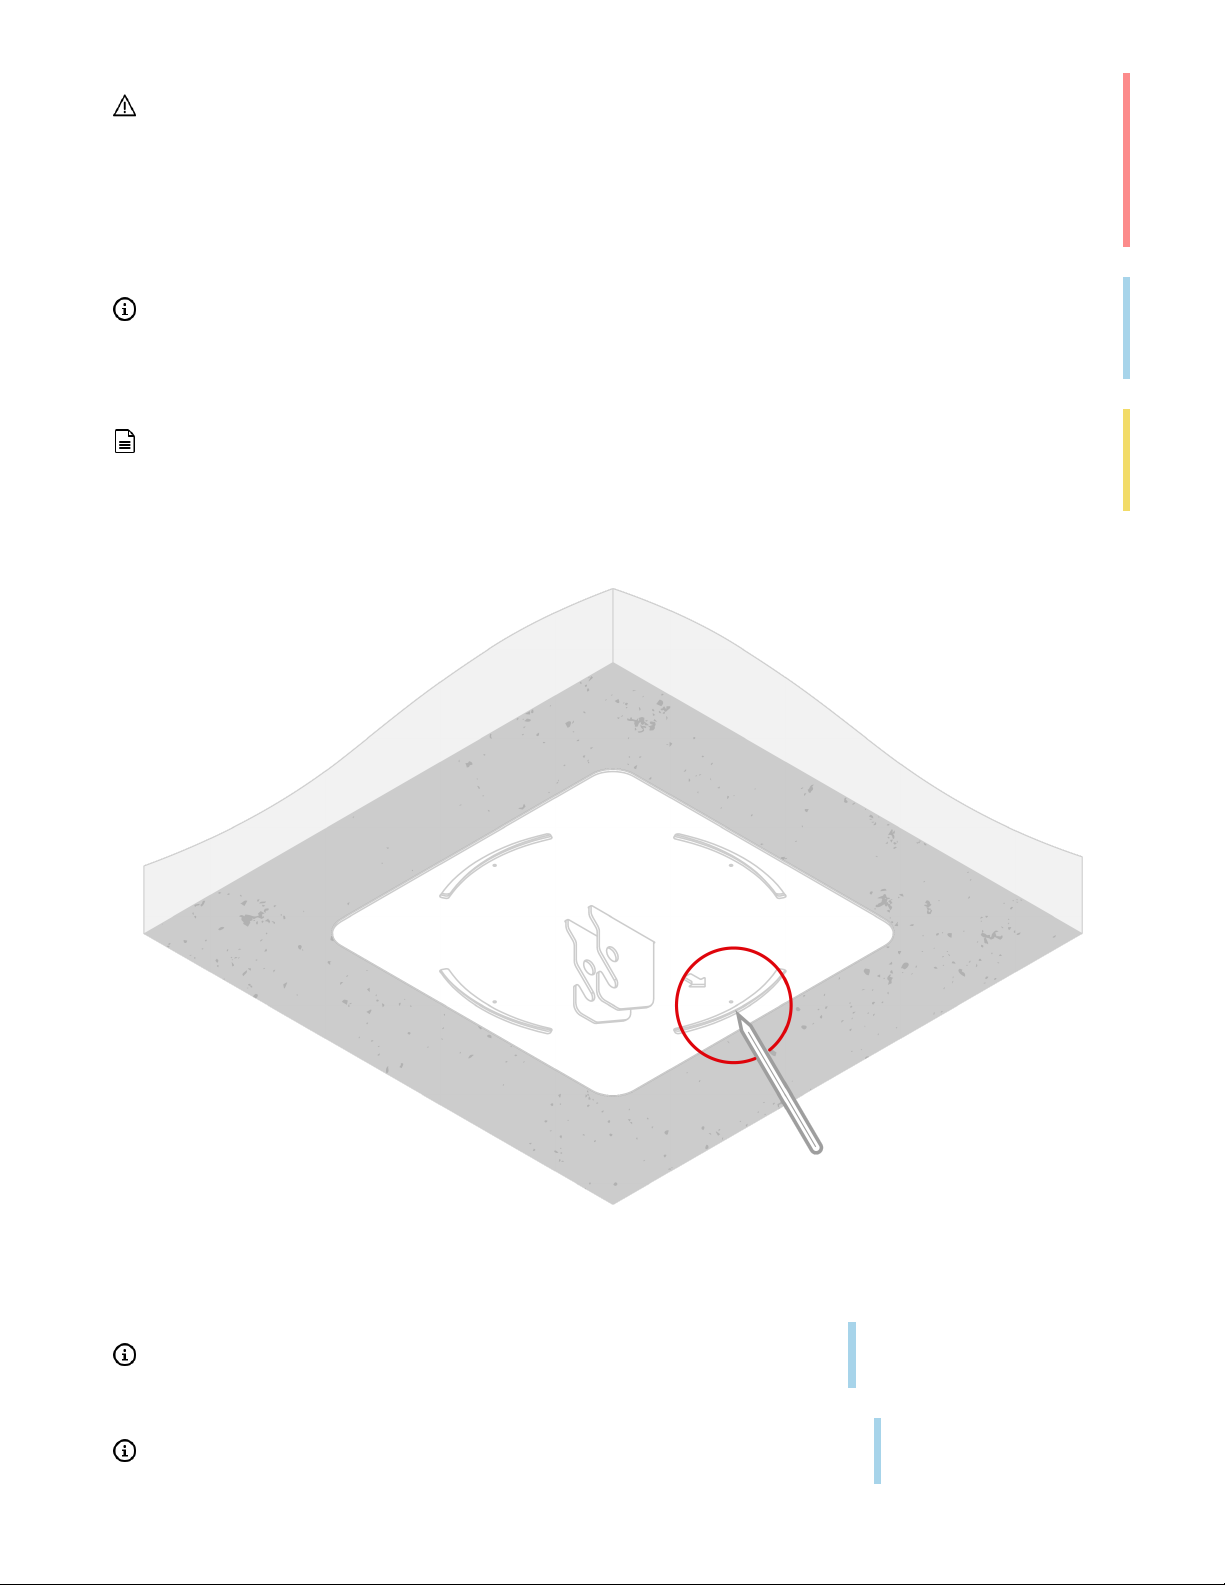
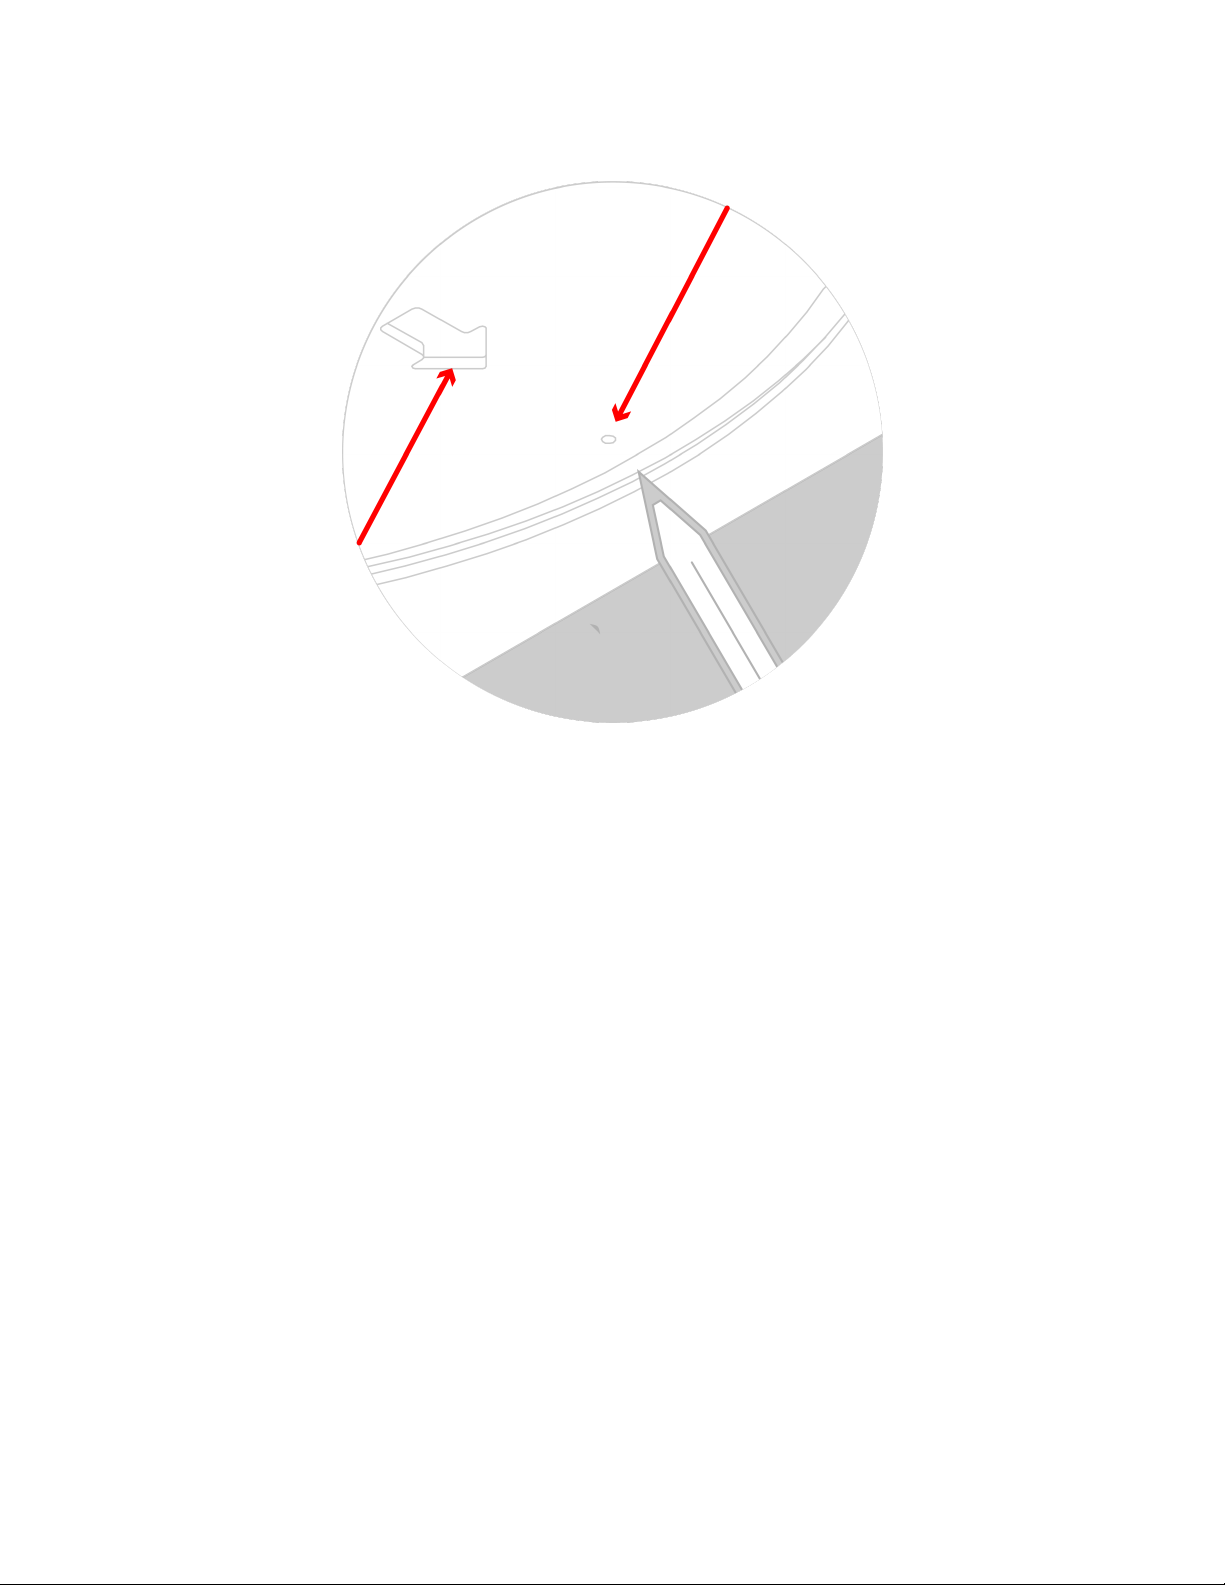
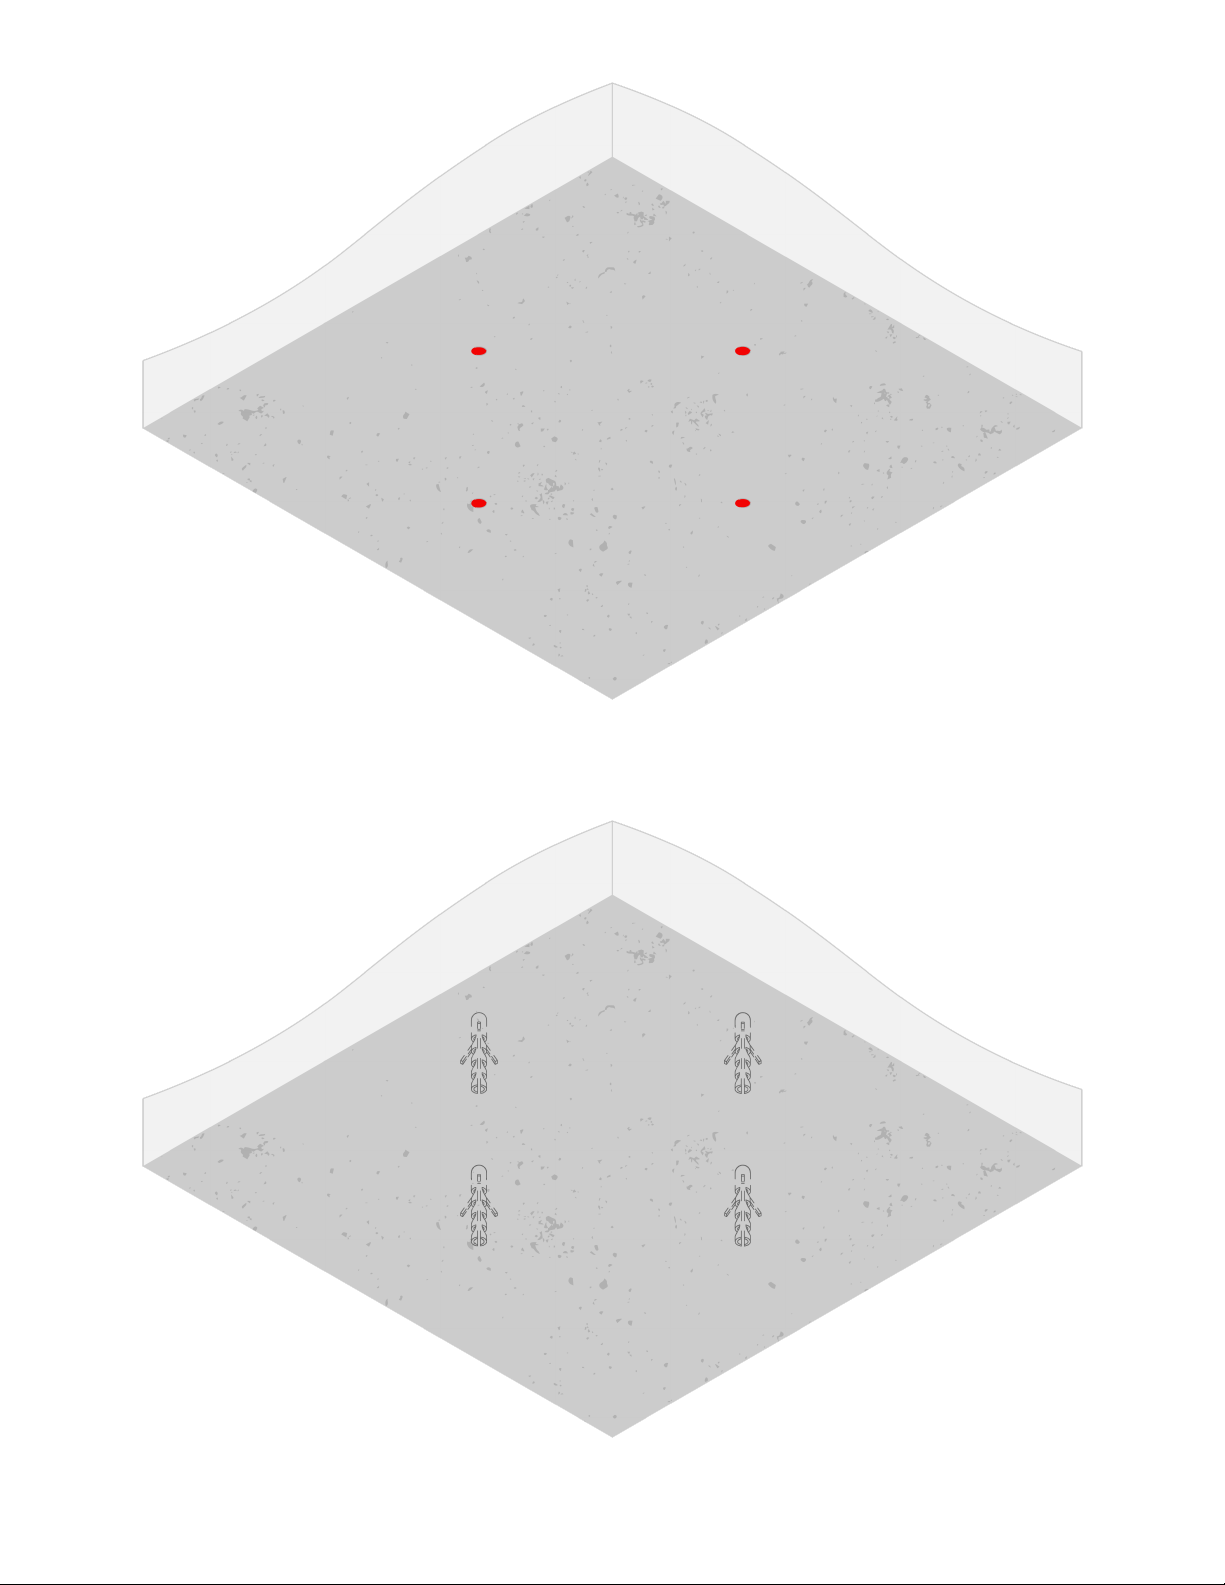
1. Find and mark the exact location of the mounting holes.
When installing ceiling mounts on cinder blocks, verify that the actual concrete thickness
is at least 35 mm for using the concrete anchors. Do not drill into mortar joints! Be sure
to mount in a solid part of the block, generally 25 mm minimum from the side of the
block.
It is recommended to use an electric drill on slow setting to drill the hole instead of a
hammer drill to avoid breaking out the back of the hole when entering a void or cavity.
The installer must verify that the supporting surface will safely support the combined
load of the equipment and all attached hardware and components.
The marks for the holes must be made in the middle of the slots
The arrow in the ceiling plate must point to the projection surface.
Page 16
12/1/21, 2:03 PM
MKPro User Manual
16/48
2. Drill four holes and insert the wall plugs.
Page 17
12/1/21, 2:03 PM
MKPro User Manual
17/48
Page 18
12/1/21, 2:03 PM
MKPro User Manual
18/48
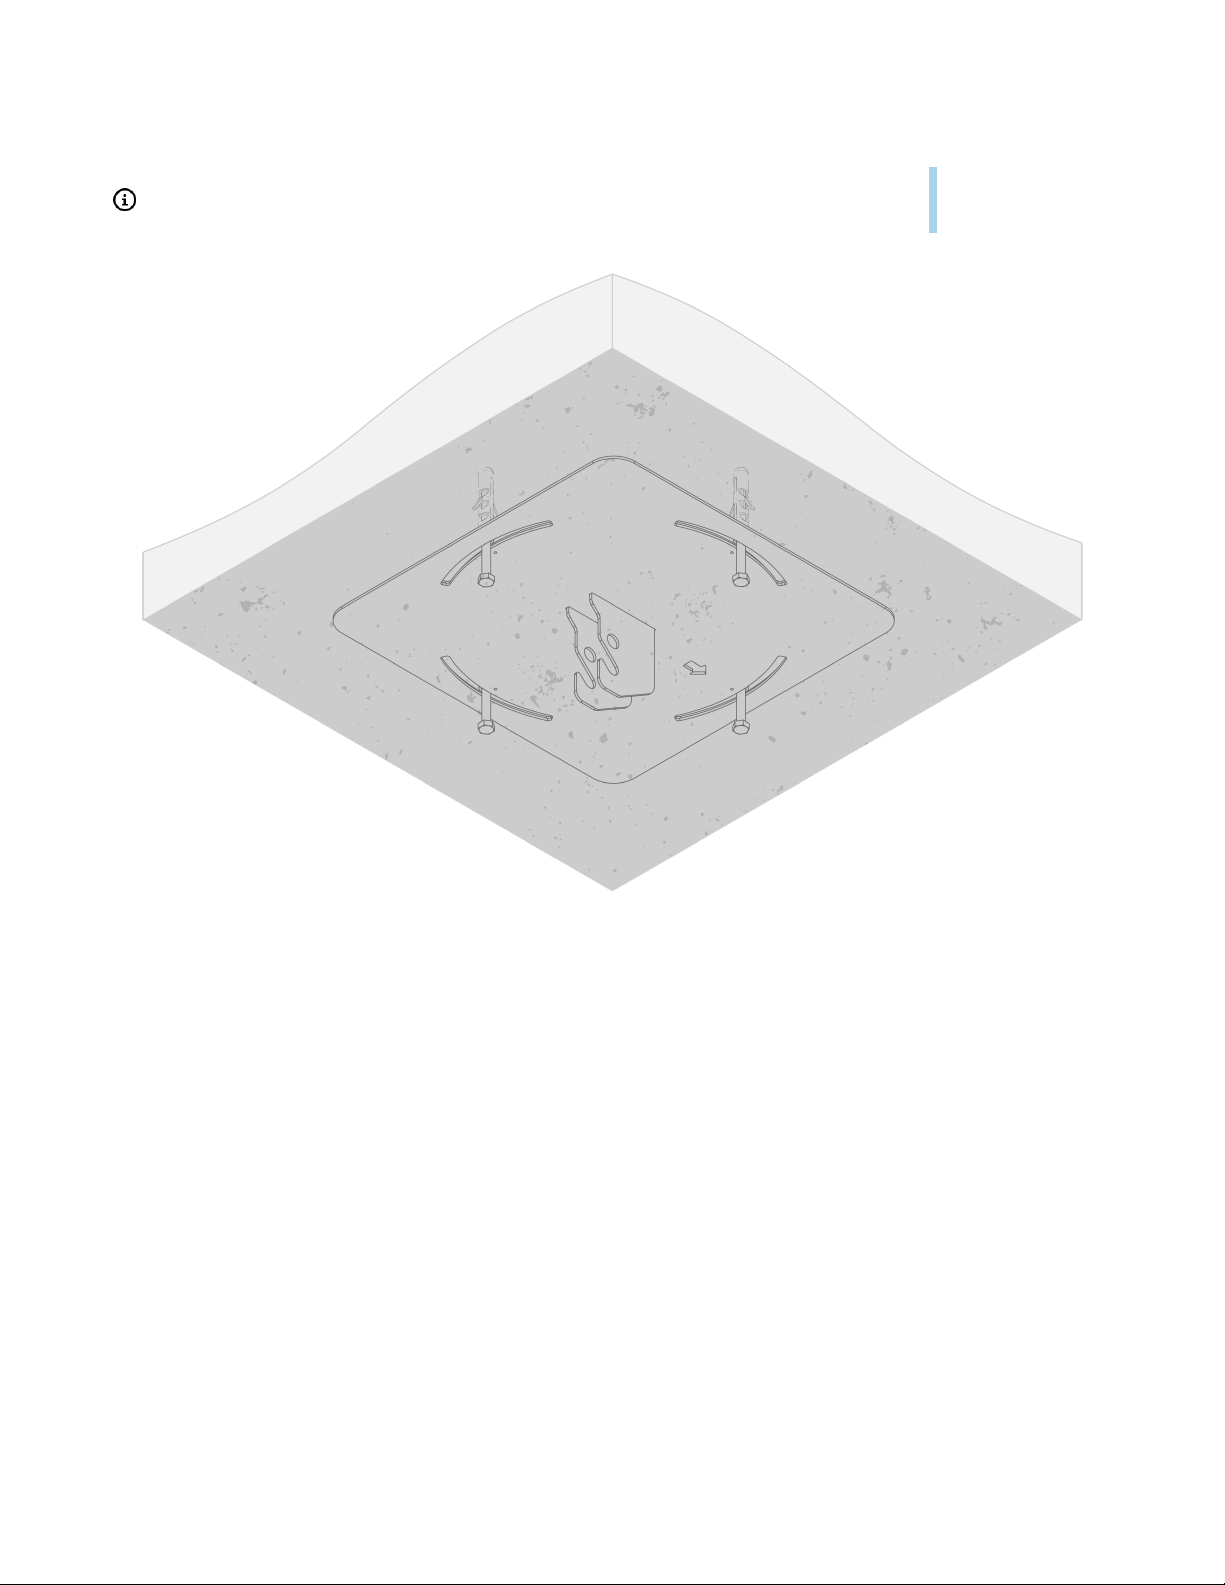
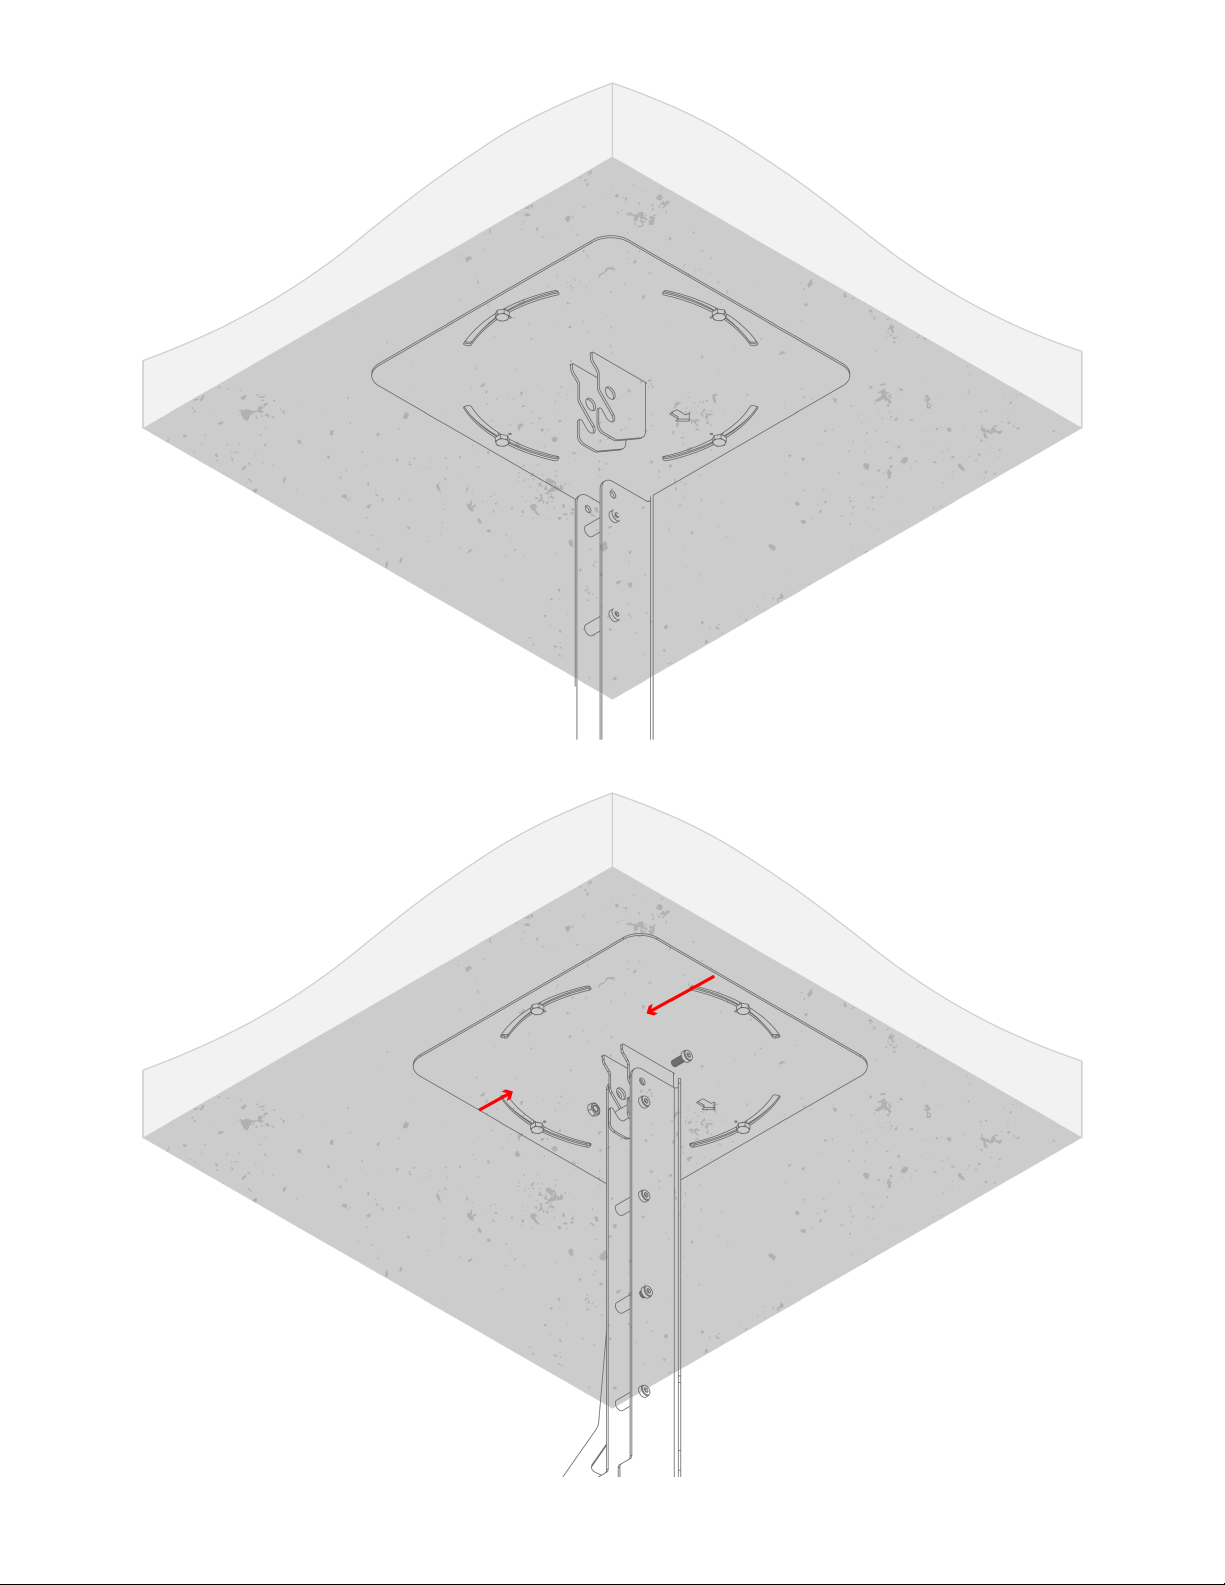
3. Hang the ceiling plate so that the screws fit through the screw holes in the plate.
4. Pre-adjust the ceiling plate into place and tighten the screws
Make sure the arrow in the ceiling plate is facing the projection surface.
Page 19
12/1/21, 2:03 PM
MKPro User Manual
19/48
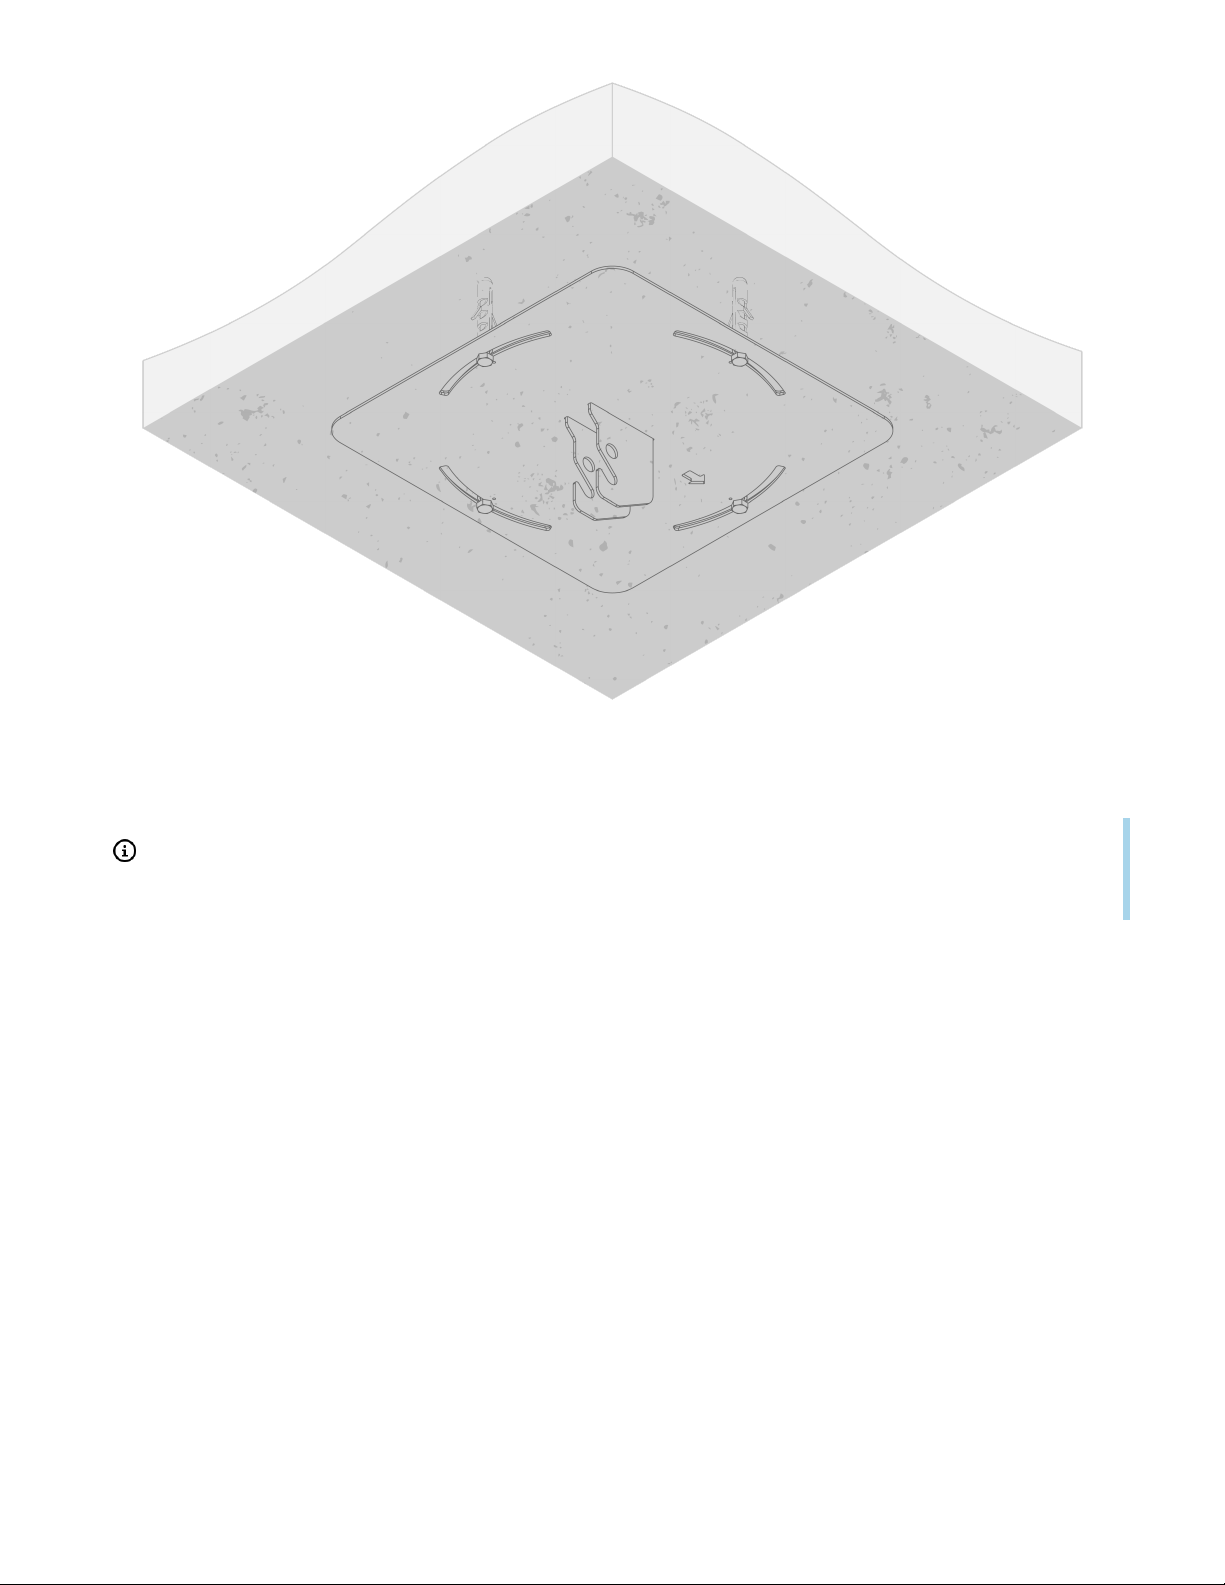
5. Install the column and secure it using the screw and nut.
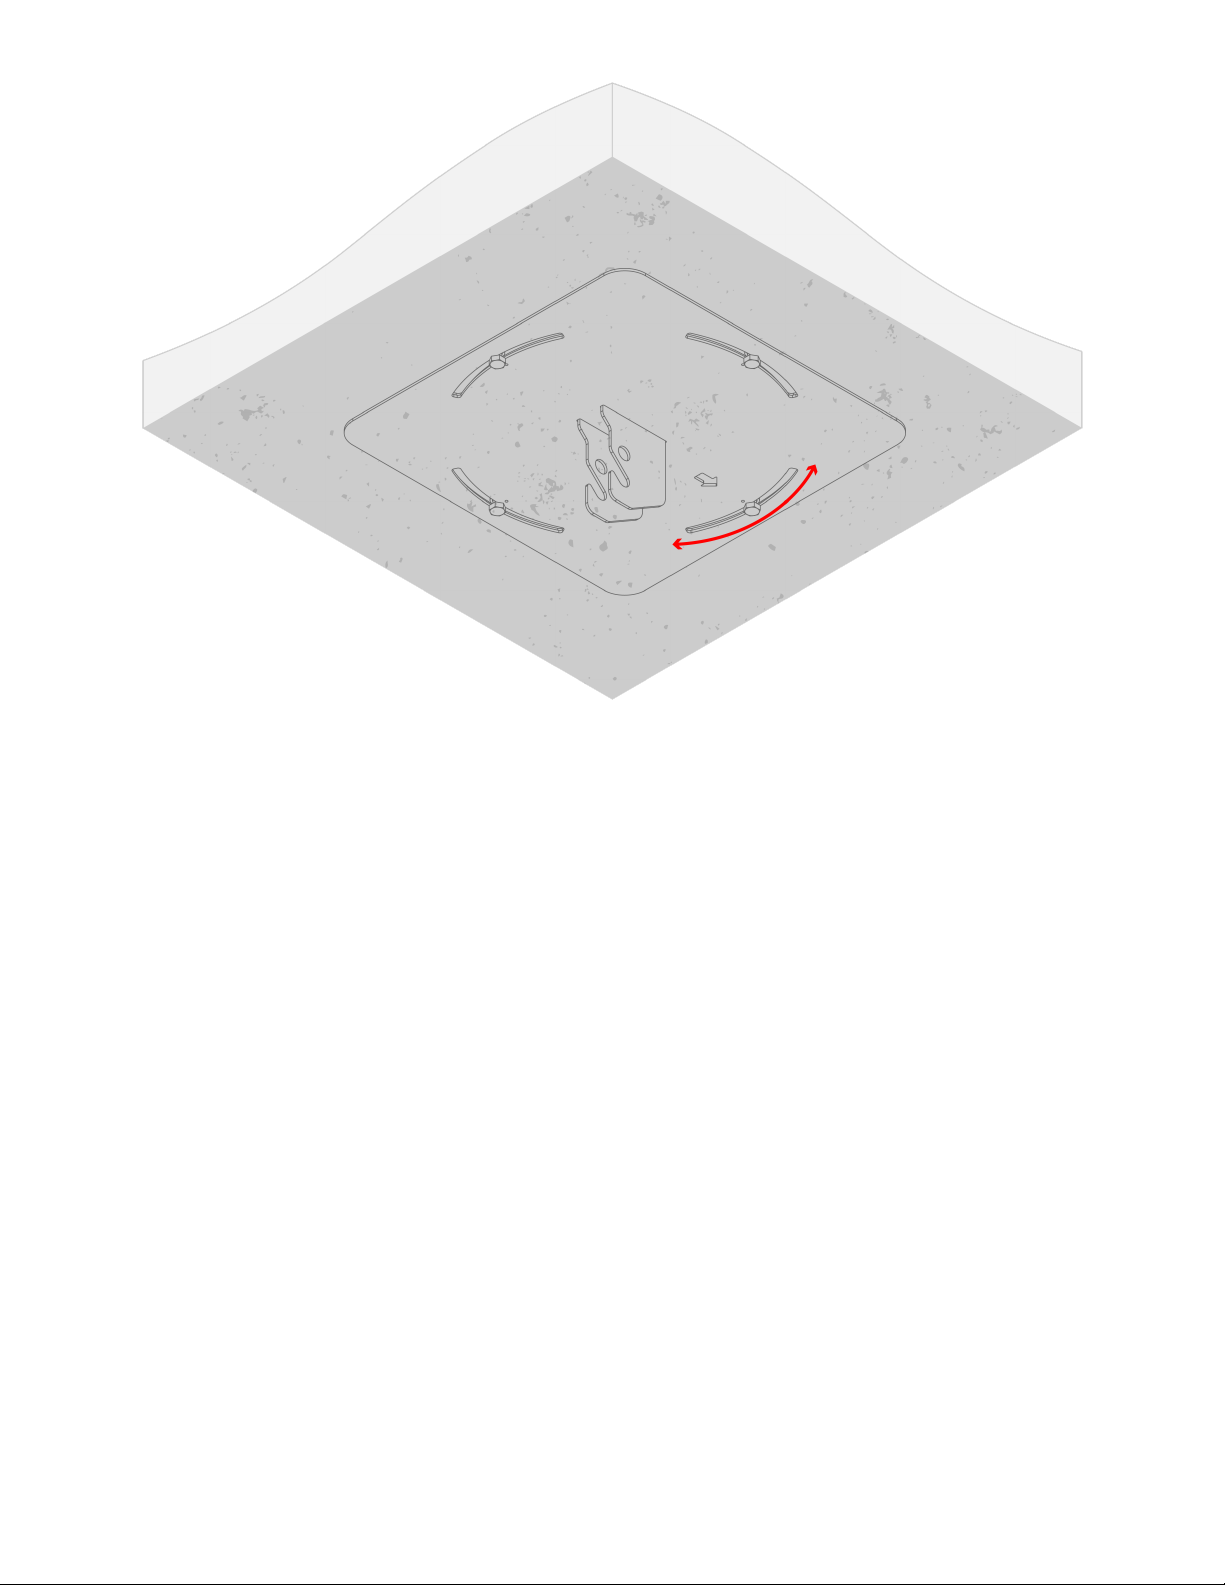
The screws have to be tightened almost all the way, allowing the ceiling plate to slide into
its slots for small adjustments of the panoramic orientation later.
Page 20
12/1/21, 2:03 PM
MKPro User Manual
20/48
Page 21
12/1/21, 2:03 PM
MKPro User Manual
21/48
Page 22
12/1/21, 2:03 PM
MKPro User Manual
22/48
Installing the MKPro
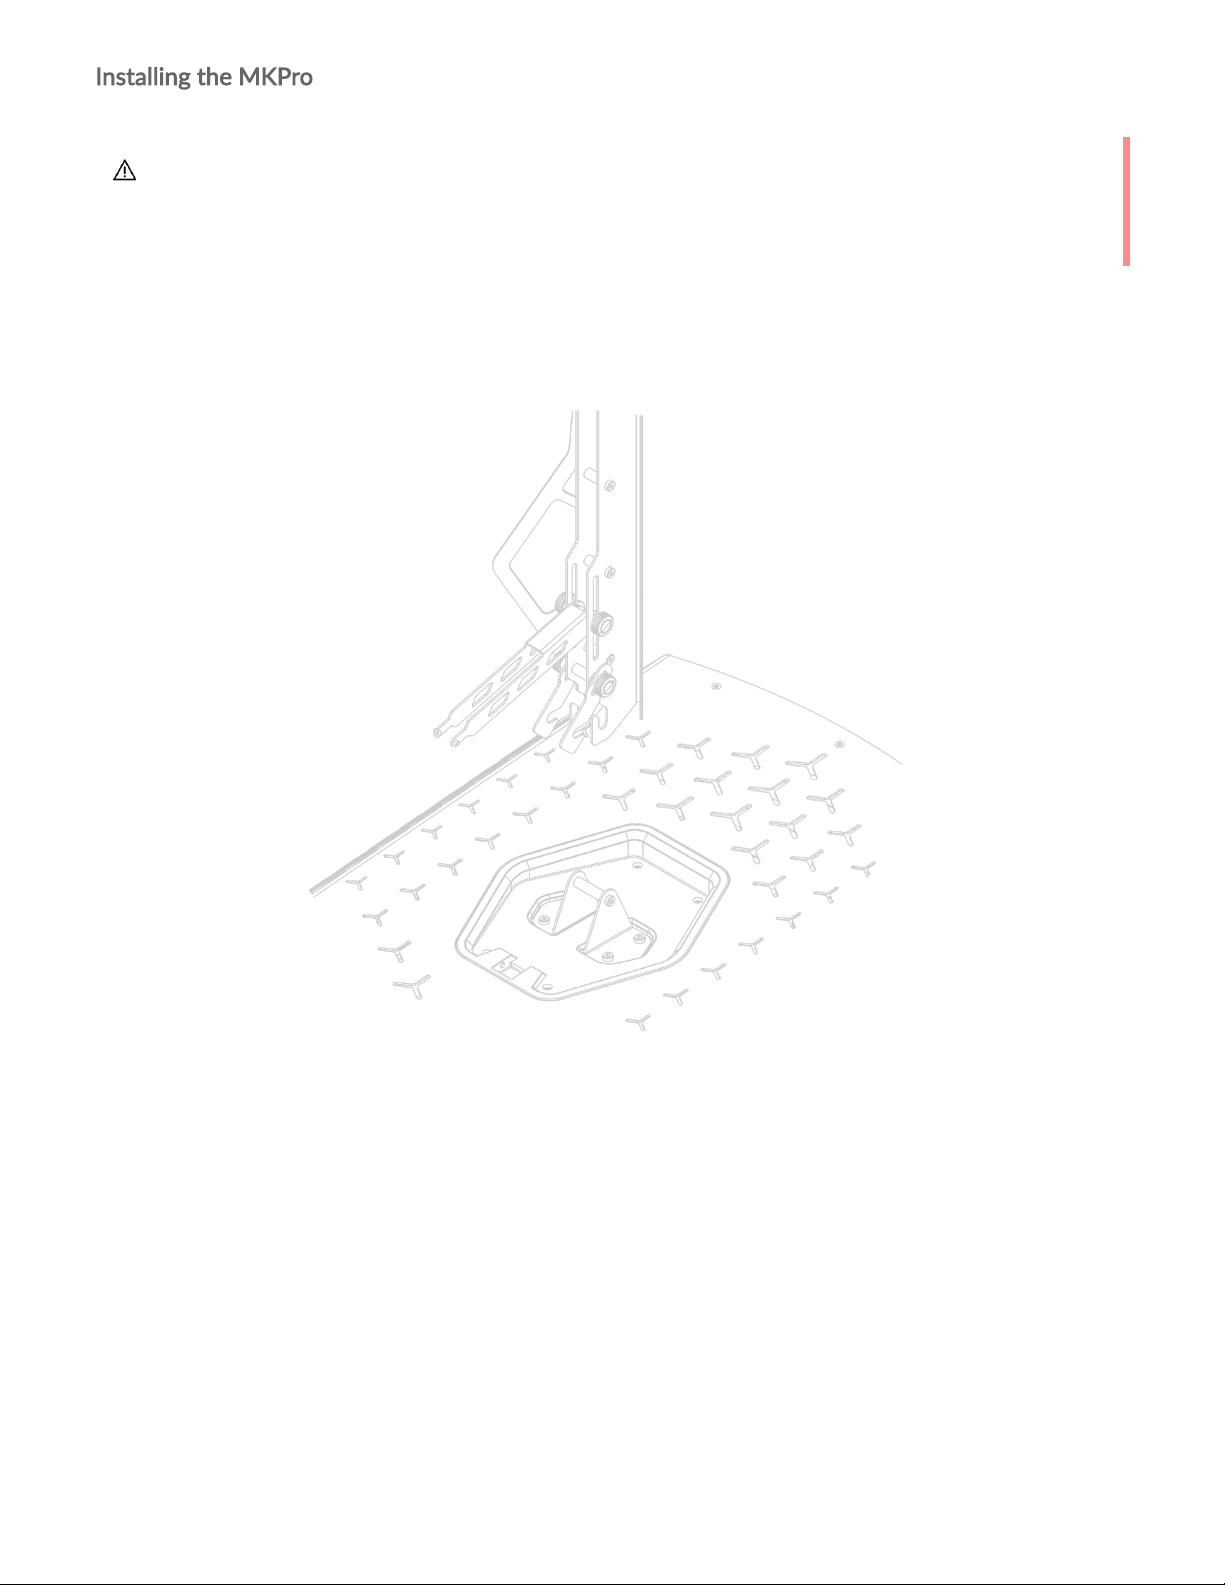
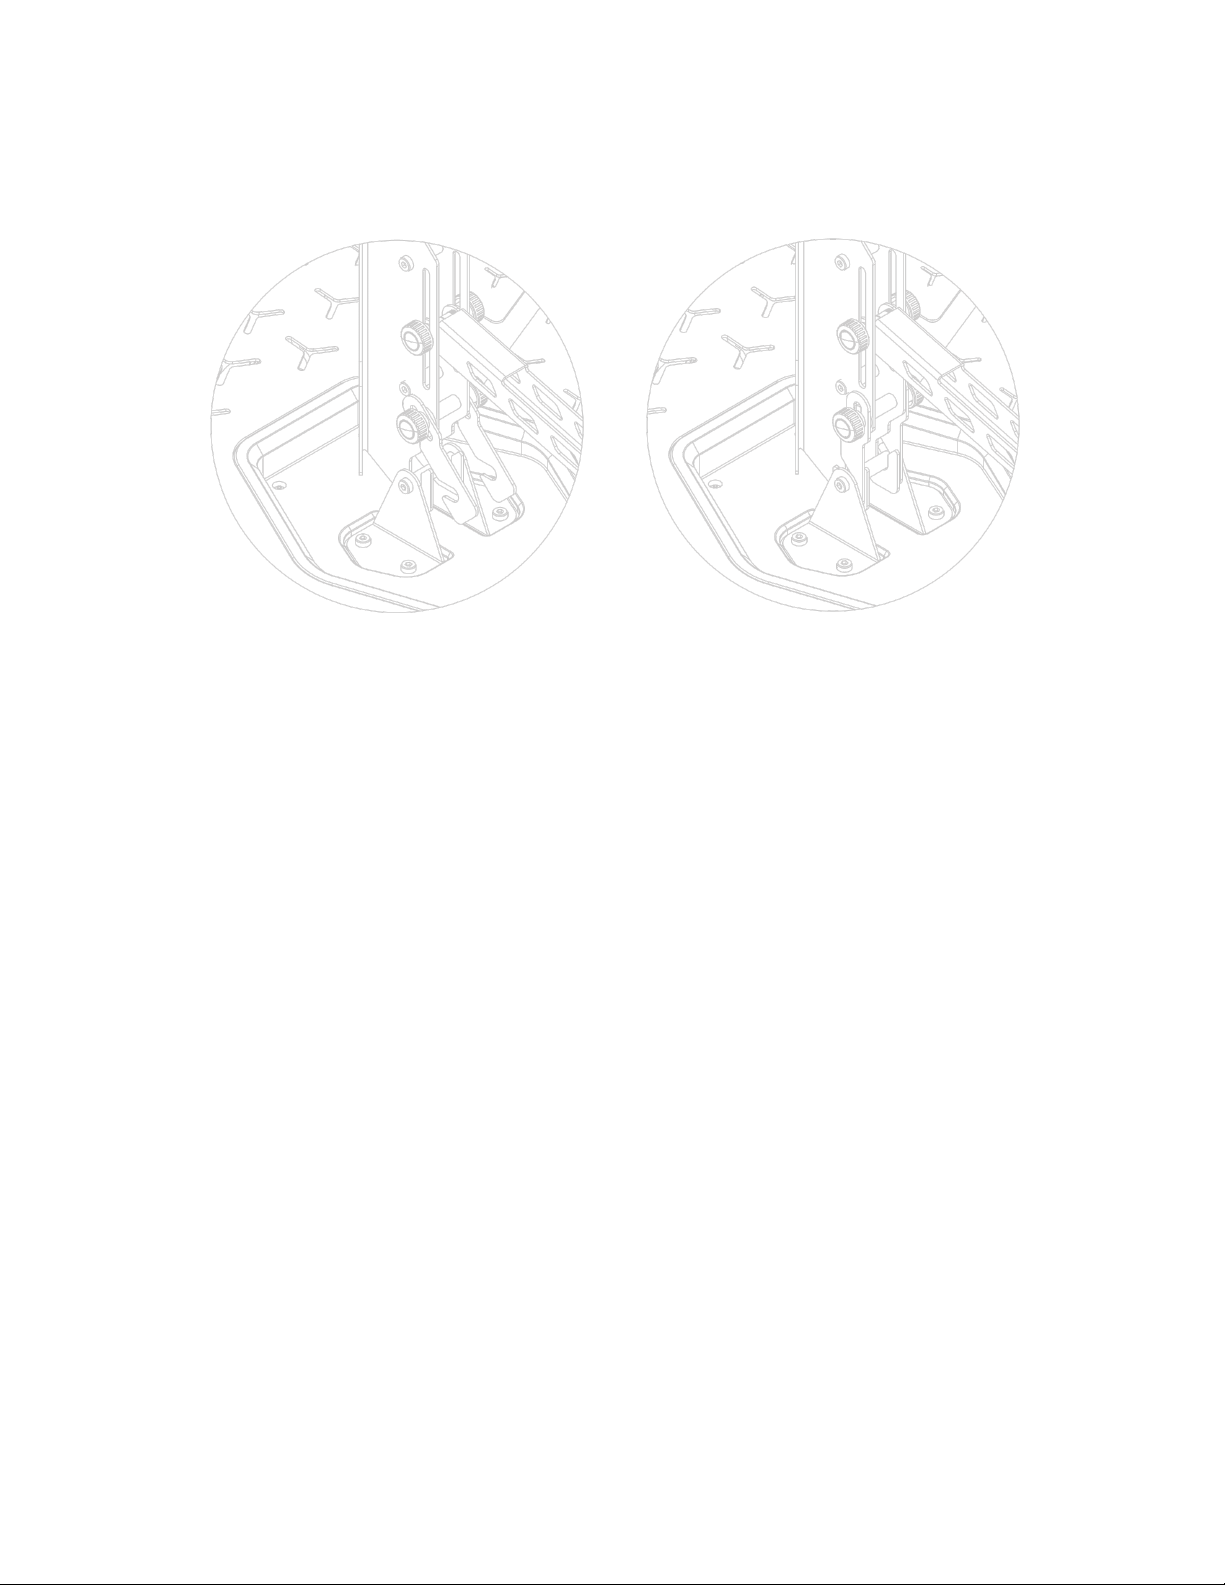
1. Hang the MK Pro on the column
2. Close the security hooks and tighten the security hook knobs
Do not begin installing the MK Pro until you have read and understood the instructions and
warnings contained in this part of the user manual. If you have any questions regarding any of the
instructions or warnings, please contact us.
Page 23
12/1/21, 2:03 PM
MKPro User Manual
23/48
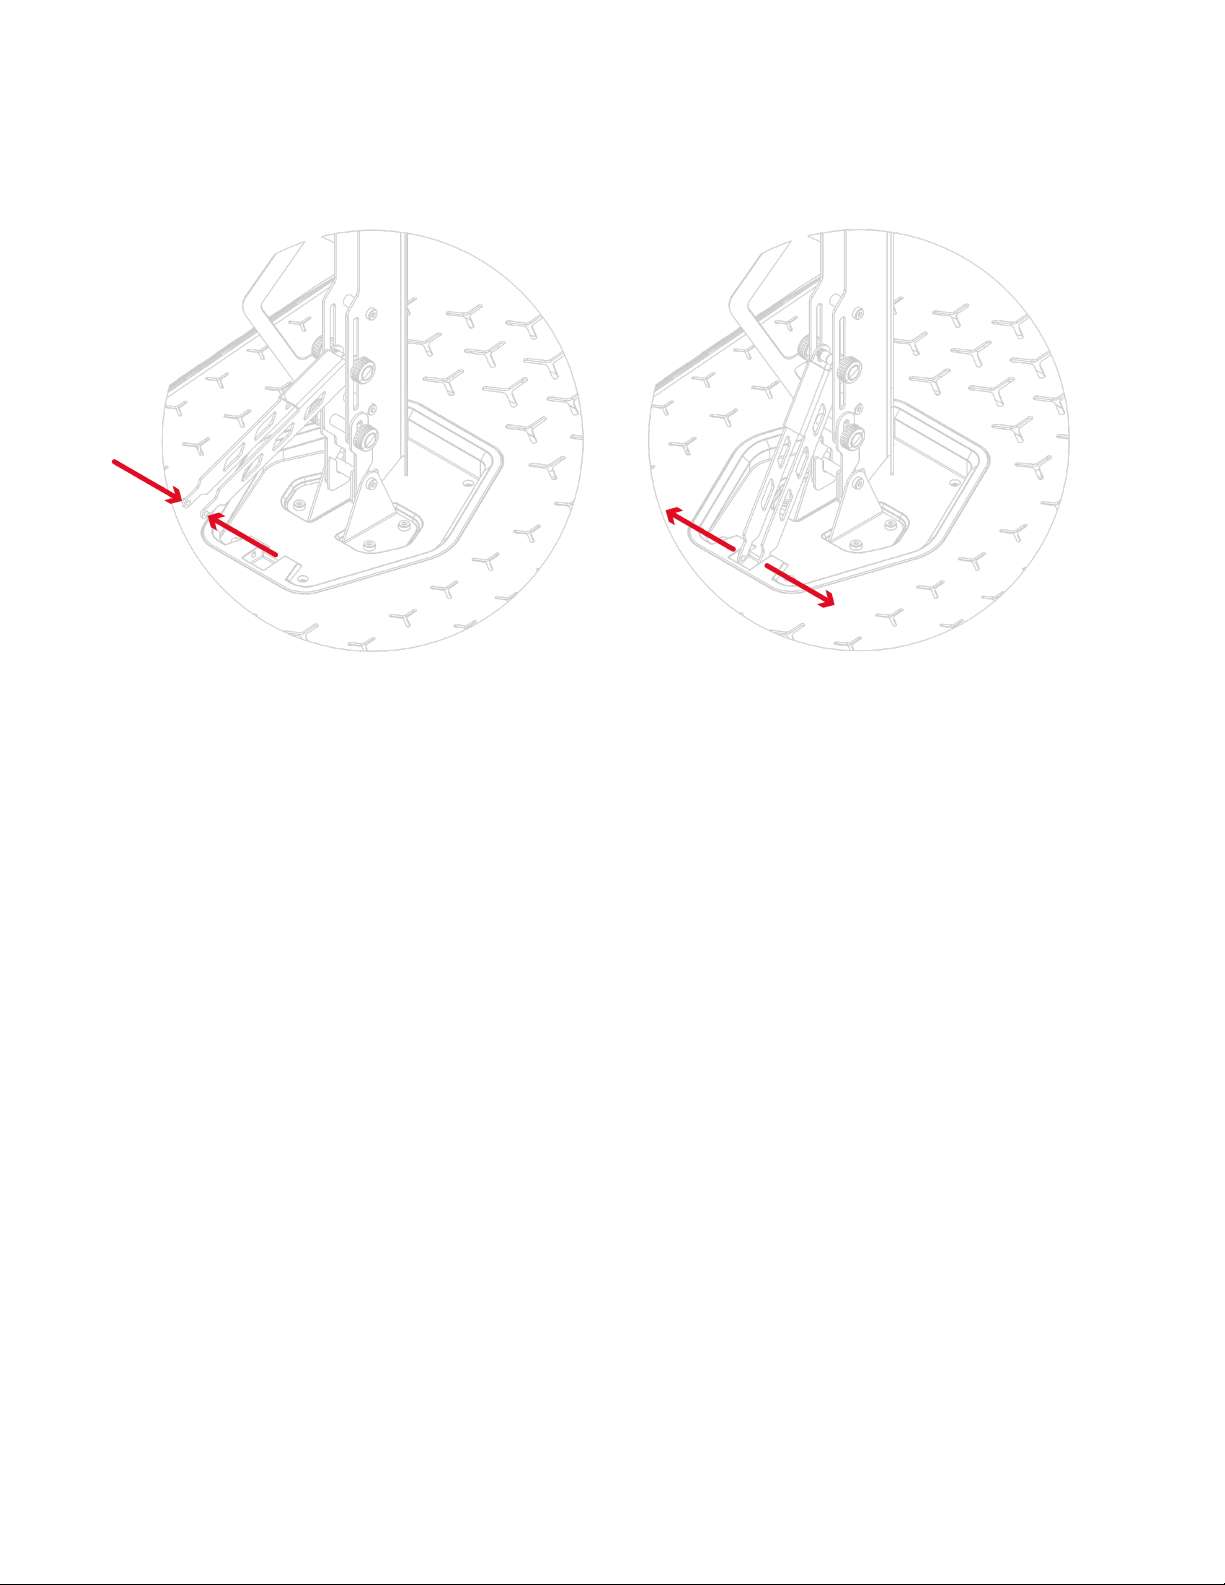
3. Insert the pins of the tilt regulator arm in the corresponding holes of the MK Pro
Page 24
12/1/21, 2:03 PM
MKPro User Manual
24/48
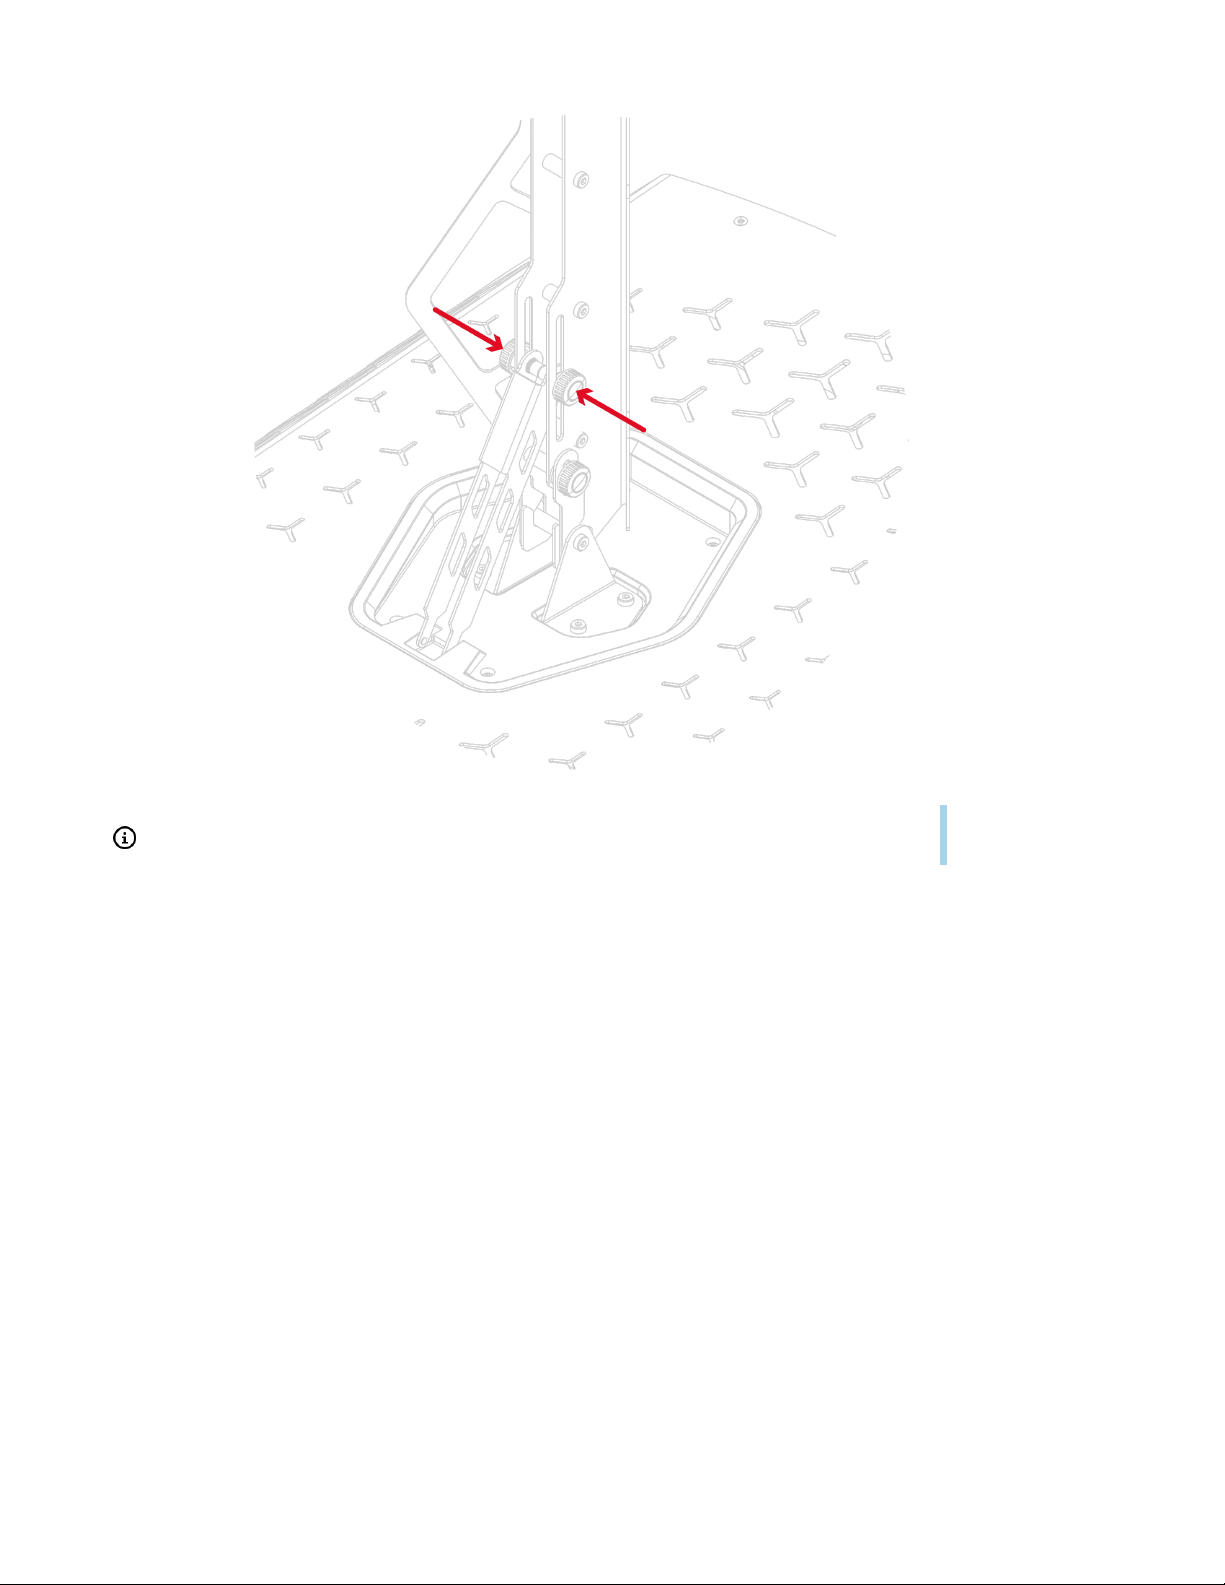
4. Pre-adjust the tilt of the MK Pro and tighten the knobs
Page 25
12/1/21, 2:03 PM
MKPro User Manual
25/48
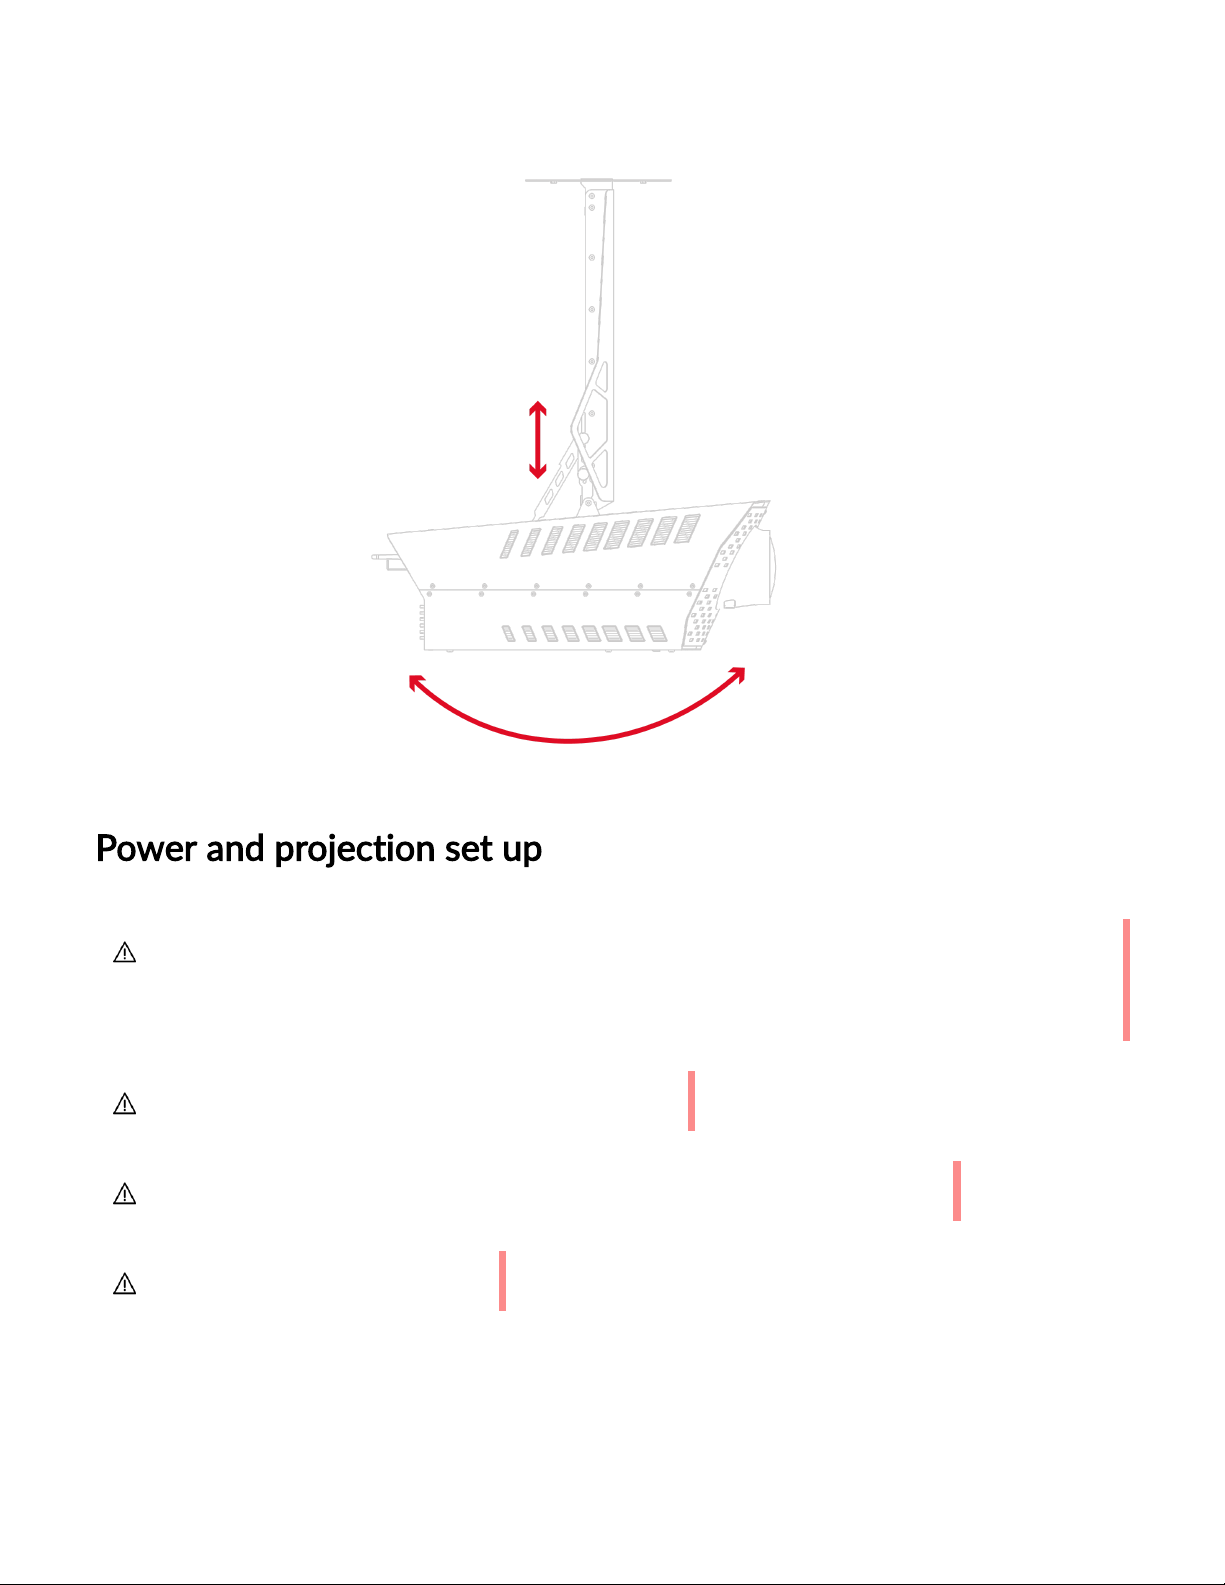
Sliding the tilt regulator up and down you can pre-adjust the tilt of the MK Pro.
Page 26
12/1/21, 2:03 PM
MKPro User Manual
26/48
Power and projection set up
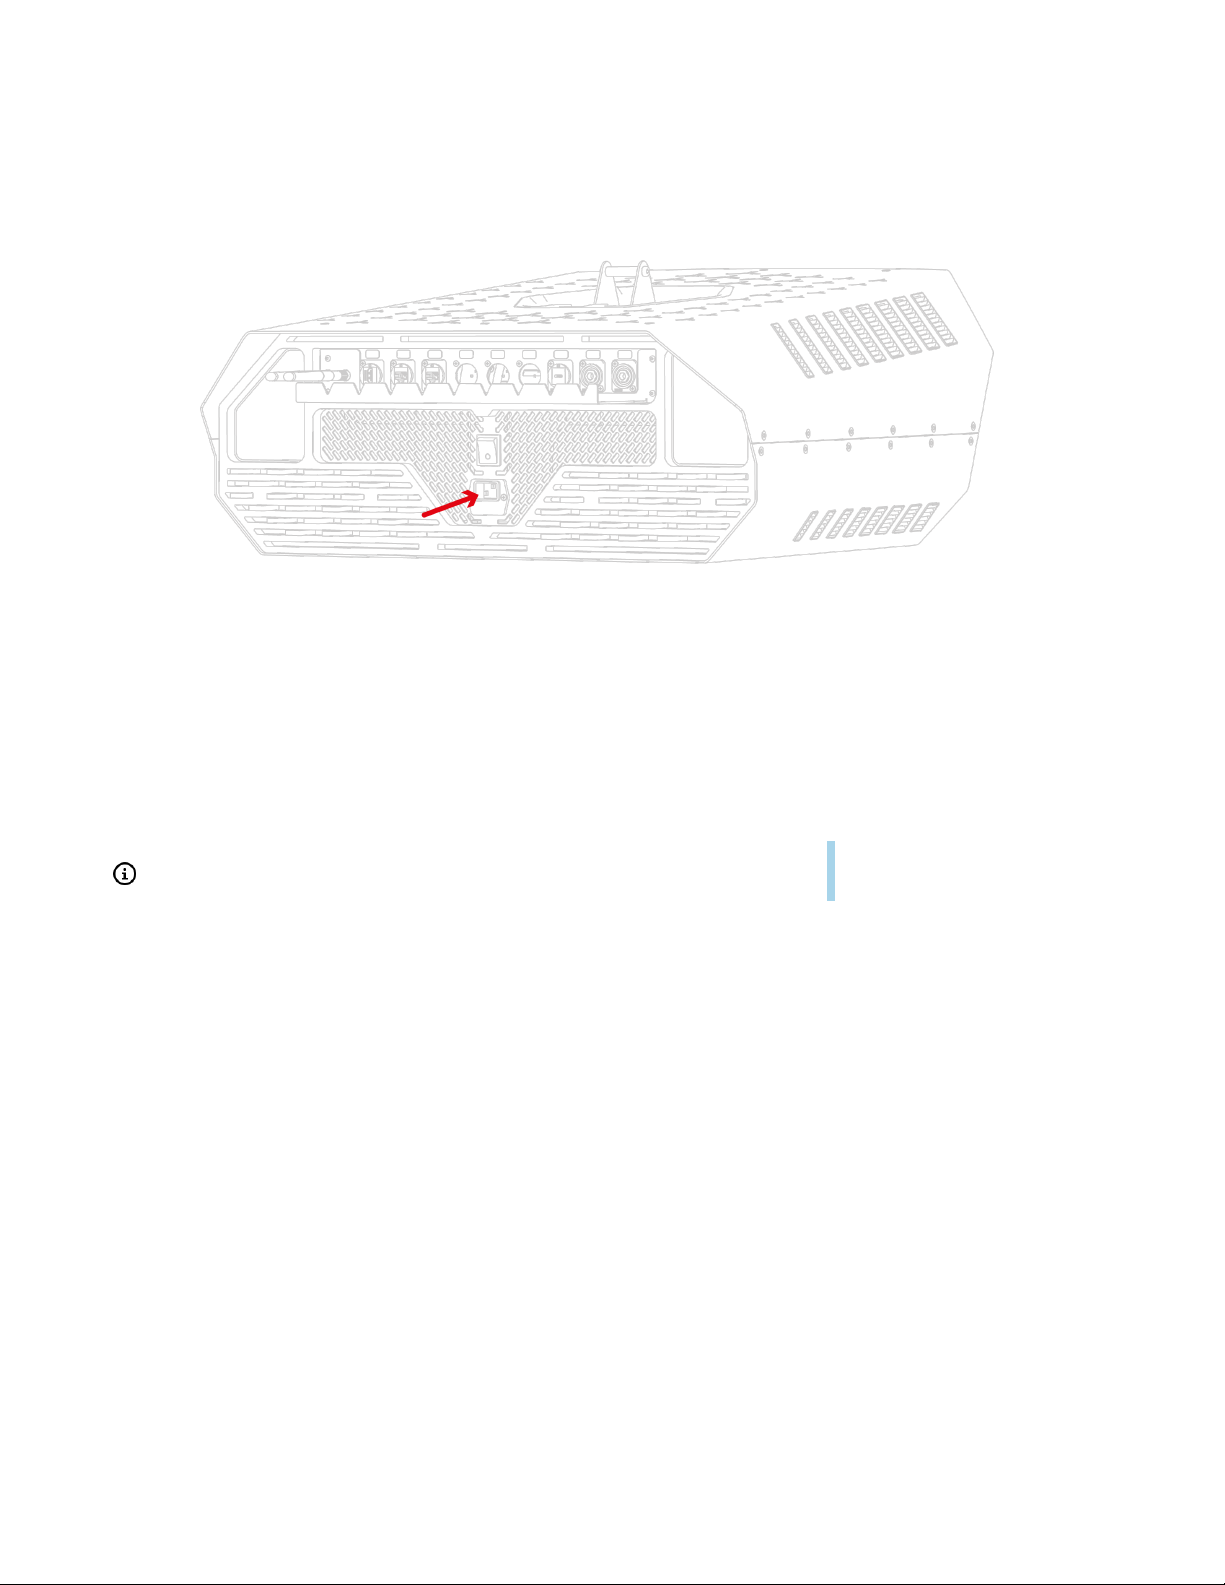
1. Connect the power cord to the MK Pro power inlet.
Do not begin the power set up until you have read and understood the instructions and warnings
contained in this part of the user manual. If you have any questions regarding any of the
instructions or warnings, please contact us.
Please use the power cord supplied with the MK Pro.
The MK Pro is designed to be used with 100-240V AC, 50/60 Hz power supply.
Do not disassemble the projector.
Page 27
12/1/21, 2:03 PM
MKPro User Manual
27/48
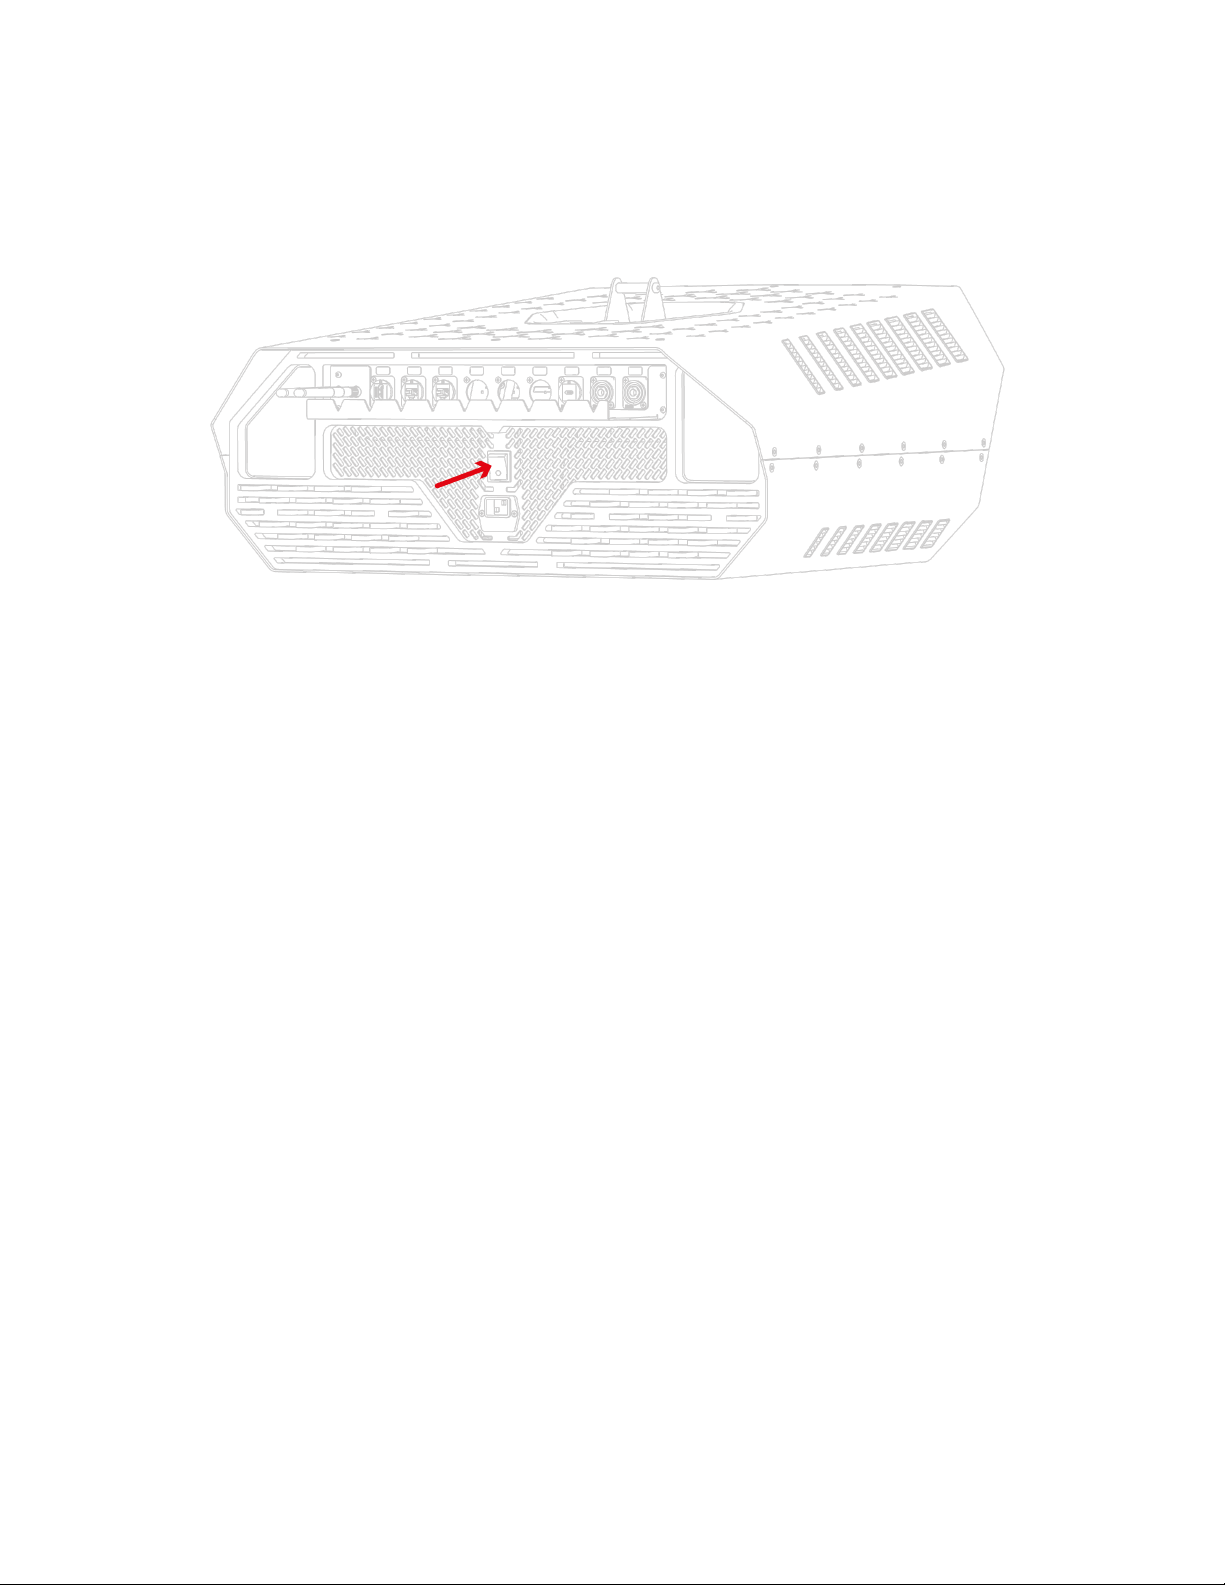
2.Press the On/Off Switch.
Wait for the MKPro to turn on before proceeding to the next steps
Page 28
12/1/21, 2:03 PM
MKPro User Manual
28/48
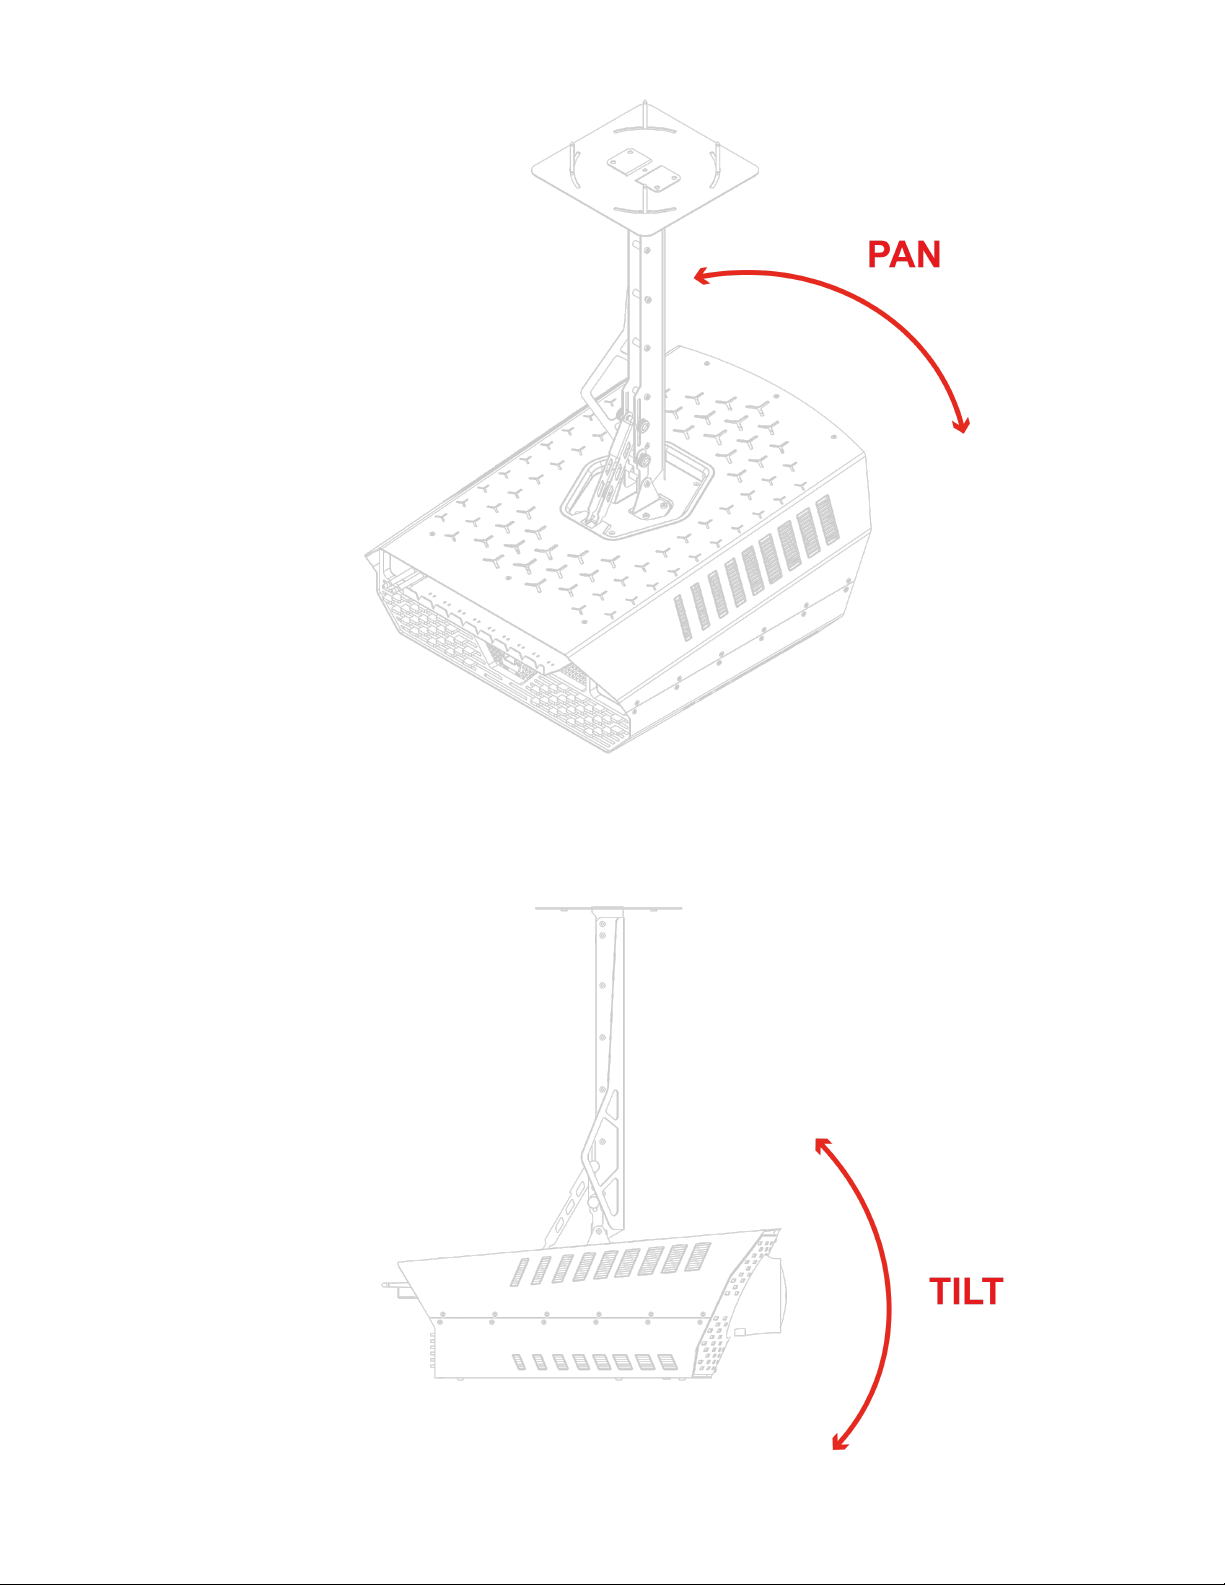
3.Find the centre of projection using the ceiling plate (pan) and the tilt regulator (tilt).
Page 29
12/1/21, 2:03 PM
MKPro User Manual
29/48
Page 30
12/1/21, 2:03 PM
MKPro User Manual
30/48
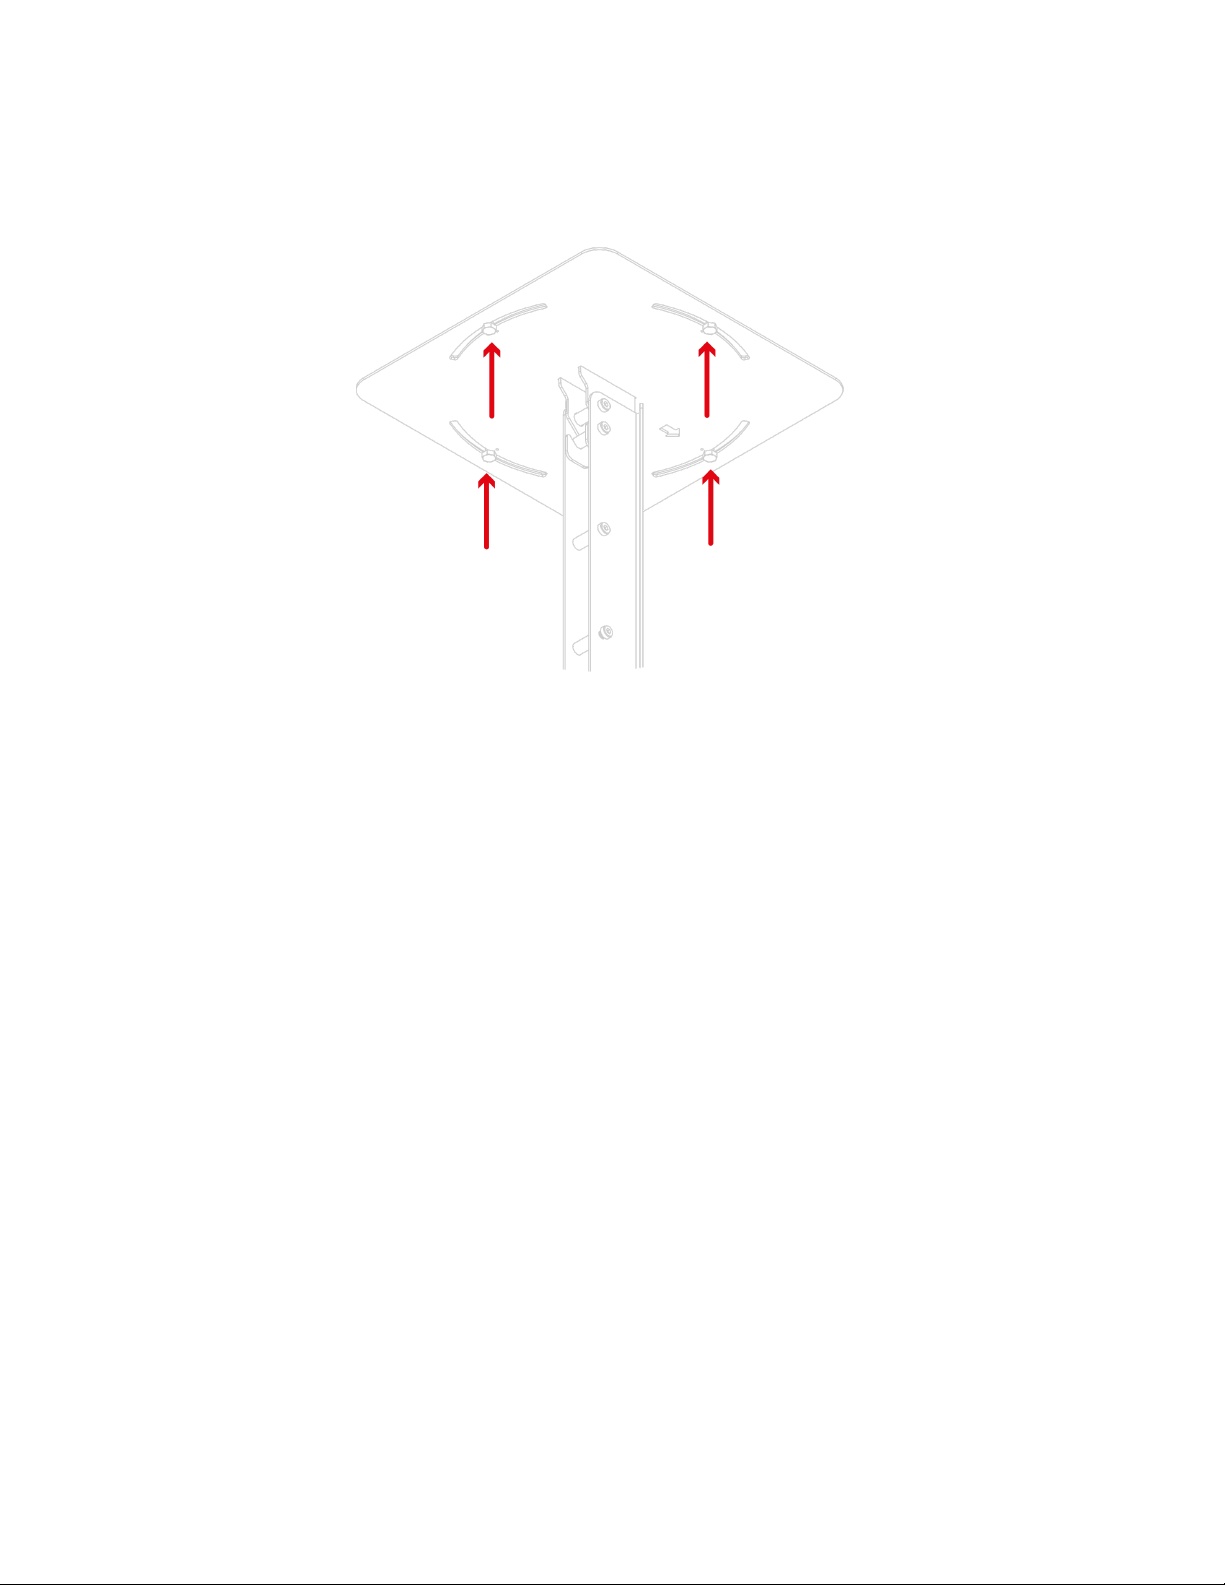
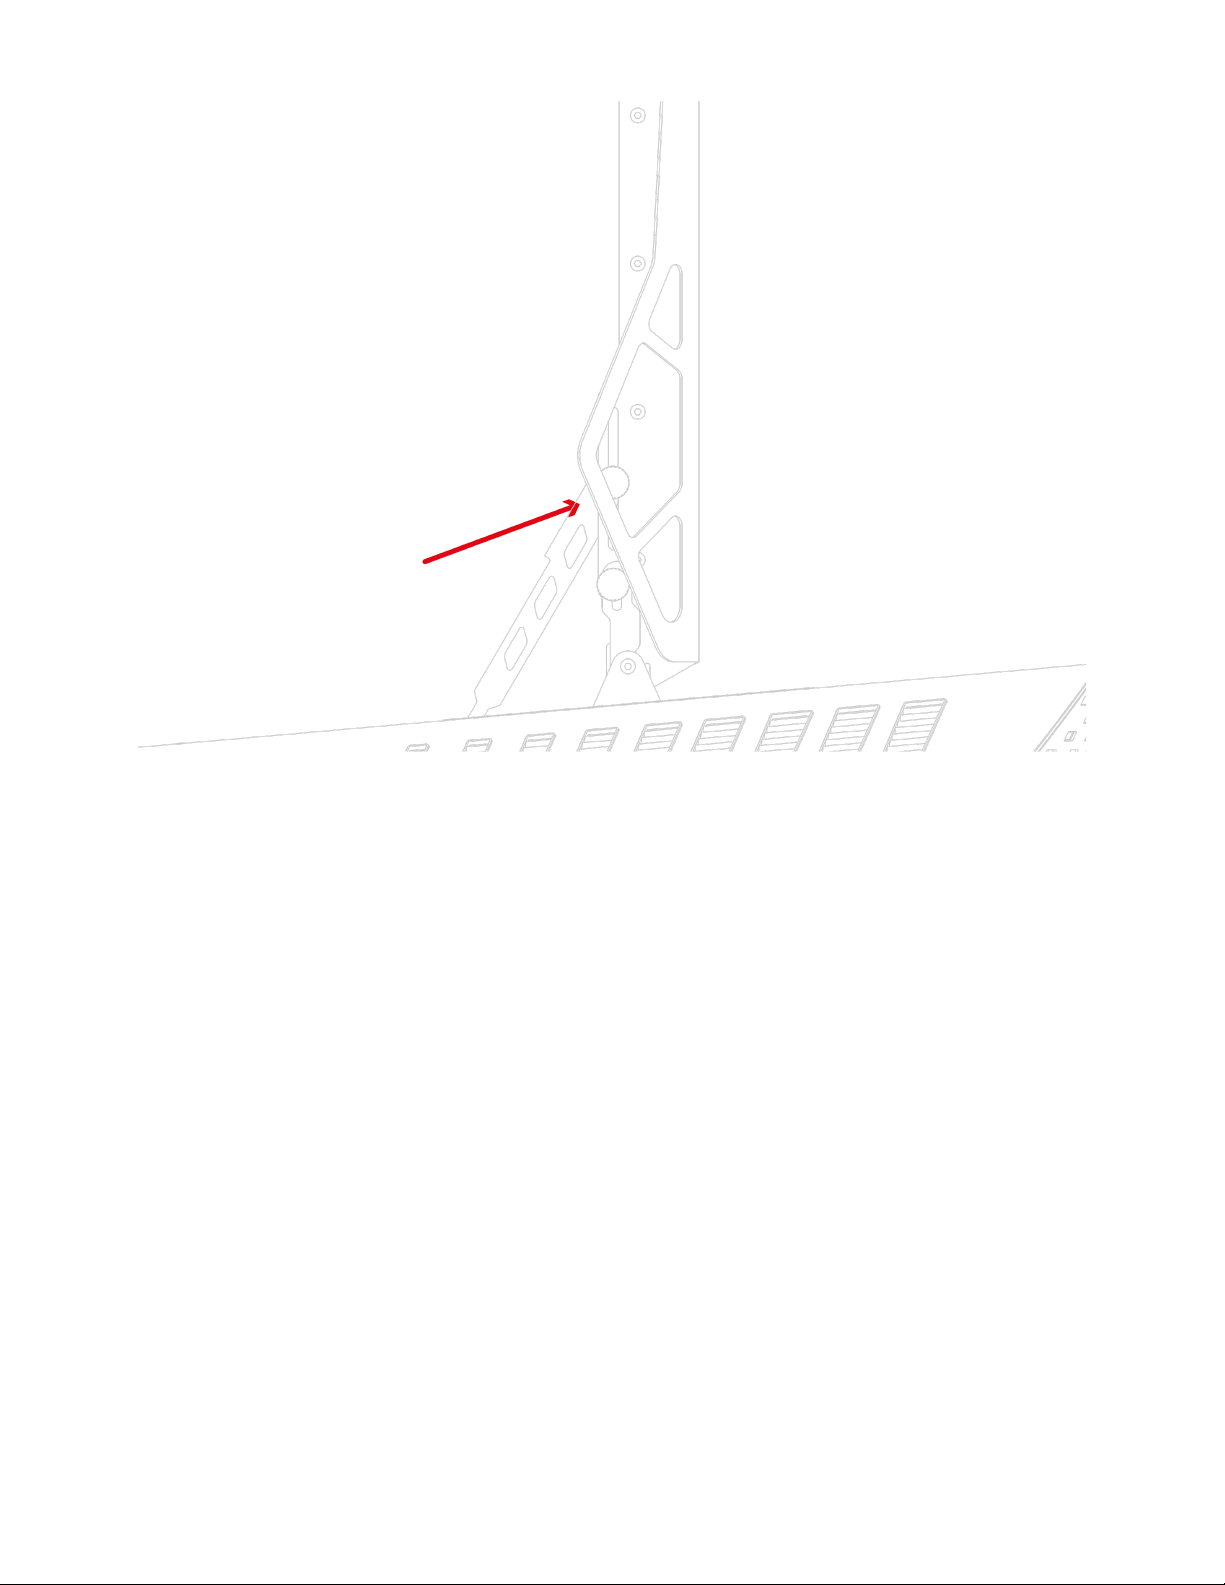
4.Tighten the ceiling plate screws and the tilt regulator knobs
Page 31
12/1/21, 2:03 PM
MKPro User Manual
31/48
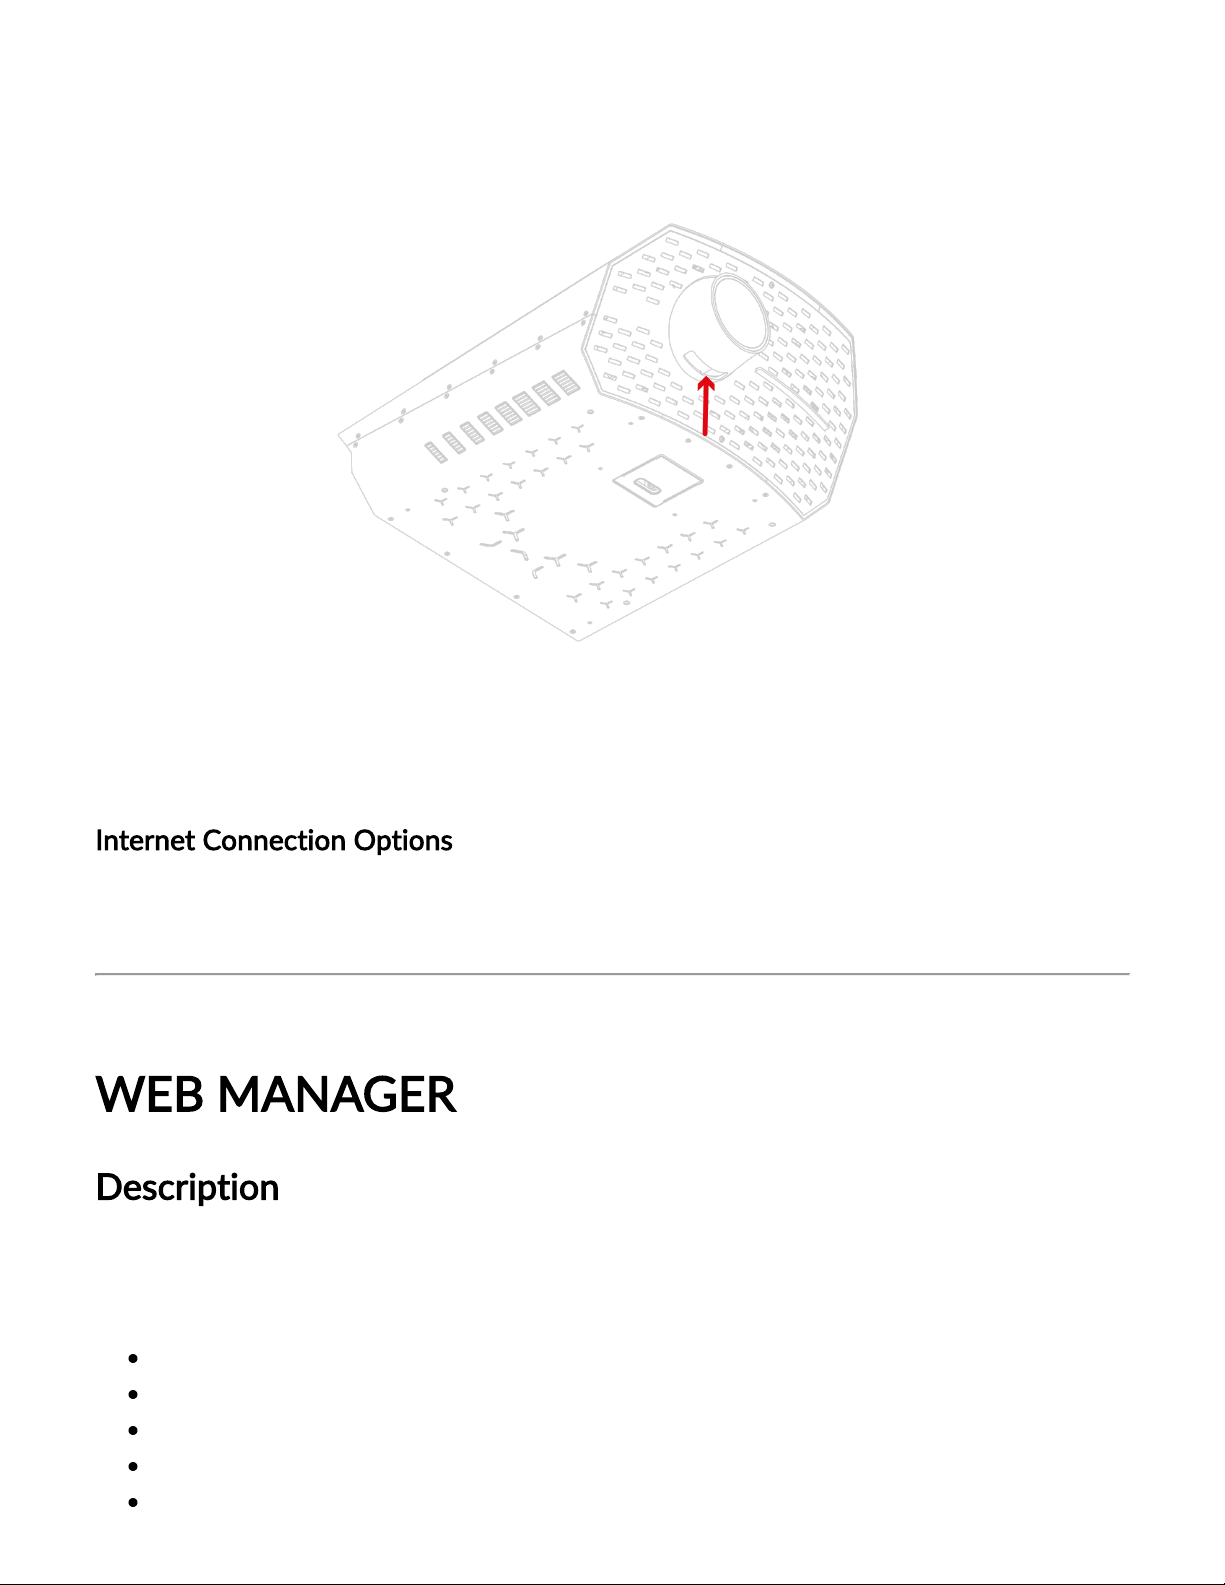
5. Adjust focus
Page 32
12/1/21, 2:03 PM
MKPro User Manual
32/48
Internet Connection Options
Please refer to theInternet Optionsarticle.
WEB MANAGER
Description
The Web Manager is a web-based interface to control the MKProusing any device with access to
a web browser (computer, tablet, smartphone, …):
Playback and navigate through the MKProcontent catalog
Simultaneous multi-user control of the MKPro
Manage system and content updates
Upload and manage user content in various formats
Control the IoT devices installed in the room
Page 33
12/1/21, 2:03 PM
MKPro User Manual
33/48
Connection
MKPro WiFi
The MKProprovides a WiFi network available for all devices:
1. Connect the control device to the MKPro WiFi network:
Network:MK#_Service (Example: MK#33_Service)
Password:MK_Service
2. Open a web browser and enter the following IP in the URL search bar:
192.168.12.1:8080
Local Network
Connection over a local network requires connecting theMKProto a router/modem/repeater via
Ethernet / WAN cable, and knowing the IP of theMKProin that network. TheMKProIP appears
in the “Settings” tab of the Web Manager.
Configuration:
1. Connect the control device to the same network as the MKPro.
2. Open a web browser and enter the MKProIP in the URL search bar, followed by :8080 (ej:
192.168.1.2:8080)
Sections
Advanced
Depending on your network bandwidth, using a local network will allow to upload larger
files in less time.
The network must be free of Firewall or Proxy.
Page 34
12/1/21, 2:03 PM
MKPro User Manual
34/48
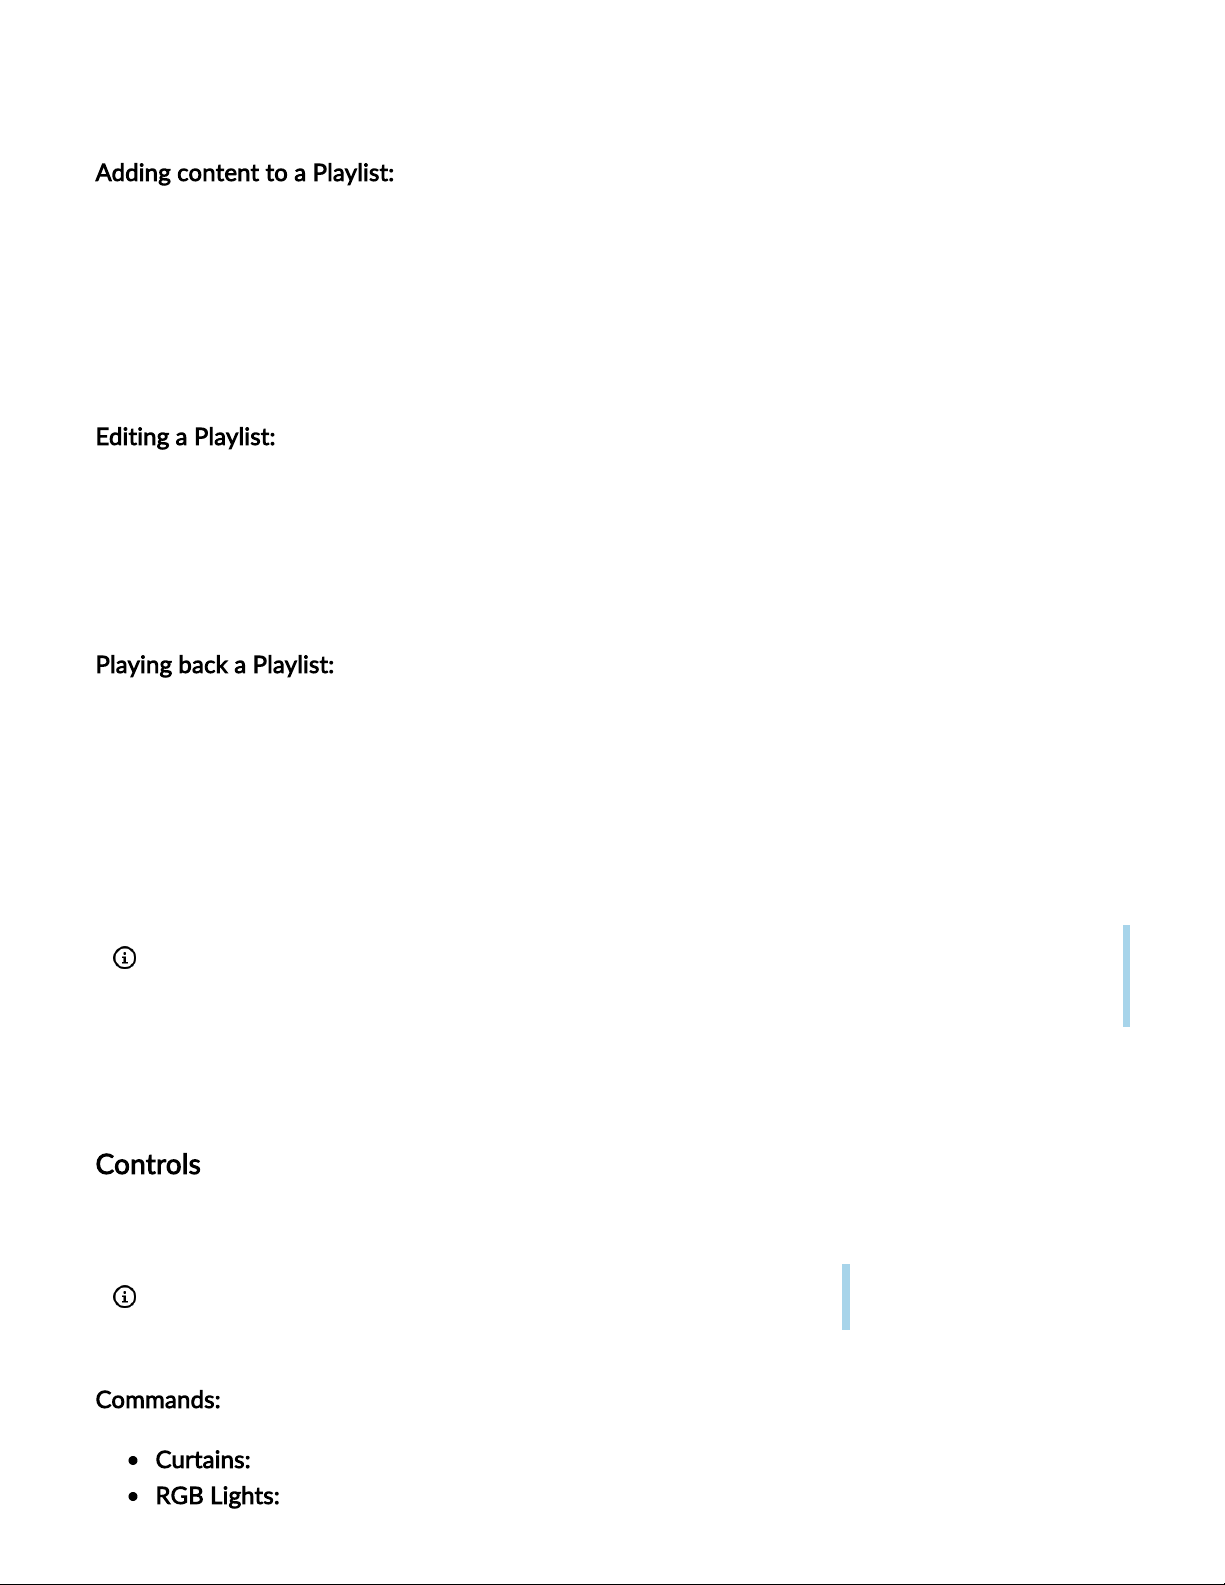
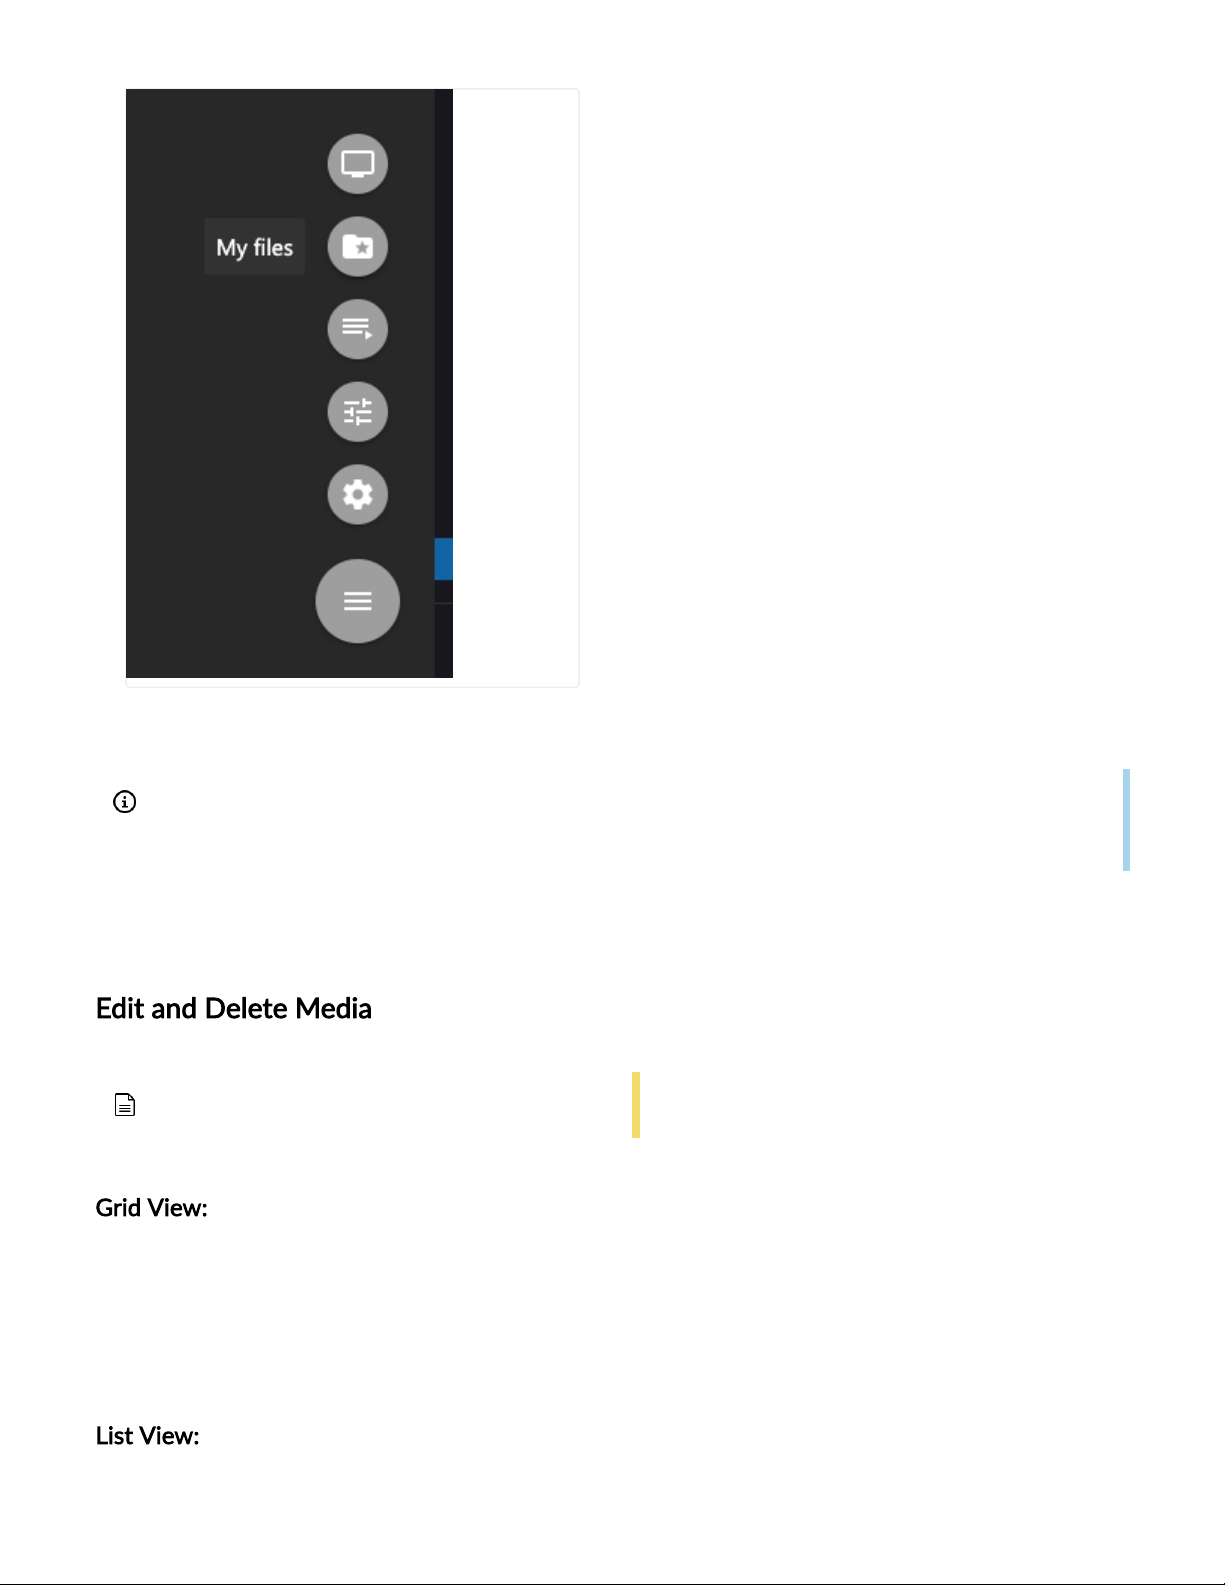
The Web Manager includes 4 sections, available from the floating menu icon on the bottom right
corner.
Contents
Catalog of 360 videos and interactive applications included with the MKPro.
Content is displayed in 2 views:
Grid view:displayed as thumbnails
List view:displayed as a list with title and metadata
In both views, content can be filtered by content type, highlighted content and text search.
My Files
Upload and manage user content.
User content is selected and displayed in the same way as included content.
Playlist
Create a video playlist from preloaded Broomx videos.
If you want to create a playlist in the web manager, it is the same process but you have to go to
the bottom right (we attach a screenshot).
Creating a Playlist:
1. Click “Add Playlist”
Page 35
12/1/21, 2:03 PM
MKPro User Manual
35/48
2. Define a name for the Playlist
Adding content to a Playlist:
1. Navigate to the “Contents” section
2. Locate a content to add to the Playlist
3. Click “Add to Playlist”
4. Select desired Playlist
Editing a Playlist:
1. In the “Playlist” tab, select the Playlist to edit
2. Order elements in the list by dragging the Reorder icon
3. Click “Save Playlist”
Playing back a Playlist:
1. In the “Playlist” tab, select the list for playback
2. Use the “Previous / Next” buttons to jump through list elements
3. Playback loops to start of the playlist upon reaching end of last element.
Controls
Control IoT devices installed in the room.
Commands:
Curtains:Open/Close/Stop the curtains
RGB Lights:Adjust RGB tone and intensity
The Playlists created with the Web Manager are also available for playback using the iOS
App.
For further information regarding IoT devices pleasecontact us.
Page 36
12/1/21, 2:03 PM
MKPro User Manual
36/48
Lights:turn on/off room lights
Settings
Manage and monitor the MKPro general settings
Internet connection monitor:green = connected, red = disconnected.
Thermometers:Indicate temperatures detected by the integrated thermometers.
Refresh Contents:Scan the MKProfor new uploaded content
Shutdown:Shuts down the system. To power on the system, select any content for
playback.
Wake Up:System powers on at a time and content specified by the user.
Autosleep:System enters standby after a specific time without user action (disabled by
default).
WiFi:Scan and connect to a WiFi network
Updates:Scan and install available system and content updates.
Playback & Navigation
The Playback & Navigation window appears when a content is selected for playback on the
MKProApp, or by clicking the [#] icon in the bottom left on the Web Manager. To close the
window, click “close”.
Projection Modes
User content can be displayed in 2 ways depending on their original format:
360 Equirectangular:Image fills the complete Field of View of the MKPro.
Flat:Image is bound to a rectangular window with aspect ratio 16:9.
Backgrounds
Traditional flat content (Flat mode) are displayed within 2 selectable backgrounds:
Screen:Solid black background
Cine:Movie theater simulation
Page 37
12/1/21, 2:03 PM
MKPro User Manual
37/48
iOS APPLICATION
Download and Connection
Download
The MKPro App is compatible with iPhone, iPad, and iPod devices. Please update the Apple
device’s operating system before installing the MKProApp.
Downloadand install the MKPro App, or search the App Store for “Broomx Technologies”.
Connection
1. Power up the MKPro
2. Connect the Apple device to the MKPro WiFi network:
Network: MK#_Service (Example: MK#33_Service)
Password: MK_Service
3. Launch the MKProApp.
Sections
The MKPro App includes 5 sections, available from the lower menu bar:
1. Highlights:Selection of highlighted immersive media and interactive applications.
2. Channels:Catalog of 360 videos by international artists.
3. Apps & Ambients:
Apps:Interactive applications and utilities.
The minimum version to install the APP is 11.0
Page 38
12/1/21, 2:03 PM
MKPro User Manual
38/48
Ambients:Immersive 4D experiences synchronising audiovisual content playback with
installed IoT elements.
4. My Files: User provided content.
5. Controls:General controls for the MKPro.
Controls
Standby:Switch On / Off the MKPro. System remains active in the background, the image
can take up to 60s to display correctly.
Sleep:System enters Standby after a certain time without user action (disabled by default).
Wake up:System powers on at a user-defined time and content.
Refresh:Refresh the MKPro App after changes in settings or content update / upload.
To refresh individual windows, slide window downwards.
To refresh the entire application, quit and restart.
Playback & Navigation
The Playback & Navigation window appears when a content is selected for playback:
Use the touchpad on the upper part of the screen to navigate in 360 videos or images.
Use the cursor on the right to Zoom in / out. Useful for high resolution images.
Use the transport functions on the lower part of the screen for traditional video playback.
To exit the Playback and Navigation window, click on the arrow in the top left corner.
USER CONTENT
Page 39
12/1/21, 2:03 PM
MKPro User Manual
39/48
User provided content can be uploaded over local network using the Web Manager, or using a
USB drive.
Media Specifications
360 Video:
Format: .mp4
Codec: H264
Resolution: 3840x2160p (4K)
Framerate: 30fps
Geometric projection: equirectangular monoscopic
Bitrate: 16-30 Mbs
Flat Video:
Format: .mp4
Codec: H264
Resolution: 1920x1080p (Full HD) / 1280x720p (HD)
Framerate: 30fps
Bitrate: 16-30 Mbs.
360 Image:
Format: .jpg / .png
Resolution: >3840x2160p (4K, 8K, 12K, 24K)
Geometric projection: equirectangular monoscopic
Web Manager
We have a section in our user manual that explains how to connect to the web manager.GO TO
SECTION
Upload Media
1. In the My Files tab(is at the bottom right of the tab), select the type of content to upload.
2. Click “File” to select a file, or drag and drop from your device.
Page 40
12/1/21, 2:03 PM
MKPro User Manual
40/48
My files tab
Edit and Delete Media
Grid View:
1. Select content to edit
2. Click +INFO
3. Click EDIT to rename the file, and DELETE to delete it
List View:
1. Select content to edit
Files uploaded through the Web Manager remain stored in the MKPro until they are
deleted by the user.
Only user content can be edited or deleted.
Page 41
12/1/21, 2:03 PM
MKPro User Manual
41/48
2. Click EDIT to rename the file, and DELETE to delete it
Unity Projects
The MKPro can display interactive applications developed with the Unity environment using
theBroomx Unity Package.
Video Live Streaming
The MKPro can receive a live 360° video stream inRTSP protocol.
Slideshow
Create an automated slideshow from user videos and images.
The videos and images can be 360 or flat, and are uploaded and stored with the Slideshow.
Creating a Slideshow:
1. Select “Create Slideshow”
2. Define a name for the Slideshow
3. Define a display time for still images
4. Drag and drop media from the external device
5. Order elements in the list by dragging the Reorder icon
6. Click “Save Slideshow”
Playing a Slideshow:
1. In the My Files tab, select a Slideshow for playback
2. Use the “Next / Previous” buttons to navigate among elements in the list.
3. When the end of the last element is reached, playback loops back to the start of the list.
Videos will play according to their original duration
Slideshows created with the Web Manager can be played back using the MK360 iOS
App.
Page 42
12/1/21, 2:03 PM
MKPro User Manual
42/48
USB Drive
1. Connect the USB Drive to the “USB In” port on the MKProrear panel.
2. In the Web Manager or the iOS App, go to the “My Files” tab.
3. Select content for playback.
4. Contents are available until the USB Drive is disconnected.
Content can be copied from the USB Drive to theMKProlocal storage using the Web Manager.
This is faster than uploading over local network:
1. With the USB Drive connected, navigate to the “My Files” tab in the Web Manager.
2. Select the content to be uploaded.
3. Select “Edit”.
4. Select “Copy to local files”.
MAINTENANCE
General Maintenance
Check that the mount is secure and safe to use at regular intervals (at least every three months).
Please visit www.broomx.com/support if you have any questions.
We reserve the right to amend or undertake any necessary changes without prior notice.
All bolts and screws must be used at the designated points as per installation instructions
to prevent damage to the projector unit, or injury.
DO NOT install near an air conditioner or where there is excessive dust and smoke.
The USB Drive must have a maximum capacity of 32 Gb, be in ExFat format, and contain
only the files to be played back through the MKPro.
Page 43
12/1/21, 2:03 PM
MKPro User Manual
43/48
Assembling without the correct use of bolts and screws at designated points may result in
injury and damage to properties or the unit collapsing from its installed position. Should a
malfunction occur disconnect the power from the main socket and surround the area with
ropes to prevent others from getting near it.
Check and ensure the ceiling where you install can support the weight or the projector and
ceiling mounting. All Ceiling Mounting Brackets are to be firmly secured so the unit will not
drop off its installed position.
Steps should be taken to ensure the ceiling and installed unit can withstand external forces
like earthquakes, vibrations, etc.
Do not remove any bolts and screws from the Ceiling Mounting Brackets or do any changes
to the Ceiling Mounting Brackets.
Do not install near an air-conditioner. Do not install at the place where there are excessive
dust and smoke as fire could arise from these sources.
Keep the room well ventilated to prevent room temperature from rising and possibilities
resulting in fire.
Do not install in locations where room temperature and humidity are excessively high to
prevent fire. To prevent fire, avoid contact with water.
Do not apply unnecessary stress or load on the installed unit.
Lamp Replacement
HEALTH & SAFETY
Before using the MKPro, read and follow all installation and operating instructions provided with
the MKPro.
Your MKProis not designed to be used with an unauthorized device, accessory and / or software.
The use of an unauthorized device, accessory and / or software may result in injury to you or
third parties, cause malfunctions, or cause damage to your system and related services.
To make the replacement of the lamp please contact our broomx support.
Page 44

12/1/21, 2:03 PM
MKPro User Manual
44/48
General precautions
To reduce the risk of damage caused by the device falling, you must always follow the assembly
instructions (there are ground fixing accessories) you must always follow these instructions and
take these precautions while using the MKPro:
Avoid performing very dynamic or uncontrolled activities close to the MKPro. Use only in a
safe environment.
Remain seated or lying down unless the content experience requires you to get up.
Do not look directly into the light source (projection lens).
Do not look directly into the air exhaust vent. If the lamp bursts, small pieces of scattered
glass and released gas could cause injury. If the glass comes in contact with the eyes or
mouth, contact a local doctor immediately.
During projection, do not place your face or hands near the air vent, or objects that can be
damaged or deformed by heat. The hot air emitted by the exhaust ventilation can cause
burns, deformations or accidents.
Interference with medical devices
Both the MKPro and its control device contain magnets and components that emit radio waves
that could affect the operation of nearby electronic devices, including pacemakers, headphones,
or defibrillators. If you have a pacemaker or other implanted medical device, do not use the
MKPro and its controller without first consulting your doctor or the manufacturer of your
medical device. Maintain a safe distance between these devices and your medical devices, and
discontinue use if you observe persistent interference with your medical device.
Electric Shock
To reduce the risk of electric shock:
• Do not alter or open any of the supplied components.
• Do not use the product if any cable is damaged or any wire is exposed.
Damaged or Broken Device
Do not use the device if any part is broken or damaged.
Page 45

12/1/21, 2:03 PM
MKPro User Manual
45/48
Do not attempt to repair any part of any of your devices yourself. Repairs should only be
done by an authorized service.
Regulatory Information
This product has been tested and complies with worldwide applicable regulations, including
directives 2014/35 UE (Electric Safety. Low Voltage Directive. LVD 2014/30 / UE (EMC);
harmonized standard UNE-EN-ISO 12100 : 2012 - Safety in Machines, UNE-EN-ISO 12100:
2012 standard. It also complies with all the essential health and safety requirements set out in
Annex I of Royal Decree 1435/1992, or Royal Decree 1644/2008 for machines manufactured as
of December 2009, as the minimum health and safety provisions set out in Annexes I and II of
Royal Decree 1215/1997
Hereby, Broomx Technologies declares that this product meets the essential requirements and
other relevant provisions of the Directive 2014/53 / EU To access the complete declaration of
conformity visit the webwww.broomx.com
This device has the CE mark, complying with the minimum legal and technical requirements
regarding the safety of the Member States of the European Union.
WARRANTY
Limited Consumer Warranty
Whose Warranty is this?
This limited consumer warranty (the "Warranty") has been issued by Broomx Technologies
("Broomx", "we" or "our").
Who is this Guarantee for?
Broomx has issued this Warranty to you, as a consumer who has purchased from Broomx, or
from an authorized seller, a new product covered by warranty (“you”). This Warranty cannot be
assigned or transferred to any buyer or subsequent user and is not available for products that are
purchased already used or from a source other than Broomx or an authorized seller.
What does this Warranty do?
Page 46

12/1/21, 2:03 PM
MKPro User Manual
46/48
This Warranty gives you certain legal rights, regardless of other rights that you may have, which
vary from state to state and from country to country. This Warranty does not affect any of the
rights that you have recognized under the laws of your jurisdiction in relation to the sale of
consumer goods (including, without limitation, national laws that implement the European
Directive 1999/44 / EC).
How long does the coverage last?
This Limited Warranty covers one (1) year from the date of purchase or shipment of the Product,
whichever is later (the "Warranty Period"). However, if you purchased the Product within the
European Union, the Warranty Period will be two (2) years.
What will Broomx do if there is a problem with the product?
If your Product is defective or malfunctions, we will repair or replace such Product or update
software or support so that the Product behaves substantially in accordance with the Guaranteed
Functionality. The criteria adopted to resolve these matters will be chosen solely by us. If we
decide that a product should be replaced, the replacement may be for a new or remanufactured
Product. If we decide, in our sole discretion, that none of the means referred to is reasonably
adequate for the defect or malfunction, then we may refund the price you paid for the purchase
of the Product.
How can I get assistance?
First, by informing us of the problem. If you have a problem with your Product, please visit us
atwww.broomx.comor send an email to [email protected]for useful assistance and contact
information and to submit a claim form and obtain warranty service.
If it is necessary to send your Product to receive assistance, you will be responsible for the
shipping costs, attaching the purchase receipt with the Product.
By shipping the Product, you agree to transfer possession of the Product to Broomx. Upon
receipt of the product, we will assess whether there is a defect or malfunction that is covered by
this Warranty. If we find a defect or malfunction covered by this Warranty, we will proceed to
repair or replace the Product to provide it with the Guaranteed Functionality and we will send
you the repaired or replaced Product assuming only the shipping costs. We may not return the
original Product to you. We cannot guarantee that we will be able to repair the Product without
risk or loss of content or files; Any replacement of Product will not contain the files saved in the
original Product. Any repair or replacement of Product will continue to be covered by this
Warranty during the remaining Warranty Period of the original Product or for ninety (90) days
after receipt of the replaced or repaired Product, whichever is longer.
What does this Warranty not cover?
Page 47

12/1/21, 2:03 PM
MKPro User Manual
47/48
This Warranty is limited and does not apply to: (i) wear and tear, (ii) damage caused by improper
use, accident (for example, accidental blow, exposure to liquids, food or other contaminants, etc.),
negligence, abuse, Improper or unauthorized alteration, repair or modification, manipulation or
use with inappropriate equipment, devices, software, services or other article (s) of unauthorized
third parties; (iii) use not in accordance with the Product documentation; (iv) commercial use; (v)
use in connection with a trade, business or profession; (vi) used or resold products; (vii) Products
purchased from sources other than Broomx or Broomx authorized vendors (including
unauthorized online auctions), (viii) Products other than Broomx; (ix) use of the Product in
violation of any law, regulation or standard in force in the place where the Product is used; or (x)
characteristics or behavioral parameters that pertain to any software or assistance beyond the
Guaranteed Product Functionality.
This Warranty does not include a specific warranty that the product will be free from errors or a
specific warranty regarding uptime or continued availability, security features of software data or
online accounts, or the uninterrupted or error-free operation of any software, firmware or online
site. This limited warranty is void if the Product is returned with labels removed, damaged or
tampered with or with any alteration (including the unauthorized removal of any component or
outer covering).
This Warranty does not cover loss of files; You are responsible for regularly making copies of your
data, electronically or physically, if you wish to keep them. Any damage or costs related to data
recovery, deletion or installation are not recoverable under this Warranty.
In this Warranty, Broomx does not extend any implied or legal warranties, conditions or
statements regarding the Product or any related software or online assistance.
UNDER THIS LIMITED WARRANTY, BROOMX ASSUMES NO LIABILITY FOR ANY SPECIFIC,
INDIRECT, INCIDENTAL, CONSEQUENTIAL DAMAGES, OR CONSEQUENTIAL DAMAGES, OF
ANY KIND, PURSUING (BUT NOT EXCLUSIVELY) INJURY, PAYMENT OF LOSS, LOSS AND
LOSS LOSS OF USE OF THE PRODUCT OR ANY ASSOCIATED EQUIPMENT, COST OF ANY
ITEM REPLACEMENT OR EQUIPMENT REPLACEMENT, OR LOSS OF USE DURING THE
PERIOD IN WHICH THE PRODUCT IS BEING REPLACED OR REPAIRED. IN ADDITION, IN NO
EVENT SHALL BROOMX BE LIABLE TO YOU FOR ANY SPECIFIC, INDIRECT, INCIDENTAL,
DAMAGES, OR CONSEQUENTIAL DAMAGES OF ANY KIND, EVEN IF BROOMX HAS BEEN
ADVISED OF ANY SUCH DAMAGES. CLAIM ARISING FROM OR RELATED TO THIS
WARRANTY CERTIFICATE, REGARDLESS OF THE FORM OF ACTION, WHETHER UNDER
CONTRACT, EXTRA-CONTRACTUAL LIABILITY (INCLUDING NEGLIGENCE), LIABILITY FOR
ANY DEFECTIVE PRODUCT OR ANY OTHER JURISDICTION.
IN NO EVENT SHALL BROOMX'S LIABILITY FOR ANY CLAIM ARISING OUT OF OR IN
CONNECTION WITH THIS WARRANTY CERTIFICATE EXCEED THE PRICE PAID FOR THE
PURCHASE OF THE PRODUCT, REGARDLESS OF ANY CONTRACT, LIABILITY ), OBJECTIVE
Page 48

12/1/21, 2:03 PM
MKPro User Manual
48/48
LIABILITY FOR A DEFECTIVE PRODUCT OR ANY OTHER CAUSE OR LEGAL OR EQUITY
THEORY.
https://help.broomx.com/portal/en/kb/articles/mkpro-user-manual#OVERVIEW
 Loading...