

Page 1

MK360
Immersive VR projector
User manual
Page 2

MK360
Welcome
Thank you for acquiring the MK360, the rst immersive projection system to
enjoy 360° media and interactive Virtual Reality applications in real spaces.
Please read the following manual carefully before installing and using the
MK360. This manual is subject to modication, please refer to this online
copy to stay updated. For further information please contact: client@
broomx.com.
The Broomx Technologies team.
2
Page 3

MK360
Table of contents
Welcome _________________________________________________ 2
Overview _____________________________________________________ 4
Description ______________________________________________ 4
Technical specications __________________________________ 5
Connections ______________________________________________ 6
Identication _____________________________________________ 7
Installation ____________________________________________________ 8
Content of package ______________________________________ 8
Projection space _________________________________________ 9
Setup ___________________________________________________ 10
Power & conguration ____________________________________11
Wi dongle _____________________________________________ 14
LAN connection _________________________________________ 15
Web Manager ________________________________________________ 16
Description _____________________________________________ 16
Connection _____________________________________________ 17
Sections _________________________________________________ 18
Playback & navigation ___________________________________ 23
iOS application _______________________________________________24
Download & connection _________________________________24
Sections ________________________________________________ 25
Controls _________________________________________________26
Playback & navigation ___________________________________27
User content _________________________________________________28
Media specications _____________________________________28
Web Manager ___________________________________________ 29
USB drive ________________________________________________ 31
Health & safety ______________________________________________ 32
Warranty _____________________________________________________36
3
Page 4
MK360
Overview
Description
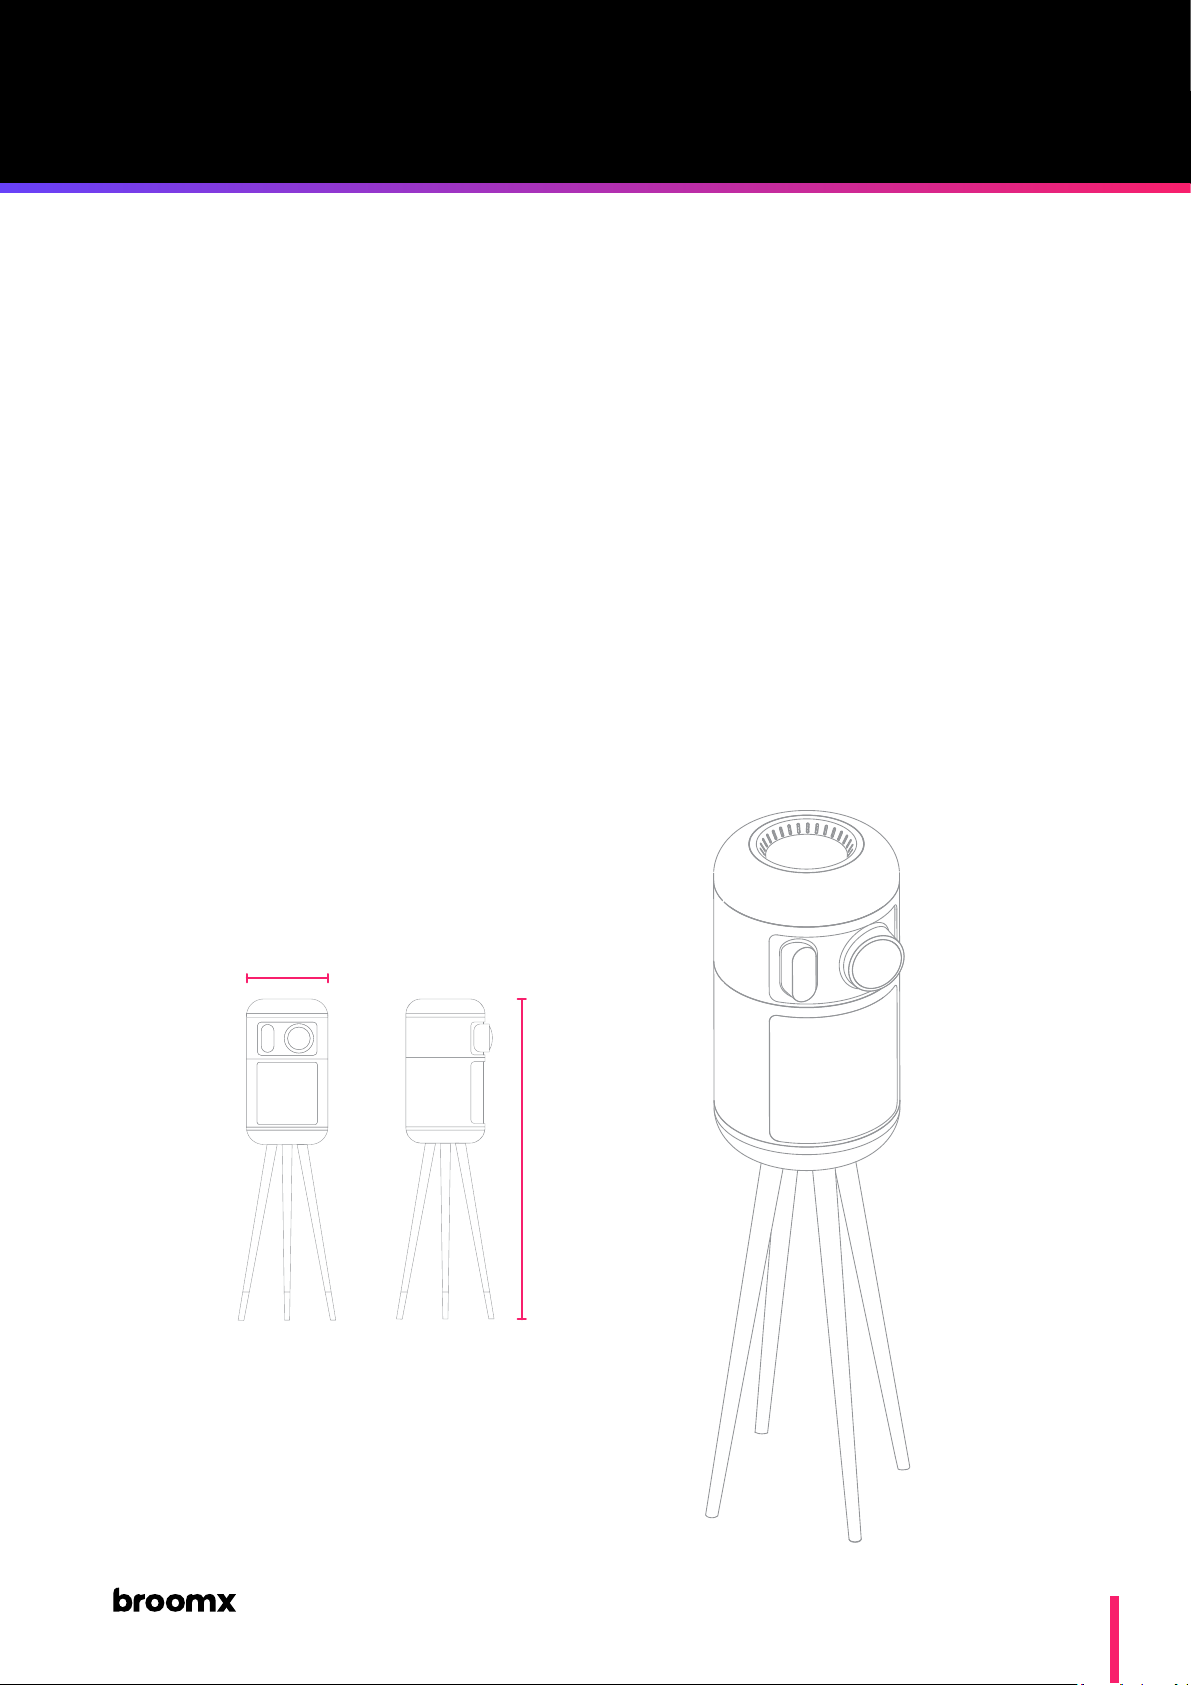
The MK360 is an immersive projection system to enjoy 360 media and
interactive Virtual Reality applications in real spaces, socially and headset
free.
It is compact, portable and easy to use. It includes a projection module,
CPU, GPU, an audio speaker, internet connection and IoT communication.
It is controlled using an iOS application or a cross-platform Web Manager,
enabling users to display and navigate through an extensive catalog of
included content, as well as upload and manage their personal content.
For further information, please visit: www.broomx.com
42cm Ø
Weight:
32Kg
168cm
Front view Side View
Isometric view
4
Page 5

Overview
Technical Specications
General
MK360
Power consumption
Size
Weight
Size with ight case
Weight with ight case
Projector
Technology
Resolution
Light output
Color Depth
Contrast ratio
Field of View
Lamp
286W
180 cm (height) x 42 cm (diam)
32 Kg
100x55x55 cm
57 Kg
3LCD
Full HD 1080p, 1920x1080p, 16:9
2500 Lumens
1.073 billion colors
60,000:1
Horizontal: 185° / Vertical: 90°
UHE, 200W, life 4500h, life 7500h
(eco mode)
Contrast ratio
Lens Shift
Focus
Video Processing
Audio
Maximum SPL
Output power (RMS)
Storage
Disk
60.000 : 1
Vertical
Manual
10Bits
101 dB
50W (25W + 25W)
500 GB*
* Total disk space is shared between factory
system and content, and user content.
5
Page 6
Overview
Connections
MK360
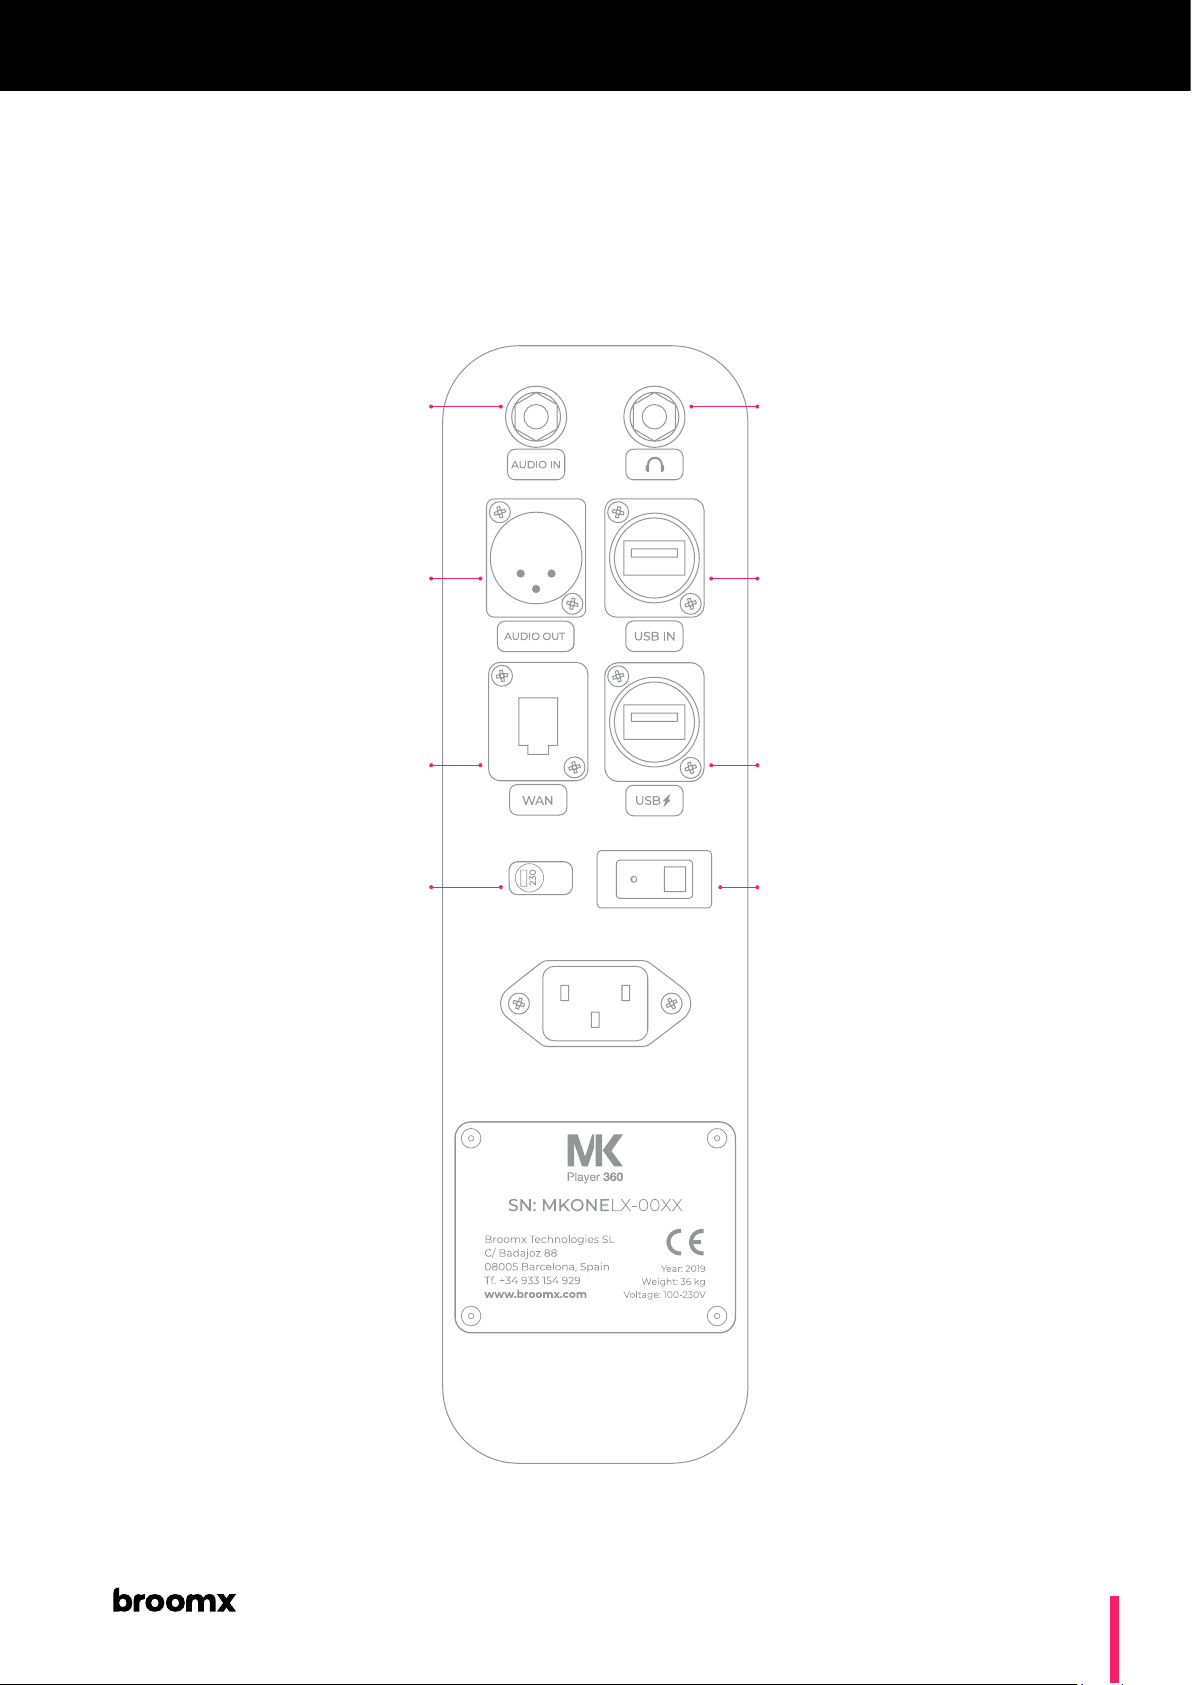
Audio In
Input connection for external audio
source (PC, tablet, smartphone, …).
Signal is mixed with system sound.
Audio Out
Output connection to external audio
system. Internal speaker isn’t muted.
Output is the result of system audio +
“Audio In”.
WAN
Internet input connection. USB 3.0 connection for charging
Voltage Selector
Select voltage (110-220V) according to
region.
Headphones
Audio output connection to
headphones. Internal speaker is muted.
USB In
Input connection for USB drive.
USB
external devices.
On / Off Switch
Power On / Off the MK360
6
Page 7
Overview
MK360
Identication
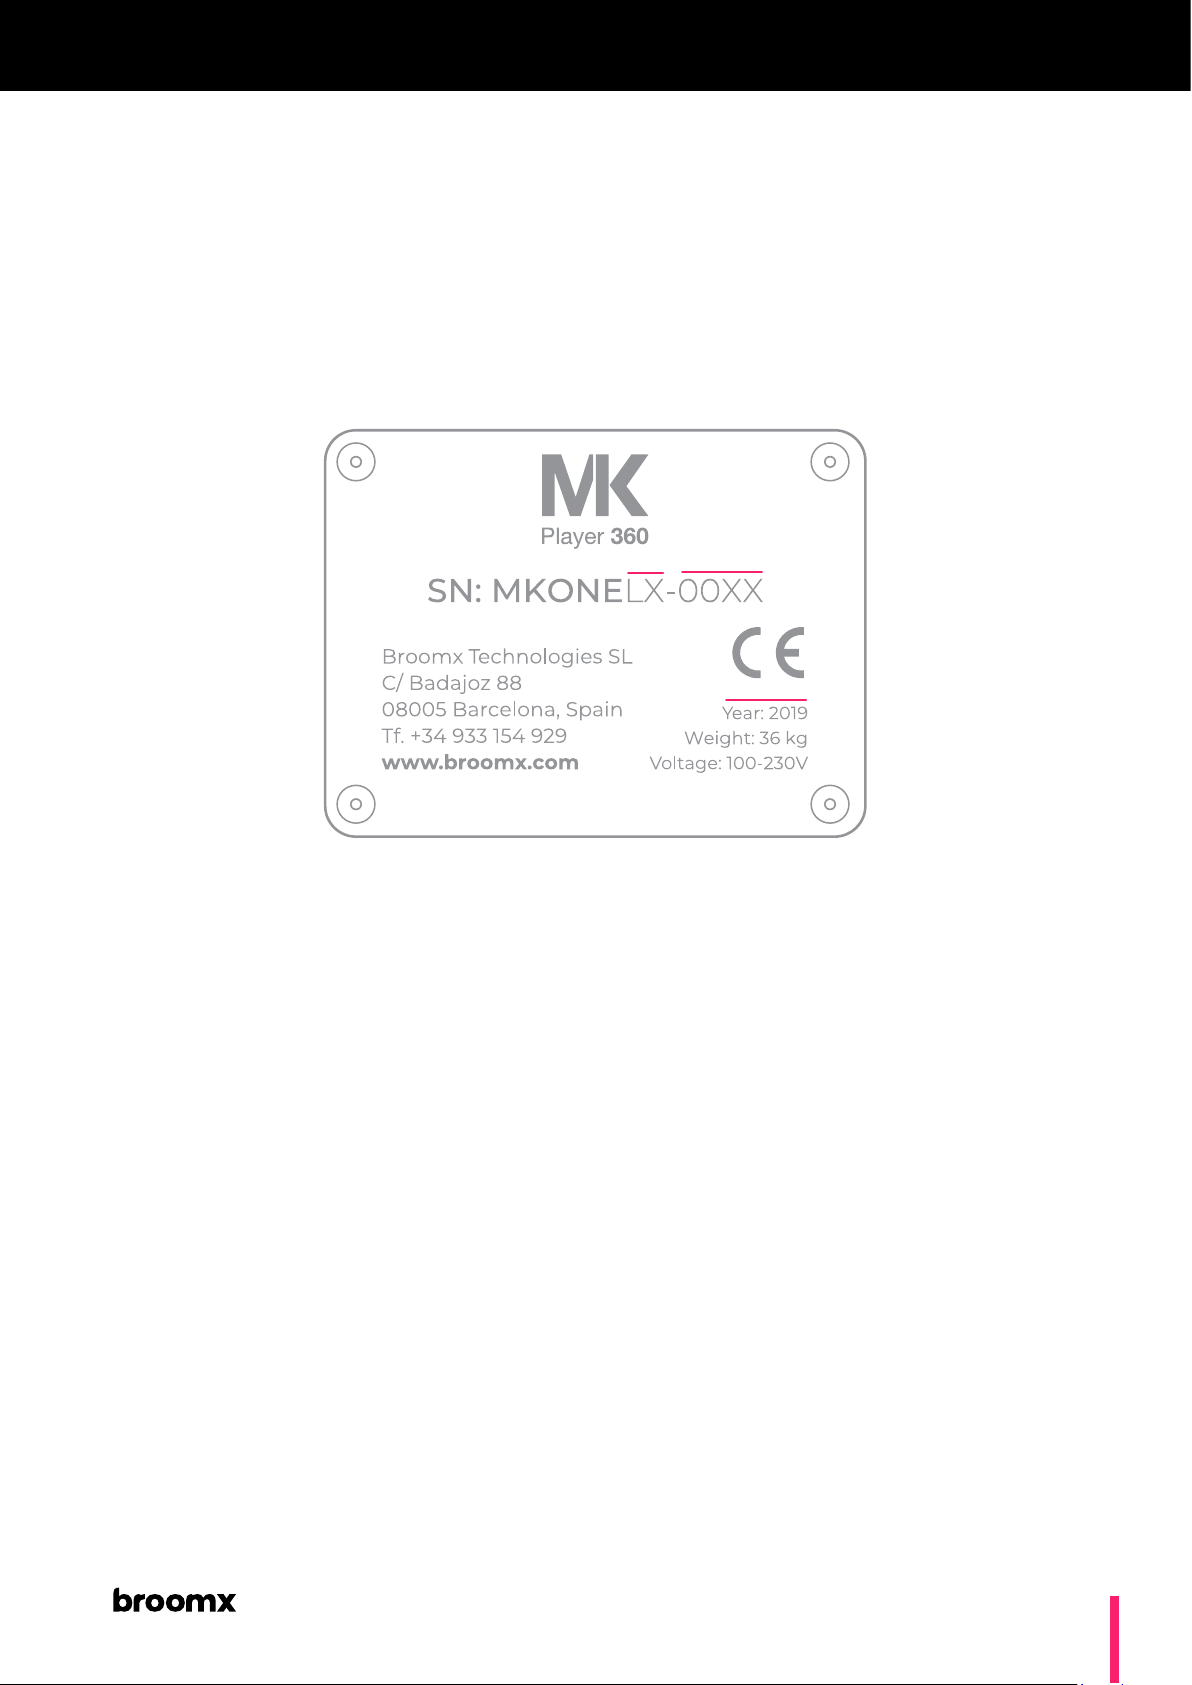
The identication plate is located on the rear panel of the MK360. It contains
useful information for technical support operations.
1 Batch
1
2 Identication number 3 Production year
2
3
7
Page 8
Installation
Content of package
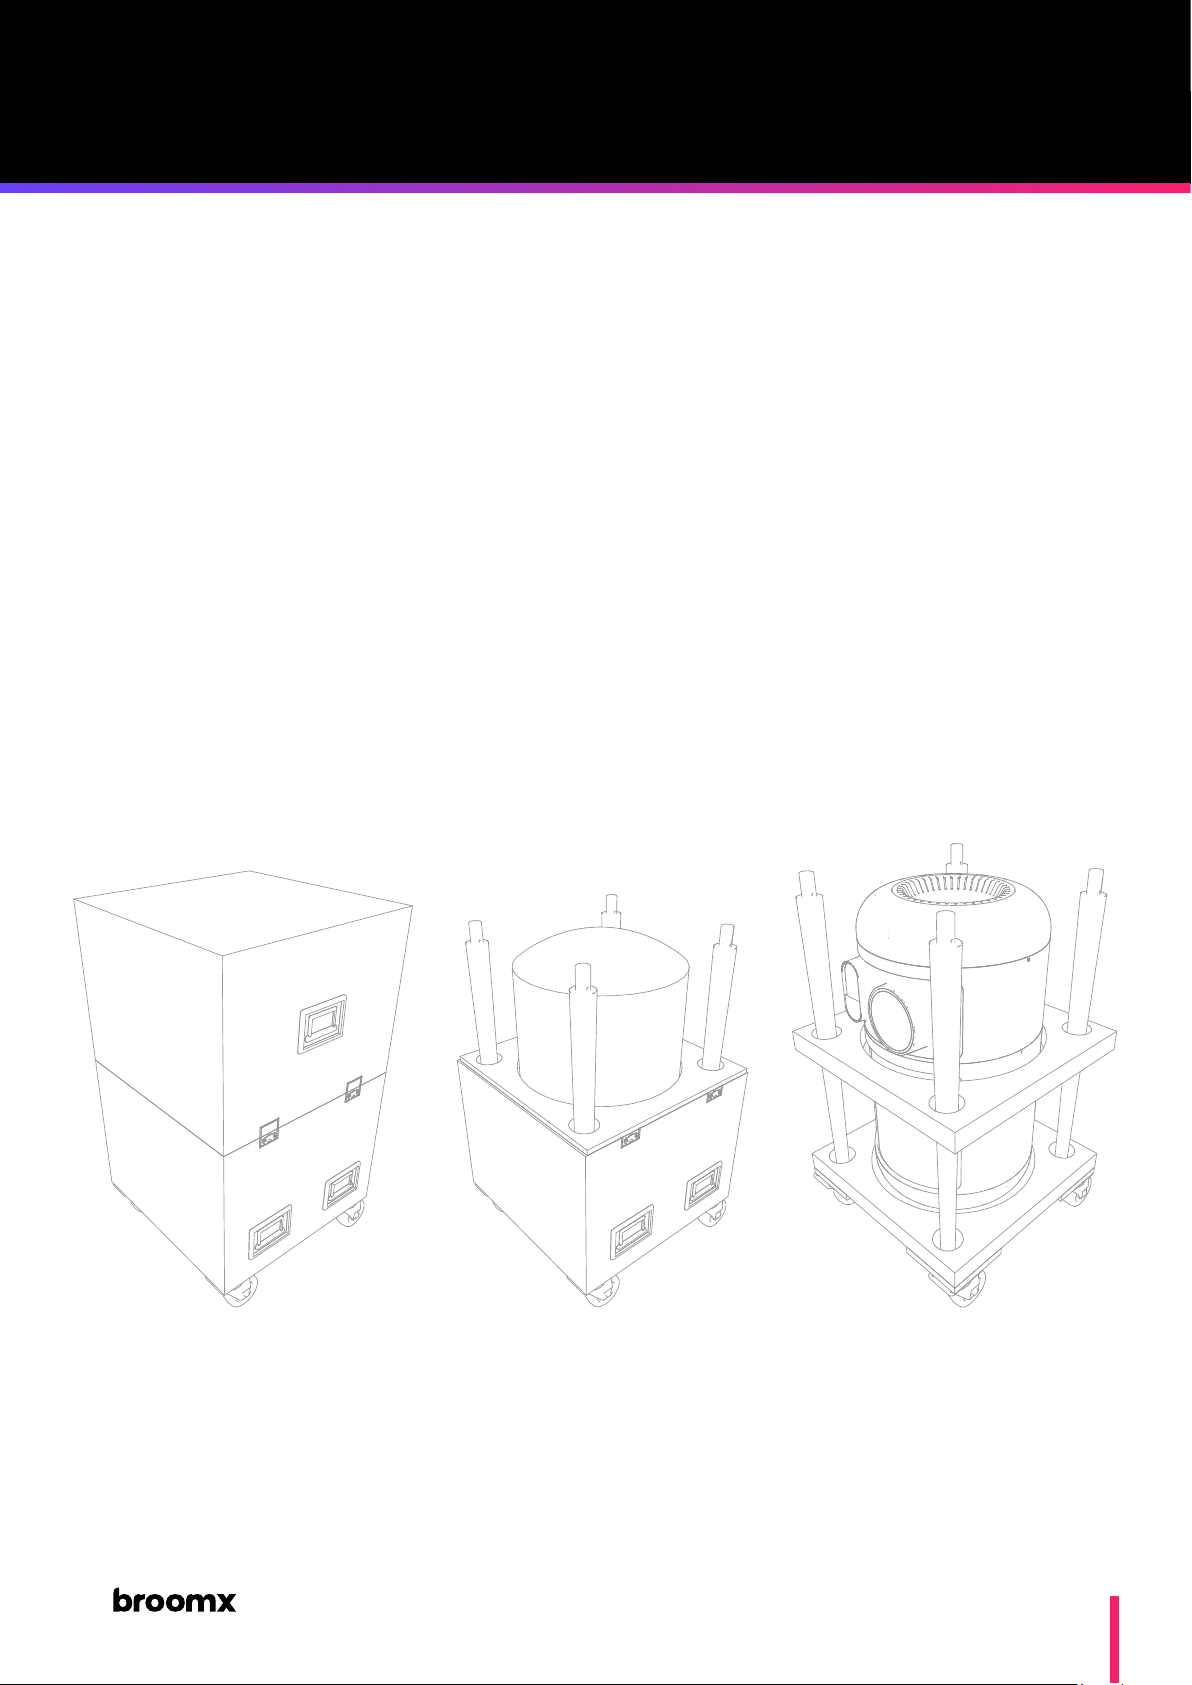
1 MK360
4 Legs
1 Power cable
1 Ethernet cable
1 Fabric sleeve
4 itting washers
1
2mm Allen wrench
1 ightcase*
MK360
*Optional accessory
8
Page 9
Installation
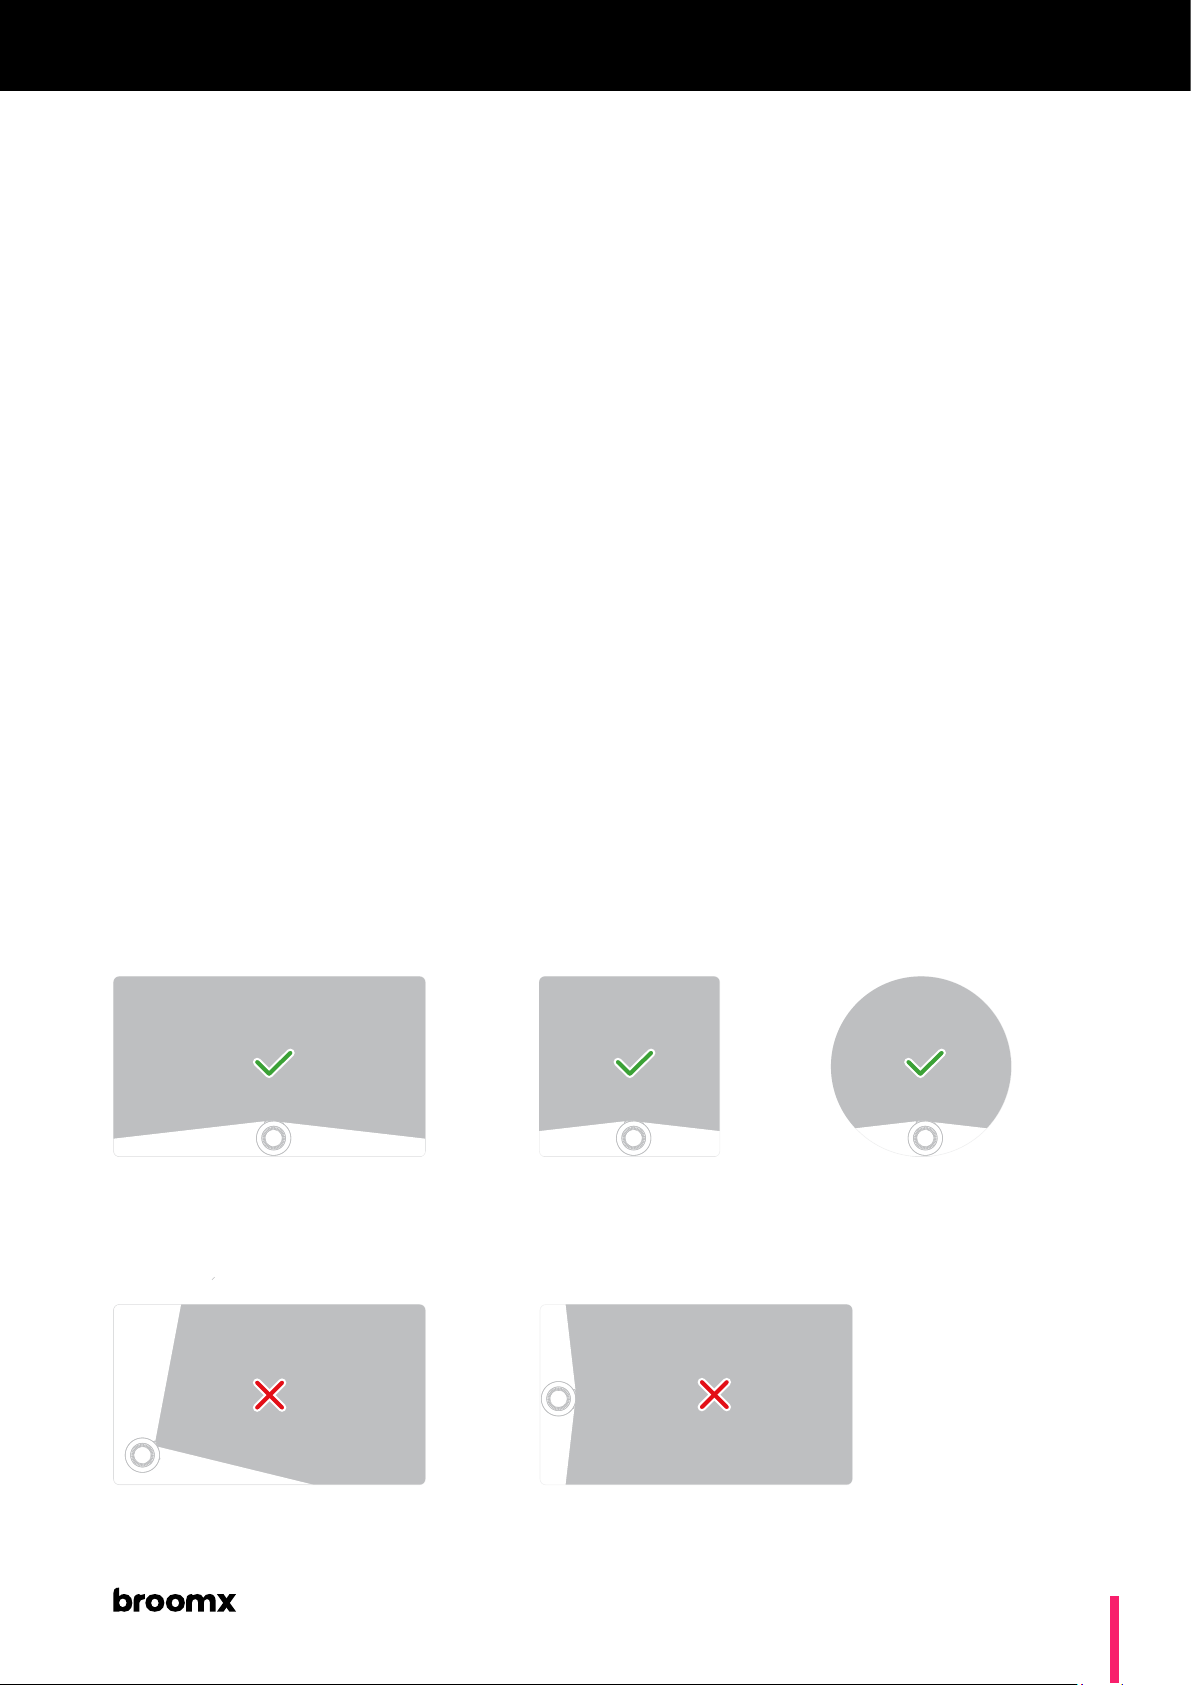
Projection Space
MK360
InteriorType of space
10-70 m2Surface
2.5 - 5 mCeiling height
Complete darknessLighting
Projection surface
Placement
Optimal placement of viewer
Correct placements
Planar or curved
Smooth and even surface
White or clear color
Reduced furnishing
Do not project over windows, glass or
reecting materials
Flat and stable, 55 cm2Floor
Directly opposite and perpendicular to
main projection wall.
2,5 - 7 m Distance to main projection wall
Seated under the MK360, facing main
projection wall.
Rectangular spaces Circular spaces & domesSquare spaces
Incorrect placements
Diagonal projection in
rectangular spaces
Length-oriented projection in
rectangular spaces
9
Page 10
Installation
MK360
Setup
Important
The setup process requires 2 persons.
Unpacking*
*The MK360 can be delivered in a wooden transport case, or an aluminum Flight Case
(with additional cost).
1 Remove the top panel of the ightcase or transport case.
2 Remove the MK360 using the fabric sleeve handles.
3 Remove the 4 legs.
4 Remove the fabric sleeve from the MK360 by sliding down.
Mounting the legs
1 Place the MK360 horizontally on a soft surface.
2 Screw together top and bottom sections of each leg
3 Insert the legs into the corresponding slots on the base of the MK360,
push until hearing a click.
Note
The MK360 package includes 4 tting washers, which can be used to regulate the
height of each leg to compensate for oor imperfections.
Lifting to position
Make sure the legs are properly inserted and secured, then lift the MK360
to its upright position and place at the desired location.
Note
An extra Floor Fixation is available from our catalog at broomx.com
10
Page 11
Installation
MK360
Power & Conguration
Important
Select the appropriate voltage for your region using the voltage selector on the
rear panel BEFORE connecting and powering up.
Powering up
1 Connect the power cord* from the power connection on the rear panel of
the MK360 to the power source.*.
2 Press the On / Off Switch (orange LED) to power up.
*The provided cable is of Type F (EU).
Recommendation
Use the iOS App or the Web Manager to turn on/off the MK360. Use the physical
switch only during transport or maintenance.
Focus & Zoom
The MK360 comes precongured to t a wide range of spatial setups. In
most cases it will not be necessary to modify the zoom and focus. This
process requires removing the hood from the MK360. Do not try to remove
parts protected by the security labels.
1 Remove the screws holding the hood to the body, using the provided
Allen.
2 Lift the hood upwards and remove.
3 Slide the small acrylic plate and locate the Focus and Zoom wheels on
the projection module.
4 Select a content for playback from the control interface.
5 Set Zoom to maximum aperture (widest image) and adjust the Focus
until image is sharp.
6 Adjust the Lens Shift until the bottom of the projected image touches the
oor.
11
Page 12
Installation
MK360
Calibration
Note
When controlling the MK360 with the iOS App, the Calibration function is disabled
by default to avoid modication by users in shared units. Calibration function can
be enabled from the Apple device Settings > Apps > MK360 Apps.
360 Image Calibration
1 On the control interface (iOS App o Web Manager), navigate to “Settings”
tab.
2 Select “Calibration”: a calibration grid appears
3 Position the center of the grid (red lines) at the desired position using the
touchpad.
4 Select any content for playback to exit calibration and save settings.
Flat Image Calibration
1 Click the Flat Image icon.
2 Adjust the desired window size and position using the touchpad.
3 Select any content for playback to exit calibration and save settings.
12
Page 13
Installation
MK360
Mesh Warp
The Mesh Warp function allows to:
- Correct the geometric deformation induced by the projection space.
- Restrict the area of the displayed image.
- Restrict display from a specic area (inverted mask).
To apply a Mesh Warp:
1 On the control interface, navigate to the “Settings” tab.
2 Click on the “Mesh Warp” icon.
3 Click and drag each anchor point to the desired position.
4 Fine tune positions using the faders.
5 Save, load or reset using the bottom right menu.
Note
The adjustments made in the “Controls” or “Settings” sections affect all contents.
To apply Mesh Warp to a specic content, launch it from the content’s navigation
window.
13
Page 14

Installation
MK360
WiFi Dongle
The MK360 requires internet connection to download system and content
updates, as well as for technical support operations. If the MK360 cannot
be connected to the internet via Ethernet cable, an external WiFi dongle
allows to connect to available WiFi networks.
Compatible devices:
Please contact [email protected] to know more about compatible WiFi
dongles.
Connecting the WiFi dongle:
1 Connect the WiFi dongle to the “USB In” port on the MK360 rear panel.
Restart the MK360 if it was powered on
2 In the Web Manager, navigate to “Settings”.
3 Click “Scan” to scan available networks and select the desired network.
14
Page 15
Installation
MK360
Cable Connection
Advanced
In cases where the MK360 WiFi network isn’t stable (ex: trade shows with
scramblers, interferences, …), the control device can be connected to the
MK360 via LAN network..
Required equipment:
- Router with minimum 2 LAN ports.
- 2 Ethernet RJ45 cables
For iOS devices:
Lightning to Ethernet adaptor : RJ45 Ethernet LAN
-
For Android devices with USB Type C port:
USB-C to Ethernet adaptor.
Note
Android devices with micro-USB ports are not compatible for cable connection.
Connection:
1 Create a local network with the router with DHCP.
2 Connect the MK360 to a LAN port of the router.
3 Connect the control device to another LAN port of the router.
4 Identify the IP for the MK360 from the “Settings” section of the Web
Manager.
Control:
- PC or Android: see Local Network
- iOS:
1 In the iOS device, navigate to Settings > Apps > MK360 App.
2 Enter the MK360 IP.
3 Refresh the MK360 App.
15
Page 16

MK360
Web Manager
Description
The Web Manager is a web-based interface to control the MK360 using any
device with access to a web browser (computer, tablet, smartphone, …):
- Playback and navigate through the MK360 content catalog
- Simultaneous multi-user control of the MK360
- Manage system and content updates
- Upload and manage user content in various formats
- Control the IoT devices installed in the room
16
Page 17
Web Manager
Connection
Wi MK360
Recommended
The MK360 provides a WiFi network available for all devices:
1 Connect the control device to the MK360 WiFi network:
MK#_Service ( Example: MK#33_Service )Network
MK_ServicePassword
2 Open a web browser and enter the following IP in the URL search bar:
192.168.12.1:8080
MK360
Local Network
Advanced
Connection over a local network requires connecting the MK360 to a
router/modem/repeater via Ethernet / WAN cable, and knowing the IP of
the MK360 in that network. The MK360 IP appears in the “Settings” tab of
the Web Manager.
Note
The network must be free of Firewall or Proxy. Depending on your network
bandwidth, using a local network will allow to upload larger les in less time.
Conguration
1 Connect the control device to the same network as the MK360.
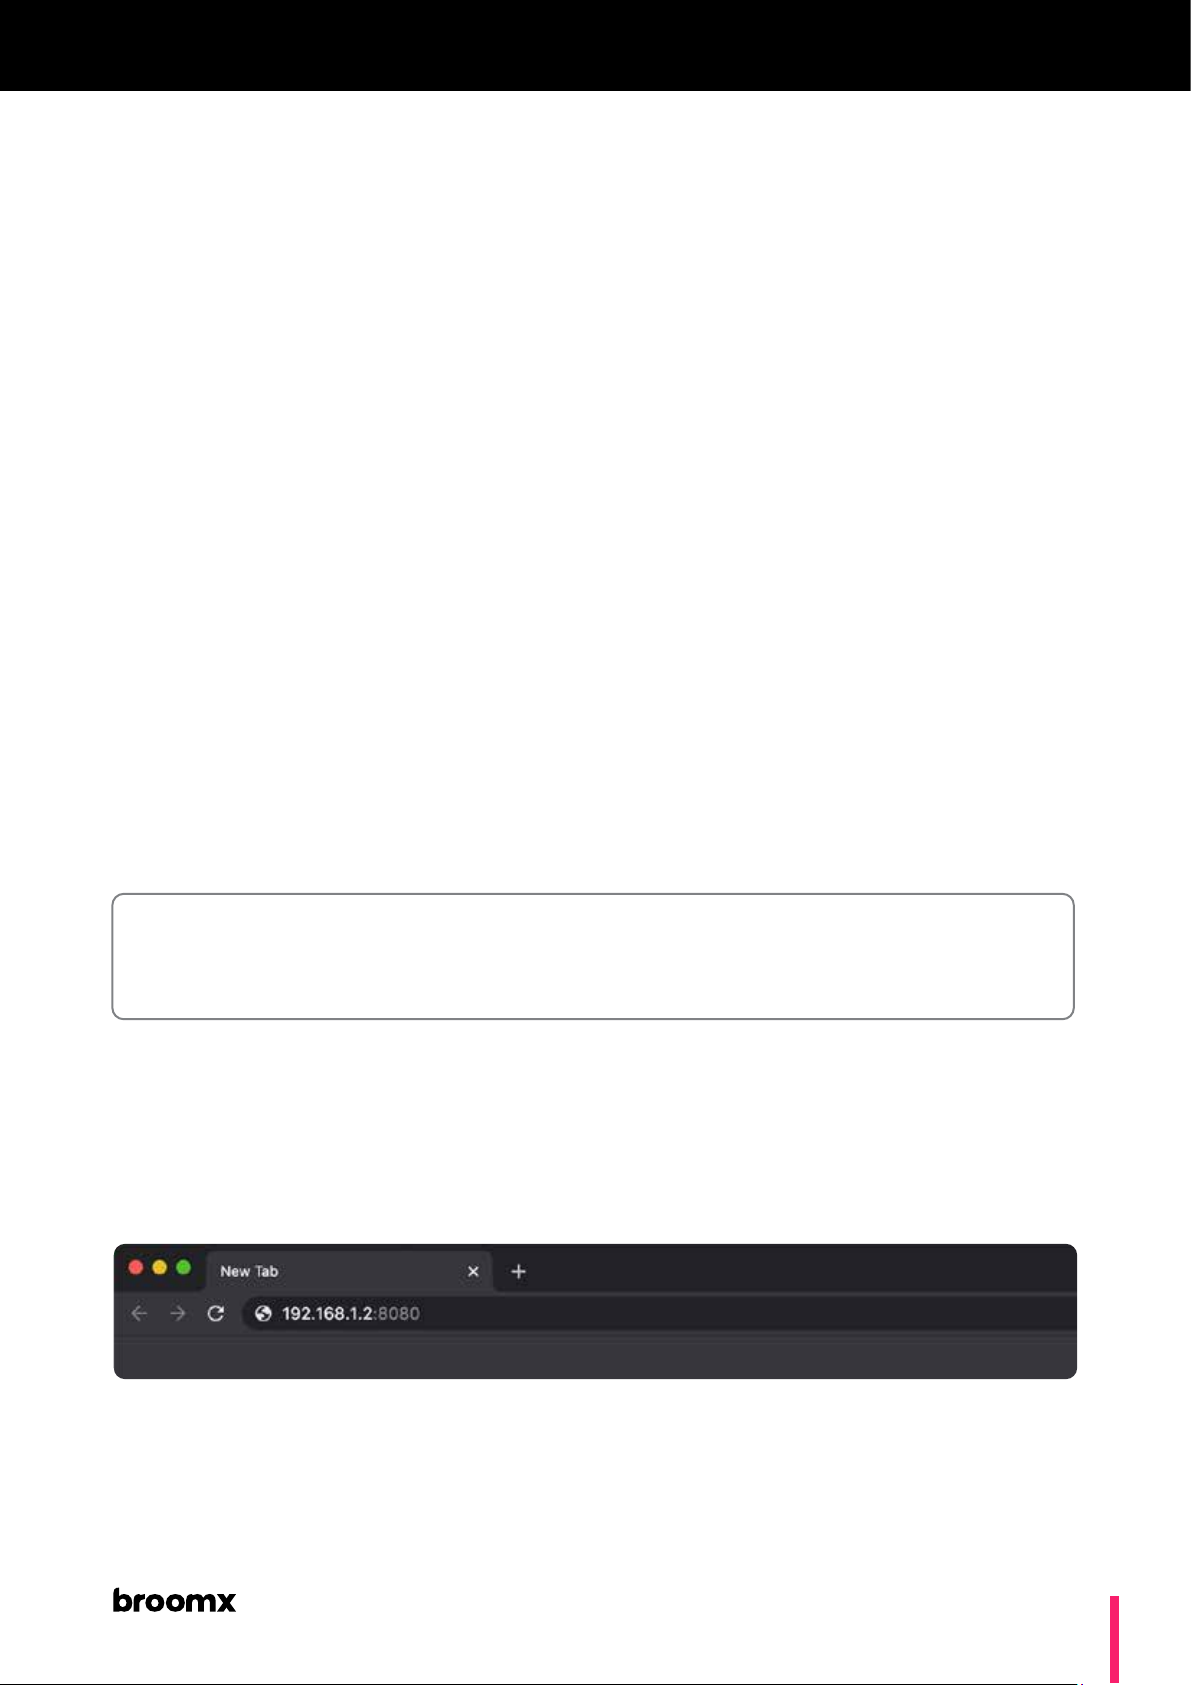
2 Open a web browser and enter the MK360 IP in the URL search bar,
followed by :8080 (ej: 192.168.1.2:8080)
17
Page 18
Web Manager
MK360
Sections
The Web Manager includes 4 sections, available from the oating menu
icon on the bottom right corner.
|
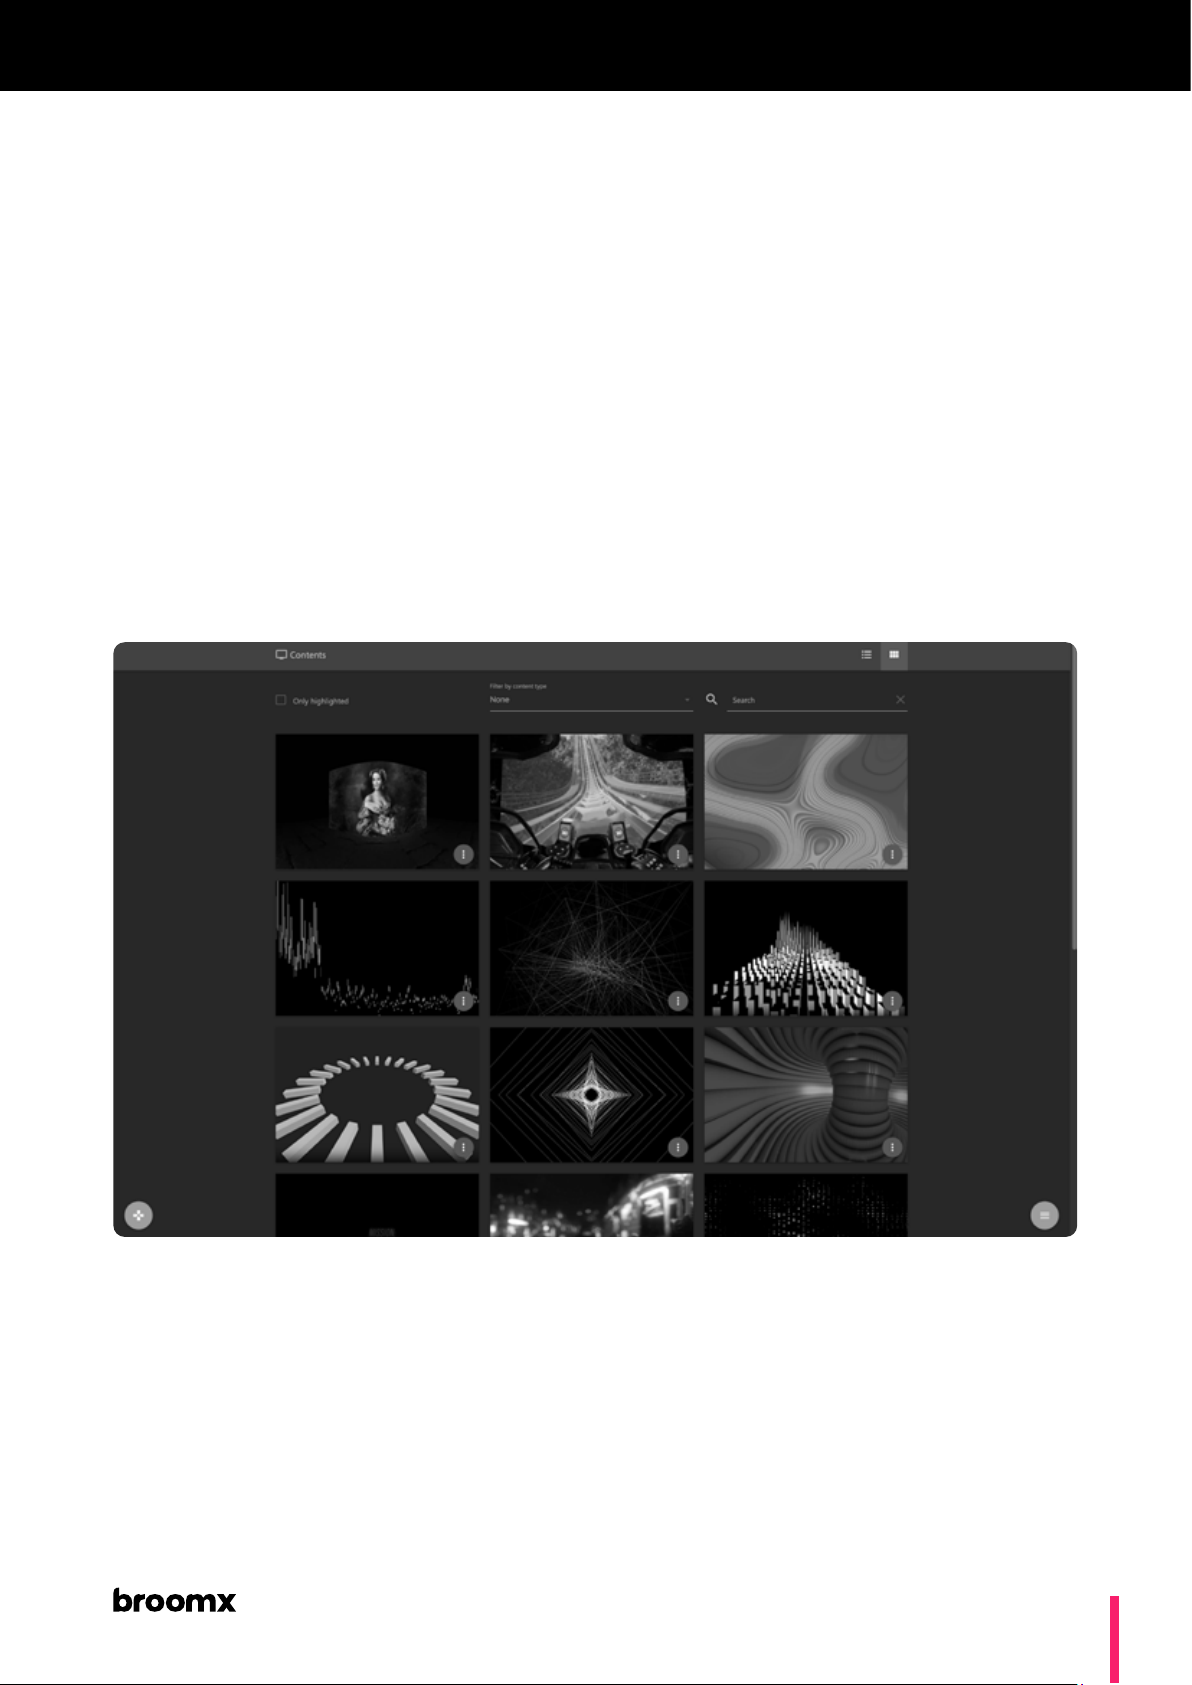
Contents
Catalog of 360 videos and interactive applications included with the MK360.
Content is displayed in 2 views:
- Grid view: displayed as thumbnails
- List view: displayed as a list with title and metadata.
In both views, content can be ltered by content type, highlighted content
and text search.
18
Page 19
Web Manager
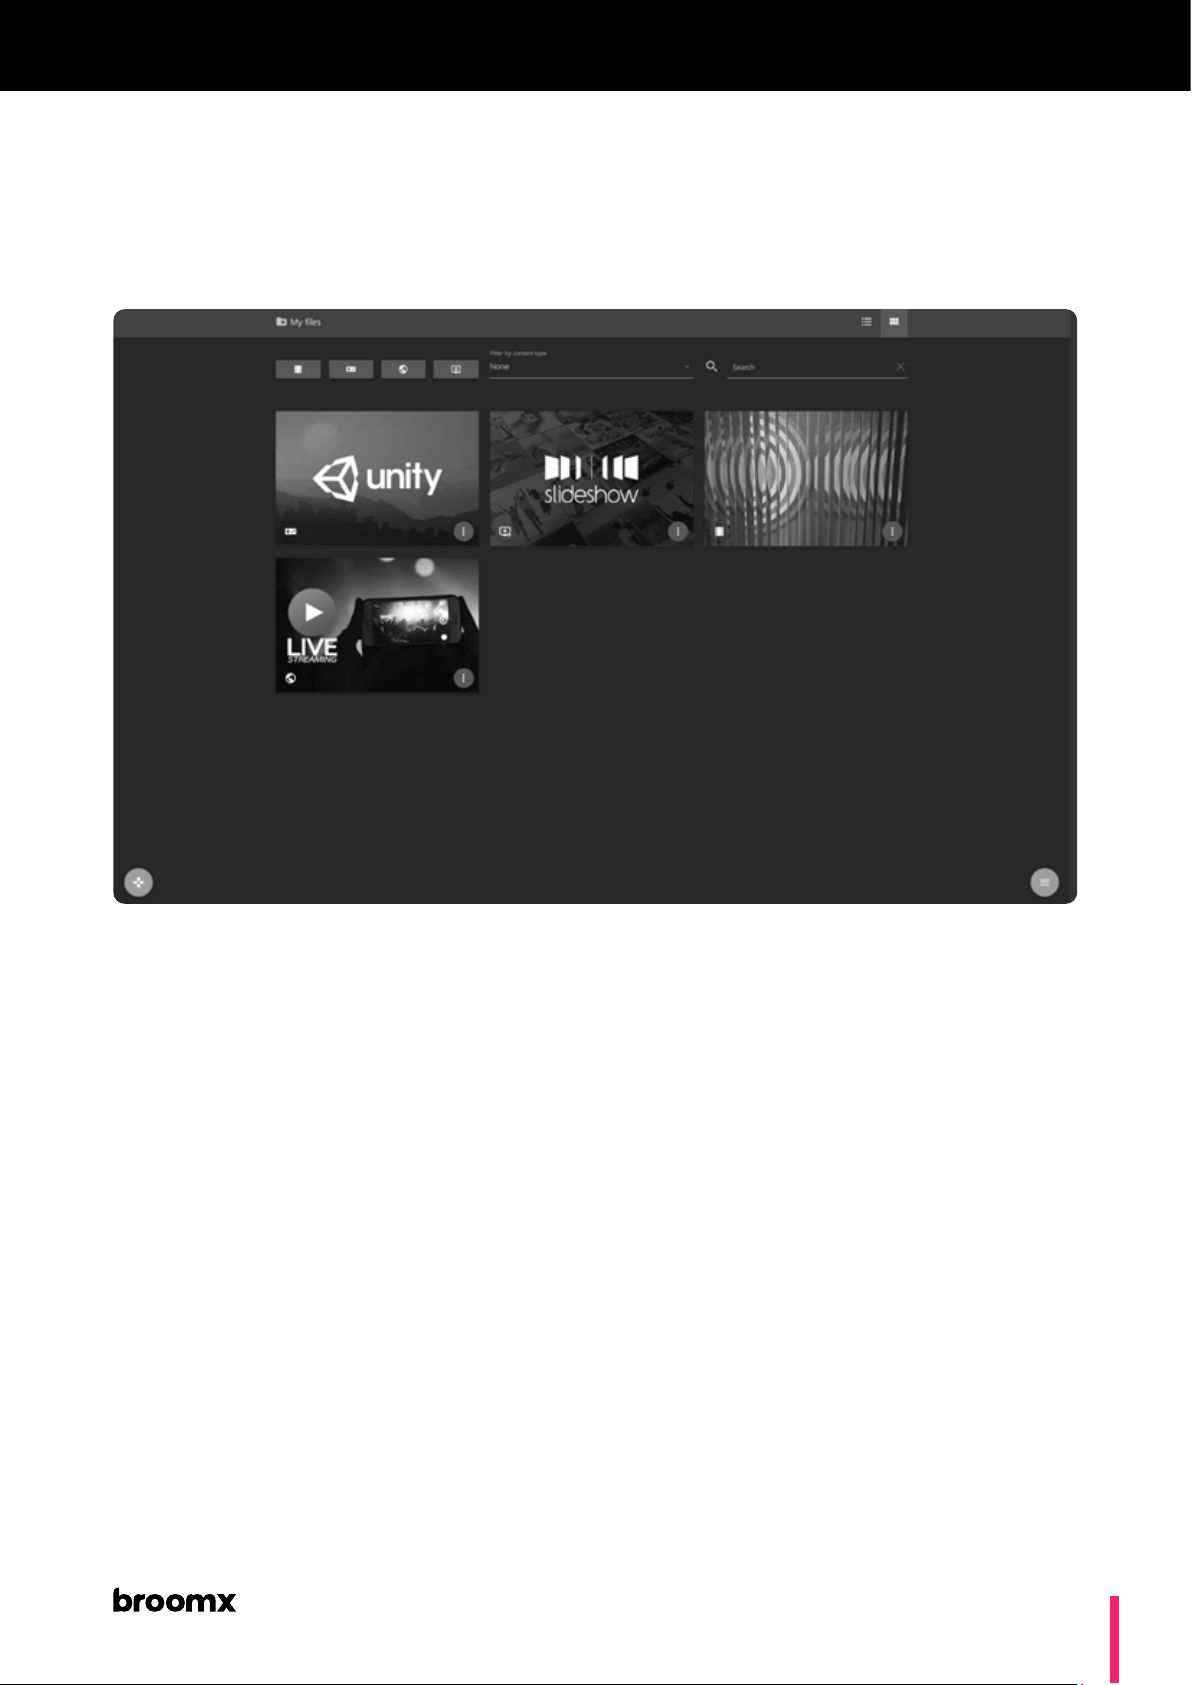
|
My Files
Upload and manage user content. User content is selected and displayed
in the same way as included content.
MK360
19
Page 20
Web Manager
|
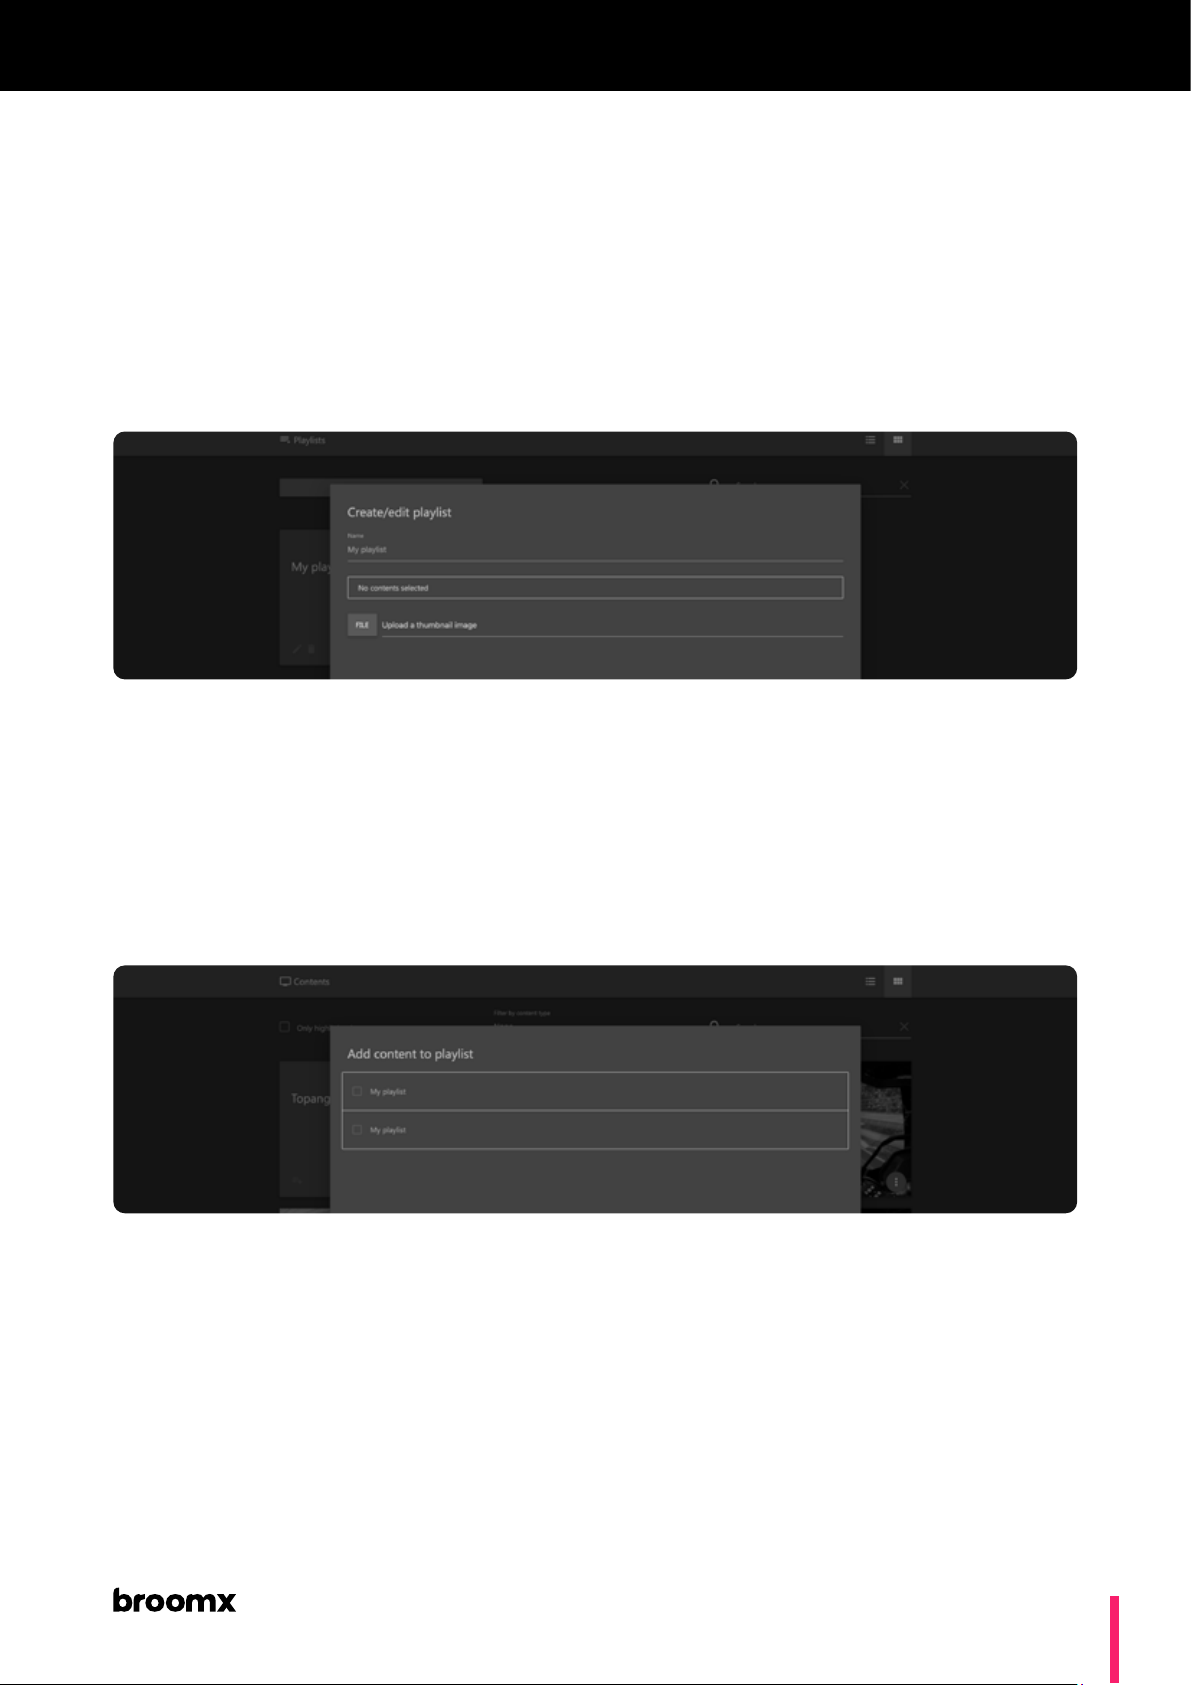
Playlist
Create a video playlist from included or user uploaded content.
Create a Playlist:
- Click “Add Playlist.
- Dene a name for the Playlist.
MK360
Add content to a Playlist:
- Navigate to sections “Contents” or “My Files”.
- Locate a content to add to the Playlist.
- Click “Add to Playlist”
- Select desired Playlist
Edit a Playlist:
- In the “Playlist” tab, select the Playlist to edit.
- Order elements in the list by dragging the Reorder icon
- Click “Save Playlist”
20
Page 21
Web Manager
MK360
Playback a Playlist
- In the “Playlist” tab, select the list for playback.
- Use the “Previous / Next” buttons to jump through list elements
- Playback loops to start of the playlist upon reaching end of last element.
Note
The Playlists created with the Web Manager are also available for playback using
the iOS App.
|
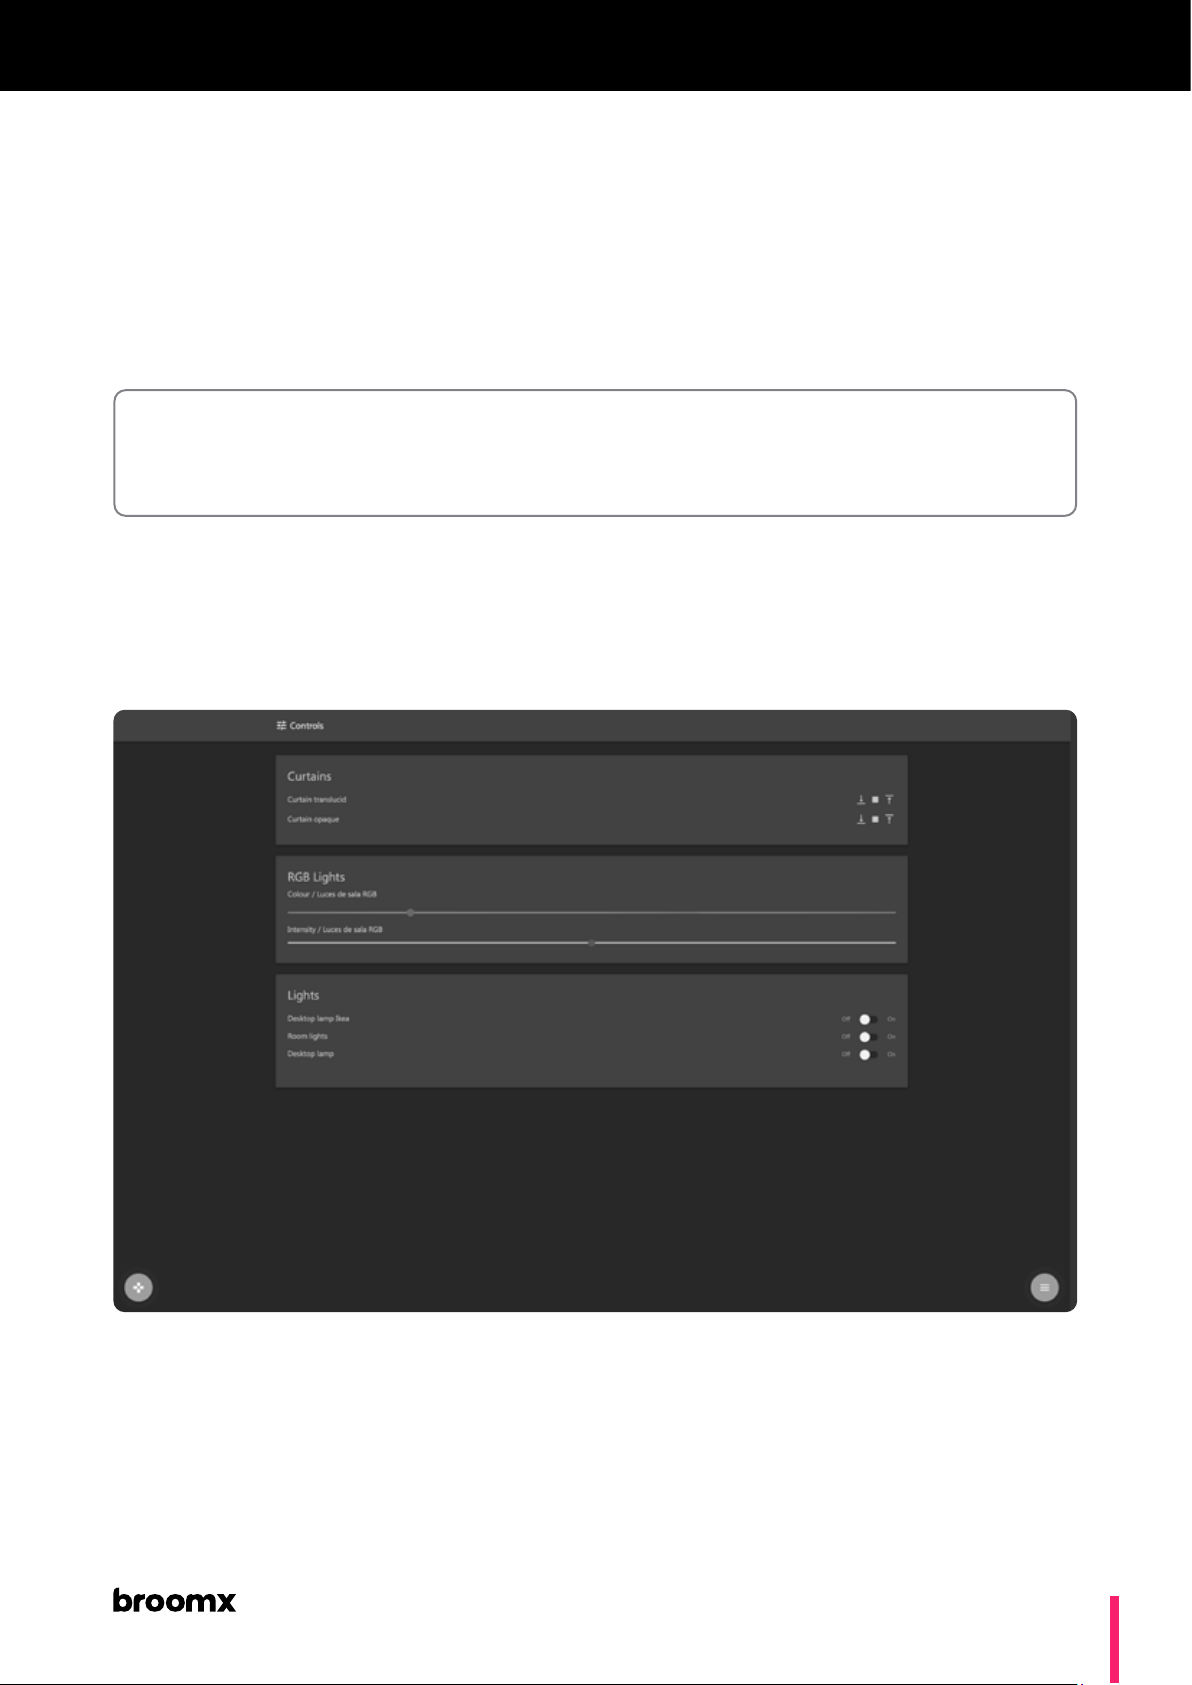
Controls
Control IoT devices installed in the room. For further information
regarding IoT devices please visit broomx.com.
Commands
Open/Close/Stop the curtainsCurtains
Adjust RGB tone and intensityRGB Lights
Turn on/off room lightsLights
21
Page 22
Web Manager
|
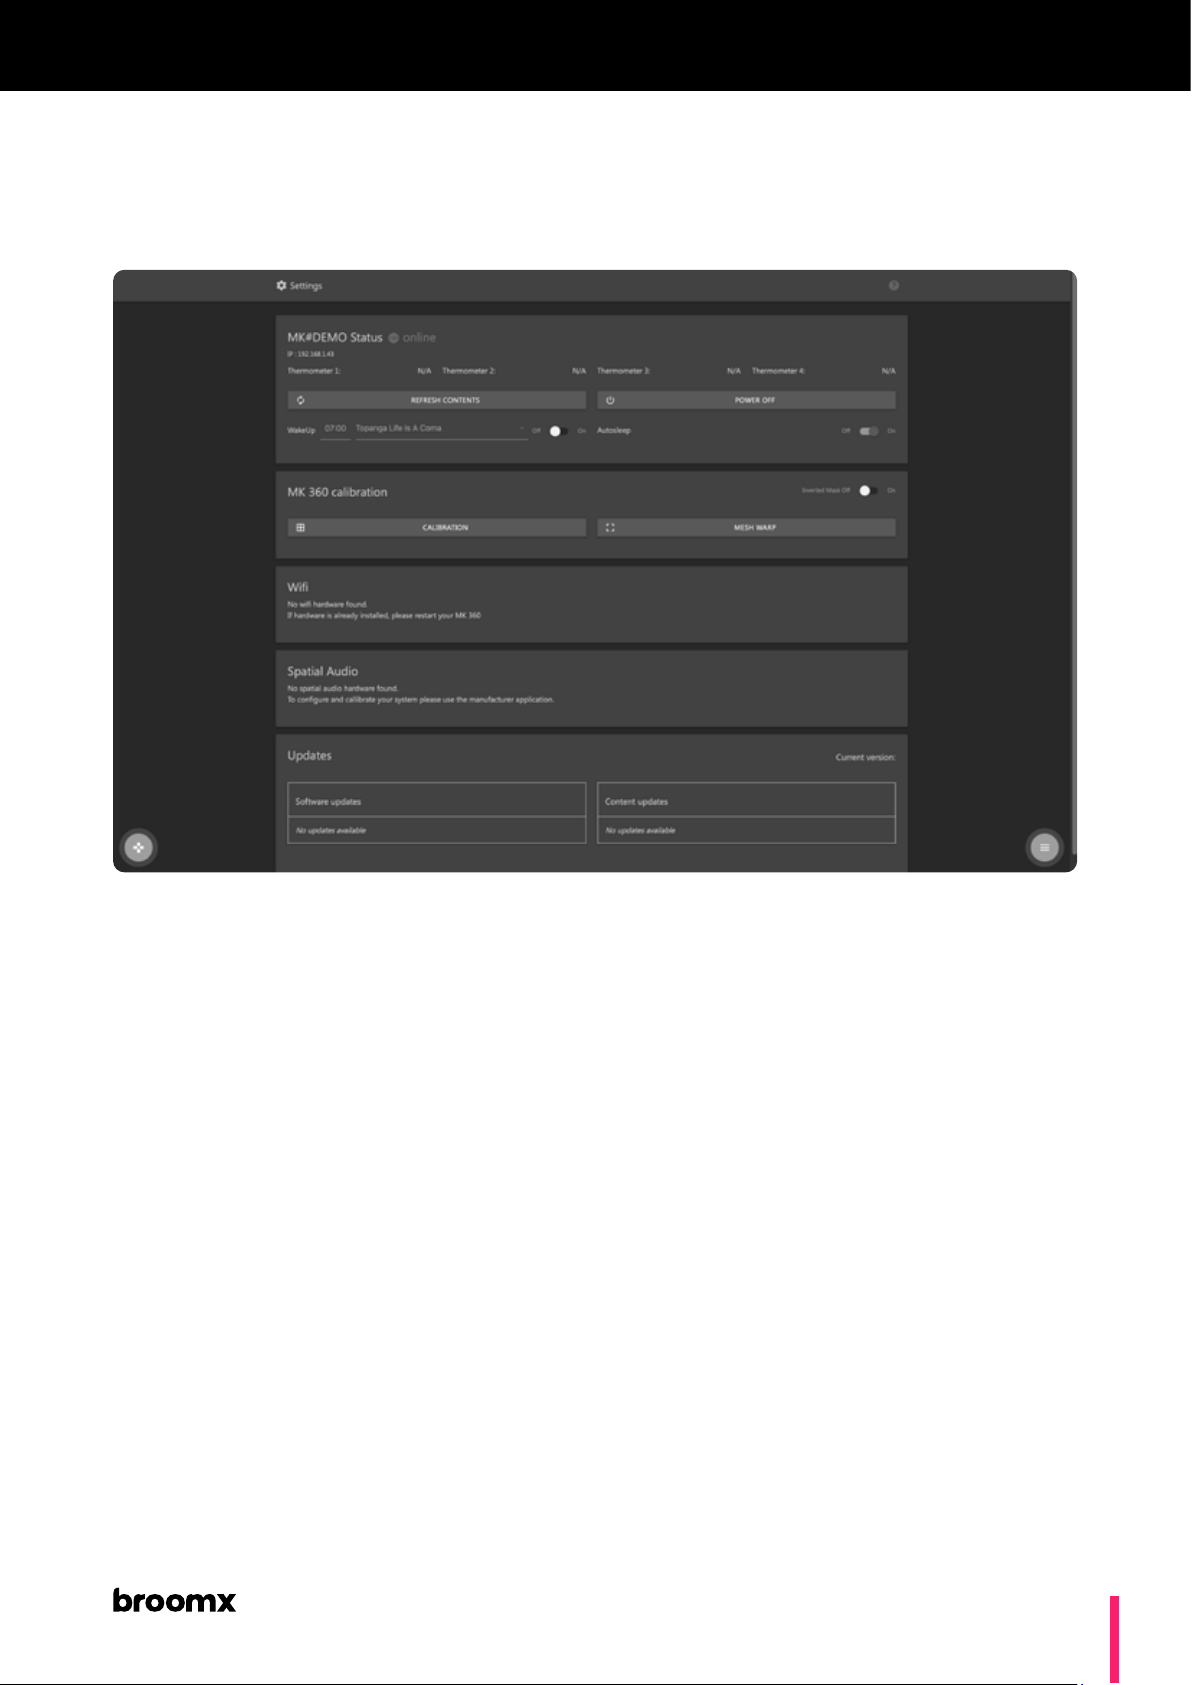
Settings
Manage and monitor the MK360 general settings.
MK360
Internet connection
Thermometers
Refresh Contents
Shutdown
WakeUp
Autosleep
WiFi
green = connected, red = disconnected.
Indicate temperatures detected by the integrated
thermometers.
Scan the MK360 for new uploaded content.
Shuts down the system. To power on the system, select
any content for playback.
System powers on at a time and content specied by the
user.
System enters standby after a specic time without user
action (disabled by default).
Scan and connect the MK360 to a WiFi network.
Updates
Scan and install available system and content updates.
22
Page 23
Web Manager
MK360
Playback & Navigation
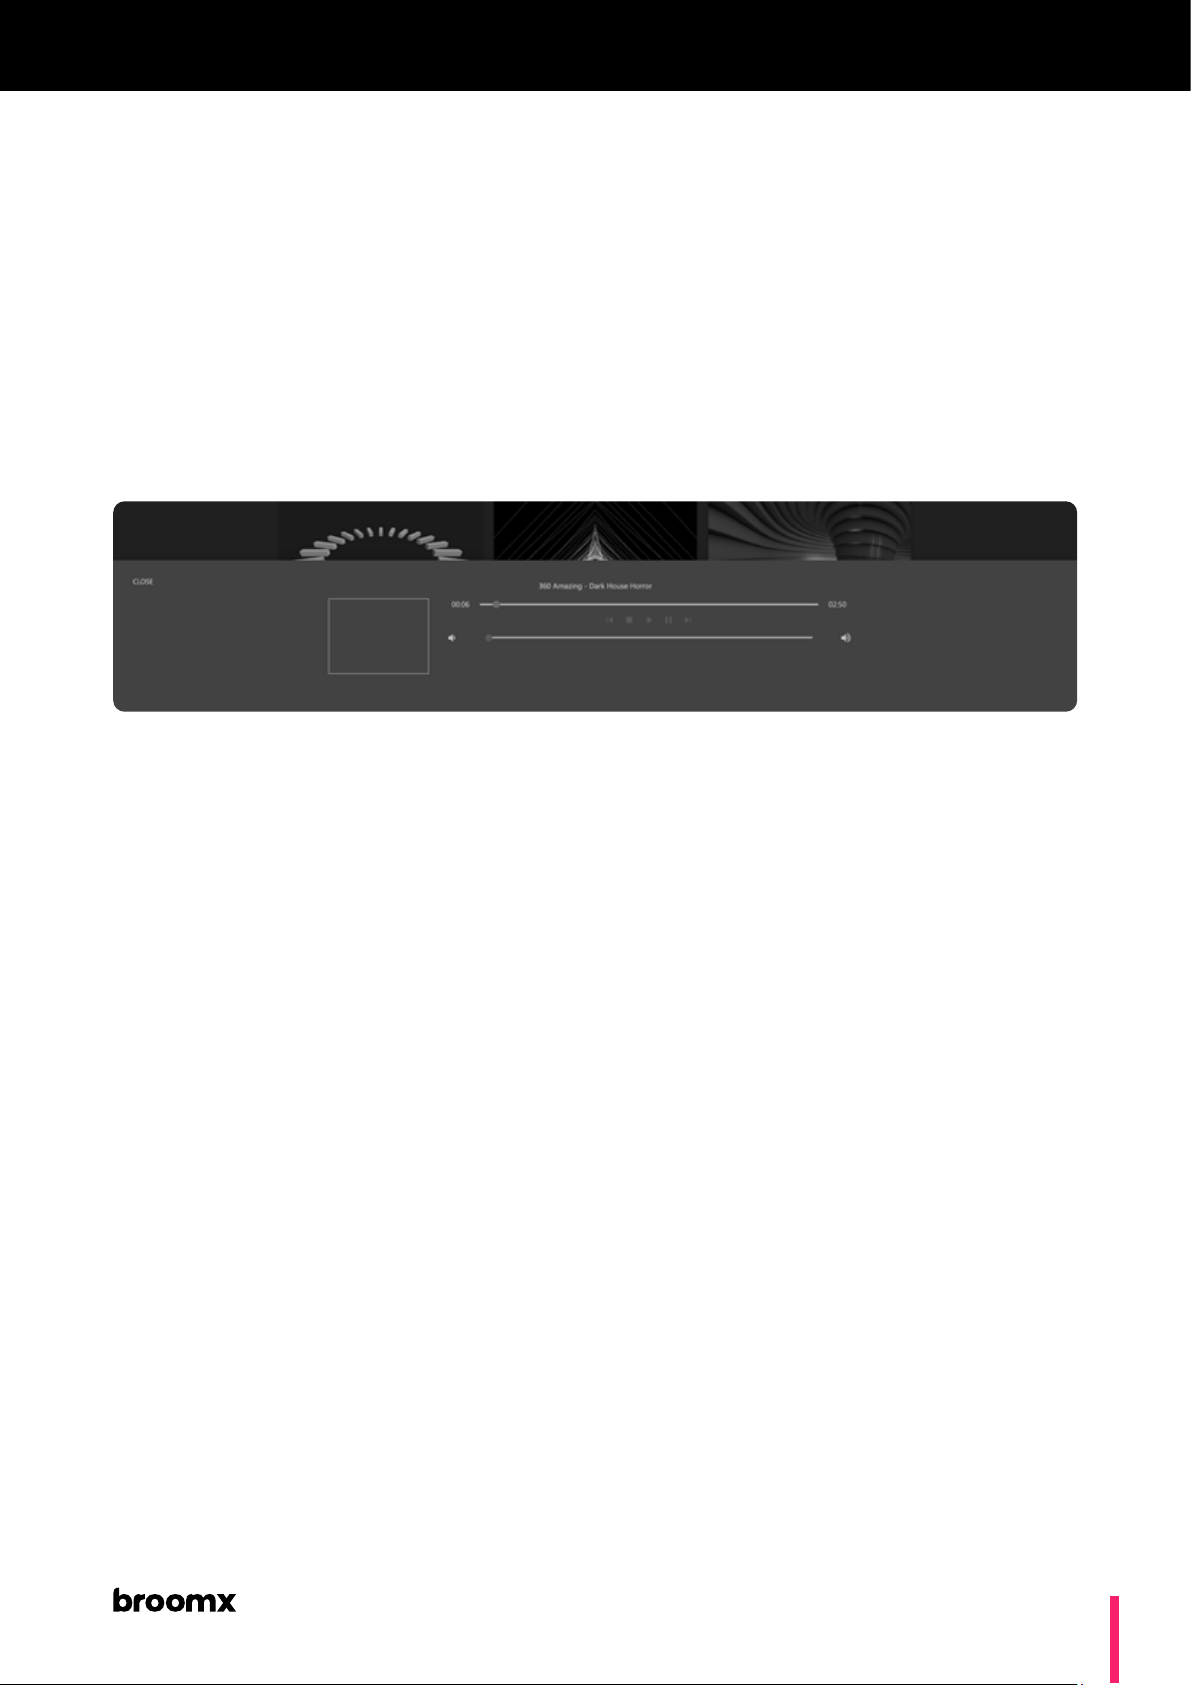
The Playback & Navigation window appears when a content is selected for
playback on the MK360 App, or by clicking the [#] icon in the bottom left on
the Web Manager. To close the window, click “close”.
Projection Modes
User content can be displayed in 2 ways depending on their original format:
Image lls the complete Field of View of the MK360. 360 Equirectangular
Image is bound to a rectangular window with aspect ratio
Flat
16:9.
Backgrounds
Traditional at content (Flat mode) are displayed within 2 selectable
backgrounds:
Solid black backgroundScreen
Movie theater simulationCine
23
Page 24

MK360
iOS application
Download and Connection
Download
The MK360 App is compatible with iPhone, iPad, and iPod devices. Please
update the Apple device’s operating system before installing the MK360
App.
Download and install the app by searching “Broomx Technologies” in the
AppStore.
Connection
1 Power up the MK360
2 Connect the Apple device to the MK360 WiFi network:
MK#_Service ( Example: MK#33_Service )Network
MK_ServicePassword
3 Launch the MK360 App.
4 The Connection icon turns blue if connection is successful.
24
Page 25
iOS application
MK360
Sections
The MK360 App includes 5 sections, available from the lower menu bar:
Highlights
Selection of highlighted immersive media and interactive applications.
Channels
Catalog of 360 videos by international artists.
Apps & Ambients
Interactive applications and utilities.Apps
Ambients
Immersive 4D experiences synchronising audiovisual content
playback with installed IoT elements.
My Files
User provided content.
Controls
General controls for the MK360.
Note
The Settings section is accessible from the gear icon at the top of all screens.
25
Page 26

iOS application
MK360
Controls
Standby
Switch On / Off the MK360. System remains active in the background, the
image can take up to 60s to display correctly.
Sleep
System enters Standby after a certain time without user action (disabled
by default).
WakeUp
System powers on at a user-dened time and content.
Refresh
Refresh the MK360 App after changes in settings or content update /
upload.
- To refresh individual windows, slide window downwards.
- To refresh the entire application, quit and restart.
26
Page 27

iOS application
MK360
Playback & Navigation
The Playback & Navigation window appears when a content is selected for
playback:
- Use the touchpad on the upper part of the screen to navigate in 360 videos
or images.
- Use the cursor on the right to Zoom in / out. Useful for high resolution
images.
- Use the transport functions on the lower part of the screen for traditional
video playback.
To exit the Playback and Navigation window, click on the arrow in the top
left corner.
27
Page 28

MK360
User content
User provided content can be uploaded over local network using the Web
Manager, or using a USB drive.
Media Specications
The MK360 can display the following media formats:
Video 360
Flat Video
360 Image
Format: .mp4 / .mov / .H264 / .ogv / .m4v
Codec: H264
Resolution: 3840x2160p (4K)
Framerate: 30fps
Geometric projection: equirectangular monoscopic
Bitrate: 16-30 Mbs
Formato: .mp4 / .mov / .H264 / .ogv / .m4v
Codec: H264
Resolution: 1920x1080p (Full HD) / 1280x720p (HD)
Framerate: 30fps
Bitrate: 16-30 Mbs
Formato: .jpg / .png / .tiff / .ogg
Resolution: >3840x2160p (4K, 8K, 12K, 24K)
Geometric projection: equirectangular monoscopic
28
Page 29
User content
Web Manager
Upload Media
1 In the My Files tab, select the type of content to upload.
2 Click “File” to select a le, or drag and drop from your device.
Note
Files uploaded through the Web Manager remain stored in the MK360 until they
are deleted by the user.
Edit and delete media
Note
Only user content can be edited or deleted.
MK360
Grid View
1 Select content to edit.
2 Click +INFO.
3 Click EDIT to rename the le, and DELETE to delete it.
List View
1 Select content to edit.
2 Click EDIT to rename the le, and DELETE to delete it.
Unity Projects
The MK360 can display interactive applications developed with the Unity
environment. To know more about compatible Unity projects, please
contact [email protected]
29
Page 30
User content
MK360
Video Live Streaming
The MK360 can receive a live 360 video stream in RTSP protocol. Select:
- Name
- URL
- Projection type (360 / at)
Note
The URL can be previously tested in an external computer using “VLC Media
Player”.
Slideshow
Create an automated slideshow from user videos and images. The videos
and images can be 360 or at, and are uploaded and stored with the
Slideshow.
Create a Slideshow:
1 Select “Create Slideshow”.
2 Dene a name for the Slideshow.
3 Dene a display time for still images.
Note
Videos will play according to their original duration.
4 Drag and drop media from the external device.
5 Order elements in the list by dragging the Reorder icon.
6 Click “Save Slideshow”.
Playback a Slideshow:
1 In the My Files tab, select a Slideshow for playback.
2 Use the “Next / Previous” buttons to navigate among elements in the list.
3 When the end of the last element is reached, playback loops back to the
start of the list.
Note
Slideshows created with the Web Manager can be played back using the MK360
iOS App.
30
Page 31
User content
MK360
USB Drive
1 Connect the USB Drive to the “USB In” port on the MK360 rear panel.
2 In the Web Manager or the iOS App, go to the “My Files” tab.
3 Select content for playback.
4 Contents are available until the USB Drive is disconnected. They can be
copied from the USB Drive to the MK360 local storage from the “My Files”
section of the Web Manager.
Note
The USB Drive must have a maximum capacity of 32 Gb, be in ExFat format, and
contain only the les to be played back through the MK360.
31
Page 32

MK360
Health and Safety
Before using the MK360:
Read and follow all installation and operating instructions provided with
the MK360.
Your MK360 is not designed to be used with an unauthorized device,
accessory and / or software. The use of an unauthorized device, accessory and
/ or software may result in injury to you or third parties, cause malfunctions,
or cause damage to your system and related services.
32
Page 33

Health and Safety
MK360
General precautions
To reduce the risk of damage caused by the device falling, you must always
follow the assembly instructions (there are ground xing accessories) you
must always follow these instructions and take these precautions while
using the MK360:
Avoid performing very dynamic or uncontrolled activities close to the
MK360. Use only in a safe environment.
Remain seated or lying down unless the content experience requires you
to get up.
Do not look directly into the light source (projection lens).
Do not look directly into the air exhaust vent. If the lamp bursts, small pieces
of scattered glass and released gas could cause injury. If the glass comes in
contact with the eyes or mouth, contact a local doctor immediately.
During projection, do not place your face or hands near the air vent, or
objects that can be damaged or deformed by heat. The hot air emitted by
the exhaust ventilation can cause burns, deformations or accidents.
33
Page 34

Health and Safety
MK360
Interference with medical devices
Both the MK360 and its control device contain magnets and components
that emit radio waves that could affect the operation of nearby electronic
devices, including pacemakers, headphones, or debrillators. If you have
a pacemaker or other implanted medical device, do not use the MK360
and its controller without rst consulting your doctor or the manufacturer
of your medical device. Maintain a safe distance between these devices
and your medical devices, and discontinue use if you observe persistent
interference with your medical device.
Electric Shock
To reduce the risk of electric shock:
- Do not alter or open any of the supplied components.
- Do not use the product if any cable is damaged or any wire is exposed.
Damaged or broken
Do not use the device if any part is broken or damaged. Do not attempt
to repair any part of any of your devices yourself. Repairs should only be
done by an authorized service.
34
Page 35

Health and Safety
MK360
Regulatory Information
This product has been tested and complies with worldwide applicable
regulations, including directives 2014/35 UE (Electric Safety. Low Voltage
Directive. LVD 2014/30 / UE (EMC); harmonized standard UNE-EN-ISO
12100 : 2012 - Safety in Machines, UNE-EN-ISO 12100: 2012 standard. It also
complies with all the essential health and safety requirements set out in
Annex I of Royal Decree 1435/1992, or Royal Decree 1644/2008 for machines
manufactured as of December 2009, as the minimum health and safety
provisions set out in Annexes I and II of Royal Decree 1215/1997
, Hereby, Broomx Technologies declares that this product meets the essential
requirements and other relevant provisions of the Directive 2014/53 / EU To
access the complete declaration of conformity visit the web www.broomx.
com
This device has the CE mark, complying with the minimum legal and
technical requirements regarding the safety of the Member States of the
European Union.
35
Page 36

MK360
Warranty
Limited Consumer Warranty
Warranty Whose Warranty is this?
This limited consumer warranty (the “Warranty”) has been issued by Broomx
Technologies (“Broomx”, “we” or “our”).
Who is this Guarantee for?
Broomx has issued this Warranty to you, as a consumer who has purchased
from Broomx, or from an authorized seller, a new product covered by
warranty (“you”). This Warranty cannot be assigned or transferred to any
buyer or subsequent user and is not available for products that are purchased
already used or from a source other than Broomx or an authorized seller.
What does this Warranty do?
This Warranty gives you certain legal rights, regardless of other rights that
you may have, which vary from state to state and from country to country.
This Warranty does not affect any of the rights that you have recognized
under the laws of your jurisdiction in relation to the sale of consumer goods
(including, without limitation, national laws that implement the European
Directive 1999/44 / EC).
How long does the coverage last?
This Limited Warranty covers one (1) year from the date of purchase
or shipment of the Product, whichever is later (the “Warranty Period”).
However, if you purchased the Product within the European Union, the
Warranty Period will be two (2) years.
What will Broomx do if there is a problem with the product?
If your Product is defective or malfunctions, we will repair or replace
such Product or update software or support so that the Product behaves
substantially in accordance with the Guaranteed Functionality.
36
Page 37

Garantía
MK360
The criteria adopted to resolve these matters will be chosen solely by us.
If we decide that a product should be replaced, the replacement may be
for a new or remanufactured Product. If we decide, in our sole discretion,
that none of the means referred to is reasonably adequate for the defect
or malfunction, then we may refund the price you paid for the purchase of
the Product.
How can I get assistance?
First, by informing us of the problem. If you have a problem with your
Product, please visit us at www.broomx.com or send an email to hello@
broomx.com for useful assistance and contact information and to submit a
claim form and obtain warranty service.
If it is necessary to send your Product to receive assistance, you will be
responsible for the shipping costs, attaching the purchase receipt with the
Product.
By shipping the Product, you agree to transfer possession of the Product
to Broomx. Upon receipt of the product, we will assess whether there is a
defect or malfunction that is covered by this Warranty. If we nd a defect or
malfunction covered by this Warranty, we will proceed to repair or replace
the Product to provide it with the Guaranteed Functionality and we will
send you the repaired or replaced Product assuming only the shipping
costs. We may not return the original Product to you. We cannot guarantee
that we will be able to repair the Product without risk or loss of content
or les; Any replacement of Product will not contain the les saved in
the original Product. Any repair or replacement of Product will continue
to be covered by this Warranty during the remaining Warranty Period of
the original Product or for ninety (90) days after receipt of the replaced or
repaired Product, whichever is longer.
37
Page 38

Garantía
MK360
What does this Warranty not cover?
This Warranty is limited and does not apply to: (i) wear and tear, (ii) damage
caused by improper use, accident (for example, accidental blow, exposure
to liquids, food or other contaminants, etc.), negligence, abuse, Improper
or unauthorized alteration, repair or modication, manipulation or use with
inappropriate equipment, devices, software, services or other article (s) of
unauthorized third parties; (iii) use not in accordance with the Product
documentation; (iv) commercial use; (v) use in connection with a trade,
business or profession; (vi) used or resold products; (vii) Products purchased
from sources other than Broomx or Broomx authorized vendors (including
unauthorized online auctions), (viii) Products other than Broomx; (ix) use of
the Product in violation of any law, regulation or standard in force in the place
where the Product is used; or (x) characteristics or behavioral parameters
that pertain to any software or assistance beyond the Guaranteed Product
Functionality.
This Warranty does not include a specic warranty that the product will
be free from errors or a specic warranty regarding uptime or continued
availability, security features of software data or online accounts, or the
uninterrupted or error-free operation of any software, rmware or online
site. This limited warranty is void if the Product is returned with labels
removed, damaged or tampered with or with any alteration (including the
unauthorized removal of any component or outer covering).
This Warranty does not cover loss of les; You are responsible for regularly
making copies of your data, electronically or physically, if you wish to keep
them. Any damage or costs related to data recovery, deletion or installation
are not recoverable under this Warranty.
In this Warranty, Broomx does not extend any implied or legal warranties,
conditions or statements regarding the Product or any related software or
online assistance.
38
Page 39

Garantía
UNDER THIS LIMITED WARRANTY, BROOMX ASSUMES NO LIABILITY FOR ANY SPECIFIC, INDIRECT, INCIDENTAL,
CONSEQUENTIAL DAMAGES, OR CONSEQUENTIAL DAMAGES, OF ANY KIND, PURSUING (BUT NOT EXCLUSIVELY)
INJURY, PAYMENT OF LOSS, LOSS AND LOSS LOSS OF USE OF THE PRODUCT OR ANY ASSOCIATED EQUIPMENT,
COST OF ANY ITEM REPLACEMENT OR EQUIPMENT REPLACEMENT, OR LOSS OF USE DURING THE PERIOD
IN WHICH THE PRODUCT IS BEING REPLACED OR REPAIRED. IN ADDITION, IN NO EVENT SHALL BROOMX BE
LIABLE TO YOU FOR ANY SPECIFIC, INDIRECT, INCIDENTAL, DAMAGES, OR CONSEQUENTIAL DAMAGES OF ANY
KIND, EVEN IF BROOMX HAS BEEN ADVISED OF ANY SUCH DAMAGES. CLAIM ARISING FROM OR RELATED TO
THIS WARRANTY CERTIFICATE, REGARDLESS OF THE FORM OF ACTION, WHETHER UNDER CONTRACT, EXTRA-
CONTRACTUAL LIABILITY (INCLUDING NEGLIGENCE), LIABILITY FOR ANY DEFECTIVE PRODUCT OR ANY OTHER
JURISDICTION.
MK360
IN NO EVENT SHALL BROOMX’S LIABILITY FOR ANY CLAIM ARISING OUT OF OR IN CONNECTION WITH THIS
WARRANTY CERTIFICATE EXCEED THE PRICE PAID FOR THE PURCHASE OF THE PRODUCT, REGARDLESS OF
ANY CONTRACT, LIABILITY ), OBJECTIVE LIABILITY FOR A DEFECTIVE PRODUCT OR ANY OTHER CAUSE OR LEGAL
OR EQUITY THEORY.
39
Page 40

Garantía
Contact
C/ Badajoz, 88.
08005 Barcelona (Poblenou 22@ District)
T: +34 933 154 929
MK360
40
 Loading...