

Page 1
Germ-Free Humidifier
UV SAN ITIZING. PURIFI ED WAR M MIST.
Model Number BWM-211D
Page 2

TABLE OF CONTENTS
Warnings and Cautions . . . . . . . . . . . . . . . . . . . . . . . . . . . . . . . . . . . . . . . . . . . . . . . . . . 2-6
Location of Controls . . . . . . . . . . . . . . . . . . . . . . . . . . . . . . . . . . . . . . . . . . . . . . . . . . . . . 7-8
Operation . . . . . . . . . . . . . . . . . . . . . . . . . . . . . . . . . . . . . . . . . . . . . . . . . . . . . . . . . . . . . .9-10
Filling the Water Tank. . . . . . . . . . . . . . . . . . . . . . . . . . . . . . . . . . . . . . . . . . . . . . . . . . . . . 11
Using Medication Cup and Grille. . . . . . . . . . . . . . . . . . . . . . . . . . . . . . . . . . . . . . . 11-12
Mineral Absorption Pad . . . . . . . . . . . . . . . . . . . . . . . . . . . . . . . . . . . . . . . . . . . . . . . . . . 12
Cleaning and Maintenance . . . . . . . . . . . . . . . . . . . . . . . . . . . . . . . . . . . . . . . . . . . . 13-14
Replacing UV Bulb . . . . . . . . . . . . . . . . . . . . . . . . . . . . . . . . . . . . . . . . . . . . . . . . . . . .15-17
Storage Tips . . . . . . . . . . . . . . . . . . . . . . . . . . . . . . . . . . . . . . . . . . . . . . . . . . . . . . . . . . . . . 17
Specifications . . . . . . . . . . . . . . . . . . . . . . . . . . . . . . . . . . . . . . . . . . . . . . . . . . . . . . . . . . . . 18
Troubleshooting . . . . . . . . . . . . . . . . . . . . . . . . . . . . . . . . . . . . . . . . . . . . . . . . . . . . . . 19-20
Warranty. . . . . . . . . . . . . . . . . . . . . . . . . . . . . . . . . . . . . . . . . . . . . . . . . . . . . . . . . . . . . 21-22
1
Page 3
CAUTION
• TO REDUCE THE RISK OF ELECTRIC SHOCK, DO NOT REMOVE COVER.
THERE ARE NO SERVICEABLE PARTS INSIDE.
• TO REDUCE THE RISK OF FIRE OR ELECTRIC SHOCK, DO NOT EXPOSE
THIS UNIT TO RAIN OR MOISTURE.
The lightning flash with arrow-head symbol within an equilateral triangle is
intended to alert the user to the presence of uninsulated “dangerous voltage”
within the unit’s enclosure that may be of sufficient magnitude to constitute
a risk of electric shock.
The exclamation point within an equilateral triangle is intended to alert
the user to the presence of important operating and maintenance
(servicing) instructions in the literature accompanying the unit.
IMPORTANT SAFETY INSTRUCTIONS
All the safety and operating instructions should be read, adhered to and followed
before the unit is operated.
SAVE THESE INSTRUCTIONS
2
Page 4

DANGER
To reduce the risk of electric shock, burns, fire or injury:
1. Do not use while bathing or in a shower.
2. Do not place or store unit where it can fall or be pulled into a tub or sink.
3. Do not place in, drop or submerge in water or other liquid.
4. Do not reach for unit that has fallen into water. Unplug it immediately.
5. Care should be taken so that objects do not fall and liquids are not
spilled onto the unit.
WARNING
1. Close supervision is necessary when this appliance/product is used by
or near children or mentally disabled individuals.
2. Use this unit only for its intended use as described in this manual.
3. Unplug this unit during lightning storms or when unused for long
periods of time.
4. Never drop or insert an object into any opening.
5. Protect the power cord from being walked on or pinched, particularly at plug
outlets, convenience receptacles and the point where it exits the unit.
6. Do not allow cord to touch hot surfaces. Wrap cord loosely around the unit
when storing.
7. The unit should be situated away from direct sunlight or heat sources such as
radiators, electric heaters, heat registers, stoves, or other units (including amplifiers)
that produce heat. Avoid placing on top of stereo equipment that radiates heat.
3
Page 5

8. Never block the air openings of the unit with materials such as clothing,
plastic bags or papers, or place it on a soft surface such as a bed or couch,
where the air openings may be blocked.
9. Do not overload electrical outlet. Use only the power source as indicated.
10. Do not carry this unit by cord or use cord as handle.
11. Never operate this unit if it has a damaged cord or plug, if it is not working
properly, or if it has been dropped or damaged, or dropped into water. If the
unit’s power supply cord or plug is damaged, do not attempt to fix it yourself.
12. To avoid the risk of electric shock, do not disassemble or attempt to repair
the unit. Incorrect repair can cause risk of electric shock or injury to persons
when unit is used.
13. Do not operate in the presence of explosive and/or flammable fumes.
14. Never remove the plug from the socket by pulling the power cord.
15. DO NOT attempt to repair this humidifier yourself. For repairs covered under warranty
call Brookstone
®
Customer Service at 1-800-846-3000.
4
Page 6

IMPORTANT SAFEGUARDS
CAUTION: BECAUSE HIGH TEMPERATURES ARE GENERATED IN
THIS HUMIDIFIER, BASIC SAFETY PRECAUTIONS SHOULD ALWAYS
BE FOLLOWED, ESPECIALLY WHEN CHILDREN ARE PRESENT.
When using electrical appliances, these basic safety precautions must be followed:
1. DO NOT operate the humidifier without the water tank.
2. ALWAYS use clean, cool tap water to fill the water tank.
3. To avoid risk of fire or shock, DO NOT use an extension cord.
4. DO NOT handle the unit with wet hands.
5. NEVER tilt, move, or attempt to empty the unit while it is operating or plugged in.
Shut off, unplug and remove water tank before moving unit.
6. DO NOT place the unit close to heated areas, such as near stoves, heaters
or in direct sunlight.
7. DO NOT operate OUTDOORS. This humidifier is intended for indoor use only.
8. DO NOT let water get into the air inlets on the bottom of the enclosure
or on the cord or plug.
9. DO NOT store or use gasoline or other flammable vapors and liquids near
the humidifier.
10. ALWAYS make sure the water tank cap and gasket are firmly in place.
11. DO NOT touch hot surfaces.
12. ALWAYS turn the humidifier off when the water tank is empty or when
the unit is not in use. If you turn your unit off for extended periods,
ALWAYS disconnect the power cord and empty the water tank and base.
5
Page 7

13. ALWAYS place the unit on a firm, flat, level, water-resistant surface and arrange
the power cord so that the product is unlikely to be upset.
14. DO NOT clean the product or service the UV bulb without disconnecting
the power cord.
15. Before connecting to electric power outlet, check your electrical power supply.
It must be 120 volts AC (alternating current). The outlet may be 15 amp or 20 amp.
The circuit must be of adequate size and must be protected by fuse or circuit breaker.
16. This item has a polarized plug. As a safety feature, this plug will fit in a polarized
electrical receptacle (outlet) only one way. If the plug does not fit fully in the outlet,
reverse the plug. If it still does not fit, contact a qualified electrician.
17. DO NOT attempt to remove MIST OUTLET during operation, or within 15 minutes after
the humidifier is turned to the “OFF” position and unplugged. Serious injury may result.
DO NOT place hands or face directly over MIST OUTLET while unit is in operation.
18. Place unit in an area where it is not accessible to children.
19. Before using the unit, check the power cord for any signs of damage.
20. DO NOT allow the MIST OUTLET to face directly at a wall surface.
Direct mist aimed at wall could cause damage, particularly to wallpaper.
21. This humidifier requires daily and weekly maintenance.
22. Refer to CLEANING AND MAINTENANCE instructions provided.
23. NEVER clean humidifier in any other manner than as instructed by this manual.
24. WARNING—Eye damage may result from directly viewing the light produced
by UV Bulb. DO NOT energize unit while Lamp Door is removed.
6
Page 8
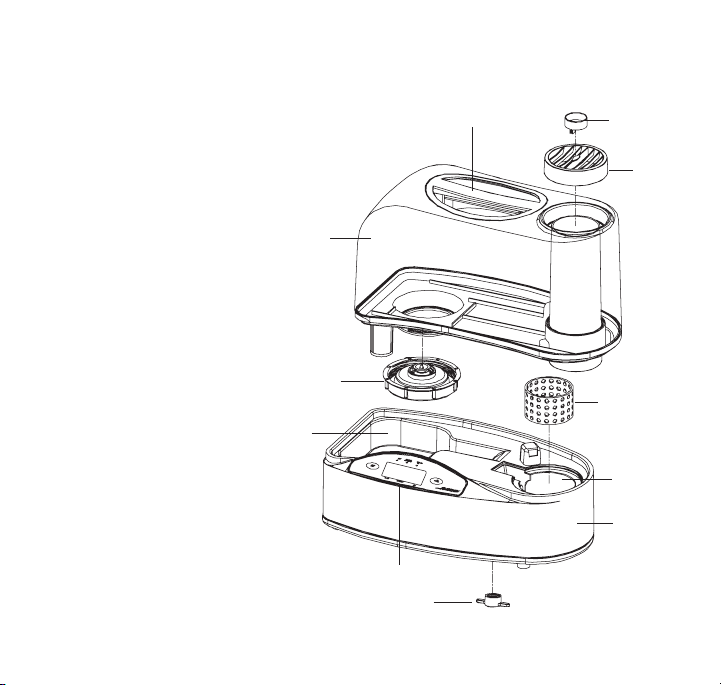
LOCATION OF PARTS AND CONTROLS
1. Water Tank
2. Tank Handle
3. Medication Cup
4. Mist Outlet Grille
5. Mineral Absorption Pad
6. Hot Water Reservoir
7. Base
8. Base Drain Cap & Gasket
9. Digital Control Panel
10. Cold Water Reservoir
11. Tank Cap with Gaske
t
1
11
10
9
8
2
3
4
5
6
7
7
Page 9

DIGITAL CONTROL PANEL
1. Power/Mode Button
2. Power Indicator Light
3. Replace UV Bulb Indicator Light
4. Refill Tank Indicator Light
1
5. Humidity Level Button
6. Mode Screen Indicator
7. Set Humidity Screen Indicator
8. Percent Humidity Screen Indicator
432
78
56
8
Page 10

OPERATING INSTRUCTIONS
Carefully unpack humidifier and remove all packing material.
NOTE: When you unpack your humidifier, you may find it has droplets
of water on some surfaces. This is normal as every unit is tested prior
to shipping.
ABOUT POWER/MODE
POWER/MODE button can be pushed to either OFF, HI or LO mode.
On HI, humidifier will operate on maximum power. On LO, humidifier
will operate more quietly on reduced power. The mode will be indicated
in the MODE window of the digital display.
ABOUT POWER INDICATOR
POWER INDICATOR will be lit to indicate that the POWER/MODE button
is in either the HI or LO position. This indicator will not be lit when the
POWER/MODE button is in the OFF position.
ABOUT HUMIDITY
The digital display window above HUMIDITY displays the ambient relative
humidity as long as the humidifier is plugged into a live electrical outlet.
SET HUMIDITY CONTROL—This controls the humidity level. For humidity
desired, the control switch should be continually pressed until the number
appears that reflects desired humidity.
9
Page 11

OPERATION
1. Place the base of the unit on a firm, flat, level and water-resistant surface.
2. Fill the WATER TANK according to the instructions on the next page and
place it on the humidifier base.
3. Plug the power cord firmly and completely into the wall outlet.
4. Push POWER/MODE switch to either the HI or LO position. Push SET HUMIDITY
button until desired humidity appears in the SET HUMIDITY
window of the digital display. The humidity can be set in 5% increments between
30 and 90% relative humidity. Desired humidity is normally set at 50% or below to
avoid over-humidification. The humidifier will produce vapor until the relative humidity
(indicated in the HUMIDITY window of digital display) reaches the SET HUMIDITY
setting. It will be normal for the humidifier to take 2 minutes to warm
up and begin to mist.
5. When the WATER TANK is empty (after approximately 24 hours running time),
the REFILL WHEN LIT light will go on, and the unit will stop heating.
Refer to the FILLING THE WATER TANK section on the next page.
6. Whenever the water falls below the level of the FLOAT during operation,
the heating element will shut off and stop heating.
7. MIST OUTPUT GRILLE may be adjusted manually by pointing in desired direction.
IMPORTANT: NEVER point the MIST OUTLET GRILLE at a wall.
8. For nighttime or other times when quieter operation is desired, push the POWER/
MODE switch until LO appears in the MODE window of digital display.
10
Page 12

FILLING THE WATER TANK
REFILL WHEN LIT—When illuminated, the water tank needs refilling. “REF” will also
be indicated in the MODE window at this time. If still illuminated after full tank is
placed on base, see TROUBLESHOOTING section.
1. Before filling the WATER TANK, push POWER/MODE switch until OFF
appears in MODE window and unplug unit.
2. Remove WATER TANK from base, turn the tank upside down and remove
TANK CAP by turning counterclockwise. Fill tank with clean, cold tap water.
Replace the TANK CAP by turning clockwise. Tighten firmly.
3. Carefully pick up tank, since it will be heavy when full, and slippery if wet.
4. Place WATER TANK on base. Make sure tank is properly seated, otherwise
the humidifier will not work correctly.
USING THE MEDICATION CUP/MIST
OUTLET GRILLE (OPTIONAL)
In order to add a medicated vapor to the mist output:
1. Press POWER/MODE switch to the OFF position and allow the outlet grille to cool.
2. Lift the MEDICATION CUP.
3. Carefully add liquid medication. DO NOT fill the cup more than half full.
4. Carefully replace the MEDICATION CUP.
5. Press POWER/MODE to either the LO or HI position.
6. After use, remove the cup from the unit and clean any residue
from the cup with warm water.
11
Page 13

WARNING: DO NOT use any liquid medication other than those specifically
recommended for use with a steam vaporizer or warm mist humidifier.
DO NOT pour medication directly into the MIST OUTLET GRILLE openings
nor add it to the water in the tank or tray.
MINERAL ABSORPTION PAD INSTRUCTIONS
Warm mist humidifiers do not spread fine mineral dust into the air that you breathe nor
onto your furniture, the way that other types of humidifiers do. The mineral dust remains
trapped in the humidifier's hot water reservoir. Use of Mineral Absorption Pads will play
a major role in capturing and removing minerals from the hot water reservoir, preventing
a stubborn mineral buildup. The unit can run without pads, but more frequent cleaning
will be required. The mineral absorption pad for this unit is EMP-17P.
1. Before starting humidifier, place mineral absorption pad in the hot water reservoir.
After the humidifier has been operating, the water will become HOT, and CAUTION
should be exercised when handling mineral absorption pad. It is best to allow humidifier
water to cool down, and to use tongs or long tweezers when handling pad.
2. The useful life of the mineral absorption pad will vary, depending on the mineral content
of the water used. In areas of moderate mineral content, the mineral absorption pad
should be changed after approximately (3) weeks of continuous use. If the water is
“Hard Water”, the pad should be changed more frequently. The best way to tell when the
pad should be changed is to examine it AFTER the water has cooled down, to see if it
is still soft and pliable. When the pad is near the end of its life, it becomes stiff and hard
and should be replaced with a new pad. Another sign you need to change the pad is
when scale begins to build up on the interior of the hot water reservoir.
12
Page 14

CLEANING AND MAINTENANCE
Water contains minerals and other particles. During operation, most of these minerals
will remain in the water reservoir. Gradual buildup of deposits will coat the hot water
reservoir and reduce its efficiency. The importance of routine cleaning and care cannot
be over-emphasized. Hard water contains more minerals and other particles.
If a mineral absorption pad appears to disintegrate (normally due to use of softened
water), discontinue use of pads.
CLEANING INSTRUCTIONS
IMPORTANT! Failure to perform the necessary cleaning steps will damage unit.
1. Before cleaning, set CONTROLS to OFF position and unplug unit.
2. Allow at least 15 minutes for the hot water to cool after shutting unit OFF before
moving base, or removing mineral absorption pad.
3. Remove water tank from humidifier base, and drain water from tank. To drain water
from humidifier base, grasp with both hands and tilt to the side, draining water into
the sink.
4. Remove mineral absorption pad from hot water reservoir using tweezers or tongs to
prevent burns from hot water.
BE CAREFUL NOT TO HAVE DRAINING WATER FALL INTO CONTROLS
OR VENT OPENINGS. DO NOT drain in any manner other than indicated.
WARNING: DO NOT place directly under running faucet. Turn the base upside down
and remove the cap by turning it counterclockwise. Clean out any foreign matter that
has accumulated inside the fitting from which the cap was removed. After cleaning,
replace this cap tightly by hand. Pour a small amount of water into the hot water
reservoir and check for leaks from this cap under the base.
13
Page 15

5. Pour about 1 cup of white vinegar into either reservoir and allow it to soak for only
20 to 30 minutes.
6. Hold the base of the humidifier over the sink and tilt it on its side to empty the vinegar.
Fill the cold and hot water reservoirs with clean, warm water to remove all traces of
the vinegar. Remove any buildup of minerals in the hot water reservoir using a small
brush, such as a toothbrush. NOTE: The buildup is due to water hardness. The harder
your water, the more often this maintenance will be needed. Empty all of this water
by turning the unit on its side. DO NOT ALLOW WATER TO ENTER THE BOTTOM
OF THE HUMIDIFIER BASE OR ANY OTHER OPENINGS, OR IMMERSE THE
CORD AND PLUG.
7. Disinfect the water tank using a solution of one teaspoon of household chlorine bleach
in 1 gallon of water. Let the solution sit for 20 minutes, swishing every few minutes to
wet all surfaces. Empty the tank completely; rinse thoroughly until all of the bleach smell
is gone. Fill the tank with fresh, cool water and replace it onto the humidifier base.
8. NEVER use any metal or hard objects to clean plastic parts—this may cause scratching
of the plastic parts. NEVER use gasoline, kerosene, glass cleaner, furniture polish,
paint thinner or other household solvents to clean any part of the humidifier.
9. Each day the reservoir and tank should be drained, rinsed and refilled with fresh
tap water.
10. To clean exterior surfaces, use a solution of water and mild detergent with a wrung-out
damp cloth. Rinse and wring out the cloth and wipe the exterior surfaces again.
Finally, wipe with a dry cloth. Allow sufficient time to dry before plugging the electrical
cord into the outlet.
11. Replace tank. Replace mineral absorption pad, if using. Plug in the unit and resume
normal use.
14
Page 16

REPLACING UV BULB
If the REPLACE UV BULB WHEN LIT signal light is illuminated during normal use,
the bulb must be replaced with the same special 3.5W bulb, EUV-13B. The UV bulb
will operate at maximum output for approximately 2,000 hours. The UV bulb may operate
longer than 2,000 hours but at a reduced output. To keep your humidifier operating at
maximum efficiency it is recommended that the UV bulb be replaced after 2,000 hours
of use.
1. If the REPLACE UV BULB indicator illuminates during normal use, it is time
to change the UV bulb, which is a special 3.5W bulb.
2. Press POWER/MODE switch to the OFF position, unplug it and allow
it to cool.
3. Remove the WATER TANK from the base of the humidifier.
4. Place the base of the humidifier over the sink and tilt the unit to remove
any remaining water.
5. Carefully turn the base of the humidifier over and place it upside down
on a flat, level surface. You will see a door that is closed with a screw(s).
6. Using a Phillips head screwdriver, carefully turn the screw(s) counterclockwise
until the screw(s) separate from the door.
7. Open the door. The UV lightbulb will be visible.
15
Page 17

8. Take a replacement 3.5W UV bulb that you purchased from Kaz Incorporated or another
supplier and change the bulb. To prolong the life of the bulb, limit your direct contact
with the glass of the bulb by using a cloth or tissue to screw it into place. Mail questions
or comments to: Kaz, Incorporated, Consumer Relations Dept., 250 Turnpike Road,
Southborough, MA 01772. Please be sure to specify model number. Call toll-free at:
800-477-0457; E-mail: consumerrelations@kaz.com; or visit the website at:
www.kaz.com. Purchase replacement mineral absorption pad part number EMP-17P
or replacement bulb part number EUV-13B.
Example of replacing
the lightbulb.
9. When the new bulb is in place, close the door and replace the screw(s) by using
your Phillips-head screwdriver and rotating it clockwise until it is just tight.
DO NOT OVER-TIGHTEN.
10. DO NOT turn power on while UV Lamp Door is open, and do not view illuminated
bulb directly as it may cause eye damage.
11. Turn the unit upright, place the WATER TANK on top of the base of the humidifier,
plug the unit in, and push POWER/MODE switch to either the HI or LO position.
The REPLACE UV BULB indicator should no longer be lit.
16
Page 18

IMPORTANT NOTE: Even though you will not receive maximum germicidal effects,
you can still use your humidifier until the replacement bulb arrives.
NOTE: You may hear a rattling sound and notice a small, round object inside your bulb.
This is normal. Your bulb is fully operational.
NOTE: Discard the old UV bulb cartridge at a household hazardous waste collection
site. Bulb and bulb housing are not intended for use with any other product or purpose.
Lamp contains mercury. Manage in accordance with disposal laws.
See www.lamprecycle.org or call 1-800-895-8842.
STORAGE TIPS
If you do not plan to use your humidifier for an extended period of time, such as during
the summer months, it is important that you follow these instructions to help prevent
problems from developing in the unit.
1. Clean your humidifier as instructed in the section entitled Cleaning and Maintenance.
2. Make sure all water is emptied from the tank and the hot and cold water reservoirs.
3. Dry the unit thoroughly.
4. Leave the tank cap off to expose the tank to air.
5. Pack your humidifier in its original carton and store it in a cool, dry place.
17
Page 19

SPECIFICATIONS
Output per Day: . . . . . . . . . . . . . . . . . . . . . . . . 2 Gallons
Electrical usage:. . . . . . . . . . . . . . . . . . . . . . . . 260W High, 130W Low
Weight (without water): . . . . . . . . . . . . . . . . . 6.34 lbs
Water Tank Capacity: . . . . . . . . . . . . . . . . . . . 2.1 Gallons
Dimensions (approximately) . . . . . . . . . . . . . 8.25" w x 14.25" l x 11.50" h
18
Page 20

TROUBLESHOOTING
ISSUE POSSIBLE CAUSE SOLUTION
Unit does not mist.
Unit is not plugged in.
Power failure.
Plug in unit.
Check circuit breaker.
19
Water tank is empty.
Power switch not
turned on.
Unit still on REFILL
after refilling tank.
Float on bottom
of tank “hangs up”.
Water tank not properly
situated on base.
Humidity level
set is achieved.
Remove and refill water.
Turn on switch.
Check that there is water
in the hot water reservoir.
Carefully clean any
residue or obstruction.
Reposition
water tank.
Turn relative humidity
control to higher setting.
Page 21

TROUBLESHOOTING (Continued)
ISSUE POSSIBLE CAUSE SOLUTION
Water leaks from
main unit.
Moist air output low.
Base Drain Cap and
Gasket, tank cap or tank
cap gasket are missing
or improperly positioned.
Mineral buildup in
hot water reservoir.
Tighten cap. Replace or
reposition cap gasket.
Clean unit as per instructions.
Check ambient humidity.
If humidity is high, output
will be low.
20
Page 22

ONE (1) YEAR LIMITED WARRANTY
Brookstone® warrants this product against defects in materials and/or workmanship
under normal use for a period of ONE (1) YEAR from the date of purchase by the
original purchaser (“Warranty Period”). If a defect arises and a valid claim is received
within the Warranty Period, at its option, Brookstone will either 1) repair the defect
at no charge, using new or refurbished replacement parts, or 2) replace the product
with a new product that is at least functionally equivalent to the original product, or
3) provide a store credit in the amount of the purchase price of the original product.
A replacement product or part, including a user-installable part installed in accordance
with instructions provided by Brookstone, assumes the remaining warranty of the
original product. When a product or part is exchanged, any replacement item becomes
your property and the replaced item becomes Brookstone’s property. When a store
credit is given, the original product must be returned to Brookstone and becomes
Brookstone’s property.
Obtaining Service: To obtain warranty service, call Brookstone Limited Warranty Service at
1-800-292-9819. Please be prepared to describe the product that needs service and
the nature of the problem. A purchase receipt is required. All repairs and replacements
must be authorized in advance. Service options, parts availability and response times
will vary. You are responsible for delivery and the cost of delivery of the product or any
parts to the authorized service center for replacement, per our instructions.
Limits and Exclusions: Coverage under this Limited Warranty is limited to the United
States of America, including the District of Columbia and the U.S. Territories of
Guam, Puerto Rico, and the U.S. Virgin Islands. This Limited Warranty applies only
to products manufactured for Brookstone that can be identified by the “Brookstone”
trademark, trade name, or logo affixed to them or their packaging. The Limited
Warranty does not apply to any non-Brookstone products. Manufacturers or
suppliers other than Brookstone may provide their own warranties to the purchaser,
21
Page 23

but Brookstone, in so far as permitted by law, provides these products “as is.”
This warranty does not apply to: a) damage caused by failure to follow instructions
relating to product’s use or the installation of components; b) damage caused by
accident, abuse, misuse, fire, floods, earthquake or other external causes; c) damage
caused by service performed by anyone who is not a representative of Brookstone;
d) accessories used in conjunction with a covered product; e) a product or part
that has been modified to alter functionality or capability; f) items intended to be
periodically replaced by the purchaser during the normal life of the product including,
without limitation, batteries or light bulbs; g) any product sold “as is” including, without
limitation, floor demonstration models and refurbished items; or h) a product that is
used commercially or for a commercial purpose.
BROOKSTONE SHALL NOT BE LIABLE FOR INCIDENTAL OR CONSEQUENTIAL
DAMAGES RESULTING FROM THE USE OF THIS PRODUCT, OR ARISING
OUT OF ANY BREACH OF THIS WARRANTY. TO THE EXTENT PERMITTED BY
APPLICABLE LAW, BROOKSTONE DISCLAIMS ANY AND ALL STATUTORY OR
IMPLIED WARRANTIES, INCLUDING, WITHOUT LIMITATION, WARRANTIES
OF ME RCHANTABILITY, FITNESS FOR A PARTICU LAR PURPOSE AND
WARRANTIES AGAINST HIDDEN OR LATENT DEFECTS. IF BROOKSTONE
CANNOT LAWFULLY DISCLAIM STATUTORY OR IMPLIED WARRANTIES, THEN
TO THE EXTENT PERMITTED BY LAW, ALL SUCH WARRANTIES SHALL BE
LIMITED IN DURATION TO THE DURATION OF THIS EXPRESS WARRANTY.
Some states disallow the exclusion or limitation of incidental or consequential
damages or how long an implied warranty lasts, so the above exclusions or limitations
may not apply to you. This warranty gives you specific legal rights and you may also
have other rights, which vary from state to state.
22
Page 24

Merrimack, New Hampshire USA 03054 • 800-846-3000 • www.Brookstone.com
636126 Rev. 0710
31IM211D192
 Loading...