

Page 1

Big Shot™
ULTRA SHORT THROW SMART PROJECTOR
Page 2

Brookstone assumes no responsibility for any errors that may appear in this
manual. Information contained herein is subject to change without notice.
All trademarks referenced herein are the property of their respective owners.
Page 3

CONTENTS
Caution .........................................................2
Warning! ........................................................5
FCC Information.................................................6
Specifications .................................................10
Operating the Remote .........................................11
Pairing the Remote ................................................11
Controls and Functions.............................................12
Operating the Projector ........................................14
Language .........................................................14
Date and Time.....................................................14
WiFi Connection ...................................................14
Projecting Content.................................................15
Audio .............................................................22
Image Adjustments ................................................24
Check Internal Storage Capacity ....................................25
Using the Projector as a Speaker ...............................26
Cleaning the Lens .............................................26
Updating the Projector.........................................27
Reset to Factory Defaults ......................................27
Troubleshooting ...............................................28
One (1) Year Limited Warranty .................................32
1
Page 4

CAUTION
• TO REDUCE THE RISK OF ELECTRIC SHOCK, DO NOT REMOVE
COVER. THERE ARE NO SERVICEABLE PARTS INSIDE
• TO REDUCE THE RISK OF FIRE OR ELECTRIC SHOCK, DO
NOT EXPOSE THIS UNIT TO RAIN OR MOISTURE.
The lightning flash with arrow-head symbol within an equilateral
triangle is intended to alert the user to the presence of
uninsulated “dangerous voltage” within the unit’s enclosure that
may be of sufficient magnitude to constitute a risk of
electric shock
The exclamation point within an equilateral triangle is intended to
alert the user to the presence of important operating and
maintenance (servicing) instructions in the literature
accompanying the unit.
IMPORTANT SAFETY INSTRUCTIONS
All of the safety and operating instructions should be read, adhered
to and followed before the unit is operated.
SAVE THESE INSTRUCTIONS!
2
Page 5

DANGER
To reduce the risk of electric shock, burns, fire or injury:
1. Do not use while bathing or in a shower.
2. Do not place or store unit where it can fall or be pulled into a
tub or sink.
3. Do not place in, drop or submerge in water or other liquid.
4. Do not reach for unit that has fallen into water. Unplug it
immediately.
5. Care should be taken so that objects do not fall and liquids are
not spilled onto the unit.
WARNING
1. Close supervision is necessary when this appliance/product is
used by or near children or mentally disabled individuals.
2. Use this unit only for its intended use as described
in this manual.
3. Unplug this unit during lightning storms or when unused for
long periods of time.
4. Never drop or insert an object into any opening.
5. Protect the adapter cord from being walked on or pinched,
particularly at plug outlets, convenience receptacles and the
point where it exits the unit.
6. Do not allow adapter cord to touch hot surfaces. Wrap cord
loosely around the unit when storing.
3
Page 6

7. The unit should be situated away from direct sunlight or heat
sources such as radiators, electric heaters, heat registers,
stoves, or other units (including amplifiers) that produce heat.
Avoid placing on top of stereo equipment that radiates heat.
8. Never block the air openings of the unit with materials such as
clothing, plastic bags or papers, or place it on a soft surface
such as a bed or couch, where the air openings
may be blocked.
9. Do not overload electrical outlet. Use only the power source
as indicated.
10. Do not carry this unit by cord or use cord as handle.
11. Never operate this unit if it has a damaged cord or plug, if it is
not working properly, or if it has been dropped or damaged, or
dropped into water. If the unit’s power supply cord or plug is
damaged, do not attempt to fix it yourself.
12. To avoid the risk of electric shock, do not disassemble or
attempt to repair the unit. Incorrect repair can cause risk of
electric shock or injury to persons when unit is used.
13. Do not operate in the presence of explosive and/or
flammable fumes.
14. Never remove the plug from the socket by pulling the
power cord.
15. The device must not be co-located or operating in conjunction
with any other antenna or transmitter.
4
Page 7

WARNING!
•Do not store this product in high temperatures, damp areas,
or in direct sunlight.
•Never disassemble the product.
•Never dispose of the product in fire or water, which may
result in explosion and/or injury.
•Keep product out of reach of children.
•Do not touch product with damp hands.
•Dispose of the product properly.
•The product must not be discarded with ordinary
household waste.
•Contact your local recycling center for proper disposal.
5
Page 8

FCC INFORMATION
This device complies with part 15 of the FCC rules. Operation is
subject to the following two conditions:
1) This device may not cause harmful interference, and
2) This device must accept any interference received including
interference that may cause undesired operation.
WARNING: Changes or modifications to this unit not expressly
approved by the party responsible for compliance could void the
user’s authority to operate the equipment.
CAUTION:
guidelines, place the product at least 8 inches from nearby persons.
NOTE: This equipment has been tested and found to comply
with the limits for a Class B digital device, pursuant to Part 15 of
the FCC Rules. These limits are designed to provide reasonable
protection against harmful interference in a residential
installation. This unit generates, uses, and can radiate radio
frequency energy and if not installed and used in accordance
with the instructions, may cause harmful interference to
radio communications. However, there is no guarantee that
6
To maintain compliance with the FCC’s RF exposure
Page 9

interference will not occur in a particular installation. If this
equipment does cause harmful interference to radio or television
reception, which can be determined by turning the equipment
off and on, the user is encouraged to try and correct the
interference by one or more of the following measures:
•Reorient or relocate the receiving antenna.
•Increase the separation between the equipment and receiver.
•Connect the equipment to an outlet on a circuit different
from that to which the receiver is connected.
•Consult the dealer or an experienced radio/TV technician
for help.
Shielded cables must be used with this unit to ensure
compliance with the Class B FCC limits.
CAUTION: The radiated output power of the Wi-Fi technology is
below the FCC radio frequency exposure limits. Nevertheless, it
is advised to use the wireless equipment in such a manner that
the potential for human contact during normal operation
is minimized.
7
Page 10
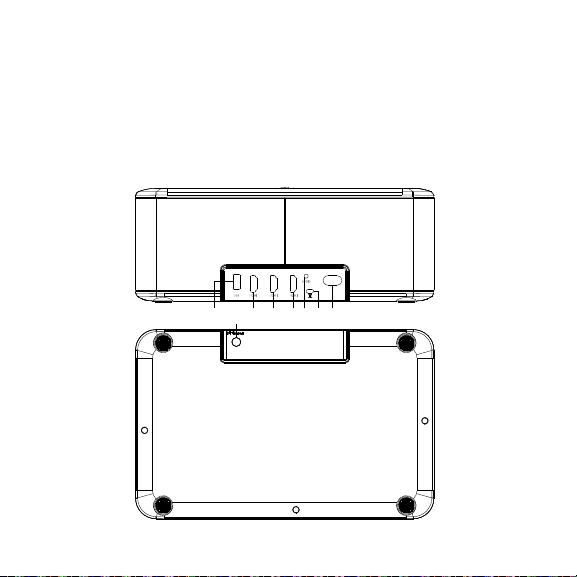
LOCATION OF PARTS AND CONTROLS
9 10 11
1. USB (5V/1A)
2. Bluetooth Reset
3. HDMI 1
4. HDMI 2
1 2 3 4 5 6 7 8
8
5. HDMI 3
6. 3.5mm Audio Out
7. Kensington Security Slot
8. Power port
Page 11
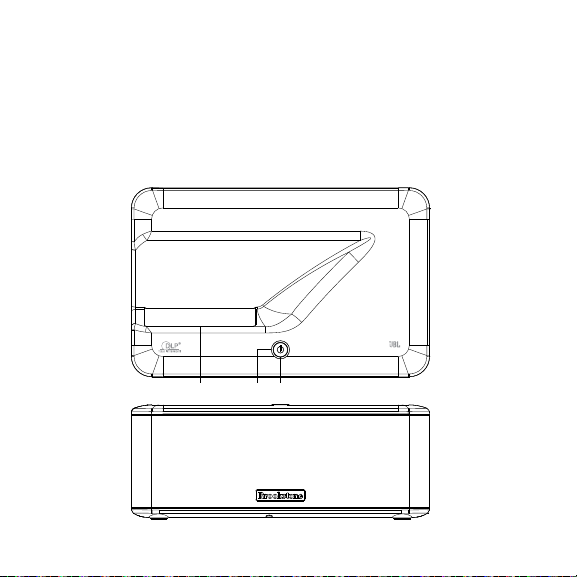
LOCATION OF PARTS AND CONTROLS
9. Lens
10. Status light
11. Power button
9 10 11
9
Page 12

SPECIFICATIONS
Product Dimensions 10.4” x 6.6” x 3.9”
Brightness 200 Lumens
Lamp Life LED lamp with up to 20,000 hours
Focus Auto
Image Size Up to 120” projected image
(30" from the wall)
Min Distance 13" from projection surface
(60" projected image*)
Throw Ratio 0.33
Contrast Ratio 400:1
Native Resolution 1280 x 720 (720p)
Aspect Ratio 16:9
Built-in Speakers 2 8-watt JBL speakers
Internal Memory 5GB
Wi-Fi 2.4Ghz & 5Ghz
System Android 4.4
Keystone Manual ±10˚ vertical adjustment
*All image dimensions are measured diagonally.
10
Page 13

OPERATING THE REMOTE
PAIRING THE REMOTE
The projector is primarily controlled through the included remote.
To pair the remote:
IMPORTANT: The distance between the remote and the projector
should be 6.5 feet or less.
1. Plug the power cord into the projector and the other end into
a wall outlet.
2. Power the projector on by pressing the on/off button on the
projector. Allow the projector a moment to startup
3. Install the (2) included AAA batteries in the remote control.
•Turn the remote control over and lcoate the battery door on
the rear of the unit.
•Press on the arrow on the remote door and slide in the
direction indicated by the arrow.
•Insert batteries negative (-) side first into the slots, pushing
the battery into the coil and then into the compartment.
IMPORTANT: Do not insert batteries positive (+) side first.
11
Page 14

4. Press and hold the volume up (+) and volume down (-) buttons
on the remote. The red light on the remote will blink as the
remote pairs with the projector.
• When paired, the remote icon on the projector's home screen
will appear blue
• When not paired, the remote icon on the projector's home
screen will appear gray
IMPORTANT: If pairing fails, press the Bluetooth reset button on
the back of the projector and restart the pairing process.
.
.
CONTROLS AND FUNCTIONS
1. [Status light]
2. [Power] Power projector on or off
3. [Up] or [Down], Move up or down; [Left] or [Right] Move
left or right
4. [Home] Return to the home screen
5. [Mouse] Use the remote as a mouse
6. [Volume down] Decrease volume
7. [Bluetooth mode] Turns on Bluetooth speaker mode
12
Displays remote usage information
Page 15

8. [OK] Select a
menu option
9. [Back] Return to
the previous screen
10. [Battery door]
11. [Volume up]
Increase volume
12. Press [Input] to
aunch the input
l
selection pop up
menu. Press and
hold for
[Auto
Focus]
to calibrate
the projector's focus.
1
2 7
3
4
5
6
10
11
12
8
9
13
Page 16

OPERATING THE PROJECTOR
LANGUAGE
1. Select "Settings" from the projector's home screen.
2. Scroll to "About this projector" on the settings menu.
3. Select the "Language" option.
4. Scroll to the desired language and select.
DATE AND TIME
1. Select "Settings" from the projector's home screen.
2. Scroll to "Date and Time"on the settings menu.
3. Select the desired date and time settings and format.
WIFI CONNECTION
1. Select "Settings" from the projector's home screen.
2. Scroll to "WiFi" on the settings menu.
IMPORTANT: The "Wifi Enable" option shown at the top of the
page must be turned on to see available networks.
14
Page 17

3. Select "Scan" to search for nearby available networks.
4. Select the desired network from the listed options.
5. Enter any required network credentials, then select "Connect."
Allow the projector and the network a few seconds to sync.
6. Press the "Home" button on the remote to return to the
projector's home screen. The wireless icon will be displayed in
the projector's home screen status bar if the connection setup
was successful. The number of blue shaded bars on the icon
depict the strength of the wireless signal.
• Not connected
Weak wireless signal
•
Strong wireless signal
•
PROJECTING CONTENT
The projector can be used as a standalone streaming device
with many popular streaming applications, to share content from
a variety of devices with a wired HDMI connection, to share
content from smartphones or tablets with a wireless connection,
or to play content from a USB flash drive.
15
Page 18

STANDALONE STREAMING
IMPORTANT:
access content. App availability can change. Streaming speeds will
vary based on your internet connection.
1. Connect the projector to a wireless network (see "WiFi
Connection" on page 14).
Downloading apps
2. Select the App Center icon from the projector’s home screen.
3. Select the desired app.
4. Press the "Mouse" button on the remote and select install.
5. Follow the app's on screen prompts as needed to install.
6. Select "Open" to launch the app.
7. Enter any required app access credentials.
Stream
8. From the projector’s home screen, select the streaming
app desired.
9. Select the content to view and play as you normally would.
Some apps require payment or a subscription to
16
Page 19

TIP: To navigate and enter passwords for many apps,
remote’s mouse mode. Mouse mode will allow the remote to show
an on screen cursor, similar to a typical computer mouse. Press the
“Mouse” button on the remote to turn mouse mode on or off.
For mobile version Apps in the App center, long press "ok" button
and then scroll the page to use it as a computer mouse.
Uninstalling Apps
1. Select "Settings" from the projector's home screen.
2. Scroll to "Apps" on the settings menu.
3. Select the app to uninstall.
4. Select "OK."
enable the
17
Page 20

HDMI CONNECTION
The projector can be connected to a variety of devices such
as smart phones, tablets, laptops, media streamers, and digital
cameras via HDMI.
IMPORTANT:
an adapter to connect or may need to be connected wirelessly. To
determine what type of adapter you need to use, reference "What
do I need to connect?" on page 19 in this manual.
1. Connect an HDMI compatible cable to the HDMI port on the
projector and the other end to the source device or plug in
an HDMI display dongle directly into one of the HDMI ports
on the projector.
2. If you are connecting a media streamer that requires power,
plug the streamer into the USB port on the projector for power
(maximum USB power output 5V/1A) or into a wall outlet.
IMPORTANT: Some devices will automatically mirror the display
from the source device in the projected image, other devices
may not have this ability. Devices that are not able to mirror can
still be used with the projector to project videos and
photo slideshows.
Devices that do not have an HDMI port will require
18
Page 21

NOTE: When connecting a laptop or computer, a multiple display
option must be enabled in your display settings.
What do I need to connect?
Source Device Needed to Connect
Apple iPad®, iPhone® and iPod touch®
devices
Android™ devices with SlimPort
Android devices with MHL
Other Android devices Wireless HDMI adapter (not included), such
Laptop or gaming console with HDMI port,
®
Apple TV
, ROKU®, Amazon Fire TV or
other HDMI streaming devices
HDMI streaming stick or
Chromecast device
GoPro devices, digital cameras, and digital
camcorders
NOTE:
If you do not see your source device listed here, contact
®
®
Apple® digital AV adapter (not included) and
HDMI compatible cable (included)
SlimPort® to HDMI adapter (not included)
and HDMI compatible cable (included)
MHL® to HDMI adapter (not included) and
HDMI compatible cable (included)
as a Chromecast™
HDMI compatible cable (included)
None, plugs directly into the projector’s
HDMI port
Micro HDMI adapter (not included) or Mini
HDMI adapter (not included) and HDMI
compatible cable (included)
your device manufacturer to confirm your device supports HDMI
video out and what, if any, adapter is required to make
the connection.
19
Page 22

WIRELESS CONNECTION
The projector can be connected to some smart phones and
tablets via a wireless connection.
Android Devices
IMPORTANT: Android devices require Android OS 4.4 or later
and the wireless screen mirroring capability to connect wirelessly
with the projector.
1. Press the “Input” button on the remote.
2. Select “Screen Mirroring“ on the pop up menu. The projector will
display a connecting screen.
3. On your Android device, swipe down from the top of the
screen to display the notification panel.
4. Select the “Quick Connect” button or the “Smart View”
option.
5. Select the Miroir projector from the list of available screen
mirroring devices.
20
Page 23

iOS Devices
IMPORTANT:
not supported on iOS devices. Wireless iOS viewing is
limited to certain file types such as native video, photos,
.PPTX files, .KEY files, and .PDF files through the
Brookstone Wireless Mobile Projector App.
1. Connect the projector to a wireless network (see the "WiFi
Connection" on page 19 of this manual).
2. On the iOS device download and install the
Brookstone Wireless Mobile Projector App.
3. Once installed, launch the app..
4. While on the projector’s home screen, press the “Input” button
on the remote.
5. Select DLNA on the pop up menu. The projector will
automatically connect to the iOS device.
IMPORTANT:
same wireless network to establish a wireless connection with the
Brookstone Wireless Mobile Projector App.
6. Select the content to project from the folders inside the
AirPlay and wireless screen mirroring are
The iOS device and your projector must be on the
21
Page 24

Brookstone Wireless Mobile Projector App on the iOS device.
TIP:
If you don't see the content you wish to project in the folders
inside the Brookstone Wireless Mobile Projector App check that
the content is a compatible file type. If the file is compatible,
AirDrop the file to the app.
USB FLASH DRIVE
Content can be played directly from a USB flash drive:
1. Select the "File Browser" icon from the projector’s home screen.
2. Select "USB Disk" from the device list.
3. Navigate to the desired file on the USB flash drive and select
the file to view.
IMPORTANT: Built in media player supports .wmv, .mpg, .mpeg,
.avi, .mov, .mp4, and .jpg file types.
CHANGING CONNECTION INPUT
Press the “Input” button on the remote to launch the connection
pop up menu to swap between the different HDMI inputs and
the wireless input. HDMI ports in use with appear green.
22
Page 25

AUDIO
The projector has built-in speakers that will be automatically
used for sound when the projector is powered on. Optionally,
connect an external speaker for bigger sound with the 3.5mm
audio out port or wirelessly with a Bluetooth speaker.
CONNECTING AN EXTERNAL SPEAKER
1. Connect the external speaker to the projector's 3.5mm audio
out port.
2. Select
3. Scroll down to “Audio Out” on the settings menu.
4. Toggle "External Speaker" to the on position.
CONNECTING A SUBWOOFER
1. Connect the subwoofer to the projector's 3.5mm audio out
port with the included RCA cable.
2. Select
3. Scroll down to “Audio Out” on the settings menu.
4. Toggle "Subwoofer" to the on position.
“Settings” from the projector’s home screen.
“Settings” from the projector’s home screen.
23
Page 26

CONNECTING A BLUETOOTH SPEAKER
1. Set the Bluetooth speaker to discoverable mode.
2. Select
3. Scroll down to “Bluetooth” on the settings menu page.
4. Select “Search for devices.”
5. Select your Bluetooth speaker from the list of
available devices.
“Settings” from the projector’s home screen.
VOLUME ADJUSTMENTS
The volume level of the projector can be adjusted using the volume
controls on the included remote control. Press the Volume up (+)
button or the Volume down (-) button to adjust to the preferred
volume level.
IMAGE ADJUSTMENTS
The projector will automatically adjust the image's focus.
CALIBRATE THE AUTOMATIC FOCUS ADJUSTMENT
Press and hold the Auto Focus button on the remote and allow
the projector a few seconds to make the required adjustments.
24
Page 27

MANUAL FOCUS ADJUSTMENTS
1. Select "Settings" from the projector's home screen.
2. Scroll to "Focus" on the settings menu.
3. Select the "Manual Focus" and use the left (‹) or right (›)
buttons on the remote to adjust the focus to the desired level
MANUAL KEYSTONE ADJUSTMENT
1. Select "Settings" from the projector's home screen.
2. Scroll to "Keystone" on the settings menu.
3. Select the "Manual Keystone" and use the left (‹) or right (›)
buttons on the remote to adjust the focus to the desired level.
VIVID MODE
Vivid mode enhances image contrast and brightness, ideal for
movie watching. To turn vivid mode on or off:
1. Select the settings icon from the projector’s home screen.
2. Scroll down to the vivid mode option in the settings menu.
3. Toggle on or off.
25
Page 28

CHECK INTERNAL STORAGE CAPACITY
1. Select "Settings" from the projector's home screen.
2. Scroll to "Apps" on the settings menu. The internal storage
capacity and free space are shown on the bar at the bottom
of the screen.
USING THE PROJECTOR AS A SPEAKER
The projector's built-in internal speakers can be used as a
Bluetooth speaker.
IMPORTANT: Before the projector can be used as an external
speaker the remote must be paired with the projector (see
"Pairing the Remote" on page 11).
1. Select the Bluetooth Audio button on the remote. The status
light will flash blue to indicate the projector is ready to be paired.
IMPORTANT:
Bluetooth Audio button will power off the projector lens.
2. On your device's Bluetooth menu, select the projector. When
successfully paired, the status light on the projector will
illuminate solid blue.
26
If you had the projector powered on, pressing the
Page 29

CLEANING THE LENS
An optical lens cleaning solution can be used to clean the
projector’s optical lens. Apply a small amount of the cleaning
solution to a clean soft cleaning cloth and gently wipe the lens in a
circular motion.
IMPORTANT:
Do not use abrasive cleaners, solvents or cleaning cloths. Do not
apply the cleaning solution to the projector’s case
Do not apply cleaning solution directly to the lens.
UPDATING THE PROJECTOR
When firmware updates are available for your projector a red
numeric indicator will appear on the home screen
icon. To update the firmware on your projector, select the system
update icon from your projector’s home screen.
system update
RESET TO FACTORY DEFAULTS
To erase all data on the projector and reset all settings to
factory defaults:
1. Select "Settings"
from the projector's home screen.
27
Page 30

2. Scroll to "About this projector " on the settings menu.
3. Select "Factory data reset."
4. Select "Erase everything" and allow the projector a few
moments to erase all the data on the projector and restart.
TROUBLESHOOTING
The projected image is blurry.
• Adjust the focus wheel on the projector to fine-tune the picture.
•Check that the surface you are projecting on is smooth.
•Check that the projector’s lens is free of dust and debris.
The projected image is too small.
•Move the projector farther away from the projection surface.
The projected image is smaller on one side and larger on the other.
•Adjust the projector so the lens is facing your projection
surface at a 90° angle.
The projector is not powering on.
•Check that the power cable is firmly attached to the
projector's power port and the other end is securely plugged
28
into a wall outlet.
Page 31

The projector is not connecting to your wireless network.
•Check that you have selected the correct wireless router
name in the setup menu.
•Check that you are inputting the correct password if your
network is security enabled (passwords are case sensitive).
•Check that there are no obstructions, like cement walls,
between the projector and your wireless router.
• Try relocating the projector to minimize wireless interference
from other household appliances and/or other wireless networks.
You can’t hear any sound.
•Check that the volume on the projector is turned up.
•If an external speaker is connected with an audio cable,
check that the connection from the speaker to the projector
is securely plugged in on both ends. Also check that any
volume controls on the external speaker are turned up and
not muted.
•If an external Bluetooth speaker is connected, check the
audio settings on the projector to ensure the device is
29
Page 32

connected properly. Also check that the Bluetooth speaker is
not muted.
The projector’s remote control isn’t functioning.
•If the status light on the remote flashes each time your press
a button on the remote, the problem is not with your remote.
•Try moving closer to the projector with the remote.
•Check that the batteries are functioning and inserted
properly.
The projector is not projecting.
•Check that there are no obstructions between the projector
and the projection surface.
•Power the unit off, press the restart button, and power the
unit back on.
•If connected to the projector with a cabled HDMI connection:
- Check that the HDMI compatible cable is securely plugged into the
HDMI port on your device and the HDMI port on the projector.
- Check that you are using any necessary adapters or cables to
connect your device. Also check with your device manufacturer to
ensure your device supports HDMI video out and you are using
any required cables and/or adapters to make the connection. If an
adapter is required, power down the projector, add the adapter, and
30
then turn the projector back on.
Page 33

- If connected to a laptop or computer, check your display settings to
ensure a multiple display option is selected.
- If connected to a gaming console, power down the console and
the projector. Check that the HDMI compatible cable is securely
connected to the HDMI port on the projector and to the HDMI port
on the gaming console. Power the projector on, then power on the
gaming console.
•If connected to the projector with a wireless connection to an
iOS device:
- Check that you have downloaded, installed and launched the Miroir
Wireless app on your device
- Check that your projector and your iOS device are connected to the
same wireless network.
- Check that you have selected compatible content for viewing from
inside the app’s folders.
- Check that the DLNA input is selected on the projector.
.
•If connected to the projector with a wireless connection to an
Android device:
- Check that your device supports screen mirroring.
- Check that the Screen Mirroring input is selected on the projector.
31
Page 34

ONE (1) YEAR LIMITED WARRANTY
Brookstone® warrants this product against defects in materials and/or
workmanship under normal use for a period of ONE (1) YEAR from the
date of purchase by the original purchaser (“Warranty Period”). If a defect
arises and a valid claim is received within the Warranty Period, at its
option, Brookstone will either 1) repair the defect at no charge, using new
or refurbished replacement parts, or 2) replace the product with a new
product that is at least functionally equivalent to the original product, or
3) provide a store credit in the amount of the purchase price of the original product.
A replacement product or part, including a user-installable part installed in
accordance with instructions provided by Brookstone, assumes the remaining
warranty of the original product. When a product or part is exchanged, any
replacement item becomes your property and the replaced item becomes
Brookstone’s property. When a store credit is given, the original product must
be returned to Brookstone and becomes Brookstone’s property.
Obtaining Service: To obtain warranty service,
call Brookstone Limited Warranty Service
at 1-800-292-9819. Please be prepared to describe the product that needs
service and the nature of the problem. A purchase receipt is required. All
repairs and replacements must be authorized in advance. Service options, parts
availability and response times will vary. You are responsible for delivery and the
cost of delivery of the product or any parts to the authorized service center for
replacement, per our instructions.
Limits and Exclusions: Coverage under this Limited Warranty is limited
to the United States of America, including the District of Columbia and
the U.S. Territories of Guam, Puerto Rico, and the U.S. Virgin Islands. This
Limited Warranty applies only to products manufactured for Brookstone
that can be identified by the “Brookstone” trademark, trade name,
or logo affixed to them or their packaging. The Limited Warranty does
32
Page 35

not apply to any non-Brookstone products. Manufacturers or suppliers
other than Brookstone may provide their own warranties to the purchaser,
but Brookstone, in so far as permitted by law, provides these products “as is.”
This warranty does not apply to: a) damage caused by failure to follow instructions
relating to product’s use or the installation of components; b) damage caused
by accident, abuse, misuse, fire, floods, earthquake or other external causes; c)
damage caused by service performed by anyone who is not a representative
of Brookstone; d) accessories used in conjunction with a covered product; e)
a product or part that has been modified to alter functionality or capability; f)
items intended to be periodically replaced by the purchaser during the normal
life of the product including, without limitation, batteries or light bulbs; g) any
product sold “as is” including, without limitation, floor demonstration models and
refurbished items; or h) a product that is used commercially or for a commercial
purpose.
BROOKSTONE SHALL NOT BE LIABLE FOR INCIDENTAL OR
CONSEQUENTIAL DAMAGES RESULTING FROM THE USE OF THIS
PRODUCT, OR ARISING OUT OF ANY BREACH OF THIS WARRANTY.
TO THE EXTENT PERMITTED BY APPLICABLE LAW, BROOKSTONE
DISCLAIMS ANY AND ALL STATUTORY OR IMPLIED WARRANTIES,
INCLUDING, WITHOUT LIMITATION, WARRANTIES OF MERCHANTABILITY,
FITNESS FOR A PARTICULAR PURPOSE AND WARRANTIES AGAINST
HIDDEN OR LATENT DEFECTS. IF BROOKSTONE CANNOT LAWFULLY
DISCLAIM STATUTORY OR IMPLIED WARRANTIES, THEN TO THE EXTENT
PERMITTED BY LAW, ALL SUCH WARRANTIES SHALL BE LIMITED IN
DURATION TO THE DURATION OF THIS EXPRESS WARRANTY.
Some states disallow the exclusion or limitation of incidental or consequential
damages or how long an implied warranty lasts, so the above exclusions or
limitations may not apply to you. This warranty gives you specific legal rights
and you may also have other rights, which vary from state to state.Brookstone
assumes no responsibility for any errors that may appear in this manual.
Information contained herein is subject to change without notice.
33
Page 36

Find thousands more
great ideas online
318490
©2016 Brookstone•Merrimack, NewHampshireUSA 03054•800-846-3000•Brookstone.com
 Loading...