

Page 1

PCMCIA 11M
Wireless LAN Card
User Manual
Rev 0.9
Page 2

Page 3

Regulatory Compliance
FCC Warning
This equipment has been tested and found to comply with the limits for
a Class B digital device, pursuant to part 15 of the FCC Rules. These
limits are designed to provide reasonable protection against harmful
interference in a residential installation. This equipment generates,
uses and can radiate radio frequency energy and, if not installed and
used in accordance with the instructions, may cause harmful interference to radio communications. However, there is no guarantee that
interference will not occur in a particular installation. If this equipment
does cause harmful interference to radio or television reception, which
can be determined by turning the equipment off and on, the user is encouraged to try to correct the interference by one or more of the
following measures:
Reorient or relocate the receiving antenna.
Increase the separation between the equipment and receiver.
Connect the equipment into an outlet on a circuit different from that
to which the receiver is connected.
Consult the dealer or an experienced radio/TV technician for help.
You are cautioned that changes or modifications not expressly approved by the party responsible for compliance could void your
authority to operate the equipment.
IMPORTANT NOTE:
Federal Communications Commission (FCC) Radiation Exposure State-
ment
This equipment complies with FCC radiation exposure limits set forth
for an uncontrolled environment.
i
Page 4

Wireless LAN card user manual
This transmitter must not be co-located or operating in conjunction with
any other antenna or transmitter.
CE Mark Warning
This is a Class B product. In a domestic environment, this product may cause radio interference, in which case the user may be
required to take adequate measures.
About this manual
This manual describes how to install and operate your Wireless LAN
card. Please read this manual before you install the product.
This manual includes the following topics:
Product description, features and specifications.
Hardware installation procedure.
Software installation procedure.
Trouble shooting procedures
ii
Page 5

Preface
Table of contents
CHAPTER 1....................................................................................................1
Introduction 1
Features............................................................................................... 1
What is Wireless LAN? ........................................................................ 2
LAN Modes .......................................................................................... 3
Notes on wireless LAN configuration .................................................. 4
CHAPTER 2....................................................................................................5
Hardware installation 5
What’s in the package..........................................................................5
Hardware description.......................................................................... 5
Inserting the Wireless LAN card.......................................................... 6
Status LEDs.......................................................................................... 7
Ejecting the Wireless LAN card........................................................... 7
CHAPTER 3....................................................................................................9
Driver installation for Windows 9
Driver installation for Windows 95 ..................................................... 9
Driver installation for Windows 98 ................................................... 15
Driver installation for Windows 2000 ...........
Driver installation for Windows NT 4.0.........
Driver Installation for Windows ME .............
錯誤! 尚未定義書籤。
錯誤! 尚未定義書籤。
錯誤! 尚未定義書籤。
8
2
6
CHAPTER 4..................................................................................................28
Using the Wireless Utility 28
Installation in Windows ..................................................................... 28
Using the Wireless Utility..................................................................36
APPENDIX A................................................................................................39
Troubleshooting 39
Q&A for Windows environments ....................................................... 39
APPENDIX B ................................................................................................ 41
Specifications..................................................................................... 41
iii
Page 6

Page 7

Chapter 1
Introduction
Thank you for purchasing the Wireless LAN card. This high-speed
Wireless LAN card provides you with an innovative wireless networking solution. The Card is easy to set up and use. With this
innovative wireless technology, you can share files and printers on
the network—without inconvenient wires! Now you can carry the
LAN in your pocket!
Features
• Wire-free access to networked resources from anywhere beyond
the desktop
• Low interference & high susceptibility guarantee reliable performance
• Delivers data rate up to 11 Mbps
• Dynamically shifts between 11, 5.5, 2, and 1 Mbps network
speed, based on signal strength, for maximum availability and reliability of connection
• Allows users move between Access Points without resetting their
connection reconfiguration
• Antenna is built in to the card with LEDs indicating Power and
Link
• Uses 2.4GHz frequency band, which complies with worldwide
requirement
• Supports most popular operating systems: Window
95/98/2000/NT 4.0/ME
• Ensures great security by providing the Wired Equivalent Privacy (WEP) defined in the IEEE 802.11 standard
1
Page 8

Wireless LAN card user manual
What is Wireless LAN?
Wireless Local Area Network (WLAN) systems offer a great
number of advantages over traditional wired systems. WLANs are
flexible and easy to setup and manage. They are also more economical than wired LAN systems.
Using radio frequency (RF) technology, WLANs transmit and receive data through the air. WLANs combine data connectivity with
user mobility. For example, users can roam from a conference
room to their office without being disconnected from the LAN.
Using WLANs, users can conveniently access shared information,
and network administrators can configure and augment networks
without installing or moving network cables.
WLAN technology provides users with many convenient and cost
saving features:
• Mobility: WLANs provide LAN users with access to real-
time information anywhere in their organization, providing
service opportunities that are impossible with wired networks.
• Ease of Installation: Installing is easy for novice and ex-
pert users alike, eliminating the need to install network
cables in walls and ceilings.
• Scalability: WLANs can be configured in a variety of to-
pologies to adapt to specific applications and installations.
Configurations are easily changed and range from peer-topeer networks suitable for a small number of users to full
infrastructure networks of thousands of users roaming over
a broad area.
2
Page 9

—Introduction
LAN Modes
Wireless LANs can be configured in one of two ways:
Ad-hoc
Networking
Infrastructure
Networking
Also known as a peer-to-peer network, an ad-hoc network is one that allows all workstations and computers
in the network to act as servers to all other users on the
network. Users on the network can share files, print to
a shared printer, and access the Internet with a shared
modem. However, with ad-hoc networking, users can
only communicate with other wireless LAN computers
that are in the wireless LAN workgroup, and are within
range.
Infrastructure networking differs from ad-hoc networking in that it includes an access point. Unlike the adhoc structure where users on the LAN contend the
shared bandwidth, on an infrastructure network the
access point can manage the bandwidth to maximize
bandwidth utilization.
Additionally, the access point enables users on a wireless LAN to access an existing wired network, allowing
wireless users to take advantage of the wired networks
resources, such as Internet, email, file transfer, and
printer sharing.
Infrastructure networking has the following advantages
over ad-hoc networking:
• Extended range: each wireless LAN computer
within the range of the access point can communicate with other wireless LAN computers within
range of the access point.
• Roaming: the access point enables a wireless
LAN computer to move through a building and still
be connected to the LAN.
• Wired to wireless LAN connectivity: the access
point bridges the gap between wireless LANs and
their wired counterparts.
3
Page 10

Wireless LAN card user manual
Notes on wireless LAN configuration
When configuring a wireless LAN (WLAN), be sure to note the
following points:
• Optimize the performance of the WLAN by ensuring that
the distance between access points is not too far. In most
buildings, WLAN cards operate within a range of 100 ~
300 feet, depending on the thickness and structure of the
walls.
• Radio waves can pass through walls and glass but not metal.
If there is interference in transmitting through a wall, it
may be that the wall has reinforcing metal in its structure.
Install another access point to circumvent this problem.
• Floors usually have metal girders and metal reinforcing
struts that interfere with WLAN transmission.
This concludes the first chapter. The next chapter deals with the
hardware installation of the Wireless LAN card.
4
Page 11
Chapter 2
Hardware installation
This chapter covers inserting your Wireless LAN card in the
PCMCIA slot of notebook, and connecting the card to a network.
What’s in the package
Please ensure that the following items are included in your package. If any items are missing, contact your dealer.
• Wireless LAN PCMCIA card
• CD-ROM (includes utility, drivers, and this manual)
• Quick installation guide
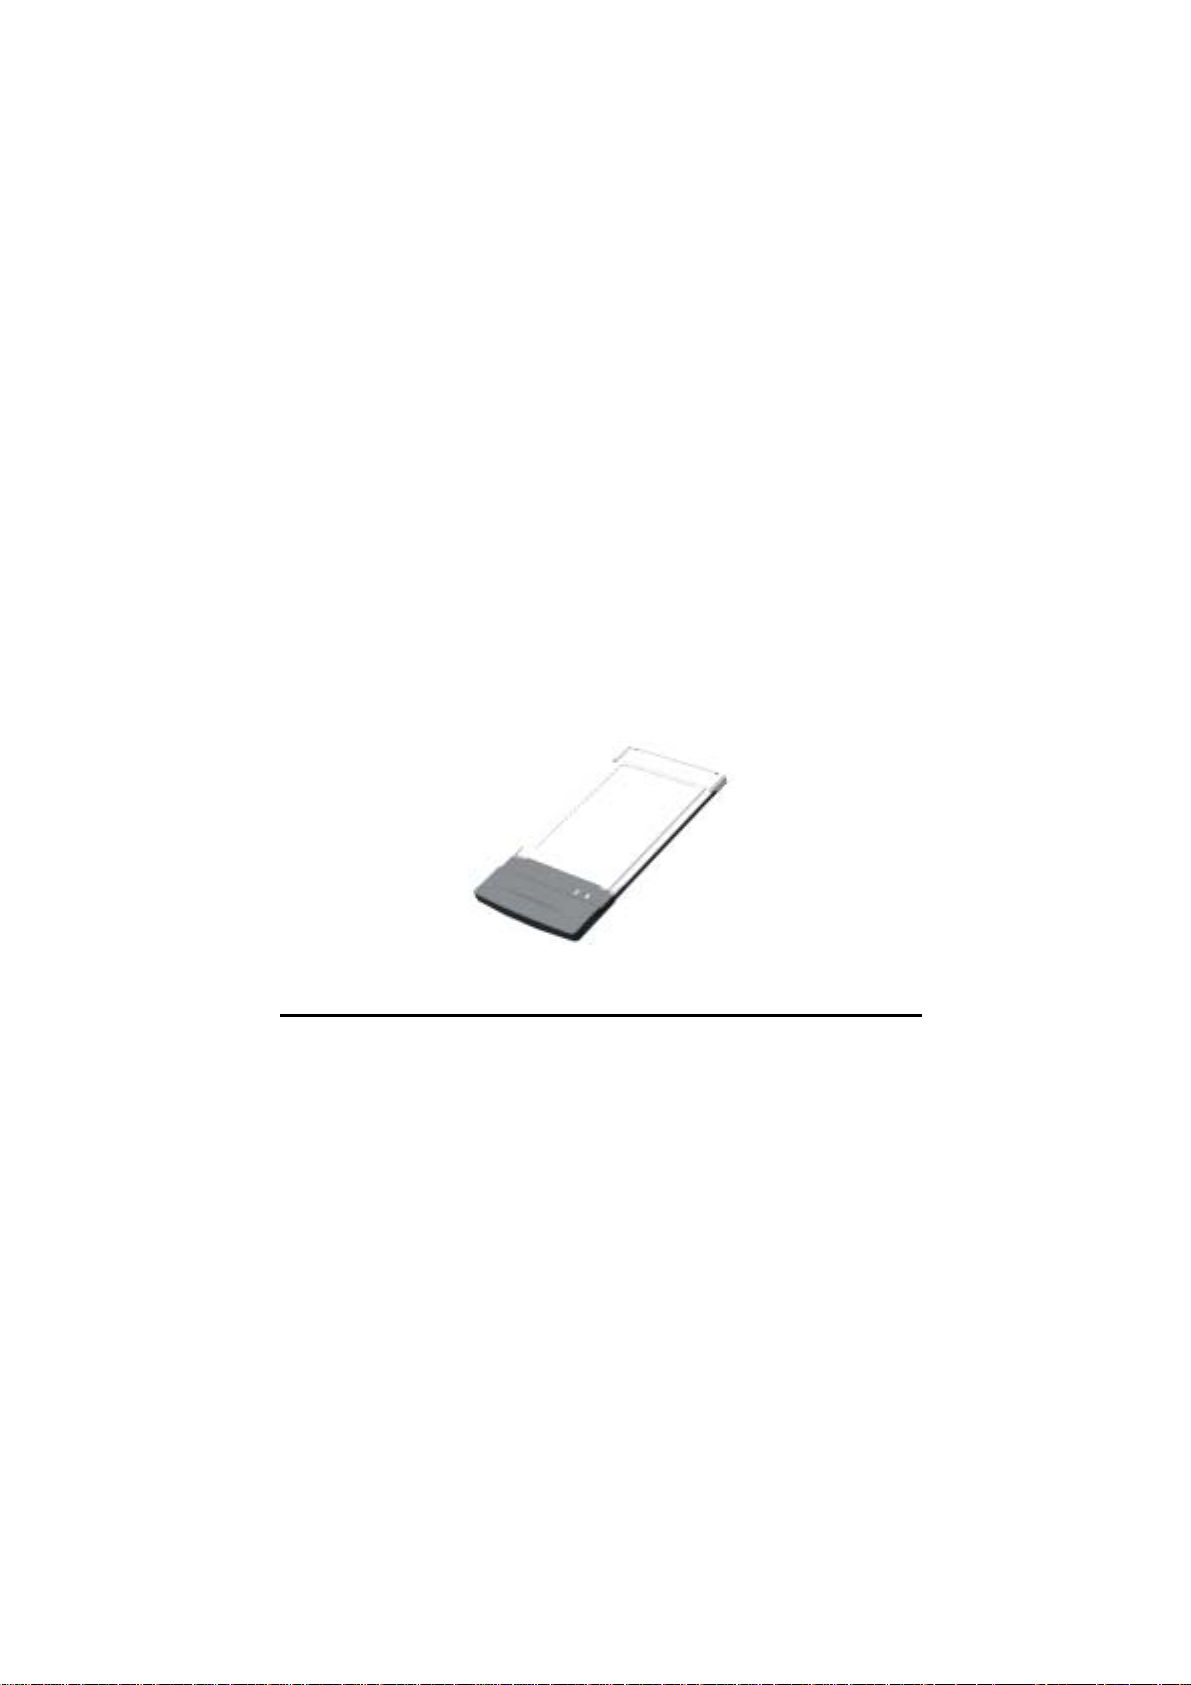
Hardware description
The Wireless LAN Card is encased in a stainless compact frame
and has a 68-pin connector for attaching to the PCMCIA port of
notebook.
5
Page 12
Wireless LAN card user manual
Inserting the Wireless LAN card
Note!
These instructions apply to most notebook computers.
For detailed information on inserting PC cards into
your notebook, consult the notebook manual.
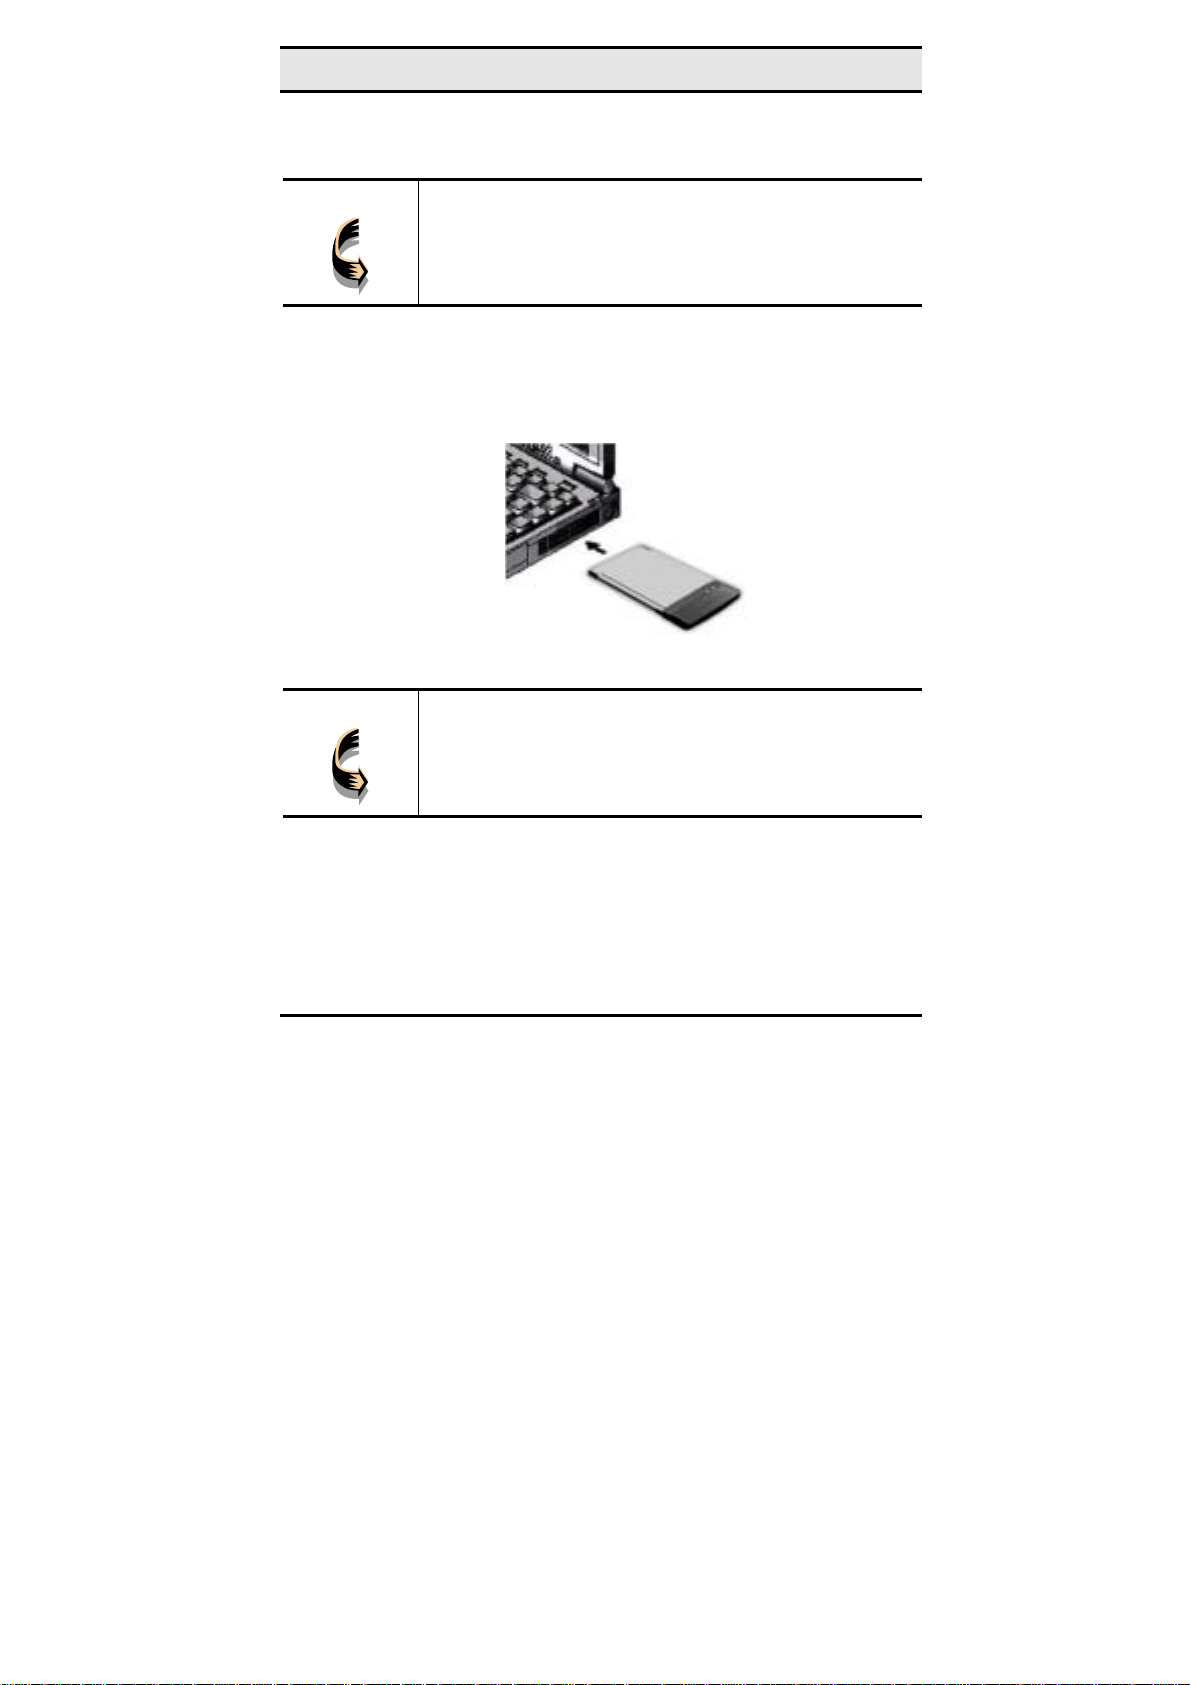
Follow the procedure below to install the Wireless LAN card.
1. With 68-pin connector of the card facing the PCMCIA
slots on notebook, slide the card all the way into an empty
slot.
2. Connect to a network.
Note!
For information on connecting your Card to the LAN,
contact your system administrator.
6
Page 13
—Hardware installation
y
-
Status LEDs
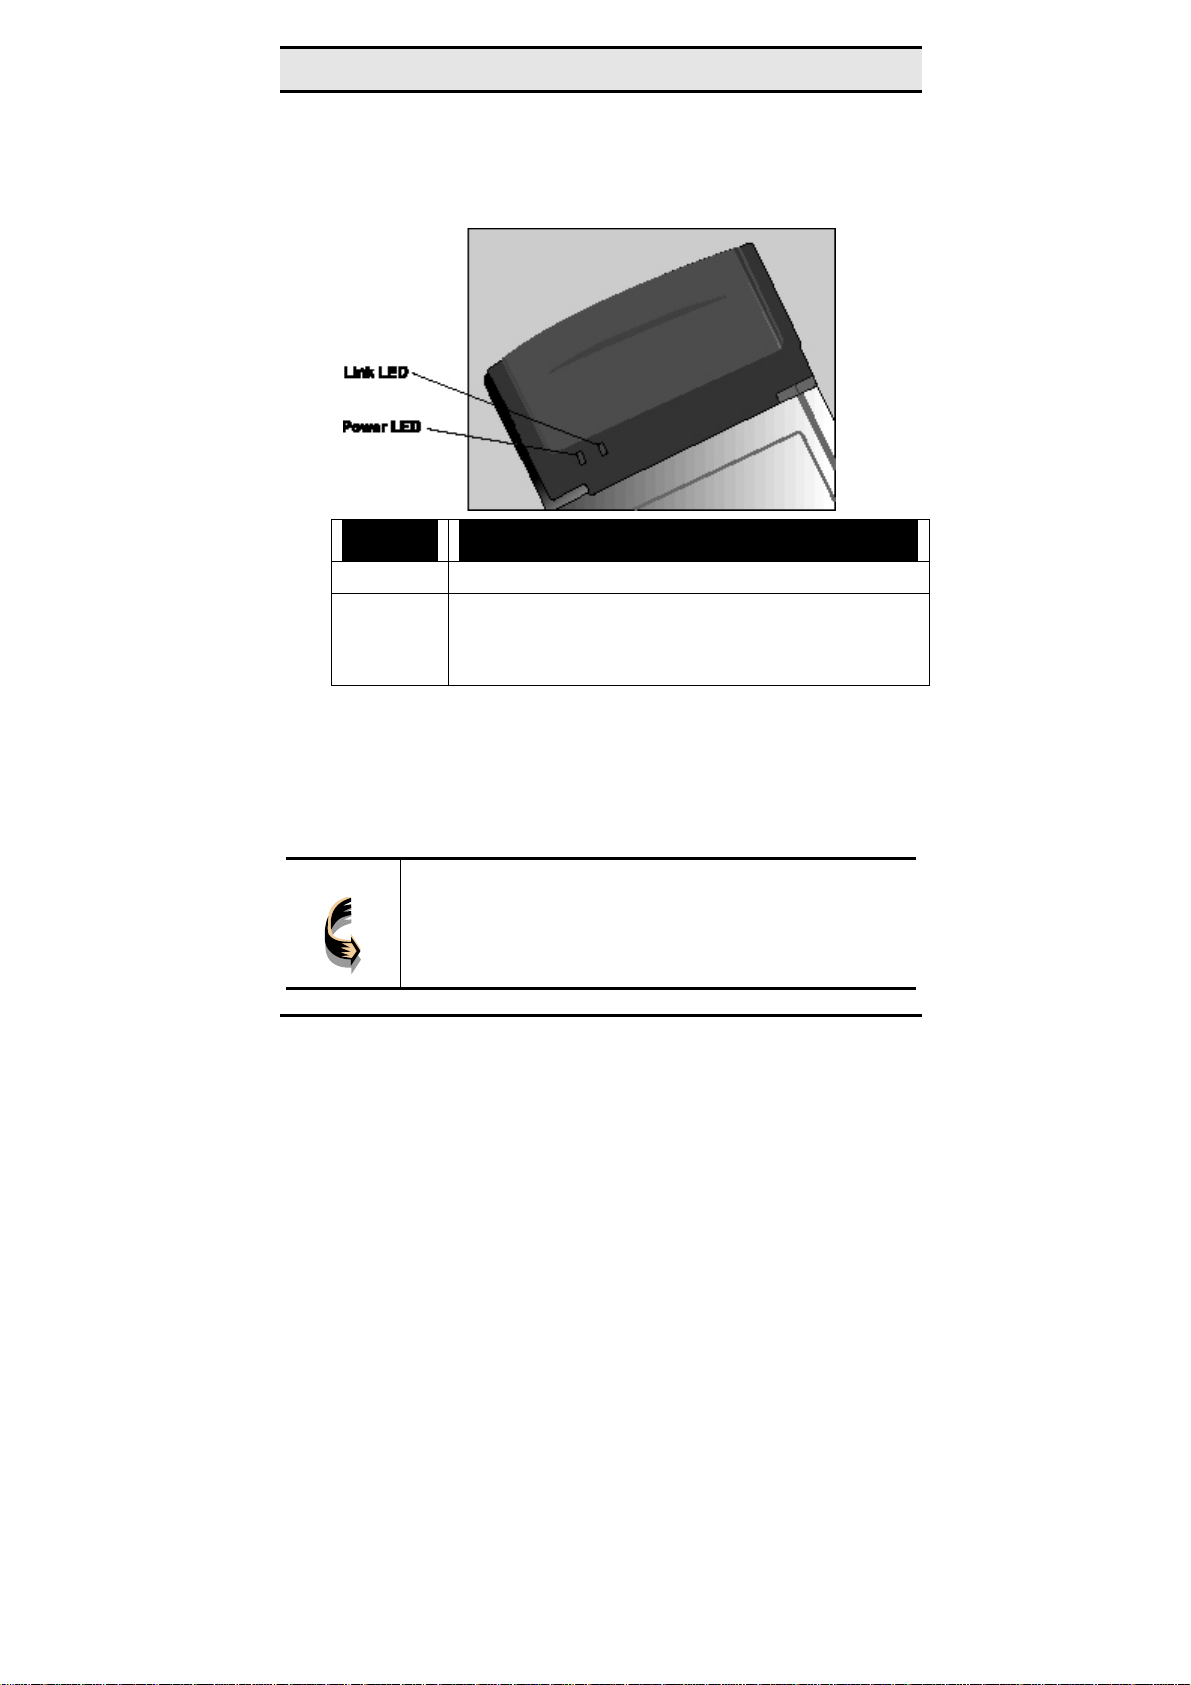
The following table describes the meaning of the LEDs:
LED MEANING
PWR
LINK
Indicates that the Card is powered on.
Indicates link status. It is normally blinking. When blink-
ing, indicates that the card is scanning the channels, and
the link is not active. When lit, indicates that the card is
locked to a channel, and the link is active.
Ejecting the Wireless LAN card
After disconnecting from the LAN, you can eject the Wireless
LAN card from the PC Card slot of notebook.
Note!
7
In Win 2000/ME/98/95 operating systems, you do not
have to power down the notebook to remove the card.
The card is hot-swappable—you can remove the card
when the notebook is powered on. However, Microsoft
recommends that
ou stop the card. Refer to your Win
Page 14

Wireless LAN card user manual
dows 2000/ME/98/95 online help for information on stopping the Wireless LAN card.
Most notebooks have an eject lever or button for ejecting PC cards
from the PC slots. Consult your notebook manual for details.
Warning!
To prevent data loss, do not eject the Wireless LAN card
when a data transmission is taking place. Exit your communications program normally, stop the card if necessary, and
then remove the card.
This concludes Chapter 2. The next chapter covers driver installation for Windows 2000/ME/98/95/NT operating systems.
8
Page 15
Chapter 3
Driver installation for Windows
The following sections cover Wireless LAN card driver installation in
the Windows 2000/ME/98/95/NT operating systems.
Driver installation for Windows 95
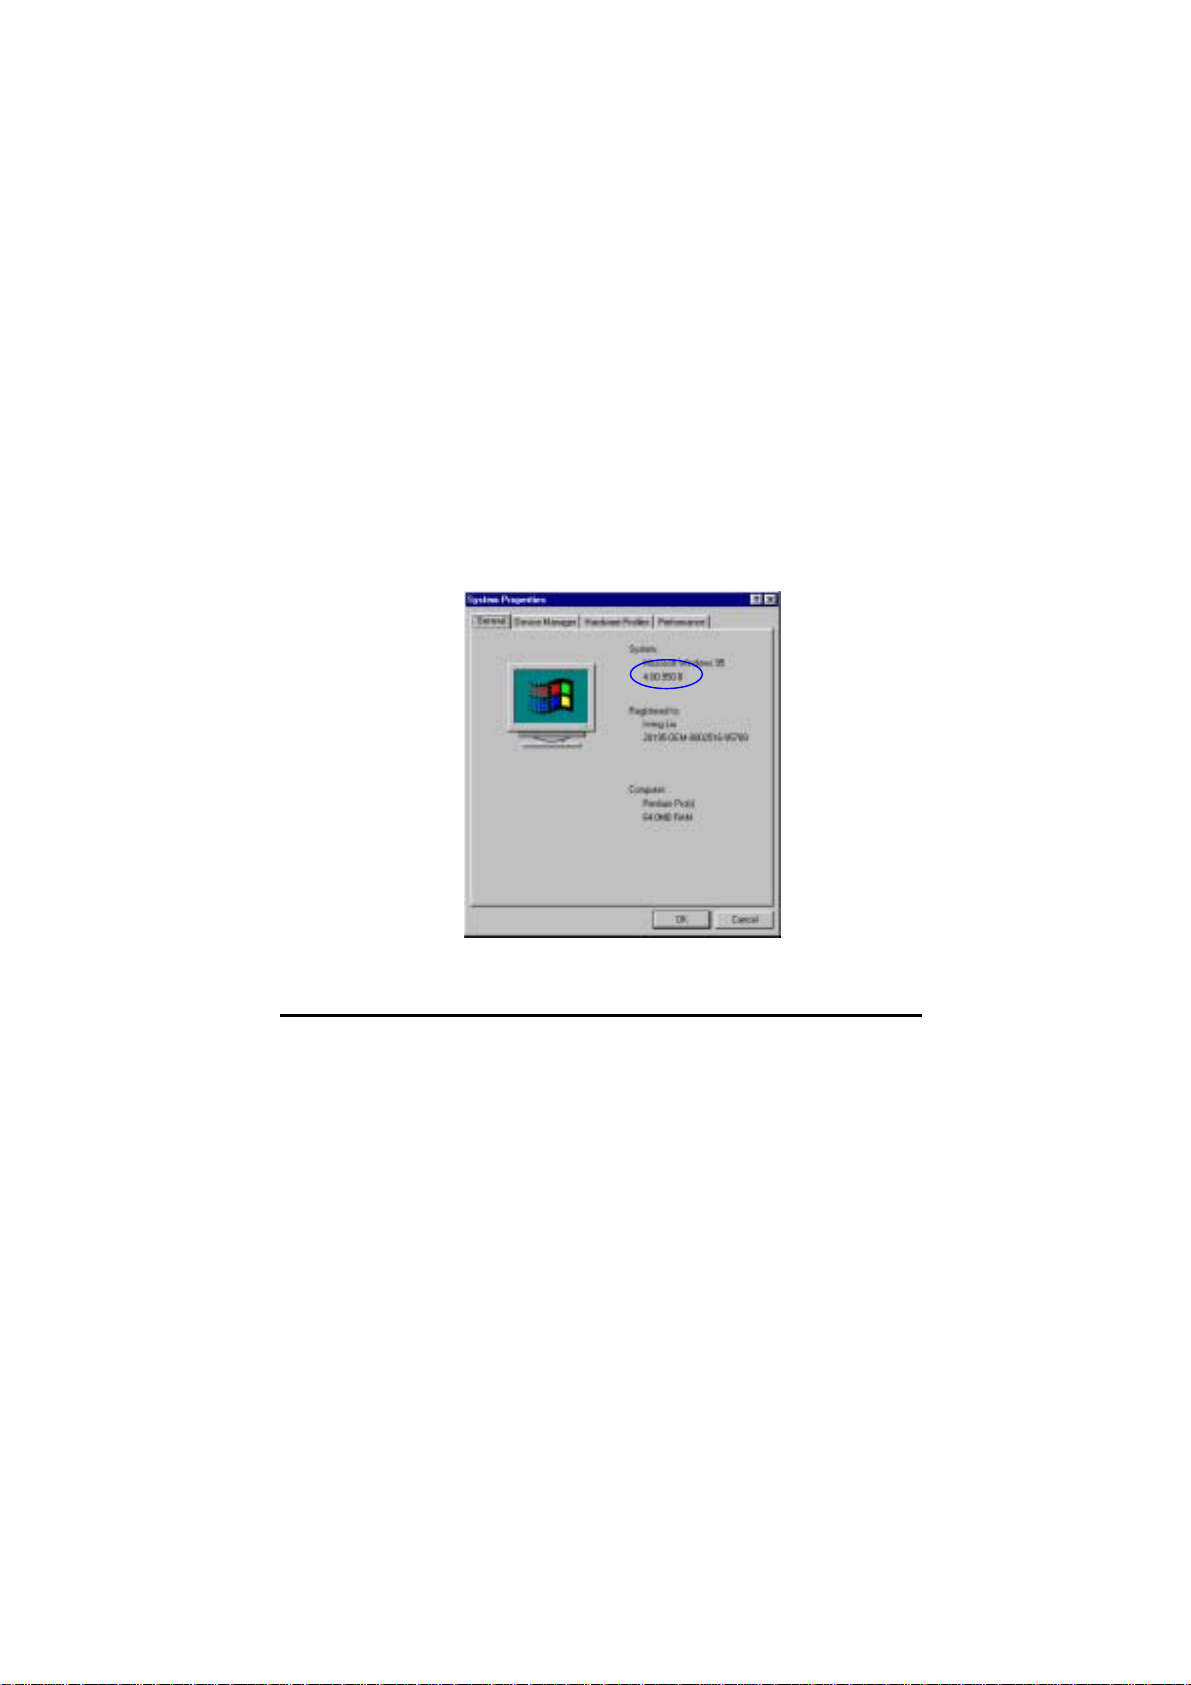
There are two popular versions of Windows 95, one is for retail
version (ver 4.00.950), and the other is OEM Service Release 2
(ver 4.00.950B). To know which version you are using, click to
run the System icon in Control Panel. You will see the following
window pops up.
9
Page 16
Wireless LAN card user manual
From the General tab, the system information shows you the version number of your windows.
Install Drivers on the Windows 95 OSR2
1. Insert the Wireless LAN card into an available PCMCIA
slot in your notebook (refer to page 錯誤! 尚未定義書
籤。 - Inserting the wireless LAN card).
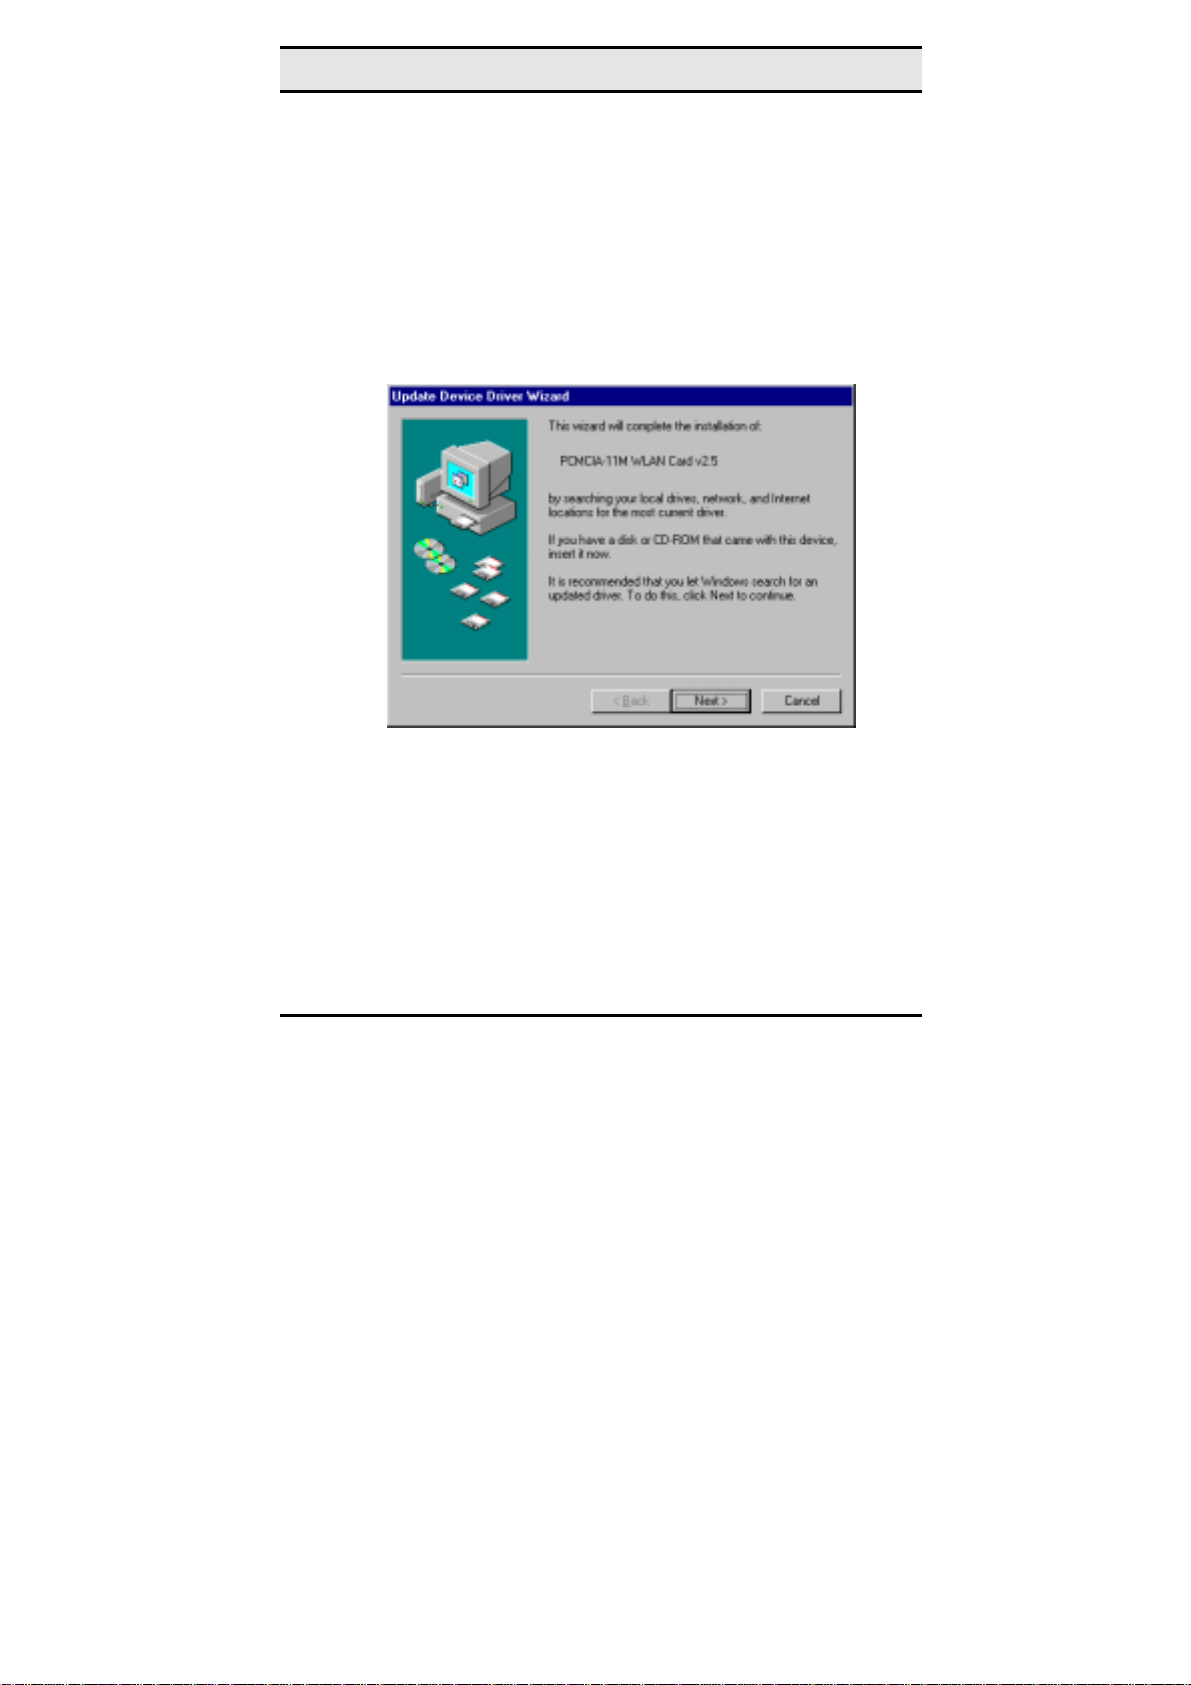
2. After Windows 95 detects the card, the Update Device
Driver Wizard window appears:
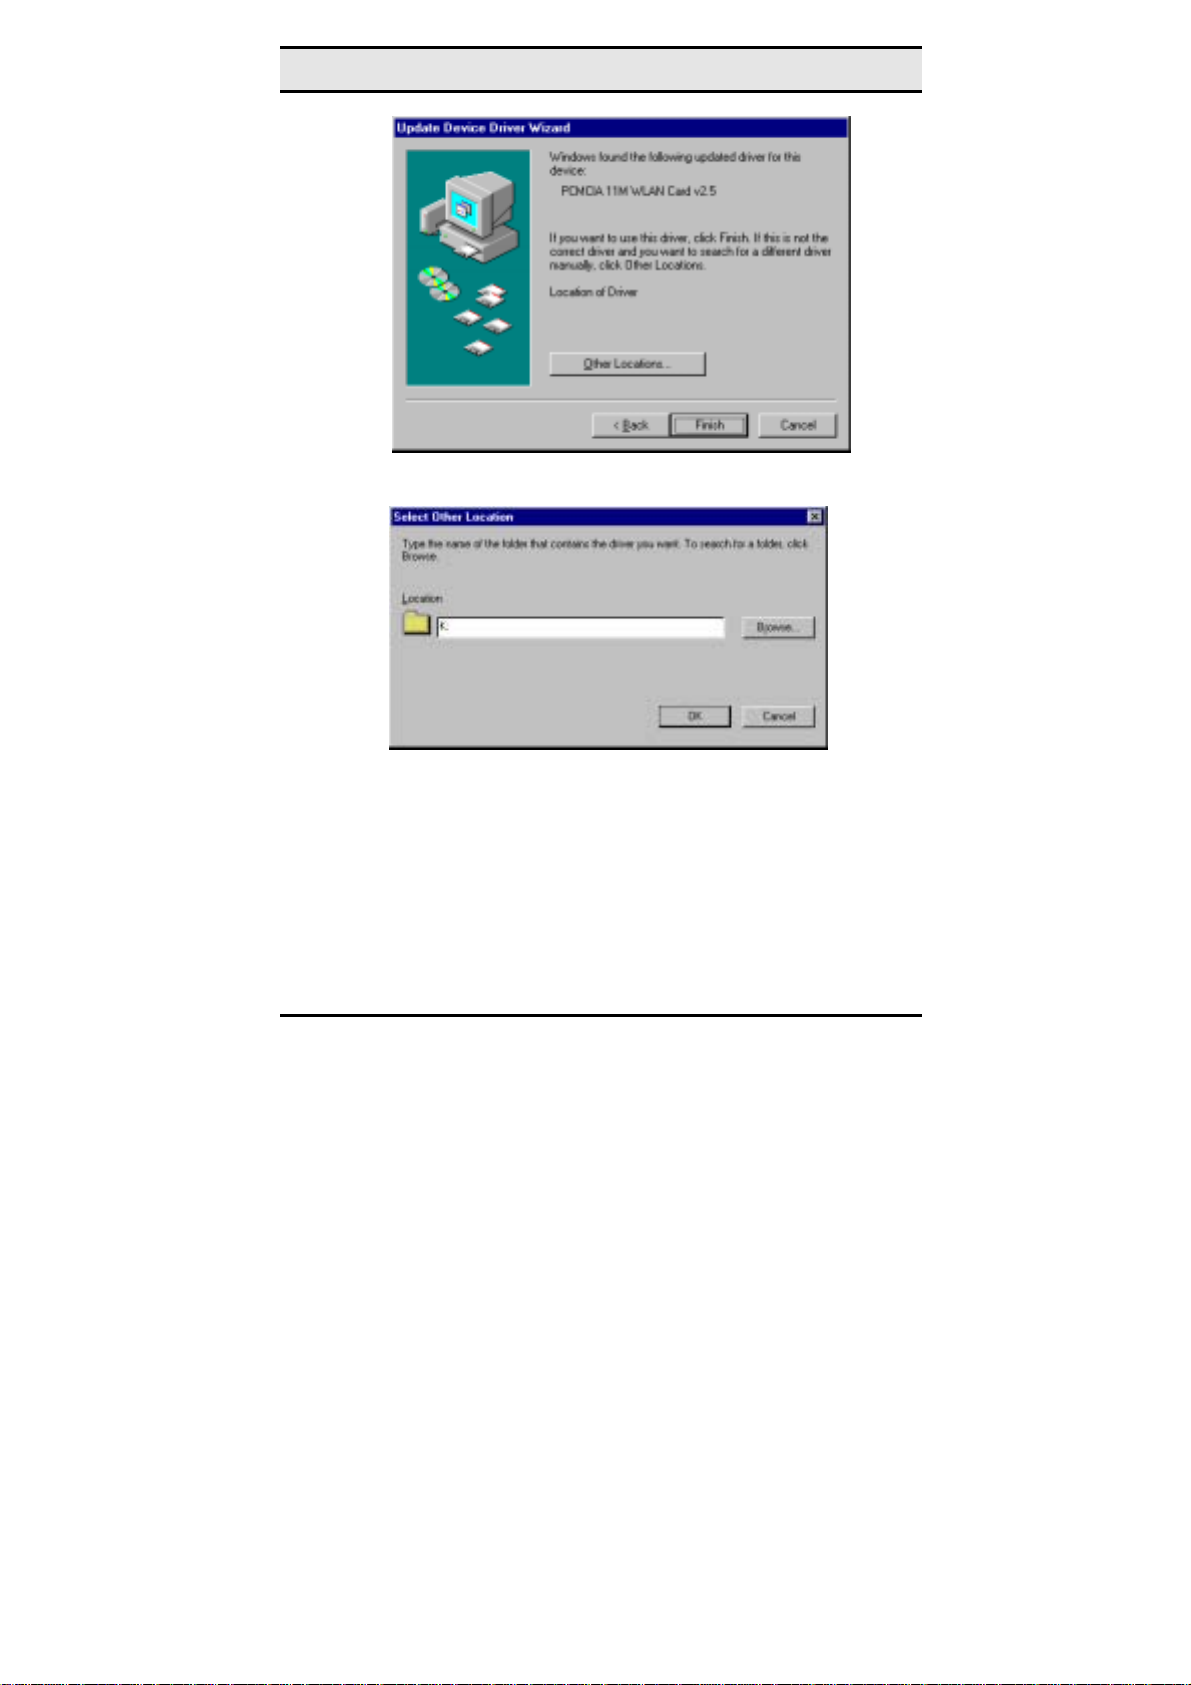
3. Insert the driver disc and click Next to continue the installation. Windows searches for the driver and the following
screen appears:
10
Page 17
—Driver installation for Windows
4. Click Other Locations to bring up the following window:
5. Type K: where K is your CD-ROM drive letter. Then click
OK. The following screen appears:
11
Page 18
Wireless LAN card user manual
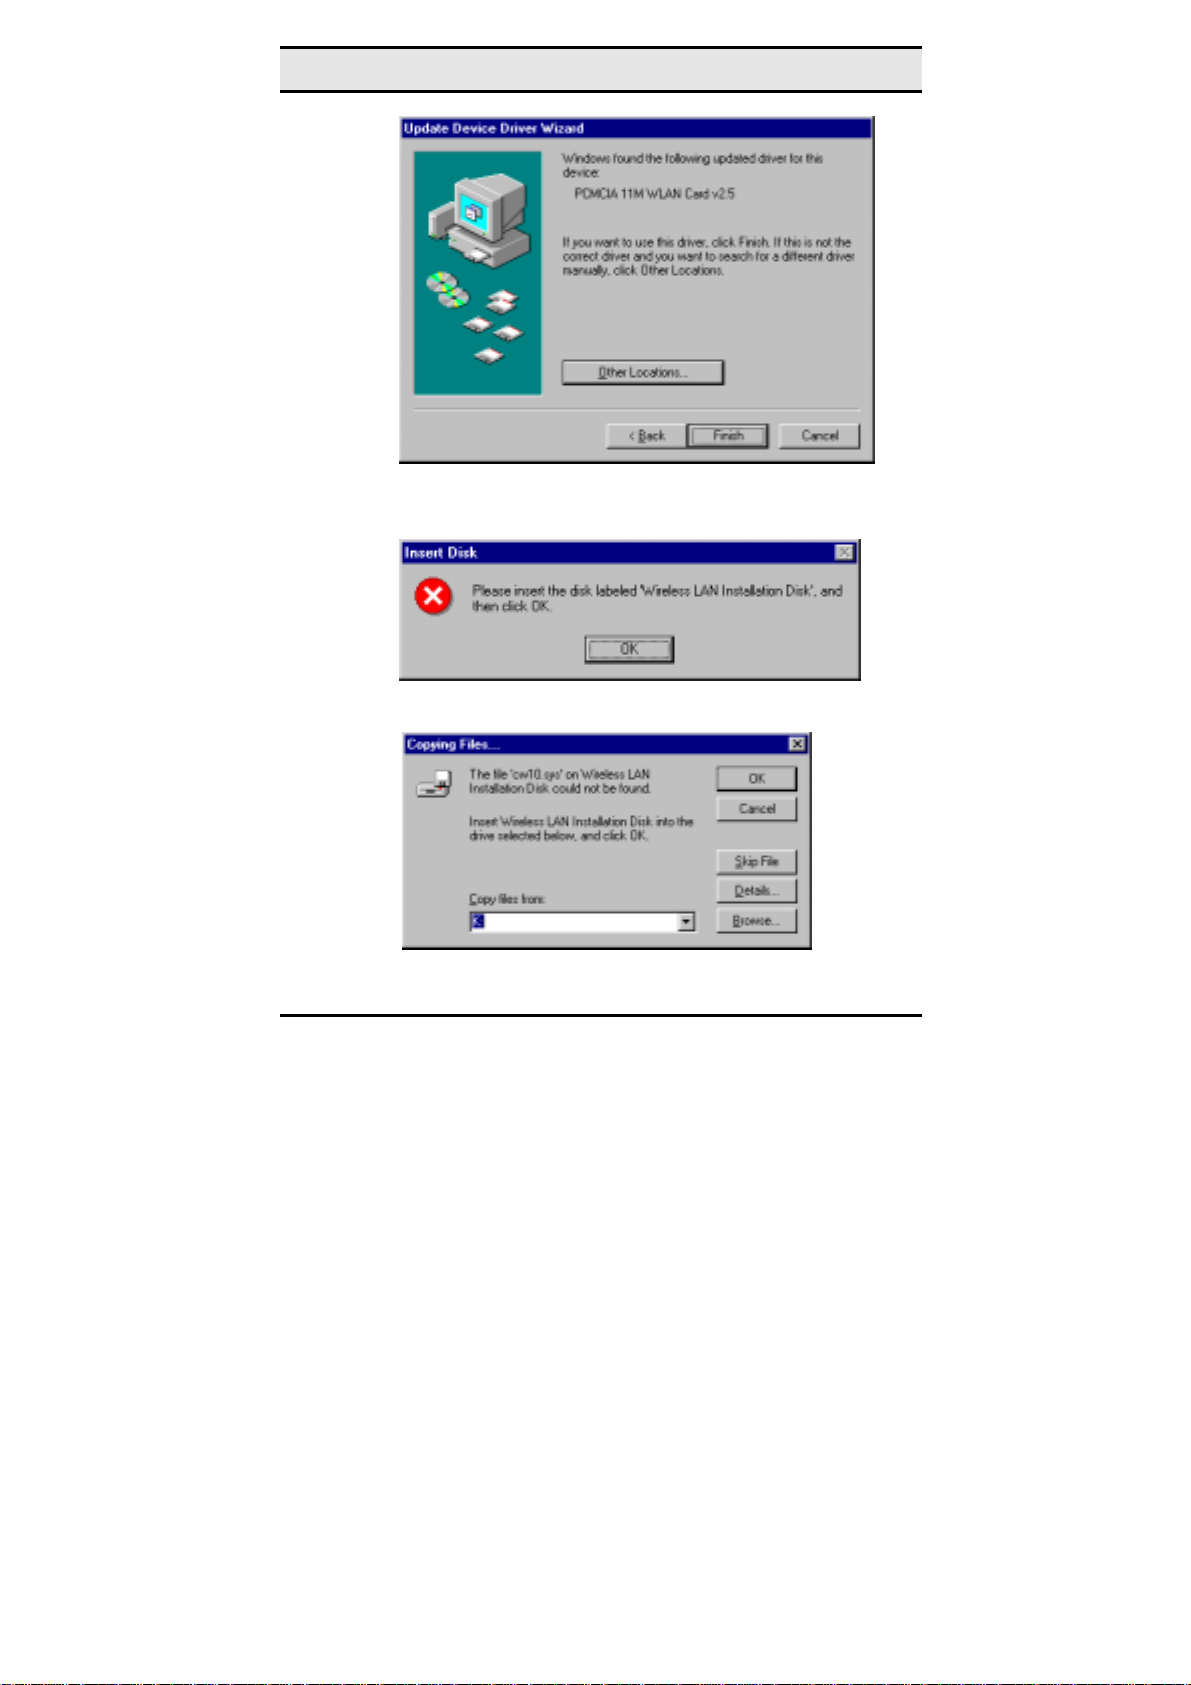
6. Click Finish to continue. Windows may prompt you the
following window to ask you insert the disc.
7. Click OK to continue.
12
Page 19

—Driver installation for Windows
8. Again type K: where K is your CD-ROM drive letter and
click OK. After copying the driver files. Windows 95
prompts you to restart the system. Click Yes to continue
the installation.
Note!
If you did not install the Windows 95
OSR2 from your hard drive, Windows
will prompt you to input the path to the
Windows 95 CD-ROM. Follow the instructions on your screen, then click
OK to continue.
9. After you rebooted the computer, system will start to install
wireless utility automatically. Please refer to procedures at
Chapter 4.
Install Drivers on the Windows 95 Retail version
1. Insert the LAN Modem card into an available PCMCIA
slot in your notebook (refer to page 錯誤! 尚未定義書
籤。 - Inserting the LAN Modem card).
2. After Windows 95 detects the card, the Update Device
Driver Wizard window appears:
13
Page 20
Wireless LAN card user manual
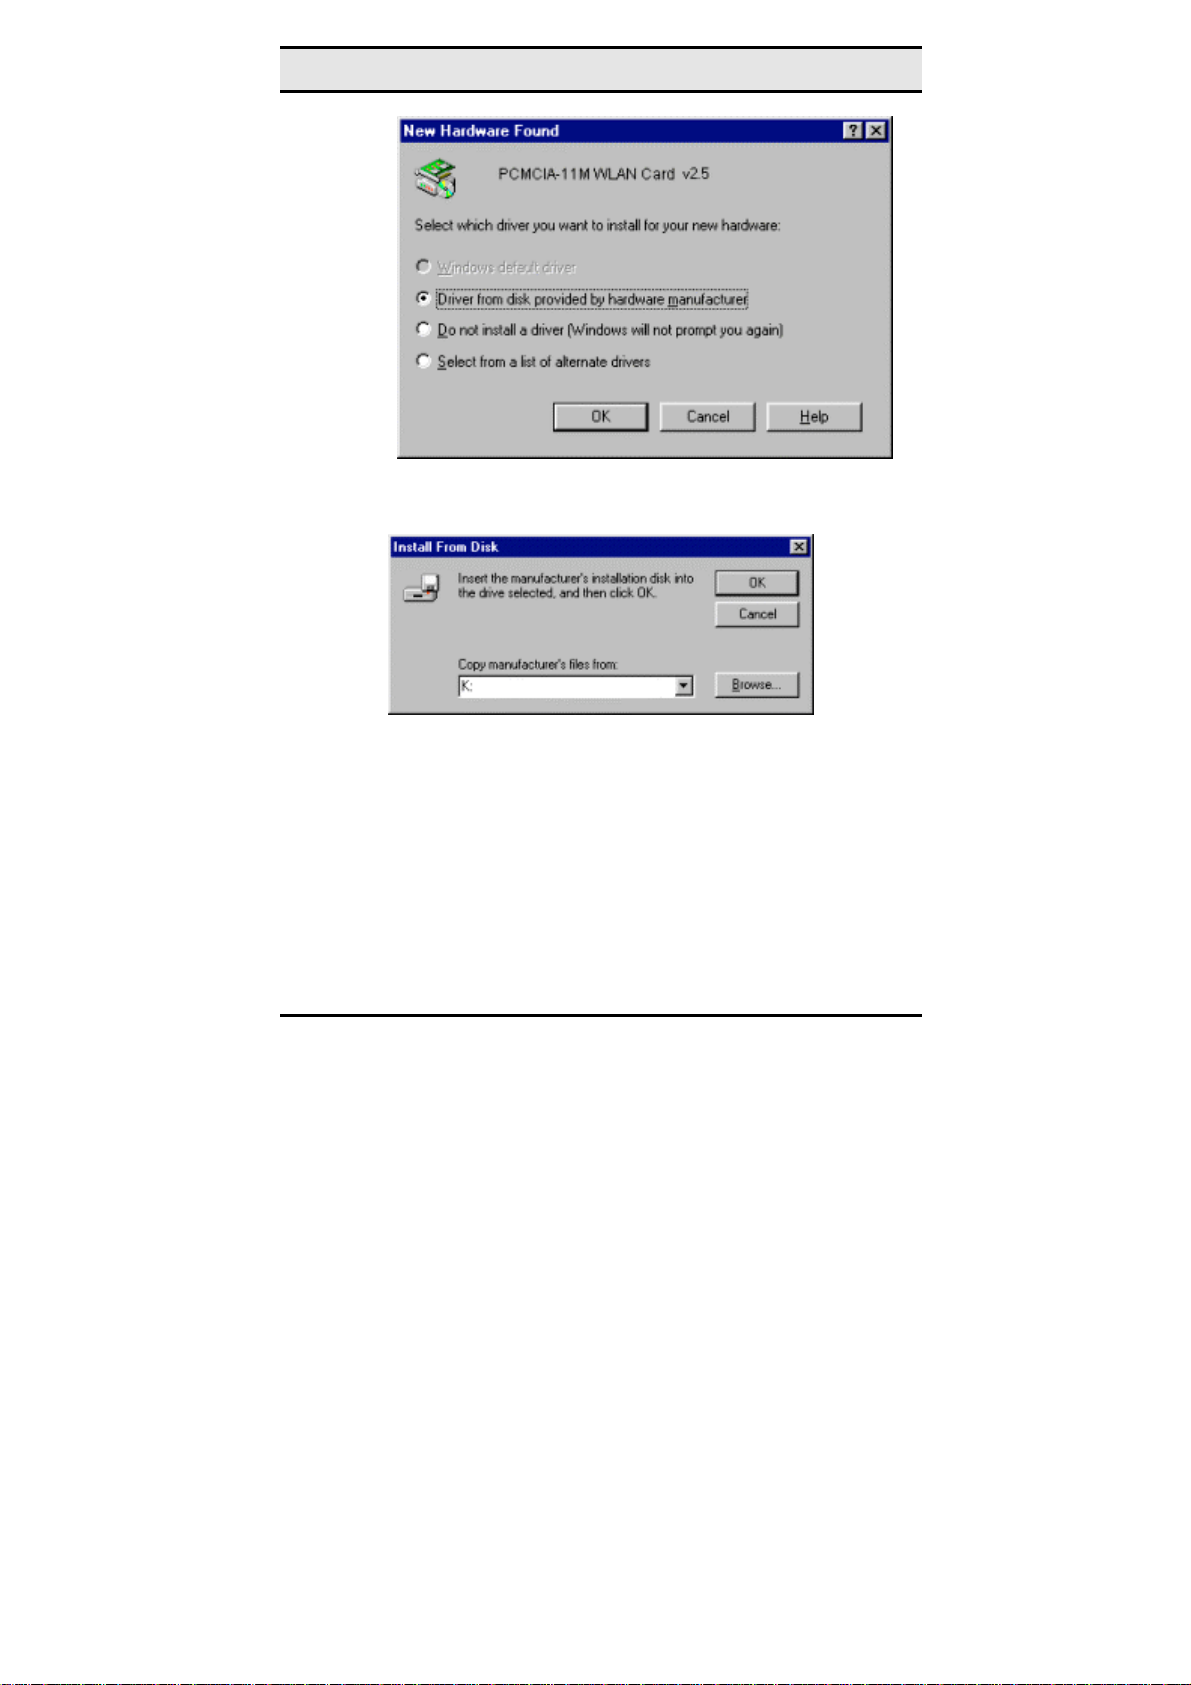
3. Click OK. The Windows prompt you to give the path of
driver files.
4. Type K: where K is your CD-ROM drive letter. Insert the
driver disc into CD-ROM drive. Then click OK.
5. The windows will start copying files from disc and install
the drivers. After the step, the installation is complete and
you should reboot the system.
After you rebooted the computer, system will start to install
Wireless utility automatically. Please refer to procedures at
Chapter 4.
14
Page 21
—Driver installation for Windows
Driver installation for Windows 98
Follow the steps below to install the Wireless LAN card drivers for
Windows 98.
1. Insert the Wireless LAN card into an available PCMCIA
slot on your notebook (refer to page 錯誤! 尚未定義書
籤。 - Inserting the Wireless LAN card).
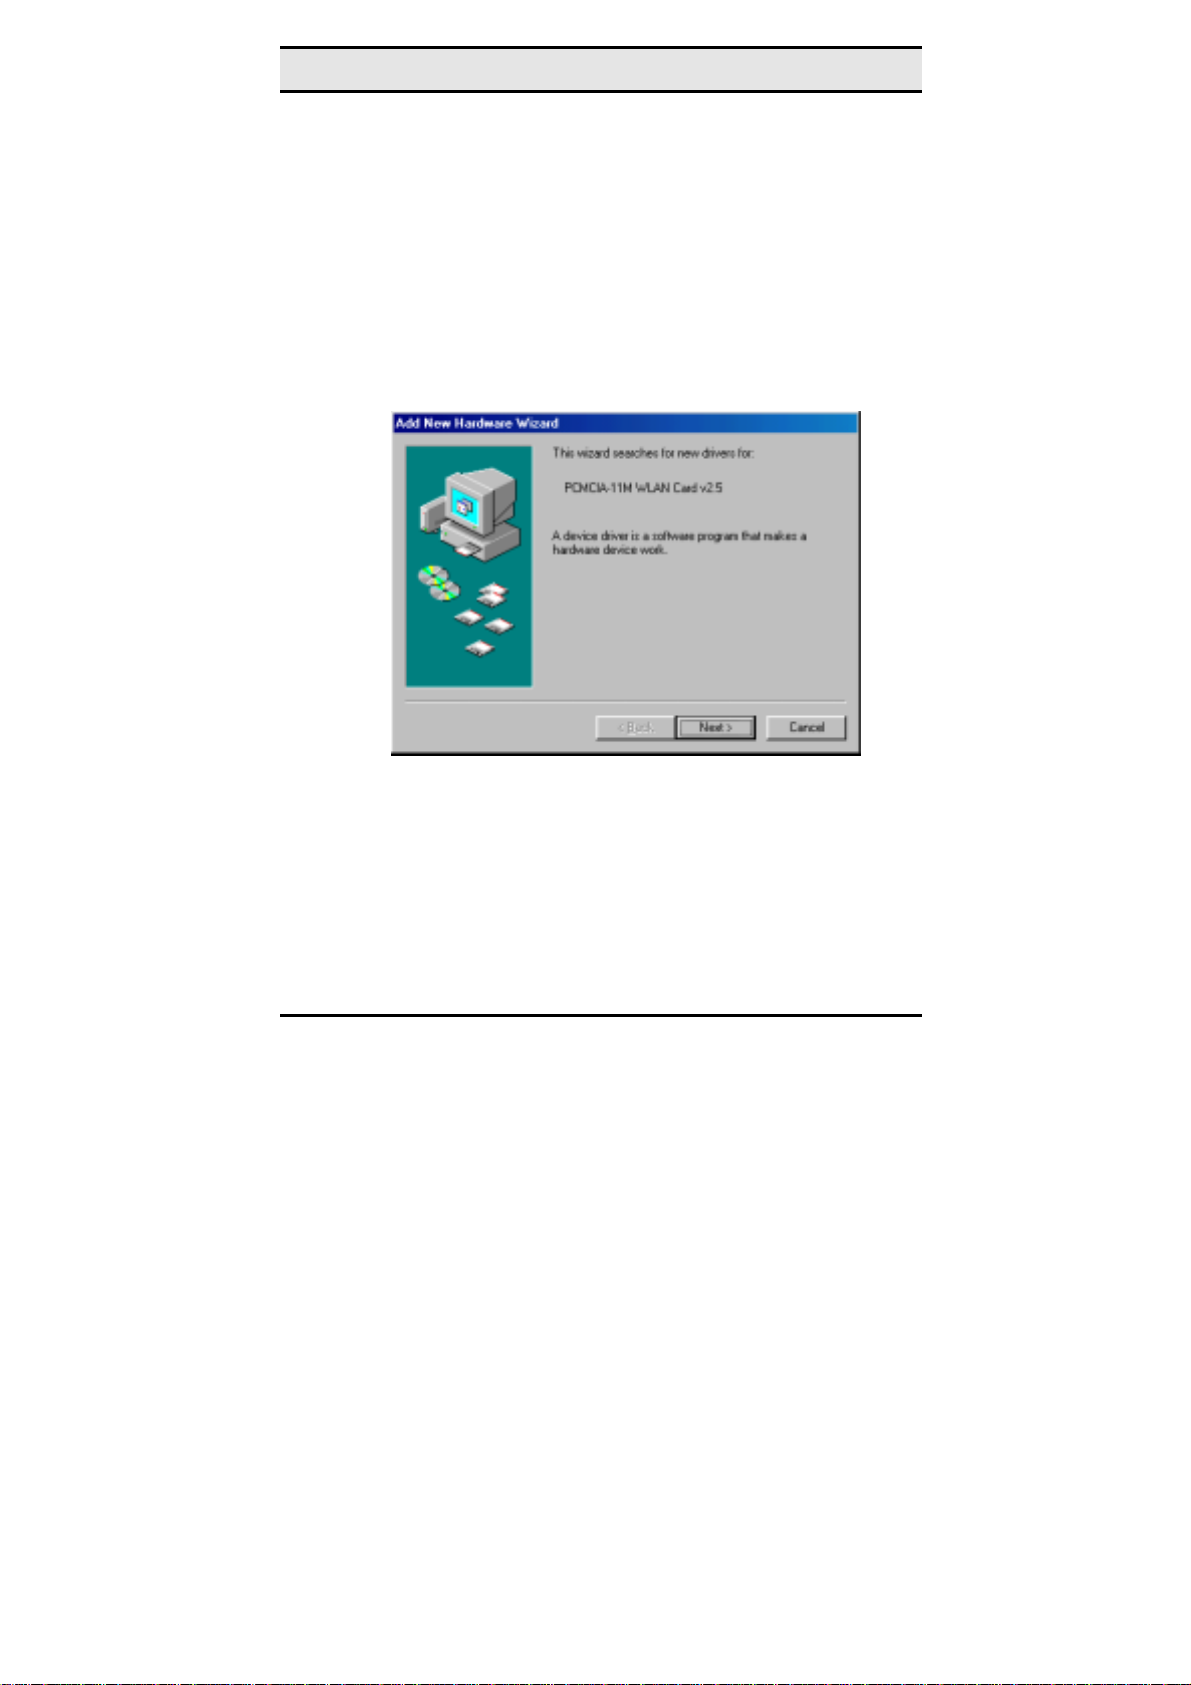
2. After Windows 98 detects the Wireless LAN card, the Add
New Hardware Wizard window appears:
3. Click Next to continue the installation. A screen appears
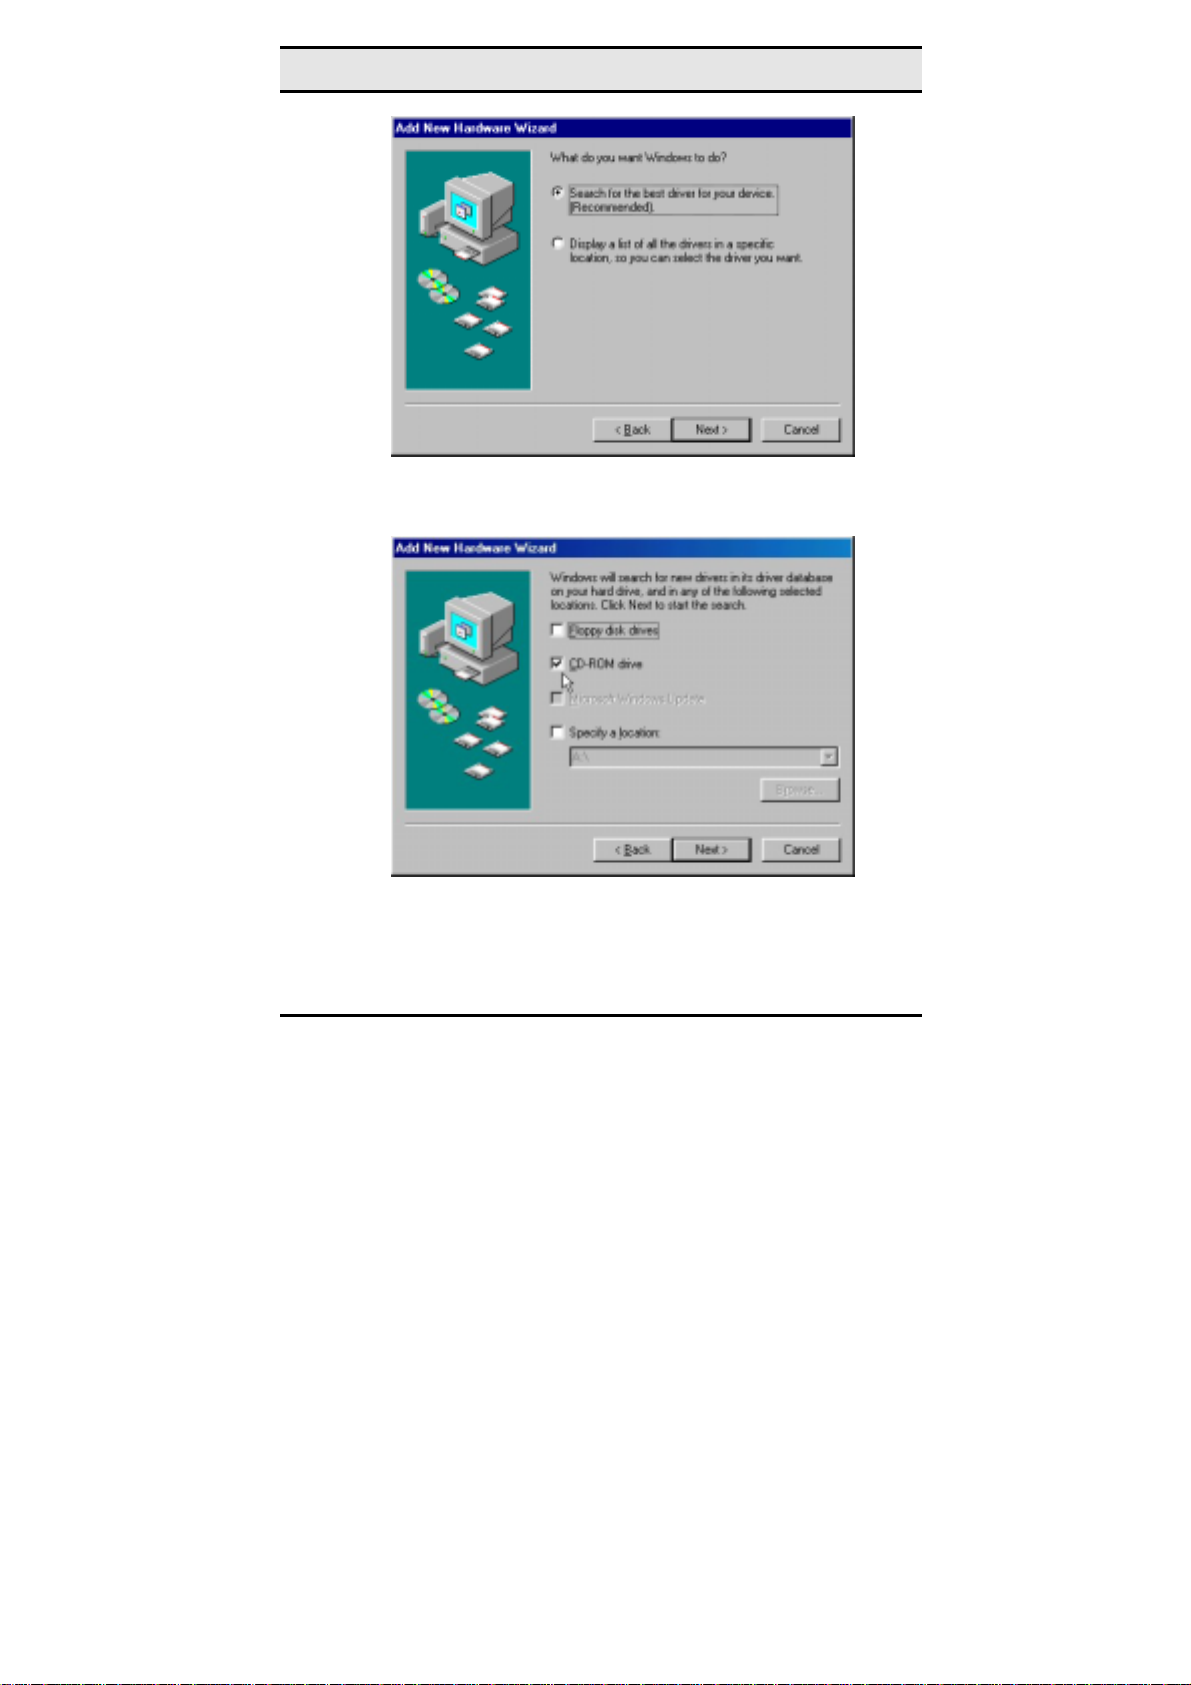
prompting you to select an installation method:
15
Page 22
Wireless LAN card user manual
4. Select Search for the best driver for your device. (Recommended) and click Next. The following screen appears:
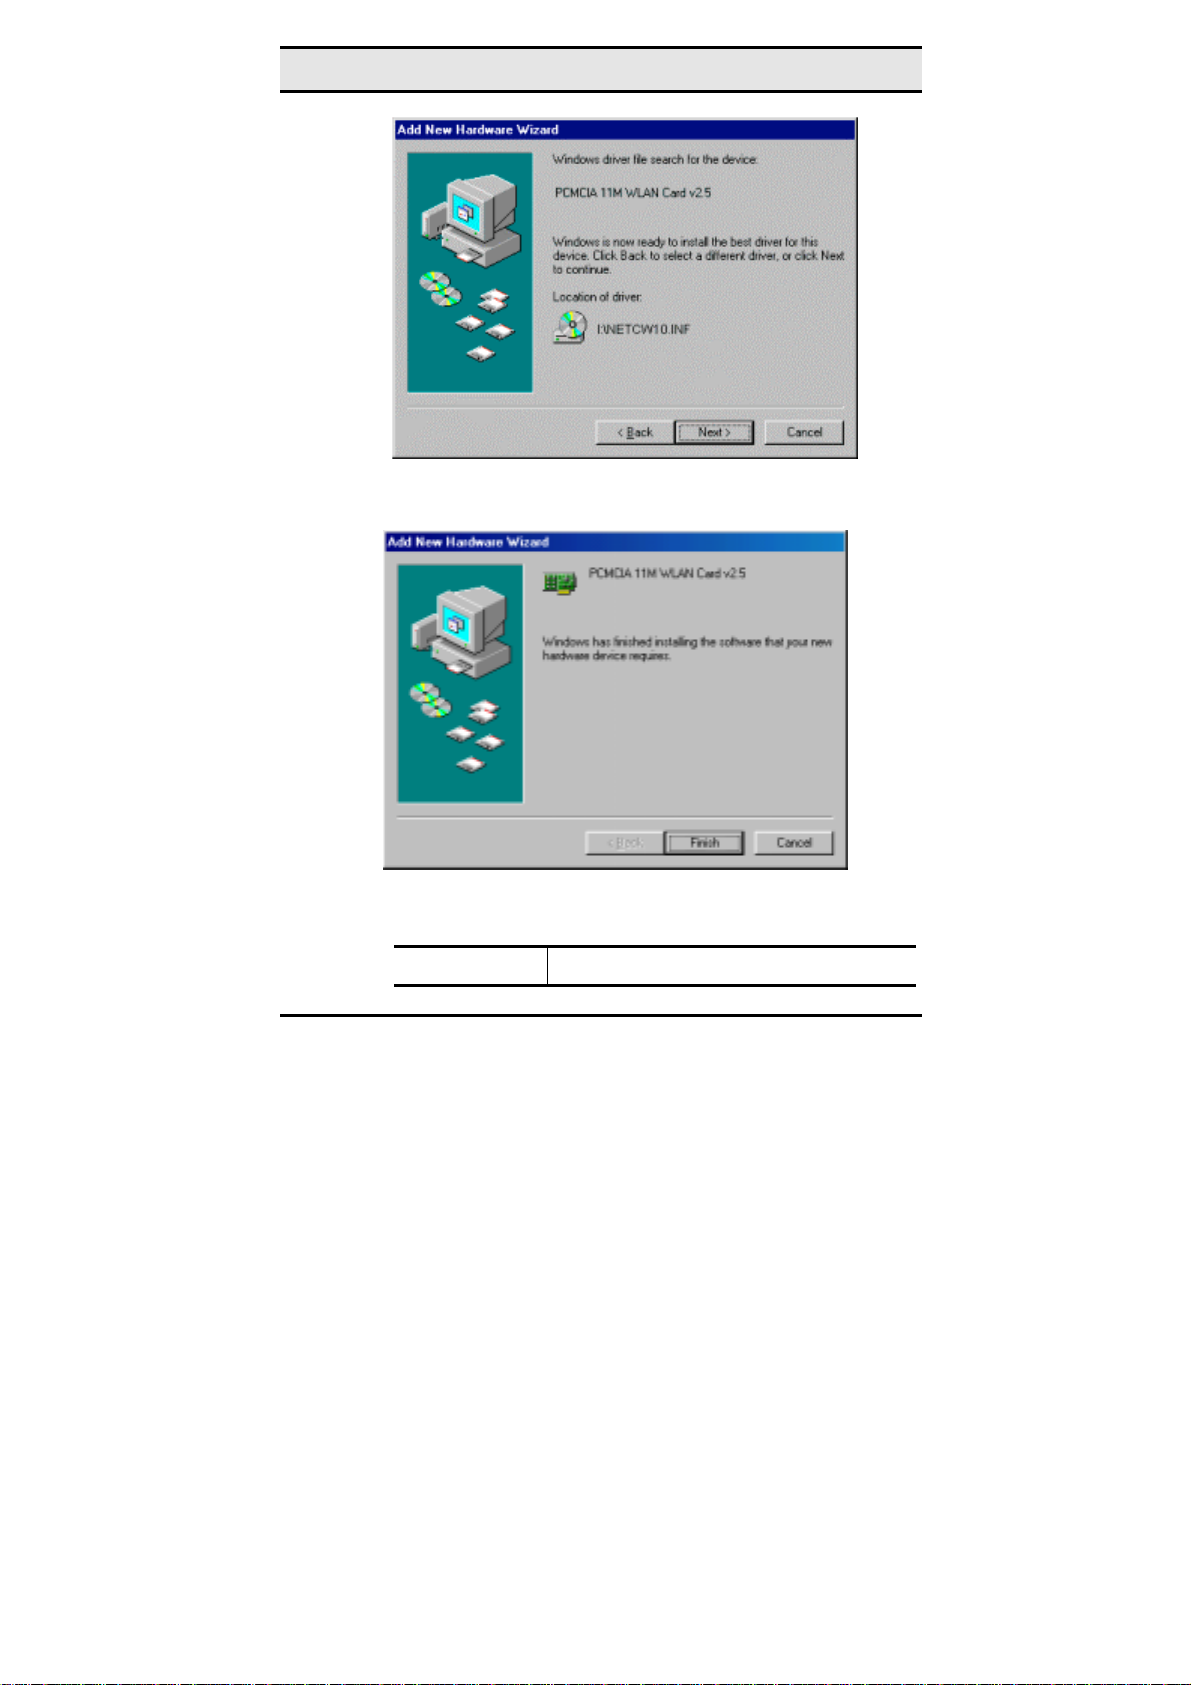
5. Ensure that the CD-ROM drive box is checked.
6. Insert the driver CD-ROM into your CD-ROM drive and
click Next. The following screen appears:
16
Page 23
—Driver installation for Windows
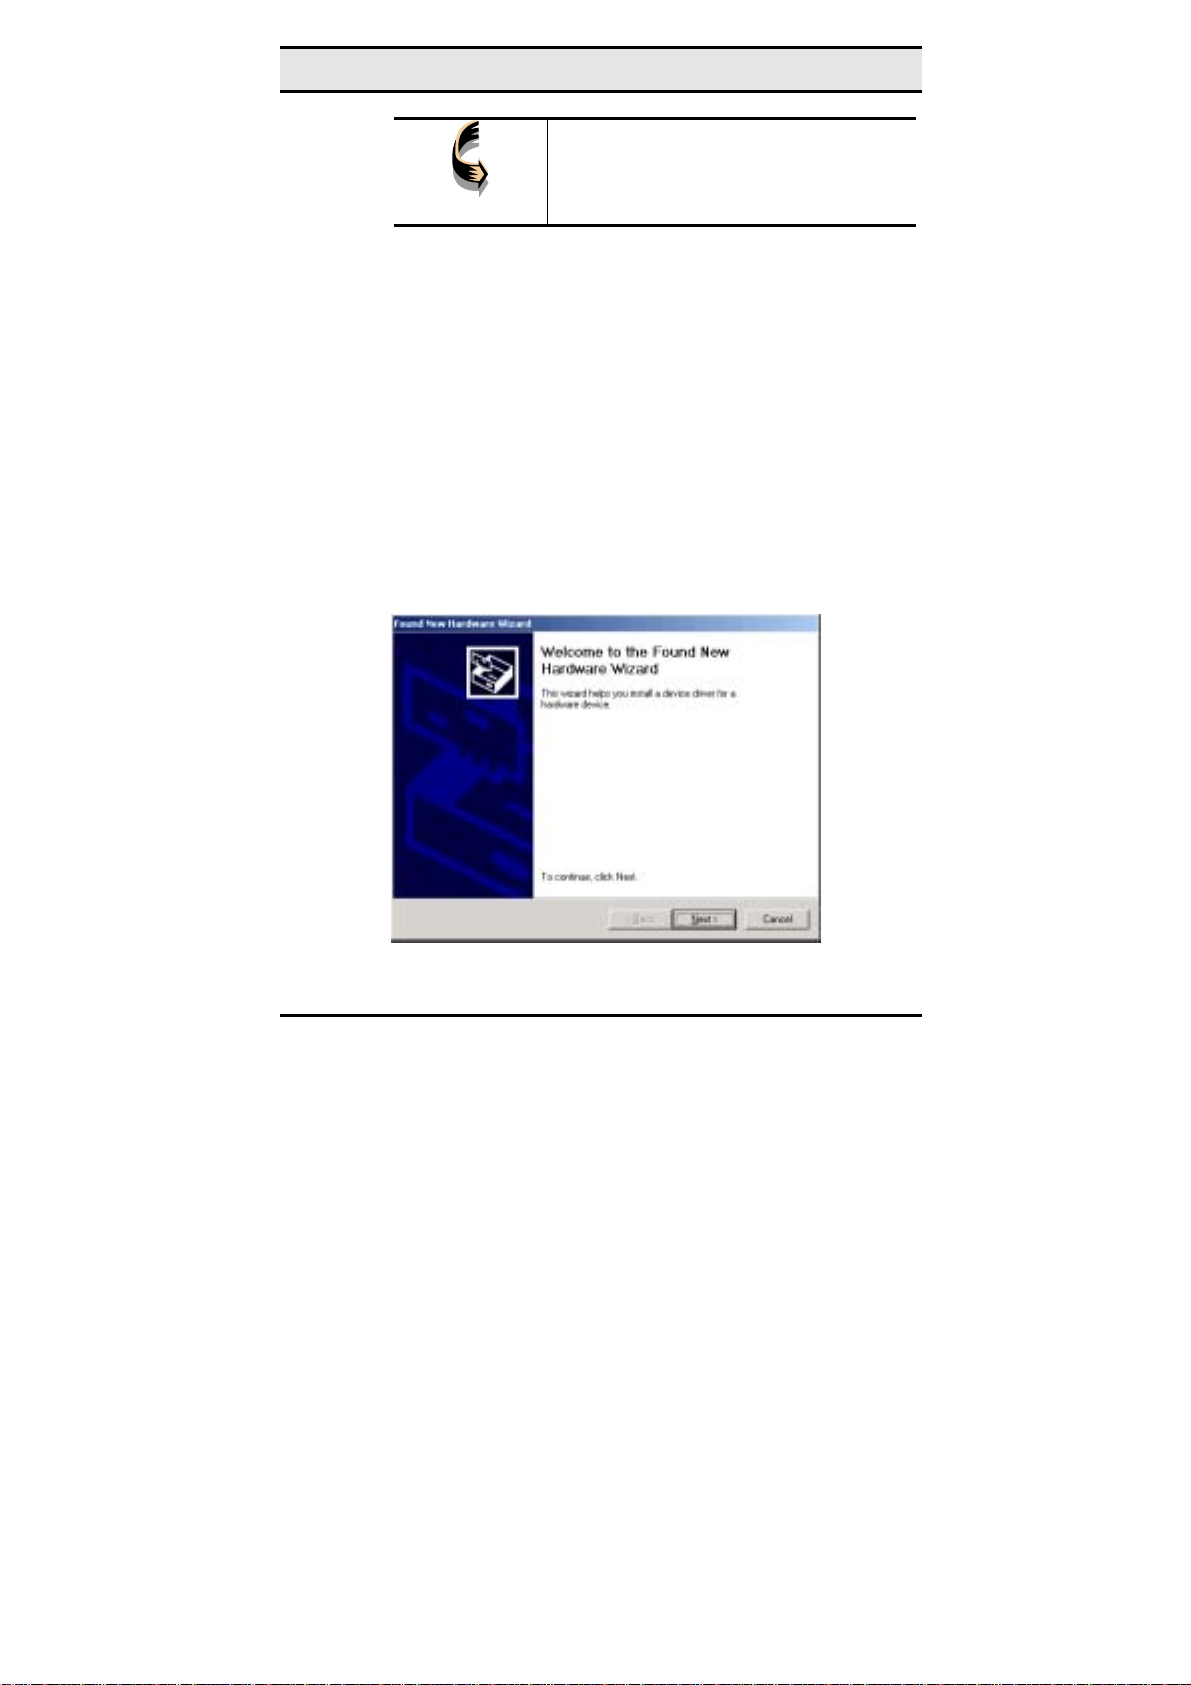
7. Click Next. Windows 98 copies files to your hard disk
drive, and you see the following screen:
8. Click Finish. You should reboot your system to finish the
installation.
Note!
17
Windows 98 may need to copy re-
Page 24
Wireless LAN card user manual
quired system files and will prompt you
to input the path to the files. Follow
the instructions on your screen, and
then click OK to continue.
After you have rebooted the computer, system will start to install
Wireless utility automatically. Please refer to procedures at Chapter 4.
Driver installation for Windows 2000
Follow the steps below to install the Wireless LAN card drivers for
Windows 2000.
1. Insert the Wireless LAN card into an available PCMCIA
slot on your notebook (refer to page 錯誤! 尚未定義書
籤。 - Inserting the Wireless LAN card).
2. After Windows 2000 detects the Wireless LAN card, the
Found New Hardware Wizard window appears:
18
Page 25
—Driver installation for Windows
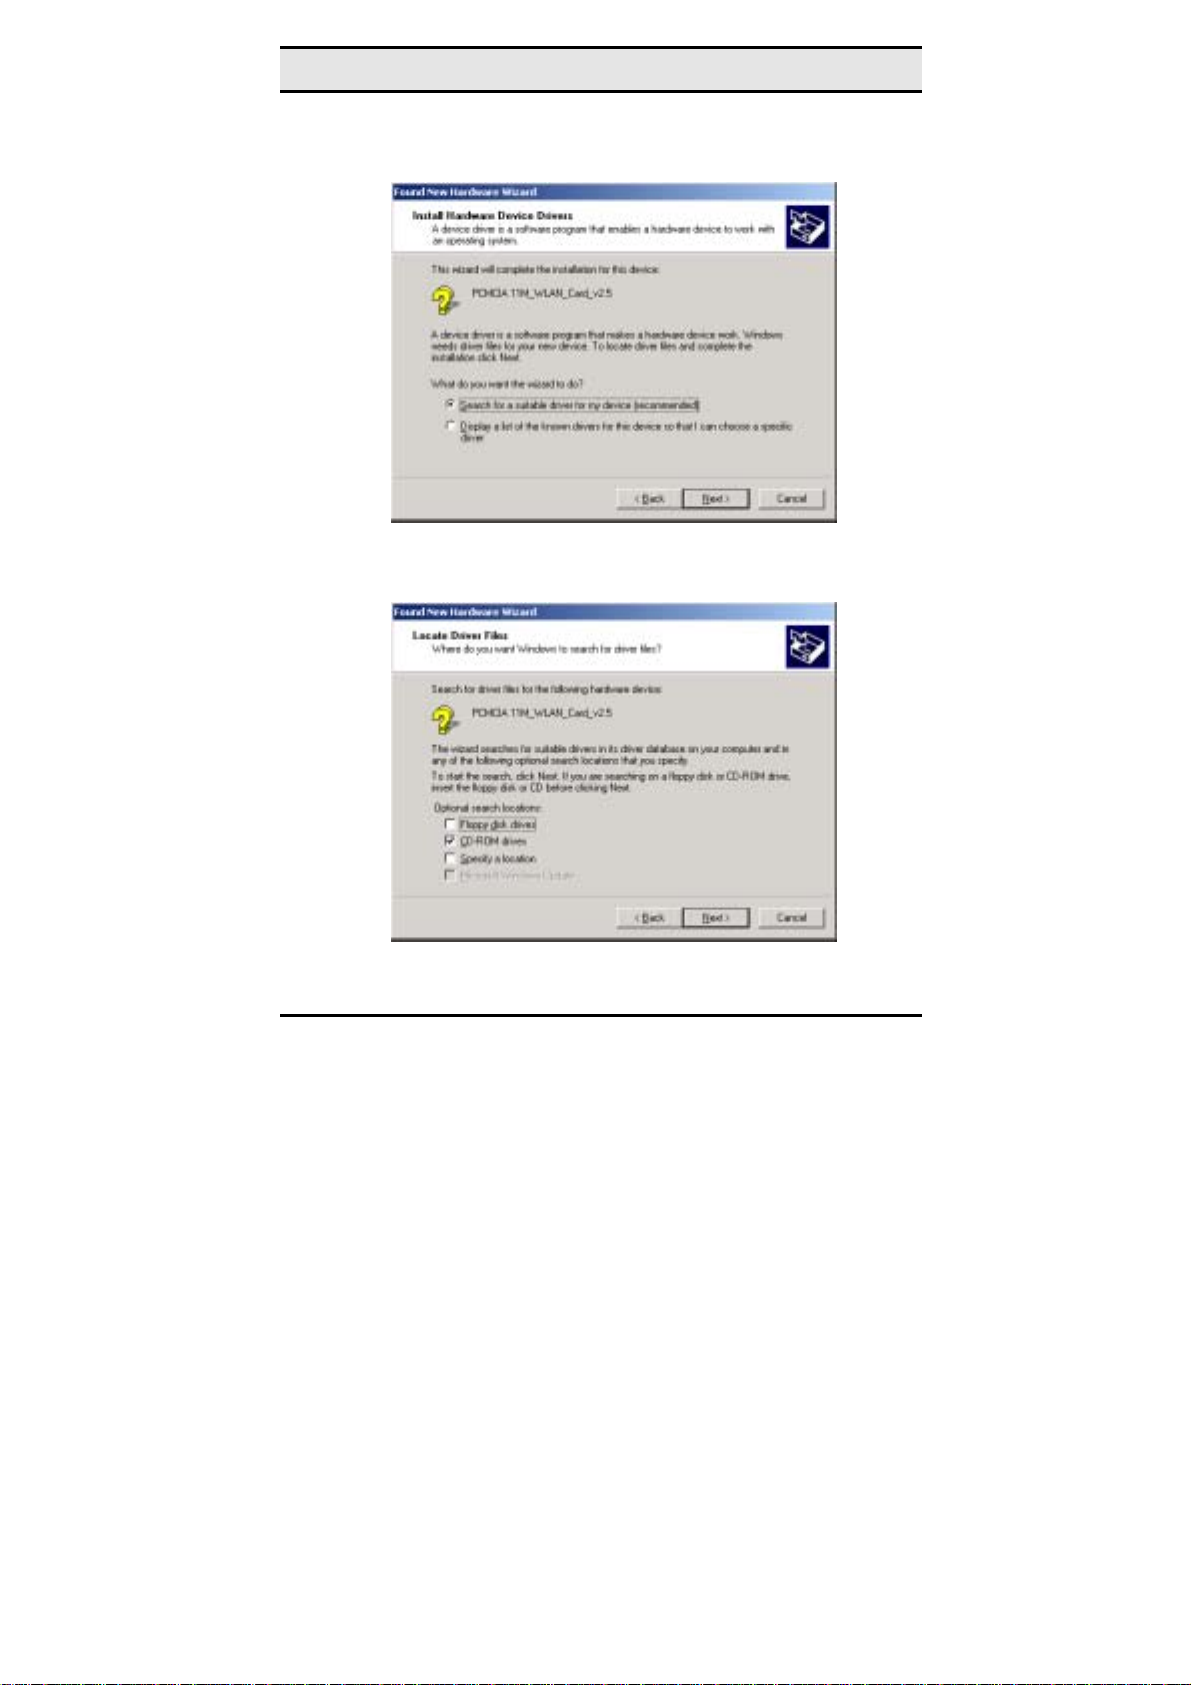
3. Click Next to continue the installation. A screen appears
prompting you to select an installation method:
4. Select Search for a suitable driver for my device (rec-
ommended) and click Next. The following screen appears:
19
Page 26
Wireless LAN card user manual
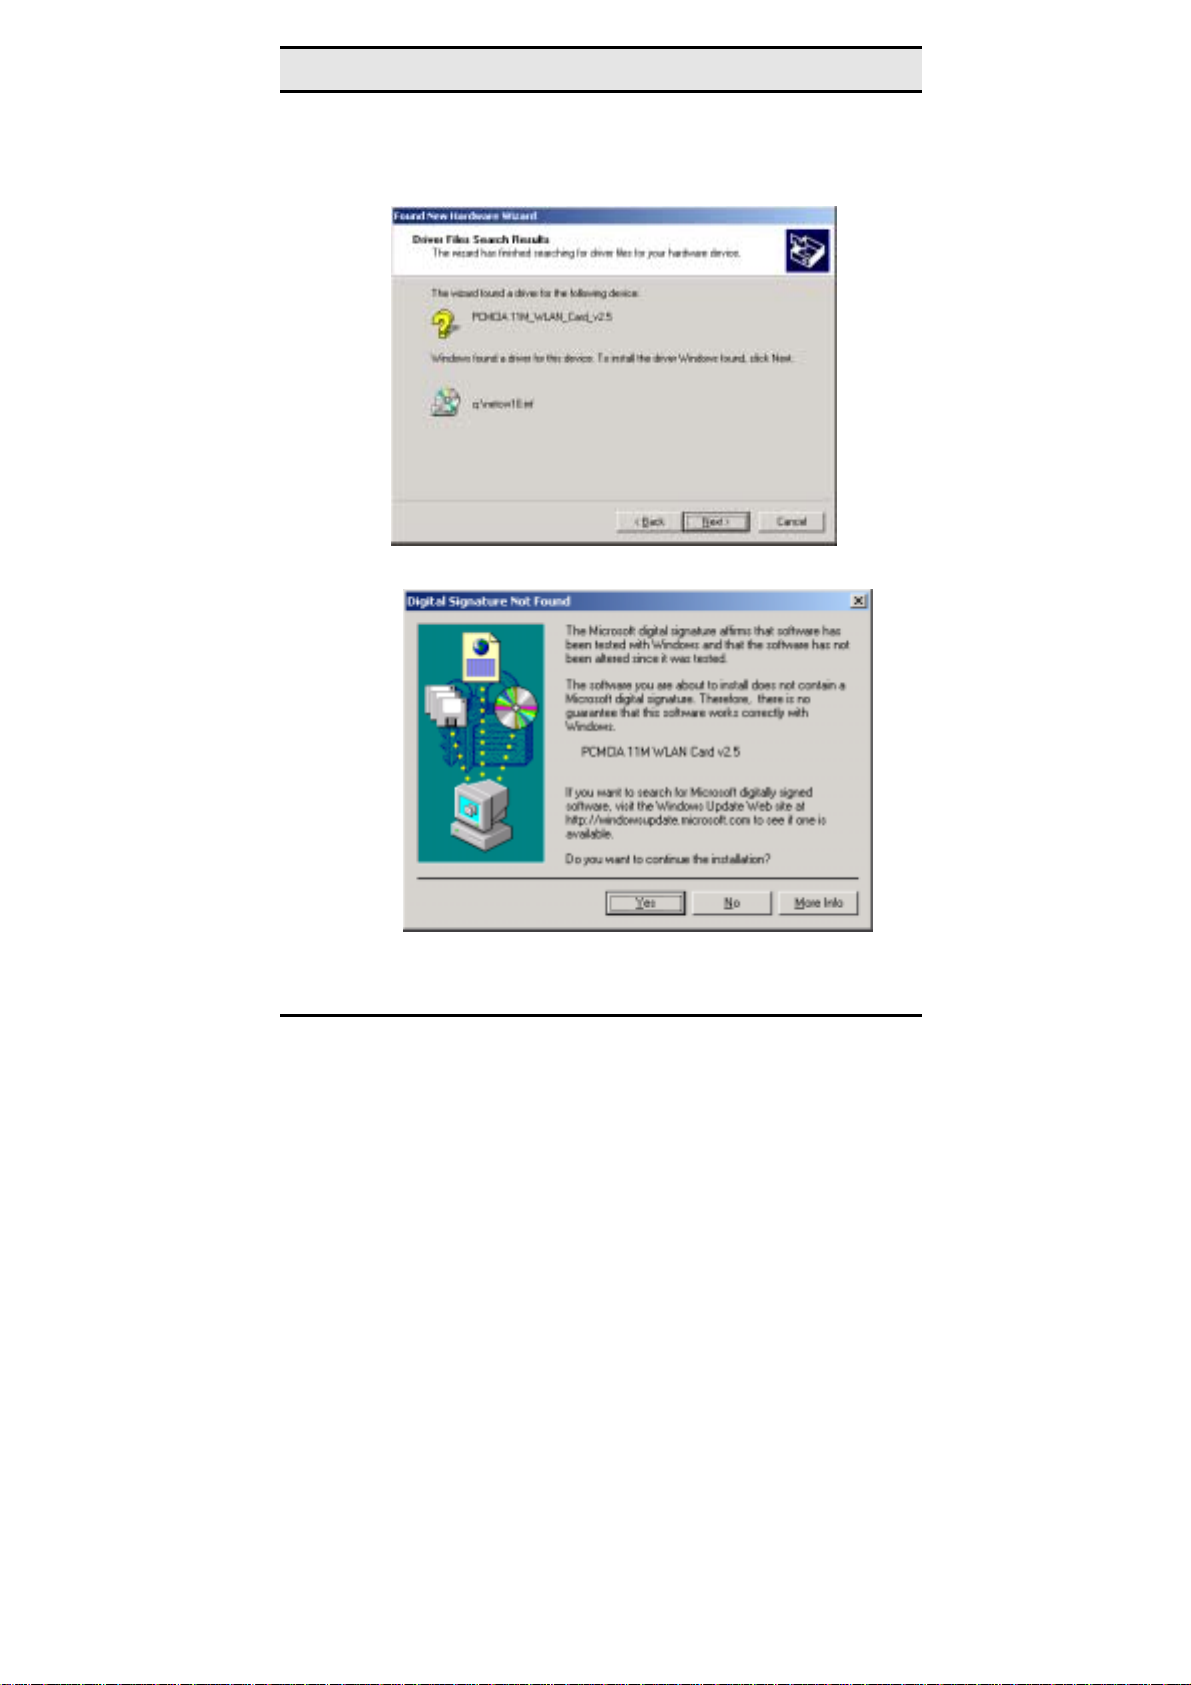
5. Ensure that the CD-ROM drivers box is checked and insert the driver disc into CD-ROM drive. Click Next to
continue. The following screen appears:
6. Click Next to continue. The following screen appears:
7. Click Yes to continue. The following screen appears:
20
Page 27
—Driver installation for Windows
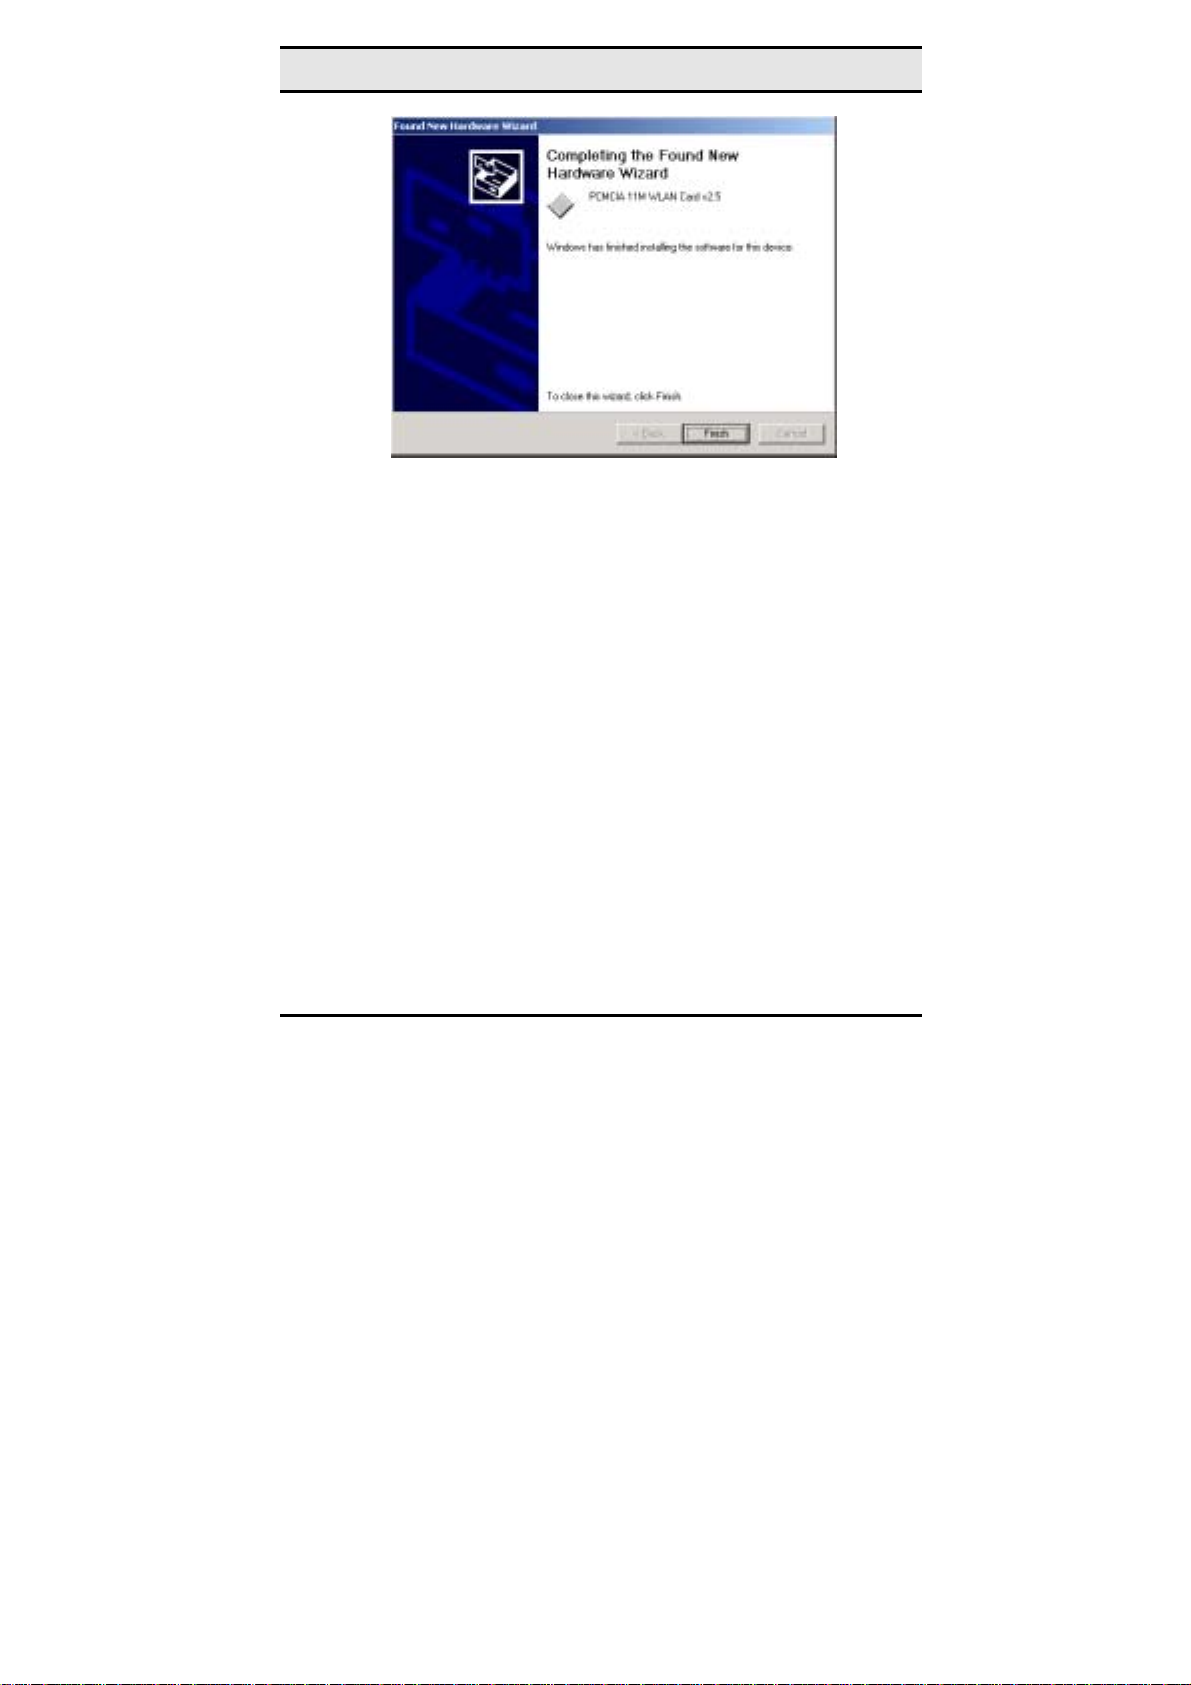
8. Click Finish to complete the installation.
9. Then system will start to install Wireless utility automatically. Please refer to procedures at Chapter 4.
21
Page 28
Wireless LAN card user manual
Driver installation for Windows NT 4.0
This installation procedure assumes that you have installed the
network component on your computer.
To check whether the network component has been installed, double click the Network icon in the Control Panel. If it has not been
installed, refer to the Windows NT 4.0 installation guide for instructions on installing the component.
Follow the steps below to install the driver.
1. Insert the Wireless LAN card into an available PCMCIA
slot on your notebook (refer to page 錯誤! 尚未定義書
籤。 - Inserting the Wireless LAN card).
2. Log in to NT 4.0 as Administrator.
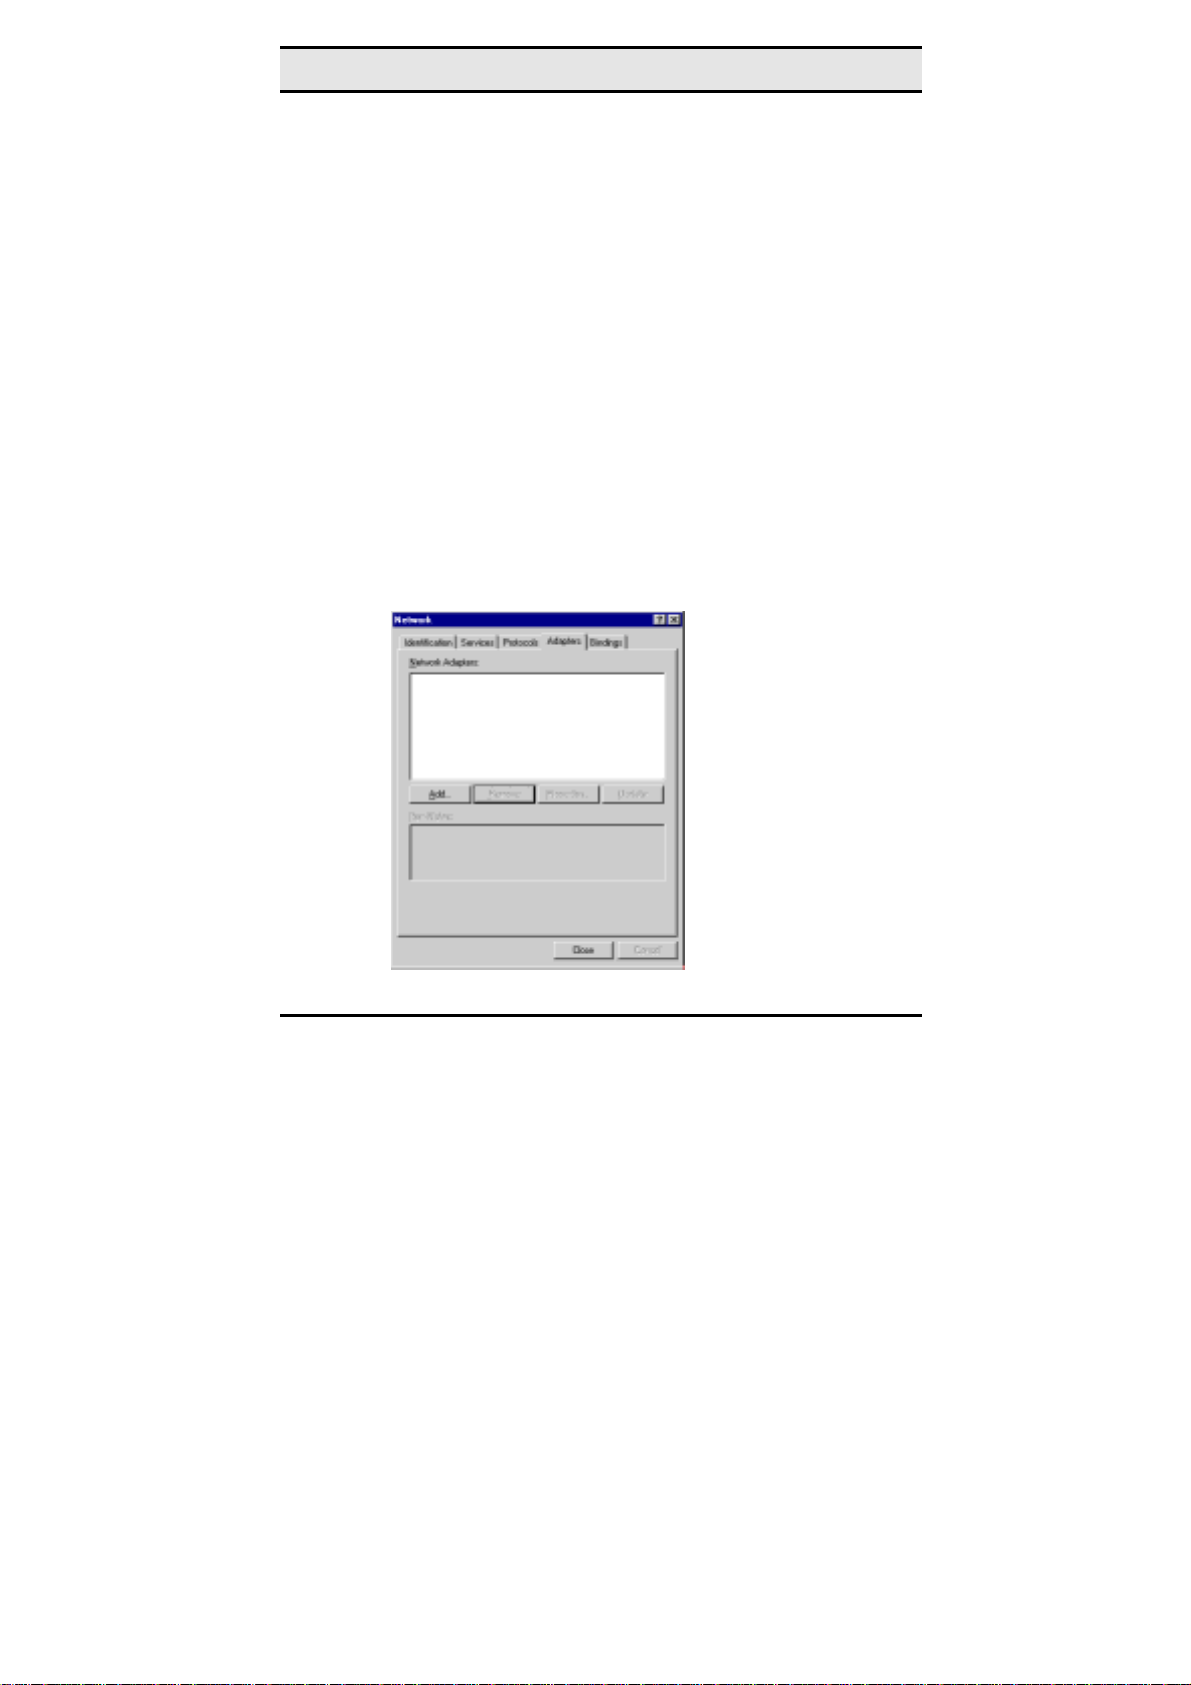
3. Double click the Network icon in the Control Panel, and
select the Adapters tab as shown in the following screen:
22
Page 29
—Driver installation for Windows
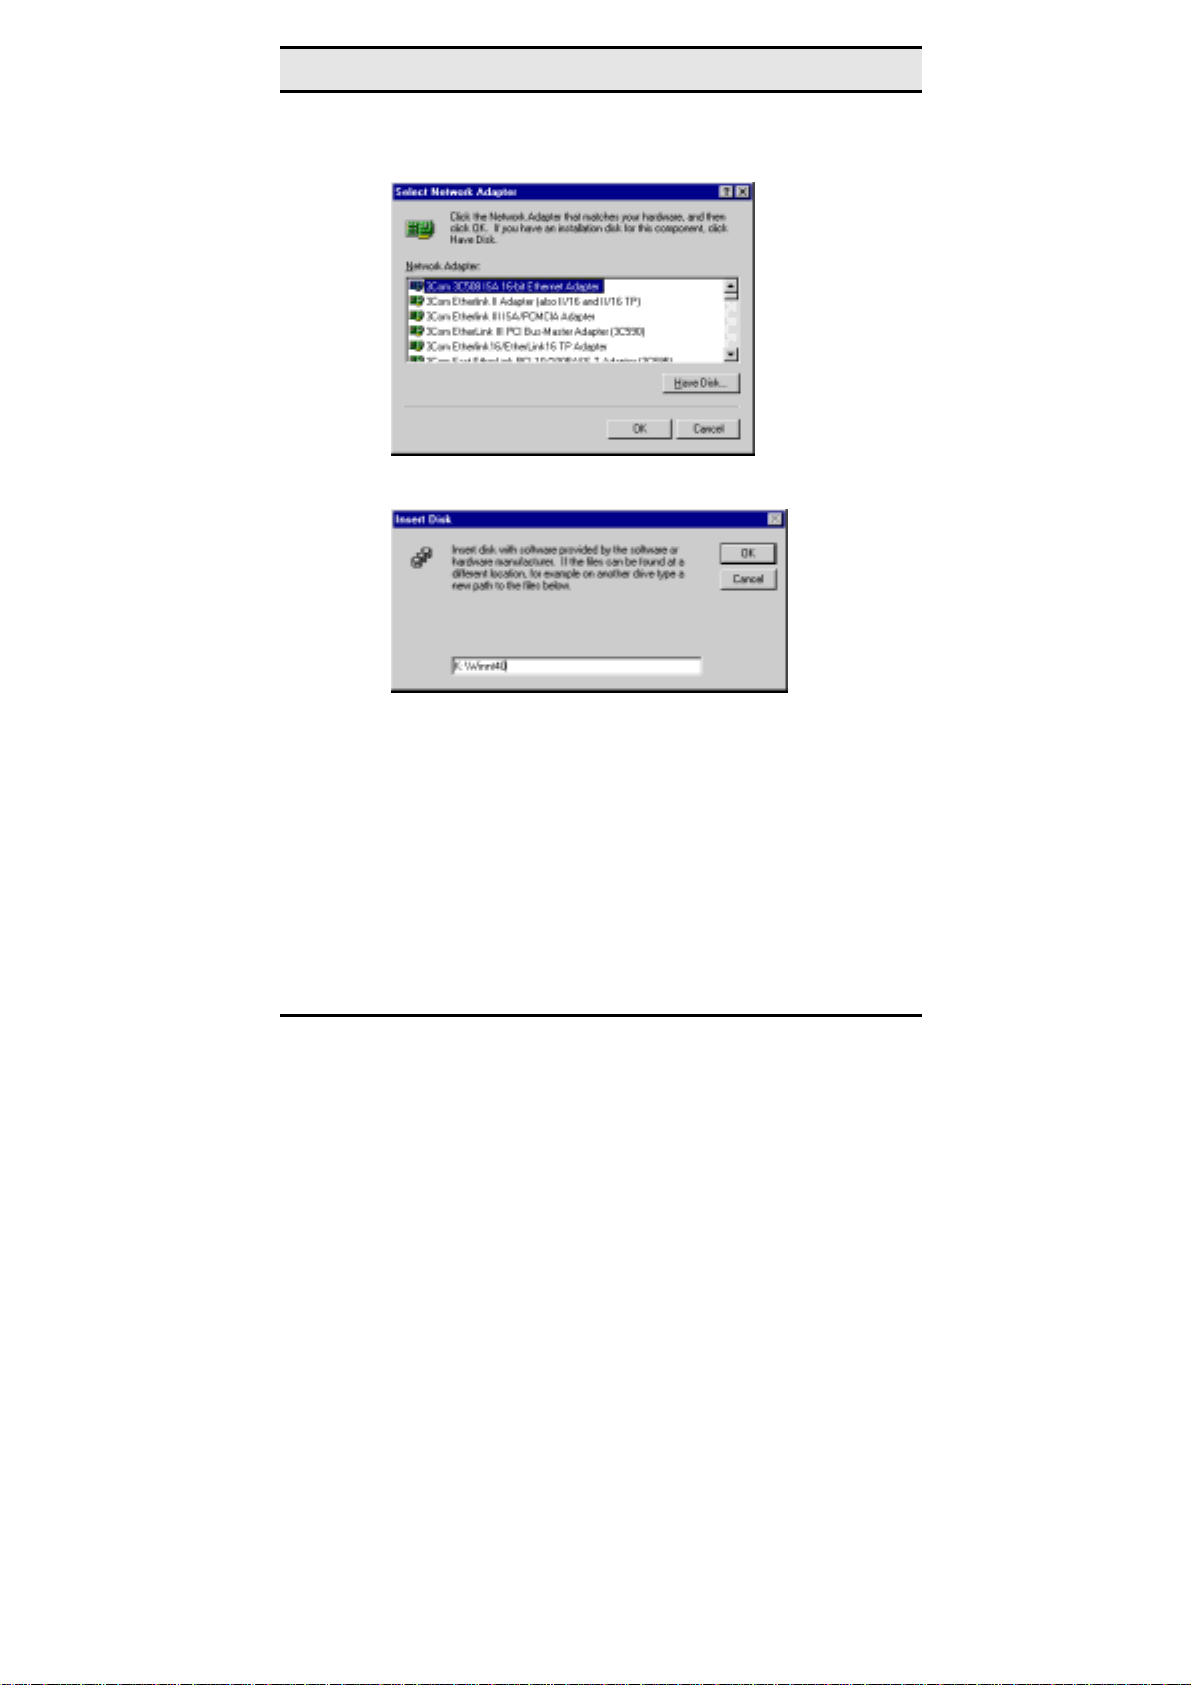
4. Click Add to add a new adapter. The following screen ap-
pears:
5. Click Have Disk. The following screen appears:
6. Type K:\ Winnt40 where K is your CD-ROM drive letter.
Insert the driver disk, and click OK.
After finding the installation file, the Select OEM Option
window is displayed.
23
Page 30
Wireless LAN card user manual
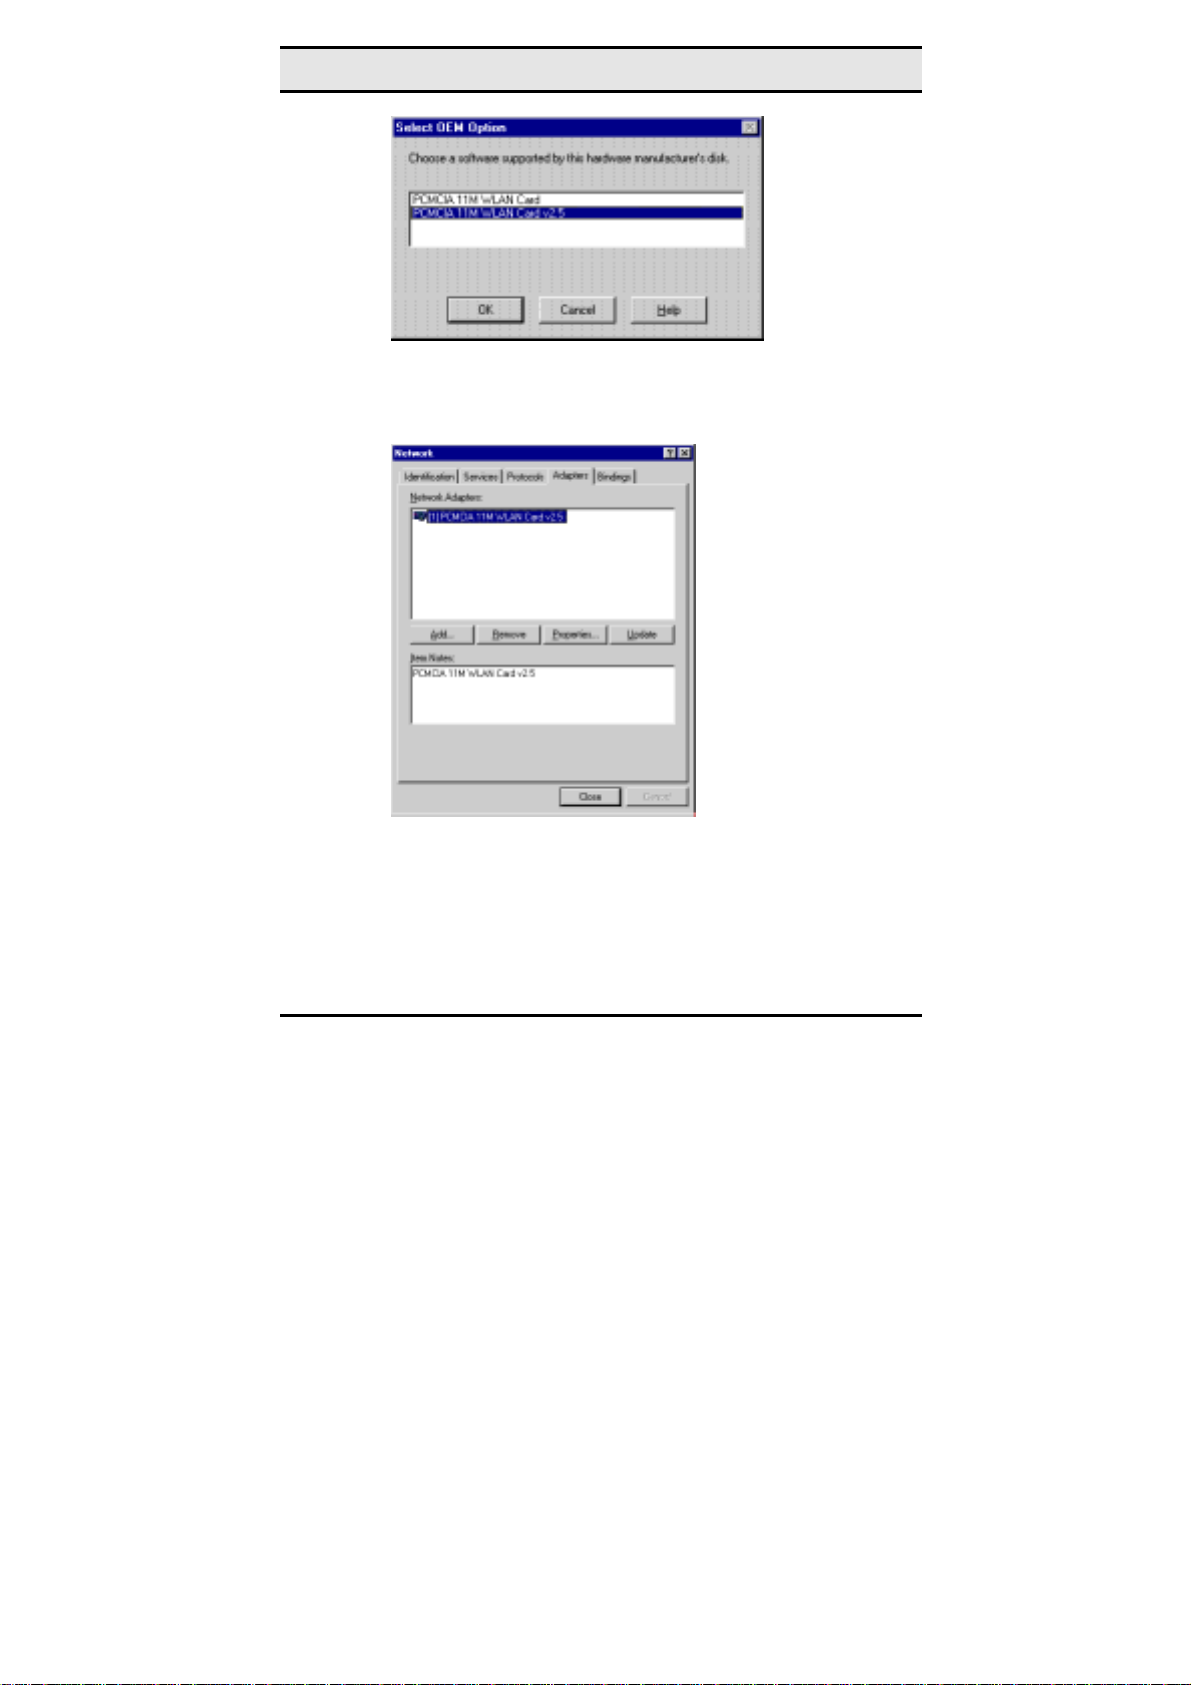
7. Select PCMCIA WLAN Card v2.5 and Click OK. Win-
dows will configure the Wireless LAN card. You are
returned to the Network window.
8. Click Close to exit the Network window. Windows NT 4.0
will bind the adapter with the network component and you
will be prompted to restart the system.
When Windows NT is finished binding the adapter to the
network component, you are prompted to restart the system.
24
Page 31

—Driver installation for Windows
9. Click Yes to finish the installation.
10. After you have rebooted the computer, system will start to
install Wireless utility automatically. Please refer to procedures at Chapter 4.
25
Page 32
Wireless LAN card user manual
Driver Installation for Windows ME
Follow the steps below to install the Wireless LAN card drivers for
Windows ME.
1. Insert the Wireless LAN card into an available PCMCIA
slot on your notebook (refer to page 錯誤! 尚未定義書
籤。 - Inserting the Wireless LAN card).
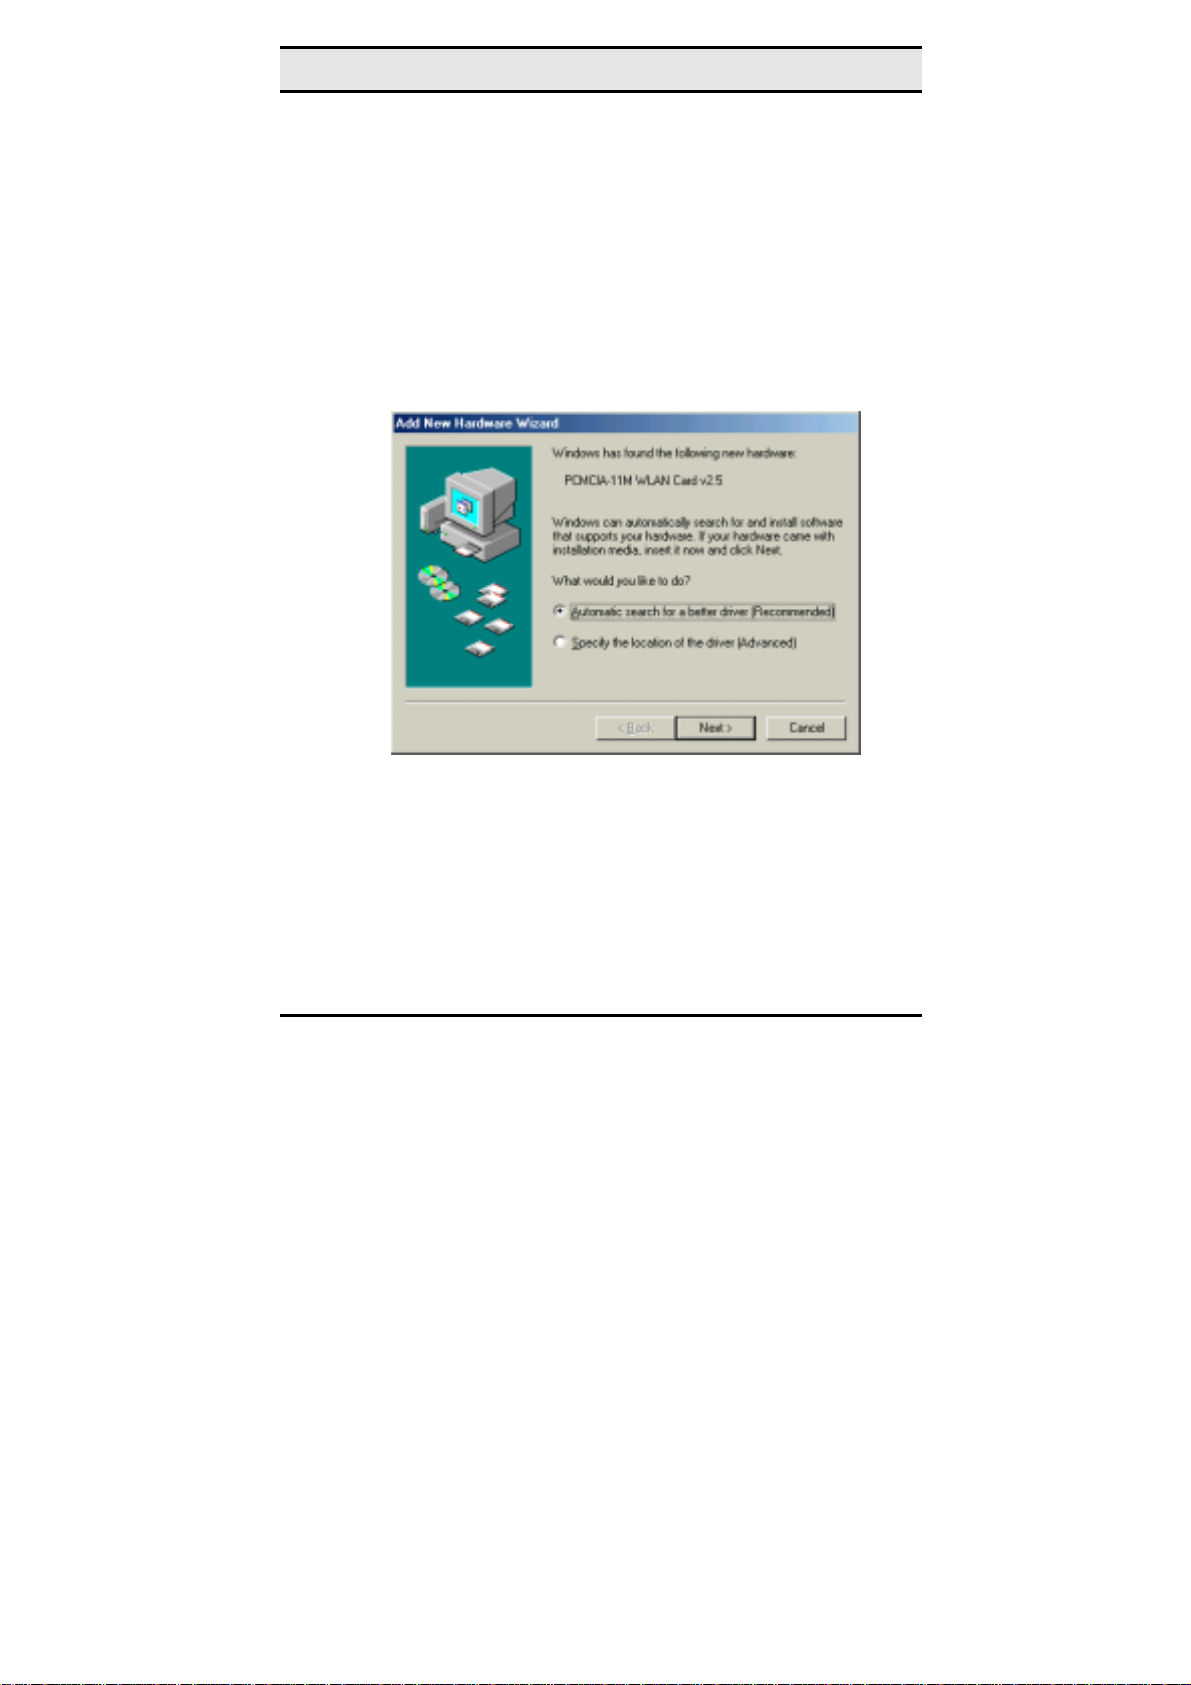
2. After Windows ME detects the Wireless LAN card, the
Add New Hardware Wizard window appears:
3. Select Automatic search for a better driver (Recom-
mended) and insert the driver disc into CD-ROM drive.
Click Next to continue.
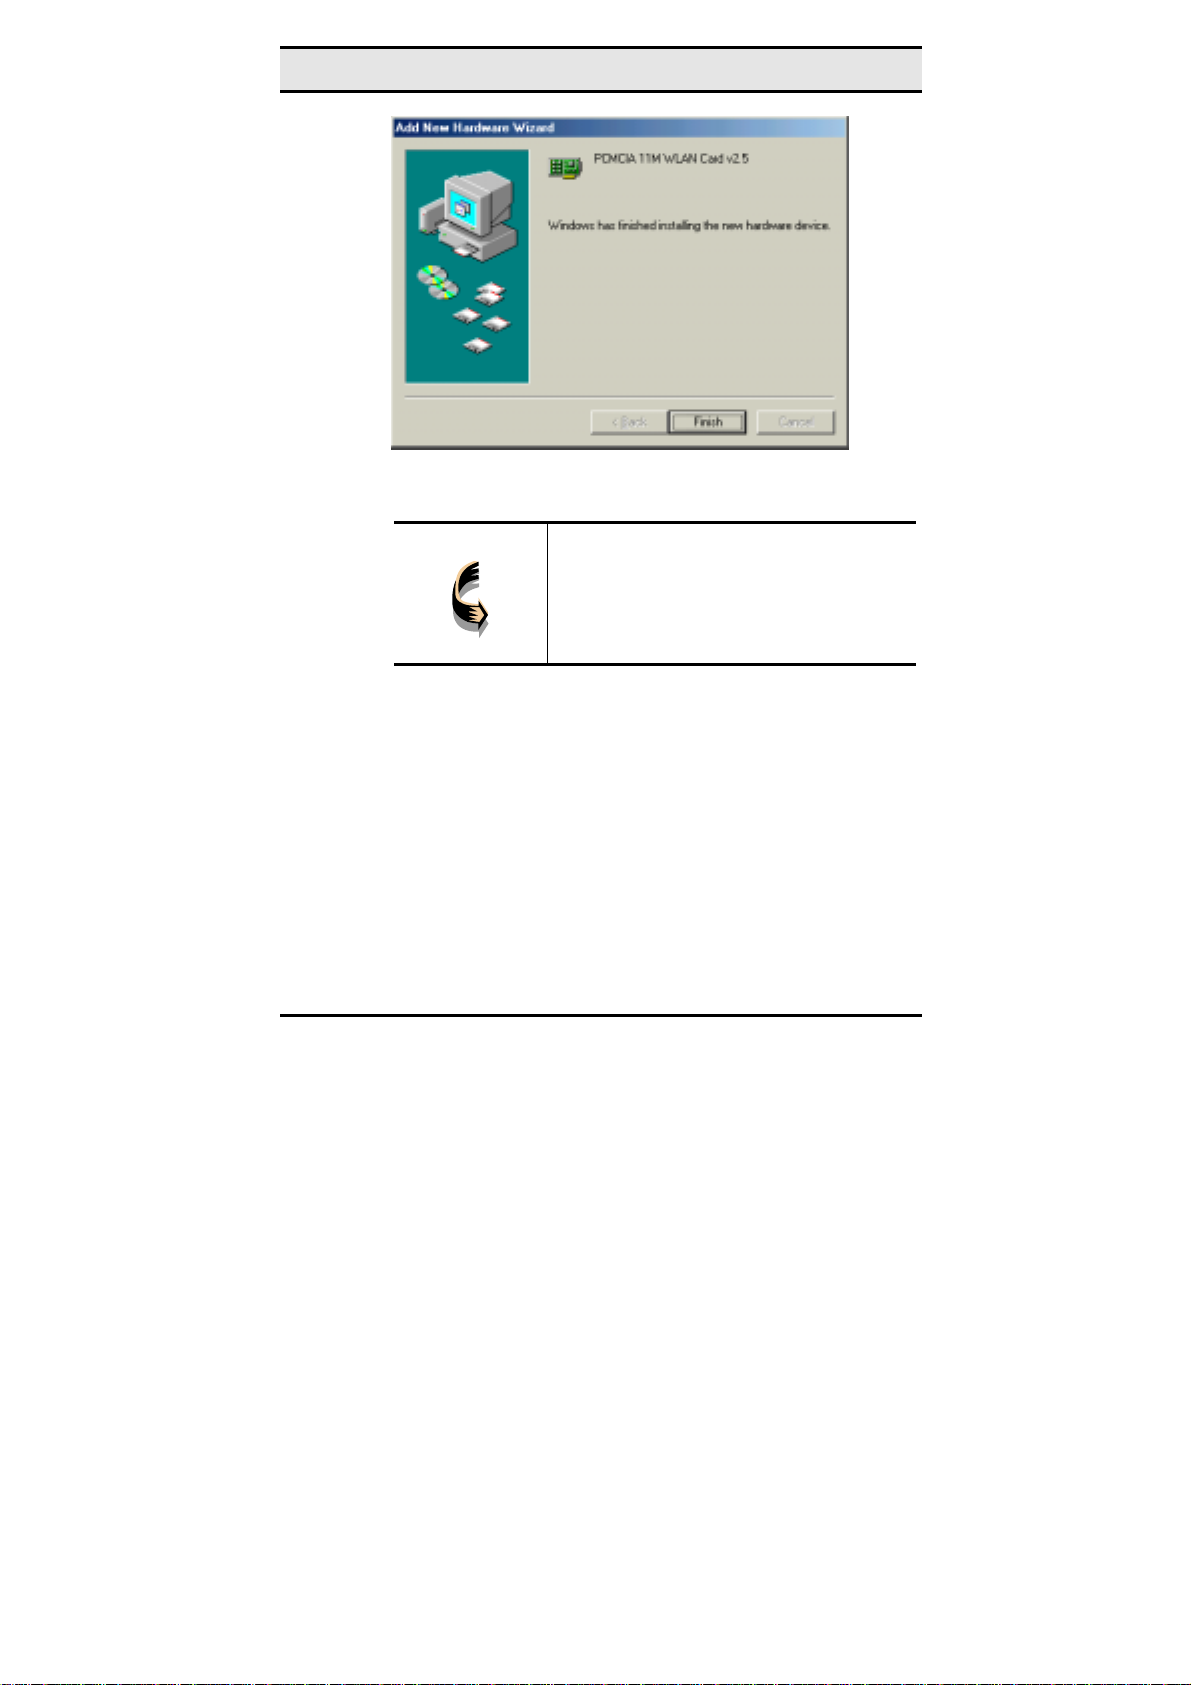
4. The system will find the setup files and follow the instruction of the setup file to copy drivers. After the drivers were
copied, the following screen appears:
26
Page 33
—Driver installation for Windows
5. Click Finish. You should reboot your system to finish the
installation.
Note!
Windows ME may need to copy required system files and will prompt you
to input the path to the files. Follow
the instructions on your screen, and
then click OK to continue.
After you have rebooted the computer, system will start to install
Wireless utility automatically. Please refer to procedures at Chapter 4.
27
Page 34
Chapter 4
Using the Wireless Utility
The following sections cover the Wireless LAN card utility
installation and usage.
Installation in Windows
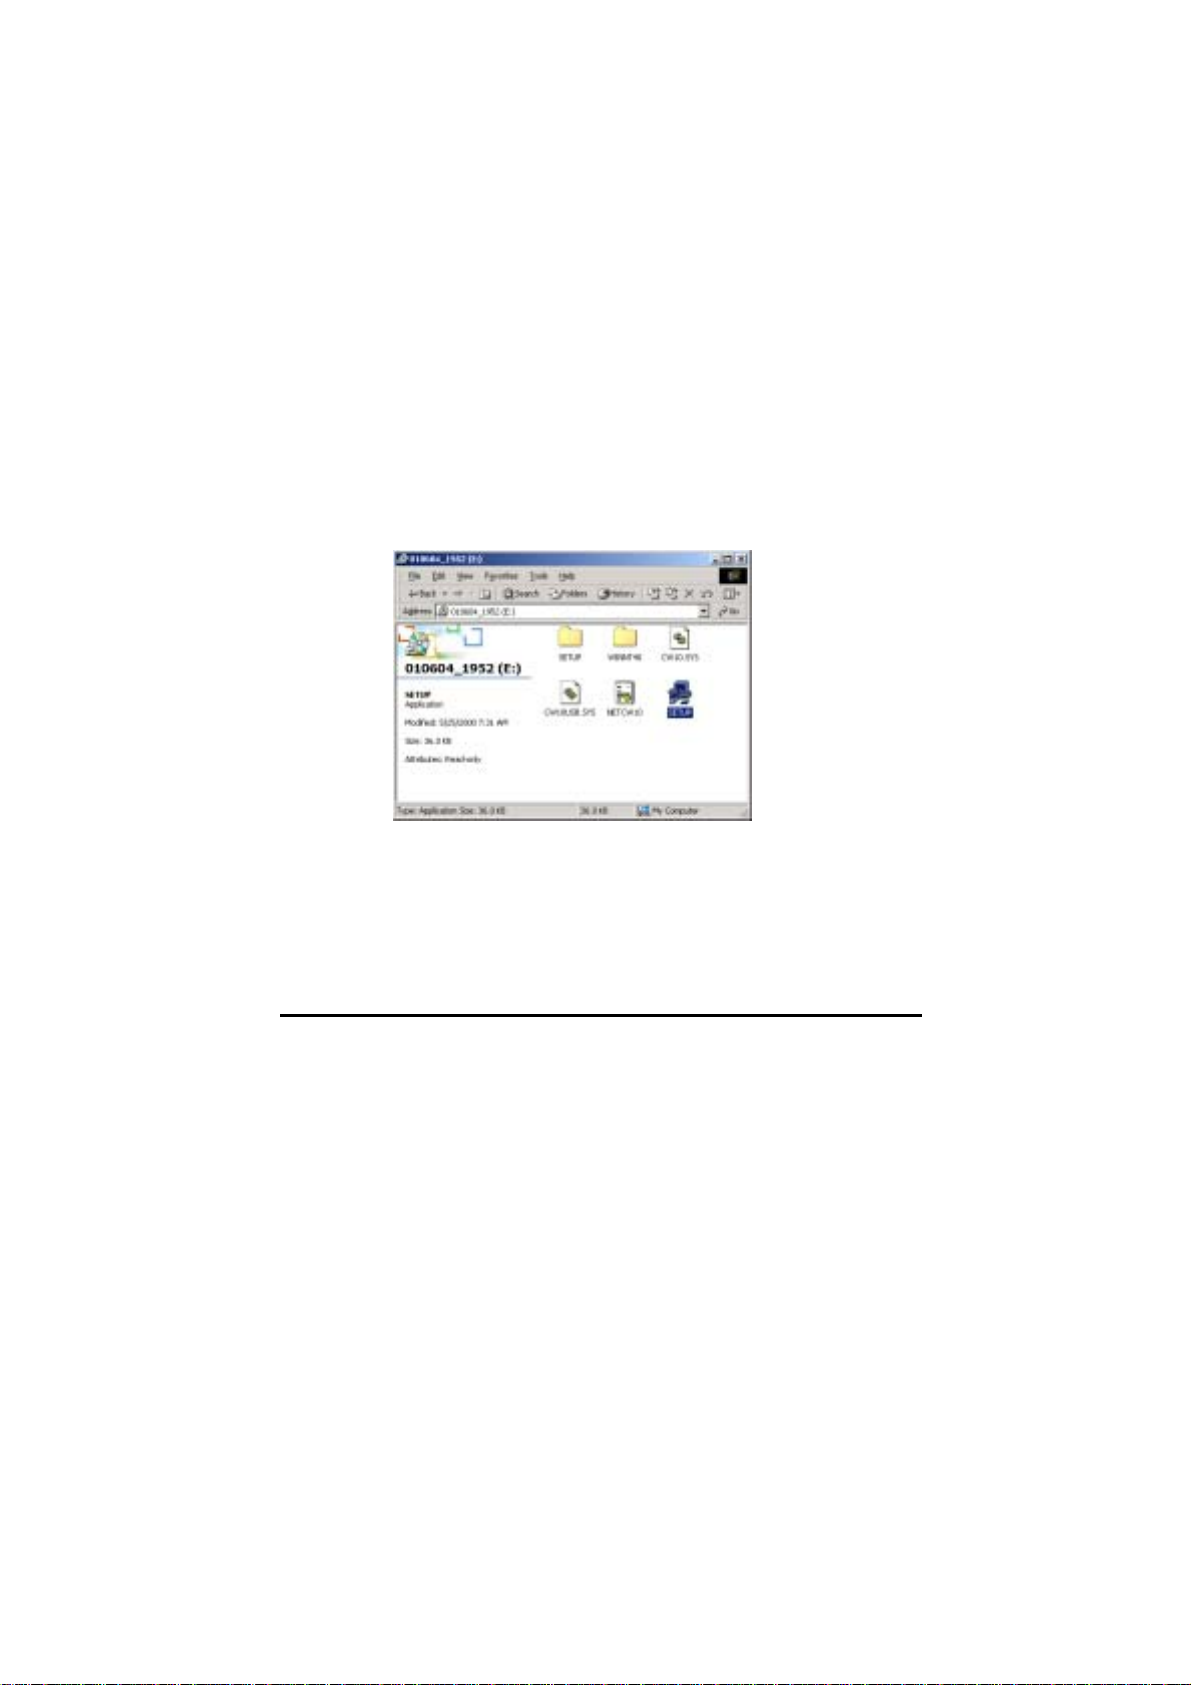
After you have installed the wireless LAN card driver and have rebooted the computer. Please follow the steps below.
1. Execute SETUP.EXE in your CD-ROM drive.
2. The following screen appears:
28
Page 35
—Using the Wireless Utility
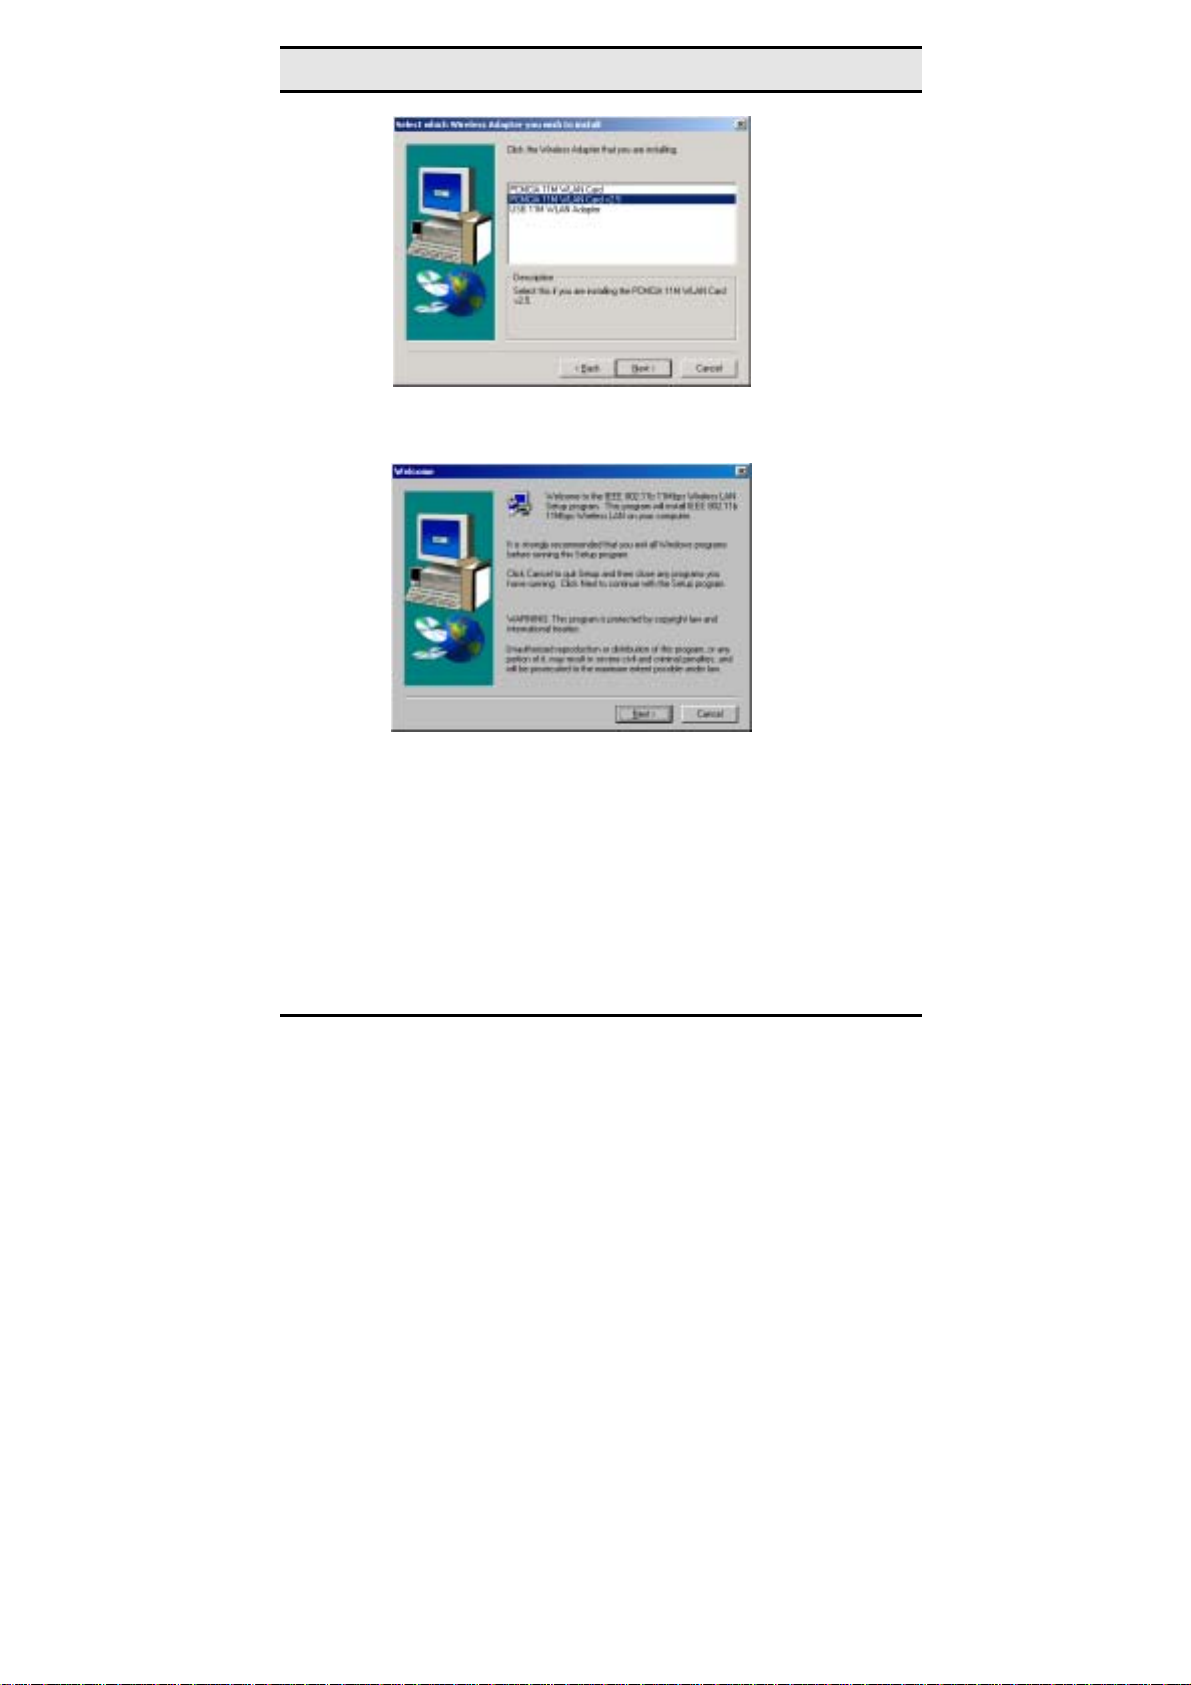
3. Select PCMCIA 11M WLAN Card v2.5 and click Next,
the following screen appears:
4. Click Next. The following screen appears:
29
Page 36
Wireless LAN card user manual
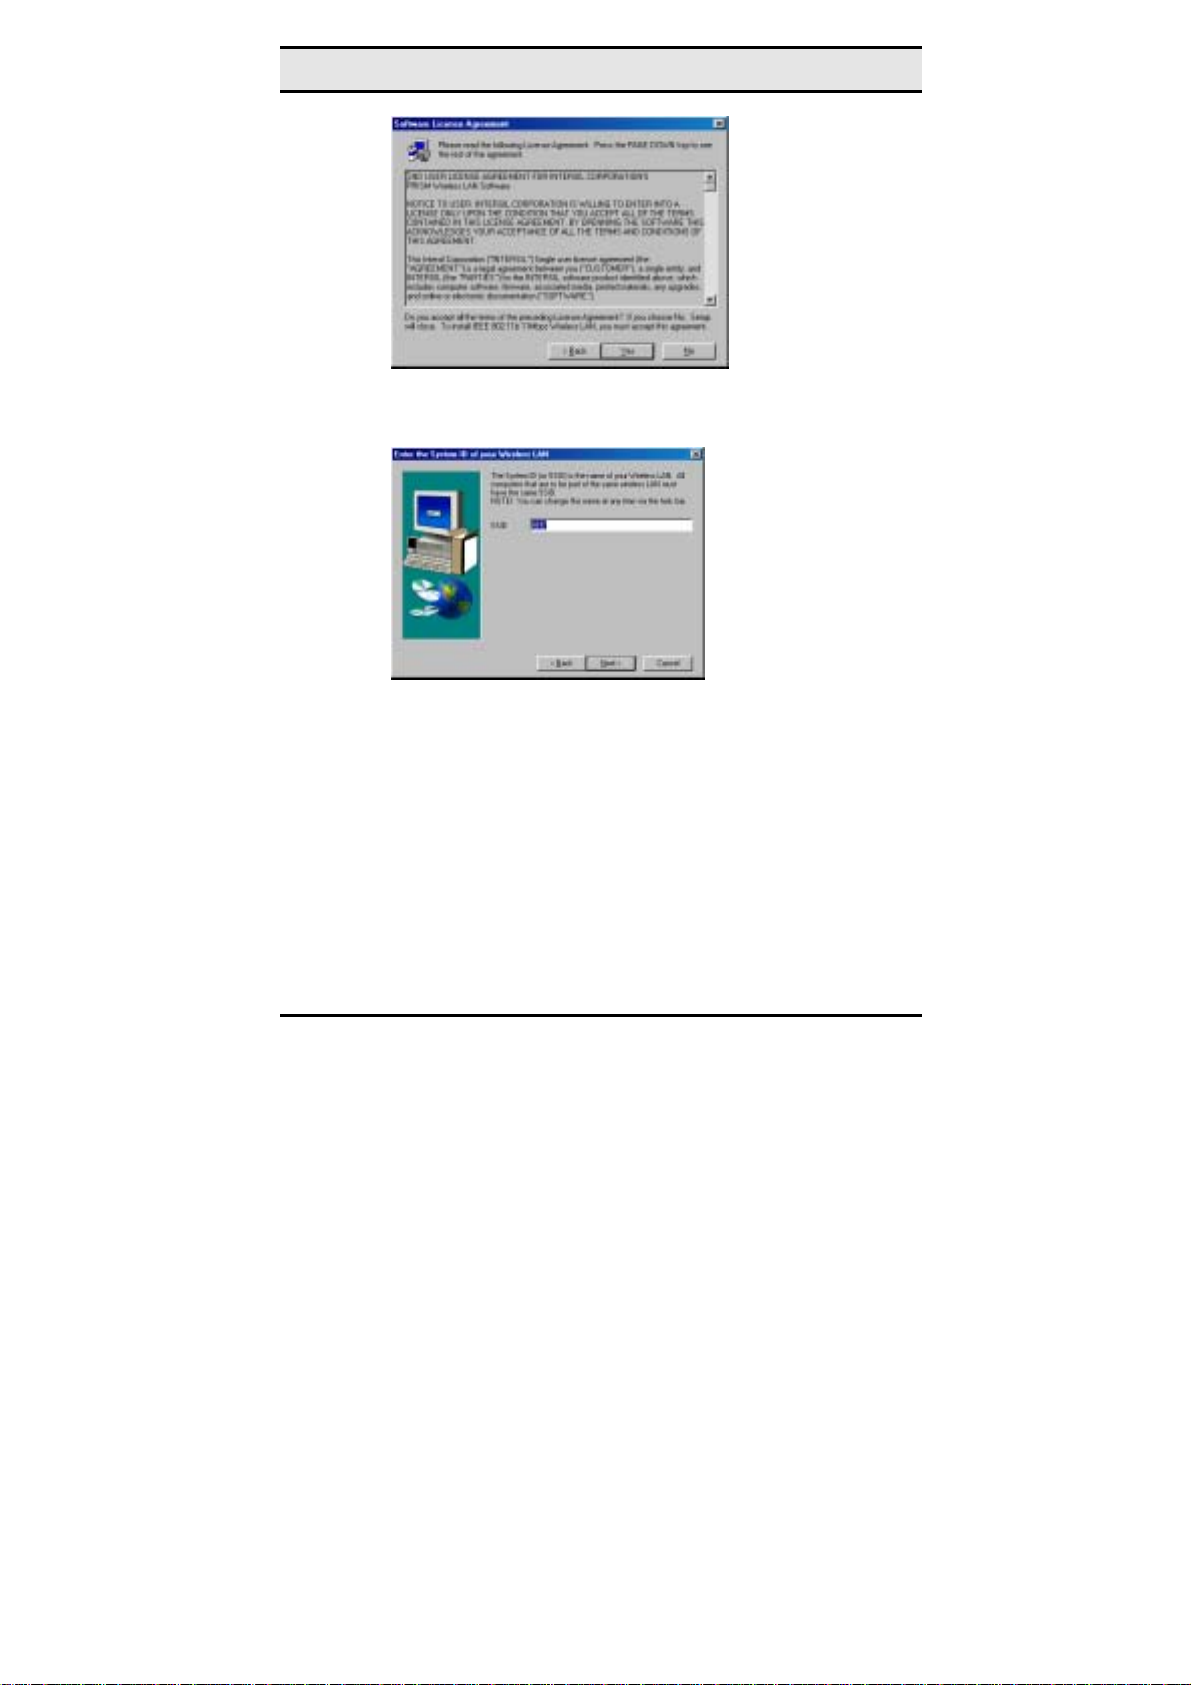
5. Read the End User License Agreement and click Yes. The
following screen appears:
6. Type in a System ID name for your wireless LAN. This
system ID identifies all computers in the wireless LAN.
Then click Next. The following screen appears:
30
Page 37
—Using the Wireless Utility
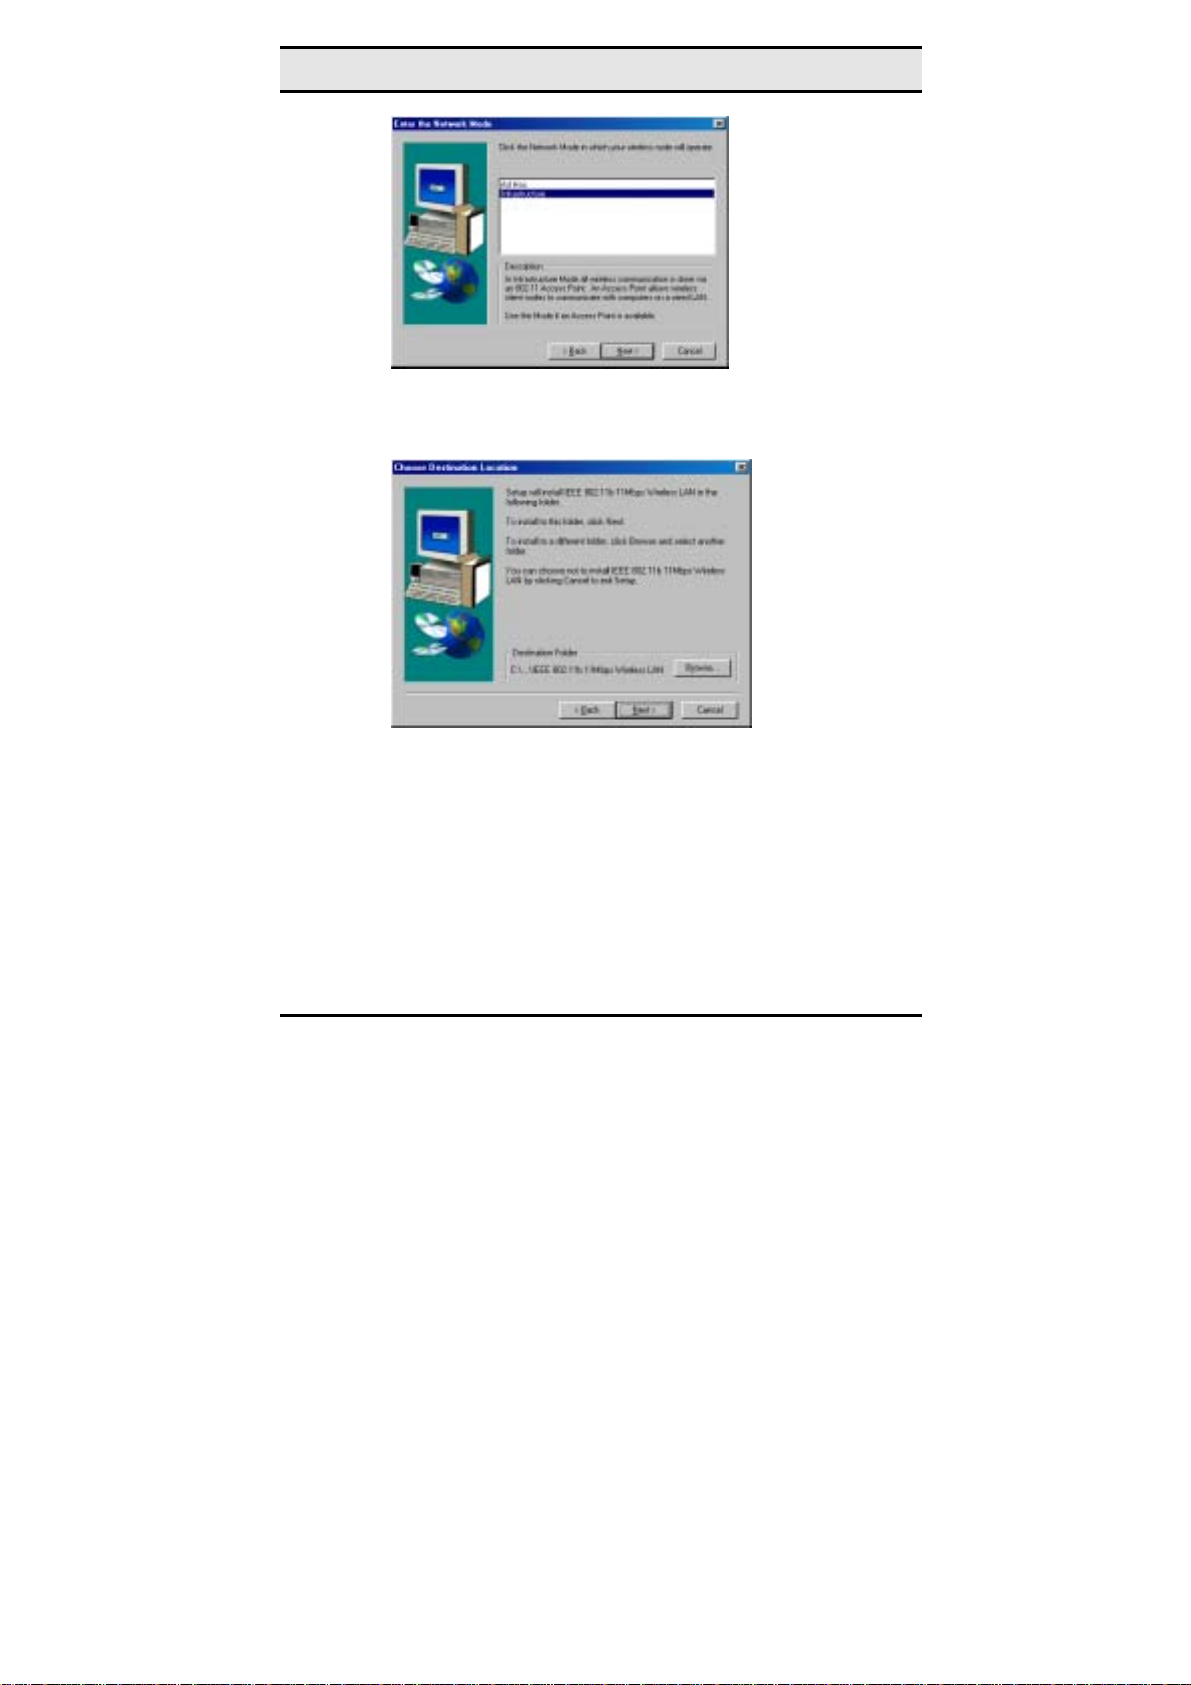
7. Choose the Network Mode for your wireless node.
8. Click Next. The following screen appears:
9. Select the default path for the wireless utility or browse to
an alternate path. Then click Next. The following screen
appears:
31
Page 38
Wireless LAN card user manual
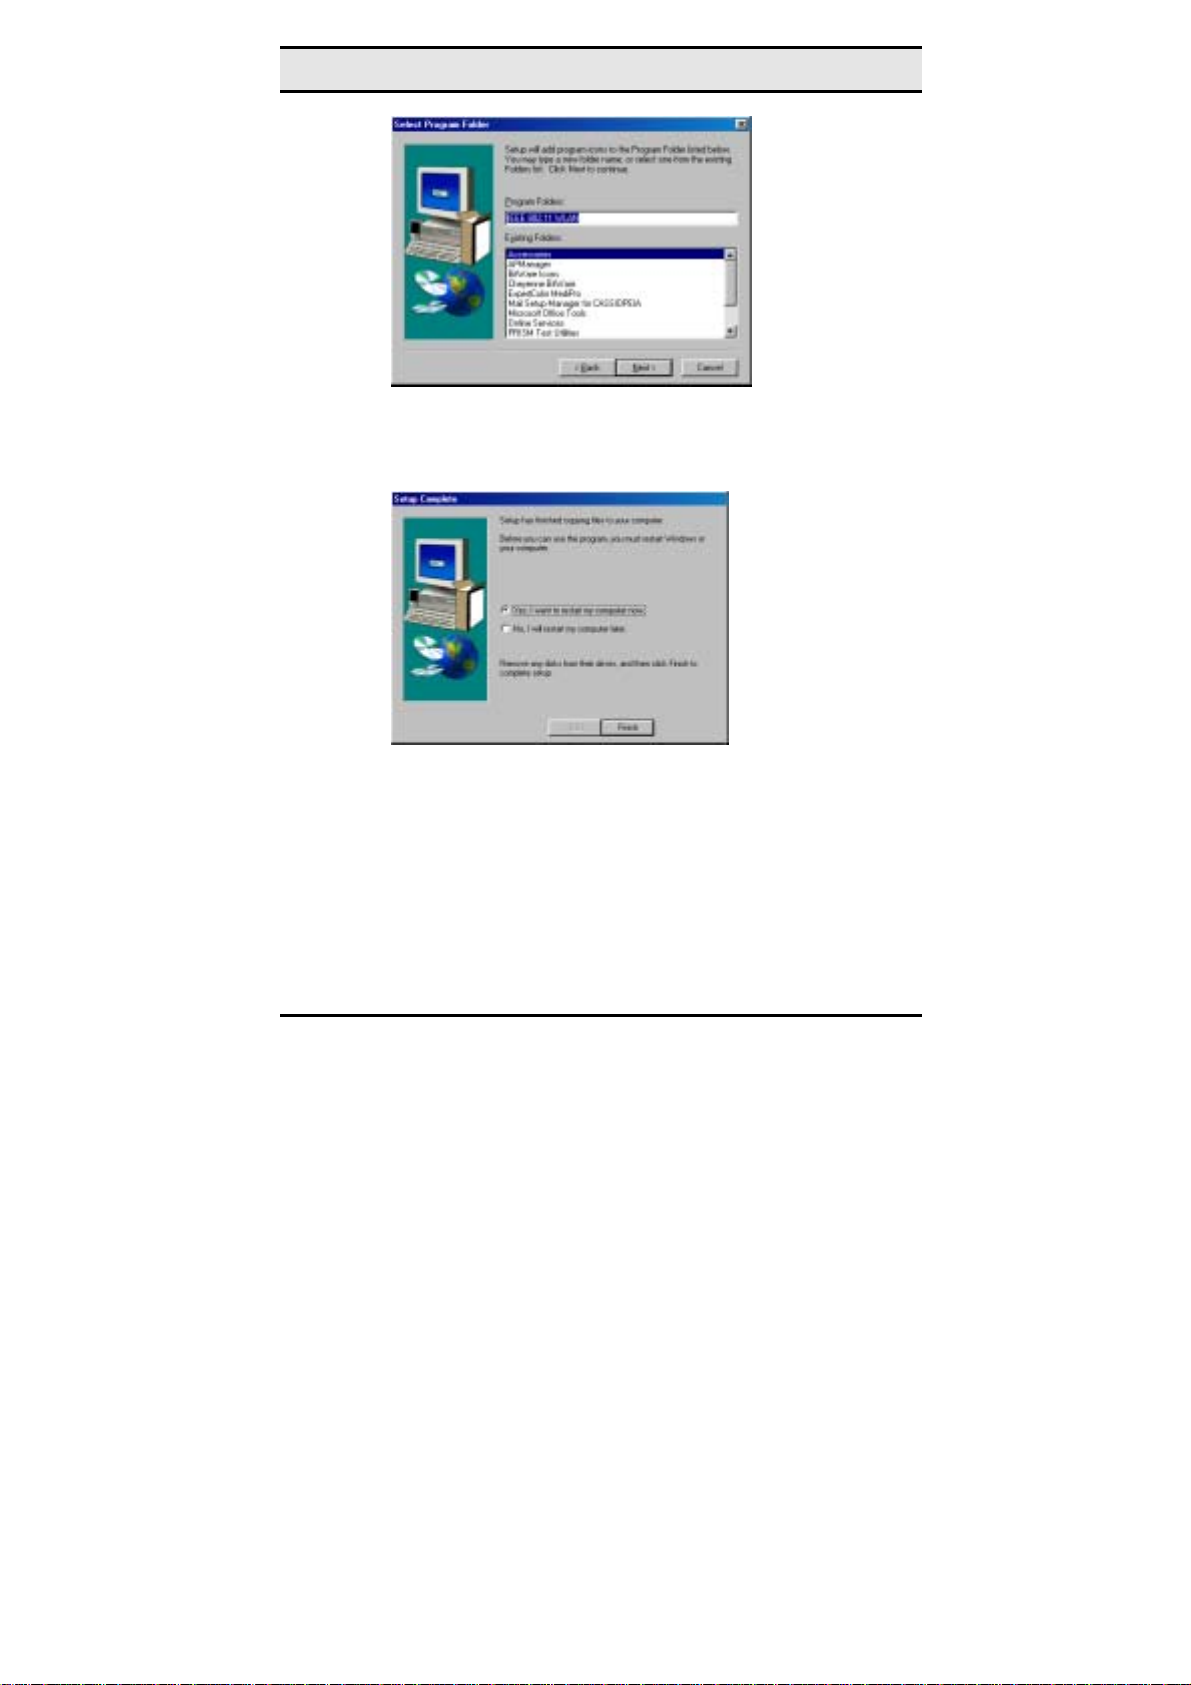
10. Type in a Program Folder name or select the default name
and click Next. Setup installs the software and the following screen appears:
11. Click Finish to finish the utility installation.
32
Page 39
—Using the Wireless Utility
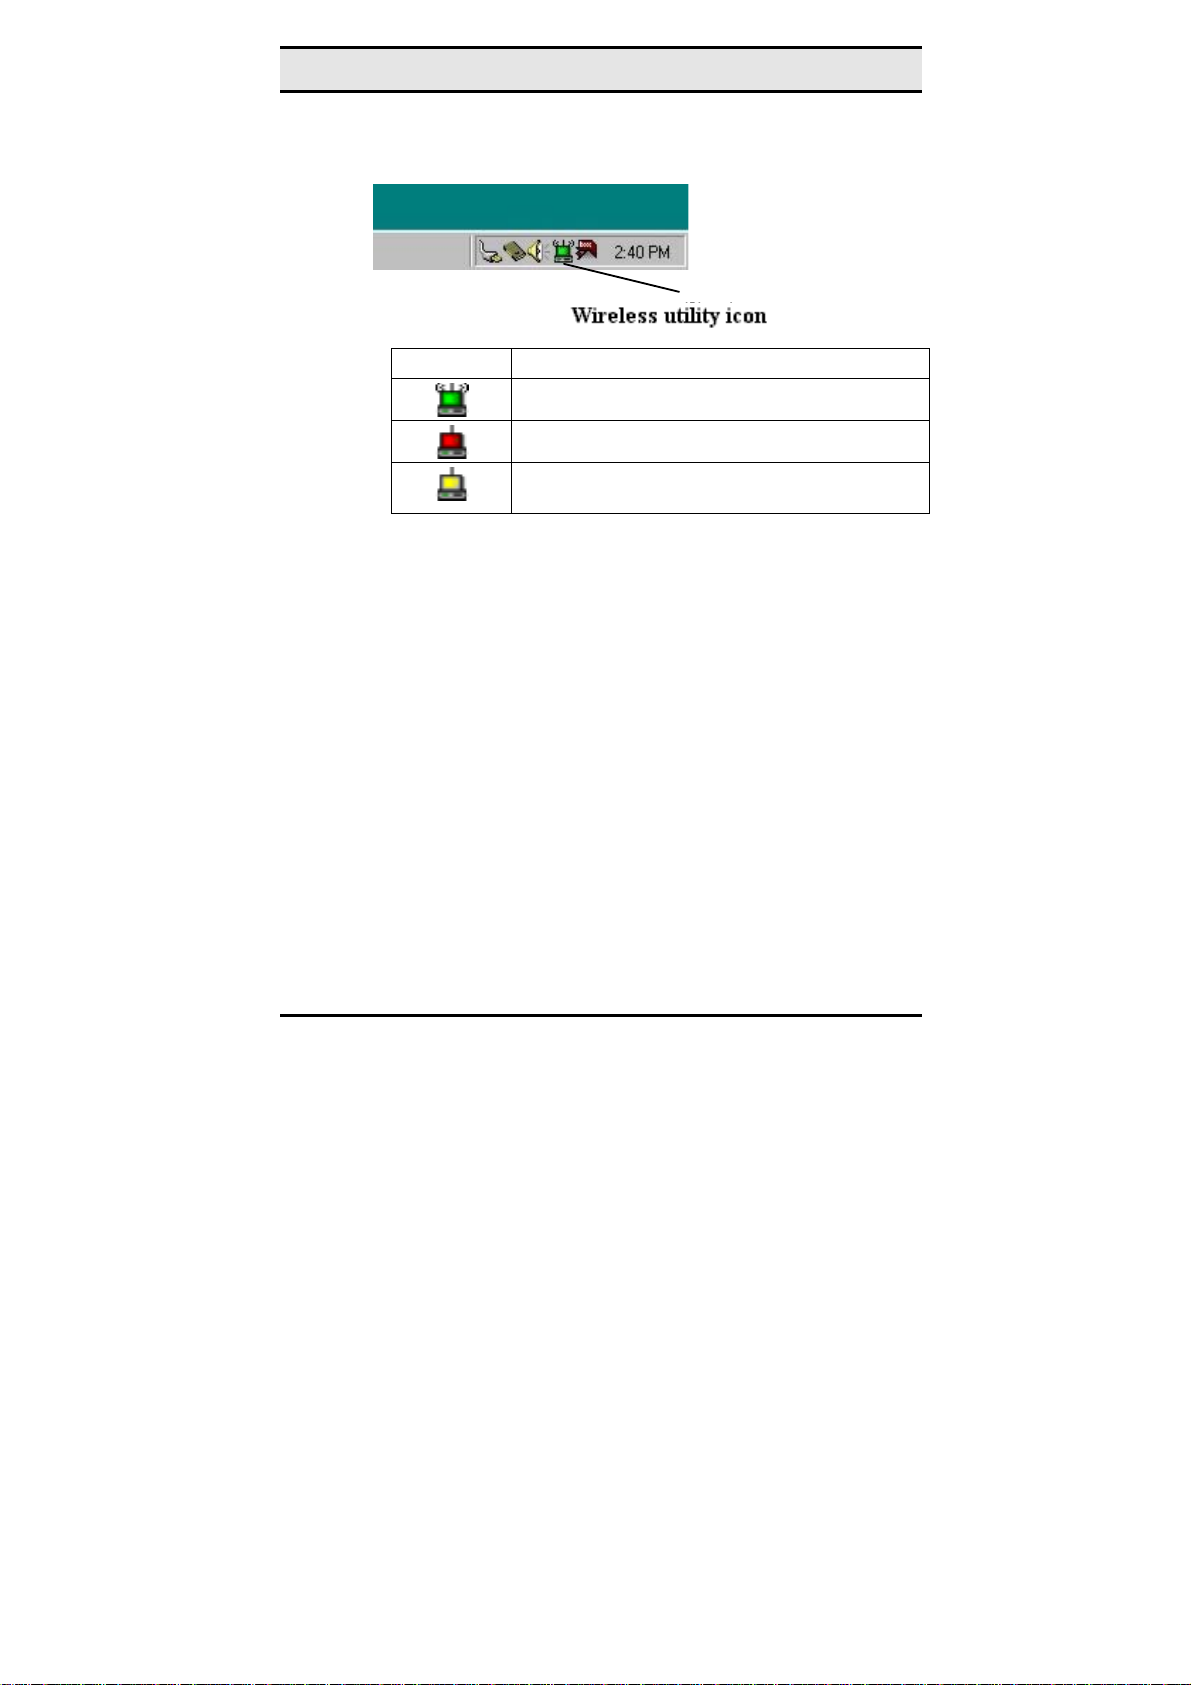
After you have installed the utility, you will see the wireless utility
icon in the Windows taskbar:
FreePort utility icon
Icon Meaning
Green: indicates a connection is active.
Red: indicates no connection is active.
Yellow: indicates that the wireless LAN card is
looking for an available access point.
Double-click the icon to open the configuration utility.
33
Page 40
Wireless LAN card user manual
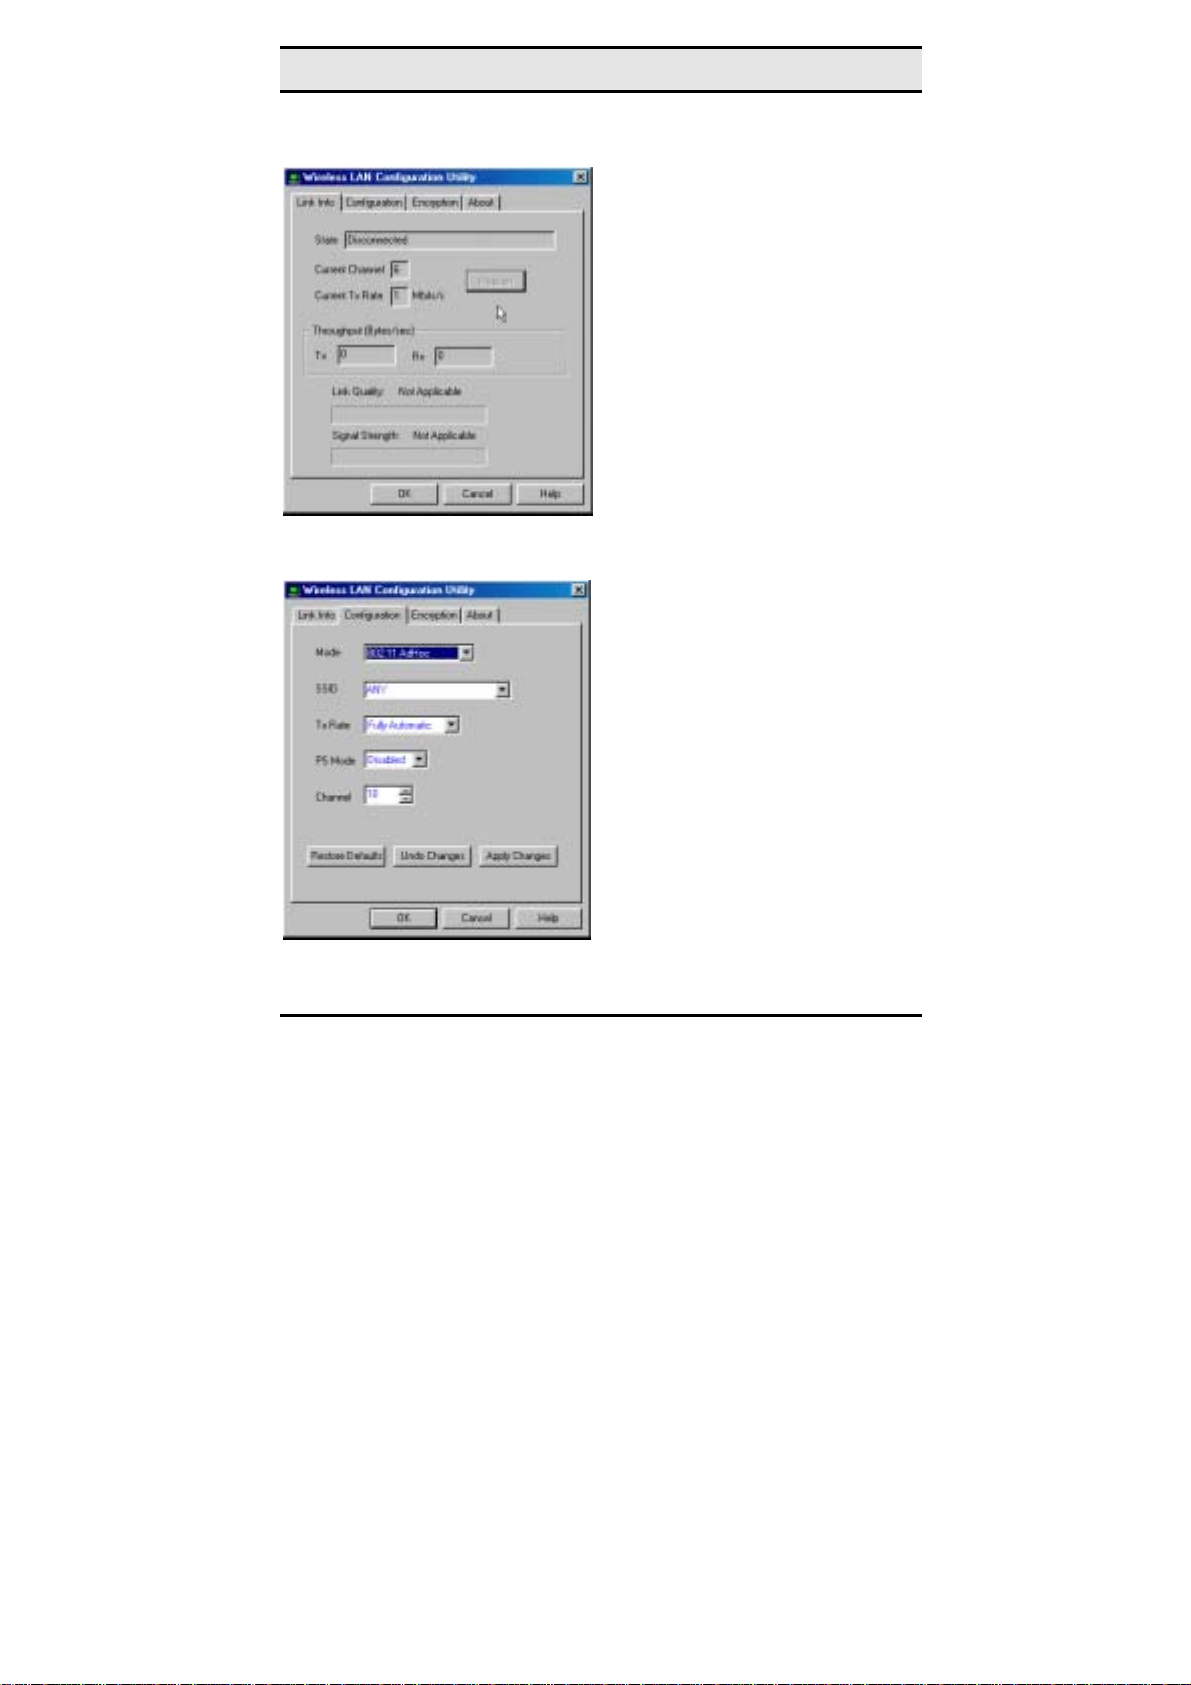
The following table describes the configuration utility:
State: displays the connection status.
Current Channel: displays the chan-
nel.
Current Tx Rate: displays the wire-
less bandwidth in megabits per
second.
Throughput: displays the transfer
and receive rates in bytes per second.
Link Quality: when connected to the
wired LAN, displays the connection
integrity.
Signal Strength: when connected to
the wired LAN, displays the signal
strength.
Note: Link quality and signal strength
are not available when using a peerto-peer connection.
Mode: displays the current LAN
mode, either 802.11 AdHoc or Infrastructure.
SSID: displays a list of Service Set
Identifications.
Tx Rate: displays a list of transfer
rates.
PS Mode: allows you to enable or
disable power saving mode.
Channel: enables you to select a
transmission channel.
34
Page 41
—Using the Wireless Utility
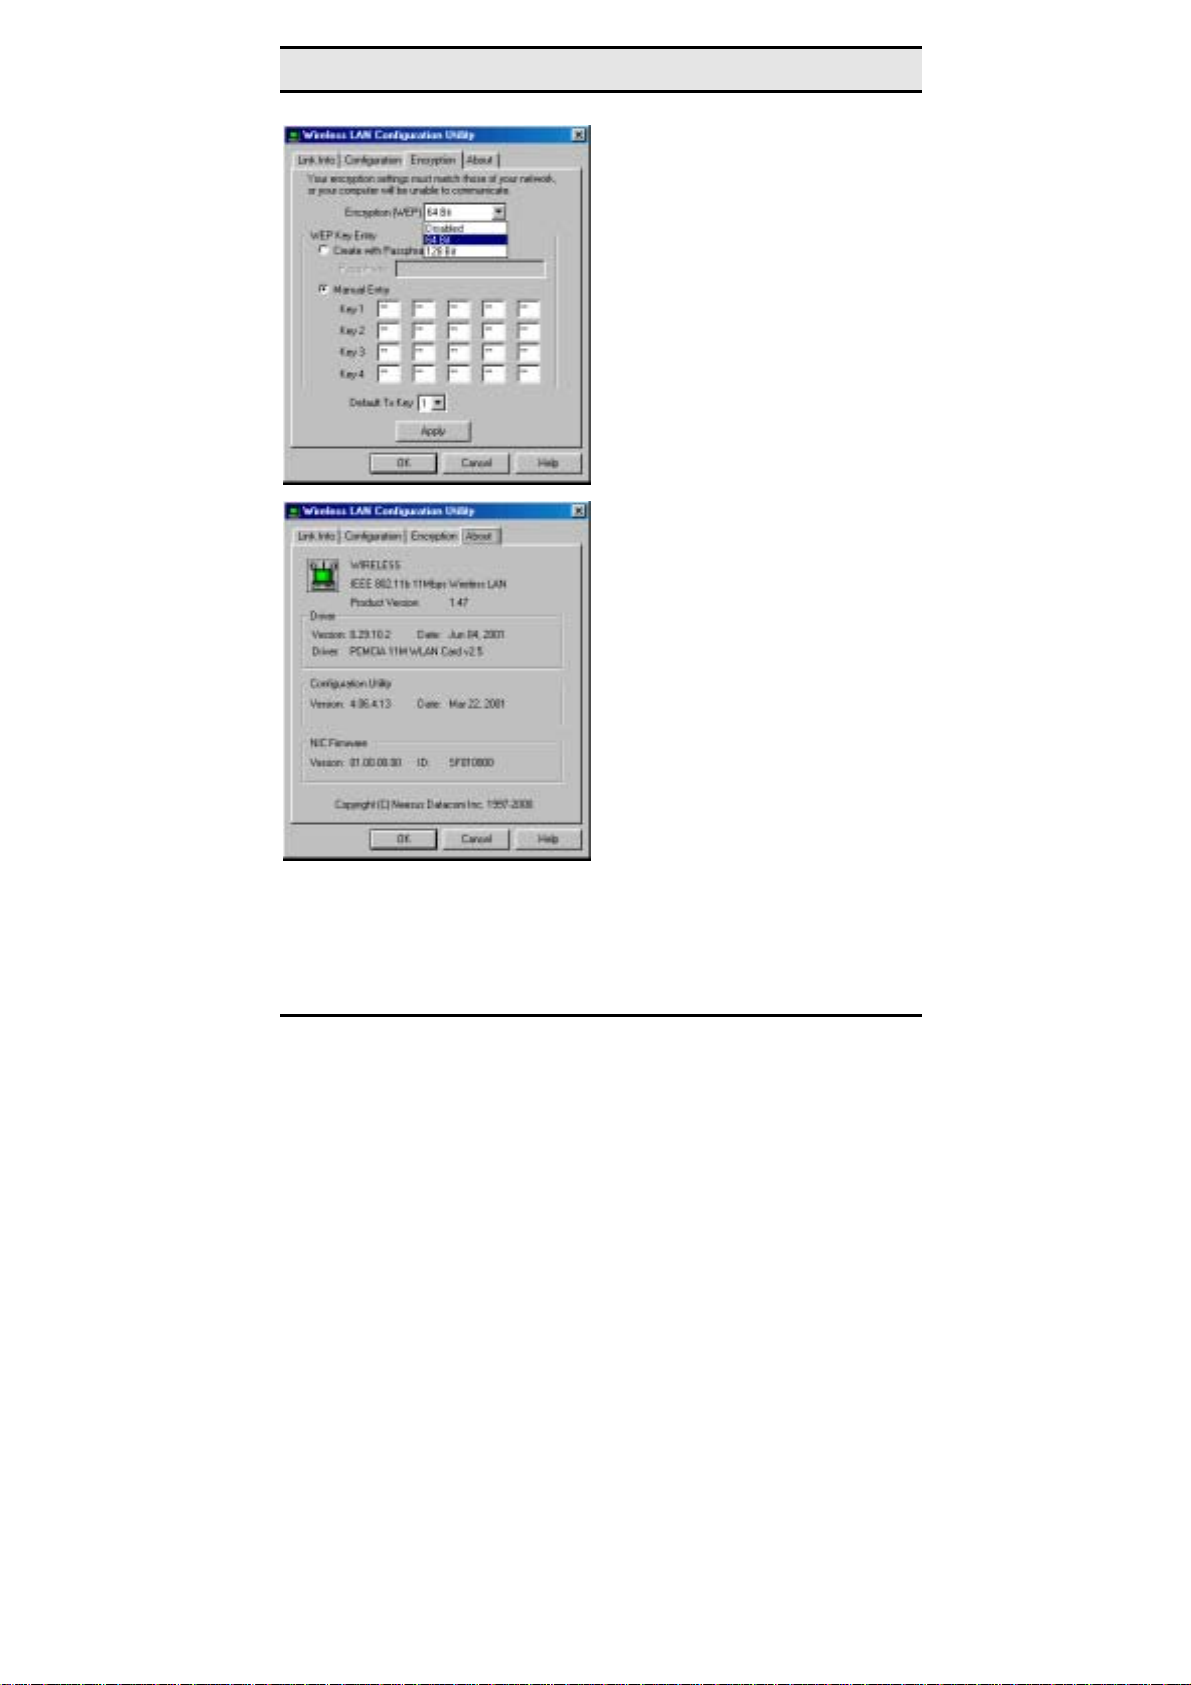
The Encryption window enables you to
create an encryption scheme for Wireless LAN transmissions.
You can also manually enter a set of
values for each key.
Note: 128-bit encryption requires
more system resources than 64-bit
encryption. Use 64-bit encryption for
better performance.
This screen displays the version number of the Wireless LAN card and the
Configuration Utility.
35
Page 42
Wireless LAN card user manual
Using the Wireless Utility
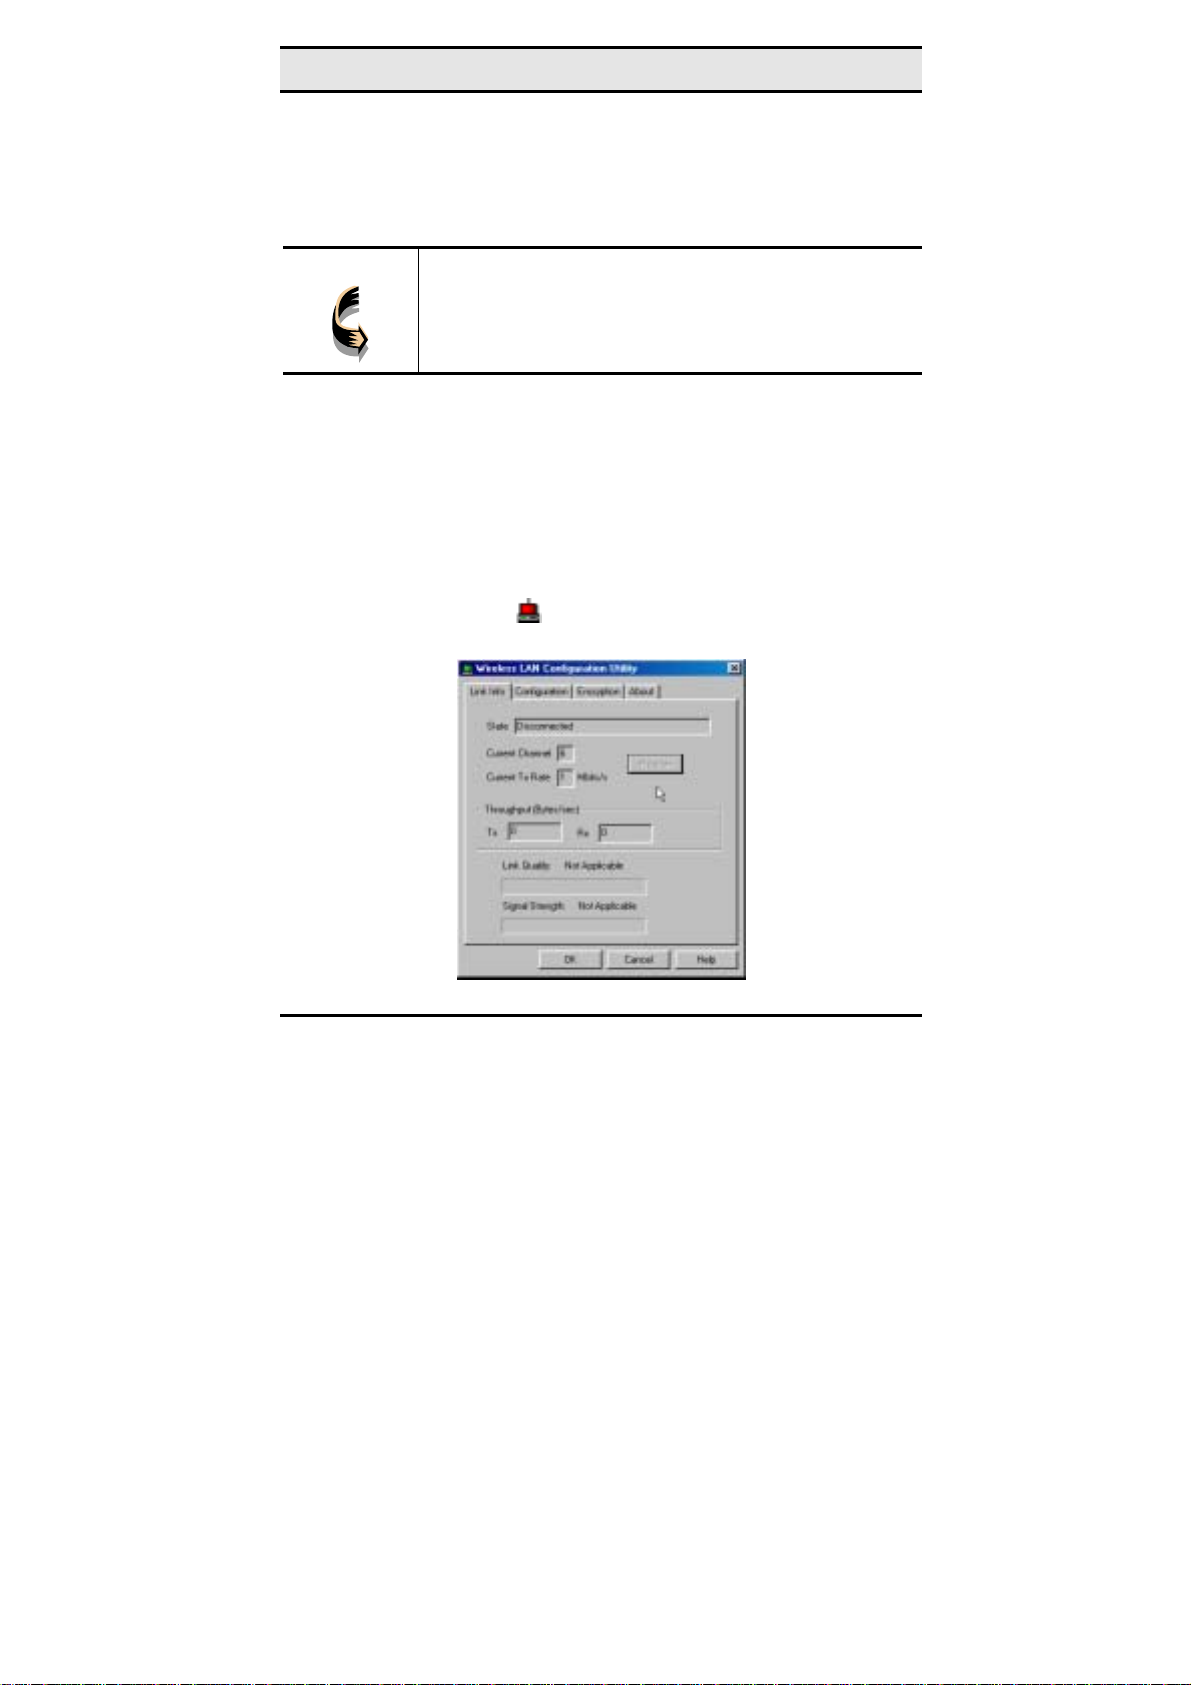
The following example will help you set up a peer-to-peer connection with the Wireless LAN card.
Note!
1. Insert a Wireless LAN card into the PCMCIA slots of two
2. Install the card drivers on both notebook computers (refer
3. Install the software on both notebook computers (refer to
4. After you have installed the software and rebooted, double-
For information on connecting your wireless LAN card
to the LAN, contact your system administrator.
Notebook PCs.
to Chapter 3).
page 錯誤! 尚未定義書籤。).
click the icon
the configuration utility:
in the lower corner of your screen to open
36
Page 43
—Using the Wireless Utility
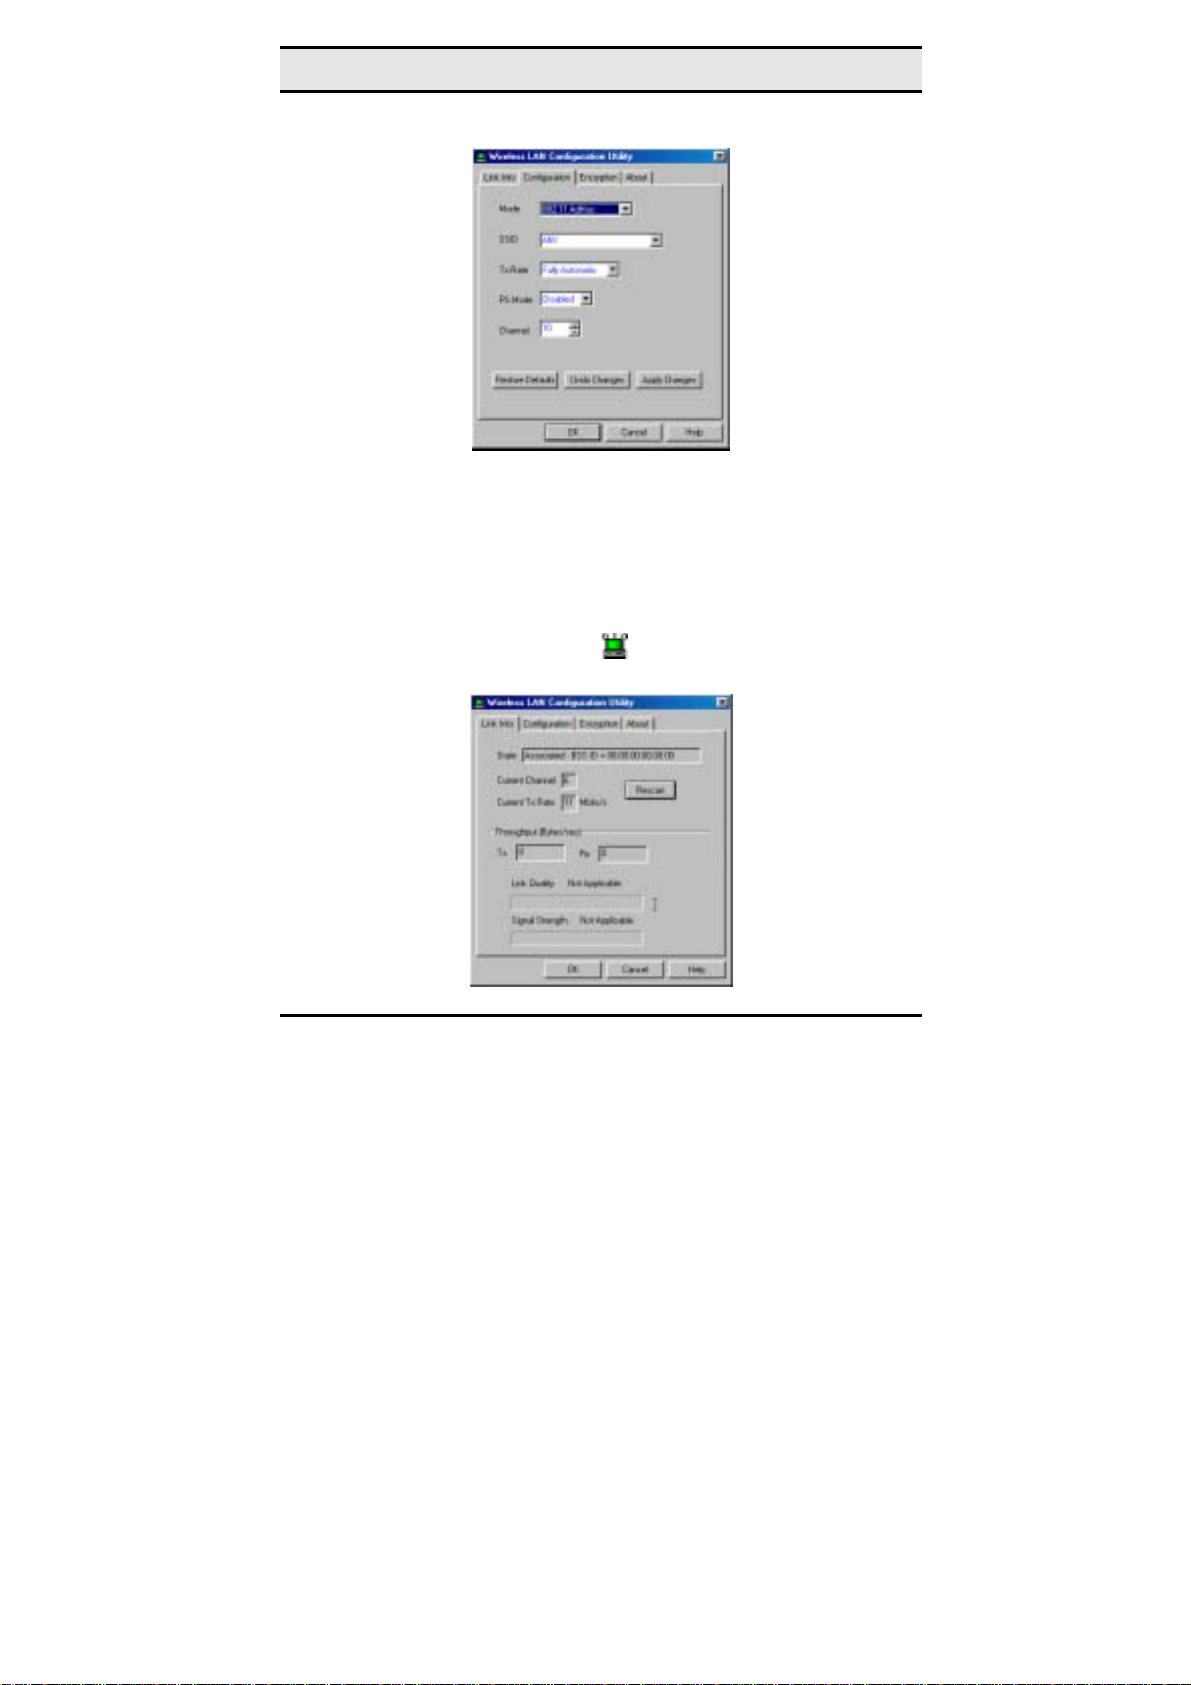
5. Click the Configuration tab:
6. Select 802.11 AdHoc from the Mode dropdown list. The
SSID should be the same as the one that you entered when
installing the software. Leave the other settings at their default values.
7. Perform steps 1 through 3 on another notebook PC. When the
two computers have connected via the Wireless LAN cards,
the tray icon turns green
and the Link Info tab of the con-
figuration utility shows an active connection:
37
Page 44
Wireless LAN card user manual
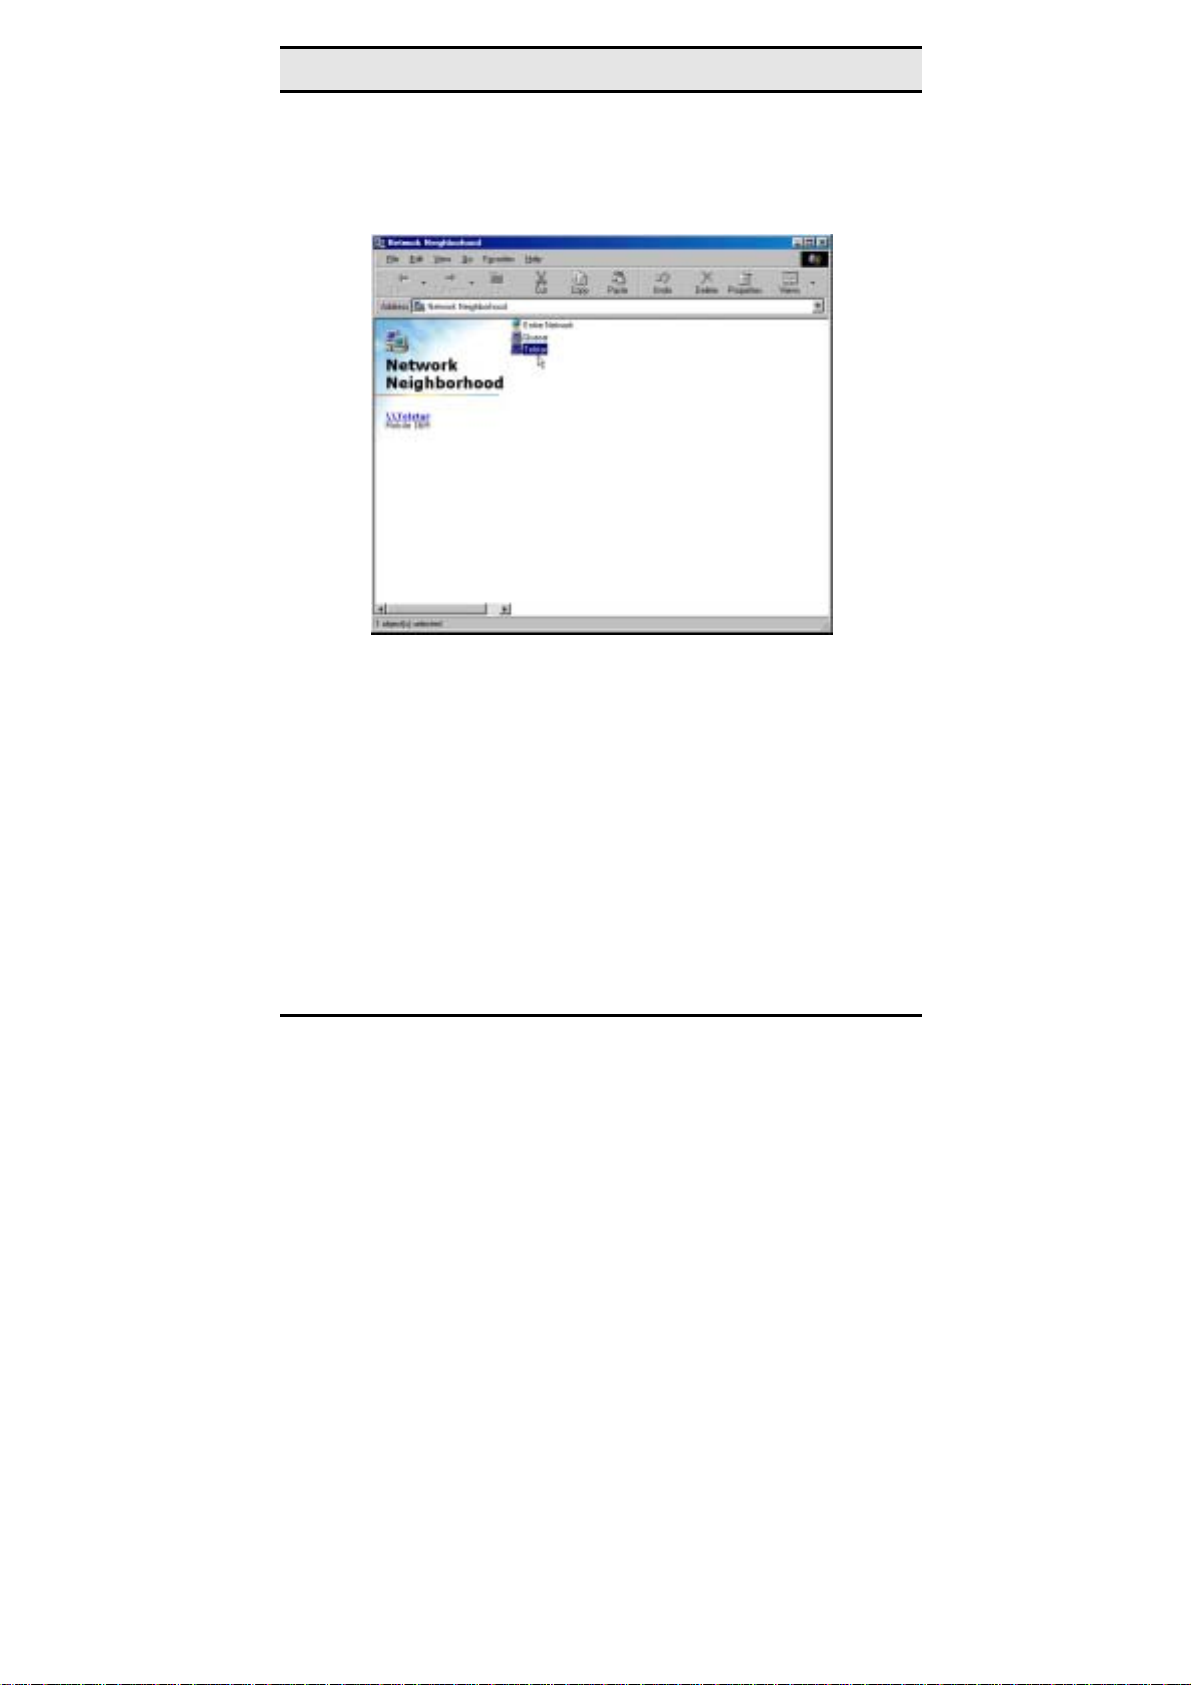
8. After the connection has been established, double-click the
Network Neighborhood icon on your desktop to view the
two computers connected to the peer-to-peer network:
38
Page 45

Appendix A
Troubleshooting
Q&A
These guidelines give you tips to deal with some problems you
may encounter while using the Wireless LAN card. If the problems remain unsolved, contact your dealer for assistance.
Problem: Windows can not recognize the card.
Solution: Please check if PC Card support is installed.
Double-click the PC Card icon on Control Panel. If PC
Card support is not activated, you should activate it now.
Problem: Ejecting the card from the PCMCIA socket
hangs or reboots the computer.
Solution: To prevent this phenomenon from occurring,
stop the card by using the PC Card tool in the Control
Panel or the PC Card icon on the taskbar before you remove the card.
Problem: The card cannot be detected when reinserted.
Cause: This is caused by certain unstable PCMCIA status
lines when the card is removed and reinserted. The Windows 95/98 drivers may read an incorrect status during
this period of signal instability, and fail to detect the correct status of the card.
39
Page 46

Wireless LAN card user manual
Solution: The card can be detected by clicking Refresh in
Device Manager.
Question: What is the Microsoft digital signature?
Answer: Drivers that pass Microsoft Windows 2000 certifi-
cation receive a digital signature file from Microsoft. The
Wireless LAN card does not have such a digital signature,
however it is fully compatible with Windows 2000.
Question: The Wireless Utility icon on system tray is always red.
Answer: Please make sure that all clients have the same
SSID. The SSID is case sensitive. And set all clients to the
same wireless channel and make sure you are within range
of an Access Point or client.
Question: Can not connect to one of the clients in the network.
Answer: First of all, make sure that all clients are up and
running with a green Wireless Utility icon. And please
check your TCP/IP setup is correct for your network.
40
Page 47

Specifications
Appendix B
Standards Compliance:
Socket Interface:
Card Size:
Frequency:
Antenna:
Roaming:
Data Rate:
Modulation Technique:
Coverage Area:
Power:
Output Power:
Receiver Sensitivity:
Operating Environment:
Dimensions:
Weight:
IEEE802.11b WLAN Standard,
PCMCIA 2.1 and JEIDA 4.2 Standard
68-pin 16-bit PCMCIA socket connector
PCMCIA extended Type II
2.4 to 2.4835GHz ( Industrial Scientific Medical
Band )
Built-in strip Antenna
802.11 compliant
11Mbps / 5.5Mbps / 2Mbps / 1Mbps
Direct Sequence Spread Spectrum
BPSK / QPSK / CCK
Indoor : 50m @ 11Mbps, 80m @ 5.5Mbps or lower
Outdoor : 150m @ 11Mbps,
300m @ 5.5Mbps or lower
DC +3.3V /+5V, 220mA (3.3V)
17dBm (typical)
-84dBm Min.
Temperature: 0
Humidity: 10% to 90%
115 x 54 x 11.5mm
47g
o
to 55oC
41
 Loading...