

Page 1

User Manual
BC4000
RAIDCore™ BC4000 Series RAID
Controllers
16215 Alton Parkway • P.O. Box 57013 • Irvine, CA 92619-7013 • Phone: 949-450-8700 • Fax: 949-450-8710 02/13/06
BC4000-UM100-R
Page 2

REVISION HISTORY
Revision Date Change Description
BC4000-UM100-R 02/13/06 Initial release; describes version 2.1 of XelCore™ software and the
BC4000 Series of hardware controllers (which includes HT-1000
controllers).
Broadcom Corporation
P.O. Box 57013
16215 Alton Parkway
Irvine, CA 92619-7013
© 2006 by Broadcom Corporation
All rights reserved
Printed in the U.S.A.
Broadcom®, the pulse logo, Connecting everything®, and the Connecting everything logo are among the trademarks of
Broadcom Corporation and/or its affiliates in the United States, certain other countries and/or the EU. Any other
trademarks or trade names mentioned are the property of their respective owners.
This user guide (including, without limitation, the Broadcom component(s) identified herein) is not designed, intended,
or certified for use in any military, nuclear, medical, mass transportation, aviation, navigations, pollution control,
hazardous substances management, or other high risk application. BROADCOM PROVIDES THIS USER GUIDE "ASIS", WITHOUT WARRANTY OF ANY KIND. BROADCOM DISCLAIMS ALL WARRANTIES, EXPRESSED AND
IMPLIED, INCLUDING, WITHOUT LIMITATION, THE IMPLIED WARRANTIES OF MERCHANTABILITY, FITNESS
FOR A PARTICULAR PURPOSE, AND NON-INFRINGEMENT.
Page 3

User Manual BC4000 Series RAID Controllers
02/13/06
TABLE OF CONTENTS
Section 1: Introduction........................................................................................................1
Audience ....................................................................................................................................................... 1
Obtaining Acrobat ........................................................................................................................................ 1
Contacting Broadcom.................................................................................................................................. 1
Section 2: Overview of RAID Concepts .............................................................................2
Understanding Arrays ................................................................................................................................. 2
Overview of Array Types ............................................................................................................................. 2
Expanding Disk Capacity Online ................................................................................................................ 3
Migrating RAID Levels Online..................................................................................................................... 3
Performance Considerations ...................................................................................................................... 4
Reliability Considerations ........................................................................................................................... 4
Flexibility and Expansion Considerations ................................................................................................. 5
Multiple Types......................................................................................................................................... 5
Future Expansion .................................................................................................................................... 5
Operating System Considerations ............................................................................................................. 5
Section 3: General Product Information............................................................................6
Overview of Features ................................................................................................................................... 6
BC4000 Series Model Numbers .................................................................................................................. 7
BC485x and BC445x Controllers ............................................................................................................ 7
BC4810 and BC4410 Controllers............................................................................................................ 8
HT-1000 Controllers................................................................................................................................ 9
Licensing Level Differences........................................................................................................................ 9
Detailed Feature List .................................................................................................................................. 10
Section 4: Installing BC4000 Series Controllers.............................................................12
Overview of the Installation Process ....................................................................................................... 12
System Requirements........................................................................................................................... 12
BC4000 Series Kit Contents ................................................................................................................. 13
Installation Steps................................................................................................................................... 13
Installing and Cabling BC4000 Hardware ................................................................................................ 15
Installing the BC4000 Controller ........................................................................................................... 15
Installing Hard Disk Drives and Cables (BC4000) ................................................................................ 17
Document BC4000-UM100-R Page iii
Broadcom Corporation
Page 4

BC4000 Series RAID Controllers User Manual
02/13/06
Preparing Disks and Arrays for New OS Installs .....................................................................................19
Initializing Disks from the BIOS .............................................................................................................19
Creating Arrays from the BIOS..............................................................................................................20
Windows: Installing Drivers and Applications.........................................................................................22
Transferring Drivers to Floppy Disk (Windows) .....................................................................................22
Installing the BC4000 Series Drivers (Windows)...................................................................................22
New Installation of Windows 2000, XP, or 2003 ...........................................................................23
Existing Installation of Windows 2000, XP, or 2003 .......................................................................24
Installing the Management Suite ...........................................................................................................27
Linux: Installing Drivers and Applications...............................................................................................28
Transferring Drivers to Floppy Disk (Linux)...........................................................................................28
Installing the BC4000 Series Drivers (Linux).........................................................................................29
New Install of Red Hat and Fedora Core 1 Linux...........................................................................29
New Install of Fedora Core 2, 3, and 4 Linux.................................................................................30
New Install of SuSE Linux..............................................................................................................30
Existing Install of Red Hat or Fedora Core 1, 2, 3, or 4 Linux........................................................31
Existing Install of SuSE Linux.........................................................................................................32
Installing the bcadm Application............................................................................................................33
Installing the Online Help.......................................................................................................................33
Installing the bc_winraid Application......................................................................................................34
Booting from a Legacy Disk ......................................................................................................................35
Section 5: Updating the Drivers, Firmware, and Applications...................................... 36
Updating Components for the BC4000 Series .........................................................................................36
Updating the BC4000 Series Components for Windows.......................................................................37
Updating the BC4000 Series Driver for Linux........................................................................................39
Updating the BC4000 Series BIOS Image (Linux) ................................................................................40
Updating the BC4000 Driver for a Linux Errata Kernel..........................................................................41
Creating a Bootable Floppy Disk ..............................................................................................................42
Page iv Document BC4000-UM100-R
Broadcom Corporation
Page 5

User Manual BC4000 Series RAID Controllers
02/13/06
Section 6: General Concepts for Managing Arrays and Disks ......................................43
RAID Minimum Disk Requirements .......................................................................................................... 43
Using Legacy Disks ................................................................................................................................... 43
Understanding Array and Disk States...................................................................................................... 44
Array States .......................................................................................................................................... 44
Disk States............................................................................................................................................ 45
Rescanning for Changes in State ......................................................................................................... 45
Starting and Stopping Tasks .................................................................................................................... 46
Working with Spares.................................................................................................................................. 47
About Sparing Options .......................................................................................................................... 47
Using Distributed Sparing ..................................................................................................................... 47
Using Dedicated Sparing ...................................................................................................................... 49
Using Global Sparing ............................................................................................................................ 49
Section 7: Using the BIOS Configuration Utility.............................................................50
When to Use the BIOS Configuration Utility............................................................................................ 50
Understanding the Color Code in the BIOS............................................................................................. 50
Initializing Disks from the BIOS................................................................................................................ 51
Creating Arrays from the BIOS ................................................................................................................. 52
Deleting Arrays from the BIOS ................................................................................................................. 54
Swapping Arrays from the BIOS............................................................................................................... 55
Hiding or Unhiding Arrays from the BIOS ............................................................................................... 56
Viewing Disk Details from the BIOS ......................................................................................................... 56
Viewing Array Details from the BIOS ....................................................................................................... 57
Rescanning All Channels from the BIOS ................................................................................................. 57
Changing Controller Options From the BIOS.......................................................................................... 58
Continue Booting from the BIOS .............................................................................................................. 59
Section 8: Using RAIDConsole.........................................................................................60
Starting the RAIDConsole Management Application.............................................................................. 60
Using Password Protection ...................................................................................................................... 62
Using the Help Menu.................................................................................................................................. 64
Document BC4000-UM100-R Page v
Broadcom Corporation
Page 6

BC4000 Series RAID Controllers User Manual
02/13/06
Reviewing the Interface..............................................................................................................................65
The Array Status Window......................................................................................................................65
Array View Elements .............................................................................................................................66
Disk List Elements.................................................................................................................................67
Array List Elements ...............................................................................................................................67
I/O Status Bar Elements........................................................................................................................68
Working with Disks.....................................................................................................................................69
Initializing Disks .....................................................................................................................................69
Rescanning Disks..................................................................................................................................69
Changing Cache Settings for Disks.......................................................................................................69
Changing Disk View Settings ................................................................................................................70
Using LEDs to Identify Disks .................................................................................................................72
Working with Arrays...................................................................................................................................72
Creating and Formatting Arrays ............................................................................................................72
Creating Arrays Larger Than 2 TB ........................................................................................................75
Naming Arrays.......................................................................................................................................83
Using LEDs to Identify Arrays................................................................................................................83
Transforming Arrays..............................................................................................................................84
Copying Arrays......................................................................................................................................85
Using the Un-Link Command.........................................................................................................89
Accessing Additional Space ..................................................................................................................90
Hiding and Unhiding Arrays...................................................................................................................90
Preparing to Physically Remove an Array ............................................................................................. 91
Deleting Arrays......................................................................................................................................91
Recovering Arrays.................................................................................................................................92
Changing Cache Settings for Arrays.....................................................................................................92
Changing the Priority Level of a Task....................................................................................................93
Interrupting or Cancelling a Task...........................................................................................................93
Checking for Consistency......................................................................................................................94
Scheduling a Consistency Check ..........................................................................................................95
Scanning an Array in the Background ...................................................................................................95
Splitting Mirrored Arrays ........................................................................................................................96
Split a Mirror Using the Default Settings ........................................................................................96
Split a Mirror Using the Advanced Split Option ..............................................................................96
Page vi Document BC4000-UM100-R
Broadcom Corporation
Page 7

User Manual BC4000 Series RAID Controllers
02/13/06
Adding or Removing Distributed Spares............................................................................................... 97
Adding or Removing Dedicated Spares................................................................................................ 97
Adding or Removing Global Spares...................................................................................................... 98
Removing Spares ................................................................................................................................. 98
Working with Options ................................................................................................................................99
Viewing or Changing the License Level................................................................................................ 99
Changing Your Password Settings ..................................................................................................... 102
Changing the Interface View............................................................................................................... 103
Setting Small Icons...................................................................................................................... 103
Using Expand On Click................................................................................................................ 103
Editing Text Columns in the Disk List .......................................................................................... 104
Editing the Physical View of the Disks ................................................................................................ 104
Viewing Logs....................................................................................................................................... 105
Setting Event Notifications .................................................................................................................. 106
Setting up Remote Management ........................................................................................................ 108
Adding a Remote System ................................................................................................................... 109
Updating the Controller Firmware....................................................................................................... 110
Reading SMART Information from Disks............................................................................................111
Turning on Advanced Options ............................................................................................................ 113
Stopping and Restarting the RAIDCore Service ................................................................................. 113
Section 9: Using bcadm..................................................................................................114
What is bcadm?........................................................................................................................................ 114
Understanding Query Output.................................................................................................................. 115
bcadm Controller List Elements.......................................................................................................... 115
bcadm Disk List Elements................................................................................................................... 115
bcadm Array List Elements ................................................................................................................. 116
Viewing Help from the Command Line................................................................................................... 117
Document BC4000-UM100-R Page vii
Broadcom Corporation
Page 8

BC4000 Series RAID Controllers User Manual
02/13/06
Managing Controllers, Arrays, and Disks: bcadm --manage................................................................118
Options ................................................................................................................................................118
--query, -q.....................................................................................................................................118
--query-all, -qa..............................................................................................................................118
--add-spare, -as............................................................................................................................119
--remove-spare, -rs.......................................................................................................................119
--remove-all-spares, -ras..............................................................................................................119
--add-global-spare, -ags ...............................................................................................................119
--remove-global-spare, -rgs..........................................................................................................120
--cache-array, -ca.........................................................................................................................120
--cache-disk, -cd...........................................................................................................................121
--check-start, -cs...........................................................................................................................121
--check-end, -ce ...........................................................................................................................122
--check-bitmap-start, -cbs.............................................................................................................122
--check-bitmap-end, -cbe .............................................................................................................122
--scan-array, -sa...........................................................................................................................123
--task, -t........................................................................................................................................123
--priority, -p...................................................................................................................................124
--initialize disk, -id.........................................................................................................................124
--blink, -b ......................................................................................................................................125
--prepare-to-remove, -ptr..............................................................................................................125
--recover-array, -rcv......................................................................................................................126
--rescan, -rsc ................................................................................................................................126
--hide, -h.......................................................................................................................................126
--unhide, -uh.................................................................................................................................127
--unlink, -ul....................................................................................................................................127
--name, -n.....................................................................................................................................127
--smart-get, -sg............................................................................................................................. 128
--flash, -f.......................................................................................................................................128
--array, -a......................................................................................................................................128
--controller, -ct .............................................................................................................................129
--disk, -d .......................................................................................................................................129
--verbose, -v .................................................................................................................................129
Page viii Document BC4000-UM100-R
Broadcom Corporation
Page 9

User Manual BC4000 Series RAID Controllers
02/13/06
Creating New Arrays: bcadm --create .................................................................................................... 130
Syntax................................................................................................................................................. 130
Options................................................................................................................................................ 131
--sub-member <num>, -sub <num>............................................................................................. 131
--spare-disk <list>, -sp <list>........................................................................................................ 131
--size <size_mb>, -s <size_mb>..................................................................................................131
--no-sync, -ns............................................................................................................................... 131
--d-spare, -ds ............................................................................................................................... 131
--cache <r, rw, w, nc>, -ca <r, rw, w, nc>..................................................................................... 131
--max-size, -ms............................................................................................................................ 131
--name "name", -n "name" ........................................................................................................... 131
--priority <1...10>, -p <1...10>...................................................................................................... 132
--preferred-id <64bit_hex>, -pid <64bit_hex> .............................................................................. 132
--scan-array, -sa .......................................................................................................................... 132
--leave-existing-data, -led ............................................................................................................ 132
--disk, -d....................................................................................................................................... 132
Examples ............................................................................................................................................ 132
Deleting Arrays: bcadm --delete ............................................................................................................. 133
Syntax................................................................................................................................................. 133
Options................................................................................................................................................ 133
Examples ............................................................................................................................................ 133
Transforming Arrays: bcadm --transform.............................................................................................. 134
Syntax................................................................................................................................................. 134
Options................................................................................................................................................ 135
--sub-member <num>, -sub <num>............................................................................................. 135
--size <size_mb>, -s <size_mb>..................................................................................................135
--same-size, -ss ........................................................................................................................... 135
--d-spare, -ds ............................................................................................................................... 135
--max-size, -ms............................................................................................................................ 135
--priority <1…10>, -p <1…10>..................................................................................................... 135
--array, -a..................................................................................................................................... 135
--disk, -d....................................................................................................................................... 135
Examples ............................................................................................................................................ 136
Document BC4000-UM100-R Page ix
Broadcom Corporation
Page 10

BC4000 Series RAID Controllers User Manual
02/13/06
Copying Arrays: bcadm --create-copy....................................................................................................136
Syntax.................................................................................................................................................. 136
Options ................................................................................................................................................137
--sub-member, -sub......................................................................................................................137
--spare-disk, -sp ...........................................................................................................................137
--size, -s........................................................................................................................................137
--d-spare, -ds................................................................................................................................137
--unlink, -ul....................................................................................................................................137
--cache, -ca ..................................................................................................................................137
--max-size, -ms.............................................................................................................................138
--name, -n.....................................................................................................................................138
--priority, -p...................................................................................................................................138
--scan-array, -sa...........................................................................................................................138
--array, -a......................................................................................................................................138
--disk, -d .......................................................................................................................................138
Examples.............................................................................................................................................138
Splitting Mirrored Arrays: bcadm --split.................................................................................................139
Syntax.................................................................................................................................................. 139
Options ................................................................................................................................................139
--no-hide, -nh................................................................................................................................139
--default, -def................................................................................................................................140
--array, -a......................................................................................................................................140
--disk, -d .......................................................................................................................................140
Examples.............................................................................................................................................140
Following or Monitoring Arrays and Disks: bcadm --follow.................................................................141
Linux Syntax and Options....................................................................................................................141
--test-mail, -tm ..............................................................................................................................141
--mail-address <to_email_address>, -ma <to_email_address> ................................................... 141
--from_user <from_email_address>, -fu <from_email_address> .................................................142
--program <program>, -p <program> ..........................................................................................142
--delay <seconds>, -d <seconds> ................................................................................................ 142
--scan, -s ......................................................................................................................................142
Page x Document BC4000-UM100-R
Broadcom Corporation
Page 11

User Manual BC4000 Series RAID Controllers
02/13/06
Windows Syntax and Options ............................................................................................................. 142
--test-mail, -tm.............................................................................................................................. 143
--mail-address <to_email_address>, -ma <to_email_address>................................................... 143
--mail-server <email_server>, -ms <email_server>..................................................................... 143
--from_user <from_email_address>, -fu <from_email_address>................................................. 143
--program, <program>, -p <program>.......................................................................................... 143
--delay <seconds>, -d <seconds> ............................................................................................... 143
--scan, -s...................................................................................................................................... 143
Examples ............................................................................................................................................ 144
Viewing or Changing License Levels: bcadm --license........................................................................ 145
Syntax................................................................................................................................................. 145
Options................................................................................................................................................ 145
--display, -d.................................................................................................................................. 145
--update <license_key>, -u <license_key> .................................................................................. 145
Example .............................................................................................................................................. 145
Retrieving and Updating the License Key........................................................................................... 146
Example bcadm Usage with Output ....................................................................................................... 147
Section 10: Compliance Information..............................................................................158
FCC Compliance Statement .................................................................................................................... 158
Industry Canada Compliance Statement ............................................................................................... 158
CE Compliance Information .................................................................................................................... 159
L'Information de Conformite de la CE ................................................................................................. 159
CE-befolgungInformationen ................................................................................................................ 159
Index..................................................................................................................................161
Document BC4000-UM100-R Page xi
Broadcom Corporation
Page 12

BC4000 Series RAID Controllers User Manual
02/13/06
Page xii Document BC4000-UM100-R
Broadcom Corporation
Page 13

User Manual BC4000 Series RAID Controllers
02/13/06
LIST OF FIGURES
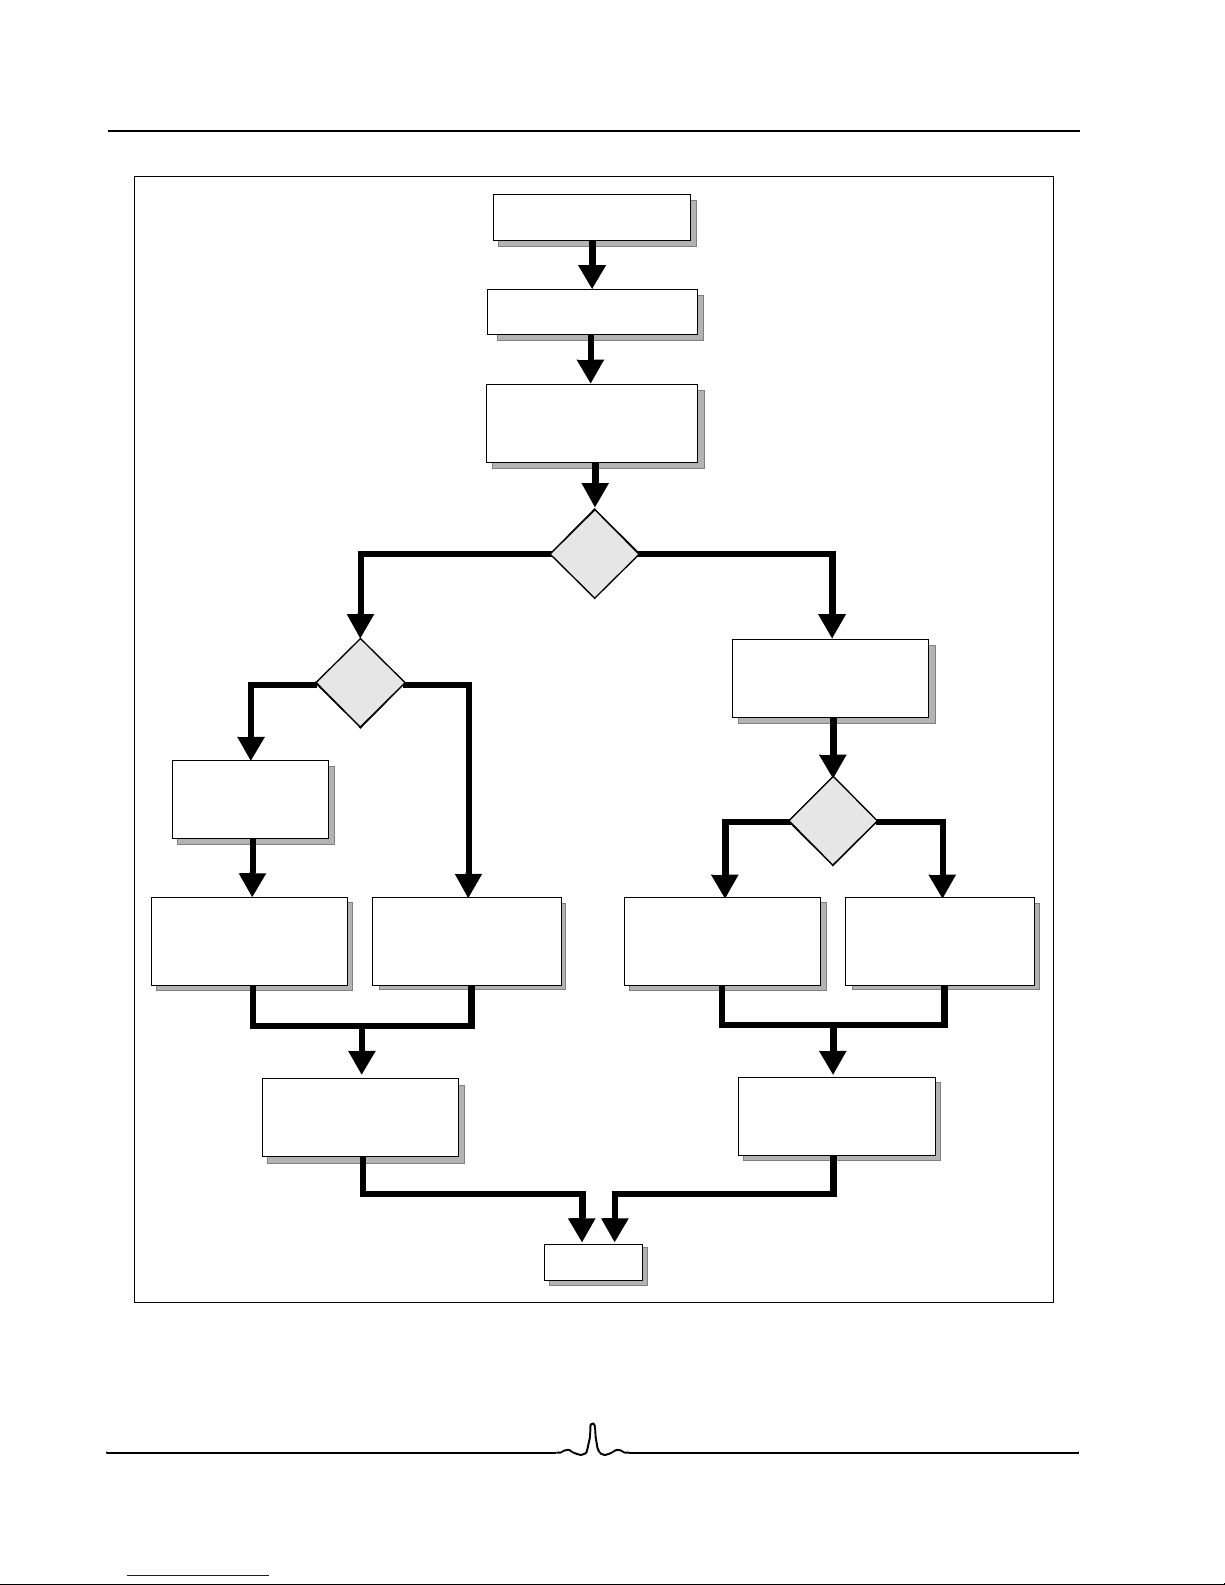
Figure 1: RAIDCore Hardware and Software Installation Process Flow......................................................... 14
Figure 2: BC4000 Series Controller Showing LED Connectors and Port Locations....................................... 15
Figure 3: BC4000 Series Controller Ports....................................................................................................... 16
Figure 4: LED Connector Pinout ..................................................................................................................... 17
Figure 5: BC4000 Series Cable Connection Between Controller and Hard Disk............................................ 18
Figure 6: The Array Status Window................................................................................................................ 65
Document BC4000-UM100-R Page xi
Broadcom Corporation
Page 14

User Manual BC4000 Series RAID Controllers
02/13/06
LIST OF TABLES
Table 1: Key to Number of Channels and Supported Functionality Level
Indicated by the BC4000 Series Model Number................................................................................ 7
Table 2: BC4000 Series License Levels.......................................................................................................... 9
Table 3: Feature List for Different License Levels of the BC4000 Series ...................................................... 10
Table 4: System Requirements ..................................................................................................................... 12
Table 5: Minimum Disks Required for Each RAID Level ............................................................................... 43
Table 6: Event Priority Levels...................................................................................................................... 106
Document BC4000-UM100-R Page xiii
Broadcom Corporation
Page 15

User Manual BC4000 Series RAID Controllers
02/13/06
Section 1: Introduction
This manual describes the installation and operation of Broadcom’s RAIDCore™ BC4000 Series RAID
controllers, which includes HT-1000 controllers, as well as the use of RAIDCore XelCore™ RAID management
software.
AUDIENCE
The intended audience is system administrators and experienced users who are familiar with RAID and
storage configuration, and who also have a general understanding of one of the following operating systems:
• Microsoft Windows
• Linux
For specific supported versions of each operating system, see the list given on the Broadcom website at the
following web address:
®
®
http://www.broadcom.com/storage
OBTAINING ACROBAT
The documentation provided for the BC4000 Series RAID controllers is in the *.pdf Acrobat reader format. To
obtain the latest version of Acrobat from Adobe Systems, Inc., use the following web address:
http://www.adobe.com/products/acrobat/readermain.html
CONTACTING BROADCOM
You can contact Broadcom by phone, e-mail, or regular mail.
• Phone: 603-324-1555
• Web Address:
For more information about RAIDCore BC4000 Series RAID controllers:
http://www.broadcom.com/storage
• E-mail:
For service and support assistance: support@raidcore.com
For sales questions: sales@raidcore.com
For documentation feedback: documentation@raidcore.com
• Postal Address:
Broadcom Corporation, Inc.
71 Spit Brook Road, Suite 304
Nashua, NH 03060
.
Document BC4000-UM100-R Introduction Page 1
Broadcom Corporation
Page 16

BC4000 Series RAID Controllers User Manual
02/13/06
Section 2: Overview of RAID Concepts
UNDERSTANDING ARRAYS
Disk arrays are several disks that are grouped together in various organizations to improve either the
performance or the reliability of a computer’s storage system. Because some array types enhance
performance while others improve reliability, and because some array types enhance both, it is important to
consider your needs when planning an array configuration.
The BC4000 Series RAID controller supports various array types. For small systems with four or less drives,
RAID1 and RAID5 are appropriate choices. For larger systems with more drives available, RAID10 and
RAID50 may be the appropriate choices. The unique ability of the RAIDCore controller to provide online
expansion to other array types such as RAID10 and RAID50 across multiple drives and controllers becomes
extremely valuable when expanding storage is a requirement.
Note: It is highly recommended that you review this documentation in its entirety before configuring
arrays. Some of the advanced features of this controller (such as Online Capacity Expansion,
Online RAID Level Migration, sparing options) need to be understood by the user before arrays are
created.
OVERVIEW OF ARRAY TYPES
The BC4000 Series RAID controller supports the following Redundant Array of Independent Disk (RAID) array
types. Note that the list of supported array types is affected by a controller’s license level.
• Vo lum e: The controller treats one or more disks or unused space on a disk as a single array. Volume
provides the ability to concatenate storage from various drives regardless of the size of the space on
those drives. Volume is useful in scavenging space on drives unused by other arrays. Volume does not
provide any performance or data redundancy benefit.
• RAID0: RAID0, or striping, provides the highest performance but no data redundancy. Data in the array is
striped (distributed) across several physical drives. RAID0 arrays are useful for holding information such
as the operating system paging file, where performance is extremely important but redundancy is not.
• RAID1: RAID1, or mirroring, mirrors data on a partition of one disk to another. RAID1 is useful when there
are only two disks available and data integrity is more important than storage capacity.
• RAID1n: RAID1n, or n-way mirroring, mirrors the data stored in one hard drive to several hard drives. This
array type provides superior data redundancy because there are three or more copies of the data, and is
useful for creating exact copies of an array for backup purposes. However, this array type is expensive, in
both performance and the amount of disk space necessary to create the array type.
• RAID10: RAID10 is also known as RAID(0+1) or striped mirror sets. This array type combines mirrors and
stripe sets. RAID10 allows multiple drive failures, up to 1 failure in each mirror that has been striped. This
array type offers better performance than a simple mirror because of the extra drives. RAID10 requires
twice the disk space of RAID0 to offer redundancy.
• RAID10n: RAID10n stripes multiple n-way mirror sets. RAID10n allows multiple drive failures per mirror
set, up to n-1 failures in each mirror set that has been striped, where n is the number of drives in each
mirror set. This array type is useful in creating exact copies of an array's data using the split command.
This array type offers better random read performance than a RAID10 array, but uses more disk space.
Page 2 Overview of RAID Concepts Document BC4000-UM100-R
Broadcom Corporation
Page 17

User Manual BC4000 Series RAID Controllers
02/13/06
• RAID5: RAID5, also known as a stripe with parity, stripes data as well as parity across all drives in the
array. Parity information is interspersed across the drive array. In the event of a failure, the controller can
restore the lost data of the failed drive from the other surviving drives. This array type offers exceptional
read performance as well as redundancy. In general, write performance is not an issue due to the
tendency of operating systems to perform many more reads than writes. This array type requires only one
extra disk to offer redundancy. For most systems with four or more disks, this is the correct choice as array
type.
• RAID50: RAID50, also known as striped RAID5 sets, intersperses parity information across each RAID5
set in the array. This array type offers good read performance as well as redundancy. A 6-drive array
provides two striped 3-drive RAID5 sets. Generally, RAID50 is useful in very large arrays, arrays with 10 or
more disks. Like the RAID1n and RAID10n array types, RAID50 can handle multiple disk failures.
For the minimum disk requirements for each type of array, see “Expanding Disk Capacity Online” on page 3.
See also “Performance Considerations” on page 4 to learn how to maximize the performance of your arrays.
EXPANDING DISK CAPACITY ONLINE
Online capacity expansion (OCE) allows you to add any number of disks to an array at any time and continue
to access the array data while it is being redistributed.
To increase the size and organization of an array, transform the array. You can also use the transform function
as an integral part of the system backup and recover strategy through the use of the RAID1, RAID10, RAID1n,
and RAID10n array types. For more information on transforming arrays from RAIDConsole, see “Transforming
Arrays” on page 84. For more information on transforming arrays from bcadm, see “Transforming Arrays:
bcadm --transform” on page 134.
MIGRATING RAID LEVELS ONLINE
With Online RAID Level Migration (ORLM), you can easily move from one RAID level to another. While the
migration is taking place, the data is accessible and protected to the lowest protection of either the source RAID
level or the destination RAID level.
The transform feature can be used to increase the size and organization of an array. It can also be used as an
integral part of the system backup and recover strategy through the use of the RAID1, RAID10, RAID1n, and
RAID10n array types. To do this from RAIDConsole, see “Transforming Arrays” on page 84, and from bcadm,
see “Transforming Arrays: bcadm --transform” on page 134.
Document BC4000-UM100-R Expanding Disk Capacity Online Page 3
Broadcom Corporation
Page 18

BC4000 Series RAID Controllers User Manual
02/13/06
PERFORMANCE CONSIDERATIONS
One of the main advantages of using RAID is increased performance. With RAID, performance is based on
four elements: the number and organization of disks in an array, the caching attributes being used for the array,
the application workload, and the PCI bus speed.
• Spindles: RAID increases performance by putting more disks to work and by buffering data for the host.
Many disks can transfer data at greater than 50 MegaBytes per second, and the BC4000 Series RAID
controllers can aggregate this bandwidth in an almost linear fashion as more of the same drives are
included in an array.
• Caching: The BC4000 Series RAID controller software can also be configured to provide read- and write-
back caching, if desired. Write-back caching has a large effect on most workloads, but should be used
with caution.
• Workload: When configuring an array, workload is probably the most important performance variable.
Most applications do many more reads than writes, so the best performance will be obtained with array
types like RAID0, RAID10, and RAID5.
• PCI Bus Speed: Performance bottlenecks can be caused by the type of PCI bus you are using. The
maximum theoretical performance of a PCI 32-bit 33-MHz bus is 132 MegaBytes per second.
Performance increases to 512 MegaBytes per second with a PCI 64-bit 66-MHz bus.
The best possible performance with the fewest bottlenecks on PCI-X systems can be obtained by using a
PCI-X 64-bit 133-MHz bus, which offers 1024 MegaBytes per second.
RELIABILITY CONSIDERATIONS
Improved reliability is the other main argument for using RAID. Reliability is enhanced through data
redundancy and backup.
• Redundancy. RAID1, RAID10, RAID1n, RAID 10n. RAID5, or RAID50 are necessary for redundancy.
With redundancy, both capacity and performance are sacrificed for reliability. It should be noted, however,
that with the BC4000 Series RAID controllers, extremely high performance is obtained even with
redundant type arrays.
• Backup. The controller’s ability to transform arrays and split mirrors can be used as part of your backup
strategy. For example, you may want to create a RAID1 or RAID10 array and periodically transform these
into RAID1n and RAID10n arrays. These RAID1n and RAID10n arrays can then be split into the original
array and a backup array. As part of a hot fallback strategy, the backup array can be kept online and
hidden from the OS or remain visible, or it can be removed and stored as a backup device.
When a boot array is split, the original and the copy are exact copies with the same labels. This means that
when using the Linux operating system, Broadcom recommends that you keep the split copy hidden during
boot time to avoid boot-time issues with duplicate labels.
Page 4 Performance Considerations Document BC4000-U M100-R
Broadcom Corporation
Page 19

User Manual BC4000 Series RAID Controllers
02/13/06
FLEXIBILITY AND EXPANSION CONSIDERATIONS
Before configuring an array, consider the following points to enhance the flexibility of your RAID system.
MULTIPLE TYPES
Most RAID controllers do not allow you to change a chosen array type, create more than one type of array for
each controller, or to create more than one array per physical disk. With the BC4000 Series RAID controller,
you can create different types of arrays on the same disk to adapt each array to the I/O that it processes.
Furthermore, depending on the array capacity and redundancy level, you can then transform an existing array
to another RAID type if the type of array you are using is not the optimal type for your application. You can also
build different arrays with different characteristics for different applications.
FUTURE EXPANSION
When creating arrays, consider whether you will need to expand your disk capacity in the future. If you
anticipate the need to expand a file system:
• On Windows, format your arrays with NTFS. Microsoft provides a utility (diskpart.exe) that will dynamically
extend an NTFS file system onto any unused adjacent space. Note also that using a single partition per
array will make expansion much easier. The diskpart.exe utility version you need depends on which
version of Windows you are running. The diskpart.exe utility can be found on the CD for some versions of
Windows or on the Microsoft website (www.microsoft.com) for others. Use the correct version for your
operating system.
• On Linux operating systems, be sure to use an expandable file system. Because the BC4000 Series
RAID controller is limited to eight arrays, if you need a large number of logical volumes, you may want to
use a logical volume manager, such as LVM.
OPERATING SYSTEM CONSIDERATIONS
One final and important array planning consideration is whether to extend the RAID benefits to your system
disk and operating system, as well as to your data disks. For example, if you install the operating system on a
RAID1 array (mirror), split the array into two volumes and then hide one of the resulting volumes, you can easily
recover your operating system should your system disk fail. Alternatively, you can improve operating system
performance by installing the OS on a RAID10 array and then splitting it and hiding one of the RAID0 arrays
(like a hot spare).
To install the operating system on an array and then boot from that array, see “Initializing Disks from the BIOS”
on page 51.
Broadcom Corporation
Document BC4000-UM100-R Flexibility and Expansion Considerations Page 5
Page 20

BC4000 Series RAID Controllers User Manual
02/13/06
Section 3: General Product Information
OVERVIEW OF FEATURES
The RAIDCore BC4000 Series RAID controllers and XelCore™ software support various array types. For small
systems with four or less drives, RAID1 and RAID5 are appropriate choices. For larger systems with more
drives available, RAID10 and RAID50 may be the appropriate choices. The unique ability of the controller to
provide online expansion to other array types such as RAID10 and RAID50 across multiple drives and
controllers becomes extremely valuable when expanding storage is a requirement.
The licensing level that you purchase determines which set of features you receive.The list of enterprise-class
RAIDCore features available with the BC4000 Series RAID Controller includes:
• Online RAID Level Migration (ORLM): With online RAID level migration, users can easily move from one
RAID level to another. While the migration is taking place, the data is accessible and protected to the
lowest protection of either the source RAID level or the destination RAID level.
• Online Capacity Expansion (OCE): With online capacity expansion, users can have a maximum of 32
disks in an array at any time and continue to access their data while it is being redistributed.
• Controller Spanning: A unique feature that allows arrays to be created across controllers so that very
wide arrays can be created.
• Array Hiding: An array can be hidden from the operating system so neither software nor users can see or
access it. This is a key element in creating secure data backups.
• Mirror Splitting: A user can split a mirrored array so that the volumes can be worked with independently.
• Drive Roaming: With drive roaming, SATA cables can be disconnected from their drives and shuffled
without confusing the controller (this is performed offline). The controller detects which disks belong to
which arrays.
• Cache Support for Arrays: Various array-caching options are supported: read, read with write-back,
write-back, and no cache.
• Cache Support for Disks: Various disk-caching options are supported: no cache, disk read ahead +
write-back, disk read ahead, and disk write-back.
• Background Array Initialization: Background initialization allows a redundant array to be used
immediately. If a disk is lost prior to completion of the create, no data is lost.
• Sparing Support: For enhanced data integrity, several types of disk sparing are supported: distributed,
dedicated, and global sparing.
• Multiple Array Types Per Drive: Support for multiple array types per drive allows the administrator to
create different array types using the same disks.
• SMART: Self-Monitoring Analysis and Reporting Technology is a set of advanced diagnostics that monitor
the internal operations of disk drives and provide early warning of any potential problems.
Page 6 General Product Information Document BC4000-UM100-R
Broadcom Corporation
Page 21
User Manual BC4000 Series RAID Controllers
02/13/06
BC4000 SERIES MODEL NUMBERS
BC485X AND BC445X CONTROLLERS
The meaning of each element of the BC4000 Series controller model number is illustrated in Table 1.
Table 1: Key to Number of Channels and Supported Functionality Level
Indicated by the BC4000 Series Model Number
Broadcom Family Identifier Ports License Level Dash Interface
BC 4—BC4000 Series 8—Eight ports
4—Four ports
52—Highest license level
50—Medium license level
10—Lowest license level
- 02—HBA, PCI-X,
Host-based
00—Reserved
First and Second
Broadcom Corporation
Characters:
First Digit:
Second Digit
Third and Fourth Digits:
Final Digits:
Current models are Serial ATA and support up to RAID50. This means the only variable model number
elements are the functionality level and the number of channels. The third and fourth numerals in the RAIDCore
controller model number reflect the functionality level that is licensed. The controller has three functionality
,
levels: level 52
level 50 and level 10.
4 = BC4000 Series: SATA RAID only
The number of ports on the controller
• 8 = Eight ports
• 4 = Four ports
License Level; see Table 3 on page 10
• 52 = Full lIcense level: RAID0, RAID , RAID5, RAID10, RAID50, RAID1N,
RAID10N, and Volume (JBOD), plus all features, including Online RAID
Level Migration (ORLM), Online Capacity Expansion (OCE), controller
spanning, distributed sparing, and mirror splitting
• 50 = RAID0, RAID1, RAID5, RAID10, and Volume (JBOD); features do not
include Online RAID Level Migration (ORLM), Online Capacity Expansion
(OCE), controller spanning, distributed sparing, and mirror splitting
• 10 = RAID0, RAID1, RAID10, and Volume (JBOD); features do not include
Online RAID Level Migration (ORLM), Online Capacity Expansion (OCE),
controller spanning, distributed sparing, and mirror splitting
Dash
-
Interface
• 02 = Host Bus Adapter (HBA), PCI-X, Host-based only
• 00 = Reserved
The RAIDCore BC4000 Series RAID controllers support either four or eight storage channels. As shown in
Table 1, the second numeral indicates the number of channels on the controller. For example, the BC4450-02
is a 4-channel controller that supports level 50 features, and the BC4852-02 is an 8-channel controller that
supports level 52 features.
Document BC4000-UM100-R BC4000 Series Model Numbers Page 7
Broadcom Corporation
Page 22

BC4000 Series RAID Controllers User Manual
02/13/06
The following advanced RAID levels are
• RAID50
• RAID1N
• RAID10N
The BC4450 and BC4850 only support the following RAID levels: RAID0, RAID1, RAID5, RAID10, and Volume
(JBOD).
The following features are
• Controller spanning; this means that disk arrays cannot be shared between two or more BC4000 Series
controllers.
• Online Capacity Expansion (OCE)
• Online RAID Level Migration (ORLM)
• Distributed sparing
• Mirror splitting
not
supported by the BC4450 and BC4850:
not
supported by the BC4450 and BC4850:
BC4810 AND BC4410 CONTROLLERS
The BC4410 and BC4810 controllers are sold as entry-level products that do not support the full complement
of features supported by the advanced BC4000 Series RAID controllers, the BC4452 and BC4852. These
features and capabilities can be subsequently added to the BC4410 and BC4810 controllers without changing
the hardware. Both controllers use the same XelCore software as the rest of the BC4000 Series.
not
The following advanced RAID levels are
• RAID 5
• RAID50
• RAID1N
• RAID10N
The BC4410 and BC4810 only support the basic RAID levels: RAID 0, RAID 1, RAID 10, and Volume (JBOD).
not
The following features are
• Controller spanning
• Online Capacity Expansion (OCE)
• Online RAID Level Migration (ORLM)
• Distributed sparing
• Mirror splitting
For more information about these features, see Section 3: “General Product Information” on page 6 and
Section 6: “General Concepts for Managing Arrays and Disks” on page 43 of this document.
Upgrading the BC4450/BC4850 or BC4410/BC4810 controller to advanced RAID levels and features can be
done with a simple license download, described in “Licensing Level Differences” on page 9.
supported by the BC4410 and BC4810:
supported by the BC4410 and BC4810:
Page 8 BC4000 Series Model Numbers Document BC4000-UM100-R
Broadcom Corporation
Page 23
User Manual BC4000 Series RAID Controllers
02/13/06
HT-1000 CONTROLLERS
The HT-1000 is an I/O controller for HyperTransport™-based server platforms. It incorporates all of the
RAIDCore BC4000 Series functionality directly through XelCore.
Boards equipped with the HT-1000 are considered part of the BC4000 Series and use the same drivers as all
other BC4000 Series controllers.
All HT-1000 controllers use the highest RAIDCore licensing level.
LICENSING LEVEL DIFFERENCES
The license level defines the RAID functionality supported by a specific RAIDCore controller model. Three
license levels are supported by the RAIDCore software. Various features are enabled when different license
levels are purchased. Licenses are keyed to the module serial number that is embedded in the hardware, with
a unique serial number for each individual controller.
The BCXX10, BCXX50, and BCXX52 license levels and associated descriptions are shown in Table 2.
Table 2: BC4000 Series License Levels
License Level Description
10 RAID(0, 1, 10, Volume)
50 RAID(0, 1, 5, 10, Volume)
52 RAID(0, 1, 5, 10, 1n, 10n, 50, Volume), Online RAID Level Migration (ORLM), Online
Capacity Expansion (OCE), controller spanning, distributed sparing, and mirror splitting
The licensing level can be viewed from the BIOS banner or the BIOS Configuration Utility. After booting to your
operating system, you can view the license level and/or modify license keys with either RAIDConsole (see
“Viewing or Changing the License Level” on page 99) or the bcadm application (see “Viewing or Changing
License Levels: bcadm --license” on page 145).
Contact your local distributor to purchase license key upgrades for your RAIDCore controllers.
Document BC4000-UM100-R Licensing Level Differences Page 9
Broadcom Corporation
Page 24
BC4000 Series RAID Controllers User Manual
02/13/06
DETAILED FEATURE LIST
Table 3: Feature List for Different License Levels of the BC4000 Series
License Level
Features BCXX52/HT-1000 BCXX50 BCXX10
SATA channels
1
Online Capacity Expansion (OCE) Yes No No
Online RAID Level Migration (ORLM) Yes No No
Controller spanning
1
RAID Levels Supported
RAID 0, 1, 0+1, Volume Yes Yes Yes
RAID 5 Yes Yes No
RAID 1n, 0+1n, 50 Yes No No
2
Split
Drive roaming
3
Cache Support
No cache Yes Yes Yes
Read cache Yes Yes Yes
Read with write-back cache Yes Yes Yes
Write-back Yes Yes Yes
Background array Initialization Yes Yes Yes
Highest PCI support 64-bit 133 MHz
Create and delete without reboot Yes Yes Yes
Zero create option Yes Yes Yes
Copy arrays Yes Yes Yes
Background consistency check Yes Yes Yes
Scheduled consistency checks Yes Yes Yes
Restore (rebuild) priority Yes Yes Yes
Sparing Support
Dedicated Yes Yes Yes
Global Yes Yes Yes
Distributed
Multiple array type per drive
Touched region logging
4
5
6
E-Mail event notification Yes Yes Yes
NT Event log integration Yes Yes Yes
Instant create support RAID 1,1n,0+1,0+1n,5,50
Hot swap support
8
7
Remote management Yes Yes Yes
4, 84, 84, 8
Yes No No
Yes No No
Yes Yes Yes
(PCI-X)
64-bit 133 MHz
(PCI-X)
64-bit 133 MHz
(PCI-X)
Yes No No
Yes Yes Yes
Yes Yes Yes
Yes Yes Yes
Yes Yes Yes
Page 10 Detailed Feature List Document BC4000-UM100-R
Broadcom Corporation
Page 25
User Manual BC4000 Series RAID Controllers
02/13/06
Table 3: Feature List for Different License Levels of the BC4000 Series
License Level
Features BCXX52/HT-1000 BCXX50 BCXX10
Delayed spin-up support Yes Yes Yes
Swap array Yes Yes Yes
BIOS Support
Create Yes Yes Yes
Boot Yes Yes Yes
INT13 control
Operating System Support
®
Windows
Windows
2000, Windows Server 2003 Yes Yes Yes
®
XP Yes Yes Yes
Linux (see Table 4 on page 12) Yes Yes Yes
Notes:
9
Yes Yes Yes
1 Arrays can be created across multiple controllers allowing the creation of very wide arrays.
2 This feature allows the administrator to split a mirror into multiple arrays. It is used for array
backup and duplication.
3 Drive roaming allows arrays to be moved between different controllers and systems.
4 Distributed sparing is a technique where the space that would normally be assigned to a
dedicated spare is instead spread across all the disks in an array. It has the advantage of
keeping all disks in an array active, increasing performance and also alleviating the problem
of a silent failure of a dedicated or global spare.
5 Multiple array types per drive allow the administrator to create different array types on the
same drives. For example: The administrator wants data redundancy for the user data, and
creates a RAID5 set using part of the disks data. At the same time the administrator wants
performance for the swap spaces, and creates a RAID0 array using the rest of the disks space.
This feature is also useful in collecting unused space from different capacity disks.
6 This feature increases data integrity for redundant array types by logging areas of an array
that have been written to. In the event of a system crash, the logged areas consistency is
checked and/or corrected. Without this feature, data corruption may occur.
7 Arrays can be instantly created and used by skipping the background consistency check. For
certain types of redundant arrays this is a viable option and has no data integrity drawbacks.
A consistency check can always be done at a later time. For RAID5 and RAID50 sets, if the
initialization is skipped, the arrays will not be redundant until a consistency check is performed.
8 Disks can be added to the system and to an array while the system is operating.
9 INT13 support can be turned on or off from the BIOS configuration utility. If on, you can boot
from an OS installed on a BC4000 Series controller. If not booting from a BC4000 Series
controller, Broadcom recommends setting INT13 support to OFF
Document BC4000-UM100-R Detailed Feature List Page 11
Broadcom Corporation
Page 26
BC4000 Series RAID Controllers User Manual
02/13/06
Section 4: Installing BC4000 Series Controllers
OVERVIEW OF THE INSTALLATION PROCESS
This section is designed to quickly get the controller up and running using default settings, which for most users
are the optimal settings. For instructions on how to modify any of the default settings, see Section 7: “Using
the BIOS Configuration Utility” on page 50 and either Section 8: “Using RAIDConsole” on page 60 or Section
9: “Using bcadm” on page 114.
To upgrade an existing BC4000 Series RAID controller, see Section 5: “Updating the Drivers, Firmware, and
Applications” on page 36.
SYSTEM REQUIREMENTS
Before attempting to install a BC4000 Series RAID controller, be sure the system meets the requirements
described in Table 4.
Table 4: System Requirements
Item Requirements
Processor x86, 32-bit or 64-bit compatible processor greater than 500 MHz
Memory 256 MB minimum
Hard disk At least one SATA disk; the number of disks depends on the number, type, and capacity of arrays to be
created.
Available
Slots
Operating
System
One PCI or PCI-X slot per controller (PCI-X 133/100/66, PCI-64 66/33, PCI-32 66/33)
• Windows 2000 (Professional, Server, Advanced Server) with Service Pack 4 or later
• Windows XP (Professional Edition–64-bit and 32-bit, Home Edition, Media Edition)
• Windows Server 2003 (Enterprise Edition, Standard Edition, Web Edition) (64-bit and 32-bit)
Note:
Microsoft .NET Framework 1.1 is required for all Windows installations.
• Red Hat
• Red Hat Enterprise Linux 4 (64-bit and 32-bit)
• Red Hat Fedora™ Core 1 and 2 (32-bit only)
• Red Hat Fedora Core 3 and 4 (64-bit and 32-bit)
• SuSE™ Linux Professional 9.1 and 9.2 (32-bit only)
• SuSE Linux Professional 9.3 (64-bit and 32-bit)
• SuSE Linux Enterprise Server 9 (64-bit and 32-bit)
• SuSE Linux Enterprise Server 10 (64-bit and 32-bit)
Visit the Broadcom website at: http://www.broadcom.com/storage
additional Linux support.
®
Linux 9 and Red Hat Enterprise Linux 3 (32-bit only)
for Linux errata kernel support and
Page 12 Installing BC4000 Series Controllers Document BC4000-UM100-R
Broadcom Corporation
Page 27
User Manual BC4000 Series RAID Controllers
02/13/06
BC4000 SERIES KIT CONTENTS
When a RAIDCore BC4000 Series RAID controller is received, the package should contain the following items:
• BC4000 Series RAID controller
• BC4000 Series RAID controller media CD
• 2U-compliant bracket
• Serial ATA cables, one per port
If any of these items are missing or damaged, contact your dealer or distributor.
Caution! Before installing the controller in an existing system, back up any critical data. Failure to
follow this accepted system management practice could result in data loss.
INSTALLATION STEPS
The major installation steps are given below and are depicted in Figure 1 on page 14:
1. Install the controller or controllers (see “Installing the BC4000 Controller” on page 15).
2. Install the hard disk drives and cables (see “Installing Hard Disk Drives and Cables (BC4000)” on page 17).
3. Initialize the disks and creating a single array or multiple arrays using the BIOS (see “Preparing Disks and
Arrays for New OS Installs” on page 19.)
If existing disks (referred to as “legacy” disks) are being used, this step can be skipped. See “Booting from a
Legacy Disk” on page 35 for details on using existing disks.
4. Transfer the drivers to a floppy disk. There are different procedures for Windows and Linux users.
• Windows users: See “Transferring Drivers to Floppy Disk (Windows)” on page 22. If a new operating
system is not being installed in the BC4000 Series RAID array, this step can be skipped.
• Linux users: See “Transferring Drivers to Floppy Disk (Linux)” on page 28.
5. Install the RAIDCore drivers and, if required, the new OS. There are different procedures for Windows and
Linux users.
• Windows users: See “Installing the BC4000 Series Drivers (Windows)” on page 22.
• Linux users: See “Installing the BC4000 Series Drivers (Linux)” on page 29.
Caution! All components (firmware, drivers and applications) must be installed when upgrading to
Version 2.0 of XelCore. This means that a version 1.x driver will not work with version 2.x of the
software and vice versa.
6. Install the RAIDCore applications. There are different procedures for Windows and Linux users.
• Windows users: See “Installing the Management Suite” on page 27.
• Linux users: See “Installing the bcadm Application” and “Installing the Online Help” on page 33.
Document BC4000-UM100-R Overview of the Installation Process Page 13
Broadcom Corporation
Page 28
BC4000 Series RAID Controllers User Manual
02/13/06
Install Controller
Install Cables & Disks
Use BIOS to Initialize
Disks & Create Arrays
Windows or Linux?
Windows Linux
Existing OS or
New Install?
Copy Drivers to
New OS
Install
Existing OS
Install
Floppy Disk
Copy Drivers to
Floppy Disk
Install OS & Drivers
Using “New OS”
Install Procedure
Install RAIDCore
Management Suite
Existing OS or
New Install?
New OS
Install
Install Driv ers
Using “Existing OS”
Install Procedure
Install OS & Drivers
Using “New OS”
Install Procedure
Install Driv ers
Using “Existing OS”
Install Procedure
Install RAIDCore
Management Suite
Done
Figure 1: RAIDCore Hardware and Software Installation Process Flow
Existing
OS
Install
Page 14 Overview of the Installation Process Document BC4000-UM100-R
Broadcom Corporation
Page 29
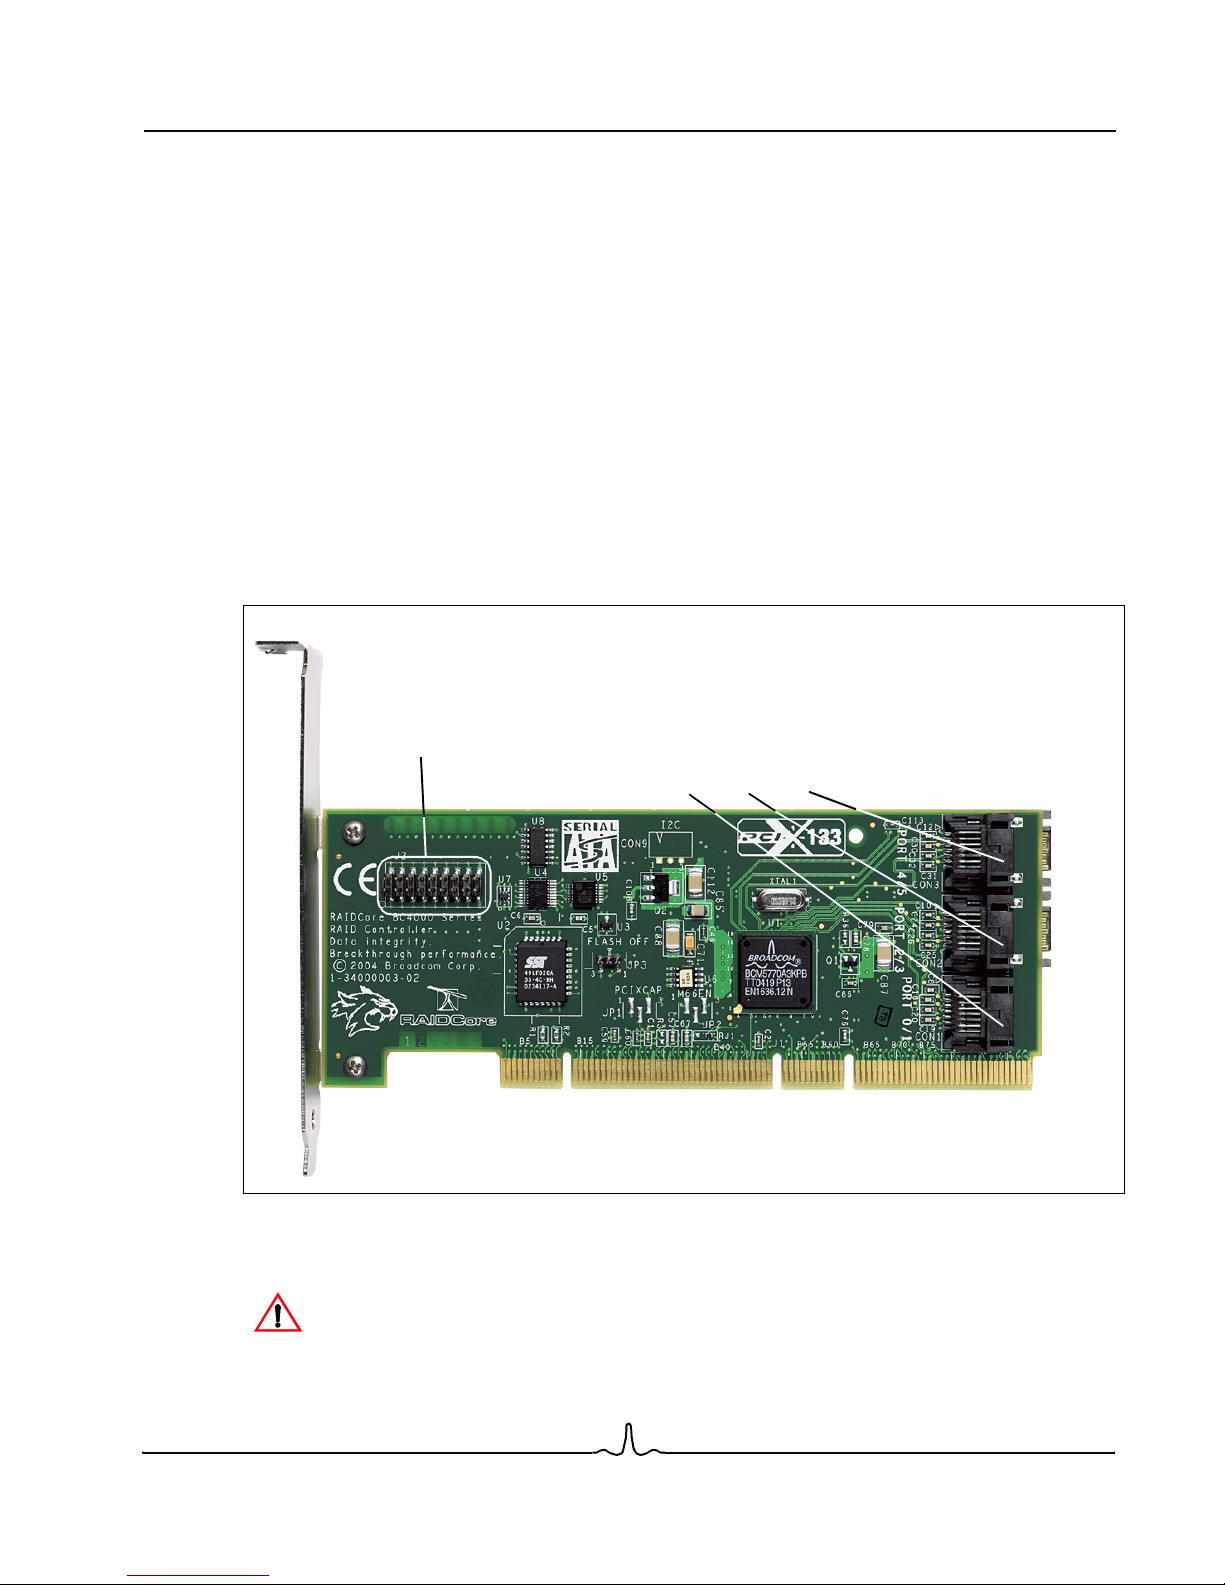
User Manual BC4000 Series RAID Controllers
02/13/06
INSTALLING AND CABLING BC4000 HARDWARE
Begin by installing the BC4000 Series RAID controller board and the disks to be used in the system, and then
cable them together.
INSTALLING THE BC4000 CONTROLLER
The controller fits into any available 32-bit PCI or 64-bit PCI-X slot on the motherboard. RAIDCore BC4000
Series RAID controllers support all PCI variants from 32-bit/33-MHz through 64-bit/133-MHz (PCI-X). For
maximum performance, installing the controller in a PCI-X slot is recommended.
Up to four controllers can be installed in a system provided there are available PCI/PCI-X slots. Controllers
with different licensing levels can be mixed in a system, but the functionality of the lowest license level is used.
The process for physically installing multiple controllers is the same as for installing a single controller.
A RAIDCore BC4000 Series controller is shown in Figure 2.
LED Connectors
Port 0
Port 1
Port 2
Port 3
Port 4
Port 5
Port 7
Por t 6
Figure 2: BC4000 Series Controller Showing LED Connectors and Port Locations
Caution! A BC4000 Series RAID controller, like every other electronic part of a computer, can be
damaged by static electricity. Be sure that you are properly grounded. Broadcom recommends that
a grounded antistatic strap be worn and/or that something grounded be held, and that the computer
be unplugged before installing the controller.
Document BC4000-UM100-R Installing and Cabling BC4000 Hardware Page 15
Broadcom Corporation
Page 30
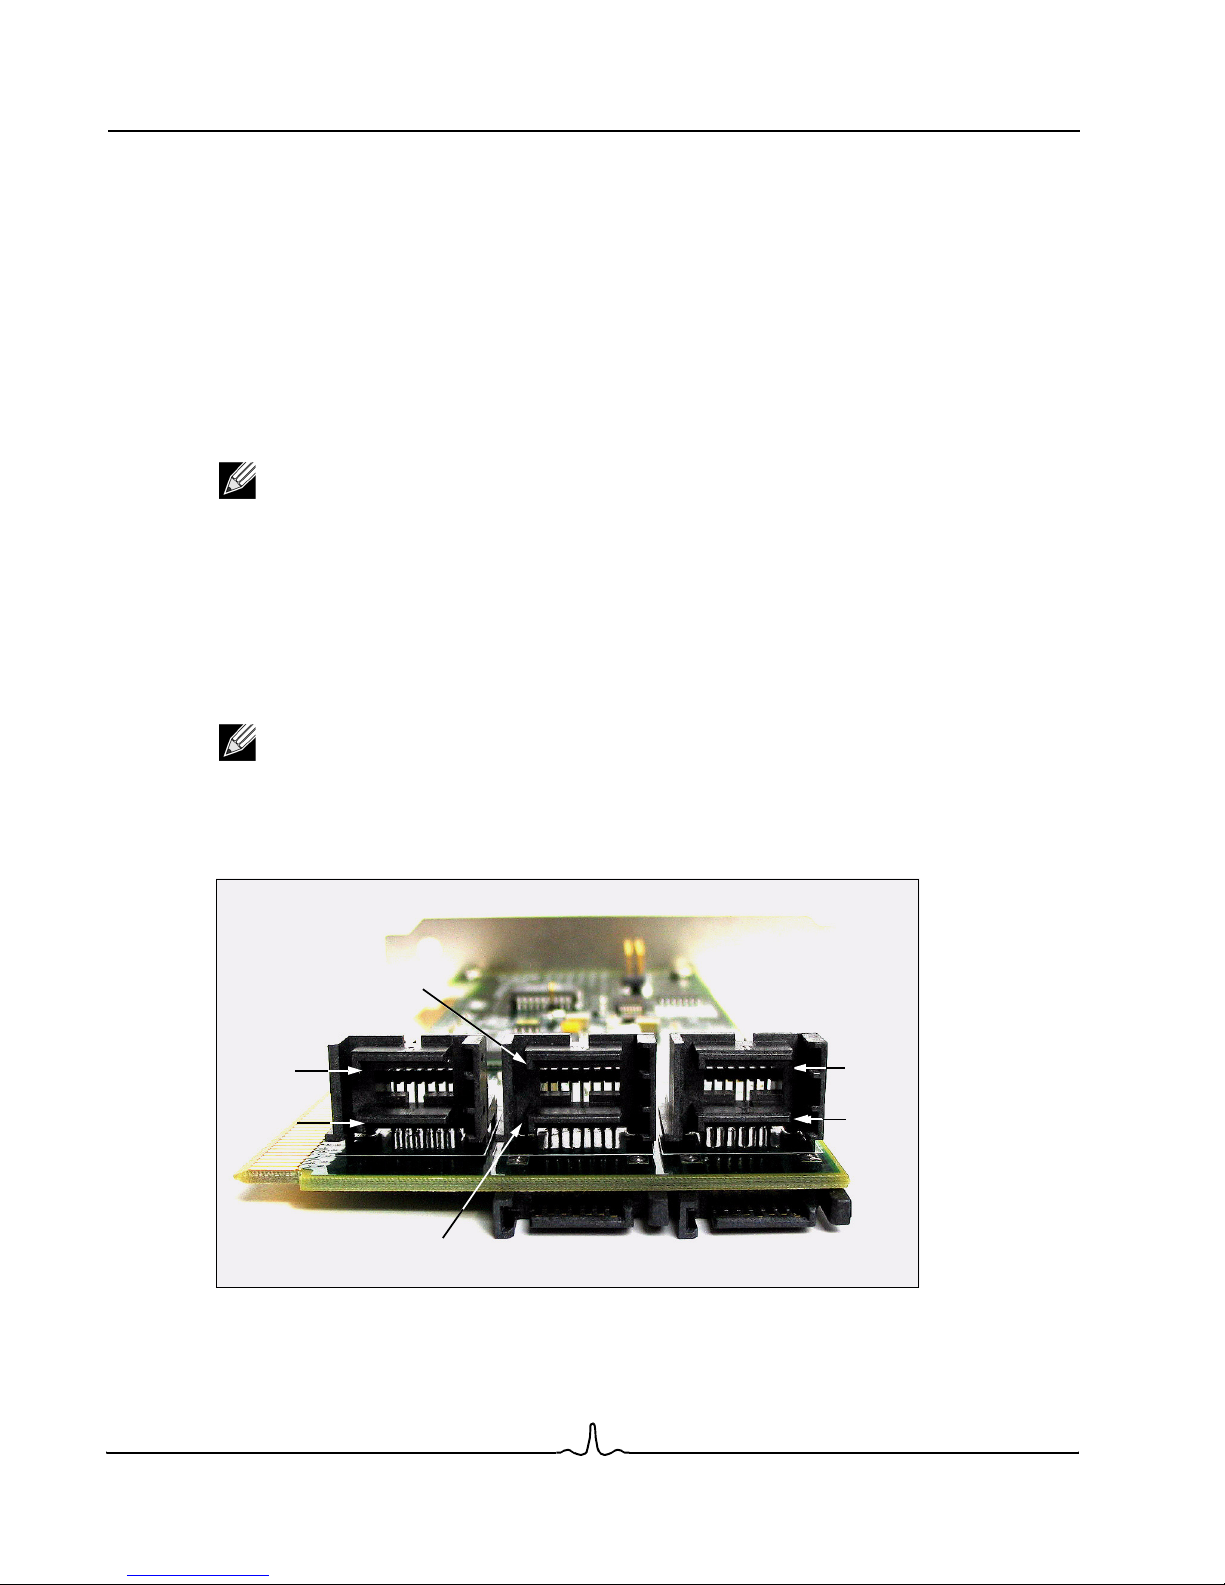
BC4000 Series RAID Controllers User Manual
02/13/06
To install the BC4000 Series RAID controller:
1. Turn off the computer and any connected peripheral devices.
2. Unplug the power cord from the computer.
3. Remove the cover of the computer and the slot cover of an available PCI slot.
4. If desired, attach LED cables from the inside of the computer to the LED connectors on the RAIDCore
controller, shown in Figure 2 (see also “Installing Hard Disk Drives and Cables (BC4000)” on page 17).
After the LED cables are attached, and the system is powered up, the BIOS can be used as a diagnostic tool
to verify that the cables are correctly connected. Each LED lights up when the drive associated with the LED
in the BIOS is selected.
Notes:
• The LED connectors are in the J2 position on the controller.
• When the controller is held as shown on Figure 2, the LED 1 connector for port 0 is on the left,
and the LED 8 connector for port 7 is on the right.
• The ground pins are in the lower row, and the power pins are in the upper row. If a light does not
work, try reversing the LED cable connection.
Until the BIOS loads, the LEDs are not indicative of disk connectivity.
5. Insert the controller in an available slot.
Note: Depending on the system, this may require changing the bracket to a 2U-compliant bracket.
Be careful to align the bus connector of the controller with the selected PCI slot on the motherboard.
Push the board down firmly until it is seated properly.
6. Secure the controller to the computer chassis with a bracket screw.
Port 3
Por t 1
Por t 0
Por t 2
Port 6
Por t 5
Por t 4
Por t 7
Page 16 Installing and Cabling BC4000 Hardware Document BC4000-U M100-R
Figure 3: BC4000 Series Controller Ports
Broadcom Corporation
Page 31
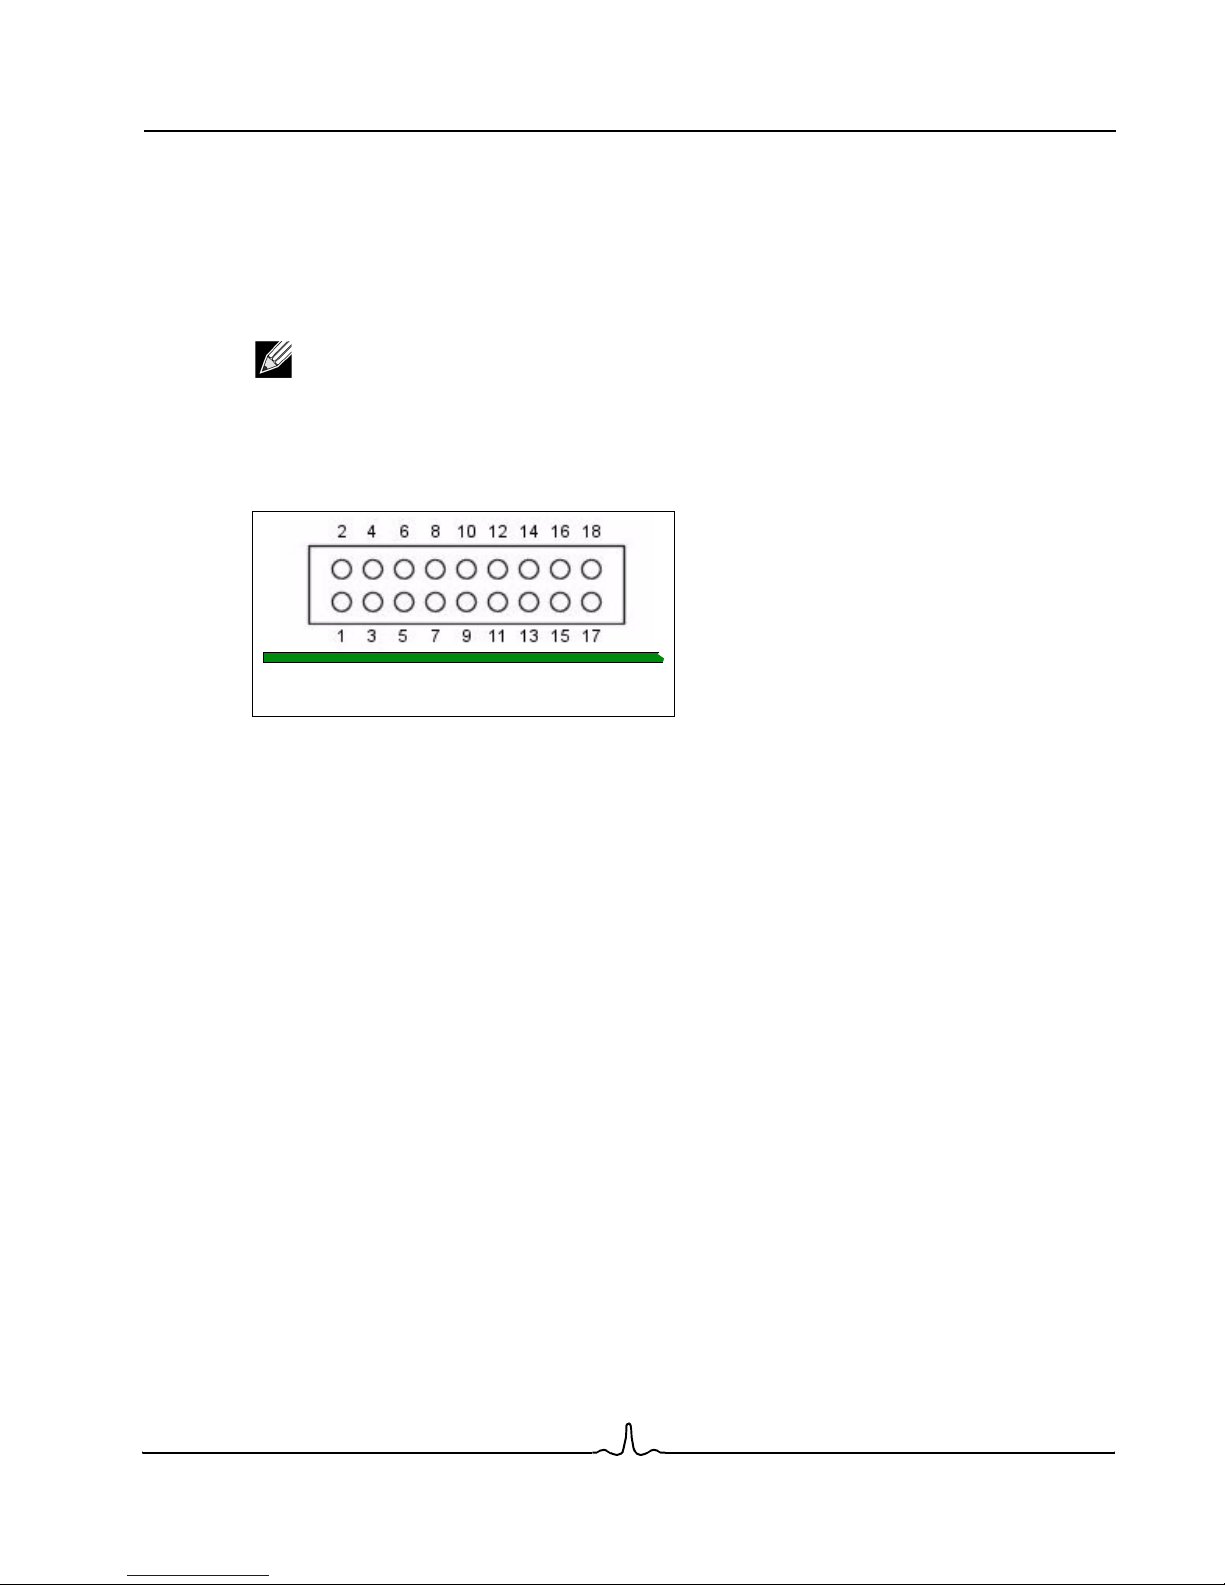
User Manual BC4000 Series RAID Controllers
02/13/06
INSTALLING HARD DISK DRIVES AND CABLES (BC4000)
RAIDCore BC4000 Series RAID controllers support native SATA drives and ATA drives that have been
converted to SATA with the use of a parallel to serial converter. Permanent or long-term use of parallel-toSATA converters is not supported; support is provided only for the length of time it takes to move the data off
the disk.
Notes:
• Parallel to serial converters require the parallel ATA drive be configured as master. If a parallel
drive is configured as slave or cable-select, the parallel to serial converter will not function
properly.
• The LED connector pinout is shown in Figure 4.
Board Edge
Figure 4: LED Connector Pinout
If there are separate LEDs, connect the positive side to pin 1 and the negative side to pin 2, and so on to
a maximum of 8 LEDs. If there are LEDs in the case that have a single common return line (that is, eight
lines for LEDs and one return line for a total of nine wires), attach the LED lines to the lower pins (1,3,5,7,
etc.) and attach the return to pin 17. If the LEDs are powered and do not have a return (such as the
SuperMicro “Brick”), attach the LED lines to 2,4,6,8 and so on, for a maximum of eight LED connections.
Pins 17 and 18 are common ground connections.
• The controller supports a feature that staggers the spinup of each disk, sequentially leaving enough time
between disk starts to prevent overloading of the power supply. If possible, set the jumpers on the disks for
delayed spinup (some vendors call this autostart delay). Consult the drive’s documentation for more
information.
• There is a correlation between how long it takes to boot the system and how many disks are attached to
the controller. The greater the number of attached hard disk drives, the longer it takes for the system to
boot.
Document BC4000-UM100-R Installing and Cabling BC4000 Hardware Page 17
Broadcom Corporation
Page 32
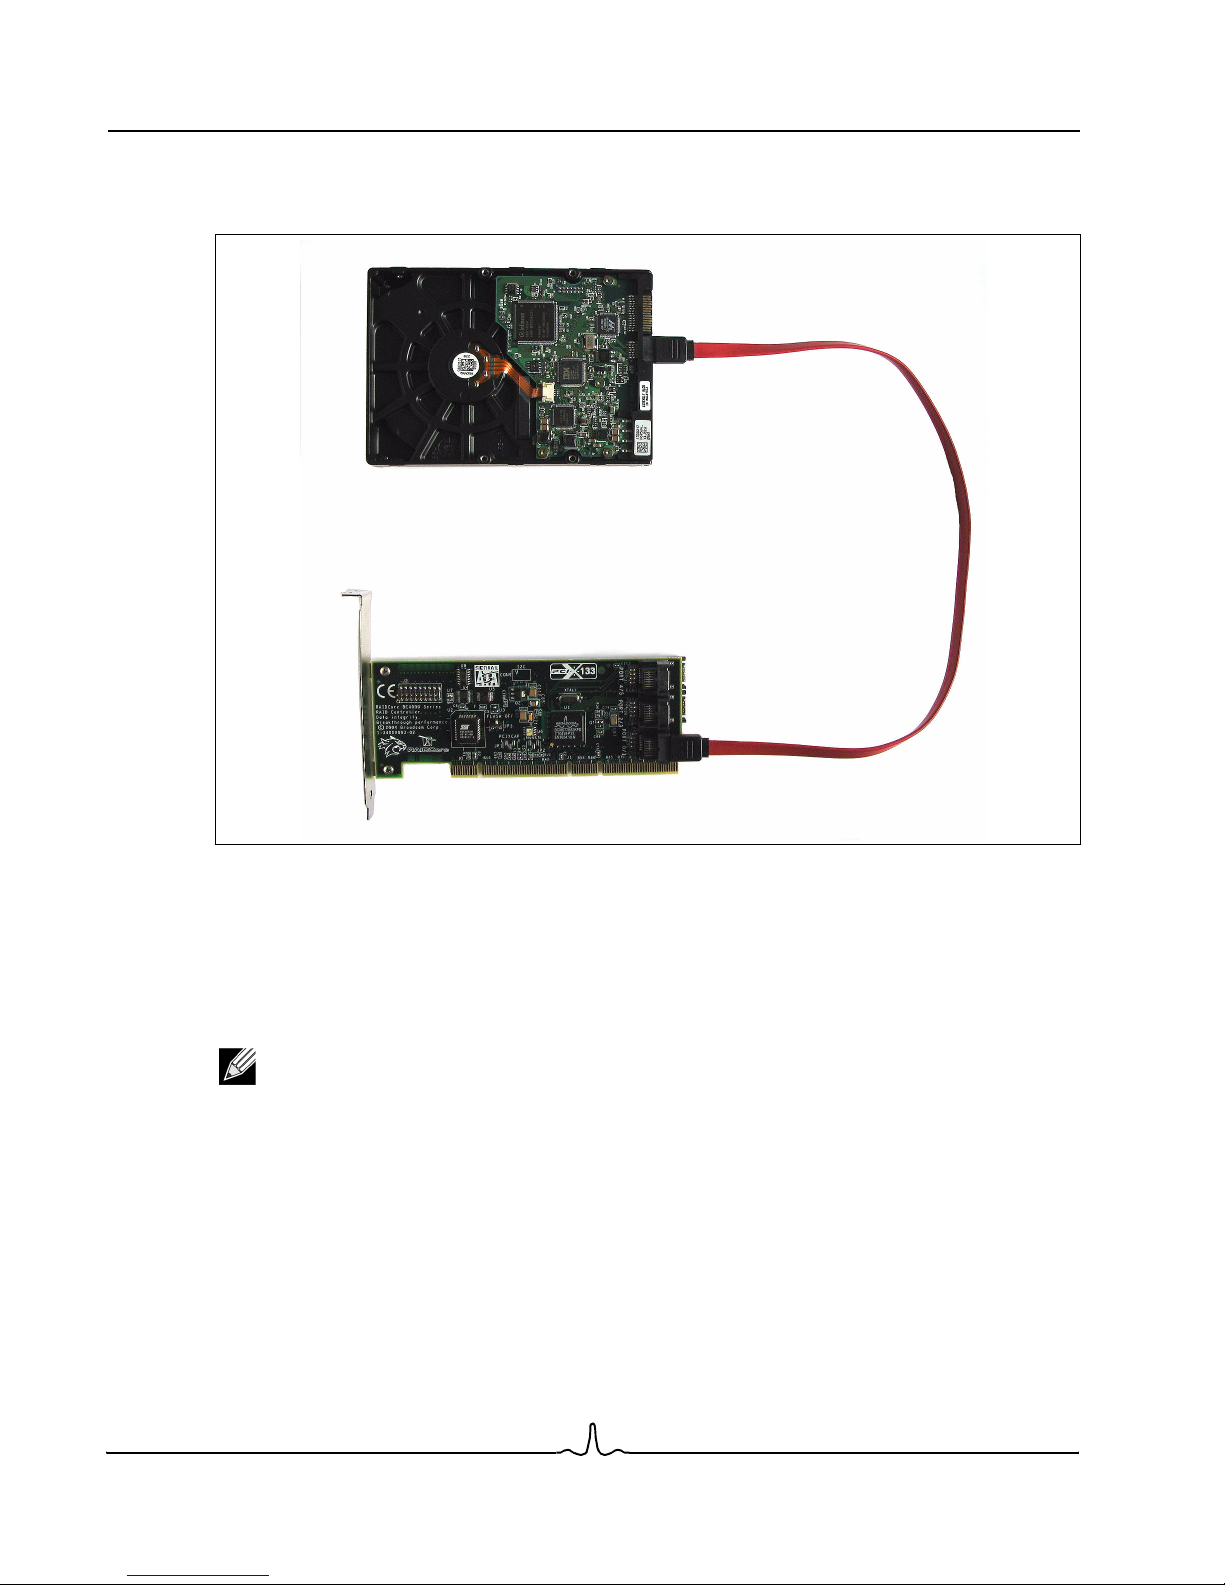
BC4000 Series RAID Controllers User Manual
02/13/06
To install a hard disk:
1. Connect the SATA cable to the BC4000 Series RAID controller as shown on Figure 5.
Figure 5: BC4000 Series Cable Connection Between Controller and Hard Disk
The SATA cable has a connector at each end. Either connector can be plugged into the drive or controller.
It does not matter which port on the controller the SATA cables are plugged into.
2. Install hard disk drive(s) into the chassis.
3. Connect power to all hard disk drives.
Note: Use either the standard Molex connector or, if available on the power supply, the new SATA
power connector. Do not use both.
4. Reconnect any peripherals or cables that were previously disconnected.
5. Replace the cover of the computer.
Page 18 Installing and Cabling BC4000 Hardware Document BC4000-U M100-R
Broadcom Corporation
Page 33
User Manual BC4000 Series RAID Controllers
02/13/06
PREPARING DISKS AND ARRAYS FOR NEW OS INSTALLS
INITIALIZING DISKS FROM THE BIOS
Before new disks are used, they must be initialized and at least the boot array must be created using RAIDCore
BIOS Array Configuration utility. Initialization writes the RAIDCore configuration information to disk. This
process is the same whether there is one controller or multiple controllers in the system.
Notes:
• No changes are necessary in the Motherboard CMOS setup for the resources or drive types.
Because RAIDCore BC4000 Series RAID controllers are PCI Plug and Play (PnP) devices, the
interrupt and port address resources are automatically assigned by the PCI PnP BIOS of the
motherboard.
• If you want to boot from the RAIDCore BC4000 Series RAID controller drive array and continue
to use the hard drives attached to your IDE controller on the motherboard, refer to the
motherboard manual for the specific BIOS settings to use to establish the proper boot order.
• A disk from the Disk list is highlighted, the LEDs on the controller or a properly cabled disk
enclosure light up to identify that disk.
• If you want to boot from another controller within the system, you may need to disable INT13
installation in the BIOS (see “Changing Controller Options From the BIOS” on page 58).
See “Understanding the Color Code in the BIOS” on page 50 for more information.
To initialize disks from the BIOS:
1. Turn on the computer to start booting.
2. When prompted, press the Ctrl + R keys to access the RAIDCore BIOS Array Configuration utility.
The Array Configuration menu is displayed (see “Understanding the Color Code in the BIOS” on
page 50).
Note: If the BIOS is not displayed, contact Broadcom support.
3. Use the arrow keys to select Initialize Disk(s) from the Main menu.
4. Press Enter.
5. Use the arrow keys to highlight a disk, and then press the Insert key to select the disk or choose all selectable
disks by pressing A.
Multiple disks can be selected; there is no need to initialize one disk at a time.
6. Press Enter to initialize the selected disks.
7. Press C to confirm the initialization.
Initialization takes 10–15 seconds per disk. A status indicator shows which disk is being initialized. When the
initialization is complete the status indicator goes away, and a complete rescan of all channels is done automatically.
Caution! If a disk has a RAIDCore array on it, it cannot be selected. If you want to initialize this disk
anyway, you must first delete the array. Be sure this is what you want to do because the data on the
disk will be lost.
Document BC4000-UM100-R Preparing Disks and Arrays for New OS Installs Pag e 19
Broadcom Corporation
Page 34
BC4000 Series RAID Controllers User Manual
02/13/06
CREATING ARRAYS FROM THE BIOS
After the disks are initialized, arrays can be created. The BIOS utility can be used to do this so that an operating
system can be installed on the array. The system is then booted from this array. A maximum of eight arrays
can be created. See “Understanding Arrays” on page 2 if you have not yet decided what type of arrays you
need.
Notes:
• For redundant arrays, the creation process does not complete until after the operating system and
controller drivers have been installed, and you have booted into the operating system context.
However, the arrays are immediately available to use for either a boot or data array.
• Array numbers are valid only for a given boot and may be different in the BIOS and drivers. If a
permanent label is required, use the labeling feature.
• When a disk from the Disk list is highlighted, the LEDs on the controller or a properly cabled disk
enclosure light up to identify that disk.
• At any point in the following procedure, you can return to a prior window by pressing Esc.
• In some circumstances, more than eight arrays are possible, but are not supported.
See “Understanding the Color Code in the BIOS” on page 50.
To create an array:
1. From the main menu of the Array Configuration window, select Create Array using the arrow keys, and then
press Enter.
2. Select the disks on which to create the array by doing the following:
a. Highlight the disk using the arrow keys.
b. For each disk, press Insert to select the disk. The disks can be inserted in any order.
c. After selecting the disks to be included in the array, press Enter.
3. In the User Input area, select an array type with the arrow keys, and then press Enter. Only array types that
can be created with the selected disks are available.
4. If spares are applicable:
a. In the User Input area, highlight a spare type using the arrow keys.
b. If applicable, in the Disks area, highlight the disk(s) to use as a spare and press the Insert key to select
them.
c. Press Enter to add the spare disk(s).
5. To select an array size, do one of the following:
Note: Use the Page Up and Page Down keys to increase or decrease the array size in large
increments, and use the Up Arrow and Down Arrow keys to increase or decrease the array size in
small increments.
• Create an array that is less than 2.199 TB by using the Page Up/Page Down keys or the Up Arrow and
Down Arrow keys to select a size, and then press Enter. By default, all available space is selected.
Or
• Create an array that is greater than 2.199 TB (the maximum allowed by some operating systems).
Note: Windows 2000 and 32-bit XP do not support arrays larger than 2 TB. Windows 2003 and 64bit XP support arrays larger than 2 TB.
Page 20 Preparing Disks and Arrays for New OS Installs Document BC4000-UM100-R
Broadcom Corporation
Page 35
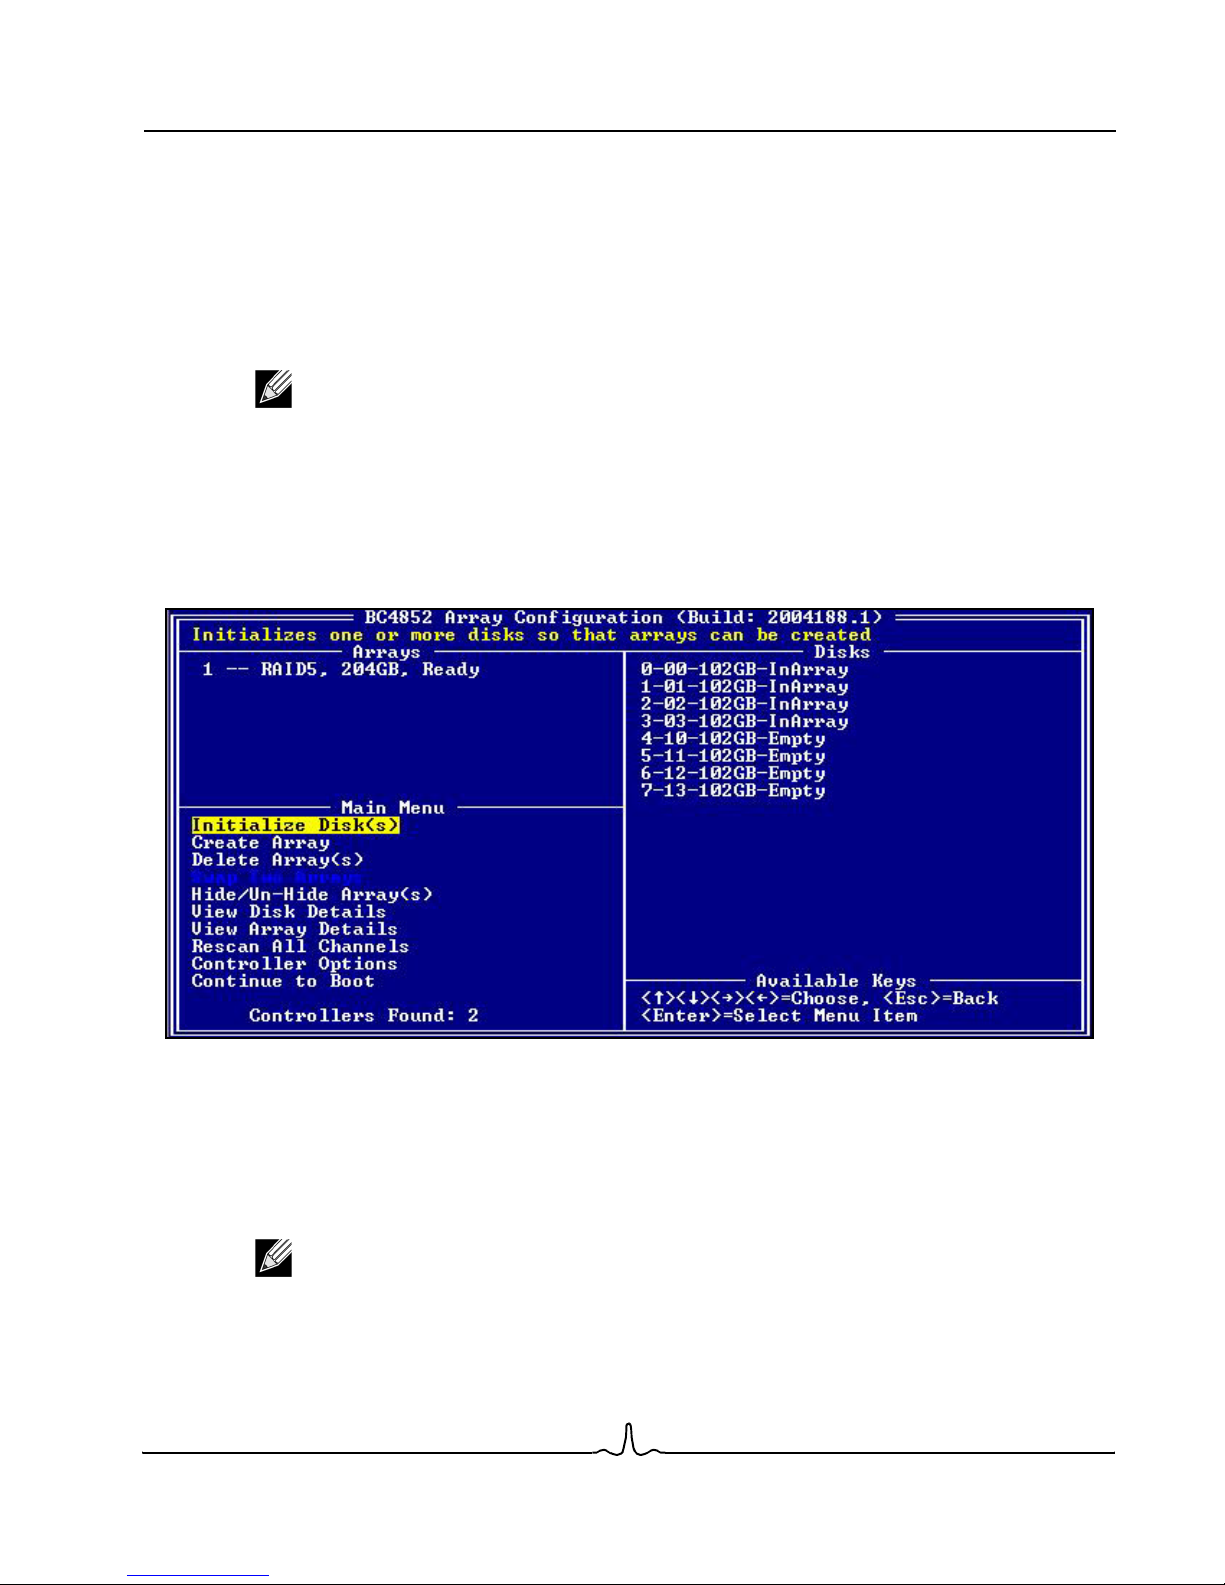
User Manual BC4000 Series RAID Controllers
02/13/06
a. Press Page Up or the Up Arrow to increase the array size. A window asks whether the size of the array
should be limited to the 2-TB maximum.
b. Press Esc to create a larger array.
c. Press Page Up or the Up Arrow until either the desired or the maximum available size has been reached.
d. Press Enter.
6. Select a caching level using the arrow keys, and then press Enter.
7. Press C to continue creating the array.
Note: For installations of SuSE Linux, a pop-up appears that says, “A new device was found, do you
want to configure it?” If you do not want to see this pop-up when arrays are created, click the “Do
not notify me” option.
The text at the top of the Array Configuration window returns to a description of the menu items.
8. When you are finished creating arrays, resume the boot process:
a. From the Main menu, highlight Continue to Boot.
b. Press Enter. No reboot is required.
In the example above, a four-drive RAID5 array has been configured.
If you are installing to a boot array on a BC4000 Series RAID controller, you must modify the boot priority list
in the motherboard BIOS. See your motherboard manual for more information. Ensure that you include the
BC4000 Series RAID controller in this list and disable other IDE devices. Also ensure that INT13 support is
enabled on the controller as described in “Changing Controller Options From the BIOS” on page 58.
Note: The array listed first in the BIOS Arrays list is the boot array. If necessary, use the swap feature
to place the array you intend to boot from in the first position.
Document BC4000-UM100-R Preparing Disks and Arrays for New OS Installs Pag e 21
Broadcom Corporation
Page 36

BC4000 Series RAID Controllers User Manual
02/13/06
WINDOWS: INSTALLING DRIVERS AND APPLICATIONS
TRANSFERRING DRIVERS TO FLOPPY DISK (WINDOWS)
If you are installing the operating system to a RAIDCore array, first copy the drivers on the RAIDCore media
CD to a floppy disk. Follow the instructions provided below, depending on your operating system.
To transfer the drivers to a floppy disk (Windows):
You can use any computer that is running Windows and has both a CD-ROM drive and a floppy disk drive.
1. Insert a floppy disk in the floppy disk drive.
2. Insert the RAIDCore media CD in the CD-ROM drive.
3. Copy all of the files in the windows\driver folder to the floppy disk.
Use this floppy disk to install the drivers during the operating system installation process described in “New
Installation of Windows 2000, XP, or 2003” on page 23.
Note: If you are installing the BC4000 Series RAID controller in a system using an existing operating
system, you can skip this step and proceed to the next section, “Existing Installation of Windows
2000, XP, or 2003” on page 24.
INSTALLING THE BC4000 SERIES DRIVERS (WINDOWS)
After the hardware has been installed, the disks have been initialized and at least one array has been created
(if a new operating system is being installed), follow the standard driver installation procedures for the version
of Windows used in the system. For reference, the procedures for installing one or more RAIDCore BC4000
Series RAID controllers on Windows 2000, XP, and 2003 are provided:
• Install drivers with a new installation of Windows 2003: See “New Installation of Windows 2000, XP, or
2003” on page 23.
• Install drivers with an existing installation of Windows 2003: See “Existing Installation of Windows 2000,
XP, or 2003” on page 24.
Caution! All components (firmware, drivers, and applications) must be installed when upgrading to
Version 2.x of XelCore. This means that version 1.x drivers will not work with version 2.x software,
and vice versa.
Page 22 Windows: Installing Drivers and Applications Document BC4000-UM100-R
Broadcom Corporation
Page 37
User Manual BC4000 Series RAID Controllers
02/13/06
New Installation of Windows 2000, XP, or 2003
You can install a new operating system at the same time you install the drivers for the controller(s). The
Windows 2003 procedure for installing more than one controller is similar to installing only one, except that the
Found New Hardware Wizard runs two additional times for each additional controller. Besides the two
components found in the single controller configuration, Windows also finds another BC4000 Series RAID
controller and the RAIDCore Multicard Device.
If you are installing to a boot array on a BC4000 Series RAID controller, you must modify the boot priority list
in the motherboard BIOS. See your motherboard manual for more information. Make sure that you include the
controller in this list and disable other IDE devices. Also ensure that INT13 support is enabled on the controller.
The array listed first in the BIOS Arrays list is the boot array; use the swap feature to place the boot array first.
To install the BC4000 Series RAID controller drivers and Windows:
1. Follow Microsoft procedures to install Windows 2000, XP, or 2003.
Note: In the next step, press F6
2. At the Windows Setup window, press F6 to install the driver.
3. When prompted, insert the driver disk, press S, and then press Enter.
4. Select the correct BC4000 option, and then press Enter.
5. Press Enter to continue and follow the on-screen instructions to complete the Windows 2003 installation.
Notes:
• If you are installing more than one controller, the operating system finds the new hardware and
installs the driver components multiple times.
• When the Software Installation warnings are displayed, click Yes. When the Hardware
Installation warnings are displayed, click Yes again.
You have completed the installation of the drivers for a RAIDCore BC4000 Series RAID controller. You can
now install the RAIDCore Management Suite for administering the controller, arrays, and disks (see
“Installing the Management Suite” on page 27).
Notes:
• Microsoft .NET Framework 1.1 must be installed in the system before installing the Windows
driver and applications.
• An installation failure with a blue screen can be encountered if you are installing Windows XP-64
or Windows Server 2003-64 edition on a system that has more than one BC4000 Series
controller. If this occurs, install the operating system to one controller, then shut down the system,
add another controller, and finish the installation. If the boot array needs to span across more than
one controller, first install the operating system to an array that resides only in one controller, and
it can then be spanned to disks on other controllers using the transform command.
immediately
upon seeing the setup window.
Document BC4000-UM100-R Windows: Installing Drivers and Applications Pag e 23
Broadcom Corporation
Page 38

BC4000 Series RAID Controllers User Manual
02/13/06
Existing Installation of Windows 2000, XP, or 2003
Installing the RAIDCore BC4000 Series controller involves the installation of device drivers for the controller
and the RAIDCore Configuration Device.
To install the BC4000 Series RAID controller device driver:
1. Install the controller and hard disk drives.
2. Reboot Windows 2000, XP, or 2003.
3. In the Found New Hardware Wizard, click Install from a List or Specific Location, and then click Next.
4. Click Don’t search, I will choose the driver to install, and then click Next.
5. Click Unknown Manufacturer, and then click Have Disk.
6. Insert the RAIDCore media CD in the CD-ROM drive if you have not already done so.
7. In Install From Disk, click Browse.
8. Locate the driver configuration file bcraid. For example, if your CD-ROM drive is mapped to D:, browse to
D:\windows\driver\i386\W2K or XP_W2K3 (for the 32-bit drivers), or D:\windows\driver\x86_64 (for the 64-
bit drivers), and then click Open.
Note: The 32-bit drivers for Windows 2000 are in the W2K subdirectory. The 32-bit drivers for
Windows 2003 and XP are in the XP_W2K3 subdirectory.
9. Click Next when the Found New Hardware Wizard indicates that the RAIDCore driver is being installed.
10. If you are warned that the RAIDCore component has not passed Windows Logo testing, click Continue
Anyway.
Page 24 Windows: Installing Drivers and Applications Document BC4000-UM100-R
Broadcom Corporation
Page 39
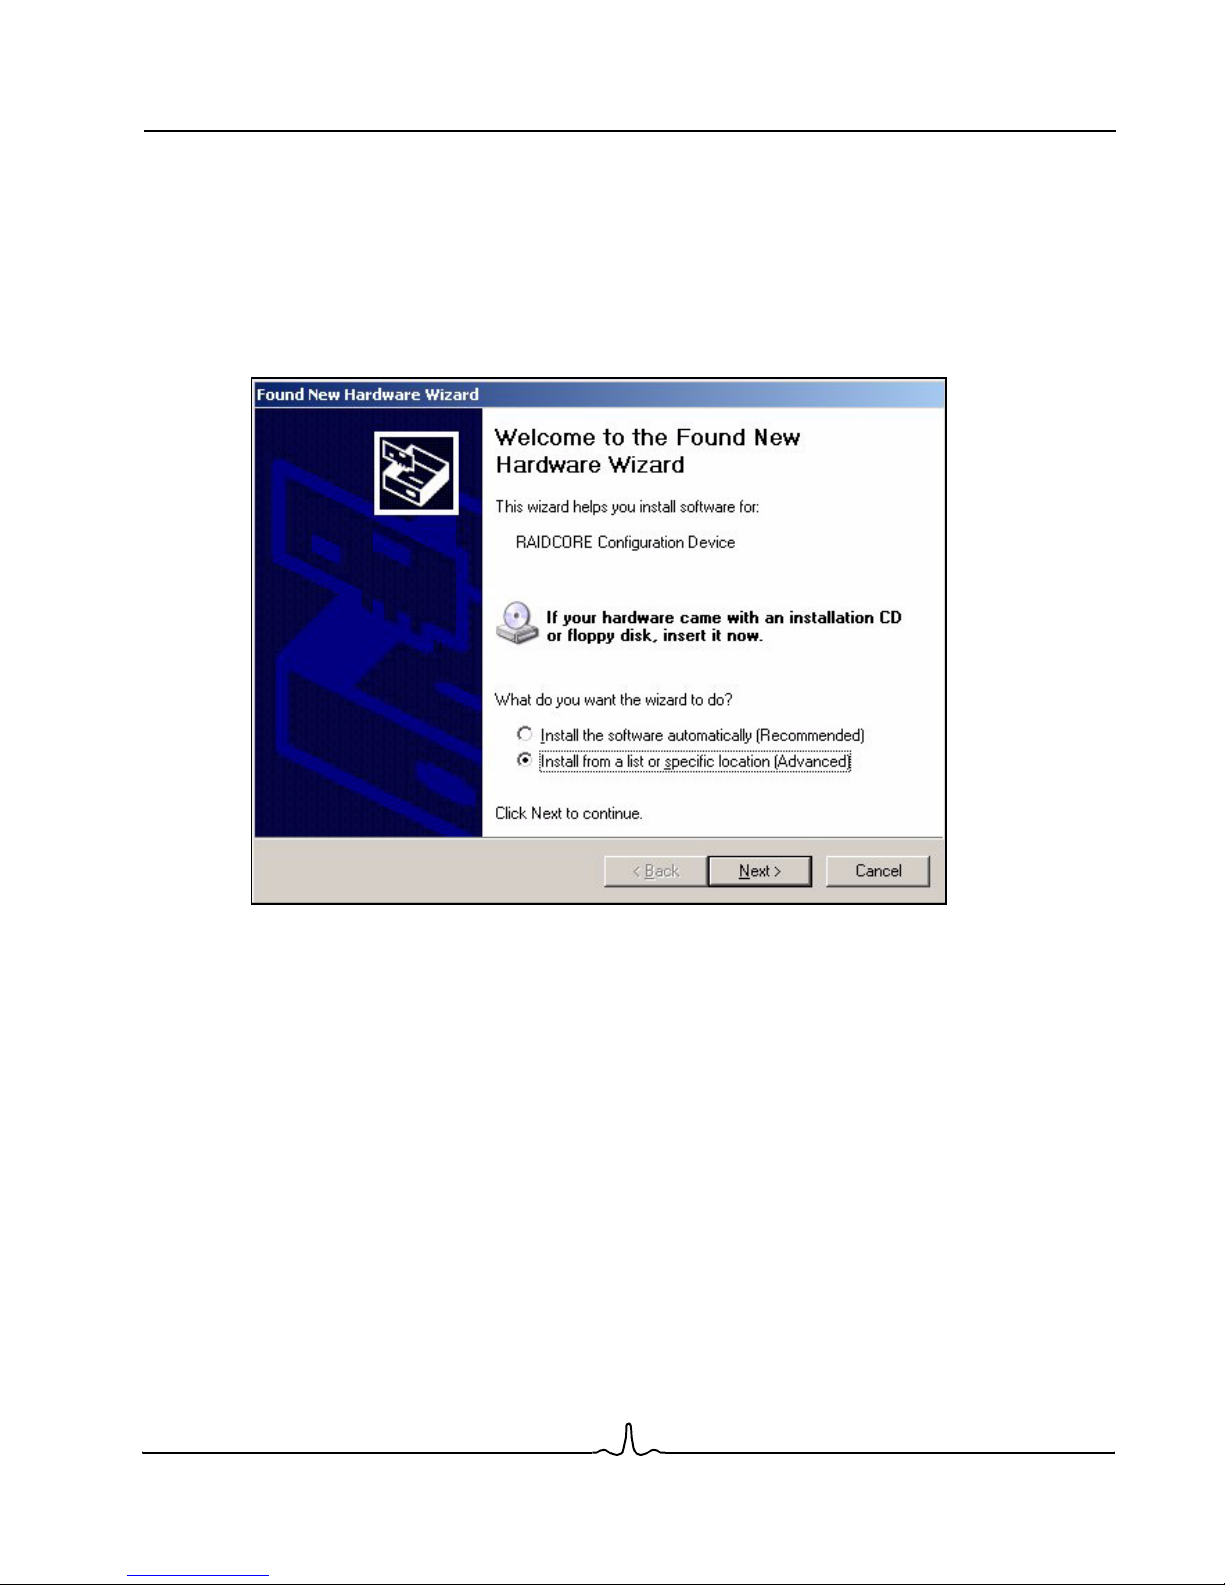
User Manual BC4000 Series RAID Controllers
02/13/06
11. Click Finish.
12. If you are installing more than one controller, the operating system discovers the next controller and repeats
this process.
When all the controller drivers are installed, the system then discovers the RAIDCore configuration device.
To install the configuration device driver:
1. In Found New Hardware Wizard, click Install from a List or Specific Location, and then click Next.
2. Click Don’t search, I will choose the driver to install, and then click Next.
3. Click Unknown Manufacturer, and then click Have Disk.
4. Insert the RAIDCore media CD in the CD-ROM drive if you have not already done so.
5. In Install From Disk, click Browse.
6. In Locate File, select bccfg, and then click Open.
7. Click Next when the Found New Hardware Wizard indicates that the RAIDCore driver is being installed.
8. If warned that the RAIDCore component has not passed Windows Logo testing, click Continue Anyway.
9. Click Finish.
Broadcom Corporation
Document BC4000-UM100-R Windows: Installing Drivers and Applications Pag e 25
Page 40

BC4000 Series RAID Controllers User Manual
02/13/06
10. If you are installing more than one controller, the Found New Hardware Wizard for the Multicard Device opens
again. Repeat this procedure for installing the drivers for the multicard device.
11. When the installation process is finished, select either Yes or No when prompted to reboot the system (a
reboot is unnecessary with the RAIDCore controller).
You have completed the installation of the drivers for the BC4000 Series RAID controller. You can now install
the RAIDCore Management Suite to administer the controller, arrays, and disks (see “Installing the
Management Suite” on page 27).
Page 26 Windows: Installing Drivers and Applications Document BC4000-UM100-R
Broadcom Corporation
Page 41

User Manual BC4000 Series RAID Controllers
02/13/06
INSTALLING THE MANAGEMENT SUITE
When you install the RAIDCore Management Suite from the RAIDCore media CD, you are installing several
components:
• RAIDConsole: A Windows-based management application (BC_WinRAID.exe) that has a graphical user
interface and an array maintenance service application (BC_Service.exe). For information on using
RAIDConsole, see Section 8: “Using RAIDConsole” on page 60. The bc_service application is responsible
for managing array event notifications and array maintenance.
• bcadm: A command-line alternative for managing the controller, disks, and arrays. By default, this
program is installed to %Program Files%\RAIDCore\noproc\bcadm.exe. For information on using bcadm,
see Section 9: “Using bcadm” on page 114.
• HTML-based online help is included on the RAIDCore media CD and can be launched from the
docs\onlinehelp.htm file. You can also open this help system from the RAIDConsole Help menu.
To install the RAIDCore Management Suite
1. Insert the RAIDCore media CD in the CD-ROM drive. Autorun launches the AutoRun CD Menu.
2. Click Install the Management Suite.
3. In InstallShield Wizard, click Next.
4. To accept the license agreement and install the kit, click Yes.
By default, setup installs the Management Suite to %Program Files%\RAIDCore.
5. To install to the default location, click Next.
Or
To choose a different location to install the application, click Browse.
By default, the RAIDConsole management application is added to a folder named RAIDCore.
6. Click Next to continue.
7. Click Finish to close the wizard.
Document BC4000-UM100-R Windows: Installing Drivers and Applications Pag e 27
Broadcom Corporation
Page 42

BC4000 Series RAID Controllers User Manual
02/13/06
LINUX: INSTALLING DRIVERS AND APPLICATIONS
The driver kit is delivered as either a compressed floppy diskette image (with a name ending in .img.gz) or as
a compressed ISO CD-ROM image (with a name ending in .iso.gz). Uncompress the image with gzip -d, and
then either mount the image using the loopback driver or write the image to a floppy or CD-ROM as
appropriate. You can also mirror the contents of the image to a USB memory drive for those systems that will
correctly install a driver from a USB memory drive. More specific instructions for using the image files and
installing the driver can be found in the README in the driver image.
TRANSFERRING DRIVERS TO FLOPPY DISK (LINUX)
To continue the installation, you must copy the drivers on the RAIDCore media CD to a floppy disk. Follow the
instructions provided below.
Linux: To transfer the drivers to a floppy disk:
You can use any computer that is running Linux and has both a CD-ROM drive and a floppy disk drive.
1. Insert a floppy disk in the floppy disk drive.
2. Insert the RAIDCore media CD in the CD-ROM drive.
3. Mount the CD at a convenient location. The CD is in ISO9660 format.
Example: mount /dev/cdrom /mnt/cdrom
4. To find the kernel version, processor type, and architecture being used, at the command prompt, type:
uname -a
Example output: Linux <
5. From the <
you need.
6. Select the driver disk image appropriate for your system architecture. Example driver names include the
following:
Fedora Core 1
Red Hat Linux 9.0
Red Hat Enterprise Linux 3.0
7. Uncompress and copy the floppy image to the floppy disk using dd.
Example: zcat dd.img-athlon.gz | dd of=/dev/fd0 bs=18k
cd mount point>/
dd-FC1-2.4.22-1.2115.nptl-athlon.img.gz
dd-FC1-2.4.22-1.2115.nptl-i686.img.gz
dd-RH9-2.4.20-8-i686.img.gz
dd-RH9-2.4.20-8-athlon.img.gz
dd-RHEL3.0-2.4.21-4.EL-i686.img.gz
dd-RHEL3.0-2.4.21-4.EL-athlon.img.gz
system
linux/<
>.<
domain
vendor>/<version
> 2.4.21-4.ELsmp #1 SMP <
date & tim
>/driver folder, select the distribution version of Linux that
e> i686 GNU/Linux
Use this floppy disk to install the drivers during the driver installation process described below.
Page 28 Linux: Installing Drivers and Applications Document BC4000-UM100-R
Broadcom Corporation
Page 43
User Manual BC4000 Series RAID Controllers
02/13/06
INSTALLING THE BC4000 SERIES DRIVERS (LINUX)
After the hardware has been installed, the disks have been initialized, and at least one array from the BIOS
has been created (if a new operating system is being installed), it is now time to install the RAIDCore BC4000
Series RAID controller drivers.
Install the drivers using one of the following procedures:
• “New Install of Red Hat and Fedora Core 1 Linux” or “New Install of Fedora Core 2, 3, and 4 Linux” or
“New Install of SuSE Linux”
• “Existing Install of Red Hat or Fedora Core 1, 2, 3, or 4 Linux” on page 31 or “Existing Install of SuSE
Linux” on page 32.
Note: The Linux operating system modules must include the gcc+ compiler and the pthreads library,
so that the bcadm program can be installed properly.
Caution! All components (firmware, drivers, and applications) must be installed when upgrading to
Version 2.x of XelCore. This means that a version 1.x driver will not work with version 2.x software,
and vice versa.
New Install of Red Hat and Fedora Core 1 Linux
Both the Linux operating system and the RAIDCore BC4000 Series RAID controller drivers can be installed at
one time. There are separate procedures in this section for:
• Red Hat and Fedora Core 1 Linux
• Fedora Core 2, 3, and 4 Linux
• SuSE Linux
If the installation is to a boot array on a BC4000 Series RAID controller, the boot priority list must be modified
in the motherboard BIOS. See your motherboard manual for more information. Make sure that the controller
is included in this list and disable other IDE devices. Also ensure that INT13 support is enabled on the
controller. The array listed first in the BIOS Arrays list is the boot array; use the swap feature to place the boot
array first.
Note: When installing Red Hat Linux using the RAIDCore BC4000 RAID Series Controller driver
disk, use the linux dd installation mode instead of the linux expert mode. However, the linux
expert mode must be used if Fedora Core 1 Linux is being installed.
To install the BC4000 Series RAID controller driver with a new Red Hat or Fedora Core 1
installation:
1. Boot your system with the Linux media.
2. At the boot prompt, insert the RAIDCore driver floppy disk and type: linux dd
If you are using a kickstart file on a floppy disk, type: linux ks=floppy dd
3. Follow the prompts to read the RAIDCore driver disk.
4. Click Exit.
Document BC4000-UM100-R Linux: Installing Drivers and Applications Page 29
Broadcom Corporation
Page 44

BC4000 Series RAID Controllers User Manual
02/13/06
The installation of the drivers for the RAIDCore BC4000 Series RAID controller has been completed. The
bcadm program to manage the controllers, arrays, and disks can now be installed as described on “Installing
the bcadm Application” on page 33.
5. Use the command bcadm -M -qa to display the RAID arrays and their associated devices as described in
“Example bcadm Usage with Output” on page 147. Refer to your Linux documentation for information on
partitioning and formatting the drives with the fdisk and mkfs utilities.
New Install of Fedora Core 2, 3, and 4 Linux
The procedure for installing the Fedora Core 2, 3, and 4 Linux operating system and the RAIDCore BC4000
Series RAID controller drivers is described below.
To install the BC4000 Series RAID controller driver with a new Fedora Core 2, 3 or 4 Linux
installation:
1. Insert the installation CD and, at the prompt, type the following:
linux expert
2. When the window asking “Do you have a driver disk?” is displayed, select No.
3. Continue with the install until you come to a window saying “Warning - No hard drives have been found. You
probably need to manually chose device drivers for the installation to succeed. Would you like to select drivers
now?” Answer by clicking Yes.
4. When the window titled Devices is displayed, select Add Device.
5. At the next window, “Select Device Driver to Load,” pressing F2 will prompt you for the driver disk.
6. When it has completed loading, you will be returned to the selection window. Scroll down the list until you come
to “RAIDCore bc4000 raid driver (bcraid)” and select it.
7. Select OK. You should see a window indicating that the driver is being loaded.
8. When you are returned to the Devices window, the bc4000 driver should be in the list.
9. Select Done and proceed with the installation as usual.
New Install of SuSE Linux
The procedure for installing the SuSE Linux operating system and the RAIDCore BC4000 Series RAID
controller drivers also differs somewhat from the one for Red Hat Linux. The driver kit is delivered as a
compressed ISO CD-ROM image (with a name ending in .iso.gz). Uncompress the image with gzip -d, and
then either mount the image using the loopback driver or write the image to a CD-ROM. You can also mirror
the contents of the image to a USB memory drive for those systems that support USB driver installs.
To install the BC4000 Series RAID controller driver with a new SuSE Linux installation:
1. Boot from the SuSE installation media and select the function key labeled “Driver Update” from the installation
window.
2. Scroll down the list to installation and press Enter to start the installation process.
3. When prompted for the driver disk, insert the floppy and select “OK.” Use fd0 as the medium and select “OK”
to copy the driver and installation support files from the disk.
Note: For SuSE 9.2 systems with 4 GB of memory, you must use the disk image named
dd-SUSE9.2-2.6.8-24-bigsmp-i386.img.gz.” For SuSE 9.1 systems with 4 GB of memory, use
“dd-SUSE9.2-2.6.8-24-smp-i386.img.gz.”
Broadcom Corporation
Page 30 Linux: Installing Drivers and Applications Document BC4000-UM100-R
Page 45

User Manual BC4000 Series RAID Controllers
02/13/06
4. While the driver is being read from the disk a “Loading update driver” message is displayed. Because it takes
several minutes to read the driver from a diskette, do not worry if it seems to be taking too long.
5. When you return to the “Choose the driver update medium” window, use the Back button and complete the
SuSE installation.
Note: Newer Linux kernels that load the libata driver (including some Fedora Core 2 errata kernels
and Fedora Core 3) do not recognize the BC445X and BC485X controllers as RAID controllers,
which makes arrays appear only as individual disks. To remedy this problem, disable the legacy
board ID as described in “Changing Controller Options From the BIOS” on page 58.
Existing Install of Red Hat or Fedora Core 1, 2, 3, or 4 Linux
If you already have Linux installed on your system, you need only to install the drivers for the RAIDCore
BC4000 Series RAID controller. The following procedure is used for Red Hat and Fedora Core 1, 2, 3, or 4
Linux.
To install the BC4000 Series RAID controller driver with an existing Red Hat or Fedora Core
1, 2, 3, or 4 Linux installation:
1. Use one of the following methods to mount the RAIDCore driver floppy disk you created in “Transferring Drivers
to Floppy Disk (Linux)” on page 28.
Note: Do not mount the floppy disk on an existing file system (such as /tmp).
• Create and mount the floppy disk on your system:
a. Mount the floppy disk by typing:
mount /dev/fd0 /mnt/floppy
b. Change to the install directory by typing:
cd /mnt/floppy
Or
• Mount the floppy disk image by running the following commands:
losetup /dev/loop0 [unzipped driver file]
mount /dev/loop0 /[some location]
cd /[some location]
2. Install the BC4000 Series RAID controller driver software by typing:
./install
Note: The bcraid module requires the scsi_mod subsystem. The bcadm program requires the sg
module.
3. At the command prompt, type:
insmod scsi_mod
insmod sg
insmod bcraid
Document BC4000-UM100-R Linux: Installing Drivers and Applications Page 31
Broadcom Corporation
Page 46

BC4000 Series RAID Controllers User Manual
02/13/06
Note: If you are installing the driver software in a Linux 2.6 system, use the modprobe command
instead of insmod.
You have completed the installation of the drivers for the BC4000 Series RAID controller. You can now install
the bcadm program to manage the controllers, arrays, and disks. See “Installing the bcadm Application” on
page 33.
4. Use the command bcadm -M -qa to display the RAID arrays and their associated devices. Refer to your Linux
documentation for information on partitioning and formatting the drives with the fdisk and mkfs utilities.
Existing Install of SuSE Linux
To install the bcraid driver to an existing SuSE Linux system or to upgrade the bcraid driver, perform the
following procedure:
To install the BC4000 Series RAID controller driver with an existing SuSE Linux installation:
1. Insert the driver disk, log on to the system as root, and run the following commands:
mount /media/floppy
cd /media/floppy
./install
cd
umount /media/floppy
modprobe bcraid
Note: For SuSE 9.2 systems with 4 GB of memory, use the disk image named
“dd-SUSE9.2-2.6.8-24-bigsmp-i386.img.gz.” For SuSE 9.1 systems with 4 GB of memory, use
“dd-SUSE9.2-2.6.8-24-smp-i386.img.gz.”
2. Install the bcadm application as described o “Installing the bcadm Application” on page 33 and use the
command bcadm -M -qa to display the RAID arrays and their associated devices. Refer to your Linux
documentation for information on partitioning and formatting the drives with the fdisk and mkfs utilities.
Note: Newer Linux kernels that load the libata driver do not recognize the BC445X and BC485X
controllers as RAID controllers, which makes arrays appear only as individual disks. To remedy this
problem, disable the legacy board ID as described in“Changing Controller Options From the BIOS”
on page 58
Page 32 Linux: Installing Drivers and Applications Document BC4000-UM100-R
Broadcom Corporation
Page 47

User Manual BC4000 Series RAID Controllers
02/13/06
INSTALLING THE bcadm APPLICATION
The bcadm program is the command-line tool for managing the RAIDCore BC4000 Series RAID controllers. If
you are updating from a previous version of the bcadm application, you must first remove the existing version.
To install bcadm on Linux
Locate the bcadm application on the RAIDCore distribution disk. You must be the root user.
1. If you have an earlier version of bcadm on your system, at the prompt, run the following command:
rpm -e bcadm-<version>-<build>.i386.rpm
2. At the prompt, run the following command:
rpm -iUh bcadm-<version>-<build>.i386.rpm
For example, a typical version number would be 2.0 and a typical build number would be 2005203.2. This
means the command would be entered as:
rpm -iUh bcadm-2.0-2005203.2.i386.rpm
INSTALLING THE ONLINE HELP
The onlinehelp program is the online help for RAIDCore BC4000 Series RAID controllers. If you are updating
from a previous version of the onlinehelp application, you must first remove the existing version.
To install onlinehelp on Linux
Locate the onlinehelp application on the RAIDCore distribution disk. You must be the root user.
1. If you have an earlier version of onlinehelp on your system, at the prompt run the following command:
rpm -e bcraid-onlinehelp-<version>-<build>.i386.rpm
2. At the prompt, run the following command:
rpm -iUh bcraid-onlinehelp-<version>-<build>.i386.rpm
For example, a typical version number would be 2.0 and a typical build number would be 2005168.2. This
means the command would be entered as:
rpm -iUh bcraid-onlinehelp-2.0-2005168.2.i386.rpm
Document BC4000-UM100-R Linux: Installing Drivers and Applications Page 33
Broadcom Corporation
Page 48

BC4000 Series RAID Controllers User Manual
02/13/06
INSTALLING THE BC_WINRAID APPLICATION
The bc_winraid program is the GUI management application for RAIDCore BC4000 Series RAID controllers.
If you are updating from a previous version of the bc_winraid application, you must first remove the existing
version.
To install bc_winraid on Linux
Locate the bc_winraid application on the RAIDCore distribution disk. You must be the root user.
1. If you have an earlier version of bc_winraid on your system, at the prompt, run the following command:
rpm -e bcraid-<version>-<build>.i386.rpm
2. At the prompt, run the following command:
rpm -iUh bcraid-<version>-<build>.i386.rpm
For example, a typical version number would be 2.0 and a typical build number would be 2005168.2. This
means the command would be entered as:
rpm -iUh bcraid-2.0-2005168.2.i386.rpm
The installation of the BC4000 Series RAID controller for your Linux system is now complete.
Page 34 Linux: Installing Drivers and Applications Document BC4000-UM100-R
Broadcom Corporation
Page 49

User Manual BC4000 Series RAID Controllers
02/13/06
BOOTING FROM A LEGACY DISK
A legacy disk is an IDE or SATA disk that was previously used on a standard parallel or SATA controller.
RAIDCore BC4000 Series RAID controllers can read from and can boot from legacy disks, but many of the
advanced RAID functions are not available for legacy disks. If additional disks are available, a legacy disk can
be transformed into a RAID array.
If you want to boot from a legacy disk attached to a BC4000 Series RAID controller, you must first install the
controller driver.
To boot from a legacy disk attached to a BC4000 Series RAID controller:
1. Shut down the system.
2. Insert the controller into the system without any disks attached and boot the system.
3. Install the controller drivers for your particular operating system. (See “Windows: Installing Drivers and
Applications” on page 22 or “Linux: Installing Drivers and Applications” on page 28.)
Note: For this procedure, you do not need to initialize disks or create arrays when installing the
controller drivers.
4. Shut down the system and connect the legacy disk to the BC4000 Series RAID controller. If you are using an
IDE drive, you must have a parallel-to-serial converter.
Caution! For parallel ATA legacy disks, Broadcom does not support the extended use of parallel-toserial converters. Data loss may occur. Broadcom suggests that if you use a converter, use it only
temporarily to include a parallel drive in a RAIDCore array and to transfer the data to a serial drive.
5. Boot the system.
Note: You should be able to see that a legacy array exists in the RAIDCore BIOS.
You should now be booting from the legacy disk. If additional disks are available, you can transform the legacy
disk into any larger size and type of RAIDCore array. See “Using Legacy Disks” on page 43 for more information.
Document BC4000-UM100-R Booting from a Legacy Disk Page 35
Broadcom Corporation
Page 50
BC4000 Series RAID Controllers User Manual
02/13/06
Section 5: Updating the Drivers, Firmware, and
Applications
UPDATING COMPONENTS FOR THE BC4000 SERIES
When you update the components, you are updating:
• The RAIDCore BC4000 Series RAID controller drivers
• The firmware, which is the BIOS and BIOS Configuration Utility
• The management applications, consisting of the RAIDConsole management application (including the
array maintenance service) and the command-line bcadm program.
The latest updates to the RAIDCore BC4000 Series RAID controller drivers, firmware, and management
applications are available from the Broadcom website. The link is given below.
http://www.broadcom.com/storage
Follow the instructions in this section to update these components. The download instructions also contain a
Kit Contents page that details the component version numbers, new features, and bug fixes in that update.
A bootable floppy disk is required for updating the firmware. See “Creating a Bootable Floppy Disk” on page 42
for details.”
Note: Between version 1.4 and version 2.0 of XelCore, the names of the drivers changed from
“RAIDCore™” to “Broadcom RAIDCore™.” This means that because the drivers are sorted
alphabetically, they now appear under the letter “B” instead of “R.”
Caution! Do not upgrade your system if there are any tasks (such as a transform or a rebuild)
running on any of the arrays.
Caution! All components (firmware, drivers, and applications) must be installed when upgrading to
Version 2.X of XelCore. This means that a version 1.X driver will not work with version 2.X software,
and vice versa.
Page 36 Updating the Drivers, Firmware, and Applications Document BC4000-UM100-R
Broadcom Corporation
Page 51

User Manual BC4000 Series RAID Controllers
02/13/06
UPDATING THE BC4000 SERIES COMPONENTS FOR WINDOWS
The instructions to update the BC4000 Series components for a Windows-based system are given in this
section.
To update the BC4000 Series components on an existing Windows-based system:
1. Download the zip file from the website by clicking the Download button.
2. Read the software licensing agreement and click Accept.
The File Download window displays.
3. Click Save to save the executable to your system.
4. In the Save As window, specify a new filename or use the default name. The default file name is
Windows_Media_Kit_V2_X_X.zip.
5. Double-click the zip file to open it.
6. Select all the files contained in the zip file and extract them to the directory of your choice.
7. From the File menu, select Exit.
8. Change to the directory where you extracted the files. For example, if you used default directory to unzip the
files, type: cd /d %temp%\raidcore
9. Open the PDF of the User Manual, which is available at:
.\docs\User_Manual.pdf.
10. Create a bootable floppy and leave it in the floppy drive. For instructions, see “Transferring Drivers to Floppy
Disk (Windows)” on page 22 or “Transferring Drivers to Floppy Disk (Linux)” on page 28.
11. Copy all files in the firmware directory to the bootable floppy.
12. From a command prompt, type the following:
net stop bc_service
13. Uninstall the RAIDCore Management Suite using the Add/Remove Programs control panel.
a. Choose the following options from the Start button on the Task bar:
Start > Settings > Control Panel
b. Select the Add/Remove Programs control panel and then select the RAIDCore Management Suite from
the list of software programs.
c. Click the Change/Remove button.
14. Update the bcraid controller driver by performing the following steps:
a. On the desktop, right-click on the My Computer icon and select Manage.
b. Select Device Manager.
c. In the Computer Management window, click to expand the folder for SCSI and RAID Controllers.
d. Double-click BC4000 Series RAID Controller to select and open it.
e. In the Properties window, select the Driver tab.
f. Click Update Driver.
The Upgrade Device Driver wizard displays.
g. Click Next.
h. In the Hardware Update window, you are asked, “Can Windows connect to Windows Update to search for
software?” Select No, not at this time and then click Next.
Document BC4000-UM100-R Updating Components for the BC4000 Series Page 37
Broadcom Corporation
Page 52

BC4000 Series RAID Controllers User Manual
02/13/06
i. The window asks, “What do you want the wizard to do?” Select Install from a list or specific location
(Advanced) and then click Next.
j. On the Please choose your search and installation options window, select the Don’t search. I will
choose the driver to install option.
k. In the Install From Disk window, click Browse to browse to the location where you downloaded the new
drivers. For example:
[some directory]\driver\nt
l. Select bcraid.inf and click Open.
m. In the Install from Disk window, click OK.
The Upgrade Device Driver wizard displays.
n. Select the BC4000 Series SATA Controller and click Next.
o. To start the device driver installation, click Next.
p. If you get a window asking whether to overwrite the existing file, select Yes. If you get a window telling you
the driver may not meet Windows testing standards, click Install Anyway.
q. When the new drivers have been installed, click Finish.
r. Close the Properties window.
s. When asked to restart the system, select No.
Continue on to the next step to update the bccfg.inf driver.
15. Update the bccfg controller driver by performing the following steps:
a. In the Computer Management window, click to expand the folder for System device.
b. Double-click RAIDCore Configuration Device to select and open it.
c. In the Properties window, select the Driver tab.
d. Click Update Driver.
The Upgrade Device Driver wizard displays.
e. Click Next.
f. In the Hardware Update window, it asks, “Can Windows connect to Windows Update to search for
software?” Select “No, not at this time” and click Next.
g. The window asks, “What do you want the wizard to do?” Select “Install from a list or specific location
(Advanced)” and then click Next.
h. On the Please choose your search and installation options window, click the “
choose the driver to install” option.
i. In the Install From Disk window, click Browse to browse to the location where the new drivers were
downloaded, for example: [some directory]\driver\nt
j. Select bccfg.inf and click Open.
k. In the Install from Disk window, click OK.
The Upgrade Device Driver wizard displays.
l. Select the RAIDCore Configuration Device and click Next.
m. To start the device driver installation, click Next.
n. If you get a window asking whether to overwrite the existing file, select Yes. If you get a window telling you
the driver may not meet Windows testing standards, click Install Anyway.
o. When the new drivers have been installed, click Finish.
p. Close the Properties window.
16. With the floppy in the drive, select Yes to restart the system and boot from the floppy.
17. At the prompt, type: bcflash
All RAIDCore controllers selected in the Update Firmware window will be flashed.
Don’t search. I will
Page 38 Updating Components for the BC4000 Series Document BC4000-UM100-R
Broadcom Corporation
Page 53

User Manual BC4000 Series RAID Controllers
02/13/06
18. Remove the floppy disk.
19. Reboot the system.
20. Reinstall RAIDConsole by running the setup located at: windows\apps\Setup.exe.
21. Verify that all the latest components are installed on your system by comparing the kit contents from the
download with those displayed in the Help > About window in RAIDConsole.
UPDATING THE BC4000 SERIES DRIVER FOR LINUX
The instructions to update the BC4000 Series driver for a Linux-based system are given in this section. The
final step of this procedure depends on whether the system is a self-hosted system or a system that only uses
the RAIDCore card for data and is not booted from it.
To update the BC4000 Series driver with an existing Linux-based system:
1. Obtain the kernel version and CPU type of the system using the following command:
uname -rm
Some examples of the kernel version and CPU type are “2.4.21-4.ELsmp i686” (for Red Hat Enterprise Linux
3.0) or “2.4.22-1.2115.nptlsmp i686” (for a Fedora Core 1 system).
2. From the <
that you need. There are different images for i586, i686, Athlon, etc.
3. Follow these instructions to transfer the driver to a floppy disk:
a. Insert a floppy disk in the floppy disk drive.
b. Insert the RAIDCore media CD in the CD-ROM drive.
c. Mount the CD at a convenient location. The CD is in ISO9660 format.
d. From the <
e. Select the driver disk image appropriate for your system architecture.
4. Uncompress the driver floppy image by running a command similar to the following (this example is for an
Athlon driver disk image).
gunzip dd.img-athlon.gz
cd mount point>/
Example: mount /dev/cdrom /mnt/cdrom
cd mount point
Linux that you need.
Example driver names include the following:
Fedora Core 1
dd-FC1-2.4.22-1.2115.nptl-athlon.img.gz
dd-FC1-2.4.22-1.2115.nptl-i686.img.gz
Red Hat Linux 9.0
dd-RH9-2.4.20-8-i686.img.gz
dd-RH9-2.4.20-8-athlon.img.gz
Red Hat Enterprise Linux 3.0
dd-RHEL3.0-2.4.21-4.EL-i686.img.gz
dd-RHEL3.0-2.4.21-4.EL-athlon.img.gz
linux/<
>/linux/<
vendor
vendor
>/<
version
>/<
version
>/driver folder, locate the distribution version of Linux
>/driver folder, select the distribution version of
Document BC4000-UM100-R Updating Components for the BC4000 Series Page 39
Broadcom Corporation
Page 54

BC4000 Series RAID Controllers User Manual
02/13/06
5. Mount the floppy image using the loopback device, running the following commands in order.
mkdir /mnt/img
mount -o loop dd.img-athlon /mnt/img
6. Change directory to the mounted image by running the following command:
cd /mnt/img
7. Install the driver by running the following command.
./install
To complete updating the driver on a self-hosted system:
8. Reboot the system.
To complete updating the driver on a data-only system:
9. Remove and install the new bcraid.o module by running the following commands in order.
rmmod bcraid
insmod bcraid
Note: If you are installing the driver software in a Linux 2.6 system, use the modprobe command
instead of insmod.
UPDATING THE BC4000 SERIES BIOS IMAGE (LINUX)
To update the BIOS firmware on a Linux system:
1. Create a DOS-bootable floppy on a Windows system as described in “Creating a Bootable Floppy Disk” on
page 42.
2. Copy all the files in the firmware\ directory to the DOS-bootable floppy.
3. Boot the Linux system into DOS from the DOS-bootable floppy.
4. At the DOS prompt, enter bcflash.
Page 40 Updating Components for the BC4000 Series Document BC4000-UM100-R
Broadcom Corporation
Page 55
User Manual BC4000 Series RAID Controllers
02/13/06
UPDATING THE BC4000 DRIVER FOR A LINUX ERRATA KERNEL
When updating the Linux kernel version, you must copy the bcraid drivers into the /lib/modules tree prior to
running the kernel RPM. The upgrade script, available on the RAIDCore distribution disk, takes a single
optional argument to specify the type of kernel. The options for kernel types are smp, bigmem and hugemem.
If no kernel type is specified, the uniprocessor version of the driver is copied into the tree.
To upgrade the driver when performing a Linux kernel version update:
1. Insert the RAIDCore driver disk and log on to the system as the root user.
2. Run the following commands in order:
mount /dev/fd0 /mnt/floppy
cd /mnt/floppy
./upgrade [smp | bigmem | hugemem]
3. Install the kernel update RPM package.
Note: Newer Linux kernels that load the libata driver (including some Fedora Core 2 errata kernels
and Fedora Core 3) do not recognize the BC445X and BC485X controllers as RAID controllers,
which makes arrays appear only as individual disks. To remedy this problem, disable the legacy
board ID as described in “Changing Controller Options From the BIOS” on page 58.
Document BC4000-UM100-R Updating Components for the BC4000 Series Page 41
Broadcom Corporation
Page 56

BC4000 Series RAID Controllers User Manual
02/13/06
CREATING A BOOTABLE FLOPPY DISK
You must create a bootable floppy disk if you are:
• Updating the firmware
• Upgrading your license level from the command line before installing your operating system
To create a DOS-bootable floppy disk:
1. At a computer running Windows and having both a floppy disk drive and a CD-ROM drive, insert a spare floppy
disk.
Note: Formatting the disk overwrites any data that may be stored on the disk. This means you should
not format a disk that contains files you do not want to lose.
2. Do one of the following depending on which version of Windows you are using:
• On a Windows 98 operating system, go to the MS-DOS command prompt and type:
format a: /s
Or
• On a Windows 2000 operating system, perform the following steps.
a. Insert the Windows 2000 CD into the CD-ROM drive.
b. At the command prompt, change to the CD-ROM drive by typing:
x
:
where
x
: is the drive letter of your CD-ROM drive.
c. At the command prompt, type the following.
cd \Valueadd\3rdparty\CA_Antiv
d. At the command prompt, type the following.
makedisk
Or
• On a Windows XP operating system, do the following:
a. In My Computer, right-click drive A and click Format.
b. In Format options, click the Create an MS-DOS startup disk option, and then click Start.
Or
• On a Windows 2003 system, in the My Computer window, right-click drive A, and then click Format.
Page 42 Creating a Bootable Floppy Disk Document BC4000-UM100-R
Broadcom Corporation
Page 57

User Manual BC4000 Series RAID Controllers
02/13/06
Section 6: General Concepts for Managing
Arrays and Disks
RAID MINIMUM DISK REQUIREMENTS
The following table lists the minimum and maximum number of disks for each RAID level.
Table 5: Minimum Disks Required for Each RAID Level
RAID Level Minimum Number of Disks Maximum Number of Disks
Volume 1 32
RAID0 2 32
RAID1 2 2
RAID1n 3 16
RAID10 4 32
RAID10n 6 32
RAID5 3 16
RAID50 6 32
USING LEGACY DISKS
A disk can be attached to the RAIDCore controller that was previously attached to a standard parallel or another,
non-RAIDCore SATA controller. The RAIDCore software recognizes disks with valid DOS partition tables as
legacy disks. With the Copy command (in RAIDConsole) or the --create-copy command (in bcadm), data can be
moved from a legacy disk onto a RAIDCore array and then the legacy disk can be reused within a RAIDCore array.
Caution! For parallel ATA legacy disks, Broadcom does not support the extended use of parallel-toserial converters. Data loss may occur. Broadcom suggests that if a converter is used, it be used
only temporarily to include a parallel drive in a RAIDCore array and to transfer its data to a serial
drive.
There are a few restrictions and some different behaviors when transforming a legacy disk as compared to a
standard RAIDCore array:
• This action cannot be undone. Copying a legacy disk moves the data to a new array, and the array on the
legacy disk is gone. The legacy disk is initialized automatically and displays in the RAIDConsole Disk List
as “Disk”. In bcadm, the disk type after initialization also displays as “Disk.”
• When copying a legacy disk, the legacy disk cannot be used in the destination array and cannot be
hidden.
• If all the space on the legacy disk has been used up, the disks in the destination array must have more
capacity than the legacy disk, or the data cannot be moved (because configuration information written to
RAIDCore arrays takes up some space on each disk).
With the proper steps, legacy disks can be booted and included in RAIDCore arrays. For more details, see
“Booting from a Legacy Disk” on page 35.
Document BC4000-UM100-R General Concepts for Managing Arrays and Disks Page 43
Broadcom Corporation
Page 58

BC4000 Series RAID Controllers User Manual
02/13/06
To copy an array from RAIDConsole, see “Copying Arrays” on page 85. To copy an array from bcadm, see
“Copying Arrays: bcadm --create-copy” on page 136.
UNDERSTANDING ARRAY AND DISK STATES
The controller uses states to report the status of arrays and disks. To ensure the health of your data, it is
important to understand what each array and disk state mean as well as what causes them to change. For
information about each RAID type, see “Overview of Array Types” on page 2.
Read about:
• Array States (on this page)
• Disk States (on page 45)
• Rescanning for Changes in State (on page 45)
ARRAY STATES
Within the management applications, an array is a logical device that can exist in one of three states:
NORMAL, CRITICAL, or OFFLINE. In RAIDConsole, these states display in the Array List area in a column
named State. Within the bcadm program, these states also display in a column named State. The states are
defined as follows:
NORMAL The NORMAL state is displayed when everything is functioning
correctly.
CRITICAL The CRITICAL state is displayed when the array is no longer
OFFLINE The OFFLINE state is displayed when arrays cannot be read or written
Whether an array is marked as CRITICAL or OFFLINE depends upon what type of an array it is, and how many
disks within the array have failed. Note the following changes in state:
• For RAID1 and RAID5 (redundant arrays), the CRITICAL state is displayed when a single disk fails.
• For RAID1n, RAID10, RAID10n, or RAID50 (array types with multiple redundancies), the CRITICAL state
is displayed if a single disk fails in any one of those sets.
• For Volume and RAID0, the OFFLINE state is displayed when a single disk fails.
• For RAID1 and RAID5 (redundant arrays), the OFFLINE state is displayed when two or more disks fail.
• For RAID1n, RAID10, RAID10n (array types with multiple redundancies), the OFFLINE state is displayed
if all disks in a set fail.
• RAID50 (an array type with multiple redundancies), the OFFLINE state is displayed if two or more disks
fail within the same set.
For example, RAID50 is a stripe of RAID5 sets. If a RAID50 set contains three RAID5 sets, each RAID5 set
can have up to one disk failure and the RAID50 array state shows as CRITICAL. If a fourth disk fails, the state
of the RAID50 array changes to OFFLINE. Or, if two drives fail on one of the RAID5 sets, the state of the
RAID50 array changes to OFFLINE.
redundant (fault tolerant) because of one or more disk failures. Arrays
can still be read and written to, but the data is no longer protected
should another drive fail.
to because of one or more disk failures.
Page 44 Understanding Array and Disk States Document BC4000-UM100-R
Broadcom Corporation
Page 59

User Manual BC4000 Series RAID Controllers
02/13/06
More than one array can be created using the same set of disks. If you disconnect a disk that belongs to more
than one array, only the arrays that try to access the disk and receive I/O errors report the failure. For example:
you have two arrays, both RAID5 sets, and both use disk 4. If a system being used by array 1 receives an I/O
error when trying to communicate with disk 4, the state of array 1 will change to CRITICAL. However, the state
of array 2 using disk 4 will not change to CRITICAL until an I/O error is reported. If systems using array 1 are
not communicating with the failed disk, the state of array 1 still displays as NORMAL. If you perform a rescan
of all channels after disconnecting a disk, the state of every array using the missing disk changes from
NORMAL to either the CRITICAL or OFFLINE, depending on the array type.
DISK STATES
Within the management applications, a disk can be part of one or more arrays and can exist in one of three
states: ONLINE, FAILED, or UNKNOWN. In RAIDConsole, these states are displayed in the Disk List area in
a column named State. Within the bcadm program, these states are also displayed in a column named State.
The states are defined as follows.
ONLINE The ONLINE state is displayed when the disk is connected,
functioning correctly, and the controller can communicate with it.
FAILED The FAILED state is displayed when the controller can recognize the
disk but cannot read or write to it.
UNKNOWN The UNKNOWN state is displayed when the disk is new and has not
been initialized, or is in a format unrecognizable by the controller.
If a disk fails, its state in the Disk List is displayed as FAILED. However, if the system tries to communicate
with a disk that has been physically disconnected, the disk shows as FAILED in the Array List window but still
appears in the Disk List as ONLINE until a rescan is performed. After you have rescanned the SATA channels
for information, the disconnected disk disappears from the Disk List.
RESCANNING FOR CHANGES IN STATE
When using the bcadm program, the disk information that displays when you run a query command is always
current. In the RAIDConsole application, however, the information displayed in the Disk List area is the state
of the disks when they were last scanned. If you have not performed a rescan, the information being displayed
is the state of the disks at boot time.
Every time you connect or disconnect a disk while online, a message asking if you want to perform a rescan
(of all SATA channels) appears. If you choose Yes, the information in both the Array List and the Disk List is
updated. However, this view may show arrays as being in a CRITICAL or OFFLINE state if not all disks have
been installed or removed.
Although it is highly recommended that you shut down the system before you add or remove disks, you may
also be able to add or remove disks while online if your system supports that feature. Because of this feature,
RAIDConsole does not automatically perform a rescan when it detects that a disk has been added or removed.
do not
For example, if you want to hot-swap a RAID5 set with six disks into a new system,
until all six disks have been connected. Otherwise, any arrays associated with the disks that are not yet
connected change state to either CRITICAL or OFFLINE. If the state of your RAID5 set changes to OFFLINE,
you will lose your data. This feature can also result in the state of a disk being reported differently in the Array
View and the Disk List. A disk within an array can have a state of FAILED in the Array tree view while at the
same time, it can show a state of ONLINE in the Disk List.
perform a rescan
Document BC4000-UM100-R Understanding Array and Disk States Page 45
Broadcom Corporation
Page 60

BC4000 Series RAID Controllers User Manual
02/13/06
STARTING AND STOPPING TASKS
Tasks are started when you perform one of the following actions.
• Create a redundant array
• Transform an array
• Copy an array
• Restore an array
• Check for consistency on redundant arrays
• Verify a consistency bitmap (check_bitmap) on a redundant array
Full task control can be used on create, copy, consistency check and bitmap check tasks. On transforms and
on restores for dedicated and global spares, task control can only pause/resume, but cannot remove the task.
To remove these types of tasks, pause and then delete them.
The following types of tasks can be displayed for each array:
TRANSFORM The TRANSFORM task is displayed while an array is being
CREATE The CREATE task is displayed while an array is being created.
COPY The COPY task is displayed while an array is being copied. In a -
CHECK The CHECK task is for redundant type arrays only. This task is
RESTORE The RESTORE task is displayed while an array is being
CHECK_BITMAP The CHECK_BITMAP task is displayed while verifying that the
NOT_ACTIVE NOT_ACTIVE is displayed when no other tasks are being
Caution! When a task is in progress and the system is shut down, the RAIDCore driver may hang
under certain circumstances. This may occur if arrays exist and a task is in progress, but a drive letter
has not been assigned AND an OS partition has not been created on the array. Because neither a
drive letter nor partition has been assigned, the OS does not notify the RAIDCore driver that the
system is shutting down. If this condition occurs, the system can be reset, the OS will start, and the
RAIDCore process will also restart.
transformed.
-verbose query, the array numbers of the source and destination
array are given (for example, COPY 2>5).
displayed while verifying that the parity (RAID5) or mirror drive
consistency is correct.
restored.
parity on a RAID5 set, or the mirror halves on a RAID1/10 set,
are consistent. This action is performed automatically if your
system crashes.
performed.
Page 46 Starting and Stopping Tasks Document BC4000-UM100-R
Broadcom Corporation
Page 61

User Manual BC4000 Series RAID Controllers
02/13/06
WORKING WITH SPARES
ABOUT SPARING OPTIONS
The BC4000 Series RAID controller supports three sparing options.
Distributed A patent-pending sparing option that consists of reserved space on
each disk in an array
Dedicated A spare disk assigned to a specific, redundant array
Global A spare disk that is shared by multiple arrays
Spares are restored in the following order:
• Dedicated
• Distributed
• Global
Notes:
• An array is marked critical or offline if a disk returns failure to an I/O, or if the SATA or power cable
is disconnected.
• You can assign one or more spares to a redundant array type.
• Spare assignments do not apply to non-redundant array types. To protect this data, you must first
transform the array to a redundant array type (see “Transforming Arrays” on page 84). You can
then assign spares.
USING DISTRIBUTED SPARING
RAIDCore’s proprietary distributed sparing feature reserves space on each drive in an array. This space is
used when the data from a failed drive is being regenerated during a restore task. Whereas other methods of
sparing (such as dedicated spares) provide the same level of protection, distributed sparing provides better
performance because all drives are active in an array and are not sitting idle, as is the case with dedicated
spares. Another advantage of distributed spares is that because all drives are active, a drive cannot fail and
go unnoticed, as is the case with dedicated or global spares. This is because with distributed sparing, each
array has its own dedicated fail-over spaces. This averts the potential problem of having insufficient space to
start a fail-over on the single disk that has been assigned as a spare.
A distributed spare is assigned at the time an array is created or transformed. Distributed spares are valid only
for RAID5 (four or more drives), RAID50 (four or more drives per RAID5 set), and RAID10 and RAID10n (six
or more drives).
This spare type is the most protective because space is allocated when the array is created. Like a dedicated
spare, this spare type is assigned to a specific array. If you initially created an array without a distributed spare,
you must transform the array to add a distributed spare. This is because a distributed spare can be assigned
only when an array is being created or transformed.
Document BC4000-UM100-R Working with Spares Page 47
Broadcom Corporation
Page 62

BC4000 Series RAID Controllers User Manual
02/13/06
Notes:
• If there is insufficient unused space on the disks in an array, you cannot add a distributed spare
without adding an additional disk and transforming to an array with distributed sparing enabled.
The distributed spare option uses the equivalent storage of one of the disks in the array. For
example: the total capacity of six drives is being used in a RAID5 array, and you have enabled
distributed sparing. The capacity of the array is the same as a
four-drive RAID0. The capacity of one disk is lost to the RAID5 parity data, and the capacity of
another disk is lost to the distributed sparing option.
• See “About Sparing Options” on page 47.
From RAIDConsole, see “Adding or Removing Distributed Spares” on page 97 to add or remove a distributed
spare. From bcadm, see “Creating New Arrays: bcadm --create” on page 130.
To add a distributed spare while creating an array:
1. From the Array menu, select Create.
2. Configure the array.
3. In the Distributed Spare field, click Enabled.
To add a distributed spare while transforming an array:
1. From the Array menu, select Transform.
2. Configure the new array.
3. In the Distributed Spare field, click Enabled.
To remove a distributed spare:
1. From the Array menu, select Transform.
2. Configure the new array.
3. In the Distributed Spare field, click Disabled.
Page 48 Working with Spares Document BC4000-UM100-R
Broadcom Corporation
Page 63

User Manual BC4000 Series RAID Controllers
02/13/06
USING DEDICATED SPARING
A dedicated spare is a disk that you assign as an alternate disk for a specific array. Should a disk fail in that
array, the alternate disk is used to replace the failed disk and the array is rebuilt. A dedicated spare can be
assigned to any redundant array type, and up to four spares can be assigned to an array.
Notes:
• Assigning a dedicated spare does not reserve space on that drive. Therefore, an automatic
restore is not guaranteed if a disk fails. If a disk does fail, you must make room on the disk for the
fail-over to complete, or you must assign a different disk with enough room. If a dedicated spare
is assigned and a drive fails, the restore process starts automatically
available on the dedicated spare
• You cannot assign a dedicated spare while a task is running on the array.
• When you assign a dedicated spare either while creating or transforming an array, the first drive
you select to create the array is assigned by default as the dedicated spare.
• When you add a dedicated spare after the array has been created, you can select which disk to
use as the spare.
• See “About Sparing Options” on page 47.
From RAIDConsole, see “Adding or Removing Dedicated Spares” on page 97 to add or remove a dedicated
spare. From bcadm, see “Creating New Arrays: bcadm --create” on page 130.
.
if there is enough space
USING GLOBAL SPARING
A global spare is a disk that you assign as an alternate disk for multiple arrays instead of associating it with
just one. Many arrays can be restored using the global spare disk as long as it is not already part of the array
and it has enough space available. Unlike a dedicated spare, this type of spare can be assigned at anytime,
even while tasks are running on arrays.
Notes:
• Assigning a disk for use as a global spare does not reserve space on that disk. Therefore, an
automatic restore is not guaranteed if a drive fails. If there is not enough disk space on the
global spare, you must either make room for the fail-over to complete or assign a different disk
with enough room as the spare. However, if there is enough space available on the global spare
and a drive failure occurs, the restore process starts automatically.
• See “About Sparing Options” on page 47.
From RAIDConsole, see “Adding or Removing Global Spares” on page 98 to add or remove a global spare.
From bcadm, see “Managing Controllers, Arrays, and Disks: bcadm --manage” on page 118.
Document BC4000-UM100-R Working with Spares Page 49
Broadcom Corporation
Page 64

BC4000 Series RAID Controllers User Manual
02/13/06
Section 7: Using the BIOS Configuration Utility
WHEN TO USE THE BIOS CONFIGURATION UTILITY
The firmware component of the installation kit includes the BIOS Configuration Utility. This utility must be used
to:
• Create the boot array: If the system is not booting off of the array, this utility does not need to be used to
create an array, although it can. A non-bootable array can be created in the RAIDConsole management
application (see “Creating and Formatting Arrays” on page 72) or the bcadm program (see “Creating New
Arrays: bcadm --create” on page 130).
• Swap in a copy of the boot array: In RAIDConsole, a copy of your boot array can be made by mirroring
the array and then splitting it; by default, it is hidden from the operating system. If the system were to lose
the boot array, the BIOS Configuration utility can be used to unhide the copy and swap it into the first
position in the Arrays list.
• Initialize a new disk: When a new disk is being added, it can be initialized from the BIOS.
Notes:
• The first device in the Arrays list is the bootable array. The system can only boot from the first
device in the list.
• Until the BIOS loads, the LEDs are not indicative of disk connectivity.
To enter the BIOS Configuration Utility:
When booting the system, press the Ctrl + R keys when the BIOS banner is displayed. A minimum of three
seconds is available to enter the BIOS using this key combination.
UNDERSTANDING THE COLOR CODE IN THE BIOS
The following color codes are used to indicate the type or status of information displayed in the window.
White text An available option or informational text.
Yellow highlighting The current option on which you may choose to take action
Green text The item has been selected.
Light blue text The item is not available for selection.
Yellow text Informational text, describing an option
Magenta text Spare options and boot options
Red text A failed drive or other warning to the user. For example,
informational text may be red if the option is not available.
Page 50 Using the BIOS Configuration Utility Document BC4000-UM100-R
Broadcom Corporation
Page 65

User Manual BC4000 Series RAID Controllers
02/13/06
INITIALIZING DISKS FROM THE BIOS
Before using new disks, they must be initialized, and at least the boot array must be created using RAIDCore
BIOS Array Configuration utility. Initialization writes the RAIDCore configuration information to disk. This process
is the same whether you have one controller or multiple controllers. The BIOS utility can be used to create and
manage arrays so that an operating system can be installed on an array. The system is then booted from this
array.
Notes:
• No changes are necessary in the motherboard CMOS setup for the resources or drive types.
Because RAIDCore BC4000 Series RAID controllers are PCI Plug and Play (PnP) devices, the
interrupt and port address resources are automatically assigned by the PCI PnP BIOS of the
motherboard.
• If you want to boot from the RAIDCore BC4000 Series RAID controller drive array and continue
to use the hard drives attached to your IDE controller on the motherboard, refer to the
motherboard manual for the specific BIOS settings to use to establish the proper boot order.
• When you highlight a disk from the Disk list, the LEDs on the controller or a properly cabled disk
enclosure light up to identify that disk.
• If you want to boot from another controller within your system, you may need to disable INT13
installation in the BIOS (see “Changing Controller Options From the BIOS” on page 58).
• See “Understanding the Color Code in the BIOS” on page 50.
To initialize disks from the BIOS:
1. Turn on your computer to start booting.
2. When prompted, press the Ctrl + R keys to access the RAIDCore BIOS Array Configuration utility.
The RAIDCore Array Configuration menu is displayed (see “Understanding the Color Code in the BIOS” on
page 50).
Note: If the BIOS is not displayed, contact Broadcom support (see page 1).
3. Use the arrow keys to select Initialize Disk(s) from the Main menu.
4. Press Enter.
5. Use the arrow keys to highlight a disk, and then press the Insert key to select the disk or choose all selectable
disks by pressing the A key.
Note: Multiple disks can be selected; there is no need to initialize one disk at a time.
Document BC4000-UM100-R Initializing Disks from the BIOS Page 51
Broadcom Corporation
Page 66
BC4000 Series RAID Controllers User Manual
02/13/06
6. Press Enter to initialize the selected disks.
7. Press the C key to continue with initialization.
Initialization takes 10–15 seconds per disk. A status indicator shows which disk is being initialized. When the initialization is
complete, the status indicator goes away and a complete rescan of all channels is done automatically.
Caution! If a disk has a RAIDCore array on it, you cannot select the disk. If you want to initialize this
disk anyway, you must first delete the array. Be sure this is what you want to do because
on the disk will be lost
.
the data
CREATING ARRAYS FROM THE BIOS
After your disks are initialized, you can create arrays. You can create a maximum of eight arrays from the
BIOS. See “Understanding Arrays” on page 2 if you have not yet decided what type of arrays you need.
Notes:
• In some circumstances, more than eight arrays are possible and may appear to function properly,
but are not supported by Broadcom.
• For redundant arrays, the creation process does not complete until after the operating system and
controller drivers have been installed and you have booted into the operating system context.
However, the arrays are immediately available to use for either a boot or data array.
• Array numbers are valid only for a given boot, and may be different in the BIOS and drivers. If a
permanent label is required, use the labeling feature.
• When you highlight a disk from the Disk list, the LEDs on the controller or a properly cabled disk
enclosure light up to identify that disk.
• At any point in the following procedure, you can return to a prior window by pressing Esc.
See “Understanding the Color Code in the BIOS” on page 50.
To create an array:
1. From the main menu of the Array Configuration window, select Create Array using the arrow keys, and then
press Enter.
2. Select the disks on which to create the array by doing the following:
a. Highlight the disk using the arrow keys.
b. For each disk, press the Insert key to select the disk. You can insert the disks in the order of your choice.
c. After selecting the disks to be included in the array, press Enter.
3. In the User Input area, select an array type with the arrow keys, and then press Enter. Only array types that
can be created with the selected disks are available.
4. If spares are applicable:
a. In the User Input area, highlight a spare type using the arrow keys.
b. In the Disks area, highlight the disk(s) to use as a spare and press Insert to select them.
c. Press Enter to add the spare disk(s).
Page 52 Creating Arrays from the BIOS Document BC4000-UM100-R
Broadcom Corporation
Page 67
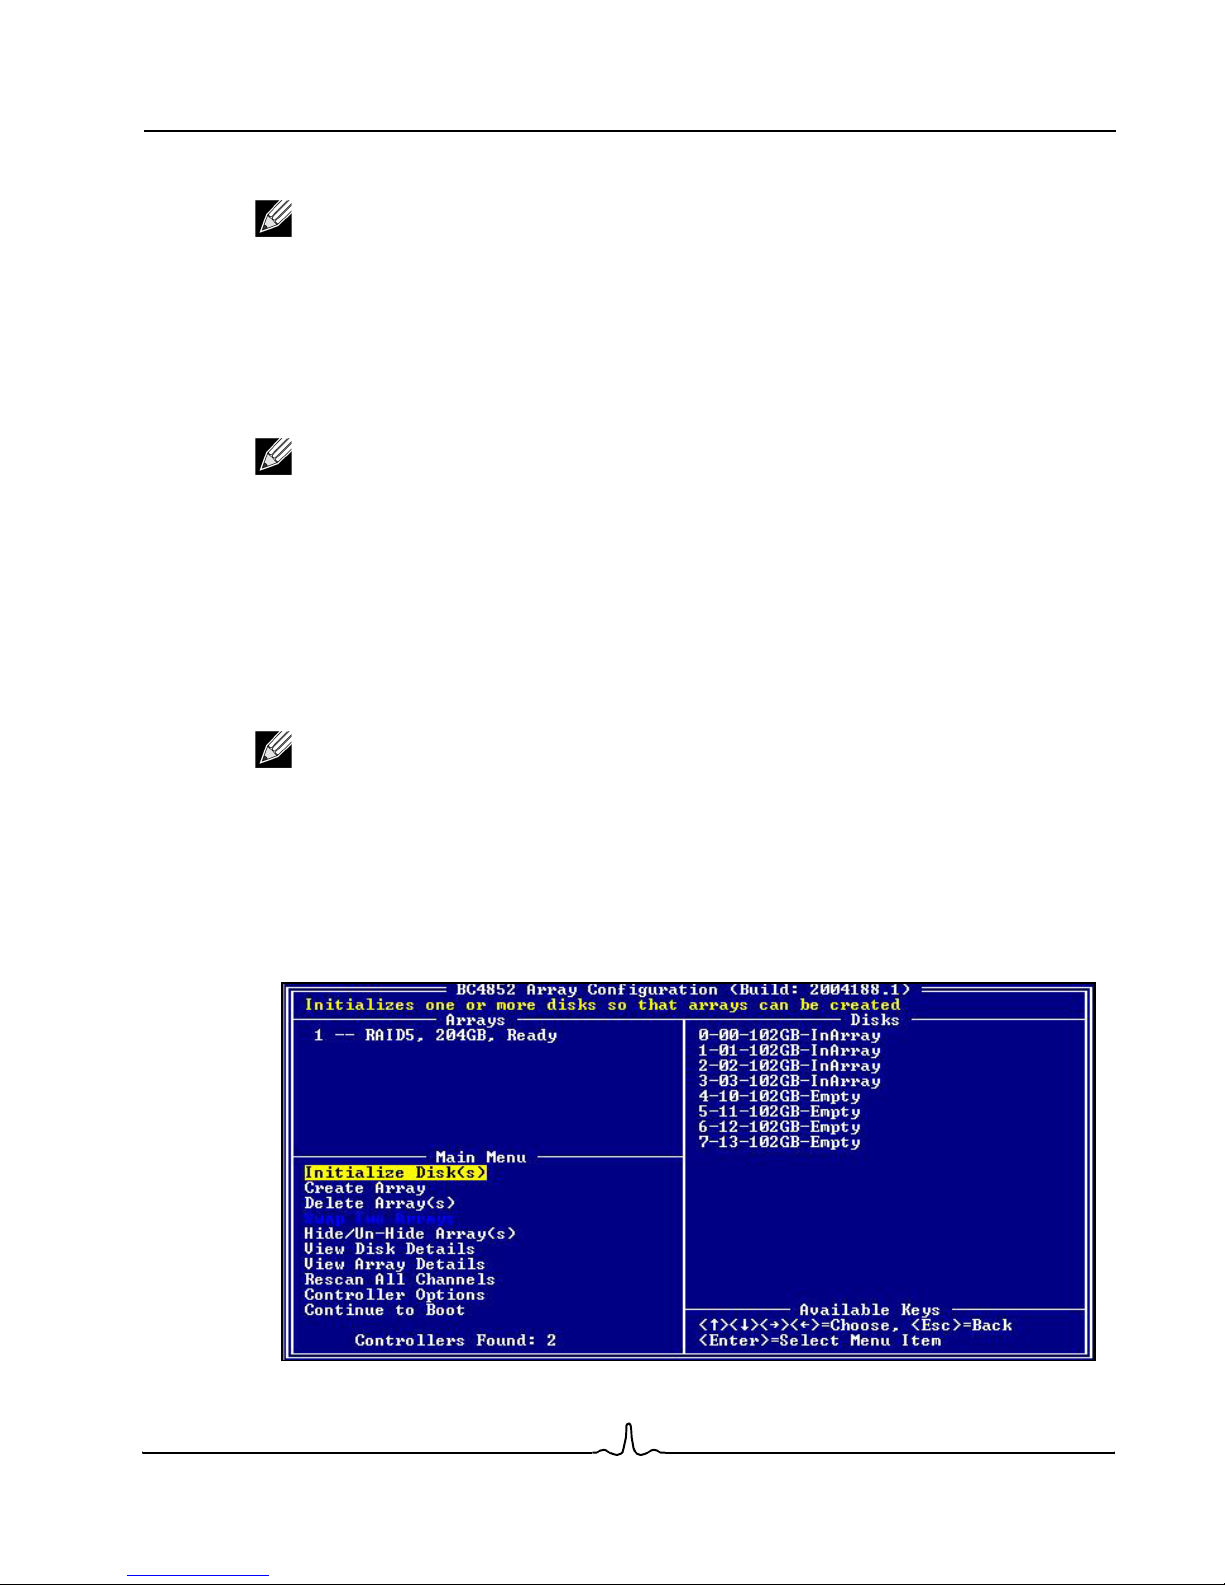
User Manual BC4000 Series RAID Controllers
02/13/06
5. To select an array size, do one of the following.
Note: Use the Page Up and Page Down keys to increase or decrease the array size in large
increments, and use the Up Arrow and Down Arrow keys to increase or decrease the array size in
small increments.
• Use the Page Up/Page Down keys or the arrow keys to select a size, and then press Enter.
By default all available space up to 2.199 TB is selected.
Or
• Create an array that is greater than 2.199 TB (the maximum allowed by some operating systems).
Note: Some versions of the Windows operating system, such as Windows 2000 and 32-bit XP, do
not support arrays larger than 2 TB. See “Creating and Formatting Arrays” on page 72
a. Press Page Up or the Up Arrow to increase the array size. You are asked if you want to limit the size of
the array to the 2-TB maximum.
b. Press Esc to create a larger array.
c. Press Page Up or the Up Arrow until you have reached either the desired or the maximum available size.
d. Press Enter.
6. Select a caching mode using the arrow keys, and then press Enter.
7. Press the C key to continue the array creation process.
Note: For installations of SuSE Linux, a pop-up appears that says, “A new device was found, do you
want to configure it?” If you do not want to see this pop-up when you create arrays, you can click the
“Do not notify me” option.
8. The array is marked Ready for use, and the text at the top of Array Configuration returns to a description of
the menu items.
9. When you are finished creating arrays, resume the boot process by doing the following:
a. From the Main menu, highlight Continue to Boot.
b. Press Enter. No reboot is required.
In the example above, a 4-drive RAID5 array has been configured.
Document BC4000-UM100-R Creating Arrays from the BIOS Page 53
Broadcom Corporation
Page 68

BC4000 Series RAID Controllers User Manual
02/13/06
DELETING ARRAYS FROM THE BIOS
This option allows you to delete arrays.
Caution! Deleting an array permanently destroys all data that was on the array. This action cannot
be undone, and all data will be lost.
To Delete an Array:
1. Highlight Delete Array(s) from the Main menu and press Enter.
2. Do one of the following:
• Highlight each array to delete and press Insert to select it.
Or
• Type A to select all arrays for deletion.
3. Press Enter.
4. Press C to continue.
Page 54 Deleting Arrays from the BIOS Document BC4000-UM100-R
Broadcom Corporation
Page 69

User Manual BC4000 Series RAID Controllers
02/13/06
SWAPPING ARRAYS FROM THE BIOS
Using the Swap Two Arrays option, you can reorder arrays.
Notes:
• If you create more than one array, you can install the operating system to any of them. However,
a small amount of boot information is always written to a disk in the first array on your array list
regardless of which array you install the operating system on. If anything happens to that disk in
Array 1, you will not be able to boot. Broadcom recommends installing on a redundant array
type—such as RAID1 or RAID5—and then swapping that array into the first position if it is not
already Array 1.
• This swap feature is
To swap arrays:
1. Highlight Swap Two Arrays in the Main menu, and then press Enter.
2. Use the arrow keys to highlight an array, and then press Insert to select it.
3. Use the arrow keys to highlight another array, and then press Insert to select it.
4. Press Enter to swap the arrays.
only
available from the BIOS.
In this example, the RAID10 array was the first array created. However, to boot from the RAID5 array, the
arrays were swapped so that the RAID5 array is the first device listed.
Document BC4000-UM100-R Swapping Arrays from the BIOS Page 55
Broadcom Corporation
Page 70

BC4000 Series RAID Controllers User Manual
02/13/06
HIDING OR UNHIDING ARRAYS FROM THE BIOS
The Hide/Un-Hide array option allows you to hide or unhide an array or arrays from the operating system. If
an array is hidden, it will not be visible through INT13 or to the operating system when booted. This is a useful
feature for hiding hot backups of the system.
Note: A legacy array cannot be hidden from the BIOS. A legacy array can be hidden from the
operating system (using RAIDConsole or bcadm), as long as the system is not booted off the legacy
array and another non-legacy disk is attached to the controller.
To hide or unhide an array:
1. Select the Hide/Un-Hide option.
2. Use the arrow keys to highlight the array to be hidden or unhidden.
3. Press the Insert to select an array.
4. Press Enter to commit the selection.
The hidden array turns blue in the BIOS Configuration Utility, and the status of the array displays as Hidden.
VIEWING DISK DETAILS FROM THE BIOS
This option allows you to view details about the disk. When you highlight a disk from the Disk list, the LEDs on
the controller or a properly cabled disk enclosure light up to identify that disk.
Nothing can be changed from this menu option. It is for information only.
To view disk details:
1. From the Main menu, select View Disk Details.
2. Use the arrow keys to choose a disk.
Information about the disk is displayed in the Information field across the top, and includes the following data:
• Disk Number
• Controller Number
• Channel Number
• Disk Size
• New/Legacy/Empty/InArray
• Free Space
• Disk Model Number
Page 56 Hiding or Unhiding Arrays from the BIOS Document BC4000-UM100-R
Broadcom Corporation
Page 71

User Manual BC4000 Series RAID Controllers
02/13/06
VIEWING ARRAY DETAILS FROM THE BIOS
This option allows the details of the array to be viewed. Nothing can be changed from this menu option. It is
for information only.
To view array details:
1. From the Main menu, select View Array Details.
2. Use the arrow keys to choose an array.
Information about the array is displayed in the Information field across the top, and includes the following data:
• Array Number
• Ty p e
• Size
• State
• Name
• Cache setting
• DOS size
Note: The Disks list shows the disks in the array as selected (green).
RESCANNING ALL CHANNELS FROM THE BIOS
This option allows you to rescan all channels to detect new or removed disks and arrays.
To perform a rescan, select Rescan All Channels from the Main menu. The activity indicator in the
Information field spins while the disks are being polled.
The Rescan All Channels option rescans all the channels, searching for new or removed disks, and rereads
the configuration information from each disk. Sometimes when a disk is offline, it can be brought online through
a rescan. Rescan also stops and then automatically resumes all tasks.
Document BC4000-UM100-R Viewing Array Details from the BIOS Page 57
Broadcom Corporation
Page 72

BC4000 Series RAID Controllers User Manual
02/13/06
CHANGING CONTROLLER OPTIONS FROM THE BIOS
Selecting Controller Options allows you to configure whether RAIDCore arrays may be bootable, as well as
other aspects of the boot process. The default is to configure an array so that an operating system can boot
from the RAIDCore BC4000 Series RAID controller. If an error occurs, an error message is displayed.
However, you may be booting from the motherboard IDE or another SCSI device in your system. If this is the
case, you should not install INT13 (without INT13, DOS cannot see the array).
Note: If you configure Boot Mode to install INT13 and to never display an error message, you will
not know during the boot process if an array is degraded or if other problems have occurred.
One symptom of having too much memory claimed by the option ROMs is a blank screen with the
message “Couldn't initialize memory” in the top left hand corner. No additional information is given.
This message is coming from the NT Boot Loader, which requires 512 KB of memory free below
640 K.
This menu also sets whether you want the boot process to pause when an error occurs. When the Pause
feature is enabled and an array goes critical or offline, or there is a controller configuration error, the boot
process stops, and you must press Enter to continue booting. This gives you time to view the error message
on the window. If the Pause feature is disabled, the error message is displayed briefly, but the system
continues to boot.
To select a boot option:
1. From the Main menu, select Controller Options.
The Controller Options area is displayed in the BIOS Array Configuration utility window as shown below. The
current settings display in magenta text above the white selectable options.
2. Use the arrow keys to select a boot option.
Note: By default, all options are turned on. Broadcom recommends that you leave them enabled.
Page 58 Changing Controller Options From the BIOS Document BC4000-UM100-R
Broadcom Corporation
Page 73

User Manual BC4000 Series RAID Controllers
02/13/06
3. Do one of the following:
• If you do not want to boot from an array, highlight Toggle INT13 Installation using the arrow keys, and
then press Enter to change the setting to Disabled. (Broadcom recommends disabling INT13 only if you
want to boot from another device and leaving the rest of the options enabled.)
Or
• To turn off warnings due to critical arrays when booting, highlight Toggle Pause if Critical, and then press
Enter to change the setting to Disabled.
Or
• To turn off warnings due to offline arrays when booting, highlight Toggle Pause if Offline, and then press
Enter to change the setting to Disabled.
Or
• To turn off warnings due to controller configuration errors when booting, highlight Toggle Pause if Error,
and then press Enter to change the setting to Disabled (these warnings include errors generated when
the license key is not found or is corrupted, or when the license level does not match on all controllers in
the system and the lowest level found is used).
Or
• To allow the BC4000 Series RAID controller to work with newer Linux kernels that load the libata driver,
highlight Toggle Legacy Board ID, and then press Enter to change the setting to Disabled.
When the libata driver is loaded by these newer Linux kernels, beginning with some errata kernels for
Fedora Core 2 and all kernels for Fedora Core 3, the BC4000 Series RAID controller is recognized as a
simple SATA controller and is taken over by the operating system. This makes it impossible to be used as
a RAID controller. If this problem occurs on your system, any previously created arrays do not appear as
arrays, but only as a group of individual disks.
By turning off the “legacy” ID used by all BC4000 Series RAID controllers, the newer Linux kernels can
recognize the BC445X or BC485X controller as a RAID controller, provided that a RAIDCore driver that is
version 1.4 or later is used (drivers that are version 1.3 or earlier will not be able to recognize the RAIDCore
controller). All Linux systems will work properly with the legacy board ID disabled. It can be enabled and
disabled as needed, so if you encounter any problems after disabling the legacy ID, it can be re-enabled
to get back to a working system.
Note: If the system has a BC4000 Series RAID controller board with legacy board ID disabled and
another board with legacy board ID enabled is added, the system may experience unpredictable
behavior due to the mismatch in legacy board ID settings. To clear this condition, go to the Toggle
Legacy Board ID option and change it. This changes the ID on all the boards. Depending on how
you want this option set, you may have to set it once (triggering an automatic reboot), and then
change it back to the setting you want (triggering a second reboot).
Or
• To limit the number of disks that can spin up at the same time, reducing power demands by the system,
highlight Set Staggered Spinup Count, and then press Enter. Using the arrow keys, specify the number
of disks that should be allowed to simultaneously spin up, and then press Enter again.
CONTINUE BOOTING FROM THE BIOS
After you have created arrays, you can continue booting the system from the point where the RAIDCore BIOS
was entered. To resume the boot, highlight Continue to Boot in the Main menu, and then press Enter. No
reboot is required.
Broadcom Corporation
Document BC4000-UM100-R Continue Booting from the BIOS Page 59
Page 74
BC4000 Series RAID Controllers User Manual
02/13/06
Section 8: Using RAIDConsole
STARTING THE RAIDCONSOLE MANAGEMENT APPLICATION
To start RAIDConsole under Windows:
Click Start, and then click the RAIDConsole icon.
To start RAIDConsole under Linux:
Open a command prompt and type /usr/bin/bc_winraid.
For most Linux systems, this starts RAIDConsole and also starts the bc_service application that logs events
in the system. It also starts the bcapiservice application that enables remote management.
If either or both of these applications do
next time (or, alternatively, stop them and keep them from autostarting next time) by changing to the /etc/init.d/
directory from a console window and typing the following:
• For bc_service: ./bcserviced star t | stop
• For bcapiservice: ./bcapid start | stop
In addition, if you want a pop-up message to appear on the desktop when an event is detected by bc_service
and reported to the log, the bcpopup application should be run. Open a command prompt and type
/usr/bin/bcpopup &.
not
autostart, you can start them manually and have them autostart
Fedora Core 4 Users Only:
For some versions of Fedora Core 4, the default SELinux settings prevent REALbasic from running properly
and launching RAIDConsole. You can fix this problem by disabling SELinux or by changing the policy from
Enforcing to Permissive.
1. Open the Security Level Configuration window by clicking Desktop from the Menu bar, then System
Settings, and finally Security Level.
2. Select the SELinux tab.
Page 60 Using RAIDConsole Document BC4000-UM100-R
Broadcom Corporation
Page 75
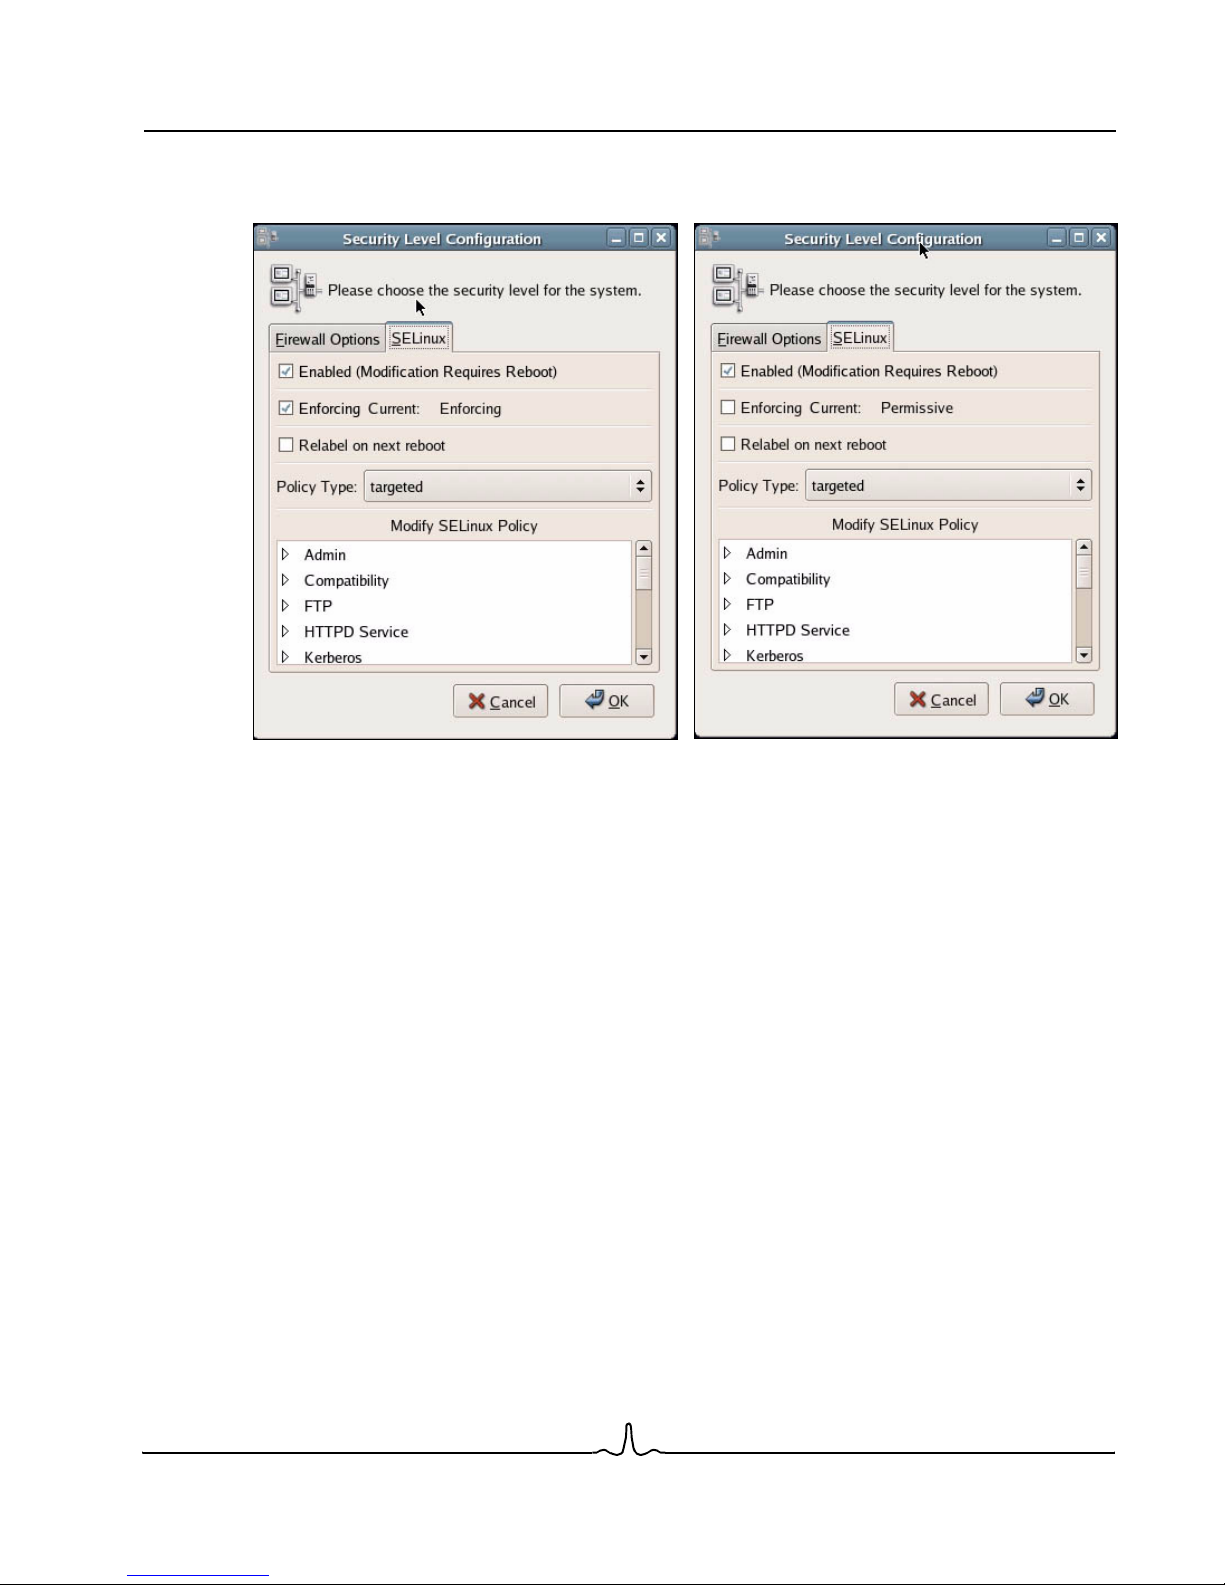
User Manual BC4000 Series RAID Controllers
02/13/06
3. Either disable SELinux by deselecting the first option or change the policy from Enforcing to Permissive using
the second option.
When RAIDConsole starts, the First Time Run window opens asking whether password protection for the
application is needed. See “Using Password Protection” on page 62
for information and instructions.
Document BC4000-UM100-R Starting the RAIDConsole Management Application Page 61
Broadcom Corporation
Page 76

BC4000 Series RAID Controllers User Manual
02/13/06
USING PASSWORD PROTECTION
Broadcom strongly recommends that the RAIDConsole management application be protected by a password
since misuse of the application could easily result in destroyed data. You have the opportunity to either enable
or disable password protection for the application the first time you start it, when First Time Run is displayed
as shown below. If you choose not to protect the application with a password at this time, you can do it later
from the Options menu.
Notes:
• If you forget your password, you will not be able to run the application. Select a password that you
will remember.
• The password must be at least six characters long.
• The password is case-sensitive.
• Four chances to enter the password correctly are given. If you fail to type the password correctly,
the application closes after the fourth try. To try again, reopen the application.
• The application does not keep track of passwords that have been previously used.
• To change an existing password, see “Changing Your Password Settings” on page 102.
To set Password Protection from First Time Run:
1. Type a password in the Password box.
2. Confirm the password by typing it again in the Confirm box.
3. Click Continue.
The Array Status window opens.
Broadcom Corporation
Page 62 Using Password Protection Document BC4000-UM100-R
Page 77

User Manual BC4000 Series RAID Controllers
02/13/06
To disable Password Protection from First Time Run:
1. Select Disable Password Protection.
2. Click Continue.
The Array Status window opens.
To set Password Protection later from the Options menu:
1. On the Options menu, select Password.
2. Check Enable Password Protection.
3. Type a password.
4. Confirm the password by typing it again.
5. Click OK.
Document BC4000-UM100-R Using Password Protection Page 63
Broadcom Corporation
Page 78

BC4000 Series RAID Controllers User Manual
02/13/06
USING THE HELP MENU
The Help menu on the Array Status window provides access to the following:
• The web-based online help system (click Contents & Index)
• A link to the Broadcom website (click http://www.raidcore.com)
• Version and license information (click About)
Version information is provided for the RAIDCore miniport driver (bcraid.sys), the configuration driver
(bccfg.sys), the array maintenance service (bc_service), the remote management service (bcapiservice),
RAIDConsole (bc_winraid), the pop-up message utility (bcpopup), and the dynamic link library (bc_vbdll.dll).
If you need a copy of the version or license information, click Copy to Clipboard, and then paste the
information into a text editor such as Notepad. This also captures the serial numbers of the disk drives in the
system, which are listed by the designation Disk
Page 64 Using the Help Menu Document BC4000-UM100-R
x:y
, where x is the controller number and y is the port number.
Broadcom Corporation
Page 79

User Manual BC4000 Series RAID Controllers
02/13/06
REVIEWING THE INTERFACE
THE ARRAY STATUS WINDOW
The Array Status window is the main RAIDConsole window. From here, you can view configuration
information such as physical disk status, logical array status, and task information. It also provides the main
function menus for managing arrays.
As shown on Figure 6, the Array Status window includes an Array View area, a Disk List area, an Array List
area, an optional Event View area, and an I/O Status bar.
Disk List Elements
Array View
Area
Disk List Area
Array List Elements
Array List Area
Event View Area
Figure 6: The Array Status Window
I/O Status Bar
Document BC4000-UM100-R Reviewing the Interface Pag e 65
Broadcom Corporation
Page 80
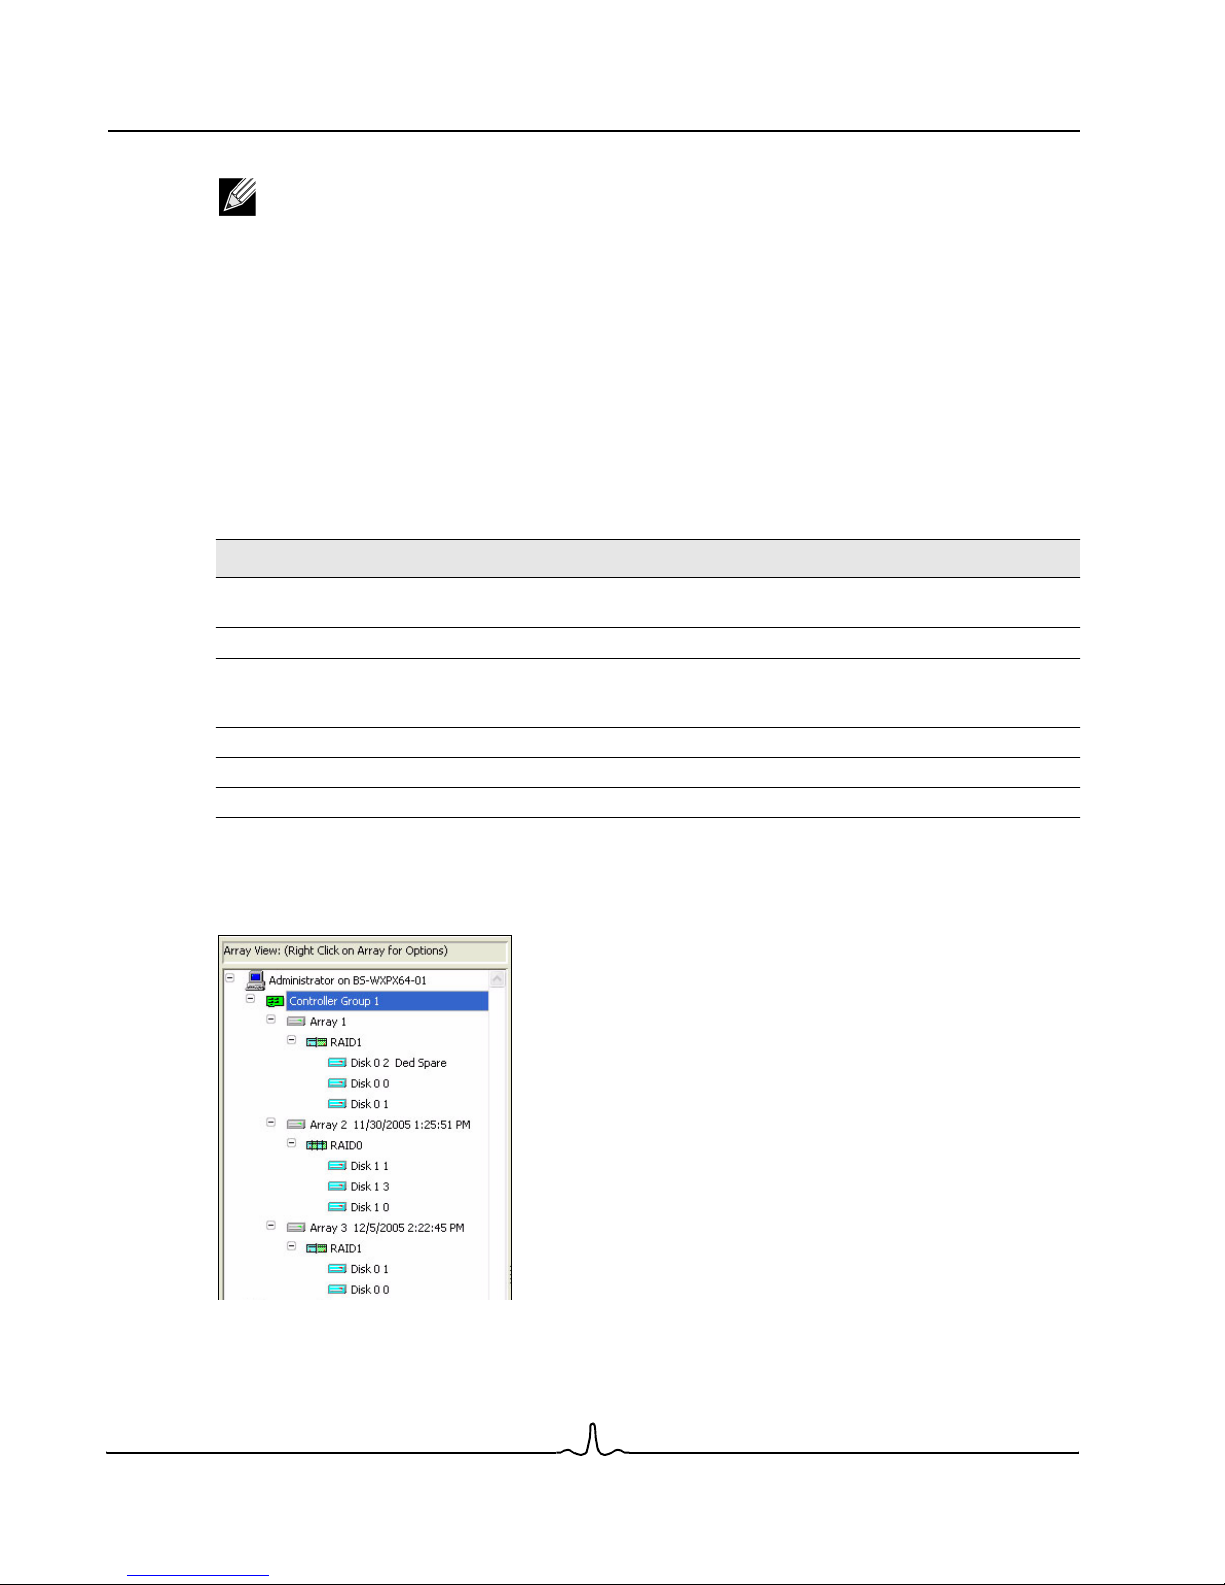
BC4000 Series RAID Controllers User Manual
02/13/06
Notes:
• Certain languages do not display correctly in the Array View area. The source of this problem is
not within RAIDConsole itself. English, other English variants, and many other languages do
display properly. If desired, set the regional language to English or another language within the
Control Panel.
• To refresh the array and disk information displayed in the Array Status window, click File, and
then click Refresh. This command rereads configuration information from the driver, but does not
poll the disks.
ARRAY VIEW ELEMENTS
The Array View area of the Array Status window shows a graphical view of array properties during and after
the creation of the array.
Property Description
Array
Array name
Task Percent Complete
and ETA
Task type
Source array
Destination array
The icons in the Array View area reflect the type of array (RAID0, RAID1, etc.) and which controller it appears
on. An example configuration of icons is shown below.
The array number assigned to created or
creating arrays
The name assigned to an array
The progress of a current array task, such as a create or transform, shown
as percent complete and estimated time left to completion
(
hours:minutes:seconds
The nature of a current task, such as a create or transform
The original array to be transformed
The array being transformed or restored to
).
Page 66 Reviewing the Interface Document BC4000-UM100-R
Broadcom Corporation
Page 81
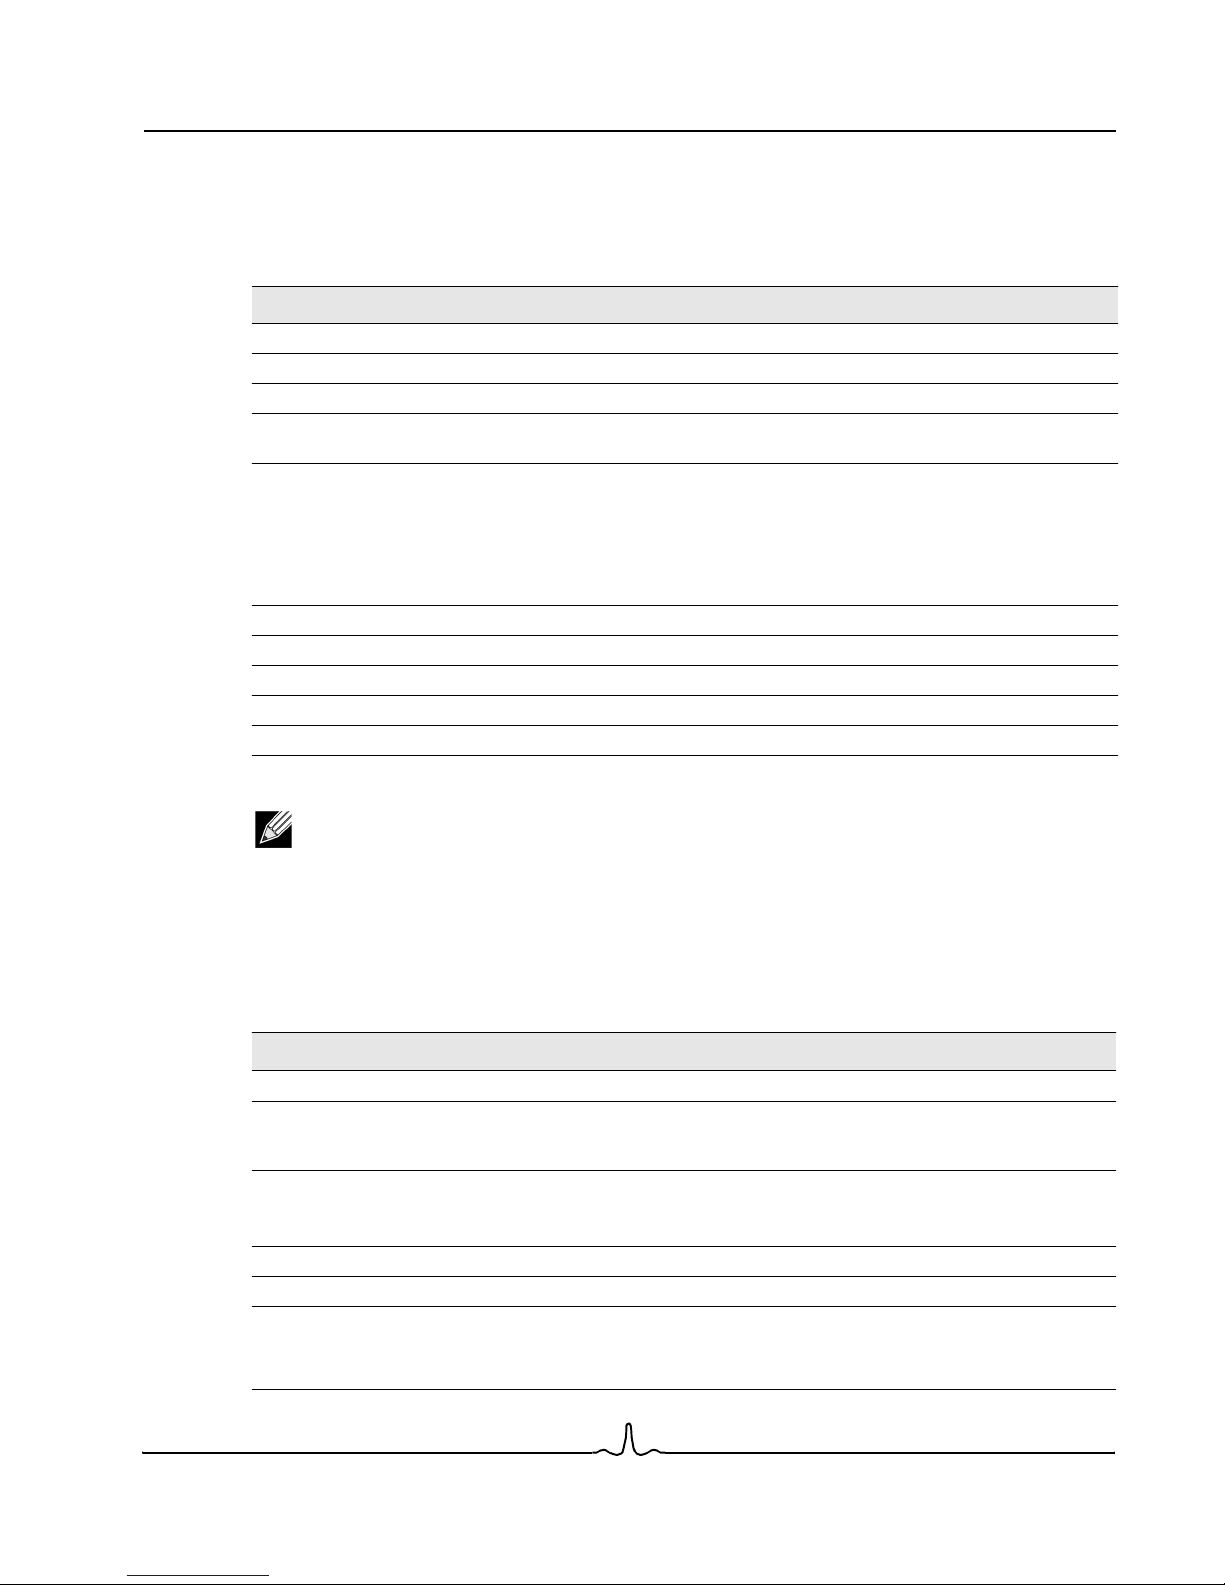
User Manual BC4000 Series RAID Controllers
02/13/06
DISK LIST ELEMENTS
The Disk List area of the Array Status window provides information about all disks assigned or available to
arrays.
Item Description
Ctrl Chan
State
Type
Port Type
Capacity
Free Space
Largest Free
GS
Model Number
Firmware Revision
Disk controller and channel number
State of the disk (Online, Failed, Unknown)
Disk type (Disk, Legacy, New)
Type of port (SATA) and its port speed; this is the speed the controller negotiates,
not the speed of the port type.
Disk capacity:
1 MB = 1 000 000 bytes,
1 GB = 1 000 000 000 bytes
Note:
Because the ATA storage industry has standardized the meanings of MB
as 1 000 000 bytes, and GB as 1 000 000 000 bytes, the RAIDCore software
reports the same units to avoid confusion.
Total amount of space unused on the disk
Largest contiguous amount of unused space on the disk
Indicates if disk is assigned as a global spare
Disk manufacturer’s model number
Disk manufacturer's firmware version
Note: If there are any disk drives missing from the Disk List, the most likely cause is a loose cable.
Ensure that all disk cables are connected and then rescan the disks. For more information, see
“Rescanning Disks” on page 69.
ARRAY LIST ELEMENTS
The Array List area of the Array Status window provides information about each array.
Item Description
Device
O.S. Name
Partition
(Mount Point
under Linux)
Array Name
Type
Total Capacity
The array number
Name assigned by the operating system to the array. The name appears as Hidden if the
array is hidden from the operating system. The name appears as NONE if the array is
offline.
Drive letter or letters that have been assigned to this array.
Note:
If you create a dynamic volume on an array, RAIDConsole cannot retrieve the
drive letter of the volume.
User-supplied name for the array
RAID type
Total capacity:
• 1 MB = 1 000 000 bytes
• 1 GB = 1 000 000 000 bytes
Document BC4000-UM100-R Reviewing the Interface Pag e 67
Broadcom Corporation
Page 82

BC4000 Series RAID Controllers User Manual
02/13/06
Item Description
State
Task
Task State
Pri
Scan
Cache
Dst Spare
Ded Spare
State of the array (NORMAL, CRITICAL, OFFLINE)
Task type if in progress (CREATE, TRANSFORM, COPY, CHECK, CHECK_BITMAP,
ZERO, NOT_ACTIVE, RESTORE)
The state of the task (STARTED, PAUSED, COMPLETED); the progress of the task is
given in the Array View area.
Task priority if a task is in progress.
Background Array Scan enabled? (Yes/No)
Current cache setting (NC=No Cache, R=Read Cache, W=Write-Back Cache,
RW=Read/Write Cache)
Indicates whether the distributed spare option is being used
Indicates the number of dedicated spares assigned to the array
I/O STATUS BAR ELEMENTS
The I/O Status bar in the Array Status window provides I/O information.
I/O Status Bar
Item
Host x.x MB/s
Disk x.x MB/s
Host x I/Os
Disk x I/Os
Host Queue
Disk Queue
Dirty
Host
Disk
I/O Information
Host traffic in MegaBytes per second
Disk traffic in MegaBytes per second
Host I/Os per second
Disk I/Os per second
Number of Host I/O requests currently in progress
Number of Disk I/O requests currently in progress
Number of dirty cache buffers if write caching has been enabled (or the number of
buffers not actually written out to the drives). This is informational only and not an error
condition.
Total amount of data transferred to or from the host since last boot
Total amount of data transferred to or from the disks since last boot
Note: The I/O status indicators are approximate in nature especially when the system is undergoing
heavy I/O traffic.
Page 68 Reviewing the Interface Document BC4000-UM100-R
Broadcom Corporation
Page 83

User Manual BC4000 Series RAID Controllers
02/13/06
WORKING WITH DISKS
INITIALIZING DISKS
When you initialize disks, the RAIDCore configuration information is written to those disks. If the disks are new
and you have not used them before, you must initialize them before you can use the disks in RAIDCore arrays.
After a disk is initialized, it shows as a “Disk” type in the Disk List.
Caution! Normally, you should not attempt to initialize disks that are part of an array, but it is possible
to do so unless the disk is part of the boot array.
To initialize disks:
1. From the Disk menu, select Initialize.
Initialize Disk is displayed.
2. Select the disk(s) to be initialized by clicking the check box(es) next to the disk(s).
3. Click Initialize Selected.
RESCANNING DISKS
The Rescan Disks option rescans all channels searching for new or removed disks and rereads the
configuration information from each disk. Sometimes when a disk is offline, it can be brought online through a
rescan. Rescan also stops and then automatically resumes all tasks.
To rescan disks, from the Disk menu, select Rescan.
CHANGING CACHE SETTINGS FOR DISKS
If the disks support this option, read ahead and write cache properties can be changed. The default settings
are to have read ahead and write-back caching enabled.
Caution! Leaving write-back caching enabled may increase the likelihood of data being corrupted
in the event that your system experiences a power interruption or unexpected shutdown.
Note: You cannot change the disk cache settings if any tasks are active on arrays. The option is
enabled when the tasks complete.
Document BC4000-UM100-R Working with Disks Page 69
Broadcom Corporation
Page 84

BC4000 Series RAID Controllers User Manual
02/13/06
To change disk caching properties:
1. From the Disk menu, select Properties.
2. Select the disks.
3. Under Disk Properties, click Enable or Disable for the Disk Write Back Caching and Disk Read Ahead
settings.
4. Click Exit.
CHANGING DISK VIEW SETTINGS
To change the disk view, on the View menu click either Disk List View or Physical View.
The Disk List View is a view of the disks in a list format (as described in “Disk List Elements” on page 67). It
is the default view. While in this view, you can:
• Right-click on a disk in the Ctrl Chan column to add or remove a dedicated or global spare.
• View information such as disk capacity and amount of free space, which do not display in the physical
view.
The Physical View is a graphical representation of the disks and their status. A default picture is provided, but
you can insert your own image in the JPEG (*.jpg) format and edit it to match the configuration of your disks.
Page 70 Working with Disks Document BC4000-UM100-R
Broadcom Corporation
Page 85

User Manual BC4000 Series RAID Controllers
02/13/06
An example Physical View is shown below with the default *.jpg image supplied with the application.
If a new controller is added to the system, the physical view must be edited; the disk information in this view is
not updated automatically. While in the Physical View, the following operations are possible:
• Right-click on a disk-identifying box to assign it as a dedicated spare (if available), or to assign it as a
global spare.
• Right-click on a disk-identifying box to use LEDs to identify that disk on a controller or in an enclosure.
• See disk status as conveyed by the font color and background color of the disk-identifying boxes.
• Use Edit Physical View on the Options menu to add your own *.jpg file, to show or hide a disk in the
view, and to change the positions of the disk identifying boxes to match the configuration of your actual
disks in their enclosure(s).
Document BC4000-UM100-R Working with Disks Page 71
Broadcom Corporation
Page 86

BC4000 Series RAID Controllers User Manual
02/13/06
USING LEDS TO IDENTIFY DISKS
The Identify Disk option can be used within RAIDConsole to physically identify a disk. By selecting a disk
within RAIDConsole and using this feature, you can cause the LED on the controller or a disk enclosure to blink
for that disk. If you have a failed disk, this feature can be used to physically identify which disk in the enclosure
has failed.
Note: If the LED cables between a disk enclosure and the controller are not properly connected, the
wrong disks may be identified.
To use LEDs to identify a disk:
1. In the Disk List area, right-click the disk that you want to identify.
2. When the Options window is displayed, click Identify Disk using LEDs, and then click OK.
When the Identify window is displayed, the LED for that disk begins to blink.
3. To stop the LEDs from blinking, click Stop Identify.
WORKING WITH ARRAYS
CREATING AND FORMATTING ARRAYS
Unlike many RAID controllers, the RAIDCore BC4000 Series RAID controllers allow the partitioning and
creation of as many as eight arrays across all disks. Portions of disks can be used to create arrays while other
arrays are using different portions of the same disks, but a maximum of eight arrays can be created.
Notes:
• Creation of arrays, even redundant arrays, allows users immediate access to the arrays, unless
the zero option is used during the create.
• If the system reboots, the creation process continues where it left off.
• Array numbers are valid only for a given boot, and may be different in the BIOS and drivers. If a
permanent label is required, use the labeling feature described in “Naming Arrays” on page 83.
• In some circumstances, having more than eight arrays is possible and may appear to function
properly, but is not supported by Broadcom.
• The array size of the new array is limited to 2.199 TB on some versions of Windows and Linux.
Please refer to your OS documentation for details on maximum array sizes.
Page 72 Working with Arrays Document BC4000-UM100-R
Broadcom Corporation
Page 87

User Manual BC4000 Series RAID Controllers
02/13/06
To create an array:
1. From the Array menu, select Create.
2. In the Disk List, select the disks to include in the array by clicking the check boxes next to the desired disks.
Note: You can also click All to select all disks, or click Unused to select those disks that have yet
to be used in an array.
3. Select an array type from the Type list.
4. Enter the capacity in the Capacity field.
Notes:
• The maximum available capacity changes with the disks selected, array type, and the sparing
options chosen.
• For arrays larger than 2 TB, see “Creating Arrays Larger Than 2 TB” on page 75.
5. Select a cache option for the array. The default is Read + Write Back Cache.
6. Select whether to configure distributed and/or dedicated spares by clicking the appropriate option.
See “Working with Spares” on page 47 to determine what kind of spare or spares to assign.
7. Select whether to enable background array scanning by clicking the Background Array Scan option. See
“Scanning an Array in the Background” on page 95 for details.
8. Choose whether to skip initialization by clicking the Skip Initialization option.
Document BC4000-UM100-R Working with Arrays Page 73
Broadcom Corporation
Page 88

BC4000 Series RAID Controllers User Manual
02/13/06
Arrays can be created instantly by skipping the background consistency check usually performed when
initializing the array. For certain types of redundant arrays this is a viable option and has no data integrity
drawbacks. You can always perform a consistency check at a later time (see “Scheduling a Consistency
Check” on page 95). For RAID5 and RAID50 sets, if you skip the initialization, the arrays are not redundant
until you do perform a consistency check. Creating a RAID 5 array with this option selected and a cache option
of No Cache can in some situations result in data corruption.
9. If you lose the configuration information for an array and want to leave data that was on the disks untouched
when writing new configuration information, you can check the option to Leave Existing Data Intact.
This option can be used to try and recover user data when an array has been accidentally deleted or the
configuration information is lost but the data is still intact. When you create an array with this option enabled,
new configuration information is written while trying to use exactly the same disk space that was used before.
Generally this option is used as a last resort, and the likelihood of recovering data with this method is very low
unless performed immediately after the array was deleted and no other tasks have been performed on the
array.
10. Choose whether to use the Zero Create option, which writes the created array with zeros. If the Zero Create
option is used, the array is not immediately available.
11. Name the array, if desired.
Note: The name can be up to 30 characters long, but only 17 of those characters are displayed in
the BIOS.
12. Click Create to create the array.
In the Create window (see page 73), a 4-disk RAID0 is created.
To partition an array for use with Windows:
Use the standard operating system format procedure to format an array. If you are unfamiliar with this
procedure, use the following procedure for Windows 2003:
1. From the Desktop, right-click My Computer, and then click Manage.
2. Click Disk Management.
Page 74 Working with Arrays Document BC4000-UM100-R
Broadcom Corporation
Page 89
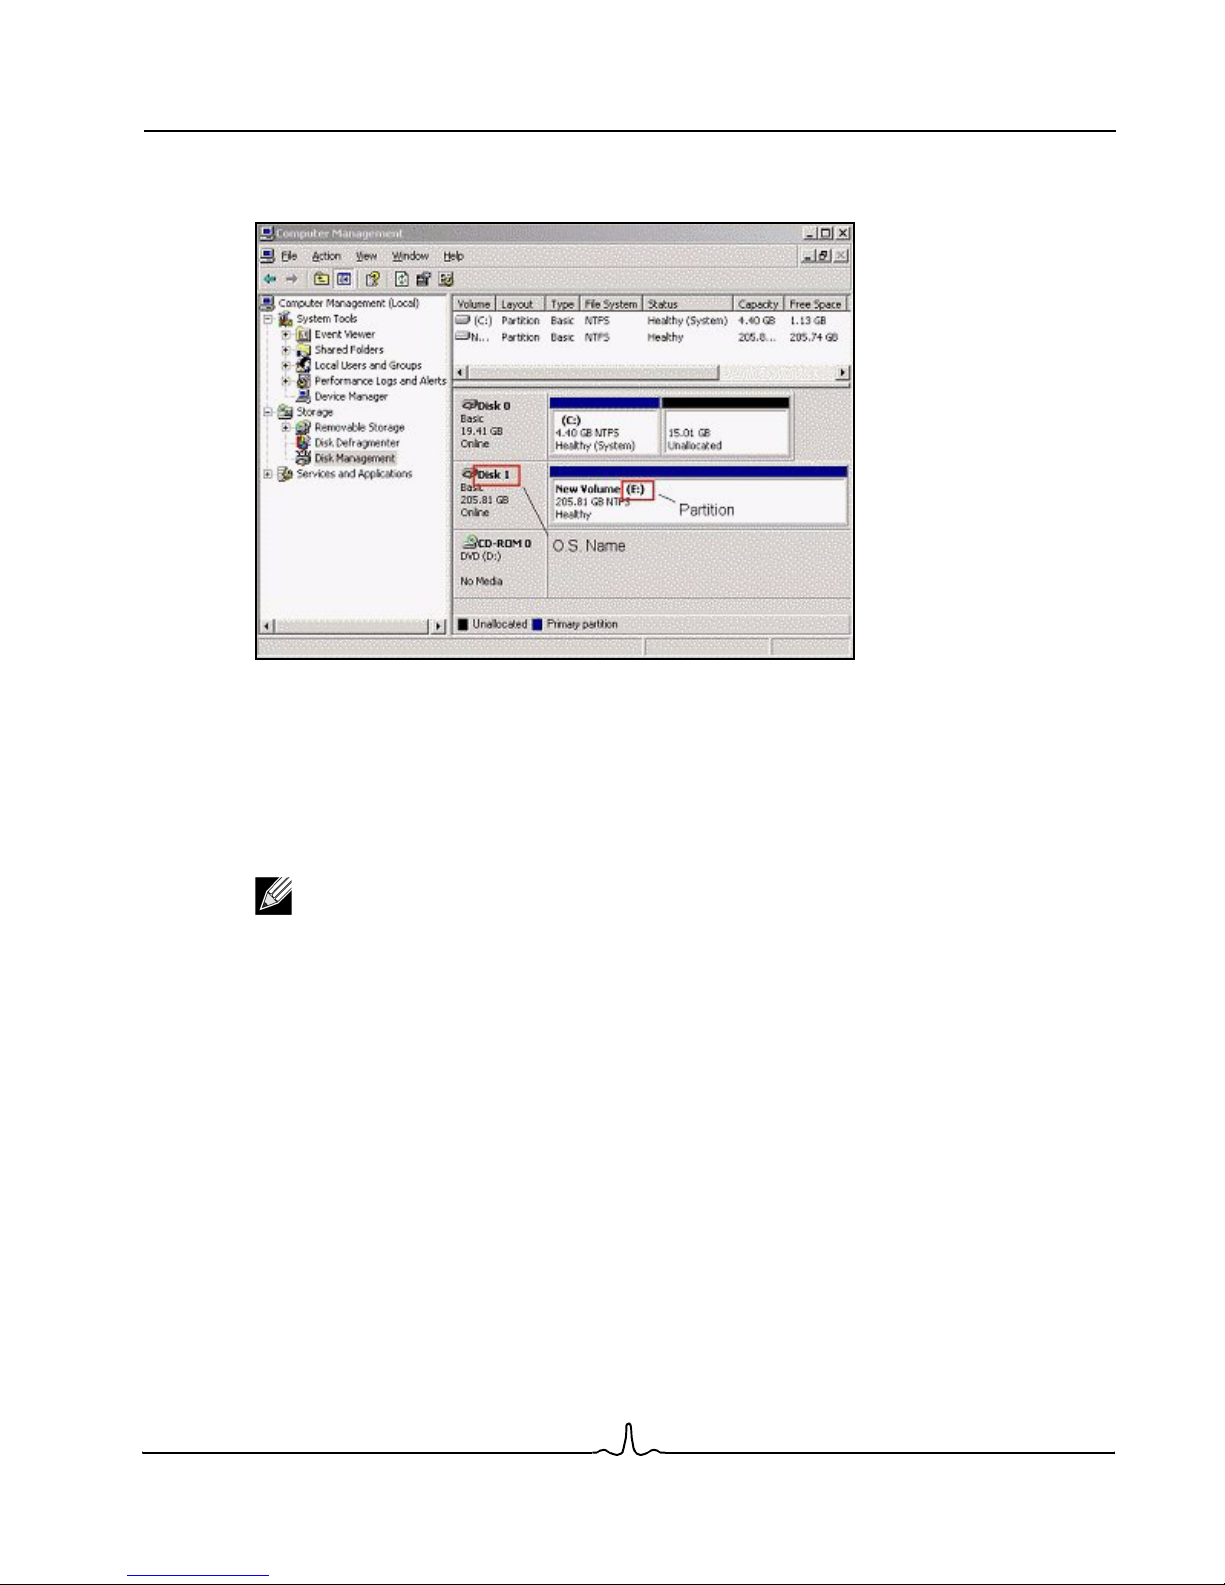
User Manual BC4000 Series RAID Controllers
02/13/06
3. Follow the instructions provided by the Write Signature and Upgrade Disk Wizard to write a signature on the
drive. When you close the wizard, the Computer Management window reappears.
The O.S. Name is the same name found in the Array Status window. This is the array that needs to be
formatted before it can be used.
To format the array:
1. Right-click in the white area surrounding the new partition, and then click Create Volume.
2. Follow the instructions provided by the Create Volume Wizard to format the disk.
Note: Expansion is easiest if the array is formatted with NTFS.
CREATING ARRAYS LARGER THAN 2 TB
In the SCSI miniport architecture, there is a limit of approximately 2 TeraBytes (TB) per array, and arrays larger
than this do not operate properly on some operating systems. Windows addresses this problem in two different
ways:
• Under Windows 2003 (with SP1) and 64-bit Windows XP: Disks greater than 2 TB are converted to the
GUID Partition Table (GPT) format, which supports very large array sizes (up to 18 ExaBytes) and has no
artificial constraints on the number of partitions. See Chapter 16 of the Extensible Firmware Interface
(EFI) specification for details on GPT disks.
• Under Windows 2000 and 32-bit Windows XP and 2003: Disks greater than 2 TB are created from
groups of smaller arrays through the use of dynamic volumes. Dynamic volumes can be striped together
using the Windows Disk Management utility to create arrays larger than 2 TB from groups of smaller
arrays.
These two cases each use a different set of procedures to create arrays larger than 2 TB.
Document BC4000-UM100-R Working with Arrays Page 75
Broadcom Corporation
Page 90
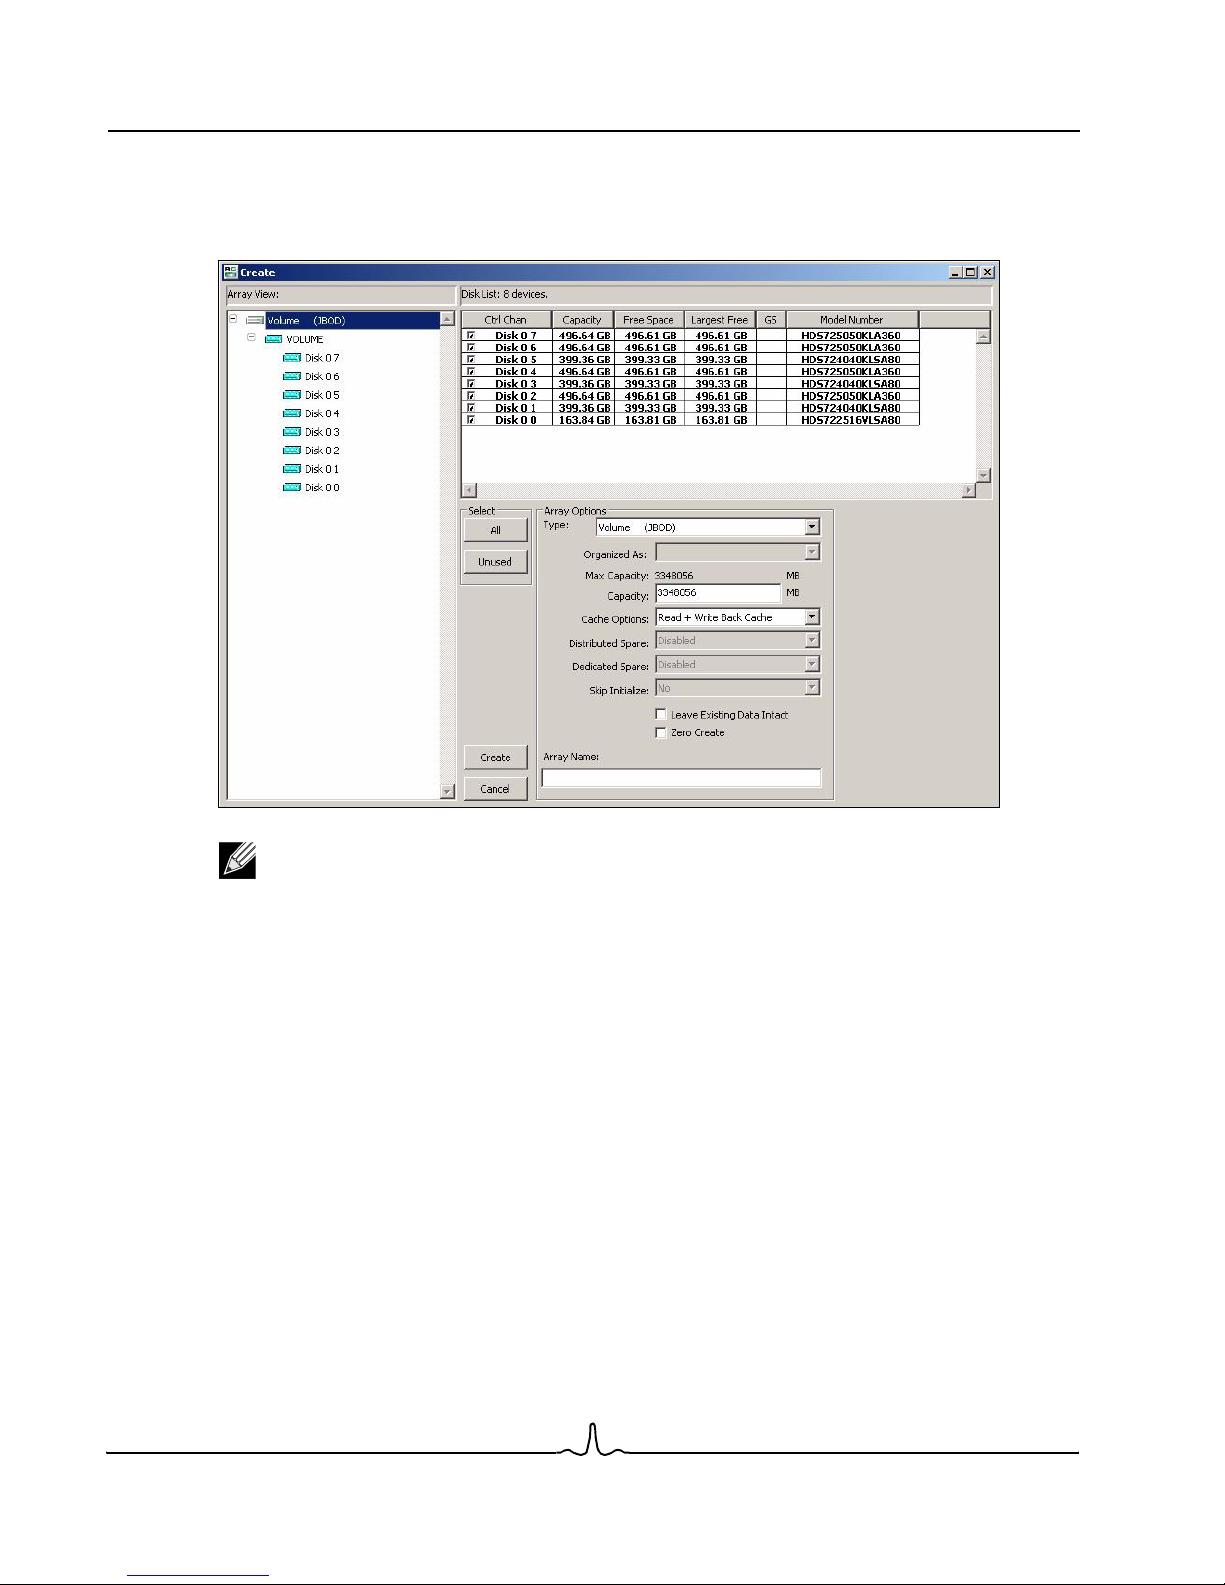
BC4000 Series RAID Controllers User Manual
02/13/06
To create volumes larger than 2 TB on Windows 2003 and 64-bit XP:
1. Create an array using the Create command, specifying the size you want the array to be. For the Type field.
select Volume (JBOD).
Note: To create arrays larger than 2 TB on 32-bit Windows 2003, make sure that Service Pack 1 has
been installed in the system.
2. From the desktop, right-click My Computer, and then click Manage.
3. Under Computer Management (Local), click Storage/Disk Management.
Page 76 Working with Arrays Document BC4000-UM100-R
Broadcom Corporation
Page 91
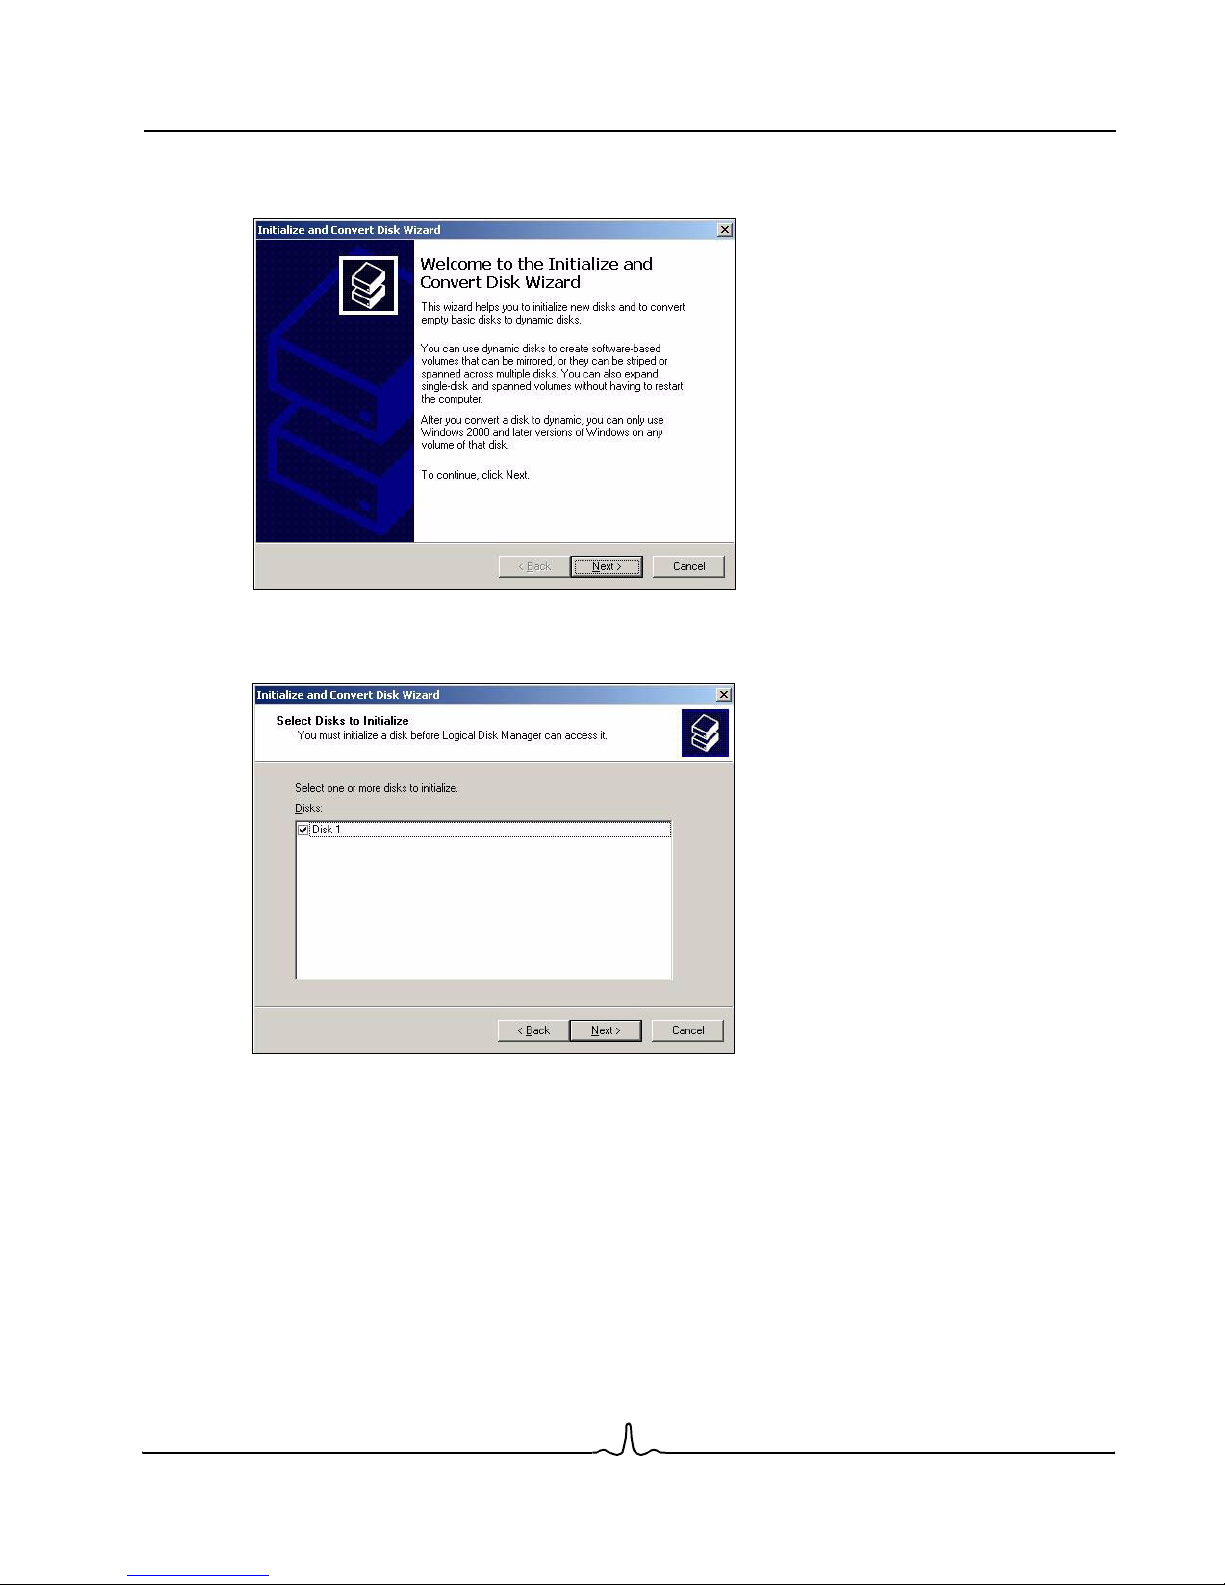
User Manual BC4000 Series RAID Controllers
02/13/06
The Initialize and Convert Disk Wizard window opens.
4. Click Next.
Document BC4000-UM100-R Working with Arrays Page 77
Broadcom Corporation
Page 92

BC4000 Series RAID Controllers User Manual
02/13/06
5. Select Disk 1, or the disk number of the new array, and then click Next to initialize the array.
6. Close the Initialize and Convert Disk Wizard by clicking Finish.
7. In the Computer Management window, position the cursor over the Disk 1 icon, which is split into two
unallocated sections. Right-click, and then select the Convert to GPT Disk option.
Put cursor here
and right-click.
Page 78 Working with Arrays Document BC4000-UM100-R
Broadcom Corporation
Page 93

User Manual BC4000 Series RAID Controllers
02/13/06
The two sections of the disk now are merged into one.
8. Close the Computer Management window.
The new array should appear in the Array List area at its specified size.
Document BC4000-UM100-R Working with Arrays Page 79
Broadcom Corporation
Page 94
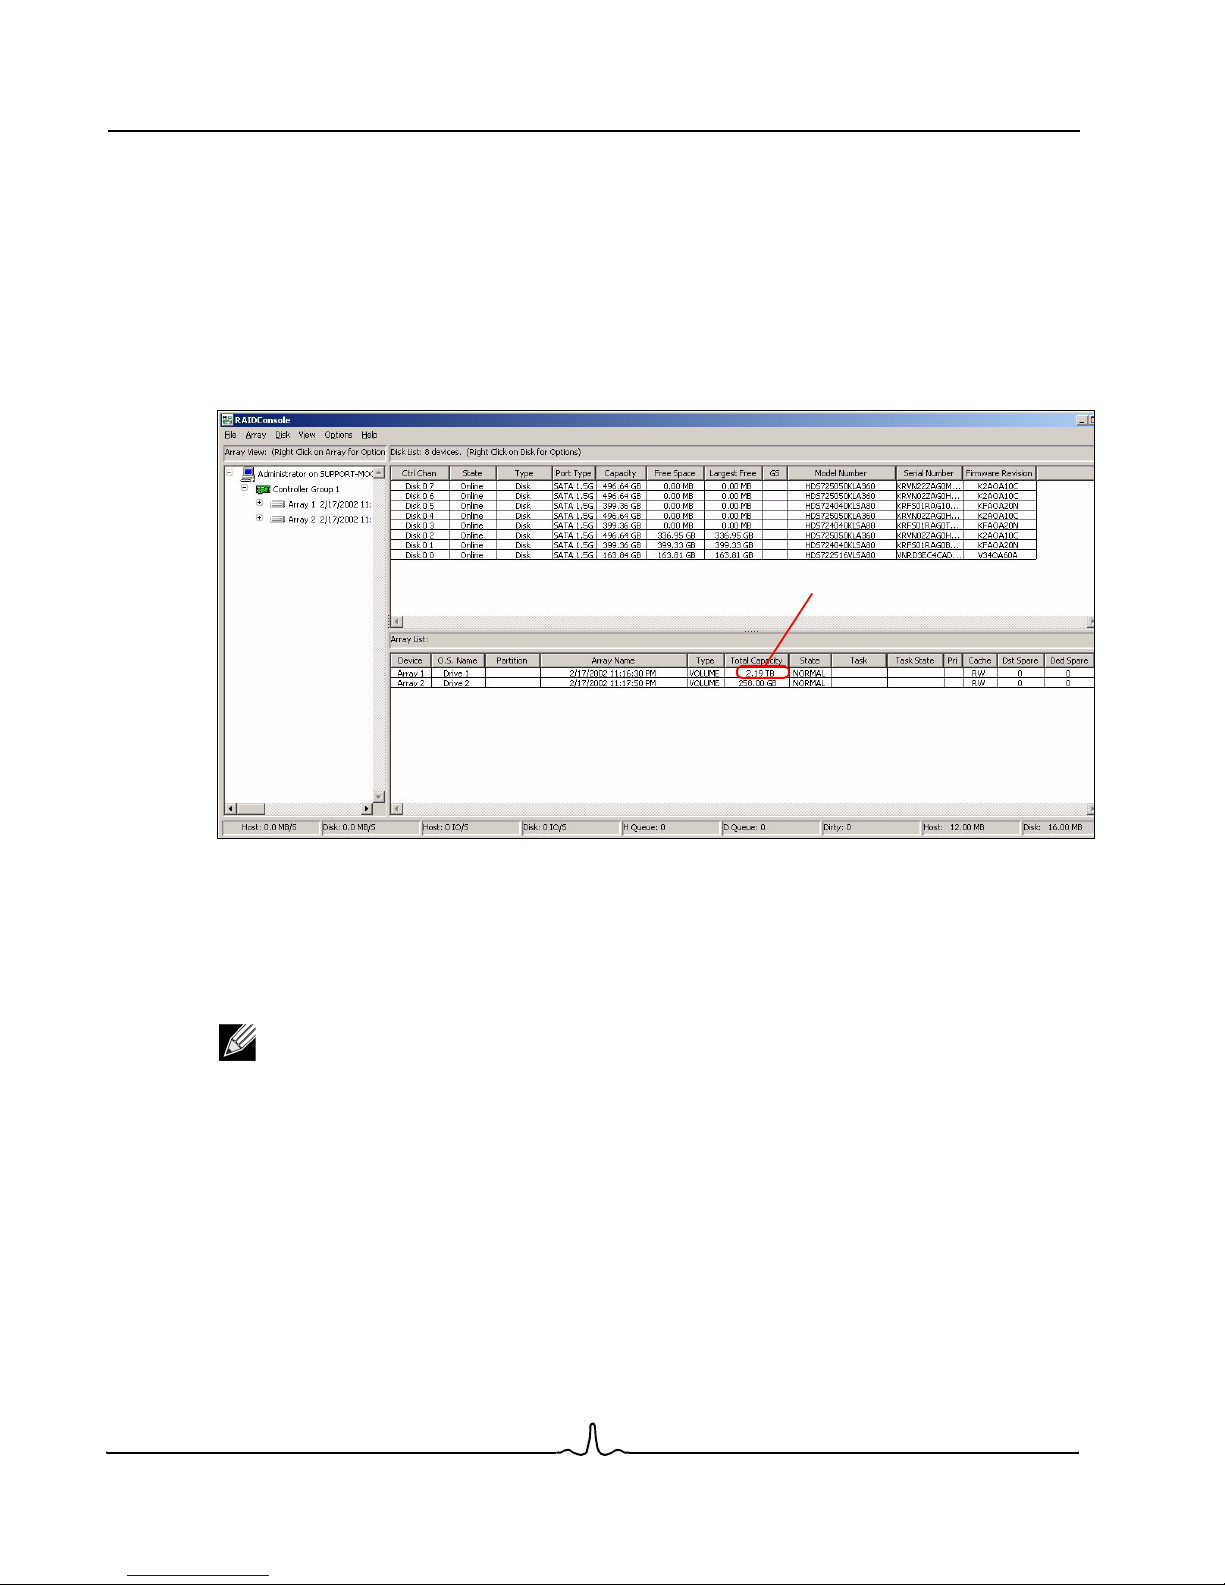
BC4000 Series RAID Controllers User Manual
02/13/06
To create volumes larger than 2 TB on Windows 2000 and 32-bit XP:
1. Decide how many maximum-sized (2.199 TB) arrays you need. To do this, take the whole-number result of
dividing the desired total array size by 2.199 TB. For example:
Desired array size = 2.46 TB.
Maximum-sized arrays needed = (2.46 / 2.199) = 1
258 GB is the remainder.
2. If there is any space left over (258 GB in above example), create one more array the size of the remainder.
The following figure shows the two arrays totaling 2.46 TB in the Array List.
2 TB Limit
3. From the desktop, right-click My Computer, and then click Manage.
4. In Computer Management, click Disk Management.
The Initialize and Convert Disk Wizard window opens.
5. Select both disks, and then click Next to initialize both arrays.
Note: Normally you would not want to convert to dynamic disks, because once a disk is dynamic, it
cannot be made basic again. This is an important point to consider before converting to dynamic
disks. In this case, however, it is required.
Page 80 Working with Arrays Document BC4000-UM100-R
Broadcom Corporation
Page 95
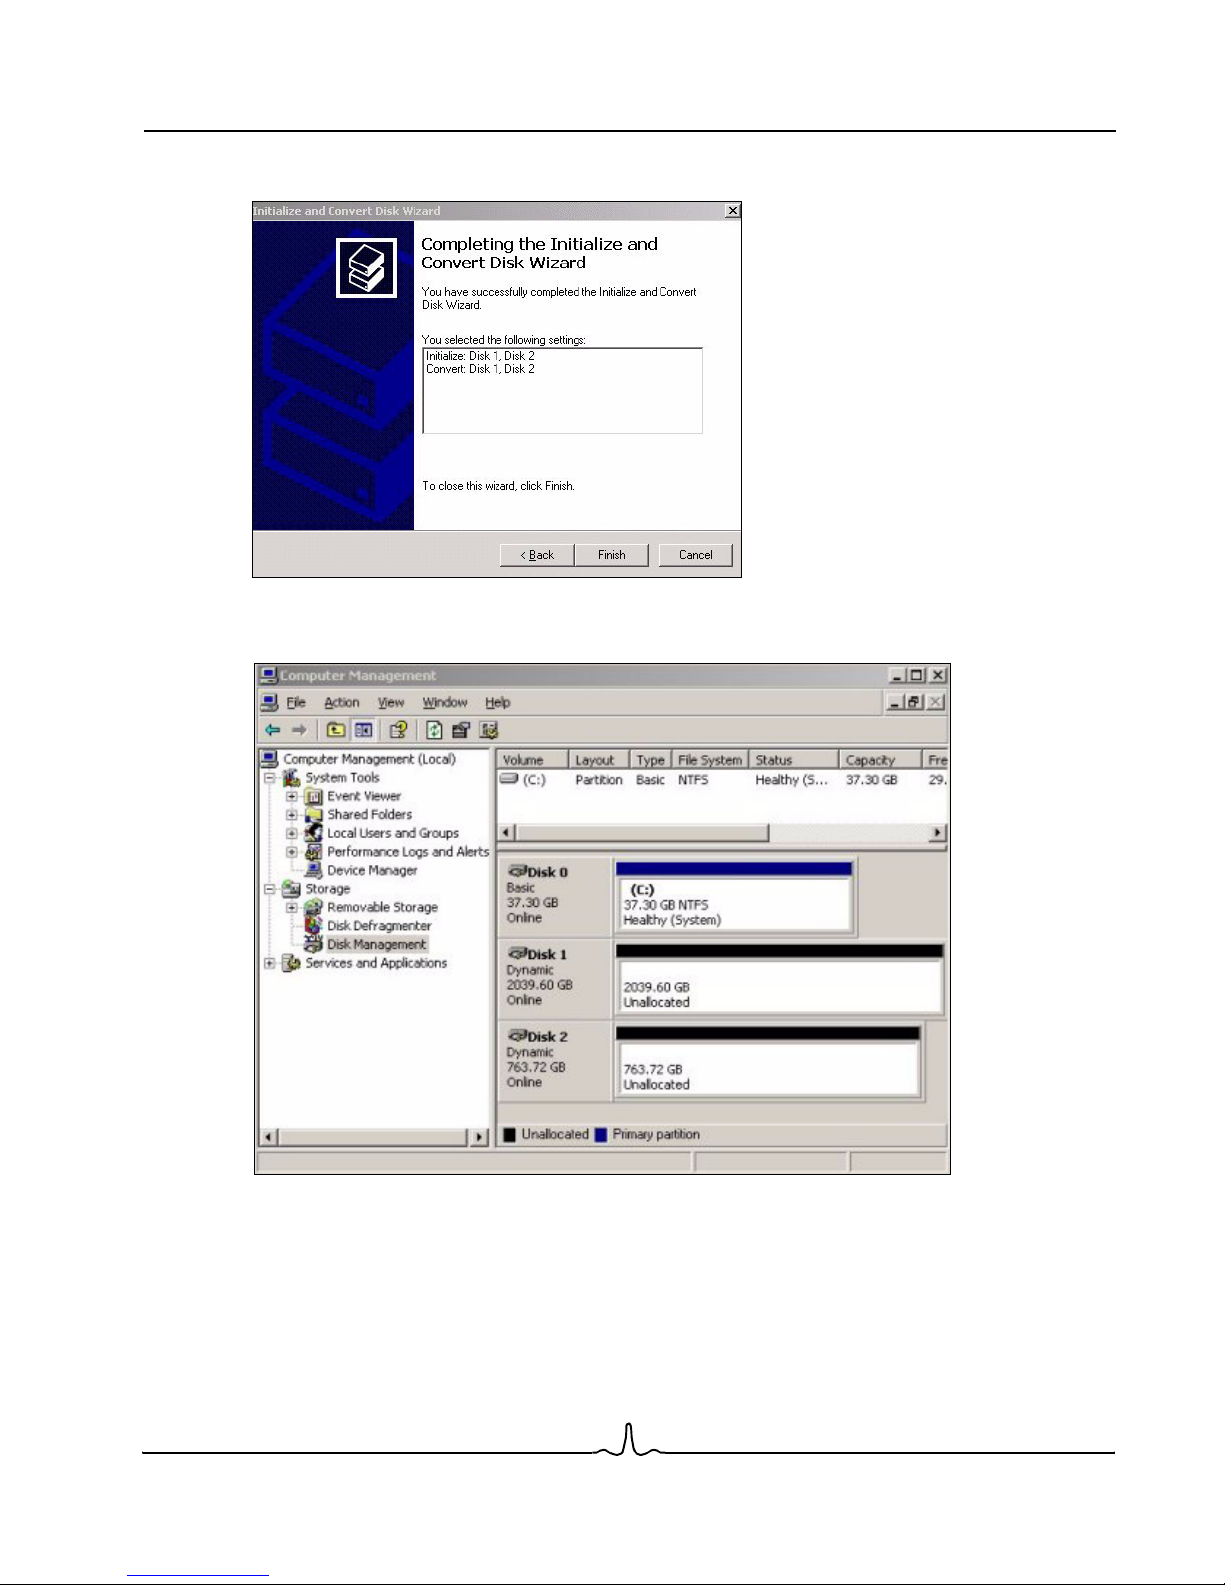
User Manual BC4000 Series RAID Controllers
02/13/06
6. After selecting both disks, click Next.
7. Click Finish. The arrays are displayed in the Computer Management window.
8. Right-click the first disk, click New Volume, and then click Next when the New Volume Wizard opens.
9. Click Spanned. This type of volume concatenates the two disks together.
10. Click Next.
Document BC4000-UM100-R Working with Arrays Page 81
Broadcom Corporation
Page 96

BC4000 Series RAID Controllers User Manual
02/13/06
The New Volume Wizard opens, which allows you to choose disks and the size of the resulting volume.
11. Click Next and follow the normal format procedure for any disk.
After the array initializes, it is displayed in Computer Management.
Page 82 Working with Arrays Document BC4000-UM100-R
Broadcom Corporation
Page 97

User Manual BC4000 Series RAID Controllers
02/13/06
NAMING ARRAYS
Naming an array can be a useful practice, particularly when using RAID1n and RAID10n to perform backups,
because it allows easy identification of an array in the BIOS.
To name an array:
1. In the Array View area, click on the array to select it.
2. From the Array menu, select Name.
3. Type the desired name in the Array Name window.
The specified name appears in the Array List and in the BIOS.
Note: Names can be up to 30 characters long, but the BIOS can only display 17 of those characters.
USING LEDS TO IDENTIFY ARRAYS
You can use the Identify Array option within RAIDConsole to physically identify the disks that are part of an
array. By selecting an array within RAIDConsole and using this feature, you can cause the LEDs on the
controller or a disk enclosure to blink for each disk within that array. If you have a failed array, this feature can
be used to physically identify the disks that are associated with the failed array.
Notes:
• If the LED cables between a disk enclosure and the controller are not properly connected, the
wrong disks may be identified.
• The LEDs for disks that are assigned as dedicated spares for an array do not blink.
• If the system is actively transforming or restoring an array, the disks associated with both the
source array and the destination array blink.
To use LEDs to identify the disks in an array:
1. In the Array View area of the Array Status window, select the array you want to identify.
2. From the Array menu, select Identify Array.
When the Identify window is displayed, the LEDs for the disks associated with that array begin to blink.
3. To stop the LEDs from blinking, click Stop Identify.
Document BC4000-UM100-R Working with Arrays Page 83
Broadcom Corporation
Page 98

BC4000 Series RAID Controllers User Manual
02/13/06
TRANSFORMING ARRAYS
With the Transform option on the Array menu, you can transform an array from one RAID level to almost any
other RAID level and expand the array dynamically, even under I/O load. In addition, if you have the 52-level
license you can use the Online Capacity Expansion (OCE)
to increase the size and organization of an array. These features can also be used as an integral part of the
system backup and recover strategy through the use of the RAID1, RAID10, RAID1n, and RAID10n array
types.
Notes:
• You cannot transform to a smaller-sized array. New arrays must be either the same capacity or
larger.
• If the system reboots during a transform, the transform continues where it left off.
• When using task control commands, a transform can only be paused/resumed but not removed.
• If a drive fails while the transform is in progress, no data is lost as long as the source and
destination array types are redundant. If a spare has been assigned to the destination array, a
fail-over task will start as soon as the transform completes, provided the spare is available after
the transform.
• If there are multiple arrays on the controller, it may not be possible to transform some of the arrays
to a larger size. If you think that in the future, you will need to expand the size of an array, it is best
to configure the available space as a single array.
• The array size of the transformed array is limited to 2.199 TB on some versions of Windows and
Linux. Please refer to your OS documentation for details on maximum array sizes.
and Online RAID Level Migration (ORLM) features
To transform an array:
1. In the Array View area of the Array Status window, select the array you want to transform.
2. From the Array menu, select Transform.
Page 84 Working with Arrays Document BC4000-UM100-R
Broadcom Corporation
Page 99

User Manual BC4000 Series RAID Controllers
02/13/06
Note: If your computer screen is not wide enough, only the Destination View is displayed.
3. Select the RAID type to which you want to transform.
4. Select all the disks that you want in the array, including disks that may already be in the array, by clicking the
check box next to the drive letter in the Disk List area.
5. Do one of the following:
• If you want to expand the array, type the size of the new array.
Or
• Accept the default size.
Notes:
• You can transform to an equal sized or larger array. You cannot transform to a smaller array size.
• If a transform is not possible, the Commit option is not enabled. A common reason for preventing
a transform is insufficient available space.
6. Click Commit.
Notes:
• If you select a transformation for which you are not licensed, the License Issue message
displays.
• Unless the transform is instantaneous, the Array Status window updates to show the source and
destination arrays along with the progress of the transformation.
COPYING ARRAYS
The Copy option on the Array menu is used to create a new array that contains an exact copy of the data on
a source array. The new array does not have to be the same RAID level as the source array. The copy is linked
to the source array upon completion, and as long as the two arrays remain linked, changes to the source are
also made on the copy. The two arrays can be automatically or “manually” unlinked. The copy command is useful
for creating a “snapshot” of a source array at a particular moment in time.
Notes:
• You cannot copy to a smaller-sized array. New arrays must be either the same capacity or larger.
• The destination array is hidden at the start of the copy. After the arrays are unlinked, the
RAIDConsole Un-Hide command can be used to unhide it.
• If the system reboots during a copy, the copy continues where it left off.
• If a drive fails while the copy of a redundant array is in progress, no data is lost.
• If there are multiple arrays on the controller, it may not be possible to copy some of the arrays to
a larger size. If you think that in the future, you will need to expand the size of an array, it is best
to configure the available space as a single array.
• The array size of the copied array is limited to 2.199 TB on some versions of Windows and Linux.
Please refer to your OS documentation for details on maximum array sizes.
Document BC4000-UM100-R Working with Arrays Page 85
Broadcom Corporation
Page 100
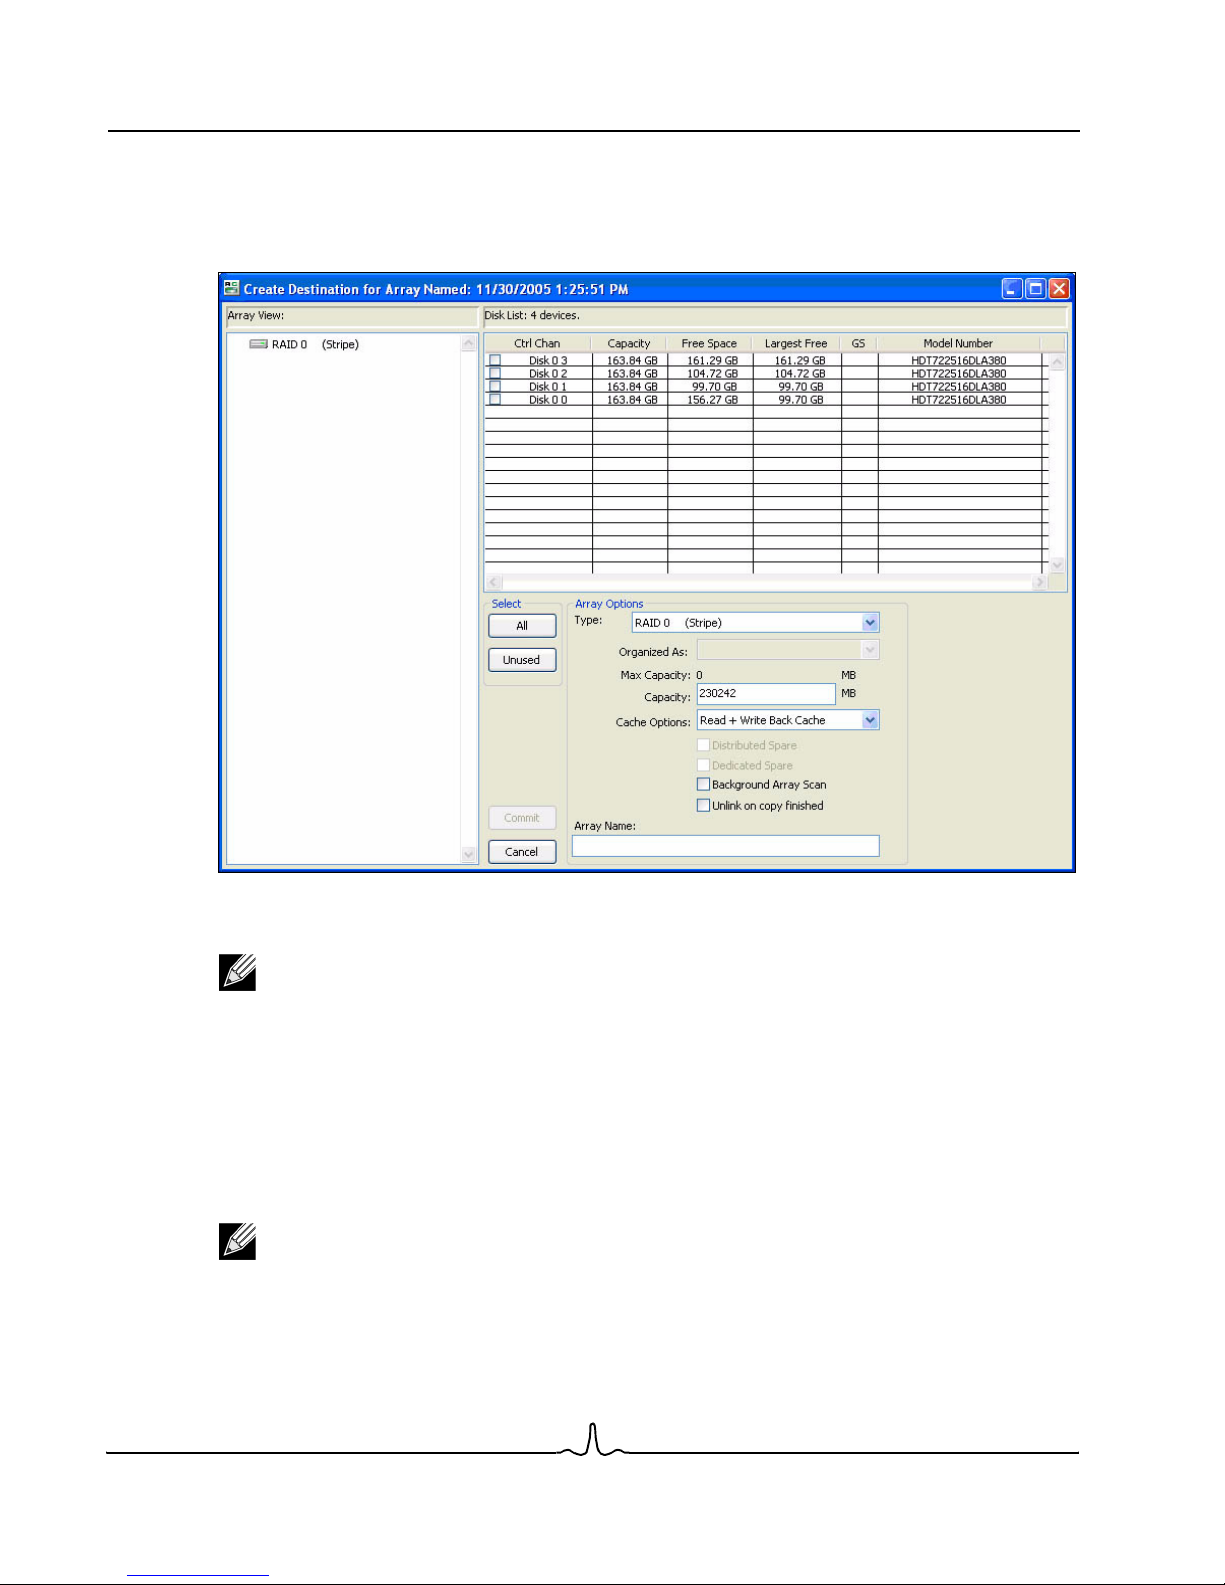
BC4000 Series RAID Controllers User Manual
02/13/06
To copy an array:
1. In the Array View area of the Array Status window, select the array you want to copy.
2. From the Array menu, select Copy.
3. Select the RAID type of the copy.
Note: If you select a type of destination array for which you are not licensed, the License Issue
message displays.
4. Select all the disks that you want in the destination array, including disks that may already be in the array, by
clicking the check box next to the drives in the Ctrl Chan section of the Disk List area.
5. Do one of the following:
• If you want to expand the array, type the size of the new array.
Or
• Accept the default size.
Notes:
• You can copy to an equal sized or larger array. You cannot copy to a smaller array size.
• If a copy is not possible, the Commit option is not enabled. A common reason preventing a copy
is insufficient available space.
6. Select a cache option for the array. The default is Read + Write Back Cache.
Broadcom Corporation
Page 86 Working with Arrays Document BC4000-UM100-R
 Loading...