

Britax Strider Compact Instruction Manual
IMPORTANT: KEEP THIS BOOKLET IN A SAFE PLACE FOR FUTURE REFERENCE.
Note: Second Seat, Bassinet, Infant Carrier & Footmuff are all sold separately.
Strider
Strider
Steelcraft
Compact
INSTRUCTION MANUAL

INDEX
Strolle r Fe at ure s
.......................................................................................
4
Quick Re fe re nc e Guid e to Comp ac t Sin gle M od e Confi gurat ions
............
6
Quick Re fe re nc e Guid e to Comp ac t Dou ble M od e Conf igura tion s
...........
7
Folding with th e S e cond S e at Warning
.....................................................
8
1 Stroller
..................................................................................................
9
1.1 Stroller General Warnings
.......................................................................
10
1.2 Stroller Parts
............................................................................................
12
1.3 Stroller frame op ening
.............................................................................
13
1.4 To fit an d remove the whee l guards
.......................................................
14
1.5 Rear wheel fit ting an d removal
...............................................................
14
1.6 Front wheel fittin g and rem oval
..............................................................
15
1.7 Swivel/fi xed front wheel o perati on
.........................................................
16
1.8 To op erate the brake
...............................................................................
16
1.9 To adjus t the pi votal handl e - 7 pos ition s
..............................................
17
1.10 To fit the acc ess or y bag
.........................................................................
17
1.11 Fittin g the str oller seat to th e frame
.......................................................
19
1.12 To fit the arm bar
.....................................................................................
20
1.13 Adjusting the backrest
............................................................................
21
1.14 Stroller seat removal
...............................................................................
21
1.15 To face the seat in opp osite di rect ion
....................................................
22
1.16 To adjust the head pill ow & shoul der harn ess hei ght
...........................
23
1.17 To fit, use and rem ove the cano py
.........................................................
23
1.18 Harness adjustment
................................................................................
24
1.19 Tether strap
.............................................................................................
28
1.20 Fit ting t he reversibl e seat pad
...............................................................
28
1.21 To use the reversible sh oulde r pads
......................................................
29
1.22 Adjustin g the le g supp or t
........................................................................
29
1.23 Fit ting th e boot c over
..............................................................................
30
1.24 To use the basket
....................................................................................
30
2

INDEX
1.25 To use the fo ot muf f
................................................................................
31
1.26 Fit ting th e mesh c over
............................................................................
32
1.27 Fit ting th e rain c over
...............................................................................
34
1.28 To fold/close th e Stroll er
.........................................................................
36
Optional Accessories (Bassinet, Infant Carrier & Second Seat)
..........
39
2.1 Bassine t Warnings
...............................................................................
40
2.2 Bassinet Par ts
........................................................................................
40
2.3 Bassinet a sse mbly, fitting & rem oval
....................................................
41
3.1 Infant Carrier Warnings
.......................................................................
44
3.2 Infant Carrier fit tin g and rem oval
..........................................................
44
4.1 S econd S eat Warnings
........................................................................
47
4. 2 Second Seat Parts
................................................................................
48
4.3 Fittin g Sec ond Seat to the s troller
........................................................
49
4.4 To adj ust into seatin g pos itio ns
............................................................
50
4.5 To fit , use an d remove the can opy
........................................................
50
4.6 Harness adjus tment
...............................................................................
51
4.7 Adjusting the h ead pill ow height p ositi on
.............................................
54
4.8 Using Reversible s hould er pads
...........................................................
55
4.9 Fittin g the B oot Cover
............................................................................
55
4.10 Folding the Sec on d Seat with the fra me
..............................................
56
4.11 Removing the Sec ond Seat fro m the frame
.........................................
57
4.12 To use t he adaptor s
...............................................................................
58
4.13 Install the Str oller Seat usin g the ada ptors
..........................................
59
4.14 Install the Infant Carr ier usin g the ada ptors
.........................................
59
4.15 Fittin g and rem oving Sof t Go ods fr om the se co nd seat fram e
...........
60
4.16 Fittin g and rem oving Infant Carr ier from t he sec on d frame
................
62
4.17 Refit and remove the sof tgo ods to the Se co nd Seat
...........................
64
Stroller Folding Configurations
..............................................................
66
Care & Maintenance
..............................................................................
67
3

STROLLER FEATURES
S20
S3
S4
S2
S5
S16
S8
S6
S9
S10
S11
S7
S13
S14
S15
S17
S12
S18
S19
S21
S22
S1
S1. Adjustable & removable canopy
S2. Peek a boo window
S3. Pivotal handle
S4. Tether Strap
S5. Frame fold mouldings (on both sid es)
S6. Canopy mesh (under zip)
S7. Stroller seat release b ut tons
(on bo th si de s)
S8. Frame sockets (on both sides) accepts
Stroller, seat, Infant Carrier,
bassinet or adaptors.
S9. Frame lock
S10. Wheel guard s
S11. Side ac c ess zip p oc ket
(on bo th si de s)
S12. UV Sun Visor
S13. Adjusta ble hea d pillow
S14. Reversible seat pad
S15. Arm bar
S16. Removable & reversib le
Stroller Seat
S17. 5 point harnes s
S18. Crotch pad
S19. Adjustable footrest
S20. Front access zip poc ket
S21. Front wheel releas e
S22. Swivel wheel loc k
4
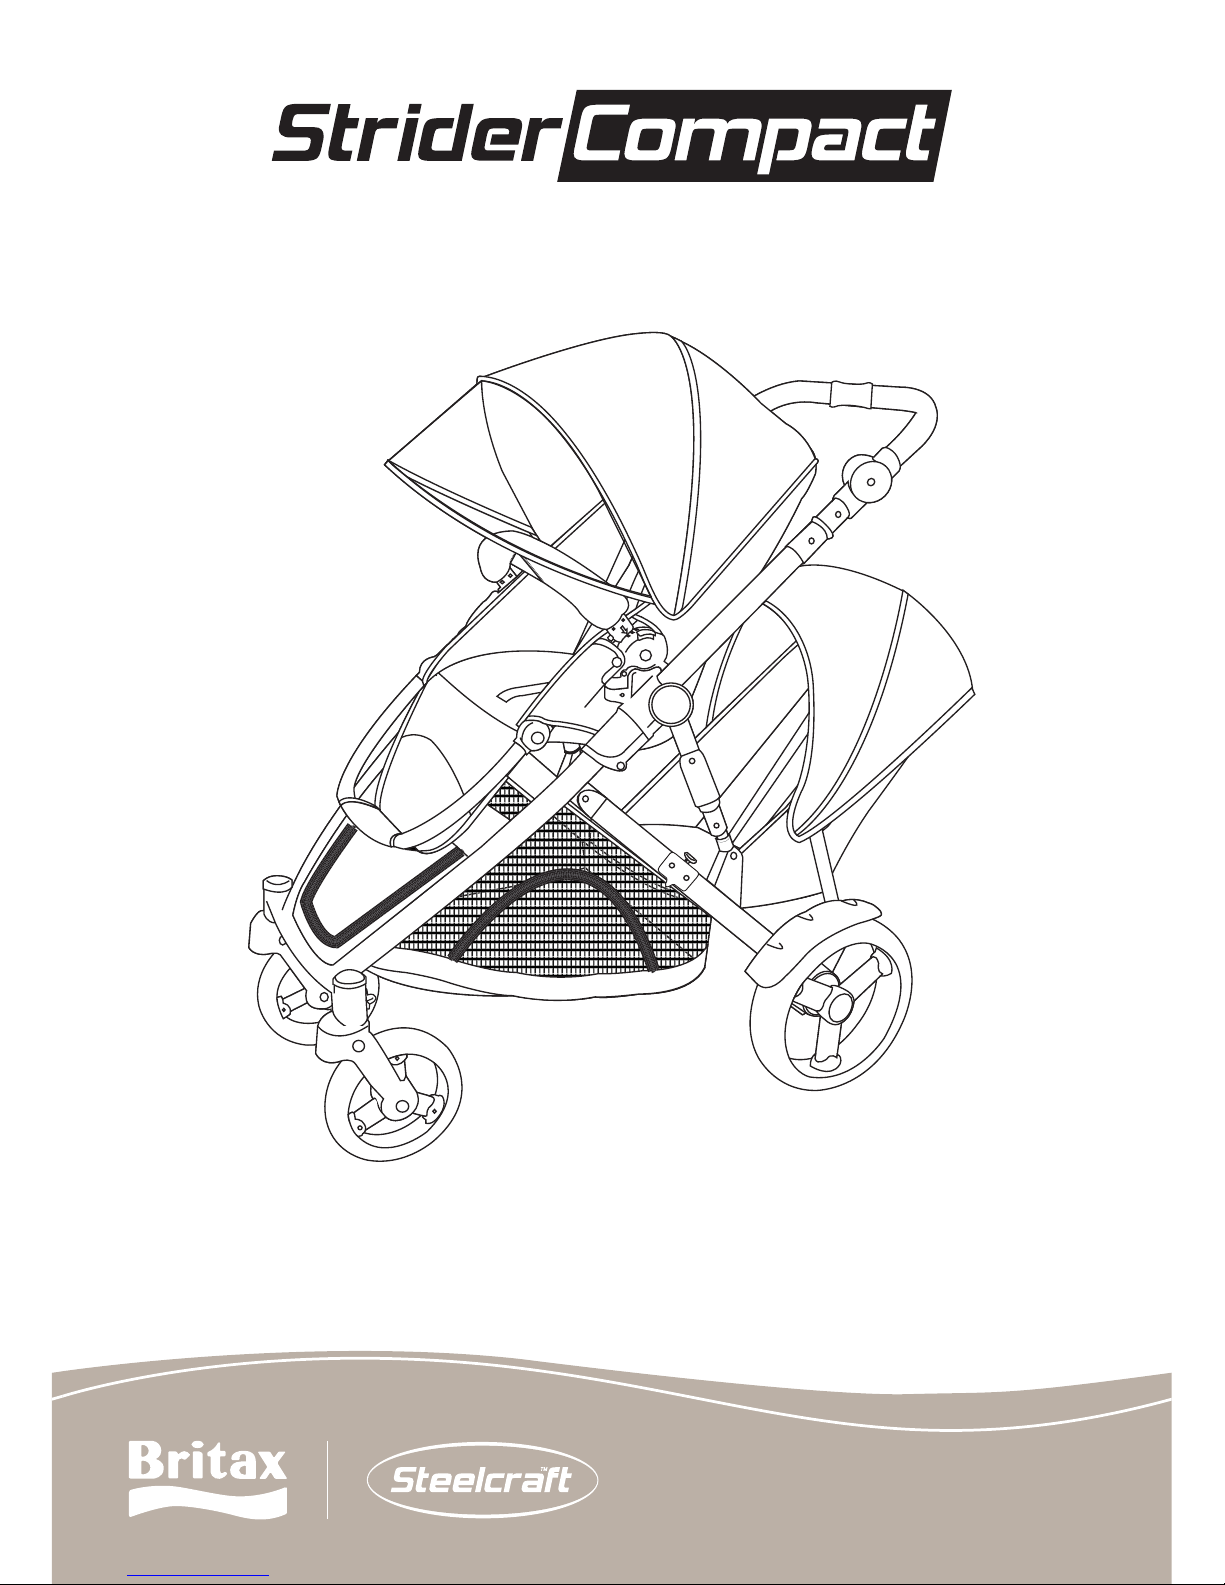
STROLLER FEATURES cont...
S24
S23
S25
S26
S27
S29
S29
S31
*Ac c ess or y bag and S troller seat
have been removed from the
frame shown on the right.
S23. Canopy window
S24. Backrest recline lever
S25. Back p o c ket
S26. Accessor y bag
S27. Brake
S28. Rear wheel release
S29. Mouldings (for
attachm ent to
Second seat
connecting pins)
S30. Second l o ck (for
Second seat)
S31. Lower mouldin gs
(for attachment to
second seat frame)
S28
S30
5
Shown with optional accessories (sold separately)
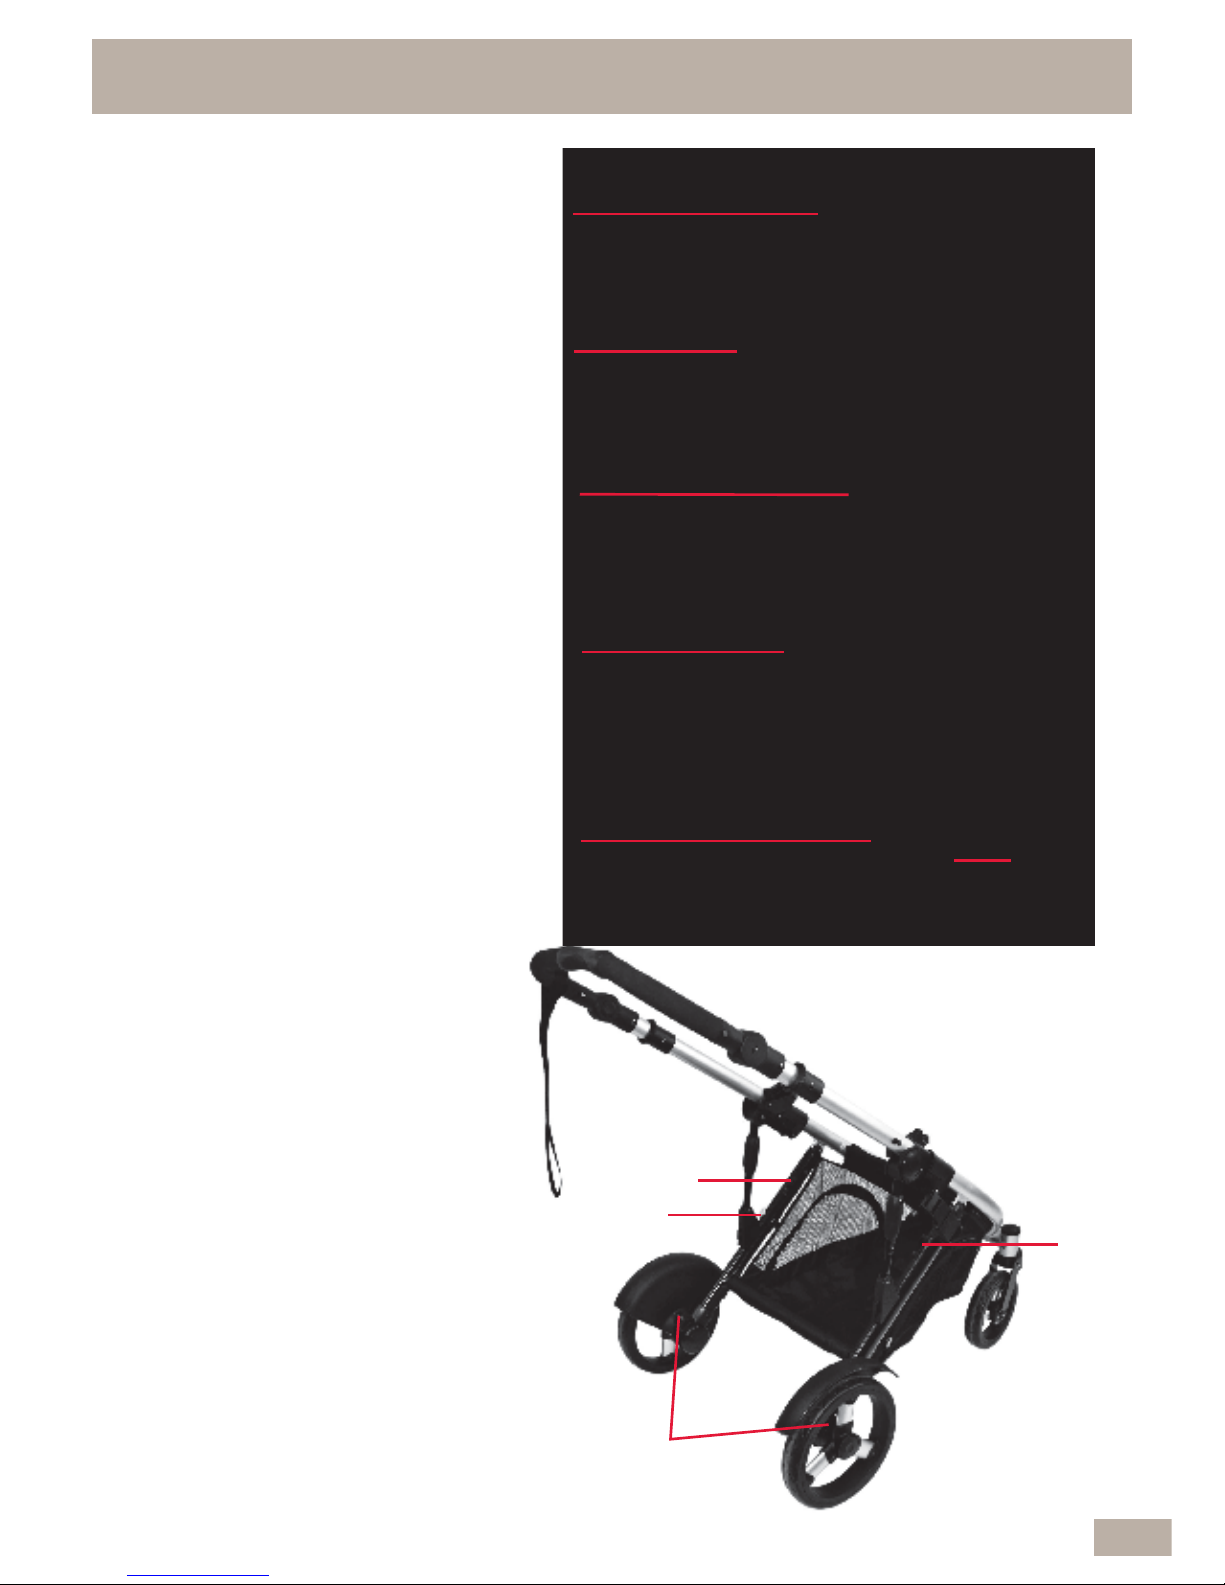
QUICK REFERENCE GUIDE - SINGLE MODE
Stroller - Rea r Facin g
Page: 22
Bassinet
Page: 41
Infant Carri er - Rea rward Facin g
Page: 45
Stroller - Forwa r d Fac in g
Page: 19
6
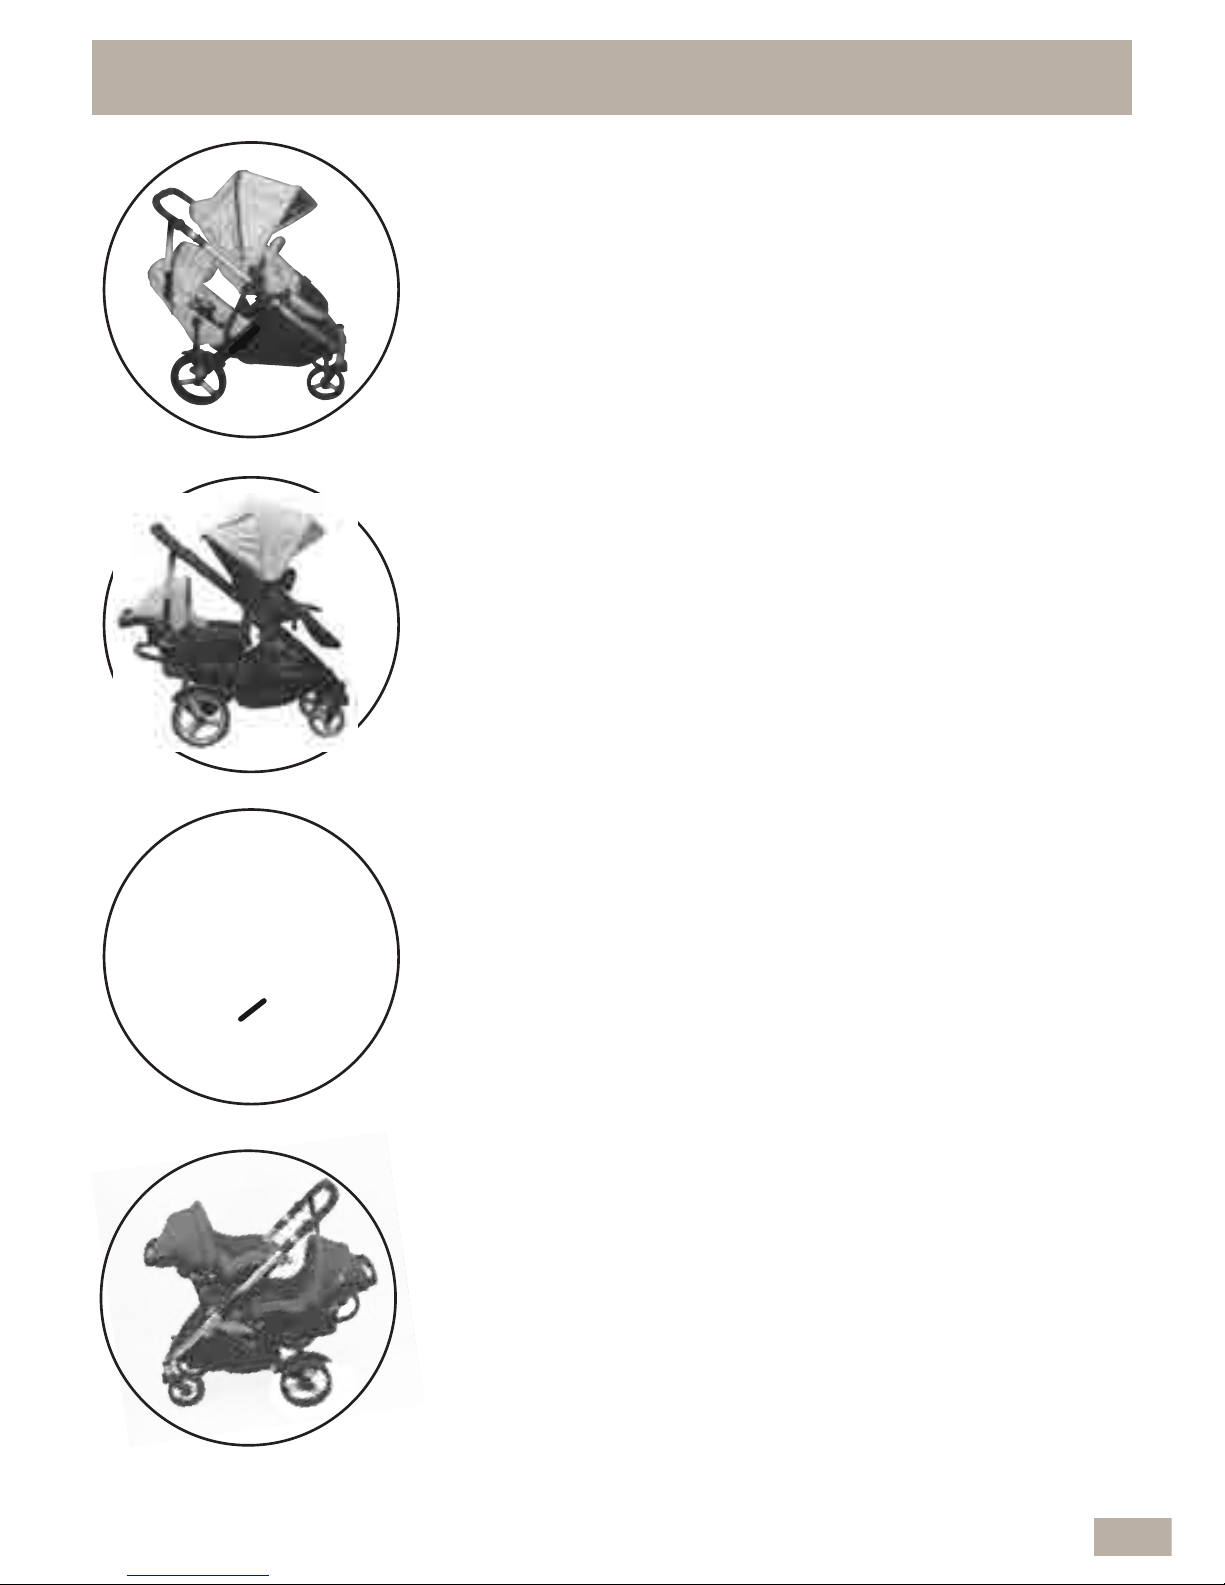
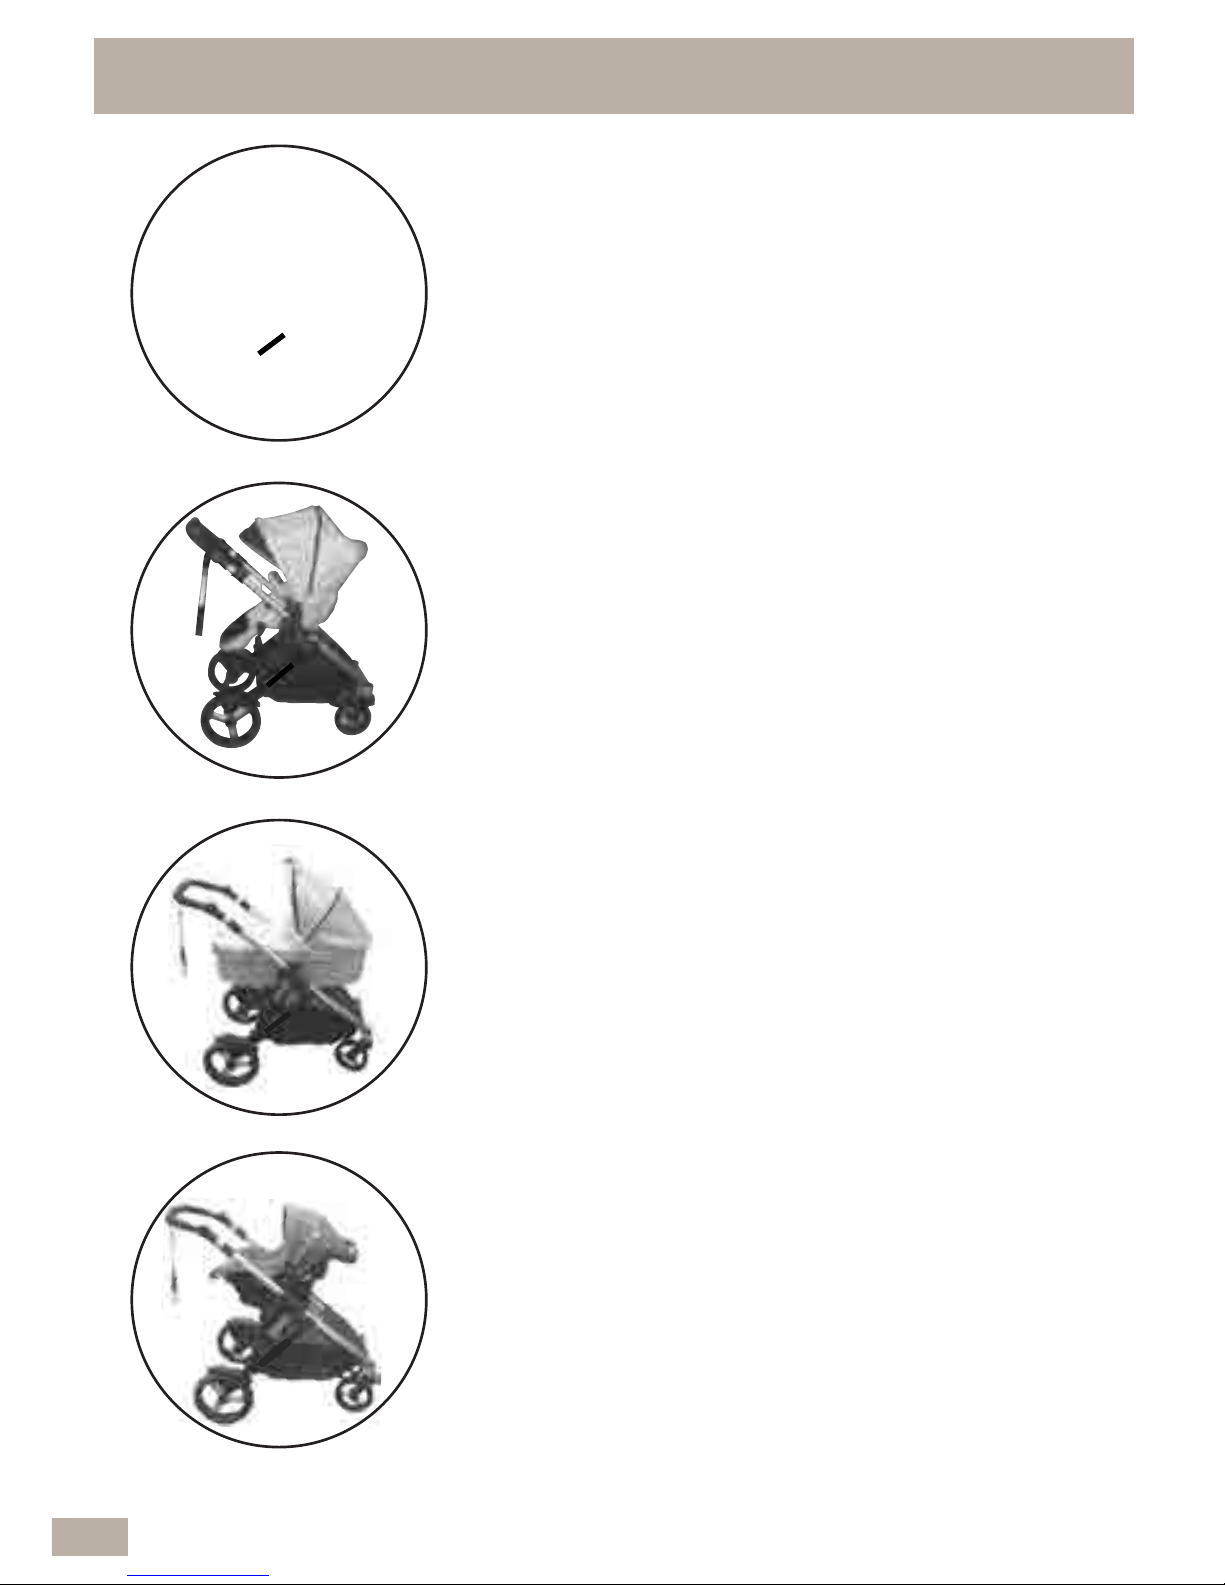
Shown with optional accessories (sold separately)
QUICK REFERENCE GUIDE - DOUBLE MODE
7
Infant Carri er + Infan t Ca rri er
Pages: 45 + 60
With Adaptors: 58 + 59
Infant Carrier + Second Seat
Pages: 45 + 49
With Adaptors: 58 + 59
Recom me n d e d to u s e th e ad a pt ors i n t hi s m o d e
Stroller Forwa r d Fac in g + Secon d Seat
Pages: 19 + 49
With Adaptors: 58 + 59
Stroller Forwa r d Fac in g + I nf a nt Ca rr i er
Pages: 19 + 60
With Adaptors: 58 + 59
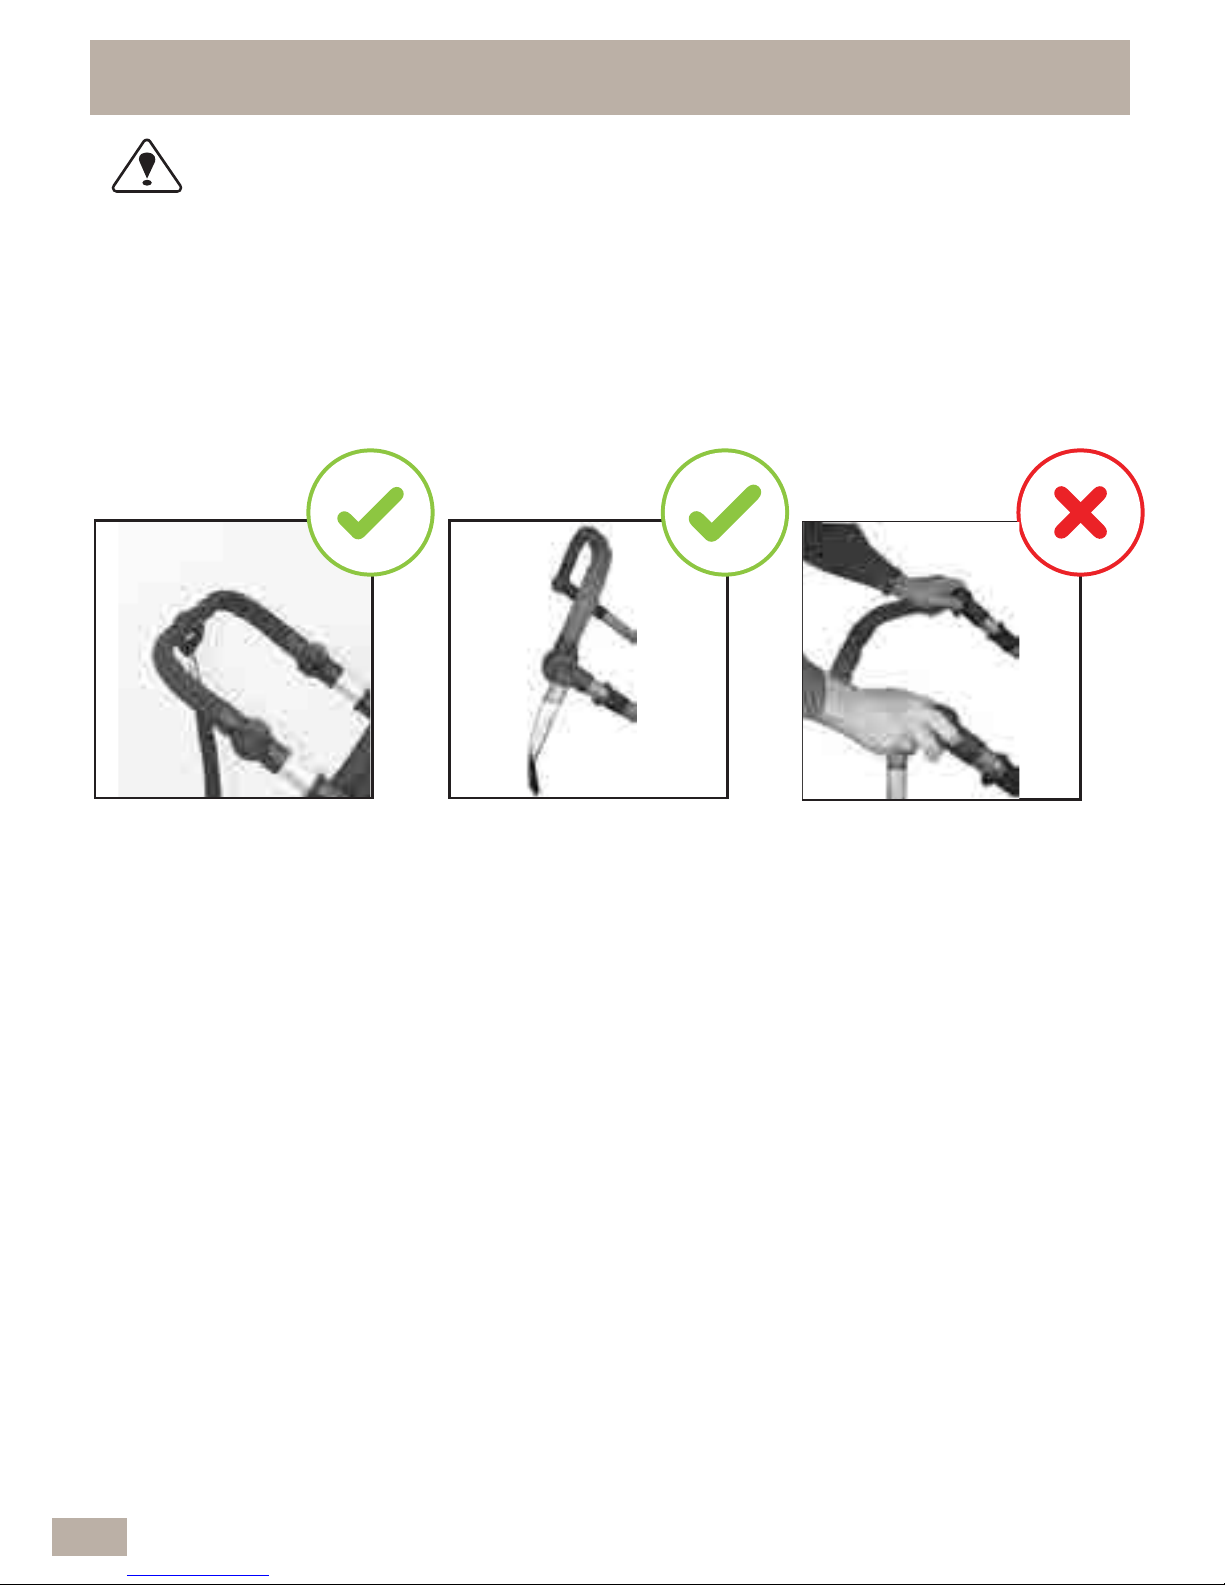
8
FOLDING WITH THE SECOND SEAT WARNING
WARNING: INCORRECT FOLDING MAY CAUSE
DAMAGE THE STROLLER & FRAME. PLE ASE FOLLOW THE
FOLDING INSTRUCTIONS CAREFULLY.
NOTE: If foldin g th e S t roll e r w it h th e S econd S eat at t ac h e d , you mus t
adjust the s tr oll e r p ivot han dl e to th e r egular or hig hest posit io n , to
prevent th e ha n dle f ro m co ming in c ont a c t wi th t he s econd seat and
causing da ma g e to th e st ro ll e r. Please refer to s e c t io n 4 .10 for
detaile d folding instructions .
HIGHEST POINTREGUL A R P OINT
LOWEST P O INT

SECTION ONE: STROLLER
9

WARNINGS: TO AVOID INJURY OR DEATH:
ALWAYS APPLY THE BRAKES WHENEVER THE STROLLER
IS STATIONARY.
• RETAIN FOR FUT URE REFERENCE.
• READ ALL INSTRUCTIONS CAREFULLY BEFORE ASSEMBLY
AND USE OF THIS STROLLER.
• ALWAYS FOLLOW THE INSTRUCTIONS.
• THE CORRECT USE AND MAINTENANCE OF THIS PRODUCT
IS ESSENTIAL .
• FOLLOW THE MANUFACTURERS INSTRUCTIONS.
• DO NOT LEAVE CHILDREN UNATTENDED.
• SECURE THE CHILD IN THE HARNESS AT ALL TIMES.
• DO NOT CARRY EXTRA CHILDREN OR BAGS ON THIS
STROLLER.
• MAKE SURE CHILDREN ARE CLEAR OF ANY MOVING PARTS
IF YOU ADJUST THE STROLLER.
• USE THE HARNESS AT ALL TIMES. WHEN NOT IN USE
DISCONNECT SHOULDER STRAPS FROM THE WAIST STRAPS
AND BUCKLE TO PREVENT STRANGULATION.
• Check that all safety locks are engaged before placing a child
in the stroller.
• Ensure your child is secured with a correctly adjusted
safety harness.
• Use the tether strap to prevent the stroller from rolling away.
• Never let go of the stroller when parked on an incline because
it may slide or tip over. Always park on a flat surface.
• Remove the child from the stroller before going up or down stairs
or escalators.
• Do not lift the stroller by the armrest because it may disengage.
• Do not allow children to stand on the seat.
• Do not hang bags or goods from the handle as this could cause
the stroller to tip over.
1.1 STROLLER GENERAL WARNINGS
10

WARNINGS: TO AVOID INJURY OR DEATH:
• Do not run while using this product.
• To prevent the risk of the stroller catching fire, do not park it near
an exposed heat source such as a radiator, an open fire or
a barbe cue, etc.
• Always lock swivel wheels when on rough surfaces as this will help
eliminate wheel wobble.
• Always raise the leg support (where fitted) to its highest position
when transporting a baby. This will reduce the risk of the baby
falling out through the front of the stroller.
• It is unsafe to use accessories other than those tested and
approved by B rita x.
• For maximum safety only use accessories designed for this stroller.
• Do not place more than 4kg in the basket, or 1kg in the seat
backrest pocket, 1kg in the Bassinet pocket, or 1kg in the
access ory bag.
• The maximum weight of the child using this product is not to
exceed 20kg for the Stroller, 9kg for the Bassinet, 9kg for the Infant
Carrier or 17kg for the Sec ond Seat.
FOR WARNINGS ON ACCESSORIES - REFER TO THEIR
INDIVIDUAL SECTIONS IN THIS BOOK. THE MAXIMUM WEIGHT
VARIES FOR EACH ACCESSORY.
SAFETY WARNING
The sun is very strong. DO NOT LEAVE YOUR CHILD EXPOSED
TO THE SUN. The canopy or hood on this product will not give your
child total protection from the harmful rays of the sun.
IMPORTANT
THE UPRIGHT POSITIONS ARE NOT SUITABLE FOR USE WITH
CHILDREN LESS THAN SIX MONTHS OLD. THE LOWEST
RECLINE POSITION SHOULD BE USED TO TRANSPORT BABIES,
AND THE BACKREST CAN BE ADJUSTED TO A MORE UPRIGHT
POSITION AS THE CHILD GROWS OLDER AND IS ABLE TO
SUPPORT ITS HEAD WITHOUT ASSISTANCE.
1.1 STROLLER GENERAL WARNINGS cont...
11
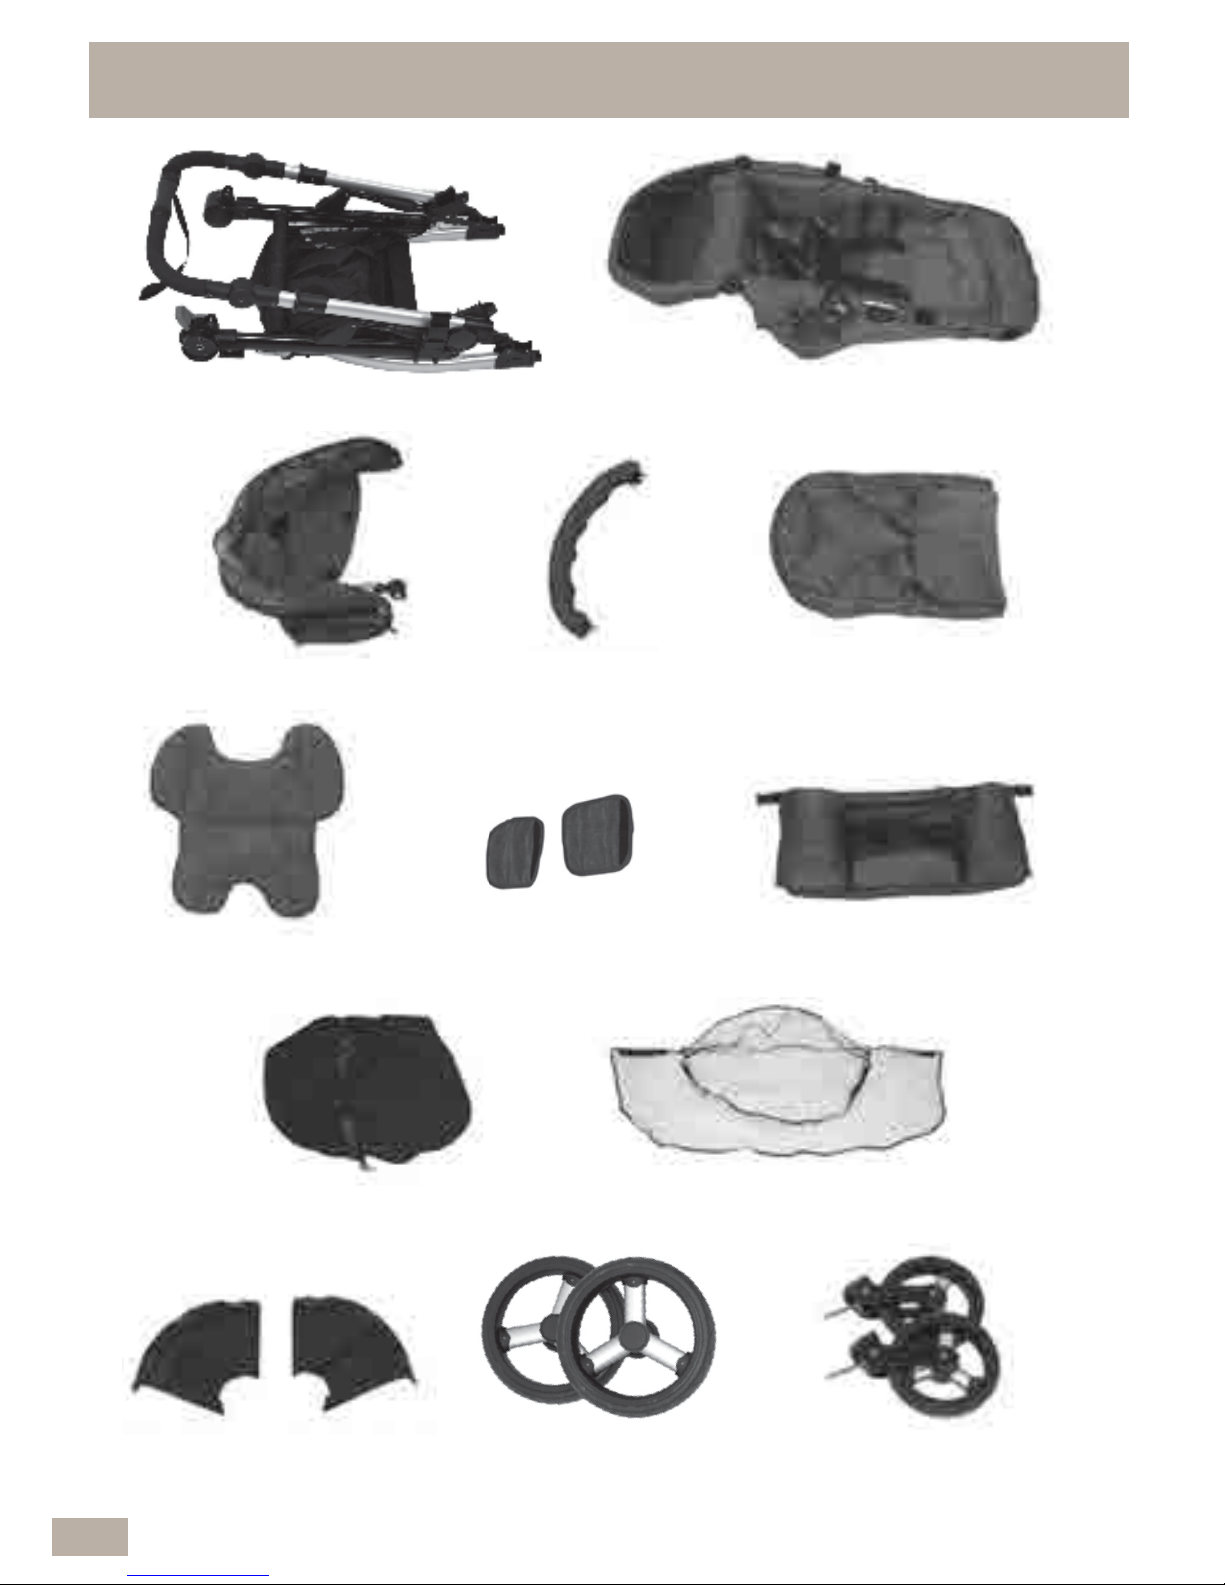
1.2 STROLLER PARTS
Rain coverMesh cover
Stroller frame Stroller seat (with head pillow)
Shoulder pads Reversible
Seat pad
Accessory bag
Wheel guards Front wheels
(4 wheel model)
Rear wheels
Boo t coverCanopy Arm bar
12
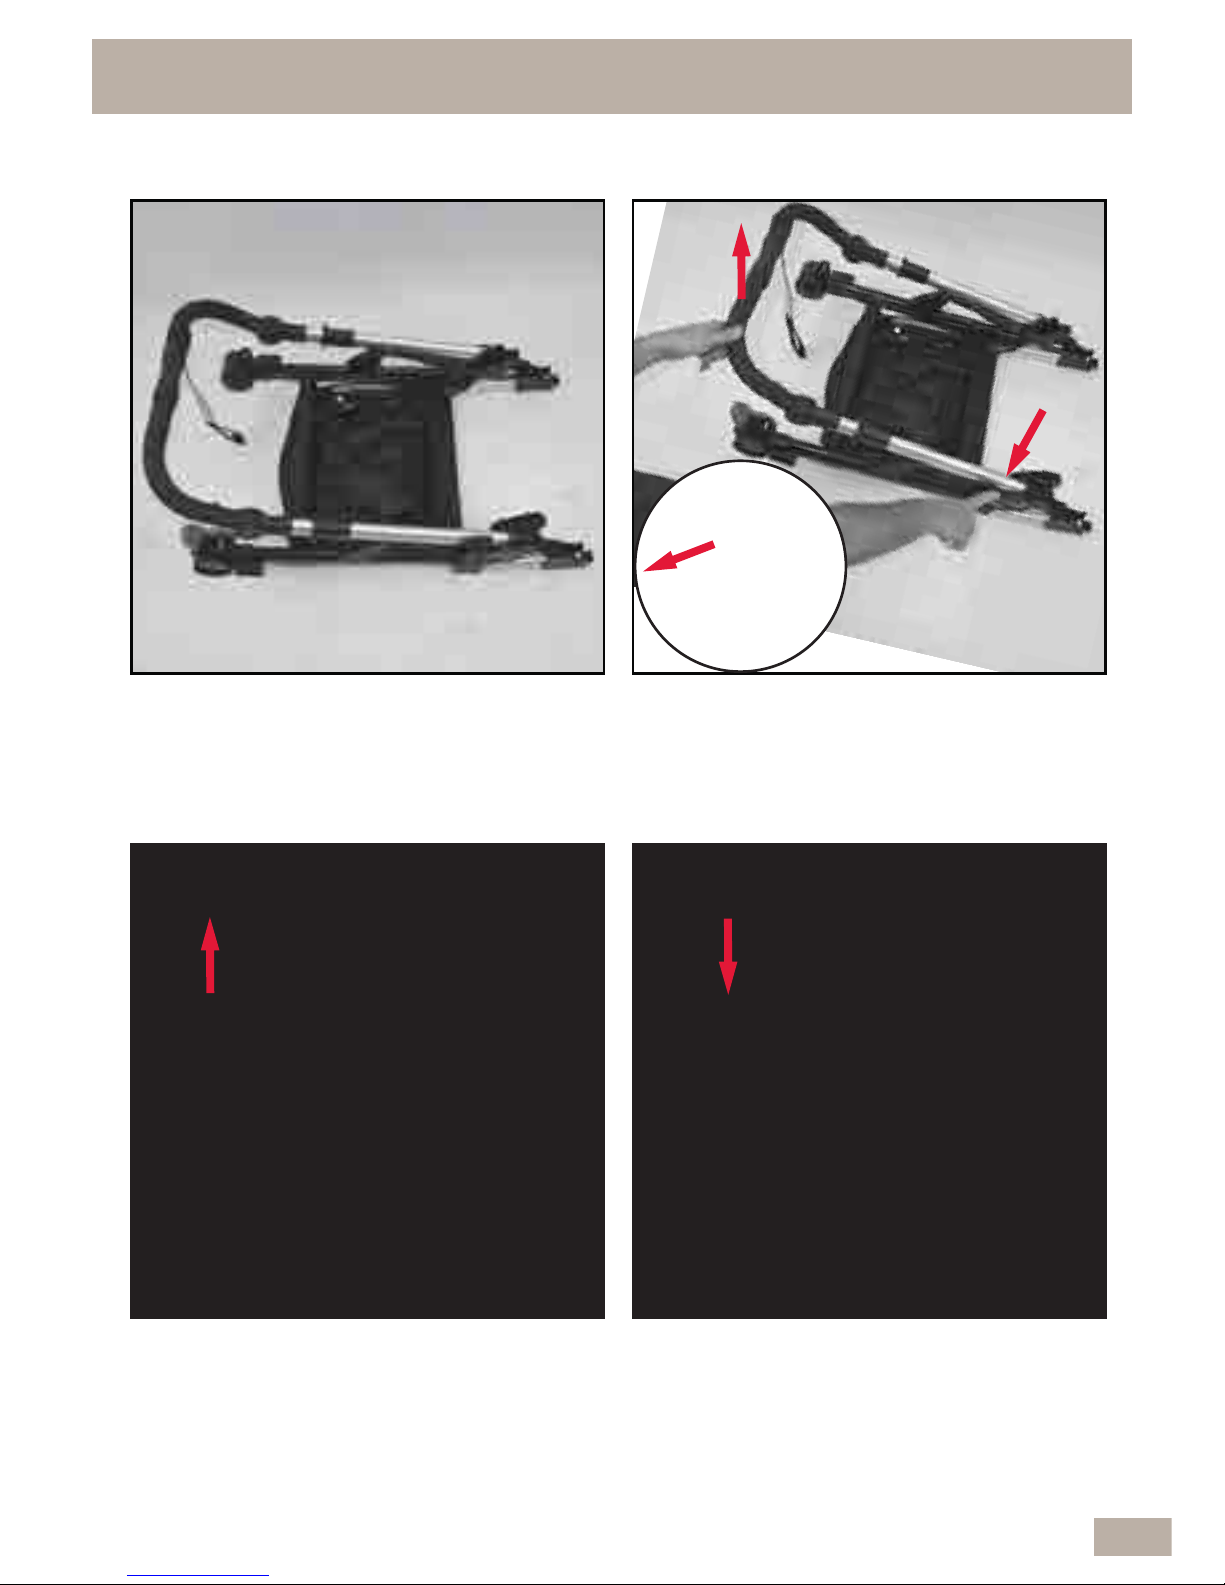
1.3 STROLLER FRAME OPENING
A Lay the frame on a flat sur fac e. B Release the frame l o ck a nd l ift
up the handle to partially op en
frame.
C Continue to lif t th e han dle u p to
open the frame unt il the l ef t a nd
right side fra me m oul din gs en gage
and lock together.
D Push down on the handle to
confirm the fra me is l o c ked ope n.
NOTE: To fold /clos e t h e fr a m e
see S ecti on 1.28.
13
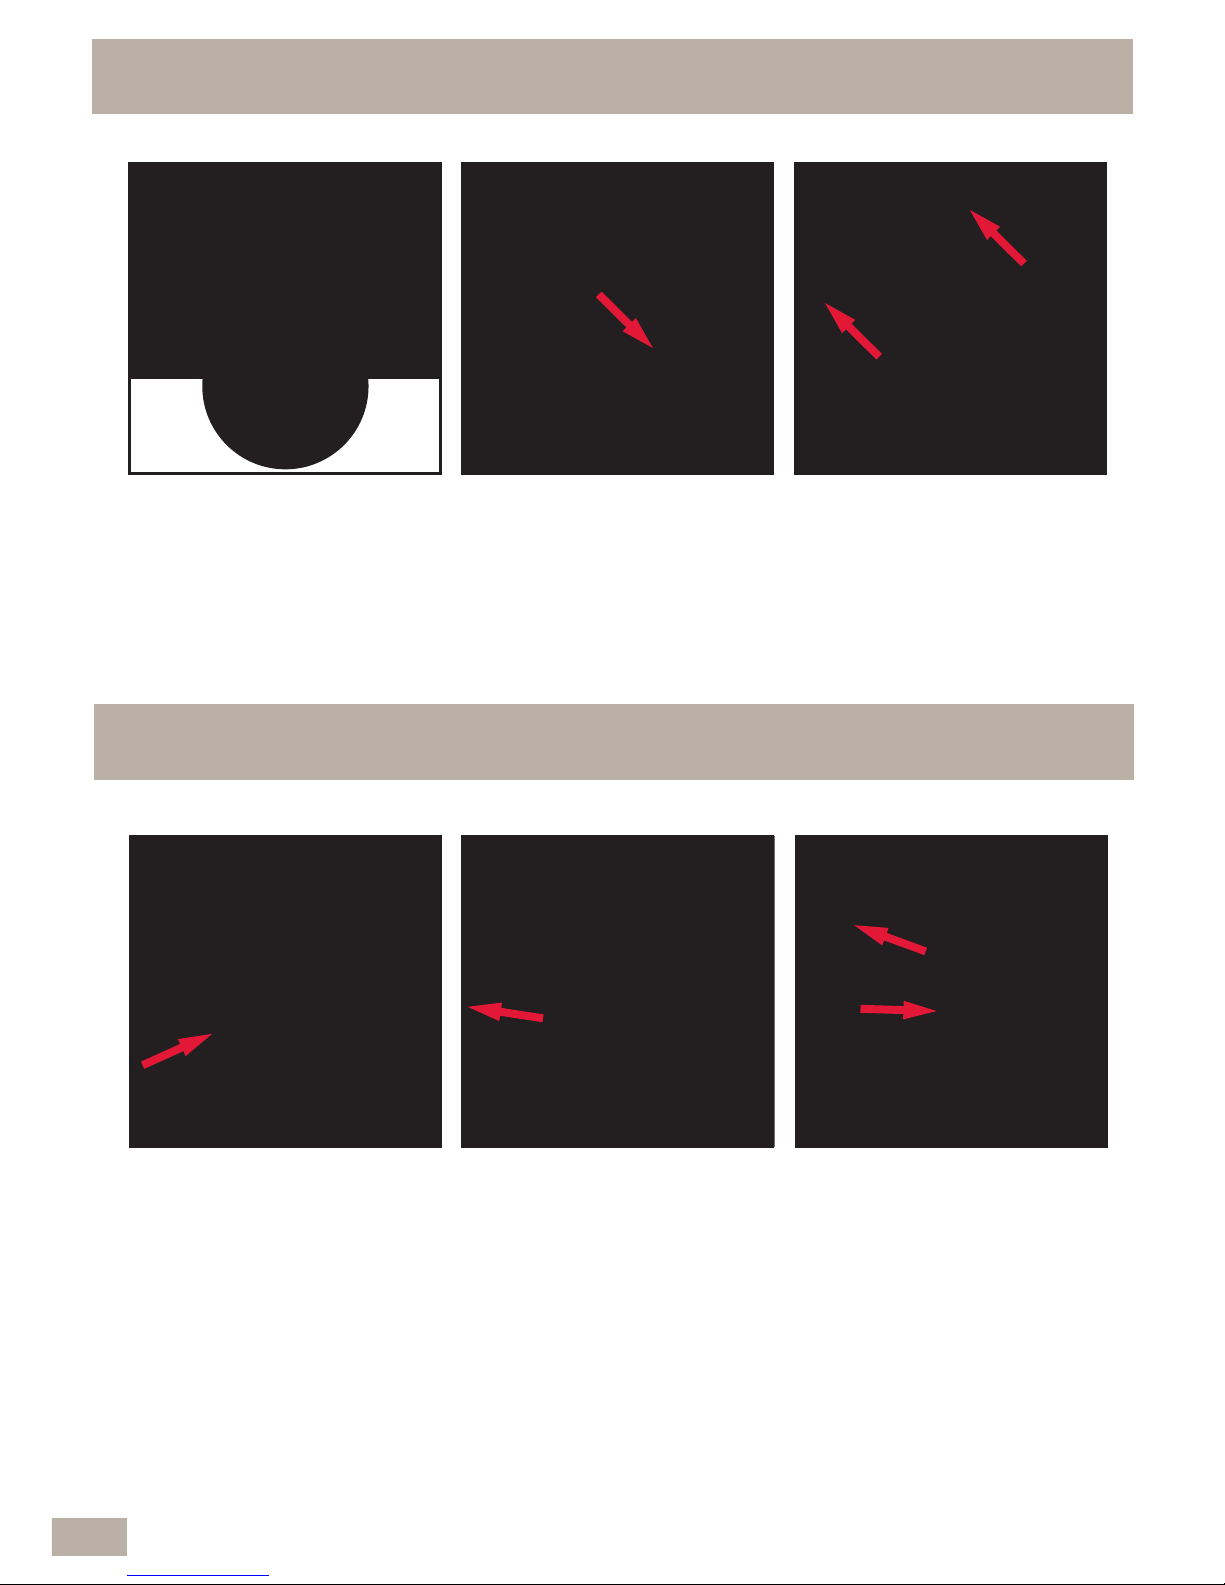
A Position the lef t a nd
right guards bes id e
the frame as shown.
B Fit each guard onto
the moulding at th e
base of the leg tub es.
Push down until they
lock into pos it io n.
C Pull on each guard
in the directi on s hown,
to make sure they are
locked on correctly.
A To fit th e rear
wheels, align the wheel
axle/ro d wit h the h ol e in
the wheel mould ing.
Press in and hold th e
central but ton, t hen p ush
the rear wheel fully into
the wheel mould ing.
B Release the cent ral
button, then p ull on th e
rear wheel to make sure
it is locked on. Rep eat
steps A & B to fit the
other rear wheel.
C To releas e th e rear
wheels, press in a nd
hold the cent ral b ut to n.
Then slide th e whe el out
and remove. Repeat for
the other side.
1.4 FIT & REMOVE THE WHEEL GUARDS
1.5 REAR WHEEL FITTING & REMOVAL
14

NOTE: Tip the frame backwards for
more conveni ent asse m b ly.
A Take each front wh eel a s sem bl y
and push the axle into the whe el
housing, until it lo c ks in.
B Pull on both front wheel set s to
make sure they are locked on.
C To remove the whe el as s emb ly,
turn top knob to the l ef t to unl o c k and
release the wheel.
1.6 FRONT WHEEL FITTING & REMOVAL
15

A To lo c k bot h rear whe els,
press the red bra ke lever all the
way down until you hear a click.
The indicator w ill c han ge to red.
Push the Stroller bac k an d forth
to confirm the whe els ar e lo c ked.
WARNING - Always apply the brakes when parking the
Stroller. The Stroller may roll away even if left unattended
for a few moments.
1.8 TO OPERATE THE BRAKE
B To unlo c k b oth rear wh eels ,
press the red bra ke lever all the way
down until you hear a clic k. T he in di c ator
will change to green.
Indicator
Always lock the fron t swive l wh eels w h en on uneven surfac es.
NOTE:
A For swivel wheel
mode, slide b oth red
latches up until they
lock it into p osi ti on.
B To lock the front wheels
into the fixed posit ion,
slide both re d latche s
down until they lock .
C The front wheels w ill
automatically lo c k into th e
fixed positio n when you
move the Stroller for ward
by approxi mate ly
one metre.
1.7 SWIVEL/FIXED FRONT WHEEL OPERATION
16
A The bag firstl y nee ds
to be attac he d to the
hook and lo op t ab o n the
inside of the Stro ller
bas ke t .
B Hold the bag up by the
black back fla p on th e rear
side of the bag.
Note: the hoo k an d l o op
tab on the edge of t h e
flap.
C Attach the h o ok an d
loop tab to th e ho ok an d
loop tab on t he ins i de of
the basket. This will help
to keep it in place.
Note: this flap a ls o
contains two pocke t s .
1.10 TO FIT THE ACCESSORY BAG
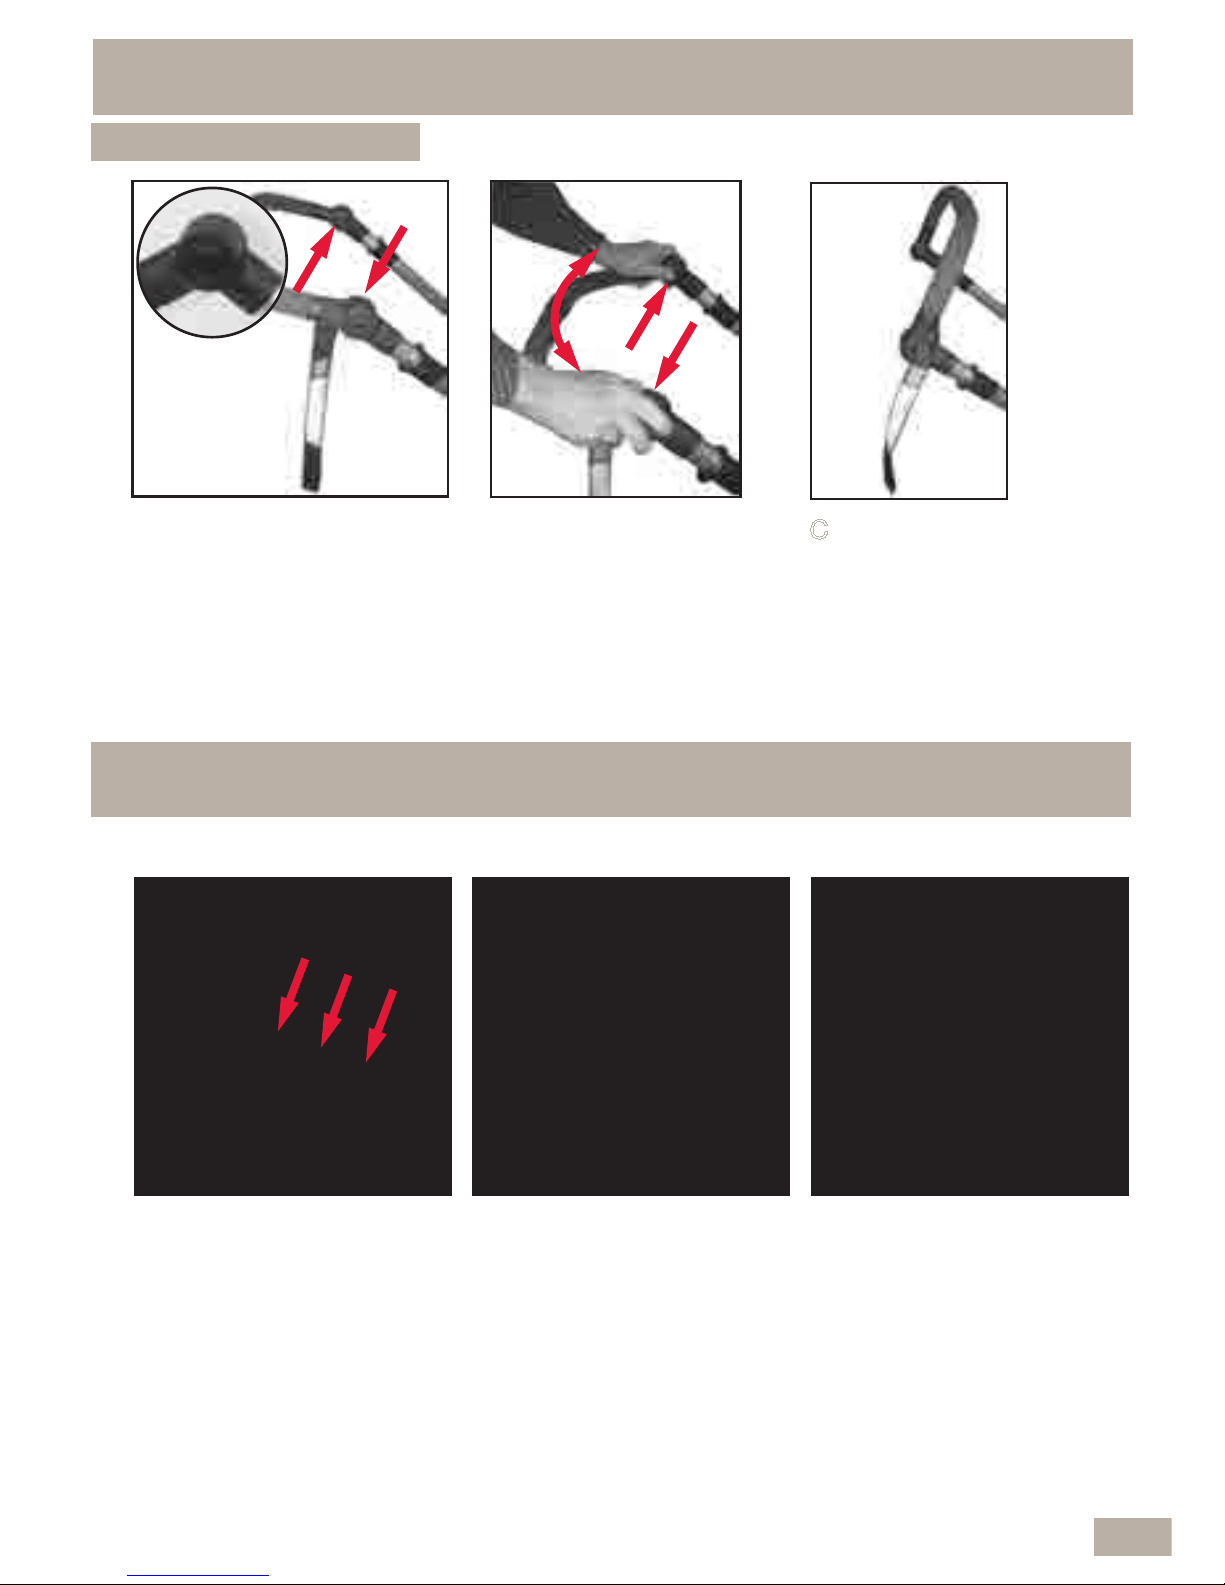
A There is an adjust in g
button on the i nsi d e of
each handle mo uldi ng.
B Press both
buttons in tog ether
and hold. Now rotate
the handle up or
down to the desired
height posit io n.
1.9 TO ADJUST THE PIVOTAL HANDLE
C When the desire d
height posit io n has
been achieved, release
both button s.
7 POSITIONS
17

D Now thread each
hook and lo op t ab t hro ugh
the frame moulding
brackets a s s h own.
NOTE: Remove the bag when using the s econd seat .
E Attach eac h str ap to
the hook and l oo p t ab
sewn onto the bag to
hold in plac e.
F The acces s ory bag is
now ready for use.
1.10 TO FIT THE ACCESSORY BAG Cont...
18
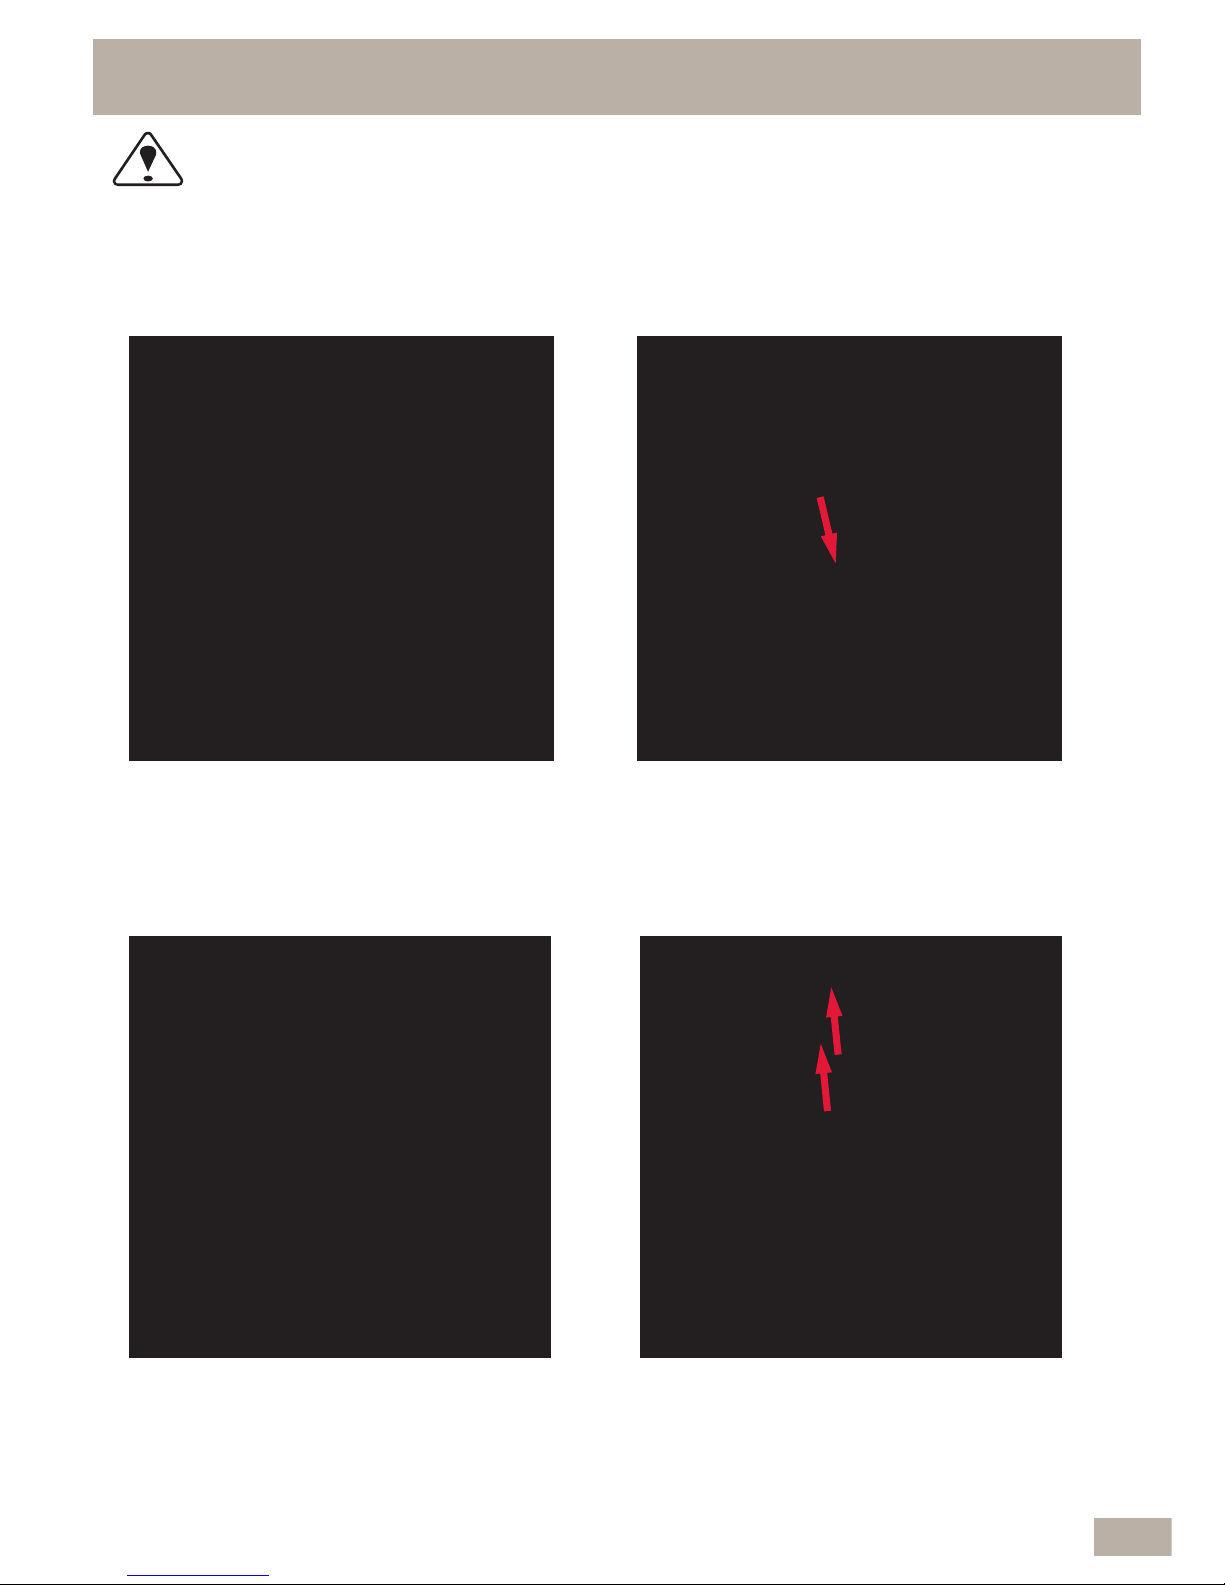
1.11 FITTING THE STROLLER SEAT TO THE FRAME
A Hold the Strol ler s eat over
the frame.
B Align the Stroll er s eat moul din gs
on both sides, over the fra me
connec ti on s oc kets lo c ated in the
middle of the Str olle r.
C Push the Stroller seat down
until both seat mould ing s are
locked into the fram e so c kets.
D Pull up on both sides of the
Stroller seat to make sure it is
securely lo c ked into the
Stroller frame.
WARNING- Always remove your child from the Stroller
seat before installing, removing or changing s eat direction.
NOTE: The se a t i s r eve r s ib l e so i t c a n f a c e in either forwa r d or
rearward position .
19
A One side at a tim e,
align the arm bar p in
with the frame
moulding as s hown.
B Press in and hold t he
engaging / releas e
button, then in sert the
pin all the way in.
C Release the but to n,
then pull on the arm bar
to make sure it is
engaged. Repeat steps
A, B & C for the other si d e.
D To relea se t he
arm bar, press in and
hold the releas e b ut to n
located under t he
arm bar conne c tor, then
pull out the arm bar.
E Rotate the arm bar
clear of the Strolle r
seat to assist wi th
puttin g a ch il d in the
Stroller.
CAUTION: When Child is in the Stroller, keep the arm bar
attached to the frame at all times.
1.12 TO FIT THE ARMBAR
F Lock the arm ba r bac k
into position after fastening
the child in th e harn es s.
Ensure the arm bar is
correctly installed. The
‘Caution’ text must appear
on the right hand s i de s o it
is possib le to read (not
upside down).
20

A To adjus t up or d own,
fully lift t he ad just in g
lever all the way up.
CAUTION: Ensure that your child’s limbs are inside the s eating area
before adjusting the backrest. be prepared to support your child’s weight
when adjusting the back
rest.
C There are 3 indic ated
seat positions while the
seat is facing forward or
rearward.
1. Upright position
2. Semi recline p osi ti on
3. Layback posi ti on
1.13 ADJUSTING THE BACKREST
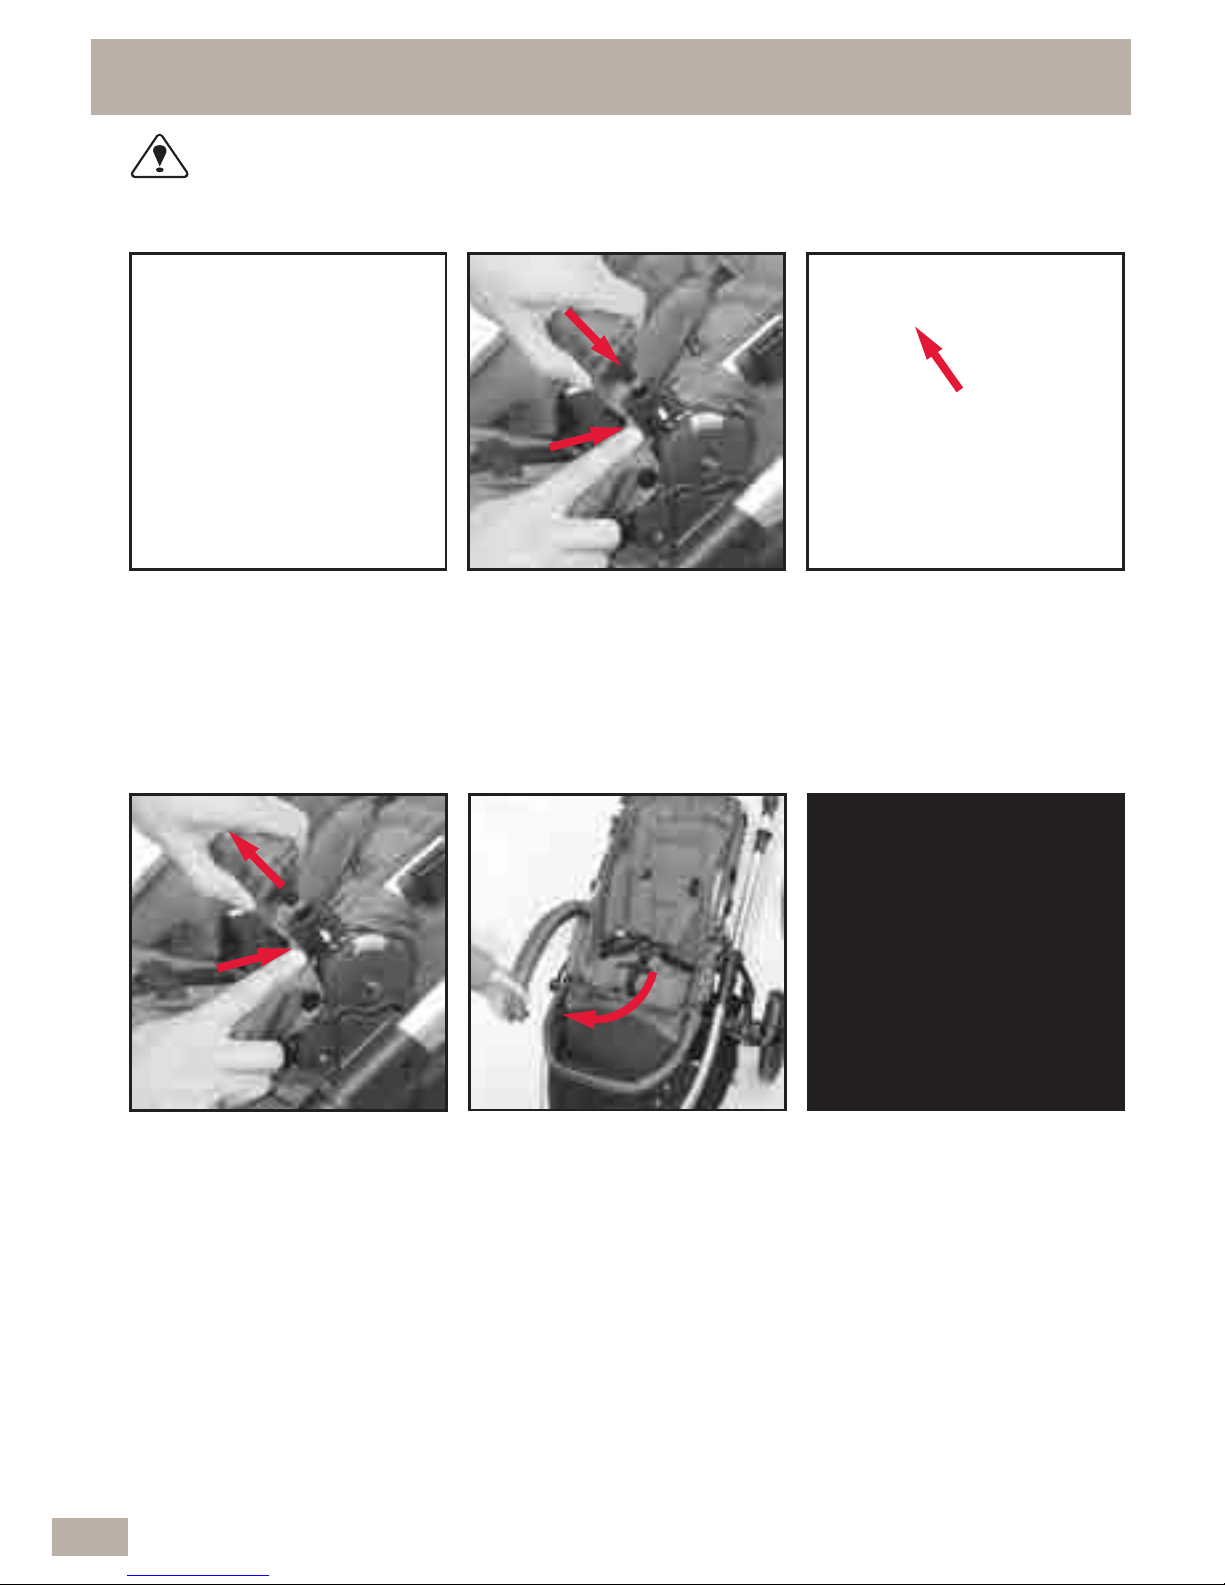
1.14 STROLLER SEAT REMOVAL
B Continue to hold t he
lever up and adjust the
seat to any one of three
positions.
A Hold the seat or ar m bar on b oth s i des wi th
your hands. Then with your fin ger o r thumb s,
press down and h ol d the g rey but ton s.
B While holdi ng th e
grey buttons, lift the seat
out of the frame.
WARNING - Always remove your child from the Stroller
seat before installing, removing or changing seat direction.
21
 Loading...