

Britax Steelcraft Zapo User Manual

ZAPO
LAYBACK STROLLER
IMPORTANT: KEEP THIS BOOKLET IN A SAFE PLACE FOR FUTURE REFERENCE.
www.britax.com.au
Series SY66A

IMPORTANT NOTES
IMPORTANT NOTES:
ALWAYS FOLLOW THE MANUFACTURERS INSTRUCTIONS.
READ ALL INSTRUCTIONS CAREFULLY BEFORE ASSEMBLY AND USE
OF THIS STROLLER.
THE CORRECT USE AND MAINTENANCE OF THIS PRODUCT IS
ESSENTIAL.
• USE GREAT CARE WHEN USING THE STROLLER ON STAIRS,
ESCALATORS, TRAVELATORS OR OTHER MOVING SURFACES.
• IT IS RECOMMENDED TO REMOVE THE CHILD FROM THE STROLLER
BEFORE GOING UP OR DOWN STAIRS OR ESCALATORS.
• DO NOT LIFT THE STROLLER BY THE ARM BAR BECAUSE IT MAY
DISENGAGE.
• DO NOT ALLOW CHILDREN TO STAND ON THE SEAT.
• DO NOT HANG BAGS OR GOODS FROM THE HANDLE AS THIS
COULD CAUSE THE STROLLER TO TIP OVER.
• DO NOT LEAVE THE STROLLER AND ITS ACCESSORIES NEAR AN
OPEN FIRE OR EXPOSED FLAME.
• DO NOT PLACE MORE THAN 4KG IN THE BASKET, OR 1KG IN THE
CANOPY POCKET (IF SUPPLIED).
02

WARNINGS
WARNINGS: TO AVOID INJURY OR DEATH:
ALWAYS APPLY THE BRAKES WHENEVER THE STROLLER IS
STATIONARY.
• DO NOT LEAVE CHILDREN UNATTENDED.
• SECURE THE CHILD IN THE HARNESS AT ALL TIMES.
• DO NOT CARRY EXTRA CHILDREN OR BAGS ON THIS STROLLER.
• MAKE SURE CHILDREN ARE CLEAR OF ANY MOVING PARTS IF YOU
ADJUST THE STROLLER.
• DO NOT USE ANY ACCESSORIES OTHER THAN THOSE APPROVED
FOR USE WITH THIS STROLLER BY BRITAX.
• IT IS UNSAFE TO USE ACCESSORIES NOT APPROVED FOR USE WITH
THIS STROLLER.
• THE MAXIMUM WEIGHT OF THE CHILD USING THIS STROLLER IS
NOT TO EXCEED 20KG.
FOR IMPORTANT NOTES AND WARNINGS ON ACCESSORIES REFER TO THEIR INDIVIDUAL SECTIONS IN THIS BOOK.
THE MAXIMUM WEIGHT VARIES FOR EACH ACCESSORY.
CAUTION
This CAUTION Symbol is shown at certain steps in
this Instruction Manual to highlight the danger
of being injured by moving parts.
03

MANUAL HANDLING TECHNIQUES
The SMART lifting technique
This technique can be used to pick up small light loads from low levels.
Size up the Load
• Assess the load (size, shape and weight).
• Assess whether the load needs to be moved;
• Where is it going to be placed” Check that there are no obstructions;
• Assess whether mechanical or human assistance is required.
Move the Load as close to the body as possible
• A load is heavier to lift or carry if it is not close to the body.
• The whole hand should be used to ensure a firm grip.
Always bend your knees
• Maintain balance.
• Keep feet apart and in a comfortable position.
• Minimise lower back bending.
• Bend knees preferable at as large an angle as possible but not at a right
angle - use a semi squat in preference to a full squat.
Raise the load with your legs
• Achieve the lift smoothly and without jerkiness.
• Maintain the normal curvature of the spine to allow the force of the
load to be distributed evenly from the spine to the pelvis.
Turn your feet in the direction that you want to move the load.
• Avoid unnecessary bending, twisting and reaching.
• Change direction by turning your feet and not your back.
• To set the load down, squat down, keep your head up and let your legs
do the work.
Remember to ‘THINK TALL’ chest lifted, shoulders relaxed, chin
tucked in and head level.
04
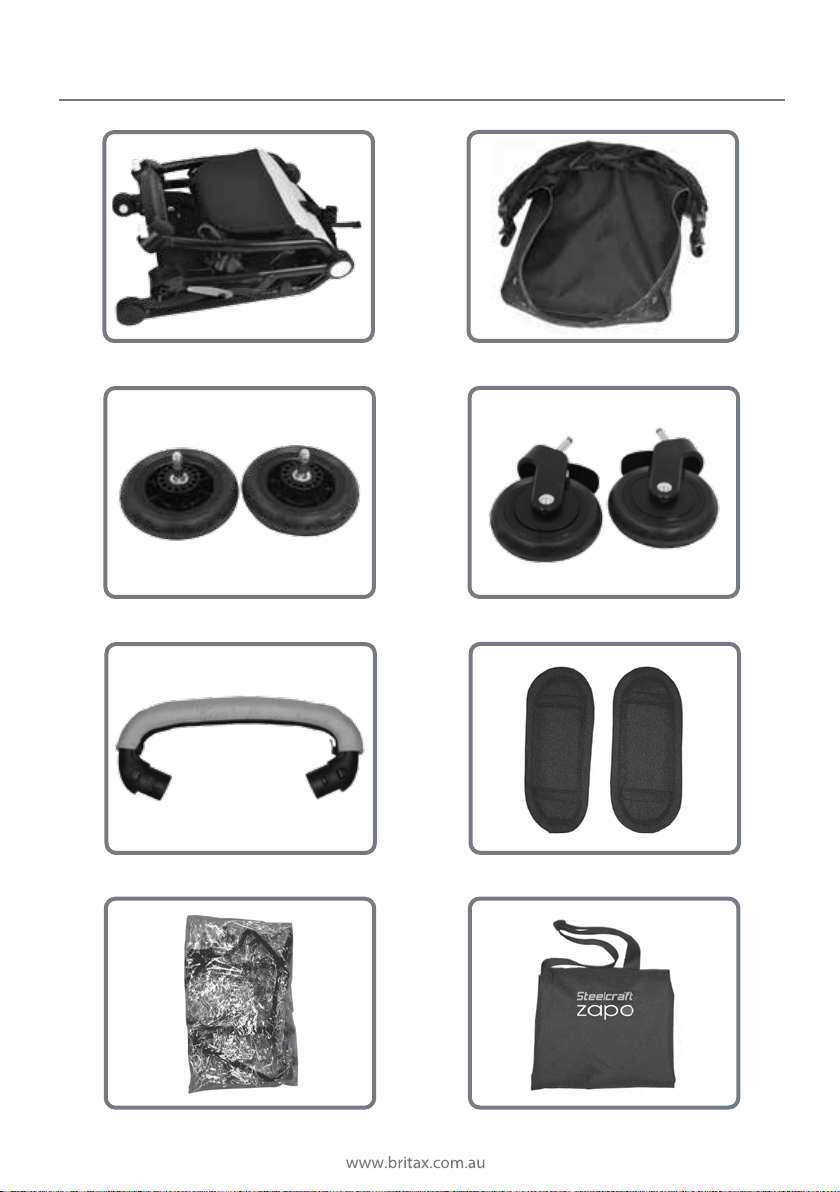
PARTS LIST
A 1 x Stroller Frame, Seat & Basket
C 2 x Rear Wheels
E 1 x Arm Bar
B 1 x Canopy
D 2 x Front Wheels
F 1 x set of Shoulder Pads
G 1 x Rain Cover
H 1 x Travel Bag
05

STROLLER ASSEMBLY
OPENING THE STROLLER FRAME
PLEASE REFER TO PAGE 4 FOR SMART LIFTING TECHNIQUES.
IMPORTANT NOTES:
• RELEASE THE STORAGE LATCH WITH DUE CARE AND OPEN THE
FRAME.
• WHEN OPENING THE STROLLER, BE AWARE OF THE DANGER OF
BEING INJURED BY MOVING PARTS AND LOCKING DEVICES DURING
THE PROCESS. KEEP ALL HANDS AND LIMBS CLEAR OF THESE
PARTS.
• THERE IS POTENTIAL FOR FINGERS OR PARTS OF THE BODY TO BE
INJURED WHEN THE STROLLER IS BEING UNFOLDED, DUE CARE
SHOULD BE EXERCISED.
• KEEP CHILDREN CLEAR OF THE STROLLER WHEN UNFOLDING THE
STROLLER.
• OPEN THE STROLLER SLOWLY AND BE CAREFUL WHERE YOU PLACE
YOUR HANDS.
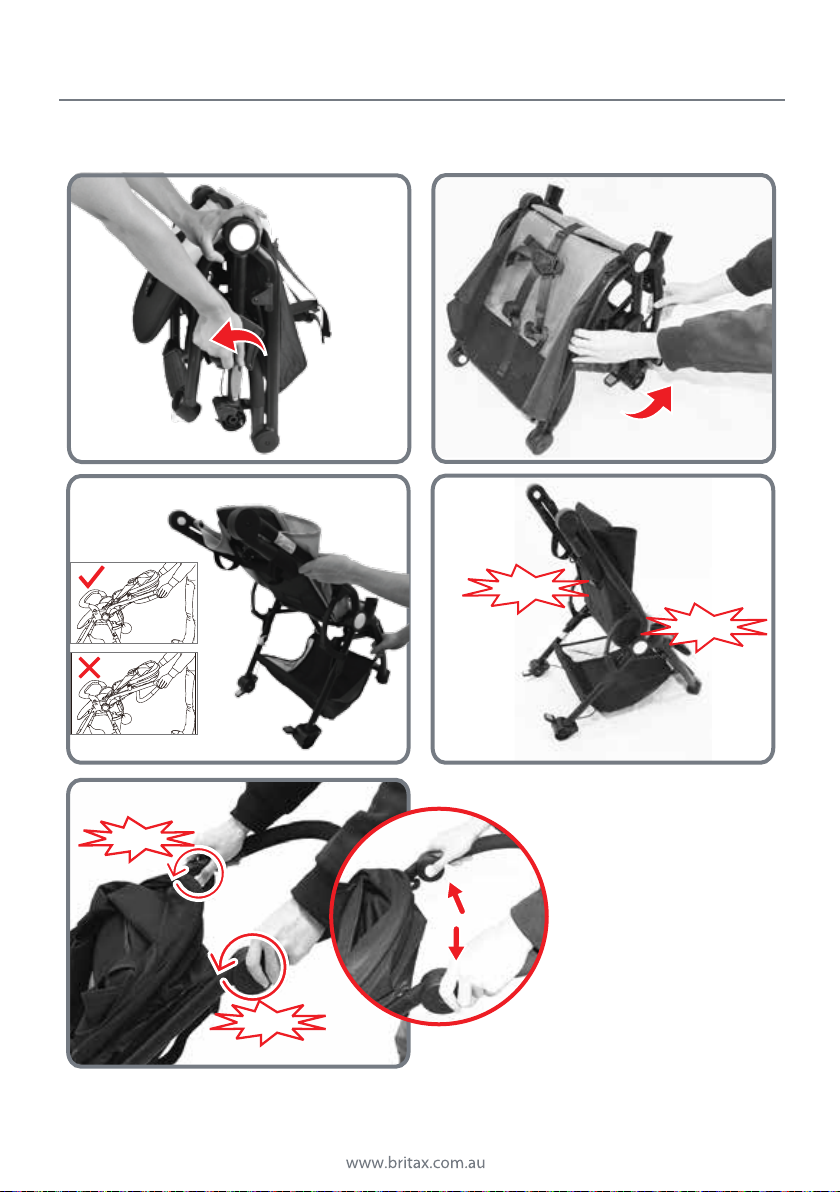
OPENING THE STROLLER FRAME
A Stand the frame on its side. Hold the stroller with one hand and with
the other hand release the storage latch.
B With each hand holding the front and rear leg frames continue to
open the frame until the stroller frame is completely upright. You
should hear a ‘click’ which indicates the frame is securely locked.
C The handle is folded down flat against the backrest. Raise the handle to
the upright position by pressing in the adjuster buttons on the inside
of each handle moulding at the same time and lifting the handle
upwards until it makes a ‘click’ and locks into position.
See Page 7 for photos of each of the above steps.
06
STROLLER ASSEMBLY
OPENING THE STROLLER FRAME
A B
click
click
B B
click
click
C
press
07
STROLLER ASSEMBLY
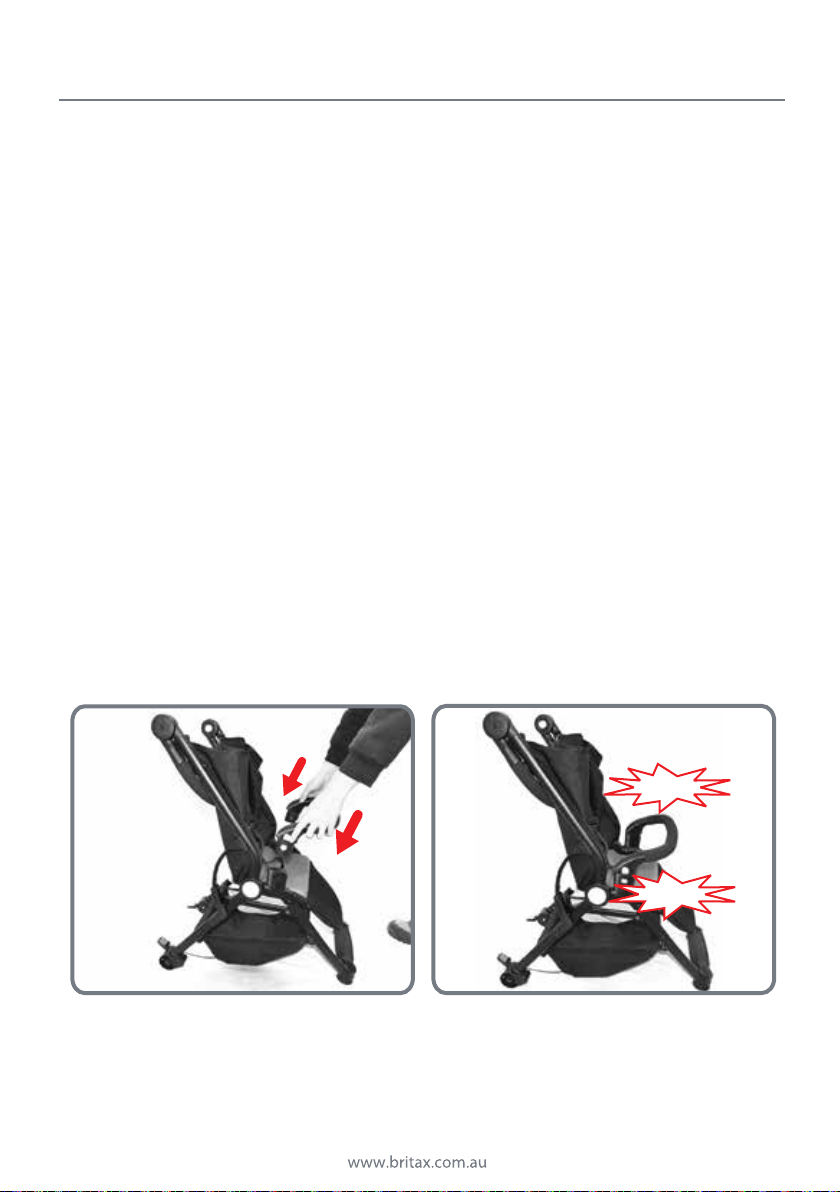
ATTACHING AND REMOVING THE ARM BAR
IMPORTANT NOTE:
WHEN A CHILD IS IN THE STROLLER IT IS RECOMMENDED THAT THE ARM
BAR IS ATTACHED TO THE STROLLER AT ALL TIMES.
A Insert the arm bar mouldings into the sockets on each side of the
stroller frame and push down on the arm bar until a ‘click’ is heard
which indicates the arm bar has locked into the sockets. Pull up on
the arm bar to ensure that it is securely locked into the sockets
B To assist with putting a child in the stroller you can release the arm bar
on one side. Press the grey button on the side of the arm bar moulding
and pull the arm bar up and out of the socket. Rotate the arm bar clear
of the stroller. Reattach the arm bar after fastening the child in the
harness.
C To remove the arm bar, press the grey button on each side of the arm
bar moulding and pull the arm bar up and out of the socket.
A A
See Page 9 for photos of steps B & C.
08
click
click
STROLLER ASSEMBLY
ATTACHING AND REMOVING THE ARM BAR
press
B B
B
press
C
C
09
STROLLER ASSEMBLY
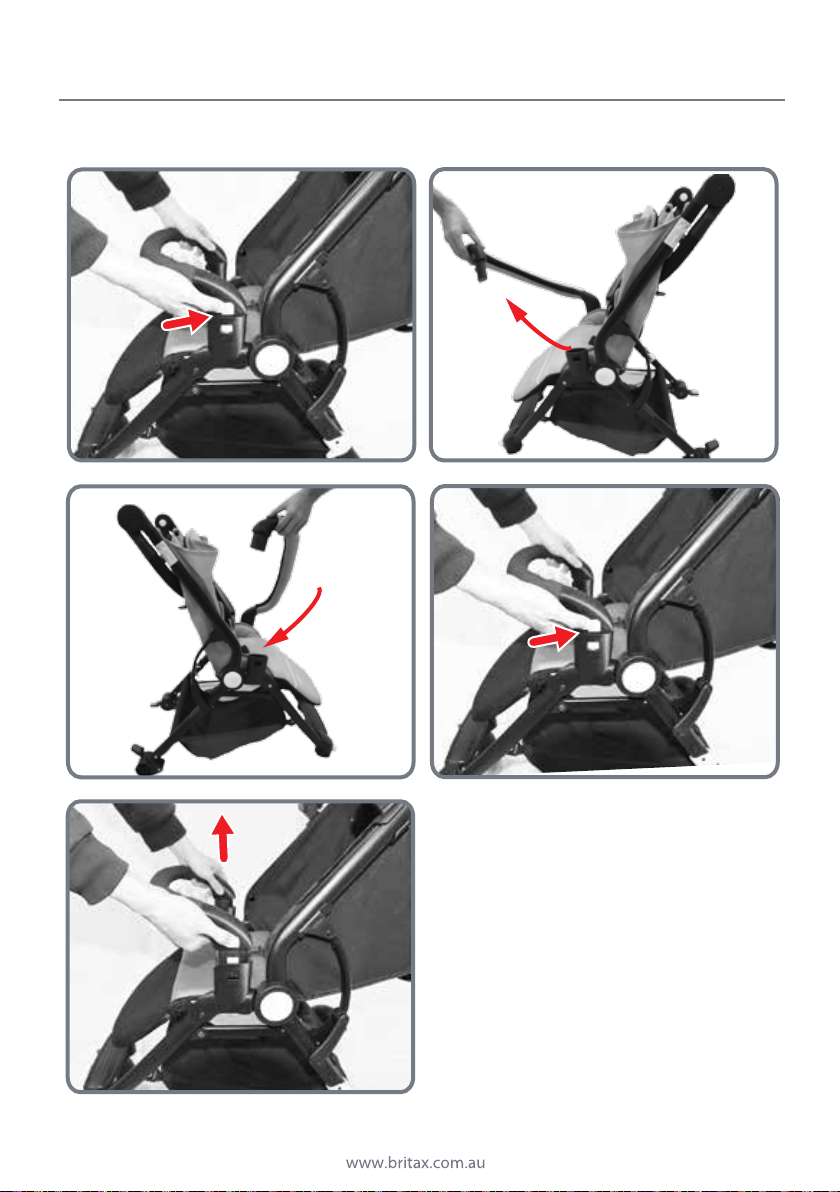
ATTACHING THE CANOPY
IMPORTANT NOTE:
The sun is very strong. DO NOT LEAVE YOUR CHILD EXPOSED TO THE
SUN. The canopy or hood on this product will not give your child
total protection from the harmful rays of the sun.
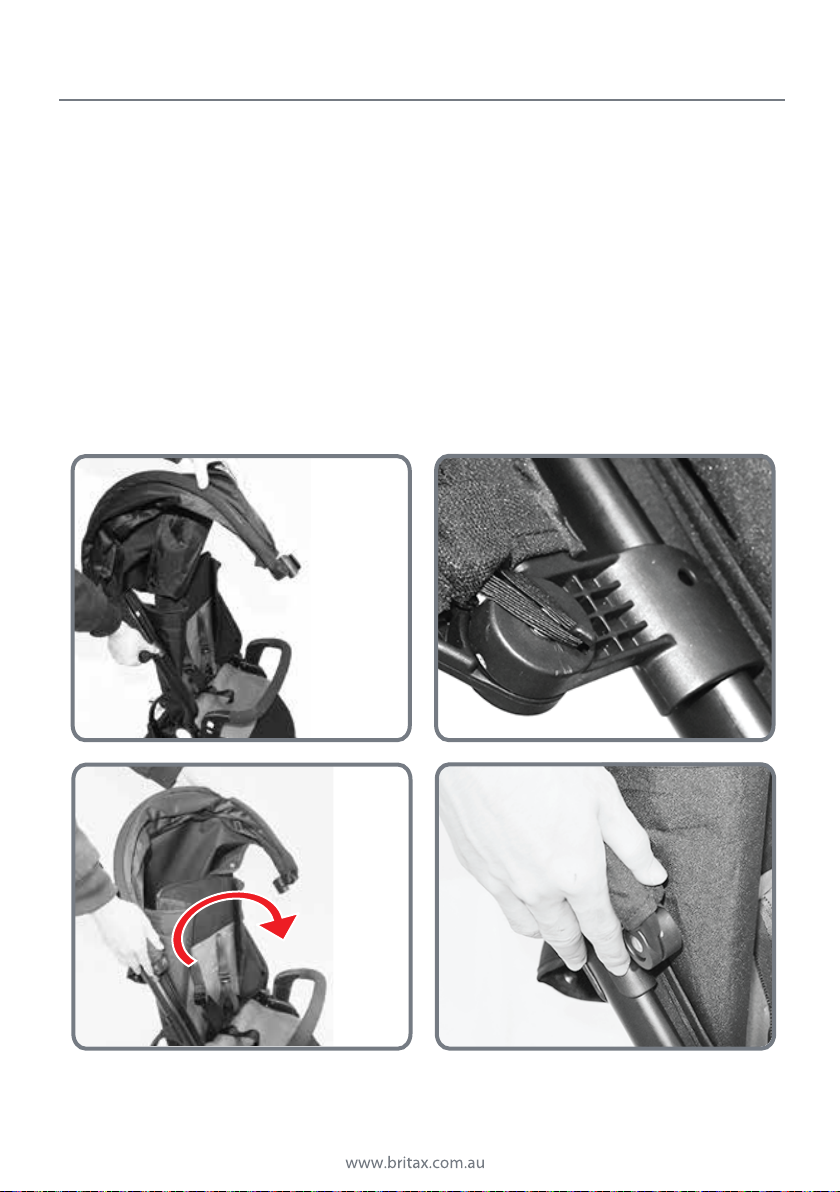
A Position the canopy side on to the stroller frame & place the canopy
bracket on the stroller frame as shown.
B Rotate the canopy so the bracket clasp fastens to the stroller frame.
A A
B B
10

STROLLER ASSEMBLY
ATTACHING THE CANOPY
C Attach the canopy to the other side of the stroller frame by pushing
the canopy bracket onto the stroller frame until the bracket clasp
fastens onto the frame.
D Pull the canopy up the stroller frame so the canopy brackets connect
with the locking pins on the inside of the stroller frame.
C C
D D
Locking pin
11
 Loading...