

Britax SICT Easy Adjust 7200/A/2010 Series Instructions For Use Manual
IMPORTANT: KEEP THIS BOOKLET IN THE PLACE PROVIDED ON THE CHILD RESTRAINT
SICT™ Easy Adjust™
Convertible Child Restraint
Series No. 7200/A/2010

INDEX
2
INTRODUCTION
WARNINGS
SHOULDER HEIGHT MARKERS A GROWING CHILD
SHOULDER HEIGHT MARKERS
SHOULDER HEIGHT MARKERS THE NEXT STEP
SPECIAL FEATURES: REARWARD-FACING
SUITABLE FOR USE
HOW TO SETUP
HOW TO INSTALL
HOW TO USE
SPECIAL FEATURES: FORWARD-FACING
SUITABLE FOR USE
HOW TO SETUP
HOW TO INSTALL
HOW TO USE
CARE & MAINTENANCE
ACCESSORIES
TRAVELLING TIPS
INSTALLATION OF CAR ANCHOR FITTING
IN CASE OF ACCIDENT
3
PAGE
7
4
6
11
8
9
13
18
24
28
36
30
31
42
41
48
50
52
56
INTRODUCTION
3
To be used only in a rearward-facing position for an infant until their shoulders reach the lower
shoulder height marker (approximately 12 months of age). Then to be used in a forward-facing
position until their shoulders reach the upper shoulder height marker (approximately 4 years of age).
Continue to use this child restraint until the child reaches this limit.
Do not use forward facing until child's shoulders are above the lower shoulder height marker.
Infants are at risk of serious injury if they face forward too early.
Children are at risk of serious injury if they move to booster seats too early.
Children that have outgrown this restraint are safest in a booster seat until their shoulders reach the
upper shoulder height marker of the booster seat.
CAREFULLY READ ALL THE INSTRUCTIONS FOR INSTALLATION. IN THE EVENT OF DOUBT ABOUT
THE METHOD OF INSTALLATION, CONSULT BRITAX CHILDCARE OR AGENT OR A CHILD RESTRAINT
FITTING STATION AUTHORISED BY A RELEVANT TRANSPORT AUTHORITY OR, IN NEW ZEALAND,
THE AGENT FOR THE VEHICLE.
No child restraint can guarantee absolute protection from injury in every crash. However, to ensure
that your child gets all the protection designed into the restraint PLEASE READ AND FOLLOW THESE
INSTRUCTIONS EXACTLY and use only BRITAX Safe-n-Sound recommended parts and accessories.
You purchased a model with the added protection of a Side Impact Cushion Technology™ you can see
the Side Impact Cushion tted on the sides of the seat. There is no installation or assembly required
to activate the Side Impact Cushion, it only functions in a side crash to provide additional protection to
the occupant.
THIS RESTRAINT MUST BE ATTACHED TO A CHILD RESTRAINT ANCHORAGE POINT IN THE CAR.
REFER TO CAR OWNER’S HANDBOOK FOR LOCATION OF ANCHORAGE POINTS. REFER TO A CHILD
RESTRAINT FITTING STATION IF NO ANCHORAGE POINTS ARE IN THE MOTOR CAR.
Always store the instruction book in the pocket provided on the side or the back of the cover.
• Use the restraint exactly as shown in the instructions.
• Fit the restraint rmly to the car seat.
• Fit the harness rmly to the child.
• A loose restraint or harness is dangerous.
• Supervision of children is needed because they may be able to undo buckles and adjusters.
• DO NOT LEAVE CHILDREN UNATTENDED IN THE CAR.
• Do not alter or modify this restraint.
• Repairs must only be done by the manufacturer or agent.
• Do not allow the restraint to come into contact with polishes, oils, bleach and other chemicals.
• Destroy the restraint if it has been in a severe crash, even if no damage is visible.
• DO NOT USE THIS RESTRAINT WITHOUT A COVER.
• Regularly check the restraint components, straps & other tments for correct function and
condition. Seek prompt repair.
• To ensure baby’s back is evenly supported do not put more than one nappy on the baby and
make sure the nappy is not thickly folded at the back.
• If an airbag is tted in the desired seating position where the child restraint is to be tted, follow
the vehicle manufacturer's warnings and instructions.
• DO NOT USE A REAR-FACING CHILD RESTRAINT WHERE AN AIRBAG IS FITTED IN THE FRONT
OF THE SEATING POSITION.
• The restraint should not be purchased or sold as a second hand item. It is recommended not to
use child restraints older that 10 years as the protection in an accident may be reduced.
• THIS RESTRAINT IS NOT SUITABLE FOR USE WHERE THE ANCHORAGE STRAP MAY FALL
INTO A SPLIT IN THE SEAT BACK (E.G. HATCHBACK OR WAGON).
4
DO NOT LEAVE CHILDREN UNATTENDED IN THE CAR.
• The restraint should not be purchased or sold as a second hand item. It is recommended not to
use child restraints older that 10 years as the protection in an accident may be reduced.
• The restraint is not intended to be a substitute baby cot or bed. It is only designed to enable safe
transportation of children in motor vehicles. Do not leave a baby in the restraint for long periods
of time.
• Upper anchorage straps and extension straps may be damaged by unsecured cargo in a
collision. Secure or remove hazardous cargo before using this strap. Hatchback or wagon: Do
not use the child restraint where the upper anchorage strap may fall into a split in the seat back.
• Protect all webbing from abrasion and cutting by sharp corners and edges.
• Do not lift the seat by the headrest.
• Do not store in areas that may get hot, like in car boots, roof space, beside shed walls which get
hot in summer. Do not place heavy items on top of the seat as this may distort the plastic.
5
:
6
SHOULDER HEIGHT MARKERS
A GROWING CHILD
Newborn (Rearward Facing)
Shoulder height
label (hidden)
Label A
Rearward Facing
Forward Facing
Shoulder
height label
Label A
Older baby (Rearward Facing)
Turn to forward-facing when the child's
shoulders reach the lower shoulder height marker.
Move to the next form of child restraint when the child's
shoulders reach the upper shoulder height marker.
Shoulder Height Labels
Label A
Label B
Child Use (Forward Facing)
7
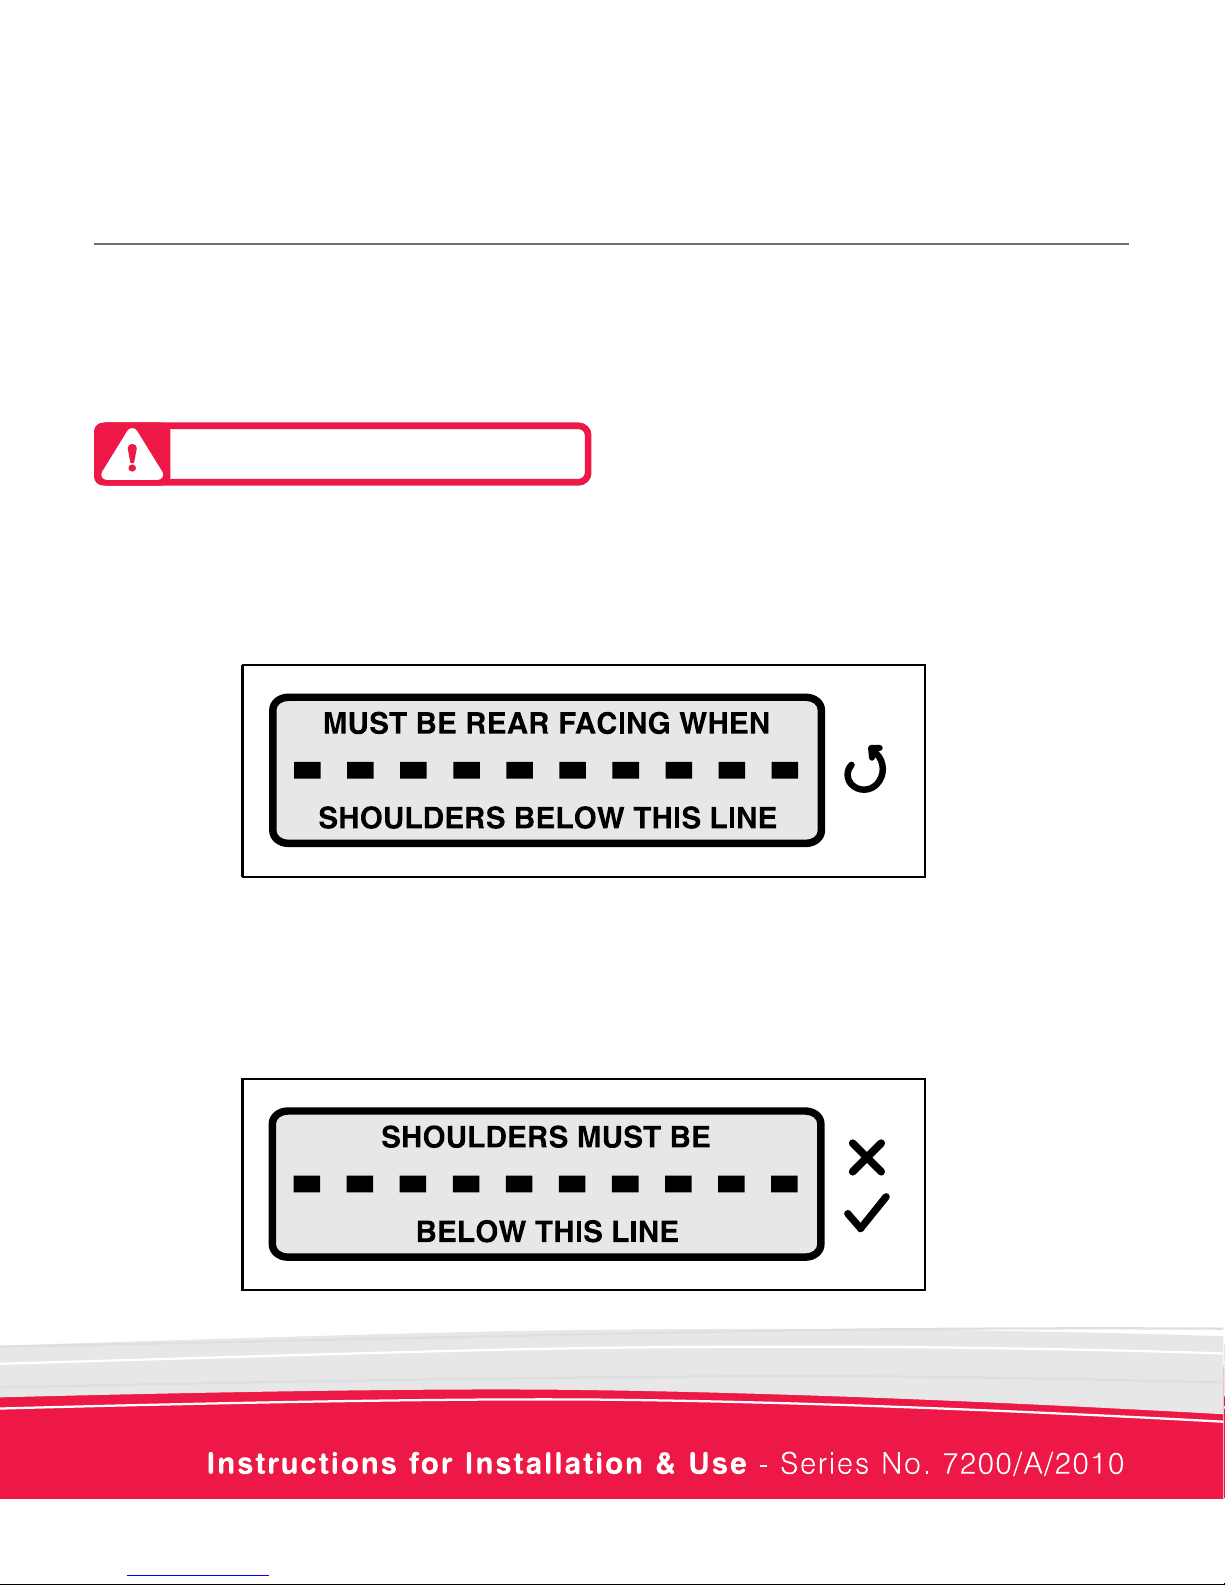
SHOULDER HEIGHT MARKERS
Shoulder height markers are provided on this restraint for a visual indication that the child is safe to
ride in this restraint. Do not turn to forward-facing until the child's shoulder's reach the lower marker.
Do not continue to use the restraint if the child's shoulders are above the top marker.
LOWER SHOULDER HEIGHT MARKER : Label A
When the child's shoulders reach the lower marker, the child restraint must be turned to face towards
the front of the vehicle or move the child to another Forward Facing seat with in built harness.
Approximately 12 months of age.
UPPER SHOULDER HEIGHT MARKER : Label B
When the child's shoulders reach this upper marker, the child is now too big for the child restraint. It is
now time to move to the next child restraint. Approximately 4 years of age.
IMPORTANT: Follow this advice.
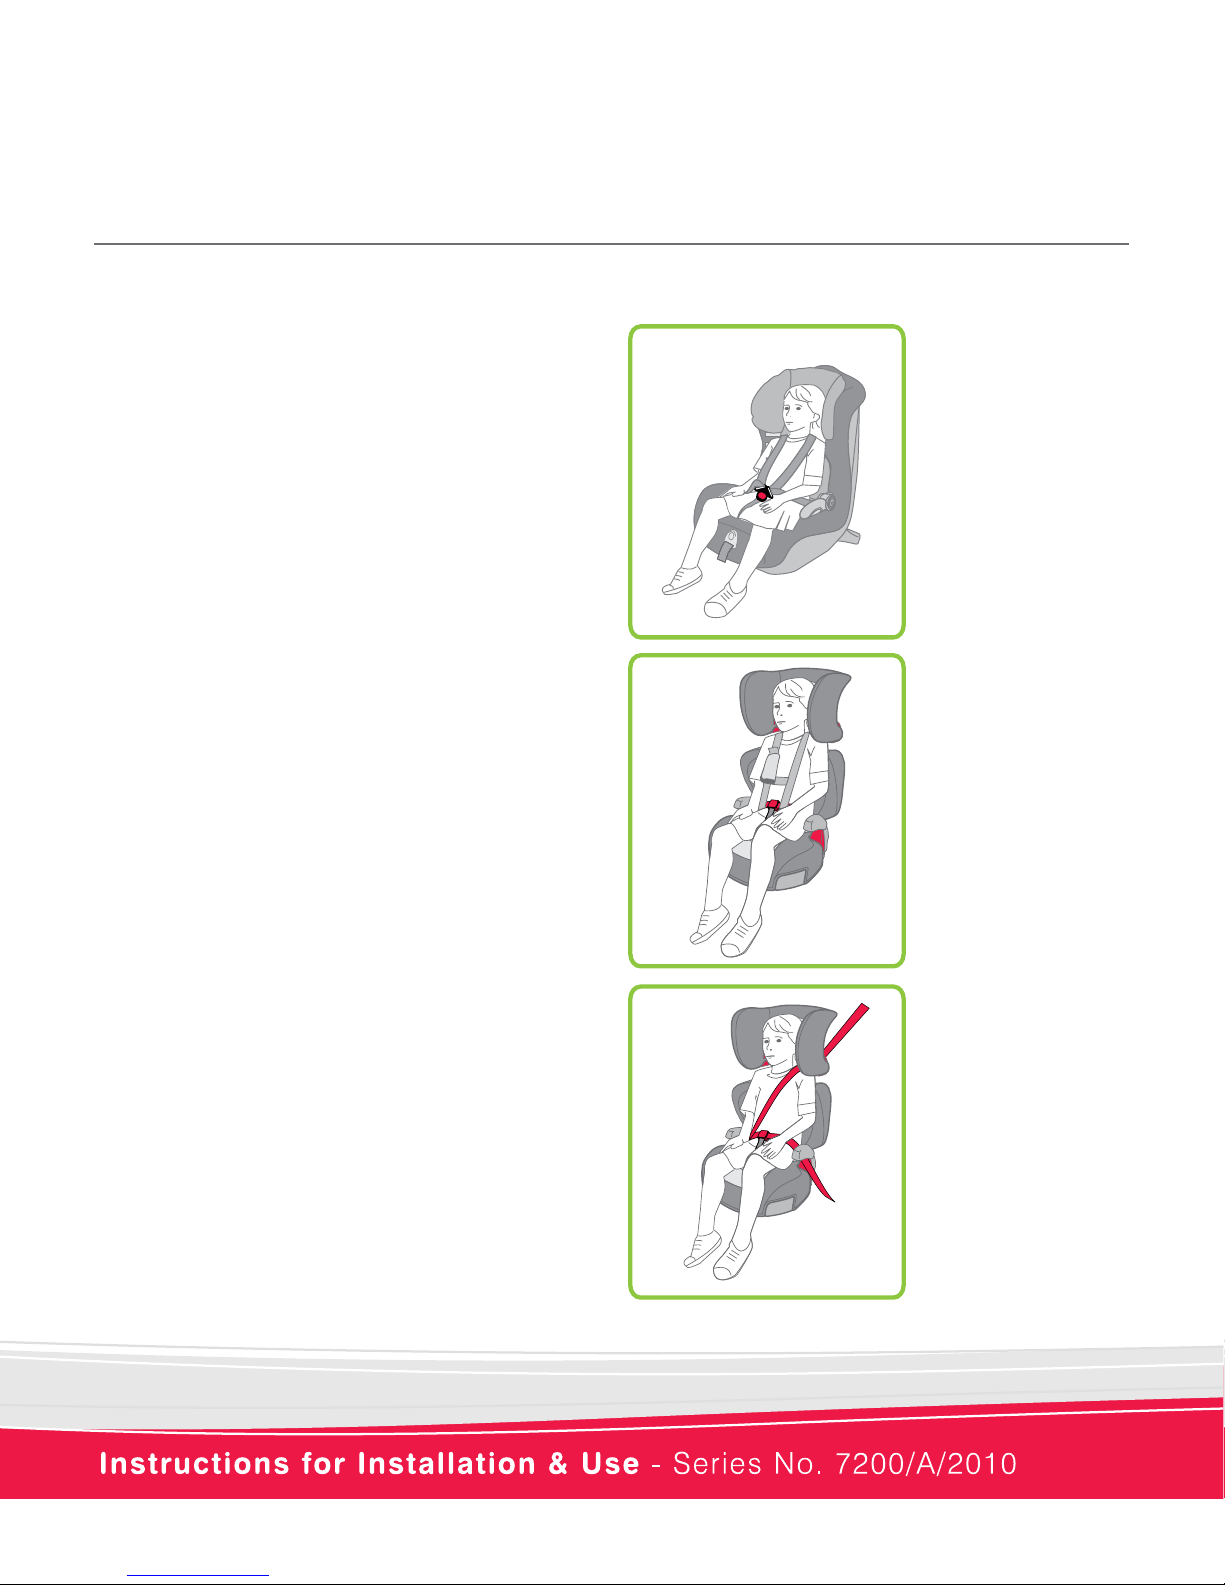
Booster seat
and lap-sash
seatbelt.
Convertible Booster
seat used with
internal harness
until approximately
4 years and then as
a booster seat.
Booster seat and
accessory Child
Harness.
For the next child restraint choose
from:
• Convertible Booster Seat ( Note: you can
move to a convertible booster seat once the
child's shoulders reach the lower shoulder
height marker),
OR
• Booster Seat and an accessory Child Harness
(A Child Harness must be used if the car is
tted with a lap only seatbelt in the desired
seating position),
OR
• Booster seat and lap-sash seatbelt.
SHOULDER HEIGHT MARKERS
THE NEXT STEP
8
9
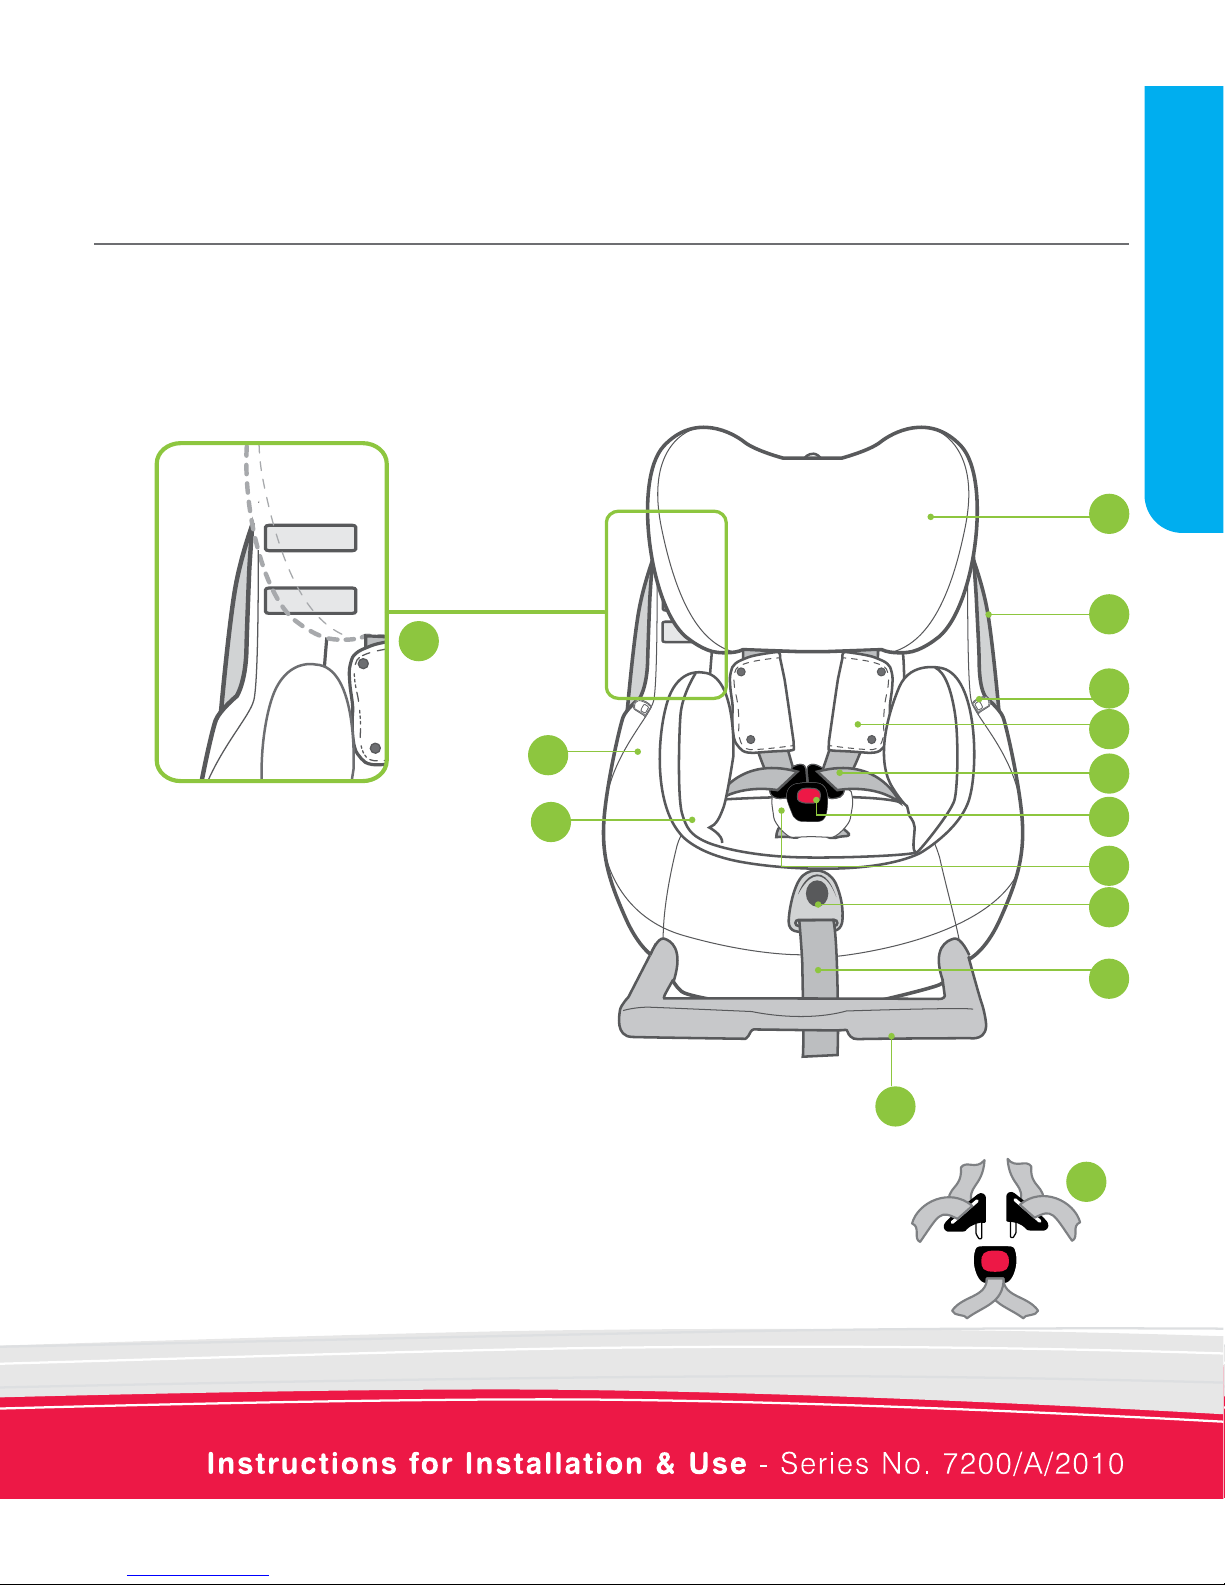
1. AHR Easy Adjust Headrest
2. Side Impact Cushion Technology™
3. Harness Tongue holders
4. Shoulder Pads
5. Fully adjustable 6 point harness
6. Quick Release Buckle (Red button)
7. Ez Buckle System
8. Harness Adjustment Button
9. Harness Adjustment Strap
10. Stabilising Bar for rearward facing use
11. Infant Safety Cushion™ Insert
12. Padded cover for comfort (may vary in style)
13. Shoulder Height Markers (Hidden behind headrest)
Shoulder Height
Markers hidden
under headrest in
lowest position.
SPECIAL FEATURES: REARWARD-FACING
To be used only in a rearward-facing position until the infant's shoulders reach the lower shoulder
height marker (approximately 12 months of age).
1
2
5
6
9
10
12
11
13
3
7
8
4
5
Harness Tongues
Harness
Buckle
REARWARD FACING
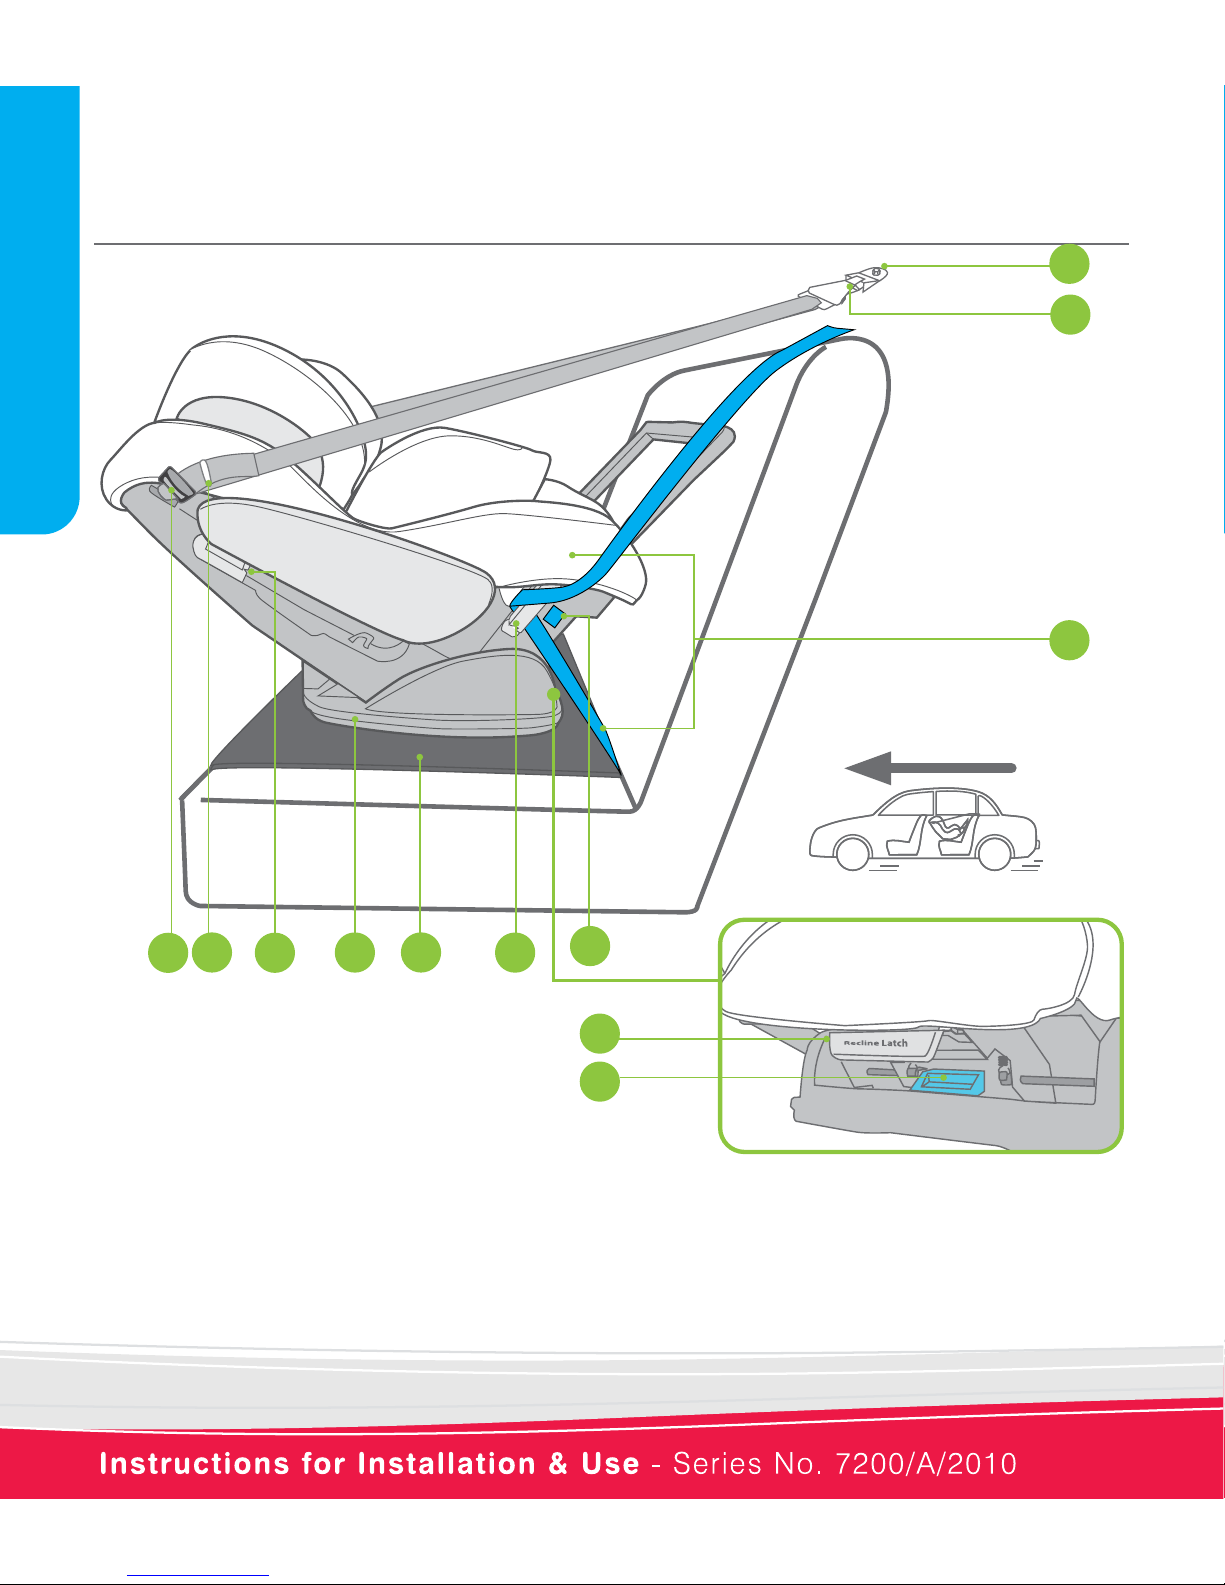
10
RECLINE MECHANISM
14. Car's Anchor Fitting
15. Attachment Clip
16. Vehicle seatbelt
17. Blue Release Latch
18. Grey Recline Latch
19. Blue REARWARD FACING BELT PATH label
20. Rearward-facing Lock-off
21. Messy Mat™
22. Base (shown in rearward-facing mode)
23. Forward facing sash belt lock-off
24. Upper Anchorage Storage Band
25. Upper Anchorage Strap Adjuster
SPECIAL FEATURES: REARWARD-FACING
Front of Vehicle
22
21
17
14
15
16
18
20
19
23
24
25
REARWARD FACING
11
SUITABLE FOR USE
TO BE USED WITH A LAP SASH OR LAP ONLY SEATBELT IN
THE BACK OF MOST CARS WITH FORWARD-FACING SEATS.
To be used only in a rearward-facing position until the
child's shoulders reach the lower shoulder height marker
(approximately 12 months of age). Then to be used in
forward-facing position until the shoulders reach the upper
shoulder height marker (approximately 4 years of age).
Continue to use this restraint in this rear facing mode until the
child's shoulders reach the limit of the lower shoulder height
marker before turning the seat to face forward. A baby's neck
muscles may be unable to support their head thus the baby
should remain rear facing until the neck muscles become
stronger.
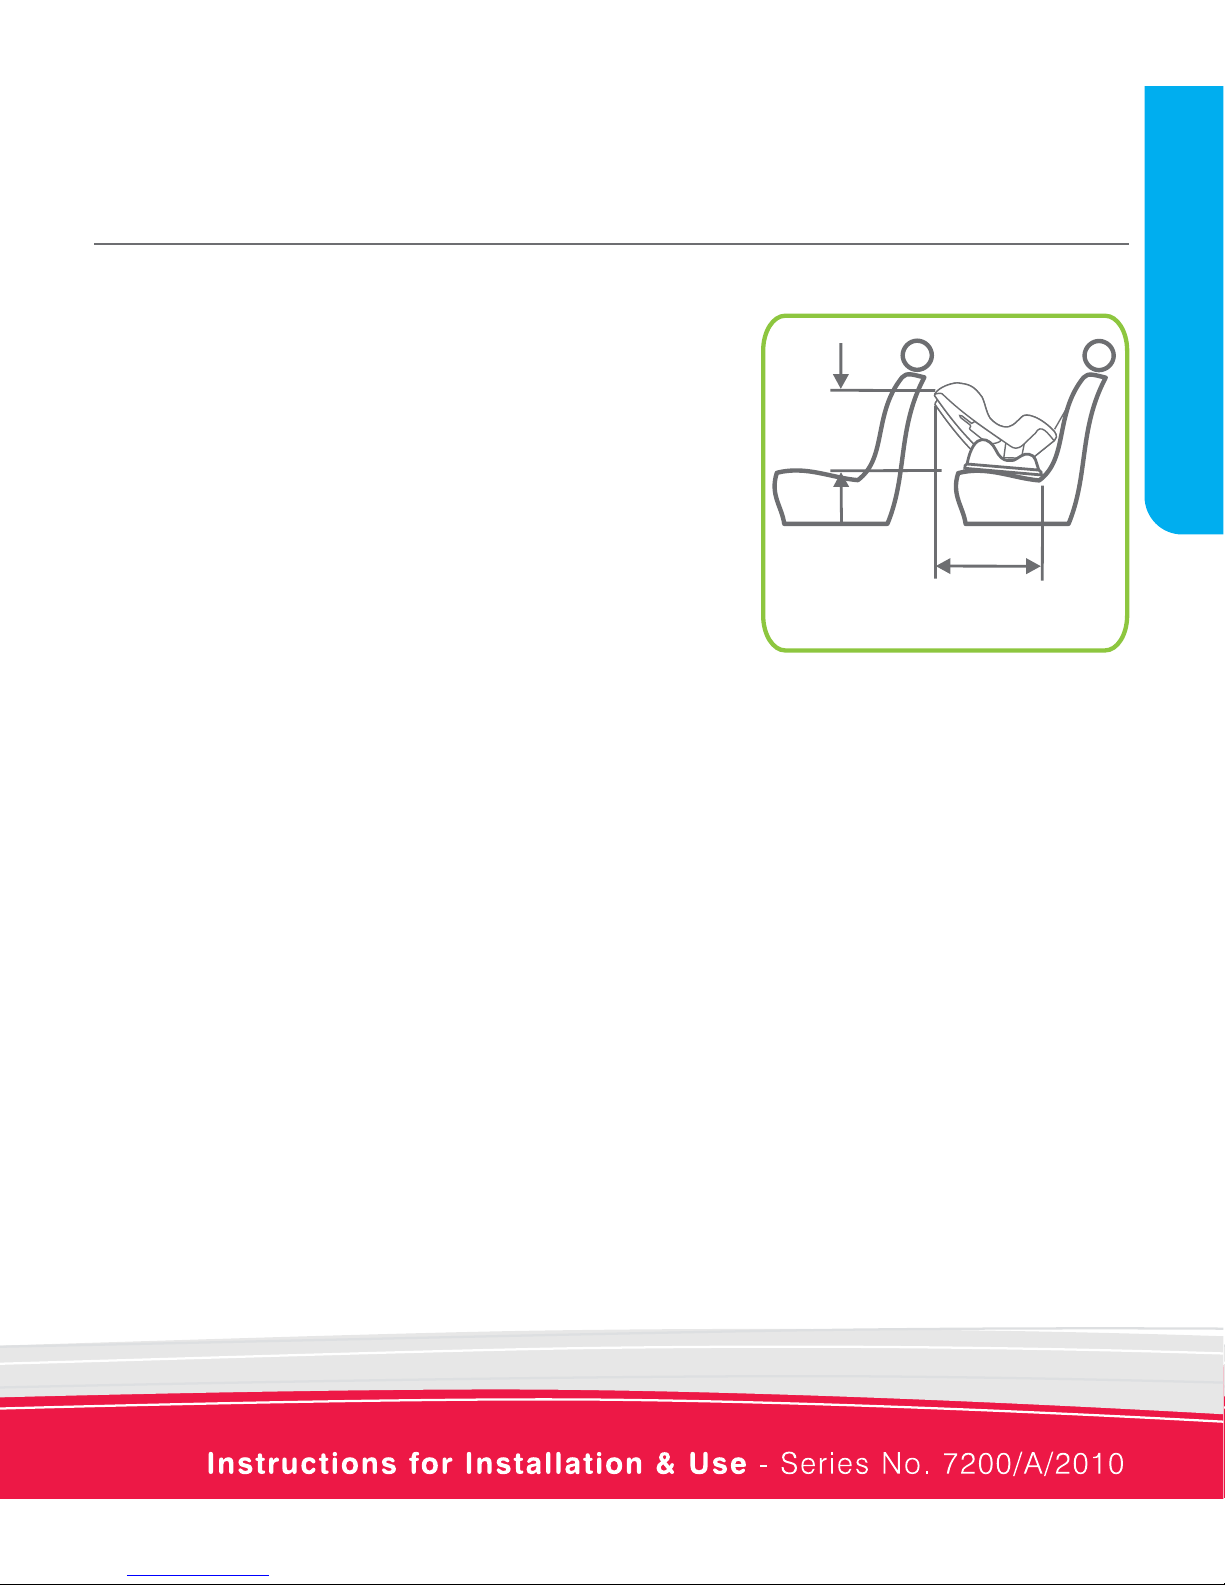
The purchaser should check the measurements between the
front of the seat back of the rear seat and all front seats in
the car in which the child restraint is intended to be used, to
ensure that the space is sufcient. If you have the restraint
check it ts in your car.
Regional Road Rules may prohibit the use of this restraint
in the front seat until the child is 4 years of age. Check your
Regional Road Rules for exemptions.
710mm
600mm
Child Restraint Width 520mm
REARWARD FACING
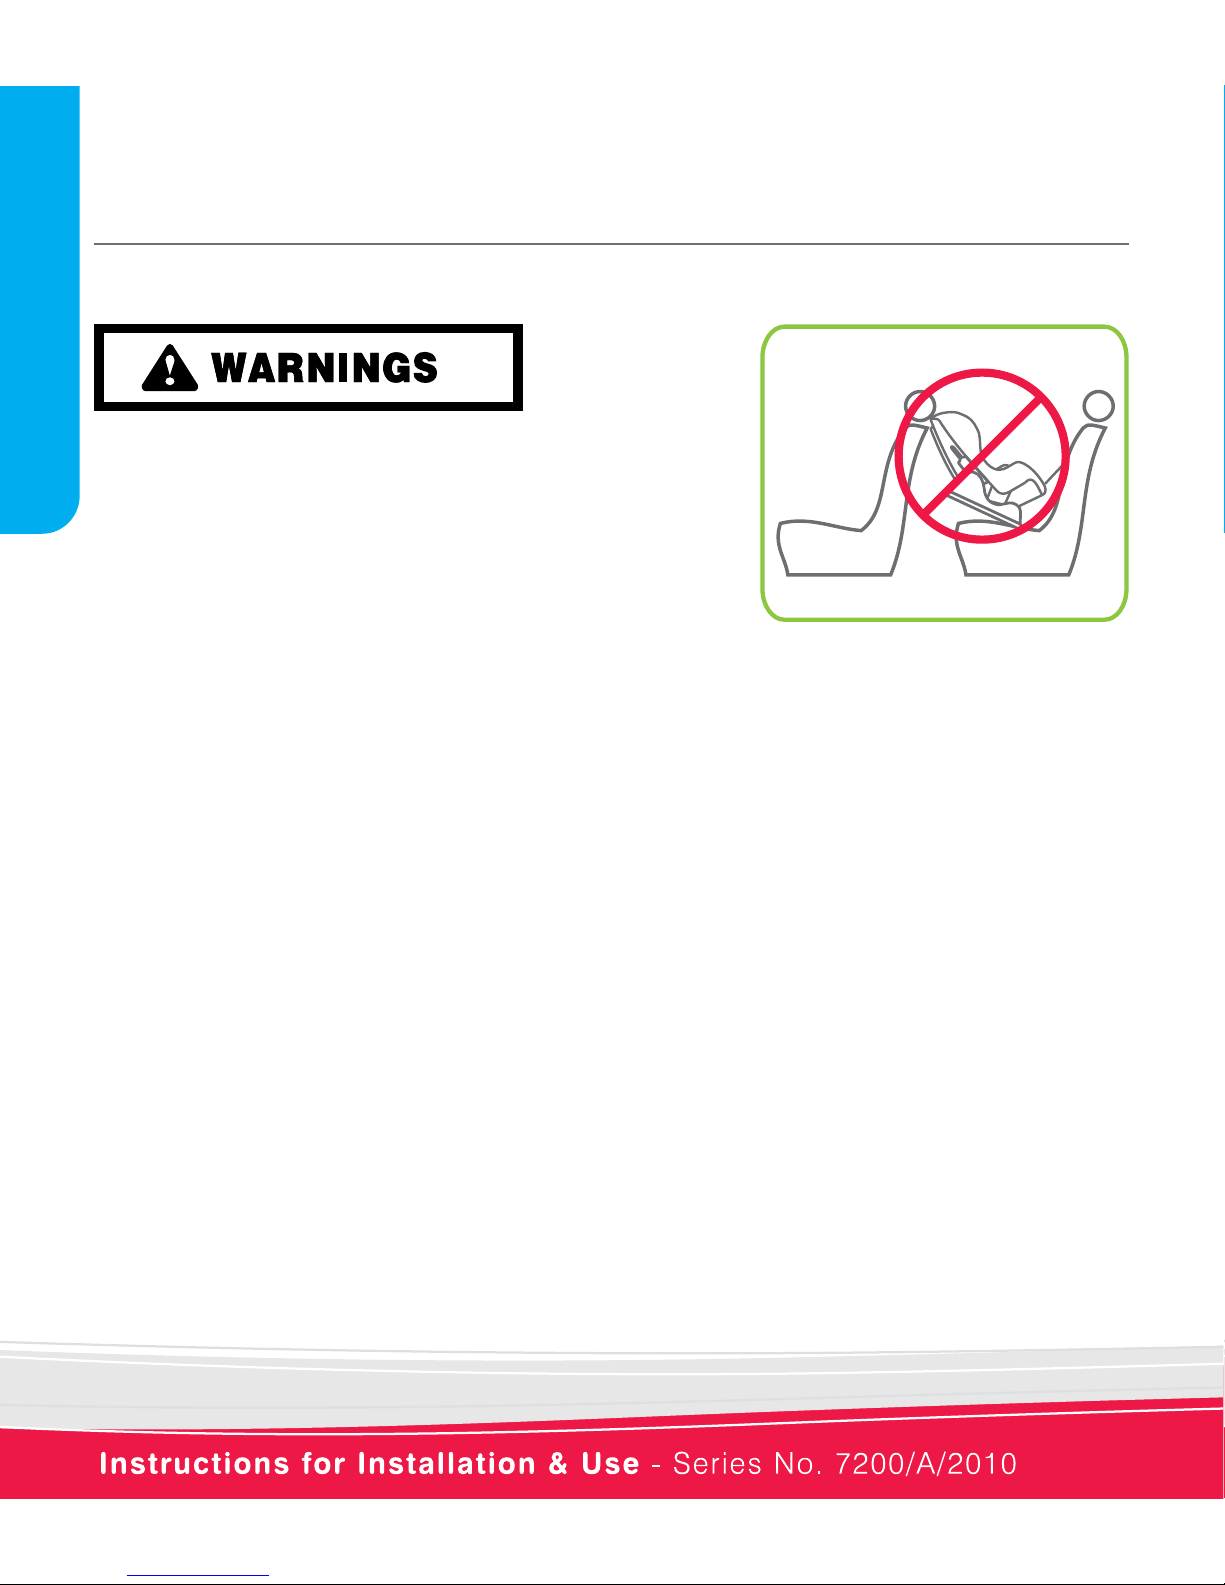
SUITABLE FOR USE
DO NOT USE RESTRAINT IN REARWARD FACING
MODE WITHOUT STABILISING BAR FULLY EXTENDED.
Do not use the restraint without the Upper Anchorage
Strap correctly attached.
DO NOT USE A REAR FACING CHILD RESTRAINT
WHERE AN AIRBAG IS FITTED IN FRONT OF THE
SEATING POSITION.
Do not use on any vehicle seat which faces sideways
or rearwards.
Never leave babies or toddlers in a stationary car in the sun because of the risk of heat exhaustion.
Ensure babies and toddlers have adequate ventilation and are shaded from direct sunlight through side
or rear windows.
Do not allow the front seat to alter
the installed position of the restraint.
It is permissible to allow the restraint
to touch the front vehicle seat.
CHILD RESTRAINT ANCHORAGE
To use this child restraint, the car will need a child restraint anchor tting in the seating position that
you intend to use. Refer to the car owner's handbook.
If no anchor tting is provided then you will need to install an anchor tting. Refer to pages 52 to 55.
The anchor tting is required for attaching the upper anchorage strap in both rear facing mode and
forward facing mode covered later in the these instructions.
12
REARWARD FACING

FULLY RECLINE IN CHILD USE MODE:
Place one hand on the front corner of the base rmly
while with the other hand lifts the Grey Recline Latch up
to unlock, continue pulling restraint forward until fully
reclined. The Blue Release Latch prevents over reclining
when installed forward facing.
CONVERT TO REARWARD FACING
MODE:
Once fully reclined, press the Blue Release Latch located
under the restraint body while with the other hand lifts
the Grey Recline Latch up to unlock, continue pulling the
restraint forward until fully reclined into rearward facing
mode.
Lift Grey
Recline Latch
Lift Grey
Recline Latch
Fully press Adjuster Button (A)
while pulling Upper Anchorage
Strap (B) to lengthen.
Pull Adjustment
Strap to remove
slack
B
A
Storage
Band
INSTALLING INTO VEHICLE REARWARD
FACING
A. The restraint is normally packaged in the fully upright
forward facing mode so if you need to use it rearward
facing you must rst fully recline the restraint. Convert
the restraint to rearward facing mode by referring to
steps below.
B. If Upper Anchorage Strap is folded up for storage
undo Storage Strap then lengthen. Fully press Upper
Anchorage Adjuster Button (A) while pulling Upper
Anchorage Strap (B) to lengthen.
Press Blue
Release Latch
HOW TO SETUP
13
REARWARD FACING
14
HOW TO SETUP
INSTALLING INTO THE CAR
(USING SEATBELT)
A. Place restraint rearward facing in the chosen
seating position with the Messy Mat™(if tted)
positioned centrally in the seating position.
B. Undo the buckle and place buckle tongues in the
Harness Tongue Holders on each side of the cover.
Lift the ap at the end of the seat sufciently to
access the stabilising bar, pull out stabilising bar
and then gently push bar forward until you hear a
click. The Stabilising bar is now latched in place.
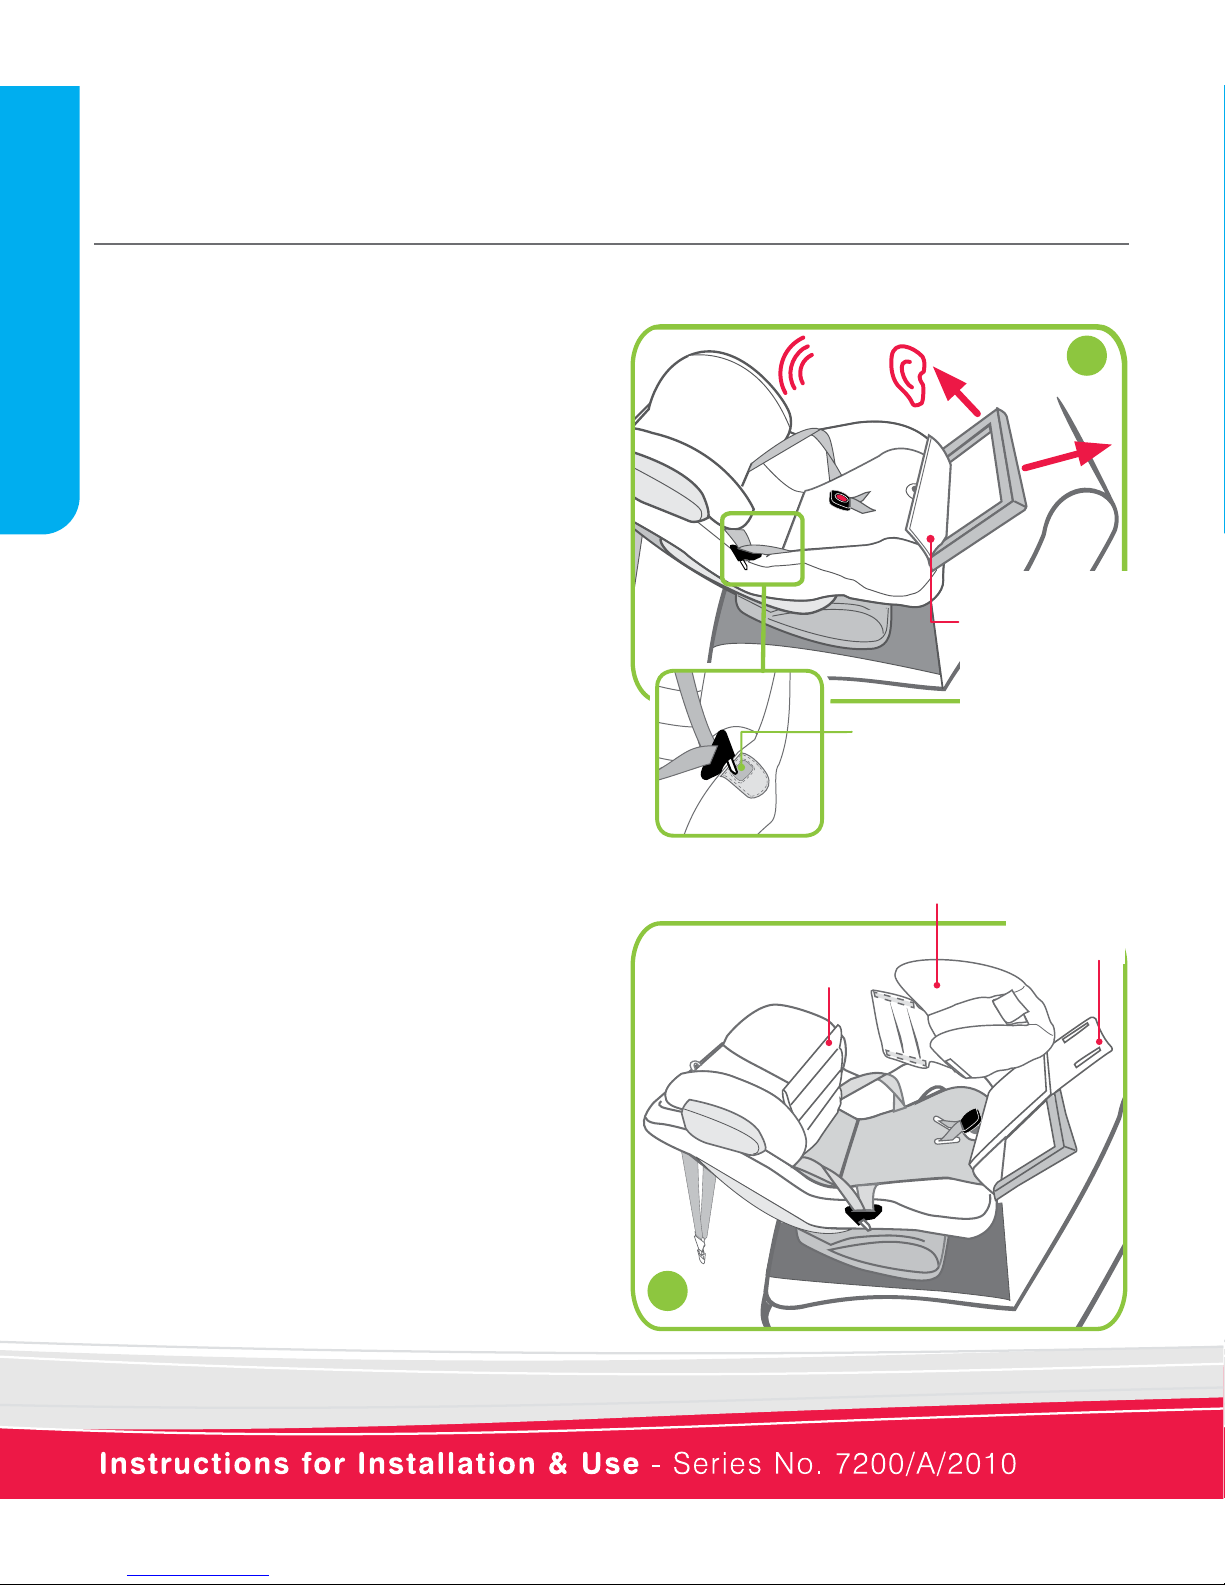
D. Remove the Infant Safety Cushion™ Insert,
and gently lift headrest trim end, then pull back
downwards the centre panel ap and Ez Buckle
System, including the comfort pad from the inner
seat of trim.
1. Lift ap
enough to
access the
stabilising bar
2. Pull out
Stabilising bar
3. Then push
bar forward
Click
B
D
Infant Safety Cushion™ Insert
Headrest trim end
Centre
panel ap
Harness
Tongue
Holders
REARWARD FACING
15
HOW TO SETUP
D
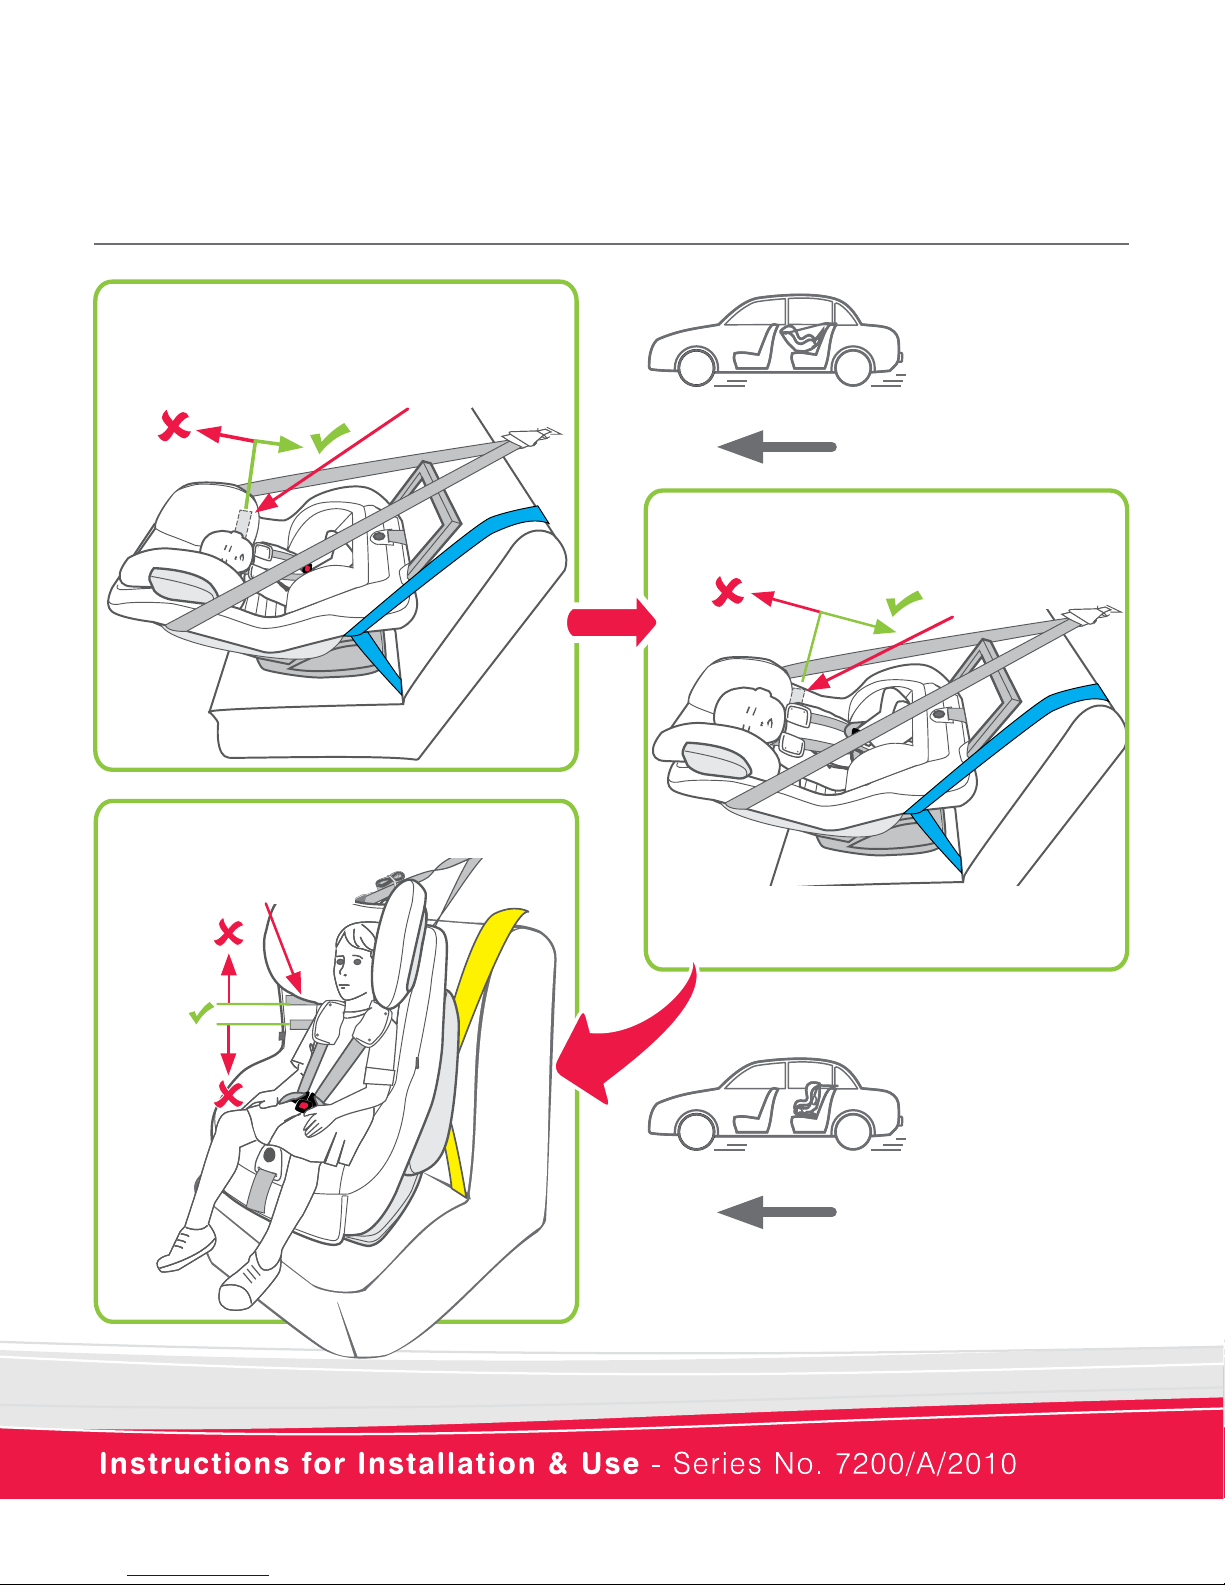
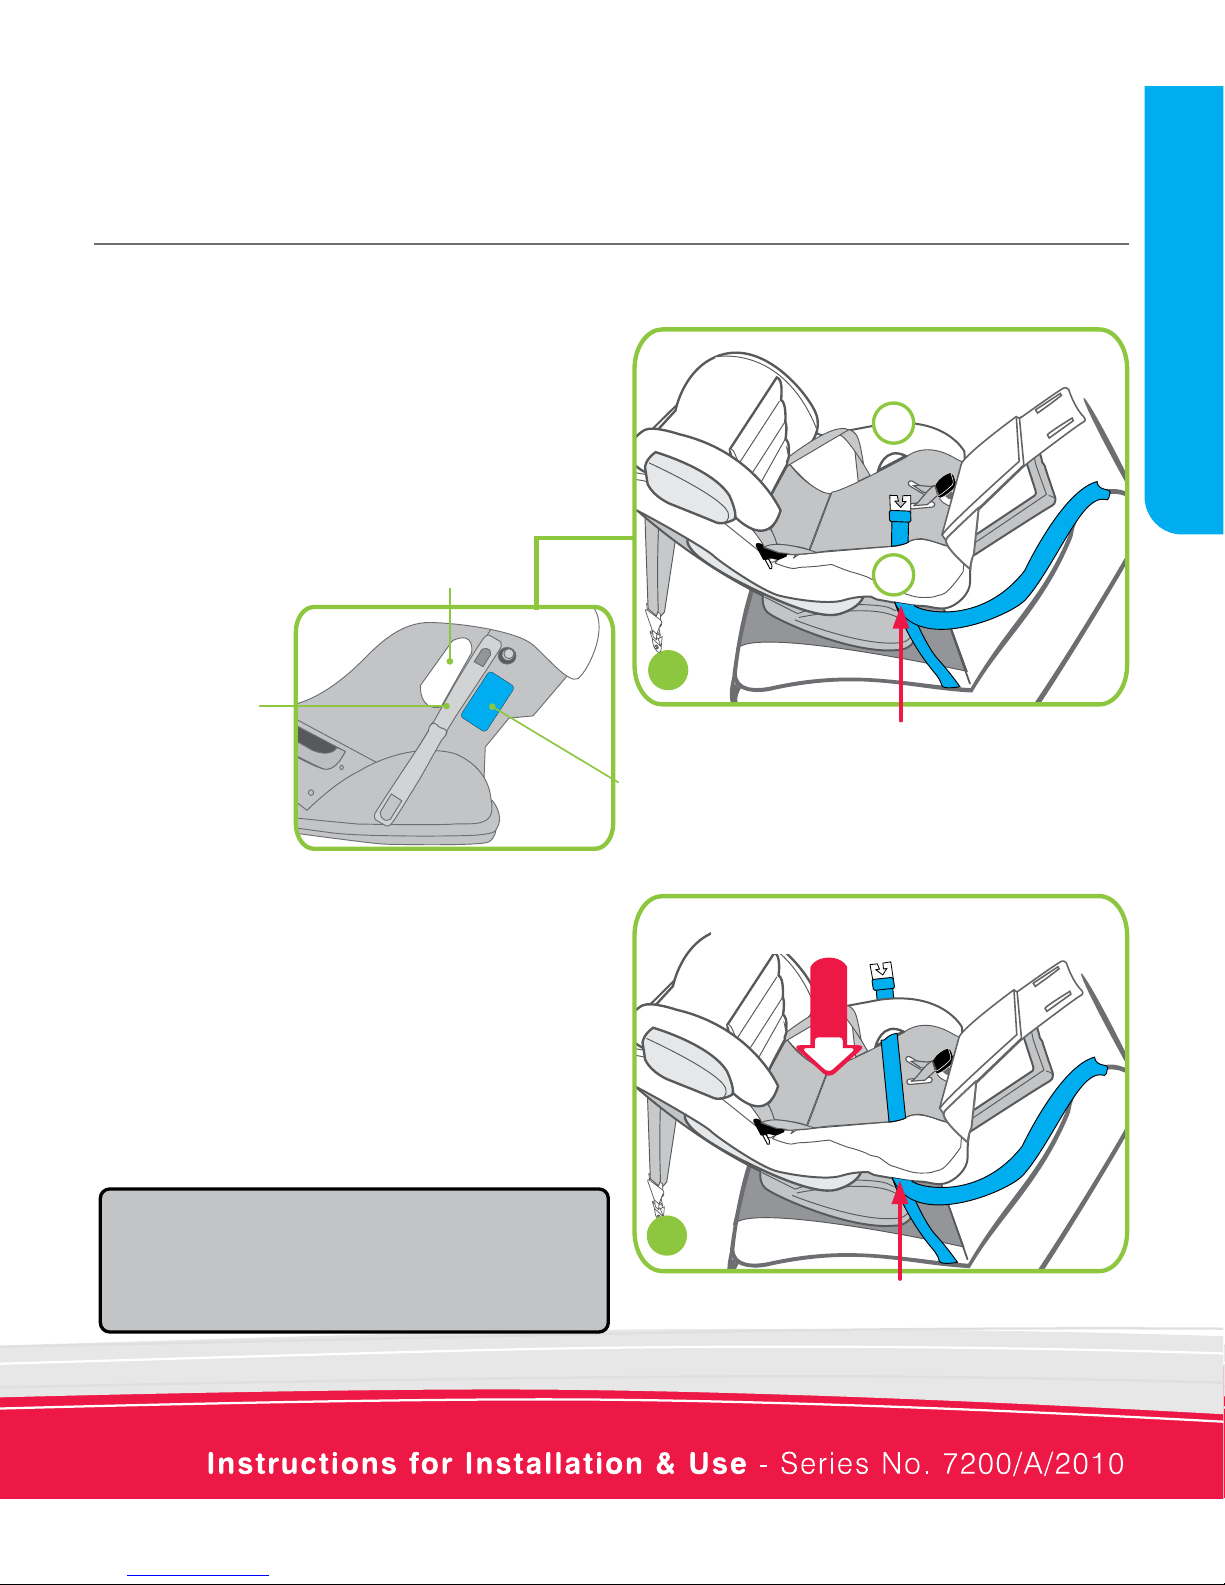
D. If using a lap-sash seatbelt, open the rearward
facing lock-off. Fully lengthen the seatbelt and
feed the seatbelt through the closest seatbelt path
slot and pass across the seating surface behind
the crotch buckle straps and through the opposite
slot. Follow the blue
REARWARD FACING
BELT PATH
label.
E. Engage seatbelt buckle and tongue. Firmly push
down on the seat with knee or hand, whilst pulling
the sash belt with the other hand to tighten the
seatbelt. while holding the tension, close the
lock-off on the buckle side, which will then hold
this tension. Close the lock-off on the other sash
side (but only clamping the lap portion). See
illustrations on page 16. Do not use the lock-off if
the buckle interferes with closing the lock-off.
Lock-off (open)
on both sides
Seatbelt path slot
Blue -
REARWARD FACING
BELT PATH label.
Pass buckle tongue through slots 1 and 2.
NOTE: Seatbelt buckle and tongue must not rest
between restraint cover and restraint. If seatbelt
buckle is adjustable, adjust buckle as low as
possible away from the restraint.
2
1
E
Pass buckle tongue through here
Push down on the seat
REARWARD FACING
HOW TO SETUP
16
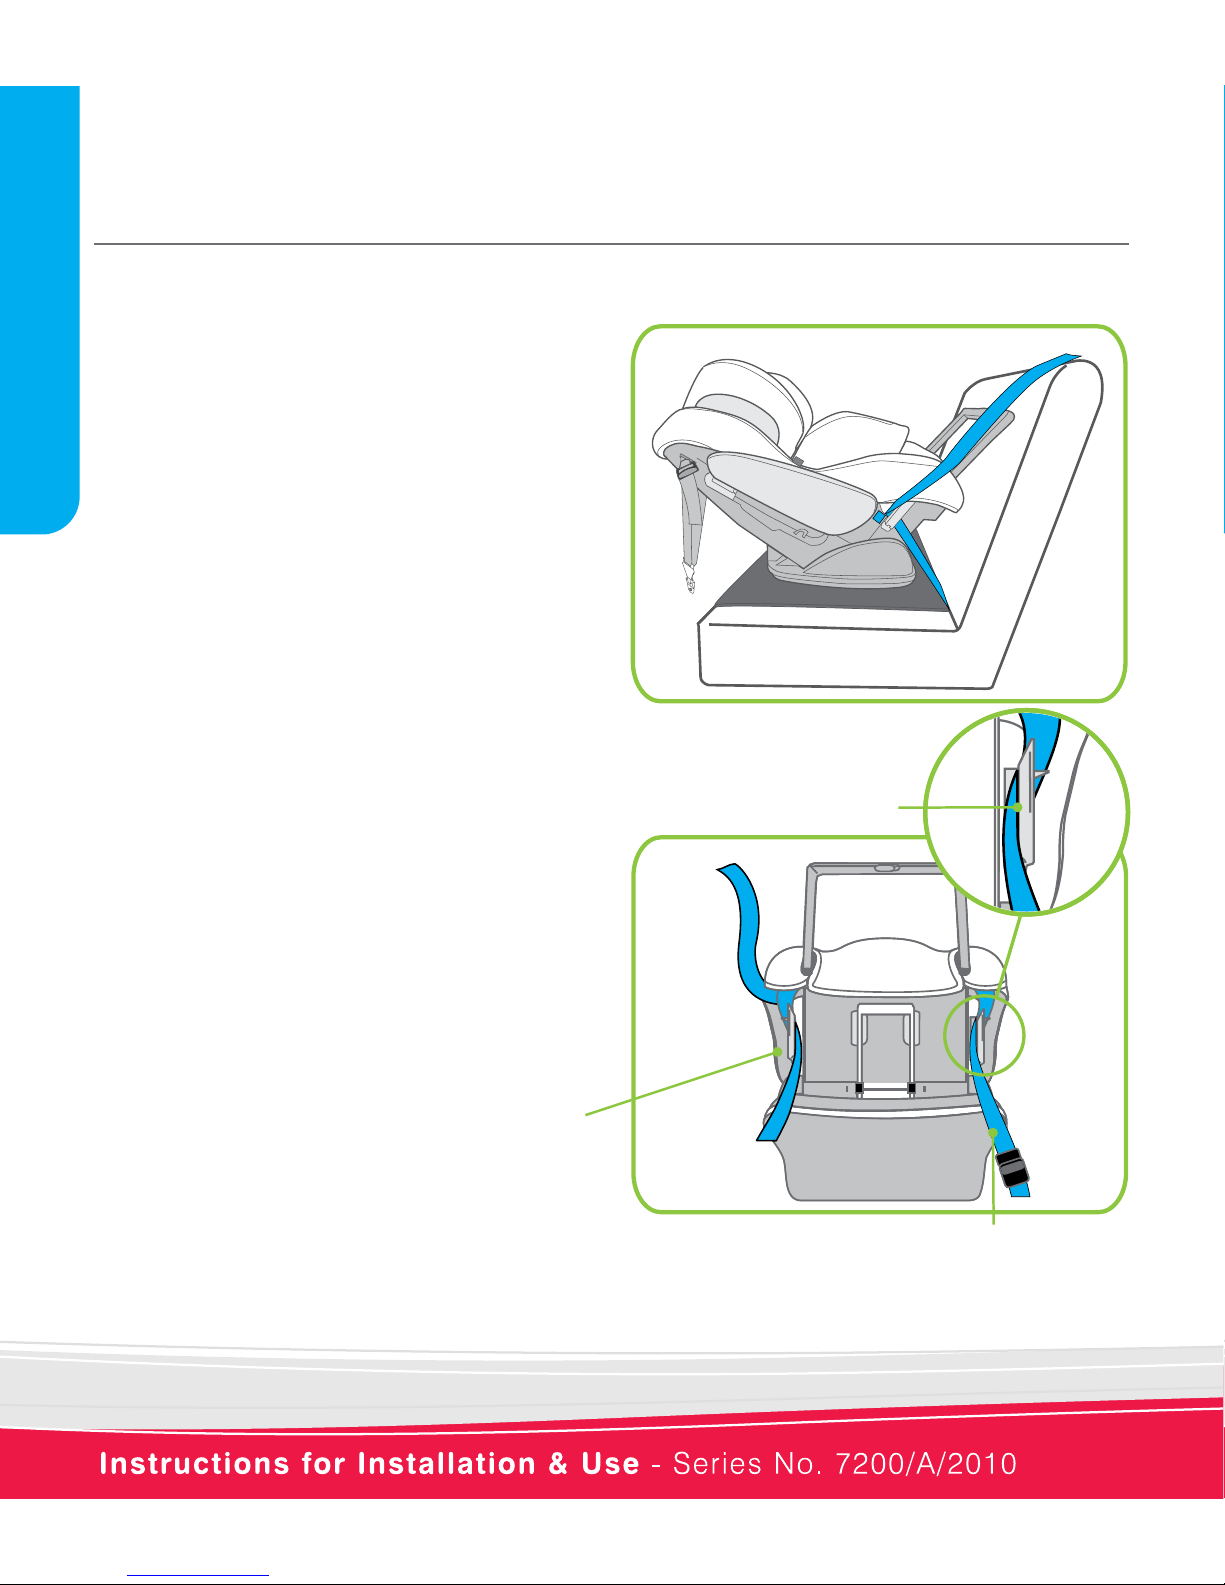
F. Ret the harness buckle through the seat pad and
t the seat pad around the push button adjuster
moulding. Ret the seat pad by connecting with
the seat cover along the seat surface and up the
backrest. For smaller babies replace the Infant
Safety Cushion™ Insert. Do not use the insert if
the child's shoulders reach the Lower Shoulder
Height Marker, remove the insert for longer use
whilst still rear facing. See page 23 for advice on
positioning the shoulder straps and headrest.
G. Align the restraint centrally to the chosen seating
position. Pull sash portion of seatbelt until all
slack is removed from lap portion of seatbelt.
Adjust seatbelt to hold the restraint rmly against
the vehicle seat back. For retractor seatbelts,
allow excess belt to feed back into retractor. Lock
the rear facing seatbelt lock-off to prevent the
seatbelt slackening.
On the car seatbelt buckle side, pass both lap and
sash seatbelt through the lock-off and lock in place
Rear facing
seatbelt
lock-off
On the opposite side to the seatbelt buckle,
only pass the lap portion of the belt through the
lock-off and lock in place (optional).
If placing the restraint in a seating position with
a lap only seatbelt, tighten the seatbelt so as to
hold the restraint rmly against the vehicle seat
back.
REARWARD FACING
17
HOW TO SETUP
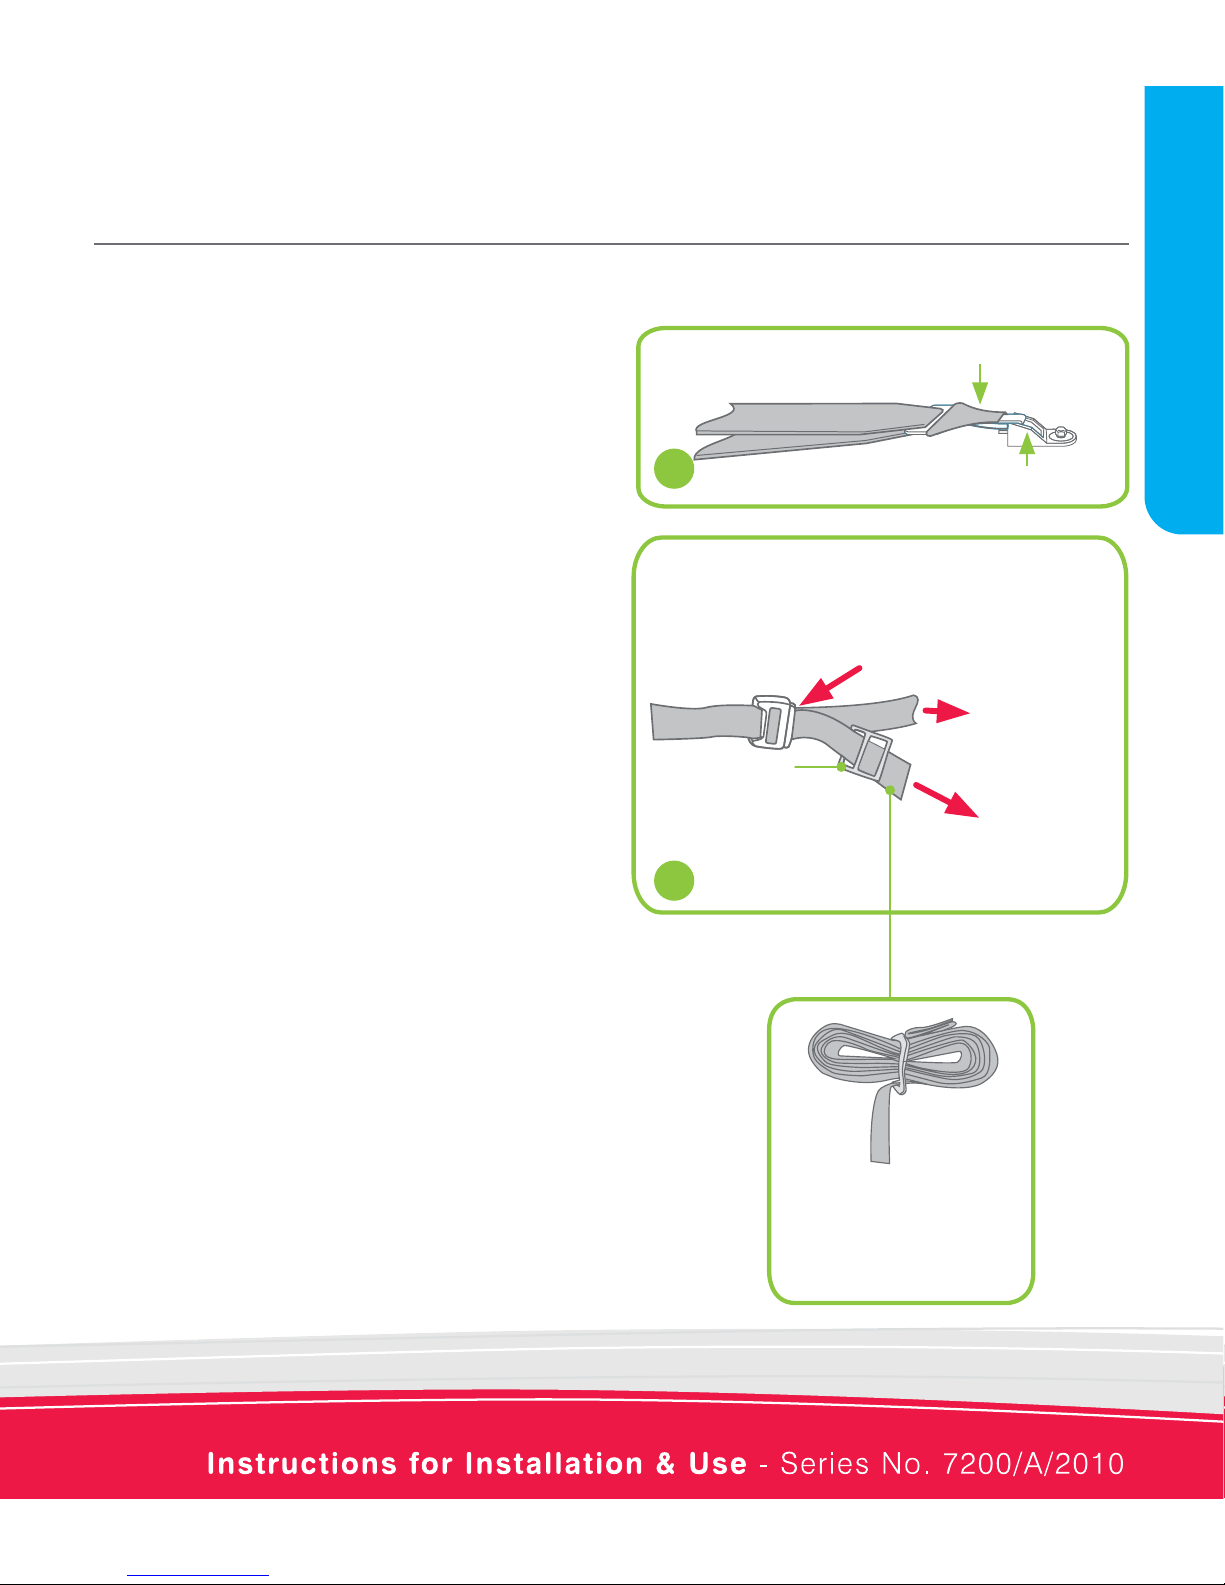
H. Fit the attachment clip to the car's anchor
tting as shown. Make sure to remove as
many twists as possible from the upper
anchorage strap. Refer to the car owner's
handbook for the location of the child
restraint anchor tting.
I. Tighten the adjustable upper anchorage strap
by pulling adjustment strap (C) to remove
slack, but do not over-tighten causing the
restraint base to lift off the vehicle seat. This
will usually be done once the baby has been
harnessed into the seat. Roll up excess strap
tightly so the webbing is thick enough to be
held in the storage band.
The strap will usually t around the outside of
the Side Impact Cushion. Do not over tighten
the upper anchorage strap, just remove the
slack from the upper anchorage strap.
Fully press Adjuster Button
(A) while pulling Upper
Anchorage Strap (B) to
lengthen.
Pull Adjustment Strap
to remove slack
Roll up excess strap
tightly so the webbing is
thick enough to be held
in the storage band.
B
A
Storage
Band
I
H
Attachment Clip
Car's Anchor Fitting
C
REARWARD FACING
18
HOW TO INSTALL
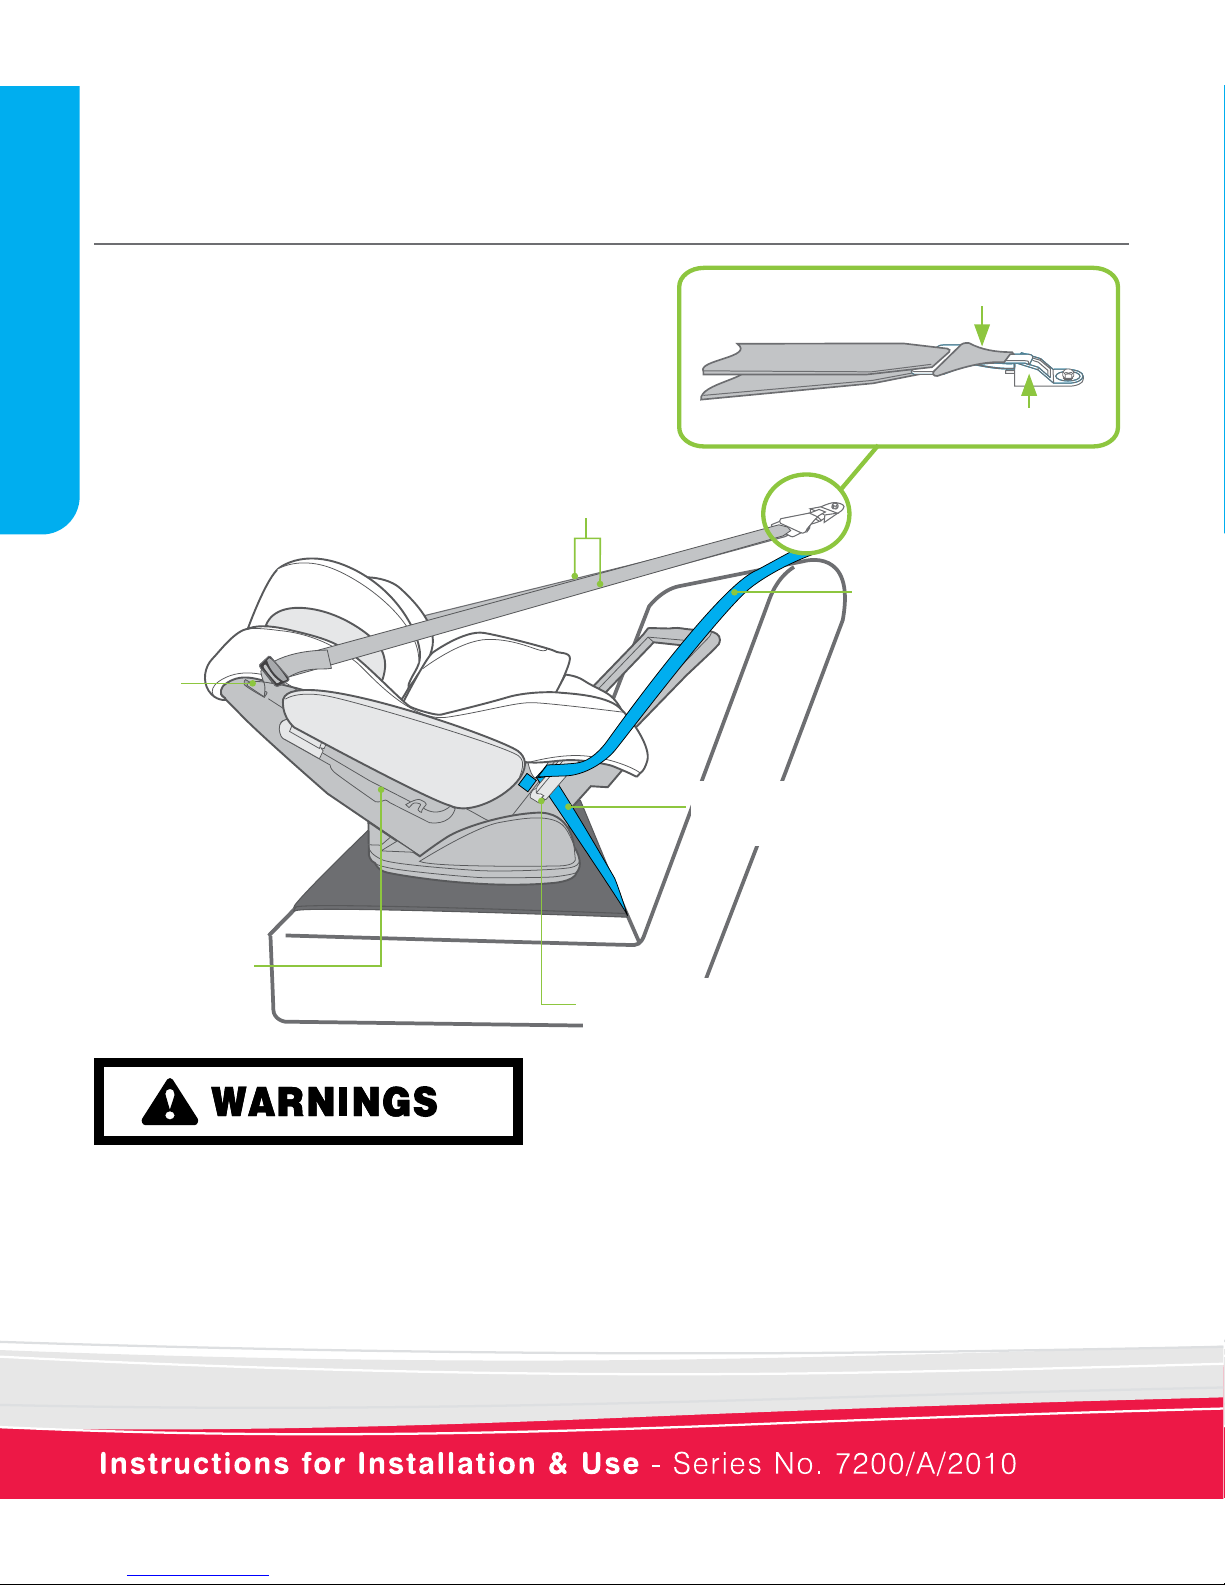
Attachment Clip
Car's Anchor Fitting
DO NOT USE RESTRAINT IN REARWARD FACING MODE WITHOUT STABILISING BAR
FULLY EXTENDED.
THE UPPER ANCHORAGE STRAP MUST ALWAYS BE FITTED WHEN THE CHILD
RESTRAINT IS USED IN A VEHICLE.
ALWAYS ATTACH THE HOOK AND REMOVE THE SLACK.
Ensure the upper anchorage strap is tightened,
attached to the anchor tting and that the straps are
the same length on both sides of attachment clip.
Pull sash portion of
seatbelt to remove slack.
A single
twist is
required in
rearward
facing
mode.
Do not use
this slot for
rearward facing
installation
Feed seatbelt between restraint cover and
restraint body (see page 15).
Engage the lock-offs to prevent the seatbelt slacking.
Do not use the lock-off if the seat buckle interferes.
REARWARD FACING
 Loading...