

Page 1
INSTRUCTION MANUAL
CONVERTIBLE CHILD SEAT
Series No. BS3700A-C20133
IMPORTANT: KEEP THIS BOOKLET IN THE PLACE PROVIDED
ON THE CHILD RESTRAINT
Birth to 2-3 years (approx) REARWARD FACING
12 months to 4 years (approx) FORWARD FACING
Instructions for Installation & Use
1
Page 2

CONTENTS CONTENTS
QUICK START GUIDE - a shortened version of the manual
• REARWARD FACING 04
• FORWARD FACING 06
MEET YOUR CHILD SEAT 08
IMPORTANT INFORMATION AND WARNINGS 10
SHOULDER HEIGHT MARKERS 12
OUTGROWN YOUR CHILD SEAT 16
CHILD SEAT SUITABILITY GUIDE 17
REARWARD FACING
CHILD SEAT FEATURES - REARWARD FACING 18
SET UP
• GENERAL INFORMATION 20
• CONVERT TO REARWARD FACING 21
• INSTALLING INTO YOUR VEHICLE 22
• RECLINE ANGLE 24
• CLICKTIGHT 26
• TOP TETHER 30
• OPEN ADVANCED SIDE IMPACT CUSHION TECHNOLOGY 32
• HEADREST AND SHOULDER HARNESS 33
• REMOVE CHILD FROM CHILD SEAT 36
• REMOVE CHILD SEAT FROM VEHICLE 37
• STORE REBOUND BAR 39
• CLOSE ADVANCED SIDE IMPACT CUSHION TECHNOLOGY 39
FORWARD FACING
CHILD SEAT FEATURES - FORWARD FACING 40
SET UP
• GENERAL INFORMATION 42
• FORWARD FACING RECLINE POSITIONS 43
• INSTALLING INTO YOUR VEHICLE 44
• CLICKTIGHT 46
• TOP TETHER 50
• HEADREST AND SHOULDER HARNESS 52
• OPEN ADVANCED SIDE IMPACT CUSHION TECHNOLOGY 55
• REMOVE CHILD FROM CHILD SEAT 56
• REMOVE CHILD SEAT FROM VEHICLE 57
• CLOSE ADVANCED SIDE IMPACT CUSHION TECHNOLOGY 59
CARE & MAINTENANCE
CARE AND MAINTENANCE 60
• CLEAN HARNESS BUCKLE 61
• REMOVE COVER 62
• REPLACE COVER 64
ACCESSORIES 66
INSTALLATION OF VEHICLE UPPER ANCHOR POINT 69
IN CASE OF ACCIDENT 74
WARRANTY 76
Instructions for Installation & Use
2
Instructions for Installation & Use
3
Page 3
QUICK START GUIDE - REARWARD FACING QUICK START GUIDE - REARWARD FACING
Hey, before you install me!
Don't forget to note your serial number found on the seat to complete your warranty registration.
22
Pull
1
5
Press
4
2
3
Remove
infant insert
Pull
6
Press
7
9
8
20
Remove slack
Replace
infant insert
Pull
21
Push
Store
strap
25
Attach
23
2624
15
Instructions for Installation & Use
4
10
16
17
11
Remove slack
18
19
12
13
14
Push down
Lift
30
31
27
Harness
Straps
not below
green zone
28
29
Instructions for Installation & Use
5
Page 4
QUICK START GUIDE - FORWARD FACING QUICK START GUIDE - FORWARD FACING
Hey, before you install me!
Don't forget to note your serial number found on the seat to complete your warranty registration.
1
5
4
2
7
Press
6
3
8
Pull
Press
9
19
Push
20
Pull
Store
strap
23
Attach
Pull
21
Remove slack
Lift
24 25
22
Remove infant insert
14
Instructions for Installation & Use
6
10
15
Remove
slack
16
18
12
1311
17
Push down
26
Harness
Straps
not below
green zone
Shoulder Level
25mm max
28
27
29
Instructions for Installation & Use
7
Page 5

MEET YOUR CHILD SEAT MEET YOUR CHILD SEAT
REARWARD FACING-
To be used only in a rearward-facing position until the child's shoulders either reach the lower
shoulder height marker (approximately 12 months of age) or reach the middle height marker
(approximately 2 to 3 years of age).
FORWARD FACING-
Then to be used in a forward-facing position until the child's shoulders reach the upper
shoulder height marker (approximately 4 years of age).
Continue to use this child restraint until the child reaches this limit.
Do not use forward facing until child's shoulders are above the lower shoulder height marker.
Infants are at risk of serious injury if they face forward too early.
Children are at risk of serious injury if they move to booster seats too early.
Children who have outgrown this restraint are safest in a larger child restraint with an in-built
harness or a booster seat until their shoulders reach the upper shoulder height marker of the
restraint.
To ensure that your child gets all the protection designed into the restraint PLEASE READ AND
FOLLOW THESE INSTRUCTIONS EXACTLY and use only Britax Safe-n-Sound recommended
parts and accessories.
If in doubt about the method of installation, consult Britax Childcare or agent, or a child
restraint fitter or, in New Zealand, to consult the agent for the vehicle.
只用于后向式安装,直到婴儿的肩膀达到靠下的肩高标记(大约12个月的宝宝)或者中部的肩高标
记(大约2-3岁的儿童)。然后用于前向式安装,直到儿童的肩膀达到靠上的肩高标记(大约4岁的儿
童)。
在儿童达到该座椅上限以前必须不断使用这一安全座椅。
在儿童肩高未超过靠下的肩高标记之前不得采用前向式坐姿。
婴儿过早乘坐前向式座椅则可能受到严重的伤害。
儿童过早使用垫高椅则可能受到严重的伤害。
个子比该安全座椅大的儿童最安全的做法是乘坐设有内置安全带的更大汽车座椅或垫高椅,直到他们
的肩膀达到该座椅靠上的肩高标记。
THE CLICKTIGHT SYSTEM
The CLICKTIGHT System makes installing your child seat easier in just a few steps. Your
child seat will be safe, secure and remain tightly fixed. It makes it seamless to change it from
rearward to forward facing or move it from one vehicle to install in another.
ADVANCED SIDE IMPACT CUSHION TECHNOLOGY™ (SICT) PROTECTION
WHY DO I NEED ADVANCED SIDE IMPACT CUSHION TECHNOLOGY (SICT)?
In the event of an accident, your child must be optimally protected at any age, especially for
the most common types of accidents, frontal and side collision. With side collisions, children
are at most risk, because compared to a frontal collision, side collisions have less crumple
zone to disperse the energy released during impact.
WHAT IS IT?
Our Advanced SICT – Side Impact Cushion Technology with crumple zone feature is
designed to provide optimum safety to your child in the event of a side impact collision.
HOW DOES IT WORK?
With maximum safety and flexibility in mind, Advanced SICT can be used when the child seat
is positioned next to the vehicle door. When deployed, it is uniquely designed to enhance
protection in the event of a side impact collision. Combined with the energy absorbing
protective shell, Advanced SICT significantly reduces the risk of injury to your child.
THE ACTIVE HEADREST RESTRAINT (AHR)
The Active Headrest Restraint is designed with deeper side wings to shield and protect your
child's head in a side impact crash. The Active Head Restraint has an inner Side Impact
Cushion Technology layer which provides 180 degree protection around your child's head.
The AHR is adjustable to grow with your child and works in conjunction with SICT to protect
your child's head and minimise the force of impact.
Instructions for Installation & Use
8
Instructions for Installation & Use
9
Page 6
IMPORTANT INFORMATION AND WARNINGS IMPORTANT INFORMATION AND WARNINGS
IMPORTANT :
TO BE USED WITH A LAP-SASH OR LAP ONLY SEATBELT IN THE BACK OF MOST
• Fit the restraint firmly to the car seat.
• Fit the harness firmly to the child.
• A loose restraint or harness is dangerous.
• Supervision of children is needed because they may be able to undo the buckles
and adjusters.
• Use the restraint exactly as shown in the instructions.
• DO NOT LEAVE CHILDREN UNATTENDED IN THE CAR.
• Do not alter or modify this restraint.
• Repairs must only be done by the manufacturer or agent.
• Do not allow the restraint to come into contact with polishes, oils, bleach and other
chemicals.
• Destroy the restraint if it has been in a severe crash, even if no damage is visible.
See page 74 to 75.
• DO NOT USE THIS RESTRAINT WITHOUT THE COVER.
• Always secure the loose end of the top tether strap. Do not use the child restraint
where this top tether strap may fall into a split in the seat back or o the side of the
seat.
• ALWAYS ATTACH TOP TETHER HOOK AND REMOVE SLACK.
• To ensure infant’s back is evenly supported, do not put more than one nappy on the
baby and make sure the nappy is not thickly folded at the back.
• DO NOT USE A REAR-FACING CHILD RESTRAINT WHERE AN AIRBAG IS FITTED IN
FRONT OF THE SEATING POSITION.
• Do not harness an infant wrapped in a blanket or swaddled. Any blanket or wrap
must only be placed over the harness and infant.
• Without ISOFIX compatible connectors; This child restraint is not approved for use
with any connectors that connect to the car's ISOFIX low anchorages.
Instructions for Installation & Use
10
CARS WITH FORWARD FACING SEATS.
GENERAL
• Babies and children below 4 years old must not sit in the front seat of a vehicle
unless allowable by the Regional Road Rules. Check your Regional Road Rules.
• Regularly check the restraint components, straps and other fitments for correct
function and condition. If faulty, cease using and seek repair by Britax.
• Protect all webbing from abrasion and cutting by sharp corners and edges.
• The restraint should not be purchased or sold as a second hand item. It is
recommended not to use child restraints older than 10 years as the protection in an
accident may be reduced.
• THIS RESTRAINT IS NOT SUITABLE FOR USE WHERE THE TOP TETHER STRAP
MAY FALL INTO A SPLIT IN THE SEAT BACK OR OFF THE SIDE OF THE SEAT.
• Seatbelt extenders are not recommended to be used if the seatbelt is not long
enough to secure the child restraint. If seatbelts are too short then seek advice from
a child restraint fitter and consider their recommendations before using a seatbelt
extender. If you use a seatbelt extender then ensure that the seatbelt buckle does
not enter the rearward or forward facing belt paths.
• A rear facing child restraint should not be used in the front seat if a passenger airbag
is fitted and cannot be disabled.
• Rearward and forward facing child restraints should always be correctly installed,
properly adjusted and used as instructed by the manufacturer instructions.
• Ensure babies and toddlers are adequately shaded from direct sunlight through side
or rear windows.
• Check the car is ventilated by opening windows or using the car's ventilation system
taking in external air. Recirculation setting is not suitable for providing ventilation.
• THIS RESTRAINT MUST BE ATTACHED TO A CHILD RESTRAINT UPPER
ANCHORAGE POINT IN THE CAR. REFER TO CAR OWNER'S HANDBOOK FOR
LOCATION OF UPPER ANCHORAGE POINTS. REFER TO A CHILD RESTRAINT
FITTING STATION IF NO UPPER ANCHORAGE POINTS ARE IN THE MOTOR CAR.
Refer to pages 69 to 73.
Instructions for Installation & Use
11
Page 7
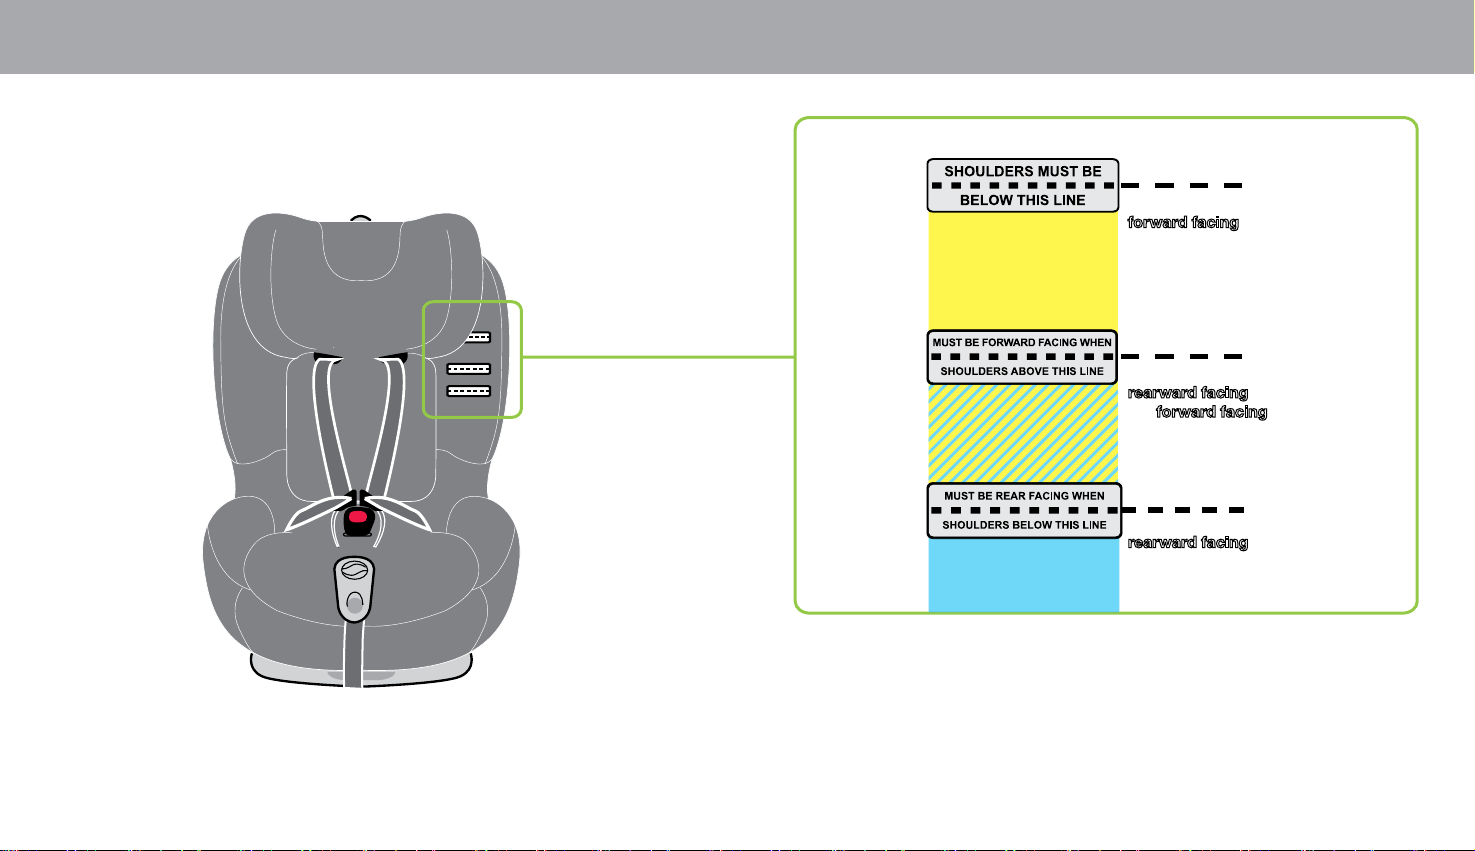
SHOULDER HEIGHT MARKERS SHOULDER HEIGHT MARKERS
Shoulder height markers are featured clearly on the child seat (as seen in diagram). The
markers provide an indicator for when your child has outgrown the child's seat rearward or
forward facing modes.
Upper Height
Marker
Middle Height
Marker
Lower Height
Marker
If your child's shoulders are above the
upper marker they have outgrown the seat
(see page 16).
Your child MUST be
forward facing if
their shoulders are
above the middle
marker.
Your child can be
rearward facing
OR forward facing
if their shoulders are
between the lower
and middle marker.
Britax
recommends
using this restraint
in rearward
facing as long as
possible.
Your child MUST be
rearward facing if
their shoulders are
below lower marker.
Instructions for Installation & Use
12
Instructions for Installation & Use
13
Page 8
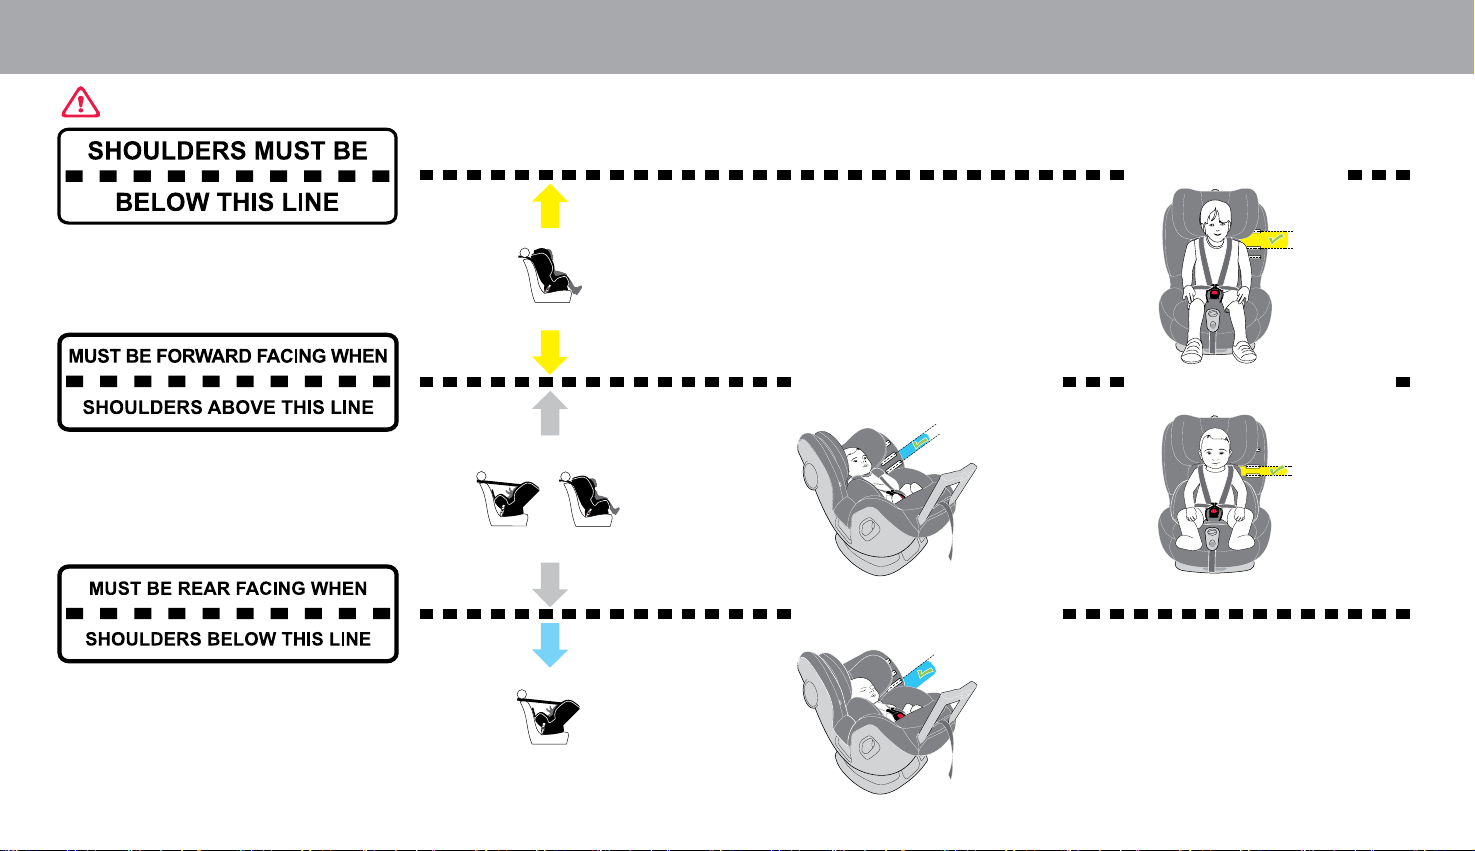
SHOULDER HEIGHT MARKERS SHOULDER HEIGHT MARKERS
IMPORTANT: Follow this advice.
Child Use (Forward Facing)
Upper Height
Marker
Middle Height
Marker
Older Baby (Rearward Facing) Older Baby (Forward Facing)
Middle Height Marker
OR
Lower Height Marker
OR
Newborn (Rearward Facing)
Middle Height
Marker
Lower Height
Marker
Instructions for Installation & Use
14
Lower Height Marker
Instructions for Installation & Use
15
Page 9
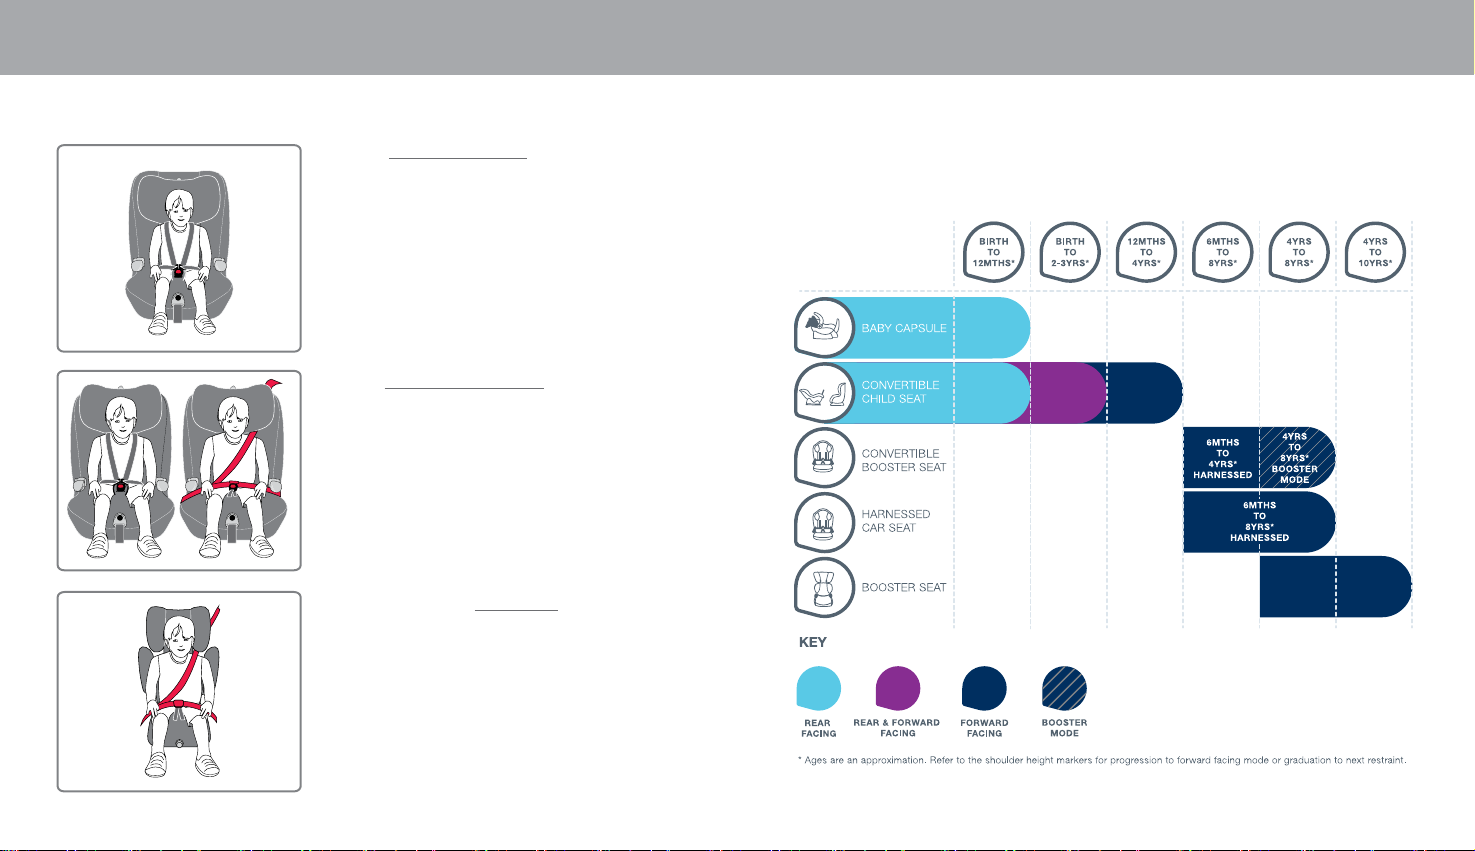
OUTGROWN YOUR CHILD SEAT
CHILD SEAT SUITABILITY GUIDE
When your child has outgrown this seat, you can use:
• A harnessed child seat with in-built harness
suitable for children approximately 6
months to 8 years old.
• A convertible booster seat with in-built harness
until approximately 4 years old and then as
a booster seat with vehicle lap-sash seatbelt
until approx 6 to 8 years of age (or seatbelt
and compatible child harness).
• Or a dedicated booster seat with vehicle lapsash seatbelt until 6 to 8 years of age or
until 8 to 10 years of age (or seatbelt and
compatible child harness).
CHILD SEAT SUITABILITY GUIDE
These child restraints, when used correctly, allow the driver to meet the Australian Road Rules
in each state.
Instructions for Installation & Use
16
Instructions for Installation & Use
17
Page 10

CHILD SEAT FEATURES - REARWARD FACING CHILD SEAT FEATURES - REARWARD FACING
13
12
11
1. Adjustable Headrest
2. Shoulder Height Markers
3. Shoulder Pads (If supplied)
4. Infant Insert (If supplied)
5. Harness
6. EZ Buckle (If supplied)
7. Rebound Bar For Rearward Facing Mode
8. CLICKTIGHT Button
9. Harness Adjuster Button
10. Harness Adjuster Strap (lower)
11. Release Buckle (Red button)
12. Cover
13. Buckle Tongue Holders (If supplied)
14. Headrest Adjuster
14
10
27
F
f
n
ro
1
2
t o
v
e
h
ic
le
26
28
25
24
3
4
15
16
7
17
18
5
6
22 21
23
7
Long or short
19
20
Vehicle Seat
Protector
(If supplied)
8
9
15. Vehicle's Anchor Fitting
16. Attachment Clip
17. REARWARD FACING BELT PATH (Blue)
18. Level Indicator
19. Grey Recline Lever
20. Blue Release Button
21. FORWARD FACING BELT PATH (Yellow)
22. Instruction Manual Location
23. Vehicle Seat Protector (If supplied)
24. Advanced Side Impact Cushion
Technology™ (SICT) (If supplied)
25. Top Tether Storage Pocket
26. Top Tether Adjuster
27. Top Tether Adjuster Strap
28. Top Tether
Instructions for Installation & Use
18
Instructions for Installation & Use
19
Page 11
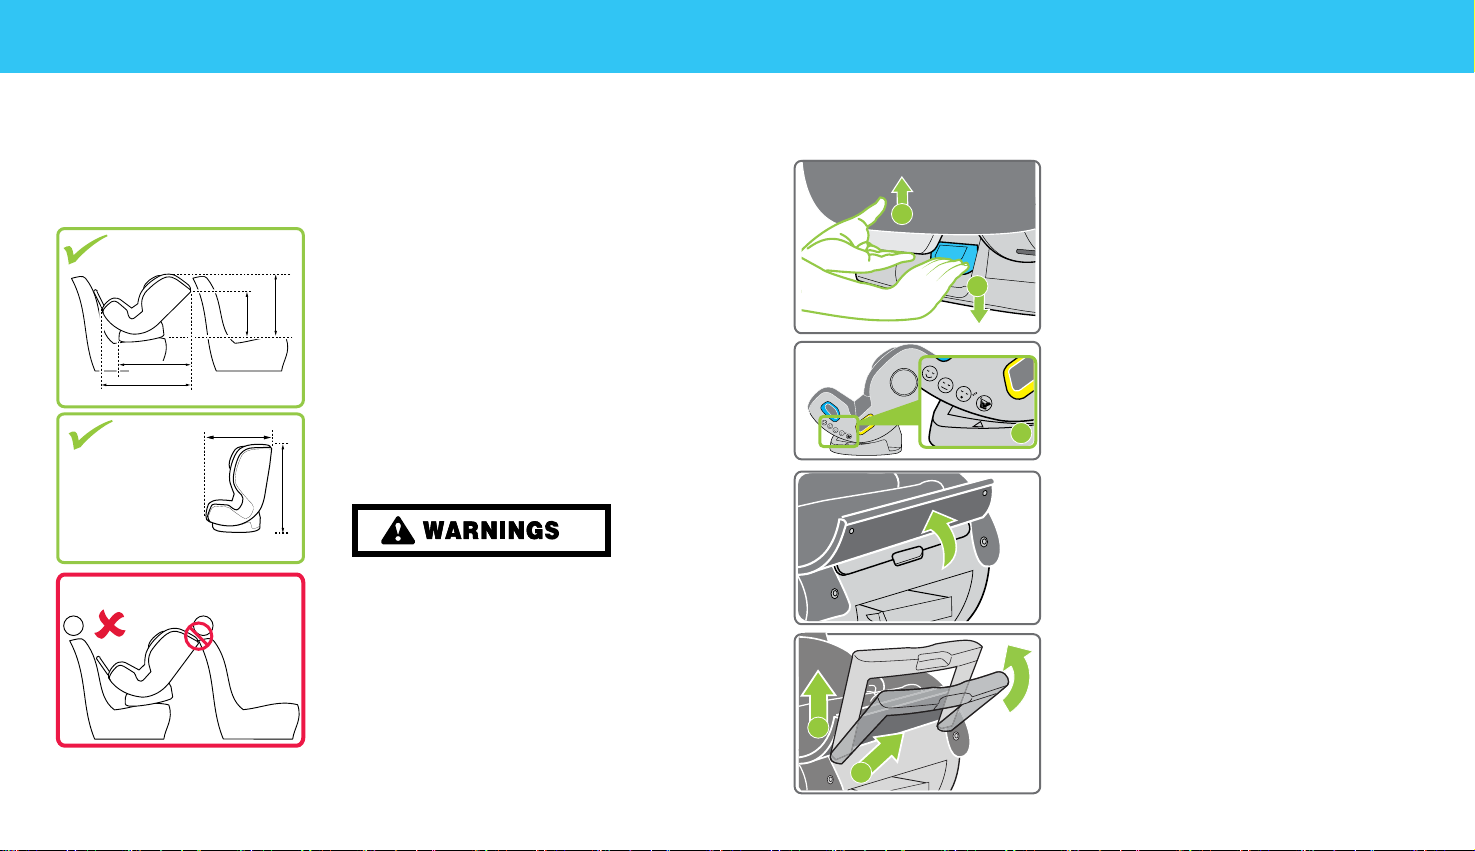
SETUP - GENERAL INFORMATION
FOR REARWARD FACING
SETUP - CONVERT TO REARWARD FACING
CHILD SEAT UPPER ANCHORAGE POINT
This child seat must be installed using the top tether. The top tether will need to attach to the
appropriate upper anchorage point for both rearward and forward facing modes. Refer to the
car owner's handbook for anchorage locations or points. If your vehicle does not have an
upper anchorage point then you will need to install an upper anchorage point. Refer to pages
69 to 73.
REARWARD FACING
MEASUREMENTS
628mm
728mm
FORWARD
FACING
MEASUREMENTS
398mm
538mm
Width 467mm
508mm
650mm
IS THERE ENOUGH ROOM ?
To ensure that the space is sucient, the
purchaser should check the measurements
between the vehicle’s rear and front seats in
which the child restraint is intended to be used
for both rear facing mode and forward facing
mode.
DO NOT USE RESTRAINT IN REARWARD
FACING MODE WITHOUT THE REBOUND
BAR FULLY EXTENDED.
Do not use the restraint without the top
tether strap correctly attached.
DO NOT USE A REAR FACING CHILD
RESTRAINT WHERE AN AIRBAG IS FITTED
IN FRONT OF THE SEATING POSITION.
Do not allow the front seat to alter
the installed angle of the restraint.
Do not use on any vehicle seat which faces
sideways or rearwards.
CONVERT TO REARWARD FACING
MODE:
To fully recline the child seat,
Step 1. Squeeze the grey recline lever
1
Step 2. Press the blue release button down
2
Step 3. Align arrow to rearward facing image.
3
upwards.
whilst squeezing the grey recline lever,
rotate the child seat to rearward facing
position.
HOW TO SETUP THE REBOUND BAR:
Step 1. Lift front flap in cover to access the
Step 2. Pull out to full extension.
Step 3. Lift up to lock into position.
3
2
rebound bar.
Instructions for Installation & Use
20
Instructions for Installation & Use
21
Page 12
SETUP - INSTALLING INTO YOUR VEHICLE
FOR REARWARD FACING
INSTALLING INTO YOUR VEHICLE:
SETUP - INSTALLING INTO YOUR VEHICLE
FOR REARWARD FACING
1
Press
3
Press
4
Step 1. Press harness adjuster button.
Step 2. Place your hand under both shoulder
2
Pull
Step 3. Disengage buckle by pressing red
Remove infant insert (if fitted).
Step 4. Place buckle tongues into buckle
harness straps, then pull shoulder
harness straps to lengthen.
5 5
button.
tongue holders.
Top tether behind the child seat
Choose the vehicle seat position.
Step 5. Ensure child seat is against vehicle
seatback - the rebound bar does not
need to contact vehicle seatback.
If desired, this gap may be packed
(see page 25).
Do not have the seat too far away from
the vehicle seat.
Step 6. Temporarily place top tether and
attachment clip over the back of child
seat.
Instructions for Installation & Use
22
6
Instructions for Installation & Use
23
Page 13

SETUP - RECLINE ANGLE FOR REARWARD FACING SETUP - RECLINE ANGLE FOR REARWARD FACING
Black ball not visible
REARWARD FACING LEVEL
INDICATOR:
The Rearward Facing Level Indicator shows
when your child seat is installed at the correct
angle for your vehicle. It gives you confidence
the child seat is positioned correctly whenever
you travel.
Figure .A.
Step 1. Check the level indicator (black ball) is
in required range.
ANGULAR ADJUSTMENT OF
RESTRAINT
Some vehicle seats have more rearward slope
than others. The angle may be adjusted by
placing a firm packing between the child seat
and the underside of the base. Packing can be a
firmly rolled up towel (see figure A).
If the vehicle seat is flat then some packing may
be required at the front edge of the base to
achieve the recline angle (see figure B).
Always check that the rearward facing level
indicator confirms the correct installation angle for
rearward facing mode (see page 24).
IMPORTANT:
This indicator should only be used in rearward
facing mode.
Figure .B.
1
If the black ball is not visible, the child seat
angle may be adjusted by placing firm packing
between vehicle seat and base (see page 25).
Instructions for Installation & Use
24
Instructions for Installation & Use
25
Page 14

SETUP - CLICKTIGHT FOR REARWARD FACING SETUP - CLICKTIGHT FOR REARWARD FACING
HOW TO INSTALL CLICKTIGHT:
Remove infant insert (if fitted).
IMPORTANT - Ensure buckle tongues are
placed into buckle tongue holders prior to
opening CLICKTIGHT frame.
Step 1. To open CLICKTIGHT frame, twist
and push the CLICKTIGHT button.
Allow frame to lift.
VEHICLE SEATBELT
Sash belt
4
Lap
belt
3
5
Step 3. Lengthen vehicle seatbelt.
Step 4. Feed vehicle seatbelt through blue
REARWARD FACING BELT PATH
guide, ensure the seatbelt is not
twisted during installation.
Step 5. Continue feeding vehicle seatbelt
through opposite blue REARWARD
FACING BELT PATH guide.
1
Step 2. Open CLICKTIGHT frame fully.
2
6
Step 6. Engage the vehicle seatbelt buckle
and tongue without twisting seatbelt.
ENSURE THERE ARE NO TWISTS IN
SEATBELT. REMOVE SLACK.
NOTE: Seatbelt extenders should not be used
if the seatbelt is not long enough to secure the
child restraint. If they are used then the buckle
must not enter the seating zone.
Instructions for Installation & Use
26
Instructions for Installation & Use
27
Page 15

SETUP - CLICKTIGHT FOR REARWARD FACING
SETUP - CLICKTIGHT FOR REARWARD FACING
Step 7. Remove any slack from the vehicle
Pull
7
8
Feed sash belt slack back into the
ALWAYS REMOVE SLACK FROM
SEATBELT.
ENSURE THERE ARE NO TWISTS IN
SEATBELT.
Step 8. Always remove any excess shoulder/
seatbelt.
seatbelt retractor.
lap straps, harness tongues and
harness adjuster strap (lower) that
may become trapped under the
CLICKTIGHT frame.
9
Push down
10
Lift
11
Step 9. Close CLICKTIGHT frame
Step 10. Press down until it locks into place.
If you need to apply excess force to
close the CLICKTIGHT frame, check
the shoulder/lap straps, harness
tongues and harness adjuster strap
(lower) are not trapped.
Step 11. Check if CLICKTIGHT frame is closed
by lifting the CLICKTIGHT FRAME up.
Your seat should feel secure.
Step 12. Refit infant insert as required.
You are now ready to install top tether.
Refer to page 30.
Instructions for Installation & Use
28
12
Instructions for Installation & Use
29
Page 16

SETUP - TOP TETHER FOR REARWARD FACING SETUP - TOP TETHER FOR REARWARD FACING
HOW TO INSTALL THE TOP TETHER:
Press
1
2
Pull
3
4
Step 1. Press top tether adjuster button and
Step 2. Lengthen top tether strap fully, ensure
all unnecessary twists are removed.
Step 3. Connect top tether attachment clip to
vehicle anchor fitting.
Step 4. Pull top tether strap slack onto side of
adjuster.
ENSURE THE TOP TETHER STRAPS ARE
NOT TWISTED.
IMPORTANT :
The top tether strap must be fitted at all times.
Always secure the loose end of the top tether strap to prevent it hanging out of the car or
being accessible by the child.
THIS RESTRAINT IS NOT SUITABLE FOR USE WHERE THE TOP TETHER STRAP MAY
FALL INTO A SPLIT IN THE SEAT BACK OR OFF THE SIDE OF THE SEAT.
ALWAYS ATTACH TOP TETHER HOOK AND REMOVE SLACK IN THE TOP
TETHER STRAP.
Step 5. Ensure slack is removed from
5
6
7
Pull
ALWAYS REMOVE SLACK IN THE TOP
TETHER AND STORE STRAP.
Step 6. Check angle of child seat is still
Step 7. Roll up any excess strap and store in
Roll up
to store
the top tether straps by pulling
top tether adjuster strap.
Do not over tighten as it may cause
your child seat to lift.
correct.
the pocket provided on the top tether
strap.
CAUTION:
CHILDREN CAN BE INJURED OR RESTRAINTS AND TOP
TETHER STRAP DAMAGED BY UNSECURED CARGO IN A
COLLISION. SECURE OR REMOVE HAZARDOUS CARGO
BEFORE USING THIS CHILD RESTRAINT.
Instructions for Installation & Use
30
Instructions for Installation & Use
31
Page 17

SETUP - OPEN ADVANCED SIDE IMPACT CUSHION
TECHNOLOGY FOR REARWARD FACING
SETUP - HEADREST AND SHOULDER HARNESS
FOR REARWARD FACING
OPEN ADVANCED SIDE IMPACT
CUSHION TECHNOLOGY:
NOTE. The SICT system should not be
For further information on SICT refer to
Step 1. Rotate the SICT anti clockwise to full
1
Step 2. Check the top tether route is above the
used if the child seat is in the centre
position.
page 9.
extension on the preferred door side.
If at full extension the SICT makes
contact with the vehicle interior, reduce
the extension by rotating clockwise,
keeping it as close as possible to full
extension (finger clearance)
SICT and not below.
3
Press
1
Press
Lift
5
Press
Pull
4
2
Pull
HOW TO USE - HEADREST AND
SHOULDER HARNESS:
Step 1. Press top tether adjuster button and
Step 2. Lengthen top tether strap fully (if
desired).
Step 3. Press harness adjuster button.
Step 4. Place your hand under both shoulder
harness straps, then pull shoulder
harness straps to lengthen.
Step 5. Disengage buckle by pressing red
button.
Step 6. Lift lever to adjust headrest/ harness
slots
Instructions for Installation & Use
32
6
Instructions for Installation & Use
33
Page 18

SETUP - HEADREST AND SHOULDER HARNESS
FOR REARWARD FACING
SETUP - HEADREST AND SHOULDER HARNESS
FOR REARWARD FACING
Flat
back
rest
Curved seat base
Harness Straps
not below
green zone
Above Shoulder Level
Step 7. Place buckle tongues into buckle
7
Step 8. Place baby into child seat. Ensure
8
Step 9. Check headrest and shoulder slot
The shoulder straps must be in the
9
Always adjust the height of the
tongue holders.
baby is positioned with their back flat
against the back rest and their bottom
correctly positioned into the curved
seat base.
position is level with shoulders but not
below.
slots which are nearest to the child's
shoulders but not lower than the
child's shoulders.
shoulder straps as the child grows.
Tongue
Buckle
Shoulder
Strap
Lap
strap
10
11
12
WARNING: DO NOT LEAVE CHILDREN UNATTENDED
IN THE CAR.
Do not harness an infant wrapped in a blanket or swaddled as this increases the risk of ejection
and injury or death in a crash. The harness needs to fit firmly to the baby, any blanket or other
covering may be placed over the harness after it is adjusted. Arms and legs must be free and not
bound or wrapped together. The legs must sit on each side of the crotch strap.
Step 10. Engage Buckle
ENSURE BUCKLE IS ALWAYS
CONNECTED DURING USE.
ENSURE ALL HARNESS STRAPS ARE
NOT TWISTED.
Step 11. Remove all slack from the lap strap
Step 12. Pull harness adjuster strap to tighten.
Ensure a firm but comfortable fit.
ENSURE ALL HARNESS SLACK IS
REMOVED.
Pull
Step 13. Remove slack from the top tether
area (including behind baby's bottom),
by pulling up on the shoulder straps.
straps by pulling top tether adjuster
strap.
Instructions for Installation & Use
34
Instructions for Installation & Use
35
Page 19

SETUP - REMOVE CHILD FROM CHILD SEAT
FOR REARWARD FACING
SETUP - REMOVE CHILD SEAT FROM VEHICLE
FOR REARWARD FACING
Press
REMOVING CHILD FROM SEAT:
1
Step 1. Press top tether adjuster button and
Step 2. Lengthen top tether strap fully.
2
Pull
Step 3. Loosen shoulder harness straps by
Press
3
4
5
Press
Step 4. Pull both shoulder harness straps
Step 5. Disengage buckle by pressing red
Step 6. Place harness buckles in buckle
6
Step 7. Lift child from the child seat.
pressing the harness adjuster button.
evenly.
3
button.
4
tongue holder.
1
Press
Pull
2
REMOVING CHILD SEAT FROM
VEHICLE:
Step 1. Press top tether adjuster button and
Step 2 . Lengthen top tether strap fully.
Step 3. Disconnect top tether attachment clip
from vehicle anchorage fitting.
Step 4. Disengage the vehicle seatbelt buckle.
Instructions for Installation & Use
36
7
Instructions for Installation & Use
37
Page 20

SETUP - REMOVE CHILD SEAT FROM VEHICLE
FOR REARWARD FACING
SETUP - STORE REBOUND BAR
FOR REARWARD FACING
STORE REBOUND BAR:
Remove infant insert (if fitted).
IMPORTANT - Ensure buckle tongues are
placed into buckle tongue holders prior to
opening CLICKTIGHT frame.
Step 5. To open CLICKTIGHT frame, twist
5
Step 6. Open CLICKTIGHT frame fully.
6
7
Step 7. Remove vehicle seatbelt from blue
and push the CLICKTIGHT button.
Allow frame to lift.
4
REARWARD FACING BELT PATH.
1
2
3
Push down
5
Step 1. Press the grey release rebound bar
button to unlock the rebound bar.
Step 2. Store the rebound bar away.
Step 3. Ensure harness adjuster strap is not
under rebound bar.
Step 4. Re-attach the flap at the front of the
child seat.
NOTE: Remove any excess shoulder/
lap straps, harness tongues and
harness adjuster strap (lower) out from
under the CLICKTIGHT frame.
Step 5. Close CLICKTIGHT frame and press
down until it locks into place.
CLOSE ADVANCED SIDE IMPACT
CUSHION TECHNOLOGY :
Step 1. Rotate clockwise to close.
Instructions for Installation & Use
38
1
Instructions for Installation & Use
39
Page 21

CHILD SEAT FEATURES - FORWARD FACING CHILD SEAT FEATURES - FORWARD FACING
11
10
1. Adjustable Headrest
2. Shoulder Height Markers
03. Shoulder Pads (If supplied)
04. Harness
5. Release Buckle (Red button)
06. EZ Buckle (If supplied)
12
1
2
3
4
5
6
7. CLICKTIGHT Button
8. Harness Adjuster Button
9. Harness Adjuster Strap (lower)
10. Cover
11. Buckle Tongue Holders (If supplied)
12. Headrest Adjuster
25
F
f
n
ro
t o
v
e
h
ic
le
26
21
22
2423
20
19
7
13
18
8
9
14
1716
15
13. REARWARD FACING BELT PATH (Blue)
14. Grey Recline Lever
15. Blue Release Button
16. Forward Facing Recline Positions
17. Instruction Manual Location
18. Vehicle Seat Protector (If supplied)
19. FORWARD FACING BELT PATH (Yellow)
20. Top Tether Storage Pocket
21. Top Tether Adjuster
22. Top Tether
23. Attachment Clip
24. Vehicle's Anchor Fitting
25. Top Tether Adjuster Strap
26. Advanced Side Impact Cushion
Long or short
Vehicle Seat
Protector
(If supplied)
Technology™ (SICT) (If supplied)
Instructions for Installation & Use
40
Instructions for Installation & Use
41
Page 22

SETUP - GENERAL INFORMATION
FOR FORWARD FACING
SETUP - FORWARD FACING
RECLINE POSITIONS
TRANSITION FROM REARWARD
FACING TO FORWARD FACING
MODE:
1
2
3
DO NOT USE RESTRAINT IN FORWARD-FACING MODE WITH THE REAR FACING MODE
REBOUND BAR PULLED OUT.
Do not use the restraint without the top tether strap correctly attached.
If your vehicle is not fitted with an anchor point, please contact a Safety Restraint Fitting
Station authorised by the relevant State Government Body for correct fitment of the restraint.
In New Zealand contact the agent for the vehicle. The top tether strap must be attached to an
upper anchorage point using an extension strap if necessary.
Do not use on any vehicle seat which faces sideways or rearwards.
If an airbag is fitted in the desired seating position where the child restraint is fitted, follow the
vehicle manufacturer's warnings and instructions.
4
If you are converting your seat from rearward
facing to forward facing for more information
refer to page 39 to store rebound bar.
Step 1. Press the grey release rebound bar
button to unlock the rebound bar.
Step 2. Store the rebound bar away.
Step 3. Place one hand on the child seat back
and with the other hand on the grey
recline lever, squeeze upwards.
Step 4. Rotate child seat into an upright
position.
FORWARD FACING RECLINE
POSITIONS:
When you convert your child seat to forward
facing mode, there are four, simple to use
forward facing recline positions you can choose
from to ensure your child travels as comfortably
as possible.
AWAKE LAZE NAP SLEEP
Step 1. To adjust to the dierent recline
positions. Use the grey recline lever to
rotate the child seat.
1
Instructions for Installation & Use
42
Instructions for Installation & Use
43
Page 23

SETUP - INSTALLING INTO YOUR VEHICLE
FOR FORWARD FACING
INSTALLING INTO YOUR VEHICLE:
SETUP - INSTALLING INTO YOUR VEHICLE
FOR FORWARD FACING
Step 1. Choose vehicle seat position.
3
Press
1
Step 2. Ensure child seat is against vehicle
seatback and top tether is not trapped
behind seat.
Place top tether and attachment clip
over back of vehicle seat towards
anchor fitting.
2
5
Press
6
4
Pull
Step 3. Press harness adjuster button.
Step 4. Place your hand under both shoulder
harness straps, then pull shoulder
harness straps to lengthen.
Step 5. Disengage buckle by pressing red
button.
Remove infant insert
Step 6. Place buckle tongues into buckle
tongue holders
Instructions for Installation & Use
44
Instructions for Installation & Use
45
Page 24

SETUP - CLICKTIGHT FOR FORWARD FACING SETUP - CLICKTIGHT FOR FORWARD FACING
HOW TO INSTALL CLICKTIGHT:
IMPORTANT - Ensure buckle tongues are
placed into buckle tongue holders prior to
opening CLICKTIGHT frame.
Step 1. To open CLICKTIGHT frame, twist
and push the CLICKTIGHT button.
Allow frame to lift.
1
Step 2. Open CLICKTIGHT frame fully.
2
3
4
5
Step 3. Lengthen vehicle seatbelt.
Step 4. Feed vehicle seatbelt through yellow
FORWARD FACING BELT PATH guide,
across the seat and out the opposite
guide.
Step 5. Engage the vehicle seatbelt buckle and
tongue.
ENSURE THERE ARE NO TWISTS IN
SEATBELT. REMOVE SLACK.
Instructions for Installation & Use
46
Instructions for Installation & Use
47
Page 25

SETUP - CLICKTIGHT FOR FORWARD FACING SETUP - CLICKTIGHT FOR FORWARD FACING
Pull
Step 6. Remove any slack from the vehicle
Feed sash belt slack back into the
ALWAYS REMOVE SLACK FROM
SEATBELT.
seatbelt.
seatbelt retractor.
8
Push down
6
ENSURE THERE ARE NO TWISTS IN
SEATBELT.
9
Step 7. Always remove any excess shoulder/
lap straps, harness tongues and
harness adjuster strap (lower) that
may become trapped under the
CLICKTIGHT frame.
10
Lift
Step 8. Close CLICKTIGHT frame
Step 9. Press down until it locks into place.
If you need to apply excess force to
close the CLICKTIGHT frame, check
the shoulder/lap straps, harness
tongues and harness adjuster strap
(lower) are not trapped.
Step 10. Check if CLICKTIGHT frame is closed
by lifting the CLICKTIGHT FRAME up.
Your seat should feel secure.
Step 11. You are now ready to install top tether.
Refer to page 50.
7
Instructions for Installation & Use
48
11
Instructions for Installation & Use
49
Page 26

SETUP - TOP TETHER FOR FORWARD FACING SETUP - TOP TETHER FOR FORWARD FACING
HOW TO INSTALL THE TOP TETHER:
1
Press
Pull
Step 1. Press top tether adjuster button and
Step 2. Lengthen top tether strap fully, ensure
2
3
Step 3. Connect top tether attachment clip to
ENSURE THE TOP TETHER STRAPS ARE
NOT TWISTED.
all unnecessary twists are removed.
vehicle anchor fitting.
CAUTION: CHILDREN CAN BE INJURED OR RESTRAINTS
AND TOP TETHER STRAP DAMAGED BY UNSECURED CARGO
IN A COLLISION. SECURE OR REMOVE HAZARDOUS CARGO
BEFORE USING THIS CHILD RESTRAINT.
IMPORTANT :
The top tether strap must be fitted at all times.
Always secure the loose end of the top tether strap to prevent it hanging out of the car or
being accessible by the child.
THIS RESTRAINT IS NOT SUITABLE FOR USE WHERE THE TOP TETHER STRAP MAY
FALL INTO A SPLIT IN THE SEAT BACK OR OFF THE SIDE OF THE SEAT.
ALWAYS ATTACH TOP TETHER HOOK AND REMOVE SLACK
IN THE TOP TETHER STRAP.
Instructions for Installation & Use
50
Roll up
to store
4
5
Step 4. Pull top tether strap slack onto side of
adjuster.
Do not over tighten as it may cause
your child seat to lift.
ALWAYS REMOVE SLACK IN THE TOP
TETHER AND STORE STRAP.
Step 5. Roll up any excess strap and store in
the pocket provided on the top tether
strap.
Instructions for Installation & Use
51
Page 27

SETUP - HEADREST AND SHOULDER HARNESS
FOR FORWARD FACING
HOW TO USE - HEADREST AND
SHOULDER HARNESS:
Step 1. Press harness adjuster button.
1
Press
2
Pull
Step 2. Place your hand under both shoulder
harness straps, then pull shoulder
harness straps to lengthen.
SETUP - HEADREST AND SHOULDER HARNESS
FOR FORWARD FACING
Step 5. Place buckle tongues into buckle
tongue holders.
3
Lift
Instructions for Installation & Use
52
Press
Step 3. Disengage buckle by pressing red
button.
Step 4. Lift lever to adjust headrest/ harness
slots.
4
5
Harness Straps
not below
green zone
Shoulder Level to
25mm below
Step 6. Place child into child seat . Ensure your
6
7
Step 7. The shoulder straps must be in the
Always adjust the height of the
child sits fully back without slouching.
slots which are nearest to the child’s
shoulders, but not more than 25mm
below the child’s shoulders.
shoulder straps as the child grows.
Instructions for Installation & Use
53
Page 28

SETUP - HEADREST AND SHOULDER HARNESS
FOR FORWARD FACING
Step 8. Engage Buckle
Tongue
Buckle
8
Shoulder
Strap
Lap
strap
9
10
Pull
ENSURE BUCKLE IS ALWAYS
CONNECTED DURING USE.
ENSURE ALL HARNESS STRAPS ARE
NOT TWISTED.
Step 9. Remove all slack from the lap strap
area (including behind child's bottom),
by pulling up on the shoulder straps.
Step 10. Pull harness adjuster strap to
tighten.
Ensure a firm but comfortable fit.
ENSURE ALL HARNESS SLACK IS
REMOVED.
SETUP - OPEN ADVANCED SIDE IMPACT CUSHION
TECHNOLOGY FOR FORWARD FACING
OPEN ADVANCED SIDE IMPACT
CUSHION TECHNOLOGY:
NOTE. The SICT system should not be
For further information on SICT refer to
Step 1. Rotate the SICT anti clockwise to full
Headrest SICT should only be
If at full extension the SICT makes
1
used if the child seat is in the centre
position.
page 9.
extension on the preferred door side
for both the torso and headrest.
used if it is exposed in the 4
highest positions of the headrest.
contact with the vehicle interior, reduce
the extension by rotating clockwise,
keeping it as close as possible to full
extension (finger clearance)
WARNING:
DO NOT LEAVE CHILDREN UNATTENDED IN THE CAR.
Instructions for Installation & Use
54
Instructions for Installation & Use
55
Page 29

SETUP - REMOVE CHILD FROM CHILD SEAT
FOR FORWARD FACING
SETUP - REMOVE CHILD SEAT FROM VEHICLE
FOR FORWARD FACING
REMOVING CHILD FROM CHILD
SEAT:
Step 1. Loosen shoulder harness straps by
2
Press
1
3
Press
Step 2. Pull both shoulder harness straps
Step 3. Disengage buckle by pressing red
Step 4. Place harness buckles in buckle
Remove child from child seat.
pressing the harness adjuster button.
evenly.
button.
tongue holder.
1
Press
Pull
2
3
HOW TO REMOVE SEAT FROM
VEHICLE:
Step 1. Press top tether adjuster button and
Step 2. Lengthen top tether strap fully.
Step 3. Disconnect top tether attachment clip
from vehicle anchorage fitting.
Step 4. Disengage the vehicle seatbelt buckle.
4
Instructions for Installation & Use
56
4
Instructions for Installation & Use
57
Page 30

SETUP - REMOVE CHILD SEAT FROM VEHICLE
FOR FORWARD FACING
Step 5. To open CLICKTIGHT frame, twist
and push the CLICKTIGHT button.
Allow frame to lift.
5
Step 6. Open CLICKTIGHT frame fully.
SETUP - CLOSE ADVANCED SIDE IMPACT CUSHION
TECHNOLOGY FOR FORWARD FACING
CLOSE ADVANCED SIDE IMPACT
CUSHION TECHNOLOGY :
Step 1. Rotate clockwise to close.
1
8
Instructions for Installation & Use
58
6
Push down
Step 7. Remove vehicle seatbelt from yellow
7
NOTE: Remove any excess shoulder/
Step 8. Close CLICKTIGHT frame and press
Forward Facing Belt Path.
lap straps, harness tongues and
harness adjuster strap (lower) out from
under the CLICKTIGHT frame.
down until it locks into place.
Instructions for Installation & Use
59
Page 31

CARE AND MAINTENANCE
CARE AND MAINTENANCE
REGULAR CARE OF THIS RESTRAINT:
Please check the following items regularly to ensure the safety of your child.
A. Check the condition of the harness straps, i.e. No damage or fraying.
B. Check the condition of the seat structure, i.e. No cracks or other forms of damage.
C. Check the harness adjuster is operating correctly.
D. Ensure the buckle is free of flu, liquid or other matter that may enter the buckle
opening. Clean the buckle if it is dicult to engage. See next page.
Immediate repair is required if any of the above issues are observed. Contact Britax
Customer Service 1300 303 330
CLEANING CHILD SEAT
HARDWARE: Use only mild soap to clean all metal and plastic parts of your child’s restraint,
using a damp sponge or cloth. Do not use chemicals or cleaning agents. Do not try
to place any hardware into a washing machine.
STRAPS/HARNESS: We recommend spot cleaning straps and harness with a damp sponge
or cloth using only cold or warm water. Never place any straps or harness into a
washing machine or tumble dryer.
WASHING CARE FOR COVER
• GENTLE COLD MACHINE WASH
• DO NOT BLEACH, SOAK OR WRING
• DO NOT TUMBLE DRY
• DO NOT DRYCLEAN
• DRY FLAT IN SHADE
• DO NOT IRON
BUCKLE OPERATION
To ensure the buckle remains operational the inside of the buckle must be kept free of liquids,
sand, dirt, flu, food or similar substances. If the buckle is not operating or you do not hear a
strong audible click when the second tongue is inserted then the buckle needs to be washed
or replaced. The buckle is fully engaged when both tongues are inserted and a 'click' is
heard. Contact Customer Service for assistance.
CLEAN HARNESS BUCKLE:
If sticky liquids such as baby formula, fruit juice, etc. get inside your harness buckle, it may
become sluggish. An indication of a sluggish harness buckle is that you cannot hear a click
when engaging the second harness tongue. To restore the harness buckle to good working
order it needs to be cleaned as follows:
A. Remove the harness buckle from the restraint:
Cover
A
B
C
Body
3-bar slide
Click
Open the CLICKTIGHT frame to expose the
metal 3-bar slides. Turn each metal 3-bar
slide on its side and push back through the
slots.
B. Place the harness buckle under warm (max.
40 degrees celsius) running water as shown
below. Let the water run through the mouth
of the buckle for five minutes. Check the
harness buckle is clean by engaging the
harness tongues and buckle several times
until you hear a click.
C. If you still cannot hear a strong audible click
then repeat the cleaning process several
times.
D. Refit the harness buckle to the restraint
ensuring the red button facing outwards and
the 3-bar slide is fed through the same slots.
If the harness buckle cannot be returned to
its original working condition then contact
Britax Customer Service for assistance.
Instructions for Installation & Use
60
Instructions for Installation & Use
61
Page 32

CARE AND MAINTENANCE - REMOVE COVER CARE AND MAINTENANCE - REMOVE COVER
Instructions for Installation & Use
62
TO REMOVE COVER FOR WASH:
NOTE: There is no need to disconnect the
shoulder harness assembly straps from restraint.
Step 1. Remove the restraint from vehicle.
Step 2. Disengage the harness tongues from
Step 3. Remove any accessories, infant insert,
3
To remove headrest cover:
Step 1. Lift headrest to the highest position and
the harness buckle.
crotch pad and shoulder pads (if
supplied).
unclip press studs on both sides, then
unhook clips on both sides attached
under headrest wings.
1
2
To remove cover:
Step 1. Lift headrest to the highest position.
Open door at the back of the child
seat and unhook elastic loops.
Step 2. Recline child seat to reveal elastic
loops at the lower front of the child
seat and remove.
Step 3. Unclip cover press studs from
CLICKTIGHT base cover found inside
child seat.
1
3
Unhook
clip inside
child seat
Step 2. Behind the headrest reveal the hidden
elastic, lift out and remove elastic over
and away from headrest.
Peel headrest cover away.
2
4
1
Step 4. Open CLICKTIGHT frame and unhook
clips inside the child seat as shown.
Step 5. Peel cover over headrest and harness
adjuster button, feed through harness
adjuster straps.
To remove CLICKTIGHT frame cover:
Step 1. Open CLICKTIGHT frame and unhook
elastics from underneath.
Step 2. Feed over CLICKTIGHT button
housing.
Instructions for Installation & Use
63
Page 33

CARE AND MAINTENANCE - REPLACE COVER CARE AND MAINTENANCE - REPLACE COVER
1
1
attach
clip inside
child seat
3
TO REPLACE COVER:
To replace CLICKTIGHT frame cover:
Step 1. Open CLICKTIGHT frame. Feed over
Loop elastics back on to clips
To replace cover:
Stretch the cover over the headrest
Step 1. Recline child seat to reveal hook at the
Step 2. Lift headrest to the highest position.
2
Step 3. Open CLICKTIGHT frame and attach
CLICKTIGHT button housing.
provided.
and harness adjuster button, pull
the adjuster strap through the cover.
Ensure none of the harness straps are
twisted.
lower front of the child seat and attach
elastic loops.
Open door at the back of the child
seat and attach elastic loops to hooks
provided.
clips as shown.
2
3
To replace headrest cover:
Step 1. Lift headrest to the highest position.
Stretch headrest cover over headrest.
Step 2. Replace elastic behind headrest into
the recess.
Step 3. Clip press studs and hook the clips
under headrest wings.
ONLY USE BRITAX
SAFE-N-SOUND SEAT COVERS
AND ACCESSORIES THAT ARE
DESIGNED AND TESTED FOR
USE WITH THIS PRODUCT.
VERY IMPORTANT:
Step 4. Clip press studs to the CLICKTIGHT
frame cover found inside child seat.
Only replace the cover with Safe-n-Sound
supplied replacement cover with identical
shoulder height markers or a replacement cover
4
meeting AS/NZS 8005.
Instructions for Installation & Use
64
Instructions for Installation & Use
65
Page 34

ACCESSORIES ACCESSORIES
The following instructions apply to accessories that may be supplied with this restraint at
point of purchase. They are for comfort use only. If not, a variety of Britax Safe-n-Sound
accessories are available from various retailers of Britax Safe-n-Sound products.
Use of aftermarket accessories, that is, accessories not provided with this child restraint can
reduce the safety provided by the child restraint and may cause injury or death. Always follow
the instructions covering the use of accessories provided with this child seat the instructions
provided with the accessory. If an aftermarket accessory is used that is not recommended by
Britax, ensure that the accessory is compliant with AS/NZS 8005 and is stated as suitable for
use with this specific child restraint.
SHOULDER PADS (If supplied)
Shoulder Pads give extra comfort for your child
Shoulder
Pads
EZ Buckle
when using the harness. They're easy to remove
and it makes washing them a breeze - unclip the
studs to clean them and fit them back onto the
shoulder harness straps once done.
EZ BUCKLE (If supplied)
The EZ Buckle makes it easier to place your child
in and out of the child seat. It prevents your child
from sitting on the buckle when seated in both
rearward and forward facing modes.
A
B
C
To remove
Feed the crotch buckle through the EZ
buckle slot. Remove EZ Buckle.
To replace
Feed EZ Buckle through base cover
front slot. Feed crotch buckle through
EZ buckle slot. EZ Buckle is behind the
buckle. See illustration C.
INFANT INSERTS
There are 3 types of infant inserts
Infant Insert
Designed to provide additional support for
smaller babies. Discontinue use when the insert
is a tight fit or creates discomfort for larger
babies. Only use when rearward facing.
The Flexi Infant Comfort Insert
Designed to support smaller babies. The
wings/side panels can be easily detached by
unclipping the press studs, allowing you the
flexibility to keep or remove panels as your baby
grows. Discontinue use when the insert is a tight
fit or creates discomfort for larger babies. Only
use when rearward facing.
Newborn Insert
Designed to oer maximum support for smaller
babies. The Newborn Insert can be used
‘stacked’ on top of either the Infant Insert or the
Flexi Infant Comfort Insert or it can be used on
its own. Discontinue use when your baby no
longer requires the additional support. Only use
when rearward facing.
To replace infant insert
A. Disconnect the buckle and place the
insert under the shoulder and lap
straps.
B. Feed the crotch strap through the
insert and re-connect buckle.
C. If using the Flexi Infant Comfort Insert,
re-attached side wings if required.
(If supplied)
Instructions for Installation & Use
66
Instructions for Installation & Use
67
Page 35

INSTALLATION OF VEHICLE UPPER ANCHOR POINTACCESSORIES
Long Vehicle
Seat Protector
(If supplied)
'A'
Pocket
Short Vehicle
Seat Protector
(If supplied)
'A'
Pocket
Note: Some Vehicle Seat Protector
may not have pockets.
VEHICLE SEAT PROTECTOR
(If supplied)
The Vehicle Seat Protector have been specifically
designed to protect your vehicle seat when
using your child seat.
Place pocket on edge of seat, smooth back
toward seat join ('A') and fit in any excess Vehicle
Seat Protector into the join of the child seat ('A').
CAUTION:
The Vehicle Seat Protector pocket is designed
for small, light items. To avoid damage do not
overload the pocket.
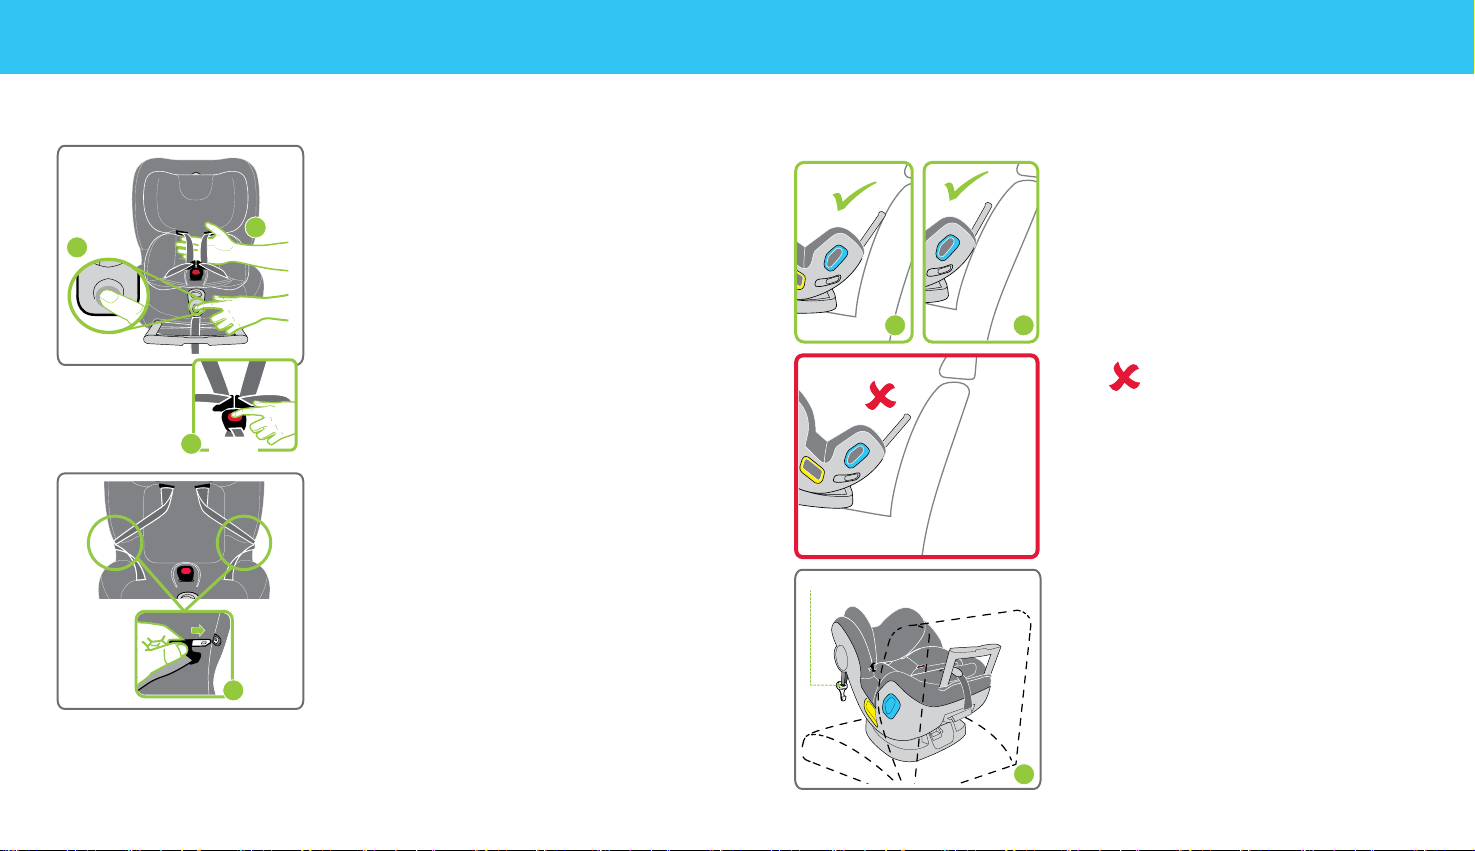
Consult the vehicle owner’s handbook for location of anchorage fittings or anchorage points
and the possible use of spacers. Some vehicles may have an anchor fitting fitted by the
vehicle manufacturer. If anchorage points cannot be found refer to car manufacturer or local
child restraint fitting station or trac authority for optimum position of upper anchorage point
and the use of spacers.
TOP TETHER STRAP
IMPORTANT:
THE ATTACHMENT CLIP COVER MUST ALWAYS BE USED AS IT PREVENTS
THE RISK OF INCORRECT FITMENT OF THE ATTACHMENT CLIP TO THE
UPPER ANCHORAGE POINT. BEFORE EACH USE OF THE RESTRAINT ALWAYS
ENSURE THAT THE ATTACHMENT CLIP IS CORRECTLY ENGAGED TO THE
UPPER ANCHORAGE POINT AND NOT HOOKED TO OR FITTED TO, ANY
OTHER OBJECT. THIS IS ESPECIALLY IMPORTANT IN VEHICLES SUCH AS
STATION WAGONS, VANS, HATCH BACKS OR VEHICLES WITHOUT A FIXED
PARCEL SHELF, SINCE THE ANCHOR POINT IS USUALLY NOT VISIBLE.
IMPORTANT INSTALLATION NOTE:
In some vehicles the upper anchorage point in the rear vertical panel can only be installed in
one way. Please refer to vehicle owner’s handbook or a child restraint fitting station for correct
method.
Instructions for Installation & Use
68
Instructions for Installation & Use
69
Page 36

Extension Straps
Length 300mm (Use Britax Safe-n-Sound part 0035 or 0291).
Length 600mm (Use Britax Safe-n-Sound part 0036 or 0290).
Available from all major child restraint retailers.
45°
Measure distance from
restraint upper anchorage
attachment clip to the car
anchor fitting.
INSTALLATION OF VEHICLE UPPER ANCHOR POINTINSTALLATION OF VEHICLE UPPER ANCHOR POINT
UPPER ANCHORAGE FITTING
Fig.1.
Vehicle trim
Attachment Bolt
Lock washer
Anchor fitting
Spacer(s) if
required
Vehicle metal
structure
IF THE CAR IS FITTED WITH A CHILD
RESTRAINT UPPER ANCHORAGE POINT
Locate the upper anchorage point behind
the rear seating position. (Consult the car
owners handbook for the location of the upper
anchorage point). The upper anchorage point
should be directly behind and central to the
restraint. Remove thread plug from the parcel
shelf/floor/roof, etc. and install attachment bolt
and fitting as shown in Fig 1.
CAUTION: DO NOT OVERTIGHTEN
ATTACHMENT BOLT. OVERTIGHTENING MAY
FRACTURE OR BREAK BOLT. MAXIMUM
TORQUE IS 20 Nm(14.75 ft.lb.)
Adjustable top
tether
strap.
The shaded areas of this diagram illustrate the possible locations of the upper anchorage
point (car anchor fitting). Within each shaded area is an upper anchorage point showing the
correct way to install the fitting. Ensure the upper anchorage point is aligned as illustrated
unless stated otherwise in the vehicle owner’s handbook.
Instructions for Installation & Use
70
F
f
n
ro
t o
v
e
h
ic
le
UPPER ANCHORAGE
FITTINGS FOR SEDANS ONLY
Fig.2.
F
f
n
ro
t o
v
e
h
ic
le
Vehicle trim
Attachment Bolt
Anchor fitting
Spacer(s) if
required
Vehicle metal
structure
Reinforcing
Note: Minimum of five full turns of attachment
bolt is required before tightening force is applied.
IF THE CAR IS NOT FITTED WITH A CHILD
RESTRAINT UPPER ANCHORAGE POINTS
For Sedans only - Drill 9mm diameter hole in
the parcel shelf on the centre line of the seating
position as shown in Fig 3. Before drilling the
hole, check the underside for accessibility.
Install the attachment bolt as shown in Fig 2. It is
recommended that this installation be carried out
by a child restraint fitting station or licenced motor
mechanic.
washer (cone
downwards).
Lock washer
Secure nut
Instructions for Installation & Use
71
Page 37

INSTALLATION OF VEHICLE UPPER ANCHOR POINTINSTALLATION OF VEHICLE UPPER ANCHOR POINT
For vehicles other than Sedans - In Australia, consult your nearest child restraint fitting
station or trac authority for vehicle inspection to find the best, correct position for the
placement of the upper anchorage point, and for the correct attachment bolt length and use
of spacers. In New Zealand, consult the agent for the vehicle. Note to Queensland purchases:
The installation of anchorage points must be approved by authorised ocers appointed by
Queensland Transport. Authorised ocers can be sourced from all Queensland Transport
Customer Service and Queensland Ambulance Service Centres.
NOTE: Marking on
the top of a Grade 5
Bolt. Do not use any bolt
without these marks.
F
f
n
ro
t o
v
e
h
ic
le
200mm
min.
ONLY USE A 5/16 UNC GRADE 5 BOLT. IF THE
BOLT IS NOT THE CORRECT LENGTH THE
CAR MANUFACTURER’S HAND BOOK CAN
PROVIDE ADVICE ON THE CORRECT LENGTH
BOLT.
CHILD RESTRAINTS MUST NOT BE ATTACHED
TO UNSOUND METAL OR TO WOOD, OR
SYNTHETIC STRUCTURES. WHEN DRILLING
9 MM HOLE DO NOT DRILL THROUGH FUEL
LINES, FUEL TANKS, ELECTRICAL WIRING, OR
RADIO SPEAKERS.
WEBBING STRAPS MUST BE PROTECTED
FROM SHARP CORNERS AND EDGES. THE
ANCHOR FITTING MUST BE USED ONLY
AS DESCRIBED ABOVE. IT MUST NOT BE
Fig.3.
Centre line of
seating position
HOOKED ONTO ANY OTHER OBJECT.
CAR INSTALLATION ACCESSORIES
(From retailers of Britax Safe-n-Sound products)
EXTRA ANCHOR KITS: Available for using the restraint in additional cars.
Re-order no: 0038 or 0289
EXTENSION STRAPS: May be required for cars without a fixed parcel shelf.
Re-order no: 0035 or 0291 (length 300mm) or
0036 or 0290 (length 600mm)
Instructions for Installation & Use
72
Instructions for Installation & Use
73
Page 38

IN CASE OF ACCIDENT IN CASE OF ACCIDENT
CRASH EXCHANGE
We would never want you to experience an accident, but unfortunately accidents do happen.
If you experience an accident you may be eligible for a free replacement.
The Britax Safe-n-Sound Crash Exchange Program is a voluntary program designed to ensure
our children are safe and that any seat that may have experienced a severe crash is taken out
of the market.
There is no method of determining if the restraint has been damaged in a severe crash, so the
restraint should be destroyed as the crash may reduce the child restraint's ability to perform.
Since its inception in 2006, the Crash Exchange program has helped hundreds of families
ensure their children have new restraints and that the restraints are not sold second hand
placing others at risk.
If your restraint has been involved in a severe crash, you should destroy the restraint even if no
damage is obvious. Restraints are eligible for exchange if they have been involved in a severe
crash in Australia or New Zealand and meet all stated criteria. (A severe crash is considered
as being one where the main body structure of the vehicle is distorted).
The Britax Safe-n-Sound child safety restraints are available for exchange under this program.
Contact your insurance company for further details. Your insurance company may require
you to keep the child restraint for assessment, but do not use the child restraint after a severe
crash.
Refer to the Britax crash exchange website for more details
Our Crash Exchange Terms and Application form are accessible on our website. Please visit
www.britax.com.au for further information.
NOTICE TO INSURANCE COMPANY CHILD RESTRAINT
INVOLVED IN AN ACCIDENT
All Britax Safe-n-Sound child restraints are manufactured to Australian/New Zealand
Standards AS/NZS1754-2013 which require us to advise users of child restraints to "Destroy
the entire restraint if it has been in use in a severe crash, even if no damage is obvious". The
joint Australian/New Zealand Standards committee CS/85, advise that this statement applies
whether a child was in the child restraint or not. A severe crash, we consider as being one
where the main body structure of the vehicle is distorted.
There is no method of determining if the restraint has been damaged and we concur with the
Australian/New Zealand Standards in recommending destruction of the child restraint.
This notice is to advise you of the requirements of the Australian/New Zealand Standards and
our obligation in complying with the standards.
Please assist the owner of this restraint in their claim.
AUSTRALIA
Britax Childcare Pty. Ltd.
A.B.N 55 006 773 600
Head oce and registered address:
Level 4, 650 Lorimer Street, Port Melbourne, VIC, 3207
P.O. Box 5119 Garden City, VIC, 3207
Customer Service 1300 303 330
Email au-custserv@britax.com
www.britax.com.au
NEW ZEALAND
Britax Childcare (NZ) Ltd.
Customer Service 0508 688 822
Email nz-custserv@britax.com
www.britax.com.nz
Instructions for Installation & Use
74
INTERNATIONAL ENQUIRIES
Contact your local Distributor
Instructions for Installation & Use
75
Page 39

Series No. BS3700A-C20133
Scan QR code for features,
how to use and installation.
WARRANTY
Our goods come with guarantees that cannot be excluded under the Australian Consumer Law.
You are entitled to a replacement or refund for a major failure and compensation for any other reasonable
foreseeable loss or damage. You are also entitled to have the goods repaired or replaced if the goods fail to
be acceptable quality and the failure does not amount to a major failure.
For the full terms of the Warranty refer to the Britax website www.britax.com.au/service-support/warranty
The Safe-n-Sound trademark and product names are the property of Britax Childcare Pty. Ltd. (Australia).
The Britax trademarks are the property of Britax Childcare Holdings LTD, UK.
We reserve the right to alter this product without notice.
© 2019 Britax Childcare Pty. Ltd. This product is covered by Australian and overseas
Patent applications. Patents pending.
P/No.2203144/B
Instructions for Installation & Use
76
 Loading...