

Britax Safe'n'Sound, Safe-n-sound Baby Capsule, Safe-N-Sound BABY CAPSULE BS0040A-i20133 Series Instructions For Installation & Use
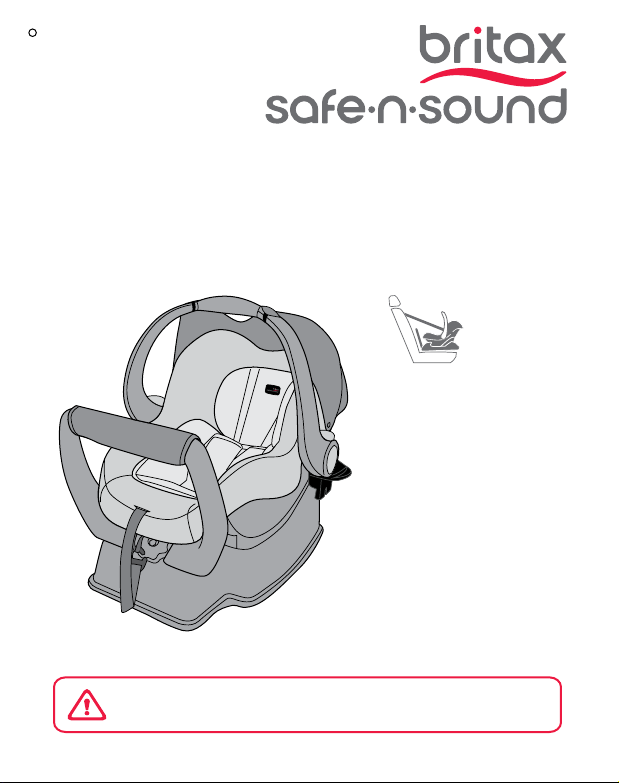
BABY CAPSULE
Birth to 12 months (approx.)
Instructions for Installation & Use
NOTE: Style may vary from image shown.
IMPORTANT: KEEP THIS BOOKLET IN THE PLACE
PROVIDED ON THE CHILD RESTRAINT BASE
Series No. BS0040B-020133
Birth to
12 months
(approx.)
Instructions for Installation & Use
1
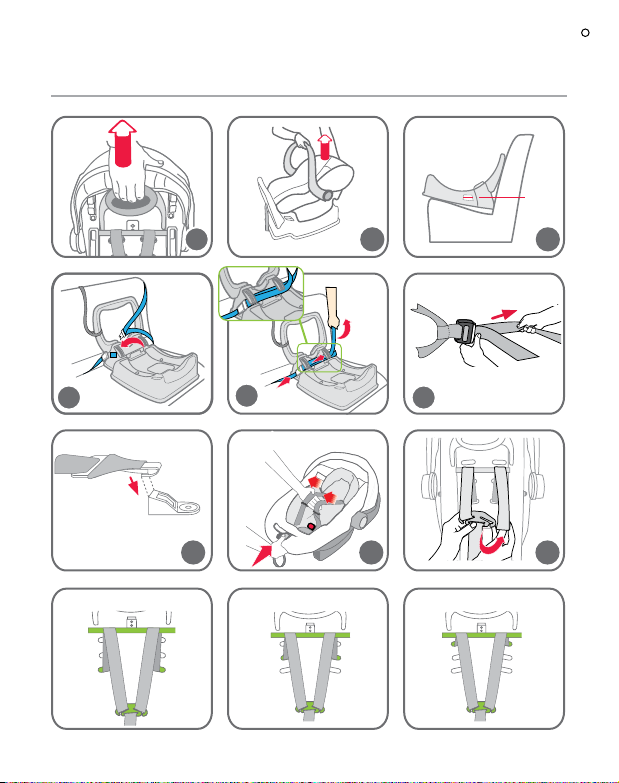
QUICK SETUP
Level
1
4
5
7 8 9
AVERAGE SIZE BABY GROWING BABY
Instructions for Installation & Use
2
2
Press
3
Pull
6
LARGER BABY
QUICK SETUP
Click
10
13
16
11
14
Instructions for Installation & Use
12
15
17
18
3

INTRODUCTION
To be used only in a rearward-facing position until the infant’s shoulders reach the
shoulder height marker (approximately 12 months of age).
Continue to use this infant restraint until the child reaches this limit.
Infants are at risk of serious injury if they face forward too early.
يتم استخدامه فقط في الوضعية المواجهة إلى الخلف حتى يصل كتفي الرضيع إلى
علامة ارتفاع الأكتاف (تقريبًا في عمر 12شهر).
استمر في استخدام حاجز الرضع هذا لحين وصول الطفل إلى هذا الحدّ.
يكون الرضّع في مخاطرة للتعرض إلى الإصابات الخطيرة إذا تم توجيههم إلى الأمام
بصورة مبكرة أكثر من اللازم.
只采用后向式安装,直到婴儿的肩膀达到肩高标记(大约12个月的宝宝)
在儿童达到该座椅上限以前必须不断使用这一婴儿汽车座椅。
婴儿过早乘坐前向式座椅则可能受到严重的伤害。
Να χρησιμοποιείται μόνο σε θέση στραμμένο προς τα πίσω μέχρι οι ώμοι του
βρέφους να φτάσουν τον δείκτη ύψους του ώμου (περίπου 12 μηνών).
Συνεχίστε να χρησιμοποιείτε αυτό το σύστημα συγκράτησης νηπίων μέχρι το παιδί
να φτάσει σε αυτό το όριο.
Τα νήπια κινδυνεύουν με σοβαρό τραυματισμό αν κοιτάζουν προς τα εμπρός πολύ
νωρίς.
Magagamit lamang sa isang nakaharap sa likuran na posisyon hanggang sa
maabot ng balikat ng sanggol ang marka ng taas ng balikat (humigit-kumulang 12
na buwang edad).
Ipagpatuloy ang paggamit ng pampigil ng sanggol na ito hanggang sa maabot ng
bata ang limitasyong ito.
Ang mga sanggol ay nasa seryosong peligro ng pagkapinsala kung sila ay haharap
ng masyadong maaga.
Instructions for Installation & Use
4

INTRODUCTION
Chỉ được sử dụng ở vị trí hướng mặt về phía sau cho đến khi vai em bé cao tới
vạch ghi độ cao của vai (khoảng 12 tháng tuổi).
Hãy tiếp tục sử dụng ghế em bé này cho đến khi em cao tới giới hạn này.
Bé sơ sinh có nguy cơ bị chấn thương nghiêm trọng nếu hướng mặt về phía trước
quá sớm.
( 12 )
Sólo debe utilizarse orientado hacia atrás hasta que los hombros del niño
alcancen el marcador de altura (aproximadamente a los 12 meses de edad).
Utilice este sistema de seguridad infantil hasta que el niño alcance ese límite.
El niño corre el riesgo de sufrir lesiones graves si se utiliza la silla orientada hacia
adelante antes de tiempo.
僅可後向安裝使用,直至嬰兒肩膀達到肩高標記(大約12個月大)。
孩子應一直采用後向式坐姿,直至其達到後向式坐姿的上限。
孩子若過早乘坐前向式汽車座椅,可能會對其造成嚴重的傷害。
Da utilizzare solo in posizione rivolta all'indietro fino a quando le spalle del bambino
raggiungono il marcatore di altezza (circa 12 mesi di età).
Continuare a utilizzare questo sistema di ritenuta per neonati fino a quando il
bambino raggiunge questo limite.
I neonati sono a rischio di lesioni gravi se messi in posizione frontale troppo presto.
Instructions for Installation & Use
5

INTRODUCTION
The Baby Capsule and base is installed so that the infant is facing rearwards. This
provides best position in a crash for infants.
No child restraint can guarantee absolute protection from injury in every crash. However,
to ensure that your child gets all the protection designed into the restraint, PLEASE
READ AND FOLLOW THESE INSTRUCTIONS EXACTLY and use only Safe-n-Sound
recommended parts and accessories.
Carefully read all the instructions for installation in this book. If in doubt about the method
of installation, consult Britax childcare or agent or a child restraint fitter or, in New
Zealand, to consult the agent for the vehicle.
Regional Road Rules restrict the use of child restraints, like this Baby Capsule, in the
front seat of the car. Check your local Road Rules.
Always store the instruction book in the place provided in the base when the Baby
Capsule is removed.
The Baby Capsule is suitable for fitting to a variety of Britax, Steelcraft and BOB Strollers
using one of the adaptor systems. For compatible Strollers refer to www.britax.com.au.
Britax CLICK & GO™ Adaptor is required for some strollers.
Britax Childcare Pty. Ltd. continues to provide care for your children when travelling in
motor cars with a range of child restraints suitable throughout their childhood.
Instructions for Installation & Use
6
PAGE
8
WARNINGS AND IMPORTANT MESSAGES
10
SHOULDER HEIGHT MARKERS AND A GROWING CHILD
12
SHOULDER HEIGHT MARKERS AND THE NEXT STEP
13
SPECIAL FEATURES
16
SUITABLE FOR USE
17
USING THE BABY CAPSULE
21
INSTALLING THE BASE
25
HOW TO INSTALL - TOP TETHER STRAP
27
BABY CAPSULE SETUP
32
HOW TO USE
39
HOW TO INSTALL IN AN AIRCRAFT
42
CARE & MAINTENANCE
47
ACCESSORIES
49
INSTALLATION OF CAR'S UPPER ANCHORAGE POINT
54
ALTERNATIVE INSTALLATION IF SEATBELT LOOSENS
56
TRAVEL SYSTEM
57
TRAVEL SYSTEM - INTEGRAL LATCH
60
TRAVEL SYSTEM - BRITAX CLICK & GO™ADAPTOR
65
TRAVELLING TIPS
66
IN CASE OF CRASH
Instructions for Installation & Use
INDEX
7

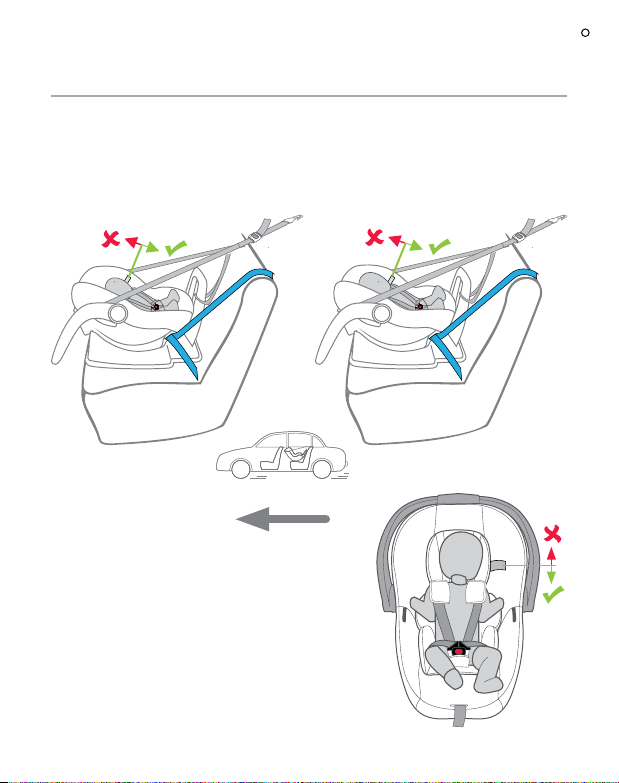
• Use the restraint exactly as shown in the instructions.
• Supervision of children is needed because they may be able to undo the buckles and
adjusters.
• DO NOT LEAVE CHILDREN UNATTENDED IN THE CAR.
• Do not alter or modify this restraint.
• Repairs must only be done by the manufacturers or agent.
• Fit the restraint firmly to the car seat.
• Fit the harness firmly to the child.
• A loose restraint or harness is dangerous.
• DO NOT USE A REAR-FACING CHILD RESTRAINT WHERE AN AIRBAG IS
FITTED IN FRONT OF THE SEATING POSITION. For other airbags, refer to the car
owner’s handbook for warnings and instructions.
• To ensure infant’s back is evenly supported do not put more than one nappy on the
baby and make sure the nappy is not thickly folded at the back.
• Do not allow the restraint to come into contact with polishes, oils, bleach and other
chemicals.
• Destroy the restraint if it has been in a severe crash, even if no damage is visible.
• Do not harness an infant wrapped in a blanket or swaddled. Any blanket or wrap
must only be placed over the harness and infant.
• Always secure the loose end of the top tether strap. Do not use the child restraint
where this strap may fall into the seat back or off the side of the seat.
• ALWAYS ATTACH HOOK AND REMOVE SLACK.
• DO NOT USE THIS RESTRAINT WITHOUT THE COVER.
• This Baby Capsule is only approved for use with the included base or an accessory
base (additional purchase) of the same series number - 40/B/2013. It is not approved
for use with a base that utilises ISOFIX compatible anchorages. Series injury may
result from use of this Baby Capsule with a non-approved base.
Instructions for Installation & Use
8

IMPORTANT :
• TO BE USED WITH A LAP-SASH OR LAP ONLY SEATBELT IN THE BACK OF
MOST CARS WITH FORWARD FACING SEATS.
• Do not use the child restraint facing forwards. Do not use excessively upright or
reclined.
• This restraint must be used in conjunction with a lap or lap-sash seat belt.
• Seatbelt extenders are not recommended to be used if the seatbelt is not long
enough to secure the child restraint. If seatbelts are too short then seek advice from
a child restraint fitter and consider their recommendations before using a seatbelt
extender, If you use a seatbelt extender then ensure that the seatbelt buckle does not
sit above the base moulding or prevent the Capsule locking onto the base.
• THIS RESTRAINT IS NOT SUITABLE FOR USE WHERE THE TOP TETHER
STRAP MAY FALL INTO A SPLIT IN THE SEAT BACK OR OFF THE SIDE OF THE
SEAT.
• THIS RESTRAINT MUST BE ATTACHED TO A CHILD RESTRAINT UPPER
ANCHORAGE POINT IN THE CAR. REFER TO CAR OWNER'S HANDBOOK FOR
LOCATION OF UPPER ANCHORAGE POINTS. REFER TO A CHILD RESTRAINT
FITTING STATION IF NO UPPER ANCHORAGE POINTS ARE IN THE MOTOR
CAR.
• The restraint should not be purchased or sold as a second hand item. It is
recommended not to use child restraints older than 10 years as the protection in an
accident may be reduced.
• This child restraint is not approved for use with any connectors that connect to the
car's ISOFIX low anchorages.
• Make sure the handle is latched properly every time you pick up the Baby Capsule.
• The restraint is not intended to be a substitute baby cot or bed. It is only designed to
enable safe transportation of children in motor vehicles. Do not leave a baby in the
restraint for long periods of time.
Instructions for Installation & Use
9
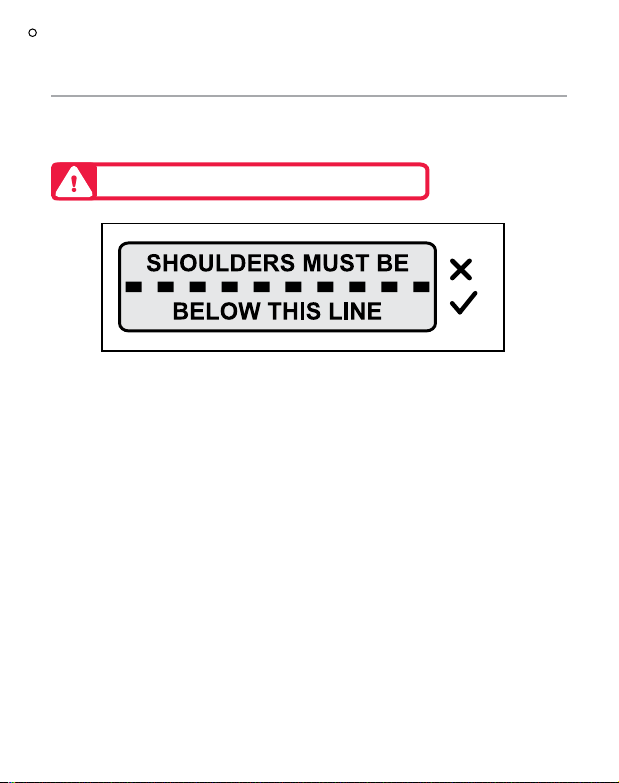
SHOULDER HEIGHT MARKERS AND A
GROWING CHILD
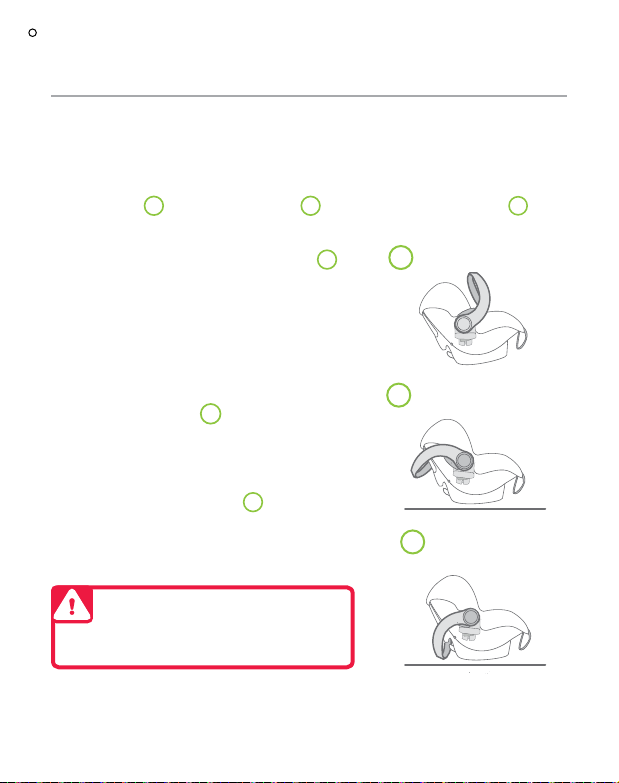
NEW BABY
Shoulders below the Shoulder
Height Marker.
Maximum Shoulder Height Marker.
FRONT OF VEHICLE
The Baby Capsule is not suitable for your child when
their shoulders are above the shoulder height marker.
If the babies neck muscles are unable to support
their head then the child should remain rear facing,
choose a child restraint that will take larger babies in
rear facing.
DO NOT MOVE TO THE NEXT RESTRAINT UNTIL
SHOULDERS REACH THE SHOULDER HEIGHT
MARKER.
OLDER BABY
Shoulders in-line with the Shoulder
Height Marker- then you will need to
move to the next child restraint.
Maximum Shoulder Height Marker.
Instructions for Installation & Use
10
SHOULDER HEIGHT MARKERS AND A
GROWING CHILD
Shoulder height markers are provided on this restraint for a visual indication that the
child is safe to ride in this restraint.
IMPORTANT: Follow this advice.
DO NOT MOVE TO THE NEXT RESTRAINT UNTIL THE BABY'S SHOULDERS
REACH THE SHOULDER HEIGHT MARKER.
When the baby's shoulders reach this marker, the child is now too big for the Baby
Capsule. It is now time to move to the next child restraint, see next page.
Instructions for Installation & Use
11
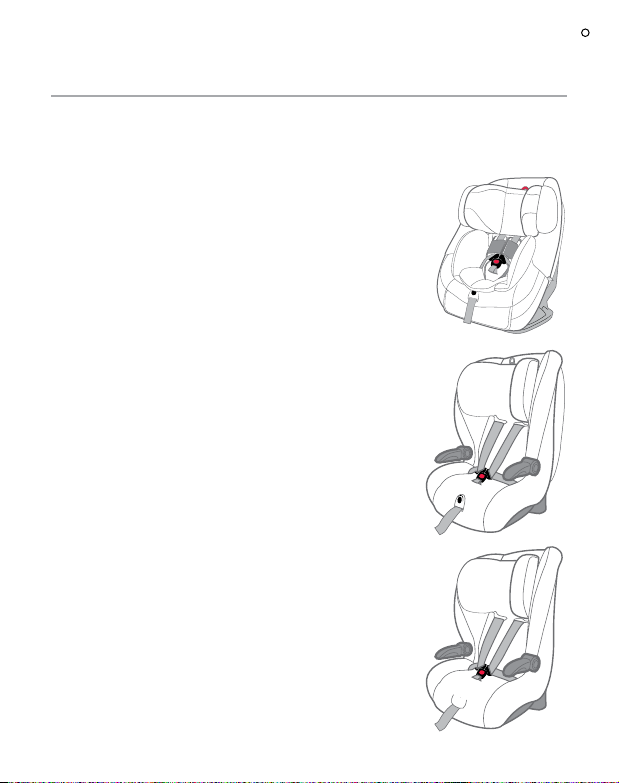
SHOULDER HEIGHT MARKERS AND
THE NEXT STEP
Next type of restraint that can be used in the car for your
child.
When your child has outgrown the seat, you can then either use:
• Convertible Child Seat: Suitable for approximately
12 months, continue to keep your child rear
facing until the shoulders reach the lower
shoulder height marker. Then turn to forward
facing until the child reaches the upper shoulder
height marker - approximately 4 years of age.
Some convertible child seats may allow for the
child to remain rearward facing until 2 to 3 years
of age.
OR
• Dedicated Forward Facing Seat with in-built
harness: Suitable for children who have outgrown
their Baby Capsule (approximately 6 months old),
up to approximately 4 years of age, or 8 years of
age depending on the restraint.
OR
• Convertible Booster Seat with in-built harness
that faces forward: Suitable for children who have
out grown their rear facing seat (approximately
6 months old). This seat can be used up to
approximately 4 years of age with built-in harness
and then be converted to a booster seat and
used up to approximately 8 years of age.
Instructions for Installation & Use
12
Convertible
Child Seat
Forward-Facing
Seat with
in-built harness
Convertible
Booster Seat
BABY CAPSULE
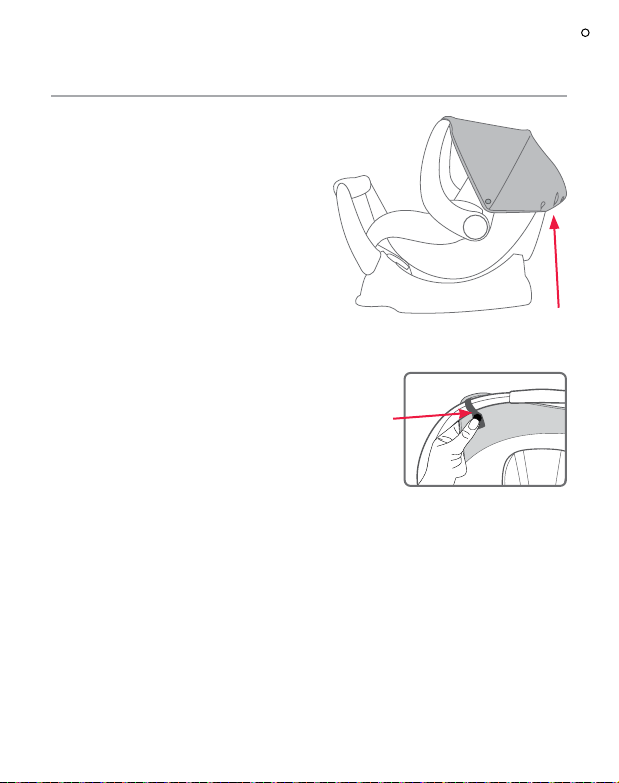
SPECIAL FEATURES
1
2
Harness Tongues
Harness
8
Buckle
9
7
6
1. Padded Insert (style may vary)
2. Shoulder Height marker
3. Buckle Tongue Holders (if fitted) (holders
are on both sides of the Padded Insert or
the sides of the cover)
4. Harness Adjuster (under cover)
5. Harness adjustment strap hook (disconnected)
6. Harness adjustment strap
7. Cover
8. Harness Tongues and Buckle (Red button)
9. Shoulder Pads (if fitted)
5
Instructions for Installation & Use
3
4
13
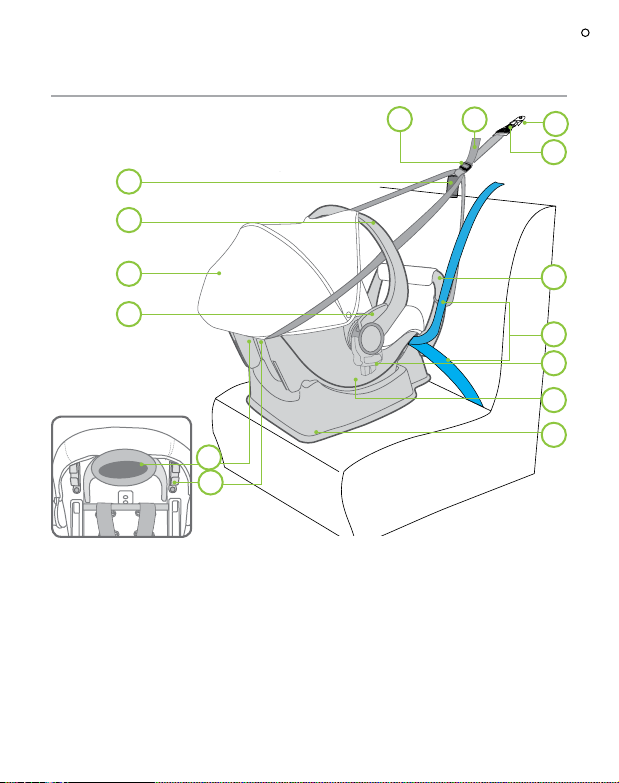
SPECIAL FEATURES
22
21
20
19
10. Car's Upper Anchorage fitting
11. Attachment Clip
12. Stabilising Bar
13. Car Seat belt
14. Britax CLICK & GO™ Adaptor
15. Baby Capsule
16. Base
17. Top Tether Strap guides
Instructions for Installation & Use
14
18
17
23
24
10
11
12
13
14
15
16
18. Baby Capsule Release Handle
(Located at the back of the Baby Capsule)
19. Carry Handle release latch
20. Canopy
21. Carry Handle
22. Top Tether Storage Pocket
23. Top Tether Adjuster
24. Top Tether strap
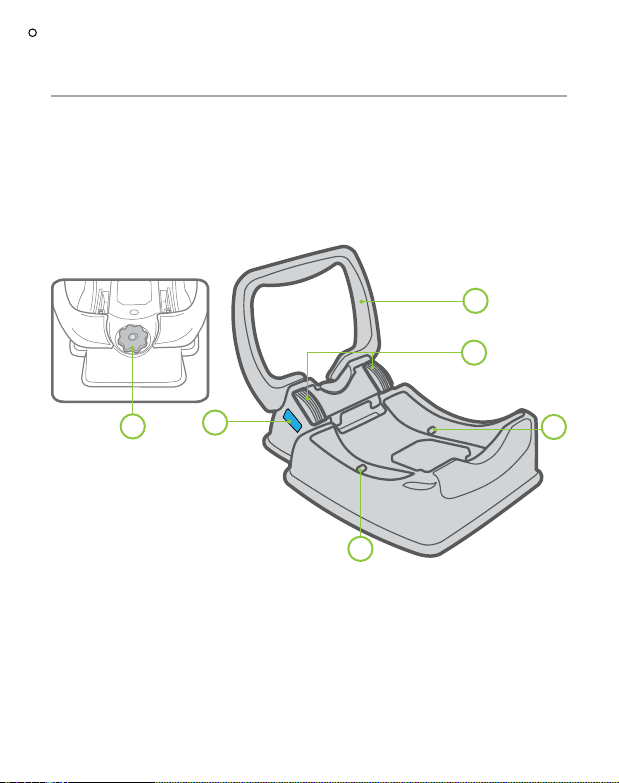
BASE
12
25
28
25. Belt Guide Hooks
26. Capsule Latching Points
27. Rearward-Facing Belt Path Label (shown in blue)
28. Levelling Knob
Top Tether not shown for illustration purposes.
27
26
Instructions for Installation & Use
26
15

SUITABLE FOR USE
If the baby’s neck muscles are unable to support
their head, then the child should remain rear-facing,
choose a restraint that will suit larger babies in a
rear-facing mode.
To ensure that the space is sufficient, the purchaser should check the measurements
between the vehicle’s rear and front seats in which the child restraint is intended to be used.
Ensure babies and toddlers are adequately shaded from direct sunlight through side or rear
windows.
Check the car is ventilated by opening windows or using the car's ventilation system taking in
external air. Recirculation setting is not suitable for providing ventilation.
THE TETHER STRAP MUST ALWAYS BE FITTED WHEN THE CHILD RESTRAINT IS
USED IN A VEHICLE.
Do not use the restraint without the top tether strap correctly attached.
The top tether strap must be attached to an anchorage point using an extension strap if
necessary.
The Baby Capsule may just touch the front seat, but must not in such a way that the
installation angle is affected.
Do not allow the front seat to alter the installed
position of the restraint, It is permissible to allow
the restraint to touch the seat in front of it.
Do not recline the seat excessively, it must be
installed at the correct angle (see page 21 - 22).
Do not use on any vehicle seat which faces
sideways or rearwards.
570mm
475mm
Instructions for Installation & Use
16
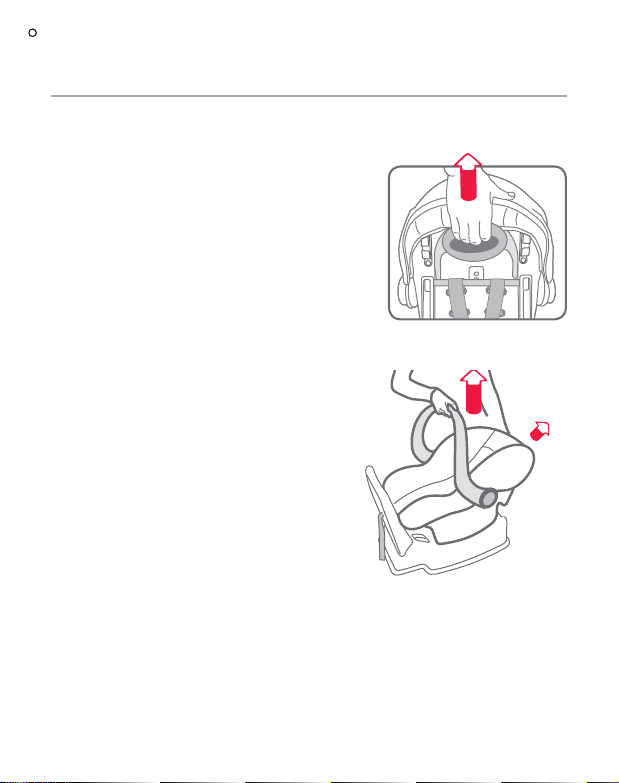
USING THE BABY CAPSULE
REMOVING BABY CAPSULE FROM BASE
A. Grasp the handle with one hand. With the other
hand, lift the catch located at the front of the Baby
Capsule.
B. With the catch still lifted raise the Baby Capsule
clear of the base.
Lift
Pull
Catch
Instructions for Installation & Use
17
B
3
USING THE BABY CAPSULE
ADJUSTMENT OF HANDLE POSITION WITH BRITAX
CLICK & GO™ ADAPTOR
A. Squeeze the carry handle release latches on both
sides of the handle and rotate handle to the first
position -“rocking position” .
B. Squeeze the latch again and start to rotate the
handle then remove both hands from the latches
and use one hand at the top of the handle to rotate
down further until the handle latches in the second or
“non-rocking position” . The Capsule is now locked to
the stroller.
2
3
Push down until it clicks into place.
To avoid pinching your fingers follow the steps
above.
2
B
3
A
Instructions for Installation & Use
18
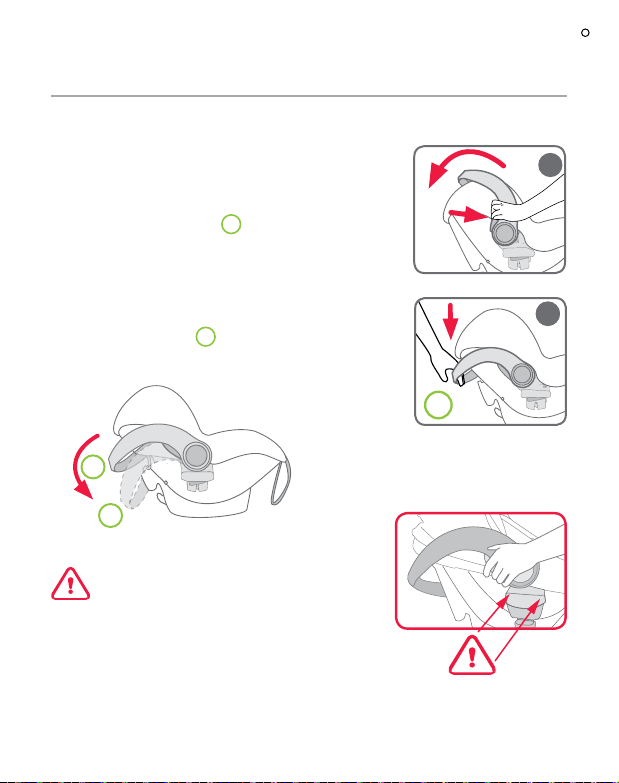
USING THE BABY CAPSULE
ADJUSTMENT OF HANDLE POSITION
The Baby Capsule features a sturdy carry handle which can be used in conjunction with
the curved base to convert it to a rocker. At the base of the handle there are two large
buttons which control the three positions of the handle. These positions are the "carry (or
travel) position" , the "rocking position" , and the "non-rocking position" .
1 2
3
A. To convert from carry to "rocking position" ,
depress the large buttons on each side and rotate
the handle towards the front of the Baby Capsule.
When you have started rotating the handle release
the buttons and continue rotating the handle round
until it locks into position.
B. Ensure the handle is locked in position securely.
The "rocking position" enables the Baby
Capsule to rock without the possibility of the Baby
Capsule tipping over.
C. To convert to a "non-rocking" position depress
both buttons and rotate the handle to the fixed
position. Ensure the handle is locked in position
securely.
2
3
2
IMPORTANT :
Do not place the Baby Capsule on a table or a
work-top where it could fall off.
1
Carry Position
2
Rocking Position
3
Non-rocking
Position
Instructions for Installation & Use
19
USING THE BABY CAPSULE
TO FIT AND USE THE
CANOPY
A. Fit Canopy over Baby Capsule with
elastic at the end.
B. Loop elastic around carry handle and
clip in press studs. Check the elastic
around the back of the Capsule has
not lifted.
D. The Canopy can be rotated to cover
the baby or folded by rotating to
the desired position using the carry
handle.
TO REMOVE CANOPY
A. Unclip the press studs from carry
handle and remove canopy.
Unclip press
studs on
carry handle
to remove
canopy
Elastic around
Baby Capsule
Instructions for Installation & Use
20
INSTALLING THE BASE
INSTALL INTO VEHICLE
Remove all packaging from the Baby Capsule.
Consult the car owner’s handbook for location of top tether anchorage points.
If there is no child restraint anchor fitting or child restraint anchor point refer to pages 49
to 53 for the installation of the anchor fitting as well as the use of extension straps.
An anchor fitting is required to attach the top tether strap to fully install the Capsule to
the car. The top tether strap must be used with this Baby Capsule when used in the car.
For installing the Base to the car, select a seating position with a child restraint anchor
fitting directly behind the seating position.
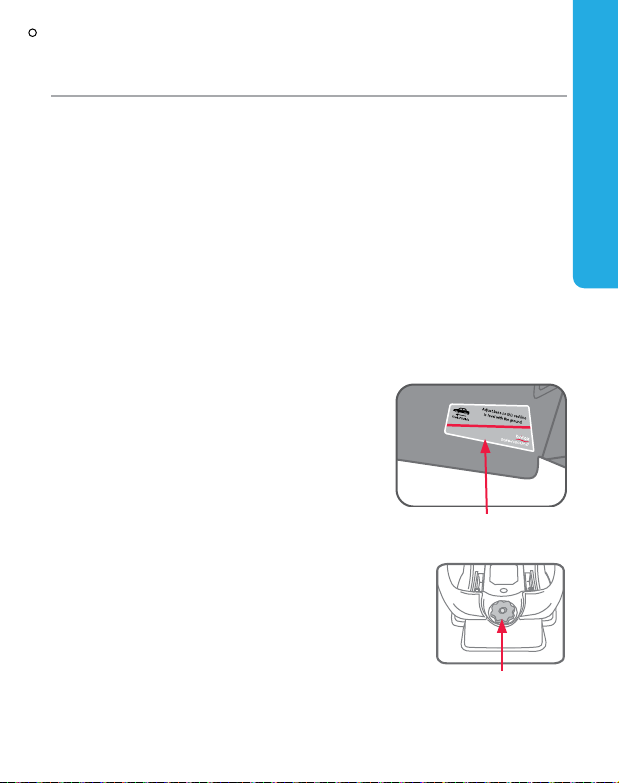
ADJUSTING THE BASE ANGLE
A. Place the base and Baby Capsule on vehicle seat
in a seating position where a child restraint anchor
fitting is installed. The Level Indicator Line should
be level with the road, (i.e. parallel with the road
surface). Check and adjust the Levelling knob of
the base if necessary.
Level Indicator Line on
B. If your car’s seat is contoured then you may need
to adjust the angle of the base so your baby is not
too upright.
The angle may be altered by turning the base
levelling knob located at the rebound bar end
which will cause the levelling foot to extend from
the underside of the base.
both sides of base.
Levelling Knob
REARWARD FACING
Instructions for Installation & Use
21
 Loading...