

Page 1
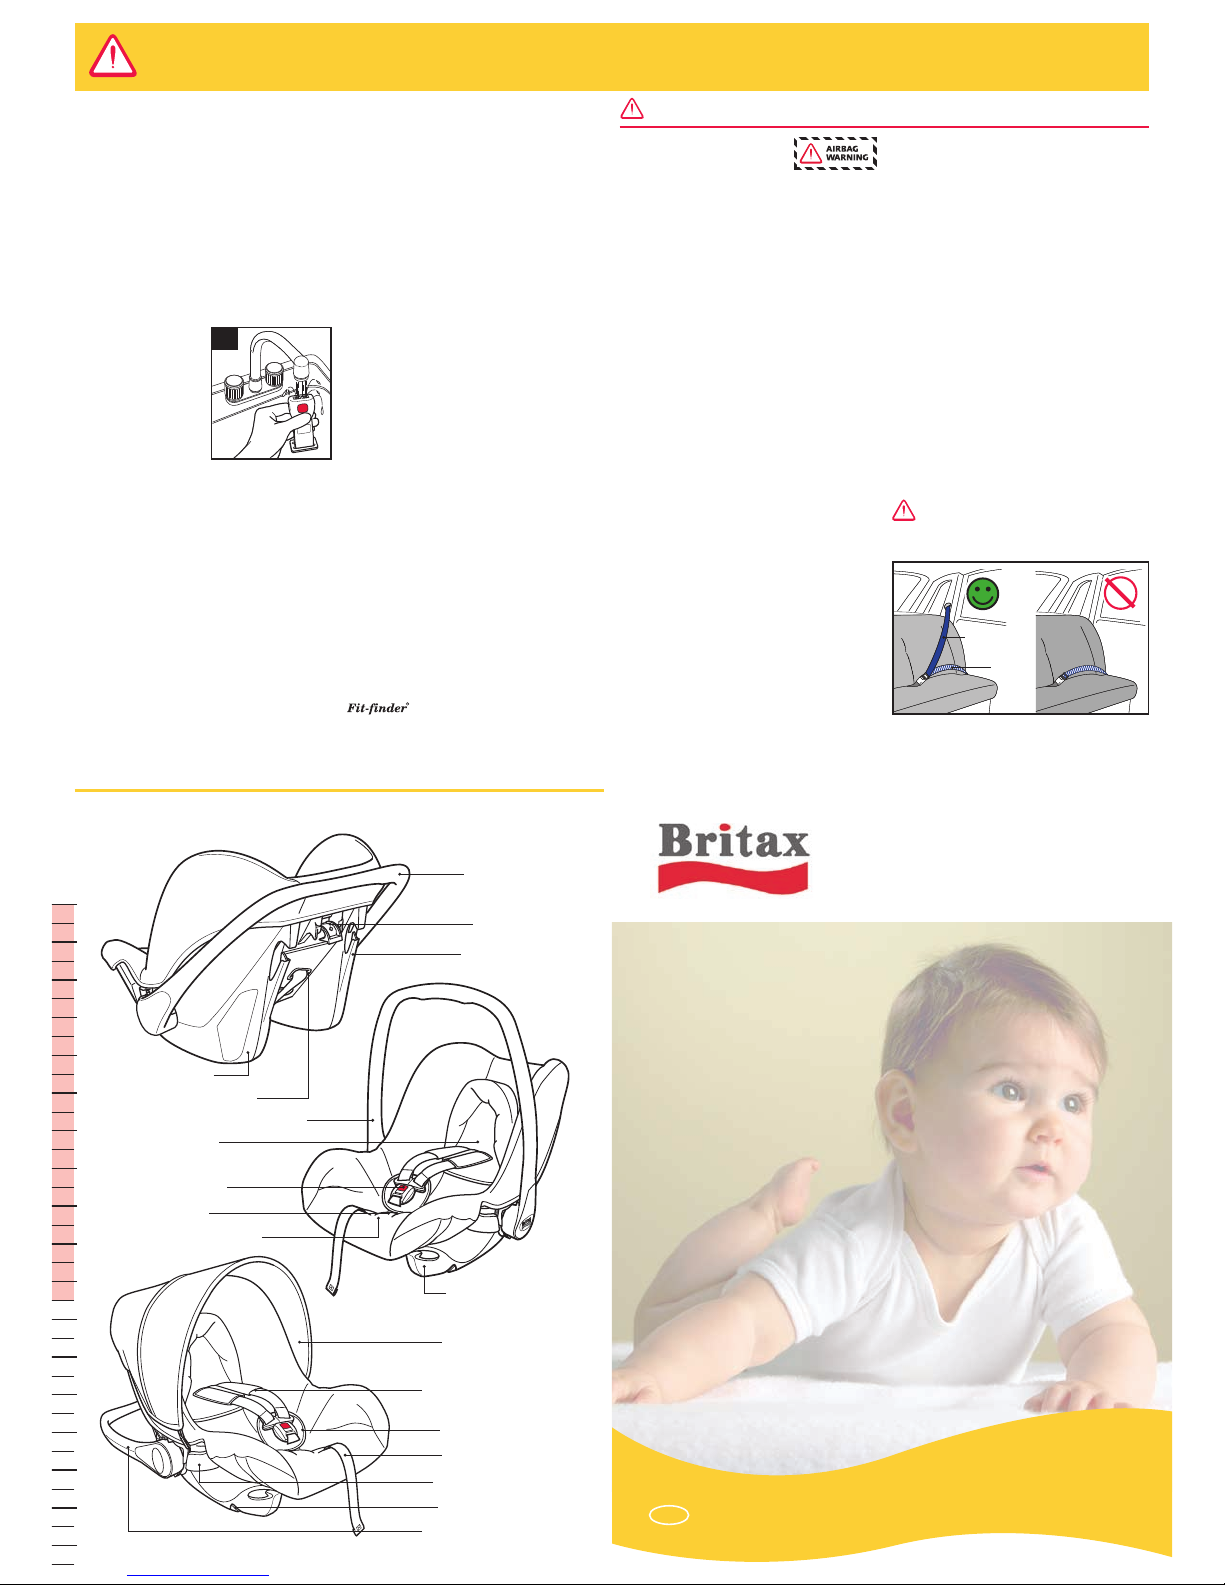
Rocking base
Sun canopy
(Rock-a-Tot Plus Si only)
Alternative lap guides
Shoulder strap slots
Diagonal belt route
(blue arrows)
Locking clip
(for travel systems)
Handle
(in rocking position)
Slots for travel systems
Lap guides (blue arrows)
Handle (in carrying position)
Head support
Shoulder straps (comfort
pads on Rock-a-Tot Si only)
Harness adjuster strap
Harness adjuster tab
(under flap)
Crotch strap
Comfort pad
(Rock-a-Tot Plus Si only)
Harness buckle
Handle (in stable position)
DO NOT use the child s eat on
a passenger seat fi tted with an
active front air bag unless your
vehicle manufac turer confirms that it is safe.
DO NOT use the child s eat on side or rear ward
facing vehicle seat s.
DO NOT use anything, such as a cushion or coat ,
to raise the child seat off the passenger seat. In
an accident the child seat and your car seat belt s
would not be able to protect your child as well as
they should.
DO NOT use the child s eat in the home. It has not
been designe d for home use and should only be
used in your car.
DO NOT attempt to dismantle, modify o r add to
any part of the child seat or change the way it s
harness or your c ar seat belts are made or used.
DO NOT leave children alone in your car, even for
a short time.
DO NOT leave loose objects, such as luggage
or books, in t he back of your car. They must be
properly secured.
DO NOT leave folding passenger seat s unlatched.
If you have to stop your car suddenly a loose seat
back could injure your chil d.
DO NOT allow childre n to play with or adjust t he
child seat.
DO NOT place the child seat on a table or wor k-top.
DO keep this user guide s afe for future reference.
DO cover the child seat if your ca r is left in direc t
sunlight. Fittin gs can become hot to touch in
sunny weather and the cover may become faded.
DO make sure that the child seat d oes not
become trapp ed by a folding passe nger seat or in
the door of your car.
DO make sure that you adjust the harness to fit
the clothes your child is wearing before each
journey – a fitting for winter clothes may b e too
slack for a child wearing summer clothes.
DO store the child seat in a safe place when it is
not being used. Avoid placing heavy obj ects on
top of it and do not store nea r direct heat sources.
DO always keep the child seat secure, even if it is
not being used by your child.
Rock-a-Tot Si
Rock-a-Tot Plus Si
User Guide
UK
WARNING
BB0-633-00
You must ensure that you follow these instructions carefully and correctly. If this seat is not fitted
securely and your child is not strapped in correctly, your child and other passengers are at serious
risk of injury in the event of an accident
IMPORTANT!
Britax, whilst taking into account child car
seat contact with vehicle seats throughout the
development of new produc ts, cannot accept responsibility
for damage occurring to vehicle seats or seat b elts.
Please read this User Guide carefully BEFORE trying to install your child car seat
The Hampshire Trading Standards Authorit y and
Britax advise that child car seat s should not be
bought or sold second-hand. Please dispose of
your child seat safely. Do not sell o r pass it on.
After an accide nt, the child seat and your car seat
belts should b e replaced. Although they may look
undamaged, if you we re to have another accident
the child seat and your c ar seat belts may not be
able to protect your child as well as they should.
No child seat is escape proof
Belt restra int systems cannot b e designed to be
completely “child proof ” and yet comply with th e
legal requirem ents of European Standard ECE R44.
Looking after your
child seat
Food and drink may
find their way inside the
buckle of the har ness.
This can stop it from
working prope rly – it
will not click. Wash in
warm water until clea n
(dia A).
The child seat and it s cover have been caref ully
designed, manufactured and tes ted to high safety
standards.
Cleaning the cover
Please read the lab els on the cover for washing
instruct ions.
DO NOT tumble dr y the cover – short spin and
drip dry onl y. The sun canopy is hand wash only.
Cleaning the ha rness and seat she ll
Sponge clean ONLY using hand soap and war m
wat er.
DO NOT take apart, or attempt to take apart, any
part of the har ness or seat when c leaning.
DO NOT use solvents, detergents or wa shingup liquid as these may weaken the harness and
the seat.
DO NOT lubricate or oil any part of the seat .
IMPOR TANT – The cover is a safety feature.
NEVER use the child seat without it. Don’t put
your child’s safety at risk by using other makes of
replacement cover, they could stop t he child seat
from protecting your child as well as it should.
A replacement cover is available from your Brit ax
stockist or conta ct Britax Custo mer Service
Department on 01264 386034.
Removing the cover
Follow the instructions for rem oving the harness
(see overleaf ). Then unfa sten the elast ics on each
side of the cover (if ap plicable slide t he shoulder
pads off the harness and remove t he head
support. and remove the comfor t pad).
Gently pull the cover off from the top of t he seat,
easing the harne ss buckle and adjuster strap
through the slot s in the cover.
Guarantee
All Britax products are ca refully designed,
manufactured and tested. However, should
this product prove faulty within 12 months of
purchase due to a materials or manufactur ing fault
please return it to the original place of purchase.
We will then, at our discretion, either repai r it free
of charge or replace it with the same or a similar
product.
For guarantee pur poses proof of purchase will be
required. We recomme nd that you retain your
receipt and attach it to this user guide. Th ey
should be kept in a safe place.
Britax does not accept liability for dam age arising
from abuse, misuse or negligence. This guar antee
is not transfer able and therefo re does not apply to
second-hand p roducts.
Your statutory rights are not affected by this
guarantee.
If in doubt
Not all car seats fit a ll cars. For advice as to the
suitability of this restraint for your car please use
on our website at www.brita x.co.uk,
call our Customer Se rvice Helpline on 0126 4
386034 or email helpline@ uk.britaxeurope.com.
Britax Excelsior Limited
1 Churchill Way West
Andover
Hampshire SP10 3UW
United Kingdom
A Britax Childcare company
Customer Service Helpline: 01264 386034
Email: helpline@ uk.britaxeurope.com
Switchboard: 01264 333343
Fax: 01264 334146
www.britax.co.uk
IMPOR TANT – The child seat MUST only be used
with a lap and diagonal seat belt (approved to U N/
ECE Regulation no. 16 or other equi valent standard s).
Introducing your new child car seat
Diagonal
Lap
DO make sure that all occupants in the vehicle are
correctly re strained.
DO Watch over your baby when using the rocking
feature. At all other times make sure the handle is
in the stable p osition to prevent rocking.
DO make sure when using the child seat with a
travel system, that it is securely att ached to the
travel system chassis before set ting off.
DO use the safety har ness provided w ith the child
seat at all times.
DO make sure the handle is upr ight and latched
properly be fore carrying your baby in the child seat.
1 2 3 4 5 6 7 8 9 10 11 12 13 14 15 16 17 18
A
Page 2
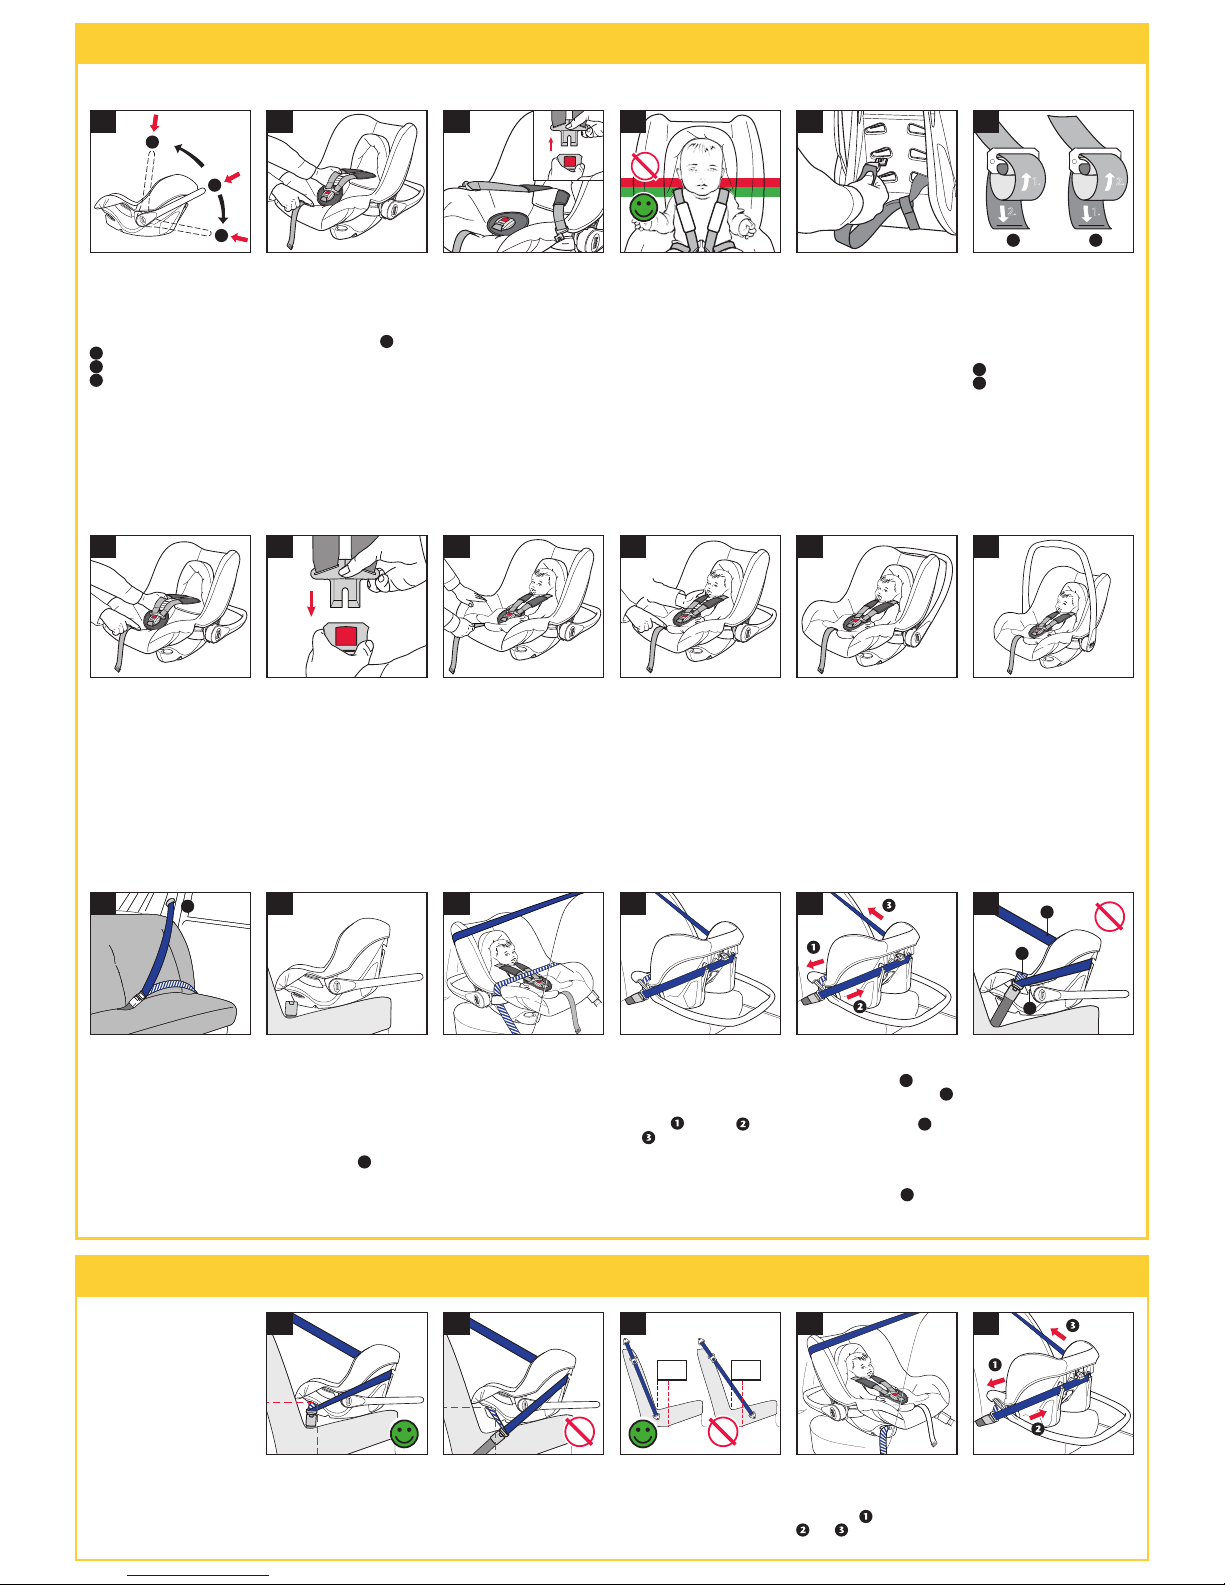
A
B
1.
2.
1.
2.
A
B
A
B
C
1 Preparing to install the child seat in a car
Handle – carrying, rocki ng
and stable position
To move the handle, push firmly
in towards the shell to release
lock and then move it to t he
desired position (dia 1a):
A
– Carryin g position
B
– Rocking positio n
C
– Stable position
IMPOR TANT – Always check
the handle is upri ght and latched
properly be fore carrying.
Harness adj ustment
IMPOR TANT – You must
adjust the shoulder straps
of the harness to t he correct
position for your child BEFORE
installing the child seat as it
cannot be adjusted in the car.
Carefully place t he child seat
on the floor. Move the handle
to the stable position,
C
(dia 1a). With one hand lift
the fabric flap and press the
harness adjus ter tab. With your
other hand pull the shoulder
straps for ward as far as possib le
to loosen the harn ess (dia 1b).
Unfasten the harness by pressing
the red harnes s buckle button.
Lay the shoulde r straps over
the sides of the seat (dia 1c).
Place your child in the child seat
and check that the sh oulder
strap slots are level with, or just
below, your child’s shoulder s
and that the head is comfortably
positioned in th e head support
when used (dia 1d).
To adjust the height of the
shoulder str aps, first remove
your child from the seat.
Remove the shoulde r pads (if
applicable) by sliding them of f
the shoulder st raps.
Next, pull one strap through
from the front and re -thread it
through the correct slot in the
harness adjus tment is not
enough, i.e. shoulder s traps
are at full extensio n.
b. Always return the crotch
strap to its original, shorter
length when usin g the seat
with a smaller baby.
c. The buckle should always
be positioned low down on
your child’s body.
d. DO NOT attempt to remove
the crotch strap from the
adjuster. Adjustment is made
by feeding the crotch s trap
through the adjus ter (dia 1f).
The adjuster at the end of the
crotch strap is found under the
front edge of the child seat.
To change the length of the
crotch strap, thread it t hrough
the adjuster in th e direction of
the arrows shown (d ia 1f).
A
– Shortening
B
– Lengthening
Using the sun cano py
(Rock-a-Tot Plus Si only)
To fit the canopy place it over
the back of the child seat.
Then fasten the hooks on either
side of the sun canopy to the
cover elastics.
Children weighing up to 13kg (birth to approx 9-12 months)
shell, cover and head supp ort
(dia 1e). Repeat with the
other strap making sure the
straps are not t wisted.
IMPOR TANT – The safety
harness provided with the child
seat must be used at all t imes.
Adjusting the crotch strap
IMPOR TANT – You must adjust
the crotch strap to the correct
length for your child BEFORE
installing the child seat as it
cannot be adjusted in the car.
IMPOR TANT –
a. The crotch strap should only
be extended w hen normal
1a 1d 1e
1f
1c1b
2 Fitting your child in the child seat
Everyday use of the ha rness
Move the handle to the
stable position, see “Handle
– carryin g, rocking and stable
position” (dia 1a).
Place your child in the chil d
seat and fit the harne ss loosely
around them. Re-fasten the
harness buck le by fitting the
two tongues together and
pushing them firmly until you
hear a click (dia 2b) . Make
sure the harnes s is not twisted.
Tighten the harn ess by pulling
the adjuster st rap forward
making sure the har ness is
a comfortable but FIRM fit
around your child (dia 2 c).
IMPOR TANT – The lap section
of the harness should rest as
forward and as l ow as possible
over your child’s pelvis. ( if not
see ‘Adjusting the crotch strap’).
To remove your child from
the child seat firs t loosen the
harness by lif ting the fabr ic flap
between your baby’s legs and
press the adjus ter button down
as you pull the shoulder straps
forward (di a 2d). Then release
Using as a low chair
With the handle in the carrying
or rocking positi on, see
“Handle – carr ying, rockin g
and stable position”, the child
seat will rock gently as your
baby moves (dia 2e).
With the handle in the stable
position, the child seat
becomes a steady seat for
feeding or slee ping.
IMPOR TANT – The safety
harness provided with the child
seat MUST be used at all times.
When using the child seat to feed
your baby, protect the harne ss
buckle with a clot h. A dirty
buckle may not close se curely.
Carryin g the seat with
your child in it
Always check th e handle is
upright and latched p roperly
before carr ying (dia 2f ).
the harness by pressing the red
button on the buckle.
IMPOR TANT – Your baby
should not stay in th e child seat
or any infant carri er for periods
exceeding 2 hours at a t ime.
Laying the shoulder straps
over the side of the seat when
removing your child helps
prevent harness twisting.
2a 2d 2e
2f
2c2b
3 Installing the child seat in a car
IMPOR TANT – Have you
adjusted the har ness to the
correct position for your child?
IMPOR TANT – The safety
harness provided with the child
seat must be used at all t imes.
IMPOR TANT – The child seat
must only be fitte d rearwardfacing, that is with yo ur baby
facing the back of t he car,
using a lap and diagonal seat
belt and NOT a lap -belt only.
Installing w ith a lap and
diagonal seat b elt
To gain adequate length
from your seat belt it may
be necessar y to slide the
vehicle seat as far back as it
will go (as you would for a tall
person), and lower the height
of the seat belt at
A
if this is
adjustable (dia 3a).
Place the child seat on a car
seat with your baby facing the
back of the car and move t he
handle to the stable position
as shown, making sure it is
latched properly (dia 3b).
Fasten the seat belt across the
child seat. Pass the lap section
of the seat belt thro ugh the lap
guides on both sides as indicated
by the blue arrows on the child
seat. Pull the diagonal section of
the seat belt around the back of
the child seat (dia 3c) .
ENSUR E THAT:
a. The lap section of the
vehicle’s seat belt
A
runs
through both belt guides
B
on the child seat (dia 3f ).
b. The diagonal section
C
runs
through the diagonal belt
guide on the back of t he seat.
c. The car seat belt buckle is
not positioned in or in front
of the belt guide s
B
.
IMPOR TANT – FOR YOUR
CHILD’S SAFET Y it is essential
that the diagonal pa rt of the
seat belt goes round the back
of the seat.
Removing the child seat
from the car
First take the seat belt out of all
four guide slots, then undo the
seat belt.
Take care to keep the moving
seat belt away from your baby.
Feed the diagonal belt through
both diagonal belt guides
indicated by the blu e arrows at
the back of the seat (dia 3d).
Tighten the seat be lt by first
pulling at
and then
and to remove any slack
(dia 3e). Check that the child
seat feels secure and t hat the
seat belt is not twisted.
IMPOR TANT – If your car seat
belt is not long enough, see
“Alternative installation”.
3a 3d 3e
3f
3c3b
A
A
B
C
Anchorage
Using the ruler guide printed on
the front of this user guide, check
that your lower anchorage is
within the white area as shown.
If it is in the red area then your
vehicle is not suitable for use with
the alternative routing (dia 4c).
The lap section of the seat belt
should pass through both belt
guides underneath the foot end
of the seat.
indicated by the blue arrows at
the back of the seat.
Tighten the seat belt by first
pulling here
and then here
and to remove any slack
(dia 4e). Check that the child
seat feels secure and that the
seat belt is not twisted.
If you are in any doubt please
contact Customer Services on
01264 386034.
4 Alternative installation
Pull the diagonal section of the
seat belt around the back of the
child seat (dia 4d).
Feed the diagonal belt through
both diagonal belt guides
Not all car seat belts meet the
latest European recommendations
and you may encounter some
installation problems. The most
common will be short seat
belts. The child seat has been
designed with this in mind and
an alternative routing for the lap
section of the seat belt is provided.
IMPORTANT – This method
is not suitable in all cars so you
MUST, before use, check the
buckle and anchorage details.
Buckle Position
The adult seat belt buckle must
be below and rearwards of the lap
guide as indicated (dia 4a & 4b).
4a 4d 4e4c4b
 Loading...