

Page 1

Page 2

Warnings . . . . . . . . . . . . . . . . . . . . . . . . . . . . . . . . . . . . . . . . . . . . . . . . . . . . . . . . . . . 2
Features . . . . . . . . . . . . . . . . . . . . . . . . . . . . . . . . . . . . . . . . . . . . . . . . . . . . . . . . . . . . 3
Assembly . . . . . . . . . . . . . . . . . . . . . . . . . . . . . . . . . . . . . . . . . . . . . . . . . . . . . . . . . . . 4
Operating Instructions
Unfold . . . . . . . . . . . . . . . . . . . . . . . . . . . . . . . . . . . . . . . . . . . . . . . . . . . . . . . . . . . . 5
Fold. . . . . . . . . . . . . . . . . . . . . . . . . . . . . . . . . . . . . . . . . . . . . . . . . . . . . . . . . . . . . . 6
Parking Brakes . . . . . . . . . . . . . . . . . . . . . . . . . . . . . . . . . . . . . . . . . . . . . . . . . . . . . . 7
Swivel Wheels . . . . . . . . . . . . . . . . . . . . . . . . . . . . . . . . . . . . . . . . . . . . . . . . . . . . . . 7
Backrest. . . . . . . . . . . . . . . . . . . . . . . . . . . . . . . . . . . . . . . . . . . . . . . . . . . . . . . . . . . 8
Hood. . . . . . . . . . . . . . . . . . . . . . . . . . . . . . . . . . . . . . . . . . . . . . . . . . . . . . . . . . . . . 8
Arm Bar . . . . . . . . . . . . . . . . . . . . . . . . . . . . . . . . . . . . . . . . . . . . . . . . . . . . . . . . . . 10
Carrier Attachment . . . . . . . . . . . . . . . . . . . . . . . . . . . . . . . . . . . . . . . . . . . . . . . . . . 10
Carrier Removal . . . . . . . . . . . . . . . . . . . . . . . . . . . . . . . . . . . . . . . . . . . . . . . . . . . . 11
Harness . . . . . . . . . . . . . . . . . . . . . . . . . . . . . . . . . . . . . . . . . . . . . . . . . . . . . . . . . . 12
Care and Maintenance . . . . . . . . . . . . . . . . . . . . . . . . . . . . . . . . . . . . . . . . . . . . . . . . 13
Warranty . . . . . . . . . . . . . . . . . . . . . . . . . . . . . . . . . . . . . . . . . . . . . . . . . . . . . . . . . . 14
This product and its components are subject to change without notice.
© 2004 Britax Child Safety, Inc. All rights reserved.
P251400 R1:11/04
Printed in China
Table of Contents
Page 3
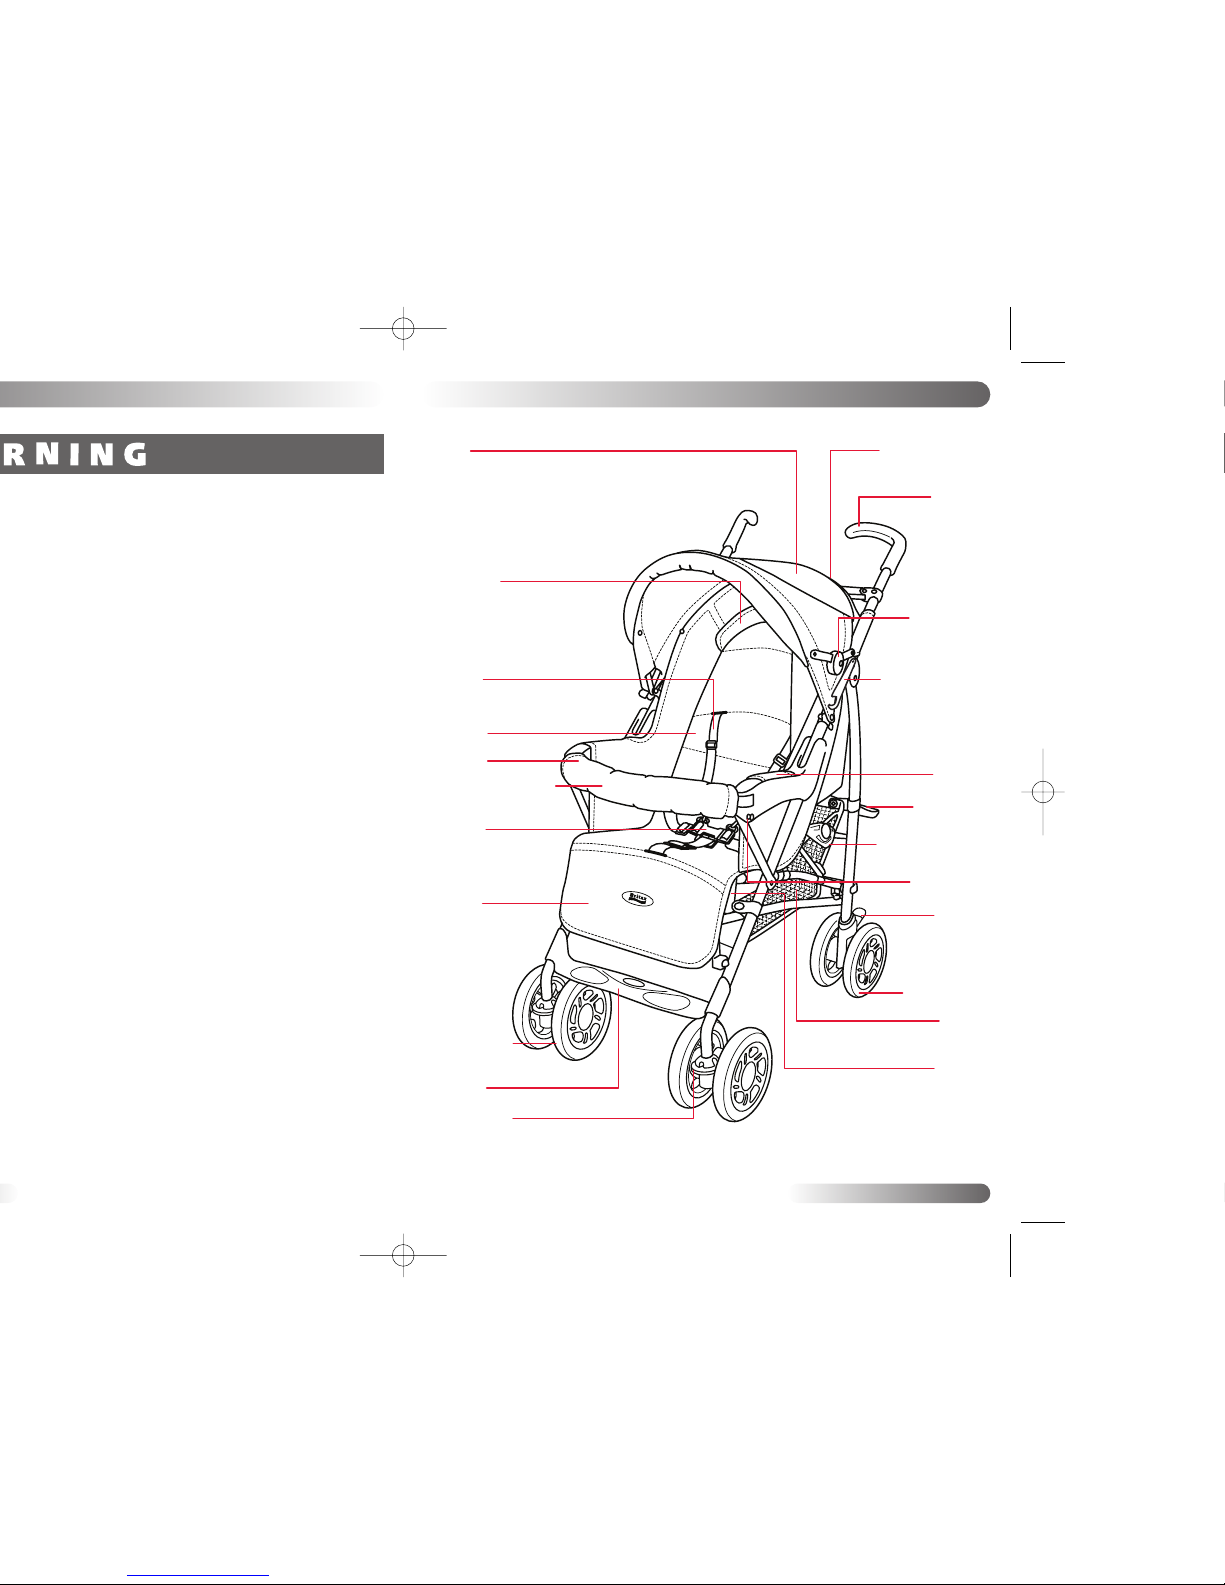
Frame Lock Arm
Parent Bag with
Bottle Holder
Handles
Hood Locks
Fold-Eze!
Lock Lever
Backrest Recline
Adjuster
Parking
Brakes
Rear Wheels
Basket
Hood
Automatic
Head Barrier
5-Point
Harness
Harness
Buckle
Seat Pad
Legrest
Front Swivel
Lock Lever
Footrest
Front Swivel
Wheels
Arm Bar
Carrier Attachment
(under arm bar cover)
Armrest
Frame Lock
Knob
Legrest
Release Levers
Features
3
Page 4

Operating Instructions
5
2
Attach front wheels to stroller frame
(fig. B).
3
Unfold Stroller as instructed on page 5.
B
1
Squeeze frame while releasing frame lock
arm from frame lock knob (fig. E).
E
2
Lift handle upward to partially unfold
stroller (fig. F).
3
Press Fold-Eze™ lever down, until stroller
frame is locked and stabile (fig. G).
F
G H
4
Adjust legrest into desired position by
pressing release levers as shown (fig. H).
Unfold
Page 5

Operating Instructions
7
3
Fold stroller forward, while pulling
support brace up to release (fig. B).
B
5
Squeeze frame together while attaching
frame lock arm to frame lock knob located
on side of armrest (fig. D).
E
To Set Parking Brake 1Locate brake lever between each set of rear wheels. 2Press each lever
down until fully engaged (fig. E). 3Verify that brakes are fully engaged by attempting to move
stroller forward and backward. To Release Parking Brake 1Locate brake lever between each
set of rear dual wheels. 2Lift each lever until released (fig. F).
F
Parking Brakes
Swivel Wheels
To allow front wheels to swivel, press
swivel lever down (fig. G).
G
To prevent front wheels from swiveling,
turn wheels forward, then lift swivel lever
up until engaged with notch (fig. H).
H
Page 6

To Collapse Hood, release each hood lock by pressing up at center (fig. G), then hood
backward to collapse (fig. H).
Operating Instructions
9
To raise backrest, push backrest up until in
one of four available positions (fig. B).
Hood (cont.)
E
To Open Hood, pull hood forward (fig. E), then engage each hood lock by pressing down (fig. F).
F
G H
To Remove Hood, lift tab on each
attachment clip (4x) to release from stroller
frame.
Release hook and loop fastener strips
at rear of hood.
Page 7
Operating Instructions
11
To Install Arm Bar, release and remove each
attachment clip, located under stroller
armrests. Slide arm bar into slots on stroller
armrest, then replace attachment clips (fig. B).
B
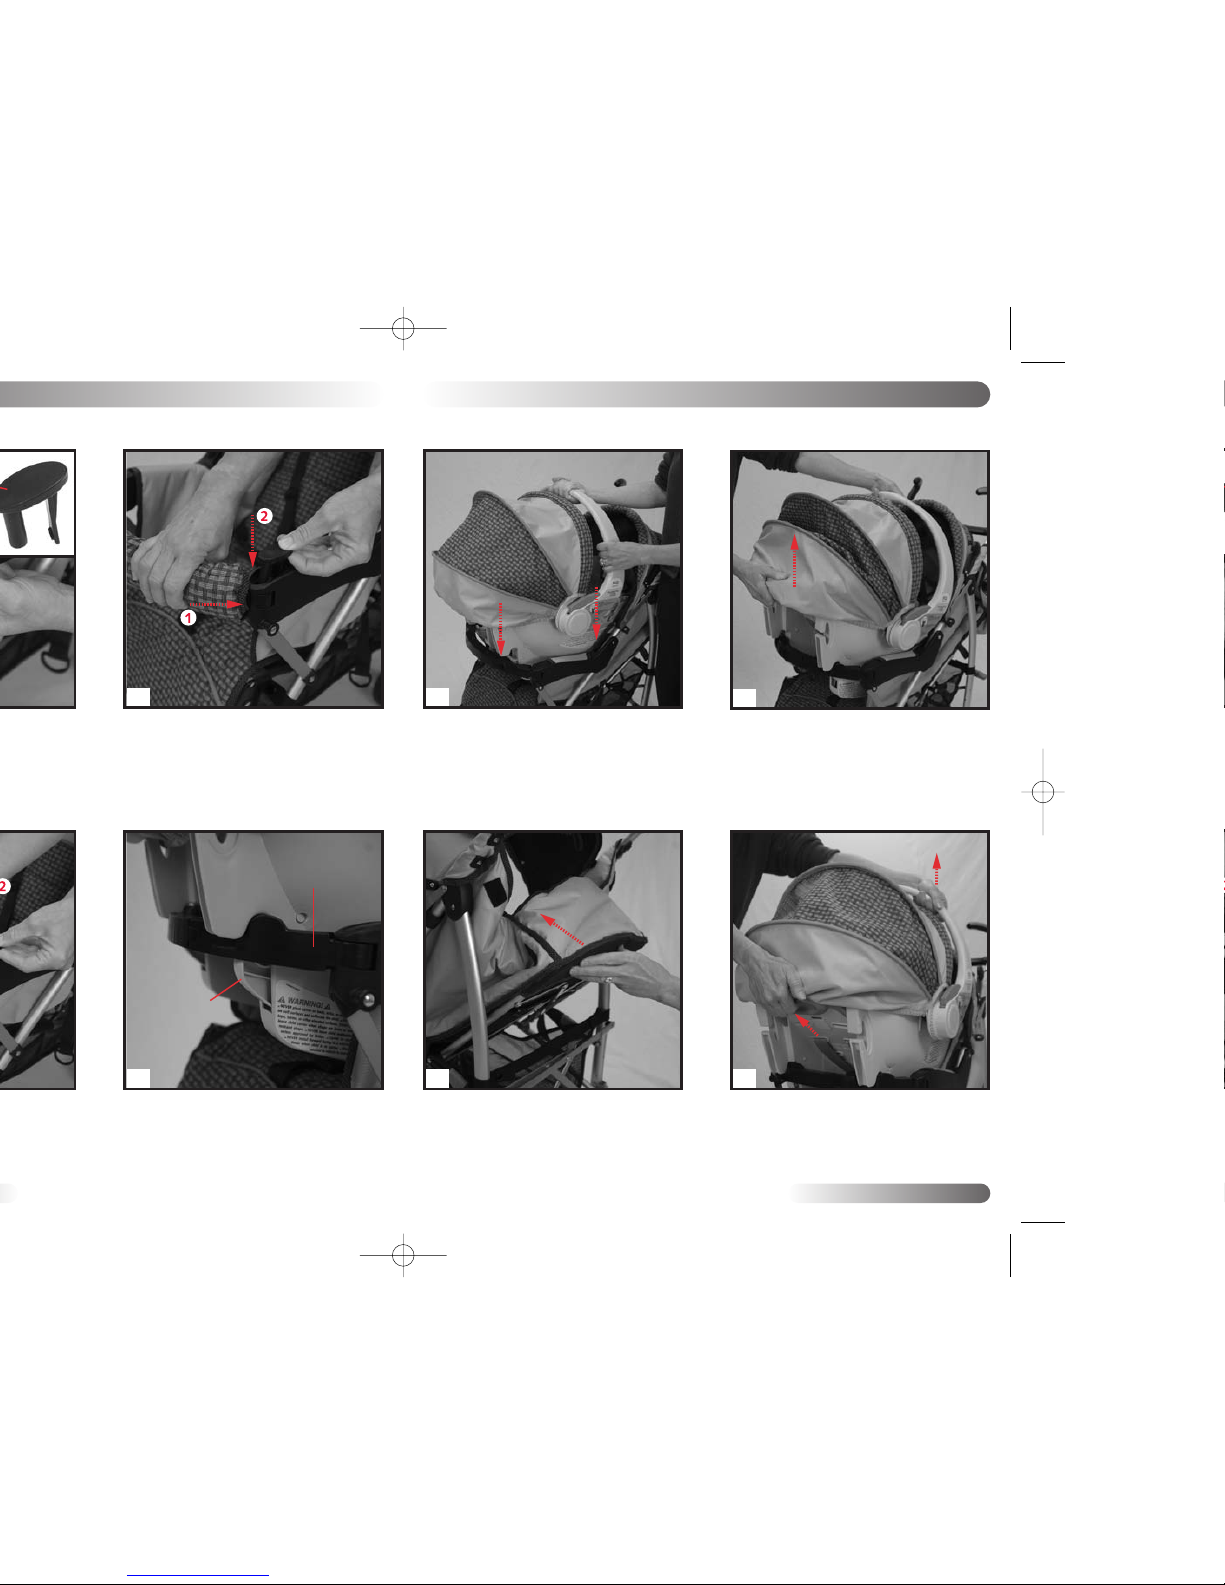
Arm Bar
Attachment
Hooks
D
3
Lower backrest into full recline position
(pg. 8).
4
Place carrier rear facing in stroller, with
attachment hooks aligned with arm bar
(fig. D).
E
F
Carrier Attachment (cont.)
Carrier Removal
4
Press carrier onto arm bar until clicks are
heard, which confirms attachment (fig. E).
5 Check installation by lifting carrier from rear
to verify that both attachment hooks are
engaged with the arm bar (fig F).
H
1
Fully recline stroller backrest (pg. 8).
2
Squeeze release lever on restraint, while
lifting restraint from stroller (fig. H).
3
If desired, reinstall zippered cover on arm bar.
G
6 Raise stroller backrest to fully secure carrier.
To raise backrest, push backrest up until in
one of four available positions (fig. G).
Page 8

Care and Maintenance
13
• Periodically check that the parking brake works properly and locks both wheels securely.
• Clean out any dirt or debris that may prevent the brake from working.
Frame
• Wipe the frame with a damp cloth and mild soap. Use clean, dry cloth or towel to wipe away
excess water and soap.
Fabric
• Do not machine wash or dry the cover.
• Hand wash with cold water and mild soap. Air dry to prevent the cover from shrinking.
Cleaning Plastic Parts:
• Wipe with a damp cloth and mild soap. Use clean, dry cloth or towel to wipe away excess water
and soap.
Wheels
• Periodically oil caster bolts and wheel axles with liquid silicone lubricant.
If Stroller Gets Wet:
• Dry stroller with a clean cloth or towel to prevent corrosion.
• Do not fold stroller when wet or damp. Always make sure that the stroller is dry before storing.
Plastic Parts
• Do not use abrasives, solvents, strong detergents, or household cleaners. These products can
scratch, discolor, and weaken plastic or cause corrosion on metal surfaces.
Storage
• Store away from extreme heat to prevent damage to plastic parts.
• Cover stroller to prevent dust build-up and exposure to sunlight.
• Do not stack other items on top of stroller.
3
Loosen or tighten harness by sliding each
(5x) adjuster to desired position (fig. B).
B
D
5
Unfasten buckle by squeezing clip on
each side (fig. D).
Page 9

Page 10

Page 11

 Loading...