

Page 1

MARATHON® CLICKTIGHT
™
User Guide
Guia del usuario
Page 2

Page 3

1
BRITAX®, CLICKTIGHT™, EZ-Buckle™, and MARATHON® are trademarks owned
by Britax Child Safety, Inc., and registered in the U.S.A. and other countries. All
rights reserved. ©2014 Britax Child Safety, Inc. This product and its components
are subject to change without notice. Printed in USA. P02088600_A:08.14
Table of Contents
User Guide - English ������������������������������������� 1
Child Seat Features ��������������������������������������� 2
Safety Information ����������������������������������������� 4
Warnings .................................................................. 4
Important Notes ....................................................... 5
Registration .............................................................. 5
Certification .............................................................. 6
Child Fit Information ................................................ 7
Rear-Facing Installation �������������������������������� 8
Lap-Shoulder Belt Installation ................................. 8
Lower Anchor Installation ...................................... 10
Lap Belt Installation ............................................... 12
Forward-Facing Installation ������������������������ 14
Lap-Shoulder Belt Installation ............................... 14
Lower Anchor Installation ...................................... 16
Lap Belt Installation ............................................... 18
Securing Your Child ������������������������������������� 20
Child Seat Functions �����������������������������������22
Adjusting the Harness Height ................................ 22
Harness Buckle Position ........................................ 23
Using the Harness Buckle ..................................... 23
Using the Chest Clip ............................................. 23
Comfort Pillow ....................................................... 24
Seat Positions ........................................................ 24
Using the Lower Anchors and Tethers for Children
(LATCH) .................................................................. 26
Lower Connectors.................................................. 26
Impact Absorbing Tether ....................................... 27
Vehicle Compatibility�����������������������������������30
Vehicle Seating Positions ....................................... 30
Incompatible Vehicle Seat Belts ............................ 31
Maintenance ������������������������������������������������ 32
Cover ..................................................................... 32
Harness Buckle ...................................................... 36
Impact Absorbing Chest Pads ............................... 38
Cleaning ������������������������������������������������������� 40
Troubleshooting ������������������������������������������� 41
Warranty ������������������������������������������������������� 42
User Guide - English
Page 4
2 3
BRITAX Child Safety, Inc. MARATHON CLICKTIGHT User Guide
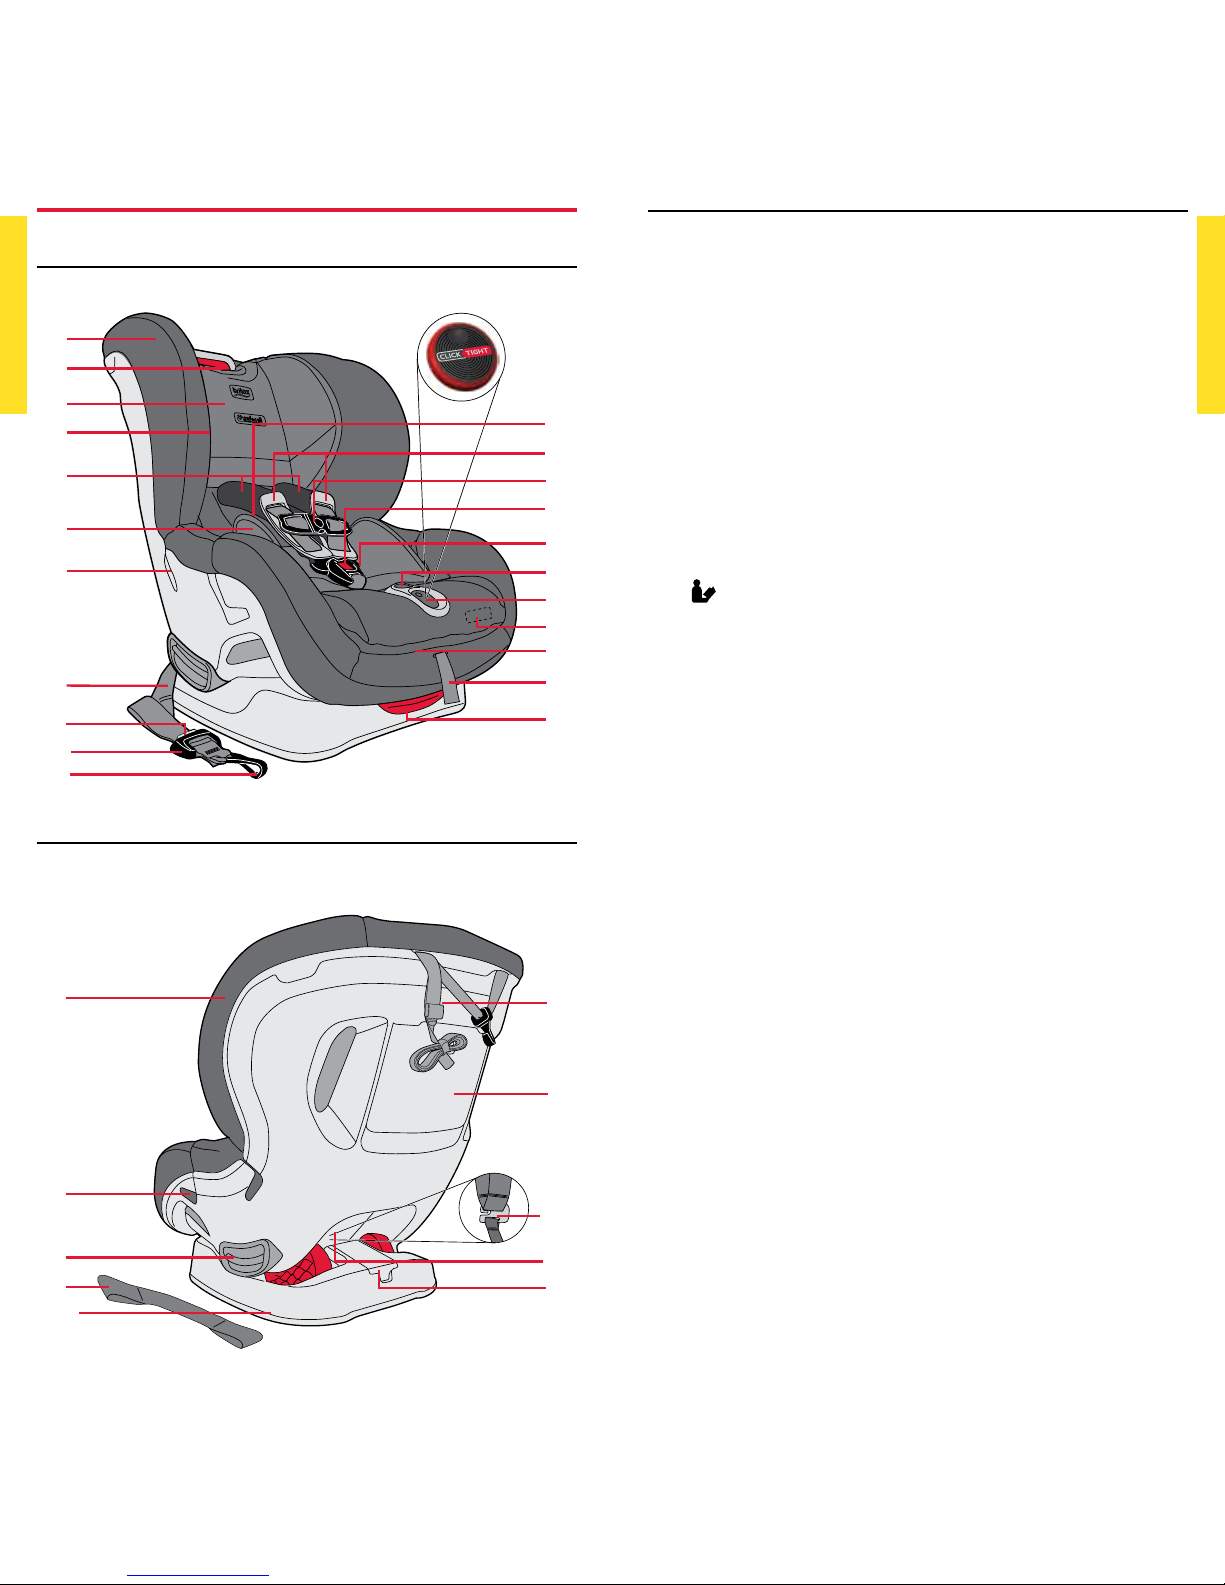
Description
1. Cover
2. Harness Height Adjuster
3. Head Pad
4. Seated Shoulder Height Label
5. Comfort Pads
6. Comfort Pillow
7. Forward-Facing Belt Slot / Harness Holder
8. Lower Connector Strap (LATCH component)
9. Lower Connector Adjuster Release Button (LATCH
component)
10. Lower Connector Adjuster (LATCH component)
11. Lower Connector (LATCH component)
12. User Guide Storage (in pocket behind cover)
13. Impact Absorbing Chest Pads
14. Chest Clip
15. Harness Buckle
16. EZ-Buckle™ Belly Pad
17. Harness Adjuster Button (red)
18. CLICKTIGHT Dial
19. Serial Number & Manufactured Date Label (under seat
cover)
20. CLICKTIGHT Mechanism
21. Harness Adjuster Strap
22. Recline Adjustment Handle
23. Shell
24. Rear-Facing Belt Slot
25. Recline Indicator
26. Tether Connector Strap (stored in Tether Storage
Compartment)
27. Impact Absorbing Base
28. Impact Absorbing Tether (Top Anchorage Strap - LATCH
component) - stored in Tether Storage Compartment
29. Tether Storage Compartment
30. Harness Yoke
31. Harness Straps
32. Lower Connector Storage
Child Seat Features
Front
Rear
1
2
3
6
5
7
8
10
11
4
9
14
15
16
17
18
19
20
21
22
12
13
23
24
25
26
28
30
31
32
29
27
18
Page 5
4 5
BRITAX Child Safety, Inc. MARATHON CLICKTIGHT User Guide
Safety Information
Failure to follow all warnings and instructions could result
in SERIOUS INJURY or DEATH.
FIT REQUIREMENTS
• Use only in a rear-facing position when using it with
an infant weighing less than 20 lbs (9.1 kg).
• Use only with children who weigh between 5 and 65 lbs
(2.3 and 29.4 kg) and whose height is 49 in. (124.5 cm)
or less. Use rear-facing for children who weigh between
5 and 40 lbs (2.3 and 18 kg). Use forward-facing for
children who weigh between 20 and 65 lbs (9.1 and
29.4 kg).
• Snugly adjust the belts provided with this child
restraint around your child.
INSTALLATION
• Secure the top anchorage strap provided with this
child restraint.
• Secure this child restraint with the vehicle’s child
restraint anchorage system if available, or with a
vehicle belt.
• Use the buckle slot closest to, but not underneath, your
child when installing the child seat rear facing. Use only
the outer buckle slot when installing forward facing.
GENERAL USAGE
• Follow all instructions on this child restraint and in the
written instructions.
• Register your child restraint with the manufacturer.
• In a vehicle with rear designated seating positions,
vehicle owners should be alerted that, according to
accident statistics, children are safer when properly
restrained in the rear seating positions than in the
front seating positions. To ensure your child’s safety,
please study Vehicle Seating Positions on page 30
and consult your vehicle owner’s manual.
• Always make sure the child restraint system is
secured to the vehicle, even when unoccupied, since
in a crash an unsecured child restraint system may
injure occupants.
• To prevent injury due to deterioration or hidden
damage, discontinue use of this child seat if it is
older than ten years or has been in a moderate or
severe crash (see below). See Serial Number and
Manufactured Date Label on child seat (pages 2-3).
• The use of non-BRITAX covers, inserts, toys,
accessories, or tightening devices is not approved by
BRITAX. Their use could cause this child seat not to
perform as intended in a crash.
Important Notes
• Do not install with the lower anchors for a child weighing
more than 35 lbs (15.8 kg) rear facing or 40 lbs (18 kg)
forward facing.
• Ensure that the shell cover is properly secured behind
the red markers to allow for proper functioning of the
CLICKTIGHT mechanism (see page 34).
• Discontinue use of this child seat if it has been in a
moderate or severe crash. It is not necessary to replace a
car seat after a minor crash, defined by the US National
Highway Trac Safety Administration (NHTSA) as:
a. The vehicle is drivable from the crash site; and
b. The vehicle door nearest the child seat was not
damaged; and
c. No vehicle occupants were injured; and
d. There is no visible damage to the child seat; and
e. The airbags (if present) did not deploy.
• Cover the child seat when the vehicle is parked in direct
sunlight. Metal parts of child seat could become hot
enough to burn a child.
• Store the child seat in a safe place when it is not being
used. Avoid placing heavy objects on top of it.
• Do not, except as described in this booklet, attempt to
disassemble any part of the child seat or change the way
the harness or vehicle’s seat belts are used.
• Never use the harness adjuster strap to lift or carry this
child seat. Doing so could cause damage to harness
adjuster and webbing. Always carry this child seat by its
shell or tether straps.
Registration
Child restraints could be recalled for safety reasons. You
must register this restraint to be reached in a recall. Send
your name, address, e-mail address if available and the
restraint’s model number and manufacturing date to
Britax Child Safety, Inc. P.O. Box 91167 Allentown, PA
18109-9925, or call 1-888-427-4829 or 1-704-409-1699,
or register online at www.BritaxUSA.com/registration. For
recall information, call the U.S. Government’s Vehicle Safety
Hotline at 1-888-327-4236 (TTY 1-800-424-9153), or go to
http://www.NHTSA.gov.
For your convenience, record all the information about
your child seat below. Refer to the Serial Number &
Manufactured Date Label for all information (see page 2).
Model Name and Number: ______________________________
Serial Number: ________________________________________
Batch Number: ________________________________________
Date of Manufacture: ___________________________________
Page 6
6 7
BRITAX Child Safety, Inc. MARATHON CLICKTIGHT User Guide
Child Fit Information
Rear Facing: 5 – 40 lbs (2�3 – 18 kg)
The American Academy of Pediatrics recommends that all
infants and toddlers should ride in a Rear-Facing Car Seat
until they are 2 years of age or until they reach the highest
weight or height allowed by their car seat manufacturer.
BRITAX strongly recommends that children ride rear facing
to the highest weight or height specified.
Use rear facing:
• with harness straps in the closest
position at or below the child’s
shoulders and
• with children who weigh 5 – 40 lbs
(2.3 – 18 kg) and
• when the top of the child’s head is at
least 1 in. (2.5 cm) below the top of
the head pad.
Forward Facing: 20 – 65 lbs (9�1 – 29�4 kg)
BRITAX strongly recommends that children should be
secured with a harness system until they exceed the weight
or height limits specified.
Use forward facing:
• with harness straps in the closest
position at or above the child’s
shoulders, parallel to level ground and
• with children who weigh 20 – 65 lbs
(9.1 – 29.4 kg) and
• who are 49 in. (124.5 cm) or less in
height and
• when the top of the ears are below the
top of the head pad.
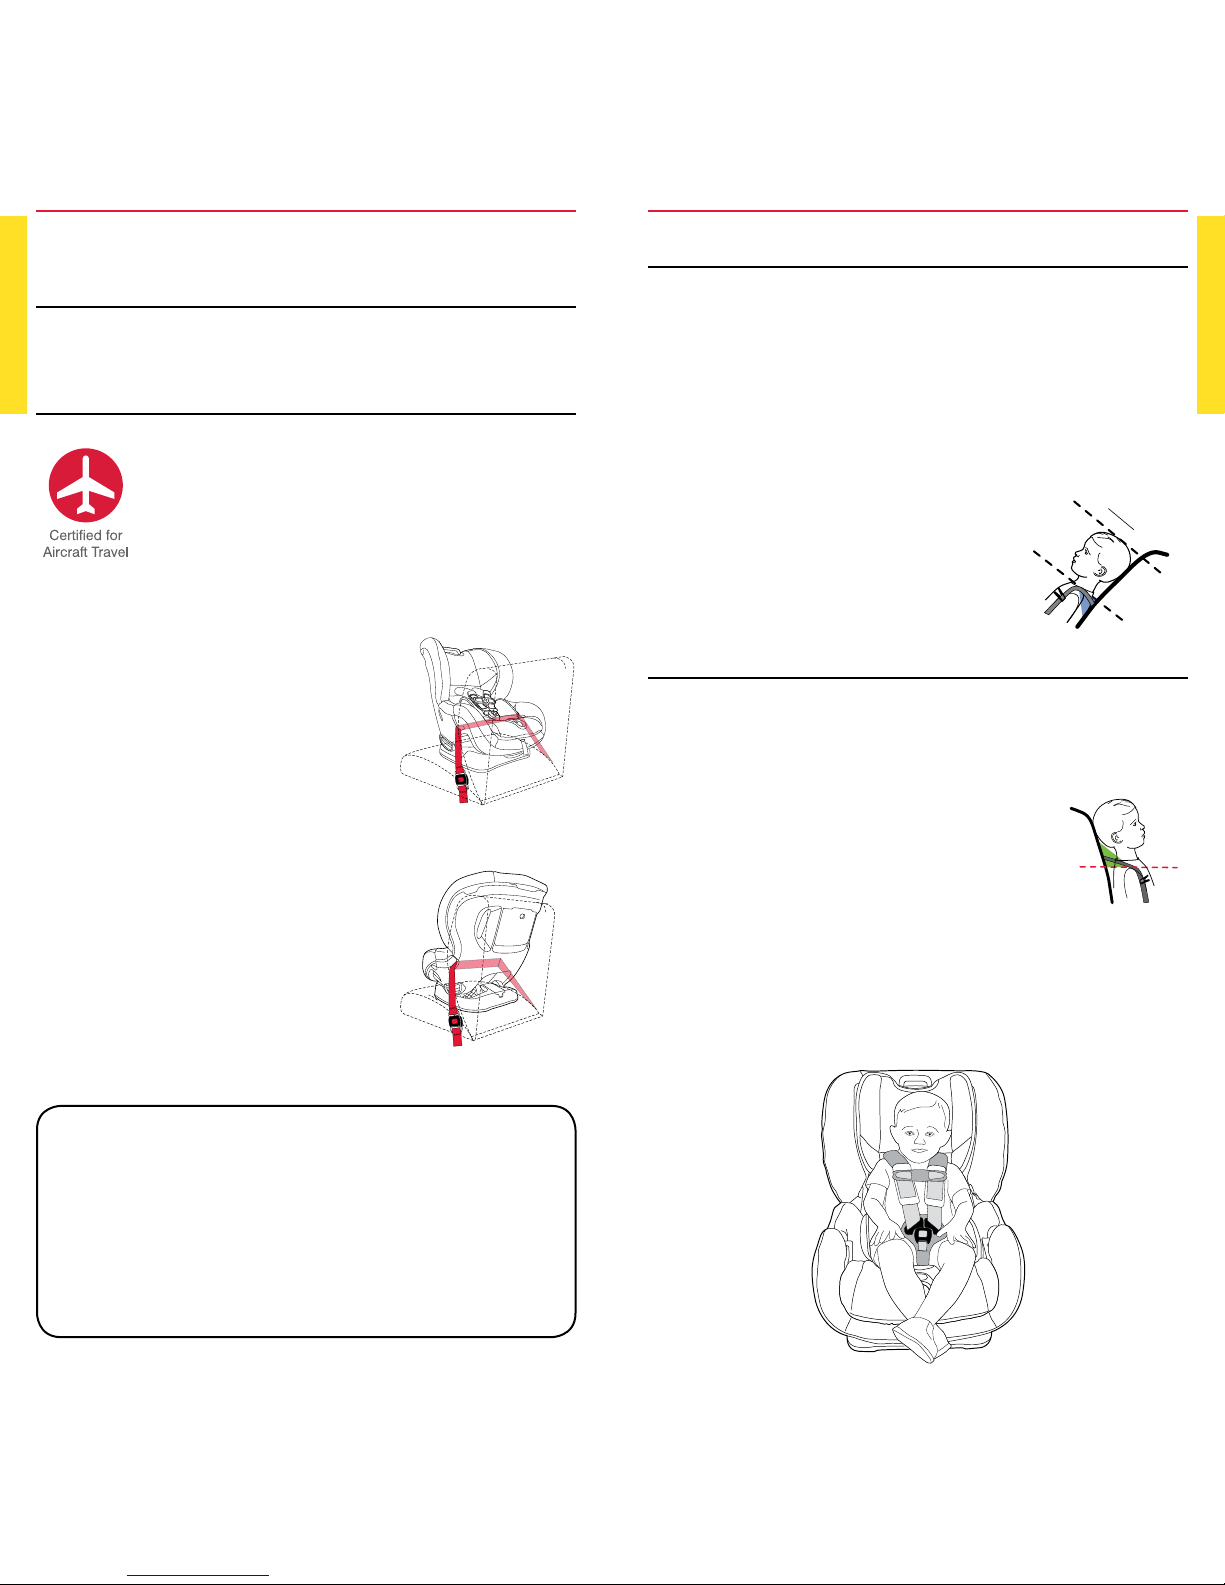
Certification
This Restraint is Certified For Use in Motor Vehicles and
Aircraft�
Motor Vehicles
This child seat system conforms to all applicable Federal
motor vehicle safety standards (FMVSS 213).
Aircraft
This child seat is certified for aircraft use. The
FAA recommends that a child weighing up to
40 lbs (18 kg) use a certified, harnessed child
seat while traveling on an aircraft. Contact the
airline about their policy prior to traveling.
For rear-facing aircraft installation:
1. Recline this child seat (see page 24) and place rearfacing on the aircraft seat.
2. Slide the aircraft lap belt into the
rear-facing belt slots over the cover
with the CLICKTIGHT in the closed
position.
3. Ensure the lap belt is not twisted,
buckle, and remove all slack.
For forward-facing aircraft
installation:
1. Place this child seat forward-facing on the aircraft seat in
the upright position.
2. Slide the aircraft lap belt into the
forward-facing belt slots under the
cover with the CLICKTIGHT in the
closed position.
3. Ensure the lap belt is not twisted,
buckle, and remove all slack.
NOTE: For further instructions on
securing your child and adjusting fit
see page 20.
– Install your child seat in a window seat to avoid
blocking the aisle.
– If the aircraft lap belt is too short, ask a flight attendant
for a belt extender.
– Your child may experience discomfort if the buckle
is located in the seating area of a the child seat after
installation.
– Inflatable aircraft lap belts are not compatible with this
child seat.
– This seat may not fit all aircraft. Contact your airline
prior to travel to verify fit.
NOTE: Use the
Seated Shoulder
Height Label on
the child seat as a
guide to determine
when your child
has reached the
top harness slot.
1 inch
2.5 cm
Shoulder
Level
Shoulder
Level
Page 7
8 9
BRITAX Child Safety, Inc. MARATHON CLICKTIGHT User Guide
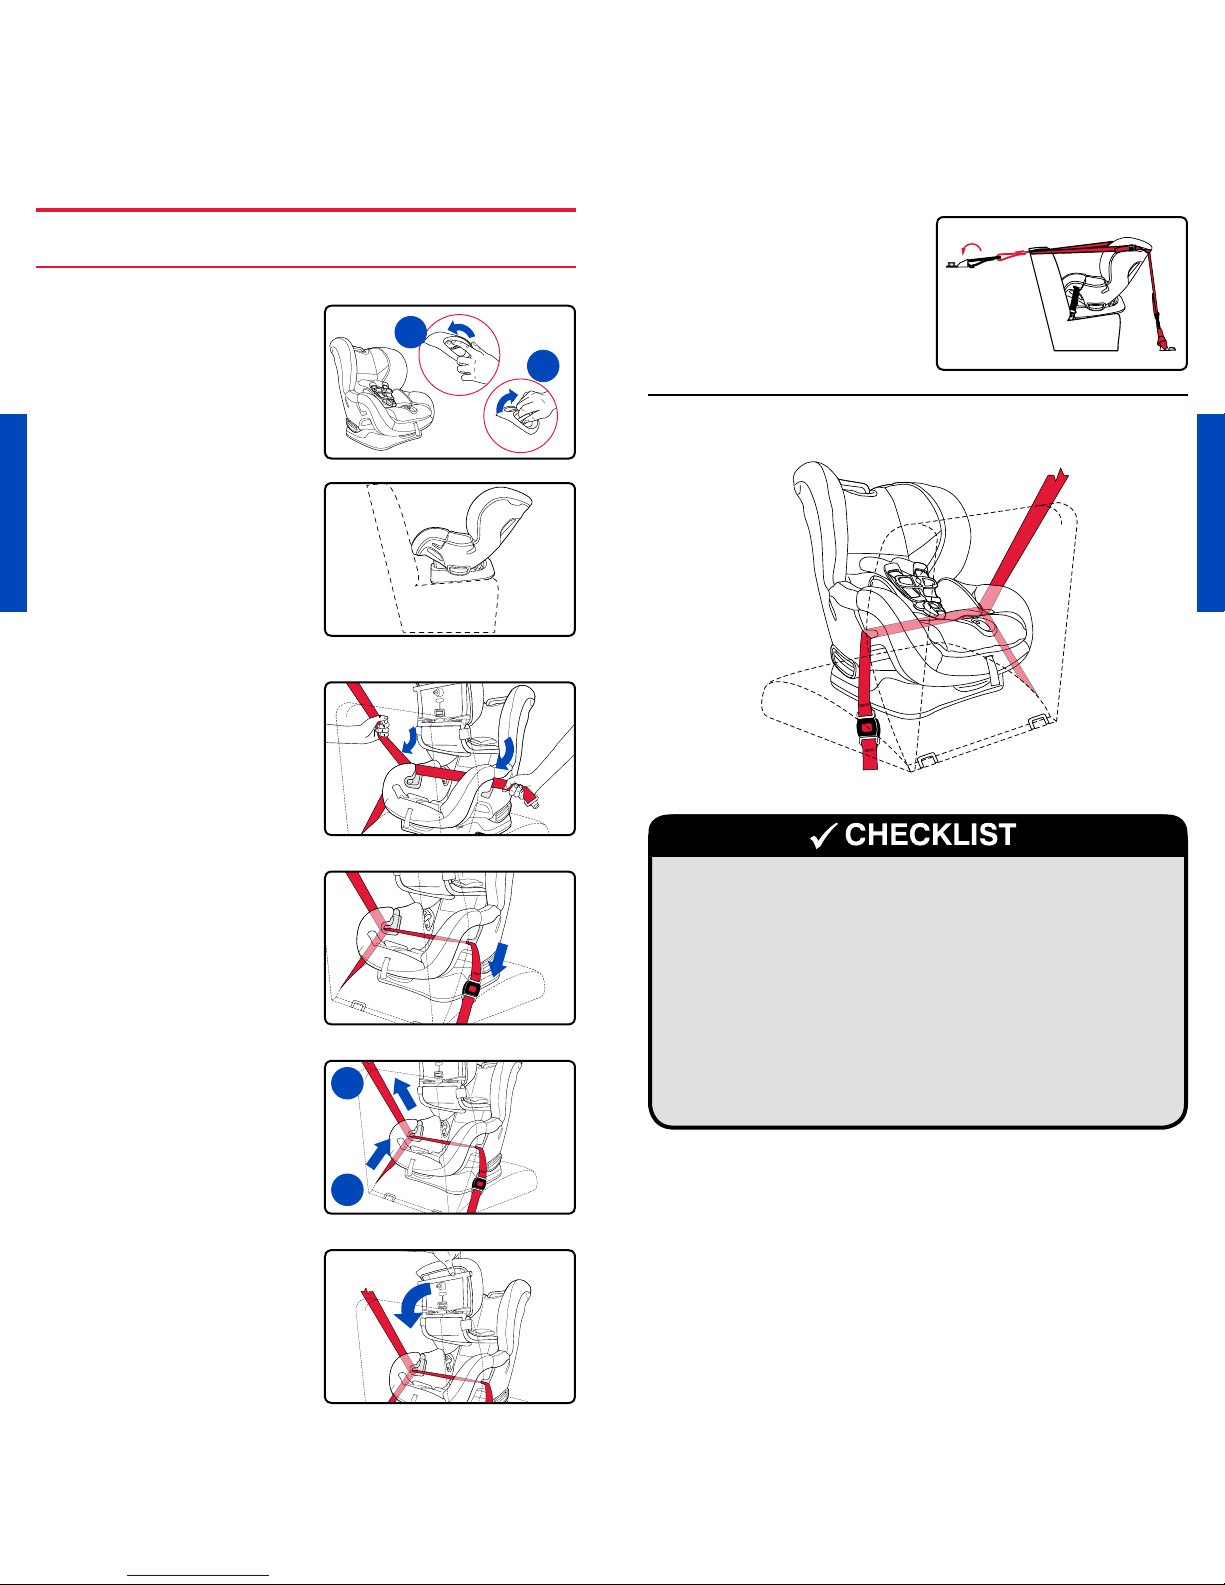
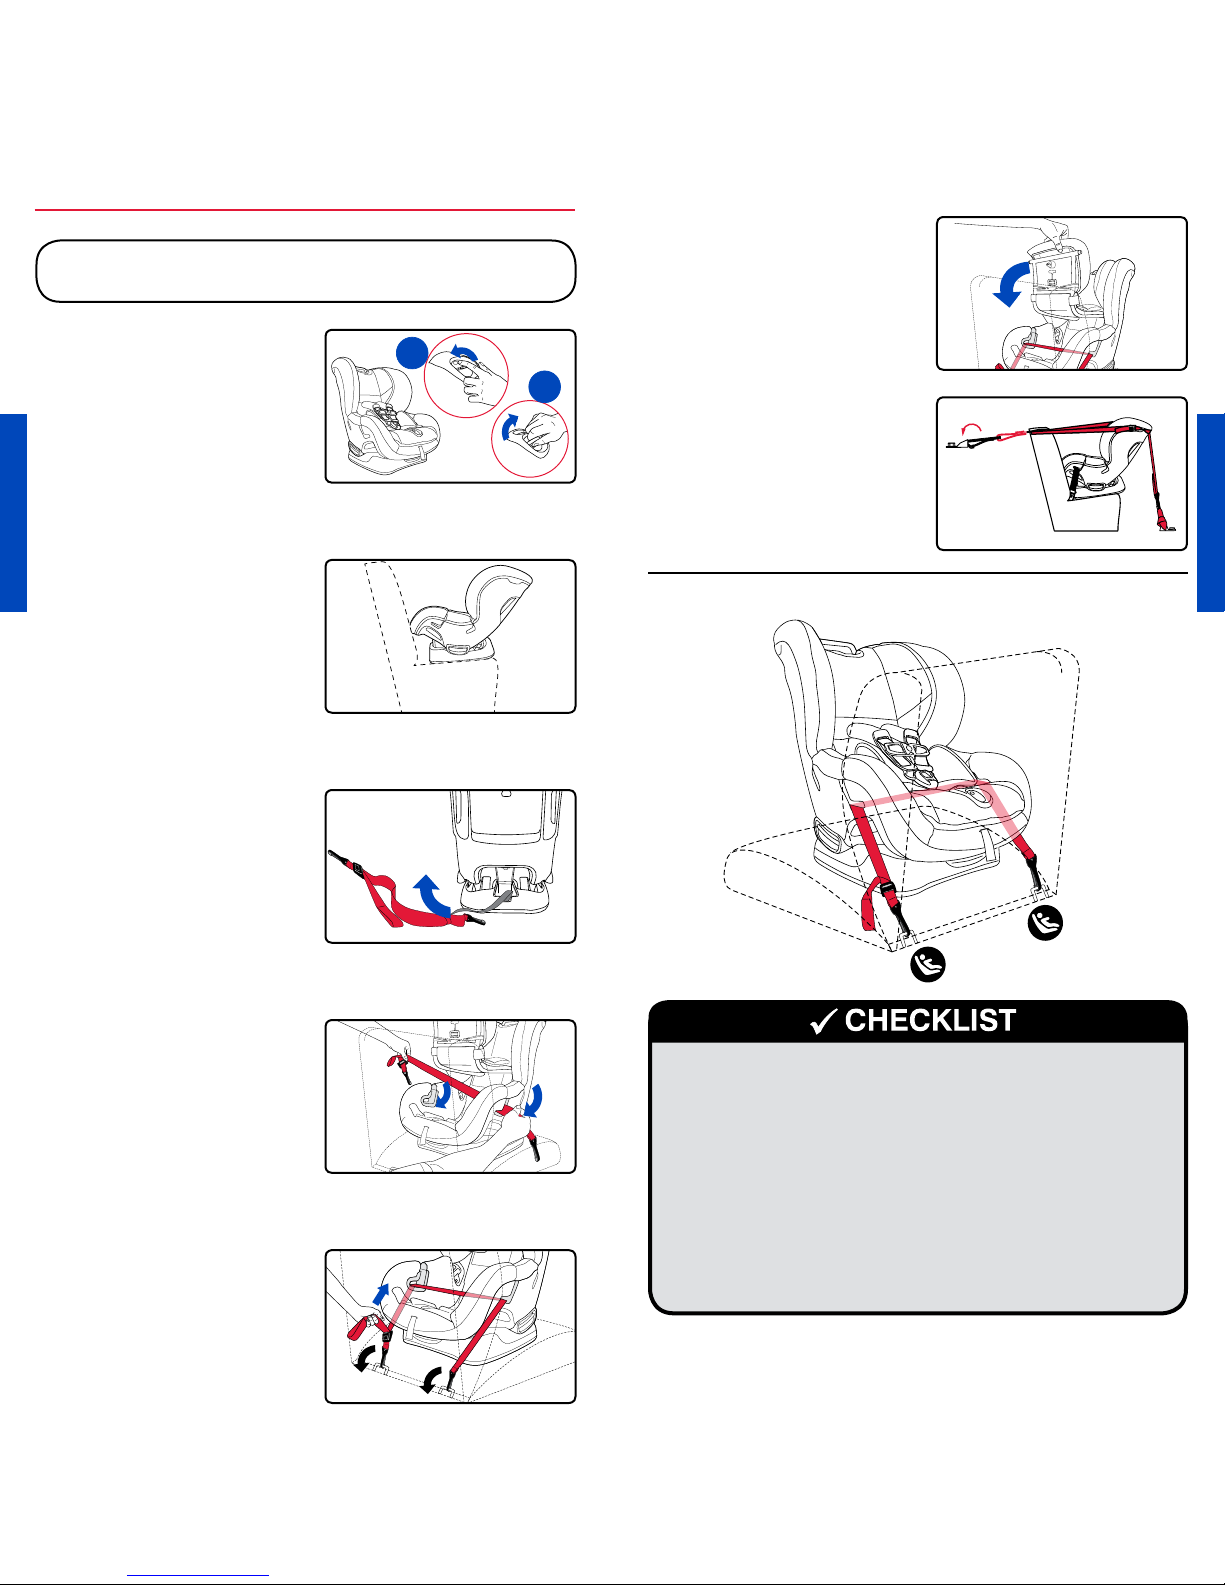
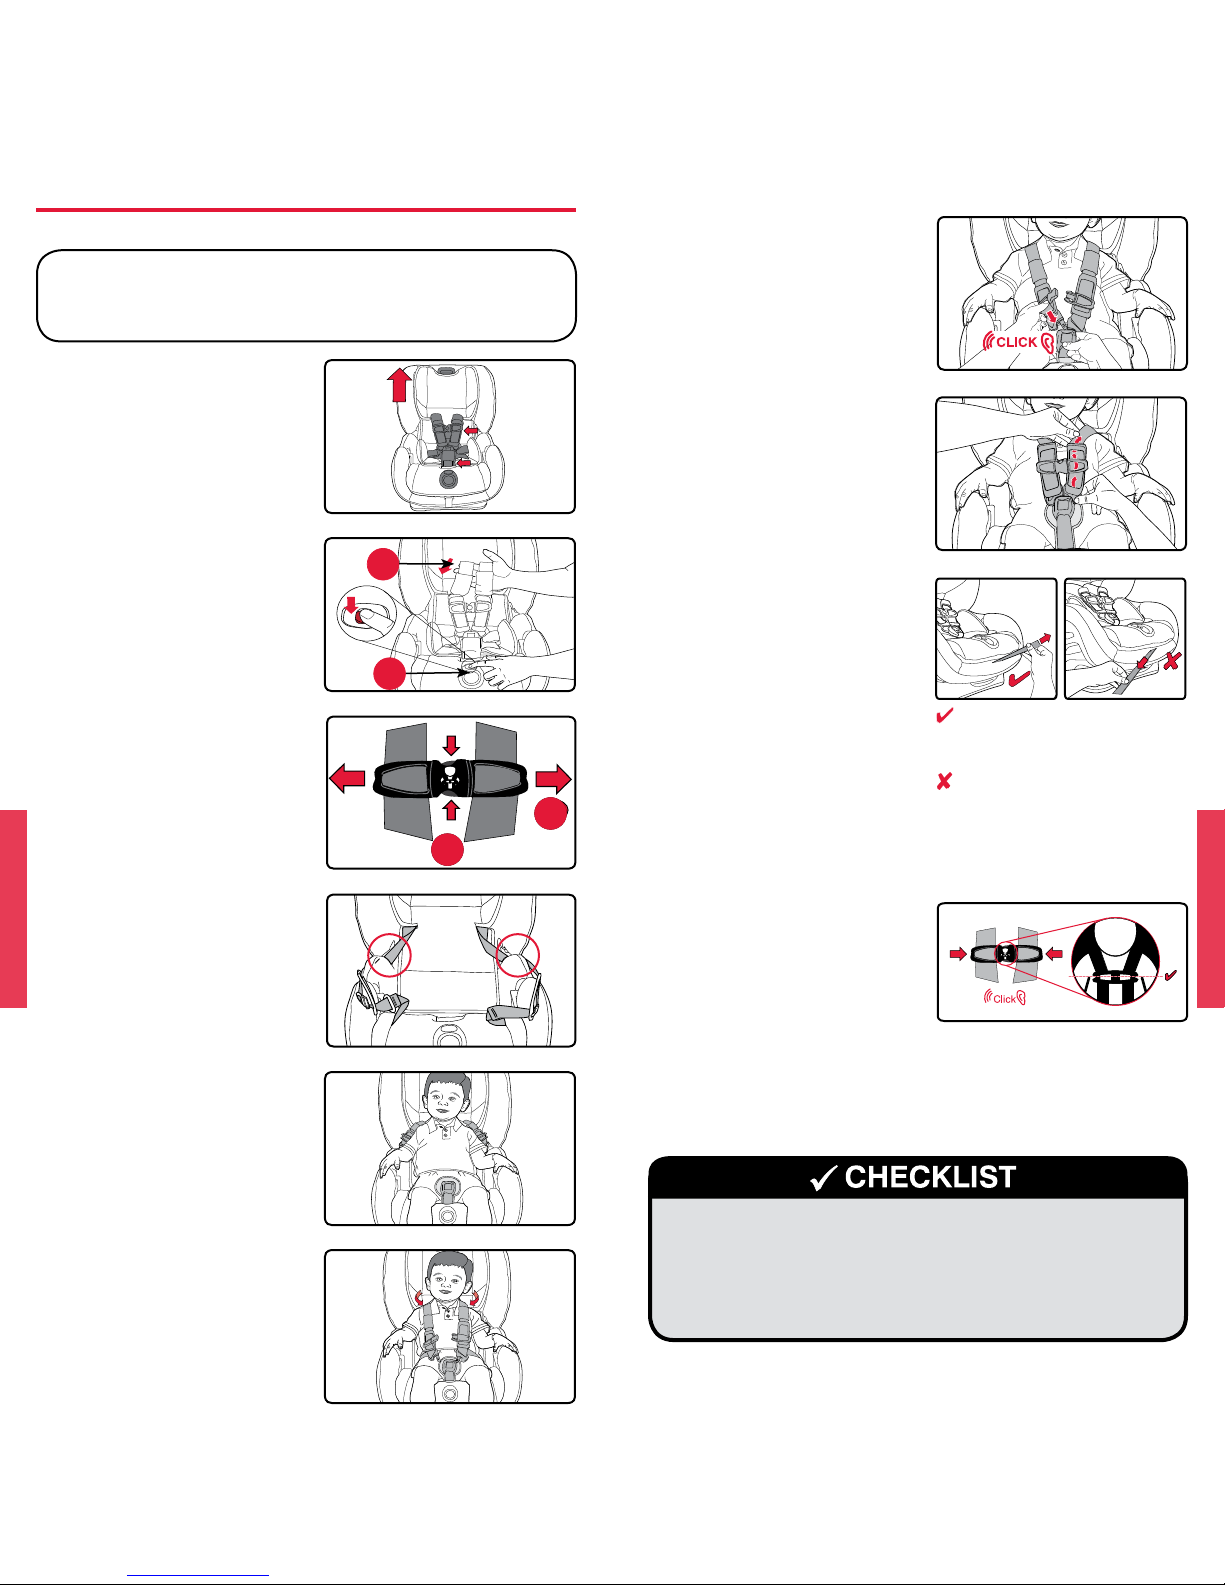
Rear-Facing Installation
Lap-Shoulder Belt Installation
1. Open the CLICKTIGHT.
a. Press the dimple on
the CLICKTIGHT
dial.
b. Rotate dial clockwise
until CLICKTIGHT
releases and lift to
open.
2. Recline the unoccupied
child seat and place rear
facing on the vehicle seat
(see page 24).
3. Slide both parts of the
vehicle belt into the rearfacing belt slots.
4. Ensure the vehicle belt is
not twisted and buckle
the seat belt.
5. Remove slack from the
lap part (a), then the
shoulder part (b) of the
vehicle belt.
6. Close the CLICKTIGHT.
– A click confirms the
CLICKTIGHT is secure.
9 Ensure that the logo on the CLICKTIGHT dial has
returned to a horizontal position.
9 Ensure that the ball in the recline indicator is within
the allowable blue section for the size of the child (see
page 24).
9 Check that all connections are secure and straps are
not twisted.
9 Check that the child seat cannot be moved front to
back or side to side more than 1 in. (2.5 cm) at the belt
path. If the child seat is not secure, repeat installation
or use a dierent seating location.
Rear-Facing Installation with Lap-Shoulder Belt
NOTE: Rear-facing
installations can be
improved by the use of
the tether (see page 27).
1b
1a
or
5b
5a
Page 8
10 11
BRITAX Child Safety, Inc. MARATHON CLICKTIGHT User Guide
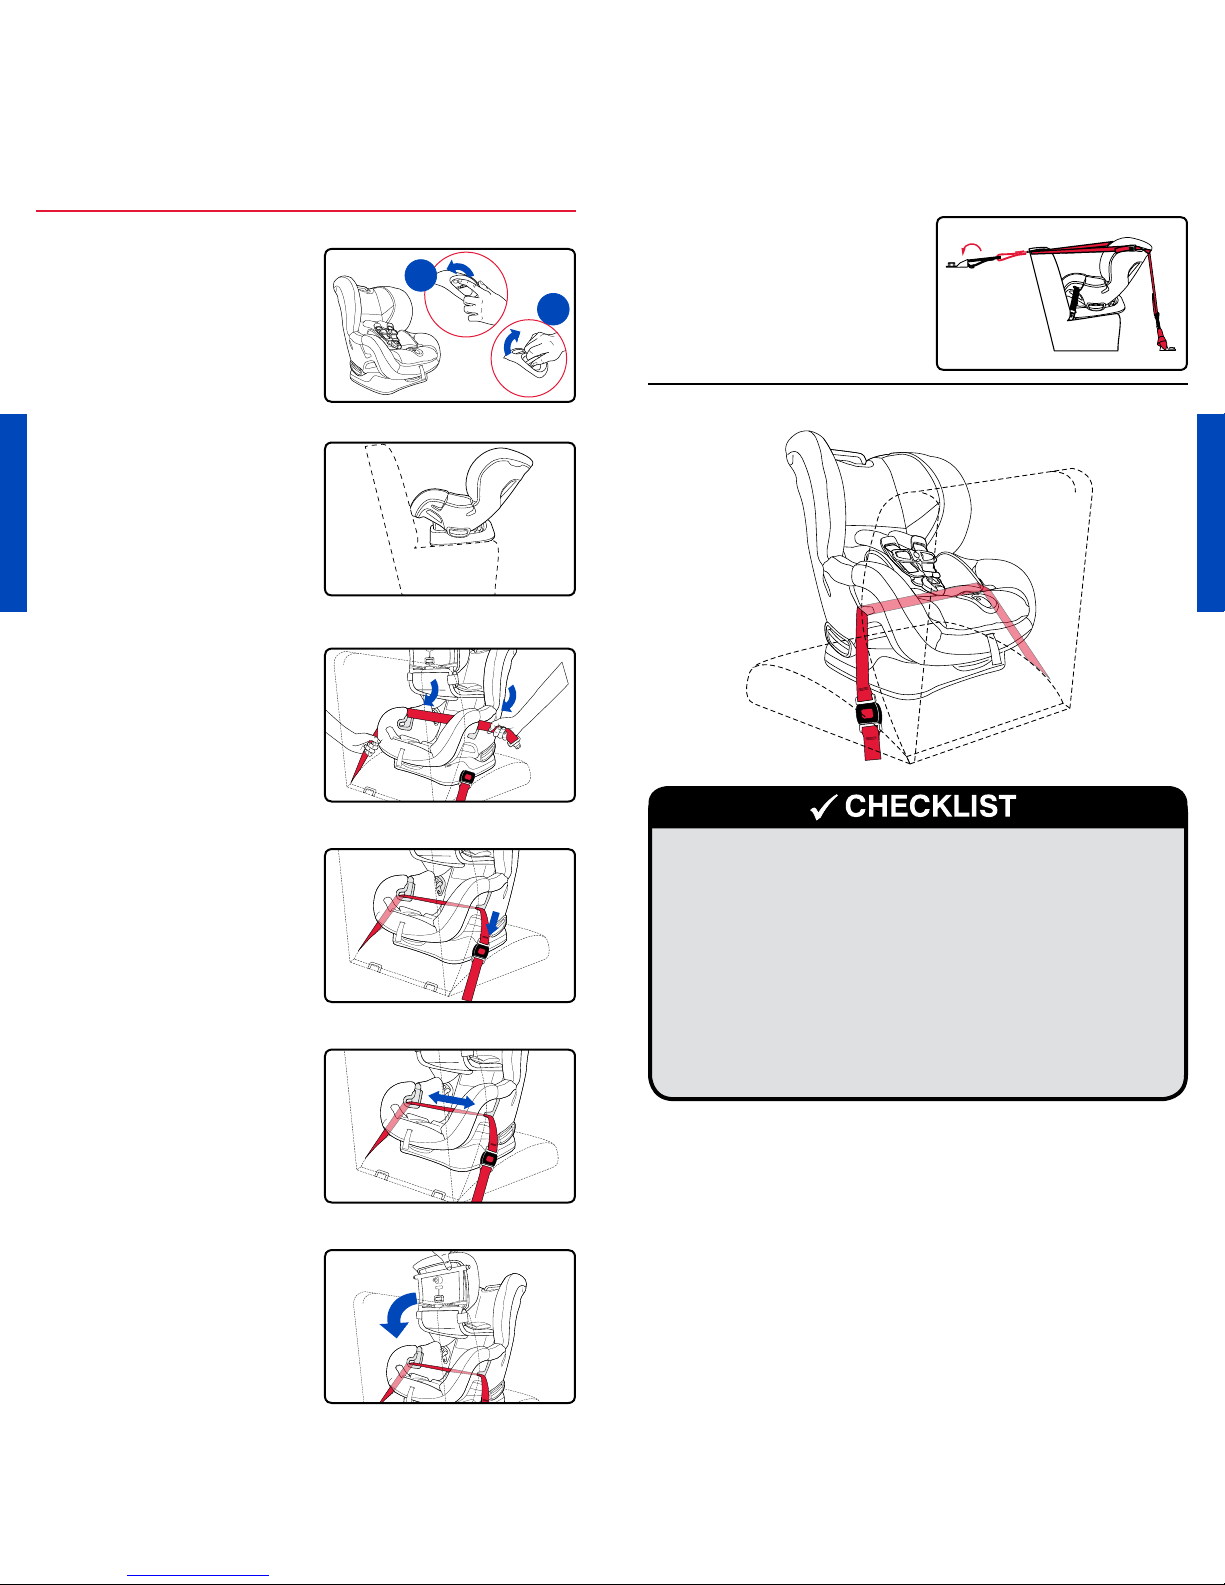
Rear-Facing Installation with Lower Anchors
1. Open the CLICKTIGHT.
a. Press the dimple on
the CLICKTIGHT
dial.
b. Rotate dial clockwise
until CLICKTIGHT
releases and lift to
open.
2. Recline the unoccupied
child seat and place rearfacing on the vehicle seat
(see page 24).
3. Remove the lower
connectors from the
storage compartment at
the rear of the seat and
pull the strap to full length
toward the child’s left
side.
4. Slide the lower connector
strap into the rear-facing
belt slots and firmly press
the lower connectors
over their adjacent lower
anchors.
– Verify that the
connectors are secure
and the strap is not
twisted.
5. Pull the end of the lower
connector strap to
remove slack.
6. Close the CLICKTIGHT.
– A click confirms the
CLICKTIGHT is secure.
NOTE: Rear-facing
installations can be
improved by the use of
the tether (see page 27).
Lower Anchor Installation
IMPORTANT:
Do not install rear-facing with the lower
anchors for a child weighing more than 35 lbs (15.8 kg).
1b
1a
or
9 Ensure that the logo on the CLICKTIGHT dial has
returned to a horizontal position.
9 Ensure that the ball in the recline indicator is within
the allowable blue section for the size of the child (see
page 24).
9 Check that all connections are secure and straps are
not twisted.
9 Check that the child seat cannot be moved front to
back or side to side more than 1 in. (2.5 cm) at the belt
path. If the child seat is not secure, repeat installation
or use a dierent seating location.
Page 9
12 13
BRITAX Child Safety, Inc. MARATHON CLICKTIGHT User Guide
Lap Belt Installation
1. Open the CLICKTIGHT.
a. Press the dimple on
the CLICKTIGHT
dial.
b. Rotate dial clockwise
until CLICKTIGHT
releases and lift to
open
2. Recline the unoccupied
child seat and place rearfacing on the vehicle seat
(see page 24).
3. Slide the vehicle belt into
the rear-facing belt slots.
4. Ensure the vehicle belt is
not twisted and buckle
the seat belt.
5. Lock and remove slack
from the vehicle belt.
NOTE: Ensure that the
vehicle belt is locked as
directed by your vehicle
owner’s manual.
6. Close the CLICKTIGHT.
– A click confirms the
CLICKTIGHT is secure.
Rear-Facing Installation with Lap Belt
NOTE: Rear-facing
installations can be
improved by the use of
the tether (see page 27).
1b
1a
or
9 Ensure that the logo on the CLICKTIGHT dial has
returned to a horizontal position.
9 Ensure that the ball in the recline indicator is within
the allowable blue section for the size of the child (see
page 24).
9 Check that all connections are secure and straps are
not twisted.
9 Check that the child seat cannot be moved front to
back or side to side more than 1 in. (2.5 cm) at the belt
path. If the child seat is not secure, repeat installation
or use a dierent seating location.
Page 10
14 15
BRITAX Child Safety, Inc. MARATHON CLICKTIGHT User Guide
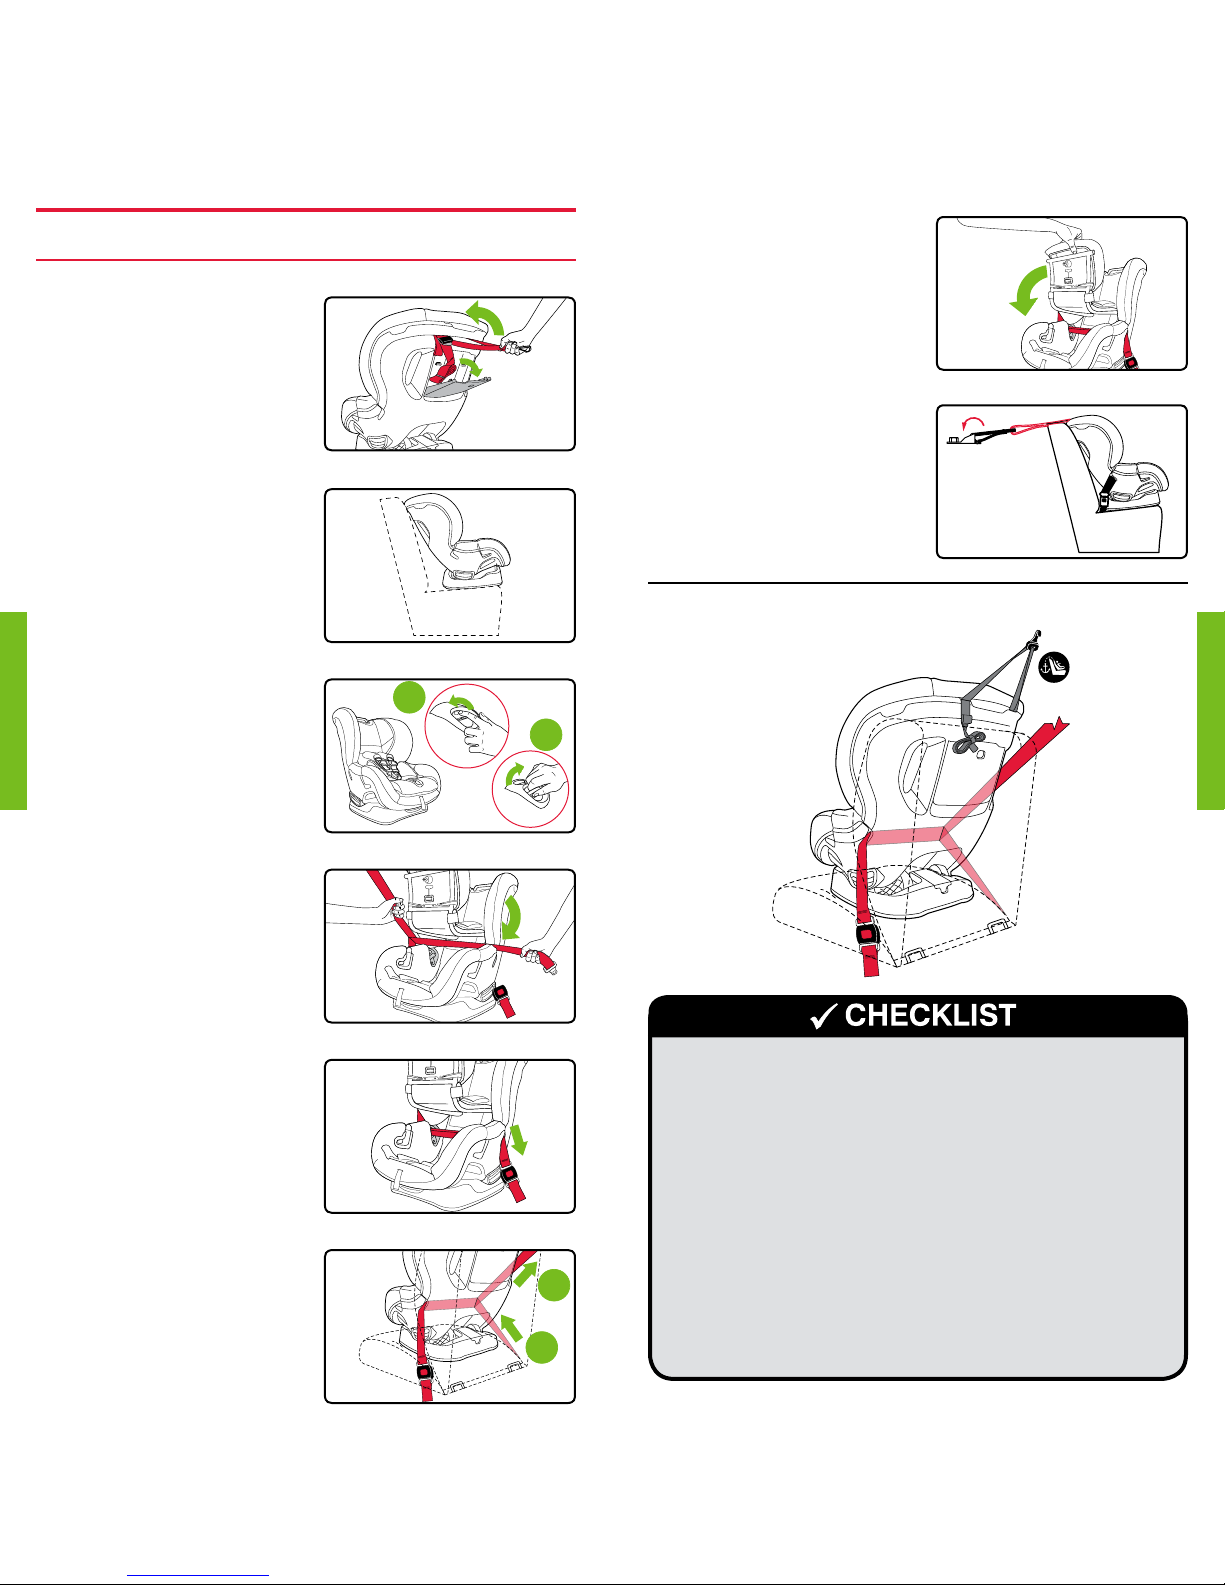
Forward-Facing Installation
Lap-Shoulder Belt Installation
1. Remove the tether
from the tether storage
compartment and retainer
tabs and place it up and
over the child seat back.
2. Recline the unoccupied
child seat and place
forward-facing on the
vehicle seat.
Ensure that
the base of the child seat
is flat on the vehicle seat
and no more than 3 in.
(7.6 cm) of the base hangs
over the edge of the
vehicle seat
(see page 25)
.
3. Open the CLICKTIGHT.
a. Press the dimple on
the CLICKTIGHT
dial.
b. Rotate dial clockwise
until CLICKTIGHT
releases and lift to
open.
4. Slide both parts of the
vehicle belt into the
forward-facing belt slots.
5. Ensure the vehicle belt is
not twisted and buckle
the seat belt.
6. Remove slack from the
lap part (a), then the
shoulder part (b) of the
vehicle belt.
7. Close the CLICKTIGHT.
– A click confirms the
CLICKTIGHT is secure
.
8. Attach the
tether
to a
designated anchor (see
vehicle owner’s manual)
and remove slack (see
page 27).
Forward-Facing Installation with Lap-Shoulder Belt
9 Ensure that the logo on the CLICKTIGHT dial has
returned to a horizontal position.
9 Check that all connections are secure and straps are
not twisted.
9 Ensure that the ball in the recline indicator is within the
allowable green section and that no more than 3 in.
(7.6 cm) of the base hangs over the edge of the vehicle
seat (see page 25).
9 Check that the child seat cannot be moved front to
back or side to side more than 1 in. (2.5 cm) at the belt
path. If the child seat is not secure, repeat installation
or use a dierent seating location.
9 Check that any excess tether webbing is contained
within your vehicle and secured in the elastic strap.
3b
3a
6a
6b
Page 11
16 17
BRITAX Child Safety, Inc. MARATHON CLICKTIGHT User Guide
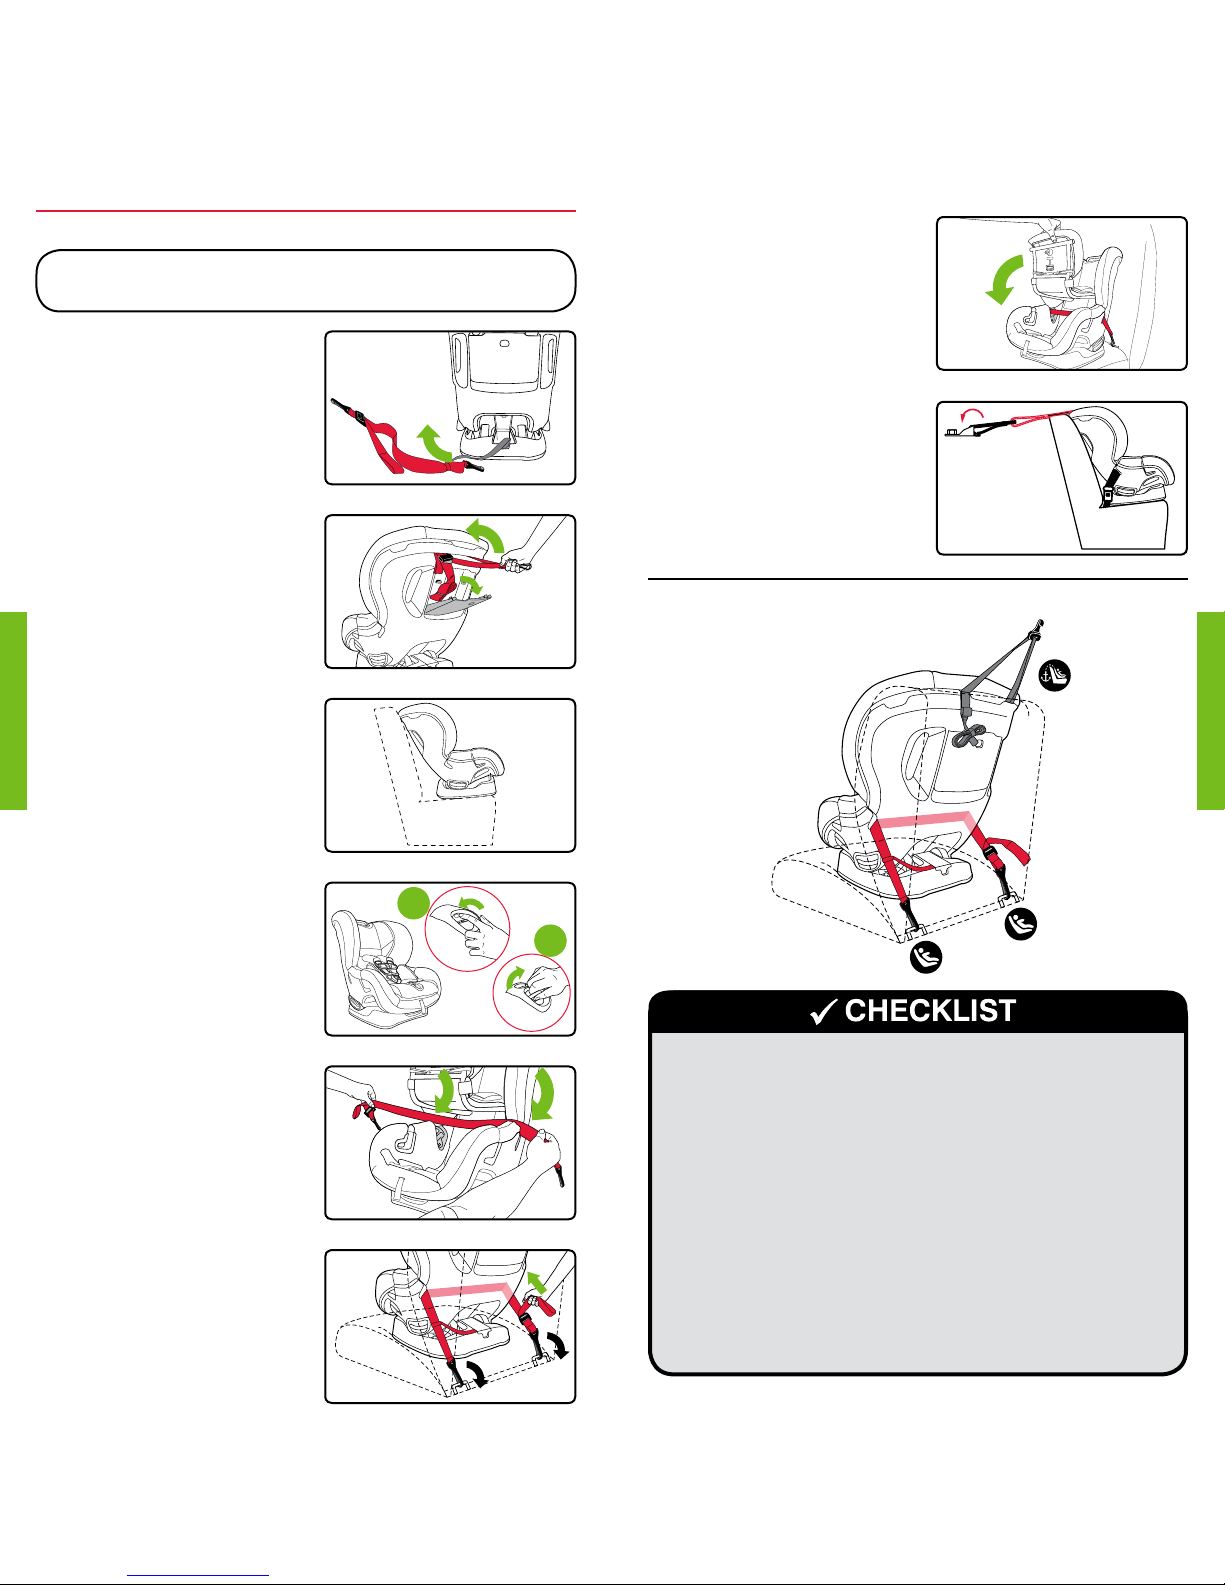
Lower Anchor Installation
IMPORTANT:
Do not install forward-facing with the lower
anchors for a child weighing more than 40 lbs (18 kg).
1. Remove the lower
connectors from the
storage compartment
at the rear of the seat
and pull the strap to
full length toward the
child’s left side.
2. Remove the tether
from the tether storage
compartment and retainer
tabs and place it up and
over the child seat back.
3. Recline the unoccupied
child seat and place
forward-facing on the
vehicle seat.
Ensure that
the base of the child seat
is flat on the vehicle seat
and no more than 3 in.
(7.6 cm) of the base hangs
over the edge of the
vehicle seat
(see page 25)
.
4. Open the CLICKTIGHT.
a. Press the dimple on
the CLICKTIGHT
dial.
b. Rotate dial clockwise
until CLICKTIGHT
releases and lift to
open.
5. Slide the lower connector
strap into the rear-facing
belt slots and firmly press
the lower connectors
over their adjacent lower
anchors.
– Verify that the
connectors are secure
and the strap is not
twisted.
6. Pull the end of the lower
connector strap to
remove slack.
7. Close the CLICKTIGHT.
– A click confirms the
CLICKTIGHT is secure
.
8. Attach the
tether
to a
designated anchor (see
vehicle owner’s manual)
and remove slack (see
page 27).
Forward-Facing Installation with Lower Anchors
4b
4a
9 Ensure that the logo on the CLICKTIGHT dial has
returned to a horizontal position.
9 Check that all connections are secure and straps are
not twisted.
9 Ensure that the ball in the recline indicator is within the
allowable green section and that no more than 3 in.
(7.6 cm) of the base hangs over the edge of the vehicle
seat (see page 25).
9 Check that the child seat cannot be moved front to
back or side to side more than 1 in. (2.5 cm) at the belt
path. If the child seat is not secure, repeat installation
or use a dierent seating location.
9 Check that any excess tether webbing is contained
within your vehicle and secured in the elastic strap.
Page 12

18 19
BRITAX Child Safety, Inc. MARATHON CLICKTIGHT User Guide
Lap Belt Installation 7. Close the CLICKTIGHT.
– A click confirms the
CLICKTIGHT is secure
.
NOTE: If the CLICKTIGHT
is dicult to close, repeat
step 6 with less tension in
the vehicle belt.
8. Attach the
tether
to a
designated anchor (see
vehicle owner’s manual)
and remove slack (see
page 27).
1. Remove the tether
from the tether storage
compartment and retainer
tabs and place it up and
over the child seat back.
2. Place the unoccupied child
seat forward-facing on the
vehicle seat in the upright
position.
Ensure that the
base of the child seat is
flat on the vehicle seat and
no more than 3 in. (7.6 cm)
of the base hangs over the
edge of the vehicle seat
(see page 25)
.
3. Open the CLICKTIGHT.
a. Press the dimple on
the CLICKTIGHT
dial.
b. Rotate dial clockwise
until CLICKTIGHT
releases and lift to
open.
4. Slide the vehicle belt into
the forward-facing belt
slots.
5. Ensure the vehicle belt is
not twisted and buckle
the seat belt.
6. Push down into the
middle of the child seating
area with moderate
force (approximately
45 lbs/20.4 kg),
compressing the vehicle
seat while tightening the
vehicle belt.
NOTE: Ensure that the
vehicle belt is locked as
directed by your vehicle
owner’s manual.
Forward-Facing Installation with Lap Belt
3b
3a
9 Ensure that the logo on the CLICKTIGHT dial has
returned to a horizontal position.
9 Check that all connections are secure and straps are
not twisted.
9 Ensure that the ball in the recline indicator is within the
allowable green section and that no more than 3 in.
(7.6 cm) of the base hangs over the edge of the vehicle
seat (see page 25).
9 Check that the child seat cannot be moved front to
back or side to side more than 1 in. (2.5 cm) at the belt
path. If the child seat is not secure, repeat installation
or use a dierent seating location.
9 Check that any excess tether webbing is contained
within your vehicle and secured in the elastic strap.
Page 13
20 21
BRITAX Child Safety, Inc. MARATHON CLICKTIGHT User Guide
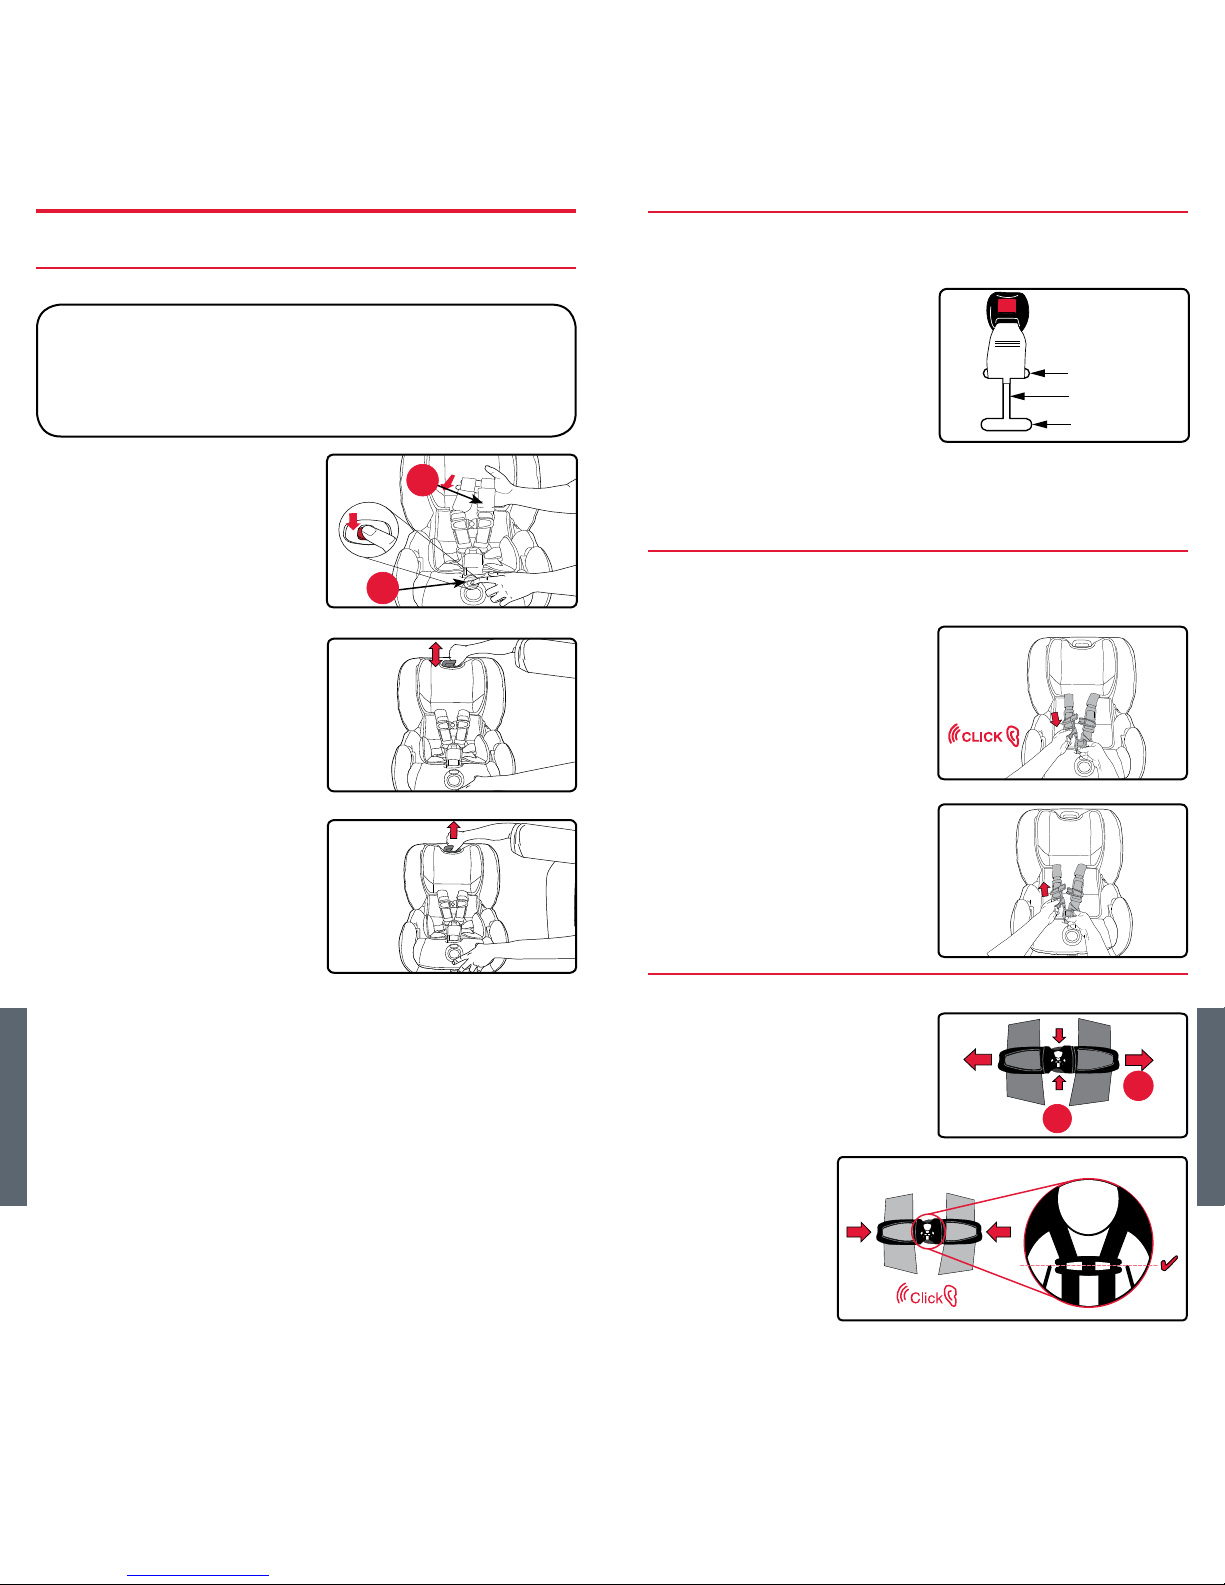
Securing Your Child
IMPORTANT: Impact absorbing chest pads are highly
recommended for forward-facing mode. Removal of chest
pads is optional for rear-facing mode to ensure a snug fit
for small infants.
7. Fasten the harness
buckle. Proper
connection is confirmed
with a click after inserting
each buckle tongue.
8. Check for proper harness
height and pull any
excess slack up to the
child’s shoulder area
before tightening.
9. Pull the harness adjuster
strap to tighten the
harness.
NOTE: The harness
should have a snug fit
around the child. A snug
strap should not allow any
slack. It lies in a relatively
straight line without
sagging. It does not press
on the child’s flesh or
push the child’s body into
an unnatural position.
You should not be able to
pinch excess.
10. Fasten the chest clip and
place the chest pads in a
comfortable position for
the child within the range
of a correctly placed
chest clip.
NOTE: The correct height
for the chest clip is at the
middle of the chest at
armpit level.
Before traveling, verify that the:
9 Harness straps are not twisted.
9 Harness is snug.
9 Buckle is fastened.
9 Chest clip is at the child’s armpit level.
1. Make the proper
adjustments to the
harness and buckle (see
pages 22-23).
2. Loosen the harness.
a. Press harness
adjuster button.
b. Pull both harness
straps forward.
3. Open the chest clip.
a. Press tabs.
b. Pull apart.
4. Release the buckle and
attach the harness straps
to the harness holders.
5. Place the child in the child
seat. Ensure the child
is positioned upright in
the child seat and not
slouching. Their bottom
must touch the child seat,
and their back must rest
flat against the back of the
child seat.
6. Position the harness
straps around the child.
IMPORTANT: Adjust the
harness to fit the clothes
the child is wearing.
Remove bulky coats and/
or jackets before putting
the child in the child seat.
2a
2b
3a
3b
2b
2a
Pull the harness adjuster
strap out from the child
seat to tighten�
Do not pull sideways�
Page 14
22 23
BRITAX Child Safety, Inc. MARATHON CLICKTIGHT User Guide
Child Seat Functions
Adjusting the Harness Height
• In rear-facing mode, the harness straps should be in
the closest position at or below your child’s shoulders.
See page 7.
• In forward-facing mode, the harness straps should
be in the closest position at or above your child’s
shoulders. See page 7.
Harness Buckle Position
1. Loosen the harness.
a. Push harness
adjuster button.
b. Pull both harness
straps forward.
2. Squeeze the harness
height adjuster, slide the
harness into the desired
position and release.
3. Ensure the harness has
locked into position.
Using the Harness Buckle
The child seat shell contains an inner buckle slot and an outer
buckle slot.
• For rear-facing installations,
position the buckle in the
slot closest to but not under
the child.
• For forward-facing
installations, use the outer
buckle slot only.
Reposition the harness buckle by following the steps on
pages 36-37.
NOTE: NEVER leave the buckle in the adjustment slot.
To Fasten:
1. Insert one tongue at a
time into the buckle.
Proper connection is
confirmed with a click
after inserting each
buckle tongue.
To Release:
1. Press the release button
and pull the tongues from
the buckle.
NOTE: Periodically clean
the buckle to ensure
proper operation. See
page 40.
ADJUSTMENT
SLOT
INNER SLOT
OUTER SLOT
Using the Chest Clip
1. Open the chest clip.
a. Press tabs.
b. Pull apart.
2. Push together
to fasten.
NOTE: Always
position the
chest clip at
armpit level.
a
b
1b
1a
NOTE: Harness length can be extended if necessary for
children over the age of 2. For more information, contact
BRITAX Consumer Services at 1-888-427-4829 or 1-704409-1699.
Page 15
24 25
BRITAX Child Safety, Inc. MARATHON CLICKTIGHT User Guide
Forward-Facing
In forward-facing
installations, it is
important that the base
of the child seat rests
completely flat on the
vehicle seat. As seen
in the illustration, it is
permissible to allow up
to 3 in. (7.6 cm) of the
base to hang over the
edge of the vehicle seat.
Some vehicle seats do
not allow enough of the child seat base to contact the vehicle
seat. If this is the case, adjust the recline angle to a more
upright position. Not doing so could cause the child seat to
not perform as intended. Use the recline indicator on the child
seat to help achieve an acceptable recline angle, with the
ball
in the recline indicator in the allowable green section
.
In some cases, the vehicle head
restraint can prevent the child
seat head pad from being raised
high enough to properly adjust the
harness for the fit of your child when
using a forward facing reclined
position. DO NOT force the child
seat head pad past the vehicle head
restraint. Doing so could cause the child seat not to
perform as intended. If the location of the vehicle head
restraint interferes with the child seat head pad, raise
or remove the vehicle head restraint. If the vehicle head
restraint cannot be removed, move the child seat to the
upright position or try a dierent seating location.
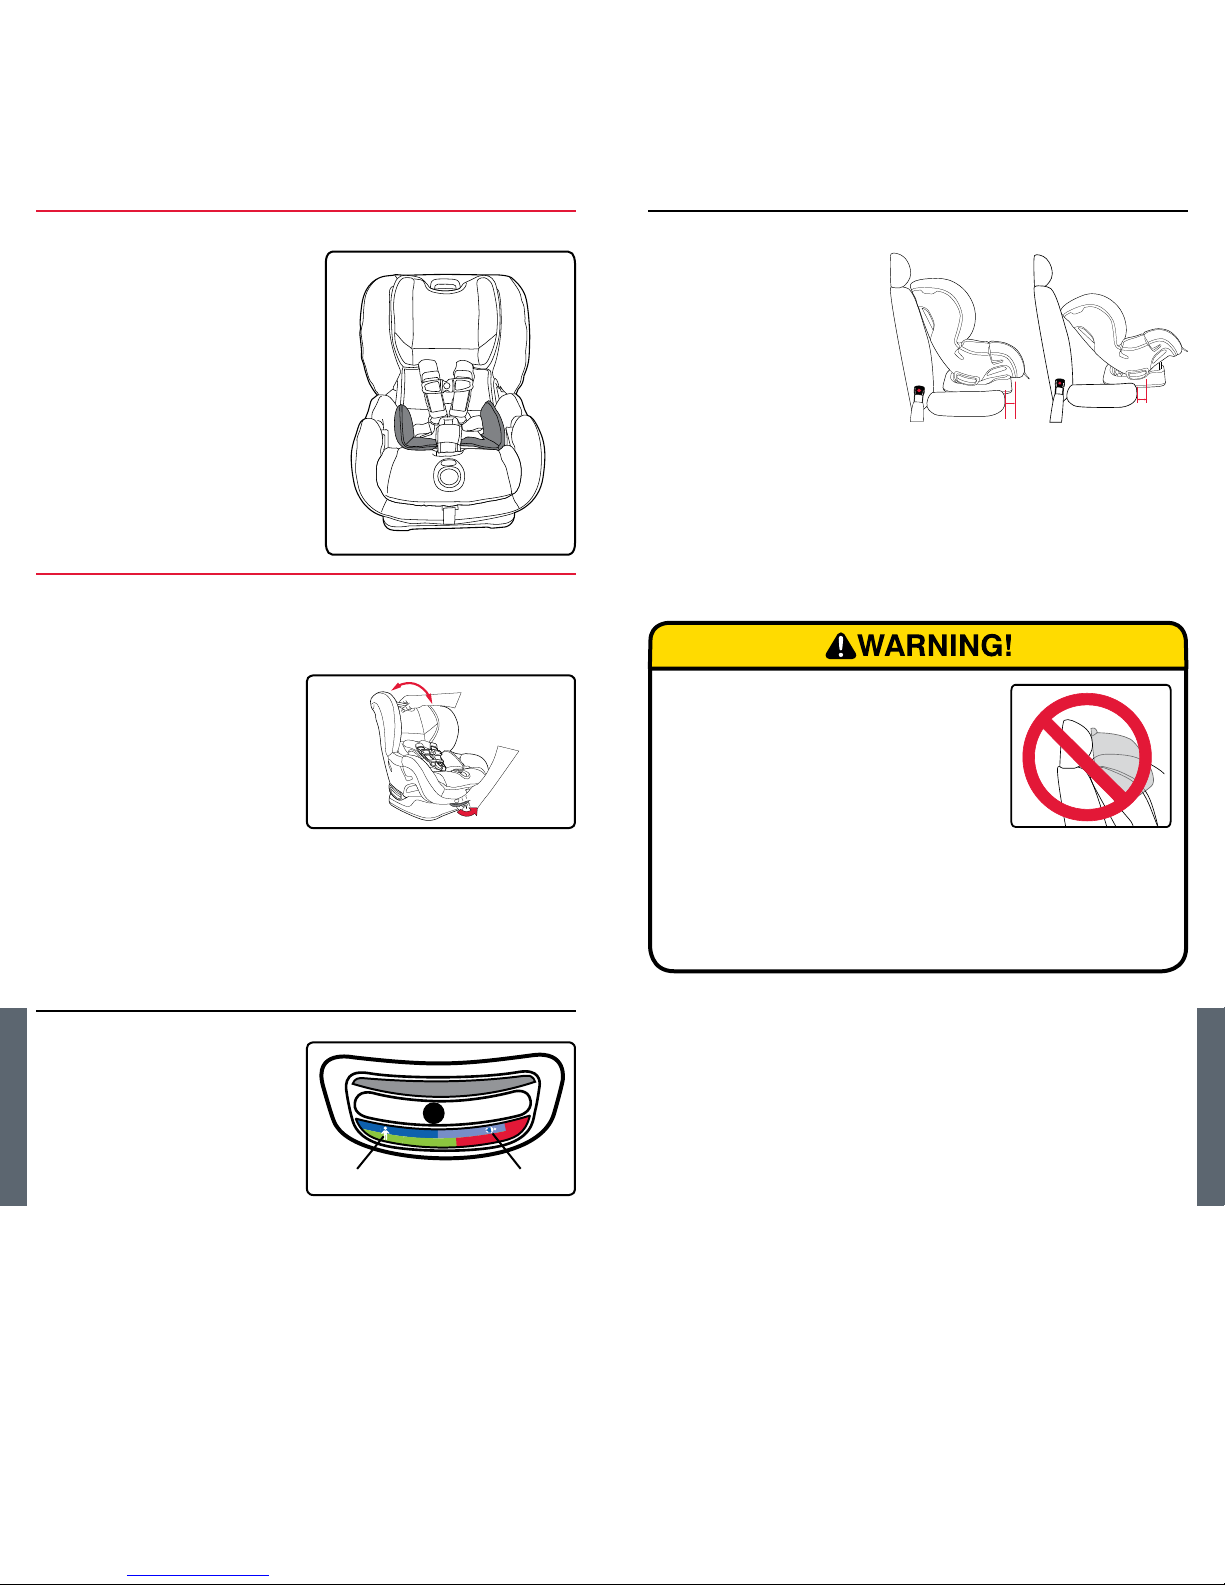
Seat Positions
This child seat has 7 recline positions. To adjust the recline
position:
1. Pull the recline handle
then rotate the child seat
shell until the ball in the
recline indicator is in the
allowable section for:
• Rear Facing - Light
Blue (Infants), or
Dark Blue (larger
children with head and neck control)
• Forward Facing - Green
2. Release the recline handle, then verify the child seat has
locked into position.
NOTE: Set the seat position BEFORE installing.
Rear-Facing
In rear-facing installations
it is important that the child
seat be reclined to maintain
proper head and neck
control with smaller infants.
Use the recline indicator on
the child seat to help achieve
an acceptable recline angle,
with the
ball in the recline indicator in the allowable blue
section for the size of the child.
Acceptable
Overhang
Unacceptable
Overhang
3”
3”
R
E
A
R
F
A
C
I
N
G
F
O
R
W
A
R
D
F
A
C
I
N
G
7
R
E
C
L
I
N
E
P
O
S
I
T
I
O
N
S
Toddler Infant
Comfort Pillow
The comfort pillow is designed
to provide better fit and
comfort for infants using this
child seat.
NOTE: Remove the comfort
pillow after the child can sit
comfortably in the child seat
without additional support.
Page 16
26 27
BRITAX Child Safety, Inc. MARATHON CLICKTIGHT User Guide
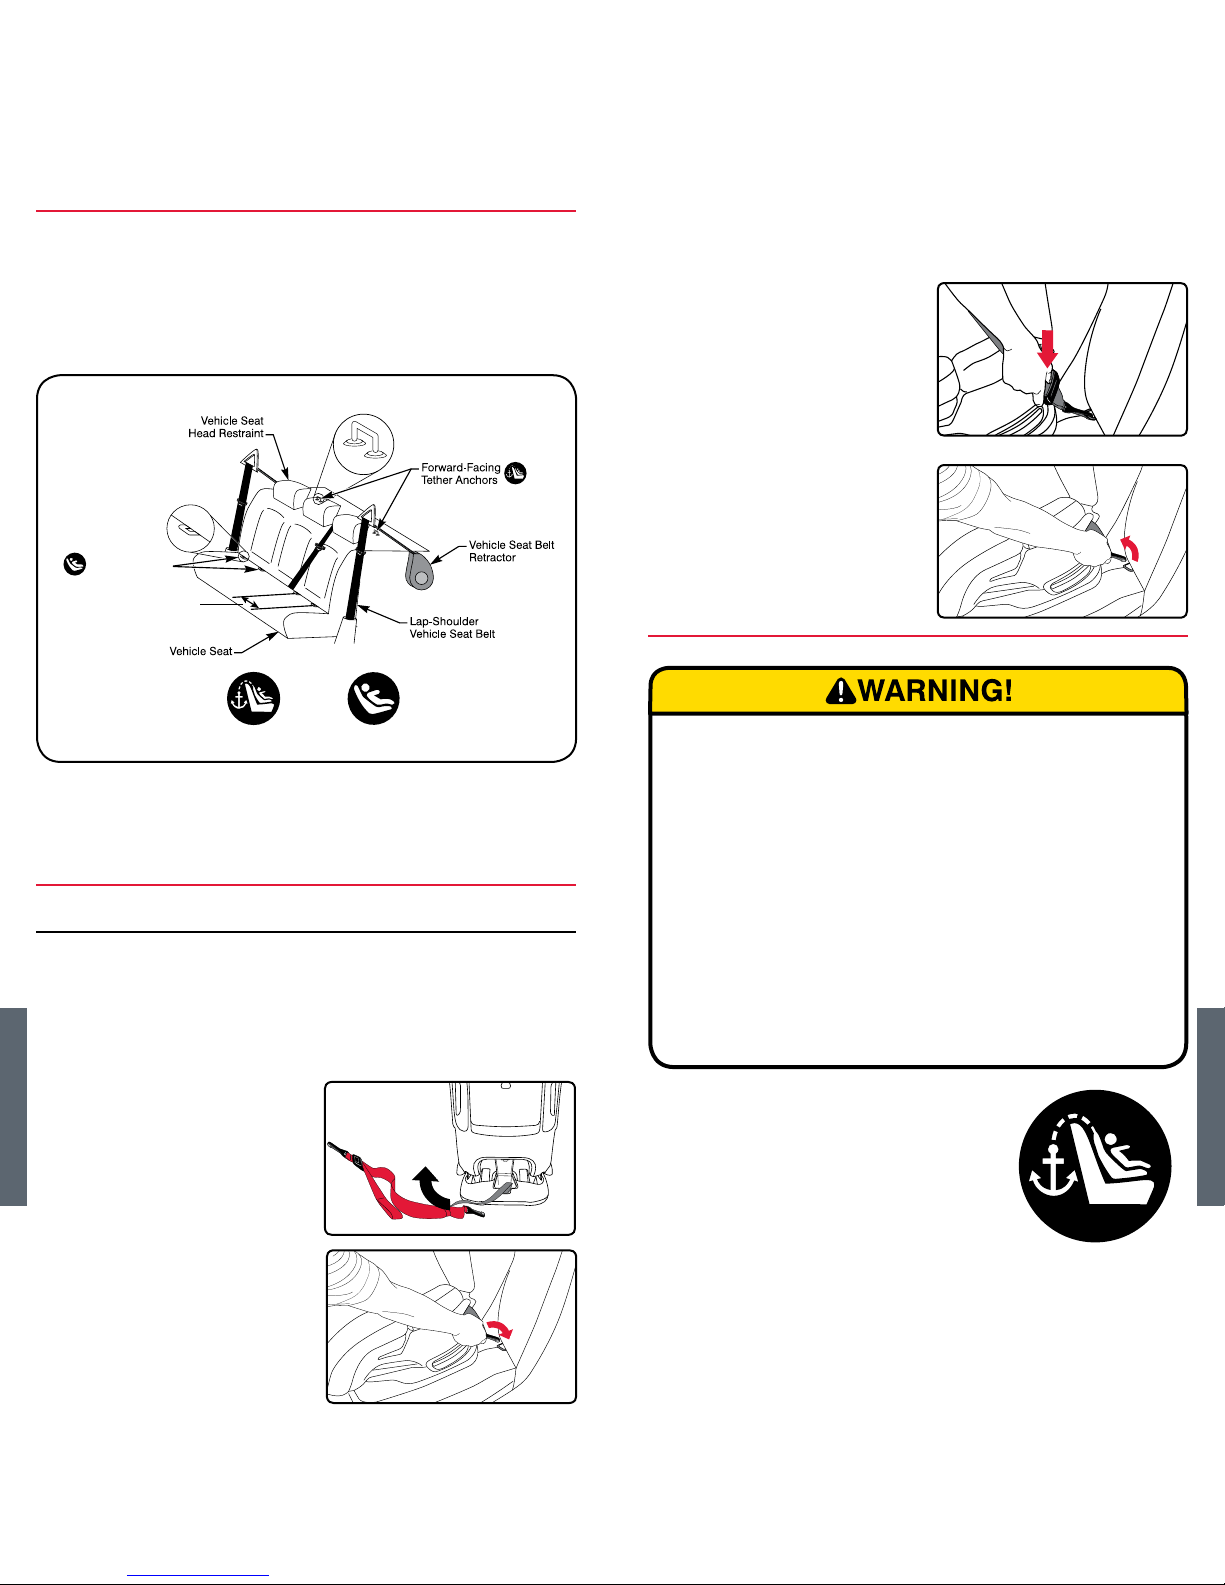
Using the Lower Anchors and Tethers for Children (LATCH)
The Lower Anchors and Tethers for Children or LATCH, is a
system available on this child seat that oers an alternative
to vehicle seat belt installation methods. The figure below
shows typical locations for lower anchors and tether anchors
in a vehicle. See pages 2-3 for LATCH components on this
child seat.
Check your vehicle owner’s manual to learn if it is equipped
with LATCH, the maximum weight rating for the lower
anchors, tether anchors capacities, and information on the
lower anchor locations and designated seating positions
available for use with this child seat.
Lower Connectors
Using the Lower Connectors
The lower connectors are located in the back of the base
of the child seat. Store the connector assembly in the
compartment when not in use.
To attach the lower connectors:
1. Remove the lower
connectors from the
storage compartment at
the rear of the seat and
pull the strap to full length
toward the child’s left
side.
2. Press the lower connector
hook over its adjacent
lower anchor. For full
installation instructions see
pages 10-11 or 16-17.
To remove the lower
connectors:
1. Push the lower connector
adjuster release button
to loosen the lower
connector strap.
2. Squeeze the lower
connector hook and lift o
the lower anchor.
Impact Absorbing Tether
Failure to follow the guidelines below may cause the child
seat not to perform as intended.
• BRITAX recommends that the tether be used at all
times when installing the child seat. Using the tether
will improve the stability of your child seat and reduce
the risk of injury.
• Attach the tether only to tether anchors identified by
your vehicle manufacturer as tether anchorage points.
Only use the designated tether anchor for each seating
position.
• If your vehicle does not currently have a tether anchor
attachment, refer to your vehicle owner’s manual or
contact your vehicle man u fac tur er for assistance. DO
NOT modify your vehicle without advice from your
vehicle manufacturer.
• Store the tether in the compartment on the back of the
child seat when not in use.
Tether anchor locations vary from
vehicle to vehicle. Check your vehicle
owner’s manual for tether anchor
capacities and look for the tether
anchor symbol shown in the diagram
to help identify where the top tether
anchor points are located in your
vehicle. See the diagrams below for
possible rear and forward-facing tether
installation configurations.
LATCH SYSTEM ANCHOR LOCATIONS
Tether
Anchor
Lower
Anchors
Lower Anchors
11 in. (27.9 cm)
Page 17

28 29
BRITAX Child Safety, Inc. MARATHON CLICKTIGHT User Guide
To remove the tether from a
tether anchor:
1. Loosen the tether.
a. Tilt the lock up.
b. Pull the tether webbing.
2. Remove the tether hook from the tether anchor.
NOTE: Store the tether in the tether compartment when
not in use and ensure the tether compartment door is
fully closed.
The Tether as a Crash Indicator
The tether can indicate when the child seat has been in a
moderate or severe crash (see “Important Notes” on page 5)
and replacement of the child seat is necessary.
Figure 1 shows a tether
acceptable for continued use
(provided the child seat has
not been involved in a crash).
The colored stitching will be
intact and not visible from the
back of the seat.
Figure 2 shows examples
of when the tether has been
damaged and is unacceptable
for continued use. If one or
both of the loops have pulled
through the back of the shell
and/or any of the colored
stitching has ripped, the child
seat is no longer acceptable
for use.
IMPORTANT: Discontinue use of child seat if it has been
involved in a moderate or severe crash, regardless of
whether the loops have pulled through the back side of the
shell and the colored stitching has been ripped.
Rear-Facing Tether Connector Strap
Because every vehicle model is dierent, locations to
anchor the tether for rear-facing installations may vary. Use
the rear-facing tether connector strap to assist in creating an
anchor point for rear-facing configuration “A” above.
1. Find a fixed location in the vehicle that is bolted to the
floor. If you cannot find a location to create an anchor
point, contact the vehicle manufacturer to identify a
tether connection point.
2. Route the strap through the anchor
point.
3. Thread the loop at one end of the strap
through the loop at the other end and
pull until the strap is tight.
4. Use the open loop as an
attachment point for the
tether.
NOTE: Store the tether
connector strap in the tether
compartment when not in
use.
Using the Tether
To attach the tether to a tether anchor:
(A) Rear Facing
(C) Forward Facing
(B) Rear Facing
3
4
Tether Configurations
1. Firmly press the hook
over the tether anchor
point.
2. Pull the loose end of the
webbing to remove slack
from the tether.
NOTE: If the tether is
too short for use in your
vehicle, contact BRITAX
Consumer Services at
1-888-427-4829 or 1-704409-1699 to obtain a
tether extender.
1
2
or
a
b
Page 18

30 31
BRITAX Child Safety, Inc. MARATHON CLICKTIGHT User Guide
Vehicle Compatibility
Vehicle Seating Positions
DO NOT place child seat rear-facing
in the front seat of a vehicle with
a passenger air bag. DEATH or
SERIOUS INJURY can occur. Owners
of vehicles with front passenger side
airbags should refer to their owner’s
manual for child restraint installation
instructions. The back seat is the
safest place for children 12 and under.
Some vehicles have no seating positions which are
compatible with this child seat. If in doubt, contact the
vehicle manufacturer for assistance.
Forward-facing vehicle seats MUST be used with this
child seat. Side-facing or rear-facing seats CANNOT be
used. See the diagram below.
Incompatible Vehicle Seat Belts
Vehicle seats and seat belts dier from vehicle to vehicle.
Refer to your vehicle owner’s manual for specific information
about your vehicle seat belts and their use with child seats.
The following types of vehicle seat belts are NOT
compatible with this child seat. If any of the belt types
listed below are in the chosen seating position, choose
another vehicle seating position or check your vehicle
owner’s manual for information on installing a car seat in
your vehicle.
NOTE: This BRITAX car seat may not be compatible with
every inflatable lap-shoulder belt. See FAQs in the support
section of the BRITAX website (www.britaxusa.com/support)
for additonal instructions.
Motorized, automatic
vehicle seat belts�
Lap belts forward of
the vehicle seat bight�
Lap-shoulder belts with
top or bottom anchor
points on the vehicle door�
Lap belts with a sewn-in
latch plate that have a
retractor that locks only
in case of a sudden stop�
Page 19

32 33
BRITAX Child Safety, Inc. MARATHON CLICKTIGHT User Guide
Maintenance
Cover
Removing the Cover
Never remove the buckle tongues from the harness.
They cannot be reattached after removal. If reassembled
incorrectly, the child seat may not perform as intended.
1. Loosen and unbuckle the
harness.
a. Push harness
adjuster button.
b. Pull both harness
straps forward.
c. Unbuckle the
harness.
2. Open the chest clip.
a. Press tabs.
b. Pull apart.
3. Remove the comfort
pillow and comfort pads if
necessary.
4. Remove the belly pad and
buckle.
a. Open the
CLICKTIGHT and
remove the two
elastic loops on
the bottom of the
CLICKTIGHT.
b. Lift the front of
the seat cover
and pull over the
CLICKTIGHT bezel
to access the buckle
strap connection.
c. Remove the harness
buckle by turning
the buckle strap
sideways and routing
the retainer out of
the front buckle slot
in the child seat (see
page 36).
4c
4b
2a
2b
a
b
1b
1a
4a
d. Pull the end of the
belly pad and buckle
retainer out of the
buckle slot in the
cover to remove.
– Turn the buckle
retainer sideways
and slide the buckle
out of the belly pad
(see page 36).
e. Remove seat cover.
5. Detach the hook and loop
fasteners on the head pad
from around the harness.
6. Remove the head pad.
a. Raise the harness to
the highest position.
b. Detach the elastic
straps from the rear
of the head pad.
7. Ensure the CLICKTIGHT
is open and remove the
lower shell cover.
a. Detach elastic loops
at front of shell.
b. Lift up from the front
to remove the lower
shell cover.
c. Pull cover up at
sides and around
rear-facing belt
paths.
8. Lower the harness, reach
around the head pad, and
pull the upper shell cover
towards you to remove.
4d
7a
7b
6b
Page 20

34 35
BRITAX Child Safety, Inc. MARATHON CLICKTIGHT User Guide
Replacing the Cover
1. Attach one side of the
upper shell cover at the
forward-facing belt path,
pull the cover over the
back of the shell, and
secure at opposite belt
path.
2. Replace lower shell cover.
a. Open the
CLICKTIGHT.
b. Tuck one of the plastic
tabs on the lower
shell cover into the
outer side of the shell
between the forward
and rear-facing belt
paths.
c. Tuck the lower shell
cover around the inner
and outer sides of the
shell from the forwardfacing belt paths to the
front of the child seat.
d. Continue replacing
the lower shell cover
around the seat to the
other forward-facing
belt path and tuck the
second plastic tab
into the shell between
the forward and rearfacing belt paths.
IMPORTANT:
Ensure shell cover is
secured behind red
markers to allow for
proper function of
CLICKTIGHT.
e. Thread the harness
adjuster strap through
the front of the lower
shell cover.
2c
2b
2a
2d
2f
f. Reattach the two
elastic loops at the
front of the lower shell.
3. Replace the belly pad and
buckle:
a. Turn the buckle
retainer sideways and
route it through the
belly pad.
b. Route the belly pad
and buckle retainer
through the buckle slot
in the cover.
– Ensure that the
buckle is through the
correct cover slot for
the buckle position.
c. Turn the buckle
retainer sideways,
route it through the
front buckle slot and
into the desired buckle
position in the child
seat.
4. Pull the seat cover around
the CLICKTIGHT bezel
and over the front of the
seat.
IMPORTANT: The seat
cover must be tucked
behind the red markers
on the CLICKTIGHT bar.
5. Reattach the two elastic
loops on the underside of
the seat cover.
3a
3b
3c
2e
Page 21

36 37
BRITAX Child Safety, Inc. MARATHON CLICKTIGHT User Guide
Harness Buckle
IMPORTANT: If your child eats and drinks while in the
child seat, you will need to check the buckle periodically
and rinse out any accumulated debris (see page 40).
Removing the Harness Buckle
1. Unbuckle the harness and
open the CLICKTIGHT.
2. Lift the front of the seat
cover and pull over the
CLICKTIGHT bezel to
access the buckle strap
connection.
3. Remove the
harness buckle by
turning the buckle
strap sideways and
routing the retainer
out of the front
buckle slot in the
child seat.
6. Replace the head pad.
a. Raise the harness to
the highest position.
b. Reattach the elastic
straps to the rear of
the head pad.
c. Reattach the hook and
loop fasteners on the
head pad around the
harness.
7. Replace the comfort
pads.
4. Pull the end of the belly
pad and buckle retainer
out of the slot in the seat
cover to remove.
5. Turn the buckle retainer
sideways and route the
buckle assembly out of
the belly pad.
Replacing the Harness Buckle
1. Turn the buckle retainer
sideways and route it
through the fabric strip on
the belly pad.
2. Route the belly pad and
buckle retainer through
the buckle slot in the
cover.
– Ensure that the buckle
is through the correct
cover slot for the
desired buckle position.
3. Slide the end of the belly
pad over the seat and
(if applicable) over the
comfort foam.
4. Turn the buckle
retainer sideways
and route it into the
corresponding buckle
slot in the seat.
– Ensure that the
buckle is in the
correct position
and the red release
button faces out.
6b
6c
Page 22

38 39
BRITAX Child Safety, Inc. MARATHON CLICKTIGHT User Guide
5. Replace the cover and
close the CLICKTIGHT.
IMPORTANT: The seat
cover must be tucked
behind the red markers
on the CLICKTIGHT bar.
Impact Absorbing Chest Pads
IMPORTANT: Impact absorbing chest pads are highly
recommended for forward-facing mode. Removal of chest
pads is optional for rear-facing mode to ensure a snug fit
for small infants.
1b
1a
Removing the Impact Absorbing Chest Pads
1. Loosen the harness.
a. Press harness
adjuster button.
b. Pull both harness
straps forward.
2. Adjust the harness to
the lowest position and
unhook the harness
straps from the yoke at
the back of the child seat.
3. Pull one harness strap
through the harness slot
to the front of the seat.
4. Route the harness strap
out of the comfort pad,
chest pad, and the chest
clip.
5. Reroute the harness strap
back through the chest
clip and comfort pad,
ensuring that the harness
strap is not twisted.
6. Repeat for other strap.
7. Route the harness straps
through the seat to the
back. Ensure that the
harness straps pass over
the tube.
8. Nest the end of the left
harness strap into the
right.
9. Slide the harness straps
completely onto the yoke.
Ensure that the adjuster
and harness straps are
not twisted and that
the ends of the harness
straps are securely
attached to the yoke.
IMPORTANT: Store the
chest pads in a safe
location when not in use.
Replacing the Impact Absorbing Chest Pads
1. Loosen the harness.
a. Press harness
adjuster button.
b. Pull both harness
straps forward.
2. Adjust the harness to
the lowest position and
unhook the harness
straps from the yoke at
the back of the child seat.
3. Pull one harness strap
through the harness slot
to the front of the seat.
4. Route the harness strap
out of the comfort pad
and chest clip.
5. Reroute the harness strap
through the chest pad,
chest clip, and comfort
pad.
6. Repeat for other strap.
1b
1a
TUBE
Page 23

40 41
BRITAX Child Safety, Inc. MARATHON CLICKTIGHT User Guide
7. Route the harness straps
through the seat to the
back. Ensure that the
harness straps pass over
the tube.
8. Nest the end of the left
harness strap into the
right.
9. Slide the harness straps
completely onto the yoke.
Ensure that the adjuster
and harness straps are
not twisted and that
the ends of the harness
straps are securely
attached to the yoke.
Shell • SPONGE CLEAN the
shell using warm water
and mild soap.
• TOWEL DRY.
DO NOT
• Use abrasive
cleaners.
Cover • HAND WASH the
cover using cold water
and mild soap.
• LINE DRY to prevent
the cover from
shrinking.
DO NOT
• Bleach
• Machine wash
• Machine dry
• Iron
Harness • SPONGE CLEAN the
harness using warm
water and mild soap.
• TOWEL DRY.
DO NOT
• Disassemble the
harness
• Bleach
• Machine wash
• Machine dry
• Iron
Harness
Buckle
• THOROUGHLY RINSE
the buckle using warm
water.
• TEST THE BUCKLE
by fastening and
unfastening until a
click is heard after
inserting each buckle
tongue. If clicks are
not heard, repeat the
cleaning procedure.
• TOWEL DRY
DO NOT
• Soak
• Lubricate
• Use solvents
• Use soap or
household
detergents
Cleaning
Troubleshooting
Problem Possible Solution
The
CLICKTIGHT
will not close
with a click to
signal that
it is secure�
There may be debris or other objects
interfering with the mechanism.
Ensure the seat area is clear of any
obstructions and try closing the
CLICKTIGHT again.
There may be too much tension in
the belt/strap. Do not overtighten
the belt/strap before closing the
CLICKTIGHT. Only remove slack.
The logo on the
CLICKTIGHT dial
will not return
to a horizontal
position�
Press down again on the
CLICKTIGHT to the left and right of
the bezel to ensure the CLICKTIGHT
pins have fully engaged.
The harness
adjuster button
will not operate�
There may be debris in the
mechanism. Clean the mechanism,
then try using the button again.
The harness
cannot be
adjusted to its
full height�
Check the seating position where
the child seat is installed. The vehicle
head restraint may obstruct the path
of the child seat harness height
adjuster. Remove or raise the vehicle
head restraint and try adjusting the
harness height again.
The harness
length is too
short�
Harness length can be extended if
necessary for children over the age
of 2. For more information, contact
BRITAX Consumer Services at 1-888427-4829 or 1-704-409-1699.
The harness is
hard to adjust�
The harness may be at maximum or
minimum height, the harness may
be too tight to adjust, or the child’s
weight may be pressing against the
head pad. Check for and correct all
of the above where necessary and
try adjusting the harness again.
The adjuster
strap is fraying
at the sides�
Pull the harness adjuster strap up and
away from the child seat to tighten.
Do not pull sideways. Doing so may
cause the harness adjuster strap to
fray at the sides. See page 29.
The buckle will
not fasten with
a click after
each tongue is
inserted�
There may be debris in the buckle
mechanism. Clean the buckle (see
page 40), then try fastening the
buckle again.
Please contact BRITAX Consumer Services at 1-888-4274829 or 1-704-409-1699 if you have an issue not listed
here.
TUBE
Page 24

42 43
BRITAX Child Safety, Inc. MARATHON CLICKTIGHT User Guide
Warranty
This child seat was manufactured by Britax Child Safety,
Inc. (“BRITAX”). BRITAX warrants this product to the original
retail purchaser as follows:
LIMITED ONE-YEAR WARRANTY
This product is warranted against defective materials or
work man ship for one year from the date of original purchase.
Proof of purchase is required. Your exclusive remedy for this
warranty is that BRITAX will, at its option, provide repair or
replacement components for this product. BRITAX reserves
the right to discontinue or change fabrics, parts, models or
products, or to make substitutions.
To make a claim under this warranty, you must contact BRITAX
Consumer Services at 1-888-427-4829 or 1-704-409-1699, or
write to us using the address on the back cover of this booklet.
PLEASE COMPLETE AND MAIL THE OWNER
REGISTRATION CARD WITHIN (30) DAYS OF PURCHASE
You may also register online at www.BritaxUSA.com/
registration.
WARRANTY LIMITATIONS
This warranty does not include damages which arise from
negligence, misuse or use not in accordance with the
product instruction.
The use of non-BRITAX covers, inserts, toys, accessories,
or tightening devices is not approved by BRITAX. Their use
could cause this child seat to fail Federal Motor Vehicle
Safety Standards or not perform as intended in a crash.
Their use may void the BRITAX warranty.
LIMITATION OF DAMAGES
The warranty and remedies as set forth above are exclusive
and in lieu of all others, oral or written, express or implied.
In no event will BRITAX, or the retailer selling this product,
be liable to you for any damages, including incidental or
consequential damages, arising out of the use or inability to
use this product.
LIMITATIONS OF WARRANTIES AND OTHER WARRANTY
TERMS AND STATE LAWS
Any implied warranties, including implied warranties of
merchantability and fitness for a particular purpose, shall
be limited to the duration and terms of the express written
warranty. Some states do not allow limitations on how long
an implied warranty lasts or the exclusion or limitation of
incidental or consequential damages, so the above lim i tations
may not apply to you. This warranty gives you specific legal
rights, and you may have other rights, which vary from state
to state. Neither BRITAX, nor the retailer selling this product,
authorizes any person to create for it any other warranty,
obligation, or liability in connection with this product.
Notes
Page 25

44 45
BRITAX Child Safety, Inc. MARATHON CLICKTIGHT User Guide
Notes Notes
Page 26

Page 27

1
Índice
Guía del usuario - Español ��������������������������� 1
Características del asiento para niños �������� 2
Información de seguridad����������������������������� 4
Advertencia �������������������������������������������������������������� 4
Notas importantes ��������������������������������������������������� 5
Registro �������������������������������������������������������������������� 5
Certificación ������������������������������������������������������������� 6
Información para acomodar al niño ������������������������� 7
Instalación con orientacíon hacia trasera ���8
Instalacíon del cinturón banda horizontal y
transversal ���������������������������������������������������������������� 8
Instalación del anclajes inferiors ���������������������������� 10
Instalación del cinturón de banda horizontal ��������� 12
Instalación con orientación hacia delante 14
Instalacíon del cinturón banda horizontal y
transversal �������������������������������������������������������������� 14
Instalación del anclajes inferiors ���������������������������� 16
Instalación del cinturón de banda horizontal ��������� 18
Sujeción del niño ����������������������������������������� 20
Funciones del asiento para niños �������������� 22
Cómo ajustar la altura del arnés ���������������������������� 22
Posición de la hebilla del arnés������������������������������ 23
Cómo usar la hebilla del arnés ������������������������������ 23
Cómo usar el broche pectoral ������������������������������ 23
Almohada de confort ��������������������������������������������� 24
Posiciones del asiento ������������������������������������������� 24
Cómo usar los anclajes inferiores y las correas de
retención para niños (sistema LATCH) ������������������� 26
Correa de retención con resistencia a impacto ����� 27
Compatibilidad con el vehículo ������������������ 30
Posiciones de los asientos en el vehículo �������������� 30
Cinturones del asiento no compatibles con el
vehículo ������������������������������������������������������������������ 31
Mantenimiento ��������������������������������������������� 32
Cubierta ����������������������������������������������������������������� 32
Hebilla del arnés ���������������������������������������������������� 36
Almohadillas de pecho con resitencia a impacto �� 38
Limpieza ������������������������������������������������������� 41
Resolución de problemas ��������������������������� 42
Garantía �������������������������������������������������������� 44
Guía del usuario - Español
BRITAX®, CLICKTIGHT™, EZ-Buckle™, y MARATHON® son marcas registradas
propiedad de Britax Child Safety, Inc�, y registradas en EE�UU� y otros países�
Todos los derechos reservados� ©2014 Britax Child Safety, Inc� Este producto y
sus componentes están sujetos a cambios sin previo aviso� Impreso en EE�UU�
P02088600_A:08�14
Page 28

2 3
BRITAX Child Safety, Inc. MARATHON CLICKTIGHT Guía del usuario
Descripción
1� Cubierta
2� Regulador de altura del arnés
3� Almohada de cabeza
4� Etiqueta de altura sentada de los hombros
5� Almohadillas de confort
6� Almohada de confort
7� Guía del cinturón para orientación delantera/ Soporte
para el arnés
8� Correa de conector inferior (piezaLATCH)
9� Botón de desbloqueo del ajuste del conector inferior
(pieza LATCH)
10� Ajuste del conector inferior (piezaLATCH)
11� Conector inferior (pieza LATCH)
12� Compartimento para la guía del usuario (en el
bolsillo detrás dela cubierta)
13� Almohadillas de pecho con resitencia a impacto
14� Broche pectoral
15� Hebilla para el arnés
16� Almohadilla abdominal EZ-Buckle
17� Botón de ajuste del arnés (rojo)
18� Disco del CLICKTIGHT
19� Etiqueta con la fecha de fabricación y el número de
serie (por debajo de la cubierta del asiento)
20� Mecanismo del CLICKTIGHT
21� Correa de ajuste del arnés
22� Palanca de ajuste de la reclinación
23� Exterior del asiento
24� Guía del cinturón para orientación trasera
25� Indicador de reclinación
26� Correa de retención (almacendo en el almcenamiento
de la correa de retención)
27� Base con resistencia a impacto
28� Correa de retención con resistencia a impacto (correa
de anclaje superior - pieza LATCH) - almacendo en el
almacenamiento de la correa de retención
29� Almacenamiento de la correa de retención
30� Gancho del arnés
31� Correas del arnés
32� Compartimentos para conectores inferiores
Características del asiento para
niños
Parte frontal
Parte trasera
1
2
3
6
5
7
8
10
11
4
9
14
15
16
17
18
19
20
21
22
12
13
23
24
25
26
28
30
31
32
29
27
18
Page 29

4 5
BRITAX Child Safety, Inc. MARATHON CLICKTIGHT Guía del usuario
Notas importantes
• No instale el asiento con los anclajes inferiores para un
niño que pese más de 15,8 kg (35 lb) orientación hacia
atrás o que pese más de 18 kg (40 lb) orientación hacia
delante�
• Asegúrese de que la cubierta del asiento esté bien sujeta
detrás de las marcadores rojos para permitir el cierre
correcto del mecanismo CLICKTIGHT (véase página 34)�
• Interrumpa el uso de este asiento para niños si ha
sufrido un accidente moderado o grave� No es necesario
reemplazarlo después de un accidente menor, definido
por la Administración Nacional de Seguridad del Tráfico
en las Carreteras (NHTSA, por sus siglas en inglés), si:
a� a� El vehículo puede conducirse desde el lugar del
accidente; y
b� b� La puerta del vehículo más cercana al asiento para
niños no resultó dañada; y
c� c� Los ocupantes del vehículo no resultaron
lesionados; y
d� d� No hay daños visibles en el asiento para niños; y
e� e� Los airbags (si hay) no se activaron�
• Cubra el asiento para niños cuando el vehículo esté
estacionado bajo la luz directa del sol� Las partes
metálicas del asiento pueden calentarse y quemar al niño�
• Guarde el asiento para niños en un lugar seguro mientras
no lo utiliza� Evite colocar objetos pesados encima�
• Nunca intente, excepto según se describe en este folleto,
desmontar ninguna parte del asiento para niños o cambiar
la forma en que se usan los cinturones de seguridad del
vehículo o del arnés�
• Nunca use la correa del ajustador del arnés para levantar
o transportar este asiento� Podría dañar el ajustador del
arnés y las correas� Transporte siempre este asiento para
niños sujetándolo por su armazón o correas de sujeción�
Registro
Los asientos de seguridad para niños pueden ser devueltos
por razones de seguridad� Usted debe registrar este asiento
para poder ser contactado en caso de una solicitud de
devolución� Envíe su nombre, dirección, dirección de correo
electrónico si está disponible y el número de modelo y
fecha de fabricación del asiento a Britax Child Safety,
Inc� P�O� Box 91167 Allentown, PA 18109-9925, o llame al
1-888-427-4829 o 1-704-409-1699, o regístrese en www.
BritaxUSA.com/registration� Para obtener información sobre
la devolución, llame a la línea directa de Seguridad Vial del
Gobierno de los EE�UU� al 1-888-327-4236 (TTY 1-800-424-
9153), o visite http://www.NHTSA.gov�
Para su comodidad, registre toda la información sobre el
asiento para niños a continuación� Consulte la Etiqueta con
la fecha de fabricación y el número de serie para obtener
toda la información (véase página 2)�
Nombre y número del modelo: __________________________
Número de serie: ______________________________________
Número de lote: _______________________________________
Fecha de fabricación: __________________________________
Información de seguridad
De no seguirse todas las advertencias e instrucciones,
podrían provocarse LESIONES GRAVES o la MUERTE�
REQUISITOS DE AJUSTE
• Utilice el asiento únicamente orientado hacia atrás
cuando lo utilice con un bebé que pese menos de 9,1 kg
(20 lb)�
• Utilícelo únicamente con niños que pesen entre 2,3
y 29,4 kg (5 y 65 lb) y cuya altura sea de 124,5 cm
(49 pulg) o menos� Utilícelo orientado hacia atrás con
niños que pesen entre 2,3 y 18 kg (5 y 40 lb)� Utilícelo
orientado hacia delante con niños que pesen entre 9,1 y
29,4 kg (20 y 65 lb)�
• Ajuste cómodamente los cinturones incluidos con este
asiento de seguridad para niños alrededor de su niño�
INSTALACIÓN
• Asegure la correa de anclaje superior incluida con este
asiento de seguridad para niños�
• Asegure este asiento de seguridad para niños con el
sistema de anclaje del vehículo, si está disponible, o
con un cinturón del vehículo�
• Use la ranura de la hebilla más cercana a su niño, pero
no debajo, cuando instale el asiento para niños con
orientación hacia atras� Cuando instale el asiento para
niños con orientación hacia delante solamente use la
ranura de la hebilla externa�
USO GENERAL
• Siga todas las instrucciones para este asiento de
seguridad para niños y las instrucciones escritas�
• Registre su asiento de seguridad para niños con el
fabricante�
• En un vehículo con posiciones designadas en los
asientos traseros, los propietarios de los vehículos
deben estar al tanto de que, según las estadísticas de
accidentes, los niños están más seguros cuando están
debidamente sujetos en los asientos traseros que en los
asientos delanteros� Para garantizar la seguridad de su
niño, consulte el apartado Posiciones de los Asientos
en el vehículo en la página 30 y consulte el manual del
propietario de su vehículo�
• Asegúrese siempre de que el sistema de seguridad
para niños esté sujeto al vehículo, incluso cuando no
esté ocupado, ya que en un accidente un sistema de
seguridad para niños no sujeto puede lesionar a los
ocupantes�
• Para evitar lesiones en caso de deterioro o daño
oculto, interrumpa el uso de este asiento para niños si
tiene más de diez años o ha sufrido en un accidente
moderado o grave (véase a continuación)� Consulte la
Etiqueta con la fecha de fabricación y el número de serie
en el asiento para niños (página 2)�
• El uso de cubiertas, piezas, juguetes, accesorios o
dispositivos de ajuste que no sean de BRITAX no está
aprobado por BRITAX� Su uso podría hacer que el
asiento para niños no cumpla con su función prevista en
un accidente�
Page 30

6 7
BRITAX Child Safety, Inc. MARATHON CLICKTIGHT Guía del usuario
Información para acomodar al niño
Orientado hacia atrás: 2,3 - 18 kg (5 - 40 lb)
La Academia Americana de Pediatría recomienda que todos
los niños y bebés deben viajar en un asiento para coches
orientado hacia atrás hasta los 2 años o hasta que alcancen
el peso o la altura máxima permitida por el fabricante de su
asiento para coches�
BRITAX recomienda firmemente que los niños viajen
orientados hacia atrás hasta la altura y el peso
especificados�
Use la orientación hacia atrás:
• Con las correas del arnés en la
posición más cercana o por debajo
de los hombros del niño y
• con niños que pesen de 2,3 - 18 kg
(5 - 40 lb) y
• cuando la parte superior de la
cabeza del niño esté al menos 2,5
cm (1 pulg) por debajo de la parte
superior de la almohada de cabezas�
Orientación hacia adelante: 9,1 - 29,4 kg (20 - 65 lb)
BRITAX recomienda firmemente que los niños estén sujetos
con un sistema de arnés hasta que excedan los límites de
peso o altura especificados�
Use la orientación hacia adelante:
• con las correas del arnés en la
posición más cercana o por encima
de los hombros del niño, en paralelo
al nivel del suelo y
• con niños que pesen 9,1 - 29,4 kg
(20 - 65 lb) y
• que midan 124,5 cm (49 pulg) o
menos y
• cuando la parte superior de las orejas
esté por debajo de la parte superior de
la almohada de cabezas�
Certificación
Este asiento está certificado para su uso en vehículos
de motor y aviones�
Vehículos de motor
Este sistema de asiento para niños cumple con todas las
normas federales de seguridad para vehículos de motor
aplicables (FMVSS 213)�
Aviones
Este asiento para niños está certificado para
su uso en aviones� La Administración Federal
de Aviación (FAA, por sus siglas en inglés)
recomienda que un niño que pesa hasta 18 kg
(40 lb) utilice un asiento para niños con arnés
certificado mientras viaja en avión�
Para instalar orientación hacia atras en avión:
1� Recline el asiento para niños y
coloque el asiento orientado hacia
atrás en el avión (véase página 24)�
2� Deslice el cinturón del avión
por las guias de cinturón del
orientación hacia atrás encima
de la cubierta con el CLICKTIGHT
cerrado�
3� Asegúrese de que el cinturón de
banda horizontal no se retuerza, abroche el cinturón del
asiento, y tenserlo�
Para instalar orientación hacia delante en avión:
1� Coloque el asiento para niños en un
posición vertical y orientado hacia
delante en el asiento del avión�
2� Deslice el cinturón abdominal del
avión por las guias
de cinturón
del orientación hacia delante
por debajo de la cubierta con el
CLICKTIGHT cerrado�
3� Asegúrese de que el cinturón de
banda horizontal no se retuerza, abroche el cinturón del
asiento, y tenserlo�
NOTA: Para obtener más instrucciones sobre la sujeción
de su niño y ajustando la forma vea la página 20.
– Instale su asiento para niños en un asiento con
ventanilla para evitar bloquear el pasillo�
– Si el cinturón del avión es demasiado corto, pida al
asistente de vuelo un extensor de cinturón�
– Su niño puede experimentar incomodidad si la hebilla
queda situada en la zona de asiento de un asiento para
niños después de su instalación�
– Los cinturones inflables para la cadera de los aviones
no son compatibles con este asiento para niños�
– Este asiento no es apto para todos los aviones�
Comuníquese con su aerolínea antes de viajar para
verificar la colocación�
Certificado para
su uso en aviones
NOTA: Use la
etiqueta con la
altura del hombro
sentado en el
asiento para niños
como guía para
determinar cuando
su hijo ha llegado a
la ranura del arnés
superior�
2,5 cm
1 pulg
Nivel de los
hombros
Nivel de
los hombros
Page 31

8 9
BRITAX Child Safety, Inc. MARATHON CLICKTIGHT Guía del usuario
Instalación con orientacíon hacia
trasera
Instalacíon del cinturón banda horizontal y transversal
1� Abra el CLICKTIGHT�
a� Presione la
cavidad en el disco
CLICKTIGHT�
b� Rote el disco en el
sentido de las agujas
del reloj hasta que
CLICKTIGHT se
suelte y se abra�
2� Recline el asiento para
niños desocupado
y coloque el asiento
orientado hacia atrás en
el vehículo (véase página
24)�
3� Deslice ambas partes
del cinturón del vehículo
en las guias de los
cinturones traseros�
4� Asegúrese de que el
cinturón del vehículo no
se retuerza y abroche el
cinturón del asiento�
5� Tense la parte horizontal
(a) y luego la parte
transversal (b) del
cinturón del vehículo�
6� Cierre el CLICKTIGHT�
– Un clic confirma que
el CLICKTIGHT está
asegurado�
Instalación con orientación hacia atrás con cinturón de
banda horizontal y transversal
NOTA: Las instalaciones
con orientación hacia
atrás pueden mejorar
usando la correa de
retención (véase la página
27).
9 Asegúrese de que el logo en el disco CLICKTIGHT ha
regresado a una posición horizontal�
9 Verifique que la bola está en el sección permitida del
indicador de reclinación, dependiendo del tamaño del
niño que está sentado (véase página 24)�
9 Verifique que todas las conexiones estén aseguradas
y las correas no estén retorcidas�
9 Compruebe que el asiento para niños no se mueva
hacia adelante y hacia atrás o de lado a lado más de
2,5 cm (1 pulgada) en la guía del cinturón� Si el niño
no está sujeto, repita la instalación o sitúelo en un
asiento diferente�
1b
1a
o
5b
5a
Page 32

10 11
BRITAX Child Safety, Inc. MARATHON CLICKTIGHT Guía del usuario
Instalación con orientación hacia atrás con anclajes
inferiores
1� Abra el CLICKTIGHT�
a� Presione la
cavidad en el disco
CLICKTIGHT�
b� Rote el disco en el
sentido de las agujas
del reloj hasta que
CLICKTIGHT se
suelte y se abra�
2� Recline el asiento para
niños desocupado
y coloque el asiento
orientado hacia atrás en
el vehículo (véase página
24)�
3� Retire los conectores
inferiores del
compartimento de
almacenamiento atras del
asiento y estire la correa
hasta la longitud máxima,
en la dirreción del lado
izquerda del niño�
4� Deslice la correa del
conector inferior en las
guias de cinturón con
orientación hacia atrás del
lado izquierdo del niño
y presione firmemente
los conectores inferiores
sobre sus anclajes
inferiores adyacentes�
– Verifique que los
conectores estén
asegurados y la correa
no se retuerza�
5� Jale del extremo de
la correa del conector
inferior para tensarla�
6� Cierre el CLICKTIGHT�
– Un clic confirma que
el CLICKTIGHT está
asegurado�
NOTA: Las instalaciones
con orientación hacia
atrás pueden mejorar
usando la correa de
retención (véase la página
27).
Instalación del anclajes inferiors
IMPORTANTE: No instale el asiento con los anclajes
inferiores para un niño que pese más de 15,8 kg (35 lb)
�
1b
1a
o
9 Asegúrese de que el logo en el disco CLICKTIGHT ha
regresado a una posición horizontal�
9 Verifique que la bola está en el sección permitida del
indicador de reclinación, dependiendo del tamaño del
niño que está sentado (véase página 24)�
9 Verifique que todas las conexiones estén aseguradas
y las correas no estén retorcidas�
9 Compruebe que el asiento para niños no se mueva
hacia adelante y hacia atrás o de lado a lado más de
2,5 cm (1 pulgada) en la guía del cinturón� Si el niño
no está sujeto, repita la instalación o sitúelo en un
asiento diferente�
Page 33

12 13
BRITAX Child Safety, Inc. MARATHON CLICKTIGHT Guía del usuario
Instalación del cinturón de banda horizontal
1� Abra el CLICKTIGHT�
a� Presione la
cavidad en el disco
CLICKTIGHT�
b� Rote el disco en el
sentido de las agujas
del reloj hasta que
CLICKTIGHT se
suelte y se abra�
2� Recline el asiento para
niños desocupado
y coloque el asiento
orientado hacia atrás en
el vehículo (véase página
24)�
3� Deslice el cinturón del
vehículo en las guias de
los cinturones traseros�
4� Asegúrese de que el
cinturón del vehículo no
se retuerza y abroche el
cinturón del asiento�
5� Bloquee y tense el
cinturón del vehículo�
NOTA: Asegúrese que
el cinturón del vehículo
quede bloqueado.
Consulte el manual de
vehículo.
6� Cierre el CLICKTIGHT�
– Un clic confirma que
el CLICKTIGHT está
asegurado�
Instalación con orientación hacia atrás con cinturón de
banda horizontal
NOTA: Las instalaciones
con orientación hacia
atrás pueden mejorar
usando la correa de
retención (véase la página
27).
1b
1a
o
9 Asegúrese de que el logo en el disco CLICKTIGHT ha
regresado a una posición horizontal�
9 Verifique que la bola está en el sección permitida del
indicador de reclinación, dependiendo del tamaño del
niño que está sentado (véase página 24)�
9 Verifique que todas las conexiones estén aseguradas
y las correas no estén retorcidas�
9 Compruebe que el asiento para niños no se mueva
hacia adelante y hacia atrás o de lado a lado más de
2,5 cm (1 pulgada) en la guía del cinturón� Si el niño
no está sujeto, repita la instalación o sitúelo en un
asiento diferente�
Page 34

14 15
BRITAX Child Safety, Inc. MARATHON CLICKTIGHT Guía del usuario
Instalación con orientación hacia
delante
Instalacíon del cinturón banda horizontal y transversal
1� Retire la correa de fijación
del compartimento de
almacenamiento para
la correa de retención y
colóquela hacia arriba y
sobre la parte trasera del
asiento para niños�
2� Recline el asiento para
niños desocupado
y coloque el asiento
orientado hacia adelante
en el vehículo� Asegúrese
de que la base del asiento
para niños sea plana en
el asiento del vehículo y
que no sobresalga más de
7,6 cm (3 pulg) de la base
sobre el borde del asiento
del vehículo (véase página
25)�
3� Abra el CLICKTIGHT�
a� Presione la
cavidad en el disco
CLICKTIGHT�
b� Rote el disco en el
sentido de las agujas
del reloj hasta que
CLICKTIGHT se
suelte y se abra�
4� Deslice ambas partes del
cinturón del vehículo en
las guias de los cinturones
orientados hacia delante�
5� Asegúrese de que el
cinturón del vehículo no
se retuerza y abroche el
cinturón del asiento�
6� Tense la parte horizontal
(a) y luego la parte
transversal (b) del cinturón
del vehículo�
7� Cierre el CLICKTIGHT�
– Un clic confirma que
el CLICKTIGHT está
asegurado�
8� Coloque la correa de
retención en un anclaje
designado (consulte el
manual del propietario del
vehículo) y ténsela (véase
página 28)�
Instalación con orientación hacia adelante con cinturón de
banda horizontal y transversal
9 Asegúrese de que el logo en el disco CLICKTIGHT ha
regresado a una posición horizontal�
9 Verifique que todas las conexiones estén aseguradas y
las correas no estén retorcidas�
9 Verifique que la bola está en el sección permitida del
indicador de reclinación, y que no mas de 7,6 cm (3 pulg)
del base sobresalga por el borde del asiento del vehiculo
(véase página 25)
�
9 Compruebe que el asiento para niños no se mueva hacia
adelante y hacia atrás o de lado a lado más de 2,5 cm
(1 pulg) en la guía del cinturón� Si el niño no está sujeto,
repita la instalación o sitúelo en un asiento diferente�
9 Compruebe que el exceso de tela de la correa de
retención esté dentro de su vehículo y sujeto con la
correa elástica�
3b
3a
6b
6a
Page 35

16 17
BRITAX Child Safety, Inc. MARATHON CLICKTIGHT Guía del usuario
Instalación del anclajes inferiors
IMPORTANTE: No instale el asiento con los anclajes
inferiores para un niño que pese más de 18 kg (40 lb)
�
1� Retire los conectores
inferiores del
compartimento de
almacenamiento atras del
asiento y estire la correa
hasta la longitud máxima,
en la dirreción del lado
izquerda del niño�
2� Retire la correa de retención
del compartimento de
almacenamiento para
la correa de fijación y
colóquela hacia arriba y
sobre la parte trasera del
asiento para niños�
3� Recline el asiento para
niños desocupado
y coloque el asiento
orientado hacia adelante
en el vehículo� Asegúrese
de que la base del asiento
para niños sea plana en
el asiento del vehículo y
que no sobresalga más de
7,6 cm (3 pulg) de la base
sobre el borde del asiento
del vehículo (véase página
25)�
4� Abra el CLICKTIGHT�
a� Presione la
cavidad en el disco
CLICKTIGHT�
b� Rote el disco en el
sentido de las agujas
del reloj hasta que
CLICKTIGHT se
suelte y se abra�
5� Deslice la correa del
conector inferior en las
guias de cinturón con
orientación hacia adelante
del lado izquierdo del niño
y presione firmemente
los conectores inferiores
sobre sus anclajes
inferiores adyacentes�
– Verifique que los
conectores estén
asegurados y la correa
no se retuerza�
6� Jale del extremo de
la correa del conector
inferior para tensarla�
7� Cierre el CLICKTIGHT�
– Un clic confirma que
el CLICKTIGHT está
asegurado
�
8� Coloque la correa de
retención en un anclaje
designado (consulte el
manual del propietario del
vehículo) y ténsela (véase
página 27)�
Instalación con orientación hacia adelante con anclajes
inferiores
4b
4a
9 Asegúrese de que el logo en el disco CLICKTIGHT ha
regresado a una posición horizontal�
9 Verifique que todas las conexiones estén aseguradas y
las correas no estén retorcidas�
9 Verifique que la bola está en el sección permitida del
indicador de reclinación, y que no mas de 7,6 cm (3 pulg)
del base sobresalga por el borde del asiento del vehiculo
(véase página 25)
�
9 Compruebe que el asiento para niños no se mueva hacia
adelante y hacia atrás o de lado a lado más de 2,5 cm
(1 pulg) en la guía del cinturón� Si el niño no está sujeto,
repita la instalación o sitúelo en un asiento diferente�
9 Compruebe que el exceso de tela de la correa de
retención esté dentro de su vehículo y sujeto con la
correa elástica�
Page 36

18 19
BRITAX Child Safety, Inc. MARATHON CLICKTIGHT Guía del usuario
Instalación del cinturón de banda horizontal
7� Cierre el CLICKTIGHT�
– Un clic confirma que
el CLICKTIGHT está
asegurado
�
NOTA: Si es difícil cerrar
el CLICKTIGHT, repita
el paso 6 con menos
tensión en el cinturón del
vehículo.
8� Coloque la correa de
retención en un anclaje
designado (consulte el
manual del propietario del
vehículo) y ténsela (véase
página 27)�
1� Retire la correa de fijación
del compartimento de
almacenamiento para
la correa de retención y
colóquela hacia arriba y
sobre la parte trasera del
asiento para niños�
2� Coloque el asiento para
niños desocupado en
un posición vertical y
orientado hacia delante
en el asiento del vehículo�
Asegúrese de que la base
del asiento para niños
sea plana en el asiento
del vehículo y que no
sobresalga más de 7,6 cm
(3 pulg) de la base sobre
el borde del asiento del
vehículo (véase página 25)�
3� Abra el CLICKTIGHT�
a� Presione la
cavidad en el disco
CLICKTIGHT�
b� Rote el disco en el
sentido de las agujas
del reloj hasta que
CLICKTIGHT se
suelte y se abra�
4� Deslice el cinturón del
vehículo en las guias de
los cinturones delanteros�
5� Asegúrese de que el
cinturón del vehículo no
se retuerza y abroche el
cinturón del asiento�
6� Empuje hacia abajo en
el medio del asiento
de seguridad con
una fuerza moderada
(aproximadamente
20,4 kg/45 lb),
comprimiendo el asiento
del vehículo, mientras
que apriete el cinturón del
vehículo�
NOTA: Asegúrese de que
el cinturón del vehículo
está bloqueado como
dirigida por el manual del
propietario del vehículo.
Instalación con orientación hacia adelante con cinturón
de banda horizontal
3b
3a
9 Asegúrese de que el logo en el disco CLICKTIGHT ha
regresado a una posición horizontal�
9 Verifique que todas las conexiones estén aseguradas y
las correas no estén retorcidas�
9 Verifique que la bola está en el sección permitida del
indicador de reclinación, y que no mas de 7,6 cm (3 pulg)
del base sobresalga por el borde del asiento del vehiculo
(véase página 25)
�
9 Compruebe que el asiento para niños no se mueva hacia
adelante y hacia atrás o de lado a lado más de 2,5 cm
(1 pulg) en la guía del cinturón� Si el niño no está sujeto,
repita la instalación o sitúelo en un asiento diferente�
9 Compruebe que el exceso de tela de la correa de
retención esté dentro de su vehículo y sujeto con la
correa elástica�
Page 37

20 21
BRITAX Child Safety, Inc. MARATHON CLICKTIGHT Guía del usuario
Sujeción del niño
IMPORTANTE: Se recomienda encarecidamente el uso
de las almohadillas de pecho con resitencia a impacto
por orientación hacia delante� Retirar los almohadillas
de pecho es opcional en la orientación hacia atrás para
asegurar un ajuste holgado para los niños pequeños�
7� Abroche la hebilla del
arnés� Las lengüetas
de la hebilla están
bien enganchadas si
escucha un clic cuando
inserta cada lado de las
lengüetas�
8� Compruebe la altura
correcta del arnés y jala
el exceso de las correas
hasta los hombros antes
de apretar�
1� Realice los ajustes
correctos al arnés y a la
hebilla (véase la página
22 - 23)�
2� Afloje el arnés�
a� Presione el botón del
ajustador del arnés�
b� Jale de ambas
correas del arnés
hacia delante�
3� Abra el broche pectoral�
a� Presione las
lengüetas�
b� Separe las dos
piezas�
4� Suelte la hebilla y acople
las correas del arnés en
las zonas de sujeción
delarnés�
5� Siente a su hijo en el
asiento de seguridad
para niños� Asegúrese
de que el niño esté en
posición vertical y no
inclinado� La parte inferior
del niño debe estar en
contacto con el asiento
de seguridad infantil y la
espalda quedar erguida
contra la parte posterior�
6� Ajuste las correas del
arnés alrededor del niño�
IMPORTANTE: Ajuste el
arnés para adaptarlo a
la ropa que usa el niño�
Retire los abrigos y/o
chaquetas voluminosas
antes de colocar al niño
en el asiento�
9� Para apretar el arnés, jale
de la correa de ajuste del
arnés�
NOTA: El arnés debe
quedar perfectamente
ajustado alrededor del
niño de manera que
este esté cómodo. Para
que una correa esté
perfectamente ajustada,
no debe quedar holgada.
Debe formar una línea
relativamente recta,
sin torsiones. No debe
oprimir la piel del niño ni
provocar que el cuerpo
adopte una postura que
no sea natural. No debe
quedar arnés sobrante.
10� Fije el broche pectoral y
coloque las almohadillas
de pecho en una
posicion comoda por el
niño dentro de la gama
de un broche pectoral
correctamente colocado�
NOTA: La altura
adecuada para el broche
pectoral está a la mitad
del pecho, justo a la
altura de las axilas.
Antes de viajar, compruebe los siguientes puntos:
9 Las correas del arnés no están torcidas�
9 El arnés está bien ajustado�
9 La hebilla está abrochada�
9 El broche pectoral está a la altura de las axilas del
niño�
2a
2b
3a
3b
2b
2a
Jale de la correa de
ajuste del arnés para
tensarla�
No jale hacia los lados�
Page 38

22 23
BRITAX Child Safety, Inc. MARATHON CLICKTIGHT Guía del usuario
Cómo ajustar la altura del arnés
• Con una orientación hacia atrás, las correas del arnés
deben estar en la posición más cercana o por debajo de
los hombros del niño� Consulte la página 7�
• Con una orientación hacia adelante, las correas del
arnés deben estar en la posición más cercana o por
encima de los hombros del niño� Consulte la página 7�
Posición de la hebilla del arnés
1� Afloje el arnés�
a� Presione el botón del
ajustador del arnés�
b� Jale de ambas
correas del arnés
hacia delante�
2� Apriete el ajustador de la
altura del arnés, deslice
el arnés en la posición
deseada y suelte�
3� Asegúrese de que el
arnés esté bloqueado en
su posición�
El exterior del asiento de seguridad para niños tiene dos
ranuras para ajustar la hebilla - una interna y una externa�
• Por instalaciones
orientación hacia atras,
coloque la hebilla en la
ranura mas cerca pero no
debajo del nino�
• Por instalaciones
orientación hacia delante,
coloque la hebilla en la
ranura externa solamente�
Sigue los instrucciones en las paginas 36-37 para cambiar el
posición de la hebilla�
NOTA: NUNCA deje la hebilla en la ranura de ajuste.
Funciones del asiento para niños
1b
1a
RANURA DE AJUSTE
RANURA INTERNA
RANURA EXTERNA
Cómo usar la hebilla del arnés
Para ajustar:
1� Inserte las lengüetas de
una en una en la hebilla�
La posición correcta
se confirma con un clic
después de introducir la
lengüeta de cada hebilla�
Para desbloquear:
1� Presione el botón de
desbloqueo y jale de las
lengüetas de la hebilla�
NOTA: Limpie
periódicamente la
hebilla para asegurar un
funcionamiento correcto.
Consulte la página 41.
Cómo usar el broche pectoral
1� Abra el broche pectoral�
a� Presione las
pestañas�
b� Desmonte�
2� Empuje para
ajustar�
NOTA: Coloque
siempre la
clavija del
pecho a la
altura de la
axila.
a
b
NOTA: El arnés se puede ampliar para acomodar niños
más de 2 años. Por más información, comuníquese con el
servicio de atención al cliente de BRITAX en el 1-888-4274829 o 1-704-409-1699.
Page 39

24 25
BRITAX Child Safety, Inc. MARATHON CLICKTIGHT Guía del usuario
Orientación hacia atrás
En los installaciones
orientación hacia atras, es
importante que el asiento
estará reclinado para
mantener estabilidad de la
cabeza y el cuello con los
bebés mas pequeños� Utilice
el indicador de reclinación
en el lado del asiento de
seguridad para niños para lograr un reclinación correcta,
con la bala en el seccion azul claro o azul oscuro en el
indicador de reclinacion para el tamaño del niño que está
sentado�
Posiciones del asiento
El asiento de seguridad para niños puede colocarse en 7
posiciones� Para ajustar el posición de reclinación:
1� Jale la palanca de
reclinación y gire el
exterior del asiento de
seguridad para niños
hasta que la pelota
está en el sección
permitida del indicador
de reclinación para el
tamaño del niño que está sentado�
• Orientación hacia atras - azul claro (bebés), o azul
oscuro (los niños más grandes con control de la
cabeza y el cuello)
• Orientación hacia delante - verde
2� Suelte la palanca de reclinación, y luego verifique que el
asiento de seguridad para niños esta bloqueado en su
posición�
NOTA: Coloque la posición del asiento ANTES de instalarlo.
Orientación hacia delante
En las instalaciones con
orientación hacia delante,
es importante que la base
del asiento para niños
quede completamente
plana sobre el asiento del
vehículo� Como se ve en
la ilustración, se permite
que sobresalga hasta
7,6 cm (3 pulgadas) de
la base sobre el borde
del asiento del vehículo�
Algunos asientos de
vehículos no permiten que una parte suficiente de la base
del asiento para niños esté en contacto con el asiento del
vehículo� En ese caso, ajuste el ángulo de reclinación para
lograr una posición más derecha� No hacerlo podría provocar
que el asiento para niños no cumpla con la función prevista�
Utilice el indicador de reclinación en el lado del asiento de
seguridad para niños para lograr un reclinación correcta, con
la bala en el seccion verde en el indicador de reclinación�
En algunos casos, la almohada de
cabezas del vehículo puede impedir
que el reposaacabezas del asiento
para niños se eleve lo suficiente
como para ajustar correctamente el
arnés que sujeta a su niño cuando
lo usa en posición reclinada con
orientación hacia adelante� NO haga
fuerza para que la almohada de cabezas del asiento para
niños pase la almohada de cabezas del vehículo� Hacerlo
podría provocar que el asiento para niños no cumpla
con la función prevista� Si la ubicación la almohada
de cabezas del vehículo interfiere con la almohada
de cabezas del asiento para niños, levante o quite la
almohada de cabezas del vehículo� Si no puede quitarlo,
mueva el asiento para niños en posición recta o intente
una ubicación diferente del asiento�
Superficie
saliente
aceptable
Superficie
saliente no
aceptable
7,6 cm
7,6 cm
Niño Bebé
Almohada de confort
La almohada de confort está
diseñada para proporcionar
comodidad a los niños que
usan este asiento para niños�
NOTA: Quite la almohada de
confort después de que el
niño se siente cómodamente
en el asiento para niños sin
apoyo adicional.
Page 40

26 27
BRITAX Child Safety, Inc. MARATHON CLICKTIGHT Guía del usuario
Cómo usar los anclajes inferiores y las correas de
retención para niños (sistema LATCH)
Los anclajes inferiores y las correas de fijación para niños o
LATCH es un sistema disponible en este asiento para niños
que ofrece una alternativa a los métodos de instalación
del cinturón de seguridad del vehículo� La siguiente figura
muestra las posiciones habituales de los anclajes inferiores
de las correas en un vehículo� Consulte las páginas 2-3 para
conocer los componentes LATCH de este asiento para niños�
Consulte el manual del propietario de su vehículo para saber
si está equipado con el sistema LATCH, el peso máximo de
los anclajes inferiores, las capacidades de los anclajes de
correa y la información sobre las posiciones disponibles de
los anclajes inferiores y de los asientos para su uso con este
asiento para niños�
Cómo usar los conectores inferiores
Los conectores inferiores se ubican en la parte posterior
de la base del asiento para niños� Guarde el conjunto del
conector en el compartimento cuando no lo utilice�
Para acoplar los conectores inferiores:
1� Retire los conectores
inferiores del
compartimento de
almacenamiento atras del
asiento y estire la correa
hasta la longitud máxima,
en la dirreción del lado
izquerda del niño�
2� Presione el conector
inferior sobre su anclaje
inferior adjacente�
Por instrucciones de
instalación completas,
consulte las paginas
10 - 11 o 16 - 17�
Para remover los conectores inferiores:
1� Empuje el
botón de
desbloqueo del ajuste
del conector inferior
para aflojar la correa del
conector inferior�
2� Apriete el conector inferior
y levante del anclaje�
Correa de retención con resistencia a impacto
Si no sigue las pautas indicadas a continuación quizás el
asiento para niños no cumpla con la función prevista�
• BRITAX recomienda que la correa de retención se utilice
en todo momento cuando se instale el asiento para
niños� Usar la correa mejorará la estabilidad de su asiento
para niños y reducirá el riesgo de lesiones�
• Coloque la correa de retención únicamente en los anclajes
de la correa identificados por el fabricante de su vehículo
como puntos de anclaje de retención� Utilice únicamente
el anclaje designado para cada posición del asiento�
• Si su vehículo no cuenta actualmente con un accesorio
de anclaje para correa de retención, consulte el manual
del propietario de su vehículo o comuníquese con el
fabricante del vehículo para obtener ayuda� NO modifique
su vehículo sin el asesoramiento del fabricante�
• Guarde la correa de retención en el compartimento
ubicado en la parte posterior del asiento para niños
cuando no la utilice�
Las posiciones de la correa de
retención varían según el vehículo�
Consulte el manual del propietario
de su vehículo para conocer las
capacidades de anclaje de la correa
de retención y busque el símbolo
del anclaje que se muestra en el
diagrama para ayudarlo a identificar
dónde se encuentran los mejores
puntos de anclaje para la correa superior en su vehículo�
Consulte los siguientes diagramas para conocer las posibles
configuraciones de la instalación de la correa de retención
con orientación hacia atrás y hacia adelante�
UBICACIONES DE LOS ANCLAJES DEL SISTEMA LATCH
Anclaje
de retención
Anclajes
inferiores
Reposacabezas del
asiento del vehículo
27,9 cm (11 in.)
Anclajes
de retención
con orientación
delantera
Sistema
retráctil del
cinturón de
seguridad
del vehículo
Anclajes inferiores
Asiento del vehículo
Cinturón de
seguridad del
vehículo con
banda horizontal
y transversal
Page 41

28 29
BRITAX Child Safety, Inc. MARATHON CLICKTIGHT Guía del usuario
Configuraciones de la correa de retención
Correa de retención del conector con orientación hacia
atrás
Dado que cada modelo de vehículo es diferente, las
ubicaciones para anclar la correa de fijación para las
instalaciones con orientación hacia atrás pueden variar� Use
la correa de fijación del conector con orientación hacia atrás
para ayudarse en la creación de un punto de anclaje en la
configuración «A» con orientación hacia atrás�
1� Busque una posición fija en el vehículo que esté
atornillada al suelo� Si no puede encontrar una
ubicación para crear un punto de anclaje, comuníquese
con el fabricante del vehículo para identificar un punto
de conexión de la correa de fijación�
2� Oriente la correa a través del punto de
anclaje�
3� Pase el lazo de un extremo de la correa
por el lazo en el otro extremo de la
correa, y jale hasta que esta ajustada�
4� Utilice el lazo abierto como
un punto de fijación para la
correa�
NOTA: Guarde la correa del
conector de fijación en el
compartimento cuando no la
utilice.
Usando la correa de retención con resistencia de
impacto
Para colocar la correa de retención en un anclaje de la
correa:
1� Presione firmemente el
gancho sobre el punto
de anclaje de la correa de
retención�
(A) Orientación hacia
atrás
(C) Orientación hacia
delante
(B) Orientación hacia
atrás
3
4
2� Jale del extremo suelto de
la correa para tensarla�
NOTA: Si la correa de
retención es demasiado
corta para usarla en su
vehículo, comuníquese
con el servicio de atención
al cliente de BRITAX en
el 1-888-427-4829 o 1-704-409-1699 para obtener un
extensor para la correa de retención.
Para retirar la correa de retención de un anclaje de la
correa:
1� Afloje la correa�
a� Incline el bloqueo�
b� Jale de la tela de la
correa de retención�
2� Retire el gancho de la
correa de retención del
anclaje�
NOTA: Guarde la correa de retención en el
almacenamiento de la correa de retención cuando no
esta en uso, y asegúrese que la puerta está cerrado
completamente.
La correa de retención como indicador de accidentes
La correa de fijación puede indicar cuándo el asiento para
niños ha estado involucrado en un choque moderado o
grave (véase «Notas importantes» en la página 5) y cuándo
es necesario reemplazarlo�
La Figura 1 muestra una correa
de retención aceptable para
un uso continuo (siempre y
cuando el asiento para niños
no haya estado involucrado de
un accidente)� Las puntadas
de color estarán intactas y no
serán visibles desde la parte
posterior del asiento�
La Figura 2 muestra ejemplos
de cuándo la correa de
retención ha sido dañada y su
uso continuo no es aceptable�
Si ha quitado una correa o
ambas a través de la parte
posterior del armazón y/o
cualquiera de las puntadas
de color han sido rasgadas, el asiento para niños ya no es
aceptable para el uso�
IMPORTANTE: Deje de utilizar el asiento para niños si este
ha estado involucrado en un accidente moderado o grave,
independientemente de que se hayan retirado las correas a
través de la parte posterior del armazón y las puntadas de
color hayan sido rasgadas�
1
2
o
a
b
Page 42

30 31
BRITAX Child Safety, Inc. MARATHON CLICKTIGHT Guía del usuario
Compatibilidad con el vehículo
Posiciones de los asientos en el vehículo
NO coloque el asiento para niños
mirando hacia atrás en el asiento
frontal de un vehículo con airbag
para el pasajero� Hay riesgo de
MUERTE o de LESIONES GRAVES�
Los propietarios de vehículos con
bolsas de aire laterales para el
pasajero delantero deben consultar
el manual del vehiculo para obtener
instrucciones por instalación de asientos de retención
para niños� El asiento trasero es el lugar más seguro para
los niños de 12 años y menores�
Algunos vehículos no disponen de posiciones de
asientos compatibles con estos asientos para niños� Si
tiene dudas, comuníquese con el fabricante del vehículo
para solicitar ayuda�
Los asientos de vehículos con orientación hacia delante
DEBEN usarse con este asiento para niños� Los asientos
NO PUEDEN usarse mirando hacia el lateral o hacia
atrás� Consulte el siguiente diagrama�
Cinturones del asiento no compatibles con el vehículo
Los asientos de los vehículos y los cinturones de los
asientos varían según el vehículo� Consulte el manual
del propietario de su vehículo para obtener información
específica sobre los cinturones de los asientos de los
vehículos y su uso con asientos para niños�
Los siguientes tipos de cinturones de asientos en
vehículos NO son compatibles con este asiento para
niños� Si alguno de los tipos de cinturones que se
indican a continuación se encuentran en la posición
de asiento elegida, escoja otra posición de asiento del
vehículo o consulte el manual del propietario de su
vehículo para obtener información sobre la instalación
de un asiento para coches en su vehículo�
Cinturones automáticos
motorizados en
los asientos de los
vehículos�
Cinturones para
la cadera que se
colocan por delante
del respaldo del
asiento del vehículo�
Cinturones sobre el hombro
y la cadera con puntos
de anclaje superiores o
inferiores en la puerta del
vehículo�
Cinturones sobre la cadera
con placa de enganche
cosida y un separador que se
bloquea únicamente en caso
de una detención repentina�
NOTE: El asiento de seguridad para niños de BRITAX
puede no ser compatible con cada uno de los cinturones
expandibles sobre el hombro y la cadera. Consulte las
preguntas frecuentes en la sección de ayuda en el sitio
web de BRITAX (www.britaxusa.com/support) para obtener
instrucciones adicionales.
Page 43

32 33
BRITAX Child Safety, Inc. MARATHON CLICKTIGHT Guía del usuario
Mantenimiento
Cubierta
Cómo quitar la cubierta
Nunca quite las lengüetas de la hebilla del arnés� No
pueden volver a colocarse después de quitarlas� Si las
vuelve a colocar de forma incorrecta, el asiento para niños
puede no cumplir con la función prevista�
1� Afloje y desbloquee el
arnés�
a� Presione el botón del
ajustador del arnés�
b� Jale de ambas
correas del arnés
hacia delante�
c� Desabroche el arnés�
2� Abra el broche pectoral�
a� Presione las
pestañas�
b� Desmonte�
3� Retire la almohada de
confort y las almohadilla
sde confort si fuese
necesario�
4� Retire la almohadilla
abdominal y la hebilla�
a� Abra el CLICKTIGHT y
quite los dos elasticos
bajo la base del
CLICKTIGHT�
b� Desde la parte
frontal del bisel del
CLICKTIGHT, retire la
cubierta para acceder
a la conexión de la
correa de la hebilla�
c� Retire la correa de
la hebilla girando
los laterales del
sujetador de la hebilla
y orientándola hacia
fuera de la ranura de
la hebilla delantera en
el asiento para niños
(véase la página 37)�
a
b
4a
d� Empuje el extremo
de la almohadilla
abdominal y el
sujetador de la
hebilla fuera de la
ranura en la cubierta
para sacarla�
– Gire los laterales
del sujetador de la
hebilla y deslícelos
hacia afuera de
la almohadilla
abdominal (véase la
página 36)�
e� Retire la cubierta del
asiento�
5� Desabroche el gancho
y la correa de sujeción
ubicados en la cubierta
de la almohada de
cabezas desde alrededor
del arnés�
6� Retire la cubierta de la
almohada de cabezas�
a� Eleve el arnés a la
posición más alta�
b� Separe las correas
elásticas de la
parte trasera de
la almohada de
cabezas�
7� Asegúrese de que el
CLICKTIGHT está abierto
y retire la cubierta inferior�
a� Separe las correas
elásticas en la parte
delantera del exterior
del asiento�
b� Elévelas desde la
parte delantera para
sacar la cubierta de
la parte del asiento
inferior�
c� Suba la cubierta
en los laterales y
sáquela de las guías
del cinturón con
orientación hacia
atrás�
8� Baje el arnés, llegue hasta
la almohada de cabezas y
jale la cubierta del asiento
superior hacia usted para
sacarla�
4d
7b
1b
1a
4b
4c
6b
7a
Page 44

34 35
BRITAX Child Safety, Inc. MARATHON CLICKTIGHT Guía del usuario
Cómo reemplazar la cubierta
1� Coloque un lado de
la cubierta del asiento
superior en la guía del
cinturón con orientación
hacia delante, jale de la
cubierta sobre la parte
posterior del asiento y
sujétela en la guía del
cinturón contrario�
2� Reemplace la cubierta del
asiento inferior�
a� Abra el CLICKTIGHT�
b� Tome la pestaña
plástica en un lado de
la cubierta del asiento
inferior e insértela
dentro de la parte
externa del asiento entre
las guias del cinturón
con orientación hacia
adelante y hacia atrás�
c� Inserte la cubierta
inferior alrededor de los
lados interior y exterior
de la cáscara de la guía
por el cinturón hacia
delante hacia la parte
delantera del asiento
para niños�
d� Sigue insertando
la cubierta inferior
alrededor del asiento
hasta la otra guía por
el cinturón, y inserte la
otra lengüeta de plástico
dentro de la parte
externa del asiento entre
las guias del cinturón
con orientación hacia
adelante y hacia atrás�
IMPORTANTE:
Asegúrese de que la
cubierta del asiento
esté firme detrás
de las marcadores
rojos para permitir
el cierre correcto del
CLICKTIGHT�
Pase la correa de ajustar
el arnés a través de la
parte delantera de la
cubierta�
2c
2b
2a
e� Coloque nuevamente
las correas elásticas
en la base del asiento
inferior�
3� Reemplace la almohadilla
abdominal y la hebilla:
a� Gire los laterales del
sujetador de la hebilla
y oriéntela a través
de la almohadilla
abdominal�
b� Oriente la almohadilla
abdominal y el
sujetador de la hebilla
a través de la ranura
de la hebilla en la
cubierta�
– Asegúrese de que
la hebilla pasa a
través de la ranura
de la cubierta para
la posición de la
hebilla�
c� Gire los laterales del
sujetador de la hebilla
y oriéntelos a través de
la ranura de la hebilla y
en la posición deseada
en el asiento para
niños�
4� Jale la cubierta alredador
del bisel CLICKTIGHT
y encima del parte
delantera del asiento�
IMPORTANTE: La
cubierta del asiento debe
ser plegado detrás de
los marcadores rojo en la
barra de CLICKTIGHT�
5� Reemplace los dos
elasticos bajo la base del
asiento�
2d
2e
2f
3a
3b
3c
Page 45

36 37
BRITAX Child Safety, Inc. MARATHON CLICKTIGHT Guía del usuario
6� Reemplace la cubierta de
la almohada de cabezas�
a� Eleve el arnés a la
posición más alta�
b� Vuelva a colocar las
correas elásticas en
la parte trasera de la
almohada de cabezas�
c� Vuelva a abrochar el
gancho y la correa
de sujeción ubicados
en la cubierta de la
almohada de cabezas
desde alrededor del
arnés�
7� Reemplace las
almohadillas de confort�
Hebilla del arnés
IMPORTANTE: Si su niño come y bebe mientras está
en el asiento para niños, tendrá que controlar la hebilla
periódicamente y enjuagar cualquier residuo acumulado
(véase la página 41)�
Cómo quitar la hebilla del arnés
1� Desabroche el arnés y
abra el CLICKTIGHT�
2� Levante la parte en frente
de la cubierta del asiento
y jale sobre el bisel
del CLICKTIGHT para
acceder a la conexión de
la correa de la hebilla�
3� Retire la hebilla
girando la correa
de la hebilla de
lado y dirigirla de
la ranura de hebilla
en el asiento para
niños�
4� Empuje el extremo de la
almohadilla abdominal y
el sujetador de la hebilla
fuera de la ranura en la
cubierta para sacarla�
5� Gire los laterales del
sujetador de la hebilla y
oriente el conjunto de la
hebilla hacia afuera de la
almohadilla abdominal�
Cómo reemplazar la hebilla del arnés
1� Gire los laterales del
sujetador de la hebilla
y oriéntela a través de
la tira de tela sobre la
almohadilla abdominal�
2� Oriente la almohadilla
abdominal y el sujetador
de la hebilla a través de la
ranura de la hebilla en la
cubierta�
– Asegúrese de que
la hebilla pasa a
través de la ranura
de la cubierta para la
posición de la hebilla�
3� Deslice el extremo de la
almohadilla abdominal
por encima de la
espuma de confort (si
corresponde) en el
asiento para niños�
4� Gira la hebilla de
retención por lado y
pase la por la ranura
correspondiente en el
asiento para niños�
– Asegúrese de que
la hebilla está en la
posición correcta,
con el botón rojo
hacia afuera�
6b
6c
Page 46

38 39
BRITAX Child Safety, Inc. MARATHON CLICKTIGHT Guía del usuario
5� Vuelve a colocar la
cubierta y cierre el
CLICKTIGHT�
IMPORTANTE: La
cubierta del asiento debe
ser plegado detrás de
los marcadores rojo en la
barra de CLICKTIGHT�
Almohadillas de pecho con resitencia a impacto
IMPORTANTE: Se recomienda encarecidamente el uso
de las almohadillas de pecho con resitencia a impacto
por orientación hacia delante� Retirar los almohadillas
de pecho es opcional en la orientación hacia atrás para
asegurar un ajuste holgado para los niños pequeños�
Cómo quitarlas almohadillas de pecho con resistencia a
1b
1a
impacto
1� Afloje el arnés�
a� Presione el botón del
ajustador del arnés�
b� Jale de ambas
correas del arnés
hacia delante�
2� Ajuste el arnes hasta
el posición más bajo, y
desacople las correas
del arnés del gancho del
arnés en la parte posterior
del asiento�
3� Jale de la correa del arnés
a través de la ranura
hacia la parte frontal del
asiento�
4� Pase la correa del arnés
fuera de la almohadilla
de confort, la almohadilla
de pecho y el broche
pectoral�
5� Vuelva a pasar la correa
del arnés a través
de broche pectoral y
almohadilla de confort,
asegurándose de que la
correa del arnés no esté
torcida�
6� Repita con la otra correa�
7� Pase las correas del
arnés a través del asiento
hacia la parte posterior�
Asegúrese de que las
correas del arnés pasen a
través del tubo�
8� Encaje el extremo de la
correa del arnés izquierdo
en el derecho�
9� Enganche las correas
del arnés en el gancho�
Asegúrese de que las
correas del arnés no
están retorcidas y que los
extremos de las correas
del arnés están sujetas al
gancho�
IMPORTANTE: Guarde
las almohadillas del
pecho en un lugar seguro
cuando no las utilice�
Cómo reemplazar las almohadillas de pecho con
resistencia a impacto
1� Afloje el arnés�
a� Presione el botón del
ajustador del arnés�
b� Jale de ambas
correas del arnés
hacia delante�
2� Ajuste el arnes al posicion
mas bajo, y desde
la parte posterior del
asiento, retire las correas
del arnés del soporte�
3� Jale de la correa del
arnés a través de la
ranura hacia la parte
frontal del asiento�
4� Pase la correa del arnés
fuera de la almohadilla
de confort y el broche
pectoral�
1b
1a
TUBO
Page 47

40 41
BRITAX Child Safety, Inc. MARATHON CLICKTIGHT Guía del usuario
5� Vuelva a pasar la correa
del arnés a través de la
almohadilla del pecho,
la broche pectoral y la
almohadilla de confort�
6� Repita con la otra correa�
7� Pase las correas del
arnés a través del asiento
hacia la parte posterior�
Asegúrese de que las
correas del arnés pasen a
través del tubo�
8� Encaje el extremo de la
correa del arnés izquierdo
en el derecho�
9� Enganche las correas
del arnés en el soporte�
Asegúrese de que las
correas del arnés no
están retorcidas y que los
extremos de las correas
del arnés están sujetas al
soporte�
Exterior • LIMPIE CON UNA
ESPONJA el exterior
usando agua tibia y
jabón suave�
• SEQUE CON UNA
TOALLA�
NO
• Utilice
limpiadores
abrasivos�
Cubierta • LAVAR A MANO con
agua fría y jabón
suave�
• SEQUE LA
CUBIERTA AL AIRE
para evitar que
encoja�
NO
• Utilice lejía
• Lave a
máquina
• Sece a
máquina
• Utilice plancha�
Arnés • LIMPIE CON UNA
ESPONJA el arnés
usando agua tibia y
jabón suave�
• SEQUE CON UNA
TOALLA�
NO
• Desmonte el
arnés
• Utilice lejía
• Utilice máquina
a lavar
• Utilice secadora
• Utilice plancha
Hebilla
del arnés
• ENJUAGUE MUY
BIEN la hebilla
usando agua tibia�
• PRUEBE LA HEBILLA
ajustándola y
aflojándola hasta
que escuche un clic
después de insertar
cada lengüeta de
la hebilla� Si no
escucha clics, repita
el procedimiento de
limpieza�
• SEQUE CON UNA
TOALLA
NO
• Deje en remojo
• Lubrique
• Utilice
disolventes
• Utilice jabón
o detergentes
domésticos
Limpieza
TUBO
Page 48

42 43
BRITAX Child Safety, Inc. MARATHON CLICKTIGHT Guía del usuario
Resolución de problemas
Problema Posible solución
El CLICKTIGHT
no se cerrará
con un clic para
indicar que es
seguro�
Puede haber suciedad u otros
objectos que interfieren con el
mecanismo� Asegúrese de que el
área del asiento esté despejado
de obstrucciones y cerráis el
CLICKTIGHT de nuevo�
Puede haber demasiada tensión en
la correa/cinta� No apriete demasiado
la correa/cinta antes de cerrar el
CLICKTIGHT� Sólo eliminar la holgura�
El logo en
el disco
CLICKTIGHT no
puede regresar
a una posición
horizontal�
Presione hacia abajo de nuevo por
la izquierda y derecha del bisel del
CLICKTIGHT para garantizar que
las clavijas del CLICKTIGHT han
conectado plenamente�
El botón para
ajustar el arnés
no funcionará�
Puede haber suciedad en el
mecanismo� Limpie el mecanismo, a
continuación tratar de usar el botón
de nuevo�
No puedo
ajustar el arnés
hasta su altura
máxima�
Controle la posición del asiento
cuando el asiento para niños esté
instalado� El reposacabezas del
vehículo puede obstruir el carril del
ajustador de altura del arnés en el
asiento para niños� Saque o eleve
el reposacabezas del vehículo y
trate de ajustar la altura del arnés
nuevamente�
La longitud
del arnés es
demasiado
corto�
El arnés se puede ampliar para
acomodar niños más de 2 años�
Por más información, comuníquese
con el servicio de atención al cliente
de BRITAX en el 1-888-427-4829 o
1-704-409-1699�
Es difícil ajustar
el arnés�
El arnés puede estar en la altura
máxima o mínima, puede ser
demasiado difícil ajustar el arnés
o el peso del niño puede estar
presionando el reposacabezas�
Controle y corrija todo lo mencionado
cuando sea necesario e intente
ajustar el arnés de nuevo�
La correa
del ajustador
se está
deshilachando
en ambos lados�
Jale de la correa del ajustador del
arnés hacia arriba y fuera del asiento
para niños para ajustarla� No jale
de los laterales� Hacer eso puede
deshilachar la correa del ajustador del
arnés en ambos lados� Consulte la
página 21�
La hebilla no se
ajusta con un
clic después de
insertar cada
lengüeta�
Puede haber residuos en el
mecanismo de la hebilla� Límpielo
(véase página 38) e intente ajustar la
hebilla de nuevo�
Comuníquese con el servicio de atención al cliente de
BRITAX en el 1-888-427-4829 o 1-704-409-1699 si tiene
alguna consulta que no esté incluida aquí.
Page 49

44 45
BRITAX Child Safety, Inc. MARATHON CLICKTIGHT Guía del usuario
Garantía
Este asiento de seguridad para niños ha sido fabricado por
Britax Child Safety, Inc� “BRITAX”� BRITAX ofrece la siguiente
garantía al comprador original:
GARANTÍA LIMITADA POR UN AÑO
Este producto ofrece una garantía por materiales defectuosos
o defectos de fabricación de un año a partir de la fecha
de compra original� Es necesario presentar la prueba de
compra� Al amparo de esta garantía, BRITAX le ofrecerá,
a su discreción, las piezas de repuesto o los servicios de
reparación que considere oportunos� BRITAX se reserva el
derecho a interrumpir, modificar o sustituir tejidos, piezas,
modelos o productos�
Para realizar una reclamación de acuerdo con esta garantía,
debe ponerse en contacto con el departamento de atención
al cliente de BRITAX llamando al 1 888 427 4829 o 1 704 409
1699, oenviando una carta a la dirección especificada en la
contraportada de este manual�
COMPLETE LA TARJETA DE REGISTRO DE COMPRA
Y ENVÍELA POR CORREO EN UN PLAZO MÁXIMO DE
TREINTA (30) DÍAS A PARTIR DE LA FECHA DE COMPRA
También puede optar por registrarse en línea en el sitio web
siguiente: www.BritaxUSA.com/registration.
LIMITACIONES DE LA GARANTÍA
Esta garantía no cubre los daños y perjuicios causados por
negligencia, uso indebido o utilización del producto de forma
distinta a la indicada en las instrucciones del producto�
BRITAX no aprueba el uso de cubiertas, piezas, juguetes,
accesorios o dispositivos de ajuste que no sean de BRITAX�
Su uso podría hacer que el asiento no cumpla con las normas
federales de seguridad automotriz o que no rinda como
debería durante un accidente� El uso de estos elementos
anula automáticamente la garantía de BRITAX�
LIMITACIÓN DE DAÑOS Y PERJUICIOS
La garantía y las soluciones expuestas anteriormente son
exclusivas y sustituyen a cualquier otra, tanto escrita como
oral, de forma expresa o implícita� En ningún caso, BRITAX
o el establecimiento que comercializa este producto serán
responsables por los daños y perjuicios, ya sean directos o
indirectos, que pudiera ocasionar el uso inadecuado de este
producto�
LIMITACIONES DE LA GARANTÍA Y OTROS TÉRMINOS
RELACIONADOS CON LA GARANTÍA Y LEYES
ESTATALES
Cualquier garantía implícita, incluidas las garantías implícitas
de comercialización o adecuación para un propósito
determinado, estará limitada a la duración y a los términos
expresados por escrito en esta garantía� Algunos estados
no admiten limitaciones en cuanto a la duración de una
garantía implícita o a la exclusión o limitación de los daños y
perjuicios directos o indirectos; por lo tanto, es posible que
las limitaciones estipuladas anteriormente no se apliquen en
su caso� Esta garantía le otorga derechos legales específicos;
y es posible que tenga otros derechos, que pueden variar
de un estado a otro� Ni BRITAX ni el establecimiento que
comercializa este producto autorizan a ninguna persona a
crear cualquier otra garantía, obligación o responsabilidad en
relación con este producto�
Notas
Page 50

46
BRITAX Child Safety, Inc.
Notas
Page 51

Page 52

Tel.: 1-888-427-4829
Tel.: 1-704-409-1699
www.Britax.com
Britax Child Safety, Inc.
4140 Pleasant Road
Fort Mill, SC 29708 USA
A Britax Childcare company
 Loading...