

Page 1
B-MOBILE
TM
Stroller
User Guide
Guía del usuario
Page 2

Page 3

1
B-MOBILETM and Britax®M are trademarks or registered trademarks owned by Britax and registered in
the U.S.A., and other countries. All rights reserved. ©2017 Britax Child Safety, Inc.
This product and its components are subject to change without notice. P08369200_A:08.17
Contents
Safety Information ���������������������������������������������������������������2
Features ��������������������������������������������������������������������������������4
In The Box ����������������������������������������������������������������������������5
Assembly ������������������������������������������������������������������������������6
Stroller Frame ..................................................................................... 6
Front Wheel ........................................................................................ 7
Rear Wheels ....................................................................................... 7
Canopy ............................................................................................... 8
Arm Bar .............................................................................................. 9
Operation ����������������������������������������������������������������������������10
Using the Stroller ............................................................................. 10
Adjusting the Seat ............................................................................ 12
Using the Leg Rest ......................................................................... 13
Using the Parking Brake .................................................................. 13
Using the Harness ........................................................................... 14
Using the Front Wheel Swivel Lock ................................................. 14
Securing Your Child ����������������������������������������������������������� 16
Infant Car Seat Mode ��������������������������������������������������������17
Using the Infant Car Seat Receivers ................................................ 17
Using a Britax Infant Car Seat ......................................................... 19
Care and Maintenance ������������������������������������������������������20
Warranty �����������������������������������������������������������������������������21
Page 4

2 3
Safety Information
Failure to follow all warnings and instructions
could result in SERIOUS INJURY or DEATH.
Read these instructions carefully before using this product�
To ensure proper use, store this user guide in a convenient
place so it can be consulted often�
• Never leave child unattended.
• Avoid serious injury from falling or sliding out. Always use
harness to secure child.
• Avoid finger entrapment or injury. Always ensure any child
occupants or bystanders are away from the stroller while
folding or unfolding.
• Stroller appropriate to use from birth, however, Britax
recommends using an infant car seat until child has head
and neck control.
• Do not use stroller with a child taller than 45 inches (114.3 cm).
• Do not use stroller with a child who weighs more than 55 lbs
(24.9 kg). Exceeding this limit may cause stroller to become
unstable.
• Do not overload basket – Maximum weight in basket is
10 lbs (4.5 kg). Overloading the basket may cause the
stroller to become unstable.
• Do not overload the seat back storage pocket - Maximum
weight in storage pocket is 1 lb (0.45 kg). Overloading the
storage pocket may cause the stroller to become unstable.
• Do not hang or place items on the stroller handle or frame
except for those approved by Britax. They may cause an
unstable or hazardous condition to exist.
• Always make certain that the stroller is fully open and locked
before use.
• Assembly of this stroller must be performed only by an
adult.
• Do not allow children to climb on or play with the stroller.
• Never use stroller on stairs or escalators.
• Stroller is intended for walking speed only. Do not use while
jogging, skating, etc.
• Always set the parking brake when stroller is not moving.
• Only use Britax approved accessories and replacement
parts with this stroller.
• Only use Britax infant car seats with this stroller.
• Do not exceed the manufacturer’s maximum weight limit
when using an infant car seat with this product. See Britax
infant car seat user guide for maximum occupant weight
and other instructions.
• All infant car seats MUST be installed rear facing.
Page 5
4 5
Actual product may vary from images.
Actual product may vary from images.
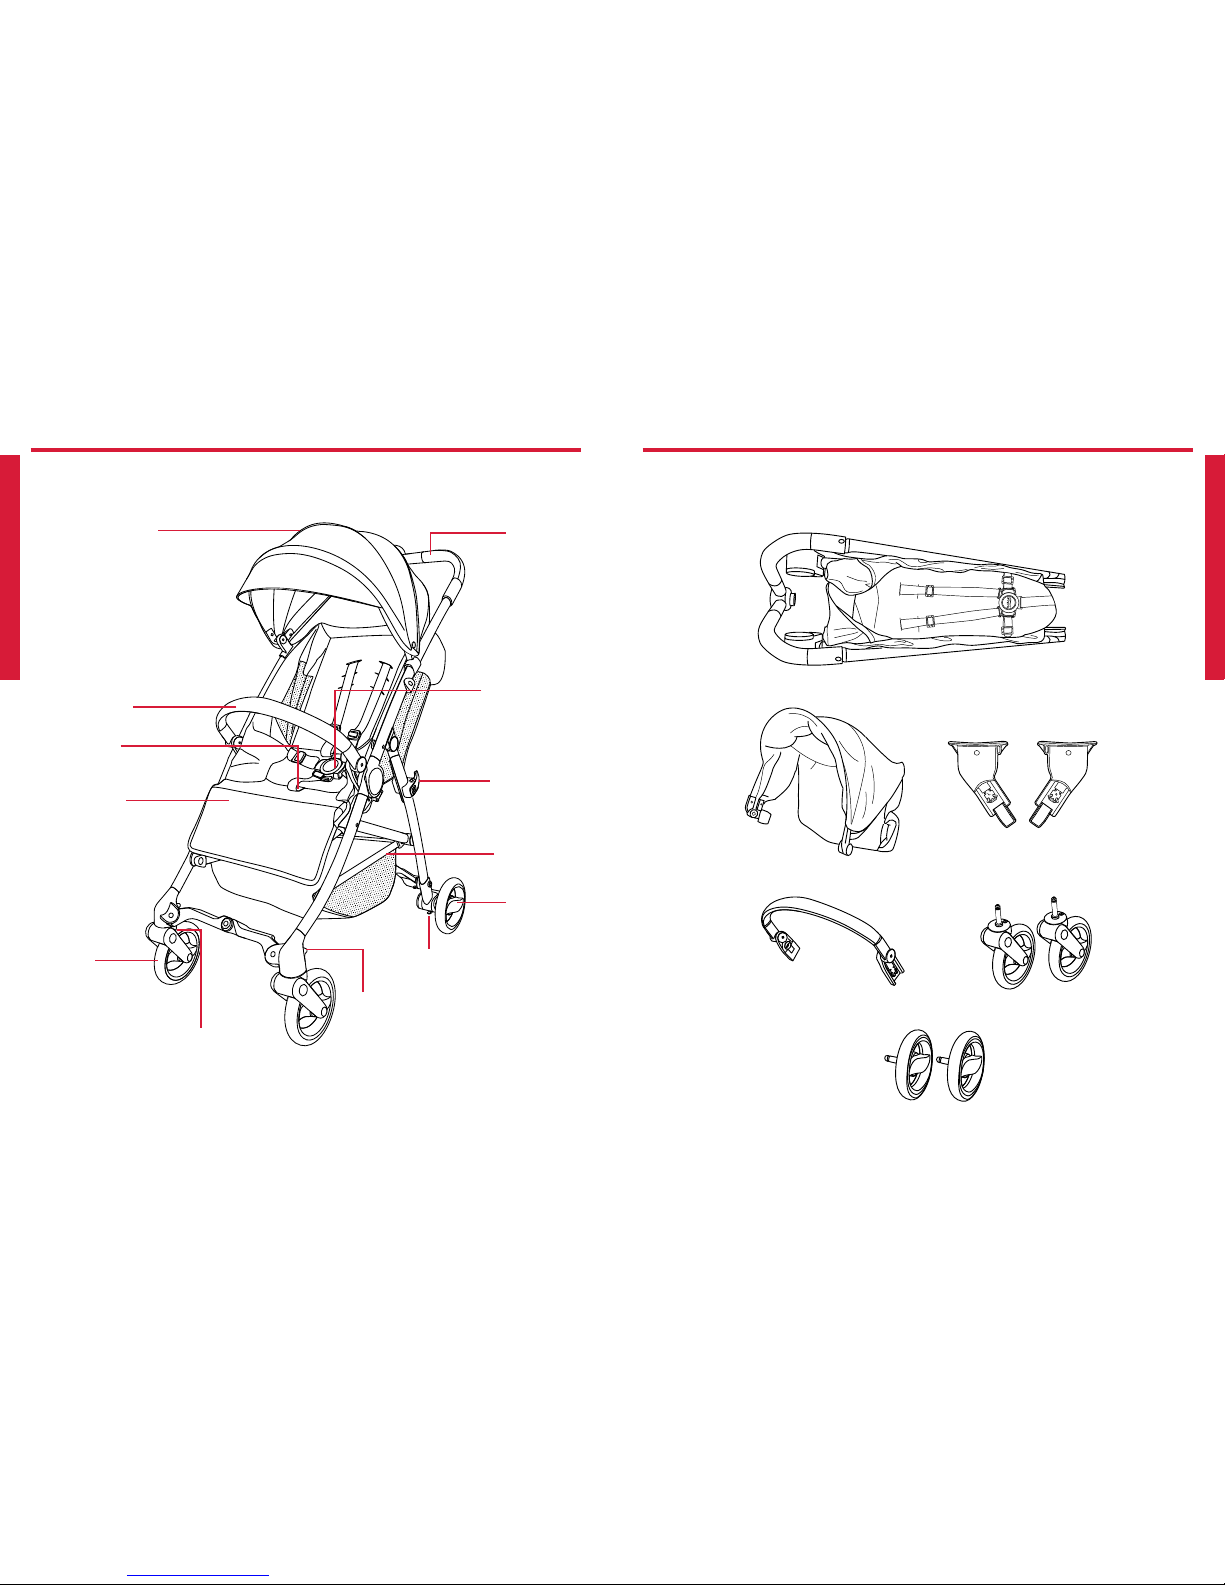
Features In The Box
Canopy
Handle
Harness
& Buckle
Leg Rest
Front
Wheel
Rear Wheel
Release
Button
Frame
Release
Strap
Under-Seat
Storage
Basket
Swivel
Lock
B-Mobile Stroller
Canopy Infant Car Seat Receivers
Front Wheels
Rear Wheels
Rear
Wheel
Front Wheel
Release Button
Chassis
Lock
Arm Bar
Arm Bar
Page 6
6 7
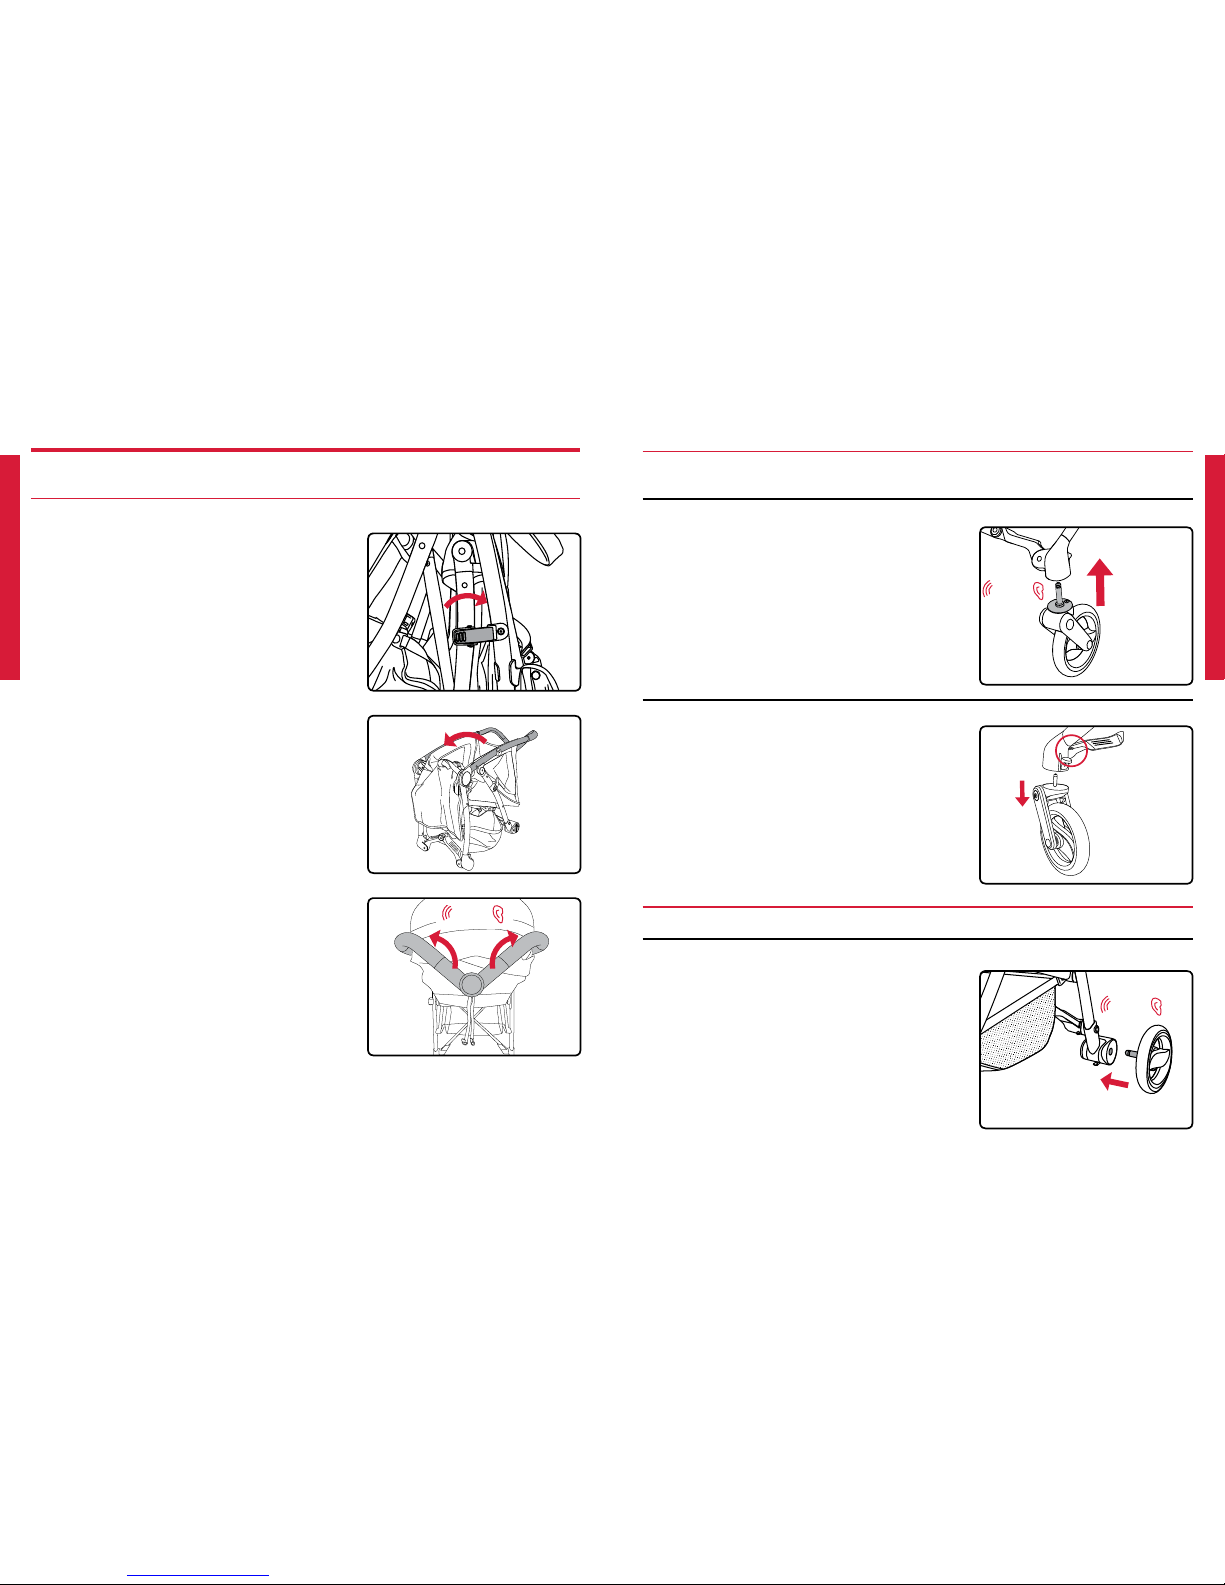
Assembly
Stroller Frame
1. Push the release on the chassis lock
and open the frame.
2. Lift upper frame until stroller locks into
upright position.
3. Lock the handlebar by rotating both
sides up until it locks into position. A
click will be heard, and the handlebar
will be horizontal.
Front Wheel
Installing the Front Wheel
1. Slide each front wheel assembly onto
the mounting post at the front of the
stroller. A click will be heard.
2. Pull wheel to ensure that it is secure.
Removing the Front Wheel
1. Push the wheel release tab on the
inside of the stroller frame and pull the
wheel away from the stroller.
Rear Wheels
Installing the Real Wheels
1. Slide the rear wheel axle into the rear
wheel hub mounting bracket until it
locks into place. A click will be heard.
2. Pull wheel to ensure that it is secure.
CLICK
CLICK
CLICK
Page 7
8 9
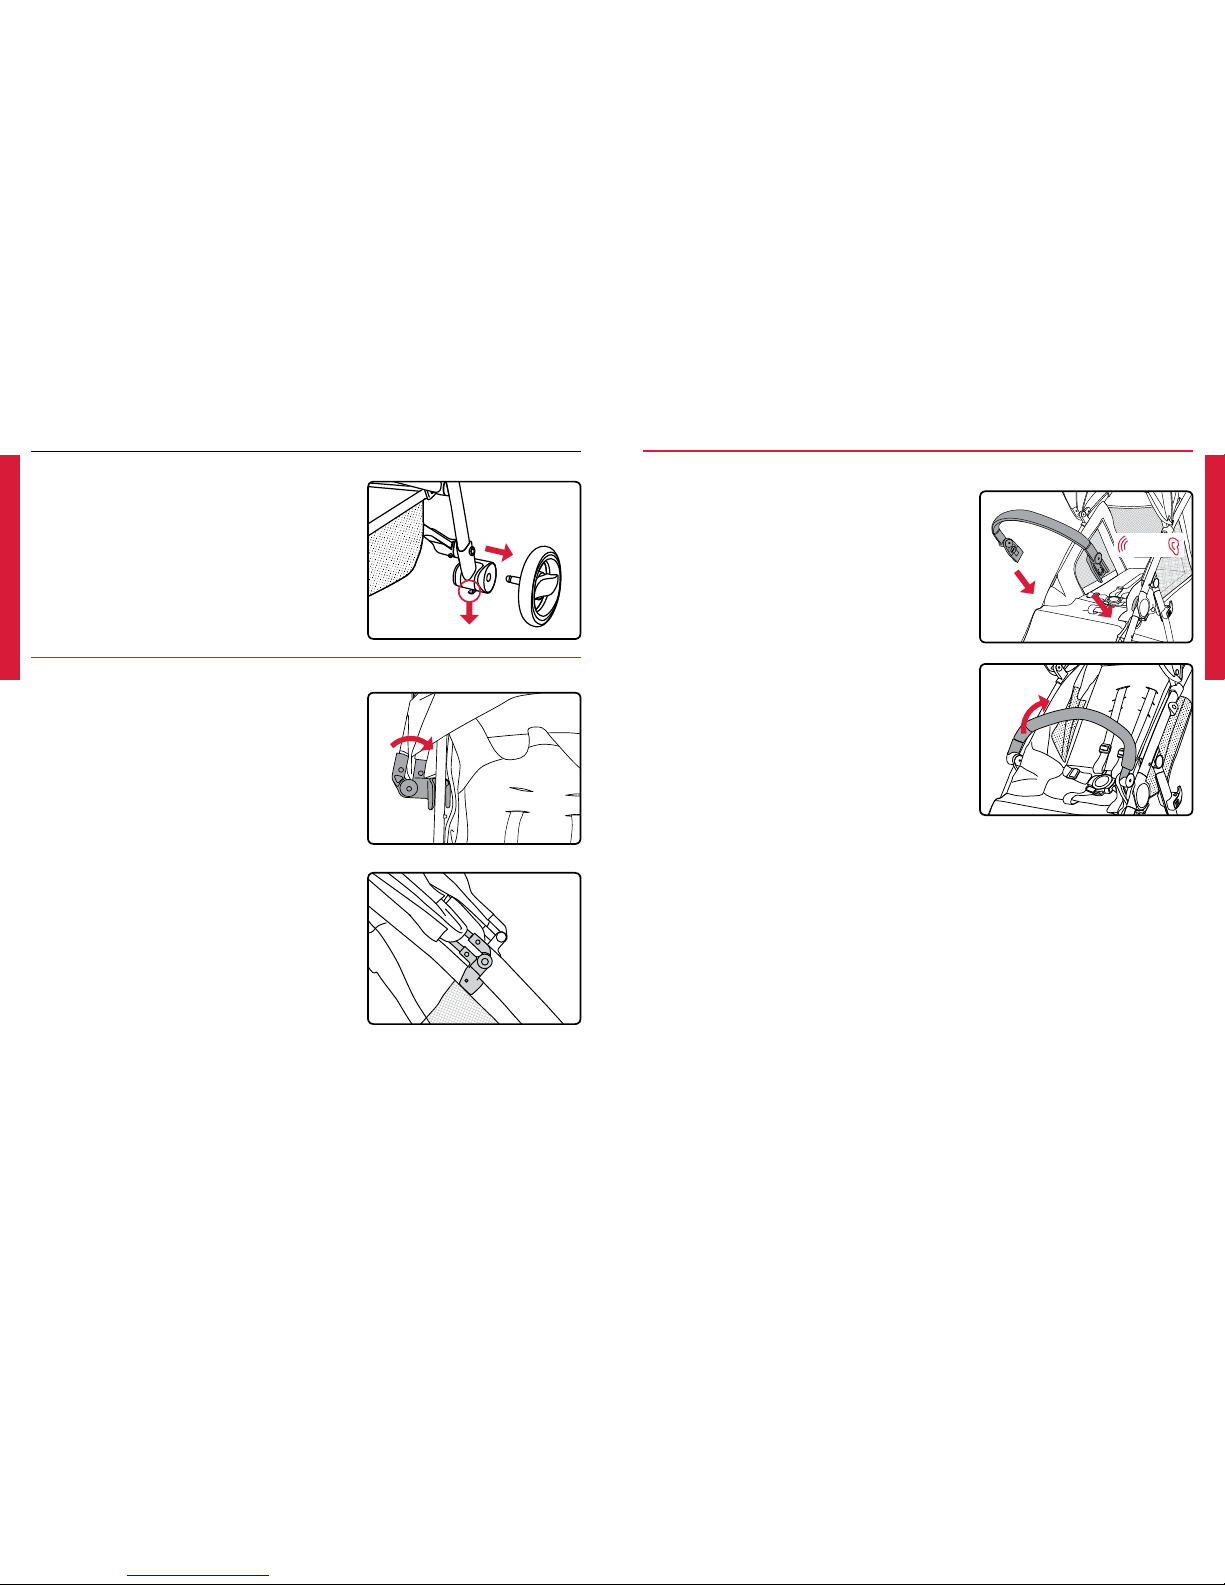
Arm Bar
1. Slide the arm bar into the receivers on
either side of the seat. Pull on arm bar
to ensure it is securely fastened.
A click will be heard.
NOTE: Arm bar and stroller are marked
left (L) and right (R), from the position
of the stroller occupant.
NOTE: When arm bar is installed
correctly, it can be rotated fully
towards stroller seat.
Canopy
1. Place the canopy bracket below the
mounting pin and rotate it onto the
stroller frame.
2. Rotate canopy bracket until it aligns
with the tab on the outside of the
stroller frame.
3. Repeat for other side.
Removing the Rear Wheels
1. Pull and hold the release lever at the
bottom of the rear wheel hub while
pulling the rear wheel away from the
stroller.
CLICK
Page 8
10 11
Unfolding the Stroller
1. Push the release on the chassis lock
and open the frame.
2. Lift the frame release strap in the
middle of the seat until the stroller
collapses.
3. Push stroller closed to engage chassis
lock. A click will be heard.
Operation
Using the Stroller
IMPORTANT: Before each use, check to make sure stroller
and all parts are in safe working order.
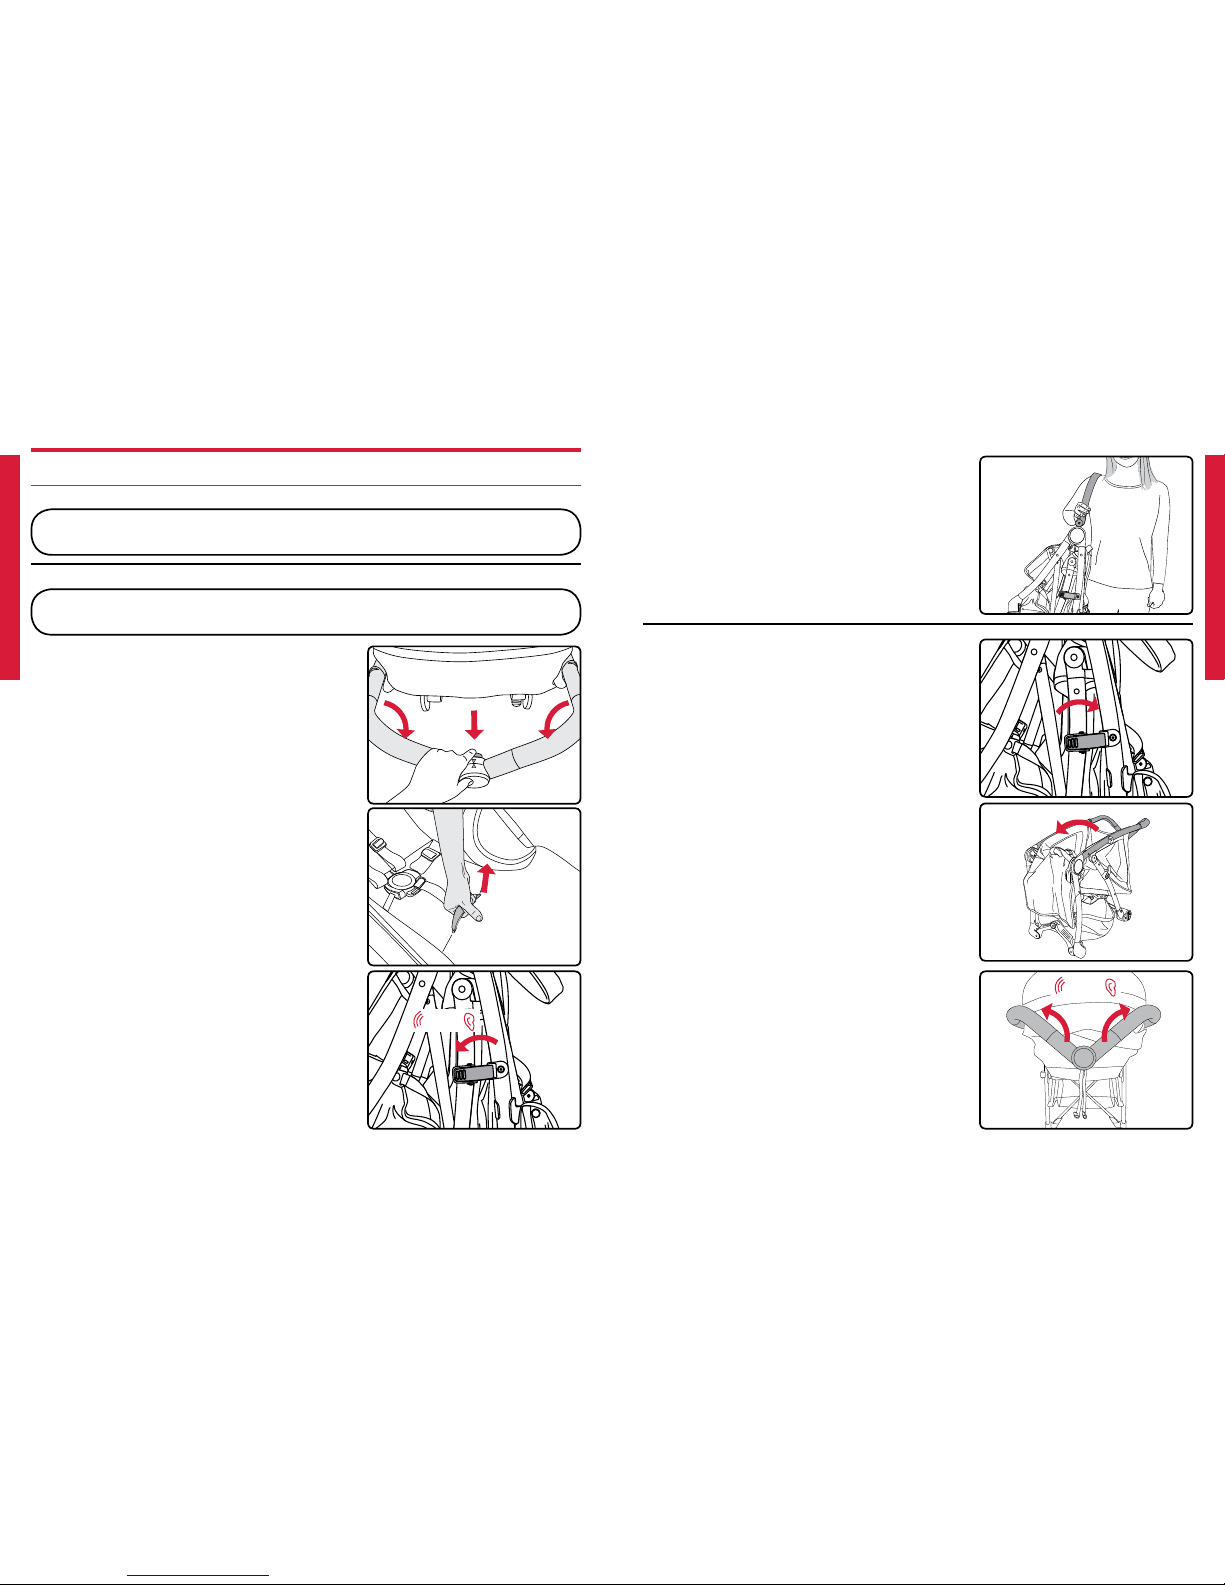
Folding the Stroller
IMPORTANT: Always apply brake, fold canopy back and
remove children before folding the stroller.
1. Press button on handlebar and rotate
down until arrows align. Handlebar will
click when it is rotated fully.
2. Lift the handle until frame locks into
upright position.
3. Lock the handlebar by rotating both
sides up until it locks into position.
A click will be heard, and the handlebar
will be horizontal.
4. When stroller is folded and chassis
lock is engaged, armbar is usable as
carry strap.
CLICK
CLICK
Page 9
12 13
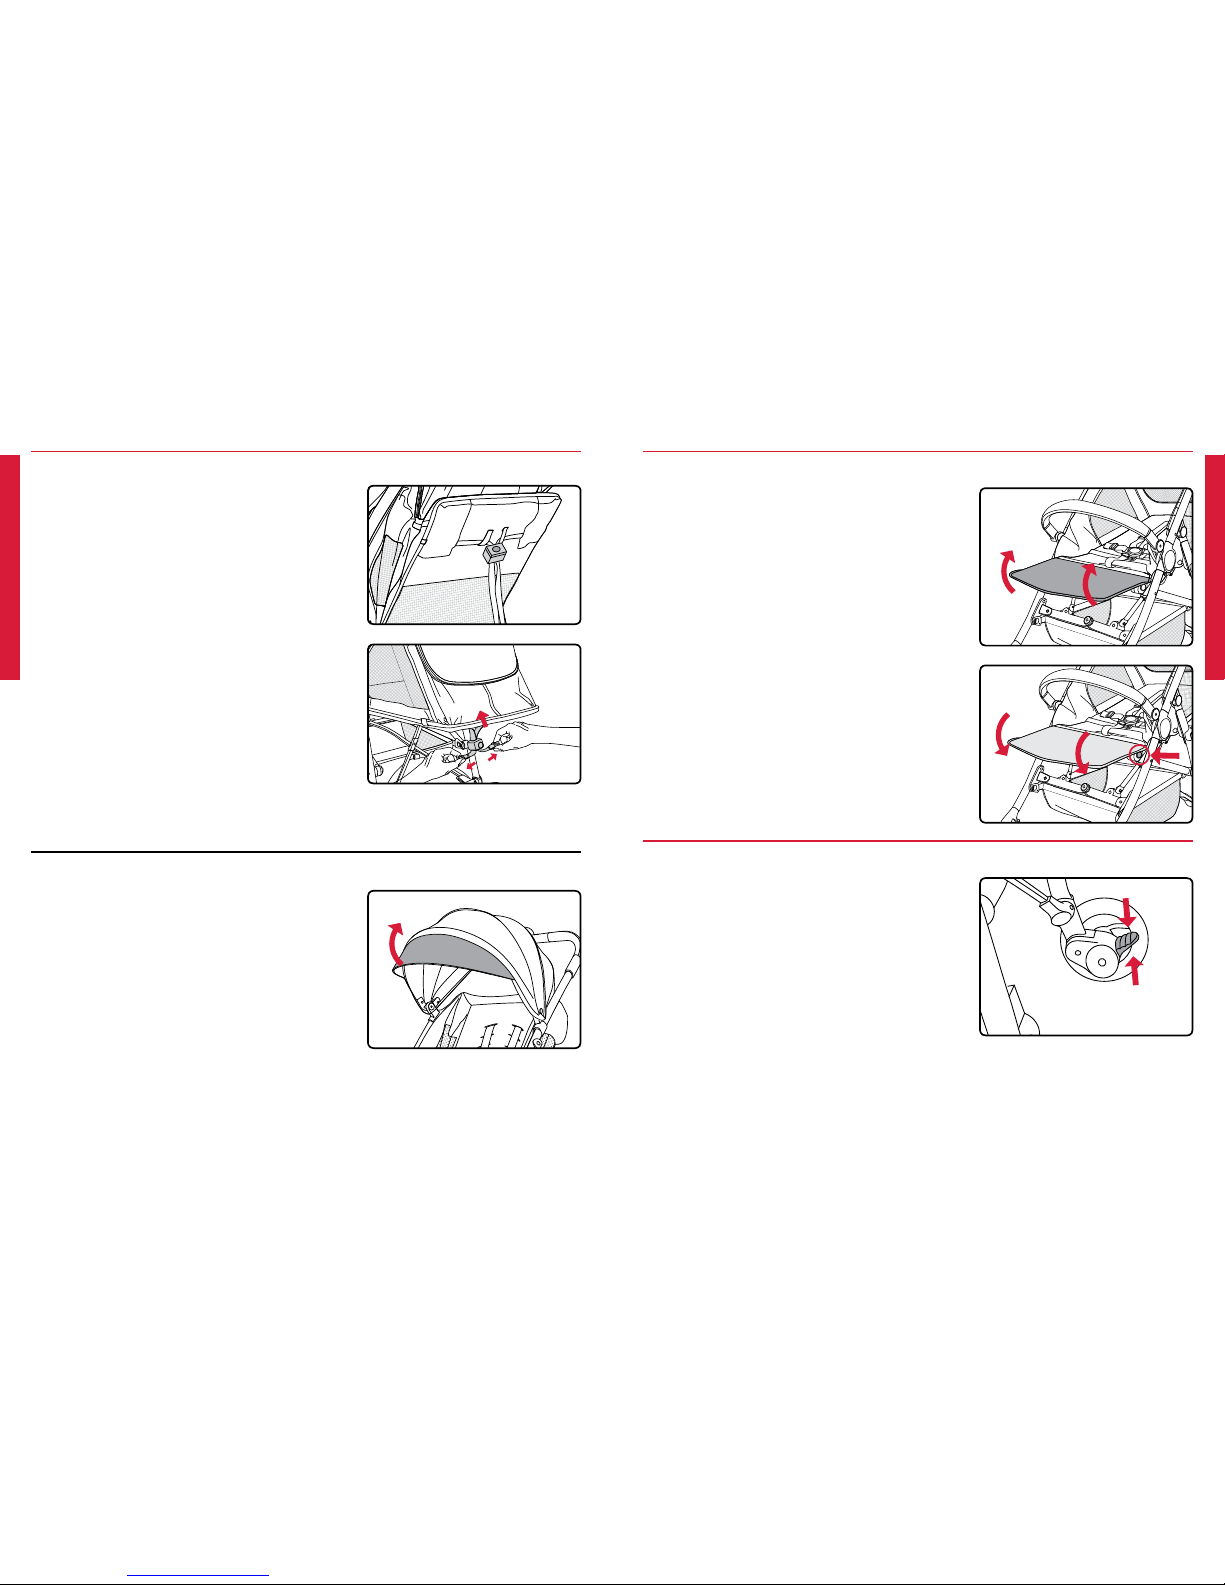
Using the Leg Rest
1. Pull up on both sides of the leg rest
until it is in the desired position. A click
will be heard and the leg rest will stay
in position.
2. Push buttons on each side under the
leg rest while pushing leg rest down in
order to lower.
Adjusting the Seat
1. To recline, push the button on the
recline adjuster and pull the recline
adjuster away from the seat.
2. To raise, pull both straps apart.
Using the Canopy Visor
1. Unfold the canopy visor to extend the
canopy over the seat.
Using the Parking Brake
1. Press the brake pedal down to lock the
brake.
NOTE: Pressing the brake locks both
back wheels.
2. Lift the brake pedal to release the
brake.
3. Confirm brake is secure.
Page 10

14 15
Using the Harness
IMPORTANT: Shoulder and waist straps separate for care and
maintenance, but should always be used together to secure
your child.
1. Align the tongues on the waist straps
with the retainers of the shoulder
straps and slide through until they lock
into place.
2. Insert the tongues into the buckle
assembly until a click is heard.
CLICK
Adjusting the Harness
IMPORTANT: The harness can be adjusted to three dierent
heights. Always ensure proper adjustment at or above your
child’s shoulders.
1. Release the harness by depressing
the button in the center of the buckle.
Squeeze the ends of the tongues
together and slide them out from the
buckle assembly.
2. Push the harness retainer into the
appropriate harness slot.
3. Insert the tongues into the buckle
assembly.
Using the Front Wheel Swivel Lock
1. Push the swivel lock switch fully down
to lock the front wheel.
2. Press the swivel lock switch fully up to
allow the wheel to swivel.
CLICK
Page 11

16 17
Securing Your Child
1. Release the harness by depressing the
button in the center of the buckle while
pulling the two tongues away from the
buckle assembly.
2. Fasten the harness by inserting the
tongues on the harness straps into the
buckle assembly.
3. Tighten or loosen the harness straps by
sliding the harness adjusters.
Infant Car Seat Mode
• Only use Britax infant car seats with this stroller.
• Do not exceed the manufacturer’s maximum weight limit
when using an infant car seat with this product. See Britax
infant car seat user guide for maximum occupant weight
and other instructions.
• All infant car seats MUST be installed rear facing.
Using the Infant Car Seat Receivers
Attaching the Infant Car Seat Receivers
NOTE: Receivers and stroller are marked left (L) and right (R). Attach
each from the position of the stroller occupant.
1. Lock the parking brake.
2. Remove arm bar. Pull armbar release
button on each side of armbar forward
and lift armbar out of receivers.
3. Align the receivers with the mounts on
the inside frame of the stroller, then
push down until a click is heard. Pull
up on the receivers to ensure they are
secure.
CLICK
Page 12

18 19
Removing the Infant Car Seat Receivers
IMPORTANT: Infant car seat receivers must be removed in
order to fold stroller.
1. Press release button on inside of
receiver, and lift receiver upward.
NOTE: Store infant car seat receivers
in the pocket in the underseat basket
when not in use.
2. Replace arm bar by sliding it into the
receivers on either side of the seat.
Pull on arm bar to ensure it is securely
fastened. A click will be heard.
NOTE: Arm bar and stroller are marked
left (L) and right (R), from the position
of the stroller occupant.
CLICK
Using a Britax Infant Car Seat
Attaching a Britax Infant Car Seat
1. Set the parking brake.
2. Line up the adapter on the infant car
seat with the receivers on the stroller.
3. Press down until locked into place.
4. Lift up on the infant car seat on both
sides to ensure that it is secure.
Removing a Britax Infant Car Seat
Refer to your infant car seat user guide for information on the removal
instructions for your specific model.
Page 13

20 21
Parking Brake
• Periodically check that the parking brake works
properly and locks both wheels securely.
• Clean out any dirt or debris that may prevent the
brake from working.
Frame • Wipe the frame with a damp cloth and mild
soap. Use clean, dry cloth or towel to wipe
away excess water and soap.
Fabric and
Harness
• DO NOT machine wash or dry the cover.
• Hand wash with cold water and mild soap. Air
dry to prevent shrinking.
• DO NOT iron.
Plastic Parts
• Wipe with a damp cloth and mild soap. Use a
clean, dry cloth or towel to wipe away excess
water and soap.
• DO NOT use abrasives, solvents, strong
detergents, or household cleaners. These
products can scratch, discolor, and weaken
plastic or cause corrosion on metal surfaces.
Maintenance • If the stroller gets wet, wipe with a clean cloth
or towel to prevent corrosion.
• DO NOT fold the stroller when wet or damp.
Always make sure that the stroller is dry before
storing.
Storage • To prevent damage to plastic parts, store away
from extreme heat.
• Cover the stroller to prevent dust build-up and
exposure to sunlight.
• DO NOT stack other items on top of the
stroller.
Care and Maintenance Warranty
This product is distributed by Britax Child Safety, Inc. (“Britax”). Britax warrants this product
to the original retail purchaser as follows:
Limited Two-Year Warranty
This product is warranted against defective materials or workmanship for two years from
the date of original purchase. Proof of purchase is required. Your exclusive remedy for
this warranty is that Britax will, at its option, provide repair or replacement components to
the original purchaser for this product or replace the product. Britax reserves the right to
discontinue or change fabrics, parts, models or products, or to make substitutions. Labor
and shipping costs for returns are not included.
To make a claim under this Warranty, you must contact Britax Customer Services
Department at 1-888-427-4829 or 704-409-1699 or write to 4140 Pleasant Road, Fort Mill,
SC 29708. Proof of purchase is required.
PLEASE COMPLETE AND MAIL THE REGISTRATION CARD WITHIN 30 DAYS OF
PURCHASE, OR VISIT WWW.US.BRITAX.COM/REGISTRATION.
Warranty Limitations
This warranty does not include damages which arise from negligence, misuse, salt
corrosion, or use not in accordance with the user guide.
The use of non-Britax accessories is not approved by Britax. The use of unapproved
accessories could cause this product to become damaged or dangerous. Their use may
void the Britax warranty.
Limitations of Damages
The warranty and remedies as set forth above are exclusive and in lieu of all others, oral or
written, express or implied. In no event will Britax or the retailer selling this product be liable
for any damages, including incidental or consequential damages, arising out of the use or
inability to use this product.
Limitations of Warranties and Other Warranty Terms and State Law Rights
Any implied warranties, including implied warranties of merchantability and fitness for
a particular purpose, shall be limited to the duration and terms of the express written
warranty. Some states do not allow limitations on how long an implied warranty lasts or
the exclusion or limitation of incidental or consequential damages, so the above limitations
may not apply to you. This warranty gives you specific legal rights, and you may have other
rights, which vary from state to state. Neither Britax, nor the retailer selling this product,
authorizes any person to create for it any other warranty, obligation, or liability in connection
with this product.
Page 14

22
Page 15

1
Contents
Información de seguridad...................................................2
Características .....................................................................4
Contenido de la caja ...........................................................5
Montaje ................................................................................. 6
Armazón del cochecito ���������������������������������������������������������������������� 6
Rueda delantera ���������������������������������������������������������������������������������7
Ruedas traseras ��������������������������������������������������������������������������������� 7
Capota ����������������������������������������������������������������������������������������������� 8
Barra de seguridad ���������������������������������������������������������������������������� 9
Utilización ........................................................................... 10
Utilización del cochecito ������������������������������������������������������������������ 10
Ajuste del asiento ����������������������������������������������������������������������������� 12
Utilización del reposapiés ��������������������������������������������������������������� 13
Utilización del freno ������������������������������������������������������������������������� 13
Utilización del arnés ������������������������������������������������������������������������� 14
Utilización de la cerradura giratoria ������������������������������������������������� 14
Sujeción del niño ...............................................................16
Modo del asiento de seguridad para bebés ...................17
Utilización de los receptores del asiento de seguridad para bebés 17
Utilización de un asiento asiento de seguridad para bebés Britax �� 19
Cuidado y mantenimiento .................................................20
Garantía ..............................................................................21
B-MOBILETM y Britax®M son marcas comerciales o marcas comerciales registradas propiedad de Britax
y registrada en EE� UU� y otros países� Todos derechos reservados� ©2017 Britax Child Safety, Inc� Este
producto y sus componentes están sujetos a cambios sin previo aviso� P08369200_A:08�17
Page 16

2 3
Información de seguridad
Si no se siguen las advertencias e instrucciones,
podría ocurrir MUERTE o LESIONES GRAVES�
Lea estas instrucciones antes de utilizar el producto. Para
garantizar un uso adecuado, guarde esta guía del usuario
en un lugar práctico, donde pueda consultarla siempre que
lo necesite.
• Nunca deje al niño solo�
• Utilice siempre el arnés para sujetar al niño, a fin de evitar
que se caiga o deslice y sufra daños graves�
• Evite atrapamiento de los dedos o lesiónes� Asegúrese
siempre de que los niños o personas presentes estén lejos
de cochecito mientras pliegue o despliegue�
• Utilización de este cochecito es adecuada desde el
nacimiento sin embargo Britax recomienda el uso de un
asiento de seguridad hasta que el niño tiene control de
cabeza y el cuello�
• No utilice el cochecito con niños que son mas altos de
114,3 cm (45 pulg�)�
• No utilice el cochecito con un niño cuyo peso sea superior
a 24,9 kg (55 lb)� Exceder el peso máximo recomendado
puede causar que el cochecito se vuelva inestable�
• No sobrecargue la cesta� El peso máximo que puede
soportar es de 4,5 kg (10 lb)� Si sobrecarga la cesta, el
cochecito podría volverse inestable�
• No sobrecargue la cesta de almacenaje atrás del asiento� El
peso máximo en la cesta de almacenaje es de 0,45 kg (1 lb)�
Exceder el peso máximo recomendado puede causar que
el cochecito se vuelva inestable�
• No cuelgue o coloque objetos en el manillar o armazón del
cochecito, excepto aquellos aprobados por Britax, ya que
pueden hacer que el cochecito se vuelva inestable�
• Antes de utilizar el cochecito, asegúrese siempre de que
está completamente abierto y bien bloqueado�
• El montaje del cochecito debe ser realizado siempre por un
adulto
• No deje que los niños suban o jueguen con el cochecito�
• Nunca utilice el cochecito en escaleras o escaleras
mecánicas�
• El cochecito está diseñado para uso de velocidad al
caminar solamente� No lo utilice cuando salga a correr,
patinar, etc�
• Deje el freno puesto siempre que el cochecito no esté en
movimiento�
• Utilice únicamente accesorios y piezas de repuesto
aprobados por Britax�
• Utilice únicamente asientos de seguridad para bebés Britax�
• No exceda el peso máximo determinado por el fabricante
al utilizar el asiento de seguridad para bebés con este
producto� Consulte la guía del usuario de asiento de
seguridad para bebés Britax para conocer los pesos
máximos y otras instrucciones�
• Todos los asientos de seguridad para bebés DEBEN
colocarse orientados hacia atrás�
ADVERTENCIA!
Page 17

4 5
Características
Cochecito B-Mobile
Es posible que el producto real no coincida con las imágenes.
Capota Manija
Arnés y
la hebilla
Reposapiés
Rueda
delantera
Rueda
trasera
Palanca de
desbloqueo
de la rueda
trasera
Correa de
liberación
Cesta bajo
el asiento
Cerradura
giratoria
Cerradura
del chasis
Contenido de la caja
Capota Receptores del asiento de
seguridad para bebés
Ruedas delanteras
Ruedas traseras
Es posible que el producto real no coincida con las imágenes.
Botón de
desbloqueo
de la rueda
delantera
Barra de
seguridad
Barra de seguridad
Page 18

6 7
Rueda delantera
Instalar la rueda delantera
1� Deslice cada rueda delantera en el
poste de montaje en la parte delantera
del cochecito� Se oirá un clic�
2� Jale de la rueda para asegurarse de
que está bien sujeta�
Extracción de la rueda delantera
1� Pulse el boton de desbloqueo situado
en el interior de la parte delantero del
armazón del cochecito y jale la rueda
delantera lejos del cochecito�
Ruedas traseras
Instalar las ruedas traseras
1� Deslice el eje de la rueda trasera en el
soporte de montaje del cubo trasero
hasta que encaje en su lugar� Se oirá
un clic�
2� Jale de la rueda para asegurarse de
que está bien sujeta�
CLIC
Montaje
Armazón del cochecito
1� Pulse el botón de desbloqueo en la
cerradura del chasis y abra el armazón�
2� Levante el armazón superior hasta
que quede bloqueado en un posición
vertical�
3� Bloquee la manija girando ambos lados
hacia arriba hasta que se bloquee en
su posición� Se oirá un clic y la manija
estará en posición horizontal�
CLIC
CLIC
Page 19

8 9
Barra de seguridad
1� Deslice la barra de seguridad hacia los
acoples a ambos lados del asiento�
Jale de la barra de seguridad para
asegurarse de que esté bien sujeta� Se
oirá un clic�
NOTA: La barra de seguridad y el
cochecito están marcadas izquierda
(L) y derecha (R) de la posición del
ocupante del cochecito.
NOTA: Si la barra de seguridad se
instala correctamente, se puede girar
completamente hacia el asiento del
cochecito.
Capota
1� Coloque la estructura de la capota
debajo de la chaveta de montaje y
gírela sobre la estructura del cochecito�
2� Gire el soporte de la capota hasta que
esté alineado con la pestaña en el
exterior de la estructura del cochecito�
3� Repite por el otro lado�
Extracción de las ruedas traseras
1� Jale y sostenga la palanca de
desbloqueo en la parte inferior del
soporte de montaje del cubo de la
rueda trasera mientras tira de la rueda
trasera fuera del cochecito�
CLIC
Page 20

10 11
2� Levante la manija hasta que el armazón
quede bloqueado en posición vertical�
3� Bloquee la manija girando ambos lados
hacia arriba hasta que se bloquee en
su posición� Se oirá un clic y la manija
estará en posición horizontal�
Despliega el cochecito
1� Empuje la liberación de la cerradura
del chasis, y abra el armazón�
2� Levante la correa de liberación que
encontrará en el centro del asiento
hasta que el cochecito se pliegue�
3� Empuje el cochecito hasta que cierre
para enganchar la cerradura del chasis�
Se oirá un clic�
Utilización
Utilización del cochecito
IMPORTANTE: Antes de cada uso, compruebe que el cochecito y
todas las piezas están funcionando de una manera segura�
Pliega el cochecito
IMPORTANTE: Deje siempre puesto el freno y saque al niño del
cochecito antes de plegarlo�
1� Presione el botón en la manija y gírelo
hasta que las flechas estén alineadas�
La manija hará un clic quando se gira
completamente�
CLIC
4� Cuando el cochecito está plegado
y se activa el bloqueo del chasis, la
barra de seguridad puede usarse
como correa de transporte�
CLIC
Page 21

12 13
Utilización del reposapiés
1� Jale hacia arriba en ambos lados
del reposapiés hasta que esté en la
posición deseada� Se oirá un clic y el
reposapiés estará en posición�
2� Empuje los botones en cada lado por
debajo del reposapiés, mientras que
empuja el reposapiés para bajarlo�
Utilización de la visera de la capota
1� Despliege la visera de la capota para
extenderla sobre el asiento�
Ajuste del asiento
1� Para reclinar, jale de la palanca de
liberación del ajustador de inclinación
y deslicela lejos del asiento�
2� Para elevar, jale las dos correas
separadas�
Utilización del freno
1� Presione el pedal del freno hacia abajo
para bloquearlo�
NOTA: Al utilizar el freno se bloquearán
ambas ruedas traseras.
2� Levante el pedal del freno para
desbloquearlo�
3� Confirme que el freno está bloqueado�
Page 22

14 15
Ajustando el arnés
IMPORTANTE:
El arnés se puede ajustar en tres alturas diferentes�
Asegúrese siempre de que se ajusta la altura correcta en o por
encima de los hombros de su niño�
1� Suelte el arnés presionando el botón
en el centro� Apriete los extremos de
las lengüetas y deslícelas hacia fuera
del conjunto de la hebilla�
2� Empuje el clip de retención del arnés a
través la ranura deseada�
3� Inserte las lengüetas en la hebilla hasta
que se oiga un clic�
Utilización del arnés
IMPORTANTE: Las correas del hombro y de la cintura se puede
separar para el cuidado y mantenimiento, pero siempre deben
utilizarse conjuntamente para sujetar al niño�
1� Alinee las lengüetas de las correas de
la cintura con los retenedores de las
correas de los hombros y se deslizan a
través hasta que encajen en su lugar�
2� Inserte las lengüetas en la hebilla hasta
que se oiga un clic�
CLIC
Utilización de la cerradura giratoria
1� Presione la cerradura giratoria de la
rueda completamente hacia abajo para
bloquear la rueda delantera�
2� Presione la cerradura giratoria de la
rueda completamente hacia arriba para
que esta pueda girar�
CLIC
Page 23

16 17
Sujeción del niño
1� Suelte el arnés presionando el botón
en el centro de la hebilla mientras jale
de las dos lengüetas lejos del conjunto
de la hebilla�
2� Sujete el arnés insertando las
lengüetas de las correas en la hebilla�
3� Deslice el regulador del arnés para
apretar o aflojar las correas de este�
Modo del asiento de seguridad para bebés
• Utilice únicamente asientos de seguridad para bebés Britax�
• No exceda el peso máximo determinado por el fabricante
al utilizar el asiento de seguridad para bebés con este
producto� Consulte la guía del usuario de asiento de
seguridad para bebés Britax para conocer los pesos
máximos y otras instrucciones�
• Todos los asientos de seguridad para bebés DEBEN
colocarse orientados hacia atrás�
Utilización de los receptores del asiento de seguridad para bebés
Instalación de los receptores del asiento de seguridad para bebés
NOTA: Los receptores y el cochecito están
marcados a la izquierda (L) o a la derecha
(R). Coloque cada uno a partir de la
posición de ocupante del asiento.
1� Active el freno�
2� Quite la barra de seguridad� Jale del
botón de desbloqueo de la barra de
seguridad a cada lado de la misma
y saque la barra de seguridad de los
acoples�
3� Alinee los receptores con la
montura del soporte interior del
cochecito� Presione hasta que oiga
un clic� Jale hacia arriba de los
receptores para comprobar que
estén fijo�
ADVERTENCIA!
CLIC
Page 24

18 19
Extracción de los receptores del asiento de seguridad para bebés
IMPORTANTE: Para plegar el cochecito, debe quitar los receptores
del asiento de seguridad�
1� Presione el botón en el receptor y jalelo
hacia arriba�
NOTA: Guarde los receptores en
la bolsa de la cesta bajo el asiento
cuando no los estén usando.
2� Reemplace la barra de seguridad
deslizándola en los acoples a ambos
lados del asiento� Jale de la barra de
seguridad para asegurarse de que esté
bien sujeta� Se oirá un clic�
NOTA: La barra de seguridad y el
cochecito están marcadas a izquierda
(L) y derecha (R) de la posición del
ocupante del cochecito.
CLIC
Utilización de un asiento asiento de seguridad para bebés Britax
Instalación de un asiento de seguridad para bebés Britax
1� Active el freno�
2� Alinee los seguros de bloqueo del
asiento para bebés o armazón
adaptador con los receptores del
cochecito�
3� Ejerza presión hacia abajo hasta que
quede inmóvil en su sitio�
4� Levante el asiento para bebés de los
dos lados para asegurarse de que está
bien fijado�
Extracción de un asiento de seguridad para bebés Britax
Consulte la guía del usuario del asiento de seguridad para bebés para
obtener información sobre las instrucciones de extracción para su
modelo específico�
Page 25

20 21
Cuidado y mantenimiento
Freno
• Compruebe periódicamente que el freno funciona
adecuadamente y que ambas ruedas quedan bien
bloqueadas�
• Retire la suciedad o cualquier objeto que pueda
impedir el funcionamiento normal del freno�
Armazón
• Limpie el armazón con un paño húmedo y
detergente suave� Utilice una toalla o un paño
seco y limpio para eliminar el exceso de agua y
jabón�
Tela y arnés
• NO los meta en la lavadora ni tampoco seque la
cubierta�
• Lavar a mano con agua fría y jabón suave� Deje
secar al aire para evitar que la cubierta se encoja�
• NO planchar el producto�
Piezas de
plástico
• Utilice un paño húmedo con detergente suave�
Utilice una toalla o un paño seco y limpio para
eliminar el exceso de agua y jabón�
• NO utilice productos abrasivos, disolventes,
detergentes fuertes o productos de limpieza para
el uso doméstico� Estos productos pueden causar
arañazos, desteñir, debilitar el plástico o causar
corrosión en las superficies metálicas
�
Mantenimiento
• Si el cochecito se moja, séquelo con una toalla o
un paño limpio para evitar la corrosión�
• NO pliegue el cochecito cuando esté mojado o
húmedo� Asegúrese siempre de que el cochecito
está seco antes de guardarlo�
Almacenamiento
• No guarde el producto cerca de fuentes de calor
extremo para impedir que se dañen las piezas de
plástico�
• Cubra el cochecito para evitar la acumulación de
polvo y la exposición al sol�
• NO coloque ningún objeto en la parte superior
del cochecito�
Garantía
Este producto, distribuido por Britax Child Safety, Inc� (“Britax”)� Britax ofrece la siguiente
garantía al establecimiento comprador original:
Dos años de garantía limitada
Este producto ofrece una garantía de dos años contra materiales defectuosos o defectos
de fabricación, a partir de la fecha de compra original� Es necesario presentar la prueba de
compra� Al amparo de esta garantía, Britax ofrecerá, a su discreción, piezas de repuesto
o servicios de reparación al comprador original del producto� Britax se reserva el derecho
a interrumpir, modificar o sustituir tejidos, piezas, modelos o productos� No incluye gastos
de envío ni de mano de obra�
Para realizar una reclamación de acuerdo con esta garantía, debe ponerse en contacto con
el departamento de atención al cliente de Britax Child Safety, Inc� llamando al 1 888 427
4829 o 1 704 409 1699, o enviando una carta a 4140 Pleasant Road, Fort Mill, Carolina del
Sur, 29708 (EE� UU�)� Es necesario presentar la prueba de compra�
RELLENE Y ENVÍE LA TARJETA DE REGISTRO EN UN PLAZO DE 30 DÍAS DESDE LA
FECHA DE COMPRA, O VISITE WWW.US.BRITAX.COM/REGISTRATION.
Limitaciones de la garantía
Esta garantía no cubre los daños ocasionados por negligencia, uso indebido, corrosión
salina o utilización del producto de forma distinta a la indicada en esta guía del usuario�
Britax no aprueba el uso de accesorios que no hayan sido manufacturados por Britax�
El uso de accesorios no aprobados podría resultar peligroso y dañar el producto� El uso
puede anular la garantía de Britax�
Limitaciones de daños
La garantía y las soluciones expuestas anteriormente son exclusivas y sustituyen a cualquier
otra, tanto escrita como oral, de forma expresa o implícita� Britax y el establecimiento que
comercializa este producto no se responsabilizarán de ninguno de los daños, tanto directos
como indirectos, que pudiera ocasionar el uso inadecuado de este producto�
Limitaciones de la garantía y otros términos relacionados con la garantía y derechos
estatales
Cualquier garantía implícita de comercialización o adecuación para un propósito determinado
estará limitada a la duración y a los términos de la garantía escrita� Algunos estados no
imponen limitaciones a la duración de una garantía o a la exclusión o limitación por daños
directos o indirectos, por lo que es posible que no le afecten las limitaciones estipuladas
anteriormente� Esta garantía ofrece unos derechos legales específicos, aunque también
puede poseer otros derechos, que variarán en función del estado en que se encuentre�
Ni Britax ni el establecimiento que comercializa este producto autorizan la creación por
terceros de otra garantía, obligación o responsabilidad relacionada con el mismo�
Page 26

22
Page 27

Page 28

Britax Child Safety, Inc.
4140 Pleasant Road
Fort Mill, SC 29708
USA
A Britax Childcare
Group Limited company
Tel.: 1-888-427-4829
Tel.: 1-704-409-1699
www.Britax.com
 Loading...