

Page 1
B-FREE
TM
Stroller
User Guide
Guide de l’utilisateur
Guía del usuario
Page 2

Page 3

1
B-FREETM, Britax®, and Click & GoTM are trademarks owned by Britax and registered
in the U.S.A., and other countries. All rights reserved. ©2017 Britax Child Safety, Inc.
This product and its components are subject to change without notice. P05636200_A:05.17
Contents
Safety Information ���������������������������������������������������������������2
Features ��������������������������������������������������������������������������������4
In The Box ����������������������������������������������������������������������������5
Assembly ������������������������������������������������������������������������������6
Stroller Frame ��������������������������������������������������������������������������������������6
Front Wheel �����������������������������������������������������������������������������������������6
Rear Wheels ����������������������������������������������������������������������������������������7
Canopy ������������������������������������������������������������������������������������������������8
Operation ������������������������������������������������������������������������������9
Using the Stroller ��������������������������������������������������������������������������������� 9
Adjusting the Seat �����������������������������������������������������������������������������10
Using the Front Basket Access ��������������������������������������������������������11
Adjusting the Handlebar��������������������������������������������������������������������11
Using the Parking Brake �������������������������������������������������������������������� 12
Using the Front Wheel Swivel Lock ��������������������������������������������������12
Using the Harness ����������������������������������������������������������������������������� 12
Securing Your Child ����������������������������������������������������������� 14
Infant Car Seat Mode ��������������������������������������������������������15
Using the Infant Car Seat Receivers �������������������������������������������������15
Using a Britax Infant Car Seat �����������������������������������������������������������17
Care and Maintenance ������������������������������������������������������18
Warranty �����������������������������������������������������������������������������19
Page 4
2 3
Safety Information
Failure to follow all warnings and instructions
could result in SERIOUS INJURY or DEATH.
Read these instructions carefully before using this product�
To ensure proper use, store this user guide in a convenient
place so it can be consulted often�
• Never leave child unattended.
• Avoid serious injury from falling or sliding out. Always use
harness to secure child.
• Avoid finger entrapment or injury. Always ensure any child
occupants or bystanders are away from the stroller while
folding or unfolding.
• Stroller appropriate to use from birth, however, Britax
recommends using an infant car seat until child has head
and neck control.
• Do not use stroller with a child taller than 45 inches (114.3 cm).
• Do not use stroller with a child who weighs more than 65 lbs
(29.4 kg). Exceeding this limit may cause stroller to become
unstable.
• Do not overload basket – Maximum weight in basket is
10 lbs (4.5 kg). Overloading the basket may cause the
stroller to become unstable.
• Do not overload the hood storage pocket - Maximum weight
in storage pockets is 1 lb (0.45 kg). Overloading the storage
pocket may cause the stroller to become unstable.
• Do not hang or place items on the stroller handle or frame
except for those approved by Britax. They may cause an
unstable or hazardous condition to exist.
• Always make certain that the stroller is fully open and locked
before use.
• Assembly of this stroller must be performed only by an
adult.
• Only use Britax approved child restraints, car seats,
accessories and replacement parts with this stroller.
• Do not allow children to climb on or play with the stroller.
• Never use stroller on stairs or escalators.
• Stroller is intended for walking speed only. Do not use while
jogging, skating, etc.
• Always set the parking brake when stroller is not moving.
• Do not exceed the manufacturer’s maximum weight limit
when using an infant car seat with this product. See infant
car seat user guide for maximum occupant weight and other
instructions.
• All infant car seats MUST be installed rear facing.
Page 5
4 5
Actual product may vary from images. Actual product may vary from images.
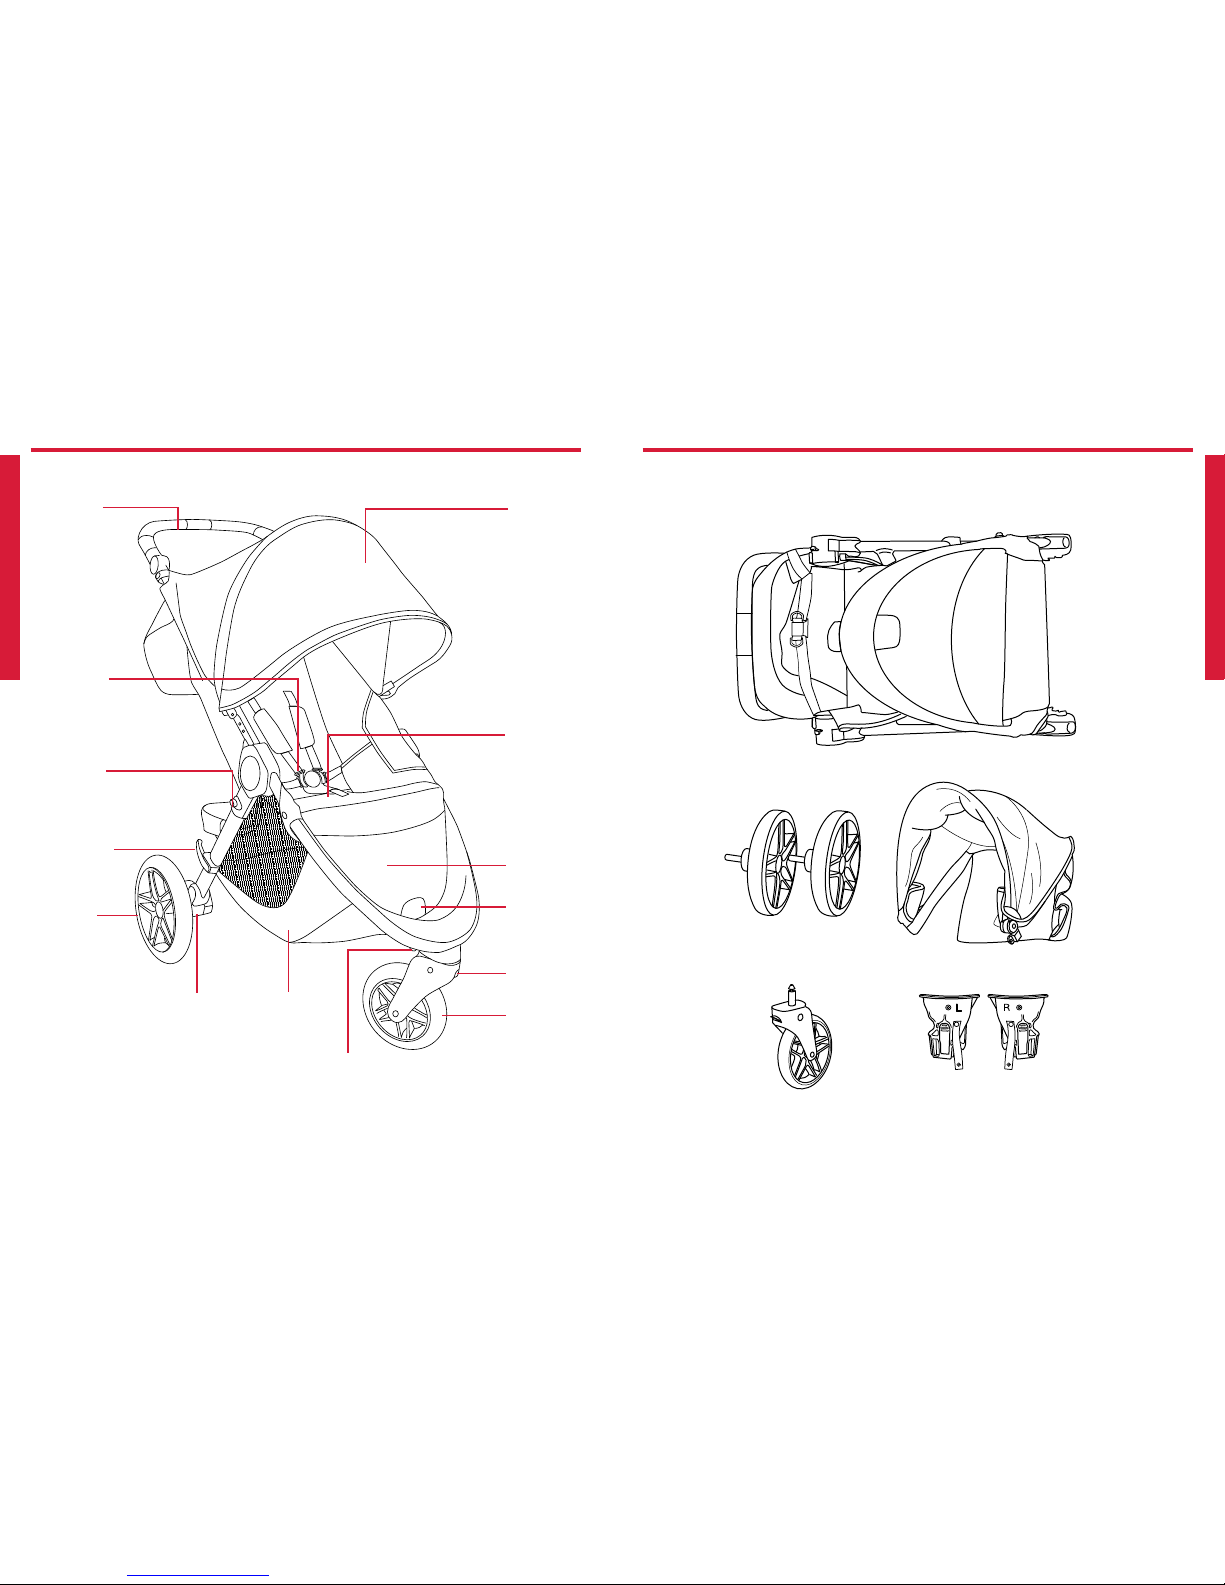
Features In The Box
Canopy
Handle
Chassis
Lock
Harness
& Buckle
Leg Rest
Front
Wheel
Rear Wheel
Release
Button
Frame
Release
Button
Frame
Release
Strap
Under-Seat
Storage
Basket
Swivel
Lock
B-FREE Stroller
Canopy
Infant Car Seat Click & Go ReceiversFront Wheel
Rear Wheels
Rear
Wheel
Front
Basket
Access
Front Wheel
Release Button
Page 6

6 7
Assembly
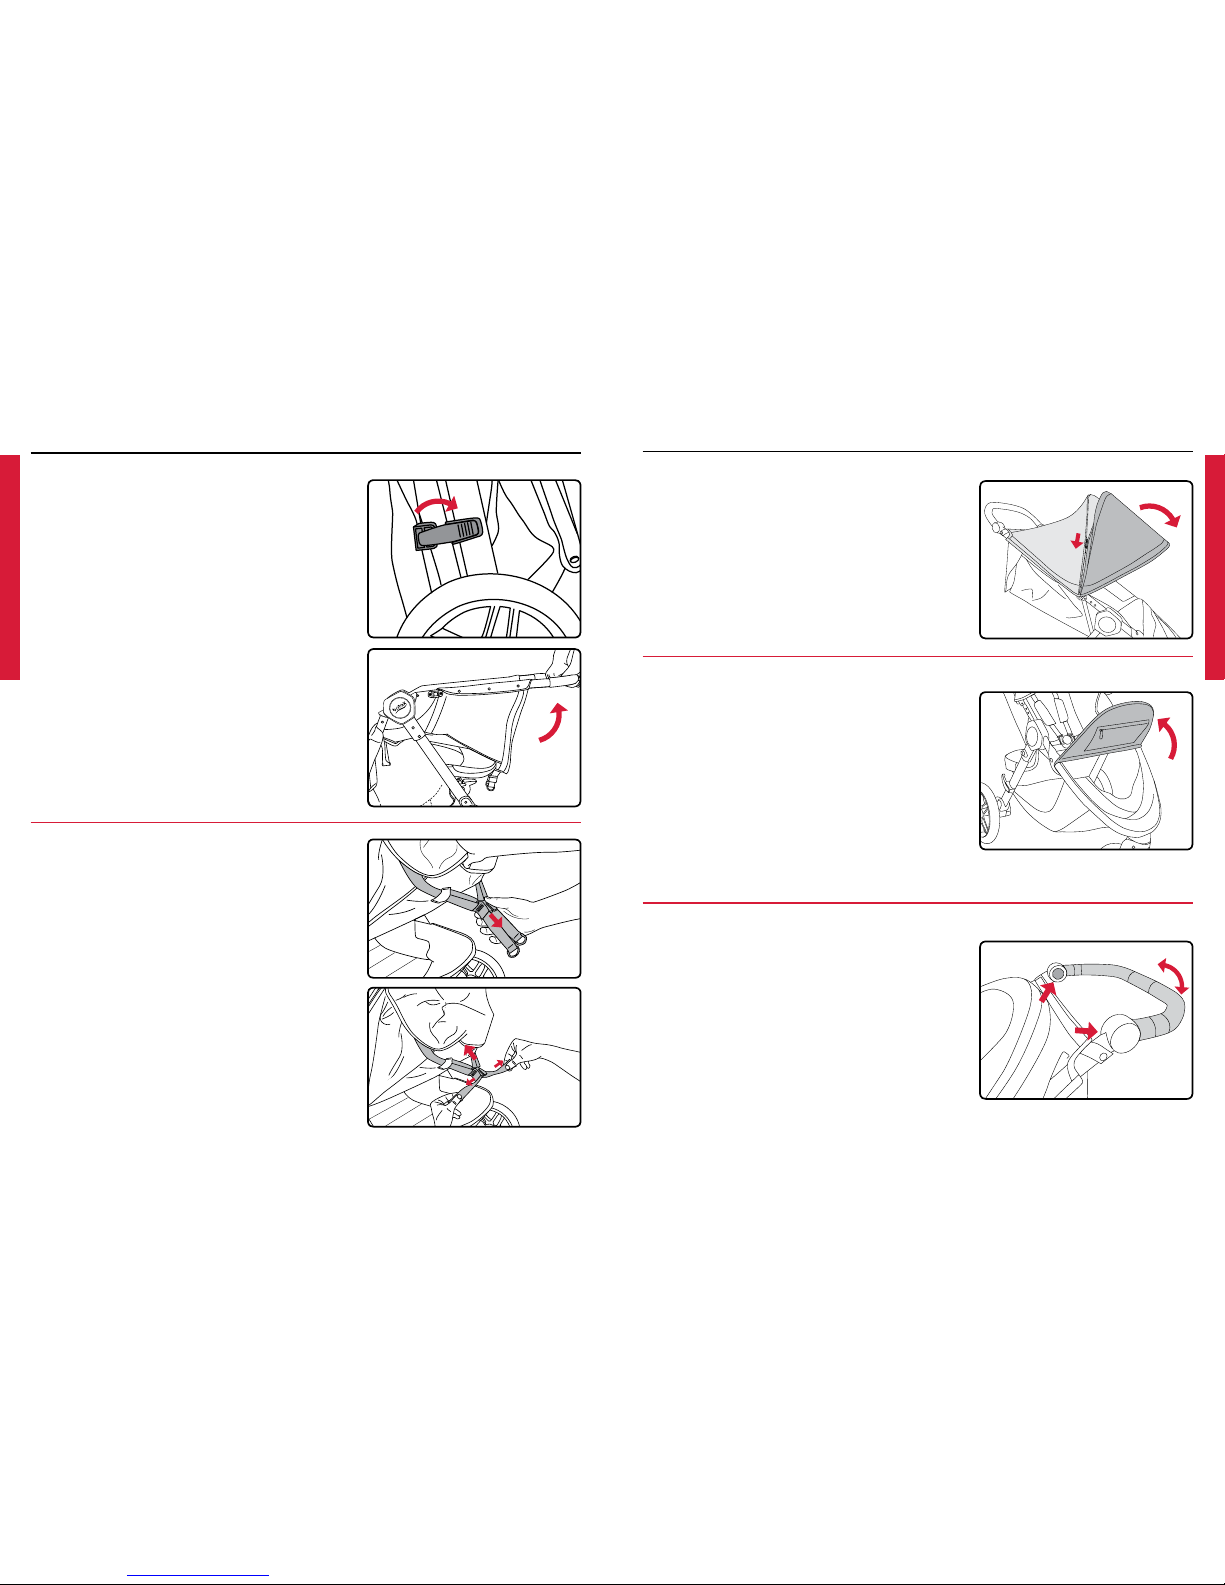
Stroller Frame
1. Push the release on the chassis lock
and open the frame.
2. Lift handle until frame locks into upright
position.
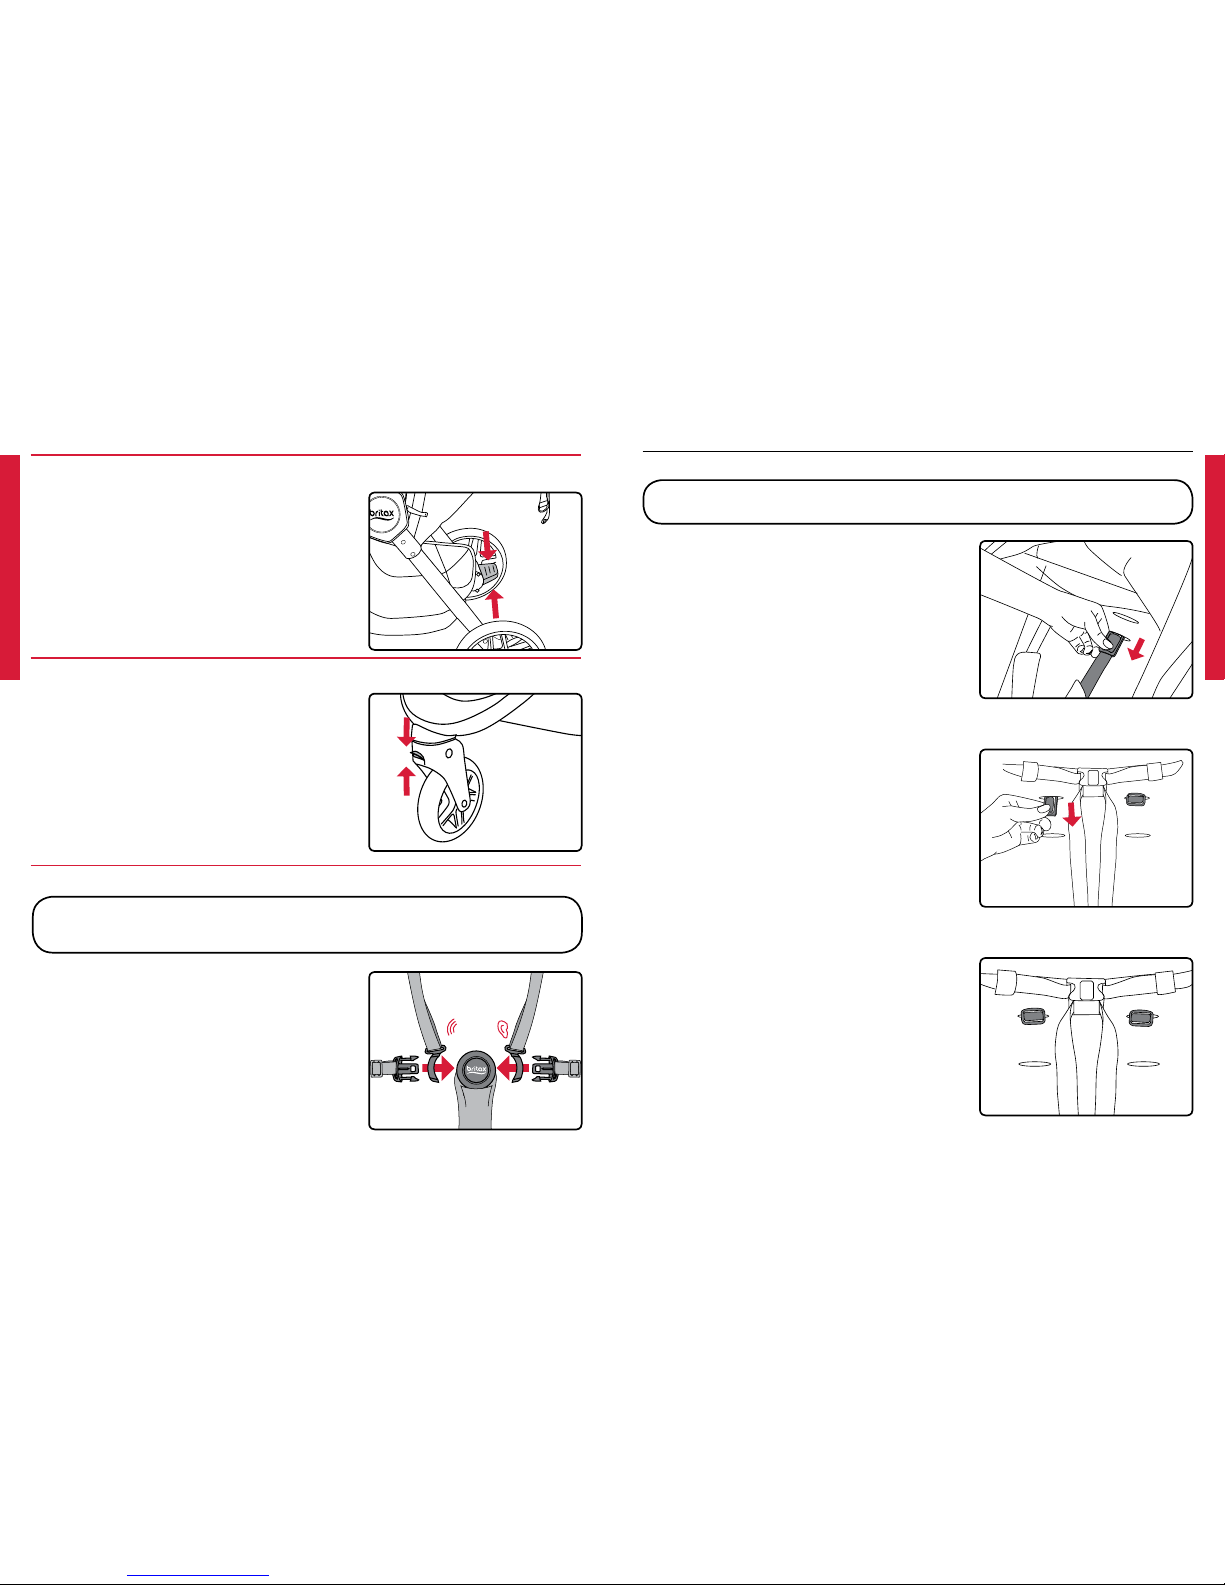
Front Wheel
Installing the Front Wheel
1. Slide the front wheel assembly onto
the mounting post at the front of the
stroller.
2. Pull wheel to ensure that it is secure.
Removing the Front Wheel
1. Press the wheel release button on the
front right side of the stroller frame and
pull the wheel away from the stroller.
Rear Wheels
Installing the Real Wheels
1. Slide the rear wheel axle into the rear
wheel hub mounting bracket until it
locks into place.
2. Pull wheel to ensure that it is secure.
Removing the Rear Wheels
1. Pull and hold the release lever at the
bottom of the rear wheel hub while
pulling the rear wheel away from the
stroller.
CLICK
Page 7
8 9
Operation
Using the Stroller
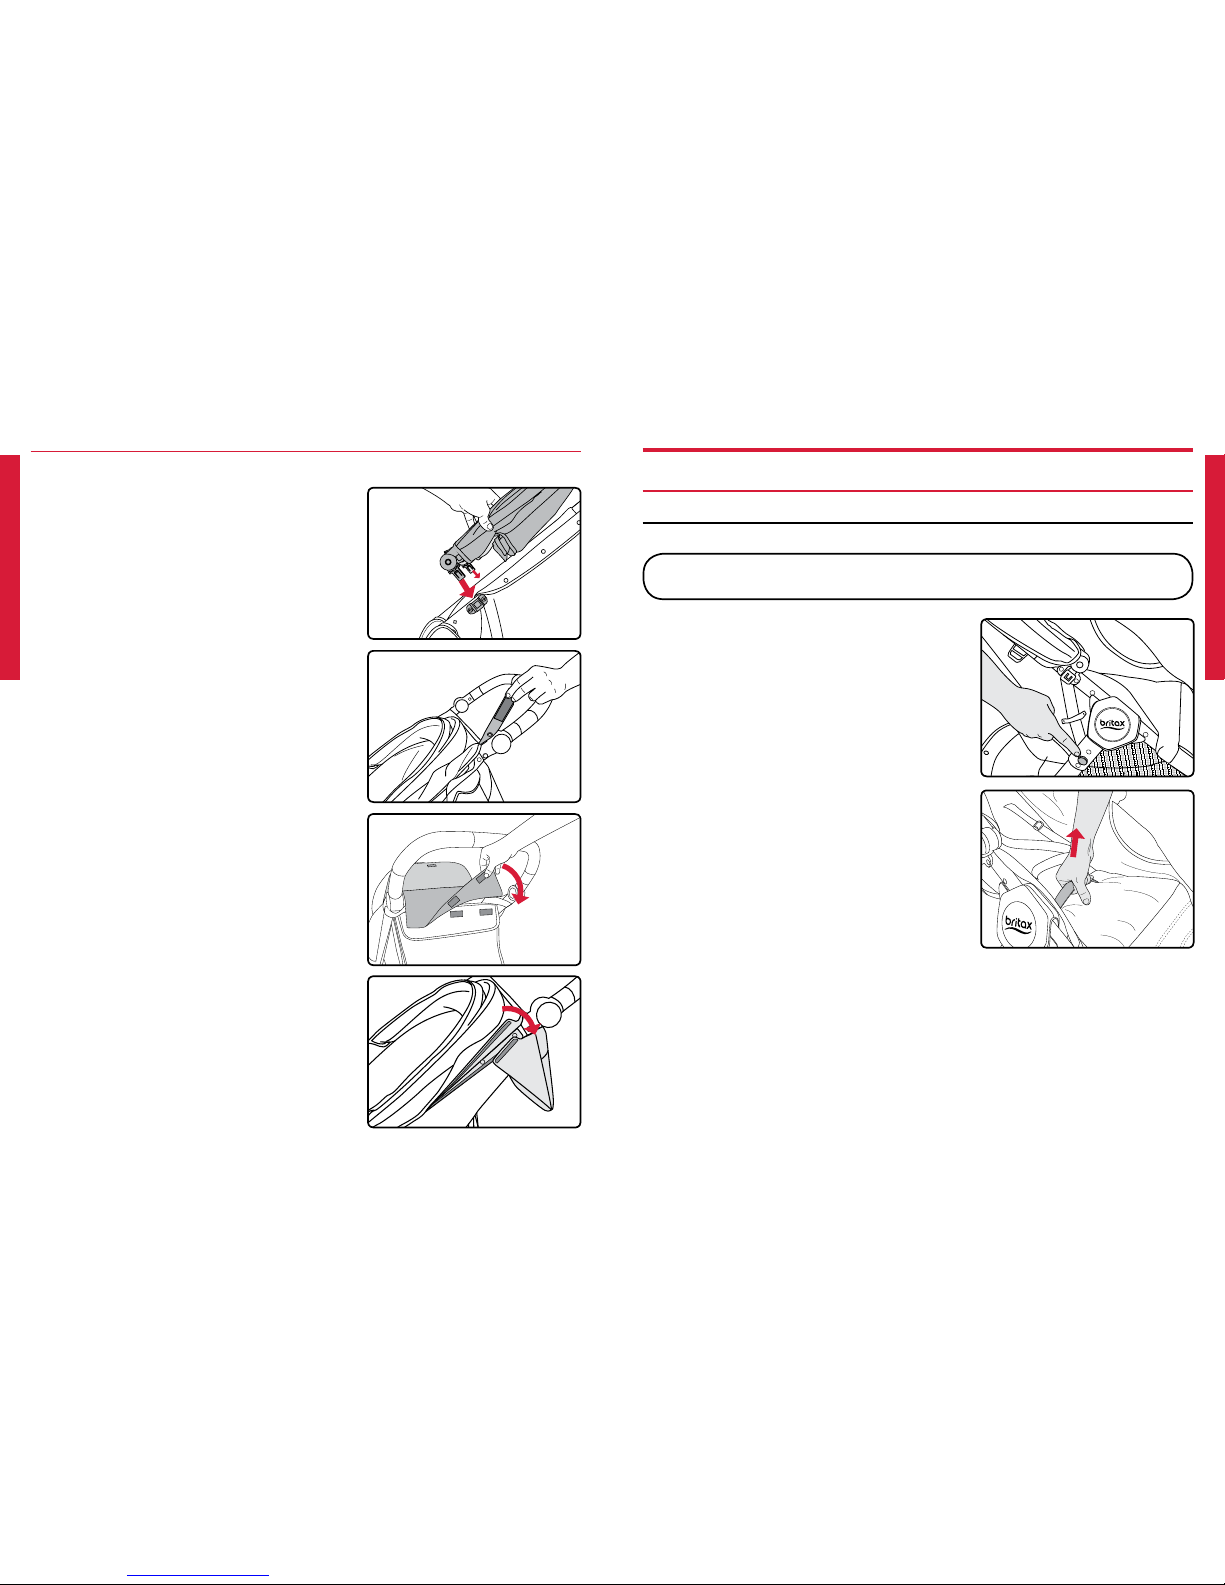
Folding the Stroller
IMPORTANT: Always apply brake and remove children before folding
the stroller.
1. Press the frame release button.
NOTE: Do not continue to hold the
frame release button once pressed.
2. Remove your hand from stroller frame
and hinge area and lift the frame
release strap in the middle of the seat
until the stroller collapses. Push stroller
closed to engage chassis lock. A click
will be heard.
Canopy
1. Slide the canopy stay brackets into the
stroller frame mounts until they lock into
place.
2. Snap the support straps to the frame
just below the stroller handle and
secure them using the hook and loop
fasteners on the inside of the canopy.
3. Drape the inner canopy flap over the
back of the stroller and secure the
hook and loop fasteners to the stroller.
Drape the outer canopy back flap over
the inner canopy flap.
4. Attach the side of back flap to the
hook and loop fasteners to the side
of the stroller, then attach the hook
and loop fasteners along each outside
edge of the canopy to the stroller
frame.
Page 8
10 11
Unfolding the Stroller
1. Push the release on the chassis lock
and open the frame.
2. Lift the handle until frame locks into
upright position.
Adjusting the Seat
1. To recline, pull the recline adjuster
release lever and slide it away from the
seat.
2. To raise, pull both straps apart.
Extending the Canopy
1. Unzip the canopy to extend over the
front of the stroller.
Using the Front Basket Access
1. Pull up on the leg rest to access the
zippered storage pocket and underseat storage basket from the front of
the stroller.
NOTE: The leg rest will only stay open
if flipped all the way up. Leg rest is not
intended to be used as an adjustable
leg rest.
2. Push the leg rest down to close.
Adjusting the Handlebar
1. Press the two release buttons on the
inside of the handle assembly and hold
while raising or lowering the handle to
the desired position.
Page 9
12 13
Using the Parking Brake
1. Press the brake pedal down to lock the
brake.
NOTE: Pressing the brake locks both
back wheels.
2. Lift the brake pedal to release the
brake.
Using the Front Wheel Swivel Lock
1. Push the swivel lock switch fully up to
lock the front wheel.
2. Press the swivel lock switch fully down
to allow the wheel to swivel.
Using the Harness
IMPORTANT: Shoulder and waist straps separate for care and
maintenance, but should always be used together to secure your
child.
1. Align the tongues on the waist straps
with the retainers of the shoulder
straps and slide through until they lock
into place.
2. Insert the tongues into the buckle
assembly until a click is heard.
CLICK
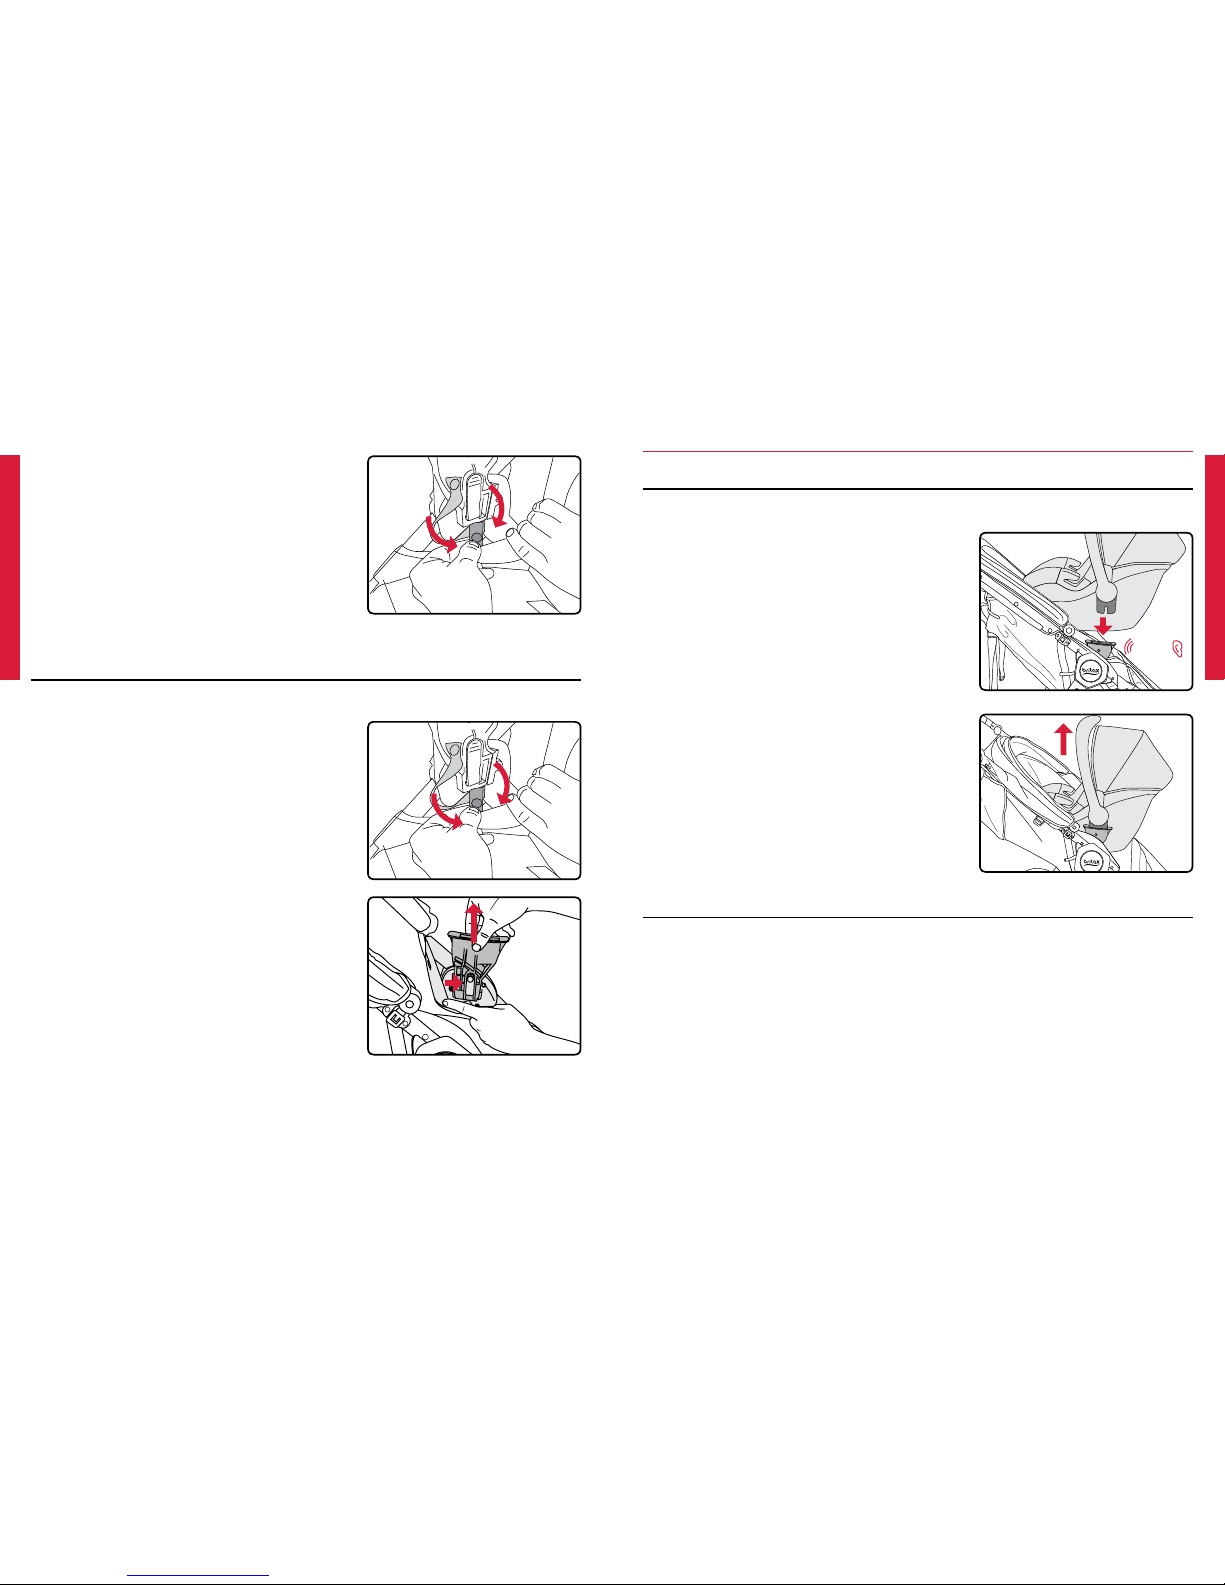
Adjusting the Harness
IMPORTANT: The harness can be adjusted to three dierent heights.
Always ensure proper adjustment at or above your child’s shoulders.
1. Pull the harness strap retainer away
from the seat back and turn 90
degrees to feed it through the harness
slot.
2. Push the harness retainer through the
appropriate harness slot to the back of
the seat.
3. Turn the harness retainer to its original
position as shown so it properly retains
the harness.
Page 10
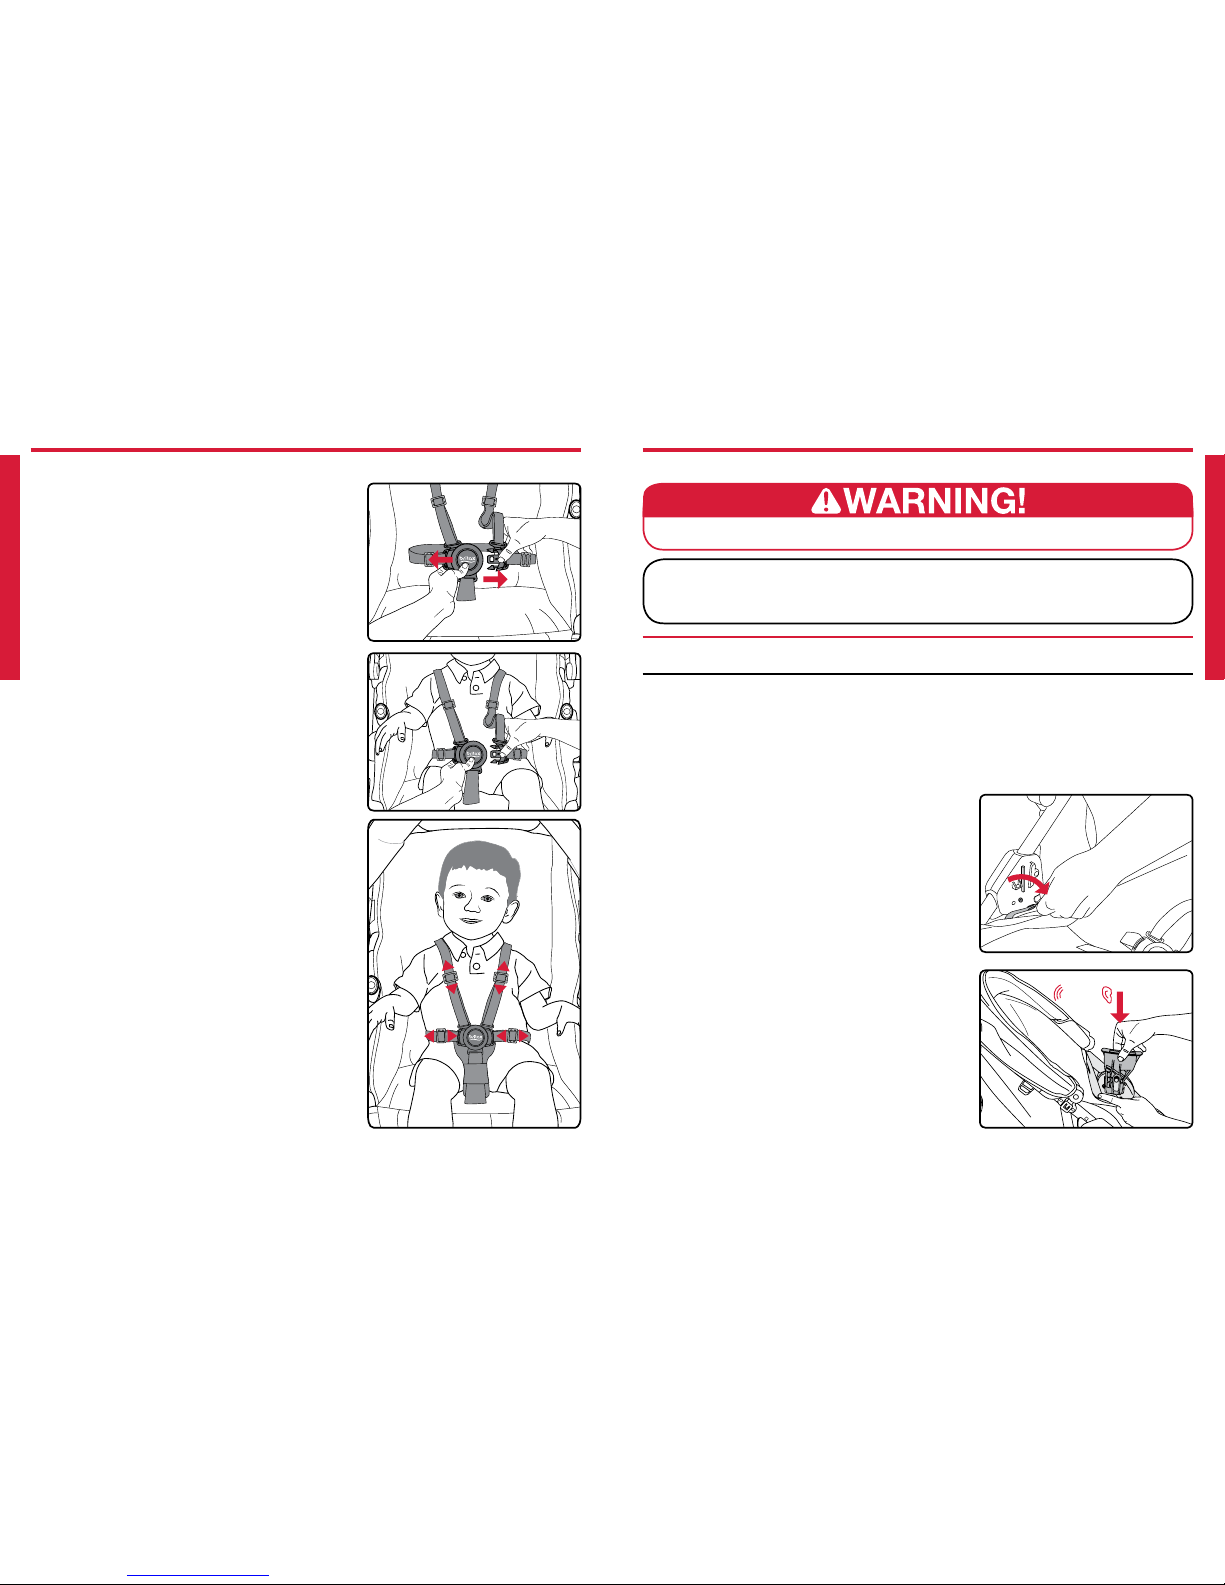
14 15
Securing Your Child
1. Release the harness by depressing the
button in the center of the buckle while
pulling the two tongues away from the
buckle assembly.
2. Fasten the harness by inserting the
tongues on the harness straps into the
buckle assembly.
3. Tighten or loosen the harness straps by
sliding the harness adjusters.
Infant Car Seat Mode
All infant car seats MUST be installed rear facing.
IMPORTANT: For non-Britax infant car seats, an infant car seat
adapter must be used. The adapter is sold separately at select
retailers and on www.us.britax.com.
Using the Infant Car Seat Receivers
Attaching the Infant Car Seat Receivers
NOTE: Receivers are marked left and right. Attach each from the
position of the stroller occupant.
1. Lock the parking brake.
2. Unsnap the stroller seat straps from
the frame of the stroller.
3. Align the receivers with the mounts on
the inside frame of the stroller, then
push down until a click is heard. Pull
up on the receivers to ensure they are
secure.
CLICK
Page 11
16 17
Using a Britax Infant Car Seat
Attaching a Britax Infant Car Seat
1. Set the parking brake.
2. Line up the adapter on the infant car
seat with the receivers on the stroller.
3. Press down until locked into place.
4. Lift up on the infant car seat to ensure
that it is secure.
Removing a Britax Infant Car Seat
Refer to your infant car seat user guide for information on the removal
instructions for your specific model.
4. Attach the receiver strap snaps to the
frame of the stroller, then attach the
stroller seat straps to the receiver strap
snaps.
Removing the Infant Car Seat Receivers
1. Unsnap the stroller seat straps from
the receiver strap snaps, then unsnap
the receiver strap snaps from the frame
of the stroller.
2. Press the button on the receiver and lift
upward.
3. Reattach the stroller seat strap to the
stroller frame.
CLICK
Page 12

18 19
Care and Maintenance
Parking Brake
• Periodically check that the parking brake works
properly and locks both wheels securely.
• Clean out any dirt or debris that may prevent the
brake from working.
Frame • Wipe the frame with a damp cloth and mild
soap. Use clean, dry cloth or towel to wipe
away excess water and soap.
Fabric and
Harness
• DO NOT machine wash or dry the cover.
• Hand wash with cold water and mild soap. Air
dry to prevent shrinking.
• DO NOT iron.
Plastic Parts
• Wipe with a damp cloth and mild soap. Use a
clean, dry cloth or towel to wipe away excess
water and soap.
• DO NOT use abrasives, solvents, strong
detergents, or household cleaners. These
products can scratch, discolor, and weaken
plastic or cause corrosion on metal surfaces.
Maintenance • If the stroller gets wet, wipe with a clean cloth
or towel to prevent corrosion.
• DO NOT fold the stroller when wet or damp.
Always make sure that the stroller is dry before
storing.
Storage • To prevent damage to plastic parts, store away
from extreme heat.
• Cover the stroller to prevent dust build-up and
exposure to sunlight.
• DO NOT stack other items on top of the
stroller.
Warranty
This product is distributed by Britax Child Safety, Inc. (“Britax”). Britax warrants this product
to the original retail purchaser as follows:
Limited Two-Year Warranty
This product is warranted against defective materials or workmanship for two years from
the date of original purchase. Proof of purchase is required. Your exclusive remedy for
this warranty is that Britax will, at its option, provide repair or replacement components to
the original purchaser for this product or replace the product. Britax reserves the right to
discontinue or change fabrics, parts, models or products, or to make substitutions. Labor
and shipping costs for returns are not included.
To make a claim under this Warranty, you must contact Britax Customer Services
Department at 1-888-427-4829 or 704-409-1699 or write to 4140 Pleasant Road, Fort Mill,
SC 29708. Proof of purchase is required.
PLEASE COMPLETE AND MAIL THE REGISTRATION CARD WITHIN 30 DAYS OF
PURCHASE, OR VISIT WWW.US.BRITAX.COM/REGISTRATION.
Warranty Limitations
This warranty does not include damages which arise from negligence, misuse, salt
corrosion, or use not in accordance with the user guide.
The use of non-Britax accessories is not approved by Britax. The use of unapproved
accessories could cause this product to become damaged or dangerous. Their use may
void the Britax warranty.
Limitations of Damages
The warranty and remedies as set forth above are exclusive and in lieu of all others, oral or
written, express or implied. In no event will Britax or the retailer selling this product be liable
for any damages, including incidental or consequential damages, arising out of the use or
inability to use this product.
Limitations of Warranties and Other Warranty Terms and State Law Rights
Any implied warranties, including implied warranties of merchantability and fitness for
a particular purpose, shall be limited to the duration and terms of the express written
warranty. Some states do not allow limitations on how long an implied warranty lasts or
the exclusion or limitation of incidental or consequential damages, so the above limitations
may not apply to you. This warranty gives you specific legal rights, and you may have other
rights, which vary from state to state. Neither Britax, nor the retailer selling this product,
authorizes any person to create for it any other warranty, obligation, or liability in connection
with this product.
Page 13

20
Page 14

1
B-FREETM, Britax®, et Click & GoMC sont des marques de commerce de Britax enregistrées
aux États-Unis et d’autres pays. Tous droits réservés. © 2017 Britax Child Safety, Inc.
Ce produit et ses composants sont modifiables sans préavis. P05636200_A:05.17
Table des matières
Information de sécurité �������������������������������������������������������2
Caractéristiques ������������������������������������������������������������������4
Contenu de la boîte �������������������������������������������������������������5
Assemblage �������������������������������������������������������������������������6
Cadre de la poussette �������������������������������������������������������������������������6
Roue avant�������������������������������������������������������������������������������������������6
Roues arrières �������������������������������������������������������������������������������������7
Capote �������������������������������������������������������������������������������������������������8
Opération ������������������������������������������������������������������������������9
Utiliser la poussette �����������������������������������������������������������������������������9
Ajuster le siège ����������������������������������������������������������������������������������10
Accéder au panier de devant ������������������������������������������������������������11
Ajuster la poignée������������������������������������������������������������������������������11
Utiliser le frein de stationnement ������������������������������������������������������� 12
Utiliser le verrou pivotante de la roue avant��������������������������������������12
Utiliser le harnais �������������������������������������������������������������������������������12
Attacher votre enfant ��������������������������������������������������������14
Mode siège d’auto pour bébé ������������������������������������������15
Utiliser les récepteurs du siège d’auto pour bébé ����������������������������15
Utiliser un siège d’auto pour bébé Britax ������������������������������������������17
Soins et entretien ��������������������������������������������������������������18
Garantie ������������������������������������������������������������������������������19
Page 15

2 3
Ils peuvent causer une condition instable ou dangereux
d’exister
.
• Toujours veiller à déplier complètement la poussette et à la
verrouiller avant de l’utiliser
.
• L’assemblage de la poussette doit être effectué par un
adulte.
• Utilisez seulement les dispositifs de retenue ou les sièges
pour enfant approuvés par Britax avec cette poussette
.
• Ne pas permettre aux enfants de grimper ou de jouer avec
cette poussette.
• N’utiliser jamais la poussette sur un escalier ou un escalier
mécanique.
• La
poussette est conçu pour la vitesse de marche
seulement. Ne pas l’utiliser pour le jogging, le patin à
roulette, etc
.
• Engager le frein de stationnement lorsque la poussette est à
l’arrêt.
• Toujours retirer les récepteurs Click & Go avant de plier la
poussette. Le non-retrait peut causer des dommages au
système Click & Go, ce qui entraîne un risque de blessure.
Gardez les récepteurs dans un endroit sûr lorsqu’ils ne sont
pas en cours d’utilisation.
• Ne pas excéder la limite de poids recommandée par le
fabricant avec un siège d’auto pour bébé. Voir le guide
de l’utilisateur du siège d’auto pour bébé pour les poids
maximaux recommandés par le fabricant et d’autres
instructions.
• Tous les sièges d’auto pour bébé DOIVENT être installés
face à l’arrière.
Information de sécurité
Le non-respect de ces mises en garde et de ces instructions
peut entraîner des BLESSURES GRAVES ou la MORT.
Lire attentivement les instructions avant d’utiliser ce
produit� Conserver ce guide dans un endroit commode
pour être en mesure de le consulter aussi souvent que
nécessaire�
• Ne jamais laisser l’enfant sans surveillance.
• Évitez les blessures graves en raison d’une chute ou du
glissement de l’enfant. Toujours utiliser le harnais pour
attacher l’enfant.
• Évitez le piégeage des doigts ou des blessures. Toujours
s’assurer que tous les occupants de l’enfant ou des passants
sont loin de la poussette tout pliage ou dépliage.
• L’utilisation de cette poussette est approprié de la naissance
cependant Britax recommande d’utiliser un siège d’auto
pour bébé jusqu’à ce l’enfant a la tête et du cou de contrôle.
• Ne pas utiliser cette poussette avec un enfant dont la taille
est supérieure à
114,3 cm (45 po)
.
• Ne pas utiliser cette poussette avec un enfant dont le poids
est supérieur à
29,4 kg (65 lb). Le dépassement de cette
limite peut rendre la poussette instable.
• Ne pas surcharger le panier - Le poids maximum est de
4,5 kg
(10 lb). La surcharge du panier peut rendre la poussette instable.
• Ne pas surcharger la pochette de rangement - Le poids
maximal de la pochette de rangement est 0,45 kg (1 lb). La
surcharge de la pochette peut rendre la poussette instable.
• Ne pas suspendre des articles sur la poignée de la poussette
ou le cadre à moins que ça ne soit approuvé par Britax.
Page 16

4 5
Le produit peut être différent de ceux qui sont illustrés. Le produit peut être différent de ceux qui sont illustrés.
Caractéristiques Contenu de la boîte
Capote
Harnais
et boucle
Reposepieds
Roue
avant
Roue
arrière
Levier de
déverrouillage
des roues
arrière
Bouton de
déverrouillage
du cadre
Sangle de
déverrouillage
du cadre
Panier de
rangement
sous le siège
Verrou
pivotante
de la roue
avant
Poussette B-FREE
Capote
Récepteurs Click & Go du
siège d’auto pour bébé
Roue avant
Roues arrière
Poignée
Verrou du
châssis
Accès au
panier de
devant
Bouton de
déverrouillage
Page 17

6 7
Assemblage
Cadre de la poussette
1. Appuyez sur le bouton de
déverrouillage situé sur le châssis et
déployer le cadre.
2. Soulevez la poignée jusqu’à ce que
le cadre soit verrouillé en position
verticale.
Roue avant
Installer la roue avant
1. Glissez la roue avant dans son axe à
l’avant de la poussette jusqu’à ce que
vous entendiez un clic.
2. Tirez sur la roue pour vous assurer
qu’elle est bien enclenchée.
Retirer la roue avant
1. Appuyez sur le bouton de déverrouillage
au côté avant de droit du cadre de la
poussette et éloigner la roue avant de la
poussette.
Roues arrières
Installer les roues arrières
1. Insérez l’essieu de la roue arrière dans
le support de fixation de la roue arrière
jusqu’à ce qu’il se verrouille en place.
2. Tirez sur la roue pour s’assurer qu’elle
est bien en place.
Retirer les roues arrières
1. Tirez et maintenez le levier de
dégagement au bas du support de
fixation arrière tout en éloignant la roue
arrière de la poussette.
CLIC
Page 18

8 9
Opération
Utiliser la poussette
Plier la poussette
IMPORTANT : Toujours engagez le frein et retirer l’enfant avant de
plier la poussette.
1. Appuyez sur le bouton de déverrouillage
situé sur le cadre.
REMARQUE : Une fois pressé ne pas
continuer à maintenir le bouton de
déverrouillage du cadre.
2. Retirez votre main du cadre et la zone
de charnière et soulever la sangle
de déverrouillage du cadre située
au milieu du siège jusqu’à ce que la
poussette se replie sur elle-même.
Poussez pour fermer la poussette et
enclencher le verrou du châssis. Un
déclic se fera entendre.
Capote
1. Glissez et enclencher les supports
de l’armeture de la capote dans les
montants situé sur le cadre de la
poussette.
2. Enclenchez les sangles de support
au cadre juste sous la poignée de la
poussette et fixer à l’aide des attaches
crochet et boucle à l’intérieur de la
capote.
3. Ramenez le rabat intérieur de la capote
par-dessus l’arrière de la poussette et
fixer les attaches crochet et boucle.
Puis, ramener le rabat extérieur pardessus le rabat intérieur.
4. À l’aide des attaches crochet et
boucle, fixez le côté du rabat arrière
au côté de la poussette, puis fixez
les attaches crochet et boucle sur la
bordure extérieure de la capote, de
chaque côté du châssis.
Page 19

10 11
Déplier la poussette
1. Appuyez sur la libération du verrou du
châssis et ouvrir le cadre.
2. Soulevez la poignée jusqu’à ce que
le cadre soit verrouillé en position
verticale.
Ajuster le siège
1. Pour incliner, tirez le levier de
déverrouillage de réglage d’inclinaison
et faire glisser loin du siège.
2. Pour soulever, séparer les deux sangles.
Déployer la capote
1. Ouvrez la fermeture à glissière de la
capote pour déployer celle-ci vers
l’avant de la poussette.
Accéder au panier de devant
1. Levez le repose-pieds pour accéder
par l’avant à la pochette munie d’une
fermeture à glissière et au panier de
rangement sous le siège.
REMARQUE : Le repose-pieds
ne restera ouvert que s’il est
complètement levé. Le repose-pieds
n’est pas conçu pour être ajustable.
2. Redescendez le repose-pieds pour le
fermer.
Ajuster la poignée
1. Maintenez enfoncés les deux boutons
de relâchement aux extrémités de
la poignée et placer celle-ci dans la
position désirée.
Page 20

12 13
Utiliser le frein de stationnement
1. Appuyez sur la pédale pour engager le
frein.
REMARQUE: Lorsque le frein est
engagé, les deux roues arrière sont
verrouillées.
2. Soulevez la pédale pour relâcher le
frein.
Utiliser le verrou pivotante de la roue avant
1. Poussez le verrou pivotant
complètement vers le haut pour
bloquer la roue avant.
2. Poussez le verrou pivotant
complètement vers le bas pour
débloquer la roue.
Utiliser le harnais
IMPORTANT : Les sangles d’épaules et de l’abdominale séparées
pour les soins et l’entretien, mais doivent être utilisés ensemble
toujours pour sécuriser votre enfant.
1. Alignez les languettes sur les sangles
abdominales avec les fixations sur les
sangles d’épaules et glisser à travers
jusqu’à ce qu’ils s’enclenchent.
2. Inserez les languettes dans la boucle
jusqu’à ce qu’un clic se fasse
entendre.
CLIC
Ajuster le harnais
IMPORTANT : Le harnais peut être ajusté sur trois hauteurs
diérentes. Assurez-vous toujours que la hauteur correcte soit
ajustée pour l‘enfant au niveau ou au-dessus de les épaules.
1. Tirez le clip de retenue du harnais loin
du dossier et tournez le sur 90 degrés
et alimentez-le à travers le trou du
harnais.
2. Poussez la retenue du harnais à travers
la fente du harnais approprié a le
dossier du siège.
3. Tournez le clip de retenue à sa position
originale comme illustré de sorte à
retenir correctement le harnais.
Page 21

14 15
Mode siège d’auto pour bébé
Tous les sièges d’auto pour bébé DOIVENT être installés
orientés vers l’arrière.
IMPORTANT : Pour les sièges d’auto pour bébé pas fabriqué par
Britax, un cadre adaptateur pour siège d’auto pour bébé doit être
utilisé. Ce cadre adaptateur se vend séparément chez certains
détaillants et à www.us.britax.com.
Utiliser les récepteurs du siège d’auto pour bébé
Attacher les récepteurs du siège d’auto pour bébé
REMARQUE: Le côté des adaptateurs est indiqué, gauche (L) ou droit
(R). Le côté est défini à partir de la position assisee.
1. Engagez le frein de stationnement.
2. Détachez les sangles qui relient le
siège au châssis.
3. Alignez les récepteurs avec les
fixations de l’intérieur du châssis, puis
poussez vers le bas jusqu’au déclic.
Tirez sur les récepteurs pour vérifier
qu’ils sont bien fixés.
Attacher votre enfant
1. Détachez le harnais en appuyant sur
le bouton au centre de la boucle tout
en tirant les deux languettes loin de
l’assemblage de boucle
2. Attachez le harnais en insérant les
languettes des sangles dans la boucle.
3. Pour serrer ou desserrer les sangles du
harnais, faites glisser les dispositifs de
réglage.
CLIC
Page 22

16 17
Utiliser un siège d’auto pour bébé Britax
Attacher un siège d’auto pour bébé Britax
1. Engager le frein de stationnement pour
bébé.
2. Aligner les adaptateurs du siège d’auto
sur les récepteurs de la poussette.
3. Appuyez jusqu’à ce que le siège ou le
cadre soit bien enclenché.
4. Tirez sur le siège ou le cadre pour
s’assurer qu’il est bien fixé.
Retirer un siège d’auto pour bébé Britax
Reportez-vous à votre guide d’utilisateur du siège d’auto pour bébé
pour obtenir des informations sur les instructions de retrait pour votre
modèle spécifique.
4. À l’aide des boutons-pression, fixez
d’abord les sangles des récepteurs au
châssis, puis fixez les sangles du siège
aux sangles des récepteurs.
Retirer les récepteurs du siège d’auto pour bébé
1. Détachez les sangles du siège des
sangles des récepteurs, puis détacher
les sangles des récepteurs du châssis.
1. Appuyez sur le bouton de chaque
récepteur, puis tirez les récepteurs vers
le haut.
1. Rattachez les sangles du siège au
châssis.
Page 23

18 19
Garantie
Ce produit est distribué par Britax Child Safety, Inc. («Britax »). Britax offre la garantie
suivante au premier acheteur:
Garantie limitée de deux ans
Ce produit est garanti contre les défauts de matériaux ou de main-d’œuvre pour une période
de deux ans à compter de la date de l’achat initial. Une preuve d’achat est exigée. Le seul
recours offert en vertu de cette garantie est que Britax fournira au premier acheteur, à son
gré, une réparation ou des pièces de rechange. Britax se réserve le droit de discontinuer ou
de modifier les tissus, les pièces, les modèles ou les produits, ou d’y faire des substitutions.
La garantie ne couvre pas les frais de main-d’œuvre et de transport.
Pour profiter de la garantie, veuillez communiquer avec le Service à la clientèle de Britax
en composant le 1888427 4829 ou 1 704 409 1699 ou en écrivant l’adresse suivante:
4140 Pleasant Road, Fort Mill, SC 29708, USA. Une preuve d’achat est exigée.
VEUILLEZ REMPLIR LA CARTE D’ENREGISTREMENT ET LA POSTER DANS LES TRENTE
(30) JOURS QUI SUIVENT L’ACHAT OU VISITER LE SITE WWW.US.BRITAX.COM/
REGISTRATION.
Limites de la garantie
Cette garantie ne couvre pas les dommages qui résultent d’une négligence, d’une mauvaise
utilisation, de la corrosion ou d’une utilisation non conforme aux instructions relatives au
produit.
Britax n’approuve pas l’emploi d’accessoires d’autres fabricants, car ils risquent
d’endommager le produit ou de le rendre dangereux. Leur utilisation pourrait annuler la
garantie deBritax.
Limitations des dommages
La garantie et les mesures de redressement énoncées ci-dessus sont exclusives et tiennent
lieu de toutes les autres, verbales ou écrites, expresses ou implicites. En aucun cas Britax,
ou le détaillant qui vend ce produit, ne pourra être tenu responsable de tout dommage,
incluant les dommages accessoires ou indirects, qui découlerait de l’utilisation de ce
produit ou de l’inaptitude à utiliser ce produit.
Limitations des garanties et des autres conditions de la garantie et droits en vertu
des lois provinciales
Toute garantie tacite, incluant les garanties tacites de qualité marchande et d’adéquation
à un but particulier, se limitera à la durée et aux conditions de la garantie écrite expresse.
Certaines provinces ne permettent pas de limite quant à la durée d’une garantie tacite
ni d’exclusion ou de limite quant aux dommages accessoires ou indirects, de sorte que
les limites énoncées ci-dessus peuvent ne pas s’appliquer. Cette garantie vous donne
des droits légaux précis, et vous pouvez avoir d’autres droits qui peuvent varier d’une
province à l’autre. Ni Britax, ni le détaillant qui vend ce produit, n’autorisent une quelconque
personne à créer en leur nom toute autre garantie, obligation ou responsabilité relativement
à ce produit.
Soins et entretien
Frein de
stationnement
• Vérifiez régulièrement le fonctionnement du frein
de stationnement en s’assurant qu’il verrouille
bien les deux roues arrière.
• Débarrasser le frein des débris et des corps étrangers
qui pourraient nuire à son fonctionnement.
Cadre
• Nettoyez le cadre à l’aide d’un chiffon humide et
d’un savon doux, puis utilisez une serviette ou
un chiffon sec pour enlever le surplus d’eau et de
savon.
Tissus et
harnais
• Ne pas mettre la housse dans la laveuse ou la
sécheuse.
• Lavez à la main avec de l’eau froide et un savon
doux. Séchez la housse à l’air pour éviter le
rétrécissement.
• Ne pas repasser.
Pièces de
plastique
• Nettoyez à l’aide d’un chiffon humide et d’un savon
doux, puis utiliser une serviette ou un chiffon sec
pour enlever le surplus d’eau et de savon.
• Évitez les matières abrasives, les solvants, les
détergents puissants ou les produits de nettoyage
domestiques. Ces produits risquent de rayer, de
décolorer ou d’affaiblir le plastique, ou encore
d’entraîner la corrosion des surfaces métalliques.
Entretien
• Si la poussette est trempée, l’essuyez à l’aide d’un
linge sec pour prévenir la corrosion.
• Ne pas plier la poussette si elle est mouillée ou
humide. Toujours s’assurez qu’elle est sèche au
moment de la ranger.
Rangement
• Évitez les hautes températures qui pourraient
endommager les pièces de plastique.
• Recouvrez la poussette pour éviter l’accumulation
de poussière et la protéger du soleil.
• Ne pas déposer sur la poussette.
Page 24

20
Page 25

1
B-FREETM, Britax®, y Click & GoTM son marcas comerciales propiedad de Britax registradas
en EE.UU. y otros países. Reservados todos los derechos. ©2017 Britax Child Safety, Inc.
Este producto y sus componentes están sujetos a cambios sin previo aviso. P05636200_A:05.17
Índice
Información de seguridad...................................................2
Características .....................................................................4
Contenido de la caja ...........................................................5
Montaje ................................................................................. 6
Armazón del cochecito �����������������������������������������������������������������������6
Rueda delantera ����������������������������������������������������������������������������������6
Ruedas traseras ����������������������������������������������������������������������������������7
Capota �������������������������������������������������������������������������������������������������8
Utilización ............................................................................. 9
Utilización del cochecito ���������������������������������������������������������������������9
Ajuste del asiento ������������������������������������������������������������������������������10
Utilizando el acceso a la cesta frontal ����������������������������������������������11
Ajustando la manija ��������������������������������������������������������������������������� 11
Utilización del freno ��������������������������������������������������������������������������� 12
Utilización de la cerradura giratoria ��������������������������������������������������12
Utilización del arnés ��������������������������������������������������������������������������12
Sujeción del niño ...............................................................14
Modo del asiento de seguridad para bebés ...................15
Utilización de los receptores del asiento de seguridad para bebés 15
Utilización un asiento asiento de seguridad para bebés Britax �������17
Cuidado y mantenimiento .................................................18
Garantía ..............................................................................19
Page 26

2 3
• No cuelgue o coloque objetos en el manillar o armazón del
cochecito, excepto aquellos aprobados por Britax, ya que
pueden hacer que el cochecito se vuelva inestable.
• Antes de utilizar el cochecito, asegúrese siempre de que
está completamente abierto y bien bloqueado.
• El montaje del cochecito debe ser realizado siempre por un
adulto.
• Utilice únicamente accesorios y piezas de repuesto
aprobados por Britax.
• No deje que los niños suban o jueguen con el cochecito.
• Nunca utilice el cochecito en escaleras o escaleras
mecánicas.
• El cochecito está diseñado para uso de velocidad al
caminar solamente. No lo utilice cuando salga a correr,
patinar, etc.
• Deje el freno puesto siempre que el cochecito no esté en
movimiento.
• Siempre deben remover los receptores Click & Go antes de
plegar el cochecito. Si no se retira podria provocar daños
al sistema Click & Go, resultando en riesgo de lesión.
Mantener a los receptores en un lugar seguro cuando no
esté en uso.
• No exceda el peso máximo determinado por el fabricante
al utilizar el asiento de seguridad para bebés con este
producto. Consulte la guía del usuario de asiento de
seguridad para bebés para conocer los pesos máximos y
otras instrucciones.
• Todos los asientos de seguridad para bebés DEBEN
colocarse orientados hacia atrás.
ADVERTENCIA!
Información de seguridad
Si no se siguen las advertencias e instrucciones,
podría ocurrir MUERTE o LESIONES GRAVES.
Lea estas instrucciones antes de utilizar el producto. Para
garantizar un uso adecuado, guarde esta guía del usuario
en un lugar práctico, donde pueda consultarla siempre que
lo necesite.
• Nunca deje al niño solo.
• Utilice siempre el arnés para sujetar al niño, a fin de evitar
que se caiga o deslice y sufra daños graves.
• Evite atrapamiento de los dedos o lesiónes. Asegúrese
siempre de que los niños o personas presentes estén lejos
de cochecito mientras pliegue o despliegue.
• Utilización de este cochecito es adecuada desde el
nacimiento sin embargo Britax recomienda el uso de un
asiento de seguridad hasta que el niño tiene control de
cabeza y el cuello.
• No utilice el cochecito con niños que son mas altos de
114,3 cm (45 pulg.).
• No utilice el cochecito con un niño cuyo peso sea superior
a 29,5 kg (65 lb). Exceder el peso máximo recomendado
puede causar que el cochecito se vuelva inestable.
• No sobrecargue la cesta. El peso máximo que puede
soportar es de 4,5 kg (10 lb). Si sobrecarga la cesta, el
cochecito podría volverse inestable.
• No sobrecargue la cesta de almacenaje. El peso máximo
en la cesta de almacenaje es de 0,45 kg (1 lb). Exceder
el peso máximo recomendado puede causar que el
cochecito se vuelva inestable.
Page 27

4 5
Es posible que el producto real no coincida con las imágenes.
Características Contenido de la caja
Capota
Manija
Arnés y
la hebilla
Reposapiés
Rueda
delantera
Rueda
trasera
Palanca de
desbloqueo
de la rueda
trasera
Botón de
liberación
Correa de
liberación
Cesta bajo
el asiento
Cerradura
giratoria
Cochecito de B-FREE
Capota
Receptores Click & Go del asiento
de seguridad para bebés
Rueda delantera
Ruedas traseras
Es posible que el producto real no coincida con las imágenes.
Cerradura
del chasis
Botón de
desbloqueo
de la rueda
delantera
Acceso a la
cesta frontal
Page 28

6 7
Montaje
Armazón del cochecito
1. Pulse el botón de desbloqueo en la
cerradura del chasis y abra el armazón.
2. Levante la manija hasta que el
armazón quede bloqueado en un
posición vertical.
Rueda delantera
Instalar la rueda delantera
1. Deslice la rueda delantera en el poste
de montaje en la parte delantera del
cochecito.
2. Jale de la rueda para asegurarse de
que está bien sujeta.
Extracción de la rueda delantera
1. Pulse el boton de desbloqueo situado
en el derecho en la parte delantero del
armazón del cochecito y jale la rueda
delantera lejos del cochecito.
Ruedas traseras
Instalar las ruedas traseras
1. Deslice el eje de la rueda trasera en el
soporte de montaje del cubo trasero
hasta que encaje en su lugar.
2. Jale de la rueda para asegurarse de
que está bien sujeta.
Extracción de las ruedas traseras
1. Jale y sostenga la palanca de
desbloqueo en la parte inferior del
soporte de montaje del cubo trasero
mientras tira de la rueda trasera fuera
del cochecito.
CLIC
Page 29

8 9
Utilización
Utilización del cochecito
Pliega el cochecito
IMPORTANTE: Deje siempre puesto el freno y saque al niño del
cochecito antes de plegarlo.
1. Pulse el botón de liberación en el
armazón.
NOTA: Una vez presionado, no
mantenga pulsado el botón de
liberación.
2. Retire su mano del armazón y del área
de la bisagra y levante la correa de
liberación que encontrará en el centro
del asiento hasta que el cochecito se
pliegue. Empuje el cochecito hasta que
cierre para enganchar la cerradura del
chasis. Se oirá un clic.
Capota
1. Deslice los soportes de la capota en el
armazón del cochecito hasta queden
encajados.
2. Encaje las correas de soporte en el
armazón, justo debajo de la manija del
cochecito, y asegurarlos usando los
sujetadores gancho y lazo en el interior
de la capota.
3. Cubra la solapas interior de la capote
sobre la parte posterior del cochecito
y asegure los sujetadores del gancho
y lazo al cochecito. Cubra la solapa
exterior de la capote sobre la solapa
interior del cochecito.
4. Fije los sujetadores gancho y lazo de la
solapa exterior de la capote a los lados
del cochecito, a continuación fije los
sujetadores gancho y lazo alrededor
del borde exterior de la capota del
cochecito.
Page 30

10 11
Despliega el cochecito
1. Empuje la liberación de la cerradura
del chasis, si se utiliza.
2. Levante la manija hasta que el armazón
quede bloqueado en posición vertical.
Ajuste del asiento
1. Para reclinar, jale de la palanca de
liberación del ajustador de inclinación
y deslicela lejos del asiento.
2. Para elevar, jale las dos correas
separadas.
Extendiendo la capota
1. Desabroche la capota para ampliarla
sobre la parte delantera del cochecito.
Utilizando el acceso a la cesta frontal
1. Jale hacia arriba del reposapiés para
acceder al bolsillo de almacenamiento
con cremallera y al cesto de
almacenamiento bajo el asiento desde
el frente del cochecito.
NOTA: El reposapiés sólo permanecerá
abierto si se voltea todo el camino.
El reposapiés no está destinado a
utilizarse como reposapiés ajustable.
2. Empuje el reposapiés por abajo para
cerrarlo.
Ajustando la manija
1. Empuje los dos botones de liberación
en el interior del montaje de la manija
y manténgalo presionado mientras
levanta o baja la manija a la posición
deseada.
Page 31

12 13
Utilización del freno
1. Presione el pedal del freno hacia abajo
para bloquearlo.
NOTA: Al utilizar el freno se bloquearán
ambas ruedas traseras.
2. Levante el pedal del freno para
desbloquearlo.
Utilización de la cerradura giratoria
1. Presione la cerradura giratoria de la
rueda completamente hacia arriba para
bloquear la rueda delantera.
2. Presione la cerradura giratoria de la
rueda completamente hacia abajo para
que esta pueda girar.
Utilización del arnés
IMPORTANTE: Las correas del hombro y de la cintura se puede
separar para el cuidado y mantenimiento, pero siempre deben
utilizarse conjuntamente para sujetar al niño.
1. Alinee las lengüetas de las correas de
la cintura con los retenedores de las
correas de los hombros y se deslizan a
través hasta que encajen en su lugar.
2. Inserte las lengüetas en la hebilla hasta
que se oiga un clic.
CLIC
Ajustando el arnés
IMPORTANTE:
El arnés se puede ajustar en tres alturas diferentes.
Asegúrese siempre de que se ajusta la altura correcta en o por
encima de los hombros de su niño
1. Jale de la correa del arnés hacia fuera
del respaldo y gire el clip de retención
90 grados para guíelo a través de la
ranura del arnés en el respaldo.
2. Empuje el clip de retención del arnés
a través la ranura deseada a la parte
posterior del asiento.
3. Gire el clip de retención a su posición
original de forma que retenga
correctamente el arnés. Repite por la
segunda correa del arnés.
Page 32

14 15
Sujeción del niño
1. Gire el clip de retención a su posición
original de forma que retenga
correctamente el arnés. Repite por la
segunda correa del arnés.
2. Sujete el arnés insertando las
lengüetas de las correas en la hebilla.
3. Deslice el regulador del arnés para
apretar o aflojar las correas de este.
Modo del asiento de seguridad para
bebés
Todos los asientos de seguridad para bebés DEBEN estar
installado orientados hacia atrás.
IMPORTANTE: Para los asientos para bebés no BRITAX, se debe
utilizar un armazón adaptador del asiento de seguridad para bebés.
Este armazón adaptador se vende por separado en tiendas selectas
y en www.us.britax.com.
Utilización de los receptores del asiento de seguridad para bebés
Instalación de los receptores del asiento de seguridad para bebés
NOTA: Los receptores vienen marcados para uso a la izquierda (L) o a la
derecha (R). Coloque cada uno a partir de la posición de ocupante del
asiento.
1. Active el freno.
2. Desconecto la cinta del asiento del
cochecito del soporte del cochecito.
3. Alinee el receptor con la montura
del soporte interior del cochecito.
Presione hasta que oiga un clic.
Jale hacia arriba del receptor para
comprobar que esté fijo.
ADVERTENCIA!
CLIC
Page 33

16 17
4. Fije el enganche de la cinta del
receptor en el soporte del cochecito, y
a continuación, fije la cinta del asiento
del cochecito en el enganche de la
cinta del receptor.
Extracción de los receptores del asiento de seguridad para bebés
1. Desconecte la cinta del asiento de
cochecito de la cinta del receptor, y
desconecte la cinta del receptor del
soporte del cochecito.
2. Presione el boton en el receptor y jalelo
hacia arriba.
3. Reconecte la cinta del asiento al
soporte del cochecito.
Utilización un asiento asiento de seguridad para bebés Britax
Instalación de un asiento de seguridad para bebés Britax
1. Active el freno.
2. Alinee los seguros de bloqueo del
asiento para bebés o armazón
adaptador con los receptores del
cochecito.
3. Ejerza presión hacia abajo hasta que
quede inmóvil en su sitio.
4. Levante el armazón adaptador o el
asiento para bebés para asegurarse de
que está bien fijado.
Extracción de un asiento de seguridad para bebés Britax
Consulte la guía del usuario del asiento de seguridad para bebés para
obtener información sobre las instrucciones de extracción para su
modelo específico.
CLIC
Page 34

18 19
Cuidado y mantenimiento
Freno
• Compruebe periódicamente que el freno funciona
adecuadamente y que ambas ruedas quedan bien
bloqueadas.
• Retire la suciedad o cualquier objeto que pueda
impedir el funcionamiento normal del freno.
Armazón
• Limpie el armazón con un paño húmedo y
detergente suave. Utilice una toalla o un paño
seco y limpio para eliminar el exceso de agua y
jabón.
Tela y arnés
• NO los meta en la lavadora ni tampoco seque la
cubierta.
• Lavar a mano con agua fría y jabón suave. Deje
secar al aire para evitar que la cubierta se encoja.
• NO planchar el producto.
Piezas de
plástico
• Utilice un paño húmedo con detergente suave.
Utilice una toalla o un paño seco y limpio para
eliminar el exceso de agua y jabón.
• NO utilice productos abrasivos, disolventes,
detergentes fuertes o productos de limpieza para
el uso doméstico. Estos productos pueden causar
arañazos, desteñir, debilitar el plástico o causar
corrosión en las superficies metálicas
.
Mantenimiento
• Si el cochecito se moja, séquelo con una toalla o
un paño limpio para evitar la corrosión.
• NO pliegue el cochecito cuando esté mojado o
húmedo. Asegúrese siempre de que el cochecito
está seco antes de guardarlo.
Almacenamiento
• No guarde el producto cerca de fuentes de calor
extremo para impedir que se dañen las piezas de
plástico.
• Cubra el cochecito para evitar la acumulación de
polvo y la exposición al sol.
• NO coloque ningún objeto en la parte superior
del cochecito.
Garantía
Este producto, distribuido por Britax Child Safety, Inc. (“Britax”). Britax ofrece la siguiente
garantía al establecimiento comprador original:
Dos años de garantía limitada
Este producto ofrece una garantía de dos años contra materiales defectuosos o defectos
de fabricación, a partir de la fecha de compra original. Es necesario presentar la prueba de
compra. Al amparo de esta garantía, Britax ofrecerá, a su discreción, piezas de repuesto
o servicios de reparación al comprador original del producto. Britax se reserva el derecho
a interrumpir, modificar o sustituir tejidos, piezas, modelos o productos. No incluye gastos
de envío ni de mano de obra.
Para realizar una reclamación de acuerdo con esta garantía, debe ponerse en contacto con
el departamento de atención al cliente de Britax Child Safety, Inc. llamando al 1 888 427
4829 o 1 704 409 1699, o enviando una carta a 4140 Pleasant Road, Fort Mill, Carolina del
Sur, 29708 (EE. UU.). Es necesario presentar la prueba de compra.
RELLENE Y ENVÍE LA TARJETA DE REGISTRO EN UN PLAZO DE 30 DÍAS DESDE LA
FECHA DE COMPRA, O VISITE WWW.US.BRITAX.COM/REGISTRATION.
Limitaciones de la garantía
Esta garantía no cubre los daños ocasionados por negligencia, uso indebido, corrosión
salina o utilización del producto de forma distinta a la indicada en esta guía del usuario.
Britax no aprueba el uso de accesorios que no hayan sido manufacturados por Britax.
El uso de accesorios no aprobados podría resultar peligroso y dañar el producto. El uso
puede anular la garantía de Britax.
Limitaciones de daños
La garantía y las soluciones expuestas anteriormente son exclusivas y sustituyen a cualquier
otra, tanto escrita como oral, de forma expresa o implícita. Britax y el establecimiento que
comercializa este producto no se responsabilizarán de ninguno de los daños, tanto directos
como indirectos, que pudiera ocasionar el uso inadecuado de este producto.
Limitaciones de la garantía y otros términos relacionados con la garantía y derechos
estatales
Cualquier garantía implícita de comercialización o adecuación para un propósito determinado
estará limitada a la duración y a los términos de la garantía escrita. Algunos estados no
imponen limitaciones a la duración de una garantía o a la exclusión o limitación por daños
directos o indirectos, por lo que es posible que no le afecten las limitaciones estipuladas
anteriormente. Esta garantía ofrece unos derechos legales específicos, aunque también
puede poseer otros derechos, que variarán en función del estado en que se encuentre.
Ni Britax ni el establecimiento que comercializa este producto autorizan la creación por
terceros de otra garantía, obligación o responsabilidad relacionada con el mismo.
Page 35

20
Notes / Remarques / Notas
Page 36

Page 37

Britax Child Safety, Inc.
4140 Pleasant Road
Fort Mill, SC 29708
USA
A Britax Childcare
Group Limited company
Tel.: 1-888-427-4829
Tel.: 1-704-409-1699
www.Britax.com
 Loading...