

Britax BEEPA 4 IN 1 - SERIES WA2819A3, Steelcraft Beepa, Steelcraft WA2819A3 Series User Manual
Page 1
08
KEEP INSTRUCTIONS IN A SAFE PLACE FOR FUTURE REFERENCE
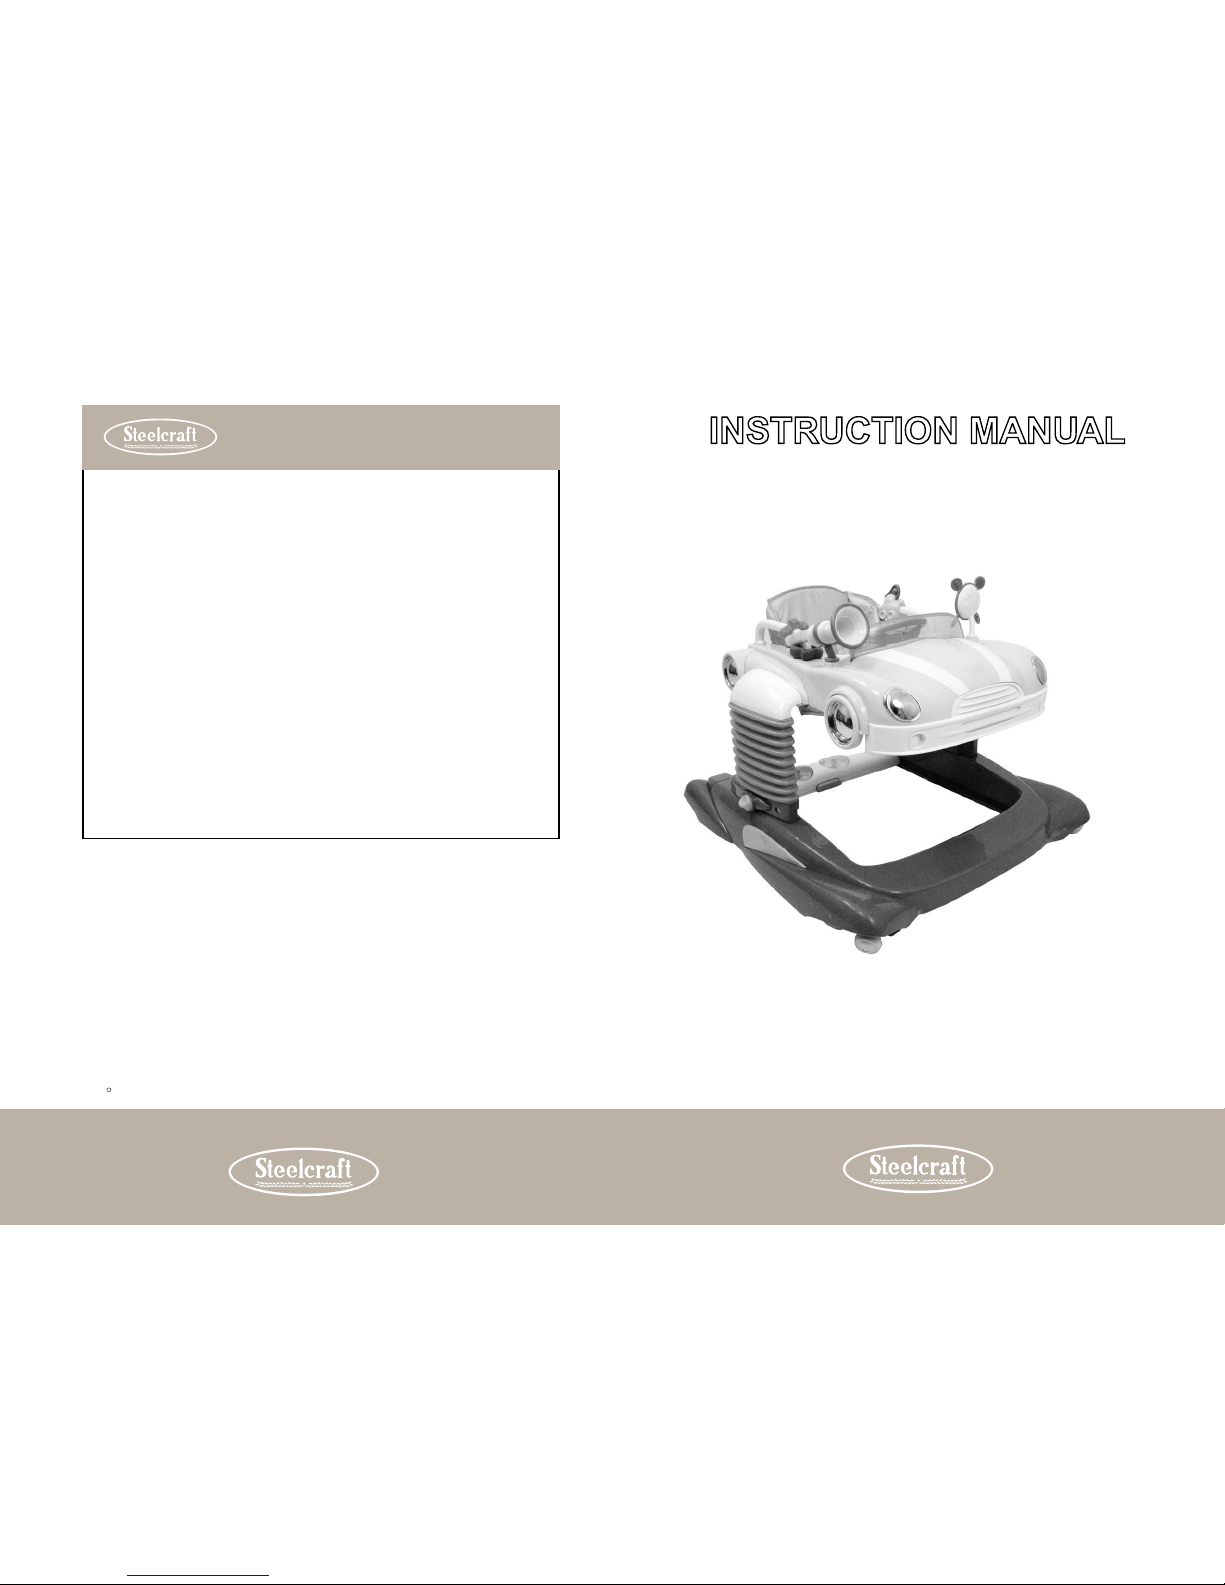
Beepa 4 in 1 Walker
series WA2819A3
Distributed by:
AUSTRALIA
BRITAX CHILDCARE PTY.LTD.
A Britax International company.
(Incorporated in Victoria)
A.B.N. 55 006 773 600
99 Derby Road, Sunshine,
Victoria 3020, Australia
Phone: (03) 9288 7288
Fax: (03) 9311 5798
Due to our continuing program of development, Britax reserves the right to alter the specifications,
colour or design without any further notice.
The Steelcraft trademark is the property of Britax Childcare Pty. Ltd-Australia.
The Britax trademark is the property of Britax Excelsior Limited - UK.
Visit the Britax website at: http:/www.britax.com.au or email us at custserv@britax.com.au
Due to the variations in the style and design of our products the illustrations used in this instruction
booklet are generic.
12/06 c 2007 Copyright Britax Childcare Pty. Ltd. Australia.
NEW ZEALAND
BRITAX CHILDCARE NZ. Limited.
A Britax International company.
101 Diana Drive, Glenfield,
Auckland 9, New Zealand.
Phone: (09) 443 0102
Fax: (09) 443 0120
Each Steelcraft unit is thoroughly inspected in our Quality Assurance
department prior to delivery. In the unlikely case that you find any
material or workmanship that affects the units normal operation,
we will repair the unit free of charge within 12 months of purchase.
You are required to present your receipt as proof of purchase.
For all concerns with your product please contact our Customer
Service team.
CUSTOMER SERVICE
1300 303 330 - Australia
0508 688 822 - New Zealand
Please read all the information carefully before using this product.
This warranty does not apply to failure due to improper care,
or normal wear and tear caused by product use. We reserve the
right to inspect the unit. You may be charged for repairs if the product
has been damaged accidentally.
Warranty
4000823
Page 2

02
07
READ THESE INSTRUCTIONS CAREFULLY BEFORE ASSEMBLY
AND USE OF THE WALKER. FOLLOW THE MANUFACTURER’S
INSTRUCTIONS.
THE CORRECT USE AND MAINTENANCE OF THIS
PRODUCT IS ESSENTIAL.
SAFETY WARNINGS
DO NOT LEAVE YOUR CHILD EXPOSED TO THE SUN.
THIS PRODUCT IS NOT INTENDED FOR COMMERCIAL USE.
• Never leave your child unattended, always keep child in view whilst
in the walker.
• Never adjust or carry the walker with the child in it.
• Do not store outdoors.
• Do not allow children to stand on the seat.
• Ensure the child can touch the floor or foot pedal with both feet,
after adjusting the height of the walker.
• Do not use accessories other than those supplied and approved
by Britax.
• Discontinue using the baby walker should any part become damaged
or broken.
• Double check assembly before child is allowed to use the baby walker.
• To asvoid burns or injuries ensure, electrical cords, heaters, barbecues,
fireplaces and other hot objects are guarded or out of reach.
• To prevent injuries, always ensure the child is well clear of any
moving parts when adjusting the baby walker.
• The baby walker seat should not be used by children who can
walk unaided.
• Do not use walker until baby can sit up by itself.
• To avoid serious injury or death, block stairs and steps securely before
using the walker.
• Use only on flat surfaces free of objects that could cause the walker to
tip over.
• Maximum weight or height for child using walker seat is 13kg or 81cm
tall.
• If used on carpets, the safety grip pads may reduce the walker speed.
• Clean safety grip pads regularly to maintain stopping performance
(see Care & Maintenance).
www.britax.com.au
www.britax.com.au
CARE AND MAINTENANCE
To prolong the life of your nursery product keep it clean and do not leave it in the
direct sunlight for extended periods of time.
Removable fabric covers and trims may be cleaned using warm water with a
household soap or a mild detergent. Allow it to dry fully, preferably away from direct
sunlight..
DO NOT DRY CLEAN, OR USE BLEACH.
Do not machine wash, tumble or spin dry, unless the care labeling on the product
permits these methods. Non removable fabric covers and trims may be cleaned
using a damp sponge with soap or mild detergent. Allow it to dry completely before
folding or storing it away.
Always check parts regularly for tightness of screws, nuts and other fasteners
- tighten if required. To maintain the safety of your nursery product, seek prompt
repairs for bent, torn, worn or broken parts. Use only those parts and accessories
approved by Britax.
WARNING: Clean safety grip pads regularly, using warm water with a household soap
or mild detergent to maintain stopping performance.
Remove batteries before storing for a prolonged period of time. Check the condition
of batteries periodically for fluid leakage. Do not use the walker if batteries are
leaking.
If the wheels squeak - use silicon based spray ensuring it penetrates the wheel and
axle assembly.
In some climates the covers and trims may be affected by mould and mildew. To help
prevent this occurring, do not fold or store the product if it is damp or wet. Always
store the product in a well ventilated area.
!
Page 3

06
03
www.britax.com.au
www.britax.com.au
PARTS LIST
A 1 x Upper plate includes seat
B 1 x Walker Car Bonnet
C 2 x Support Legs
D 1 x Lower base includes foot pedal
E 1 x Car windscreen
F 4 x Swivel Wheels
G&H 2 x Handrails
I 1 x Toy Fan
J 1 x Toy Horn
1. ASSEMBLY
A
Push the button on the foot pedal and pull backward
and engage in furthest location at the rear of the
lower base.
B Align and insert the support legs into corresponding
holes on the lower base, push down until engaged.
C Align and insert the support legs into the
corresponding hole of the sides of upper plate and
press until engaged.
5. TO ADJUST HEIGHT AND USE BOUNCE FUNCTION
NOTE: The support legs can be adjusted to three
heights to allow for child’s growth.
A To adjust seat height turn support leg knobs to
‘Lock’ position. Press the buttons in whilst pushing
down on the upper tray. Find the desired height
indicated by the numbers 1 to 3 and release the
buttons to lock into position.
B To use bounce function turn the leg knobs to
‘Jump’.
6. TO ADJUST FOOT PEDAL
NOTE: There are 3 foot pedal positions. 1. Front
beneath car bonnet, 2. Centre under seat and 3. Rear
behind seat.
A Push button on foot pedal and slide to adjust to
desired position.
7. TO INSTALL AND REMOVE SEAT FABRIC
A Raise the seat back rest and cover with rear flap
of seat cloth.
B Insert 6 plastic seat slots into corresponding upper
plate holes.
C Turn upper plate upside down, pull plastic seat
slots over plastic molding to hold seat in place.
Reverse steps A, B and C to remove seat fabric.
D
E
F
G
A
B
C
H
I
J
A
C
B
B
A
A
A
A
B
C
Page 4

5. TO INSTALL CAR WINDSCREEN, CAR BONNET, TOYS AND HANDRAILS
04
05
www.britax.com.au
www.britax.com.au
1. ASSEMBLY CONT...
E
Open seat by pulling release button on upper
plate.
F Slide open until engaged.
G Raise seat backrest and click into rear of seat
moulding.
H To slide seat away release back-rest of seat by
pushing upwards and forwards from moulding.
Fold seat cloth forward until flat. Pull seat
release button on upper tray, and slide seat
forward until hidden beneath car bonnet.
2. TO INSTALL SWIVEL WHEELS
A Turn lower base upside down and insert the end
of the swivel wheel posts all the way into the
holes located in each of the four corners.
3. TO INSTALL BATTERIES
NOTE: There are two individual battery housings.
You will need 5 x AA batteries for lights and
sounds. (Batteries not included)
FOOT PEDAL BATTERIES
E
F
H
G
A
A
B
B
3. TO INSTALL BATTERIES CONT...
CAR BONNET BATTERIES
B
Locate battery housing underneath car bonnet.
Remove the Phillips head screw in battery lid
with a screwdriver. Install the 2 x AA batteries
taking care to install in correct positive and
negative directions. Cover with housing lid and
tighten the screw. Test correct installation by
turning over and pressing light and sound
buttons on steering wheel.
4. TO INSTALL BATTERIES
A
Insert car windscreen into slot provided in car
bonnet.
B Insert the toy fan and horn in corresponding holes
found on the left and right side of car bonnet.
C Place car bonnet over front end of upper plate,
push down to lock into place.
D To remove car bonnet gently pull front wheels
away from either side of upper plate molding.
Release and lift away.
E Insert the handrails into corresponding holes
found on left and right sides of upper plate.
NOTE: The car bonnet can remain uninstalled to use
convenient snack tray.
A
B
C
D
D
E
E
A
A Turn over lower base to locate battery housing in foot pedal. Remove the
Phillips head screw in battery lid with a screwdriver. Install the 3 x AA batteries
taking care to install in correct positive and negative directions. Cover with
housing lid and tighten the screw. Test correct installation by turning over foot
pedal and pressing light and sound buttons.
WARNING: Non-rechargeable batteries are not to be recharged. Adult supervision
is required when charging rechargeable batteries. Used and new or different types
of batteries should not be mixed. Remove the batteries as soon as they become
exhausted. Supply terminals for batteries are not to be short circuited.
 Loading...