

Page 1
User Guide
GB
9-25kgs (Group 1 & 2)
Brugervejledning
DK
9-25 kg (gruppe 1 & 2)
Käyttöohje
FIN
9–25 kg (ryhmä 1 & 2)
Brukerhåndbok
N
9–25 kg (gruppe 1 & 2)
Användarhandbok
S
9–25 kg (grupp 1 & 2)
Multi-Tech
Page 2
GB
Important!
9-25kgs Group 1-2 (approximate age 9 months - 6 years)
You must ensure that you follow these instructions carefully and correctly. If this seat is not
fi tted securely and your child is not strapped in correctly, your child and other passengers are
at serious risk of injury in the event of an accident
Please read this User Guide carefully BEFORE trying to install your ch ild car seat.
The Hampshire Trading Standards Authority and Britax
advise that child car seats should not be bought or sold
second-hand. Please dispose of your child seat safely
Do not sell or pass it on.
After an accident, the child seat and your car seat
belts should be replaced.
undamaged, if you were to have another accident the
child seat and your car seat belts may not be able to
protect your child as well as they should.
No child seat is escape proof
Harness systems cannot be designed to be completely
“child proof” and yet comply with the legal requirements
of European Standard ECE R44. The harness must be
fastened and adjusted correctly at all times and children
encouraged to remain within the harness system.
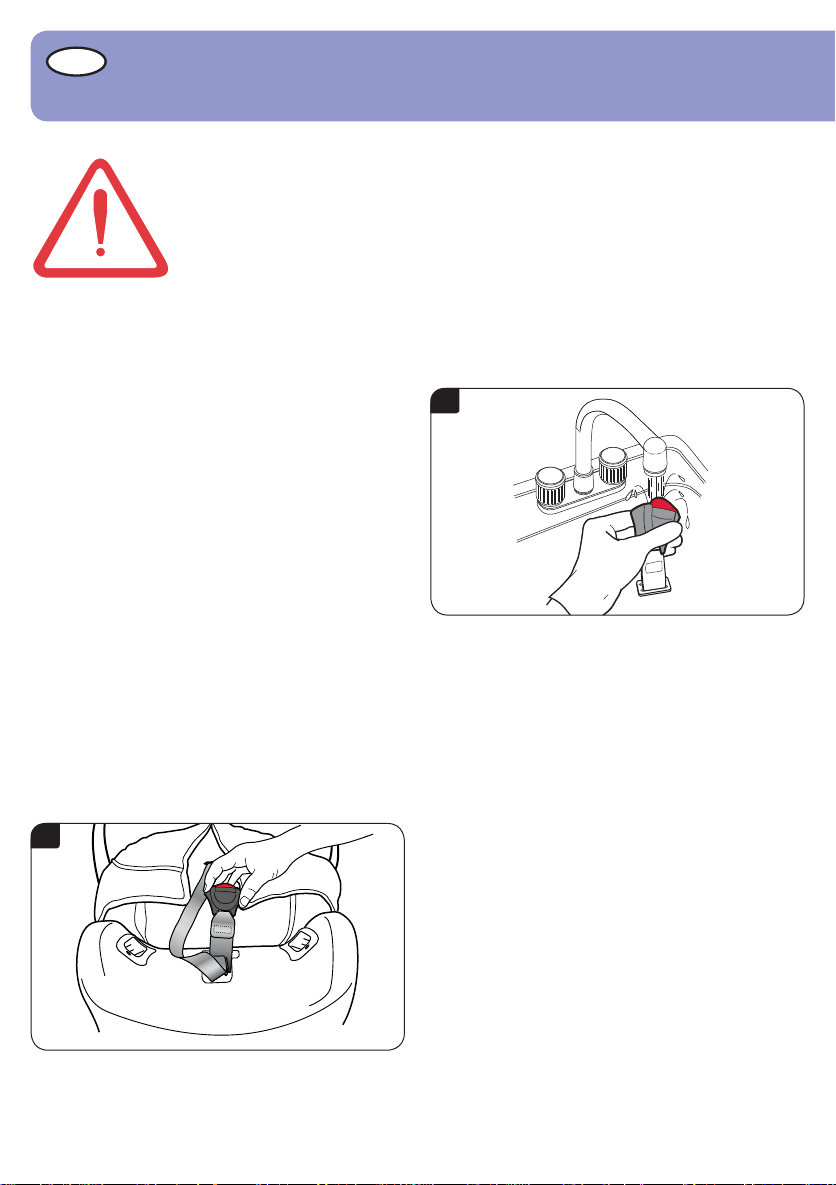
Looking after your child seat
Food and drink may fi
the harness. This can stop it from working properly – it
will not click. Wash in warm water until clean (dia A and
B).
A
Although they may look
nd their way inside the buckle of
.
B
Cleaning the cover
Please read the labels on the cover for washing
instructions.
DO NOT tumble dry the cover – short spin and drip dry
only.
Cleaning the harness and seat shell
Sponge clean
DO NOT take apart, or attempt to take apart, any part of
the harness or seat when cleaning.
DO NOT use solvents, detergents or washing-up liquid
as these may weaken the harness and the seat.
DO NOT lubricate or oil any part of the seat.
Removing and refi
Press in and hold the harness release button and with
your hand below the chest pads pull BOTH shoulder
straps forwards as far as they will go.
Pull the yoke out from behind the seat and unhook both
shoulder straps.
Pull the cover from the top of the seat and use the
method shown to bring the straps to the front of the seat
(dia 6c)(dia 6c). Unfasten the buckle and remove the comfort
pad by unfastening the hook and eye strip. Slide the
chest pads of
cover off the seat, easing the shoulder straps, harness
buckle and adjuster strap through the slots in the cover.
To refi t the cover, perform the process in reverse.
Make sure the straps are not twisted.
ONLY using hand soap and warm water.
tting the cover
f of the shoulder straps. Gently pull the
Page 3

IMPORTANT – The cover and chest pads are a safety
feature. NEVER use the child seat without them. Don’t
put your child’s safety at risk by using other makes of
replacement cover, they could stop the child seat from
protecting your child as well as it should.
A replacement cover is available from your Britax
stockist or contact Britax Customer Service Department
on +46 8564 841 00.
Guarantee
All Britax products are carefully designed, manufactured
and tested. However
, should this product prove faulty
within 12 months of purchase due to a materials or
manufacturing fault please return it to the original place
of purchase. We will then, at our discretion, either repair
it free of charge or replace it with the same or a similar
product.
For guarantee purposes proof of purchase will be
required. We recommend that you retain your receipt
and attach it to this user guide and store in the seat.
Britax does not accept liability for damage arising from
abuse, misuse or negligence.
This guarantee is not transferable and therefore does
not apply to second-hand products.
Y
our statutory rights are not affected by this guarantee.
If in doubt
Not all car seats fi t all cars. For advice as to the
suitability of this restraint for your car please see our
website at www.britax.se, call our Customer Service
Helpline on +46 8564 841 00 or email:
info@se.britaxeurope.com.
9-25kg
9-25kg
Page 4
Warning
9-25kgs Group 1-2 (approximate age 9 months - 6 years)
EXTREME HAZARD!
DO NOT under any circumstances use a rearward
facing child seat on a passenger seat fi tted with an
active airbag.
DO NOT use a forward facing child seat on a passenger
seat fi tted with an active airbag unless your vehicle
manufacturer confi rms that it is safe.
DO NOT use the child seat on side facing or rearward
facing vehicle seats.
DO NOT use anything, such as a cushion or coat,
to raise the child seat off the passenger seat. In an
accident the child seat and your car seat belts would not
be able to protect your child as well as they should.
DO NOT use the child seat in the home. It has not been
designed for home use and should only be used in your
car.
DO NOT attempt to dismantle, modify or add to any
part of the child seat or change the way its harness
or your car seat belts are made or used. The offi cial
approval is no longer valid if modifi cations are made.
NO modifi cations may be made to the child seat other
than by the manufacturer.
DO NOT leave children alone in your car, even for a
short time.
DO NOT leave loose objects, such as luggage or books,
in the back of your car. They must be properly secured,
because if you have to stop your car suddenly loose
objects will keep moving and can then cause serious
injuries. Large and heavy loose objects are a particular
risk.
DO NOT leave folding passenger seats unlatched. If you
have to stop your car suddenly a loose seat back could
injure your child.
DO NOT allow children to play with or adjust the child
seat.
DO keep this user guide in the user guide storage area.
DO cover the child seat if your car is left in direct
sunlight. Fittings can become hot to touch in sunny
weather and the cover may become faded.
DO make sure that the child seat does not become
trapped by a folding passenger seat or in the door of
your car.
DO make sure that you adjust the harness to fi t the
clothes your child is wearing before each journey –
a fi tting for winter clothes may be too slack for a child
wearing summer clothes.
DO store the child seat in a safe place when it is not
being used. Avoid placing heavy objects on top of it
and do not store near direct heat sources or in direct
sunlight.
DO always keep the child seat secure, even if it is not
being used by your child.
DO make sure that all occupants in the vehicle have
their seat belts fastened.
Britax, whilst taking into account child car seat contact
with vehicle seats throughout the development of new
products, cannot accept responsibility for damage
occurring to vehicle seats or seat belts.
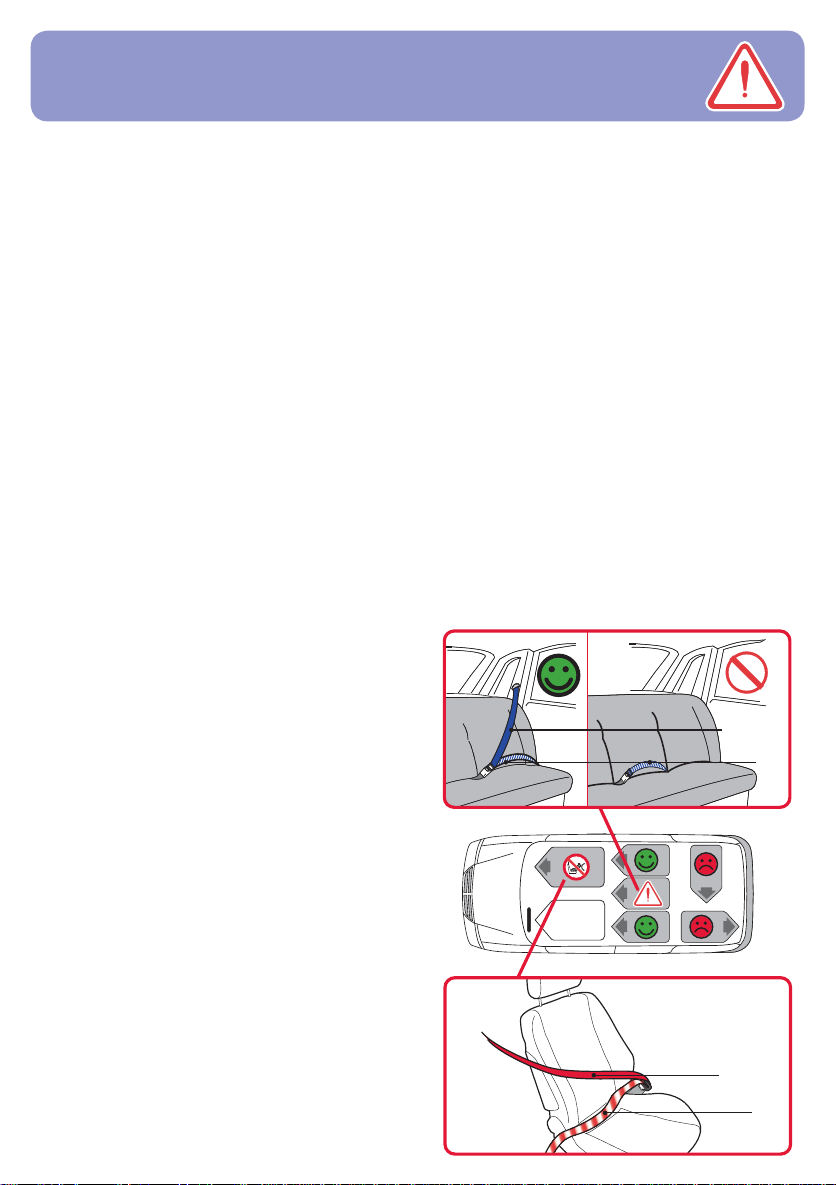
IMPORTANT:
Rearward facing installation
The child seat
and diagonal seat belt (approved to UN/ECE regulation
no. 16 or equivalent standards).
Forward facing installation
The child seat MUST only be used with a lap and
diagonal seat belt (approved to UN/ECE regulation no.
16 or equivalent standards).
MUST only be used with a lap or a lap
Diagonal
Lap
Diagonal
Lap
Page 5
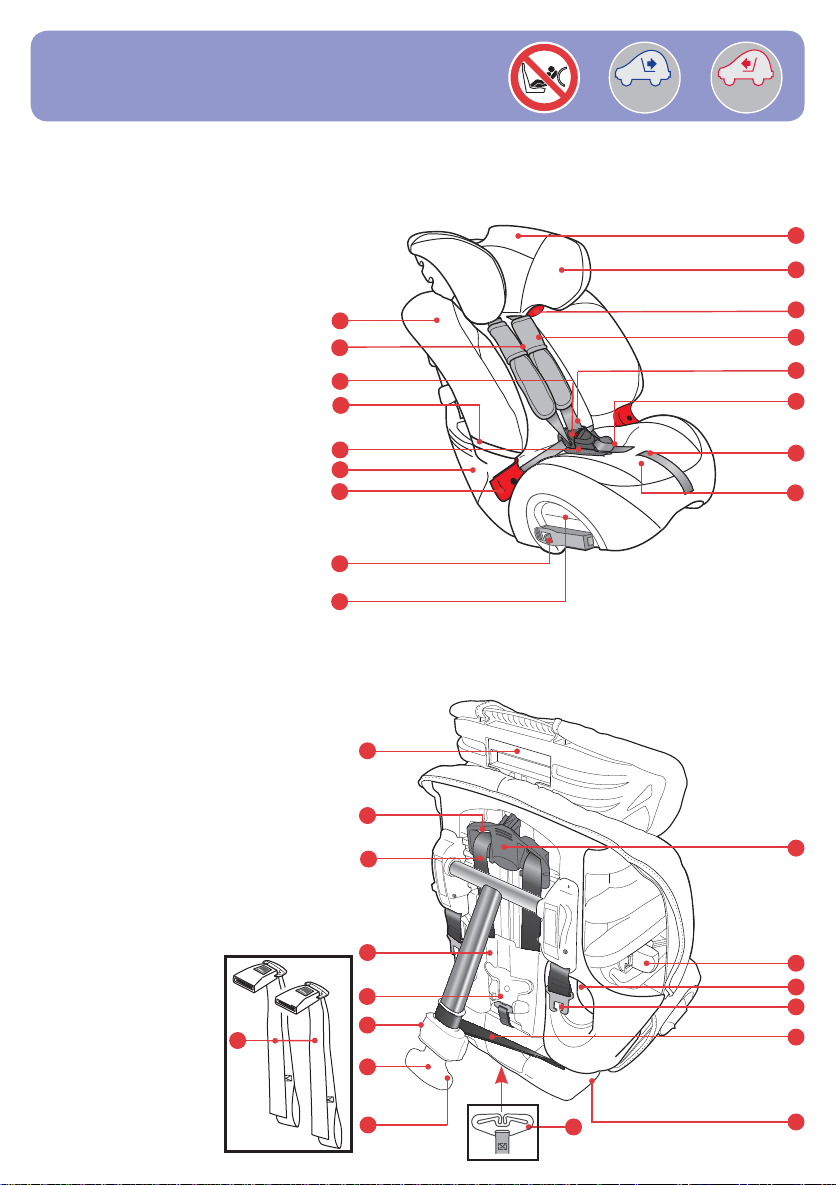
Introducing your new child seat
9-25kgs Group 1-2 (approximate age 9 months - 6 years)
1. Seat cover
2. User guide storage (behind cover)
3. Harness buckle
4. Elastic harness stowage strap
5. Comfort pad
6. Routing label
7. Lap belt guide (forward-facing)
8. Lock-off
9. Belt tunnel slot (rear-facing)
10. Harness adjuster button
11. Harness adjuster strap
12. Crotch strap
13. Harness
14. Chest pad
15. Upper belt guide
(15-25kg, forward-facing)
16. Headrest cover
17. Sliding headrest
18. Headrest adjuster
(15-25kg, forward-facing)
19. Harness strap slot
20. Harness strap
21. Belt shield
22. Yoke and footprop storage area
23. Footprop release button
24. Footprop
25. Footprop lock indicator
26. Yoke (under seat)
27. Swinging base - (for rear facing use)
28. Footprop tether
29. Tether strap buckle tongue
30. Seat belt routing slot
(forward-facing)
31. Width adjuster
32. Harness height /
headrest adjuster
(harness mode)
33
33. Tether straps
1
2
3
4
5
6
7
8
9
18
19
20
21
22
23
24
9-25kg
9-25kg
17
16
15
14
13
12
11
10
32
31
30
29
28
25
26
27
Page 6

1. Adjusting the child seat
2
1
1a
1b
1c
9-18kg
Place the child seat on the fl oor.
Push the adjuster button in and at the same time pull BOTH shoulder straps
forward as far as possible (dia 1a).
Release the harness from the buckle (dia 1a inset).
To avoid the harness twisting, lay the shoulder straps over the sides of the
seat by placing the buckle tongues behind the elastic harness stowage straps.
Carefully place your child in the seat, fi
re-fasten the harness buckle.
Pull the top of the footprop away from the back of the child seat 1 (dia 1b).
Lift the harness adjuster and move it up or down
slots in the headrest are level with or just above your child’s shoulders.
When the headrest is in the correct position let go of the
harness adjuster and ensure it has locked in to place.
Once you reach the top of the slots, your child may continue
to use the seat until their eye-level becomes level with the
9-25kg
top of the seat or their weight exceeds the following:
Rearward facing: 25kg
Forward facing: 18kg
Use the width adjuster (see ‘Introducing your new child seat’
on previous page) to adjust the width of your child seat.
t the harness loosely around them and
2
so that the harness strap
Page 7

9-25kg
9-18kg
Page 8

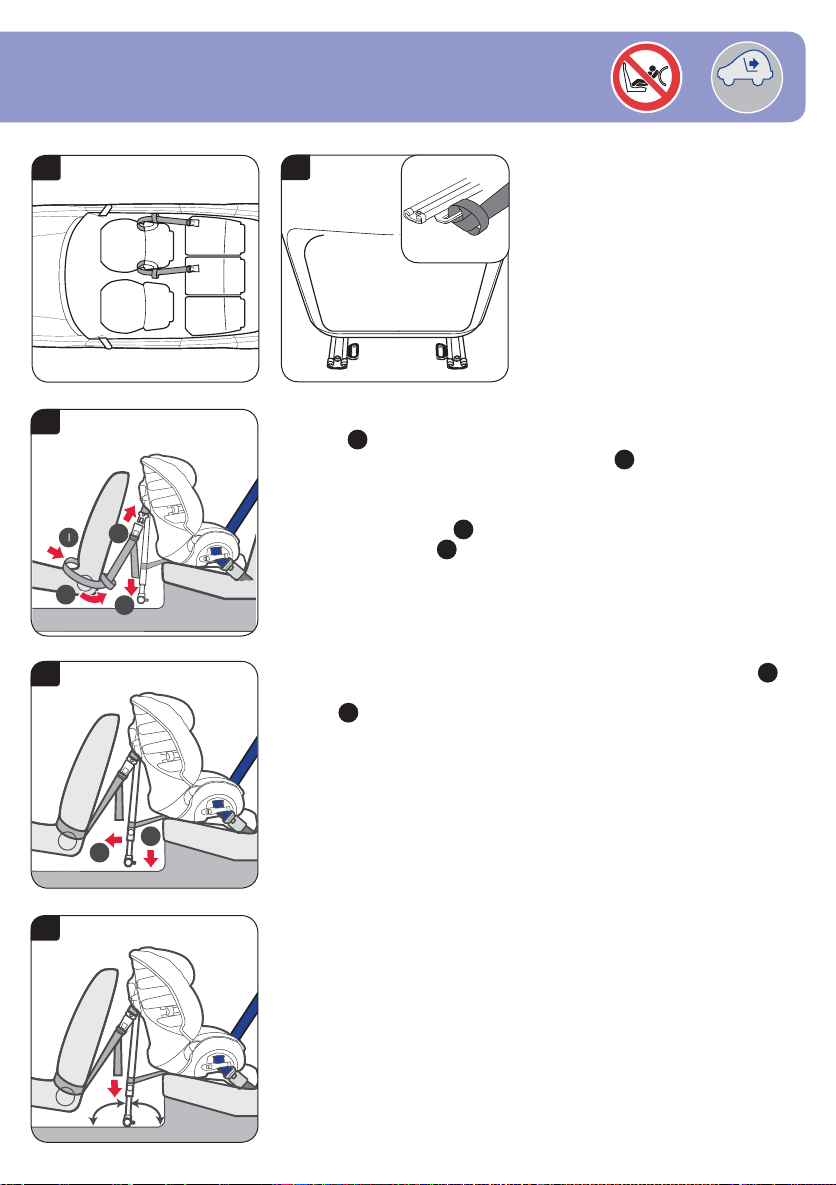
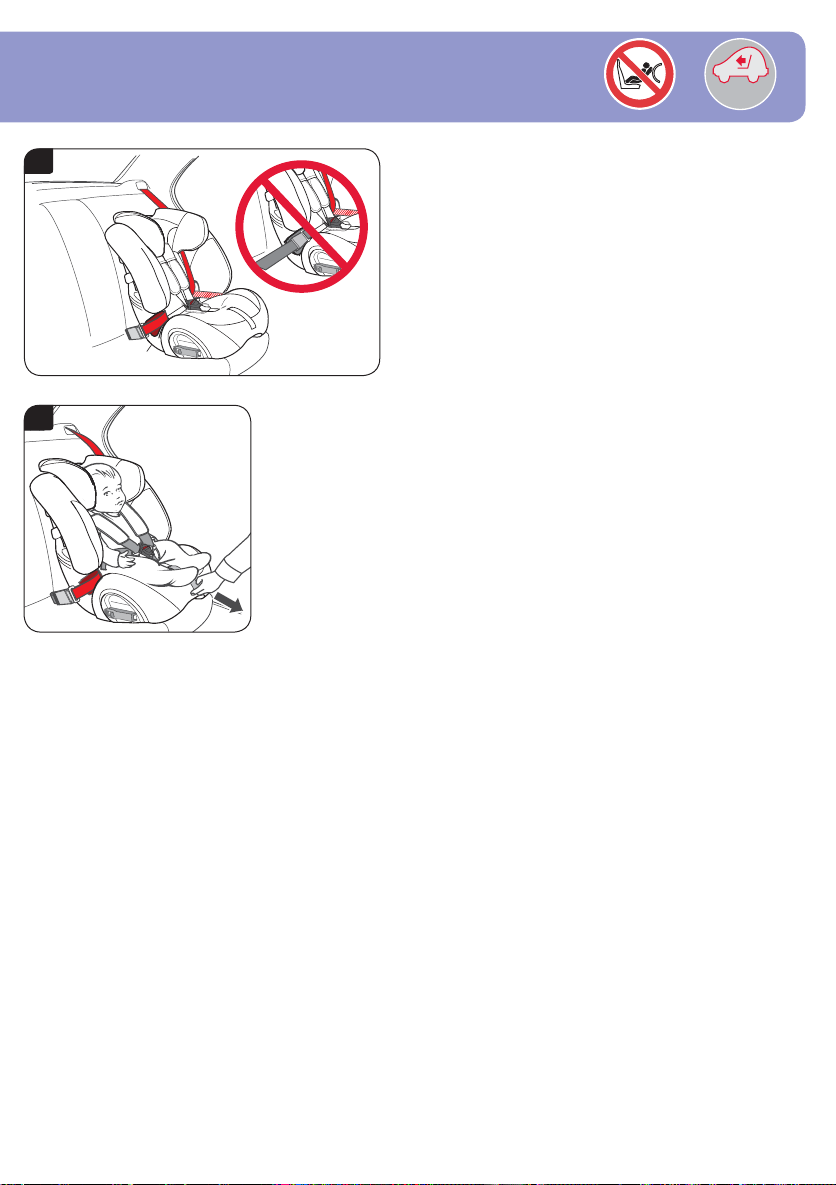
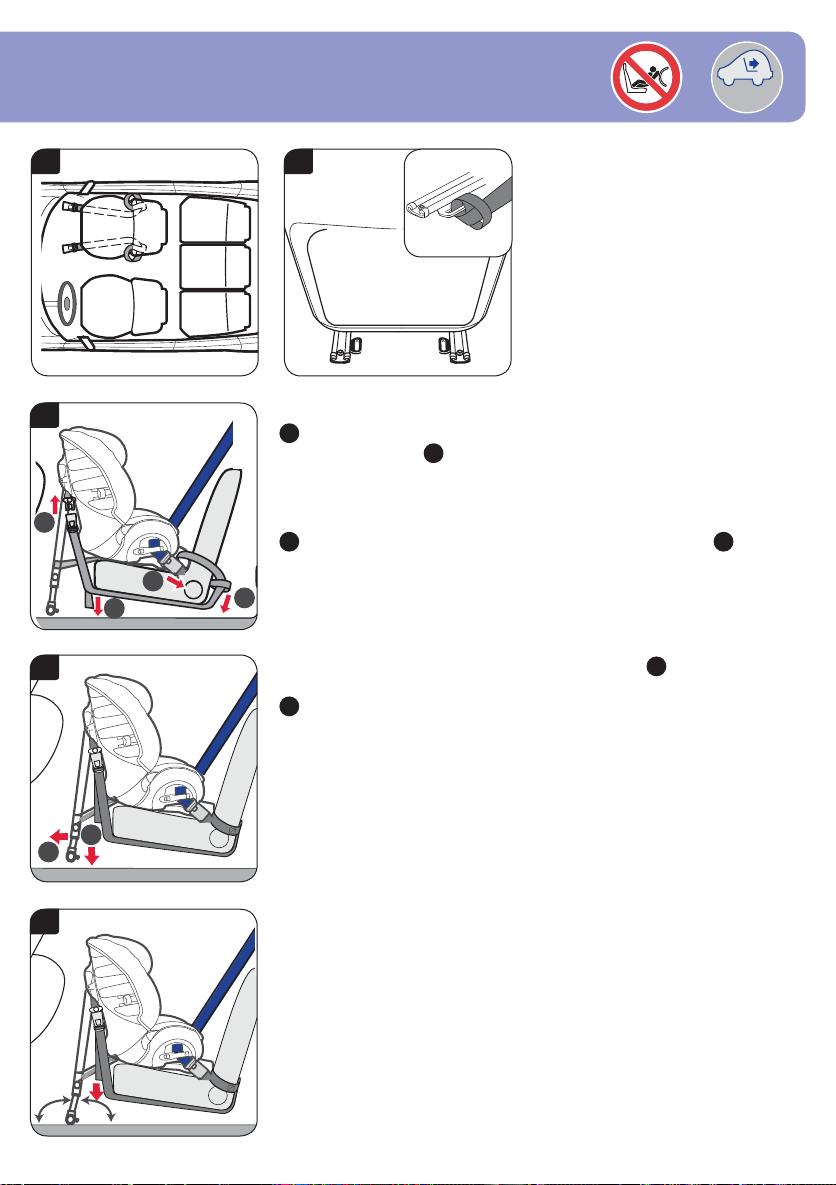
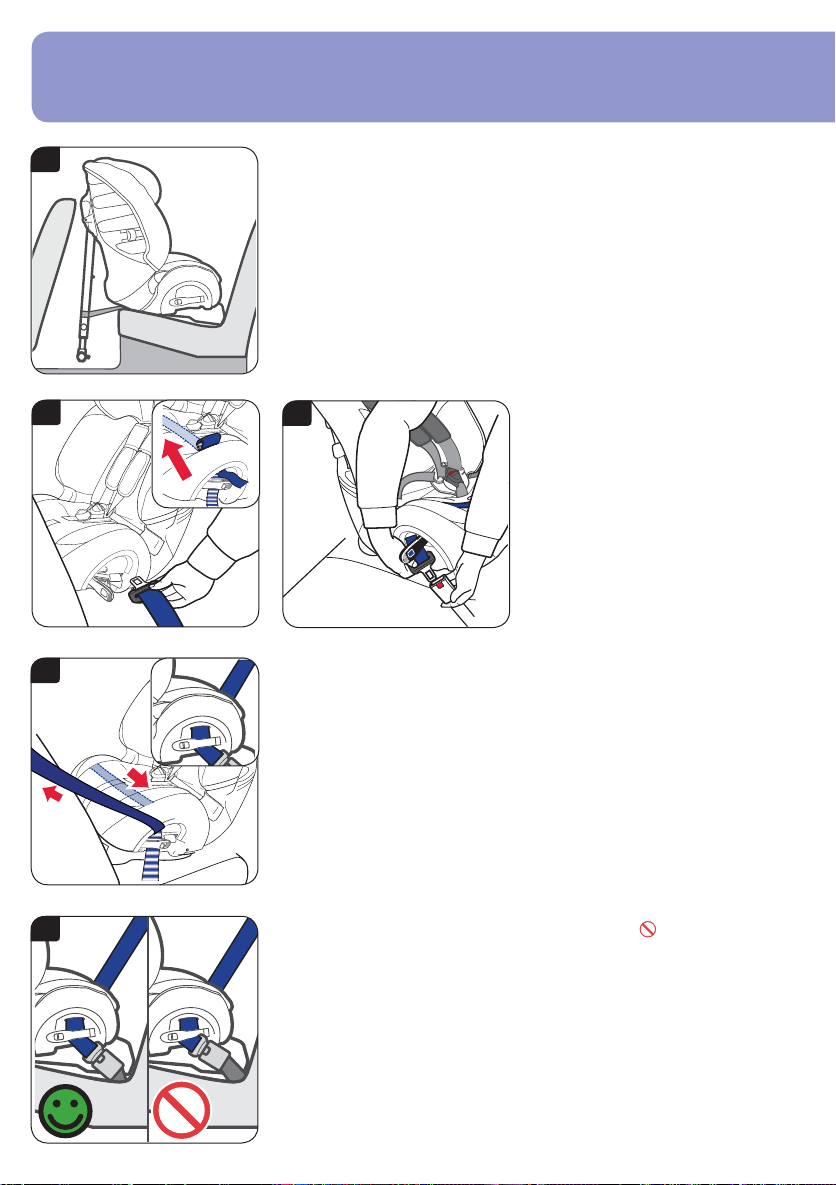
2. Installing your child seat (rearward facing) in rear side seat
2a
IMPORTANT - The child seat MUST only be used with a lap or a lap and
diagonal seat belt (approved to UN/ECE regulation no. 16 or equivalent
standards).
With the footprop adjusted to the shortest length, place the child seat rearward
facing on the car seat with the swinging base resting against the back of the
vehicle seat. After installation the gap between the seat in front and the child
seat should ideally be a minimum of 10mm (dia 2a).
The child seat can touch the seat in front but must not rest against it. If it does
then adjust the car seat in the front without making the driver or passenger sit
in an uncomfortable position. If not try another seating position in the car.
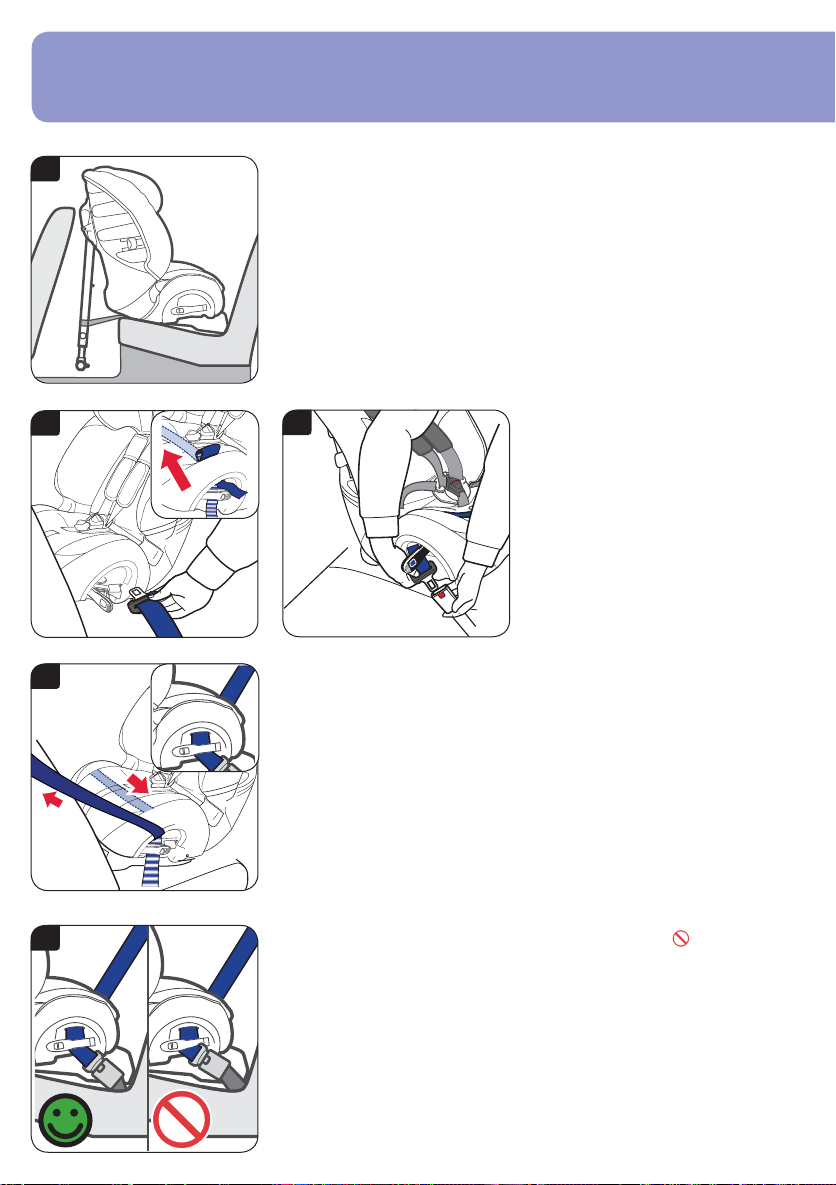
2b
2c
Open both lock-offs. Pull off suffi cient lap
and diagonal belt (approx. 600-900mm).
Feed the belt through the lock-off belt
guide on the opposite side to the buckle
and in to the belt tunnel (dia 2b). There
are two access slots in the seat cover to
aid feeding of the belt through the belt
tunnel and underneath the seat cover (dia
2b inset).
Feed the seat belt through the belt tunnel
and lock-off on the opposite side and
attach the tongue into the buckle (dia 2c).
2d
Pull all the seat belt slack through the child seat ensuring the seat belt is not
twisted. When the belt is as tight as possible, close the lock-off on the seat belt
buckle side, ensuring that both the lap and diagonal sections of the belt are
secured by it (dia 2d inset).
Close the lock-off on the opposite side, ensuring that only the lap section of the
belt is secured by it (dia 2d).
Ensure that both lock-offs have been clicked into place.
2e
If the buckle now lies in the position marked as wrong with a
and the seat
belt cannot be correctly tightened (dia 2e), try another seating position in the
car.
Page 9
9-25kg
2
1
4
3
2
1
100°
80°
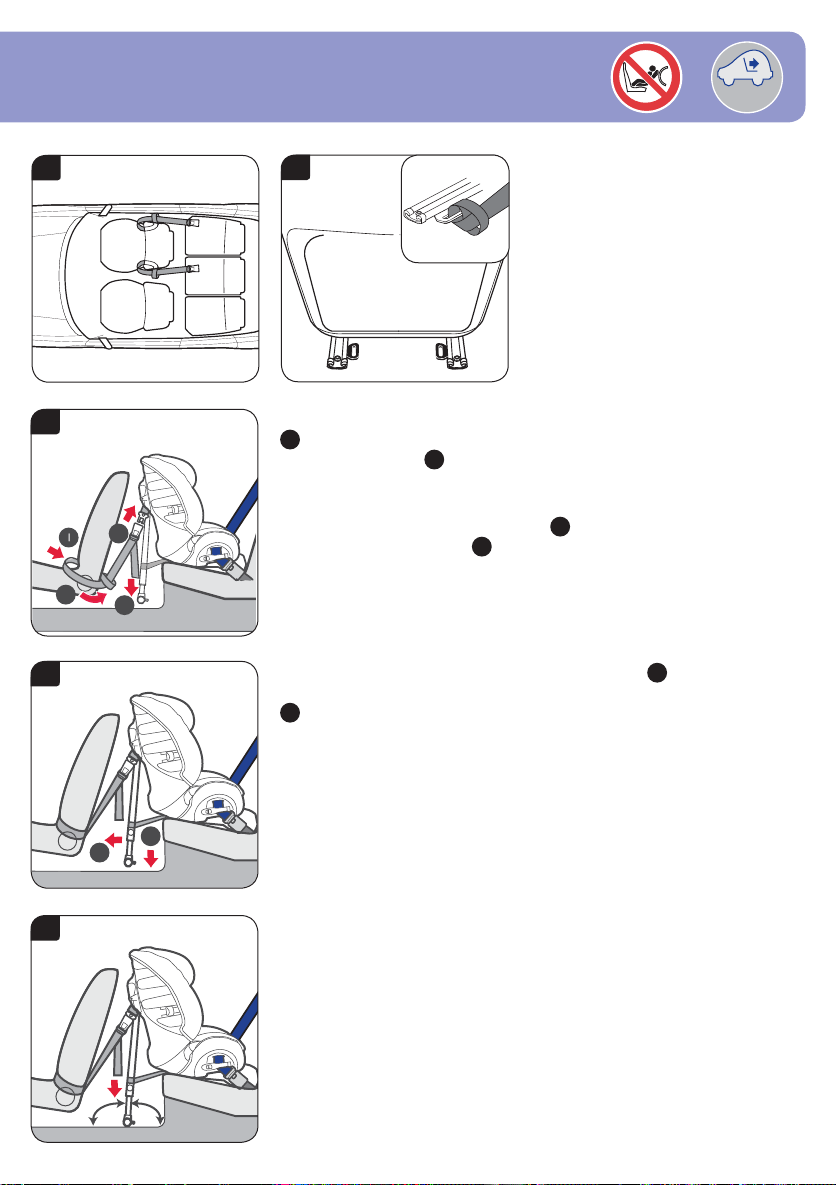
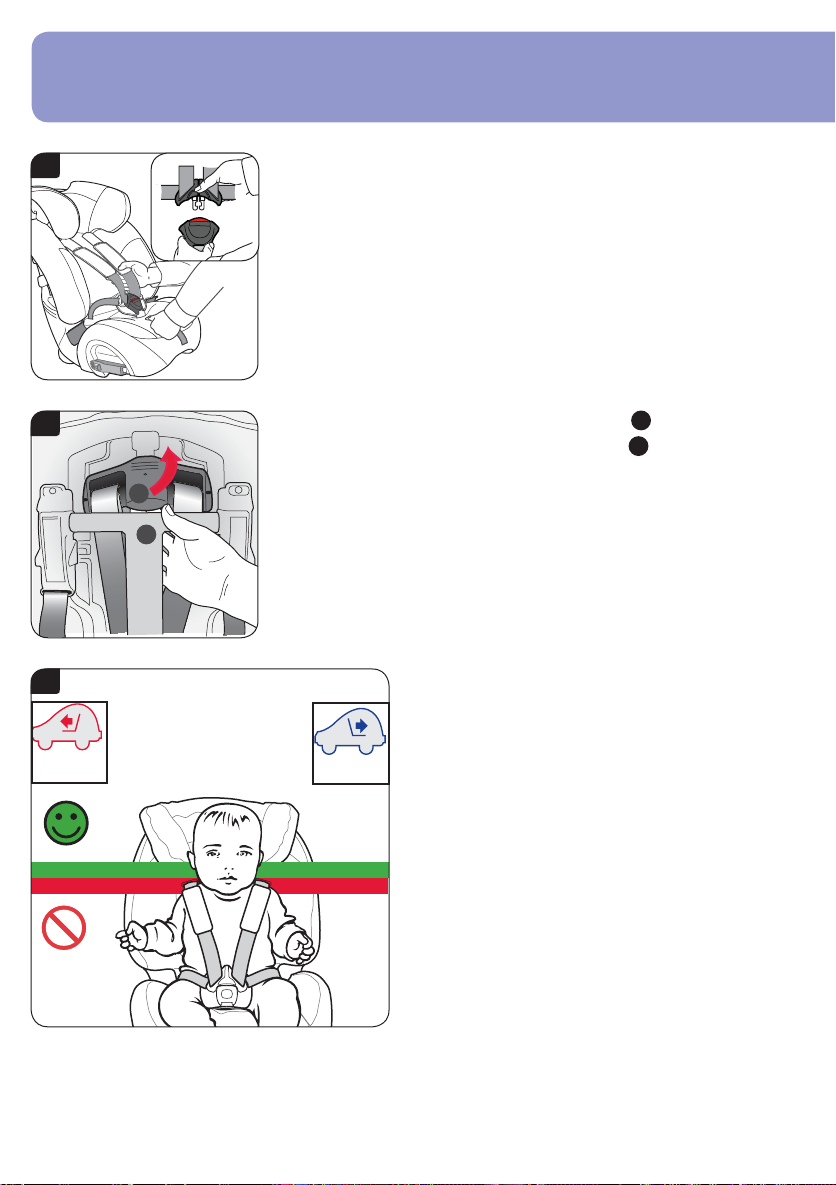
2f
2g
Loop the tether straps around the vehicle
seat in front of the child seat as shown
(dia 2f).
If your car is equipped with a runner loop
on the seat runners, these may be used
as an alternative (dia 2g inset).
IMPORTANT - Do not install the tether
straps using the luggage loops.
2h
Slide the loop ends of the tether straps between the front car seat and back
as shown
outside of the car seat and feed through the loops
1
(dia 2h). Bring the buckle ends of the tether straps around the
2
.
Making sure that the footprop tether brackets are facing forward and that the
straps are not twisted, snap the buckle of the tether straps onto the tongues on
the sides of the child seat
loose ends downwards
2i
Pull the footprop away from the back of the child seat as far as possible
. Tighten the tether straps by equally pulling the
3
.
4
1
(dia 2i). Whilst maintaining the correct angle, lower the footprop until it touches
the fl oor
2
. Make sure that the footprop is securely locked in place by pulling
the sliding section of the footprop.
2j
Finally ensure that the tether straps are fully tightened by pulling the loose
ends downwards (dia 2j). The footprop must rest on a solid fl oor, not on the
lids of storage boxes or similar, at an angle of 100° to the horizontal (dia 2j).
Use the angle guide on the back page of this user guide to check the angle of
the footprop to the fl oor.
Once fi rmly strapped in, test the child seat by trying to move it back and forth
and side to side. If it seems loose or if the footprop is not at 100° to the fl oor
you must re-install until fi rmly installed at the correct angle.
To fi t your child in the child seat refer to dia 5f.
,
Page 10

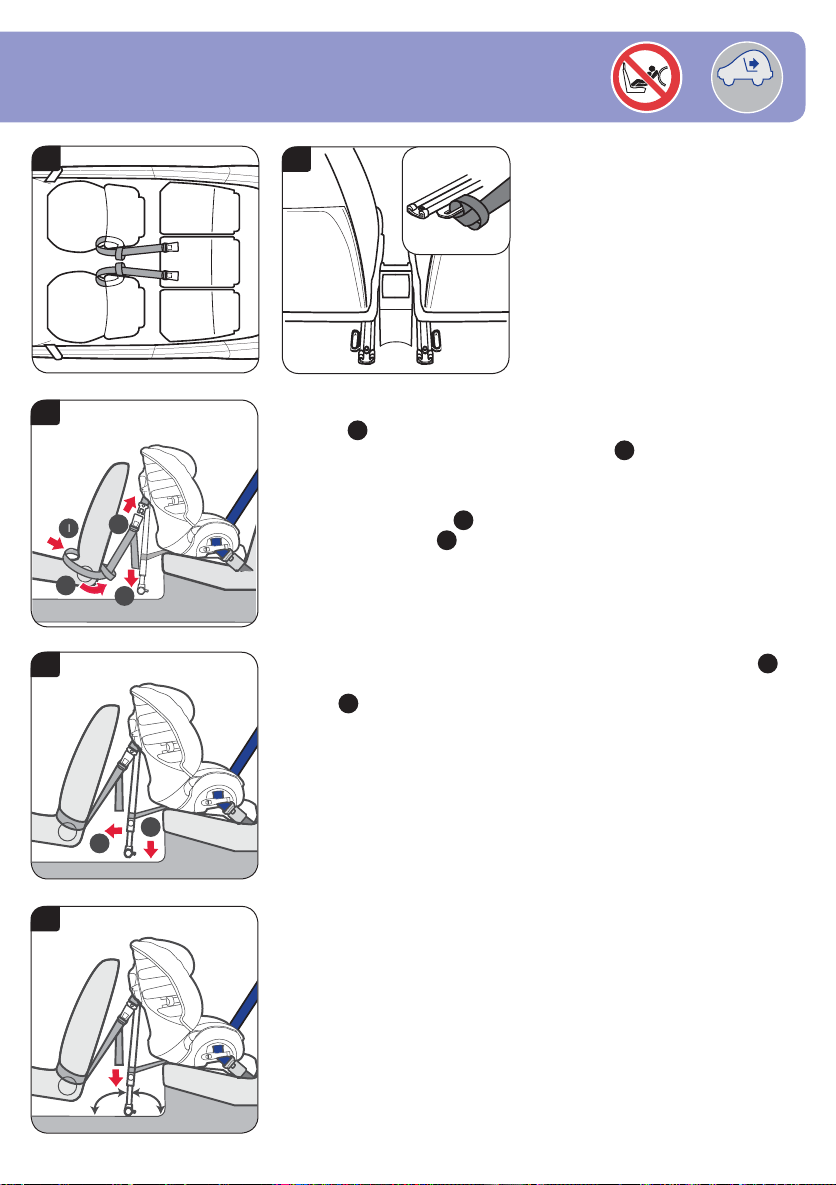
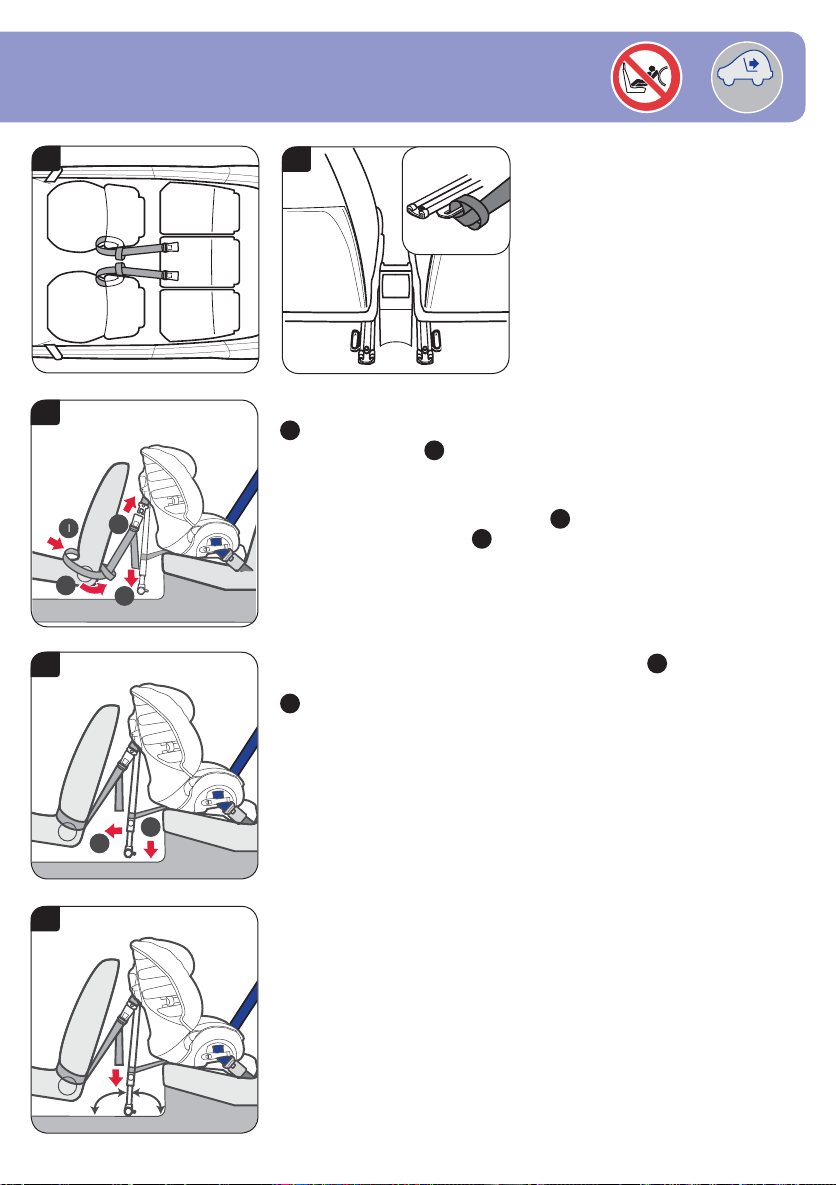
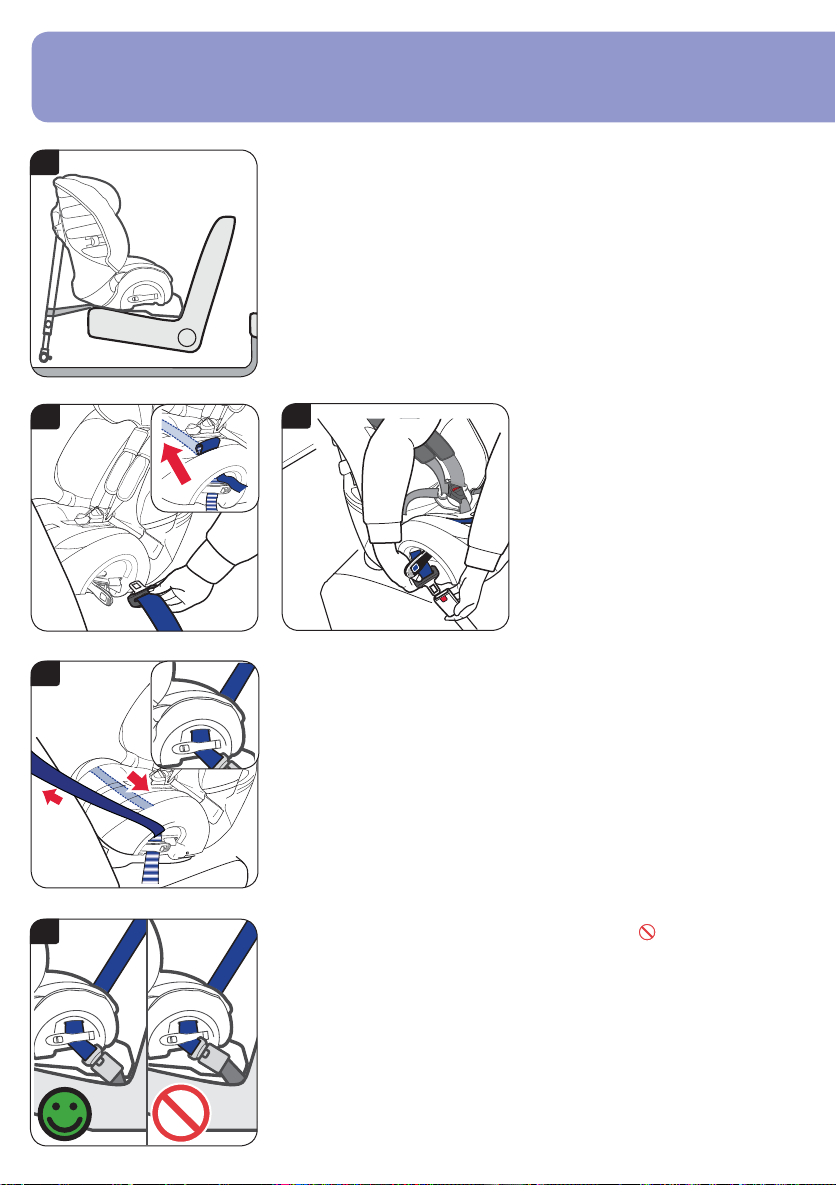
3. Installing your child seat (rearward facing) in rear middle seat
3a
IMPORTANT - The child seat
diagonal seat belt (approved to UN/ECE regulation no. 16 or equivalent
MUST only be used with a lap or a lap and
standards).
With the footprop adjusted to the shortest length, place the child seat rearward
facing on the car seat with the back of the child seat positioned centrally
between the driver and passenger seat and with the swinging base resting
against the back of the vehicle seat (dia 3a).
3b
3c
Open both lock-offs. Pull off suffi cient
lap and diagonal belt (approx. 600-
900mm). Feed the belt through the
lock-off belt guide on the opposite side
to the buckle and in to the belt tunnel
(dia 3b). There are two access slots in
the seat cover to aid feeding of the belt
through the belt tunnel and underneath
the seat cover (dia 3b inset).
Feed the seat belt through the belt
tunnel and lock-off on the opposite side
and attach the tongue into the buckle
(dia 3c).
3d
Pull all the seat belt slack through the child seat ensuring the seat belt is not
twisted. When the belt is as tight as possible, close the lock-off on the seat belt
buckle side, ensuring that both the lap and diagonal sections of the belt are
secured by it (dia 3d inset).
Close the lock-off on the opposite side, ensuring that only the lap section of the
belt is secured by it (dia 3d).
Ensure that both lock-offs have been clicked into place.
3e
If the buckle now lies in the position marked as wrong with a
and the seat
belt cannot be correctly tightened (dia 3e), try another seating position in the
car.
Page 11
9-25kg
2
1
4
3
2
1
100°
80°
3f
3g
Loop a tether strap around both the front
driver and passenger seats as shown
(dia 3f).
If your car is equipped with a runner loop
on the seat runners, these may be used
as an alternative (dia 3g inset).
IMPORTANT - Do not install the tether
straps using the luggage loops.
3h
Slide the loop ends of the tether straps between the front car seat and back
as shown
outside of the car seat and feed through the loops
1
(dia 3h). Bring the buckle ends of the tether straps around the
2
.
Making sure that the footprop tether brackets are facing forward and that the
straps are not twisted, snap the buckle of the tether straps onto the tongues on
the sides of the child seat
loose ends downwards
3i
Pull the footprop away from the back of the child seat as far as possible
. Tighten the tether straps by equally pulling the
3
.
4
1
(dia 3i). Whilst maintaining the correct angle, lower the footprop until it touches
the fl oor
2
. Make sure that the footprop is securely locked in place by pulling
the sliding section of the footprop.
3j
Finally ensure that the tether straps are fully tightened by pulling the loose
ends downwards (dia 3j). The footprop must rest on a solid fl oor, not on the
lids of storage boxes or similar, at an angle of 100° to the horizontal (dia 3j).
Use the angle guide on the back page of this user guide to check the angle of
the footprop to the fl oor.
Once fi rmly strapped in, test the child seat by trying to move it back and forth
and side to side. If it seems loose or if the footprop is not at 100° to the fl oor
you must re-install until fi rmly installed at the correct angle.
To fi t your child in the child seat refer to dia 5f.
,
Page 12

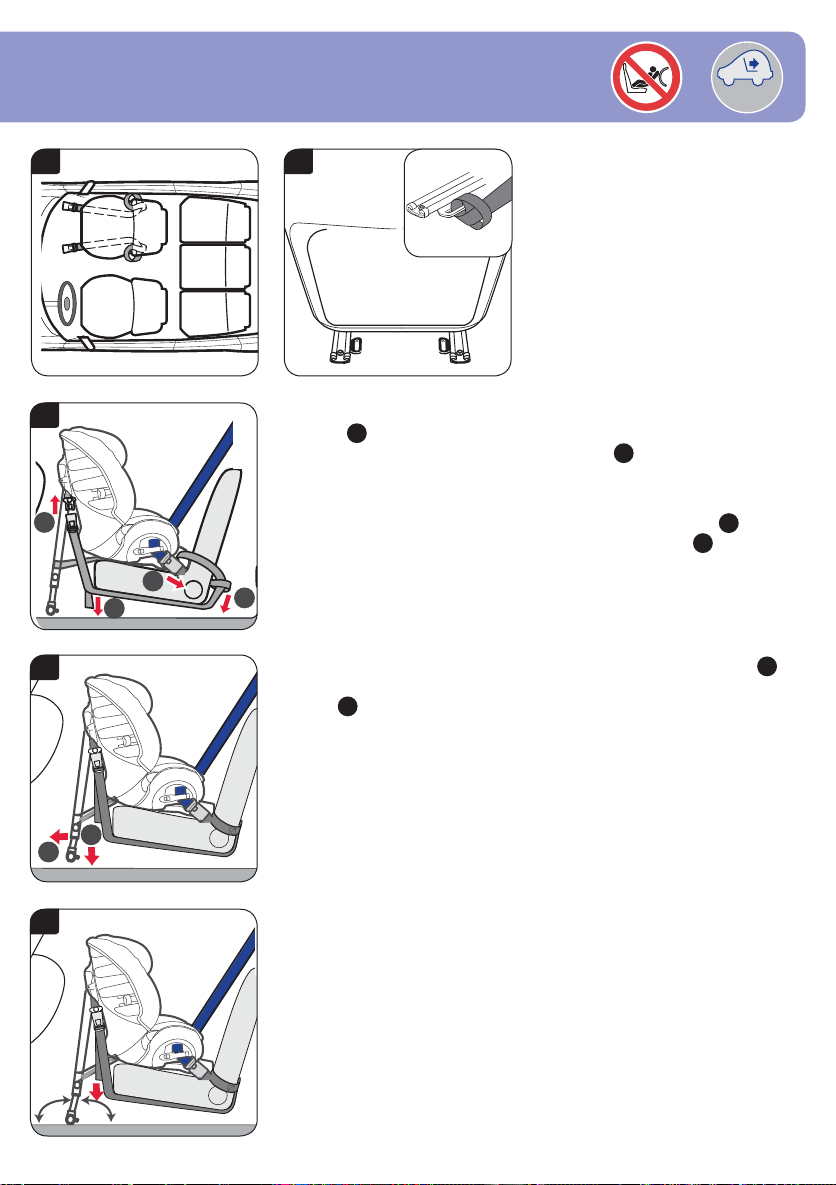
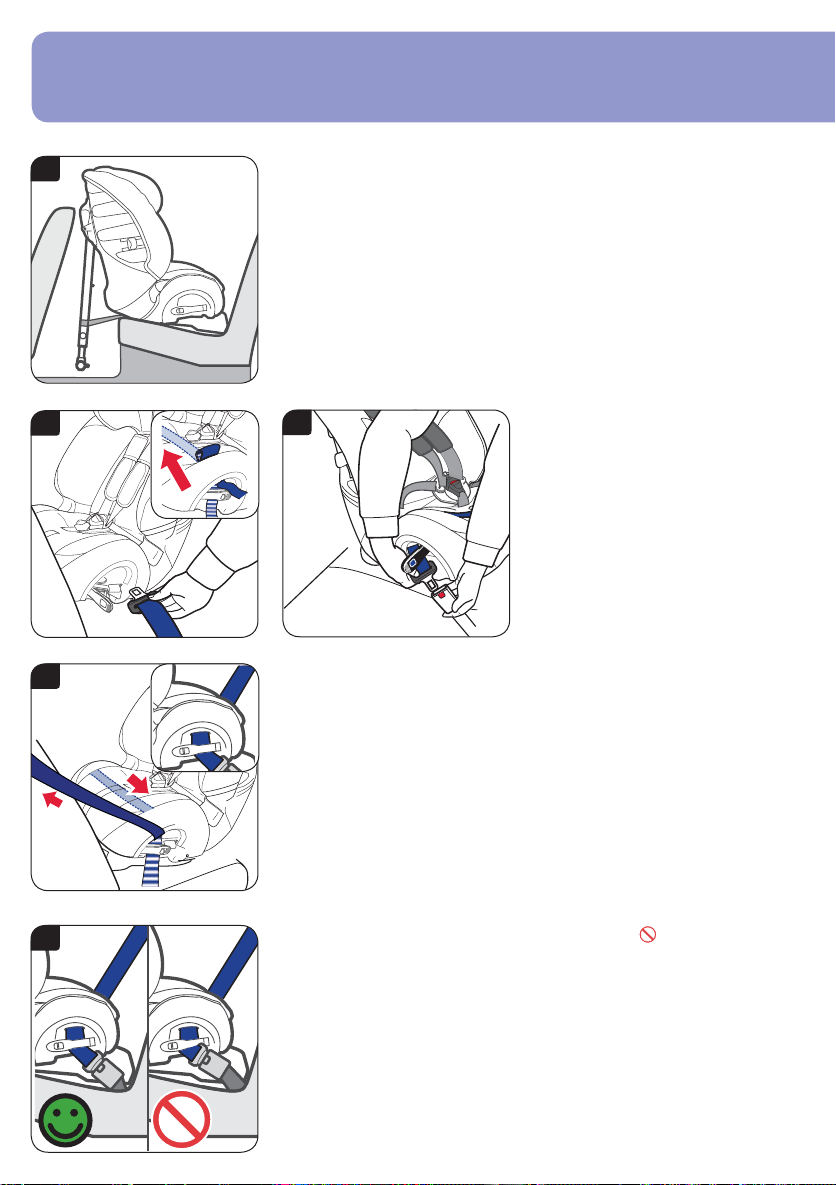
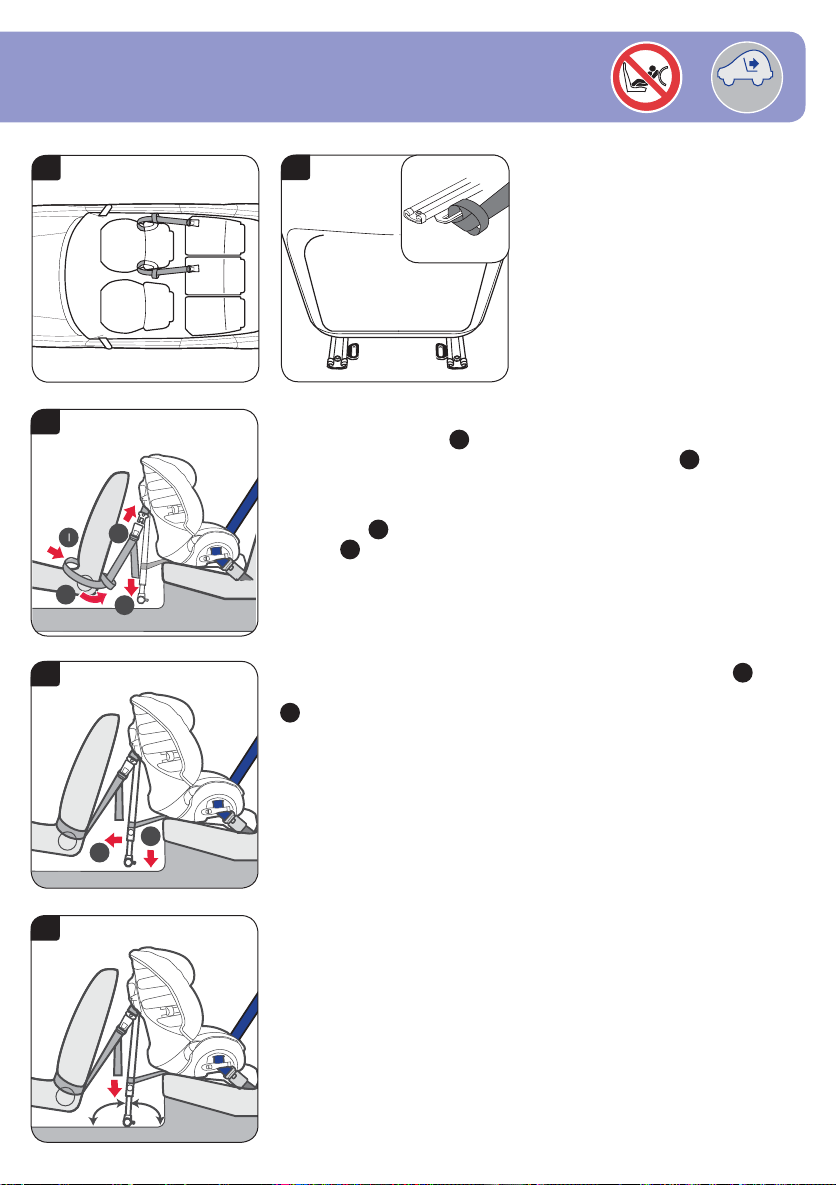
4. Installing your child seat (rearward facing) in front seat
4a
IMPORTANT - The child seat MUST only be used with a lap or a lap and
diagonal seat belt (approved to UN/ECE regulation no. 16 or equivalent
standards).
Push the vehicle front seat back to accommodate the child seat ensuring that
any passenger directly behind will still be able to sit in a comfortable position.
With the footprop adjusted to the shortest length, place the child seat rearward
facing with the swinging base resting against the back of the vehicle seat (dia
4a).
IMPORTANT
- DO NOT rest the back of the child seat on the dashboard or
close to the windscreen.
4b
4c
Open both lock-offs. Pull off suffi cient
lap and diagonal belt (approx. 600-
900mm). Feed the belt through the
lock-off belt guide on the side opposite
to the buckle and in to the belt tunnel
(dia 4b). There are two access slots in
the seat cover to aid feeding of the belt
through the belt tunnel and underneath
the seat cover (dia 4b inset).
Feed the seat belt through the belt
tunnel and lock-off on the opposite side
and attach the tongue into the buckle
(dia 4c).
4d
Pull all the seat belt slack through the child seat ensuring the seat belt is not
twisted. When the belt is as tight as possible, close the lock-off on the seat belt
buckle side, ensuring that both the lap and diagonal sections of the belt are
secured by it (dia 4d inset).
Close the lock-off on the opposite side, ensuring that only the lap section of the
belt is secured by it (dia 4d).
Ensure that both lock-offs have been clicked into place.
4e
If the buckle now lies in the position marked as wrong with a
and the seat
belt cannot be correctly tightened (dia 4e), try another seating position in the
car.
Page 13
9-25kg
2
1
4
3
1
2
100°
80°
4f
4g
Loop a tether strap around the front
passenger seat as shown (dia 4f).
If your car is equipped with a runner loop
on the seat runners, these may be used
as an alternative (dia 4g inset).
IMPORTANT - Do not install the tether
straps using the luggage loops.
4h
Slide the loop ends of the tether straps between the front car seat and back
as shown
outside of the car seat and feed through the loops
1
(dia 4h). Bring the buckle ends of the tether straps around the
2
.
Slide the buckle ends under the seat. Making sure that the footprop tether
brackets are facing forward and that the straps are not twisted, snap the buckle
of the tether straps onto the tongues on the sides of the child seat
the tether straps by equally pulling the loose ends downwards
4i
Pull the footprop away from the back of the child seat as far as possible
4
3
.
. Tighten
1
(dia 4i). Whilst maintaining the correct angle, lower the footprop until it touches
the fl oor
2
. Make sure that the footprop is securely locked in place by pulling
the sliding section of the footprop.
4j
Finally ensure that the tether straps are fully tightened by pulling the loose
ends downwards (dia 4j). The footprop must rest on a solid fl oor, not on the
lids of storage boxes or similar, at an angle of 100° to the horizontal (dia 4j).
Use the angle guide on the back page of this user guide to check the angle of
the footprop to the fl oor.
Once fi rmly strapped in, test the child seat by trying to move it back and forth
and side to side. If it seems loose or if the footprop is not at 100° to the fl oor
,
you must re-install until fi rmly installed at the correct angle.
To fi t your child in the child seat refer to dia 5f.
Page 14
5. Installing your child seat (forward facing) with harness
3
2
1
70-80cm
9-18kgs Group 1 (approximate age 9 months - 4 years)
5a
5b
5c
IMPORTANT - The child seat MUST only be used with a lap and diagonal
seat belt (approved to UN/ECE regulation no. 16 or equivalent standards).
Stow the footprop in the footprop storage area.
Place the child seat forward facing in your car
front of the child seat towards you. Pull out the seat belt as shown, holding the
lap and diagonal sections together (dia 5a inset).
IMPORTANT - Do not allow the belt to twist at any time.
Feed the seat belt around the front of the child seat, through the fi rst
slot, directly in to the back of the seat at the point shown (dia 5a).
IMPORT
ANT - Do not use the red diagonal guide on the headrest.
Take the seat belt and pass it through the second routing slot (dia 5b).
Handy hint - If your seat belt is too short you may need to direct the diagonal
section behind the headrest before starting the installation.
Pull all the slack from the seat belt to the front of the child seat and fasten the
seat belt in the buckle (dia 5c).
Make sure the seat belt is not twisted and the lap section passes across both
red lap belt guides. Ensure the diagonal belt is positioned in the back corner of
the child seat shell behind the headrest.
. For ease of access, turn the
routing
5d
Push the child seat in to your vehicle seat using your full body weight and
tighten using the following sequence.
Pull and hold the diagonal belt
and pull to tighten
Check the seat by pulling firmly on the harness. There should be little or no
movement. If the child seat is still loose, carefully repeat the above tightening
sequence.
3
(dia 5d).
, pull at position 2 to remove all the slack
Page 15
9-18kg
5e
IMPORTANT - Check the position of the seat belt buckle,
ensuring that it is the seat belt NOT the seat belt buckle
holding the seat in position (dia 5e).
If your seat belt buckle is incorrectly located, try another
seating position.
If you are in any doubt, contact Customer Services on +46
8564 841 00 or email info@se.britaxeurope.com or use
www.britax.se
5f
Sit your child in the child seat and fi t the harness. Make sure the harness
straps are not twisted. Tighten the harness by pulling the adjuster strap
forward.
IMPORTANT - The lap section of the harness should rest as forward and as
low as possible over your child’s pelvis.
Finally, ensure the chest pads are pulled down on to your child’s chest (dia 5f).
Page 16

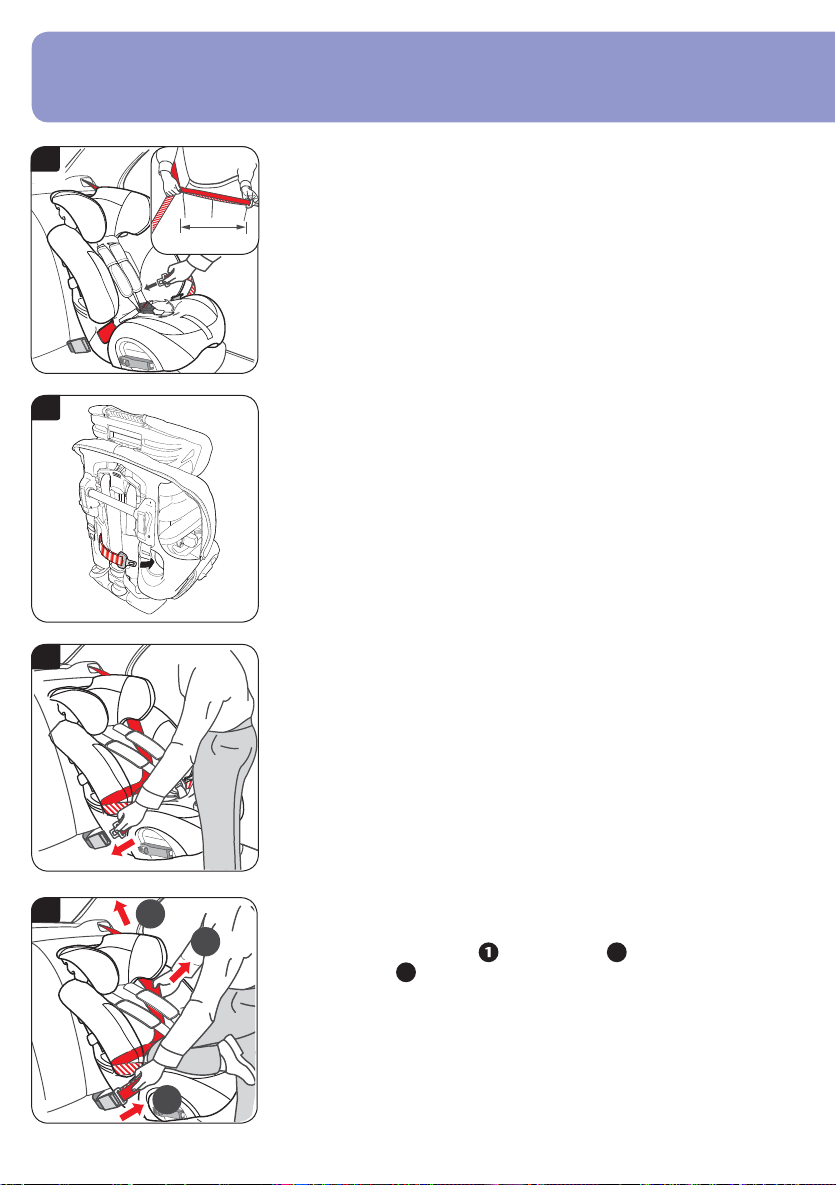
6. Installing your child seat (forward facing) with adult belt
15-25kgs Group 2 (approximate age 4 - 6 years)
6a 6b
6c
6e
Adjusting the child seat
To stow away the harness in the child seat,
first place the child seat on the fl oor.
Push the adjuster button in and at the same
time pull BOTH shoulder straps forward as
far as possible (dia 6a).
T
urn the seat around. Lift the harness
adjuster at the back of the seat and move
it up so that the shoulder strap slots in the
headrest are in the uppermost position (dia
6b).
Unhook both shoulder straps from the yoke
6d
at the back of the child seat (dia 6c), stow
the yoke on the lower part of the belt shield
(dia 6g).
Remove the chest pads from the chest pad
attachment arms (dia 6c inset). Pull both
the shoulder straps and the chest pads
through to the front of the seat, remove the
chest pads from the shoulder straps.
Place the child seat on it’
s back. Remove
the adjuster strap from the bracket of the
crotch strap. Turn the bracket so that it will
go through the crotch strap and push it
6f
through to the front of the seat (dia 6d).
Stand the child seat upright and release
the harness from the buckle (dia 6e inset)
.
Push the harness straps and buckle
tongues under the cover through the lap
belt slots (dia 6e).
Place the buckle, harness straps and chest
pads in to the elastic stowage straps (dia
6f). Push the adjuster strap through the slot
in the cover
.
6g
6h
Support the seat and squeeze the headrest
adjuster at the rear of the headrest (dia
6g). Check that the chest pads have been
removed as directed in (dia 6c) above.
Move the headrest up so that the head is
positioned centrally (dia 6h). When the
headrest is in the correct position let go
of the headrest adjuster
, check that it has
locked in to place.
Page 17

15-25kg
6i
Installing the child seat
IMPORTANT - The child seat MUST only be used with a lap and diagonal
seat belt (approved to UN/ECE regulation no. 16 or equivalent standards).
Place the child seat forward facing in your car
.
Feed the diagonal section of the seat belt through the dark red upper belt
guide on the OPPOSITE side to the buckle (dia 6i).
6j
Fasten the seat belt across your child (dia 6j). The lap section should rest on
the red lap belt guides on each side of the child seat. Make sure the seat belt
is not twisted and remove any slack.
IMPORT
ANT - The lap section of the seat belt should rest as forward and as
low as possible over your child’s pelvis.
6k
IMPORTANT - Check the position of the seat belt buckle, ensure that it is not
being pulled around the child seat on to the red lap belt guide (dia 6k).
6l
Check the position of your vehicle’s upper seat belt anchorage point (dia 6l).
If this anchorage point is in front of the child seat it should not be used, try
another seating position in the car
.
Page 18

DK
Vigtigt!
9-25 kg, gruppe 1-2 (børn i alderen fra ca. 9 måneder til ca. 6 år)
Det er vigtigt at følge denne vejledning nøje. Hvis autostolen ikke er monteret forsvarligt, og
hvis barnet ikke er fastspændt korrekt, vil barnet og andre passagerer være i alvorlig fare for
legemsbeskadigelse i tilfælde af en ulykke.
Læs brugervejledningen grundigt, FØR barnet anbringes i autostolen.
Britax fraråder køb og salg af brugte autostole.
Autostolen skal bortskaffes på sikker vis, og den bør
ikke videresælges eller foræres væk.
Efter en ulykke bør autostolen og bilens sikkerhedssele
udskiftes. Selv om de ikke ser ud til at være
beskadigede, vil de muligvis ikke kunne yde tilstrækkelig
beskyttelse af barnet i tilfælde af endnu en ulykke.
Ingen autostol er fl ugtsikker
Selesystemer kan ikke konstrueres til at være
fuldstændigt "børnesikrede" og samtidig leve op til
kravene i den europæiske norm ECE R44. Selen skal
altid være spændt og justeret korrekt, og barnet skal
lære, at det ikke må forsøge at komme ud af selen.
edligeholdelse af autostolen
V
Mad- og drikkevarer kan trænge ind i selespændet,
hvilket kan medføre, at det ikke fungerer korrekt (at det
ikke klikker). Spændet skal i så fald rengøres med varmt
vand (billede A
A
og B).
B
Rengøring af betrækket
Se vaskeanvisningen på betrækkets mærkater.
IKKE tørretumbles, kun centrifugeres kortvarigt og
hænges til tørre.
Rengøring af selerne og skalkonstruktionen
Brug KUN svamp, håndsæbe og varmt vand.
IKKE at adskille nogle af autostolens eller
selesystemets dele i forbindelse med rengøring.
IKKE opløsningsmidler
opvaskemiddel, da disse kan forringe autostolens og
selesystemets funktionsdygtighed.
IKKE smøremiddel eller olie til nogen af autostolens
dele.
Aftagning og genmontering af betrækket
Tryk udløserknappen til selen ind, hold den inde, før
hånden ind under brystpolstringerne, og træk BEGGE
skulderstropper helt frem.
T
ræk selehægten på autostolens bagside ud, og tag
begge skulderstropper ud.
Træk betrækket af den øverste del af autostolen, og
brug den viste fremgangsmåde til at føre stropperne om
på autostolens forside
op, og afmonter komfortpolstringen ved at løsne
hægterne.
Træk forsigtigt betrækket af autostolen ved at føre
skulderstropperne, selespændet og justeringsstroppen
gennem slidserne i betrækket.
Træk brystpolstringerne af skulderstropperne.
, rengøringsmidler eller
(billede 6c)(billede 6c). Spænd spændet
Page 19

Betrækket monteres igen ved at gentage
fremgangsmåden i omvendt rækkefølge.
Sørg for, at stropperne ikke er snoede.
VIGTIGT – Betrækket og brystpolstringerne er vigtige
for sikkerheden. Autostolen må derfor ALDRIG bruges
uden disse dele. Undlad at bringe deres barns sikkerhed
i fare ved at bruge et betræk af et andet fabrikat, da
dette muligvis vil medføre, at autostolen ikke længere
beskytter barnet optimalt.
Et nyt betræk kan fås hos forhandleren eller ved
henvendelse til Britax' kundeserviceafdeling på
+46 8564 841 00.
Garanti
Alle Britax-produkter er konstrueret, fremstillet og testet
omhyggeligt. Skulle der imidlertid inden for 12 måneder
fra købsdatoen opstå et problem med produktet som
følge af materiale- eller produktionsfejl, bedes du
venligst returnere det til forhandleren. Herefter vil vi
efter eget skøn enten reparere det uden beregning eller
udskifte det med et tilsvarende produkt.
Et købsbevis vil være påkrævet af hensyn til garantien.
V
i anbefaler, at kvitteringen opbevares i autostolen
sammen med brugervejledningen.
Britax påtager sig intet ansvar for skader som følge af
misbrug, forkert anvendelse eller forsømmelighed.
Denne garanti må ikke overdrages til andre og gælder
derfor ikke for brugte produkter.
Garantien har ingen indfl ydelse på dine lovmæssige
rettigheder.
I tvivlstilfælde
Autostolen passer ikke nødvendigvis til alle biler. Du kan
få information om, hvorvidt autostolen passer til netop
din bil, på vores hjemmeside på adressen
www.britax.se, ved at ringe til vores
kunderserviceafdeling på +46 8564 841 00 eller ved at
sende en e-mail til følgende adresse:
info@se.britaxeurope.com.
9-25kg
9-25kg
Page 20

Advarsel
9-25 kg, gruppe 1-2 (børn i alderen fra ca. 9 måneder til ca. 6 år)
ALVORLIG FARE!
INGEN omstændigheder en bagudvendt autostol på et
passagersæde med aktiv airbag.
IKKE en fremadvendt autostol på et passagersæde med
aktiv airbag, medmindre bilproducenten bekræfter, at
det er forsvarligt.
IKKE autostolen på side- eller bagudvendte sæder.
IKKE andre genstande, såsom en pude eller en frakke,
til at hæve autostolen i forhold til passagersædet. I
tilfælde af en ulykke vil autostolen og sikkerhedsselen i
så fald ikke kunne beskytte barnet optimalt.
IKKE autostolen i hjemmet. Den er kun beregnet til brug
i biler.
IKKE at adskille eller modifi cere nogen af autostolens
dele, tilføje dele eller ændre den måde, hvorpå
autostolens sele eller bilens sikkerhedssele skal bruges,
da dette vil medføre, at den offi cielle godkendelse ikke
længere er gyldig. INGEN andre end producenten må
foretage modifi kationer af autostolen.
IKKE børn alene i bilen, heller ikke bare et kort øjeblik.
IKKE genstande såsom bagage eller bøger ligge løst
bagest i bilen. Løse genstande skal fastgøres forsvarligt,
da de kan forårsage alvorlig legemsbeskadigelse i
tilfælde af en pludselig opbremsning. Dette gælder især
store og tunge genstande.
IKKE nedfældelige passagersæder være ulåste. Ved en
pludselig opbremsning kan et ulåst bagsæde forårsage
alvorlig skade på barnet.
IKKE børn lege med eller justere autostolen.
OPBEVAR denne brugervejledning i det dertil
beregnede opbevaringsrum i autostolen.
SØRG FOR at dække autostolen til, hvis bilen efterlades
i direkte sollys. Autostolens dele kan blive meget varme i
solskinsvejr, og betrækket kan falme.
SØRG FOR, at autostolen ikke bliver klemt af et
nedfældeligt passagersæde eller i bildøren.
SØRG FOR at justere selen efter barnets beklædning
inden hver køretur – hvis selen er tilpasset vintertøj,
vil den muligvis være for slap, når barnet er iført
sommertøj.
SØRG FOR at opbevare autostolen et sikkert sted, når
den ikke er i brug. Undlad at anbringe tunge genstande
oven på den, og undlad at opbevare den i nærheden af
en varmekilde eller i direkte sollys.
SØRG FOR, at autostolen altid er fastgjort forsvarligt,
også når barnet ikke sidder i den.
SØRG FOR, at alle passagerer i bilen er korrekt
fastspændt.
Selv om der i hele produktudviklingsforløbet er taget
hensyn til, at autostolen er i kontakt med bilsædet, kan
Britax ikke påtage sig noget ansvar for beskadigelse af
bilens sæder eller sikkerhedsseler.
VIGTIGT:
Bagudvendt placering
Autostolen må
trepunktssele (godkendt ifølge FN/ECE-regulativ nr
eller tilsvarende normer).
Fremadvendt placering
Autostolen må KUN bruges sammen med trepunktssele
(godkendt ifølge FN/ECE-regulativ nr
tilsvarende normer).
KUN bruges sammen med hoftesele eller
. 16
. 16 eller
Diagonaldel
Hoftedel
Diagonaldel
Hoftedel
Page 21

Præsentation af autostolen
9-25 kg, gruppe 1-2 (børn i alderen fra ca. 9 måneder til ca. 6 år)
1. Betræk
2. Opbevaringsrum til brugervejledning
(bag betrækket)
3. Selespænde
4. Elastisk seleholder
5. Komfortpolstring
6. Seleplaceringsanvisning
7. Hofteselestyr (fremadvendt placering)
8. Lås
9. Seletunnelslids (bagudvendt placering)
10. Selejusteringsknap
11. Selejusteringsstrop
12. Skridtstrop
13. Sele
14. Brystpolstring
15. Øverste selestyr
(15-25 kg, fremadvendt placering)
16. Hovedstøttebetræk
17. Justerbar hovedstøtte
18. Hovedstøttejusteringsgreb
(15-25 kg, fremadvendt placering)
19. Selestropslids
20. Selestrop
21. Selebeskyttelse
22. Selehægte og støttebensholder
23. Støttebensudløserknap
24. Støtteben
25. Støttebenslåseindikator
26. Selehægte (under autostolen)
27. Roterbar underdel (til bagudvendt placering)
28. Tøjringsstrop til støtteben
29. Låsetunge på tøjringsstrop
30. Selegennemføring
(fremadvendt
placering)
31. Breddejusteringsgreb
33
32. Selehøjde-/
hovedstøttejusteringsgreb
selemontering)
33. Tøjringsstroppe
1
2
3
4
5
6
7
8
9
18
19
20
21
22
23
24
25
9-25kg
26
9-25kg
17
16
15
14
13
12
11
10
32
31
30
29
28
27
Page 22

1. Justering af autostolen
2
1
1a
1b
1c
9-18kg
Anbring autostolen på gulvet.
Tryk justeringsknappen ind, og træk samtidigt BEGGE skulderstropper så langt
frem som muligt (billede 1a).
Frigør selen fra spændet (det lille billede i 1a).
Læg skulderstropperne hen over autostolens sider ved at føre låsetungerne
ind under de elastiske seleholdere, så selen ikke bliver snoet.
Anbring forsigtigt barnet i autostolen, før selestropperne rundt om barnet, og
spænd selespændet igen.
Træk den øverste del af støttebenet ud fra autostolen 1(billede 1b).
Træk i selehøjdejusteringsgrebet, og flyt det op eller ned
selestropslidserne i hovedstøtten er ud for eller lige over barnets skuldre.
Slip selehøjdejusteringsgrebet, når hovedstøtten er placeret
korrekt, og kontrollér, at det er låst.
Når barnet er så stort, at det er nødvendigt at bruge de
øverste slidser, kan det fortsætte med at benytte autostolen,
9-25kg
indtil dets øjenhøjde er ud for toppen af stolen, eller indtil
dets vægt er højere end følgende angivelser:
Bagudvendt placering: 25kg
Fremadvendt placering: 18kg
Brug breddejusteringsgrebet (se "Præsentation af
autostolen" på forrige side) til at justere autostolens bredde.
2
, så
Page 23

9-25kg
9-18kg
Page 24
2. Montering af autostolen (bagudvendt placering) i den ene
side af bagsædet
2a
2b
2d
VIGTIGT – Autostolen må KUN bruges sammen med hoftesele eller
trepunktssele (godkendt ifølge FN/ECE-regulativ nr. 16 eller tilsvarende
normer).
Anbring autostolen bagudvendt på sædet med støttebenet justeret til den
korteste længde og den roterbare underdel hvilende mod sæderyggen. Efter
montering skal afstanden mellem autostolen og sædet foran ideelt set være
mindst 10 mm (billede 2a).
Autostolen må gerne berøre sædet foran, men den må ikke hvile mod det. Gør
den det, skal sædet foran fl yttes frem, dog uden at det går ud over førerens
eller passagerens komfort. Hvis dette ikke er muligt, skal der fi
placering til autostolen.
2c
Træk sikkerhedsselen igennem autostolen, indtil selen er strammet til, og sørg
for, at den ikke er snoet. Luk låsen i den side, hvor sikkerhedsselespændet
sidder, når selen er så stram som muligt, og sørg for, at både diagonal- og
hoftedelen af selen er låst (det lille billede i 2d).
Luk låsen i den modsatte side, og sørg for, at den kun låser hoftedelen af
selen (billede 2d).
Kontrollér, at begge låse er låst forsvarligt.
Åbn begge låse. Træk trepunktsselen
ud i en passende længde (ca. 60-
90 cm). Før selen gennem selestyret
på modsatte side i forhold til spændet
og ind i seletunnelen (billede 2b).
Der er to slidser i betrækket, som
gør det lettere at føre selen gennem
seletunnelen og ind gennem betrækket
(det lille billede i 2b).
Før selen gennem seletunnelen
og låsen på modsatte side, og sæt
låsetungen fast i spændet (billede 2c).
ndes en anden
2e
Hvis spændet er i den position, der er angivet som forkert (
ikke kan strammes korrekt (billede 2e), skal der fi ndes en anden placering til
autostolen.
), og selen
Page 25
9-25kg
2
1
4
3
2
1
100°
80°
2f
2g
Før tøjringsstropperne rundt om sædet
foran autostolen som vist (billede 2f).
Hvis bilen er udstyret med øjer på
sædeskinnerne, kan disse benyttes som
alternativ (det lille billede i 2g).
VIGTIGT – Tøjringsstropperne må ikke
føres gennem bagageremmene.
2h
Før tøjringsstroppernes løkker ind mellem sædehynden og ryglænet som vist
1
(billede 2h). Før tøjringsstroppernes spænder rundt om sædets yderside
og igennem løkkerne
2
.
Sæt låsetungerne på hver side af autostolen fast i tøjringsstroppernes
spænder, og sørg for, at beslagene til støttebenets tøjringsstrop vender
fremad, og at stropperne ikke er snoede
trække de løse ender nedad
2i
Træk støttebenet så langt som muligt ud fra autostolen
4
.
3
. Stram tøjringsstropperne ved at
1
(billede 2i). Hold
støttebenet i den korrekte vinkel, og sænk det, indtil det berører bilens bund
2
. Kontrollér, at støttebenet er låst forsvarligt, ved at trække i den del af
støttebenet, der kan skydes ud.
2j
Sørg til sidst for, at tøjringsstropperne er strammet helt til, ved at trække
de løse ender nedad (billede 2j). Støttebenet skal hvile på et fast underlag
(ikke på låget til en opbevaringsboks eller lignende) i en vinkel på 100° i
forhold til vandret (billede 2j). Brug vinkelindikatoren på bagsiden af denne
brugervejledning til at kontrollere støttebenets vinkel i forhold til bunden af
bilen.
Kontrollér, at autostolen er placeret forsvarligt, ved at forsøge at bevæge den
frem og tilbage og fra side til side. Hvis den føles løs, eller hvis støttebenet
ikke er i en vinkel på 100° i forhold til bunden, skal monteringsproceduren
gentages, indtil autostolen er placeret korrekt og støttebenet har den korrekte
vinkel.
På billede 5f er det vist, hvordan barnet placeres i autostolen.
Page 26

3. Montering af autostolen (bagudvendt placering) i midten
af bagsædet
3a
3b
3d
VIGTIGT – Autostolen må KUN bruges sammen med hoftesele eller
trepunktssele (godkendt ifølge FN/ECE-regulativ nr. 16 eller tilsvarende
normer).
Anbring autostolen bagudvendt på sædet med støttebenet justeret til den
korteste længde og med autostolens bagside placeret midt mellem fører- og
passagersædet og den roterbare underdel hvilende mod sæderyggen
(billede 3a).
3c
Træk sikkerhedsselen igennem autostolen, indtil selen er strammet til, og sørg
for, at den ikke er snoet. Luk låsen i den side, hvor sikkerhedsselespændet
sidder, når selen er så stram som muligt, og sørg for, at både diagonal- og
hoftedelen af selen er låst (det lille billede i 3d).
Luk låsen i den modsatte side, og sørg for, at den kun låser hoftedelen af
selen (billede 3d).
Kontrollér, at begge låse er låst forsvarligt.
Åbn begge låse. Træk trepunktsselen
ud i en passende længde (ca. 60-
90 cm). Før selen gennem selestyret på
modsatte side i forhold til spændet og
ind i seletunnelen (billede 3b). Der er to
slidser i betrækket, som gør det lettere
at føre selen gennem seletunnelen og
ind gennem betrækket (det lille billede
i 3b).
Før selen gennem seletunnelen
og låsen på modsatte side, og sæt
låsetungen fast i spændet (billede 3c).
3e
Hvis spændet er i den position, der er angivet som forkert (
ikke kan strammes korrekt (billede 3e), skal der fi ndes en anden placering til
autostolen.
), og selen
Page 27
9-25kg
2
1
4
3
2
1
100°
80°
3f
3g
Før tøjringsstropperne rundt om
hhv. førersædet og det forreste
passagersæde som vist (billede 3f).
Hvis bilen er udstyret med øjer på
sædeskinnerne, kan disse benyttes som
alternativ (det lille billede i 3g).
VIGTIGT – Tøjringsstropperne må ikke
føres gennem bagageremmene.
3h
Før tøjringsstroppernes løkker ind mellem sædehynden og ryglænet som vist
1
(billede 3h). Før tøjringsstroppernes spænder rundt om sædets yderside
og igennem løkkerne
2
.
Sæt låsetungerne på hver side af autostolen fast i tøjringsstroppernes
spænder, og sørg for, at beslagene til støttebenets tøjringsstrop vender
fremad, og at stropperne ikke er snoede
trække de løse ender nedad
3i
Træk støttebenet så langt som muligt ud fra autostolen
4
.
3
. Stram tøjringsstropperne ved at
1
(billede 3i). Hold
støttebenet i den korrekte vinkel, og sænk det, indtil det berører bilens bund
2
. Kontrollér, at støttebenet er låst forsvarligt, ved at trække i den del af
støttebenet, der kan skydes ud.
3j
Sørg til sidst for, at tøjringsstropperne er strammet helt til, ved at trække
de løse ender nedad (billede 3j). Støttebenet skal hvile på et fast underlag
(ikke på låget til en opbevaringsboks eller lignende) i en vinkel på 100° i
forhold til vandret (billede 3j). Brug vinkelindikatoren på bagsiden af denne
brugervejledning til at kontrollere støttebenets vinkel i forhold til bunden af
bilen.
Kontrollér, at autostolen er placeret forsvarligt, ved at forsøge at bevæge den
frem og tilbage og fra side til side. Hvis den føles løs, eller hvis støttebenet
ikke er i en vinkel på 100° i forhold til bunden, skal monteringsproceduren
gentages, indtil autostolen er placeret korrekt og støttebenet har den korrekte
vinkel.
På billede 5f er det vist, hvordan barnet placeres i autostolen.
Page 28

4. Montering af autostolen (bagudvendt placering) på forsædet
4a
VIGTIGT – Autostolen må KUN bruges sammen med hoftesele eller
trepunktssele (godkendt ifølge FN/ECE-regulativ nr. 16 eller tilsvarende
normer).
Skub forsædet så langt bagud, at der er plads til autostolen, uden at det går ud
over komforten for den passager, der skal sidde lige bag forsædet.
Anbring autostolen bagudvendt på sædet med støttebenet justeret til den
korteste længde og den roterbare underdel hvilende mod sæderyggen
(billede 4a)
.
VIGTIGT – IKKE hvile mod instrumentbrættet eller være for tæt på forruden.
4b
4c
Åbn begge låse. Træk trepunktsselen
ud i en passende længde (ca. 60-
90 cm). Før selen gennem selestyret
på modsatte side i forhold til spændet
og ind i seletunnelen (billede 4b).
Der er to slidser i betrækket, som
gør det lettere at føre selen gennem
seletunnelen og ind gennem betrækket
(det lille billede i 4b).
Før selen gennem seletunnelen
og låsen på modsatte side, og sæt
låsetungen fast i spændet (billede 4c).
4d
Træk sikkerhedsselen igennem autostolen, indtil selen er strammet til, og sørg
for, at den ikke er snoet. Luk låsen i den side, hvor sikkerhedsselespændet
sidder, når selen er så stram som muligt, og sørg for, at både diagonal- og
hoftedelen af selen er låst (det lille billede i 4d).
Luk låsen i den modsatte side, og sørg for, at den kun låser hoftedelen af
selen (billede 4d).
Kontrollér, at begge låse er låst forsvarligt.
4e
Hvis spændet er i den position, der er angivet som forkert (
), og selen
ikke kan strammes korrekt (billede 4e), skal der fi ndes en anden placering til
autostolen.
Page 29
9-25kg
2
1
4
3
1
2
100°
80°
4f
4g
Før en tøjringsstrop rundt om det forreste
passagersæde som vist (billede 4f).
Hvis bilen er udstyret med øjer på
sædeskinnerne, kan disse benyttes som
alternativ (det lille billede i 4g).
VIGTIGT – Tøjringsstropperne må ikke
føres gennem bagageremmene.
4h
Før tøjringsstroppernes løkker ind mellem sædehynden og ryglænet som vist
1
(billede 4h). Før tøjringsstroppernes spænder rundt om sædets yderside
og igennem løkkerne
2
.
Før tøjringsstroppernes spænder ind under sædet. Sæt låsetungerne på hver
side af autostolen fast i tøjringsstroppernes spænder, og sørg for, at beslagene
til støttebenets tøjringsstrop vender fremad, og at stropperne ikke er snoede
3
. Stram tøjringsstropperne ved at trække de løse ender nedad 4.
4i
Træk støttebenet så langt som muligt ud fra autostolen
1
(billede 4i). Hold
støttebenet i den korrekte vinkel, og sænk det, indtil det berører bilens bund
2
. Kontrollér, at støttebenet er låst forsvarligt, ved at trække i den del af
støttebenet, der kan skydes ud.
4j
Sørg til sidst for, at tøjringsstropperne er strammet helt til, ved at trække
de løse ender nedad (billede 4j). Støttebenet skal hvile på et fast underlag
(ikke på låget til en opbevaringsboks eller lignende) i en vinkel på 100° i
forhold til vandret (billede 4j). Brug vinkelindikatoren på bagsiden af denne
brugervejledning til at kontrollere støttebenets vinkel i forhold til bunden af
bilen.
Kontrollér, at autostolen er placeret forsvarligt, ved at forsøge at bevæge den
frem og tilbage og fra side til side. Hvis den føles løs, eller hvis støttebenet
ikke er i en vinkel på 100° i forhold til bunden, skal monteringsproceduren
gentages, indtil autostolen er placeret korrekt og støttebenet har den korrekte
vinkel.
På billede 5f er det vist, hvordan barnet placeres i autostolen.
Page 30

5. Montering af autostolen (fremadvendt placering) til børn
3
2
1
70-80cm
på 9-18 kg
9-18 kg, gruppe 1 (børn i alderen fra ca. 9 måneder til ca. 4 år)
5a
5b
5c
VIGTIGT – Autostolen må KUN bruges sammen med trepunktssele (godkendt
ifølge FN/ECE-regulativ nr. 16 eller tilsvarende normer).
Lås støttebenet fast i støttebensholderen.
Anbring autostolen fremadvendt på sædet, og drej den lidt ind mod dig selv for
at få mere plads. Træk sikkerhedsselen udad som vist, og hold diagonal- og
hoftedelen sammen (det lille billede i 5a).
VIGTIGT – Selen må aldrig være snoet.
Før sikkerhedsselen rundt om den forreste del af autostolen, gennem den første
selegennemføring og direkte ind gennem den bageste del af autostolen på det
angivne sted (billede 5a).
VIGTIGT – Brug ikke det røde diagonalselestyr på hovedstøtten.
Før sikkerhedsselen gennem den anden selegennemføring (billede 5b).
Tip – Hvis sikkerhedsselen er for kort, kan det være nødvendigt at føre
diagonaldelen bag om hovedstøtten inden monteringen.
Træk sikkerhedsselen om på forsiden af autostolen, indtil selen er strammet til,
og sæt låsetungen fast i spændet (billede 5c).
Sørg for, at sikkerhedsselen ikke er snoet, og at hoftedelen er ført hen over
begge de to røde hofteselestyr. Sørg for, at selens diagonaldel er placeret i det
bageste hjørne af autostolens skalkonstruktion bag hovedstøtten.
5d
Brug hele din kropsvægt til at skubbe autostolen ind mod sædet, og stram
selen på følgende måde:
Træk i selens diagonaldel og hold i den
den til, og træk opad for at stramme det øverste stykke
Kontrollér, at autostolen er placeret forsvarligt, ved at trække hårdt i
autostolens sele. Stolen må kun bevæge sig en lille smule. Hvis stolen sidder
for løst, skal ovenstående procedure gentages.
1
, træk i position 2 for at stramme
3
(billede 5d).
Page 31

9-18kg
5e
VIGTIGT – Kontrollér sikkerhedsselespændets placering, og
sørg for, at det er sikkerhedsselen og IKKE spændet, der
holder autostolen på plads (billede 5e).
Hvis sikkerhedsselespændet er placeret forkert, skal der
fi ndes en anden placering til autostolen.
I tvivlstilfælde kan du ringe til vores kundeserviceafdeling på
+46 8564 841 00, sende en e-mail til
info@se.britaxeurope.com eller gå ind på vores
hjemmeside på adressen www
5f
Anbring barnet i autostolen, og før selestropperne rundt om barnet.
Sørg for, at selestropperne ikke er snoede. Spænd selen ved at trække i
.britax.se
justeringsstroppen.
VIGTIGT – Selens hoftedel skal være placeret så langt fremme og så lavt som
muligt over barnets bækken.
Sørg til sidst for, at brystpolstringerne er trukket ned over barnets bryst
(billede 5f).
Page 32

6. Montering af autostolen (fremadvendt placering) til børn på
15-25 kg
15-25 kg, gruppe 2 (børn i alderen fra ca. 4 år til ca. 6 år)
6a 6b
6c
6e
6g
Justering af autostolen
Når autostolens sele skal pakkes væk, skal
stolen først anbringes på gulvet.
Tryk justeringsknappen ind, og træk
samtidigt BEGGE skulderstropper så langt
frem som muligt (billede 6a).
Vend autostolen. Træk i
selehøjdejusteringsgrebet på
autostolens bagside, og fl
selestropslidserne i hovedstøtten er i den
øverste position (billede 6b).
Tag begge skulderstropper ud af
6d
6f
6h
selehægten på autostolens bagside
(billede 6c), og anbring selehægten på den
nederste del af selebeskyttelsen
(billede 6g).
Tag brystpolstringerne ud af deres
holdere (det lille billede i 6c). Træk
begge skulderstropper og brystpolstringer
om på autostolens forside, og tag
brystpolstringerne af skulderstropperne.
Anbring autostolen med bagsiden nedad.
ag justeringsstroppen ud af skridtstroppens
T
beslag. Drej beslaget, således at det kan
føres ind over skridtstroppen, og skub det
om på autostolens forside (billede 6d).
Rejs autostolen op, og frigør selen fra
spændet (det lille billede i 6e). Skub
selestropperne og låsetungerne ind under
betrækket gennem hofteseleslidserne
(billede 6e).
Før spændet, selestropperne og
brystpolstringerne ind under de
elastiske seleholdere (billede 6f). Skub
justeringsstroppen gennem slidsen i
betrækket.
Hold på autostolen, og tryk ind på
hovedstøttejusteringsgrebet på bagsiden
af hovedstøtten (billede 6g). Kontrollér, at
brystpolstringerne er taget af som vist på
(billede 6c) ovenfor.
Flyt hovedstøtten opad, således
at barnets hoved er placeret midt
for hovedstøtten (billede 6h). Slip
hovedstøttejusteringsgrebet, når
hovedstøtten er placeret korrekt, og
kontrollér
, at det er låst.
yt det opad, så
1
Page 33

15-25kg
6i
Montering af autostolen
VIGTIGT – Autostolen må KUN bruges sammen med trepunktssele (godkendt
ifølge FN/ECE-regulativ nr. 16 eller tilsvarende normer).
Anbring autostolen fremadvendt på sædet,
Før sikkerhedsselens diagonaldel gennem det mørkerøde øverste selestyr på
MODSATTE side i forhold til spændet (billede 6i).
6j
Spænd sikkerhedsselen omkring barnet (billede 6j). Selens hoftedel skal hvile
på de røde hofteselestyr i hver side af autostolen. Sørg for, at sikkerhedsselen
ikke er snoet, og stram den til.
VIGTIGT – Sikkerhedsselens hoftedel skal være placeret så langt fremme og
så lavt som muligt over barnets bækken.
6k
VIGTIGT – Kontrollér sikkerhedsselespændets placering, og sørg for, at det
ikke er trukket rundt om autostolen og ind mod det røde hofteselestyr
(billede 6k).
6l
Kontrollér placeringen af bilens øverste seleforankringspunkt (billede 6l).
Hvis forankringspunktet er placeret foran autostolen, skal der findes en anden
placering til autostolen.
Page 34

FIN
Tärkeää!
9–25 kg, ryhmä 1-2 (n. 9 kuukaudesta 6 ikävuoteen)
Varmista, että noudatat näitä ohjeita huolellisesti ja oikein. Jos istuinta ei ole kiinnitetty lujasti
eikä lasta vyötetty oikealla tavalla, sekä lapsi että muut matkustajat ovat kolaritilanteessa
vaarassa loukkaantua vakavasti.
Lue tämä käyttöohje huolellisesti ENNEN kuin yrität vyöttää lapsen istuimeen.
Hampshire Trading Standards Authority ja Britax
suosittavat, ettei lasten turvaistuimia osteta eikä myydä
käytettyinä. Älä siis myy omaasi äläkä anna sitä muiden
käyttöön.
Kolarin jälkeen on sekä turvaistuin että auton
turvavyöt uusittava. Ulkoisesti ne voivat näyttää
vahingoittumattomilta, mutta jos joudut toiseen kolariin,
turvaistuin ja auton turvavyöt eivät ehkä anna riittävän
hyvää suojaa lapselle ja matkustajille.
Mikään lasten turvaistuin ei takaa, ettei lapsi pääse
irti valjaista
V
aljaita ei voida suunnitella täysin ”lapsivarmoiksi”
niin, että ne samalla täyttävät myös eurooppalaisen
standardin ECE R44 lakimääräiset vaatimukset. V
täytyy aina kiinnittää ja säätää oikein, kehottaen lapsia
pysymään valjaissa ajon aikana.
Lapsen turvaistuimen hoito
Valjaiden lukon sisään voi päästä ruokaa tai juomaa.
Silloin lukko ei ehkä toimi kunnolla – siitä ei kuulu
naksahdusta. Pese sitä lämpimällä vedellä kunnes se
tulee puhtaaksi (kuvat
A
A ja B).
aljaat
B
V
aljaiden ja turvaistuimen päällisen puhdistus
Puhdistetaan käyttäen PELKÄSTÄÄN sientä,
käsienpesusaippuaa ja lämmintä vettä.
ÄLÄ pura tai edes yritä purkaa osiin mitää valjaiden tai
istuimen osaa puhdistuksen yhteydessä.
ÄLÄ käytä liuottimia, pesuaineita tai astianpesuainetta.
Ne voivat heikentää valjaita ja istuinta.
ÄLÄ voitele tai öljyä mitään istuimen osaa.
Päällyksen irrotus ja kiinnitys
Paina valjaiden vapautusnappula sisään ja pidä sitä
painettuna; pane samalla kätesi rintapehmusteiden alle
ja vedä MOLEMMAT olkahihnat niin pitkälle eteen kuin
mahdollista.
V
edä kiinnityssalpa istuimen takaa ja vapauta molemmat
olkahihnat.
Vedä päällinen irti istuimen yläosasta ja tuo hihnat
istuimen eteen toimien kuvan osoittamalla tavalla
(kuva 6c). A
koukku ja silmukkahihna irti. V
olkahihnoista. Vedä pääällinen varoen irti istuimesta
pujottaen samalla olkahihnat, valjaiden lukko ja
säätöhihna päällisessä olevista aukoista.
vaa vyölukko ja poista pehmuste ottamalla
edä rintapehmusteet irti
Page 35

Päällinen kiinnitetään suorittamalla samat toimenpiteet
kääntäen.
Varmista, että hihnat eivät tule kierteelle.
Päällinen kiinnitetään suorittamalla samat toimenpiteet
kääntäen.
Varmista, että hihnat eivät tule kierteelle.
TÄRKEÄÄ – Päällinen ja rintapehmusteet parantavat
turvallisuutta. ÄLÄ KOSKAAN käytä turvaistuinta ilman
niitä. Älä vaaranna lapsen turvallisuutta käyttämällä
muuta valmistetta olevaa päällistä. Se voi estää
turvaistuinta suojaamasta lasta parhaalla mahdollisella
tavalla.
V
aihtopäällisiä on saatavissa Britax-edustajilta tai
ottamalla yhteys Britax-asiakaspalveluun,
puh. 09-343 60 10.
Takuu
Kaikki Britax-tuotteet on suunniteltu, valmistettu ja
testattu huolella. Jos tämä tuote siitä huolimatta
osoittautuu vialliseksi 12 kuukauden sisällä ostopäivästä
siinä ilmenevän aine- tai valmistusvian vuoksi, se on
toimitettava takaisin myyjäliikkeeseen. Me korjaamme
sen veloituksetta taikka korvaamme sen samalla tai
samanlaisella tuotteella, oman harkintamme mukaan.
T
akuun voimassaolo edellyttää ostotositetta.
Suositamme, että säilytät ostokuittisi kiinnittämällä
sen tähän oppaaseen ja säilyttämällä opasta
turvaistuimessa.
Britax ei vastaa vahingoista, jotka aiheutuvat
kovakouraisesta käsittelystä, väärästä käyttötavasta tai
huolimattomuudesta.
Tätä takuuta ei voi siirtää toiselle, joten se ei koske
käytettynä myytyjä tai ostettuja tuotteita.
Tämä takuu ei vaikuta lakimääräisiin oikeuksiisi.
Jos olet epävarma asiasta
Kaikki turvaistuimet eivät sovi kaikkiin autoihin.
iedot tämän turvaistuimen soveltuvuudesta
T
autoosi saat nettisivuiltamme, osoite www.britax.
fi
, asiakaspalvelustamme puh. 09-343 60 10 tai
sähköpostitse osoitteesta info@fi .britaxeurope.com.
9-25kg
9-25kg
Page 36

Varoitus!
9–25 kg, ryhmä 1-2 (n. 9 kuukaudesta 6 ikävuoteen)
MERKITTÄVÄ VAARA!
ÄLÄ missään tapauksessa käytä selkä menosuuntaan
sijoitettavaa lasten turvaistuinta sellaisella
matkustajapaikalla, joka on varustettu toimivalla
turvatyynyllä.
ÄLÄ käytä kasvot menosuuntaan sijoitettavaa lasten
turvaistuinta sellaisella matkustajapaikalla, joka on
varustettu toimivalla turvatyynyllä, jollei autotehdas ole
vahvistanut, että se on turvallista.
ÄLÄ käytä lasten turvaistuinta sivuttain tai taaksepäin
asennetulla autonistuimella.
ÄLÄ nosta lasten turvaistuinta ylemmäs matkustajan
istuimesta tyynyn, takin tms avulla. Kolarin sattuessa
turvaistuin ja auton turvavyöt eivät silloin suojaa lasta
täysitehoisesti.
ÄLÄ käytä lasten turvaistuinta kotona. Se ei ole
tarkoitettu kotikäyttöön, vaan ainoastaan autossa
käytettäväksi.
ÄLÄ yritä purkaa tai muuntaa lasten turvaistuinta,
lisätä mitään turvaistuimen mihinkään osaan taikka
muuttaa valjaiden tai auton turvavöiden valmistus- tai
käyttötapaa. Virallinen hyväksyntä ei enää ole voimassa,
jos istuimeen on tehty muutoksia. VAIN valmistaja saa
tehdä muutoksia lasten turvaistuimiin.
ÄLÄ jätä lapsia yksin autoon lyhyeksikään ajaksi.
ÄLÄ jätä auton takaosaan irtonaisia esineitä, kuten
matkatavaroita tai kirjoja. Ne täytyy kiinnittää hyvin
paikoilleen, sillä jos joudut äkisti pysäyttämään auton,
irtonaiset esineet jatkavat liikettään eteenpäin ja voivat
aiheuttaa vaikeita vammoja. Erityisen suuren riskin
muodostavat isot ja painavat esineet.
ÄLÄ jätä kokoontaittuvaa autonistuinta lukitsematta. Jos
joudut äkisti pysäyttämään auton, lukitsematon istuin voi
aiheuttaa lapselle vammoja.
ÄLÄ anna lasten leikkiä turvaistuimella tai säädellä sitä.
PIDÄ tämä käyttöopas sille tarkoitetussa
säilytyspaikassa.
PIDÄ lasten turvaistuin peitettynä, kun jätät auton
auringonpaisteeseen. Kiinnikkeet voivat tulla kuumiksi
aurinkoisella säällä ja päällinen voi haalistua.
PIDÄ huoli, ettei lasten turvaistuin jää kokoontaittuvan
autonistuimen tai auton oven väliin.
PIDÄ huoli, että säädät valjaat ennen jokaista
matkaa lapsen päällä olevien vaatteiden mukaan
– talvivaatteiden yhteydessä käytettävä säätö voi olla
liian väljä silloin, kun lapsi on kesävaatteissa.
PIDÄ lasten turvaistuin turvallisessa paikassa
silloin, kun se ei ole käytössä. Vältä panemasta
painavia esineitä sen päälle äläkä säilytä sitä
suorien lämmönlähteiden läheisyydessä tai suorassa
auringonvalossa.
PIDÄ lasten turvaistuin aina turvallisesti kiinnitettynä
silloinkin, kun lapsesi ei käytä sitä.
PIDÄ huoli, että auton kaikkien matkustajien turvavyöt
ovat kiinnitettyinä.
Vaikka Britax ottaakin uusien tuotteiden suunnittelussa
huomioon sen, että lasten turvaistuimet ovat
kosketuksessa auton istuimiin, se ei vastaa auton
istuimille tai turvavöille mahdollisesti aiheutuvista
vaurioista.
TÄRKEÄÄ:
Selkä menosuuntaan asennettava istuin
Tätä lasten turvaistuinta SAA käyttää VAIN lantiotaikka lantio- ja olkavyön yhteydessä (hyväksytty
UN/ECE-määräyksen nro 16 tai vastaavien standardien
vaatimusten mukaisesti).
Kasvot menosuuntaan asennettava istuin
Tätä lasten turvaistuinta SAA
olkavyön yhteydessä (hyväksytty UN/ECE-määräyksen
nro 16 tai vastaavien standardien vaatimusten
mukaisesti).
käyttää VAIN lantio- ja
Olkavyö
Lantiovyö
Olkavyö
Lantiovyö
Page 37

Uuden lasten turvaistuimen esittely
9–25 kg, ryhmä 1-2 (n. 9 kuukaudesta 6 ikävuoteen)
1. Istuimen päällinen
2. Käyttöoppaan säilytyspaikka (päällisen
takana)
3. Valjaiden lukko
4. Kumihihna valjaiden säilytystä varten
5. Pehmustetyyny
6. Reititysmerkintä
7. Lantiovyöopas (kasvot meno-
suuntaan)
8. Lukitsin
9. Vyötunnelin aukko (selkä meno-
suuntaan)
10. Valjaiden säätönappi
11. V aljaiden säätöhihna
12. Haaranauha
13. Valjaat
14. Rintapehmuste
15. Vyön yläohjain (15–25 kg, kasvot
menosuuntaan)
16. Pääntuen päällinen
17. Liikuteltava pääntuki
18. Pääntuen säädin (15–25 kg, kasvot
menosuuntaan)
19. Valjashihna-aukko
20. Valjashihna
21. Vyön suojus
22. Kiinnityssalvan ja tukijalan säilytystila
23. Tukijalan vapautusnappi
24. Tukijalka
25. Tukijalan lukitusilmaisin
26. Pidike (istuimen alla)
27. Kääntyvä alusta - (selkä menosu-
untaan käyttöä varten)
28. Tukijalan kiinnike
29. Kiinnityshinan lukon kieli
30. Turvavyön reititysaukko (kasvot meno-
suuntaan)
31. Leveyssäädin
32. Valjaiden korkeuden /
pääntuen säädin
(valjastila)
33. Kiinnityshihnat
33
1
2
3
4
5
6
7
8
9
18
19
20
21
22
23
24
9-25kg
9-25kg
17
16
15
14
13
12
11
10
32
31
30
29
28
25
26
27
Page 38
1. Turvaistuimen säätö
2
1
1a
1b
1c
9-18kg
Aseta turvaistuin lattialle.
Paina säätönappi sisään ja vedeä samalla MOLEMMAT olkahihnat
mahdollisimman pitkälle eteen (kuva 1a).
Irrota valjaat lukosta (kuvan 1a pikkukuva).
V
aljaiden kiertyminen estyy, kun olkahihnat asetetaan turvaistuimen molemmin
puolin sijoittamalla lukkojen kielet valjaiden säilytykseen tarkoitettujen
kumihihnojen taakse.
Aseta lapsi varoen turvaistuimeen, sijoita valjaat väljästi lapsen ympärille ja
kiinnitä valjaslukko.
Vedä tukijalan yläosa ulos turvaistuimen takaosasta 1 (kuva 1b).
Nosta valjaiden säädin ylös ja siirrä sitä ylös tai alas
olevat valjashihna-aukot tulevat lapsen olkapäiden tasoon tai hiukan ylemmäs.
Kun pääntuki on oikeassa asennossa, päästä ote valjaiden
säätimestä ja varmista, että se lukittuu hyvin.
Tultaessa aukkojen yläpäähän, turvaistuinta voi käyttää
edelleen kunnes lapsen silmät ja istuimen yläreuna ovat
9-25kg
samassa tasossa tai lapsen paino ylittää seuraavat lukemat:
Selkä menosuuntaan: 25 kg
Kasvot menosuuntaan: 18 kg
Säädä turvaistuimen leveys leveyssäätimellä (ks. kohtaa
’Uuden turvaistuimen esittely’ edellisellä sivulla).
2
niin että pääntuessa
Page 39

9-25kg
9-18kg
Page 40
2. Turvaistuimen asennus (selkä menosuuntaan) takaistuimelle
2a
TÄRKEÄÄ - Turvaistuinta SAA käyttää VAIN lantio- tai lantio- ja olkavyön
yhteydessä (hyväksytty UN/ECE nro 16:n tai vastaavien standardien
mukaisesti).
Säädä tukijalka lyhyimpään asentoonsa ja aseta turvaistuin selkä
menosuuntaan auton istuimelle niin, että kääntyvä pohja tulee autonistuimen
selkänojaa vasten. Asennuksen jälkeen edessä olevan istuimen ja
turvaistuimen välisen raon tulee mieluimmin olla vähintään 10 mm (kuva 2a).
Turvaistuin saa koskettaa edessä olevaa istuinta, mutta se ei saa nojata
sitä vasten. Jos se nojaa, silloin edessä olevaa autonistuinta täytyy siirtää
eteenpäin, kuitenkin niin, ettei kuljettaja tai matkustaja joudu istumaan
epämukavassa asennossa. Jos tämä ei onnistu, kokeile jotakin muuta
sijoituspaikkaa autossa.
2b
2c
Avaa molemmat lukitukset. Vedä lantio- ja
olkavyötä riittävästi ulos (n. 600–900
mm). Pujota vyö lukon vastakkaisella
puolella olevan lukitushihnan ohjaimen
läpi ja edelleen hihnatunneliin (kuva
2b). Turvaistuimen päällisessä on kaksi
aukkoa, joista on apua pujotettaessa vyötä
vyötunnelin läpi ja istuimen päällisen alitse
(kuvan 2b pikkukuva).
Pujota turvavyö vyötunnelin ja
vastakkaisella puolella olevan lukitsimen
läpi ja kiinnitä kieli lukkoon.
2d
Poista turvavyön väljyys vetämällä se turvaistuimen läpi ja varmista, ettei vyö
ole kierteellä. Kun vyö on niin tiukalla kuin mahdollista, sulje turvavyön lukon
puoleinen lukitsin ja varmistaudu, että siihen kiinnittyvät sekä turvavyön lantioettä olkavyöosa (kuvan 2d pikkukuva).
Sulje vastakkaisen puolen lukitsin ja varmistaudu, että siihen kiinnittyy vain
turvavyön lantiovyöosa (kuva 2d).
Varmista, että molemmat lukitsimet ovat hyvin kiinni.
2e
Jos lukko on nyt kohdassa, jossa on merkintä ’väärin’
eikä turvayötä saa
kiristettyä kunnolla (kuva 2e), kokeile jotakin muuta sijoituspaikkaa autossa.
Page 41
9-25kg
2
1
4
3
2
1
100°
80°
2f
2g
Kierrä kiinnityshihnat turvaistuimen
edessä olevan autonistuimen ympäri
kuten kuvassa (kuva 2f).
Jos autossa on kiinnityslenkit istuimien
liukukiskoissa, toinen vaihtoehto on
käyttää niitä (kuvan 2g pikkukuva).
TÄRKEÄÄ - Älä käytä
matkatavarahihnoja kiinnityshihnojen
asennukseen.
2h
Työnnä kiinnityshihnojen lenkkipäät auton etu- ja takaistuimen väliin
kuvassa esitetyllä tavalla
ulkopuolelta autonistuimen ympäri ja pujota ne lenkkien läpi
1
(kuva 2h). Tuo kiinnityshihnojen lukolliset päät
2
.
Varmista, että tukijalan kiinnitystuet on suunnattu eteenpäin ja etteivät hihnat
ole kierteellä, ja kiinnitä sitten kiinnistyshihnojen lukot turvaistuimen sivuilla
oleviin kieliin
alaspäin
2i
Vedä tukijalka ulos turvaistuimen takaa niin pitkälle kuin mahdollista
. Kiristä kiinnityshihnat vetämällä vapaita päitä tasaisesti
3
.
4
1
(kuva 2i). Pidä kulma oikeana ja laske tukijalkaa kunnes se koskettaa lattiaa
2
. Varmista tukijalan liikkuvaa osaa vetämällä, että tukijalka on lukittunut
hyvin paikalleen.
2j
Varmista lopuksi, että kiinnityshihnat on kiristetty hyvin vetämällä niiden
vapaita päitä alaspäin (kuva 2j). Tukijalan täytyy olla tukevasti lattia vasten
– se ei siis saa olla minkään laatikon kannen tms varassa – 100 asteen
kulmassa vaakatasoon nähden (kuva 2j). Tarkista tukijalan ja lattian välinen
kulma ottamalla avuksi tämän käyttöohjeen takasivulla oleva kulmaopas.
Kun istuin on kiinnitetty lujasti paikalleen, kokeile vielä kiinnitys yrittämällä
liikutella istuinta eteen ja taakse sekä puolelta toiselle. Jos se tuntuu olevan
löyhällä tai jos tukijalka ei ole 100 asteen kulmassa lattiaan nähden, istuin
täytyy asentaa uudelleen kunnes se tulee lujasti paikalleen ja oikeaan
kulmaan.
Ohjeet lapsen sijoittamisesta turvaistuimeen on annettu kuvassa 5f.
Page 42
3. Turvaistuimen asennus (selkä menosuuntaan) takaistuimen
keskipaikalle
3a
3b
3d
TÄRKEÄÄ - Turvaistuinta SAA käyttää VA
yhteydessä (hyväksytty UN/ECE nro 16:n tai vastaavien standardien
mukaisesti).
Säädä tukijalka lyhyimpään asentoonsa ja aseta turvaistuin autonistuimelle
selkä menosuuntaan päin niin, että turvaistuimen selkänoja tulee aivan
keskelle kuljettajan ja matkustajn istuimen väliin ja käännettävä pohja tulee
autonistuimen selkänojaa vasten (kuva 3a).
3c
Poista turvavyön väljyys vetämällä se turvaistuimen läpi ja varmista, ettei vyö
ole kierteellä. Kun vyö on niin tiukalla kuin mahdollista, sulje turvavyön lukon
puoleinen lukitsin ja varmistaudu, että siihen kiinnittyvät sekä turvavyön lantioettä olkavyöosa (kuvan 3d pikkukuva).
Sulje vastakkaisen puolen lukitsin ja varmistaudu, että siihen kiinnittyy vain
turvavyön lantio-osa (kuva 3d).
Varmista, että molemmat lukitsimet ovat hyvin kiinni.
IN lantio- tai lantio- ja olkavyön
Avaa molemmat lukitukset. Vedä lantioja olkavyötä riittävästi ulos (n. 600–900
mm). Pujota vyö lukon vastakkaisella
puolella olevan lukitushihnan ohjaimen
läpi ja edelleen hihnatunneliin (kuva
3b). Turvaistuimen päällisessä on kaksi
aukkoa, joista on apua pujotettaessa
vyötä vyötunnelin läpi ja istuimen
päällisen alitse (kuvan 3b pikkukuva).
Pujota turvavyö vyötunnelin ja
vastakkaisella puolella olevan
lukitsimen läpi ja kiinnitä kieli lukkoon
(kuva 3c).
3e
Jos lukko on nyt kohdassa, jossa on merkintä ’väärin’
kiristettyä kunnolla (kuva 3e), kokeile jotakin muuta sijoituspaikkaa autossa.
eikä turvayötä saa
Page 43

9-25kg
2
1
4
3
2
1
100°
80°
3f
3g
Kierrä yksi kiinnityshihna sekä kuljettajan
että matkustajan istuimen ympäri kuten
kuvassa (kuva 3a).
Jos autossa on kiinnityslenkit istuimien
liukukiskoissa, toinen vaihtoehto on
käyttää niitä (kuvan 3g pikkukuva).
TÄRKEÄÄ - Älä käytä
matkatavarahihnoja kiinnityshihnojen
asennukseen.
3h
Työnnä kiinnityshihnojen lenkkipäät auton etu- ja takaistuimen väliin
kuvassa esitetyllä tavalla
ulkopuolelta autonistuimen ympäri ja pujota ne lenkkien läpi
1
(kuva 3h). Tuo kiinnityshihnojen lukolliset päät
2
.
Varmista, että tukijalan kiinnitystuet on suunnattu eteenpäin ja etteivät hihnat
ole kierteellä, ja kiinnitä sitten kiinnistyshihnojen lukot turvaistuimen sivuilla
oleviin kieliin
alaspäin
3i
Vedä tukijalka ulos turvaistuimen takaa niin pitkälle kuin mahdollista
. Kiristä kiinnityshihnat vetämällä vapaita päitä tasaisesti
3
.
4
1
(kuva 3i). Pidä kulma oikeana ja laske tukijalkaa kunnes se koskettaa lattiaa
2
. Varmista tukijalan liikkuvaa osaa vetämällä, että tukijalka on lukittunut
hyvin paikalleen.
3j
Varmista lopuksi, että kiinnityshihnat on kiristetty hyvin vetämällä niiden
vapaita päitä alaspäin (kuva 3j). Tukijalan täytyy olla tukevasti lattia vasten
– se ei siis saa olla minkään laatikon kannen tms varassa – 100 asteen
kulmassa vaakatasoon nähden (kuva 3j). Tarkista tukijalan ja lattian välinen
kulma ottamalla avuksi tämän käyttöohjeen takasivulla oleva kulmaopas.
Kun istuin on kiinnitetty lujasti paikalleen, kokeile vielä kiinnitys yrittämällä
liikutella istuinta eteen ja taakse sekä puolelta toiselle. Jos se tuntuu olevan
löyhällä tai jos tukijalka ei ole 100 asteen kulmassa lattiaan, istuin täytyy
asentaa uudelleen kunnes se tulee lujasti paikalleen ja oikeaan kulmaan.
Ohjeet lapsen sijoittamisesta turvaistuimeen on annettu kuvassa 5f.
Page 44
4. Turvaistuimen asennus (selkä menosuuntaan) etuistuimelle
4a
TÄRKEÄÄ - Turvaistuinta SAA käyttää VA
yhteydessä (hyväksytty UN/ECE nro 16:n tai vastaavien standardien
IN lantio- tai lantio- ja olkavyön
mukaisesti).
Työnnä auton etuistuinta taaksepäin, niin että turvaistuimen saa asennettua,
ja varmistaudu, että sen takana takaistuimella matkustava voi yhä istua
mukavassa asennossa.
Säädä tukijalka lyhyimpään asentoonsa ja aseta turvaistuin autonistuimelle
selkä menosuuntaan päin niin, että käännettävä pohja tulee autonistuimen
selkänojaa vasten (kuva 4a).
TÄRKEÄÄ - ÄLÄ aseta turvaistuimen selkänojaa kojelautaa vasten tai lähelle
tuulilasia.
4b
4c
Avaa molemmat lukitukset. Vedä lantioja olkavyötä riittävästi ulos (n. 600–900
mm). Pujota vyö lukon vastakkaisella
puolella olevan lukitushihnan ohjaimen
läpi ja edelleen hihnatunneliin (kuva
4b). Turvaistuimen päällisessä on kaksi
aukkoa, joista on apua pujotettaessa
vyötä vyötunnelin läpi ja istuimen
päällisen alitse (kuvan 4b pikkukuva).
Pujota turvavyö vyötunnelin ja
vastakkaisella puolella olevan
lukitsimen läpi ja kiinnitä kieli lukkoon
(kuva 4c).
4d
Poista turvavyön väljyys vetämällä se turvaistuimen läpi ja varmista, ettei vyö
ole kierteellä. Kun vyö on niin tiukalla kuin mahdollista, sulje turvavyön lukon
puoleinen lukitsin ja varmistaudu, että siihen kiinnittyvät sekä turvavyön lantioettä olkavyöosa (kuvan 4d pikkukuva).
Sulje vastakkaisen puolen lukitsin ja varmistaudu, että siihen kiinnittyy vain
turvavyön lantio-osa (kuva 4d).
Varmista, että molemmat lukitsimet ovat hyvin kiinni.
4e
Jos lukko on nyt kohdassa, jossa on merkintä ’väärin’
eikä turvayötä saa
kiristettyä kunnolla (kuva 4e), kokeile jotakin muuta sijoituspaikkaa autossa.
Page 45
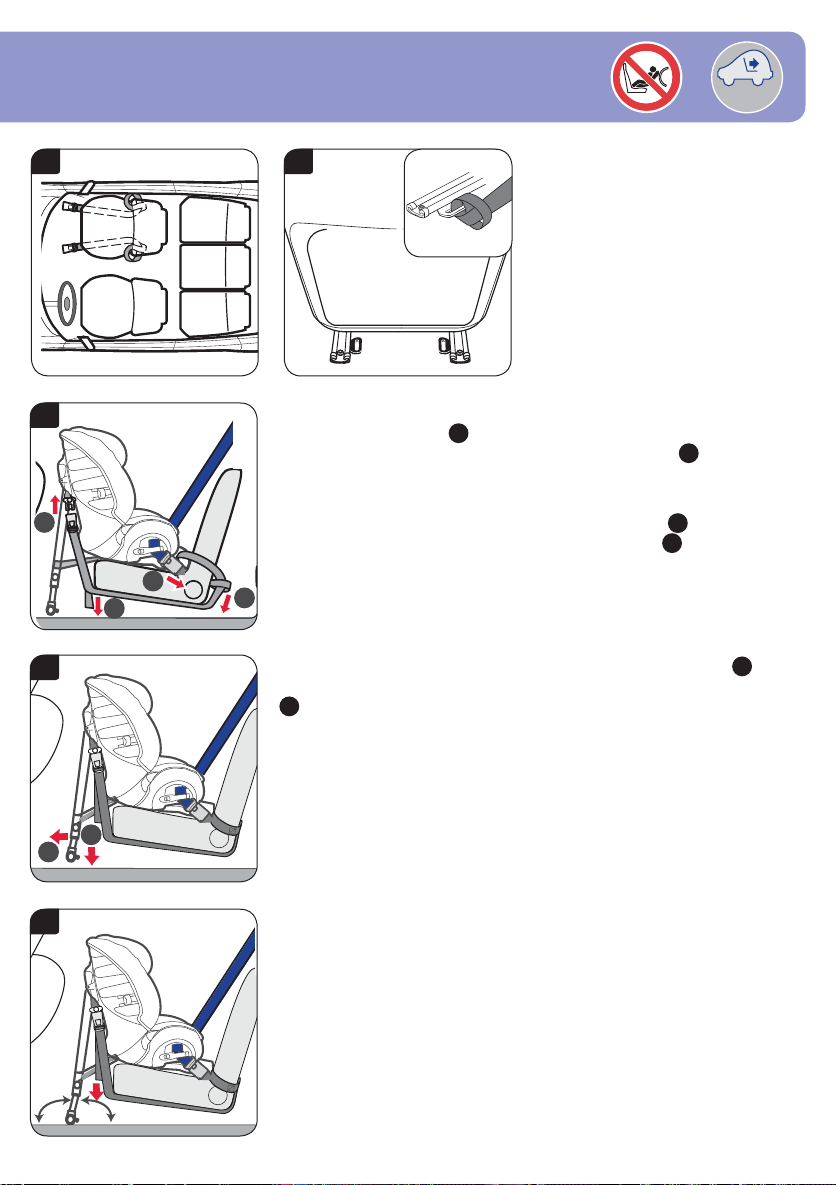
9-25kg
2
1
4
3
1
2
100°
80°
4f
4g
Kierrä yksi kiinnityshihna
etuistuinmatkustajan istuimen ympäri
kuten kuvassa (kuva 4f).
Jos autossa on kiinnityslenkit istuimien
liukukiskoissa, toinen vaihtoehto on
käyttää niitä (kuvan 4g pikkukuva).
TÄRKEÄÄ - Älä käytä
matkatavarahihnoja kiinnityshihnojen
asennukseen.
4h
Työnnä kiinnityshihnojen lenkkipäät auton etu- ja takaistuimen väliin
kuvassa esitetyllä tavalla
ulkopuolelta autonistuimen ympäri ja pujota ne lenkkien läpi
1
(kuva 4h). Tuo kiinnityshihnojen lukolliset päät
2
.
Työnnä lukolliset päät istuimen alle. Varmista, että tukijalan kiinnitystuet
on suunnattu eteenpäin ja etteivät hihnat ole kierteellä, ja kiinnitä sitten
kiinnistyshihnojen lukot turvaistuimen sivuilla oleviin kieliin
kiinnityshihnat vetämällä vapaita päitä tasaisesti alaspäin
4i
Vedä tukijalka ulos turvaistuimen takaa niin pitkälle kuin mahdollista
. Kiristä
3
.
4
1
(kuva 4i). Pidä kulma oikeana ja laske tukijalkaa kunnes se koskettaa lattiaa
2
. Varmista tukijalan liikkuvaa osaa vetämällä, että tukijalka on lukittunut
hyvin paikalleen.
4j
Varmista lopuksi, että kiinnityshihnat on kiristetty hyvin vetämällä niiden
vapaita päitä alaspäin (kuva 4j). Tukijalan täytyy olla tukevasti lattia vasten
– se ei siis saa olla minkään laatikon kannen tms varassa – 100 asteen
kulmassa vaakatasoon nähden (kuva 4j). Tarkista tukijalan ja lattian välinen
kulma ottamalla avuksi tämän käyttöohjeen takasivulla oleva kulmaopas.
Kun istuin on kiinnitetty lujasti paikalleen, kokeile vielä kiinnitys yrittämällä
liikutella istuinta eteen ja taakse sekä puolelta toiselle. Jos se tuntuu olevan
löyhällä tai jos tukijalka ei ole 100 asteen kulmassa lattiaan, istuin täytyy
asentaa uudelleen kunnes se tulee lujasti paikalleen ja oikeaan kulmaan.
Ohjeet lapsen sijoittamisesta turvaistuimeen on annettu kuvassa 5f.
Page 46
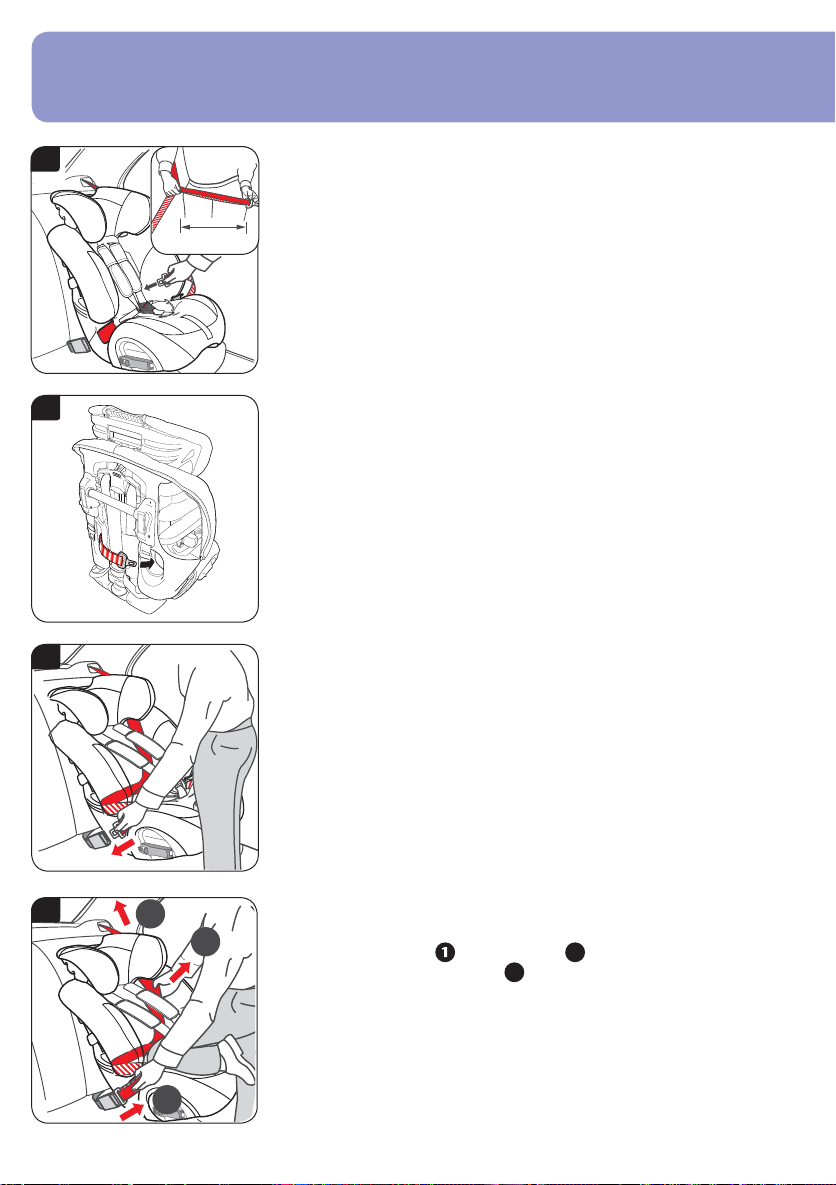
5. Turvaistuimen (kasvot menosuuntaan) ja valjaiden asennus
3
2
1
70-80cm
9–18 kg, ryhmä 1 (n. 9 kuukaudesta 4 ikävuoteen)
5a
5b
5c
TÄRKEÄÄ – Turvaistuinta SAA käyttää VAIN lantio- ja olkavyön yhteydessä
(hyväksytty UN/ECE nro 16:n tai vastaavien standardien mukaisesti).
Käännä tukijalka tukijalan säilytystilaan.
Aseta turvaistuin autoon niin, että kasvot tulevat menosuuntaan. Käännä
turvaistuimen etuosa itseesi päin, niin että lapsi on helpompi sijoittaa siihen.
Vedä turvavyö ulos kuvan mukaisesti pitäen lantio- ja olkavyötä yhdessä
(kuvan 5a pikkukuva).
TÄRKEÄÄ – Älä anna vyön missään vaiheessa joutua kierteelle.
Pujota turvavyö turvaistuimen etuosan ympäri, ensimmäisen reititysaukon läpi
ja suoraan istuimen takaosaan kuvan esittämään kohtaan (kuva 5a).
TÄRKEÄÄ – Älä käytä pääntuessa olevaa punaista olkavyöohjainta.
Tartu turvavyöhön ja pujota se toisen reititysaukon läpi (kuva 5b).
Hyödyllinen vihje – Jos turvavyö on liian lyhyt, voi olkavyöosan joutua
vetämään pääntuen takaa ennen asennusta.
Vedä kaikki turvavyössä oleva löyhyys turvaistuimen etupuolelle ja kiinnitä
turvavyö lukkoon (kuva 5c).
Varmista, ettei turvavyö ole kierteellä ja että lantiovyö kulkee molempien
punaisten lantiovyöohjainten kautta. Varmista, että olkavyö on sijoitettu
turvaistuimen päällisen takakulmaan pääntuen taakse.
5d
Työnnä turvaistuin autoosi käyttäen apuna koko ruumiinpainoasi ja suorita
kiristys seuraavassa järjestyksessä.
Vedä ja pitele olkavyötä
löyhyys, ja vedä se sitten tiukkaan
Tarkista istuimen asennus vetämällä voimakkaasti valjaista. Istuimessa ei
tällöin saa tapahtu juuri mitään liikettä. Jos turvaistuin on vielä liian löyhällä,
suorita edellä selostetut kiristystoimenpiteet huolellisesti uudelleen.
, vedä kohdasta 2 niin että vyöstä poistuu kaikki
3
(kuva 5d).
Page 47

9-18kg
5e
TÄRKEÄÄ - Tarkista turvavyön lukon paikka ja varmista, että
istuinta pitää paikallaan turvavyö, EI turvavyön lukko
(kuva 5e).
Jos turvavyön lukko on väärässä paikassa, kokeile
turvaistuimen sijoittamista johonkin muuhun paikkaan
autossa.
Jos olet epävarma asiasta, ota yhteys asiakaspalveluumme,
puh. 09-343 60 10, sähköpostitse
info@fi .britaxeurope.com tai käymällä nettisivuillamme
www.britax.fi.
5f
Pane lapsi turvaistuimeen ja kiinnitä valjaat. Varmista, että valjashihnat eivät
tule kierteelle. Kiristä valjaat vetämällä säätöhihnaa eteenpäin.
TÄRKEÄÄ – Valjaiden lantio-osan tulee olla niin edessä ja alhaalla kuin
mahdollista lapsen lantion päällä.
Varmista lopuksi, että rintapehmusteet on vedetty alas lapsen rintakehän
päälle (kuva 5f).
Page 48

6. Turvaistuimen asennus (kasvot menosuuntaan) 3-Pisteturvavyötä
käyttäen
15–25 kg, ryhmä 2 (n. 4–6 ikävuoteen)
6a 6b
6c
6e
Turvaistuimen säätö
Turvaistuimen valjaiden talteen laittamiseen
säilytystilaansa on ensin asetettava istuin
lattialle.
Paina säätönappi sisään ja vedä samalla
MOLEMMAT olkahihnat niin kauas eteen
kuin mahdollista (kuva 6a).
Käännä istuin ympäri. Nosta istuimen
takaosassa olevaa valjaiden säädintä
ja käännä se ylös, niin että pääntuessa
olevat olkahihna-aukot tulevat aivan
yläasentoonsa (kuva 6b).
6d
6f
Irrota molemmat olkahihnat turvaistuimen
takaosassa olevasta pidikkeestä (kuva
6c) ja pane pidike turvavyön suojuksen
alaosaan
Irrota rintapehmusteet niiden
kiinnitystangoista (kuvan 6c
pikkukuva). Vedä sekä olkahihnat että
rintakehäpehmusteet istuimen etuosan läpi
ja irrota rintakehäpehmusteet olkahihnoista.
Aseta turvaistuin makuuasentoon. Irrota
säätöhihna haarahihnan pidikkeestä. Kierrä
pidikettä niin, että se menee haarahihnan
läpi, ja työnnä se läpi istuimen etupuolelle
(kuva 6d).
Käännä turvaistuin pystyasentoon ja irrota
valjaat lukosta (kuvan 6e pikkukuva).
T
yönnä valjashihnat ja lukon kieli päällisen
alle lantiohihnan aukoista (kuva 6e).
Kiinnitä lukko, valjashihnat ja
rintapehmusteet säilytystilaan kumihihnoilla
(kuva 6f). Työnnä säätöhihna päällisessä
olevasta aukosta.
(kuva 6g).
6g
6h
Kannata istuinta ja purista pääntuen
takaosassa olevaa pääntuen säädintä
(kuva 6g). Varmistaudu, että
rintapehmusteet on poistettu edellä
kohdassa (kuva 6c) esitetyllä tavalla.
Siirrä pääntukea ylöspäin niin, että lapsen
pää tulee sen keskikohtaan (kuva 6h). Kun
pääntuki on saatu oikeaan asentoon, irrota
ote pääntuen säätimestä; varmista, että se
lukittuu paikalleen.
Page 49

15-25kg
6i
Turvaistuimen asennus
TÄRKEÄÄ - Turvaistuinta SAA käyttää VAIN lantio- ja olkavyön yhteydessä
(hyväksytty UN/ECE nro 16:n tai vastaavien standardien mukaisesti).
Aseta turvaistuin autoon niin, että lapsen kasvot tulevat menosuuntaan.
Pujota turvavyön olkavyöosa vyön tummanpunaisen yläohjaimen läpi lukon
VASTAKKAISELLA puolella (kuva 6i).
6j
Kiinnitä auton 3-pisteturvavyö lapsen ympärille (kuva 6j). Turvavyön
lantiovyöosan tulee olla lantiovyön punaisissa ohjaimissa turvaistuimen
molemmin puolin. V
armista, ettei turvavyö ole kierteellä, ja poista siitä kaikki
löyhyys.
TÄRKEÄÄ - Turvavyön lantiovyöosan tulee olla niin edessä ja alhaalla kuin
mahdollista lapsen lantion päällä.
6k
TÄRKEÄÄ - Tarkista turvavyön lukon paikka ja varmista, ettei se pääse
kulkeutumaan turvaistuimen ympäri lantiovyön punaisen ohjaimen päälle
(kuva 6k).
6l
Tarkista autosi turvayön ylemmän kiinnityspisteen paikka (kuva 6l). Jos tämä
kiinnityspiste on turvaistuinta edempänä, silloin sitä ei pidä käyttää; yritä jotakin
muuta sijoituspaikkaa autossa.
Page 50
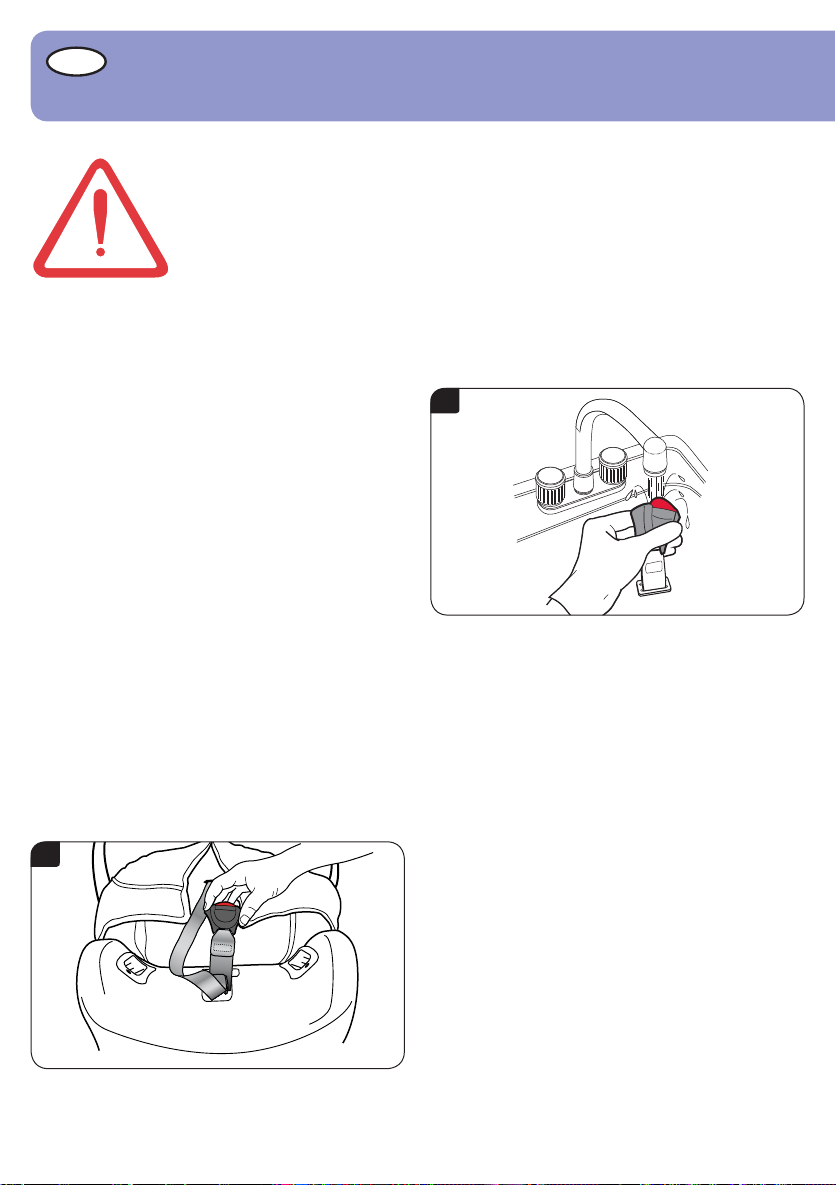
N
Viktig!
9-25kg gruppe 1-2 (ca. 9 måneder - 6 år)
Du må porsikre deg om at du følger disse instruksjonene nøyaktig og riktig. Hvis denne stolen
ikke er godt festet og barnet ikke er riktig festet i stolen, er det sterk risiko for at barnet og
andre passasjerer kan skades i et eventuelt uhell
Les denne brukerveiledningen godt FØR du prøver å installere barnesetet i bilen.
Hampshire Trading Standards Authority og Britax
anbefaler at barnesetetr ikke skal kjøpes eller selges
i brukt tilstand. V
barnesetet på en trygg måte. Ikke selg det eller gi det til
andre.
Etter en kollisjon må barnesetet og bilbeltene skiftes ut.
Selv om de kan se uskadet ut, er det ikke sikkert de vil
beskytte deg og barnet like godt som de bør dersom det
skulle bli bruk for dem igjen.
Ingen barneseter er sikret mot at barnet klarer å
komme seg ut av det
Selesystemer kan ikke utviklet til å være helt
"barnesikret" i tillegg til at de overholder kravene til
europeisk standard ECE R44. Selen må festes og
justeres riktig til enhver tid, og barn oppfordres til å bli
sittende i selene.
Stell av barnesetet
Mat og drikke kan bli liggende i spennen på selen. Dette
kan forhindre at den fungerer som den skal - den vil ikke
klikke igjen. V
(dia A
og B).
A
ennligst sørg for å kvitte deg med
ask i varmt vann til den er ren
B
Rens trekket
Les etikettene på trekket for informasjon om vask.
IKKE tørk trekket i tørketrommel – bare sentrifuger på
kort syklus og la drypptørke.
Rengjøre selen og seteskallet
Rengjør KUN med SVAMP for hånd, med såpe og varmt
vann.
IKKE demonter eller prøv på å demontere noen del av
selen eller setet ved rengjøring.
IKKE bruk løsemidler
oppvaskmiddel, da disse kan tære på selen og setet.
IKKE smør noen del av setet.
T
a av trekket og sette det på igjen
Trykk inn og hold seleutløserknappen og med hånden
under brystputene, trekk BEGGE skulderstropper
forover så langt de går
Trekk ut krysshodet fra bak setet og hekt av begge
skulderstropper.
rekk av trekket fra øverst på setet og bruk metoden
T
som vises for å føre stroppene foran på setet
Løsne på spennen og fjern puten ved å hekte av hekteog maljen. Skyv brystputene av skulderstroppene. Dra
trekket forsiktig av setet, slakk på skulderstroppene,
fest spennen og juster stroppen gjennom åpningene i
trekket.
Utfør prosedyren i revers for å sette trekket på igjen.
Pass på at stroppene ikke er vridd.
, rengjøringsmidler eller
.
(dia 6c)(dia 6c).
Page 51

VIKTIG – Trekket og brystputene er en
sikkerhetsfunksjon. ALDRI bruk barnesetet uten dem.
Ikke utsett barnet for risiko ved å bruke trekk laget av
andre produsenter
, da de kan forhindre at barnesetet
beskytter barnet så godt som det skal.
Et reservetrekk kan fås fra Britax-forhandleren eller
Britax kundeservice, tlf. +46 8564 841 00.
Garanti
Alle Britax-produkter er nøye designet, produsert og
testet. Dersom imidlertid dette produktet viser seg å
være defekt innen 12 måneder etter at de er kjøpt på
grunn av feil i materialer eller produksjon, send tilbake
til kjøpsstedet. V
i vil da reparere det gratis eller bytte det
med det samme eller et lignende produkt.
For garantiformål må kvittering forelegges. Vi anbefaler
at du beholder kvitteringen og fester den til denne
brukerveiledningen og oppbevarer den i setet.
Britax påta seg ikke ansvar for skade som følge av
mishandling eller forsømmelse.
Denne garantien kan ikke overdras og gjelder derfor
ikke brukte produkter.
Dine lovbestemte rettigheter påvirkes ikke av denne
garantien.
Hvis du i tvil
Ikke alle bilseter passer til alle biler
. For råd om
egnetheten av dette setet for bilen din, se vår
nettside, www
.britax.se, ta kontakt med kundeservices
hjelptelefon, +46 8564 841 00 eller
e-post: info@se.britaxeurope.com.
9-25kg
9-25kg
Page 52

Advarsel
9-25kg gruppe 1-2 (ca. 9 måneder - 6 år)
EKSTREM FARE!
IKKE bruk, under noen omstendigheter, et barnesete
som vendes bakover i et passasjersete der det er en
aktiv kollisjonspute.
IKKE bruk et barnesete som vendes forover i et
passasjersete med aktiv kollisjonspute hvis ikke
bilprodusenten bekrefter at det er trygt.
IKKE bruk barnesetet i bilseter som er vendt mot siden
eller baksiden av bilen.
IKKE bruk noe, f.eks. en pute eller jakke, til å løfte
barnesetet opp fra passasjersetet. Ved en kollisjon ville
ikke barnesetet og bilbeltet kunne beskytte barnet så
godt som de skal.
IKKE bruk barnesetet i hjemmet. Det er ikke designet
for hjemmebruk og skal kun brukes i bilen.
IKKE prøv å demontere, endre eller legge til noe til
barnesetet eller forandre måten selen eller bilbeltene
brukes på. Den offi sielle godkjenningen er ikke lenger
gyldig hvis det gjøres modifi seringer. NEI modifi seringer
kan foretas på barnesetet av andre enn produsenten.
IKKE la barn bli sittende alene i bilen, selv en kort stund.
IKKE la løse gjenstander som f.eks. baggasje eller
bøker, bli liggende bak i bilen. De må festes godt, for
hvis du plutselig må stoppe bilen, vil løse gjenstander
kastes forover og kan føre til alvorlig skade. Store og
tunge løse gjenstander er en særskilt risiko.
IKKE la sammenleggbare pasasjerseter være ulåst.
Hvis du må plutselig stoppe bilen, kan et løst baksete
skade barnet.
IKKE la barn leke med eller justere barnesetet.
Oppbevar denne brukerveiledningen i lommen for
brukerveiledningen.
Dekk til barnesetet hvis bilen blir stående i direkte
sollys. Beslag kan bli for varme å ta på i varmen fra
solen, og trekket kan bli falmet.
Pass på at barnesetet ikke klemmes av et
sammenleggbart passasjersete eller i døren på bilen.
Pass på at du justerer selen for å passe til klærne
barnet brukes før hver kjøretur – et beslag for
vinterpåkledning kan være for løst for et barn som har
på seg sommerklær.
Oppbevar barnesetet på et trygt sted når det ikke er i
bruk. Unngå å legge tunge gjenstander på den og ikke
oppbevar i nærheten av direkte varmekilder eller direkte
sollys.
Alltid sørg for at barnesetet sitter godt, selv om den ikke
brukes av barnet.
Pass på at alle passasjerer i bilen har setebeltet festet.
Selv om Britax tar hensyn til kontakt mellom barnesetet
og bilseter i utviklingen av nye produkter, kan de ikke
påta seg ansvar for skade som påføres bilseter eller
setebelter.
VIKTIG:
Montert vendt bakover
Barnesetet
magebelte (godkjent i henhold til UN/ECE-forskrift nr
eller tilsvarende standarder).
Montering vendt forover
Barnesetet MÅ kun brukes med magebelte og diagonalt
setebelte (godkjent i henhold til UN/ECE-forskrift nr
eller tilsvarende standarder).
MÅ kun brukes med diagonalt setebelte eller
. 16
. 16
Diagonal
Fanget
Diagonal
Fanget
Page 53

Ditt nye barnesete
9-25kg gruppe 1-2 (ca. 9 måneder - 6 år)
1. Setetrekk
2. Lomme til brukerveiledning (bak
trekk)
3. Selespenne
4. Elastisk oppbevaringsstropp
5. Komfortpute
6. Etikett for montering
7. Magebelteføring (vendt forover)
8. Lås
9. Beltetunnelspor (vendt bakover)
10. Selereguleringsknapp
11. Selereguleringsknapp
12. Skrittstropp
13. Sele
14. Brystpute
15. Øvre belteføring
(15-25kg, vendt forover)
16. Hodestøttetrekk
17. Glidende nakkestøtte
18. Nakkestøttejustering
(15-25kg, vendt forover)
19. Åpning til selestropp
20. Selestropp
21. Beltebeskytter
22. Oppbevaringsrom under fotstøtte
23. Fotstøtteutløserknapp
24. Fotstøtte
25. Fotstøttelåsindikator
26. Bæreåk (under sete)
27. Svingende sokkel - (til bruk når
vendt bakover)
28. Fotstøttebinding
29. Bindestoppspennenal
30. Setebelteåpning
(vendt forover)
31. Breddejustering
32. Selehøyde /
nakkestøttejustering
(selemodus)
33
9-25kg
1
2
3
4
5
6
7
8
9
18
19
20
21
22
23
24
9-25kg
17
16
15
14
13
12
11
10
32
31
30
29
28
25
26
27
Page 54

1. Justere barnesetet
2
1
1a
1b
1c
9-18kg
Sett barnesetet på gulvet.
Trykk inn justeringsknappen og trekk samtidig BEGGE skulderstropper forover
så langt som mulig (dia 1a).
Løs ut selen fra spennen (dia 1a innfelt).
For å unngå at selen vris, legg skulderstroppene over sidene av setet ved å
sette spennenalene bak de elastiske oppbevaringsstroppene.
Sett barnet forsiktig i setet, fest selen løst rundt det og fest selespennen på
nytt.
Trekk toppen av fotstøtten bort fra baksiden av barnesetet 1 (dia 1b).
Løft selejusteringen og flytt den opp eller ned
nakkestøtten er i flukt med eller like overfor barnets skuldre.
Når nakkestøtten er riktig plassert, slipp selejusteringen og
pass på at den er låst på plass.
Når du har nått toppen på åpningene, kan barnet fortsette å
bruke setet til øyenivået er plant med toppen på setet eller
9-25kg
vekten overstiger følgende:
Montert vendt bakover: 25kg
Montert vendt forover: 18kg
Bruk breddejusteringen (se "Ditt nye barnesete" på forrige
side) til å justere bredden på barnesetet.
2
slik at selestroppåpningene i
Page 55

9-25kg
9-18kg
Page 56

2. Montere barnesetet (vendt bakover) i baksetet på siden
2a
IMPORTANT - BarnetsetetMÅkun brukes med diagonalt setebelte eller
magebelte (godkjent i henhold til UN/ECE-forskrift nr. 16 eller tilsvarende
standarder).
Med fotstøtten justert til det korteste, sett barnesetet vendt bakover i bilsetet
med dreiesokkelen liggende mot baksiden av setet i kjøretøyet. Etter
montering skal mellomrommet mellom setet foran og barnesetet ideelt sett
være minst 10 mm (dia 2a).
Barnesetet kan være i kontakt med setet foran, men må ikke ligge mot det.
Hvis det gjør det, justeres bilsetet foran uten at føreren eller passasjeren sitter
ubehagelig. Hvis ikke, prøv en annen seteposisjon i bilen.
2b
2c
Åpne begge låsene. Trekk av
nok mage- og diagonalbelte (ca.
600-900mm). Før beltet gjennom
låsebelteføringen ovenfor spennen og
inn til beltetunnelen (dia 2b). Det er to
åpninger i setetrekket som hjelp til å
føre beltet gjennom åpningen og under
setetrekket (dia 2b innfelt).
Før setebeltet gjennom beltetunnelen
og avlåsing på motsatt side og fest
nalen i spennen (dia 2c).
2d
Trekk hele belteslarken gjennom barnesetet og pass på at beltet ikke er vridd.
Når beltet er så stramt som mulig, lukk avlåsingen på setebeltespennesiden,
og sørg for at både mage- og diagonalbeltene er festet med det (dia 2d
innfelt).
Lukk avlåsingen på motsatt side, og pass på at magebeltet er festet med den
(dia 2d).
Pass på at begge avlåsinger er klikket på plass.
2e
Hvis spennen nå ligger i posisjonen merket som feil med
og setebeltet ikke
kan strammes riktig (dia 2e), prøv en annen seteposisjon i bilen.
Page 57
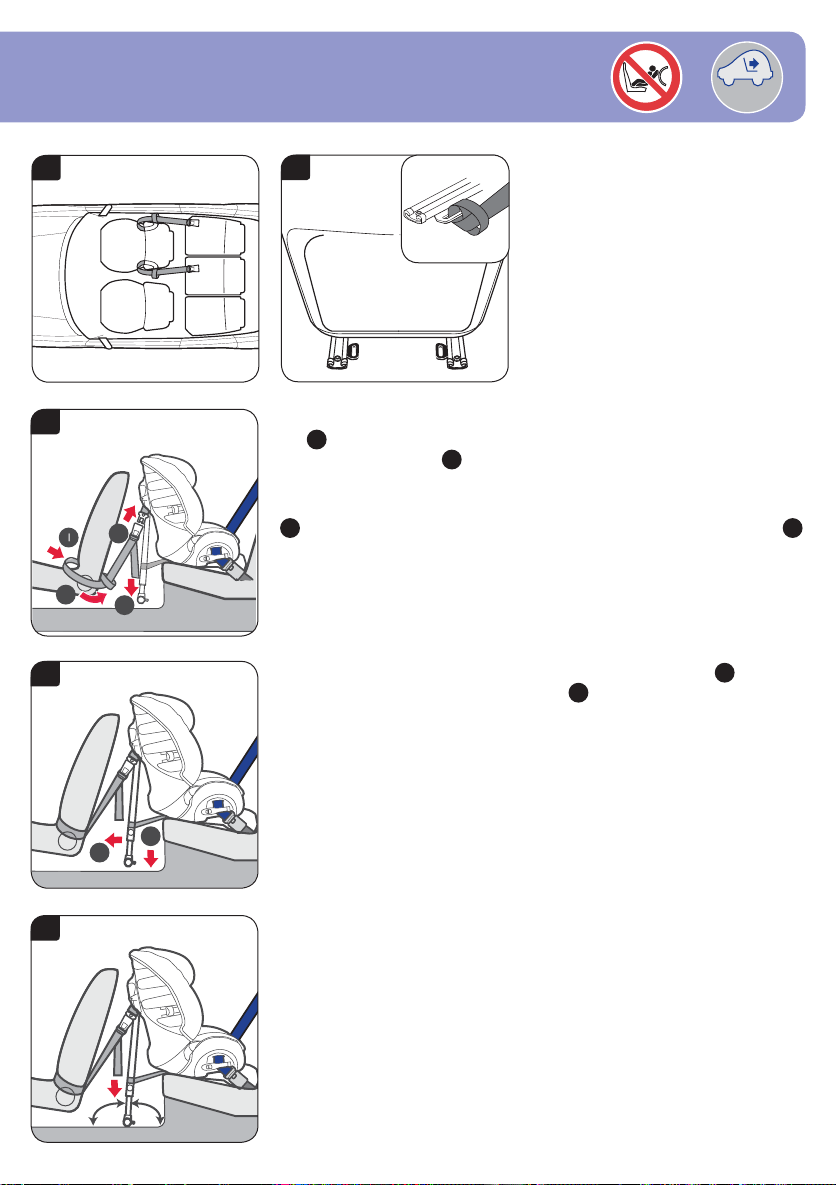
9-25kg
2
1
4
3
2
1
100°
80°
2f
2g
Legg festestroppene rundt bilsetet foran
barnesetet, som vist (dia 2f).
Hvis bilen er utstyrt med en løpeløkke
på seteløpere, kan disse brukes som
alternativ (dia 2g innfelt).
VIKTIG - Ikke monter festestroppene
med bagasjeløkkene.
2h
Skyv løkke-endene på festestroppene mellom forsetet i bilen og baksetet, som
1
vist
(dia 2h). Før spenn-endene av festestroppene rundt utsiden av bilsetet
og før gjennom løkkene
2
.
Pass på at fotstøttefestebrakettene vender forover og at stroppene ikke er
vridd, og klikk spennen på festestroppene på nalene på siden av barnesetet
3
. Stram til festestroppene ved å trekke de løse endene nedover samtidig 4.
1
2i
Trekk fotstøtten så langt som mulig bort fra ryggen på barnesetet
Senk fotstøtten i riktig vinkel til den berører
2
. Pass på at fotstøtten er godt
(dia 2i).
festet ved å trekke i fotstøttens glidedel.
2j
Pass til slutt på at festestroppene er strammet helt ved å trekke de løse
endene nedover (dia 2j). Fotstøtten må ligge på et solid underlag, ikke
på lokkene på oppbevaringseskene eller lignende, i en vinkel på 100 °
mot det horisontale (dia 2j). Bruk vinkelføringen på baksiden av denne
brukerveiledningen til å sjekke vinkelen på fotstøtten mot gulvet.
Når barnesetet er godt festet med stroppene, test det ved å prøve å fl ytte det
forover og bakover og fra side til side. Hvis det virker løst eller hvis fotstøtten
ikke er 100 ° mot gulvet, må du remontere det godt montert i riktig vinkel.
For instruksjoner om hvordan barnet skal festes i barnesetet, se dia 5f.
Page 58

3. Montere barnesetet (vendt bakover) i baksetet på midten
3a
IMPORTANT - BarnetsetetMÅkun brukes med diagonalt setebelte eller
magebelte (godkjent i henhold til UN/ECE-forskrift nr. 16 eller tilsvarende
standarder).
Med fotstøtten justert til den korteste lengden, sett barnesetet vendt bakover
på bilsetet med ryggen på barnesetet plassert midt mellom fører- og
passasjersetet med dreiesokkelen liggende mot ryggen på setet i kjøretøyet
(dia 3a).
3b
3c
Åpne begge låsene. Trekk av
nok mage- og diagonalbelte (ca.
600-900mm). Før beltet gjennom
låsebelteføringen ovenfor spennen og
inn til beltetunnelen (dia 3b). Det er to
åpninger i setetrekket som hjelp til å
føre beltet gjennom åpningen og under
setetrekket (dia 3b innfelt).
Før setebeltet gjennom beltetunnelen
og avlåsing på motsatt side og fest
nalen i spennen (dia 3c).
3d
Trekk hele belteslarken gjennom barnesetet og pass på at beltet ikke er vridd.
Når beltet er så stramt som mulig, lukk avlåsingen på setebeltespennesiden,
og sørg for at både mage- og diagonalbeltene er festet med det (dia 3d
innfelt).
Lukk avlåsingen på motsatt side, og pass på at magebeltet er festet med den
(dia 3d).
Pass på at begge avlåsinger er klikket på plass.
3e
Hvis spennen nå ligger i posisjonen merket som feil med
og setebeltet ikke
kan strammes riktig (dia 3e), prøv en annen seteposisjon i bilen.
Page 59

9-25kg
2
1
4
3
2
1
100°
80°
3f
3g
Legg en festestropp rundt både førersetet
og passasjersetene foran som vist (dia
3f).
Hvis bilen er utstyrt med en løpeløkke
på seteløpere, kan disse brukes som
alternativ (dia 3g innfelt).
VIKTIG - Ikke monter festestroppene
med bagasjeløkkene.
3h
Skyv løkke-endene på festestroppene mellom forsetet i bilen og baksetet, som
1
vist
(dia 3h). Før spenn-endene av festestroppene rundt utsiden av bilsetet
og før gjennom løkkene
2
.
Pass på at fotstøttefestebrakettene vender forover og at stroppene ikke er
vridd, og klikk spennen på festestroppene på nalene på siden av barnesetet
3
. Stram til festestroppene ved å trekke de løse endene nedover samtidig 4.
1
3i
Trekk fotstøtten så langt som mulig bort fra ryggen på barnesetet
Senk fotstøtten i riktig vinkel til den berører
2
. Pass på at fotstøtten er godt
(dia 3i).
festet ved å trekke i fotstøttens glidedel.
3j
Pass til slutt på at festestroppene er strammet helt ved å trekke de løse
endene nedover (dia 3j). Fotstøtten må ligge på et solid underlag, ikke
på lokkene på oppbevaringseskene eller lignende, i en vinkel på 100 °
mot det horisontale (dia 3j). Bruk vinkelføringen på baksiden av denne
brukerveiledningen til å sjekke vinkelen på fotstøtten mot gulvet.
Når barnesetet er godt festet med stroppene, test det ved å prøve å fl ytte det
forover og bakover og fra side til side. Hvis det virker løst eller hvis fotstøtten
ikke er 100 ° mot gulvet, må du remontere det godt montert i riktig vinkel.
For instruksjoner om hvordan barnet skal festes i barnesetet, se dia 5f.
Page 60

4. Montere barnesetet (vendt bakover) i forsetet
4a
IMPORTANT - BarnetsetetMÅkun brukes med diagonalt setebelte eller
magebelte (godkjent i henhold til UN/ECE-forskrift nr
. 16 eller tilsvarende
standarder).
Skyv forsetet i kjøretøyet tilbake for å få plass til barnesetet, slik at eventuell
passasjer som sitter bak kan sitte behagelig.
Med fotstøtten justert til det korteste, sett barnesetet vendt bakover med
dreiesokkelen liggende mot baksiden av setet i kjøretøyet (dia 4a).
VIKTIG - IKKE
la ryggen på barnesetet ligge mot dashbordet eller nær
frontruten.
4b
4c
Åpne begge låsene. Trekk av
nok mage- og diagonalbelte (ca.
600-900mm). Før beltet gjennom
låsebelteføringen ovenfor spennen og
inn til beltetunnelen (dia 4b). Det er to
åpninger i setetrekket som hjelp til å
føre beltet gjennom åpningen og under
setetrekket (dia 4b innfelt).
Før setebeltet gjennom beltetunnelen
og avlåsing på motsatt side og fest
nalen i spennen (dia 4c).
4d
Trekk hele belteslarken gjennom barnesetet og pass på at beltet ikke er vridd.
Når beltet er så stramt som mulig, lukk avlåsingen på setebeltespennesiden,
og sørg for at både mage- og diagonalbeltene er festet med det (dia 4d
innfelt).
Lukk avlåsingen på motsatt side, og pass på at magebeltet er festet med den
(dia 4d).
Pass på at begge avlåsinger er klikket på plass.
4e
Hvis spennen nå ligger i posisjonen merket som feil med
og setebeltet ikke
kan strammes riktig (dia 4e), prøv en annen seteposisjon i bilen.
Page 61
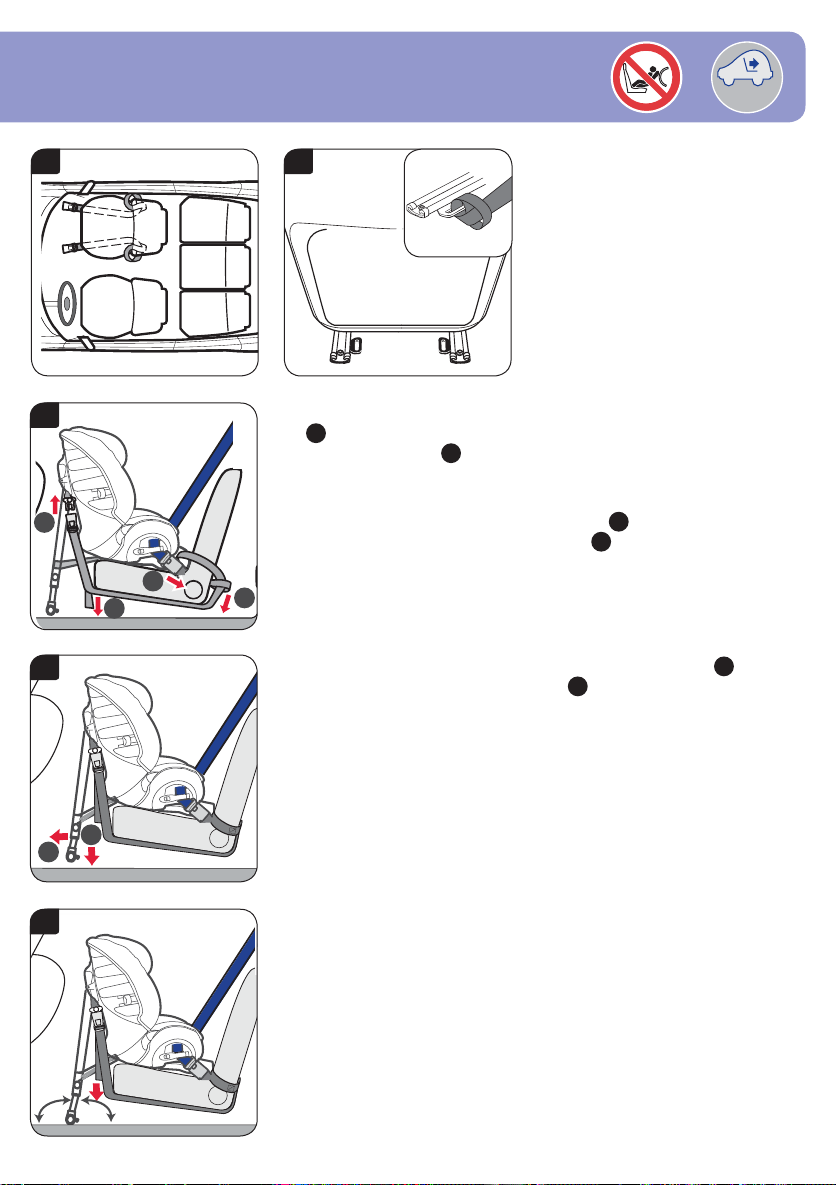
9-25kg
2
1
4
3
1
2
100°
80°
4f
4g
Legg en festestropp rundt både
passasjersetet foran som vist (dia 4f).
Hvis bilen er utstyrt med en løpeløkke
på seteløpere, kan disse brukes som
alternativ (dia 4g innfelt).
VIKTIG - Ikke monter festestroppene
med bagasjeløkkene.
4h
Skyv løkke-endene på festestroppene mellom forsetet i bilen og baksetet, som
1
vist
(dia 4h). Før spenn-endene av festestroppene rundt utsiden av bilsetet
og før gjennom løkkene
2
.
Skyv endene av spennen under setet. Pass på at fotstøttefestebrakettene
vender forover og at stroppene ikke er vridd, og klikk spennen på
festestroppene på nalene på siden av barnesetet
ved å trekke de løse endene nedover samtidig
4i
Trekk fotstøtten så langt som mulig bort fra ryggen på barnesetet
Senk fotstøtten i riktig vinkel til den berører
3
. Stram til festestroppene
4
.
1
2
. Pass på at fotstøtten er godt
(dia 4i).
festet ved å trekke i fotstøttens glidedel.
4j
Pass til slutt på at festestroppene er strammet helt ved å trekke de løse
endene nedover (dia 4j). Fotstøtten må ligge på et solid underlag, ikke
på lokkene på oppbevaringseskene eller lignende, i en vinkel på 100 °
mot det horisontale (dia 4j). Bruk vinkelføringen på baksiden av denne
brukerveiledningen til å sjekke vinkelen på fotstøtten mot gulvet.
Når barnesetet er godt festet med stroppene, test det ved å prøve å fl ytte det
forover og bakover og fra side til side. Hvis det virker løst eller hvis fotstøtten
ikke er 100 ° mot gulvet, må du remontere det godt montert i riktig vinkel.
For instruksjoner om hvordan barnet skal festes i barnesetet, se dia 5f.
Page 62

5. Montere barnesetet (vendt forover) med sele
3
2
1
70-80cm
9-18kg gruppe 1-2 (ca. 9 måneder - 4 år)
5a
5b
5c
VIKTIG - Barnesetet må BARE brukes med mage- og diagonal-setebelte
(godkjent i henhold til UN/ECE-forskrift nr. 16 eller tilsvarende).
Oppbevar fotstøtten i oppbevaringsrommet for fotstøtten.
Sett barnesetet slik at det vender forover i bilen. For enkel tilgang, snu forsiden
av barnesetet mot deg. Trekk ut setebeltet som vist, idet du holder mage- og
diagonaldelene sammen (dia 5a innfelt).
VIKTIG - Ikke la beltet vris på noe tidspunkt.
Før setebeltet rundt foran på barnesetet, gjennom den første åpningen, direkte
inn i ryggen på setet på stedet som er vist (dia 5a).
VIKTIG - Ikke bruk den røde diagonale føringen på nakkestøtten.
Ta setebeltet og før det gjennom den andre åpningen (dia 5b).
Praktisk tips - Hvis setebeltet er for kort, må du kanskje føre den diagonale
delen bak nakkestøtten før du begynner å montere det.
Trekk beltet helt igjennom foran barnesetet og fest setebeltet i spennen
(dia 5c).
Pass på at setebeltet ikke er vridd og magedelen passerer gjennom begge
røde magebelteføringer
bakerste hjørnet på barneseteskallet, bak nakkestøtten.
. Pass på at det diagonale beltet er plassert i det
5d
Skyv barnesetet inn i kjøretøysetet med hele kroppsvekten og stram til i
følgende sekvens.
Trekk og hold i det diagonale beltet
for å stramme til
Sjekk setet ved å trekke godt i selen. Det skal være liten eller ingen bevegelse.
Hvis barnesetet er fortsatt løst, gjenta forsiktig strammesekvensen ovenfor
3
(dia 5d).
1
, trekk ved 2 for å fjerne slark og trekk
.
Page 63

9-18kg
5e
VIKTIG - Sjekk posisjonen på setebeltespennen, og pass på
at det er setebeltet og IKKE setebeltespennen som holder
setet på plass (dia 5e).
Prøv en annen seteposisjon hvis setebeltespennen er feil
plassert.
Hvis du er i tvil, ta kontakt med Kundeservice, tlf. +46 8564
841 00 eller e-post info@se.britaxeurope.com eller bruk
www.britax.se
5f
Sett barnet i barnesetet og tilpass selen. Pass på at selestroppene ikke er
vridd. Stram til selen ved å trekke reguleringsstroppen forover.
VIKTIG - Magedelen av selen skal ligge så langt forover og så lavt ned som
mulig over barnets bekken.
Pass til slutt på at brystputene er trukket ned over barnets bryst (dia 5f).
Page 64
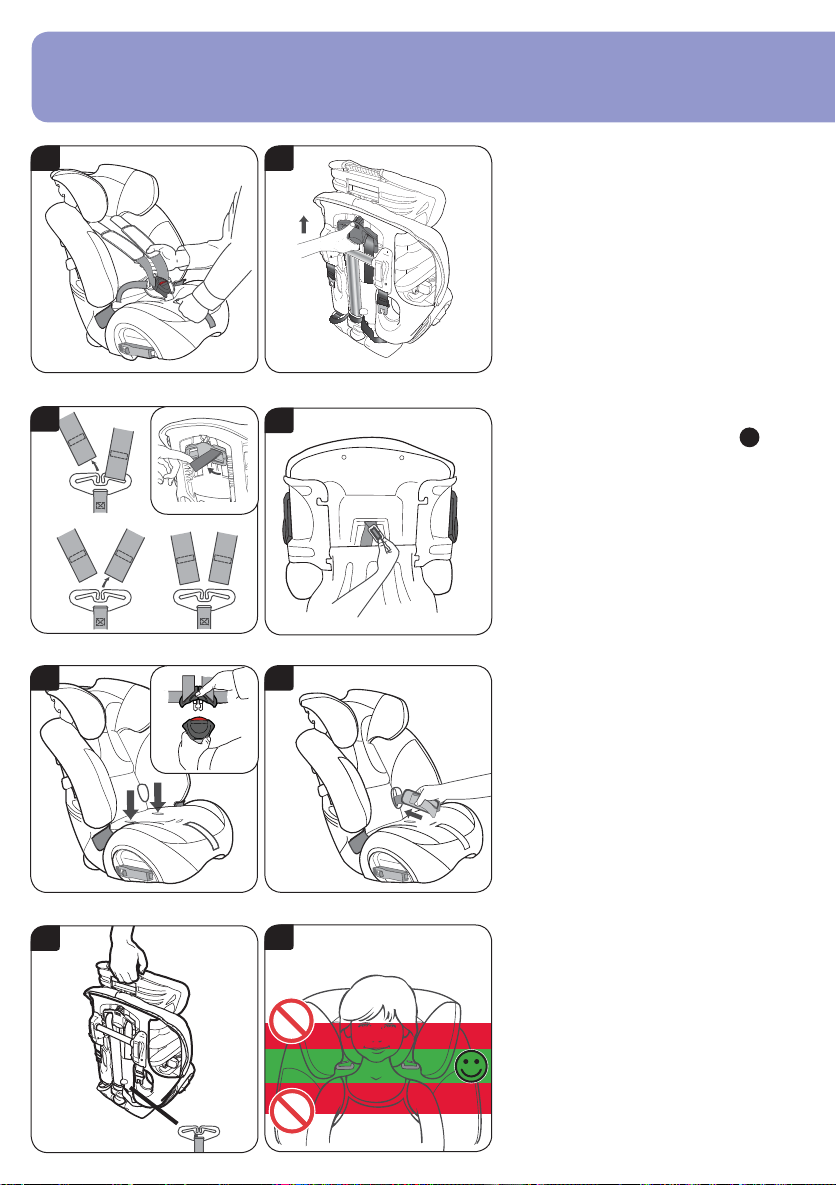
6. Montere barnesetet (vendt forover) med belte til voksne
15-25kg gruppe 2 (ca. 4 - 6 år)
6a 6b
6c
6e
Justere barnesetet
Når du skal pakke vekk selen i barnesetet,
sett først barnesetet på gulvet.
Trykk inn justeringsknappen og trekk
samtidig BEGGE skulderstropper forover så
langt som mulig (dia 6a).
Snu på setet. Løft selejusteringen
bak på setet og fl
ytt den opp så
skulderstroppåpningene i hodestøtten står i
øverste posisjon (dia 6b).
Hekt av begge skulderstropper fra åket
6d
bak på barnesetet (dia 6c), oppbevar åket
i nederste del av beltebeskytteren
1
(dia
6g).
Ta ut brystpustene fra festearmene for
brystputene (dia 6c inset). Trekk gjennom
begge skulderstropper og brystputer
til foran på setet, ta ut brystputene fra
skulderstroppene.
Legg barnesetet på ryggen.
ut
Ta
justeringsstroppen fra braketten fra
skrittstroppen. Snu braketten så den går
igjennom skrittstroppen og skyv gjennom til
6f
foran på setet (dia 6d).
Sett barnesetet i stående posisjon og utløs
selen fra spennen (dia 6e innfelt). Skyv
selestroppene og spennenalene under
trekket, gjennom magebelteåpningene (dia
6e).
Legg spennen, selestroppene og
brystputene i de elastiske stroppene (dia
6f). Skyv justeringsstroppen gjennom
åpningen i trekket.
6g
6h
Støtt setet og klem på
nakkestøttejusteringen bak på nakkestøtten
(dia 6g). Sjekk at brystputene er fjernet
som angitt i (dia 6c) ovenfor.
Flytt opp nakkestøtten slik at hodet ligger
midt på det (dia 6h). Når nakkestøtten er
riktig plassert, slipp nakkejusteringen og
pass på at den er låst på plass.
Page 65

15-25kg
6i
Justere barnesetet
VIKTIG - Barnesetet må BARE brukes med mage- og diagonal-
setebelte (godkjent i henhold til UN/ECE-forskrift nr. 16 eller tilsvarende).
Sett barnesetet slik at det vender forover i bilen.
Før inn den diagonale delen av setebeltet gjennom den røde øvre
belteføringen på MOTSATT side av spennen (dia 6i).
6j
Fest setebeltet på barnet (dia 6j). Magedelen skal ligge mot de røde
magebelteføringene på hver side av barnesetet. Pass på at setebeltet ikke er
vridd, og fjern eventuell slark.
VIKTIG - Magedelen av setebeltet skal ligge så langt forover og så lavt ned
som mulig over barnets bekken.
6k
VIKTIG - Sjekk posisjonen på setebeltespennen, og pass på at den ike trekkes
rundt barnesetet på den røde magebelteføringen (dia 6k).
6l
Sjekk posisjonen på kjøretøyets øvre setebeltefestepunkt (dia 6l). Hvis dette
festepunktet er foran barnesetet, skal den ikke brukes. Prøv en annen plass i
bilen.
Page 66

S
Viktigt!
9-25 kg grupp 1-2 (ungefärlig ålder 9 månader till 6 år)
Du måste följa dessa instruktioner noga - punkt för punkt. Om bältesstolen inte monteras på
ett säkert sätt, och om barnet inte spänns fast korrekt, fi nns det risk för att barnet och andra
passagerare skadas i händelse av en olycka
Läs den här bruksanvisningen noga INNAN du monterar Multi-Tech.
Myndigheten Hampshire Trading Standards Authority
och Britax råder av säkerhetsskäl att bilbarnstolar inte
säljs eller köps begagnade. Förvara din bilbarnstol på
säkert sätt. Sälj den inte och ge inte bort den.
Efter en trafi
bilbälten bytas ut. Även om de ser oskadade ut kan de i
en ny olycka ge ett sämre skydd än annars.
Ingen bilbarnstol är rymningssäker
Bältena kan inte vara fullständigt "rymningssäkra"
och samtidigt uppfylla de lagstadgade kraven i den
europeiska standarden ECE R44. De måste alltid vara
fästa och justerade på rätt sätt. Uppmuntra barnen att
sitta med bältet ordentligt påsatt.
Bilbarnstolens skötsel
Mat och dryck kan komma in i bältets lås. Det kan göra
att det inte fungerar som det ska – det klickar inte i läge.
Tvätta det med varmt vatten tills det är helt rent (bild
och B)
A
kolycka måste bilbarnstolen och dina
A
.
B
Rengöra bältet och stolen
Rengör ENDAST med tvål och varmt vatten.
T
A I
E isär någon del av bältet eller stolen vid
NT
rengöring.
ANVÄND INTE lösningsmedel, tvättmedel eller
diskmedel eftersom dessa kan försvaga bältet och
stolen.
Smörj INTE och olja INTE in någon del av stolen.
T
a bort och sätta tillbaka överdraget
Tryck in bältets frigöringsknapp och håll den intryckt
och dra med ena handen under bröstdynorna BÄGGE
axelremmar så långt framåt som det går
Dra ut oket från bakom sätet och haka av bägge
axelremmarna.
Dra av överdraget från stolens överdel och dra fram
remmarna till stolens framsida enligt bilden
Knäpp upp spännet och ta bort komfortdynan genom
att lossa hake/ögleremmen. Skjut av bröstdynorna från
axelremmarna. Dra försiktigt bort överdraget från sätet
och för axelremmarna, bältets spänne och justerremmen
genom öppningarna i överdraget.
Utför stegen i omvänd ordning för att sätta tillbaka
.
(bild 6c)(bild 6c).
Page 67

överdraget.
Kontrollera att remmarna inte är snodda.
VIKTIGT – Överdraget och bröstdynorna har en
säkerhetsfunktion. Använd ALDRIG bilbarnstolen
utan dem. Riskera inte ditt barns säkerhet genom att
använda andra tillverkares överdrag, eftersom dessa
kan göra att bilbarnstolen inte skyddar ditt barn på bästa
sätt.
Reservöverdrag kan köpas hos din Britaxåterförsäljare.
Alternativt kan du kontakta Britax kundtjänstavdelning
på telefon +46 8564 841 00.
Garanti
Alla Britaxprodukter är noggrant konstruerade,
tillverkade och testade. Kontakta återförsäljaren
om denna produkt inte fungerar som den ska inom
garantitiden, på grund av material- eller tillverkningsfel.
Felet åtgärdas då antingen gratis, eller så ersätts
stolen med en annan likadan, eller en likvärdig
stol. Garantitiden och reklamationstiden följer
konsumentlagen i det land där stolen sålts.
För att garantin ska gälla krävs inköpskvitto. V
i
rekommenderar att du sparar ditt kvitto och fäster det i
bruksanvisningen och förvarar i stolen.
Britax ansvarar inte för skador som uppstår på grund av
misskötsel, felanvändning eller oaktsamhet.
Denna garanti kan inte överföras och gäller därför inte
för produkter som köpts begagnade.
Dina lagstadgade rättigheter påverkas inte av denna
garanti.
Om du är osäker
Alla bilbarnstolar passar inte i alla bilar. Upplysningar om
denna bilbarnstol passar din bil får du på vår webbsida
på adress www.britax.se, eller genom att kontakta vår
kundsupport på telefon +46 8564 841 00 eller på
e-postadressen info@se.britaxeurope.com.
9-25 k g
9-25 k g
Page 68

Varning:
Illustrationerna visar framåtvänt åkande, vid
bakåtvänt åkande kan stolen sättas i höftbältet.
9-25 kg grupp 1-2 (ungefärlig ålder 9 månader till 6 år)
MYCKET STOR RISK!
ANVÄND INTE under några omständigheter en
bakåtvänd bilbarnstol på en plats i bilen med en aktiv
krockkudde.
ANVÄND INTE en framåtriktad bilbarnstol på en plats i
bilen med en aktiv krockkudde om biltillverkaren inte kan
garantera att det är riskfritt att göra det.
ANVÄND INTE bilbarnstolen på sid- eller bakåtriktade
bilsäten.
ANVÄND INTE någonting – exempelvis en kudde eller
en jacka – för att höja upp bilbarnstolen på bilsätet. Om
du gör det kan stolen och säkerhetsbältena inte skydda
barnet på bästa möjliga sätt i händelse av en olycka.
ANVÄND INTE bilbarnstolen i hemmet. Den är inte
avsedd för hemmabruk - den ska bara användas i bilen.
FÖRSÖK INTE att montera ner, ändra eller lägga till
någon del på bilbarnstolen eller ändra bilbältet eller dess
funktion. Det offi ciella godkännandet gäller inte längre
om ändringar görs. INGA ändringar på bilbarnstolen får
göras av någon annan än tillverkaren.
LÄMNA INTE barn ensamma i bilen, ens för en kort
stund.
LÄMNA INTE lösa föremål, som exempelvis väskor eller
böcker, i bilens baksäte. Alla sådana föremål måste sitta
fast ordentligt eftersom lösa föremål kan fara iväg om
du tvingas att bromsa plötsligt, med risk för allvarliga
skador. Stora och tunga lösa föremål är särskilt farliga.
LÅT INTE fällbara ryggstöd på säten vara olåsta. Om du
måste bromsa bilen plötsligt kan ett löst ryggstöd skada
ditt barn.
LÅT INTE barn leka med eller ändra något på
bilbarnstolen.
FÖRVARA denna bruksanvisning i förvaringsutrymmet i
barnbilstolen.
TÄCK ÖVER bilbarnstolen om du lämnar bilen i direkt
solljus. Beslagen kan bli mycket heta i solsken och
klädseln bleks.
VAR NOGA MED att se till att bilbarnstolen inte fastnar i
ett nedfällt ryggstöd eller i dörren.
JUSTERA bältet så att det passar ditt barns kläder före
varje åktur – inställningarna för vinterkläder kanske inte
är bra när barnet har sommarkläder på sig.
FÖVARA bilbarnstolen på säker plats när den inte
används. Undvik att placera tunga föremål ovanpå
stolen och förvara den inte nära direkta värmekällor eller
i direkt solljus.
FÖRVARA alltid stolen säkert, även när den inte
används.
KONTROLLERA att alla i bilen har sina säkerhetsbälten
på sig.
Britax tar i sin produktutveckling hänsyn till
bilbarnstolens kontakt med bilsätet men ansvarar inte
för skador som kan uppstå på bilsäten eller bilbälten.
VIKTIGT:
Bakåtvänd montering
Denna bilbarnstol får
ENDAST användas med
trepunktsbilbälten eller tvåpunktsbälte av typen höft-
bälte (godkända enligt UN/ECE reg. 16,
eller annan motsvarande standard).
Framåtvänd montering
Denna bilbarnstol får ENDAST användas med
trepunktsbilbälten (godkända enligt UN/ECE reg. 16,
eller annan motsvarande standard).
Diagonalbälte
Höftbälte
Diagonalbälte
Höftbälte
Page 69

En presentation av din nya bilbarnstol
9-25 kg grupp 1-2 (ungefärlig ålder 9 månader till 6 år)
1. Överdrag
2. Förvaring av bruksanvisningen (innanför överdraget)
3. Bältets lås
4. Elastisk bältesfasthållningsrem
5. Komfortdyna
6. Etikett med diagram
7. Höftdelsstyrning (framåtvänd)
8. Låsning
9. Remtunnelsprund (bakåtvänd)
10. Tryckknapp för att justera bältet
11. Justerband för bältet
12. Grenbälte
13. Bälte
14. Bröstdyna
15. Övre bältesstyrning
(15-25 kg, framåtvänd)
16. Huvudstödets överdrag
17. Ställbart huvudstöd
18. Spak för huvudstödsjustering
(15-25 kg, framåtvänd)
19. Bältessprund
20. Bälte
21. Bältesskydd
22. Utrymme för ok och stöd
23. Frigöringsknapp för stödet
24. Stöd
25. Låsindikator för stöd
26. Ok (under stolen)
27. Vridsockel - (för bakåtvänt bruk)
28. Fäste för stödet
29. Låstunga för underförankringsband
30. Bältessprund
(framåtvänd)
31. Breddjustering
32. Bälteshöjd/
spak för
33
huvudstödsjustering
(bältesläge)
33. Förankringsband
1
2
3
4
5
6
7
8
9
18
19
20
21
22
23
24
25
9-25 k g
26
9-25 k g
17
16
15
14
13
12
11
10
32
31
30
29
28
27
Page 70

1. Justera bilbarnstolen
2
1
1a
1b
1c
9-18kg
Ställ Multi-Tech på golvet.
Tryck in justeringsknappen och dra samtidigt BÄGGE axelremmarna så långt
framåt som möjligt (bild 1a).
Lås upp spännet (infälld i bild 1a).
Lägg axelremmarna över stolens sida, genom att placera låstungorna bakom
bältets elastiska fasthållningsremmar så att bältet inte vrider sig.
Sätt försiktigt barnet i stolen. Sätt på bältet löst och för in låstungan i låset.
Dra stödets överdel bort från bilbarnstolens baksida 1 (bild 1b).
Lyft på bältets justeringsspak och rör den uppåt eller nedåt
för remmarna i huvudstödet hamnar i nivå med eller alldeles ovanför barnets
axlar
.
Släpp spaken när huvudstödet är på rätt nivå och
kontrollera att den låses fast på plats.
När barnet är så stort att de översta sprunden används kan
barnet fortsätta att använda stolen tills ögonen är i nivå med
9-25 k g
överkanten på stolen eller tills barnet väger mer än så här:
Bakåtvänd montering: 25 kg
Framåtvänd montering: 18 kg
Använd breddjusteraren (se 'En presentation av din nya
bilbarnstol’ på föregående sida) för att ställa in stolens
bredd.
2
så att sprunden
Page 71

9-25 k g
9-18 kg
Page 72
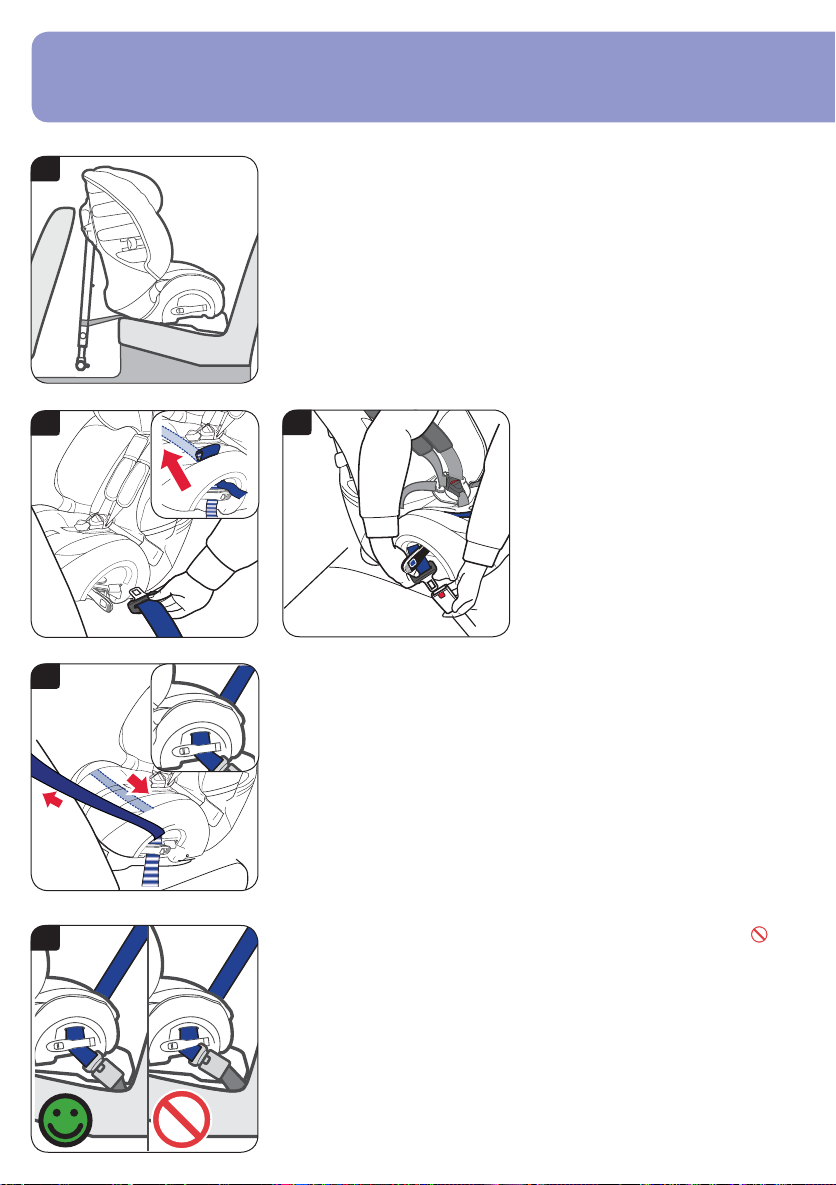
2. Montera bilbarnstolen (bakåtvänd) i det bakre sidosätet
2a
VIKTIGT - Denna bilbarnstol får ENDAST användas med ett trepunktsbälte
eller ett höftbälte (godkända enligt UN/ECE reg. nr. 16, eller annan
motsvarande standard).
Ställ in stödet till den kortaste längden och placera stolen bakåtvänd på
bilsätet, med vridsockeln vilande mot framsätets rygg. Efter monteringen ska
utrymmet mellan ryggstödet framför och bilbarnstolen helst vara minst 10 mm
(bild 2a).
Bilbarnstolen får komma i kontakt med ryggstödet fram men får inte vila
mot det. Om det gör det måste sätet framför ställas in så att föraren eller
passageraren får en bekväm sittställning. Prova annars en annan plats i bilen.
2b
2c
Lossa bägge låsen. Dra ut tillräckligt
för höft- och diagonaldelarna (ungefär
600-900 mm). För in bältet genom
styrningen på den motsatta sidan mot
spännet och in i tunneln (bild 2b).
Det fi nns två sprund i överdraget som
gör det lättare att mata bältet genom
tunneln och in under överdraget
(infälld i bild 2b).
Mata säkerhetsbältet genom tunneln
och låset på den motsatta sidan och för
in låstungan i spännet (bild 2c).
2d
Dra allt slack i bältet genom bilbarnstolen. Var noga med att bältet inte vrids.
Lås säkerhetsbältets spänne när bältet är så spänt som det går. Se till att såväl
höft- som diagonaldelarna av bältet hålls fast av det (infällt i bild 2d).
Lås på den motsatta sidan. Se till att endast bältets höftdel hålls fast av den
(bild 2d).
Kontrollera att bägge låsen har klickat på plats.
2e
Om spännet nu befi nner sig i den position som markerats som felaktig
med
och säkerhetsbältet inte kan dras åt ordentligt (bild 2e) ska du prova på en
annan plats i bilen.
Page 73

9-25 k g
2
1
4
3
2
1
100°
80°
2f
2g
Dra underförankringsbanden runt sätet
framför bilbarnstolen enligt bilden
(bild 2f).
Om din bil har en skenslinga på
glidskenorna så kan dessa alternativt
användas (infälld i bild 2g).
VIKTIGT - Montera inte
underförankringsbanden med
bagageremmarna.
2h
Skjut in slingändarna på underförankringsbanden mellan stolen framför och
baksidan enligt bilden
utsidan av sätet och mata igenom slingorna
1
(bild 2h). För underförankringsbandens ändar runt
2
.
Kontrollera att stödfästena är vända framåt och inte vridna. För på
underförankringsbandens spännen på tungorna på bilbarnstolens sida
3
. Dra
åt underförankringsbanden genom att dra de lösa ändarna nedåt på ett jämnt
4
sätt
.
2i
Dra ut stödet från stolen så långt det går
golvet utan att ändra vinkeln
2
. Kontrollera att stödet är ordentligt fastlåst
1
(bild 2i). Sänk ner stödet till
genom att dra i dess skjutbara del.
2j
Kontrollera slutligen att underförankringsbanden är helt åtdragna genom att
dra de lösa ändarna nedåt (bild 2j). Stödet måste vila mot stadigt golvet och
inte mot locken på förvaringslådor, eller något liknande, i en vinkel på 100° mot
horisontalplanet (bild 2j). Använd vinkelmallen på bruksanvisningens baksida
för att kontrollera stödets vinkel mot golvet.
T
esta om bilbarnstolen är stadigt monterad genom att försöka fl ytta den fram
och tillbaka och åt sidorna när allt är klart. Om den sitter löst, eller om stödet
inte är i 100° vinkel mot golvet, måste du montera på nytt så att den sitter
stadigt på plats, i rätt vinkel.
Placera barnet i stolen enligt bild 5f.
Page 74

3. Montera bilbarnstolen (bakåtvänd) i det bakre mittsätet
3a
VIKTIGT - Denna bilbarnstol får ENDAST användas med ett trepunktsbälte
eller ett höftbälte (godkända enligt UN/ECE reg. nr. 16, eller annan
motsvarande standard).
Ställ in stödet till den kortaste längden och placera bilbarnstolen bakåtvänd
med baksidan centralt mellan förar- och passagerarsätet med vridsockeln
vilande mot framsätets rygg (bild 3a).
3b
3c
Lossa bägge låsen. Dra ut tillräckligt
för höft- och diagonaldelarna (ungefär
600-900 mm). För in bältet genom
styrningen på den motsatta sidan mot
spännet och in i tunneln (bild 3b).
Det fi nns två sprund i överdraget som
gör det lättare att mata bältet genom
tunneln och in under överdraget
(infälld i bild 3b).
Mata bältet genom tunneln och låset på
den motsatta sidan och för in låstungan
i spännet (bild 3c).
3d
Dra allt slack i bältet genom bilbarnstolen. Var noga med att bältet inte vrids.
Lås spännet när det är så spänt som det går. Var noga med att såväl höft- som
diagonaldelarna är fastspända (infälld i bild 3d).
Lås på den motsatta sidan. Kontrollera att endast bältets höftdel är fastlåst
(bild 3d).
Kontrollera att bägge låsen har klickat på plats.
3e
Om spännet nu befi nner sig i den position som markerats som felaktig
med
och säkerhetsbältet inte kan dras åt ordentligt (bild 3e) ska du prova på en
annan plats i bilen.
Page 75

9-25 k g
2
1
4
3
2
1
100°
80°
3 h
3f
3g
Dra ett underförankringsband runt både
förar- och passagerarsätet enligt bilden
(bild 3f).
Om din bil har en skenslinga på
glidskenorna så kan dessa alternativt
användas (infälld i bild 3g).
VIKTIGT - Montera inte
underförankringsbanden med
bagageremmarna.
För in ändarna på underförankringsbanden mellan stolen framför och baksidan
enligt bilden
sätet och mata igenom slingorna
1
(bild 3h). För underförankringsbandens ändar runt utsidan av
2
.
Kontrollera att stödfästena är vända framåt och inte vridna. För på
underförankringsbandens spännen på tungorna på bilbarnstolens sida
3
. Dra
åt underförankringsbanden genom att dra de lösa ändarna nedåt på ett jämnt
4
sätt
.
3i
Dra ut stödet från stolen så långt det går
golvet utan att ändra vinkeln
2
. Kontrollera att stödet är ordentligt fastlåst
1
(bild 3i). Sänk ner stödet till
genom att dra i dess skjutbara del.
3j
Kontrollera slutligen att underförankringsbanden är helt åtdragna genom att
dra de lösa ändarna nedåt (bild 3j). Stödet måste vila stadigt mot golvet och
inte mot locken på förvaringslådor, eller något liknande, i en vinkel på 100° mot
horisontalplanet (bild 3j). Använd vinkelmallen på bruksanvisningens baksida
för att kontrollera stödets vinkel mot golvet.
T
esta om bilbarnstolen är stadigt monterad genom att försöka fl ytta den fram
och tillbaka och åt sidorna när allt är klart. Om den sitter löst, eller om stödet
inte är i 100° vinkel mot golvet, måste du montera på nytt så att den sitter
stadigt på plats, i rätt vinkel.
Placera barnet i stolen enligt bild 5f.
Page 76
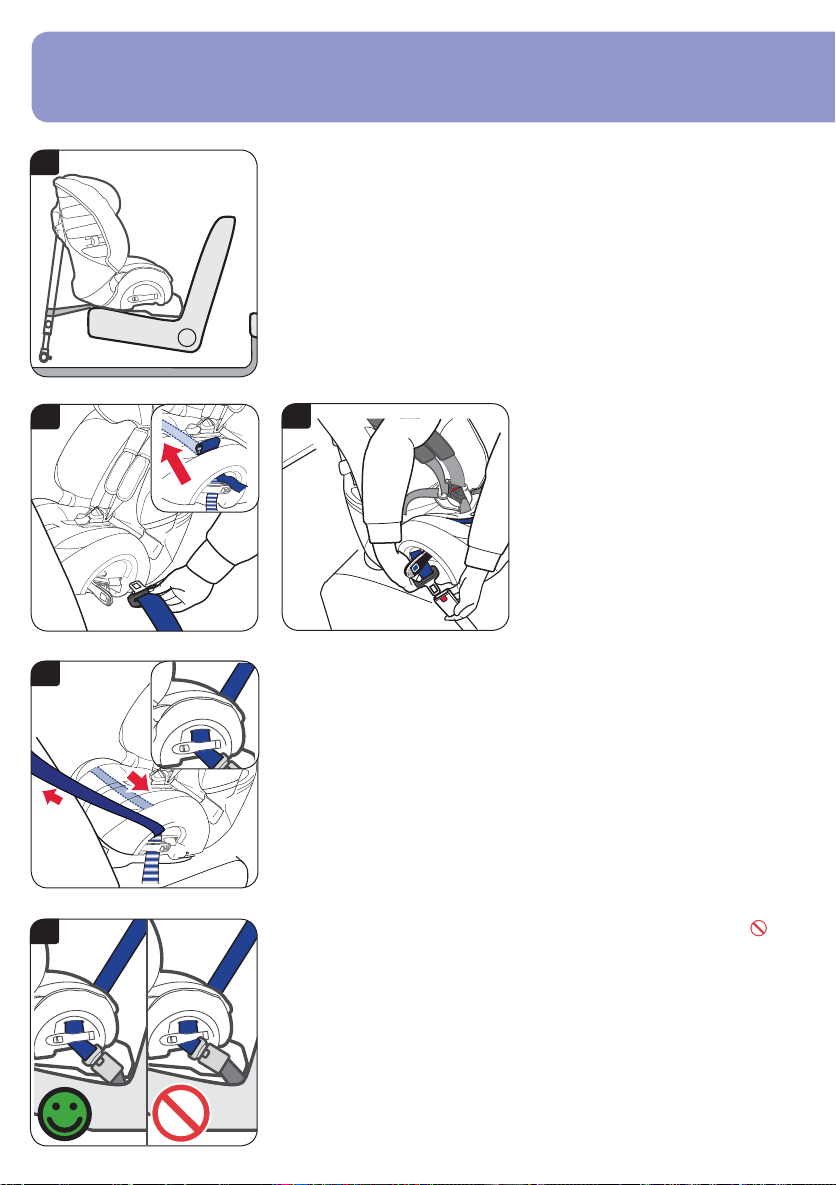
4. Montera bilbarnstolen (bakåtvänd) i framsätet
4a
VIKTIGT - Denna bilbarnstol får ENDAST användas med ett trepunktsbälte
eller ett höftbälte (godkända enligt UN/ECE reg. nr. 16, eller annan
motsvarande standard).
Skjut framsätet bakåt för att göra plats för bilbarnstolen, men så att en
passagerare alldeles bakom ändå kan sitta bekvämt.
Ställ in stödet till den kortaste längden och placera bilbarnstolen bakåtvänd
med vridsockeln vilande mot framsätets rygg (bild 4a).
VIKTIGT - LÅT INTE bilbarnstolen vila mot instrumentbrädan eller vara för
nära vindrutan.
4b
4c
Lossa bägge låsen. Dra ut tillräckligt
för höft- och diagonaldelarna (ungefär
600-900 mm). För in bältet genom
styrningen på den motsatta sidan mot
spännet och in i tunneln (bild 4b).
Det fi nns två sprund i överdraget som
gör det lättare att mata bältet genom
tunneln och in under överdraget
(infälld i bild 4b).
Mata bältet genom tunneln och låset på
den motsatta sidan och för in låstungan
i spännet (bild 4c).
4d
Dra allt slack i bältet genom bilbarnstolen. Var noga med att bältet inte
vrids. Lås bältet när det är så spänt som det går. Se till att såväl höft- som
diagonaldelarna av bältet är fastlåsta (infälld bild i 4d).
Lås på den motsatta sidan. Kontrollera att endast bältets höftdel är fastlåst
(bild 4d).
Kontrollera att bägge låsen har klickat på plats.
4e
Om spännet nu befi nner sig i den position som markerats som felaktig
med
och säkerhetsbältet inte kan dras åt ordentligt (bild 4e) ska du prova på en
annan plats i bilen.
Page 77

9-25 k g
2
1
4
3
1
2
100°
80°
4 h
4f
4g
Dra ett underförankringsband runt det
främre passagerarsätet enligt bilden
(bild 4f).
Om din bil har en skenslinga på
glidskenorna så kan dessa alternativt
användas (infälld i bild 4g).
VIKTIGT - Montera inte
underförankringsbanden med
bagageremmarna.
Skjut in ändarna på underförankringsbanden mellan stolen framför och
baksidan enligt bilden
utsidan av sätet och mata igenom slingorna
1
(bild 4h). För underförankringsbandens ändar runt
2
.
För in spännändarna under sätet. Kontrollera att stödfästena är vända framåt
och inte vridna. För på underförankringsbandens spännen på tungorna på
barnstolens sida
ändarna nedåt på ett jämnt sätt
4i
Dra ut stödet från stolen så långt det går
golvet utan att ändra vinkeln
3
. Dra åt underförankringsbanden genom att dra de lösa
4
.
1
2
. Kontrollera att stödet är ordentligt fastlåst
(bild 4i). Sänk ner stödet till
genom att dra i dess skjutbara del.
4j
Kontrollera slutligen att underförankringsbanden är helt åtdragna genom att
dra de lösa ändran nedåt (bild 4j). Stödet måste vila mot stadigt golv och inte
mot locken på förvaringslådor, eller något liknande, i en vinkel på 100° mot
horisontalplanet (bild 4j). Använd vinkelmallen på bruksanvisningens baksida
för att kontrollera stödets vinkel mot golvet.
T
esta om bilbarnstolen är stadigt monterad genom att försöka fl ytta den fram
och tillbaka och åt sidorna när allt är klart. Om den sitter löst, eller om stödet
inte är i 100° vinkel mot golvet, måste du montera på nytt så att den sitter
stadigt på plats, i rätt vinkel.
Placera barnet i stolen enligt bild 5f.
Page 78

5. Montera bilbarnstolen (framåtvänd) med bälte
3
2
1
9-18 kg grupp 1 (ungefärlig ålder 9 månader till 4 år)
NTF och VTI rekommenderar framåtvänt åkande tidigast från 15 kg, 3 år, då bakåtvänt åkande ger bättre skydd.
5a
70-80cm
5b
5c
VIKTIGT - Bilbarnstolen FÅR BARA användas med ett trepunktsbälte
(som godkänts i enlighet med UN/ECE reg. 16 eller motsvarande standard).
Förvara stödet i sitt förvaringsutrymme.
Placera stolen framåtvänd i bilen. Vänd framsidan mot dig för att komma
åt bättre. Håll ihop höftdelen och diagonaldelen enligt bilden, när du drar ut
säkerhetsbältet (infälld i bild 5a).
VIKTIGT - Låt aldrig bältet sno sig.
Dra säkerhetsbältet runt bilbarnstolens framsida, genom den första öppningen,
och igenom till stolens baksida i den punkt som visas (bild 5a).
VIKTIGT - Använd inte den röda diagonalstyrningen på huvudstödet.
Ta bältet och för det genom det andra sprundet (bild 5b).
Praktiskt tips - Om bältet är för kort måste du kanske dra diagonaldelen
bakom huvudstödet innan du börjar montera.
Dra allt slack i bältet till bilbarnstolens framsida och fäst bältet i spännet
(bild 5c).
Kontrollera att bältet inte är snott och att höftdelen går över båda de röda
höftstyrningarna. Kontrollera också att diagonaldelen går över bilbarnstolens
bakre hörn, bakom huvudstödet.
5d
Tryck ner stolen i bilsätet med hela din kroppsvikt och dra åt enligt nedan.
Dra och håll diagonaldelen
sedan för att spänna
Kontrollera stolen genom att dra hårt i bältet. Den ska inte röra sig alls, eller
bara ytterst lite. Upprepa åtdragningssekvensen ovan om stolen fortfarande
sitter för löst.
1
i position 2 för att få bort allt slack och dra
3
(bild 5d).
Page 79

9-18 kg
NTF och VTI rekommenderar framåtvänt åkande tidigast från 15 kg,
3 år, då bakåtvänt åkande ger bättre skydd.
5e
5f
Sätt barnet i stolen och sätt på bältet. Kontrollera att bältet inte är snott. Dra åt
bältet genom att dra justerremmen framåt.
VIKTIGT - Bältets höftdel ska vara så långt fram och så långt nere som möjligt
på barnets bäcken.
Kontrollera avslutningsvis att bröstdynorna är neddragna på barnets bröst
(bild 5f).
VIKTIGT - Kontrollera positionen på bältets spänne och att
det är bältet och INTE spännet som håller stolen på plats
(bild 5e).
Prova ett annat läge på sätet om spännet hamnar fel.
Kontakta vår kundtjänst på nummer +46 8564 841 00 eller
per e-post på adressen info@se.britaxeurope.com eller gå
till www.britax.se
Page 80

6. Montera stolen (framåtvänd) med vuxenbälte
15-25 kg grupp 2 (ungefärlig ålder 4 till 6 år)
6a 6b
6c
6e
Justera bilbarnstolen
Ställ först stolen på golvet när du ska
förvara bältet i den.
Tryck in justeringsknappen och dra
samtidigt BÄGGE axelremmarna så långt
framåt som möjligt (bild 6a).
Vänd på stolen. L
yft på justeringsspaken för
bältet baktill på stolen och dra den uppåt så
att axelremsprunden i huvudstödet hamnar i
den allra översta positionen (bild 6b).
Haka av båda axelremmarna från oket på
6d
stolens baksida (bild 6c), stuva in oket
nedtill på bältesskyddet
1
(bild 6g).
Ta bort bröstdynorna från fästarmarna
(infälld i bild 6c). Dra de båda
axelremmarna och bröstdynorna genom
stolens framsida och ta bort bröstdynorna
från remmarna.
Lägg stolen med ryggen nedåt.
a bort
T
justeringsstroppen från grenbältets fäste.
Vrid på fästet så att det kan passera igenom
grenbältets sprund och tryck det genom
stolens framsida (bild 6d).
6f
Ställ stolen upprätt och lossa bältet (infälld
i bild 6e).
Tryck in bältesremmarna och
låstungorna under överdraget genom
höftdelssprunden (bild 6e).
Placera spännet, bältesremmarna
och bröstdynorna bakom de elastiska
fasthållningsremmarna (bild 6f). Tryck
justeringsremmen genom sprundet i
överdraget.
6g
6 h
Håll fast stolen och tryck på huvudstödets
justeringsspak på huvudstödets baksida
(bild 6g). Kontrollera att bröstdynorna tagits
bort enligt anvinsningarna i (bild 6c) .
Flytta upp huvudstödet så att huvudet
blir centralt placerat (bild 6h). Släpp
huvudstödsjusteringsspaken när
huvudstödet är på rätt nivå och kontrollera
att den låses fast på plats.
Page 81
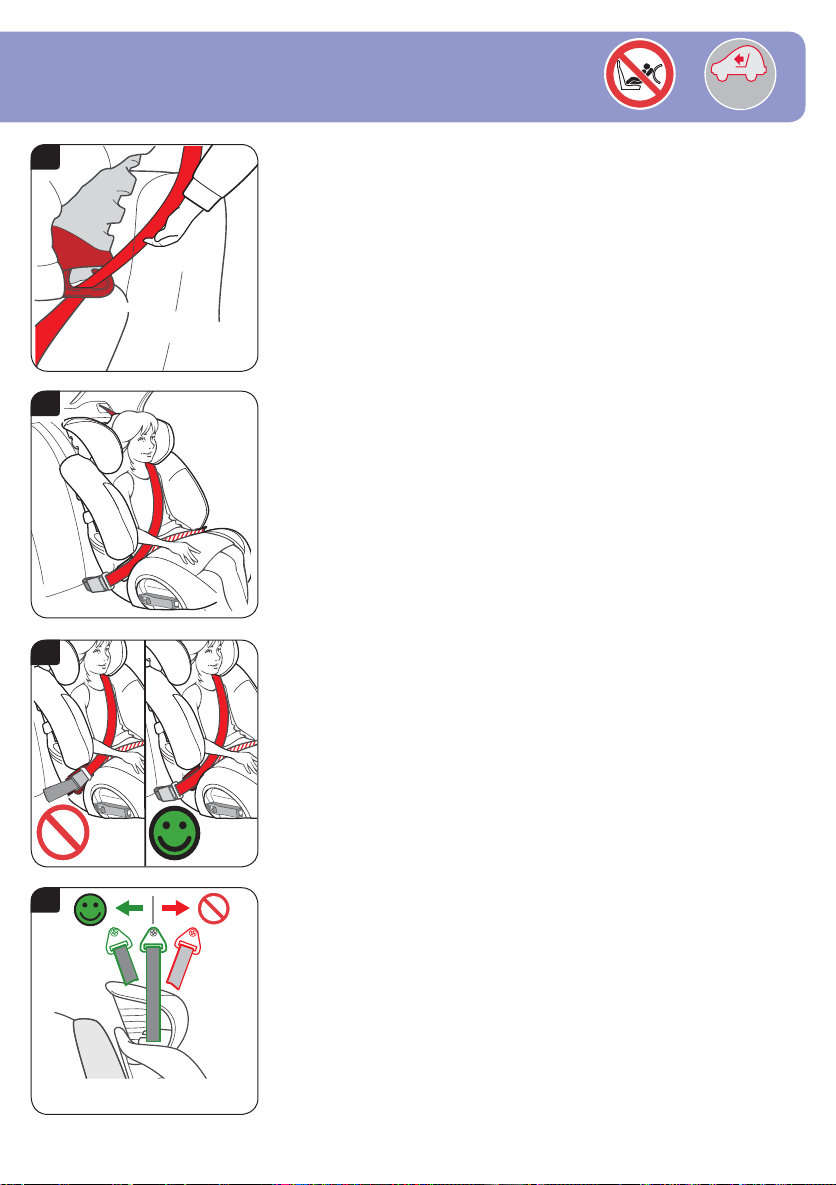
15-25 kg
6i
Montera stolen
VIKTIGT - Bilbarnstolen FÅR BARA användas med ett trepunktsbälte
(som godkänts i enlighet med UN/ECE reg. 16 eller motsvarande standard).
Placera stolen framåtvänd i bilen.
Mata bältets diagonaldel genom den mörkröda övre remstyrningen MITT
EMOT spännet (bild 6i).
6j
Spänn bältet runt barnet (bild 6j). Höftdelen ska vila mot de röda
höftstyrningarna på vardera sidan om stolen. Kontrollera att säkerhetsbältet
inte är snott och ta upp allt slack.
VIKTIGT - Bältets höftdel ska vara så långt fram och så långt nere som möjligt
på barnets bäcken.
6k
VIKTIGT - Kontrollera positionen på bältets spänne. Kontrollera att det inte är
draget runt bilbarnstolen till den röda styrningen för höftdelen (bild 6k).
6l
Kontrollera positionen på bilens övre bältesfästpunkt (bild 6l). Om denna
fästpunkt befinner sig framför bilbarnstolen ska den inte användas. Prova en
annan plats i bilen.
Page 82

GB
Britax Excelsior Limited
1 Churchill Way West
Andover
Hampshire SP10 3UW
Storbritannien
Tel.: 01264 386034
www.britax.co.uk
Britax är ett inregistrerat varumärke som tillhör Britax
Childcare
DK
FIN
F. Bülow & Co. ApS
Baldersbuen 37-39
DK-2640 Hedehusene
Tlf: 46 59 11 55
Fax: 46 59 11 66
E-post: post@bylow.dk
www.bylow.dk
Britax er et registreret varemærke tilhørende
Britax Childcare
Oy Britax Pohjolan Lapset Ab
Kauppakartanonkatu 15 D
FI - 00930 Helsinki
Puhelin 09-343 60 10
Fax: 09-343 22 13
E-post: info@fi .britaxeurope.com
www.britax.fi
Britax on Britax Childcaren rekisteröity tavaramerkki
N
Britax AB
Strömögatan 5
164 40 KISTA
Tel.: 08-564 841 00
Fax: 08-98 01 89
E-post: info@se.britaxeurope.com
www.britax.se
Britax er et registrert varemerke for Britax Childcare
S
Britax AB
Strömögatan 5
164 40 KISTA
Tel.: 08-564 841 00
Fax: 08-98 01 89
E-post: info@se.britaxeurope.com
www.britax.se
Britax är ett registrerat varumärke som tillhör
Britax Childcare
Page 83
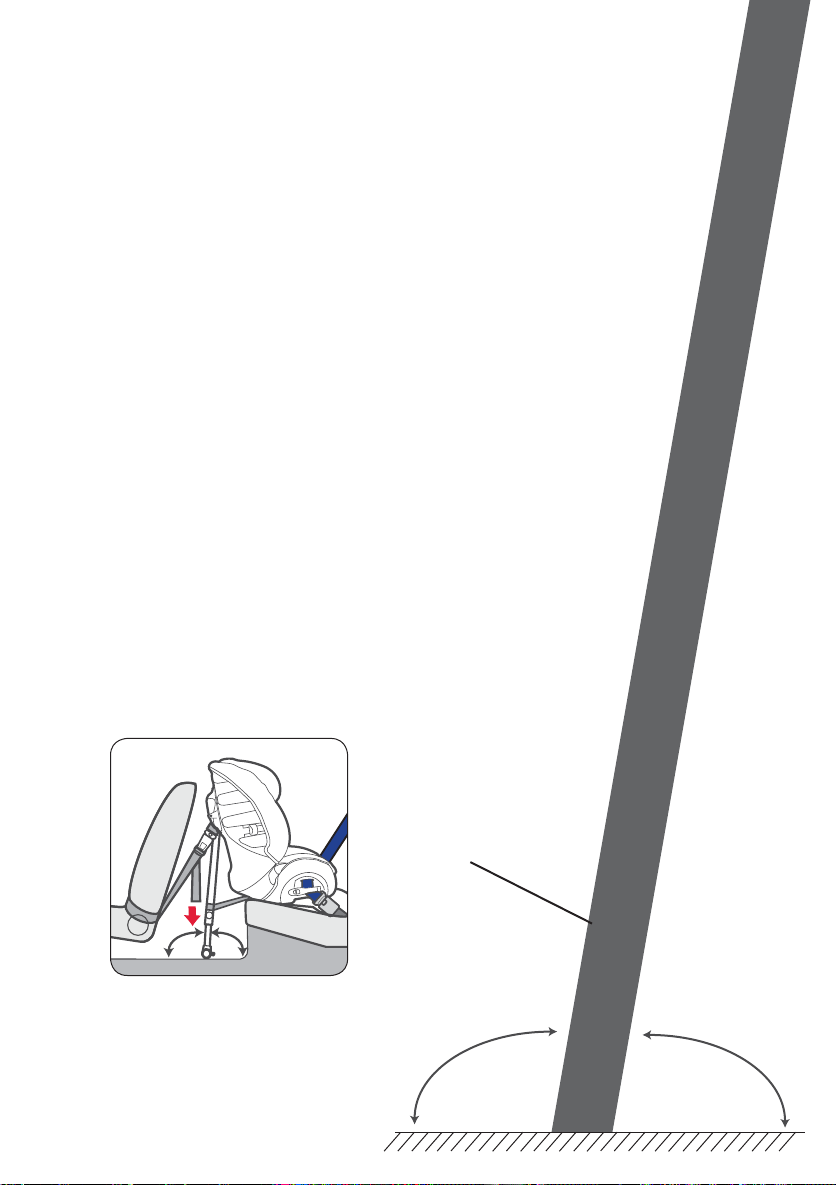
100°
80°
Footprop installation - angle guide
Use this angle guide to check the angle of the footprop to the fl oor.
Placering af støtteben – vinkelindikator
Brug vinkelindikatoren til at kontrollere støttebenets vinkel i forhold til bilens bund.
Tukijalan asennus – kulmaopas
Tämän kulmaoppaan avulla tarkistetaan tukijalan kulma lattian suhteen.
Montere fotstøtten - vinkelføring
Bruk denne vinkelføringen for å sjekke vinkelen på fotstøtten mot gulvet.
Stödmontering - vinkelmall
Använd den här vinkelmallen för att kontrollera stödets vinkel mot golvet.
Line of footprop
Støttebenets vinkel
Tukijalan asennuskulma
På linje med fotstøtte
Stödlinje
100°
80°
Page 84

1. This is a “Universal” child restraint. It is approved to Regulation no. 44, 04 series of amendments, for general use in vehicles and it will fi t most, but not all car
seats.
2. A correct fi t is likely if the vehicle manufacturer has declared in the vehicle handbook that the vehicle is capable of accepting a “Universal” child restraint for
this age group.
3. This child restraint has been classifi ed as “Universal” under more stringent conditions than those which applied to earlier designs which do not carry this
notice.
4. If in double consult either the child restraint manufacturer or the retailer.
5. Only suitable if the approved vehicles are fi tted with lap/3 point/static/ with retractor safety-belts, approved to UN/ECE Regulation No. 16 or other equivalent
standards.
6. This Child Restraint is classifi ed for “Semi-universal” use and is suitable for fi xing into the seat positions of the following cars:
Seat positions in other cars may also be suitable to accept this child restraint. If in doubt, consult either the child restraint manufacturer or the retailer.
Notice
Please refer to vehicle list
OBS!
1. Denne autostol er klassifi ceret som "universal". Den er godkendt til generel anvendelse i biler ifølge FN/ECE-regulativ nr. 44.04, og den passer til de fl este,
men ikke alle, bilsæder.
2. Korrekt montering er mulig, hvis det i bilens instruktionsbog er angivet, at der kan benyttes en "universal" autostol til denne aldersgruppe.
3. Denne autostol er klassifi ceret som "universal" under strengere betingelser end tidligere klassifi ceringer.
4. Kontakt producenten eller forhandleren i tvivlstilfælde.
5. Autostolen er kun beregnet til biler, som er udstyret med trepunktsseler med selestrammere, der er godkendt ifølge FN/ECE-regulativ nr. 16 eller tilsvarende
normer.
6. Autostolen er godkendt til anvendelse som "semiuniversal" autostol og kan monteres i følgende biler:
Autostolen kan muligvis også anvendes i andre biler. Kontakt producenten eller forhandleren i tvivlstilfælde.
Se listen over godkendte biler.
Huomautus
1. Tämä on ”yleiskäyttöön” tarkoitettu lasten turvaistuin. Se on hyväksytty testistandardin ECE R44 rev. 04 mukaisesti yleiskäyttöön autoissa, ja se sopii
useimpiin mutta ei kuitenkaan kaikkiin autonistuimiin.
2. Turvaistuin sopii todennäköisesti omaan autoosi, jos autotehdas on auton käyttöoppaassa ilmoittanut, että autossasi voi käyttää tälle ikäryhmälle tarkoitettuja
”yleismallisia” turvaistuimia.
3. Tämä turvaistuin on luokitettu ”yleismalliseksi” aikaisempiin malleihin sovellettuja tiukempien vaatimusten mukaan. Vanhemmissa malleissa ei ole tällaista
huomautusta.
4. Jos olet epätietoinen asiasta, ota yhteys joko turvaistuimen valmistajaan tai jälleenmyyjään.
5. Sopii käytettäväksi vain, jos hyväksytyt autot on varustettu
UN/ECE nro 16:n tai muiden vastaavien standardien mukaisin lantio-, 3-piste-, kiinto- tai rullaturvavöin.
6. Tämä lasten turvaistuin on luokitettu ”puoliyleiskäyttöön” ja se sopii asennettavaksi seuraavien automerkkien istuimiin:
Myös muiden automerkkien istuimet voivat soveltua tämän turvaistuimen asennukseen. Jos olet epätietoinen asiasta, ota yhteys joko turvaistuimen
valmistajaan tai jälleenmyyjään.
Katso automerkkiluetteloa
Kunngjøring
1. Dette er et "universalt" barnesete. Den er godkjent i henhold til nr. 44, 04 serie med endringer, til generell bruk i kjøretøy, og det vil passe de fl este, men ikke
alle bilsetene.
2. Det er sannsynlig at det vil passe hvis det står i håndboken fra bilprodusenten at det kan monteres et "universalt" barnesete i bilen, til denne aldersgruppen.
3. Dette barnesetet er klassifi sert som "universalt" under strengere forhold enn e som gjaldt tidligere designer som ikke bærer denne kunngjøringen.
4. Hvis du er i tvil, ta kontakt med produsenten eller selgeren av barnesetet.
5. Egnet bare hvis de godkjente kjøretøyene er utstyrt med mage-/3-punkts/statiske selvopprullende sikkerhetsbelter, godkjent i henhold til UN/ECE-forskrift nr.
16 eller andre tilsvarende standarder.
6. Denne barnesikringen er klassifi sert for "semi-universal" bruk og er egnet for å feste i setene på følgende biler:
Seteposisjoner i andre biler kan også være egnet til dette barnesetet. Hvis du er i tvil, ta kontakt med produsenten eller selgeren av barnesetet.
Se listen over kjøretøy
Observera
1. Detta är "universell" bilbarnstol. Den är godkänd enligt förordning nr. 44, 04-serien med ändringar, för allmänt bruk i fordon och passar de fl esta, men inte
alla, bilar.
2. Korrekt inpassning är sannolikt möjlig om fordonstillverkaren anger i handboken att bilbarnstolar av "universell" typ kan användas i bilen för denna
åldersgrupp.
3. Bilbarnstolen har klassats som "universell" under strängare villkor än dem som tillämpas för tidigare konstruktioner som inte innefattar detta meddelande.
4. Kontakta antingen bilbarnstolens tillverkare eller återförsäljaren om du är osäker.
5. Endast lämplig om de godkända fordonen är försedda med höftbälten/trepunktsbälten/statiska säkerhetsbälten/säkerhetsbälten med tillbakadragare, som är
godkända enligt FN/ECE-förordningen nr. 16 eller annan motsvarande standard.
6. Denna bilbarnstol har klassifi cerats för "semiuniversellt” bruk och kan monteras på säten i följande bilar:
Stolar i andra bilar kan också lämpa sig för denna bilbarnstol. Kontakta antingen bilbarnstolens tillverkare eller återförsäljaren om du är osäker.
BB0-702-00
Se fordonsförteckningen
 Loading...