

Page 1

BABY-SAFE SLEEPER
1
Gebrauchsanleitung
Wir freuen uns, dass unser BABY-SAFE SLEEPER
Ihr Kind sicher durch die ersten Monate seines
Lebens begleiten darf.
Um Ihr Baby richtig schützen zu können, muss
der BABY-SAFE SLEEPER unbedingt so
verwendet und eingebaut werden, wie wir es
Ihnen in dieser Anleitung beschreiben.
Wenn Sie noch Fragen zur Benutzung haben ,
wenden Sie sich bitte an uns.
BRITA X RÖ ME R Kindersicherheit GmbH
Britax Excelsior Ltd.
Inhalt
1. Eignung ........................... .................................... 5
2. Gebrauch Ihrer Babywanne ............................... 9
2.1 Verstellen des Tragebügel .......................... 11
2.2 Klappen des Sonnenverdeckes.................. 13
2.3 Anbringen des Windschutzes ..................... 13
2.4 Einstellen der Rückenlehne ........................15
3. Sichern Ihres Babys ......................................... 17
3.1 Lockern der Schu l te r g ur te ..........................17
Page 2

User instructions
We are pleased that our BABY-SAFE SLEEPER
may accompany your child safely through the first
months of his or her life.
In order to protect your baby correctly, the
BABY-SAFE SLEEPER must always be used
and installed as described in these instructions.
If you have any further questions regarding its use,
please feel free to contact us.
BRITAX RÖMER Kindersicherheit GmbH
Britax Excelsior Ltd.
Mode d’emploi
Nous sommes heureux que notre BABY-SAFE
SLEEPER puisse accompagner votre enf ant en
toute sécurité durant les premi ers mois de sa vie.
Pour protéger efficacement votre bébé, le
BABY-SAFE SLEEPER doit impérativem ent ê tre
utilisé et installé de la manière décrite dans le
présent mode d’emploi.
Pour toute question complémentaire, n' hésitez pas
à nous contacter.
BRITA X RÖ ME R Kindersicherheit GmbH
Britax Excelsior Ltd.
Contents
1. Suitability ........................ ..................................... 6
2. Using the carrycot ............................................10
2.1 Adjusti ng th e h and l e ...................................12
2.2 Folding the sunshade ..................................14
2.3 Fitting the apro n ............................ ..............14
2.4 Adjusti ng th e b ac kr es t ................... ..............16
3. Securing your baby ..........................................18
3.1 Loosening the shoulder straps ....................18
Table des matières
1. Habilitation ............................ .............................. 6
2. Utilisation de votre nacelle pour bébé ............ 10
2.1 Ajustage de l’anse ......................................12
2.2 Repliage du pare-soleil ...............................14
2.3 Fixation du coupe-vent ...............................14
2.4 Réglage du dossier ..................................... 16
3. Protection de votre bébé ................................. 18
3.1 Desserra ge des br e te lle s ............................ 18
2
Page 3

3.2 Anschnallen des Babys .............................. 19
3.3 Straffen der Schultergurte ...........................21
3.4 So ist Ihr Baby richtig
gesichert ................... .................................. 21
4. Verwendung im Fahrzeug ................................ 23
4.1 Einbau im Fahrzeug ...................................27
4.2 Ausbau aus dem Fahrzeug ........................37
4.3 So ist Ihre Babywanne
im Fahrzeug richtig eingebaut ....................39
5. Verwendung als Kinderwagen-Aufsatz ..........41
5.1 Anbringen auf dem Kinderwagen ...............45
5.2 Abnehme n vom Kin de r wa gen .................... 47
6. Pflegeanleitung .......... .......................... ............. 49
6.1 Pflege des Gurtschlosse s ...... ..................... 53
6.2 Reinigung ....................................................55
6.3 Aushängen des Sonnenverdeckes .............57
6.4 Einhängen des Sonnenverdeckes .............. 57
6.5 Abziehen des Bezuges ...............................59
6.6 Aufziehen des Bezuges .............................. 63
7. Hinweise zur Entsorgung .......................... .. ... .. 63
8. Folgesitze ................. ......................................... 65
9. 2 Jahre Garantie ............................................... 65
10. Garantiekarte / Übergabe-Check ........ ... .......... 72
3
Page 4

3.2 Securing your baby using the harness ........20
3.3 Tightening the harness ................................22
3.4 Checklist to ensure that
your baby is buckled up correctly ................22
4. Use in the vehicle ..............................................24
4.1 Installation in th e ve h ic l e .............................28
4.2 Removing from the vehicle .........................38
4.3 Checklist to ensure that your carrycot is
installed correctly in the vehicle ..................40
5. Use as a pram attachment ................................42
5.1 Fitting on a pr a m .........................................46
5.2 Removing from the pram ............................48
6. Care instructions ..................................... ... ......50
6.1 Care for the harness buckle ........................54
6.2 Cleaning ...... ............................... .................56
6.3 Unhooking the sunshade ............................58
6.4 Hooking the sunshade in ............................58
6.5 Removing th e cover ........................... ... .. ... .60
6.6 Re-fitting the cover ......................................64
7. Notes regarding disposal .................................64
8. Next child safety seat ........................ .. .............66
9. 2-year warranty .................................................6 6
10. Warranty Card / Transfer Check ......................74
3.2 Mise en place de la ceinture du bébé .........20
3.3 Tendre les bretelles ....................................22
3.4 Comment savoir si votre bébé est bien
protégé ....................................................... 22
4. Utilisation dans le véhicule . .. .......................... 24
4.1 Montage dans le véhicule ...........................28
4.2 Démontage du véhicule ..............................38
4.3 Montage correct de votre nacelle pour bébé
dans le véhicule .......................................... 40
5. Utilisation comme nacelle de poussette ........ 42
5.1 Mise en place sur la poussette ................... 46
5.2 Retrait de la poussette ................................ 48
6. Consignes d’entretien ......................................50
6.1 Entretien du fe r m oir de ceintu r e ................. 54
6.2 Nettoya ge ................................................... 56
6.3 Décrochage du pare-soleil .......................... 58
6.4 Fixation du pare-soleil ................................ 58
6.5 Retrait de la housse .................................... 60
6.6 Remise en place de la housse ...................64
7. Remarques relatives à l’élimination ...............64
8. Sièges ultérieurs ............................................... 66
9. 2 ans de garantie .............................................. 66
10. Carte de garantie / Procès-verbal de remise ..76
4
Page 5
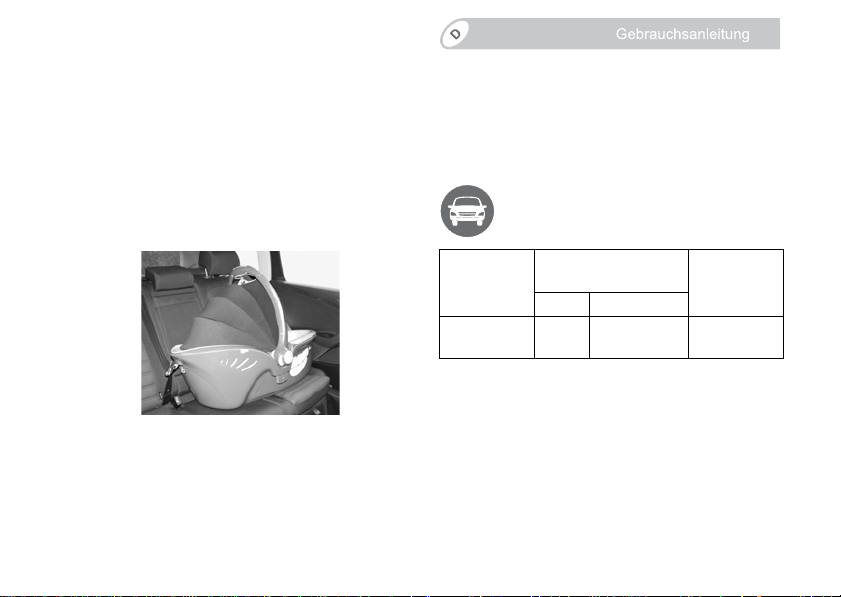
1. Eignung
Zulassung
Der BABY-SAFE SLEEPER ist für zwei
unterschiedliche Anwendungsarten
zugelassen:
... als Babywanne eingebaut im
Fahrzeug:
Britax /
RÖMER
Babywanne
BABY-SAFE
SLEEPER
*ECE = Europäische Norm für Sicherheitsausrüstung
Prüfung und Zulassung
nach ECE* R 44/04
Gruppe Körpergewicht
0bis 10 kg
empfohlener
Altersbereich
Geburt bis
ca. 6 Monate
• Die Babywanne ist ausgelegt, geprüft und
zugelassen entsprechend den Anfo rderungen
der europäischen Norm für KindersicherheitsEinrichtungen (ECE R 44/04).
Das Prüfzeichen E (in einem Kreis) und die
Zulassungsnummer befinden sich auf dem
Zulassungsetikett (Aufkleber an der
Babywanne).
5
Page 6
1. Suitability
Certification
The BABY-SAFE SLEEPER is approved for two
different methods of inst a llation:
1. Habilitation
Homologation
La coque BABY-SAFE SLEEPER est
homologuée pour deux types d'application
différents :
... as a carrycot
installed in a vehicle:
Britax/
RÖMER
Carrycot
BABY-SAFE
SLEEPER
*ECE = European Standard for Safety Equipment
T ested and certifi ed
according to
ECE* R 44/04
Group Body weight
0 up to 10 kg
Recommended
age range
From birth to
around 6 months
• The carrycot has been designed, tested and
certified according to the requirements of the
European Standard for Child Safety Equipment
(ECE R 44/04).
The seal of approval E (in a circle) and the
approval number are located on the approval
label (sticker on the carrycot).
... en tant que nacelle pour bébé monté
dans la voiture :
Britax /
RÖMER
Nacelle pour
bébé
BABY-SAFE
SLEEPER
*ECE = norme européenne pour les é quipements de sécurité
Examen et homologation
selon ECE* R 44/04
Groupe Poids
0 jusqu'à 10 kg
tranche d'âge
recommandée
de la naissance
à env. 6 mois
• La nacelle po ur bébé est conçue, contrôlée et
homologuée conformément aux exigences de la
norme européenne pour les équipements de
sécurité pour enfants (ECE R 44/04).
Le signe de contrôle E (dans un cercle) et le
numéro d’homologation se trouvent sur
l’étiquette d’homologation (autocollant sur la
nacelle pour bébé).
6
Page 7
• Die Zulassung erlischt sobald Sie an der
A
Babywanne etwas verändern. Änderungen darf
ausschließlich der Hersteller vornehmen.
... als Kinderwagen-Aufsatz auf einem
Britax Fahrgestell:
Die Babywanne eignet sich als KinderwagenAufsatz von Geburt bis sich Ihr Kind selb s tständig
aufsetzen kann (mit ca. 6 Monaten).
Die Babywanne kann als KinderwagenAufsatz auf allen Britax Fahrgestellen
verwendet werden die mit dem Symbol
Kinderwagen-Aufsatz „Typ A“
gekennzeichnet sind und für ein en
Kinderwagen-Aufsatz freigeg eben sind.
Dieser Kinderwagen-Aufsatz ist entwickelt und
hergestellt entsprechend der Normen
EN1888:2005-11 und EN1466:2004.
7
Page 8

• This approval shall be invalidated if you make
A
A
any modifications to the carrycot. Only the
manufacturer is permitted to make modification s.
• La nacelle pour bébé perd son homologation dès
que vous réalisez des modifications. Toute
modification doit exclusiveme nt être réalisée par
le fabricant.
... as a pram attachment on a Britax
frame:
The carrycot is suitable for use as a pram
attachment from birth until your baby is old enough
to sit up unaided (around 6 months).
The carrycot can be used as a pram
attachment on all Britax frames which
are marked with the "type A" carryc ot
icon and which have been approved for
use with a pram attachment.
This pram attachment has been designed and
manufactured in accordance with European
standards EN1888:2005-11 and EN1466:2004.
.. en tant que nacelle de poussette sur
un châssis de poussette Britax :
La nacelle pour bébé convient en tant que nacelle
pour poussette de la naissance jusqu'à ce que
votre enfant puisse s'assoi r seul (à env. 6 mois).
La nacelle pour bébé peut être utilisée
en tant que nacelle de poussett e su r
tous les châssis de poussette B ritax
équipés du symbole nacelle pour
poussette « type A » et dont l'utilisation
avec des nacelles pour bébé est
autorisée.
Cette nacelle de poussette est conçu e et fa briq uée
conformément à la norme EN1888:2005-11 et
EN1466:2004.
8
Page 9
2. Gebrauch Ihrer Babywanne
Zum Schutz Ihres Babys
• Schnallen Sie Ihr Baby in der Babywanne immer
an.
• Die Babywanne ist nicht geeignet als Ersatz für
Bett oder Wiege. Er darf nur für den Transport
genutzt werden.
• Lassen Sie Ihr Baby in der Babywanne niemals
aus den Augen, wenn Sie es auf erhöhten
Flächen abstellen.
(z.B. Wickelkomode, Tisch...)
• Klemmen Sie das Gurtende 8 (siehe 3.3)
niemals in bewegliche Teile ein (z.B.
automatische Türen, Rolltreppen...) .
• Vorsicht! Die Kunstoffteile der Babywanne
heizen sich in der Sonne auf. Ihr Baby kann sich
daran verbrennen. Schützen Sie Ihr Baby und
die Babywanne vor intensiver
Sonneneinstrahlung (z.B. ein leichtes Tuch über
die Schale legen).
9
Page 10
2. Using the carrycot
2. Utilisation de votre nacelle pour
bébé
For the protection of your baby
• Always secu re your baby in the carrycot using
the harness.
• The carrycot is not suitable as a substitute for a
cot or a cradle. It must only be us ed for t ransport .
• Never leav e your baby unattended in the
carrycot when placing it on elevat ed surfaces
(e.g. a table, nappy changing unit, etc.).
• Never allow the strap end 8 (see 3.3) to become
caught in moving parts (e.g. automatic door s,
escalators, etc.).
• Caution! The plastic parts of the carrycot heat
up in the sun, so that your baby may get burnt.
Protect your baby and the carrycot agai nst
intense sunlight (e.g. by putti ng a li ght c lot h ove r
the carrycot).
Pour protéger votre bébé
• Attachez toujo u rs votre bébé dans la nacelle
pour bébé.
• La nacelle po ur bébé n'est pas adaptée pour
remplacer le lit ou le berceau. Elle ne doit être
que pour le transport.
• Ne perdez j amais de vue votre bébé lorsque
vous déposez la nacelle sur des surfaces
surélevées
(table à langer, table à manger, etc.)
• Ne coincez jamais l'extrémité de la sangle 8 (voir
paragraphe 3.3) dans des pièces mobi les (par
ex. portes automatiques, escalier roulant...).
• Attention ! Les parties en matière plastique de
la nacelle pour bébé se réchauffent en plein
soleil. Votre bébé risque de se brûler. Protégez
votre bébé et la nacelle pour bébé contre le
rayonnement intensif du sol eil (recouvrez-la par
ex. de linge).
10
Page 11

2.1 Verstellen des Tragebügel
A
B
5
4
Sie können den Tragebügel in drei Stellungen
einrasten:
Þ Drücken Sie gleichzeitig die beiden Tasten 4 am
Tragebügel 5.
Þ Schwenken Sie nun den Tragebügel 5 mit
gedrückten Tasten 4 vor oder zurüc k, bi s er in
der gewünschten Stellung einrastet.
• A : Zum Tragen und zum Transport im Auto
Vorsicht! Vergewissern Sie sich ob der
Tragelbügel 5 sicher eingerastet ist, bevor Sie
die Babywanne anheben.
• B : Zum Hineinlegen Ihres Babys in die
Babywanne.
11
Page 12
2.1 Adjusting the handle
You can engage the handle in three positions:
Þ Simultaneously press both buttons 4 on the
handle 5.
Þ Then whilst holding the buttons pressed 4 turn
the handle 5 backwards or forwards until it
engages in the desired position.
2.1 Ajustage de l’anse
Vous pouvez enclencher l’anse en trois
positions :
Þ Appuyez simultanément sur les deux touche s 4
de l’anse 5.
Þ Pivotez à présent l’anse 5 en avant ou en arrière
jusqu'à ce qu'elle s'enclench e dans la position
souhaitée, les touches 4 ét ant enfoncées.
• A : For carrying and for transport in the car
Caution! Ensure that the handle 5 is securely
engaged before you pick up the carrycot.
• B : For putting your baby into the carrycot
• A : pour porter la nacelle et pour la transporter
dans la voiture
Attention ! Assurez-vous que l'anse 5 est
correctement enclenchée avant de soulever la
nacelle pour bébé.
• B : Pour coucher votre bébé dan s la nacelle.
12
Page 13
9
10
C
• C : Zum Hineinlegen Ihres Babys un d beim
Gebrauch als Kinderwagen-Aufsatz
2.2 Klappen des Sonnenverdeckes
So klapppen Sie das Sonnenverdeck 9 auf:
Þ Schwenken Sie den Verdeckbügel 10 nach oben
bis er einhakt.
So klapppen Sie das Sonnenverdeck 9 zu:
Þ Heben Sie den Verdeckbügel 10 etwas an um
ihn auszuhaken. Schwenken Sie den
Verdeckbügel 10 zurück auf den Schalenrand.
2.3 Anbringen des Windschutzes
Hängen Sie die beiden Gummischlaufen 11 in
Þ
die Haken unter dem Tragebügel-Gelenk ein.
Þ Ziehen Sie den elastische Saumkante über den
Schalenrand.
Þ Stecken Sie den D-Ring 12 durch den Schlitz im
13
Windschutz 30.
Page 14

• C : For putting your baby in and when used as a
pram attachment
2.2 Folding the sunshade
This is how to unfold the sunshade 9:
Þ Swivel the handle 10 of the sunshade upwards
until it engages.
This is how to fold the sunshade 9 back:
Þ Lift the sunshade handle 10 slightly to disengage
it. Swivel the sunshade handle 10 back to the
edge of the shell.
• C : Pour coucher votre bébé ou à u tiliser en tant
que nacelle pour poussette
2.2 Repliage du pare-soleil
Pour déplier le pare-soleil 9, procédez comme
suit :
Þ Basculez l'anse du pare-soleil 10 vers le haut
jusqu'à ce qu'elle s'enclenche.
Pour rabattre le pare-soleil 9, procédez comme
suit :
Þ Soulevez légèrement l'anse du pare-soleil 10
jusqu'à ce qu'elle se décroche. Basc u lez l'anse
du pare-soleil 10 vers l'arrière jusqu'au bord de
la coque.
2.3 Fitting the apron
Þ Hook the two elastic loops 11 around the hooks
under the handle mounting.
Þ Pull the elastic seam over the edge of the shell.
Þ Push the D ring 12 through the slot in the
apron 30.
2.3 Fixation du coupe-vent
Accrochez les deux passants en caoutchouc 11
Þ
dans les crochets sous l'articulation de l'anse.
Þ Tirez le bord él as tiq ue de la couture au-dessus
du bord de la coque.
Þ Passez l'anneau D 12 dans la fente du coupe-
vent 30.
14
Page 15

19
13
6
15
2.4 Einstellen der Rückenlehne
Zum Schutz Ihres Babys
• Verwenden Sie die Babywanne im Auto
nur mit ganz flacher (waagerechter)
Rückenlehne 6!
So können Sie die Neigung der
Rückenlehne 6 verstellen:
Þ Lockern Sie die Schultergurte 3. (siehe
3.1)
Þ Greifen Sie am Fußende 19 von unten an den
Boden der Babywanne.
Þ Drehen Sie das graue Verstellrad 13...
...im Uhrzeigersinn: die Rückenlehne 6 wird
flacher.
...gegen den Uhrzeigersinn: die Rückenlehne 6
wird steiler.
Vorsicht! Die Rückenlehne 6 lässt sich nur
verstellen wenn die Schultergur te 3 ganz
gelockert sind.
Þ Straffen Sie die Schultergurte 3 bis sie eng am
Körper Ihres Babys anliegen.
(siehe 3.3)
Page 16
2.4 Adjusting the backrest
2.4 Réglage du dossier
For the protection of your baby
• In a vehicle, only use the carrycot with
the backrest 6 completely flat (horizontal)!
This is how to adjust the angle of the
backrest 6:
Þ Loosen the shoulder straps. (see 3.1)
Þ Reach under the carrycot at the foot end 19.
Þ Turn the grey adjustment wheel 13...
...clockwise: the backrest 6 becomes more flat
...anti-clockwise: the backrest 6 becomes
steeper.
Caution! The backrest 6 can only be adjusted if
the shoulder straps 3 are completely loosened.
Þ Tighten the straps until they are in contact with
your baby's body.
(see 3.3)
Pour protéger votre bébé
• N'utilisez la nacelle pour bébé dans la
voiture que lorsque le dossier est complètement
abaissé (horizontal) et plat 6!
Pour régler l'inclinaison du dossier 6,
procédez comme suit :
Þ Desserrez les bretelles 3. (voir 3.1)
Þ Passez votre main de l'extrémité pied 19 depuis
le bas sur le fond de la nacelle pour bébé.
Þ Tournez la molette de réglage grise 13...
...dans le sens horaire : le dossier 6
s'abaisse.
...dans le sens anti-horaire : le dossier 6
se redresse.
Attention ! Le dossier 6 ne peut être réglé que
lorsque les bretelles 3 sont entièrement
relâchées.
Þ Tendez les bretelles 3 jusqu’à ce qu’elles
reposent sur le corps de votre bébé.
(voir 3.3)
16
Page 17
3. Sichern Ihres Babys
7
3
Zum Schutz Ihres Babys
• Schnallen Sie Ihr Baby in der Babywanne immer
an.
• Die Spannung der Schultergurte 3 verändert sich
wenn Sie die Neigung der Rückenlehne 6
verstellen.
Vorsicht! Vergewissern Sie sich, dass die
Schultergurte 3 i mmer körpernah anliegen, ohne
das Baby einzuengen.
3.1 Lockern der Schultergurte
Þ Drücken Sie auf die Verstelltaste 7 und ziehen
Sie gleichzeitig die beiden S chultergurte 3 nach
vorne.
17
Page 18
3. Securing your baby
3. Protection de votre bébé
For the protection of your baby
• Always secu re your baby in the carrycot using
the harness.
• The tension of the shoulder straps 3 changes
when you change the angle of the backrest 6.
Caution! Always ensure that the shoulder straps
3 are comfortable but FIRM fit around your child,
3.1 Loosening the shoulder straps
Þ Press the adjustment button 7 and at the same
time pull both shoulder straps 3 forward.
Pour protéger votre bébé
• Attachez toujo u rs votre bébé dans la nacelle
pour bébé.
• La tension des bretelles 3 changent lorsque vous
changez l'inclinaison de votre dossier 6.
Attention ! Assurez-vous que les bretelles 3
épousent bien le corps sans pour autant
comprimer le bébé.
3.1 Desserrage des bretelles
Appuyez sur la touche de réglage 7 et tirez les
Þ
deux bretelles 3 en même temps vers l’avant.
18
Page 19
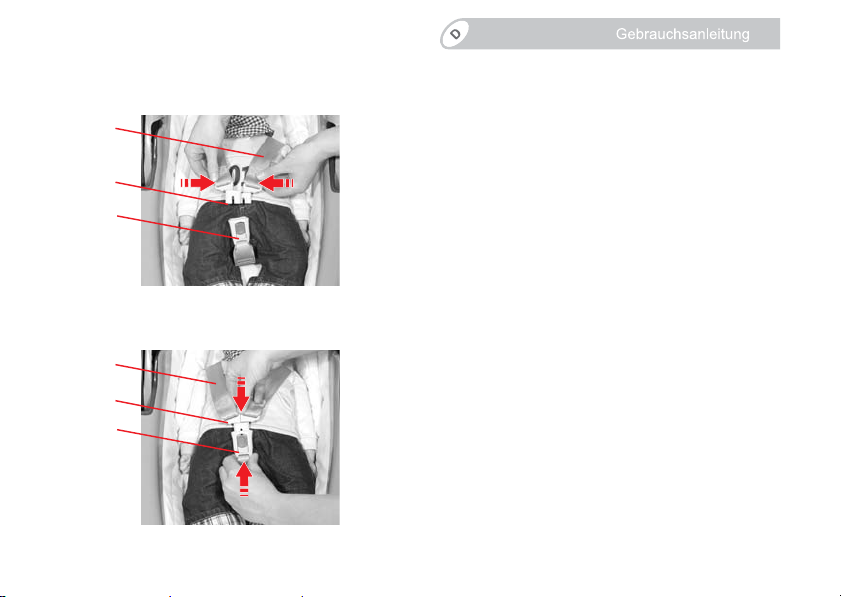
3.2 Anschnallen des Babys
1
2
3
1
2
3
Þ Lockern Sie die Schultergurte 3. (siehe 3.1)
Þ Öffnen Sie das Gurtschloss 1 (auf die rote Taste
drücken).
Þ Legen Sie Ihr Baby in die Babywanne.
Þ Führen Sie die Schultergurte 3 über die
Schultern Ihres Babys.
Vorsicht! Schultergurte nicht verdrehen oder
vertauschen.
Þ Führen Sie die beiden Schlosszungen 2
zusammen...
Þ ...und rasten Sie sie im Gurtschloss 1 hörbar ein.
KLICK!
Þ Straffen Sie die Schultergurte 3 bis sie eng am
Körper Ihres Babys anliegen.
(siehe 3.3)
19
Page 20

3.2 Securing your baby using the
harness
Loosen the shoulder straps. (see 3.1)
Þ
Þ Open the harness buckle 1 (press the red
release button).
Þ Place your baby into the carryc ot.
Þ Put the shoulder straps 3 over the shoulders of
your baby.
Caution! Do not twist or interchange the
shoulder straps.
Þ Put the two buckle tongues 2 together...
3.2 Mise en place de la ceinture du
bébé
Desserrez les bretelles 3. (voir 3.1).
Þ
Þ Ouvrez le fermoir de la ceinture 1 (appuyez sur
la touche rouge).
Þ Couchez votre bébé dans la nacelle.
Þ Passez les bretelles 3 sur les épaules de votre
bébé.
Attention ! Veillez à ne pas torsader ou
confondre les bretelles.
Þ Rapprochez les deux languettes 2 l’une de
l’autre...
Þ ...and engage in the harness buckle 1 with an
audible CLICK!
Þ Tighten the straps until they are in contact with
your baby's body.
(see 3.3)
Þ ...et enclenchez-les dans le fermoir 1 de manière
audible.
CLIC !
Þ Tendez les bretelles 3 jusqu’à ce qu’elles
épousent bien le corps de votre bébé
(voir 3.3).
20
Page 21
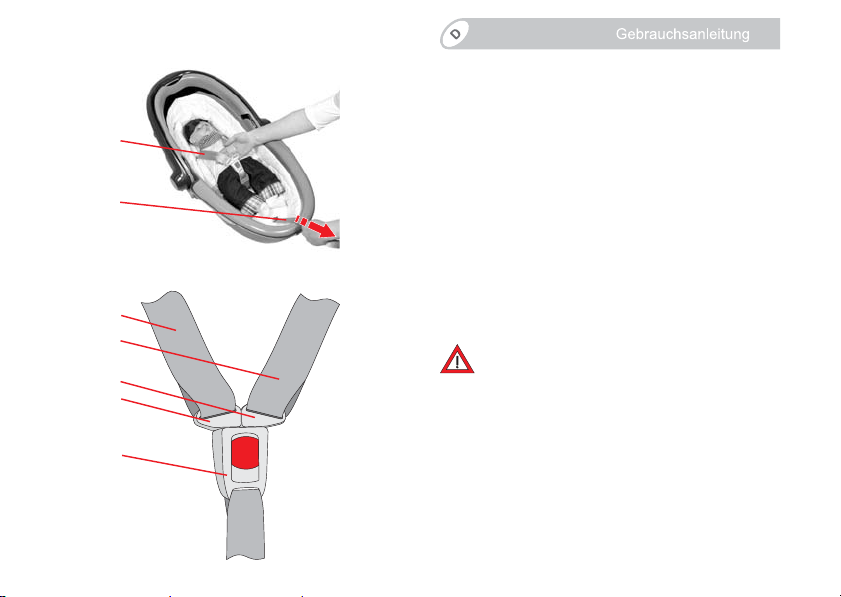
3.3 Straffen der Schultergurte
3
1
3
2
2
8
3
Þ Ziehen Sie am Gurtende 8.
Vorsicht! Gurtende gerade heraus ziehen, nicht
schräg ziehen.
3.4 So ist Ihr Baby richtig gesichert
21
Prüfen Sie zur Sicherheit Ihres Babys,
dass...
• die Schultergurte 3 der Babywanne körpernah
anliegen, ohne das Baby einzuengen,
• die Schultergurte 3 nicht verdreht sind,
• die Schlosszungen 2 im Gurtschloss 1
eingerastet sind.
Page 22
3.3 Tightening the harness
Pull the strap end 8.
Þ
Caution! Pull the strap end straight and not at an
angle.
3.3 Tendre les bretelles
Þ Tirez sur l'extrémité de la sangle 8.
Attention ! Tirez l'extrémité horizontalement,
pas de biais.
3.4 Checklist to ensure that
your baby is buckled up correctly
For your baby's safety, check that...
• the shoulder straps 3 of the carrycot are
comfortable but FIRM fit around your ch ild ,
• the shoulder straps 3 are not twisted,
• the buckle tongues 2 are engaged in the harness
buckle 1.
3.4 Comment savoir si votre bébé est
bien protégé
Vérifiez, pour la protection de votre bébé,
que...
• les bretelles 3 de la nacelle pour bébé épousent
bien le corps sans le comprimer,
• les bretelles 3 ne sont pas torsadées,
• les languettes 2 sont enclenchées dans le
fermoir 1.
22
Page 23
23
4. Verwendung im Fahrzeug
Bitte beachten Sie die Hinweise zur
Benutzung von Kinder-RückhalteSystemen in Ihrem Fahrzeughandbuch.
So können Sie Ihre Babywanne verwenden:
quer zur Fahrtrichtung ja
in Fahrtrichtung nein
entgegen der Fahrtrichtung nein
mit 2-Punkt-Gurt ja 1)
mit 3-Punkt-Gurt ja 1)
auf äußeren Rücksitzen ja 2)
auf mittlerem Rücksitz ja 2)
auf vorwärtsgberichteten Rücksitzen ja
auf rückwärtsgerichteten Rücksitzen nein
auf längsgerichteten Rücksitzen nein
auf dem Beifahrersitz nein
(Bitte beachten Sie die Vorschriften Ihres Landes.)
1) Der Gurt muß nach ECE R 16 (oder vergleichbar er Norm)
genehmigt sein z.B. erkennbar am umrandeten „E“, „e“ auf dem
Prüfetikett am Gurt.
Es werden immer zwei Autogurte benötigt.
2) Es werden immer zwei nebeneinander liegende Rücksitze
benötigt
Page 24
4. Use in the vehicle
4. Utilisation dans le véhicule
Please observe the instructions on the
use of child restraint systems
described in your vehicle owner's
manual.
You can use your carrycot
as follows:
crossways to the direction of travel yes
in the direction of travel no
against the direction of travel no
with 2-point belt yes 1)
with 3-point belt yes 1)
on outer rear seat yes 2)
on centre rear seat yes 2)
on forward-facing rear seats yes
on backward-facing rear seats no
on sideways-facing rear seats no
on front passenger seat no
(Please observe the regulations applicable to your
particular country).
1) The safety belt must be approved to ECE R 16 or a equivalent
standard (see test label on belt wit h an "E" or "e" in a circle) . T wo
vehicle safety belts are always required.
2) Two adjacent rear seats are always required.
Veuillez consulter à ce sujet les indications
d’utilisation des systèmes de retenue des
sièges auto pour enfants figurant dans le
manuel d’utilisation de votre véhicule.
Voici comment vous pouvez utiliser la nacelle pour
bébé :
transversalement au sens de la marche oui
dans le sens de la marche non
dans le sens contraire de la marche non
avec ceinture à 2 points oui 1)
avec ceinture à 3 points oui 1)
sur les sièges arrière latéraux oui 2)
sur le siège arrière central oui 2)
sur les sièges arrière dirigés vers l'avant oui
sur les sièges arrière dirigés vers l'arrière non
sur les sièges arrière positionnés de
manière longitudinale
sur le siège passager non
(Veuillez respecter les directives en vigueur dans votre pays)
1) La ceinture doit être homologuée selon ECE R 16 (ou une norme
comparable) ce qui est par exemple signalé par la lettre «E », « e »
insérée dans un cercle et figurant sur l’étiquette de contrôle.
Il faut toujours deux ceintures.
2) Il faut toujours deux ceintures de siège arrière situées l'une à côté de
l'autre.
non
24
Page 25

25
Zum Schutz Ihres Babys
• Bitte lassen Sie Ihr Kind in der Babywanne nie
unbeaufsichtigt im Fahrzeug zurück.
Zum Schutz aller Fahrzeuginsassen
Bei einer Notbremsung oder einem Unfall können
ungesicherte Gegenstände und Personen andere
Mitfahrer verletzen. Bitte achten Sie deshalb stehts
darauf, dass...
• die Rückenlehnen der Fahrzeugsitze festgestellt
sind (z.B. umklappbare Rücksitzbank einrasten).
• im Fahrzeug (z.B. auf der Hutablage) alle
schweren oder scharfkantigen Gegenstände
gesichert sind.
• alle Personen im Fahrzeug angeschnallt sind .
• die Babywanne im Auto immer gesichert ist,
auch wenn kein Kind transportiert wird.
Zum Schutz Ihres Fahrzeuges
• An einigen Auto-Sitzbezügen aus empfindlichem
Material (z.B. Velours, Leder etc.) können durch
die Benutzung von Babywannen
Page 26

For the protection of your baby
• Please do not leave your child unattended in the
carrycot in the vehicle.
Pour protéger votre bébé
• Ne laissez pas votre enfant dans la nacelle pour
bébé dans la voiture sans surveillance.
For the protection of all vehicle
occupants
In the case of an emergency stop or an accident
unsecured persons or objects may cause injury to
other vehicle occupants. Please always check
that...
• the backrests of the vehicle seats are locked (i.e.
that a foldable rear seat bench latch is engaged).
• all heavy or sharp-edged objects in the vehicle
(e.g. on the parcel shelf) are secu re d.
• all persons in the vehicle have their seat belts
fastened.
• the carryco t is always secured when it is in the
vehicle, even if no child is bein g transported.
To protect your vehicle
• Some vehicle seat covers of sensitive material s
(e.g. velour, leather, etc.) may develop wear
marks when carrycots are used. This can be
Pour protéger tous les passagers
En cas de freinage d'urgence ou d'accident, les
objets et personnes non attachés risquent de
blesser d'autres passager s. Veuillez donc toujours
veiller à ce que…
• les dossier s des sièges de voiture soient
verrouillés (enclenchez par exemple la
banquette arrière rabattable),
• tous les objets lourds ou à bords tran chants (par
exemple sur la lunette arrièr e) soient bien fixés,
• toutes les personnes aient mis leur ceinture,
• la nacelle pour bébé est toujours fixée dans la
voiture même si aucun enfant ne l’oc cupe.
Pour protéger votre véhicule
• Sur certains revêtement de sièges auto en
matériau délicat (p. ex. velours, cuir, etc.),
l’utilisation de nacelles pour bébé risque de
26
Page 27

14
14
Gebrauchsspuren auftreten. Um das zu
vermeiden können Sie z.B. eine Dec ke oder ein
Handtuch unterlegen.
4.1 Einbau im Fahrzeug
So sichern Sie Ihre Babywanne auf der
Rücksitzbank Ihres Fahrzeugs:
Sie benötigen zwei nebeneinander liegende
Sitzplätze mit 3-Punkt-Gurt oder 2-Punkt-Gurt
(zugelassen nach ECE R 16 oder vergleichbarer
Norm).
1. Babywanne im Auto platzieren
Þ Wählen Sie die beiden Rücksitze aus, an denen
die Befestigungspunkte 14 der Beckengurte 15
an der Aussenkante beider Sitzfläche liegen.
27
Page 28

avoided by placing a blanket or towel
underneath.
laisser des traces. Pour éviter cela, vous pouvez
mettre en dessous une couverture ou une
serviette, par exemple.
4.1 Installation in the vehicle
This is how to secure the carrycot on
the rear seat bench of your vehicle:
You will need two adjacent seats with a 3-point
or 2-point belt (certified according to ECE R 16 or a
equivalent standard).
1. Placing the carrycot in the vehicle
Þ Select the two rear seats where the fastening
points 14 for the lap belt sections 15 are at t he
outside edges of the two seat surfaces.
4.1 Montage dans le véhicule
Pour fixer la nacelle pour bébé sur la
banquette arrière de votre voiture ,
procédez comme suit :
Vous avez besoin de deux places assises
contigües dotées de ceintures 3 points ou 2 points
(homologué selon ECE R 16 ou une norme
comparable).
1. Placez la nacelle pour bébé dans le véhicule.
Þ Choisissez les deux sièges arrière pour lesquels
les points de fixation 14 des ceintures ventrales
15 se trouvent sur les bords extérieurs des deux
surfaces assises.
28
Page 29

5
15
16
Þ Stellen Sie die Babywanne quer zur
Fahrtrichtung auf die Rücksitzbank.
Gefahr! Wählen Sie die Position auf den
Rücksitzen immer so, dass der K op f Ihre s
Kindes auf der der Fahrzeugtür
abgewandten Seite liegt!
Þ Tipp! Steht die Babywanne unsicher der schräg
auf den Fahrzeugsitzen, können Sie dies mit
einer unterlegten Decke oder Handtuch
verbessern.
Þ Vergewissern Sie sich, dass der Tragebügel 5 in
der oberen Stellung A ist.
2. Autogurt-Beschläge 18 an den Beckengurten
15 befestigen.
Þ Legen Sie den Becken gurt 15 des Autogurtes zu
einer Schlaufe 16 aufeinander.
29
Page 30

Place the carry cot on the rear seat bench
Þ
crossways to the direction of travel.
Danger! Always position the carrycot on
the rear seats such that your child's head
is on the side away from the vehicle door!
Þ Placez la nacelle pour bébé transversalement au
sens de la marche sur la banquette arrière.
Danger ! Sélectionnez la position sur la
banquette arrière toujours de manière à
ce que la tête de votre enfant se trouve du
côté opposé à la portière du véhicule !
Þ Tip! In certain cases it is possible that the
carrycot does not rest securely or is slanted on
the vehicle seat. This can be remedied by
placing a blanket under the carr ycot.
Þ Ensure that the handle 5 is in its upper
position A.
2. Fastening the vehicle seat b elt fittings 18 to
the lap belt sections 15.
Þ Fold the lap belt section 15 of the vehicle seat
belt together to form a loop 16.
Þ Astuce ! Lorsque la nacelle pour bébé est posée
de manière instable ou de biais sur les sièges du
véhicule, consolidez sa position au moyen d’une
couverture.
Þ Assurez-vous que l’anse 5 se trouve dans la
position supérieure A.
2. Fixez les attaches de la ceinture du véhicule
18 sur les ceintures ventrales 15.
Þ Placez la ceinture ventrale 15 de la ceinture du
véhicule dans le passant 16.
30
Page 31

17
16
18
16
17
18
17
15
Þ Schwenken Sie den roten Riegel 17 am
Autogurt-Beschlag 18 zur Seite.
Þ Führen Sie diese Gurtschlaufe 16 durch den
Autogurt-Beschlag 18.
Þ Hängen Sie die Gurtschlaufe 16 in den roten
Riegel 17 am Autogurt-Beschlag 18 ein.
Þ Schwenken Sie den roten Riegel 17 wieder
zurück so dass der Riegel 17 mit der
Gurtschlaufe 16 mittig auf dem Beschlag 18
liegt.
Þ Befestigen Sie auf gleiche Weise den zweiten
Autogurt-Beschlag 18 am Beckengurt 15 des
andern Rücksitzes.
31
Page 32

Swivel the red latch 17 on the vehicle seat belt
Þ
fitting 18 to the side.
Þ Guide the seat belt loop 16 through the vehicl e
seat belt fitting 18.
Þ Basculez le verrou rouge 17 de l'attache de la
ceinture du véhicule 18 sur le côté.
Þ Passez ce passant de sangle 16 dans l'attache
de la ceinture du véhicule 18 .
Þ Hook the seat belt loop 16 onto the red latch 17
on the vehicle seat belt fitting 18.
Þ Swivel the red latch 17 back again so that the
latch 17 and the s eat belt loop 16 are centred on
the fitting 18.
Þ Fasten the second vehicle seat belt fitting 18 to
the lap belt section 15 of the other rear seat in
the same way .
Þ Accrocher le passant de sangle 16 dans le
verrou rouge 17 au niveau de l'attache de la
ceinture du véhicule 18.
Þ Basculez à nouveau le verrou rouge 17 vers
l'arrière de sorte que le verrou 17 avec le
passant de sangle 16 repose au centre de
l'attache 18.
Þ Fixez de la même manière la deuxième attache
de la ceinture du véhicule 18 sur la ceinture
ventrale 15 de l'autre siège arrière.
32
Page 33

18
12
19
21
3. Babywanne im Auto festzurren.
Þ Hängen Sie einen Autogurt-Beschlag 18 des
äusseren Rücksitzes am Fußende 19 der
Babywanne in den D-Ringe 12 ein.
Þ Ziehen Sie kräftig am losen Gurtende des
Autogurtes bzw. am Diagonalgurt 21 um die
Babywanne straff auf den Rück sitzen
festzuzurren.
Þ Ziehen Sie am Kopfende 20 den D-Ring 12 an
der grünen Lasche 31 vollständig heraus
Vorsicht! Wenn sich der D-Ring 12 nicht
herausziehen lässt, ist die Rückenlehne 6 noch
in aufgerichteter Position. Stellen Sie die
Rückenlehne 6 in die ganz flache Position
(siehe 2.4).
33
Page 34

3. Securing the carrycot in the vehicle.
Þ Hook the vehicle seat belt fitting 18 at the outer
rear seat onto the D ring 12 at the foot end 19 of
the carrycot.
3. Serrez la nacelle pour bébé dans le véhicule.
Þ Accrochez une attache de ceinture de véhicule
18 du siège arrière exté rieur dans l' anneau D 12
à l'extrémité pied 19.
Þ Secure the carrycot tightly on the rear seats by
pulling firmly on the free end of the vehicle seat
belt or on the diagonal seat belt se ction 21.
Þ Pull the green tag 31 at the head end 20 to pull
the D ring 12 out fully.
Caution! If the D-Ring 12 will not pull out, the
backrest 6 is still in upright position. Adjust the
backrest 6 to the completely fl at position
(see 2.4)
Þ Tirez avec force sur l'extrémité libre de la
ceinture du véhicule ou de la ceinture diagonale
21 afin de placer fermem ent la nacelle pour béb é
contre les sièges arrière.
Þ Au niveau de l'extrémité tête 20, tirez
complètement sur l'anneau D 12 en le tenant à la
languette verte 31.
Attention ! Si vous n'arrivez pas à retirer
complètement l'anneau D 12 , le dossier
arrière 6 se trouve encore en position redressé e.
Abaissez complètement le dossier arrière 6
(voir 2.4).
34
Page 35

21
15
18
14
Þ Hängen Sie den Autogurt- B es ch lag 18 des
mittleren Rücksitzes, am Kopfende 20 der
Babywanne, in den D-Ringe 12 ein.
Þ Ziehen Sie kräftig am losen Gurtende des
Autogurtes bzw. am Diagonalgurt 21 um die
Babywanne straff auf den Rück sitzen
festzuzurren.
Þ Vorsicht! Vergewissern Sie sich dass die
Beckengurte 15 von ihren Verankerungspun ken
14 in der Sitzfläche straff und direkt zum
Autogurt-Beschlag 18 ver laufen.
Þ Ziehen Sie an der Schale der Babywanne um
den festen Einbau zu überprüfen.
35
Page 36

Hook the vehicle seat belt fitting 18 at the centre
Þ
rear seat onto the D ring 12 at the head end 20
of the carrycot.
Þ Accrochez l'attache de ceinture de véhicule 18
du siège arrière central sur l'extrémité tête 20 de
la nacelle pour bébé dans l'anneau D 12.
Þ Secure the carrycot tightly on the rear seats by
pulling firmly on the free end of the vehicle seat
belt or on the diagonal seat belt se ction 21.
Þ Caution! Make sure that the lap belt sections 15
are tightened up and run from their anchoring
points 14 in the seat surface directly to the
vehicle seat belt fitting 18.
Þ Pull on the shell of the carrycot to chec k that it is
securely installed.
Þ Tirez avec force sur l'extrémité libre de la
ceinture du véhicule ou de la ceinture diagonale
21 afin de placer fermem ent la nacelle pour béb é
contre les sièges arrière.
Þ Attention ! Vérifiez sur les ceintures ventrales
15 sont tendues et passent directement des
points d'ancrage 14 des surfaces d'assise à
l'attache de la ceinture du véhicule 18.
Þ Tirez sur la coque de la nacelle pour bébé pour
vérifier la solidité du montage.
36
Page 37

17
16
18
4.2 Ausbau aus dem Fahrzeug
Þ Greifen Sie den Autogurt-Beschlag 18
mit beiden Händen und drehen Sie ihn
nach vorne um den Autogurt zu lockern.
Þ Drehen Sie nun den Beschlag 18 weiter bis er
aus dem D-Ring 12 aushakt.
Þ Haken Sie so beide Autogurt-Beschlä ge 18 aus.
Tipp! Im täglichen Gebrauch können Sie die
Beschläge 18 an den Autogurten befestigt
lassen.
Vorsicht! Entfernen Sie die Beschläge 18 immer
bevor Sie andere Kindersitze oder Personen mit
den Autogurten sichern.
Þ Lösen Sie die Gurtschlaufe 16 aus dem
Autogurt-Beschlag 18.
Þ Schwenken Sie den roten Riegel 17 zur Seite
und ziehen Sie den Autogurt aus den AutogurtBeschlag 18 heraus.
37
Page 38

4.2 Removing from the vehicle
Grip the seat belt fitting 18 with both
Þ
hands and rotate it forward to loosen the
seat belt slightly.
Þ Continue to rotate th e fittin g 18 until they unhook
from the D rings 12.
Þ Unhook both seat belt fittings 18 that way.
Tip! For day-to-day use, you can leave the
fittings 18 fasted to the vehicle seat belts.
Caution! Always remove the fittings 18 before
using the vehicle seat belts to secure other child
seats or persons.
4.2 Démontage du véhicule
Þ Tenez l'attache de la ceinture du
véhicule 18 avec les deux mains et
tournez-la vers l'avant pour détendre la ceinture.
Þ Tournez l'attache 18 jusqu'à ce qu'elle se
décroche de l'anneau D 12.
Þ Décrochez de cette manière les deux attaches
de la ceinture du véhicule 18.
Astuce ! Pour l'usage quotidien, les attaches 18
peuvent rester sur la ceinture du véhicule.
Attention ! Retirez toujours les attaches 18
avant d'attacher des sièges auto ou des
personnes avec les ceintures du véhicule.
Þ Unhook the seat belt loop 16 from the vehicle
seat belt fitting 18.
Þ Swivel the red latch 17 to the side and pull the
vehicle seat belt out of the vehicle seat belt
fitting 18.
Þ Ôtez le passant de sangle 16 de l'attache de la
ceinture du véhicule 18.
Þ Basculez le verrou rouge 17 sur le côté et retirez
la ceinture de l'attache de la ceinture du
véhicule 18.
38
Page 39

4.3 So ist Ihre Babywanne
20
19
im Fahrzeug richtig
eingebaut
Prüfen Sie zur Sicherheit Ihres Babys,
dass...
• die Babywanne quer zur Fahrtrichtung befestigt
ist,
• der Kopf des Kindes auf der Fahrzeugtür
abgewanten Seite liegt.
• die Babywanne mit zwei Autogurten befestigt ist,
• der Autogurt straff und nicht verdreht ist,
• der Autogurt des mittleren Rücksitzes am
Kopfende 20 eingehängt ist,
• der Autogurt des äusseren Rücksitzes am
Fußende 19 eingehängt ist.
• Sie nie ander e Befestigunspunkte für den
Autogurt benutzen wie hier beschrieben.
39
Page 40

4.3 Checklist to ensure that
your carrycot is installed
correctly in the vehicle
For your baby's safety,
check that...
• the carrycot is fastened crossways to the
direction of travel,
• the child' s head is on the side away from the
vehicle door.
• the carrycot is fastened with two vehicle seat
belts,
• the vehicle seat belt is tightened up and not
twisted,
• the vehicle seat belt for the centre rear seat is
hooked onto the head end 20,
4.3 Montage correct de
votre nacelle pour bébé
dans le véhicule
Vérifiez, pour la protection de votre bébé,
que...
• la nacelle pour bébé est bien fixée
transversalement au sens contra ire de la
marche,
• la tête de l'enfant se trouve du côté opposé à la
portière du véhicule,
• la nacelle pour bébé est fixée avec deux
ceintures du véhicule,
• la ceintur e du véhicule est bien tendue et n'es t
pas torsadée,
• la ceinture du dossier central est attachée à
l'extrémité tête 20,
• the vehicle seat belt for the outer rear seat is
hooked onto the foot end 19.
• you only use the attachment points for the
vehicle seat belt as shown.
• la ceinture du siège arrière latéral est attachée à
l'extrémité pied 19,
• vous n'uti lisez jamais d'autres points de fixation
pour la ceinture du véhicule, que ceux décrits
dans ce paragraphe.
40
Page 41

41
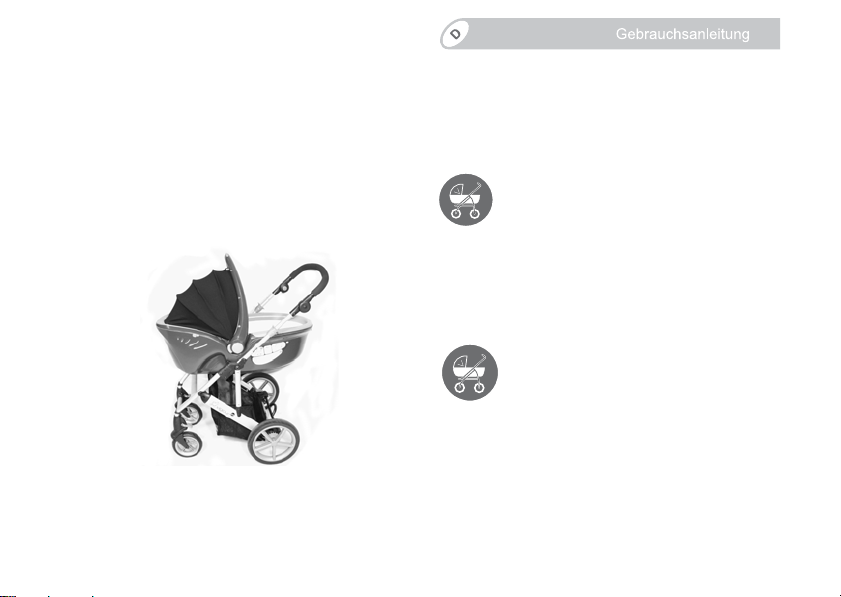
5. Verwendung als
Kinderwagen-Aufsatz
Bitte beachten Sie die
Gebrauchsanleitung Ihres
Kinderwagens!
Die Babywanne kann als Kinderwagen-Aufsatz auf
allen Britax Fahrgestellen verwen det werden die
mit dem Symbol Kinderwagen-Aufsatz „Typ A“
gekennzeichnet sind und für ei nen KinderwagenAufsatz freigegeben sind.
Tipp! Eine passende Regenhaube ist als Zubehör
im Fachhandel erhältlich.
Zum Schutz Ihres Babys
WARNUNG! Dieser Kinderwagen-Aufsatz ist
nicht geeignet...
• ... als Ersatz für Bett oder Wiege.
Tragetaschen, Kinder- und Sportwagen dürfen
nur für den Transport genutzt werden.
• ... für den Transport von mehr als einem Kind.
• ... für den gewerblichen Gebrauch.
• ... in Verbindung mit anderen Fahrgestellen.
Page 42

5. Use as a pram attachment
Please refer to the operating
instructions supplied with your pram.
5. Utilisation comme nacelle
de poussette
Veuillez respecter le mode d'emploi de
votre poussette !
The carrycot can be used as a pram att achme nt on
all Britax frames which are marked with the
"type A" carrycot icon and which have been
approved for use with a pram attachment.
Tip! A fitting raincover is available in the
specialized trade as acces sories.
For the protection of your baby
WARNING! This pram attachment is not
suitable...
• ... as a substitute for a cot or a cradle.
Carrycots, pushchairs and buggies must be only
used to transport babies or children.
• ... to tran sport more than one child.
• ... for c o mmercial use.
• ... in conj unction with other frames.
La nacelle pour bébé peut être ut ilisée en tant que
nacelle de poussette sur tous les châssis de
poussette Britax équipés du symbole nacelle
pour poussette « type A » et dont l'utilisation avec
des nacelles pour bébé est autorisée.
Astuce ! Un habillage de pluie coordonné est
disponible en accessoire dans le commerce.
Pour protéger votre bébé
AVERTISSEMENT! Cette nacelle de poussette
ne convient pas...
• ... pour remplacer le lit ou le berceau.
Les porte-bébés, les poussettes et les buggys
doivent uniquement être utilisés pour le
transport.
• ... pour le transport de plus d’un enfant.
• ... pour un usage professionnel.
• ... en association avec d'autres châssis.
42
Page 43

43
Zum Schutz Ihres Babys
• WARNUNG! Vergewissern Sie sich, dass der
Kinderwagen-Aufsatz sicher mit dem
Kinderwagen verbunden ist.
• Greifen Sie nie an die Kinderwagen-Aufsatz, um
den Kinderwagen anzuheben oder zu schieben.
• Rasten Sie immer die Bremse ein, bevor Sie den
Kinderwagen-Aufsatz auf dem Kinderwagen
anbringen oder wieder abnehmen.
• Der Kinderwagen-Aufsatz eignet sich nur für den
Transport von Babys die sich noch nicht selbst
aufsetzen können.
• WARNUNG! Verwenden Sie nur Einlagen oder
Matratzen die von Britax/RÖMER für diesen
Kinderwagen-Aufsatz zugelas sen sind.
• Verwenden Sie diesen Kinderwagen-Aufsatz nie
auf einem Ständer.
Page 44

For the protection of your baby
• WARNING! Make sure that the pram
attachment is securely connected to the pram.
• Never lift or push the pram by the pram
attachment.
• Always apply the brake before fitting the pram
attachment onto the pram or removing it.
• The pram attachment is only suitable fo r carrying
babies who cannot yet sit up by themselves.
• WARNING! Only use inserts or mattresses
approved by Britax/RÖMER for use with this
pram attachment.
• Never use this pram attachment on a stand.
Pour protéger votre bébé
• AVERTISSEMENT! Assurez-vous que la
nacelle de poussette est solidarisée
correctement sur la poussette.
• Ne prenez jamais appui sur la nacelle de
poussette pour soulever ou pousser la
poussette.
• Enclenchez toujours le frein avant de fixer la
nacelle de poussette sur la poussette ou la
retirer de la poussette.
• La nacelle de poussette ne convient qu'au
transport de bébés qui ne savent pas encore
tenir assis seuls.
• AVERTISSEMENT! Utiliser uniquement les
rembourrages et les matelas autor isés par
Britax/RÖMER pour cette nacelle de poussette.
• N'utilisez jamais cette nacelle de poussette sur
un support.
44
Page 45

23
22
45
5.1 Anbringen auf dem
Kinderwagen
Rasten Sie die Bremse ein, wie in der
Þ
Kinderwagen-Anleitung beschrieben.
Þ Bereiten Sie den Kinderw agen, wie in der
Kinderwagen-Anleitung beschrieben, für den
Kinderwagen-Aufsatz vor (z.B. Kinderwagen-Sitz
verstellen oder Sitzeinheit abnehmen)
Þ Heben Sie die Babywanne entgegen der
Fahrtrichtung über den Kinderwagen.
Vorsicht! Versuchen Sie nie, die Babywanne in
Fahrtrichtung auf dem Kinderwagen zu
befestigen.
Þ Rasten Sie die Befestigungszungen 22 der
Babywanne beidseitig in den
Befestigungsschlitzen 23 ein.
„KLICK“
Vorsicht! Vergewissern Sie sich, dass die
Babywanne sicher mit dem Kinderwagen
verbunden ist indem Sie am Tragebügel 5 nach
oben ziehen.
Page 46

5.1 Fitting on a pram
Always apply the brake as shown in the
Þ
instructions provided with the pram.
Þ Prepare the pram for the pram attachment as
described in the operating instructions for the
pram (e.g. adjust the seat or remove the seat
unit).
Þ With the carrycot in a rearward-facing position,
lift it above the pram.
Caution! Never try to attach the carrycot to the
pram in a forward-facing position.
5.1 Mise en place sur la
poussette
Enclenchez le frein comme indi qué
Þ
dans le mode d'emploi de votre poussette.
Þ Préparez la poussette à accueillir la nac e lle de
poussette comme indiqué dans le mode d'emploi
de votre poussette (par ex. déplace r le siège de
la poussette, décrocher le si ège)
Þ Soulevez la nacelle pour bébé au-dessus de la
poussette dans le sens contraire de la marche.
Attention ! N'essayez jamais de fixer la nacelle
pour bébé sur la poussette dan s le sens de la
marche.
Þ Engage the locking latches 22 of the carrycot in
the locking slots 23 on both sides.
"CLICK!"
Caution! Make sure that the carrycot is securely
connected to the pram by pulli ng upwar ds on the
carrycot handle 5.
Þ Enclenchez les languettes de fixation 22 des
deux côtés de la nacelle pour bébé dans les
rainures de fixation 23.
« CLIC ! »
Attention ! Assurez-vous que la nacelle pour
bébé est solidarisée correctement sur la
poussette en tirant l'anse 5 vers le haut.
46
Page 47

5
25
5
24
23
22
5.2 Abnehmen vom
Kinderwagen
Rasten Sie die Bremse ein,
Þ
wie in der Kinderwagen-Anleitun g beschrieben.
Þ Schwenken Sie den Tragebügel 5 der
Babywanne nach oben (siehe 2.1).
Þ Schieben Sie den Sicherungsschieber 24 am
Tragebügel 5 zur Seite.
Þ Drücken Sie auf die Entrieglungstaste 25 am
Tragebügel 5.
Þ Heben Sie die Babywanne an, bis sich die
Befestigungszungen 22 aus den
Befestigungsschlitzen 23 gelöst haben.
Vorsicht! Halten Sie dabei die Ba bywanne gut
fest.
Þ Nun können Sie die Babywanne vom
47
Kinderwagen herunternehmen.
Page 48

5.2 Removing from the pram
Engage the brake as shown in the
Þ
instructions provided with the pram.
Þ Swivel the handle 5 of the carrycot upwards (see
2.1).
Þ Push the safety slide 24 on the handle 5 to the
side.
Þ Press the release button 25 on the handle 5.
5.2 Retrait de la poussette
Þ Enclenchez le frein
comme indiqué dans le mode d'emploi
de votre poussette.
Þ Faites basculer l'anse 5 de la nacelle pour bébé
vers le haut (voir 2.1).
Þ Déplacez le coulisseau de sécurité 24 de l'anse
5 sur le côté.
Þ Appuyez sur la touche de déverrouillage 25 de
l’anse 5.
Þ Lift the carrycot until the locking lat ches 22 are
released from the locking slots 23.
Caution! Keep a firm grip on the carrycot while
doing this.
Þ You can now remove the carrycot from the pram.
Þ Soulevez la nacelle pour bébé jusqu’à ce que les
languettes de fixation 22 soient déga g ées des
rainures de fixation 23.
Attention ! Tenez fermement la nacelle pour
bébé.
Þ La nacelle pour bébé peut à présent êtr e retirée
de la poussette.
48
Page 49

49
6. Pflegeanleitung
Zum Erhalt der Schutzwirkung
• Bei einem Unfall mit einer Aufprallgeschwindigkeit über 10 km/h können Beschäd igungen an
der Babywanne aufgetreten sein, die nicht unbedingt offensichtlich sind.
Lassen Sie diese Babywanne unbedingt vom
Hersteller überprüfen und gegebenenfalls austauschen.
• Kontrollieren Sie regelmäßig alle wichtigen Teile
auf Beschädigungen. Vergewissern Sie sich,
dass die mechanischen Bauteile einwandfrei
funktionieren.
• Achten Sie darauf, daß die Babywanne nicht
zwischen harten Teilen (Fahrzeugtür,
Sitzschiene etc.) eingeklemmt und be schädigt
wird.
• Lassen Sie di e beschädigte Babywanne (z.B.
nach einem Sturz), unbedingt vom Hersteller
überprüfen.
• Verwenden Sie nie andere als die mitgelieferten
oder vom Hersteller freigegebenen Zubehör- und
Ersatzteile.
Page 50

6. Care instructions
6. Consignes d’entretien
To retain the protective effect
• In an accident at a collision speed above
10 km/h the child safety seat could suffer
damage which is not necessarily obvious.
In such cases it is extremely important that you
replace the child seat. Please dispose of it
properly (see 7.).
• Regularly check all important parts for damage.
Ensure the correct operation of al l mechanical
components.
• To prevent damage or breakage, ensure that the
carrycot does not become jammed in the car
door, seat runners, etc.
• Should the carrycot be damaged (for example
after dropping it) it must be inspected by the
manufacturer.
• Never use other spare parts or accessories than
those supplied or approved by the manufacturer.
Pour conserver l’efficacité de la protection
• En cas de collision à une vitesse supérieure à
10 km/h, il est possible que la nacelle pour bébé
soit endommagée, les dégâts n’étant pas
forcément visibles.
Dans ce cas, la nacelle doit impérativement être
contrôlée par le fabricant ou remplacée, le cas
échéant.
• Contrôlez régulièrement l’état de toutes les
pièces importantes. Assurez-vous du bon
fonctionnement de toutes les pièces
mécaniques.
• Veillez à ce que la nacelle pour bébé ne soit pas
coincée entre des pièces en matériaux durs
(portière du véhicule, glissière du siège, etc.), ce
qui risquerait de l’endommager.
• Faites impérativement contrôler une nace lle pour
bébé endommagée (par exemple après une
chute) par le fabricant.
• Ne jamais utiliser des pièces de rechange ou
accessoires autres que ceux li vrés ou autorisés
par le fabricant.
50
Page 51

51
• Halten Sie das Produkt sauber.
• Vermeiden Sie es, dass die Babywanne über
eine längere Zeit nass bleibt . Wenn sie nass
wird, lassen Sie sie aufgeklappt bei
Zimmertemperatur trocknen.
• Legen Sie nie G egenstände auf dem Verdeck
ab.
Bewahren Sie die Babywanne, wenn sie nicht
benutzt wird, sorgfältig auf:
• Stellen Sie keine schweren Dinge auf ihn.
• Lagern Sie ihn nie in der Nähe von Hitzequellen
z.B. Heizkörpern.
• Setzen Sie ihn nicht direktem Sonnenlicht aus.
Der Bezug könnte ausbleichen.
Page 52

• Keep the product clean.
• Do not allow the carrycot to remain wet for
prolonged periods of time. If it does get wet,
allow to dry unfolded at room temperature.
• Do not place anything on the sunshade.
• Garder la poussette dans un parfait état de
propreté.
• Éviter de laisser une nacelle mouillée pendant
une période prolongée. La faire séc her d épliée à
température ambiante.
• Ne jamais déposer d'objets lourds sur la capote.
Store the carrycot in a safe place when it is not
in use:
• Avoid placing heavy objects on top of it.
• Do not store it near a direct heat source, e.g.
radiators.
• Do not store it in direct sunlight. The cover may
fade.
Conserver soigneusement la nacelle pour bébé
en cas de non utilisation :
• Ne poser aucun objet lourde sur la poussette.
• Ne jamais la mettre à proximité des sources de
chaleur, par exemple des radiateurs.
• Ne pas l’exposer directement à la lumière du
soleil. La housse pourrait se dé colorer.
52
Page 53

53
6.1 Pflege des Gurtschlosses
Das Funktionieren des Gurt sc hlosses trägt
wesentlich zur Sicherheit bei . Funktionsstörungen
am Gurtschloss sind meist auf Verunreinigungen
zurückzuführen:
Funktionsstörung
• Die Schloßzungen werden beim Drücken der
roten Taste verlangsamt ausgeworfen.
• Die Schloßzungen rasten nicht mehr ein (werden
wieder ausgestoßen).
• Die Schloßzungen rasten ohne deutliches "Klick"
ein.
• Die Schloßzungen werden beim Einführen
gebremst (teigig).
• Das Gurtschloß lä ßt sich nur noch mit hohem
Kraftaufwand öffnen.
Abhilfemaßnahme
Die T eile des Gurtschlosses nicht ölen oder
schmieren.
Das Gurtschloss kann nur vom Hersteller
ausgetauscht werden.
Page 54

6.1 Care for the harness buckle
The function of the harness buckle is important for
the safety of your child. Malf unctions of the harne ss
buckle are mostly attributable to accumulations of
dirt and dust.
6.1 Entretien du fermoir de ceinture
Le bon fonctionnement du fermoir contribue de
manière essentielle à la sécurité. Dans la plupart
des cas, les dysfonctionnement s du fermoir sont
causés par l’encrassement.
Malfunction
• The buckle tongues are ejected only slowly when
the red release button is pressed.
• The buckle tongues will no longer lock home (are
ejected again).
• The buckle tongues engage without an audible
"click".
• The buckle tongues are difficult to inse rt (you feel
resistance).
• The buckle only opens if extreme force is
applied.
Remedy
Do not oil or grease the parts of the
harness buckle.
The buckle is only suitable to be replaced by
the manufacturer.
Dysfonctionnements
• L'éjection des languettes est ralentie lors de
l'actionnement de la touche rouge.
• Les languettes ne s'enclenchent plus (rejet hors
du fermoir).
• Les languettes s’enclenchent sans « clic »
audible.
• Les languettes sont freinées lors de l’intr oduction
(impression de blocage pâteux).
• Le fermoir ne peut être ouvert qu’en appliquant
une grande force.
Remèdes
Ne jamais huiler ou graisser les pièces du
fermoir.
Le fermoir de la ceinture ne peut être
remplacé que par le fabricant.
54
Page 55

55
6.2 Reinigung
Verwenden Sie nur Einlagen oder Matratzen die
von Britax/RÖMER für diese Babywanne
zugelassen sind. Achten Sie da rauf, dass Sie nur
einen Original-Ersatzbezug einsetzen, da der
Bezug einen wesentlichen Teil der Systemfunktion
darstellt. Ersatz erhalten Sie im Fachhandel.
Die Babywanne darf nicht ohne Bezug
verwendet werden.
•Den Bezug können Sie abziehen und mit
Feinwaschmittel im Schonwaschgang bei 30 °C
in der Waschmaschine waschen. Halten Sie sich
bitte genau an die Waschanleitung am Bezug.
Wenn Sie mit mehr als 30 °C waschen, ist ein
Ausfärben des Bezugsstoffes möglich. Den
Bezug nicht schleudern und auf keinen Fall im
elektrischen Wäschetrockner trocknen (der Stoff
kann sich von der Polsterung lösen).
•Das Sonnenverdeck können Sie abnehmen
und mit Feinwaschmittel bei 30 °C von Hand
waschen.
•Die Kunststoffteile können Sie mit einer
Seifenlösung abwaschen. Keine scharfen Mittel
(wie z.B. Lösungsmittel) verwenden.
Page 56

6.2 Cleaning
Only use inserts or mattresses approved by Britax/
RÖMER for use with this carrycot. Please be sure
to use only original Britax/RÖMER replacement
covers, as the cover is important to the pro pe r
functioning of the system. Repl acement covers are
available from your retailer.
The carrycot must not be used without the
cover.
•The cover can be removed and washed with
a mild detergent using the washing machine's
cycle for delicate items (30 °C). Please observe
the instructions on the washing label of the
cover. The colours of the cover may fade if
washed at more than 30°C. Do not spin, and
never tumble dry in an electric clothes dryer (the
fabric may separate from the padding).
•The sunshade can be removed and washed by
hand using a mild detergent (30 °C).
•The plastic parts can be cleaned using soapy
water. Do not use harsh cleaning agents (such
as solvents).
6.2 Nettoyage
Utilisez uniquement les rembourrages et les
matelas autorisés par Britax/RÖMER pour cette
nacelle de poussette. Veillez à seulement utiliser
une housse de rechange d'origine ca r la ho us s e
représente un élément fonctionnel essentiel du
système. Demandez conseil dans un maga sin
spécialisé.
La nacelle pour bébé ne doit pas être
utilisé sans housse.
•La housse peut être enlevée et lavée en
machine à 30 °C avec une lessive pour linge
délicat. Veui lle z re specter exactement les
instructions de lavage sur l’étiquette de la
housse. Si vous lavez la housse à des
températures supérieures à 30 °C, le tissu risque
de déteindre. N'essorez pas la housse et ne la
mettez en aucun cas dans le sèche-linge (le
tissu risque de se décoller du rembourrag e).
•Le pare-soleil peut être enlevé et lavé en
machine à 30 °C avec une lessive pour linge
délicat.
• Vous pouvez laver les éléments en matière
plastique à l'eau savonneuse. N'utilisez pas
pas de détergents ou de produits corrosifs
(solvants par exemple).
56
Page 57

9
10
26
10
26
•Die Gurte können Sie mit einer lauwarmen
Seifenlösung abwaschen.
6.3 Aushängen des Sonnenverdeckes
Þ Hängen Sie die Stäbe im Saum des
Sonnenverdeckes 9 aus den Haken am
Verdeckbügel 10 und an der Bezugblende 26
aus.
6.4 Einhängen des Sonnenverdeckes
Hängen Sie die beiden kurzen Stäbe im Saum
Þ
des Sonnenverdeckes 9 in die Haken am
Verdeckbügel 10 ein.
Þ Hängen sie den langen Stab in die Haken an der
Bezugblende 26 ein.
57
Page 58

•The harness can be cleaned using lukewa rm
soapy water.
•Les sangles peuvent être lavées à l’eau
savonneuse tiède.
6.3 Unhooking the sunshade
Unhook the rods in the seam of the sunshade 9
Þ
from the hooks on the sunshade handle 10 and
on the cover bezel 26.
6.4 Hooking the sunshade in
Hook the two short rods in the seam of the
Þ
sunshade 9 into the hooks on the sunshade
handle 10.
Þ Hook the long rod into the hooks on the cover
bezel 26.
6.3 Décrochage du pare-soleil
Þ Décrochez les armatures dans l'ourlet du pare-
soleil 9 des crochets sur l'é trier 10 et sur le
support de housse 26.
6.4 Fixation du pare-soleil
Þ Accrochez les deux armatures courtes dans
l'ourlet du pare-soleil 9 dans les crochets de
l'étrier 10.
Þ Accrochez les armatures longues dans les
crochets du support de housse 26.
58
Page 59

20
26
27
19
27
6.5 Abziehen des Bezuges
Þ Hängen Sie das Sonnenv erdeck 9 aus
(siehe 6.3).
Þ Nehmen Sie die Bezugblende 26 am
Kopfende 20 ab.
Þ Ziehen Sie die Enden der Bezugblende 27
Fußendes 19 vom Schalenrand ab.
Þ Nehmen Sie die Bezugblende 27 am Fußende
19 ab.
59
Page 60

6.5 Removing the cover
Unhook the sunshade 9 (see 6.3).
Þ
Þ Remove the cover bezel 26 at the head end 20.
6.5 Retrait de la housse
Þ Décrochez le pare-soleil 9.
Þ Retirez le pare-soleil 26 à l'extrémité pied 20.
Þ Pull the ends of the cover bezel 27 on the foot
end 19 off of the edge of the shell.
Þ Remove the cover bezel 27 at the foot end 19.
Þ Retirez les extrémités du support de housse 27
de l'extrémité pied 19 du bord de la coque.
Þ Retirez le support de housse 27 à l'extrémit é
pied 19.
60
Page 61

28
29
6
1
3
Þ Hängen Sie die Gummischlaufen 29 des
Bezuges aus den Haken 28 am Schalenrand
aus.
Þ Öffnen Sie das Gurtschloss 1 (auf die rote Taste
drücken.)
Þ Fädeln Sie das Gurtschloss 1 aus dem Bezug
aus.
Þ Fädeln Sie die Schultergurte 3 mit den
Schlosszungen 2 aus dem Bezug au s.
Þ Verstellen Sie die Rückenlehne 6 in die oberste
Position (siehe 2.4).
Þ Ziehen Sie den Bezug von der Rückenlehne 6
ab.
Þ Nun können Sie den Bezug abnehmen.
61
Page 62

Unhook the elastic loops 29 of the cover from the
Þ
hooks 28 on the edge of the shell.
Þ Décrochez les passants en caoutchouc 29 de la
housse de leur crochet 28 situé sur le bord de la
coque.
Þ Open the harness buckle 1 (press the red
release button).
Þ Unthread the harness buckle 1 from the cover.
Þ Unthread the shoulder straps 3 and the buckle
tongues 2 from the cover.
Þ Adjust the backrest 6 to the fully upright position
(see 2.4).
Þ Pull the cover off of the backrest 6.
Þ You can now remove the cover.
Þ Ouvrez le fermoir de la ceinture 1 (appuyez sur
la touche rouge).
Þ Sortez le fermoir 1 de la housse.
Þ Sortez les bretelles 3 de la housse avec les
languettes 2 .
Þ Redressez complètement le dossier arrière 6
dans sa position haute (voir 2.4).
Þ Retirez la housse du dossier 6 .
Þ Maintenant vous pouvez retirer la housse.
62
Page 63

6.6 Aufziehen des Bezuges
8
1
3
Þ Gehen Sie einfach in umgekehrter Reihenfolge
wie in 6.5 beschrieben vor.
Þ Vorsicht! Vergewissern Sie sich dass die Gurte
nicht verdreht sind und richtig in die Gurtschlitze
des Bezuges eingelegt sind.
7. Hinweise zur Entsorgung
Bitte beachten Sie die Entsorgungsbestimmungen Ihres Landes.
Entsorgung der Verpackung
Container für Pappe
Entsorgung der Einzelteile
Bezug Restmüll, thermische
Kunststoffteile entsprechend Kennzeich nung in
63
Metallteile Container für Metalle
Gurtband Container für Polyester
Schloss & Zunge Restmüll
Verwertung
die dafür vorgesehenen
Container
Page 64

6.6 Re-fitting the cover
Simply proceed in the reverse order of section
Þ
6.5.
Þ Caution! Ensure that the straps are not twisted
and that they were correctly inserted in the belt
slots of the cover.
6.6 Remise en place de la housse
Þ Procédez simplement en sens inverse, comme
décrit au point 6.5.
Þ Attention ! Assurez vous que les sangle s ne
sont pas torsadées et qu'elles ont bien été
passées dans les fentes pour ceinture de la
housse.
7. Notes regarding disposal
Please observe the disposal regulations in your
country.
Disposal of packaging
container for paperboard
Disposal of components
cover garbage, thermal utilisation
plastic parts container corresponding to the
label on the part
metal parts container for metals
webbing container for Polyester
buckle and tongue garbage
7. Remarques relatives à
l’élimination
Veuillez respecter les directives d’élimination
en vigueur dans votre pays.
Élimination de l’emballage
Conteneur pour le carton
Élimination des pièces détachées
Housse Déchets résiduels, recyclage
Pièces en matière
plastique
Pièces métalliques Conteneur pour métaux
Sangle Conteneur pour polyester
Fermoir & languette Déchets résiduels
thermique
suivant le marquage, dans le
conteneur spécialement prévu
à cet usage
64
Page 65

65
8. Folgesitze
Britax / RÖMER
Child safety seats
• BABY-SAFE
• BABY-SAFE plus
• BABY-SAFE plus
SHR
• First Class plus
Tested and certified according to
ECE R 44/04
Group
0+
0+/ I
Body weight
0 to 13 kg
0 to 18 kg
9. 2 Jahre Garantie
Für diesen Auto-/Fahrradkindersitz /Kinderwagen
leisten wir eine Garantie für Fabrikations- oder
Material-Fehler von 2 Jahren. Die Garantiezeit
beginnt am Tage des Kaufes. Zum Nachweis
bewahren Sie bitte die ausgefüllte Garantiekarte,
den von Ihnen unterzeichneten Übergabe-Check
sowie den Kaufbeleg für die Dauer der Garantiezeit
auf.
Bei Reklamationen ist der Garantieschein dem
Kindersitz beizufügen. Die Garantieleistung
beschränkt sich auf Auto-/Fahrradkindersitze /
Kinderwagen, die sachgemäß behandelt wurden
Page 66

8. Next child safety seat
Britax / RÖMER
Child safety seats
• BABY-SAFE
• BABY-SAFE plus
• BABY-SAFE plus
SHR
• First Class plus
Tested and certified according to
ECE R 44/04
Group
0+
0+/ I
Body weight
0 to 13 kg
0 to 18 kg
8. Sièges ultérieurs
Britax /RÖMER
Child safety seats
• BABY-SAFE
• BABY-SAFE plus
• BABY-SAFE plus
SHR
• First Class plus
Tested and certified according to
Group
0+
0+/ I
ECE R 44/04
Body weight
0 to 13 kg
0 to 18 kg
9. 2-year warranty
For this car/bicycle child seat / pram / pushchair /
carry cot we provide a 2-year warranty against
manufacturing or material defects. The warranty
period is effective from the day of purchase. As
proof we ask that you fill out the Warranty Card and
retain it for the whole term of the warranty p er iod ,
together with the Transfer Check signed by you and
your sales receipt.
In the case of a warranty claim, the Warranty Card
must be returned together with the product. The
warranty covers only car/bicycle child seats / prams /
pushchairs / carry cot which have been handled
9. 2 ans de garantie
Pour ce siège auto / bicyclette / poussette, nous
accordons une garantie de 2 ans pour le s défauts d e
fabrication ou de matériau. La garantie débute le
jour de l’achat. Pour apporter la preuve de la
garantie, veuillez conserver pendant toute la durée
de la garantie : la carte de garantie remplie, le
procès-verbal de remise q ue v ous avez signé ainsi
que la facture d’achat.
Pour toute réclamation, la carte de garantie doit être
jointe au siège pour enfant. La prestation de
garantie est limitée aux sièges auto / bicyclette /
poussettes qui ont été utilisés conformément à leur
66
Page 67

67
und die in sauberem und ordentlichem Zustand
zurückgesandt werden.
Die Garantie erstreckt sich nicht auf:
• natürliche Abnutzungs-erscheinungen und
Schäden durch übermäßige Beanspruchung
• Schäden durch ungeeignete oder unsachgemäße
Verwendung
Garantiefall oder nicht?
Stoffe:
Alle unsere Stoffe erfüllen hohe
Anforderungen in Bezug auf
Farbbeständigkeit gegen UV-Strahlung. Dennoch
bleichen alle Stoffe aus, wenn sie der UV-S trahlung
ausgesetzt sind. Hierbei handelt es sich um keinen
Material-Fehler, sondern um normale
Verschleißerscheinungen, für die keine Garantie
übernommen wird.
Schloss:
Gurtschloss auftreten, so sind diese meist auf
Verunreinigungen zurückzuführen, welche
ausgewaschen werden können. Bitte halten Sie sich
in der Vorgehensweise an Ihre Gebrauchsanleitung.
Sollten Funktionsstörungen am
Page 68

properly and which have bee n sent to us in a clean
condition.
usage et qui sont renvoyés propres et complets.
The Warranty does not cover:
• natural signs of wear and damage resulting from
excessive stress.
• damage resulting from inappropriate or improper
use.
What is covered by the warranty?
Fabrics:
All our materials meet very high
requirements with regard to
colour fastness when exposed to UV radiation.
Nevertheless, all fabrics fade when exposed to UV
radiation. This is not a material defect, but rather a
normal sign of wear which is not covered by the
warranty.
Buckle:
Buckle malfunction is often due to
accumulations of dirt and dust which may stop it
from working properly. If this happens, the buckle
can be washed out. Please refer to your user
instructions.
La garantie ne couvre pas les défauts suivan ts :
• l'usure naturelle et les dommages dus à une
sollicitation excessive
• les dommages dus à une utilisation inappropriée
et non conforme
Cas de garantie ou non ?
Tissus :
élevées quant à
la résistance des couleurs aux rayons UV. Malgré
tout, les tissus se décolorent lorsqu’ils sont soumis
aux rayons UV. Dans ce cas, il ne s’agit pas de
défaut de matériel mais d’une usure normale qui
n’est pas couverte par la garantie.
Fermoir :
dysfonctionnements, ceux-ci sont souvent dus aux
encrassements qui peuvent être enlevés par lavage.
Veuillez vous conformer aux instructions de votre
mode d’emploi.
tous nos tissus répondent aux exigences
au cas où le fermoir présenter ait des
68
Page 69

69
Im Garantiefall wenden Sie sich bitte unverzüglich
an Ihren Fachhändler. Er wird Ihnen mit Rat und Tat
zur Seite stehen. Bei der Bearbeitung von
Reklamationsansprüchen kommen
produktspezifische Abschreibungssätze zur
Anwendung. Hier verweisen wir auf die beim
Händler ausliegenden Allgemeinen
Geschäftsbedingungen.
Verwendung, Pflege und Wartung
Der Auto-/Fahrradkindersitz / Kinderwagen muss
entsprechend der Gebrauchsanleitung behandelt
werden. Wir weisen ausdrücklich darauf hin, dass
nur Original-Zubehör bzw. Ersatzteile verwendet
werden dürfen.
Page 70

Please contact your retailer directly in the event of a
warranty claim. He or she will give you the advice
and support you need. When processing claims,
product-specific depreciation rates will be applied.
Please refer to our General Terms and Conditions
which are available from your retailer.
En cas de recours en garantie, veuillez vous
adresser immédiatement à votre revendeur
spécialisé. Il vous assistera volontiers. Lors du
traitement des droits résultant de réclamations, les
taux d’amortissement spécifiques au produit sont
appliqués. Pour cela, veuillez consulter nos
conditions générales de vente disponibles auprès
de votre revendeur.
Use, care and maintenance
The car/bicycle child seat / pram / pushchair / carry
cot must be used in accordance with the user
instructions. We would like to point out that it is
extremely important that only Britax/RÖMER
accessories and replacement parts are used.
Utilisation, entretien et maintenance
Le siège auto / bicyclette / la pousse tte doivent être
traités conformément au mode d’emploi. Nous
signalons expressément que seuls les accessoires
et les pièces de rechange d’origine doivent être
utilisés.
70
Page 71

71
Page 72

10. Garantiekarte / Übergabe-Check
Name:
________________________________________________
Adresse:
Postleitzahl:
Ort:
Telefon (mit Vorwahl):
E-Mail:
Produktname:
Artikel-Nummer:
Stoff-Farbe (Dessin):
Zubehör:
________________________________________________
________________________________________________
________________________________________________
________________________________________________
________________________________________________
________________________________________________
________________________________________________
________________________________________________
________________________________________________
________________________________________________
72
Page 73

Übergabe-Check:
1. Vollständigkeit { geprüft / in Ordnung
2. Funktionsprüfung
- Verstellmechanismus Sitz { geprüft / in Ordnung
- Gurtzeug-Verstellung { geprüft / in Ordnung
3. Unversehrtheit
- Sitz überprüfen { geprüft / in Ordnung
- Stoffteile überprüfen { geprüft / in Ordnung
- Kunststoffteile überprüfen { geprüft / in Ordnung
Kaufdatum: ___________________________________
{ Ich habe den Auto-/Fahrradkindersitz geprüft
und mich vergewissert, dass der Sitz komplett
übergeben wurde und dass alle Funktionen
vollständig funktionieren.
{ Ich habe ausreichend Informationen über das
Produkt und seine Funktionen vor dem Kauf
erhalten und die Pflege- und
Wartungsanweisungen zur Kenntnis
genommen.
Käufer (Unterschrift): ___________________________________
Händler: ___________________________________
73
Händler Stempel
Page 74

10. Warranty Card / Transfer Check
Name:
________________________________________________
Address:
Post Code:
City/Town:
Telephone No.
(including area code):
E-mail address:
Product name:
Article No.:
Fabric colour (design):
Accessories:
________________________________________________
________________________________________________
________________________________________________
________________________________________________
________________________________________________
________________________________________________
________________________________________________
________________________________________________
________________________________________________
________________________________________________
74
Page 75

Transfer Check:
1. Completeness { examined / OK
2. Function test
- Seat adjustment
mechanism
- Harness adjustment { examined / OK
3. Intactness
- Seat { examined / OK
- Fabrics { examined / OK
- Plastic parts { examined / OK
Date of purchase: ___________________________________
{ examined / OK
{ I have checked the child car/bicycle seat and
am sure that the seat was complete on delivery
and that all functions are sound.
{ I received adequate information on the product
and its functions prior to purchase and have
noted the care and maintenance instructions.
Buyer (signature): ___________________________________
Retailer: ___________________________________
75
Retailer's stamp
Page 76

10. Carte de garantie / Procès-verbal de remise
Nom :
________________________________________________
Adresse :
Code postal :
Ville :
Téléphone
(avec préfixe) :
E-mail :
Nom de produit :
Référence :
Couleur du tissu
(dessin) :
Accessoires :
________________________________________________
________________________________________________
________________________________________________
________________________________________________
________________________________________________
________________________________________________
________________________________________________
________________________________________________
________________________________________________
________________________________________________
76
Page 77

Procès-verbal de remise :
1. Intégralité { contrôlé / en ordre
2. Contrôle fonctionnel
- Mécanisme de réglage siège { contrôlé / en ordre
- Réglage des ceintures { contrôlé / en ordre
3. Absence de dommages
- Contrôle du siège { contrôlé / en ordre
- Contrôle des éléments textiles { contrôlé / en ordre
- Contrôle des pièces en
matière plastique
Date de l’achat : ___________________________________
{ contrôlé / en ordre
{ J’ai contrôlé le siège auto / bicyclette / la
poussette et vérifié qu’il/elle a été remis(e) en
bon état et complet(-ète), et que toutes les
fonctions sont parfaitement opérationnelles.
{ J’ai reçu des informations suffisantes
concernant le produit et ses fonctions avant
l’achat, et j’ai pris connaissance des instructions
d’entretien et de maintenance.
Acheteur
(signature) :
Revendeur : ___________________________________
___________________________________
77
Cachet du revendeur
 Loading...