

Page 1
D
D
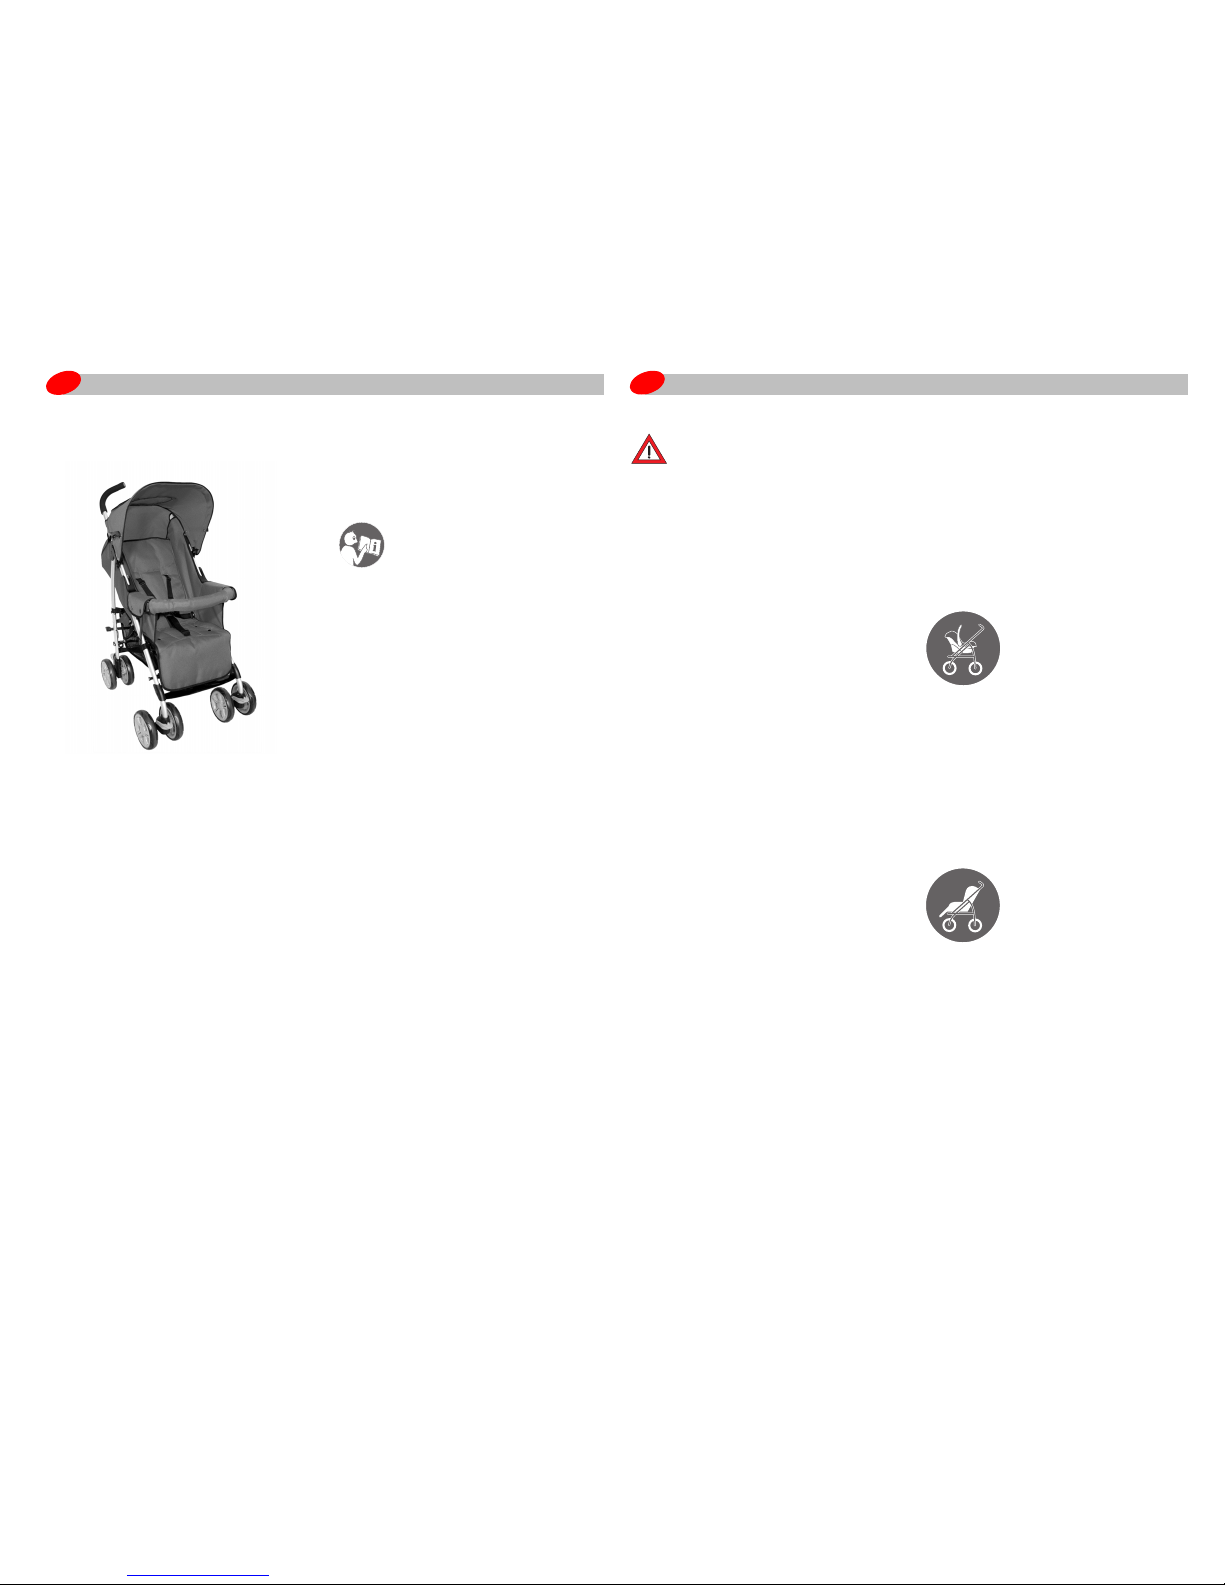
User instruction
We are pleased that our B2 will
accompany your child safely through
the first years of his or her life.
A child’s safety is your
responsibility
• Read these instructions carefully
and make yourself familiar with the
pushchair before using it with your
child.
• If your pushchair is used by
someone unfamiliar with it (for
example grandparents) always
show them how the pushchair
works.
• Your child’s safety may be affected
if you do not follow these
instructions.
• Keep this user instruction in a safe
place for future reference.
If you have any further questions
regarding its use, please feel free to
contact us.
BRITAX RÖMER
Kindersicherheit GmbH
1. Suitability
For the protection of your
child
WARNING! This pushchair is not
suitable...
• ... for the transport of children under
6 months in the pushchair seat.
• ... as a substitute for a cot or a
cradle.
Carrycots, prams and buggies may
be used only for transporting babies
or children.
• ... for jogging, running, skating or
similar activities.
Using a pram or buggy for another
than its typical purpose can be
dangerous.
• ... for the transport of more than one
child.
• ... for commercial use.
• ... as a Travel System in connection
with other infant carriers.
This pushchair is suitable...
This pushchair is designed and
manufactured to comply to the
following Standard EN1888:2005-11.
... as a Travel System
with the infant carrier:
• from birth to 13 kg.
The Visi o can be used as a travel
system with all RÖMER infant carriers
which are equipped with the "Type A"
adapter.
... as a buggy
in the pushchair seat:
• from 6 months to 15 kg.
Contents
1. Suitability........................................1
2. Folding the pushchair ..................2
3. Assembling the pushchair ...........3
4. Using the pushchair .....................4
4.1 Using the brakes ..................... 4
4.2 Applying and adjusting the
harness ................................... 4
4.3 Adjusting the backrest ............. 5
4.4 Adjusting the leg support ........5
4.5 Adjusting the swivel wheels .... 5
4.6 Varying the hood .....................6
5. Use with the infant carrier -
Travel System ................................ 6
5.1 Fitting the infant carrier ...........6
5.2 Removing the infant carrier .....7
6. Care instructions .......................... 7
6.1 Cleaning .................................. 8
7. 2-year warranty ..............................8
8. Warranty Card / Transfer Check .. 9
Britax B2
Page 2
D
-2-
D
D
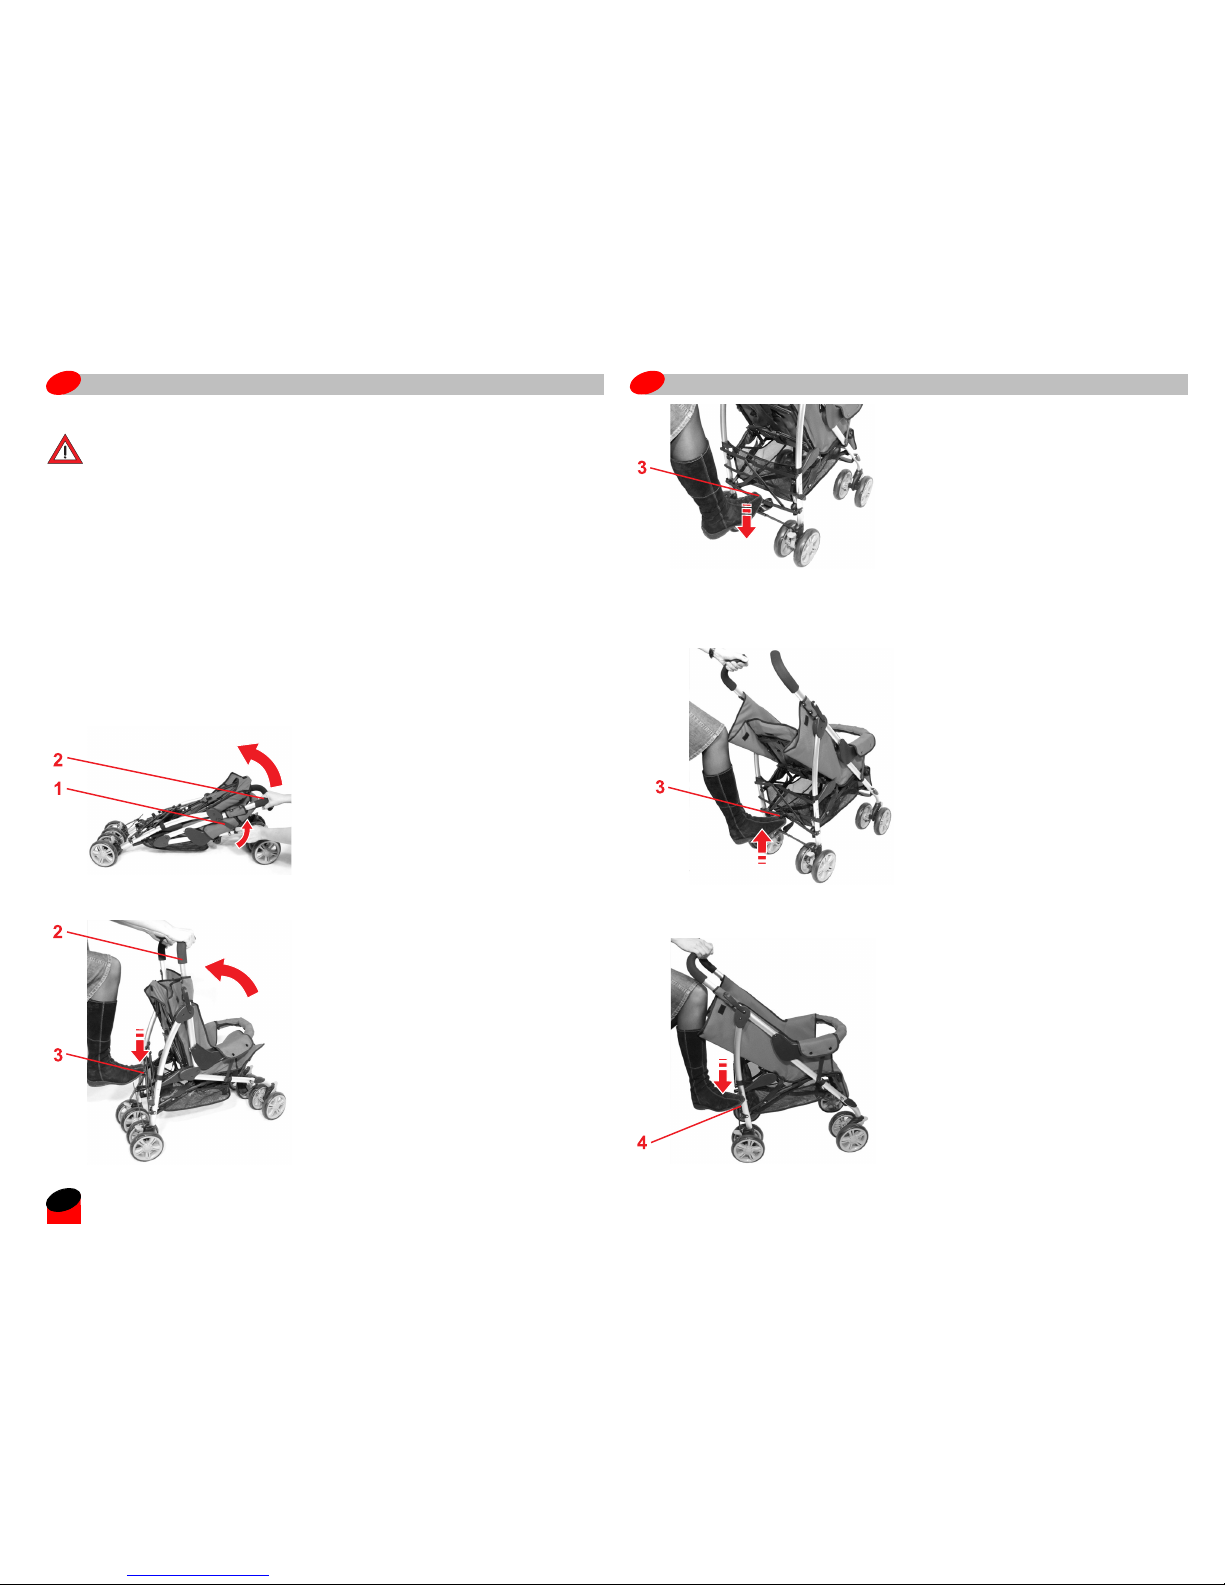
This is how to unfold the pushchair:
Þ Undo the locking hook 1 and pull
the upper part of the pushchair
upwards by the handles 2.
Þ Pull the handles 2 towards you and
hold the pushchair with your foot
placed on the knob 3 of the rear Xbrace.
Þ Press the knob 3 on the rear X-
brace downwards with your foot.
Caution! Ensure the rear X-brace is
fully engaged.
This is how to fold the pushchair:
Tip! The pushchair can be folded
more comfortable if the brakes 13 are
released (see 4.1), he canopy 11 is
folded back and the swivel wheels 5
are locked (see 4.5).
Þ Push the knob 3 on the rear X-
bracing upwards.
Þ Push the safety button 4 on the right
side downwards with the foot.
Now the folding mechanism is
unlocked.
2. Folding the pushchair
For the protection of your
child
• WARNING! Make sure that all
locks are properly latched prior to
every use.
• Make sure that no locks disengage
accidentally while the pushchair is
carried.
• When folding the pushchair make
sure that you do not pinch any part
of yourself or others.
• Never fold the pushchair when it is
occupied by a child.
Page 3
D
D
Þ Push the handles 2 as far forward
as possible.
The pushchair folds.
Þ Close the locking hook 1.
3. Assembling the
pushchair
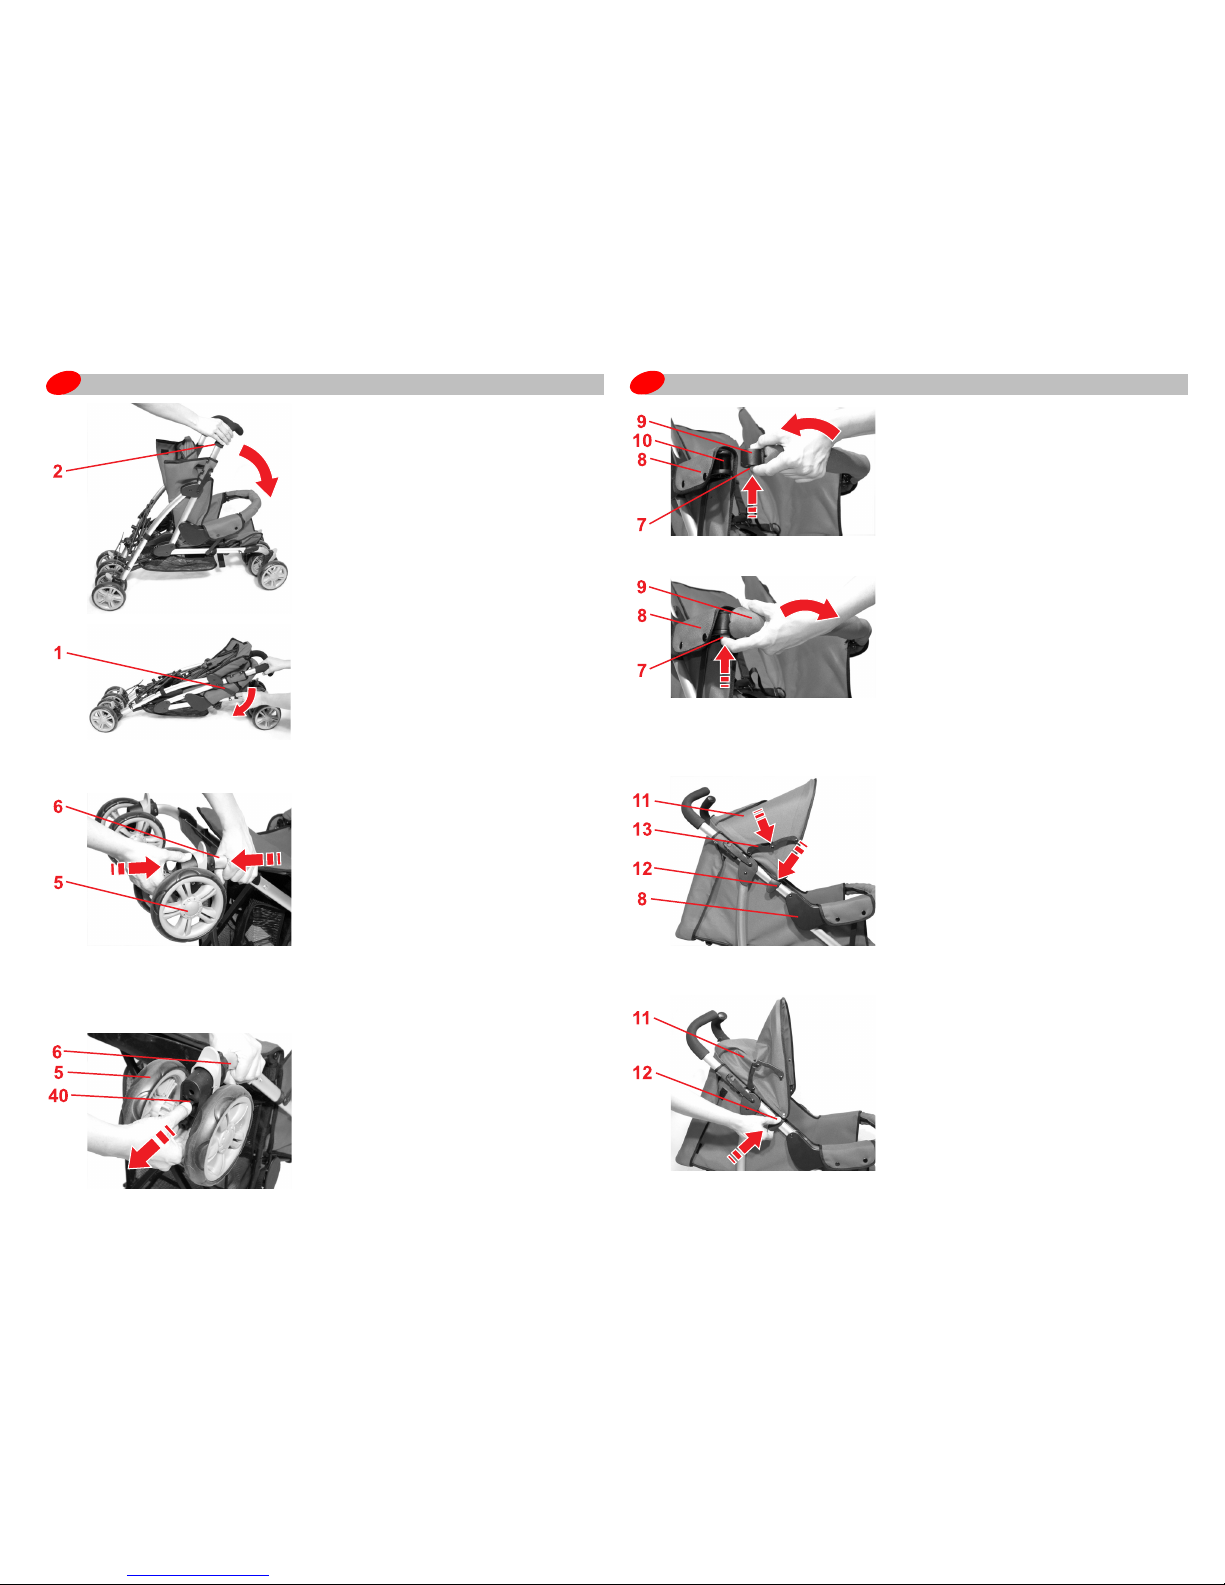
This is how to assemble the
wheels:
Þ Lay the pushchair back with its
handles 2 to the floor.
Þ Push the two swivel wheels 5 onto
the end of the front legs 6.
Þ Press down the swivel wheels 5 on
the front legs 6 until they engage.
Þ Repeat this with the other wheels.
Caution! Pull on the wheels to
check if they engaged properly.
To take off the wheels:
Þ Lay the pushchair back with the
push handles 2 on the floor.
Þ Press on the locking tab 40 and pull
the swivel wheels 5 from the front
legs 6.
How to mount the safety bar 9:
Þ Slide the ends of the safety bar 9
into the recesses 10 in the armrests
8 until the locking button 7 engages.
To take off the safety bar 9:
Þ Press from below on the locking
button 7 and pull out the safety bar
9 from the recess 10.
How to fasten the hood 11:
Þ Clip the hood clips 12 above the
armrests 8 onto the frame tube.
Þ Press both hood tensioners 13
downwards.
Þ Fasten the Velcro fasteners on the
side of the seat cover.
How to take off the hood 11:
Þ Undo the Velcro fasteners.
Þ Pull the hood clip 12 upwards at the
recessed grip.
The hood 11 disengages.
Page 4

D
-4-
D
D
4. Using the pushchair
For the protection of your
child
• WARNING! Always secure your
child in the pushchair using the
harness.
• WARNING! Never leave your child
unattended in the pushchair, even
for a short time.
• Always put the brakes on when
parking the pushchair and before
letting go of it.
• Always avoid parking on slopes.
• Support the back of the pushchair
seat when reclining it.
• Make sure that your child is clear of
moveable parts when re-adjusting
the pushchair.
• Do not allow your child to play with
or adjust the pushchair.
• Do not allow your child to stand or
ride in the shopping basket.
• WARNING! Do not hang shopping
or other heavy objects on the
handles. This can make the
pushchair unstable.
• Take special care to ensure the
pushchair stands firmly and safely
when using public transport.
This is how to release the brakes:
Þ Push upwards on an end of the
brake bar 14 with your toes.
4.2 Applying and
adjusting the
harness
A correctly adjusted 5-point
harness gives your child the
necessary support in the pushchair.
Tip! If using an alternative harness
conforming to BS6684, D ring
attachements are found on each side
of the pushchair.
For the protection of your
child
• WARNING! Always use a correctly
fitted and adjusted harness.
• WARNING! Always use the crotch
strap in connection with lap belt
part.
This is how to secure your child
using the harness:
Þ Push the buckle prongs 16 on either
side through the slots in the
shoulder straps 17.
4.1 Using the brakes
This is how to engage the brakes:
Þ Push down on the end of the brake
bar 14 with your toes.
Caution! Always check if the
brakes have engaged firmly before
letting go of the pushchair.
Page 5

D
D
Þ Engage both buckle prongs 16 in
the buckle housing 18 with an
audiable CLICK.
Þ Adjust the harness by pulling the
slider 19 until the desired fit is
achieved.
Tip! All straps can be adjusted
separately.
Caution! Always re-adjust the
harness when changing the seating
position of your child.
This is how to open the harness:
Þ Squeeze the top and bottom prongs
16 at the buckle housing 18.
4.3 Adjusting the
backrest
This is how to adjust the
backrest to one of 4 positions:
Þ Hold the backrest 20 with one hand.
Þ Pull upwards the backrest
adjustment handle 21 with the other
hand.
Þ Move the backrest 20 upwards or
downwards until it locks into the
desired position.
4.4 Adjusting the leg
support
This is how to put the leg
support 23 up:
Þ Swing the leg support 23 upwards
into the desired position.
This is how to put the leg support
23 down:
Þ Press the regulating buttons 22 on
both sides.
Þ Adjust the leg support 23 to the
desired position.
4.5 Adjusting the swivel
wheels
This is how to adjust the swivel
wheels 5 pivoted:
Þ Push the clips 24 down.
This is how to lock the swivel
wheels 5:
Þ Align both swivel wheels 5 to rear of
the front leg.
Þ Push the clips 24 upwards.
16
18
19
16
18
Page 6

D
-6-
D
D
20
14
4.6 Varying the hood
Opening the hood window 34
Þ Open the Velcro fastener.
Þ Roll up the cover 35 and fasten it
with the retaining strap.
5. Use with the infant
carrier - Travel
System
The B2 can be used as a travel
system with all RÖMER infant carriers
which are equipped with the "Type A"
adapter. It is simply clipped from
underneath into the edge of the infant
carrier.
For the protection of your
child
• WARNING! Make sure that the
infant carrier is safely connected
with the pushchair.
• Never grasp at the infant carrier to
lift or push the pushchair.
• Always engage the brake before
fitting the infant carrier onto the
pushchair or removing it.
5.1 Fitting the infant
carrier
Þ
Engage the brake 14 (see
4.1).
Þ Move the backrest 20 of the
pushchair seat to the lie flat position
(see 4.3).
Þ Unhook the cover at the armrests 8.
You can now see the locating slots
26 in the armrests 8.
Þ Fold the cover to the seating
surface.
Þ Lower the infant carrier on the
pushchair rearward facing.
Caution! Never try to fix the infant
carrier on the pushchair forward
facing.
Þ Engage the fixation prongs 28 of
the infant carrier into the fixation
slots 26 either side.
Caution! Make sure that the infant
carrier is safely connected with the
pushchair.
Þ Lower the infant carrier handle to
the rocking position.
Page 7

D
D
5.2 Removing the
infant carrier
Þ
Engage the brake 14 (see
4.1).
Þ Return the infant carrier handle to
the carrying position.
Þ Push up the release button 29 on
both sides of the infant carrier.
Þ Lift the infant carrier until the fixation
prongs 28 release from the fixation
slots 26.
Caution! Firmly hold the infant
carrier when lifting.
Þ Now you can lift off the infant carrier
from the pushchair.
Þ Hook the cover in place at the
armrests 8.
6. Care instructions
To retain the safe function
• Regularly check all important parts
for damage. Ensure the correct
operation of all mechanical
components.
• The pushchair can be damaged or
destroyed by overloading, improper
folding or use of unapproved
accessories.
• Never use other spare parts or
accessories than those supplied or
approved by the manufacturer.
• Keep your nursery product clean.
• Do not allow the pushchair to
remain wet for prolonged periods of
time. If it does get wet, allow to dry
unfolded at room temperature.
• Never place heavy objects on the
hood.
• Do not carry more than 3 kg in the
shopping basket.
Store the pushchair in a safe place
when it is not in use:
• Avoid placing heavy objects on top
of it.
• Do not store it near a direct heat
source, e.g. radiators.
• Do not store it in direct sunlight. The
cover may fade.
• Do not store the product folded in
damp or wet climates. Always store
it unfolded in a well ventilated area
to avoid mildew.
This is how you can remedy minor
defects yourself:
If the wheels squeak:
Þ Use a silicon based spray or light oil
ensuring it penetrates the wheel
and axle assembly.
When using your pushchair at the
beach:
Þ Completely clean your pushchair
afterwards to remove the sand and
salt from the mechanisms and
wheel assemblies.
If there are compressions on the
tyres:
Þ Use a domestic hair dryer to gently
warm the tyre. The compression
marks should slowly disappear.
Caution! Do not overheat!
If fasteners become loose:
Þ Promptly tighten screws and nuts
using appropriate tools.
If parts become bent, torn or broken:
Þ Promptly exchange the parts. Use
only those parts and accessories
approved by Britax.
Page 8

D
-8-
D
D
6.1 Cleaning
•The seat cover cannot be
removed. Clean the seat cover and
the canopy with a sponge and luke
warm soapy water. Please observe
the washing instructions on the
label. Allow the parts to dry fully,
preferably away from direct
sunlight.
•The plastic parts and the metal
parts can be cleaned with a damp
cloth. After contact with water the
metal parts should be wiped off to
avoid rust.
This is how you can remove the
shopping basket 30 for cleaning:
Þ Open the push buttons on the
retaining straps 31.
7. 2-year warranty
For this car/bicycle child seat /
pushchair we provide a 2-year
warranty against manufacturing or
material defects. The warranty period
is effective from the day of purchase.
As proof we ask that you fill out the
Warranty Card and retain it for the
whole term of the warranty period,
together with the Transfer Check
signed by you and your sales receipt.
In the case of a warranty claim, the
Warranty Card must be returned
together with the product. The
Warranty covers only car/bicycle child
seats / pushchair which have been
handled properly and which have
been sent to us in a clean condition.
The Warranty does not cover:
• natural signs of wear and damage
resulting from excessive stress.
• damage resulting from
inappropriate or improper use.
What is covered by the Warranty?
Fabric: All our materials meet very
high requirements with regard to
colour fastness when exposed to UV
radiation. Nevertheless, all fabrics
fade when exposed to UV radiation.
This is not a material defect, but rather
a normal sign of wear which is not
covered by the Warranty.
Buckle: Buckle malfunction is often
due to accumulations of dirt and dust
which may stop it from working
properly. If this happens, the buckle
can be washed out. Please refer to
your user instructions.
Please contact your retailer directly in
the event of a warranty claim. He or
she will give you the advice and
support you need. When processing
claims, product-specific depreciation
rates will be applied. Please refer to
our General Terms and Conditions
which are available from your retailer.
Use, care and maintenance
The car/bicycle child seat / pushchair
must be used in accordance with the
user instructions. We would like to
point out that it is extremely important
that only Britax accessories and
replacement parts are used.
Page 9

D
8. Warranty Card / Transfer Check
Name: _____________________________________________
Address: _____________________________________________
Post Code: _____________________________________________
City/Town: _____________________________________________
Telephone No.
(including area code):
_____________________________________________
e-mail address: _____________________________________________
_____________________________________________
Car/bicycle child seat
/ pushchair:
_____________________________________________
Article No.: _____________________________________________
Fabric colour
(design):
_____________________________________________
Accessories: _____________________________________________
Date of purchase: ____________________________________________
Buyer (signature): ____________________________________________
Retailer: ____________________________________________
Transfer Check:
1. Completeness { examined OK{ I have checked the child car/
bicycle seat / pushchair and am
sure that the seat was complete
on delivery and that all functions
are sound.
{ I received adequate information
on the product and its functions
prior to purchase and have
noted the care and maintenance
instructions.
2. Function test
- Seat adjustment
mechanism
{ examined
OK
- Harness adjustment { examined
OK
3. Intactness
- Seat { examined
OK
- Fabrics { examined
OK
- Plastic parts { examined
OK
Retailer's stamp
 Loading...